Shintom Co T3017 Mobile Cellular Telephone User Manual EXHIBIT 12 Revised Installation Manual
Shintom Co Ltd Mobile Cellular Telephone EXHIBIT 12 Revised Installation Manual
EXHIBIT 12 Revised Installation Manual
555 Wireless Blvd., Hauppauge, NY 11788 288E9930INSTALLATION GUIDE FORCELLULAR CAR TELEPHONE
3SAFETY INFORMATION FOREXPOSURE TO RADIO FREQUENCY SIGNALSYour wireless mobile telephone is a low power radio tran-smitter and receiver. When it is ON, it receives and also se-nds out radio frequency (RF) signals.In August, 1996, the Federal Communications Commission(FCC) adopted RF exposure guidelines with safety levels   • ICNIRP (1996)Those standards were based on comprehensive and periodicevaluations of the relevant scientific literature. For example,over 120 scientists, engineers, and physicians from universities,government health agencies, and industry reviewed the av-ailable body of research to develop the ANSI Standard (C95.1).The design of your phone complies with the FCC guidelines(and those standards).Use only the supplied or an approved replacement antenna.Unauthorized antennas, modifications, or attachments coulddamage the phone and may violate FCC regulations.SAFE PHONE INSTALLATION AND OPERATIONFor safe and efficient operation, this phone must be properlyinstalled using recommended installation procedure specifiedin the installation guide for this unit. A "thru-glass" antennamust be mounted on the center of the rear window of thevehicle. At no time should anyone touch the antenna or comein close contact with it while the phone is in operation.ANTENNA CAREWIRELESS MOBILE PHONESREAD THIS INFORMATION BEFORE USINGYOUR MOBILE CELLULAR TELEPHONEfor mobile wireless phones. Those guidelines are consis-tent with the safety standards previously set by both U.S. andInternational standards bodies:   • ANSI C95.1 (1992)   • NCRP Report 86 (1986)
4DRIVINGCheck the laws and regulations on the use of wireless telephonesin the areas where you drive. Always obey them. Also, if using •  Use hands-free operation, if available. •  Pull off the road and park before making or answering a    call if driving conditions so require.ergy. However, RF energy from cellular telephones may af-fect inadequately shielded electronic equipment.RF energy may affect improperly installed or inadequatelyshielded electronic operating and entertainment systems inmotor vehicles.  Check with the manufacturer or its repre-sentative to determine if these systems are adequatelyConsult the manufacturer of any personal medical devicesregulations posted in the areas instruct you to do so. Hospit-als or health care facilities may be using equipment thatcould be sensitive to external RF energy.to your vehicle.shielded from external RF energy.  You should also checkwith the manufacturer of any equipment that has been addedyour phone while driving, please:  •  Give full attention to driving - driving safely is your     first responsibility.ELECTRONIC DEVICESMost modern electronic equipment is shielded from RF en-(such as pacemakers, hearing aids, etc.) to determine if theyare adequately shielded from external RF energy.Turn your phone OFF in health care facilities when any
5BLASTING AREASTo avoid interfering with blasting operations, turn your unitOFF when in a “Blasting area” or in areas posted “Turn offSparks in such areas could cause an explosion or fire result-ing in bodily injury or even death.Areas with a potentially explosive atmosphere are often butnot always clearly marked. They include fueling areas suchas gasoline stations, below deck on boats, fuel or chemical(such as propane or butane), areas where the air containschemicals or particles, such as: grain, dust,or metal powders,and any other area where you would normally be advised totwo-way radio”.  Obey all signs and instructions.POTENTIALLY EXPLOSIVE ATMOSPHERESTurn your phone OFF when in any area with a potentiallyexplosive atmosphere and obey all signs and instructions.transfer or storage vehicles using liquefied petroleum gasturn off your vehicle engine.
6For Vehicles Equipped with an Air BagAn air bag inflates with great force. DO NOT place objects,including both installed or mobile wireless equipment, inthe area over the air bag or in the air bag deployment area.If in-vehicle wireless equipment is improperly installedand air bag inflates, serious injury could result.
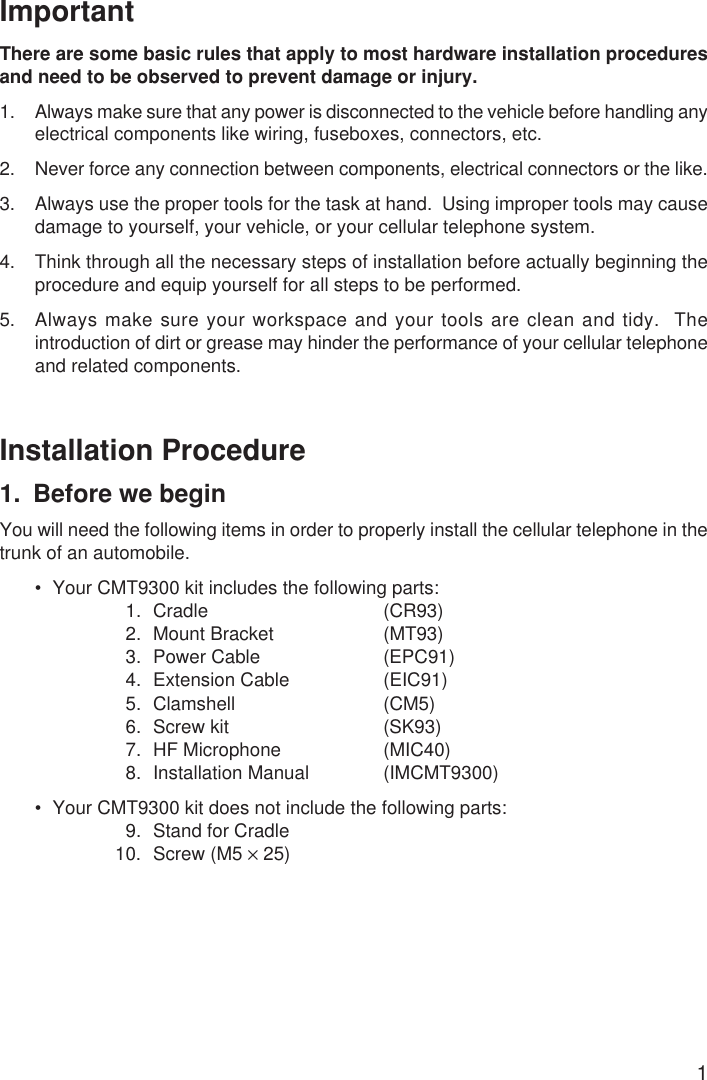
1ImportantThere are some basic rules that apply to most hardware installation proceduresand need to be observed to prevent damage or injury.1. Always make sure that any power is disconnected to the vehicle before handling anyelectrical components like wiring, fuseboxes, connectors, etc.2. Never force any connection between components, electrical connectors or the like.3. Always use the proper tools for the task at hand.  Using improper tools may causedamage to yourself, your vehicle, or your cellular telephone system.4. Think through all the necessary steps of installation before actually beginning theprocedure and equip yourself for all steps to be performed.5. Always make sure your workspace and your tools are clean and tidy.  Theintroduction of dirt or grease may hinder the performance of your cellular telephoneand related components.Installation Procedure1. Before we beginYou will need the following items in order to properly install the cellular telephone in thetrunk of an automobile.• Your CMT9300 kit includes the following parts:1. Cradle (CR93)2. Mount Bracket (MT93)3. Power Cable (EPC91)4. Extension Cable (EIC91)5. Clamshell (CM5)6. Screw kit (SK93)7. HF Microphone (MIC40)8. Installation Manual (IMCMT9300)• Your CMT9300 kit does not include the following parts:9. Stand for Cradle10. Screw (M5 × 25)
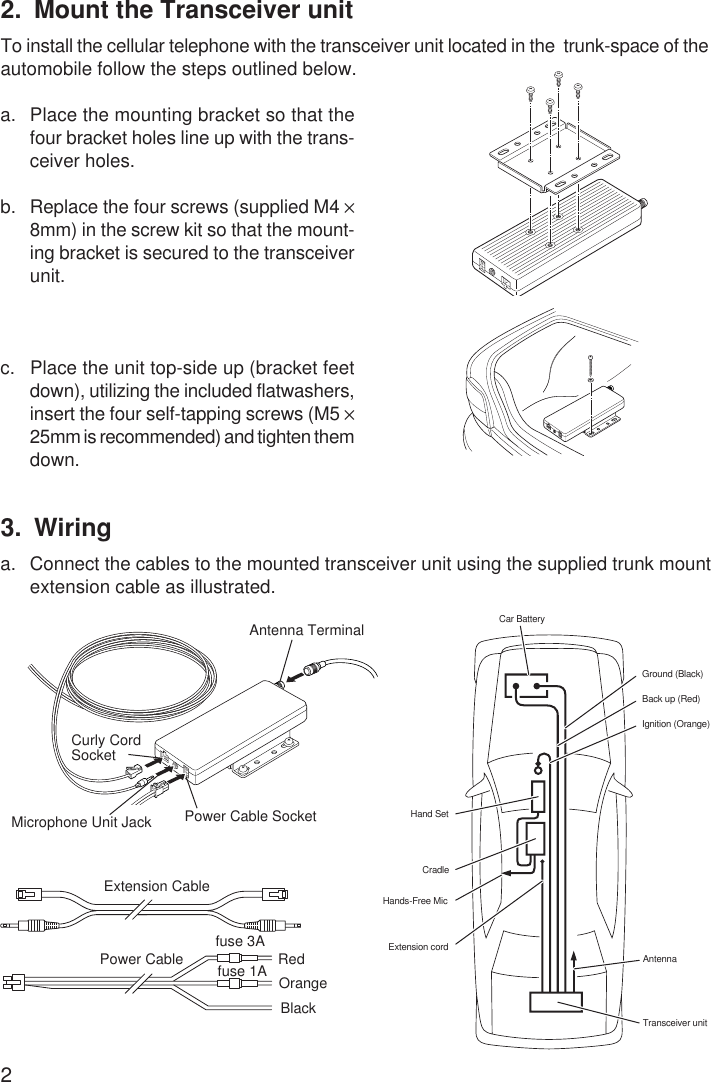
22. Mount the Transceiver unitTo install the cellular telephone with the transceiver unit located in the  trunk-space of theautomobile follow the steps outlined below.a. Place the mounting bracket so that thefour bracket holes line up with the trans-ceiver holes.b. Replace the four screws (supplied M4 ×8mm) in the screw kit so that the mount-ing bracket is secured to the transceiverunit.c. Place the unit top-side up (bracket feetdown), utilizing the included flatwashers,insert the four self-tapping screws (M5 ×25mm is recommended) and tighten themdown.OrangeExtension CablePower Cable fuse 3Afuse 1A RedBlack3. Wiringa. Connect the cables to the mounted transceiver unit using the supplied trunk mountextension cable as illustrated.Car BatteryGround (Black)Back up (Red)Ignition (Orange)Extension cordHands-Free MicCradleHand SetTransceiver unitAntennaAntenna TerminalPower Cable SocketMicrophone Unit JackCurly CordSocket
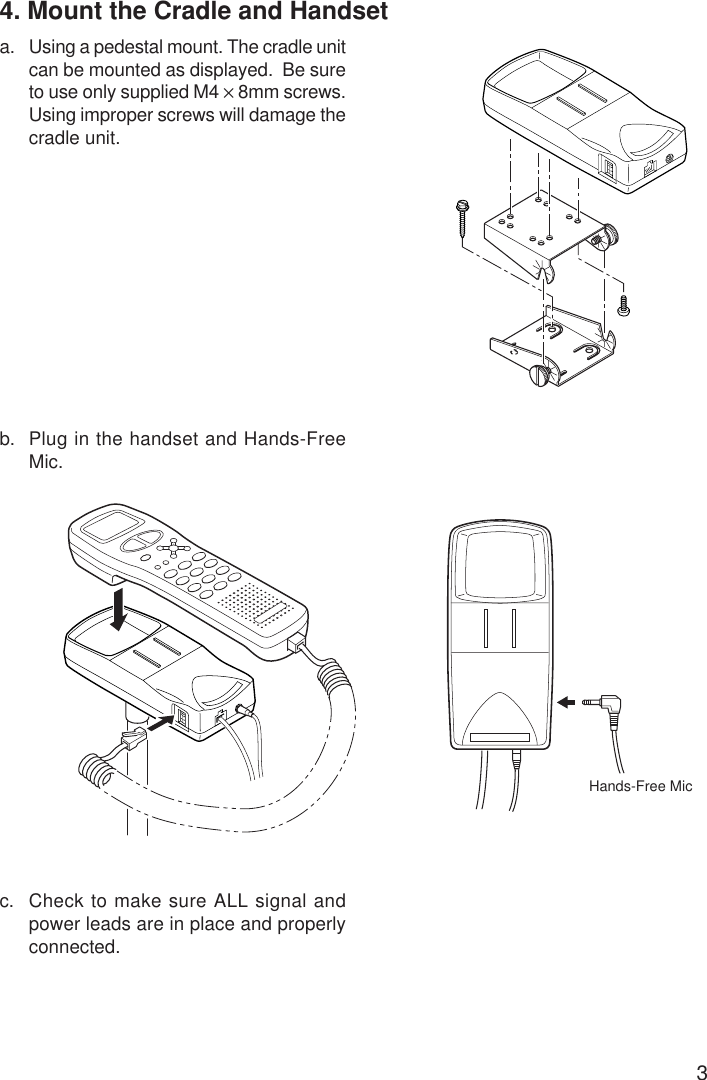
34. Mount the Cradle and Handseta. Using a pedestal mount. The cradle unitcan be mounted as displayed.  Be sureto use only supplied M4 × 8mm screws.Using improper screws will damage thecradle unit.b. Plug in the handset and Hands-FreeMic.c. Check to make sure ALL signal andpower leads are in place and properlyconnected.Hands-Free Mic
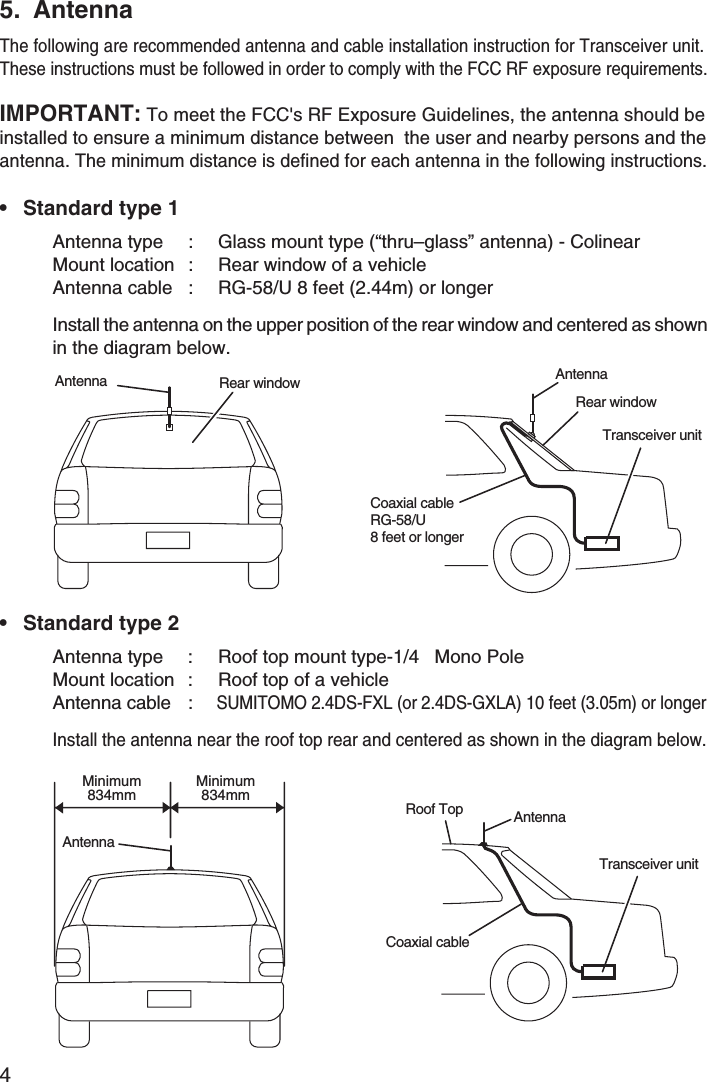
45. Antenna• Standard type 1IMPORTANT: To meet the FCC's RF Exposure Guidelines, the antenna should beinstalled to ensure a minimum distance between  the user and nearby persons and theantenna. The minimum distance is defined for each antenna in the following instructions.Antenna type : Glass mount type (“thru–glass” antenna) - ColinearMount location : Rear window of a vehicleAntenna cable : RG-58/U 8 feet (2.44m) or longerInstall the antenna on the upper position of the rear window and centered as shownin the diagram below.• Standard type 2Antenna type : Roof top mount type-1/4 Mono PoleMount location : Roof top of a vehicleAntenna cable :SUMITOMO 2.4DS-FXL (or 2.4DS-GXLA) 10 feet (3.05m) or longerInstall the antenna near the roof top rear and centered as shown in the diagram below.Rear windowTransceiver unitAntennaCoaxial cableRG-58/U8 feet or longerRear windowAntennaTransceiver unitRoof Top AntennaCoaxial cableAntennaMinimum834mmMinimum834mmThe following are recommended antenna and cable installation instruction for Transceiver unit.These instructions must be followed in order to comply with the FCC RF exposure requirements.
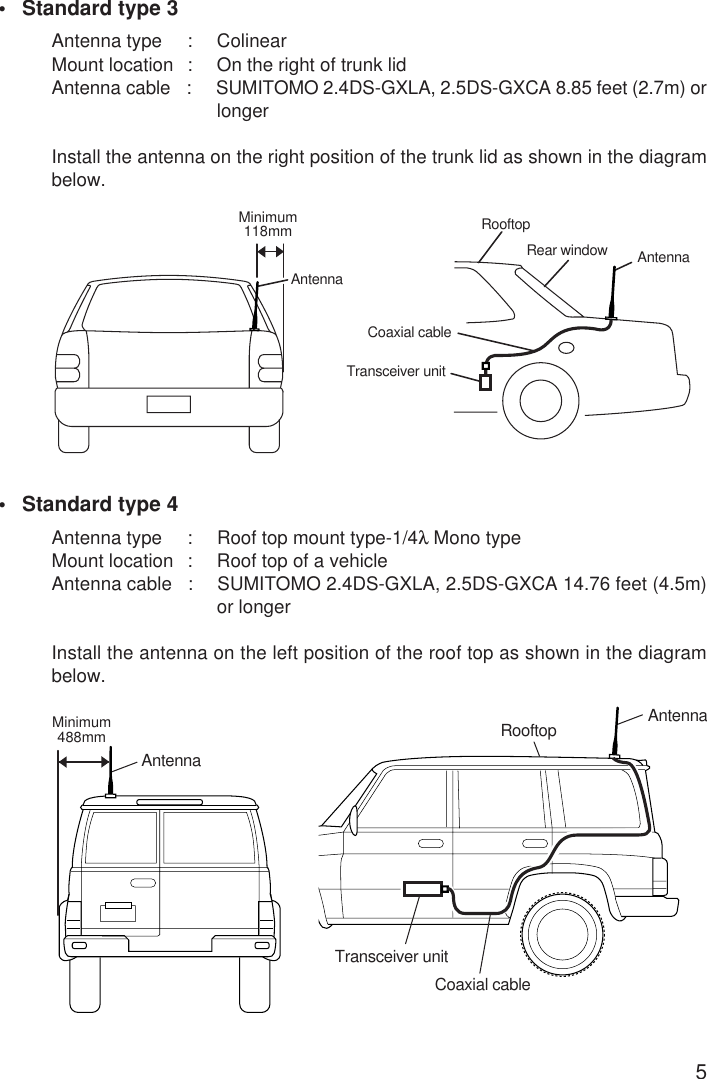
5•Standard type 3Antenna type : ColinearMount location : On the right of trunk lidAntenna cable : SUMITOMO 2.4DS-GXLA, 2.5DS-GXCA 8.85 feet (2.7m) orlongerInstall the antenna on the right position of the trunk lid as shown in the diagrambelow.•Standard type 4Antenna type : Roof top mount type-1/4λ Mono typeMount location : Roof top of a vehicleAntenna cable : SUMITOMO 2.4DS-GXLA, 2.5DS-GXCA 14.76 feet (4.5m)or longerInstall the antenna on the left position of the roof top as shown in the diagrambelow.AntennaMinimum488mmRooftopTransceiver unitAntennaCoaxial cableAntennaMinimum118mmRooftopTransceiver unitAntennaCoaxial cableRear window
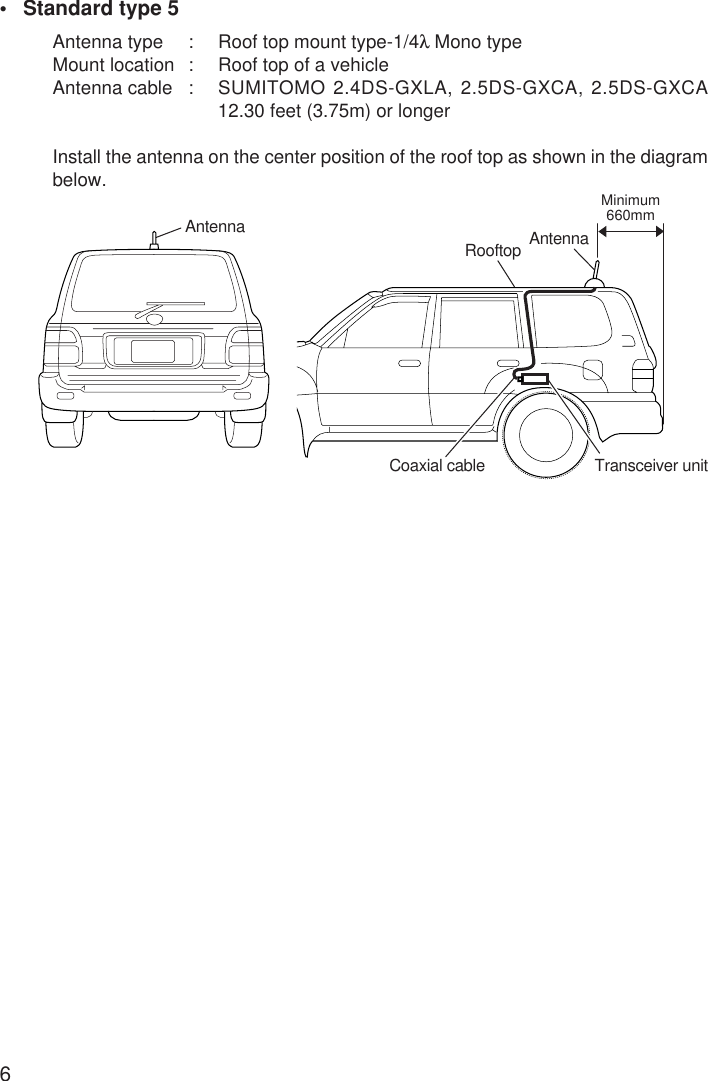
6•Standard type 5Antenna type : Roof top mount type-1/4λ Mono typeMount location : Roof top of a vehicleAntenna cable : SUMITOMO 2.4DS-GXLA, 2.5DS-GXCA, 2.5DS-GXCA12.30 feet (3.75m) or longerInstall the antenna on the center position of the roof top as shown in the diagrambelow.AntennaRooftopTransceiver unitAntennaCoaxial cableMinimum660mm

Navigation menu