Siemens Communications OPWL2PRO VoIP Handset User Manual oi
Siemens Communications, Inc. VoIP Handset oi
UserManual.wiki
>
Siemens Communications
>
OPWL2PRO User Manual
>
User Manual 1
Contents
1.
User Manual 1
2.
User Manual 2
User Manual 1
Navigation menu
Upload a User Manual
Namespaces
Wiki Guide
HTML
PDF
Info
Views
User Manual
Discussion / Help
Navigation
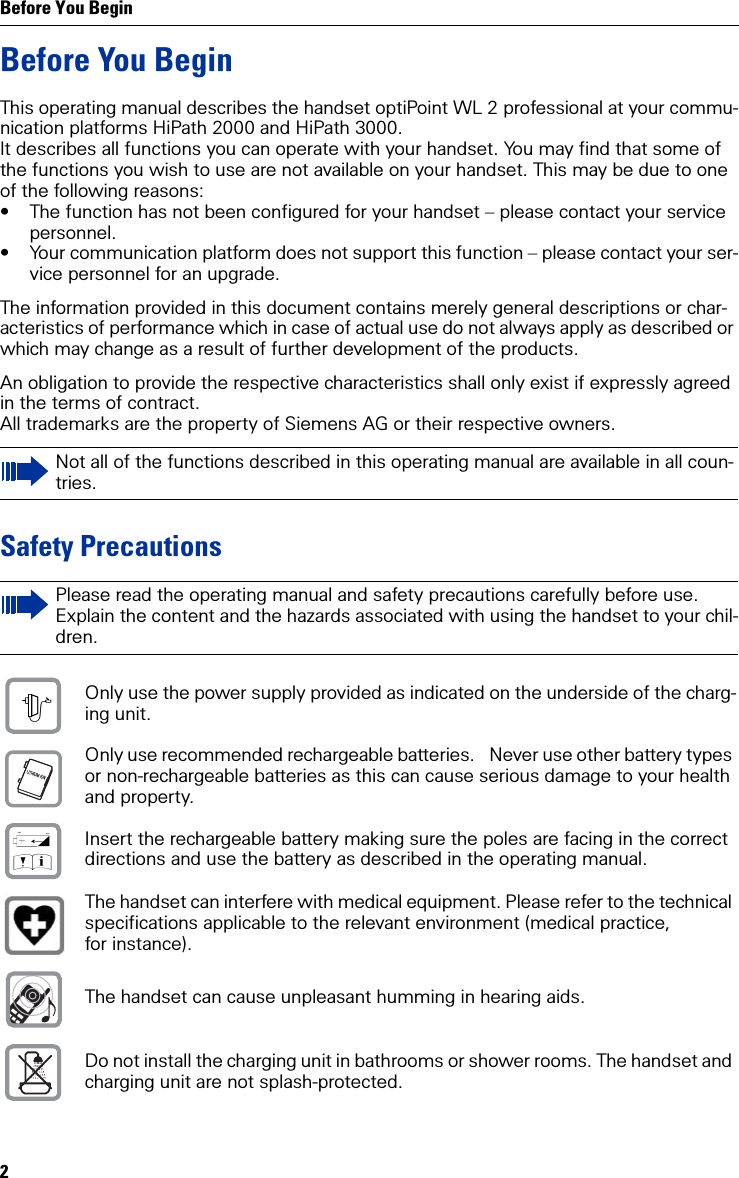


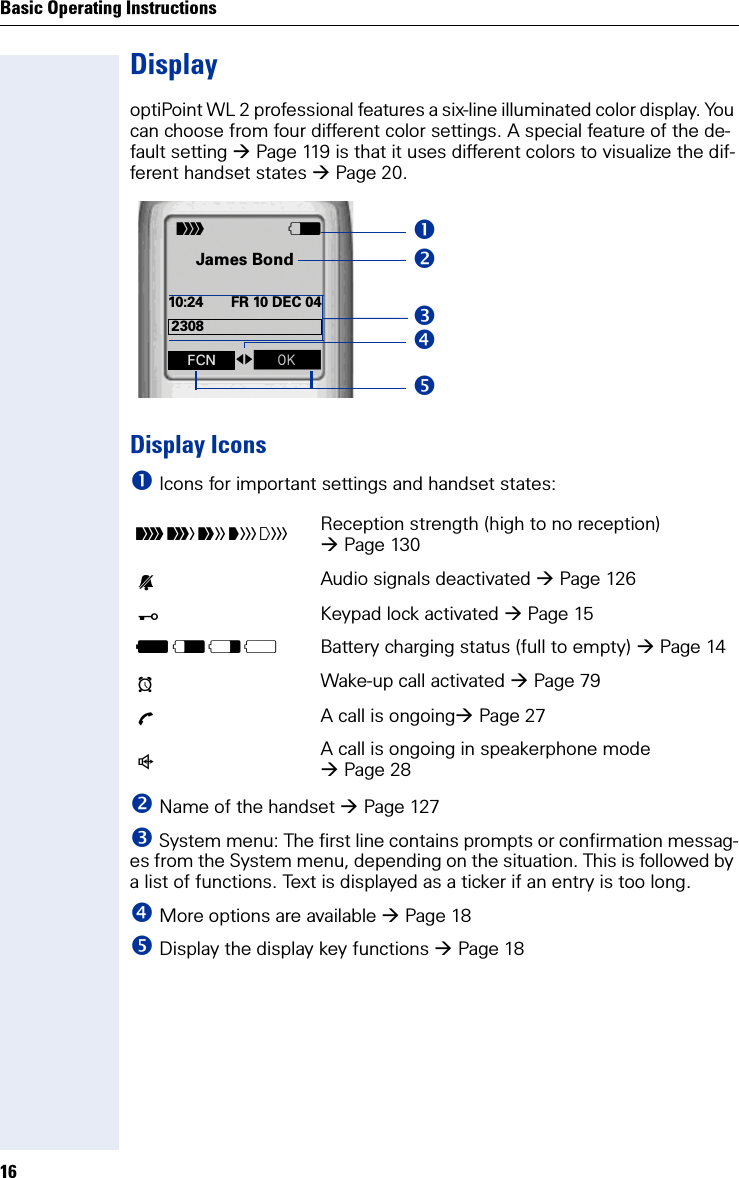
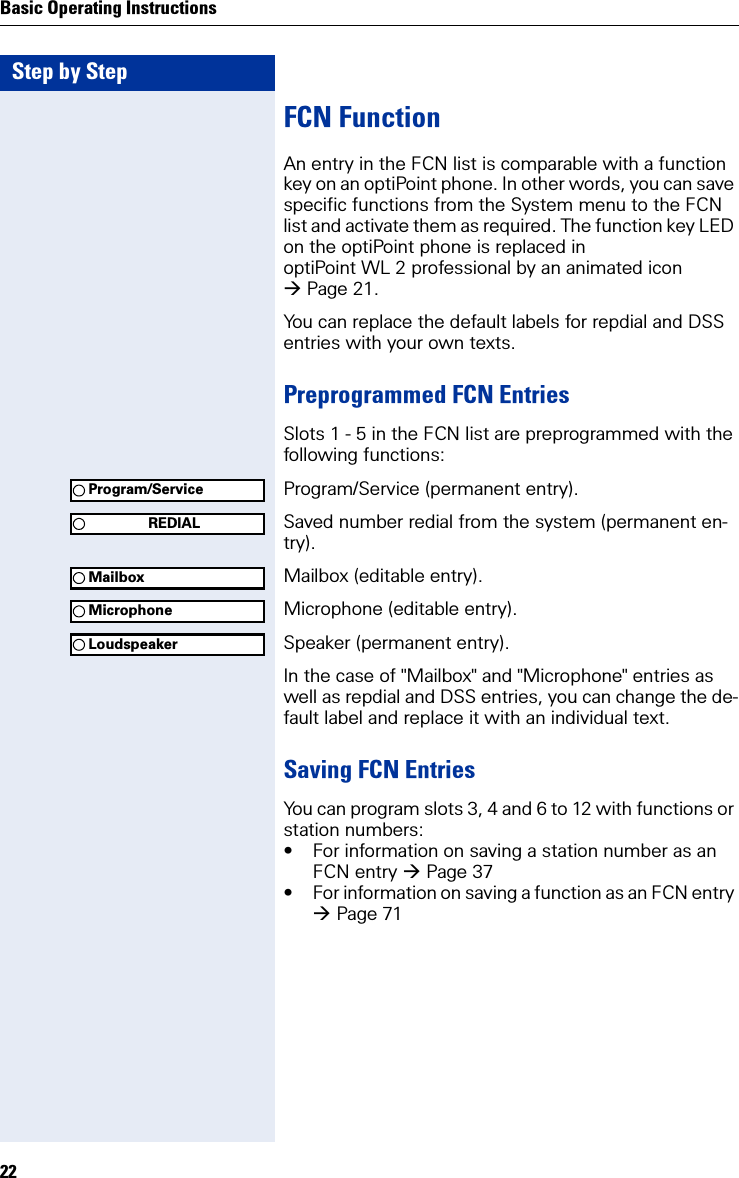
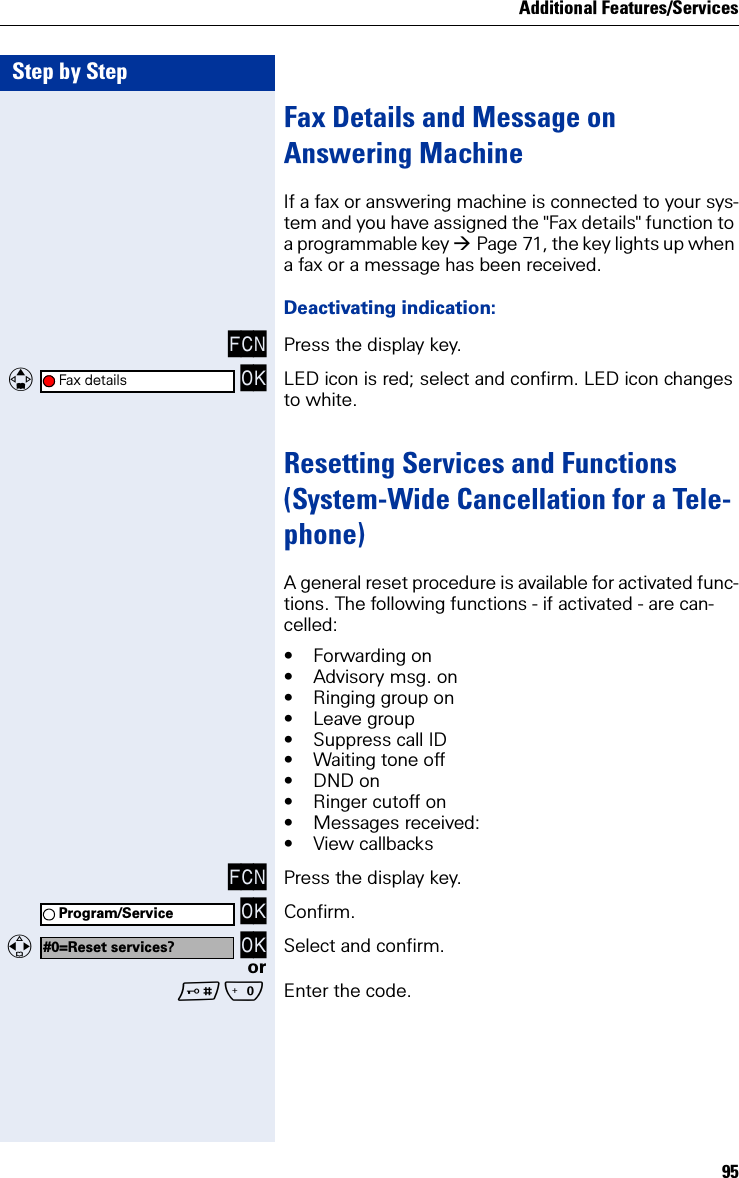
![Basic Operating Instructions17KeyboardNavigation KeyNavigation key functionsThe side of the navigation key (up, down, right, left) to be pressed is marked black. Key Mode FunctionIdle state Open the main menu Page 20Lists[1]/menus[1] Call lists, such as the directory listScroll upText entry Move the cursor upIdle statePress quickly: Open the directory Page 113Hold down: Start voice dialing Page 53Lists[1]/menus Scroll downText entry Move the cursor downIdle state Open the System menu Page 20System menu Scroll through functions Page 20Lists[1]/menus Confirm the selected entryText entry Move the cursor rightLists[1]/menus Jump back to the previous layer or cancelSystem menu Scroll through functions Page 20Text entry Move the cursor left](https://usermanual.wiki/Siemens-Communications/OPWL2PRO.User-Manual-1/User-Guide-608313-Page-17.png)
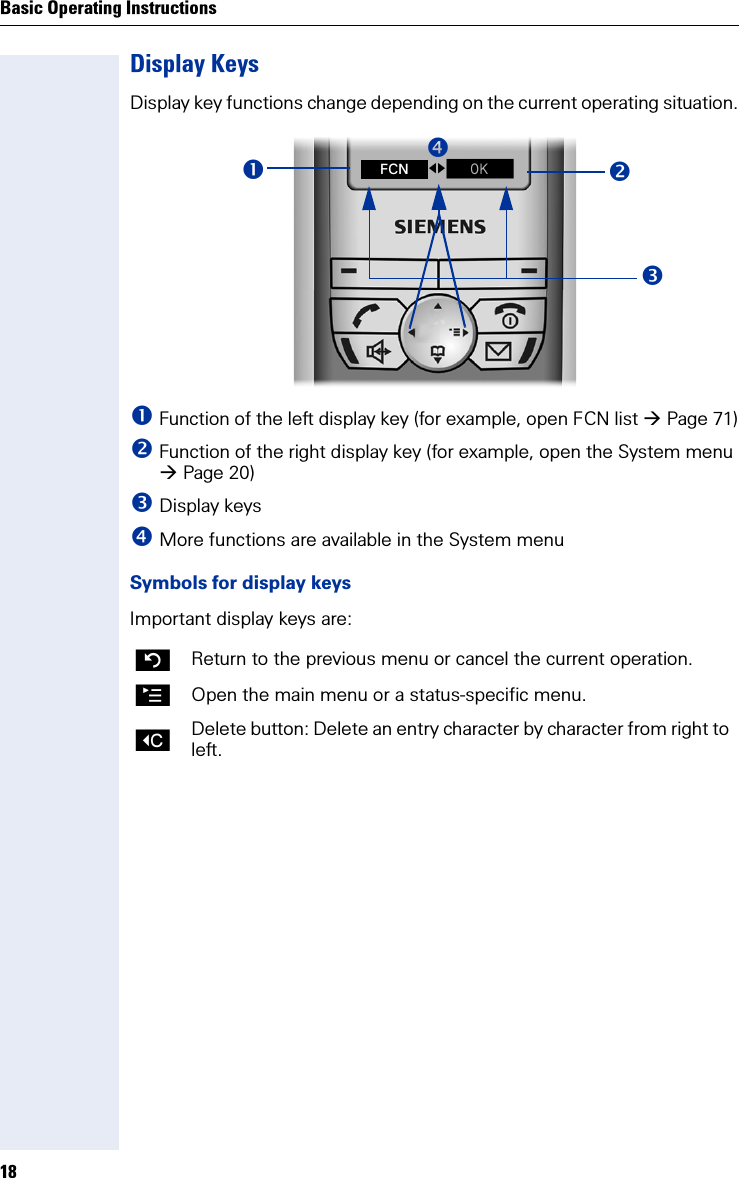
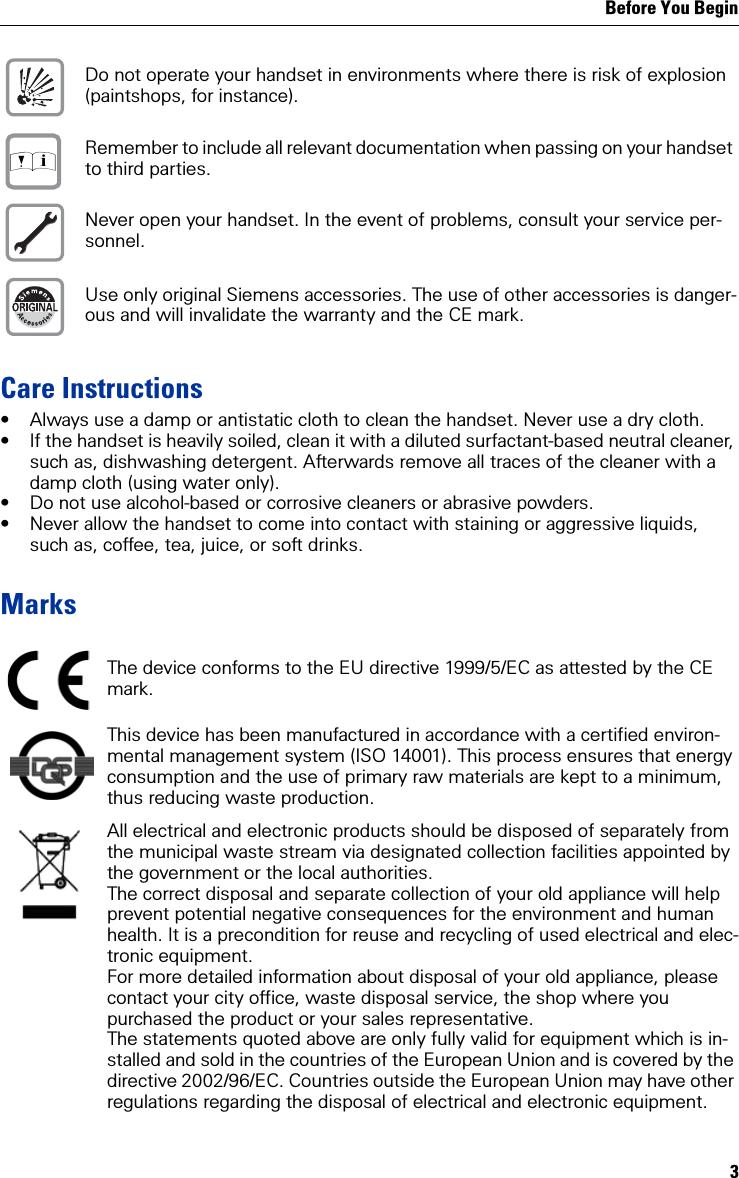
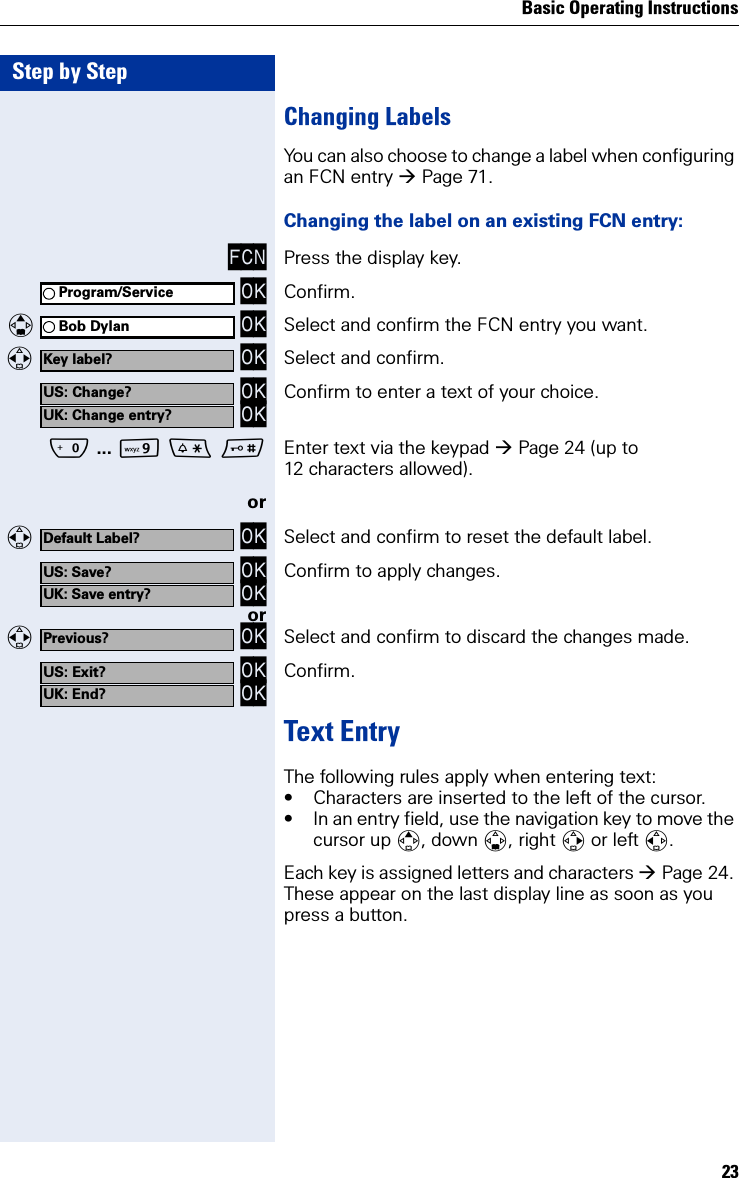
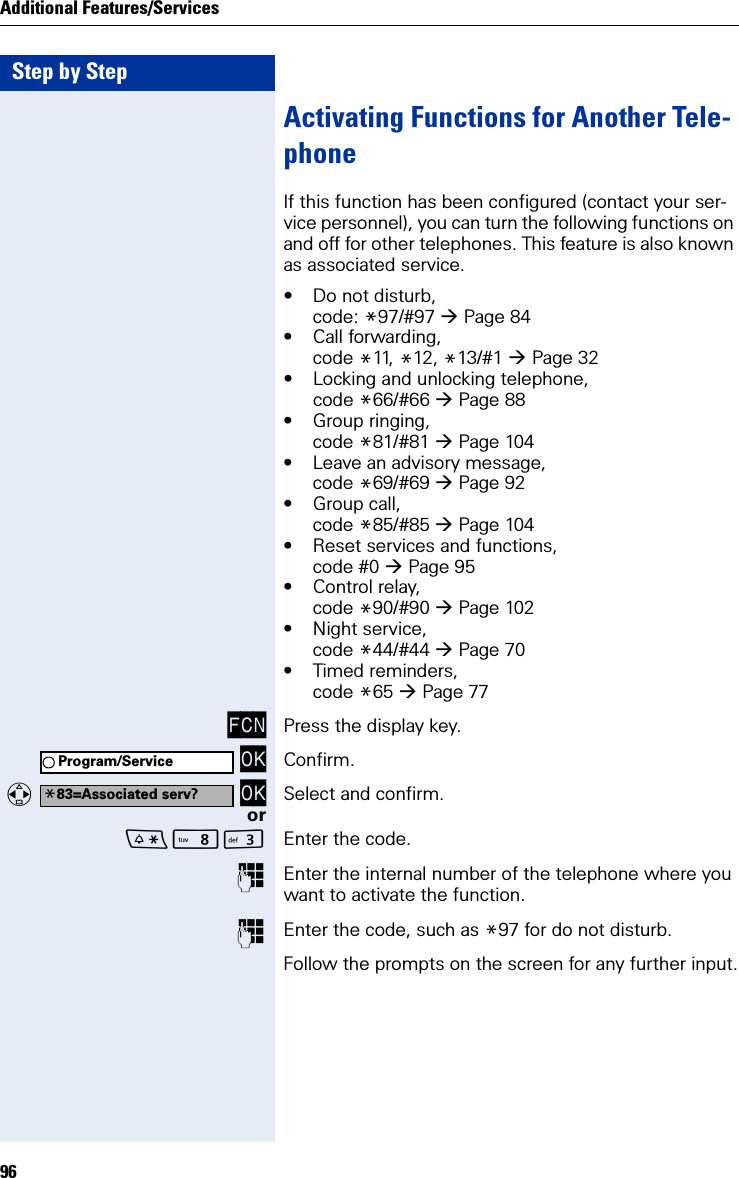
![Basic Operating Instructions19Additional Key FunctionsKey Mode FunctionCall state Accept a call Page 27Lists[1][1] Call lists, such as the directory listStart dialing the selected entryIdle state Press quickly: Open the redial list Hold down: Start dialing Handset deacti-vated Hold down: Activate the handsetCall state End the callGeneral (apart from in system state)Press quickly: One layer backHold down: Return to idle stateLists[1] Close the listIdle state Hold down: Deactivate the handset[2] [2] These keys have an additional LED display Page 21Call state Accept a call in speakerphone modeLists[1] Start dialing the selected entryIdle state Hold down: Start dialing[2] LED lit Start polling voice messages*Idle state Hold down: Deactivate audio signalsText entry Press quickly: Toggle case# Idle state Hold down: Activate/deactivate the keypad lockSIdle state Settings in the System menu Page 39Call state Adjust the volume (lower)CIdle state Settings in the System menu Page 39Call state Adjust the volume (higher)](https://usermanual.wiki/Siemens-Communications/OPWL2PRO.User-Manual-1/User-Guide-608313-Page-19.png)
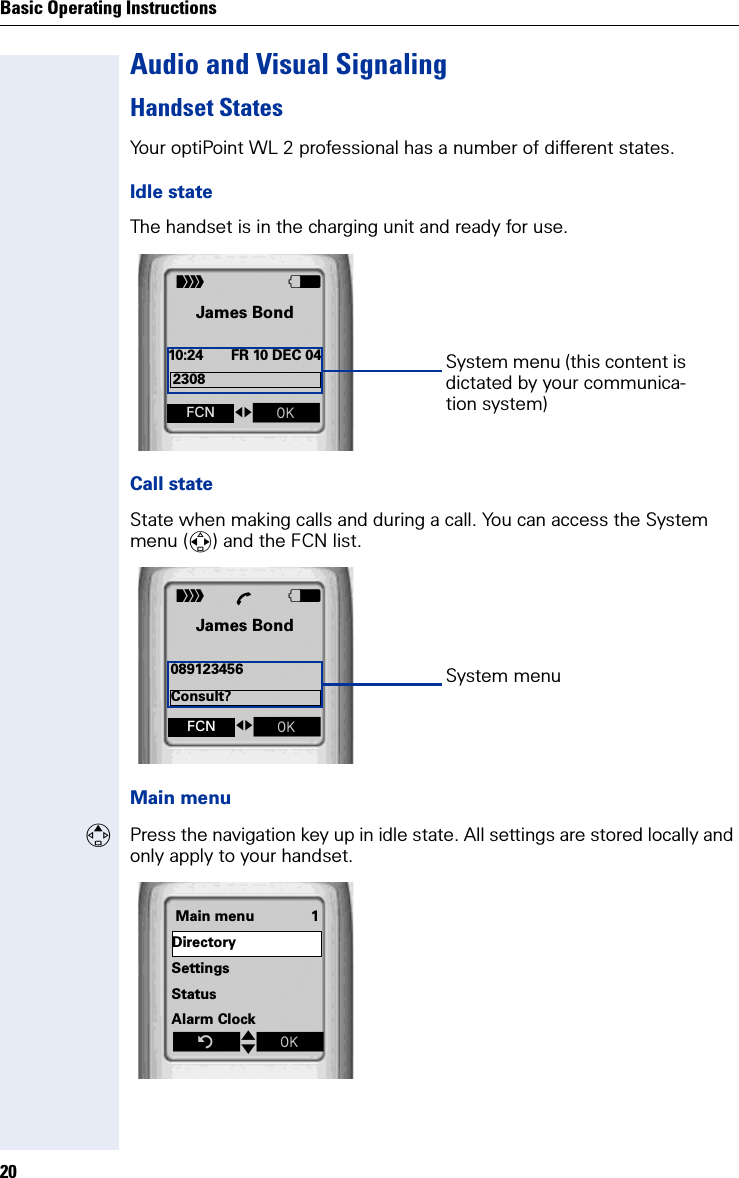
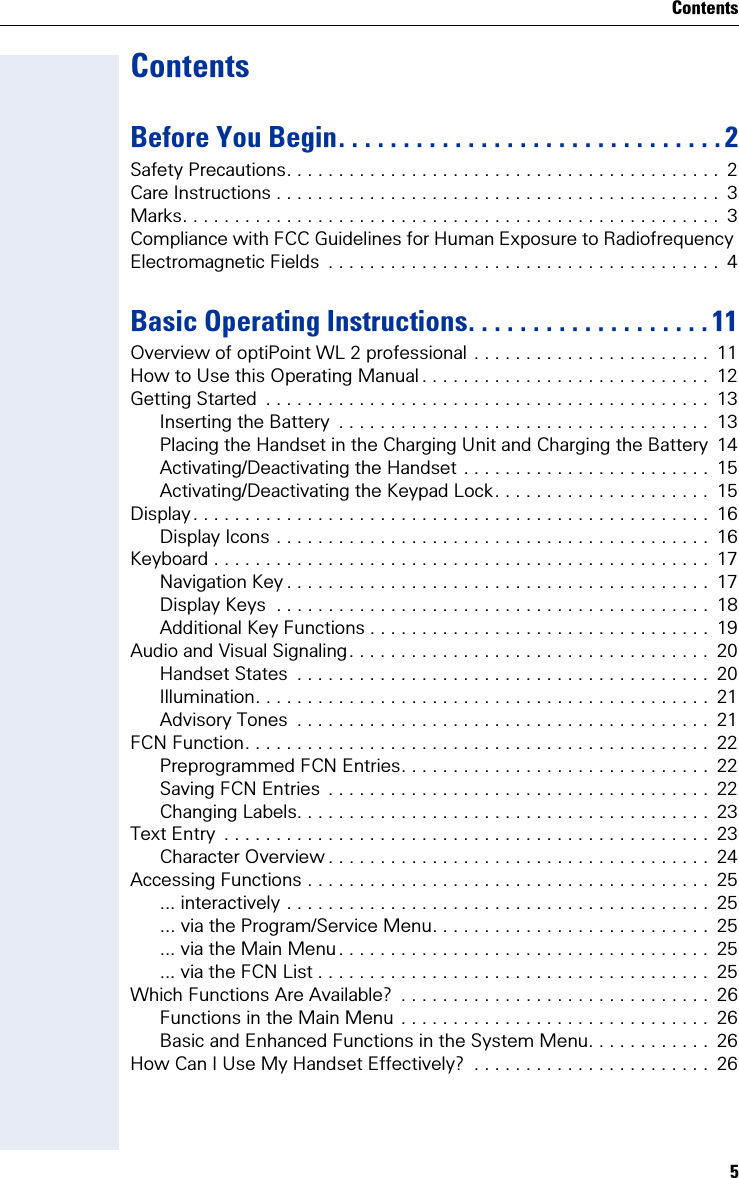
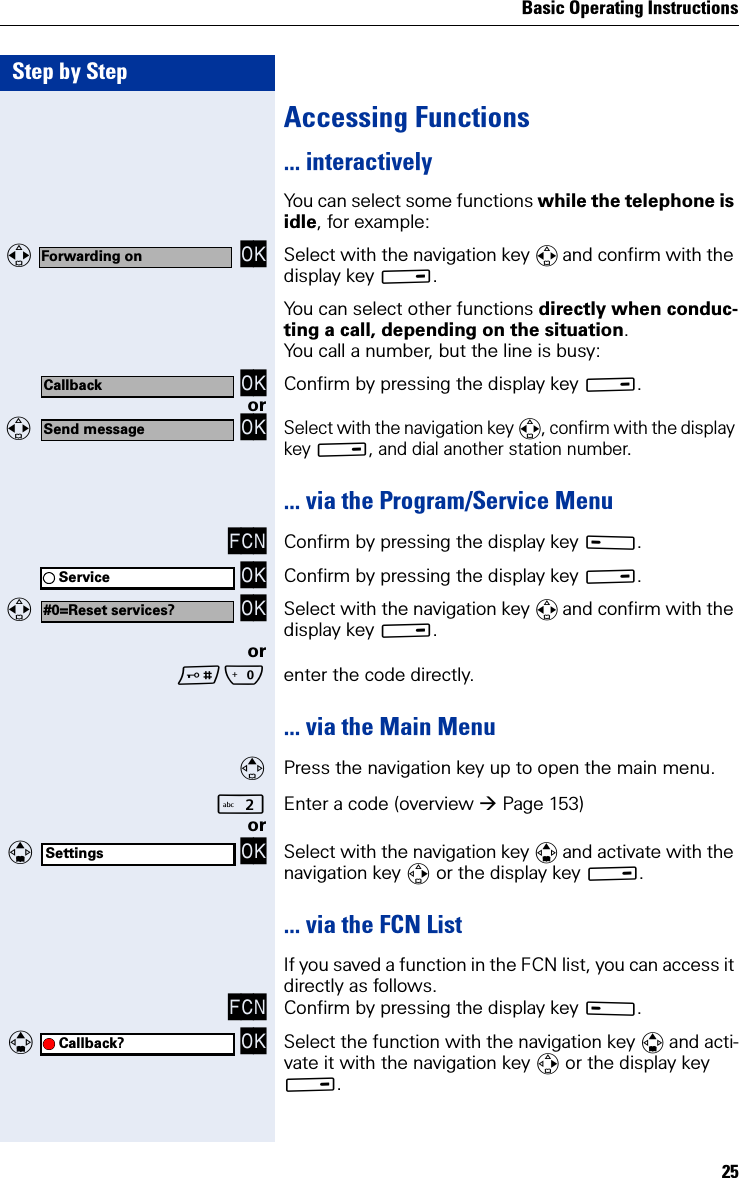
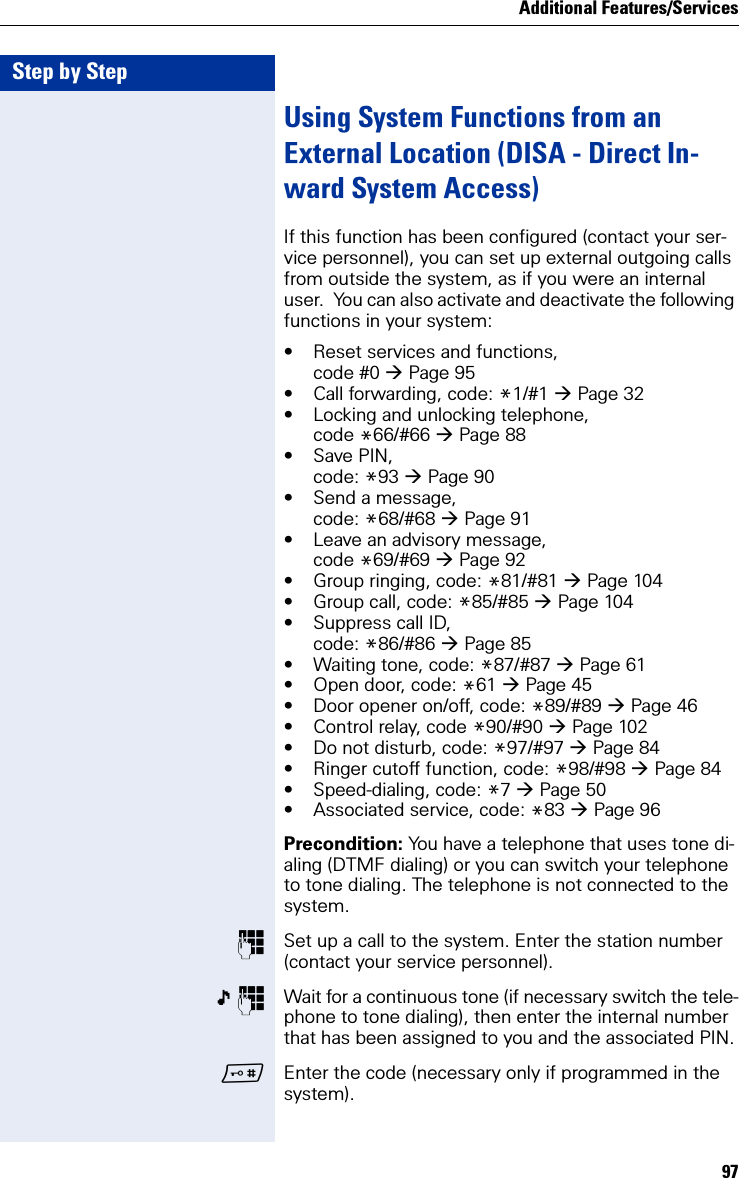
![Basic Operating Instructions24Character OverviewAdditional character setAn extended (country-specific) character set is available for entries in the local directory.Example:"R" = Press the * key once and the M key three times.Key 1x 2x 3x 4x 5x1a b c 2Id e f 3g h I 4j k l 5Lm n o 6Mp q r s 7Nt u v 8Ow x y z 9Q[1][1] Space. - 0*[2][2] Toggle to uppercase#[3][3] Delete characterKey 1x 2x 3x 4x 5x 6x 7x 8x 9x 10x 11 x 12x 13x 14x 15x[1][1] Space1⣠$ ¥ ¤a b c 2 äáàâãçId e f 3 ëéèêg h I 4 ïíìîj k l 5Lm n o 6 öñóòô õMp q r s 7ßNt u v 8 üúùûOw x y z 9ÿýæø åQ. , ? ! 0 + - : ¿ ¡ / " ' ; _*[2][2] Next letter uppercase (active for up to one second)[3][3] Toggle to digit input*## @ \ & §](https://usermanual.wiki/Siemens-Communications/OPWL2PRO.User-Manual-1/User-Guide-608313-Page-24.png)
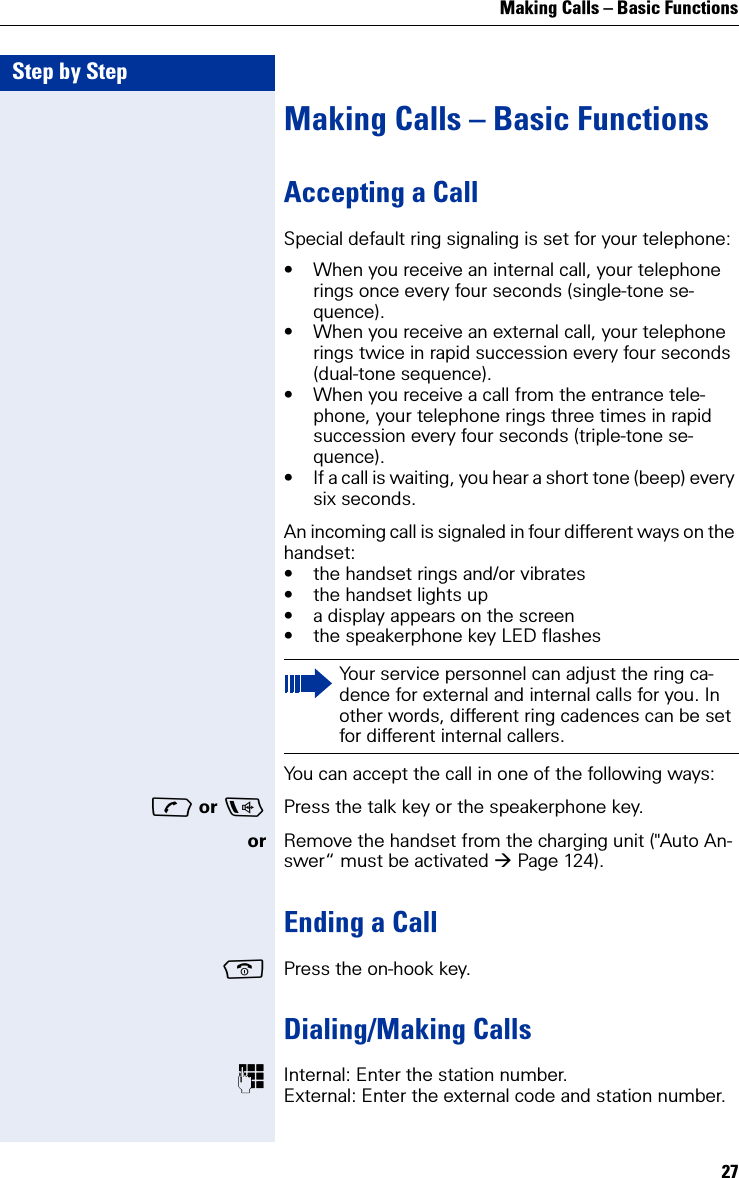
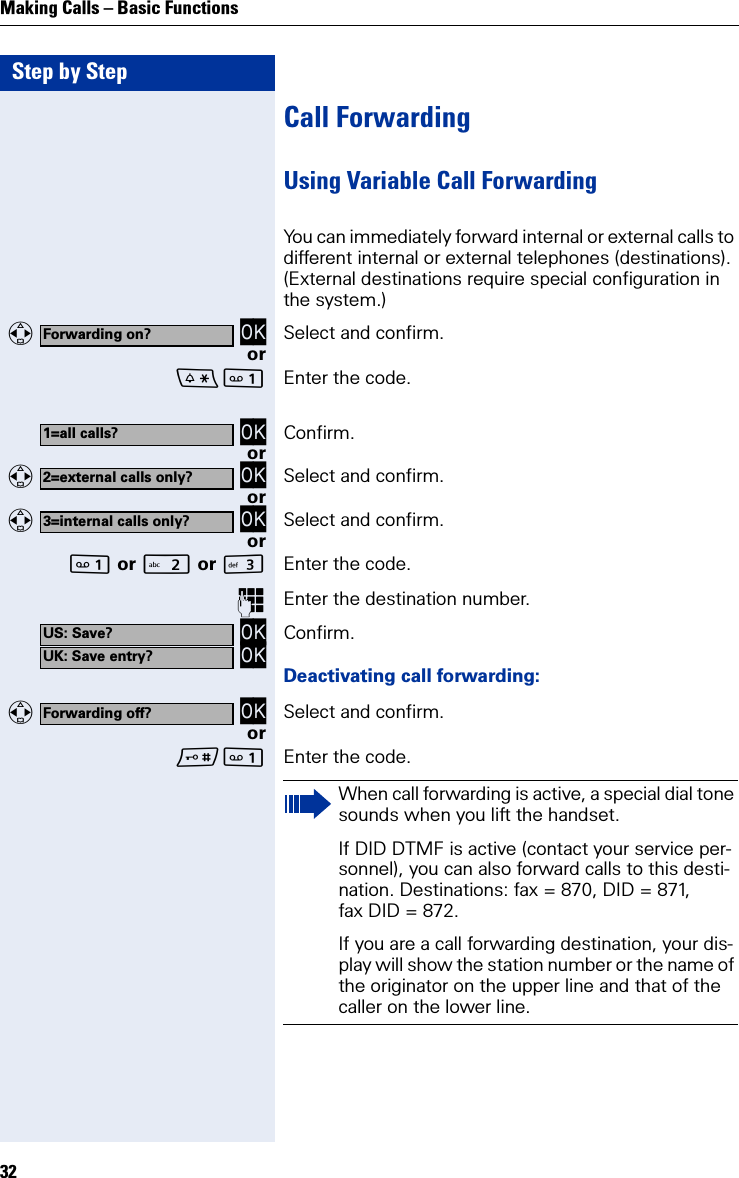
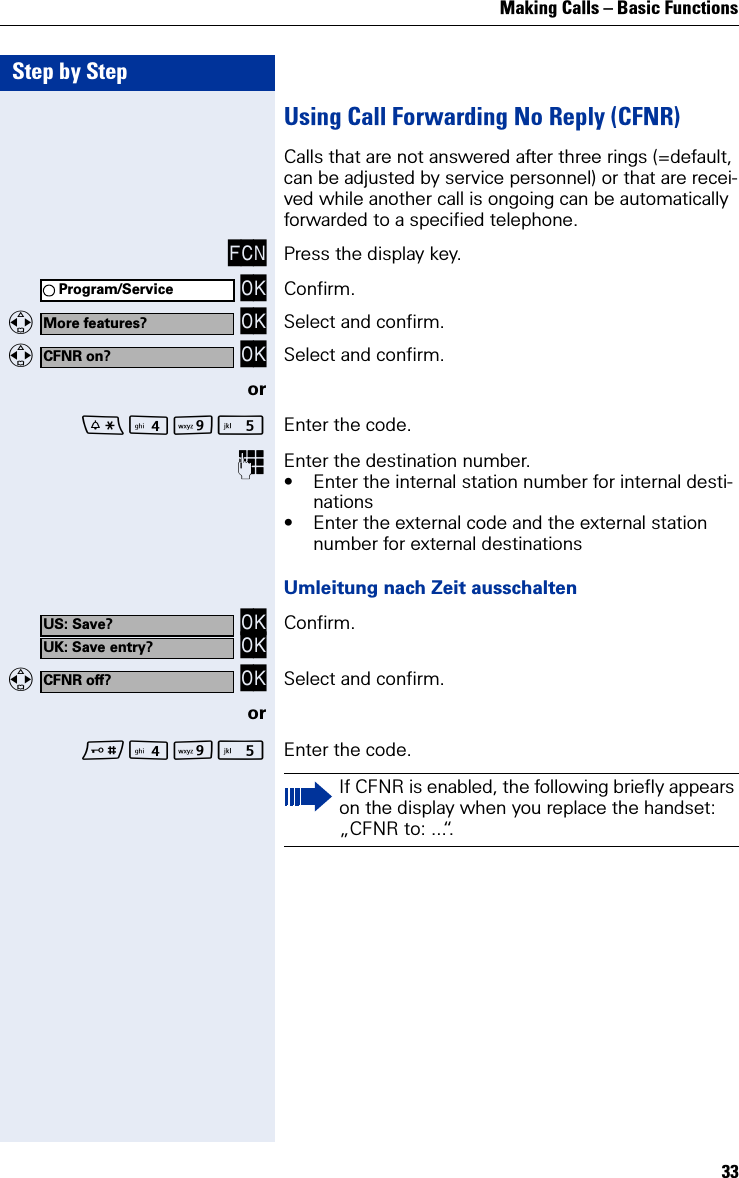
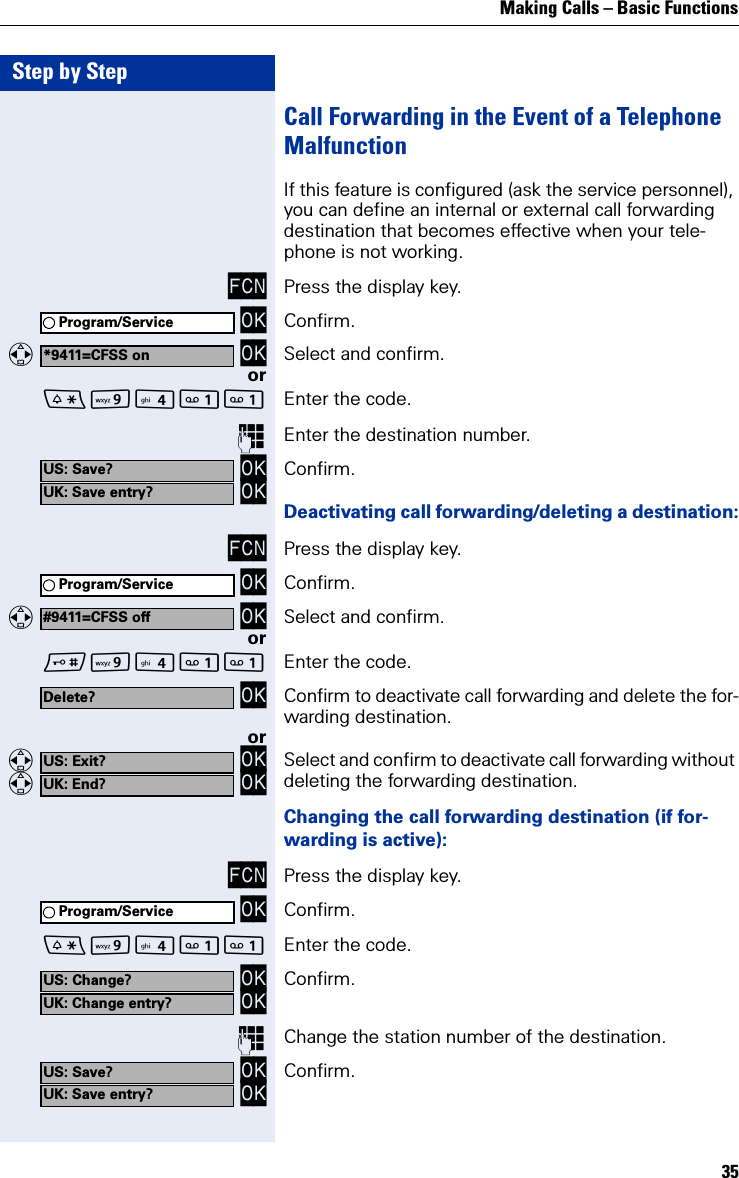
![Making Calls – Basic Functions31Step by StepTransferring a CallIf the person you are speaking to wants to talk to a spe-cific colleague of yours, you can transfer the call to this colleague. OK OK Confirm.Enter the number of the party to whom you want to transfer the call.Announce the call, if necessary.Press the on-hook key.or OK Select and confirm[1].US: Consult?UK: Enquiry?Transfer?[1] ”Different Displays (HiPath 4000 Environment)” Page 136](https://usermanual.wiki/Siemens-Communications/OPWL2PRO.User-Manual-1/User-Guide-608313-Page-31.png)

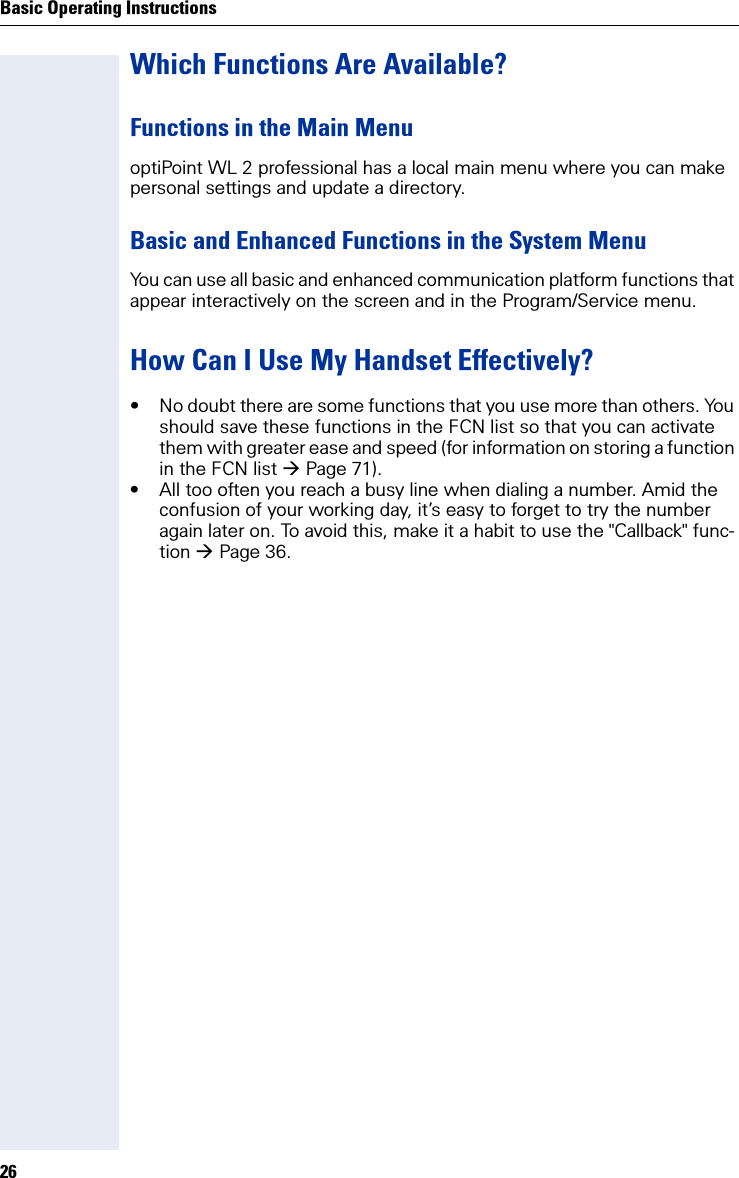
![Step by StepMaking Calls – Basic Functions36Using CallbackIf a user is busy or is not answering, you can store an automatic callback. This feature saves you from having to make repeated attempts to reach the user.You receive a callback,• when the other party is no longer busy• when the user who did not answer has conducted another call.Storing a CallbackPrecondition: You have reached a busy line or no one answers. OK OK Confirm.orN Enter the code.Answering a CallbackPrecondition: A callback was saved. Your telephone rings. "Callback: ..." appears on the display.Press the talk key.orPress the speakerphone key.You hear a ring tone.Checking and Canceling a Saved Callback OK Select and confirm[1].orN Enter the code. OK OK Select and confirm to display additional entries.Deleting a displayed entry: OK Confirm.Ending a retrieve operation: OK OK Select and confirm.US: CallbackUK: Set CallbackView callbacks?[1] ”Different Displays (HiPath 4000 Environment)” Page 136US: Next callback?UK: Display next?Delete?US: Exit?UK: End?](https://usermanual.wiki/Siemens-Communications/OPWL2PRO.User-Manual-1/User-Guide-608313-Page-36.png)


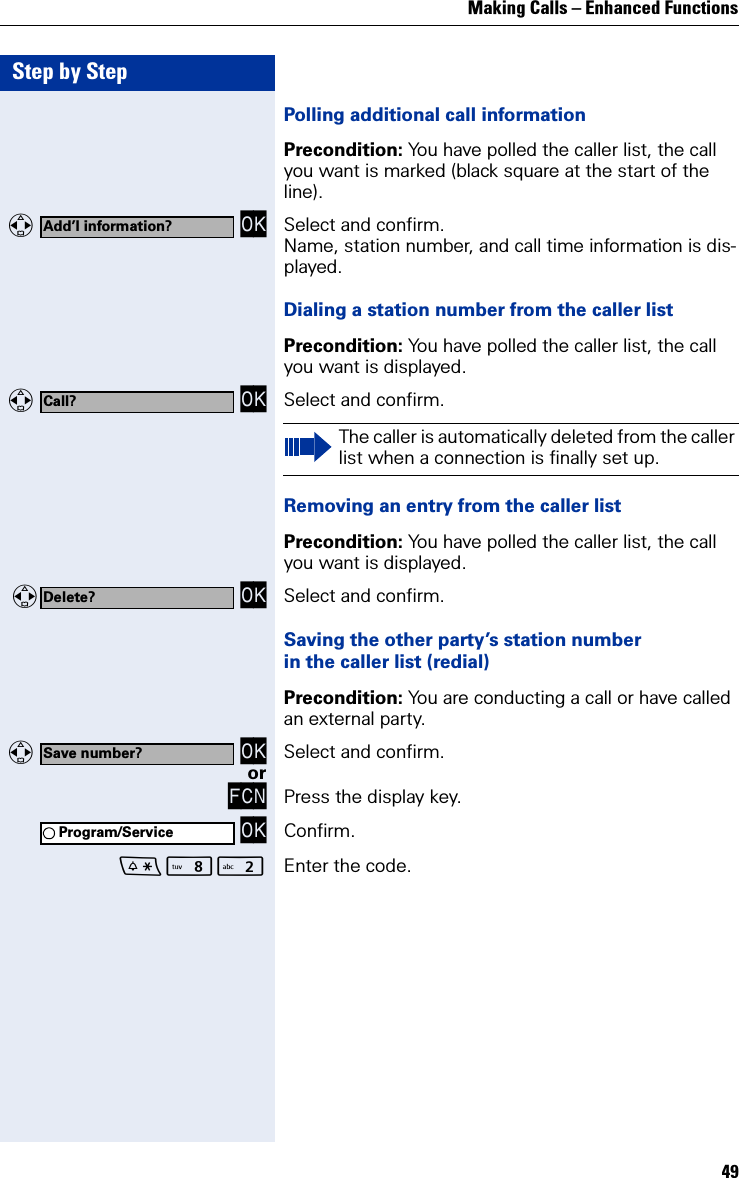
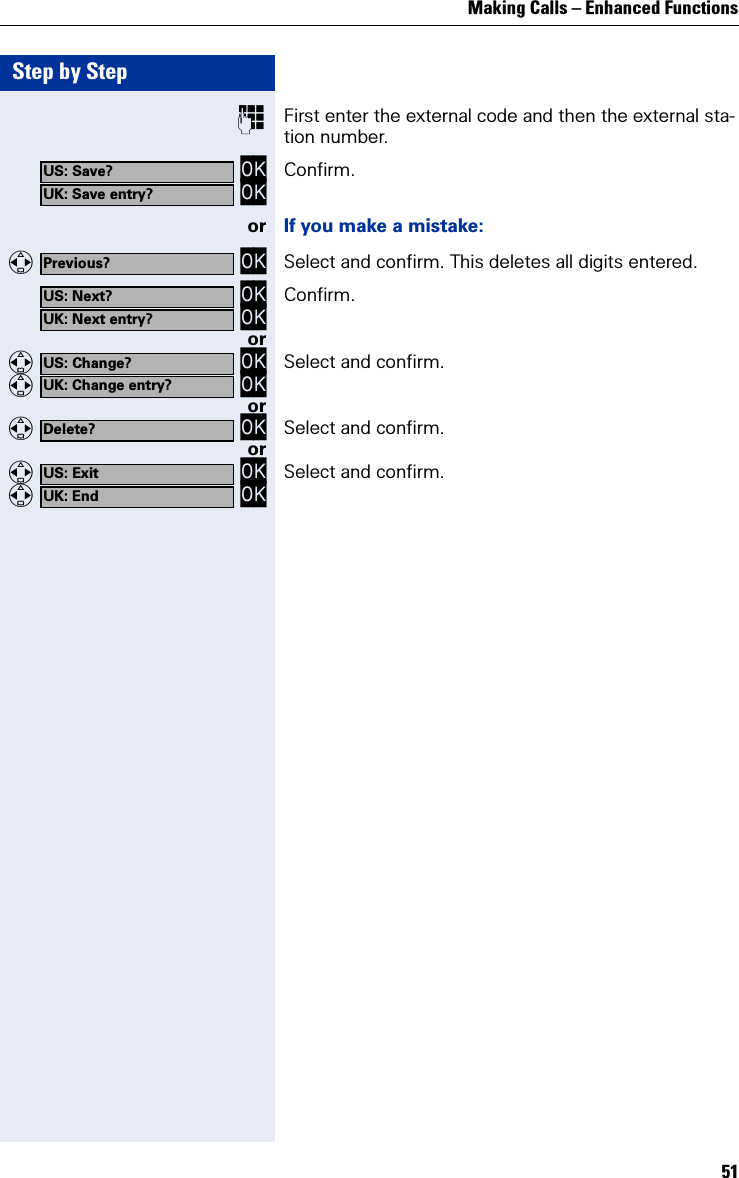
![Step by StepMaking Calls – Enhanced Functions48Using a Caller ListIf you are unable to accept an external or internal call, the call attempt is stored in the caller list.You can store answered calls either manually (both in-ternal and external calls) or automatically (external calls only). Contact your service personnel for details.Your telephone stores up to ten calls in chronological or-der. Each call is assigned a time stamp. The most re-cent entry not yet answered in the list is displayed first. Multiple calls from the same caller do not automatically generate new entries in the caller list. Instead, only the most recent time stamp for this caller is updated and its number incremented.Polling the caller listPrecondition: The service personnel in charge set up a caller list for your telephone. OK Select and confirm[1],orN Enter the code.The last call is displayed. OK OK Confirm to display other calls.Ending a poll operation OK OK Select and confirm.orPress the on-hook key.orPress the speakerphone key.Caller list?[1] ”Different Displays (HiPath 4000 Environment)” Page 136US: Next?UK: Next entry?US: Exit?UK: End?](https://usermanual.wiki/Siemens-Communications/OPWL2PRO.User-Manual-1/User-Guide-608313-Page-48.png)
![Step by StepMaking Calls – Enhanced Functions50Speed DialingUsing station and system speed-dial numbersPrecondition: You have stored station speed-dial num-bers Page 50 or the service personnel has stored system speed-dial numbers.FCN Press the display key. OK Confirm. OK Confirm[1],orM Enter the code.Enter a speed-dial number."*0" to "*9" = station speed-dialing."000" to "999" = system speed-dialing (contact your ser-vice personnel).If applicable Suffix-dialingIf necessary, you can suffix-dial additional digits (for example, the user’s extension) at the end of the saved station number.If this feature is configured, a suffix is automatically di-aled (for example, "0" for the exchange) if no entries are made within 4 or 5 seconds.Storing station speed-dial numbersYou can store the ten numbers which you use the most and dial them using your own station speed-dial num-bers: *0 through *9 Page 50.FCN Press the display key. OK Confirm. OK Select and confirm1.orO Enter the code.Enter the speed-dial number you wish to use (*0 to *9). If the speed-dial number is already in use, the pro-grammed station number appears on the screen. OK OK Confirm.Program/Service*7=Use speed dialing?[1] ”Different Displays (HiPath 4000 Environment)” Page 136Program/Service*92=Change Speed Dial?US: Change?UK: Change entry?](https://usermanual.wiki/Siemens-Communications/OPWL2PRO.User-Manual-1/User-Guide-608313-Page-50.png)

![Making Calls – Enhanced Functions61Step by Stepor Press the on-hook key. "Recall ..." appears on the screen. Press the talk key.Preventing and Allowing Call Waiting (Auto-matic Camp-On)If this function has been configured (ask the service per-sonnel), you can prevent or allow a second call Page 60 from being signaled by automatic camp-on during an ongoing call. FCN Press the display key. OK Confirm. OK Select and confirm[1].or OKorOQ Enter the code for "Call wait.trm.off“.orOQ Enter the code for "Call wait.term.on".Activating/Deactivating the Call Waiting Tone You can suppress the call waiting tone (that sounds ev-ery six seconds) for external calls. A special nonrecur-ring dial tone then alerts you to the waiting call. OK Select and confirm.or OKorNM Enter the code for "Waiting tone off".or NM Enter the code for "Waiting tone on".Program/Service#490=Call wait.trm.off?[1] ”Different Displays (HiPath 4000 Environment)” Page 136*490=Call wait.term.on?Waiting tone off?Waiting tone on?](https://usermanual.wiki/Siemens-Communications/OPWL2PRO.User-Manual-1/User-Guide-608313-Page-61.png)
![Step by StepMaking Calls – Enhanced Functions66Activating Tone Dialing/DTMF Suffix-DialingYou can transmit dual-tone multifrequency (DTMF) sig-nals to control devices such as an answering machine or automatic information system.FCN Press the display key. OK Confirm. OK Select and confirm[1].orI Enter the code.You can use the keys Q to O, *, and # to transmit DTMF signals.Program/Service*53=DTMF dialing?[1] ”Different Displays (HiPath 4000 Environment)” Page 136Ending the call also deactivates DTMF suffix dial-ing.Your system may be configured so that you can start DTMF suffix dialing immediately after set-ting up a connection.](https://usermanual.wiki/Siemens-Communications/OPWL2PRO.User-Manual-1/User-Guide-608313-Page-66.png)
![Making Calls – Enhanced Functions67Step by StepForwarding a Call After an AnnouncementIf this function has been configured (contact your ser-vice personnel), you can use a speaker call to announce a call in progress to a group of users Page 56 (an-nouncement Page 104).You can transfer the held call once a member of the group has accepted the call request.Precondition: You are conducting a call. OK OK Confirm. The other party is placed on hold.FCN Press the display key. OK Confirm. OK Select and confirm.orNQ Enter the code.Enter the group’s station number. Announce the call.When a member of the group accepts the call Page 43, you are connected to this party.Press the on-hook key.or OK Select and confirm[1].US: Consult?UK: Enquiry?Program/Service*80=Speaker call?Transfer?[1] ”Different Displays (HiPath 4000 Environment)” Page 136If the connection between the two other parties is not established within 45 seconds, the call from the first party returns to you (recall).](https://usermanual.wiki/Siemens-Communications/OPWL2PRO.User-Manual-1/User-Guide-608313-Page-67.png)


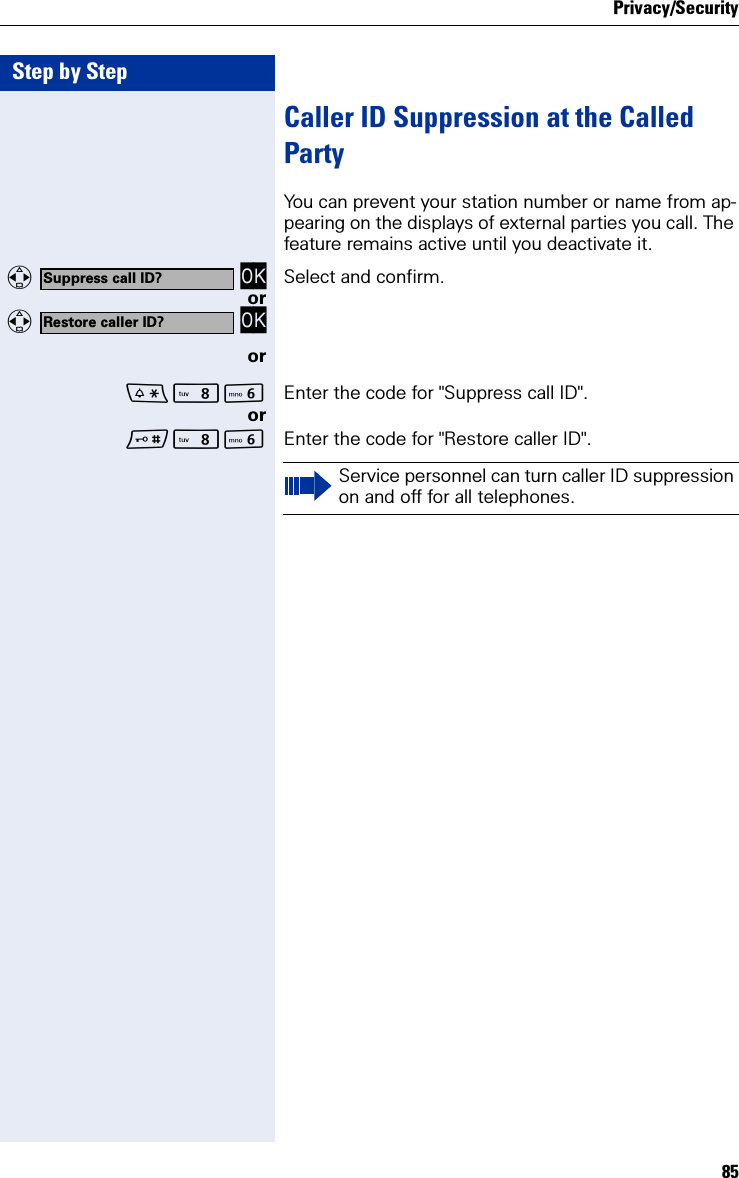
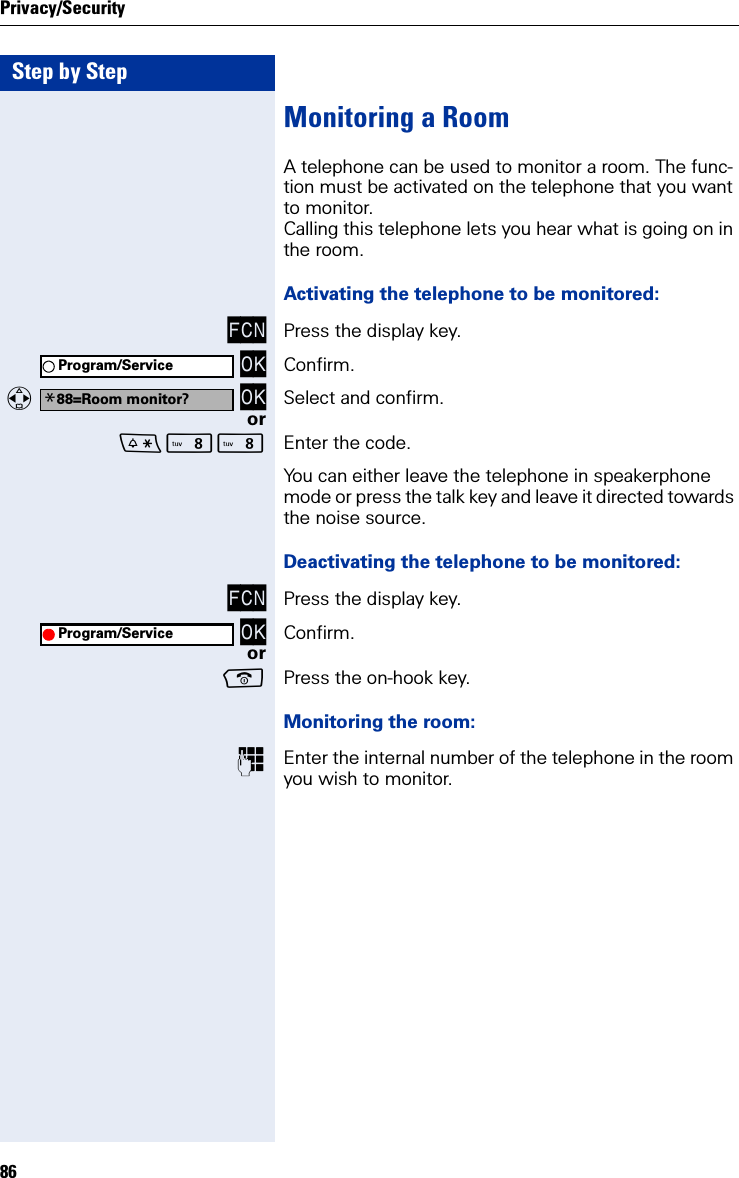
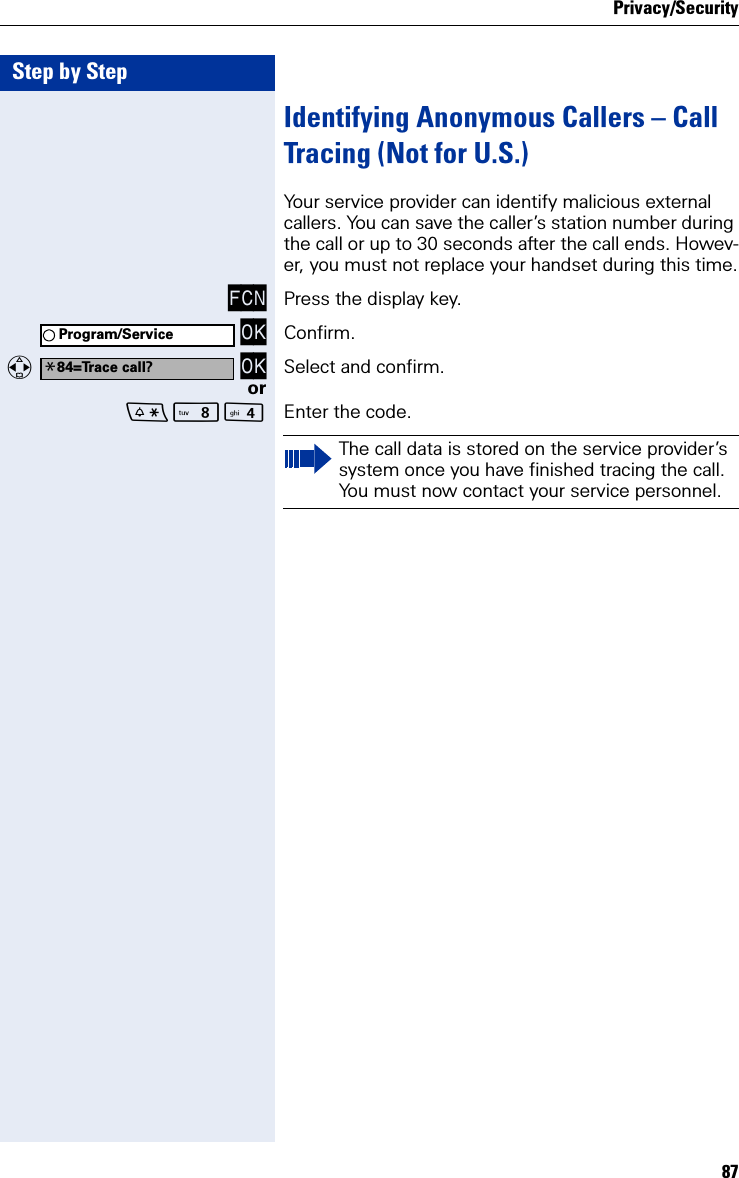
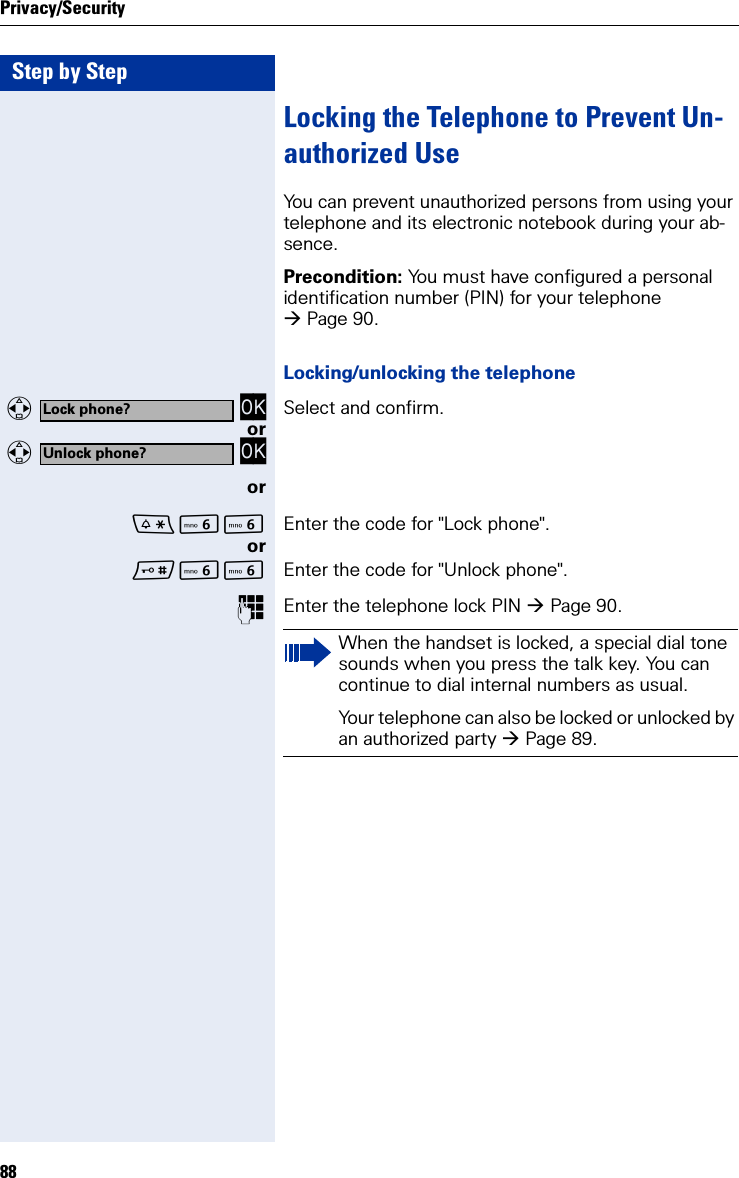
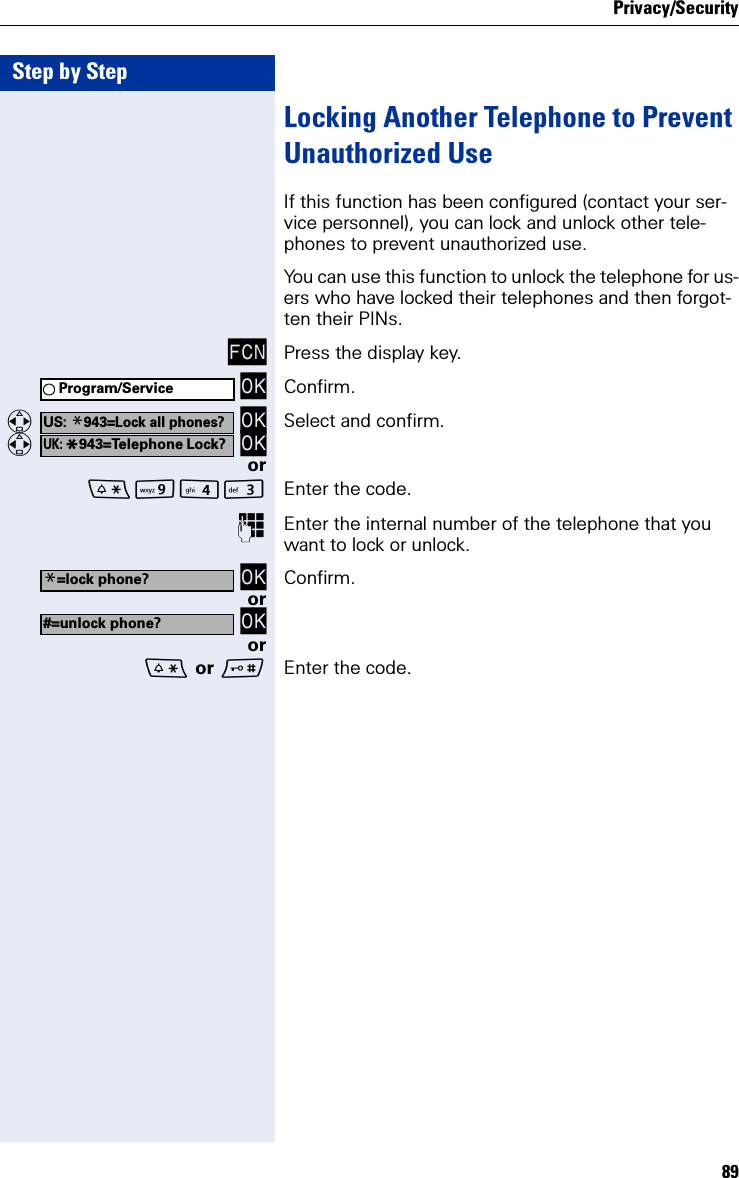
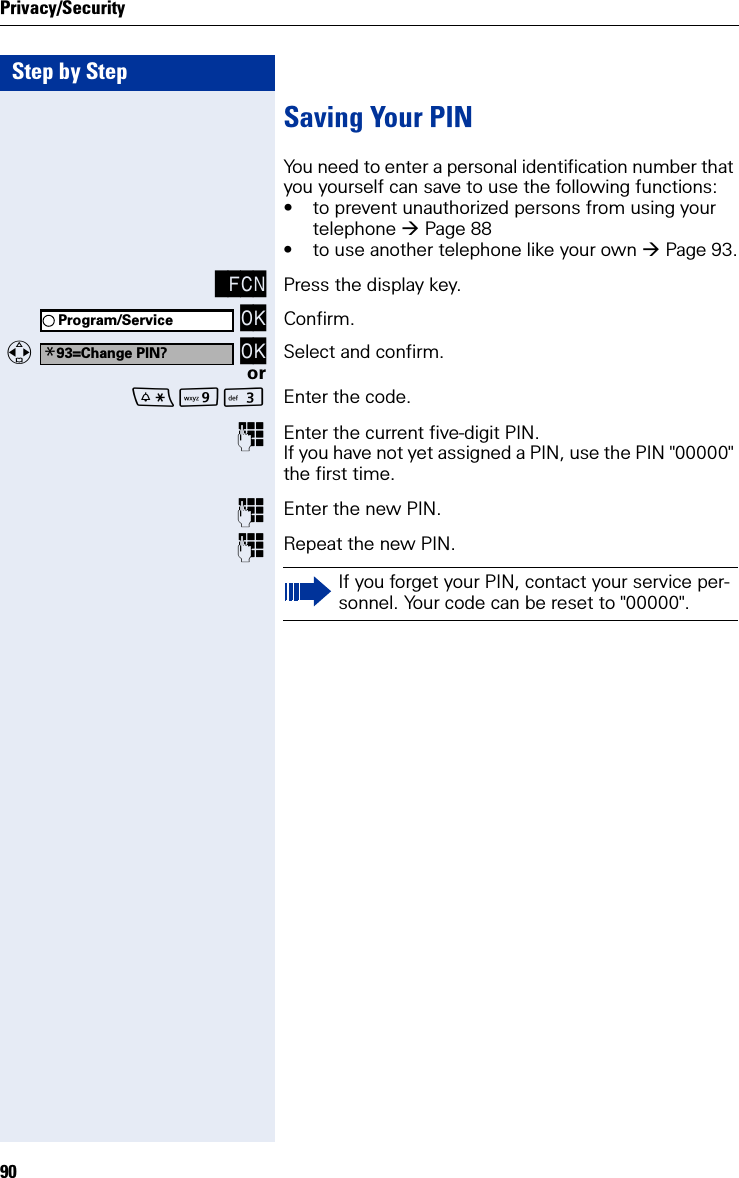
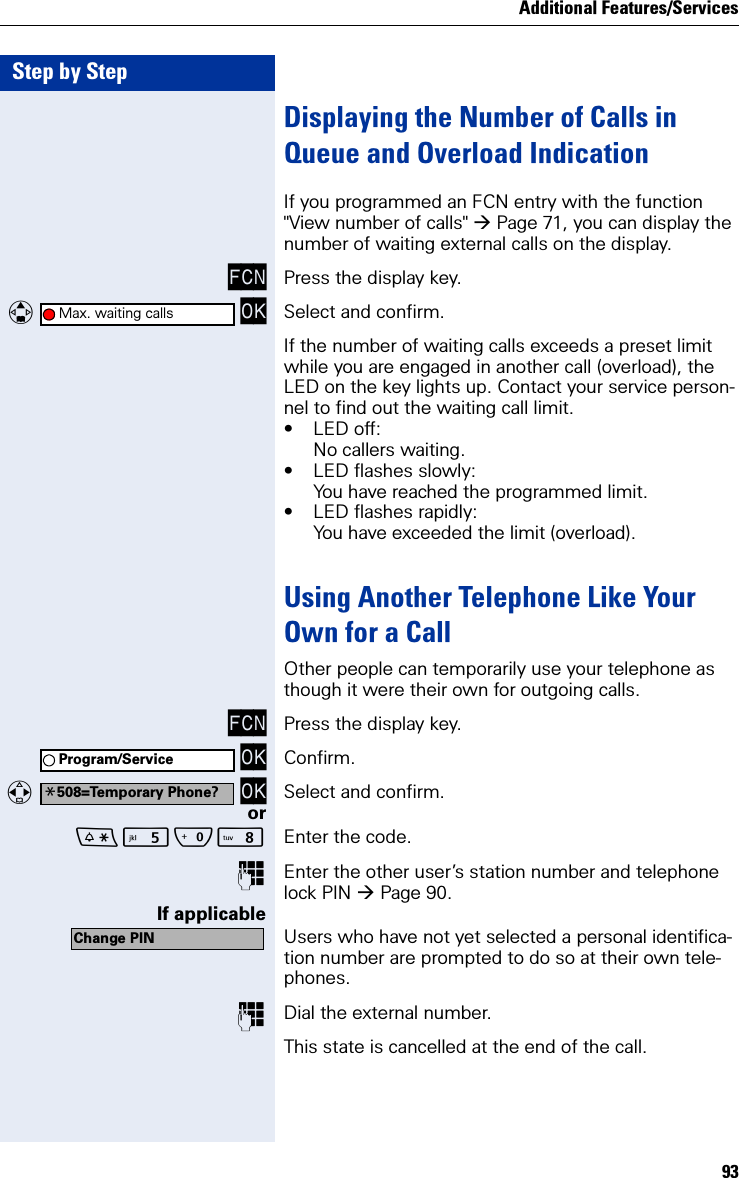
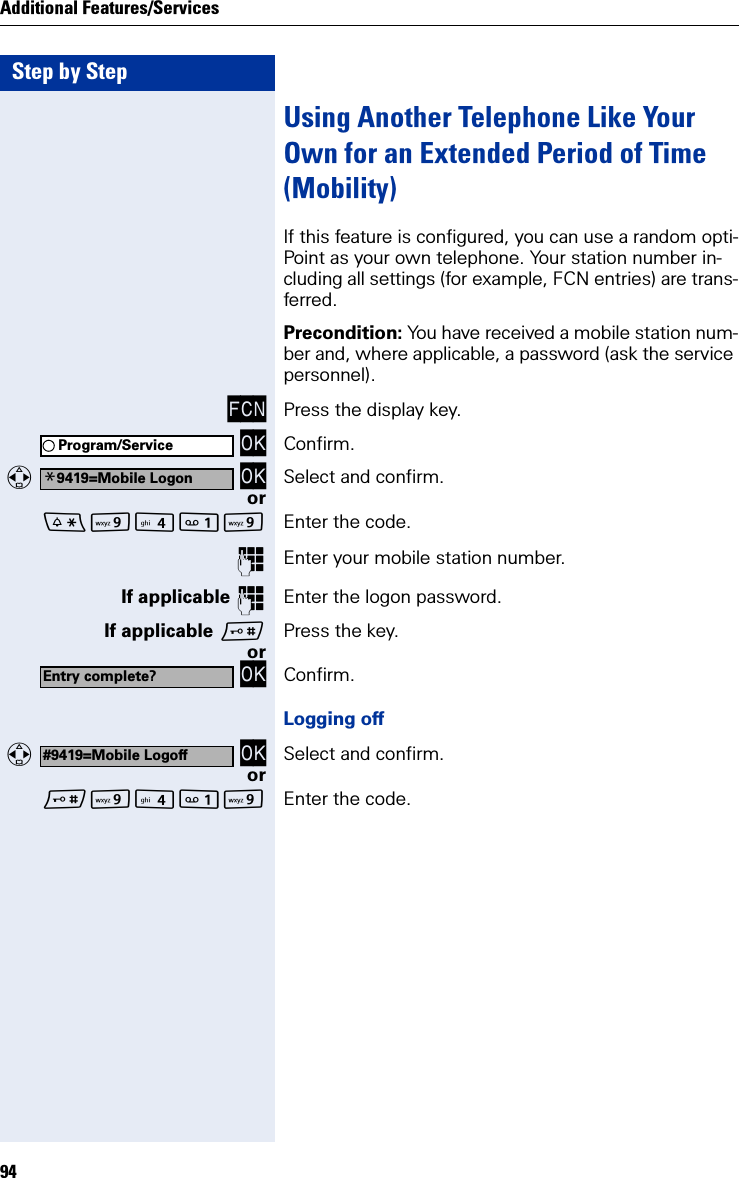
![Step by StepPrivacy/Security84Privacy/SecurityTurning Ringer Cutoff On and OffYou can activate the ringer cutoff function if you do not want the receive any calls. Calls are only identified by one ring signal, an indication on the display, and by a flashing icon associated with a programmed FCN entry. OK Select and confirm[1].or OKorON Enter the code for "Ringer cutoff on".orON Enter the code for "Ringer cutoff off".Activating/Deactivating Do Not DisturbYou can activate the do not disturb function if you do not want the receive any calls. When do not disturb is acti-vated, internal callers hear a busy signal and external callers are rerouted to a telephone assigned for this pur-pose (contact your service personnel). OK Select and confirm.or OKorOM Enter the code for "DND on".orOM Enter the code for "DND off".Ringer cutoff on?[1] ”Different Displays (HiPath 4000 Environment)” Page 136Ringer cutoff off?DND on?DND off?When you press the talk key, a special dial tone (continuous whirring tone) reminds you that DND is on.Authorized internal callers can automatically override the do not disturb function after five sec-onds.](https://usermanual.wiki/Siemens-Communications/OPWL2PRO.User-Manual-1/User-Guide-608313-Page-84.png)


![Using Team Functions105Step by StepYou belong to a hunt group or a group call: OK OK Select and confirm[1].or OK OKorN Enter the code for "Leave group".orN Enter the code for "Join group".orFCN Press the display key. OK Select and confirm.You belong to multiple groups or to one group with trunk keys: OK OK Select and confirm1.or OK OKorN Enter the code for "Leave group".orN Enter the code for "Join group".orFCN Press the display key. OK Select and confirm. OK or OKIf an "X" appears between group/trunk number (such as 301) and group name, the audible tone is active for this group or trunk. No "X" means that the audible tone was deactivated. OK OK Press the dialog key to confirm your selection and dis-play the next group or trunk number and group name.US: Leave group?UK: Leave hunt group?[1] ”Different Displays (HiPath 4000 Environment)” Page 136US: Join group?UK: Join hunt group?Join/leave group?US: Leave group?UK: Leave hunt group?US: Join group?UK: Join hunt group?Join/leave group?301 X group name301 group nameUS: Next?UK: Next entry?](https://usermanual.wiki/Siemens-Communications/OPWL2PRO.User-Manual-1/User-Guide-608313-Page-105.png)
![Step by StepUsing Team Functions106or OK OK Select and confirm.This turns off the audible tone for the displayed group or trunk.or OK OK Select and confirm.This turns on the audible tone for the displayed group or trunk. or OK Select and confirm[1].This turns off the audible tone for all groups and trunks.orEnter the code for "Leave all groups".or OK Select and confirm1.This turns off the audible tone for all groups and trunks.orEnter the code for "Rejoin all groups".Accepting a Call for Another Member of Your TeamYou can accept calls for other telephones in your team (call pickup group; consult your service personnel) at your own telephone even while engaged in another call. Precondition: Your telephone rings briefly. "Call for:" ap-pears on the upper display line with the station number or name of the originator; the station number or name of the caller appears on the lower line. OK Confirm.orFCN Press the display key. OK Confirm.M Enter the code.US: Leave group?UK: Leave hunt group?US: Join group?UK: Join hunt group?#=Leave all groups?[1] ”Different Displays (HiPath 4000 Environment)” Page 136*=Rejoin all groups?If you deactivate the audible tone for another group or trunk, or deactivate it for all groups and trunks to which you belong, a special dial tone sounds when you lift the handset.Pickup - group?Program/Service](https://usermanual.wiki/Siemens-Communications/OPWL2PRO.User-Manual-1/User-Guide-608313-Page-106.png)

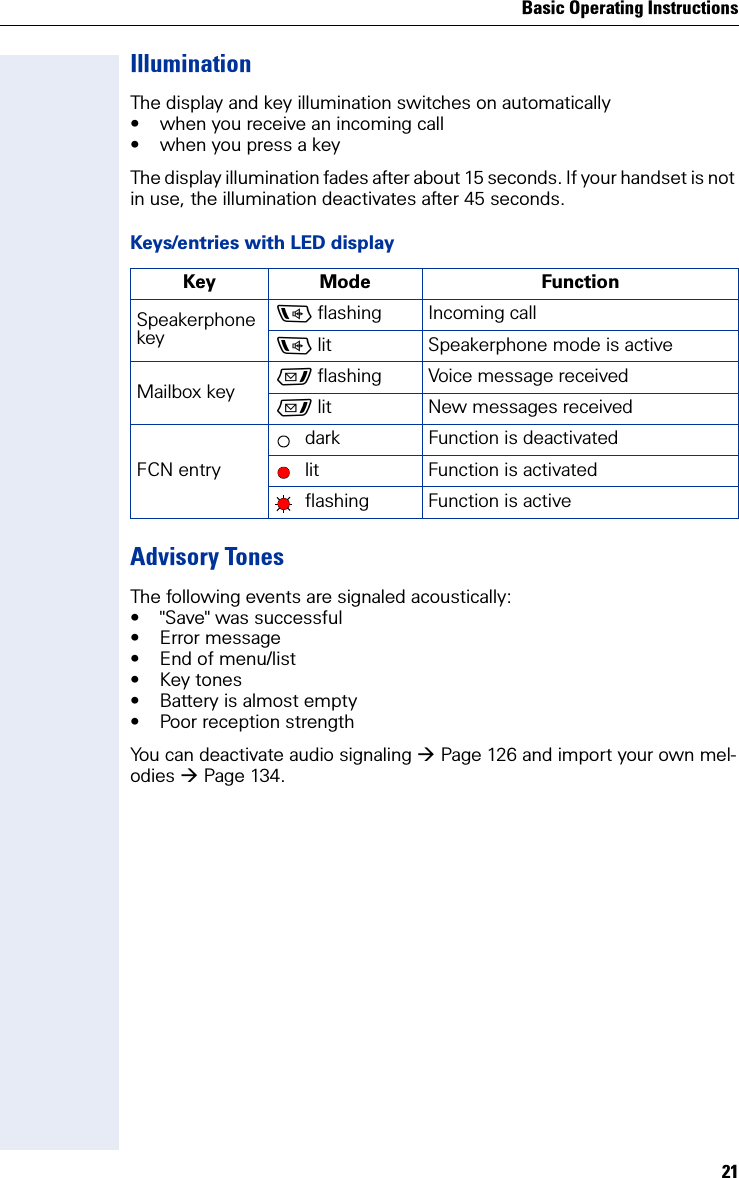
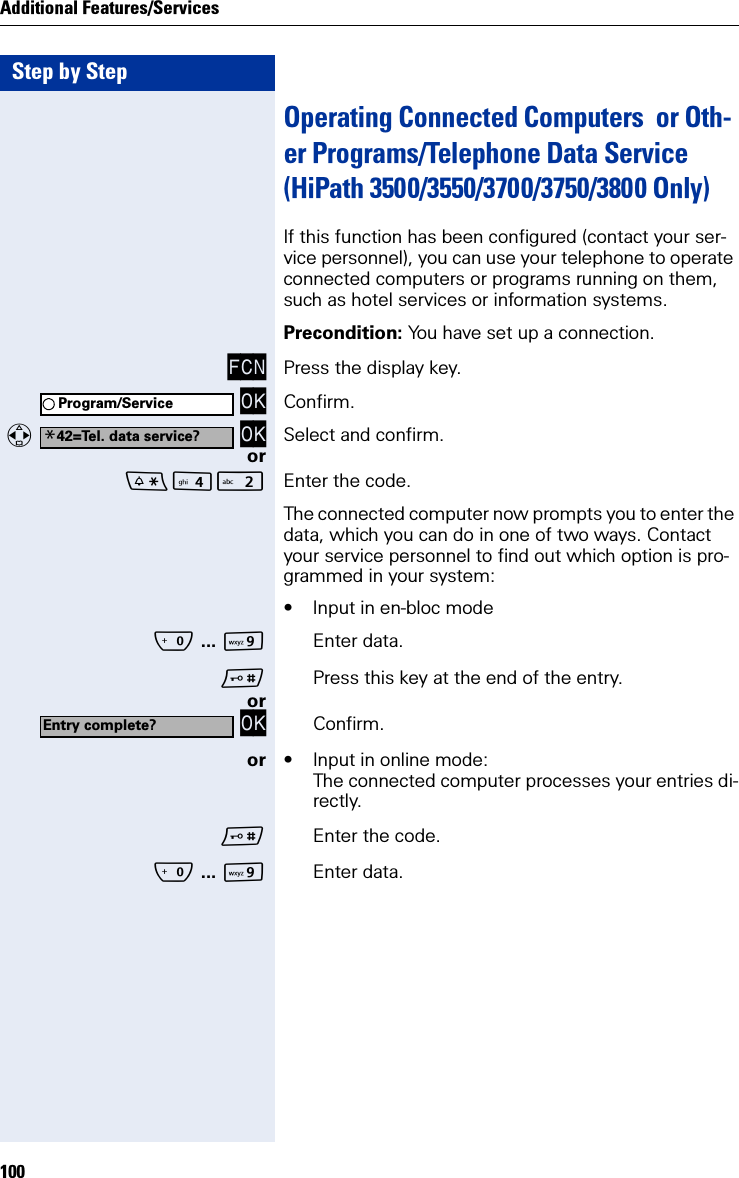
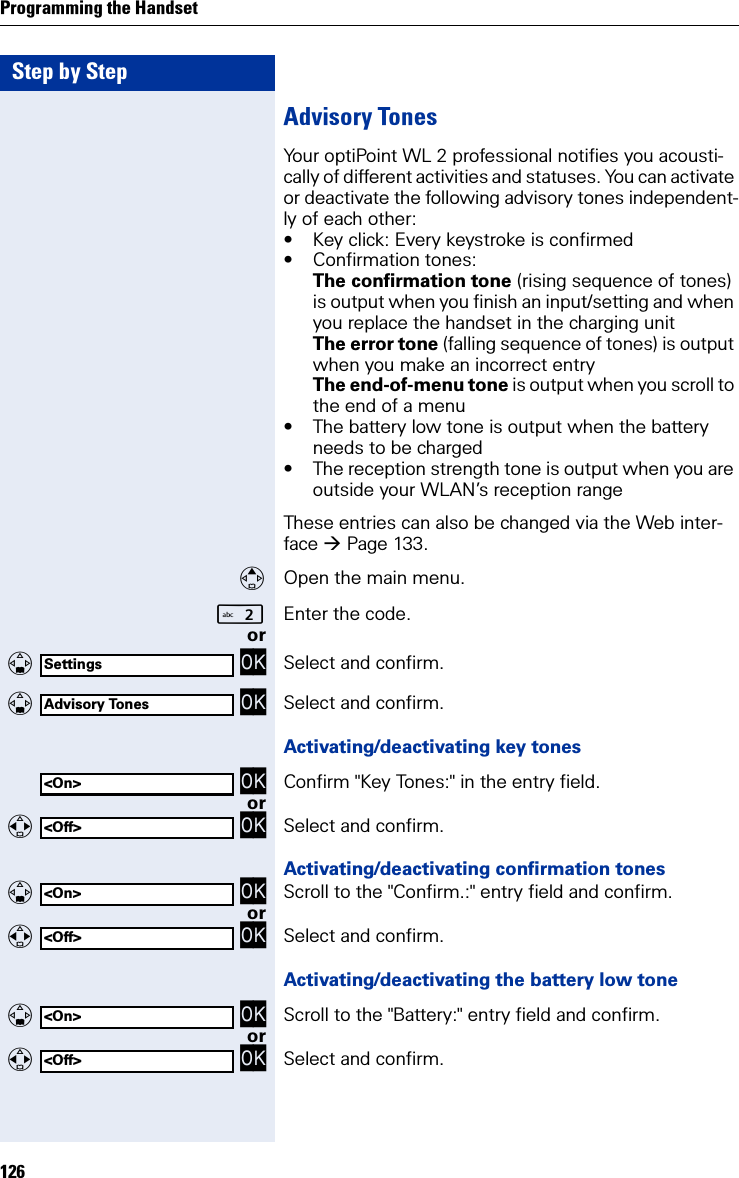
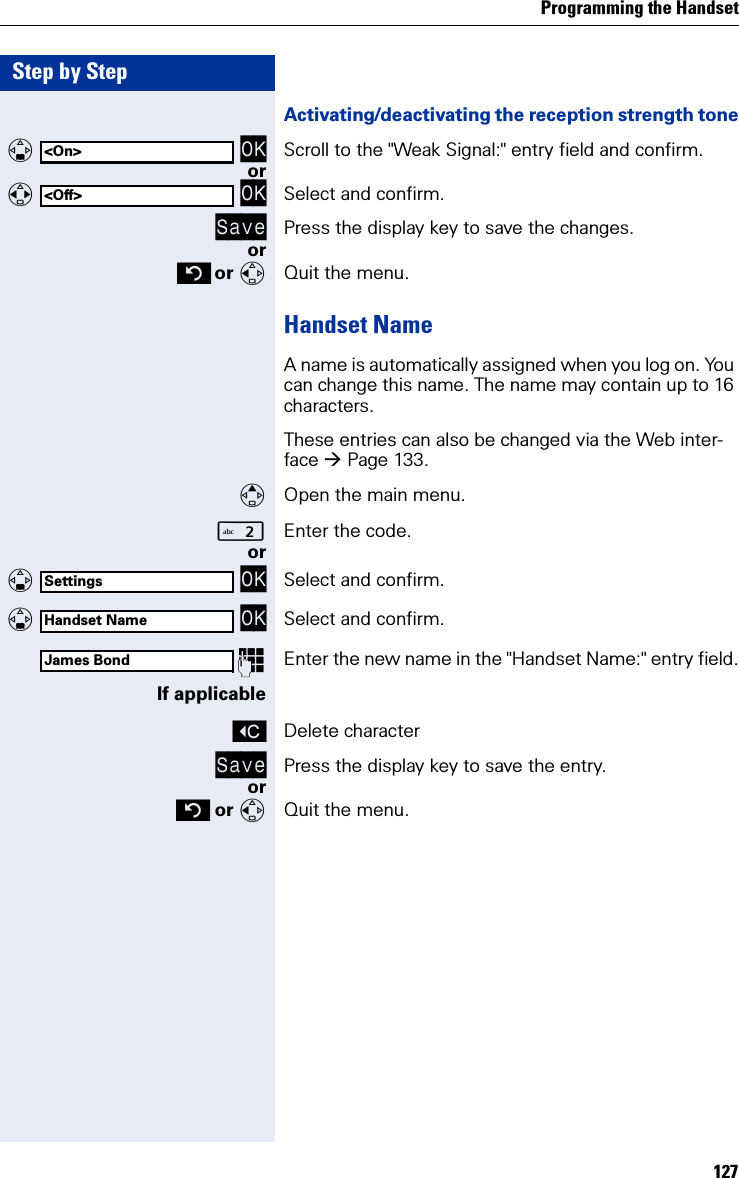
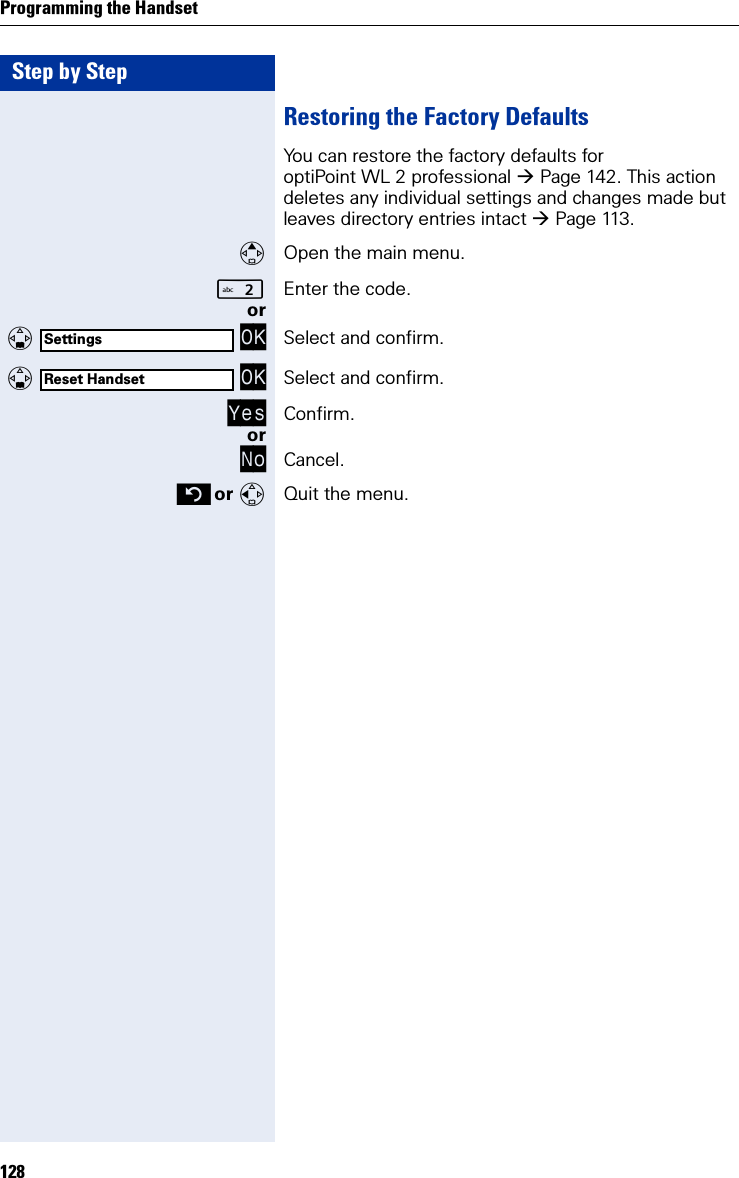
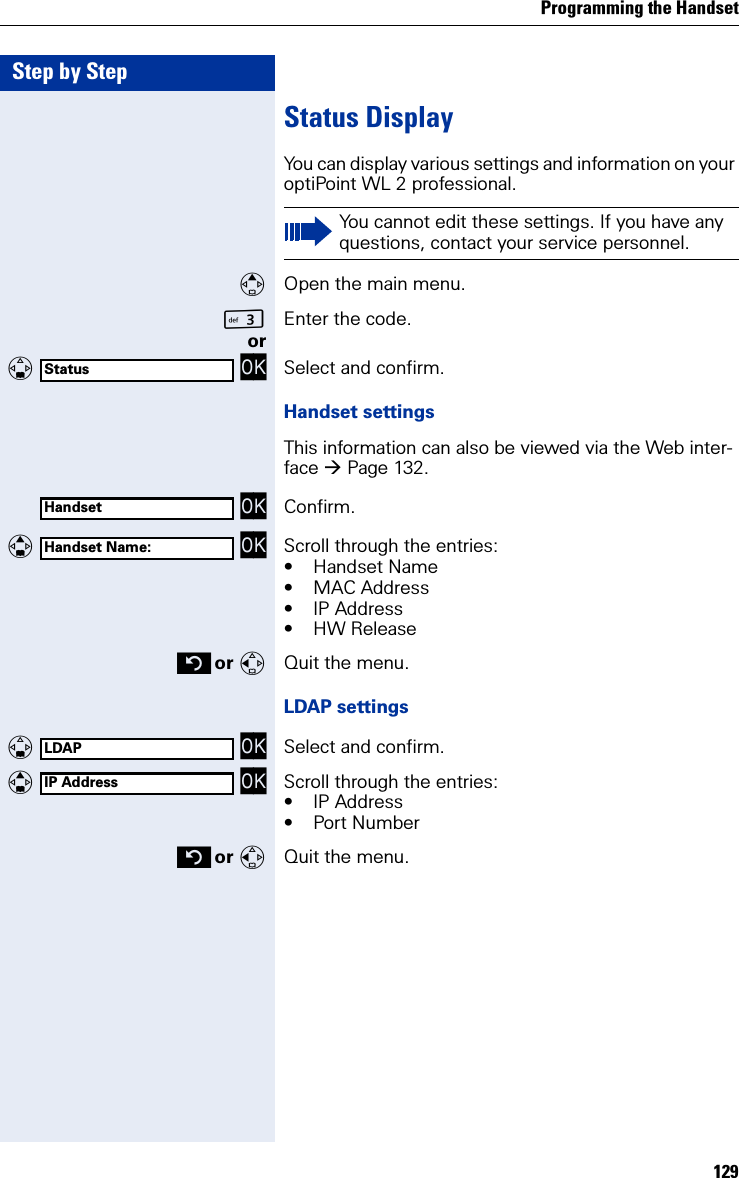
![Programming the Handset125Step by StepPINYou can protect your optiPoint WL 2 professional against unauthorized access by setting a PIN. You are then prompted to enter the PIN when you activate the handset Page 15.These entries can also be changed via the Web inter-face Page 133.Open the main menu.Enter the code. or OK Select and confirm. OK Select and confirm.Enter the current PIN in the "Old PIN: “ entry field (if available).and OK Confirm.Enter the new PIN in the "New PIN:" entry field (four dig-its, 0 to 9).or To remove PIN protection:Do not make an entry.Save Press the display key to save the change. or Quit the menu.SettingsPIN[- - - ][0077][- - - ]Your handset will block after three failed at-tempts to enter the PIN and can only be un-locked by your service personnel.](https://usermanual.wiki/Siemens-Communications/OPWL2PRO.User-Manual-1/User-Guide-608313-Page-125.png)
![Technical Data142Technical DataGeneral DataOperating Times/Charging TimesFactory DefaultsThese settings are active when you buy your optiPoint WL 2 professional. You can restore the factory defaults Page 128.WLAN standard 802.11g (fall-back to 802.11b)Frequency range 2.4 - 2.497 GHzDialable channels 13 (ETSI) or 11 (North America)Range[1][1] The range is heavily dependent on the environment, especially the materials between the access point and the WLAN phone Page 141up to 300 m outdoors,up to 30 m indoors Power supply 3.7-V Li-ion batteryAmbient operating condi-tions+5°C to +45°C;20% to 75% relative humidityHandset dimensions 132 x 52 x 22 mm (L × W × H)Handset weight including battery approximately 110 gStandby time up to 60 hours[1][1] Values only guaranteed with recommended batteriesTalk time up to 4 hours[1]Charging time approximately 2 hours[1]Function Factory defaults Page Battery/key click/confirmation tone on Page 126Auto answer on Page 124Display language Country-spec. Page 122Ring tone: melody/timer Melody 01/off Page 134Alarm clock off Page 79Local character set Default Page 24](https://usermanual.wiki/Siemens-Communications/OPWL2PRO.User-Manual-1/User-Guide-608313-Page-142.png)


![Main Menu Overview153Main Menu OverviewAlthough you can always select a function by scrolling to it, it is quicker to open the main menu and enter an appropriate digit combination (or shortcut).Example: to create a new entry in the directory (Pa g e 111 ) .Press (open the main menu) when the handset is idle. 1Directory 1Neuer Eintrag2<LDAP>3Entry#1[1] 1Edit Entry2New Entry3Delete Entry4Record Pattern[2]5Play Pattern[3]6Delete Pattern[3]7Global Patterns [4]8Erase list buffer9Available Memory2Settings 1Display 1Colour Scheme2Contrast3Brightness4Night Mode5Language2Access Profiles3Easy Answer4Vibration Alert5PIN6Advisory Tones7Handset Name8Reset Handset3Status 1Handset2LDAP4Alarm Clock5Connect. Assistant[1] Up to 200 entries are possible[2] Voice recordings can be saved for up to 30 entries[3] Only appears if a voice recording already exists[4] Only appears if a voice recording is already set as the default recording](https://usermanual.wiki/Siemens-Communications/OPWL2PRO.User-Manual-1/User-Guide-608313-Page-153.png)