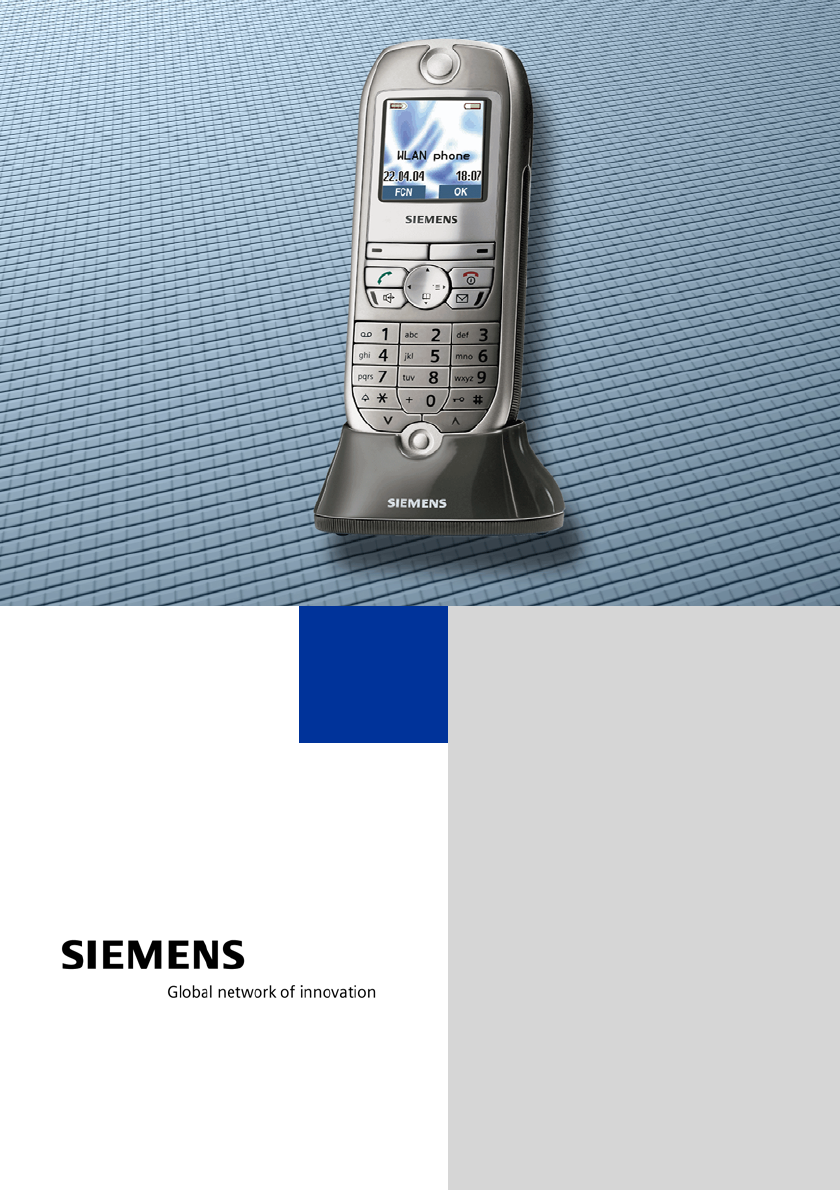
Siemens Communications OPWL2PRO VoIP Handset User Manual oi
Siemens Communications, Inc. VoIP Handset oi
Contents
- 1. User Manual 1
- 2. User Manual 2
User Manual 1
HiPath 2000
HiPath 3000
optiPoint WL 2 professional
Operating Manual
Before You Begin
2
Before You Begin
This operating manual describes the handset optiPoint WL 2 professional at your commu-
nication platforms HiPath 2000 and HiPath 3000.
It describes all functions you can operate with your handset. You may find that some of
the functions you wish to use are not available on your handset. This may be due to one
of the following reasons:
• The function has not been configured for your handset – please contact your service
personnel.
• Your communication platform does not support this function – please contact your ser-
vice personnel for an upgrade.
The information provided in this document contains merely general descriptions or char-
acteristics of performance which in case of actual use do not always apply as described or
which may change as a result of further development of the products.
An obligation to provide the respective characteristics shall only exist if expressly agreed
in the terms of contract.
All trademarks are the property of Siemens AG or their respective owners.
Safety Precautions
Not all of the functions described in this operating manual are available in all coun-
tries.
Please read the operating manual and safety precautions carefully before use.
Explain the content and the hazards associated with using the handset to your chil-
dren.
Only use the power supply provided as indicated on the underside of the charg-
ing unit.
Only use recommended rechargeable batteries. Never use other battery types
or non-rechargeable batteries as this can cause serious damage to your health
and property.
Insert the rechargeable battery making sure the poles are facing in the correct
directions and use the battery as described in the operating manual.
The handset can interfere with medical equipment. Please refer to the technical
specifications applicable to the relevant environment (medical practice,
for instance).
The handset can cause unpleasant humming in hearing aids.
Do not install the charging unit in bathrooms or shower rooms. The handset and
charging unit are not splash-protected.
$
‹
Œ
Before You Begin
3
Care Instructions
• Always use a damp or antistatic cloth to clean the handset. Never use a dry cloth.
• If the handset is heavily soiled, clean it with a diluted surfactant-based neutral cleaner,
such as, dishwashing detergent. Afterwards remove all traces of the cleaner with a
damp cloth (using water only).
• Do not use alcohol-based or corrosive cleaners or abrasive powders.
• Never allow the handset to come into contact with staining or aggressive liquids,
such as, coffee, tea, juice, or soft drinks.
Marks
Do not operate your handset in environments where there is risk of explosion
(paintshops, for instance).
Remember to include all relevant documentation when passing on your handset
to third parties.
Never open your handset. In the event of problems, consult your service per-
sonnel.
Use only original Siemens accessories. The use of other accessories is danger-
ous and will invalidate the warranty and the CE mark.
The device conforms to the EU directive 1999/5/EC as attested by the CE
mark.
This device has been manufactured in accordance with a certified environ-
mental management system (ISO 14001). This process ensures that energy
consumption and the use of primary raw materials are kept to a minimum,
thus reducing waste production.
All electrical and electronic products should be disposed of separately from
the municipal waste stream via designated collection facilities appointed by
the government or the local authorities.
The correct disposal and separate collection of your old appliance will help
prevent potential negative consequences for the environment and human
health. It is a precondition for reuse and recycling of used electrical and elec-
tronic equipment.
For more detailed information about disposal of your old appliance, please
contact your city office, waste disposal service, the shop where you
purchased the product or your sales representative.
The statements quoted above are only fully valid for equipment which is in-
stalled and sold in the countries of the European Union and is covered by the
directive 2002/96/EC. Countries outside the European Union may have other
regulations regarding the disposal of electrical and electronic equipment.
Œ

Before You Begin
4
Compliance with FCC Guidelines for Human Exposure to Ra-
diofrequency Electromagnetic Fields
For body worn operation, this phone has been tested and meets FCC RF exposure guide-
lines when used with an accessory that contains no metal and that positions the handset
a minimum of 0 in from the body. Use of other accessories may not ensure compliance
with FCC RF exposure guidelines.

5
Contents
Contents
Before You Begin. . . . . . . . . . . . . . . . . . . . . . . . . . . . . . 2
Safety Precautions. . . . . . . . . . . . . . . . . . . . . . . . . . . . . . . . . . . . . . . . . . 2
Care Instructions . . . . . . . . . . . . . . . . . . . . . . . . . . . . . . . . . . . . . . . . . . . 3
Marks. . . . . . . . . . . . . . . . . . . . . . . . . . . . . . . . . . . . . . . . . . . . . . . . . . . . 3
Compliance with FCC Guidelines for Human Exposure to Radiofrequency
Electromagnetic Fields . . . . . . . . . . . . . . . . . . . . . . . . . . . . . . . . . . . . . . 4
Basic Operating Instructions. . . . . . . . . . . . . . . . . . . 11
Overview of optiPoint WL 2 professional . . . . . . . . . . . . . . . . . . . . . . . 11
How to Use this Operating Manual . . . . . . . . . . . . . . . . . . . . . . . . . . . . 12
Getting Started . . . . . . . . . . . . . . . . . . . . . . . . . . . . . . . . . . . . . . . . . . . 13
Inserting the Battery . . . . . . . . . . . . . . . . . . . . . . . . . . . . . . . . . . . . 13
Placing the Handset in the Charging Unit and Charging the Battery 14
Activating/Deactivating the Handset . . . . . . . . . . . . . . . . . . . . . . . . 15
Activating/Deactivating the Keypad Lock. . . . . . . . . . . . . . . . . . . . . 15
Display. . . . . . . . . . . . . . . . . . . . . . . . . . . . . . . . . . . . . . . . . . . . . . . . . . 16
Display Icons . . . . . . . . . . . . . . . . . . . . . . . . . . . . . . . . . . . . . . . . . . 16
Keyboard . . . . . . . . . . . . . . . . . . . . . . . . . . . . . . . . . . . . . . . . . . . . . . . . 17
Navigation Key . . . . . . . . . . . . . . . . . . . . . . . . . . . . . . . . . . . . . . . . . 17
Display Keys . . . . . . . . . . . . . . . . . . . . . . . . . . . . . . . . . . . . . . . . . . 18
Additional Key Functions . . . . . . . . . . . . . . . . . . . . . . . . . . . . . . . . . 19
Audio and Visual Signaling. . . . . . . . . . . . . . . . . . . . . . . . . . . . . . . . . . . 20
Handset States . . . . . . . . . . . . . . . . . . . . . . . . . . . . . . . . . . . . . . . . 20
Illumination. . . . . . . . . . . . . . . . . . . . . . . . . . . . . . . . . . . . . . . . . . . . 21
Advisory Tones . . . . . . . . . . . . . . . . . . . . . . . . . . . . . . . . . . . . . . . . 21
FCN Function. . . . . . . . . . . . . . . . . . . . . . . . . . . . . . . . . . . . . . . . . . . . . 22
Preprogrammed FCN Entries. . . . . . . . . . . . . . . . . . . . . . . . . . . . . . 22
Saving FCN Entries . . . . . . . . . . . . . . . . . . . . . . . . . . . . . . . . . . . . . 22
Changing Labels. . . . . . . . . . . . . . . . . . . . . . . . . . . . . . . . . . . . . . . . 23
Text Entry . . . . . . . . . . . . . . . . . . . . . . . . . . . . . . . . . . . . . . . . . . . . . . . 23
Character Overview . . . . . . . . . . . . . . . . . . . . . . . . . . . . . . . . . . . . . 24
Accessing Functions . . . . . . . . . . . . . . . . . . . . . . . . . . . . . . . . . . . . . . . 25
... interactively . . . . . . . . . . . . . . . . . . . . . . . . . . . . . . . . . . . . . . . . . 25
... via the Program/Service Menu. . . . . . . . . . . . . . . . . . . . . . . . . . . 25
... via the Main Menu . . . . . . . . . . . . . . . . . . . . . . . . . . . . . . . . . . . . 25
... via the FCN List . . . . . . . . . . . . . . . . . . . . . . . . . . . . . . . . . . . . . . 25
Which Functions Are Available? . . . . . . . . . . . . . . . . . . . . . . . . . . . . . . 26
Functions in the Main Menu . . . . . . . . . . . . . . . . . . . . . . . . . . . . . . 26
Basic and Enhanced Functions in the System Menu. . . . . . . . . . . . 26
How Can I Use My Handset Effectively? . . . . . . . . . . . . . . . . . . . . . . . 26

6
Contents
Making Calls – Basic Functions . . . . . . . . . . . . . . . .27
Accepting a Call. . . . . . . . . . . . . . . . . . . . . . . . . . . . . . . . . . . . . . . . . . . 27
Ending a Call . . . . . . . . . . . . . . . . . . . . . . . . . . . . . . . . . . . . . . . . . . . . . 27
Dialing/Making Calls . . . . . . . . . . . . . . . . . . . . . . . . . . . . . . . . . . . . . . . 27
Speakerphone Mode . . . . . . . . . . . . . . . . . . . . . . . . . . . . . . . . . . . . . . . 28
Activating/Deactivating Speakerphone Mode . . . . . . . . . . . . . . . . . 28
Saved Number Redial . . . . . . . . . . . . . . . . . . . . . . . . . . . . . . . . . . . . . . 29
Local Redial List. . . . . . . . . . . . . . . . . . . . . . . . . . . . . . . . . . . . . . . . 29
Saved Number Redial in the System Menu. . . . . . . . . . . . . . . . . . . 29
Calling a Second Party (Consultation Hold) . . . . . . . . . . . . . . . . . . . . . . 30
Switching to the Party on Hold (Toggle/Connect) . . . . . . . . . . . . . . 30
Transferring a Call . . . . . . . . . . . . . . . . . . . . . . . . . . . . . . . . . . . . . . 31
Call Forwarding . . . . . . . . . . . . . . . . . . . . . . . . . . . . . . . . . . . . . . . . . . . 32
Using Variable Call Forwarding . . . . . . . . . . . . . . . . . . . . . . . . . . . . 32
Using Call Forwarding No Reply (CFNR) . . . . . . . . . . . . . . . . . . . . . 33
Call Forwarding in the Carrier Network
and Forwarding Multiple Subscriber Numbers (MSN) (Not for U.S.) 34
Call Forwarding in the Event of a Telephone Malfunction . . . . . . . . 35
Using Callback . . . . . . . . . . . . . . . . . . . . . . . . . . . . . . . . . . . . . . . . . . . . 36
Storing a Callback . . . . . . . . . . . . . . . . . . . . . . . . . . . . . . . . . . . . . . 36
Answering a Callback. . . . . . . . . . . . . . . . . . . . . . . . . . . . . . . . . . . . 36
Checking and Canceling a Saved Callback. . . . . . . . . . . . . . . . . . . . 36
Saving a Repdial Key as an FCN Entry . . . . . . . . . . . . . . . . . . . . . . . . . 37
Using Repdial Entries for Dialing . . . . . . . . . . . . . . . . . . . . . . . . . . 38
Telephone Settings . . . . . . . . . . . . . . . . . . . . . . . . . . . . . . . . . . . . . . . . 39
Adjusting the Ring Volume . . . . . . . . . . . . . . . . . . . . . . . . . . . . . . . 39
Adjusting the Ring Tone . . . . . . . . . . . . . . . . . . . . . . . . . . . . . . . . . 39
Adjusting the Attention Ring Volume. . . . . . . . . . . . . . . . . . . . . . . . 39
Changing the Display Contrast . . . . . . . . . . . . . . . . . . . . . . . . . . . . 40
Changing the Receiving Volume During A Call . . . . . . . . . . . . . . . . 40
Selecting the System Menu Language . . . . . . . . . . . . . . . . . . . . . . 40
Switching from the System Menu to Idle State . . . . . . . . . . . . . . . . . . 41
Making Calls – Enhanced Functions . . . . . . . . . . . .42
Accepting Calls . . . . . . . . . . . . . . . . . . . . . . . . . . . . . . . . . . . . . . . . . . . 42
Accepting a Specific Call for Your Colleague . . . . . . . . . . . . . . . . . . 42
Rejecting Calls . . . . . . . . . . . . . . . . . . . . . . . . . . . . . . . . . . . . . . . . . 43
Using the Speakerphone . . . . . . . . . . . . . . . . . . . . . . . . . . . . . . . . . 43
Answering a Call with the Headset . . . . . . . . . . . . . . . . . . . . . . . . . 44
Answering Calls from the Entrance
Telephone and Opening the Door . . . . . . . . . . . . . . . . . . . . . . . . . . 45
Accepting a Call From an Answering Machine . . . . . . . . . . . . . . . . 46
Dialing/Making Calls . . . . . . . . . . . . . . . . . . . . . . . . . . . . . . . . . . . . . . . 47
En-Bloc Sending/Correcting Numbers . . . . . . . . . . . . . . . . . . . . . . . 47
Using a Caller List . . . . . . . . . . . . . . . . . . . . . . . . . . . . . . . . . . . . . . 48
Speed Dialing. . . . . . . . . . . . . . . . . . . . . . . . . . . . . . . . . . . . . . . . . . 50

7
Contents
Dialing from the Internal Directory. . . . . . . . . . . . . . . . . . . . . . . . . . 52
Dialing from the Local Directory . . . . . . . . . . . . . . . . . . . . . . . . . . . 53
Voice Dialing . . . . . . . . . . . . . . . . . . . . . . . . . . . . . . . . . . . . . . . . . . 53
Dialing from the Telephone Database (LDAP) . . . . . . . . . . . . . . . . . 54
Dialing from the LDAP Database . . . . . . . . . . . . . . . . . . . . . . . . . . . 55
Using Mailboxes . . . . . . . . . . . . . . . . . . . . . . . . . . . . . . . . . . . . . . . 56
Addressing Colleagues over the Speaker . . . . . . . . . . . . . . . . . . . . 56
Talking to Your Colleague with Discreet Calling . . . . . . . . . . . . . . . 57
Automatic Connection Setup (Hotline). . . . . . . . . . . . . . . . . . . . . . . 57
Reserving a Trunk . . . . . . . . . . . . . . . . . . . . . . . . . . . . . . . . . . . . . . 57
Assigning a Station Number (Not for U.S.) . . . . . . . . . . . . . . . . . . . 58
Associated Dialing/Dialing Aid . . . . . . . . . . . . . . . . . . . . . . . . . . . . . 58
During a Call . . . . . . . . . . . . . . . . . . . . . . . . . . . . . . . . . . . . . . . . . . . . . 60
Using Second Call . . . . . . . . . . . . . . . . . . . . . . . . . . . . . . . . . . . . . . 60
Accepting a Waiting Call (Camp-On) . . . . . . . . . . . . . . . . . . . . . . . . 60
Preventing and Allowing Call Waiting (Automatic Camp-On). . . . . . 61
Activating/Deactivating the Call Waiting Tone . . . . . . . . . . . . . . . . 61
Parking a Call . . . . . . . . . . . . . . . . . . . . . . . . . . . . . . . . . . . . . . . . . . 62
Placing External Calls on Hold . . . . . . . . . . . . . . . . . . . . . . . . . . . . . 63
Conducting a Conference . . . . . . . . . . . . . . . . . . . . . . . . . . . . . . . . 64
Ending a Conference (Initiator Only) . . . . . . . . . . . . . . . . . . . . . . . . 65
Activating Tone Dialing/DTMF Suffix-Dialing . . . . . . . . . . . . . . . . . . 66
Forwarding a Call After an Announcement . . . . . . . . . . . . . . . . . . . 67
Trunk Flash . . . . . . . . . . . . . . . . . . . . . . . . . . . . . . . . . . . . . . . . . . . 68
If You Cannot Reach a Destination . . . . . . . . . . . . . . . . . . . . . . . . . . . . 69
Call Waiting (Camp-On) . . . . . . . . . . . . . . . . . . . . . . . . . . . . . . . . . . 69
Override - Joining an Ongoing Call. . . . . . . . . . . . . . . . . . . . . . . . . . 69
Using Night Answer . . . . . . . . . . . . . . . . . . . . . . . . . . . . . . . . . . . . . . . 70
Saving Functions, Procedures, Wake-Up Calls, and
Reminders . . . . . . . . . . . . . . . . . . . . . . . . . . . . . . . . . . . 71
Storing a Function in the FCN List. . . . . . . . . . . . . . . . . . . . . . . . . . . . . 71
Activating a Function in the FCN List. . . . . . . . . . . . . . . . . . . . . . . . 72
Saving a Procedure (Operating Steps) as an FCN Entry . . . . . . . . . . . . 75
Reminder Function . . . . . . . . . . . . . . . . . . . . . . . . . . . . . . . . . . . . . . . . 77
Saving Reminders . . . . . . . . . . . . . . . . . . . . . . . . . . . . . . . . . . . . . . 77
Using Timed Reminders . . . . . . . . . . . . . . . . . . . . . . . . . . . . . . . . . 78
Setting the Alarm Clock. . . . . . . . . . . . . . . . . . . . . . . . . . . . . . . . . . . . . 79
Activating/Deactivating and Setting the Alarm Clock. . . . . . . . . . . . 79
Deactivating a Wake-Up Call . . . . . . . . . . . . . . . . . . . . . . . . . . . . . . 80
Displaying and Assigning Call Charges . . . . . . . . . 81
Displaying Call Charges (Not for U.S.) . . . . . . . . . . . . . . . . . . . . . . . . . . 81
Displaying Call Charges for Another Telephone (Not for U.S.) . . . . . . . 82
Dialing with Call Charge Assignment. . . . . . . . . . . . . . . . . . . . . . . . . . . 83

8
Contents
Privacy/Security. . . . . . . . . . . . . . . . . . . . . . . . . . . . . .84
Turning Ringer Cutoff On and Off . . . . . . . . . . . . . . . . . . . . . . . . . . . . . 84
Activating/Deactivating Do Not Disturb. . . . . . . . . . . . . . . . . . . . . . . . . 84
Caller ID Suppression at the Called Party . . . . . . . . . . . . . . . . . . . . . . . 85
Monitoring a Room . . . . . . . . . . . . . . . . . . . . . . . . . . . . . . . . . . . . . . . . 86
Identifying Anonymous Callers – Call Tracing (Not for U.S.) . . . . . . . . . 87
Locking the Telephone to Prevent Unauthorized Use . . . . . . . . . . . . . . 88
Locking Another Telephone to Prevent Unauthorized Use . . . . . . . . . . 89
Saving Your PIN. . . . . . . . . . . . . . . . . . . . . . . . . . . . . . . . . . . . . . . . . . . 90
Additional Features/Services . . . . . . . . . . . . . . . . . .91
Sending a Message. . . . . . . . . . . . . . . . . . . . . . . . . . . . . . . . . . . . . . . . 91
Creating and Sending a Message . . . . . . . . . . . . . . . . . . . . . . . . . . 91
Deleting/Displaying the Message Sent . . . . . . . . . . . . . . . . . . . . . . 91
Answering Messages . . . . . . . . . . . . . . . . . . . . . . . . . . . . . . . . . . . 92
Leaving an Advisory Message . . . . . . . . . . . . . . . . . . . . . . . . . . . . . 92
Deleting Advisory Messages . . . . . . . . . . . . . . . . . . . . . . . . . . . . . . 92
Displaying the Number of Calls in Queue and Overload Indication . . . . 93
Using Another Telephone Like Your Own for a Call . . . . . . . . . . . . . . . 93
Using Another Telephone Like Your Own for an Extended Period of Time
(Mobility) . . . . . . . . . . . . . . . . . . . . . . . . . . . . . . . . . . . . . . . . . . . . . . . . 94
Fax Details and Message on Answering Machine . . . . . . . . . . . . . . . . 95
Resetting Services and Functions
(System-Wide Cancellation for a Telephone). . . . . . . . . . . . . . . . . . . . . 95
Activating Functions for Another Telephone . . . . . . . . . . . . . . . . . . . . . 96
Using System Functions from an
External Location (DISA - Direct Inward System Access) . . . . . . . . . . . 97
Using Functions in ISDN via Code Dialing (Keypad Dialing) . . . . . . . . . 99
Operating Connected Computers or Other Programs/Telephone Data Ser-
vice (HiPath 3500/3550/3700/3750/3800 Only) . . . . . . . . . . . . . . . . . . 100
Communicating with PC Applications over a CSTA Interface . . . . . . . 101
Controlling Relays . . . . . . . . . . . . . . . . . . . . . . . . . . . . . . . . . . . . . . . . 102
Sensors (HiPath 3300/3350/3500/3550 Only) . . . . . . . . . . . . . . . . . . . 102
Radio Paging (Not for U.S.) . . . . . . . . . . . . . . . . . . . . . . . . . . . . . . . . . 102
Simple Paging Equipment . . . . . . . . . . . . . . . . . . . . . . . . . . . . . . . 103
Enhanced Paging Equipment (HiPath 3700/3750/3800 Only) . . . . 103
Using Team Functions. . . . . . . . . . . . . . . . . . . . . . . .104
Turning Group Call On and Off . . . . . . . . . . . . . . . . . . . . . . . . . . . . . . 104
Accepting a Call for Another Member of Your Team . . . . . . . . . . . . . 106
Activating and Deactivating a Ringing Group. . . . . . . . . . . . . . . . . . . . 107
Uniform Call Distribution (UCD). . . . . . . . . . . . . . . . . . . . . . . . . . . . . . 108

9
Contents
Station Number Directories and Lists . . . . . . . . . . 110
Directory . . . . . . . . . . . . . . . . . . . . . . . . . . . . . . . . . . . . . . . . . . . . . . . 110
Creating a New Entry. . . . . . . . . . . . . . . . . . . . . . . . . . . . . . . . . . . 111
Adding Voice Dialing Recordings for an Entry . . . . . . . . . . . . . . . . 111
Directory List . . . . . . . . . . . . . . . . . . . . . . . . . . . . . . . . . . . . . . . . . 113
LDAP Database . . . . . . . . . . . . . . . . . . . . . . . . . . . . . . . . . . . . . . . . . . 116
Searching for an LDAP Entry . . . . . . . . . . . . . . . . . . . . . . . . . . . . . 116
Importing an LDAP Entry into the Directory . . . . . . . . . . . . . . . . . 117
Redial List . . . . . . . . . . . . . . . . . . . . . . . . . . . . . . . . . . . . . . . . . . . . . . 118
Importing an Entry into the Directory. . . . . . . . . . . . . . . . . . . . . . . 118
Programming the Handset . . . . . . . . . . . . . . . . . . . . 119
Handset Configuration. . . . . . . . . . . . . . . . . . . . . . . . . . . . . . . . . . . . . 119
Setting the Display Color . . . . . . . . . . . . . . . . . . . . . . . . . . . . . . . . 119
Adjust Contrast . . . . . . . . . . . . . . . . . . . . . . . . . . . . . . . . . . . . . . . 120
Adjust brightness. . . . . . . . . . . . . . . . . . . . . . . . . . . . . . . . . . . . . . 120
Setting night mode . . . . . . . . . . . . . . . . . . . . . . . . . . . . . . . . . . . . 121
Setting Display Language . . . . . . . . . . . . . . . . . . . . . . . . . . . . . . . 122
WLAN Access . . . . . . . . . . . . . . . . . . . . . . . . . . . . . . . . . . . . . . . . 123
Easy Answer . . . . . . . . . . . . . . . . . . . . . . . . . . . . . . . . . . . . . . . . . 124
Vibration Alert . . . . . . . . . . . . . . . . . . . . . . . . . . . . . . . . . . . . . . . . 124
PIN . . . . . . . . . . . . . . . . . . . . . . . . . . . . . . . . . . . . . . . . . . . . . . . . . 125
Advisory Tones . . . . . . . . . . . . . . . . . . . . . . . . . . . . . . . . . . . . . . . 126
Handset Name. . . . . . . . . . . . . . . . . . . . . . . . . . . . . . . . . . . . . . . . 127
Restoring the Factory Defaults . . . . . . . . . . . . . . . . . . . . . . . . . . . 128
Status Display . . . . . . . . . . . . . . . . . . . . . . . . . . . . . . . . . . . . . . . . . . . 129
Connection Wizard . . . . . . . . . . . . . . . . . . . . . . . . . . . . . . . . . . . . . . . 130
Automatic Start . . . . . . . . . . . . . . . . . . . . . . . . . . . . . . . . . . . . . . . 130
Manual Start. . . . . . . . . . . . . . . . . . . . . . . . . . . . . . . . . . . . . . . . . . 130
Configuration over the Web Interface . . . . . . . . . . . . . . . . . . . . . . . . . 131
Start Preparations . . . . . . . . . . . . . . . . . . . . . . . . . . . . . . . . . . . . . 132
Testing the Telephone . . . . . . . . . . . . . . . . . . . . . . . 135
Testing the Telephone Functions . . . . . . . . . . . . . . . . . . . . . . . . . . . . 135
Checking FCN Programming . . . . . . . . . . . . . . . . . . . . . . . . . . . . . . . . 135
Different Displays
(HiPath 4000 Environment) . . . . . . . . . . . . . . . . . . . . 136
Documentation. . . . . . . . . . . . . . . . . . . . . . . . . . . . . . 138

10
Contents
Reference Guide. . . . . . . . . . . . . . . . . . . . . . . . . . . . .138
Telephone Maintenance . . . . . . . . . . . . . . . . . . . . . . . . . . . . . . . . . . . 138
Echo Effect . . . . . . . . . . . . . . . . . . . . . . . . . . . . . . . . . . . . . . . . . . . . . 138
Troubleshooting. . . . . . . . . . . . . . . . . . . . . . . . . . . . . . . . . . . . . . . . . . 138
Responding to Error Messages on the Screen . . . . . . . . . . . . . . . . . . 139
Factors influencing standby and talk times . . . . . . . . . . . . . . . . . . . . . 141
Contacts in the Event of Problems . . . . . . . . . . . . . . . . . . . . . . . . . . . 141
Technical Data . . . . . . . . . . . . . . . . . . . . . . . . . . . . . .142
General Data . . . . . . . . . . . . . . . . . . . . . . . . . . . . . . . . . . . . . . . . . . . . 142
Operating Times/Charging Times . . . . . . . . . . . . . . . . . . . . . . . . . . . . 142
Factory Defaults . . . . . . . . . . . . . . . . . . . . . . . . . . . . . . . . . . . . . . . . . 142
Index. . . . . . . . . . . . . . . . . . . . . . . . . . . . . . . . . . . . . . .143
Overview of Functions/Codes (Alphabetical). . . .148
Main Menu Overview . . . . . . . . . . . . . . . . . . . . . . . .153
Basic Operating Instructions
11
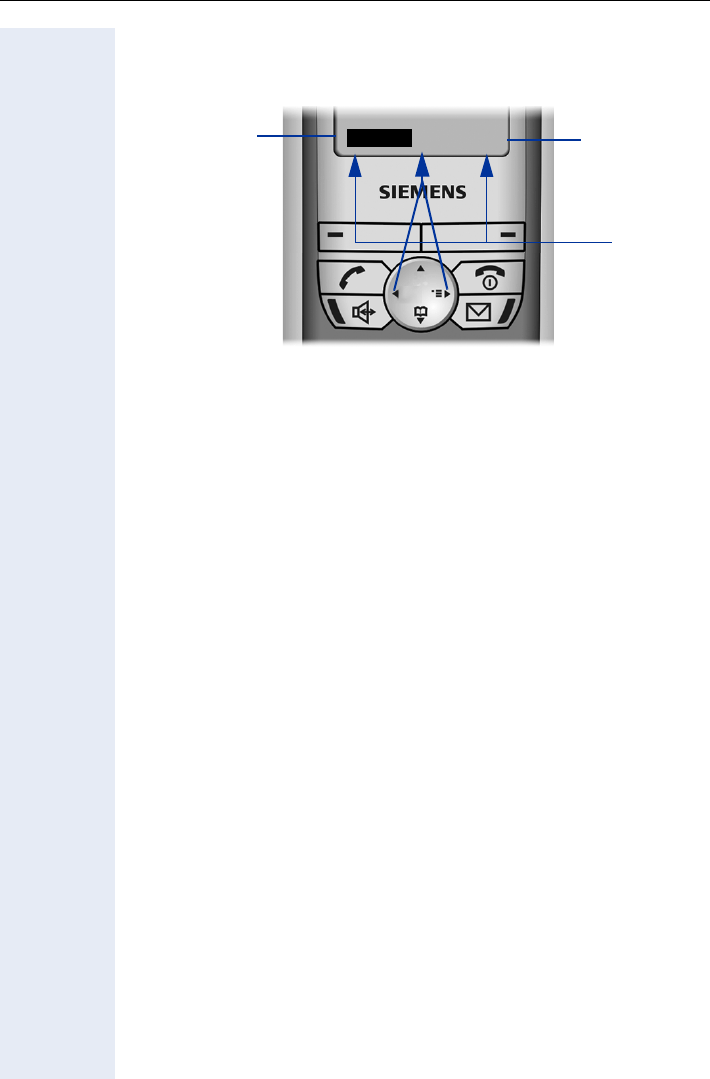
Basic Operating Instructions
Overview of optiPoint WL 2 professional
Display keys Page 18
On-hook key
Mailbox key with LED
Talk key
Speakerphone key
with LED
STAR key POUND key
Settings keys
Navigation key Page 17
Microphone
Connection jack for headset and PC
Six-line color display
Page 16
Loudspeaker
Rear

Step by Step
Basic Operating Instructions
12
How to Use this Operating Manual
Operating steps are depicted in their logical se-
quence in the colored column. Below is an explana-
tion of the icons used:
ÅThe handset is ringing.
ÕYou are conducting a call.
Enter digits or letters via the keypad.
Save Current display key function.
Press the display key directly below (A or B) to
activate the function.
Press the navigation key left or right.
Press the navigation key up or down.
Q etc. Press the key shown on the handset.
You hear an alerting tone or a melody.
FCN entry with sample label.
Entry from the local main menu.
OK An option from the System menu is displayed.
Confirm by pressing the display key B.
OK Browse the System menu for an option.
Do this by pressing the navigation key until the op-
tion appears on the display.
Then confirm it by pressing the display key B.
Bob Dylan
Settings
Delete?
Display contrast?
Basic Operating Instructions
13
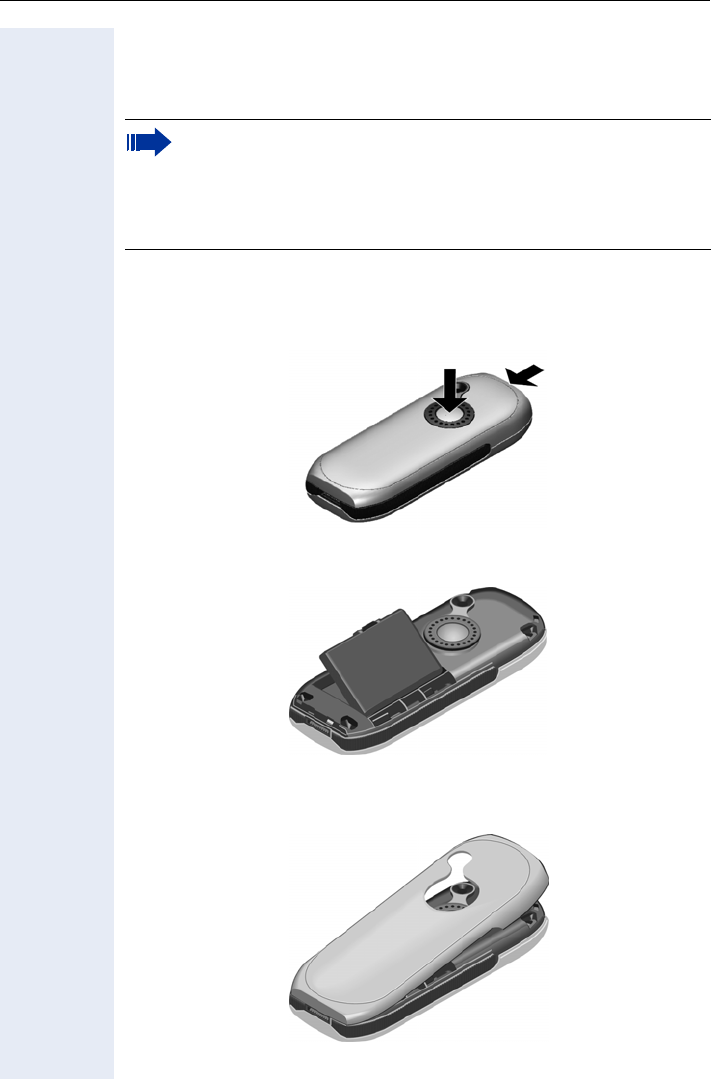
Getting Started
Inserting the Battery
1. Hold your handset face down in the palm of your hand.
2. With the other hand, place your thumb on the loudspeaker on the back
of the device (a) and use your index finger to grip the recess provided
at the top of the handset (b).
3. Lift the cover.
4. Insert the battery correctly and lock it in place.
5. Hold the battery cover at a slight angle and insert the two projections
provided on the lower side into the battery compartment. Then close
the cover until it snaps shut.
Only use rechargeable batteries recommended by Siemens
Page 142. Never use conventional (non-rechargeable) batteries or
other battery types as this can cause serious damage to your health
and property. For instance, it could damage the battery cladding or
cause the battery to explode. It could also damage your handset and
interfere with how your it works.
ab

Basic Operating Instructions
14
Placing the Handset in the Charging Unit and Charging the
Battery
1. Connect the charging unit’s power supply to the power outlet.
2. Place the handset in the charging unit with the display facing towards
you.
You can perform manual logon for the handset if "No Access" or "No Server"
appears on the display Page 130.
Leave the handset in the charging unit to charge the batteries.
=Battery charging is indicated on the upper right of the display by the battery
icon’s change level indicator. The battery icon shows the battery charging
status during operation Page 16.
Initial battery charging and discharging
Accurate charging status display can only be guaranteed if the battery is
first fully charged and then discharged.
Do this by leaving the handset in the charging unit for five straight hours.
Then, remove the handset from the charging unit and do not put it back in
until the battery is fully discharged.
Once the battery has been initially charged and discharged, you can return
your handset to the charging unit after every call.
Your handset is now ready for use!
• You must repeat this procedure every time you remove and re-
place your handset battery.
• The battery can warm up during charging. This is not dangerous.
• For technical reasons, the battery’s charging capacity decreases
over time.

Basic Operating Instructions
15
Activating/Deactivating the Handset
Activating
Hold down the on-hook key.
Enter your PIN (if set Page 125).
The handset is now idle Page 20.
Deactivating
Hold down the on-hook key.
Activating/Deactivating the Keypad Lock
Activating
Hold down the POUND key.
ØThis icon appears on the display and you hear the confirmation tone.
Deactivating
Hold down the POUND key once more.
The keypad lock automatically deactivates when you receive an incoming
call. It reactivates when the call is finished.
Your handset will block after three failed attempts to enter the PIN
and can only be unlocked by your service personnel.
You cannot make emergency calls if the keypad lock is active.

Basic Operating Instructions
16
Display
optiPoint WL 2 professional features a six-line illuminated color display. You
can choose from four different color settings. A special feature of the de-
fault setting Page 119 is that it uses different colors to visualize the dif-
ferent handset states Page 20.
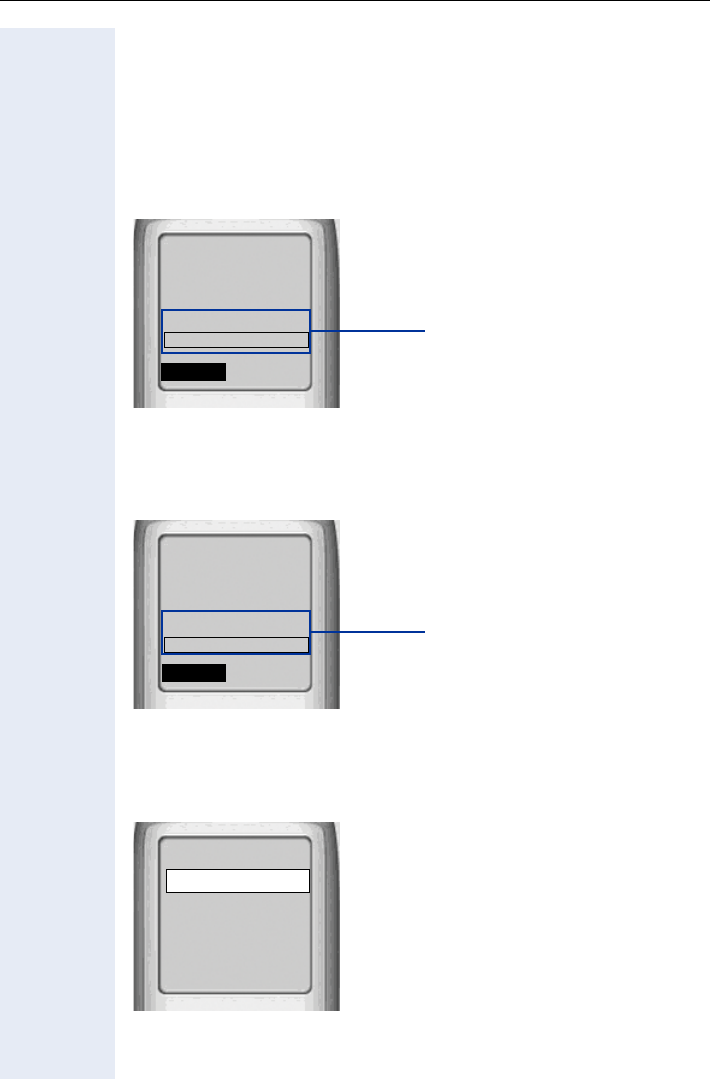
Display Icons
Icons for important settings and handset states:
Name of the handset Page 127
System menu: The first line contains prompts or confirmation messag-
es from the System menu, depending on the situation. This is followed by
a list of functions. Text is displayed as a ticker if an entry is too long.
More options are available Page 18
Display the display key functions Page 18
Ð i Ñ Ò | Reception strength (high to no reception)
Page 130
ÚAudio signals deactivated Page 126
Ø Keypad lock activated Page 15
U V e = Battery charging status (full to empty) Page 14
¼Wake-up call activated Page 79
Õ A call is ongoingPage 27
Ö A call is ongoing in speakerphone mode
Page 28
V
James Bond
10:24 FR 10 DEC 04
Ð
fgZ
FCN
2308

Basic Operating Instructions
17
Keyboard
Navigation Key
Navigation key functions
The side of the navigation key (up, down, right, left) to be pressed is
marked black.
Key Mode Function
Idle state Open the main menu Page 20
Lists[1]/menus
[1] Call lists, such as the directory list
Scroll up
Text entry Move the cursor up
Idle state
Press quickly: Open the directory
Page 113
Hold down: Start voice dialing Page 53
Lists[1]/menus Scroll down
Text entry Move the cursor down
Idle state Open the System menu Page 20
System menu Scroll through functions Page 20
Lists[1]/menus Confirm the selected entry
Text entry Move the cursor right
Lists[1]/menus Jump back to the previous layer or cancel
System menu Scroll through functions Page 20
Text entry Move the cursor left
Basic Operating Instructions
18
Display Keys
Display key functions change depending on the current operating situation.
Function of the left display key (for example, open FCN list Page 71)
Function of the right display key (for example, open the System menu
Page 20)
Display keys
More functions are available in the System menu
Symbols for display keys
Important display keys are:
Return to the previous menu or cancel the current operation.
©Open the main menu or a status-specific menu.
XDelete button: Delete an entry character by character from right to
left.
fgZ
FCN

Basic Operating Instructions
19
Additional Key Functions
Key Mode Function
Call state Accept a call Page 27
Lists[1]
[1] Call lists, such as the directory list
Start dialing the selected entry
Idle state Press quickly: Open the redial list
Hold down: Start dialing
Handset deacti-
vated Hold down: Activate the handset
Call state End the call
General
(apart from in
system state)
Press quickly: One layer back
Hold down: Return to idle state
Lists[1] Close the list
Idle state Hold down: Deactivate the handset
[2]
[2] These keys have an additional LED display Page 21
Call state Accept a call in speakerphone mode
Lists[1] Start dialing the selected entry
Idle state Hold down: Start dialing
[2] LED lit Start polling voice messages
*Idle state Hold down: Deactivate audio signals
Text entry Press quickly: Toggle case
# Idle state Hold down: Activate/deactivate the keypad
lock
SIdle state Settings in the System menu Page 39
Call state Adjust the volume (lower)
CIdle state Settings in the System menu Page 39
Call state Adjust the volume (higher)
Basic Operating Instructions
20
Audio and Visual Signaling
Handset States
Your optiPoint WL 2 professional has a number of different states.
Idle state
The handset is in the charging unit and ready for use.
Call state
State when making calls and during a call. You can access the System
menu () and the FCN list.
Main menu
Press the navigation key up in idle state. All settings are stored locally and
only apply to your handset.
V
James Bond
10:24 FR 10 DEC 04
Ð
System menu (this content is
dictated by your communica-
tion system)
fgZ
FCN
2308
V
James Bond
089123456
ÐÕ
System menu
fgZ
FCN
Consult?
Main menu 1
Directory
Settings
Status
Alarm Clock
Z
t
x
Î
Basic Operating Instructions
21
Illumination
The display and key illumination switches on automatically
• when you receive an incoming call
• when you press a key
The display illumination fades after about 15 seconds. If your handset is not
in use, the illumination deactivates after 45 seconds.
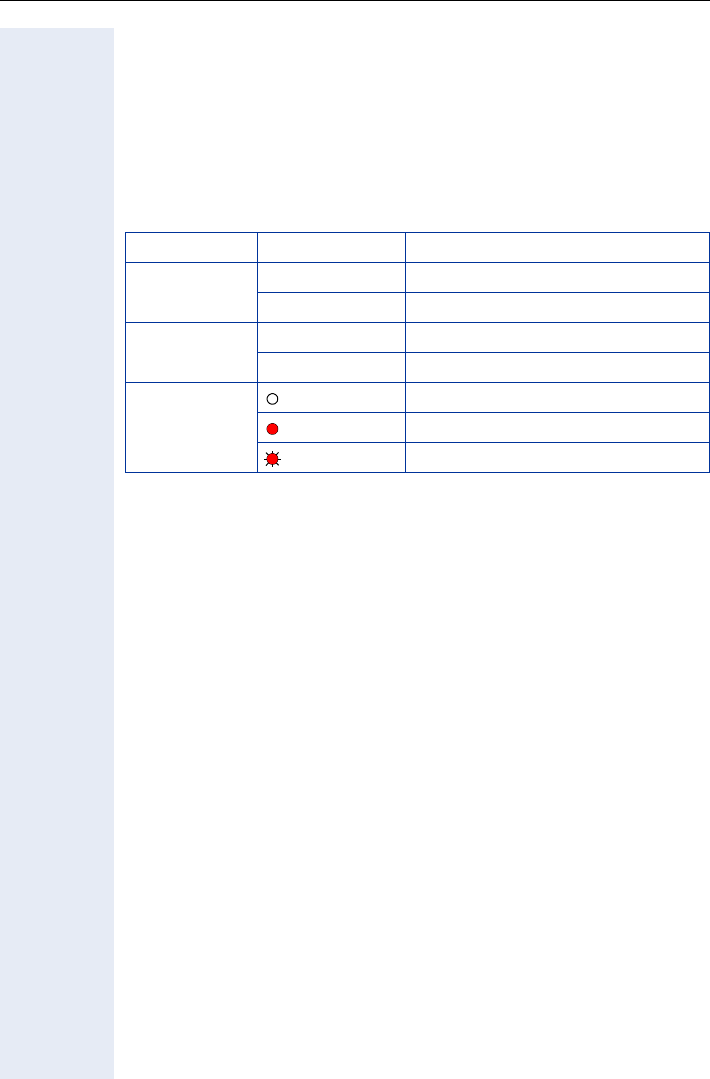
Keys/entries with LED display
Advisory Tones
The following events are signaled acoustically:
• "Save" was successful
• Error message
• End of menu/list
• Key tones
• Battery is almost empty
• Poor reception strength
You can deactivate audio signaling Page 126 and import your own mel-
odies Page 134.
Key Mode Function
Speakerphone
key
flashing Incoming call
lit Speakerphone mode is active
Mailbox key flashing Voice message received
lit New messages received
FCN entry
dark Function is deactivated
lit Function is activated
flashing Function is active
Step by Step
Basic Operating Instructions
22
FCN Function
An entry in the FCN list is comparable with a function
key on an optiPoint phone. In other words, you can save
specific functions from the System menu to the FCN
list and activate them as required. The function key LED
on the optiPoint phone is replaced in
optiPoint WL 2 professional by an animated icon
Page 21.
You can replace the default labels for repdial and DSS
entries with your own texts.
Preprogrammed FCN Entries
Slots 1 - 5 in the FCN list are preprogrammed with the
following functions:
Program/Service (permanent entry).
Saved number redial from the system (permanent en-
try).
Mailbox (editable entry).
Microphone (editable entry).
Speaker (permanent entry).
In the case of "Mailbox" and "Microphone" entries as
well as repdial and DSS entries, you can change the de-
fault label and replace it with an individual text.
Saving FCN Entries
You can program slots 3, 4 and 6 to 12 with functions or
station numbers:
• For information on saving a station number as an
FCN entry Page 37
• For information on saving a function as an FCN entry
Page 71
Program/Service
REDIAL
Mailbox
Microphone
Loudspeaker
Basic Operating Instructions
23
Step by Step
Changing Labels
You can also choose to change a label when configuring
an FCN entry Page 71.
Changing the label on an existing FCN entry:
FCN Press the display key.
OK Confirm.
OK Select and confirm the FCN entry you want.
OK Select and confirm.
OK
OK Confirm to enter a text of your choice.
Q ... O Enter text via the keypad Page 24 (up to
12 characters allowed).
or
OK Select and confirm to reset the default label.
OK
OK Confirm to apply changes.
or
OK Select and confirm to discard the changes made.
OK
OK Confirm.
Text Entry
The following rules apply when entering text:
• Characters are inserted to the left of the cursor.
• In an entry field, use the navigation key to move the
cursor up , down , right or left .
Each key is assigned letters and characters Page 24.
These appear on the last display line as soon as you
press a button.
Program/Service
Bob Dylan
Key label?
US: Change?
UK: Change entry?
Default Label?
US: Save?
UK: Save entry?
Previous?
US: Exit?
UK: End?

Basic Operating Instructions
24
Character Overview
Additional character set
An extended (country-specific) character set is available for entries in the
local directory.
Example:
"R" = Press the * key once and the M key three times.
Key 1x 2x 3x 4x 5x
1
a b c 2
Id e f 3
g h I 4
j k l 5
Lm n o 6
Mp q r s 7
Nt u v 8
Ow x y z 9
Q[1]
[1] Space
. - 0
*[2]
[2] Toggle to uppercase
#[3]
[3] Delete character
Key 1x 2x 3x 4x 5x 6x 7x 8x 9x 10x 11 x 12x 13x 14x 15x
[1]
[1] Space
1⣠$ ¥ ¤
a b c 2 äáàâãç
Id e f 3 ëéèê
g h I 4 ïíìî
j k l 5
Lm n o 6 öñóòô õ
Mp q r s 7ß
Nt u v 8 üúùû
Ow x y z 9ÿýæø å
Q. , ? ! 0 + - : ¿ ¡ / " ' ; _
*[2]
[2] Next letter uppercase (active for up to one second)
[3]
[3] Toggle to digit input
*
## @ \ & §

Basic Operating Instructions
25
Step by Step
Accessing Functions
... interactively
You can select some functions while the telephone is
idle, for example:
OK Select with the navigation key and confirm with the
display key B.
You can select other functions directly when conduc-
ting a call, depending on the situation.
You call a number, but the line is busy:
OK Confirm by pressing the display key B.
or
OK
Select with the navigation key
, confirm with the display
key
B
, and dial another station number.
... via the Program/Service Menu
FCN Confirm by pressing the display key A.
OK Confirm by pressing the display key B.
OK Select with the navigation key and confirm with the
display key B.
or
Q enter the code directly.
... via the Main Menu
Press the navigation key up to open the main menu.
Enter a code (overview Page 153)
or
OK Select with the navigation key and activate with the
navigation key or the display key B.
... via the FCN List
If you saved a function in the FCN list, you can access it
directly as follows.
FCN Confirm by pressing the display key A.
OK Select the function with the navigation key and acti-
vate it with the navigation key or the display key
B.
Forwarding on
Callback
Send message
Service
#0=Reset services?
Settings
Callback?

Basic Operating Instructions
26
Which Functions Are Available?
Functions in the Main Menu
optiPoint WL 2 professional has a local main menu where you can make
personal settings and update a directory.
Basic and Enhanced Functions in the System Menu
You can use all basic and enhanced communication platform functions that
appear interactively on the screen and in the Program/Service menu.
How Can I Use My Handset Effectively?
• No doubt there are some functions that you use more than others. You
should save these functions in the FCN list so that you can activate
them with greater ease and speed (for information on storing a function
in the FCN list Page 71).
• All too often you reach a busy line when dialing a number. Amid the
confusion of your working day, it’s easy to forget to try the number
again later on. To avoid this, make it a habit to use the "Callback" func-
tion Page 36.

Making Calls – Basic Functions
27
Step by Step
Making Calls – Basic Functions
Accepting a Call
Special default ring signaling is set for your telephone:
• When you receive an internal call, your telephone
rings once every four seconds (single-tone se-
quence).
• When you receive an external call, your telephone
rings twice in rapid succession every four seconds
(dual-tone sequence).
• When you receive a call from the entrance tele-
phone, your telephone rings three times in rapid
succession every four seconds (triple-tone se-
quence).
• If a call is waiting, you hear a short tone (beep) every
six seconds.
An incoming call is signaled in four different ways on the
handset:
• the handset rings and/or vibrates
• the handset lights up
• a display appears on the screen
• the speakerphone key LED flashes
You can accept the call in one of the following ways:
or Press the talk key or the speakerphone key.
or Remove the handset from the charging unit ("Auto An-
swer“ must be activated Page 124).
Ending a Call
Press the on-hook key.
Dialing/Making Calls
Internal: Enter the station number.
External: Enter the external code and station number.
Your service personnel can adjust the ring ca-
dence for external and internal calls for you. In
other words, different ring cadences can be set
for different internal callers.

Step by Step
Making Calls – Basic Functions
28
Press the talk key.
or
Hold down the talk key.
Internal: Enter the station number.
External: Enter the external code and station number.
Speakerphone Mode
If you choose to let someone else listen in on your call,
make sure you inform the other party first.
Activating/Deactivating Speakerphone Mode
Activation when dialing
Enter a station number
and
Press the speakerphone key.
Activation during a call
Press the speakerphone key.
Deactivation during a call
Press the speakerphone key.
Changing the volume while speakerphone mode is
active
S or CRaise or lower the volume. Keep pressing the keys until
you are happy with the volume.
Save Press the display key.
The icon Ö appears on the first display line when
speakerphone mode is active.
If you want to place the handset in the charging
unit during a call, you must hold down the speak-
erphone key when inserting the handset.

Making Calls – Basic Functions
29
Step by Step
Saved Number Redial
Local Redial List
Precondition: Your handset is idle and your service per-
sonnel activated the local redial list.
Press the talk key quickly.
Select the required entry.
Press the talk key to start dialing.
Saved Number Redial in the System Menu
The last three external telephone numbers dialed are
stored automatically.
You can select this again with an FCN entry.
The station number appears on your screen for two sec-
onds and is then dialed.
FCN Press the display key.
OK Select and confirm.
Confirm entry (= last station number dialed).
Press the entry twice (=second-to-last station number
dialed).
Press the entry three times (=third-to-the-last station
number dialed).
Displaying and dialing saved station numbers
FCN Press the display key.
OK Select and confirm.
OK
OK Press the dialog key within two seconds to confirm your
choice.
OK
OK The next stored number is displayed. Press the dialog
key to confirm your selection.
OK
OK Select and confirm.
089123456
You are not yet able to transfer saved entries to
the "Directory" Page 118.
Saved number redial
Saved number redial
US: Next?
UK: Next entry?
US: Next?
UK: Next entry?
US: Next?
UK: Next entry? If this feature is configured (contact your service
personnel), account codes entered are also
saved Page 83.
Step by Step
Making Calls – Basic Functions
30
Calling a Second Party (Consultation
Hold)
You can call a second party while conducting a call. The
first party is placed on hold.
OK
OK Confirm.
Call the second party.
Return to the first party:
OK Confirm.
or
OK
or
FCN Press the display key.
OK Confirm.
Q Enter the code.
Switching to the Party on Hold (Toggle/Con-
nect)
OK Select and confirm.
or
FCN Press the display key.
OK Confirm.
Enter the code.
Combining the calling parties into a three-party
conference
OK Select and confirm.
or
FCN Press the display key.
OK Confirm.
I Enter the code.
Connecting the other parties to each other
OK Select and confirm.
US: Consult?
UK: Enquiry?
Return to held call?
Quit and return?
Program/Service
Toggle/Connect?
Program/Service
Conference?
Program/Service
Transfer?

Making Calls – Basic Functions
31
Step by Step
Transferring a Call
If the person you are speaking to wants to talk to a spe-
cific colleague of yours, you can transfer the call to this
colleague.
OK
OK Confirm.
Enter the number of the party to whom you want to
transfer the call.
Announce the call, if necessary.
Press the on-hook key.
or
OK Select and confirm[1].
US: Consult?
UK: Enquiry?
Transfer?
[1] ”Different Displays (HiPath 4000 Environment)” Page 136
Step by Step
Making Calls – Basic Functions
32
Call Forwarding
Using Variable Call Forwarding
You can immediately forward internal or external calls to
different internal or external telephones (destinations).
(External destinations require special configuration in
the system.)
OK Select and confirm.
or
Enter the code.
OK Confirm.
or
OK Select and confirm.
or
OK Select and confirm.
or
or or IEnter the code.
Enter the destination number.
OK
OK Confirm.
Deactivating call forwarding:
OK Select and confirm.
or
Enter the code.
Forwarding on?
1=all calls?
2=external calls only?
3=internal calls only?
US: Save?
UK: Save entry?
Forwarding off?
When call forwarding is active, a special dial tone
sounds when you lift the handset.
If DID DTMF is active (contact your service per-
sonnel), you can also forward calls to this desti-
nation. Destinations: fax = 870, DID = 871,
fax DID = 872.
If you are a call forwarding destination, your dis-
play will show the station number or the name of
the originator on the upper line and that of the
caller on the lower line.
Making Calls – Basic Functions
33
Step by Step
Using Call Forwarding No Reply (CFNR)
Calls that are not answered after three rings (=default,
can be adjusted by service personnel) or that are recei-
ved while another call is ongoing can be automatically
forwarded to a specified telephone.
FCN Press the display key.
OK Confirm.
OK Select and confirm.
OK Select and confirm.
or
O Enter the code.
Enter the destination number.
• Enter the internal station number for internal desti-
nations
• Enter the external code and the external station
number for external destinations
Umleitung nach Zeit ausschalten
OK
OK Confirm.
OK Select and confirm.
or
O Enter the code.
Program/Service
More features?
CFNR on?
US: Save?
UK: Save entry?
CFNR off?
If CFNR is enabled, the following briefly appears
on the display when you replace the handset:
„CFNR to: ...“.
Step by Step
Making Calls – Basic Functions
34
Call Forwarding in the Carrier Network
and Forwarding Multiple Subscriber Num-
bers (MSN) (Not for U.S.)
If this function has been configured (contact your ser-
vice personnel), you can forward calls to your assigned
multiple subscriber number (MSN), i.e. DID number, di-
rectly within the carrier network.
For example, you can forward your phone line to your
home phone after business hours.
OK Select and confirm.
or
L Enter the code.
OK Confirm the call forwarding type you wish to use,
or
OK Select and confirm.
or
OK Select and confirm.
or
or or IEnter the code.
Enter your DID number.
Enter the destination number (without the external code).
OK
OK Confirm.
Deactivating call forwarding:
OK Select and confirm.
or
L Enter the code.
OK Confirm the displayed call forwarding type.
or
or or IEnter the activated call forwarding type.
Enter your DID number.
Trunk FWD on?
1=immediate?
2=on no answer?
3=on busy?
US: Save?
UK: Save entry?
Trunk FWD off?
Making Calls – Basic Functions
35
Step by Step
Call Forwarding in the Event of a Telephone
Malfunction
If this feature is configured (ask the service personnel),
you can define an internal or external call forwarding
destination that becomes effective when your tele-
phone is not working.
FCN Press the display key.
OK Confirm.
OK Select and confirm.
or
O Enter the code.
Enter the destination number.
OK
OK Confirm.
Deactivating call forwarding/deleting a destination:
FCN Press the display key.
OK Confirm.
OK Select and confirm.
or
O Enter the code.
OK Confirm to deactivate call forwarding and delete the for-
warding destination.
or
OK
OK Select and confirm to deactivate call forwarding without
deleting the forwarding destination.
Changing the call forwarding destination (if for-
warding is active):
FCN Press the display key.
OK Confirm.
O Enter the code.
OK
OK Confirm.
Change the station number of the destination.
OK
OK Confirm.
Program/Service
*9411=CFSS on
US: Save?
UK: Save entry?
Program/Service
#9411=CFSS off
Delete?
US: Exit?
UK: End?
Program/Service
US: Change?
UK: Change entry?
US: Save?
UK: Save entry?

Step by Step
Making Calls – Basic Functions
36
Using Callback
If a user is busy or is not answering, you can store an
automatic callback. This feature saves you from having
to make repeated attempts to reach the user.
You receive a callback,
• when the other party is no longer busy
• when the user who did not answer has conducted
another call.
Storing a Callback
Precondition: You have reached a busy line or no one
answers.
OK
OK Confirm.
or
N Enter the code.
Answering a Callback
Precondition: A callback was saved. Your telephone
rings. "Callback: ..." appears on the display.
Press the talk key.
or
Press the speakerphone key.
You hear a ring tone.
Checking and Canceling a Saved Callback
OK Select and confirm[1].
or
N Enter the code.
OK
OK Select and confirm to display additional entries.
Deleting a displayed entry:
OK Confirm.
Ending a retrieve operation:
OK
OK Select and confirm.
US: Callback
UK: Set Callback
View callbacks?
[1] ”Different Displays (HiPath 4000 Environment)” Page 136
US: Next callback?
UK: Display next?
Delete?
US: Exit?
UK: End?
Making Calls – Basic Functions
37
Step by Step
Saving a Repdial Key as an FCN Entry
FCN list entries that are unassigned by default can be
programmed with frequently used station numbers.
If you save internal station numbers, you can save a
LED display (=save with LED) that signals various
states Page 73.
FCN Press the display key.
OK Confirm.
OK Select and confirm.
or
O Enter the code.
FCN Press the display key.
OK Select an entry. If the relevant entry has already been
programmed, the programming is also displayed.
OK
OK Confirm.
OK Confirm.
Enter the station number.
If you make a mistake:
OK Select and confirm. This deletes all digits entered.
The system telephone automatically recognizes if you
want to save an internal or an external station number.
The options "Save without LED" or "Save with LED" are
only available for internal station numbers.
OK Confirm.
or
OK Select and confirm to save the repdial entry without
LED display.
If applicable
OK Select and confirm to adjust the automatic entry label.
For more information, see Page 23.
OK
OK Confirm.
or
OK
OK Select and confirm.
Program/Service
*91=Prog. feature key?
US: Change key?
UK: Change feature?
Repdial key?
Previous?
Save with LED?
Save without LED?
Key label?
US: Exit?
UK: End?
US: Another key?
UK: Program another key?
Step by Step
Making Calls – Basic Functions
38
or
OK
OK Select and confirm.
Using Repdial Entries for Dialing
Precondition: You have saved a station number as a
repdial entry Page 37.
FCN Press the display key.
OK Select and confirm an entry with a saved station num-
ber.
US: Clear key?
UK: Delete feature? Dial the station number saved Page 38.
You can do this while a call is in progress.
For information on display messages when sav-
ing station numbers Page 139.
You can also press the repdial entry during a call.
This automatically sets up a consultation
Page 30.

Making Calls – Basic Functions
39
Step by Step
Telephone Settings
Adjusting the Ring Volume
S or CPress one of these keys while the handset is idle.
OK
OK Confirm.
S or CRaise or lower the volume. Keep pressing the keys until
you are happy with the volume.
OK Save.
Adjusting the Ring Tone
S or CPress one of these keys while the handset is idle.
OK
OK Select and confirm.
S or CTo adjust the ring tone, keep pressing the keys until the
desired tone is set.
OK Save.
Adjusting the Attention Ring Volume
If you belong to a team that uses trunk keys, the tele-
phone can alert you to other calls in the team even
when you are engaged in another call. You hear the at-
tention ring.
S or CPress one of these keys while the phone is idle.
OK
OK Select and confirm.
S or CRaise or lower the volume. Keep pressing the keys until
you are happy with the volume.
OK Save.
US: Ring volume?
UK: Ringer volume?
US: Ring tone?
UK: Ringer tone?
US: Attention Ring Vol.
UK: Attention Ring Volume

Step by Step
Making Calls – Basic Functions
40
Changing the Display Contrast
You can adjust the display contrast to suit your individu-
al lighting conditions.
S or CPress one of these keys while the phone is idle.
OK Select and confirm.
S or CChange the contrast (1 - 4). Keep pressing the keys until
the desired contrast is set.
OK Save.
Changing the Receiving Volume During A Call
ÕYou are conducting a call.
S or CRaise or lower the volume. Keep pressing the keys until
you are happy with the volume.
If applicable
SC together Save to keep the setting for future calls.
Selecting the System Menu Language
FCN Press the display key.
OK Confirm.
OK Confirm.
OK Confirm.
or
N Enter the code.
OK Select the language you wish to use (such as "Spanish")
and press the dialog key to confirm.
Display contrast?
Program/Service
More features?
*48= Select language?
15=Spanish?

Making Calls – Basic Functions
41
Step by Step
Switching from the System Menu to
Idle State
You are in a HiPath 3000 menu and would like to quickly
revert to idle state.
FCN Press the display key.
OK Confirm.
Program/Service
Step by Step
Making Calls – Enhanced Functions
42
Making Calls – Enhanced
Functions
Accepting Calls
Accepting a Specific Call for Your Colleague
You hear another telephone ring.
FCN Press the display key.
OK Confirm.
OK Select and confirm.
or
O Enter the code.
All called stations appear on the screen.
If applicable
OK
OK Select and confirm until the station you want to call is
displayed.
OK Confirm.
or
If you know the number of the telephone that is ringing,
enter it directly.
Program/Service
*59=Pickup - directed
US: Next?
UK: Next entry?
Accept call?
Accepting calls in a team Page 106.
Making Calls – Enhanced Functions
43
Step by Step
Rejecting Calls
You can reject calls which you do not wish to take. The
call is then signaled at another definable telephone
(contact your service personnel).
The telephone rings. The caller is displayed.
Press the on-hook key.
If call rejection is not permitted, your telephone will con-
tinue to ring. The message "Currently not possible" is
displayed (for example, in the case of recalls).
Using the Speakerphone
A colleague addresses you directly over the speaker.
You hear a tone before the announcement. The other
party’s name or station number appears on the screen.
You can reply to the call in handsfree answerback mode.
or Press the talk key or the speakerphone key and reply.
or
OK Press the key to confirm your selection and answer the
call.
Enabling and disabling handsfree answerback
OK Select and confirm.
or
OK
or
OL Code for "HF answerback on"
or
OL Enter the code for "HF answerback off".
Mute off?
If handsfree answerback is enabled (see below),
you do not need to switch on the microphone -
you can answer directly. You can answer immedi-
ately in speakerphone mode.
If handsfree answerback is disabled (default set-
ting), follow the procedure described above.
Placing a speaker call to a colleague Page 56.
HF answerback on?
HF answerback off?

Step by Step
Making Calls – Enhanced Functions
44
Answering a Call with the Headset
The procedure is the same as for speakerphone mode
Page 28.
Precondition: The headset is connected.
The LED flashes to signal an incoming call.
Press the speakerphone key. Conduct the call.
Ending a call
Press the speakerphone key. The LED goes out.

Making Calls – Enhanced Functions
45
Step by Step
Answering Calls from the Entrance
Telephone and Opening the Door
If an entrance telephone has been programmed, you
can use your handset to speak to someone at the en-
trance telephone and activate a door opener.
If you have the proper authorization (contact your ser-
vice personnel), you can activate the door opener, en-
abling visitors to open the door themselves by entering
a five-digit code (for example, using a DTMF transmitter
or installed keypad).
Speaking to visitors via the entrance telephone:
Precondition: Your telephone rings.
Press the talk key within 30 seconds. You are connect-
ed to the entrance telephone immediately.
or
Press the talk key after more than thirty seconds.
Dial the entrance telephone number.
Opening the door from your telephone during a call
from the entrance telephone:
OK Confirm.
Opening the door from your telephone without
calling the entrance telephone:
FCN Press the display key.
OK Confirm.
OK Select and confirm.
or
L Enter the code.
Dial the entrance telephone number.
Opening the door with a code (at the door):
After ringing the bell, enter the five-digit code (using the
keypad or a DTMF transmitter). Depending on how the
door opener has been programmed, a doorbell call sig-
nal may or may not be forwarded.
Open door?
Program/Service
*61=Open door?
Step by Step
Making Calls – Enhanced Functions
46
Activating the door opener:
FCN Press the display key.
OK Confirm.
OK Select and confirm.
or
NO Enter the code.
Dial the entrance telephone number.
Enter the five-digit code. Default code = "00000".
or
OK Select the displayed function and press the dialog key
to change the code.
OK Select and confirm.
or
OK You can also open the door without a doorbell ring.
Deactivating the door opener:
FCN Press the display key.
OK Confirm.
OK Select and confirm.
or
NO Enter the code.
Accepting a Call From an Answering Machine
You can accept a call from any answering machine if the
machine is connected to your system (contact your ser-
vice personnel) and you have saved the answering ma-
chine number as an FCN entry Page 71.
FCN Press the display key.
OK Select and confirm.
Program/Service
*89=Door opener on?
3=change password?
1=enable with ring?
2=enable w/o ring?
Program/Service
#89=Door opener off?
Making Calls – Enhanced Functions
47
Step by Step
Dialing/Making Calls
En-Bloc Sending/Correcting Numbers
If this feature is configured (contact your service per-
sonnel), a connection is not attempted immediately
when a station number is entered. This means that you
can correct the number if necessary.
The station number is only dialed at your specific re-
quest.
Internal: Enter the station number.
External: Enter external code and station number.
Dialing entered/displayed numbers:
Press the talk key.
or
OK Confirm.
Correcting numbers entered:
OK Select and confirm.
The last digit entered in each case is deleted.
Enter the required digit(s).
Canceling en-bloc sending:
OK
OK Select and confirm.
or
Press the on-hook key.
or
Press the speakerphone key.
Dial?
Delete number?
US: Exit?
UK: End?
A station number can only be corrected as it is
being entered. Station numbers stored for num-
ber redial, for example, cannot be corrected.

Step by Step
Making Calls – Enhanced Functions
48
Using a Caller List
If you are unable to accept an external or internal call,
the call attempt is stored in the caller list.
You can store answered calls either manually (both in-
ternal and external calls) or automatically (external calls
only). Contact your service personnel for details.
Your telephone stores up to ten calls in chronological or-
der. Each call is assigned a time stamp. The most re-
cent entry not yet answered in the list is displayed first.
Multiple calls from the same caller do not automatically
generate new entries in the caller list. Instead, only the
most recent time stamp for this caller is updated and its
number incremented.
Polling the caller list
Precondition: The service personnel in charge set up a
caller list for your telephone.
OK Select and confirm[1],
or
N Enter the code.
The last call is displayed.
OK
OK Confirm to display other calls.
Ending a poll operation
OK
OK Select and confirm.
or
Press the on-hook key.
or
Press the speakerphone key.
Caller list?
[1] ”Different Displays (HiPath 4000 Environment)” Page 136
US: Next?
UK: Next entry?
US: Exit?
UK: End?
Making Calls – Enhanced Functions
49
Step by Step
Polling additional call information
Precondition: You have polled the caller list, the call
you want is marked (black square at the start of the
line).
OK Select and confirm.
Name, station number, and call time information is dis-
played.
Dialing a station number from the caller list
Precondition: You have polled the caller list, the call
you want is displayed.
OK Select and confirm.
Removing an entry from the caller list
Precondition: You have polled the caller list, the call
you want is displayed.
OK Select and confirm.
Saving the other party’s station number
in the caller list (redial)
Precondition: You are conducting a call or have called
an external party.
OK Select and confirm.
or
FCN Press the display key.
OK Confirm.
N Enter the code.
Add’l information?
Call?
The caller is automatically deleted from the caller
list when a connection is finally set up.
Delete?
Save number?
Program/Service

Step by Step
Making Calls – Enhanced Functions
50
Speed Dialing
Using station and system speed-dial numbers
Precondition: You have stored station speed-dial num-
bers Page 50 or the service personnel has stored
system speed-dial numbers.
FCN Press the display key.
OK Confirm.
OK Confirm[1],
or
M Enter the code.
Enter a speed-dial number.
"*0" to "*9" = station speed-dialing.
"000" to "999" = system speed-dialing (contact your ser-
vice personnel).
If applicable Suffix-dialing
If necessary, you can suffix-dial additional digits
(for example, the user’s extension) at the end of the
saved station number.
If this feature is configured, a suffix is automatically di-
aled (for example, "0" for the exchange) if no entries are
made within 4 or 5 seconds.
Storing station speed-dial numbers
You can store the ten numbers which you use the most
and dial them using your own station speed-dial num-
bers: *0 through *9 Page 50.
FCN Press the display key.
OK Confirm.
OK Select and confirm1.
or
O Enter the code.
Enter the speed-dial number you wish to use (*0 to
*9). If the speed-dial number is already in use, the pro-
grammed station number appears on the screen.
OK
OK Confirm.
Program/Service
*7=Use speed dialing?
[1] ”Different Displays (HiPath 4000 Environment)” Page 136
Program/Service
*92=Change Speed Dial?
US: Change?
UK: Change entry?

Making Calls – Enhanced Functions
51
Step by Step
First enter the external code and then the external sta-
tion number.
OK
OK Confirm.
or If you make a mistake:
OK Select and confirm. This deletes all digits entered.
OK
OK Confirm.
or
OK
OK Select and confirm.
or
OK Select and confirm.
or
OK
OK Select and confirm.
US: Save?
UK: Save entry?
Previous?
US: Next?
UK: Next entry?
US: Change?
UK: Change entry?
Delete?
US: Exit
UK: End
Step by Step
Making Calls – Enhanced Functions
52
Dialing from the Internal Directory
If this function has been configured (ask the service per-
sonnel), all internal station numbers and central speed-
dial numbers for which a name was assigned are stored
in your internal directory.
Precondition: Names have been assigned to the sta-
tion numbers stored in the system.
OK
OK Confirm.
or
Enter the code.
If applicable If several directories have been configured:
OK Confirm.
The first entry is displayed.
OK Display additional entries.
or
OK
or
Use the keypad to enter the name you want or just the
initial letters. The system searches for the name.
The keypad’s digit keys are used here like an alphanu-
meric keyboard to enter the name. Each letter is en-
tered by pressing the relevant key the appropriate num-
ber of times. Character overview Page 24.
If applicable
OK Select and confirm. The letter entered last is deleted. If
you deleted all letters, the first entry in the directory re-
appears.
If applicable
OK Select and confirm. All letters entered are deleted, the
first entry in the directory reappears.
The entry you want is displayed:
OK Select and confirm.
In contrast to the "local directory", the internal di-
rectory is configured centrally in the communica-
tion system Page 53
US: Directory?
UK: Phonebook?
1=internal?
Scroll Next?
Scroll Previous?
Delete Character?
Delete Line?
Call?
Making Calls – Enhanced Functions
53
Step by Step
or
OK Select and confirm.
Name, station number, and/or system speed-dial num-
ber information is displayed.
Dialing from the Local Directory
Precondition: An entry is saved in the directory list
Pag e 111 .
Open the directory.
OK Select and confirm the entry you want.
or
Select the required entry and
press the talk key.
The connection is set up.
Voice Dialing
Precondition: A voice recording has been saved for an
entry in the directory Pag e 111 .
Hold down the navigation key.
State the name of the party you want to call into the mi-
crophone.
The name is repeated for confirmation and the corre-
sponding entry is shown on the display for five seconds.
The connection is set up.
or
Press the speakerphone key to cancel dialing.
Add’l information?
089123456789
Bond, James
Please following the onscreen instructions.
Bond, James ´
Step by Step
Making Calls – Enhanced Functions
54
Dialing from the Telephone Database (LDAP)
If configured (ask your service personnel), you can
search for directory data in the LDAP database and dial
the number of any subscriber you find there.
Precondition: The LDAP search feature has been con-
figured in the system.
OK
OK Confirm.
or
Enter the code.
If applicable If several directories have been configured:
OK Select and confirm.
Enter the name you want via the keypad (up to
16 characters).
You can enter incomplete names, for example, "mil p"
for "Miller Peter“.
The keypad’s digit keys are used here like an alphanu-
meric keyboard to enter the name. Each letter is en-
tered by pressing the relevant key the appropriate num-
ber of times.
Example: Press "7" three times to enter "r" or press "3"
twice to enter "e". Character overview Page 24.
If applicable If configured (ask your service personnel), you can also
search for surname and first name. To separate sur-
name and first name by a space, enter "0". You can en-
ter incomplete names, for example, "mil p" for "Miller
Peter".
If applicable
OK Select and confirm. The letter entered last is deleted.
OK Confirm.
The system search for the name. This may take a few
seconds.
The result is displayed:
The first station found appears on the screen.
OK Confirm.
US: Directory?
UK: Phonebook?
2=LDAP?
Delete Character?
In large databases, entering insufficient charac-
ters can lead to incomplete search results
Page 55.
Search?
Call?
Making Calls – Enhanced Functions
55
Step by Step
If several names are found (max. 50), you must first select
the one you want:
OK
or
OK
OK Select and confirm.
If no name is found:
If your search does not yield any name corresponding to
your query, you can extend the range of the search,
for example, by deleting characters.
OK Select and confirm.
Proceed as described above.
If too many names are found:
If more than the maximum of 50 names are found cor-
responding to your query, only an incomplete list of re-
sults can be displayed.
You can view these results, select any of the names, or
change the search string (for example, narrow the
search by entering more characters).
OK Confirm to scroll through the incomplete list. Proceed
as described above.
or Narrow the search down.
OK Select and confirm, in order to change the search string.
Proceed as described above.
Dialing from the LDAP Database
Precondition: You have searched for and selected an
entry in the LDAP database Page 116.
©Press the display key.
OK Confirm.
Scroll Next?
Scroll Previous?
Call?
Change search string?
In this case it is advisable to narrow down the
search so that all corresponding names can be
displayed.
Show results?
Change search string?
Dial
Step by Step
Making Calls – Enhanced Functions
56
Using Mailboxes
The mailbox key LED lights up or the LED icon in the
FCN list turns red when you have new messages. In-
coming messages are signaled in the same way if your
telephone is connected to a voice mail system.
Polling the mailbox
Press the mailbox LED, the LED flashes.
or
FCN Press the display key.
OK Select and confirm, the LED icon flashes.
or
OK
OK Confirm.
OK
OK Select and confirm.
or
OK
OK Follow the user prompts.
Addressing Colleagues over the Speaker
You can conduct a speaker call over a connected loud-
speaker (ask the service personnel) or address an inter-
nal user’s system telephone directly without any action
on their part.
FCN Press the display key.
OK Confirm.
OK Select and confirm.
or
NQ Enter the code.
Enter the station number.
Mailbox
US: View messages?
UK: Display Messages?
US: Message sent?
UK: Text?
US: Call voice mail?
UK: Call Voice Mail?
Program/Service
*80=Speaker call?
Responding to a speaker call Page 43.

Making Calls – Enhanced Functions
57
Step by Step
Talking to Your Colleague with Discreet Call-
ing
If this function has been configured (ask your service
personnel), you can join an ongoing call conducted by
an internal user at a system telephone with display. You
can listen in unnoticed and speak to the internal user wi-
thout being overheard by the other party (discreet cal-
ling).
Press the talk key.
O Enter the code.
Enter your internal station number.
Automatic Connection Setup (Hotline)
If this function is configured (contact your service per-
sonnel), the system automatically sets up a connection
to a preset internal or external destination.
Press the talk key.
Depending on the setting, the connection is either set
up immediately or only after a preset period of
time (hotline after a timeout).
Reserving a Trunk
If this feature is configured (contact your service per-
sonnel), you can reserve a busy trunk for your own use.
When the trunk is free, you receive a call and a message
appears on the display.
Precondition: "Currently busy" appears on the display.
OK Confirm.
When the reserved trunk becomes free:
Your telephone rings. The display shows "Trunk is free".
Press the talk key. You hear the CO dial tone.
Enter the number of the external station.
Your service personnel can protect your telepho-
ne against discreet calling.
Reserve trunk?

Step by Step
Making Calls – Enhanced Functions
58
Assigning a Station Number (Not for U.S.)
If this function has been configured (contact your ser-
vice personnel), you can assign a specific number (DID
number) to your telephone before making an external
call. The assigned number then appears on the called
party’s display.
FCN Press the display key.
OK Confirm.
OK Select and confirm.
or
Enter the code.
Enter the DID number you wish to use.
Dial the external number.
Associated Dialing/Dialing Aid
If this function has been configured (contact your ser-
vice personnel), you can use a dialing aid to dial num-
bers and set up calls for your telephone.
The operating procedure depends on whether the dial-
ing aid is connected to the S0 bus or the a/b (T/R) port.
You can also use your system telephone as a dialing aid
for other telephones.
Dialing aid on the S0 bus:
On the PC, select a destination and start dialing.
The speaker on your telephone is switched on. Press
the speakerphone key when the other party answers.
Dialing aid at the a/b (T/R) port:
On the PC, select a destination and start dialing.
"Lift the handset" appears on the PC screen.
Press the talk key.
Program/Service
*41=Temporary MSN?

Making Calls – Enhanced Functions
59
Step by Step
Dialing aid from your telephone for another tele-
phone:
FCN Press the display key.
OK Confirm.
OK Select and confirm.
or
LM Enter the code.
Enter the internal station number ("Dial for:")
Enter the number you wish to dial.
Program/Service
*67=Associated dial?

Step by Step
Making Calls – Enhanced Functions
60
During a Call
Using Second Call
Callers can reach you even while you are conducting an-
other call. A signal alerts you to the waiting call.
You can either ignore or accept the waiting call.
When you accept the waiting call, you can either end
the first call or place it on hold and resume the call later
on.
You can also bar call waiting or the call waiting tone
Page 61.
Accepting a Waiting Call (Camp-On)
Precondition: You are engaged in a phone call and hear
a tone (every six seconds).
Ending the first call and answering the waiting call:
Press the on-hook key. Your telephone rings.
Answer the second call. Press the talk key.
Placing the first call on hold and answering the sec-
ond call:
OK Select and confirm.
or
FCN Press the display key.
OK Confirm.
Enter the code.
You are immediately connected to the second caller.
The first party is placed on hold.
Ending the second call and resuming the first one
OK Confirm.
or
FCN Press the display key.
OK Confirm.
Q Enter the code.
Call waiting?
Program/Service
Quit and return?
Program/Service
Making Calls – Enhanced Functions
61
Step by Step
or
Press the on-hook key. "Recall ..." appears on the
screen. Press the talk key.
Preventing and Allowing Call Waiting (Auto-
matic Camp-On)
If this function has been configured (ask the service per-
sonnel), you can prevent or allow a second call
Page 60 from being signaled by automatic camp-on
during an ongoing call.
FCN Press the display key.
OK Confirm.
OK Select and confirm[1].
or
OK
or
OQ Enter the code for "Call wait.trm.off“.
or
OQ Enter the code for "Call wait.term.on".
Activating/Deactivating the Call Waiting Tone
You can suppress the call waiting tone (that sounds ev-
ery six seconds) for external calls. A special nonrecur-
ring dial tone then alerts you to the waiting call.
OK Select and confirm.
or
OK
or
NM Enter the code for "Waiting tone off".
or
NM Enter the code for "Waiting tone on".
Program/Service
#490=Call wait.trm.off?
[1] ”Different Displays (HiPath 4000 Environment)” Page 136
*490=Call wait.term.on?
Waiting tone off?
Waiting tone on?
Step by Step
Making Calls – Enhanced Functions
62
Parking a Call
You can park up to ten calls, either internal, external, or
both. Parked calls can be displayed on and picked up
from another telephone. This feature is useful,
for example, if you want to continue a call at another
phone.
Precondition: You are conducting a call.
FCN Press the display key.
OK Confirm.
OK Select and confirm.
or
L Enter the code.
Q ... OEnter the number of the park slot (0 - 9) and make a note
of it. If the park slot number you entered is not dis-
played, it is already in use; enter another one.
Retrieving a parked call
Precondition: One or more calls have been parked. The
telephone is idle.
FCN Press the display key.
OK Confirm.
OK Select and confirm.
or
L Enter the code.
Q ... OEnter the park slot number you noted earlier.
If the park slot number you enter is not in use, you can-
not retrieve the call.
Program/Service
*56=Park a call?
Program/Service
Retrieve call?
If a parked call is not resumed within a specific pe-
riod of time, it is returned to the telephone from
where it was parked (recall).

Making Calls – Enhanced Functions
63
Step by Step
Placing External Calls on Hold
If you have programmed an FCN entry on your tele-
phone for "Hold" Page 71, you can place external calls
on hold.
This enables all other parties to retrieve the call on the
assigned line.
FCN Press the display key.
OK Select and confirm, the LED icon is red.
A message appears showing which line is on hold
(e.g. 801); make a note of the line number.
The LED associated with the FCN entry (if available)
flashes slowly.
If applicable
Press the on-hook key.
Depending on your system configuration, this may be
necessary so other users can also pick up the held call.
Picking up (retrieving) a held call
Precondition: One or more calls have been parked. The
telephone is idle.
FCN Press the display key.
OK Confirm.
OK Select and confirm.
or
LI Enter the code.
Hold
Held on line: 801
Program/Service
*63=Retrieve line?

Step by Step
Making Calls – Enhanced Functions
64
Conducting a Conference
In a conference call, you can talk to as many as four oth-
er parties at the same time. These may be internal or
external users.
Call the first party.
OK Select and confirm.
Call the second party. Announce the conference.
OK Select and confirm.
or
FCN Press the display key.
OK Confirm.
I Enter the code.
A tone sounds every 30 seconds to indicate that a con-
ference is in progress. Contact your service personnel
for instructions on how to turn it off.
If the second party does not answer
OK Confirm.
or
Q Enter the code.
Adding up to five parties to the conference
(initiator only)
OK Confirm.
Call the new party. Announce the conference.
OK Select and confirm.
or
FCN Press the display key.
OK Confirm.
I Enter the code.
Start conference?
Conference?
Program/Service
Return to held call?
Add party?
Conference?
Program/Service
Making Calls – Enhanced Functions
65
Step by Step
Checking which parties are in the conference
(initiator only)
OK Select and confirm.
The first conference party found appears on the screen.
OK
OK Confirm to display the other users.
OK To close the list: select and confirm.
Removing parties from the conference
(initiator only)
OK Select and confirm.
The first conference party found appears on the screen.
OK
OK Confirm to display the other users.
OK Select and confirm.
Leaving a conference
Press the on-hook key.
or
OK
OK Select and confirm.
Ending a Conference (Initiator Only)
OK Select and confirm.
or
FCN Press the display key.
OK Confirm.
I Enter the code.
Removing the ISDN central office party
from the conference (U.S. only)
OK Select and confirm.
or
FCN Press the display key.
OK Confirm.
O Enter the code.
View conf parties?
US: Next?
UK: Next entry?
Exit list?
View conf parties?
US: Next?
UK: Next entry?
Remove party?
US: Leave conference?
UK: Withdraw?
End conference?
Program/Service
Drop last conf. party
Program/Service
Step by Step
Making Calls – Enhanced Functions
66
Activating Tone Dialing/DTMF Suffix-Dialing
You can transmit dual-tone multifrequency (DTMF) sig-
nals to control devices such as an answering machine
or automatic information system.
FCN Press the display key.
OK Confirm.
OK Select and confirm[1].
or
I Enter the code.
You can use the keys Q to O, *, and # to
transmit DTMF signals.
Program/Service
*53=DTMF dialing?
[1] ”Different Displays (HiPath 4000 Environment)” Page 136
Ending the call also deactivates DTMF suffix dial-
ing.
Your system may be configured so that you can
start DTMF suffix dialing immediately after set-
ting up a connection.
Making Calls – Enhanced Functions
67
Step by Step
Forwarding a Call After an Announcement
If this function has been configured (contact your ser-
vice personnel), you can use a speaker call to announce
a call in progress to a group of users Page 56 (an-
nouncement Page 104).
You can transfer the held call once a member of the
group has accepted the call request.
Precondition: You are conducting a call.
OK
OK Confirm. The other party is placed on hold.
FCN Press the display key.
OK Confirm.
OK Select and confirm.
or
NQ Enter the code.
Enter the group’s station number.
Announce the call.
When a member of the group accepts the call
Page 43, you are connected to this party.
Press the on-hook key.
or
OK Select and confirm[1].
US: Consult?
UK: Enquiry?
Program/Service
*80=Speaker call?
Transfer?
[1] ”Different Displays (HiPath 4000 Environment)” Page 136
If the connection between the two other parties is
not established within 45 seconds, the call from
the first party returns to you (recall).

Step by Step
Making Calls – Enhanced Functions
68
Trunk Flash
To activate ISDN-type services and features (such as
"consultation hold") over the network carrier’s analog
trunks or those of other communication platforms, you
must send a signal to the trunks before dialing the ser-
vice code or telephone number.
Precondition: You have set up an external connection.
FCN Press the display key.
OK Confirm.
OK Select and confirm.
or
Enter the code.
Enter the service code and/or telephone number.
Program/Service
*51=Trunk flash?
Making Calls – Enhanced Functions
69
Step by Step
If You Cannot Reach a Destination
Call Waiting (Camp-On)
Precondition: You have dialed an internal number and
hear a busy signal. It is important that you reach the
called party.
Wait (approx. five seconds) until "Camp-on" appears on
the display and the busy tone is followed by the ring
tone.
The called party can then respond Page 60.
Override - Joining an Ongoing Call
This function is only available if it has been configured
(contact your service personnel).
Precondition: You have dialed an internal number and
hear a busy signal. It is important that you reach the
called party.
OK Select and confirm.
or
L Enter the code.
The called party and person to whom this party is talk-
ing hear an alerting tone every two seconds.
If the called party has a system telephone with display,
the following appears on the screen: "Preempt: (station
number or name)".
You can now start talking.
Camp-on
The called party can prevent automatic camp-on
Page 61.
If this feature is configured (contact your service
personnel), you immediately hear the ring tone
and the message "Camp-on" is displayed.
Override?
Step by Step
Making Calls – Enhanced Functions
70
Using Night Answer
When night answer mode is active, for example during
a lunch break or after office hours, all external calls are
immediately forwarded to a specific internal telephone
(night station). The night station can be defined by the
service personnel (= default night answer service) or by
you (= temporary night answer service).
Activating night answer
OK Select and confirm.
or
Enter the code.
OK Press (= default night answer).
or
Enter the code (= default night answer).
or
Enter the destination number (= temporary night an-
swer).
OK
OK Confirm.
Deactivating night answer
OK Select and confirm.
or
Enter the code.
Night answer on?
*=default?
US: Save?
UK: Save entry?
Night answer off?
Saving Functions, Procedures, Wake-Up Calls, and Reminders
71
Step by Step
Saving Functions, Procedures,
Wake-Up Calls, and Reminders
You can save a frequently-dialed number Page 37, a
frequently-used function or procedures (comprising
several operating steps) to any free slot in your
optiPoint WL 2 professional’s FCN list.
Storing a Function in the FCN List
In addition to station numbers and procedures
(Page 75), you can also save functions as entries (up
to 12 entries) in the FCN list.
Precondition: Your handset is idle.
FCN Press the display key.
OK Confirm.
OK Select and confirm.
or
O Enter the code.
FCN Press the display key.
OK Select and confirm an FCN entry.
OK
OK Confirm.
OK Select and confirm one of the system functions avail-
able.
OK
OK Select and confirm.
Some functions (such as "Call forwarding") accept in-
complete entries. This means you have to insert addi-
tional digits later on when you press the button to acti-
vate the function.
If applicable Change the label Page 23.
OK
OK Confirm.
or
OK
OK Select and confirm.
An incoming call will interrupt the programming
procedure.
Program/Service
*91=Prog. feature key?
US: Change key?
UK: Change feature?
US: Save incomplete
UK: Store incomplete text
US: Exit?
UK: End?
US: Another key?
UK: Program another key?
Step by Step
Saving Functions, Procedures, Wake-Up Calls, and Reminders
72
The function is now saved (but not active) in the FCN
list. For information on activating the function
Page 72.
Activating a Function in the FCN List
You can save up to 12 functions in the FCN list.
Precondition: The function is saved in the FCN list
Page 71.
FCN Press the display key.
OK Select and confirm the function you want.
Meaning of LED icons associated with saved func-
tions:
Call forwarding, Forwarding - trunk, Night answer,
Do not disturb, Telephone lock, Advisory message,
Ringer cutoff, HF answerback on/off, Join/leave
group, Caller ID suppression, Call wait.term., Wai-
ting tone off, Door opener on/off, Control Relay, Rin-
ging group on, Shift Key, UCD (Available on/off,
Work on/off, Night answer on/off):
Saved function is not active.
Saved function is active.
Callback:
You have not set a callback.
You have set a callback.
Mute on/off:
The microphone is switched on.
The microphone is switched off.
Headset:
The headset is switched off.
The headset is switched on.
Flashing slowly – call can be taken via headset.
Caller list:
No calls saved.
Call request saved.
Callback?
If the function is activated, a red LED icon ap-
pears (like the LED on an optiPoint phone with
function keys).
Saving Functions, Procedures, Wake-Up Calls, and Reminders
73
Step by Step
Repdial key (internal), Direct station select:
The other party is not conducting a call.
The other party is conducting a call or has activated do not
disturb.
Flashing rapidly - a caller is trying to reach you, please
pick up the phone.
Flashing slowly - a caller is trying to reach another party
who has not yet answered.
Mailbox:
No messages received.
Message(s) received.
Call key, General call key, Trunk key, Temporary
MSN:
No call on assigned trunk.
Active call on assigned trunk.
Flashing rapidly - a call has arrived on this trunk; press
the key to pick up the call.
Flashing slowly - a call on this trunk was placed on hold.
Trunk grp:
At least one trunk is free.
All trunks in the trunk group are busy.
View call charges:
No chargeable calls have been made since the last time
call charges were displayed.
Chargeable calls have been made since the last time
call charges were displayed.
Call forwarding:
Flashing slowly - either you or your trunk is the destina-
tion of a forwarded call.
Fax details
No fax received or no message on answering machine.
Fax received or message on answering machine.
View number of calls:
No callers waiting
Flashing rapidly - callers waiting (a certain number is ex-
ceeded).
Flashing slowly - callers waiting (a certain number was
reached).

Step by Step
Saving Functions, Procedures, Wake-Up Calls, and Reminders
74
Data I/O Service:
No connection to an application.
Active connection to an application.
Flashing slowly - Connection to application temporarily
interrupted.
The following functions are saved as FCN entries
and have no LED:
Repdial key (external), Procedure key, Trace call, Speed
dial, Release call, Clear, Lock all phones, Send mes-
sage, Directory (1=internal, 2=LDAP), Call waiting, Tog-
gle/Connect, Conference, Speaker call, Retrieve line,
Reserve trunk, Release trunk, Temporary Phone, Over-
ride, Park, Pickup - directed, Pickup - group, Account
code, Show call charges, Page, Answer page, Timed re-
minder, Open door, DTMF dialing, Recall-key, Room
monitor, Hold key, Consultation, Associated dial, Asso-
ciated serv., Tel. data service, Mobile Login, Discreet
Call.
Saving Functions, Procedures, Wake-Up Calls, and Reminders
75
Step by Step
Saving a Procedure (Operating Steps)
as an FCN Entry
Station numbers and functions which require additional
inputs, i.e. comprise several operating steps, can be
saved as FCN entries.
Using the associated dial function Page 59,
for example, you can save all the remaining inputs re-
quired (station number of the calling party and the sta-
tion number to be dialed) as an FCN entry.
Station numbers which require additional inputs but
also dial pauses can also be stored.
FCN Press the display key.
OK Confirm.
OK Select and confirm.
or
O Enter the code.
FCN Press the display key.
OK Select and confirm.
If the selected entry has already been programmed, the
programming is displayed.
OK
OK Confirm.
OK Select and confirm.
Enter the procedure, for example, "*67 231
089123456".
*67= code for associated dial
231= station number of the calling party
089123456 = number to be dialed.
OK
OK Confirm.
Program/Service
*91=Prog. feature key?
US: Change key?
UK: Change feature?
Procedure key?
US: Save?
UK: Save entry?

Step by Step
Saving Functions, Procedures, Wake-Up Calls, and Reminders
76
or If you make a mistake:
OK Select and confirm. This deletes all digits entered.
If applicable
OK Select and confirm to adjust the automatic label. For
more information, see Page 23.
OK
OK Confirm.
or
OK
OK Select and confirm.
Previous?
Key label?
US: Exit?
UK: End?
US: Another key?
UK: Program another key? Select the FCN entry to activate the procedure
saved.
Procedures containing functions which can be
switched on/off can be activated by pressing the
OK key and deactivated by pressing the same key
again.
You can also select the procedure entry during a
call. The stored digits are automatically transmit-
ted as DTMF signals Page 66.
For information on display messages when sav-
ing procedures Page 139.
Saving Functions, Procedures, Wake-Up Calls, and Reminders
77
Step by Step
Reminder Function
You can program your telephone to give you a call when
you want to be reminded of special appointments
Page 78.
To do this you must save the required time of the call.
You can enter a single appointment that will take place
in the next twenty-four hours, or you can enter a daily
recurring appointment (see also the alarm function
Page 79).
Saving Reminders
FCN Press the display key.
OK Confirm.
OK Confirm.
or
L Enter the code.
Enter the time in four-digit format, for example, 0905 for
9.05 (= 9.05 a.m.) or 1430 for 14.30 (= 2.30 p.m.).
If applicable or MIf the language is set to "US English" (configure
Page 40) you can enter the code 2 for "am" or 7 for
"pm" (standard = "am").
OK Confirm.
or
OK Select and confirm.
OK
OK Confirm.
Deleting and checking a saved timed reminder:
FCN Press the display key.
OK Confirm.
OK Confirm.
or
L Enter the code.
OK Confirm.
or
OK Select and confirm.
Program/Service
*46=Timed reminder on?
One time only?
Daily?
US: Save?
UK: Save entry?
Program/Service
#46=Timed reminder off?
Delete?
Exit

Step by Step
Saving Functions, Procedures, Wake-Up Calls, and Reminders
78
Using Timed Reminders
Precondition: You must have saved a timed reminder
Page 77. The current time now matches the saved
time.
ÅThe handset rings.
The timed reminder appears on the screen.
Press the speakerphone key twice.
or
Press the talk key followed by the on-hook key.
US: Reminder:
UK: Reminder at:
If you fail to answer the timed reminder, it re-
peats five times and is then erased.

Saving Functions, Procedures, Wake-Up Calls, and Reminders
79
Step by Step
Setting the Alarm Clock
If the alarm function is activated, you receive a call sig-
naled by the melody you selected everyday at the wake-
up time set (see also the reminder function Page 77).
Activating/Deactivating and Setting the
Alarm Clock
Precondition: The handset is idle.
Open the main menu.
Enter the code.
or
OK Select and confirm.
Activating/deactivating the alarm clock
In the "Alarm Clock:" entry field:
OK Confirm.
or
OK Select and confirm.
Setting the alarm clock
Scroll to the "Time" entry field.
Enter the wake-up time (hours/minutes; four-digit).
Setting the wake-up melody
You can choose from up to 16 melodies Page 134.
Scroll to the "Melody" entry field.
OK Select and confirm.
Save Press the display key to save changes.
Hold down the on-hook key.
¼Icon appears on the idle display.
Alarm Clock
<On>
<Off>
<00:00>
<Melody 1>
<Melody 1>

Step by Step
Saving Functions, Procedures, Wake-Up Calls, and Reminders
80
Deactivating a Wake-Up Call
Precondition: You have saved a wake-up call. The cur-
rent time now matches the saved time.
ÅThe selected melody signals the wake-up call for 60
seconds at the handset.
Press any key to deactivate the wake-up call.
If your optiPoint WL 2 professional is in use at
the set wake-up time, the wake-up call is sig-
naled as soon as the handset returns to idle sta-
tus.
Displaying and Assigning Call Charges
81
Step by Step
Displaying and Assigning Call
Charges
Displaying Call Charges (Not for U.S.)
For the current call:
The display usually shows call charges at the end of a
call (default setting).
If you wish to display charges while a call is in progress,
service personnel must request this feature from your
carrier.
Call charge display has to be requested from the service
provider and installed by an authorized technician.
The call charges are displayed will show the cost either
during or after the call, depending on the setting.
Some carriers also let you display toll-free external calls.
The message "Free of Charge" appears on the screen ei-
ther before or during the call.
If the call charge display function has not been installed,
the display will show the dialed number and/or the call
duration.
For all calls and the last one conducted:
The connection charges for the last toll call conducted
are displayed first. The total accumulated connection
charges appear five seconds later.
FCN Press the display key.
OK Confirm.
OK Select and confirm.
or
L Enter the code.
When a call is transferred, all charges are for-
warded to the telephone to which the call was
transferred.
Program/Service
*65=Show call charges?
Step by Step
Displaying and Assigning Call Charges
82
Displaying Call Charges for Another
Telephone (Not for U.S.)
If this function is configured (contact your service per-
sonnel), you can display and print the toll calls conduct-
ed by other telephones (such as a pay phone)
Precondition: You have configured an FCN entry with
the function "View call charges" Page 71.
The LED lights up to indicate that a you have conducted
chargeable call since the last time you viewed the
charges.
FCN Press the display key.
OK Select and confirm, the LED icon is red.
OK
OK Confirm to display additional toll calls.
OK Select and confirm.
or
OK
or
OK
or
OK
OK
View call charges
US: Next?
UK: Next entry?
Print?
Delete?
Add’l information?
US: Exit?
UK: End?
Displaying and Assigning Call Charges
83
Step by Step
Dialing with Call Charge Assignment
You can assign external calls to certain projects.
Precondition: Service personnel has set up account
codes for you.
FCN Press the display key.
OK Confirm.
OK Select and confirm.
or
LQ Enter the code.
Enter the account code.
Necessary depending on the configuration (consult
your service personnel):
If applicable Enter.
or
OK
OK Confirm.
Enter the number of the external station.
Program/Service
*60=Account code?
US: #=Save?
UK: #=Save entry?
You can also enter the account code during an
external call.
Step by Step
Privacy/Security
84
Privacy/Security
Turning Ringer Cutoff On and Off
You can activate the ringer cutoff function if you do not
want the receive any calls. Calls are only identified by
one ring signal, an indication on the display, and by a
flashing icon associated with a programmed FCN entry.
OK Select and confirm[1].
or
OK
or
ON Enter the code for "Ringer cutoff on".
or
ON Enter the code for "Ringer cutoff off".
Activating/Deactivating Do Not Disturb
You can activate the do not disturb function if you do not
want the receive any calls. When do not disturb is acti-
vated, internal callers hear a busy signal and external
callers are rerouted to a telephone assigned for this pur-
pose (contact your service personnel).
OK Select and confirm.
or
OK
or
OM Enter the code for "DND on".
or
OM Enter the code for "DND off".
Ringer cutoff on?
[1] ”Different Displays (HiPath 4000 Environment)” Page 136
Ringer cutoff off?
DND on?
DND off?
When you press the talk key, a special dial tone
(continuous whirring tone) reminds you that DND
is on.
Authorized internal callers can automatically
override the do not disturb function after five sec-
onds.
Privacy/Security
85
Step by Step
Caller ID Suppression at the Called
Party
You can prevent your station number or name from ap-
pearing on the displays of external parties you call. The
feature remains active until you deactivate it.
OK Select and confirm.
or
OK
or
NL Enter the code for "Suppress call ID".
or
NL Enter the code for "Restore caller ID".
Suppress call ID?
Restore caller ID?
Service personnel can turn caller ID suppression
on and off for all telephones.

Step by Step
Privacy/Security
86
Monitoring a Room
A telephone can be used to monitor a room. The func-
tion must be activated on the telephone that you want
to monitor.
Calling this telephone lets you hear what is going on in
the room.
Activating the telephone to be monitored:
FCN Press the display key.
OK Confirm.
OK Select and confirm.
or
NN Enter the code.
You can either leave the telephone in speakerphone
mode or press the talk key and leave it directed towards
the noise source.
Deactivating the telephone to be monitored:
FCN Press the display key.
OK Confirm.
or
Press the on-hook key.
Monitoring the room:
Enter the internal number of the telephone in the room
you wish to monitor.
Program/Service
*88=Room monitor?
Program/Service
Privacy/Security
87
Step by Step
Identifying Anonymous Callers – Call
Tracing (Not for U.S.)
Your service provider can identify malicious external
callers. You can save the caller’s station number during
the call or up to 30 seconds after the call ends. Howev-
er, you must not replace your handset during this time.
FCN Press the display key.
OK Confirm.
OK Select and confirm.
or
N Enter the code.
Program/Service
*84=Trace call?
The call data is stored on the service provider’s
system once you have finished tracing the call.
You must now contact your service personnel.
Step by Step
Privacy/Security
88
Locking the Telephone to Prevent Un-
authorized Use
You can prevent unauthorized persons from using your
telephone and its electronic notebook during your ab-
sence.
Precondition: You must have configured a personal
identification number (PIN) for your telephone
Page 90.
Locking/unlocking the telephone
OK Select and confirm.
or
OK
or
LL Enter the code for "Lock phone".
or
LL Enter the code for "Unlock phone".
Enter the telephone lock PIN Page 90.
Lock phone?
Unlock phone?
When the handset is locked, a special dial tone
sounds when you press the talk key. You can
continue to dial internal numbers as usual.
Your telephone can also be locked or unlocked by
an authorized party Page 89.
Privacy/Security
89
Step by Step
Locking Another Telephone to Prevent
Unauthorized Use
If this function has been configured (contact your ser-
vice personnel), you can lock and unlock other tele-
phones to prevent unauthorized use.
You can use this function to unlock the telephone for us-
ers who have locked their telephones and then forgot-
ten their PINs.
FCN Press the display key.
OK Confirm.
OK
OK Select and confirm.
or
OI Enter the code.
Enter the internal number of the telephone that you
want to lock or unlock.
OK Confirm.
or
OK
or
or Enter the code.
Program/Service
US:
*
943=Lock all phones?
UK:
*943=Telephone Lock?
*=lock phone?
#=unlock phone?
Step by Step
Privacy/Security
90
Saving Your PIN
You need to enter a personal identification number that
you yourself can save to use the following functions:
• to prevent unauthorized persons from using your
telephone Page 88
• to use another telephone like your own Page 93.
FCN Press the display key.
OK Confirm.
OK Select and confirm.
or
OI Enter the code.
Enter the current five-digit PIN.
If you have not yet assigned a PIN, use the PIN "00000"
the first time.
Enter the new PIN.
Repeat the new PIN.
Program/Service
*93=Change PIN?
If you forget your PIN, contact your service per-
sonnel. Your code can be reset to "00000".
Additional Features/Services
91
Step by Step
Additional Features/Services
Sending a Message
You can send short text messages (infotexts) to single
users or groups of users with system telephones.
Incoming text messages are saved as callback requests
on system telephones without display (for example,
optiPoint 500 entry), ISDN, pulse or tone dialing tele-
phones.
Creating and Sending a Message
OK
OK Select and confirm.
or
LN Enter the code.
Enter the internal station number of the recipient or
group.
OK Select and confirm the preprogrammed message
(which can be changed by the service personnel).
or
Q ... OEnter the code directly.
The codes appear on the screen next to the associated
message.
or
OK Select and confirm to enter another text (up to
24 characters). For information on entering text, see
Page 23.
OK Confirm.
Deleting/Displaying the Message Sent
OK Select and confirm.
or
LN Enter the code.
OK Follow the display prompts.
US: Send message?
UK: Send Message?
0=Please callback
Enter message text?
Send?
View sent message?
Texts sent to groups can be deleted only by the
originator.
Step by Step
Additional Features/Services
92
Answering Messages
"Messages received:" appears on your screen, along
with an indication of the length.
OK
OK Confirm.
OK Follow the display prompts.
Leaving an Advisory Message
You can leave an advisory message on your telephone
screen for internal callers who want to reach you while
you are away from your desk.
When another party calls you, the message appears on
the caller’s screen.
OK Select and confirm.
or
LO Enter the code.
OK Select and confirm the preprogrammed message
(which can be changed by the service personnel).
or
Q ... OEnter the code directly.
The codes appear on the screen next to the associated
message.
or
OK Select and confirm to enter another text. For informa-
tion on entering text, see Page 23.
OK Confirm.
Deleting Advisory Messages
OK Select and confirm.
or
LO Enter the code.
or If you have saved "Advisory message" as an FCN entry
Page 71.
FCN Press the display key.
OK Select and confirm, the LED icon is red.
US: View messages?
UK: Display Messages?
Advisory msg. on?
0=Will return at:
You can enter digits after preprogrammed mes-
sages that end in a colon.
Enter message text?
Save?
Advisory msg. off
Advisory message

Additional Features/Services
93
Step by Step
Displaying the Number of Calls in
Queue and Overload Indication
If you programmed an FCN entry with the function
"View number of calls" Page 71, you can display the
number of waiting external calls on the display.
FCN Press the display key.
OK Select and confirm.
If the number of waiting calls exceeds a preset limit
while you are engaged in another call (overload), the
LED on the key lights up. Contact your service person-
nel to find out the waiting call limit.
• LED off:
No callers waiting.
• LED flashes slowly:
You have reached the programmed limit.
• LED flashes rapidly:
You have exceeded the limit (overload).
Using Another Telephone Like Your
Own for a Call
Other people can temporarily use your telephone as
though it were their own for outgoing calls.
FCN Press the display key.
OK Confirm.
OK Select and confirm.
or
QN Enter the code.
Enter the other user’s station number and telephone
lock PIN Page 90.
If applicable
Users who have not yet selected a personal identifica-
tion number are prompted to do so at their own tele-
phones.
Dial the external number.
This state is cancelled at the end of the call.
Max. waiting calls
Program/Service
*508=Temporary Phone?
Change PIN
Step by Step
Additional Features/Services
94
Using Another Telephone Like Your
Own for an Extended Period of Time
(Mobility)
If this feature is configured, you can use a random opti-
Point as your own telephone. Your station number in-
cluding all settings (for example, FCN entries) are trans-
ferred.
Precondition: You have received a mobile station num-
ber and, where applicable, a password (ask the service
personnel).
FCN Press the display key.
OK Confirm.
OK Select and confirm.
or
OO Enter the code.
Enter your mobile station number.
If applicable Enter the logon password.
If applicable Press the key.
or
OK Confirm.
Logging off
OK Select and confirm.
or
OO Enter the code.
Program/Service
*9419=Mobile Logon
Entry complete?
#9419=Mobile Logoff

Additional Features/Services
95
Step by Step
Fax Details and Message on
Answering Machine
If a fax or answering machine is connected to your sys-
tem and you have assigned the "Fax details" function to
a programmable key Page 71, the key lights up when
a fax or a message has been received.
Deactivating indication:
FCN Press the display key.
OK LED icon is red; select and confirm. LED icon changes
to white.
Resetting Services and Functions
(System-Wide Cancellation for a Tele-
phone)
A general reset procedure is available for activated func-
tions. The following functions - if activated - are can-
celled:
• Forwarding on
• Advisory msg. on
• Ringing group on
• Leave group
• Suppress call ID
• Waiting tone off
• DND on
• Ringer cutoff on
• Messages received:
• View callbacks
FCN Press the display key.
OK Confirm.
OK Select and confirm.
or
Q Enter the code.
Fax details
Program/Service
#0=Reset services?

Step by Step
Additional Features/Services
96
Activating Functions for Another Tele-
phone
If this function has been configured (contact your ser-
vice personnel), you can turn the following functions on
and off for other telephones. This feature is also known
as associated service.
• Do not disturb,
code: *97/#97 Page 84
• Call forwarding,
code *11, *12, *13/#1 Page 32
• Locking and unlocking telephone,
code *66/#66 Page 88
• Group ringing,
code *81/#81 Page 104
• Leave an advisory message,
code *69/#69 Page 92
• Group call,
code *85/#85 Page 104
• Reset services and functions,
code #0 Page 95
• Control relay,
code *90/#90 Page 102
• Night service,
code *44/#44 Page 70
• Timed reminders,
code *65 Page 77
FCN Press the display key.
OK Confirm.
OK Select and confirm.
or
NI Enter the code.
Enter the internal number of the telephone where you
want to activate the function.
Enter the code, such as *97 for do not disturb.
Follow the prompts on the screen for any further input.
Program/Service
*83=Associated serv?

Additional Features/Services
97
Step by Step
Using System Functions from an
External Location (DISA - Direct In-
ward System Access)
If this function has been configured (contact your ser-
vice personnel), you can set up external outgoing calls
from outside the system, as if you were an internal
user. You can also activate and deactivate the following
functions in your system:
• Reset services and functions,
code #0 Page 95
• Call forwarding, code: *1/#1 Page 32
• Locking and unlocking telephone,
code *66/#66 Page 88
• Save PIN,
code: *93 Page 90
• Send a message,
code: *68/#68 Page 91
• Leave an advisory message,
code *69/#69 Page 92
• Group ringing, code: *81/#81 Page 104
• Group call, code: *85/#85 Page 104
• Suppress call ID,
code: *86/#86 Page 85
• Waiting tone, code: *87/#87 Page 61
• Open door, code: *61 Page 45
• Door opener on/off, code: *89/#89 Page 46
• Control relay, code *90/#90 Page 102
• Do not disturb, code: *97/#97 Page 84
• Ringer cutoff function, code: *98/#98 Page 84
• Speed-dialing, code: *7 Page 50
• Associated service, code: *83 Page 96
Precondition: You have a telephone that uses tone di-
aling (DTMF dialing) or you can switch your telephone
to tone dialing. The telephone is not connected to the
system.
Set up a call to the system. Enter the station number
(contact your service personnel).
Wait for a continuous tone (if necessary switch the tele-
phone to tone dialing), then enter the internal number
that has been assigned to you and the associated PIN.
Enter the code (necessary only if programmed in the
system).

Step by Step
Additional Features/Services
98
Wait for a dial tone and then enter the code, such as
*97 for Do not disturb on. Make other inputs as neces-
sary (refer to the operating instructions for pulse and
DTMF telephones).
or
Dial the external number.
You can only execute one function or set up only
one outgoing connection at a time.
The connection is immediately cleared down
once a function has been successfully activated.
In the case of an external-external call, the con-
nection is cleared down as soon as either of the
parties ends the call.
Additional Features/Services
99
Step by Step
Using Functions in ISDN via Code Dial-
ing (Keypad Dialing)
In some countries, you can use code dialing to set ISDN
functions, provided you have appropriate authorization
(contact your service personnel).
FCN Press the display key.
OK Confirm.
OK Select and confirm.
or
QI Enter the code.
Enter the number of the trunk you wish to use (contact
your service personnel).
Enter the code for the required ISDN function (consult
your service personnel).
Program/Service
*503=Keypad dialing?
Contact your network provider to find out which
ISDN functions can be code-operated in your
country.
Siemens AG shall not be liable for damages/
costs which may be incurred by fraudulent activ-
ities or remote operation (for example, toll fraud).

Step by Step
Additional Features/Services
100
Operating Connected Computers or Oth-
er Programs/Telephone Data Service
(HiPath 3500/3550/3700/3750/3800 Only)
If this function has been configured (contact your ser-
vice personnel), you can use your telephone to operate
connected computers or programs running on them,
such as hotel services or information systems.
Precondition: You have set up a connection.
FCN Press the display key.
OK Confirm.
OK Select and confirm.
or
Enter the code.
The connected computer now prompts you to enter the
data, which you can do in one of two ways. Contact
your service personnel to find out which option is pro-
grammed in your system:
• Input in en-bloc mode
Q ... OEnter data.
Press this key at the end of the entry.
or
OK Confirm.
or • Input in online mode:
The connected computer processes your entries di-
rectly.
Enter the code.
Q ... OEnter data.
Program/Service
*42=Tel. data service?
Entry complete?
Additional Features/Services
101
Step by Step
Communicating with PC Applications
over a CSTA Interface
If this function has been configured (ask your service
personnel), you can use your telephone to communica-
te with PC applications (CSTA = Computer Supported
Telecommunications Applications). You send informati-
on to the application and receive information from the
application, for example, on your telephone's display.
O Enter the code.
or
FCN Press the display key.
OK Select "Data I/O Service". (Storing a Function in the FCN
List Page 71).
Enter the three-digit ID for the application you want to
operate.
SC,Q ... O, Use the relevant keys to communicate with the applica-
tion.
Temporarily interrupting communication with the
application
Das Mobilteil läutet. Sie nehmen das Gespräch an.
LED icon is flashing: communication with the applicati-
on was automatically interrupted.
Resuming communication with the application
FCN Press the display key.
OK LED icon is flashing. Select and confirm "Data I/O Ser-
vice". LED icon is red.
Ending communication with the application
OK Select and confirm the appropriate CSTA message.
or
Lift and replace the handset.
Data I/O Service
Data I/O Service
Data I/O Service

Step by Step
Additional Features/Services
102
Controlling Relays
If this function has been configured (contact your ser-
vice personnel), you can turn up to four relays on and off
to control different facilities (such as a door opener).
Depending on how they are programmed, you can
switch the relays on and off or switch them on and let
them switch off automatically after a timeout.
OK Select and confirm.
or
OK
or
OQ Enter the code for "Control Relay On“.
or
OQ Enter the code for "Control Relay Off".
... Enter the relay.
Sensors (HiPath 3300/3350/3500/3550
Only)
If this function has been configured (contact your ser-
vice personnel), sensors will detect signals causing
your phone to ring and a message to appear on your
screen.
Radio Paging (Not for U.S.)
If paging equipment is connected to your system (con-
tact your service personnel), you can contact people via
their pocket receivers.
The pocket receiver informs the owner that someone is
trying to get in touch. The person you page can then go
to the nearest telephone and call you.
Operating procedures differ according to the type of ra-
dio paging equipment connected (simple or enhanced
paging equipment).
*90=Control Relay On?
#90=Control Relay Off?
Additional Features/Services
103
Step by Step
Simple Paging Equipment
Paging:
To be paged, you must have activated a call ringing
group Page 107, call forwarding Page 32, or call
redirection (service engineer) to your paging equip-
ment’s internal station number.
A call request is then signaled automatically.
Answering the page from the nearest telephone:
Press the talk key.
O Enter the code.
Enter your own station number.
Enhanced Paging Equipment (HiPath 3700/
3750/3800 Only)
Paging:
FCN Press the display key.
OK Confirm.
OK Select and confirm.
or
Enter the code.
Enter the number of the party you want to page.
OK Select and confirm.
or
OK
Answering the page from the nearest telephone:
Press the talk key.
FCN Press the display key.
OK Confirm.
OK Select and confirm.
or
Enter the code.
Enter your own station number.
Program/Service
*45=Page?
1=Display information
2=Text?
Program/Service
#45=Answer page?

Step by Step
Using Team Functions
104
Using Team Functions
Turning Group Call On and Off
If this function has been configured (contact your ser-
vice personnel), you belong to one or more groups of
users who can each be reached under a hunt group or
group station number.
Incoming calls are signaled at all group member tele-
phones in the order in which they are received (= hunt
group) or simultaneously (= group call) until one mem-
ber of the group accepts the call.
Each member of the group remains available at his or
her own station number.
You can activate and deactivate the audible signal for a
hunt group, group call or individual trunks in a group.
If an FCN entry is programmed for "Join/leave group"
Page 71, the red LED icon indicates that the audible
tone was activated for at least one group.
Using Team Functions
105
Step by Step
You belong to a hunt group or a group call:
OK
OK Select and confirm[1].
or
OK
OK
or
N Enter the code for "Leave group".
or
N Enter the code for "Join group".
or
FCN Press the display key.
OK Select and confirm.
You belong to multiple groups or to one group with
trunk keys:
OK
OK Select and confirm1.
or
OK
OK
or
N Enter the code for "Leave group".
or
N Enter the code for "Join group".
or
FCN Press the display key.
OK Select and confirm.
OK
or
OK
If an "X" appears between group/trunk number (such as
301) and group name, the audible tone is active for this
group or trunk. No "X" means that the audible tone was
deactivated.
OK
OK Press the dialog key to confirm your selection and dis-
play the next group or trunk number and group name.
US: Leave group?
UK: Leave hunt group?
[1] ”Different Displays (HiPath 4000 Environment)” Page 136
US: Join group?
UK: Join hunt group?
Join/leave group?
US: Leave group?
UK: Leave hunt group?
US: Join group?
UK: Join hunt group?
Join/leave group?
301 X group name
301 group name
US: Next?
UK: Next entry?
Step by Step
Using Team Functions
106
or
OK
OK Select and confirm.
This turns off the audible tone for the displayed group or
trunk.
or
OK
OK Select and confirm.
This turns on the audible tone for the displayed group or
trunk.
or
OK Select and confirm[1].
This turns off the audible tone for all groups and trunks.
or
Enter the code for "Leave all groups".
or
OK Select and confirm1
.
This turns off the audible tone for all groups and trunks.
or
Enter the code for "Rejoin all groups".
Accepting a Call for Another Member
of Your Team
You can accept calls for other telephones in your team
(call pickup group; consult your service personnel) at
your own telephone even while engaged in another call.
Precondition: Your telephone rings briefly. "Call for:" ap-
pears on the upper display line with the station number
or name of the originator; the station number or name
of the caller appears on the lower line.
OK Confirm.
or
FCN Press the display key.
OK Confirm.
M Enter the code.
US: Leave group?
UK: Leave hunt group?
US: Join group?
UK: Join hunt group?
#=Leave all groups?
[1] ”Different Displays (HiPath 4000 Environment)” Page 136
*=Rejoin all groups?
If you deactivate the audible tone for another
group or trunk, or deactivate it for all groups and
trunks to which you belong, a special dial tone
sounds when you lift the handset.
Pickup - group?
Program/Service
Using Team Functions
107
Step by Step
Activating and Deactivating a Ringing
Group
You can have calls for your telephone signaled audibly at
up to five other internal phones. The person who an-
swers first receives the call.
Saving, displaying, and deleting telephones for the
ringing group:
FCN Press the display key.
OK Confirm.
OK Select and confirm.
or
N Enter the code.
OK Follow the display prompts (enter the internal station
number).
Removing all telephones for a call ringing group:
OK Select and confirm.
or
N Enter the code.
Program/Service
*81=Ringing group on?
If your telephone belongs to a ringing group, the
originator’s and the caller’s station number or
name are shown on the display’s upper line and
lower line respectively.
Ringing group off?
Step by Step
Using Team Functions
108
Uniform Call Distribution (UCD)
If this function has been configured (contact your ser-
vice personnel), you belong to a group of users (agents)
to whom calls are distributed.
An incoming call is always assigned to the agent who
has had the longest break without a call.
Logging on and off at the beginning and end of your
shift:
FCN Press the display key.
OK Confirm.
OK Select and confirm.
OK Confirm.
or
OK Select and confirm.
or
Q Enter the code for "Log on".
or
Q Enter the code for "Log off".
To log on, enter your identification number ("Agent:").
Contact your service personnel to find out what it is.
Logging on and off during your shift:
FCN Press the display key.
OK Confirm.
OK Select and confirm.
OK Select and confirm.
or
OK Select and confirm.
or
Q Enter the code for "Not available".
or
Q Enter the code for "Available".
Program/Service
UCD?
*401=Log on?
#401=Log off?
Program/Service
UCD?
#402=Not available?
*402=Available?
Using Team Functions
109
Step by Step
Requesting and activating a work time:
If you want to follow up on the last call you answered
without being disturbed, you can request and activate a
work time. This removes your telephone from the call
distribution cycle for a programmable period of time un-
til you log back on.
FCN Press the display key.
OK Confirm.
OK Select and confirm.
OK Confirm.
or
OK Select and confirm.
or
QI Enter the code for "Work on".
or
QI Enter the code for "Work off".
Turning the night service on and off for UCD:
FCN Press the display key.
OK Confirm.
OK Select and confirm.
OK Select and confirm.
or
OK Select and confirm.
or
Q Enter the code for "UCD night on".
or
Q Enter the code for "UCD night off".
Displaying the number of calls in queue:
FCN Press the display key.
OK Confirm.
OK Select and confirm.
OK Select and confirm.
or
Q Enter the code for "Calls in queue".
Program/Service
UCD?
*403=Work on
#403=Work off
Program/Service
UCD?
*404=UCD night on?
#404=UCD night off?
Program/Service
UCD?
*405=Calls in queue?

Step by Step
Station Number Directories and Lists
110
Station Number Directories and
Lists
Directory
You can use the directory to save station numbers and
additional information on contacts (up to 200 entries).
You can create a new entry:
• via the main menu Pa g e 111
• via the menu if an entry is selected Page 114
• by importing from the redial list Page 118
• by importing from the LDAP database Page 117
Possible entry fields are:
•"Name:"
• "First name:"
• "Tel.(Private):"
• "Tel. (Office):"
• "Tel.(Mobile):"
• "Department:"
•"Address:"
• "ZIP code:"
•"City:"
You must enter at least a station number before you can
save an entry.
You can use the Web interface to import a direc-
tory file from your PC to the directory and create
backup copies of your data Page 134.
All station numbers that are assigned to an entry
are available when dialing from the directory
Page 53.
Station Number Directories and Lists
111
Step by Step
Creating a New Entry
Open the directory.
OK Confirm.
The cursor jumps to the "Name:" entry field.
Enter the name here.
Select the "First name:" entry field and enter the first
name.
For example, select the "Tel.(Private)" entry field and en-
ter the station number.
XPress the display key to delete the character to the left
of the cursor.
Select additional entry fields and enter the relevant da-
ta.
Save Press the display key to save the entries.
Press the display key to discard the entries.
Adding Voice Dialing Recordings for an Entry
You can add voice dialing recordings for up to
30 entries.
Saving a voice recording
Precondition: The entry in the directory list is selected
Page 113.
©Press the display key.
OK Select and confirm.
State the name of the party you want to call into the mi-
crophone.
<New Entry>
Bond
James
The reliability of voice recognition depends on
the pitch of the voice, and the speaker’s voice
speed and volume.
Use the long, unique name and avoid loud back-
ground noise during the recording.
Bond, James
Record Pattern
Please follow the onscreen instructions while re-
cording.

Step by Step
Station Number Directories and Lists
112
Wait for a positive alerting tone.
Repeat the recording.
´If recording is successful, the entry is marked with this
icon in the directory list.
If recording failed, an error message is displayed and
you hear a negative alerting tone.
Playing back a voice recording
Precondition: A voice recording has already been
saved, the entry in the directory list is selected.
©Press the display key.
OK Select and confirm.
The recording associated with the entry is played back.
Deleting a voice recording
Precondition: A voice recording has already been
saved, the entry in the directory list is selected.
©Press the display key.
OK Select and confirm.
The recording associated with the entry is deleted.
Play Pattern
Delete Pattern

Station Number Directories and Lists
113
Step by Step
Directory List
All entries are listed in alphabetical order in the directory
list.
Other sort rules:
1. Complete entries (name/first name)
– Numbers before letters
– Lowercase before uppercase
2. Entries that only contain station numbers
Representation in the directory list
Precondition: There are entries saved in the directory
list Pag e 111 .
Entries that have not been selected are shown on a sin-
gle line.
A selected entry is displayed on two lines.
The entry can contain the following icons:
Searching for an entry
Precondition: There are entries saved in the directory
list Pag e 111 .
Open the directory.
Scroll through the directory list.
or
Enter the first letters of the required contact’s name (for
information on entering characters Page 24).
If applicable If there are multiple matching entries:
Select the required entry.
Bond, James
Bond, James
0455 3625 ´
´Voice dialing
Business telephone num-
ber
Private telephone number
Mobile telephone number
Bond, James
0455 3625 ´

Step by Step
Station Number Directories and Lists
114
Viewing an entry
Precondition: The entry in the directory list is selected
Page 113.
View Press the display key.
Scroll through the entry fields.
Change Confirm to edit the entry Page 114.
OK Confirm. You are returned to the directory list.
Editing an entry
Precondition: The entry in the directory list is selected
Page 113.
©Press the display key.
OK Confirm.
Use the navigation key to select the entry field you want
to edit.
XPress the display key to delete the character to the left
of the cursor.
Save Press the display key to save the entries.
Creating an entry
Precondition: An entry is selected in the directory list
Page 113.
©Press the display key.
OK Select and confirm.
Deleting an entry
Precondition: The entry in the directory list is selected
Page 113.
©Press the display key.
OK Select and confirm.
The entry is deleted from the directory list.
Edit Entry
New Entry
Delete Entry

Station Number Directories and Lists
115
Step by Step
Clearing the directory list
Precondition: The entry in the directory list is selected
Page 113.
©Press the display key.
OK Select and confirm.
Yes Press the display key to permanently delete all directory
entries.
Memory capacity
©Press the display key.
OK Select and confirm.
Erase list buffer
Available Memory
Step by Step
Station Number Directories and Lists
116
LDAP Database
You can access your corporate directory (LDAP data-
base).
Searching for an LDAP Entry
Open the directory.
OK Select and confirm.
OK Confirm.
or
OK Select and confirm.
If applicable Select the search field ("Advanced Search" only).
Enter the search text (for information on entering char-
acters Page 24).
The hit list contains one or more entries, the first of
which is selected.
Select the required entry.
You can now
• call the LDAP contact Page 55
• view the LDAP entry Page 116
• import an LDAP entry to the directory
Viewing an LDAP entry
Precondition: You have searched for and selected an
entry in the LDAP database Page 116.
©Press the display key.
OK Select and confirm.
Cancel.
This function must be correctly configured to use
the LDAP database. Consult your service person-
nel.
<LDAP>
Basic Search
Advanced Search
In contrast to the standard search, the advanced
search provides options for running searches on
the basis of additional corporate directory fields
(max. five).
Bond, James
0455 3625 ´
View

Station Number Directories and Lists
117
Step by Step
or
OK Select and confirm to copy the LDAP entry to the direc-
tory Page 117.
Importing an LDAP Entry into the Directory
Precondition: You have searched for and selected an
entry in the LDAP database Page 116.
©Press the display key.
OK Select and confirm.
The LDAP entry is now saved in your directory.
Copy to Directory
Import

Step by Step
Station Number Directories and Lists
118
Redial List
The redial list contains the last ten numbers dialed by
the handset. If any of the numbers are in the directory,
the matching names are displayed.
Importing an Entry into the Directory
Precondition: You dialed station numbers that are not
yet saved in the directory.
Press the talk key quickly.
Select the required entry.
©Press the display key.
OK Confirm.
You are now in the directory list. The station number is
entered.
Use the navigation key to select the "Name:" entry field
and enter the name.
Use the navigation key to select other entry fields and
enter additional information.
XPress the display key to delete the character to the left
of the cursor.
Save Press the display key to save the entries.
Removing an entry from the redial list
Press the talk key quickly.
Select the required entry.
©Press the display key.
OK Confirm.
Deleting the redial list
Press the talk key quickly.
Select the required entry.
©Press the display key.
OK Confirm.
089123456
Copy to Directory
Bond
089123456
Delete Entry
089123456
Erase list buffer
Programming the Handset
119
Step by Step
Programming the Handset
You can configure audio and visual settings directly at
your optiPoint WL 2 professional via the main menu or
over the Web interface Page 131. You can also view
or check various settings.
Handset Configuration
Setting the Display Color
You can choose from four color settings.
These entries can also be changed via the Web inter-
face Page 133.
Open the main menu.
Enter the code.
or
OK Select and confirm.
OK Confirm.
OK Confirm.
OK Select and confirm the color setting you want.
or Quit the menu.
"Default" color setting
The default color setting uses different colors to repre-
sent the different handset states:
The display contrast can only be set via the Web
interface.
Settings
Display
Colour Scheme
Brown
Color Handset state:
Brown Idle, call and system state
Ochre FCN mode
Blue Main menu, directory list

Step by Step
Programming the Handset
120
Adjust Contrast
You can adjust the display contrast to suit your require-
ments and surroundings.
These entries can also be changed via the Web inter-
face Page 133.
Open the main menu.
Enter the code.
or
OK Select and confirm.
OK Confirm.
OK Select and confirm.
Set value 1-9.
Your display settings are applied as a preview.
Save Save setting.
ESC Cancel modification.
Adjust brightness
You can adjust the brightness to suit your requirements
and surroundings.
These entries can also be changed via the Web inter-
face Page 133.
Open the main menu.
Enter the code.
or
OK Select and confirm.
OK Confirm.
OK Select and confirm.
Set value 1-9.
Your display settings are applied as a preview.
Save Save setting.
ESC Cancel modification.
Settings
Display
Contrast
Settings
Display
Brightness

Programming the Handset
121
Step by Step
Setting night mode
The display is dimmed when the handset is idle. In night
mode, the display illumination switches off completely
when the handset is idle and inserted into the charging
unit.
These entries can also be changed via the Web inter-
face Page 133.
Open the main menu.
Enter the code.
or
OK Select and confirm.
OK Confirm.
OK Select and confirm (activate).
or
OK Select and confirm (deactivate).
or
or Quit the menu.
Settings
Display
Night Mode
Night Mode ‰
Step by Step
Programming the Handset
122
Setting Display Language
You can display your optiPoint WL 2 professional’s main
menu and display keys in different languages.
These entries can also be changed via the Web inter-
face Page 133.
Open the main menu.
Enter the code.
or
OK Select and confirm.
OK Confirm.
OK Select and confirm.
OK Confirm.
or
or Quit the menu.
Shortcut to the Language menu
Use this key combination if you mistakenly set a lan-
guage you don’t understand, for example.
OK Select the correct language.
Set the display language for the system menu
Page 40.
Settings
Display
Language
German ‰
German

Programming the Handset
123
Step by Step
WLAN Access
You can program up to 16 profiles for WLAN access on
your optiPoint WL 2 professional. The profile marked ‰
is active. You can select various profiles. If you have any
questions, contact your service personnel.
These entries can also be changed via the Web inter-
face Page 133.
Open the main menu.
Enter the code.
or
OK Select and confirm.
OK Confirm.
Activating a profile
OK Select and confirm.
or Quit the menu.
Viewing settings
View Press the display key.
Scroll through the entries.
or
or Quit the menu.
Settings
Access Profiles
Profile 3 ‰

Step by Step
Programming the Handset
124
Easy Answer
If this function is active, you can answer a call by simply
removing the optiPoint WL 2 professional from the
charging unit, that is, without pressing the talk key
.
These entries can also be changed via the Web inter-
face Page 134.
Open the main menu.
Enter the code.
or
OK Select and confirm.
OK Select and confirm (to activate).
or
OK Select and confirm (to deactivate).
or
or Quit the menu.
Vibration Alert
You can program the handset to also signal incoming
calls by vibrating. If the optiPoint WL 2 professional is in
the charging unit, the vibration alert function - even if ac-
tive - is suppressed.
Open the main menu.
Enter the code.
or
OK Select and confirm.
OK Select and confirm (to activate).
or
OK Select and confirm (to deactivate).
or
orQuit the menu.
Settings
Easy Answer
Easy Answer ‰
Settings
Vibration Alert
Vibration Alert ‰
Programming the Handset
125
Step by Step
PIN
You can protect your optiPoint WL 2 professional
against unauthorized access by setting a PIN. You are
then prompted to enter the PIN when you activate the
handset Page 15.
These entries can also be changed via the Web inter-
face Page 133.
Open the main menu.
Enter the code.
or
OK Select and confirm.
OK Select and confirm.
Enter the current PIN in the "Old PIN: “ entry field (if
available).
and
OK Confirm.
Enter the new PIN in the "New PIN:" entry field (four dig-
its, 0 to 9).
or To remove PIN protection:
Do not make an entry.
Save Press the display key to save the change.
or Quit the menu.
Settings
PIN
[- - - ]
[0077]
[- - - ]
Your handset will block after three failed at-
tempts to enter the PIN and can only be un-
locked by your service personnel.

Step by Step
Programming the Handset
126
Advisory Tones
Your optiPoint WL 2 professional notifies you acousti-
cally of different activities and statuses. You can activate
or deactivate the following advisory tones independent-
ly of each other:
• Key click: Every keystroke is confirmed
• Confirmation tones:
The confirmation tone (rising sequence of tones)
is output when you finish an input/setting and when
you replace the handset in the charging unit
The error tone (falling sequence of tones) is output
when you make an incorrect entry
The end-of-menu tone is output when you scroll to
the end of a menu
• The battery low tone is output when the battery
needs to be charged
• The reception strength tone is output when you are
outside your WLAN’s reception range
These entries can also be changed via the Web inter-
face Page 133.
Open the main menu.
Enter the code.
or
OK Select and confirm.
OK Select and confirm.
Activating/deactivating key tones
OK Confirm "Key Tones:" in the entry field.
or
OK Select and confirm.
Activating/deactivating confirmation tones
OK Scroll to the "Confirm.:" entry field and confirm.
or
OK Select and confirm.
Activating/deactivating the battery low tone
OK Scroll to the "Battery:" entry field and confirm.
or
OK Select and confirm.
Settings
Advisory Tones
<On>
<Off>
<On>
<Off>
<On>
<Off>

Programming the Handset
127
Step by Step
Activating/deactivating the reception strength tone
OK Scroll to the "Weak Signal:" entry field and confirm.
or
OK Select and confirm.
Save Press the display key to save the changes.
or
or Quit the menu.
Handset Name
A name is automatically assigned when you log on. You
can change this name. The name may contain up to 16
characters.
These entries can also be changed via the Web inter-
face Page 133.
Open the main menu.
Enter the code.
or
OK Select and confirm.
OK Select and confirm.
Enter the new name in the "Handset Name:" entry field.
If applicable
XDelete character
Save Press the display key to save the entry.
or
or Quit the menu.
<On>
<Off>
Settings
Handset Name
James Bond

Step by Step
Programming the Handset
128
Restoring the Factory Defaults
You can restore the factory defaults for
optiPoint WL 2 professional Page 142. This action
deletes any individual settings and changes made but
leaves directory entries intact Page 113.
Open the main menu.
Enter the code.
or
OK Select and confirm.
OK Select and confirm.
Yes Confirm.
or
No Cancel.
or Quit the menu.
Settings
Reset Handset
Programming the Handset
129
Step by Step
Status Display
You can display various settings and information on your
optiPoint WL 2 professional.
Open the main menu.
IEnter the code.
or
OK Select and confirm.
Handset settings
This information can also be viewed via the Web inter-
face Page 132.
OK Confirm.
OK Scroll through the entries:
• Handset Name
• MAC Address
• IP Address
• HW Release
or Quit the menu.
LDAP settings
OK Select and confirm.
OK Scroll through the entries:
• IP Address
• Port Number
or Quit the menu.
You cannot edit these settings. If you have any
questions, contact your service personnel.
Status
Handset
Handset Name:
LDAP
IP Address
Step by Step
Programming the Handset
130
Connection Wizard
You can define multiple WLAN access points to guaran-
tee the reception quality within your telephone system.
You can program appropriate connection profiles (up to
16 profiles Page 123).
These are accessed and activated via the connection
wizard.
Automatic Start
If your optiPoint WL 2 professional is out of the WLAN
access point’s range, you receive an error message
(Page 139) and can log on again over the connection
wizard.
Re-Scan Press the display key.
OK Confirm.
OK Confirm.
Manual Start
If you deliberately exit the range of your current WLAN
access point (for example, enter another company
building), you can manually select the connection pro-
file.
Precondition: An appropriate profile is configured
Page 123.
Open the main menu.
Enter the code.
or
OK Select and confirm.
OK Confirm.
OK Select and confirm a profile.
Re-Scan Confirm.
Use exist. Profile
Profile 1
The list of configured stations contains active
profiles in green that are sorted according to the
reception strength (highest reception strength
first). Profiles displayed in black are not active.
Connect. Assistant
Use exist. Profile
Profile 1
Programming the Handset
131
Step by Step
Configuration over the Web Interface
The optiPoint WL 2 professional features a HTTP Web
server that permits handset content to be displayed via
a Web browser installed on a PC integrated in the
WLAN ("Web interface").
Application:
• Accessing parameters and lists
• Making settings for your
optiPoint WL 2 professional
• Importing ring tones
The Web interface contains the following form ele-
ments, for example:
User Click the link to reach the relevant page.
Click the button to apply the changes to the current
form. The changes are then applied to the
optiPoint WL 2 professional.
Click the button to reset the changes in the current form
to the previous values in optiPoint WL 2 professional.
Choose an option from the selection box.
Click a checkbox or radio button to activate/deactivate a
function.
The IP data associated with the
optiPoint WL 2 professional and the PC must be
correctly configured (consult your service person-
nel).
"Device is locked by WEB access" appears on the
handset’s display during Web interface configu-
ration. Keyboard inputs are not possible at this
time and incoming calls are ignored.
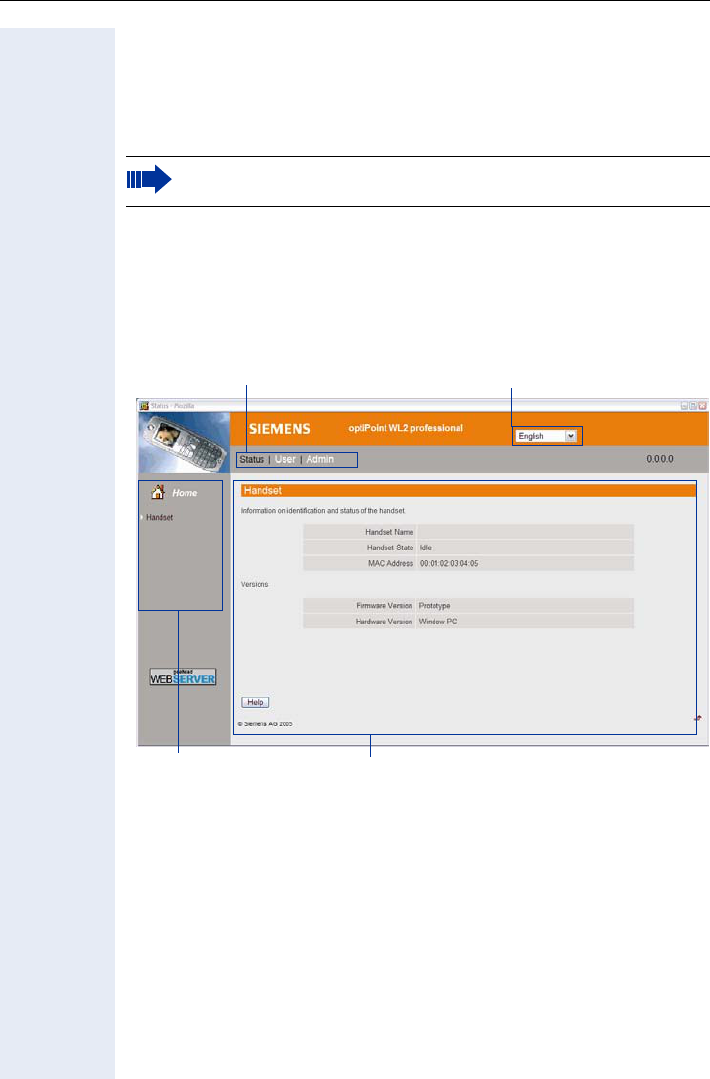
Programming the Handset
132
Start Preparations
Precondition: The handset is idle.
1. Open the browser
2. Enter the IP address of optiPoint WL 2 professional.
Example: http://IP of optiPoint WL 2 professional
The home page opens in a separate window.
Home page
You can select the language of the Web interface here and view informa-
tion on your optiPoint WL 2 professional (corresponds to the main menu
Page 129).
The IP address of your handset is shown in the status display
Page 129.
User selection
Web main menu Content
Language selection
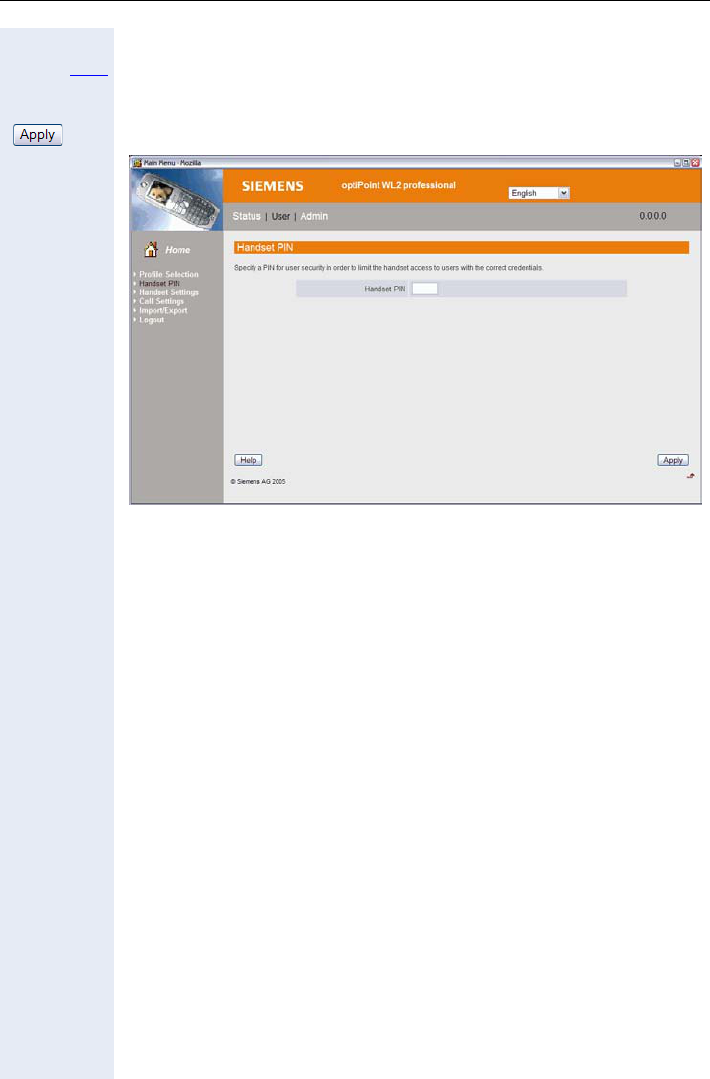
Programming the Handset
133
Login
User Select.
If applicable Enter the handset PIN (at the handset, see Page 15).
Confirm.
You can access additional configuration menus via the Web main menu:
Select profile
Select a preconfigured WLAN profile here (corresponds to the main menu
Page 123).
Handset PIN
You can set a PIN to protect your optiPoint WL 2 professional against un-
authorized use (corresponds to the main menu Page 125).
Handset settings: Audio
You can activate/deactivate advisory tones (corresponds to the main menu
Page 126).
Handset settings: Display
Enter the following settings for the display:
• Rename (corresponds to the main menu Page 127)
• Set Language (corresponds to the main menu Page 122)
• Adjust Contrast (corresponds to the main menu Page 120)
• Adjust Brightness (corresponds to the main menu Page 120)
• Colour Scheme (corresponds to the main menu Page 119)
• Night Mode on/off (dimmed displays, corresponds to the main menu
Page 121)

Programming the Handset
134
Call Settings
You can activate/deactivate "Easy Answer" here (corresponds to the main
menu Page 124).
Import/Export: Ring tones
Twelve ring tone melodies are saved for your optiPoint WL 2 professional.
You can import four additional individual melodies and save them in slots
13-16.
Import/Export: Directory
You can update your directory entries here. Import a directory file from your
PC to the "Directory".
Existing entries are overwritten in the process. Use "Export..." to save a
backup copy of your directory entries on the PC.
Logout
Select this option to quit the configuration area for your
optiPoint WL 2 professional. The home page Page 132 opens.
Always make sure you close the Web interface by clicking "Logout",
as otherwise your handset will remain locked.

Testing the Telephone
135
Step by Step
Testing the Telephone
Testing the Telephone Functions
You can test your telephone functions.
Precondition: Your telephone is idle.
FCN Press the display key.
OK Confirm.
OK Select and confirm.
or
OQ Enter the code.
If everything is OK,
• all LEDs on the phone flash;
• your station number appears on the screen;
• all pixels in the display are activated;
• the ringer signal sounds.
Checking FCN Programming
You can check the assignment of FCN entries on your
optiPoint WL 2 professional to see which entries are
programmed with which function.
FCN Press the display key.
OK Confirm.
OK Select and confirm.
or
O Enter the code.
FCN Press the display key.
OK Select and confirm.
The key assignment appears on the screen.
OK
OK Select and confirm.
or
OK
OK Select and confirm.
Program/Service
*940=Phone test?
Program/Service
*91=Prog. feature key?
US: Another key?
UK: Program another key?
US: Exit?
UK: End?

Different Displays (HiPath 4000 Environment)
136
Different Displays
(HiPath 4000 Environment)
Depending on the system configuration, not all functions may appear on
the display exactly as shown in this document.
The following table gives an overview of these functions and shows you
under which menus they can be found:
Menu Function Description
Destinations? Forwarding on? Page 32
Change Speed Dial? Page 50
Caller list? Page 48
Ringing group on? Page 107
UCD? Page 108
Feature Settings? DND on? Page 84
US: Join group?
UK: Join hunt group?
Page 104
US: Leave group?
UK: Leave hunt group?
Page 104
Forwarding on? Page 32
Ringer cutoff on? Page 84
HF answerback on? Page 43
Waiting tone off? Page 61
Suppress call ID? Page 85
Advisory msg. on? Page 92
Use speed dialing? Page 50
Prog. feature key? Page 37
Page 135
PIN / COS? US: Lock phone?
UK: Changeover on?
Page 88
US: Lock all phones?
UK: Telephone Lock?
Page 89
Change PIN? Page 90
US: PIN Code reset?
UK: Lock code reset?
Page 89
Temporary Phone? Page 93
Timed reminder on? Page 77
More features? DTMF dialing? Page 66
Speaker call? Page 56
Retrieve call? Page 62
Pickup - directed? Page 42
Account code? Page 83
Show call charges? Page 81
Reset services? Page 95
Trunk flash? Page 68
Temporary MSN? Page 58
Cancel?

Different Displays (HiPath 4000 Environment)
137
Depending on the system configuration, some display texts may differ
from the display texts described in this document.
Please refer to the following table for an overview of such texts:
HiPath 3000 Display HiPath 4000 Display Description
Call wait.term.? Camp-on termination?
Call wait.term.off? Camp-on deact.? Page 61
Caller list? Call log? Page 48
Change Speed Dial? Speed dialing? Page 50
Ringer cutoff on? Ringer on? Page 84
Service? Program/Service?
View callbacks? Display callbacks? Page 36

Documentation
138
Documentation
A PDF version of this operating manual is available on the Internet at http:/
/www.siemens.com/hipath A CD-ROM containing HTML and PDF ver-
sions is also available (ask your service personnel).
To display and print the PDF manual, you need a computer running Adobe’s
free Acrobat Reader software. To display the HTML manual, you need a
computer and a Web browser, for example, Microsoft Internet Explorer.
Reference Guide
Telephone Maintenance
• Always use a damp or antistatic cloth to clean the telephone. Never
use a dry cloth.
• If the handset is heavily soiled, clean it with a diluted surfactant-based
neutral cleaner, such as, dishwashing detergent Afterwards remove all
traces of the cleaner with a damp cloth (using water only).
• Do not use alcohol-based or corrosive cleaners or abrasive powders.
Echo Effect
You may hear a very distinct echo during a call. This effect is not caused by
a product or design fault in your telephone but rather by the other party's
telephone.
Troubleshooting
Pressed key does not respond:
Check whether the key is stuck.
Telephone does not ring:
Check whether the do not disturb function was activated on your tele-
phone ("Do not disturb" appears on the screen). If so, deactivate it
Page 84.
You cannot dial an external number:
Check whether you telephone is locked ("Not authorized" appears on the
screen). If so, unlock the telephone Page 88.
To correct any other problem:
First contact service personnel. If service personnel is unable to correct
the problem, contact Customer Service.

Reference Guide
139
Step by Step
Responding to Error Messages on the
Screen
Possible cause:
The station number is incorrect.
Possible response:
Enter the correct station number.
Possible cause:
You tried to activate a disabled function.
Possible response:
Ask the service personnel to authorize you to use the
function.
Possible cause:
The station number you dialed does not exist. The tele-
phone you are trying to call is unplugged.
Possible response:
Enter the correct station number. Try calling the tele-
phone again later on.
Possible cause:
You dialed your own station number.
Possible response:
Enter the correct station number.
Possible cause:
All memory locations for external station numbers are
currently in use.
Possible response:
Try again later on.
Invalid entry
Not authorized
Currently not possible
Invalid station number
Key memory is full

Step by Step
Reference Guide
140
Possible cause 1:
If "Delete other layer" appears on the menu:
you tried to program a function or internal station num-
ber with LED on a key that is already programmed on
the second layer (for example, external station number).
Possible response:
Confirm "Delete other layer" to program the station
number/function.
Possible cause 2:
If "Delete LED support" appears on the menu:
you tried to program a station number without LED or
an external station number on a key that is already pro-
grammed with an internal station number with LED.
Possible response:
Confirm "Delete LED support" to save the station num-
ber. The internal station number already programmed
remains on the other layer without LED display.
Possible cause:
You are outside the WLAN access point range.
Possible response:
Scan Press the display key. The Connect. Assistant starts
Page 130.
Key affects other layer
No Access Point
No Server

Reference Guide
141
Factors influencing standby and talk times
Standby time is the time when the handset is not in use (for example, no
calls or other user operation). Ta l k t i m e is the time the handset is used for
making calls
Both periods are influenced by the battery charging status and the follow-
ing factors:
•Field strength: he handset's range is heavily influenced by its sur-
roundings and particularly by materials located between the access
point and the WLAN phone.
The further away the handset is from the WLAN access point, the
shorter the standby and talk times (Page 142).
•Display lighting: Frequently activating the display for long periods of
time reduces standby time.
•Vibration alarm: Activating the vibration alarm reduces standby and
talk times.
•Codec: Power consumption is influenced by the packet length used for
voice transmission. In the case of G.711, for example, processing pack-
et lengths of 10 ms requires more power than processing packet
lengths of 20 ms.
•Volume setting: Je lauter ein Parameter eingestellt ist, desto geringer
ist die Standby- und Sprechzeit.
•Further factors: Environmental conditions (for example, temperature)
also influence standby and talk times.
Contacts in the Event of Problems
If you encounter a problem that lasts longer than five minutes, contact your
service personnel.

Technical Data
142
Technical Data
General Data
Operating Times/Charging Times
Factory Defaults
These settings are active when you buy your optiPoint WL 2 professional.
You can restore the factory defaults Page 128.
WLAN standard 802.11g (fall-back to 802.11b)
Frequency range 2.4 - 2.497 GHz
Dialable channels 13 (ETSI) or 11 (North America)
Range[1]
[1] The range is heavily dependent on the environment, especially the materials between the
access point and the WLAN phone Page 141
up to 300 m outdoors,
up to 30 m indoors
Power supply 3.7-V Li-ion battery
Ambient operating condi-
tions
+5°C to +45°C;
20% to 75% relative humidity
Handset dimensions 132 x 52 x 22 mm (L × W × H)
Handset weight
including battery approximately 110 g
Standby time up to 60 hours[1]
[1] Values only guaranteed with recommended batteries
Talk time up to 4 hours[1]
Charging time approximately 2 hours[1]
Function Factory defaults Page
Battery/key click/confirmation tone on Page 126
Auto answer on Page 124
Display language Country-spec. Page 122
Ring tone: melody/timer Melody 01/off Page 134
Alarm clock off Page 79
Local character set Default Page 24

143
Index
Index
A
Accepting calls ........................................... 27
Account code .............................................. 83
Advisory message ..................................... 92
Advisory messages, deleting ................... 92
Advisory tones ............................................ 21
Agents ........................................................ 108
Alarm clock
activating/deactivating ........................... 79
deactivating a wake-up call ................... 80
setting the melody ................................. 79
setting the time ...................................... 79
Answer machine ........................................ 95
call pickup ................................................ 46
Assistant
automatic start ...................................... 130
manual start .......................................... 130
Associated dialing/dialing aid ................... 58
Associated service ..................................... 96
Attention ring volume ................................ 39
Automatic camp-on
preventing and allowing ........................ 61
Automatic connection setup .................... 57
B
Battery ......................................................... 13
Battery power ........................................... 141
Broadcast .................................................... 56
C
Call
accepting from the answer machine .. 46
distributing ............................................. 108
entrance telephone ................................ 45
forwarding ............................................... 32
forwarding MSN in CO .......................... 34
parking ...................................................... 62
pickup, directed ...................................... 42
pickup, group ........................................ 106
placing on hold ........................................ 63
rejecting ................................................... 43
retrieving from park ............................... 62
retrieving held ......................................... 63
transfer after announcement ............... 67
transferring .............................................. 31
Call acceptance
automatic ............................................... 124
Call charge assignment ............................. 83
Call charges
for another telephone ............................ 81
for your telephone .................................. 81
Call duration ................................................ 81
Call forwarding ............................................ 32
in the event of telephone malfunction 35
MSN in CO .............................................. 34
Call request ................................................. 48
Call tracing ................................................... 87
Call volume .................................................. 40
Call waiting
accepting ................................................. 60
allowing .................................................... 61
preventing ................................................ 61
Call waiting (camp-on) ............................... 69
tone off ..................................................... 61
Call waiting on/off ...................................... 61
Call waiting tone on/off ............................. 61
Callback ........................................................ 36
Caller ID suppression ................................ 85
Caller list, using .......................................... 48
Calling a second party ............................... 30
Calls in queue ..................................... 93, 108
Central telephone lock .............................. 89
Character set .............................................. 24
Charges
for another telephone ............................ 81
for your telephone .................................. 81
Cleaning the telephone ........................... 138
Code dialing in ISDN .................................. 99
Codes ........................................................... 25
Conference .................................................. 30
Connection setup, automatic ................... 57
Connection wizard
explanation ............................................ 130
Consultation hold ....................................... 30
Contacts/problems ................................... 141

144
Index
D
Dial input
editing ...................................................... 47
Dialing
en-bloc ..................................................... 47
from the caller list .................................. 49
from the internal directory .................... 52
from the LDAP database ...................... 54
from the local directory ......................... 53
LDAP database ....................................... 55
voice dialing ............................................. 53
with repertory dialing keys ................... 38
Dialing aid
S0–bus ..................................................... 58
Dialing numbers
using speed dial ..................................... 50
DID number, assigning ............................. 58
Direct Inward System Access ................. 97
Direct station select .................................. 73
Directory (local)
creating an entry .......................... 111, 114
importing an entry from the redial list ....
118
importing an LDAP entry .................... 117
making calls ............................................. 53
sorting .................................................... 113
Directory, internal ...................................... 52
DISA ............................................................. 97
Discreet Calling .......................................... 57
Display
in the HiPath 4000 environment ........ 136
Display color ............................................. 119
Display contrast ........................................ 119
Display contrast, changing ....................... 40
Display keys ................................................ 18
Symbols ................................................... 18
Distributing calls ....................................... 108
Do not disturb ............................................. 84
Door opener ................................................ 46
Door opener, activating ............................. 45
Door, opening ............................................. 45
DTMF tone dialing ..................................... 66
E
Editing dial inputs ....................................... 47
En-bloc dialing ............................................ 47
Enhanced paging equipment ................. 103
Entrance telephone ................................... 45
Error messages ........................................ 139
F
Fax details ................................................... 95
FCN
activating a function ............................... 72
changing labels ....................................... 23
explanation .............................................. 22
function .................................................... 22
saving a function .................................... 71
FCN entry
checking programming ........................ 135
saving an incomplete entry .................. 71
Forwarding .................................................. 32
multiple subscriber number (MSN) ..... 34
Functions
activating/deactivating for another tele-
phone ....................................................... 96
display keys ............................................. 18
navigation key ......................................... 17
resetting ................................................... 95
using from outside ................................. 97
G
Group call .................................................. 104
H
Handset
IP address ...................................... 129, 132
operating and charging time ............... 142
programming ......................................... 119
Handset charging time ............................ 142
Handset operating time .......................... 142
Handsfree answerback ............................. 43
off .............................................................. 43
on .............................................................. 43
Headset ....................................................... 44
Holding a call ............................................... 63
Hotline .......................................................... 57
Hotline delayed ........................................... 57
Hunt group ................................................ 104

145
Index
I
Icons
directory list ........................................... 113
display ...................................................... 16
operating manual .................................... 12
Illumination .................................................. 21
Internal directory ........................................ 52
K
Keypad dialing ............................................ 99
Keys
display keys ............................................. 18
navigation key ......................................... 17
L
Language
display keys ........................................... 122
display language ................................... 122
main menu ............................................ 122
shortcut .................................................. 122
LDAP
searching for an entry .......................... 116
LDAP directory ........................................... 54
LDAP telephone database ........................ 54
Leaving an advisory message .................. 92
LED indications, meaning of .................... 72
Locking/unlocking the telephone ............ 88
M
Mailbox ........................................................ 56
Main menu
entry ......................................................... 20
overview ................................................ 153
Making calls .......................................... 27, 28
saved number redial .............................. 29
with the dialing aid ................................. 58
Making calls with the headset ................. 44
Malfunctions ............................................. 138
Max. waiting calls ...................................... 93
Message
answering ................................................ 92
deleting/displaying ................................. 91
receiving .................................................. 92
sending .................................................... 91
Mobile calls, making .................................. 93
Mobility ........................................................ 94
MSN in CO, forwarding ............................ 34
Multiple subscriber number (MSN), for-
warding ........................................................ 34
N
Night answer .............................................. 70
O
Opening door
with a code .............................................. 45
Operating steps
saving as an FCN entry ......................... 75
Overload ...................................................... 93
Override ....................................................... 69
Overview
character set ........................................... 24
main menu ............................................ 153
P
Parking a call ............................................... 62
Personal identification number ................ 90
Pickup (call) ......................................... 42, 106
PIN ................................................................ 90
for a telephone ........................................ 88
PIN, saving .................................................. 90
Problems/contacts ................................... 141
Procedure
saving as an FCN entry ......................... 75
Program/Service menu ............................. 25
Programmed items on the phone ........... 39
Project calls ................................................. 83
R
Radio paging equipment PSE ................ 102
Recall ............................................................ 67
Receiving volume ....................................... 40
Redial list ................................................... 118
Redialing a number
via the caller list ...................................... 49
Relays ......................................................... 102
Reminder ..................................................... 77
Reserving a trunk ....................................... 57
Resetting functions .................................... 95

146
Index
Resetting services ..................................... 95
Ring signaling ............................................. 27
Ring tone ..................................................... 39
Ring tones, importing .............................. 134
Ring volume ................................................ 39
Ringer cutoff ............................................... 84
Ringing group, activating/deactivating . 107
Room monitor ............................................. 86
S
Saved number redial ................................. 29
redial list ................................................... 29
system menu .......................................... 29
Second call, accepting .............................. 60
Sensors ...................................................... 102
Services, resetting ..................................... 95
Setting
advisory tones ...................................... 126
auto answer .......................................... 124
brightness .............................................. 120
Contrast ................................................. 120
display color .......................................... 119
display contrast .................................... 119
display language ................................... 122
factory defaults ..................................... 128
handset name ....................................... 127
night mode ............................................ 121
PIN .......................................................... 125
vibration alert ........................................ 124
WLAN ..................................................... 123
Setting factory defaults ........................... 128
Setting the PIN ................................. 125, 133
Settings at the phone ................................ 39
Shortcuts ................................................... 153
Simple paging equipment ...................... 103
Speaker call ................................................. 56
Speakerphone mode ................................. 28
Special dial tone ......................................... 84
Speed dial
dialing numbers ...................................... 50
saving station speed-dialing ................. 50
suffix-dialing ............................................ 50
system ..................................................... 50
Standby time ............................................ 141
Station number
assigning .................................................. 58
correcting ................................................. 47
deactivating the display ......................... 85
editing ...................................................... 47
saving ....................................................... 37
suppressing ............................................. 85
Station speed dial ...................................... 50
Suffix-dialing ................................................ 66
automatic ................................................. 50
Switches .................................................... 102
Symbols
Display ...................................................... 18
Display keys ............................................ 18
System speed dial ..................................... 50
System-wide cancellation ......................... 95
T
Talk time .................................................... 141
Telephone
caring for ................................................ 138
cleaning .................................................. 138
locking ...................................................... 88
locking another ....................................... 89
locking/unlocking .................................... 88
locking/unlocking centrally .................... 89
setting ...................................................... 39
testing .................................................... 135
using another like your own ................. 93
Telephone data service ........................... 100
Telephone functions, testing ................. 135
Telephone lock
central ...................................................... 89
Telephone maintenance ......................... 138
Temporary phone ....................................... 93
Testing the telephone ............................. 135
Text message
answering ................................................ 92
deleting/displaying ................................. 91
receiving .................................................. 92
sending .................................................... 91
Three-party conference ............................. 30
Timed reminder, answering ..................... 78
Toggle/Connect .......................................... 30
Tone dialing ................................................. 66
Tone dialing (DTMF dialing) ...................... 66

147
Index
Transfer (call) .............................................. 31
after announcement .............................. 67
Troubleshooting ....................................... 138
Trunk flash, sending .................................. 68
Trunk, reserving ......................................... 57
U
UCD ............................................................ 108
V
Variable call forwarding ............................. 32
Voice dialing ................................................ 53
deleting .................................................. 112
saving ..................................................... 111
W
Web interface ........................................... 131
launching ................................................ 132
logout ..................................................... 134
Work time .................................................. 109

Overview of Functions/Codes (Alphabetical)
148
Overview of Functions/Codes (Alphabetical)
The table below lists all available functions as they appear on the display. Functions can be
activated interactively (select + confirm), via the Program/Service menu (select + confirm
or enter a code), or by pressing a saved FCN entry, provided that they have been config-
ured (contact your service personnel).
Functions
(display)
... acti-
vated in-
ter-
actively
... activated via the
Program/Service menu
FCN
FCN
entry
Code FCN
Account code *60 X
Advisory msg. on
Advisory msg. off
*69
#69
X
X
Associated dial *67 X
Associated serv. *83 X
Callback
View callbacks/Delete
*58
#58
X
Caller list
Save number
#82
*82
X
X
Call waiting
Waiting tone off
Waiting tone on
Call wait.term.on
Call wait.trm.off
*55
*87
#87
*490
#490
X
X
X
X
X
CFSS on
CFSS off
*9411
#9411
Conference
Start conference
Add party
End conference
View conf parties
Remove party
Drop last conf. party (USA only)
*3
#3
*491
X
Program/Service

Overview of Functions/Codes (Alphabetical)
149
Consult
Return to held call
Quit and return
Transfer/Accept call
*0
*0
Control Relay On
Control Relay Off
*90
#90
X
X
Data I/O Service *494 X
Directory
1=internal
2=LDAP
*54
*54
X
X
DISA
Discreet Call *945 X
DND on
DND off
*97
#97
X
X
Door opener on
Door opener off
*89
#89
X
X
DTMF dialing *53 X
En-bloc sending
Dial
Forwarding on
1=all calls
2=external calls only
3=internal calls only
Forwarding off
No Reply (CFNR) on
No Reply (CFNR) out
Trunk FWD on
Trunk FWD off
*1
*11
*12
*13
#1
*495
#495
*64
#64
X
X
X
X
X
X
X
X
X
Headset
Answer call
X
Functions
(display)
... acti-
vated in-
ter-
actively
... activated via the
Program/Service menu
FCN
FCN
entry
Code FCN
Program/Service

Overview of Functions/Codes (Alphabetical)
150
HF answerback on
HF answerback off
*96
#96
X
X
Hotline
Join group
Leave group
Rejoin all groups
Leave all groups
*85
#85
*85*
#85#
X
X
X
X
Keypad dialing *503
Lock all phones *943 X
Lock phone
Unlock phone
Change PIN
*66
#66
*93
X
X
Mobile Logon
Mobile Logoff
*9419
#9419
X
Night answer on
Night answer off
*44
#44
X
X
Open door *61 X
Override
*62 X
Page
Answer page (not for U.S.)
*45
#45
X
X
Park a call
Retrieve call
*56
#56
X
Phone test *940
Pickup - directed
Pickup - group
Accept call
*59
*57
X
X
Prog. feature key *91 X
Reject call
Release X
Reserve trunk X
Reset services #0 X
Functions
(display)
... acti-
vated in-
ter-
actively
... activated via the
Program/Service menu
FCN
FCN
entry
Code FCN
Program/Service

Overview of Functions/Codes (Alphabetical)
151
Retrieve line *63 X
Ringer cutoff on
Ringer cutoff off
*98
#98
X
X
Ringing group on
Ringing group off
*81
#81
X
X
Room monitor *88 X
Saved number redial X
Select language *48
Send message
View sent message
View messages
Mailbox
*68
#68
#68
X
X
X
X
Shift Key X
Show call charges (own phone)
View call charges (remote phone)
*65 X
X
Speaker call *80 X
Suppress call ID
Restore caller ID
*86
#86
X
X
Tel. data service *42
Temporary Phone *508 X
Temporary MSN (not for U.S.)
*41 X
Timed reminder on
Timed reminder off
*46
#46
X
X
Toggle/Connect
*2X
Trace call *84 X
Tra n sfer
Trunk flash *51 X
Functions
(display)
... acti-
vated in-
ter-
actively
... activated via the
Program/Service menu
FCN
FCN
entry
Code FCN
Program/Service

Overview of Functions/Codes (Alphabetical)
152
UCD
Log on
Log off
Available
Not available
Work on
Work off
UCD night on
UCD night off
Calls in queue
*401
#401
*402
#402
*403
#403
*404
#404
*405
X
X
X
X
X
X
X
X
X
Use speed dialing
Change Speed Dial (station)
*7
*92
X
X
Functions
(display)
... acti-
vated in-
ter-
actively
... activated via the
Program/Service menu
FCN
FCN
entry
Code FCN
Program/Service
Main Menu Overview
153
Main Menu Overview
Although you can always select a function by scrolling to it, it is quicker to open the main
menu and enter an appropriate digit combination (or shortcut).
Example: to create a new entry in the directory (Pa g e 111 ) .
Press (open the main menu) when the handset is idle.
1Directory 1Neuer Eintrag
2<LDAP>
3Entry#1[1] 1Edit Entry
2New Entry
3Delete Entry
4Record Pattern[2]
5Play Pattern[3]
6Delete Pattern[3]
7Global Patterns [4]
8Erase list buffer
9Available Memory
2Settings 1Display 1Colour Scheme
2Contrast
3Brightness
4Night Mode
5Language
2Access Profiles
3Easy Answer
4Vibration Alert
5PIN
6Advisory Tones
7Handset Name
8Reset Handset
3Status 1Handset
2LDAP
4Alarm Clock
5Connect. Assistant
[1] Up to 200 entries are possible
[2] Voice recordings can be saved for up to 30 entries
[3] Only appears if a voice recording already exists
[4] Only appears if a voice recording is already set as the default recording

© Siemens AG 2005
Siemens Communications
Hofmannstr. 51 • D-81359 Munich
Reference no.: A31003-H1012-W200-11-7619
Subject to availability. Right of modification reserved.
Non-binding provisional draft 04.11.05
www.siemens.com/hipath
The information provided in this document contains merely general de-
scriptions or characteristics which in case of actual use do not always
apply as describes or which may change as a result of further develop-
ment of the products.
An obligation to provide the respective characteristics shall only exist if
expressly agreed in the terms of contract.
All trademarks are the property of Siemens AG or their respective own-
ers.