Silex Technology SXDS3000WAN SX-DS-3000WAN User Manual Manual
Silex Technology, Inc. SX-DS-3000WAN Manual
Manual
WA100070XX Easy Setup Using WPS Feature
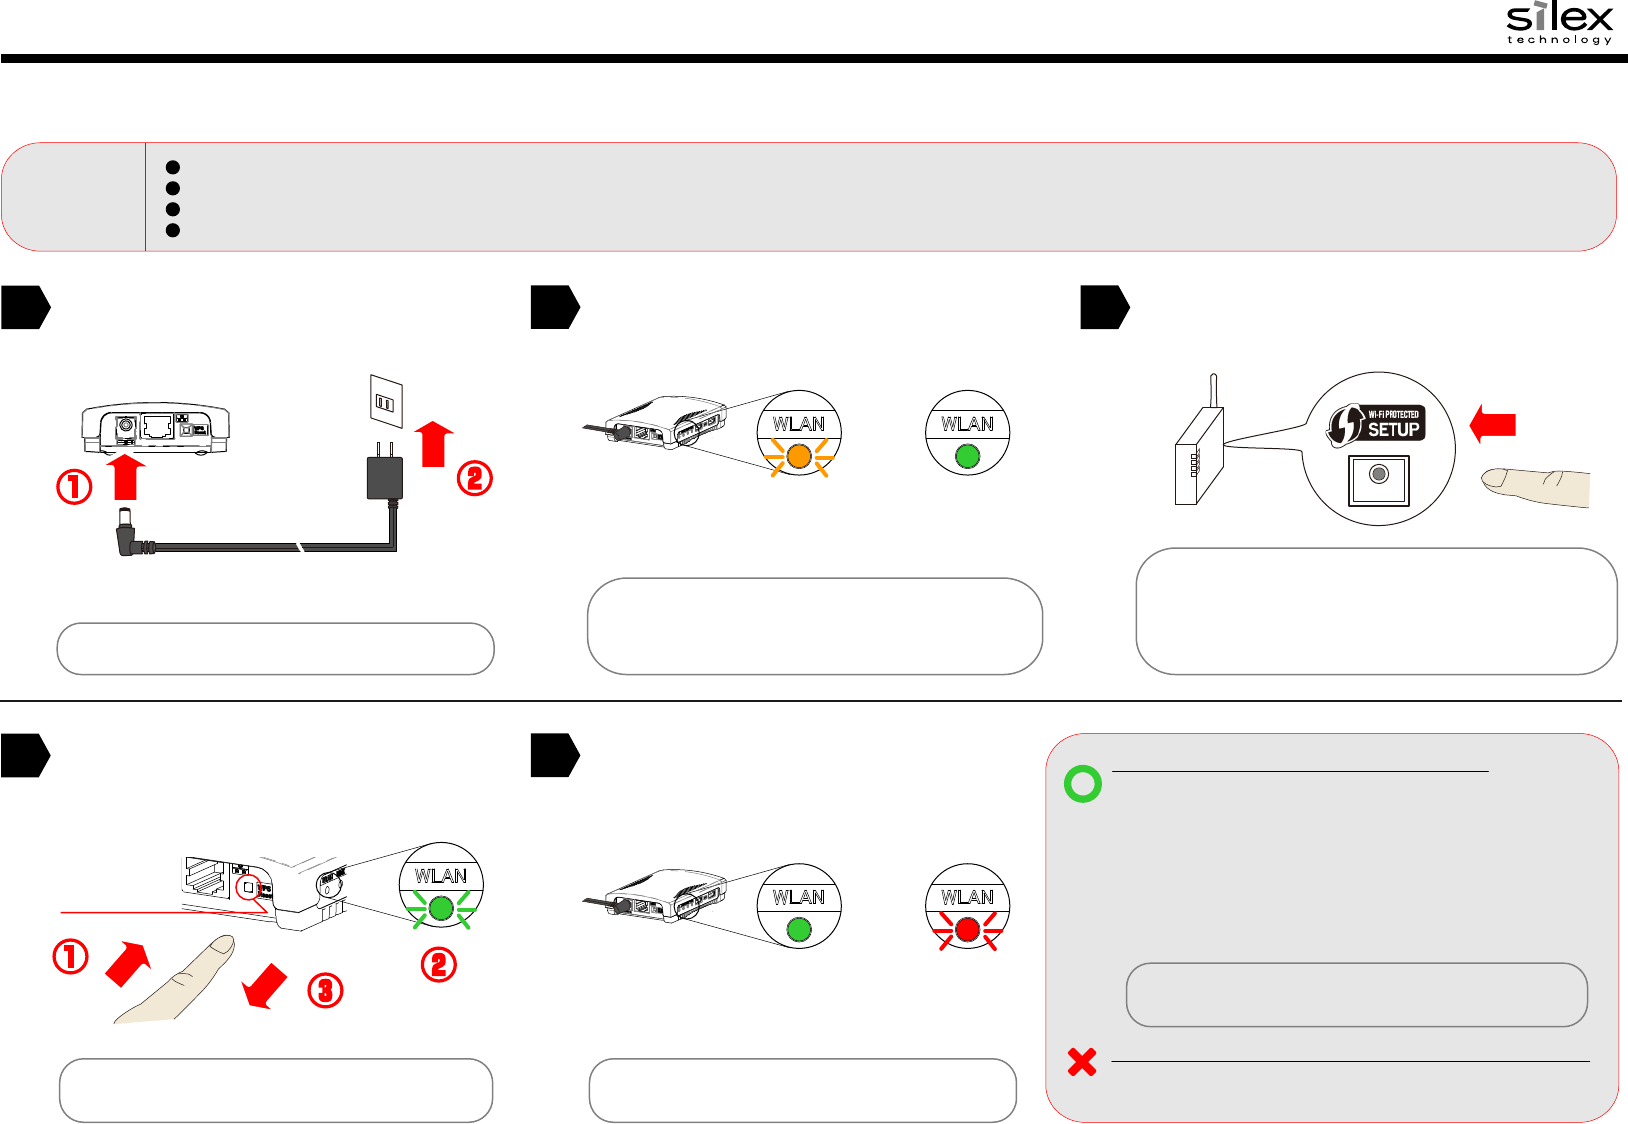
SX-DS-3000WAN allows you to congure its wireless settings easily using a push switch if your wireless router supports WPS (Wi-Fi Protected Setup).
This sheet explains how to congure wireless settings using the push switch.
English
SX-DS-3000WAN will start to communicate with your
wireless router.
The Wireless LED's lighting pattern will show you if the
wireless conguration succeeded or failed.
- The name, position and shape of the WPS button will dier depending
on your wireless router. For details, refer to the operation manual that
came with your wireless router.
- Please use only one wireless router. If two or more routers are waiting for
wireless connections, SX-DS-3000WAN will not be able to connect
properly.
Success
or
SX-DS-3000WAN
Fail
- Within 3-10 sec after pressing and holding down the push switch,
the Wireless LED will blink in Green.
- It may take a while to complete the wireless conguration
depending on your environment (up to 2 min).
Connect the AC adaptor to SX-DS-3000WAN and the AC plug
to the power outlet.
SX-DS-3000WAN
Power Outlet
AC Adaptor
- It is not necessary to connect a network cable to SX-DS-3000WAN.
1
Conrm that the Wireless LED(WLAN) on SX-DS-3000WAN
blinks in Orange or turns to Green.
- If the Wireless LED does not blink in Orange or turn to Green, reset
SX-DS-3000WAN to factory defaults and start from step 1 again.
For how to reset SX-DS-3000WAN to its factory defaults, refer to the
Users Manual or Setup Guide.
Press the WPS button on your wireless router.
Conrm that your wireless router is ready for a wireless
connection to be made.
Wireless Router
WPS
Press and hold the push switch on SX-DS-3000WAN. When
the Wireless LED blinks in Green, release the push switch.
When successful, the Wireless LED will turn to Green.
In this case, wireless conguration is complete.
- Power o SX-DS-3000WAN, move it to where you wish to use it and
then power it on again.
- Connect the USB device(s) that you wish to use over the network to
SX-DS-3000WAN.
- To install the software applications onto your computer, click Computer
Conguration from the menu screen. For details, refer to the Users Manual.
When wireless conguration has failed, the Wireless LED will blink in Red.
Read the instructions on this sheet and start from step 3 again.
- It is not necessary to install the applications if you plan to use printers
with the standard Windows printing feature.
! NOTE
or
SX-DS-3000WAN
Searching for
network
Connected to
existing network
23
45
Push Switch
SX-DS-3000WAN
To perform the wireless conguration using WPS, your wireless router must support WPS. Please make sure that a wireless router supporting WPS is set up in your environment.
While performing this conguration, please temporarily move SX-DS-3000WAN closer to your wireless router to make it easier for both devices to communicate.
Depending on your wireless router, WPS may need to be enabled manually. For details, refer to the operation manual that came with your wireless router.
If a security feature such as MAC Address ltering is enabled on your wireless router, disable it temporarily so that SX-DS-3000WAN can communicate with your wireless router.
Push Switch SX-DS-3000WAN Power Outlet
* The information below will be your own information that is used on your network and none of us are able to nd it from our side. For how to see each setting,
please refer to the operating manual that came with your router or contact the manufacturer.
(De) Auf der CD-ROM befindet sich ein deutschsprachiges
Setup-Handbuch im PDF-Format. Zum Anzeigen der PDF-Datei
unter Windows benötigen Sie den Acrobat Reader.
(Fr) Un guide d'installation en français au format PDF est inclus
dans le CD-ROM. Acrobat Reader est nécessaire pour lire les
fichiers PDF dans un environnement Windows.
(It)
Una Guida alla configurazione in italiano è inclusa nel CD-ROM
come file PDF. Per visualizzare il file PDF in ambiente Windows è
necessario Acrobat Reader.
(Es)
En el CD-ROM se incluye una Guía de instalación en español
como archivo PDF. Se necesita Acrobat Reader para ver el
archivo PDF en un entorno Windows.
(Pt)
Um Guia de Configuração em português é fornecido no
CD-ROM no formato de arquivo PDF. É necessário ter o Acrobat
Reader para visualizar o arquivo PDF em um ambiente Windows.
SX-DS-3000WAN
AC Adaptor
Device Server Setup CD
(Including conguration software and online manual)
http://www.silex.jp/register/
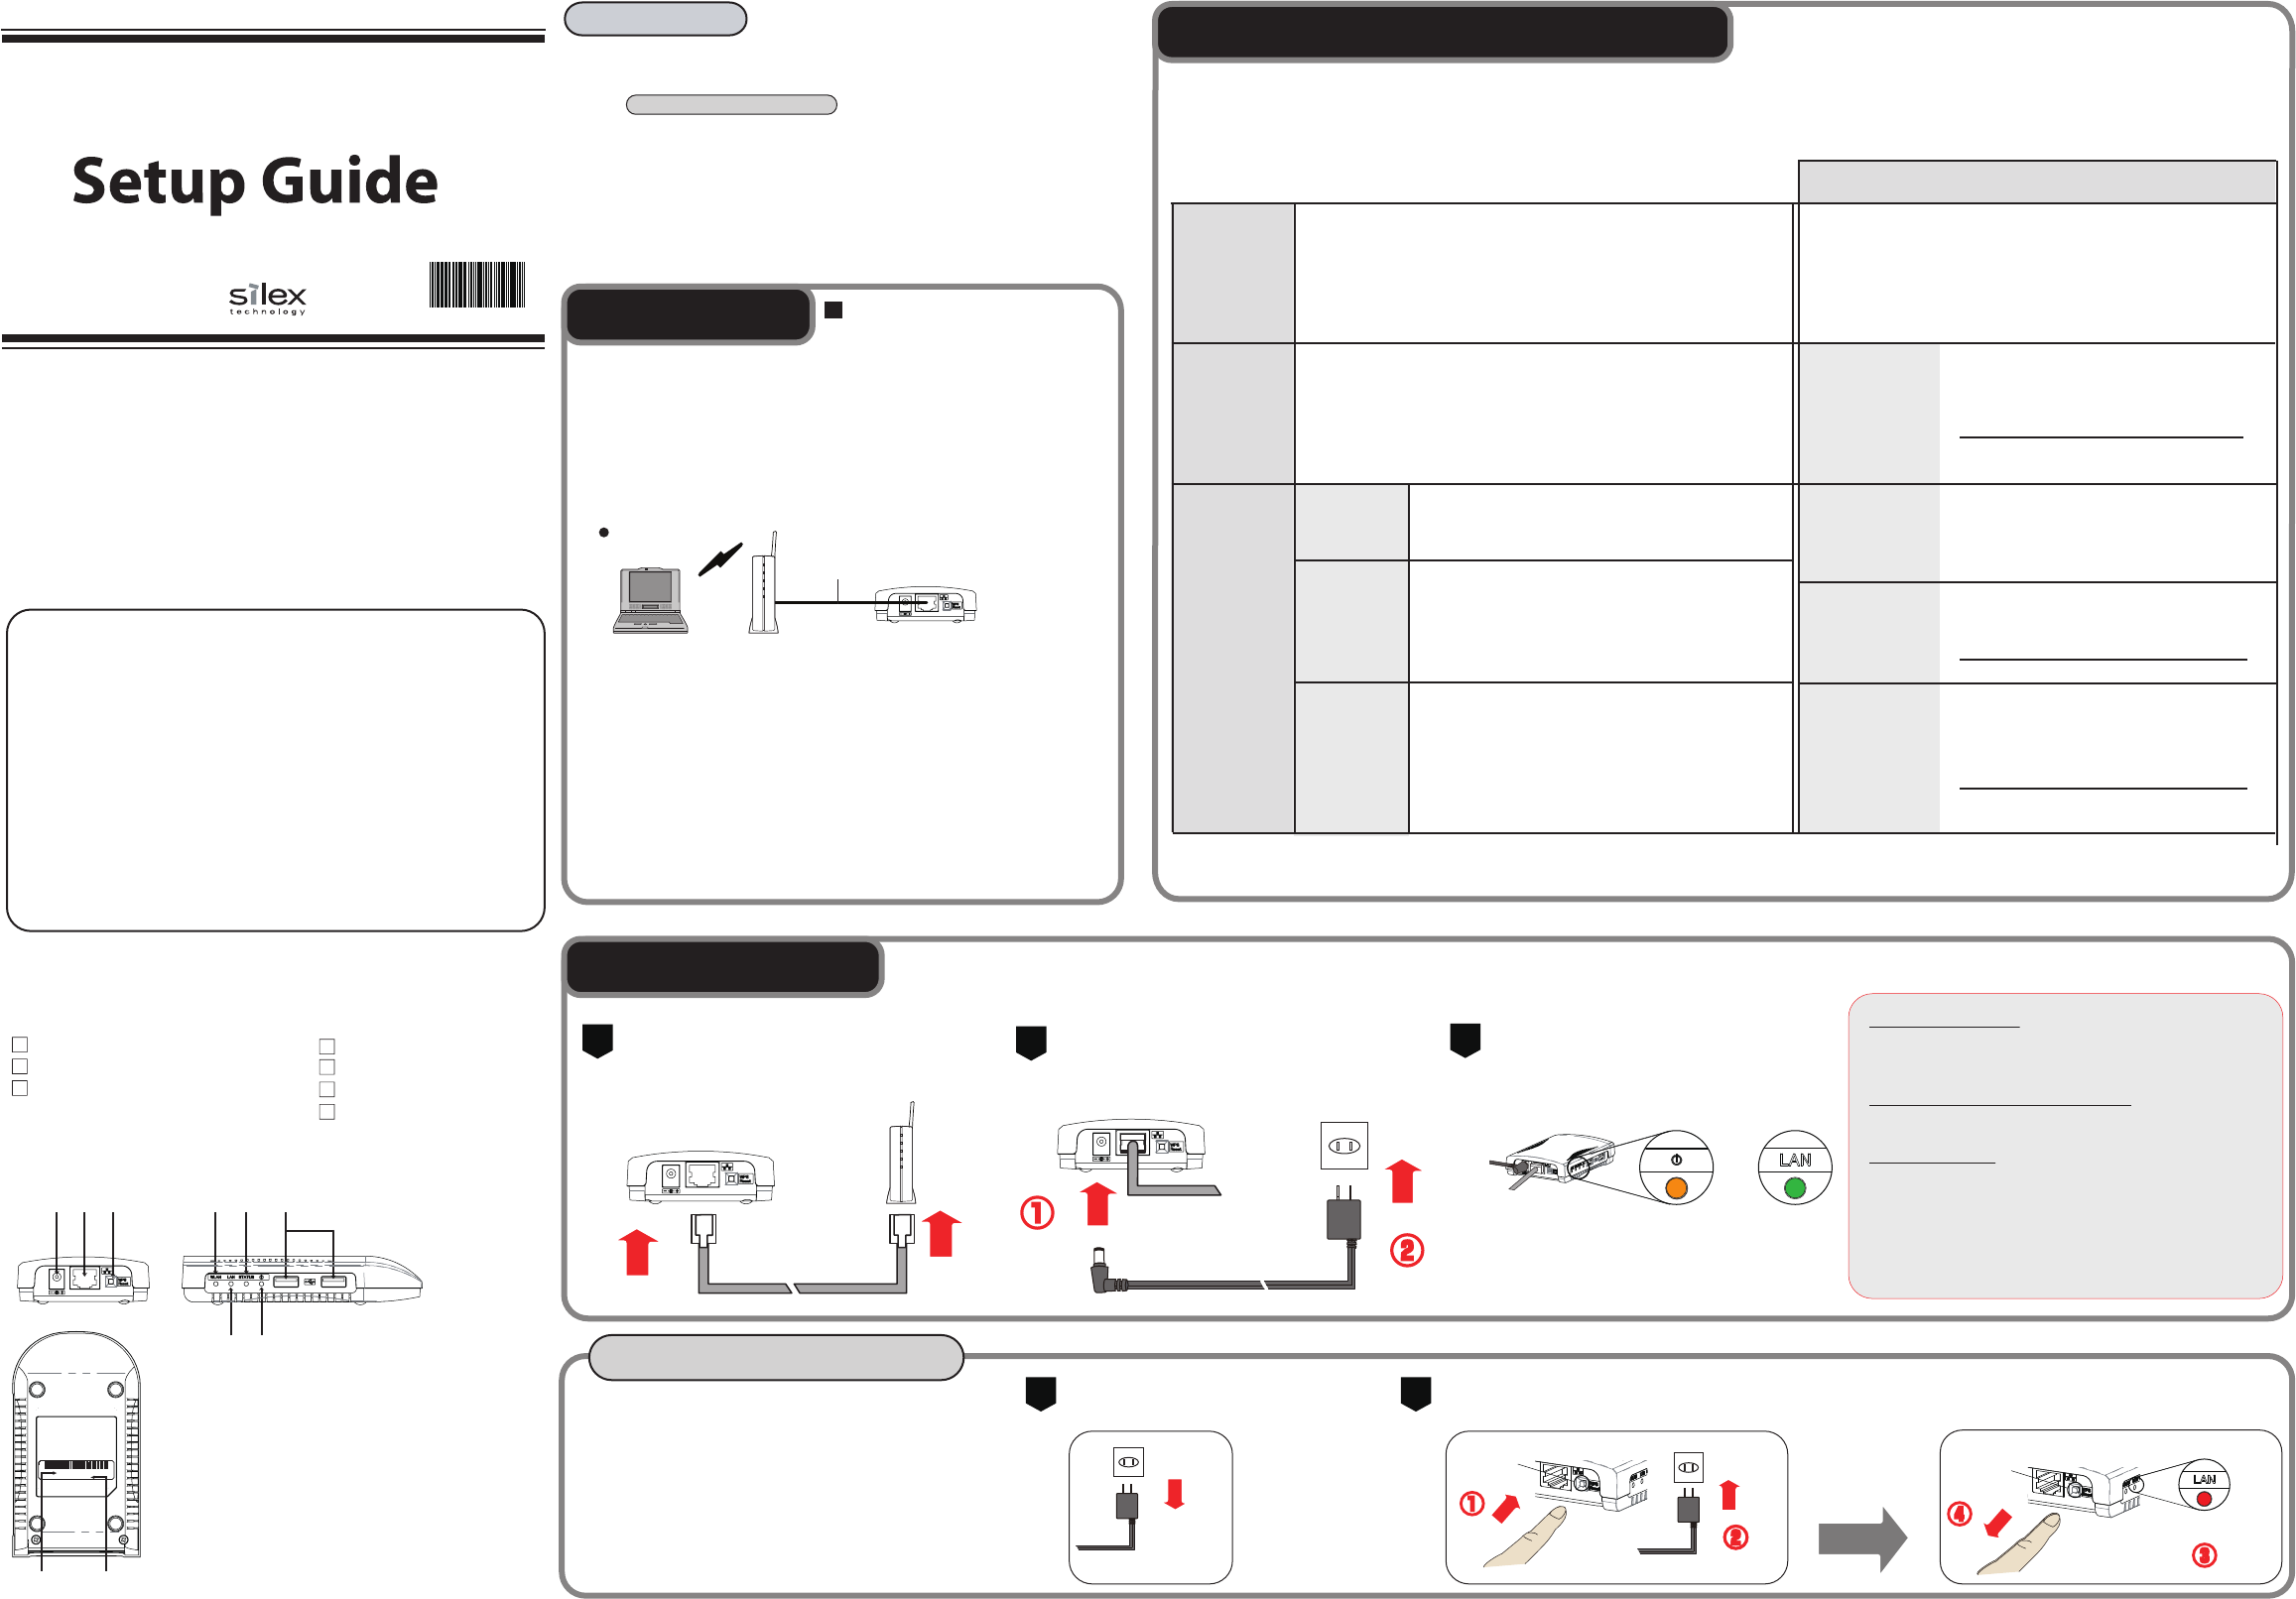
Parts and Fucntions
Thank you very much for purchasing our wireless USB Device Server
"SX-DS-3000WAN".
This Setup Guide provides information on how to congure and use
SX-DS-3000WAN in your network environment. Please follow instructions
on Step1- Step 4 to congure SX-DS-3000WAN.
Before you begin, please carefully read the "Safety Instructions" and
"About Wireless Interference" in the online manual included in the
CD-ROM to properly congure SX-DS-3000WAN.
Please complete the user registration after you nish the setup.
It is required to provide you better technical supports and services.
User Registration
For the user registration, a Serial Number is required. The Serial Number is
a last 6-digit number of the Ethernet Address(12-digit number) which can
be found on the bottom of the unit.
Package Contents
WA06170XX
User Registration Website
Example: If the Ethernet Address is "00:80:92:00:11:22", the Serial Number will be "001122".
Network Cable
Connect the AC adaptor to SX-DS-3000WAN and the AC
plug to the power outlet.
SX-DS-3000WAN Power Outlet
AC Adaptor
Conrm that both POWER LED and LAN LED
turn on.
3
If SX-DS-3000WAN has been used in other network or
you wish to start conguration from factory defaults
again, follow the instructions below.
Remove the AC plug from the power outlet. Press and hold down the push switch on SX-DS-3000WAN while inserting the AC plug back into the power outlet.
Keep holding a while and release the push switch when LAN LED turns to Red.
12
Step2 Getting Started
Factory Default Conguration
Connect SX-DS-3000WAN to your wireless router using
a network cable.
SX-DS-3000WAN
Wireless Router
12
Connect SX-DS-3000WAN to your network using a network cable.
Before You Begin About conguration methods
This Setup Guide explains how to congure SX-DS-3000WAN using a network
cable. For other conguration methods, please refer to the online manual
included in the CD-ROM.
Following 3 conguration methods are supported.
- Conguration using a network cable (Recommended)
- Conguration using a WPS feature of your wireless router
- Conguration using a USB ash drive
By connecting SX-DS-3000WAN to your existing network using a network
cable, you can congure the network settings from your computer.
For this method, a network cable is required.
By saving the conguration information to a USB ash drive and connecting it to
SX-DS-3000WAN, you can congure the network settings. To save the conguration
information to the USB ash drive, please use the conguration utility contained in
the CD-ROM. For this conguration method, a USB ash drive is required.
If your wireless router supports WPS (Wi-Fi Protected Setup), the network
conguration can be done automatically by pressing the wireless connection button
on your wireless router and the push switch on SX-DS-3000WAN.
For this conguration method, a wireless router supporting WPS is required.
Network Cable
SX-DS-3000WAN
Wireless Router
Sample connection
August, 2011
English
SX-DS-3000WAN
If LAN LED turns to Green or Orange
Succsessfully connected to your network. Go on to Step 3.
If LAN LED is OFF
The network cable is not plugged properly. Start from Step2-1 again.
If the network cable is plugged properly, SX-DS-3000WAN may contain
icorrect network settings. In such a case, reset SX-DS-3000WAN to factory
defaults and start from Step2-1 again. For details on how to reset
SX-DS-3000WAN to factory defaults, refer to “Factory Default Conguration”.
Step1 Necessary Wireless Setting Information
To use SX-DS-3000WAN in your wireless network, SX-DS-3000WAN must have the same settings as your wireless router (Access Point).
Please check the wireless settings of your router and write it down on the table below:
Wireless Mode
The SSID is an ID that distinguishes a wireless LAN network from others. For
wireless devices to communicate with each other on a wireless network, they
must share the same SSID. (The SSID is also referred to as "ESSID".) Depending
on your wireless router, it may have several SSIDs. If there are dierent SSIDs
for a game machine and computer, use the one for the computer.
There are "Infrastructure" mode and "Ad hoc" mode.
Select "Infrastructure" mode when you wish to connect to your network
via a wireless router.
Select "Ad hoc" mode when you wish to make a direct connection to
your wireless computer without using a wireless router. When using this
mode, set the same channel as your wireless computer.
SSID SSID
Encryption Mode
(Network
Authentication)
No Encryption
If WEP encryption is used, wireless communication will
be encrypted using the settings for "WEP Key 1-4" and
"Key Index".
Set the same "WEP key Size(64bit/128bit)", "WEP Key"
and "Key Index" as your wireless router.
Uses no encryption for wireless communication.
(In this case, you do not have to check any of your
settings beforehand.)
WEP
Uses PSK for network authentication. The encryption
key will be generated by communicating with the
wireless router using a Pre-Shared key. WEP key setting
is not used for this mode. Set the same "Pre-Shared
key" and "Encryption Mode"(TKIP/AES) as your wireless
router. The Pre-Shared key is also referred to as
"Network Key" or "Password".
WPA / WPA2
WEP Key
or
Pre-Shared Key
WEP key Size and
Key Index
or
Encryption Mode
(Open / Shared)
Network
Authentication
WEP
Conguration Memo
Setup Guide (this document)
SX Virtual Link User’s Guide
Warranty Booklet
Rubber feet (4 psc)
If POWER LED is OFF
The AC adaptor is not plugged properly.
Start from Step2-2 again.
Keep holding down
the push switch
LAN LED
Push Switch
SX-DS-3000WAN
ON
and
SX-DS-3000WAN
POWER LED LAN LED
ON ON
Please check the following items are bundled with SX-DS-3000WAN:
WPA WPA2
/ /
Power Outlet
(1) Power Connector
(2) Network Port
(3) Push Switch
(4) Wireless LED
(5) LAN LED
(6) STATUS LED
(7) POWER LED
(8) USB Port
(9) Ethernet Address
(
10
) Serial Number
(8)
(7)(5)
(2)(3)(1) (6)(4)
(9)
E/ A : 008092XXXXXX
S/ N : YYYYYYYYY
(
10
)
Infrastructure / Ad hoc (ch. )
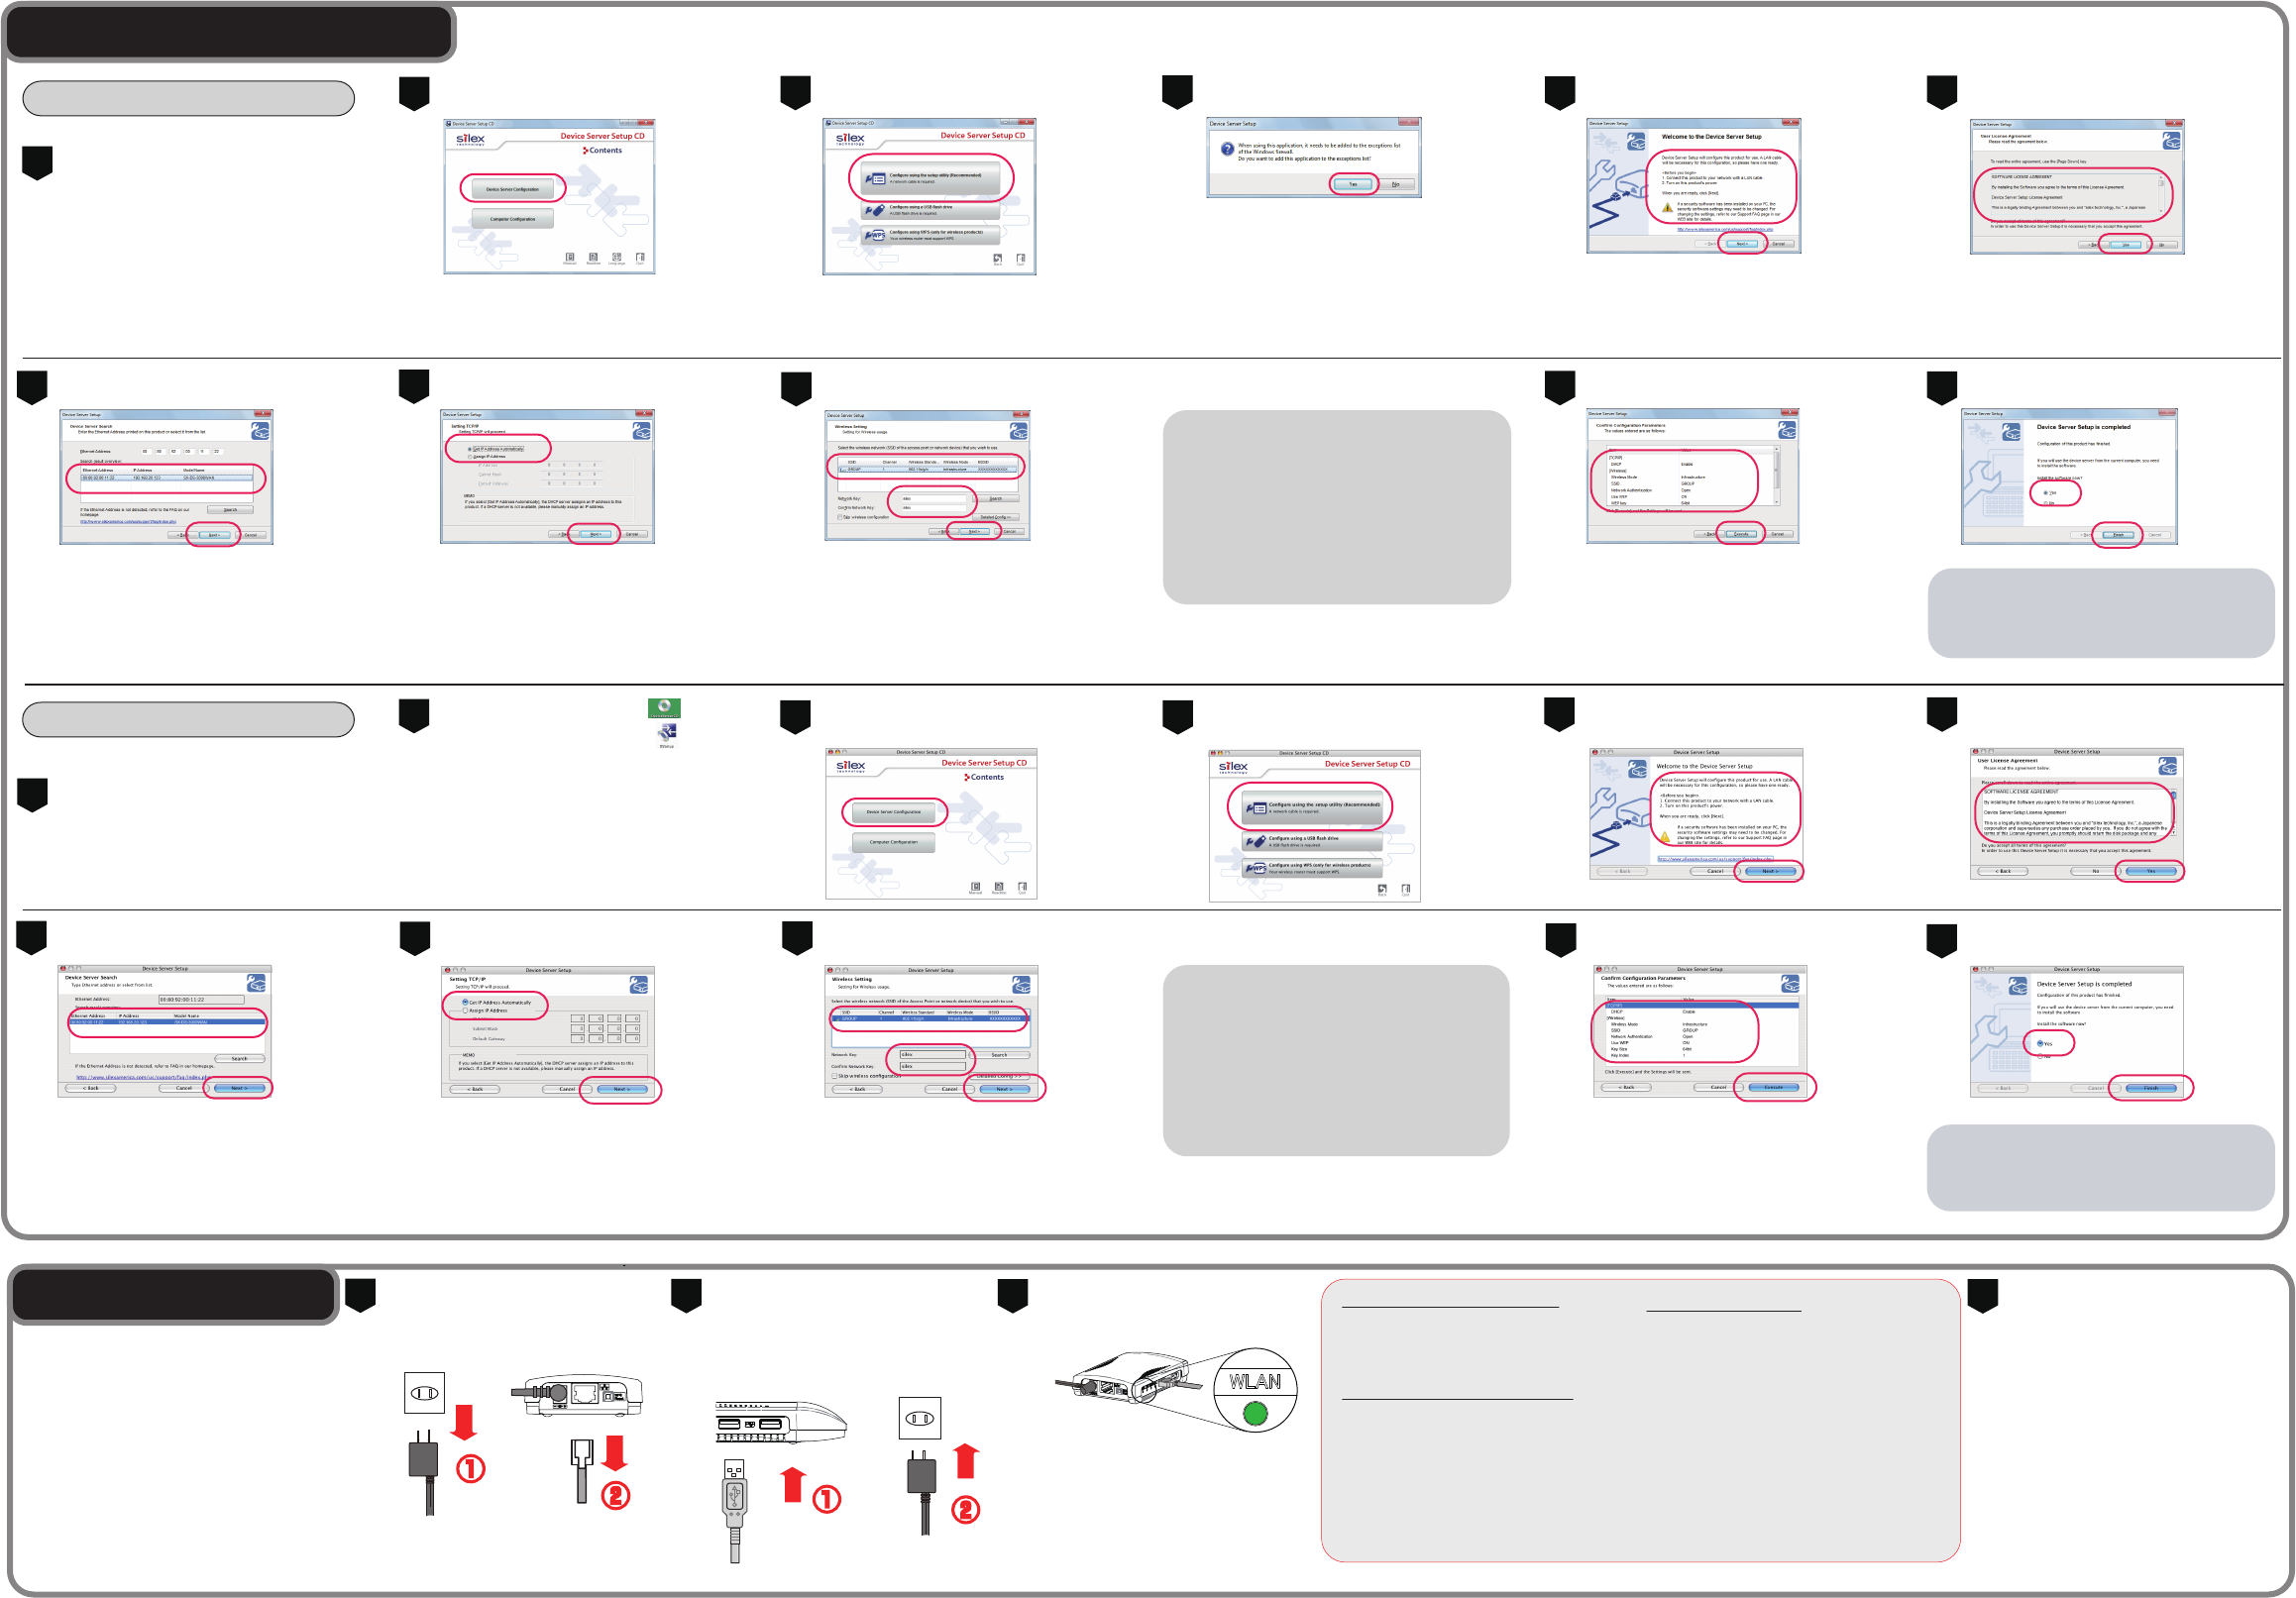
Step3 Setup SX-DS-3000WAN
<<< Windows environment >>>
Insert the Device Server Setup CD into your
computer.
* In Windows 7 (or Windows Vista), the User Account
Control screen is displayed. Click Yes .
(Click Continue in Windows Vista).
* If SX-DS-3000WAN is not displayed in a list,,,
- Check the network setting on your computer (IP
address setting) is properly congured.
- Please temporarily disable the security software
(e.g. "Virus Buster" of Trend Micro, Inc.) or the
rewall function of Windows XP.
1
2356
7
Before clicking Finish, follow the instructions on Step 4
to take eect of the conguration you made. After
completing Step 4, click Finish and go on to install the
USB device connection utility, "SX Virtual Link".
* The information diplayed here will dier depending
on how you have congured.
* If you wish to assign the IP address manually, click
Assign IP Address and enter the IP address, subnet
mask and default gateway.
* If the window does not have the option, ”Get IP
Address Automatically”, it is unable to obtain the IP
address from DHCP server. In such a case, the sample
address created with your computer's setting will be
displayed. Please enter the IP address manually.
* Use the wireless setting information that you have
checked at Step 1.
Select the SSID of the wireless network that you to
connect to and enter the network key.
If the wireless network that you wish to connect to is
not shown on a list, click Detailed Cong button and
congure each setting in the window displayed.
* If you plan to use SX-DS-3000WAN on a wired network
using a network cable, check Skip wireless
conguration and click Next.
89
11
Congure SX-DS-3000WAN using the conguration software included in the Device Server Setup CD.
The conguration can be done from Windows or Macintosh computers.
Insert the Device Server Setup CD into your
computer.
Double click the CD-ROM icon ( )
and then double click DSSetup ( ).
1
23456
789
11
10
Restart SX-DS-3000WAN to take eect of
the new settings.
Remove the AC plug from the power
outlet and then network cable from
SX-DS-3000WAN.
* If you plan to use SX-DS-3000WAN on a wired
network, it is not necessary to unplug the
network cable.
Step4 Enabling the New Settings
SX-DS-3000WAN
USB Devices
Conrm that the Wireless LED turns on.
SX-DS-3000WAN
SX-DS-3000WAN
Power Outlet
Network
Cable
Power Outlet
If Wireless LED turns to Green
Successfully connected to the wireless
network. The setup is complete now.
Go on to install the USB device
connection utility, SX Virtual Link.
Please refer to the "SX Virtual Link
User's Guide".
If Wireless LED blinks in Orange
Searching for a wireless network.
Please wait until a wireless connection is made.
When not connected within 2-3 min, the SX-DS-3000WAN's
wiress settings may not have been congured
properly. Go back to Step 1 and check the wireless
setting information once again.
If Wireless LED is OFF
The network cable is plugged.
When you plan to use SX-DS-3000WAN in a
wireless network, follow the instructions
from Step 4-1 again.
When you plan to use SX-DS-3000WAN in a
wired network, check the LAN LED's
lighting pattern. If the LAN LED turns to
Green or Orange, SX-DS-3000WAN has
been connected to a wired network.
The setup is complete now.
1234
<<< Macintosh environment >>>
ON
Wireless LED
Click Device Server Conguration.Click Congure using the setup utility
(Recommended).
Check the notice information and click Next.Read the software license agreement and click
Yes .
Select SX-DS-3000WAN and click Next.Select Get IP Address Automatically and click
Next.
Select the wireless network that you wish to connect
to from a list , enter the network key and click Next.
Check the settings and click Execute.
Click Device Server Conguration.Click Congure using the setup utility
(Recommended).
Check the notice information and click Next.Read the software license agreement and click
Yes .
Select SX-DS-3000WAN and click Next.
* If SX-DS-3000WAN is not displayed in a list,,,
- Check the network setting on your computer
(IP address setting) is properly congured.
Select Get IP Address Automatically and click
Next.
* If you wish to assign the IP address manually, click
Assign IP Address and enter the IP address, subnet
mask and default gateway.
* If the window does not have the option, ”Get IP
Address Automatically“, it is unable to obtain the IP
address from DHCP server. In such a case, the sample
address created with your computer's setting will be
displayed. Please enter the IP address manually.
Select the wireless network that you wish to connect
to from a list, enter the network key and click Next.
* Use the wireless setting information that you have
checked at Step 1.
Select the SSID of the wireless network that you with to
connect to and enter the network key.
If the wireless network that you wish to connect to is
not shown on a list, click Detailed Cong button and
congure each setting in the window displayed.
* If you plan to use SX-DS-3000WAN on a wired network
using a network cable, check Skip wireless
conguration and click Next.
Check the settings and click Execute.
* The information diplayed here will dier depending
on how you have congured.
Before clicking Finish, follow the instructions on Step 4
to take eect of the conguration you made. After
completing Step 4, click Finish and go on to install the
USB device connection utility, "SX Virtual Link".
Connect the USB device that you wish to use
over the network to SX-DS-3000WAN using
a USB cable and then insert the AC plug of
SX-DS-3000WAN to the power outlet.
Click Yes and click Finish.
Click Yes and click Finish.
* If the menu screen does not appear automatically,
open My Computer, select the CD-ROM drive and
execute Autorun.exe.
4
Click Yes .
10
FederalCommunicationCommissionInterferenceStatement
ThisequipmenthasbeentestedandfoundtocomplywiththelimitsforaClassBdigitaldevice,pursuanttoPart15oftheFCCRules.Theselimitsaredesignedtoprovide
reasonableprotectionagainstharmfulinterferenceinaresidentialinstallation.Thisequipmentgenerates,usesandcanradiateradiofrequencyenergyand,ifnotinstalled
andusedinaccordancewiththeinstructions,maycauseharmfulinterferencetoradiocommunications.However,thereisnoguaranteethatinterferencewillnotoccurin
aparticularinstallation.Ifthisequipmentdoescauseharmfulinterferencetoradioortelevisionreception,whichcanbedeterminedbyturningtheequipmentoffandon,
theuserisencouragedtotrytocorrecttheinterferencebyoneormoreofthefollowingmeasures:
Reorientorrelocatethereceivingantenna.
Increasetheseparationbetweentheequipmentandreceiver.
Connecttheequipmentintoanoutletonacircuitdifferentfromthattowhichthereceiverisconnected.
Consultthedealeroranexperiencedradio/TVtechnicianforhelp.
ThisdevicecomplieswithPart15oftheFCCRules.Operationissubjecttothefollowingtwoconditions:(1)Thisdevicemaynotcauseharmfulinterference,and(2)this
devicemustacceptanyinterferencereceived,includinginterferencethatmaycauseundesiredoperation.
Thisdeviceisrestrictedtoindoorusewhenoperatedinthe5.15to5.25GHzfrequencyrange.
This equipment complies with FCC radiation exposure limits set forth for an uncontrolled environment. This equipment should be installed and operated with minimum distance
20cm between the radiator & your body.
CanadaRequest
ThisdevicecomplieswithIndustryCanadalicence‐exemptRSSstandard(s).Operationissubjecttothefollowingtwoconditions:(1)thisdevicemaynotcauseinterference,
and(2)thisdevicemustacceptanyinterference,includinginterferencethatmaycauseundesiredoperationofthedevice.
Thedevicefortheband5150‐5250MHzisonlyforindoorusagetoreducepotentialforharmfulinterferencetoco‐channelmobilesatellitesystems;
ThisClassBdigitalapparatuscomplieswithCanadianICES‐003.
CetappareilnumeriquedelaclasseBestconformealanormeNMB‐003duCanada.
This equipment complies with IC RSS-102 radiation exposure limits set forth for an uncontrolled environment. This equipment should be installed and operated with minimum
distance20cmbetweentheradiator&yourbody.