Silver Star Intelligent Technology I3 Robotic Vacuum Cleaner User Manual
Shenzhen Silver Star Intelligent Technology Co., Ltd. Robotic Vacuum Cleaner Users Manual
15_I3 UserMan
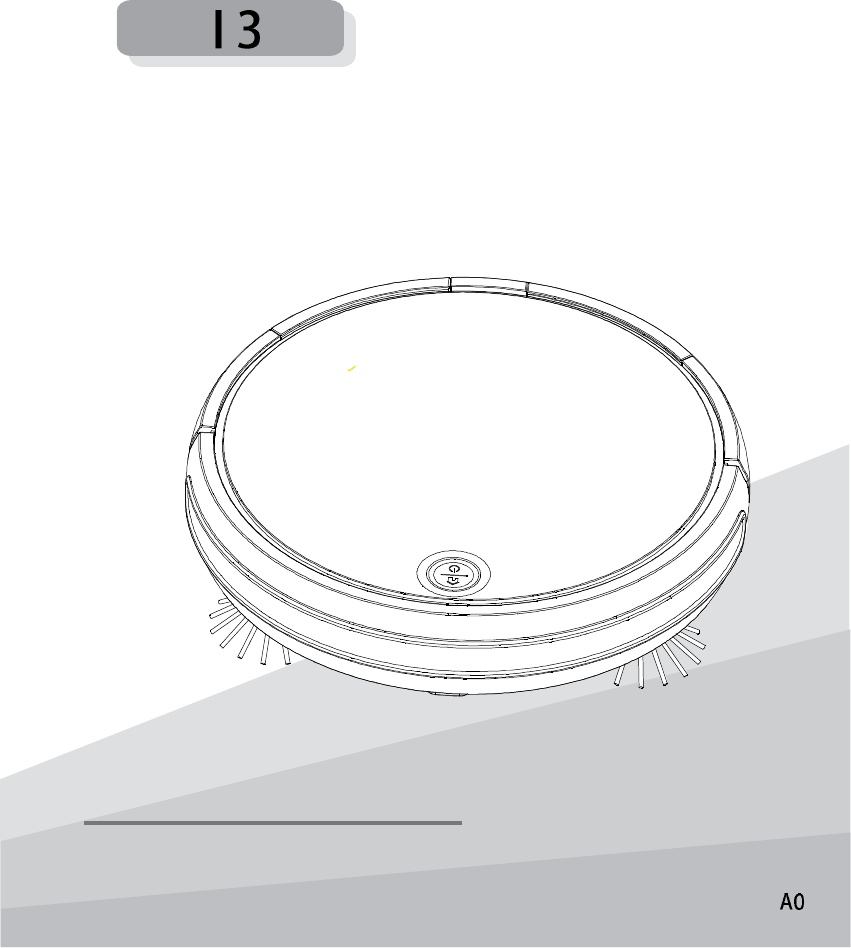
Intelligent Vacuum Cleaner
USER MANUAL
Thank you for purchasing the product.
Please read the manual carefully before using.
1. Safety Instruction………………2-4
2. Product Formation………………5-6
3. Product Installation……………… 7
4. Product Usage…………………8-11
5. Product Maintenance……………12-15
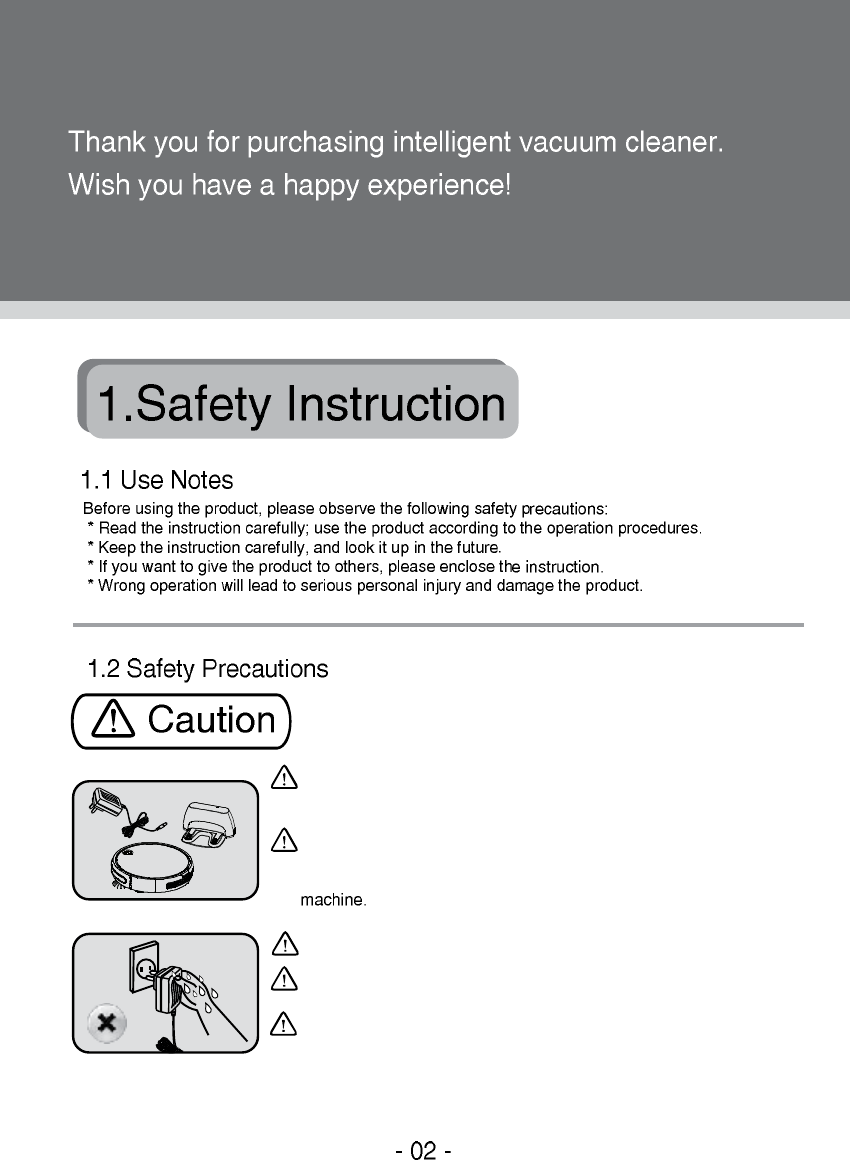
1.1 Use Notes
1.2 Safety Precautions
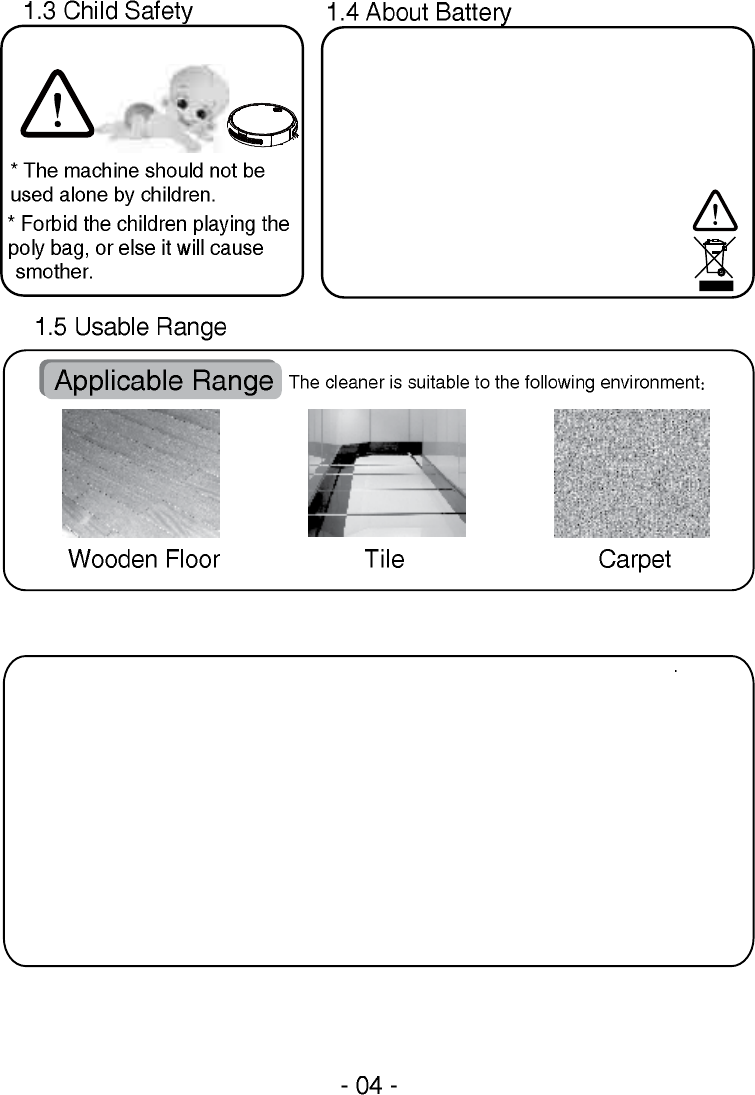
1.3 Child Safety
1.4 About Battery
1.5 Usable Range
1.6 Exception Clause
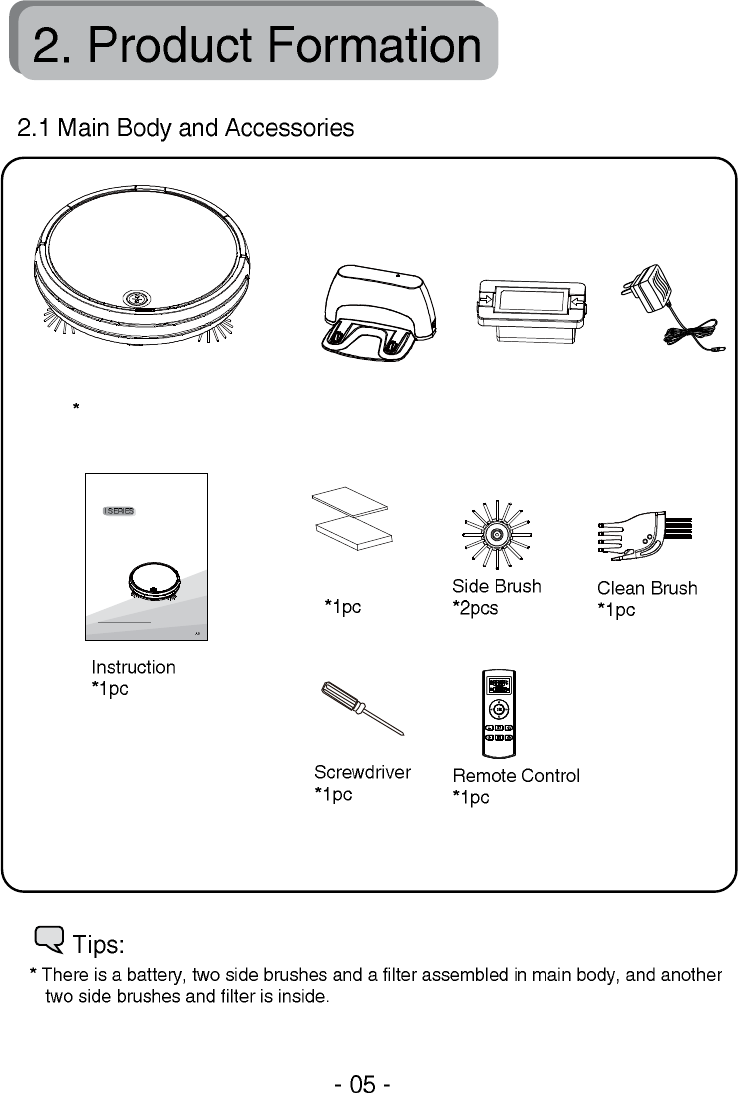
2.1 Main Body and Accessories
2.2 Accessories Introduction
4.1 Main body’s Usage
4.2 Charging Methods
4.3 Remote Control’s Usage
5.1 Daily Storage
5.2 Cleaning of Charging Plate
5.3 Clean the Dust Box
5.4 Clean the Main Brush
5.5 Clean the Side Brush
5.6 Clean the Wheels
5.7 Clean the Sensors
Instructions for use shall be provided with the appliance so
that appliance can be used safely.
The plug must be removed from the socket-outlet before
cleaning or maintaining the appliance.
This appliance can be used by children aged from 8 years and
above and persons with reduced physical, sensory or mental
capabilities or lack of experience and knowledge if they have
been given supervision or instruction concerning use of the
appliance in a safe way and understand the hazards involved.
Children shall not play with the appliance. Cleaning and user
maintenance shall not be made by children without supervision.
Children should be supervised to ensure that they do not play
with the appliance.
Only to be used with the power supply unit provided with the
appliance.
This appliance is intended to be used in household only.
Warnings
Only use the original adaptor, battery and charging station, or else it
will damage the machine and cause fire because of electric shock
and high voltage.
If you find that the main body and accessories are damaged, Please do
not use the cleaner and keep contact with the after-service department.
Anyone is not allowed to disassemble, maintenance or remould the
Do not touch the battery socket and the machine when your hands are
wet, or else it will cause electric shock.
Pull off the plug before doing the maintenance.
If the mains cord is destroyed, to avoid danger, please contact us and
wait for professional persons to replace it.
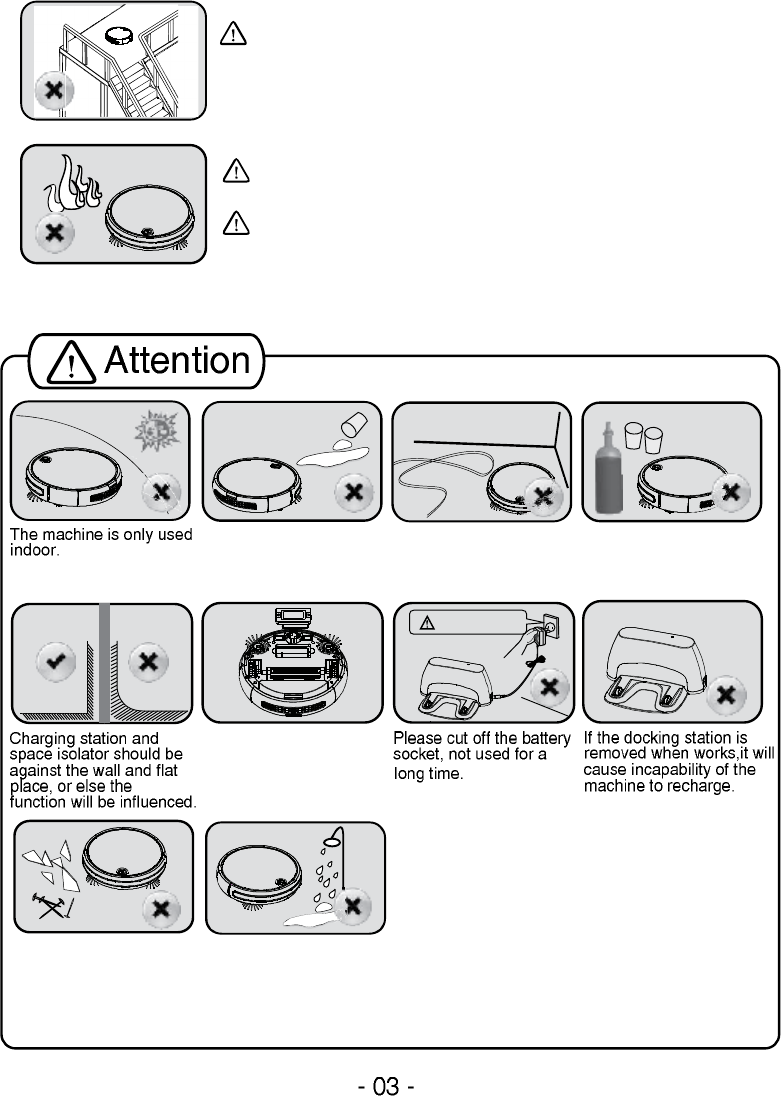
Switch off the cleaner
when taking out the
battery.
Prevent water, oil and
other liquid into the
machine.
Clean up the wire in the
floor, or else it will hinder
the working of the machine.
Please remove all fragile
objects.
Please don’t collect
something sharp with
the device, such as
glass sheet, iron nail and
others, for fear of the
damage to the product.
Don’t use this product without the protective guard if it is suspended
in the air so as to prevent the vacuum cleaner from falling accidentally
and causing personal injury.
Do not put the machine behind the fire, inflammable, explosive and
corrosive materials.
Do not put your clothes or any place of your body(hair, finger and so on)
into the main brush and wheels, or it will cause personal injury.
Please don’t use this cleaner
in humid or flammable,
explosive and corrosive
environments.
Danger!
Electric shock.
1.6 Exception Clause
One of the following circumstances of the product is not in the range of free service. Repair under
payment can be carried out:
A. The damage to the product arises out of the user’s operation and storage against our Manual;
B. The whole machine and its components have been out of the free warranty period;
C. The damage to the product arises out of the disassembly by the serviceman not sent or authorized
by our company;
D. The valid purchase invoice can’t be provided;
E. The model in the warranty card is inconsistent with that of the product for repair or is altered;
F. The damage to the product arises out of the irresistible factors such as natural disasters;
G. The failure or damage to the product arises out of accidental or human factors (including
disoperation, liquid feeding, improper insertion and pulling, scratch, handling, bumping,
inappropriate voltage input, etc).
1. The machine will only be used with the original battery.
2. Please turn off the power switch before taking out the battery.
3. The battery must be taken out before abandoning it.
4. If you wnt to replace the battery,please keep contact with
our after service department. It will lead to accident if wrong
battery is put in the machine.
5. If the battery is leaked,please do not touch the liquid,
wipe the liquid with dry cloth,and put the battery to recycle
bin or maintenance point,do not throw it at random.
6. Please handle the old battery of the parts
(remmote control). The battery includes hazardous
substance,please put it to recycle site according to
original environmental protection regulations.
Intelligent Vacuum Cleaner
USER MANUAL
Thank you for purchasing the product.
Please read the manual carefully before using.
Main Body
1pc Charging Station
*1pc Battery
*1pc
Filter
Adaptor
*1pc
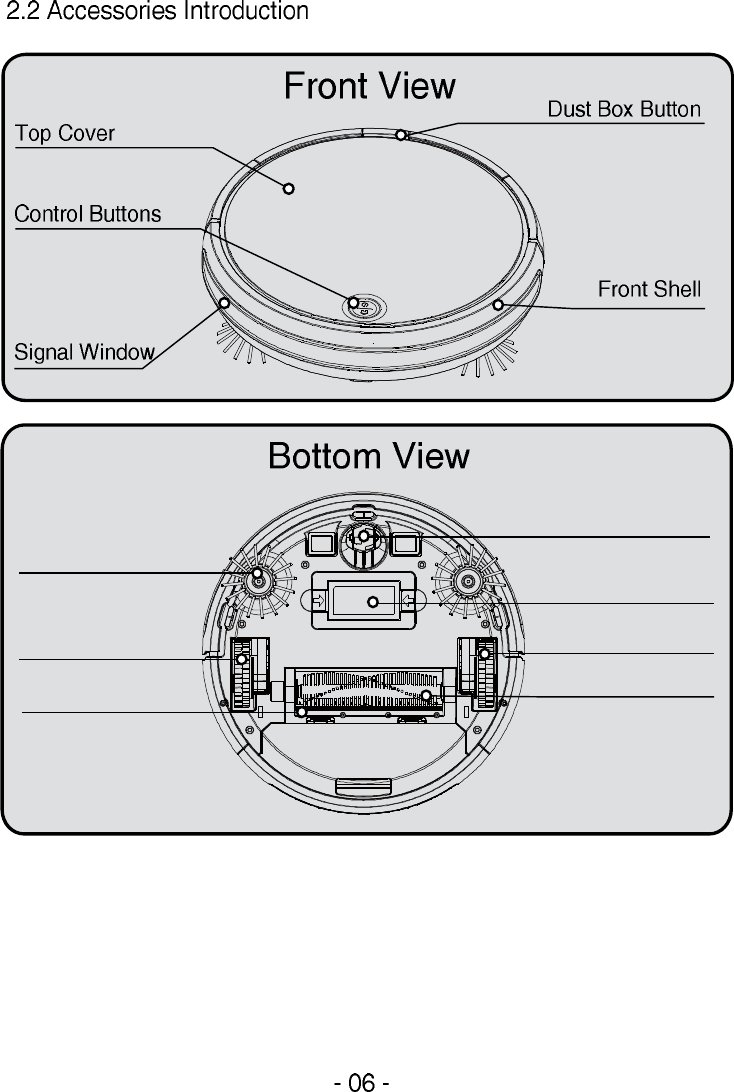
Right Wheel
Rubber Brush
Side Brush
Left Wheel
Middle Brush
Battery
Front Wheel
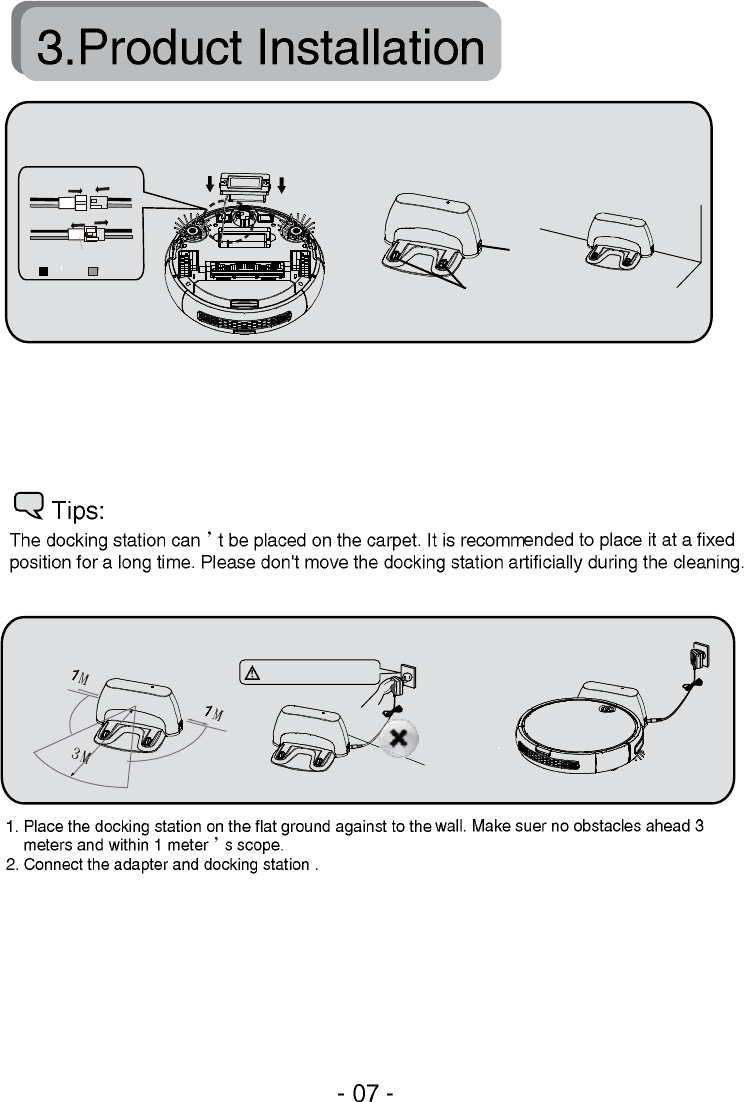
1. Connect the terminal of the battery pack to the machine; then press the battery pack downforwad into
the battery box.
2. Please put the docking station on the flat ground against the wall. Please clean up the dust and other
debris ,stick the dock station on floor. Next, inserting the adapter into the power socket.
Danger! Electric shock.
Adapter Socket
Charging Terminal
Please install the battery before using the cleaner.
Red
Black
Aim at the terminal and insert
it during wiring.
Unplug it in the reverse
direction during unwiring.
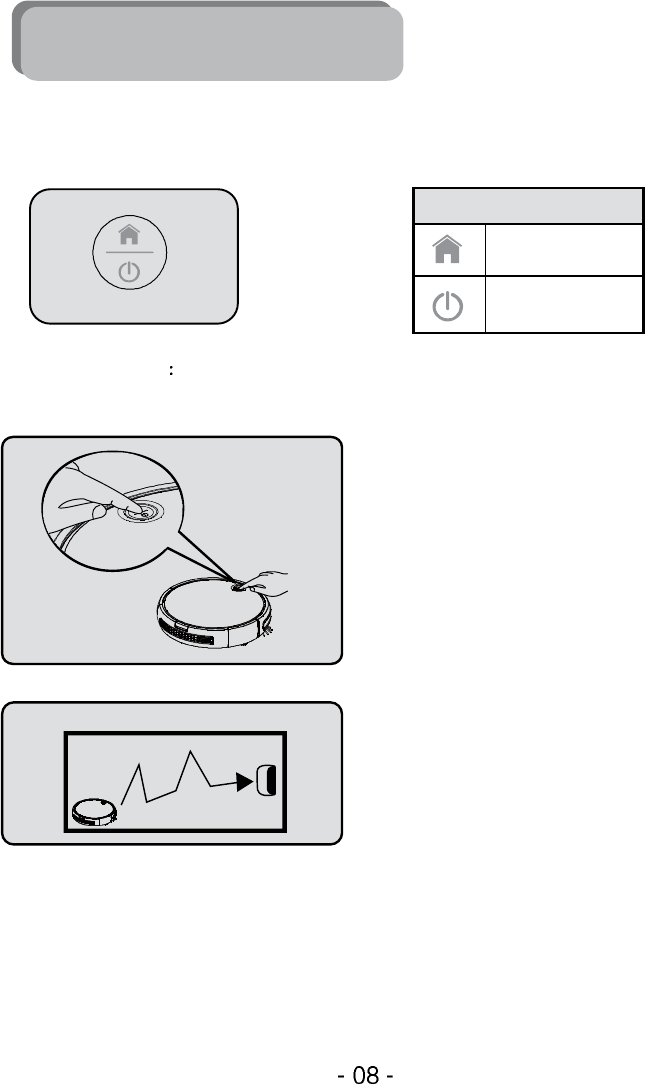
4.Product Usage
4.1.1 Introduction to Control Button
4.1.2.1 Manual Mode
4.1 Main body’s Usage
4.1.2 Work Mode
1. Shortly-press the Power key and the indicator
will light. The cleaner will enter the standby state.
And then start cleaning automatically.
2. When the vacuum cleaner is in the standby
state, press the Power key and it will start running.
The Recharge key will flash blue and the device
will find the dock station.
Recharge Button
Power Button
Button Introduction
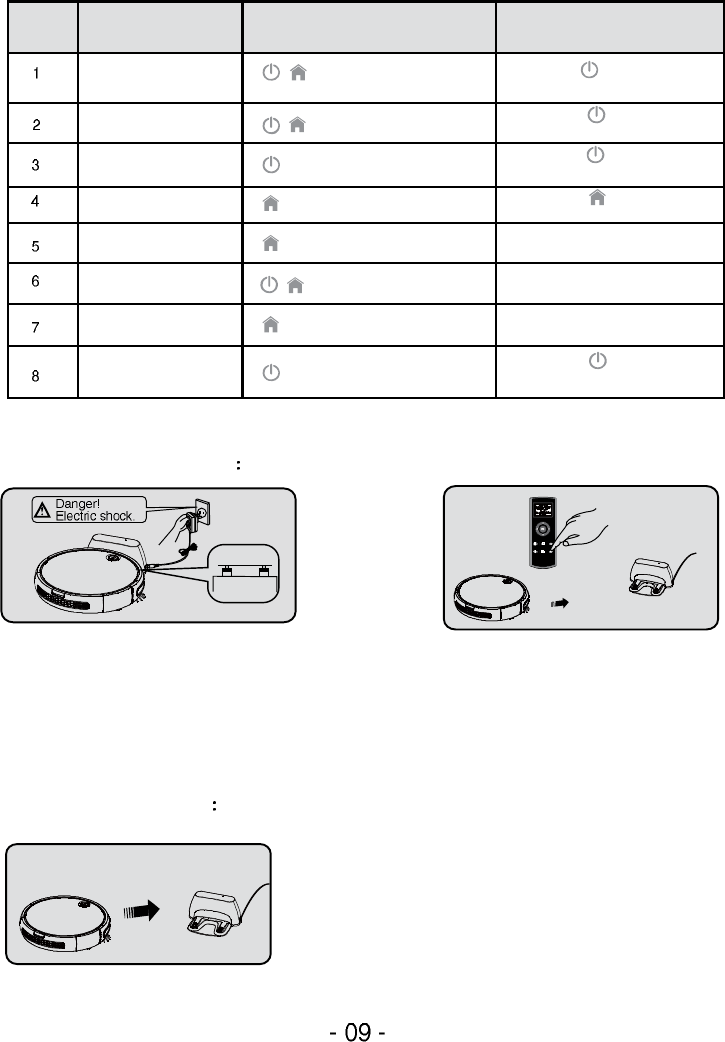
4.1.3 Operation guideline of indicators
4.2 Charging Methods
4.2.1 Manual Charging
4.2.2 Auto Charging
2. Charging via the remote control:
When the cleaner is at the standby state,
press the “recharge” button to let the machine
enter the recharge mode.
Automatic Charging:
When the working voltage is below 13V.The blue indicator
of the recharge key will flash and the device will enter the
Recharge mode.
1. Charging with the docking station:
Connect the adapter to the docking station first, and
then insert to the power supply; place the vacuum
cleaner on the docking station for charging. (The blue
indicator of the recharge key will flash during the
recharge; the blue indicator will be on all the time after
the device is fully charged).
Turn-off Light-off
Light-on
Light-on
Flash Blue
Flash Blue
Flash Blue
Flash Blue at the same time
Blue-light Long-Bright
Long-press" "4S and enter the
OFF state.
Short-press " " and enter the
Auto Cleaning mode.
Long-press " " 6S and it will
enter pairing mode.
Short-press " " and it will enter
the Recharge mode.
Short-press " " and enter the
Standby state.
Turn-on
Cleaning
Recharge
Charging
Error
Fully Charged
Pairing mode
No. State Display Operation
Tips:
1. Customers should operate the cleaner within 7 meters distance covered by WIFI signal with our
remote control; otherwise, the operation fails.
2. When press the “auto-recharge” button, the vacuum cleaner will may fail to return to the charging
base either because of complex surrounding obstacles or running-out-of batteries.
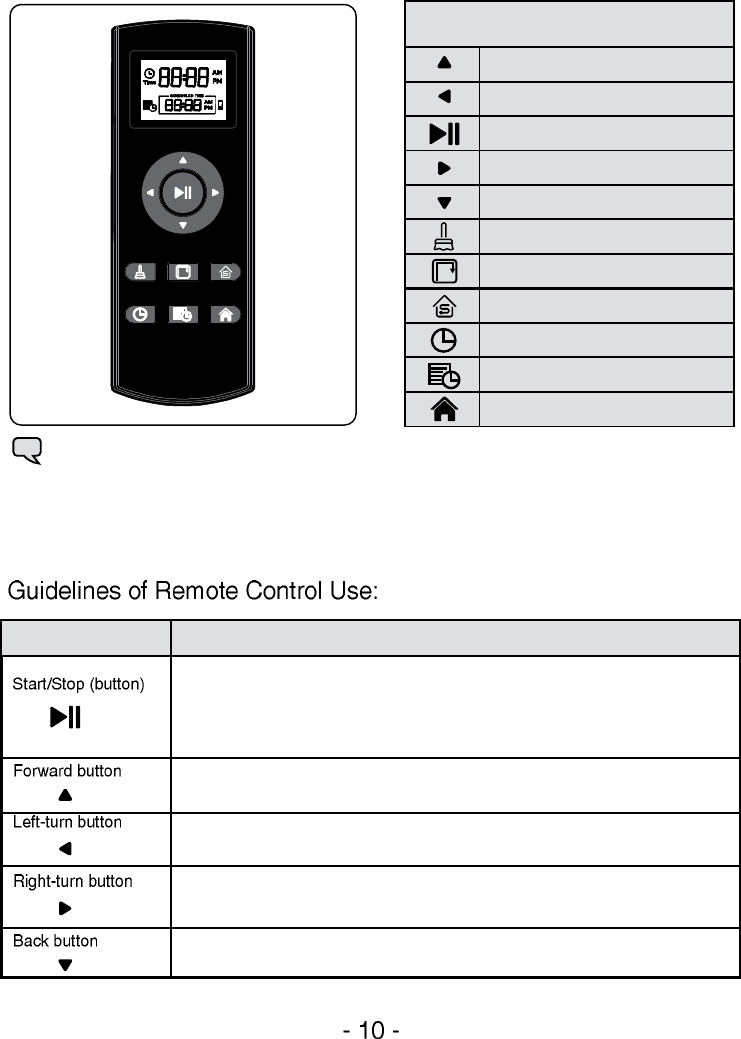
Single Room Cleaning
Start/Stop Auto cleaning
Right-turn button
Back button
Auto cleaning button
Left-turn button
Forward button
Auto charging
Set the current time
Button of scheduling to clean
Edge cleaning button
4.3 Use of Remote Control
Function Guidelines
1. When the cleaner is in standby mode, press the button to enter the auto-cleaning mode.
2. When the cleaner is at any cleaning mode, press the button to let it shift to standby
mode. After finishing the sweeping task it automatically turns into recharging mode.
3. When setting the time, press this button to hold settings.
4. The cleaner will respond with a sound when receiving an order from the remote control.
Long-press the button and the cleaner will forward; releasing, it stops moving.
Long-press the button and the cleaner rotates counterclockwise; releasing, it stops.
Long-press the button and the cleaner rotates clockwise; releasing, it stops rotating.
Long-press the button and the cleaner moves backward; releasing, it stops moving.
Function Information
Introduction of remote control buttons
1. Press the button to change the cleaner’s cleaning state to standby.
2. When the cleaner is standby, press the button to let it shift to auto cleaning mode. After
finishing the sweeping will turns into recharging mode.
3. The cleaner will respond with a sound when receiving an order from the remote control.
1. Press the button to change the cleaner’s cleaning state to standby.
2. When the cleaner is standby, press the button to let it shift to edge cleaning mode.
After finishing the sweeping task it automatically turns into recharging mode.
3. The cleaner will respond with a sound when receiving an order from the remote control.
1. Press the button to change the cleaner’s cleaning state to standby.
2. When the cleaner is standby, press the button to let it shift to single-room cleaning
mode. After finishing the sweeping task it automatically turns into recharging mode.
3. The cleaner will respond with a sound when receiving an order from the remote control.
1. In the standby state pressing this button, the “ ”and“ ” on the display screen
will flash. Then press the up/down key to adjust the hour.
2. Press the left/right-turn key “ ” and “ ” to change into “ ” to adjust the
minute.
3. Please save your settings by pressing the “ ” or “ ” key. The cleaner will
respond with a sound when receiving an order from the remote control.
1. In the standby state pressing this button, the “ ”and“ ” on the display
screen will flash. Then press the up/down key to adjust the hour.
2. Press the left/right-turn key “ ” and “ ” to change into “ ” to adjust the
minute.
3. Please save your settings by pressing the “ ” or “ ”. The cleaner will respond
with a sound when receiving an order from the remote control.
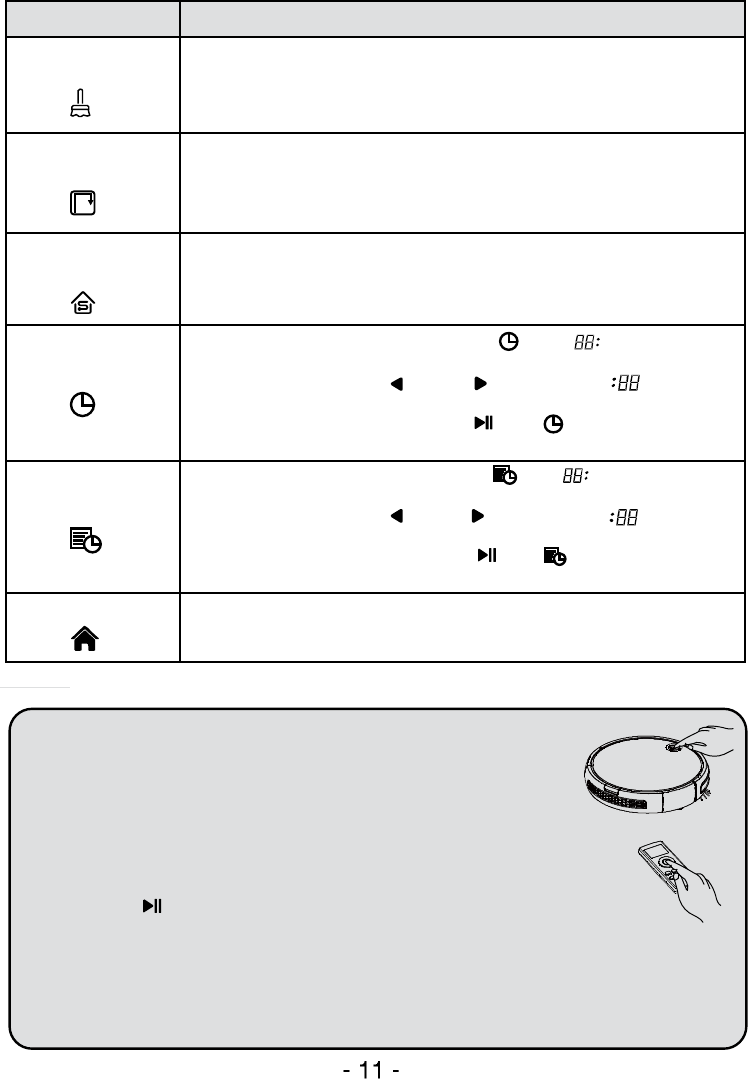
1. In the cleaning mode, press the button to change the vacuum cleaner into standby.
2. In the standby mode, press the button to let it do in recharging mode. The cleaner will
respond with a sound when receiving an order from the remote control.
Auto Cleaning button
Edge Cleaning button
Single Room Cleaning
button
Button of time-setting
Button of scheduling
to clean
Button of recharging
Function Guidelines Function Information
Steps of resetting the remote control:
A. Keep the cleaner in the standby mode;
B. Press the “power” button of the cleaner;
C. Waiting for 6s the machine will start to reset its code. The power indicator will flash.
D. Press the “ ” button, release the key. When listened the “didi” sound.The pairing
code process is finished.
Remarks:
if do not listen the “didi” sound, it means the pair-code operation is failed. Please repeat the above
procedures.
Note:
If the remote control fails to respond, please check whether its battery power
is too low. If you still can't operate the cleaner after charge,then re-pair again.
- 12 -
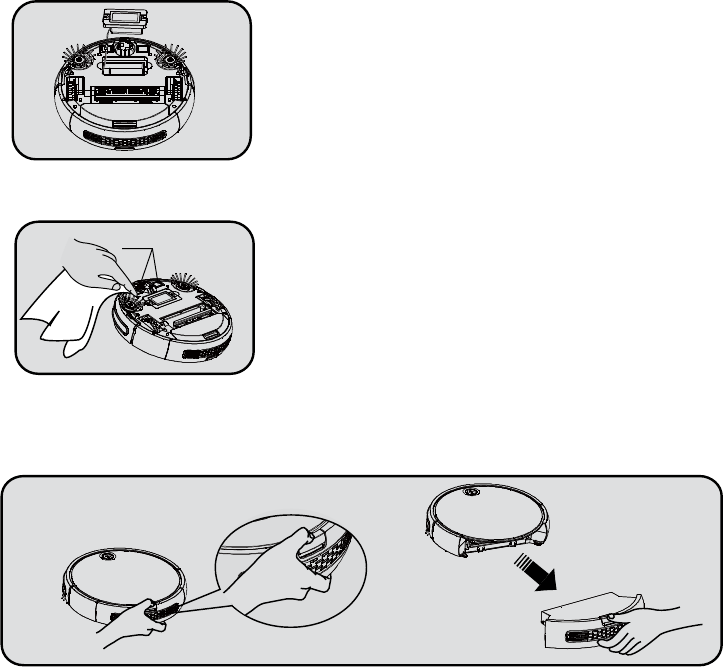
5.1 Daily Storage
5.2 Cleaning of Charging Plate
5.3 Clean the Dust Box
5.3.1 Assembly and Disassembly of Dustbin
5. Product Maintenance
If do not use the cleaner for a long time please fully
charge the battery first and store it in a dry place.
1. Please turn off the power switch or disconnect the
power plug first.
2. Please clean the charging plate monthly with dry cloth.
3. Do not use oil for scrubbing.
Press and hold the dustbin key and then take out the dustbin.
Charging
Pole Piece
- 13 -
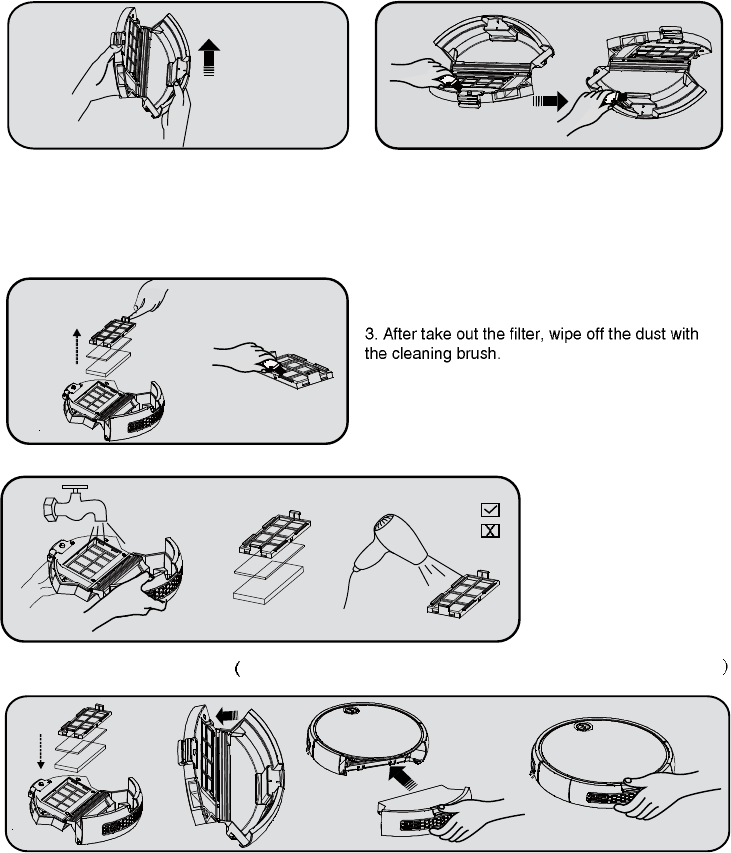
5.3.2 Cleaning dustbin
1. Open the baffle first, and then pour out the dust.
Recommendation:the dustbin should be cleaned
periodically.
2. Please clean the dustbin with the cleaning
brush.
4.The dustbin can be washed. Note: the dust box should be completely air-dried before re-inserting
cold air
hot air
5. After cleaning, re-assemble the filter in the dustbin first, and then install the dustbin into the cleaner.
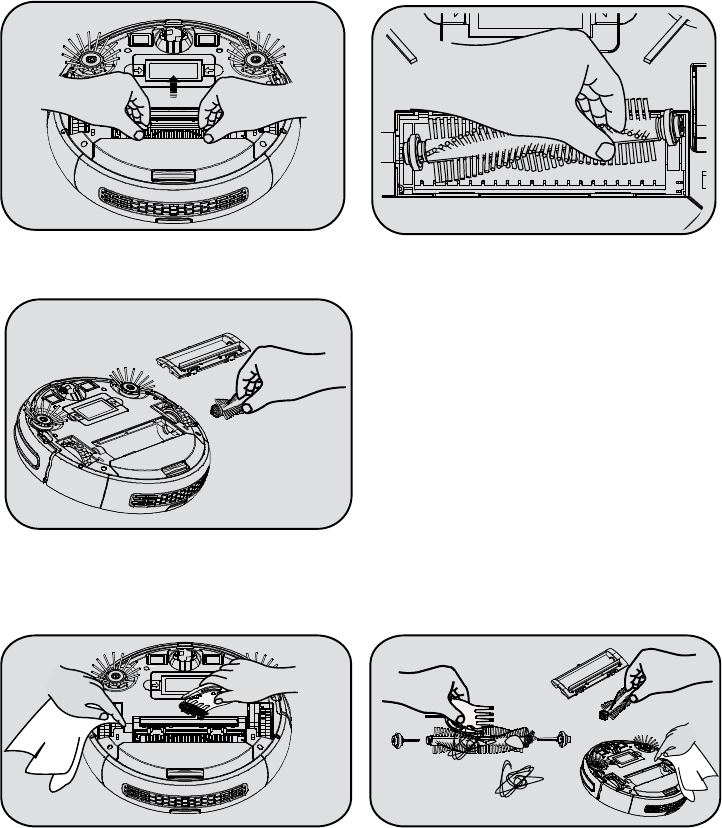
5.4 Clean the Main Brush
5.4.1 Disassemble the Main Brush
5.4.2 Cleaning the main brush and the rubber brush
3. Take out the middle brushes and its scraper assembly.
1. Push the locking-bar buckle and lift it upward. 2. Clutch the main brush and lift it upward.
1. Please clean the main brush and rubber brush
with the cleaning brush regularly. 2. Please remove the hair and other entanglements
on the main brush regularly.
- 14 -
- 15 -
5.7 Clean the Sensors
1. Unscrew the screws on the side brush
with a screwdriver. 2. Take out the side brush, tidy the hair and trash
on and inside the cell.
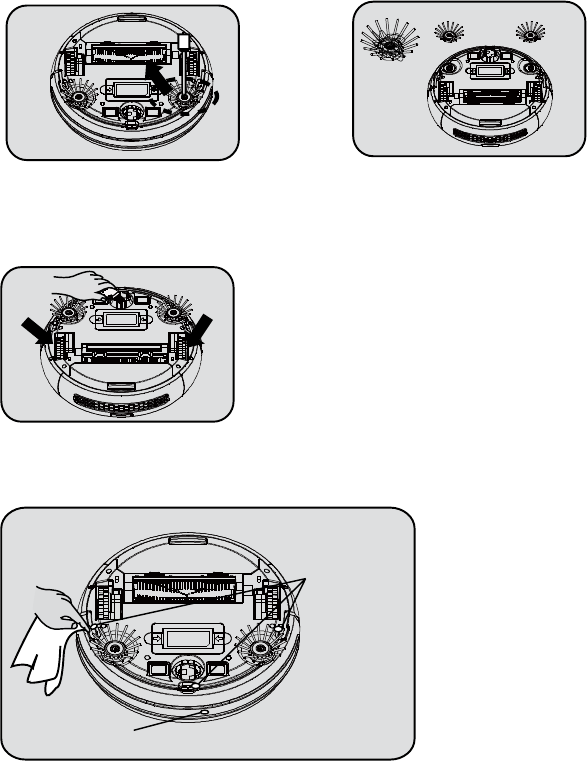
Clean the front, left and right wheels regularly with a cleaning brush.
After each cleaning work is completed, dry cotton cloth is used to dry the transparent plate to
prevent dust from being accumulated on the plate so as to affect the performance of this product.
Ground Monitoring
Sensor
IR Sensor
5.5 Clean the Side Brush
5.6 Clean the Wheels

- 16 -
Warm tips: If corresponding faults cannot be removed, please contact our after service team.
6. Common
Failure of device
taking off The device takes off and stops in
1 second.
Failure of front
wheel
The front wheel gets stuck and
doesn’t rotate.
Failure of ground
inspection There is a problem in the ground
inspection.
Low electricity of
battery
Battery power has been extremely
low (but not the critical point of
recharge voltage).
Failure of front
bumper The impact switches on the left and
right front shells can’t be restored.
Failure of main
brush
The main brush wheel is overloaded
or under loaded.
Failure of side
brush
The side-sweeper wheel is overloaded
or under loaded.
There is a problem in the wall
inspection.
Failure of fan
Flash blue light
twice with one
sound
Flash blue light
three times with
one sound
Flash blue light
four times with
one sound
Flash blue light
five times with
one sound
Flash blue light
six times with
one sound
Flash blue light
seven times with
one sound
Flash blue light
eight times with
one sound
Flash blue light
nine times with
one sound
Flash blue light
ten times with
one sound
Flash blue light
eleven times with
one sound
Flash blue light
twelve times with
one sound
Error-flash
indicator Fault NamesFault Forms Solutions
Failure of right
wheel
The left wheel doesn’t rotate and is
overloaded.
Please check if there are twisters on
the left wheel of the device.
Please check if there are twisters on
the right wheel of the device.
Please take the device back to the
floor. Don’t have it suspended in
the air.
Please check if there are twisters on
the small wheels of the front wheel.
Please check if the sensing window at
the bottom of the device is abnormally
shielded.
Please return the device to the docking
station for charging.
Please check if there are things like
hair or cloth twine the side brush.
Please check if the transparent window
of the wall inspection is shielded or
obstructed by hair and cloth.
Failure of charging
Flash blue light
fourteen times
with one sound
The right wheel doesn’t rotate and
is overloaded.
- 17 -
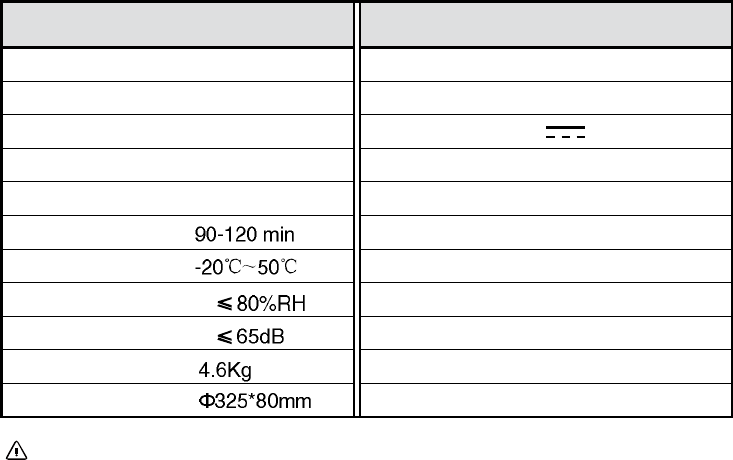
7.Technical Parameters
Main Body ParametersAccessories Parameters
Working Voltage
Rated Power
Remarks: our company reserve the right due to the need forany technology,
product design changes on products improvement. The power of interpretation is
owned by our company.
Voice
N.W.
Specification
Charging TimeAbout 3-5H
Working Time
Work Temp Range
Work Humidity Range
DC14.8 V
24 W Output Voltage
Adaptor
Charging Station
Input Voltage
DC19V
Output Current 600mA
DC 19V
Battery
Battery Capacity 2600mAh
Lithium battery
- 18 -
This device complies with Industry Canada licence-exempt RSS standard(s). Operation is subject to
the following two conditions: (1) this device may not cause interference, and (2) this device must
accept any interference, including interference that may cause undesired operation of the device.
Le présentappareilestconforme aux CNR d'Industrie Canada applicables aux appareils radio exempts
de licence. L'exploitationestautorisée aux deux conditions suivantes : (1) l'appareil ne doit pas produire
de brouillage, et (2) l'utilisateur de l'appareildoit accepter tout brouillageradioélectriquesubi, mêmesi le
brouillageest susceptible d'encompromettre le fonctionnement.
The manufacturer is not responsible for any radio or TV interference caused by unauthorized
modifications or change to this equipment. Such modifications or change could void the user’s authority
to operate the equipment.
This equipment has been tested and found to comply with the limits for a Class B digital device,
pursuant to part 15 of the FCC Rules. These limits are designed to provide reasonable protection
against harmful interference in a residential installation. This equipment generates, uses and can
radiate radio frequency energy and, if not installed and used in accordance with the instructions,
may cause harmful interference to radio communications. However, there is no guarantee that
interference will not occur in a particular installation. If this equipment does cause harmful
interference to radio or television reception, which can be determined by turning the equipment off
and on, the user is encouraged to try to correct the interference by one or more of the following
measures:
-- Reorient or relocate the receiving antenna.
-- Increase the separation between the equipment and receiver.
-- Connect the equipment into an outlet on a circuit different from that to which the receiver is connected.
-- Consult the dealer or an experienced radio/TV technician for help.
RF warning statement:
The device has been evaluated to meet general RF exposure requirement. The device can be used in
portable exposure condition without restriction.

Shenzhen Silver Star Intelligent Electronic Co., Ltd
Address: Block D, Huiqing Technical Park, Dafu Industrial Zone, Aobei
Community, Guanlan Street, Baoan District, Shenzhen City
Http://www. yxrobot.com