Sony Group DCRPC120 Digital Video Camera Recorder - Bluetooth User Manual network operating instructions
Sony Corporation Digital Video Camera Recorder - Bluetooth network operating instructions
Contents
- 1. network operating instructions
- 2. Note on model names
- 3. Users Manual I
- 4. Users Manual II
network operating instructions


![9Basic operations in the NETWORK modeThis section describes basic control ways to operate the camcorder, which are used forthe network operations.How to use the Network MenuTo access the Network Menu, refer to the section “Accessing to the network” in theoperating instructions supplied with your camcorder.<illustration>[a]: Send and receive e-mail. For details, see “Using e-mail” on page XX.[b]: Upload the images to your album on the Web and post the images on the Internet.For details, see “Making your album on the Web” on page XX.[c]: View a Web page through the Internet. For details, see “Viewing Web pages” onpage XX.[d]: You have to make various setup through this menu before using the networkfunction. For details, see “Setting network preferences” on page XX.](https://usermanual.wiki/Sony-Group/DCRPC120.network-operating-instructions/User-Guide-168905-Page-9.png)
![10How to use the control buttonMost of the network operations are carried out by the control button. Select a button onthe screen using the control button, then enter it by pressing the control button.NoteThe shape of the control button differs depending on your camcorder model.(1)Press v/V/b/B on the control button repeatedly to select the desired buttondisplayed on the screen.The selected button turns orange.<illustration>(2)Press the center z on the control button to enter it.<illustration>Repeat steps 1 and 2 to execute the function.The procedure above is referred to as “Select [XXXX], then execute it” in thisnetwork function operating instructions.How to input charactersYou have to frequently enter characters, such as e-mail addresses, Web page addresses(URL) to use the network function. This section describes how to input characters.1Selecting the character type(1)Display the character input screen.<illustration>Basic operations in the NETWORK mode](https://usermanual.wiki/Sony-Group/DCRPC120.network-operating-instructions/User-Guide-168905-Page-10.png)
![11(2)Select either of the character type tab.ROMAN: When inputting alphabetical characters.123: When inputting numerical characters.When selecting ROMAN When selecting 123<illustration> <illustration>2Inputting characters(1)Select the key which has the character you want to input.<illustration>(2)Press the center z on the control button to enter it.Pressing it repeatedly selects the other characters on the key. When inputtingthe same character or the other characters on the same key, select another keyusing v/V/b/B on the control button, then select the previous key again. Fordetails on available characters, see the “The characters list” on page XX.<illustration>(3)Repeat steps 1 and 2 to input characters.(4)After you input the characters, select [Enter], then execute it.The screen which is displayed before you display the character input screenappears.NoteEven if you cancel inputting characters, select [Enter], then execute it to exit thecharacter input screen.To delete the characterSelect [<] or [,]. Each time you press the center z on the control button, the cursor ismoved to the left or right. Move the cursor at the right of the character you want todelete, select [Back Space], then execute it. The character at the left of the cursor isdeleted.Basic operations in NETWORK](https://usermanual.wiki/Sony-Group/DCRPC120.network-operating-instructions/User-Guide-168905-Page-11.png)
![12To add a characterSelect [<] or [,]. Each time you press the center z on the control button, the cursor ismoved to the left or right. Move the cursor at the position you want to add a character,then input characters.To start a new lineSelect [ ], then execute it.E.g., Enter “Hello” into the Subject item on the Send screen(1)Select the abc tab.<illustration>(2)Select [ghi], then press the center z on the control button five times.“H” is entered.<illustration>(3)Select [def], then press the center z on the control button twice.“e” is entered.<illustration>(4)Select [jkl], then press the center z on the control button three times.“l” is entered.<illustration>Basic operations in NETWORK](https://usermanual.wiki/Sony-Group/DCRPC120.network-operating-instructions/User-Guide-168905-Page-12.png)
![13(5)Select [ ], then execute it.The cursor moves to the next position.<illustration>(6)Select [jkl], then press the center z on the control button three times.“l” is entered.<illustration>(7)Select [mno], then press the center z on the control button three times.“o” is entered.<illustration>(8)Select [enter], execute it.“Hello” is entered and the Send screen appears again.<illustration>Basic operations in NETWORK](https://usermanual.wiki/Sony-Group/DCRPC120.network-operating-instructions/User-Guide-168905-Page-13.png)
![14The available characters listAlphabetical charactersKey Characterabc a t b t c t A t B t C t a t...def d t e t f t D t E t F t d t...ghi g t h t i t G t H t I t g t...jkl j t k t l t J t K t L t j t...mno m t n t o t M t N t O t m t...pqrs p t q t r t s t P t Q t R t S t p t...tuv t t u t v t T t U t V t t t...wxyz w t x t y t z t W t X t Y t Z t w t...Symbol charactersKey Character. ',?! . t ' t , t ? t ! t . t...@/~\^ @ t / t ~ t \ t ^ t @ t...www. www. t .com t .net t .html t www. t...`´ˆ a: à t á t â t à t... A: À t Á t  t À t...e: è t é t ê t è t... E: È t É t Ê t È t...i: ì t í t î t ì t... I: Ì t Í t Î t Ì t...o: ò t ó t ô t ò t... O: Ò t Ó t Ô t Ò t...u: ù t ú t û t ù t... U: Ù t Ú t Û t Ù t...y: # Y: #¨ ˜ a: ä t ã t ä t... A: Ä t à t Ä t...e: ë E: Ëi: ï I: Ïo: ö t õ t ö t... O: Ö t Õ t Ö t...u: ü U: Üy: ÿ n: ñN: Ñçß¿¡ ç t ß t ¿ t ¡ t Ç t ç t...|<>{} | t < t > t { t } t | t...()[] ( t ) t [ t ] t ( t....+-=_ . t + t - t = t _ t . t...*;&:' * t ; t & t : t ' t * t...#"$% # t " t $ t % t # t...Basic operations in NETWORK](https://usermanual.wiki/Sony-Group/DCRPC120.network-operating-instructions/User-Guide-168905-Page-14.png)
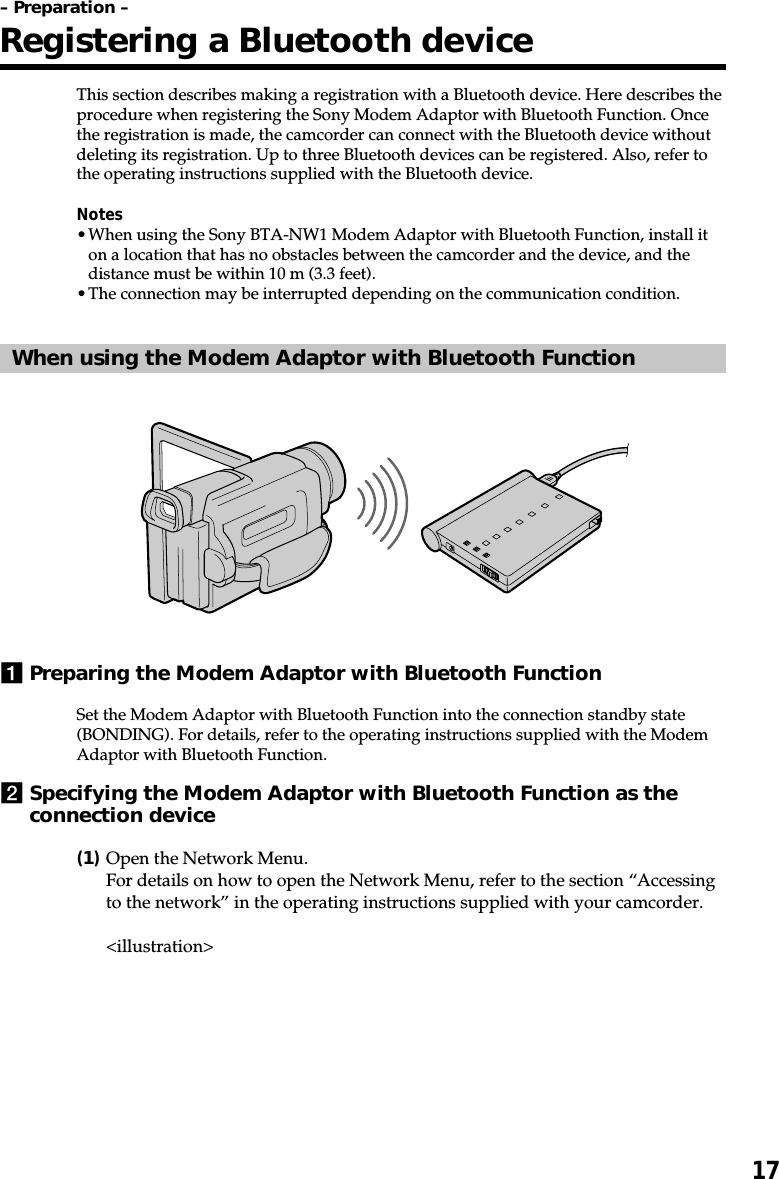
![18(2)Select [ Setup], then execute it.The Setup screen appears.<illustration>(3)Select [Bluetooth Setup], then execute it.The Bluetooth Setup screen appears.<illustration>(4)Select [Select], then execute it.The Bluetooth devices list appears. When making a registration for the firsttime, only [Return] and [New] are indicated. The list shows up to threeBluetooth devices. When selecting the Bluetooth device listed on it, see thesection “Selecting other Bluetooth devices from the list” on page XX.<illustration>TipThe last-used Bluetooth equipped device is listed next to [New].(5)Select [New], then execute it.The camcorder starts searching Bluetooth devices. When the searching iscompleted, the available Bluetooth devices list appears.<illustration>Notes•The searching time is for about 10 to 60 seconds. This time depends on the numberof Bluetooth devices around the camcorder.•If the Bluetooth device you want to register is not searched, carry out theprocedure again from step 4.Registering a Bluetooth device](https://usermanual.wiki/Sony-Group/DCRPC120.network-operating-instructions/User-Guide-168905-Page-18.png)
![19(6)Select the desired Bluetooth device, then execute it.The character input screen appears.<illustration>(7)Enter the pass key.For details on how to input characters, see “How to input characters” on pageXX.E. g., When using the BTA-NW1 Modem Adaptor with Bluetooth Function, thepass key is its serial number which is indicated on the label on the rear panel.Tip on “Pass key”The pass key is an identification number needed to allow two Bluetoothdevices to communicate with each other. The connection will be permittedafter entering the pass key. This “Pass key” is also referred to as a “Bluetoothpass key,” “PIN,” “Bluetooth PIN,” etc. For details, refer to the operatinginstructions supplied with the Bluetooth adaptor.(8)Select [Enter], then execute it.After the registration is completed, the Bluetooth Setup screen appears again.The selected Bluetooth device is specified.<illustration>NoteWhen the message “Bluetooth Registration Error Check The Passkey” isindicated, select [OK], then execute it. Carry out the procedure again from step4.(9)Select [Exit], then execute it.The Setup screen appears again. For details on how to turn off the ModemAdaptor with Bluetooth Function, refer to the operating instructions suppliedwith the Modem Adaptor with Bluetooth Function.MODEM ADAPTOR WITH BLUETOOTHTM FUNCTIONMODEL NO. BTA-NW1®Pass keyThe number used when registering aBluetooth deviceRegistering a Bluetooth device](https://usermanual.wiki/Sony-Group/DCRPC120.network-operating-instructions/User-Guide-168905-Page-19.png)
![20(10)Select [Exit], then execute it.The Network Menu appears again.When the registration was failedCarry out the procedure “When using the Modem Adaptor with Bluetooth Function ”on page xx again from step 4.Displaying self informationYou can display your camcorder information.(1)Open the Network Menu.For details on how to open the Network Menu, refer to the section “Accessingto the network” in the operating instructions supplied with your camcorder.<illustration>(2)Select [ Setup], then execute it.The Setup screen appears.<illustration>(3)Select [Bluetooth Setup], then execute it.The Bluetooth Setup screen appears.<illustration>(4)Select [Self information], then execute it.The Bluetooth: Self information screen appears.<illustration>Registering a Bluetooth deviceThis is the unique address equippedwith each camcorder at the factory. Thisis used when exchanging informationbetween the devices. This cannot bemodified.The model name](https://usermanual.wiki/Sony-Group/DCRPC120.network-operating-instructions/User-Guide-168905-Page-20.png)
![21To clear the Self InformationSelect [Return], then execute it.Radio wave indication indicates a radio wave condition with the connected Bluetooth device. (Use thisindication as a guide.)Deleting the registered Bluetooth device from the listUp to three Bluetooth devices can be registered on the camcorder. When deleting theBluetooth device from the list, follow the procedure below.(1)Open the Network Menu.For details on how to open the Network Menu, refer to the section “Accessingto the network” in the operating instructions supplied with your camcorder.<illustration>(2)Select [ Setup], then execute it.The Setup screen appears.<illustration>(3)Select [Bluetooth Setup], then execute it.The Bluetooth Setup screen appears.<illustration>Registering a Bluetooth device](https://usermanual.wiki/Sony-Group/DCRPC120.network-operating-instructions/User-Guide-168905-Page-21.png)
![22(4)Select [Select], then execute it.The Bluetooth devices list appears.<illustration>(5)Select the device you want to delete, then execute it.The device name and address of the selected device are indicated.<illustration>(6)Select [Delete], then execute it.The selected device is deleted from the list.Selecting other Bluetooth devices from the listSelect the Bluetooth device you want to specify, then execute it in step 4 in “When usingthe Modem Adaptor with Bluetooth Function” on page XX. The Self Information screenappears. Select [OK], then execute it.Registering a Bluetooth device](https://usermanual.wiki/Sony-Group/DCRPC120.network-operating-instructions/User-Guide-168905-Page-22.png)
![24(2)Select [ Setup], then execute it.The Setup screen menu appears.<illustration>(3)Select [Online Registration], then execute it.The screen for verifying the connection appears. Select [OK], then execute it.The camcorder starts connecting to the site. Once the connection is completed,the online registration screen appears. Set the Bluetooth device to connectionstandby with the camcorder beforehand. For details, refer to the operatinginstructions supplied with the Bluetooth device.(4)Register your information following the indication on the screen.When registering for the first time, select [????] from the menu, and when youalready have your DI customer ID, select [????].<illustration>NoteWhen making an online registration through the camcorder, the connection will beautomatically disconnected after a period of time. However, data entry can be doneoffline. When the camcorder need to connect with the site, the screen for verifying theconnection appears. Select [OK], then execute it, the connection will be establishedagain.Entry your DI customer ID and passwordDI customer IDPasswordBe careful to manage your DI customer ID and password so that they are not detected.Making the registration other than the online registrationthrough your camcorderXXXXCustomer registration](https://usermanual.wiki/Sony-Group/DCRPC120.network-operating-instructions/User-Guide-168905-Page-24.png)


![30You have to access the Internet to make your album on the Web, view a Web page, orsend or receive your e-mail. This section describes how to set network preferences toaccess the Internet.Entering your customer ID and passwordEnter your customer ID and password you obtained by the DI customer registration.This setup is required for making your album on the Web.(1)Open the Network Menu.For details on how to open the Network Menu, refer to the section “Accessingto the network” in the operating instructions supplied with your camcorder.<illustration>(2)Select [ Setup], then execute it.The Setup screen appears.<illustration>(3)Select [Network Setup], then execute it.The Network Setup screen appears.<illustration>(4)Select [ID], then execute it.The character input screen appears.<illustration>(5)Enter your DI customer ID.For details on how to input characters, see “How to input characters” on pageXX.Setting network preferences](https://usermanual.wiki/Sony-Group/DCRPC120.network-operating-instructions/User-Guide-168905-Page-30.png)
![31(6)Select [Enter], then execute it.The Network Setup screen appears again.<illustration>(7)Select [Password], then execute it.The character input screen appears.<illustration>(8)Enter your password.For details on how to input characters, see “How to input characters” on pageXX.NoteWhen you check the item “Verify Password” in the Network Options screen,you cannot enter your password. If you try to enter it, the message “PasswordAlready Set Check The Password Profile” appears.(9)Select [Enter], then execute it.The Network Setup screen appears again.<illustration>TipWhile inputting password characters, they are visible as they are. However,after it has been entered, each character is indicated as “∗”. If you enter yourpassword again, delete all “∗” before entering the password.(10)Select [Exit], then execute it.The setup of the DI customer ID and password are completed, and the Setupscreen appears again.Setting network preferences](https://usermanual.wiki/Sony-Group/DCRPC120.network-operating-instructions/User-Guide-168905-Page-31.png)
![32Setting your provider preferencesWhen using “Sony Style Connect,” carry out the following procedures: “1 Selectingyour provider type” on page xx, “2 Entering telephone numbers of your accesspoints” on page xx, and “4 Setting other preferences” on page xx.When using other providers, carry out the following procedures: “1 Selecting yourprovider type” on page xx, “3 Setting your provider preferences manually” on pagexx, and “4 Setting other preferences” on page xx.TipEven if you do not set up the items described in “4 Setting other preferences,” you canaccess the Internet by using the default setting.Tip on passwordWhen you check the item “Verify Password” in the Network Options screen, you haveto enter your password whenever you connect your provider. For details, see “4Setting other preferences” on page xx.1Selecting your provider typeSelect whether you are use “Sony Style Connect” or not.(1)Select [Network Setup], then execute it.The Network Setup screen appears.<illustration>(2)Select your provider type.When using R-net:1 Select [Sony Style Connect], then execute it.a is checked and changs to .<illustration>Setting network preferences](https://usermanual.wiki/Sony-Group/DCRPC120.network-operating-instructions/User-Guide-168905-Page-32.png)
![332 Select [Setting], then execute it. The Provider Setting: Sony Style Connect screen appears.<illustration>Go to “2 Entering telephone numbers of your access points” on page XX.When using other providers:1 Select [Custom], then execute it.a is checked and changs to .<illustration>2 Select [Setting], then execute it. The Provider Setup: Custom screen appears.<illustration>Go to “3 Setting your provider preferences manually” on page XX.2Entering telephone numbers of your access pointsThis setup is only for using “Sony Style Connect.” ??For more information on telephonenumbers of access points, consult your nearest R-net.??Tip on access pointMost of the providers install the access points in various areas. We recommend that youselect the most convenient access point in charge.(1)Select [TEL1], then execute it.The character input screen appears.<illustration>Setting network preferences](https://usermanual.wiki/Sony-Group/DCRPC120.network-operating-instructions/User-Guide-168905-Page-33.png)
![34(2)Enter the telephone number of your access point.For details on how to input characters, see “How to input characters” on pageXX.(3)Select [Enter], then execute it.The Provider Setting: Sony Style Connect screen appears again.<illustration>TipYou can also register the telephone numbers of access points into [TEL2] and[TEL3]. If necessary, enter the numbers into [TEL2] and [TEL3].(4)Select [OK], then execute it.The telephone numbers registration is complete.Go to “4 Setting other preferences” on page XX.3Setting your provider preferences manuallyThis setup is only for using general providers. For details, consult your provider.(1)Display the PPP screen following from step 3 in “1 Selecting your providertype” on page XX.If the PPP screen is not displayed, select the PPP tab.<illustration>(2)Set up the following items:ID: Enter your login name for accessing your provider using a dial-upconnection.Tip on “ID”This “ID” is also referred to as a “user ID,” “login name,” “PPP login name,”“network ID,” “account name,” “logon name,” “user name,” etc.Password: Enter your password for accessing your provider using a dial-upconnection.Tip on “Password”This “Password” is also referred to as a “PPP password,” “networkpassword,” “connection password,” etc.Setting network preferences](https://usermanual.wiki/Sony-Group/DCRPC120.network-operating-instructions/User-Guide-168905-Page-34.png)
![36SMTP Server: Enter the SMTP (Simple Mail Transfer Protocol) server addressof your provider. The SMTP server is for sending e-mail.Tip on “SMTP Server”This “SMTP Server” is also referred to as a “mail server,” “SMTP mail server,”etc. The SMTP server is the same as the POP server depending on the provider.POP Server: Enter the POP (Post Office Protocol) server address of yourprovider. The POP server is for receiving e-mail.Tip on “POP Server”This “POP Server” is also referred to as a “mail server,” “POP3 server,” etc.APOP: Select whether you use APOP.Tip on “APOP”APOP is the authentication protocol for security. When your provider supportsAPOP, we recommend that you check this item. For more information onwhether the provider support APOP or not, consult your provider.(5)Select the Browse tab.The Browse screen appears.<illustration>(6)Set up the following items:Proxy: Enter the proxy server address of your provider.Port: Enter the port number of the proxy server of your provider. This entrymay be unnecessary depending on your provider. For details, consult yourprovider.(7)Select [Exit], then execute it.The setup is completed, and the Network Setup screen appears again.(8)Select [Exit], then execute it.The Setup screen appears again.4Setting other preferences(1)Display the Setup screen.<illustration>Setting network preferences](https://usermanual.wiki/Sony-Group/DCRPC120.network-operating-instructions/User-Guide-168905-Page-36.png)
![37(2)Select [Network Options], then execute it.The Network Options screen appears.<illustration>(3)Set up the following items:Verify Password: Select whether the password entry is required when youaccess your provider. When you check this item, you have to enter your DIcustomer ID password or password for accessing your provider each timeyou try to make a connection.NoteWhen this item is checked:–You cannot set your DI customer ID password and the password for accessingyour provider.–You cannot use your album on the Web if you set your preferences manually.Tip on “Verify Password”When you check this item, you have to enter your DI customer password andyour password for accessing your provider each time you try to make aconnection. This can prevent other person from connecting your provider withyour ID.Time Out: Select whether the connection is automatically canceled if nocommunication is made for specific time (1 minute, 2 minutes, 5 minutes, 15minutes, or 30 minutes).MailSend&Receive: Select whether check the e-mail inbox after sending e-mail.This item is checked at the factory.Restrict: Select whether to skip e-mail if its file size is more then 50 KB,200 KB, or 500 KB.Save Mail to Server: Select whether to keep copies of the messages on theserver.NoteIf you try to receive e-mail without checking this item, the e-mail messagemay not be able to receive and may lost from your server depending on thetype of e-mail. For details, see “Note on “Save Mail to Server”” on page XX.Signature: Set up the signature when you attach your signature to e-mail.BrowseCookie: Select whether to accept a cookie. When you do not want to sendyour user identifying information, do not check this item. This item ischecked at the factory.Setting network preferences](https://usermanual.wiki/Sony-Group/DCRPC120.network-operating-instructions/User-Guide-168905-Page-37.png)
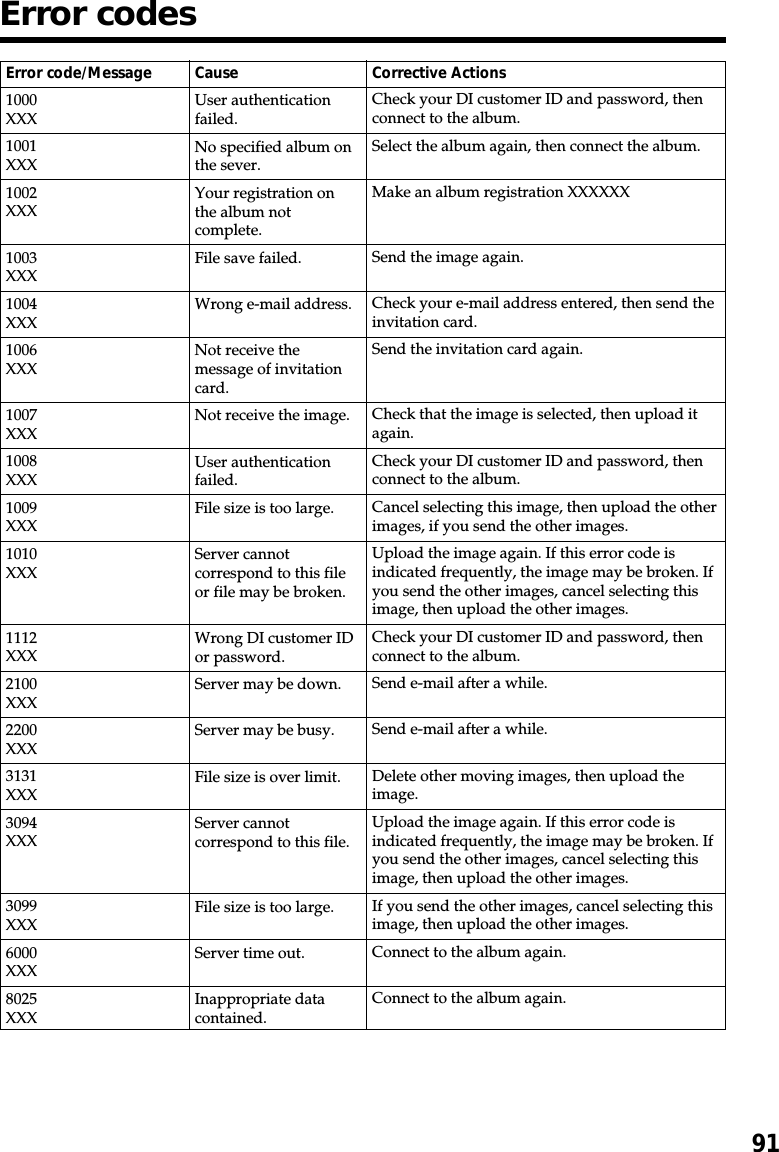
![38Image Display: Select whether to display images on the screen whenviewing a Web page. This item is checked at the factory.Reset: Reset all the items on the Network Options screen except “Signature”and “Modem Init.”NoteThe screen for verification does not appear when you try to reset items.Modem Init: Set up the character sting of the modem initialization. If nosetup is specified, you need not to modify this item.(4)Select [Exit], then execute it.The Setup screen appears again.Note on “Save Mail to Server”When “Save Mail to Server” is not checked, the copies of the received e-mail messageswill not be stored on the server. However, the following cases described below dependon the types of e-mail messages. See the table below.Messages* Cause and/or Corrective ActionsMemory Stick Memory FullAction CanceledMail Over Size LimitReceiving Mail CanceledAttached Invalid File Type....DeletedMail Over Size LimitMessage DeletedMemory Stick Directory ErrorAttached File Deleted* These error messages are indicated on the top of a message.1) The received e-mail is stored on the server when you did not check the item “SaveMail to Server.” You can receive that e-mail using your computer etc.2) The received e-mail is not stored on the server when you did not check the item “SaveMail to Server.” You cannot also receive that e-mail using your computer etc.3) As for the e-mail message that has lots of line break, the number of availablecharacters is less than 4000.You tried to receive e-mail when the “Memory Stick” isalready full 1).cDelete the e-mail, and delete unnecessary e-mailmessages or image files in the “Memory Stick,” thenreceive e-mail again.cInsert another “Memory Stick” that has sufficientmemory, then receive e-mail again.You tried to receive e-mail whose size is over the size set inthe item “Restrict” 1).cYou can receive that e-mail using your computer etc.cDelete the e-mail, and release the checkmark of the item“Restrict,” then receive e-mail again.You received e-mail that has the attached file whose filename extension is invalid 2).cThe camcorder cannot receive the files other than theJPEG or MPEG format.You received e-mail that the number of characters of themessage is more than 4000 2).cThe camcorder cannot receive the e-mail message thathas 4000 characters or more 3).cInsert another “Memory Stick” that has sufficientmemory, then receive e-mail again.Setting network preferences](https://usermanual.wiki/Sony-Group/DCRPC120.network-operating-instructions/User-Guide-168905-Page-38.png)
![40(2)Select [ Album], then execute it.The Album screen appears.<illustration>(3)Select [ Upload], then execute it.The Web Album – Upload screen appears.<illustration>(4)Select [Album No.], then execute it.The album list page appears.<illustration>(5)Select the desired album, then execute it.Selecting the album is complete.<illustration>The number of prepared albumsThere are 10 albums (ALBUM 01 to 10).Making your album on the Web](https://usermanual.wiki/Sony-Group/DCRPC120.network-operating-instructions/User-Guide-168905-Page-40.png)
![412Selecting images to uploadNext, select the images to upload.(1)Select [ImageSelect], then execute it.The image index list appears.<illustration>(2)Select the desired images.Move the yellow arrow mark onto the image you want to upload, then pressthe control button. The selected image is indicated by the checkmark ( ).<illustration>To page up or down the image index listSelect [<] or [,], then execute it. The next or previous page is displayed.(3)Repeat step 2 to select other images.Notes•The total number of images is 99, and the total file size is up to 3 MB.•You cannot upload images to two albums or more at the same time.(4)Select [OK], then execute it.The Album: Upload screen appears again. The total number of selected imagesand total file size are indicated.<illustration>When you only upload the images, go to “5 Uploading images” on page XX.Making your album on the Web](https://usermanual.wiki/Sony-Group/DCRPC120.network-operating-instructions/User-Guide-168905-Page-41.png)
![423Sending an invitation cardSelect the addressee to send the invitation card.(1)Select [Invitation], then execute it.The Album: Invitation screen appears.<illustration>(2)Select [To], then execute it.The address list appears. The list shows the destination addresses that areregistered on the address book. For details on the address book, see “Using theaddress book” on page XX.<illustration>When you select the address listed on it, go to step 6.Tips•The last-used address is listed next to New.•Addresses are listed in the historical order.(3)Select [@ New], then execute it.The character input screen appears.<illustration>(4)Enter the e-mail address of the destination address.For details on how to input characters, see “How to input characters” on pageXX.Making your album on the Web](https://usermanual.wiki/Sony-Group/DCRPC120.network-operating-instructions/User-Guide-168905-Page-42.png)
![43(5)Select [Enter], then execute it.The Album: Invitation screen appears again. The new e-mail address is listedand its check box is indicated by the checkmark ( ).<illustration>(6)If you send the invitation card to other addresses, select other e-mailaddresses, then execute it.The check box of the selected e-mail address is indicated by the checkmark().<illustration>(7)Select [@ Return], then execute it.The Album: Invitation screen appears again.NoteIf you try to send the invitation card with 50 addresses registered on the address book,the latest-used address will be deleted. The message “Address Book Full Overwrite theData with Current Address?” appears for verification. When you overwrite it, select[OK], then execute it. When you select [Cancel], delete the unnecessary address fromthe address book, then enter a new address.4Entering the text of a messageEnter the text of the message. You can select the text from the message list, or modify itto use. The list shows up to six messages.(1)Select [Message], then execute it.The message list appears.<illustration>Making your album on the Web](https://usermanual.wiki/Sony-Group/DCRPC120.network-operating-instructions/User-Guide-168905-Page-43.png)
![44The list shows the messages that were entered. When you select the messagelisted on it, select it from the list.When you use the selected text, select [OK], then execute it. After you selectthe message, go to “5 Uploading images” on page XX.When you modify the selected text, select [Edit], then execute it. The characterinput screen appears. Go to step 3.(2)Select [@ New], then execute it.The character input screen appears.<illustration>(3)Enter the text.For details on how to input characters, see “How to input characters” on pageXX.NoteThe total number of characters is up to 512.(4)Select [Enter], then execute it.The Album: Invitation screen appears again.<illustration>(5)Select [OK], then execute it.The Album: Upload screen appears again.“Yes” is indicated next to [Invitation].<illustration>Making your album on the Web](https://usermanual.wiki/Sony-Group/DCRPC120.network-operating-instructions/User-Guide-168905-Page-44.png)
![455Uploading images(1)Select [Send], then execute it.The screen for verifying the connection appears.<illustration>(2)Check the telephone number.When dialing to other telephone numbersSelect [TEL No.], then execute it. The registered telephone number list appears.Select the desired telephone number, then execute it. The selected telephonenumber is specified.(3)Select [Connect], then execute it.The camcorder starts dialing to the selected telephone number. After theuploading is completed, the message “Upload Complete” appears.<illustration> <illustration> <illustration>(4)Select [OK], then execute it.The Album: Upload screen appears again.To cancel uploadingDuring uploading, select [Cancel], then execute it.To send only an invitation cardYou can send only an invitation card. Carry out the following procedures: “1 Selectingthe album number” on page XX, “3 Sending an invitation card” on page XX, “4Entering the text of a message” on page XX, and “5 Uploading images” on page XX.After the invitation card has been sent, the message “Invitation Mail Complete”appears.Making your album on the Web](https://usermanual.wiki/Sony-Group/DCRPC120.network-operating-instructions/User-Guide-168905-Page-45.png)
![46Viewing or editing images of your album on the WebYou can view or download images of your album on the Web.1Viewing images(1)Open the Network Menu.For details on how to open the Network Menu, refer to the section “Accessingto the network” in the operating instructions supplied with your camcorder.<illustration>(2)Select [ Album], then execute it.The Album screen appears.<illustration>(3)Select [ View/Edit], then execute it.The screen for verifying the connection appears.Set the Bluetooth device to connection standby with the camcorderbeforehand. For details, refer to the operating instructions supplied with theBluetooth device.<illustration>(4)Check the telephone number.When dialing to other telephone numbersSelect [TEL No.], then execute it. The registered telephone number list appears.Select the desired telephone number, then execute it. The selected telephonenumber is specified.Making your album on the Web](https://usermanual.wiki/Sony-Group/DCRPC120.network-operating-instructions/User-Guide-168905-Page-46.png)
![47(5)Select [Connect], then execute it.The camcorder starts dialing to the selected telephone number. After theconnection is completed, the album list page appears.<illustration>(6)Select the album number that the image you want to view or edit is stored,then execute it.The index page appears.<illustration>(7)Select the desired image, then execute it.The image is enlarged to fill the screen.2Downloading images from the albumPreparation•Insert the “Memory Stick” for storing images into the camcorder.•Release the lock of the “Memory Stick.”(1)Select the images to download.You can select the images in the following two ways:Selecting the images from the index page:You can select several images and download them at once. For details, see“When selecting images from the index page” on page XX.Selecting the image displayed on the single-image screen:You can select the image displayed on the single-image screen and downloadit. For details, see “When selecting the image displayed on the single-imagescreen” on page XX.Making your album on the Web](https://usermanual.wiki/Sony-Group/DCRPC120.network-operating-instructions/User-Guide-168905-Page-47.png)
![48(2)Check the number of images and the total file size.When selecting single image When selecting several images<illustration> <illustration>To cancel the downloading imagesSelect [Cancel], then execute it.(3)Select [OK], then execute it.The message “Downloading” appears. After the downloading is completed,the message “Download Complete” appears.<illustration>(4)Select [OK], then execute it.The index page or single-image screen appears.To cancel downloadingDuring downloading, select [Cancel], then execute it.To view the downloaded imageExit the NETWORK mode, then view the image following the procedure for viewingthe image recorded on a “Memory Stick.” In such cases, the file name displayed on thecamcorder is indicated in the following order: 700-0001, 700-0002, 700-0003 ...Notes•Do not eject the “Memory Stick” during downloading.•When returned to the index page in step 4, the checkmark remains indicated.•You can download the file whose file name is indicated with “jpg” or “mpg.”•When you downloaded images modified with a computer, or images recorded withanother devices, the camcorder may not be able to play back the images properly.Making your album on the Web](https://usermanual.wiki/Sony-Group/DCRPC120.network-operating-instructions/User-Guide-168905-Page-48.png)
![49When selecting images from the index page(1)Select the check box of the desired image, then execute it.The check box is indicated by the checkmark ( ).<illustration>(2)When you select other images, repeat step 1.(3)Select [ Download], then execute it.The screen for verification appears.Set the Bluetooth device to connection standby with the camcorderbeforehand. For details, refer to the operating instructions supplied with theBluetooth device.<illustration>To select all the imagesSelect [ Select All], then execute it.To cancel specifying imagesSelect the check box of the image again, then execute it.To cancel all the selected imagesSelect [Delete All], then execute it.To return to the album list pageSelect [Album List], then execute it.When selecting the image displayed on the single-image screenYou can select the image displayed on the full-screen and download it.(1)When the index page is displayed, select the image to enlarge.The image is indicated on the single-image screen.<illustration>Making your album on the Web](https://usermanual.wiki/Sony-Group/DCRPC120.network-operating-instructions/User-Guide-168905-Page-49.png)
![50(2)When selecting another image, select [ Previous] or [ Next], then executeit.(3)Select [ Download], then execute it.The screen for verification appears.<illustration>To return to the index pageSelect [Index Page], then execute it.Deleting images from the albumYou can delete the images from the album.When deleting the image displayed on the index pageYou can select several images and delete them at once. Select [Delete] in step 3 in“When selecting images from the index page” on page XX, then execute it. The screenfor verification appears. Select [OK], then execute it. The index page appears again.When deleting the image displayed on the single-image screenSelect [Delete] in step 3 in “When selecting the image displayed on the single-imagescreen” on page XX, then execute it. The screen for verification appears. Select [OK],then execute it. The next image is displayed.If the album is emptyThe message “XXX XXX” appears.<illustration>Select [Album List], then execute it to return to the album list page.Making your album on the Web](https://usermanual.wiki/Sony-Group/DCRPC120.network-operating-instructions/User-Guide-168905-Page-50.png)
![52This section describes the basic usage of e-mail. E-mail is send and received via theInternet. E-mail is very convenient; you can send e-mail anytime, and its e-mail hasbeen sent in a moment, you can also send images stored in a “Memory Stick” byattaching them to e-mail.Sending e-mailBy entering the destination e-mail address, you can send e-mail in a moment.1Specifying the destination addressBe careful to enter the address correctly.TipYou can select the e-mail address from the address book. For details, see “Selecting thedestination address from the address book” on page XX.(1)Open the Network Menu.For details on how to open the Network Menu, refer to the section “Accessingto the network” in the operating instructions supplied with your camcorder.<illustration>(2)Select [ Mail], then execute it.The Send screen appears.<illustration>(3)Select [To], then execute it.The address list appears. The list shows the addresses that are registered onthe address book. For details on the address book, see “Using the addressbook” on page XX.<illustration>When you select the address listed on it, go to step 7.Using e-mail](https://usermanual.wiki/Sony-Group/DCRPC120.network-operating-instructions/User-Guide-168905-Page-52.png)
![53Tips•The last-used address is listed next to New.•Addresses are listed in the historical order.(4)Select [New], then execute it.The character input screen appears.<illustration>(5)Enter the e-mail address of an addressee.For details on how to input characters, see “How to input characters” on pageXX.(6)Select [Enter], then execute it.The Send screen appears again. The new e-mail address is listed and its checkbox is indicated by the checkmark ( ).<illustration>TipIf you notice that the e-mail address is wrong, you can correct it in the addressbook. For details on the address book, see “Editing the address book” on pageXX.(7)If you send the e-mail message to other addresses, select other e-mailaddresses.The check box of the selected e-mail address is indicated by the checkmark().<illustration>Using e-mail](https://usermanual.wiki/Sony-Group/DCRPC120.network-operating-instructions/User-Guide-168905-Page-53.png)
![54(8)Select [Return], then execute it.The Send screen appears again.<illustration>NoteIf you try to send the e-mail message with 50 addresses registered on the address book,the latest-used address will be deleted. The message “Address Book Full Overwrite theData with Current Address?” appears for verification. When you overwrite it, select[OK], then execute it. When you select [Cancel], delete the unnecessary address fromthe address book, then enter a new address.2Entering the subject of the message(1)Select [Subject], then execute it.The subject list appears. The list shows up to six subjects.<illustration>When you select the subject listed on it, select the subject, then execute it. Afterselecting it, go to “3 Entering the text of a message” on page XX.TipThe last-used address is listed next to New.(2)Select [New], then execute it.The character input screen appears.<illustration>(3)Enter the subject.For details on how to input characters, see “How to input characters” on pageXX.NoteThe total number of characters is up to 24.Using e-mail](https://usermanual.wiki/Sony-Group/DCRPC120.network-operating-instructions/User-Guide-168905-Page-54.png)
![55(4)Select [Enter], then execute it.The Send screen appears again.<illustration>3Entering the text of a messageEnter the text of the message. You can select the text from the message list, or modify itto use. The list shows up to six messages.(1)Select [Message], then execute it.The message list appears.<illustration>The list shows the messages that were entered.When you use the selected text, select [OK], then execute it. After you selectthe message, go to “4 Sending e-mail” on page XX.When you modify the selected text, select [Edit], then execute it. The characterinput screen appears. Go to step 3.(2)Select [@ New], then execute it.The character input screen appears.<illustration>(3)Enter the message.For details on how to input characters, see “How to input characters” on pageXX.NoteThe total number of characters is up to 512.Using e-mail](https://usermanual.wiki/Sony-Group/DCRPC120.network-operating-instructions/User-Guide-168905-Page-55.png)
![56(4)Select [Enter], then execute it.The Send screen appears again.<illustration>4Sending e-mailTipYou can send the e-mail message with your signature. For details, see “Attaching yoursignature to the message” on page XX.(1)Select whether you attach images or not.When attaching images, see “Attaching images to e-mail” on page XX.(2)Check the message.When you check or modify the message, see “Checking or modifying themessage” on page XX.(3)Select [Send], then execute it.The screen for verifying the connection appears. Set the Bluetooth device intoconnection standby with the camcorder beforehand. For details, refer to theoperating instructions supplied with the Bluetooth device.<illustration>(4)Check the telephone number.When dialing to other telephone numbersSelect [TEL No.], then execute it. The registered telephone number list appears.Select the desired telephone number, then execute it. The selected telephonenumber is specified.(5)Select [Connect], then execute it.The camcorder starts dialing to the selected telephone number. After thesending is completed, the message “Sending Mail Complete” appears. Thephone line is automatically disconnected.<illustration> <illustration>Using e-mail](https://usermanual.wiki/Sony-Group/DCRPC120.network-operating-instructions/User-Guide-168905-Page-56.png)
![57(6)Select [OK], then execute it.The Send screen appears again.To cancel sending e-mailDuring sending, select [Cancel], then execute it.TipYou can check the e-mail inbox after sending e-mail. For details, see “4 Setting otherpreferences” on page XX.Checking or modifying the message(1)Display the Send screen.<illustration>(2)Select [Message], then execute it.The message list appears.<illustration>(3)Select the message you want to check or modify, then execute it.The following screen appears.<illustration>(4)Check or modify the message. When the message is too long, select themessage area, then press the control button V repeatedly to scroll the message.When you only check the message:After checking the message, select [OK], then execute it. The Send screenappears again.When you modify the message:Go to step 5.Using e-mail](https://usermanual.wiki/Sony-Group/DCRPC120.network-operating-instructions/User-Guide-168905-Page-57.png)
![58(5)Select [Edit], then execute it.The character input screen appears.<illustration>(6)Modify the message.For details on how to input characters, see “How to input characters” on pageXX.(7)Select [Enter], then execute it.The Send screen appears again.Attaching images to e-mailYou can send images by attaching them to e-mail.PreparationStore the desired images in the “Memory Stick” and insert it into the camcorder.(1)Follow the procedure: “1 Specifying the destination address” on page XX,“2 Entering the subject of the message” on page XX, “3 Entering the text ofa message” on page XX.The Send screen appears.<illustration>(2)Select [Attach], then execute it.The image index list appears.<illustration>Using e-mail](https://usermanual.wiki/Sony-Group/DCRPC120.network-operating-instructions/User-Guide-168905-Page-58.png)
![59(3)Select the desired images.Move the yellow arrow mark onto the image you want to upload, then pressthe control button. The selected image is indicated by the checkmark ( ).<illustration>To page up or down the index listSelect [<] or [,], then execute it. The next or previous page is displayed.(4)Repeat step 3 to select other images.NoteThe total number of images is 99, and the total file size is up to 3 MB.(5)Select [@ OK], then execute it.The Send screen appears again. The total number of selected images and totalfile size are indicated.<illustration>To cancel the selected imageSelect the image again, then execute it. Its checkmark will go off from theimage.To cancel all the selected imagesSelect [@ Delete All], then execute it.(6)Carry out from step 3 in “4 Sending e-mail” on page XX.NoteIt takes more time to send images depending on the image file size.Attaching your signature to the messageYou can attach your signature to the last column of the e-mail message.Using e-mail](https://usermanual.wiki/Sony-Group/DCRPC120.network-operating-instructions/User-Guide-168905-Page-59.png)
![60(1)Open the Network Menu.For details on how to open the Network Menu, refer to the section “Accessingto the network” in the operating instructions supplied with your camcorder.<illustration>(2)Select [ Setup], then execute it.The Setup screen appears.<illustration>(3)Select [Network Options], then execute it.The Network Options screen appears.<illustration>(4)Select [Signature], then execute it.The character input screen appears.<illustration>(5)Enter your signature.For details on how to input characters, see “How to input characters” on pageXX.NoteThe total number of characters is up to 256.Using e-mail](https://usermanual.wiki/Sony-Group/DCRPC120.network-operating-instructions/User-Guide-168905-Page-60.png)
![61(6)Select [Enter], then execute it.The setup of your signature is completed, and the Network Options screenappears again. “Yes” is indicated next to [Signature].<illustration>(7)Select [Exit], then execute it.The Setup screen appears again.(8)Select [Exit], then execute it.The Network Menu appears again.Using the address bookOnce you register the frequently used e-mail addresses on the address book, you cansend e-mail without entering the e-mail address.Registering destination addresses on the address bookYou can register the frequently used e-mail addresses on the address book. Up to 50addresses can be registered. Be careful to enter the address correctly.(1)Open the Network Menu.For details on how to open the Network Menu, refer to the section “Accessingto the network” in the operating instructions supplied with your camcorder.<illustration>(2)Select [ Mail], then execute it.If the Address screen is not displayed, select the Address tab. The addressscreen appears.<illustration>Using e-mail](https://usermanual.wiki/Sony-Group/DCRPC120.network-operating-instructions/User-Guide-168905-Page-61.png)
![62(3)Select [New], then execute it.The Address Book: New screen appears.<illustration>(4)Select [Name], then execute it.The character input screen appears.<illustration>(5)Enter the destination name.For details on how to input characters, see “How to input characters” on pageXX.NoteThe total number of characters you can enter in the [Name] box is up to 24.(6)Select [Enter], then execute it.The Address Book: New screen appears again.<illustration>(7)Select [Address], then execute it.The character input screen appears.<illustration>(8)Enter the e-mail address.For details on how to input characters, see “How to input characters” on pageXX.Using e-mail](https://usermanual.wiki/Sony-Group/DCRPC120.network-operating-instructions/User-Guide-168905-Page-62.png)
![63(9)Select [Enter], then execute it.The Address Book: New screen appears again.<illustration>(10)Select [Return], then execute it.The Address screen appears again.<illustration>(11)Select [Exit], then execute it.The Network Menu appears again.Tips•The addresses are listed in alphabetical order.•When you reply to the received address, the address will be automatically registeredon the Addressbook. To edit the address, see “Editing the address book” below.Editing the address bookYou can edit the name or e-mail address.(1)Follow steps 1 to 3 in “Registering destination addresses on the address book”on page XX.The Address screen appears.<illustration>(2)Select the area that the name and address are indicated, then select the addressyou want to edit using the control button b/B, then execute it.The Address Book: Edit screen appears.<illustration>Using e-mail](https://usermanual.wiki/Sony-Group/DCRPC120.network-operating-instructions/User-Guide-168905-Page-63.png)
![64(3)Select [Name] or [Address], then execute it.When modifying the name, select [Name], and when modifying the address,select [Address].The character input screen appears.<illustration>(4)Modify the name or address.For details on how to input characters, see “How to input characters” on pageXX.(5)Select [Enter], then execute it.The Address screen appears again.<illustration>(6)Select [Return], then execute it.The Address screen appears again.<illustration>(7)Check the name or address.(8)Select [Exit], then execute it.The Network Menu appears again.Using e-mail](https://usermanual.wiki/Sony-Group/DCRPC120.network-operating-instructions/User-Guide-168905-Page-64.png)
![65Selecting the destination address from the address bookYou can select the destination address from the address book.(1)Follow steps 1 to 3 in “Registering destination addresses on the address book”on page XX.The Address screen appears.<illustration>(2)Select the area that the name and address are indicated, then select thedestination address using the control button b/B.<illustration>(3)Select [To], then execute it.The Send screen appears. The selected address is set as the destination address.<illustration>(4)Carry out the procedures from “2 Entering the subject of the message” onpage XX.Receiving e-mailOnce you receive e-mail, you can reply or forward it.Preparation•Insert the “Memory Stick” into the camcorder, which is for storing images.•Release the lock of the “Memory Stick.”Checking your e-mail inboxTipYou can keep copies of the messages on the server. For details, see “4 Setting otherpreferences” on page XX.Using e-mail](https://usermanual.wiki/Sony-Group/DCRPC120.network-operating-instructions/User-Guide-168905-Page-65.png)
![66(1)Open the Network Menu.For details on how to open the Network Menu, refer to the section “Accessingto the network” in the operating instructions supplied with your camcorder.<illustration>(2)Select [ Mail], then execute it.If the Receive screen is not displayed, select the Receive tab. The Receivescreen appears.<illustration>(3)Select [Receive], then execute it.The screen for verifying the connection appears. Set the Bluetooth device toconnection standby with the camcorder beforehand. For details, refer to theoperating instructions supplied with the Bluetooth device.<illustration>(4)Check the telephone number.When dialing to other telephone numbersSelect [TEL No.], then execute it. The registered telephone number list appears.Select the desired telephone number, then execute it. The selected telephonenumber is specified.(5)Select [Connect], then execute it.The camcorder starts dialing to the selected telephone number. When e-mailhas been sent, the message “Receiving Mail Complete” appears. Select [OK],then execute it. The phone line is automatically disconnected.<illustration> <illustration>Using e-mail](https://usermanual.wiki/Sony-Group/DCRPC120.network-operating-instructions/User-Guide-168905-Page-66.png)
![67(6)When an e-mail message is received, select the area that the message isdisplayed, then select the message using the control button b/B, then executeit.The message is displayed.<illustration>(7)Select [Return], then execute it.The Receive screen appears again.To cancel receiving e-mailDuring receiving, select [Cancel], then execute it. Incoming E-mail not received remainsin your server.When the message is too longSelect the message area, then press the control button V repeatedly to scroll themessage.To view the attached imageExit the NETWORK mode, then view the image following the procedure for viewingthe image recorded on a “Memory Stick.” In such cases, the file name displayed on thecamcorder is indicated in the following order: 700-0001, 700-0002, 700-0003 ...When a file is attached to e-mailThe files that the camcorder can receive have the following extensions, “.jpg” or“.mpg”. When the other files is sent, the message “Attached Invalid File Type....Deleted” is attached to the top of the e-mail message. The camcorder cannot play backthe attached image depending on the file.To view attached filesExit the NETWORK mode, then view images following the procedure to see images onthe camcorder.When no new messages have been sent to youThe message “No New Incoming Mail” appears.URL in a e-mail messageWhen a URL (http://...) is typed on the message, select the URL, then execute it. Thebrowser starts automatically and access its Web page.Notes•The total number of e-mail message characters is up to 4000. Available characters of amessage is up to 4000. The characters of more than it will be deleted and the messagefor indicating that some of the text were deleted is attached to the top of the message.•It takes more time to receive images depending on the image file size.Using e-mail](https://usermanual.wiki/Sony-Group/DCRPC120.network-operating-instructions/User-Guide-168905-Page-67.png)
![68Tips•You can check the e-mail inbox after sending e-mail. For details, see “4 Setting otherpreferences” on page XX.•You can skip e-mail if its file size is too large. For details, see “4 Setting otherpreferences” on page XX.•As for a received e-mail, the total number of characters used for the subject and thesender name has an upper limit of 24 characters. When you receive such an e-mail,you cannot read the subject and the sender name on the camcorder.Sending your answer – ReplyYou can quickly reply the e-mail message without entering the address.(1)Display the Receive screen.<illustration>(2)Select the area that a message is indicated, then select the message you want toreply using the control button b/B, then execute it.The selected message is displayed.<illustration>(3)Select [Reply], then execute it.The Send screen appears.<illustration>Tip“Re:” is added to the top of the subject.(4)Carry out the procedure in “3 Entering the text of a message” on page XX toenter the text of the message.TipYou cannot quote a received e-mail message.Using e-mail](https://usermanual.wiki/Sony-Group/DCRPC120.network-operating-instructions/User-Guide-168905-Page-68.png)
![69(5)Carry out the procedure from step 3 in “4 Sending e-mail” on page XX.Forwarding the message to another person – ForwardYou can forward the received message to another person.(1)Display the Receive screen.<illustration>(2)Select the area that a message is indicated, then select the message you want toforward using the control button b/B, then execute it.The selected message is displayed.<illustration>(3)Select [Forward], then execute it.The Send screen appears.<illustration>(4)Carry out the procedure from step 3 in “1 Specifying the destination address”on page XX or “Selecting the destination address from the address book” onpage XX to specify the destination address.(5)Carry out the procedure in “3 Entering the text of a message” on page XX tomodify the message.Tips•“Fw:” is added to the top of the subject.•Available characters of a message is up to 512. The characters of more than it willbe deleted.(6)Carry out the procedure from step 3 in “4 Sending e-mail” on page XX.Using e-mail](https://usermanual.wiki/Sony-Group/DCRPC120.network-operating-instructions/User-Guide-168905-Page-69.png)
![70Deleting e-mailUp to 50 received e-mail messages can be stored in a “Memory Stick.” If you try toreceive a 51th e-mail message, the error message appears and the camcorder cannotreceive the e-mail message.Preparation•Insert the “Memory Stick” into the camcorder, which stores e-mail.•Release the lock of the “Memory Stick.”(1)Open the Network Menu.For details on how to open the Network Menu, refer to the section “Accessingto the network” in the operating instructions supplied with your camcorder.<illustration>(2)Select [ Mail], then execute it.If the Receive screen is not displayed, select the Receive tab. The Receivescreen appears.<illustration>(3)Select the area that a message is indicated, then select the message you want todelete using the control button b/B, then execute it.The selected message is displayed.<illustration>(4)Select [Delete], then execute it.The message “Delete This Mail?” for verification appears.<illustration>Using e-mail](https://usermanual.wiki/Sony-Group/DCRPC120.network-operating-instructions/User-Guide-168905-Page-70.png)
![71(5)Select [OK], then execute it.The selected e-mail message is deleted.To cancel deletingSelect [Cancel], then execute it in step 5.Using e-mail](https://usermanual.wiki/Sony-Group/DCRPC120.network-operating-instructions/User-Guide-168905-Page-71.png)
![72A site that posts information on the Internet is called a “Home Page” or “Web site.” Youcan easily retrieve information by accessing a Web site on the Internet.Viewing Web pages1Entering URL to access the Web pageEnter the address of the Web page, and connect to the Internet. Be careful to enter theaddress correctly.Tip on URLA Web site has its unique address on the Internet. The address is called a URL. This isrequired to access a Web site.(1)Open the Network Menu.For details on how to open the Network Menu, refer to the section “Accessingto the network” in the operating instructions supplied with your camcorder.<illustration>(2)Select [ Browser], then execute it.The following screen appears.<illustration>(3)Select (New URL), then execute it.The character input screen appears.<illustration>(4)Enter the address.For details on how to input characters, see “How to input characters” on pageXX.Viewing Web pages](https://usermanual.wiki/Sony-Group/DCRPC120.network-operating-instructions/User-Guide-168905-Page-72.png)
![73(5)Select [Enter], then execute it.The screen for verifying the connection appears. Set the Bluetooth device toconnection standby with the camcorder beforehand. For details, refer to theoperating instructions supplied with the Bluetooth device.<illustration>(6)Check the telephone number.When dialing to other telephone numbersSelect [TEL No.], then execute it. The registered telephone number list appears.Select the desired telephone number, then execute it. The selected telephonenumber is specified.(7)Select [Connect], then execute it.The camcorder starts dialing to the selected telephone number. After theconnection is completed, the Web page selected in step 4 is loaded.<illustration>(8)Operate the browser using the toolbar.For details on the toolbar, see “How to use the toolbar on the browser” on pageXX.Note on connection status indicationThe connection status is indicated on the top of the screen. This also shows a connectingtime and the address of a Web page. The connecting time indication is as a guide.Off Line: being offline<illustration>Loading: Loading a Web page<illustration>On Line: being online<illustration>Viewing Web pages](https://usermanual.wiki/Sony-Group/DCRPC120.network-operating-instructions/User-Guide-168905-Page-73.png)
![74Notes•When the address is too long to display it, the whole of the address is not indicated. Ifyou want to know the correct address of the page, select , then execute it.•All of the page is not displayed on the screen.•It takes more time to load the page that has lots of images ,and its images or text maynot be displayed properly. This is not a malfunction.•When viewing the scaled-down page, the screen may be caused some flicker or thecolor may be strange. This is not a malfunction.•To prevent occurring a malfunction, operate the toolbar buttons after loading thepage.TipYou can access the Web page from the bookmark. For details, see “3 Jumping to theWeb page specified by the bookmark ” on page XX.2Bookmarking the Web page – BookmarkYou can register the Web page you frequently access. Up to 30 bookmarks are available.(1)Display the Web page you want to bookmark.(2)When the toolbar is not displayed, press BROWSER MENU on the camcorder.The toolbar appears.<illustration>(3)Select (Bookmark), then execute it.The bookmark list appears.<illustration>(4)Select [Add], then execute it.The bookmark is added, and returns to the Web page.Viewing Web pages](https://usermanual.wiki/Sony-Group/DCRPC120.network-operating-instructions/User-Guide-168905-Page-74.png)
![75To edit the bookmarkYou can edit the title of a bookmark.(1)Select (Bookmark), then execute it.The bookmark list appears.<illustration>(2)Select the bookmark you want to edit, then execute it.The title and URL are indicated.<illustration>(3)Select [Edit], then execute it.The character input screen appears.<illustration>(4)Edit the name.For details on how to input characters, see “How to input characters” on pageXX.(5)Select [Enter], then execute it.The title of the bookmark is modified.<illustration>(6)Select [Return], then execute it.The screen displayed in step 2 appears again.Viewing Web pages](https://usermanual.wiki/Sony-Group/DCRPC120.network-operating-instructions/User-Guide-168905-Page-75.png)
![76To delete bookmarksYou can delete bookmarks. We recommend that you delete unnecessary bookmarkssince you can store up to 30 bookmarks .(1)Select (Bookmark), then execute it.The bookmark list appears.<illustration>(2)Select the bookmark you want to delete, then execute it.<illustration>(3)Select [Delete], then execute it.The message “Delete This Bookmark?” for verification appears.<illustration>(4)Select [OK], then execute it.The selected bookmark is deleted.<illustration>To cancel deleting a bookmarkSelect [Cancel], then execute it in step 4.Viewing Web pages](https://usermanual.wiki/Sony-Group/DCRPC120.network-operating-instructions/User-Guide-168905-Page-76.png)
![773Jumping to the Web page specified by the bookmark(1)When the toolbar is not displayed, press BROWSER MENU on the camcorder.The toolbar appears.(2)Select (Bookmark), then execute it.The bookmark list appears.<illustration>(3)Select the bookmark, then execute it.<illustration>(4)Select [Go], then execute it.Set the Bluetooth device to connection standby with the camcorderbeforehand. For details, refer to the operating instructions supplied with theBluetooth device.<illustration>(5)Check the telephone number.When dialing to other telephone numbersSelect [Tel], then execute it. The registered telephone number list appears.Select the desired telephone number, then execute it. The selected telephonenumber is specified.(6)Select [Connect], then execute it.The camcorder starts dialing to the selected telephone number. After theconnection is completed, the Web page specified by the bookmark isdisplayed.To select another bookmarkSelect [Cancel], then execute it in step 4. The bookmark list appears. Select anotherbookmark.Viewing Web pages](https://usermanual.wiki/Sony-Group/DCRPC120.network-operating-instructions/User-Guide-168905-Page-77.png)
![78Storing the Web page into a “Memory Stick” – Page MemoYou can store the desired Web pages in a “Memory Stick.” Once you store them, youcan view the Web page without accessing the Internet.Storing the Web page into a “Memory Stick”Preparation•Insert the “Memory Stick” for storing images into the camcorder.•Release the lock of the “Memory Stick.”(1)Display the Web page you want to store.(2)When the toolbar is not displayed, press BROWSER MENU on the camcorder.The toolbar appears.(3)Select (Page Memo), then execute it.The page memo list appears.<illustration>(4)Select [Add], then execute it.The message “Saving Page Memo Do Not Remove Memory Stick” appears.After the message disappears, the adding the bookmark is complete.<illustration>(5)Select [Return], then execute it.The page memo list appears again.To cancel storing the Web pageDuring storing, select [Cancel], then execute it.NoteYou cannot store the Web page while loading the page.Viewing Web pages](https://usermanual.wiki/Sony-Group/DCRPC120.network-operating-instructions/User-Guide-168905-Page-78.png)
![79Editing the title of a page memoYou can edit the title of a page memo stored in a “Memory Stick.”Preparation•Insert the “Memory Stick” into the camcorder, which is for storing images.•Release the lock of the “Memory Stick.”(1)Select (Page Memo), then execute it.The page memo list appears.<illustration>(2)Select the page memo you want to edit, then execute it.The title and URL of the selected page memo are indicated.<illustration>(3)Select [Edit], then execute it.The character input screen appears.<illustration>(4)Edit the name.For details on how to input characters, see “How to input characters” on pageXX.(5)Select [Enter], then execute it.The title of the page memo is modified.<illustration>Viewing Web pages](https://usermanual.wiki/Sony-Group/DCRPC120.network-operating-instructions/User-Guide-168905-Page-79.png)
![80(6)Select [Return], then execute it.The page memo list appears again.<illustration>(7)Select [Return], then execute it.The browser screen appears again.To delete the page memoYou can delete page memos. We recommend that you delete unnecessary page memossince you can store up to 30 bookmarks .Preparation•Insert the “Memory Stick” into the camcorder, which is storing page memos.•Release the lock of the “Memory Stick.”(1)Select (Page Memo), then execute it.The page memo list appears.<illustration>(2)Select the page memo you want to delete, then execute it.<illustration>(3)Select [Delete], then execute it.The message “Delete This Page Memo Item?” for verification appears.<illustration>Viewing Web pages](https://usermanual.wiki/Sony-Group/DCRPC120.network-operating-instructions/User-Guide-168905-Page-80.png)
![81(4)Select [OK], then execute it.The selected page memo is deleted and the page memo list appears again.(5)Select [Return], then execute it.The browser screen appears again.To cancel deleting a page memoSelect [Cancel], then execute it in step 4.Displaying the Web page stored in page memo(1)Select (Page Memo), then execute it.The page memo list appears.<illustration>(2)Select the page memo you want to display its page.<illustration>(3)Select [Open], then execute it.The Web page stored in page memo is displayed.To select another page memoSelect [Cancel], then execute it in step 3. The page memo list appears. Select anotherpage memo.Viewing Web pages](https://usermanual.wiki/Sony-Group/DCRPC120.network-operating-instructions/User-Guide-168905-Page-81.png)


![90BrowserMessage MeaningYou Are About to ViewPages Over a Secure ConnectionDo You Want To Continue?You Are About to Leavea Secure InternetDo You Want to Continue?Warrant Date ExpiredInvalid DataOpen Anyway?Set The Date and TimeInvalid DataOpen Anyway?Page Certification ErrorInvalid DataOpen Anyway?Opening ErrorInvalid File TypeDNS ErrorThe Requested URLCould Not FoundLoading ErrorOpening ErrorUnknown Protocol SelectedRead-Only File in DirectoryUnable to Delete The FileCheck The File StatusOpening File ErrorRead-Only FileThis File Is LockedEnter User Nameand PasswordTimeoutDisconnected AutomaticallyYou try to open an SSL page. When you know that the page is safe,select [OK], then execute it.The clock is not set up on the camcorder. Set up the clock.The certification of the page may be broken, wrong, or it may be ofother pages. When you know that the page is safe, select [OK], thenexecute it.You cannot this page on the camcorder.•The URL may be wrong.•The DNS entry on the PPP screen in manual setup may be wrong.Check this item.•Connect the page after a while.Connect the page after a while.You cannot this page on the camcorder.The files modified with a computer may not be deleted by thecamcorder.User authentication is required to access the page. Enter your username and password.Check the Network Options setup (p. XX).Messages](https://usermanual.wiki/Sony-Group/DCRPC120.network-operating-instructions/User-Guide-168905-Page-90.png)