Sony Group DCRPC120 Digital Video Camera Recorder - Bluetooth User Manual DCR PC115 PC120BT
Sony Corporation Digital Video Camera Recorder - Bluetooth DCR PC115 PC120BT
UserManual.wiki
>
Sony Group
>
DCRPC120 User Manual
>
Users Manual I
Contents
1.
network operating instructions
2.
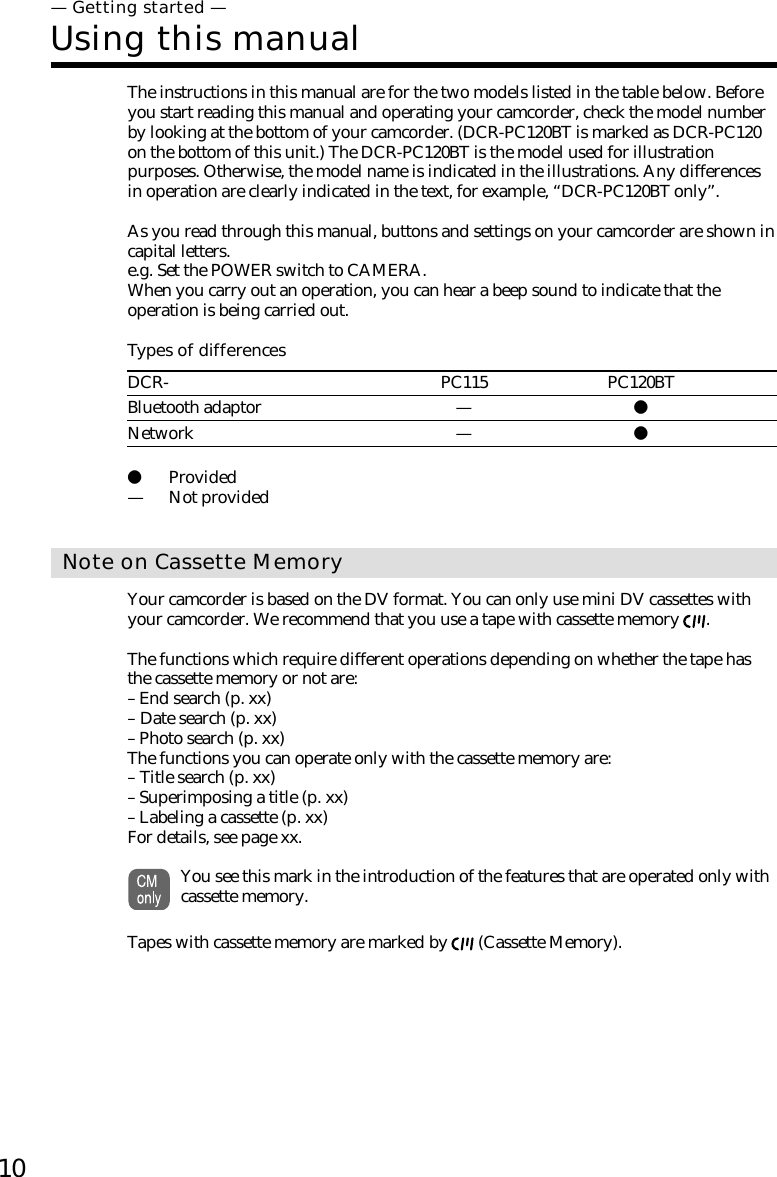
Note on model names
3.
Users Manual I
4.
Users Manual II
Users Manual I
Navigation menu
Upload a User Manual
Namespaces
Wiki Guide
HTML
PDF
Info
Views
User Manual
Discussion / Help
Navigation


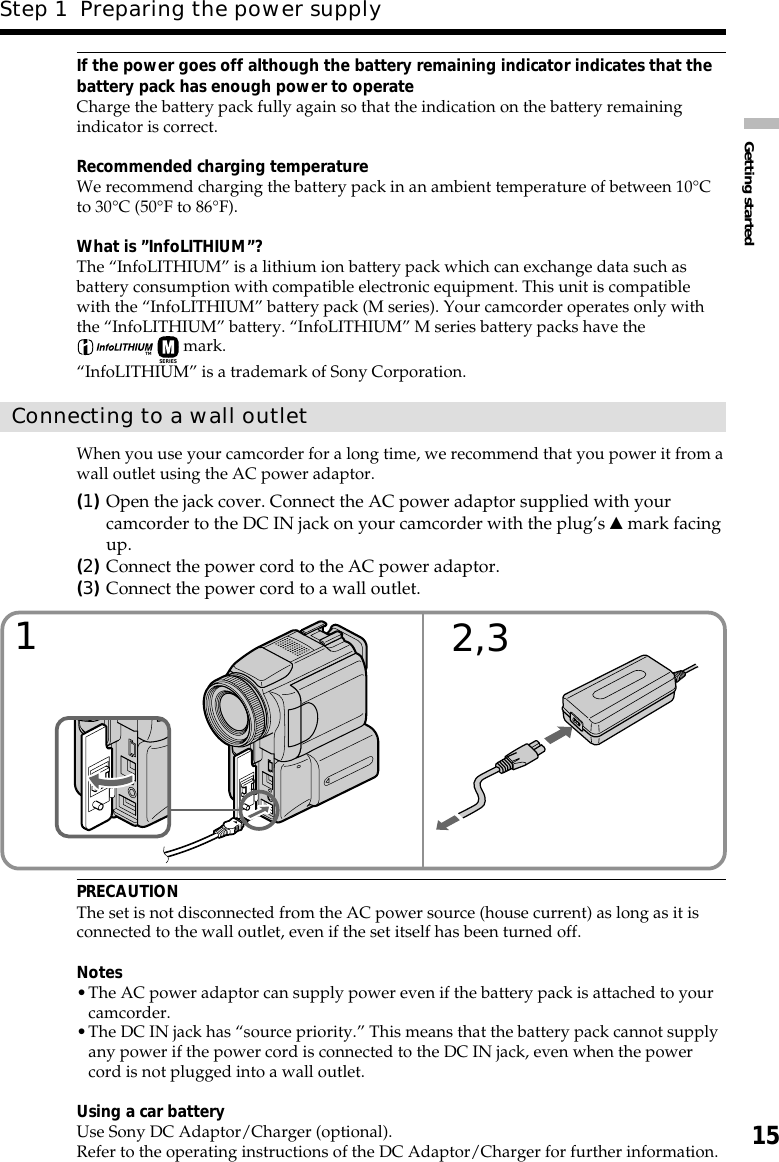
![Getting started11Using this manualNote on TV color systemsTV color systems differ from country to country. To view your recordings on a TV, youneed an NTSC system-based TV.Copyright precautionsTelevision programs, films, video tapes, and other materials may be copyrighted.Unauthorized recording of such materials may be contrary to the provision of thecopyright laws.Precautions on camcorder careLens and LCD screen/finder (on mounted models only)•The LCD screen and the finder are manufactured using extremely high-precisiontechnology, so over 99.99% of the pixels are operational for effective use.However, there may be some tiny black points and/or bright points (white, red,blue or green in color) that constantly appear on the LCD screen and the finder.These points are normal in the manufacturing process and do not affect therecording in any way.•Do not let your camcorder get wet. Keep your camcorder away from rain and seawater. Letting your camcorder get wet may cause your camcorder to malfunction.Sometimes this malfunction cannot be repaired [a].•Never leave your camcorder exposed to temperatures above 60°C (140°F), such as in acar parked in the sun or under direct sunlight [b].•Be careful when placing the camera near a window or outdoors. Exposing the LCDscreen, the finder or the lens to direct sunlight for long periods may causemalfunctions [c].•Do not directly shoot the sun. Doing so might cause your camcorder to malfunction.Take pictures of the sun in low light conditions such as dusk [d].[a][b][c][d]](https://usermanual.wiki/Sony-Group/DCRPC120.Users-Manual-I/User-Guide-168907-Page-11.png)
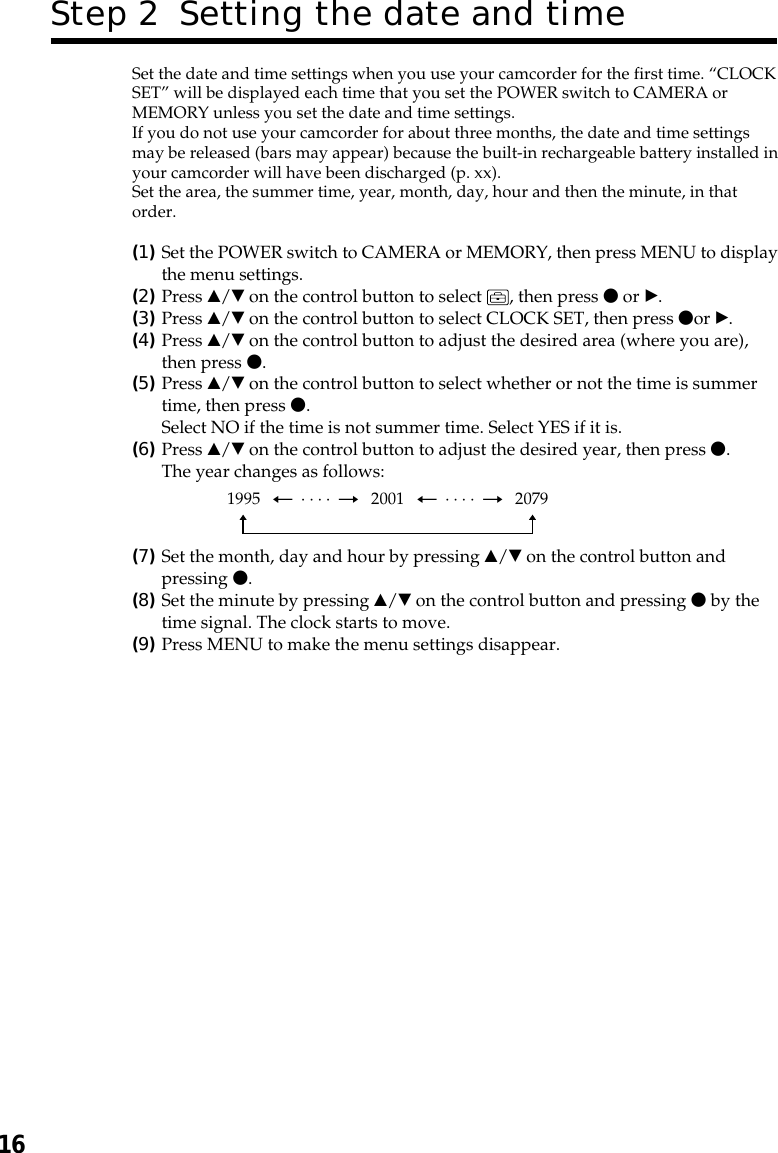
![17Getting startedIf you do not set the date and time“--:--:--” and “--- -- ----” are recorded on the data code of the tape and the “MemoryStick.”When using your camcorder abroadSet the clock to the local time (p. xx).Note on the time indicatorThe internal clock of your camcorder operates on a 12-hour cycle.•12:00 AM stands for midnight.•12:00 PM stands for noon.Step 2 Setting the date and time234568SETUP MENUCLOCK SETLTR S IZE ––:––:––DEMO MODERETURN[MENU] : ENDSETUP MENUCLOCK SETLTR S IZE JUL4 20015:30:00PMDEMO MODERETURN[MENU] : ENDSETUP MENUCLOCK SET ––:––:––LTR S IZEDEMO MODERETURN[MENU] : ENDMANUA L SE TPROGRAM AEPEFFECTDEFFECTWHT BALAUTO SHTR[MENU] : ENDCLOCK SET[EXEC] : NEXT I TEM––––––– –– ––:––DATE Y M DSUMMERT I ME OFFrL i sbon , LondonAREA1RGMT +0.0[EXEC] : NEXT I TEM––––––– –– ––:––DATE Y M DSUMMERT I ME OFFrNewYo r k , Bo go t aAREA14RGMT +9.0[EXEC] : NEXT I TEM––––––– –– ––:––DATE Y M DSUMMERT I ME OFFNewYo r k , Bo go t aAREA14GMT +9.0[EXEC] : NEXT I TEMrrrrr2001JAN112:00AMDATE Y RMRDRRRSUMMERT I ME OFFrNewYo r k , Bo go t aAREA14RGMT +9.0[EXEC] : NEXT I TEMrrrrr2001JAN112:00AMDATE Y RMRDRRRONSUMMERT I ME OFFNewYo r k , Bo go t aAREA14GMT +9.0CLOCK SET[EXEC] : NEXT I TEMrrrrr2001JUL45:30PM DATE Y RMRDRRRSUMMERT I ME OFFrNewYo r k , Bo go t aAREA14RGMT +9.0CLOCK SETCLOCK SETCLOCK SET CLOCK SETMENU](https://usermanual.wiki/Sony-Group/DCRPC120.Users-Manual-I/User-Guide-168907-Page-17.png)
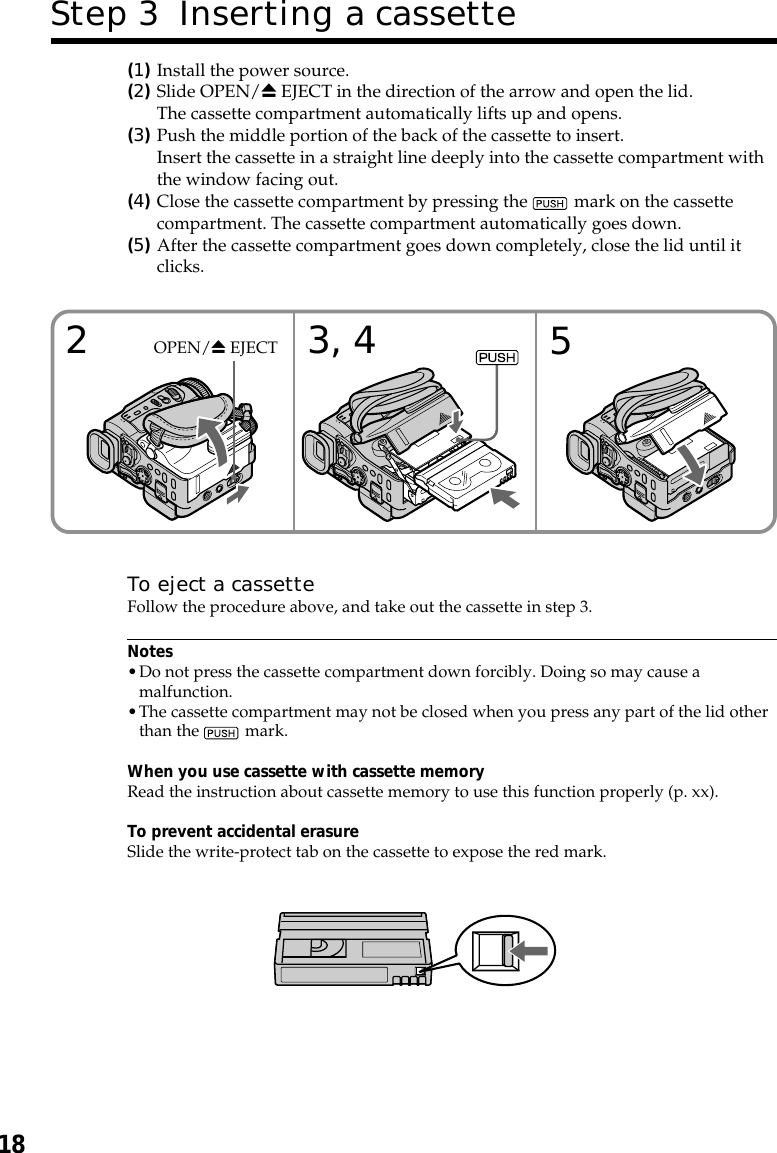

![21Recording – BasicsAdjusting the LCD screenThe LCD panel moves about 90 degrees to the viewfinder side and about 180 degrees tothe lens side.When closing the LCD panel, set it vertically, and swing it into the camcorder body.NoteWhen using the LCD screen except in the mirror mode, the viewfinder automaticallyturns off (p. xx).When you use the LCD screen outdoors in direct sunlightThe LCD screen may be difficult to see. If this happens, we recommend that you use theviewfinder.When you adjust the angle of the LCD panelMake sure if the LCD panel is opened up to 90 degrees.Adjusting the brightness of the LCD screen(1)Set the POWER switch to CAMERA, VCR or MEMORY. Press MENU, thenselect and decide upon LCD BRIGHT in with the control button. The barindicator appears.(2)Press b/B on the control button to adjust the brightness of the LCD screen,then press z.LCD screen backlightYou can change the brightness of the backlight. Select LCD B.L. in the menu settingswhen using the battery pack (p. xx).Recording a picture180°90°12LCD/VF SETLCD BRIGHTLCD B.L.LCD COLORVF B.L. RETURN [MENU] : ENDLCD/VF SETLCD BRIGHTLCD B.L.LCD COLORVF B.L. RETURN [MENU] : ENDTo lightenTo darkenMENU](https://usermanual.wiki/Sony-Group/DCRPC120.Users-Manual-I/User-Guide-168907-Page-21.png)
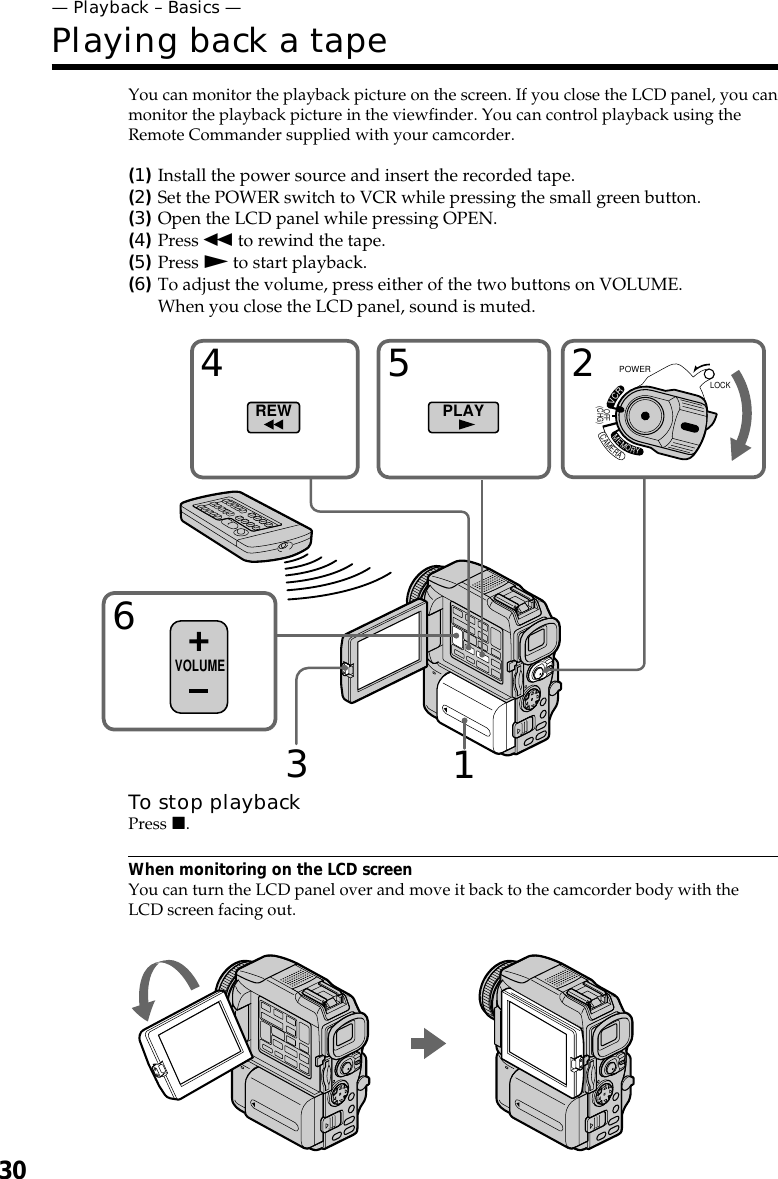
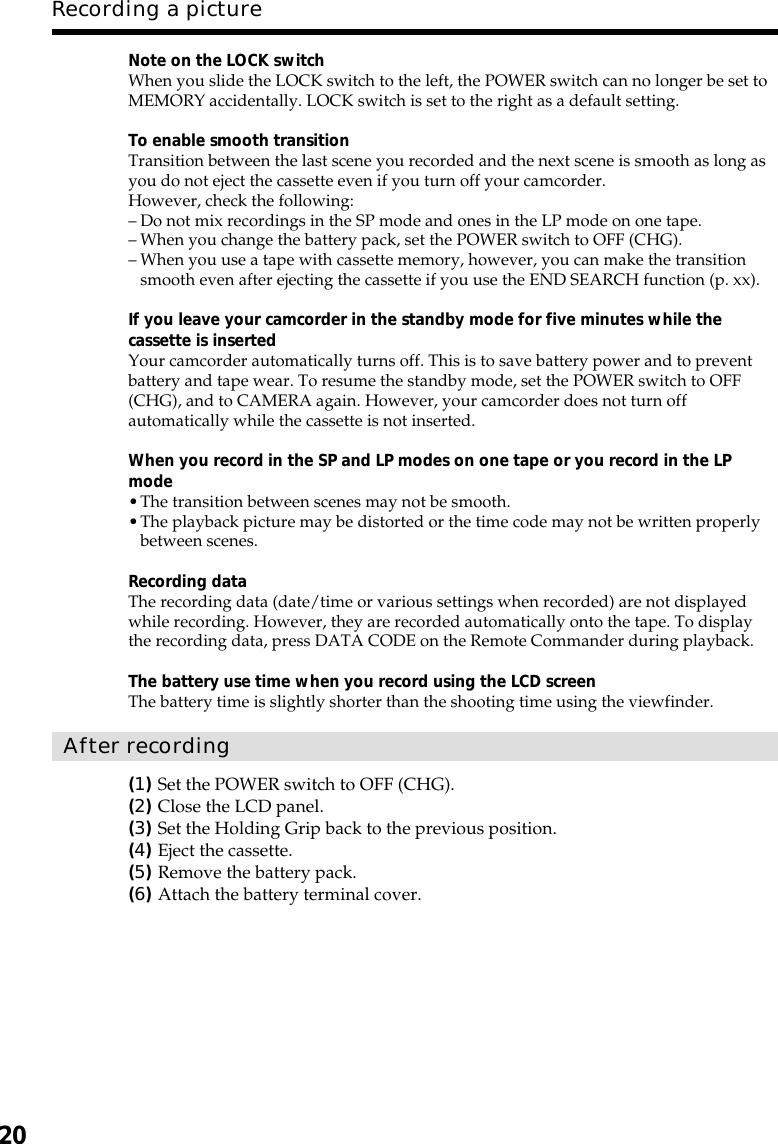
![31Playback – BasicsIf you leave the power on for a long timeYour camcorder gets warm. This is not a malfunction.When you open or close the LCD panelOpen or close the LCD panel vertically.To display the screen indicators – Display functionPress DISPLAY. The indicators appear on the screen. To make the indicators disappear,press DISPLAY again.About date/time and various settingsYour camcorder automatically records not only images on the tape but also therecording data (date/time or various settings when recorded) (Data code).Use the Remote Commander for this operation.1 Set the POWER switch to VCR, then playback a tape.2Press DATA CODE on the Remote Commander.The display changes as follows:date/time t various settings (SteadyShot, exposure, white balance, gain, shutterspeed, aperture value) t no indicator[a]Tape counter[b]SteadyShot off[c]Exposure mode[d]White balance[e]Gain[f]Shutter speed[g]Aperture valueNot to display various settingsSet DATA CODE to DATE in the menu settings (p. xx).The display changes as follows when you press DATA CODE on the RemoteCommander: date/time y no indicatorPlaying back a tapeDISPLAYDATA CODE DISPLAYDate/time Various settings[g][b][d][e][f][c] 60 AWBF1.8 9dB AUTOJUL 4 200112:05:56 AM40min0:00:23:0140min0:00:23:01[a]](https://usermanual.wiki/Sony-Group/DCRPC120.Users-Manual-I/User-Guide-168907-Page-31.png)

![39Advanced Recording OperationsYou can manually adjust and set the white balance. This adjustment makes whitesubjects look white and allows more natural color balance. Normally white balance isautomatically adjusted.(1)Set the POWER switch to CAMERA or MEMORY. Press MENU, then selectand decide upon WHT BAL in with the control button (p. xx).(2)Select and decide upon the desired white balance mode with the controlbutton.HOLD :Recording a single-colored subject or background OUTDOOR :•Recording a sunset/sunrise, just after sunset, just before sunrise, neon signs, orfireworks•Under a color matching fluorescent lampn INDOOR :•Lighting condition changes quickly•Too bright place such as photography studios•Under sodium lamps or mercury lampsTo return to the automatic white balance modeSet WHT BAL to AUTO in the menu settings.If the picture is being taken in a studio lit by TV lightingWe recommend that you record in the n indoor mode.When you record under fluorescent lightingUse the automatic white balance or hold mode.Your camcorder may not adjust the white balance correctly in the n indoor mode.In the automatic white balance modePoint your camcorder at a white subject for about 10 seconds after setting the POWERswitch to CAMERA to get a better adjustment when:–You detach the battery for replacement.–You bring your camcorder to the outdoors from the interior of a house holding theexposure, or vice versa.In the hold white balance modeSet the white balance to AUTO and reset to HOLD after a few seconds when:–You change the PROGRAM AE mode.–You bring your camcorder to the outdoors from the interior of a house, or vice versa.Adjusting the white balance manuallyMANUA L SETAUTOHOLDPROGRAM AEPEFFEC TDEFFECTWHT BALI NDOOROUTDOORA U T O S H T RRETURN[MENU] : END1MENU](https://usermanual.wiki/Sony-Group/DCRPC120.Users-Manual-I/User-Guide-168907-Page-39.png)
![40You can record a 16:9 wide picture to watch on the 16:9 wide-screen TV (16:9WIDE).Black bands appear on the screen during recording in 16:9WIDE mode [a]. The pictureduring a playback on a normal TV [b] or on a wide-screen TV [c] is compressed in thewidthwise direction. If you set the screen mode of the wide-screen TV to the full mode,you can watch pictures of normal images [d].(1)In the standby mode, press MENU, then select and decide upon 16:9WIDE inwith the control button (p. xx).(2)Select and decide upon ON with the control button.To cancel the wide modeSet 16:9WIDE to OFF in the menu settings.In the wide modeYou cannot select the following functions:– OLD MOVIE– BOUNCEDuring recordingYou cannot select or cancel the wide mode. When you cancel the wide mode, set yourcamcorder to the standby mode and then set 16:9WIDE to OFF in the menu settings.Connection for a TVPictures recorded in the 16:9WIDE mode automatically appear on the TV screen at fullsize when:– you connect your camcorder to a TV that is compatible with the video ID (ID-1/ID-2)system.– you connect your camcorder to the S video jack on the TV.ID-1 systemThe ID-1 system sends aspect ratio information (16:9, 4:3, or letter box) with videosignals. If you connect a TV compatible with the ID-1 system, the screen size isautomatically selected.ID-2 systemThe ID-2 system sends a copyright protection signal with ID-1 signals inserted betweenvideo signals when you connect your camcorder to other equipment using an A/Vconnecting cable.Using the wide mode[a][c][b][d]16:9WIDE2CAMERA SETNOSTEADYSHOTDZOOM16:9WIDENRUTER[MENU] : ENDN.S.LIGHTINT.RECFLASH LVLFRAME RECMENU](https://usermanual.wiki/Sony-Group/DCRPC120.Users-Manual-I/User-Guide-168907-Page-40.png)
![41Advanced Recording OperationsYou can fade in or out to give your recording a professional appearance.MONOTONEWhen fading in, the picture gradually changes from black-and-white to color.When fading out, the picture gradually changes from color to black-and-white.1) You can use the bounce function when D ZOOM is set to OFF in the menu settings.2) Fade in only.Using the fader functionFADEROVERLAP2)WIPE2)DOT2)[a]RECSTBYRECSTBY[b]M. FADER(mosaic)BOUNCE1) 2)](https://usermanual.wiki/Sony-Group/DCRPC120.Users-Manual-I/User-Guide-168907-Page-41.png)
![42(1) When fading in [a]In the standby mode, press FADER until the desired fader indicator flashes.When fading out [b]In the recording mode, press FADER until the desired fader indicator flashes.The indicator changes as follows:FADER tM. FADER tBOUNCE tMONOTONEno indicator TDOT TWIPE TOVERLAPThe last selected fader mode is indicated first of all.(2)Press START/STOP. The fader indicator stops flashing.After the fader in/out is carried out, your camcorder automatically returns tonormal mode.To cancel the fader functionBefore pressing START/STOP, press FADER until the indicator disappears.NoteYou cannot use the following functions while using the fader function. Also, you cannotuse the fader function while using the following functions:–Digital effect–Low lux of PROGRAM AE (Overlap, Wipe, or Dot function only) (The indicatorflashes.)–Super NightShot–Tape photo recording–Interval recording–Cut recordingWhen you select OVERLAP, WIPE, or DOTYour camcorder automatically stores the image recorded on a tape. As the image isbeing stored, the indicators flash fast, and the playback picture disappears. At thisstage, the picture may not be recorded clearly, depending on the tape condition.When you set the POWER switch to MEMORYYou cannot use the fader function.Using the fader function1FADERFADER](https://usermanual.wiki/Sony-Group/DCRPC120.Users-Manual-I/User-Guide-168907-Page-42.png)
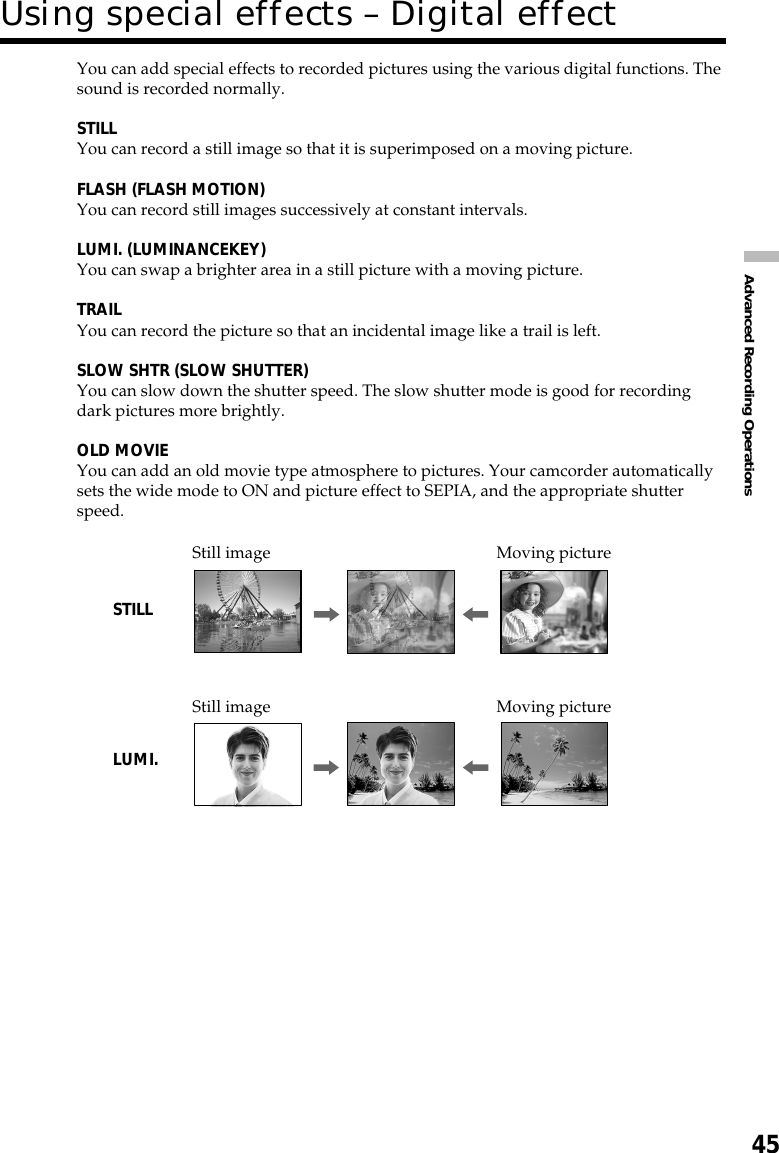
![44You can digitally process images to obtain special effects like those in films or on TV.NEG. ART [a] : The color and brightness of the picture are reversed.SEPIA : The picture gets sepia.B&W : The picture appears in monochrome (black-and-white).SOLARIZE [b] : The light intensity is clearer, and the picture looks like an illustration.SLIM [c] : The picture expands vertically.STRETCH [d] : The picture expands horizontally.PASTEL [e] : The contrast of the picture is emphasized, and the picture looks like ananimated cartoon.MOSAIC [f] : The picture gets mosaic-patterned.(1)Set the POWER switch to CAMERA. Press MENU, then select and decide uponP EFFECT in with the control button (p. xx).(2)Select and decide upon the desired picture effect mode with the control button.To cancel the picture effect functionSet P EFFECT to OFF in the menu settings.While using the picture effect functionYou cannot select OLD MOVIE mode with DIGITAL EFFECT.When you set the POWER switch to OFF (CHG)The picture effect is automatically canceled.Using special effects – Picture effect[a] [b] [c] [d] [e] [f]MANUA L SE T.FFO TRAGEN AIPESW&B EZIRALOS MILS HCTERTS LETSAP CIASOMDEFFECTPROGRAM AEPEFFECTLABTHWRTHSOTUA NRUTER[MENU] : END1MENU](https://usermanual.wiki/Sony-Group/DCRPC120.Users-Manual-I/User-Guide-168907-Page-44.png)
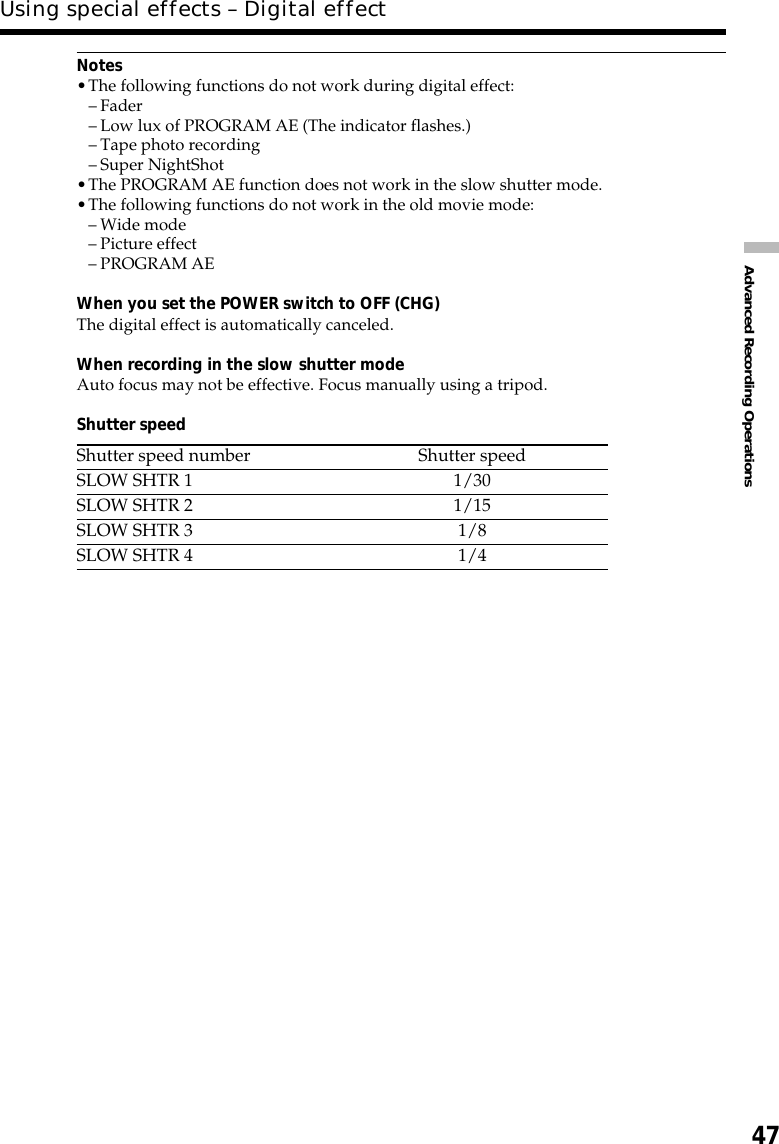
![46(1)Set the POWER switch to CAMERA. Press MENU, then select and decide uponD EFFECT in with the control button (p. xx).(2)Select and decide upon the desired digital effect mode with the control button.The bars appear. In the STILL or LUMI. mode, the still image is stored inmemory.(3)Adjust and dicide upon the effect with the control button.Items to be adjustedSTILL The rate of the still image you want to superimpose on the movingpictureFLASH The interval of flash motionLUMI. The color scheme of the area in the still image which is to beswapped with a moving pictureTRAIL The time until the incidental image vanishesSLOW SHTR Shutter speed. The larger the shutter speed number, the slower theshutter speed becomes.OLD MOVIE No adjustment necessaryThe more bars there are on the screen, the stronger the digital effect. The barsappear in the following modes: STILL, FLASH, LUMI. and TRAIL.To cancel the digital effect functionSet D EFFECT to OFF in the menu settings.Using special effects – Digital effect2MANUA L SETOFFST I LLFLASHTRA I LDEFFECT[MENU] : ENDLUMI.MANUA L SET[MENU] : ENDRETURNMANUA L SETOFFST I LLFLASHTRA I LDEFFECT[MENU] : ENDLUMI.MANUA L SET[MENU] : ENDPEFFECTDEFFECTSLOWSHTROLD MOV I EPROGRAM AEST I LLIIIIIIIIIIIIIIIIAUTO SHTRRTHSWOLS EIVOMDLOWHT BAL3MANUA L SET[MENU] : ENDPROGRAM AEPEFFECTDEFFECTWHT BALAUTO SHTRRETURN1IIIIIIII••••••••OFFLLITSTCEFFEDMENU](https://usermanual.wiki/Sony-Group/DCRPC120.Users-Manual-I/User-Guide-168907-Page-46.png)
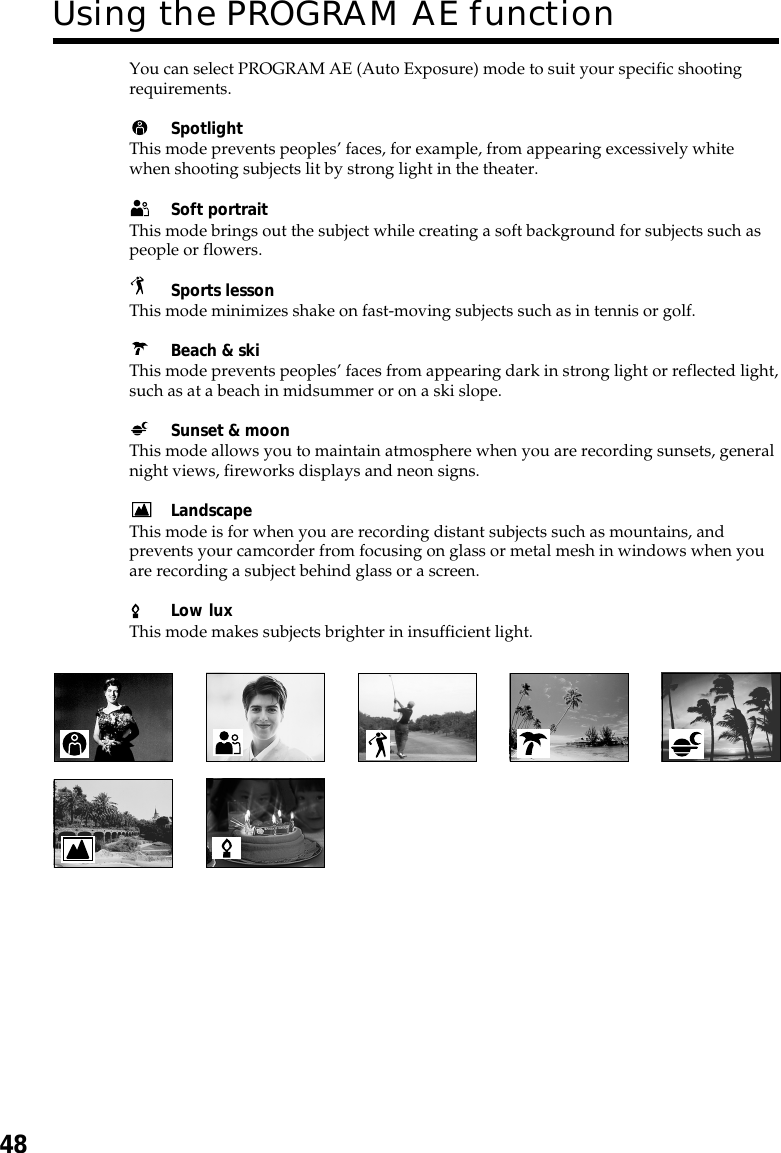
![49Advanced Recording Operations(1)Set the POWER switch to CAMERA or MEMORY. Press MENU select anddecide upon PROGRAM AE in in the menu settings with the controlbutton (p. xx).(2)Select and decide upon the desired PROGRAM AE mode with the controlbutton.To cancel the PROGRAM AE functionSelect PROGRAM AE to AUTO in the menu settings.Notes•Because your camcorder is set to focus only on subjects in the middle to far distance,you cannot take close-ups in the following modes:–Spotlight–Sports lesson–Beach & ski•Your camcorder is set to focus only on distant subjects in the following modes:–Sunset & moon–Landscape•The following functions do not work in the PROGRAM AE mode:–Slow shutter–Old movie–Bounce•The following functions do not work in the low lux mode:–Digital effect–Overlap–Wipe–Dot–Recording with the flash•When you set the POWER switch to MEMORY, the following modes do not work(The indicator flashes.):–Low lux–Sports lesson•The PROGRAM AE function does not work in the following cases. (The indicatorflashes.)–To set NIGHTSHOT to ON–To record images on a “Memory Stick” using the MEMORY MIX function.Using the PROGRAM AE functionMANUA L SET AUTOSPOTL I GHTPORTRA I TPROGRAM AEPEFFECTDEFFECTWH T B A LAUTO SHTRRETURN[MENU] : ENDBEACH&SK ISPORTSSUNSETMOONLANDSCAPELOWLUX1MENU](https://usermanual.wiki/Sony-Group/DCRPC120.Users-Manual-I/User-Guide-168907-Page-49.png)

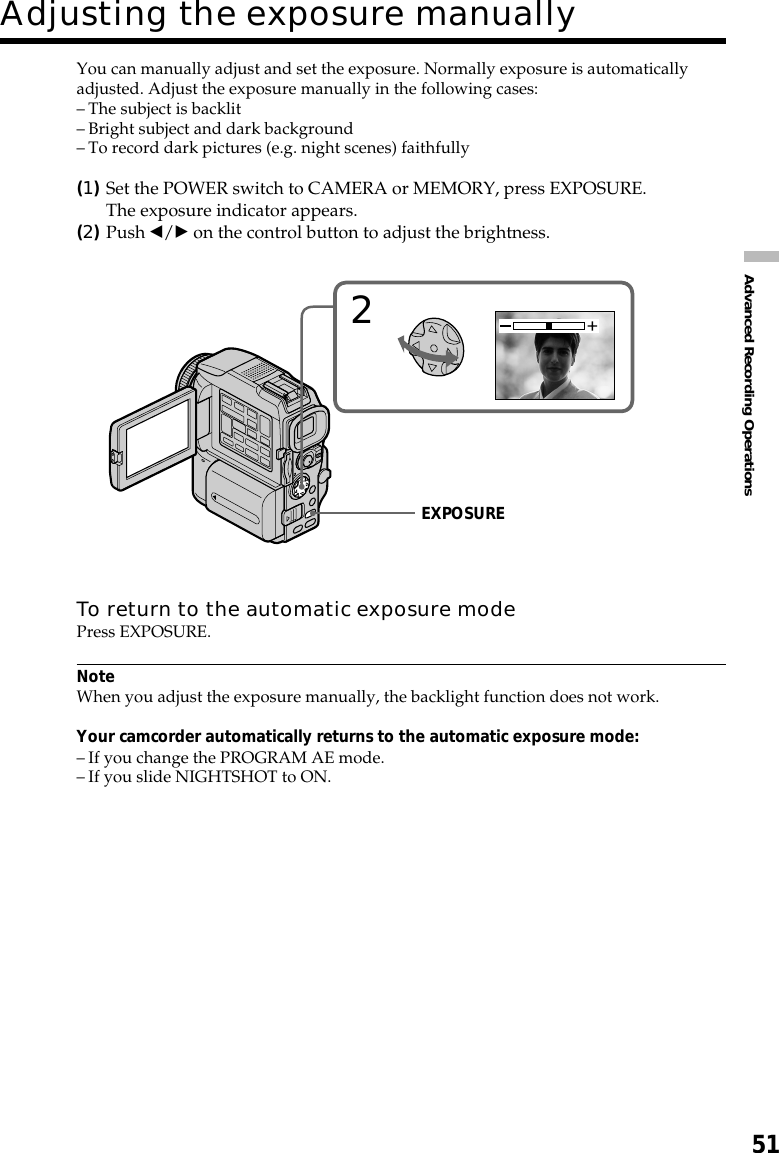
![54You can make a time-lapse recording bysetting the camcorder to automatically recordand standby sequentially. You can achieve anexcellent recording for flowering, emergence,etc., with this function.(1)In the standby mode, press MENU, then select and decide upon INT. REC in with the control button (p. xx).(2)Select and decide upon SET with the control button.(3)Set INTERVAL and REC TIME.1 Select and decide upon INTERVAL with the control button.2 Select and decide upon the desired interval time with the control button.The time: 30SEC y 1MIN y 5MIN y 10MIN3 Select and decide upon REC TIME with the control button.4 Select and decide upon the desired recording time with the control button.The time: 0.5SEC y 1SEC y 1.5SEC y 2SEC5 Select and decide upon RETURN with the control button.(4)Select and decide upon ON with the control button.(5)Press MENU to erase the menu display. The INTERVAL indicator flashes.(6)Press START/STOP to start interval recording. The INTERVAL indicator lightsup.Interval recording10 min10 min1 s 1 s9 min 59 s 9 min 59 s[a][a][b][b]Example[a]REC TIME[b]INTERVAL](https://usermanual.wiki/Sony-Group/DCRPC120.Users-Manual-I/User-Guide-168907-Page-54.png)
![55Advanced Recording OperationsInterval recording46CAMERA SETD ZOOM16 : 9W I DESTEADYSHOTN. S. L I GHTFRAME REC I NT. RECFLASH LVL RETURNON [MENU] : ENDLOCKPOWERVCRMEMORYCAMERAOFF(CHG)5 I NTERVALSTBYMENUCAMERA SETD ZOOM OFF16 : 9W I DESTEADYSHOTN. S. L I GHTFRAME REC I NT. RECFLASH LVL RETURN [MENU] : ENDCAMERA SETD ZOOM16 : 9W I DESTEADYSHOTN. S. L I GHTFRAME REC I NT. RECFLASH LVL RETURNONOFFSET [MENU] : ENDCAMERA SET I NT. REC I NTERVAL REC T I ME RETURN 30SEC [MENU] : ENDCAMERA SET I NT. REC I NTERVAL REC T I ME RETURN 30SEC 1M I N 5M I N10M I N [MENU] : ENDCAMERA SET I NT. REC I NTERVAL REC T I ME RETURN 0 . 5SEC [MENU] : ENDCAMERA SET I NT. REC I NTERVAL REC T I ME RETURN 0 . 5SEC 1SEC1 . 5SEC 2SEC [MENU] : END23To cancel the interval recordingPerform either of the following:–Set INT. REC to OFF in the menu settings.–Set the POWER switch to other than CAMERA.To perform normal recording during the interval recordingYou can perform normal recording only once during INTERVAL.Press START/STOP. The INTERVAL indicator flashes, and normal recording starts. Tostop normal recording, press START/STOP again.On recording timeThere may be a discrepancy in recording time of up to +/– six frames from the selectedtime.](https://usermanual.wiki/Sony-Group/DCRPC120.Users-Manual-I/User-Guide-168907-Page-55.png)
![56You can make a recording with a stop-motion animated effect using cut recording. Tocreate this effect, alternately move the subject a little and make a cut recording. Werecommend that you use a tripod, and operate the camcorder using the RemoteCommander after step 4.(1)In the standby mode, press MENU, then select and decide upon FRAME RECin with the control button (p. xx).(2)Select and decide upon ON with the control button.(3)Press MENU to erase the menu display.The FRAME REC indicator lights up.(4)Press START/STOP to start cut recording. The camcorder makes a recordingfor about six frames, and returns to recording standby.(5)Move the subject, and repeat step 4.To cancel the cut recordingPerform either of the following:–Set FRAME REC to OFF in the menu settings.–Set the POWER switch to other than CAMERA.NoteThe proper remaining tape time is not indicated if you use this function continuously.When using the cut recording functionThe last recorded cut is longer than other cuts.Frame by frame recording – Cut recording42LOCKPOWERVCRMEMORYCAMERAOFF(CHG)CAMERA SETD ZOOM16 : 9W I DESTEADYSHOTN. S. L I GHTFRAME REC I NT. RECFLASH LVL RETURNON [MENU] : ENDCAMERA SETD ZOOM16 : 9W I DESTEADYSHOTN. S. L I GHTFRAME REC I NT. RECFLASH LVL RETURNOFFON [MENU] : ENDMENU](https://usermanual.wiki/Sony-Group/DCRPC120.Users-Manual-I/User-Guide-168907-Page-56.png)
![57Advanced Playback OperationsDuring playback, you can process a scene using the picture effect functions: NEG. ART,SEPIA, B&W and SOLARIZE.(1)In the playback or playback pause mode, press MENU, then select and decideupon P EFFECT in with the control button (p. xx).(2)Select and decide upon the desired mode with the control button.For details of each picture effect function, see page xx.To cancel the picture effect functionSet P EFFECT to OFF in the menu settings.Notes•You cannot process externally input scenes using the picture effect function.•You cannot record images on a tape on your camcorder when you have processed theimage using the picture effect function. However, you can record images on a“Memory Stick” (p. xxx, xxx), or on a VCR using your camcorder as a player.Pictures processed by the picture effect functionPictures processed by the picture effect function are not output through the DV jack.When you set the POWER switch to OFF (CHG) or stop playing backThe picture effect function is automatically canceled.— Advanced Playback Operations —Playing back a tape with picture effectsMENU1MANUA L SE T.OFFNEG ARTSEP I AB&WSOL AR I ZEPEFFECTDRETURNEFFECT[MENU] : END](https://usermanual.wiki/Sony-Group/DCRPC120.Users-Manual-I/User-Guide-168907-Page-57.png)
![58During playback, you can process a scene using the digital effect functions: STILL,FLASH, LUMI. and TRAIL.(1)In the playback or playback pause mode, press MENU, then select and decideupon D EFFECT in with the control button (p. xx).(2)Select and decide upon the desired mode with the control button.The bars appear. In the STILL or LUMI. mode, the picture is captured and isstored in memory as a still image.(3)Press b/B on the control button to adjust the effect with the control button.For details of each digital effect function, see page xx.To cancel the digital effect functionSet D EFFECT to OFF in the menu settings.Notes•You cannot process externally input scenes using the digital effect function.•You cannot record images on a tape on your camcorder when you have processed theimage using the digital effect function. However, you can record images on a“Memory Stick” (p. xxx, xxx), or on a VCR using your camcorder as a player.Pictures processed by the digital effect functionPictures processed by the digital effect function are not output through the DV jack.When you set the POWER switch to OFF (CHG) or stop playing backThe digital effect function is automatically canceled.Playing back a tape with digital effects123MANUA L SETOFFST I LLFLASHTRA I LDEFFECT[MENU] : ENDLUMI.MANUA L[MENU] : ENDST I LLIIIIIIII••••••••RETURNMANUA L SETOFFST I LLFLASHTRA I LDEFFECT[MENU] : ENDLUMI.MANUA L SETDEFFECT[MENU] : ENDST I LLIIIIIIIIIIIIIIIIPEFFECTDEFFECTMENU](https://usermanual.wiki/Sony-Group/DCRPC120.Users-Manual-I/User-Guide-168907-Page-58.png)

![61Advanced Playback OperationsIf you use a tape with cassette memory, you can search for the boundaries ofrecorded tape by title. Use the Remote Commander for this operation.Before operationSet CM SEARCH in to ON in the menu settings (p. xx). (The default setting is ON.)(1)Set the POWER switch to VCR.(2)Press SEARCH MODE on the Remote Commander repeatedly, until the TITLESEARCH indicator appears.The indicator changes as follows:TITLE SEARCH t DATE SEARCH t PHOTO SEARCHno indicator TPHOTO SCAN(3)Press . or > on the Remote Commander to select the title for playback.Your camcorder automatically starts playback of the scene having the title thatyou selected.[a]Actual point you are trying to search for[b]Present point on the tapeTo stop searchingPress x.If you use a tape without cassette memoryYou cannot superimpose or search a title.If a tape has a blank portion between recorded portionsThe title search function may not work correctly.To superimpose a titleSee page xx.Searching the boundaries of recordedtape by title – Title search3.>2SEARCHMODETITLE SEARCH1HELLO!2CONGRA TUL AT I ONS!3HAPPY NEWYEAR!4PRESENT5GOODMORN I NG6WEDD I NG[b][a]HCRAESELTIT3HAPPY NEWYEAR!4PRESENT5GOODMORN I NG6WEDD I NG7NIGHT8BASEBAL L](https://usermanual.wiki/Sony-Group/DCRPC120.Users-Manual-I/User-Guide-168907-Page-61.png)
![62You can automatically search for the point where the recording date changes and startplayback from that point (Date search). Use a tape with cassette memory forconvenience. Use the Remote Commander for this operation.Use this function to check where recording dates change or to edit the tape at eachrecording date.Searching for the date by using cassette memoryBefore operation•You can use this function only when playing back a tape with cassette memory.•Set CM SEARCH in to ON in the menu settings (p. xx). (The default setting isON).(1)Set the POWER switch to VCR.(2)Press SEARCH MODE on the Remote Commander repeatedly, until the DATESEARCH indicator appears.The indicator changes as follows:TITLE SEARCH t DATE SEARCH t PHOTO SEARCHno indicator TPHOTO SCAN(3)Press . or > on the Remote Commander to select the date for playback.Your camcorder automatically starts playback at the beginning of the selecteddate.[a]Actual point you are trying to search for[b]Present point on the tapeTo stop searchingPress x.Searching a recording by date– Date search3.>2SEARCHMODEDATE SEARCH1SEP/5/012SEP/6/013DEC/24/014JAN/1/025FEB/11/026APR/29/02[b][a]DATE SEARCH1SEP/5/012SEP/6/013DEC/24/014JAN/1/025FEB/11/026APR/29/02](https://usermanual.wiki/Sony-Group/DCRPC120.Users-Manual-I/User-Guide-168907-Page-62.png)
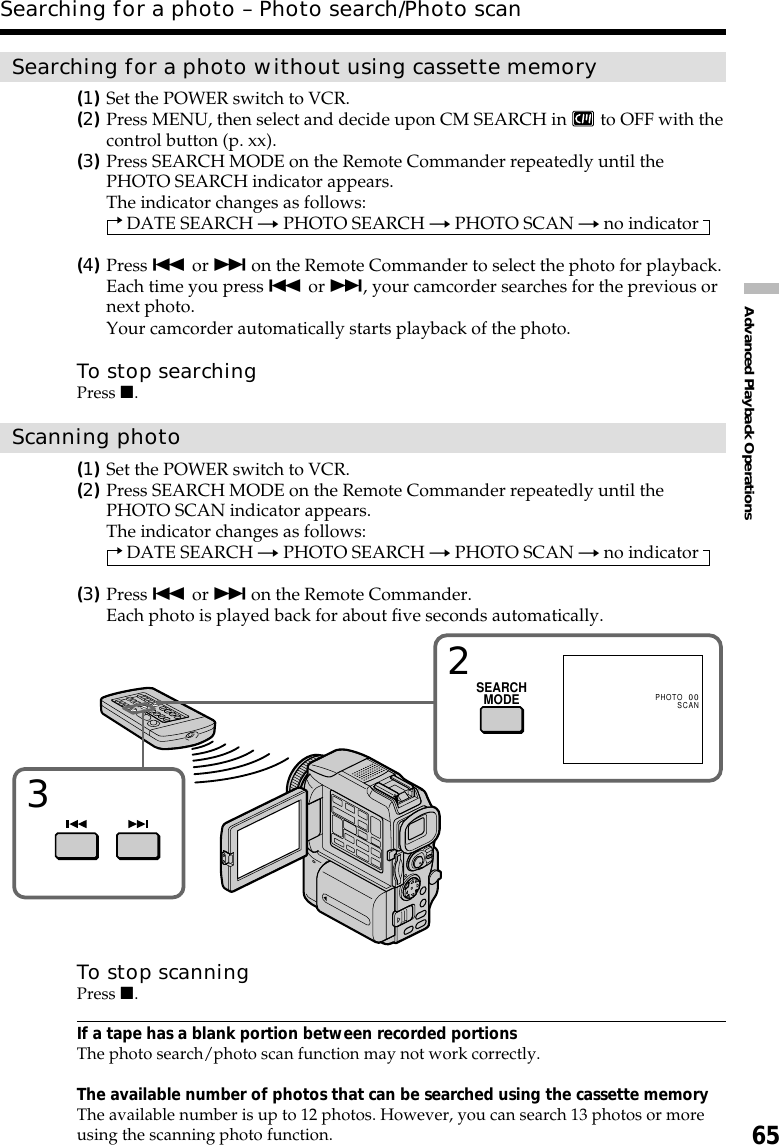
![64You can search for a still image you have recorded on a tape (photo search).You can also search for still images one after another and display each image forfive seconds automatically regardless of cassette memory (photo scan). Use the RemoteCommander for these operations.Use this function to check or edit still images.Searching for a photo by using cassette memoryBefore operation•You can use this function only when playing back a tape with cassette memory.•Set CM SEARCH in to ON in the menu settings (p. xx). (The default setting isON.)(1)Set the POWER switch to VCR.(2)Press SEARCH MODE on the Remote Commander repeatedly, until thePHOTO SEARCH indicator appears.The indicator changes as follows:TITLE SEARCH t DATE SEARCH t PHOTO SEARCHno indicator TPHOTO SCAN(3)Press . or > on the Remote Commander to select the date for playback.Your camcorder automatically starts playback of the photo having the datethat you selected.[a]Actual point you are trying to search for[b]Present point on the tapeTo stop searchingPress x.Searching for a photo– Photo search/Photo scan3.>2SEARCHMODEPHOTO SEARCH1SEP/ 5/01 5:30P M2SEP/ 6/01 8:50A M3DEC/24/01 10:30A M4JAN/ 1/02 11:25P M5FEB/11/02 4:11P M6APR/29/02 1:45P M[b][a]PHOTO SEARCH1SEP/5/0117:302SEP/6/01 8:503DEC/24 /01 10 : 304JAN/1/0223:255FEB/11 /02 16 : 116APR/29 /02 13 : 45MENU](https://usermanual.wiki/Sony-Group/DCRPC120.Users-Manual-I/User-Guide-168907-Page-64.png)