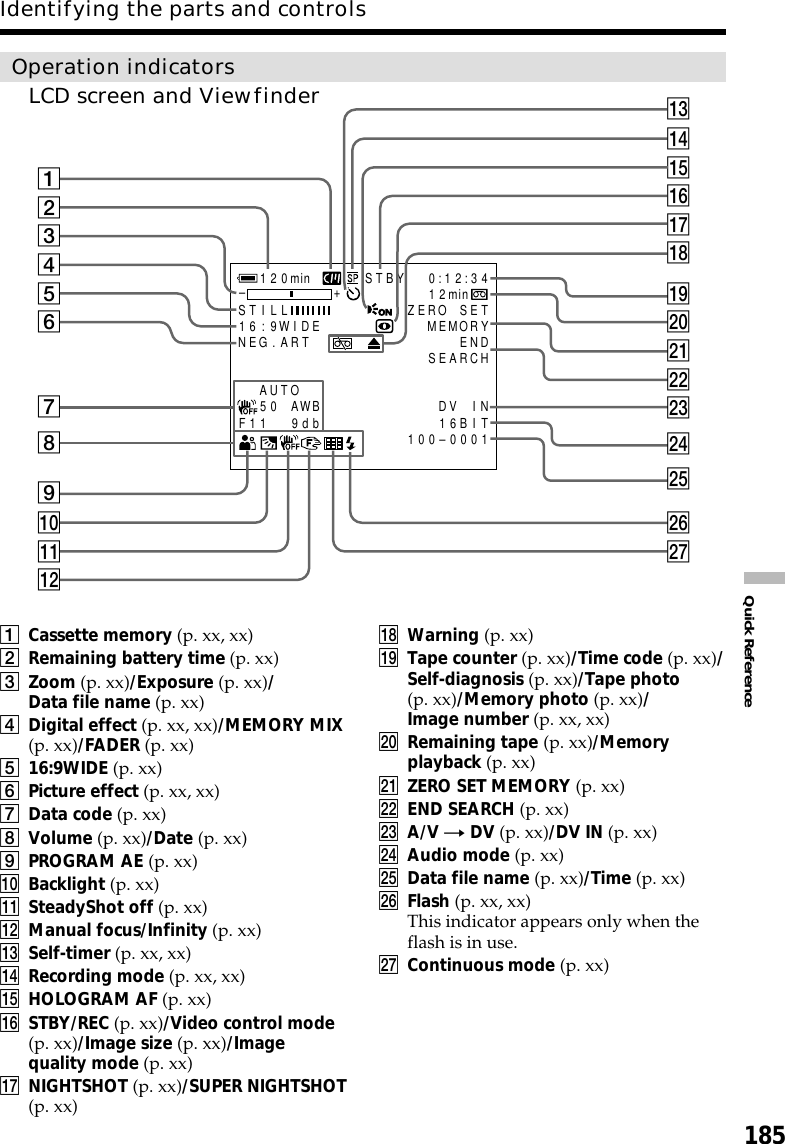
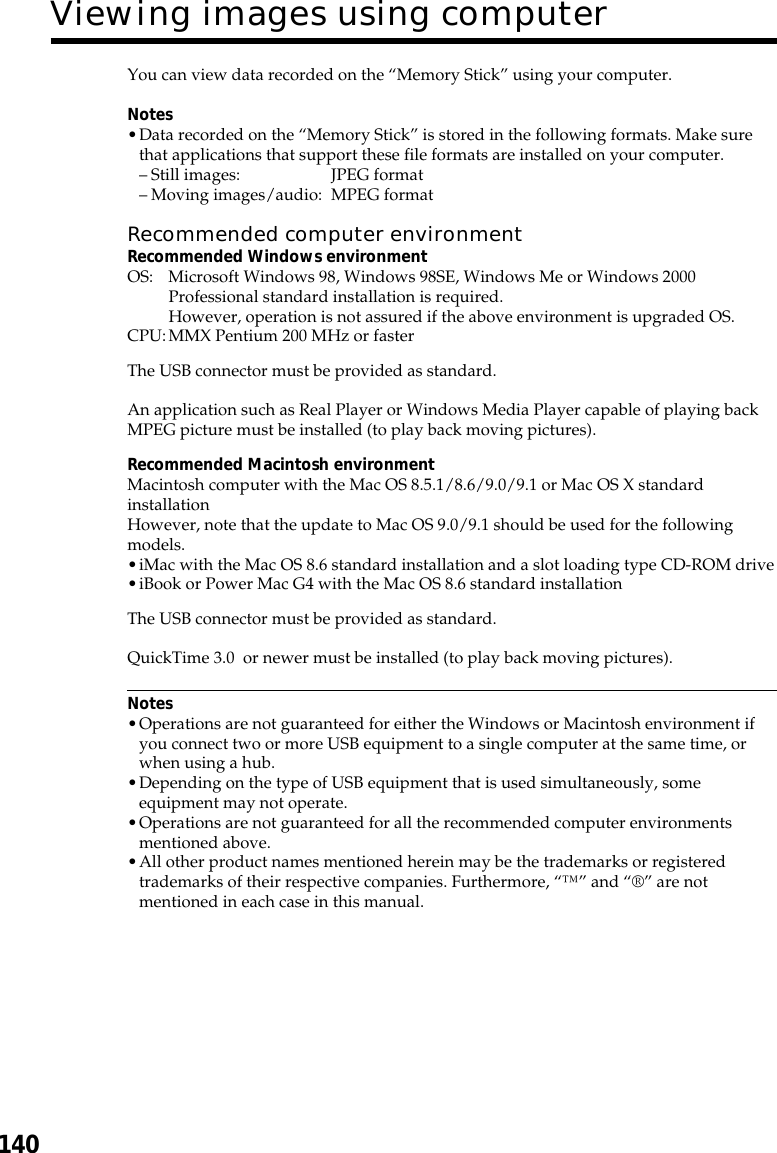
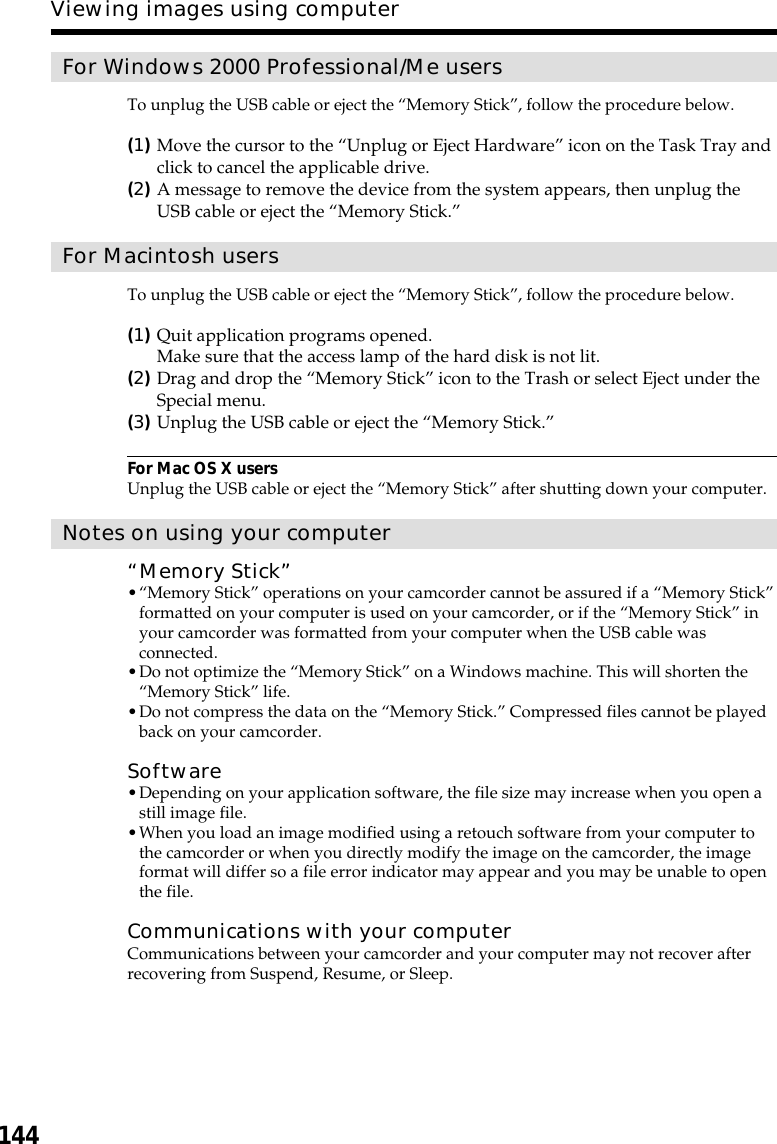
Sony Group DCRPC120 Digital Video Camera Recorder - Bluetooth User Manual DCR PC115 PC120BT
Sony Corporation Digital Video Camera Recorder - Bluetooth DCR PC115 PC120BT
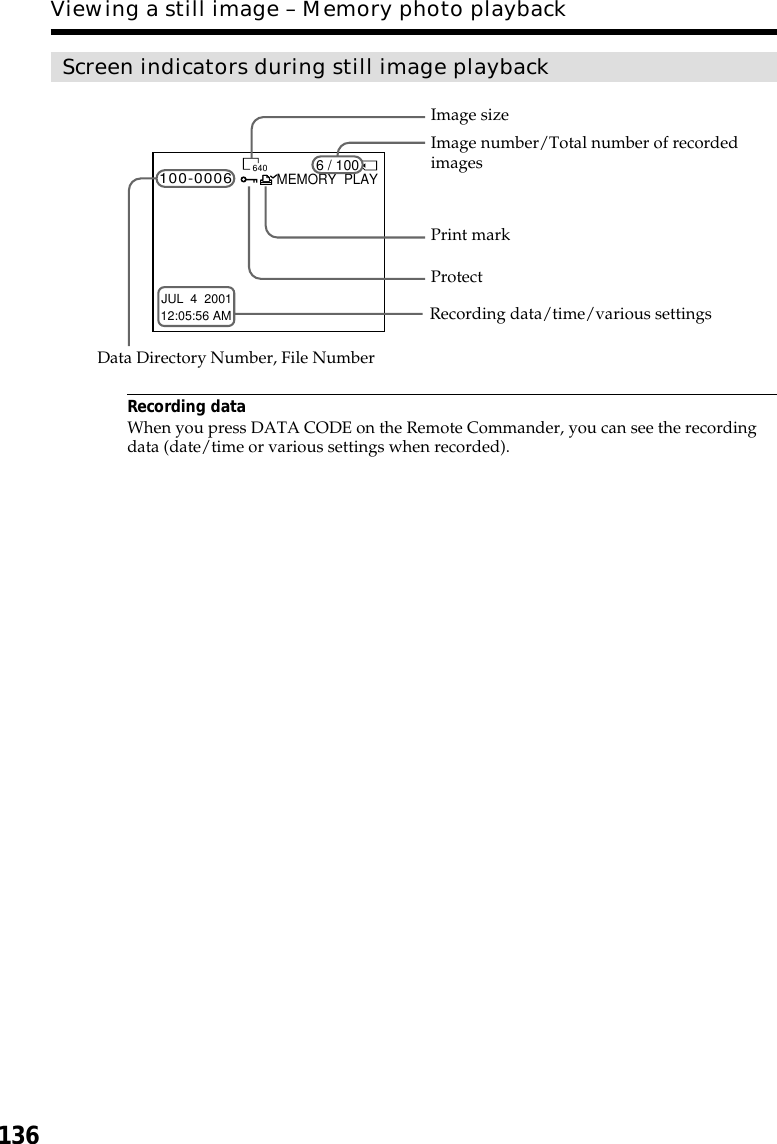
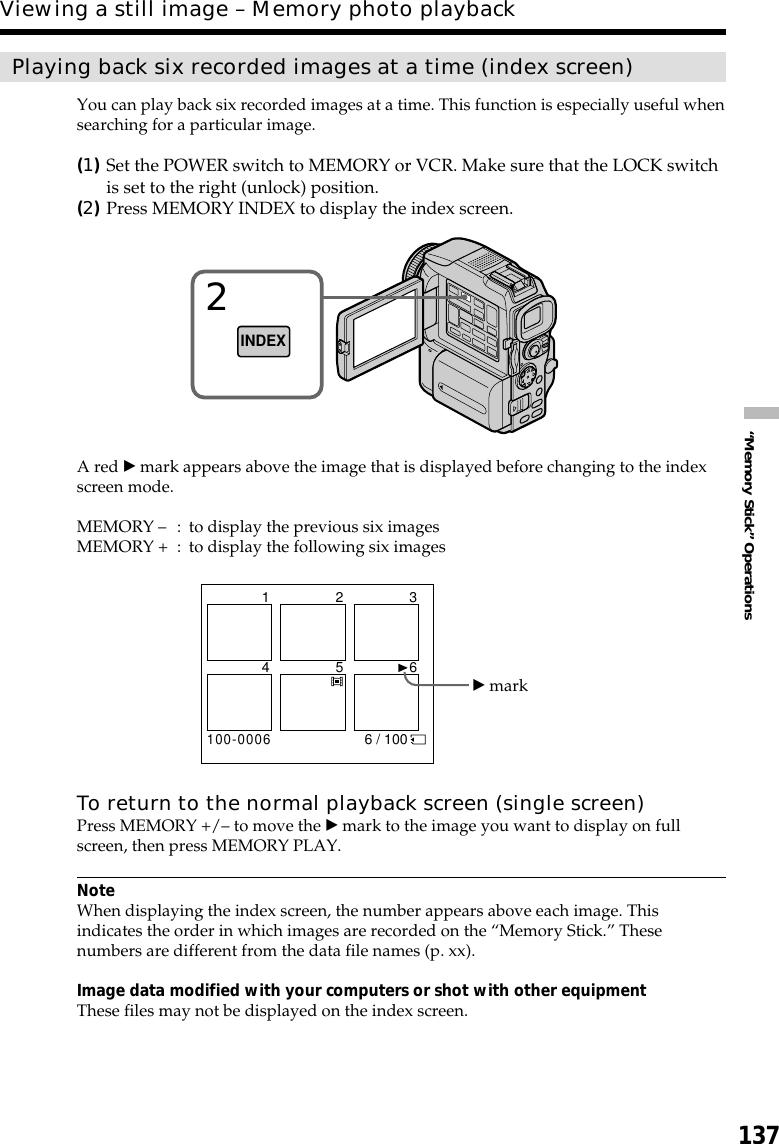
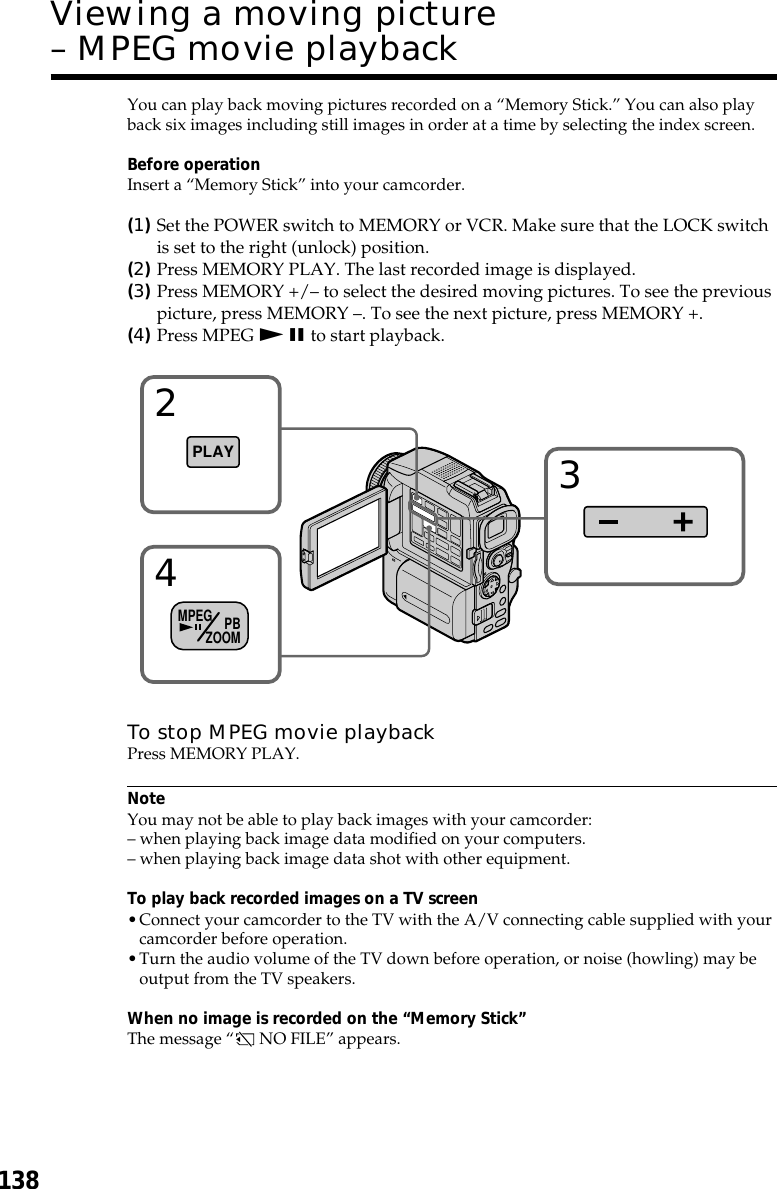
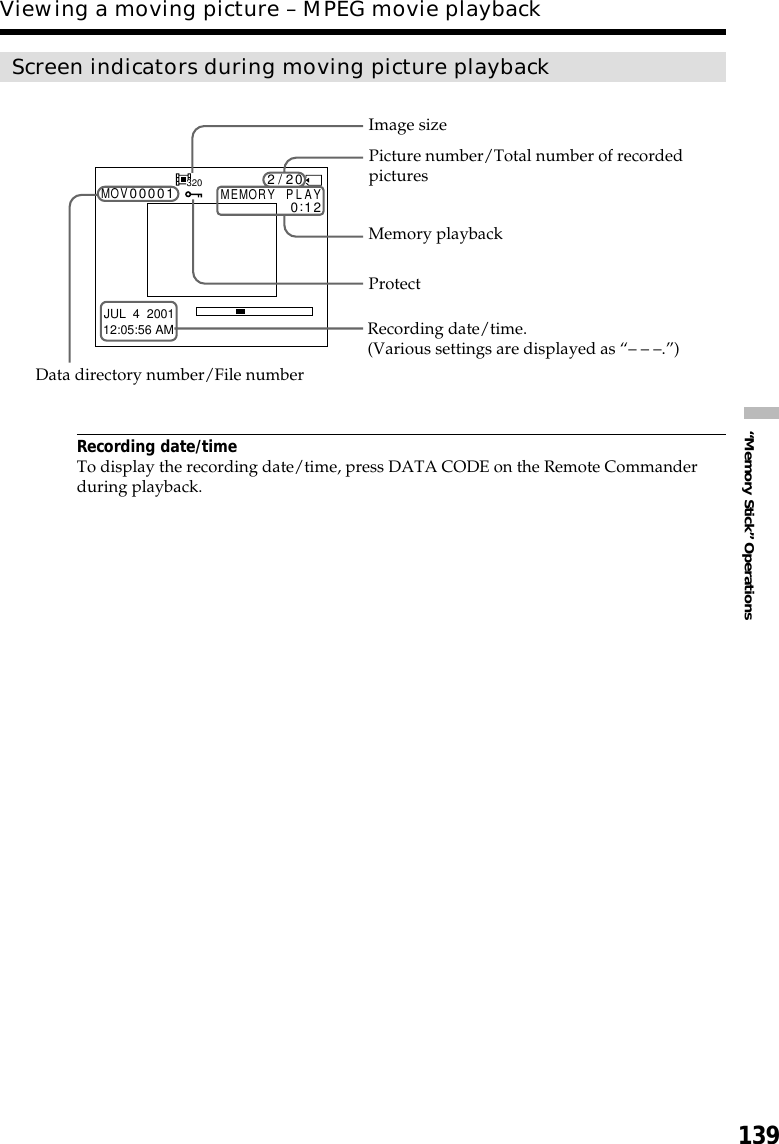
Contents
- 1. network operating instructions
- 2. Note on model names
- 3. Users Manual I
- 4. Users Manual II
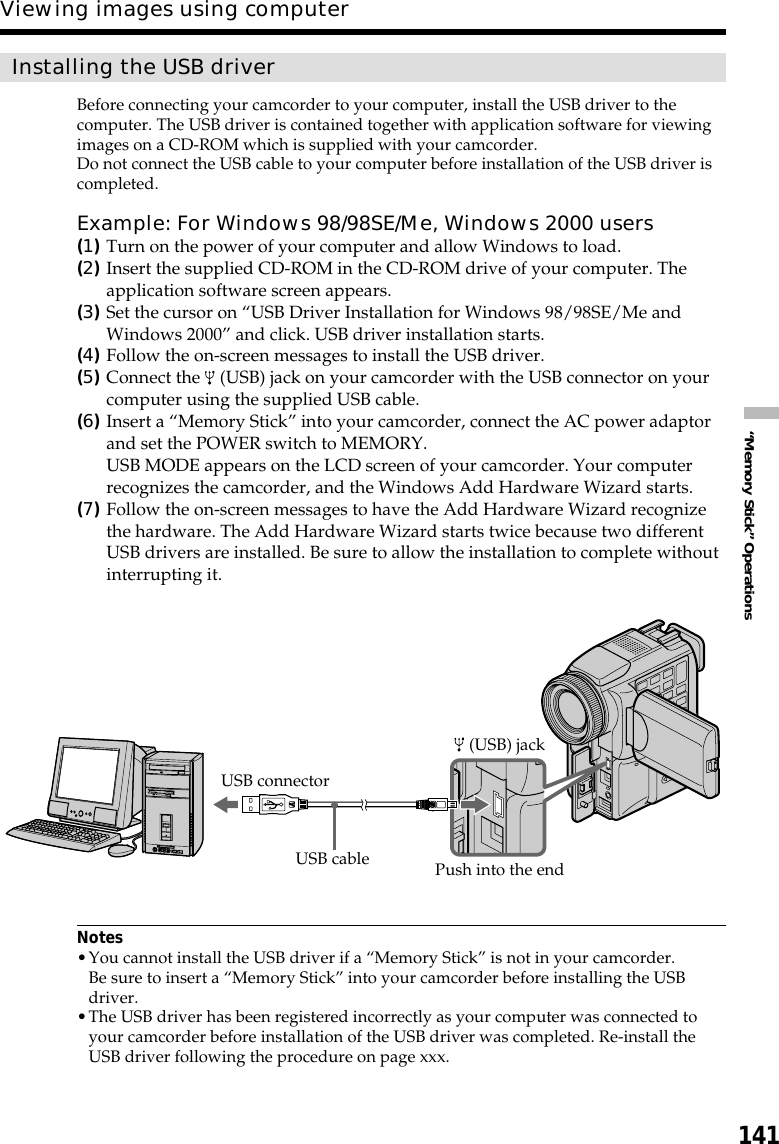
Users Manual II
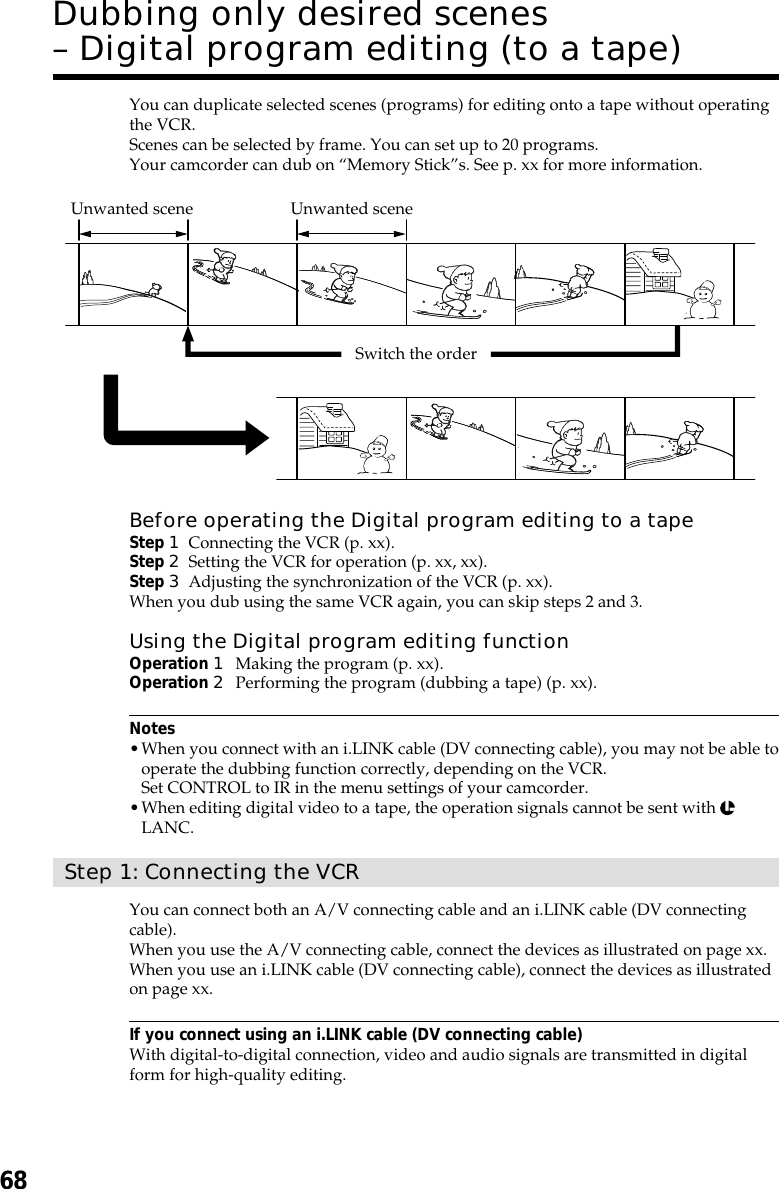
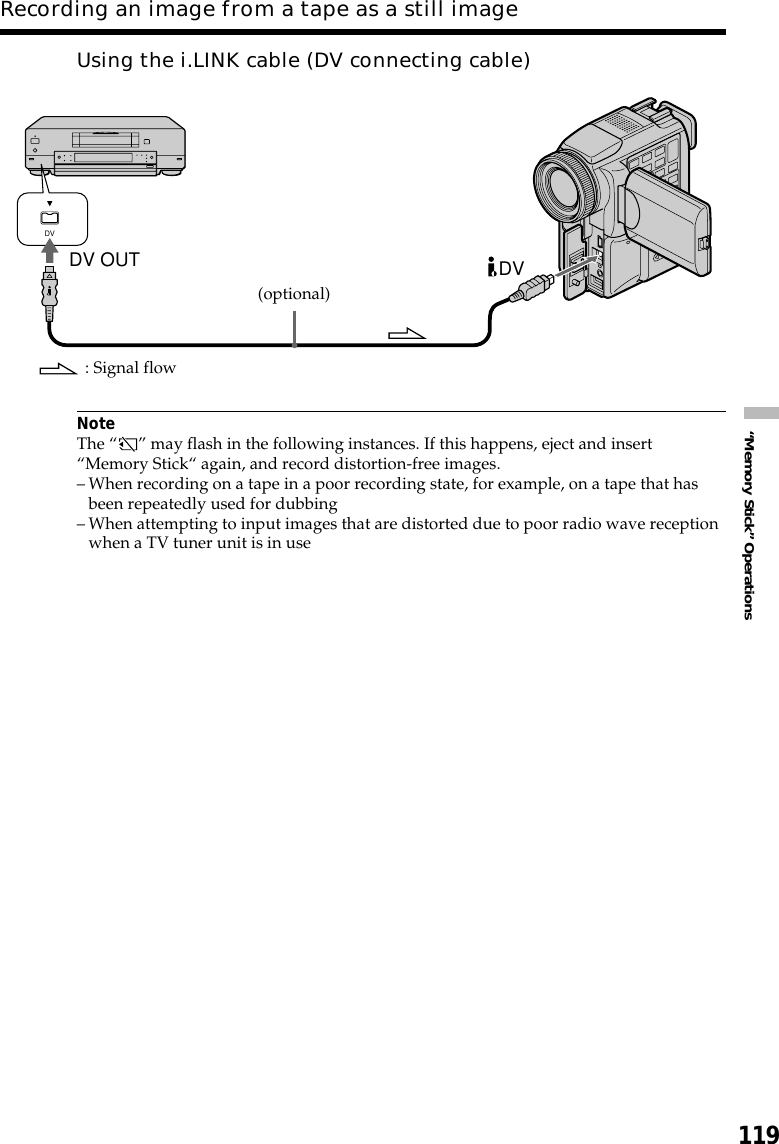
![69EditingStep 2: Setting the VCR to operate with the A/V connecting cableTo edit using the VCR, send the control signal by infrared rays to the remote sensor onthe VCR.When you connect using an A/V connecting cable, follow the procedure below, (1) to(4), to send the control signal correctly.(1) Set the IR SETUP code1Set the POWER switch to VCR on your camcorder.2Turn the power of the connected VCR on, then set the input selector to LINE.When you connect a video camera recorder, set its power switch to VCR/VTR.3Press MENU, then select and decide upon VIDEO EDIT in with the controlbutton (p. xx).4Select and decide upon TAPE with the control button.5Select and decide upon EDIT SET with the control button.6Select and decide upon CONTROL with the control button.7Select and decide upon IR with the control button.8Select and decide upon IR SETUP, then select and decide upon IR SETUP codeof your VCR with the control button.Check the code in “About the IR SETUP code.” (p. xx)Dubbing only desired scenes – Digital program editing (to a tape)683,4,5VIDEO ED I TED I T SETCONTROLADJ TEST”CUT-IN””CUT-OUT”IR SETUPPAUSEMODEIR TESTIRRETURN[MENU] : END0:08:55:06VIDEO ED I TED I T SETCONTROLADJ TEST”CUT-IN””CUT-OUT”IR SETUPPAUSEMODEIR TEST1RETURN[MENU] : END0:08:55:06VIDEO EDITDATA CODEOTHERSBEEPCOMMANDERDI SPLAY READY[MENU] : ENDRETURNDATA CODEOTHERSBEEPCOMMANDERDI SPLAYVIDEO EDIT RETURNTAPEMEMORY[MENU] : ENDRETURNDATA CODEOTHERSBEEPCOMMANDERDI SPLAYVIDEO EDIT RETURNTAPEMEMORY[MENU] : ENDRETURNKRAM ODNU LLAESARE TRATS TES/TIDELATOT ENECSNI10:08:55:060:00:00:000[MENU] : ENDVIDEO ED I Ti.LINKMENU](https://usermanual.wiki/Sony-Group/DCRPC120.Users-Manual-II/User-Guide-168908-Page-4.png)
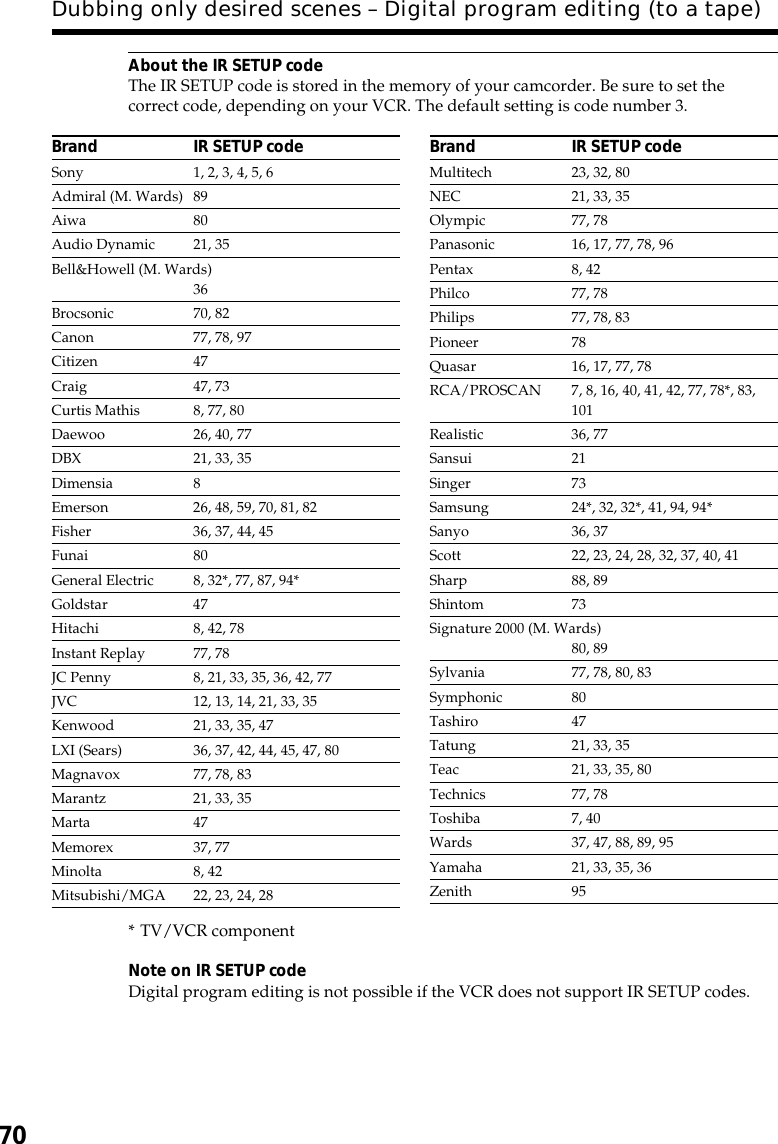
![71Editing(2) Setting the modes to cancel the recording pause on the VCRSelect and decide upon PAUSEMODE with the control button, then select anddecide upon the mode to cancel recording pause on the VCR with the controlbutton.Refer to the operating instructions of your VCR.The buttons to cancel recording pause on the VCRThe buttons vary depending on your VCR. To cancel recording pause:– Select PAUSE if the button to cancel recording pause is X.– Select REC if the button to cancel recording pause is z.– Select PB if the button to cancel recording pause is N.(3) Setting your camcorder and the VCR to face each otherLocate the infrared rays emitter of your camcorder and face it towards the remotesensor of the VCR.Set the devices about 30 cm (12 in.) apart, and remove any obstacles between thedevices.Dubbing only desired scenes – Digital program editing (to a tape)ED I T SETCONTROLADJ TEST”CUT-IN””CUT-OUT”IR SETUPPAUSEMODEIR TEST PAUSERECPBRETURN[MENU] : ENDVIDEO ED I T0:08:55:06VIDEO ED I TED I T SETCONTROLADJ TEST”CUT-IN””CUT-OUT”IR SETUPPAUSEMODEIR TEST PAUSERETURN[MENU] : END0:08:55:06Infrared rays emitterA/V connecting cableRemote sensor](https://usermanual.wiki/Sony-Group/DCRPC120.Users-Manual-II/User-Guide-168908-Page-6.png)
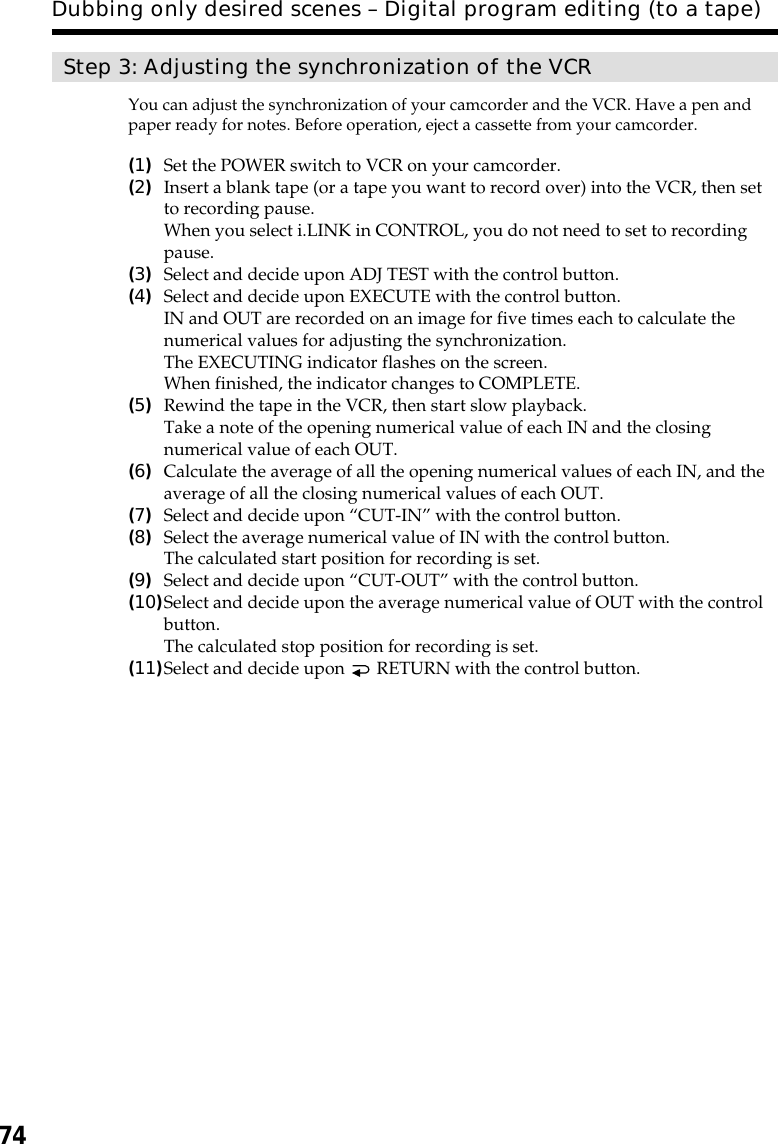
![72(4) Confirming the VCR operation1Insert a recordable tape into the VCR, then set to recording pause.2Select and decide upon IR TEST with the control button.3Select and decide upon EXECUTE with the control button.If the VCR starts recording, the setting is correct.When recording is finished, the indicator changes to COMPLETE.When the VCR does not operate correctly•After checking the code in “About the IR SETUP code”, set the IR SETUP or thePAUSEMODE again.•Place your camcorder at least 30 cm (12 in.) away from the VCR.•Refer to the operating instructions of your VCR.Dubbing only desired scenes – Digital program editing (to a tape)23VIDEO ED I TED I T /SETCONTROLADJ TEST”CUT-IN””CUT-OUT”IR SETUPPAUSEMODEIR TEST RETURNEXECUTERETURN[MENU] : ENDVIDEO ED I TED I T /SETCONTROLADJ TEST”CUT-IN””CUT-OUT”IR SETUPPAUSEMODEIR TEST COMPL ETERETURN[MENU] : ENDENGAGERECCP A U S E0:08:55:060:08:55:06](https://usermanual.wiki/Sony-Group/DCRPC120.Users-Manual-II/User-Guide-168908-Page-7.png)
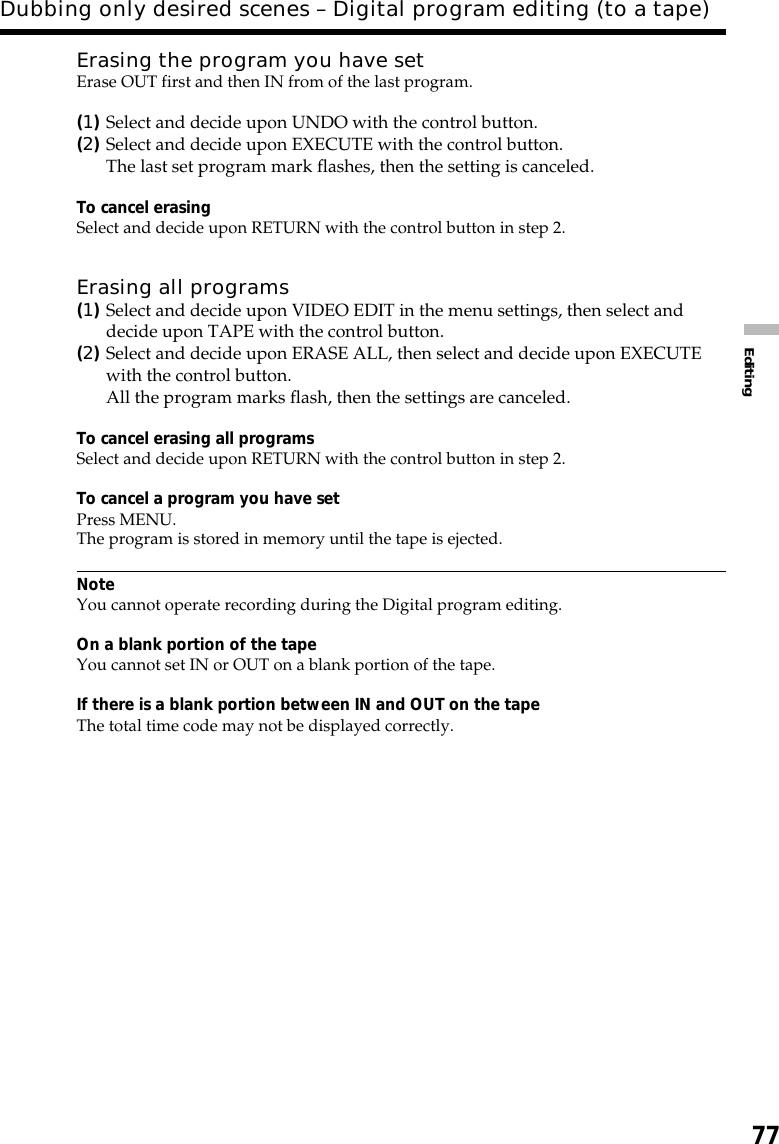
![73EditingStep 2: Setting the VCR to operate with the i.LINK cable(DV connecting cable)When you connect using i.LINK cable (DV connecting cable) (optional), follow theprocedure below.(1)Set the POWER switch to VCR on your camcorder.(2)Turn the power of the connected VCR on, then set the input selector to DVinput. When you connect a digital video camera recorder, set its power switchto VCR/VTR.(3)Press MENU, then select and decide upon VIDEO EDIT in with the controlbutton (p. xx).(4)Select and decide upon TAPE with the control button.(5)Select and decide upon EDIT SET with the control button.(6)Select and decide upon CONTROL with the control button.(7)Select and decide upon i.LINK with the control button.When you connect using i.LINK cable (DV connecting cable)You cannot dub the titles, display indicators.Dubbing only desired scenes – Digital program editing (to a tape)VIDEO ED I TED I T SETCONTROLADJ TEST”CUT-IN””CUT-OUT”IR SETUPPAUSEMODEIR TESTiLINKRETURN[MENU] : END.0:08:55:0657VIDEO ED I TED I T SETCONTROLADJ TEST”CUT-IN””CUT-OUT”IR SETUPPAUSEMODEIR TESTIRRETURN[MENU] : END0:08:55:06VIDEO EDITDATA CODEOTHERSBEEPCOMMANDERDI SPLAY READY[MENU] : ENDRETURNDATA CODEOTHERSBEEPCOMMANDERDI SPLAYVIDEO EDIT RETURNTAPEMEMORY[MENU] : ENDRETURNDATA CODEOTHERSBEEPCOMMANDERDI SPLAYVIDEO EDIT RETURNTAPEMEMORY[MENU] : ENDRETURN3,4MARKUNDOERASE ALLSTARTED I T /SETTOTALSCENE1IN0:08:55:060:00:00:000[MENU] : ENDVIDEO ED I TMENU](https://usermanual.wiki/Sony-Group/DCRPC120.Users-Manual-II/User-Guide-168908-Page-8.png)
![75EditingNotes•When you complete step 3, the image to adjust the synchronization is recorded forabout 50 seconds.•If you start recording from the very beginning of the tape, the first few seconds of thetape may not record properly. Be sure to allow about 10 seconds’ lead before startingrecording.•When the recording unit cannot be operated properly by the i.LINK cable (DVconnecting cable), leave the connection as it is, and make the A/V connecting cablesettings (p. xx). Video and audio are sent by digital signals.Dubbing only desired scenes – Digital program editing (to a tape)3,4 79VIDEO ED I TED I T SETCONTROLADJ TEST”CUT-IN””CUT-OUT”IR SETUPPAUSEMODEIR TESTRETURNEXECUTE[MEENGAGERECCP A U S E0:08:55:06VIDEO ED I TED I T SETCONTROLADJ TEST”CUT-IN””CUT-OUT”IR SETUPPAUSEMODEIR TESTEXECUT I NGNo5IN–60[ME.0:08:55:06VIDEO ED I TED I T SETCONTROLADJ TEST”CUT-IN””CUT-OUT”IR SETUPPAUSEMODEIR TESTCOMPLE TERETURN[MENU] : END0:08:55:06VIDEO ED I TED I T SETCONTROLADJ TEST”CUT-IN””CUT-OUT”IR SETUPPAUSEMODEIR TEST0RETURN[MENU] : END0:08:55:06VIDEO ED I TED I T SETCONTROLADJ TEST”CUT-IN””CUT-OUT”IR SETUPPAUSEMODEIR TEST0RETURN[MENU] : END0:08:55:06](https://usermanual.wiki/Sony-Group/DCRPC120.Users-Manual-II/User-Guide-168908-Page-10.png)
![76Dubbing only desired scenes – Digital program editing (to a tape)Operation 1: Making the program(1)Insert the tape for playback into your camcorder, and insert a tape forrecording into the VCR.(2)Press MENU, then select and decide upon VIDEO EDIT in with the controlbutton (p. xx).(3)Select and decide upon TAPE with the control button.(4)Search for the beginning of the first scene you want to insert using the videooperation buttons, then pause playback.You can fine-adjust one frame at a time with EDITSEARCH.(5)Press MARK on the Remote Commander, or z on the control button.The IN point of the first program is set, and the top part of the program markchanges to light blue.(6)Search for the end of the first scene you want to insert using the videooperation buttons, then pause playback.(7)Press MARK on the Remote Commander, or z on the control button.The OUT point of the first program is set, then the bottom part of the programmark changes to light blue.(8)Repeat steps 4 to 7, then set the program.When the program is set, the program mark changes to light blue.You can set up to 20 programs.52387ED I T SETMARKUNDOERASE ALLSTARTTOTALSCENE1IN0:08:55:060:00:00:000[MENU] : ENDVIDEO ED I TMARKUNDOERASE AL LSTARTED I T /SET EDI T /SET ED I T /SETTOTALSCENE1OUT0:08:55:060:00:00:000VIDEO ED I T[MENU] : ENDMARKUNDOERASE ALLSTARTTOTALSCENE2IN0:09:07:060:00:12:001VIDEO ED I T[MENU] : ENDMARKUNDOERASE ALLSTARTTOTALSCENE4IN0:10:01:230:00:47:123VIDEO ED I T[MENU] : ENDVIDEO EDITDATA CODEOTHERSBEEPCOMMANDERDI SPLAY EXECUTE[MENU] : ENDRETURNDATA CODEOTHERSBEEPCOMMANDERDI SPLAYVIDEO EDIT RETURNTAPEMEMORY[MENU] : ENDRETURNMENU](https://usermanual.wiki/Sony-Group/DCRPC120.Users-Manual-II/User-Guide-168908-Page-11.png)
![83EditingInserting a scene from a VCR– Insert editingYou can insert a new scene from a VCR onto your originally recorded tape byspecifying the insert start and end points. Use the Remote Commander for thisoperation. Connections are the same as on page xx or xx.Insert a cassette containing the desired scene to insert into the VCR.[A]: A tape that contains the scene to be superimposed[B]: A tape before editing[C]: A tape after editing(1)Set the POWER switch to VCR on your camcorder.(2)On the connected VCR, locate just before the insert start point [a], then pressX to set the VCR to the playback pause mode.(3)On your camcorder, locate the insert end point [c]. Then press X to set it to theplayback pause mode.(4)Press ZERO SET MEMORY on the Remote Commander. The ZERO SETMEMORY indicator flashes and the end point of the insert is stored inmemory. The tape counter shows “0:00:00.”(5)On your camcorder, locate the insert start point [b] by pressing m, then pressz REC and the button on its right simultaneously.(6)First press X on the VCR, and after a few seconds press X on your camcorderto start inserting the new scene.Inserting automatically stops near the zero point on the tape counter. Yourcamcorder automatically returns to the recording pause mode.40:00:00ZERO SETMEMORYZERO SETMEMORY5REC[a][b][c][A][B][C]](https://usermanual.wiki/Sony-Group/DCRPC120.Users-Manual-II/User-Guide-168908-Page-18.png)

![87EditingAdding an audio sound on a recorded tapeChoose a connection mentioned before, and connect audio equipment or microphone toyour camcorder. Then follow the procedure below.(1)Insert the recorded tape into your camcorder.(2)Set the POWER switch to VCR on your camcorder.(3)Locate the recording start point by pressing N. Then press X at the pointwhere you want to start recording to set your camcorder to the playback pausemode.(4)Press AUDIO DUB on the Remote Commander. The green X indicatorappears on the screen.(5)Press X and start playing back the audio you want to record at the same time.The new sound is recorded in stereo 2 (ST2) during playback. Duringrecording new sound, the red appears on the screen.(6)Press x at the point where you want to stop recording.Monitoring the new recorded soundTo play back the soundAdjust the balance between the original sound (ST1) and the new sound (ST2) byselecting AUDIO MIX in in the menu settings (p. xx).Five minutes after when you disconnect the power source or remove the battery pack,the setting of AUDIO MIX returns to the original sound (ST1) only. The default settingis original sound only.Audio dubbingST1 ST2VCR SETRETURNHiFi SOUNDAUD I O M I XA/VcDV OUT[MENU] : ENDAUDIO DUB](https://usermanual.wiki/Sony-Group/DCRPC120.Users-Manual-II/User-Guide-168908-Page-22.png)
![89EditingSuperimposing a titleIf you use a tape with cassette memory, you can superimpose the title. Whenyou play back the tape, the title is displayed for five seconds from the pointwhere you superimposed it.You can select one of eight preset titles and two custom titles (p. xx). You can also selectthe color, size and position of titles.(1)Set the POWER switch to CAMERA or VCR. Press MENU, then select anddecide upon TITLE in with the control button (p. xx).(2)Select and decide upon with the control button.(3)Select and decide upon the desired title with the control button. The titleflashes.(4)Change the color, size, or position, if necessary.1Select and decide upon the COLOR, SIZE or POSITION with the controlbutton. The item appears.2Select and decide upon the desired item with the control button.3Repeat steps 1 and 2 until the title is laid out as desired.(5)Press z on the control button again to complete the setting.In the recording, playback or playback pause mode:The TITLE SAVE indicator appears on the screen for five seconds and the titleis set.In the standby mode:The TITLE indicator appears. And when you press START/STOP to startrecording, TITLE SAVE appears on the screen for five seconds and the title isset.VACATION234SIZE SMALLVACATIONSIZE LARGEPRESET T I TLEHELLO!HAPPY B I RTHDAYHAPPY HOL I DAYSCONGRA TUL AT I ONS!OUR SWEET BABYWEDD I NGVACAT IONTHE END[MENU]:ENDPRESET T I TLEHELLO!HAPPY B I RTHDAYHAPPY HOL I DAYSCONGRA TUL AT I ONS!OUR SWEET BABYWEDD I NGVACAT IONTHE END[MENU]:ENDRETURNPRESET T I TLEHELLO!HAPPY B I RTHDAYHAPPY HOL I DAYSCONGRA TUL AT I ONS!OUR SWEET BABYWEDD I NGVACAT IONTHE END[MENU]:ENDRETURNVACATIONTITLE[EXEC]: :SAVE[MENU]ENDVACATIONTITLE[EXEC]: :SAVE[MENU]ENDMENU](https://usermanual.wiki/Sony-Group/DCRPC120.Users-Manual-II/User-Guide-168908-Page-24.png)
![91EditingErasing a title(1)Set the POWER switch to CAMERA or VCR.(2)Press MENU, then select and decide upon TITLEERASE in with the controlbutton (p. xx).(3)Select and decide upon the title you want to erase with the control button.ERASE OK ? indicator appears.(4)Make sure the title is the one you want to erase, and select and decide uponOK with the control button. OK changes to EXECUTE.(5)Select and decide upon EXECUTE with the control button.ERASING flashes on the screen. When the title is erased, COMPLETE isdisplayed.To cancel erasing a titleSelect and decide upon RETURN in step 5.Superimposing a title234CM SE TTITLETITLEERASET I TLE DSPLCM SEARCHTAPE T I TLEERASE AL L[MENU] : END[MENU] : ENDTITLE ERASE1HELLO!2CONGRATULAT IONS!3HAPPY NEWYEAR!4PRESENT5GOODMORNING6WEDD I NG4PRESENTERASE O OKK?RETURN[MENU] : ENDT I TLE ERASERETURN[MENU] : ENDTITLE ERASE1HELLO!2CONGRATULAT IONS!3HAPPY NEWYEAR!4PRESENT5GOODMORNING6WEDD I NGMENU](https://usermanual.wiki/Sony-Group/DCRPC120.Users-Manual-II/User-Guide-168908-Page-26.png)
![92Making your own titlesYou can make up to two titles and store them in the memory of your camcorder. Eachtitle can have up to 20 characters.(1)Set the POWER switch to CAMERA or VCR.(2)Press MENU, then select and decide upon TITLE in with the controlbutton (p. xx).(3)Select and decide upon with the control button.(4)Select and decide upon CUSTOM1 SET or CUSTOM2 SET with the controlbutton.(5)Select and decide upon the desired character with the control button.(6)Repeat steps 5 to complete making your own title.(7)To finish making your own titles, select and decide upon [SET] with thecontrol button.To change a title you have storedIn step 4, select the original title you want to change, and then press z on the controlbutton.Select [C] to select the title to delete, then press z to delete the last character of yourtitle. Enter the new title as desired.If you take five minutes or longer to enter characters in the standby mode while acassette is in your camcorderThe power automatically goes off. The characters you have entered remain stored inmemory. Set the POWER switch to OFF (CHG) once and then to CAMERA again, thenproceed from step 1.We recommend setting the POWER switch to VCR or removing the cassette so thatyour camcorder does not automatically turn off while you are entering title characters.To erase the titleSelect [C]. The last character is erased.To enter a spaceSelect [ Z& ? ! ], then select the blank part.345____________________TITLE SETABCDEFGH I JKLMNOPQRSTUVWXYZ&?!1234567890’.,/–[SET][MENU]:END____________________TITLE SETABCDEFGH I JKLMNOPQRSTUVWXYZ&?!1234567890’.,/–[SET][MENU]:ENDS___________________TITLE SETABCDEFGH I JKLMNOPQRSTUVWXYZ&?!1234567890’.,/–[SET][MENU]:ENDCUSTOM1TITLE SETCUSTOM2[MENU]:ENDRETURNTES TESTITLE SETCUSTOM1CUSTOM2[MENU]:ENDTES TES CUSTOM1TITLE SETCUSTOM2[MENU]:ENDRETURNTES TES[C][C][C]MENU](https://usermanual.wiki/Sony-Group/DCRPC120.Users-Manual-II/User-Guide-168908-Page-27.png)
![93EditingLabeling a cassetteIf you use a tape with cassette memory, you can label a cassette. The label canconsist of up to 10 characters and is stored in cassette memory. When you insertthe labelled cassette and turn the power on, the label is displayed for aboutfive seconds.(1)Insert the cassette you want to label.(2)Set the POWER switch to CAMERA or VCR.(3)Press MENU, then select and decide upon TAPE TITLE in with the controlbutton (p. xx).Tape title display appears.(4)Select and decide upon the desired character with the control button.(5)Repeat steps 4 until you complete the label.(6)Select and decide upon [SET] with the control button.The label is stored in memory.34CM SE TERASE AL LT I TLEERASETAPE T I TLERETURN[MENU] : END__________TAPE T I TLEABCDEFGH I JKLMNOPQRSTUVWXYZ&?!1234567890’.,/–[C•][SET][MENU] : ENDM_________TAPE T I TLEABCDEFGH I JKLMNOPQRSTUVWXYZ&?!1234567890’.,/–[C•][SET][MENU] : ENDTITLE YDAR E CM SE TTITLEERASE__________TAPE T I TLEERASE AL LRETURN[MENU] : ENDTITLE__________TAPE T I TLEABCDEFGH I JKLMNOPQRSTUVWXYZ&?!1234567890’.,/–[C][SET][MENU] : ENDMENU](https://usermanual.wiki/Sony-Group/DCRPC120.Users-Manual-II/User-Guide-168908-Page-28.png)
![94To erase the label you have madeSelect and decide upon [C] with the control button in step 4. The last character is erased.To change the label you have madeInsert the cassette to change the label, and operate in the same way to make a new label.If you set the write-protect tab of the tape to lockYou cannot label a cassette. Slide the write-protect tab to release the write protection.If the tape has too many index signalsYou may not be able to label a cassette because the memory is full. In this case, deletedata you do not need.If you have superimposed titles in the cassetteWhen the label is displayed, up to four titles also appear.When the “-----” indicator has fewer than 10 spacesThe cassette memory is full.The “-----” indicates the number of characters you can select for the label.To erase the characterPress [C]. The last character is erased.To enter a spaceSelect [ Z& ? ! ], then select the blank part.Erasing all the data in cassette memoryYou can erase all the data in cassette memory at once.(1)Set the POWER switch to CAMERA or VCR.(2)Press MENU, then select and decide upon ERASE ALL in with the controlbutton (p. xx).(3)Select and decide upon OK with the control button. OK changes to EXECUTE.(4)Select and decide upon EXECUTE with the control button. ERASING flasheson the screen. When all the data is erased, COMPLETE is displayed.To cancel deletingSelect and decide upon RETURN with the control button in step 4.Labeling a cassette](https://usermanual.wiki/Sony-Group/DCRPC120.Users-Manual-II/User-Guide-168908-Page-29.png)
![95Customizing Your CamcorderTo change the mode settings in the menu settings, select the menu items with thecontrol button. The default settings can be partially changed. First, select the icon, thenthe menu item and then the mode.(1)Set the POWER switch to CAMERA, VCR or MEMORY, press MENU.(2)Press v/V on the control button to select the desired icon, then press z or B.(3)Press v/V on the control button to select the desired item, then press z or B.(4)Press v/V on the control button to select the desired mode, then press z.(5)If you want to change other items, select RETURN and press z or b, thenrepeat steps 2 to 4.For details, see “Selecting the mode setting of each item” (p. xx).— Customizing Your Camcorder —Changing the menu settingsCAMERAVCRMEMORYMANUA L SETPROGRAM AEPEFFECTDEFFECTWHT BALAUTO SHTR[MENU] : ENDMANUA L SETPEFFECTDEFFECT[MENU] : ENDMANUA L SETPROGRAM AEWHT BAL[MENU] : ENDTAPE SETREC MODEAUD I O MO DREMA I NRETURN AUTOON[MENU] : ENDMENUTAPE SETREC MODEAUD I O MODEREMAINTAPE SETREC MODEAUD I O MODEREMA I NRETURN AUTOTAPE SETREC MODEAUD I O MODEREMA I NRETURN ON[MENU]:ENDTAPE SETREC MODE SPAUD I O MODEREMA I NRETURNTAPE SETREC MODEAUD I O MODEREMA I NRETURN AUTOON1234ororTo make the menu display disappearPress MENU.This manual refers to selecting and deciding upon items by theabove procedure as “Select and decide upon [(item name)].”](https://usermanual.wiki/Sony-Group/DCRPC120.Users-Manual-II/User-Guide-168908-Page-30.png)

![106Selecting still image quality modeYou can select image quality mode in still image recording. The default setting isSUPER FINE.(1)Set the POWER switch to MEMORY or VCR. Make sure that the LOCK switchis set to the right (unlock) position.(2)Press MENU, then select and decide upon STILL SET in with the controlbutton (p. xx).(3)Select and decide upon QUALITY with the control button.(4)Select and decide upon the desired image quality with the control button.Using a “Memory Stick” – introduction134LOCKLOCKPOWERVCRMEMORYCAMERAOFF(CHG)PIC MODEMEMORY SET SFN12ST I LL SETRETURN STANDARD[MENU] : ENDQUAL I TY SUPER F I NEREMA I NIMAGESIZE FINEMEMORY SETSTANDARD[MENU] : ENDPIC MODE36ST I LL SETRETURNQUA L I TYREMA I NIMAGESIZEMENU](https://usermanual.wiki/Sony-Group/DCRPC120.Users-Manual-II/User-Guide-168908-Page-41.png)
![108Selecting the image sizeYou can select either of two image sizesStill images: 1360 × 1020 or 640 × 480. (When the POWER switch is set to VCR, theimage size is automatically set to 640 × 480.)The default setting is 1360 × 1020.Moving pictures: 320 × 240 or 160 × 112The default setting is 320 × 240.(1)Set the POWER switch to MEMORY. Make sure that the LOCK switch is set tothe right (unlock) position.(2)Press MENU, then select and decide upon STILL SET (still image) or MOVIESET (moving picture) in with the control button (p. xx).(3)Select and decide upon IMAGESIZE with the control button.(4)Select and decide upon the desired image size with the control button.The indicator changes as follows:Still images:1360 640Moving pictures:320 160Using a “Memory Stick” – introduction341LOCKLOCKPOWERVCRMEMORYCAMERAOFF(CHG)MEMORY SETMOVIE SETRETURNREMA I N[MENU] : ENDIMAGESIZE320 240160 112REMA I N320160 112MEMORY SETMOVIE SETRETURNREMA I N[MENU] : ENDIMAGESIZEREMA I N2minPIC MODEMEMORY SETST I LL SETRETURN[MENU] : ENDQUA L I TYIMAGESIZE1360 1020640 48013602REMA I NPIC MODEMEMORY SETST I LL SETRETURN[MENU] : ENDQUA L I TYIMAGESIZE640 48060REMA I N40sec1STILL SET MOVIE SETSTILL SET MOVIE SETMENU](https://usermanual.wiki/Sony-Group/DCRPC120.Users-Manual-II/User-Guide-168908-Page-43.png)


![111“Memory Stick” OperationsYou can record still images on “Memory Stick”s.Before operationInsert a “Memory Stick” into your camcorder.(1)Set the POWER switch to MEMORY. Make sure that the LOCK switch is set tothe right (unlock) position.(2)Keep pressing PHOTO lightly until the desired still image appears. The greenz mark stops flashing, then lights up. The brightness of the image and focusare adjusted, being targeted for the middle of the image and are fixed.Recording does not start yet.(3)Press PHOTO deeper.The still image will be displayed after the shutter sounds.Recording is complete when the bar scroll indicator disappears.The image when you pressed PHOTO deeper will be recorded on the“Memory Stick.”When the POWER switch is set to MEMORYThe following functions do not work:–Wide mode–Digital zoom–SteadyShot function–SUPER NIGHTSHOT–Fader–Picture effect–Digital effect–Title–Low lux of PROGRAM AE (The indicator flashes.)–Sports lesson of PROGRAM AE (The indicator flashes.)Recording still images on “MemoryStick”s – Memory Photo recording321 / 12SFN1360SFN1360PHOTOPHOTO1LOCKLOCKPOWERVCRMEMORYCAMERAOFF(CHG)[a][b][a]: Number of recorded images[b]: Approximate number ofimages can be recorded onthe “Memory Stick”](https://usermanual.wiki/Sony-Group/DCRPC120.Users-Manual-II/User-Guide-168908-Page-46.png)
![112Recording still images on “Memory Stick”s– Memory Photo recordingWhile you are recording a still imageYou can neither turn off the power nor press PHOTO.When you press PHOTO on the Remote CommanderYour camcorder immediately records the image that is on the screen when you pressthe button.When you press PHOTO lightly in step 2The image momentarily flickers. This is not a malfunction.Recording dataThe recording data (date/time or various settings when recorded) are not displayedwhile recording. However, they are recorded automatically onto the “Memory Stick.”To display the recording data, press DATA CODE on the Remote Commander duringplayback.When POWER switch is set to MEMORYThe angle of view is slightly larger compared with the angle of view in CAMERAmode.Recording images continuouslyYou can record still images continuously. Select one of the three modes described belowbefore recording.NORMAL [a]Your camcorder shoots up to three still images in 1360 × 1020 size or nine still images in640 × 480 size at about 0.5 sec intervals. ( )HIGH SPEED (Recording image size is 640 × 480) [a]Your camcorder shoots up to 16 still images in 640 × 480 size at about 0.07 sec intervals.( )MULTI SCRN (Recording image size is 640 × 480) [b]Your camcorder shoots nine still images at about 0.4 sec intervals and displays theimages on a single page divided into nine boxes. Still images are recorded in 640 × 480size. ( )[a] [b]](https://usermanual.wiki/Sony-Group/DCRPC120.Users-Manual-II/User-Guide-168908-Page-47.png)
![113“Memory Stick” Operations(1)Set the POWER switch to MEMORY. Make sure that the LOCK switch is set tothe right (unlock) position.(2)Press MENU, then select and decide upon STILL SET in with the controlbutton (p. xx).(3)Select and decide upon PIC MODE with the control button.(4)Select and decide upon the desired setting with the control button.(5)Press MENU to make the menu setting disappear.(6)Press PHOTO deeper.If the capacity of the “Memory Stick” becomes full” FULL” appears on the screen, and you cannot record a still image on this “MemoryStick.”The number of images in continuous shootingThe number of images you can shoot continuously varies depending on the image sizeand the capacity of the “Memory Stick.”During recording images continuouslyThe flash does not work.When shooting with the self-timer function or the Remote CommanderYour camcorder automatically records up to the maximum recordable number of stillimages.When selecting HIGH SPEEDFlickering or changes in color may occur. Also, your camcorder prevents focusing onnear objects.When selecting NORMAL or HIGH SPEEDRecording continues up to the maximum number of still images during pressingPHOTO deeper. Release PHOTO to stop recording.Recording still images on “Memory Stick”s– Memory Photo recordingPIC MODEMEMORY SETST I LL SETRETURN[MENU] : ENDQUA L I TY H I GH SPEEDIMAGESIZEPIC MODEMEMORY SETST I LL SETRETURN[MENU] : ENDSINGLEQUA L I TYIMAGESIZEPIC MODEMEMORY SETMUL T I SCRNNORMALST I LL SETRETURN[MENU] : ENDQUA L I TY SINGLEIMAGESIZE H I GH SPEED34PHOTOMENU](https://usermanual.wiki/Sony-Group/DCRPC120.Users-Manual-II/User-Guide-168908-Page-48.png)
![125“Memory Stick” OperationsYou can record moving pictures with sound on “Memory Stick”s.Before operationInsert a “Memory Stick” into your camcorder.(1)Set the POWER switch to MEMORY. Make sure that the LOCK switch is set tothe right (unlock) position.(2)Press START/STOP. Your camcorder starts recording. The camera recordinglamp located on the front of your camcorder lights up. When IMAGESIZE inthe menu settings is set to 320 × 240, the maximum recording time is 15seconds. However, when IMAGESIZE in the menu settings is set to 160 × 112,the maximum recording time is 60 seconds.To stop recordingPress START/STOP.NoteSound is recorded in monaural.When the POWER switch is set to MEMORYThe following functions do not work:– Wide mode– Digital zoom– SteadyShot function– SUPER NIGHTSHOT– Fader– Picture effect– Digital effect– Title– Low lux of PROGRAM AE (The indicator flashes.)– Sports lesson of PROGRAM AE (The indicator flashes.)Recording moving pictures on “MemoryStick”s – MPEG movie recording[a]: Recording time can be recorded on the“Memory Stick”[b]: This indicator is displayed for five secondsafter pressing START/STOP. This indicatoris not recorded.232040REC0:03[15 ]minSECBBBLOCKPOWERVCRMEMORYCAMERAOFF(CHG)[a][b]](https://usermanual.wiki/Sony-Group/DCRPC120.Users-Manual-II/User-Guide-168908-Page-60.png)
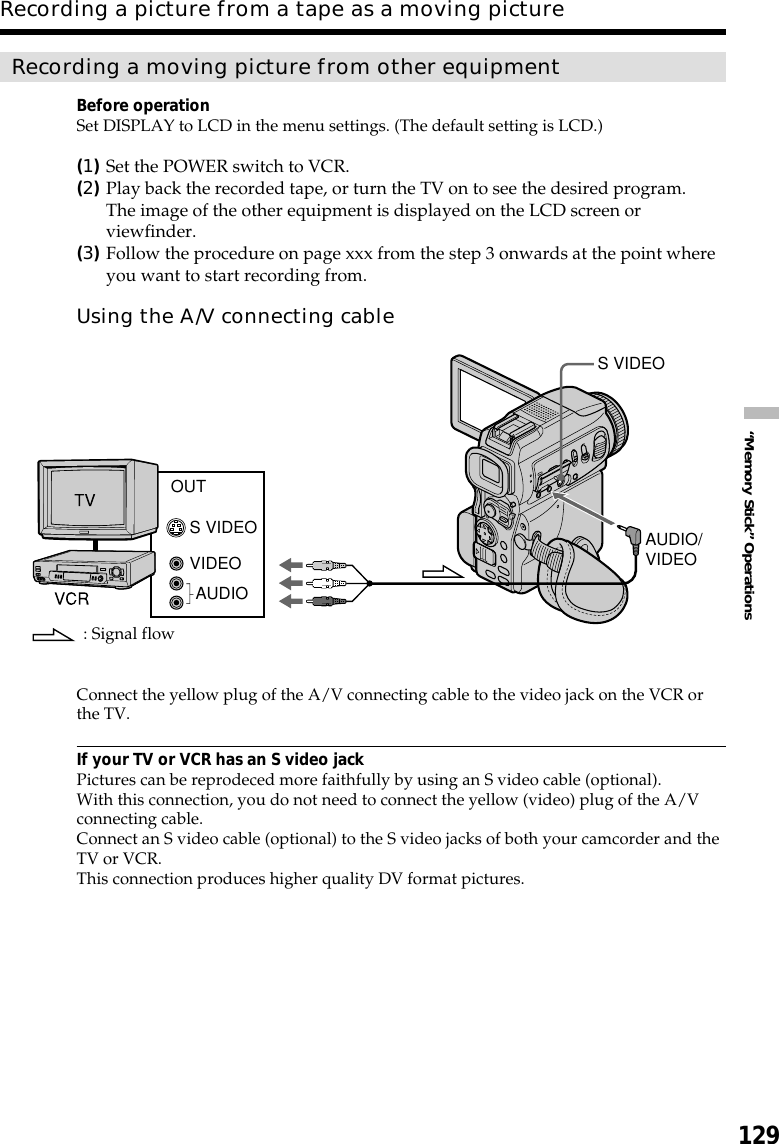
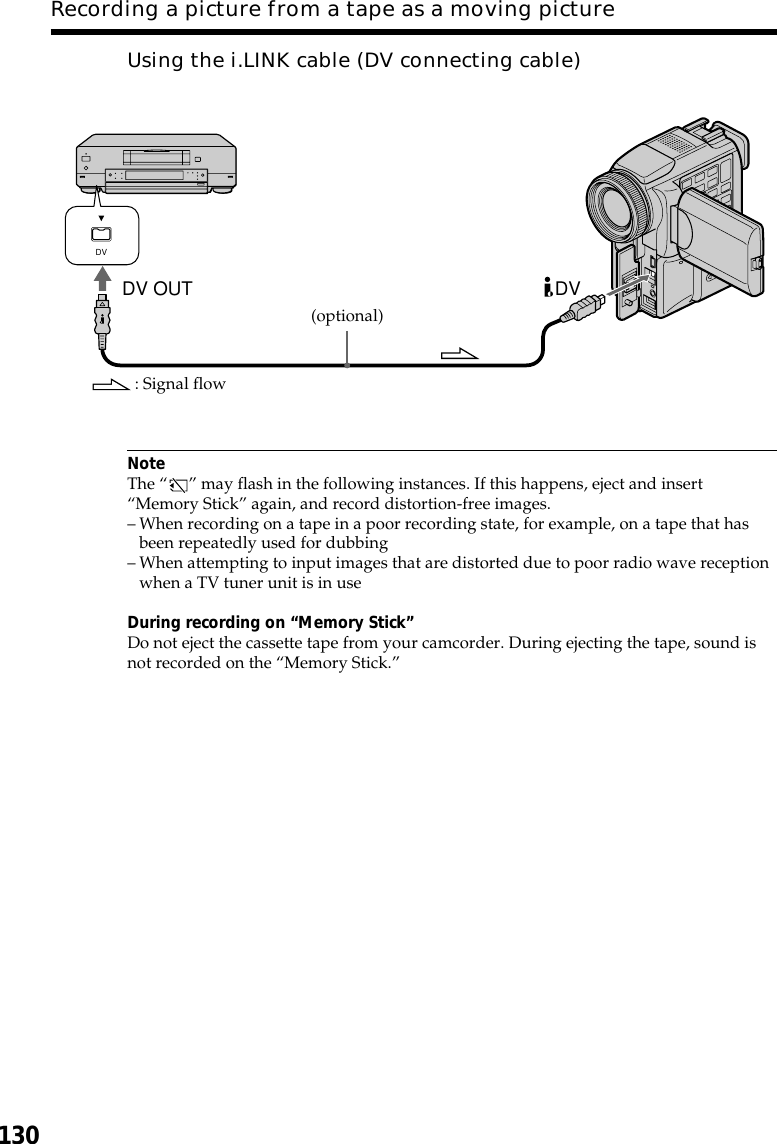
![127“Memory Stick” OperationsYour camcorder can read moving picture data recorded on a tape and record it as amoving picture on a “Memory Stick.” Your camcorder can also take in moving picturedata through the input connector and record it as a moving picture on a “MemoryStick.”Before operation•Insert a recorded tape into your camcorder.•Insert a “Memory Stick” into your camcorder.(1)Set the POWER switch to VCR.(2)Press N. The picture recorded on the tape is played back.And press X at the scene where you want to start recording from.(3)Press START/STOP on your camcorder. When IMAGESIZE in the menusettings is set to 320 × 240, the maximum recording time is 15 seconds.However, when IMAGESIZE in the menu settings is set to 160 × 112, themaximum recording time is 60 seconds.To stop recordingPress START/STOP.Recording a picture from a tape as amoving picture3232040REC[15 ]0:030:15:42:43minSECBBBNPLAYPAUSELOCKPOWERVCRMEMORYCAMERAOFF(CHG)[a]: Recording time can be recorded on the“Memory Stick.”[b]: This indicator is displayed forfive seconds after pressing START/STOP.This indicator is not recorded.[a][b]](https://usermanual.wiki/Sony-Group/DCRPC120.Users-Manual-II/User-Guide-168908-Page-62.png)

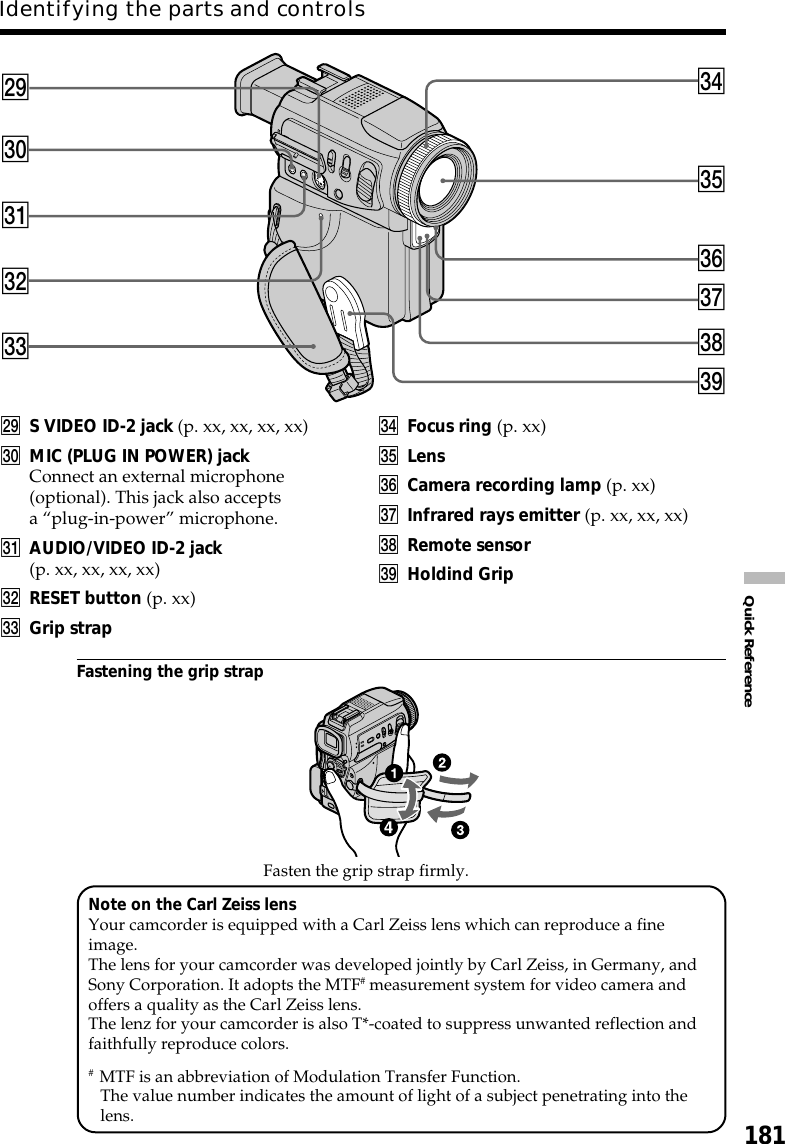
![131“Memory Stick” OperationsYou can duplicate selected scenes (programs) for editing onto a “Memory Stick.”Making the program(1)Set the POWER switch to VCR on your camcorder.(2)Insert the tape for playback, and a “Memory Stick” for recording into yourcamcorder.(3)Press MENU, then select and decide upon VIDEO EDIT in with thecontrol button (p. xx).(4)Select and decide upon MEMORY with the control button.(5)Select and decide upon IMAGESIZE with the control button.When IMAGESIZE is set to 320 × 240, the maximum recording time is 15seconds. However, when IMAGESIZE is set to 160 × 112, the maximumrecording time is 60 seconds.(6)Search for the beginning of the first scene you want to insert using the videooperation buttons, then pause playback.You can fine-adjust one frame at a time with EDITSEARCH.(7)Press MARK on the Remote Commander, or z on the control button.The IN point of the first program is set, and the top part of the program markchanges to light blue.(8)Search for the end of the first scene you want to insert using the videooperation buttons, then pause playback.(9)Press MARK on the Remote Commander, or z on the control button.The OUT point of the first program is set, then the bottom part of the programmark changes to light blue.(10) Repeat steps 6 to 9, then set the program.When one program is set, the program mark changes to light blue.You can set 20 programs in maximum.Recording edited pictures as a movingpicture – Digital program editing (to a“Memory Stick”)6,87910STOPFFPAUSEPLAYREWRECMARKUNDOERASE AL LSTARTTOTAL1OUT0:08:55:060SEC[15SEC]MOV I E ED I T[MENU] : ENDMARKUNDOERASE ALLSTARTTOTAL2IN0:09:07:060SEC[15SEC]MOV I E ED I T[MENU] : ENDMARKUNDOERASE ALLSTARTTOTAL4IN0:10:01:230SEC[15SEC]MOV I E ED I T[MENU] : ENDTESTIDE TESTIDE TESTIDE320 320 320MENU](https://usermanual.wiki/Sony-Group/DCRPC120.Users-Manual-II/User-Guide-168908-Page-66.png)
![134Using the search function, you can automatically take in only still images from tapesand record them on a “Memory Stick” in sequence.Before operation•Insert a recorded tape into your camcorder and rewind the tape.•Insert a “Memory Stick” into your camcorder.(1)Set the POWER switch to VCR.(2)Press MENU, then select and decide upon PHOTO SAVE in with thecontrol button (p. xx).PHOTO BUTTON appears on the screen.(3)Press PHOTO deeper. The still image from the tape is recorded on a “MemoryStick.” The number of still images copied is displayed. END is displayed whencopying is completed.To stop copyingPress MENU.When the memory of the “Memory Stick” is fullMEMORY FULL appears on the screen, and the copying stops. Insert another “MemoryStick” and repeat the procedure from step 2.Image size of still imagesImage size is automatically set to 640 × 480.When the access lamp is lit or flashingDo not shake or strike your camcorder. As well do not turn the power off, eject a“Memory Stick” or remove the battery pack. Otherwise, the image data breakdown mayoccur.If the write-protect tab on the “Memory Stick” is set to LOCKNOT READY appears when you select the item in the menu settings.When you change “Memory Stick”s in the middle of copyingYour camcorder resumes copying from the last image recorded on the previous“Memory Stick.”Copying still images from a tape– Photo save32PHOTOSAV I NG0[MENU] : ENDPHOTO SAVE4/150:00:00:00END4[MENU] : ENDPHOTO SAVE8/150:30:00:00PHOTO BUTTON[PHOTO] : START[MENU] : ENDPHOTO SAVE4/150:00:00:00MEMORY SETST I LL SETMOV I E S E TPR I NT MARKPROTECT READYPHOTO SAVERETURN[MENU] : END640STD640STD640STDMENU](https://usermanual.wiki/Sony-Group/DCRPC120.Users-Manual-II/User-Guide-168908-Page-69.png)
![145“Memory Stick” OperationsImage file storage destinations and image filesImage files recorded with your camcorder are grouped in folders by recording mode.The meanings of the file names are as follows. ssss stands for any number withinthe range from 0001 to 9999.For Windows Me users(The drive recognizing the camera is [E:].)Folder File Meaning100msdcf DSC0ssss.JPG Still image fileMoml0001 MOV0ssss.MPG Moving picture fileViewing images using computerFolder containing moving picture dataFolder containing still image data](https://usermanual.wiki/Sony-Group/DCRPC120.Users-Manual-II/User-Guide-168908-Page-80.png)
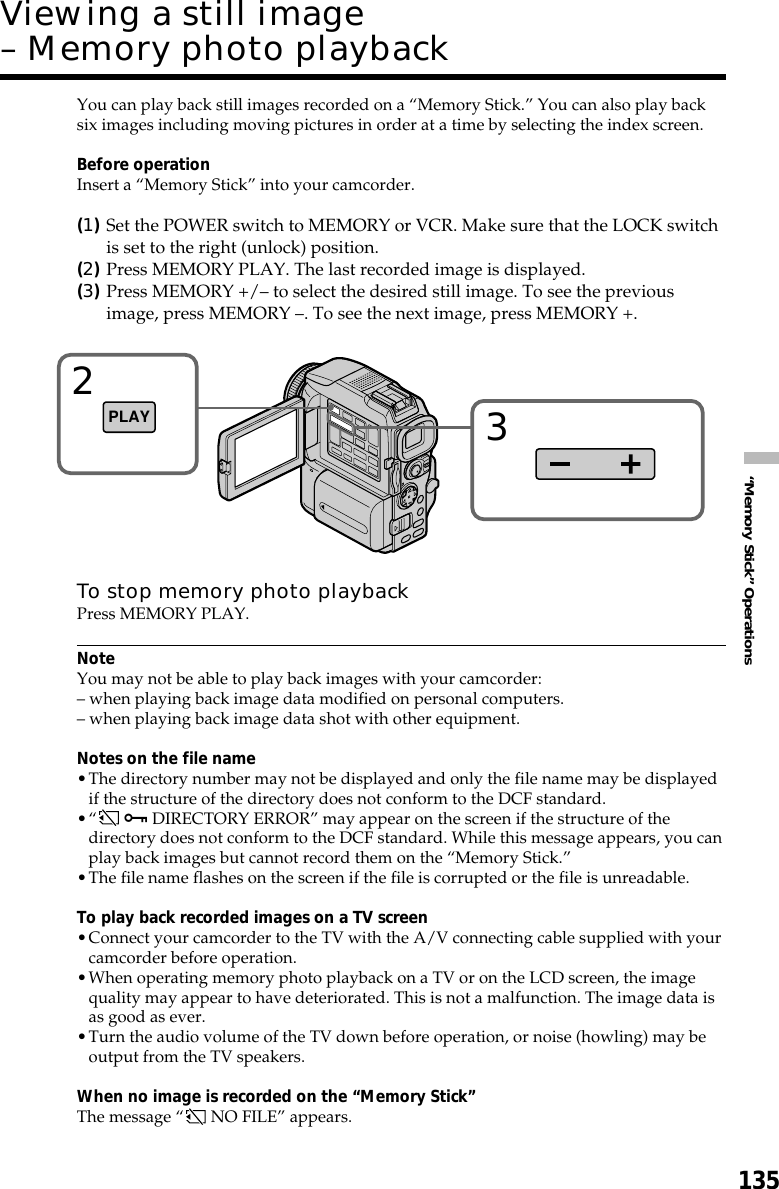
![148You can automatically play back images in sequence. This function is useful especiallywhen checking recorded images or during a presentation.Before operationInsert a “Memory Stick” into your camcorder.(1)Set the POWER switch to MEMORY. Make sure that the LOCK switch is set tothe right (unlock) position.(2)Press MENU, then select and decide upon SLIDE SHOW in with thecontrol button (p. xx).(3)Press MEMORY PLAY. Your camcorder plays back the images recorded on a“Memory Stick” in sequence.To stop the slide showPress MENU.To pause during a slide showPress MEMORY PLAY.To start the slide show from a particular imageSelect the desired image using MEMORY +/– buttons before step 2.To view the recorded images on TVConnect your camcorder to a TV with the A/V connecting cable supplied with yourcamcorder before operation.If you change the “Memory Stick” during operationThe slide show does not operate. If you change the “Memory Stick,” be sure to followthe steps again from the beginning.Playing back images in a continuous loop– SLIDE SHOW32MEMORY SETST I LL SETMOV I E SE TPR I NT MARKPROTECTSL IDE SHOWREADYDELETE ALLFORMATRETURN[MENU] : END640[MPLAY]:START[MENU]:ENDSL IDE SHOW100-0001 1/100PLAYMENU](https://usermanual.wiki/Sony-Group/DCRPC120.Users-Manual-II/User-Guide-168908-Page-83.png)
![149“Memory Stick” OperationsTo prevent accidental erasure of important images, you can protect selected images.Before operationInsert a “Memory Stick” into your camcorder.(1)Set the POWER switch to MEMORY or VCR. Make sure that the LOCK switchis set to the right (unlock) position.(2)Play back the image you want to protect.(3)Press MENU, then select and decide upon PROTECT in with the controlbutton (p. xx).(4)Select and decide upon ON with the control button.(5)Press MENU to make the menu display disappear. The “-” mark isdisplayed beside the data file name of the selected image.To cancel image protectionSelect and decide upon OFF with the control button in step 4.NoteFormatting erases all information on the “Memory Stick,” including the protectedimage data. Check the contents of the “Memory Stick” before formatting.If the write-protect tab on the “Memory Stick” is set to LOCKYou cannot carry out image protection.Preventing accidental erasure– Image protection34MEMORY SETST I LL SETMOV I E S E TPR I NT MARKPROTECTSL IDE SHOWDELETE ALLFORMATRETURN[MENU] : ENDMEMORY SETST I LL SETMOV I E S E TPRINT MARKPROTECTSL IDE SHOWONOFFDELETE ALLFORMATRETURN[MENU] : END10/ 12MEMORY SETST I LL SETMOV I E S E TPR I NT MARKPROTECTSL IDE SHOWONDELETE ALLFORMATRETURN[MENU] : END10/12MEMORY SETST I LL SETMOV I E S E TPR I NT MARKPROTECTSL IDE SHOWOFFDELETE ALLFORMATRETURN[MENU] : END10/12MENU](https://usermanual.wiki/Sony-Group/DCRPC120.Users-Manual-II/User-Guide-168908-Page-84.png)
![150You can delete images stored in a “Memory Stick.” You can delete all images or selectedimages.Deleting selected imagesBefore operationInsert a “Memory Stick” into your camcorder.(1)Set the POWER switch to MEMORY or VCR. Make sure that the LOCK switchis set to the right (unlock) position.(2)Playback the image to delete.(3)Press MEMORY DELETE. “DELETE?” appears on the screen.(4)Press MEMORY DELETE again. The selected image is deleted.To cancel deleting an imagePress MEMORY – in step 4.To delete an image displayed on the index screenPress MEMORY +/– to move the B indicator to the desired image you want to deleteand follow steps 3 and 4.Notes•To delete a protected image, first cancel image protection.•Once you delete an image, you cannot restore it. Check the images to delete carefullybefore deleting them.If the write-protect tab on the “Memory Stick” is set to LOCKYou cannot delete images.Deleting images3DELETEDELETE?640[DELETE] : DEL[–] : CANCELDELETE100-0010 89 /100](https://usermanual.wiki/Sony-Group/DCRPC120.Users-Manual-II/User-Guide-168908-Page-85.png)
![151“Memory Stick” OperationsDeleting all the imagesYou can delete all the unprotected images in a “Memory Stick.”Before operationInsert a “Memory Stick” into your camcorder.(1)Set the POWER switch to MEMORY. Make sure that the LOCK switch is set tothe right (unlock) position.(2)Press MENU, then select and decide upon DELETE ALL in with the controlbutton (p. xx).(3)Select and decide upon OK with the control button. OK changes to EXECUTE.(4)Select and decide upon EXECUTE with the control button. DELETING flasheson the screen. When all the unprotected images are deleted, COMPLETE isdisplayed.To cancel deleting all the images in the “Memory Stick”Select and decide upon RETURN with the control button in step 3.While DELETING appearsDo not turn the POWER switch or press any buttons.Deleting images243MEMORY SETST I LL SETMOV I E S E TPR I NT MARKPROTECTSL IDE SHOWDELETE ALL RETURNFORMAT OKRETURN[MENU] : ENDMEMORY SETST I LL SETMOV I E S E TPR I NT MARKPROTECTSL IDE SHOWDE LETE A L L RE TURNFORMAT OKRETURN[MENU] : ENDMEMORY SETST I LL SETMOV I E S E TPRINT MARKPROTECTSL IDE SHOWDELETE ALL RETURNFORMAT EXECUTERETURN[MENU] : ENDMEMORY SETST I LL SETMOV I E S E TPR I NT MARKPROTECTSL IDE SHOWDELETE ALL DELET INGFORMATRETURN[MENU] : ENDMEMORY SETST I LL SETMOV I E S E TPRINT MARKPROTECTSL IDE SHOWDELETE ALL COMPLETEFORMATRETURN[MENU] : ENDMEMORY SETST I LL SETMOV I E S E TPR I NT MARKPROTECTSL IDE SHOWDELETE ALLFORMATRETURN[MENU] : ENDMENU](https://usermanual.wiki/Sony-Group/DCRPC120.Users-Manual-II/User-Guide-168908-Page-86.png)
![152You can specify the recorded still image to print out by putting marks. This function isuseful for printing out still images later.Your camcorder conforms with the DPOF (Digital Print Order Format) standard forspecifying the still images to print out.Before operationInsert a “Memory Stick” into your camcorder.(1)Set the POWER switch to MEMORY or VCR. Make sure that the LOCK switchis set to the right (unlock) position.(2)Playback the still image you want to write a print mark on.(3)Press MENU, then select and decide upon PRINT MARK in with thecontrol button (p. xx).(4)Select and decide upon ON with the control button.(5)Press MENU to make the menu display disappear. The print mark isdisplayed beside the data file name of the image.To cancel writing print marksSelect and decide upon OFF with the control button in step 4.If the write-protect tab on the “Memory Stick” is set to LOCKYou cannot write print marks on still images.Moving picturesYou cannot write print marks on moving pictures.While the file name is flashingYou cannot write a print mark on the still image.Writing a print mark – PRINT MARK34MEMORY SETST I LL SETMOV I E S E TPR I NT MARKPROTECTSL IDE SHOWDELETE ALLFORMATRETURN[MENU] : ENDMEMORY SETST I LL SETMOV I E S E TPR I NT MARKPROTECTSL IDE SHOWOFFDELETE ALLFORMATRETURN[MENU] : END10/ 12MEMORY SETST I LL SETMOV I E S E TPRINT MARKPROTECTSL IDE SHOWONOFFDELETE ALLFORMATRETURN[MENU] : END10/ 12MEMORY SETST I LL SETMOV I E S E TPR I NT MARKPROTECTSL IDE SHOWONDELETE ALLFORMATRETURN[MENU] : END10/12MENU](https://usermanual.wiki/Sony-Group/DCRPC120.Users-Manual-II/User-Guide-168908-Page-87.png)
![153“Memory Stick” OperationsYou can use the optional printer on your camcorder to print images on the print paper.For details, refer to the operating instructions of the printer.There are various ways of printing still images. The following, however, describes howto print by selecting in the menu on your camcorder.Before operation•Insert a recorded “Memory Stick” into your camcorder.•Connect the optional printer to your camcorder as illustrated.You can print nine still images on the 9-split print paper. Select the desired mode in themenu settings.* Nine still images with print marks are printed together.You can make prints with the recording date and/or recording time. Select the desiredmode in the menu settings.Images recorded in multi screen modeYou cannot print images recorded in multi screen mode on sticker type print paper.Moving pictures recorded on “Memory Stick”You cannot print moving pictures.When “Memory Stick” has no files“ NO STILL IMAGE FILE” appears on the screen.When there are no files with a PRINT MARK“ NO PRINT MARK” appears on the screen.Using the optional printerSAME PICS MULTI PICS or *MARKED PICSDATEJUL 4 2001DAY & TIME412:00AMPrinterPR I NT SET[MENU] : ENDRETURN9PIC PRINTDATE/TIME RETURNSAMEMUL T IMARKEDPR I NT SET[MENU] : ENDRETURN9PIC PRINTDATE/TIME OFFDATEDAY&T IMEDATEMENU9PIC PRINT DATE/TIME](https://usermanual.wiki/Sony-Group/DCRPC120.Users-Manual-II/User-Guide-168908-Page-88.png)

![165Additional InformationAudio mode12-bit mode: The original sound can be recorded in stereo 1, and the new sound instereo 2 in 32 kHz. The balance between stereo 1 and stereo 2 can be adjusted byselecting AUDIO MIX in the menu settings during playback. Both sounds can be playedback.16-bit mode: A new sound cannot be recorded but the original sound can be recorded inhigh quality. Moreover, it can also play back sound recorded in 32 kHz, 44.1 kHz or48 kHz. When playing back a tape recorded in the 16-bit mode, 16BIT indicator appearson the screen.When you play back a dual sound track tapeWhen you play back a dual sound track tape recorded in a stereo system, set HiFiSOUND to the desired mode in the menu settings (p. xx).Sound from speakerHiFi SOUND Playing back Playing back a dualmode a stereo tape sound track tapeSTEREO Stereo Main sound andsub sound1 Left sound Main sound2 Right sound Sub soundYou cannot record dual sound programs on your camcorder.Notes on the cassetteWhen affixing a label on the cassetteBe sure to affix a label only on the locations as illustrated below [a] so as not to causemalfunction of your camcorder.After using the cassetteRewind the tape to the beginning, put the cassette in its case, and store it in an uprightposition.When the cassette memory function does not workReinsert a cassette. The gold-plated connector of cassettes may be dirty or dusty.Cleaning gold-plated connectorIf the gold-plated connector on the cassette is dirty or dusty, the remaining tapeindicator is sometimes not displayed correctly, and you may not be able to operatefunctions using cassette memory. Clean up the gold-plated connector with cotton-woolswab, about every 10 times ejection of a cassette. [b]Usable cassettes[b][a]Do not affix a labelaround this border.](https://usermanual.wiki/Sony-Group/DCRPC120.Users-Manual-II/User-Guide-168908-Page-100.png)

![170Using your camcorder abroadCountries and areas where you can use network functions are restricted. For details,refer to the separate Network Operating Instructions. (DCR-PC120BT only)You can use your camcorder in any country or area with the AC power adaptorsupplied with your camcorder within 100 V to 240 V AC, 50/60 Hz.When charging the battery pack, use a commercially available AC plug adaptor [a], ifnecessary, depending on the design of the wall outlet [b].Your camcorder is an NTSC system based camcorder. If you want to view the playbackpicture on a TV, it must be an NTSC system based TV with the AUDIO/VIDEO inputjack.The following shows TV color systems used overseas.NTSC systemBahama Islands, Bolivia, Canada, Central America, Chile, Colombia, Ecuador, Jamaica,Japan, Korea, Mexico, Peru, Surinam, Taiwan, the Philippines, the U.S.A., Venezuela,etc.PAL systemAustralia, Austria, Belgium, China, Czech Republic, Denmark, Finland, Germany, GreatBritain, Holland, Hong Kong, Italy, Kuwait, Malaysia, New Zealand, Norway, Portugal,Singapore, Slovak Republic, Spain, Sweden, Switzerland, Thailand, etc.PAL-M systemBrazilPAL-N systemArgentina, Paraguay, UruguaySECAM systemBulgaria, France, Guyana, Hungary, Iran, Iraq, Monaco, Poland, Russia, Ukraine, etc.Simple setting of clock by time differenceYou can easily set the clock to the local time by setting a time difference. Select AREASET, SUMMERTIME in the menu settings. See page xxx for more information.Using your camcorder abroad[b][a]AC-L10A/L10B/L10C](https://usermanual.wiki/Sony-Group/DCRPC120.Users-Manual-II/User-Guide-168908-Page-105.png)
![172Maintenance informationCleaning the video headTo ensure normal recording and clear pictures, clean the video heads. The video headmay be dirty when:•mosaic-pattern noise appears on the playback picture.•playback pictures do not move.•playback pictures do not appear.•the x indicator and “ CLEANING CASSETTE” message appear one after anotheror the x indicator flashes on the screen during recording.If the above problem, [a], [b] or [c] occurs, clean the video heads for 10 seconds withthe Sony DVM-12CLD cleaning cassette (optional). Check the picture and if the aboveproblem persists, repeat cleaning.If the video heads get dirtier, the entire screen becomes blue [c].Cleaning the LCD screenIf fingerprints or dust make the LCD screen dirty, we recommend using a LCDCleaning Kit (optional) to clean the LCD screen.Removing dust from inside the viewfinder(1)Pull out the viewfinder in the direction of the arrow 1.Remove the two screws in the direction of the arrow 2 with a screwdriver(optional). Remove the eyecup in the direction of the arrow 3.(2)Remove dust from inside the eyecup and viewfinder with a commerciallyavailable blower.(3)In the reverse way of (1), attach the eyecup. Then replace the screws in thedirection of the arrow 2.CautionDo not remove any other screws. You may remove only the screw to remove theeyecup.Notes•Do not drop or bend the eyecup shaft.•Be careful when handling the eyecup.Maintenance information and precautions[a] [b] [c]2213](https://usermanual.wiki/Sony-Group/DCRPC120.Users-Manual-II/User-Guide-168908-Page-107.png)