Sony Group DCRTRV950 Digital Video Camera Recorder TRV950 User Manual manual3
Sony Corporation Digital Video Camera Recorder TRV950 manual3
Contents
manual3
129
“Memory Stick” Operations
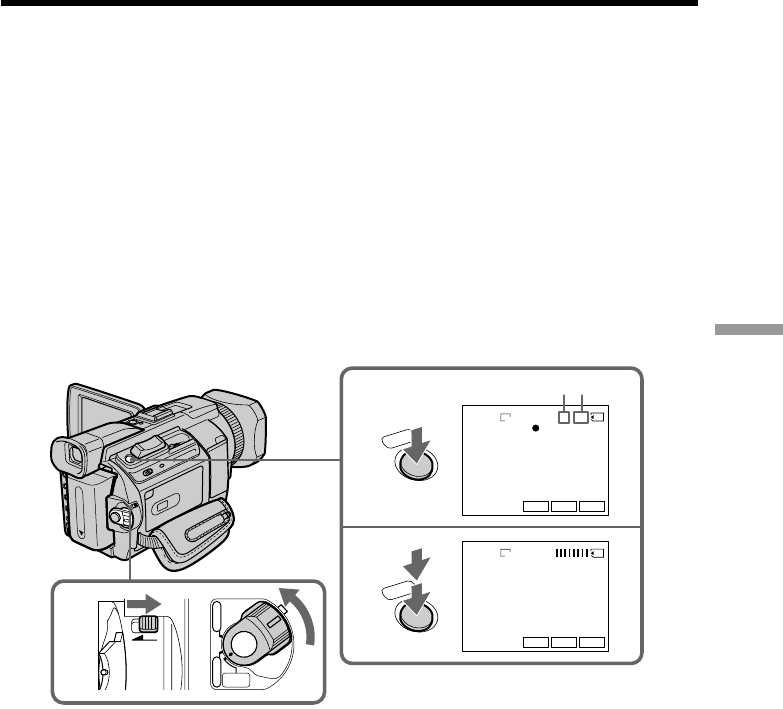
Using a “Memory Stick” – Introduction
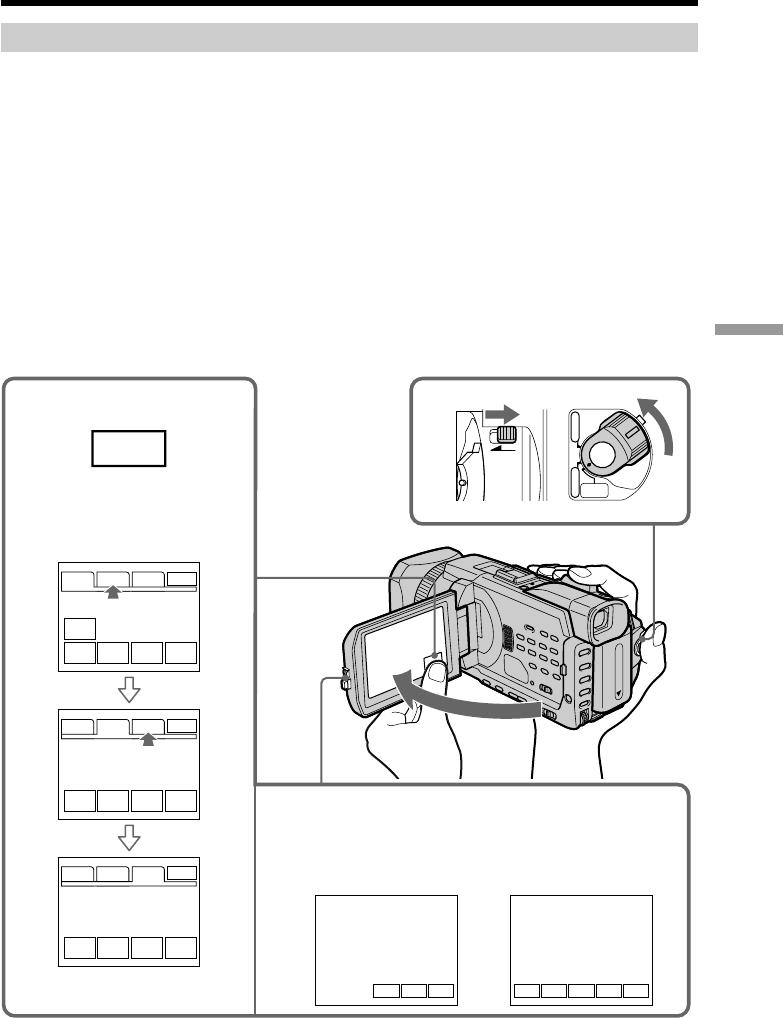
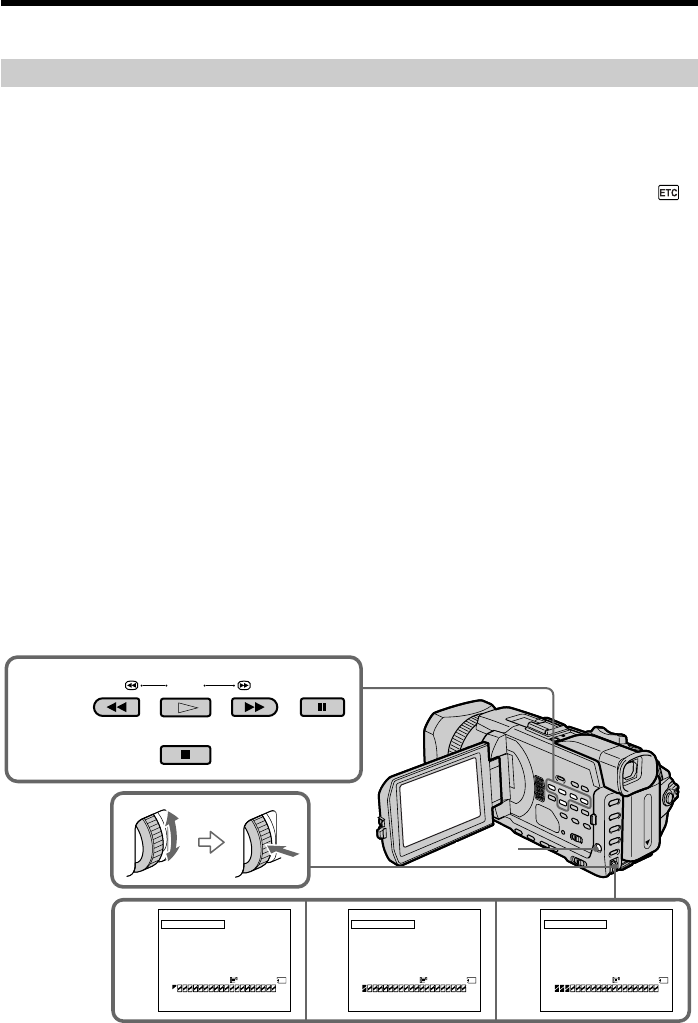
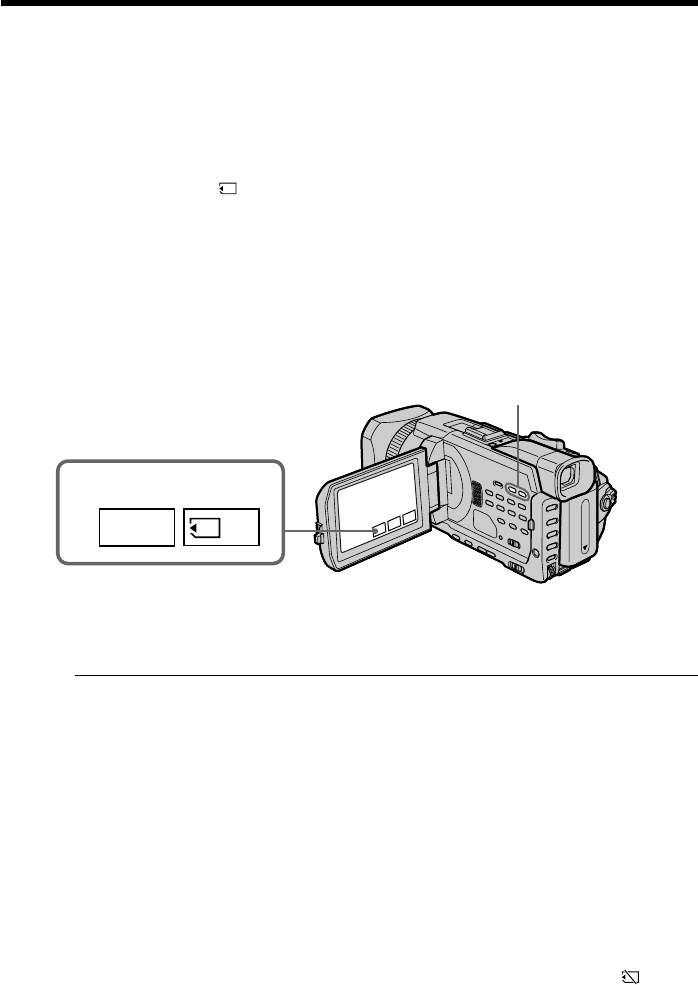
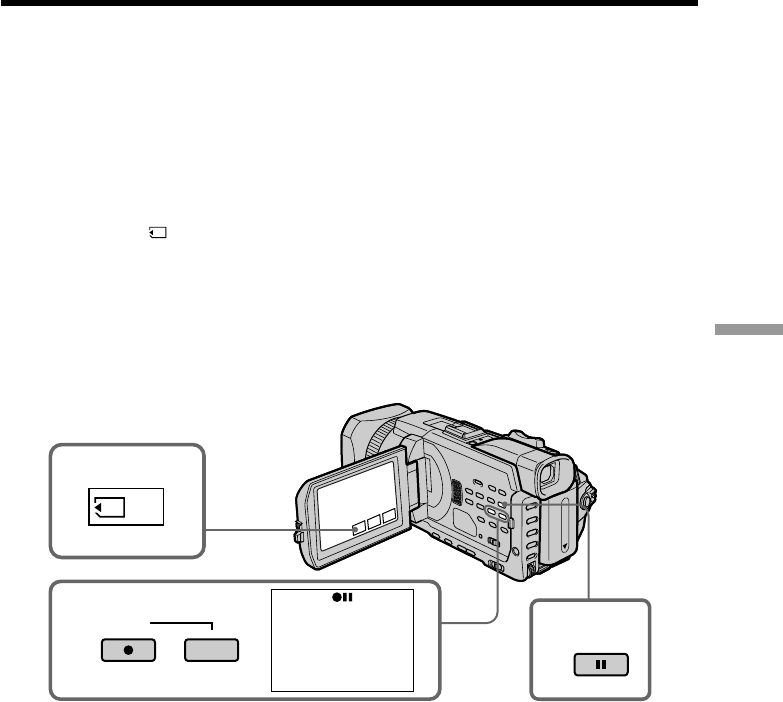
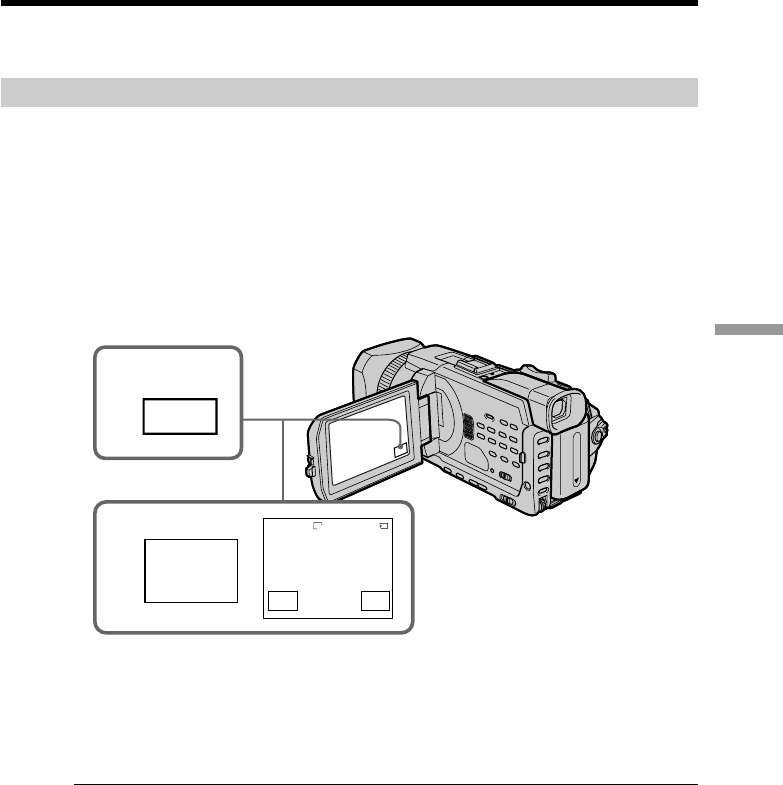
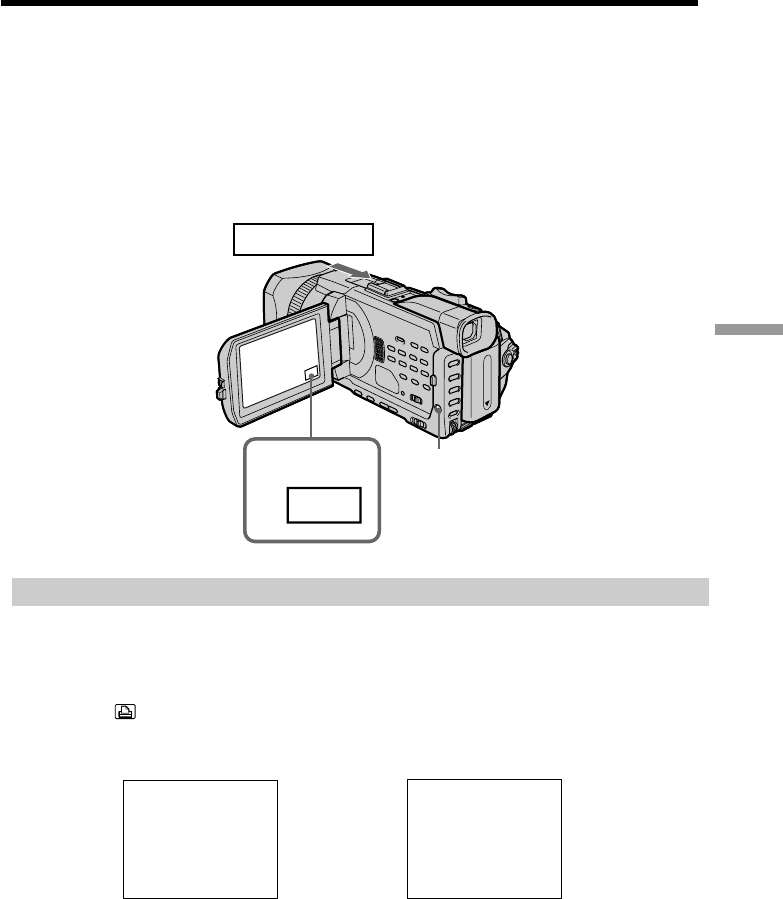
Using a touch panel
Most operation buttons for use of a “Memory Stick” are displayed on the LCD screen.
Touch the LCD screen directly with your finger or the supplied stylus (DCR-TRV950
only) to operate each function.
(1)Set the POWER switch to MEMORY/NETWORK (DCR-TRV950 only). Make
sure that the LOCK switch is set to the further side (unlock position).
(2)Press OPEN to open the LCD panel. Operation buttons appear on the LCD
screen. You can switch the memory playback/memory camera by pressing
PLAY/CAM.
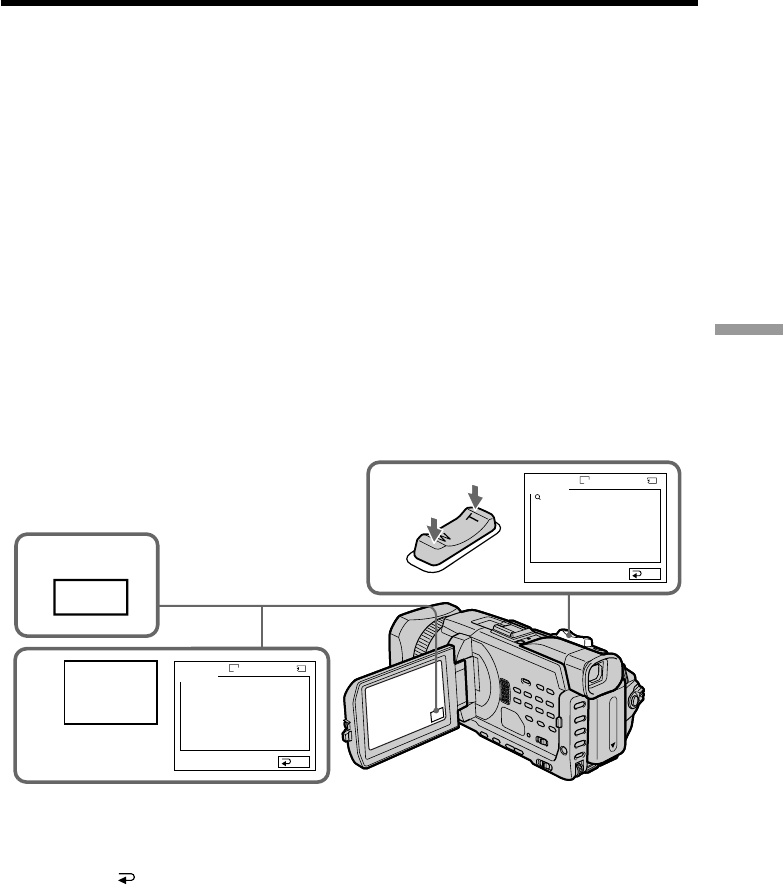
(3)Press FN. Operation buttons appear on the LCD screen.
(4)Press PAGE2 to go to PAGE2. Operation buttons appear on the LCD screen.
(5)Press PAGE3 to go to PAGE3. Operation buttons appear on the LCD screen.
(6)Press a desired operation item.
Refer to relevant pages for each function.
FN 1
3~6
2
FNINDEXPLAY FNINDEXCAM
SPOT
FOCUS PLAY INDEX SPOT
METER
SELF
TIMER
MEM
MIX
9PIC
PRINT
LCD
BRT PLAY INDEX
PLAY INDEX
+–
PAGE1 PAGE2 PAGE3
PAGE1 PAGE2 PAGE3
SLIDE
SHOW
PAGE1 PAGE2 PAGE3
EXIT
EXIT
EXIT
LOCK
POWER
OFF(CHG)
CAMERA
MEMORY/
NETWORK
VCR
In the memory camera
In the memory
camera
In the memory
playback (still
image)
130
Using a “Memory Stick” – Introduction
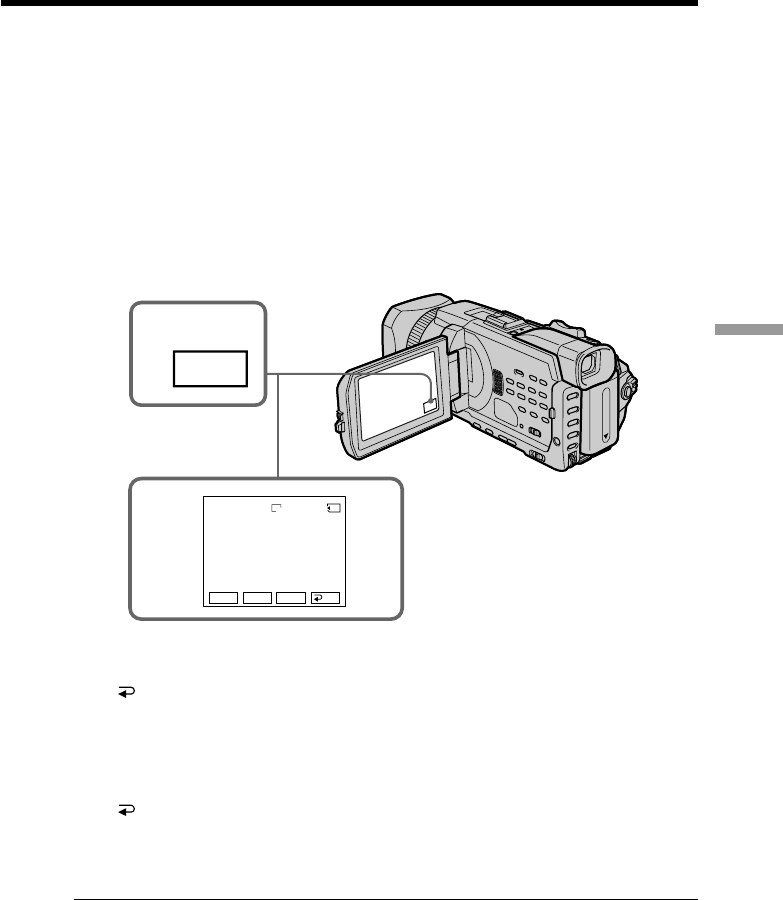
To return to FN
Press EXIT.
To execute settings
Press OK.
To cancel settings
Press OFF to return to PAGE1/PAGE2/PAGE3.
Notes
•When using the touch panel, press operation buttons with your thumb supporting the
LCD screen from the back side of it or press those buttons lightly with your index
finger.
•Do not press the LCD screen with sharp-pointed objects other than the supplied
stylus. (DCR-TRV950 only)
•Do not press the LCD screen too hard.
•Do not touch the LCD screen with wet hands.
•If FN is not on the LCD screen, touch the LCD screen lightly to make it appear. You
can control the display with DISPLAY/TOUCH PANEL on your camcorder.
•When operation buttons do not work even if you press them, an adjustment is
required (CALIBRATION) (p. 238).
•When the LCD screen gets dirty, clean it with the supplied cleaning cloth.
When executing each item
The green bar appears above the item.
If the items are not available
The color of the items changes to gray.
Press FN to display the following buttons:
In the memory camera
PAGE1 SELFTIMER, SPOT FOCUS, PLAY, INDEX, SPOT METER
PAGE2 LCD BRT, PLAY, INDEX, MEM MIX
PAGE3 SLIDE SHOW, PLAY, INDEX, 9PIC PRINT
In the memory playback
PAGE1 PB ZOOM, CAM, INDEX, DELETE,
+
,
–
PAGE2 LCD BRT, CAM, INDEX,
+
,
–
PAGE3 SLIDE SHOW, CAM, INDEX, 9PIC PRINT,
+
,
–

131
“Memory Stick” Operations
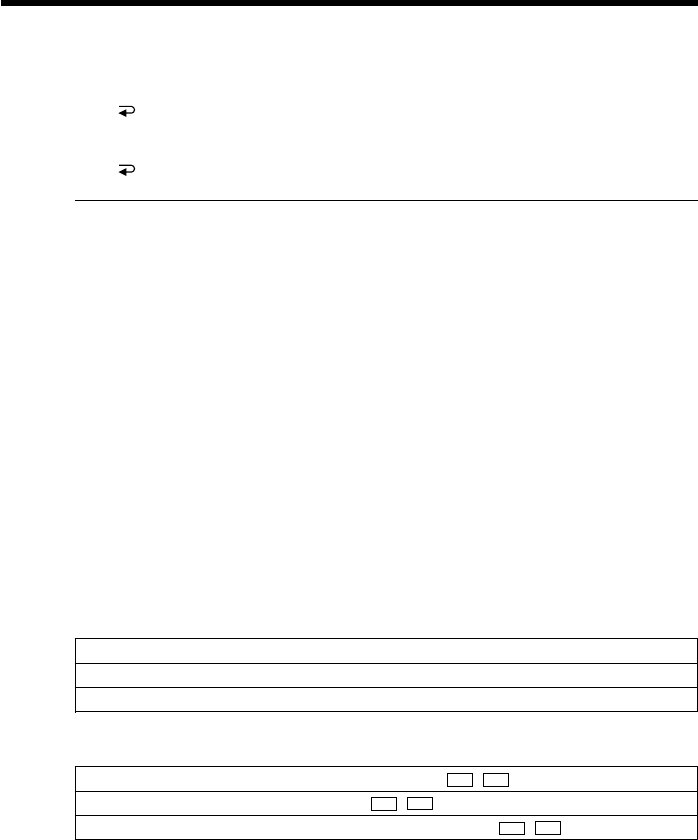
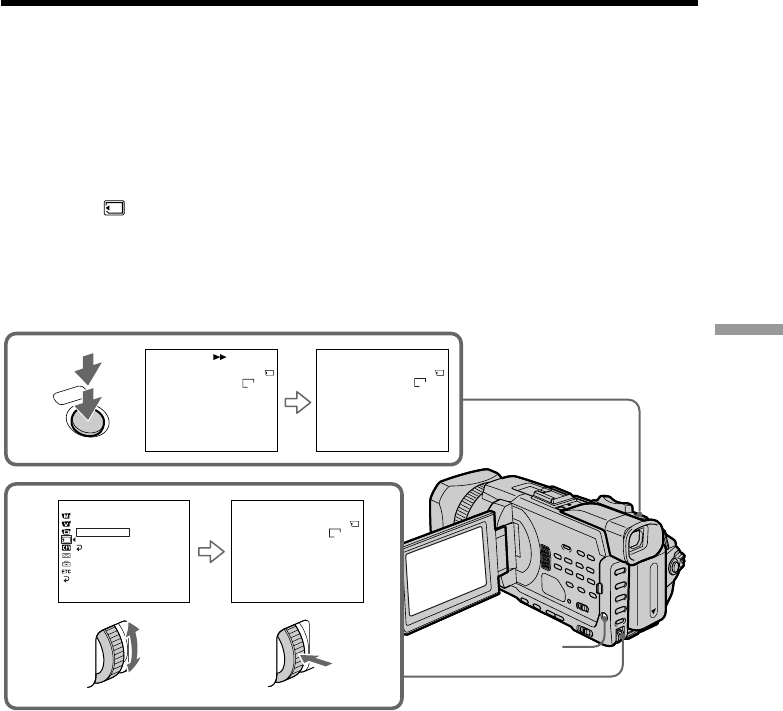
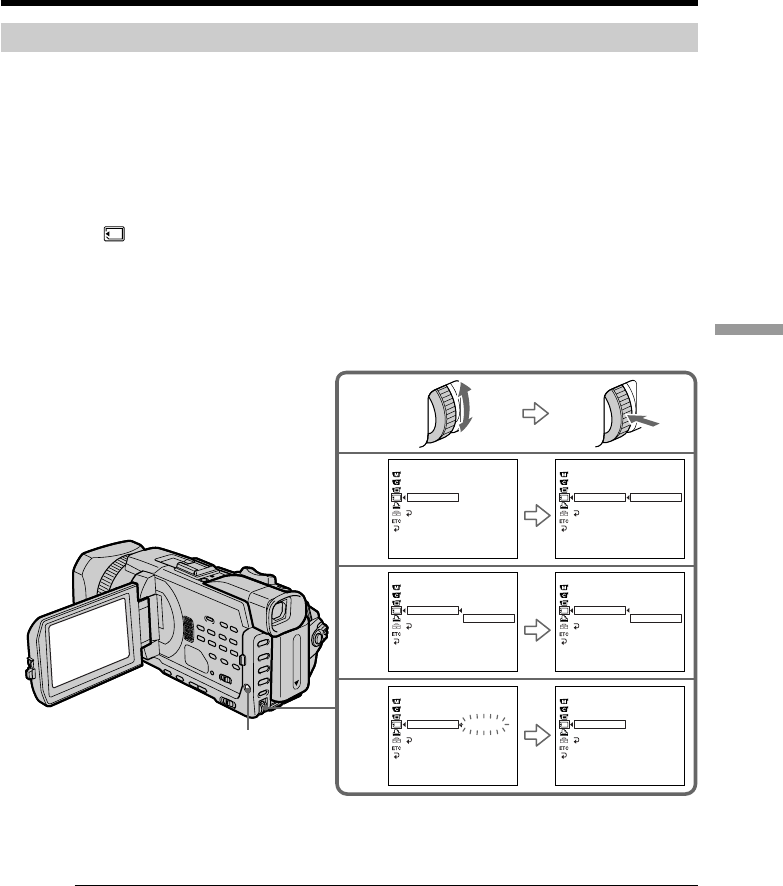
Selecting the still image quality
You can select the image quality in still image recording. The default setting is SUPER
FINE.
(1)Set the POWER switch to MEMORY/NETWORK (DCR-TRV950 only) or VCR.
Make sure that the LOCK switch is set to the further side (unlock position).
(2)Press MENU, then select STILL SET in with the SEL/PUSH EXEC dial
(p. 211).
(3)Turn the SEL/PUSH EXEC dial to select QUALITY , then press the dial.
(4)Turn the SEL/PUSH EXEC dial to select the desired image quality , then press
the dial.
Using a “Memory Stick” – Introduction
MENU
1
3
4
MEMORY SET
STILL SET
BURST
QUALITY
IMAGESIZE
RETURN
SUPER FINE
FINE
STANDARD
[MENU] : END
REMAIN
12
MEMORY SET
STILL SET
BURST
QUALITY
IMAGESIZE
RETURN
STANDARD
[MENU] : END
REMAIN
36
LOCK
POWER
OFF(CHG)
CAMERA
MEMORY/
NETWORK
VCR

132
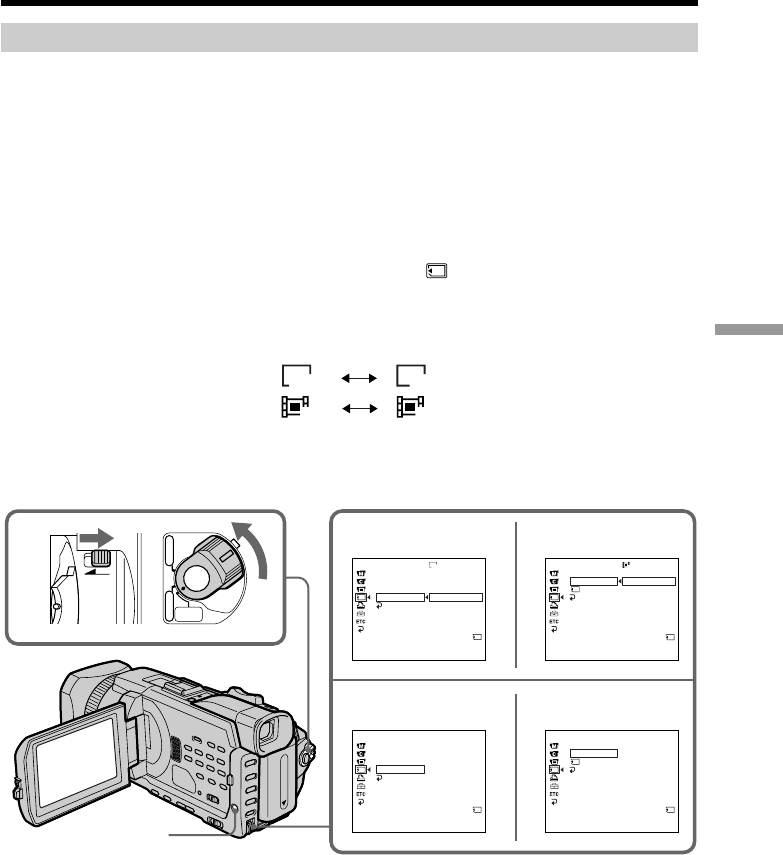
Image quality settings
Setting Meaning
SUPER FINE (SFN) This is the highest image quality in your camcorder.
The number of still images you can record is less than
in FINE mode. Super fine images are compressed to
about 1/3.
FINE (FINE) Use this mode when you want to record high quality
images. Fine images are compressed to about 1/6.
STANDARD (STD) This is the standard image quality in your camcorder.
Standard images are compressed to about 1/10.
Note
In some cases, changing the image quality may not affect the image quality, depending
on the type of images you are shooting.
Differences in image quality
Recorded images are compressed in JPEG format before being stored in memory. The
memory capacity allotted to each image varies depending on the selected image quality
and image size. Details are shown in the table below. (You can select 1152 × 864 or 640 ×
480 image size in the menu settings.)
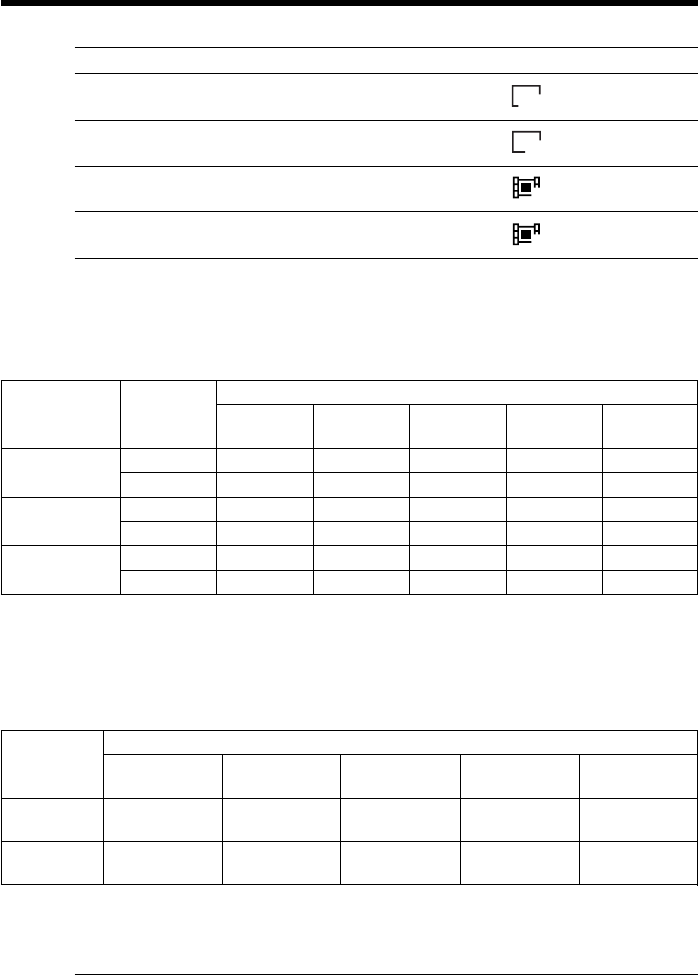
1152 × 864 image size
Image quality Memory capacity
SUPER FINE About 600 KB
FINE About 300 KB
STANDARD About 200 KB
640 × 480 image size
Image quality Memory capacity
SUPER FINE About 190 KB
FINE About 100 KB
STANDARD About 60 KB
Image quality indicator
The image quality indicator is not displayed during playback.
When you select image quality
The number of images you can shoot in the currently selected image quality appears on
the screen.
Using a “Memory Stick” – Introduction
133
“Memory Stick” Operations
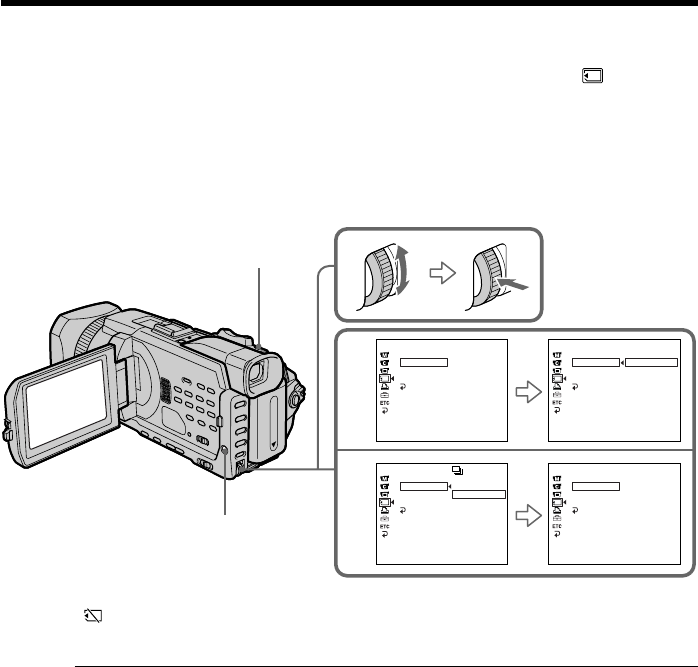
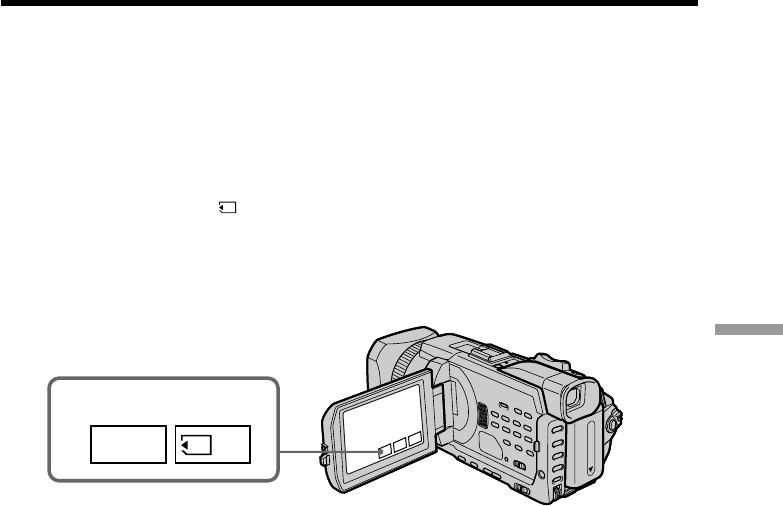
Selecting the image size
You can select either of two image sizes
Still images: 1152 × 864 or 640 × 480. (When the POWER switch is set to CAMERA
or VCR, the image size is automatically set to 640 × 480.)
The default setting is 1152 × 864.
Moving pictures: 320 × 240 or 160 × 112
The default setting is 320 × 240.
(1)Set the POWER switch to MEMORY/NETWORK (DCR-TRV950 only). Make
sure that the LOCK switch is set to the further side (unlock position).
(2)Press MENU, then turn the SEL/PUSH EXEC dial to select STILL SET (still
image) or MOVIE SET (moving picture) in , then press the dial (p. 211).
(3)Turn the SEL/PUSH EXEC dial to select IMAGESIZE, then press the dial.
(4)Turn the SEL/PUSH EXEC dial to select the desired image size, then press the
dial.
The indicator changes as follows:
Still images:
Moving pictures:
Using a “Memory Stick” – Introduction
1152 640
320 160
3
4
1
320
1152
MEMORY SET
STILL SET
BURST
QUALITY
IMAGESIZE
RETURN 1152 × 864
640 × 480
[MENU] : END
MEMORY SET
MOVIE SET
IMAGESIZE
REMAIN
RETURN
320 × 240
160 × 112
[MENU] : END
REMAIN
1min
MEMORY SET
STILL SET
BURST
QUALITY
IMAGESIZE
RETURN 640 × 480
[MENU] : END
REMAIN
40
REMAIN
12
MEMORY SET
MOVIE SET
IMAGESIZE
REMAIN
RETURN
160 × 112
[MENU] : END
REMAIN
5min
LOCK
POWER
OFF(CHG)
CAMERA
MEMORY/
NETWORK
VCR
MENU
STILL SET MOVIE SET
STILL SET MOVIE SET
134
Using a “Memory Stick” – Introduction
Image size settings
Setting Meaning Indicator
1152 × 864 Records 1152 × 864 still images.
1152
640 × 480 Records 640 × 480 still images.
640
320 × 240 Records 320 × 240 moving pictures.
320
160 × 112 Records 160 × 112 moving pictures.
160
Approximate number of still images you can record on a
“Memory Stick”
The number of images you can record varies depending on which image quality and
image size you select and the complexity of the subject.
Approximate time of moving pictures you can record on a
“Memory Stick”
The time of moving pictures you can record varies depending on which image size you
select and the complexity of the subject.
The table above shows approximate number and times of still images and moving
pictures you can record on a “Memory Stick” formatted by your camcorder.
Note
When still images recorded on your camcorder in 1152 × 864 size are played back on
other equipment that does not support 1152 × 864 size, the full image may not appear,
or images in the reduced size may appear in the center of the screen.
Type of the “Memory Stick”
Image size 8MB 16MB 32MB 64MB 128MB
(supplied) (optional) (optional) (optional) (optional)
320 × 240 1 min. 2 min. 5 min. 10 min. 21 min.
20 sec. 40 sec. 20 sec. 40 sec. 20 sec.
160 × 112 5 min. 10 min. 21 min. 42 min. 85 min.
20 sec. 40 sec. 20 sec. 40 sec. 20 sec.
Type of the “Memory Stick”
Image quality Image size 8MB 16MB 32MB 64MB 128MB
(supplied) (optional) (optional) (optional) (optional)
SUPER FINE 1152 × 864 12 images 25 images 51 images 100 images 205 images
640 × 480 40 images 80 images 160 images 325 images 650 images
FINE 1152 × 864 25 images 50 images 100 images 205 images 415 images
640 × 480 80 images 160 images 325 images 650 images 1310 images
STANDARD 1152 × 864 37 images 74 images 150 images 300 images 600 images
640 × 480 120 images 240 images 485 images 980 images 1970 images
135
“Memory Stick” Operations
You can record still images on a “Memory Stick.”
Before operation
Insert a “Memory Stick” into your camcorder.
(1)Set the POWER switch to MEMORY/NETWORK (DCR-TRV950 only). Make
sure that the LOCK switch is set to the further side (unlock position).
(2)Press PHOTO lightly. The green z mark stops flashing, then lights up. The
brightness of the image and focus are adjusted, being targeted for the middle
of the image and are fixed. Recording does not start yet.
(3)Press PHOTO deeper.
The still image will be displayed after the shutter sounds.
Recording is complete when the bar scroll indicator disappears.
The image when you pressed PHOTO deeper will be recorded on the
“Memory Stick.”
You can record still images on a “Memory Stick” in the tape
recording or recording standby
For the details, see p. 46.
3
21 / 12
SFN
1152
SFN
1152
FN
INDEXPLAY
FN
INDEXPLAY
PHOTO
PHOTO
1
LOCK
POWER
OFF(CHG)
CAMERA
MEMORY/
NETWORK
VCR
[a][b]
[a]:Number of recorded images
[b]:Approximate number of images can be
recorded on the “Memory Stick”
Recording still images on a “Memory
Stick”– Memory Photo recording

136
Recording still images on a“Memory Stick”
– Memory Photo recording
When the POWER switch is set to MEMORY/NETWORK (DCR-TRV950 only)
The following functions do not work:
–Digital zoom
–Wide mode
–Fader
–Picture effect
–Digital effect
–Sports lesson of PROGRAM AE (The indicator flashes.)
–Title
While you are recording a still image
You can neither turn off the power nor press PHOTO.
When you press PHOTO on the Remote Commander
Your camcorder immediately records the image that is on the screen when you press
the button.
When you press PHOTO lightly in step 2
The image momentarily flickers. This is not a malfunction.
Recording data
The recording data (date/time or various settings when recorded) are not displayed
while recording. However, they are recorded automatically onto the “Memory Stick.”
To display the recording data, press the DATA CODE button during playback. You can
also use the Remote Commander for this operation (p. 41).
When the POWER switch is set to MEMORY/NETWORK (DCR-TRV950 only)
The angle of view is slightly larger compared with the angle of view when the POWER
switch is set to CAMERA.
137
“Memory Stick” Operations
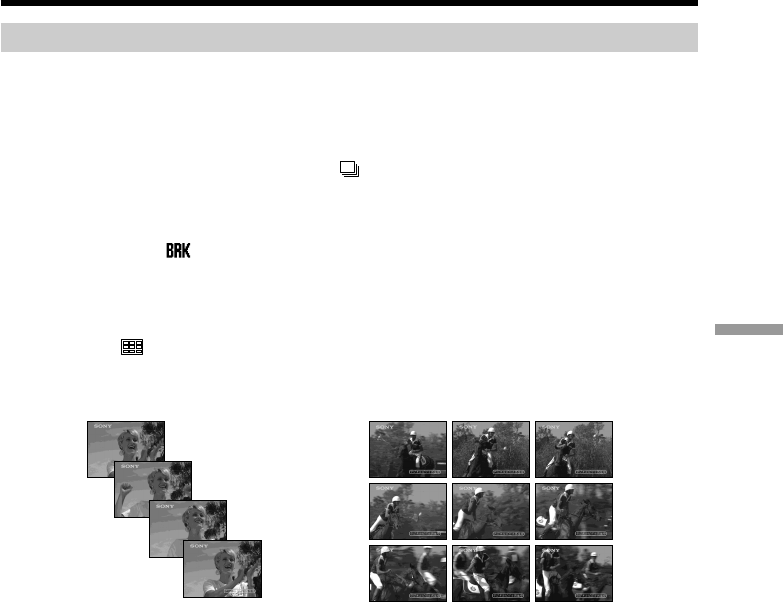
Recording images continuously
You can record still images continuously. Before recording, select one of the four modes
described below in the menu settings.
NORMAL [a]
Your camcorder shoots up to four still images in 1152 × 864 size or 13 still images in 640
× 480 size at about 0.5 sec intervals. ( )
EXP BRKTG (Exposure Bracketing)
Your camcorder automatically shoots three images at about 0.5 sec intervals at different
exposures. ( )
MULTI SCRN (Multi Screen) [b]
Your camcorder shoots nine still images at about 0.4 sec intervals and displays the
images on a single page divided into nine boxes. Still images are recorded in 640 × 480
size. ( )
[a] [b]
Recording still images on a“Memory Stick”
– Memory Photo recording
138
(1)Set the POWER switch to MEMORY/NETWORK (DCR-TRV950 only). Make
sure that the LOCK switch is set to the further side (unlock position).
(2)Press MENU, then select BURST while STILL SET is selected in , then press
the dial (p. 211).
(3)Turn the SEL/PUSH EXEC dial to select the desired setting, then press the
dial.
(4)Press MENU to make the menu setting disappear.
(5)Press PHOTO deeper.
If the capacity of the “Memory Stick” becomes full
” FULL” appears on the screen, and you cannot record a still image on this “Memory
Stick.”
The number of still images in continuous shooting
The number of still images you can shoot continuously varies depending on the image
size and the capacity of the “Memory Stick.”
During recording still images continuously
The flash does not work.
The effect of exposure bracketing (EXP BRKTG)
The effect may not appear clearly on the LCD screen.
Checking images on a TV monitor or computer display for the expected effect is
recommended.
When selecting NORMAL
Recording continues up to the maximum number of still images during pressing
PHOTO deeper. Release PHOTO to stop recording.
When shooting with the self-timer or the Remote Commander
Your camcorder automatically records up to the maximum recordable number of still
images.
Recording still images on a “Memory Stick”
– Memory Photo recording
2
3
MEMORY SET
STILL SET
BURST
QUALITY
IMAGESIZE
RETURN
OFF
[MENU] : END
MEMORY SET
STILL SET
BURST
QUALITY
IMAGESIZE
RETURN
OFF
NORMAL
EXP BRKTG
MULTI SCRN
[MENU] : END
MEMORY SET
STILL SET
BURST
QUALITY
IMAGESIZE
RETURN
NORMAL
[MENU] : END
MEMORY SET
STILL SET
BURST
QUALITY
IMAGESIZE
RETURN
OFF
NORMAL
EXP BRKTG
MULTI SCRN
[MENU] : END
PHOTO
MENU
139
“Memory Stick” Operations
If there is space remaining on the “Memory Stick” for less than three photos
You cannot carry out the exposure bracketing (EXP BRKTG). “ FULL” is displayed
when you press PHOTO.
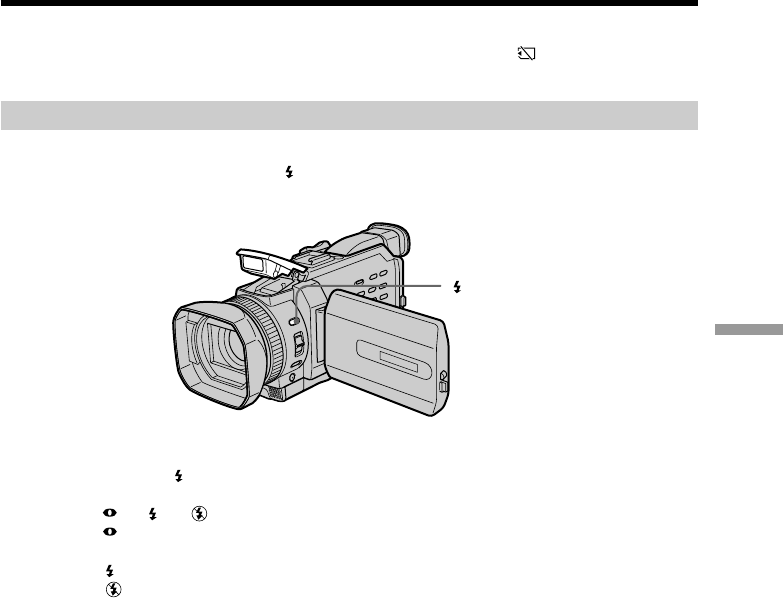
Recording images with the flash
The flash automatically pops up to strobe. The default setting is auto (no indicator). To
change the flash mode, press (flash) repeatedly until the flash mode indicator
appears on the screen.
Each press of (flash) changes the indicator as follows:
t t t (no indicator)
Auto red-eye reduction: The flash fires before recording to reduce the red-eye
phenomenon.
Forced flash: The flash fires regardless of the surrounding brightness.
No flash: The flash does not fire.
The flash is automatically adjusted to the appropriate brightness. You can also change
FLASH LVL to the desired brightness in the menu settings (p. 208). Try recording
various images to find the most appropriate setting for FLASH LVL.
(flash)
Recording still images on a “Memory Stick”
– Memory Photo recording

140
Recording still images on a “Memory Stick”
– Memory Photo recording
Notes
•The recommended shooting distance using the built-in flash is 0.8 m to 2.5 m (2 3/5
feet to 8 1/3 feet).
•Attaching the lens hood or a conversion lens (optional) may block the light from the
flash or cause lens shadow to appear.
•You cannot use an external flash (optional) and the built-in flash at the same time.
• (auto red-eye reduction) may not produce the desired effect depending on
individual differences, the distance to the subject, the subject not looking at the pre-
recording flash or other conditions.
•The flash effect cannot be obtained easily when you use forced flash in a bright
location.
•If it is not easy to focus on a subject automatically, for example, when recording in the
dark, use HOLOGRAM AF (p. 141) or the focal distance information (p. 77) for
focusing manually.
When the flashlight does not reach to the subjects
The color of the image may change.
If you leave your camcorder for five or more minutes after removing the power
supply
Your camcorder returns to the default setting (auto).
The flash does not fire even if you select auto and (auto red-eye reduction)
during the following operations:
–Spot light
–Shutter speed adjustment
–Sunset & moon of PROGRAM AE
–Landscape of PROGRAM AE
–Exposure
–Flexible Spot meter
When you use an external flash (optional) which does not have the auto red-eye
reduction
You cannot select the auto red-eye reduction.
During recording images continuously
The flash does not work.
141
“Memory Stick” Operations
Shooting with an auxiliary light – HOLOGRAM AF
The HOLOGRAM AF is an auxiliary light source used for focusing on subjects in dark
places.
Set HOLOGRAM F in to AUTO in the menu settings. (The default setting is AUTO.)
When appears on the screen in a dark place, press PHOTO lightly. Then the
auxiliary light will automatically emit until the subject is focused.
About HOLOGRAM AF
“HOLOGRAM AF (Auto-Focus),” an application of laser holograms, is a new AF
optical system that enables still image shooting in dark places. Having gentler radiation
than conventional high-brightness LEDs or lamps, the system satisfies Laser Class 1 (*)
specification and thus maintains higher safety for human eyes.
No safety problems will be caused by directly looking into the HOLOGRAM AF emitter
at a close range. However, it is not recommended to do so, because you may experience
such effects like several minutes of image residual and dazzling, that you encounter
after looking into a flashlight.
*HOLOGRAM AF satisfies Class 1(time base 30 000 seconds), specified in all of JIS
(Japan), IEC(EU), and FDA(US) industry standards.
Complying with these standards identifies the laser product to be safe, under a
condition that a human looks at the laser light either directly or even through a lens
for 30 000 seconds.
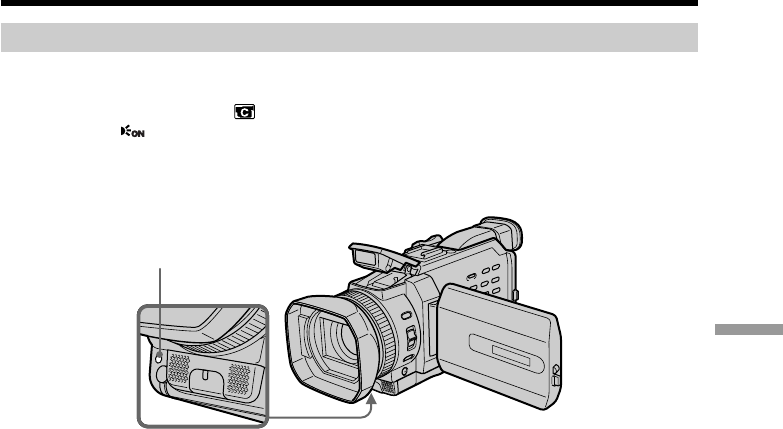
HOLOGRAM AF emitter
Recording still images on a “Memory Stick”
– Memory Photo recording

142
Recording still images on a“Memory Stick”
– Memory Photo recording
Notes
•Attaching the lens hood or a conversion lens (optional) may obstruct the
HOLOGRAM AF light and make focusing difficult. We recommend removing the lens
hood or a conversion lens while shooting with the HOLOGRAM AF.
•If enough light does not reach the subject even if the HOLOGRAM AF emitter is
emitted (recommended shooting distance is 2.5 m (8 1/3 feet)), the subject will not be
focused.
•Focusing may be hampered if the light emitted from the HOLOGRAM AF is blocked
by an obstruction.
•Focus is achieved as long as HOLOGRAM AF light reaches to the subject even if its
light is slightly out of the middle position of the subject.
•If HOLOGRAM AF light is dim, it sometimes becomes difficult to focus. If this
happens, wipe the HOLOGRAM AF emitter with a soft, dry cloth.
The HOLOGRAM AF does not emit when:
–Flash is set to No flash
–Focus manually
–Spot Focus
–Sunset & moon of PROGRAM AE
–Landscape of PROGRAM AE
–Continuous photo recording
When you use the external flash (optional) as well
HOLOGRAM AF emits.
143
“Memory Stick” Operations
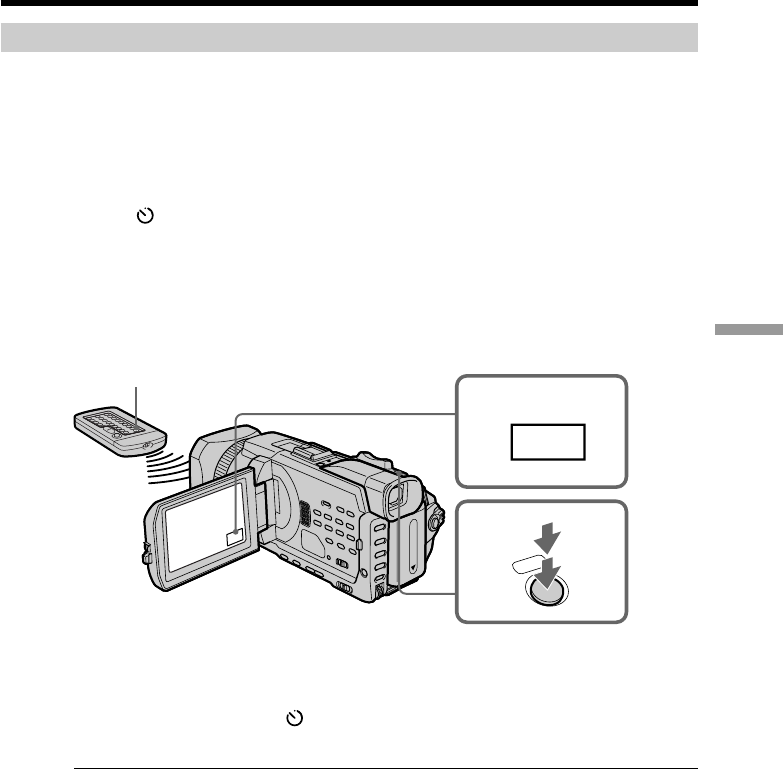
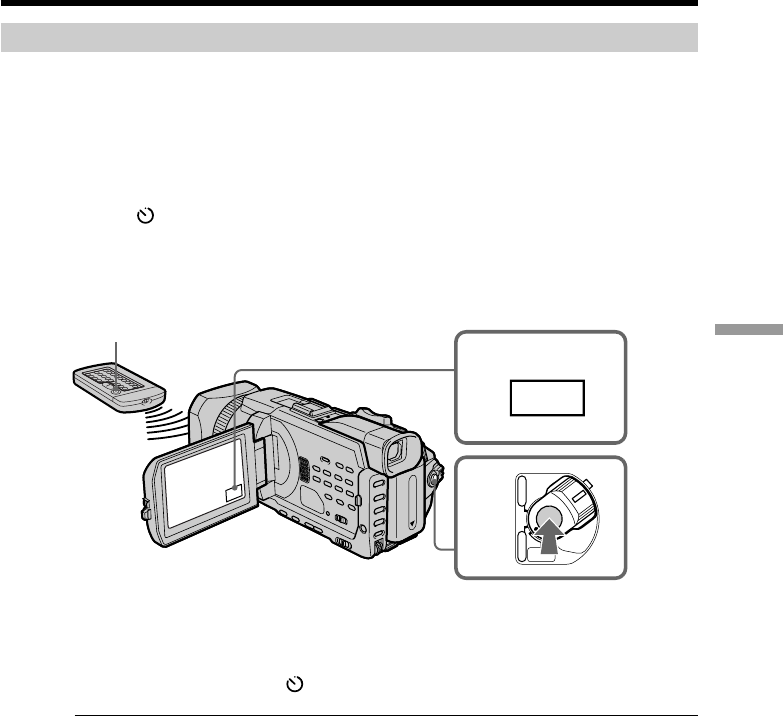
Self-timer memory photo recording
You can record images on a “Memory Stick” with the self-timer. You can also use the
Remote Commander for this operation.
(1)Set the POWER switch to MEMORY/NETWORK (DCR-TRV950 only). Make
sure that the LOCK switch is set to the further side (unlock position).
(2)Press FN to display PAGE1.
(3)Press SELFTIMER.
The (self-timer) indicator appears on the screen.
(4)Press PHOTO deeper.
Self-timer starts counting down from 10 with a beep. In the last two seconds of
the countdown, the beep gets faster, then recording starts automatically.
To cancel the self-timer
Press SELFTIMER so that the (self-timer) indicator disappears on the screen. You
cannot stop the countdown.
Note
The self-timer is automatically canceled when:
–Self-timer recording is finished.
–The POWER switch is set to OFF (CHG) or VCR.
Recording still images on a “Memory Stick”
– Memory Photo recording
4
PHOTO
2FN
PHOTO
144
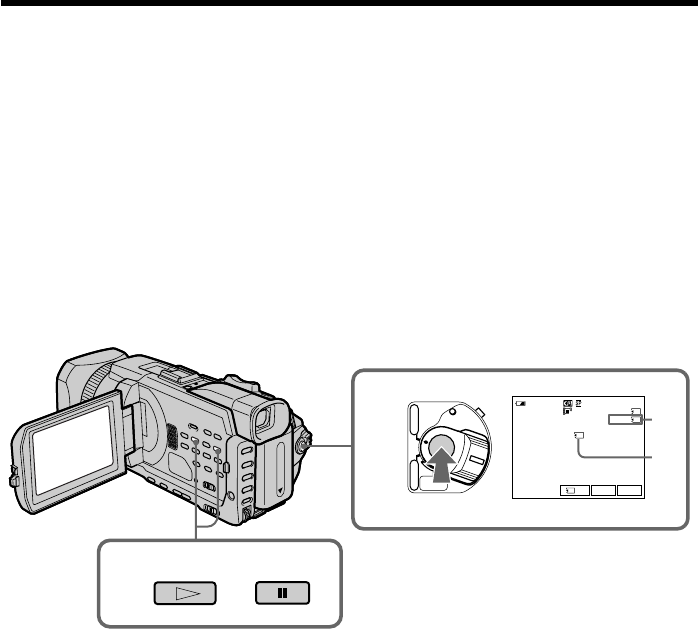
Your camcorder can read moving picture data recorded on a tape and record it as a still
image on a “Memory Stick.” Your camcorder can also capture moving picture data
through the input connector and record it as a still image on a “Memory Stick.”
Before operation
Insert a “Memory Stick” and the recorded tape into your camcorder.
(1)Set the POWER switch to VCR.
(2)Press N. Moving pictures recorded on the tape are played back.
(3)Press PHOTO lightly until the picture you want to capture from the tape
freezes and CAPTURE appears on the screen. Recording does not start yet.
To change from the selected image to another image, release PHOTO once and
press it lightly again.
(4)Press PHOTO deeper. The image displayed on the screen will be recorded on
the “Memory Stick.” Recording is complete when the bar scroll indicator
disappears.
[a] : Number of the recorded images
[b] : Approximate number of the images that can be recorded on the “Memory Stick”
Recording images from a tape as still
images
34
CAPTURE
FN
INDEXPB FN
INDEXPB
1 / 12
SFN
640
SFN
640
2
PHOTO
PHOTO
REW FFPLAY
[a] [b]

145
“Memory Stick” Operations
Image size of still images
Image size is automatically set to 640 × 480.
When the access lamp is lit or flashing
Do not shake or strike the unit. Also, do not turn the power off , eject the “Memory
Stick.” Otherwise, image data may become damaged.
If “ FORMAT ERROR” appears on the screen
The inserted “Memory Stick” is incompatible with your camcorder because its format
does not conform with your camcorder. Check the format of the “Memory Stick.”
If you press PHOTO lightly in the playback
Your camcorder stops momentarily.
Sound recorded on a tape
You cannot record audio from a tape.
Titles already recorded on cassettes
You cannot record titles on a “Memory Stick.” Titles do not appear while you are
recording a still image with PHOTO.
Recording date/time
The recording data (date/time) when it is recorded on a “Memory Stick” is recorded.
Various settings are not recorded.
Data codes recorded on a tape cannot be recorded on a “Memory Stick.”
When you press PHOTO on the Remote Commander
Your camcorder immediately records the image that is on the screen when you press
the button.
Recording images from a tape as still images
146
Recording images from a tape as still images
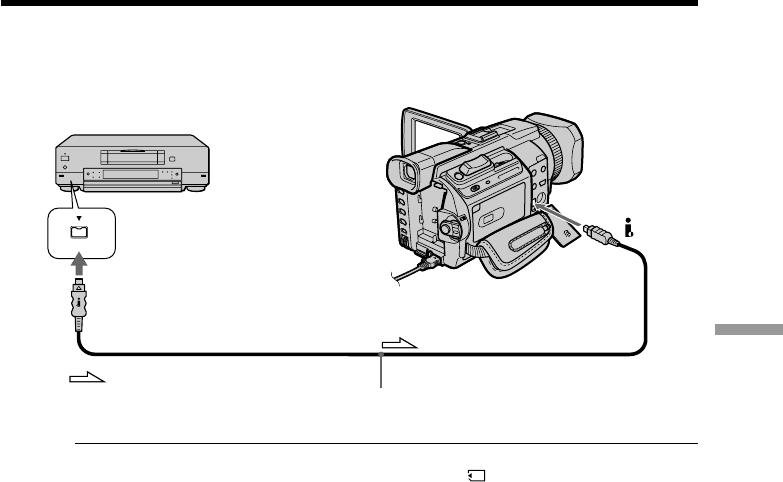
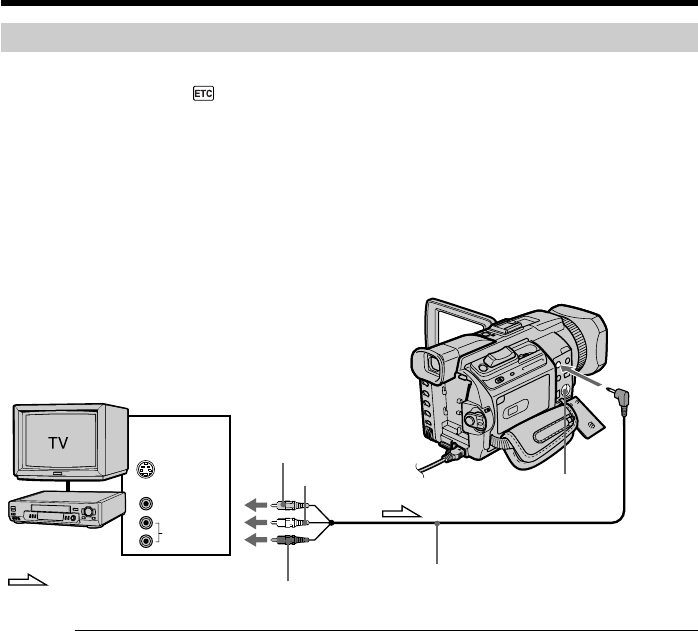
Recording a still image from external equipment
Before operation
Set DISPLAY in to LCD in the menu settings. (The default setting is LCD.)
(1)Set the POWER switch to VCR.
(2)Play back the recorded tape, or turn the TV on to see the desired program.
The image of the external equipment is displayed on the screen.
(3)Follow steps 3 and 4 on page 144.
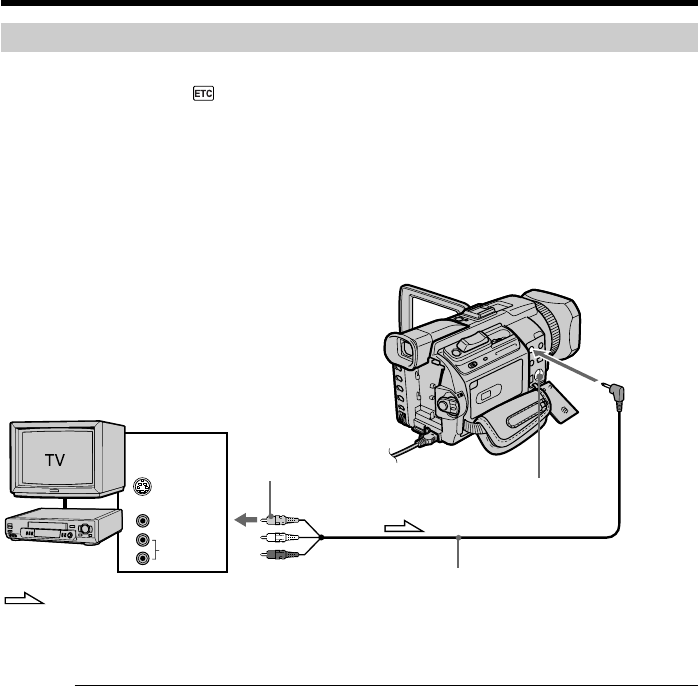
Using the A/V connecting cable
Connect the yellow plug of the A/V connecting cable to the video jack on the VCR or
the TV.
If your TV or VCR has an S video jack
Pictures can be reproduced more faithfully by using an S video cable (optional).
With this connection, you do not need to connect the yellow (video) plug of the A/V
connecting cable.
Connect an S video cable (optional) to the S video jacks of both your camcorder and the
TV or VCR.
AUDIO/
VIDEO
S VIDEO
S VIDEO
VIDEO
OUT
AUDIO
: Signal flow
VCR
Yellow
A/V connecting cable (supplied)
147
“Memory Stick” Operations
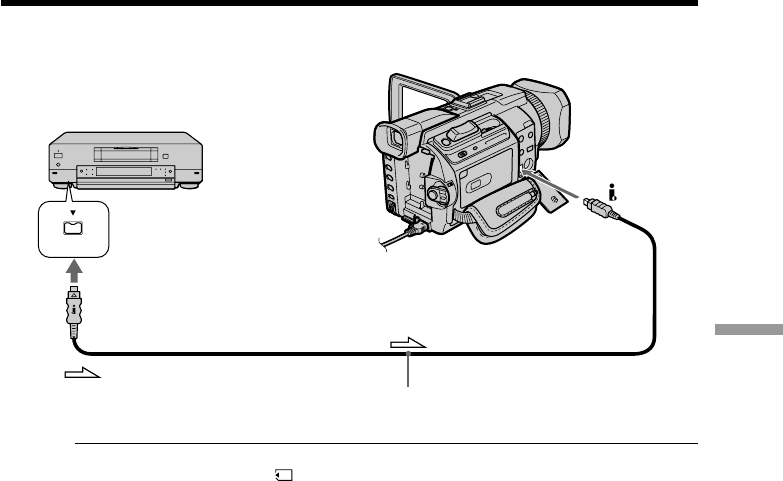
Using the i.LINK cable
Note
In the following instances, recording is interrupted or “ REC ERROR” is displayed,
and recording is not possible. Reinsert the “Memory Stick” to record distortion-free
images.
–When recording on a tape in a poor recording state, for example, on a tape that has
been repeatedly used for dubbing.
–When attempting to input images that are distorted due to poor radio wave reception
when a TV tuner unit is in use.
Recording images from a tape as still images
DV
DV OUT
DV
: Signal flow
i.LINK cable (optional)
148
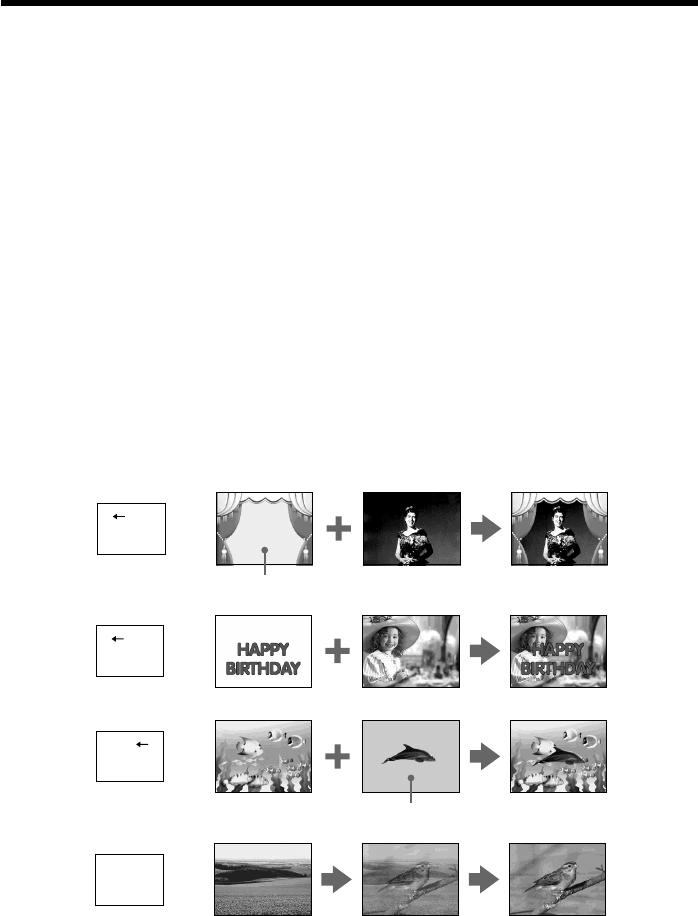
You can superimpose a still image you have recorded on the “Memory Stick” on the
moving picture you are recording. You can record the superimposed images on a tape
or a “Memory Stick.” (However, you can record only superimposed still images on the
“Memory Stick.”)
M. CHROM (memory chroma key)
You can swap a blue area of a still image such as an illustration or a frame with a
moving picture.
M. LUMI (memory luminance key)
You can swap a brighter area of a still image such as a handwritten illustration or title
with a moving picture. Record a title on the “Memory Stick” before a trip or event for
convenience.
C. CHROM (camera chroma key)
You can superimpose a moving picture on a still image such as an image can be used as
background. Shoot the subject against a blue background. The blue area of the moving
picture will be swapped with a still image.
M. OVERLAP* (memory overlap)
You can make a moving picture fade in on top of a still image recorded on the “Memory
Stick.”
*The superimposed image using Memory overlap can be recorded on tapes only.
Superimposing a still image in the
“Memory Stick” on an image
– MEMORY MIX
M C A M
C H R O M
M C A M
L U M I
C A M M
C H R O M
O V E R –
L A P
M. CHROM Still image Moving picture
M. OVERLAP*
Still image Moving picture
C. CHROM
Blue
M. LUMI Still image Moving picture
Blue
Still image Moving picture

149
“Memory Stick” Operations
Superimposing a still image in the “Memory Stick” on an image
– MEMORY MIX
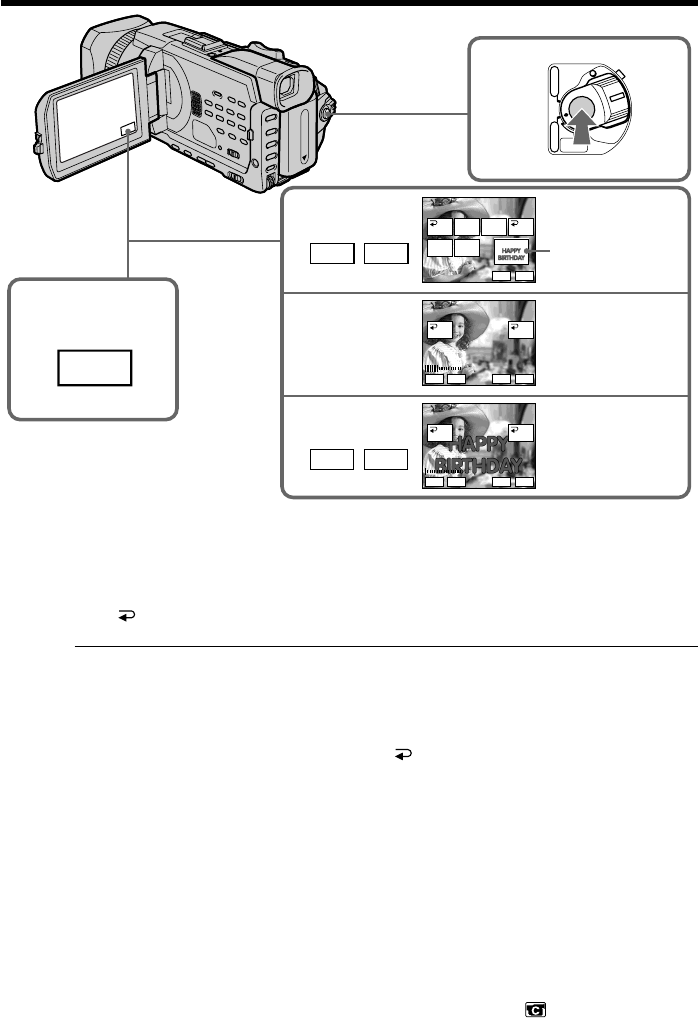
Recording superimposed images on a tape
Before operation
•Insert a tape for recording into your camcorder.
•Insert a “Memory Stick” recorded still images into your camcorder.
(1)Set the POWER switch to CAMERA.
(2)Press FN to display PAGE1.
(3)Press MEM MIX. The last recorded or last composed image appears on the
lower part of the screen as a thumbnail image.
(4)Press –/+ on the right lower corner of the screen to select the still image which
you want to superimpose.
–:To see the previous image
+: To see the next image
(5)Press a desired mode. The still image is superimposed on the moving picture.
(6)Press –/+ on the left lower corner of the screen to adjust the effect, then press
OK to return to PAGE1.
M. CHROM: Blue chroma key (only blue background portion) to extract a
still image and superimpose it on a moving image
M. LUMI: Brightness level used when extracting a still image and
superimposing it on a moving image
C. CHROM: Blue chroma key (only blue background portion) to extract a
moving picture and superimpose it on a still image
M. OVERLAP: No adjustment necessary
The fewer bars there are on the screen, the stronger the effect.
(7)Press EXIT to return to FN.
(8)Press START/STOP to start recording.
150
Superimposing a still image in the “Memory Stick” on an image
– MEMORY MIX
To change the still image to be superimposed
Press –/+ on the right lower corner before step 6.
To cancel MEMORY MIX
Press OFF to return to PAGE1.
Notes
•You cannot use the MEMORY MIX for moving pictures recorded on a “Memory
Stick.”
•When the overlapping still image has a large amount of white, the thumbnail image of
the picture may not be clear.
•You cannot change the mode setting. Press OFF to return to PAGE1.
Image data modified on your computer or shot with other equipment
You may not be able to play back modified images with your camcorder.
When you record the still image without superimposing
Select M. LUMI. mode. Press <-/+ mark> until all bars are displayed. Only the still
image will be displayed on the screen.
When you select M. OVERLAP
You cannot change the still image or the mode setting.
To record the superimposed image as a still image
Press PHOTO deeper in step 8 (You should set PHOTO REC in to TAPE in the
menu settings beforehand).
MEM
M
I
X
4
5
6
FN
+–
+–
2
8
POWER
OFF(CHG)
CAMERA
MEMORY/
NETWORK
VCR
100–0001
+–
MEM MIX
MCCAM
LUMI OVER-
LAP
OFF OK
MCCAM
CHROM
CAMCM
CHROM
M. LUMI
100–0001
+–
MEM MIX
OFF OK
+–
M. LUMI
100–0001
+–
MEM MIX
OFF OK
+–
Still image

151
“Memory Stick” Operations
Superimposing a still image in the “Memory Stick” on an image
– MEMORY MIX
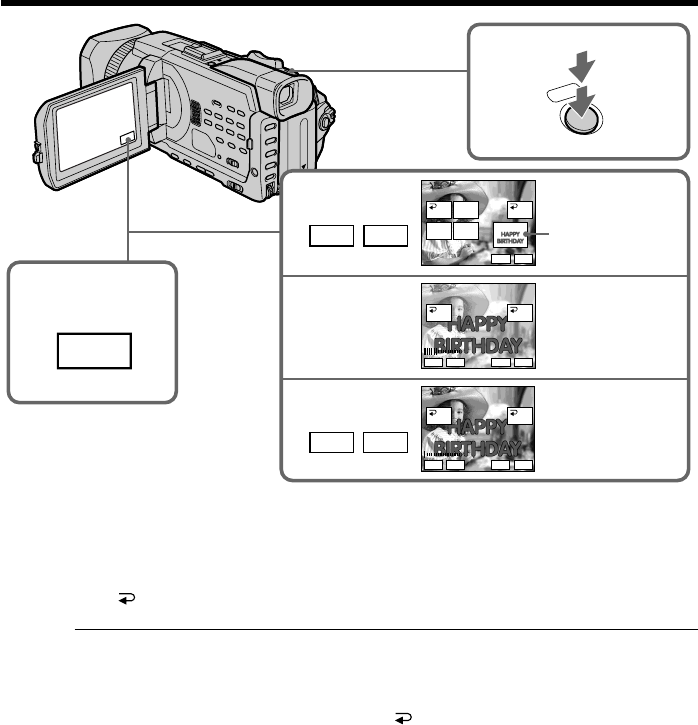
Recording superimposed images on a “Memory Stick” as a still
image
Before operation
Insert a “Memory Stick” recorded still images into your camcorder.
(1)Set the POWER switch to MEMORY/NETWORK (DCR-TRV950 only). Make
sure that the LOCK switch is set to the further side (unlock position).
(2)Press FN and select PAGE2.
(3)Press MEM MIX. The last recorded or last composed image appears on the
lower part of the screen as a thumbnail image.
(4)Press –/+ on the right lower corner of the screen to select the still image which
you want to superimpose.
–:To see the previous image
+: To see the next image
(5)Press a desired mode. The still image is superimposed on the moving picture.
(6)Press –/+ on the left lower corner of the screen to adjust the effect, then press
OK to return to PAGE2.
M. CHROM: Blue chroma key (only blue background portion) to extract a
still image and superimpose it on a moving image
M. LUMI: Brightness level used when extracting a still image and
superimposing it on a moving image
C. CHROM: Blue chroma key (only blue background portion) to extract a
moving picture and superimpose it on a still image
The fewer bars there are on the screen, the stronger the effect.
(7)Press EXIT to return to FN.
(8)Press PHOTO deeper to start recording.
The image displayed on the screen will be recorded on the “Memory Stick.”
Recording is complete when the bar scroll indicator disappears.
152
Superimposing a still image in the “Memory Stick” on an image
– MEMORY MIX
To change the still image to be superimposed
Press –/+ on the right lower corner before step 6.
To cancel MEMORY MIX
Press OFF to return to PAGE2.
Notes
•You cannot use MEMORY MIX for moving pictures recorded on a “Memory Stick.”
•When the overlapping still image has a large amount of white, the thumbnail image of
the picture may not be clear.
•You cannot change the mode setting. Press OFF to return to PAGE2.
Image size of still pictures
Image size is automatically set to 640 × 480.
Image data modified with your computers or shot with other equipment
You may not be able to play back modified images with your camcorder.
When recording images on a “Memory Stick” using the MEMORY MIX
The PROGRAM AE does not work. (The indicator flashes.)
The “Memory Stick” supplied with your camcorder stores 20 images
–For M. CHROM: 18 images (such as a frame) 100-0001~100-0018
–For C. CHROM: two images (such as a background) 100-0019~100-0020
Sample images
Sample images stored in the “Memory Stick” supplied with your camcorder are
protected (p. 176).
4
5
6
FN
+–
2
8
+–
100–0001
+–
MEM MIX
MCCAM
LUMI
OFF OK
MCCAM
CHROM
CAMCM
CHROM
M. LUMI
100–0001
+–
MEM MIX
OFF OK
+–
M. LUMI
100–0001
+–
MEM MIX
OFF OK
+–
PHOTO
Still image

153
“Memory Stick” Operations
You can record moving pictures with sound on a “Memory Stick.”
You can record picture and sound continuously up to the capacity of a “Memory
Stick”(MPEG MOVIE EX).
Before operation
Insert a “Memory Stick” into your camcorder.
(1)Set the POWER switch to MEMORY/NETWORK (DCR-TRV950 only). Make
sure that the LOCK switch is set to the further side (unlock position).
(2)Press START/STOP. Your camcorder starts recording. The camera recording
lamp located on the front of your camcorder lights up. The picture and sound
are recorded up to the remaining capacity of the “Memory Stick.” For more
information about recording time, see page 134.
To stop recording
Press START/STOP.
2
POWER
OFF(CHG)
CAMERA
MEMORY/
NETWORK
VCR
320
40min REC 0:00:03
15
min
BBB
FN
INDEXPLAY
[a]
[b]
[a]:Recording time can be recorded on the
“Memory Stick”.
[b]:This indicator is displayed for five seconds
after pressing START/STOP. This indicator
is not recorded.
Recording moving pictures on a“Memory
Stick” – MPEG movie recording

154
Note
Sound is recorded in monaural.
When the POWER switch is set to MEMORY/NETWORK (DCR-TRV950 only)
The following functions do not work:
–Digital zoom
–Wide mode
–Fader
–Picture effect
–Digital effect
–Sports lesson of PROGRAM AE (The indicator flashes.)
–Title
When using an external flash (optional)
Turn the power of the external flash off when recording moving pictures on a “Memory
Stick.” Otherwise, the charging sound for the flash may be recorded.
Recording date/time
The date/time are not displayed while recording. However, they are automatically
recorded onto the “Memory Stick.”
To display the recording date/time, press the DATA CODE button during playback.
You can also use the Remote Commander for this operation (p. 41). Various settings
cannot be recorded.
During recording on a “Memory Stick”
Do not eject the cassette tape from your camcorder. During ejecting the tape, sound is
recorded on the “Memory Stick.”
When the POWER switch is set to MEMORY/NETWORK (DCR-TRV950 only)
The angle of view is slightly larger compared with the angle of view when the POWER
switch is set to CAMERA.
Recording moving pictures on a “Memory Stick”
– MPEG movie recording
155
“Memory Stick” Operations
Self-timer MPEG movie recording
You can record images on a “Memory Stick” with the self-timer. You can also use the
Remote Commander for this operation.
(1)Set the POWER switch to MEMORY/NETWORK (DCR-TRV950 only). Make
sure that the LOCK switch is set to the further side (unlock position).
(2)Press FN to display PAGE1.
(3)Press SELFTIMER.
The (self-timer) indicator appears on the screen.
(4)Press START/STOP.
Self-timer starts counting down from 10 with a beep. In the last two seconds of
the countdown, the beep gets faster, then recording starts automatically.
To stop the self-timer
Press START/STOP. To restart the self-timer, press START/STOP again.
To cancel the self-timer
Press SELFTIMER so that the (self-timer) indicator disappears on the screen.
Note
The self-timer is automatically canceled when:
–Self-timer recording is finished.
–The POWER switch is set to OFF (CHG) or VCR.
4
2FN
POWER
OFF(CHG)
CAMERA
MEMORY/
NETWORK
VCR
START/STOP button
Recording moving pictures on a “Memory Stick”
– MPEG movie recording
156
Your camcorder can read moving picture data recorded on a tape and record it as a
moving picture on a “Memory Stick.” Your camcorder can also capture moving picture
data through the input connector and record it as a moving picture on a “Memory
Stick.”
Before operation
Insert a “Memory Stick” and the recorded tape into your camcorder.
(1)Set the POWER switch to VCR.
(2)Press N. The picture recorded on the tape is played back.
And press X at the scene where you want to start recording from.
(3)Press START/STOP on your camcorder. The picture and sound are recorded
up to the remaining capacity of the “Memory Stick.” For more information
about recording time, see page 134.
To stop recording
Press START/STOP.
Recording pictures from a tape as a
moving picture
3
2PLAY PAUSE
POWER
OFF(CHG)
CAMERA
MEMORY/
NETWORK
VCR
320
BBB
N
40min REC 0:00:03
15
min
0:15:42:43
FN
INDEXPB
[a]:The recording time can be recorded on
the “Memory Stick.”
[b]:This indicator is displayed for
five seconds after pressing START/
STOP. This indicator is not recorded.
[a]
[b]

157
“Memory Stick” Operations
Notes
•Sound recorded in 48 kHz is converted to 32 kHz sound when recording images from
a tape to a “Memory Stick.”
•Sound recorded in stereo is converted to monaural sound when recording from a tape.
When the access lamp is lit or flashing
Do not shake or knock the unit. Also, do not turn the power off, eject the “Memory
Stick.” Otherwise, image data may become damaged.
Titles already recorded on cassettes
You cannot record titles on a “Memory Stick.” Titles do not appear while you are
recording moving picture with START/STOP.
If “ AUDIO ERROR” is displayed
Sound that cannot be recorded by your camcorder has been recorded. Connect the A/V
connecting cable to input images from external equipment used to play back the image
(p. 158).
Recording date/time
The recording data (date/time) when it is recorded on a “Memory Stick” is recorded.
Various settings are not recorded.
Data codes recorded on a tape cannot be recorded on a “Memory Stick.”
Recording pictures from a tape as a moving picture
158
Recording a moving picture from external equipment
Before operation
Set DISPLAY in to LCD in the menu settings. (The default setting is LCD.)
(1)Set the POWER switch to VCR.
(2)Play back the recorded tape, or turn the TV on to see the desired program.
The image of the other equipment is displayed on the screen.
(3)Follow the procedure on page 156 from the step 3 onwards at the point where
you want to start recording from.
Using the A/V connecting cable
If your TV or VCR has an S video jack
Pictures can be reproduced more faithfully by using an S video cable (optional).
With this connection, you do not need to connect the yellow (video) plug of the A/V
connecting cable.
Connect an S video cable (optional) to the S video jacks of both your camcorder and the
TV or VCR.
Recording pictures from a tape as a moving picture
S VIDEO
VIDEO
OUT
AUDIO/
VIDEO
S VIDEO
AUDIO
: Signal flow
VCR
Yellow
White
A/V connecting cable (supplied)
Red
159
“Memory Stick” Operations
Using the i.LINK cable
Note
In the following instances, “ REC ERROR” is displayed and you cannot record
pictures.
–When recording on a tape in a poor recording state, for example, on a tape that has
been repeatedly used for dubbing.
–When attempting to input images that are distorted due to poor radio wave reception
when a TV tuner unit is in use.
– When the input signal is cut off.
DV OUT
DV
DV
: Signal flow
i.LINK cable (optional)
Recording pictures from a tape as a moving picture
160
You can duplicate selected scenes (programs) for editing onto a “Memory Stick.”
Making the program
Before operation
Insert a “Memory Stick” and a recorded tape into your camcorder.
(1)Set the POWER switch to VCR.
(2)Press MENU, then turn the SEL/PUSH EXEC dial to set VIDEO EDIT in
to MEMORY, then press the dial (p.217).
(3)Turn the SEL/PUSH EXEC dial to select IMAGESIZE and select the desired
image size, then press the dial.
(4)Search for the beginning of the first scene you want to insert using the video
operation buttons, then pause playback.
You can fine-adjust one frame at a time with EDITSEARCH.
(5)Press MARK on the Remote Commander, or turn the SEL/PUSH EXEC dial to
select MARK, then press the dial.
The IN point of the first program is set, and the top part of the program mark
changes to light blue.
(6)Search for the end of the first scene you want to insert using the video
operation buttons, then pause playback.
You can fine-adjust one frame at a time with EDITSEARCH.
(7)Press MARK on the Remote Commander, or the SEL/PUSH EXEC dial.
The OUT point of the first program is set, then the bottom part of the program
mark changes to light blue.
(8)Repeat steps 4 to 7, then set the program.
When one program is set, the program mark changes to light blue.
You can set 20 programs in maximum.
578
4,7
PAUSE
STOP
REW FFPLAY
320 320 320
VIDEO EDIT
MARK
UNDO
ERASE ALL
START
IMAGESIZE
1 OUT
0:08:55:06
TOTAL 0:00:00
SCENE 0 2min TOTAL 0:00:12
SCENE 1 2min TOTAL 0:00:31
SCENE 3 2min
[MENU] : END
VIDEO EDIT
MARK
UNDO
ERASE ALL
START
IMAGESIZE
2 IN 0:08:58:06
[MENU] : END
VIDEO EDIT
MARK
UNDO
ERASE ALL
START
IMAGESIZE
4 IN 0:10:01:23
[MENU] : END
N X N X N X
MENU
Recording edited pictures from a tape as
a moving picture – Digital program
editing (on a “Memory Stick”)

161
“Memory Stick” Operations
Erasing the program you have set
Erase OUT first and then IN of the last program.
(1)Turn the SEL/PUSH EXEC dial to select UNDO, then press the dial.
(2)Turn the SEL/PUSH EXEC dial to select EXECUTE, then press the dial.
The last set program mark flashes, then the setting is canceled.
To cancel erasing
Select RETURN with the SEL/PUSH EXEC dial in step 2.
Erasing all programs
(1)Turn the SEL/PUSH EXEC dial to select ERASE ALL, then press the dial.
(2)Turn the SEL/PUSH EXEC dial to select EXECUTE, then press the dial.
All the program marks flash, then the settings are canceled.
To cancel erasing all programs
Select RETURN with the SEL/PUSH EXEC dial in step 2.
To cancel a program you have set
Press MENU.
The program is stored in memory until the tape is ejected.
Notes
•You cannot dub the titles, display indicators, or the contents of cassette memory.
•You cannot operate recording during the digital program editing on a “Memory
Stick.”
If the tape has a blank portion
You cannot set IN or OUT on the portion
If there is a blank portion between IN and OUT on the tape
The total time code may not be displayed correctly.
During making a program
If you eject the cassette, the program will be erased.
Recording edited pictures from a tape as a moving picture
– Digital program editing (on a “Memory Stick”)

162
Recording edited pictures from a tape as a moving picture
– Digital program editing (on a “Memory Stick”)
Performing the program (Dubbing on a “Memory Stick”)
(1)Turn the SEL/PUSH EXEC dial to select START, then press the dial.
(2)Turn the SEL/PUSH EXEC dial to select EXECUTE, then press the dial.
Search for the beginning of the first program, then start dubbing.
The program mark flashes.
The SEARCH indicator appears during search and the EDITING indicator
appears during writing of data on your camcorder, and REC appears during
dubbing on the screen.
The program mark changes to light blue after dubbing is complete.
When the dubbing ends, your camcorder automatically stops.
To stop dubbing during editing
Press x using the video operation buttons.
The program you made is recorded on a “Memory Stick” up to the place where you
pressed x.
To end the Digital program editing
Your camcorder stops when the dubbing ends. Then the display returns to VIDEO
EDIT in the menu settings.
Press MENU to erase the menu display.
When the program to operate the Digital program editing has not been made.
You cannot press START.
When the “Memory Stick” does not have enough space to record
“LOW MEMORY ” appears on the screen. However, you can record pictures up to the
time indicated.
When the “Memory Stick” has no space to record
“MEMORY FULL” appears on the screen.
When a “Memory Stick” is not set
“NO MEMORY STICK” appears on the screen.
When the write-protect switch on the “Memory Stick” is set to LOCK
“MEMORY STICK LOCKED” appears on the screen.
163
“Memory Stick” Operations
Using the search function, you can automatically capture only still images from tapes
and record them on a “Memory Stick” in sequence.
Before operation
•Insert a recorded tape into your camcorder and rewind the tape.
•Insert a “Memory Stick” into your camcorder.
(1)Set the POWER switch to VCR.
(2)Press MENU, then turn the SEL/PUSH EXEC dial to select PHOTO SAVE in
, then press the dial (p. 212).
PHOTO BUTTON appears on the screen.
(3)Press PHOTO deeper. The still image from the tape is recorded on the
“Memory Stick.” The number of still images copied is displayed. END is
displayed when copying ends.
To stop copying
Press x using the video operation buttons or press MENU.
When the “Memory Stick” becomes full
“MEMORY FULL” appears on the screen, and copying stops. Insert another “Memory
Stick” and repeat the procedure from step 2.
Copying still images from a tape
– PHOTO SAVE
3
2
PHOTO
SAV
I
NG
0END
4
PHOTO BUTTON
640
STD
640
STD
640
STD
PHOTO SAVE 0:00:00:00
4/15
[MENU] : END
PHOTO SAVE 0:30:00:00
8/15
[MENU] : END
MEMORY SET
STILL SET
MOVIE SET
PHOTO SAVE
FILE NO.
RETURN
READY
[MENU] : END
PHOTO SAVE 0:00:00:00
4/15
[PHOTO] : START [MENU] : END
MENU

164
Copying still images from a tape – PHOTO SAVE
Image size of still images
Image size is automatically set to 640 × 480.
When the access lamp is lit or flashing
Do not shake or knock your camcorder. As well do not turn the power off, eject the
“Memory Stick.” Otherwise, image data may become damaged.
If the write-protect switch on the “Memory Stick” is set to LOCK
“NOT READY” appears when you select the item in the menu settings.
When you change the “Memory Stick” during copying
Your camcorder resumes copying from the last image recorded on the previous
“Memory Stick.”
165
“Memory Stick” Operations
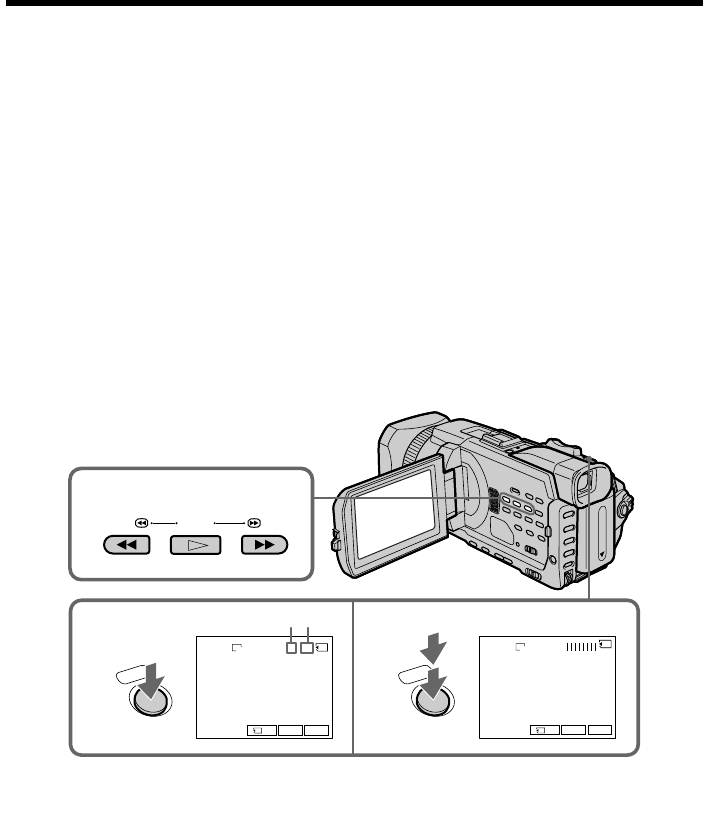
You can play back still images recorded on a “Memory Stick.” You can also play back
six images including moving pictures in order at a time by selecting the index screen.
You can also use the Remote Commander for this operation.
Before operation
Insert a “Memory Stick” into your camcorder.
(1)Set the POWER switch to MEMORY/NETWORK (DCR-TRV950 only) or VCR.
Make sure that the LOCK switch is set to the further side (unlock position).
(2)Press PLAY or PB. The last recorded image is displayed.
(3)Press –/+ on your camcorder to select the desired still image.
–:To see the previous image
+: To see the next image
To stop memory photo playback
Press CAM, VCR on your camcorder or MEMORY PLAY button on the Remote
Commander.
PLAY PB
2
Viewing still images
– Memory photo playback
166
You may not be able to play back images with your camcorder:
–when playing back image data modified on your computer.
–when playing back image data shot with other equipment.
Notes on the file name
•The directory number may not be displayed and only the file name may be displayed
if the structure of the directory does not conform to the DCF standard.
•“ - DIRECTORY ERROR” may appear on screen if the structure of the directory
does not conform to the DCF standard. While this message appears, you can play back
images but cannot record them on the “Memory Stick.”
•The file name flashes on the screen if the file is corrupted or the file is unreadable.
To play back recorded images on a TV screen
•Before operation, connect your camcorder to the TV with the A/V connecting cable
supplied with your camcorder.
•When operating memory photo playback on a TV or on the LCD screen, image quality
may appear to have deteriorated. This is not a malfunction. The image data is as good
as ever.
•Turn the audio volume of the TV down before operation, or noise (howling) may be
output from the TV speakers.
Still images
You can select still images also with –/+ on PAGE1/PAGE2/PAGE3.
When no still image is recorded on the “Memory Stick”
When you press MEMORY PLAY on the Remote Commander, “ NO FILE” appears.
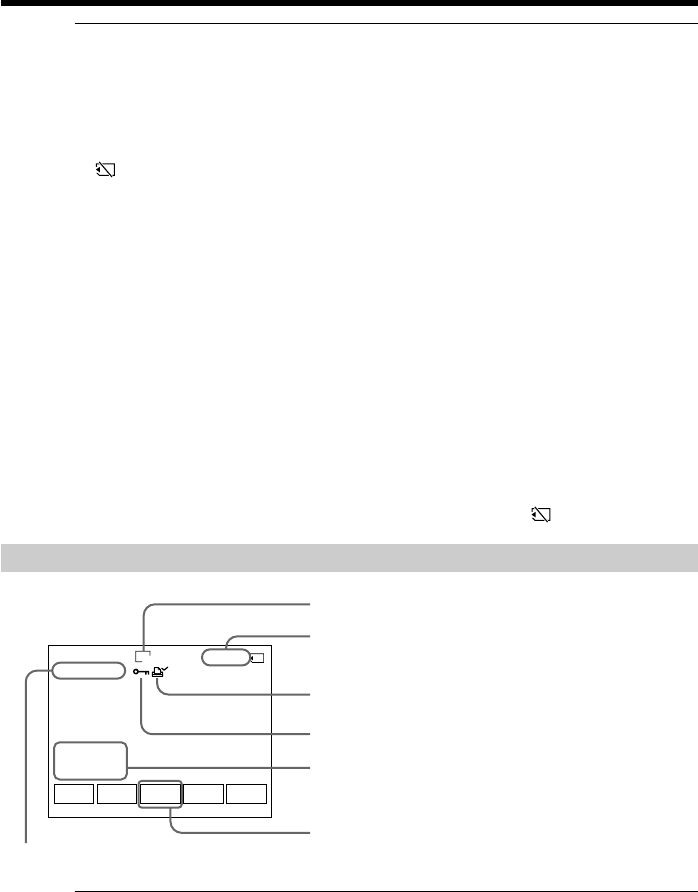
Screen indicators during still image playback
Recording data
You can view recording data (date/time or various settings when recorded) when you
press DATA CODE. You can also use the Remote Commander for this operation (p. 41).
To make screen indicators disappear
Press DISPLAY/TOUCH PANEL.
Viewing still images – Memory photo playback
Recording date/time/various settings
6/ 40
MEMORY PLAY
100–0006
1152
JUL 4 2002
12:05:56 AM
FNINDEXCAM
+–
Image number/Total number of recorded images
Image size
Data Directory Number, File Number
Protect
Print mark
When the POWER switch is set to VCR, VCR is
displayed instead of CAM
167
“Memory Stick” Operations
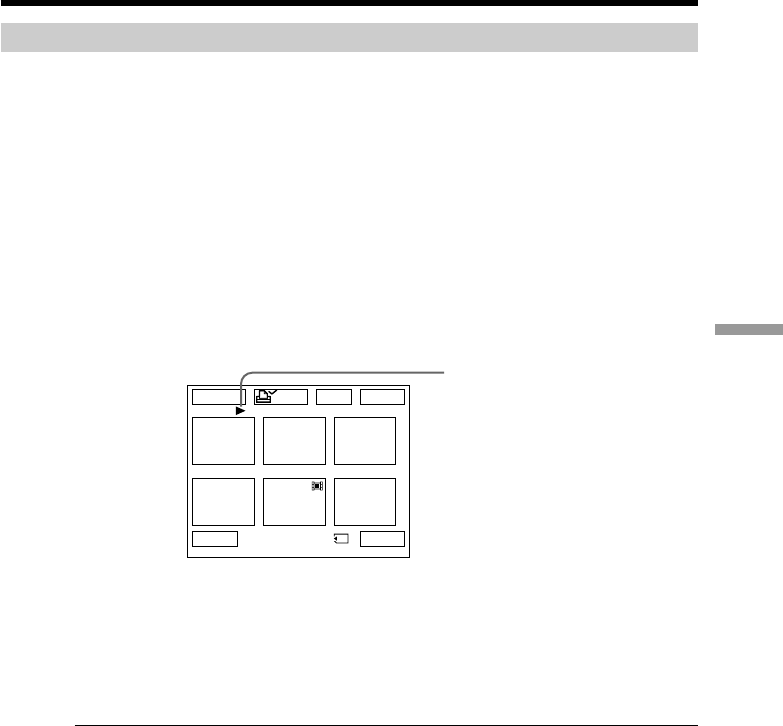
Playing back six recorded images at a time (index screen)
You can play back six recorded images at a time. This function is especially useful when
searching for a particular image.
Before operation
Insert a “Memory Stick” into your camcorder.
(1)Set the POWER switch to MEMORY/NETWORK (DCR-TRV950 only) or VCR.
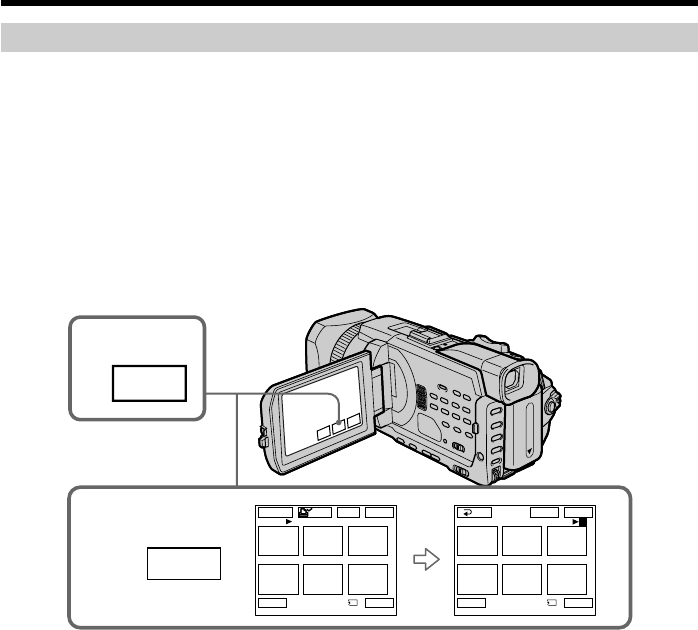
Make sure that the LOCK switch is set to the further side (unlock position).
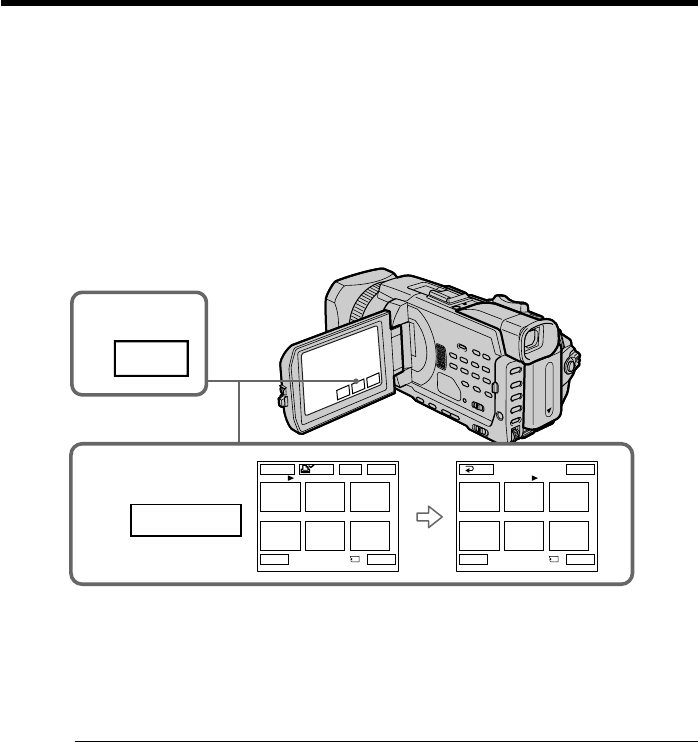
(2)Press INDEX to display the index screen.
A red B mark appears above the image that is displayed before changing to the index
screen mode.
T : To display the previous 6 images
t : To display the following 6 images
To return to FN
Press EXIT.
To return to the normal playback screen (single screen)
Press the image you want to display.
Note
When displaying the index screen, the number appears above each image. This
indicates the order in which images are recorded on the “Memory Stick.” These
numbers are different from the data file names.
Image data modified on your computer or shot with other equipment
These files are sometimes not displayed on the index screen.
1 / 40
123
456
EXITDEL
MARK
-
MARK
T t
B mark
Viewing still images – Memory photo playback
168
You can play back moving pictures recorded on a “Memory Stick.” You can also play
back six images including still images in order at a time by selecting the index screen.
Before operation
Insert a “Memory Stick” into your camcorder.
(1)Set the POWER switch to MEMORY/NETWORK (DCR-TRV950 only) or VCR.
Make sure that the LOCK switch is set to the further side (unlock position).
(2)Press PLAY or PB. The last recorded image is displayed.
(3)Press +/– to select the desired moving pictures.
– : To see the previous picture
+ : To see the next picture
(4)Press MPEG N X to start playback.
(5)To adjust the volume, press either of the two buttons on VOLUME.
– : To turn down
+ : To turn up
When you close the LCD panel, sound is muted.
To stop MPEG movie playback
Press MPEG N X.
Note
You may not be able to play back images with your camcorder:
–When playing back image data modified on your computer.
–When playing back image data shot with other equipment.
To play back recorded images on a TV screen
•Before operation connect your camcorder to the TV with the A/V connecting cable
supplied with your camcorder.
•Turn the audio volume of the TV down before operation, or noise (howling) may be
output from the TV speakers.
Moving pictures
You can select moving pictures also with –/+ on PAGE1/PAGE2/PAGE3.
When no image is recorded on the “Memory Stick”
When you press MEMORY PLAY on the Remote Commander, the message “ NO
FILE” appears.
Viewing moving pictures
– MPEG movie playback
PLAY PB
2
VOLUME
169
“Memory Stick” Operations
Playing back a moving picture from the desired part
The moving picture recorded on a “Memory Stick” is divided into 23 parts.
You can select every each one point and play back pictures.
Before operation
Insert a “Memory Stick” into your camcorder.
(1)Set the POWER switch to MEMORY/NETWORK (DCR-TRV950 only) or VCR.
Make sure that the LOCK switch is set to the further side (unlock position).
(2)Press PLAY or PB. The last recorded image is displayed.
(3)Press –/+ to select the desired moving pictures.
– : To see the previous picture
+ : To see the next picture
(4)Press </, to select the point where you want to play back.
< :To see previous part
, :To see next part
(5)Press MPEG N X to start playback.
To stop MPEG movie playback
Press MPEG N X
When recording time is too short
The moving picture may not be divided into 23 parts.
FN
MPEG
N X
INDEXCAM
+–
320
1/2
0 : 00 : 00MOV00001
Viewing moving pictures – MPEG movie playback
170
Screen indicators during moving picture playback
Recording date/time
To display the recording date/time, press DATA CODE. You can also use the Remote
Commander for this operation. (p. 41)
To make screen indicator disappear
Press DISPLAY/TOUCH PANEL.
Viewing moving pictures – MPEG movie playback
FN
MPEG
N X
–– –
–– –
INDEXCAM
+–
320
1/20
0 : 01 : 00MOV00001
––
JUL
4 2002
12 : 05 : 56
Data directory number/File number
Picture number/Total number of recorded pictures
Image size
Protect
Recording date/time. (Various settings are displayed as
“– – –”.)
When the POWER switch is set to VCR, VCR is
displayed instead of CAM.
171
“Memory Stick” Operations
You can copy images recorded on a “Memory Stick” and record them to a tape.
Before operation
Insert a “Memory Stick” and a tape for recording into your camcorder.
(1)Set the POWER switch to VCR.
(2)Using the video control buttons, search a point where you want to record the
desired images. Set the tape to playback pause.
(3)Press z REC and the button on its right simultaneously on your camcorder.
The tape is set to the recording pause.
(4)Press PB. The last recorded image is displayed.
(5)Press –/+ to select the desired image.
– : To see the previous image
+ : To see the next image
(6)Press X to start recording and press X again to stop.
z appears on the screen during recording.
(7)If you have more to copy, repeat steps 5 and 6.
To stop copying in the middle
Press x.
Copying images recorded on a “Memory
Stick” to a tape
3
4
PB
2
REC PAUSE

172
Copying images recorded on a “Memory Stick” to a tape
During copying
You cannot operate the following functions:
–MEMORY PLAY
–MEMORY INDEX
–MEMORY DELETE
–MEMORY +/–
Note on the index screen
You cannot record the index screen.
If you press EDITSEARCH during pause
Memory playback stops.
Image data modified on your computers or shot with other equipment
You may not be able to copy modified images with your camcorder.
When copying movies
After step 6, press MPEG u and play back the image.
173
“Memory Stick” Operations
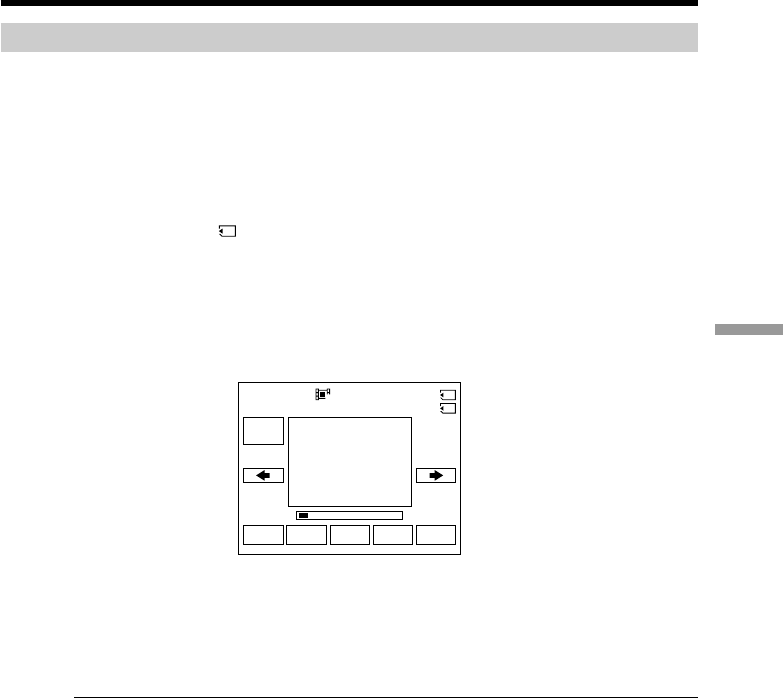
You can enlarge still images recorded on a “Memory Stick.” You can select and view a
desired part from the enlarged still image. Also, you can copy the desired part of the
enlarged still image to tapes or a “Memory Stick”.
Before operation
Insert a “Memory Stick” into your camcorder.
(1)Set the POWER switch to MEMORY/NETWORK (DCR-TRV950 only). Press
FN to display PAGE1 during the memory playback. When you set the POWER
switch to VCR, press FN and select PAGE2 during the memory playback.
(2)Press PB ZOOM. PB ZOOM screen appears.
(3)Press the area that you want to enlarge in the frame on the PB ZOOM screen.
The area you pressed moves to the center of the screen, and the playback
image is enlarged approximately at twice the size. If you press the other area,
the area moves to the center of the screen.
(4)Adjust the zoom ratio by the power zoom lever.
You can enlarge the image from approximately 1.1 times up to five times its
size.
W : Decreases the zoom ratio.
T : Increases the zoom ratio.
To cancel PB ZOOM
Press END.
1
4
FN
2
PB
ZOOM
MEMORY PLAY
3/14
END
100–0003
1152
MEMORY PLAY
3/14
END
100–0003
1152
PB ZOOM
PB ZOOM
× 5.0
Enlarging still images recorded on a
“Memory Stick” – Memory PB ZOOM

174
Enlarging still images recorded on a “Memory Stick”
– Memory PB ZOOM
The PB ZOOM is canceled when executing the following operations:
–MENU
–MEMORY PLAY*
–MEMORY INDEX*
–MEMORY +/–*
* When these functions are selected by the Remote Commander.
Moving pictures recorded on a “Memory Stick”
The PB ZOOM does not work.
To record the still image processed by Memory PB ZOOM on a “Memory Stick”
Press PHOTO to record the still image processed by PB ZOOM. (Images are recorded at
640 × 480 size.)
In the PB ZOOM mode
If you press DISPLAY/TOUCH PANEL button, the frame on the PB ZOOM screen
disappears. You cannot move the part you pressed to the center of the screen.
Edge of the enlarged image
The edge of the enlarged image cannot be displayed at the center of the screen.
To record an image processed on PB ZOOM on tapes
Follow the procedure on page 171 and execute the PB ZOOM after step 5.
175
“Memory Stick” Operations
You can automatically play back images in sequence. This function is useful especially
when checking recorded images or during a presentation.
Before operation
Insert a “Memory Stick” into your camcorder.
(1)Set the POWER switch to MEMORY/NETWORK (DCR-TRV950 only). Make
sure that the LOCK switch is set to the further side (unlock position).
(2)Press FN and select PAGE3.
(3)Press SLIDE SHOW.
(4)Press START. Your camcorder plays back the images recorded on the
“Memory Stick” in sequence.
To stop the slide show
Press END.
To pause during a slide show
Press PAUSE.
To return to FN
Press END to return to PAGE3, then press EXIT.
To start the slide show from a particular image
Select the desired image using –/+ buttons before step 4.
To view recorded images on TV
Before operation connect your camcorder to a TV with the A/V connecting cable
supplied with your camcorder.
If you change the “Memory Stick” during operation
The slide show does not operate. If you change the “Memory Stick,” be sure to follow
the steps again from the beginning.
2FN
41 / 6
SLIDE SHOW
100–00001
+–
START
END
1152
Playing back images in a continuous loop
– SLIDE SHOW
176
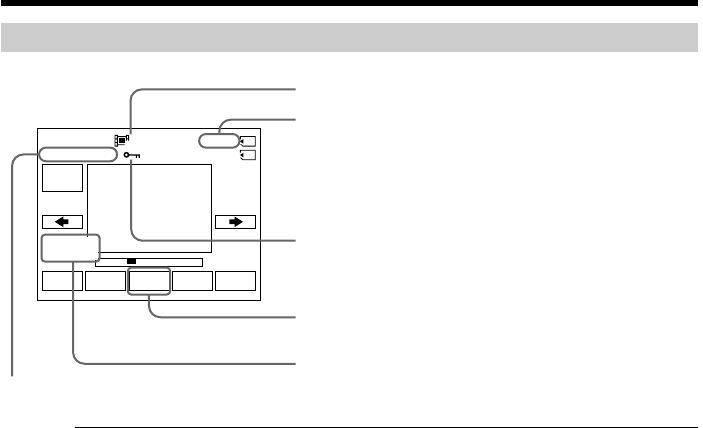
You can protect selected images to prevent accidental erasure of important images.
Before operation
Insert a “Memory Stick” into your camcorder.
(1)Set the POWER switch to MEMORY/NETWORK (DCR-TRV950 only) or VCR.
Make sure that the LOCK switch is set to the further side (unlock position).
(2)Press INDEX on your camcorder to display the index.
(3)Press - MARK. The screen to protect the image appears.
(4)Press the image you want to protect. A “-” appears on the protected image.
To return to FN
Press EXIT.
To cancel image protection
Press the image you want to cancel image protection in step 4 again. The “-”
disappears.
Note
Formatting erases all information on the “Memory Stick,” including the protected
image data. Before formatting a “Memory Stick,” check its contents.
If the write-protect switch on the “Memory Stick” is set to LOCK
You cannot protect images.
Preventing accidental erasure
– Image protection
2
INDEX
3,4
123
456
EXIT
RET.
-
MARK
1 / 40
123
456
EXITDEL
MARK
-
MARK
T t
-
2 / 40
Tt
-
MARK
177
“Memory Stick” Operations
You can delete images stored in a “Memory Stick.” You can delete all images or only
selected images.
Deleting selected images
Before operation
Insert a “Memory Stick” into your camcorder.
(1)Set the POWER switch to MEMORY/NETWORK (DCR-TRV950 only) or VCR.
Make sure that the LOCK switch is set to the further side (unlock position).
(2)Play back the image you want to delete.
(3)Press FN to display PAGE1.
(4)Press DELETE. “DELETE?” appears on the LCD screen.
(5)Press OK. The selected image is deleted.
To return to FN
Press EXIT.
To cancel deleting an image
Press CANCEL in step 5.
Notes
•To delete a protected image, first cancel image protection.
•Once you delete an image, you cannot restore it. Before deleting an image, carefully
check the image.
If the write-protect switch on the “Memory Stick” is set to LOCK
You cannot delete images.
4
DELE–
TE
DELETE
100–00003 3 / 40
DELETE?
OK CAN–
CEL
3FN
1152
Deleting images – DELETE
178
Deleting selected images on the index screen
Before operation
Insert a “Memory Stick” into your camcorder.
(1)Set the POWER switch to MEMORY/NETWORK (DCR-TRV950 only). Make
sure that the LOCK switch is set to the further side (unlock position).
(2)Press INDEX to display the index screen.
(3)Press DEL. Then press the images you want to delete. The number of the
selected image is highlighted.
(4)Press EXEC. “DELETE?” appears on the LCD screen.
(5)Press OK. The selected images are deleted.
To return to FN
Press EXIT.
To cancel deleting an image
Press CANCEL in step 5.
Deleting images – DELETE
2
INDEX
313
2
456
EXIT
123
456
EXITDEL
MARK
-
MARK
-
EXEC
DEL
1 / 40
Tt 3 / 40
Tt
RET.
DEL
179
“Memory Stick” Operations
Deleting all images
You can delete all unprotected images in the “Memory Stick.”
Before operation
Insert a “Memory Stick” into your camcorder.
(1)Set the POWER switch to MEMORY/NETWORK (DCR-TRV950 only). Make
sure that the LOCK switch is set to the further side (unlock position).
(2)Press MENU, then turn the SEL/PUSH EXEC dial to select DELETE ALL in
, then press the dial (p. 212).
(3)Turn the SEL/PUSH EXEC dial to select OK, then press the dial. OK changes
to EXECUTE.
(4)Turn the SEL/PUSH EXEC dial to select EXECUTE, then press the dial.
DELETING flashes on the screen. When all unprotected images are deleted,
COMPLETE is displayed.
To cancel deleting all the images in the “Memory Stick”
Select RETURN in step 3 or 4.
While DELETING appears
Do not turn the POWER switch or press any buttons.
2
4
3
MEMORY SET
STILL SET
MOVIE SET
FILE NO.
DELETE ALL
FORMAT
RETURN
[MENU] : END
READY
MEMORY SET
STILL SET
MOVIE SET
FILE NO.
DELETE ALL
FORMAT
RETURN
[MENU] : END
RETURN
OK
MEMORY SET
STILL SET
MOVIE SET
FILE NO.
DELETE ALL
FORMAT
RETURN
[MENU] : END
RETURN
OK
MEMORY SET
STILL SET
MOVIE SET
FILE NO.
DELETE ALL
FORMAT
RETURN
[MENU] : END
RETURN
EXECUTE
MEMORY SET
STILL SET
MOVIE SET
FILE NO.
DELETE ALL
FORMAT
RETURN
[MENU] : END
DELETING
MEMORY SET
STILL SET
MOVIE SET
FILE NO.
DELETE ALL
FORMAT
RETURN
[MENU] : END
COMPLETE
Deleting images – DELETE
MENU
180
You can specify a recorded still image to print out by writing a print mark. This
function is useful for printing out still images later.
Your camcorder conforms to the DPOF (Digital Print Order Format) standard for
specifying still images to print out.
Before operation
Insert a “Memory Stick” into your camcorder.
(1)Set the POWER switch to MEMORY/NETWORK (DCR-TRV950 only) or VCR.
Make sure that the LOCK switch is set to the further side (unlock position).
(2)Press INDEX to display the index screen.
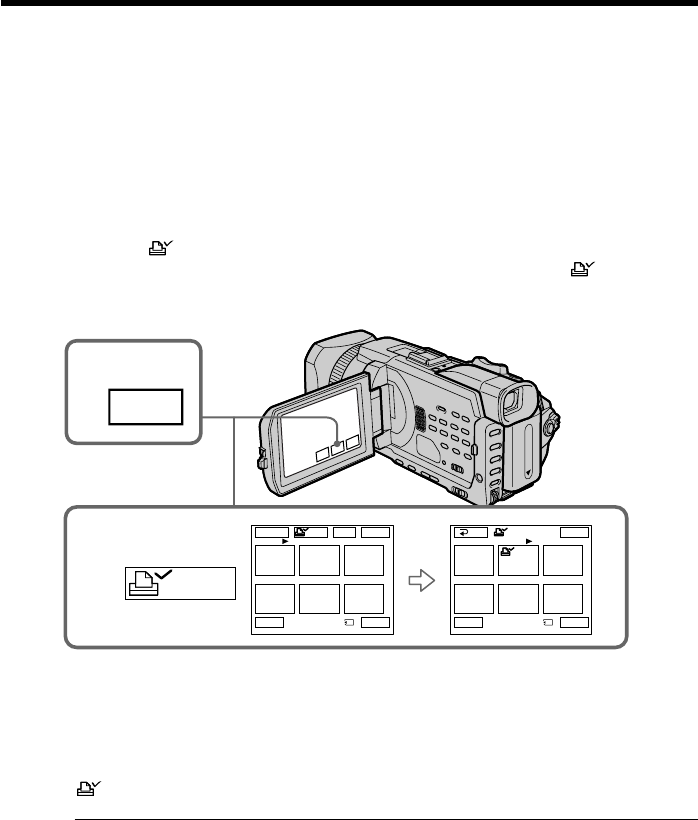
(3)Press MARK. The screen used to write a print mark appears.
(4)Press the image for which you want to write a print mark. A “ ” appears on
the selected image.
To return to FN
Press EXIT.
To cancel writing print marks
Press the image for which you want to cancel the print mark set in step 4 again. The
disappears.
If the write-protect switch on the “Memory Stick” is set to LOCK
You cannot write print marks on still images.
Moving pictures
You cannot write print marks on moving pictures.
Writing a print mark – PRINT MARK
2
INDEX
3,4
123
456
EXIT
123
456
EXITDEL
MARK
-
MARK
MARK
1 / 40
Tt 2 / 40
Tt
RET. MARK
181
“Memory Stick” Operations
You can use the optional printer on your camcorder to print images on print paper.
For details, refer to the operating instructions of the printer.
There are various ways of printing still images. The following describes the setup for
printing with the DATE/DAY & TIME information superimposed and the print setup
required to select 9PIC PRINT.
Before operation
•Insert a recorded “Memory Stick” into your camcorder.
•Attach the optional printer to your camcorder as illustrated.
Inserting DATE/DAY & TIME
You can print the recorded DATE/DAY & TIME data on the print paper.
(1)Set the POWER switch to MEMORY/NETWORK (DCR-TRV950 only). Make
sure that the LOCK switch is set to the further side (unlock position).
(2)Press MENU, then turn the SEL/PUSH EXEC dial to select DATE/TIME in
, then press the dial (p. 213).
(3)Turn the SEL/PUSH EXEC dial to select the desired mode.
DATE DAY & TIME
JUL 4 2002
4 12:00
AM
Using the optional printer
2FN
MENU
Printer

182
Selecting 9PIC PRINT
You can make 9 stickers on a single sheet when you print images recorded on a
“Memory Stick” in 9PIC PRINT.
(1)Set the POWER switch to MEMORY/NETWORK (DCR-TRV950 only). Make
sure that the LOCK switch is set to the further side (unlock position).
(2)Press FN and select PAGE3.
(3)Press 9PIC PRINT.
(4)Press the desired mode.
*Nine still images with print marks are printed together.
Moving pictures recorded on a “Memory Stick”
You cannot print moving pictures. When there are no files other than moving pictures,
“ NO STILL IMAGE FILE” appears on the screen.
When the “Memory Stick” has no files
“ NO FILE” appears on the screen.
When there are no files with a PRINT MARK
“ NO PRINT MARK” appears on the screen.
Images processed by 9PIC PRINT
You cannot insert a DATE/TIME indicator.
Images recorded in the MULTI SCRN
You can print images recorded in the multi screen mode on sticker type print paper.
However, each flame cannot be properly adjusted to the flames on the print paper.
Using the optional printer
SAME PICS MULTI PICS or MARKED PICS*
183
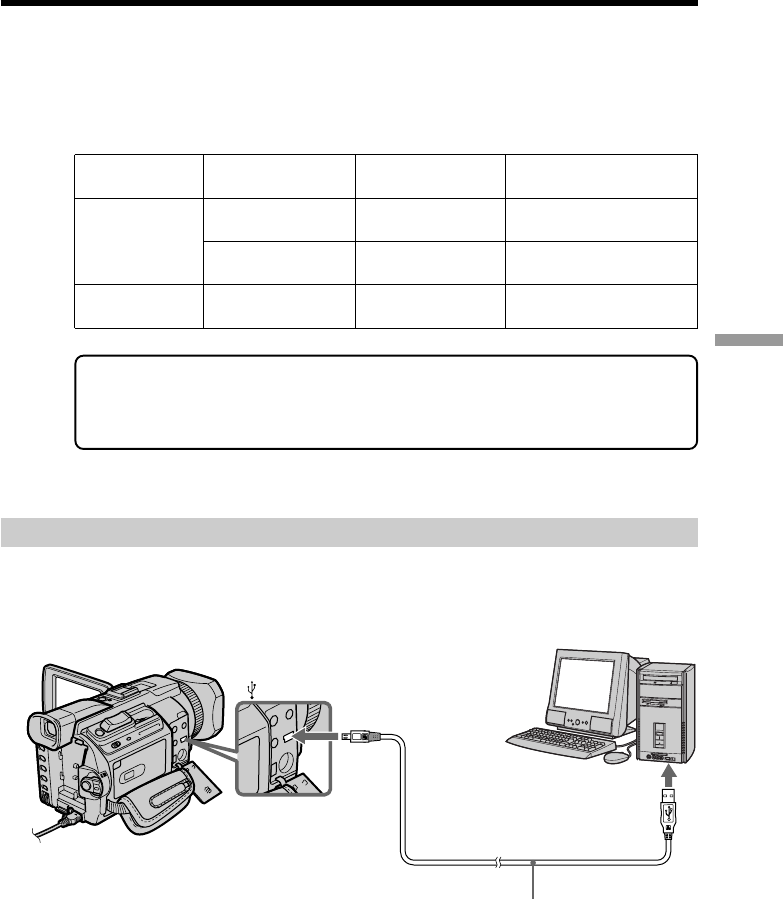
Viewing Images Using your Computer
There are the following ways of connecting the camcorder to a computer in order to
view images saved on the “Memory Stick” or recorded on the tape on your computer.
To view images on a computer which has a “Memory Stick” slot, first remove the
“Memory Stick” from the camcorder and then insert it into the computer’s “Memory
Stick” slot.
When connecting to a computer via the USB jack, complete installation of the
USB driver before connecting the camcorder to the computer. If you connect
the camcorder to the computer first, you will not be able to install the USB
driver correctly.
For details about your computer’s connectors and editing software, contact the
computer manufacturer.
Viewing images recorded on a tape
When connecting to a computer using the USB jack
For more information, see page 186.
Camcorder Connection Computer environment
Connection jack cable requirements
USB jack USB cable USB connector,
Tape stills and (supplied) editing software
movies i.LINK i.LINK cable DV connector,
(DV Interface) (optional) editing software
“Memory Stick” USB jack USB cable USB connector,
stills and movies (supplied) editing software
— Viewing Images Using your Computer —
Viewing images on your computer
– Introduction
(USB) jack
USB connector
USB cable (supplied)
Push into the end
184
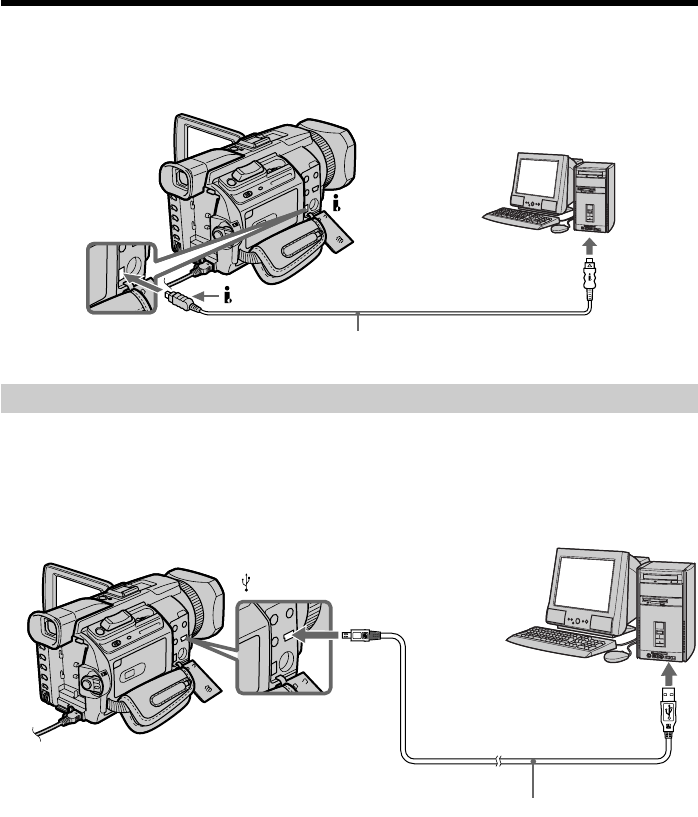
When connecting to a computer using the i.LINK (DV interface)
Your computer must have a DV connector and editing software installed that can read
video signals.
Viewing images recorded on a “Memory Stick”
When connecting to a computer using the USB jack
There are two methods of USB connection, NORMAL and PTP. The default setting is
NORMAL. Here we explain how to use the camcorder with a standard USB connection
(NORMAL).
See page 186 when using Windows and page 201 when using Macintosh.
You can also use a Memory Stick Reader/Writer (optional).
When connecting to a computer without a USB jack
Use an optional floppy disk adaptor for a Memory Stick or a PC card adaptor for a
Memory Stick.
When purchasing an accessory, check its catalog beforehand for the recommended
operating environment.
Viewing images on your computer – Introduction
USB cable (supplied)
(USB) jack
USB connector
DV connector
i.LINK cable (optional)
DV
is marked on this side

185
Viewing Images Using your Computer
Viewing images on your computer – Introduction
Notes on using your computer
“Memory Stick”
•“Memory Stick” operations on your camcorder cannot be assured if a “Memory Stick”
formatted on your computer is used on your camcorder, or if the “Memory Stick” in
your camcorder was formatted from your computer when the USB cable was
connected.
•Do not compress the data on the “Memory Stick.” Compressed files cannot be played
back on your camcorder.
Software
•Depending on your application software, the file size may increase when you open a
still image file.
•When you load an image modified using retouching software from your computer to
your camcorder or when you directly modify the image on your camcorder, the image
format will differ so a file error indicator may appear and you may be unable to open
the file.
Communications with your computer
Communications between your camcorder and your computer may not recover after
recovering from Suspend, Resume, or Sleep.

186
Connecting your camcorder to your computer
using the USB cable – For Windows users
Complete installation of the USB driver before connecting the camcorder to
the computer. If you connect the camcorder to the computer first, you will not
be able to install the USB driver correctly.
When connecting to a computer using the USB cable
You must install a USB driver onto your computer in order to connect the camcorder to
the computer’s USB connector. The USB driver can be found on the CD-ROM supplied,
along with the application software required for viewing images.
If you connect your camcorder and your computer using the USB cable, you can view
pictures live from your camcorder and pictures recorded on a tape on your computer
(USB streaming function).
Furthermore, if you download pictures from your camcorder to your computer, you
can process or edit them in image processing software and append them to e-mail.
You can view images recorded on the “Memory Stick” on your computer.
Recommended computer usage environment when connecting
via USB cable and viewing tape images on the computer
OS:
Microsoft Windows 98SE, Windows Me, Windows 2000 Professional, Windows XP
Home Edition or Windows XP Professional
Standard installation is required.
However, operation is not assured if the above environment is an upgraded OS.
You cannot hear sound if your computer is running Windows 98, but you can read still
images.
CPU:
Minimum 500 MHz Intel Pentium III or faster (800 MHz or faster recommended)
Application:
DirectX 8.0a or later
Sound system:
16 bit stereo sound card and speakers
Memory:
64 MB or more
Hard disk:
Available memory required for installation:
at least 200MB
Available hard disc memory recommended:
at least 1GB (depending on the size of the image files edited)
Display:
4 MB VRAM video card, Minimum 800 × 600 dot Hi color (16 bit color, 65,000 colors),
Direct Draw display driver capability (At 800 × 600 dot or less, 256 colors and less, this
product will not operate correctly.)
Others:
This product is compatible with DirectX technology, so it is necessary to install DirectX.
The USB connector must be provided as standard.
You cannot use this function in the Macintosh environment.

187
Viewing Images Using your Computer
Connecting your camcorder to your computer using the USB cable
– For Windows users
Recommended computer usage environment when connecting
via USB cable and viewing “Memory Stick” images on the
computer
OS:
Microsoft Windows 98, Windows 98SE, Windows Me, Windows 2000 Professional,
Windows XP Home Edition or Windows XP Professional
Standard installation is required.
However, operation is not assured if the above environment is an upgraded OS.
CPU:
MMX Pentium 200 MHz or faster
The USB connector must be provided as standard.
Windows Media Player must be installed (to play back moving pictures).
Notes
•Operations are not guaranteed for the Windows environment if you connect two or
more USB equipment to a single computer at the same time, or when using a hub.
•Some equipment may not operate depending on the type of USB equipment that is
used simultaneously.
•Operations are not guaranteed for all the recommended computer environments
mentioned above.
•Windows and Windows Media are trademarks or registered trademarks of Microsoft
Corporation in the United States and/or other countries.
•Pentium is trademark or registered trademark of Intel Corporation.
•All other product names mentioned herein may be the trademarks or registered
trademarks of their respective companies. Furthermore, “TM” and “®” are not
mentioned in each case in this manual.
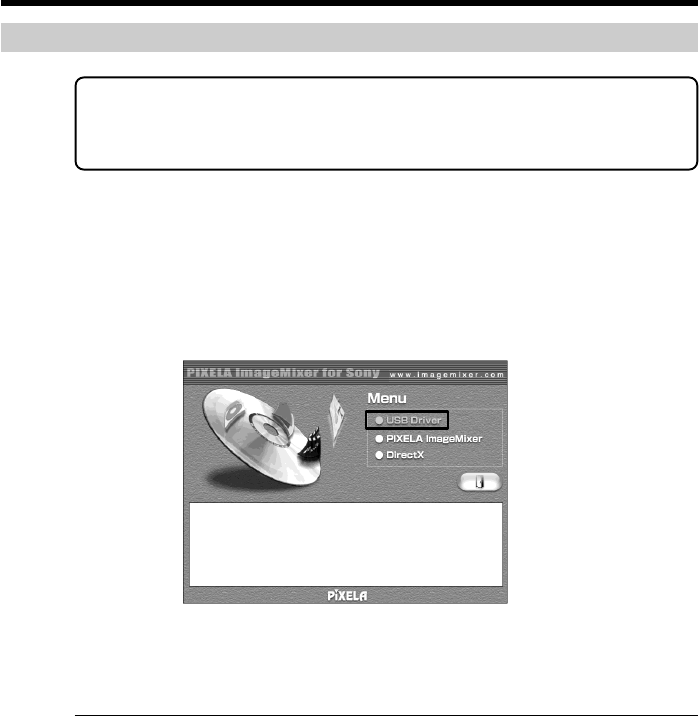
188
Installing the USB driver
Start the following operation without connecting the USB cable to your
computer.
Connect the USB cable according to “Making the computer recognize the
camcorder.”
If you are using Windows 2000 Professional or Windows XP Home Edition/
Professional, log in with permission of Administrators.
(1)Turn on your computer and allow Windows to load.
(2)Insert the supplied CD-ROM into the CD-ROM drive of your computer. The
application software starts up and the title screen appears.
(3)Move the cursor to “USB Driver” and click. This starts USB driver installation.
(4)Follow the on-screen messages to install the USB driver.
(5)Remove the CD-ROM and then restart the computer, in accordance with the
instructions on the screen.
Note
If you connect the USB cable before USB driver installation is complete, the USB driver
will not be properly registered. Carry out installation again in accordance with the steps
on page 191.
Windows XP Home Edition/Professional users
If you go to “USB CONNECT” in the menu settings and select “PTP,” you can copy
“Memory Stick” images from the camcorder onto your computer without installing the
USB driver. This is ideal for simply copying images from a camcorder onto a computer.
Refer to page 215 for details.
Connecting your camcorder to your computer using the USB cable
– For Windows users
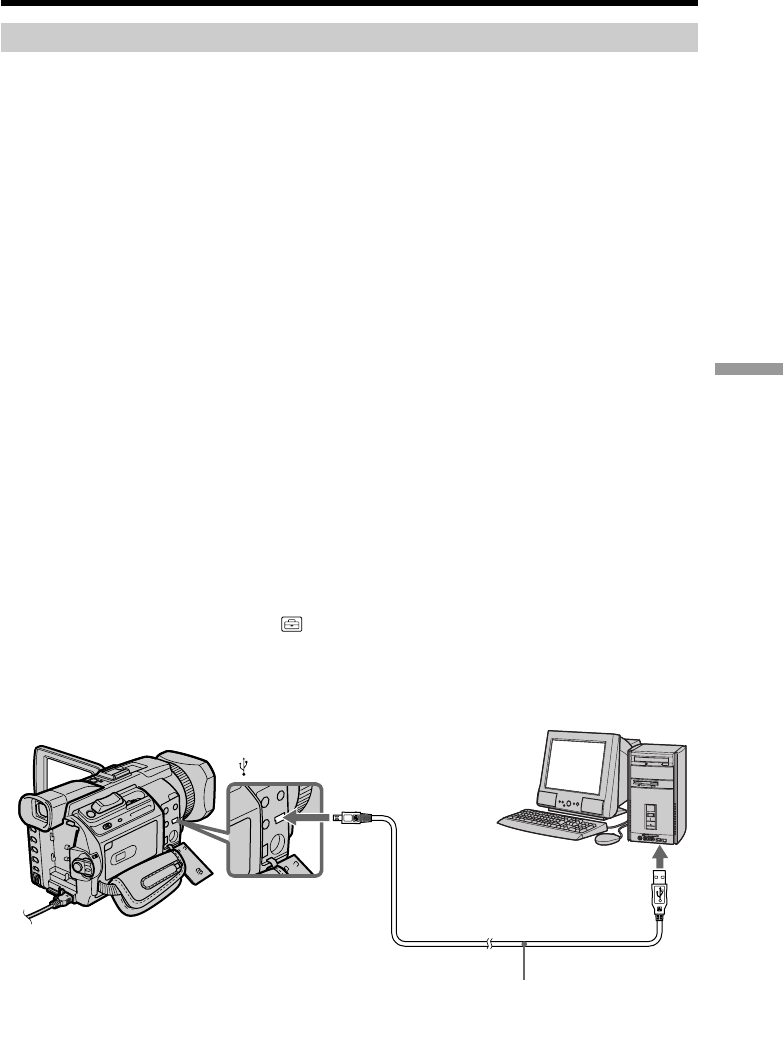
189
Viewing Images Using your Computer
Making the computer recognize the camcorder
Viewing images recorded on a tape
Refer to page 190 for details on viewing “Memory Stick” images on your computer.
You need to install “PIXELA ImageMixer ” to view images recorded on a tape on your
computer. Install it from the CD-ROM supplied with your camcorder.
To install and use this software in Windows 2000 Professional. You must be authorized
as Power Users or Administrators. For Windows XP Home Edition/Professional, you
must be authorized as Administrators.
(1)Turn on your computer and allow Windows to load.
If you are using your computer, close all running applications.
(2)Insert the supplied CD-ROM into the CD-ROM drive of your computer.
The application software starts up and the title screen appears. If the title
screen does not appear, double-click “My Computer” and then “ImageMixer”
(CD-ROM Drive). The application software screen appears after a while.
(3)Move the cursor to “PIXELA ImageMixer” and click.
The Install Wizard program starts up and the “Select Settings Language”
screen appears.
(4)Select the language for installation.
(5)Follow the on-screen messages.
The installation screen disappears when installation is complete.
(6)Click DirectX
Follow the on-screen messages to install DirectX.
Restart your computer when the installation is completed.
(7)Connect the AC power adaptor to your camcorder.
(8)Set the POWER switch to VCR.
(9)Select USB STREAM in to ON in the menu settings (p. 215).
(10)With the CD-ROM inserted, connect the USB jacks of the camcorder and
computer using the USB cable supplied with your camcorder.
Your computer recognizes the camcorder, and the Add Hardware Wizard
starts.
Connecting your camcorder to your computer using the USB cable
– For Windows users
USB connector
(USB) jack
USB cable (supplied)
Push into the end
(continued on the following page)

190
(11) Follow the on-screen messages so that the Add Hardware Wizard recognizes
that the USB drivers have been installed. The Add Hardware Wizard starts
three times because three different USB drivers are installed. Be sure to allow
the installation to complete without interrupting it.
For Windows 2000 Professional, Windows XP Home Edition/Professional users
(12)After the “File Needed” screen appears.
Open “Browse...” t “My Computer” t “ImageMixer” t “Sonyhcb.sys”,
and click “OK.”
Viewing images recorded on a “Memory Stick”
Set USBCONNECT in to NORMAL in the menu settings. (The default setting is set
to NORMAL.)
(1)Insert a “Memory Stick” into your camcorder.
(2)Connect the AC power adaptor and set the POWER switch to MEMORY/
NETWORK (DCR-TRV950 only).
(3)Connect the (USB) jack on your camcorder to the USB connector on your
computer using the supplied USB cable.
USB MODE appears on the LCD screen of your camcorder. Your computer
recognizes the camcorder, and the Add Hardware Wizard starts.
(4)Follow the on-screen messages to make the Add Hardware Wizard recognize
that the USB drivers have been installed. The Add Hardware Wizard starts
two times because two different USB drivers are installed. Be sure to allow
each installation to complete without interrupting it.
You cannot install the USB driver if a “Memory Stick” is not in your camcorder.
Be sure to insert a “Memory Stick” into your camcorder before installing the USB
driver.
Connecting your camcorder to your computer using the USB cable
– For Windows users
USB connector
(USB) jack
USB cable (supplied)
Push into the end

191
Viewing Images Using your Computer
Connecting your camcorder to your computer using the USB cable
– For Windows users
If you cannot install the USB driver
The USB driver has been registered incorrectly as your computer was connected to your
camcorder before installation of the USB driver was completed. Perform the following
procedure to correctly install the USB driver.
Viewing images recorded on a tape
Step 1: Uninstall the incorrect USB driver
1Turn on your computer and allow Windows to load.
2Connect the AC power adaptor, and set the POWER switch to VCR.
3Connect the USB connector on your computer to the (USB) jack on your
camcorder using the USB cable supplied with your camcorder.
4Open your computer’s “Device Manager.”
Windows XP Home Edition/Professional:
Select “Start” t “Control Panel” t “System” t “Hardware,” and click the
“Device manager” button.
If there is no “System” inside “Pick a category” after clicking “Control Panel,”
click “Switch to classic view” instead.
Windows 2000 Professional:
Select “My Computer” t “Control Panel” t “System” t “Hardware” tab,
and click the “Device Manager” button.
Windows 98 SE/Windows Me:
Select “My Computer” t “Control Panel” t “System,” and click “Device
Manager.”
(continued on the following page)

192
Windows 2000 Professional
Windows XP Home Edition/Professional
Connecting your camcorder to your computer using the USB cable
– For Windows users
Windows 98SE Windows Me
5Select and delete the underlined devices below.