Sony Group DCRTRV950 Digital Video Camera Recorder TRV950 User Manual manual3
Sony Corporation Digital Video Camera Recorder TRV950 manual3
UserManual.wiki
>
Sony Group
>
DCRTRV950 User Manual
>
manual3
Contents
1.
network1
2.
network2
3.
manual1
4.
manual2
5.
manual3
6.
manual4
manual3
Navigation menu
Upload a User Manual
Namespaces
Wiki Guide
HTML
PDF
Info
Views
User Manual
Discussion / Help
Navigation

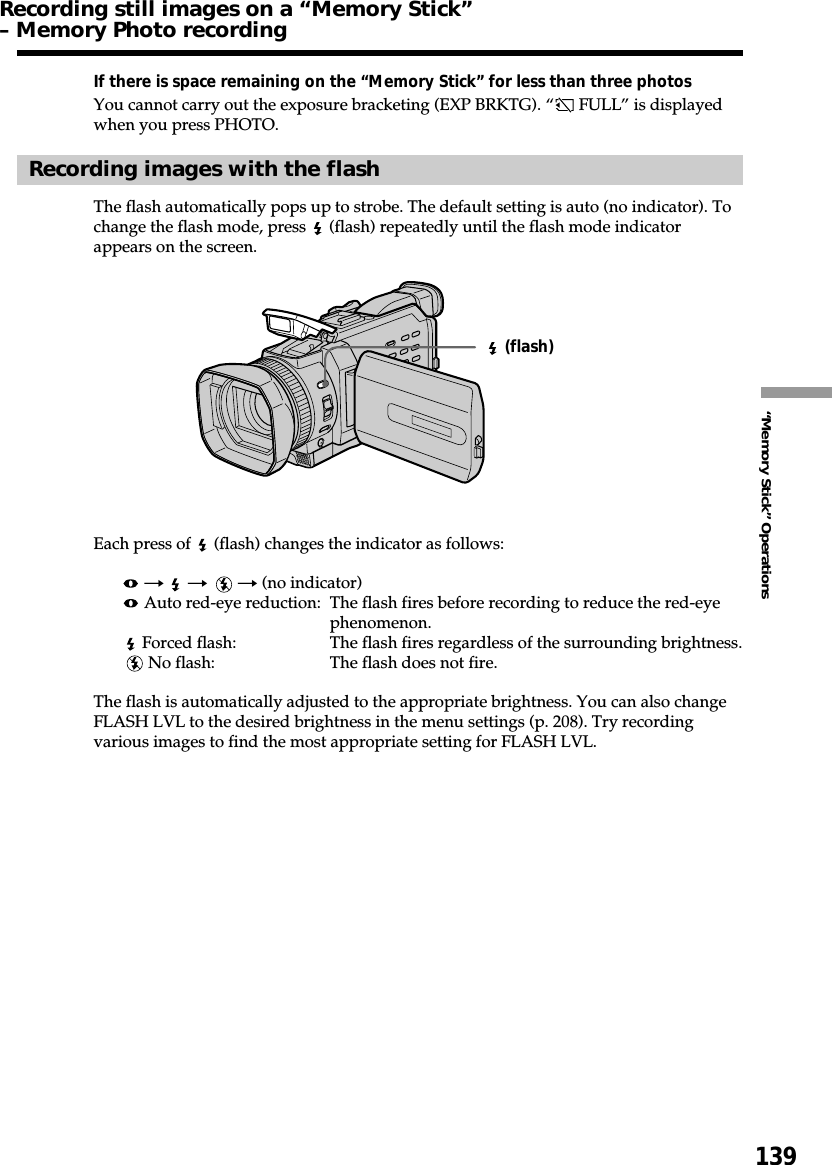
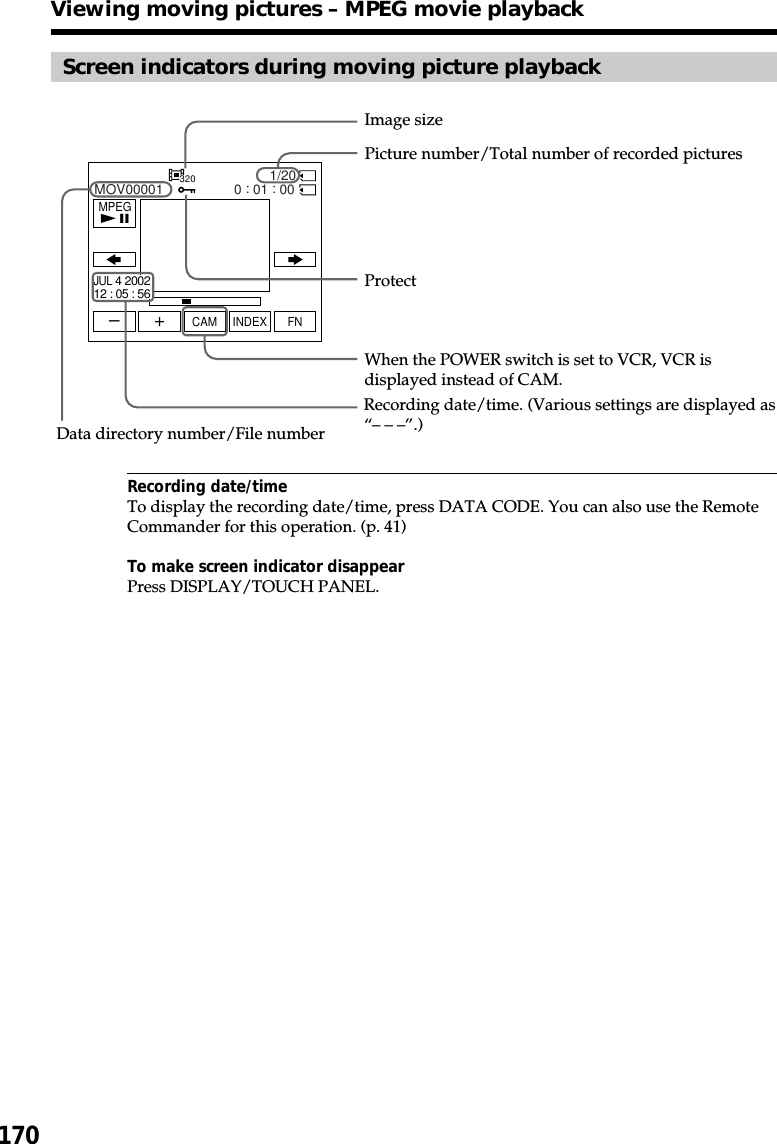
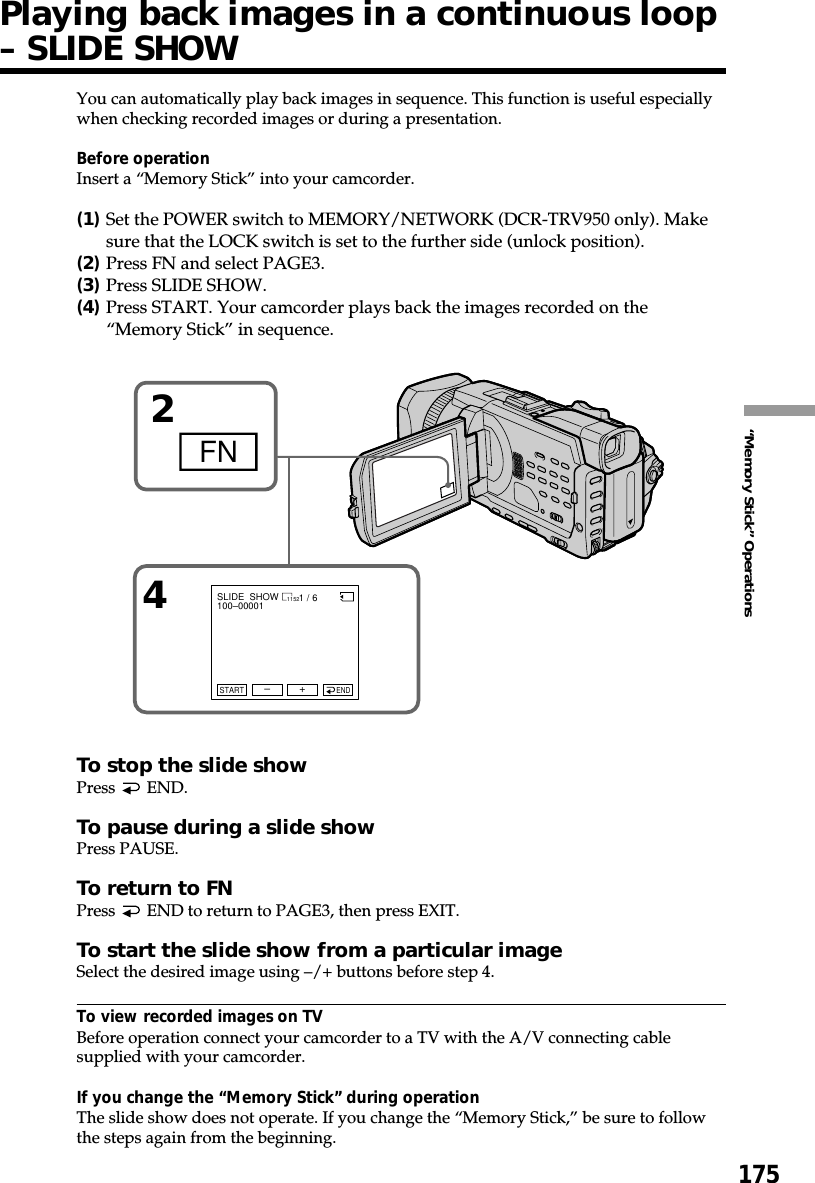
![131“Memory Stick” OperationsSelecting the still image qualityYou can select the image quality in still image recording. The default setting is SUPERFINE.(1)Set the POWER switch to MEMORY/NETWORK (DCR-TRV950 only) or VCR.Make sure that the LOCK switch is set to the further side (unlock position).(2)Press MENU, then select STILL SET in with the SEL/PUSH EXEC dial(p. 211).(3)Turn the SEL/PUSH EXEC dial to select QUALITY , then press the dial.(4)Turn the SEL/PUSH EXEC dial to select the desired image quality , then pressthe dial.Using a “Memory Stick” – IntroductionMENU134MEMORY SET STILL SET BURST QUALITY IMAGESIZE RETURNSUPER FINEFINESTANDARD[MENU] : ENDREMAIN 12MEMORY SET STILL SET BURST QUALITY IMAGESIZE RETURNSTANDARD[MENU] : ENDREMAIN 36LOCKPOWEROFF(CHG)CAMERAMEMORY/NETWORKVCR](https://usermanual.wiki/Sony-Group/DCRTRV950.manual3/User-Guide-240528-Page-3.png)
![133“Memory Stick” OperationsSelecting the image sizeYou can select either of two image sizesStill images: 1152 × 864 or 640 × 480. (When the POWER switch is set to CAMERAor VCR, the image size is automatically set to 640 × 480.)The default setting is 1152 × 864.Moving pictures: 320 × 240 or 160 × 112The default setting is 320 × 240.(1)Set the POWER switch to MEMORY/NETWORK (DCR-TRV950 only). Makesure that the LOCK switch is set to the further side (unlock position).(2)Press MENU, then turn the SEL/PUSH EXEC dial to select STILL SET (stillimage) or MOVIE SET (moving picture) in , then press the dial (p. 211).(3)Turn the SEL/PUSH EXEC dial to select IMAGESIZE, then press the dial.(4)Turn the SEL/PUSH EXEC dial to select the desired image size, then press thedial.The indicator changes as follows:Still images:Moving pictures:Using a “Memory Stick” – Introduction1152 640320 1603413201152MEMORY SET STILL SET BURST QUALITY IMAGESIZE RETURN 1152 × 864 640 × 480[MENU] : ENDMEMORY SET MOVIE SET IMAGESIZE REMAIN RETURN320 × 240160 × 112[MENU] : ENDREMAIN 1minMEMORY SET STILL SET BURST QUALITY IMAGESIZE RETURN 640 × 480[MENU] : ENDREMAIN 40REMAIN 12MEMORY SET MOVIE SET IMAGESIZE REMAIN RETURN160 × 112[MENU] : ENDREMAIN 5minLOCKPOWEROFF(CHG)CAMERAMEMORY/NETWORKVCRMENUSTILL SET MOVIE SETSTILL SET MOVIE SET](https://usermanual.wiki/Sony-Group/DCRTRV950.manual3/User-Guide-240528-Page-5.png)
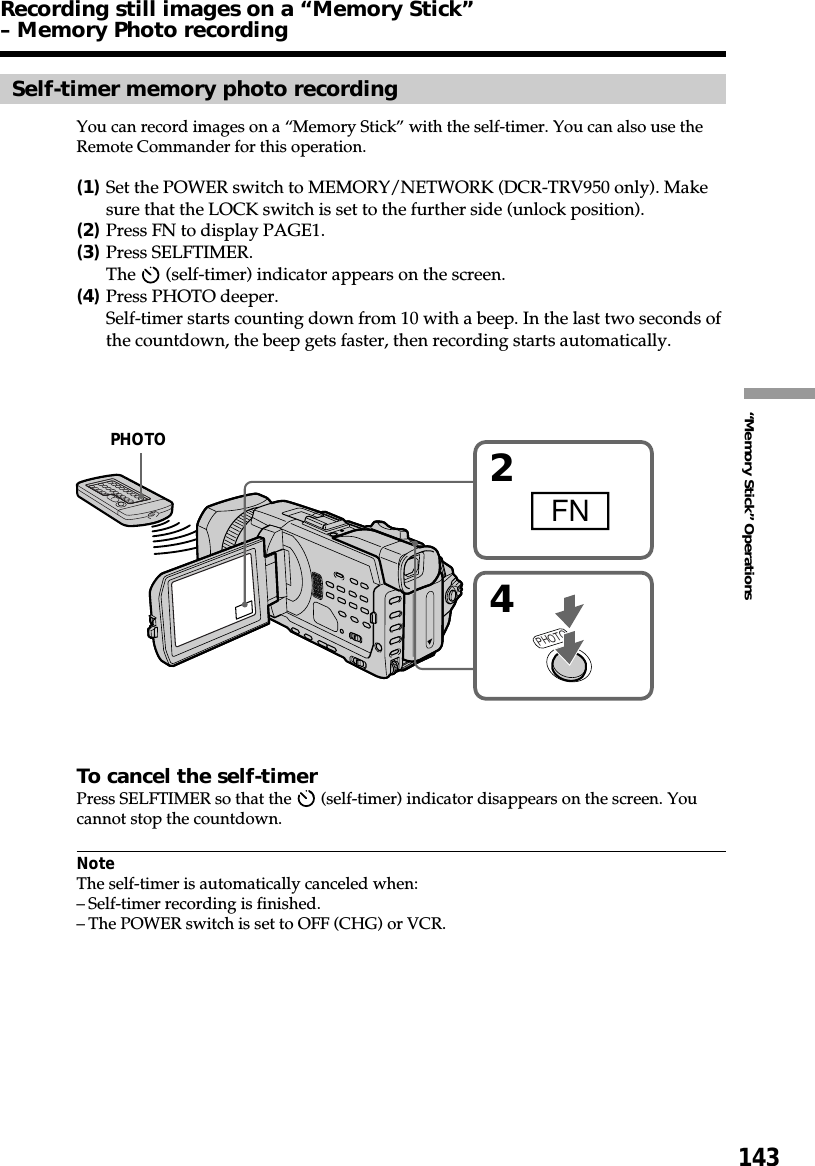
![135“Memory Stick” OperationsYou can record still images on a “Memory Stick.”Before operationInsert a “Memory Stick” into your camcorder.(1)Set the POWER switch to MEMORY/NETWORK (DCR-TRV950 only). Makesure that the LOCK switch is set to the further side (unlock position).(2)Press PHOTO lightly. The green z mark stops flashing, then lights up. Thebrightness of the image and focus are adjusted, being targeted for the middleof the image and are fixed. Recording does not start yet.(3)Press PHOTO deeper.The still image will be displayed after the shutter sounds.Recording is complete when the bar scroll indicator disappears.The image when you pressed PHOTO deeper will be recorded on the“Memory Stick.”You can record still images on a “Memory Stick” in the taperecording or recording standbyFor the details, see p. 46.321 / 12SFN1152SFN1152FNINDEXPLAYFNINDEXPLAYPHOTOPHOTO1LOCKPOWEROFF(CHG)CAMERAMEMORY/NETWORKVCR[a][b][a]:Number of recorded images[b]:Approximate number of images can berecorded on the “Memory Stick”Recording still images on a “MemoryStick”– Memory Photo recording](https://usermanual.wiki/Sony-Group/DCRTRV950.manual3/User-Guide-240528-Page-7.png)
![137“Memory Stick” OperationsRecording images continuouslyYou can record still images continuously. Before recording, select one of the four modesdescribed below in the menu settings.NORMAL [a]Your camcorder shoots up to four still images in 1152 × 864 size or 13 still images in 640× 480 size at about 0.5 sec intervals. ( )EXP BRKTG (Exposure Bracketing)Your camcorder automatically shoots three images at about 0.5 sec intervals at differentexposures. ( )MULTI SCRN (Multi Screen) [b]Your camcorder shoots nine still images at about 0.4 sec intervals and displays theimages on a single page divided into nine boxes. Still images are recorded in 640 × 480size. ( )[a] [b]Recording still images on a“Memory Stick”– Memory Photo recording](https://usermanual.wiki/Sony-Group/DCRTRV950.manual3/User-Guide-240528-Page-9.png)
![138(1)Set the POWER switch to MEMORY/NETWORK (DCR-TRV950 only). Makesure that the LOCK switch is set to the further side (unlock position).(2)Press MENU, then select BURST while STILL SET is selected in , then pressthe dial (p. 211).(3)Turn the SEL/PUSH EXEC dial to select the desired setting, then press thedial.(4)Press MENU to make the menu setting disappear.(5)Press PHOTO deeper.If the capacity of the “Memory Stick” becomes full” FULL” appears on the screen, and you cannot record a still image on this “MemoryStick.”The number of still images in continuous shootingThe number of still images you can shoot continuously varies depending on the imagesize and the capacity of the “Memory Stick.”During recording still images continuouslyThe flash does not work.The effect of exposure bracketing (EXP BRKTG)The effect may not appear clearly on the LCD screen.Checking images on a TV monitor or computer display for the expected effect isrecommended.When selecting NORMALRecording continues up to the maximum number of still images during pressingPHOTO deeper. Release PHOTO to stop recording.When shooting with the self-timer or the Remote CommanderYour camcorder automatically records up to the maximum recordable number of stillimages.Recording still images on a “Memory Stick”– Memory Photo recording23MEMORY SET STILL SET BURST QUALITY IMAGESIZE RETURNOFF[MENU] : ENDMEMORY SET STILL SET BURST QUALITY IMAGESIZE RETURNOFFNORMALEXP BRKTGMULTI SCRN[MENU] : ENDMEMORY SET STILL SET BURST QUALITY IMAGESIZE RETURNNORMAL[MENU] : ENDMEMORY SET STILL SET BURST QUALITY IMAGESIZE RETURNOFFNORMALEXP BRKTGMULTI SCRN[MENU] : ENDPHOTOMENU](https://usermanual.wiki/Sony-Group/DCRTRV950.manual3/User-Guide-240528-Page-10.png)
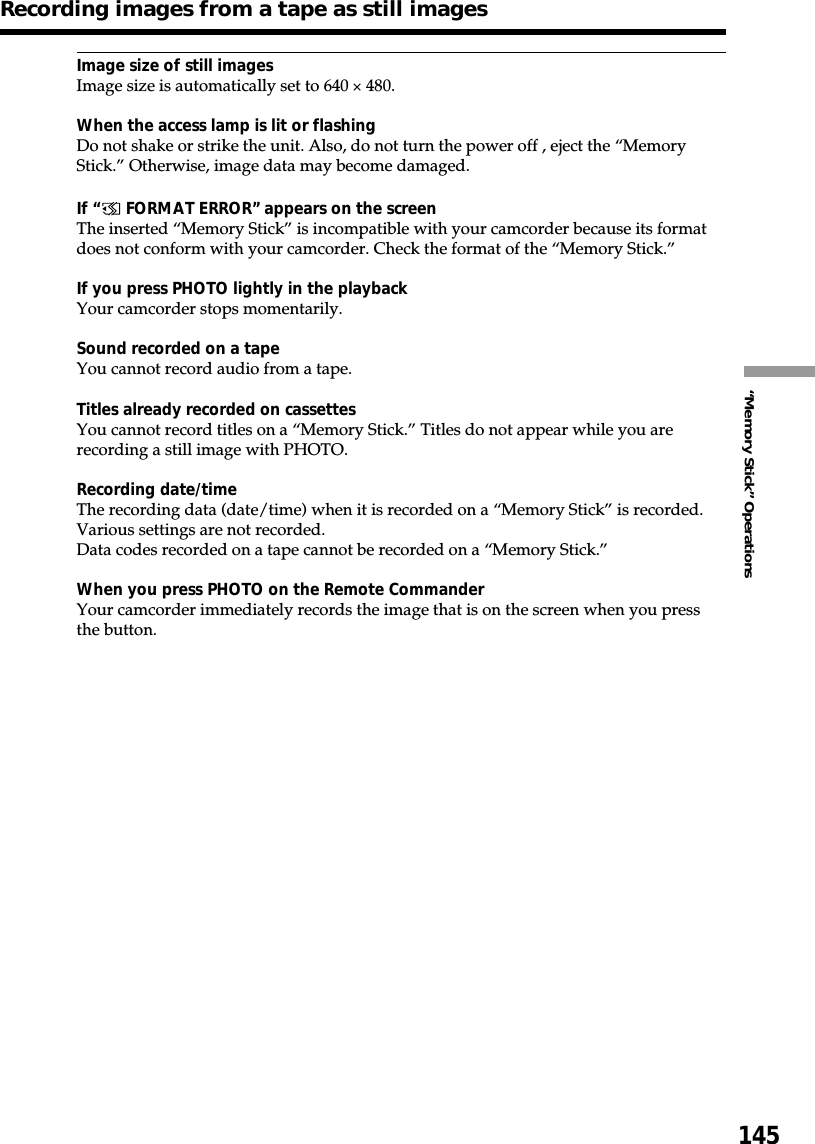
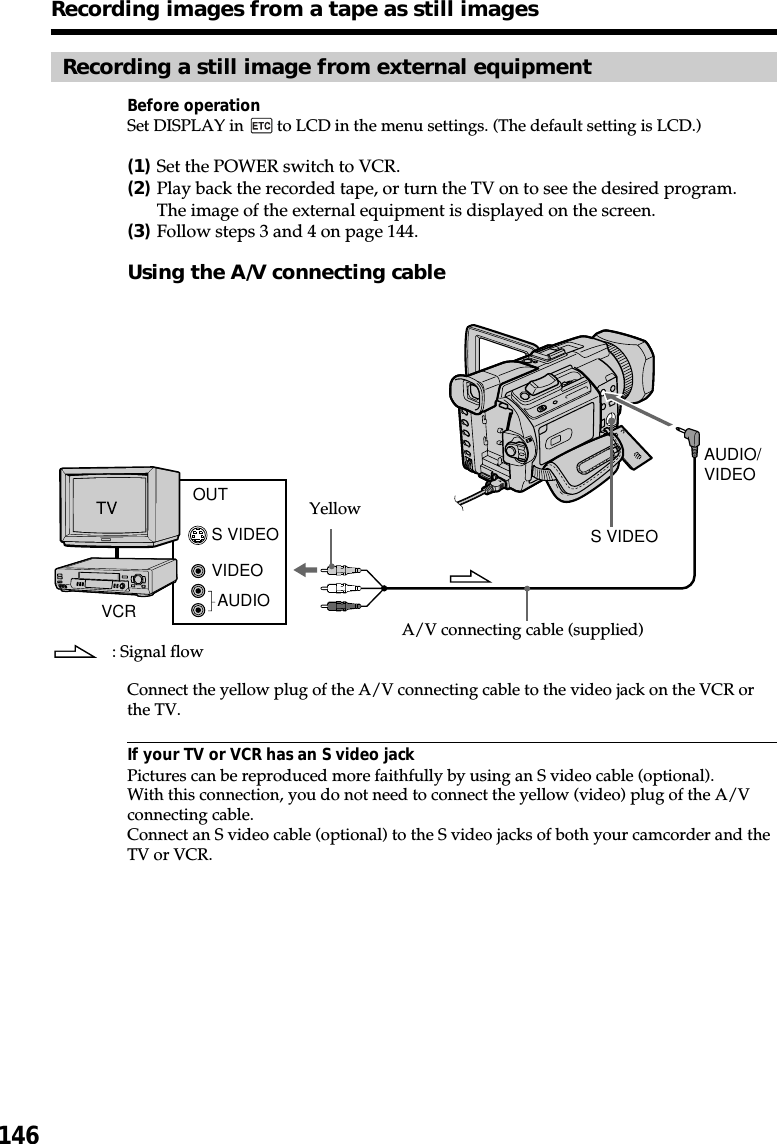
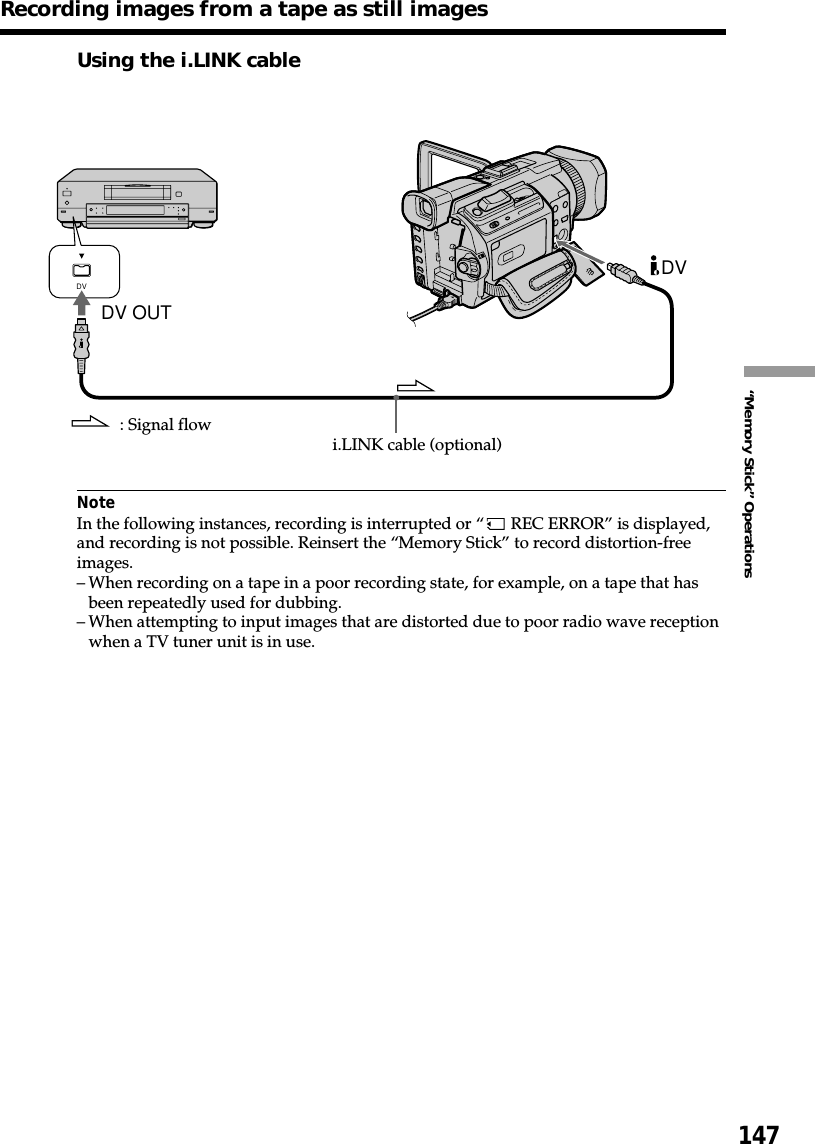
![144Your camcorder can read moving picture data recorded on a tape and record it as a stillimage on a “Memory Stick.” Your camcorder can also capture moving picture datathrough the input connector and record it as a still image on a “Memory Stick.”Before operationInsert a “Memory Stick” and the recorded tape into your camcorder.(1)Set the POWER switch to VCR.(2)Press N. Moving pictures recorded on the tape are played back.(3)Press PHOTO lightly until the picture you want to capture from the tapefreezes and CAPTURE appears on the screen. Recording does not start yet.To change from the selected image to another image, release PHOTO once andpress it lightly again.(4)Press PHOTO deeper. The image displayed on the screen will be recorded onthe “Memory Stick.” Recording is complete when the bar scroll indicatordisappears.[a] : Number of the recorded images[b] : Approximate number of the images that can be recorded on the “Memory Stick”Recording images from a tape as stillimages34CAPTUREFNINDEXPB FNINDEXPB1 / 12SFN640SFN6402PHOTOPHOTOREW FFPLAY[a] [b]](https://usermanual.wiki/Sony-Group/DCRTRV950.manual3/User-Guide-240528-Page-16.png)

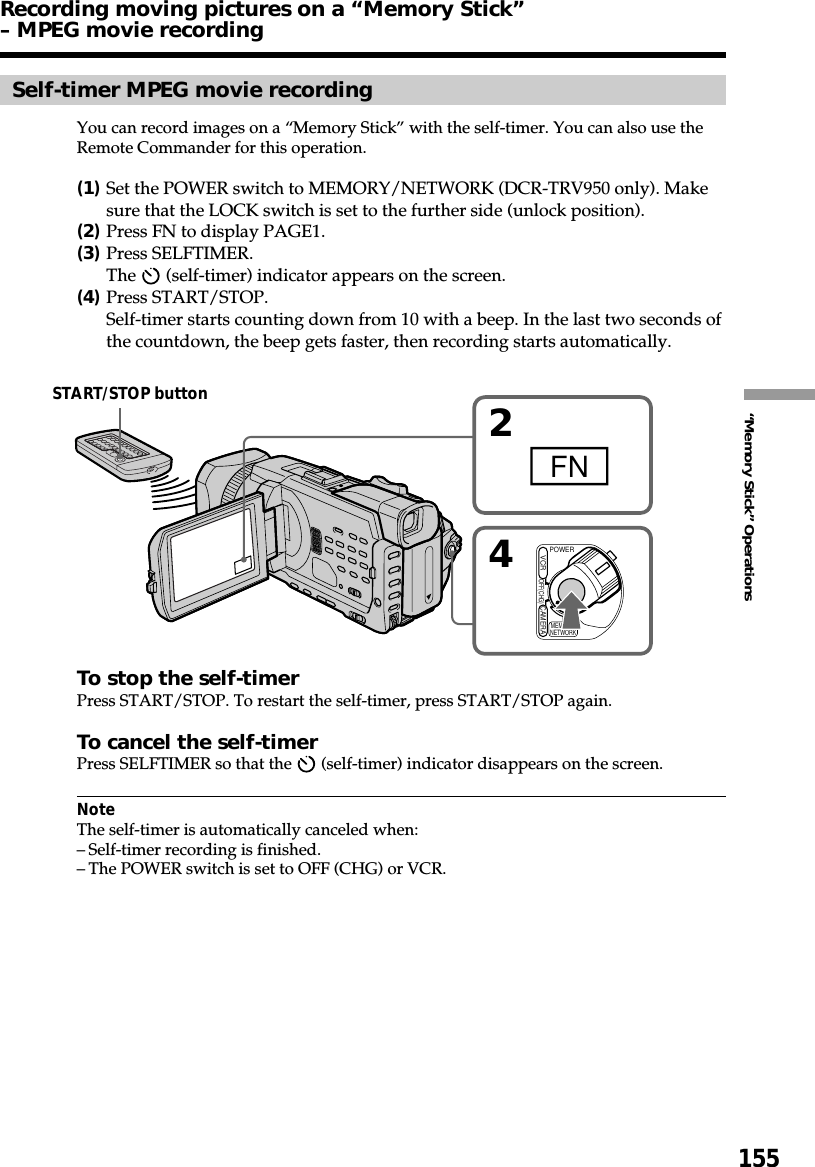
![153“Memory Stick” OperationsYou can record moving pictures with sound on a “Memory Stick.”You can record picture and sound continuously up to the capacity of a “MemoryStick”(MPEG MOVIE EX).Before operationInsert a “Memory Stick” into your camcorder.(1)Set the POWER switch to MEMORY/NETWORK (DCR-TRV950 only). Makesure that the LOCK switch is set to the further side (unlock position).(2)Press START/STOP. Your camcorder starts recording. The camera recordinglamp located on the front of your camcorder lights up. The picture and soundare recorded up to the remaining capacity of the “Memory Stick.” For moreinformation about recording time, see page 134.To stop recordingPress START/STOP.2POWEROFF(CHG)CAMERAMEMORY/NETWORKVCR32040min REC 0:00:0315minBBBFNINDEXPLAY[a][b][a]:Recording time can be recorded on the“Memory Stick”.[b]:This indicator is displayed for five secondsafter pressing START/STOP. This indicatoris not recorded.Recording moving pictures on a“MemoryStick” – MPEG movie recording](https://usermanual.wiki/Sony-Group/DCRTRV950.manual3/User-Guide-240528-Page-25.png)
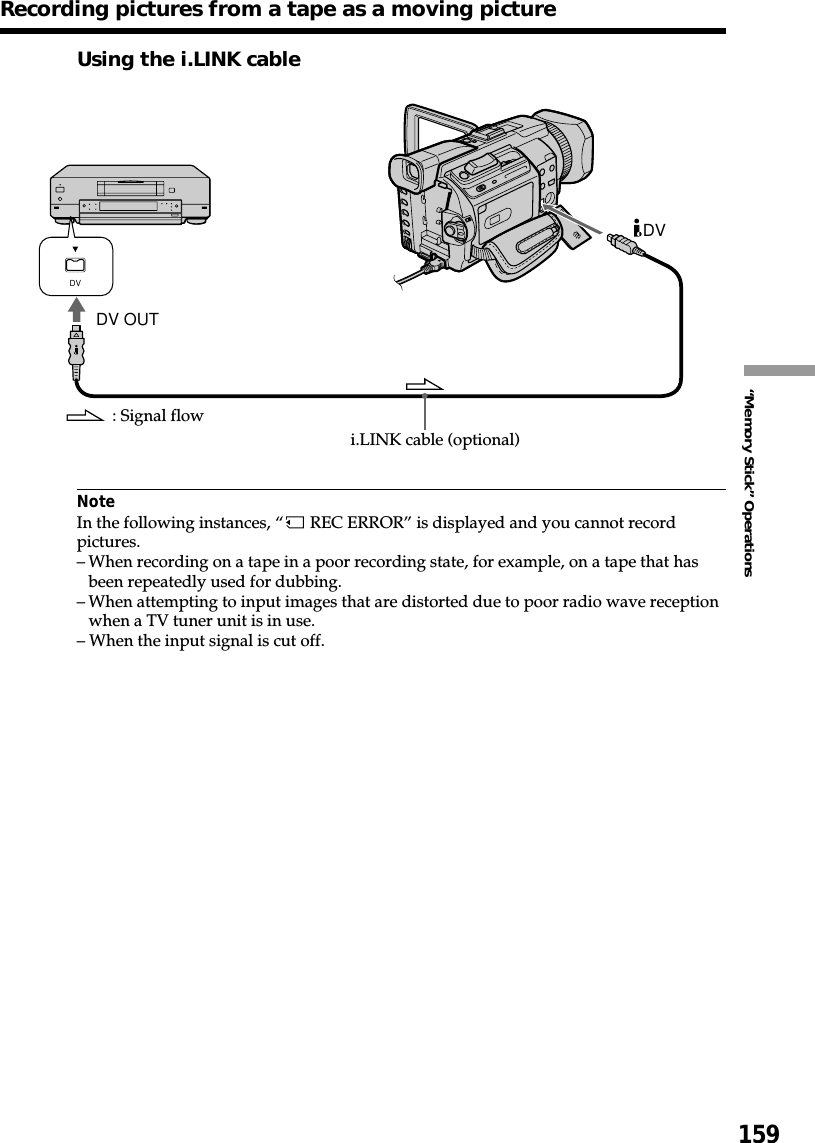
![156Your camcorder can read moving picture data recorded on a tape and record it as amoving picture on a “Memory Stick.” Your camcorder can also capture moving picturedata through the input connector and record it as a moving picture on a “MemoryStick.”Before operationInsert a “Memory Stick” and the recorded tape into your camcorder.(1)Set the POWER switch to VCR.(2)Press N. The picture recorded on the tape is played back.And press X at the scene where you want to start recording from.(3)Press START/STOP on your camcorder. The picture and sound are recordedup to the remaining capacity of the “Memory Stick.” For more informationabout recording time, see page 134.To stop recordingPress START/STOP.Recording pictures from a tape as amoving picture32PLAY PAUSEPOWEROFF(CHG)CAMERAMEMORY/NETWORKVCR320BBBN40min REC 0:00:0315min0:15:42:43FNINDEXPB[a]:The recording time can be recorded onthe “Memory Stick.”[b]:This indicator is displayed forfive seconds after pressing START/STOP. This indicator is not recorded.[a][b]](https://usermanual.wiki/Sony-Group/DCRTRV950.manual3/User-Guide-240528-Page-28.png)

![160You can duplicate selected scenes (programs) for editing onto a “Memory Stick.”Making the programBefore operationInsert a “Memory Stick” and a recorded tape into your camcorder.(1)Set the POWER switch to VCR.(2)Press MENU, then turn the SEL/PUSH EXEC dial to set VIDEO EDIT in to MEMORY, then press the dial (p.217).(3)Turn the SEL/PUSH EXEC dial to select IMAGESIZE and select the desiredimage size, then press the dial.(4)Search for the beginning of the first scene you want to insert using the videooperation buttons, then pause playback.You can fine-adjust one frame at a time with EDITSEARCH.(5)Press MARK on the Remote Commander, or turn the SEL/PUSH EXEC dial toselect MARK, then press the dial.The IN point of the first program is set, and the top part of the program markchanges to light blue.(6)Search for the end of the first scene you want to insert using the videooperation buttons, then pause playback. You can fine-adjust one frame at a time with EDITSEARCH.(7)Press MARK on the Remote Commander, or the SEL/PUSH EXEC dial.The OUT point of the first program is set, then the bottom part of the programmark changes to light blue.(8)Repeat steps 4 to 7, then set the program.When one program is set, the program mark changes to light blue.You can set 20 programs in maximum.5784,7PAUSESTOPREW FFPLAY320 320 320VIDEO EDIT MARK UNDO ERASE ALL START IMAGESIZE1 OUT0:08:55:06TOTAL 0:00:00SCENE 0 2min TOTAL 0:00:12SCENE 1 2min TOTAL 0:00:31SCENE 3 2min[MENU] : ENDVIDEO EDIT MARK UNDO ERASE ALL START IMAGESIZE2 IN 0:08:58:06[MENU] : ENDVIDEO EDIT MARK UNDO ERASE ALL START IMAGESIZE4 IN 0:10:01:23[MENU] : ENDN X N X N XMENURecording edited pictures from a tape asa moving picture – Digital programediting (on a “Memory Stick”)](https://usermanual.wiki/Sony-Group/DCRTRV950.manual3/User-Guide-240528-Page-32.png)
![163“Memory Stick” OperationsUsing the search function, you can automatically capture only still images from tapesand record them on a “Memory Stick” in sequence.Before operation•Insert a recorded tape into your camcorder and rewind the tape.•Insert a “Memory Stick” into your camcorder.(1)Set the POWER switch to VCR.(2)Press MENU, then turn the SEL/PUSH EXEC dial to select PHOTO SAVE in, then press the dial (p. 212).PHOTO BUTTON appears on the screen.(3)Press PHOTO deeper. The still image from the tape is recorded on the“Memory Stick.” The number of still images copied is displayed. END isdisplayed when copying ends.To stop copyingPress x using the video operation buttons or press MENU.When the “Memory Stick” becomes full“MEMORY FULL” appears on the screen, and copying stops. Insert another “MemoryStick” and repeat the procedure from step 2.Copying still images from a tape– PHOTO SAVE32PHOTOSAV I NG0END4PHOTO BUTTON640STD640STD640STDPHOTO SAVE 0:00:00:004/15[MENU] : ENDPHOTO SAVE 0:30:00:008/15[MENU] : ENDMEMORY SET STILL SET MOVIE SET PHOTO SAVE FILE NO. RETURNREADY[MENU] : ENDPHOTO SAVE 0:00:00:004/15[PHOTO] : START [MENU] : ENDMENU](https://usermanual.wiki/Sony-Group/DCRTRV950.manual3/User-Guide-240528-Page-35.png)


![179“Memory Stick” OperationsDeleting all imagesYou can delete all unprotected images in the “Memory Stick.”Before operationInsert a “Memory Stick” into your camcorder.(1)Set the POWER switch to MEMORY/NETWORK (DCR-TRV950 only). Makesure that the LOCK switch is set to the further side (unlock position).(2)Press MENU, then turn the SEL/PUSH EXEC dial to select DELETE ALL in, then press the dial (p. 212).(3)Turn the SEL/PUSH EXEC dial to select OK, then press the dial. OK changesto EXECUTE.(4)Turn the SEL/PUSH EXEC dial to select EXECUTE, then press the dial.DELETING flashes on the screen. When all unprotected images are deleted,COMPLETE is displayed.To cancel deleting all the images in the “Memory Stick”Select RETURN in step 3 or 4.While DELETING appearsDo not turn the POWER switch or press any buttons.243MEMORY SET STILL SET MOVIE SET FILE NO. DELETE ALL FORMAT RETURN[MENU] : ENDREADYMEMORY SET STILL SET MOVIE SET FILE NO. DELETE ALL FORMAT RETURN[MENU] : ENDRETURNOKMEMORY SET STILL SET MOVIE SET FILE NO. DELETE ALL FORMAT RETURN[MENU] : ENDRETURNOKMEMORY SET STILL SET MOVIE SET FILE NO. DELETE ALL FORMAT RETURN[MENU] : ENDRETURNEXECUTEMEMORY SET STILL SET MOVIE SET FILE NO. DELETE ALL FORMAT RETURN[MENU] : ENDDELETINGMEMORY SET STILL SET MOVIE SET FILE NO. DELETE ALL FORMAT RETURN[MENU] : ENDCOMPLETEDeleting images – DELETEMENU](https://usermanual.wiki/Sony-Group/DCRTRV950.manual3/User-Guide-240528-Page-51.png)