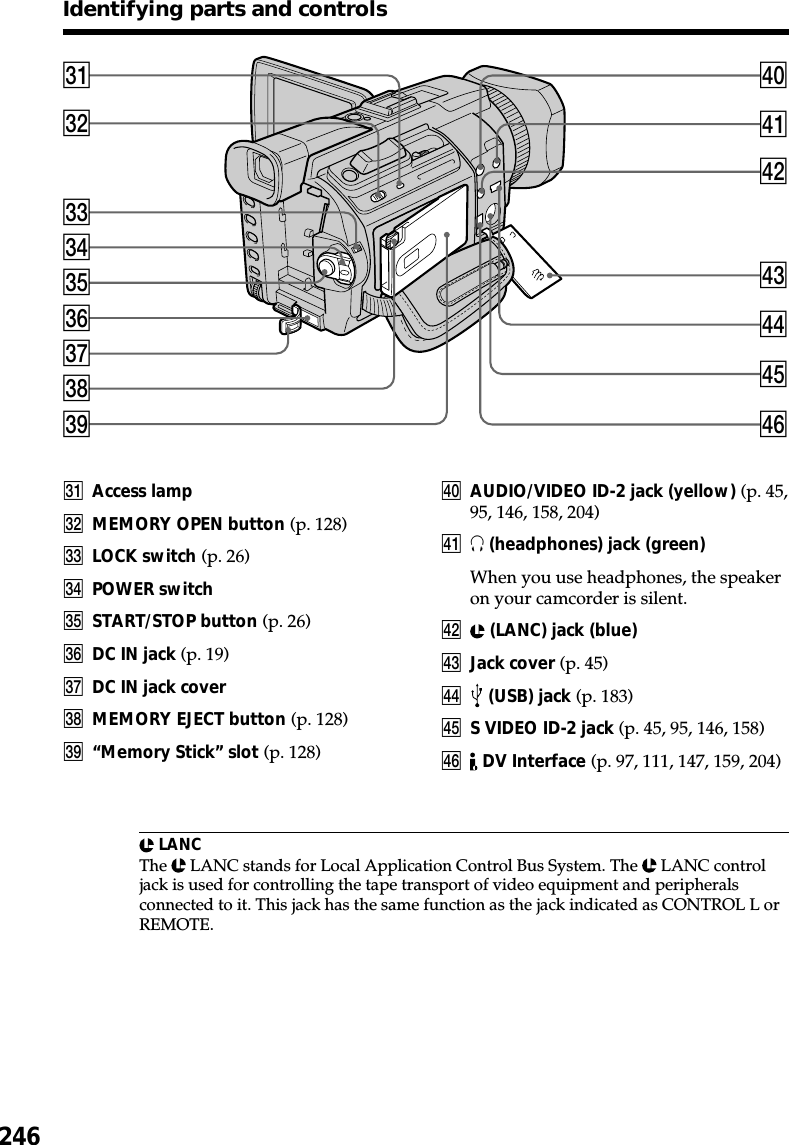
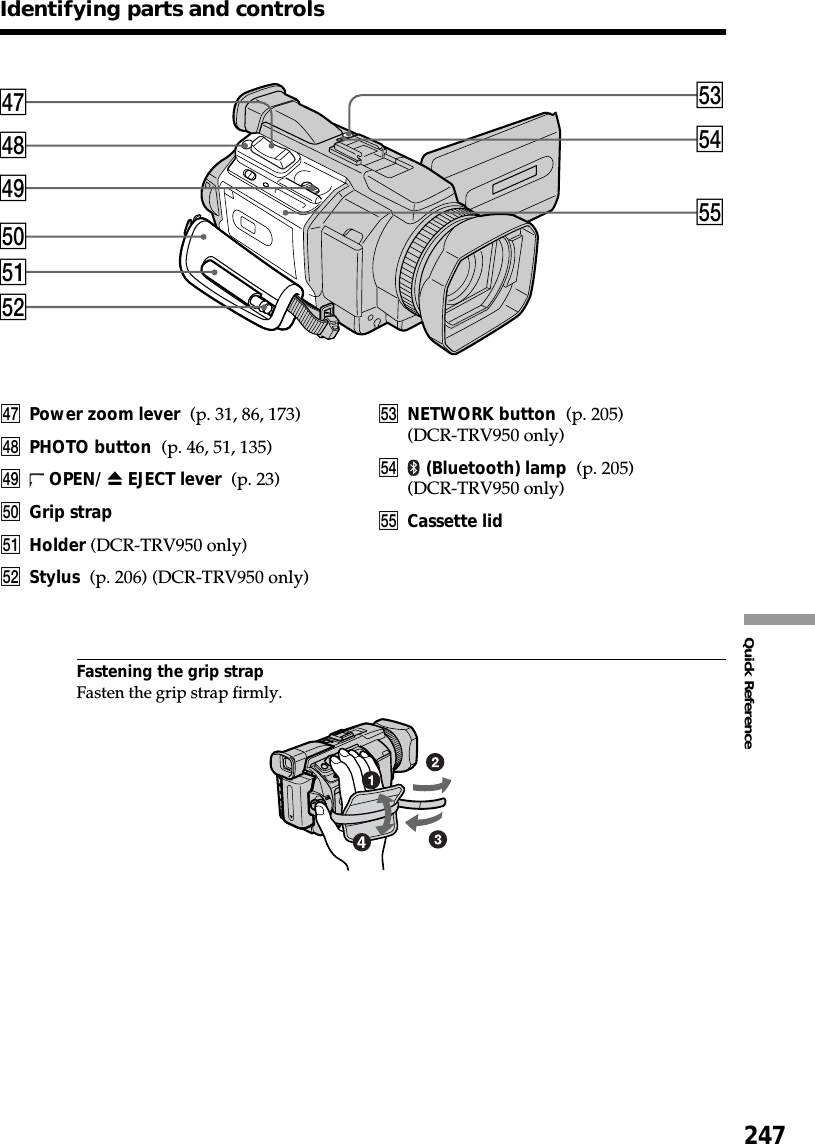
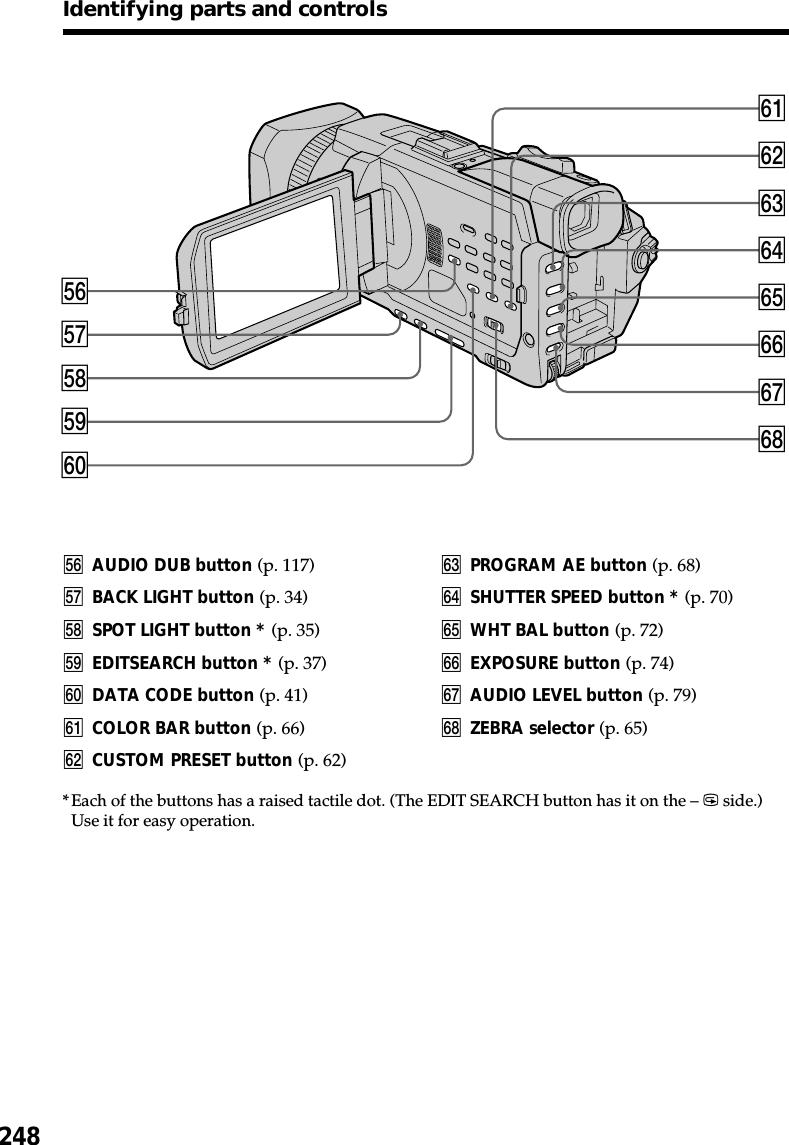
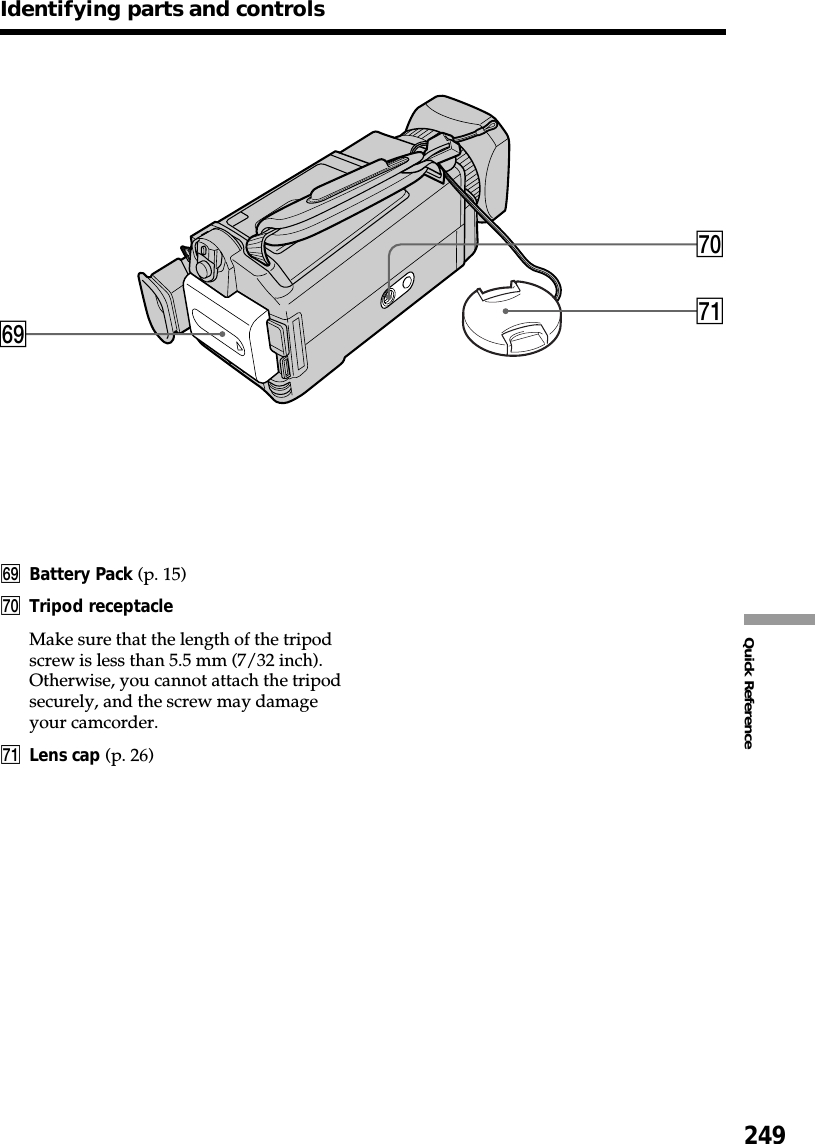
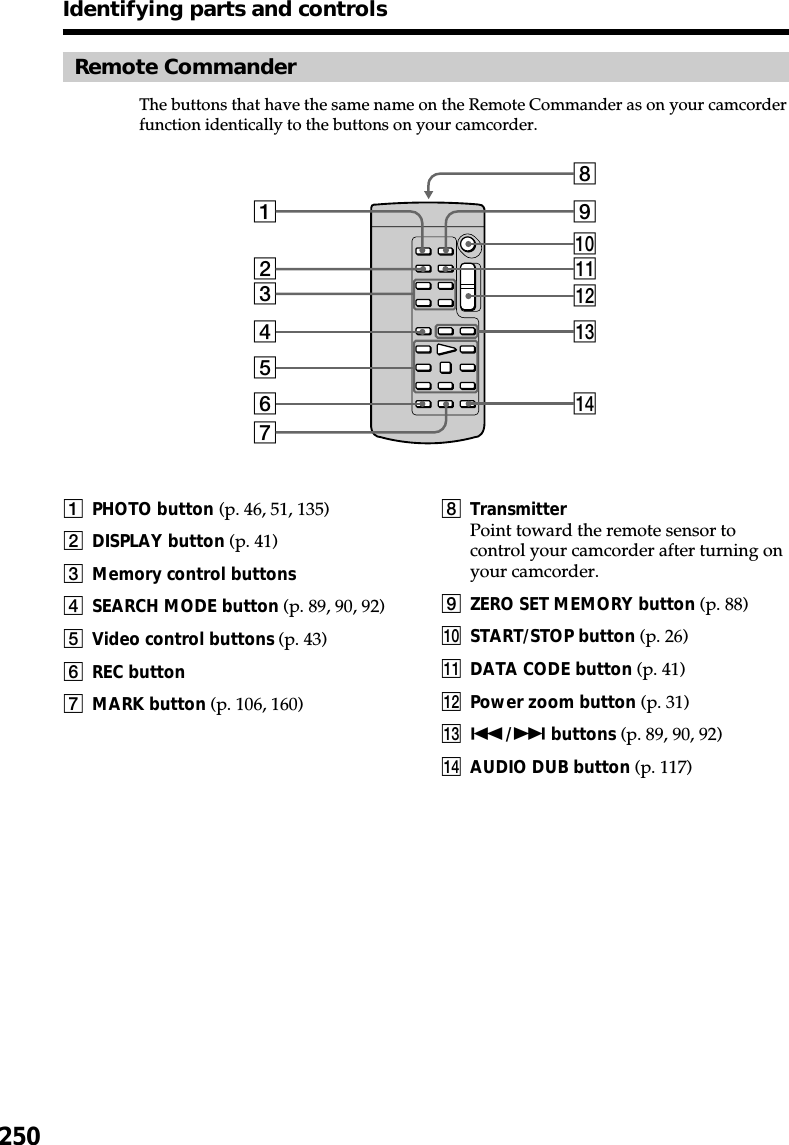
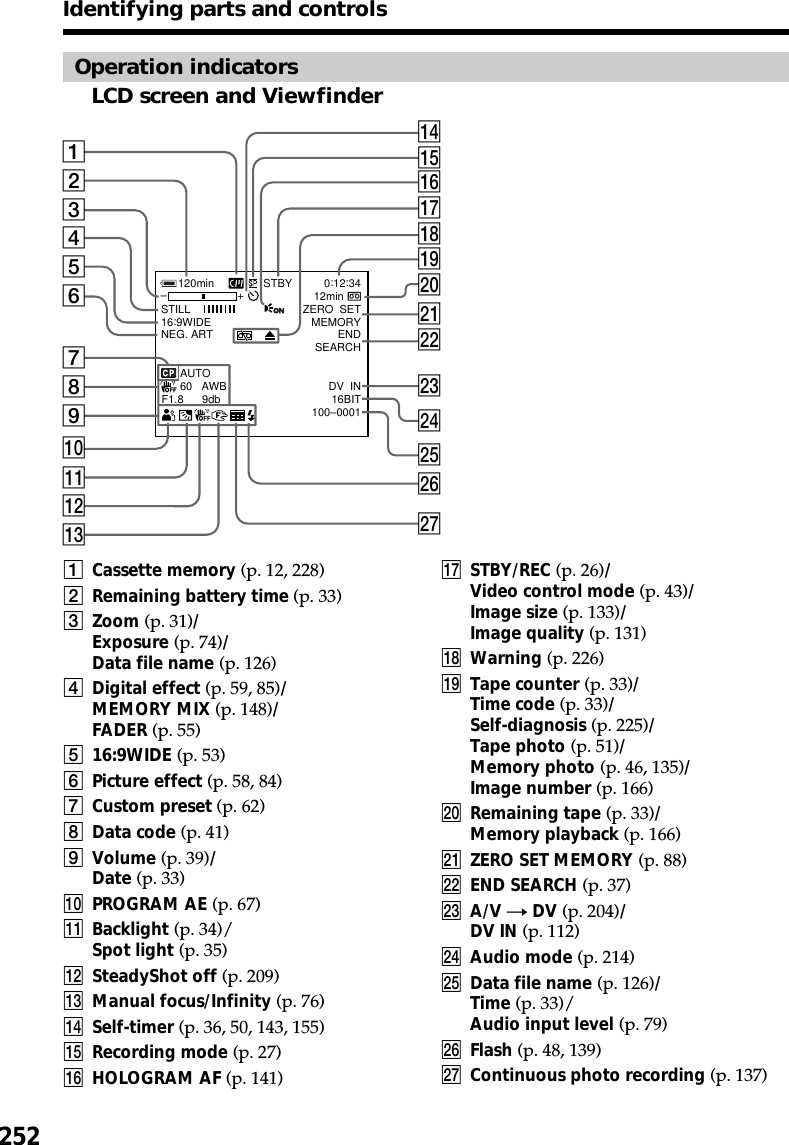
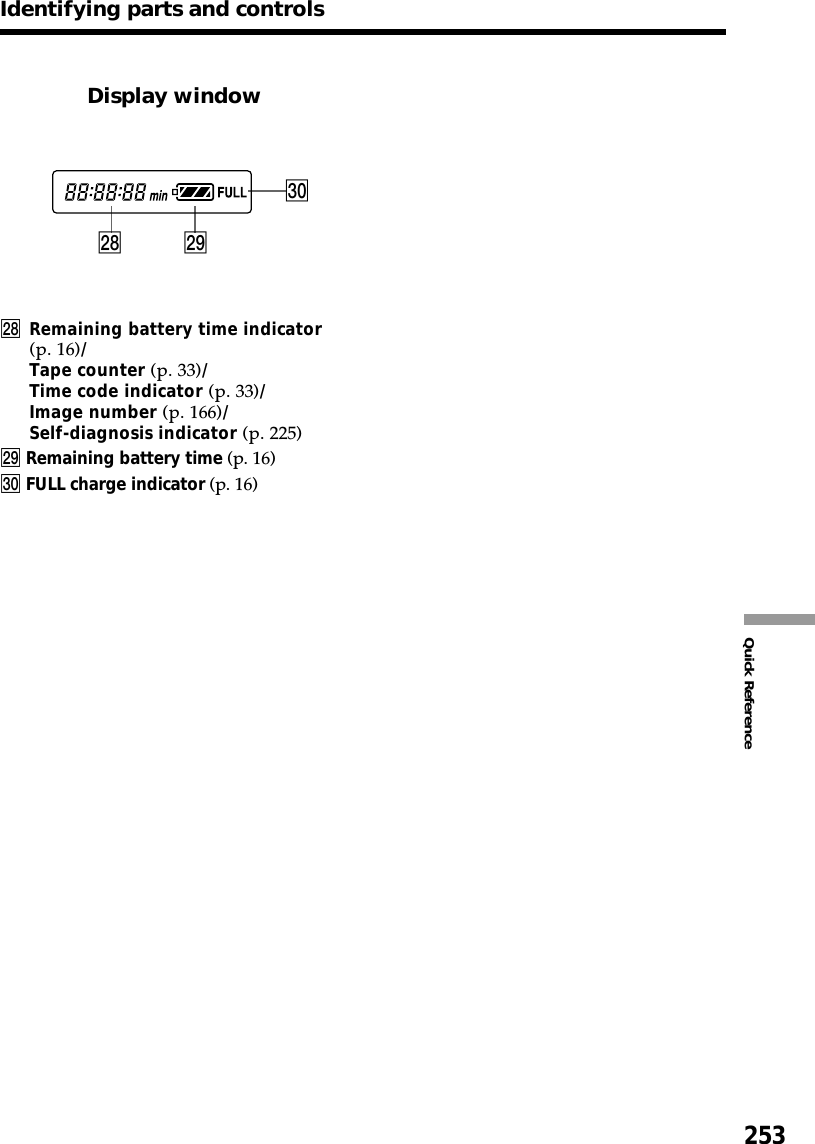
Sony Group DCRTRV950 Digital Video Camera Recorder TRV950 User Manual manual4
Sony Corporation Digital Video Camera Recorder TRV950 manual4
UserManual.wiki
>
Sony Group
>
DCRTRV950 User Manual
>
manual4
Contents
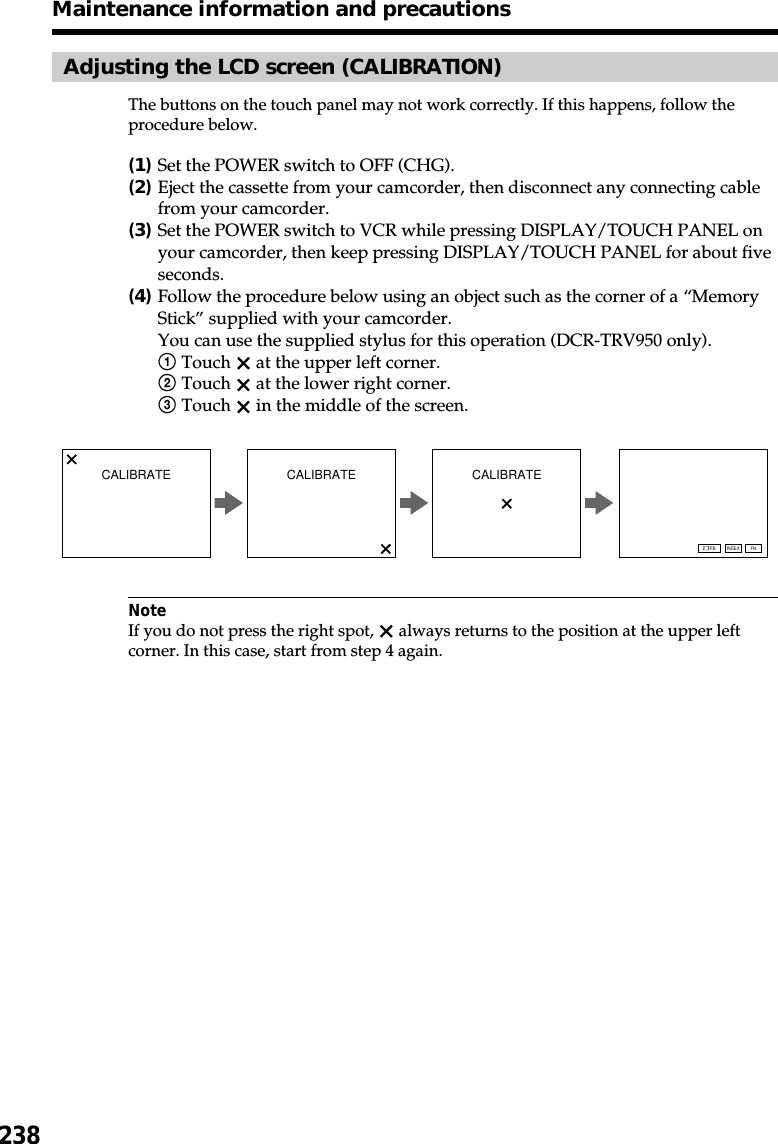
1.
network1
2.
network2
3.
manual1
4.
manual2
5.
manual3
6.
manual4
manual4
Navigation menu
Upload a User Manual
Namespaces
Wiki Guide
HTML
PDF
Info
Views
User Manual
Discussion / Help
Navigation
![200Image file storage destinations and image filesImage files recorded with your camcorder are grouped in folders by recording mode.The meanings of the file names are as follows. ssss stands for any number withinthe range from 0001 to 9999.For Windows Me users(When your camcorder is recongnized as the drive [E:])Folder File Meaning100MSDCF DSC0ssss.JPG Still image fileMOML0001 MOV0ssss.MPG Moving picture fileFolder containing moving picture dataFolder containing still image dataViewing images recorded on a “Memory Stick” on your computer– For Windows usersDisconnect the USB cable and eject the “Memory Stick” or setthe POWER switch to OFF (CHG)– For Windows 2000 Professional/Me, Windows XP Home Edition/ProfessionalusersTo disconnect the USB cable, eject the “Memory Stick” or set the POWER switch to OFF(CHG) following the procedure below.(1)Move the cursor to the “Unplug or Eject Hardware” icon on the Task Tray andclick to cancel the applicable drive.(2)After the “Safe to remove” message appears, disconnect the USB cable andeject the “Memory Stick” or set the POWER switch to OFF(CHG).](https://usermanual.wiki/Sony-Group/DCRTRV950.manual4/User-Guide-240529-Page-8.png)
![207Customizing Your Camcorder— Customizing Your Camcorder —Changing the default settings with themenuTo change the mode settings in the menu settings, select the menu items with the SEL/PUSH EXEC dial. The default settings can be partially changed. First, select the icon,then the menu item and then the mode.(1)Set the POWER switch to CAMERA, VCR or MEMORY/NETWORK (DCR-TRV950 only), then press MENU.(2)Turn the SEL/PUSH EXEC dial to select the desired icon, then press the dial toset.(3)Turn the SEL/PUSH EXEC dial to select the desired item, then press the dial toset.(4)Turn the SEL/PUSH EXEC dial to select the desired mode, then press the dialto set.(5)If you want to change other items, select RETURN and press the dial, thenrepeat steps 2 to 4.For details, see “Selecting the mode setting of each item” (p. 208).CAMERA VCRMEMORY/NETWORK*1234MENU[MENU]:ENDTAPE SET REC MODE[MENU]:ENDTAPE SET REC MODESP[MENU]:ENDAUTO[]:ENDAUTOON[]:ENDAUTOON[]:END MIC LEVEL RETURNON[]:END FLASH LVL[]:END P EFFECT[]:END* DCR-TRV950 only](https://usermanual.wiki/Sony-Group/DCRTRV950.manual4/User-Guide-240529-Page-15.png)


![230Usable cassettesDo not affix a labelalong this border.[a][b]Notes on the cassetteWhen affixing a label on the cassetteBe sure to affix a label only at the locations illustrated below [a] to prevent malfunctionof your camcorder.After using the cassetteRewind the tape to the beginning, put the cassette in its case, and store it upright.When the cassette memory does not workReinsert a cassette. The gold-plated connector of the cassette may be dirty or dusty.Cleaning the gold-plated connectorIf the gold-plated connector on the cassette is dirty or dusty, the remaining tapeindicator is sometimes not displayed correctly, and you may not be able to operatefunctions using cassette memory. Clean the gold-plated connector with a cotton-woolswab, about every 10 times that the cassette is ejected. [b]](https://usermanual.wiki/Sony-Group/DCRTRV950.manual4/User-Guide-240529-Page-38.png)
![235Additional InformationUsing your camcorder abroadCountries and areas where you can use network functions are restricted. For details,refer to the separate Network Operating Instructions. (DCR-TRV950 only)You can use your camcorder in any country or area with the AC power adaptorsupplied with your camcorder within 100 V to 240 V AC, 50/60 Hz.When charging the battery pack, use a commercially available AC plug adaptor [a], ifnecessary, depending on the design of the wall outlet [b].Your camcorder is an NTSC system based camcorder. If you want to view the playbackpicture on a TV, it must be an NTSC system based TV with the AUDIO/VIDEO inputjack.The following shows TV color systems used overseas.NTSC systemBahama Islands, Bolivia, Canada, Central America, Chile, Colombia, Ecuador, Guyana,Jamaica, Japan, Korea, Mexico, Peru, Surinam, Taiwan, the Philippines, the U.S.A.,Venezuela, etc.PAL systemAustralia, Austria, Belgium, China, Czech Republic, Denmark, Finland, Germany,Holland, Hong Kong, Hungary, Italy, Kuwait, Malaysia, New Zealand, Norway,Poland, Portugal, Singapore, Slovak Republic, Spain, Sweden, Switzerland, Thailand,United Kingdom etc.PAL-M systemBrazilPAL-N systemArgentina, Paraguay, UruguaySECAM systemBulgaria, France, Guiana, Iran, Iraq, Monaco, Russia, Ukraine, etc.Using your camcorder abroad[b][a]AC-L10A/L10B/L10C](https://usermanual.wiki/Sony-Group/DCRTRV950.manual4/User-Guide-240529-Page-43.png)
![237Additional InformationMaintenance informationCleaning the video headsTo ensure normal recording and clear pictures, clean the video heads. The video headsmay be dirty when:•Mosaic-pattern noise appears on the playback picture.•Playback pictures do not move.•Playback pictures do not appear.•The x indicator and “ CLEANING CASSETTE” message appear one after another,or the x indicator flashes on the screen during recording.If the above problem [a], [b] or [c] occurs, clean the video heads for 10 seconds with theSony DVM-12CLD cleaning cassette (optional). Check the picture and if the aboveproblem persists, repeat cleaning.If the video heads get dirtier, the entire screen becomes blue [c].Cleaning the LCD screenIf fingerprints or dust make the LCD screen dirty, we recommend using the Cleaningcloth (supplied) to clean the LCD screen. When you use the LCD Cleaning Kit(optional), do not apply the cleaning liquid directly to the LCD screen. Clean the LCDscreen with cleaning paper moistened with the liquid.Maintenance information and precautions[a] [b] [c]](https://usermanual.wiki/Sony-Group/DCRTRV950.manual4/User-Guide-240529-Page-45.png)