Sony Group DCRTRV950 Digital Video Camera Recorder TRV950 User Manual 01US00COV UC p65 001 001
Sony Corporation Digital Video Camera Recorder TRV950 01US00COV UC p65 001 001
UserManual.wiki
>
Sony Group
>
DCRTRV950 User Manual
>
network1
Contents
1.
network1
2.
network2
3.
manual1
4.
manual2
5.
manual3
6.
manual4
network1
Navigation menu
Upload a User Manual
Namespaces
Wiki Guide
HTML
PDF
Info
Views
User Manual
Discussion / Help
Navigation
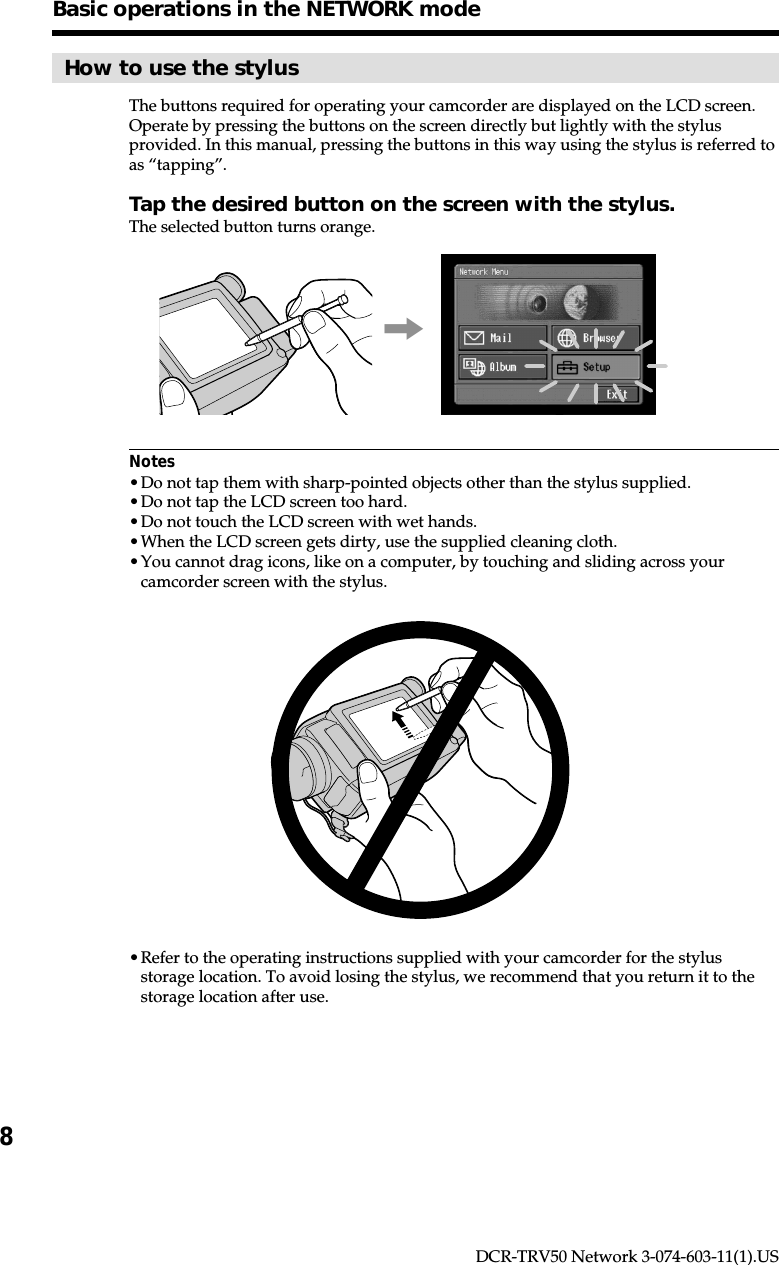
![6DCR-TRV50 Network 3-074-603-11(1).USThis section describes basic control ways to operate your camcorder, those which areused for network operations.How to use the Network MenuTo access the Network Menu, refer to “Accessing the network” in the operatinginstructions supplied with your camcorder.[a]: Send and receive email. For details, see “Using email” (p. 58).[b]: View a web page through the Internet. For details, see “Viewing web pages”(p. 82).[c]: You have to make various settings using this menu before using the networkfunction. For details, see “Setting network preferences” (p. 34).[d]: Exit the NETWORK mode.[e]: Upload images to your album on the Web and post the images on the Internet. Fordetails, see “Making your album on the Web” (p. 45).The actual screens may differ slightly from the illustrations in this networkfunction operating instructions.Basic operations in the NETWORK mode[a][b][c][d][e]](https://usermanual.wiki/Sony-Group/DCRTRV950.network1/User-Guide-240524-Page-6.png)

![9IntroductionDCR-TRV50 Network 3-074-603-11(1).USHow to input charactersYou have to frequently enter characters, such as email addresses, or web pagesaddresses (URL), to use the network function. This section describes how to inputcharacters.1(1)Open the Network Menu.For details on how to open the Network Menu, refer to “Accessing thenetwork” in the operating instructions supplied with your camcorder.(2)Tap [ Mail].The Send screen appears.,(3)Tap [To].,(4)Tap [ New].The character input screen appears.,Basic operations in the NETWORK mode](https://usermanual.wiki/Sony-Group/DCRTRV950.network1/User-Guide-240524-Page-9.png)
![10DCR-TRV50 Network 3-074-603-11(1).USBasic operations in the NETWORK mode2Selecting the character typeTap [abcy123], then tap the desired character type.abc: When inputting alphabetical characters.123: When inputting numerical characters.When you selected abc When you selected 1233Inputting characters(1)Tap the character you want to input.(2)After you input the characters, tap [Enter].The screen which is displayed before you display the character input screenappears.](https://usermanual.wiki/Sony-Group/DCRTRV950.network1/User-Guide-240524-Page-10.png)
![11IntroductionDCR-TRV50 Network 3-074-603-11(1).USBasic operations in the NETWORK mode1[a/A] button[a/A] button is displayed when you input alphabetical characters.You can switch between upper case and lower case.2[abcy123] buttonA list box appears when you tap the [abcy123] button. Tap the desiredtype of letter from the list box.3Input byte number/maximum byte number4PreferencesYou can change the keyboard type for alphabet input.5Text areaYou can scroll up or down the display by tapping v or V.6[Space] buttonA space is entered.7[Back space] buttonThe letter right before the cursor is deleted. If you tap the button forabout three seconds, all the characters before the cursor are deleted.8 buttonThe cursor moves to a new line.9[Enter] buttonTap this button to decide or close the input screen.126789543Character input display](https://usermanual.wiki/Sony-Group/DCRTRV950.network1/User-Guide-240524-Page-11.png)
![12DCR-TRV50 Network 3-074-603-11(1).USSymbol charactersThe symbol characters below are inputted by single tapping:The green keys input the symbol characters.The symbol characters change as follows:Basic operations in the NETWORK modeThe available characters listWhen selecting [abc]Alphabetical charactersThe alphabet keyboard has 2 types (PC Style and Alphabetical order). The defaultsetting is PC arrangement. You can change the keyboard setting in . Refer to page 17for more information.(PC Style) (Alphabetical order)Key Character` ´ ˆ* a: à t á t â t a t... A: À t Á t  t A t...e: è t é t ê t e t... E: È t É t Ê t E t...i: ì t í t î t i t... I: Ì t Í t Î t I t...o: ò t ó t ô t o t... O: Ò t Ó t Ô t O t...u: ù t ú t û t u t... U: Ù t Ú t Û t U t...y: ´y t y t... Y: ´Y t Y t...¨ ˜* a: ä t ã t a t... A: Ä t à t A t...e: ë t e t... E: Ë t E t...i: ï t i t... I: Ï t I t...n: ñ t n t... N: Ñ t N t...o: ö t õ t o t... O: Ö t Õ t O t...u: ü t u t... U: Ü t U t...y: ÿ t y t...’ ”’ t ” t ’ t ...? ¿? t ¿ t ? t ...! ¡! t ¡ t ! t ...ç Ç ßç t Ç t ß t ç t.... ,. t , t . t .../ \/ t \ t / t ...abcdefghi jklmnopqr s tuvwxy zABCDEFGHI J KLMNOPQR S TUVWXY Z* You can input the alphabet characters with accent symbols. When you input thecharacters, tap ` ´ ˆ or ¨ ˜ after inputting a, e, i, n, o, u, y, A, E, I, N, O, U or Y.~–_@:](https://usermanual.wiki/Sony-Group/DCRTRV950.network1/User-Guide-240524-Page-12.png)
![13IntroductionDCR-TRV50 Network 3-074-603-11(1).USBasic operations in the NETWORK modeTo switch between upper and lower case alphabet lettersTap [a/A] to change the alphabetical keyboard, then enter characters.To delete a characterMove the cursor with the stylus to the right of the character at which you want todelete, tap [Back space]. The character at the left of the cursor is deleted.To add a characterMove the cursor with the stylus to the position at which you want to add a character,then input characters.To start a new lineTap [ ].When selecting [123]Symbol characters(Numerical order)123+( )$C\%456–[]&ˆ|˜789/{}`”’ ,* 0#=<> . : ; _](https://usermanual.wiki/Sony-Group/DCRTRV950.network1/User-Guide-240524-Page-13.png)
![14DCR-TRV50 Network 3-074-603-11(1).USBasic operations in the NETWORK modeE.g., Enter “Hello” into the Subject item on the Send screen1(1)Open the Network Menu.For details on how to open the Network Menu, refer to “Accessing thenetwork” in the operating instructions supplied with your camcorder.(2)Tap [ Mail].The Send screen appears.,2Entering the subject of a message(1)Tap [Subject].(2)Tap [ New].The character input screen appears.,](https://usermanual.wiki/Sony-Group/DCRTRV950.network1/User-Guide-240524-Page-14.png)
![15IntroductionDCR-TRV50 Network 3-074-603-11(1).USBasic operations in the NETWORK mode3(1)Tap [abcy123], then tap [abc].(2)Tap [a/A] to be able to enter upper-case letters.,(3)Tap [H].“H” is entered.,(4)Tap [a/A] to be able to enter lower-case letters.,](https://usermanual.wiki/Sony-Group/DCRTRV950.network1/User-Guide-240524-Page-15.png)
![16DCR-TRV50 Network 3-074-603-11(1).USBasic operations in the NETWORK mode(5)Tap [e].“e” is entered.,(6)Tap [l], [l] and [o].“llo” is entered.,(7)Tap [Enter].“Hello” is entered and the Send screen appears again.,](https://usermanual.wiki/Sony-Group/DCRTRV950.network1/User-Guide-240524-Page-16.png)
![17IntroductionDCR-TRV50 Network 3-074-603-11(1).USBasic operations in the NETWORK modeCharacter input settingKeyboardYou can change the display of the alphabet, PC arrangement keyboard or ABCarrangement keyboard into a setup you want when you input characters.1Tap in the character input screen.,2Tap the desired setting.You can set as the following two displays when [abcy123] is set as [abc].(PC Style is the default setting.)– PC Style (PC arrangement keyboard)– Alphabetical order (ABC arrangement keyboard)To switch the setting, tap on the upper-right LCD screen.Alphabetical orderPC Style](https://usermanual.wiki/Sony-Group/DCRTRV950.network1/User-Guide-240524-Page-17.png)

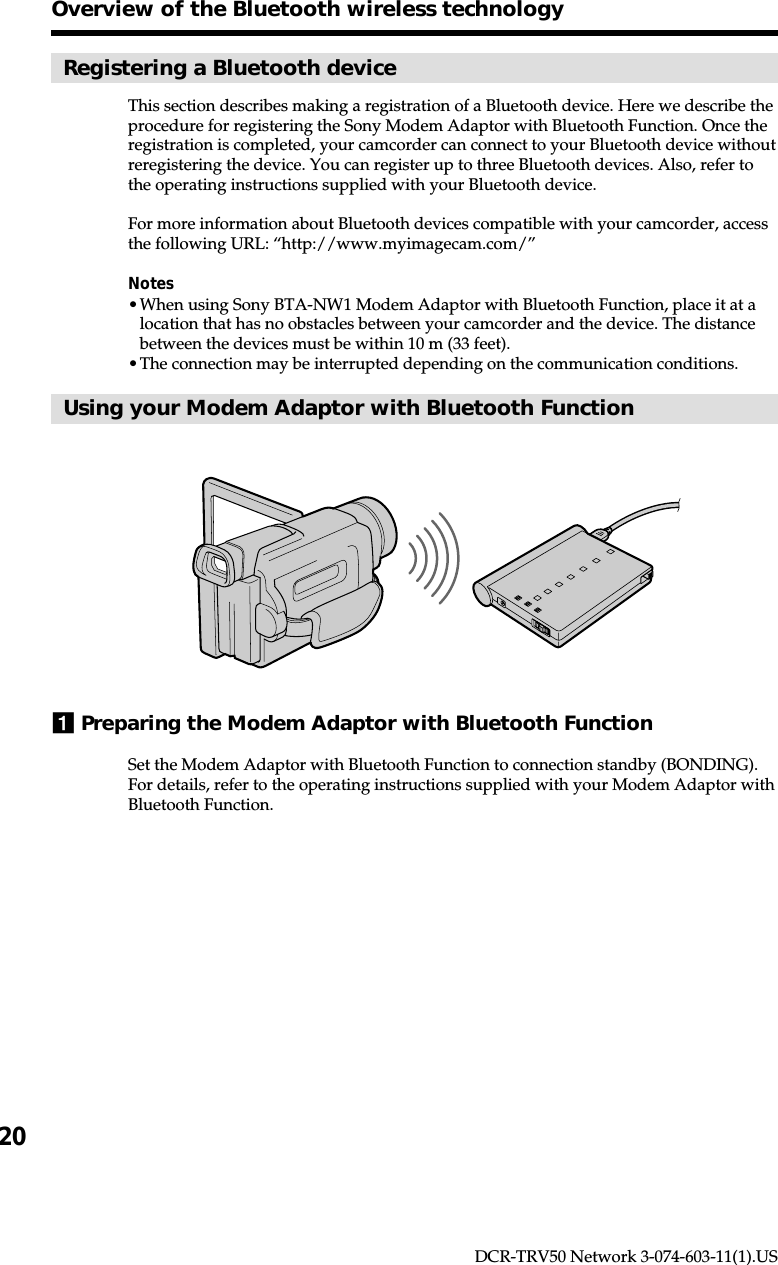
![21PreparationDCR-TRV50 Network 3-074-603-11(1).USOverview of the Bluetooth wireless technology2Specifying your Modem Adaptor with Bluetooth Function as theconnection device(1)Open the Network Menu.For details on how to open the Network Menu, refer to “Accessing thenetwork” in the operating instructions supplied with your camcorder.(2)Tap [ Setup].The Setup screen appears.,(3)Tap [Bluetooth Setup].The Bluetooth Setup screen appears.,](https://usermanual.wiki/Sony-Group/DCRTRV950.network1/User-Guide-240524-Page-21.png)
![22DCR-TRV50 Network 3-074-603-11(1).US(4)Tap [Select].The Bluetooth devices list appears. When making a registration for the firsttime, only [ Return] and [ New] are indicated. The list shows up to threeBluetooth devices. You can select one of the latest used three Bluetooth devicesfrom the list.,TipThe last-used Bluetooth device is listed next to [ Return] and [ New].(5)Tap [ New].Your camcorder starts searching for your Bluetooth devices. When thesearching is completed, the available Bluetooth devices list appears.When some Bluetooth devices with the same name appear, display eachBluetooth device address by tapping [More info.].,,Notes•The search takes from about 10 to 60 seconds. The time depends on the number ofBluetooth devices around your camcorder.•If the Bluetooth device you want to register is not found, carry out the procedureagain from step 4.(6)Tap the desired Bluetooth device.The character input screen appears.,Overview of the Bluetooth wireless technology](https://usermanual.wiki/Sony-Group/DCRTRV950.network1/User-Guide-240524-Page-22.png)
![23PreparationDCR-TRV50 Network 3-074-603-11(1).USOverview of the Bluetooth wireless technology(7)Enter the passkey.For details on how to input characters, see “How to input characters” (p. 9).For example, when using the BTA-NW1 Modem Adaptor with BluetoothFunction, the passkey is its serial number which is indicated on the label on therear panel.Tip on “Passkey”The passkey is an identification number needed to allow two Bluetoothdevices to communicate with each other. The connection will be permittedafter entering the passkey. This “Passkey” is also referred to as a “Bluetoothpasskey”, “PIN”, “Bluetooth PIN”, etc. For details, refer to the operatinginstructions supplied with your Bluetooth adaptor.(8)After entering the passkey, tap [Enter].After the registration is completed, the Bluetooth Setup screen appears again.“Bluetooth Registration Complete” message is displayed. Tap [OK].The selected Bluetooth device is specified.,,NoteWhen the message “Bluetooth Registration Error Check the Passkey” isindicated, tap [OK]. Carry out the procedure again from step 4.(9)Tap [Exit].The Setup screen appears again. For details on how to turn off the ModemAdaptor with Bluetooth Function, refer to the operating instructions suppliedwith your Modem Adaptor with Bluetooth Function.MODEM ADAPTOR WITH BLUETOOTHTM FUNCTIONMODEL NO. BTA-NW1®PasskeyThe number used when registering aBluetooth device](https://usermanual.wiki/Sony-Group/DCRTRV950.network1/User-Guide-240524-Page-23.png)
![24DCR-TRV50 Network 3-074-603-11(1).USOverview of the Bluetooth wireless technology(10)Tap [Exit].The Network Menu appears again.,When the registration has failedAfter pressing [OK], and carry out the procedure described in step 4 on page 22 again.Displaying information on your camcorderYou can display your camcorder information.(1)Open the Network Menu.For details on how to open the Network Menu, refer to “Accessing thenetwork” in the operating instructions supplied with your camcorder.](https://usermanual.wiki/Sony-Group/DCRTRV950.network1/User-Guide-240524-Page-24.png)
![25PreparationDCR-TRV50 Network 3-074-603-11(1).US(2)Tap [ Setup].The Setup screen appears.,(3)Tap [Bluetooth Setup].The Bluetooth Setup screen appears.,(4)Tap [Info.].The Bluetooth Setup: Self information screen appears.To return Bluetooth Setup screenTap [Return].Overview of the Bluetooth wireless technologyThe model nameThis is the unique address assigned to eachcamcorder at the factory. This address is usedwhen exchanging information betweendevices. This address cannot be modified.(The number indicated on the illustration isan example number.)](https://usermanual.wiki/Sony-Group/DCRTRV950.network1/User-Guide-240524-Page-25.png)
![26DCR-TRV50 Network 3-074-603-11(1).USRadio wave indication indicates the radio wave status of the connected Bluetooth device. (Use thisindication as a guide.)Selecting other Bluetooth devices from the listTap the Bluetooth device you want to specify in step 4 on page 22. The deviceinformation is indicated.Tap [Exit].Deleting a registered Bluetooth device from the listYou can register up to three Bluetooth devices on your camcorder. When deleting aBluetooth device from the list, follow the procedure below.(1)Open the Network Menu.For details on how to open the Network Menu, refer to “Accessing thenetwork” in the operating instructions supplied with your camcorder.(2)Tap [ Setup].The Setup screen appears.,Overview of the Bluetooth wireless technology](https://usermanual.wiki/Sony-Group/DCRTRV950.network1/User-Guide-240524-Page-26.png)
![27PreparationDCR-TRV50 Network 3-074-603-11(1).USOverview of the Bluetooth wireless technology(3)Tap [Bluetooth Setup].The Bluetooth Setup screen appears.,(4)Tap [Select].The Bluetooth devices list appears.,(5)Tap the device you want to delete.The device name and address of the selected device are indicated.,(6)Tap [Delete].The selected device is deleted from the list.](https://usermanual.wiki/Sony-Group/DCRTRV950.network1/User-Guide-240524-Page-27.png)
![29PreparationDCR-TRV50 Network 3-074-603-11(1).US(1)Open the Network Menu.For details on how to open the Network Menu, refer to “Accessing thenetwork” in the operating instructions supplied with your camcorder.(2)Tap [ Setup].The Setup screen menu appears.,(3)Tap [Online Registration].The screen for verifying the connection appears. Tap [Connect]. Yourcamcorder starts connecting to the site. Once the connection is completed, theonline registration screen appears. Set the Bluetooth device to connectionstandby using the camcorder beforehand. For details, refer to the operatinginstructions supplied with your Bluetooth device.(4)Register your information following the on-screen guidance.When registering for the first time, tap [Registration link] from the menu.NoteWhen you are registering, you will need the registration code located on the coverof your operating instructions. After entering this code, follow the on-screenguidance.Customer registration](https://usermanual.wiki/Sony-Group/DCRTRV950.network1/User-Guide-240524-Page-29.png)
![30DCR-TRV50 Network 3-074-603-11(1).US(5)After you complete your customer registration, continue on to register youralbum (page 31).NoteWhen registering online with your camcorder, the connection may be disconnected.However, data entry can be done offline. When your camcorder needs to connect withthe site, the screen for verifying the connection appears. Tap [Connect], the connectionwill be established again.About the DI customer ID and passwordAfter customer registration, album registration, or “So-net” registration hasbeen completed, a DI customer ID and password will be displayed. The ID andpassword are very important, so be sure to write them down in the “Setupmemo” on page 108.Continue to “Registering your album on the Web”.Customer registration](https://usermanual.wiki/Sony-Group/DCRTRV950.network1/User-Guide-240524-Page-30.png)
![31PreparationDCR-TRV50 Network 3-074-603-11(1).USTo upload an image recorded with your camcorder to your album on the Web, youhave to complete your album registration. Before registering, be sure to read“ImageStation’s Privacy Policy” (p. 109) and “Member Agreement” (p. 114). If you donot agree to the terms, you cannot complete the registration.The Album registration is done by either of the following ways:1Complete the album registration during your DI customer registration step2Complete the album registration after the DI customer registration is completed1Complete the album registration during your DI customerregistration step(1)Continue the album registration after completing DI customer registration. Fillin the album registration form following on-screen directions.After the album registration is completed, continue on to the “So-net” registrationscreen (page 33).2Complete the album registration after the DI customer registrationis completed(1)Display the online registration screen following the procedure described in“Completing the online registration with your camcorder” (p. 28).(2)Tap [Login link].(3)Enter your DI customer ID and password, and log in.(4)Tap [Album sign-up link].(5)Complete the album registration following the on-screen guidance.Tip on Member nameYour member name is a nickname used on the ImageStation web site.Once you register your member name, that member name is indicated on your albumwhen it is opened using a computer, and it is also used on your invitation card.Tip•If you do not have email address, complete registering “So-net” before registeringyour album on the Web.•To cancel your album registration, then tap menu on the upper-right LCD screen, andtap END in the menu bar. For detail on how to display menu bar, refer to page 84.Registering your album on the Web](https://usermanual.wiki/Sony-Group/DCRTRV950.network1/User-Guide-240524-Page-31.png)
![33PreparationDCR-TRV50 Network 3-074-603-11(1).USYou can complete your online registration with “So-net” using your camcorder. Youcan also sign up with “So-net” in your DI customer registration step. The “So-net”registration is done by either of the following ways:1Register for “So-net” in your DI customer registration step2Register for “So-net” after the DI customer registration is completed1Register for “So-net” in your DI customer registration step(1)Fill in “So-net” registration form following on-screen directions.(2)After completing registration, tap END in the menu bar.2Register for “So-net” after the DI customer registration iscompleted(1)Display the online registration screen following the procedure described in“Online registration with your camcorder” (p. 28).(2)Tap [Login link].(3)Enter your DI customer ID and password, and log in.(4)Tap [So-net sign-up link].(5)Input necessary items for registering “So-net” as following message on thescreen.You can search information about access point on the registration web site. For details,see the supplied flyer “Getting Online with your Sony Network Handycam®camcorder.”Tip•Be sure to make a note of telephone numbers of access points indicated on the screenon the “Setup Menu” (p. 108).•To cancel registering with “So-net”, then tap the menu button menu on the upper-rightLCD screen, and tap END in the menu bar.For detail on how to display the menu bar, refer to page 84.Registering with “So-net”](https://usermanual.wiki/Sony-Group/DCRTRV950.network1/User-Guide-240524-Page-33.png)
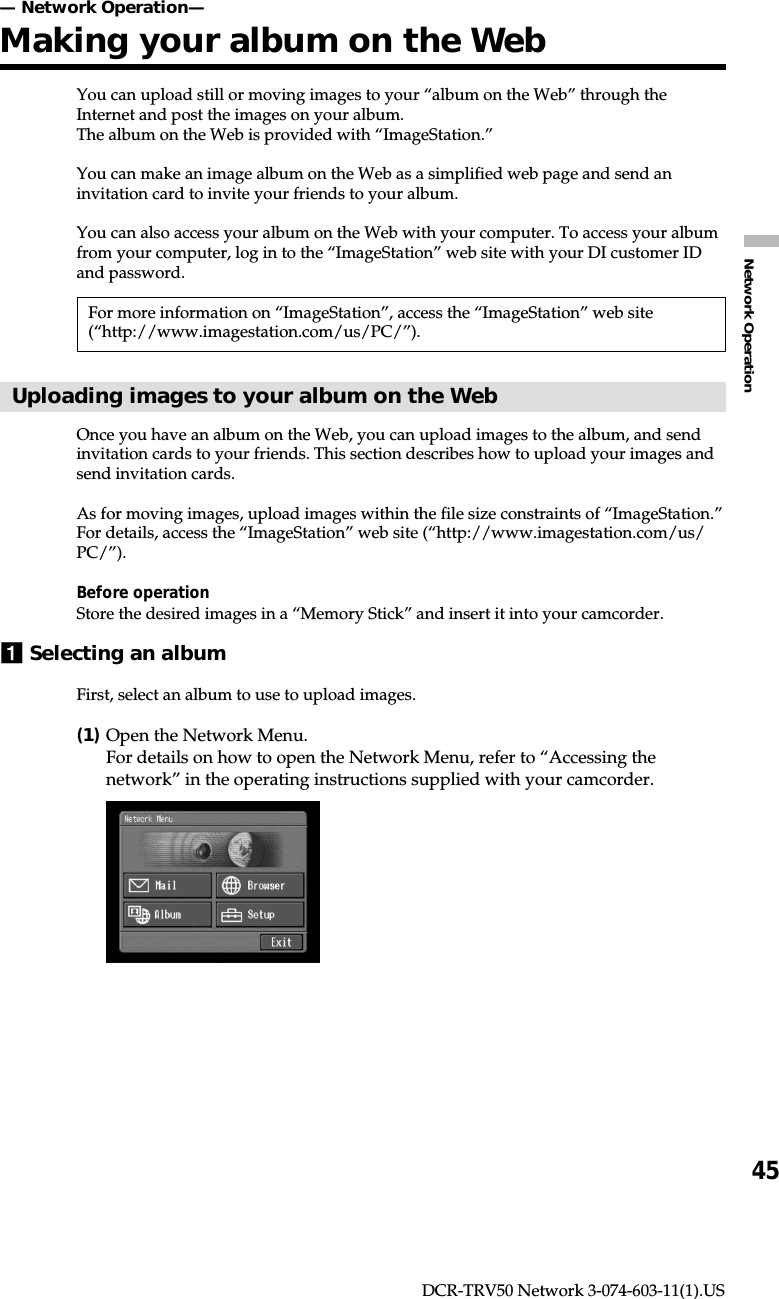
![34DCR-TRV50 Network 3-074-603-11(1).USYou have to access the Internet to make your album on the Web, view web pages, orsend or receive your email. This section describes how to set network preferences toaccess the Internet.Entering your DI customer ID and passwordEnter the DI (Digital Imaging) customer ID and password you obtained as a result ofyour DI customer registration. This setup is required to use the “So-net” option andmake your album on the Web.(1)Open the Network Menu.For details on how to open the Network Menu, refer to “Accessing thenetwork” in the operating instructions supplied with your camcorder.(2)Tap [ Setup].The Setup screen appears.,(3)Tap [Network Setup].The Network Setup screen appears.,Setting network preferences](https://usermanual.wiki/Sony-Group/DCRTRV950.network1/User-Guide-240524-Page-34.png)
![35PreparationDCR-TRV50 Network 3-074-603-11(1).US(4)Tap [ID].The character input screen appears.,(5)Enter your DI customer ID.For details on how to input characters, see “How to input characters” (p. 9).(6)Tap [Enter].The Network Setup screen appears again.,(7)Tap [Password].The character input screen appears.,(8)Enter your password.For details on how to input characters, see “How to input characters” (p. 9).NoteWhen you check the item “Verify Password” in the Network Options screen,you cannot enter your password. If you try to enter it, the message “PasswordAlready Set Check the Password Profile” appears.Setting network preferences](https://usermanual.wiki/Sony-Group/DCRTRV950.network1/User-Guide-240524-Page-35.png)
![36DCR-TRV50 Network 3-074-603-11(1).US(9)Tap [Enter].The Network Setup screen appears again.,TipWhile inputting password characters, they are visible as they are. However,after it has been entered, each character is indicated as “∗”. If you enter yourpassword again, delete all “∗” before entering the password.(10)Tap [Exit].The setup of the DI customer ID and password are complete, and the Setupscreen appears again.Setting your provider preferencesWhen using “So-net” carry out the following procedures:“1 “So-net” setting”“2 Entering the telephone numbers of your access points”“4 Setting network options preferences”When using the other provider, carry out the following procedures:“3 Setting your provider preferences manually”“4 Setting network options preferences”TipEven if you do not set up the items described in “4 Setting network optionspreferences,” you can access the Internet by using the default setting.Tip on passwordWhen you check the item “Verify Password” on the Network Options screen, you haveto enter your password whenever you connect to your Internet service provider. Fordetails, see “4 Setting network options preferences”Setting network preferences](https://usermanual.wiki/Sony-Group/DCRTRV950.network1/User-Guide-240524-Page-36.png)
![37PreparationDCR-TRV50 Network 3-074-603-11(1).US1“So-net” settings(1)Tap [Network Setup].The Network Setup screen appears.The default setting is “So-net”.,(2)Tap [Setting].The Provider Setting: So-net screen appears.,Go to “2 Entering the telephone numbers of your access points” on page 38.Setting network preferences](https://usermanual.wiki/Sony-Group/DCRTRV950.network1/User-Guide-240524-Page-37.png)
![38DCR-TRV50 Network 3-074-603-11(1).US2Entering the telephone numbers of your access pointsThis setup is only for those using “So-net”. For more information on the telephonenumbers of access points, see the supplied flyer “Getting Online with your SonyNetwork Handycam® camcorder.”Tip on access points“So-net” installs access points in various areas. We recommend that you select the mostconvenient access point which allows you to obtain the lowest telephone charges.(1)Tap [TEL1].The character input screen appears.,(2)Enter the telephone number of your access point.For details on how to input characters, see “How to input characters”(p. 9).NoteDo not insert hyphens or spaces in the telephone number. (e.g. 0312345678)(3)Tap [Enter].The Provider Setting: “So-net” screen appears again.,TipYou can also register the telephone numbers of access points into [TEL2] and[TEL3]. If necessary, enter the numbers into [TEL2] and [TEL3].(4)Tap [Exit].The telephone number registration is complete.Go to 4 “Setting other preferences” (p. 42).Setting network preferences](https://usermanual.wiki/Sony-Group/DCRTRV950.network1/User-Guide-240524-Page-38.png)
![39PreparationDCR-TRV50 Network 3-074-603-11(1).US3Setting your provider preferences manuallyIf you have already made the So-net settings, you do not need to make the followingsettings.(1)Tap [Network Setup].The Network Setup screen appears.,(2)Tap [Custom].a is checked and changes to .,(3)Tap [Setting].The Provider Setup: Custom screen appears.,(4)Tap [PPP].Setting network preferences](https://usermanual.wiki/Sony-Group/DCRTRV950.network1/User-Guide-240524-Page-39.png)
![40DCR-TRV50 Network 3-074-603-11(1).US(5)Set up the following items:ID: Enter the login name you use for accessing your provider using a dial-upconnection. This “ID” is also referred to as a “user ID”, “login name”, “PPPlogin name”, “network ID”, “account name”, “logon name”, “user name”,etc.Password: Enter the password you use for accessing your provider using adial-up connection. (Dial-up connection t Glossary (p. 107))This “Password” is also referred to as a “PPP password”, “networkpassword”, “connection password”, etc.DNS1: Enter the DNS (Domain Name System) server address of your provider.•This “DNS1” is also referred to as a “name server”, “primary DNS server”,“primary name server”, etc.•This entry may be unnecessary, depending on your provider. For details, consultyour provider.DNS2: Enter the secondary DNS server address of your provider, if necessary.•This “DNS2” is also referred to as a “secondary DNS server”, etc.•This entry may be unnecessary, depending on your provider. For details, consultyour provider.TEL No. 1: Enter the telephone number of your most convenient access point.(Access point t “Glossary” (p. 106))TEL No. 2/TEL No. 3: Enter the second and third telephone numbers, ifnecessary.(6)Tap [Mail].The Mail preference screen appears.(7)Set up the following items:User ID: Enter the user ID name you use for your provider.Password: Enter the password of your user ID for accessing the POP server.Your user ID and password are required to use email. This “Password” isalso referred to as a “mail password”, “mail server password”, etc.Address: Enter your email address. This “Address” is also referred to as a“mail address”, “email address”, etc.Setting network preferences](https://usermanual.wiki/Sony-Group/DCRTRV950.network1/User-Guide-240524-Page-40.png)
![41PreparationDCR-TRV50 Network 3-074-603-11(1).USPOP Server: Enter the POP (Post Office Protocol) server address of yourprovider. The POP server is for receiving email. This “POP Server” is alsoreferred to as a “mail server”, “POP3 server”, etc.SMTP Server: Enter the SMTP (Simple Mail Transfer Protocol) server addressof your provider. The SMTP server is for sending email. This “SMTP Server”is also referred to as a “mail server”, “SMTP mail server”, etc. The SMTPserver may be the same as the POP server, depending on the provider.APOP: Select whether you want to use APOP. (APOP t “Glossary” (p. 106))(8)Tap [Browser].The Browser screen appears.(9)Set up the following items:Proxy: Enter the proxy server address of your provider.Port: Enter the port number of the proxy server of your provider. This entrymay be unnecessary, depending on your provider. For details, consult yourprovider.(10)Tap [Exit].The setup is completed, and the Network Setup screen appears again.(11)Tap [Exit].The Setup screen appears again.Setting network preferences](https://usermanual.wiki/Sony-Group/DCRTRV950.network1/User-Guide-240524-Page-41.png)
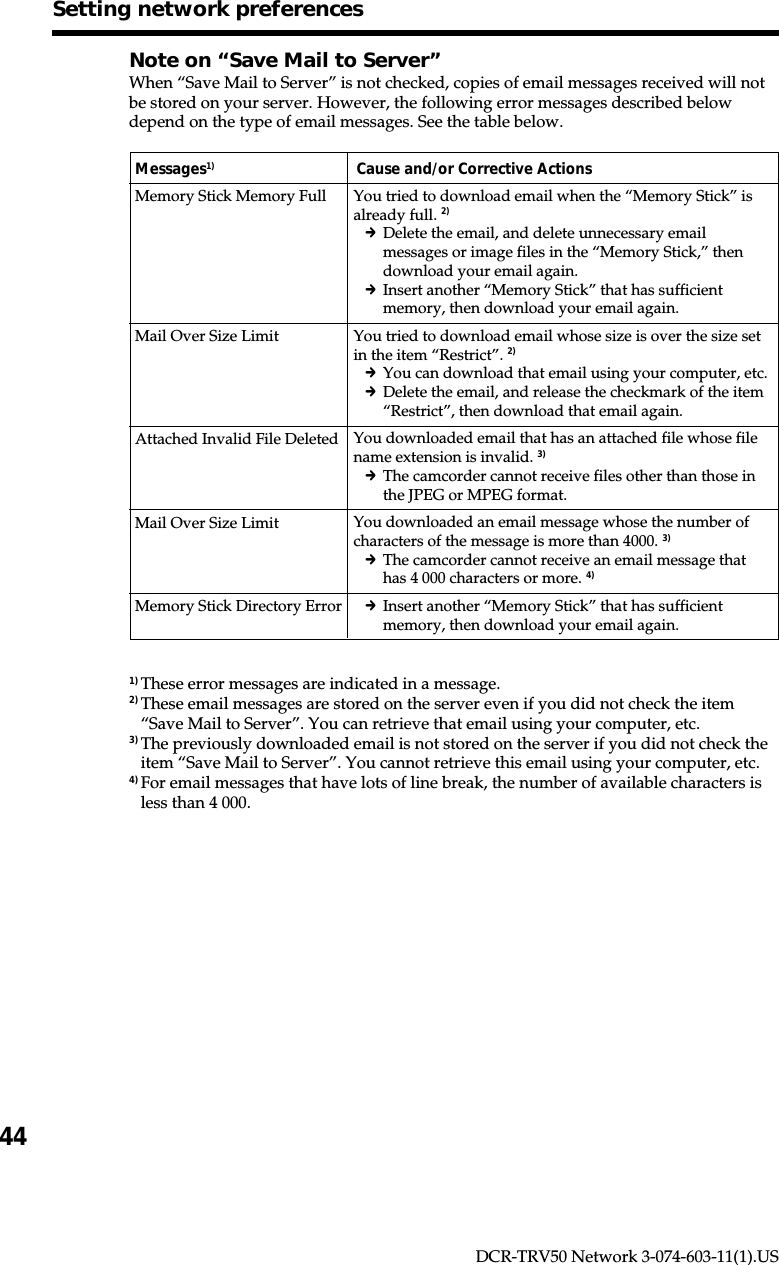
![42DCR-TRV50 Network 3-074-603-11(1).US4Setting other preferencesYou can access the Internet with your camcorder using the default settings. It is notnecessary to make the following settings. This example is provided to show you how tomake changes, if necessary, in the future.(1)Display the Setup screen.(2)Tap [Network Options].The Network Options screen appears.,(3)Set up the following items:Verify Password: Select whether password entry is required when you accessyour provider. When you check this item, your password on the PPP screenis deleted. You have to enter your DI customer ID and password foraccessing your album on the Web, or enter your password for accessing yourprovider each time you try to make a connection. This can prevent otherpersons from connecting to your provider using your ID.NoteWhen this item is checked:–You cannot set your DI customer ID password and your password for accessingyour provider.–You cannot use your album on the Web if you set your preferences manually.Time Out: Select whether the connection is automatically canceled if nocommunication is made for specific time (1 minute, 2 minutes, 5 minutes, 15minutes, or 30 minutes).NoteThe telephone line may not be disconnected automatically depending on webpages. In this case, disconnect the telephone line manually (p. 95).Setting network preferences](https://usermanual.wiki/Sony-Group/DCRTRV950.network1/User-Guide-240524-Page-42.png)
![43PreparationDCR-TRV50 Network 3-074-603-11(1).USSetting network preferencesMailSend&Receive: Select whether to check the email inbox after sending email.Restrict: Select whether to skip an email message if its file size is more than50 KB, 200 KB, or 500 KB.Save Mail to Server: Select whether to keep copies of the messages on theserver.NoteIf you try to receive email without checking this item, email messages maynot be downloaded and may be lost from your server, depending on thetype of email you receive. For details, see “Note on “Save Mail to Server””(p. 44).Signature: Set up this item when you want to attach your signature toemail (p. 67).BrowserCookie: Select whether to accept a cookie. When you do not want to sendyour personal information, do not check this item. This item is checked atthe default setting.Image Display: Select whether to display images on the screen whenviewing a web page. This item is checked at the default setting.Reset: Reset all the items on the Network Options screen except “Signature”and “Modem Init.”NoteA verification message does not appear when you try to reset items.Modem Init: Set up the character string to be used for modem initialization. Ifno setup is specified, you do not need to modify this item.NoteIf the setup is wrong, the message “Connection Error No Response FromPPP Server” appears when you try to access the Internet and you will not beable to access the Internet.(4)Tap [Exit].The Setup screen appears again.](https://usermanual.wiki/Sony-Group/DCRTRV950.network1/User-Guide-240524-Page-43.png)
![46DCR-TRV50 Network 3-074-603-11(1).US(2)Tap [ Album].The Album screen appears.,(3)Tap [ Upload].The Album: Upload screen appears.,(4)Tap [Album No.].The album list page appears.,(5)Tap the desired album.Selecting the album is complete.,The number of prepared albumsThere are 10 albums (Album 01 to 10).Making your album on the Web](https://usermanual.wiki/Sony-Group/DCRTRV950.network1/User-Guide-240524-Page-46.png)
![47Network OperationDCR-TRV50 Network 3-074-603-11(1).US2Selecting images to uploadNext, select the images to upload.(1)Tap [Image Sel.].The image index list appears.,(2)Tap the desired images.Tap the image you want to upload. The selected image is indicated by thecheckmark ( ).To page up or down the image index listTap [<] or [,]. The next or previous page that contains six images isdisplayed.(3)Repeat step 2 to select other images.Notes•The total number of images you can upload is 99, and the maximum file size youcan upload is up to total 3 MB.•You can upload images to only one album once.(4)Tap [ OK].The Album: Upload screen appears again. The total number of selected imagesand total file size are indicated.,When you only want to upload images, go to “5 Uploading images” on (p. 51).Making your album on the Web](https://usermanual.wiki/Sony-Group/DCRTRV950.network1/User-Guide-240524-Page-47.png)
![48DCR-TRV50 Network 3-074-603-11(1).US3Sending an invitation card (email)Select the addressee to send the invitation card (email) to.(1)Tap [Invitation].The Album: Invitation screen appears.,(2)Tap [To].The address list appears. The list shows the destination addresses that areregistered in the address book. For details on the address book, see “Using theaddress book” (p. 69).,When you have selected the address listed in the address book, go to step 6.Tips•The last-used address is listed next to New.•Addresses are listed in historical order.(3)Tap [ New].The character input screen appears.,(4)Enter the email address of the destination address.For details on how to input characters, see “How to input characters” (p. 9).Making your album on the Web](https://usermanual.wiki/Sony-Group/DCRTRV950.network1/User-Guide-240524-Page-48.png)
![49Network OperationDCR-TRV50 Network 3-074-603-11(1).US(5)Tap [Enter].The Album: Invitation screen appears again. The new email address is listedand its check box is indicated by the checkmark ( ).,(6)If you want to send the invitation card to other addressees, tap other emailaddresses.The check box of the selected email address is indicated by the checkmark ( ).(7)Tap [ Return].The Album: Invitation screen appears again.NoteIf you try to send an invitation card with 50 addresses registered in the address book,the last-used address will be deleted. The message “Address Book Full Overwrite theData with Current Address?” appears for verification. To overwrite it, tap [OK].Otherwise you tap [Cancel], and delete the unnecessary address from the address book,then enter a new address.Making your album on the Web](https://usermanual.wiki/Sony-Group/DCRTRV950.network1/User-Guide-240524-Page-49.png)
![50DCR-TRV50 Network 3-074-603-11(1).US4Entering the text of a messageEnter the text of the message. You can select the text from the message list, or edit it tosuit your purposes. The list shows up to six messages.Selecting a lately used messageTap [Message].The message list appears.,The list shows messages that were written previously. Tap the message toselect it from the list.If you want to edit text, tap [Edit]. The character input screen appears. Go tostep 3.When desired text is selected, tap [OK]. After you select the message, go to“5 Uploading images” (p. 51).Writing a new message(1)Tap [ New].The character input screen appears.,(2)Enter your text.For details on how to input characters, see “How to input characters” (p. 9).NoteThe maximum number of characters you can enter is 512.Making your album on the Web](https://usermanual.wiki/Sony-Group/DCRTRV950.network1/User-Guide-240524-Page-50.png)
![51Network OperationDCR-TRV50 Network 3-074-603-11(1).US(3)Tap [Enter].The Album: Invitation screen appears again.,(4)Tap [OK].The Album: Upload screen appears again.“Yes” is indicated next to [Invitation].,5Uploading images(1)Tap [Send].The screen for verifying the connection appears.Set your Bluetooth device to connection standby with your camcorderbeforehand. For details, refer to the operating instructions supplied with yourBluetooth device.,(2)Check the telephone number.When dialing other telephone numbersTap [TEL No.]. The registered telephone number list appears. Tap the desiredtelephone number to select it.Making your album on the Web](https://usermanual.wiki/Sony-Group/DCRTRV950.network1/User-Guide-240524-Page-51.png)
![52DCR-TRV50 Network 3-074-603-11(1).US(3)Tap [Connect].Your camcorder starts dialing the selected telephone number. After theuploading is completed, the message “Upload Complete” appears.,,(4)Tap [OK].The Album: Upload screen appears again.To cancel uploadingDuring uploading, tap [Cancel].To send only an invitation card (email)You can send an invitation card without uploading images. Carry out the followingprocedures:“1 Selecting an album” (p. 45)“3 Sending an invitation card” (email) (p. 48)“4 Entering the text of a message” (p. 50)“5 Uploading images” (p. 51)After the invitation card has been sent, the message “Invitation Mail Complete”appears.Viewing or editing your album on the WebYou can view or download images from your album on the Web.1Viewing images(1)Open the Network Menu.For details on how to open the Network Menu, refer to “Accessing thenetwork” in the operating instructions supplied with your camcorder.(2)Tap [ Album].The Album screen appears.,Making your album on the Web](https://usermanual.wiki/Sony-Group/DCRTRV950.network1/User-Guide-240524-Page-52.png)
![53Network OperationDCR-TRV50 Network 3-074-603-11(1).US(3)Tap [ View/Edit].The screen for verifying the connection appears.Set your Bluetooth device to connection standby with your camcorderbeforehand. For details, refer to the operating instructions supplied with yourBluetooth device.,(4)Check the telephone number.When dialing other telephone numbersTap [TEL No.]. The registered telephone number list appears. Tap the desiredtelephone number. The selected telephone number is specified.(5)Tap [Connect].Your camcorder starts dialing the selected telephone number. After theconnection is completed, the album list page appears.,(6)Tap the album number that you want to view or edit.The index page appears.,To see a description of each function buttonTap [?].(7)Tap the desired image.The image is enlarged to fill the screen.Tips•When you want to end viewing or editing images in your album on the Web, tap menuon the upper-right LCD screen, then tap END.•The actual screen may differ.Making your album on the Web](https://usermanual.wiki/Sony-Group/DCRTRV950.network1/User-Guide-240524-Page-53.png)
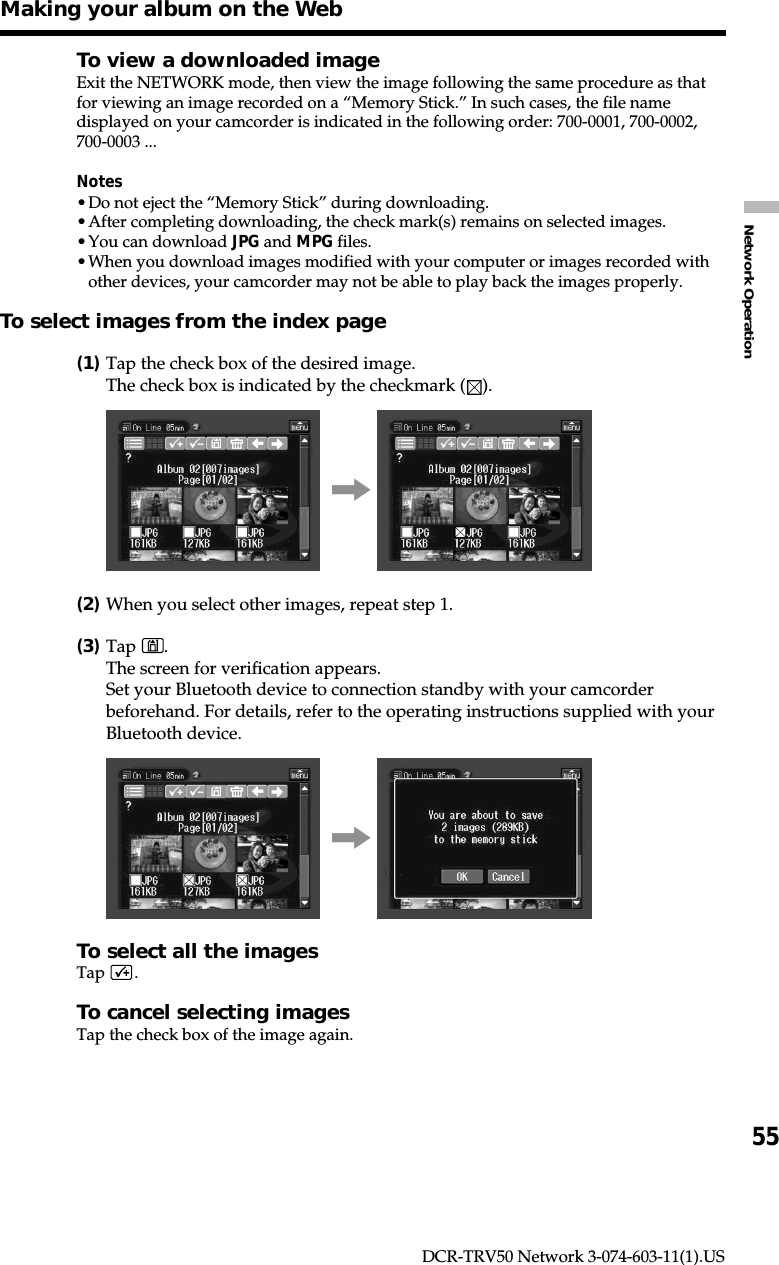
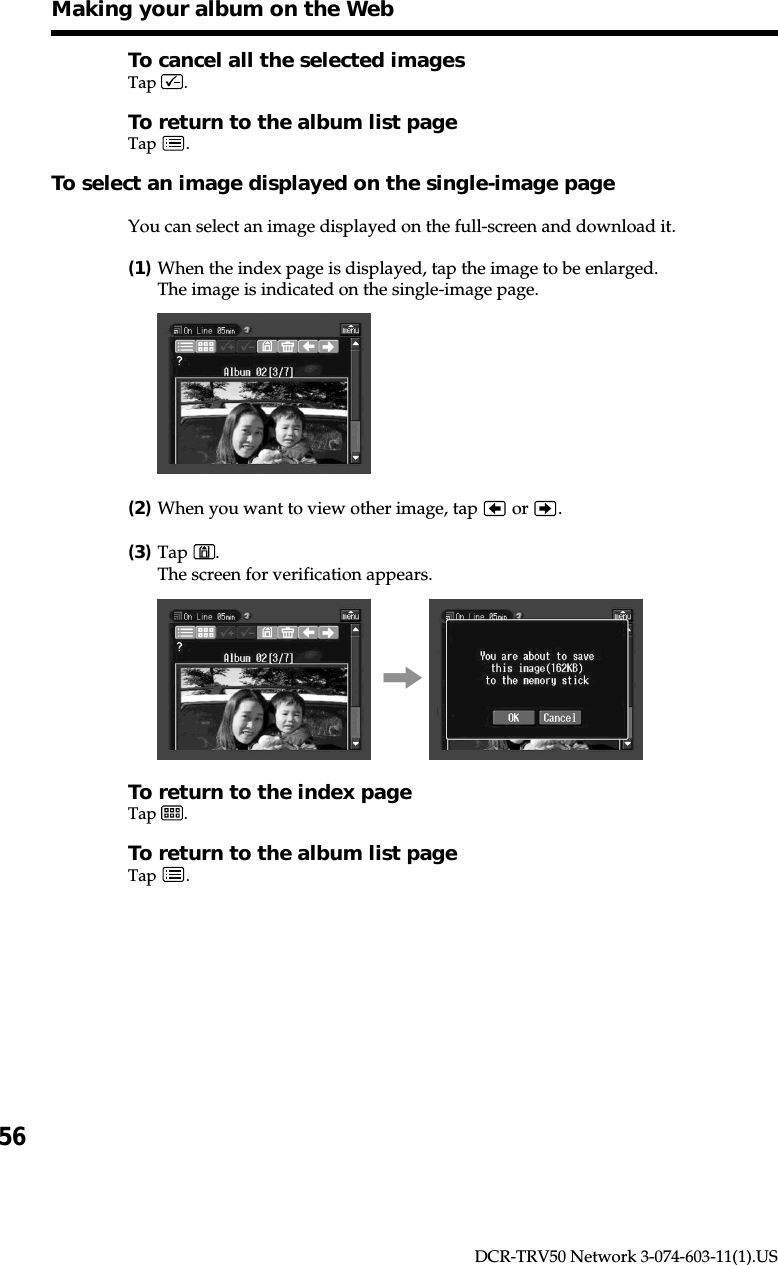
![54DCR-TRV50 Network 3-074-603-11(1).US2Downloading images from the albumBefore operation•Insert a “Memory Stick” into your camcorder, for storing images.•Release the lock of the “Memory Stick.”(1)Select the images you want to download.You can select the images in the following two ways:Selecting images from the index page:You can select several images and download them at one time. For details, see“To select images from the index page” (p. 55).Selecting an image displayed on the single-image page:You can select the image displayed on the single-image page and download it.For details, see “To select an image displayed on the single-image page” (p.56).(2)Check the number of images and the total file size.When you selected a When you selectedsingle image several imagesTo cancel downloading the imagesTap [Cancel].(3)Tap [OK].The message “Downloading” appears. After the downloading is completed,the message “Download Complete” appears.,,(4)Tap [OK].The index page or single-image page appears.To cancel downloadingDuring downloading, tap [Cancel].Making your album on the Web](https://usermanual.wiki/Sony-Group/DCRTRV950.network1/User-Guide-240524-Page-54.png)
![57Network OperationDCR-TRV50 Network 3-074-603-11(1).USDeleting images from your albumYou can delete images from your album.To delete images displayed on the index pageYou can select several images and delete them at one time. Tap in step 3 in “Toselect images from the index page” (p. 55). The screen for verification appears. Tap[OK]. The index page appears again.To delete an image displayed on the single-image pageTap in step 3 in “To select an image displayed on the single-image page”(p. 56). The screen for verification appears. Tap [OK]. The next image is displayed.If the album is emptyThe message “There is no pictures in this album.” appears.Return to the Album list pageTap .Finishing viewing or editing the albumTo finish viewing or editing the album, and disconnect thephone line(1)When the menu bar is not displayed, tap menu on the upper-right LCD screen.The menu bar appears.(2)Tap END (End).The album is closed, then the line is disconnected.To only disconnect the phone lineTap (Line Close). Only the phone line is disconnected.TipWhen you only disconnect the phone line, you can continue to view the albumdisplayed on the screen. If you try to download an image, delete an image, or viewanother album, verification appears on the screen.Making your album on the Web](https://usermanual.wiki/Sony-Group/DCRTRV950.network1/User-Guide-240524-Page-57.png)