Sony Group DCRTRV950 Digital Video Camera Recorder TRV950 User Manual manual2
Sony Corporation Digital Video Camera Recorder TRV950 manual2
UserManual.wiki
>
Sony Group
>
DCRTRV950 User Manual
>
manual2
Contents
1.
network1
2.
network2
3.
manual1
4.
manual2
5.
manual3
6.
manual4
manual2
Navigation menu
Upload a User Manual
Namespaces
Wiki Guide
HTML
PDF
Info
Views
User Manual
Discussion / Help
Navigation

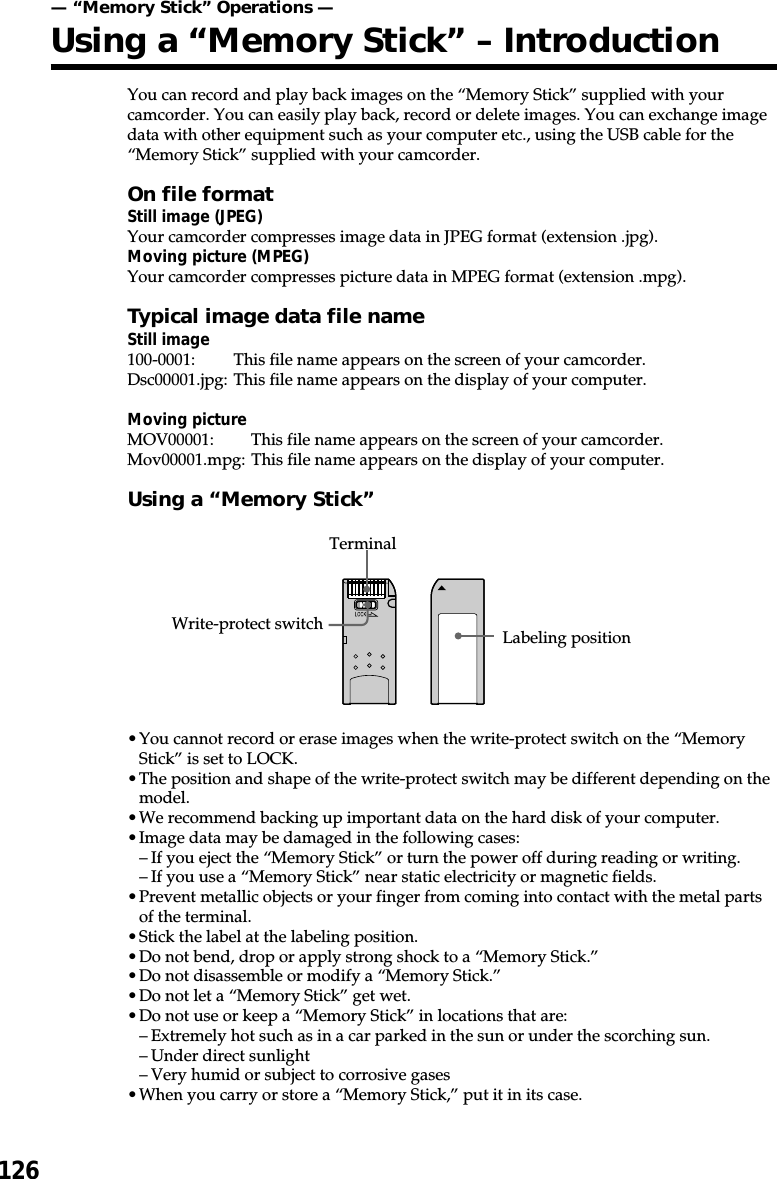
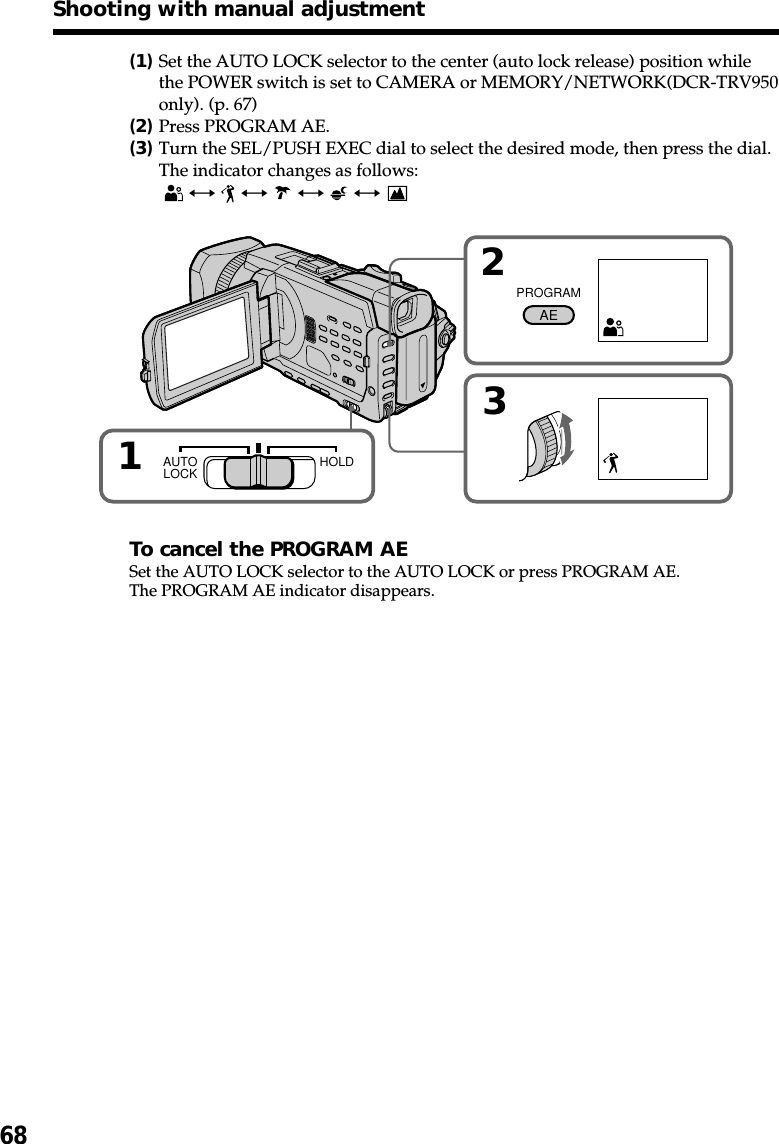
![67Advanced Recording OperationsAUTO LOCK selectorSet the selector as shown below to maintain or release the settings of the functions.Manually adjusted functions are retained even if you set the AUTO LOCK selector toAUTO LOCK. However, all functions will automatically return to the default settingsfive minutes after removing the power supply.AUTO LOCK [a]Select this position to lock the PROGRAM AE, Shutter speed, White balance, Exposureand Flexible spot meter functions in order to make these function automaticallyadjusted. We recommend that you set the AUTO LOCK selector to AUTO LOCK if youuse the video flash light (optional).AUTO LOCK release [b]Select this position for setting the functions manually.HOLD [c]Select AUTO LOCK release [b], and set the functions manually. Select this position [c]to maintain the settings.Using the PROGRAM AEYou can select the PROGRAM AE (Auto Exposure) to suit your specific shootingrequirements.Soft portraitThis mode brings out the subject while creating a soft background for subjects such aspeople or flowers.Sports lessonThis mode minimizes camera-shake on fast-moving subjects such as in tennis or golf.Beach & skiThis mode prevents people’s faces from appearing dark in strong light or reflected light,such as at a beach in midsummer or on a ski slope.Sunset & moonThis mode allows you to maintain atmosphere when you are recording sunsets, generalnight views, fireworks displays and neon signs.LandscapeThis mode is for when you are recording distant subjects such as mountains, andprevents your camcorder from focusing on glass or metal mesh in windows when youare recording a subject behind glass or a screen.AUTOLOCK HOLD[a] [c][b]Shooting with manual adjustment](https://usermanual.wiki/Sony-Group/DCRTRV950.manual2/User-Guide-240527-Page-3.png)
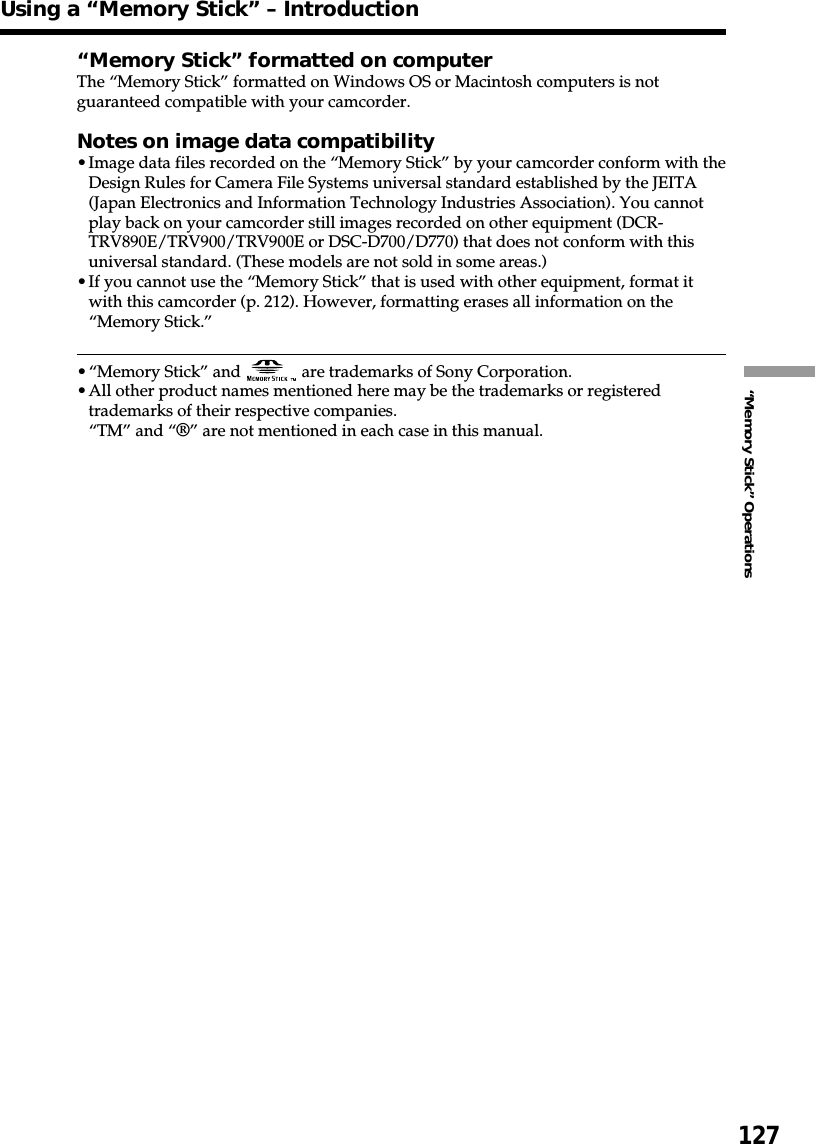
![70Adjusting the shutter speedYou can adjust the shutter speed manually to suit your preference and with its shutterspeed fixed.(1) Set the AUTO LOCK selector to the center (auto lock release) position while thePOWER switch is set to CAMERA or MEMORY/NETWORK(DCR-TRV950only). (p. 67)(2)Press SHUTTER SPEED. The shutter speed indicator appears on the screen.(3)Turn the SEL/PUSH EXEC dial to select the desired speed. The availableshutter speed ranges from 1/4 to 1/10000. As you turn the dial, the shutterspeed changes as follows:[CAMERA] 1/4 y 1/8 y 1/15 y 1/30 y ... y 1/4000 y 1/6000y 1/10000[MEMORY/NETWORK] 1/60 y 1/90 y 1/100 y 1/125 y 1/180y 1/250 y 1/350 y 1/500The shutter speed increases when a smaller number is selected. The size of thepicture displayed on the screen also increases. Conversely, the shutter speed isslower when a larger number is selected. The picture displayed on the screenwill thus decrease in size.To return to automatic shutter speed modeSet the AUTO LOCK selector to AUTO LOCK or press SHUTTER SPEED. The shutterspeed indicator disappears.Notes•If you set the shutter speed value to 1/30 or smaller, You cannot use the flash and thedigital effect.•The Shutter speed cannot be adjusted while you are using the following functions.– PROGRAM AE– Exposure–Flexible spot meterIf you press PROGRAM AEShutter speed adjusted manually returns to the automatic shutter speed.Shooting with manual adjustment2603SHUTTERSPEED1AUTOLOCK HOLD](https://usermanual.wiki/Sony-Group/DCRTRV950.manual2/User-Guide-240527-Page-6.png)
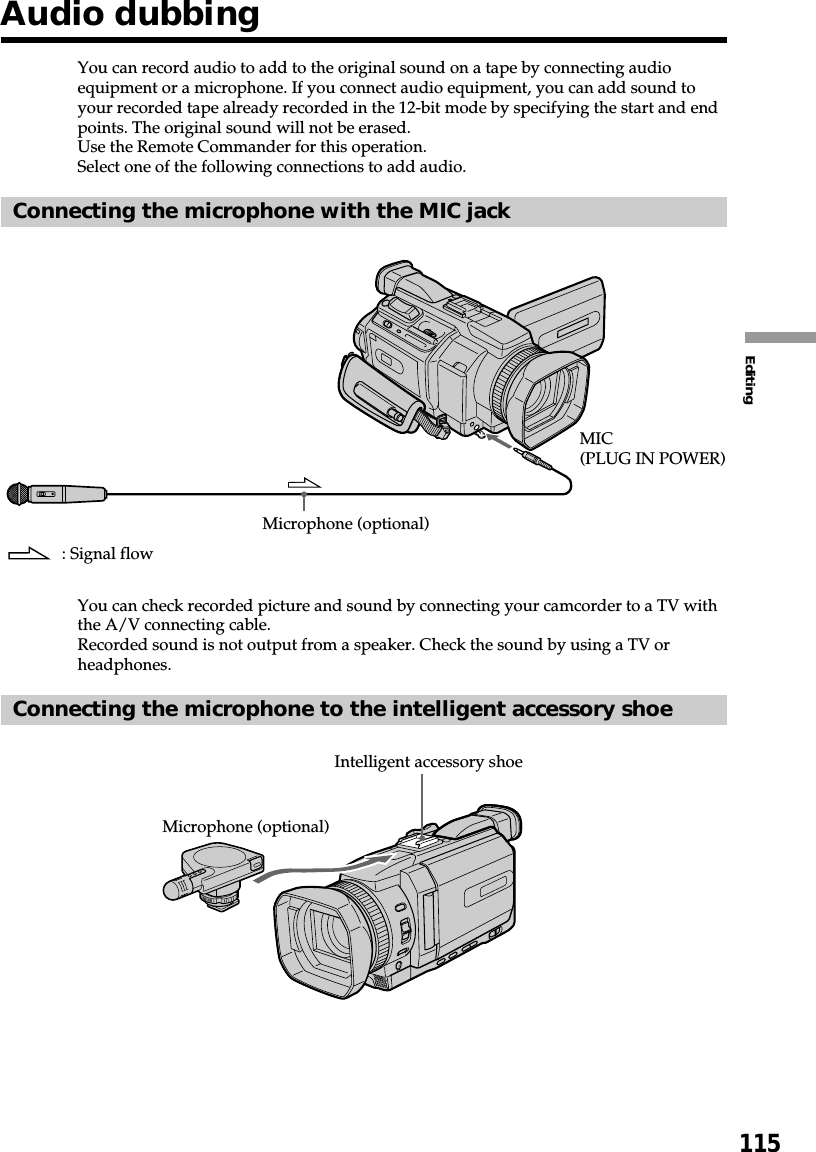
![79Advanced Recording OperationsYou can adjust the recording sound level. Use headphones to monitor the sound whenyou adjust it.(1)Set MIC LEVEL in to MANUAL in the menu setting while the POWERswitch is set to CAMERA or VCR. (p. 214)(2)Press MENU to erase the menu display.(3)Press AUDIO LEVEL to display the recording level adjustment display instandby mode.(4)Turn the SEL/PUSH EXEC dial to adjust the recording level.[a] Recording level meter[b]Decreases the recording level[c] Increases the recording levelTo clear the recording level adjustment displayPress AUDIO LEVEL.To return to automatic recording sound levelSet MIC LEVEL to AUTO in the menu setting. [MENU] : ENDTAPE SETREC MODEAUD I O MODE REMA I NM I C LEVEL RETURN MANUAL [MENU] : END2330 20 12 0 dB [MENU] : END [MENU] : ENDTAPE SETREC MODEAUD I O MODE REMA I NM I C LEVEL RETURN AUTOMANUAL [a][b][c]MENUAUDIO LEVEL1Adjusting recording level manually – Soundrecording level](https://usermanual.wiki/Sony-Group/DCRTRV950.manual2/User-Guide-240527-Page-15.png)
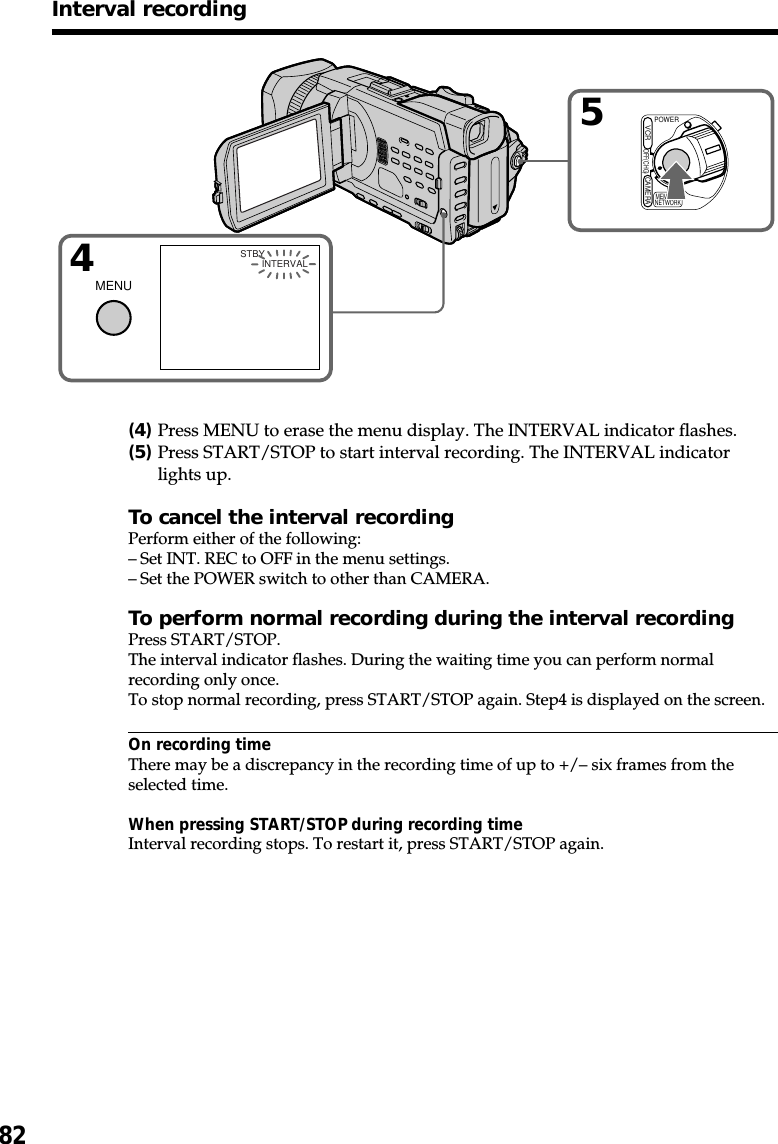
![81Advanced Recording OperationsExample[a]REC TIME[b]Waiting time[c]INTERVALYou can make a time-lapse recording by setting the camcorder to automatically recordand standby sequentially. You can achieve an excellent recording for flowering, gradualappearances, etc., with this function.(1)In the standby, set INT. REC in to SET in the menu setting. (p. 209)(2)Turn the SEL/PUSH EXEC dial to set INTERVAL and REC TIME.1 Turn the SEL/PUSH EXEC dial to select INTERVAL, then press the dial.2Turn the SEL/PUSH EXEC dial to select the desired interval time, thenpress the dial.The time: 30SEC y 1MIN y 5MIN y 10MIN3Turn the SEL/PUSH EXEC dial to select REC TIME, then press the dial.4Turn the SEL/PUSH EXEC dial to select the desired recording time, thenpress the dial.The time: 0.5SEC y 1SEC y 1.5SEC y 2SEC5Turn the SEL/PUSH EXEC dial to select RETURN, then press the dial.(3)Turn the SEL/PUSH EXEC dial to select ON, then press the dial.10 min10 min1 s 1 s9 min 59 s 9 min 59 s[a][b][c]3CAMERA SET D ZOOM PHOTO REC 16:9WIDE STEADYSHOT FRAME REC INT. REC RETURN ON[MENU] : END[MENU] : END [MENU] : END[MENU] : END [MENU] : ENDCAMERA SET INT. REC INTERVAL REC TIME RETURN 30SECCAMERA SET INT. REC INTERVAL REC TIME RETURN 30SEC 1MIN 5MIN10MINCAMERA SET INT. REC INTERVAL REC TIME RETURN 0.5SECCAMERA SET INT. REC INTERVAL REC TIME RETURN 0.5SEC 1SEC1.5SEC 2SEC12[MENU] : ENDCAMERA SET D ZOOM PHOTO REC 16:9WIDE STEADYSHOT FRAME REC INT. REC RETURN ONOFFSETSTBYSTBYSTBYSTBY[MENU] : ENDCAMERA SET INT. REC INTERVAL REC TIME RETURN 30SECSTBYSTBYSTBY(continued on the following page)Interval recording](https://usermanual.wiki/Sony-Group/DCRTRV950.manual2/User-Guide-240527-Page-17.png)
![83Advanced Recording OperationsYou can make a recording with a stop-motion animated effect using frame recording.To create this effect, alternately move the subject a little and make a frame recording.We recommend that you use a tripod, and operate your camcorder using the RemoteCommander after step 3.(1) In the standby, set FRAME REC in to ON in the menu setting. (p.209)(2)Press MENU to erase the menu display.The FRAME REC indicator lights up.(3)Press START/STOP to start frame recording. Your camcorder makes arecording for about six frames, and returns to recording standby.(4)Move the subject, and repeat step 3.To cancel the frame recordingPerform either of the following:–Set FRAME REC to OFF in the menu settings.–Set the POWER switch to other than CAMERA.NoteThe remaining tape time is not indicated correctly if you use this function continuously.When using the frame recordingThe last recorded frame is longer than other frames.Frame by frame recording– Frame recordingMENU13CAMERA SET D ZOOM PHOTO REC 16:9WIDE STEADYSHOT FRAME REC INT. REC RETURNON [MENU] : ENDCAMERA SET D ZOOM PHOTO REC 16:9WIDE STEADYSHOT FRAME REC INT. REC RETURNOFFON [MENU] : ENDSTBY STBYPOWEROFF(CHG)CAMERAMEMORY/NETWORKVCRMENU](https://usermanual.wiki/Sony-Group/DCRTRV950.manual2/User-Guide-240527-Page-19.png)
![84During playback, you can process a scene using the following picture effect:NEG. ART, SEPIA, B&W and SOLARIZE.(1)In the playback or playback pause, press MENU, then select P EFFECT in with the SEL/PUSH EXEC dial, then press the dial (p. 208).(2)Turn the SEL/PUSH EXEC dial to select the desired mode, then press the dial.For details of each picture effect, see page 58.To cancel the picture effectSet P EFFECT to OFF in the menu settings.Notes•You cannot process externally input scenes using picture effect.•You cannot record images on a tape on your camcorder when you have processed theimage using the picture effect. However, you can record images on a “Memory Stick”(p. 144, 156), or on a VCR using your camcorder as a player.Pictures processed by picture effectPictures processed by picture effect are not output through the DV Interface.When you set the POWER switch to OFF (CHG) or stop playing backPicture effect is automatically canceled.— Advanced Playback Operations —Playing back tapes with picture effectMENU1MANUAL SET P EFFECT RETURN OFFNEG. ARTSEPIAB&WSOLARIZE[MENU] : END](https://usermanual.wiki/Sony-Group/DCRTRV950.manual2/User-Guide-240527-Page-20.png)
![89Advanced Playback OperationsIf you use a cassette with cassette memory, you can search for the boundaries of arecorded tape by title. Use the Remote Commander for this operation.Before operationSet CM SEARCH in to ON in the menu settings. (The default setting is ON.)(1)Set the POWER switch to VCR.(2)Press SEARCH MODE on the Remote Commander repeatedly until the TITLESEARCH indicator appears. The indicator changes as follows:TITLE SEARCH t DATE SEARCH t PHOTO SEARCH(no indicator) TPHOTO SCAN(3)Press . or > on the Remote Commander to select the title for playback.Your camcorder automatically starts playback of the scene having the title thatyou selected.[a]Actual point you are trying to search for[b]Present point on the tapeTo stop searchingPress x.If you use a cassette without cassette memoryYou cannot superimpose or search a title.If a tape has a blank portion between recorded portionsThe title search may not work correctly.To superimpose a titleSee page 119.3.>2SEARCHMODETITLE SEARCH 1 HELLO!2 CONGRATULATIONS!3 HAPPY NEW YEAR!4 PRESENT5 GOOD MORNING6 WEDDINGTITLE SEARCH 3 HAPPY NEW YEAR!4 PRESENT5 GOOD MORNING6 WEDDING7 NIGHT8 BASEBALL[b][a]Searching the boundaries of a recordedtape by title – TITLE SEARCH](https://usermanual.wiki/Sony-Group/DCRTRV950.manual2/User-Guide-240527-Page-25.png)
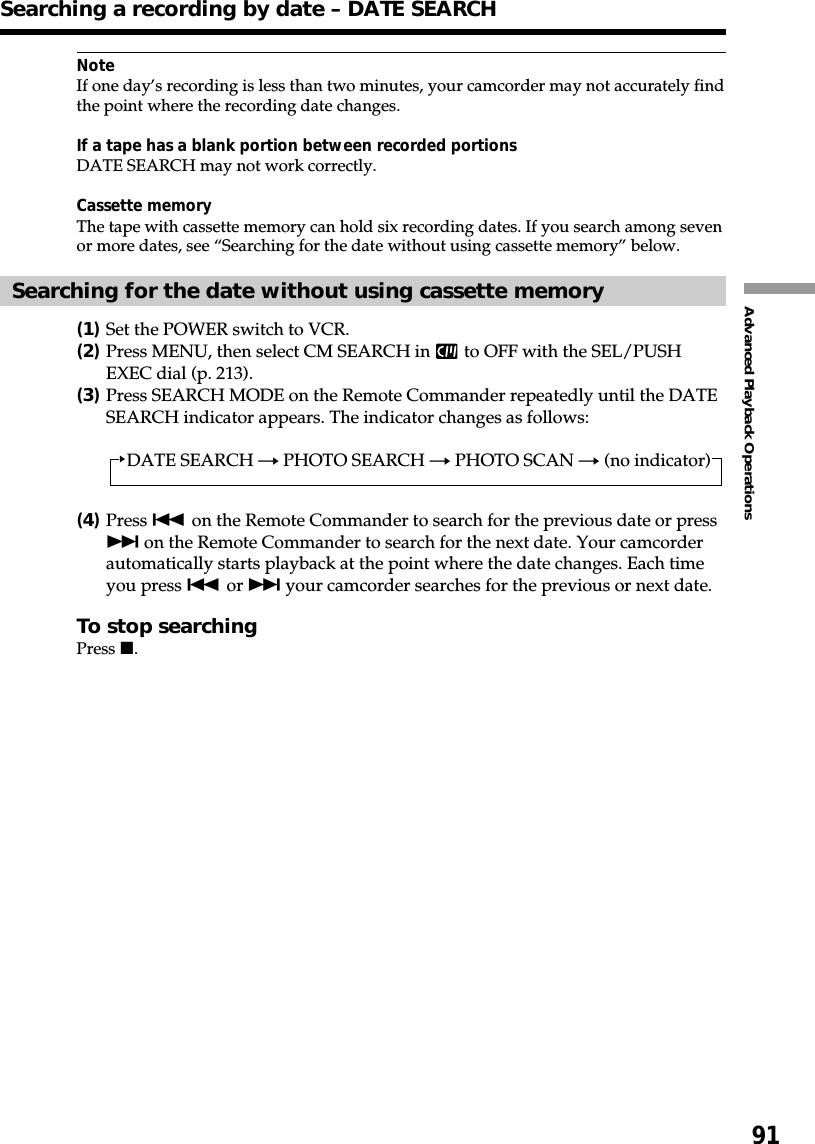
![90You can automatically search for the point where the recording date changes and startplayback from that point (date search). Use a cassette with cassette memory forconvenience. Use the Remote Commander for this operation.Use this function to check where recording dates change or to edit the tape at eachrecording date.Searching for the date by using cassette memoryBefore operation•You can use this function only when playing back a cassette with cassette memory.•Set CM SEARCH in to ON in the menu settings. (The default setting is ON.)(1)Set the POWER switch to VCR.(2)Press SEARCH MODE on the Remote Commander repeatedly until the DATESEARCH indicator appears. The indicator changes as follows:TITLE SEARCH t DATE SEARCH t PHOTO SEARCH(no indicator) TPHOTO SCAN(3)Press . or > on the Remote Commander to select the date for playback.Your camcorder automatically starts playback at the beginning of the selecteddate.[a]Actual point you are trying to search for[b]Present point on the tapeTo stop searchingPress x.Searching a recording by date– DATE SEARCH3.>2SEARCHMODEDATE SEARCH1 SEP/ 5/022 SEP/ 6/023 DEC/24/024 JAN/ 1/035 FEB/ 11/036 APR/ 29/03DATE SEARCH1 SEP/ 5/022 SEP/ 6/023 DEC/24/024 JAN/ 1/035 FEB/ 11/036 APR/ 29/03[b][a]](https://usermanual.wiki/Sony-Group/DCRTRV950.manual2/User-Guide-240527-Page-26.png)
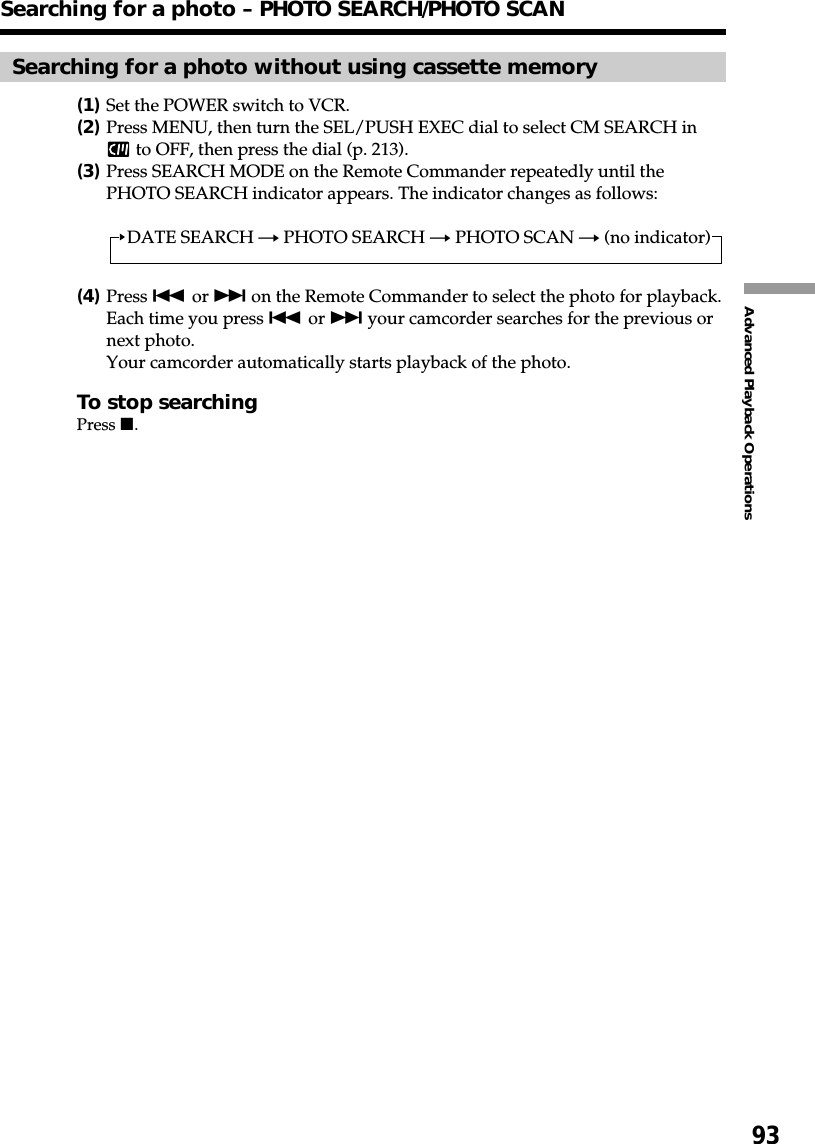
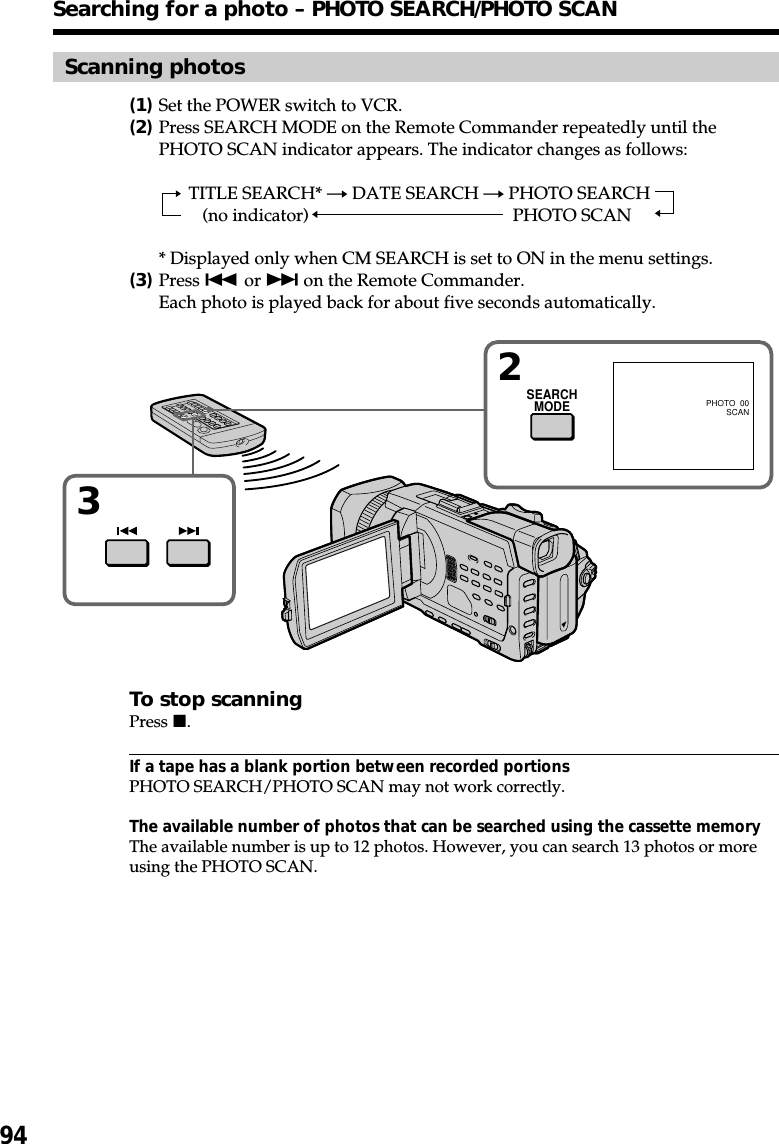
![92You can search for a still image you have recorded on a tape (PHOTO SEARCH).You can also search for still images one after another and display each image forfive seconds automatically regardless of cassette memory (PHOTO SCAN). Use theRemote Commander for these operations.Use this function to check or edit still images.Searching for a photo by using cassette memoryBefore operation•You can use this function only when playing back a cassette with cassette memory.•Set CM SEARCH in to ON in the menu settings. (The default setting is ON.)(1)Set the POWER switch to VCR.(2)Press SEARCH MODE on the Remote Commander repeatedly until thePHOTO SEARCH indicator appears. The indicator changes as follows:TITLE SEARCH t DATE SEARCH t PHOTO SEARCH(no indicator) TPHOTO SCAN(3)Press . or > on the Remote Commander to select the date for playback.Your camcorder automatically starts playback of the photo having the datethat you selected.[a]: Actual point you are trying to search for[b]: Present point on the tapeTo stop searchingPress x.Searching for a photo– PHOTO SEARCH/PHOTO SCAN3.>2SEARCHMODEPHOTO SEARCH1 SEP/ 5/02 5:30PM2 SEP/ 6/02 8:50AM3 DEC/24/02 10:30AM4 JAN/ 1/03 11:25PM5 FEB/ 11/03 4:11PM6 APR/ 29/03 1:45PMPHOTO SEARCH1 SEP/ 5/02 5:30PM2 SEP/ 6/02 8:50AM3 DEC/24/02 10:30AM4 JAN/ 1/03 11:25PM5 FEB/ 11/03 4:11PM6 APR/ 29/03 1:45PM[b][a]](https://usermanual.wiki/Sony-Group/DCRTRV950.manual2/User-Guide-240527-Page-28.png)
![99EditingDubbing only desired scenes – Digital program editing (on tapes)MENU3475OTHERS DATA CODE BEEP COMMANDER DISPLAY VIDEO EDIT RETURN RETURNTAPEMEMORYVIDEO EDIT MARK UNDO ERASE ALL START EDIT SET IR0:08:55:06TOTAL 0:00:00:00SCENE 0[MENU] : ENDVIDEO EDIT EDIT SET CONTROL ADJ TEST ”CUT–IN” ”CUT–OUT” IR SETUP PAUSEMODE IR TEST RETURNIR0:08:55:06[MENU] : ENDVIDEO EDIT MARK UNDO ERASE ALL START EDIT SET1 IN0:08:55:06TOTAL 0:00:00:00SCENE 0[MENU] : END[MENU] : ENDOTHERS DATA CODE BEEP COMMANDER DISPLAY VIDEO EDIT RETURN READY[MENU] : ENDVIDEO EDIT EDIT SET CONTROL ADJ TEST ”CUT–IN” ”CUT–OUT” IR SETUP PAUSEMODE IR TEST RETURN 30:08:55:06[MENU] : ENDVIDEO EDIT EDIT SET CONTROL ADJ TEST ”CUT–IN” ”CUT–OUT” IR SETUP PAUSEMODE IR TEST RETURNIRi. LINK0:08:55:06[MENU] : ENDStep 2: Setting the VCR to operate with the A/V connecting cableTo edit using the VCR, send the control signal by infrared rays to the remote sensor onthe VCR.When you connect using the A/V connecting cable, follow the procedure below, steps(1) to (4), to send the control signal correctly.(1) Set the IR SETUP code1Set the POWER switch to VCR on your camcorder.2Turn the power of the connected VCR on, then set the input selector to LINE.When you connect a video camera recorder, set its power switch to VCR/VTR.3Press MENU, then turn the SEL/PUSH EXEC dial to set VIDEO EDIT in toTAPE, then press the dial (p. 217).4Turn the SEL/PUSH EXEC dial to select EDIT SET, then press the dial.5Turn the SEL/PUSH EXEC dial to select CONTROL, then press the dial.6Turn the SEL/PUSH EXEC dial to select IR, then press the dial.7Turn the SEL/PUSH EXEC dial to select IR SETUP and turn the dial to selectIR SETUP code number of your VCR, then press the dial.Check the code in “About IR SETUP codes.” (p. 100)](https://usermanual.wiki/Sony-Group/DCRTRV950.manual2/User-Guide-240527-Page-35.png)
![101Editing(2) Setting the modes to cancel the recording pause on the VCR1Turn the SEL/PUSH EXEC dial to select PAUSEMODE, then press the dial.2Turn the SEL/PUSH EXEC dial to select the mode to cancel recording pauseon the VCR, then press the dial.Refer to the operating instructions of your VCR.Buttons to cancel recording pause on the VCRThe buttons vary depending on your VCR. To cancel recording pause:–Select PAUSE if the button to cancel recording pause is X.–Select REC if the button to cancel recording pause is z.–Select PB if the button to cancel recording pause is N.(3) Setting your camcorder and the VCR to face each otherLocate the infrared rays emitter of your camcorder and face it towards the remotesensor of the VCR.Set the devices about 30 cm (12 in.) apart, and remove any obstacles between thedevices.Dubbing only desired scenes – Digital program editing (on tapes)VIDEO EDIT EDIT SET CONTROL ADJ TEST ”CUT–IN” ”CUT–OUT” IR SETUP PAUSEMODE IR TEST RETURNPAUSERECPB0:08:55:06[MENU] : ENDVIDEO EDIT EDIT SET CONTROL ADJ TEST ”CUT–IN” ”CUT–OUT” IR SETUP PAUSEMODE IR TEST RETURNPAUSE0:08:55:06[MENU] : END21VCRRemote sensorA/V connecting cable (supplied)Infrared rays emitter](https://usermanual.wiki/Sony-Group/DCRTRV950.manual2/User-Guide-240527-Page-37.png)
![102(4) Confirming VCR operation1Insert a recordable tape into the VCR, then set to recording pause.2Turn the SEL/PUSH EXEC dial to select IR TEST, then press the dial.3Turn the SEL/PUSH EXEC dial to select EXECUTE, then press the dial.If the VCR starts recording, the setting is correct.When recording is finished, the indicator changes to COMPLETE.When the VCR does not operate correctly•After checking the code in “About IR SETUP codes”, set the IR SETUP or thePAUSEMODE again.•Place your camcorder at least 30 cm (12 in.) away from the VCR.•Refer to the operating instructions of your VCR.Dubbing only desired scenes – Digital program editing (on tapes)23VIDEO EDIT EDIT SET CONTROL ADJ TEST ”CUT–IN” ”CUT–OUT” IR SETUP PAUSEMODE IR TEST RETURNENGAGEREC PAUSERETURNEXECUTE0:08:55:06[MENU] : ENDVIDEO EDIT EDIT SET CONTROL ADJ TEST ”CUT–IN” ”CUT–OUT” IR SETUP PAUSEMODE IR TEST RETURN COMPLETE0:08:55:06[MENU] : END](https://usermanual.wiki/Sony-Group/DCRTRV950.manual2/User-Guide-240527-Page-38.png)
![103EditingStep 2: Setting the VCR to operate with the i.LINK cableWhen you connect using the i.LINK cable (optional), follow the procedure below.(1)Set the POWER switch to VCR on your camcorder.(2)Turn the power of the connected VCR on, then set the input selector to DVinput. When you connect a digital video camera recorder, set its power switchto VCR/VTR.(3)Press MENU, then turn the SEL/PUSH EXEC dial to set VIDEO EDIT in toTAPE, then press the dial (p. 217).(4)Turn the SEL/PUSH EXEC dial to select EDIT SET, then press the dial.(5)Turn the SEL/PUSH EXEC dial to select CONTROL, then press the dial.(6)Turn the SEL/PUSH EXEC dial to select i.LINK, then press the dial.When you connect using an i.LINK cableYou cannot dub the titles, display indicators.Dubbing only desired scenes – Digital program editing (on tapes)3546OTHERS DATA CODE BEEP COMMANDER DISPLAY VIDEO EDIT RETURN RETURNTAPEMEMORYVIDEO EDIT EDIT SET CONTROL ADJ TEST ”CUT–IN” ”CUT–OUT” IR SETUP PAUSEMODE IR TEST RETURNIRi. LINK0:08:55:06[MENU] : ENDVIDEO EDIT MARK UNDO ERASE ALL START EDIT SET1 IN0:08:55:06TOTAL 0:00:00:00SCENE 0[MENU] : END[MENU] : ENDOTHERS DATA CODE BEEP COMMANDER DISPLAY VIDEO EDIT RETURN READY[MENU] : ENDVIDEO EDIT MARK UNDO ERASE ALL START EDIT SET IR0:08:55:06TOTAL 0:00:00:00SCENE 0[MENU] : ENDVIDEO EDIT EDIT SET CONTROL ADJ TEST ”CUT–IN” ”CUT–OUT” IR SETUP PAUSEMODE IR TEST RETURNIR0:08:55:06[MENU] : ENDVIDEO EDIT EDIT SET CONTROL ADJ TEST ”CUT–IN” ”CUT–OUT” IR SETUP PAUSEMODE IR TEST RETURNi. LINK0:08:55:06[MENU] : ENDMENU](https://usermanual.wiki/Sony-Group/DCRTRV950.manual2/User-Guide-240527-Page-39.png)
![105EditingDubbing only desired scenes – Digital program editing (on tapes)2,3 68VIDEO EDIT EDIT SET CONTROL ADJ TEST ”CUT–IN” ”CUT–OUT” IR SETUP PAUSEMODE IR TEST RETURNEXECUTEENGAGEREC PAUSE0:08:55:06[ME VIDEO EDIT EDIT SET CONTROL ADJ TEST ”CUT–IN” ”CUT–OUT” IR SETUP PAUSEMODE IR TEST EXECUTINGNo. 5 IN –600:08:55:06[ME VIDEO EDIT EDIT SET CONTROL ADJ TEST ”CUT–IN” ”CUT–OUT” IR SETUP PAUSEMODE IR TEST RETURNCOMPLETE0:08:55:06[MENU] : ENDVIDEO EDIT EDIT SET CONTROL ADJ TEST ”CUT–IN” ”CUT–OUT” IR SETUP PAUSEMODE IR TEST RETURN 00:08:55:06[MENU] : ENDVIDEO EDIT EDIT SET CONTROL ADJ TEST ”CUT–IN” ”CUT–OUT” IR SETUP PAUSEMODE IR TEST RETURN 00:08:55:06[MENU] : ENDNotes•When you complete step 3, the image used to adjust the synchronization is recordedfor about 50 seconds.•If you start recording from the very beginning of the tape, the first few seconds of thetape may not record properly. Be sure to allow about 10 seconds’ lead before startingrecording.•When the recording unit cannot be operated properly by the i.LINK cable, leave theconnection as it is, and make the A/V connecting cable settings (p. 99). Video andaudio are sent by digital signals.](https://usermanual.wiki/Sony-Group/DCRTRV950.manual2/User-Guide-240527-Page-41.png)
![106Dubbing only desired scenes – Digital program editing (on tapes)Operation 1: Making a program(1)Insert the tape for playback into your camcorder, and insert a tape forrecording into the VCR.(2)Press MENU, then turn the SEL/PUSH EXEC dial to set VIDEO EDIT in toTAPE, then press the dial (p. 217).(3)Search for the beginning of the first scene you want to insert using the videooperation buttons, then pause playback.You can fine-adjust one frame at a time with EDITSEARCH.(4)Press MARK on the Remote Commander, or turn the SEL/PUSH EXEC dial toselect MARK, then press the dial.The IN point of the first program is set, and the top part of the program markchanges to light blue.(5)Search for the end of the first scene you want to insert using the videooperation buttons, then pause playback. You can fine-adjust one frame at atime with EDITSEARCH.(6)Press MARK on the Remote Commander, or the SEL/PUSH EXEC dial.The OUT point of the first program is set, then the bottom part of the programmark changes to light blue.(7)Repeat steps 3 to 6, then set the program.When the program is set, the program mark changes to light blue.You can set up to 20 programs in maximum.MENU4276OTHERS DATA CODE BEEP COMMANDER DISPLAY VIDEO EDIT RETURN READY[MENU] : ENDOTHERS DATA CODE BEEP COMMANDER DISPLAY VIDEO EDIT RETURN RETURNTAPEMEMORY[MENU] : ENDVIDEO EDIT MARK UNDO ERASE ALL START EDIT SET1 IN 0:08:55:06TOTAL 0:00:00:00SCENE 0[MENU] : ENDVIDEO EDIT MARK UNDO ERASE ALL START EDIT SET4 IN 0:10:01:23TOTAL 0:00:47:12SCENE 3[MENU] : ENDVIDEO EDIT MARK UNDO ERASE ALL START EDIT SET2 IN 0:09:07:06TOTAL 0:00:12:00SCENE 1[MENU] : ENDVIDEO EDIT MARK UNDO ERASE ALL START EDIT SET1 OUT0:08:55:06TOTAL 0:00:00:00SCENE 0[MENU] : ENDN X N X N X](https://usermanual.wiki/Sony-Group/DCRTRV950.manual2/User-Guide-240527-Page-42.png)
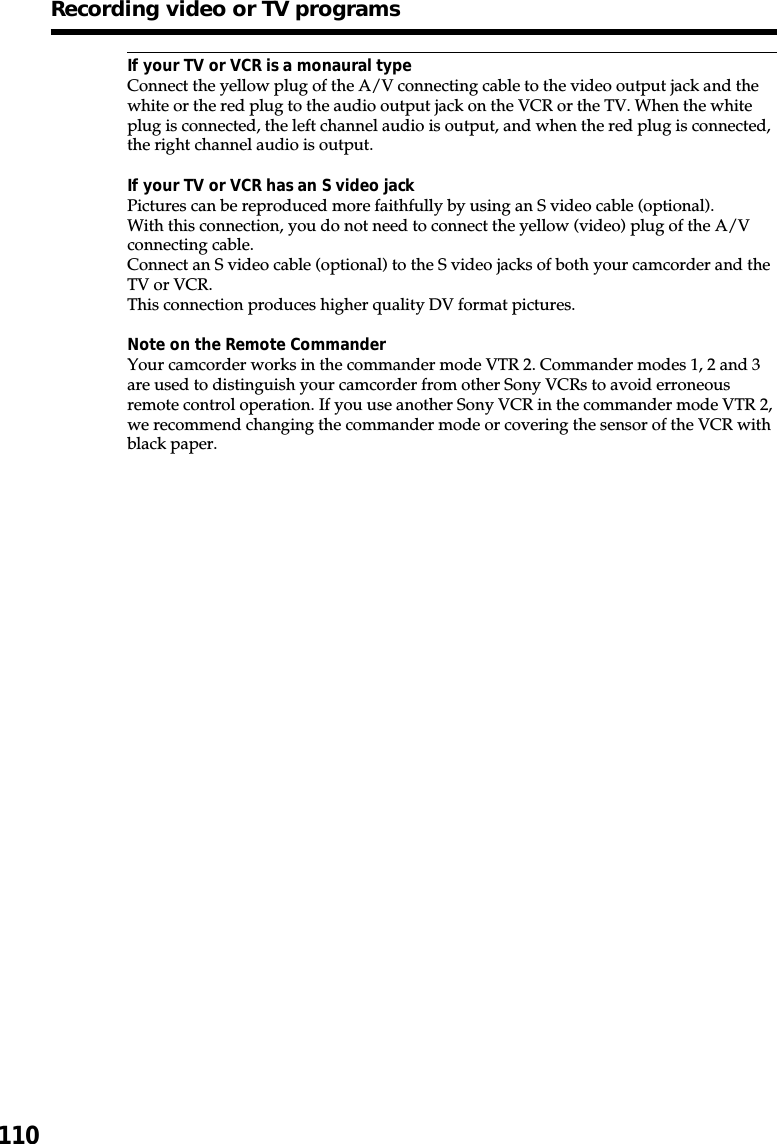

![113EditingYou can insert a new scene from a VCR onto your originally recorded tape byspecifying the insert start and end points. Use the Remote Commander for thisoperation. Connections are the same as on page 109 or 111.Insert a cassette containing the desired scene to insert into the VCR.[A]:A tape that contains the scene to be superimposed[B]:A tape before editing[C]:A tape after editing(1)Set the POWER switch to VCR on your camcorder.(2)On the connected VCR, locate just before the insert start point [a], then pressX to set the VCR to the playback pause.(3)On your camcorder, locate the insert end point [c]. Then press X to set yourcamcorder to the playback pause.(4)Press ZERO SET MEMORY on the Remote Commander. The ZERO SETMEMORY indicator flashes and the end point of the insert is stored inmemory. The tape counter shows “0:00:00.”(5)On your camcorder, locate the insert start point [b] by pressing m, then pressz REC and the button on its right simultaneously.(6)First press X on the VCR, and after a few seconds press X on your camcorderto start inserting the new scene.Inserting automatically stops near the zero point on the tape counter. Yourcamcorder automatically returns to the recording pause.Inserting a scene from a VCR– Insert Editing[A][B][C][a][b][c]](https://usermanual.wiki/Sony-Group/DCRTRV950.manual2/User-Guide-240527-Page-49.png)
![118Audio dubbingMonitoring the new recorded sound(1)Play back the tape on which you added audio.(2)Turn the SEL/PUSH EXEC dial to select AUDIO MIX in in the menusettings, then press the dial.(3)Turn the SEL/PUSH EXEC dial to adjust the balance between the originalsound (ST1) and the new sound (ST2), then press the dial.Five minutes after you remove the power supply or the battery pack, the AUDIO MIXsetting returns to original sound (ST1) only. The default setting is original sound only.Notes•New audio cannot be recorded on a tape already recorded in the 16-bit mode (32 kHz,44.1 kHz or 48 kHz).•New audio cannot be recorded on a tape already recorded in the LP mode.•You cannot add audio on the blank portion of the tape.If an i.LINK cable (optional) is connected to your camcorderYou cannot add audio to a recorded tape.We recommend that you add audio on a tape recorded with your camcorderIf you add audio on a tape recorded with another camcorder (including anotherDCR-TRV940/TRV950), the sound quality may become worse.If you set the write-protect tab of the cassette to lockYou cannot record on a tape. Slide the write-protect tab to release the write protection.ST1 ST2VCR SET HiFi SOUND AUDIO MIX A/VcDV OUT RETURN[MENU] : END](https://usermanual.wiki/Sony-Group/DCRTRV950.manual2/User-Guide-240527-Page-54.png)
![119EditingIf you use a tape with cassette memory, you can superimpose the title. Whenyou play back the tape, the title is displayed for five seconds from the pointwhere you superimposed it.(1)In the recording , recording standby, playback or playback pause, pressMENU, then select TITLE in with the SEL/PUSH EXEC dial (p. 213).(2)Turn the SEL/PUSH EXEC dial to select , then press the dial.(3)Turn the SEL/PUSH EXEC dial to select the desired title, then press the dial.The title flashes.(4)Change the color, size, or position, if necessary.1Turn the SEL/PUSH EXEC dial to select COLOR, SIZE or POSITION, thenpress the dial. The selected item appears.2Turn the SEL/PUSH EXEC dial to select the desired item, then press thedial.3Repeat steps 1 and 2 until the title is laid out as desired.(5)Press the SEL/PUSH EXEC dial again to complete the setting.In the recording, playback or playback pause:The TITLE SAVE indicator appears on the screen for five seconds and the titleis set.In the standby:The TITLE indicator appears. When you press START/STOP to startrecording, TITLE SAVE appears on the screen for five seconds, and the title isset.VACATION234VACATIONVACATIONVACATIONPRESET TITLE HELLO! HAPPY BIRTHDAY HAPPY HOLIDAYS CONGRATULATIONS! OUR SWEET BABY WEDDING VACATION THE END[MENU] : ENDPRESET TITLE HELLO! HAPPY BIRTHDAY HAPPY HOLIDAYS CONGRATULATIONS! OUR SWEET BABY WEDDING VACATION THE END RETURN[MENU] : ENDPRESET TITLE HELLO! HAPPY BIRTHDAY HAPPY HOLIDAYS CONGRATULATIONS! OUR SWEET BABY WEDDING VACATION THE END RETURN[MENU] : ENDTITLE[EXEC] : SAVE [MENU] : ENDTITLE[EXEC] : SAVE [MENU] : ENDSIZE SMALLSIZE LARGEMENUSuperimposing a title](https://usermanual.wiki/Sony-Group/DCRTRV950.manual2/User-Guide-240527-Page-55.png)
![121EditingErasing a title(1)Set the POWER switch to CAMERA or VCR.(2)Press MENU, then turn the SEL/PUSH EXEC dial to select TITLEERASE in, then press the dial (p. 213).(3)Turn the SEL/PUSH EXEC dial to select the title you want to erase, then pressthe dial. ERASE OK ? indicator appears.(4)Make sure that the title is the one you want to erase, and turn the SEL/PUSHEXEC dial to select OK, then press the dial. OK changes to EXECUTE.(5)Turn the SEL/PUSH EXEC dial to select EXECUTE, then press the dial.The ERASING flashes on the screen. When the title is erased, the COMPLETEis displayed.To cancel erasing a titleSelect RETURN in step 4 or 5.Superimposing a titleMENU234CM SET TITLE TITLEERASE TITLE DSPL CM SEARCH TAPE TITLE ERASE ALL RETURN[MENU] : ENDTITLE ERASE1 HELLO!2 CONGRATULATIONS!3 HAPPY NEW YEAR!4 PRESENT5 GOOD MORNING6 WEDDING[MENU] : ENDTITLE ERASE1 HELLO!2 CONGRATULATIONS!3 HAPPY NEW YEAR!4 PRESENT5 GOOD MORNING6 WEDDING[MENU] : ENDTITLE ERASE4 PRESENT ERASE OK? RETURNEXECUTE[MENU] : END](https://usermanual.wiki/Sony-Group/DCRTRV950.manual2/User-Guide-240527-Page-57.png)
![122You can make up to two titles and store them in the memory of your camcorder. Eachtitle can have up to 20 characters.(1)Set the POWER switch to CAMERA or VCR.(2)Press MENU, then turn the SEL/PUSH EXEC dial to select TITLE in , thenpress the dial (p. 213).(3)Turn the SEL/PUSH EXEC dial to select , then press the dial.(4)Turn the SEL/PUSH EXEC dial to select CUSTOM1 SET or CUSTOM2 SET,then press the dial.(5)Turn the SEL/PUSH EXEC dial to select the column of the desired character,then press the dial.(6)Turn the SEL/PUSH EXEC dial to select the desired character, then press thedial.(7)Repeat steps 5 and 6 until you have selected all characters and completed thetitle.(8)To finish making your own titles, turn the SEL/PUSH EXEC dial to select[SET], then press the dial.Making your own titles34571234TITLE SET CUSTOM1 SET CUSTOM2 SET[MENU] : ENDTITLE SET CUSTOM1 SET CUSTOM2 SET RETURN[MENU] : ENDTITLE SET––––––––––––––––––––[MENU] : ENDTITLE SET––––––––––––––––––––[MENU] : END[MENU] : ENDTITLE SETS–––––––––––––––––––[MENU] : ENDTITLE SET CUSTOM1 SET CUSTOM2 SET RETURN[MENU] : END[MENU] : ENDTITLE SET––––––––––––––––––––TITLE SET––––––––––––––––––––MENU](https://usermanual.wiki/Sony-Group/DCRTRV950.manual2/User-Guide-240527-Page-58.png)
![123EditingTo change a title you have storedIn step 4, select CUSTOM1 SET or CUSTOM2 SET, depending on which title you wantto change, then press the SEL/PUSH EXEC dial. Turn the SEL/PUSH EXEC dial toselect [C], then press the dial to delete the title. The last character is erased. Enter thenew title as desired.If you take five minutes or longer to enter characters in the standby while acassette is set in your camcorderThe power automatically goes off. The characters you have entered remain stored inmemory. Set the POWER switch to OFF (CHG) once and then to CAMERA again, thenproceed from step 1.We recommend setting the POWER switch to VCR or removing the cassette so thatyour camcorder does not automatically turn off while you are entering title characters.To delete the titleSelect [C]. The last character is erased.To enter a spaceSelect [ Z& ? ! ], then select the blank part.Making your own titles](https://usermanual.wiki/Sony-Group/DCRTRV950.manual2/User-Guide-240527-Page-59.png)
![124If you use a cassette with cassette memory, you can label a cassette. Labels canconsist of up to 10 characters and is stored in cassette memory. When you insertthe labeled cassette and when the POWER switch is set to CAMERA or VCR, thelabel is displayed for about five seconds.(1)Insert the cassette you want to label.(2)Set the POWER switch to CAMERA or VCR.(3)Press MENU, then turn the SEL/PUSH EXEC dial to select TAPE TITLE in ,then press the dial (p. 213). Tape title display appears.(4)Turn the SEL/PUSH EXEC dial to select the column of the desired character,then press the dial.(5)Turn the SEL/PUSH EXEC dial to select the desired character, then press thedial.(6)Repeat steps 4 and 5 until you finish the label.(7)Turn the SEL/PUSH EXEC dial to select [SET], then press the dial.The label is stored in the memory.Labeling a cassette3 4~6[MENU] : ENDTAPE TITLE––––––––––[MENU] : ENDTAPE TITLE––––––––––[MENU] : ENDTAPE TITLE––––––––––[MENU] : ENDTAPE TITLEM–––––––––[MENU] : ENDCM SET TITLE TITLEERASE TITLE DSPL CM SEARCH TAPE TITLE ERASE ALL RETURNREADY––––––––––[MENU] : ENDCM SET TITLE TITLEERASE TITLE DSPL CM SEARCH TAPE TITLE ERASE ALL RETURN[MENU] : ENDTAPE TITLE––––––––––MENU](https://usermanual.wiki/Sony-Group/DCRTRV950.manual2/User-Guide-240527-Page-60.png)
![125EditingTo erase the label you have madeIn step 4 turn the SEL/PUSH EXEC dial to select [C], then press the dial. The lastcharacter is erased.To change the label you have madeInsert the cassette to change the label, and operate in the same way to make a new label.If you set the write-protect tab of the cassette to lockYou cannot label the tape. Slide the write-protect tab to release the write protection.If the tape has too many index signalsYou may not be able to label a cassette because the cassette memory becomes full. Inthis case, delete data you do not need.If you have superimposed titles in the cassetteWhen the label is displayed, up to four titles also appear.When the “-----” indicator has fewer than 10 spacesThe cassette memory is full.The “-----” indicates the number of characters you can select for the label.To delete the titleSelect [P]. The last character is erased.To enter a spaceSelect [ Z& ? ! ], then select the blank part.Erasing all the data in cassette memoryYou can erase all the data in cassette memory at once.(1)Set the POWER switch to CAMERA or VCR.(2)Press MENU, then turn the SEL/PUSH EXEC dial to select ERASE ALL in ,then press the dial (p. 213).(3)Turn the SEL/PUSH EXEC dial to select OK, then press the dial. OK changesto EXECUTE.(4)Turn the SEL/PUSH EXEC dial to select EXECUTE, then press the dial.ERASING flashes on the screen. When all the data is erased, COMPLETE isdisplayed.To cancel deletingSelect RETURN with the SEL/PUSH EXEC dial in step 3 or 4.Labeling a cassette[MENU] : ENDCM SET TITLE TITLEERASE TITLE DSPL CM SEARCH TAPE TITLE ERASE ALL RETURN RETURNOK[MENU] : ENDCM SET TITLE TITLEERASE TITLE DSPL CM SEARCH TAPE TITLE ERASE ALL RETURN RETURNEXECUTE](https://usermanual.wiki/Sony-Group/DCRTRV950.manual2/User-Guide-240527-Page-61.png)