Sony Group MEXN4100BT Bluetooth Audio System User Manual MEX N5100BT MEX N4100BT
Sony Corporation Bluetooth Audio System MEX N5100BT MEX N4100BT
Contents
- 1. (Short-Term Confidential) User Manual- I
- 2. (Short-Term Confidential) User Manual -II
(Short-Term Confidential) User Manual- I

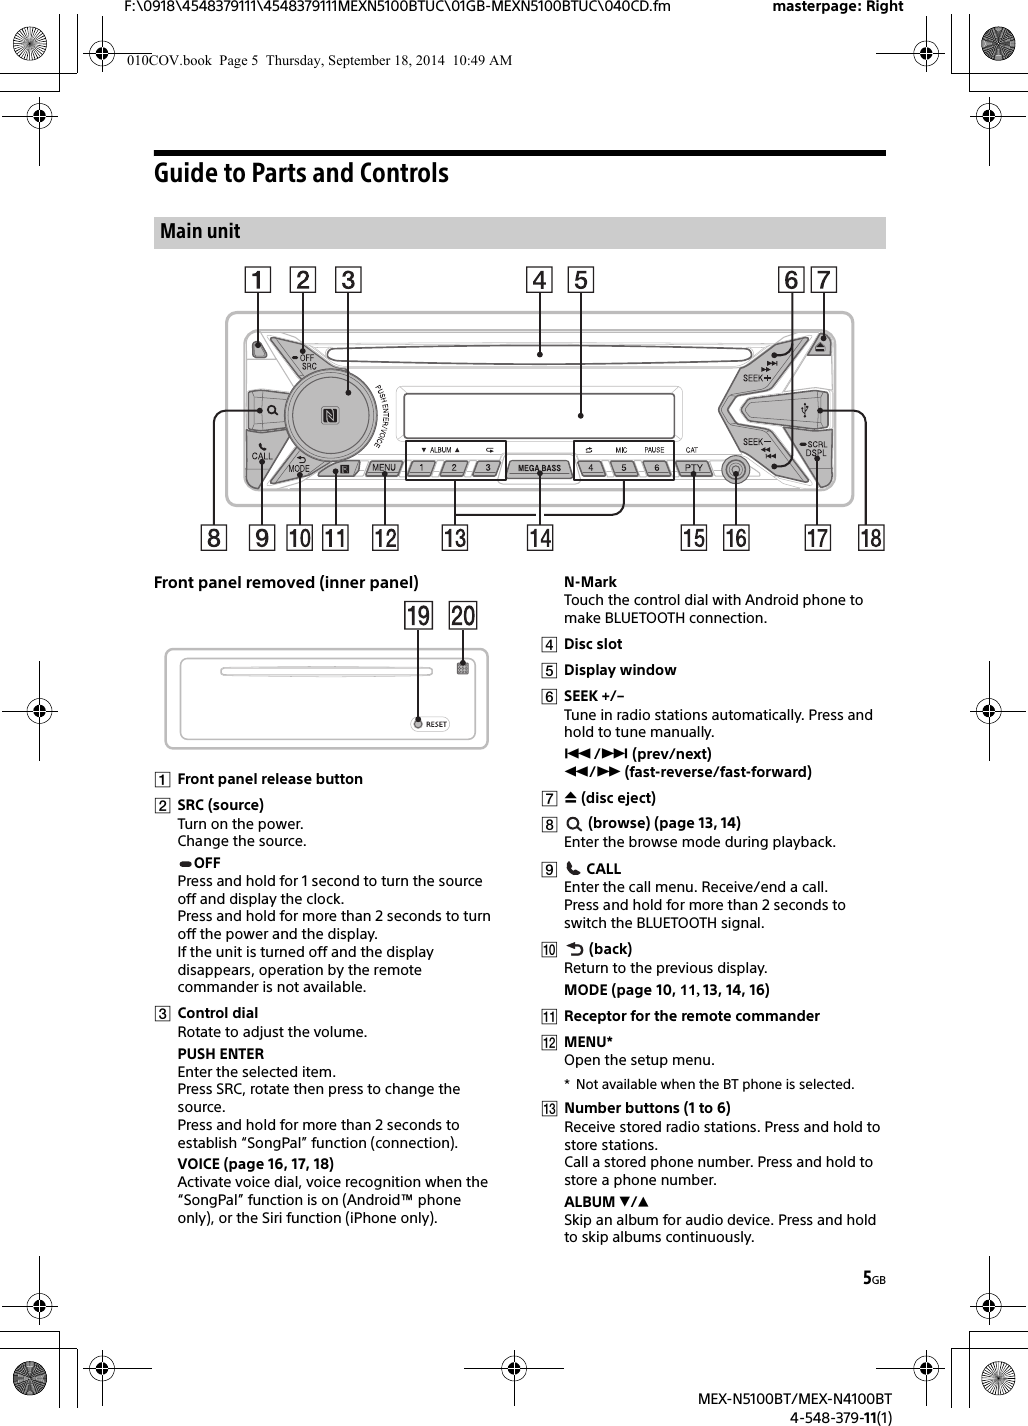
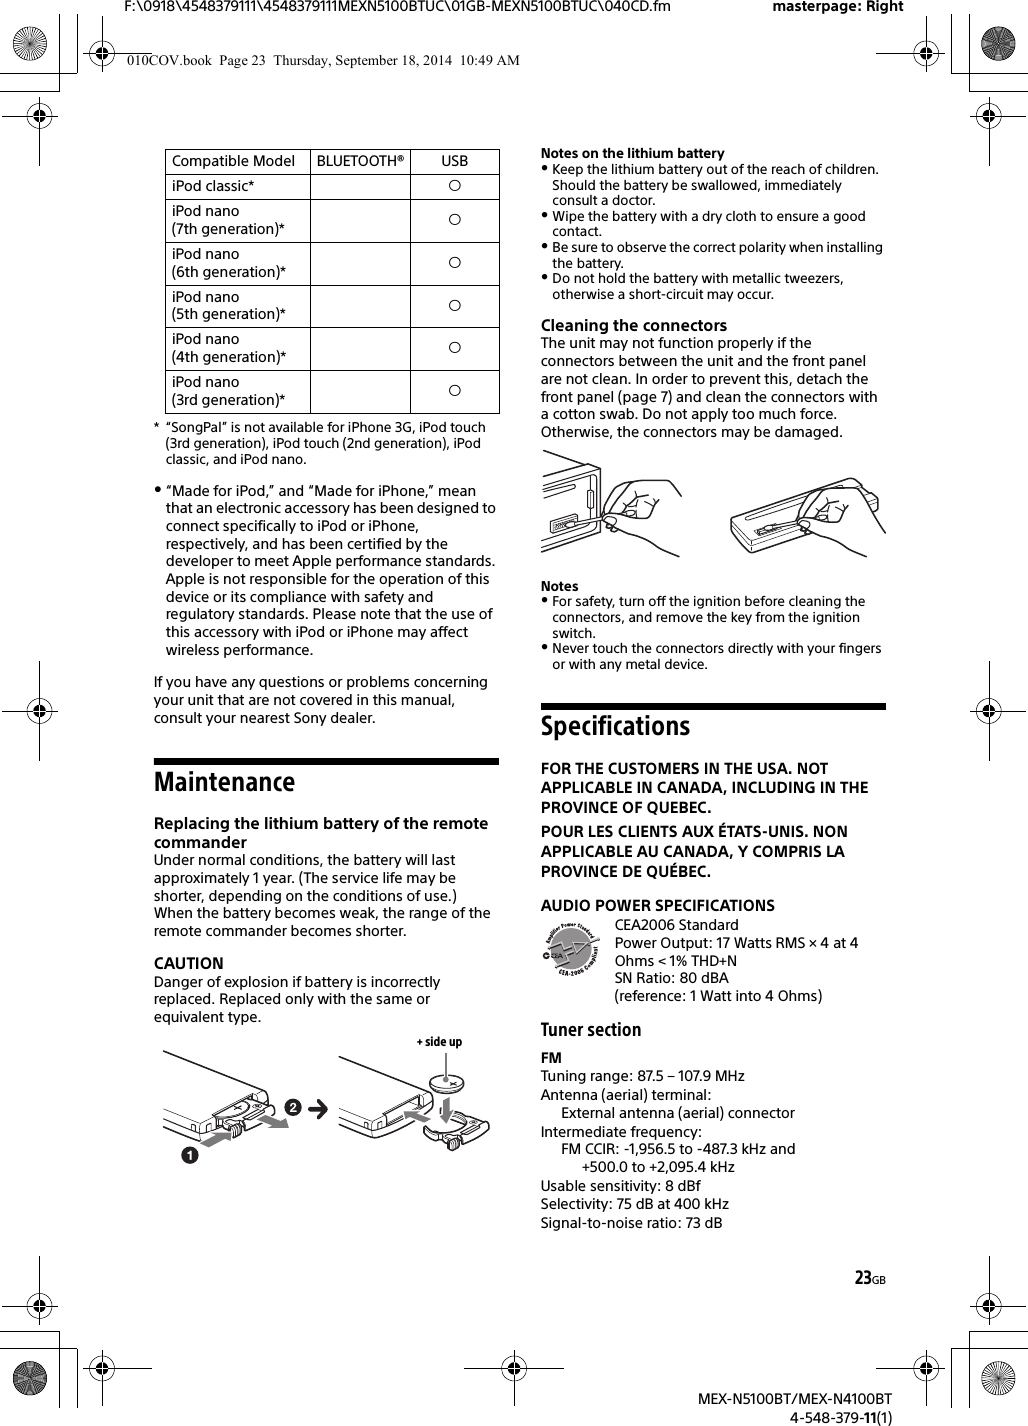
![7GBF:\0918\4548379111\4548379111MEXN5100BTUC\01GB-MEXN5100BTUC\040CD.fm masterpage: RightMEX-N5100BT/MEX-N4100BT4-548-379-11(1)Detaching the Front PanelYou can detach the front panel of this unit to prevent theft.1Press and hold OFF until the unit turns off, press the front panel release button , then pull the panel towards you to remove.Caution alarmIf you turn the ignition switch to the OFF position without detaching the front panel, the caution alarm will sound for a few seconds. The alarm will only sound if the built-in amplifier is used.Serial numbersMake sure the serial numbers on the bottom of the unit and the back of the front panel are matched correctly. Otherwise you cannot make BLUETOOTH pairing, connection and disconnection by NFC.Resetting the unitBefore operating the unit for the first time, after replacing the car battery, or changing the connections, you must reset the unit. Press RESET on the inner panel with a ball-point pen, etc., after detaching the front panel.NotePressing RESET will erase the clock setting and some stored contents.Setting the Clock1Press MENU, rotate the control dial to select [SET GENERAL], then press it.2Rotate the control dial to select [SET CLOCK-ADJ], then press it.The hour indication flashes.3Rotate the control dial to set the hour and minute.To move the digital indication, press SEEK +/–.4After setting the minute, press MENU.The setup is complete and the clock starts.To display the clockPress DSPL.Preparing a BLUETOOTH DeviceYou can enjoy music, or perform handsfree calling depending on the BLUETOOTH compatible device such as a smartphone, cellular phone and audio device (hereafter “BLUETOOTH device” if not otherwise specified). For details on connecting, refer to the operating instructions supplied with the device.Before connecting the device, turn down the volume of this unit; otherwise, loud sound may result.Getting StartedAttaching the front panel010COV.book Page 7 Thursday, September 18, 2014 10:49 AM](https://usermanual.wiki/Sony-Group/MEXN4100BT.Short-Term-Confidential-User-Manual-I/User-Guide-2434702-Page-7.png)
![8GBF:\0918\4548379111\4548379111MEXN5100BTUC\01GB-MEXN5100BTUC\040CD.fm masterpage: LeftMEX-N5100BT/MEX-N4100BT4-548-379-11(1)By touching the control dial on the unit with an NFC* compatible smartphone, the unit is paired and connected with the smartphone automatically.* NFC (Near Field Communication) is a technology enabling short-range wireless communication between various devices, such as mobile phones and IC tags. Thanks to the NFC function, data communication can be achieved easily just by touching the relevant symbol or designated location on NFC compatible devices.For a smartphone with Android OS 4.0 or lower installed, downloading the app “NFC Easy Connect” available at Google Play™ is required. The app may not be downloadable in some countries/regions.1Activate the NFC function on the smartphone.For details, refer to the operating instructions supplied with the smartphone.2Touch the N-Mark part of the unit with the N-Mark part of the smartphone.Make sure that lights up on the display of the unit.To disconnect by One touchTouch the N-Mark part of the unit with the N-Mark part of the smartphone again.NotesWhen making the connection, handle the smartphone carefully to prevent scratches.One touch connection is not possible when the unit is already connected to another NFC compatible device. In this case, disconnect the other device, and make connection with the smartphone again.When connecting a BLUETOOTH device for the first time, mutual registration (called “pairing”) is required. Pairing enables this unit and other devices to recognize each other.1Place the BLUETOOTH device within 1 m (3 ft) of this unit.2Press CALL, rotate the control dial to select [SET PAIRING], then press it. flashes while the unit is in pairing standby mode.3Perform pairing on the BLUETOOTH device so it detects this unit.4Select [MEX-XXXX] (your model name) shown in the display of the BLUETOOTH device.If your model name does not appear, repeat from step 2.5If passkey* input is required on the BLUETOOTH device, input [0000].* Passkey may be called “Passcode,” “PIN code,” “PIN number” or “Password,” etc., depending on the device.When pairing is made, stays lit.6Select this unit on the BLUETOOTH device to establish the BLUETOOTH connection. or lights up when the connection is made.NoteWhile connecting to a BLUETOOTH device, this unit cannot be detected from another device. To enable detection, enter the pairing mode and search for this unit from another device.To start playbackFor details, see “Playing a BLUETOOTH Device” (page 13).To cancel pairingPerform step 2 to cancel the pairing mode after this unit and the BLUETOOTH device are paired.Connecting with a Smartphone by One touch (NFC)Pairing and connecting with a BLUETOOTH device[0000]Input passkey010COV.book Page 8 Thursday, September 18, 2014 10:49 AM](https://usermanual.wiki/Sony-Group/MEXN4100BT.Short-Term-Confidential-User-Manual-I/User-Guide-2434702-Page-8.png)
![9GBF:\0918\4548379111\4548379111MEXN5100BTUC\01GB-MEXN5100BTUC\040CD.fm masterpage: RightMEX-N5100BT/MEX-N4100BT4-548-379-11(1)To use a paired device, connection with this unit is required. Some paired devices will connect automatically.1Press CALL, rotate the control dial to select [SET BT SIGNL], then press it.Make sure that lights up.2Activate the BLUETOOTH function on the BLUETOOTH device.3Operate the BLUETOOTH device to connect to this unit. or lights up.Icons in the display:To connect the last-connected device from this unitActivate the BLUETOOTH function on the BLUETOOTH device.Press SRC, then select [BT PHONE] or [BT AUDIO].Press ENTER to connect with the cellular phone, or PAUSE to connect with the audio device.NoteWhile streaming BLUETOOTH audio, you cannot connect from this unit to the cellular phone. Connect from the cellular phone to this unit instead.TipWith BLUETOOTH signal on: when the ignition is turned to on, this unit reconnects automatically to the last-connected cellular phone.To install the microphoneFor details, see “Installing the microphone (MEX-N5100BT only)” (page 34).When an iPhone/iPod with iOS5 or later installed is connected to the USB port, the unit is paired and connected with the iPhone/iPod automatically.To enable BLUETOOTH Auto Pairing, make sure [AUTOPAIR] in [BT] is set to [ON] (page 21).1Activate the BLUETOOTH function on the iPhone/iPod.2Connect an iPhone/iPod to the USB port.Make sure that lights up on the display of the unit.NotesBLUETOOTH Auto Pairing is not possible if the unit is already connected to another BLUETOOTH device. In this case, disconnect the other device, then connect the iPhone/iPod again.If BLUETOOTH Auto Pairing is not established, see “Preparing a BLUETOOTH Device” for details (page 7).Connecting an iPod/USB Device1Turn down the volume on the unit.2Connect the iPod/USB device to the unit.To connect an iPod/iPhone, use the USB connection cable for iPod (not supplied).Connecting with a paired BLUETOOTH deviceLights up when handsfree calling is available by enabling the HFP (Handsfree Profile).Lights up when the audio device is playable by enabling the A2DP (Advanced Audio Distribution Profile).Indicates the signal strength status of connected cellular phone.Connecting with an iPhone/iPod (BLUETOOTH Auto Pairing)010COV.book Page 9 Thursday, September 18, 2014 10:49 AM](https://usermanual.wiki/Sony-Group/MEXN4100BT.Short-Term-Confidential-User-Manual-I/User-Guide-2434702-Page-9.png)
![10GBF:\0918\4548379111\4548379111MEXN5100BTUC\01GB-MEXN5100BTUC\040CD.fm masterpage: LeftMEX-N5100BT/MEX-N4100BT4-548-379-11(1)Connecting Other Portable Audio Device1Turn off the portable audio device.2Turn down the volume on the unit.3Connect the portable audio device to the AUX input jack (stereo mini jack) on the unit with a connecting cord (not supplied)*.* Be sure to use a straight type plug.4Press SRC to select [AUX].To match the volume level of the connected device to other sourcesStart playback of the portable audio device at a moderate volume, and set your usual listening volume on the unit.Press MENU, then select [SET SOUND] [SET AUX VOL] (page 20).Listening to the RadioTo listen to the radio, press SRC to select [TUNER].1Press MODE to change the band (FM1,FM2, FM3, AM1 or AM2).2Press MENU, rotate the control dial toselect [SET GENERAL], then press it.3Rotate the control dial to select [SETBTM], then press it.The unit stores stations in order of frequency on the number buttons.1Press MODE to change the band (FM1,FM2, FM3, AM1 or AM2).2Perform tuning.To tune manuallyPress and hold SEEK +/– to locate the approximate frequency, then press SEEK +/– repeatedly to fine adjust to the desired frequency.To tune automaticallyPress SEEK +/–.Scanning stops when the unit receives a station.1While receiving the station that you want to store, press and hold a number button (1 to 6) until [MEM] appears.1Select the band, then press a numberbutton (1 to 6).Listening to the RadioStoring automatically (BTM)TuningStoring manuallyReceiving the stored stations010COV.book Page 10 Thursday, September 18, 2014 10:49 AM](https://usermanual.wiki/Sony-Group/MEXN4100BT.Short-Term-Confidential-User-Manual-I/User-Guide-2434702-Page-10.png)
![11GBF:\0918\4548379111\4548379111MEXN5100BTUC\01GB-MEXN5100BTUC\040CD.fm masterpage: RightMEX-N5100BT/MEX-N4100BT4-548-379-11(1)Using Radio Data System (RDS)1Press PTY during FM reception.2Rotate the control dial until the desiredprogram type appears, then press it.The unit starts to search for a station broadcasting the selected program type.Type of programsThe CT data from the RDS transmission sets the clock.1Set [SET CT-ON] in [SET GENERAL](page 19).Listening to the SiriusXM Radio (MEX-N5100BT only)Only SiriusXM brings you more of what you love to listen to, all in one place. Get over 140 channels, including commercial-free music plus the best sports, news, talk, comedy and entertainment. Welcome to the world of satellite radio. A SiriusXM Connect Vehicle Tuner and Subscription are required. For more information, visit www.siriusxm.comAfter installing your SiriusXM Connect Vehicle Tuner and antenna, press SRC to select [SIRIUSXM]. You should be able to hear the SiriusXM preview channel on Channel 1. After verifying that you can hear the preview channel, select Channel 0 to find the Radio ID of your tuner. In addition, the Radio ID is located on the bottom of the SiriusXM Connect Vehicle Tuner and its packaging. You will need this number to activate your subscription. Write the number down for reference.In the USA, you can activate online or by calling SiriusXM Listener Care:Online: Visit www.siriusxm.com/activatenowPhone: Call 1-866-635-2349As part of the activation process, the SiriusXM satellites will send an activation message to your tuner. When your radio detects that the tuner has received the activation message, your radio will display: [SUBSCRIPTION UPDATED - ENTER TO CONTINUE]. Once subscribed, you can tune to channels in your subscription plan.NotesThe activation process usually takes 10 to 15 minutes, but may take up to an hour.Your radio will need to be turned on and receiving the SiriusXM signal to receive the activation message.1Press (browse).2Rotate the control dial to select thedesired channel, then press it.To select channels from categories1Press CAT.2Rotate the control dial to select the desiredcategory, then press it.To store channels1While receiving the channel that you want to store,press and hold a number button (1 to 6) until [MEM] appears.To receive the stored channel, press MODE to select [SX1], [SX2] or [SX3], then press a number button (1 to 6).To set a parental controlThe parental control feature allows you to limit access to SiriusXM channels with mature content. When enabled, the parental control feature requires you to enter a passcode to tune to the locked channels. Information on setting up the passcode and locking channels can be found below.1Press MENU and rotate the control dial.2Select [GENERAL] [PARENTAL] [LOCK SEL] [LOCK-ON].3Enter the passcode, then press ENTER.The initial passcode is [0000].To unlock the channels, select [OFF].To change the passcode1Press MENU and rotate the control dial.2Select [GENERAL] [PARENTAL] [CODE EDIT].Selecting program types (PTY)NEWS (News), INFORM (Information), SPORTS (Sports), TALK (Talk), ROCK (Rock), CLS ROCK (Classic Rock), ADLT HIT (Adult Hits), SOFT RCK (Soft Rock), TOP 40 (Top 40), COUNTRY (Country), OLDIES (Oldies), SOFT (Soft), NOSTALGA (Nostalgia), JAZZ (Jazz), CLASSICL (Classical), R AND B (Rhythm and Blues), SOFT R B (Soft Rhythm and Blues), LANGUAGE (Foreign Language), REL MUSC (Religious Music), REL TALK (Religious Talk), PERSNLTY (Personality), PUBLIC (Public), COLLEGE (College), WEATHER (Weather)Setting clock time (CT)Activating your SiriusXM SubscriptionSelecting channels for SiriusXM010COV.book Page 11 Thursday, September 18, 2014 10:49 AM](https://usermanual.wiki/Sony-Group/MEXN4100BT.Short-Term-Confidential-User-Manual-I/User-Guide-2434702-Page-11.png)
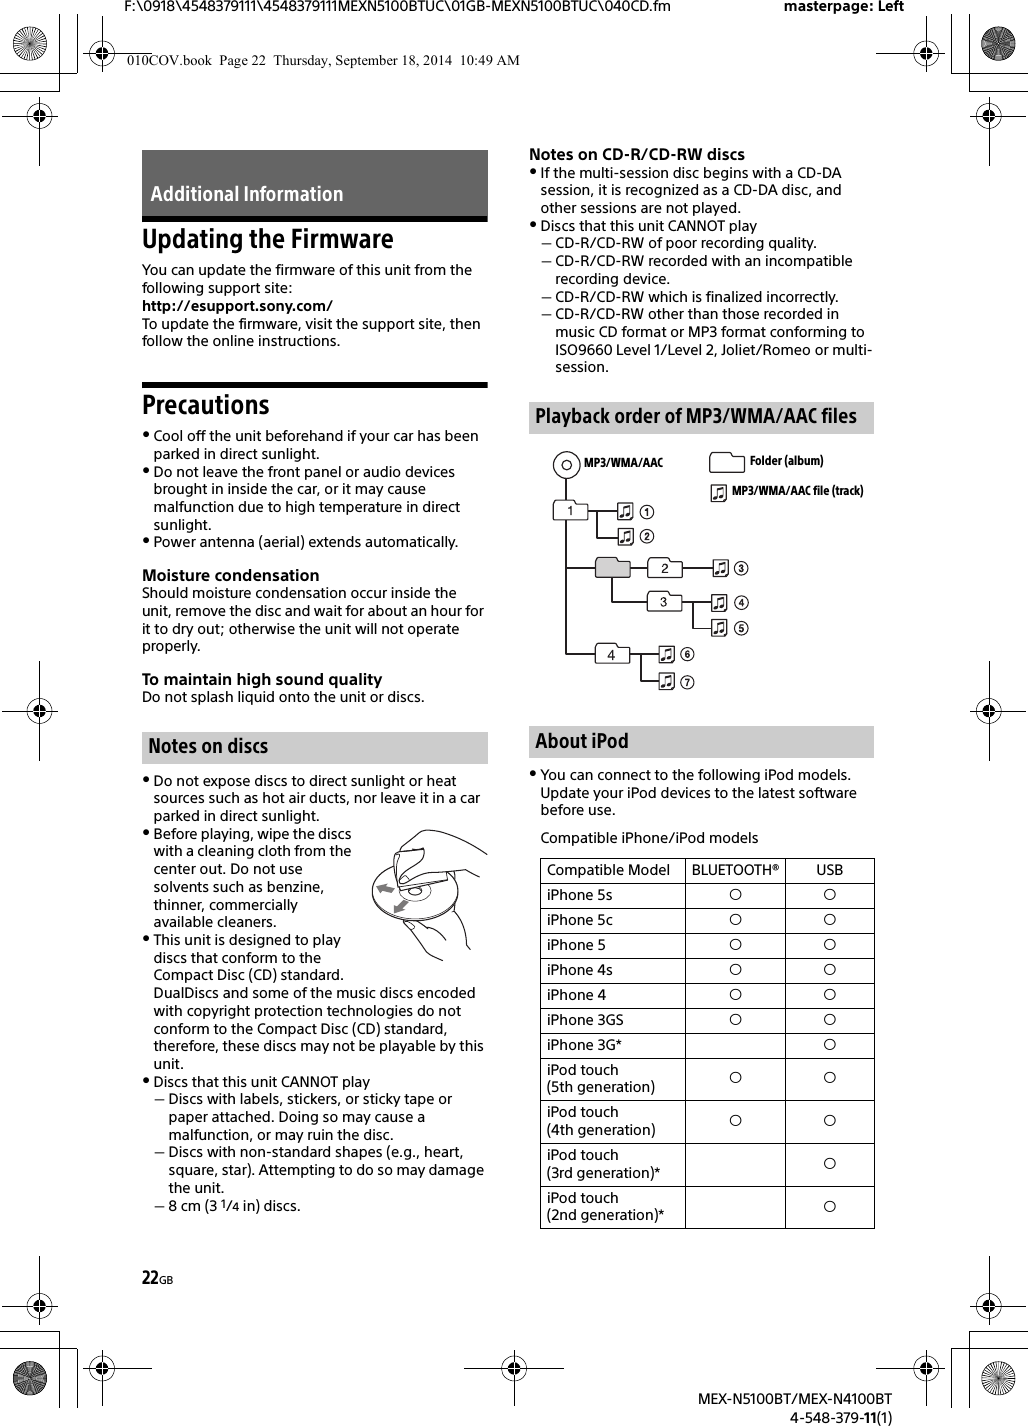
![12GBF:\0918\4548379111\4548379111MEXN5100BTUC\01GB-MEXN5100BTUC\040CD.fm masterpage: LeftMEX-N5100BT/MEX-N4100BT4-548-379-11(1)3Enter the current passcode on the current passcode input display, then press ENTER.The initial passcode is [0000].4Enter your new 4-digit passcode on the new passcode input display, then press ENTER.To change display itemsPress DSPL to change as follows:Channel Number (Default) Channel Name Artist Name Song Title Content Info Category Name ClockPlaying a Disc1Insert the disc (label side up).Playback starts automatically.Playing an iPod/USB DeviceIn these Operating Instructions, “iPod” is used as a general reference for the iPod functions on an iPod and iPhone, unless otherwise specified by the text or illustrations.For details on the compatibility of your iPod, see “About iPod” (page 22) or visit the support site on the back cover.MSC (Mass Storage Class) and MTP (Media Transfer Protocol) type USB devices (such as a USB flash drive, digital media player, Android phone) compliant with the USB standard can be used.Depending on the digital media player or Android phone, setting the USB connection mode to MTP is required.NotesFor details on the compatibility of your USB device, visit the support site on the back cover. Playback of the following MP3/WMA/ACC/FLAC files is not supported.copyright-protected filesDRM (Digital Rights Management) filesMulti-channel audio files Playback of the following MP3/WMA/ACC files is not supported.lossless compression files1Connect an iPod/USB device to the USBport (page 9).Playback starts.If a device is already connected, to start playback, press SRC to select [USB] ([IPD] appears in the display when the iPod is recognized).2 Adjust the volume on this unit.To stop playbackPress and hold OFF for 1 second.Playback010COV.book Page 12 Thursday, September 18, 2014 10:49 AM Playback of the following WAV files is not supported. Multi-channel audio files](https://usermanual.wiki/Sony-Group/MEXN4100BT.Short-Term-Confidential-User-Manual-I/User-Guide-2434702-Page-12.png)
![13GBF:\0918\4548379111\4548379111MEXN5100BTUC\01GB-MEXN5100BTUC\040CD.fm masterpage: RightMEX-N5100BT/MEX-N4100BT4-548-379-11(1)To remove the deviceStop playback, then remove the device.Caution for iPhoneWhen you connect an iPhone via USB, phone call volume is controlled by the iPhone, not the unit. Do not inadvertently increase the volume on the unit during a call, as a sudden loud sound may result when the call ends.1During playback, press and hold MODE until [MODE IPOD] appears.Operations of the iPod become available.Note that the volume can be adjusted only by the unit.To exit passenger controlPress and hold MODE until [MODE AUDIO] appears.Playing a BLUETOOTH DeviceYou can play contents on a connected device that supports BLUETOOTH A2DP (Advanced Audio Distribution Profile).1Make BLUETOOTH connection with the audio device (page 8).2Press SRC to select [BT AUDIO].3Operate the audio device to start playback.4Adjust the volume on this unit.NotesDepending on the audio device, information such as title, track number/time and playback status may not be displayed on this unit.Even if the source is changed on this unit, playback of the audio device does not stop.[BT AUDIO] does not appear in the display while running the “SongPal” application via the BLUETOOTH function.To match the volume level of the BLUETOOTH device to other sourcesStart playback of the BLUETOOTH audio device at a moderate volume, and set your usual listening volume on the unit.Press MENU, then select [SET SOUND] [SET BTA VOL] (page 20).Searching and Playing Tracks1During playback, press (repeat) or (shuffle) repeatedly to select the desired play mode.Playback in the selected play mode may take time to start.Available play modes differ depending on the selected sound source.1During CD, USB or BT AUDIO*1 playback, press (browse)*2 to display the list of search categories.When the track list appears, press (back) repeatedly to display the desired search category.*1 Available only for audio devices supporting AVRCP (Audio Video Remote Control Profile) 1.4 or above.*2 During USB playback, press (browse) for more than 2 seconds to directly return to the beginning of the category list.2Rotate the control dial to select the desired search category, then press it to confirm.3Repeat step 2 to search the desired track.Playback starts.To exit the Quick-BrowZer modePress (browse).1Press (browse).2Press SEEK +.3Rotate the control dial to select the item.The list is jumped in steps of 10% of the total number of items.4Press ENTER to return to the Quick-BrowZer mode.The selected item appears.5Rotate the control dial to select the desired item, then press it.Playback starts.Operating an iPod directly (Passenger control)Repeat play and shuffle playSearching a track by name (Quick-BrowZer™)Searching by skipping items (Jump mode)010COV.book Page 13 Thursday, September 18, 2014 10:49 AM](https://usermanual.wiki/Sony-Group/MEXN4100BT.Short-Term-Confidential-User-Manual-I/User-Guide-2434702-Page-13.png)
![14GBF:\0918\4548379111\4548379111MEXN5100BTUC\01GB-MEXN5100BTUC\040CD.fm masterpage: LeftMEX-N5100BT/MEX-N4100BT4-548-379-11(1)Pandora® is available to stream music through your iPhone and Android phone. You can control Pandora® on a BLUETOOTH connected iPhone/Android phone from this unit.The Pandora® service is not available in some countries/regions.Setting up Pandora®1Check the compatibility of your mobile device by visiting the support site on the back cover.2Download the latest version of the Pandora® application from your smartphone’s app store. A list of compatible devices can be found atwww.pandora.com/everywhere/mobileStreaming Pandora®1Connect the mobile device with this unit (page 7).2Press SRC to select [PANDORA].3Launch Pandora® application on your mobile device.4Press PAUSE to start playback.If the device number appearsMake sure that the same numbers are displayed (e.g., 123456) in this unit and the mobile device, then press ENTER on this unit and select [Yes] on the mobile device.When activating the BLUETOOTH functionYou can adjust the volume level.Press MENU, then select [SET SOUND] [SET BTA VOL] (page 20).Available Operations in Pandora®“Thumbs Up” or “Thumbs Down” feedback allows you to personalize stations.1During playback, press (Thumbs Up) or (Thumbs Down).The station list allows you to easily select a desired station.1During playback, press (browse).2Press SEEK + to select the sorting order [BY DATE] or [A TO Z].3Rotate the control dial to select the desired station, then press it.Playback starts.The track currently being played can be bookmarked and stored in your Pandora® account.1During playback, press MODE.Listening to Pandora®“Thumbs” feedbackUsing the station listBookmarking010COV.book Page 14 Thursday, September 18, 2014 10:49 AM](https://usermanual.wiki/Sony-Group/MEXN4100BT.Short-Term-Confidential-User-Manual-I/User-Guide-2434702-Page-14.png)
![15GBF:\0918\4548379111\4548379111MEXN5100BTUC\01GB-MEXN5100BTUC\040CD.fm masterpage: RightMEX-N5100BT/MEX-N4100BT4-548-379-11(1)To use a cellular phone, connect it with this unit. For details, see “Preparing a BLUETOOTH Device” (page 7).Receiving a Call1Press CALL when a call is received with a ringtone.The phone call starts.NoteThe ringtone and talker’s voice are output only from the front speakers.To reject the callPress and hold OFF for 1 second.To end the callPress CALL again.Making a CallYou can make a call from the phonebook or call history when a cellular phone supporting PBAP (Phone Book Access Profile) is connected.1Press CALL, rotate the control dial to select [PHONEBOOK], then press it.2Rotate the control dial to select an initial from the initial list, then press it.3Rotate the control dial to select a name from the name list, then press it.4Rotate the control dial to select a number from the number list, then press it.The phone call starts.1Press CALL, rotate the control dial to select [RECENT CALL], then press it.A list of the call history appears.2Rotate the control dial to select a name or phone number from the call history, then press it.The phone call starts.1Press CALL, rotate the control dial to select [DIAL NUMBER], then press it.2Rotate the control dial to enter the phone number, and lastly select [ ] (space), then press ENTER*.The phone call starts.* To move the digital indication, press SEEK +/–.Note[_] appears instead of [#] on the display.1Press CALL, rotate the control dial to select [REDIAL], then press it.The phone call starts.1Press SRC, rotate the control dial to select [BT PHONE], then press it.2Press a number button (1 to 6) to select the contact you want to call.3Press ENTER.The phone call starts.Presetting phone numbersYou can store up to 6 contacts in the preset dial.1Select a phone number that you want to store in the preset dial, from the phonebook, call history or by inputting the phone number directly.The phone number appears in the display of this unit.2Press and hold a number button (1 to 6) until [MEM] appears.The contact is stored in the selected preset number.Handsfree Calling (via BLUETOOTH only)From the phonebookFrom the call historyBy phone number inputBy redialBy preset number010COV.book Page 15 Thursday, September 18, 2014 10:49 AM](https://usermanual.wiki/Sony-Group/MEXN4100BT.Short-Term-Confidential-User-Manual-I/User-Guide-2434702-Page-15.png)
![16GBF:\0918\4548379111\4548379111MEXN5100BTUC\01GB-MEXN5100BTUC\040CD.fm masterpage: LeftMEX-N5100BT/MEX-N4100BT4-548-379-11(1)You can make a call by saying the voice tag stored in a connected cellular phone that has a voice dialing function.1Press CALL, rotate the control dial toselect [VOICE DIAL], then press it.Alternatively, press ENTER while the “SongPal” function is off.2Say the voice tag stored on the cellularphone.Your voice is recognized, and the call is made.To cancel voice dialingPress ENTER.Available Operations during CallTo adjust the ringtone volumeRotate the control dial while receiving a call.To adjust the talker’s voice volumeRotate the control dial during a call.To adjust the volume for the other party (Mic gain adjustment)Press MIC.Adjustable volume levels: [MIC-LOW], [MIC-MID], [MIC-HI].To reduce echo and noise (Echo Canceler/Noise Canceler Mode)Press and hold MIC.Settable mode: [EC/NC-1], [EC/NC-2].To transfer a callIn order to activate/deactivate the appropriate device (this unit/cellular phone), press MODE or use your cellular phone.NoteDepending on the cellular phone, handsfree connection may be cut off when call transfer is attempted.To check the status of SMS* flashes when a new SMS is received, and stays lit when there are unread messages.* Available only for a cellular phone supportingMAP (Message Access Profile).SongPal with iPhone/Android PhoneDownloading the “SongPal” application (version 2.0 or later) is required from the App Store for iPhone or from Google Play for Android phone.NotesFor your safety, follow your local traffic laws and regulations, and do not operate the application while driving.“SongPal” is an app for controlling Sony audio devices which are compatible with “SongPal”, by your iPhone/Android phone.What you can control with “SongPal” varies depending on the connected device.To make use of “SongPal” features, see the details on your iPhone/Android phone.For further details on “SongPal,” visit the following URL: http://rd1.sony.net/help/speaker/songpal/1Make the BLUETOOTH connection withiPhone/Android phone (page 7).2Launch the “SongPal” application.3Press and hold ENTER on the unit formore than 2 seconds.Connection to iPhone/Android phone starts.For details on the operations on iPhone/Android phone, see the help of the application.If the device number appearsMake sure that the number is displayed (e.g., 123456), then select [Yes] on the iPhone/Android phone.To terminate connectionPress and hold ENTER.By voice tagsUseful FunctionsEstablishing the SongPal connection010COV.book Page 16 Thursday, September 18, 2014 10:49 AM](https://usermanual.wiki/Sony-Group/MEXN4100BT.Short-Term-Confidential-User-Manual-I/User-Guide-2434702-Page-16.png)
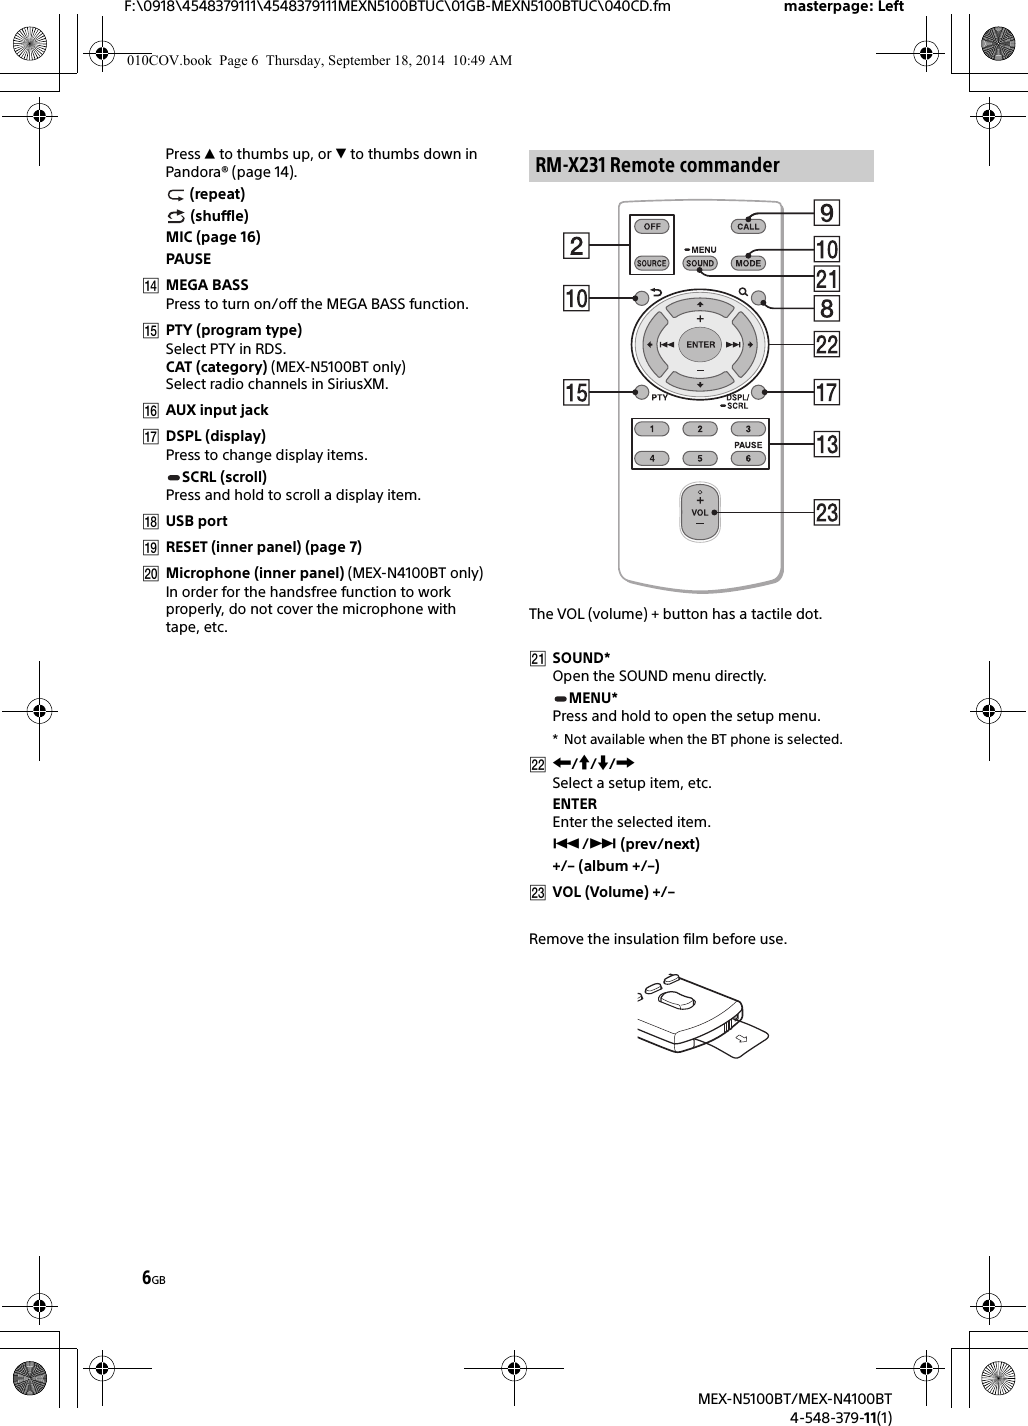
![17GBF:\0918\4548379111\4548379111MEXN5100BTUC\01GB-MEXN5100BTUC\040CD.fm masterpage: RightMEX-N5100BT/MEX-N4100BT4-548-379-11(1)Selecting the source or applicationYou can operate to select the desired source or application on iPhone/Android phone.To select the sourcePress SRC repeatedly. Alternatively, press SRC, rotate the control dial to select the desired source, then press ENTER.To display the source listPress SRC.Announcement of various information by voice guide (Android phone only)When SMS, Twitter/Facebook/Calendar notifications, etc., are received, they are automatically announced through the unit speakers.For details on settings, refer to the help of the application.Activating voice recognition (Android phone only)By registering applications, you can control an application by voice command. For details, refer to the help of the application.To activate voice recognition1Press VOICE to activate voice recognition.2Say the desired voice command into the microphone when [Say Source or App] appears on the Android phone.NotesVoice recognition may not be available in some cases.Voice recognition may not work properly depending on the performance of the connected Android phone.Operate under conditions where noise such as engine sound is minimized during voice recognition.Replying a message of SMSYou can reply a message by voice recognition.1Activate voice recognition, then input “Reply.”The message input display appears on the “SongPal” application.2Input a reply message by voice recognition.The list of message candidates appears on the “SongPal” application.3Press and to select the desired message, press ENTER.The message is sent out.Making sound and display settingsYou can adjust the settings relating to sound and display via iPhone/Android phone.For details on settings, refer to the help of the application.010COV.book Page 17 Thursday, September 18, 2014 10:49 AM](https://usermanual.wiki/Sony-Group/MEXN4100BT.Short-Term-Confidential-User-Manual-I/User-Guide-2434702-Page-17.png)
![18GBF:\0918\4548379111\4548379111MEXN5100BTUC\01GB-MEXN5100BTUC\040CD.fm masterpage: LeftMEX-N5100BT/MEX-N4100BT4-548-379-11(1)Using Siri Eyes FreeSiri Eyes Free allows you to use an iPhone handsfree by simply speaking into the microphone. This function requires you to connect an iPhone to the unit with BLUETOOTH Auto Paring. Availability is limited iPhone 4s or later. Make sure that your iPhone is running the latest iOS version. You must complete BLUETOOTH registration and connection configurations for the iPhone with the unit in advance. For details, see “Preparing a BLUETOOTH Device” (page 7).1Activate the Siri function on the iPhone.For details, refer to the operating instructions supplied with the iPhone.2Press VOICE.The voice command display appears.3Speak into the microphone after the beep.The iPhone beeps again and Siri Eyes Free is activated.To deactivate Siri Eyes FreePress ENTER.NotesThe iPhone may not recognize your voice depending on usage conditions. (For example, if you are in a moving car.)Siri may not function properly, or the response time may lag in locations where iPhone signals are difficult to receive. Depending on the iPhone’s operating condition, Siri may not function properly, or may quit.If you play a track with an iPhone using the BLUETOOTH audio connection, when the track starts playback via BLUETOOTH, the Siri function automatically quits and the unit switches to the BLUETOOTH audio source.When Siri is activated during audio playback, the unit may switch to the BLUETOOTH audio source even if you do not specify a track to play.When connecting the iPhone to the USB port, Siri may not function properly, or may quit.When connecting the iPhone to the unit, do not activate Siri with the iPhone. Siri may not function properly, or may quit.There is no audio sound while Siri Eyes Free is activated.Canceling the DEMO ModeYou can cancel the demonstration display which appears when the source is off and the clock is displayed.1Press MENU, rotate the control dial to select [SET DISPLAY], then press it.2Rotate the control dial to select [SET DEMO], then press it.3Rotate the control dial to select [SET DEMO-OFF], then press it.The setting is complete.4Press (back) twice.The display returns to normal reception/play mode.Basic Setting OperationYou can set items in the following setup categories:General setup (GENERAL), Sound setup (SOUND), Display setup (DISPLAY), BLUETOOTH setup (BT), SongPal setup (SONGPAL)(Not available when the BT phone is selected.)1Press MENU.2Rotate the control dial to select the setup category, then press it.The items that can be set differ depending on the source and settings.3Rotate the control dial to select the options, then press it.To return to the previous displayPress (back).General Setup (GENERAL)CLOCK-ADJ (clock adjust) (page 7)CAUT ALM (caution alarm)Activates the caution alarm: [ON], [OFF] (page 7). (Available only while the source is off and the clock is displayed.)BEEPActivates the beep sound: [ON], [OFF].Settings010COV.book Page 18 Thursday, September 18, 2014 10:49 AM](https://usermanual.wiki/Sony-Group/MEXN4100BT.Short-Term-Confidential-User-Manual-I/User-Guide-2434702-Page-18.png)
![19GBF:\0918\4548379111\4548379111MEXN5100BTUC\01GB-MEXN5100BTUC\040CD.fm masterpage: RightMEX-N5100BT/MEX-N4100BT4-548-379-11(1)AUTO OFFShuts off automatically after a desired time when the unit is turned off: [NO], [30S] (30 seconds), [30M] (30 minutes), [60M] (60 minutes).STEERINGRegisters/resets the setting of the steering wheel remote. (Available when connected with the connection cable RC-SR1 (not supplied).) (Available only while the source is off and the clock is displayed.)STR EDITRegisters the functions (SOURCE, ATT, VOL+/–, SEEK+/–, VOICE, CALL) to the steering wheel remote:Rotate the control dial to select the function you want to assign to the steering wheel remote, then press it.While [REGISTER] is blinking, press and hold the button on the steering wheel remote you want to assign the function to. When registration is complete, [REGISTERED] is displayed.To register other functions, repeat steps and .STR RESETResets the setting of the steering wheel remote: [YES], [NO].NoteWhile making settings, only button operation on the unit is available. For safety, park your car before making this setting.If an error occurs while registering, all the registered information is cleared. Restart registration from the beginning.This function may not be available on some vehicles. For details on the compatibility of your vehicle, visit the support site on the back cover.AUX-A (AUX audio)Activates the AUX source display: [ON], [OFF]. (Available only while the source is off and the clock is displayed.)REAR/SUB (MEX-N4100BT only)Switches the audio output: [SUB-OUT] (subwoofer), [REAR-OUT] (power amplifier). (Available only while the source is off and the clock is displayed.)CT (clock time)Activates the CT function: [ON], [OFF].BTM (page 10)(Available only when the tuner is selected.)PARENTAL (MEX-N5100BT only)Sets the parental lock to [ON], [OFF], and edits the passcode (page 11). (Available only when the SiriusXM is selected.)SXM RESET (SiriusXM reset) (MEX-N5100BT only)Initializes the SiriusXM Connect Vehicle Tuner settings (preset channels/parental lock): [ON], [OFF].FIRMWAREChecks/updates the firmware version. For details, visit the following support site:http://esupport.sony.com/FW VERSIONDisplays current firmware version.FW UPDATEEnters firmware update process: [YES], [NO].(Available only while the source is off and the clock is displayed.)Sound Setup (SOUND)This setup menu is available when any source except for the BT phone is selected.MEGABASS (mega bass)Reinforces bass sound in synchronization with the volume level: [ON], [OFF].(Automatically sets to [OFF] when [C.AUDIO+] is set to [ON].)C.AUDIO+ (ClearAudio+)Reproduces sound by optimizing the digital signal with the Sony recommended sound settings: [ON], [OFF].(Automatically sets to [OFF] when [EQ10 PRESET] is changed and/or [MEGABASS] is set to [ON].)EQ10 PRESETSelects an equalizer curve from 10 equalizer curves or off: [OFF], [R AND B], [ROCK], [POP], [DANCE], [HIP-HOP], [ELECTRONICA], [JAZZ], [SOUL], [COUNTRY], [CUSTOM].The equalizer curve setting can be memorized for each source.EQ10 SETTINGSets [CUSTOM] of EQ10.BASESelects a preset equalizer curve as a basis for further customizing: [BAND1] 32 Hz, [BAND2] 63 Hz, [BAND3] 125 Hz, [BAND4] 250 Hz, [BAND5] 500 Hz, [BAND6] 1 kHz, [BAND7] 2 kHz, [BAND8] 4 kHz, [BAND9] 8 kHz, [BAND10] 16 kHz.The volume level is adjustable in 1 dB steps, from -6 dB to +6 dB.POSITION (listening position)010COV.book Page 19 Thursday, September 18, 2014 10:49 AM](https://usermanual.wiki/Sony-Group/MEXN4100BT.Short-Term-Confidential-User-Manual-I/User-Guide-2434702-Page-19.png)
![20GBF:\0918\4548379111\4548379111MEXN5100BTUC\01GB-MEXN5100BTUC\040CD.fm masterpage: LeftMEX-N5100BT/MEX-N4100BT4-548-379-11(1)SET F/R POS (set front/rear position)Simulates a natural sound field by delaying the sound output from speakers to suit your position: [FRONT L] (front left), [FRONT R] (front right), [FRONT] (center front), [ALL] (center of your car), [OFF] (no position set)ADJ POSITION* (adjust position)Fine-tunes the listening position setting: [+3] – [CENTER] – [-3].SET SW POS* (set subwoofer position) [NEAR] (near), [NORMAL] (normal), [FAR] (far)BALANCEAdjusts the sound balance: [RIGHT-15] – [CENTER] – [LEFT-15].FADERAdjusts the relative level: [FRONT-15] – [CENTER] – [REAR-15].DSEE (digital sound enhancement engine)Improves digitally compressed sound by restoring high frequencies lost in the compression process.This setting can be memorized for each source other than the tuner.Selects the DSEE mode: [ON], [OFF].AAV (advanced auto volume)Adjust the playback volume level of all playback sources to the optimum level: [ON], [OFF].RB ENH (rear bass enhancer)Rear Bass Enhancer enhances the bass sound by applying a low pass filter setting to the rear speakers. This function allows the rear speakers to work as a subwoofer if one is not connected. (Available only when [SW DIREC] is set to [OFF].)(MEX-N4100BT: Available only when [REAR-OUT] is selected in [REAR/SUB].)RBE MODE (rear bass enhancer mode)Selects the rear bass enhancer mode: [1], [2], [3], [OFF].LPF FREQ (low pass filter frequency)Selects the subwoofer cut-off frequency: [50Hz], [60Hz], [80Hz], [100Hz], [120Hz].LPF SLOP (low pass filter slope)Selects the LPF slope: [1], [2], [3].SW DIREC (subwoofer direct connection)You can use the subwoofer without a power amplifier when it is connected to the rear speaker lead. (Available only when [RBE MODE] is set to [OFF].)(MEX-N4100BT: Available only when [REAR-OUT] is selected in [REAR/SUB].)Be sure to connect a 4 – 8 ohm subwoofer to either of the rear speaker leads. Do not connect a speaker to the other rear speaker lead.SW MODE (subwoofer mode) Selects the subwoofer mode: [1], [2], [3], [OFF].SW PHASE (subwoofer phase) Selects the subwoofer phase: [NORM], [REV].SW POS* (subwoofer position)Selects the subwoofer position: [NEAR], [NORMAL], [FAR].LPF FREQ (low pass filter frequency) Selects the subwoofer cut-off frequency: [50Hz], [60Hz], [80Hz], [100Hz], [120Hz].LPF SLOP (low pass filter slope) Selects the LPF slope: [1], [2], [3].S.WOOFER (subwoofer)SW LEVEL (subwoofer level)Adjusts the subwoofer volume level: [+10 dB] – [0 dB] – [-10 dB].([ATT] is displayed at the lowest setting.)SW PHASE (subwoofer phase)Selects the subwoofer phase: [NORM], [REV].SW POS* (subwoofer position)Selects the subwoofer position: [NEAR], [NORMAL], [FAR].LPF FREQ (low pass filter frequency)Selects the subwoofer cut-off frequency: [50Hz], [60Hz], [80Hz], [100Hz], [120Hz].LPF SLOP (low pass filter slope)Selects the LPF slope: [1], [2], [3].HPF (high pass filter)HPF FREQ (high pass filter frequency)Selects the front/rear speaker cut-off frequency: [OFF], [50Hz], [60Hz], [80Hz], [100Hz], [120Hz].HPF SLOP (high pass filter slope)Selects the HPF slope (effective only when [HPF FREQ] is set to other than [OFF]): [1], [2], [3].AUX VOL (AUX volume level)Adjusts the volume level for each connected auxiliary device: [+18 dB] – [0 dB] – [-8 dB].This setting negates the need to adjust the volume level between sources.BTA VOL (BLUETOOTH audio volume level)Adjusts the volume level for each connected BLUETOOTH device: [+6 dB] – [0 dB] – [-6 dB].This setting negates the need to adjust the volume level between sources.* Does not appear when [SET F/R POS] is set to [OFF].010COV.book Page 20 Thursday, September 18, 2014 10:49 AM](https://usermanual.wiki/Sony-Group/MEXN4100BT.Short-Term-Confidential-User-Manual-I/User-Guide-2434702-Page-20.png)
![21GBF:\0918\4548379111\4548379111MEXN5100BTUC\01GB-MEXN5100BTUC\040CD.fm masterpage: RightMEX-N5100BT/MEX-N4100BT4-548-379-11(1)Display Setup (DISPLAY)DEMO (demonstration)Activates the demonstration: [ON], [OFF].DIMMERFor MEX-N5100BT:Dims the display: [ON], [OFF], [AT] (auto) ([AT] is available only when the illumination control lead is connected, and turn on the head light).For MEX-N4100BT:Changes the display brightness: [ON], [OFF].ILLUM (Illumination) (MEX-N4100BT only)Changes the illumination color: [1], [2].BUTTON-C (button color) (MEX-N5100BT only)Sets a preset color or customized color for the buttons.COLORSelects from 15 presets colors, 1 customized color.CUSTOM-C (custom color)Registers a customized color for the buttons.RGB RED, RGB GRN, RGB BLUEAdjustable color range: [0] – [32] ([0] cannot be set for all color ranges).DISP-C (display color) (MEX-N5100BT only)Sets a preset color or customized color for the display.COLORSelects from 15 presets colors, 1 customized color.CUSTOM-C (custom color)Registers a customized color for the display.RGB RED, RGB GRN, RGB BLUEAdjustable color range: [0] – [32] ([0] cannot be set for all color ranges).ALL-C (all color) (MEX-N5100BT only)Sets a preset color or customized color for the display and buttons.COLORSelects from 15 presets colors, 1 customized color.CUSTOM-C (custom color)Registers a customized color for the display and buttons.RGB RED, RGB GRN, RGB BLUEAdjustable color range: [0] – [32] ([0] cannot be set for all color ranges).SND SYNC (sound synchronization)Selects the color with sound synchronization: [ON], [OFF].WHT MENU (white menu) (MEX-N5100BT only)You can display the menu more clearly (white) without concern for color setting: [ON], [OFF].START-WHT (start white) (MEX-N5100BT only)When SRC is pressed, the display and buttons on the main unit turn white once, then change to the customized color: [ON], [OFF].AUTO SCR (auto scroll)Scrolls long items automatically: [ON], [OFF].(Not available when the AUX or tuner is selected.)BLUETOOTH Setup (BT)PAIRING (page 8)PHONEBOOK (page 15)REDIAL (page 15)RECENT CALL (page 15)VOICE DIAL (page 16)DIAL NUMBER (page 15)RINGTONESelects whether this unit or the connected cellular phone outputs the ringtone: [1] (this unit), [2] (cellular phone).AUTO ANS (auto answer)Sets this unit to answer an incoming call automatically: [OFF], [1] (about 3 seconds), [2] (about 10 seconds).AUTOPAIRStart BLUETOOTH pairing automatically when iOS device version 5.0 or later is connected via USB: [ON], [OFF].BT SIGNL (BLUETOOTH signal) (page 9)Activates/deactivates the BLUETOOTH function.BT INIT (BLUETOOTH initialize)Initializes all the BLUETOOTH related settings (pairing information, preset number, device information, etc.).When disposing the unit, initialize all the settings. (Available only while the source is off and the clock is displayed.)SongPal Setup (SONGPAL)Establish and terminate “SongPal” function (connection).010COV.book Page 21 Thursday, September 18, 2014 10:49 AM](https://usermanual.wiki/Sony-Group/MEXN4100BT.Short-Term-Confidential-User-Manual-I/User-Guide-2434702-Page-21.png)
![25GBF:\0918\4548379111\4548379111MEXN5100BTUC\01GB-MEXN5100BTUC\040CD.fm masterpage: RightMEX-N5100BT/MEX-N4100BT4-548-379-11(1)SiriusXM Connect Vehicle Tuner and Subscription sold separately.www.siriusxm.comSirius, XM and all related marks and logos are trademarks of Sirius XM Radio Inc. All rights reserved.The Bluetooth® word mark and logos are registered trademarks owned by Bluetooth SIG, Inc. and any use of such marks by Sony Corporation is under license. Other trademarks and trade names are those of their respective owners.The N-Mark is a trademark or registered trademark of NFC Forum, Inc. in the United States and in other countries. Windows Media is either a registered trademark or trademark of Microsoft Corporation in the United States and/or other countries.This product is protected by certain intellectual property rights of Microsoft Corporation. Use or distribution of such technology outside of this product is prohibited without a license from Microsoft or an authorized Microsoft subsidiary.iPhone, iPod, iPod classic, iPod nano, iPod touch, and Siri are trademarks of Apple Inc., registered in the U.S. and other countries. App Store is a service mark of Apple Inc.MPEG Layer-3 audio coding technology and patents licensed from Fraunhofer IIS and Thomson.Pandora, the Pandora logo, and the Pandora trade dress are trademarks or registered trademarks of Pandora Media, Inc., used with permission.Google, Google Play and Android are trademarks of Google Inc.libFLACCopyright (C) 2000-2009 Josh CoalsonCopyright (C) 2011-2013 Xiph.Org FoundationRedistribution and use in source and binary forms, with or without modification, are permitted provided that the following conditions are met:Redistributions of source code must retain the above copyright notice, this list of conditions and the following disclaimer.Redistributions in binary form must reproduce the above copyright notice, this list of conditions and the following disclaimer in the documentation and/or other materials provided with the distribution.Neither the name of the Xiph.org Foundation nor the names of its contributors may be used to endorse or promote products derived from this software without specific prior written permission.THIS SOFTWARE IS PROVIDED BY THE COPYRIGHT HOLDERS AND CONTRIBUTORS “AS IS” AND ANY EXPRESS OR IMPLIED WARRANTIES, INCLUDING, BUT NOT LIMITED TO, THE IMPLIED WARRANTIES OF MERCHANTABILITY AND FITNESS FOR A PARTICULAR PURPOSE ARE DISCLAIMED. IN NO EVENT SHALL THE FOUNDATION OR CONTRIBUTORS BE LIABLE FOR ANY DIRECT, INDIRECT, INCIDENTAL, SPECIAL, EXEMPLARY, OR CONSEQUENTIAL DAMAGES (INCLUDING, BUT NOT LIMITED TO, PROCUREMENT OF SUBSTITUTE GOODS OR SERVICES; LOSS OF USE, DATA, OR PROFITS; OR BUSINESS INTERRUPTION) HOWEVER CAUSED AND ON ANY THEORY OF LIABILITY, WHETHER IN CONTRACT, STRICT LIABILITY, OR TORT (INCLUDING NEGLIGENCE OR OTHERWISE) ARISING IN ANY WAY OUT OF THE USE OF THIS SOFTWARE, EVEN IF ADVISED OF THE POSSIBILITY OF SUCH DAMAGE.TroubleshootingThe following checklist will help you remedy problems you may encounter with your unit.Before going through the checklist below, check the connection and operating procedures.For details on using the fuse and removing the unit from the dashboard, see “Connection/Installation” (page 31).If the problem is not solved, visit the support site on the back cover.GeneralNo power is being supplied to the unit.If the unit is turned off and the display disappears, the unit cannot be operated with the remote commander.Turn on the unit.No sound or the sound is very low.The position of the fader control [FADER] is not set for a 2-speaker system.The volume of the unit and/or connected device is very low.Increase the volume of the unit and connected device.No beep sound.An optional power amplifier is connected and you are not using the built-in amplifier.Copyrights010COV.book Page 25 Thursday, September 18, 2014 10:49 AM](https://usermanual.wiki/Sony-Group/MEXN4100BT.Short-Term-Confidential-User-Manual-I/User-Guide-2434702-Page-25.png)
![26GBF:\0918\4548379111\4548379111MEXN5100BTUC\01GB-MEXN5100BTUC\040CD.fm masterpage: LeftMEX-N5100BT/MEX-N4100BT4-548-379-11(1)The contents of the memory have been erased.The reset button has been pressed.Store again into the memory.The power supply lead or battery has been disconnected or not connected properly.Stored stations and correct time are erased.The fuse has blown.Makes a noise when the position of the ignition is switched.The leads are not matched correctly with the car’s accessory power connector.During playback or reception, the demonstration mode starts.If no operation is performed for 5 minutes with [DEMO-ON] set, the demonstration mode starts.Set [DEMO-OFF] (page 21).The display disappears from/does not appear in the display window.The dimmer is set to [DIM-ON] (page 21).The display disappears if you press and hold OFF.Press OFF on the unit until the display appears.The connectors are dirty (page 23).The operation buttons do not function.The disc will not eject.The connection is not correct.Check the connection of the unit.If the situation does not improve, press RESET (page 7).The contents stored in memory are erased.For your safety, do not reset the unit while you are driving.Radio receptionStations cannot be received.The sound is hampered by noises.The connection is not correct.If your car has built-in radio antenna (aerial) in the rear/side glass, connect an REM OUT lead (blue/white striped) or accessory power supply lead (red) to the power supply lead of a car’s antenna (aerial) booster.Check the connection of the car antenna (aerial).If the auto antenna (aerial) will not extend, check the connection of the power antenna (aerial) control lead.Preset tuning is not possible.The broadcast signal is too weak.RDSPTY displays [- - - - - - - -].The current station is not an RDS station.RDS data has not been received.The station does not specify the program type.CD playbackThe disc does not play.Defective or dirty disc.The CD-R/CD-RW is not for audio use (page 22).MP3/WMA/AAC files cannot be played.The disc is incompatible with the MP3/WMA/AAC format and version. For details on playable discs and formats, visit the support site on the back cover.MP3/WMA/AAC files take longer to play than others.The following discs take a longer time to start playback.A disc recorded with a complicated tree structure.A disc recorded in Multi Session.A disc to which data can be added.The sound skips.Defective or dirty disc.USB device playbackYou cannot play items via a USB hub.This unit cannot recognize USB devices via a USB hub.A USB device takes longer to play.The USB device contains files with a complicated tree structure.The sound is intermittent.The sound may be intermittent at a high-bit-rate of more than 320 kbps.Audio file cannot be played.USB device formatted with file systems other than FAT16 or FAT32 are unsupported.** This unit supports FAT16 and FAT32, but some USB device may not support all of these FAT. For details, refer to the operating instruction of each USB device or contact the manufacturer.NFC functionOne touch connection (NFC) is not possible.If the smartphone does not respond to the touching.Check that the NFC function of the smartphone is turned on.Move the N-Mark part of the smartphone closer to the N-Mark part on this unit.If the smartphone is in a case, remove it.NFC receiving sensitivity depends on the device.If One touch connection with the smartphone fails several times, make BLUETOOTH connection manually.010COV.book Page 26 Thursday, September 18, 2014 10:49 AM](https://usermanual.wiki/Sony-Group/MEXN4100BT.Short-Term-Confidential-User-Manual-I/User-Guide-2434702-Page-26.png)
![27GBF:\0918\4548379111\4548379111MEXN5100BTUC\01GB-MEXN5100BTUC\040CD.fm masterpage: RightMEX-N5100BT/MEX-N4100BT4-548-379-11(1)BLUETOOTH functionThe connecting device cannot detect this unit.Before the pairing is made, set this unit to pairing standby mode.While connected to a BLUETOOTH device, this unit cannot be detected from another device.Disconnect the current connection and search for this unit from another device.When the device pairing is made, set the BLUETOOTH signal output to on (page 9).Connection is not possible.The connection is controlled from one side (this unit or BLUETOOTH device), but not both.Connect to this unit from a BLUETOOTH device or vice versa.The name of the detected device does not appear.Depending on the status of the other device, it may not be possible to obtain the name.No ringtone.Adjust the volume by rotating the control dial while receiving a call.Depending on the connecting device, the ringtone may not be sent properly.Set [RINGTONE] to [1] (page 21).The front speakers are not connected to the unit.Connect the front speakers to the unit. The ringtone is output only from the front speakers.The talker’s voice cannot be heard.The front speakers are not connected to the unit.Connect the front speakers to the unit. The talker’s voice is output only from the front speakers.A call partner says that the volume is too low or high.Adjust the volume accordingly using mic gain adjustment (page 16).Echo or noise occurs in phone call conversations.Lower the volume.Set EC/NC Mode to [EC/NC-1] or [EC/NC-2] (page 16).If the ambient noise other than the phone call sound is loud, try reducing this noise.E.g.: If a window is open and road noise, etc., is loud, shut the window. If an air conditioner is loud, lower the air conditioner.The phone is not connected.When BLUETOOTH audio is played, the phone is not connected even if you press CALL.Connect from the phone.The phone sound quality is poor.Phone sound quality depends on reception conditions of cellular phone. Move your car to a place where you can enhance the cellular phone’s signal if the reception is poor.The volume of the connected audio device is low (high).Volume level will differ depending on the audio device.Adjust the volume of the connected audio device or this unit.The sound skips during playback of a BLUETOOTH audio device.Reduce the distance between the unit and the BLUETOOTH audio device.If the BLUETOOTH audio device is stored in a case which interrupts the signal, remove the audio device from the case during use.Several BLUETOOTH devices or other devices which emit radio waves are in use nearby.Turn off the other devices.Increase the distance from the other devices.The playback sound stops momentarily when the connection between this unit and the cellular phone is being made. This is not a malfunction.The connected BLUETOOTH audio device cannot be controlled.Check that the connected BLUETOOTH audio device supports AVRCP.Some functions do not work.Check if the connecting device supports the functions in question.A call is answered unintentionally.The connecting phone is set to answer a call automatically.Pairing failed due to time out.Depending on the connecting device, the time limit for pairing may be short.Try completing the pairing within the time.BLUETOOTH function cannot operate.Turn off the unit by pressing OFF for more than 2 seconds, then turn the unit on again.No sound is output from the car speakers during handsfree call.If the sound is output from the cellular phone, set the cellular phone to output the sound from the car speakers.010COV.book Page 27 Thursday, September 18, 2014 10:49 AM](https://usermanual.wiki/Sony-Group/MEXN4100BT.Short-Term-Confidential-User-Manual-I/User-Guide-2434702-Page-27.png)
![28GBF:\0918\4548379111\4548379111MEXN5100BTUC\01GB-MEXN5100BTUC\040CD.fm masterpage: LeftMEX-N5100BT/MEX-N4100BT4-548-379-11(1)Siri Eyes Free is not activated.Perform the handsfree registration for an iPhone that supports Siri Eyes Free.Set the Siri function on the iPhone to on.Cancel the BLUETOOTH connection with the iPhone and the unit, and reconnect.SongPal operationApplication name is mismatched with the actual application in “SongPal”.Launch the application again from the “SongPal” application.While running the “SongPal” application via BLUETOOTH, the display automatically switches to [BT AUDIO].The “SongPal” application or BLUETOOTH function has failed.Run the application again.While running the “SongPal” application, the display automatically switches to [IPD].The source of the unit automatically switches to [IPD] when an iPhone/iPod is connected to the USB port.Make the BLUETOOTH connection and launch the “SongPal” application again.Pandora® operationPandora® connection is not possible.Shut down the Pandora® application on the mobile device, and then launch it again.Error displays/MessagesCD ERROR: The disc cannot be played. The disc will be ejected automatically.Clean or insert the disc correctly, or make sure the disc is not blank or defective.CD NO MUSIC: There is no playable file. The disc will be ejected automatically.Insert a disc or connect a USB device containing playable files (page 24).CD PUSH EJT: The disc could not be ejected properly.Press (eject).HUB NO SUPRT: USB hubs are not supported.IPD STOP: iPod playback has finished.Operate your iPod/iPhone to start playback.NO DEV: A USB device is not connected or recognized.Make sure the USB device or USB cable is securely connected.OVERLOAD: The USB device is overloaded.Disconnect the USB device, then press SRC to select another source. The USB device has a fault, or an unsupported device is connected.READ: Now reading information.Wait until reading is complete and playback starts automatically. This may take some time depending on the disc structure.RESET: The unit cannot be operated due to the problem.Press RESET (page 7).USB ERROR: The USB device cannot be played.Connect the USB device again.USB NO SUPRT: The USB device is not supported.For details on the compatibility of your USB device, visit the support site on the back cover. or : The beginning or the end of the disc has been reached.: The character cannot be displayed.For BLUETOOTH function:BT BUSY: The BLUETOOTH device is busy.Wait for a while, then try again.ERROR: The selected operation could not be performed.Wait for a while, then try again.MEMORY BUSY: Now storing data.Wait for a while, then try again.NO DEV: The BLUETOOTH device is not connected or recognized.Make sure the BLUETOOTH device is securely connected, or the BLUETOOTH connection is established with the BLUETOOTH device.P EMPTY: No phone numbers are stored.UNKNOWN: A name or phone number cannot be displayed.WITHHELD: The phone number is hidden by the caller.For SongPal operation:APP DISCNCT: The application is disconnected.Make the “SongPal” connection (page 16).010COV.book Page 28 Thursday, September 18, 2014 10:49 AM](https://usermanual.wiki/Sony-Group/MEXN4100BT.Short-Term-Confidential-User-Manual-I/User-Guide-2434702-Page-28.png)