Sony Group PCH2001 PlayStation(R) Vita User Manual Basics PlayStationRVita User s Guide
Sony Corporation PlayStation(R) Vita Basics PlayStationRVita User s Guide
Contents
users guide
This section introduces the basic operations of your PS Vita system and gives hints about how to get the most
from your PS Vita system.
Hardware part names
Types of card media
Charging
Turning your PS Vita system on and off
Touch operations, and sensing orientation and motion
Basic operations
Controlling with buttons on the system
Using the screens
Starting and closing applications
Displaying software manuals
Customizing the home screen
Entering text
Connecting to the Internet
Muting the audio
Adjusting the brightness of the screen
Taking a screenshot
Using menus
Using parental controls
Before disposing of your PS Vita system
Top > Basics
PlayStation®Vita
User's Guide
Top > Basics
Basics
A
bout this site
This guide is for use with system software version 2.60 or later.
© 2013 Sony Computer Entertainment Inc. All Rights Reserved.
Basics
|
PlayStation®Vita User's Guide http://manuals.playstation.net/document/en/psvita/basic/index.html
1 / 1 2013/08/27 15:02
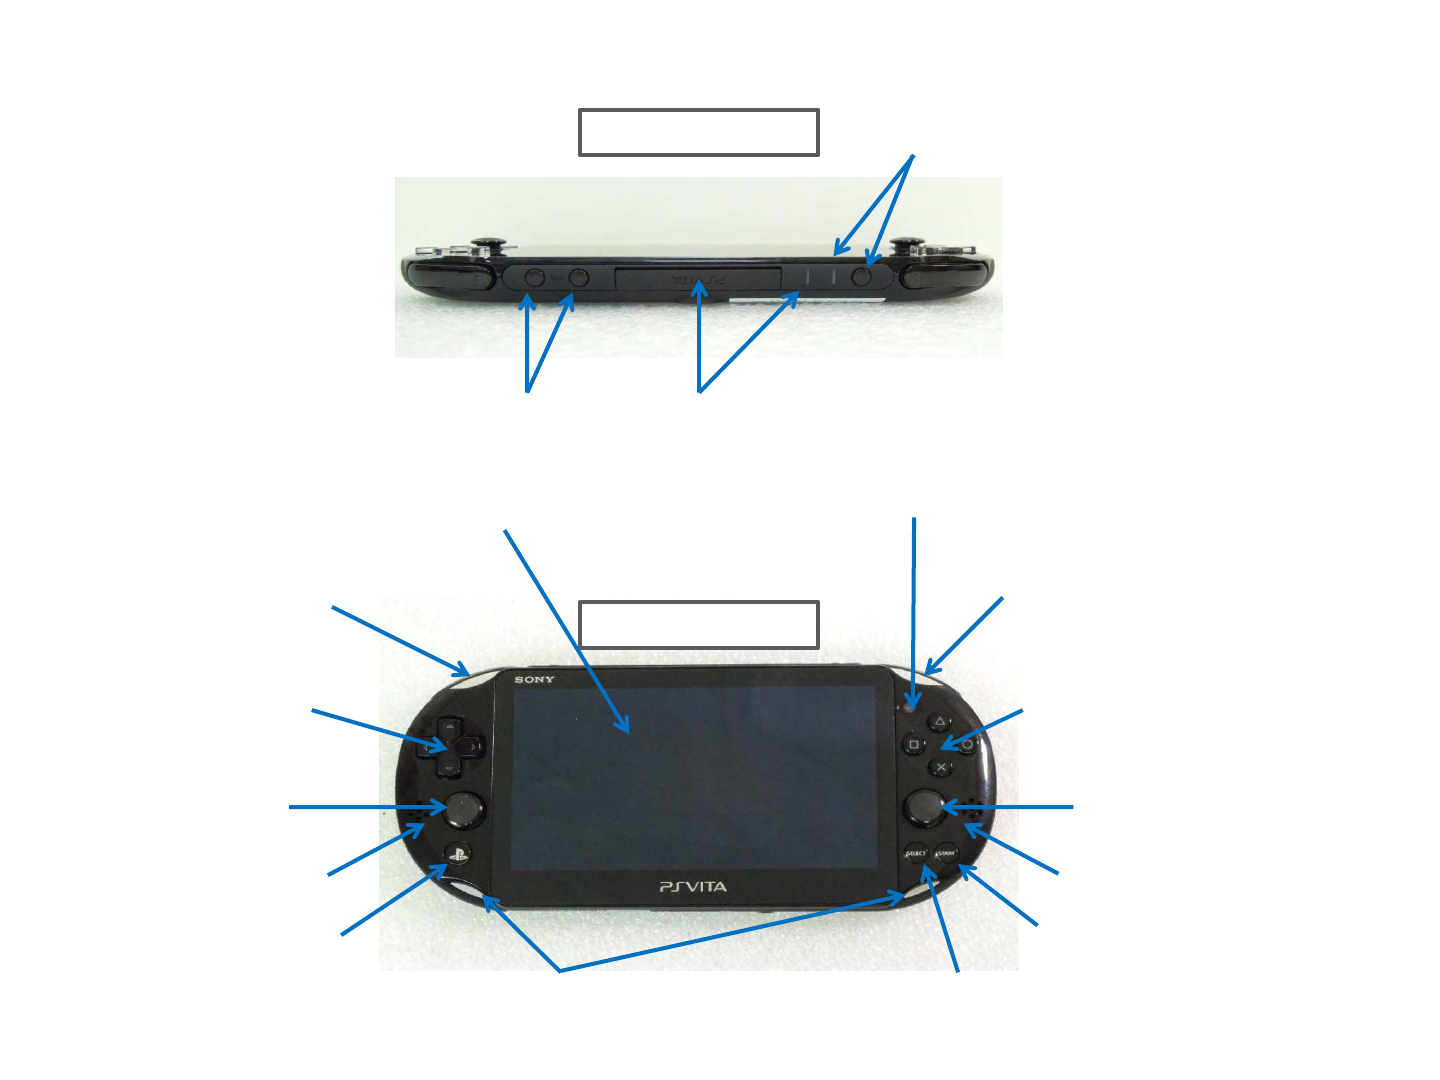
Front Side
Top Side
SCEI Confidential
Power Button / Power indicator
PS Vita card slot / Vita card access indicator VOL + button / VOL - button
Front camera
R button
△button / ○button/
×button / □button
Right stick
Right speaker
Select button
Start button
Strap holder
L button
Left stick
Left speaker
PS button
Directional buttons
Screen (touchscreen)
Hardware part names
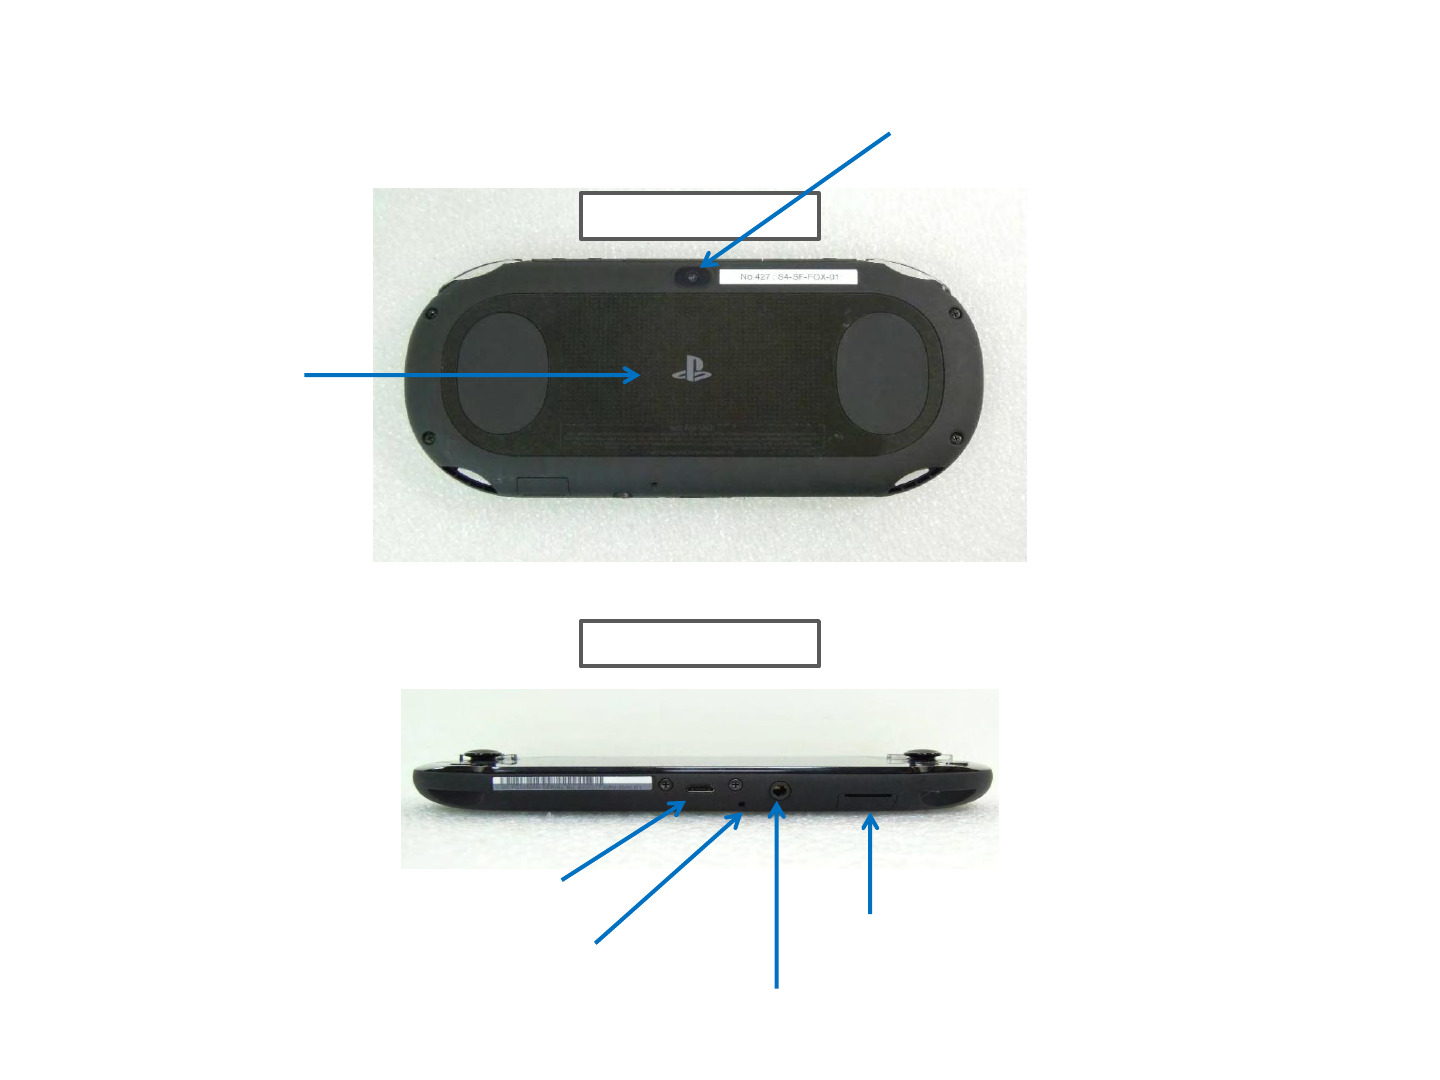
Rear Side
Bottom Side
SCEI Confidential
Rear camera
Rear touch pad
Memory card slot
USB port
Microphone
Headset jack
Hardware part names
Your PS Vita system uses the following types of card media:
Memory card
The memory card is designed specifically for the PS Vita system. Your system stores games downloaded from
PlayStation®Store, as well as saved data and add-on data for games, on the memory card. You can also save
content such as photos and music on the memory card.
You cannot use Memory Stick™ media such as the Memory Stick Micro™ (M2™) on your PS Vita
system.
Insert or remove the memory card only when the power is off. Inserting or removing the memory card
while the power is on, including when your system is in standby mode, can cause data corruption or
loss.
After you sign up for Sony Entertainment Network from your PS Vita system, memory cards that you
insert are linked to your account. You can only use the memory cards in PS Vita systems to which the
same account is linked.
PlayStation®Vita card
The PS Vita card is designed specifically for storing PlayStation®Vita format software (games and other
applications) for use on your PS Vita system. For some games, the PS Vita card can also store saved data and
add-on data.
A region code is assigned to each PS Vita card according to the country or region in which the PS Vita card is
sold.
You cannot use UMD™ (such as those used for games and videos) on your PS Vita system.
Removing the PS Vita card or turning off the power when the PS Vita card access indicator is blinking
can cause data corruption or loss.
SIM card (only for 3G/Wi-Fi models)
PlayStation®Vita
User's Guide
Top > Basics > Types of card media
Types of card media
Types of card media
|
PlayStation®Vita User's Guide http://manuals.playstation.net/document/en/psvita/basic/media.html
1 / 2 2013/08/27 15:03
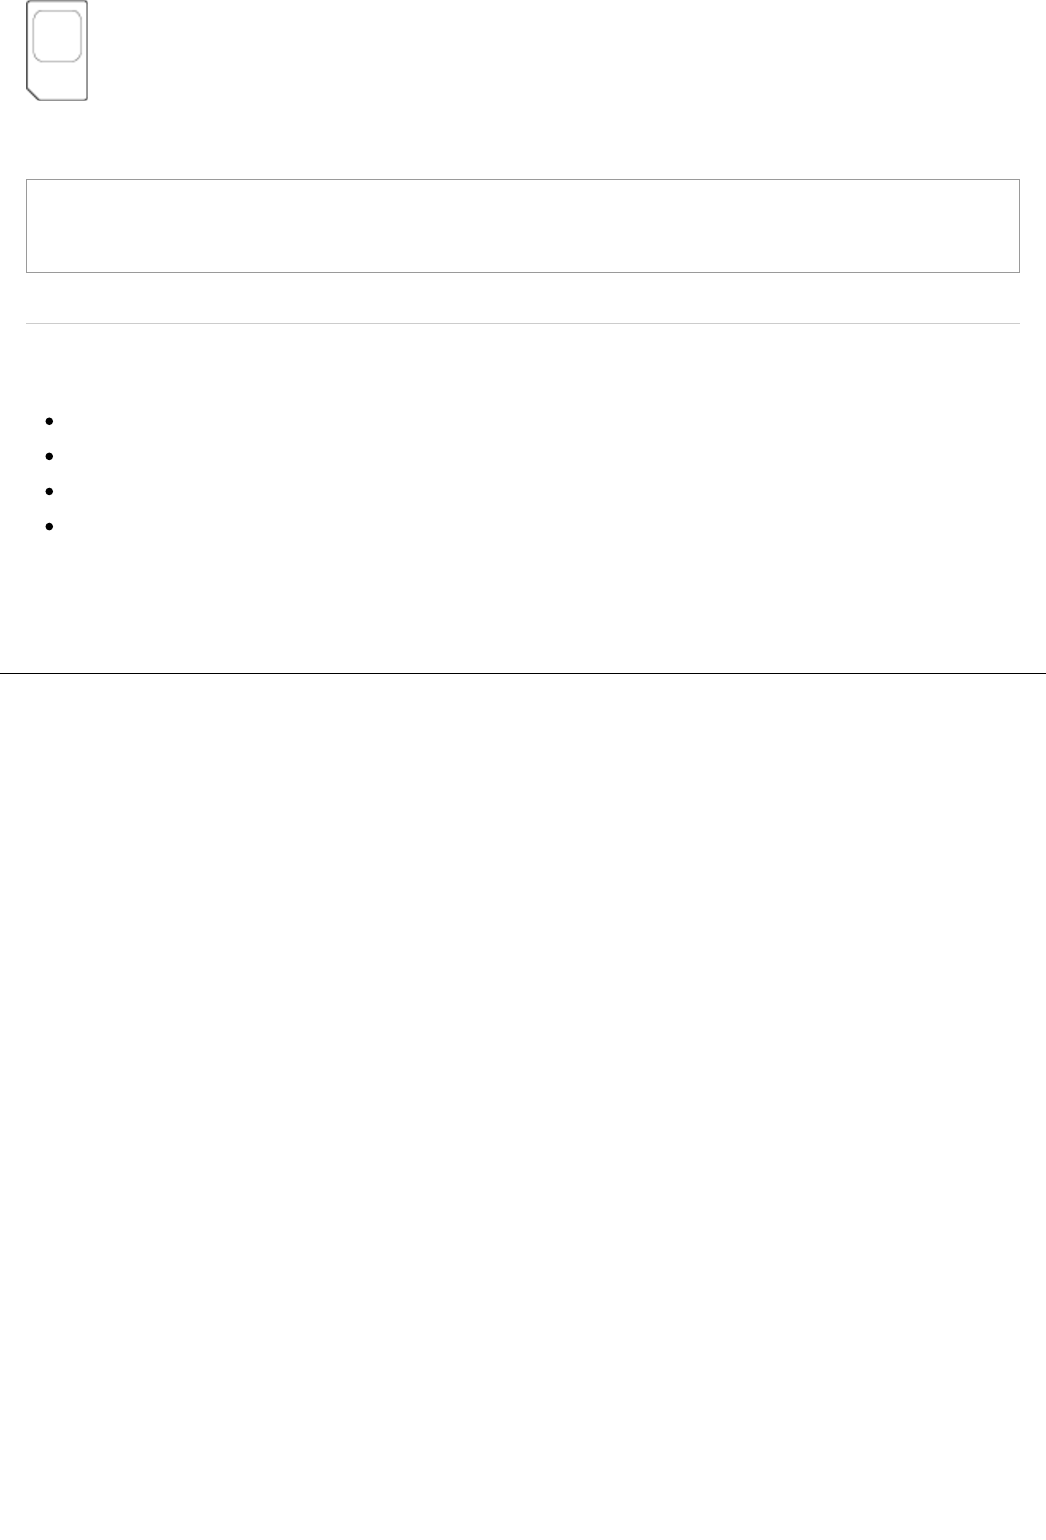
On 3G/Wi-Fi models, you need a SIM card to access a mobile network.
Insert or remove the SIM card only when the power is off. Inserting or removing the SIM card while the
power is on, including when your system is in standby mode, can cause data corruption or loss.
Related articles
Playing a game on a PlayStation®Vita card
Photos
Music
Videos
Top > Basics > Types of card media
A
bout this site
This guide is for use with system software version 2.60 or later.
© 2013 Sony Computer Entertainment Inc. All Rights Reserved.
Types of card media
|
PlayStation®Vita User's Guide http://manuals.playstation.net/document/en/psvita/basic/media.html
2 / 2 2013/08/27 15:03
A )
B )
C )
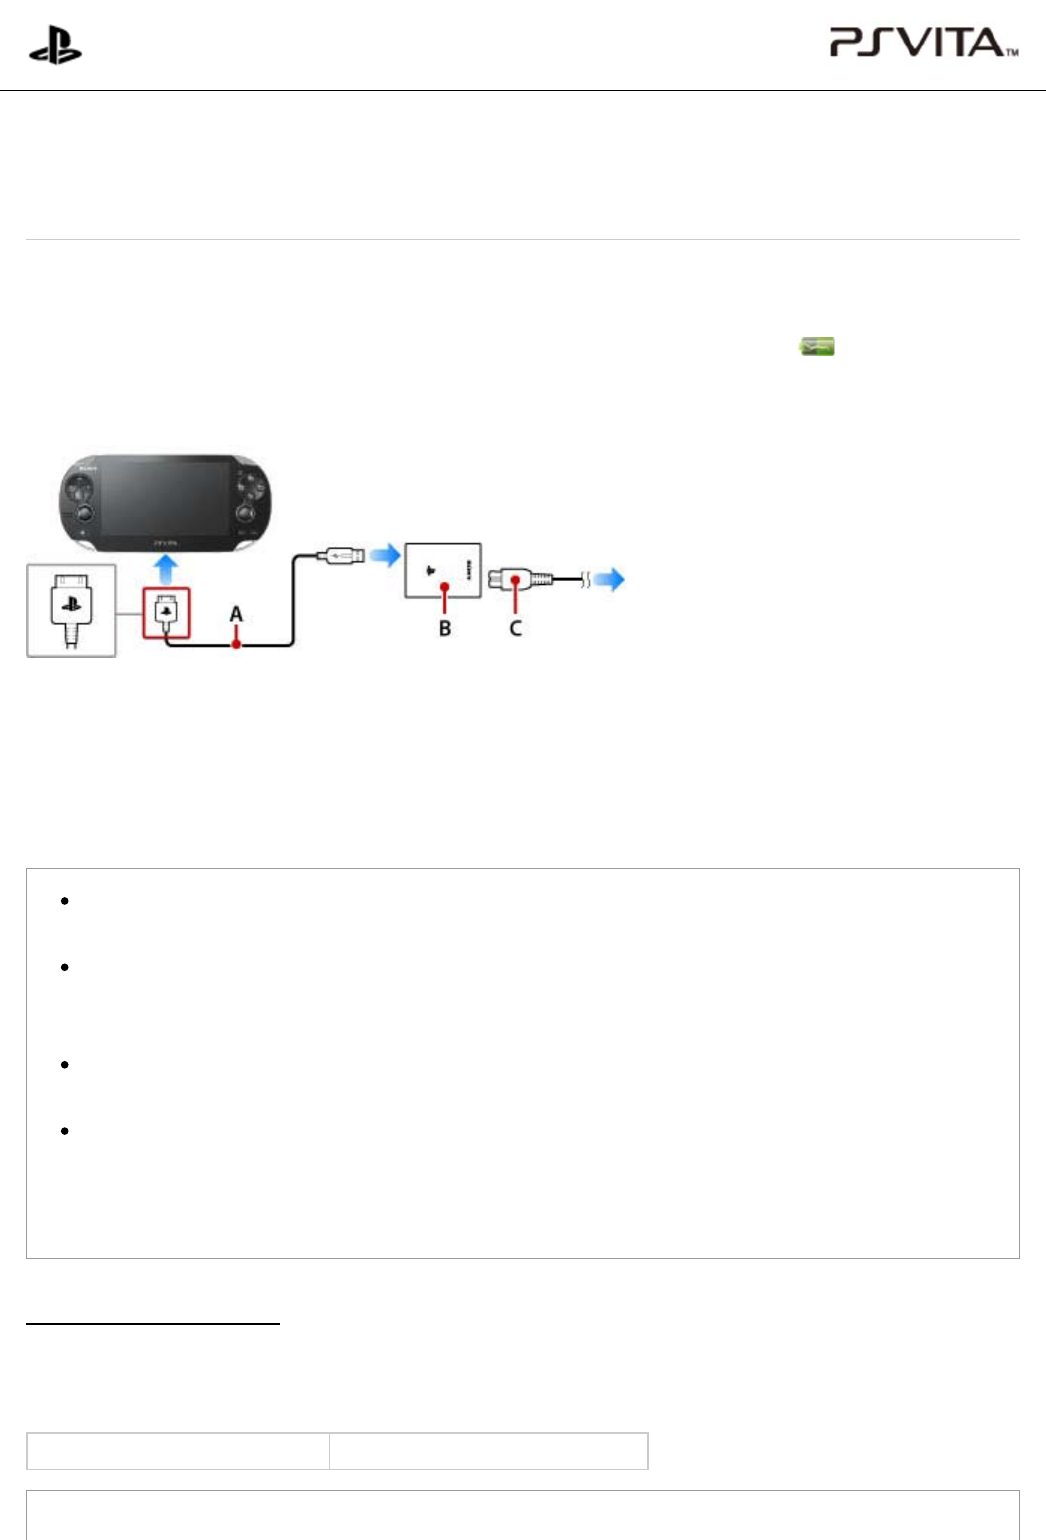
To charge your PS Vita system, connect it to an electrical outlet as shown below using the included USB cable,
AC adaptor and AC power cord.
While your system is charging, the remaining battery charge is shown on the info bar as (Charging). Also,
while the system is charging when the system is in standby mode or it is turned off completely, the PS button
lights up orange. When charging is complete, the light in the PS button goes out.
USB cable
AC adaptor
AC power cord
Plug the power cord into the power outlet last, after making all of the other connections.
Use an electrical outlet that is easily accessible, so the AC power cord can be unplugged quickly if the
need arises.
Charge your system in an environment where the ambient temperature is between 10 °C and 30 °C (50
°F and 86 °F). In environments outside of this range, charging can be inefficient and might lead to
decreased battery life.
When the PS button blinks orange during charging, the battery charge is too low to turn on your PS Vita
system. Wait until the PS button stops blinking and lights up orange before turning on your system.
You can also charge your system by connecting it to a USB device such as a computer using the USB
cable. When charging your system using a USB device, turn off your system. You cannot charge your
system when it is in standby mode. To completely power off the system, press and hold the power
button for two seconds, and then tap [Power Off] on the screen that appears.
Approximate charging time
The following table gives the approximate charging time for your PS Vita system when the battery has no
remaining charge.
Charging using the AC adaptor Approximately 2 hours, 40 minutes
Charging your PS Vita system while using it or while the system is in standby mode can increase the
PlayStation®Vita
User's Guide
Top > Basics > Charging
Charging
Charging
|
PlayStation®Vita User's Guide http://manuals.playstation.net/document/en/psvita/basic/charge.html
1 / 2 2013/08/27 15:04
*1
*2
charging time.
Approximate duration of continuous use
The durations in the table assume that the screen brightness is set to the default setting, the Bluetooth® feature
is not being used, and headphones are being used.
Playing games*1 Approximately 3-5 hours
Playing videos Approximately 5 hours
Playing music*2 Approximately 9 hours
When the network features are not being used.
When the system enters standby mode during music playback, and music continues playing.
Battery duration may vary depending on the screen brightness, how network features (mobile network/Wi-
Fi/Bluetooth®) are being used, and the type of content being played.
Battery life
The battery in your PS Vita system has a limited life. Over an extended period of time, a gradual decrease occurs
in the duration of continuous use. If you experience a dramatic decrease in the duration of continuous use, contact
customer support in your country or region.
Battery life varies depending on how you use your PS Vita system and the environment in which the
system is used and stored.
Related articles
USB Power Supply
Top > Basics > Charging
A
bout this site
This guide is for use with system software version 2.60 or later.
© 2013 Sony Computer Entertainment Inc. All Rights Reserved.
Charging
|
PlayStation®Vita User's Guide http://manuals.playstation.net/document/en/psvita/basic/charge.html
2 / 2 2013/08/27 15:04
Turning the power on
Press the power button for two seconds. When the system is turned on, the PS button lights up blue.
When turning on your PS Vita system for the first time, press and hold the power button for five
seconds.
If your system does not turn on even when you press and hold the power button, the battery charge
might be too low to turn on the system. Use the AC adaptor to charge your system, and then try turning
on the system again.
Putting your system into standby mode
You can put your system into standby mode by pressing the power button. When the power button is pressed,
the screen (touchscreen) is turned off, the PS button blinks in blue, and the system enters standby mode.
To exit standby mode, press the power button or the PS button.
When your system is in standby mode, Wi-Fi and mobile networking remain enabled. The PS button
blinks slowly in blue when there are new notifications, such as those generated when messages arrive.
With the default setting, when your system is idle for three minutes, it automatically enters standby
mode. However, your system does not enter standby mode automatically in some cases, depending on
the status of the application. For example, when you are viewing a slideshow or video, your system
does not enter standby mode.
When your PS Vita system is in either of the following states while it is in standby mode, the PS button
either lights up blue or blinks in blue:
Applications or features for which the auto-start setting is enabled have started automatically.
Power is being supplied to the system by a USB device such as a computer.
Turning the power off completely
Press and hold the power button for two seconds and then tap [Power Off] on the screen that appears.
When your PS Vita system is not operating correctly
If you cannot turn off your PS Vita system or the system is not operating correctly, you might be able to solve the
problem by using safe mode.
Safe mode is a start-up mode for your PS Vita system, in which only a few system functions are available for
solving problems. To start your PS Vita system in safe mode, press and hold the power button until the safe
mode menu appears. In safe mode, use your PS Vita system's buttons to operate the menu.
PlayStation®Vita
User's Guide
Top > Basics > Turning your PS Vita system on and off
Turning your PS Vita system on and off
Turning your PS Vita system on and off
|
PlayStation®Vita User's Guide http://manuals.playstation.net/document/en/psvita/basic/power.html
1 / 2 2013/08/27 15:04

When the PS Vita system does not start in safe mode even after you keep pressing the power button for more
than 30 seconds, the battery charge might be too low to turn on the system. In this case, charge your PS Vita
system using the included AC adaptor.
Related articles
Auto Standby
Auto-Start Settings
USB Power Supply
Screen Lock
Top > Basics > Turning your PS Vita system on and off
A
bout this site
This guide is for use with system software version 2.60 or later.
© 2013 Sony Computer Entertainment Inc. All Rights Reserved.
Turning your PS Vita system on and off
|
PlayStation®Vita User's Guide http://manuals.playstation.net/document/en/psvita/basic/power.html
2 / 2 2013/08/27 15:04
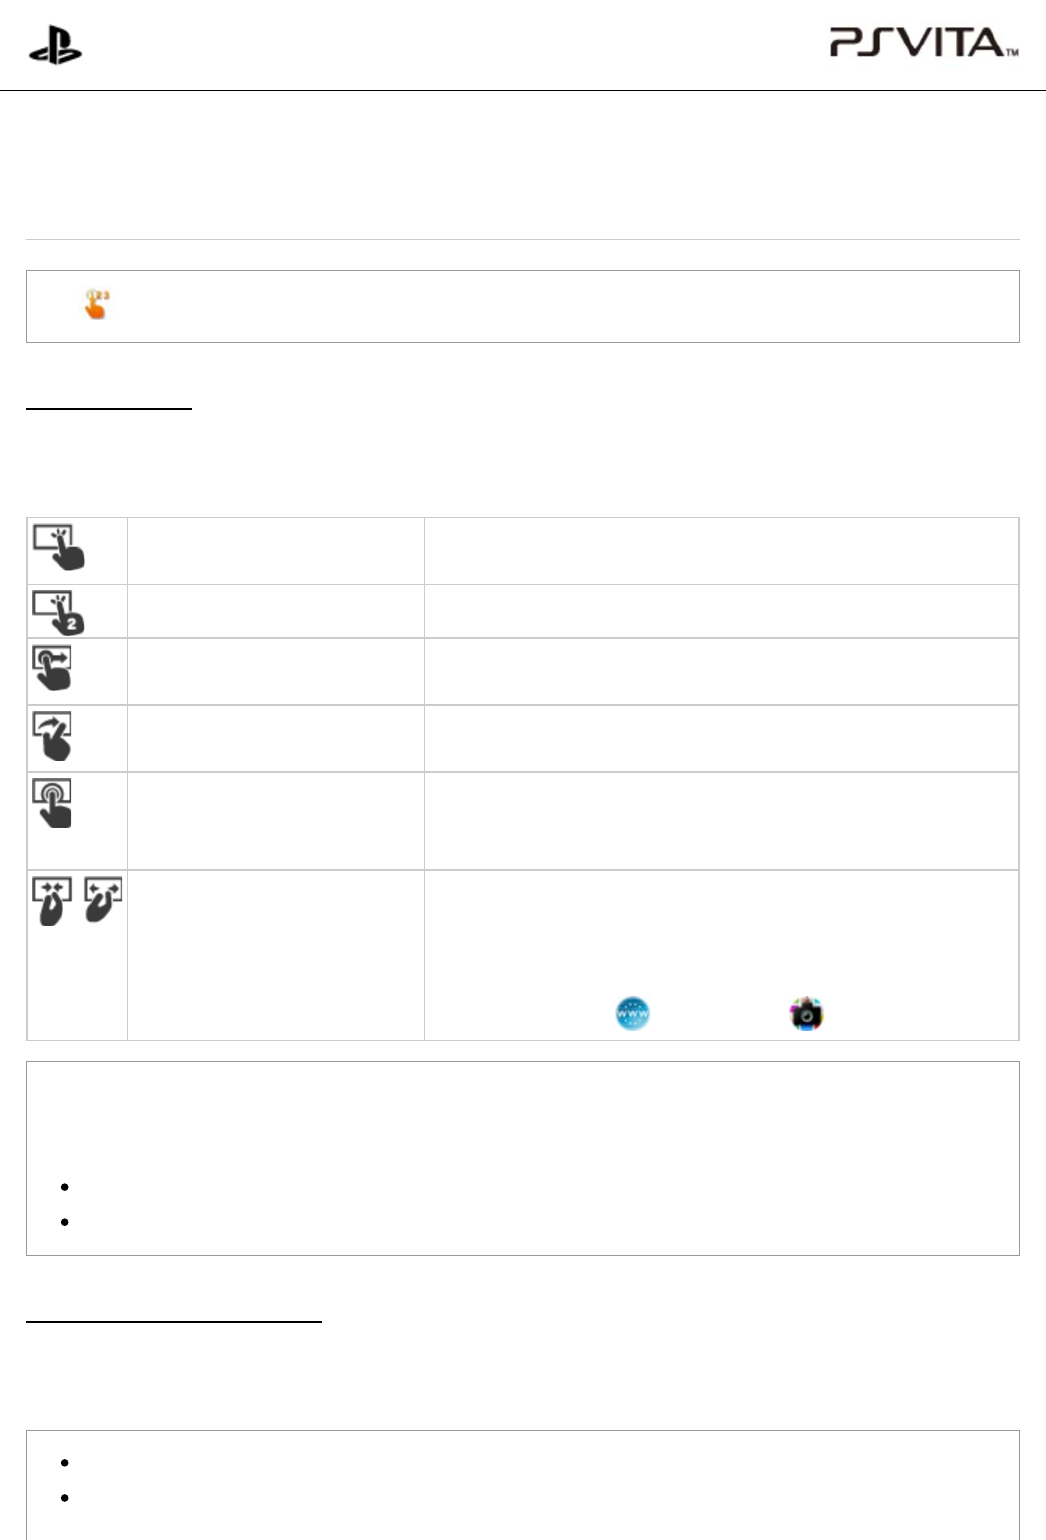
In (Welcome Park), have fun learning the basic operations and features of your PS Vita system.
Touch operations
Your PS Vita system is equipped with a screen (touchscreen) and a rear touch pad. To perform various
operations, make these gestures with your fingers:
Tap Touch lightly with your finger and then raise your finger.
Tap to select an icon or an item.
Double tap Tap twice in a row.
Drag Touch and then move your finger while still touching.
Drag to scroll up, down, right and left.
Flick Touch and move your finger rapidly while still touching.
Flick to quickly scroll up, down, right and left.
Touch and hold Touch and keep touching.
Touch and hold for some operations, for example, to enter edit
mode for the home screen.
Pinch in/pinch out Touch with two fingers and then move your fingers closer together
or further apart.
Pinch inward to make things smaller on the screen. Pinch outward
to make things larger on the screen. Use pinch in and pinch out in
applications such as (Browser) and (Photos).
You might not be able to operate the touchscreen or rear touch pad correctly, or your operations might be
interfered with and might cause an application or your system to operate in an unintended manner, if you
are:
Wearing gloves or touching with your fingernails.
Holding your PS Vita system with your fingers or other objects touching the touchscreen.
Sensing orientation and motion
Your PS Vita system has motion sensors to sense the tilt and motion of the system and an electronic compass to
sense the orientation of your system.
Do not swing your system around. This might result in accidents or injuries.
A message appears if it is necessary to adjust the compass. Adjust the compass by following the
PlayStation®Vita
User's Guide
Top > Basics > Touch operations, and sensing orientation and motion
Touch operations, and sensing orientation and motion
Touch operations, and sensing orientation and motion
|
PlayStation®... http://manuals.playstation.net/document/en/psvita/basic/touch.html
1 / 2 2013/08/27 15:06

on-screen instructions.
Top > Basics > Touch operations, and sensing orientation and motion
A
bout this site
This guide is for use with system software version 2.60 or later.
© 2013 Sony Computer Entertainment Inc. All Rights Reserved.
Touch operations, and sensing orientation and motion
|
PlayStation®... http://manuals.playstation.net/document/en/psvita/basic/touch.html
2 / 2 2013/08/27 15:06
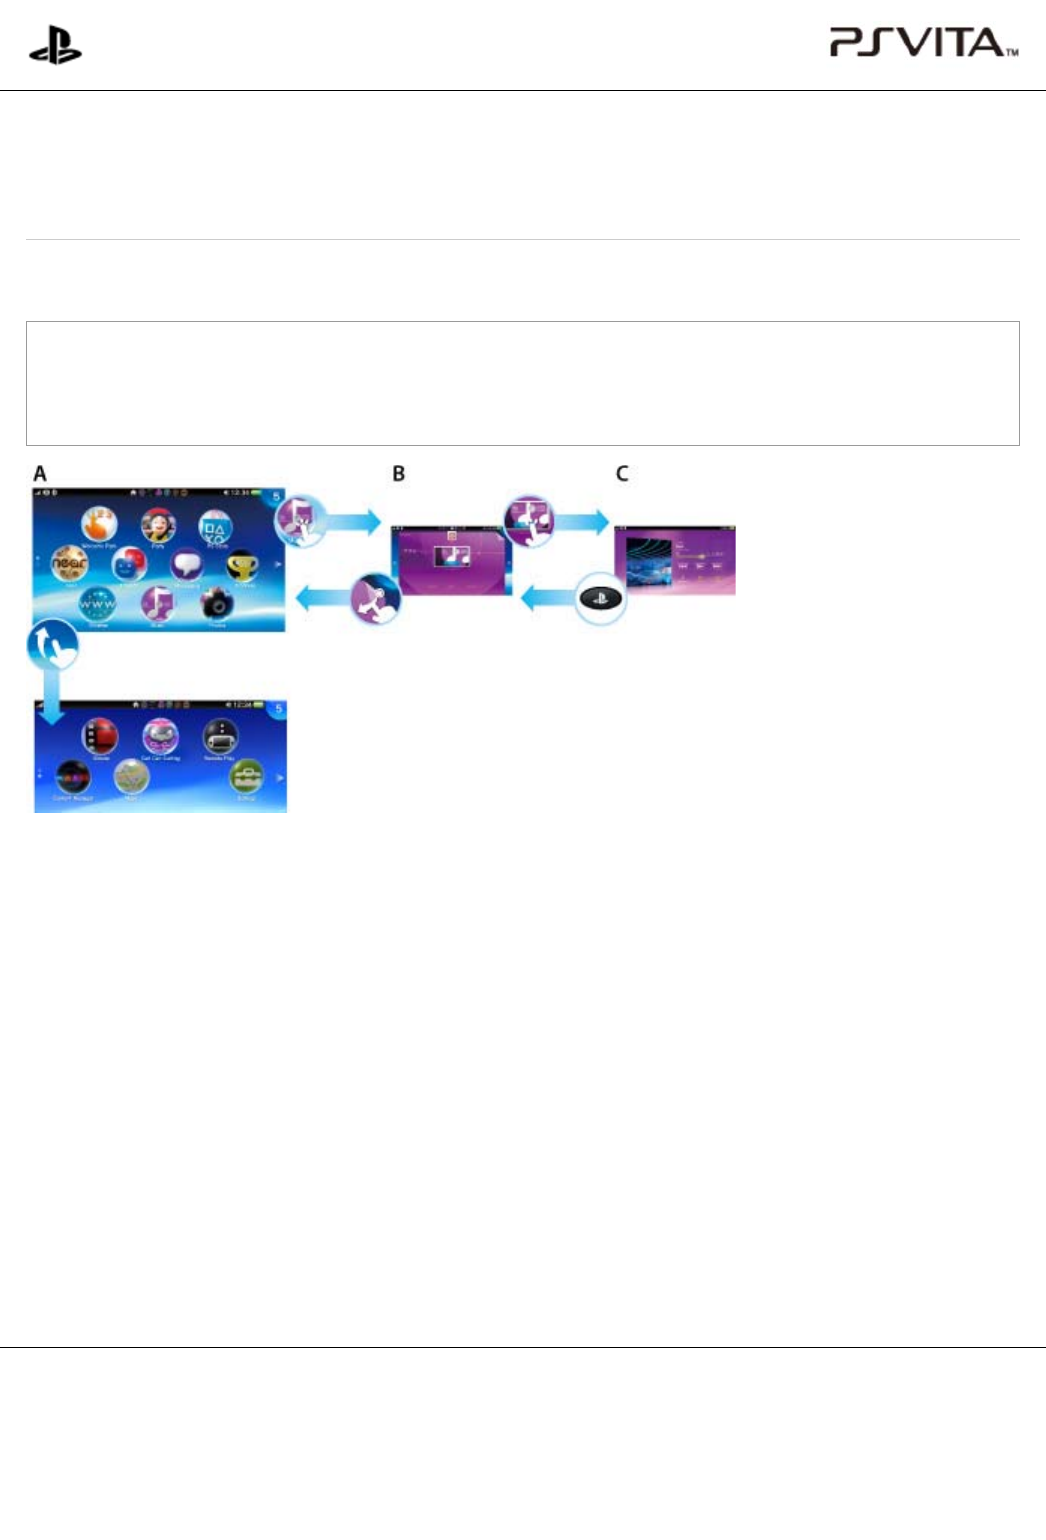
A )
B )
C )
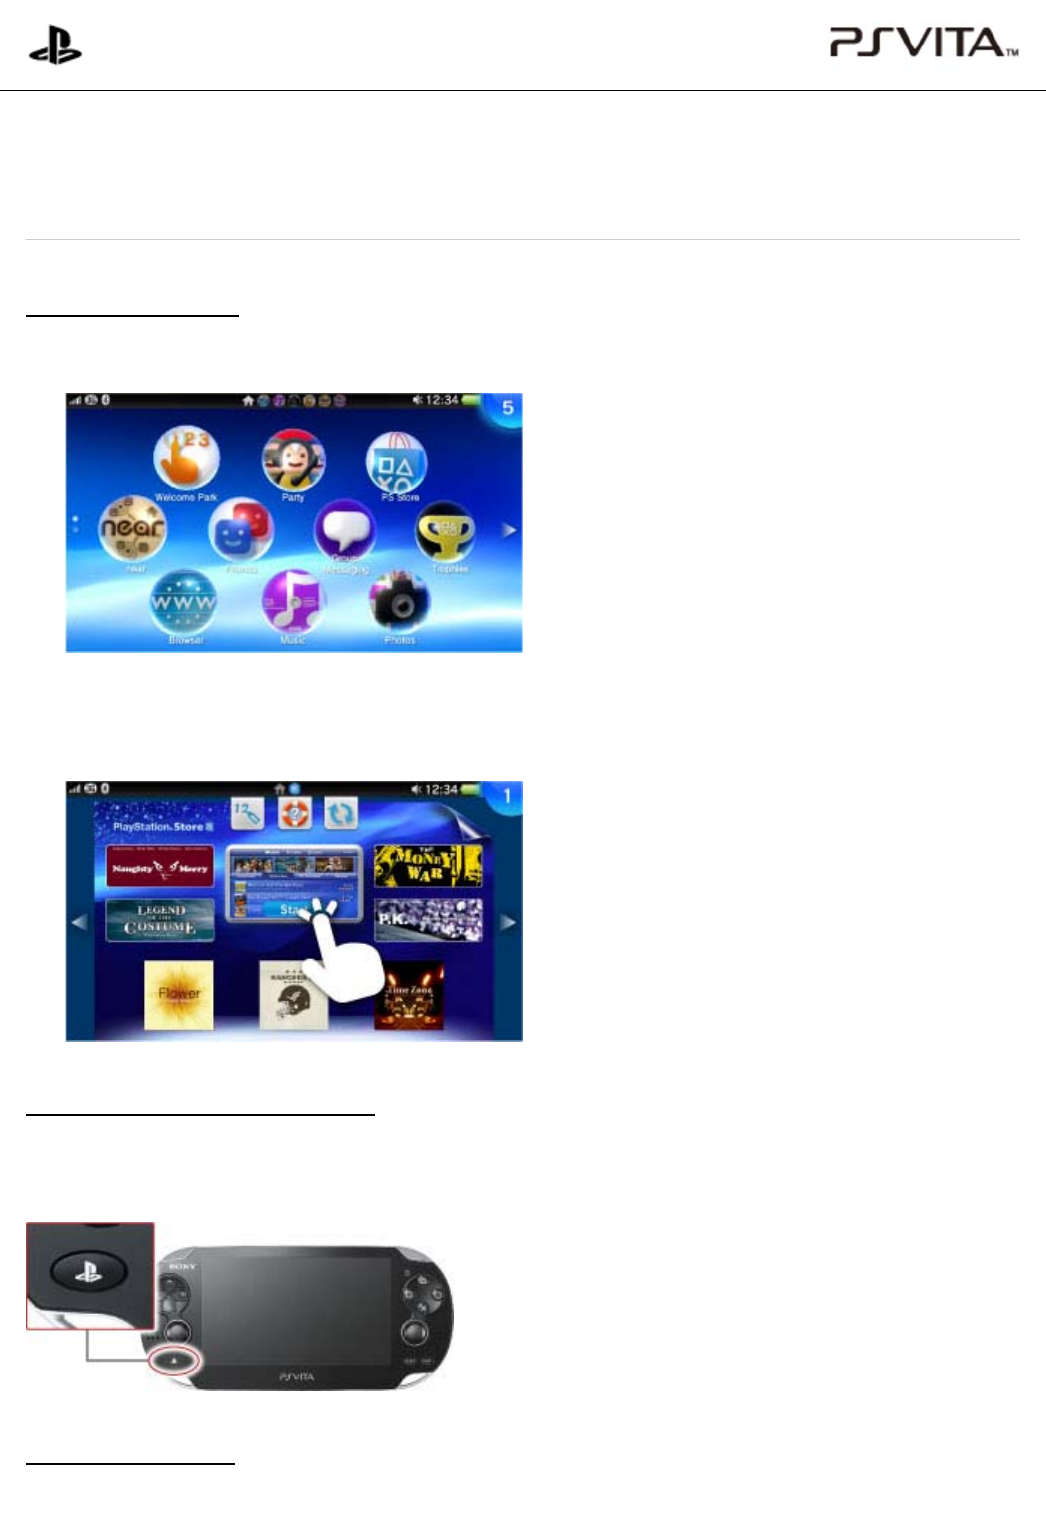
Tap the icon for a game or other application on the home screen to open the application's LiveArea™ screen.
You can open LiveArea™ screens for up to six applications at the same time, and go back and forth
between the screens. When you open the LiveArea™ screen for a seventh application, the first
LiveArea™ screen that you opened is closed automatically.
Home screen
The home screen displays icons for games and other applications. The home screen can have a maximum of
10 pages. Move from page to page by flicking the home screen up and down.
LiveArea™ screen
The LiveArea™ screen for an application presents a number of features that relate to the application. To
start an application, tap [Start]. The application runs, using the full screen.
You can go back and forth between the home screen and the open LiveArea™ screens by flicking the
screens right and left.
Application screens
Press the PS button to return to the LiveArea™ screen.
Top > Basics > Basic operations
PlayStation®Vita
User's Guide
Top > Basics > Basic operations
Basic operations
A
bout this site
This guide is for use with system software version 2.60 or later.
© 2013 Sony Computer Entertainment Inc. All Rights Reserved.
Basic operations
|
PlayStation®Vita User's Guide http://manuals.playstation.net/document/en/psvita/basic/basicoper...
1 / 1 2013/08/27 15:06
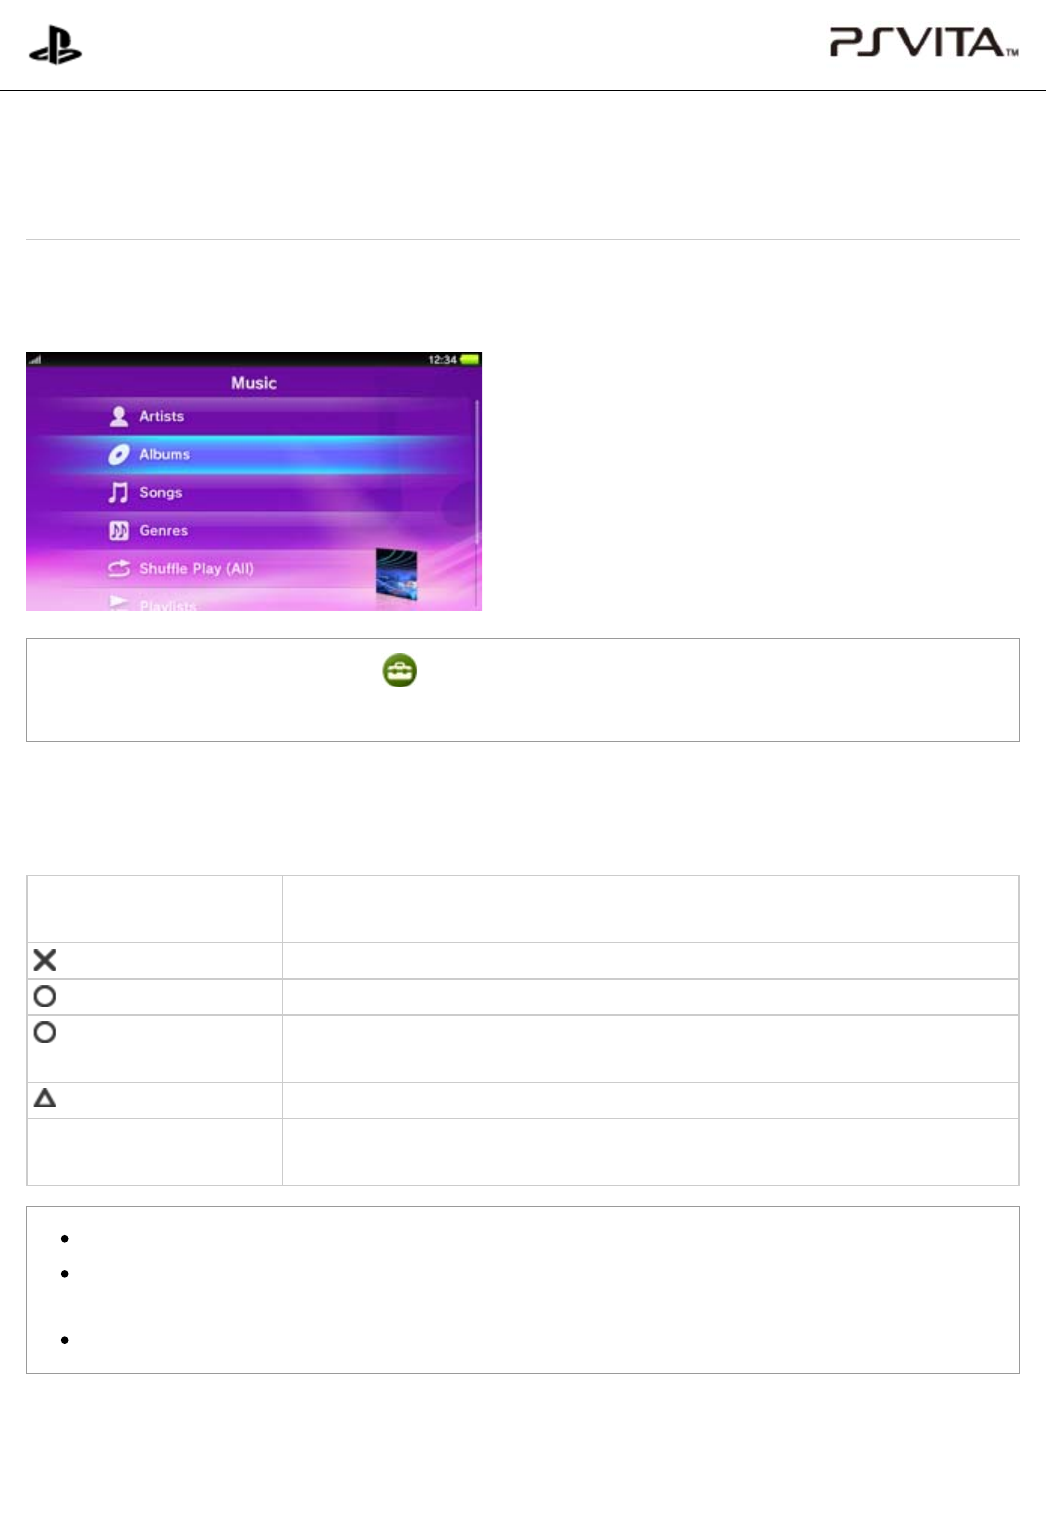
In addition to touch operation, you can also control the system using the buttons on the PS Vita system.
When you are on a screen that supports button control and you press a button, a cursor appears.
You can disable button control under (Settings) > [Start] > [System] > [Control with Buttons on PS
Vita System].
Button control examples
Controllable features vary by application and the screen that is displayed.
Directional buttons/Left
stick
Select an application or an item
button Confirm the selected item
button Cancel operation
button (Press and
Hold)
When the LiveArea™ screen is open, peel the LiveArea™ screen
button Display the option menu or the control panel
L button/R button When the LiveArea™ screen is open, switch between the home screen and the
LiveArea™ screen
The cursor is hidden after a few seconds. Press any button to display the cursor again.
Tap the screen to switch to touch operation. If you want to use the buttons on the PS Vita system
again, press any button. A cursor will appear on the screen and button control will be enabled.
You will not be able to control some features with buttons.
PlayStation®Vita
User's Guide
Top > Basics > Controlling with buttons on the system
Controlling with buttons on the system
Controlling with buttons on the system
|
PlayStation®Vita User's Guide http://manuals.playstation.net/document/en/psvita/basic/hwbutton...
1 / 2 2013/08/27 15:07

Related articles
Control with Buttons on PS Vita System
Top > Basics > Controlling with buttons on the system
A
bout this site
This guide is for use with system software version 2.60 or later.
© 2013 Sony Computer Entertainment Inc. All Rights Reserved.
Controlling with buttons on the system
|
PlayStation®Vita User's Guide http://manuals.playstation.net/document/en/psvita/basic/hwbutton...
2 / 2 2013/08/27 15:07
A )
B )
C )
A )
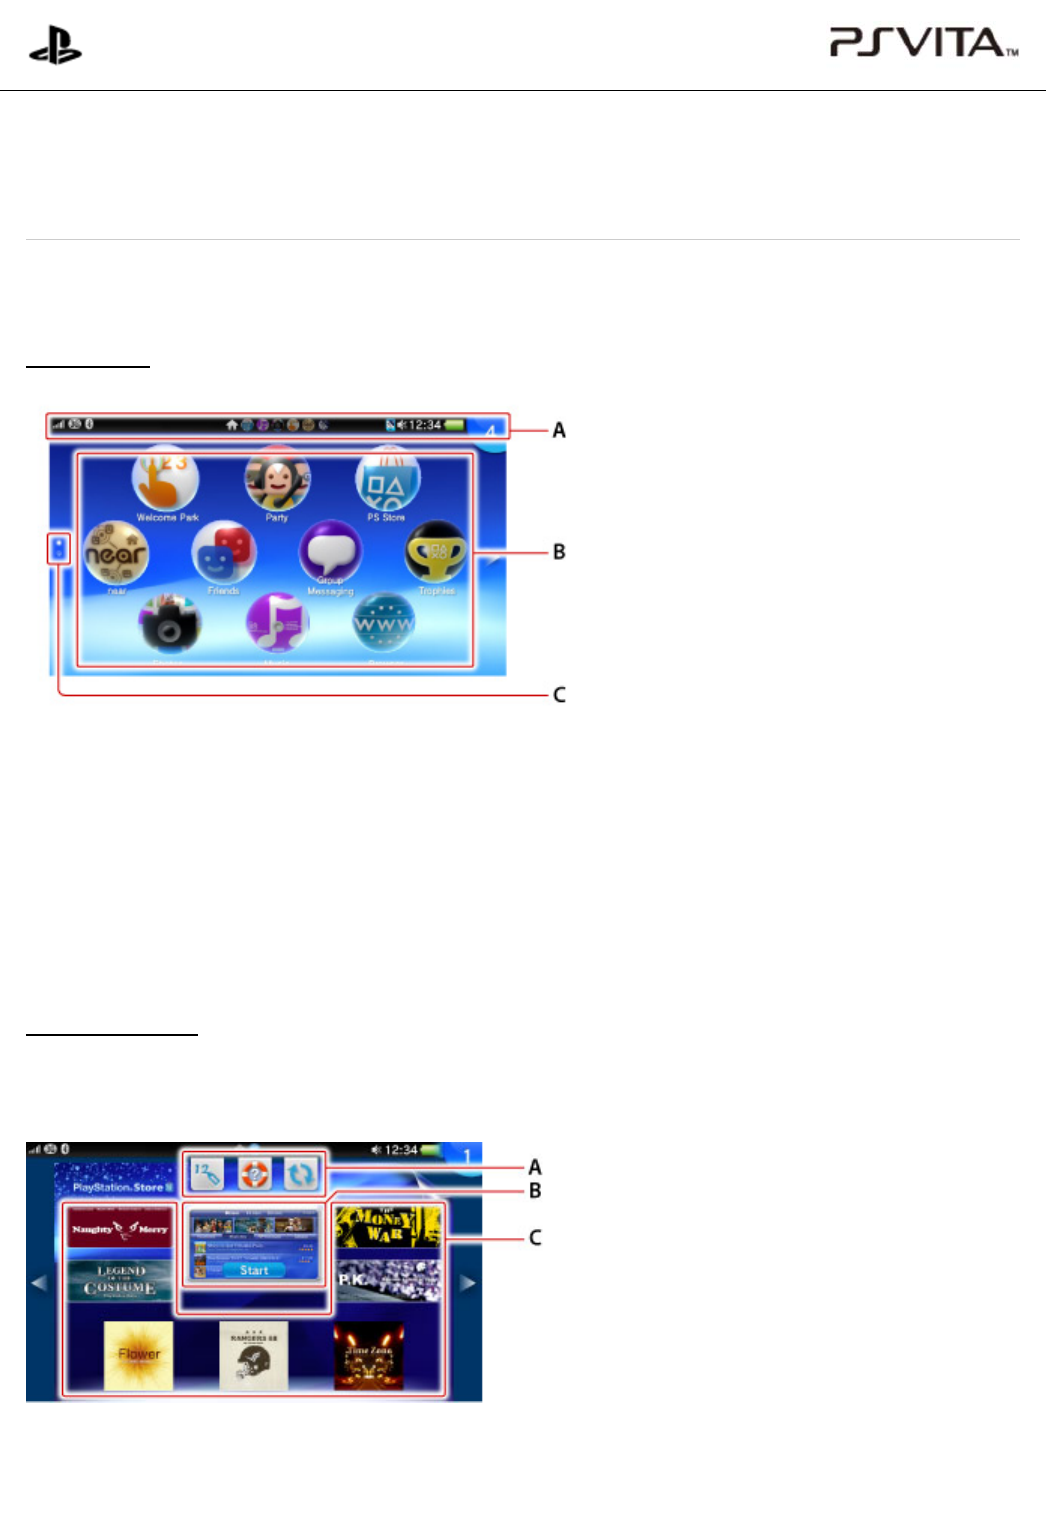
This section explains how to use the home screen, LiveArea™ screens and application screens.
Home screen
Info bar
Check the status of your PS Vita system on the info bar.
Application icons
The home screen displays icons for applications. A maximum of 100 icons can be displayed.
Page indicator
The page indicator shows the number of pages in the home screen. The dot for the current page is white.
LiveArea™ screen
The LiveArea™ screen for an application presents information and features that relate to the application. The
content and appearance of the screen vary for different applications.
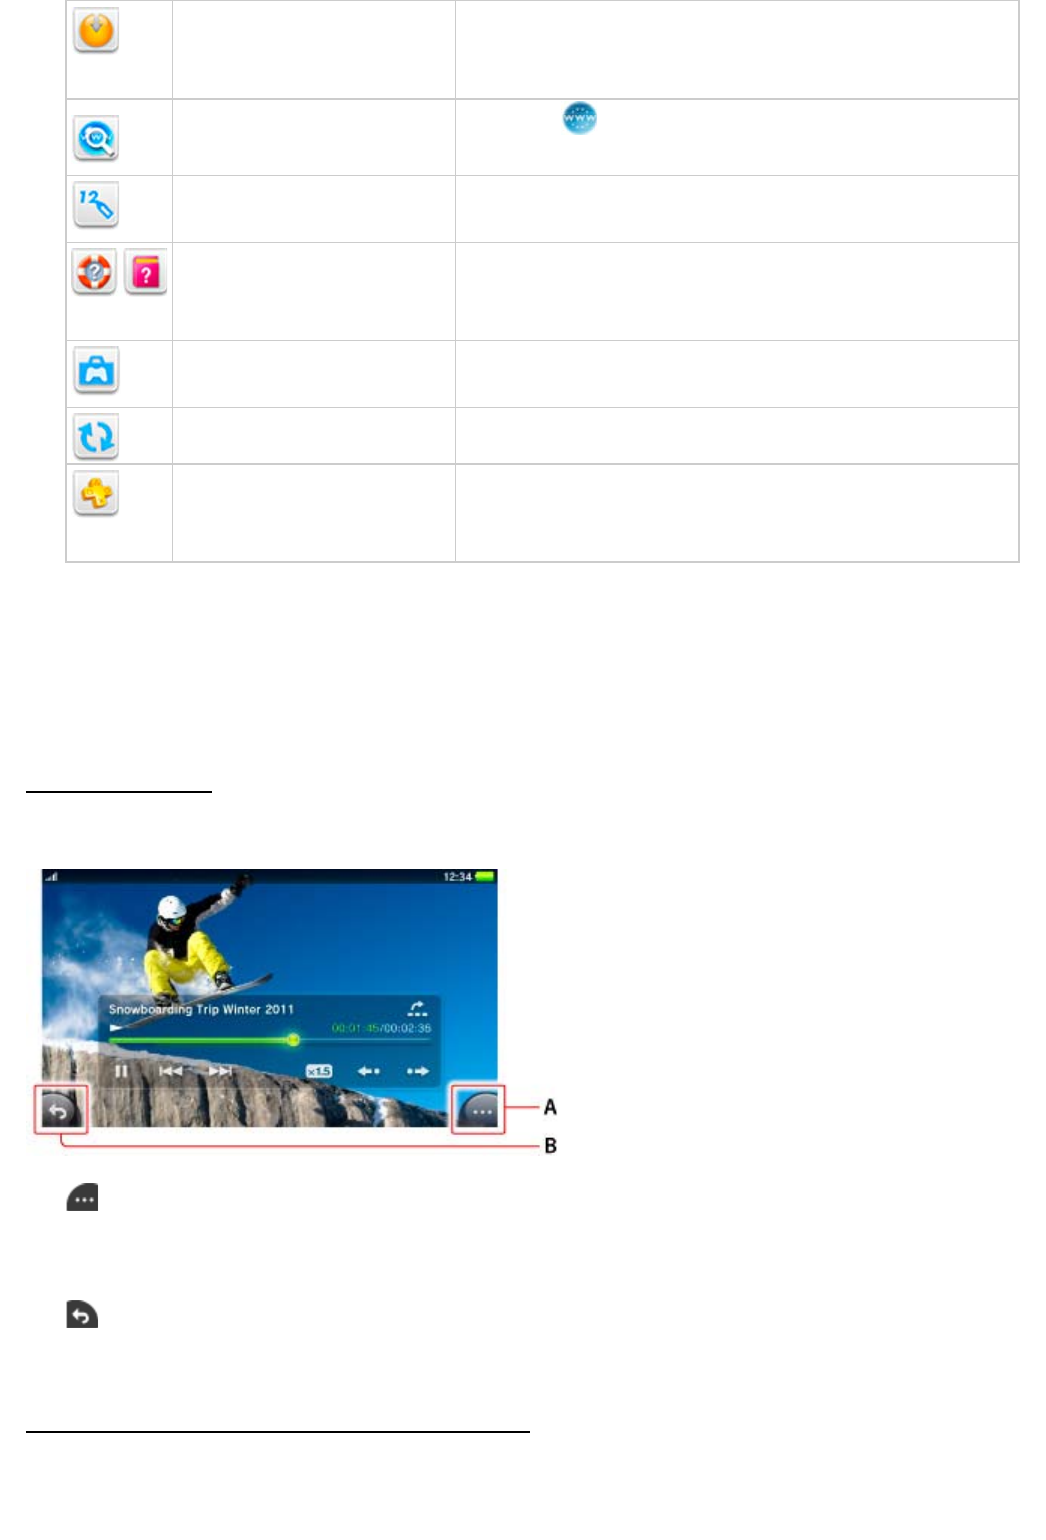
Action icons
Action icons let you perform common functions across applications. Only the icons for functions supported by
the application are shown:
PlayStation®Vita
User's Guide
Top > Basics > Using the screens
Using the screens
Using the screens
|
PlayStation®Vita User's Guide http://manuals.playstation.net/document/en/psvita/basic/screens.html
1 / 5 2013/08/27 15:08
B )
C )
A )
B )
Update Updates the application
This icon is only displayed when a newer version of the
application is available for download.
Internet Search Opens the (Browser) application and displays the
keyword search screen
Redeem Codes Displays a screen for entering a code for a purchase from
PlayStation®Store
Help Displays the user's guide for your PS Vita system (the first
icon) or the software manual for the application (the second
icon)
Import Saved Data Imports saved data
This icon is displayed only for games that support this feature.
Refresh LiveArea™ Screen Refreshes the content displayed on the LiveArea™ screen
PlayStation®Plus Accesses online storage
Access the PlayStation®Network server, so you can upload or
download the saved data.
Gate
Tap the gate to start the application.
Live items
Live items display various information related to the application. The information varies by application.
Application screens
Application screens are the screens where you operate the application.
(Options)
Tap the options button to display an options menu, which is a context-sensitive menu of options such as
[Delete] and [Copy].
(Back)
Tap the back button to go back to the previous screen.
Checking the status of your PS Vita system (info bar)
Using the screens
|
PlayStation®Vita User's Guide http://manuals.playstation.net/document/en/psvita/basic/screens.html
2 / 5 2013/08/27 15:08
A )
*
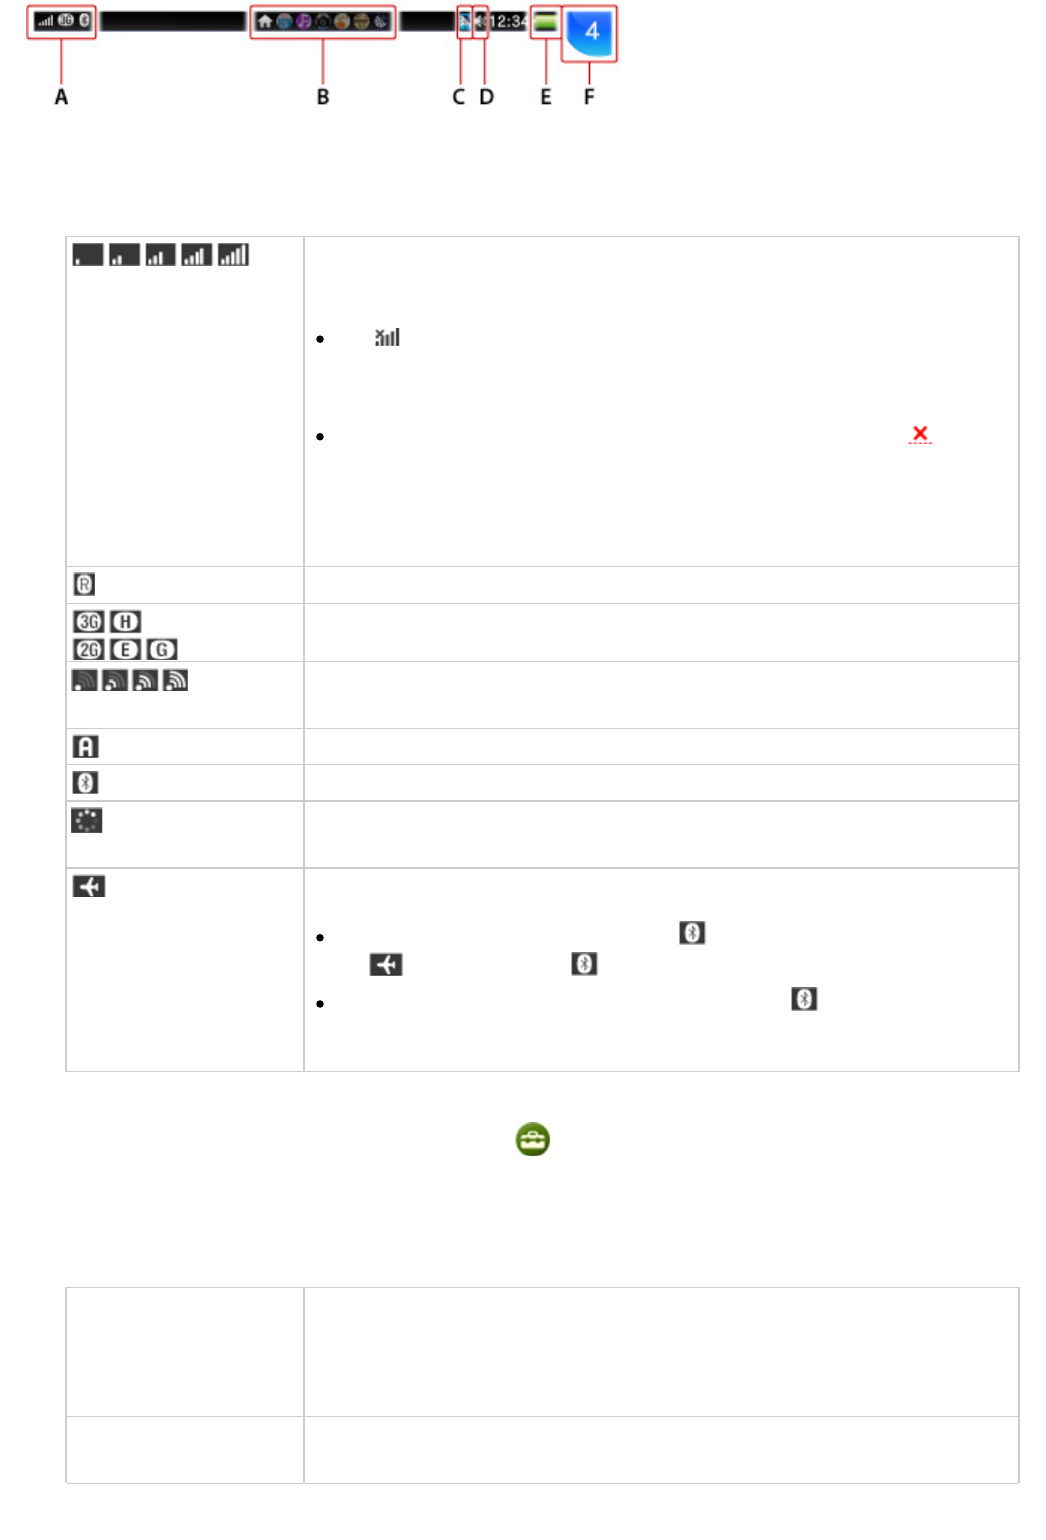
Communication status
View information about network connections, signal strengths, and current communications. The icons that
are displayed will differ depending on the model of your PS Vita system.
Mobile signal strength*
Shows the signal strength by displaying "No Signal" or the number of bars (1-5).
The (Limited Connectivity) icon is displayed when your connection is
limited by your mobile network operator. For details, contact your mobile
network operator.
If the temperature of your PS Vita system becomes too high, the
(Temporary Suspension) icon appears. When this icon is visible, your system
cannot use the mobile network connection until the system cools down. When
the system cools down, the icon for the mobile signal strength re-appears.
Roaming*
Data transmission mode*
Wi-Fi signal strength
Shows the signal strength in four levels.
Connected in ad hoc mode
Bluetooth® device in use
Network activity indicator
Currently transmitting and/or receiving data over the Wi-Fi or mobile network.
Flight Mode
Communication status icons other than (Bluetooth®) disappear, and only
the (Flight Mode) and (Bluetooth®) icons are displayed.
When you are not using the Bluetooth® feature, the (Bluetooth®) icon is
not displayed.
Only on 3G/Wi-Fi models
If you tap the [Mobile Network] checkbox under (Settings) > [Start] > [Network] > [Mobile Network
Settings] to remove the checkmark, all the communication status icons will no longer be displayed.
The SIM card status might appear on 3G/Wi-Fi models.
No SIM No SIM card is inserted.
If [No SIM] appears while a SIM card is inserted, turn off your PS Vita system,
remove the SIM card, and insert the SIM card again with the correct
orientation.
Invalid SIM An unusable SIM card is inserted.
For details, contact your mobile network operator.
Using the screens
|
PlayStation®Vita User's Guide http://manuals.playstation.net/document/en/psvita/basic/screens.html
3 / 5 2013/08/27 15:08
B )
C )
D )
E )
F )
Locked SIM A locked SIM card is inserted.
The [Lock SIM Card] setting under (Settings) > [Start] > [Network] >
[Mobile Network Settings] > [SIM Card Settings] is enabled. You must enter
your PIN number every time your PS Vita system is turned on.
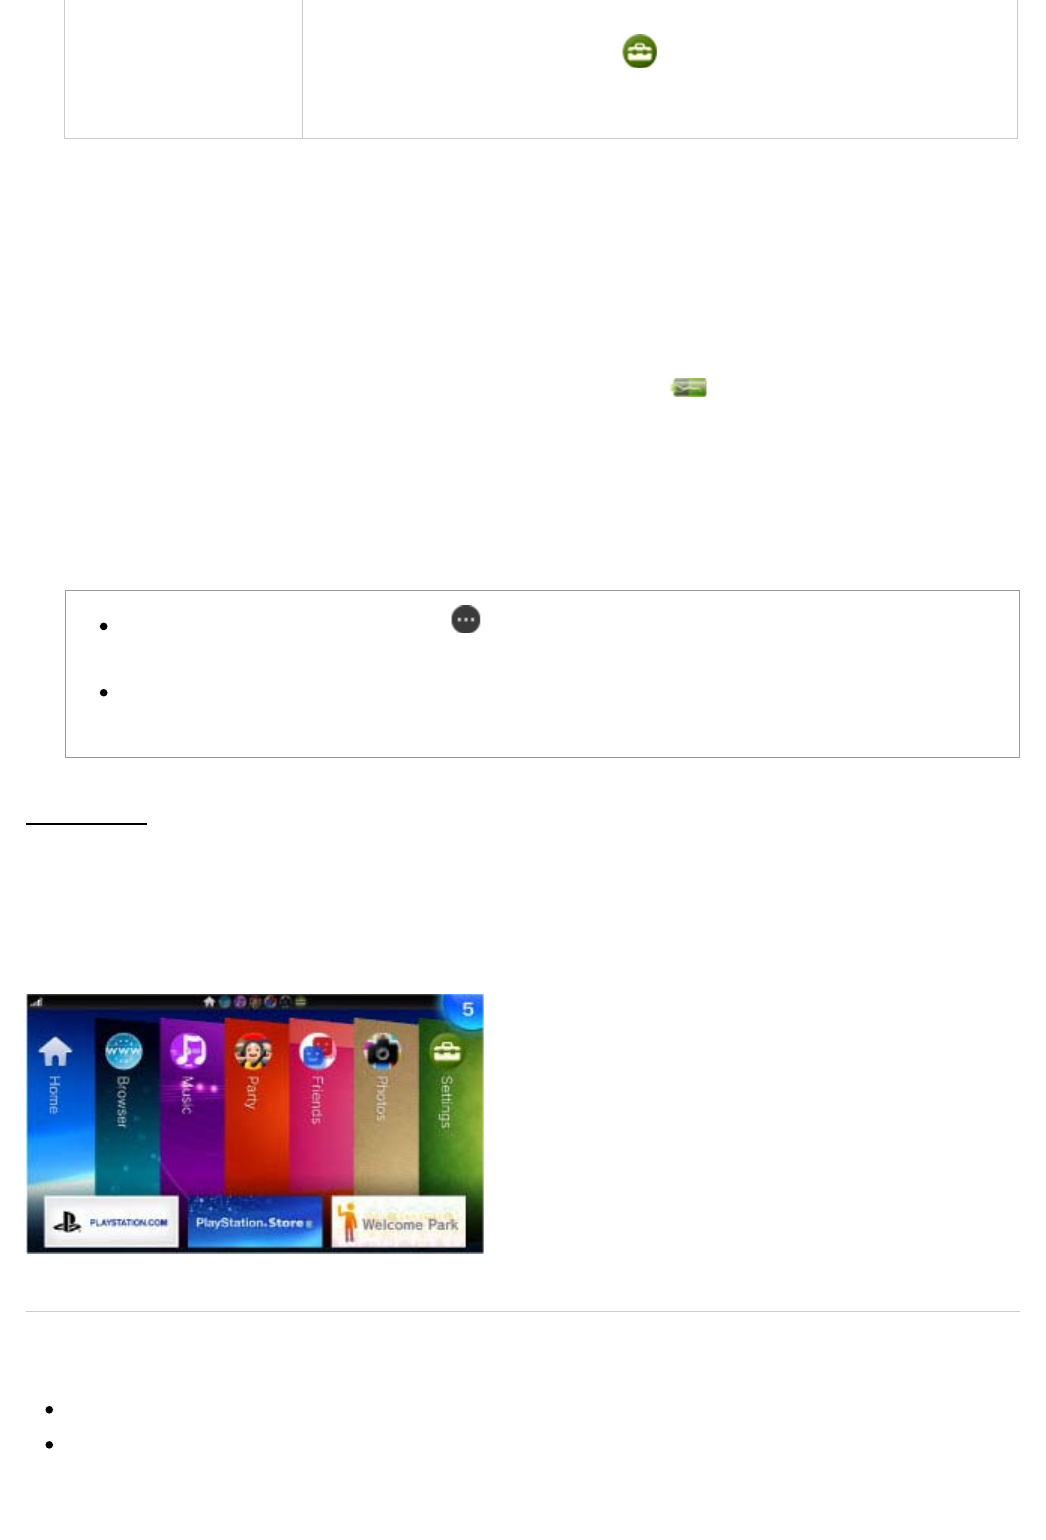
Open LiveArea™ screens
PS Vita card
The icon appears when a PS Vita card is inserted.
Audio output status
Remaining battery charge
The remaining battery charge is shown in five levels. When charging, (Charging) is displayed.
Notification indicator
When the user receives a new notification, a notification message appears on the upper right of the screen.
The notification indicator displays the number of new notifications.
Tap the notification indicator to display the notification list, from which you can view the download status of
content. From the notification list you can tap an item on the list to go to the relevant application.
Depending on the type of notification, (Options) appears. Tap it to display an options menu,
which is a context-sensitive menu of options.
When a notification is generated while a video is being played or when the system is in standby
mode, the PS button blinks slowly in blue.
Index screen
Press the PS button while on the home screen or a LiveArea™ screen to display the index screen, where you can
view the list of open LiveArea™ screens.
Tap an item on the index screen to display the LiveArea™ screen for the application. On the index screen, you
can display the home screen by pressing the PS button.
Related articles
LiveArea™ screens for games
Flight Mode
Using the screens
|
PlayStation®Vita User's Guide http://manuals.playstation.net/document/en/psvita/basic/screens.html
4 / 5 2013/08/27 15:08

Top > Basics > Using the screens
A
bout this site
This guide is for use with system software version 2.60 or later.
© 2013 Sony Computer Entertainment Inc. All Rights Reserved.
Using the screens
|
PlayStation®Vita User's Guide http://manuals.playstation.net/document/en/psvita/basic/screens.html
5 / 5 2013/08/27 15:08
1.
2.
1.
Starting an application
On the home screen, tap the icon of the application you want to start.
The LiveArea™ screen for the application appears.
Tap [Start] on the gate.
Pausing and resuming an application
Press the PS button to pause the application and return to an application's LiveArea™ screen. Tap [Continue] on
the application's LiveArea™ screen to resume using an application.
Closing an application
Press the PS button.
PlayStation®Vita
User's Guide
Top > Basics > Starting and closing applications
Starting and closing applications
Starting and closing applications
|
PlayStation®Vita User's Guide http://manuals.playstation.net/document/en/psvita/basic/start.html
1 / 2 2013/08/27 15:08

2.
The application pauses and the LiveArea™ screen appears.
Peel the LiveArea™ screen from the upper right to the lower left.
Top > Basics > Starting and closing applications
A
bout this site
This guide is for use with system software version 2.60 or later.
© 2013 Sony Computer Entertainment Inc. All Rights Reserved.
Starting and closing applications
|
PlayStation®Vita User's Guide http://manuals.playstation.net/document/en/psvita/basic/start.html
2 / 2 2013/08/27 15:08
A )
B )
C )
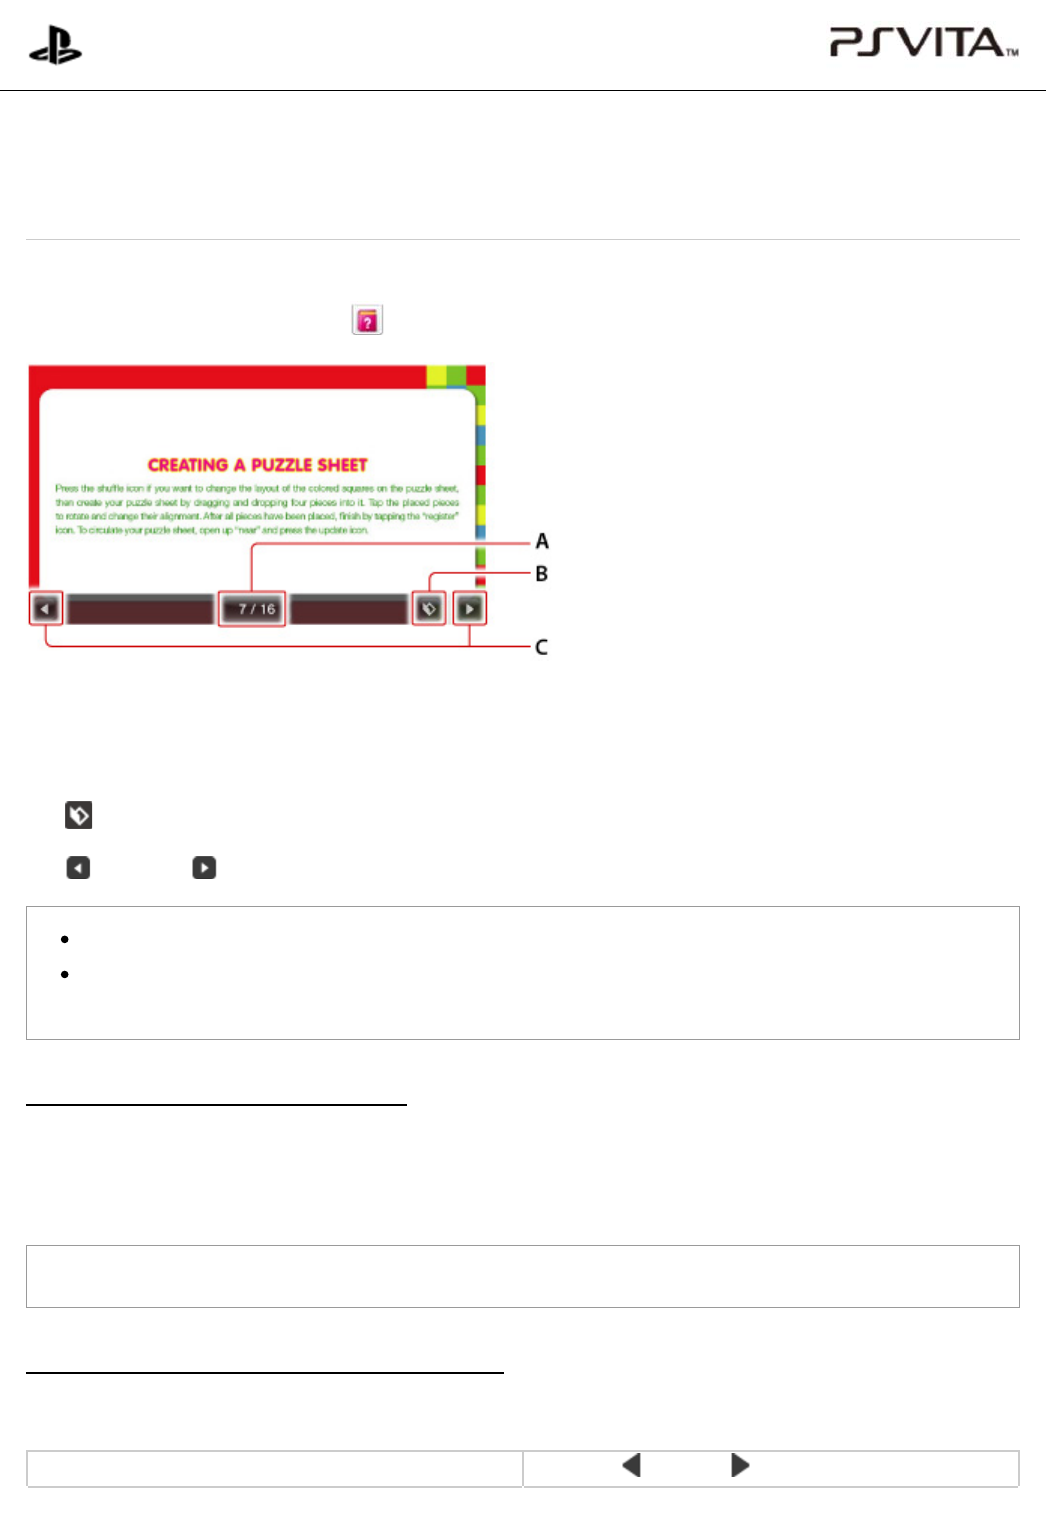
With some applications, you can read a software manual.
When on the LiveArea™ screen, tap (Help) to display the software manual.
Page display
Tap to display the slider to move to any page. Drag the slider until you reach the desired page, and then
release your finger.
(Single page/Double-page spread)
(Previous)/ (Next)
Flick the screen left or right to view the next or previous page.
You can hide controls such as the operation buttons by tapping the screen. Tap the screen again to
display the controls.
Enlarging and reading software manuals
When reading the software manual, double tap the screen to zoom in. The area around the spot you double tap is
enlarged. Double tap the screen again to zoom out and return the software manual to its original size.
You can also zoom in by pinching the screen in and zoom out by pinching the screen out.
You can perform these operations only when a single page is displayed.
Controlling with the buttons on the PS Vita system
Hide controls such as the operation buttons to control with the buttons on the PS Vita system.
Go to the previous or next page Press the button or button
PlayStation®Vita
User's Guide
Top > Basics > Displaying software manuals
Displaying software manuals
Displaying software manuals
|
PlayStation®Vita User's Guide http://manuals.playstation.net/document/en/psvita/basic/help.html
1 / 2 2013/08/27 15:09
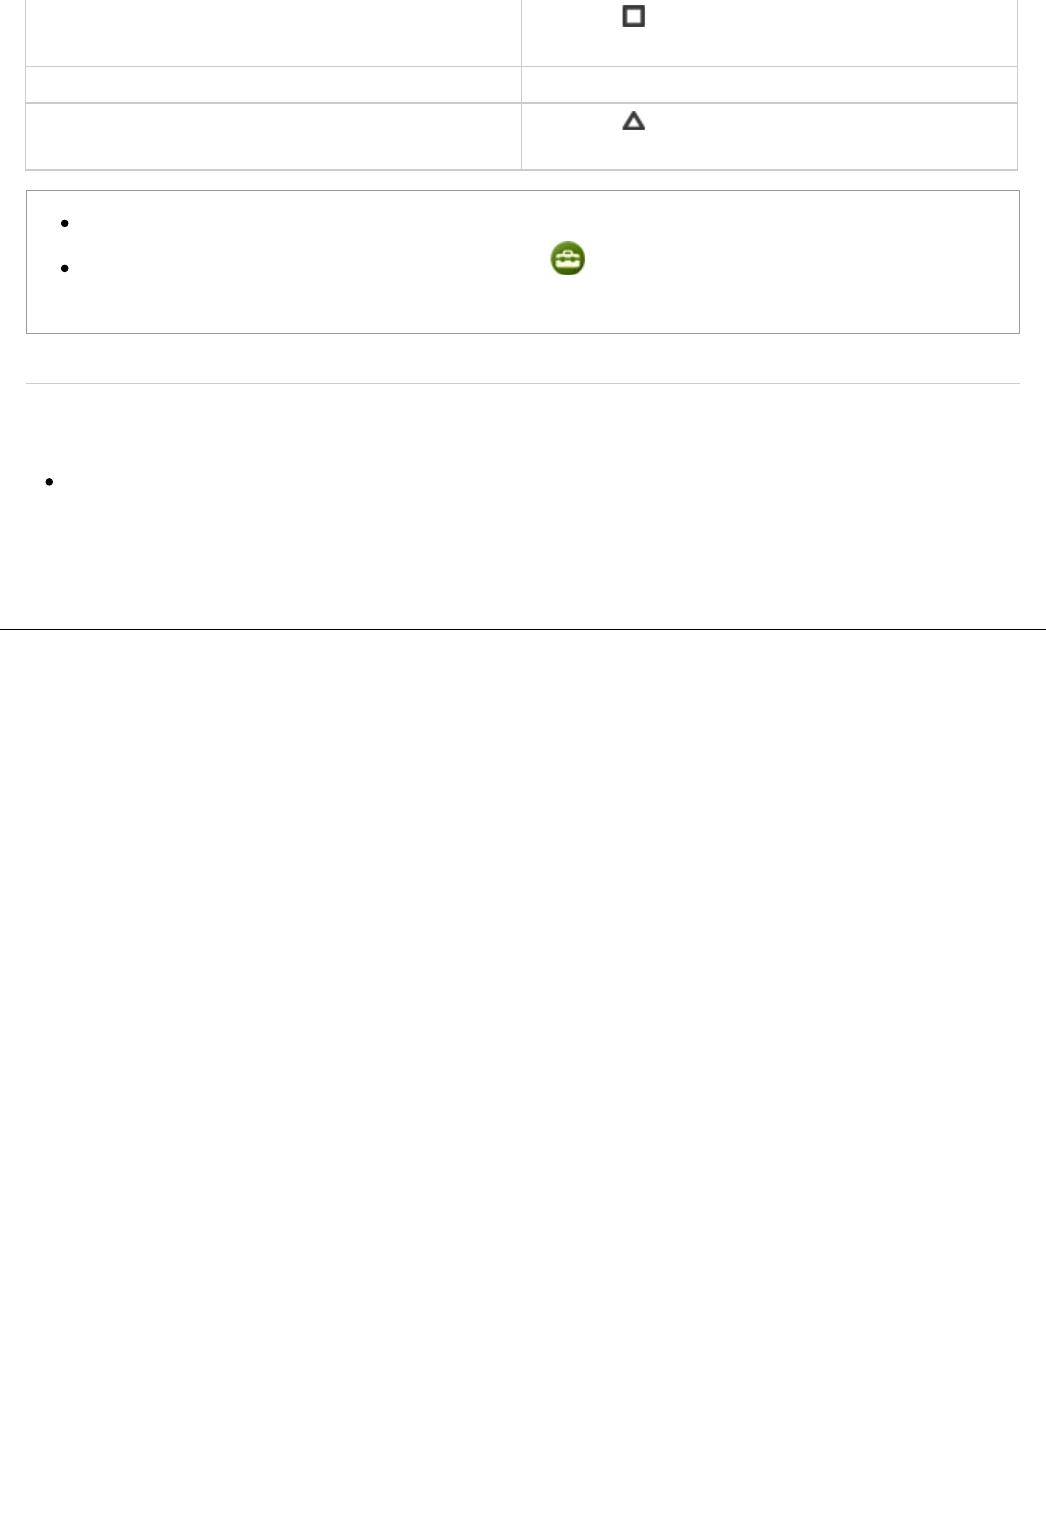
Switch between the single page and double-page
spread
Press the button
Zoom in/Zoom out Move the right stick up and down
Switch between displaying/hiding the operation
buttons
Press the button
For operations controlled by the directional buttons, you can use the left stick instead.
To enable operation with some buttons, you must tap (Settings) > [Start] > [System] > [Control
with Buttons on PS Vita System] to set a checkmark.
Related articles
Control with Buttons on PS Vita System
Top > Basics > Displaying software manuals
A
bout this site
This guide is for use with system software version 2.60 or later.
© 2013 Sony Computer Entertainment Inc. All Rights Reserved.
Displaying software manuals
|
PlayStation®Vita User's Guide http://manuals.playstation.net/document/en/psvita/basic/help.html
2 / 2 2013/08/27 15:09
A )
B )
C )
Your PS Vita system needs a wireless network to connect to the Internet. All models can connect via a Wi-Fi
network. 3G/Wi-Fi models can also connect via a mobile network.
If you do not have a Wi-Fi network in your home, you can use public Wi-Fi access points (hotspots) to connect to
the Internet.
Terms of use and the costs of using public Wi-Fi hotspots vary among Wi-Fi service providers. Consult
your service provider for details.
Connecting using a Wi-Fi network
To set up your PS Vita system to connect to the Internet using Wi-Fi network, you need the following:
A connection to the Internet via a home Wi-Fi access point or a public Wi-Fi hotspot. (A contract with an
Internet service provider might be required.)
A wireless access point or a wireless router
A wireless access point is hardware that devices can connect to wirelessly. A wireless router is a device that
provides access points and allows multiple devices (for example, your PS Vita system and a computer) to
connect to the Internet at the same time.
A cable modem or DSL modem
The SSID (the name of the access point) and security information (for example, the WEP key or WPA key).
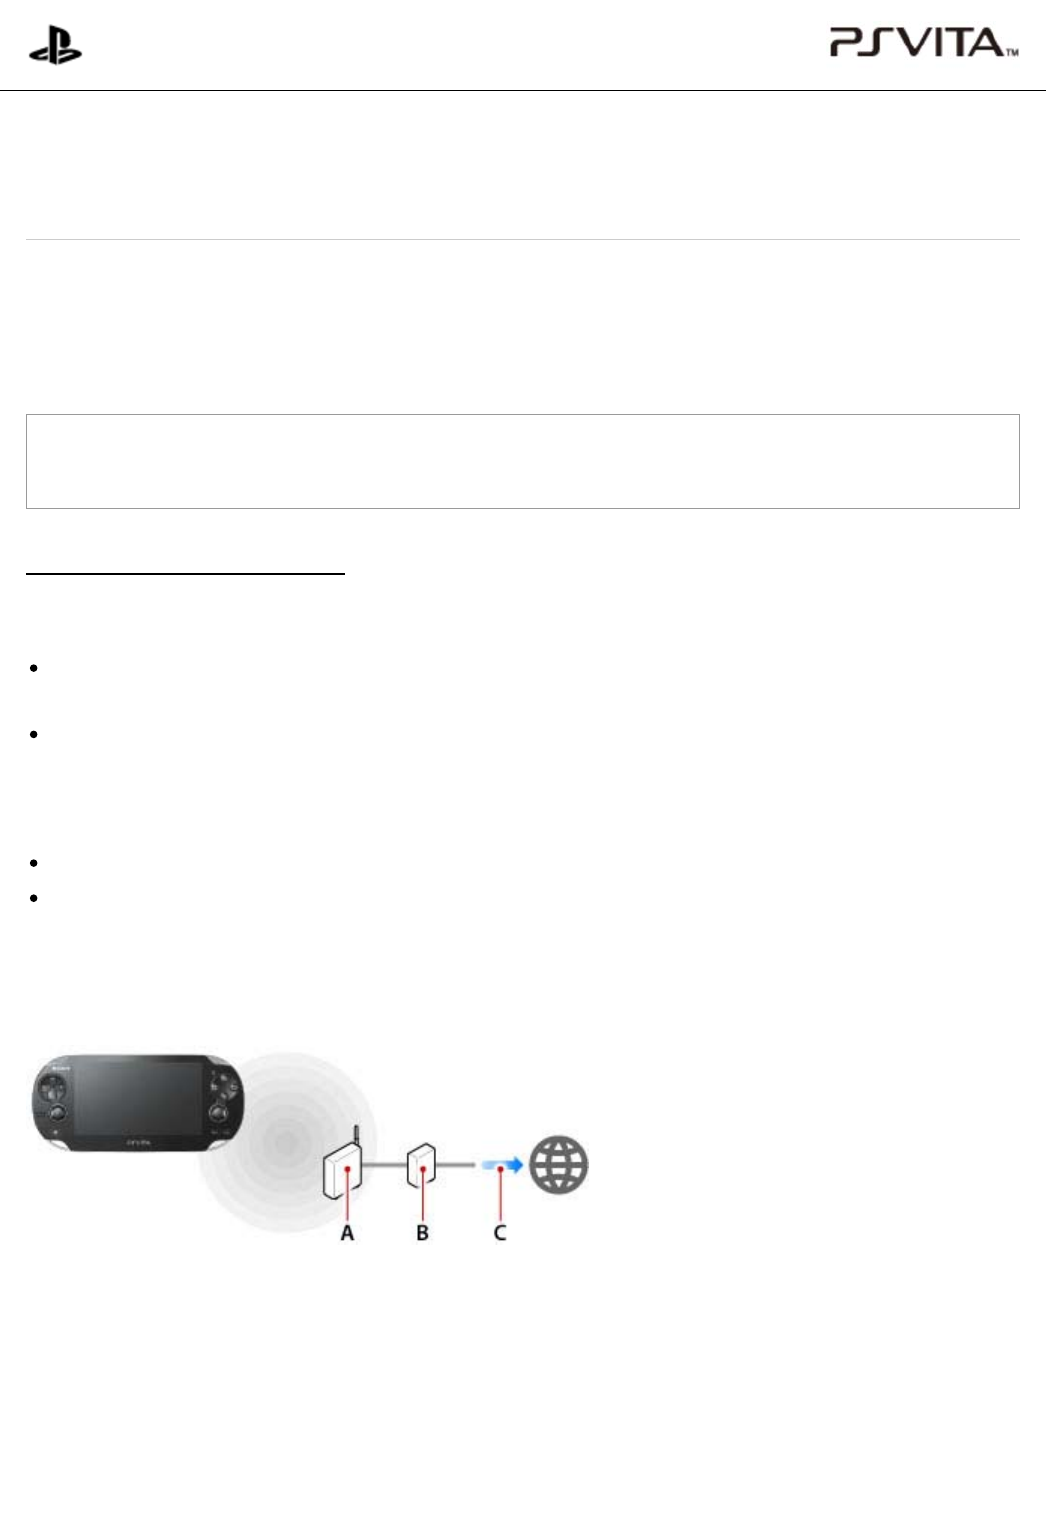
Wi-Fi network example
The diagram below shows a sample Wi-Fi network setup. Actual connections might vary depending on the types
of devices you use for the access point and modem, and on device settings.
A wireless access point or a wireless router
A cable modem or DSL modem
A connection to the Internet
Connecting via a wireless access point
When an Internet connection is required, your PS Vita system automatically searches for nearby wireless access
points.
PlayStation®Vita
User's Guide
Top > Basics > Connecting to the Internet
Connecting to the Internet
Connecting to the Internet
|
PlayStation®Vita User's Guide http://manuals.playstation.net/document/en/psvita/basic/internet.html
1 / 2 2013/08/27 15:09
To set up the connection with a wireless access point, go to a location with an access point that you can use, tap
(Settings) > [Start] > [Network] > [Wi-Fi Settings], and then select the access point you use. You will need
the information to connect to the access point (the SSID and security information such as the WEP key or WPA
key).
After your PS Vita system has connected to an access point one time, it will automatically connect to the access
point in the future.
Connecting via a mobile network (only on 3G/Wi-Fi models)
Setting up your PS Vita system to use a mobile network is done during initial setup of the system. It can also be
done later by tapping the (Network Operator) icon on the home screen.
When an Internet connection is required and no saved access points are found, the Wi-Fi Settings screen
appears. Tap (Close) in the upper left of the screen to close the dialog box and to connect your PS Vita
system to the Internet using the mobile network.
You can configure your PS Vita system to connect to the Internet using a mobile network without
displaying the Wi-Fi settings screen when there are no saved access points nearby. Tap (Settings)
> [Start] > [Network] > [Wi-Fi Settings] and remove the checkmark from the [Display Wi-Fi Settings
Automatically] checkbox.
The (Network Operator) icon on the home screen might differ, depending on the model of your PS
Vita system.
Disabling all wireless network features
When you are on an airplane or in a hospital or other location where using devices that emit radio waves is
prohibited, tap (Settings) > [Start], and then tap the [Flight Mode] checkbox to set a checkmark.
Related articles
Wi-Fi Settings
Mobile Network Settings
Flight Mode
Top > Basics > Connecting to the Internet
A
bout this site
This guide is for use with system software version 2.60 or later.
© 2013 Sony Computer Entertainment Inc. All Rights Reserved.
Connecting to the Internet
|
PlayStation®Vita User's Guide http://manuals.playstation.net/document/en/psvita/basic/internet.html
2 / 2 2013/08/27 15:09
A )
B )
C )
D )
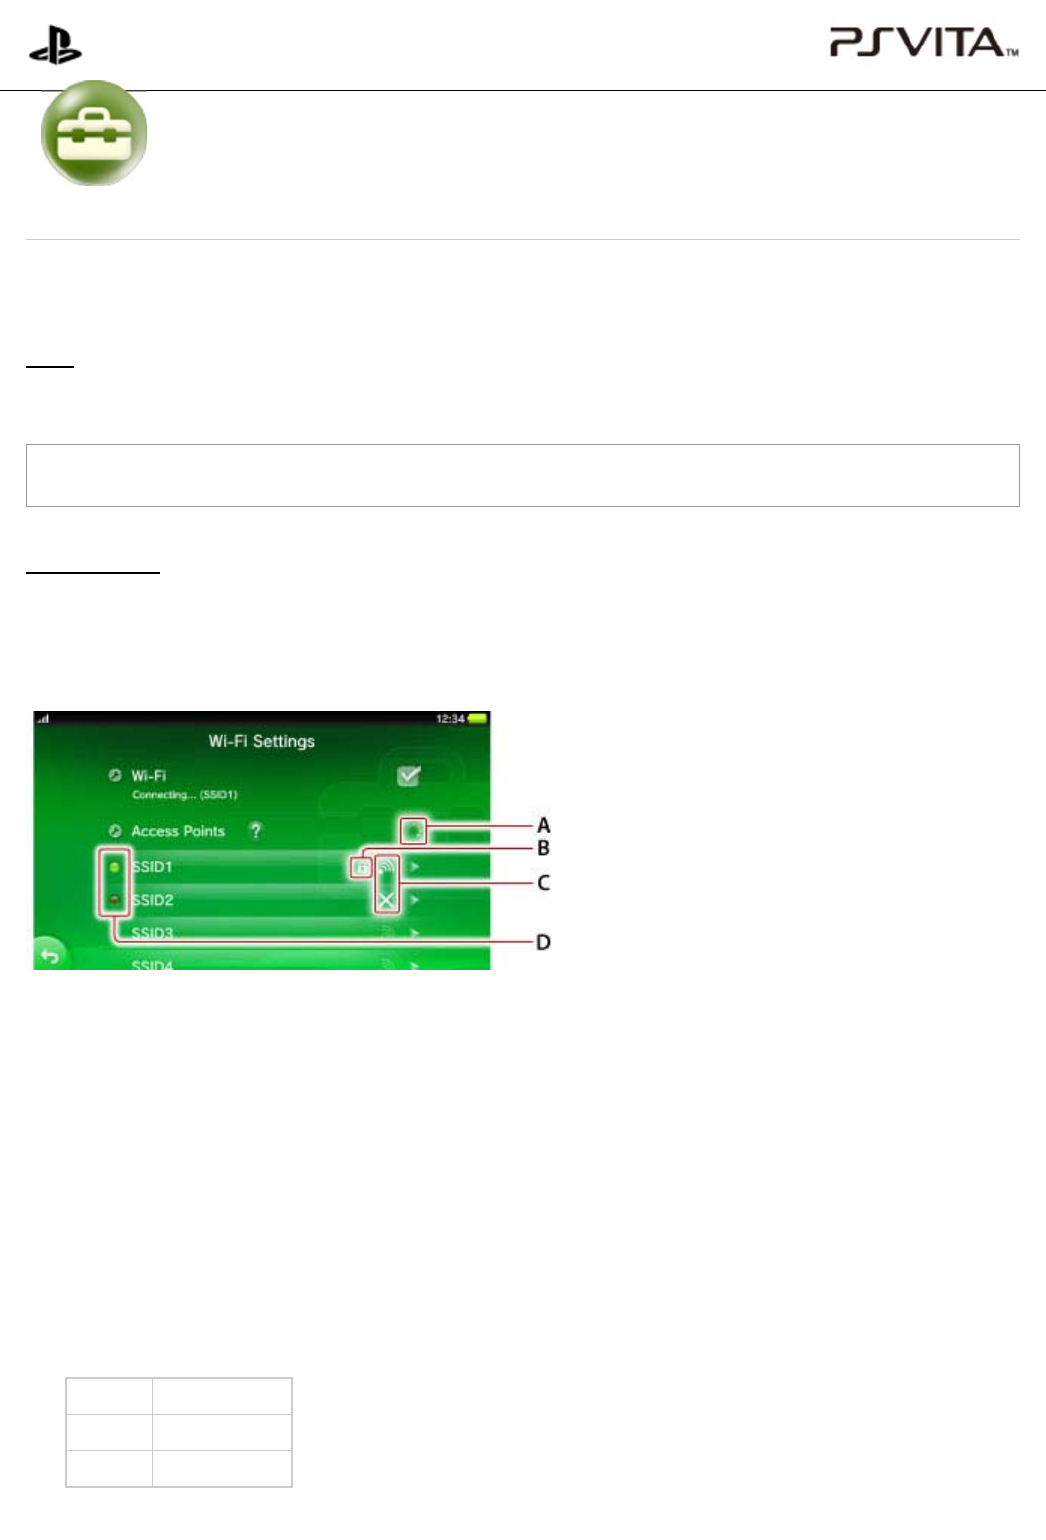
You can adjust the various Wi-Fi connection settings.
Wi-Fi
To disable the Wi-Fi feature, tap the checkbox to remove the checkmark.
For details about the use of the Wi-Fi feature when flight mode is on, see "Flight Mode".
Access Points
Saved access points and access points that have been found will be displayed. Once a connection has been
established with an access point, the system will automatically connect to it the next time Wi-Fi is used.
You can perform a connection test and adjust advanced settings by tapping a saved access point.
Searching for access point
Security
When displayed, the security has been set for the access point. To connect the access point, you must enter
the WEP or WPA key set on the access point.
Signal strength of the access point
Signal strength is shown in four levels, including no signal.
When there are multiple saved access points, the system connects to the access point with the strongest
signal.
Connection status
Connection status of saved access points.
Lit connected
Blinking connecting
Out not connected
PlayStation®Vita
User's Guide
Top > Settings > Network > Wi-Fi Settings
Wi-Fi Settings
Wi-Fi Settings
|
PlayStation®Vita User's Guide http://manuals.playstation.net/document/en/psvita/settings/wifi.html
1 / 3 2013/08/27 15:11
1.
2.
1.
2.
1.
2.
3.
Save Access Point Automatically
When you are using an access point that supports WPS, AOSS or Rakuraku WLAN Start®, you can save access
points in just a few easy steps. In addition to these instructions, also consult the access point instruction manual.
When connecting using the WPS PIN method, adjust the settings by tapping [Save Access Point
Manually] > [Use WPS PIN Method].
AOSS and Rakuraku WLAN Start® are only available in certain countries and regions.
WPS
Tap [WPS].
Press the access point's WPS button.
AOSS
Tap [AOSS™].
Press and hold the access point's AOSS button until the AOSS indicator starts to blink.
Rakuraku WLAN Start®
Tap [Rakuraku WLAN Start].
Press and hold the access point's Rakuraku Start button until the power indicator of the access point starts
to blink green.
When a message is displayed on the PS Vita system, press and hold the access point's Rakuraku Start
button until the power indicator of the access point lights up orange.
Save Access Point Manually
In addition to these instructions, also refer to the access point instruction manual.
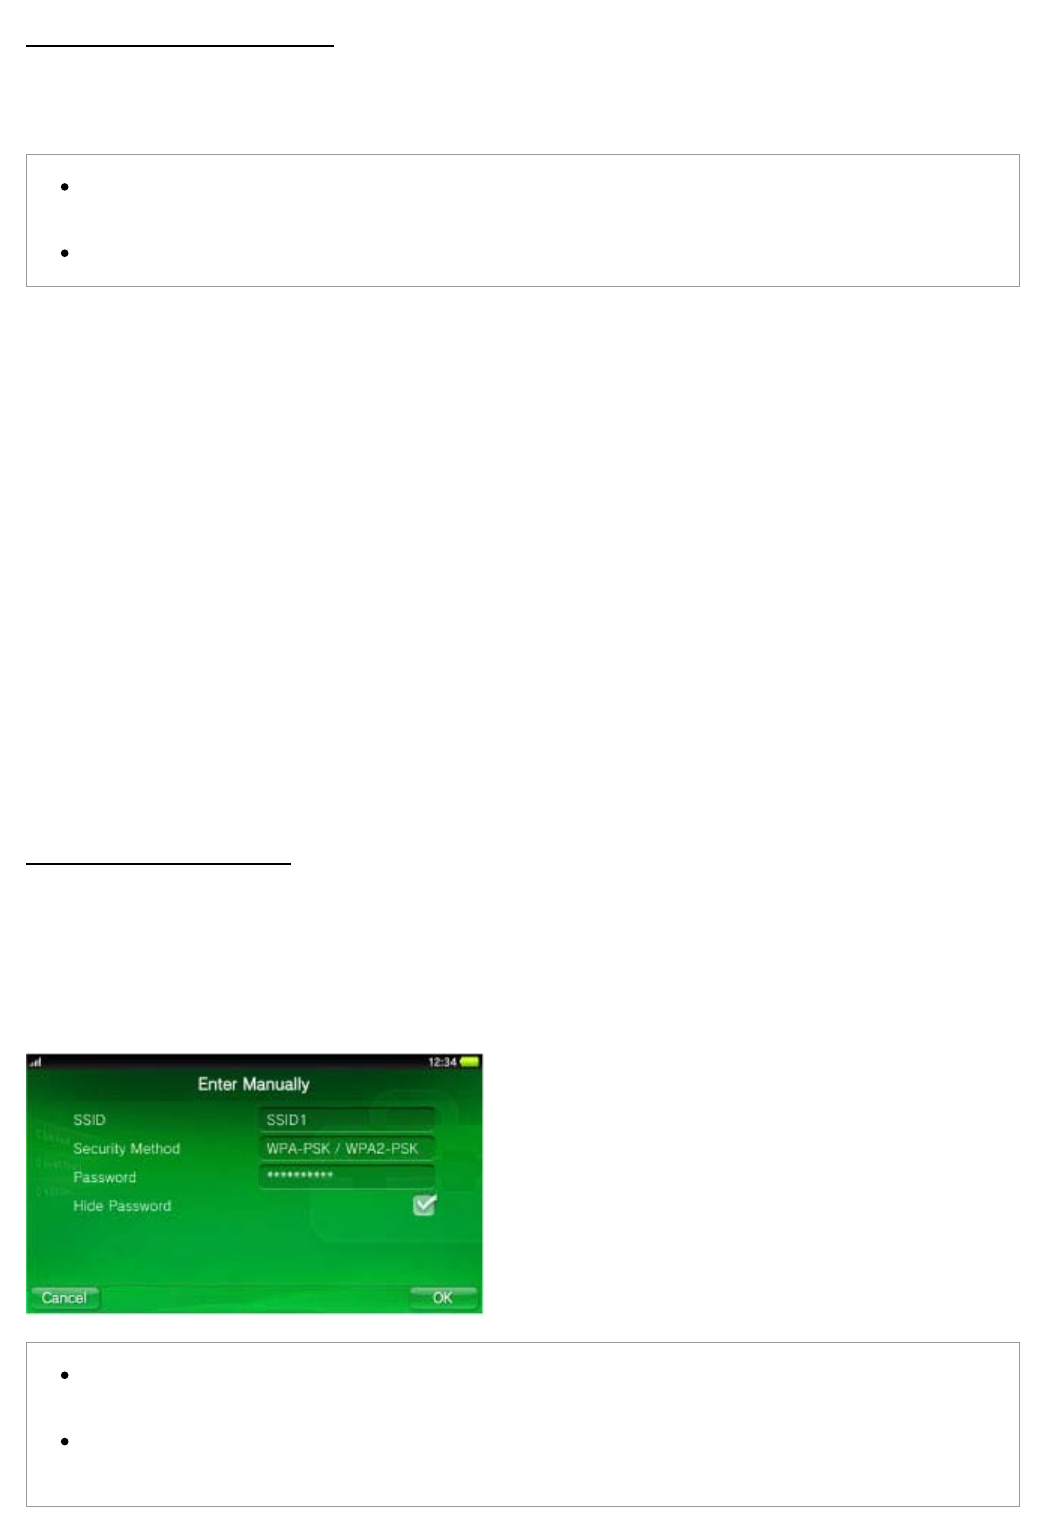
Enter Manually
Set up the access point by entering the setting information (SSID and WEP key or WPA key) for the access point
you are using.
It is recommended that you use WPA-PSK or WPA2-PSK as the security method, because these
security methods provide more robust encryption.
If you tap the [Hide Password] checkbox to set a checkmark, the password that you enter appears as
a series of asterisks.
Wi-Fi Settings
|
PlayStation®Vita User's Guide http://manuals.playstation.net/document/en/psvita/settings/wifi.html
2 / 3 2013/08/27 15:11

1.
2.
Use WPS PIN Method
Tap [Use WPS PIN Method].
Enter the PIN code that is displayed into the access point.
Display Wi-Fi Settings Automatically
To display the Wi-Fi settings screen automatically if you cannot connect to the saved access point, tap this
checkbox to set a checkmark.
Ad Hoc Mode Channel
When connecting using ad hoc mode, your PS Vita system must be set to the same channel as the other devices
you want to connect with.
The default setting is [Automatic]. With this setting, the system will automatically select the optimum channel.
Related articles
Connecting to the Internet
Top > Settings > Network > Wi-Fi Settings
A
bout this site
This guide is for use with system software version 2.60 or later.
© 2013 Sony Computer Entertainment Inc. All Rights Reserved.
Wi-Fi Settings
|
PlayStation®Vita User's Guide http://manuals.playstation.net/document/en/psvita/settings/wifi.html
3 / 3 2013/08/27 15:11