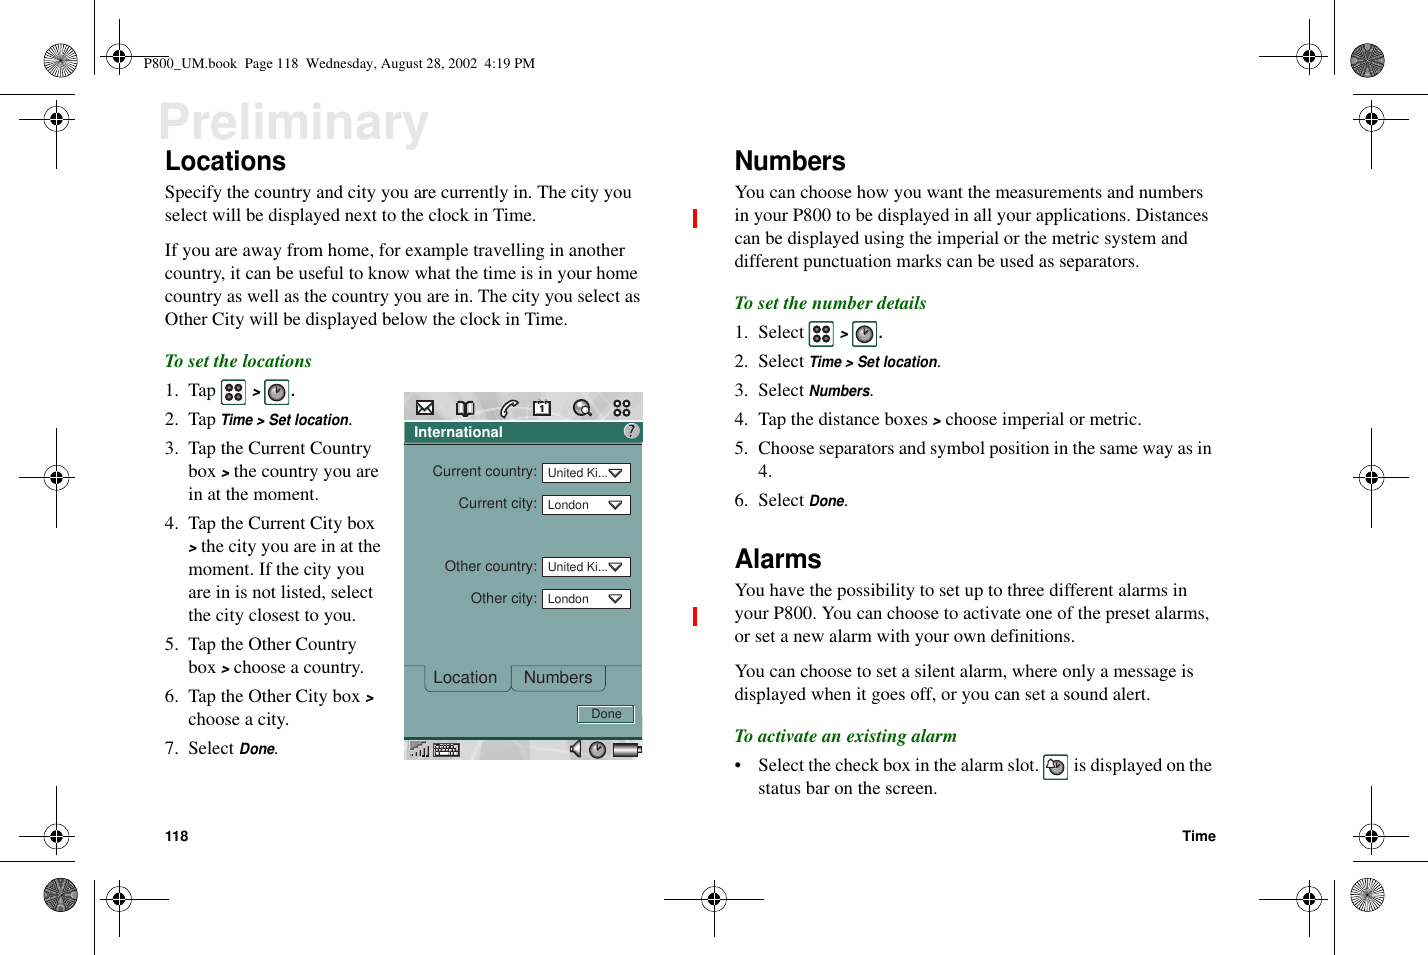
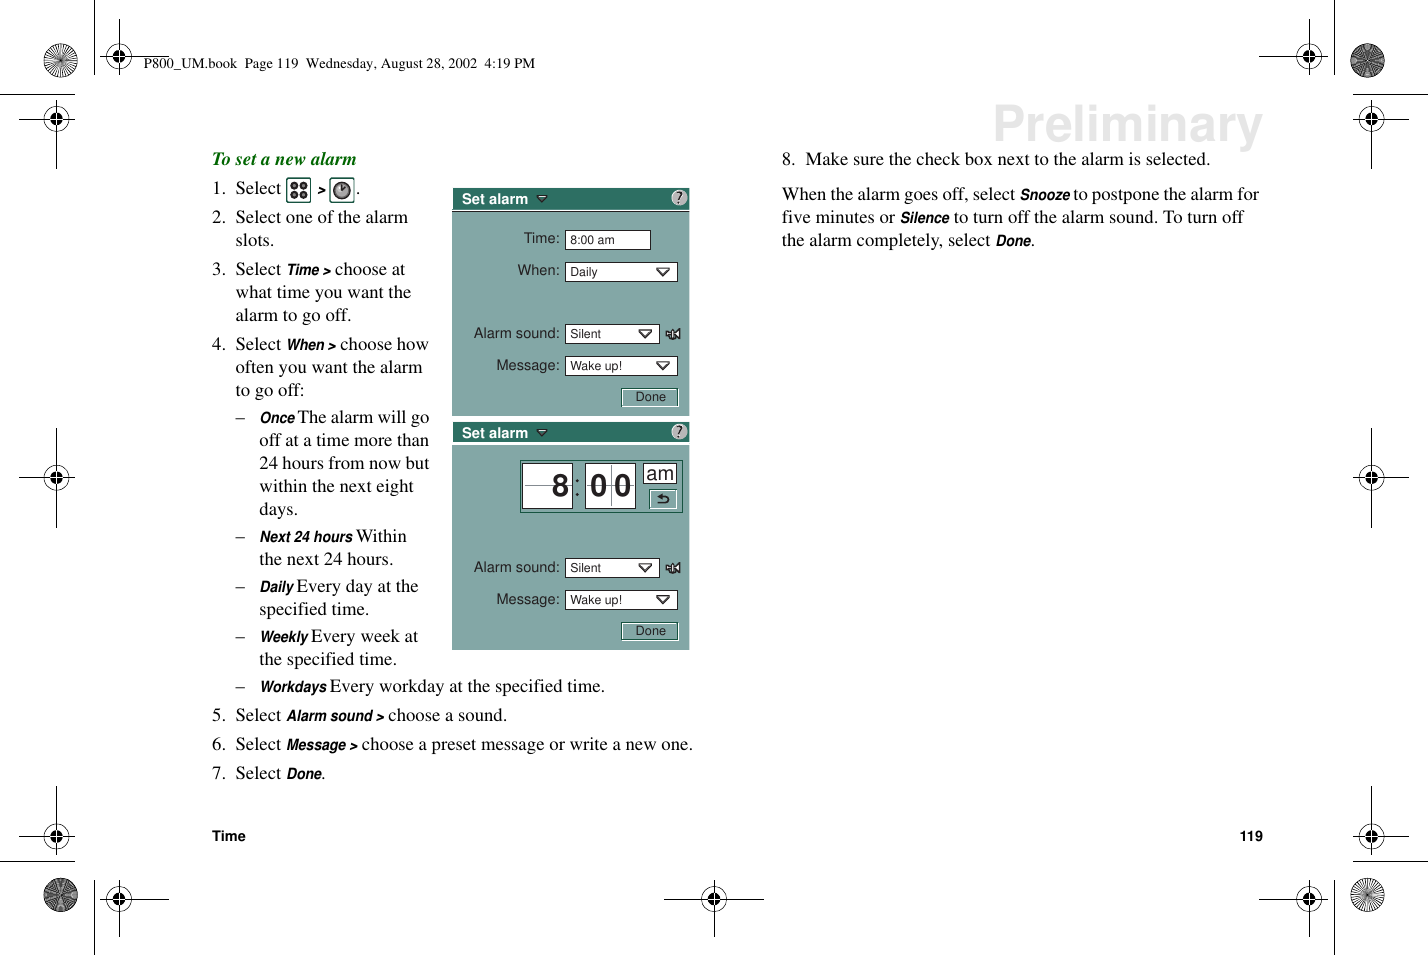
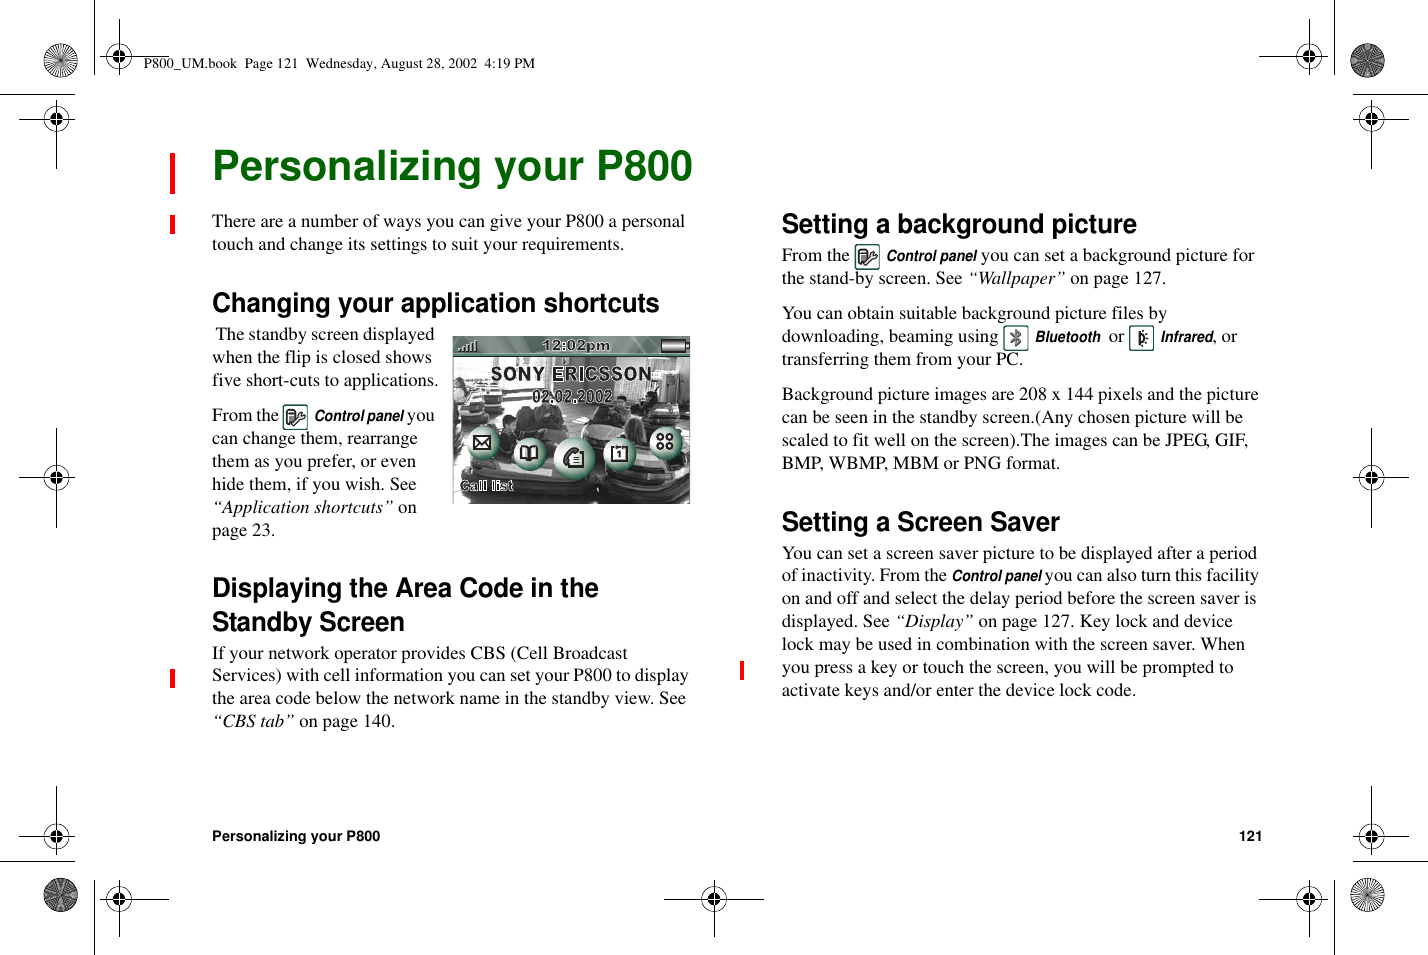
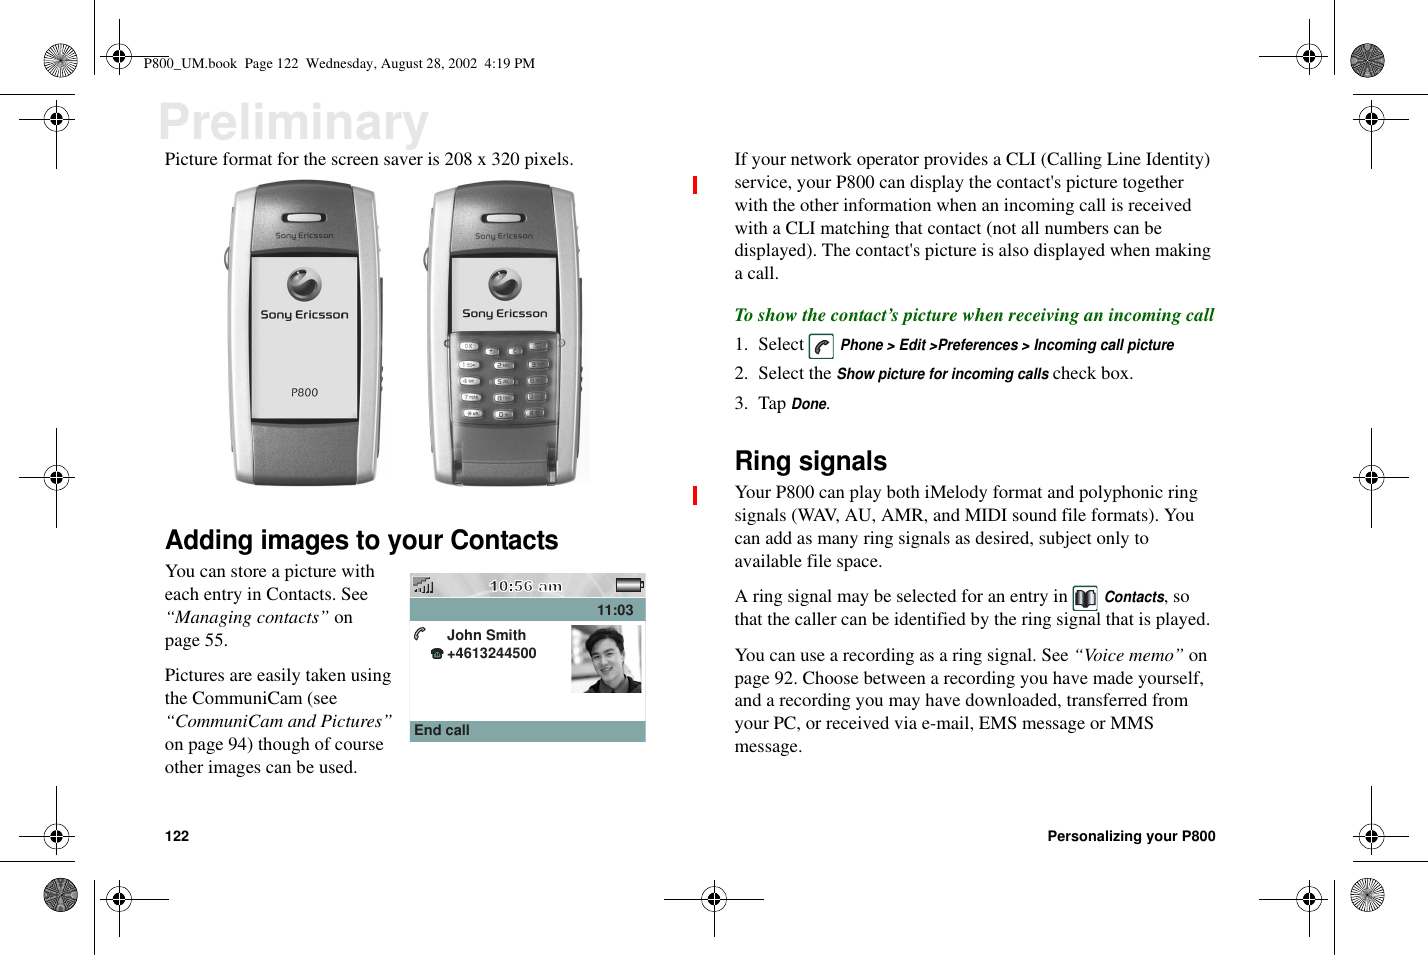
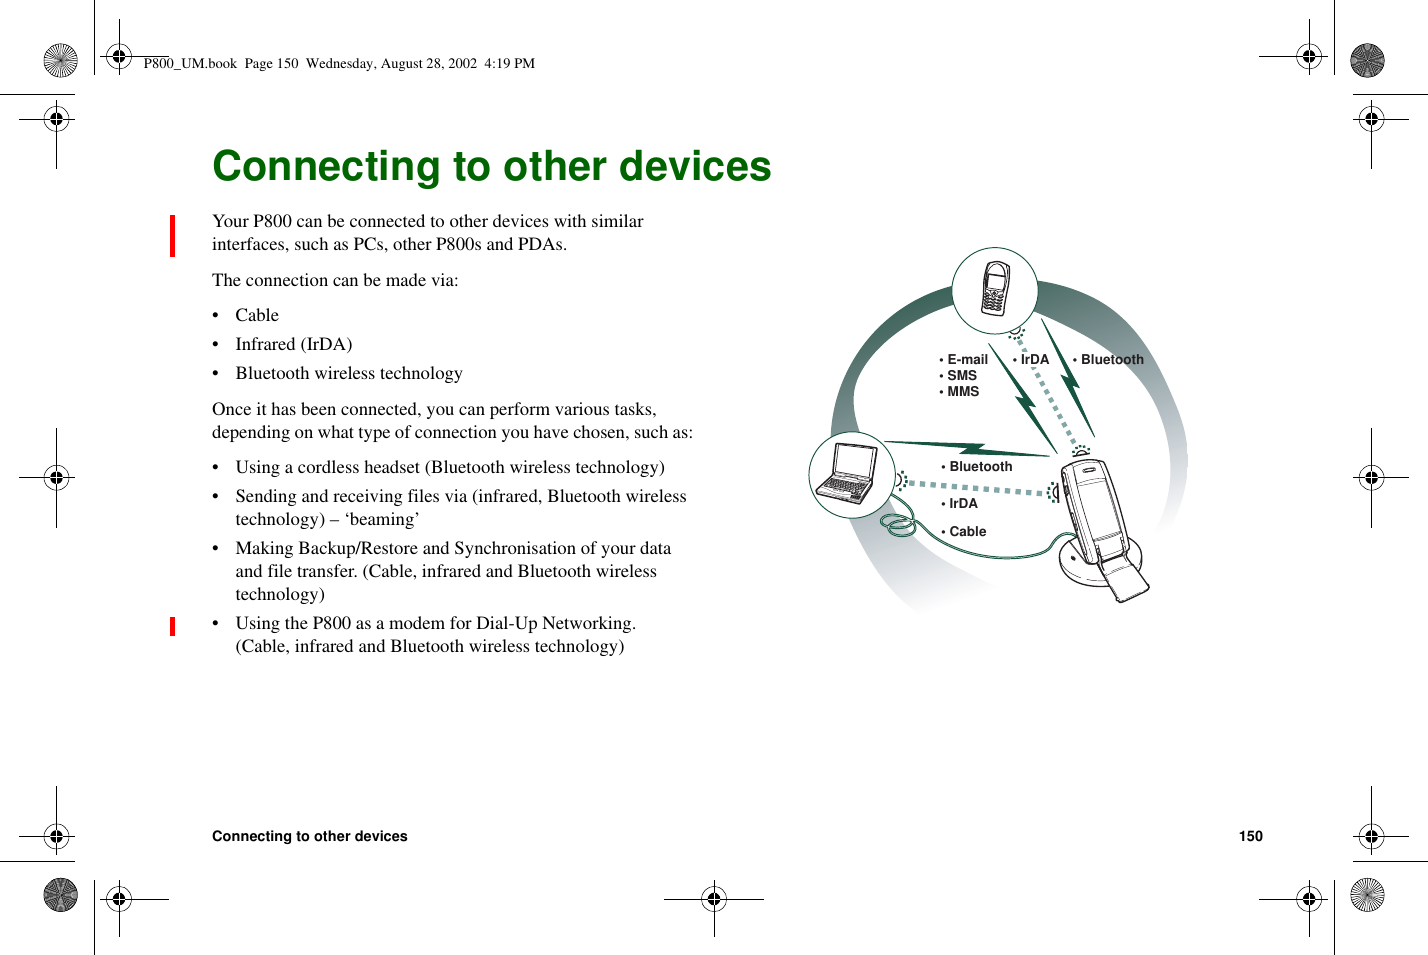
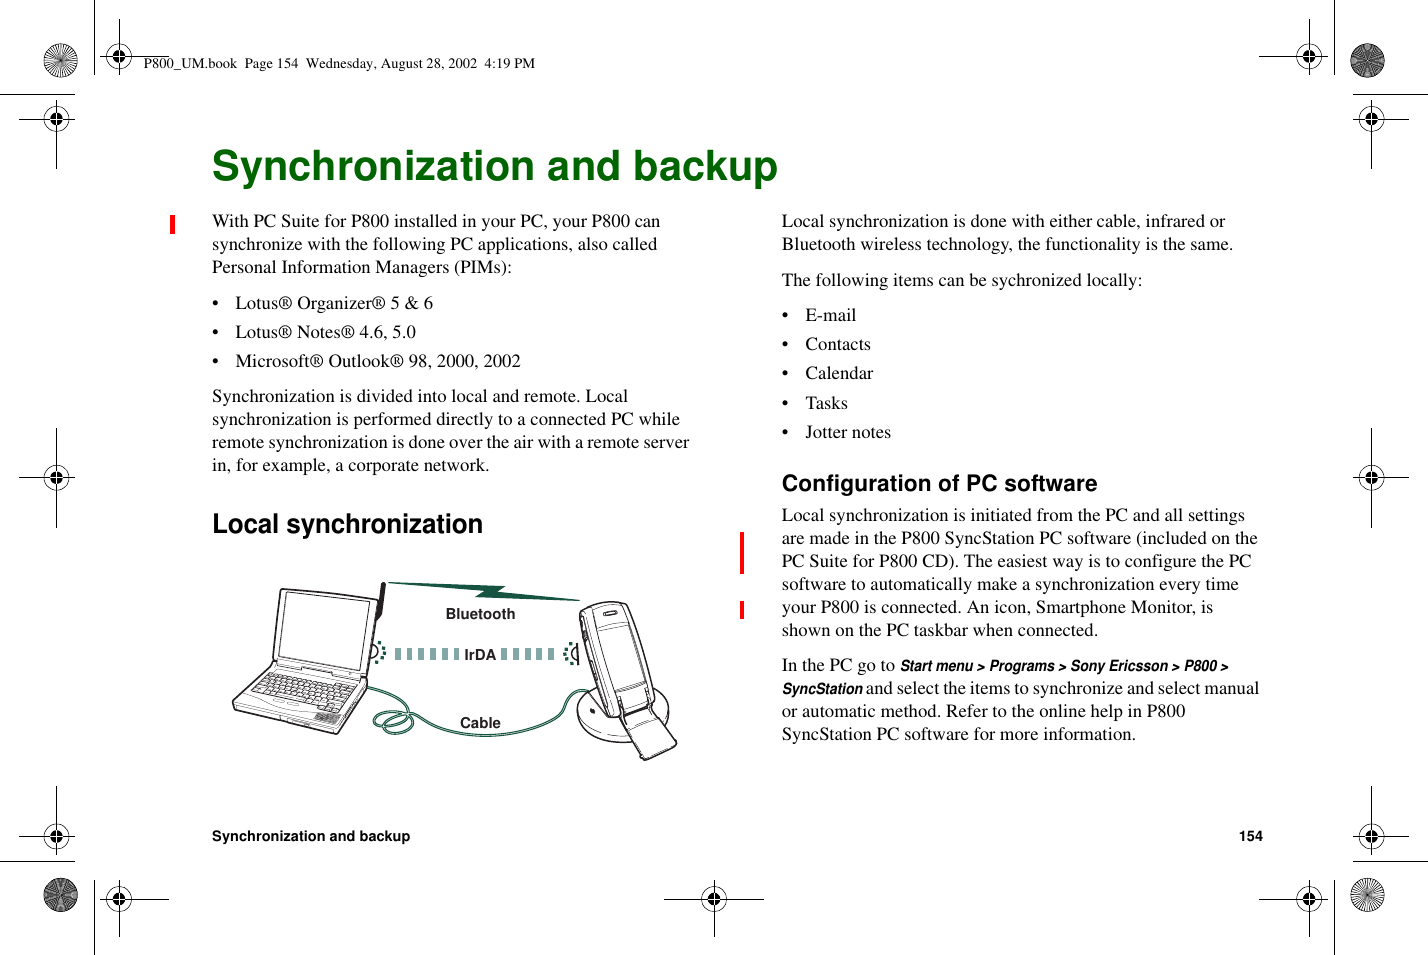
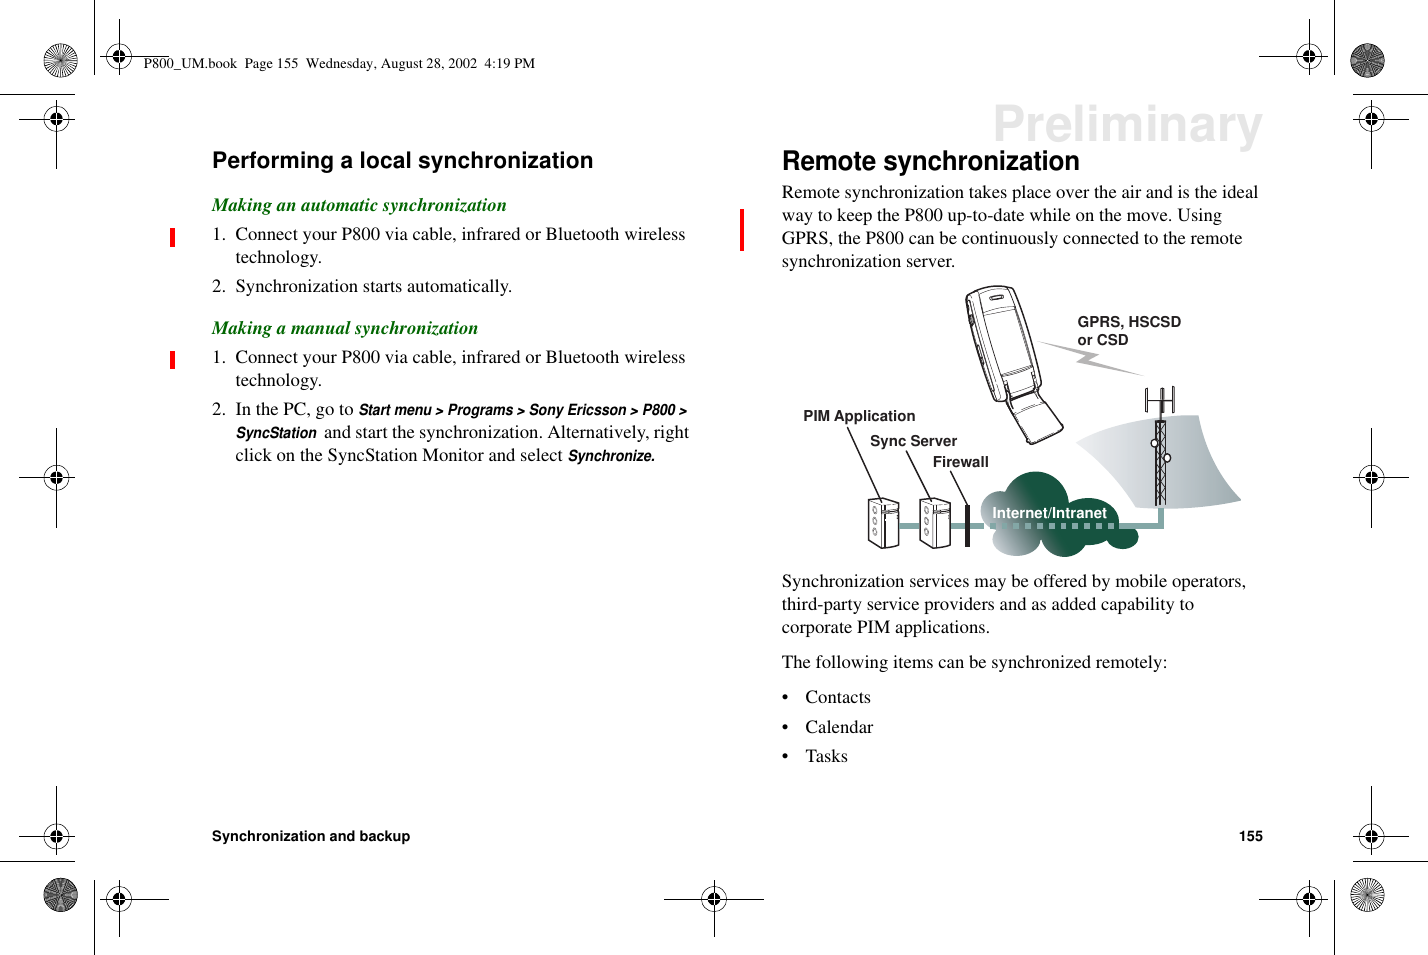
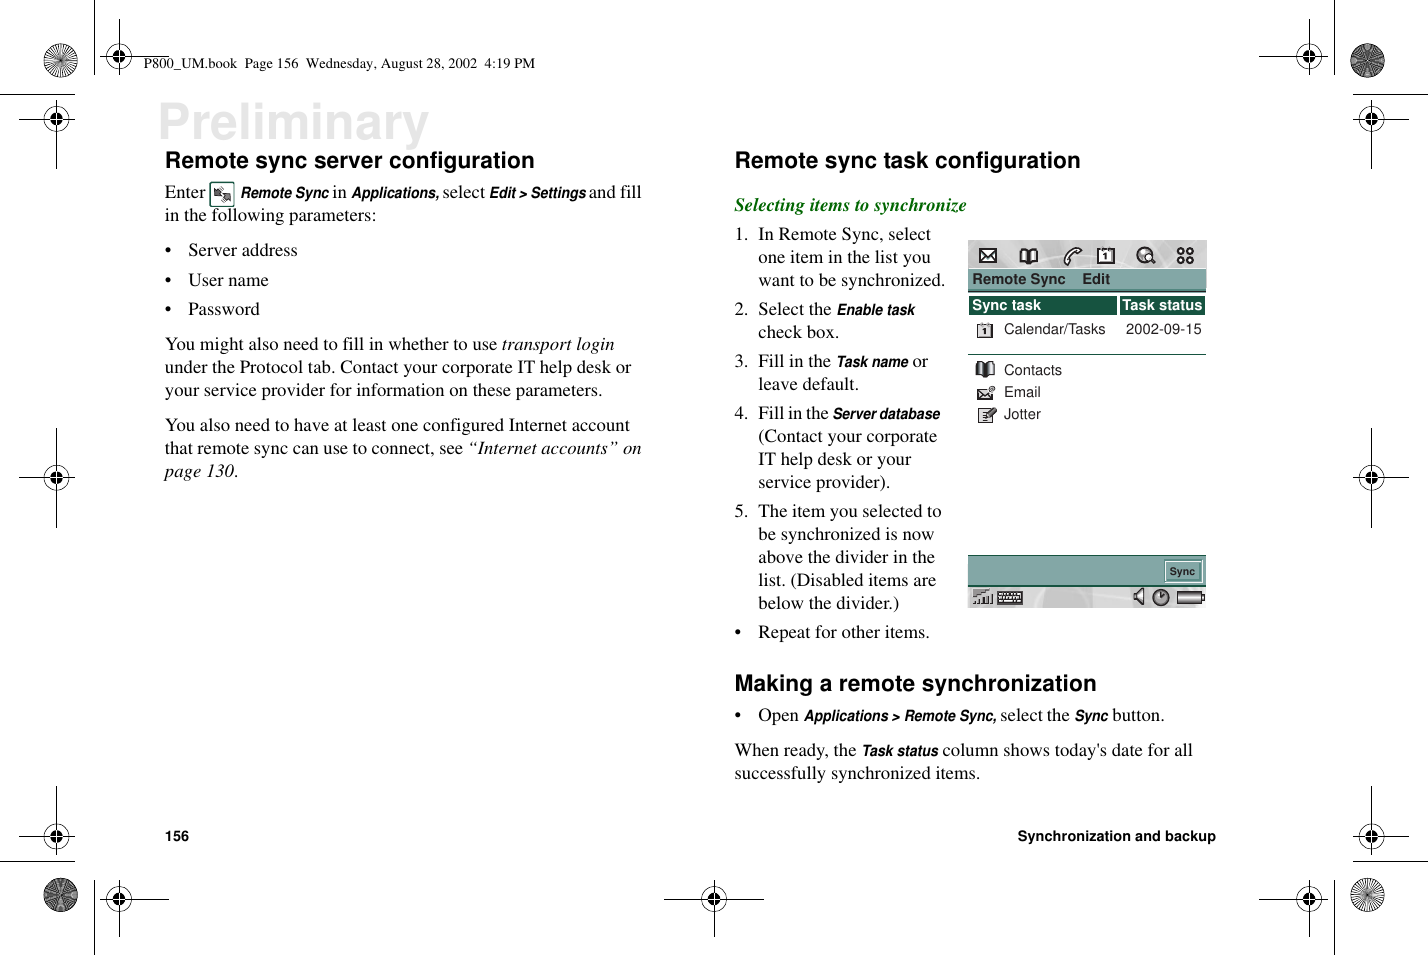
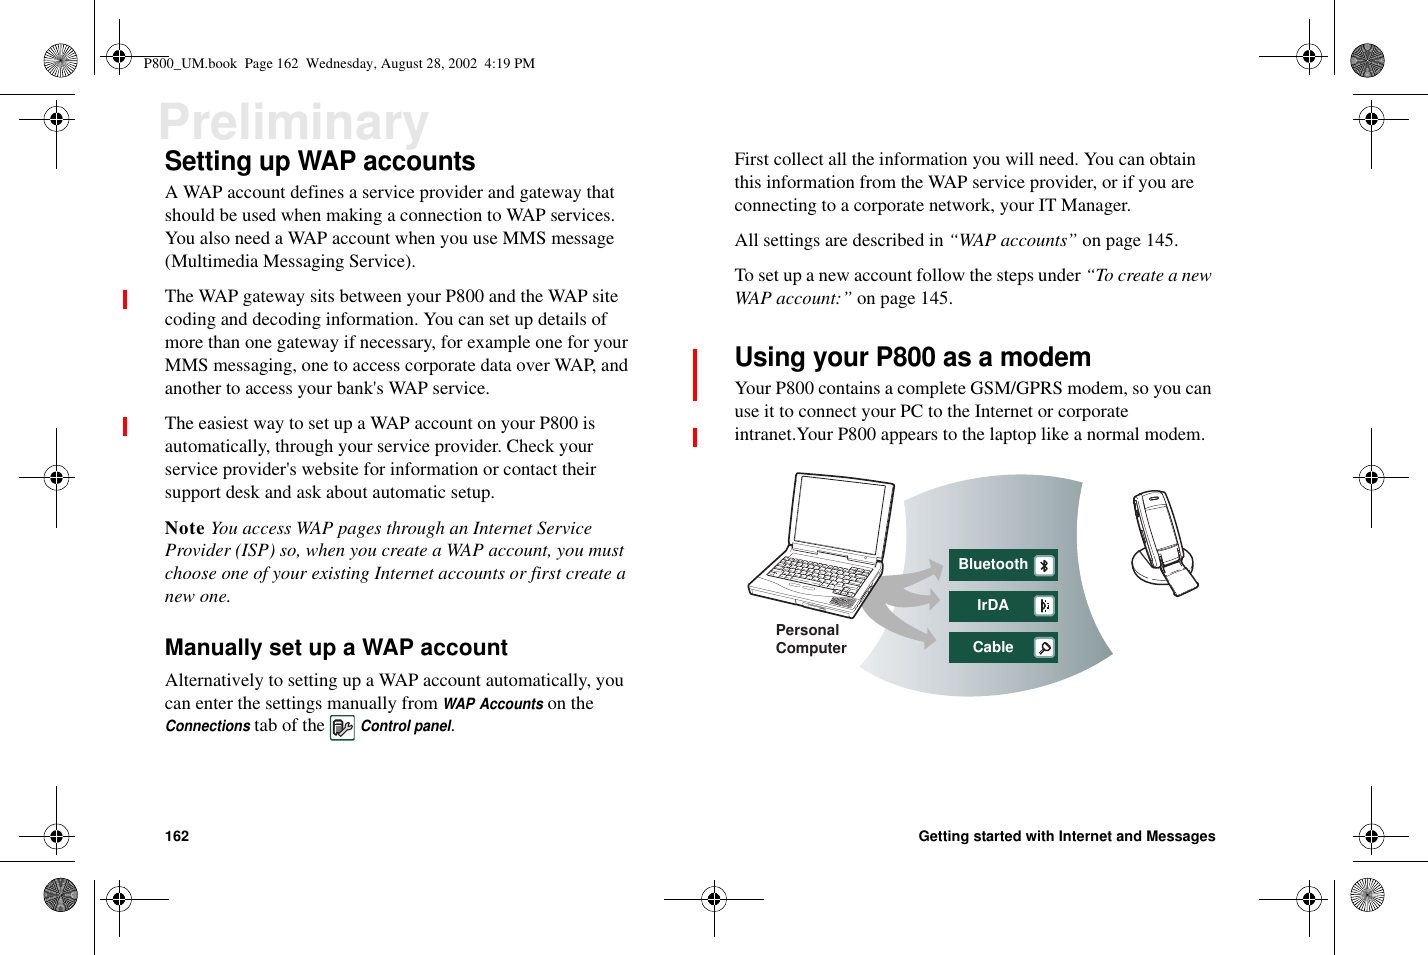
Sony 7130501 User Manual Exhibit 8 New Part 2

Sony Mobile Communications Inc Exhibit 8 New Part 2
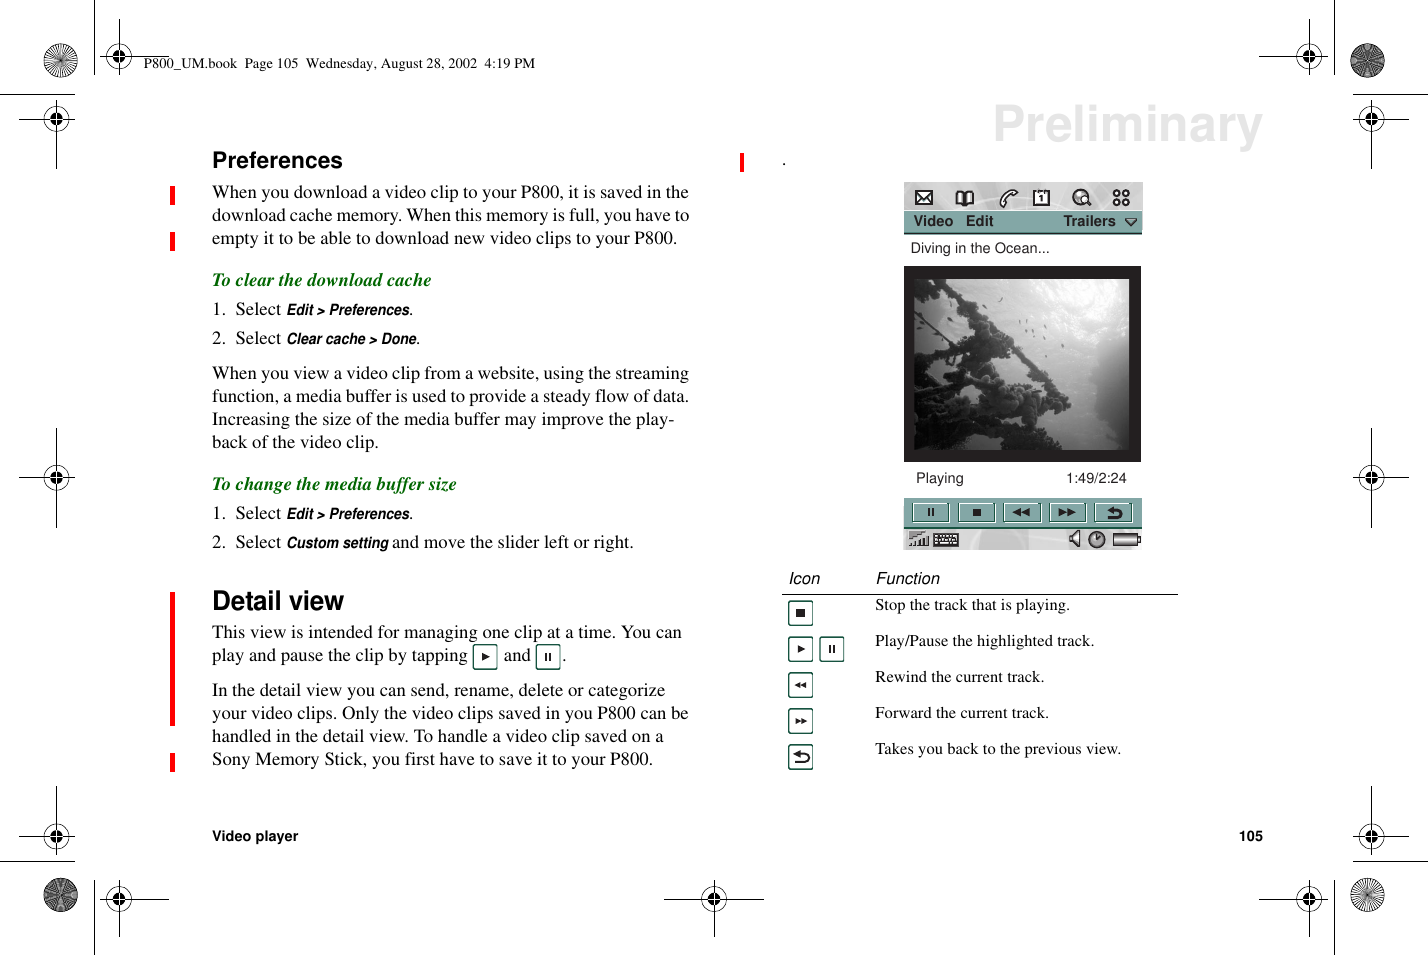
Exhibit 8 New User Manual Part 2

Audio player 101PreliminaryIn the detail view, you can move tracks between your differentfolders using the folder function, send tracks to other phones orto a PC, using e-mail, multimedia messaging, Bluetoothwireless technology, infrared communication or cable. Here it isalso possible to rename and delete tracks saved in your P800.The detail view displaysthe name of the track, theartist name, the album title,the track number, thecopyright year, the soundfile type and the durationof the track.Note The amount ofinformation displayeddepends on how muchinformation is available onthe sound file.Move between the tracksin the current folder usingthe and buttons.To rename a track1. SelectAudio > Rename track.2. Enter a track name> Done.Two or more tracks cannot have the same name.To delete a track from the P8001. SelectAudio > Delete track.2. SelectYes.To send a track• SelectAudio > Send as.See Messaging for further details.Note You cannot send MP3 or AU sound files in a multimediamessage. WAV and AMR sound files can be sent usingmultimedia messaging.Audio    Edit                 UnfiledSony Ericsson themeMP3 1:34/1:40Artist: VariousAlbum: Autumn 2002Track: 01Copyright: Sony EricssonFilename: SEM.MP3P800_UM.book Page 101 Wednesday, August 28, 2002 4:19 PM
102 Audio playerPreliminaryDownloading tracksWhen you receive soundfiles in other applications,such as e-mail andmultimedia messages, youactivate the viewer in yourP800. From the viewer youcan then save the soundfile to your P800.To save a track fromanother application1. Tap Save or selectAudio>Save.2. Select what folder youwant to save the track in>Save.Note To create your ownmelodies, see the information on the CD for your P800. Audio    Edit                         allMah Na Mah NaWAV 1:34/1:40P800_UM.book Page 102 Wednesday, August 28, 2002 4:19 PM
Audio player 103PreliminaryP800_UM.book Page 103 Wednesday, August 28, 2002 4:19 PM
104 Video playerPreliminaryVideo playerYou can view video clips that you have saved in your P800. Thevideo clips can be downloaded in the P800 from an Internet siteor transferred from a PC via cable or from Memory Stick. It isalso possible to send these video clips to other phones or PCs,via infrared communication, Bluetooth wireless technology andmultimedia messaging.It is not necessary to download the video clips to be able to viewthem. You can use the streaming function and view the videoclip from the website where it is located. The video clip isplayed with only a short time delay.The video player supports files in the MPEG-4 file format, forexample name.mp4.To adjust the volume• Move the Jog Dial up to increase the volume, and down todecrease the volume.Warning! The volume may be uncomfortably loud at thehigher volume levels if the phone is close to your ear. Exposureto excessive volume levels may damage hearing.List viewIn the list view, you get anoverview of all the MPEG-4 video clips in your P800.You can search for specificvideo clips, zoom the videoclip names and sort them byname, date, size or type. Atthe bottom of the screenyou can see how manyvideo clips you have savedin your P800.To view a video clip1. Select>.2. Select a video clip in thelist.Tip Use theFindfunction tolocate a certain video clip, and theZoomfunction to change thesize of the screen fonts.To sort the video clips• SelectEditand choose how you want to sort the video clips inthe current folder.Video   Edit                 Trailers5 clipsA Beautiful MindPanic RoomSpider ManDiving in the Ocean...The Time MachineP800_UM.book Page 104 Wednesday, August 28, 2002 4:19 PM
Video player 105PreliminaryPreferencesWhen you download a video clip to your P800, it is saved in thedownload cache memory. When this memory is full, you have toempty it to be able to download new video clips to your P800.To clear the download cache1. SelectEdit > Preferences.2. SelectClear cache > Done.Whenyouviewavideoclipfromawebsite,usingthestreamingfunction, a media buffer is used to provide a steady flow of data.Increasing the size of the media buffer may improve the play-back of the video clip.To change the media buffer size1. SelectEdit > Preferences.2. SelectCustom settingand move the slider left or right.Detail viewThis view is intended for managing one clip at a time. You canplayandpausetheclipbytapping and .In the detail view you can send, rename, delete or categorizeyour video clips. Only the video clips saved in you P800 can behandled in the detail view. To handle a video clip saved on aSony Memory Stick, you first have to save it to your P800..Icon FunctionStop the track that is playing.Play/Pause the highlighted track.Rewind the current track.Forward the current track.Takes you back to the previous view.Video   Edit                 TrailersDiving in the Ocean...Playing   1:49/2:24P800_UM.book Page 105 Wednesday, August 28, 2002 4:19 PM
106 Video playerPreliminaryTo rename a video clip1. SelectVideo > Rename clip.2. Enter a video clip name> Done.Two or more video clips cannot have the same name.To send a video clip1. Select the video clip you want to send.2. SelectVideo > Send asand choose how you want to send it.Tip Use theFolderfunction to organize all your video clips.To copy the current video clip to another folder, selectVideo >Copy to, then select a folder from the list.To view the video clip information• SelectVideo > Clip info.To delete a video clip1. Select the video clip you want to delete.2. SelectVideo > Delete clip.Saving video clipsWhen you play video clips that you have received via e-mail ormultimedia messaging, or that you have downloaded to yourP800 from the web, the viewer detail view is automaticallylaunched. From the viewer detail view you can then save thevideocliptoyourP800.To save a video clip from another application1. Select the video clip you want to save.2. SelectVideo > Save clip.3. Select what folder you want to save the video clip in>Save.P800_UM.book Page 106 Wednesday, August 28, 2002 4:19 PM
Video player 107PreliminaryP800_UM.book Page 107 Wednesday, August 28, 2002 4:19 PM
Viewer 108ViewerViewer is an application used to view various types ofdocuments:• Word processing documents• Spreadsheets•Drawings• PDF documents• Presentations•ArchivesDocument viewer has two views in flip open mode:In addition to opening documents from the list view, you canalso open a document from another application, for example byselecting an attached document in an e-mail.The functions available differ depending on the document type.General functions are similar between the document types andare therefore described separately.General functionsIn all views there is a menu bar from where you can access someof the functions. This section describes the functions that arecommon to all document types.List viewList view An alphabetical list of files, for selecting a file toview.Detail view The contents of a file, for viewing and manipulatingthe file.Menus Option DescriptionViewerFind file Search files with a name containing aspecific text.EditSort by name Sort the file list by name.Sort by size Sort the file list by file size.Zoom Set the zoom level of the file list,small, medium or large.Zoom inZoom outRestoreSet the zoom level of the vieweddocument.FoldersAll Show all files in the list.Unfiled Show the files that are not in a folder.Edit folders Categorize your files in folders (forexample business or personal).P800_UM.book Page 108 Wednesday, August 28, 2002 4:19 PM
Viewer 109PreliminaryDetail viewTo open a document from an e-mail• Select the document link.The document viewer is started, showing the detail view ofthe document.To save the document in the P8001. SelectDocument > Savefrom the menu.2. Select where to save the document and selectSave.To open a document from the list view1. Select the Application launcher icon .2. Select the Document viewer icon .3. If required, change folder.4. Scroll to the desired file and select the file name.The document is shown in the Detail view.To save the document to a different location1. SelectEdit > Copy tofrom the menu.2. Select where to save the document and selectSave.Functions specific for different documenttypesWhen you open a document, the document type is indicated bythe name of the first menu, for exampleSpreadsheet.Menus Option DescriptionDocumentRename Rename the document.Send as Send a document as e-mail,Bluetooth™ wireless technology, IRor, multimedia message.Save (if openedfrom anotherapplication)Save the document in the P800.Delete Delete the active document.Properties Show information on the activedocument.EditZoom in Increase the view of the file.Zoom out Decrease the view of the file.Restore Restore to the original size.FoldersUnfiled Show the contacts that are not in afolder.Edit folders Categorize your documents in folders(for example business, personal and soon).Spreadsheet   Edit        Unfiled                 P800_UM.book Page 109 Wednesday, August 28, 2002 4:19 PM
110 ViewerPreliminaryDetail view - DocumentTo copy text from the document1. Select the text to be copied. To select all text in thedocument, selectEdit > Select all.2. SelectEdit > Copy.The text is put into the clipboard and a message is displayed.To search for a text in the document1. SelectDocument > Findfrom the menu.2. Enter the text to search for.3. Select find.4. If required, selectDocument > Find next.5. To clear the highlighted search hits, selectDocument > Clearsearch hits.To change the document view1. To display the document as formatted text without pictures,wrapped to the screen size, selectEdit > Draft view.2. To display the document as formatted text including pictures,wrapped to the screen size, selectEdit > Normal view.3. To display the complete layout of the document, selectEdit >Page view.Menus Option DescriptionDocumentFind Search the document for a specifictext.Find next Search for the next occurrence of thesearch text.Clear search hits Remove the search hits.EditCopy Copy the selected text or elements ofthe document.Select all Select the contents of the entiredocument.Draft view Display the document as formatted textwithout graphics, adapted to thescreen.Normal view Display the document as formatted textincluding graphics, adapted to thescreen.Page view Display the document in print preview,showing the complete layout.P800_UM.book Page 110 Wednesday, August 28, 2002 4:19 PM
Viewer 111PreliminaryDetail view - SpreadsheetsTo copy text from the document1. Select the text to be copied. To select all text in thedocument, selectEdit > Select all.2. SelectEdit > Copy.The text is put into the clipboard and a message is displayed.To search for a text in the document1. SelectDocument > Findfrom the menu.2. Enter the text to search for.3. Select find.4. If required, selectDocument > Find next.5. To clear the highlighted search hits, selectDocument > Clearsearch hits.To change the document view1. To display the document as formatted text without pictures,wrapped to the screen size, selectEdit > Draft view.2. To display the document as formatted text including pictures,wrapped to the screen size, selectEdit > Normal view.3. To display the complete layout of the document, selectEdit >Page view.To show/hide the spreadsheet grid lines1. SelectEdit > Show gridlines.To navigate in the workbook1. To go to the next sheet in the workbook, selectEdit > Nextsheet.2. To go to the previous sheet in the workbook, selectEdit >Previous sheet.Menus Option DescriptionSpread-sheetFind Search the document for a specifictext.Find next Search for the next occurrence of thesearch text.Clear search hits Remove the search hits.EditCopy Copy the selected text or elements ofthe document.Select all Select the contents of the entiredocument.Draft view Display the document as formatted textwithout graphics, adapted to thescreen.Show gridlines Turn the gridlines on/off.Next sheet Open the view of the next sheet in theworkbook.Previous sheet Open the previous sheet in theworkbook.P800_UM.book Page 111 Wednesday, August 28, 2002 4:19 PM
112 ViewerPreliminaryDetail view - DrawingTo search for a text in the document1. SelectDocument > Findfrom the menu.2. Enter the text to search for.3. Select find.4. If required, selectDocument > Find next.5. To clear the highlighted search hits, selectDocument > Clearsearch hits.To navigate in a multi-page drawing1. To go to the next slide in the drawing, selectEdit > Next slide.2. To go to the previous slide in the drawing, selectEdit >Previous slide.Detail view - ArchiveTo extract documents from an archive1. To open a file for viewing in the Document viewer, select thefile and selectEdit > Open.2. To extract a file and save it in the selected folder, selectEdit >Extract.3. To extract all files in the archive and save them in theselected folder, selectEdit > Extract all.Menus Option DescriptionDrawingFind Search the document for a specifictext.Find next Search for the next occurrence of thesearch text.Clear search hits Remove the search hits.EditFit to width Displays the drawing with a widthequal to the screen width.Fit to window Displays the drawing with a width andheight equal to the screen width andheight.Next slide Open the view of the next slide inmulti-page documents.Previous slide Open the view of the previous slide inmulti-page documents.Menus Option DescriptionEditOpen OpentheselectedfileforviewinginaDocument viewer window.Extract Extracttheselectedfiletobesavedina selected folder.Extract all Extract all the archive files to be savedin a selected folder.Sort by Allow the user to view files in anarchive by name, date, or size.Sort order Allow the user to view files inascending or descending order.P800_UM.book Page 112 Wednesday, August 28, 2002 4:19 PM
Viewer 113PreliminaryTo change the archive sort order1. To sort the documents by name, date or size, selectEdit > Sortbyand select as desired.2. To change between ascending and descending order, selectEdit > Sort order.P800_UM.book Page 113 Wednesday, August 28, 2002 4:19 PM
Online services 114Online servicesOnline services is a customized service offered by a networkoperator.This symbol indicates that a service or function is network-or subscription-dependent.On-line services provides a mechanism that allows applicationsthat exist on the SIM to interact and operate with the P800. Itmay provide services ranging from weather forecasts to thelatest information from the stock market.Online service are placed on your SIM card by your operator.Note Contact your operator to find out which services areavailable for your account.P800_UM.book Page 114 Wednesday, August 28, 2002 4:19 PM
Online services 115PreliminaryP800_UM.book Page 115 Wednesday, August 28, 2002 4:19 PM
116 TimePreliminaryTimeThe time and date are always displayed in standby mode. Youcan customize the display of times and dates throughout yourP800. You can set your current location and another location ofyour choice. It is also possible to set three different alarms.Time and dateTo set the current time and date1. Select>.2. Taptheclocktoviewthecurrent time and datesettings.3. Tap the Date box, thenuse the arrows to set thecurrent year and month.Then select the currentday.4. TapDaylight saving time,then select the check boxnext to the zone thatcurrently has summertime>Done.Thisisonlyrequired if you arecurrently in a countrywith summer time.5. Tap the time box, then tap the upper half of the hour orminute box to increase the number displayed, or the lowerhalf to decrease the number.TimeStockholmLondonFriday4th Jan 200312 1234678910115Fri 11:04:28Fri      10:04 amDaily 8:00 a... Wak...Workday 12:30...  Lunc...Once(Su... 9:00 p...  Earl... Week 01Alarm slotOther cityCurrent cityCurrent dateTime & dateTime & date FormatSummertimeDate:Time:?Cancel Done11:04 am04/01/2003P800_UM.book Page 116 Wednesday, August 28, 2002 4:19 PM
Time 117Preliminary6. Use theam/pmbox to switch between am and pm>.Thisis only possible if you use the 12-hour time format.7. SelectDone.FormatYou can specify how you want the time and date to be displayedon the screen, and if you want to use the 12- or 24-hour timeformat.To set the time and date display format1. Select>.2. Tap the clock to view thecurrent time and datesettings.3. SelectFormat.4. Tap the Date Format box>choose a format.5. Tap the Date Separatorbox>choose a separator.6. Select aTime format.7. Tap the Time separatorbox>choose a separator.8. SelectDone.WorkdaysYou can specify what days you work, if, for example, you wantto set an alarm that sounds only on workdays. You can alsospecify the first day of your week to customize the display ofboth Week and Month views in Calendar.To specify your workdays1. Select>.2. Tap the clock3. Tap the right arrow keyicon twice.4. Tap the check boxes nextto the days you normallywork.5. SelectFirst day of week >choose a day.6. SelectDone.Time & dateTime & date FormatDate format:Date separator:Time format: 12 hour24 hourTime separator:?Cancel Done/04/01/2003:Time & dateWorkdaysFormatMonday:Tuesday:Wednesday:Thursday:Friday:Saturday:Sunday:First day of week:?Cancel DoneMondayP800_UM.book Page 117 Wednesday, August 28, 2002 4:19 PM
118 TimePreliminaryLocationsSpecify the country and city you are currently in. The city youselectwillbedisplayednexttotheclockinTime.If you are away from home, for example travelling in anothercountry, it can be useful to know what the time is in your homecountry as well as the country you are in. The city you select asOther City will be displayed below the clock in Time.To set the locations1. Tap>.2. TapTime > Set location.3. Tap the Current Countrybox>the country you arein at the moment.4. Tap the Current City box>the city you are in at themoment. If the city youare in is not listed, selectthe city closest to you.5. Tap the Other Countrybox>choose a country.6. Tap the Other City box>chooseacity.7. SelectDone.NumbersYou can choose how you want the measurements and numbersin your P800 to be displayed in all your applications. Distancescan be displayed using the imperial or the metric system anddifferent punctuation marks can be used as separators.To set the number details1. Select>.2. SelectTime > Set location.3. SelectNumbers.4. Tap the distance boxes>choose imperial or metric.5. Choose separators and symbol position in the same way as in4.6. SelectDone.AlarmsYou have the possibility to set up to three different alarms inyour P800. You can choose to activate one of the preset alarms,or set a new alarm with your own definitions.You can choose to set a silent alarm, where only a message isdisplayed when it goes off, or you can set a sound alert.To activate an existing alarm• Select the check box in the alarm slot. is displayed on thestatus bar on the screen.InternationalNumbersLocationCurrent country:Current city:Other country:Other city:?DoneUnited Ki...LondonUnited Ki...LondonP800_UM.book Page 118 Wednesday, August 28, 2002 4:19 PM
Time 119PreliminaryTo set a new alarm1. Select>.2. Select one of the alarmslots.3. SelectTime >choose atwhat time you want thealarm to go off.4. SelectWhen >choose howoften you want the alarmto go off:–OnceThe alarm will gooff at a time more than24 hours from now butwithin the next eightdays.–Next 24 hoursWithinthe next 24 hours.–DailyEvery day at thespecified time.–WeeklyEvery week atthe specified time.–WorkdaysEvery workday at the specified time.5. SelectAlarm sound >choose a sound.6. SelectMessage >choose a preset message or write a new one.7. SelectDone.8. Make sure the check box next to the alarm is selected.When the alarm goes off, selectSnoozeto postpone the alarm forfive minutes orSilenceto turn off the alarm sound. To turn offthe alarm completely, selectDone.Set alarmTime:When:Alarm sound:Message:?Done8:00 amDailySilentWake up!Set alarmAlarm sound:Message:?DoneSilentWake up!800amP800_UM.book Page 119 Wednesday, August 28, 2002 4:19 PM
120 CalculatorPreliminaryCalculatorThe Calculator is a standard 10-digit calculator. You can add,subtract, multiply, divide, calculate square root and percentage.It also has a memory function.To use the calculator1. Select>.2. Enter the calculations by tapping the digits.All calculations, except percentage calculations, are performedas they are entered, for example: 5+5x5=50, not 30.Percentage calculations are performed backwards. To calculate,for example, 10% of 50, enter 50x10%. The result is displayedwhen you tap the %-key.Key functionsYou can copy and paste values to and from other applications byselectingCalculator > CopyorPaste.Values stored in the memory are retained while using otherapplications.m+Taponcetostoreanenteredvalueinthememory.If you already have entered a value in the memory, tap onceto add the value on the screen to the value in the memory.mrTap once to retrieve a value from the memory and enter itinto the screen.Tap twice to clear the memory.m-Tap once to subtract the entered value from the value in thememory. The memory is adjusted but not displayed.Tap once to delete the last digit you entered.CTaponcetoresetthescreento0.P800_UM.book Page 120 Wednesday, August 28, 2002 4:19 PM
Personalizing your P800 121Personalizing your P800There are a number of ways you can give your P800 a personaltouch and change its settings to suit your requirements.Changing your application shortcutsThe standby screen displayedwhen the flip is closed showsfive short-cuts to applications.From theControl panelyoucan change them, rearrangethem as you prefer, or evenhide them, if you wish. See“Application shortcuts” onpage 23.Displaying the Area Code in theStandby ScreenIf your network operator provides CBS (Cell BroadcastServices) with cell information you can set your P800 to displaytheareacodebelowthenetworknameinthestandbyview.See“CBS tab” on page 140.Setting a background pictureFrom theControl panelyou can set a background picture forthe stand-by screen. See “Wallpaper” on page 127.You can obtain suitable background picture files bydownloading, beaming usingBluetoothorInfrared,ortransferring them from your PC.Background picture images are 208 x 144 pixels and the picturecan be seen in the standby screen.(Any chosen picture will bescaled to fit well on the screen).The images can be JPEG, GIF,BMP, WBMP, MBM or PNG format.Setting a Screen SaverYou can set a screen saver picture to be displayed after a periodof inactivity. From theControl panelyou can also turn this facilityon and off and select the delay period before the screen saver isdisplayed. See “Display” on page 127. Key lock and devicelock may be used in combination with the screen saver. Whenyou press a key or touch the screen, you will be prompted toactivate keys and/or enter the device lock code.P800_UM.book Page 121 Wednesday, August 28, 2002 4:19 PM
122 Personalizing your P800PreliminaryPicture format for the screen saver is 208 x 320 pixels.Adding images to your ContactsYou can store a picture witheach entry in Contacts. See“Managing contacts” onpage 55.Pictures are easily taken usingthe CommuniCam (see“CommuniCam and Pictures”on page 94) though of courseother images can be used.If your network operator provides a CLI (Calling Line Identity)service, your P800 can display the contact's picture togetherwith the other information when an incoming call is receivedwith a CLI matching that contact (not all numbers can bedisplayed). The contact's picture is also displayed when makinga call.To show the contact’s picture when receiving an incoming call1. SelectPhone > Edit >Preferences > Incoming call picture2. Select theShow picture for incoming callscheck box.3. TapDone.Ring signalsYour P800 can play both iMelody format and polyphonic ringsignals (WAV, AU, AMR, and MIDI sound file formats). Youcan add as many ring signals as desired, subject only toavailable file space.A ring signal may be selected for an entry inContacts,sothat the caller can be identified by the ring signal that is played.You can use a recording as a ring signal. See “Voice memo” onpage 92. Choose between a recording you have made yourself,and a recording you may have downloaded, transferred fromyour PC, or received via e-mail, EMS message or MMSmessage.John Smith+4613244500 11:03End callP800_UM.book Page 122 Wednesday, August 28, 2002 4:19 PM
Personalizing your P800 123PreliminaryThe recommended format for WAV files is PCM, 22,050 Hz, 8bit, Mono, often called 'radio quality'. This format requiresapproximately 22 kilobytes of space for each second duration.Many PC audio applications support WAV.Alarm tones and sound notificationYou can choose different sounds for alarms and notifications inthese applications:Master resetIn theControl panelyou can reset all the settings in yourP800 to the way they were when you originally bought it. See“Master reset” on page 136 for more details.TimeSee“Alarms” on page 118CalendarSet a sound for reminder alerts, see “Customize thecalendar” on page 81)TasksSet a sound for reminder alarms. See “Settings” onpage 85MessagesSet a different sound for each type of message asnotification of a new message:See “Alerts” on page 141P800_UM.book Page 123 Wednesday, August 28, 2002 4:19 PM
Control panel 124Control panelThe Control Panel is the location for all the main settings onyour P800 that are system-wide and affect more than oneapplication. This is the main place to go to initially set up yourP800, and to change settings at any point thereafter. To access it,selectControl PanelinApplications.Tip YoucanfindsettingsthatapplytoasingleapplictioninthePreferencesmenu of the application, for example:Phone > Edit>Preferences, Communicam > Preferences, Internet > PreferencesTo make theControl panelsettings easier to find, they have beengrouped into three groups shown on separate tabs:Device,ConnectionsandGeneral:To see a list of all control panel settings and the groups to whichthey have been assigned, selectControl panel > Set groups.• To sort the list of settings by group name: at the top of thelist, selectGroup.• To change the group to which a setting is assigned: select thename of the setting in the list.The sections below, arranged in alphabetical order, describe thesettings available for each of the default items in theControlpanel.BluetoothBluetooth™ wireless technology uses radio waves to enablewireless connections between your P800 and other Bluetooth-enabled devices. This method of linking works well at a range ofup to 8-10 metres. Obstructions between the transmittingdevices will have an effect on the performance.Device tab Connections tab General tabCertificate Manager Bluetooth InternationalDisplay Cable Time & dateFlip closed shortcuts InfraredFlip removed Internet accountsFormat disk IP security managerLanguage Messaging accountsMaster reset Secure tokensStorage manager WAP accountsSystem soundsText inputUser greetingWIM managementP800_UM.book Page 124 Wednesday, August 28, 2002 4:19 PM
Control panel 125PreliminaryBluetoothsettings are shown on two tabs:Tip You will probably find that the preset name of your P800,and of devices you pair it with, are not very meaningful or easilyrecognizable. It is a good idea to change these names tosomething more useful. The name you choose for your P800appears on any devices you pair it with.To locate other Bluetooth-enabled devices in the vicinity• SelectAdd.TheAvailable Bluetooth devicesdialogue opens:– All enabled devices that are discoverable within range areshownwiththeirnameandicon.YoucanuseShow:torestrict the list to one category (only PC, for example).– Paired devices that are within range are shown withregular text.– Non-paired devices that are within range are shown withtheir names in italics.– Devices that are within range but unknown are shownwith a preset name.If a device you want to pair with your P800 does not appear inthe list, check that:• It is on and within range.• Bluetooth function on the device has been activated and thatit is in discoverable mode.To pair a device to your P8001. Select the device in theAvailable Bluetooth deviceslist.2. If the device requires a passkey, you will be asked to enter it.3. SelectDone.Note The other device (a PC, for example) may require that youenter the same passkey in its own dialogue.SecurityOn theSettingstab you can make the following security-relatedsettings:• You can set your P800 to different operation modes:DevicesA list of all the Bluetooth-enabled devices that yourP800 is paired (bonded) with.• To change the name of a device, select the name in thelist.• To remove a device from the list, select the name andselectRemove.Settings• A “friendly” device name for your P800.Security-related settings:• Its Bluetooth wireless technology operation mode.• How it should act when receiving a beamed entry.OnAll Bluetooth wireless technology functionality fromyour P800 works. Your P800 is connectable,paireddevices can access it.AutoAll Bluetooth wireless technology functionality fromyour P800 works. Your P800 is not connectable.P800_UM.book Page 125 Wednesday, August 28, 2002 4:19 PM
126 Control panelPreliminary• You can also set how your P800 should act when receivingbeamed items:CableUseCableto set the cable connection mode and the connectionparameters used when communicating through your P800'scable port.SelectControl Panel > Connectionsand selectCableto:• Choose the cable connection mode: when connecting viacable the P800 must be set in PC connect mode or Modemmode, see table below.• Set the baud rate, parity, number of stop bits, character lengthand type of flow control required for the connection. Whenconnecting your P800 via the desk stand to a USB port onyour PC, use the following (default) settings:Tip You can set the cable connection mode when the flip isclosed by selectingApplications>Connections>Cable.Certificate managerDigital certificates ensure that the web or WAP pages you visit,or any software you install, really are created by the person youexpect.Certificates may be present on the pages that you view or thesoftware that you download. Your P800 compares thesecertificates with a set of certificates that are stored inCertificatemanagerto ensure the authenticity of the page or software. If thecertificates do not match, your P800 informs you, and gives youthe following choices:• Prevent the page being loaded or the software being installed.• Continue at your own risk.OffBluetooth wireless technology is turned off.DiscoverableOther Bluetooth-enabled devices can find andconnect to your P800. To pair with another device,your P800 must beDiscoverable.Always receiveReceives the entry automatically.Ask firstYou will be shown aConnection requestthat youcan accept or reject.Never receiveRejects the item automatically.PC connect mode Modem mode• Synchronization• Installation of software• Backup and restore• P800 as a modem• Phone Book Manager (PCsoftware)Baud rate460800ParityNoneStop bits1Character length8Flow controlCTS/RTSP800_UM.book Page 126 Wednesday, August 28, 2002 4:19 PM
Control panel 127PreliminaryThe certificates on your P800 have been created and issued byan independent organisation that ensures their authenticity.Security informationSecurity information is displayed whenCertificate managercannot be sure of the origin of the page or software. Forexample, security information will be displayed if:• The certificate on a page has expired.• The identity of a software manufacturer cannot be verified.Security information is also displayed when a certificate on yourP800 has:•Expired.• Been revoked by the independent organisation that issued it.Adding and removing certificatesYour P800 handles certificates automatically so, most of thetime, you can browse the Internet securely without usingCertificate manager.Ifyoudo need to add or remove a certificate,you will usually be informed by your network operator orsystem administrator. You should remove a certificate fromCertificate managerif you are informed, or suspect, that:• The certificate does not belong to the person who suppliedit.• The certificate was issued incorrectly by the independentorganisation that created it.Type of certificateThe type can be eitherCertificate AuthorityorUser.•Certificate Authoritycertificates contain server details. Thistype of certificate is handled by your P800 when the serveronly requires server authentication. This means that youridentity remains anonymous.•Usercertificates contain your identity. This type of certificateis used when the server asks for client authentication. Theclient application requests you to identify yourself bychoosing a user certificate.DisplayUse theDisplaysettings to control the screen and powerfunctions of your P800.WallpaperYou can set a picture to be the background for the standbyscreen. (See“Flip closed - overview” on page 22 for details onthe standby view.) SelectBrowserfrom the drop-down list to seepicture files available on your P800. Read more aboutbackground pictures in “Personalizing your P800” onpage 121.P800_UM.book Page 127 Wednesday, August 28, 2002 4:19 PM
128 Control panelPreliminaryScreen saverYou can set a screen saver picture to be displayed after a periodof inactivity. You can also turn this facility on and off and selecta delay period of up to 15 minutes before the screen saver isdisplayed. Read more about screensaver images in“Personalizing your P800” on page 121.If you select thePhone lock protectedcheck box the Device lockwill activate when the delay runs out. Read more about locksand security in “P800 locks” on page 33.Power saveYou can set a power saver to switch off the screen after a periodof inactivity (2, 3, 5, 7, 10, 15, or 30 minutes). When the powersaver activates, the screen will be switched off.If you set times for both screen saver and power saver, thepower saver setting will automatically be set higher.LightYou can set the screen light settings for car use and handhelduse.LockSelectLockto activate the screen saver immediately. If thePhonelock protectedcheck box has been selected, this will also activatethe Device lock.CalibrateOccasionally you may find that you tap one item (for example abutton or menu option) but another is activated. Calibrating thescreen ensures that the correct item is activated. To restorecalibration to the factory settings, press the Jog Dial.Flip closed shortcutsUse this dialogue to configure the application shortcuts shownin the Flip ClosedStandbyview, see “Standby view” on page 23.You can change the five shortcuts shown. If you feel that theshortcuts obscure your background image, you can choose tohave them hidden when you do not need them. By default theseshortcut icons are displayed:AutoLight switches on when you tap the screen, press a key, orreceive an incoming callOnLight is always onOffLight is always offMessages Contacts Call list Calendar ApplicationsP800_UM.book Page 128 Wednesday, August 28, 2002 4:19 PM
Control panel 129PreliminaryTo change an application shortcut in the Standby view1. In theFlip closed shortcutsdialogue, select the icon you wishto change. The name of the application is shown in theSetApplicationpick list.2. Choose the application you want to replace it with from thelist.To hide the application shortcuts when your P800 is inactive3. Clear theShortcuts always displayedcheck box.Flip removedWhen you use your P800 with the hardware flip removed, youcan use the keys on the virtual flip instead. Use this setting toturn it on or off (see “Virtual flip” on page 26).Format diskThis dialogue primarily lets you rename and format any SonyMemory Stick Duo that you install in your P800. Your P800comes with one Memory Stick Duo.When you format a disk, you delete all the information on it,including any applications that you may have installed.Your P800’s internal ROM drive is also listed in the dialogue,so that you can rename it to give it a more meaningful name ifyou wish.InfraredUse this setting to control the state of the infraredcommunications port of your P800. You can set itOn,OfforOnfor 10 minutes.Read more about connecting to other devicesusing infrared in “Connection via infrared port” on page 151.InternationalUse these settings to set the locations shown inTime,as wellas the units for distances, numerical separators, and howcurrency values should be shown.There are two tabs:LocationsandNumbers.On the Locations tab•SetCurrent countryandCurrent cityto your current location.•SetOther countryandOther cityto an alternative location (forexample your home location if you are abroad).If the city you want is not listed, select another city in thedesired time zone.On the Numbers tab•SetLong DistanceandShort distancetoImperialorMetric.Long distances are those that are displayed in and aremeasured in miles or kilometres. Short distances are thosethat are measured in metres or and centimetres, or feet andinches.P800_UM.book Page 129 Wednesday, August 28, 2002 4:19 PM
130 Control panelPreliminary• Set the decimal separator and thousands separator you desire.• For applications that use currency values you can set acurrency symbol and choose how the symbol should beplacedinrelationtothesymbol.Internet accountsYou access the Internet using an Internet Service Provider (ISP),who supplies you with account details including: a username, apassword, and the phone number or web site address that yourP800 automatically uses to access the Internet. You need to setup an Internet account before you can:• Access web pages and download multimedia messages.• Set up an e-mail account to send and receive e-mailmessages.Tip A simple way of setting up an Internet account is to askyour service provider to send you a message that contains therequired information to create an account automatically onyour P800.There are three types of Internet account:Thedialoguehastwotabs:AccountsandOther.Accounts tabThe Internet accounts dialogue lists all the Internet accounts thathave been set up on your P800.You can add aNewaccount to the list andEditorDeleteanexisting account.If you want to select an Internet account every time you connectto the Internet, select theShow connectiondialogue check box.This may be useful if you use different Internet accounts forInternetandMessages.Dial-Up account:.With a Dial-Up account, you're charged for thelength of time that you are connected to theInternet.High -speed Dial-Upaccount:This is a special kind of Dial-Up account. Witha High-Speed Dial-Up account, you're chargedfor the length of time you're connected but youcan increase the connection speed so thatinformation is transferred faster. Billing ratesfrom your Internet Service Provider (ISP) mayincrease as you increase the connection speed.GPRS account: With a GPRS account, you're charged for theamount of information you view, download, orsend.P800_UM.book Page 130 Wednesday, August 28, 2002 4:19 PM
Control panel 131PreliminaryWhenever you connect to the Internet, yourPreferredaccount isthe account that your P800 prompts you to use.To create a new Internet account1. On theAccountstab, selectNew.2. Give the account a name. This will be the name shown inyour list of accounts. (In dialogs that appear while aconnection is being established the text-GPRSisautomatically added to names of GPRS accounts.)3. Choose theConnection typefor the type of account that youwant to create, GPRS or Dial-Up.4. Continue entering settings as required. These will differdepending on the type of account: GPRS, Dial-Up or High-Speed Dial-Up:New GPRS accountFor some accounts you may need to make advanced settings. Ifadvanced settings are required, they must be provided by yourISP. SelectAdvancedand enter settings on the tabs as describedbelow:GPRS Advanced settings tabsServer User name and passwordNormally, you do not have to enter a user name andpassword when you connect to a GPRS account. However,some service providers may require you to enter thesedetails.If you select theUser name and password requiredcheckbox, but do not enter a user name and password, you willbe prompted to enter these when the P800 connects.AddressEnter the Internet address of your access point. The addressis supplied by your service provider.Log inThe settings on this tab deal with IP and DNS addresses.The DNS address uniquely identifies your Internet ServiceProvider (ISP)'s computers, which your P800 uses toconnect to the Internet. Your P800 can normally fetch theseaddresses automatically from most ISPs.If, after setting up an Internet account, you cannot connectto the Internet and you suspect these addresses areincorrect, ask your ISP for their primary and secondaryDNS addresses.P800_UM.book Page 131 Wednesday, August 28, 2002 4:19 PM
132 Control panelPreliminaryNew Dial-Up or High-Speed Dial-Up accountYour Internet Service Provider (ISP) supplies you with yourUser name,yourPassword,andtheirPhone number, which yourP800 dials to connect to the Internet. If you have a High-SpeedDial-Up account with your ISP you can increase the speed ofyour connection by making settings underAdvancedsettings ontheSpeedtab.IP address typesThere are four different types of IP addresses:•IPv4: Consists of four 3-digit boxes and valid input isbetween 000 and 256 in each box.•IPv6: Consists of eight hexadecimal boxes and valid inputis between 0000 and FFFF.•IPv4 compatible: Consists of six hexadecimal boxes andfour 3-digit boxes. The last hexadecimal box is prefilledwith 0:0:0:0. Only the four 3-digit boxes can be changed,and the valid input is between 000 and 256.•IPv4 mapped: Consists of six hexadecimal boxes and four3-digit boxes. The last hexadecimal box is prefilled withF:F:F:F. Only the four 3-digit boxes can be changed, andthe valid input is between 000 and 256.IPv4 is the most common addressing method.ProxyA proxy server is a computer connected between yourP800 and the computer you communicate with. Thisarrangement can be used for connections to SyncMLservers, or within a company network. If this setting isneeded, your company's Information Services departmentor SyncML provider must give you instructions.GPRS Advanced settings tabsOtherIf your Internet Service Provider (ISP) supports Point toPoint Protocol (PPP) extensions, you can select theEnablePPP extensionscheck box. PPP extensions allow yourP800 to provide features such as encryption, whichincreases the security of your Internet connection.Your ISP may require plain text authentication. If youselect thePlain text authenticationcheck box, the securityof your connection will decrease during the connectionprocess. Once you are connected, the security of yourconnection will be restored.QoSCheck with your mobile operator before changing any ofthe QoS (Quality of Service) settings.If your operator supports the use ofHeader compression,selectingOncan speed up your connection.The settingsPrecedence,Delay,Reliability,Peak rate,andMean Rateare all by default set toSubscribed,whichmeans that your operators default QoS (Quality of Service)values will apply.GPRS Advanced settings tabsP800_UM.book Page 132 Wednesday, August 28, 2002 4:19 PM
Control panel 133PreliminaryTip To avoid having to change the phone number when youtravel abroad: enter the international dialling prefix (forexample '+') and the appropriate country code for your ISP.For some accounts you may also need to make advancedsettings.SelectAdvancedand enter settings on the tabs as describedbelowDial-Up and High-Speed Dial-Up advanced settings tabsLog inThe settings on this tab deal with IP and DNSaddresses. For an explanation of these settings, seeLog inin the table GPRS Advanced settings tabs.ScriptAs an alternative to entering your user name andpassword to access the Internet you may need to use alogin script stored on your P800. Althoughuncommon, scripts may be required by your InternetService Provider (ISP). Select theUse login scriptcheck box and enter the script text in theScript editorIf you select the check boxPlain text authentication(required by some ISPs), the security of yourconnection will decrease during the connectionprocess. Once you are connected, the security of yourconnection will be restored.Select the check boxPost connect terminalif:• The login script of the account that you are settingup requires that you input certain information oryou will need to respond to prompts from theInternet account.• You are connecting to a Dial-Up account that usesSecure Access generated by a separate smart cardor password generator.ProxyFor an explanation of these settings, seeProxyin thetable GPRS Advanced settings tabs.P800_UM.book Page 133 Wednesday, August 28, 2002 4:19 PM
134 Control panelPreliminarySpeedYou can only increase the speed of your connection ifyou have a High-Speed Dial-Up account with yourInternet Service Provider (ISP).Dial-Up and High-Speed Dial-Up advanced settings tabsSecureTo enable secure access for this Internet account youmust link it to a vendor-associated Secure Token inthis dialogue:1. Select the Enable secure access check box.To create or delete Secure Tokens on your P800,selectControl panel > Connections >Secure tokens.2. Select the vendor and token names of the SecureToken that you want to link to this account from thedrop-down lists.OtherIf your Internet Service Provider (ISP) supports Pointto Point Protocol (PPP) extensions, you can select theEnable PPP extensionscheck box. PPP extensionsallow your P800 to provide features such asencryption, which increases the security of yourInternet connection.If the computer that you connect to supports callback, it can break the Internet connection after youhave logged in and then call your P800 back to re-establish the connection. Call back saves you moneyand increases security.To enable call back:1. Select theUse call backcheck box.2. In theCall back typelist, choose whether you wantthe ISP to call you back using the phone numberstored on the provider's server (Use server number)or another phone number (Use number below).Dial-Up and High-Speed Dial-Up advanced settings tabsP800_UM.book Page 134 Wednesday, August 28, 2002 4:19 PM
Control panel 135PreliminaryToEditan Internet account1. On theAccountstab, select the account in the list.2. SelectEdit.3. Change your settings as desired.4. SelectDone.Note If you change theConnection type,all account data for thataccount will be deleted.ToDeletean account1. On theAccountstab, select the account in the list.2. SelectDelete.3. SelectDone.Other tabYou can use theDial-Up timeoutandGPRS timeoutsettings to setup your P800 to disconnect automatically from the Internet, ifyou're not using it. The connection is broken after the period youspecify has lapsed.Preferred Mode (bearer preference)SelectGPRS onlyif you do not want to be disturbed by incomingphone calls while browsing the web. All incoming voice (andGSM data) calls are rejected.When you have selectedGSM only,no GPRS data connection ispossible.If you selectAutomatic,your P800 will let you answer incomingGSM calls while having normal GPRS functionality. A GPRSdata connection will be temporarily interrupted by a voice call.IP security managerThe IP security manager displays stored policies and only onepolicy can be activated at a time.This is used for secureconnections over the Internet, typically to a corporate intranet.Ifneeded, your company IS department will supply the necessaryinformation.There are two types of passwords needed:•IP security password: is to be set when activating the veryfirst policy, that is, this password is only set once, but it ispossible to change it later at any time by tapping thePassword button.•Activation password: is needed when a policy is activatedfor the first time and the supplier of the policy gives this.LanguageUse this list of all languages stored on your P800 to changelanguage. The highlighted entry is the language presently in use.P800_UM.book Page 135 Wednesday, August 28, 2002 4:19 PM
136 Control panelPreliminaryTip To conserve storage space only a limited set of languages isloaded on your P800 at delivery. You can use the P800 ChangeLanguage utility on thePC suite for P800CD to load and deletelanguages.Master resetUseMaster resetto return your P800 to the state it was in whenoriginally delivered.Warning! All user data will be deleted and all settings will bein your P800 to the way they were when it was originallydelivered.If you want to keep installed applications clear theDelete userinstalled applicationscheck box.Messaging accountsTheMessagesapplication can handle many different typesof messages, but you must first set up accounts and makesettings as described below.The Messaging accounts dialogue has four tabs, one for eachtype of messaging account:Tip A simple way of setting up an e-mail or multimediamessage account is to ask your service provider to send you amessage that contains the required information to create anaccount automatically on your P800.Read more about the different types of messages in “Messages”on page 59.EmailYou can have any number of e-mail accounts. To receiveand send e-mail, you must first set up an Internet account(if one isn't already set up). See“Internet accounts” onpage 130.SMSYou can only have one SMS message (Short MessageService) account.These settings also apply to EMS(Extended Message Service) messages.MMSYou can only have one MMS message (MultimediaMessaging Service) account. To receive MMS messageWAP-based content you must first set up an Internetaccount (if one isn't already set up). See“Internetaccounts” on page 130.CBSYou can only have one CBS (Cell Broadcast Services)account. The number of Area Information channels thatyou can subscribe to is limited by the space on your SIM.P800_UM.book Page 136 Wednesday, August 28, 2002 4:19 PM
Control panel 137PreliminaryEmail tabTheEmailtab shows a list of the e-mail accounts on yourP800.You can add aNewaccounttothelistandEditorDeleteanexisting account.You can choose one of your e-mail accounts asPreferred.Thiswill be the e-mail account that your P800 uses when you useSend asto send an entry as e-mail directly from one of your P800applicationsTo create a new e-mail account1. On theEmailtab, selectNew.2. On theBasictab, enter the following settings:3. On theInboxtab, enter the following settings, as required:E-mail account basic tab settingsAccount nameThis is the name you give to your e-mail account.Your nameThis name appears on your outgoing e-mailmessages.Email addressYour Internet Service Provider (ISP) supplies youwith your e-mail address.Connection typeSelect POP3 or IMAP. POP3 is most common.Internet accountSelect the Internet account to access your e-mailmessages.E-mail account Inbox tab settingsUser nameYour Internet Service Provider (ISP) supplies youwith your user name, your password, and itsincoming server address, which identifies thecomputer where your incoming e-mail messagesare stored.PasswordIncoming serveraddressDownloadIf you do not have much time to download your e-mail messages, you can choose to receive justJustheaders(the sender, subject, and date only) or set asize limit (if a message is larger than thee-mailssmaller thanlimit, only the headers aredownloaded). You can download the completemessage later.ScheduleSelectScheduleto schedule an automaticdownload of your incoming e-mail messages.Messages that are waiting in yourOutboxwill notbe sent at the same time.P800_UM.book Page 137 Wednesday, August 28, 2002 4:19 PM
138 Control panelPreliminary4. On theOutboxtab:5. On theAdvancedtab:Toeditan e-mail account1. On theEmailtab, select the account in the list.2. SelectEdit.3. Change your settings as desired.4. SelectDone.Todeletean e-mail account1. On theEmailtab, select the account in the list.2. SelectDelete.3. SelectDone.E-mail account Outbox tab settingsOutgoing serveraddressYour Internet Service Provider (ISP) supplies youwith its Outgoing server address, which identifiesthe computer through which your outgoing e-mailmessages are sent.Use SMTPauthenticationSome SMTP servers might require authenticationalso when sending e-mail. In that case, select thecheck boxUse SMTP authenticationand enter yourUser nameandPassword.Use Inbox logindetailsIf the SMTP server accepts using your Inbox logininformation for authentication, select the checkboxUse Inbox login details.E-mail account Advanced tab settingsSecureconnectionYour Internet Service Provider (ISP) will tell youwhether you can use either aSecure connectionorSecure password authentication.A secure connection means that all information(including your username, password, and allmessages) is encrypted to maximize security whileyou're connected to the Internet. In contrast, securepassword authentication means that only yourpassword is encrypted.SecurepasswordauthenticationOutgoing mailportNormally 25. Do not change unless your ISPinstructs you to.Incoming mailportNormally 110. Do not change unless your ISPinstructs you to.Use MIMEencodingMIME encoding is a standard that allows non-textual information (for example graphics) andaccented characters to be sent in e-mail messages.If you should not wish toUse MIME encoding,clear the check box.E-mail account Advanced tab settingsP800_UM.book Page 138 Wednesday, August 28, 2002 4:19 PM
Control panel 139PreliminarySMS tabUse these settings to set up text message and EMS messaging:Tip If you send and receive text messages in several countries,you can avoid having to change the service centre address whenyou travel abroad by entering the international dialling prefix(for example '+') and the appropriate country code for yournetwork operator.You can set theConnection typeto one of the bearer types in thelist.MMS tabUse these settings to set up multimedia messaging:Messaging accounts SMS tab settingsService centreaddressTheService centre addressis the phone numberwhere your text messages are stored. It is normallyimported from the SIM card but if that fails, yournetwork operator can provide you with the servicecentre address.Character Set.Your network operator may also specify theCharacter Set.Messages storedforYou can set a time limit after which text messagesare deleted from the network by choosing a valuein theMessages stored forlist.ExtendedmessagingClear the check boxExtended messagingwhenyou do not want to use EMS message functionswhen composing your messages.SmiliesClear the check boxSmiliesif you want to useonly plain text smilies.Messaging accounts MMS tab settingsService centreaddressThe Service centre address is URI to the server onwhich your multimedia messages are stored. YourMMS service provider or your network operatorcan provide you with the service centre address.WAP Accounts.Specify which of your configured WAP accountsyouwishtouse.•WAP accounts are created inControl panel >General (tab) > WAP AccountsDownloadmethodSelect between Manual or Auto:•Manual- only a notification will be sent to yourP800 and you can decide whether or not todownload the full message.•Auto- the full message is downloaded directly toyour P800Download sizeandLess thanSet whether or not to have a size limit forincoming messages:•No restrictions- the size of the incomingmessages doesn't matter, all messages will bereceived.•Less than- messages smaller than the limit willbe received, bigger messages will be deflected.P800_UM.book Page 139 Wednesday, August 28, 2002 4:19 PM
140 Control panelPreliminaryAdvanced settingsSelectAdvancedto make settings about how your P800 will sendand receive multimedia messages.CBS tabOn the CBS tab you make settings related to CBS (CellBroadcast Services). CBS services include Area Informationand Cell Information. The availability of Cell BroadcastServices (Cell and Area Information) is operator dependent.Cell information may be used to display the area code below thenetwork name in the flip closed standby view.Area Information is a type of text message that is sent to allsubscribers in a certain network area, for example a local trafficreport.MMS Advanced settings tabsSendThe values you give these settings will be default for allmultimedia messages that you send. You can of coursechoose other values for an individual message in Messages.You can set theValidity periodfor your messages, that is,how long they should be available to the receiver.Maximumis the default.You can give your messages aPriority levelofLow,Normal(default) orHigh.YoucansetalevelofConformancefor the multimediamessages that you send to make sure that they will beplayed back correctly on different products.You can choose one of these levels:• Standard - a warning message is displayed whenever youadd non-conformant item to a multimedia message. Youhavetheoptiontosendanyway.• None - non-conformant messages are sent.Select the check boxes to provide the function you want:Hide numberprevents the sent message from showing yournumber.Read reportrequests a read notification from receivers ofyour messages.Delivery reportrequests a delivery notification fromreceivers of your messages.Reply with historyincludes the original with your reply.ReceiveThese settings apply to multimedia messages that youreceive.Select the check boxes to send a notification message to thesender when a message is:• Delivered to you:Allow delivery notification• Read by you:Allow read notificationYoucanfilterreceptionofincomingmessagesbymessageclass (Advertisements,Personal,Automatic,Information)as well messages from senders listed in Contacts. Selectinga check box will filter out messages of that category.To receive multimedia messages only from senders listedin your Contacts, select all other check boxes and clear thecheck box forContacts.MMS Advanced settings tabsP800_UM.book Page 140 Wednesday, August 28, 2002 4:19 PM
Control panel 141PreliminaryTo enable Cell Information• Select the Cell Information check boxTo turn Area Information on•ChecktheArea Informationcheck box. Received messageswill be displayed and automatically stored in theArea InfoInboxwhen dismissed.The list shows all the channels that you have defined on yourP800. The check box for each channel shows if it is on (checked,ready to receive messages) or off (cleared, not active):To add a new channel1. SelectNew.2. Enter the number of the new channel in the New Channeldialogue. Channel numbers can be from 0 to 999. If there aretoomanychannelsdefined,Newwill be disabled and you willsee a message:Maximum channels on SIM.Channel numbering is operator dependent. Please consultyour network operator for information.To turn a channel on or off• Select the channel in the list and check the check box. To turnit off, clear the check box.To delete a channel• SelectDelete. Since deleting a channel cannot be undone, youwill be asked to confirm the delete. Deleting the channel willalso delete any stored Area Information messages for thatchannel in your Area Info Inbox.AlertsYour P800 can notify you when a new message arrives with adifferent sound for each type of message that it can receive.To set up notification, selectAlert.If you check theDisplay notification messagecheck box, you willalso see a notification message.For each type of message you can either• Select theDefault Melody,or• SelectFind Melodyto open theSelect audiodialogue, whereyou can browse through your folders to pick a melody fromthose stored on your P800.Secure tokensYour P800 supports secure access systems from a number ofvendors. You manage secure access by using Secure Tokens.Read more about secure access in “Secure access” on page 164.P800_UM.book Page 141 Wednesday, August 28, 2002 4:19 PM
142 Control panelPreliminaryEach token is associated with one system and with one Internetaccount, or none, when you use your P800 as a Hard Token(password generator). You can configure as many tokens asneeded.TheSecure tokensdialogue shows a list of secure accessproviders. Secure tokens relating to the provider's name arelistedunderthenameinanopentreestructure.SelectControl panel > Connections > Secure tokensto:•Edit,Delete,orCreatea new token, or•Generatea password.These options are only displayed as available when a Securetoken is highlighted, and greyed out when the vendor's name ishighlighted. The sequence of the dialogs they generate will bevendor specific.A token is associated with an Internet account through theInternet settings for the account. See“Internet accounts” onpage 130.Many dialogue details when using secure access are vendor,system and network specific. You should contact theadministrator of the network you wish to access to get thecorrect information.Storage managerThis dialogue helps you do housekeeping with the storage spaceon your P800.The list shows the applications on your P800 and the space theyoccupy.Removing information from applicationsTo remove information from an application: select anapplication in the list. This application is then displayed.Remove the old or unwanted entries or information.Here are some housekeeping tips for different applications:• Remove any unwanted recordings as even short ones occupya lot of space.•InMessages, remove any old messages from your Inboxor Sent folders.•InTasks, remove all completed entries by selectingTasks > Delete completedin your list of entries.•InCalendar, remove all entries in a specified time periodby selectingCalendar > Remove entriesin your list of entries.• Throughout your P800, use folders as you create and receiveinformation to speed up housekeeping later.P800_UM.book Page 142 Wednesday, August 28, 2002 4:19 PM
Control panel 143PreliminaryRemoving unwanted general filesSelectFilesto see a list of all stored general file types on yourP800. You can remove unwanted files and launch a viewer foreach file.Uninstalling applicationsIf you uninstall an application, you will have to reinstall theapplication if you want to use it later.To uninstall an entire application, selectUninstall.Note You cannot uninstall the applications that came with yourP800.System soundsTo set the sounds given when you press a key on the keypad ortap the screen in your P800 selectSystem sounds.You can choose between the following sounds:Text inputThere are several standard ways of entering text in your P800.See “Entering text - Flip open” on page 29 and “Entering textin flip closed mode” on page 25.Use the settings on thePrimary,AlternativeandFlip Closedtabs toset methods for entering text in your P800.If you load other text input software, select it and adjust itssettings here.Time & dateAdjusting the time and date here sets these throughout yourP800.Thedialoguehasthreetabs.Youcanset:Note These settings are also available in theTimeapplication.Keypad Tone,ClickorSilentTouch screen ClickorSilentPrimaryThe method that you select here is activatedautomatically when you need to enter text into yourP800.AlternativeThe method that you select here is activated if youtap at the bottom of the screen.Time & dateThe current time and date. Here you can also turnSummertime (daylight saving time) on or off for yourlocation.FormatSpecify how you want the time and date to be displayedon the screen.WorkdaysSpecify the days in your working weekP800_UM.book Page 143 Wednesday, August 28, 2002 4:19 PM
144 Control panelPreliminaryTime & date tabTo set the current date1. On theTime &datetab, select the date. A calendar view opens.Tap the arrows to set the current year and month.2. Select the current date.To set the current time1. On theTime & datetab, select the time. Select the upper half ofthe hour or minute box to increase the number displayed, orthe lower half to decrease the number.2. Select theam/pmbox>.This is only possible if you use the 12-hour time format.If the locations you have set underControl panel >Internationalare in a country that currently has summer time(Daylight Saving Time), you can adjust the time and date.To turn daylight savings time on1. On theTime &datetab, selectDaylight saving,select the checkboxes for the zones that currently have daylight savings time.2. SelectDone.Format tabYou can specify how you want the time and date to be displayedon the screen, and if you want to use the 12-hour (am/pm) or 24-hour time format.To set the time and date display format1. SelectDate formatand choose a format.2. SelectDate separator> choose a separator.3. Select aTime format.4. SelectTime separatorchoose a separator.5. SelectDone.Workdays tabYou can specify what days you work, if, for example, you wantto set an alarm that sounds only on workdays. You can alsospecify the first day of your week to customize the display ofboth Week and Month views in Calendar.To specify your workdays1. Select the check boxes next to the days you normally work.2. SelectFirst day of weekand choose a day.User greetingYour P800 can show a user greeting on the standby screen whenyou turn it on. Use this dialogue to turn this function on or off.You can define your own user greeting text (up to 32characters).P800_UM.book Page 144 Wednesday, August 28, 2002 4:19 PM
Control panel 145PreliminaryWAP accountsUse these settings to set up and manage WAP accounts(sometimes called WAP profiles) on your P800.WAP accounts are intended for multimedia message and foraccessing the Internet through a WAP gateway. (Such gatewaysmake use of proxy port 9200-9203.) All other proxy settingsshould be included in your Internet accounts!For security reasons, some WAP pages and services, forexample online banking, can only be accessed from a particularWAP account.The dialogue has two tabs:BasicandPreferred.Basic tabThe dialogue shows a list of all the WAP accounts on yourP800. You can add aNewaccount to the list andEditorDeleteanexisting account.Note You access WAP pages through an Internet ServiceProvider (ISP) so, when you create a WAP account, you mustchoose one of your existing Internet accounts or first create anew one.To create a new WAP account:1. Enter the name of the WAP account.2. Select the Internet account you want to use.3. If you are going to use a WAP gateway or a proxy, select theUse proxycheck box.4. Enter theIP Addressof the gateway or proxy5. Enter thePort addressof the gateway or proxy.For a WAP gateway use:– 9201 for a normal connection– 9203 for an encrypted secure connection.• If the gateway/proxy requiresUser nameandPassword,whichis very unusual, fill in the last two fields in the dialogue.Preferred tabSelect the check box to set a preferred WAP account. It will beused when you use theOpen pagecommand in theInternetapplication and when a page is opened from another P800application.If you do not set a preferred WAP account, the preferred Internetaccount will be used when connecting to the Internet.WIM managementWIM (WAP Identity Module) is used for performing securityfunctions, especially to store and process information needed foruser identification and authentication. It is a tamper-resistantstore for private keys, certificates and other items that mayrequire a PIN for access or modification.P800_UM.book Page 145 Wednesday, August 28, 2002 4:19 PM
146 Control panelPreliminaryTheWIM managementdialogue consists of PIN choice list and aWIM items list.You can select a PIN from the PIN choice list. The WIM itemslist changes content dynamically, displaying only the keys thatare protected by the selected PIN and also have an associatedcertificate. Other keys that are protected by the selected PIN butdo not have an associated certificate are not shown in the WIMitem list. This is the case when WIM PIN (PIN-G) is selected.Note This is the PIN to access the WIM. The PIN-G applies tothe whole WIM and any items that do not have a different PIN,that is, no specific items on the WIM are linked to PIN-G.You can change status of a PIN:•Enable PIN: A PIN code that is enabled is requested forauthorisation of an operation. To proceed with the operationyou must enter the PIN code.•Disable PIN: A PIN code that is disabled is not requested toauthorize an operation to proceed.To change the PIN code:1. Select the PIN you want to change from the choice list.2. SelectChange PIN.If a PIN code has been blocked, you must unblock it before itcan be used again. Select the PIN and selectChange PIN.P800_UM.book Page 146 Wednesday, August 28, 2002 4:19 PM
Installing applications 147Installing applicationsIt is possible to install new applications in your P800 either fromthe PC or directly from the P800.These applications can beobtained in several ways, for example:• from the Internet• from a CD• from a Memory Stick• as an e-mail attachment.Applications can also be downloaded directly to your P800 fromother devices, the Internet or via e-mail.There are two types of installation files for applications:• SIS (Symbian Standard Installation)• MIDP JAR (Mobile Information Device Profile JavaArchive)Note SIS and JAR files are installation packages containingseveral files.This chapter also applies to other types of software to install, forexample, system components and add-ons.PC Suite for P800The PC Suite for P800 CD delivered with your P800 contains aset of useful applications to install applications and manage yourP800:•Backup and Restore– Make safety copies of your data.•File Manager– Transfer files (images, documents, music, andso on) between your P800 and PC.•Change Language– Change the system language in the P800.•Download Station– Install applications in the P800.•Smartphone Monitor– Monitors the connection, runsautomatically.•Sync Station– Synchronizes data in your PC and P800.•Phone Book Manager– Edit SIM card from your PC.Refer to the online help for each specific application.InstallationWhen inserting the CD in the PC, a start menu is automaticallyshown. Select language and then start the PC Suite for P800Setup. Follow the instructions in the installation wizard.By default the PC Suite for P800 is accessed fromStart menu >Programs > Sony Ericsson > P800.P800_UM.book Page 147 Wednesday, August 28, 2002 4:19 PM
148 Installing applicationsPreliminaryThe Setup application also can be used later to add or deletecomponents.Installing applicationsInstallation file securityInstallation files in SIS format are typically used for installationof C++ or PersonalJava applications or other content into theP800 file system.The vendor who prepared the SIS file decideswhere in the file system the various content of the SIS file willbe installed. This means that you need to decide if you trust thatthe SIS file does not contain harmful content. If you know forsure who produced the SIS file then you can take an installationdecision based on what you know about that vendor. Your P800supports cryptographic verification of vendor identity.During installation the P800 verifies a digital signature andcertificate in the SIS file against a root certificate on the phone.Successful verification means that you can trust who producedthe SIS file and that the content has not been modified after itwas created. If the SIS file does not contain a digital signatureyou will be given a warning about the problem but you can stilldecide to proceed with installation at own risk. In general it isrecommended that you install only from SIS files where thevendor identity and file integrity can be verified.MIDP applications run in a protected environment with noaccess to sensitive information so no signatures are required forMIDP JAR files.From a PCPC Suite for P800 must be installed in your PC and the P800must be connected to the PC via cable, IR or Bluetooth wirelesstechnology in order to install applications from your PC.Installing applications from your PC1. Connect your P800 to the PC via cable, infrared or Bluetoothwireless technology. When connected, an icon is shown inthe taskbar on the PC.2. Start the PC softwareP800 Download Stationand select theapplication (.sis or .jar file) to install. It is also possible todouble-click a file in file manager and make the P800Download Station start automatically.3. Confirm to install the application in the P800.4. Select target drive (phone memory or Memory Stick).Download to the P800 begins.5. Installation starts when download is complete.6. Installation is complete.P800_UM.book Page 148 Wednesday, August 28, 2002 4:19 PM
Installing applications 149PreliminaryFrom the P800Program packages can also be downloaded to your P800 fromthe Internet or from a Memory Stick. When downloading a filefrom the Internet, the installation will start automatically whenthe file is completely downloaded to your P800. The procedurebelow describes installation of application packages already inthe P800 but not yet installed.Installing applications in the P8001. Select> Applications > Install.2. Select software in the list.3. SelectInstall.If the software is certified, an informationdialog will be shown with the name of the software, versionand supplier. SelectInstallagain.4. Now, depending on the software, you may be prompted toreplace a previous installation, select language, memorylocation and select other installation options.5. Installation is complete. SelectDone.Removing applications in your P800It is sometimes necessary to remove installed applications anduser data to free up memory.Removing applications in the P8001. Select> Applications > Uninstalland then select software toremove.2. Confirm selection.3. SelectDone.Note If you delete an application from your P800, any copy onyour PC (including backups) will be deleted the next time yousynchronize with your PC.Tip See alsoMaster ResetandStorage ManagerinControl Panelformore options regarding removal of applications and user data.P800_UM.book Page 149 Wednesday, August 28, 2002 4:19 PM
Connecting to other devices 150Connecting to other devicesYour P800 can be connected to other devices with similarinterfaces, such as PCs, other P800s and PDAs.The connection can be made via:•Cable• Infrared (IrDA)• Bluetooth wireless technologyOnce it has been connected, you can perform various tasks,depending on what type of connection you have chosen, such as:• Using a cordless headset (Bluetooth wireless technology)• Sending and receiving files via (infrared, Bluetooth wirelesstechnology) – ‘beaming’• Making Backup/Restore and Synchronisation of your dataand file transfer. (Cable, infrared and Bluetooth wirelesstechnology)• Using the P800 as a modem for Dial-Up Networking.(Cable, infrared and Bluetooth wireless technology)• Bluetooth• E-mail• SMS• MMS• Bluetooth• Cable• IrDA• IrDAP800_UM.book Page 150 Wednesday, August 28, 2002 4:19 PM
Connecting to other devices 151PreliminaryPC connectivity softwareYour P800 is delivered with a CD, PC Suite for P800.Thissoftware must be installed in the PC you want to connect to. Seethe chapter “Installing applications” on page 148 for moreinformation. You do not need to install the PC Suite for P800 ifyouonlywanttoperformbeamingwiththePCoruseacordlessheadset.Connection via cablePut your P800 in the desk stand and connect the cable to anempty USB port on the PC. When connecting via cable, theP800 must be set in PC connect mode or Modem mode, seetable below. The setting is made inControl panel > Connections >Cable.Serial settingsThe default settings for normal use:Connection via infrared portWhen connecting via the infrared port, make sure that bothdevices are placed within one metre from each other and that theinfrared ports have a free line of sight between them. Theinfrared port on your P800 is located on the left-hand side, nextto the On/Off button.Activating the infrared portThe infrared port must be activated before communication canbegin. Go toControl panel > Connections > Infrared portand set theport state toOnorOn for 10 minutes.See the chapter “Controlpanel” on page 124 for more information on infrared settings.Connection via Bluetooth wirelesstechnologyYou can connect your P800 to other products equipped withBluetooth wireless technology, for example PCs or other mobilephones, and exchange data. Since Bluetooth wireless technologyis radio-based, transmitting and receiving devices do not have tobe in a free line of sight. This means that your P800 can stay inyour pocket while communicating. However, objects betweentransmitting and receiving units might weaken the signal.PC connect mode Modem mode• Synchronization• Installation of software• Backup and restore• P800 as a modem• Phone Book Manager (PCsoftware)Baud rate: 460800Parity: NoneStop bits: 1Character length: 8Flow control: CTS/RTSP800_UM.book Page 151 Wednesday, August 28, 2002 4:19 PM
152 Connecting to other devicesPreliminaryConnection to another device can be made within a range of upto 10 metres. For all tasks, except beaming, it is necessary thatyou first set up a permanent and trusted relationship betweenyour P800 and the other device. This process is called pairing(other documentation refer to it as bonding). The paired devicesare remembered by your P800 also after you have turned it offso you do not need to repeat the process for every connectionwith those devices. The reason for pairing is to simplify futureconnections and to make them secure – only paired devices canconnect to your P800.Activating Bluetooth wireless technologyActivate Bluetooth wireless technology on your P800 inControlpanel > Connections > Bluetooth > Settings.SetOperation modetoAuto,OnorDiscoverableand setReceiving itemstoAsk firstorAlways receive. See the chapter “Control panel” on page 124 formore information on Bluetooth wireless technology settings.PairingTo let your P800 initiate pairing with another device1. InControl panel > Connections> Bluetooth > Settings,setOperation mode toDiscoverable.2. InControl panel > Connections > Bluetooth > Add. Your P800searches for all devices in the vicinity and lists them.3. Select the device you want your P800 to pair with and, entera passkey when asked for it. When the passkey is accepted,the pairing process is complete, refer to the section Passkeysbelow.4. If you in the future want to allow a paired device to connectto your P800 without you explicitly approving eachconnection you should selectControl panel > Connections >Bluetooth > Devices,then select a device and the check boxAllow to connect without confirmation.To let another device initiate pairing with your P8001. InControl panel > Connections > Bluetooth > Settings,setOperation mode toDiscoverable.2. Follow the other device´s manual to initiate pairing.3. When asked for a passkey, enter the same on both devices.4. If you in the future want to allow a paired device to connectto your P800 without you explicitly approving eachconnection you should selectControl panel > Connections >Bluetooth > Devicesselect a device and the check boxAllow toconnect without confirmation.To remove a paired device from your P800Select a device in the list and selectRemove.P800_UM.book Page 152 Wednesday, August 28, 2002 4:19 PM
Connecting to other devices 153PreliminaryPasskeysPasskeys ensure that the device you pair with really is the deviceyou think it is. A passkey is a set of numbers and/or letters (atleast four characters) that you agree to exchange with the ownerof the other device. Accessories like headsets often have adefault passkey, usually ‘0000’, see the specific user’s guide.Transfer items with Send AsFrom many applications it is possible to transfer (and receive)items like appointments, contacts and images to other users. Thetransfer starts by entering theSend asmenu in the specificapplication.Depending on the application and item you can choose betweenthe following transfer methods:• Infrared• Bluetooth wireless technology• Text message• Multimedia message•E-mailNote To be able to send or receive an item over infrared orBluetooth wireless technology, these functions must beactivated. See“Connection via infrared port” on page 151 and“Activating Bluetooth wireless technology” on page 152.P800_UM.book Page 153 Wednesday, August 28, 2002 4:19 PM
Synchronization and backup 154Synchronization and backupWith PC Suite for P800 installed in your PC, your P800 cansynchronize with the following PC applications, also calledPersonal Information Managers (PIMs):• Lotus® Organizer® 5 & 6• Lotus® Notes® 4.6, 5.0• Microsoft® Outlook® 98, 2000, 2002Synchronization is divided into local and remote. Localsynchronization is performed directly to a connected PC whileremote synchronization is done over the air with a remote serverin, for example, a corporate network.Local synchronizationLocal synchronization is done with either cable, infrared orBluetooth wireless technology, the functionality is the same.The following items can be sychronized locally:•E-mail•Contacts• Calendar•Tasks• Jotter notesConfiguration of PC softwareLocal synchronization is initiated from the PC and all settingsare made in the P800 SyncStation PC software (included on thePC Suite for P800 CD). The easiest way is to configure the PCsoftware to automatically make a synchronization every timeyour P800 is connected. An icon, Smartphone Monitor, isshown on the PC taskbar when connected.In the PC go toStart menu > Programs > Sony Ericsson > P800 >SyncStationand select the items to synchronize and select manualor automatic method. Refer to the online help in P800SyncStation PC software for more information.BluetoothCableIrDAP800_UM.book Page 154 Wednesday, August 28, 2002 4:19 PM
Synchronization and backup 155PreliminaryPerforming a local synchronizationMaking an automatic synchronization1. Connect your P800 via cable, infrared or Bluetooth wirelesstechnology.2. Synchronization starts automatically.Making a manual synchronization1. Connect your P800 via cable, infrared or Bluetooth wirelesstechnology.2. In the PC, go toStart menu > Programs > Sony Ericsson > P800 >SyncStationand start the synchronization. Alternatively, rightclick on the SyncStation Monitor and selectSynchronize.Remote synchronizationRemote synchronization takes place over the air and is the idealway to keep the P800 up-to-date while on the move. UsingGPRS, the P800 can be continuously connected to the remotesynchronization server.Synchronization services may be offered by mobile operators,third-party service providers and as added capability tocorporate PIM applications.The following items can be synchronized remotely:•Contacts• Calendar•TasksGPRS, HSCSDor CSDPIM ApplicationSync ServerFirewallInternet/IntranetP800_UM.book Page 155 Wednesday, August 28, 2002 4:19 PM
156 Synchronization and backupPreliminaryRemote sync server configurationEnterRemote SyncinApplications,selectEdit > Settingsand fillin the following parameters:•Serveraddress•Username• PasswordYou might also need to fill in whether to use transport loginunder the Protocol tab. Contact your corporate IT help desk oryour service provider for information on these parameters.You also need to have at least one configured Internet accountthat remote sync can use to connect, see “Internet accounts” onpage 130.Remote sync task configurationSelecting items to synchronize1. In Remote Sync, selectone item in the list youwant to be synchronized.2. Select theEnable taskcheck box.3. Fill in theTask nameorleave default.4. Fill in theServer database(Contact your corporateIT help desk or yourservice provider).5. The item you selected tobe synchronized is nowabove the divider in thelist. (Disabled items arebelow the divider.)• Repeat for other items.Making a remote synchronization•OpenApplications > Remote Sync,select theSyncbutton.When ready, theTask statuscolumn shows today's date for allsuccessfully synchronized items.Remote Sync    EditSync2002-09-15Calendar/TasksContactsEmailJotterSync task Task statusP800_UM.book Page 156 Wednesday, August 28, 2002 4:19 PM
Synchronization and backup 157PreliminaryBacking up dataYou can use theP800 Backup and RestorePC software to back upthe contents stored in your P800 to your computer. Keepingbackups of your P800 contents on your computer means thatyou have a separate copy of the contents of the P800, which canbe restored into the P800. Backups should be made on a regularbasis. A backup reminder can be set.SeetheonlinehelpforP800 Backup and Restorefor moreinformation on how to use the application.PreconditionsThe PC Suite for P800 must be installed in the PC and the P800must be connected to the PC via cable.Note Backup and restore does not work via IR or Bluetoothwireless technology.Performing a backupTo make a backup1. Connect your P800 to the PC via cable.2. In the PC, go toStart > Programs > Sony Ericsson > P800 >Backup and Restore.3. Select P800; several can be registered.4. StartBackupand select media: P800 and/or Memory Stick.Backup begins, the progress is shown in the P800.5. Follow the instructions in the P800.6. Backup is complete.Restoring dataIf you have lost data or accidentally deleted information in yourP800 you can restore an earlier backup. A backup from a certainmemory type (phone memory or Memory Stick) can only berestored to the same type.To restore a backup1. Connect your P800 to the PC via cable.2. Go toStart menu > Programs > Sony Ericsson > P800 > P800Backup and Restorein the PC.3. Select P800; several can be registered.4. Select one of the backups in the list of previously savedbackups and clickRestore.Restore begins, the progress is shown in the P800.5. Follow the instructions in the P800.6. Restore is complete.Warning! Everything in your P800 will be overwritten by thechosen backup. Once you have clicked Yes to start the restore,you cannot cancel the procedure.P800_UM.book Page 157 Wednesday, August 28, 2002 4:19 PM
158 Synchronization and backupPreliminaryNote If you have used your Secure Tokens (Secure Access files)since you made your backup, you must reconfigure these. If yourestore another P800, you must reconfigure your SecureTokens.P800_UM.book Page 158 Wednesday, August 28, 2002 4:19 PM
Getting started with Internet and Messages 159Getting started with Internet and MessagesIntroductionBefore you can useInternetandMessagesto access theInternet and send or receive messages you will need to makesome user-specific settings in theControl Panel.Service providerYou will need a service provider to connect your P800 to thenetwork.The service provider could be:• An Internet service provider (ISP) which connects you to theInternet.• An access point provided by your network operator.• A private service provider such as your company or yourbank.You will need to enter specific service provider details into yourP800 to set up an Internet account. It can hold the details ofmultiple service providers, for example, you may have separateInternet and corporate accounts.Your network operator or retailer may have pre-installedservices, check with them.Connection typeWhen your P800 connects to a service provider, it will use aGSM or GPRS network provided by a network operator. Manynetwork operators offer both GPRS and GSM services.The connection type defines which network your account usesto connect to the Internet. GPRS Internet accounts use the GPRSnetwork, and Dial-Up Internet accounts use the GSM network.GPRSIf your network operator supports GPRS, a GPRS Internetaccount allows you to:• Remain permanently connected to the Internet without beingcharged for connection time. With a GPRS account, you arecharged for the amount of information you view, downloador send when your are connected to the Internet.Check youroperator for details of your subscription.• Avoid having to reconnect to the Internet if the connection isbroken.Dial-UpFor both Dial-Up and High-Speed Dial-Up accounts, you arecharged for the length of time you are connected. If yournetwork operator supports them, you can increase yourconnection speed (at a cost) by setting up a high-speed account.P800_UM.book Page 159 Wednesday, August 28, 2002 4:19 PM
160 Getting started with Internet and MessagesPreliminaryAutomatically set up service providerand messagingThe easiest way to set up your P800 is automatically, throughyour service provider.ForMessagessettings your P800 supports automatic setupof:• e-mail accounts• MMS message (Multimedia Messaging Service) settings.Check your service provider's website for information or contacttheir support desk and ask about automatic remote configurationof ISP (Internet Service Provider) settings, e-mail and MMSmessage settings.If remote configuration is possible, they will send you the autoconfiguration messages required by SMS message.Settings valid for your network operator and one or more ofthese services may also be available through the phoneconfigurator utility at www.sonyericsson.comTo check that your SMS messaging settings are correct:• SelectControl panel > Connections > Messaging accounts >SMS.Accepting new Internet or MessagessettingsNew configuration messages will appear in theAuto setupaccount inbox ofMessages.(Configuration messages for e-mail accounts will, however, be found in yourSMS messageinbox.)When an auto setup message appears, select it.A dialogue with a brief text and operator message appears on thescreen. You can accept the new settings or leave the message inthe inbox.Ifthenameofthenewaccountisthesameasthatofanexistingaccount you can choose to create a new account with the samename or replace the existing account.Warning! Never accept remote configuration messages if youare not expecting them or are unsure where they have comefrom.Manually set up service providerAlternatively to setting up an Internet account automatically,you can enter the settings manually fromInternet accountson theConnectionstab of theControl panel.First collect all the information you will need. You can obtainthis information from your ISP (Internet Service Provider), or ifyou are connecting to a corporate network, your IT Manager.P800_UM.book Page 160 Wednesday, August 28, 2002 4:19 PM
Getting started with Internet and Messages 161PreliminaryAll settings are described in “Internet accounts” on page 130.To set up a new account follow the steps under “To create a newInternet account” on page 131.Manually set up MessagesAlternatively to setting upMessagesautomatically, you can enterthe settings for the messaging services you want to use yourselffromMessaging accountson theConnectionstab of theControlpanel.First collect all the information you will need. You can obtainthis information from the following sources:• If your mobile operator offers an e-mail service you can getthe necessary details from them.• Your Internet service provider.• Your IT Manager in the case of connecting to the corporatenetwork to access your work e-mail account.• Your network operator in the case of SMS message and CBSservices.The dialogue has four tabs, one for each type of messagingservice:e-mailThe provider of your e-mail service, or for a corporateaccount, your IT Manager can provide you with thenecessary details.All settings are described in “Email tab” on page 137.To set up a new account follow the steps under “To create anew e-mail account” on page 137.SMSmessageShort Message ServiceThe necessary settings are usually provided on your SIMcard.All settings are described in “SMS tab” on page 139.MMSmessageMultimedia Messaging ServiceYour MMS messaging provider will be able to provide youwith the necessary information.Before you set up MMS messaging you need to set up anInternet account inControl panel > Internet accountsand aWAP account inControl panel > WAP AccountsAll settings are described in “MMS tab” on page 139.CBSCell Broadcast Service: Area and Cell informationYour network operator will be able to inform you if theseservices are available.All settings are described in “CBS tab” on page 140.P800_UM.book Page 161 Wednesday, August 28, 2002 4:19 PM
162 Getting started with Internet and MessagesPreliminarySetting up WAP accountsA WAP account defines a service provider and gateway thatshould be used when making a connection to WAP services.You also need a WAP account when you use MMS message(Multimedia Messaging Service).The WAP gateway sits between your P800 and the WAP sitecoding and decoding information. You can set up details ofmore than one gateway if necessary, for example one for yourMMS messaging, one to access corporate data over WAP, andanother to access your bank's WAP service.The easiest way to set up a WAP account on your P800 isautomatically, through your service provider. Check yourservice provider's website for information or contact theirsupport desk and ask about automatic setup.Note You access WAP pages through an Internet ServiceProvider (ISP) so, when you create a WAP account, you mustchoose one of your existing Internet accounts or first create anew one.Manually set up a WAP accountAlternatively to setting up a WAP account automatically, youcan enter the settings manually fromWAP Accountson theConnectionstab of theControl panel.First collect all the information you will need. You can obtainthis information from the WAP service provider, or if you areconnecting to a corporate network, your IT Manager.All settings are described in “WAP accounts” on page 145.To set up a new account follow the steps under “To create a newWAP account:” on page 145.Using your P800 as a modemYour P800 contains a complete GSM/GPRS modem, so you canuse it to connect your PC to the Internet or corporateintranet.Your P800 appears to the laptop like a normal modem.BluetoothIrDACablePersonalComputerP800_UM.book Page 162 Wednesday, August 28, 2002 4:19 PM
Getting started with Internet and Messages 163PreliminaryYou link the laptop to your P800 using Bluetooth wirelesstechnology infrared, or cable (USB or serial).Theconnection over the air can be by any of the bearers that yourP800 supports:•GPRS• HSCSD (High-speed Circuit Switched Data)• CSD (Circuit Switched Data).A Windows® modem driver file and a PC utility, theDial-UpNetworking Wizardis provided on yourPC suite for P800CD. Thewizard will help you configure DUN (Dial-Up Networking)entries on your PC for GPRS and HSCSD connections.Once paired with a Bluetooth-enabled laptop, your P800 isready to make a connection to the Internet or corporate network.Because Bluetooth is wire-free and requires no line-of-sightalignment, you can place the laptop in a comfortable positionand let your P800 remain in your pocket, briefcase, or even beplaced up to 10 metres away.If you wish to use an infrared link, the range is typically up to 1metre. The two infrared 'eyes' must be kept in line of sight, at anangle of no more than approximately 30 degrees.The Dial-Up Networking WizardThe wizard simplifies creating GPRS DUN connections bysetting the proper values in the PC DUN entry and linking theentry to one of the GPRS configurations in your P800. You canalso view and modify the GPRS settings in the P800.For HSCSD DUN entries, it updates the modem settings suchthat the specified data rate and type of bearer (ISDN / Analogue)will be used when you make a DUN connection.You can view or change the DUN entries created with thewizard using the standard Windows® DUN user interface.The Dial-Up Networking Wizard software included in thePCsuite for P800must be installed in your PC and your P800 must beconnected to the PC via cable, infrared or Bluetooth wirelesstechnology.You should have any information concerning, for example,phone numbers, names of servers or domains, that the serverthat you want to connect to may require.To set up a GPRS or HSCSD (High-Speed Circuit SwitchedData) connection using the Dial-Up Networking Wizard1. Start theDial-Up Networking Wizardfrom the Sony Ericssonfolder of the Start menu on your PC.2. Choose Create a new Dial-Up connection.3. Follow the instructions in the Wizard.P800_UM.book Page 163 Wednesday, August 28, 2002 4:19 PM
164 Getting started with Internet and MessagesPreliminaryTo edit a previously created DUN entry1. Start theDial-Up Networking Wizardfrom the Sony Ericssonfolder of the Start menu on your PC.2. Modify a Dial-Up connection.3. Select the desired connection from the list.4. Follow the instructions in the Wizard.CSD connectionsTo set up a CSD (GSM Data) connection you will need to installyour P800 as a modem manually.To set up a Dial-Up entry for CSD1. On the PC, open the Control Panel.2. Choose to install a new modem.3. Choose your P800 as the modem.4. Select the port where the P800 is connected.5. Confirm the selection. A new DUN connection has beencreated.ConnectingTo connect using a DUN entry created by the wizard1. If you are connecting by cable, set your P800 toModemcableconnection mode.2. Use any conventional method to make a connection:– Click the Desktop short-cut created by the wizard.– Select the entry from within the system DUN folder.– Run an application that has built-in support for usingDUN entries (for example a browser or e-mail client).Secure accessIf you need access to a network that requires secure access(often known as “strong authentication”), for example acorporate intranet, you can set up the Internet account you use tolog in to that network to use secure access and generate therequired one-time password when you make the connection.Your P800 supports the following secure access systems:• SecureID from RSA• DigiPass from Vasco• SafeWord from Security ComputingIf you have a separate device or application that requires one-time passwords according to one of these systems, you do notneed a separate hardware token generator (Hard Token). YourP800 can generate passwords that are not associated with anInternet account.You manage secure access in your P800 using Secure Tokens:P800_UM.book Page 164 Wednesday, August 28, 2002 4:19 PM
Getting started with Internet and Messages 165PreliminaryEach token is associated with one vendor/system and may beassociated with one or more Internet accounts (or none, whenyou use your P800 as a Hard Token). You can configure asmany tokens as needed.To edit, delete, create a new token, or generate a one timepassword, tap:Control panel > Connections > Secure tokens.Note You should have the flip open when generating a one timepassword.Internet account settingsA token is associated with an Internet account through theInternet settings for the account:To set up a Dial-Up (CSD or High-Speed CSD) account forSecure access1. TapControl panel > Connections > Internet Accounts.2. Create aNeworEditan existing Dial-Up account.3. TapAdvanced.4. On theSecuretab for the account select theEnable secureaccesscheck box.5. Select the appropriateVendorandToken.To set up a GPRS account for Secure access1. TapControl panel > Connections > Internet Accounts.2. Create aNeworEditan existing GPRS account.3. TapAdvanced4. On theServertab for the account select theUser name andpassword requiredcheck box.5. Enter yourUser nameif desired. If you leave it empty, youwill be asked to fill it in at connection time.6. Leave thePasswordbox empty.Connecting to an Internet accountFor Dial-Up accounts there are two possible ways to connect toa secure access account, depending on if the login procedureuses a script and the PCT (Post Connect Terminal) or not.To connect to a Dial-Up account that does not require the PCT1. In the login dialogue, enter your vendor specific logininformation in thePINbox.2. TapDone, the one-time password is generated and passed tothe network invisibly.To connect to a Dial-Up account using the PCT1. In the PCT tapGenerate.2. In the vendor-specificGenerate Passcodedialogue, generatethe one-time password.3. TapCopy.4. Return to the PCT, tapPasteto enter the one-time passwordin the script.P800_UM.book Page 165 Wednesday, August 28, 2002 4:19 PM
166 Getting started with Internet and MessagesPreliminary5. TapDone.To connect to a GPRS account1. In the login dialogue, tapGenerate.2. Select the appropriateVendorandToken.3. In the vendor-specificGenerate Passcodedialogue, generatethe one-time password.4. TapCopy.5. Return to the login dialogue, enter your user name if requiredand tapPasteto enter the one-time password in thePinbox.6. TapDone.Tip Many dialogue details when using secure access arevendor, system and network specific. You should contact theadministrator of the network you wish to access to get thecorrect information.GPRS - data logsIcons on the status bar let you overview the information on dataconnection calls.A combined signal strength and GPRS signal icon providesinformation on the GPRS service status. The GPRS connectionstatus appears above the signal strength icon. There are threestates for the icon, unavailable , available and active .The HSCSD/CSD and GPRS icons are displayed duringa data connection. Where GPRS is suspended, for example, theGPRS suspended state is indicated by a combined icon .There are three states for the GPRS icon: Active , activetransferring data (alternates between and ) andsuspended . Any data transfer either received or sentactivates the GPRS active icon for 2 seconds.Connection informationWhen you select the data connection icon, during an active dataconnection, a menu appears with the choicesInformationandDisconnect.• SelectInformationto view information on the connection.• SelectDisconnectto end the connection.GPRS status informationWhen the signal strength icon is selected, network, GPRS statusinformation and, if applicable, GPRS error text appear.GPRS data logA new GPRS data log entry is created when a GPRS accountestablishes a connection for the first time. If there is an existingdata log associated with the current GPRS connection, this isupdated.P800_UM.book Page 166 Wednesday, August 28, 2002 4:19 PM
Getting started with Internet and Messages 167PreliminaryThe GPRS data log shows a list of GPRS Internet accounts.Where one account is active or suspended, the relevant statusicon is displayed to the left of the account.Toviewinformationonanaccount• Select an account in the list.Information on the account is shown. The data log is updateddynamically.Buttons allow you to delete or reset the current data. Thesebuttons are disabled during an active or suspendedconnection.To delete the log for an account1. Select an account in the list.2. SelectDelete.To reset the log of an account1. Select an account in the list.2. SelectReset.To delete or reset the log of several accounts1. Select the check boxes of the accounts in the list to be deletedor reset.2. SelectGPRS data log > ResetorGPRS data log > Delete.Session dataWhen the connection is deactivated, for example when thecurrent Internet account is disconnected, the total data sent andreceived in the last session is displayed.In both flip open and flip closed the information is displayed fora couple of seconds. In the flip closed mode, the information canbe dismissed with the return key .P800_UM.book Page 167 Wednesday, August 28, 2002 4:19 PM
Troubleshooting 168TroubleshootingThis chapter consists of a selection of suggestions for solvingpossible problems with your P800.Start problems• Hand-held phone: Recharge or replace the battery.• Vehicle Handsfree: Check that the P800 is properly insertedinto the holder and check the fuse in the fuse holder(connected to the battery cable).SIM card related problemsInsert cardA SIM card has not been inserted into your P800. See “Gettingstarted” on page 7 for instructions on inserting the SIM card.PIN & unblocking PUK codeContact your dealer if you have forgotten your PIN orunblocking PUK code. By default you need your PIN or PUKcode to unlock your P800.Tip Store PIN and unblocking PUK code information in a safeplace.Wrong PINThe PIN code has been entered incorrectly. The message isfollowedbythepromptEnter PIN.Enter the PIN code correctly and press or .Note If your PIN is entered incorrectly three times in a row, theSIM card will be blocked. You can unblock it by using yourPUK.Blocked contact card providerThe SIM card is permanently blocked after the PersonalUnblocking Key (PUK) has been entered incorrectly ten timesin a row. Contact your network operator.Card blocked unblock?This message appears if the PIN code has been enteredincorrectly three times in a row.To unblock the SIM card1. Press2. Enter your personal unblocking key (PUK) and press .Note Your PUK is provided by your network operator when youpurchase your SIM card.P800_UM.book Page 168 Wednesday, August 28, 2002 4:19 PM
Troubleshooting 169PreliminaryEnter new PINappears on the screen.3. Enter your PIN code and press . You can enter eitheryour current PIN code or a new one. Repeat new PIN appearson the screen.4. Enter your PIN code again for confirmation and press .If you entered both your unblocking key and PIN code correctly,the messageNew PINwill appear on the screen.Alternative method for unblocking the SIM cardTo unblock the SIM card, enter the following sequence:unblock keynew PIN repeat new PINLock problemsDevice lockPhone locked is displayed followed by the promptEnter lockcode.Your P800 is locked to prevent unauthorized use.To unlock the P800:Enter your personal security code, then press or .Key symbolThe keypad is locked to prevent unintentional key action.• Press followed by to unlock the keys.Screen limitationsIn all cases where numbers or characters exceed the availablescreen space, truncation or dots are used to compensate for this.Numbers are truncated at the beginning, for example...555666777.Characters are truncated at the end, for exampleMethusel....Emergency calls onlyA network is within range but you are not allowed to use thisnetwork. You may, however, call the emergency number 112.Fax callsYour P800 does not support fax transmission. Even if youroperator subscription supports fax transmission, fax calls will berejected. However they can be forwarded to another numbersuch as the office fax number, see “Forward calls” on page 47for more information.P800_UM.book Page 169 Wednesday, August 28, 2002 4:19 PM
170 TroubleshootingPreliminaryNote Make sure potential fax callers do not try to send a fax toyour P800 as they can experience a number of retries before thefax transmission is stopped.Indicator lightBlinks redThis indicates that the battery is running low and soon needsrecharging or replacing with a spare.Note With Vehicle Handsfree (VHF) equipment, make sure thatthe following are inserted or connected: your P800 and itsholder, the fuse in the fuse holder, and/or the external antenna.Does not blinkIf the indicator light at the top of your P800 does not blink andno network is displayed there is no network within range. See“No network” on page 170.Memory/Disk fullDue to memory limitations, your P800 has no more spaceavailable to save or store information.Warning! Make sure regular backups are made withCommunications Suite to reduce the risk of lost or corruptedinformation.To free up memory, delete unused or old:•Calllogs.•Contacts.• Messages.• Calendar To-Dos or appointments.• WAP history or bookmarks.•Notepadnotes.No networkThis indicates that no network is within range. The reason forthis is either:1. You are in an area that is not covered by a network.2. The received signal is too weak, possibly because you arebeing shielded from the signal. Move to obtain a sufficientlystrong signal. Check your display signal strength indicator.System failureIn case of a system failure, your P800 will flash an animatedwarning. To recover, please restart the P800 like this:P800_UM.book Page 170 Wednesday, August 28, 2002 4:19 PM
Troubleshooting 171Preliminary1. Press and hold the On/Off button atleast 10 seconds to turn the P800 off.2. Restart as normal: Press the On/Offbutton to turn on your smartphone.1010P800_UM.book Page 171 Wednesday, August 28, 2002 4:19 PM
172 Guidelines for safe and efficient usePreliminaryGuidelines for safe and efficient usePlease read this information before using your mobile phone.Important: To avoid hearing impairment, answer call or lowervolume before placing this product to the ear.Recommendations• Always treat your product with care and keep it in a cleanand dust-free place.• Do not expose your product to liquid or moisture orhumidity.• Do not expose your product to extreme high or lowtemperatures.• Do not expose your product to open flames or lit tobaccoproducts.• Do not drop, throw or try to bend your product.• Do not paint your product.• Turn your product off in places where posted notices instructyou to do so and in places where mobile phones areprohibited including aircraft and hospitals.• Do not place your product or install wireless equipment inthe area above your car's air bag.• Do not attempt to disassemble your product. Only SonyEricsson authorised personnel should perform service.• If your mobile phone is equipped with infrared, never directthe infrared ray at anyone's eye and make sure that it does notdisturb any other infrared units.AntennaOnly use an antenna that has been specifically designed by SonyEricsson for your mobile phone. Use of unauthorised ormodified antennas could damage your mobile phone and mayviolate regulations, causing loss of performance and SAR levelsabove the recommended limits (see below).Efficient UseHold your mobile phone as you would any other phone. Do notcover the top of the phone when in use, as this affects callquality and may cause the phone to operate at a higher powerlevel than needed, thus shortening talk and standby times.Radio Frequency (RF) Exposure and SARYour mobile phone is a low-power radio transmitter andreceiver. When it is turned on, it emits low levels of radiofrequency energy (also known as radio waves or radio frequencyfields).P800_UM.book Page 172 Wednesday, August 28, 2002 4:19 PM
Guidelines for safe and efficient use 173PreliminaryGovernments around the world have adopted comprehensiveinternational safety guidelines, developed by scientificorganizations, e.g. ICNIRP (International Commission on Non-Ionizing Radiation Protection) and IEEE (The Institute ofElectrical and Electronics Engineers Inc.), through periodic andthorough evaluation of scientific studies. These guidelinesestablish permitted levels of radio wave exposure for the generalpopulation. The levels include a safety margin designed toassure the safety of all persons, regardless of age and health, andto account for any variations in measurements.Specific Absorption Rate (SAR) is the unit of measurement forthe amount of radio frequency energy absorbed by the bodywhen using a mobile phone. The SAR value is determined at thehighest certified power level in laboratory conditions, but theactual SAR level of the mobile phone while operating can bewell below this value. This is because the mobile phone isdesigned to use the minimum power required to reach thenetwork. Therefore, the closer you are to a base station, themore likely it is that the actual SAR level will decrease.Variations in SAR below the radio frequency exposureguidelines do not mean that there are variations in safety. Whilethere may be differences in SAR levels among mobile phones,all Sony Ericsson mobile phone models are designed to meetradio frequency exposure guidelines.Accessories can significantly affect a mobile phone'scompliance with the radio frequency exposure guidelines. Forexample, the Federal Communication Commission in the U.S.requires that some manufacturers' accessories shall be tested,and Sony Ericsson has done so with respect to its products. Toavoid causing loss of performance or radio frequency exposurelevels above the permissible limits it is recommended that youonly use Sony Ericsson or Ericsson original accessoriesintended for use with the mobile phone. If you wear the mobilephone on your body while it is transmitting, and you do not usea Sony Ericsson or Ericsson original body worn accessory,please ensure that you are not using an accessory that containany metal.A separate leaflet with SAR information for this mobile phonemodel is included with the material that comes with this mobilephone. This information can also be found, together with moreinformation on radio frequency exposure and SAR, onwww.sonyericsson.com/.DrivingPlease check if local laws/regulations restrict the use of mobilephones while driving or require drivers to use handsfreesolutions. We recommend that you use only Ericsson or SonyEricsson handsfree solutions intended for use with your product.P800_UM.book Page 173 Wednesday, August 28, 2002 4:19 PM
174 Guidelines for safe and efficient usePreliminaryAlways give full attention to driving and pull off the road andpark before making or answering a call if driving conditions sorequire.Please note that because of possible interference to electronicequipment, some vehicle manufacturers forbid the use of mobilephones in their vehicles unless a handsfree kit with an externalantenna supports the installation.Personal Medical DevicesMobile phones may affect the operation of cardiac pacemakersand other implanted equipment. Please avoid placing the mobilephone over the pacemaker, e.g. in your breast pocket. Whenusing the mobile phone, place it at the ear opposite thepacemaker. If a minimum distance of 15 cm (6 inches) is keptbetween the mobile phone and the pacemaker, the risk ofinterference is limited. If you have any reason to suspect thatinterference is taking place, immediately turn off your mobilephone. Contact your cardiologist for more information.For other medical devices, please consult the manufacturer ofthe device.ChildrenDO NOT ALLOW CHILDREN TO PLAY WITH YOURMOBILE PHONE OR ITS ACCESSORIES. THEY COULDHURT THEMSELVES OR OTHERS, OR COULDACCIDENTALLY DAMAGE THE MOBILE PHONE ORACCESSORY. YOUR MOBILE PHONE OR ITSACCESSORY MAY CONTAIN SMALL PARTS THATCOULD BE DETACHED AND CREATE A CHOKINGHAZARD.Disposing of the ProductYour mobile phone should not be placed in municipal waste.Please check local regulations for disposal of electronicproducts.Power SupplyConnect the AC power adapter only to designated powersources as marked on the product. Make sure the cord ispositioned so that it will not be subjected to damage or stress. Toreduce risk of electric shock, unplug the unit from any powersource before attempting to clean it. The AC power adaptermust not be used outdoors or in damp areas. Never alter the cordor plug. If the plug will not fit into the outlet, have a properoutlet installed by a qualified electrician.P800_UM.book Page 174 Wednesday, August 28, 2002 4:19 PM
Guidelines for safe and efficient use 175PreliminaryEmergency CallsMobile phones operate using radio signals, which cannotguarantee connection under all conditions. Therefore you shouldnever rely solely upon any mobile phone for essentialcommunications (e.g. medical emergencies).Emergency calls may not be possible on all cellular networks orwhen certain network services and/or mobile phone features arein use. Check with your local service provider.Using wireless technology to help find you in case of anemergency is a goal shared by the entire wireless industry, localphone companies and the emergency response centers. Yourphone includes technology which represents the first steptowards that goal. However, the complexity of mobilecommunication technology, combined with relatedimplementation technologies means that this locating featuremay not work in all cases, even if you are able to speak with anemergency response center. Always review with an emergencyresponse center all location data you have, includingintersecting streets, as well as any landmarks, to assist inlocating you. Sony Ericsson is committed to continuing to workwith the entire communications industry to improve locationfeatures for emergency response.Sony Ericsson is not liable for any service( s) includingoperation, coverage, or range of the network services providedby network carriers independent of Sony Ericsson.Battery InformationWe recommend that you charge the battery for 4 hours beforeyou use your mobile phone for the first time. The battery canonly be charged in temperatures between +5°C (+41°F) and+45°C (+113°F).A new battery or one that has not been used for a long timecould have reduced capacity the first few times it is used.The talk and standby times depend on usage conditions andnetwork configurations when using the mobile phone. If themobile phone is used near a base station, less power is requiredand talk and standby times are prolonged.P800_UM.book Page 175 Wednesday, August 28, 2002 4:19 PM
176 Guidelines for safe and efficient usePreliminary•Warning! May explode if disposed of in fire.• Use only Ericsson or Sony Ericsson brandedoriginal batteries and chargers intended for usewith your mobile phone. Other chargers may notcharge sufficiently or may produce excessiveheat. Using other batteries and chargers could bedangerous.• Do not expose the battery to liquid.• Do not let the metal contacts on the battery touchanother metal object. This could short-circuit anddamage the battery.• Do not disassemble or modify the battery.• Do not expose the battery to extremetemperatures, never above +60°C (+140°F). Formaximum battery capacity, use the battery inroom temperature.• Turn off your mobile phone before removing thebattery.• Keep out of children's reach.• Use the battery for the intended purpose only.• Do not allow the battery to be put into the mouth.Battery electrolytes may be toxic if swallowed.Disposing of the batteryThe battery should never be placed in municipalwaste. Please check local regulations for disposal ofbatteries or call your local Sony Ericsson CustomerCare Center for information.Limited warrantySony Ericsson Mobile Communications AB, S-221 88 Lund,Sweden, (Sony Ericsson), provides this Limited Warranty foryour mobile phone and original accessory delivered with yourmobile phone (hereinafter referred to as "Product").Should your Product need warranty service, please return it tothe dealer from whom it was purchased, or contact your localSony Ericsson Customer Care Centre (national rates may apply)or visit www.SonyEricsson.com/ to get further information.Our warrantySubject to the conditions of this Limited Warranty, SonyEricsson warrants this Product to be free from defects in design,material and workmanship at the time of its original purchase bya consumer, and for a subsequent period of one (1) year.P800_UM.book Page 176 Wednesday, August 28, 2002 4:19 PM
Guidelines for safe and efficient use 177PreliminaryWhat we will doIf, during the warranty period, this Product fails to operate undernormal use and service, due to defects in design, materials orworkmanship, Sony Ericsson authorised distributors or servicepartners, in the country/region* where you purchased theProduct, will, at their option, either repair or replace the Productin accordance with the terms and conditions stipulated herein.Sony Ericsson and its service partners reserve the right to chargea handling fee if a returned Product is found not to be underwarranty according to the conditions below.Conditions1. The warranty is valid only if the original proof of purchaseissued to the original purchaser by the dealer, specifying thedate of purchase and serial number**, is presented with theProduct to be repaired or replaced. Sony Ericsson reservesthe right to refuse warranty service if this information hasbeen removed or changed after the original purchase of theProduct from the dealer.2. If Sony Ericsson repairs or replaces the Product, the repairedor replaced Product shall be warranted for the remaining timeof the original warranty period or for ninety (90) days fromthe date of repair, whichever is longer. Repair or replacementmay involve the use of functionally equivalent reconditionedunits. Replaced parts or components will become theproperty of Sony Ericsson.3. This warranty does not cover any failure of the Product dueto normal wear and tear, or due to misuse, including but notlimited to use in other than the normal and customarymanner, in accordance with the Sony Ericsson instructionsfor use and maintenance of the Product. Nor does thiswarranty cover any failure of the Product due to accident,modification or adjustment, acts of God or damage resultingfrom liquid.4. Since the cellular system on which the Product is to operateis provided by a carrier independent from Sony Ericsson,Sony Ericsson will not be responsible for the operation,availability, coverage, services or range of that system.5. This warranty does not cover Product failures caused byinstallations, modifications, or repair or opening of theProduct performed by a non-Sony Ericsson authorisedperson.6. The warranty does not cover Product failures which havebeen caused by use of accessories or other peripheral deviceswhicharenotEricssonorSonyEricssonbrandedoriginalaccessories intended for use with the Product.7. Tampering with any of the seals on the Product will void thewarranty.P800_UM.book Page 177 Wednesday, August 28, 2002 4:19 PM
178 Guidelines for safe and efficient usePreliminary8. THERE ARE NO EXPRESS WARRANTIES, WHETHERWRITTEN OR ORAL, OTHER THAN THIS PRINTEDLIMITED WARRANTY. ALL IMPLIED WARRANTIES,INCLUDING WITHOUT LIMITATION THE IMPLIEDWARRANTIES OF MERCHANTABILITY OR FITNESSFOR A PARTICULAR PURPOSE, ARE LIMITED TO THEDURATION OF THIS LIMITED WARRANTY. IN NOEVENT SHALL SONY ERICSSON OR ITS LICENSORSBE LIABLE FOR INCIDENTAL OR CONSEQUENTIALDAMAGES OF ANY NATURE WHATSOEVER,INCLUDING BUT NOT LIMITED TO LOST PROFITSOR COMMERCIAL LOSS, TO THE FULL EXTENTTHOSE DAMAGES CAN BE DISCLAIMED BY LAW.Some countries/states do not allow the exclusion or limitation ofincidental or consequential damages, or limitation of theduration of implied warranties, so the preceding limitations orexclusions may not apply to you.The warranty provided does not affect the consumer's statutoryrights under applicable legislation in force, nor the consumer'srights against the dealer arising from their sales/ purchasecontract.*EuropeanUnion(EU)If you have purchased your Product in an EU country you canhave your Product serviced, under the conditions set out above,within the warranty period in any EU country where an identicalProduct is sold by an authorised Sony Ericsson distributor. Tofind out if your Product is sold in the EU country you are in,please call the local Sony Ericsson Customer Care Centre.Please observe that certain services may not be possibleelsewhere than in the country of original purchase, for exampledue to the fact that your Product may have an interior or exteriorwhich is different from equivalent models sold in other EUcountries. It may not be possible to repair SIM-locked Products.** In some countries/regions additional information isrequested. If so, this is clearly shown on the valid proof ofpurchase.FCC StatementThis device compiles with Part 15 of the FCC rules. Operation issubject to the following two conditions: (1) This device may notcause harmful interference, and (2) This device must accept anyinterference received, including interface that may causeundesired operation.P800_UM.book Page 178 Wednesday, August 28, 2002 4:19 PM
Terms and definitions 179PreliminaryTerms and definitionsAU, .auFormat for audio data files.BearerPath over which data flows. Specifically in CSD and HSCSD,the type of telephony link from the GSM network to the server –PSTN or ISDN.BluetoothBluetooth wireless technology is a secure, fast, point-to-multipoint radio connection technology. It is a computing andtelecommunications industry specification that describes howmobile phones, computers, and personal digital assistants(PDAs) can easily interconnect with each other and with homeand business phones and computers using a short-range wirelessconnection.BookmarkA URL and header/title stored in the phone, enabling the user togo directly to a Web or WAP page.bpsBits per second – rate of data flow.BMPMicrosoft Windows Bitmap. A graphics format defined byMicrosoft supporting 1, 4, 8 or 24 bit colour depth. Nocompression, so files can be large.cHTMLA version of HTML optimized for small devices.CLICalling Line Identity. Shows the number of the person callingyou in your mobile phone display. Your smartphone will alsodisplay the name and photograph of the caller if they are inContacts. You can then make an informed choice as to whetheror not to take the call. Bear in mind that not all numbers can bedisplayed. To use this service, it must be supported by yournetwork.COM PortDefines a serial/RS-232 port within the Windows environment.May be physical (COM1 port on the rear of the PC) or virtual(COM5 port communicating with a PC card modem).CSCircuit Switched. Connection from A to B which has a fixedbandwidth and is maintained over a period of time, for examplea voice telephone call.P800_UM.book Page 179 Wednesday, August 28, 2002 4:19 PM
180 Terms and definitionsPreliminaryCSDCircuit Switched Data. CSD is a GSM service providing a CSdata connection at a rate of 9.6 or 14.4kbps.CSSCascading Style Sheet. A feature of browsers.DTMFDual Tone Multi Frequency. A method of coding digits as acombination of two audible tones.DUNDial-Up Networking. The dial-up networking capability inWindows.e-GSMExtended GSM. New frequencies specified by the EuropeanRadio Communications Committee (ERC) for GSM use whenadditional spectrum is needed (network-dependent). It allowsoperators to transmit and receive just outside GSM's core900MHz frequency band. This extension gives increasednetwork capability.EMSEnhanced Messaging Service. An extension of SMS enablingpictures, animations, sound and text formatting to be added totext messages.ESMEricsson Smart Messaging. Used for OTA configuration; anenhancement of the Nokia Smart Messaging standard.FCCFederal Communications Commission. US government agencywhich regulates radio communications.GIFGraphics Interchange Format. Format for storing images whichalso supports animated images. Highly compressed by limitingthe colour palette to 16 or 256 colours. It is one of the two mostcommon file formats for graphic images on the World WideWeb. The other is JPEG.GPRSGeneral Packet Radio Services. A radio technology for GSMnetworks that adds packet-switching protocols, shorter set-uptime for ISP connections, and offer the possibility to charge byamount of data sent rather than connect time. GPRS promises tosupport flexible data transmission rates typically up to 20 or 30kbps (with a theoretical maximum of 171.2 kbps), as well ascontinuous connection to the network.GSMGlobal System for Mobile Communications. GSM is the world'smost widely-used digital mobile phone system, now operatingin over 160 countries around the world.P800_UM.book Page 180 Wednesday, August 28, 2002 4:19 PM
Terms and definitions 181PreliminaryGSM 900The GSM system family includes GSM 900, GSM 1800 andGSM 1900. There are different phases of roll-out for the GSMsystem and GSM phones are either phase 1 or phase 2compliant.GSM 1800Also known as DCS 1800 or PCN, this is a GSM digital networkworking on a frequency of 1800 MHz. It is used in Europe andAsia-Pacific.GSM 1900Also known as PCS. Refers to a GSM system running in the1900 MHz band. Used in the USA and Canada, for instance.HSCSDHigh-Speed Circuit-Switched Data (HSCSD) is circuit-switchedwireless data transmission for mobile users at data rates up to38.4 kbps, four times faster than the standard data rates of theGlobal System for Mobile (GSM) communication standard in1999.HTMLHypertext Markup Language is the set of markup symbols orcodes inserted in a file intended for display on a World WideWeb browser page. The markup tells the web browser how todisplayawebpage'swordsandimages.HTTPHyperText Transfer Protocol. The communications protocolused to connect to servers on the World Wide Web. Its primaryfunction is to establish a connection with a Web server andtransmit HTML pages to the client browser.IMAP4Internet Message Access Protocol (the latest version is IMAP4)is a standard client/server protocol for accessing e-mail fromyour local server. The e-mail is received and held for you byyour Internet server. You (or your client e-mail receiver) canview just the heading and the sender of the letter and then decidewhether to download the mail.IrDAThe Infrared Data Association. is dedicated to developingstandards for wireless, infrared transmission systems betweendevices. With IrDA ports, a device such as your smartphone canexchange data with other devices without a cable connection.IrDA requires line-of-sight transmission.ISDNIntegrated Services Digital Network. Communication protocoloffered by telephone companies that permits telephone networksto carry data, voice, and other source traffic. It can providecircuit-switched data connections in multiples of 64 kbps.P800_UM.book Page 181 Wednesday, August 28, 2002 4:19 PM
182 Terms and definitionsPreliminaryISPInternet Service Provider. An organization that provides accessto the Internet.JFIFJPEG File Interchange Format.JPEGJoint Photographic Experts Group, best known for the .JPGformat for still image compression.MBMMultiple Bit Map. Symbian OS bitmap format.MeTMobile Electronic Transactions. An initiative founded byEricsson, Nokia and Motorola to establish a secure andconsistent framework for mobile transactions.MIDIMIDI (Musical Instrument Digital Interface) is a protocoldesigned for recording and playing back music on digitalsynthesizers that is supported by many makes of personalcomputer sound cards.MIMEMultipurpose Internet Mail Extensions. A protocol defininghow messages are sent on the internet. For example, MIME isused to describe how attachments are encoded and what type ofdata they contain.MMSMultimedia Messaging Service. Logical extension of SMS andEMS. MMS defines a service enabling sound, images and videoto be combined into multimedia messages. It supports photoquality pictures, and sounds in WAV, MIDI, AMR, or Melodiesformat.MP3MPEG-1 Audio Layer-3 is a standard technology and format forcompression a sound sequence into a very small file (about one-twelfth the size of the original file) while almost preserving theoriginal level of sound quality when it is played.P800_UM.book Page 182 Wednesday, August 28, 2002 4:19 PM
Terms and definitions 183PreliminaryMPEG-4The Moving Picture Experts Group, develops standards fordigital video and digital audio compression. It operates underthe auspices of the International Organization forStandardization (ISO). MPEG-4 goes far beyond compressionmethods: Instead of treating the data as continuous streams,MPEG-4 deals with audio/video objects that can be manipulatedindependently, allowing for interaction with the coded data andproviding flexibility in editing. MPEG-4 supports a wide rangeof audio and video modes and transmission speeds. It also dealswith intellectual property and protection issues.OSOperating System, such as Symbian OS, Linux, MicrosoftWindows.OTAOver The Air. A technology for transmission and reception ofapplication related configuration information in a wirelesscommunications system.PCPersonal Computer.PCSPersonal Communications Services, often used to describe GSM1900 networks.PDFPortable Document Format. A format created by Adobe forstoring and distributing documents.Phone bookA memory in the SIM card where phone numbers can be storedand accessed by name or position.PIMPersonal Information Management. Generic term forapplications such as Contacts, Calendar, Tasks, and so on.PINA PIN is a personal identification number. PINs are commonlyassigned to bank customers for use with automatic cashdispensers. They are also used, sometimes with a security token,for individual access to computer networks or other securesystems.POP3Post Office Protocol 3 is a standard client/server protocol forreceiving e-mail. The e-mail is received and held for you byyour Internet server. Periodically, you (or your client e-mailreceiver) can check your mail-box on the server and downloadany mail.QQVGAQuarter Quarter VGA, 160 x 120 pixels.P800_UM.book Page 183 Wednesday, August 28, 2002 4:19 PM
184 Terms and definitionsPreliminaryQVGAQuarter VGA size, typically refers to a portrait oriented screen240 pixels wide x 320 pixels high.PDAPersonal Digital Assistant. A handheld computer havingfunctions such as address book, calendar, and so on.PNGPortable Network Graphics. Format for storing images on filewith data compression but without lowering of quality (loss ofinformation).ProtocolIn information technology, a protocol is the special set of rulesthat end points in a telecommunication connection use whenthey communicate. Protocols exist at several levels in atelecommunication connection.RS232A standard for serial transmission between computers andperipheral devicesSGMLA generic markup language for representing documents.SCService Centre (for SMS).Service ProviderA company that provides services and subscriptions to mobilephone users.SIMA SIM (Subscriber Identity Module) card is a “smart card”,inserted into GSM phones, that contains your telephone accountinformation. SIM cards can also be programmed to displaycustom menus for personalized services, for instance to assistoperators in providing mobile commerce applications.SMILSynchronized Multimedia Integration Language. Used by MMSto describe how media objects are to be played.SMSShort Message Service. Allows messages of up to 160characters to be sent and received via the network operator'smessage centre to a mobile phone.SMTPSimple Mail Transfer Protocol. Protocol used to send e-mailfrom an e-mail client via an SMTP server.SWIMASWIMcardisaSIMcardcontainingaWIM.P800_UM.book Page 184 Wednesday, August 28, 2002 4:19 PM
Terms and definitions 185PreliminarySyncMLSyncML is a universal protocol for data synchronization,developed by the SyncML initiative Ltd.TCP/IPTransmission Control Protocol/Internet Protocol. TCP/IP is thebasic communication language or protocol of the Internet. It canalso be used as a communications protocol in a private network(either an intranet or an extranet).TLSTransport Layer Security. Used by Web browsers, for example.URLUniform Resource Locator. Points to a service or information onthe internet, for example: http://www.sonyericsson.comUSBUniversal Serial Bus. A plug-and-play interface between acomputer and add-on devices (such as audio players, joysticks,keyboards, telephones, scanners, and printers). With USB, anew device can be added to your computer without having toadd an adapter card or even having to turn the computer off.USSDUnstructured Supplementary Services Data. Narrow-band GSMdata service. For example entering M79M1234# might returnthe stock price for stock 1234.vCal; vCalendarvCalendar defines a transport and platform-independent formatfor exchanging calendar and scheduling information for use inPIMs/PDAs and group schedulers. vCalendar is specified byIETF.vCardvCard automates the exchange of personal information typicallyfound on a traditional business card, for use in applications suchas internet mail, voice mail, Web browsers, telephonyapplications, call centres, video conferencing, PIMs /PDAs,pagers, fax, office equipment, and smart cards. vCard isspecified by IETF.VGAVideo Graphics Array. Graphics standard introduced by IBM,having a resolution of 640 x 480 pixels.VPNVirtual Private Network. A private network that is configuredwithin a public network. A VPN appear as private national orinternational network to the customer, but physically shares abackbone trunk with other customers. VPNs enjoy the securityof a private network via access control and encryption, whiletaking advantage of the economies of scale and built-inmanagement facilities of large public networks. Today, there istremendous interest in VPNs over the Internet, especially due tothe constant threat of hacker attacks.P800_UM.book Page 185 Wednesday, August 28, 2002 4:19 PM
186 Terms and definitionsPreliminaryWAPWireless Application Protocol is a specification for a set ofcommunication protocols to standardize the way that wirelessdevices, such as cellular telephones and radio transceivers, canbe used for Internet access, including e-mail, the World WideWeb, newsgroups, and Internet Relay Chat (IRC).WavA Wave file is an audio file format, created by Microsoft, thathas become a standard PC audio file format for everything fromsystem and game sounds to CD-quality audio. A Wave file isidentified by a file name extension of WAV (.wav).WBXMLWireless Binary Extensible Markup Language.WIMThe Wireless Identity Module is a data module for electronicidentity certificates. It can contain both trusted and clientcertificates, private keys and algorithms needed for WTLShandshaking, encryption, decryption, and signature generation.The WIM module can be placed on a SIM card, called a SWIMcard.WMLWireless Markup Language. A markup language used forauthoring services, fulfilling the same purpose as HyperTextMarkup Language (HTML) does on the World Wide Web(WWW).IncontrasttoHTML,WMLisdesignedtofitsmallhandheld devices.WTLSWireless Transport Layer Security. Part of WAP, WTLSprovides privacy, data integrity and authentication on transportlayer level between two applications.W3CThe main standards body for the WWW.xHTMLExtensible Hypertext Markup Language. A reformulation ofHTML 4.01 in XML. Being XML, means that XHTML can beviewed, edited, and validated with standard XML tools. At thesame time, it operates as well as or better than HTML 4 inexisting HTML 4 conforming user agents.XMLExtensible Markup Language. An initiative from the W3Cdefining an “extremely simple” dialect of SGML suitable foruse on the WWW.P800_UM.book Page 186 Wednesday, August 28, 2002 4:19 PM
Technical data 187PreliminaryTechnical dataGeneral ScreenIntegrated CommuniCamProduct name P800 Standard version, latin character setSize 117x59x27mmWeight 158 grams with battery and flip, 148 gramswith battery, flip removed.System and powerclassE-GSM900Class4GSM 1800 Class 1GSM 1900 Class 1SIM Card Small plug-in card, 3V or 5V typeOperating System Symbian OS v7.0 with UIQ user interfaceand applications environmentProcessor ARM 9User storage For settings, user data (for example images,contacts, messages) and third partyapplications: 12MbyteBattery life, standardbatteryTalkTime:upto13hoursStand-by time: up to 400 hoursOperating temperature –15° to +55° CScreen type TFTScreen size Flip closed: 208 x 144 pixels, 40 x 28 mmFlip open: 208 x 320 pixels, 40 x 61 mmPixel size 0.192 x 0.192 mm, or 132 ppi (Pixels Per Inch)Colour resolution 12-bit (4096 colours)Screen surface Touch-sensitiveIllumination Front-lightPicture Size 640 x 480 pixels (VGA)320 x 240 pixels (QVGA)160 x 120 pixels (QQVGA)Colour depth 24 bit (16 million colours)Storage format JPEG/JFIF, 3 quality (compression) levels, user-selectable.P800_UM.book Page 187 Wednesday, August 28, 2002 4:19 PM
188 Technical dataPreliminaryPicture viewerVideo playerAudio playerBluetooth wireless technologyInfrared transceiverIntegrated browserFormats JPEG, BMP, GIF, PNG, WBMPSharing via IR, Bluetooth wireless technology, MMS message,e-mail, PC file transferFile Format .MP4 (MPEG4)File Format .MP3, WAV, AU, G-MIDI andAMRSpecification Version 1.1.Coverage area Up to 10 metres (33 feet)Data transmission rate Max speed between phone and IrDAdevice (that is PC, another phone): up to115,200 bpsMarkup languages HTML 3.2 (excluding features not relevantto a small screen device)WML 1.2.1WBXMLxHTML BasicxHTML Mobile ProfilecHTMLWAP version 2.0Scripting Compiled WML scriptsStyle sheets WCSSImages WBMP, GIF (including animated), JPEGSecurity WTLS Class 1, 2, 3TLS/SSLWIM WIM interface including SIM-WIM(SWIM)Cache 15 - 120kbyte user-configurable; 30kbytedefault.P800_UM.book Page 188 Wednesday, August 28, 2002 4:19 PM
189PreliminaryAAccented letters 31Accepted callers 48Accepting new Internet or Messages settings 160Accounts tab 130Activating Bluetooth wireless technology 152Activating the infrared port 151Addtocontacts47Adding and removing certificates 127Adding images to your Contacts 122Advice of Charge (AoC) 41Alarm tones and sound notification 123Alarms 118Alerts 141AoC - Call meter settings 49Application icons 20Application shortcuts 23Applications - Flip closed 9Applications - Flip open 10Applications in flip closed mode 24Area information 67Audio player 188Auto retrying 42Automatically set up service provider and messaging 160BBackground Image 24Backing up data 157Banking services 44Basic tab 145Battery 12Battery insertion and removal 12Beaming 19Before using Messages 60Blinks red 170Blocked contact card provider 168Bluetooth 124Bluetooth wireless technology 188Bookmark view 75Browser view 71CCable 126Calibrate 128Calibration 28Call handling 37,39Call log 41Call waiting 48Calling cards 49Card blocked unblock? 168Care instructions 17CBS tab 140Certificate manager 126Change code 35Change phone volume 44Changing your application shortcuts 121P800_UM.book Page 189 Wednesday, August 28, 2002 4:19 PM
190PreliminaryCharging the battery 13Chess 89Closing applications 25Common functions 18Conference calls 42Configuration of PC software 154Connecting 164Connecting and disconnecting from the Internet 68Connecting the accessories 15Connecting to an Internet account 165Connection information 166Connection type 159Connection via Bluetooth wireless technology 151Connection via cable 151Connection via infrared port 151Context sensitive menus 72Copying/pasting number 40Creating and editing notes 87CSD connections 164Customize the calendar 81DDelay timer 94Demo application 16Detail view 97,100,105,109Detail view - Archive 112Detail view - Document 110Detail view - Drawing 112Detail view - Spreadsheets 111Device lock 35,169Dial-Up 159Different views 79Disconnecting and connecting 66Display 127Displaying calls 41Displaying the Area Code in the Standby Screen 121Does not blink 170Downloading 65Downloading e-mails automatically 66Downloading tracks 102Draft 60Drawing pictures 86EE-mail 64Email tab 137Emergency calls 43Emergency calls only 169Ending a call when another call is on hold 42Entering text - Flip open 29Entering text in flip closed mode 25Exchanging sound recordings 93Extended characters 32FFax calls 169File list view 100P800_UM.book Page 190 Wednesday, August 28, 2002 4:19 PM
191PreliminaryFind 18Finding messages 68First time start-up 16Flight mode 45,47Flip closed - overview 22Flip closed mode 50Flip closed shortcuts 128Flip open 27Flip open mode 52Flip removed 129Folders 18Folders in Messages 60Format 117Format disk 129Format tab 144Forward calls 47From a PC 148From the smartphone 149Functions specific for different document types 109GGeneral 187General functions 40,108Get and send 67Getting help 20GPRS 159GPRS - data logs 166GPRS data log 166GPRS status information 166GSM Networks 49HHandsfree 47Handwriting recognition 30Hints and smart functions 43How to use 61IIcon views 18Icons 20,76Icons within a page 73If your service provider or network is unavailable 68Inbox 60Incoming call alert 46Incoming call picture 46Indicator light 170Indicators and status bar icons 21Infrared 129Infrared transceiver 188Insert card 168Inserting symbols 26Inserting text 26Installation 147Installation file security 148Installing applications 148Integrated browser 188Integrated CommuniCam 187P800_UM.book Page 191 Wednesday, August 28, 2002 4:19 PM
192PreliminaryInternational 129Internet account settings 165Internet accounts 130Introduction 159IP security manager 135JJog Dial 11KKey functions 92,120Key lock 35Key symbol 169Keypad buttons 22LLanguage 135Letters 31Light 128List view 96,99,104,108Local synchronization 154Locations 118Lock 128Lock problems 169Locks 47Loop 100MMaking a call with the flip closed 51Making a call with the flip open 54Making a remote synchronization 156Making and receiving calls 16Making sound recordings 92Managing contacts 55Managing entries 80Managing notes 87Managing play lists 100Managing task entries 84Managing the SIM phone book 56Manually set up a WAP account 162Manually set up Messages 161Manually set up service provider 160Master reset 123,136Memory Stick Duo 14Memory Stick Duo Adapter 14Memory/Disk full 170Menu options in detail view 51Menu options in detail view and edit view 54Menu options in list view 50,53Menu options in SIM phone book 51Menu options in SIM phone book list view 53Menus 50,52,72,76Messaging accounts 136Methods for storing data 19Missed calls 41MMS tab 139Mobile music 99Multimedia messages 62P800_UM.book Page 192 Wednesday, August 28, 2002 4:19 PM
193PreliminaryNNavigation 28Network indication 41New Dial-Up or High-Speed Dial-Up account 132New GPRS account 131No network 170Numbers 31,118OOn-screen keyboard 29Options in flip closed mode 36Options in flip open mode 38Options menu 23Other tab 135Outbox 60PPairing 152Passkeys 153PC connectivity software 151PC Suite for P800 147Performing a backup 157Performing a local synchronization 155Personal details 54Phone book manager 57Picture viewer 188Pictures 95PIN & unblocking PUK code 168PIN2 34Play list view 99Play Solitaire 90Power save 128Preconditions 157Preferences 45,95,100,105Preferred Mode (bearer preference) 135Preferred tab 145RReceiving a call when another call is on hold 42Receiving attachments 65Remote party notifications 42Remote sync server configuration 156Remote sync task configuration 156Remote synchronization 155Removing and attaching the flip keypad 32Removing applications in your smartphone 149Removing information from applications 142Removing unwanted general files 143Restoring data 157Restrict calls 48Ring signals 122Rules 90SSaving changes 82Saving contact details 68Saving video clips 106Screen 71,75,187P800_UM.book Page 193 Wednesday, August 28, 2002 4:19 PM
194PreliminaryScreen areas 27Screen limitations 169Screen saver 128Secure access 164Secure tokens 141Security 125Security information 127Selecting and starting applications 25Sending a contact 57Sending a note 87Sending and moving task entries 84Sending and receiving pictures 97Sending attachments 65Sending e-mail 64Sent 60Serial settings 151Service provider 159Services 15Session data 167Setting a background picture 121Setting a Screen Saver 121Setting up WAP accounts 162Settings 57,77,85,90Set-up 44Signing documents 74Silent mode 43SIM card lock 34SIM card related problems 168Smartphone locks 33Smartphone outline 8SMS tab 139Solitaire 90Sony Image Station 98Sorting your files 19Speakerphone 43Special characters 44Speed dial numbers 44Standby view 23Start problems 168Status bar 24Storage manager 142Synchronized e-mails 66System sounds 143TText input 143Text messages including EMS features 61The accounts in Messages 61The Dial-Up Networking Wizard 163The SIM card 12The smartphone package 7Time & date 143Time & date tab 144Time and date 116To delete a contact 52Transfer items with Send As 153P800_UM.book Page 194 Wednesday, August 28, 2002 4:19 PM
195PreliminaryType of certificate 127UUnderstand the game 90Uninstalling applications 143User authentication request 74User greeting 144Using sound recordings as ring signals 93Using Tasks 83Using the calendar 79Using the camera 94Using your smartphone as a modem 162VVideo player 188Virtual flip 26Virtual flip open mode 33Voice control 46Voice mail 43,49WWallpaper 127WAP accounts 145WAP and OTA provisioning messages 77WIM Access 74WIM management 145Workdays 117Workdays tab 144Writing e-mails 64Writing text notes 86Wrong PIN 168ZZooming 18P800_UM.book Page 195 Wednesday, August 28, 2002 4:19 PM

Navigation menu