Sony 7130501 User Manual Exhibit 8 New Part 1

Sony Mobile Communications Inc Exhibit 8 New Part 1

Exhibit 8 New User Manual Part 1
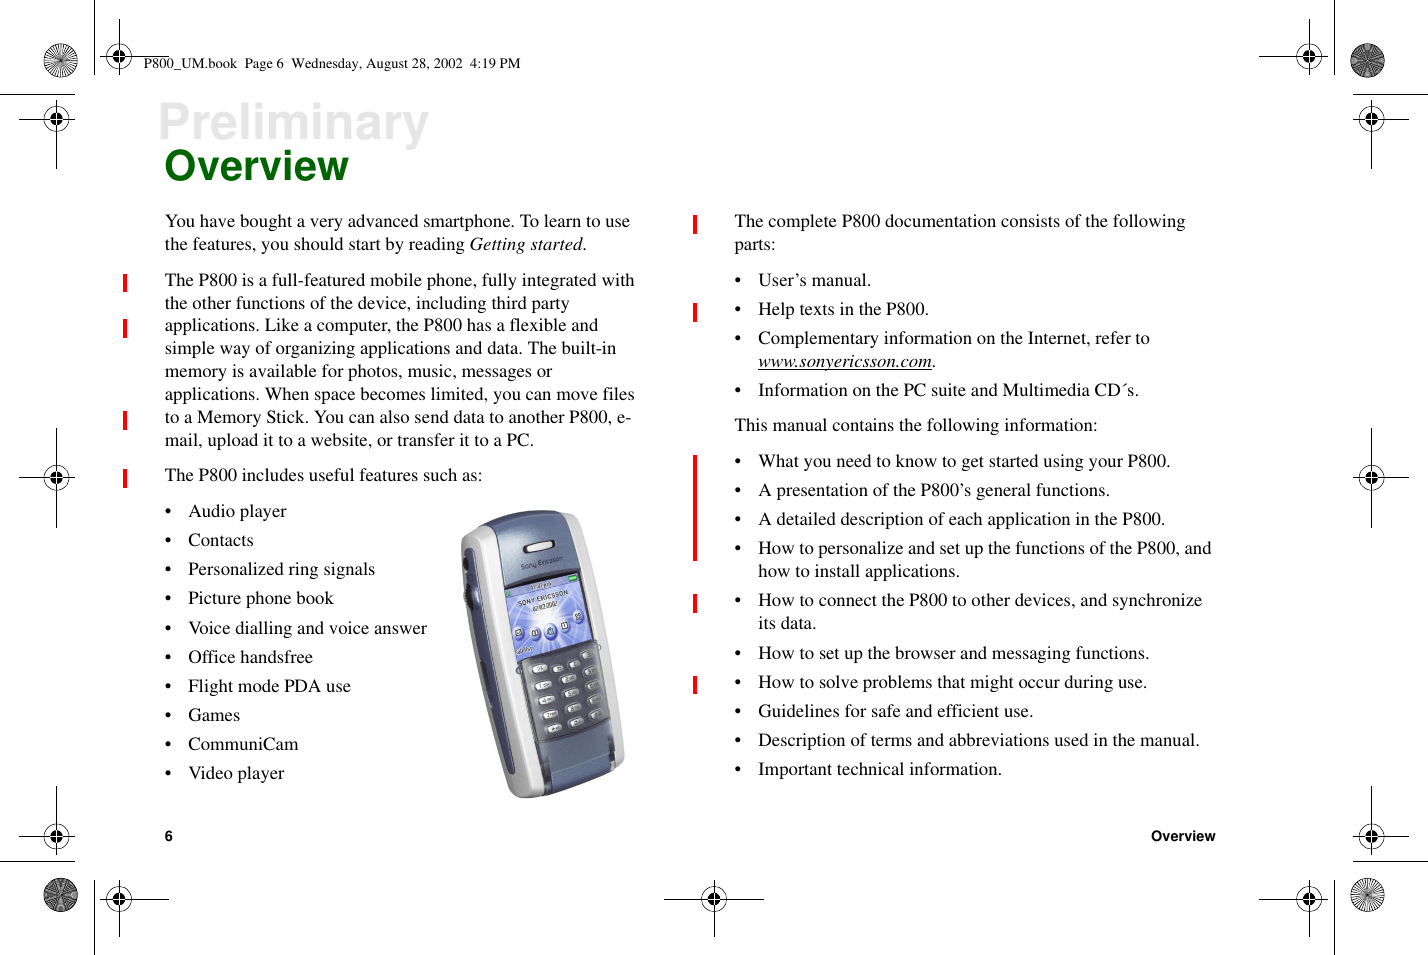
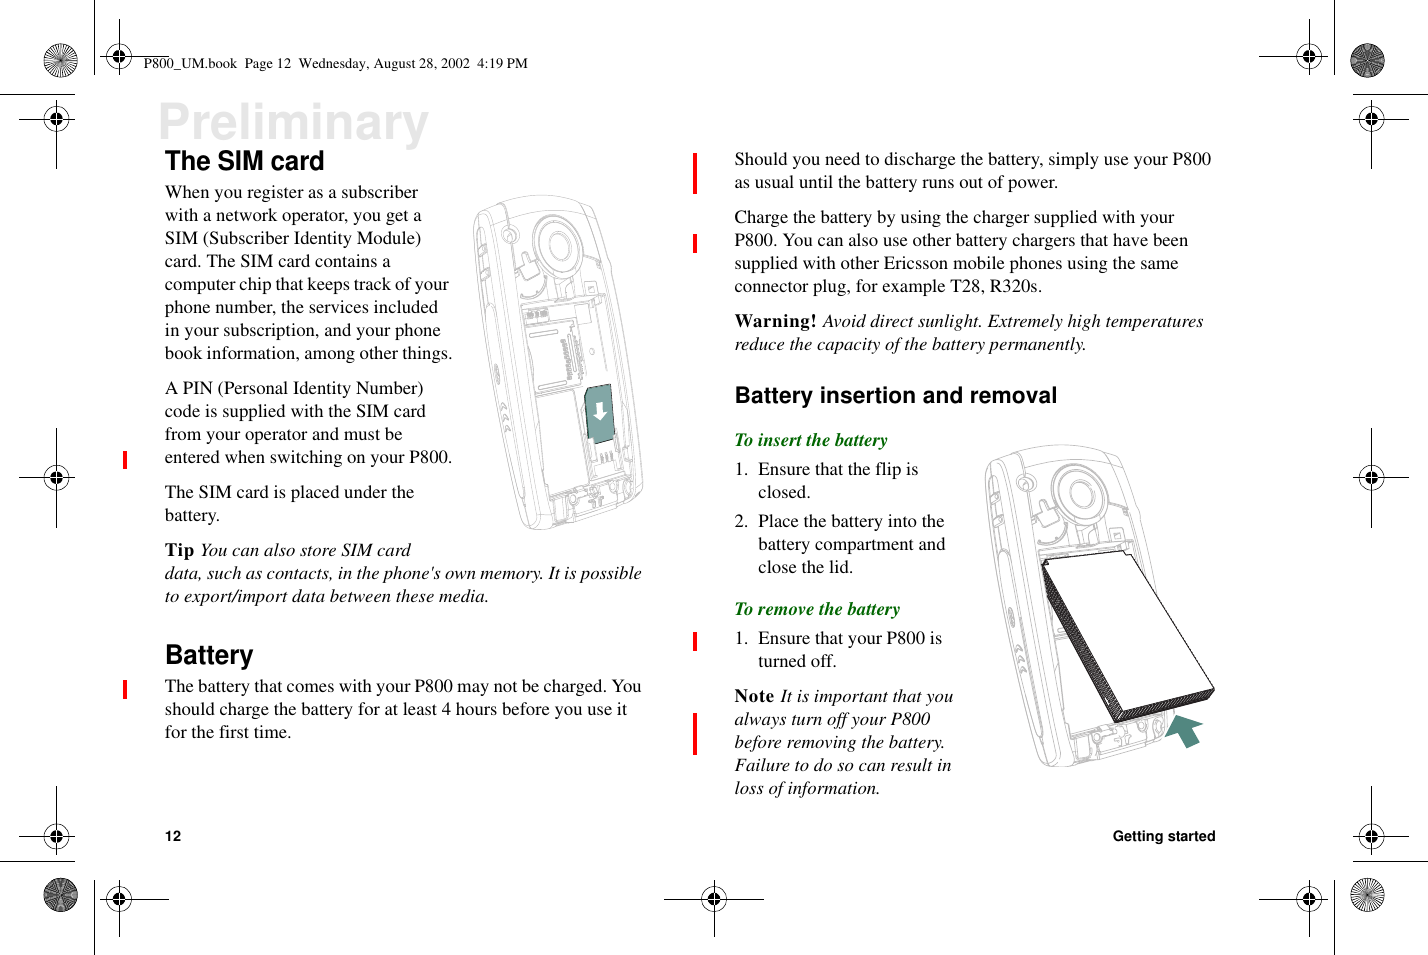
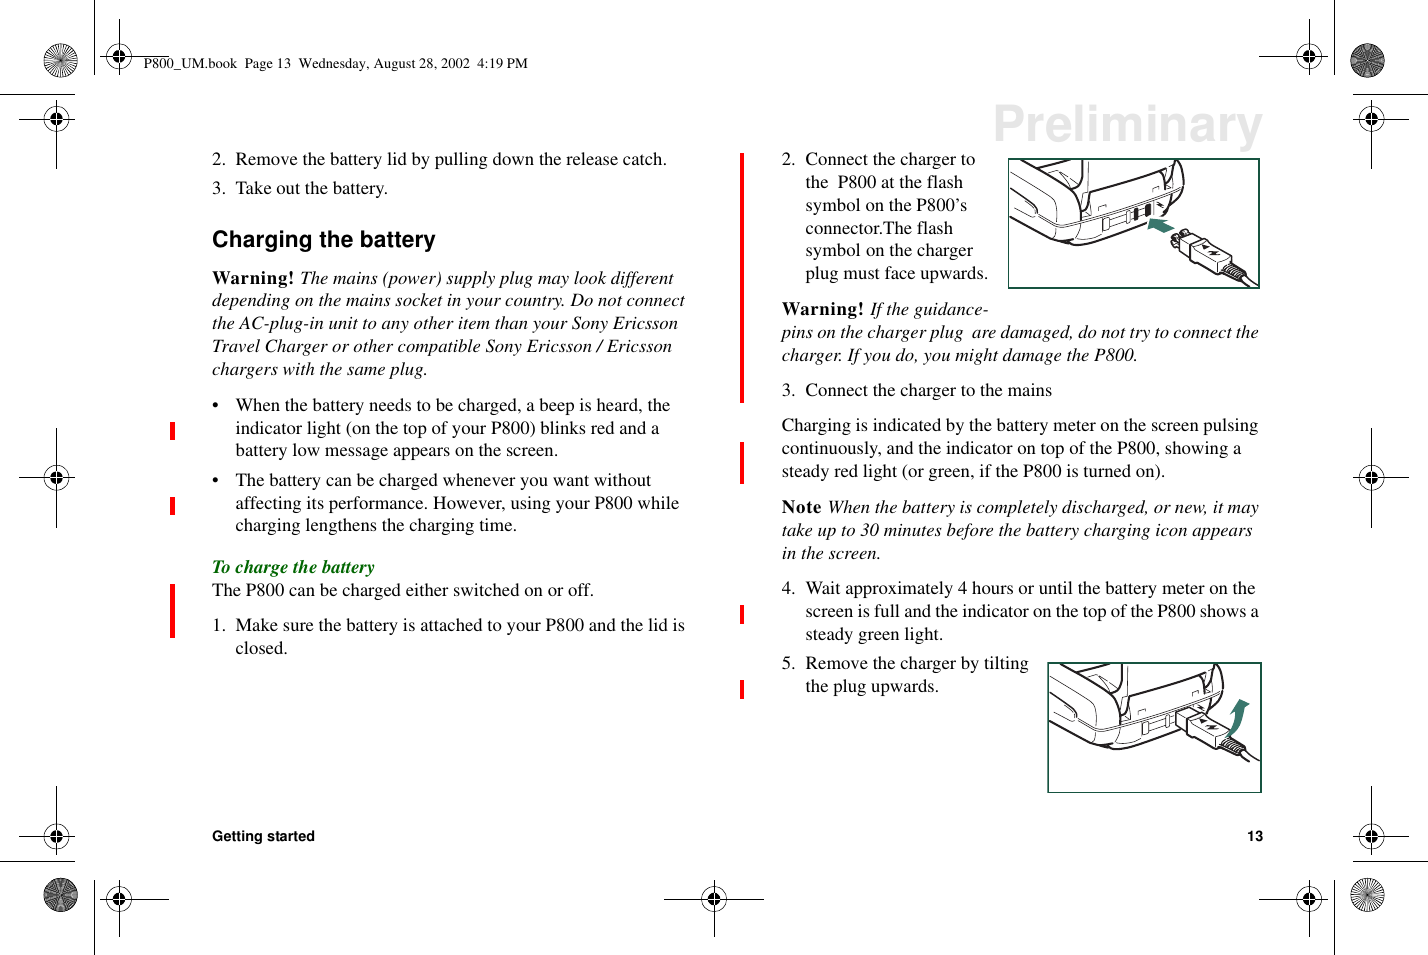
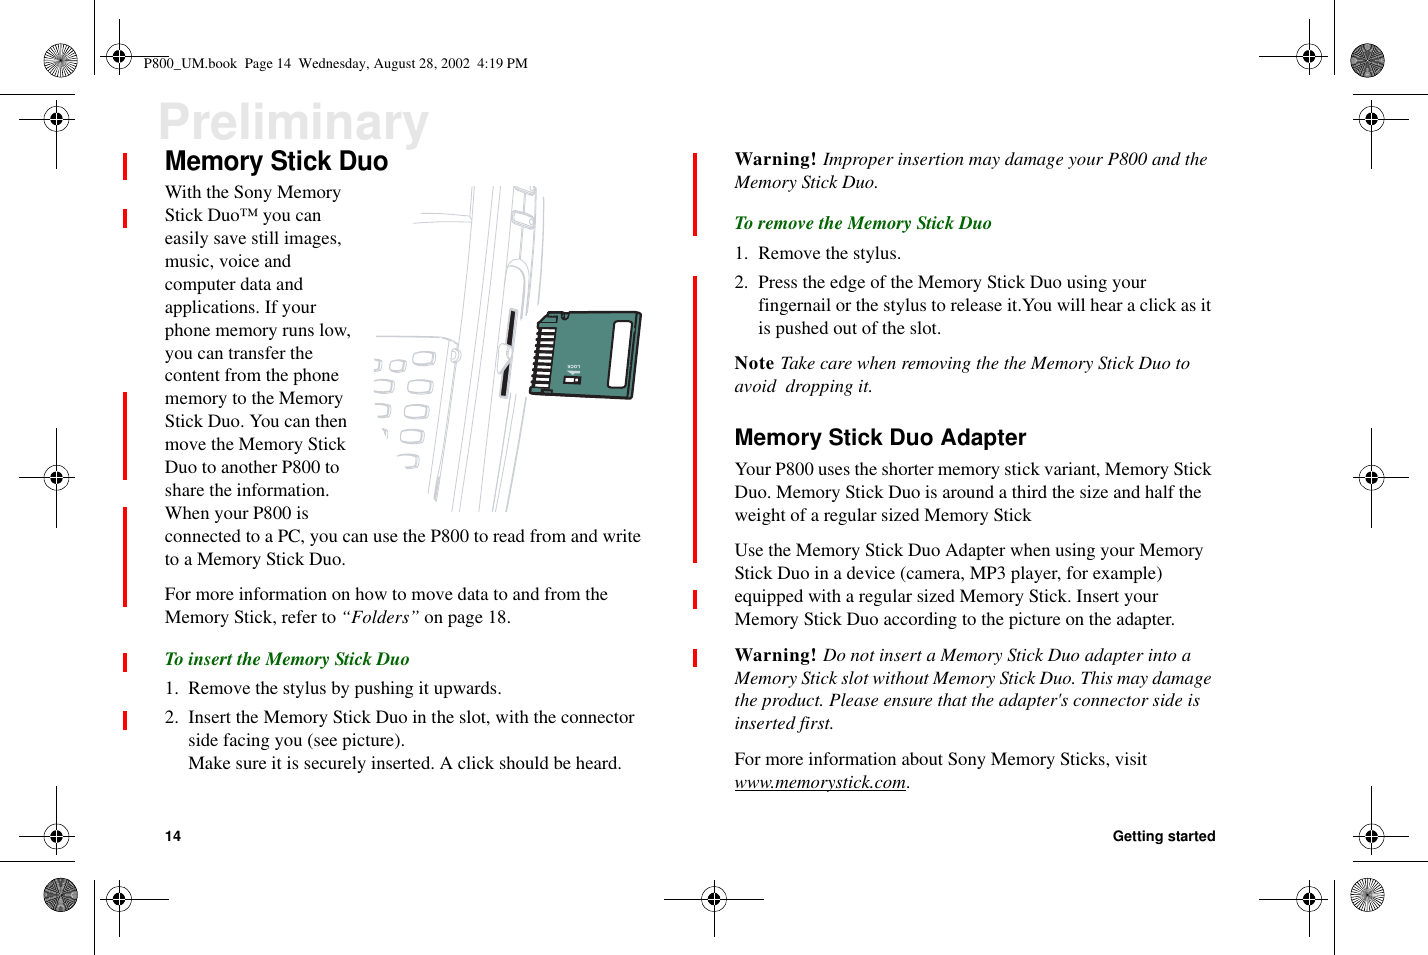
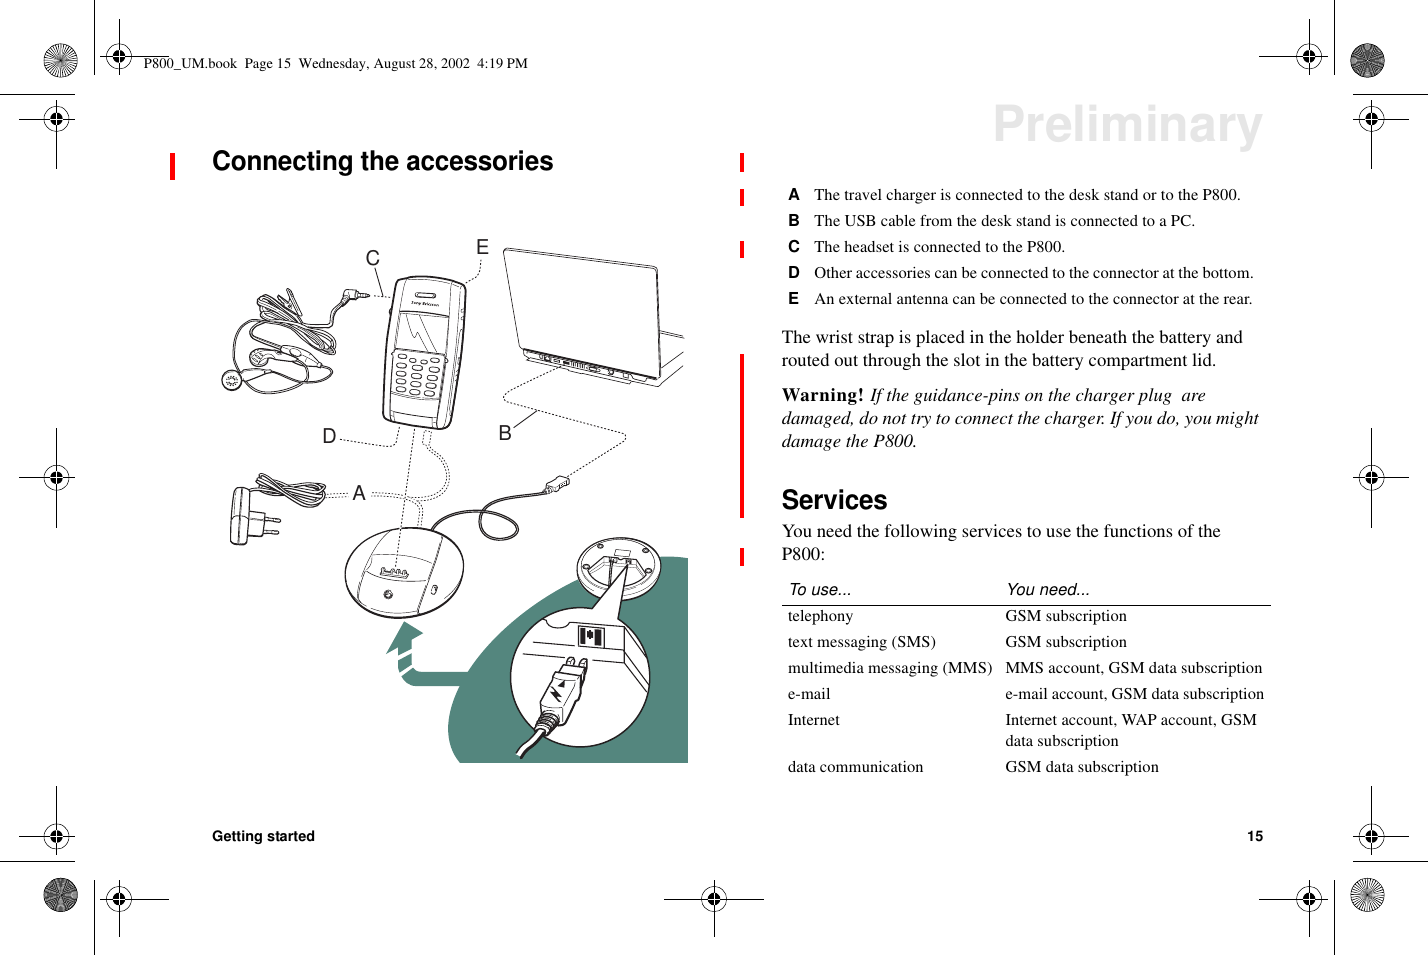
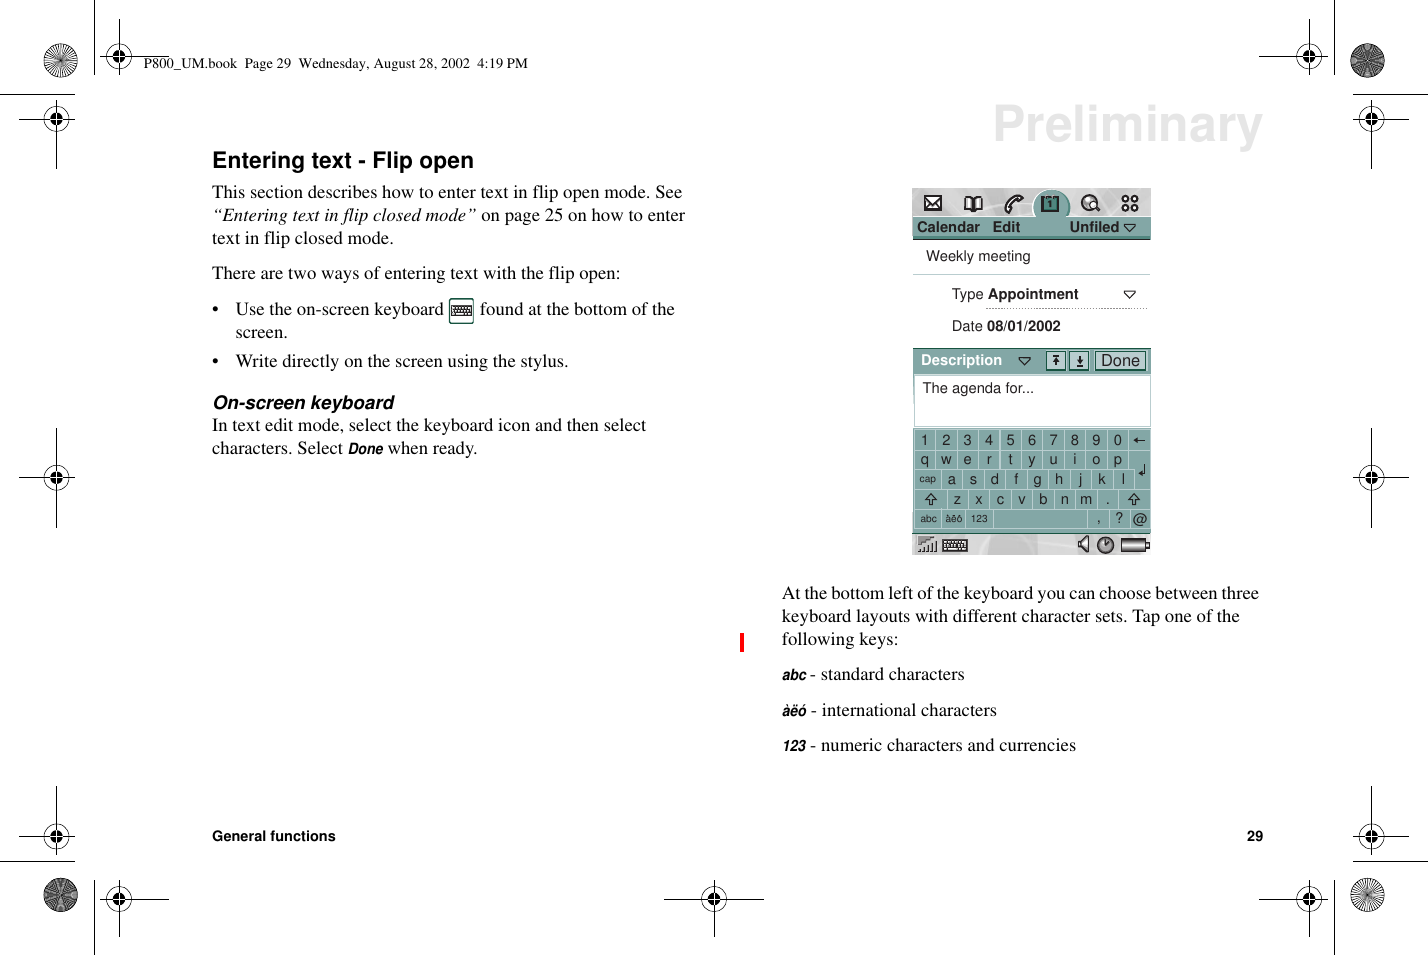
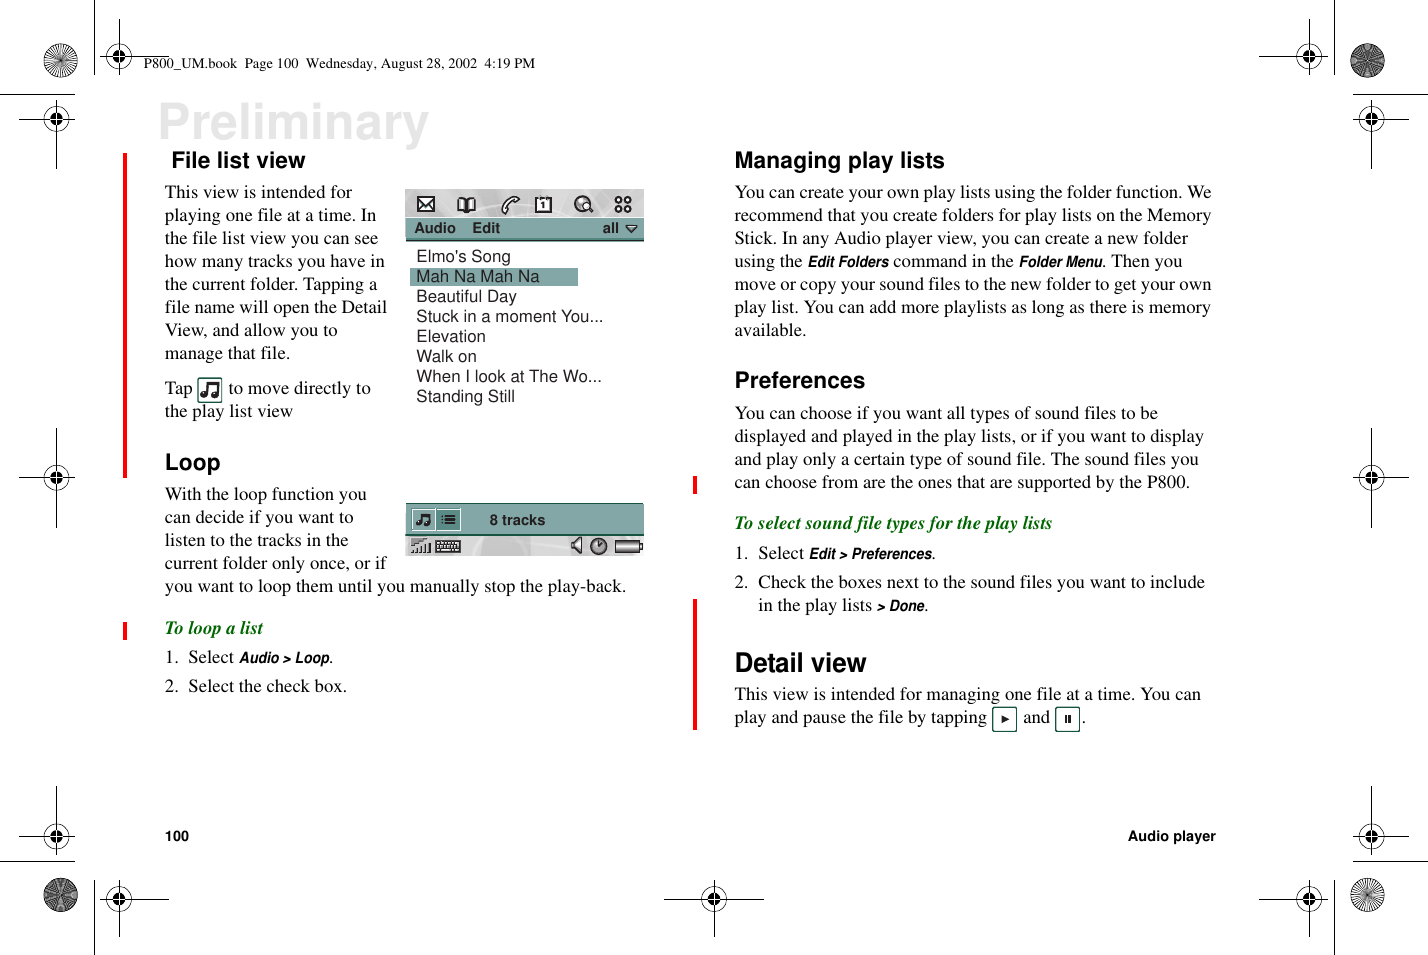
1P800User’s manualP800_UM.book Page 1 Wednesday, August 28, 2002 4:19 PM
2PreliminarySony Ericsson P800User’s ManualFirst edition (September 2002)This manual is published by Sony Ericsson MobileCommunications AB, without any warranty. Improvements andchanges to this manual necessitated by typographical errors,inaccuracies of current information, or improvements toprograms and/or equipment, may be made by Sony EricssonMobile Communications AB at any time and without notice.Such changes will, however, be incorporated into new editionsof this manual.Sony Ericsson Mobile Communications AB, 2002. All rightsreserved.Publication number:User’s ManualEN/LZT1086039P1AThe Bluetooth trademarks are owned by Bluetooth SIG, Inc.Symbian and all Symbian-based marks and logos aretrademarks of Symbian Limited.“Memory Stick” is a trademark of Sony Corporation.Beatnik is a trademark of Beatnik, Inc.Java and all Java based trademarks and logos are trademarks orregistered trademarks of Sun Microsystems, Inc. in the U.S. andother countries.Other product and company names mentioned herein may be thetrademarks of their respective owners.Copyright SyncML initiative Ltd. (1999-2002). All rightsreserved.MenInBlack2(2002) Columbia Pictures Industries, Inc.All rights reserved.This product contains software copyright Beatnik, Inc. 1996-2002. The user is granted non-exclusive, non-sublicensablerights to use a single copy of the Licensed Software solely inconjunction with the Licensee Product [i.e. the P800]. The usermay not alter, transfer, modify, incorporate into or with othersoftware or create a derivative work of any part of the LicensedSoftware. No ownership rights to the Licensed Software andDocumentation are transferred to the user. The user may not usethe Licensed Software otherwise than as a part of the equipmentor software in which the Licensed Software has beenincorporated or for which they have been delivered. The usermay not remove any proprietary, copyrights, trade secret orwarning legend from the Licensed Software or Documentationor copies thereof. The user may not copy any LicensedSoftware, except for archival purposes. The user may notdecompile or reverse engineer Licensed Software except to theextent permitted by compulsory law. The user may not furnishP800_UM.book Page 2 Wednesday, August 28, 2002 4:19 PM
3Preliminaryany Licensed Programs or Documentation into any country invioEnd-user license agreement for SunJavaJ2ME:1. Restrictions: Software is confidential copyrightedinformation of Sun and title to all copies is retained by Sun and/or its licensors. Customer shall not modify, decompile,disassemble, decrypt, extract, or otherwise reverse engineerSoftware. Software may not be leased, assigned, or sublicensed,in whole or in part.2. Export Regulations: Software, including technical data, issubject to U.S. export control laws, including the U.S. ExportAdministration Act and its associated regulations, and may besubject to export or import regulations in other countries.Customer agrees to comply strictly with all such regulations andacknowledges that it has the responsibility to obtain licenses toexport, re-export, or import Software. Software may not bedownloaded, or otherwise exported or re-exported (i) into, or toa national or resident of, Cuba, Irak, Iran, North Korea, Libya,Sudan, Syria (as such listing may be revised from time to time)or any country to which the U.S. has embargoed goods; or (ii) toanyone on the U.S. Treasury Department's list of SpeciallyDesignated Nations or the U.S. Commerce Department's Tableof Denial Orders.3. Restricted Rights: Use, duplication or disclosure by theUnited States government is subject to the restrictions as setforth in the Rights in Technical Data and Computer SoftwareClauses in DFARS 252.227-7013(c) (1) (ii) and FAR 52.227-19(c) (2) as applicable.Any rights not expressly granted herein are reserved.Note Some of the services in this manual are not supported byall networks. This also applies to the GSM InternationalEmergency Number 112. Please contact your network operatoror service provider if you are in doubt whether you can use aparticular service or not.ImportantYour mobile phone has the capability to load, store and forwardadditional content, e.g. ring tone melodies. The use of suchcontent may be restricted or prohibited by rights of third parties,including but not limited to restriction under applicablecopyright laws. You, and not Sony Ericsson, are entirelyresponsible for additional content that you download to orforward from your mobile phone. Prior to your use of anyadditional content, please verify that your intended use isproperly licensed or is otherwise authorised. Sony Ericssondoes not guarantee the accuracy, integrity or quality of anyadditional content or any other third party content. Under nocircumstances will Sony Ericsson be liable in any way for yourimproper use of additional content or other third party content.P800_UM.book Page 3 Wednesday, August 28, 2002 4:19 PM
4PreliminaryContentsOverview....................................................................... 6Getting started ............................................................... 7General functions ........................................................ 18Phone........................................................................... 36Contacts....................................................................... 50Messages ..................................................................... 59Internet ........................................................................ 70Calendar ...................................................................... 79Tasks............................................................................ 83Jotter............................................................................ 86Games.......................................................................... 89Voice memo ................................................................ 92CommuniCam and Pictures......................................... 94Audio player................................................................ 99Video player.............................................................. 104Viewer....................................................................... 108Online services.......................................................... 114Time.......................................................................... 116Calculator.................................................................. 120Personalizing your P800........................................... 121Control panel............................................................. 124Installing applications............................................... 147Connecting to other devices...................................... 150Synchronization and backup..................................... 154Getting started with Internet and Messages.............. 159Troubleshooting........................................................ 168Guidelines for safe and efficient use......................... 172Terms and definitions ............................................... 179Technical data........................................................... 187P800_UM.book Page 4 Wednesday, August 28, 2002 4:19 PM
5PreliminaryP800_UM.book Page 5 Wednesday, August 28, 2002 4:19 PM
6OverviewPreliminaryOverviewYou have bought a very advanced smartphone. To learn to usethe features, you should start by reading Getting started.The P800 is a full-featured mobile phone, fully integrated withthe other functions of the device, including third partyapplications. Like a computer, the P800 has a flexible andsimple way of organizing applications and data. The built-inmemory is available for photos, music, messages orapplications. When space becomes limited, you can move filesto a Memory Stick. You can also send data to another P800, e-mail, upload it to a website, or transfer it to a PC.The P800 includes useful features such as:• Audio player•Contacts• Personalized ring signals• Picture phone book• Voice dialling and voice answer• Office handsfree• Flight mode PDA use•Games•CommuniCam• Video playerThe complete P800 documentation consists of the followingparts:•User’smanual.• Help texts in the P800.• Complementary information on the Internet, refer towww.sonyericsson.com.• Information on the PC suite and Multimedia CD´s.This manual contains the following information:• What you need to know to get started using your P800.• A presentation of the P800’s general functions.• A detailed description of each application in the P800.• How to personalize and set up the functions of the P800, andhow to install applications.• How to connect the P800 to other devices, and synchronizeits data.• How to set up the browser and messaging functions.• How to solve problems that might occur during use.• Guidelines for safe and efficient use.• Description of terms and abbreviations used in the manual.• Important technical information.P800_UM.book Page 6 Wednesday, August 28, 2002 4:19 PM
Getting started 7PreliminaryGetting startedThe P800 packageNote If your package does not include all the listed items above,please contact your retailer.Note Before you can use your P800 you need to insert the SIMcard, and insert and charge the battery. Always detach thecharger and turn off the phone before you insert or remove theSIM card.BCADEFFHJKMSmartPhoneP800LGAP800 with stylusBBatteryCTravel chargerDSyncstation with USB cableEStereo headsetFProtective bag and strapG3extrastyliHCover - flip replacementJMemory Stick DuoKMemory Stick Duo adapterLUser´s Manual packageM2 CDs, PC Suite for P800 and Multimedia for P800P800_UM.book Page 7 Wednesday, August 28, 2002 4:19 PM
8Getting startedPreliminaryP800 outlineAConnector for stereo headphonesBJog Dial for navigating through menus and moreCInfrared port for communicationDOn/Off buttonEFlip with Keypad (in closed position)FConnector for accessoriesBDCAFEAExternal antenna connector (on the rear side)BCommuniCam lens (on the rear side)CBattery compartment (on the rear side)DTouchscreenEFlip (in open position)FShutter release for the CommuniCamGInternet button for activation of the browserHSlot for Sony Memory Stick Duo™ (under the stylus)IStylus for writing on the screenAFGHIBCEDP800_UM.book Page 8 Wednesday, August 28, 2002 4:19 PM
Getting started 9PreliminaryApplications - Flip closedThe P800 works in different operational modes.With the Keypad Flip closed, the P800 can be used like aconventional mobile telephone with the added benefit of the JogDial.You can select between the four most important applications byrotating the Jog Dial. You start the selected application bypressing the Jog Dial inward or pressing the key.If you select the Applications icon, all applications that can beused with the Flip closed are shown in a list. Rotate the Jog Dialto select an application, and press the Jog Dial or press thekey to start the application.At any time you can open the Flip to continue working in themore comprehensive flip open mode. Closing the flip generallyends an activity. (Multimedia will however continue playing.)CDEBA123456CommuniCamMessagesContactsCalendarTasksJotter123456CommuniCamApplicationsMessagesContactsCalendarTasksJotterApplications789Voice memoOnline servicesConnectionsAShortcut to the Messages applicationBShortcut to the Contacts applicationCShortcut to the Call list applicationDShortcut to the Calendar applicationEShows all Flip closed applicationsP800_UM.book Page 9 Wednesday, August 28, 2002 4:19 PM
10 Getting startedPreliminaryApplications - Flip openWhen the Flip is opened, the large touch-screen is revealed. Inthis mode, the stylus can be used to navigate and enter data. TheJog Dial provides further navigation and selection capability.Text can be entered using natural handwriting on the screen. Anon-screen keyboard is also available at all times. Symbol andspecial character keyboards can be selected when required.With the Flip open, you can select between the five mostimportant applications, either by tapping the icon with thestylus, or by rotating and pressing the Jog Dial.If you select the Applications icon, all applications are shown ina list. Tap the application with the stylus, or rotate and press theJog Dial to start the application.The Flip can also be removed. A virtual flip is then available,making it possible to work in both operational modes.CommuniCamPicturesVideoAudioInternetMessagesContactsPhoneCalendarTasksJotterVoice MemoCalculatorTimeViewerRemote SyncOnline servicesControl panelDemoGPRS data logChessSolitaireApplications   View            AllCommuniCamPicturesVideoAudioInternetMessagesContactsPhoneCalendarTasksJotterVoice MemoCalculatorCEDFBAAShortcut to the Messages applicationBShortcut to the Contacts applicationCShortcut to the Call list applicationDShortcut to the Calendar applicationEShortcut to the Internet applicationFShows all Flip open applicationsP800_UM.book Page 10 Wednesday, August 28, 2002 4:19 PM
Getting started 11PreliminaryJog DialAction FunctionRotate the Jog Dial (up) Scrolls up items in a list;Adjusts volume during a call;moves back a page whenplaying a multimediamessage.Rotate the Jog Dial (down) Scrolls down items in a list;Adjusts volume during a call;moves forward a page whenplaying a multimediamessage.Press the Jog Dial (inward) Flip closed: Generally thesame as (select/action).Flip open: Selects ahighlighted item.Dials selected phone number.Press the Jog Dial (away) Flip closed: This always hasthesameactionas .Goes back to the previousscreen, dismisses dialogues,andsendsabusysignaltothecalling party when youreceive a call. It will not end acall.Flip open: Scrolls to the leftacross the main Applicationtabs at the top.Press the Jog Dial (toward) Flip closed: Always brings upthe Options menu.Flip open: Scrolls to the rightacross the main Applicationtabs at the top.Action FunctionUpDownInwardAway TowardP800_UM.book Page 11 Wednesday, August 28, 2002 4:19 PM
12 Getting startedPreliminaryThe SIM cardWhen you register as a subscriberwith a network operator, you get aSIM (Subscriber Identity Module)card. The SIM card contains acomputer chip that keeps track of yourphone number, the services includedin your subscription, and your phonebook information, among other things.A PIN (Personal Identity Number)code is supplied with the SIM cardfrom your operator and must beentered when switching on your P800.The SIM card is placed under thebattery.Tip You can also store SIM carddata, such as contacts, in the phone's own memory. It is possibleto export/import data between these media.BatteryThe battery that comes with your P800 may not be charged. Youshould charge the battery for at least 4 hours before you use itfor the first time.Should you need to discharge the battery, simply use your P800as usual until the battery runs out of power.Charge the battery by using the charger supplied with yourP800. You can also use other battery chargers that have beensupplied with other Ericsson mobile phones using the sameconnector plug, for example T28, R320s.Warning! Avoid direct sunlight. Extremely high temperaturesreduce the capacity of the battery permanently.Battery insertion and removalTo insert the battery1. Ensure that the flip isclosed.2. Place the battery into thebattery compartment andclose the lid.To remove the battery1. Ensure that your P800 isturned off.Note It is important that youalways turn off your P800before removing the battery.Failure to do so can result inloss of information.P800_UM.book Page 12 Wednesday, August 28, 2002 4:19 PM
Getting started 13Preliminary2. Remove the battery lid by pulling down the release catch.3. Take out the battery.Charging the batteryWarning! The mains (power) supply plug may look differentdepending on the mains socket in your country. Do not connectthe AC-plug-in unit to any other item than your Sony EricssonTravel Charger or other compatible Sony Ericsson / Ericssonchargers with the same plug.• When the battery needs to be charged, a beep is heard, theindicator light (on the top of your P800) blinks red and abattery low message appears on the screen.• The battery can be charged whenever you want withoutaffecting its performance. However, using your P800 whilecharging lengthens the charging time.To charge the batteryThe P800 can be charged either switched on or off.1. Make sure the battery is attached to your P800 and the lid isclosed.2. Connect the charger tothe P800 at the flashsymbol on the P800’sconnector.The flashsymbol on the chargerplug must face upwards.Warning! If the guidance-pins on the charger plug are damaged, do not try to connect thecharger. If you do, you might damage the P800.3. Connect the charger to the mainsCharging is indicated by the battery meter on the screen pulsingcontinuously, and the indicator on top of the P800, showing asteady red light (or green, if the P800 is turned on).Note When the battery is completely discharged, or new, it maytake up to 30 minutes before the battery charging icon appearsin the screen.4. Wait approximately 4 hours or until the battery meter on thescreen is full and the indicator on the top of the P800 shows asteady green light.5. Remove the charger by tiltingthe plug upwards.P800_UM.book Page 13 Wednesday, August 28, 2002 4:19 PM
14 Getting startedPreliminaryMemory Stick DuoWith the Sony MemoryStickDuo™youcaneasily save still images,music, voice andcomputer data andapplications. If yourphone memory runs low,you can transfer thecontent from the phonememory to the MemoryStick Duo. You can thenmove the Memory StickDuotoanotherP800toshare the information.When your P800 isconnected to a PC, you can use the P800 to read from and writeto a Memory Stick Duo.For more information on how to move data to and from theMemory Stick, refer to “Folders” on page 18.To insert the Memory Stick Duo1. Remove the stylus by pushing it upwards.2. Insert the Memory Stick Duo in the slot, with the connectorside facing you (see picture).Make sure it is securely inserted. A click should be heard.Warning! Improper insertion may damage your P800 and theMemory Stick Duo.ToremovetheMemoryStickDuo1. Remove the stylus.2. Press the edge of the Memory Stick Duo using yourfingernail or the stylus to release it.You will hear a click as itis pushed out of the slot.Note Take care when removing the the Memory Stick Duo toavoid dropping it.Memory Stick Duo AdapterYour P800 uses the shorter memory stick variant, Memory StickDuo. Memory Stick Duo is around a third the size and half theweight of a regular sized Memory StickUse the Memory Stick Duo Adapter when using your MemoryStick Duo in a device (camera, MP3 player, for example)equipped with a regular sized Memory Stick. Insert yourMemory Stick Duo according to the picture on the adapter.Warning! Do not insert a Memory Stick Duo adapter into aMemory Stick slot without Memory Stick Duo. This may damagethe product. Please ensure that the adapter's connector side isinserted first.For more information about Sony Memory Sticks, visitwww.memorystick.com.LOCKP800_UM.book Page 14 Wednesday, August 28, 2002 4:19 PM
Getting started 15PreliminaryConnecting the accessoriesThe wrist strap is placed in the holder beneath the battery androuted out through the slot in the battery compartment lid.Warning! If the guidance-pins on the charger plug aredamaged, do not try to connect the charger. If you do, you mightdamage the P800.ServicesYou need the following services to use the functions of theP800:CEBDAAThe travel charger is connected to the desk stand or to the P800.BThe USB cable from the desk stand is connected to a PC.CThe headset is connected to the P800.DOther accessories can be connected to the connector at the bottom.EAn external antenna can be connected to the connector at the rear.To use... You need...telephony GSM subscriptiontext messaging (SMS) GSM subscriptionmultimedia messaging (MMS) MMS account, GSM data subscriptione-mail e-mail account, GSM data subscriptionInternet Internet account, WAP account, GSMdata subscriptiondata communication GSM data subscriptionP800_UM.book Page 15 Wednesday, August 28, 2002 4:19 PM
16 Getting startedPreliminaryAlthough the manual covers the modes of operation in detail, itis very important to remember that many of the functionsdescribed are dependent on them being available from yournetwork operator and Internet service provider. Please consultyour network operator and Internet service provider for moreinformation about the services that are available to you.Note To keep track of the cost using data connections, a GPRSdata log is available. See “GPRS - data logs” on page 166.First time start-up1. Press the On/Off button to turn on your P800, keeping theflip closed.2. Enter your PIN when the dialogue box appears and press,press to delete a digit.When the P800 is turned on for the first time, theSetup Wizardwill be started automatically, and guide you through theessential settings. Follow the instructions on the screen.The different steps in the Setup Wizard1. You will be prompted to open the flip.2. Information on the wizard.3. Calibrating the screen.4. Setting the location.5. Setting date, time and formats.6. More information about the Jog Dial, text entry and statusbar.7. Setup complete.Demo applicationThe Demo application demonstrates some of the most commonfunctions in your P800.To start the Demo1. Select the Applications icon .2. Select the demo icon .The demo is started.To stop the Demo• Tap the screen or rotate the Jog Dial to stop the demo. Thedemo is also stopped at:– An incoming call.– An incoming text or multimedia message.Making and receiving callsTo make a call• Entertheareacodeandphonenumber,andpresstheJogDialinward or press to make the call.P800_UM.book Page 16 Wednesday, August 28, 2002 4:19 PM
Getting started 17PreliminaryTo end a call• Press the Jog Dial inward or press to end the call.To receive a call• Press the Jog Dial inward or press to answer anincoming call.Care instructionsYour P800 is a highly sophisticated electronic device. To get themost out of it, please make sure that you follow this advice:• Keep the P800 in its protective bag when not using it.• Use a commercial glass screen cleaner sprayed on a cloth,when you clean the screen.• Use only the stylus to tap on the screen.See chapter “Guidelines for safe and efficient use” on page 172for more information how to take care of your P800.P800_UM.book Page 17 Wednesday, August 28, 2002 4:19 PM
18 General functionsPreliminaryGeneral functionsThis chapter describes a number of general functions that are thesame for many applications in your P800.Icon viewsThe P800 can present the applications in two ways:• List view (small icons appears in one column)• Icon view (large icons in two columns)FoldersOn the right of the menu bar is the folders menu.Foldersareused to organize user data, for example contacts, jotter entries,or task lists, into user definable sets.Each application has its own set of folders: a folder created inone application is not visible in another.In list view, the folder menu is used to organize your entries. Indetail view, the folder menu allows you to change the folder ofthe current item.Every item created in an application is always assigned to asingle folder, by default the same folder as displayed in list (ordetailed view). There are three recommended folders for mostapplications:Unfiled, Personal,andBusiness.In list view, there is a super-folder calledAll,which, whenselected, displays items from all folders.Allis the default valuein list views and when an application is first launched.You can add folders or change the names of existing foldersthrough theEdit Foldersmenu item. A folder can only be deletedif it is empty. Not all folders can be deleted.You use folders to move items to and from the Memory Stick.When a Memory Stick is available in the P800, the folders on itare shown in the folders menu.Common functionsZoomingYou can change the size of the screen fonts between Small,Medium or Large. From the menu bar, selectEdit > Zoom.FindThe Find function searches through all the items stored in anapplication. The standardFinddialogue contains a single textedit box with two buttons,FindandCancel. SelectingFindstartsthe search,Cancelcloses theFinddialogue.P800_UM.book Page 18 Wednesday, August 28, 2002 4:19 PM
General functions 19PreliminaryIn some applications, for example Messaging, Find may bemore complicated:• the size of each message is so large that you may want torestrict the search to the current message only.• folders are potentially more significant, so you may want torestrict the search to the current folder only.Sorting your filesYou can sort the files you have stored in your P800. By sortingyour files, you choose in which order you want the files to bedisplayed on the screen. You can choose between four differentways:Type: The different file types are sorted together in the list.Size: The largest file (size in kB) is displayed at the top of thelist, and the smallest at the bottom of the list.Date: The latest file you saved in your P800 is displayed at thetop of the list.Name: The files are displayed in alphabetical order, from top tobottom.Note Sort is not valid for all applications.BeamingIt is very convenient to be able to exchange data using infraredor Bluetooth™wireless technology when “beaming” betweentwo devices that support the exchange standards.For example, one user selects an item in the Pictures applicationand then enters the menuPictures > Send as > IR,andthetwousers align their devices.The receiving user usually does not have to initiate anythingprovided that the infrared or Bluetooth wireless technology isenabled. As a precaution, however, the recipient does have theopportunity to accept or reject the item sent and has the option toview it after saving.Savesaves the item into the destination application and thenoptionally opens the application to show the item just saved.Methods for storing dataYour P800 can store data in three different ways:• SIM card (Only for phone numbers and associated names).See “Managing the SIM phone book” on page 56.• Phone memory (12 MB of capacity for storing pictures,messages, music, applications and so on).• MemoryStick(Expansionmemory.Thereareseveralalternatives with different amounts of memory on themarket). See “Folders” on page 18.P800_UM.book Page 19 Wednesday, August 28, 2002 4:19 PM
20 General functionsPreliminaryGetting helpFrom the menu bar selectEdit > HelporView > Helpto get to theinbuilt help system. The help system uses two views:•TheTopics view shows all available topics, for example boththe topics connected to a specific application and generaltopics.•TheDetail view presents the title and text of a single topic.The Topics view allows you to select a topic, which opens thedetail view/text view and displays the selected topic. You canalso set the zoom level and exit the Help system.Also, in many dialogue boxes it is possible to select the helpicon in the upper right corner to get help.IconsApplication iconsAn application icon starts its application when you select it.Below are the default application icons that you can see in thescreen when the flip is closed, or in the application picker whenthe flip is open. A list of more application icons is available inthe application launcher.PhoneContactsMessagesCalendarInternetApplication launcherCall listP800_UM.book Page 20 Wednesday, August 28, 2002 4:19 PM
General functions 21PreliminaryIndicators and status bar iconsThese icons appear in the flip closed standby screen or in thestatus bar when the flip is open. They indicate status for severalfunctions or that something has happened, for example, theP800 has received a text message. .When the flip is open, you can often select the icons to get moredetailed information or start an application.Incoming callGPRSBluetooth onDivert all calls notificationBattery strengthHelpHeld call?Calls screenedSpeed dial entryOngoing data callMissed callSMS notificationSignal strength, GPRS activeStatusInfrared port activeTime, alarm setKeyboardSMS overflowP800_UM.book Page 21 Wednesday, August 28, 2002 4:19 PM
22 General functionsPreliminaryFlip closed - overviewThis chapter describeshow your P800 workswith the flip closed. Withthe flip closed the P800behaves very much likean ordinary mobiletelephone.The screen is not touchsensitive when the flip isclosed; therefore youoperate the P800 bypressing the keys.KeypadKey FunctionOK Enter selected function.BACK•Returntopreviousmenu.•PressandholdtoreturntoStandby.CLEAR• Delete entered characters/digits from the screenone by one.•Pressandholdtodeleteanentirerowofenteredcharacters/digits.• Delete an entry from Contacts, Calendar, Tasks,Voice memo, and Messaging.• Press and hold to disconnect the microphone(mute function) when a call is in progress.• Mute the ring signal during an incoming call.• Press and hold to put the P800 into silent mode,when in the standby mode.OPTIONS• Open the menu with different options fordifferent applications.• Press and hold to open Applications.ASTERISK• Enter the character*.•Pressandholdtoenterap(pause) character.•Pressandholdtoswitchbetweendifferentinputmodes (Abc, 123 ... ).P800_UM.book Page 22 Wednesday, August 28, 2002 4:19 PM
General functions 23PreliminaryStandby viewWhen you switch your P800on, the standby view isdisplayed. This view isdisplayedonlyinflipclosedmode and containsconfigurable shortcuts (seethe section Applicationshortcuts below) to otherapplications. Also, whenclosing the flip, you always return to the standby view.There are five application shortcuts in the standby view. Theselected application is highlighted and its name is shown at thebottom left of the screen above the key. PressJog Dialorto start the application.There are also 6 icon positions, 3 at each side of the screen, fortemporary indicators such as missed calls and unread messages.Options menuPress or press the Jog Dial towards you to open thestandby options menu to get access to keylock, battery status,missed calls and more.Application shortcutsIt is very convenient to have shortcuts to the applications youuse most frequently in the standby view. Change the shortcuts inthe following menu in flip open mode:HASH /@• Enter the character #.• Press and hold to see a list with specialcharacters.• Terminate the input of PIN and security codes.• Retrieve a phone number from the SIM cardphone book (enter the number of the memoryposition and then press ).-NUMERIC KEYS• Enter the digits 0 to 9.• Enter associated characters or performassociated functions, for example:Press and hold , to enter the internationalcharacter '+'.Press and hold , to dial your voice mail.• Press and hold any of the keys - toreach a contact beginning with a specific letter.Key FunctionP800_UM.book Page 23 Wednesday, August 28, 2002 4:19 PM
24 General functionsPreliminaryControl panel > Device > Flip closed shortcutsBackground ImageYou can change the background image (wallpaper) in flip openmode, go toControl panel > Device > Display.Tip More background images can be found on the Multimediafor P800 CD, delivered with your P800.Status barThe status bar on top of the screen displays:Signal strength. Varies from very low to full signal.Indicates also the status of your GPRS connection.12:02 pmTime. Shows the current time and indicates activatedalarms.Battery. Indicates current battery level (zero to four units)and charging status.Note More information about battery status and GPRS can befound in Options menu > StatusApplications in flip closed modeSelect to list all the applications that can be started with theflip closed.Call listThe Call List displays the latest calls either outgoing, incomingormissed.PresstheJogDialor tocallselectedentry.Activated from the standby view only.ContactsDisplays a list of your contacts. Select a contact to viewassociated contact data. Then press the Jog Dial or to makea call.MessagesYou can read, create, send and delete text (SMS), multimedia(MMS) and e-mail messages in this view.CalendarThe Calendar view displays entries, if any, for the current day.UsetheJogDialtogetmoreinformationaboutaselectedentryor to change day.ExampleTuesday 29 January11:00 Lunch with A. Eriksson14:00 Project meetingTasksKeeps track of your tasks. Set due date, alarm, priority, and soon, for all your tasks and let your P800 remind you on time.P800_UM.book Page 24 Wednesday, August 28, 2002 4:19 PM
General functions 25PreliminaryJotterDisplays a list of stored entries. In detailed view, the whole entrycan be seen. With , it is possible to edit or make a new entryvia the keypad. It is not possible to make, edit or view a drawingin this mode.Voice MemoYour P800 can be used like a voice recorder. Use to play,create a new or delete an old memo.CommuniCamIn CommuniCam view the screen becomes a viewfinder. Pressthe CommuniCam button or the Jog Dial to take a photo.Tip TheCommuniCambuttonisalsoashortcuttotheCommuniCam application.Online servicesYour service provider might offer different services reachablefrom your P800. For example: weather forecasts, financialinformation or newsletters. Contact your service provider formore information.ConnectionsSet the way you communicate with your PC or other device.Select between infrared, Bluetooth wireless technology andcable. In the cable menu, you also select whether the P800 isgoing to operate as a modem or not.Selecting and starting applicationsRotate the Jog Dial to select an application. In the standby view,the selected application becomes coloured and slightly enlargedand the name is shown down to the left of the screen, just abovethe key on the keypad. Press the Jog Dial or on thekeypad to start the selected application.Tip In view, it is also possible to start an application bypressing its specific number.Closing applicationsThe current application automatically closes and the data issaved when you return to the standby view or switch to anotherapplication.Entering text in flip closed modeWhen you press a key, a pre-edit box with different characters isshownonthetoolbar:If the same key is pressed again, the next character in the pre-edit box will be selected.wxyz9P800_UM.book Page 25 Wednesday, August 28, 2002 4:19 PM
26 General functionsPreliminaryThe key deletes the character to the left of the cursor. Ifcontinuously pressed, the key deletes several charactersandthenwholewords.Inserting textThere are four text entry types:• Abc – initial uppercase letter, the rest lowercase. Default foreach new text edit field.• 123–numericentryonly.• ABC – uppercase entry.• abc – lowercase entryIn text edit mode, press and chooseText Options > Input typeto select text entry type.A short press on toggles the input types in text edit mode.Inserting symbolsIn text edit mode, press and chooseText Options > Add symbolto select an item from the symbol selector table. Use Jog Dial toselect the row and press . Then scroll within the row toselect a symbol and press .Virtual flipThe virtual flip is to be usedwhen you have physicallyremoved the flip and want touse your P800 in flip closedmode.The virtual flip gives you thesame functionality as the realflip keypad. Enter numbersand characters using yourstylus.Select to open the virtualflip. Select to close thevirtual flip.See the chapter “Removingand attaching the flipkeypad” on page 32” on howto remove the flip andactivate the virtual flip.P800_UM.book Page 26 Wednesday, August 28, 2002 4:19 PM
General functions 27PreliminaryFlip openThis chapter describes what functions are available with the flipopen.Screen areasIn the flip open mode the screen is touch sensitive. The screen isdivided into a number of areas, see the figure and table below..Item DescriptionAApplication picker Displays six icons for quick and easy access tothe most common applications, customizable.Internet      Edit              P800 WEB/WAPInternet BrowserP800 WEB/WAPInternet BrowserABCDEP800_UM.book Page 27 Wednesday, August 28, 2002 4:19 PM
28 General functionsPreliminary NavigationIn flip open mode navigation is carried out using the stylus andtapping selected items and by using the Jog Dial, see the chapter“Jog Dial” on page 11”.CalibrationThe screen is pre-calibrated to factory settings. However, thismay not necessarily agree with how you use the stylus.Calibration is calculated by the average stylus tap speed and thelocation of the stylus tap on selection.To recalibrate the screen1. SelectApplications > Control panel > Device > Display.2. TapCalibrateand the calibrate screen appears.3. Tap once at the centre of each of the three calibration pointsin numerical order.4. TapYesorNoto accept or reject the new settings.To restore the factory settings1. SelectApplications > Control panel > Device > Display.2. TapCalibrateand the calibrate screen appears.3. Press Jog Dial - the text “Factory settings restored” is shownand you are taken back to the screen.BMenu bar Usually, contains two menus on the left, and afolder menu on the right.The two left-hand menus always have the sameform:•theapplication menu,whosenameisalwaysthe same as the application, and whichcontains the system services used by mostapplications, such asFind,Send as,andDelete.•theedit menu, with editing items such asCut,Copy, Paste, Zoom, PreferencesandHelpCApplication space Applications use this central area of the screenin a way that is appropriate to the informationthat they display.Many of the built-in applications are based ontwo standard view layouts: a list view and adetail viewDButton bar Optionally, an application view displays abutton bar at the bottom of the applicationspace, containing useful controls and shortcuts.Not all application views require a button bar.EStatus bar Displays device status information such assignal strength, battery and device information.Settings for sounds and time.On-screen keyboard.Temporary indicators such as missed calls andunread messages.P800_UM.book Page 28 Wednesday, August 28, 2002 4:19 PM
General functions 29PreliminaryEntering text - Flip openThis section describes how to enter text in flip open mode. See“Entering text in flip closed mode” on page 25 on how to entertext in flip closed mode.There are two ways of entering text with the flip open:• Use the on-screen keyboard found at the bottom of thescreen.• Write directly on the screen using the stylus.On-screen keyboardIn text edit mode, select the keyboard icon and then selectcharacters. SelectDonewhen ready.At the bottom left of the keyboard you can choose between threekeyboard layouts with different character sets. Tap one of thefollowing keys:abc- standard charactersàëó- international characters123- numeric characters and currenciesCalendar   Edit            UnfiledWeekly meetingType AppointmentDate 08/01/2002The agenda for...1234567890qwertyuiopacapabc 123aeosdfghjklzxcvbnm.,?@DoneDescriptionP800_UM.book Page 29 Wednesday, August 28, 2002 4:19 PM
30 General functionsPreliminaryThe current input field is shown to the left in the top bar of thekeyboard. Tap the arrows or rotate the Jog Dial to change inputfield. The keyboard top bar also contains a drop-down menuwithCut,CopyandPaste.When copying or cutting, the text mustbe selected first.Handwriting recognitionHandwriting recognition translates stylus gestures into letters,numbers or other characters, and displays these characters astext. Handwriting recognition is only active when needed, thatis, when focus is currently on a text input field in an applicationview or in a dialogue that needs an text entry.The text mode screen is split into an upper and a lower part, byan arrow in the middle of the right edge. Write lowercase lettersbelow the arrow and uppercase in line with it. Write numbersabove the arrow.Note Most letters can be written in different stroke styles, seethe tables below. The style itself does not matter when makingletters upper- or lowercase, this depends only on the position onthe screen.Contacts     Edit            UnfiledFirst nameLast nameJob titlePhone (w)Phone (h)Mobile (w)Ring tone Default MelodyEmail (w)Fax (w)WebJaneJonesGraphic DesiP800_UM.book Page 30 Wednesday, August 28, 2002 4:19 PM
General functions 31PreliminaryLettersLowercase letters are written below the arrow and uppercaseletters in line with the arrow.Note Start each stroke at the dotted end.Accented lettersWrite the character as described above, then write the accentabove the arrow.Note Start each stroke at the dotted end.NumbersNumbers are written above the arrow.Note Start each stroke at the dotted end.abcdefghklmnopqrstuvyzwx12ij11111121222222full stopcommaapostrophequestionexclamationampersandatdouble quotetabspacebackspacecarriage return0123456789full stopcomma*ortabdashtilde+*/\()=backspaceP800_UM.book Page 31 Wednesday, August 28, 2002 4:19 PM
32 General functionsPreliminaryExtended charactersWrite the character above the arrow, then insert the character l(written from bottom to top) before writing the extendedcharacter. See the Handwriting recognition help topic forinformation on how to write these characters.Removing and attaching the flip keypadTo remove the Flip1. Use your fingernail to gently lift up and push the cover plateunder and away from the keypad, see picture below.Note Be careful with the touch-sensitive screen. Never use asharp object like a screwdriver.2. Unlock the catch and lift away the keypad.3. Attach the flip replacement by first placing the small hooksby the screen and then press on the curved front part until it issecurely fixed.To attach the Flip1. Use your fingernail to gently lift up and push the flipreplacement.2. If needed, turn the hinge on the keypad to the correctposition, see the figure below.12P800_UM.book Page 32 Wednesday, August 28, 2002 4:19 PM
General functions 33Preliminary3. Attach the keypad to the P800.4. Secure the flip by pressing the catch until you hear a click.5. Attach the cover plate by first placing the small hooks by thescreen and then press on the curved front part until it issecurely fixed.Virtual flip open modeThe virtual flip is to be used when you physically have removedthe flip. Activate this function inControl Panel > Device > Flipremoved.is shown on the status bar when virtual flip isactivated. Tap it to get to virtual flip closed mode.P800 locksYou can lock your P800 to prevent other people from using it.Use the SIM card lock and the device lock to protect your SIMcard and your P800 from unauthorized use.The P800 will ask you to enter the codes when necessary. Yourelease the locks by entering codes that will be displayed asasterisks (*) when you enter them.Note You can usually make an emergency call withoutunlocking the P800.ClickP800_UM.book Page 33 Wednesday, August 28, 2002 4:19 PM
34 General functionsPreliminarySIM card lockThe SIM card lock protects your SIM card, not the P800, againstunauthorized use. It is unlocked by the PIN and PUK codes.You can find your PIN code and sometimes your PUK code inthe documentation you received with your SIM card. If required,contact your service provider to obtain your PUK code. (PINstands for Personal Identification Number and PUK for PersonalUnblock Key.)Your PIN code consists of four to eight digits. If the PIN code isenabled, the P800 will ask for the PIN code when you start it.To activate the SIM card lock1. Select Phone > Edit > Preferences > Locks2. Select a lock option.3. SelectDone.You can choose to have the SIM card locked every time you turnthe P800 on, or to have the SIM card unlocked.An error message informs you if a wrong PIN code has beenentered. Usually after three wrong attempts (SIM carddependent) the SIM card will be blocked and you need to enterthe PUK code to unlock it.The PUK code consists of eight digits. When you have enteredthe right PUK code you must enter a new PIN code. You haveten attempts to enter the PUK code. If all ten attempts fail, theSIM card will be disabled and you need to contact your networkoperator.You cannot change the PUK code.PIN2Some functions on the SIM card can be protected by asecondary code feature.LocksChange CodesLocksDevice lock:At power on?DoneOffSIM card lock:Automatic key lockAt power onOffWhen SIM changedCancelP800_UM.book Page 34 Wednesday, August 28, 2002 4:19 PM
General functions 35PreliminaryThe PIN2 lock cannot be deactivated. The code can be changedby a user who knows the old code. Some SIM cards do not havea PIN2 lock.Device lockThe device lock protects your P800 against unauthorized use. Ifthe device lock is set toWhen SIM changed, it means that normallythe P800 is not locked. However, if the SIM is changed, theP800 asks you to enter the code to unlock the P800 before youcan use it. Thus, if someone steals your P800 and puts anotherSIM card into it, they will not be able to use it.To activate the device lock1. Select Phone > Edit > Preferences > Locks2. Select a lock option.3. SelectDone.You can choose to have the P800 locked every time you turn iton, locked when the SIM card has been changed, or unlocked.It is also possible to use the device lock in combination with thescreen saver. Just mark the checkboxControl panel > Device >Display>Phonelockprotectedto have the device lock activatedwhen the screen saver goes on.Change codeTo change a code1. Select Phone> Edit> Preferences> Locks.2. Select Change Codes.3. Select the code you want to change.4. First enter the old code, then the new one. (To ensure thatyou have typed the new code correctly you have to enter ittwice.)Key lockThis option locks the keys on your P800. This is to protect thedevice if the keys are being accidentally pressed.To activate or change the key lock• Select Phone > Edit > Preferences > Locks.To unlock the keys• Select >.P800_UM.book Page 35 Wednesday, August 28, 2002 4:19 PM
36 PhonePreliminaryPhoneThis chapter describes how to use your P800 as a telephone.Different possibilities are available:• In flip closed mode you can call using the keypad.• In flip open mode you can call using the virtual keypad onthe screen.• Inflipclosedaswellasflipopenmodeyoucanmakeacallfrom the contact list.• In flip open mode you can speed dial any of the 9 speed dialnumbers using the Speed Dial view. In flip closed you canpress the number representing the speed dial entry on thekeypad.• Inflipclosedaswellasflipopenmodeyoucancallanypreviously called numbers using the call list.• You can even call by selecting a number included in a textmessage or listed in an application.Options in flip closed modeThe following options, available by pressing , areavailable during or after a call:•Endcall.• Hold call/retrieve call/switch calls.• Add to contacts (displayed if the phone number of the activecall is known, and not found in the contacts database).• Show contact (displayed if the phone number of the activecall is known, and appears in the contacts database).• Transfer sound (to a Bluetooth™ wireless technologyheadset).• Turn On/Off tones.• Microphone mute On/Off.• Copy number (displayed if the phone number of the activecall is known).• Paste number (displayed if the clipboard contains a number).• Speakerphone On/Off.• Transfer calls.• Join calls.• Call list.The following options, available by pressing , areavailable in the call list:• Incoming calls.•Outgoingcalls.• Missed calls.• SIM last dialled.P800_UM.book Page 36 Wednesday, August 28, 2002 4:19 PM
Phone 37Preliminary• Zoom in/out.•Allcalls.•Applications.Note The currently selected filter is not shown in the optionslist, for example if the call list is currently showing Incomingcalls, then this option is not shown in the options list.Call handlingTo call in flip closed mode, you can use either the keypad or theJog Dial.To make a call• Enter the telephone number on the keypad and press .To delete a typed character - press . To delete allcharacters - press and hold.To make a call using Speed DialSpeed Dial is a fast way to call one of your special speed dialnumbers. See “Speed dial numbers” on page 441. Select the key corresponding to the desired number.2. Press .To make a call using the Call list1. Select .2. Press the Jog Dial inward or press .3. Scroll with the Jog Dial to select an entry.4. Press the Jog Dial inward or press .To make a call using the Contact list1. Select .2. Press the Jog Dial inward or press .3. Scroll with the Jog Dial to select a contact and number.4. If more telephone numbers are shown, scroll with the JogDial to select a number.5. Press the Jog Dial inward or press .To answer a callThe P800 rings when you receive a call. If the calling party isfound in contacts, the name of the caller will be displayed. Ifthere is a picture, it will also be shown.• Press to answer the call.Tomakeanewcallduringacall1. Make a call or answer a call.P800_UM.book Page 37 Wednesday, August 28, 2002 4:19 PM
38 PhonePreliminary2. Make a second call, oranswer a call. The first callis put on hold.The held call is shownwith a grey background.• Toswitchbetweenthecalls,press ,thenselectSwitch calls(could benetwork dependent).• To end the active call and continue with the held call,press and selectEnd active call.• To join the calls to a conference, press and selectJoincalls.See“Conference calls” on page 42To end a call• Press , or press the Jog Dial.To reject a call• Press , or press , and selectReject.To silence the ring signalThis does not affect the call. It just silences the ring signal. Thecalling party will not notice that you have silenced the call.• Press , or press , and selectMute.To make a call using voice control• Say the “magic word” and then the name of the person youwant to call, and the P800 will connect you. For moreinformation on, see “Voice control” on page 46.Note This option requires that the number of the calling party isprovided with a voice recording. See“To record a voicecommand” on page 46Tip The magic word is not needed if you use a portablehandsfree or a Bluetooth™ wireless technology headset. Pressthe headset call button and say the name of the person you wantto call.Options in flip open modeThe following options are available during or after a call:• End call.• Hold call.• Add to contacts (displayed if the phone number of the activecall is known, and not found in the contacts database).• Show contact (displayed if the phone number of the activecall is known, and appears in the contacts database).• Transfer sound (Only when Bluetooth™ wireless technologyheadset has audio).• Show cost / Hide cost.John Smith+4613244500 11:03Ann Jones(w)(h)End active callP800_UM.book Page 38 Wednesday, August 28, 2002 4:19 PM
Phone 39PreliminaryCall handlingTomakeacallinflipopenmode,youusethestylusandthevirtual keyboard.To make a call1. Select .2. Select .3. Call the number with the virtual keyboard and select .To remove a typed character - select .To make a call using Speed DialSpeed Dial is a fast way to call one of your special speed dialnumbers. See “Speed dial numbers” on page 441. Select the speed dial icon .2. Use the Jog Dial or tap with the stylus to select an entry.To make a call using the Call list1. Select the call list icon from the button bar.2. Scroll with the Jog Dial or tap with the stylus to select anentry.3. Select the phone icon .To make a call using the Contact list1. Select the contacts icon .2. Scroll with the Jog Dial or tap with the stylus to select acontact.3. Scroll with the Jog Dial or tap with the stylus to select anumber.To answer a callThe P800 rings when you receive a call. If the calling party isfound in contacts, the name of the calling party will bedisplayed. If there is a picture, it will also be shown.• SelectAnswerto answer the call.To make a new call during a call1. While making or answering a call, selectHold call.P800_UM.book Page 39 Wednesday, August 28, 2002 4:19 PM
40 PhonePreliminary2. Make a second call, oranswer a call. The heldcall is shown with a greybackground.• Toswitchbetweenthecalls, select the call withthe grey background andselectSwitch calls(can benetwork dependent).• To end the active call andcontinue with the heldcall, selectEnd active call.• To join the calls to aconference, selectJoincalls.See“Conferencecalls” on page 42To end a call• SelectEnd call,orpresstheJogDial.To reject a call• SelectSend busy.To silence the ring signalThis does not affect the call. It just silences the signal. Thecalling party will not notice that you have silenced the call.• Rotate the Jog Dial and selectMute.To make a call using voice control• Say the “magic word” and then the name of the person youwant to call, and the P800 will connect you. For more detailssee “To make a call using voice control” on page 38.General functionsCopying/pasting numberA highlighted telephone number may be copied and pasted forexchange with other text fields or in applications.• Copy number - if a number has been entered.• Paste number - if there is a copied number stored on theclipboard.To copy/paste a number (flip open)• SelectTelephone > Edit > Copy/Paste numberTo copy/paste a number (flip closed)1. Press and selectcopy numberorpaste number.Phone   EditJohn Smith+4613244500 11:03Ann Jones(w)(h)End active callSwitch callsJoin callsP800_UM.book Page 40 Wednesday, August 28, 2002 4:19 PM
Phone 41PreliminaryDisplaying callsDuring call setup, a progress window shows the current status.Callingis displayed until a line has been allocated. When the linehas been allocated,Connectingis displayed.If an incoming call matches an entry in contacts, thecorresponding information will be displayed. If the number isnot found in Contacts, only the telephone number will bedisplayed.At the top of the window, the call timer for the call is displayed.The cost meter is also displayed, if available.Missed callsWhen a call has been missed, a message is displayed.• SelectViewto display information on the missed call.Network indicationThe area at the top of the screen contains network indication (instandby view in flip closed), which can be:• Network/service provider name.•Nonetwork.• Emergency calls only.•Searching.Call logThe call log allows you to check the P800's data on calls made,received, rejected, or missed. The log keeps track of date, time,length, and cost information (if available) of each call.The List view of the call log shows the calls in order with themostrecentcallatthetop.In flip open:1. Select from the button bar.2. Select a listed call to see more detailed information about it.In flip closed:1. Press and selectCalls.2. SelectCall listorMissed calls, depending on what you arelooking for.Tip In flip closed mode you may press twice to call thelast number used in the P800.Advice of Charge (AoC)Advice of charge allows you to keep track of the cost of callsandtostopthedevicefrommakingchargeablecallswhenacertain credit limit has been exceeded. This option is onlyavailableifAdviceofChargeissupportedbytheSIMsubscription.P800_UM.book Page 41 Wednesday, August 28, 2002 4:19 PM
42 PhonePreliminaryIf the credit is limited, a warningLow creditis displayed, whenthere is approximately thirty seconds of credit left.When the credit runs out,Credit expiredis displayed and ongoing,chargeable calls are stopped.Auto retryingIf a call attempt is not successfully connected, the P800 can beset to automatically retry the call after a while.When retry has been initiated, the P800 will continue to retry anumber of times or until you invoke any other action.While the time between retry attempts is elapsing, the dialogueRetryingis shown. When a retry is successful, the P800 alertsyou with a single ring signal.Remote party notificationsWhen a remote party carries out certain operations, the P800may notify you of the operation. An alarm is sounded and one ofthese messages is shown.• Call held by other party.• Call retrieved by other party.• Call transferred by other party.• Calls joined by other party.• Call is waiting at other party.Ending a call when another call is on holdWhen the active call is ended, you are asked to retrieve the heldcall. If you do not respond within a few seconds, the held callwill also be ended.Receiving a call when another call is on holdIf someone calls when a call is on hold, you will be asked if youwant to release the held call and answer the incoming call.Conference callsA conference call can bestartedwhenyouhaveanactive call and a held call.The conference call view isautomatically displayedwhenever a member has beenadded to the conference. Theconference call view isdisplayed when selecting theShow partiesbutton, from thestandard call control view.You return to the standard callcontrol view by pressing theHide partiesbutton.Phone   EditJohn SmithTom Clark11:03Ann Jones(w)1(w)(h)End conferenceHold conferenceHide parties23P800_UM.book Page 42 Wednesday, August 28, 2002 4:19 PM
Phone 43PreliminaryIf an incoming call is answered during a conference call, theconference call will be put on hold.To start a conference call• Select theJoin callsbutton, or selectPhone > Join callsfrom themenu.To extract a party• Tap the required party and chooseExtractfrom the pop upmenu.This causes the conference call to be put on hold, the selectedparty is then removed from the conference and becomes theactive call.To release a party• Tap the required party and chooseReleasefrom the pop upmenu.This ends the call to the selected party.Note If you have set up the conference, you still have to pay forthe total time.Emergency callsIf you initiate a call to a number which is identified as anemergency number,Emergency callwill be shown.An emergency call can be made without PIN or PUK codes. Youcan end the call using the menu key.Note Emergency calls are not confined to the network of youroperator; they can be made as long as you have coverage fromany GSM network.Hints and smart functionsSpeakerphoneIf you open the flip during a call, the speaker phone function isactivated and the volume will increase. This lets you continuethe conversation while using other functions of the P800.Silent modePress and hold in standby view, flip closed, to put thephone in silent mode. Press again to turn off silent mode.Note When silent mode is on, this will also silence personalhandsfree.Voice mailIn flip closed, you can call the voice mail number if you pressand hold .P800_UM.book Page 43 Wednesday, August 28, 2002 4:19 PM
44 PhonePreliminarySpecial characters• Press and hold to insert a pause (represented by thecharacterp)in a DTMF (Dual Tone Multi Frequency)sequence.• Press and hold to insert the international call prefix+.Change phone volumeDuring a call you can use the Jog Dial to change the phonevolume.Warning! The volume may be uncomfortably loud at thehigher volume levels if the phone is close to your ear. Exposureto excessive volume levels may damage hearing.• During an active call, pressing and holding mutes themicrophone. Pressing reactivates the microphone.• When entering text in flip closed mode, pressing erasesthe last entered letter. Pressing and holding deletes alltext in the active field.• When in stand by mode, pressing and holding puts thephone in silent mode.Banking servicesYou can use your telephone banking services or other tone basedservices.The P800 provides different ways of sending tones during a call:• Pressing keypad keys during an active call, like on mostlandline phones.• Including tone digits already in the call set up. After thephone number, but before the digits, press and hold toinsert ap.Then insert your digits. Finally send away the callby pressing .• Program digit sequences into your Contact card for the bank.Each digit sequence to be sent as tones must begin with ap.Once your call to the bank has been established and you want tosend your pre-programmed digit sequences, chooseShow contacton the menu to get to the Contact card with the tone sequences.Warning! Never program any personal codes into your P800.Set-upSpeed dial numbersTo set a speed dial number1. Select from the button bar.2. Select an empty position.3. Select the desired contact.4. SelectDone.P800_UM.book Page 44 Wednesday, August 28, 2002 4:19 PM
Phone 45PreliminaryTo remove a speed dial number1. Select , on the status bar.2. SelectEdit > Remove speed dial.3. Select the contact to remove.4. SelectDone.Flight modeTurns off the radio function so it does not disturb sensitiveequipment, for instance in an aeroplane or in a hospital.Note The phone and other communication functions must neverbe used in an aircraft unless otherwise instructed by the aircraftpersonnel. If the use of equipment without a radio transmitter ispermitted you can turn on the flight mode on the product. Doingso turns off the radio function.When the flight mode option is set, you have the possibility tostart the P800 in normal or flight mode each time the power isturned on.To use the power menuThis menu is activated when pressing the On/Off button if themenu has been activated. See “Flight mode” on page 47 on howto activate the menu.• Select thePhone onalternative to start the P800 in the normalway.• Select theFlight modealternative to start the P800 in flightmode.• Select thePower offalternative to turn the P800 off.To set flight mode on without restarting the P8001. SelectPhone > Edit > Preferences.2. SelectFight mode.3. SelectFlight mode now > DoneTosetflightmodeoff1. SelectPhone>Edit > Preferences.2. SelectFlight mode.3. SelectPhone on now > Done.PreferencesIn this menu you may change the settings for a number oftelephony options.To set the telephony preferences1. SelectEdit > Preferences.2. Select the item to setup.P800_UM.book Page 45 Wednesday, August 28, 2002 4:19 PM
46 PhonePreliminaryIncoming call alertThis option lets you choose individual ring melodies for voiceand data calls. You may use any sound recording or audio file.You may also set individual volume levels for Handheld,Handsfree and Car, or let the P800 vibrate.You may personalize the ring melodies further for individualcontacts, see “Contacts”.1. Use the stylus to point and drag the bar lever to the preferredsound level.Warning! The volume may be uncomfortably loud at thehigher volume levels if the phone is close to your ear. Exposureto excessive volume levels may damage hearing.2. Select the list view and highlight the signal of your choice.3. SelectDoneto activate the changes.Incoming call picture• Select the option to automatically show the picture saved incontacts at incoming calls.Voice controlThe voice control option lets you handle calls using your voice.Say a “magic word” and then the name of the person you wantto call, and the P800 will try to call the person.The magic word is used to ensure that the P800 will not callsomebody whose name has just been mentioned by chance.To enter settings for voice commands• SelectPhone > Edit > Preferences > Voice control.In this menu you can:–TurnVoice dialingon/off–SetwhentousetheMagic word(Handheld, Handsfree orCar).–TurnVoice answeron/off– Select if the P800 shouldPlay caller nameat incomingcalls.– Record voice commands forMagic word,AnswerandBusy.To record a voice command1. Select one of the options,Magic word,Answer,orBusyandselectRecord.2. Say the “magic word” after the toneBe sure to use a word that you can remember. For example“Calling”.3. SelectPlayif you want listen to your recording.4. Select the voice message options for each P800 profile.5. SelectDoneto exit.To record voice tags for individual contacts, see “Contacts”.P800_UM.book Page 46 Wednesday, August 28, 2002 4:19 PM
Phone 47PreliminaryFlight modeHere you select if you want to turn the flight mode on or off andalso if you want thePower menuactivated.To access flight mode settings• SelectPhone > Edit > Preferences > Flight mode.To turn on the Power menu1. Select Phone > Edit > Preferences > Flight mode2. Select thePrompt me...check box and tapDone.LocksLocks contains options for:• Activating the lock on the device, the SIM card or the keyson the keypad.• Changing the lock codes.ThedevicelockoptionappearswhenpoweringontheP800.Keylockblocksyourkeysfrombeingpressedbymistake,forinstance when the P800 is in your pocket.The SIM card lock demands your code when the phone is turnedon or when a new SIM card is installed.Note For more information see “P800 locks” on page 33.Add to contactsThis option enables the function for adding called and callingparties toContacts. After a call has ended, if the telephonenumberisnotalreadystoredintheContacts, you are asked if youwouldliketoaddit.HandsfreeHandsfree lets you choose how to answer the P800 when it isused with a handsfree kit connected.You may also select preferred Bluetooth™ wireless technologydevice from this menu.To set handsfree options•1ringmeans that the P800 answer automatically after onesignal.•Any keymeans that the you answer by pressing any key.Note Using1ringas the automatic answering mode may violateyour privacy (for instance passengers in your car can hear whois calling if the phone is used with a car kit).To set Bluetooth wireless technology options• Select the preferred sound device;PhoneorHeadset.Forward callsForward calls lets you choose how to forward incoming calls toanother number, on:P800_UM.book Page 47 Wednesday, August 28, 2002 4:19 PM
48 PhonePreliminary•Busy• Not reachable•Noreply•Allcalls• Data calls• Fax callsTo forward calls1. Enter the telephone number you want to forward to.2. Select Done.Tip Normally the data/fax options should not be changed.Accepted callersAccepted callers allows you to set up a filter for incoming calls.All calls except from persons on your list of Accepted callerswill be rejected.To add an accepted caller1. SelectAdd new.2. SelectLookupand chose a contact, or write the name andnumber of the contact.3. SelectDone.Call waitingThis option sets the call waiting option on or off.Restrict callsYou can set restrictions for calls made from or to your P800.You may for example protect it from being used for longdistance calls.To restrict incoming calls1. Select theIncoming callstab.2. Set restrictions for:– All incoming calls.– Incoming calls when roaming.To restrict outgoing calls1. Select theOutgoing callstab.2. Set restrictions for:– All outgoing calls.– Outgoing international calls.– Outgoing international calls except to home PLMN.To change the password1. SelectChange password.2. Enter the old code.3. Enter the new code.4. Confirm the new code.P800_UM.book Page 48 Wednesday, August 28, 2002 4:19 PM
Phone 49PreliminaryVoice mailFor easy voice mail access, enter the number to the voice mail ofyour operator.GSM NetworksThis option lets you choose what net to use when you areoutside your operators area. Choose if you want to search for anew network or use a preferred one. You can also make a list ofpreferred networks.Note Your operator may not allow you to access all availablenetworks, depending on your operator’s policy.Calling cardsThis option is used to handle calling cards.AoC - Call meter settingsThis option is only available if Advice of Charge (AoC) issupported by the SIM subscription. PIN2 is required for storinganychangesyoumaketotheCallmetersettings.•Limited– the limit is preset by the user. When the credit is setto limited, chargeable calls should only be made if the creditis larger than 0. The option is, however, useful if you want torestrict the call cost for yourself or another person that usesthe P800.•Unlimited– there is no credit limit. Not all networks providecharging information to the phone during a call. If yournetwork provides this service and your subscription is forAoC Charging, you cannot make or receive any chargeablecalls if you are roaming in a network that does not providecharging information. This restriction does not apply whenyour subscription is for AoC Information. You cannot changethe type of subscription from your phone settings. Pleaseconsult your operator for more details.P800_UM.book Page 49 Wednesday, August 28, 2002 4:19 PM
50 ContactsPreliminaryContactsContacts is like an address book, in which you can store names,phone numbers, e-mail addresses and other useful information.The information stored in the SIM phone book is alsoaccessible. SIM phone book entries can be imported to Contactsand Contacts entries can be exported to the SIM phone book.Flip closed modeWith the flip closed, you can place calls and send text ormultimedia messages.Contacts has two views in flip closed mode:MenusIn both views, you can use to access some of the P800’scontact functions.Menu options in list viewList view An alphabetical list of contacts. The list view is thestarting point for finding a contact.Detail view The details for a contact.Option DescriptionZoom in/out Zoom the screen in or out.SIM phone book Display the contacts of the SIM card.Send owner card Send your owner card via IR or Bluetooth wirelesstechnology.Find Search for a specific contact.Undo delete Restore the last deleted contact.Applications Return to the application launcher.P800_UM.book Page 50 Wednesday, August 28, 2002 4:19 PM
Contacts 51PreliminaryMenu options in SIM phone bookMenu options in detail viewMaking a call with the flip closedTo select a contact1. Select .2. To place a call to a contact in the SIM phone book, selectSIMphone bookfrom the options menu.If there are information numbers or service numbers storedon the SIM card, you can also access them.3. Scroll down to the desired contactor selectFindfrom the menu and search for the contact.To use the quick index1. Press and hold a number key.The first contact, corresponding to the first letter of the key,appears.2. To search further, continue to enter the letters with the keys.To make a call1. Select a phone number.2. Press the Jog Dial inward or press .or1. Select a phone number.2. SelectCallfrom the options menu.Option DescriptionZoom in/out Zoom the screen in or out.View all Switch to Contacts list.InformationnumbersDisplay the Information numbers on the SIM card.This option is only displayed if there areInformation numbers stored on the SIM card.Service numbers Display the Service numbers on the SIM card.Thisoption is only displayed if there are Servicenumbers stored on the SIM card.Applications Return to the application launcher.Option DescriptionCall Call the active contact.Send SMS Send a text message to the active contact.Send MMS Send a multimedia message to the active contact.Send as Send the active contact via text message, IR orBluetooth wireless technology.Delete contact Delete the active contact.Applications Start other applications.P800_UM.book Page 51 Wednesday, August 28, 2002 4:19 PM
52 ContactsPreliminaryTo send a text message1. Select a phone number.2. SelectSend SMSfrom the options menu.To send a multimedia message1. Select an e-mail address.2. SelectSend MMSfrom the options menu.To add a contactYou can create a new contact using information from a recentlyreceived voice call or message.1. SelectYeswhen asked to add to contacts.2. Enter contact name and edit the number, if required.• To access the full edit view, open the flip.To delete a contact1. Select the contact.2. SelectDelete contactfrom the options menu.• To restore a deleted contact, selectUndo deletefrom theoptions menu.Flip open modeOpen the flip and tap or selectContactsin the Applicationlauncher to open Contacts.Contacts has three views in flip open mode:Tabs at the bottom of the list view provide a fast way to locateinformation. To highlight the first entry that begins with the firstletter on a tab, select the tab once. To highlight the first entrythat begins with the next letter on the tab, select the tab again.MenusIn all views there is a menu bar from which you can access someof the contact functions.List view An alphabetical list of contacts. The list view is thestarting point for finding a contact.Detail view The details for a contact.Edit view Contact details, displayed in a way that allows youto add and change the information.abc def ghi jkl mno pqr stu v-zP800_UM.book Page 52 Wednesday, August 28, 2002 4:19 PM
Contacts 53PreliminaryMenu options in list view Menu options in SIM phone book list viewMenus Option DescriptionContactsNew Create a new contact.Find Search contacts containing a specifictext.Send owner card Send your business card via Bluetoothwireless technology, e-mail, textmessage, IR or multimedia message.View ownercardView your personal business card.EditUndo delete Restore the last deleted contact.Paste contact Paste a received or copied contact intoContacts.Zoom Set zoom level, small, medium orlarge.Preferences Select how the contact list is to besorted, and if telephone numbersshould be displayed in the list.Help Open the help application.FoldersAll Show all contacts in the list.Unfiled Show the contacts that are not in afolder.Edit folders Categorize your contacts in folders.Menus Option DescriptionContactsNew Create a new contact.InformationnumbersDisplay the information numbers onthe SIM card.Service numbers Display the service numbers on theSIM card.Own numbers Display speech, fax and data numberson the SIM card.EditPaste contact Paste a received or copied contact intoContacts.Copy to contacts Copy the shown SIM card entry intoContacts.Copy all tocontactsCopy all SIM card entries intoContacts.Sort by SIMpositionSort the list according to SIM position.Zoom Set zoom level, small, medium orlarge.Preferences Select how the contact list is to besorted, and if telephone numbersshould be displayed in the list.Help Open the help application.P800_UM.book Page 53 Wednesday, August 28, 2002 4:19 PM
54 ContactsPreliminaryMenu options in detail view and edit viewPersonal detailsThe first time you use your P800 you are advised to enter yourpersonal details. You create an electronic business card,containing your contact details, including notes and a photo.You can attach this card to e-mails, or beam it to another device.To create your owner card1. SelectContacts > Newand enter your details.2. SelectContacts > Set as owner card.Making a call with the flip openTo open Contacts• Tap or selectContactsin the Application launcher .Menus Option DescriptionContactsNew Create a new contact.Find Search contacts containing a specifictext.Send as Send a contact via Bluetooth wirelesstechnology, e-mail, text message, IR ormultimedia message.Set as ownercardSet the active contact as your ownercard.Delete contact Delete the active contact.EditEdit contact Change the details of the activecontact.Copy contact Copy the active contact entry.Cut Cut out the marked text.Copy Copy the marked text.Paste Paste the copied text into the selectedfield.Add field (inEdit view only)Addanextrafieldtotheactivecontact.Show in list Specify the phone number to bedisplayed next to the contact in the listview.Zoom Set zoom level, small, medium orlarge.Preferences Select how the contact list is to besorted, and if the telephone numbershould be displayed in the list.Export to SIM Export the contact to SIM.Help Open the help applicationFoldersUnfiled Show the contacts that are not in afolder.Edit folders Categorize your contacts in folders (foreample business, personal and so on.)Menus Option DescriptionP800_UM.book Page 54 Wednesday, August 28, 2002 4:19 PM
Contacts 55PreliminaryTo search for an entry containing specific text1. SelectContacts > Find.2. Enter the text string you wish to search for.3. Select eitherIn all fieldsorIn Names & Companyand tapFind.4. When search is completed, all results are displayed.Note Searching is not case sensitive and you do not have toenter an entire word to locate a matching entry.To make a call1. If required, change category from theFoldersmenu.2. Scroll down to the desired contact.If the contact list is long, first select a tab at the at the bottomof the view.3. Select the contact to display the information.4. Depending on what you want to do, select according to thefollowing:– Tap or or the phone number to place a call.– Select or the e-mail address to send an e-mail.– Select or URL to open a web page.– Select to send a multimedia message.– Select to send a text message.Managing contactsYou can sort the contacts according to first name, last name orcompany. The contact entries can also be filtered by category,such as business or personal.To create a new contact1. SelectContacts > New.2. Enter the desired information. When applicable, select fromthe drop-down menus.ToaddavoicediallingcommandVoice dialling commands can be added when you create orchange a contact.1. Select at the bottom of the screen.2. Select a number.3. Select theRecordbutton.4. Record a new voice command after the tone.• To play a recorded voice command, select thePlaybutton.• To remove a voice command, select theDelbutton.Toaddanotetoacontact1. Select .2. Enter the text.P800_UM.book Page 55 Wednesday, August 28, 2002 4:19 PM
56 ContactsPreliminary3. If you do not want the note to be included when you send,beam, or synchronize the contact, select thePrivatecheckbox.Toaddaphotoorotherpicturetoacontact1. Select the photo view tab .2. Select the picture space.3. If required, change folder.4. Select the picture to use.5. Select theSelectbutton.• To change a picture, select the old picture and selectReplaceimage.• To remove a picture, select the old picture and selectDeleteimage.To change the details of a contact1. Select a contact.2. SelectEdit > Edit contact.3. Change the desired information. When applicable, selectfrom the drop-down menus.Toaddafieldtoacontact1. Select the contact.2. SelectEdit > Edit contact.3. SelectEdit > Add field.4. Select the field to be added from the drop-down list.5. SelectAdd.To delete a contact1. Select the contact.2. SelectContacts > Delete contact.Managing the SIM phone bookYou manage the SIM phone book the same way as the Contacts.You may also sort the SIM phone book according to SIMposition. You can also copy information between the P800 andthe SIM card.To import contacts from SIM1. SelectSIM phone bookin the folders menu to the right in themenu bar.2. SelectEdit > Copy all to Contactsfor importing all SIM entriesorTap a SIM entry to open it and selectEdit > Copy to Contactsfor importing the selected SIM entry.To export contacts to SIM1. Select a contact.2. SelectEdit > Export to SIM.3. If the contact has multiple telephone numbers, select thenumber to export.P800_UM.book Page 56 Wednesday, August 28, 2002 4:19 PM
Contacts 57Preliminary4. SelectDone.Sending a contactYou can send contact details to others: by text message,multimedia message, infrared, or Bluetooth wireless technology.To send contact details1. Select a contact.2. SelectContacts > Send as.3. Select the message type.4. SelectDone.To send your own contact details1. In list view, selectContacts > Send owner card.2. Select the message type.3. SelectDone.SettingsTo sort the contact list and show the preferred phone number1. SelectEdit > Preferences.2. Select the desired sorting option (first name, last name orcompany) and clickDone.3. If you want a telephone number to be shown next to the namein list view, selectShow preferred phone number.If no number is selected, the first telephone number will beused.4. SelectDone.To change the preferred phone number1. Select a contact.2. SelectEdit > Edit contact.3. SelectEdit > Show in list.4. Select the number to be shown from the list.5. ClickDone.Note If no numbers appears, ensure thatShow preferred phonenumberis checked in preferences.Phone book managerOn the CD, there is an application calledPhone book manager.This application is used to manage the SIM card informationfrom a PC.To use the Phone book manager1. Connect the P800 to the PC. See “Connecting to otherdevices” on page 150 for more information.2. Start the Phone book manager on the PC.P800_UM.book Page 57 Wednesday, August 28, 2002 4:19 PM
58 ContactsPreliminary3. For instructions on thePhone book manager, refer to theapplication help information.P800_UM.book Page 58 Wednesday, August 28, 2002 4:19 PM
Messages 59PreliminaryMessagesWithMessagesyou can create, send, and receive differenttypes of messages:YoualsouseMessagesto receive:• Area Information messages.These are text messagesbroadcast to all subscribers in a network area for examplelocal road reports or local taxi phone numbers (AreaInformation services are not available from all operators).• BIO (Bearer Independent Object) messages. There aredifferent types of BIO messages:– Setup (e-mail, Internet, WAP accounts)– E-mail notifications.– Files for exchanging electronic business cards (vCard)and calendar information (vCal).• Auto setup files for OTA (Over The Air configuration).• Beamed messages. These are files received via Infrared orBluetooth.The different types of messages, e-mail, text messages, andmultimedia messages are handled by separate messagingaccounts. SelectControl panel > Connections > Messagingaccountsto see the details of the messaging accounts on yourP800.You can have any number of e-mail accounts - a typicalconfiguration will be one business and one personal account.When you set up a synchronization with your PC, an account forsynchronized e-mails is automatically created on your P800.Accounts are automatically created for storing received:• Text messages• Multimedia messages• Area information messages• Auto setup messages• Beamed messagesE-mail messages. Your P800’s mail client supportsPOP3 and IMAP4 mail servers, MIME attachments andSMTP for sending mail.SMS (Short Message Service) messages are textmessages sent and received via the network operator'smessage centre. EMS (Enhanced Message Service)messages also allow pictures, sounds, melodies andanimations to be inserted.MMS (Multimedia Message Service) messages. Amultimedia message can contain text, graphics,animations, photographic images, audio clips and ringmelodies.P800_UM.book Page 59 Wednesday, August 28, 2002 4:19 PM
60 MessagesPreliminaryBefore using MessagesBefore you can send and receive any messages you need to setup the necessary accounts.See “Getting started with Internetand Messages” on page 159Tip A simple way of setting up an Internet or e-mail account isto ask your service provider to send you a message that containsthe required information to create an account automatically onyour P800.Folders in MessagesThere are four folders for each messaging account:Inbox,Outbox,DraftandSent.InboxInboxcontains received messages. You can reply to, forward,and delete messages, but not edit them.Received auto configuration messages are stored in theAutosetupaccountInbox.OutboxOutboxcontains messages that are ready to be sent. Saving amessage toOutboxis useful if you have several to send: youreduce connection time by sending them all at the same time.To save an e-mail message to Outbox1. After composing your message, selectSend.2. SelectSave to Outbox.You cannot save text messages toOutboxunless the phonefails to connect.Messages that you send from an e-mail synchronization accountare always saved toOutboxand sent from your PC after yournext synchronization.DraftDraft contains messages that are not ready to be sent.To store a new message in Draft• Create the message and exit without selectingSend.To move a message from Outbox to Draft• Open the Outbox message list and selectMessage > Move toDraft.SentSent contains messages you have sent from your P800.Tip To avoid running out of storage space on your P800, makeit a habit to clear out unneeded messages from yourSentfolder.P800_UM.book Page 60 Wednesday, August 28, 2002 4:19 PM
Messages 61PreliminaryThe accounts in MessagesWhen you open Messages, alist of your accounts appears.The top item in the list,CreateSMS,is a shortcut for directlycreating a new text messageAn asterisk next to an accountindicates that a message hasarrived since you last openedthe accounts inbox.How to useMessagesText messagesincluding EMSfeaturesSMS text message is a short message that you can send andreceive on a mobile telephone. It can contain up to 160characters. If you create a longer message it will be sent as two(or more) separate messages, but received (if the receivingtelephone supports this) as one message. If you add pictures,animations, melodies and sounds to your message it becomes anEMS (Enhanced Message Service) message.Text messages can be sent to one person, or to a group ofrecipients that you have saved in Contacts.Towriteandsendatextmessage1. InMessagesselectCreate SMS. (You can also selectSMS >Message > New.2. Enter the recipients number or selectToand select recipientor recipients from your contact list and selectDone.3. Write your message and selectSend.To add EMS features to your text message1. SelectEdit > Insert Object.2. Select the type of media you wish to import and selectDone3. Select the item you want to insert and tapSelect.Messages   Edit                 AccountsSMSCreate SMSMMSPersonal e-mail Area Info02202331Auto setup 01Beamed 01Unread OutP800_UM.book Page 61 Wednesday, August 28, 2002 4:19 PM
62 MessagesPreliminaryHere you can see an exampleof an text message withinserted EMS features.MultimediamessagesA MMS (Multi MediaService) messages caninclude real pictures,animations and sound,organized like a slidepresentation with time-basedcontrol of the playback.Composing a multimediamessage is like building asmall slide presentation. Atypical page will consist of apicture, some text and sound.A picture taken with the integrated CommuniCam can bequickly and conveniently be sent via multimedia message usingtheSend ascommand from the viewer. Multimedia messagescanbesenttoamobilephoneorane-mailaccount.To create a new multimedia message1. Select your multimedia message account and then selectMessage > Newor open an existing message and selectMessage > New.2. From theSelect templatedialog, tap on the name of thetemplate you want and tapSelect.TheBlanktemplate willopen a blank message.3. The first page of the newmessage is now displayed.To add a picture, text,audio, voice or scribbleselectTo insert an item1. Select .2. Select the type of item youwant to insert from the list. Messages   Edit              InboxSendTo:Hello TomI'll        see you at...Size: 29+46 13 244500 Message     Edit              DraftSend1/1 2 Add image Add scribble Add text Add audio Add voiceP800_UM.book Page 62 Wednesday, August 28, 2002 4:19 PM
Messages 63PreliminaryHere you can see the firstpage with an inserted picture.To delete, replace or edit aninserted item• Select the inserted itemand choose an action.To add a new page to your multimedia message• Select .You now have acompletely new page toinsert items onto.To edit an inserted picture1. Select the picture so that itis highlighted.2. SelectEdit image.While editing your pictureyou can add scribble,resize, crop or rotate yourpicture. To undo yourchanges, selectEdit > Undoall.Note If you have acceptedchanges by selecting Done,you will not be able to undothem.To insert an attachment1. While creating your multimedia message, select the tab withthe attachment icon, SelectAdd.2. Select the type of attachment you want to add.3. Select the attachment. Message     Edit              DraftSend1/1 5 Add text above New image Edit image Edit time Delete Copy Message     Edit              DraftSend2/2 5 Add text Add audio Add voiceP800_UM.book Page 63 Wednesday, August 28, 2002 4:19 PM
64 MessagesPreliminaryTo play a received multimedia message• The first time a MMS is opened it plays automatically. Thenext time you open the MMS you can play it by pressing thePlay Button (flip open) or choosingPlayfrom the menu (flipclosed)To set the download method for receiving multimediamessages, manual or automatic1. InControl panel,selectConnections > Messaging accounts >MMS > Download method.–Manualmeans that only headers will be downloaded andcan be viewed. The full message will be downloaded toyour P800 when you selectReceive.–Automaticmeans that the MMS is downloaded and can beread like any other message. There is no intermediatestep.E-mailWriting e-mailsTo write a new e-mail• Select an e-mail account and selectMessage > Newor open anexisting e-mail and selectMessage > New.If you leave the message before sending it, it will automaticallybe stored in theDraftfolder (unless it was created from Outbox).To mark an e-mail as urgent• On the address tab, selectHighin thePrioritylist.Tip If you are creating several e-mails, you can reduceconnection time by saving them toOutboxand then connect andsend them all at the same time.To save an e-mail to Outbox1. SelectSend.2. SelectSave to Outbox > Done.To enter addresses from Contacts when writing an e-mail1. SelectTo:2. In theFind contactdialogue select the check box for eachentry you want to send the e-mail to.3. SelectDone.Tip To enter several addresses manually (without usingContacts) in a text message or e-mail: enter a comma betweeneach address.Sending e-mailTo send an e-mail message• SelectSend > Send immediately.P800_UM.book Page 64 Wednesday, August 28, 2002 4:19 PM
Messages 65PreliminaryNote If your P800 is connected to the Internet when you sendan e-mail, it will be sent immediately and your P800 will remainconnected to the Internet when it is finished. If not, your P800will connect to the Internet, send the e-mail and then disconnect.To save an e-mail message and send it later• SelectSend > Save to Outbox.To move an e-mail message from Outbox to Draft• In your list of Outbox messages, tap to the left of the e-mail(a tick appears), and selectMessage > Move to draft.Sending attachmentsTo attach an entry to an e-mail message1. On the attachment tab, selectAdd.2. Select the type of attachment you want to add.3. Select the item.You can attach entries to e-mails directly from the followingapplications:Calendar,Contacts,Tasks,Jotter,andVoiceandPictures.To attach a Calendar entry to an e-mail message1. Open the entry in Calendar and selectCalendar > Send As.2. Selecte-mail > Done.3. Create the e-mail and selectSend.To attach a Contact to an e-mail message1. Open the contact details for the contact you wish to send andselectContacts > Send as.2. Selecte-mail > Done.3. Create the e-mail and selectSend.Note When you forward an e-mail, you can choose whether ornot you wish to forward the attachment. Large attachmentsincrease the size of an e-mail and consequently the connectiontime needed to send it.Receiving attachmentsAny attachments to an e-mail message are displayed on thetab. The icon next to an attachment in the list identifies thetype of attachment.To view an attachment you need a viewer for that type offile.Your P800 comes with pre-installed viewers for Microsoft®Word, Excel, PowerPoint® and Adobe® Acrobat® (PDF) files.Many more are available from theMultimedia for P800CD.DownloadingYou can choose not to download large e-mails and receive just aheader instead. A header contains the subject line, sender’sdetails, and date, but not the full message.P800_UM.book Page 65 Wednesday, August 28, 2002 4:19 PM
66 MessagesPreliminaryTo specify a size limit for e-mail, above which you only receiveaheader1. SelectControl panel > Connections > Messaging accounts > E-mail(select the e-mail account)>Edit.2. SelectInbox.3. Select an option from theDownloadlist.In your list of messages, headers are denoted by .To download the full message• In your list of messages: Select the header.To download a series of messages1. In your list of messages: select the check box to the left ofeach entry (a tick appears).2. SelectGet & Send.Note If you delete a header the message will no longer bevisible in your message list, but the actual message will not bedeleted until your P800 has connected to the mail server.Downloading e-mails automaticallyYou can schedule your e-mail messages to be downloadedautomatically at certain times.To download your e-mails automatically1. In Control Panel, selectConnections > Messaging accounts > E-mail.2. Select the required e-mail account and selectEdit3. SelectInbox > Schedule.4. Set time or interval for scheduled download and selectDone.Synchronized e-mailsWhen you set up a synchronization with your PC, an account forsynchronized e-mail messages is automatically created on youP800 and indicated by . You can have more than one accountfor synchronized e-mails.If you set up an account to call in for messages that you alsoreceive using e-mail synchronisation, the two accounts willcontain the same messages. Note that there is no connectionbetween the accounts; the copies in each account are separate.Disconnecting and connectingIf your P800 is already connected to the Internet when you sendan e-mail, it will remain connected after sending it. If your P800is not connected before sending an e-mail, it will connect andsend the message and then disconnect.Note You can send text messages while connected to theInternet. If your connection is CSD or HSCSD it must bedisconnected before you can make or receive a phone call. Ifyour connection is GPRS, it may be suspended to enable aphone call to be made or received. You may need to repeat thedata activity (web page fetch, get e-mail) after the call hasended.P800_UM.book Page 66 Wednesday, August 28, 2002 4:19 PM
Messages 67PreliminaryIf your P800 cannot connect to the e-mail account, automaticdownload will fail, and will be displayed next to the e-mailaccount. Check, if downloads are scheduled to occur from thesame location each time, that the reception in that location isgood enough.A scheduled download will fail if your P800 is engaged in avoice call. It may fail if it is connected to another ISP that is,through a different Internet account than specified for the e-mailaccount.If e-mail messages are not downloaded because a scheduleddownload fails, they will be downloaded during the nextsuccessful connection.You can select an e-mail account that uses Dial-Up rather than aGPRS account but automatic download will fail if your P800 isnot connected to the Internet when downloads are scheduled.Area informationArea information messages are text messages that are sent to allsubscribers in a certain network area, for example, a local trafficreport. When you receive an area information message, themessage automatically appears on the screen. When you dismissthe information, it will be stored in theArea InfoInbox until it iswritten over by a new message received on the same channel.Please consult your service provider for more information aboutavailability of area information services and area informationchannel numbering.To add an area information channel1. In Control Panel, selectConnections > Messaging accounts >CBS.2. Check theArea informationcheck box.3. SelectNew.4. Enter the desiredChannel numberand check theSubscriptionactivecheck box.5. SelectDone.To remove an area information channel1. In Control Panel, selectConnections > Messaging accounts >CBS.2. Select the channel to be deleted.3. SelectDeleteand confirm the removal by selectingYesin thesubsequent dialog. Any messages belonging to that channelwill also be deleted.Get and sendTo get and send messages for one specific account1. SelectMessages.2. Select the desired account (text message, multimediamessage or e-mail for example).3. SelectGet&send.P800_UM.book Page 67 Wednesday, August 28, 2002 4:19 PM
68 MessagesPreliminaryTo get and send messages for all your accounts1. SelectMessages.2. SelectMessage > Get&send.Any unsent messages in yourOutboxwill now be sent and new messages not yetdownloaded will be downloaded to your P800.Connecting and disconnecting from theInternetTo disconnect from the Internet1. Select the connection icon (HSCSD/CSD or GPRS )in the status bar.2. The dialogDo you want to disconnect, Yes/Noappears.3. SelectYes.Finding messagesIn both the list of accounts and list of messages,Findsearchesthrough the subject lines, senders’ details and dates.In an open message, Find searches through the text of themessage and highlights the text it finds.You can only search through e-mail messages that have thathave been fully downloaded.Saving contact detailsWhen you receive a message, you can save the contact details ofthe person who sent you the message.To save the sender’s details• In the message selectFrom.Note If you save an address from an e-mail synchronized fromyour company PC, the corporate version of the address ratherthan the full Internet e-mail address, will be saved to Contacts.If the corporate version of the address is not an Internet address(an X.400 address, or just the sender's name, for example), youcan use it to send e-mails from your synchronized account, butyou cannot use it in e-mails that you send directly from yourP800.If your service provider or network isunavailableSometimes a message cannot be sent because your P800 cannotconnect to a network. Please check that the Messaging Accountand Internet Account information in the Control Panel is correct.If you have both GPRS and Dial-Up Internet accounts, trysending the e-mail message using an account of the other type.This works when only the GPRS or the GSM network isavailable (but not both), because the two account types usedifferent networks. GPRS Internet accounts use the GPRSnetwork and Dial-Up Internet accounts use the GSM network.P800_UM.book Page 68 Wednesday, August 28, 2002 4:19 PM
Messages 69PreliminaryIf your e-mail service provider is unavailable and you haveaccess to another account, you can copy and paste the text fromtheunsente-mailinOutboxinto a new one created with the otheraccount and send it.You can cancel sending an e-mail. The message will remain inOutboxand you can send it later.P800_UM.book Page 69 Wednesday, August 28, 2002 4:19 PM
70 InternetPreliminaryInternetYou use the browser to:• Connect to the Internet to view and access Web and WAPpages.• View HTML and WML e-mail attachments.• Receive and view Push messages from your WAP serviceprovider.• Download Java applications, images and audio.The browser can open web pages that do not use Java script orframes.You can save bookmarks to viewed pages, to be able to accessthem easily. You can also save pages in the P800 for off-lineviewing.The browser uses folders for categorizing the information. Thefolders used are bookmarks, saved pages, signed documents,and Push messages.Before you can use Internet, you need to set up an Internetaccount in theControl panel. If you intend to use certain WAPservices it might be necessary to set up a WAP account in theControl panelas well.To start the browser• Start the browser by:– pressing the browser button (the homepage is shown).– selecting in the application picker (thestart page is shown).– selecting in the application launcher (the startpage is shown).– selecting a URL in another application.Note If required, you have to enter your ID and password to login to your Internet account.The application has two views:BrowserviewThe base view of the application, where youcan view Web and WAP pages.Bookmarksview A list view where you can save shortcuts:• toWebandWAPsitesontheInternet• to locally stored pages• todocumentsdigitallysignedbyyou.P800_UM.book Page 70 Wednesday, August 28, 2002 4:19 PM
Internet 71PreliminaryBrowser viewScreenAInternet menu.BEdit menu.CSelect to change to the next page.DSelect to change to the previous page.Edit               0:03Internet      Edit              P800 WEB/WAPInternet BrowserP800 WEB/WAPInternet BrowserAHJKGBCDEFESelect to see the bookmarks view.FSelect to close or get information about the connection.GSelect to go to the home page.HSelect to stop loading the page.JA secure connection is established.KProgress bar, shows the loading progress.P800_UM.book Page 71 Wednesday, August 28, 2002 4:19 PM
72 InternetPreliminaryMenusContext sensitive menusThe context sensitive menu is opened when you keep the styluspressedonalinkorapicture.Menus Option DescriptionInternetOpen page Enter the URL, or select from thedrop-down list.Add tobookmarksEnter the name of the bookmark andselect the folder to save it in.Save page Enter the name of the page and selectthe folder to save it in.Send as Send the current URL via textmessage, IR or Bluetooth wirelesstechnology.Find Enter a text and search for the text inthe page.Find next Search for the next occurrence of thesearch text.Reload page Reload the page.Load all images Load all images of the page.PageinformationShow the page information.EditCut Cut out the marked information froman input field.Copy Copy the marked information.Copy all Copy all information on the page.Paste Paste the copied text into the selectedfield.Zoom Set zoom level.Preferences Set the preferences of the browser.Help Open the help application.Link/picture Option DescriptionText link andpicture linkOpen link Open the active link.LinkinformationShow information on the link.Add tobookmarksAdd the active link URL to thebookmark list.Loaded picture(with or withoutlink)Save image Save the picture in the P800.View image View the picture adopted to thescreen (enlarged or reduced).Copy image Copy the picture to the clipboard.Send image as Send the picture as text message,IR or Bluetooth wirelesstechnology.Not loadedpicture (with orwithout link)Load image Load the picture.Menus Option DescriptionP800_UM.book Page 72 Wednesday, August 28, 2002 4:19 PM
Internet 73PreliminaryIcons within a pagePicture not loaded (can be loaded manually).Damaged picture (not possible to load).To open a specific web page1. SelectInternet > Open page.2. Enter the page URL or select a previously viewed page fromthe drop-down list.3. SelectOpen.Note If images are not loaded, select the picture iconsor selectInternet > Load all images.To navigate through recently opened pages1. Select to move back to previously viewed pages.2. Select to move forward.To save a page for off-line browsing1. SelectInternet > Save page.2. Change the page name, if required, and select a folder to saveit in.3. SelectDone.Tocreateabookmarktotheopenpage1. SelectInternet > Add to bookmarks.2. Change the bookmark name, if required, and select a folderto save it in.3. SelectDone.To download and upload files• When you select a link to a downloadable file, informationon the file is displayed.SelectYesto start the download.• When you select a link for uploading a file, a form forsubmitting the file is displayed.Select the file and selectYesto start the upload.Voice call linkCall Place a call according to the link.New SMS Send an SMS according to thelink.New MMS Send an MMS message accordingto the link.New contact Create a contact with the linkinformation.Mailto linkNew e-mail Send an e-mail according to thelink.New MMS Place an MMS messageaccording to the link.New contact Create a contact with the linkinformation.Link/picture Option DescriptionP800_UM.book Page 73 Wednesday, August 28, 2002 4:19 PM
74 InternetPreliminaryTo view information on the open page1. SelectInternet > Page information.2. Select theContenttab to view the page information.3. Select theConnectiontabtoviewinformationontheconnection.4. Select the Certificates button to view the information on:–Server–UserTo disconnect the connection1. Select the connection icon (HSCSD/CSD or GPRS )in the status bar.2. SelectDisconnect.3. SelectYes.WIM AccessWhen the Browser requires access to the WIM card, forexample when establishing a secure connection, you have toenter the correct PIN.Signing documentsYou have to enter the signing PIN each time a signing operationis going to be performed.User authentication requestWhenever a user authentication is requested, you have thepossibility either to select a certificate and confirm the userauthentication, to select to continue anonymous or to cancel theconnection.IfAlways connect anonymoushas been set, the browser willinstead automatically try to connect anonymous.P800_UM.book Page 74 Wednesday, August 28, 2002 4:19 PM
Internet 75PreliminaryBookmark viewScreenAInternet menu.BEdit menu.CSelect an icon to view information on the bookmark.DChecked bookmarks can be deleted from the Internet menu.ESelect the bookmark text to view the page.Internet      Edit                    AllEricsson Mobile OrganiserLinneaTestSonyEricssonSvD MenyTV4Yahoo711 time tableCSS fontsABCDEFHGFSelect to see the browser view.GFolder menu.HSelect to go to the home page.P800_UM.book Page 75 Wednesday, August 28, 2002 4:19 PM
76 InternetPreliminaryMenusIconsBookmarkSaved pagePush message from the WAP service providerSigned documentTo open a bookmark• Select the bookmark text.The bookmarked item is opened.To view bookmark information• Select the bookmark icon.Information on the bookmark is shown. From theinformation screen you can:– Edit the bookmark.– Delete the bookmark.– Send the bookmark as e-mail, SMS message, Bluetoothwireless technology, IR, or MMS message.To delete several bookmarks1. Select the check box of the bookmarks to delete.2. SelectInternet > Delete.3. SelectYesto confirm.Menus Option DescriptionInternetOpen page Enter the URL, or select from thedrop-down list.New bookmark Enter the URL, the name of thebookmark and select the folder to saveit in.Edit Edit the selected bookmark.Delete Remove the selected bookmark.ViewZoom Set zoom level.Preferences Set the preferences of the browser.Help Open the help application.FoldersAll Show all contacts in the list.Bookmarks Show all bookmarks.Saved pages Show all saved pages.Unfiled Show the bookmarks that are not in afolder.Edit folders Categorize your contacts in folders(business, personal and so on).P800_UM.book Page 76 Wednesday, August 28, 2002 4:19 PM
Internet 77PreliminaryWAP and OTA provisioning messagesWAP Provisioning and OTA messages are received by thebrowser application and stored within the messaging store.These messages are then accessed and managed by Auto setupaccount in Messages. When you select a provisioning or OTAmessage, dialogues are shown to aid the provisioning process.SettingsYou must set up the account for the application to work. Refer tothe Control Panel section for more information. The browser isinitially set up to work. However, you can change these settings,if required.The easiest way to set up Internet and WAP accounts is to askyour Internet service provider to send you an auto setup messagecontaining the required setup information. The accounts willthen be set up automatically on your P800. To guarantee theintegrity of the settings, a PIN may be used.For security reasons, some WAP pages and services, forexample on-line banking, can only be accessed from a particularWAP account. Refer to the Control panel section for moreinformation.Note Proxy settings for MMS message and for a WAP gatewayshould be set in the WAP account. Other proxy settings shouldbe set in the Internet account.To set up the browser1. SelectEdit > Preferences.2. Perform the setup according to the following:Basic settings– Enter the URL for the page to be shown when the browseris started from the application picker; either a page in theP800 or a page on the Internet.– Select the WAP account to be used when the home page isloaded. The accounts are set up in the control panel.– Select if images should be loaded. If images are notloaded, the page will be loaded faster. Non-loaded imagescan be loaded manually when viewing the page.– Select if sounds should be played when the page isopened.– Select if animations should be played when the page isopened.Security settings– Select if you want to save signed documents.– Select if you want to connect without giving away youridentity.– Select if you want to connect using the WIM card.– Select if you want to allow cookies.Advanced settingsP800_UM.book Page 77 Wednesday, August 28, 2002 4:19 PM
78 InternetPreliminary– Select if you want to be able to receive messages fromyour WAP service provider.– Select if you want to automatically open the URL in WAPPush messages.– Select if you want to remove out-of-date messagesautomatically.– Set the size of memory where viewed pages are stored.Stored pages will load faster when you visit them again.– SelectClear memoryto empty the list of pages visited.– SelectClear cacheto empty the cache memory.P800_UM.book Page 78 Wednesday, August 28, 2002 4:19 PM
Calendar 79PreliminaryCalendarThe Calendar function helps you to keep track of appointmentsand events, and you can also set reminder alarms for the entries.There are three types of entries in the calendar:• Appointments - An entry with start and end time (forexample, a meeting).• Reminders - An entry that does not need a specified time (forexample, a birthday). However, you can specify a time ifyou, for example, want to set an alarm. A reminder isdenoted by a .• All day events - An entry with start and end dates but nospecific times. An appointment can overlap an All DayEvent.Different viewsYou can see your Calendar entries in three views with the flipopen: Day, Week and Month.To change view• Select to display the Day view.• Select to display the Week view.• Select to display the Month view.The icon places itself over the selected view.With the flip closed you will see the Day view.Using the calendarTo create a new calendar entry1. SelectCalendar > Newand enter a short description of theentry. This is the description you see in the calendar.2. SelectUnfiled(the folder menu) in the menu bar and select afolder to store the entry in.3. Continue to enter information to the items on the detail page.–Type- Specify if the entry is an appointment, reminder orall day event.–Date- Select the date to get a calendar where you can set adate for the entry.–Time- Set start and end time for the entry.–Location- Specify a location or select a location you haveused before.–Alarm- Select the check box if you want your telephone toalert you about the entry with a sound. Select the time anddate that appears for your settings.–Repeat- Specify if you want to repeat the entry or not.Read more about this below.P800_UM.book Page 79 Wednesday, August 28, 2002 4:19 PM
80 CalendarPreliminary–Private- Select the check box to prevent the task frombeing viewed by others than yourself if you synchronizeyour calendar with, for example, your PC.4. Selectthenotepagetabtowriteanotetothisentry.5. Select to save and close the entry.You should delete old entries regularly to release memory in theP800.To repeat re-occurring entries1. When the entry is open, selectRepeat.– Set repeating toDaily,Weekly,Monthly by date,Monthly byday,Yearly by dayorYearly by date.–Interval- Specify how often the event will happen, forexample, by selectingWeeklyandInterval 2means that theevent will go off every two weeks on the specified day.–Forever/Until- Set the time limit for the alarm or selectforever.2.Select days- Weekly repeated events can be set to occur twiceor more in a week. For example, eating lunch with a friendTuesday and Friday every week.Note You cannot repeat All Day EventsTo edit an entry1. Open the entry by tapping it in the calendar.2. Make the changes in accordance with the instructions above.Managing entriesTo find a certain entry1. SelectCalendar > Find.2. Enter a search word in the menu that appears.3. Select where to search (Everywhere, Future, Past).4. SelectFind. A result list is then displayed.5. Select an entry on the result list to open it.To delete an entry• Open the entry and selectCalendar > Delete entry.A deleted entry may be restored withEdit > Undo delete.To delete all entries in a period of time1. SelectCalendar > Remove entries.2. Select the time period and selectDone. All entries from thattime period are deleted from the Calendar.Note Repeated entries will not be deleted.To copy, cut or paste an entry1. Open the entry.2. SelectEdit > Copy entry/ Cut entry.3. Go to the day where you want to place the entry.4. SelectPaste entry.P800_UM.book Page 80 Wednesday, August 28, 2002 4:19 PM
Calendar 81PreliminaryTo move a Calendar item to Tasks• Open the entry and selectCalendar > Move to Tasks.The entry is moved, not copied.If you move an entry with an alarm, it will also sound in Tasks.To cut or copy Calendar entries to the Tasks application1. Open the entry and selectEdit > Cut entryorCopy entry.2. Open Tasks.3. SelectEdit > Paste entry.Customize the calendarYou can customize the calendar views and alarm settings to suityour own needs.To customize the calendar view, General tab1. SelectEdit > Preferences.2. Select theGeneraltab.Now you can change the following settings:• The hours to be shown in a day.• Standard time intervals in the day view. How detailed thetime is shown in the calendar day view.• Standard entry length.• View hours in week from/to.To customize the alarm settings1. SelectEdit > Preferences.2. Select theAlarmtab.Now you can change the following settings:•Alarm precedes event by- how long before an entry the alarmgoes off.•Alarm sound- select sound for the alarm.To customize the screen1. In calendar, selectEdit > Preferences.2. On theGeneraltab you change the hours displayed in oneday, one week, standard time intervals or standard entrylength.3. On theAlarmtab you set the alarm to proceed an entry in thecalendar.To set colours to your entries using the folders1. In Calendar, select the folders menu to the right in the menubar and selectEdit folders.2. Select a folder and selectEditor create a new folder byselectingAdd.3. Select the colour box and select colour for that folder andselectDone.P800_UM.book Page 81 Wednesday, August 28, 2002 4:19 PM
82 CalendarPreliminaryEntries in a folder with a specific colour appear in that colour inDay and Week views (but not in Month view) so that you cansee the pattern of events in your diary. Reminders appear aswhatever the folder colour.Saving changesIf you leave Calendar while editing an entry, your changes willbe saved automatically.P800_UM.book Page 82 Wednesday, August 28, 2002 4:19 PM
Tasks 83PreliminaryTasksWith the Tasks function you can make a list of things you needto do. The folders help you to separate different types ofactivities.You can move entries between Tasks and the Calendar, which isuseful when you come to schedule a Tasks entry. You can alsosend an entry via text message, IR, Bluetooth wirelesstechnology, multimedia message or e-mail.Using TasksWhen opening Tasks you will have a task list of entered tasks.In this list you can only see a short description of the task. Selecta task to see its full information.A task entry consists of two pages. One detail page where youset the properties for the task, and one page where you can addnotes.To create a new task entry1. SelectTasks > Newand enter a short description of the task.This is the description you see in the task list.2. SelectUnfiled(the folder menu) in the menu bar and select afolder to store the task in.3. Continue to enter information to the items on the detail page.–Completed– Select the check box when task is done.Thiscan also be done directly in the tasks list.–Priority– Set a priority for the task. You can sort the tasksby priority.–Due date– Select the check box to set a deadline to thetask. Select the date that appears to get a calendar whereyou can set a due date.–Alarm– Select the check box if you want your telephone toalert you about the task. Select the time and date thatappears for your settings.–Private– Select the check box to prevent the task frombeing visible when synchronized with tasks in otherdevices, for example your PC.4. Selectthenotepagetabtowriteanotetothisentry.5. Select to save and close the task.Note Delete will delete the whole task entry.To edit an entry1. Open the entry by tapping it in the tasks list.2. Make the changes according to the instructions above.P800_UM.book Page 83 Wednesday, August 28, 2002 4:19 PM
84 TasksPreliminaryManaging task entriesTo open an existing entry• Select the entry in the tasks listTo mark an entry as completed• Select the check box to the left of the entry in the tasks list.To sort the entries• SelectEdit > Sort on priorityorSort on date.To find a certain entry1. SelectTasks > Find.2. Enter a search word in the menu that appears.3. Select in which folder to search or use the default valueAllfolders.4. SelectFind. A result list is then displayed.5. Select an entry on the result list to open it.To make a copy of an entry1. SelectEdit > Copy entry.2. SelectEdit > Paste entry.To delete an entry• Open the entry in the task list and then selectDelete.To restore a deleted entry• SelectEdit > Undo delete.To delete all completed entries• Inyourtasklist,selectTasks > Delete completed.Note Unlike individual entries; when you delete All CompletedEntries, they are removed permanently and cannot be restored.Sending and moving task entriesTo send an entry to another device1. Open the entry and selectTasks > Send as.2. Select how to send entry (text message, infrared, Bluetoothwireless technology or multimedia message) and then selectDone.To move an entry to the Calendar• Open the entry and selectTasks > Move to Calendar.The entryis moved, not copied.To copy a task entry to Calendar1. Open the entry and selectEdit > Copy entry.2. Open Calendar.3. Enter the day you wish the task to appear.4. SelectEdit > Paste Entryin Calendar.P800_UM.book Page 84 Wednesday, August 28, 2002 4:19 PM
Tasks 85PreliminaryNote If you move or copy an entry to the Calendar, it will losethe priority it was assigned in Tasks.If you do not set a due date for the tasks entry, the current datewill be used for the new Calendar entry. If you move or copy anentry with an alarm, the alarm will also be moved to theCalendar.Settings• SelectEdit > Preferencesto do the settings. The followingsettings are available.–Display due dates– Select whether or not to display them inthe tasks list.–Display completed– Select whether or not to display themin the tasks list. This will not delete the completed tasks.–Alarm sound–Selectanalarmsoundfromthelist.Youcantap the trumpet symbol to hear it.P800_UM.book Page 85 Wednesday, August 28, 2002 4:19 PM
86 JotterPreliminaryJotterThe Jotter works as a notebook where you can write notes anddraw pictures. The folders help you to separate different types ofnotes. You can read the notes with the flip closed but you shouldhave the flip open when you work with them.A Jotter entry consists of two pages. One text page and onedrawing page.When opening Jotter you will see a list of entered notes. In thislist you can only see the first words of the text note. Select anote to see its full information.Writing text notesOpen Jotter and select Jotter >New.The new note will automatically start as a text note.Note You write text notes on the text page by using the keys orthe handwriting recognition. See the Getting Started chapter toget more information.Select to get bold text and to create a bullet list.Drawing picturesThe drawing mode gives you several options to draw in differentstyles or colours. The main window is the “paper” where youmay draw with your stylus in the same way as you draw with anordinary pen.Select to change colour.A colour scheme will bedisplayed. Select the colouryou prefer.Select to change thevirtual nib. A list of nibsrepresenting different penwidths appears. Select thenib you want to use.Select to activate theeraser. The eraser is either onor off and it works like thepen. Tap the eraser again tore-activate the pen.A Jotter    Edit                 UnfiledP800_UM.book Page 86 Wednesday, August 28, 2002 4:19 PM
Jotter 87PreliminaryAll jotter files (both text and drawings) are automatically storedin the telephone. The list view will be presented to you as soonas you start the Jotter application.Creating and editing notesTo create a new note1. SelectJotter > Newand enter a note on the text page.The first words will name the note in the jotter list.2. SelectUnfiled(the folder menu) in the menu bar and select afolder to store the jotter in.3. Select the drawing page tab to draw a sketch to this note.4. Select to save and close the note.To edit a note while working with it• For text, selectEdit > RevertThe text returns to its original state. All changes are lost.• For sketches, selectEdit > UndoThis choice removes your last pen stroke. If you change yourmind, selectEdit > Redo.To create a new note from text or sketches copied from anotherapplication1. Open the list of notes and selectEdit > Paste.Note If you paste a sketch over an existing sketch, the existingsketch will be deleted.Create a note from the flip closed mode1. Select Applications >Jotter from the flip closed mode.2. If you have previous notes stored, these will now be listed.Use the Jog Dial to select a previous note in order to open it.3. Press the menu key if you want to create a new note. SelectNew. Insert your text by using the keypad.Managing notesTo delete a note1. Select the note in the notes list.The note opens.2. SelectJotter > Delete note.Sending a noteYou can send a Jotter note by e-mail, text message, multimediamessage, infrared or Bluetooth wireless technology.Tosendanote• Open the note and selectJotter > Send as.The note will be sent as text and/or with the picturedepending on message type:P800_UM.book Page 87 Wednesday, August 28, 2002 4:19 PM
88 JotterPreliminary– textmessage:textonly.– e-mail: text as body and picture as an attachment.– multimedia message: text and picture on first slide.– Bluetooth wireless technology and infrared: completejotter entry, text only or picture only.P800_UM.book Page 88 Wednesday, August 28, 2002 4:19 PM
Games 89PreliminaryGamesThere are two pre-installed games in your P800. TraditionalChess and the card game Solitaire. You will find both games inthe flip open mode’s list view.There are more games available for the P800. You will findthese games on a disc in your original P800 box.Games from third-party developers might be installed in theP800. Games which are not certified by Sony Ericsson or theirpartners are not guaranteed to work correctly or securely, andusers install them at their own risk.ChessYou can play Chess against the P800 or against another P800user. In the latter mode, Chess communicates with the otherplayer through SMS text messaging.On completion of a move, the move data is transmitted in textmessage form to the other player. After transmission, the gamewaits for an incoming text message from your opponent anduses its contents to determine the next move on the board, atwhich point control reverts to you.To start a new game1. SelectChess > New gameto initiate a game.2. Enter details as desired in theNew gamedialogue. You canreturn to these details later.–Name– Give the game a name so you can return to it laterif you have to interrupt it.–Notes–Writeanoteaboutthegame.–You play– Choose to play white or black.–Against– Select the level of your opponent. If you end upwinning all the games, it may be time to select a moredifficult level. Choosing a higher level may, however,force the P800 to take longer to select a move.–Locally– Select if you want to play against your P800 oragainst another P800 user.3. TapPlayto start the game.To play Chess1. Select the piece you want to move.The square where it is standing will now be highlighted.2. Select the square to where you want to move the piece.The square will flash and the selected piece will move to it.Selecting a square that is not allowed for a piece is not possible.P800_UM.book Page 89 Wednesday, August 28, 2002 4:19 PM
90 GamesPreliminarySwitching to flip closed mode closes the game temporarily andsaves the session status. In multi-player mode, an end-game textmessage is sent to the remote player.SolitaireSolitaire is a card game played with a standard deck of 52 cardsandupto4Jokers.Understand the gameThe purpose of Solitaire is to remove all the cards from the pilesto the layout card whilst scoring as many points as possible.Points are awarded for playing pile cards and bonus points areawarded for unbroken, ascending or descending runs of four ormore rank cards.When you cannot play any more cards and cards still remain inthe piles, the game is over. If all the pile cards are removed,bonus points are awarded and the hand is won. You are thenchallenged to play a Hi/Low game to acquire more bonus points.After the challenge, the game continues and a new hand is dealtwith one less Joker.RulesWhen the game starts, 35 cards are dealt from the deck into 7piles of 5 cards. A further card is then dealt face up to from thelayout card.• Cards can only be played from the bottom of the piles.• To play a pile card it must have a face value of one or moreor one less than the layout card.• Aces are low and may not be played onto Kings. Jokers canbe played onto any card and any card can be played onto aJoker.SettingsTo restart the game during a game• Select Solitaire > New.To undo/redo a move• Select Edit > Undo/Redo.To change card backs and playing background• Select Edit >Preferences.If your result is one of the sixth best it will be placed in the highscore table. You can also watch individual player statistics.Play SolitaireSolitaire is only available in the flip open mode.1. Select the icon for Solitaire.P800_UM.book Page 90 Wednesday, August 28, 2002 4:19 PM
Games 91PreliminaryThegamewilleitherstartwithanewgameorwiththelayoutfor an earlier, interrupted game. (The game data is saved onreturn to desktop, when the flip is closed or when the batteryis low.)2. Select the card you want to move and it will be higlighted.3. Select the card where you would like to move the higlightedcard.P800_UM.book Page 91 Wednesday, August 28, 2002 4:19 PM
92 Voice memoPreliminaryVoice memoInVoice Memoyoucanrecordandlistentoyourownsoundrecordings. You can also exchange sound recordings betweenphones via Bluetooth wireless technology, infraredcommunication, e-mail or multimedia message, and use a soundrecording as a ring signal.You cannot name a sound recording that you have recorded.Each memo is identified by the date and time it was recordedand by its position in the list of sound recordings. For example,the third of five sound recordings is identified as3of5on thescreen.Making sound recordingsYoucanrecordandlistentoyourownsoundrecordings,aswellas save and listen to sound recordings that others have sent toyou.You can add a new recording to the end of an existing soundrecording. When you do this, the position of the sound recordingin the list does not change and the original date and time of therecording are retained.To record and save a sound recording1. Select>>New.A new sound recording is created.2. Select and start recording after the beep.3. Select to finish the recording.The new sound recording is automatically saved in the list ofsound recordings with the current date and time.Key functionsTo delete a sound recording1. Select a sound recording you want to delete.2. SelectDelete > Yes.Select... To...start recording a sound.listen to the current sound recording.stop the current sound recording.go to the previous sound recording, in the list of soundrecordings.go to the next sound recording, in the list of soundrecordings.P800_UM.book Page 92 Wednesday, August 28, 2002 4:19 PM
Voice memo 93PreliminaryUsing sound recordings as ring signalsYou can set a sound recording as a ring signal. Choose betweena recording you have made yourself, and a recording you mayhave received via e-mail or in a multimedia message.• To set a sound recording as ring signal see “Incoming callalert” on page 46.Exchanging sound recordingsYou can send and receive sound recordings by Bluetoothwireless technology, infrared communication, e-mail ormultimedia message.To send a sound recording1. SelectVoice Memo>Send as.2. Select how you want to send the sound recording.See the chapter “Messages” on page 59 for further details onhow to send and receive sound recordings.P800_UM.book Page 93 Wednesday, August 28, 2002 4:19 PM
94 CommuniCam and PicturesPreliminaryCommuniCam and PicturesUsing the cameraWith the built-in camera CommuniCam you can take pictures,view them in your phone screen and send them to friends orcolleagues via multimedia messaging. You can also send thepictures you have saved in your P800 to any other PC device viainfrared communication or Bluetooth wireless technology. It isalso possible to exchange pictures between the P800 and theweb.The pictures in your P800 can be set as background pictures orthey can be added to the contacts in your phone book.See chapter “Personalizing your P800” on page 121 to find outmore about using pictures.To take a picture1. Press the camera button to activate the CommuniCamapplication.2. Press the camera button again to capture the image on thescreen.The picture is automatically saved inPictures.To send the picture via multimedia message, selectSend as MMSfrom the flip closed context menu.Open the flip to access the full range of CommuniCam settings.With the flip open, the CommuniCam is activated by selecting>.To view, edit or send the picture, select which takes youdirectly toPictures.Delay timerYou can take a picture with a 15-second delay before the actualpicture is taken. This is a useful function if you want to be in thepicture yourself.To take a picture with delay timer1. Select>.2. SelectCommuniCam > Delay Timer.3. Press the camera button. The timer beeps for 15 seconds anda timer icon is shown before the picture is taken.SelectCommuniCam > Delay Timeragain to deactivate the delaytimer.P800_UM.book Page 94 Wednesday, August 28, 2002 4:19 PM
CommuniCam and Pictures 95PreliminaryPreferencesYou may want to change some of these settings if, for exampleyou are taking a picture in daylight or in dark surroundings. Youcan also choose what resolution (size and quality) you want foreach separate picture.To change preferences for the camera1. Select>.2. SelectCommuniCam > Preferences.3. Select the setting you want to change:To restore default camera preferences1. SelectCommuniCam > Restore defaults.2. SelectYes.PicturesIn Pictures you can manage all pictures saved in your P800. Thepictures can be taken using the CommuniCam, received via e-mail, Bluetooth wireless technology or infrared communication,downloaded via the browser or transferred from your PC via acable. Your P800 supports JPEG, GIF, PNG, WBPM and BMPpicture formats. The pictures can be sent in multimediamessages, added to the contacts in your phone book, or used asbackground image and screensaver.Move the slider to change the brightness of the picture.Move the slider to change the contrast.Turn the backlight On when the light behind the subject isbrighter than the light in front of the subject.Turn the flicker free function On to reduce the effects offlicker from, for example, fluorescent light.Choose white balance according to the lighting conditionsyou are in when taking the picture.Choose quality and size for the picture. High picture qualitymeans larger file size and larger memory size than low picturequality. The picture sizes are displayed in pixels.P800_UM.book Page 95 Wednesday, August 28, 2002 4:19 PM
96 CommuniCam and PicturesPreliminaryList viewIn the list view, you get an overview of all the pictures in yourP800. You can search for specific pictures, zoom the picturenames and sort your pictures by name, date, size or type.Change between a thumbnail view and a list view of the picturesby selecting and .At the bottom of the screen you can see how many pictures youhave saved in your P800.Tip To take a new picture, select which takes you directly totheCommuniCam.Tip Use theFindfunction to locate a certain picture, and theZoomfunction to change the size of the screen fonts.To sort the pictures• SelectEdit >to choose how you want to sort the pictures inyour folders. Picture    Edit               Photos Brioney  Mer de glace Mont Blanc 4 pictures WakeboardP800_UM.book Page 96 Wednesday, August 28, 2002 4:19 PM
CommuniCam and Pictures 97PreliminaryDetail viewIn the detail view, you can rename your pictures and sort theminto folders. This makes it easier for you to keep track of thepictures in your P800.To rename a picture1. SelectPictures > Rename picture.2. Enter a picture name>Done.Note Two or more pictures cannot have the same name.Tip Use theFolderfunction to organize all your pictures. Readmore about organizing files in the chapter General functions.At the bottom of the screen you can see the picture information,for example, the size of the picture and the date the picture wastaken.To change between the actual size of the picture and a size thatfits on the screen, select and .Use and to move between the pictures in the currentfolder. takes you back to the list view.Sending and receiving picturesYou can send pictures to other phones or to a PC via multimediamessaging. You can also save pictures that you have receivedvia e-mail and in multimedia messages.To send a picture• SelectPictures > Send as.See “Messages” on page 59 for further details.To save a picture from a message•See“Messages” on page 59 for further details.To delete a picture1. SelectPictures > Delete picture.2. SelectYes. Pictures    Edit             PhotosMont Blanc21 June 2001  JPG(39 Kb)P800_UM.book Page 97 Wednesday, August 28, 2002 4:19 PM
98 CommuniCam and PicturesPreliminaryIf you want to use one of your pictures in another applicationyou can simply copy it and then paste it into the application ofyour choice.To copy a picture• SelectEdit > Copy picture. A copy of the picture is saved inPictures.Sony Image StationYou can exchange pictures between your P800 and Sony ImageStationontheWeb.UsethebrowserinyourP800togotohttp://www.imagestation.com andsignup.P800_UM.book Page 98 Wednesday, August 28, 2002 4:19 PM
Audio player 99PreliminaryAudio playerYour P800 has mobile music in the form of an audio player.With the audio player you can listen to the latest music tracks, orcomplete albums. You can download tracks to your P800 from aPC, the Internet or Memory Stick, and create different play lists,using the folder function. Your P800 supports a number ofdifferent sound files. Refer to “Technical data” on page 187 formore information on supported file types.List viewIn the list view, you can decide what types of sound files toinclude in your different play lists, and how to play back theplay list you are currently in. You can also easily move betweenthe play list view and the file list view for the current folder.To adjust the volume• Move the Jog Dial up to increase the volume, and down todecrease the volume.Warning! The volume may be uncomfortably loud at thehigher volume levels if the phone is close to your ear. Exposureto excessive volume levels may damage hearing.Play list viewThis view is intended forplaying entire folders. In theplay list view you canPlay, Pause,andStopthe playback of thecurrent folder, and see theduration of the track.Selecting a track and tappingwill Play the selectedtrack and all the followingtracks in the folder. Tapto move directly to thefile list view. Audio    Edit                         allMah Na Mah NaMP3         1:40Sesame StreetElmo's SongMah Na Mah NaBeautiful DayStuck in a moment You...ElevationWalk onWhen I look at The Wo...Standing StillP800_UM.book Page 99 Wednesday, August 28, 2002 4:19 PM
100 Audio playerPreliminaryFile list viewThis view is intended forplaying one file at a time. Inthe file list view you can seehow many tracks you have inthe current folder. Tapping afile name will open the DetailView, and allow you tomanage that file.Tap to move directly tothe play list viewLoopWith the loop function youcan decide if you want tolisten to the tracks in thecurrent folder only once, or ifyou want to loop them until you manually stop the play-back.To loop a list1. SelectAudio > Loop.2. Select the check box.Managing play listsYou can create your own play lists using the folder function. Werecommend that you create folders for play lists on the MemoryStick. In any Audio player view, you can create a new folderusing theEdit Folderscommand in theFolder Menu.Thenyoumove or copy your sound files to the new folder to get your ownplay list. You can add more playlists as long as there is memoryavailable.PreferencesYou can choose if you want all types of sound files to bedisplayed and played in the play lists, or if you want to displayandplayonlyacertaintypeofsoundfile.Thesoundfilesyoucan choose from are the ones that are supported by the P800.To select sound file types for the play lists1. SelectEdit > Preferences.2. Check the boxes next to the sound files you want to includein the play lists> Done.Detail viewThis view is intended for managing one file at a time. You canplay and pause the file by tapping and . Audio    Edit                         all8 tracksElmo's SongMah Na Mah NaBeautiful DayStuck in a moment You...ElevationWalk onWhen I look at The Wo...Standing StillP800_UM.book Page 100 Wednesday, August 28, 2002 4:19 PM

Navigation menu