Sony 7130501 User Manual Exhibit 8 New Part 1
Sony Mobile Communications Inc Exhibit 8 New Part 1
Sony >
Contents
- 1. Exhibit 8 User Manual Part 1
- 2. Exhibit 8 User Manual Part 2
- 3. Exhibit 8 New User Manual Part 1
- 4. Exhibit 8 New User Manual Part 2
Exhibit 8 New User Manual Part 1

1
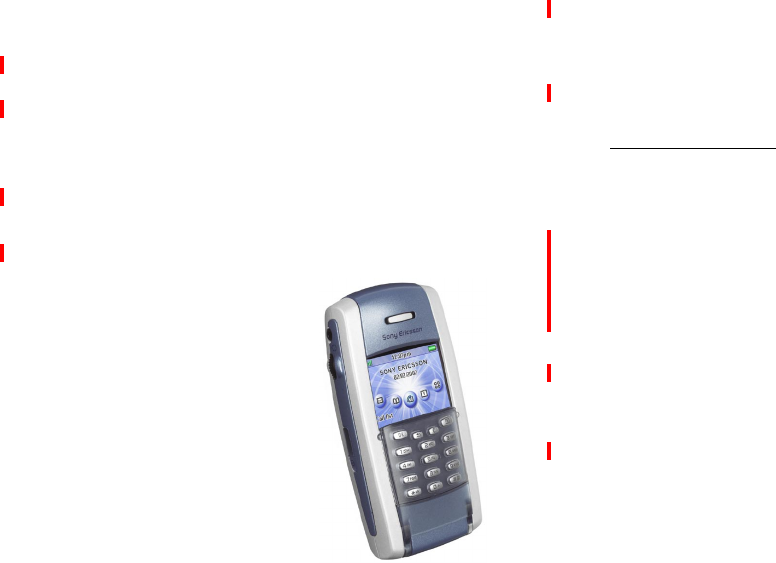
P800
User’s manual
P800_UM.book Page 1 Wednesday, August 28, 2002 4:19 PM
2
Preliminary
Sony Ericsson P800
User’s Manual
First edition (September 2002)
This manual is published by Sony Ericsson Mobile
Communications AB, without any warranty. Improvements and
changes to this manual necessitated by typographical errors,
inaccuracies of current information, or improvements to
programs and/or equipment, may be made by Sony Ericsson
Mobile Communications AB at any time and without notice.
Such changes will, however, be incorporated into new editions
of this manual.
Sony Ericsson Mobile Communications AB, 2002. All rights
reserved.
Publication number:
User’s Manual
EN/LZT1086039P1A
The Bluetooth trademarks are owned by Bluetooth SIG, Inc.
Symbian and all Symbian-based marks and logos are
trademarks of Symbian Limited.
“Memory Stick” is a trademark of Sony Corporation.
Beatnik is a trademark of Beatnik, Inc.
Java and all Java based trademarks and logos are trademarks or
registered trademarks of Sun Microsystems, Inc. in the U.S. and
other countries.
Other product and company names mentioned herein may be the
trademarks of their respective owners.
Copyright SyncML initiative Ltd. (1999-2002). All rights
reserved.
MenInBlack2(2002) Columbia Pictures Industries, Inc.
All rights reserved.
This product contains software copyright Beatnik, Inc. 1996-
2002. The user is granted non-exclusive, non-sublicensable
rights to use a single copy of the Licensed Software solely in
conjunction with the Licensee Product [i.e. the P800]. The user
may not alter, transfer, modify, incorporate into or with other
software or create a derivative work of any part of the Licensed
Software. No ownership rights to the Licensed Software and
Documentation are transferred to the user. The user may not use
the Licensed Software otherwise than as a part of the equipment
or software in which the Licensed Software has been
incorporated or for which they have been delivered. The user
may not remove any proprietary, copyrights, trade secret or
warning legend from the Licensed Software or Documentation
or copies thereof. The user may not copy any Licensed
Software, except for archival purposes. The user may not
decompile or reverse engineer Licensed Software except to the
extent permitted by compulsory law. The user may not furnish
P800_UM.book Page 2 Wednesday, August 28, 2002 4:19 PM

3
Preliminary
any Licensed Programs or Documentation into any country in
vioEnd-user license agreement for SunJavaJ2ME:
1. Restrictions: Software is confidential copyrighted
information of Sun and title to all copies is retained by Sun and/
or its licensors. Customer shall not modify, decompile,
disassemble, decrypt, extract, or otherwise reverse engineer
Software. Software may not be leased, assigned, or sublicensed,
in whole or in part.
2. Export Regulations: Software, including technical data, is
subject to U.S. export control laws, including the U.S. Export
Administration Act and its associated regulations, and may be
subject to export or import regulations in other countries.
Customer agrees to comply strictly with all such regulations and
acknowledges that it has the responsibility to obtain licenses to
export, re-export, or import Software. Software may not be
downloaded, or otherwise exported or re-exported (i) into, or to
a national or resident of, Cuba, Irak, Iran, North Korea, Libya,
Sudan, Syria (as such listing may be revised from time to time)
or any country to which the U.S. has embargoed goods; or (ii) to
anyone on the U.S. Treasury Department's list of Specially
Designated Nations or the U.S. Commerce Department's Table
of Denial Orders.
3. Restricted Rights: Use, duplication or disclosure by the
United States government is subject to the restrictions as set
forth in the Rights in Technical Data and Computer Software
Clauses in DFARS 252.227-7013(c) (1) (ii) and FAR 52.227-
19(c) (2) as applicable.
Any rights not expressly granted herein are reserved.
Note Some of the services in this manual are not supported by
all networks. This also applies to the GSM International
Emergency Number 112. Please contact your network operator
or service provider if you are in doubt whether you can use a
particular service or not.
Important
Your mobile phone has the capability to load, store and forward
additional content, e.g. ring tone melodies. The use of such
content may be restricted or prohibited by rights of third parties,
including but not limited to restriction under applicable
copyright laws. You, and not Sony Ericsson, are entirely
responsible for additional content that you download to or
forward from your mobile phone. Prior to your use of any
additional content, please verify that your intended use is
properly licensed or is otherwise authorised. Sony Ericsson
does not guarantee the accuracy, integrity or quality of any
additional content or any other third party content. Under no
circumstances will Sony Ericsson be liable in any way for your
improper use of additional content or other third party content.
P800_UM.book Page 3 Wednesday, August 28, 2002 4:19 PM
4
Preliminary
Contents
Overview....................................................................... 6
Getting started ............................................................... 7
General functions ........................................................ 18
Phone........................................................................... 36
Contacts....................................................................... 50
Messages ..................................................................... 59
Internet ........................................................................ 70
Calendar ...................................................................... 79
Tasks............................................................................ 83
Jotter............................................................................ 86
Games.......................................................................... 89
Voice memo ................................................................ 92
CommuniCam and Pictures......................................... 94
Audio player................................................................ 99
Video player.............................................................. 104
Viewer....................................................................... 108
Online services.......................................................... 114
Time.......................................................................... 116
Calculator.................................................................. 120
Personalizing your P800........................................... 121
Control panel............................................................. 124
Installing applications............................................... 147
Connecting to other devices...................................... 150
Synchronization and backup..................................... 154
Getting started with Internet and Messages.............. 159
Troubleshooting........................................................ 168
Guidelines for safe and efficient use......................... 172
Terms and definitions ............................................... 179
Technical data........................................................... 187
P800_UM.book Page 4 Wednesday, August 28, 2002 4:19 PM

5
Preliminary
P800_UM.book Page 5 Wednesday, August 28, 2002 4:19 PM
6Overview
Preliminary
Overview
You have bought a very advanced smartphone. To learn to use
the features, you should start by reading Getting started.
The P800 is a full-featured mobile phone, fully integrated with
the other functions of the device, including third party
applications. Like a computer, the P800 has a flexible and
simple way of organizing applications and data. The built-in
memory is available for photos, music, messages or
applications. When space becomes limited, you can move files
to a Memory Stick. You can also send data to another P800, e-
mail, upload it to a website, or transfer it to a PC.
The P800 includes useful features such as:
• Audio player
•Contacts
• Personalized ring signals
• Picture phone book
• Voice dialling and voice answer
• Office handsfree
• Flight mode PDA use
•Games
•CommuniCam
• Video player
The complete P800 documentation consists of the following
parts:
•User’smanual.
• Help texts in the P800.
• Complementary information on the Internet, refer to
www.sonyericsson.com.
• Information on the PC suite and Multimedia CD´s.
This manual contains the following information:
• What you need to know to get started using your P800.
• A presentation of the P800’s general functions.
• A detailed description of each application in the P800.
• How to personalize and set up the functions of the P800, and
how to install applications.
• How to connect the P800 to other devices, and synchronize
its data.
• How to set up the browser and messaging functions.
• How to solve problems that might occur during use.
• Guidelines for safe and efficient use.
• Description of terms and abbreviations used in the manual.
• Important technical information.
P800_UM.book Page 6 Wednesday, August 28, 2002 4:19 PM
Getting started 7
Preliminary
Getting started
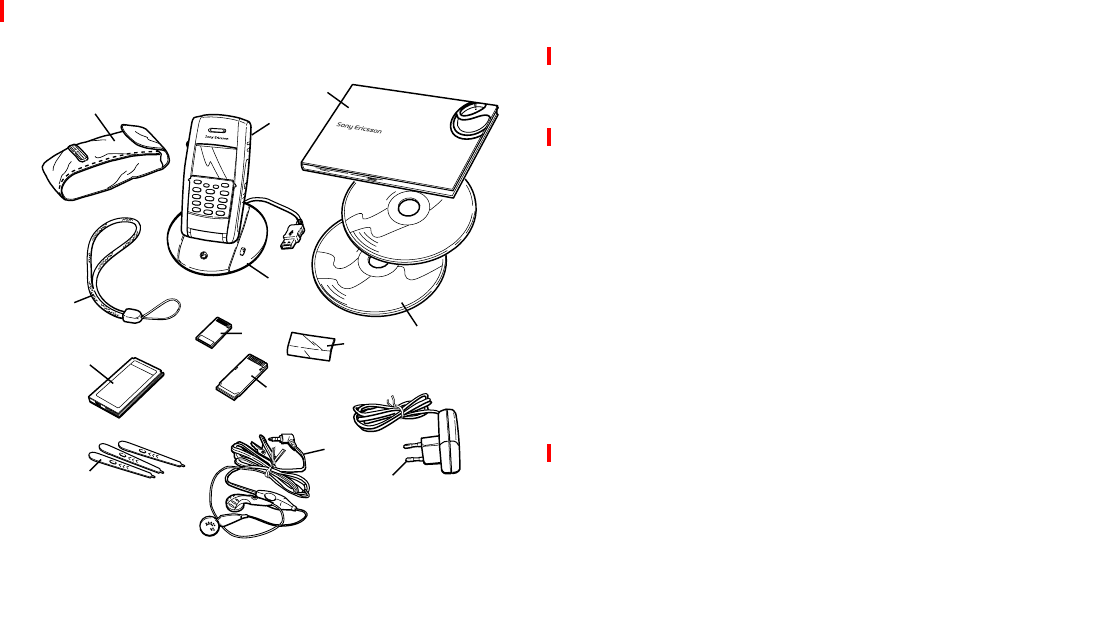
The P800 package
Note If your package does not include all the listed items above,
please contact your retailer.
Note Before you can use your P800 you need to insert the SIM
card, and insert and charge the battery. Always detach the
charger and turn off the phone before you insert or remove the
SIM card.
B
C
A
D
E
F
F
H
J
K
M
SmartPhone
P800
L
G
AP800 with stylus
BBattery
CTravel charger
DSyncstation with USB cable
EStereo headset
FProtective bag and strap
G3extrastyli
HCover - flip replacement
JMemory Stick Duo
KMemory Stick Duo adapter
LUser´s Manual package
M2 CDs, PC Suite for P800 and Multimedia for P800
P800_UM.book Page 7 Wednesday, August 28, 2002 4:19 PM
8Getting started
Preliminary
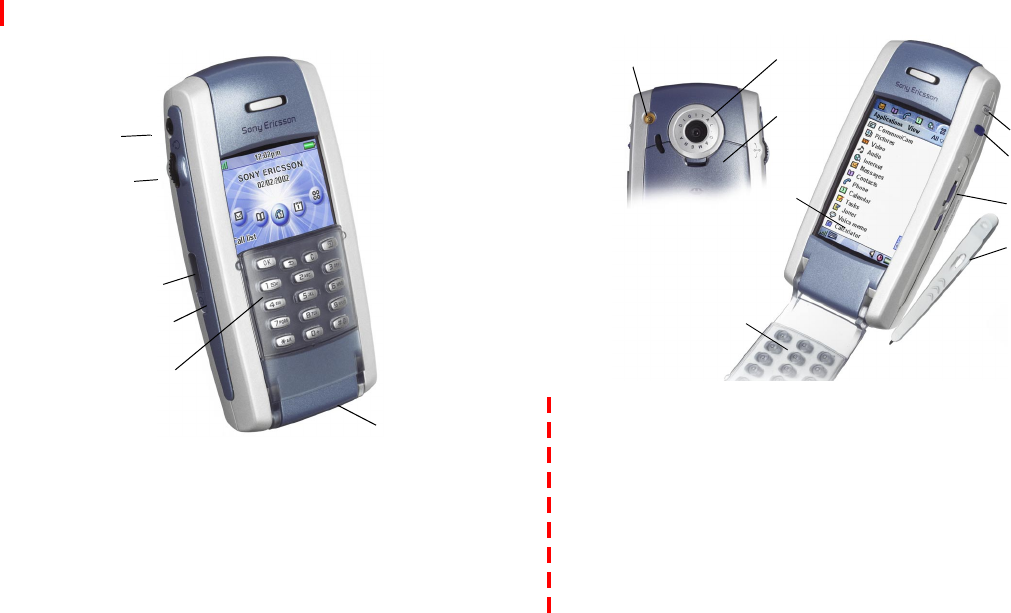
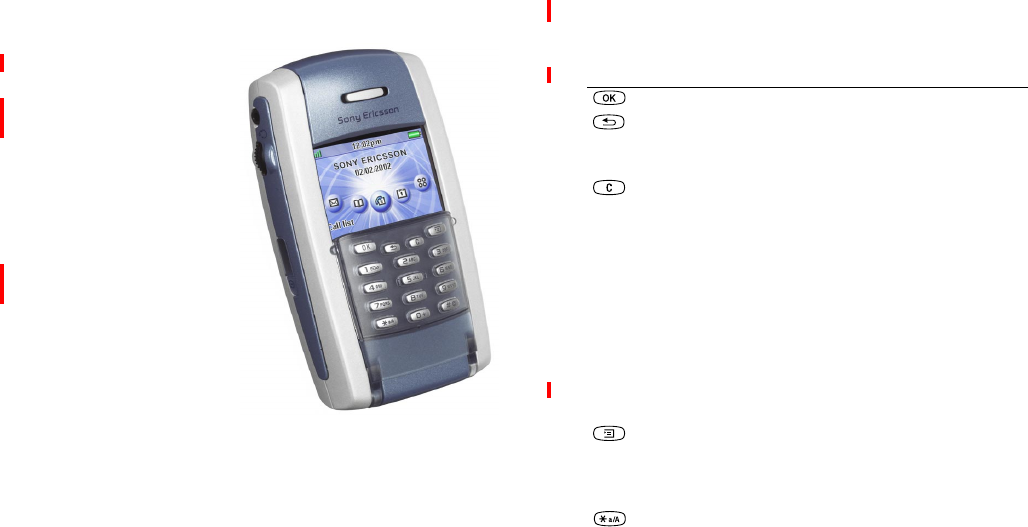
P800 outline
AConnector for stereo headphones
BJog Dial for navigating through menus and more
CInfrared port for communication
DOn/Off button
EFlip with Keypad (in closed position)
FConnector for accessories
B
D
C
A
F
E
AExternal antenna connector (on the rear side)
BCommuniCam lens (on the rear side)
CBattery compartment (on the rear side)
DTouchscreen
EFlip (in open position)
FShutter release for the CommuniCam
GInternet button for activation of the browser
HSlot for Sony Memory Stick Duo™ (under the stylus)
IStylus for writing on the screen
A
F
G
H
I
B
C
E
D
P800_UM.book Page 8 Wednesday, August 28, 2002 4:19 PM
Getting started 9
Preliminary
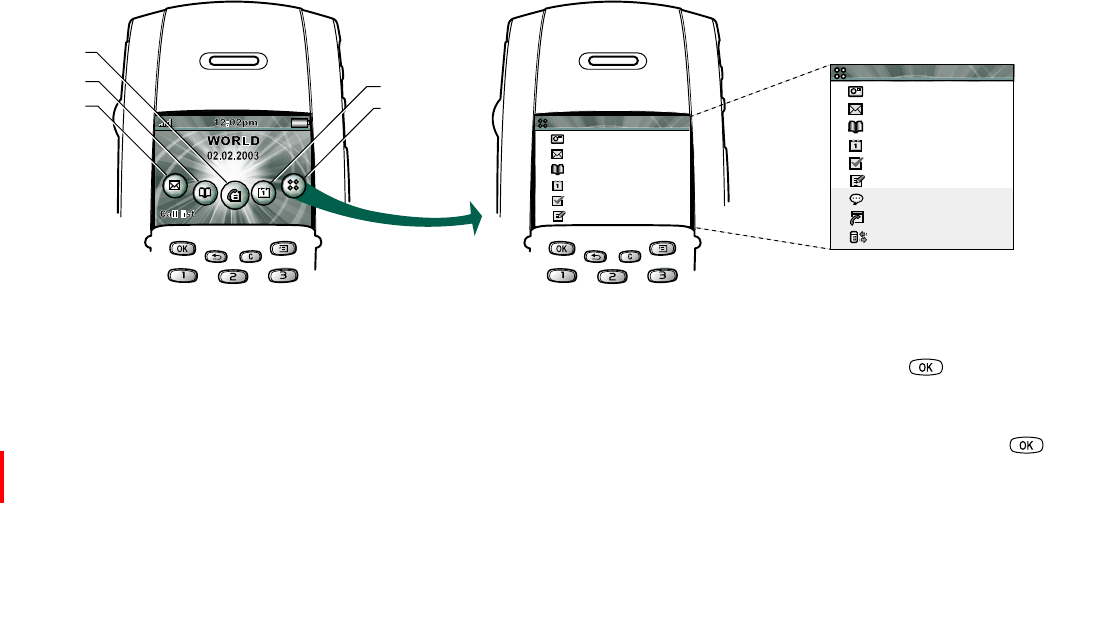
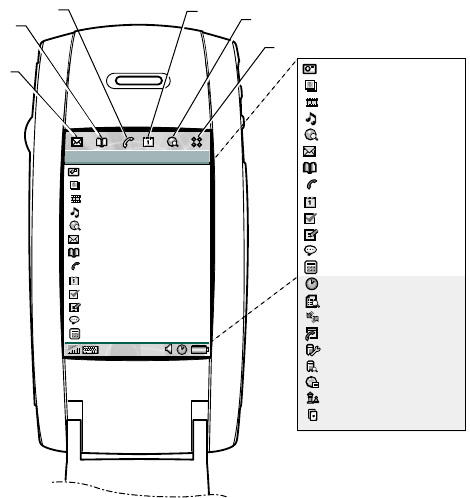
Applications - Flip closed
The P800 works in different operational modes.
With the Keypad Flip closed, the P800 can be used like a
conventional mobile telephone with the added benefit of the Jog
Dial.
You can select between the four most important applications by
rotating the Jog Dial. You start the selected application by
pressing the Jog Dial inward or pressing the key.
If you select the Applications icon, all applications that can be
used with the Flip closed are shown in a list. Rotate the Jog Dial
to select an application, and press the Jog Dial or press the
key to start the application.
At any time you can open the Flip to continue working in the
more comprehensive flip open mode. Closing the flip generally
ends an activity. (Multimedia will however continue playing.)
C
D
E
B
A
1
2
3
4
5
6
CommuniCam
Messages
Contacts
Calendar
Tasks
Jotter
1
2
3
4
5
6
CommuniCam
Applications
Messages
Contacts
Calendar
Tasks
Jotter
Applications
7
8
9
Voice memo
Online services
Connections
AShortcut to the Messages application
BShortcut to the Contacts application
CShortcut to the Call list application
DShortcut to the Calendar application
EShows all Flip closed applications
P800_UM.book Page 9 Wednesday, August 28, 2002 4:19 PM
10 Getting started
Preliminary
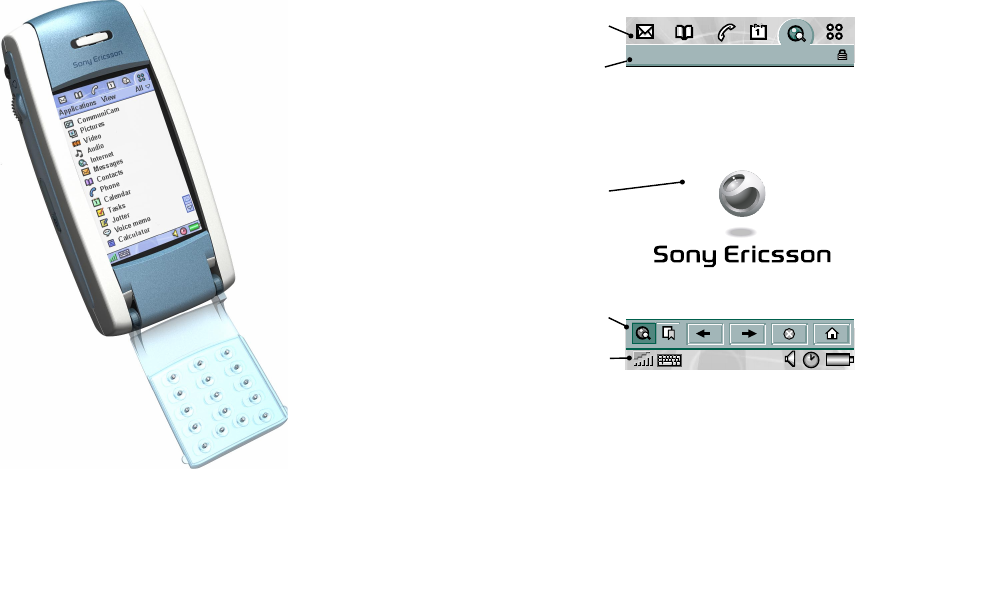
Applications - Flip open
When the Flip is opened, the large touch-screen is revealed. In
this mode, the stylus can be used to navigate and enter data. The
Jog Dial provides further navigation and selection capability.
Text can be entered using natural handwriting on the screen. An
on-screen keyboard is also available at all times. Symbol and
special character keyboards can be selected when required.
With the Flip open, you can select between the five most
important applications, either by tapping the icon with the
stylus, or by rotating and pressing the Jog Dial.
If you select the Applications icon, all applications are shown in
a list. Tap the application with the stylus, or rotate and press the
Jog Dial to start the application.
The Flip can also be removed. A virtual flip is then available,
making it possible to work in both operational modes.
CommuniCam
Pictures
Video
Audio
Internet
Messages
Contacts
Phone
Calendar
Tasks
Jotter
Voice Memo
Calculator
Time
Viewer
Remote Sync
Online services
Control panel
Demo
GPRS data log
Chess
Solitaire
Applications View All
CommuniCam
Pictures
Video
Audio
Internet
Messages
Contacts
Phone
Calendar
Tasks
Jotter
Voice Memo
Calculator
CE
D
F
B
A
AShortcut to the Messages application
BShortcut to the Contacts application
CShortcut to the Call list application
DShortcut to the Calendar application
EShortcut to the Internet application
FShows all Flip open applications
P800_UM.book Page 10 Wednesday, August 28, 2002 4:19 PM
Getting started 11
Preliminary
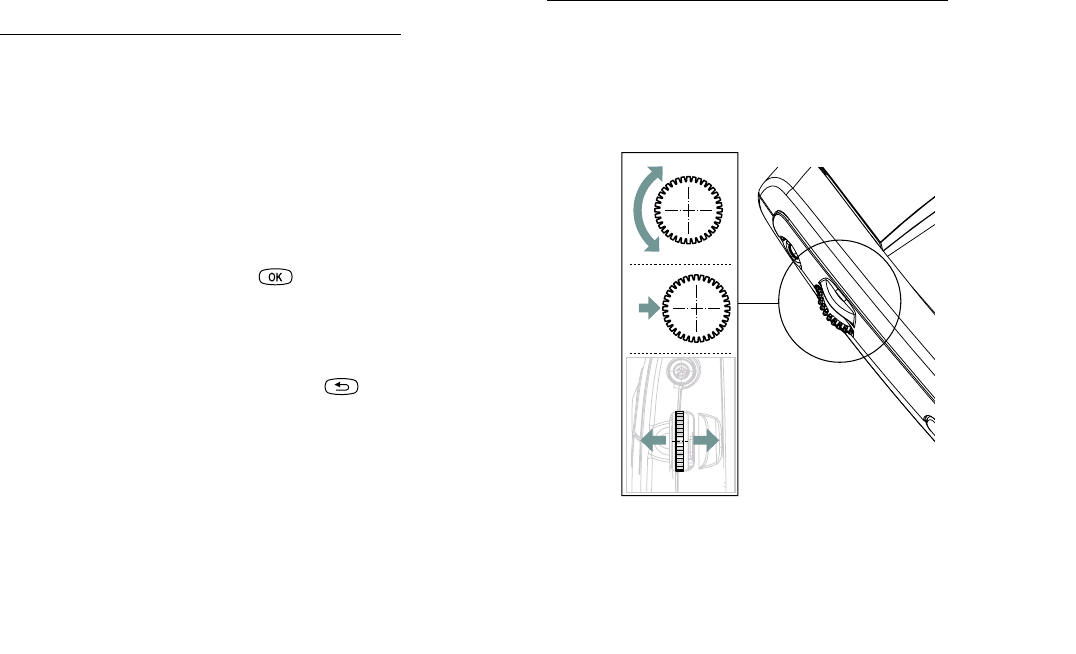
Jog Dial
Action Function
Rotate the Jog Dial (up) Scrolls up items in a list;
Adjusts volume during a call;
moves back a page when
playing a multimedia
message.
Rotate the Jog Dial (down) Scrolls down items in a list;
Adjusts volume during a call;
moves forward a page when
playing a multimedia
message.
Press the Jog Dial (inward) Flip closed: Generally the
same as (select/action).
Flip open: Selects a
highlighted item.
Dials selected phone number.
Press the Jog Dial (away) Flip closed: This always has
thesameactionas .
Goes back to the previous
screen, dismisses dialogues,
andsendsabusysignaltothe
calling party when you
receive a call. It will not end a
call.
Flip open: Scrolls to the left
across the main Application
tabs at the top.
Press the Jog Dial (toward) Flip closed: Always brings up
the Options menu.
Flip open: Scrolls to the right
across the main Application
tabs at the top.
Action Function
Up
Down
Inward
Away Toward
P800_UM.book Page 11 Wednesday, August 28, 2002 4:19 PM
12 Getting started
Preliminary
The SIM card
When you register as a subscriber
with a network operator, you get a
SIM (Subscriber Identity Module)
card. The SIM card contains a
computer chip that keeps track of your
phone number, the services included
in your subscription, and your phone
book information, among other things.
A PIN (Personal Identity Number)
code is supplied with the SIM card
from your operator and must be
entered when switching on your P800.
The SIM card is placed under the
battery.
Tip You can also store SIM card
data, such as contacts, in the phone's own memory. It is possible
to export/import data between these media.
Battery
The battery that comes with your P800 may not be charged. You
should charge the battery for at least 4 hours before you use it
for the first time.
Should you need to discharge the battery, simply use your P800
as usual until the battery runs out of power.
Charge the battery by using the charger supplied with your
P800. You can also use other battery chargers that have been
supplied with other Ericsson mobile phones using the same
connector plug, for example T28, R320s.
Warning! Avoid direct sunlight. Extremely high temperatures
reduce the capacity of the battery permanently.
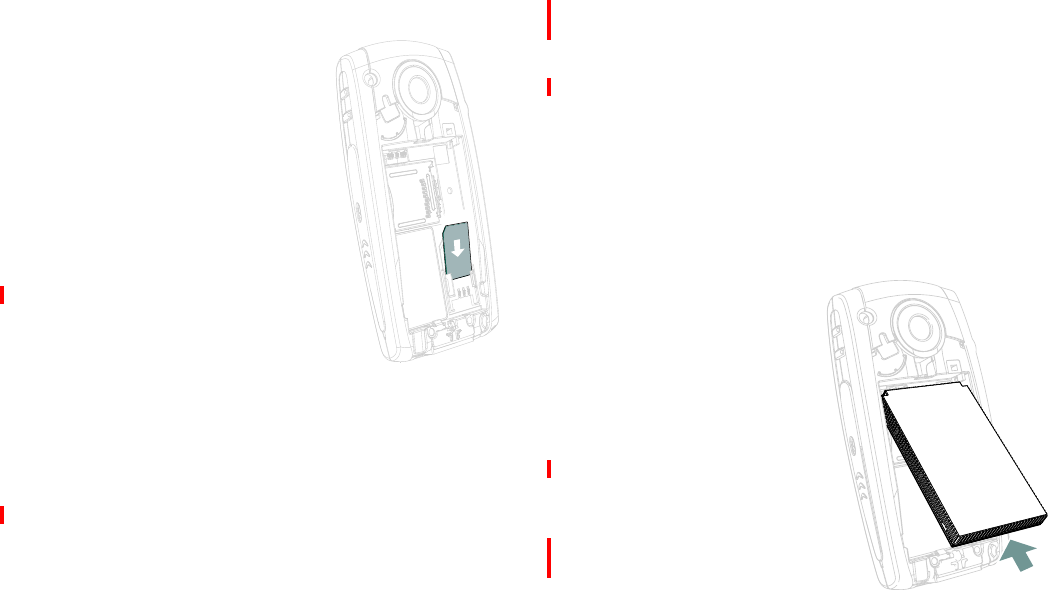
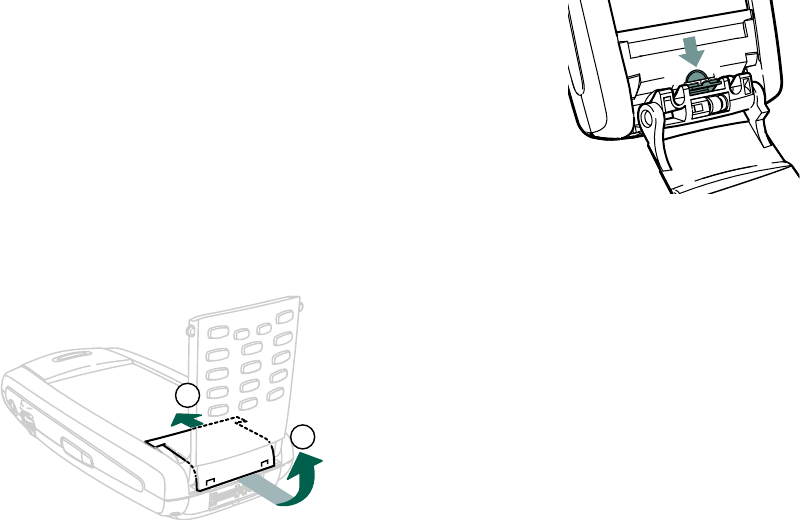
Battery insertion and removal
To insert the battery
1. Ensure that the flip is
closed.
2. Place the battery into the
battery compartment and
close the lid.
To remove the battery
1. Ensure that your P800 is
turned off.
Note It is important that you
always turn off your P800
before removing the battery.
Failure to do so can result in
loss of information.
P800_UM.book Page 12 Wednesday, August 28, 2002 4:19 PM
Getting started 13
Preliminary
2. Remove the battery lid by pulling down the release catch.
3. Take out the battery.
Charging the battery
Warning! The mains (power) supply plug may look different
depending on the mains socket in your country. Do not connect
the AC-plug-in unit to any other item than your Sony Ericsson
Travel Charger or other compatible Sony Ericsson / Ericsson
chargers with the same plug.
• When the battery needs to be charged, a beep is heard, the
indicator light (on the top of your P800) blinks red and a
battery low message appears on the screen.
• The battery can be charged whenever you want without
affecting its performance. However, using your P800 while
charging lengthens the charging time.
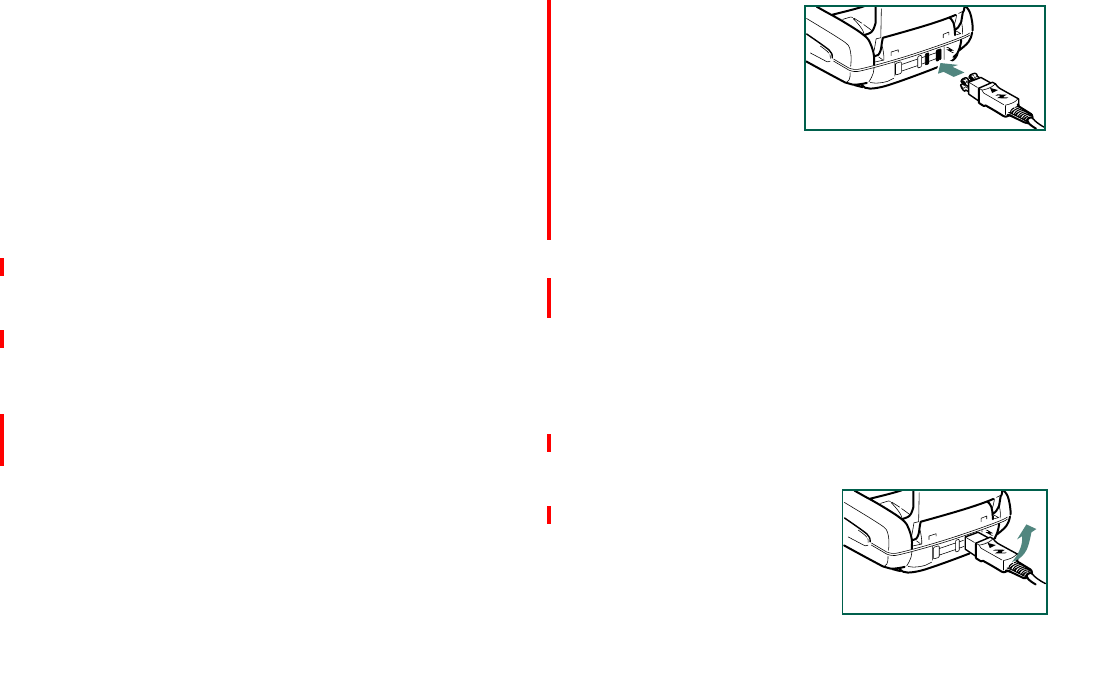
To charge the battery
The P800 can be charged either switched on or off.
1. Make sure the battery is attached to your P800 and the lid is
closed.
2. Connect the charger to
the P800 at the flash
symbol on the P800’s
connector.The flash
symbol on the charger
plug must face upwards.
Warning! If the guidance-
pins on the charger plug are damaged, do not try to connect the
charger. If you do, you might damage the P800.
3. Connect the charger to the mains
Charging is indicated by the battery meter on the screen pulsing
continuously, and the indicator on top of the P800, showing a
steady red light (or green, if the P800 is turned on).
Note When the battery is completely discharged, or new, it may
take up to 30 minutes before the battery charging icon appears
in the screen.
4. Wait approximately 4 hours or until the battery meter on the
screen is full and the indicator on the top of the P800 shows a
steady green light.
5. Remove the charger by tilting
the plug upwards.
P800_UM.book Page 13 Wednesday, August 28, 2002 4:19 PM
14 Getting started
Preliminary
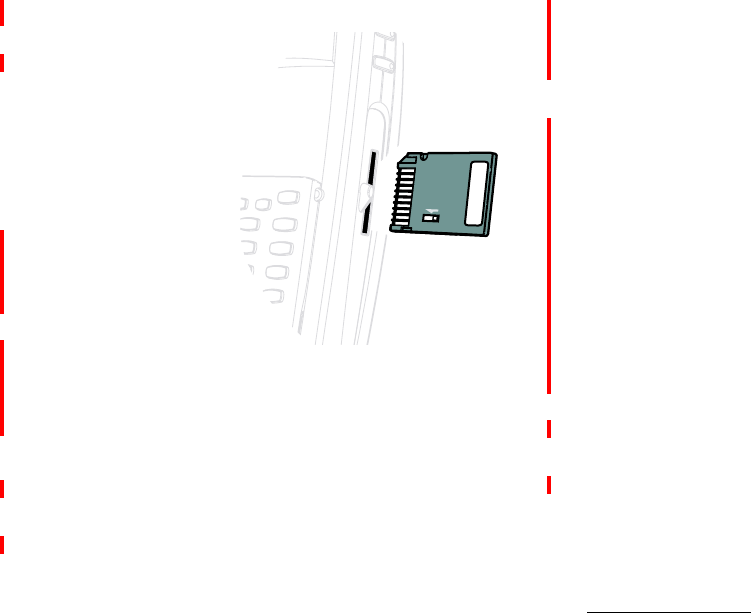
Memory Stick Duo
With the Sony Memory
StickDuo™youcan
easily save still images,
music, voice and
computer data and
applications. If your
phone memory runs low,
you can transfer the
content from the phone
memory to the Memory
Stick Duo. You can then
move the Memory Stick
DuotoanotherP800to
share the information.
When your P800 is
connected to a PC, you can use the P800 to read from and write
to a Memory Stick Duo.
For more information on how to move data to and from the
Memory Stick, refer to “Folders” on page 18.
To insert the Memory Stick Duo
1. Remove the stylus by pushing it upwards.
2. Insert the Memory Stick Duo in the slot, with the connector
side facing you (see picture).
Make sure it is securely inserted. A click should be heard.
Warning! Improper insertion may damage your P800 and the
Memory Stick Duo.
ToremovetheMemoryStickDuo
1. Remove the stylus.
2. Press the edge of the Memory Stick Duo using your
fingernail or the stylus to release it.You will hear a click as it
is pushed out of the slot.
Note Take care when removing the the Memory Stick Duo to
avoid dropping it.
Memory Stick Duo Adapter
Your P800 uses the shorter memory stick variant, Memory Stick
Duo. Memory Stick Duo is around a third the size and half the
weight of a regular sized Memory Stick
Use the Memory Stick Duo Adapter when using your Memory
Stick Duo in a device (camera, MP3 player, for example)
equipped with a regular sized Memory Stick. Insert your
Memory Stick Duo according to the picture on the adapter.
Warning! Do not insert a Memory Stick Duo adapter into a
Memory Stick slot without Memory Stick Duo. This may damage
the product. Please ensure that the adapter's connector side is
inserted first.
For more information about Sony Memory Sticks, visit
www.memorystick.com.
LOCK
P800_UM.book Page 14 Wednesday, August 28, 2002 4:19 PM
Getting started 15
Preliminary
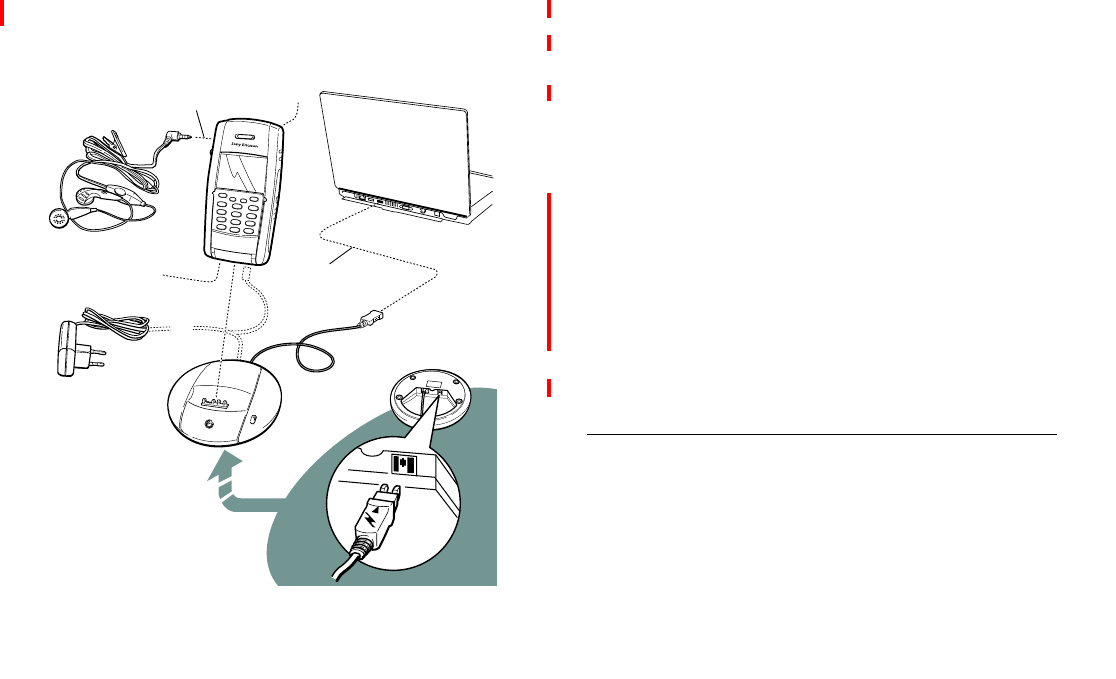
Connecting the accessories
The wrist strap is placed in the holder beneath the battery and
routed out through the slot in the battery compartment lid.
Warning! If the guidance-pins on the charger plug are
damaged, do not try to connect the charger. If you do, you might
damage the P800.
Services
You need the following services to use the functions of the
P800:
CE
B
D
A
AThe travel charger is connected to the desk stand or to the P800.
BThe USB cable from the desk stand is connected to a PC.
CThe headset is connected to the P800.
DOther accessories can be connected to the connector at the bottom.
EAn external antenna can be connected to the connector at the rear.
To use... You need...
telephony GSM subscription
text messaging (SMS) GSM subscription
multimedia messaging (MMS) MMS account, GSM data subscription
e-mail e-mail account, GSM data subscription
Internet Internet account, WAP account, GSM
data subscription
data communication GSM data subscription
P800_UM.book Page 15 Wednesday, August 28, 2002 4:19 PM
16 Getting started
Preliminary
Although the manual covers the modes of operation in detail, it
is very important to remember that many of the functions
described are dependent on them being available from your
network operator and Internet service provider. Please consult
your network operator and Internet service provider for more
information about the services that are available to you.
Note To keep track of the cost using data connections, a GPRS
data log is available. See “GPRS - data logs” on page 166.
First time start-up
1. Press the On/Off button to turn on your P800, keeping the
flip closed.
2. Enter your PIN when the dialogue box appears and press
,press to delete a digit.
When the P800 is turned on for the first time, the
Setup Wizard
will be started automatically, and guide you through the
essential settings. Follow the instructions on the screen.
The different steps in the Setup Wizard
1. You will be prompted to open the flip.
2. Information on the wizard.
3. Calibrating the screen.
4. Setting the location.
5. Setting date, time and formats.
6. More information about the Jog Dial, text entry and status
bar.
7. Setup complete.
Demo application
The Demo application demonstrates some of the most common
functions in your P800.
To start the Demo
1. Select the Applications icon .
2. Select the demo icon .
The demo is started.
To stop the Demo
• Tap the screen or rotate the Jog Dial to stop the demo. The
demo is also stopped at:
– An incoming call.
– An incoming text or multimedia message.
Making and receiving calls
To make a call
• Entertheareacodeandphonenumber,andpresstheJogDial
inward or press to make the call.
P800_UM.book Page 16 Wednesday, August 28, 2002 4:19 PM

Getting started 17
Preliminary
To end a call
• Press the Jog Dial inward or press to end the call.
To receive a call
• Press the Jog Dial inward or press to answer an
incoming call.
Care instructions
Your P800 is a highly sophisticated electronic device. To get the
most out of it, please make sure that you follow this advice:
• Keep the P800 in its protective bag when not using it.
• Use a commercial glass screen cleaner sprayed on a cloth,
when you clean the screen.
• Use only the stylus to tap on the screen.
See chapter “Guidelines for safe and efficient use” on page 172
for more information how to take care of your P800.
P800_UM.book Page 17 Wednesday, August 28, 2002 4:19 PM

18 General functions
Preliminary
General functions
This chapter describes a number of general functions that are the
same for many applications in your P800.
Icon views
The P800 can present the applications in two ways:
• List view (small icons appears in one column)
• Icon view (large icons in two columns)
Folders
On the right of the menu bar is the folders menu.Foldersare
used to organize user data, for example contacts, jotter entries,
or task lists, into user definable sets.
Each application has its own set of folders: a folder created in
one application is not visible in another.
In list view, the folder menu is used to organize your entries. In
detail view, the folder menu allows you to change the folder of
the current item.
Every item created in an application is always assigned to a
single folder, by default the same folder as displayed in list (or
detailed view). There are three recommended folders for most
applications:
Unfiled, Personal,
and
Business
.
In list view, there is a super-folder called
All,
which, when
selected, displays items from all folders.
All
is the default value
in list views and when an application is first launched.
You can add folders or change the names of existing folders
through the
Edit Folders
menu item. A folder can only be deleted
if it is empty. Not all folders can be deleted.
You use folders to move items to and from the Memory Stick.
When a Memory Stick is available in the P800, the folders on it
are shown in the folders menu.
Common functions
Zooming
You can change the size of the screen fonts between Small,
Medium or Large. From the menu bar, select
Edit > Zoom.
Find
The Find function searches through all the items stored in an
application. The standard
Find
dialogue contains a single text
edit box with two buttons,
Find
and
Cancel
. Selecting
Find
starts
the search,
Cancel
closes the
Find
dialogue.
P800_UM.book Page 18 Wednesday, August 28, 2002 4:19 PM

General functions 19
Preliminary
In some applications, for example Messaging, Find may be
more complicated:
• the size of each message is so large that you may want to
restrict the search to the current message only.
• folders are potentially more significant, so you may want to
restrict the search to the current folder only.
Sorting your files
You can sort the files you have stored in your P800. By sorting
your files, you choose in which order you want the files to be
displayed on the screen. You can choose between four different
ways:
Type: The different file types are sorted together in the list.
Size: The largest file (size in kB) is displayed at the top of the
list, and the smallest at the bottom of the list.
Date: The latest file you saved in your P800 is displayed at the
top of the list.
Name: The files are displayed in alphabetical order, from top to
bottom.
Note Sort is not valid for all applications.
Beaming
It is very convenient to be able to exchange data using infrared
or Bluetooth
™
wireless technology when “beaming” between
two devices that support the exchange standards.
For example, one user selects an item in the Pictures application
and then enters the menu
Pictures > Send as > IR
,andthetwo
users align their devices.
The receiving user usually does not have to initiate anything
provided that the infrared or Bluetooth wireless technology is
enabled. As a precaution, however, the recipient does have the
opportunity to accept or reject the item sent and has the option to
view it after saving.
Save
saves the item into the destination application and then
optionally opens the application to show the item just saved.
Methods for storing data
Your P800 can store data in three different ways:
• SIM card (Only for phone numbers and associated names).
See “Managing the SIM phone book” on page 56.
• Phone memory (12 MB of capacity for storing pictures,
messages, music, applications and so on).
• MemoryStick(Expansionmemory.Thereareseveral
alternatives with different amounts of memory on the
market). See “Folders” on page 18.
P800_UM.book Page 19 Wednesday, August 28, 2002 4:19 PM

20 General functions
Preliminary
Getting help
From the menu bar select
Edit > Help
or
View > Help
to get to the
inbuilt help system. The help system uses two views:
•TheTopics view shows all available topics, for example both
the topics connected to a specific application and general
topics.
•TheDetail view presents the title and text of a single topic.
The Topics view allows you to select a topic, which opens the
detail view/text view and displays the selected topic. You can
also set the zoom level and exit the Help system.
Also, in many dialogue boxes it is possible to select the help
icon in the upper right corner to get help.
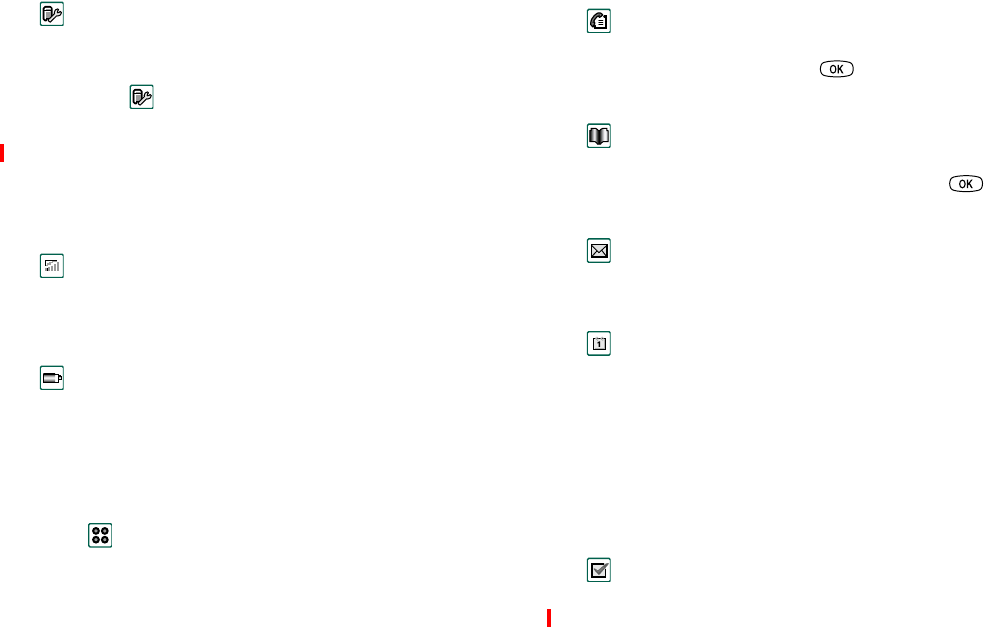
Icons
Application icons
An application icon starts its application when you select it.
Below are the default application icons that you can see in the
screen when the flip is closed, or in the application picker when
the flip is open. A list of more application icons is available in
the application launcher.
Phone
Contacts
Messages
Calendar
Internet
Application launcher
Call list
P800_UM.book Page 20 Wednesday, August 28, 2002 4:19 PM
General functions 21
Preliminary
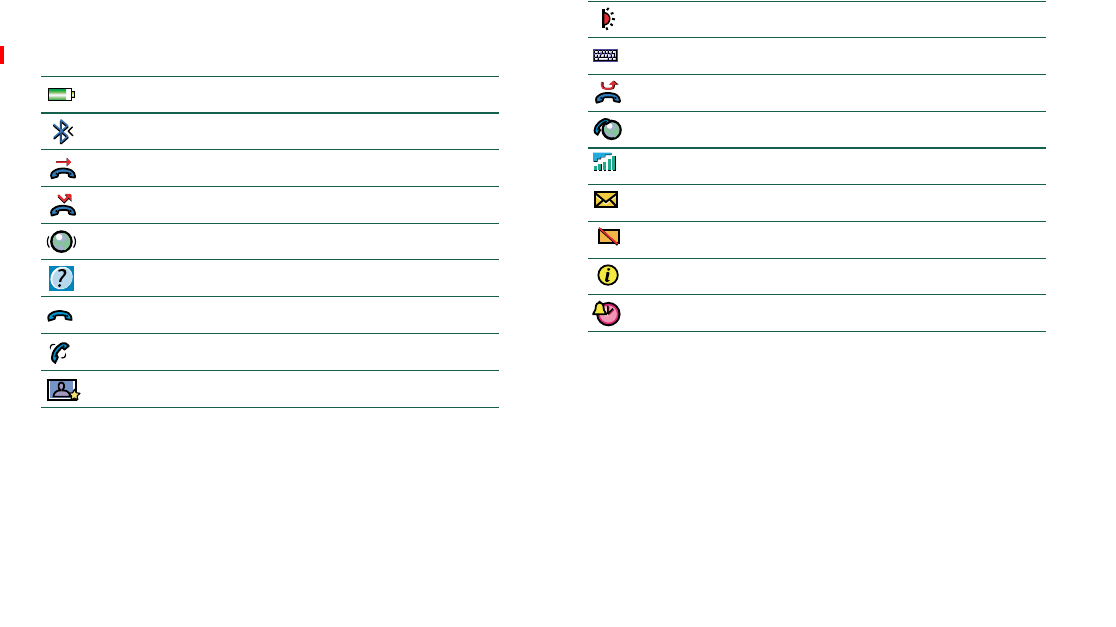
Indicators and status bar icons
These icons appear in the flip closed standby screen or in the
status bar when the flip is open. They indicate status for several
functions or that something has happened, for example, the
P800 has received a text message. .
When the flip is open, you can often select the icons to get more
detailed information or start an application.
Incoming call
GPRS
Bluetooth on
Divert all calls notification
Battery strength
Help
Held call
?
Calls screened
Speed dial entry
Ongoing data call
Missed call
SMS notification
Signal strength, GPRS active
Status
Infrared port active
Time, alarm set
Keyboard
SMS overflow
P800_UM.book Page 21 Wednesday, August 28, 2002 4:19 PM
22 General functions
Preliminary
Flip closed - overview
This chapter describes
how your P800 works
with the flip closed. With
the flip closed the P800
behaves very much like
an ordinary mobile
telephone.
The screen is not touch
sensitive when the flip is
closed; therefore you
operate the P800 by
pressing the keys.
Keypad
Key Function
OK Enter selected function.
BACK
•Returntopreviousmenu.
•PressandholdtoreturntoStandby.
CLEAR
• Delete entered characters/digits from the screen
one by one.
•Pressandholdtodeleteanentirerowofentered
characters/digits.
• Delete an entry from Contacts, Calendar, Tasks,
Voice memo, and Messaging.
• Press and hold to disconnect the microphone
(mute function) when a call is in progress.
• Mute the ring signal during an incoming call.
• Press and hold to put the P800 into silent mode,
when in the standby mode.
OPTIONS
• Open the menu with different options for
different applications.
• Press and hold to open Applications.
ASTERISK
• Enter the character
*
.
•Pressandholdtoenterap(pause) character.
•Pressandholdtoswitchbetweendifferentinput
modes (Abc, 123 ... ).
P800_UM.book Page 22 Wednesday, August 28, 2002 4:19 PM
General functions 23
Preliminary
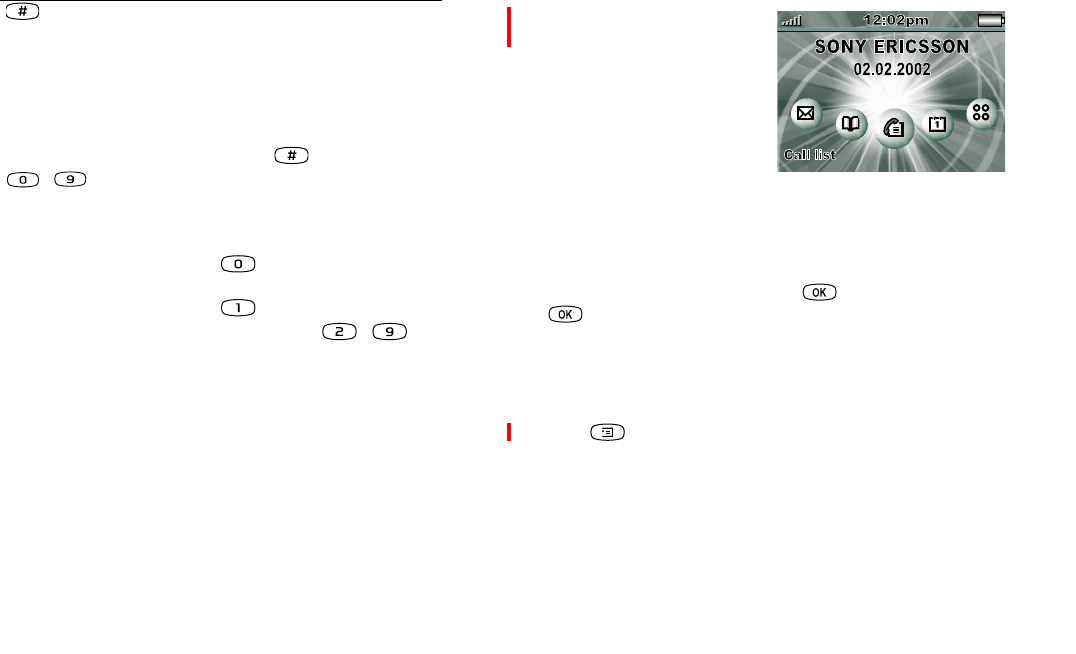
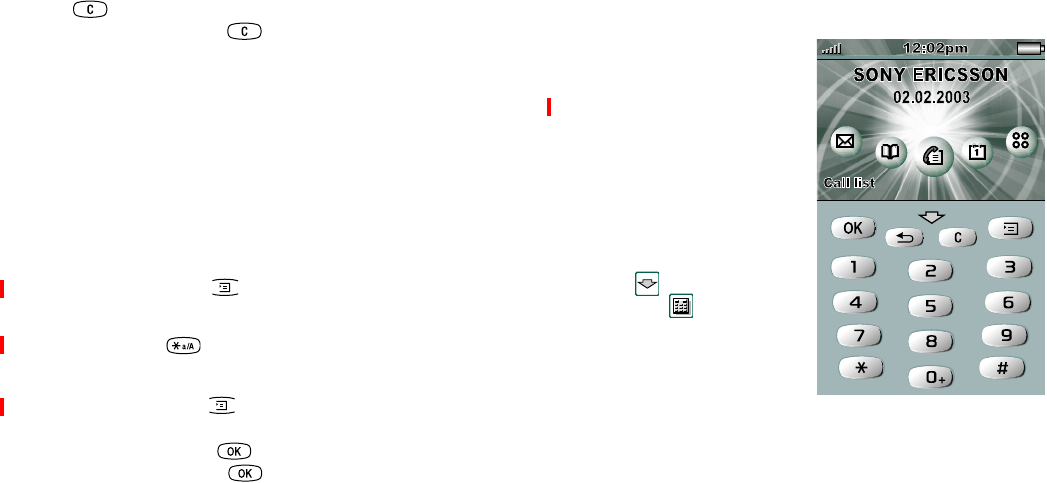
Standby view
When you switch your P800
on, the standby view is
displayed. This view is
displayedonlyinflipclosed
mode and contains
configurable shortcuts (see
the section Application
shortcuts below) to other
applications. Also, when
closing the flip, you always return to the standby view.
There are five application shortcuts in the standby view. The
selected application is highlighted and its name is shown at the
bottom left of the screen above the key. Press
Jog Dial
or
to start the application.
There are also 6 icon positions, 3 at each side of the screen, for
temporary indicators such as missed calls and unread messages.
Options menu
Press or press the Jog Dial towards you to open the
standby options menu to get access to keylock, battery status,
missed calls and more.
Application shortcuts
It is very convenient to have shortcuts to the applications you
use most frequently in the standby view. Change the shortcuts in
the following menu in flip open mode:
HASH /@
• Enter the character #.
• Press and hold to see a list with special
characters.
• Terminate the input of PIN and security codes.
• Retrieve a phone number from the SIM card
phone book (enter the number of the memory
position and then press ).
-NUMERIC KEYS
• Enter the digits 0 to 9.
• Enter associated characters or perform
associated functions, for example:
Press and hold , to enter the international
character '+'.
Press and hold , to dial your voice mail.
• Press and hold any of the keys - to
reach a contact beginning with a specific letter.
Key Function
P800_UM.book Page 23 Wednesday, August 28, 2002 4:19 PM
24 General functions
Preliminary
Control panel > Device > Flip closed shortcuts
Background Image
You can change the background image (wallpaper) in flip open
mode, go to
Control panel > Device > Display.
Tip More background images can be found on the Multimedia
for P800 CD, delivered with your P800.
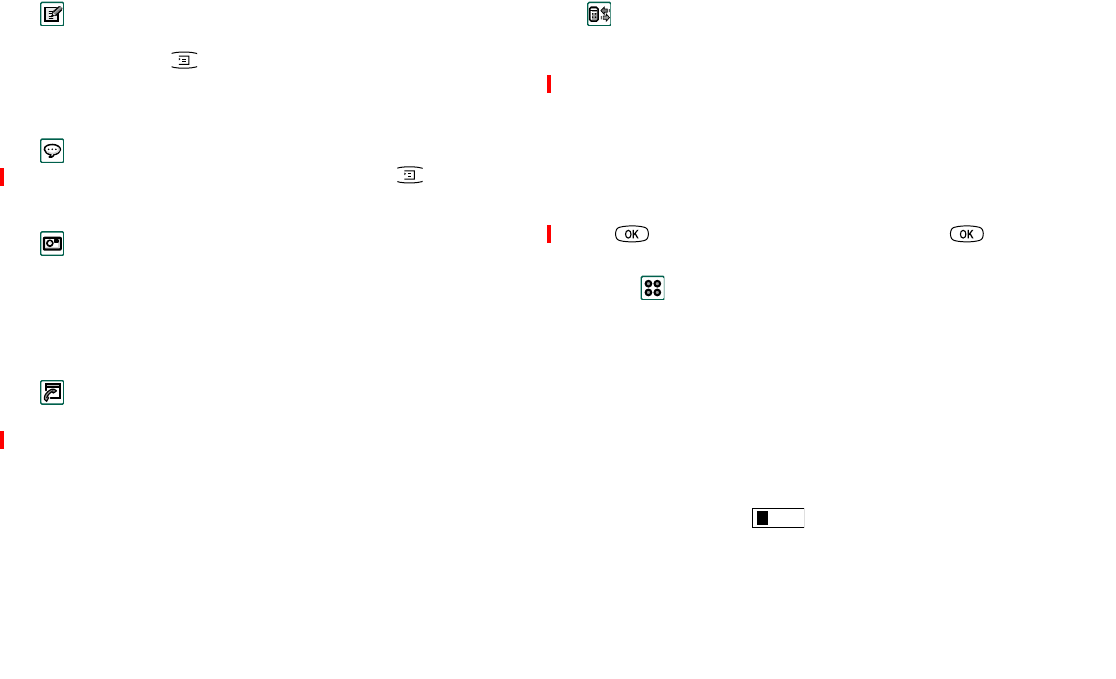
Status bar
The status bar on top of the screen displays:
Signal strength. Varies from very low to full signal.
Indicates also the status of your GPRS connection.
12:02 pm
Time. Shows the current time and indicates activated
alarms.
Battery. Indicates current battery level (zero to four units)
and charging status.
Note More information about battery status and GPRS can be
found in Options menu > Status
Applications in flip closed mode
Select to list all the applications that can be started with the
flip closed.
Call list
The Call List displays the latest calls either outgoing, incoming
ormissed.PresstheJogDialor tocallselectedentry.
Activated from the standby view only.
Contacts
Displays a list of your contacts. Select a contact to view
associated contact data. Then press the Jog Dial or to make
a call.
Messages
You can read, create, send and delete text (SMS), multimedia
(MMS) and e-mail messages in this view.
Calendar
The Calendar view displays entries, if any, for the current day.
UsetheJogDialtogetmoreinformationaboutaselectedentry
or to change day.
Example
Tuesday 29 January
11:00 Lunch with A. Eriksson
14:00 Project meeting
Tasks
Keeps track of your tasks. Set due date, alarm, priority, and so
on, for all your tasks and let your P800 remind you on time.
P800_UM.book Page 24 Wednesday, August 28, 2002 4:19 PM
General functions 25
Preliminary
Jotter
Displays a list of stored entries. In detailed view, the whole entry
can be seen. With , it is possible to edit or make a new entry
via the keypad. It is not possible to make, edit or view a drawing
in this mode.
Voice Memo
Your P800 can be used like a voice recorder. Use to play,
create a new or delete an old memo.
CommuniCam
In CommuniCam view the screen becomes a viewfinder. Press
the CommuniCam button or the Jog Dial to take a photo.
Tip TheCommuniCambuttonisalsoashortcuttothe
CommuniCam application.
Online services
Your service provider might offer different services reachable
from your P800. For example: weather forecasts, financial
information or newsletters. Contact your service provider for
more information.
Connections
Set the way you communicate with your PC or other device.
Select between infrared, Bluetooth wireless technology and
cable. In the cable menu, you also select whether the P800 is
going to operate as a modem or not.
Selecting and starting applications
Rotate the Jog Dial to select an application. In the standby view,
the selected application becomes coloured and slightly enlarged
and the name is shown down to the left of the screen, just above
the key on the keypad. Press the Jog Dial or on the
keypad to start the selected application.
Tip In view, it is also possible to start an application by
pressing its specific number.
Closing applications
The current application automatically closes and the data is
saved when you return to the standby view or switch to another
application.
Entering text in flip closed mode
When you press a key, a pre-edit box with different characters is
shownonthetoolbar:
If the same key is pressed again, the next character in the pre-
edit box will be selected.
wxyz9
P800_UM.book Page 25 Wednesday, August 28, 2002 4:19 PM
26 General functions
Preliminary
The key deletes the character to the left of the cursor. If
continuously pressed, the key deletes several characters
andthenwholewords.
Inserting text
There are four text entry types:
• Abc – initial uppercase letter, the rest lowercase. Default for
each new text edit field.
• 123–numericentryonly.
• ABC – uppercase entry.
• abc – lowercase entry
In text edit mode, press and choose
Text Options > Input type
to select text entry type.
A short press on toggles the input types in text edit mode.
Inserting symbols
In text edit mode, press and choose
Text Options > Add symbol
to select an item from the symbol selector table. Use Jog Dial to
select the row and press . Then scroll within the row to
select a symbol and press .
Virtual flip
The virtual flip is to be used
when you have physically
removed the flip and want to
use your P800 in flip closed
mode.
The virtual flip gives you the
same functionality as the real
flip keypad. Enter numbers
and characters using your
stylus.
Select to open the virtual
flip. Select to close the
virtual flip.
See the chapter “Removing
and attaching the flip
keypad” on page 32” on how
to remove the flip and
activate the virtual flip.
P800_UM.book Page 26 Wednesday, August 28, 2002 4:19 PM
General functions 27
Preliminary
Flip open
This chapter describes what functions are available with the flip
open.
Screen areas
In the flip open mode the screen is touch sensitive. The screen is
divided into a number of areas, see the figure and table below..
Item Description
AApplication picker Displays six icons for quick and easy access to
the most common applications, customizable.
Internet Edit
P800 WEB/WAP
Internet Browser
P800 WEB/WAP
Internet Browser
A
B
C
D
E
P800_UM.book Page 27 Wednesday, August 28, 2002 4:19 PM
28 General functions
Preliminary Navigation
In flip open mode navigation is carried out using the stylus and
tapping selected items and by using the Jog Dial, see the chapter
“Jog Dial” on page 11”.
Calibration
The screen is pre-calibrated to factory settings. However, this
may not necessarily agree with how you use the stylus.
Calibration is calculated by the average stylus tap speed and the
location of the stylus tap on selection.
To recalibrate the screen
1. Select
Applications > Control panel > Device > Display.
2. Tap
Calibrate
and the calibrate screen appears.
3. Tap once at the centre of each of the three calibration points
in numerical order.
4. Tap
Yes
or
No
to accept or reject the new settings.
To restore the factory settings
1. Select
Applications > Control panel > Device > Display.
2. Tap
Calibrate
and the calibrate screen appears.
3. Press Jog Dial - the text “Factory settings restored” is shown
and you are taken back to the screen.
BMenu bar Usually, contains two menus on the left, and a
folder menu on the right.
The two left-hand menus always have the same
form:
•theapplication menu,whosenameisalways
the same as the application, and which
contains the system services used by most
applications, such as
Find
,
Send as
,and
Delete
.
•theedit menu, with editing items such as
Cut,
Copy, Paste, Zoom, Preferences
and
Help
CApplication space Applications use this central area of the screen
in a way that is appropriate to the information
that they display.
Many of the built-in applications are based on
two standard view layouts: a list view and a
detail view
DButton bar Optionally, an application view displays a
button bar at the bottom of the application
space, containing useful controls and shortcuts.
Not all application views require a button bar.
EStatus bar Displays device status information such as
signal strength, battery and device information.
Settings for sounds and time.
On-screen keyboard.
Temporary indicators such as missed calls and
unread messages.
P800_UM.book Page 28 Wednesday, August 28, 2002 4:19 PM
General functions 29
Preliminary
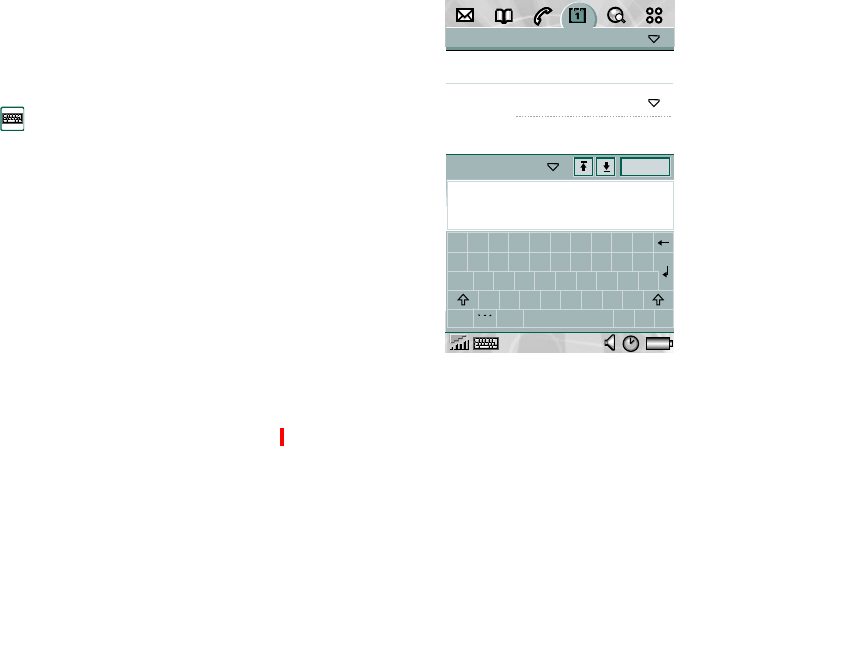
Entering text - Flip open
This section describes how to enter text in flip open mode. See
“Entering text in flip closed mode” on page 25 on how to enter
text in flip closed mode.
There are two ways of entering text with the flip open:
• Use the on-screen keyboard found at the bottom of the
screen.
• Write directly on the screen using the stylus.
On-screen keyboard
In text edit mode, select the keyboard icon and then select
characters. Select
Done
when ready.
At the bottom left of the keyboard you can choose between three
keyboard layouts with different character sets. Tap one of the
following keys:
abc
- standard characters
àëó
- international characters
123
- numeric characters and currencies
Calendar Edit Unfiled
Weekly meeting
Type Appointment
Date 08/01/2002
The agenda for...
1234567890
qwertyuiop
a
cap
abc 123aeo
sdfghjkl
zxcvbnm.
,?@
Done
Description
P800_UM.book Page 29 Wednesday, August 28, 2002 4:19 PM
30 General functions
Preliminary
The current input field is shown to the left in the top bar of the
keyboard. Tap the arrows or rotate the Jog Dial to change input
field. The keyboard top bar also contains a drop-down menu
with
Cut
,
Copy
and
Paste.
When copying or cutting, the text must
be selected first.
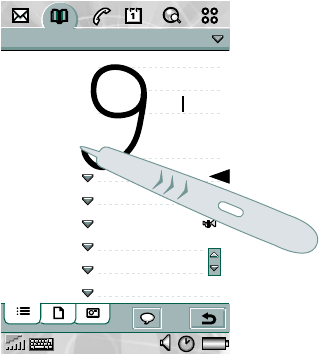
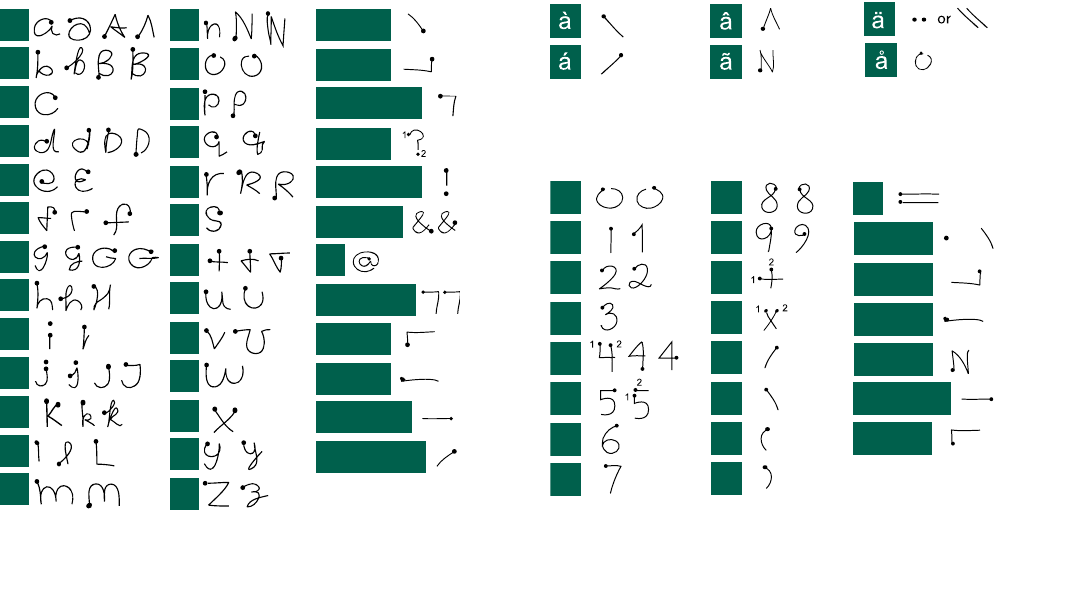
Handwriting recognition
Handwriting recognition translates stylus gestures into letters,
numbers or other characters, and displays these characters as
text. Handwriting recognition is only active when needed, that
is, when focus is currently on a text input field in an application
view or in a dialogue that needs an text entry.
The text mode screen is split into an upper and a lower part, by
an arrow in the middle of the right edge. Write lowercase letters
below the arrow and uppercase in line with it. Write numbers
above the arrow.
Note Most letters can be written in different stroke styles, see
the tables below. The style itself does not matter when making
letters upper- or lowercase, this depends only on the position on
the screen.
Contacts Edit Unfiled
First name
Last name
Job title
Phone (w)
Phone (h)
Mobile (w)
Ring tone Default Melody
Email (w)
Fax (w)
Web
Jane
Jones
Graphic Desi
P800_UM.book Page 30 Wednesday, August 28, 2002 4:19 PM
General functions 31
Preliminary
Letters
Lowercase letters are written below the arrow and uppercase
letters in line with the arrow.
Note Start each stroke at the dotted end.
Accented letters
Write the character as described above, then write the accent
above the arrow.
Note Start each stroke at the dotted end.
Numbers
Numbers are written above the arrow.
Note Start each stroke at the dotted end.
a
b
c
d
e
f
g
h
k
l
m
n
o
p
q
r
s
t
u
v
y
z
w
x
12
i
j
1
1
1
1
1
1
2
1
2
2
2
22
2
full stop
comma
apostrophe
question
exclamation
ampersand
at
double quote
tab
space
backspace
carriage return
0
1
2
3
4
5
6
7
8
9
full stop
comma
*
or
tab
dash
tilde
+
*
/
\
(
)
=
backspace
P800_UM.book Page 31 Wednesday, August 28, 2002 4:19 PM
32 General functions
Preliminary
Extended characters
Write the character above the arrow, then insert the character l
(written from bottom to top) before writing the extended
character. See the Handwriting recognition help topic for
information on how to write these characters.
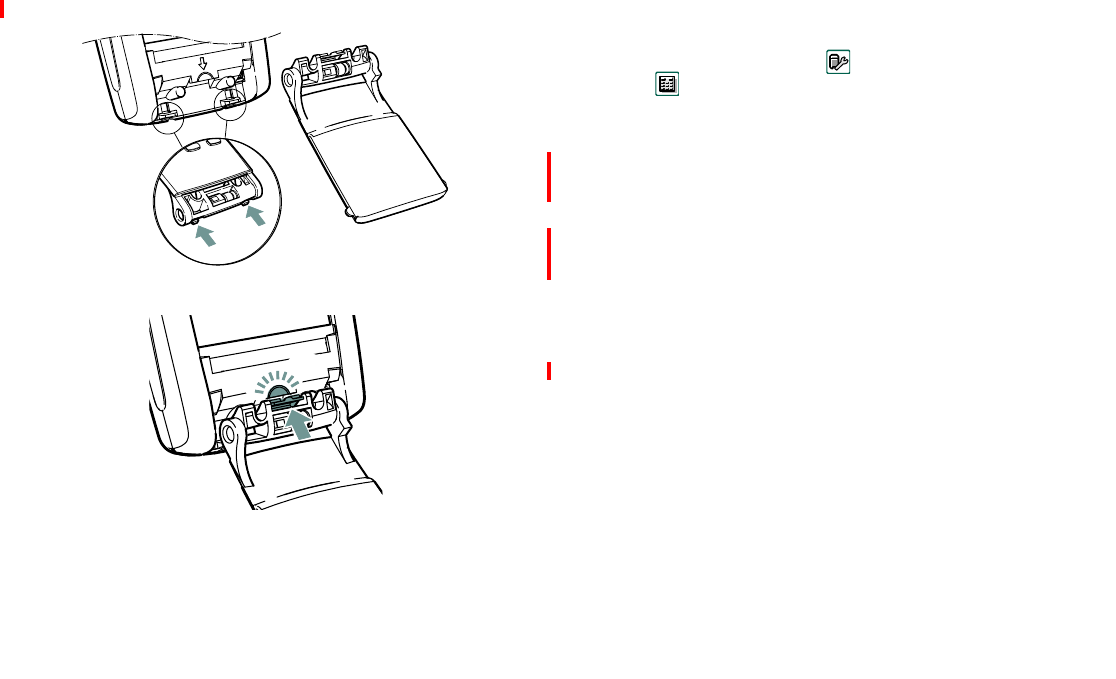
Removing and attaching the flip keypad
To remove the Flip
1. Use your fingernail to gently lift up and push the cover plate
under and away from the keypad, see picture below.
Note Be careful with the touch-sensitive screen. Never use a
sharp object like a screwdriver.
2. Unlock the catch and lift away the keypad.
3. Attach the flip replacement by first placing the small hooks
by the screen and then press on the curved front part until it is
securely fixed.
To attach the Flip
1. Use your fingernail to gently lift up and push the flip
replacement.
2. If needed, turn the hinge on the keypad to the correct
position, see the figure below.
1
2
P800_UM.book Page 32 Wednesday, August 28, 2002 4:19 PM
General functions 33
Preliminary
3. Attach the keypad to the P800.
4. Secure the flip by pressing the catch until you hear a click.
5. Attach the cover plate by first placing the small hooks by the
screen and then press on the curved front part until it is
securely fixed.
Virtual flip open mode
The virtual flip is to be used when you physically have removed
the flip. Activate this function in
Control Panel > Device > Flip
removed.
is shown on the status bar when virtual flip is
activated. Tap it to get to virtual flip closed mode.
P800 locks
You can lock your P800 to prevent other people from using it.
Use the SIM card lock and the device lock to protect your SIM
card and your P800 from unauthorized use.
The P800 will ask you to enter the codes when necessary. You
release the locks by entering codes that will be displayed as
asterisks (*) when you enter them.
Note You can usually make an emergency call without
unlocking the P800.
Click
P800_UM.book Page 33 Wednesday, August 28, 2002 4:19 PM
34 General functions
Preliminary
SIM card lock
The SIM card lock protects your SIM card, not the P800, against
unauthorized use. It is unlocked by the PIN and PUK codes.
You can find your PIN code and sometimes your PUK code in
the documentation you received with your SIM card. If required,
contact your service provider to obtain your PUK code. (PIN
stands for Personal Identification Number and PUK for Personal
Unblock Key.)
Your PIN code consists of four to eight digits. If the PIN code is
enabled, the P800 will ask for the PIN code when you start it.
To activate the SIM card lock
1. Select Phone > Edit > Preferences > Locks
2. Select a lock option.
3. Select
Done
.
You can choose to have the SIM card locked every time you turn
the P800 on, or to have the SIM card unlocked.
An error message informs you if a wrong PIN code has been
entered. Usually after three wrong attempts (SIM card
dependent) the SIM card will be blocked and you need to enter
the PUK code to unlock it.
The PUK code consists of eight digits. When you have entered
the right PUK code you must enter a new PIN code. You have
ten attempts to enter the PUK code. If all ten attempts fail, the
SIM card will be disabled and you need to contact your network
operator.
You cannot change the PUK code.
PIN2
Some functions on the SIM card can be protected by a
secondary code feature.
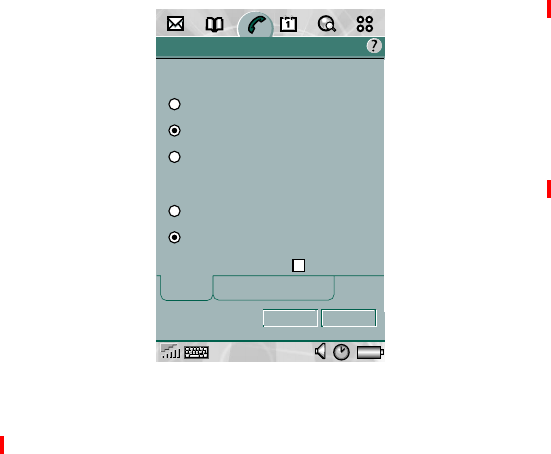
Locks
Change CodesLocks
Device lock:
At power on
?
Done
Off
SIM card lock:
Automatic key lock
At power on
Off
When SIM changed
Cancel
P800_UM.book Page 34 Wednesday, August 28, 2002 4:19 PM

General functions 35
Preliminary
The PIN2 lock cannot be deactivated. The code can be changed
by a user who knows the old code. Some SIM cards do not have
a PIN2 lock.
Device lock
The device lock protects your P800 against unauthorized use. If
the device lock is set to
When SIM changed
, it means that normally
the P800 is not locked. However, if the SIM is changed, the
P800 asks you to enter the code to unlock the P800 before you
can use it. Thus, if someone steals your P800 and puts another
SIM card into it, they will not be able to use it.
To activate the device lock
1. Select Phone > Edit > Preferences > Locks
2. Select a lock option.
3. Select
Done
.
You can choose to have the P800 locked every time you turn it
on, locked when the SIM card has been changed, or unlocked.
It is also possible to use the device lock in combination with the
screen saver. Just mark the checkbox
Control panel > Device >
Display>Phonelockprotected
to have the device lock activated
when the screen saver goes on.
Change code
To change a code
1. Select Phone> Edit> Preferences> Locks.
2. Select Change Codes.
3. Select the code you want to change.
4. First enter the old code, then the new one. (To ensure that
you have typed the new code correctly you have to enter it
twice.)
Key lock
This option locks the keys on your P800. This is to protect the
device if the keys are being accidentally pressed.
To activate or change the key lock
• Select Phone > Edit > Preferences > Locks.
To unlock the keys
• Select >.
P800_UM.book Page 35 Wednesday, August 28, 2002 4:19 PM

36 Phone
Preliminary
Phone
This chapter describes how to use your P800 as a telephone.
Different possibilities are available:
• In flip closed mode you can call using the keypad.
• In flip open mode you can call using the virtual keypad on
the screen.
• Inflipclosedaswellasflipopenmodeyoucanmakeacall
from the contact list.
• In flip open mode you can speed dial any of the 9 speed dial
numbers using the Speed Dial view. In flip closed you can
press the number representing the speed dial entry on the
keypad.
• Inflipclosedaswellasflipopenmodeyoucancallany
previously called numbers using the call list.
• You can even call by selecting a number included in a text
message or listed in an application.
Options in flip closed mode
The following options, available by pressing , are
available during or after a call:
•Endcall.
• Hold call/retrieve call/switch calls.
• Add to contacts (displayed if the phone number of the active
call is known, and not found in the contacts database).
• Show contact (displayed if the phone number of the active
call is known, and appears in the contacts database).
• Transfer sound (to a Bluetooth™ wireless technology
headset).
• Turn On/Off tones.
• Microphone mute On/Off.
• Copy number (displayed if the phone number of the active
call is known).
• Paste number (displayed if the clipboard contains a number).
• Speakerphone On/Off.
• Transfer calls.
• Join calls.
• Call list.
The following options, available by pressing , are
available in the call list:
• Incoming calls.
•Outgoingcalls.
• Missed calls.
• SIM last dialled.
P800_UM.book Page 36 Wednesday, August 28, 2002 4:19 PM
Phone 37
Preliminary
• Zoom in/out.
•Allcalls.
•Applications.
Note The currently selected filter is not shown in the options
list, for example if the call list is currently showing Incoming
calls, then this option is not shown in the options list.
Call handling
To call in flip closed mode, you can use either the keypad or the
Jog Dial.
To make a call
• Enter the telephone number on the keypad and press .
To delete a typed character - press . To delete all
characters - press and hold
.
To make a call using Speed Dial
Speed Dial is a fast way to call one of your special speed dial
numbers. See “Speed dial numbers” on page 44
1. Select the key corresponding to the desired number.
2. Press .
To make a call using the Call list
1. Select .
2. Press the Jog Dial inward or press .
3. Scroll with the Jog Dial to select an entry.
4. Press the Jog Dial inward or press .
To make a call using the Contact list
1. Select .
2. Press the Jog Dial inward or press .
3. Scroll with the Jog Dial to select a contact and number.
4. If more telephone numbers are shown, scroll with the Jog
Dial to select a number.
5. Press the Jog Dial inward or press .
To answer a call
The P800 rings when you receive a call. If the calling party is
found in contacts, the name of the caller will be displayed. If
there is a picture, it will also be shown.
• Press to answer the call.
Tomakeanewcallduringacall
1. Make a call or answer a call.
P800_UM.book Page 37 Wednesday, August 28, 2002 4:19 PM

38 Phone
Preliminary
2. Make a second call, or
answer a call. The first call
is put on hold.
The held call is shown
with a grey background.
• Toswitchbetweenthe
calls,press ,then
select
Switch calls
(could be
network dependent).
• To end the active call and continue with the held call,
press and select
End active call
.
• To join the calls to a conference, press and select
Join
calls
.See“Conference calls” on page 42
To end a call
• Press , or press the Jog Dial.
To reject a call
• Press , or press , and select
Reject
.
To silence the ring signal
This does not affect the call. It just silences the ring signal. The
calling party will not notice that you have silenced the call.
• Press , or press , and select
Mute
.
To make a call using voice control
• Say the “magic word” and then the name of the person you
want to call, and the P800 will connect you. For more
information on, see “Voice control” on page 46.
Note This option requires that the number of the calling party is
provided with a voice recording. See“To record a voice
command” on page 46
Tip The magic word is not needed if you use a portable
handsfree or a Bluetooth™ wireless technology headset. Press
the headset call button and say the name of the person you want
to call.
Options in flip open mode
The following options are available during or after a call:
• End call.
• Hold call.
• Add to contacts (displayed if the phone number of the active
call is known, and not found in the contacts database).
• Show contact (displayed if the phone number of the active
call is known, and appears in the contacts database).
• Transfer sound (Only when Bluetooth™ wireless technology
headset has audio).
• Show cost / Hide cost.
John Smith
+4613244500
11:03
Ann Jones
(w)
(h)
End active call
P800_UM.book Page 38 Wednesday, August 28, 2002 4:19 PM

Phone 39
Preliminary
Call handling
Tomakeacallinflipopenmode,youusethestylusandthe
virtual keyboard.
To make a call
1. Select .
2. Select .
3. Call the number with the virtual keyboard and select .
To remove a typed character - select .
To make a call using Speed Dial
Speed Dial is a fast way to call one of your special speed dial
numbers. See “Speed dial numbers” on page 44
1. Select the speed dial icon .
2. Use the Jog Dial or tap with the stylus to select an entry.
To make a call using the Call list
1. Select the call list icon from the button bar.
2. Scroll with the Jog Dial or tap with the stylus to select an
entry.
3. Select the phone icon .
To make a call using the Contact list
1. Select the contacts icon .
2. Scroll with the Jog Dial or tap with the stylus to select a
contact.
3. Scroll with the Jog Dial or tap with the stylus to select a
number.
To answer a call
The P800 rings when you receive a call. If the calling party is
found in contacts, the name of the calling party will be
displayed. If there is a picture, it will also be shown.
• Select
Answer
to answer the call.
To make a new call during a call
1. While making or answering a call, select
Hold call
.
P800_UM.book Page 39 Wednesday, August 28, 2002 4:19 PM

40 Phone
Preliminary
2. Make a second call, or
answer a call. The held
call is shown with a grey
background.
• Toswitchbetweenthe
calls, select the call with
the grey background and
select
Switch calls
(can be
network dependent).
• To end the active call and
continue with the held
call, select
End active call
.
• To join the calls to a
conference, select
Join
calls
.See“Conference
calls” on page 42
To end a call
• Select
End call
,orpresstheJogDial.
To reject a call
• Select
Send busy.
To silence the ring signal
This does not affect the call. It just silences the signal. The
calling party will not notice that you have silenced the call.
• Rotate the Jog Dial and select
Mute
.
To make a call using voice control
• Say the “magic word” and then the name of the person you
want to call, and the P800 will connect you. For more details
see “To make a call using voice control” on page 38.
General functions
Copying/pasting number
A highlighted telephone number may be copied and pasted for
exchange with other text fields or in applications.
• Copy number - if a number has been entered.
• Paste number - if there is a copied number stored on the
clipboard.
To copy/paste a number (flip open)
• Select
Telephone > Edit > Copy/Paste number
To copy/paste a number (flip closed)
1. Press and select
copy number
or
paste number
.
Phone Edit
John Smith
+4613244500
11:03
Ann Jones
(w)
(h)
End active call
Switch calls
Join calls
P800_UM.book Page 40 Wednesday, August 28, 2002 4:19 PM
Phone 41
Preliminary
Displaying calls
During call setup, a progress window shows the current status.
Calling
is displayed until a line has been allocated. When the line
has been allocated,
Connecting
is displayed.
If an incoming call matches an entry in contacts, the
corresponding information will be displayed. If the number is
not found in Contacts, only the telephone number will be
displayed.
At the top of the window, the call timer for the call is displayed.
The cost meter is also displayed, if available.
Missed calls
When a call has been missed, a message is displayed.
• Select
View
to display information on the missed call.
Network indication
The area at the top of the screen contains network indication (in
standby view in flip closed), which can be:
• Network/service provider name.
•Nonetwork.
• Emergency calls only.
•Searching.
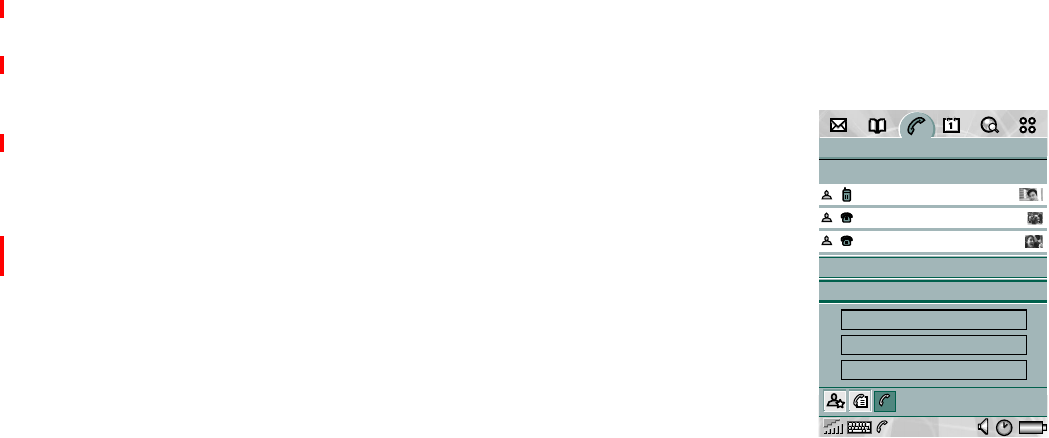
Call log
The call log allows you to check the P800's data on calls made,
received, rejected, or missed. The log keeps track of date, time,
length, and cost information (if available) of each call.
The List view of the call log shows the calls in order with the
mostrecentcallatthetop.
In flip open:
1. Select from the button bar.
2. Select a listed call to see more detailed information about it.
In flip closed:
1. Press and select
Calls
.
2. Select
Call list
or
Missed calls
, depending on what you are
looking for.
Tip In flip closed mode you may press twice to call the
last number used in the P800.
Advice of Charge (AoC)
Advice of charge allows you to keep track of the cost of calls
andtostopthedevicefrommakingchargeablecallswhena
certain credit limit has been exceeded. This option is only
availableifAdviceofChargeissupportedbytheSIM
subscription.
P800_UM.book Page 41 Wednesday, August 28, 2002 4:19 PM
42 Phone
Preliminary
If the credit is limited, a warning
Low credit
is displayed, when
there is approximately thirty seconds of credit left.
When the credit runs out,
Credit expired
is displayed and ongoing,
chargeable calls are stopped.
Auto retrying
If a call attempt is not successfully connected, the P800 can be
set to automatically retry the call after a while.
When retry has been initiated, the P800 will continue to retry a
number of times or until you invoke any other action.
While the time between retry attempts is elapsing, the dialogue
Retrying
is shown. When a retry is successful, the P800 alerts
you with a single ring signal.
Remote party notifications
When a remote party carries out certain operations, the P800
may notify you of the operation. An alarm is sounded and one of
these messages is shown.
• Call held by other party.
• Call retrieved by other party.
• Call transferred by other party.
• Calls joined by other party.
• Call is waiting at other party.
Ending a call when another call is on hold
When the active call is ended, you are asked to retrieve the held
call. If you do not respond within a few seconds, the held call
will also be ended.
Receiving a call when another call is on hold
If someone calls when a call is on hold, you will be asked if you
want to release the held call and answer the incoming call.
Conference calls
A conference call can be
startedwhenyouhavean
active call and a held call.
The conference call view is
automatically displayed
whenever a member has been
added to the conference. The
conference call view is
displayed when selecting the
Show parties
button, from the
standard call control view.
You return to the standard call
control view by pressing the
Hide parties
button.
Phone Edit
John Smith
Tom Clark
11:03
Ann Jones
(w)
1
(w)
(h)
End conference
Hold conference
Hide parties
2
3
P800_UM.book Page 42 Wednesday, August 28, 2002 4:19 PM

Phone 43
Preliminary
If an incoming call is answered during a conference call, the
conference call will be put on hold.
To start a conference call
• Select the
Join calls
button, or select
Phone > Join calls
from the
menu.
To extract a party
• Tap the required party and choose
Extract
from the pop up
menu.
This causes the conference call to be put on hold, the selected
party is then removed from the conference and becomes the
active call.
To release a party
• Tap the required party and choose
Release
from the pop up
menu.
This ends the call to the selected party.
Note If you have set up the conference, you still have to pay for
the total time.
Emergency calls
If you initiate a call to a number which is identified as an
emergency number,
Emergency call
will be shown.
An emergency call can be made without PIN or PUK codes. You
can end the call using the menu key.
Note Emergency calls are not confined to the network of your
operator; they can be made as long as you have coverage from
any GSM network.
Hints and smart functions
Speakerphone
If you open the flip during a call, the speaker phone function is
activated and the volume will increase. This lets you continue
the conversation while using other functions of the P800.
Silent mode
Press and hold in standby view, flip closed, to put the
phone in silent mode. Press again to turn off silent mode.
Note When silent mode is on, this will also silence personal
handsfree.
Voice mail
In flip closed, you can call the voice mail number if you press
and hold .
P800_UM.book Page 43 Wednesday, August 28, 2002 4:19 PM
44 Phone
Preliminary
Special characters
• Press and hold to insert a pause (represented by the
character
p)
in a DTMF (Dual Tone Multi Frequency)
sequence.
• Press and hold to insert the international call prefix
+
.
Change phone volume
During a call you can use the Jog Dial to change the phone
volume.
Warning! The volume may be uncomfortably loud at the
higher volume levels if the phone is close to your ear. Exposure
to excessive volume levels may damage hearing.
• During an active call, pressing and holding mutes the
microphone. Pressing reactivates the microphone.
• When entering text in flip closed mode, pressing erases
the last entered letter. Pressing and holding deletes all
text in the active field.
• When in stand by mode, pressing and holding puts the
phone in silent mode.
Banking services
You can use your telephone banking services or other tone based
services.
The P800 provides different ways of sending tones during a call:
• Pressing keypad keys during an active call, like on most
landline phones.
• Including tone digits already in the call set up. After the
phone number, but before the digits, press and hold to
insert a
p.
Then insert your digits. Finally send away the call
by pressing .
• Program digit sequences into your Contact card for the bank.
Each digit sequence to be sent as tones must begin with a
p
.
Once your call to the bank has been established and you want to
send your pre-programmed digit sequences, choose
Show contact
on the menu to get to the Contact card with the tone sequences.
Warning! Never program any personal codes into your P800.
Set-up
Speed dial numbers
To set a speed dial number
1. Select from the button bar.
2. Select an empty position.
3. Select the desired contact.
4. Select
Done
.
P800_UM.book Page 44 Wednesday, August 28, 2002 4:19 PM

Phone 45
Preliminary
To remove a speed dial number
1. Select , on the status bar.
2. Select
Edit > Remove speed dial
.
3. Select the contact to remove.
4. Select
Done
.
Flight mode
Turns off the radio function so it does not disturb sensitive
equipment, for instance in an aeroplane or in a hospital.
Note The phone and other communication functions must never
be used in an aircraft unless otherwise instructed by the aircraft
personnel. If the use of equipment without a radio transmitter is
permitted you can turn on the flight mode on the product. Doing
so turns off the radio function.
When the flight mode option is set, you have the possibility to
start the P800 in normal or flight mode each time the power is
turned on.
To use the power menu
This menu is activated when pressing the On/Off button if the
menu has been activated. See “Flight mode” on page 47 on how
to activate the menu.
• Select the
Phone on
alternative to start the P800 in the normal
way.
• Select the
Flight mode
alternative to start the P800 in flight
mode.
• Select the
Power off
alternative to turn the P800 off.
To set flight mode on without restarting the P800
1. Select
Phone > Edit > Preferences.
2. Select
Fight mode
.
3. Select
Flight mode now > Done
Tosetflightmodeoff
1. Select
Phone
>
Edit > Preferences.
2. Select
Flight mode
.
3. Select
Phone on now > Done.
Preferences
In this menu you may change the settings for a number of
telephony options.
To set the telephony preferences
1. Select
Edit > Preferences.
2. Select the item to setup.
P800_UM.book Page 45 Wednesday, August 28, 2002 4:19 PM

46 Phone
Preliminary
Incoming call alert
This option lets you choose individual ring melodies for voice
and data calls. You may use any sound recording or audio file.
You may also set individual volume levels for Handheld,
Handsfree and Car, or let the P800 vibrate.
You may personalize the ring melodies further for individual
contacts, see “Contacts”.
1. Use the stylus to point and drag the bar lever to the preferred
sound level.
Warning! The volume may be uncomfortably loud at the
higher volume levels if the phone is close to your ear. Exposure
to excessive volume levels may damage hearing.
2. Select the list view and highlight the signal of your choice.
3. Select
Done
to activate the changes.
Incoming call picture
• Select the option to automatically show the picture saved in
contacts at incoming calls.
Voice control
The voice control option lets you handle calls using your voice.
Say a “magic word” and then the name of the person you want
to call, and the P800 will try to call the person.
The magic word is used to ensure that the P800 will not call
somebody whose name has just been mentioned by chance.
To enter settings for voice commands
• Select
Phone > Edit > Preferences > Voice control.
In this menu you can:
–Turn
Voice dialing
on/off
–Setwhentousethe
Magic word
(Handheld, Handsfree or
Car).
–Turn
Voice answer
on/off
– Select if the P800 should
Play caller name
at incoming
calls.
– Record voice commands for
Magic word
,
Answer
and
Busy
.
To record a voice command
1. Select one of the options,
Magic word
,
Answer
,or
Busy
and
select
Record
.
2. Say the “magic word” after the tone
Be sure to use a word that you can remember. For example
“Calling”.
3. Select
Play
if you want listen to your recording.
4. Select the voice message options for each P800 profile.
5. Select
Done
to exit.
To record voice tags for individual contacts, see “Contacts”.
P800_UM.book Page 46 Wednesday, August 28, 2002 4:19 PM

Phone 47
Preliminary
Flight mode
Here you select if you want to turn the flight mode on or off and
also if you want the
Power menu
activated.
To access flight mode settings
• Select
Phone > Edit > Preferences > Flight mode.
To turn on the Power menu
1. Select Phone > Edit > Preferences > Flight mode
2. Select the
Prompt me...
check box and tap
Done
.
Locks
Locks contains options for:
• Activating the lock on the device, the SIM card or the keys
on the keypad.
• Changing the lock codes.
ThedevicelockoptionappearswhenpoweringontheP800.
Keylockblocksyourkeysfrombeingpressedbymistake,for
instance when the P800 is in your pocket.
The SIM card lock demands your code when the phone is turned
on or when a new SIM card is installed.
Note For more information see “P800 locks” on page 33.
Add to contacts
This option enables the function for adding called and calling
parties to
Contacts
. After a call has ended, if the telephone
numberisnotalreadystoredinthe
Contacts
, you are asked if you
wouldliketoaddit.
Handsfree
Handsfree lets you choose how to answer the P800 when it is
used with a handsfree kit connected.
You may also select preferred Bluetooth™ wireless technology
device from this menu.
To set handsfree options
•
1ring
means that the P800 answer automatically after one
signal.
•
Any key
means that the you answer by pressing any key.
Note Using
1ring
as the automatic answering mode may violate
your privacy (for instance passengers in your car can hear who
is calling if the phone is used with a car kit).
To set Bluetooth wireless technology options
• Select the preferred sound device;
Phone
or
Headset
.
Forward calls
Forward calls lets you choose how to forward incoming calls to
another number, on:
P800_UM.book Page 47 Wednesday, August 28, 2002 4:19 PM

48 Phone
Preliminary
•Busy
• Not reachable
•Noreply
•Allcalls
• Data calls
• Fax calls
To forward calls
1. Enter the telephone number you want to forward to.
2. Select Done.
Tip Normally the data/fax options should not be changed.
Accepted callers
Accepted callers allows you to set up a filter for incoming calls.
All calls except from persons on your list of Accepted callers
will be rejected.
To add an accepted caller
1. Select
Add new.
2. Select
Lookup
and chose a contact, or write the name and
number of the contact.
3. Select
Done
.
Call waiting
This option sets the call waiting option on or off.
Restrict calls
You can set restrictions for calls made from or to your P800.
You may for example protect it from being used for long
distance calls.
To restrict incoming calls
1. Select the
Incoming calls
tab.
2. Set restrictions for:
– All incoming calls.
– Incoming calls when roaming.
To restrict outgoing calls
1. Select the
Outgoing calls
tab.
2. Set restrictions for:
– All outgoing calls.
– Outgoing international calls.
– Outgoing international calls except to home PLMN.
To change the password
1. Select
Change password
.
2. Enter the old code.
3. Enter the new code.
4. Confirm the new code.
P800_UM.book Page 48 Wednesday, August 28, 2002 4:19 PM

Phone 49
Preliminary
Voice mail
For easy voice mail access, enter the number to the voice mail of
your operator.
GSM Networks
This option lets you choose what net to use when you are
outside your operators area. Choose if you want to search for a
new network or use a preferred one. You can also make a list of
preferred networks.
Note Your operator may not allow you to access all available
networks, depending on your operator’s policy.
Calling cards
This option is used to handle calling cards.
AoC - Call meter settings
This option is only available if Advice of Charge (AoC) is
supported by the SIM subscription. PIN2 is required for storing
anychangesyoumaketotheCallmetersettings.
•
Limited
– the limit is preset by the user. When the credit is set
to limited, chargeable calls should only be made if the credit
is larger than 0. The option is, however, useful if you want to
restrict the call cost for yourself or another person that uses
the P800.
•
Unlimited
– there is no credit limit. Not all networks provide
charging information to the phone during a call. If your
network provides this service and your subscription is for
AoC Charging, you cannot make or receive any chargeable
calls if you are roaming in a network that does not provide
charging information. This restriction does not apply when
your subscription is for AoC Information. You cannot change
the type of subscription from your phone settings. Please
consult your operator for more details.
P800_UM.book Page 49 Wednesday, August 28, 2002 4:19 PM

50 Contacts
Preliminary
Contacts
Contacts is like an address book, in which you can store names,
phone numbers, e-mail addresses and other useful information.
The information stored in the SIM phone book is also
accessible. SIM phone book entries can be imported to Contacts
and Contacts entries can be exported to the SIM phone book.
Flip closed mode
With the flip closed, you can place calls and send text or
multimedia messages.
Contacts has two views in flip closed mode:
Menus
In both views, you can use to access some of the P800’s
contact functions.
Menu options in list view
List view An alphabetical list of contacts. The list view is the
starting point for finding a contact.
Detail view The details for a contact.
Option Description
Zoom in/out Zoom the screen in or out.
SIM phone book Display the contacts of the SIM card.
Send owner card Send your owner card via IR or Bluetooth wireless
technology.
Find Search for a specific contact.
Undo delete Restore the last deleted contact.
Applications Return to the application launcher.
P800_UM.book Page 50 Wednesday, August 28, 2002 4:19 PM

Contacts 51
Preliminary
Menu options in SIM phone book
Menu options in detail view
Making a call with the flip closed
To select a contact
1. Select .
2. To place a call to a contact in the SIM phone book, select
SIM
phone book
from the options menu.
If there are information numbers or service numbers stored
on the SIM card, you can also access them.
3. Scroll down to the desired contact
or select
Find
from the menu and search for the contact.
To use the quick index
1. Press and hold a number key.
The first contact, corresponding to the first letter of the key,
appears.
2. To search further, continue to enter the letters with the keys.
To make a call
1. Select a phone number.
2. Press the Jog Dial inward or press .
or
1. Select a phone number.
2. Select
Call
from the options menu.
Option Description
Zoom in/out Zoom the screen in or out.
View all Switch to Contacts list.
Information
numbers
Display the Information numbers on the SIM card.
This option is only displayed if there are
Information numbers stored on the SIM card.
Service numbers Display the Service numbers on the SIM card.This
option is only displayed if there are Service
numbers stored on the SIM card.
Applications Return to the application launcher.
Option Description
Call Call the active contact.
Send SMS Send a text message to the active contact.
Send MMS Send a multimedia message to the active contact.
Send as Send the active contact via text message, IR or
Bluetooth wireless technology.
Delete contact Delete the active contact.
Applications Start other applications.
P800_UM.book Page 51 Wednesday, August 28, 2002 4:19 PM

52 Contacts
Preliminary
To send a text message
1. Select a phone number.
2. Select
Send SMS
from the options menu.
To send a multimedia message
1. Select an e-mail address.
2. Select
Send MMS
from the options menu.
To add a contact
You can create a new contact using information from a recently
received voice call or message.
1. Select
Yes
when asked to add to contacts.
2. Enter contact name and edit the number, if required.
• To access the full edit view, open the flip.
To delete a contact
1. Select the contact.
2. Select
Delete contact
from the options menu.
• To restore a deleted contact, select
Undo delete
from the
options menu.
Flip open mode
Open the flip and tap or select
Contacts
in the Application
launcher to open Contacts.
Contacts has three views in flip open mode:
Tabs at the bottom of the list view provide a fast way to locate
information. To highlight the first entry that begins with the first
letter on a tab, select the tab once. To highlight the first entry
that begins with the next letter on the tab, select the tab again.
Menus
In all views there is a menu bar from which you can access some
of the contact functions.
List view An alphabetical list of contacts. The list view is the
starting point for finding a contact.
Detail view The details for a contact.
Edit view Contact details, displayed in a way that allows you
to add and change the information.
abc def ghi jkl mno pqr stu v-z
P800_UM.book Page 52 Wednesday, August 28, 2002 4:19 PM

Contacts 53
Preliminary
Menu options in list view Menu options in SIM phone book list view
Menus Option Description
Contacts
New Create a new contact.
Find Search contacts containing a specific
text.
Send owner card Send your business card via Bluetooth
wireless technology, e-mail, text
message, IR or multimedia message.
View owner
card
View your personal business card.
Edit
Undo delete Restore the last deleted contact.
Paste contact Paste a received or copied contact into
Contacts.
Zoom Set zoom level, small, medium or
large.
Preferences Select how the contact list is to be
sorted, and if telephone numbers
should be displayed in the list.
Help Open the help application.
Folders
All Show all contacts in the list.
Unfiled Show the contacts that are not in a
folder.
Edit folders Categorize your contacts in folders.
Menus Option Description
Contacts
New Create a new contact.
Information
numbers
Display the information numbers on
the SIM card.
Service numbers Display the service numbers on the
SIM card.
Own numbers Display speech, fax and data numbers
on the SIM card.
Edit
Paste contact Paste a received or copied contact into
Contacts.
Copy to contacts Copy the shown SIM card entry into
Contacts.
Copy all to
contacts
Copy all SIM card entries into
Contacts.
Sort by SIM
position
Sort the list according to SIM position.
Zoom Set zoom level, small, medium or
large.
Preferences Select how the contact list is to be
sorted, and if telephone numbers
should be displayed in the list.
Help Open the help application.
P800_UM.book Page 53 Wednesday, August 28, 2002 4:19 PM

54 Contacts
Preliminary
Menu options in detail view and edit view
Personal details
The first time you use your P800 you are advised to enter your
personal details. You create an electronic business card,
containing your contact details, including notes and a photo.
You can attach this card to e-mails, or beam it to another device.
To create your owner card
1. Select
Contacts > New
and enter your details.
2. Select
Contacts > Set as owner card.
Making a call with the flip open
To open Contacts
• Tap or select
Contacts
in the Application launcher .
Menus Option Description
Contacts
New Create a new contact.
Find Search contacts containing a specific
text.
Send as Send a contact via Bluetooth wireless
technology, e-mail, text message, IR or
multimedia message.
Set as owner
card
Set the active contact as your owner
card.
Delete contact Delete the active contact.
Edit
Edit contact Change the details of the active
contact.
Copy contact Copy the active contact entry.
Cut Cut out the marked text.
Copy Copy the marked text.
Paste Paste the copied text into the selected
field.
Add field (in
Edit view only)
Addanextrafieldtotheactivecontact.
Show in list Specify the phone number to be
displayed next to the contact in the list
view.
Zoom Set zoom level, small, medium or
large.
Preferences Select how the contact list is to be
sorted, and if the telephone number
should be displayed in the list.
Export to SIM Export the contact to SIM.
Help Open the help application
Folders
Unfiled Show the contacts that are not in a
folder.
Edit folders Categorize your contacts in folders (for
eample business, personal and so on.)
Menus Option Description
P800_UM.book Page 54 Wednesday, August 28, 2002 4:19 PM
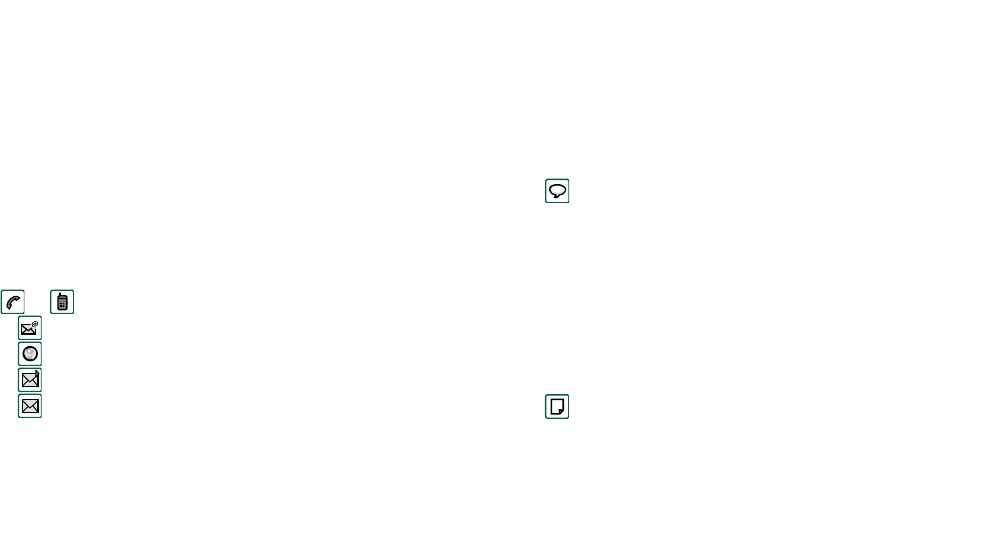
Contacts 55
Preliminary
To search for an entry containing specific text
1. Select
Contacts > Find.
2. Enter the text string you wish to search for.
3. Select either
In all fields
or
In Names & Company
and tap
Find.
4. When search is completed, all results are displayed.
Note Searching is not case sensitive and you do not have to
enter an entire word to locate a matching entry.
To make a call
1. If required, change category from the
Folders
menu.
2. Scroll down to the desired contact.
If the contact list is long, first select a tab at the at the bottom
of the view.
3. Select the contact to display the information.
4. Depending on what you want to do, select according to the
following:
– Tap or or the phone number to place a call.
– Select or the e-mail address to send an e-mail.
– Select or URL to open a web page.
– Select to send a multimedia message.
– Select to send a text message.
Managing contacts
You can sort the contacts according to first name, last name or
company. The contact entries can also be filtered by category,
such as business or personal.
To create a new contact
1. Select
Contacts > New
.
2. Enter the desired information. When applicable, select from
the drop-down menus.
Toaddavoicediallingcommand
Voice dialling commands can be added when you create or
change a contact.
1. Select at the bottom of the screen.
2. Select a number.
3. Select the
Record
button.
4. Record a new voice command after the tone.
• To play a recorded voice command, select the
Play
button.
• To remove a voice command, select the
Del
button.
Toaddanotetoacontact
1. Select .
2. Enter the text.
P800_UM.book Page 55 Wednesday, August 28, 2002 4:19 PM

56 Contacts
Preliminary
3. If you do not want the note to be included when you send,
beam, or synchronize the contact, select the
Private
check
box.
Toaddaphotoorotherpicturetoacontact
1. Select the photo view tab .
2. Select the picture space.
3. If required, change folder.
4. Select the picture to use.
5. Select the
Select
button.
• To change a picture, select the old picture and select
Replace
image.
• To remove a picture, select the old picture and select
Delete
image.
To change the details of a contact
1. Select a contact.
2. Select
Edit > Edit contact.
3. Change the desired information. When applicable, select
from the drop-down menus.
Toaddafieldtoacontact
1. Select the contact.
2. Select
Edit > Edit contact.
3. Select
Edit > Add field.
4. Select the field to be added from the drop-down list.
5. Select
Add.
To delete a contact
1. Select the contact.
2. Select
Contacts > Delete contact.
Managing the SIM phone book
You manage the SIM phone book the same way as the Contacts.
You may also sort the SIM phone book according to SIM
position. You can also copy information between the P800 and
the SIM card.
To import contacts from SIM
1. Select
SIM phone book
in the folders menu to the right in the
menu bar.
2. Select
Edit > Copy all to Contacts
for importing all SIM entries
or
Tap a SIM entry to open it and select
Edit > Copy to Contacts
for importing the selected SIM entry.
To export contacts to SIM
1. Select a contact.
2. Select
Edit > Export to SIM
.
3. If the contact has multiple telephone numbers, select the
number to export.
P800_UM.book Page 56 Wednesday, August 28, 2002 4:19 PM

Contacts 57
Preliminary
4. Select
Done
.
Sending a contact
You can send contact details to others: by text message,
multimedia message, infrared, or Bluetooth wireless technology.
To send contact details
1. Select a contact.
2. Select
Contacts > Send as.
3. Select the message type.
4. Select
Done.
To send your own contact details
1. In list view, select
Contacts > Send owner card
.
2. Select the message type.
3. Select
Done.
Settings
To sort the contact list and show the preferred phone number
1. Select
Edit > Preferences.
2. Select the desired sorting option (first name, last name or
company) and click
Done.
3. If you want a telephone number to be shown next to the name
in list view, select
Show preferred phone number.
If no number is selected, the first telephone number will be
used.
4. Select
Done.
To change the preferred phone number
1. Select a contact.
2. Select
Edit > Edit contact.
3. Select
Edit > Show in list.
4. Select the number to be shown from the list.
5. Click
Done.
Note If no numbers appears, ensure that
Show preferred phone
number
is checked in preferences.
Phone book manager
On the CD, there is an application called
Phone book manager
.
This application is used to manage the SIM card information
from a PC.
To use the Phone book manager
1. Connect the P800 to the PC. See “Connecting to other
devices” on page 150 for more information.
2. Start the Phone book manager on the PC.
P800_UM.book Page 57 Wednesday, August 28, 2002 4:19 PM
58 Contacts
Preliminary
3. For instructions on the
Phone book manager
, refer to the
application help information.
P800_UM.book Page 58 Wednesday, August 28, 2002 4:19 PM
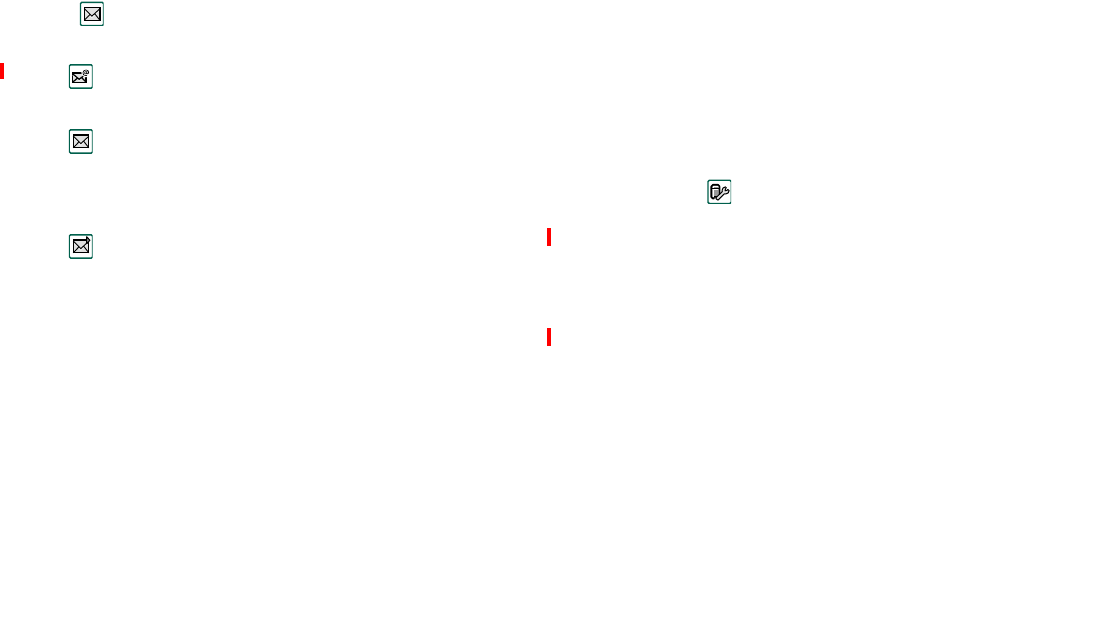
Messages 59
Preliminary
Messages
With
Messages
you can create, send, and receive different
types of messages:
Youalsouse
Messages
to receive:
• Area Information messages.These are text messages
broadcast to all subscribers in a network area for example
local road reports or local taxi phone numbers (Area
Information services are not available from all operators).
• BIO (Bearer Independent Object) messages. There are
different types of BIO messages:
– Setup (e-mail, Internet, WAP accounts)
– E-mail notifications.
– Files for exchanging electronic business cards (vCard)
and calendar information (vCal).
• Auto setup files for OTA (Over The Air configuration).
• Beamed messages. These are files received via Infrared or
Bluetooth.
The different types of messages, e-mail, text messages, and
multimedia messages are handled by separate messaging
accounts. Select
Control panel > Connections > Messaging
accounts
to see the details of the messaging accounts on your
P800.
You can have any number of e-mail accounts - a typical
configuration will be one business and one personal account.
When you set up a synchronization with your PC, an account for
synchronized e-mails is automatically created on your P800.
Accounts are automatically created for storing received:
• Text messages
• Multimedia messages
• Area information messages
• Auto setup messages
• Beamed messages
E-mail messages. Your P800’s mail client supports
POP3 and IMAP4 mail servers, MIME attachments and
SMTP for sending mail.
SMS (Short Message Service) messages are text
messages sent and received via the network operator's
message centre. EMS (Enhanced Message Service)
messages also allow pictures, sounds, melodies and
animations to be inserted.
MMS (Multimedia Message Service) messages. A
multimedia message can contain text, graphics,
animations, photographic images, audio clips and ring
melodies.
P800_UM.book Page 59 Wednesday, August 28, 2002 4:19 PM

60 Messages
Preliminary
Before using Messages
Before you can send and receive any messages you need to set
up the necessary accounts.See “Getting started with Internet
and Messages” on page 159
Tip A simple way of setting up an Internet or e-mail account is
to ask your service provider to send you a message that contains
the required information to create an account automatically on
your P800.
Folders in Messages
There are four folders for each messaging account:
Inbox
,
Outbox
,
Draft
and
Sent
.
Inbox
Inbox
contains received messages. You can reply to, forward,
and delete messages, but not edit them.
Received auto configuration messages are stored in the
Auto
setup
account
Inbox
.
Outbox
Outbox
contains messages that are ready to be sent. Saving a
message to
Outbox
is useful if you have several to send: you
reduce connection time by sending them all at the same time.
To save an e-mail message to Outbox
1. After composing your message, select
Send.
2. Select
Save to Outbox.
You cannot save text messages to
Outbox
unless the phone
fails to connect.
Messages that you send from an e-mail synchronization account
are always saved to
Outbox
and sent from your PC after your
next synchronization.
Draft
Draft contains messages that are not ready to be sent.
To store a new message in Draft
• Create the message and exit without selecting
Send
.
To move a message from Outbox to Draft
• Open the Outbox message list and select
Message > Move to
Draft
.
Sent
Sent contains messages you have sent from your P800.
Tip To avoid running out of storage space on your P800, make
it a habit to clear out unneeded messages from your
Sent
folder.
P800_UM.book Page 60 Wednesday, August 28, 2002 4:19 PM
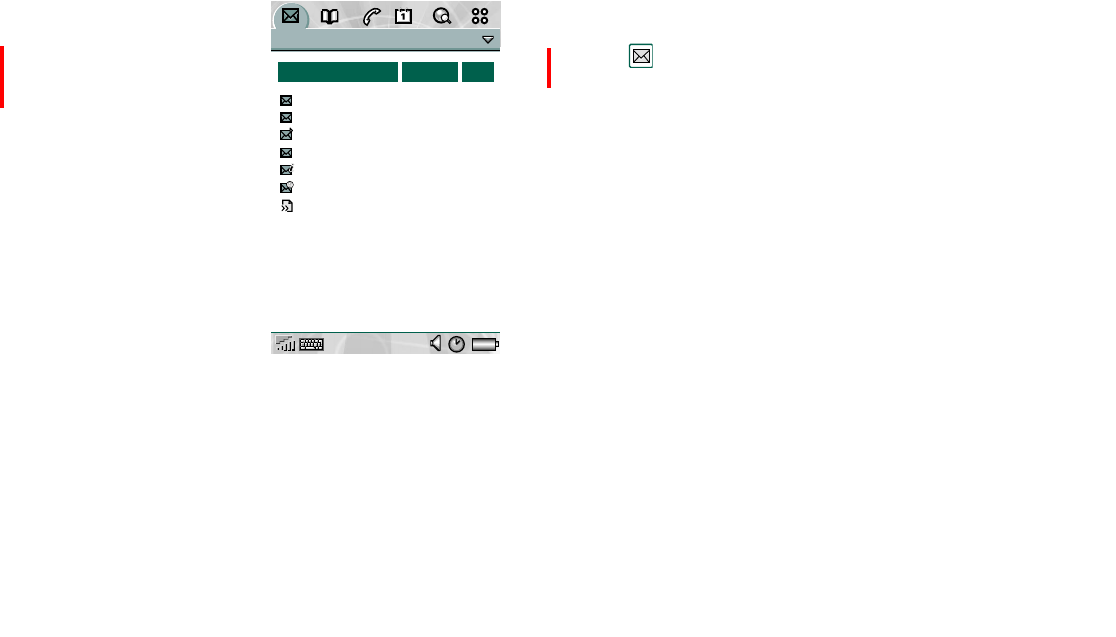
Messages 61
Preliminary
The accounts in Messages
When you open Messages, a
list of your accounts appears.
The top item in the list,
Create
SMS,
is a shortcut for directly
creating a new text message
An asterisk next to an account
indicates that a message has
arrived since you last opened
the accounts inbox.
How to use
Messages
Text messages
including EMS
features
SMS text message is a short message that you can send and
receive on a mobile telephone. It can contain up to 160
characters. If you create a longer message it will be sent as two
(or more) separate messages, but received (if the receiving
telephone supports this) as one message. If you add pictures,
animations, melodies and sounds to your message it becomes an
EMS (Enhanced Message Service) message.
Text messages can be sent to one person, or to a group of
recipients that you have saved in Contacts.
Towriteandsendatextmessage
1. In
Messages
select
Create SMS
. (You can also select
SMS >
Message > New
.
2. Enter the recipients number or select
To
and select recipient
or recipients from your contact list and select
Done.
3. Write your message and select
Send.
To add EMS features to your text message
1. Select
Edit > Insert Object.
2. Select the type of media you wish to import and select
Done
3. Select the item you want to insert and tap
Select.
Messages Edit
Accounts
SMS
Create SMS
MMS
Personal e-mail
Area Info
0
2
2
0
2
3
3
1
Auto setup 01
Beamed 01
Unread Out
P800_UM.book Page 61 Wednesday, August 28, 2002 4:19 PM
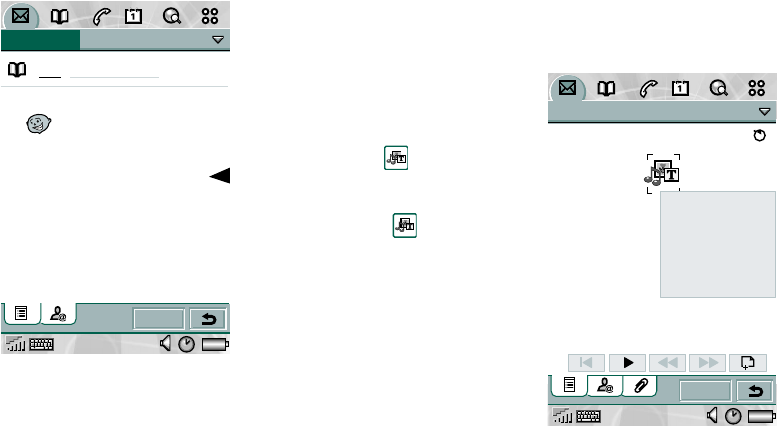
62 Messages
Preliminary
Here you can see an example
of an text message with
inserted EMS features.
Multimedia
messages
A MMS (Multi Media
Service) messages can
include real pictures,
animations and sound,
organized like a slide
presentation with time-based
control of the playback.
Composing a multimedia
message is like building a
small slide presentation. A
typical page will consist of a
picture, some text and sound.
A picture taken with the integrated CommuniCam can be
quickly and conveniently be sent via multimedia message using
the
Send as
command from the viewer. Multimedia messages
canbesenttoamobilephoneorane-mailaccount.
To create a new multimedia message
1. Select your multimedia message account and then select
Message > New
or open an existing message and select
Message > New
.
2. From the
Select template
dialog, tap on the name of the
template you want and tap
Select
.The
Blank
template will
open a blank message.
3. The first page of the new
message is now displayed.
To add a picture, text,
audio, voice or scribble
select
To insert an item
1. Select .
2. Select the type of item you
want to insert from the list.
Messages Edit Inbox
Send
To:
Hello Tom
I'll see you at...
Size: 29
+46 13 244500
Message Edit Draft
Send
1/1 2
Add image
Add scribble
Add text
Add audio
Add voice
P800_UM.book Page 62 Wednesday, August 28, 2002 4:19 PM
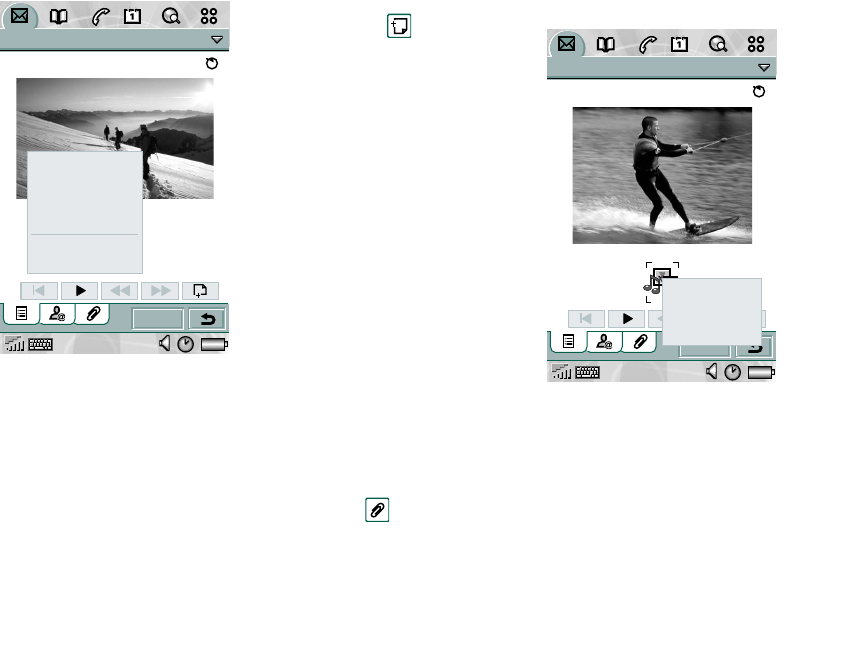
Messages 63
Preliminary
Here you can see the first
page with an inserted picture.
To delete, replace or edit an
inserted item
• Select the inserted item
and choose an action.
To add a new page to your multimedia message
• Select .You now have a
completely new page to
insert items onto.
To edit an inserted picture
1. Select the picture so that it
is highlighted.
2. Select
Edit image.
While editing your picture
you can add scribble,
resize, crop or rotate your
picture. To undo your
changes, select
Edit > Undo
all.
Note If you have accepted
changes by selecting Done,
you will not be able to undo
them.
To insert an attachment
1. While creating your multimedia message, select the tab with
the attachment icon, Select
Add
.
2. Select the type of attachment you want to add.
3. Select the attachment.
Message Edit Draft
Send
1/1 5
Add text above
New image
Edit image
Edit time
Delete
Copy
Message Edit Draft
Send
2/2 5
Add text
Add audio
Add voice
P800_UM.book Page 63 Wednesday, August 28, 2002 4:19 PM

64 Messages
Preliminary
To play a received multimedia message
• The first time a MMS is opened it plays automatically. The
next time you open the MMS you can play it by pressing the
Play Button (flip open) or choosing
Play
from the menu (flip
closed)
To set the download method for receiving multimedia
messages, manual or automatic
1. In
Control panel,
select
Connections > Messaging accounts >
MMS > Download method.
–
Manual
means that only headers will be downloaded and
can be viewed. The full message will be downloaded to
your P800 when you select
Receive
.
–
Automatic
means that the MMS is downloaded and can be
read like any other message. There is no intermediate
step.
E-mail
Writing e-mails
To write a new e-mail
• Select an e-mail account and select
Message > New
or open an
existing e-mail and select
Message > New.
If you leave the message before sending it, it will automatically
be stored in the
Draft
folder (unless it was created from Outbox).
To mark an e-mail as urgent
• On the address tab, select
High
in the
Priority
list.
Tip If you are creating several e-mails, you can reduce
connection time by saving them to
Outbox
and then connect and
send them all at the same time.
To save an e-mail to Outbox
1. Select
Send.
2. Select
Save to Outbox > Done.
To enter addresses from Contacts when writing an e-mail
1. Select
To:
2. In the
Find contact
dialogue select the check box for each
entry you want to send the e-mail to.
3. Select
Done
.
Tip To enter several addresses manually (without using
Contacts) in a text message or e-mail: enter a comma between
each address.
Sending e-mail
To send an e-mail message
• Select
Send > Send immediately
.
P800_UM.book Page 64 Wednesday, August 28, 2002 4:19 PM

Messages 65
Preliminary
Note If your P800 is connected to the Internet when you send
an e-mail, it will be sent immediately and your P800 will remain
connected to the Internet when it is finished. If not, your P800
will connect to the Internet, send the e-mail and then disconnect.
To save an e-mail message and send it later
• Select
Send > Save to Outbox
.
To move an e-mail message from Outbox to Draft
• In your list of Outbox messages, tap to the left of the e-mail
(a tick appears), and select
Message > Move to draft
.
Sending attachments
To attach an entry to an e-mail message
1. On the attachment tab, select
Add.
2. Select the type of attachment you want to add.
3. Select the item.
You can attach entries to e-mails directly from the following
applications:
Calendar
,
Contacts
,
Tasks
,
Jotter
,
and
Voice
and
Pictures.
To attach a Calendar entry to an e-mail message
1. Open the entry in Calendar and select
Calendar > Send As.
2. Select
e-mail > Done.
3. Create the e-mail and select
Send
.
To attach a Contact to an e-mail message
1. Open the contact details for the contact you wish to send and
select
Contacts > Send as.
2. Select
e-mail > Done.
3. Create the e-mail and select
Send
.
Note When you forward an e-mail, you can choose whether or
not you wish to forward the attachment. Large attachments
increase the size of an e-mail and consequently the connection
time needed to send it.
Receiving attachments
Any attachments to an e-mail message are displayed on the
tab. The icon next to an attachment in the list identifies the
type of attachment.
To view an attachment you need a viewer for that type of
file.Your P800 comes with pre-installed viewers for Microsoft®
Word, Excel, PowerPoint® and Adobe® Acrobat® (PDF) files.
Many more are available from the
Multimedia for P800
CD.
Downloading
You can choose not to download large e-mails and receive just a
header instead. A header contains the subject line, sender’s
details, and date, but not the full message.
P800_UM.book Page 65 Wednesday, August 28, 2002 4:19 PM
66 Messages
Preliminary
To specify a size limit for e-mail, above which you only receive
aheader
1. Select
Control panel > Connections > Messaging accounts > E-
mail
(select the e-mail account)
>Edit.
2. Select
Inbox.
3. Select an option from the
Download
list.
In your list of messages, headers are denoted by .
To download the full message
• In your list of messages: Select the header.
To download a series of messages
1. In your list of messages: select the check box to the left of
each entry (a tick appears).
2. Select
Get & Send
.
Note If you delete a header the message will no longer be
visible in your message list, but the actual message will not be
deleted until your P800 has connected to the mail server.
Downloading e-mails automatically
You can schedule your e-mail messages to be downloaded
automatically at certain times.
To download your e-mails automatically
1. In Control Panel, select
Connections > Messaging accounts > E-
mail.
2. Select the required e-mail account and select
Edit
3. Select
Inbox > Schedule.
4. Set time or interval for scheduled download and select
Done
.
Synchronized e-mails
When you set up a synchronization with your PC, an account for
synchronized e-mail messages is automatically created on you
P800 and indicated by . You can have more than one account
for synchronized e-mails.
If you set up an account to call in for messages that you also
receive using e-mail synchronisation, the two accounts will
contain the same messages. Note that there is no connection
between the accounts; the copies in each account are separate.
Disconnecting and connecting
If your P800 is already connected to the Internet when you send
an e-mail, it will remain connected after sending it. If your P800
is not connected before sending an e-mail, it will connect and
send the message and then disconnect.
Note You can send text messages while connected to the
Internet. If your connection is CSD or HSCSD it must be
disconnected before you can make or receive a phone call. If
your connection is GPRS, it may be suspended to enable a
phone call to be made or received. You may need to repeat the
data activity (web page fetch, get e-mail) after the call has
ended.
P800_UM.book Page 66 Wednesday, August 28, 2002 4:19 PM

Messages 67
Preliminary
If your P800 cannot connect to the e-mail account, automatic
download will fail, and will be displayed next to the e-mail
account. Check, if downloads are scheduled to occur from the
same location each time, that the reception in that location is
good enough.
A scheduled download will fail if your P800 is engaged in a
voice call. It may fail if it is connected to another ISP that is,
through a different Internet account than specified for the e-mail
account.
If e-mail messages are not downloaded because a scheduled
download fails, they will be downloaded during the next
successful connection.
You can select an e-mail account that uses Dial-Up rather than a
GPRS account but automatic download will fail if your P800 is
not connected to the Internet when downloads are scheduled.
Area information
Area information messages are text messages that are sent to all
subscribers in a certain network area, for example, a local traffic
report. When you receive an area information message, the
message automatically appears on the screen. When you dismiss
the information, it will be stored in the
Area Info
Inbox until it is
written over by a new message received on the same channel.
Please consult your service provider for more information about
availability of area information services and area information
channel numbering.
To add an area information channel
1. In Control Panel, select
Connections > Messaging accounts >
CBS
.
2. Check the
Area information
check box.
3. Select
New
.
4. Enter the desired
Channel number
and check the
Subscription
active
check box.
5. Select
Done
.
To remove an area information channel
1. In Control Panel, select
Connections > Messaging accounts >
CBS
.
2. Select the channel to be deleted.
3. Select
Delete
and confirm the removal by selecting
Yes
in the
subsequent dialog. Any messages belonging to that channel
will also be deleted.
Get and send
To get and send messages for one specific account
1. Select
Messages
.
2. Select the desired account (text message, multimedia
message or e-mail for example).
3. Select
Get&send.
P800_UM.book Page 67 Wednesday, August 28, 2002 4:19 PM
68 Messages
Preliminary
To get and send messages for all your accounts
1. Select
Messages
.
2. Select
Message > Get&send.
Any unsent messages in your
Outbox
will now be sent and new messages not yet
downloaded will be downloaded to your P800.
Connecting and disconnecting from the
Internet
To disconnect from the Internet
1. Select the connection icon (HSCSD/CSD or GPRS )
in the status bar.
2. The dialog
Do you want to disconnect, Yes/No
appears.
3. Select
Yes
.
Finding messages
In both the list of accounts and list of messages,
Find
searches
through the subject lines, senders’ details and dates.
In an open message, Find searches through the text of the
message and highlights the text it finds.
You can only search through e-mail messages that have that
have been fully downloaded.
Saving contact details
When you receive a message, you can save the contact details of
the person who sent you the message.
To save the sender’s details
• In the message select
From
.
Note If you save an address from an e-mail synchronized from
your company PC, the corporate version of the address rather
than the full Internet e-mail address, will be saved to Contacts.
If the corporate version of the address is not an Internet address
(an X.400 address, or just the sender's name, for example), you
can use it to send e-mails from your synchronized account, but
you cannot use it in e-mails that you send directly from your
P800.
If your service provider or network is
unavailable
Sometimes a message cannot be sent because your P800 cannot
connect to a network. Please check that the Messaging Account
and Internet Account information in the Control Panel is correct.
If you have both GPRS and Dial-Up Internet accounts, try
sending the e-mail message using an account of the other type.
This works when only the GPRS or the GSM network is
available (but not both), because the two account types use
different networks. GPRS Internet accounts use the GPRS
network and Dial-Up Internet accounts use the GSM network.
P800_UM.book Page 68 Wednesday, August 28, 2002 4:19 PM

Messages 69
Preliminary
If your e-mail service provider is unavailable and you have
access to another account, you can copy and paste the text from
theunsente-mailin
Outbox
into a new one created with the other
account and send it.
You can cancel sending an e-mail. The message will remain in
Outbox
and you can send it later.
P800_UM.book Page 69 Wednesday, August 28, 2002 4:19 PM

70 Internet
Preliminary
Internet
You use the browser to:
• Connect to the Internet to view and access Web and WAP
pages.
• View HTML and WML e-mail attachments.
• Receive and view Push messages from your WAP service
provider.
• Download Java applications, images and audio.
The browser can open web pages that do not use Java script or
frames.
You can save bookmarks to viewed pages, to be able to access
them easily. You can also save pages in the P800 for off-line
viewing.
The browser uses folders for categorizing the information. The
folders used are bookmarks, saved pages, signed documents,
and Push messages.
Before you can use Internet, you need to set up an Internet
account in the
Control panel
. If you intend to use certain WAP
services it might be necessary to set up a WAP account in the
Control panel
as well.
To start the browser
• Start the browser by:
– pressing the browser button (the home
page is shown).
– selecting in the application picker (the
start page is shown).
– selecting in the application launcher (the start
page is shown).
– selecting a URL in another application.
Note If required, you have to enter your ID and password to log
in to your Internet account.
The application has two views:
Browser
view
The base view of the application, where you
can view Web and WAP pages.
Bookmarks
view A list view where you can save shortcuts:
• toWebandWAPsitesontheInternet
• to locally stored pages
• todocumentsdigitallysignedbyyou.
P800_UM.book Page 70 Wednesday, August 28, 2002 4:19 PM
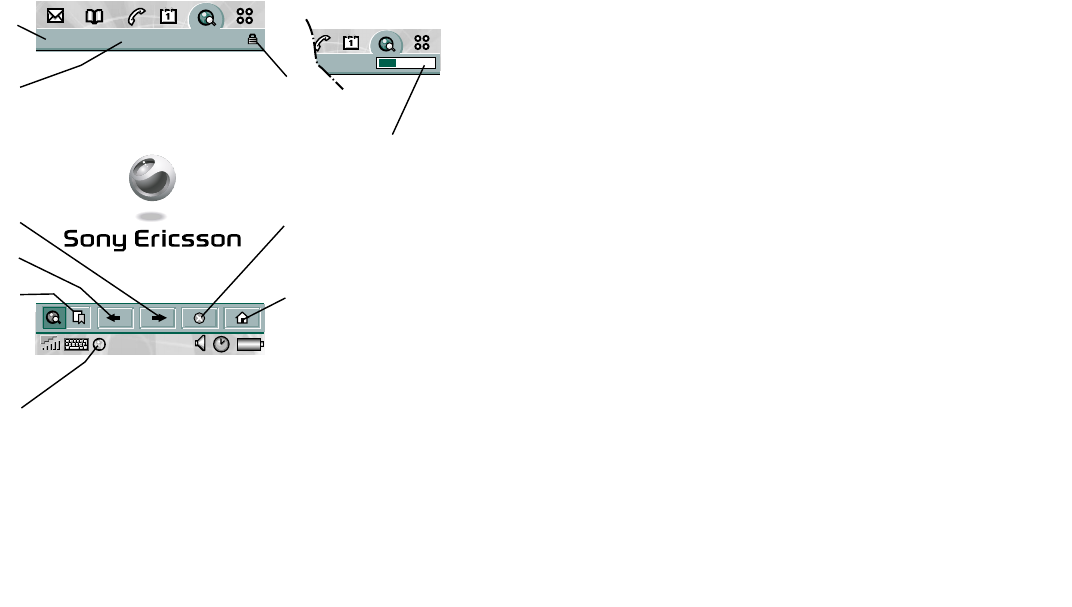
Internet 71
Preliminary
Browser view
Screen
AInternet menu.
BEdit menu.
CSelect to change to the next page.
DSelect to change to the previous page.
Edit 0:03
Internet Edit
P800 WEB/WAP
Internet Browser
P800 WEB/WAP
Internet Browser
A
H
J
K
G
B
C
D
E
F
ESelect to see the bookmarks view.
FSelect to close or get information about the connection.
GSelect to go to the home page.
HSelect to stop loading the page.
JA secure connection is established.
KProgress bar, shows the loading progress.
P800_UM.book Page 71 Wednesday, August 28, 2002 4:19 PM

72 Internet
Preliminary
Menus
Context sensitive menus
The context sensitive menu is opened when you keep the stylus
pressedonalinkorapicture.
Menus Option Description
Internet
Open page Enter the URL, or select from the
drop-down list.
Add to
bookmarks
Enter the name of the bookmark and
select the folder to save it in.
Save page Enter the name of the page and select
the folder to save it in.
Send as Send the current URL via text
message, IR or Bluetooth wireless
technology.
Find Enter a text and search for the text in
the page.
Find next Search for the next occurrence of the
search text.
Reload page Reload the page.
Load all images Load all images of the page.
Page
information
Show the page information.
Edit
Cut Cut out the marked information from
an input field.
Copy Copy the marked information.
Copy all Copy all information on the page.
Paste Paste the copied text into the selected
field.
Zoom Set zoom level.
Preferences Set the preferences of the browser.
Help Open the help application.
Link/picture Option Description
Text link and
picture link
Open link Open the active link.
Link
information
Show information on the link.
Add to
bookmarks
Add the active link URL to the
bookmark list.
Loaded picture
(with or without
link)
Save image Save the picture in the P800.
View image View the picture adopted to the
screen (enlarged or reduced).
Copy image Copy the picture to the clipboard.
Send image as Send the picture as text message,
IR or Bluetooth wireless
technology.
Not loaded
picture (with or
without link)
Load image Load the picture.
Menus Option Description
P800_UM.book Page 72 Wednesday, August 28, 2002 4:19 PM
Internet 73
Preliminary
Icons within a page
Picture not loaded (can be loaded manually).
Damaged picture (not possible to load).
To open a specific web page
1. Select
Internet > Open page.
2. Enter the page URL or select a previously viewed page from
the drop-down list.
3. Select
Open.
Note If images are not loaded, select the picture icons
or select
Internet > Load all images.
To navigate through recently opened pages
1. Select to move back to previously viewed pages.
2. Select to move forward.
To save a page for off-line browsing
1. Select
Internet > Save page
.
2. Change the page name, if required, and select a folder to save
it in.
3. Select
Done.
Tocreateabookmarktotheopenpage
1. Select
Internet > Add to bookmarks.
2. Change the bookmark name, if required, and select a folder
to save it in.
3. Select
Done.
To download and upload files
• When you select a link to a downloadable file, information
on the file is displayed.
Select
Yes
to start the download.
• When you select a link for uploading a file, a form for
submitting the file is displayed.
Select the file and select
Yes
to start the upload.
Voice call link
Call Place a call according to the link.
New SMS Send an SMS according to the
link.
New MMS Send an MMS message according
to the link.
New contact Create a contact with the link
information.
Mailto link
New e-mail Send an e-mail according to the
link.
New MMS Place an MMS message
according to the link.
New contact Create a contact with the link
information.
Link/picture Option Description
P800_UM.book Page 73 Wednesday, August 28, 2002 4:19 PM

74 Internet
Preliminary
To view information on the open page
1. Select
Internet > Page information
.
2. Select the
Content
tab to view the page information.
3. Select the
Connection
tabtoviewinformationonthe
connection.
4. Select the Certificates button to view the information on:
–Server
–User
To disconnect the connection
1. Select the connection icon (HSCSD/CSD or GPRS )
in the status bar.
2. Select
Disconnect.
3. Select
Yes.
WIM Access
When the Browser requires access to the WIM card, for
example when establishing a secure connection, you have to
enter the correct PIN.
Signing documents
You have to enter the signing PIN each time a signing operation
is going to be performed.
User authentication request
Whenever a user authentication is requested, you have the
possibility either to select a certificate and confirm the user
authentication, to select to continue anonymous or to cancel the
connection.
If
Always connect anonymous
has been set, the browser will
instead automatically try to connect anonymous.
P800_UM.book Page 74 Wednesday, August 28, 2002 4:19 PM

Internet 75
Preliminary
Bookmark view
Screen
AInternet menu.
BEdit menu.
CSelect an icon to view information on the bookmark.
DChecked bookmarks can be deleted from the Internet menu.
ESelect the bookmark text to view the page.
Internet Edit All
Ericsson Mobile Organiser
LinneaTest
SonyEricsson
SvD Meny
TV4
Yahoo
711 time table
CSS fonts
A
B
C
D
E
F
H
G
FSelect to see the browser view.
GFolder menu.
HSelect to go to the home page.
P800_UM.book Page 75 Wednesday, August 28, 2002 4:19 PM
76 Internet
Preliminary
Menus
Icons
Bookmark
Saved page
Push message from the WAP service provider
Signed document
To open a bookmark
• Select the bookmark text.
The bookmarked item is opened.
To view bookmark information
• Select the bookmark icon.
Information on the bookmark is shown. From the
information screen you can:
– Edit the bookmark.
– Delete the bookmark.
– Send the bookmark as e-mail, SMS message, Bluetooth
wireless technology, IR, or MMS message.
To delete several bookmarks
1. Select the check box of the bookmarks to delete.
2. Select
Internet > Delete.
3. Select
Yes
to confirm.
Menus Option Description
Internet
Open page Enter the URL, or select from the
drop-down list.
New bookmark Enter the URL, the name of the
bookmark and select the folder to save
it in.
Edit Edit the selected bookmark.
Delete Remove the selected bookmark.
View
Zoom Set zoom level.
Preferences Set the preferences of the browser.
Help Open the help application.
Folders
All Show all contacts in the list.
Bookmarks Show all bookmarks.
Saved pages Show all saved pages.
Unfiled Show the bookmarks that are not in a
folder.
Edit folders Categorize your contacts in folders
(business, personal and so on).
P800_UM.book Page 76 Wednesday, August 28, 2002 4:19 PM

Internet 77
Preliminary
WAP and OTA provisioning messages
WAP Provisioning and OTA messages are received by the
browser application and stored within the messaging store.
These messages are then accessed and managed by Auto setup
account in Messages. When you select a provisioning or OTA
message, dialogues are shown to aid the provisioning process.
Settings
You must set up the account for the application to work. Refer to
the Control Panel section for more information. The browser is
initially set up to work. However, you can change these settings,
if required.
The easiest way to set up Internet and WAP accounts is to ask
your Internet service provider to send you an auto setup message
containing the required setup information. The accounts will
then be set up automatically on your P800. To guarantee the
integrity of the settings, a PIN may be used.
For security reasons, some WAP pages and services, for
example on-line banking, can only be accessed from a particular
WAP account. Refer to the Control panel section for more
information.
Note Proxy settings for MMS message and for a WAP gateway
should be set in the WAP account. Other proxy settings should
be set in the Internet account.
To set up the browser
1. Select
Edit > Preferences.
2. Perform the setup according to the following:
Basic settings
– Enter the URL for the page to be shown when the browser
is started from the application picker; either a page in the
P800 or a page on the Internet.
– Select the WAP account to be used when the home page is
loaded. The accounts are set up in the control panel.
– Select if images should be loaded. If images are not
loaded, the page will be loaded faster. Non-loaded images
can be loaded manually when viewing the page.
– Select if sounds should be played when the page is
opened.
– Select if animations should be played when the page is
opened.
Security settings
– Select if you want to save signed documents.
– Select if you want to connect without giving away your
identity.
– Select if you want to connect using the WIM card.
– Select if you want to allow cookies.
Advanced settings
P800_UM.book Page 77 Wednesday, August 28, 2002 4:19 PM
78 Internet
Preliminary
– Select if you want to be able to receive messages from
your WAP service provider.
– Select if you want to automatically open the URL in WAP
Push messages.
– Select if you want to remove out-of-date messages
automatically.
– Set the size of memory where viewed pages are stored.
Stored pages will load faster when you visit them again.
– Select
Clear memory
to empty the list of pages visited.
– Select
Clear cache
to empty the cache memory.
P800_UM.book Page 78 Wednesday, August 28, 2002 4:19 PM

Calendar 79
Preliminary
Calendar
The Calendar function helps you to keep track of appointments
and events, and you can also set reminder alarms for the entries.
There are three types of entries in the calendar:
• Appointments - An entry with start and end time (for
example, a meeting).
• Reminders - An entry that does not need a specified time (for
example, a birthday). However, you can specify a time if
you, for example, want to set an alarm. A reminder is
denoted by a .
• All day events - An entry with start and end dates but no
specific times. An appointment can overlap an All Day
Event.
Different views
You can see your Calendar entries in three views with the flip
open: Day, Week and Month.
To change view
• Select to display the Day view.
• Select to display the Week view.
• Select to display the Month view.
The icon places itself over the selected view.
With the flip closed you will see the Day view.
Using the calendar
To create a new calendar entry
1. Select
Calendar > New
and enter a short description of the
entry. This is the description you see in the calendar.
2. Select
Unfiled
(the folder menu) in the menu bar and select a
folder to store the entry in.
3. Continue to enter information to the items on the detail page.
–
Type
- Specify if the entry is an appointment, reminder or
all day event.
–
Date
- Select the date to get a calendar where you can set a
date for the entry.
–
Time
- Set start and end time for the entry.
–
Location
- Specify a location or select a location you have
used before.
–
Alarm
- Select the check box if you want your telephone to
alert you about the entry with a sound. Select the time and
date that appears for your settings.
–
Repeat
- Specify if you want to repeat the entry or not.
Read more about this below.
P800_UM.book Page 79 Wednesday, August 28, 2002 4:19 PM

80 Calendar
Preliminary
–
Private
- Select the check box to prevent the task from
being viewed by others than yourself if you synchronize
your calendar with, for example, your PC.
4. Selectthenotepagetabtowriteanotetothisentry.
5. Select to save and close the entry.
You should delete old entries regularly to release memory in the
P800.
To repeat re-occurring entries
1. When the entry is open, select
Repeat
.
– Set repeating to
Daily
,
Weekly
,
Monthly by date
,
Monthly by
day
,
Yearly by day
or
Yearly by date
.
–
Interval
- Specify how often the event will happen, for
example, by selecting
Weekly
and
Interval 2
means that the
event will go off every two weeks on the specified day.
–
Forever/Until
- Set the time limit for the alarm or select
forever.
2.
Select days
- Weekly repeated events can be set to occur twice
or more in a week. For example, eating lunch with a friend
Tuesday and Friday every week.
Note You cannot repeat All Day Events
To edit an entry
1. Open the entry by tapping it in the calendar.
2. Make the changes in accordance with the instructions above.
Managing entries
To find a certain entry
1. Select
Calendar > Find
.
2. Enter a search word in the menu that appears.
3. Select where to search (
Everywhere, Future, Past
).
4. Select
Find
. A result list is then displayed.
5. Select an entry on the result list to open it.
To delete an entry
• Open the entry and select
Calendar > Delete entry
.
A deleted entry may be restored with
Edit > Undo delete
.
To delete all entries in a period of time
1. Select
Calendar > Remove entries
.
2. Select the time period and select
Done
. All entries from that
time period are deleted from the Calendar.
Note Repeated entries will not be deleted.
To copy, cut or paste an entry
1. Open the entry.
2. Select
Edit > Copy entry/ Cut entry.
3. Go to the day where you want to place the entry.
4. Select
Paste entry.
P800_UM.book Page 80 Wednesday, August 28, 2002 4:19 PM

Calendar 81
Preliminary
To move a Calendar item to Tasks
• Open the entry and select
Calendar > Move to Tasks
.
The entry is moved, not copied.
If you move an entry with an alarm, it will also sound in Tasks.
To cut or copy Calendar entries to the Tasks application
1. Open the entry and select
Edit > Cut entry
or
Copy entry.
2. Open Tasks.
3. Select
Edit > Paste entry.
Customize the calendar
You can customize the calendar views and alarm settings to suit
your own needs.
To customize the calendar view, General tab
1. Select
Edit > Preferences.
2. Select the
General
tab.
Now you can change the following settings:
• The hours to be shown in a day.
• Standard time intervals in the day view. How detailed the
time is shown in the calendar day view.
• Standard entry length.
• View hours in week from/to.
To customize the alarm settings
1. Select
Edit > Preferences.
2. Select the
Alarm
tab.
Now you can change the following settings:
•
Alarm precedes event by
- how long before an entry the alarm
goes off.
•
Alarm sound
- select sound for the alarm.
To customize the screen
1. In calendar, select
Edit > Preferences.
2. On the
General
tab you change the hours displayed in one
day, one week, standard time intervals or standard entry
length.
3. On the
Alarm
tab you set the alarm to proceed an entry in the
calendar.
To set colours to your entries using the folders
1. In Calendar, select the folders menu to the right in the menu
bar and select
Edit folders.
2. Select a folder and select
Edit
or create a new folder by
selecting
Add
.
3. Select the colour box and select colour for that folder and
select
Done
.
P800_UM.book Page 81 Wednesday, August 28, 2002 4:19 PM

82 Calendar
Preliminary
Entries in a folder with a specific colour appear in that colour in
Day and Week views (but not in Month view) so that you can
see the pattern of events in your diary. Reminders appear as
whatever the folder colour.
Saving changes
If you leave Calendar while editing an entry, your changes will
be saved automatically.
P800_UM.book Page 82 Wednesday, August 28, 2002 4:19 PM

Tasks 83
Preliminary
Tasks
With the Tasks function you can make a list of things you need
to do. The folders help you to separate different types of
activities.
You can move entries between Tasks and the Calendar, which is
useful when you come to schedule a Tasks entry. You can also
send an entry via text message, IR, Bluetooth wireless
technology, multimedia message or e-mail.
Using Tasks
When opening Tasks you will have a task list of entered tasks.
In this list you can only see a short description of the task. Select
a task to see its full information.
A task entry consists of two pages. One detail page where you
set the properties for the task, and one page where you can add
notes.
To create a new task entry
1. Select
Tasks > New
and enter a short description of the task.
This is the description you see in the task list.
2. Select
Unfiled
(the folder menu) in the menu bar and select a
folder to store the task in.
3. Continue to enter information to the items on the detail page.
–
Completed
– Select the check box when task is done.This
can also be done directly in the tasks list.
–
Priority
– Set a priority for the task. You can sort the tasks
by priority.
–
Due date
– Select the check box to set a deadline to the
task. Select the date that appears to get a calendar where
you can set a due date.
–
Alarm
– Select the check box if you want your telephone to
alert you about the task. Select the time and date that
appears for your settings.
–
Private
– Select the check box to prevent the task from
being visible when synchronized with tasks in other
devices, for example your PC.
4. Selectthenotepagetabtowriteanotetothisentry.
5. Select to save and close the task.
Note Delete will delete the whole task entry.
To edit an entry
1. Open the entry by tapping it in the tasks list.
2. Make the changes according to the instructions above.
P800_UM.book Page 83 Wednesday, August 28, 2002 4:19 PM
84 Tasks
Preliminary
Managing task entries
To open an existing entry
• Select the entry in the tasks list
To mark an entry as completed
• Select the check box to the left of the entry in the tasks list.
To sort the entries
• Select
Edit > Sort on priority
or
Sort on date
.
To find a certain entry
1. Select
Tasks > Find
.
2. Enter a search word in the menu that appears.
3. Select in which folder to search or use the default value
All
folders
.
4. Select
Find
. A result list is then displayed.
5. Select an entry on the result list to open it.
To make a copy of an entry
1. Select
Edit > Copy entry.
2. Select
Edit > Paste entry.
To delete an entry
• Open the entry in the task list and then select
Delete
.
To restore a deleted entry
• Select
Edit > Undo delete.
To delete all completed entries
• Inyourtasklist,select
Tasks > Delete completed
.
Note Unlike individual entries; when you delete All Completed
Entries, they are removed permanently and cannot be restored.
Sending and moving task entries
To send an entry to another device
1. Open the entry and select
Tasks > Send as
.
2. Select how to send entry (text message, infrared, Bluetooth
wireless technology or multimedia message) and then select
Done
.
To move an entry to the Calendar
• Open the entry and select
Tasks > Move to Calendar.
The entry
is moved, not copied.
To copy a task entry to Calendar
1. Open the entry and select
Edit > Copy entry
.
2. Open Calendar.
3. Enter the day you wish the task to appear.
4. Select
Edit > Paste Entry
in Calendar.
P800_UM.book Page 84 Wednesday, August 28, 2002 4:19 PM

Tasks 85
Preliminary
Note If you move or copy an entry to the Calendar, it will lose
the priority it was assigned in Tasks.
If you do not set a due date for the tasks entry, the current date
will be used for the new Calendar entry. If you move or copy an
entry with an alarm, the alarm will also be moved to the
Calendar.
Settings
• Select
Edit > Preferences
to do the settings. The following
settings are available.
–
Display due dates
– Select whether or not to display them in
the tasks list.
–
Display completed
– Select whether or not to display them
in the tasks list. This will not delete the completed tasks.
–
Alarm sound
–Selectanalarmsoundfromthelist.Youcan
tap the trumpet symbol to hear it.
P800_UM.book Page 85 Wednesday, August 28, 2002 4:19 PM
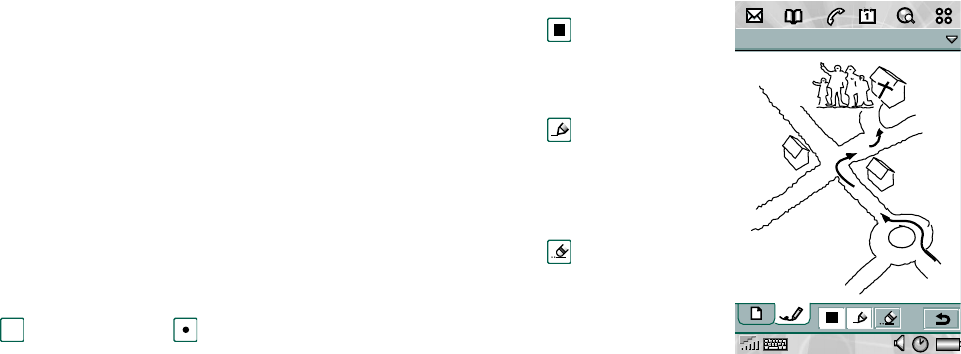
86 Jotter
Preliminary
Jotter
The Jotter works as a notebook where you can write notes and
draw pictures. The folders help you to separate different types of
notes. You can read the notes with the flip closed but you should
have the flip open when you work with them.
A Jotter entry consists of two pages. One text page and one
drawing page.
When opening Jotter you will see a list of entered notes. In this
list you can only see the first words of the text note. Select a
note to see its full information.
Writing text notes
Open Jotter and select Jotter >New.
The new note will automatically start as a text note.
Note You write text notes on the text page by using the keys or
the handwriting recognition. See the Getting Started chapter to
get more information.
Select to get bold text and to create a bullet list.
Drawing pictures
The drawing mode gives you several options to draw in different
styles or colours. The main window is the “paper” where you
may draw with your stylus in the same way as you draw with an
ordinary pen.
Select to change colour.
A colour scheme will be
displayed. Select the colour
you prefer.
Select to change the
virtual nib. A list of nibs
representing different pen
widths appears. Select the
nib you want to use.
Select to activate the
eraser. The eraser is either on
or off and it works like the
pen. Tap the eraser again to
re-activate the pen.
A
Jotter Edit Unfiled
P800_UM.book Page 86 Wednesday, August 28, 2002 4:19 PM

Jotter 87
Preliminary
All jotter files (both text and drawings) are automatically stored
in the telephone. The list view will be presented to you as soon
as you start the Jotter application.
Creating and editing notes
To create a new note
1. Select
Jotter > New
and enter a note on the text page.
The first words will name the note in the jotter list.
2. Select
Unfiled
(the folder menu) in the menu bar and select a
folder to store the jotter in.
3. Select the drawing page tab to draw a sketch to this note.
4. Select to save and close the note.
To edit a note while working with it
• For text, select
Edit > Revert
The text returns to its original state. All changes are lost.
• For sketches, select
Edit > Undo
This choice removes your last pen stroke. If you change your
mind, select
Edit > Redo
.
To create a new note from text or sketches copied from another
application
1. Open the list of notes and select
Edit > Paste
.
Note If you paste a sketch over an existing sketch, the existing
sketch will be deleted.
Create a note from the flip closed mode
1. Select Applications >Jotter from the flip closed mode.
2. If you have previous notes stored, these will now be listed.
Use the Jog Dial to select a previous note in order to open it.
3. Press the menu key if you want to create a new note. Select
New
. Insert your text by using the keypad.
Managing notes
To delete a note
1. Select the note in the notes list.
The note opens.
2. Select
Jotter > Delete note
.
Sending a note
You can send a Jotter note by e-mail, text message, multimedia
message, infrared or Bluetooth wireless technology.
Tosendanote
• Open the note and select
Jotter > Send as
.
The note will be sent as text and/or with the picture
depending on message type:
P800_UM.book Page 87 Wednesday, August 28, 2002 4:19 PM
88 Jotter
Preliminary
– textmessage:textonly.
– e-mail: text as body and picture as an attachment.
– multimedia message: text and picture on first slide.
– Bluetooth wireless technology and infrared: complete
jotter entry, text only or picture only.
P800_UM.book Page 88 Wednesday, August 28, 2002 4:19 PM

Games 89
Preliminary
Games
There are two pre-installed games in your P800. Traditional
Chess and the card game Solitaire. You will find both games in
the flip open mode’s list view.
There are more games available for the P800. You will find
these games on a disc in your original P800 box.
Games from third-party developers might be installed in the
P800. Games which are not certified by Sony Ericsson or their
partners are not guaranteed to work correctly or securely, and
users install them at their own risk.
Chess
You can play Chess against the P800 or against another P800
user. In the latter mode, Chess communicates with the other
player through SMS text messaging.
On completion of a move, the move data is transmitted in text
message form to the other player. After transmission, the game
waits for an incoming text message from your opponent and
uses its contents to determine the next move on the board, at
which point control reverts to you.
To start a new game
1. Select
Chess > New game
to initiate a game.
2. Enter details as desired in the
New game
dialogue. You can
return to these details later.
–
Name
– Give the game a name so you can return to it later
if you have to interrupt it.
–
Notes
–Writeanoteaboutthegame.
–
You play
– Choose to play white or black.
–
Against
– Select the level of your opponent. If you end up
winning all the games, it may be time to select a more
difficult level. Choosing a higher level may, however,
force the P800 to take longer to select a move.
–
Locally
– Select if you want to play against your P800 or
against another P800 user.
3. Tap
Play
to start the game.
To play Chess
1. Select the piece you want to move.
The square where it is standing will now be highlighted.
2. Select the square to where you want to move the piece.
The square will flash and the selected piece will move to it.
Selecting a square that is not allowed for a piece is not possible.
P800_UM.book Page 89 Wednesday, August 28, 2002 4:19 PM
90 Games
Preliminary
Switching to flip closed mode closes the game temporarily and
saves the session status. In multi-player mode, an end-game text
message is sent to the remote player.
Solitaire
Solitaire is a card game played with a standard deck of 52 cards
andupto4Jokers.
Understand the game
The purpose of Solitaire is to remove all the cards from the piles
to the layout card whilst scoring as many points as possible.
Points are awarded for playing pile cards and bonus points are
awarded for unbroken, ascending or descending runs of four or
more rank cards.
When you cannot play any more cards and cards still remain in
the piles, the game is over. If all the pile cards are removed,
bonus points are awarded and the hand is won. You are then
challenged to play a Hi/Low game to acquire more bonus points.
After the challenge, the game continues and a new hand is dealt
with one less Joker.
Rules
When the game starts, 35 cards are dealt from the deck into 7
piles of 5 cards. A further card is then dealt face up to from the
layout card.
• Cards can only be played from the bottom of the piles.
• To play a pile card it must have a face value of one or more
or one less than the layout card.
• Aces are low and may not be played onto Kings. Jokers can
be played onto any card and any card can be played onto a
Joker.
Settings
To restart the game during a game
• Select Solitaire > New.
To undo/redo a move
• Select Edit > Undo/Redo.
To change card backs and playing background
• Select Edit >Preferences.
If your result is one of the sixth best it will be placed in the high
score table. You can also watch individual player statistics.
Play Solitaire
Solitaire is only available in the flip open mode.
1. Select the icon for Solitaire.
P800_UM.book Page 90 Wednesday, August 28, 2002 4:19 PM

Games 91
Preliminary
Thegamewilleitherstartwithanewgameorwiththelayout
for an earlier, interrupted game. (The game data is saved on
return to desktop, when the flip is closed or when the battery
is low.)
2. Select the card you want to move and it will be higlighted.
3. Select the card where you would like to move the higlighted
card.
P800_UM.book Page 91 Wednesday, August 28, 2002 4:19 PM

92 Voice memo
Preliminary
Voice memo
In
Voice Memo
youcanrecordandlistentoyourownsound
recordings. You can also exchange sound recordings between
phones via Bluetooth wireless technology, infrared
communication, e-mail or multimedia message, and use a sound
recording as a ring signal.
You cannot name a sound recording that you have recorded.
Each memo is identified by the date and time it was recorded
and by its position in the list of sound recordings. For example,
the third of five sound recordings is identified as
3of5
on the
screen.
Making sound recordings
Youcanrecordandlistentoyourownsoundrecordings,aswell
as save and listen to sound recordings that others have sent to
you.
You can add a new recording to the end of an existing sound
recording. When you do this, the position of the sound recording
in the list does not change and the original date and time of the
recording are retained.
To record and save a sound recording
1. Select
>>New
.
A new sound recording is created.
2. Select and start recording after the beep.
3. Select to finish the recording.
The new sound recording is automatically saved in the list of
sound recordings with the current date and time.
Key functions
To delete a sound recording
1. Select a sound recording you want to delete.
2. Select
Delete > Yes
.
Select... To...
start recording a sound.
listen to the current sound recording.
stop the current sound recording.
go to the previous sound recording, in the list of sound
recordings.
go to the next sound recording, in the list of sound
recordings.
P800_UM.book Page 92 Wednesday, August 28, 2002 4:19 PM

Voice memo 93
Preliminary
Using sound recordings as ring signals
You can set a sound recording as a ring signal. Choose between
a recording you have made yourself, and a recording you may
have received via e-mail or in a multimedia message.
• To set a sound recording as ring signal see “Incoming call
alert” on page 46.
Exchanging sound recordings
You can send and receive sound recordings by Bluetooth
wireless technology, infrared communication, e-mail or
multimedia message.
To send a sound recording
1. Select
Voice Memo
>
Send as
.
2. Select how you want to send the sound recording.
See the chapter “Messages” on page 59 for further details on
how to send and receive sound recordings.
P800_UM.book Page 93 Wednesday, August 28, 2002 4:19 PM

94 CommuniCam and Pictures
Preliminary
CommuniCam and Pictures
Using the camera
With the built-in camera CommuniCam you can take pictures,
view them in your phone screen and send them to friends or
colleagues via multimedia messaging. You can also send the
pictures you have saved in your P800 to any other PC device via
infrared communication or Bluetooth wireless technology. It is
also possible to exchange pictures between the P800 and the
web.
The pictures in your P800 can be set as background pictures or
they can be added to the contacts in your phone book.
See chapter “Personalizing your P800” on page 121 to find out
more about using pictures.
To take a picture
1. Press the camera button to activate the CommuniCam
application.
2. Press the camera button again to capture the image on the
screen.The picture is automatically saved in
Pictures
.
To send the picture via multimedia message, select
Send as MMS
from the flip closed context menu.
Open the flip to access the full range of CommuniCam settings.
With the flip open, the CommuniCam is activated by selecting
>
.
To view, edit or send the picture, select which takes you
directly to
Pictures
.
Delay timer
You can take a picture with a 15-second delay before the actual
picture is taken. This is a useful function if you want to be in the
picture yourself.
To take a picture with delay timer
1. Select
>
.
2. Select
CommuniCam > Delay Timer
.
3. Press the camera button. The timer beeps for 15 seconds and
a timer icon is shown before the picture is taken.
Select
CommuniCam > Delay Timer
again to deactivate the delay
timer.
P800_UM.book Page 94 Wednesday, August 28, 2002 4:19 PM

CommuniCam and Pictures 95
Preliminary
Preferences
You may want to change some of these settings if, for example
you are taking a picture in daylight or in dark surroundings. You
can also choose what resolution (size and quality) you want for
each separate picture.
To change preferences for the camera
1. Select
>
.
2. Select
CommuniCam > Preferences
.
3. Select the setting you want to change:
To restore default camera preferences
1. Select
CommuniCam > Restore defaults
.
2. Select
Yes
.
Pictures
In Pictures you can manage all pictures saved in your P800. The
pictures can be taken using the CommuniCam, received via e-
mail, Bluetooth wireless technology or infrared communication,
downloaded via the browser or transferred from your PC via a
cable. Your P800 supports JPEG, GIF, PNG, WBPM and BMP
picture formats. The pictures can be sent in multimedia
messages, added to the contacts in your phone book, or used as
background image and screensaver.
Move the slider to change the brightness of the picture.
Move the slider to change the contrast.
Turn the backlight On when the light behind the subject is
brighter than the light in front of the subject.
Turn the flicker free function On to reduce the effects of
flicker from, for example, fluorescent light.
Choose white balance according to the lighting conditions
you are in when taking the picture.
Choose quality and size for the picture. High picture quality
means larger file size and larger memory size than low picture
quality. The picture sizes are displayed in pixels.
P800_UM.book Page 95 Wednesday, August 28, 2002 4:19 PM
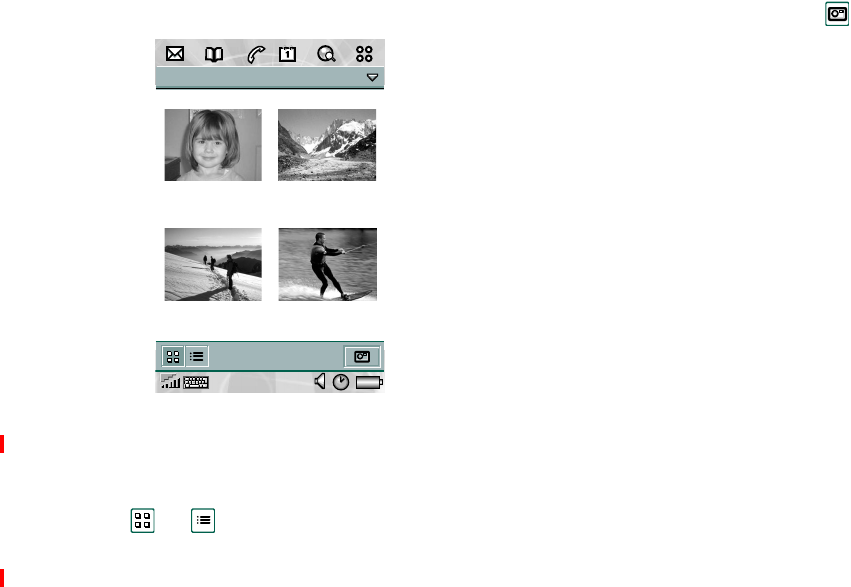
96 CommuniCam and Pictures
Preliminary
List view
In the list view, you get an overview of all the pictures in your
P800. You can search for specific pictures, zoom the picture
names and sort your pictures by name, date, size or type.
Change between a thumbnail view and a list view of the pictures
by selecting and .
At the bottom of the screen you can see how many pictures you
have saved in your P800.
Tip To take a new picture, select which takes you directly to
the
CommuniCam
.
Tip Use the
Find
function to locate a certain picture, and the
Zoom
function to change the size of the screen fonts.
To sort the pictures
• Select
Edit >
to choose how you want to sort the pictures in
your folders.
Picture Edit Photos
Brioney Mer de glace
Mont Blanc
4 pictures
Wakeboard
P800_UM.book Page 96 Wednesday, August 28, 2002 4:19 PM
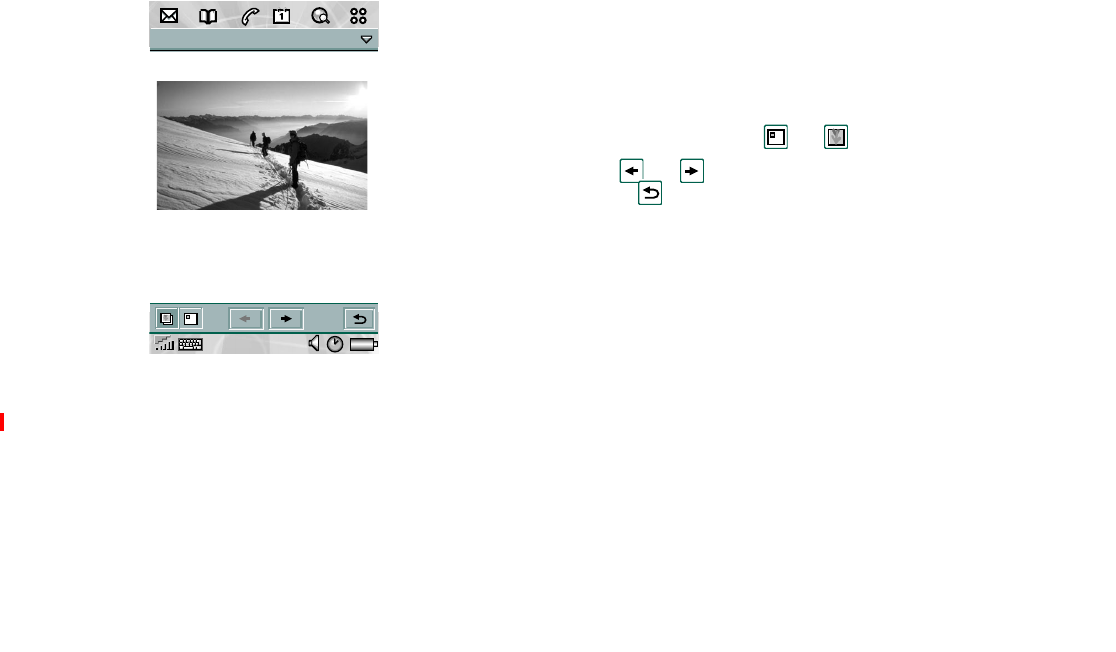
CommuniCam and Pictures 97
Preliminary
Detail view
In the detail view, you can rename your pictures and sort them
into folders. This makes it easier for you to keep track of the
pictures in your P800.
To rename a picture
1. Select
Pictures > Rename picture
.
2. Enter a picture name
>Done
.
Note Two or more pictures cannot have the same name.
Tip Use the
Folder
function to organize all your pictures. Read
more about organizing files in the chapter General functions.
At the bottom of the screen you can see the picture information,
for example, the size of the picture and the date the picture was
taken.
To change between the actual size of the picture and a size that
fits on the screen, select and .
Use and to move between the pictures in the current
folder. takes you back to the list view.
Sending and receiving pictures
You can send pictures to other phones or to a PC via multimedia
messaging. You can also save pictures that you have received
via e-mail and in multimedia messages.
To send a picture
• Select
Pictures > Send as
.
See “Messages” on page 59 for further details.
To save a picture from a message
•See“Messages” on page 59 for further details.
To delete a picture
1. Select
Pictures > Delete picture
.
2. Select
Yes
.
Pictures Edit Photos
Mont Blanc
21 June 2001 JPG(39 Kb)
P800_UM.book Page 97 Wednesday, August 28, 2002 4:19 PM

98 CommuniCam and Pictures
Preliminary
If you want to use one of your pictures in another application
you can simply copy it and then paste it into the application of
your choice.
To copy a picture
• Select
Edit > Copy picture
. A copy of the picture is saved in
Pictures.
Sony Image Station
You can exchange pictures between your P800 and Sony Image
StationontheWeb.UsethebrowserinyourP800togotohttp:/
/www.imagestation.com andsignup.
P800_UM.book Page 98 Wednesday, August 28, 2002 4:19 PM
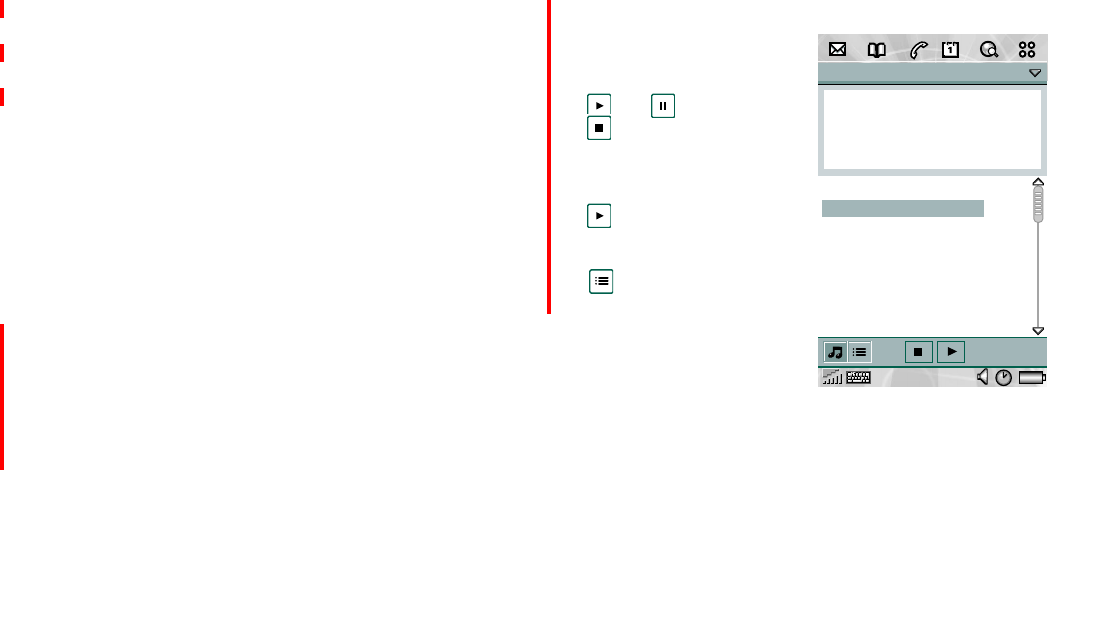
Audio player 99
Preliminary
Audio player
Your P800 has mobile music in the form of an audio player.
With the audio player you can listen to the latest music tracks, or
complete albums. You can download tracks to your P800 from a
PC, the Internet or Memory Stick, and create different play lists,
using the folder function. Your P800 supports a number of
different sound files. Refer to “Technical data” on page 187 for
more information on supported file types.
List view
In the list view, you can decide what types of sound files to
include in your different play lists, and how to play back the
play list you are currently in. You can also easily move between
the play list view and the file list view for the current folder.
To adjust the volume
• Move the Jog Dial up to increase the volume, and down to
decrease the volume.
Warning! The volume may be uncomfortably loud at the
higher volume levels if the phone is close to your ear. Exposure
to excessive volume levels may damage hearing.
Play list view
This view is intended for
playing entire folders. In the
play list view you can
Play, Pause,
and
Stop
the playback of the
current folder, and see the
duration of the track.
Selecting a track and tapping
will Play the selected
track and all the following
tracks in the folder. Tap
to move directly to the
file list view.
Audio Edit all
Mah Na Mah Na
MP3 1:40
Sesame Street
Elmo's Song
Mah Na Mah Na
Beautiful Day
Stuck in a moment You...
Elevation
Walk on
When I look at The Wo...
Standing Still
P800_UM.book Page 99 Wednesday, August 28, 2002 4:19 PM
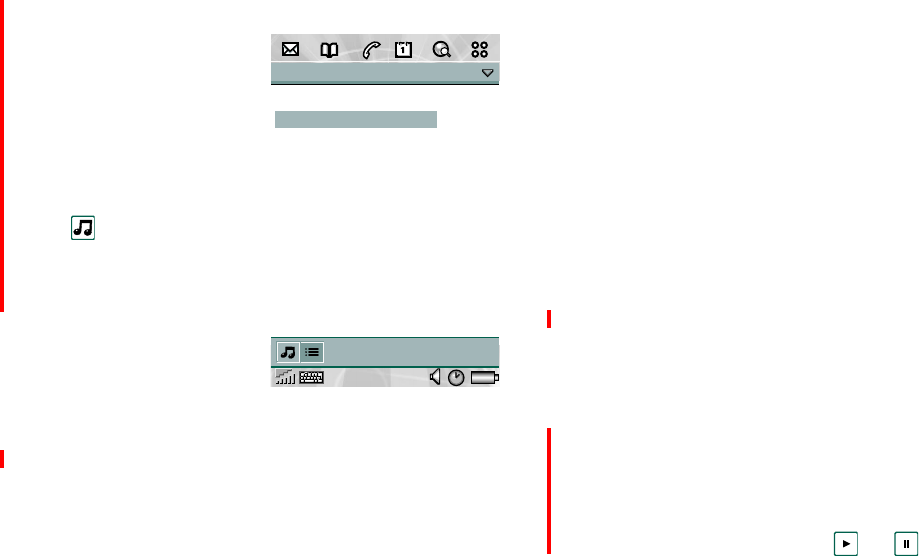
100 Audio player
Preliminary
File list view
This view is intended for
playing one file at a time. In
the file list view you can see
how many tracks you have in
the current folder. Tapping a
file name will open the Detail
View, and allow you to
manage that file.
Tap to move directly to
the play list view
Loop
With the loop function you
can decide if you want to
listen to the tracks in the
current folder only once, or if
you want to loop them until you manually stop the play-back.
To loop a list
1. Select
Audio > Loop
.
2. Select the check box.
Managing play lists
You can create your own play lists using the folder function. We
recommend that you create folders for play lists on the Memory
Stick. In any Audio player view, you can create a new folder
using the
Edit Folders
command in the
Folder Menu
.Thenyou
move or copy your sound files to the new folder to get your own
play list. You can add more playlists as long as there is memory
available.
Preferences
You can choose if you want all types of sound files to be
displayed and played in the play lists, or if you want to display
andplayonlyacertaintypeofsoundfile.Thesoundfilesyou
can choose from are the ones that are supported by the P800.
To select sound file types for the play lists
1. Select
Edit > Preferences
.
2. Check the boxes next to the sound files you want to include
in the play lists
> Done
.
Detail view
This view is intended for managing one file at a time. You can
play and pause the file by tapping and .
Audio Edit all
8 tracks
Elmo's Song
Mah Na Mah Na
Beautiful Day
Stuck in a moment You...
Elevation
Walk on
When I look at The Wo...
Standing Still
P800_UM.book Page 100 Wednesday, August 28, 2002 4:19 PM