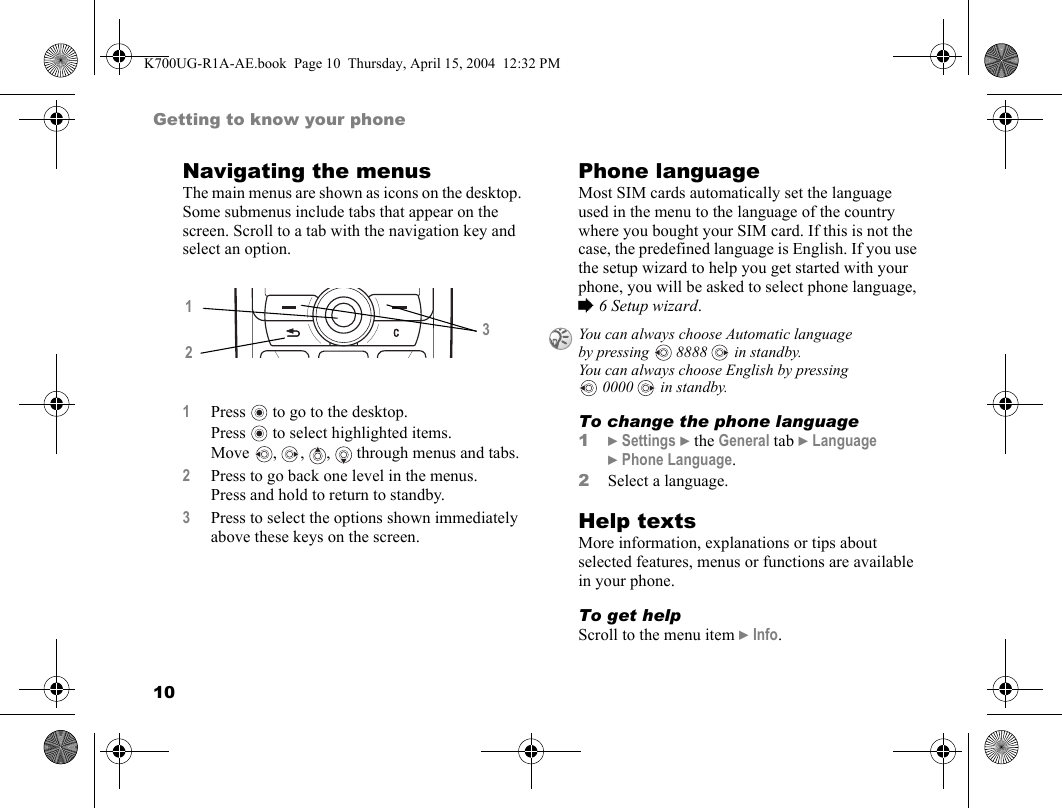
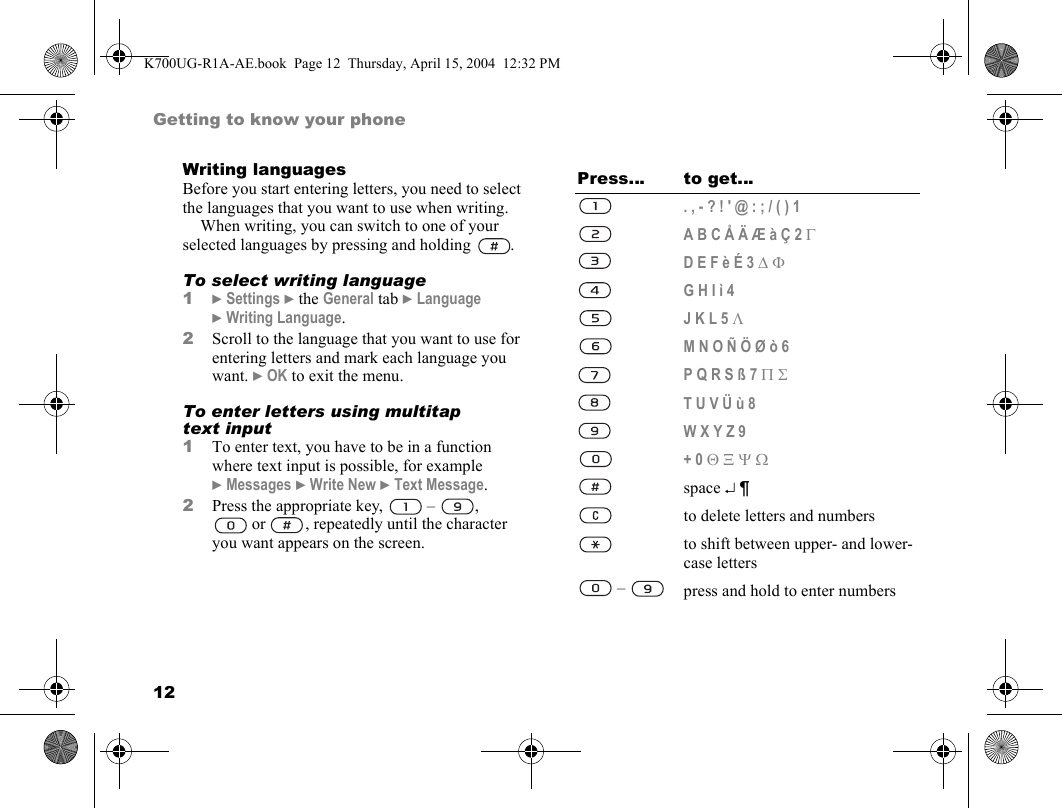
Sony A1021041 Licensed Transmitter User Manual Exhibit 8 part 1

Sony Mobile Communications Inc Licensed Transmitter Exhibit 8 part 1

Contents

Exhibit 8 User manual part 1

1ContentsContentsGetting started   . . . . . . . . . . . . . . . . . .   4Assembling the phone, SIM card, battery, making a call.Getting to know your phone  . . . . . . . .   8Phone overview, using the menus, entering letters, file manager.Calling  . . . . . . . . . . . . . . . . . . . . . . . .   17Calls, phonebook, voice control, call options.Messaging  . . . . . . . . . . . . . . . . . . . . .   36Text messaging, picture messaging, email, My Friends, messaging glossary.Imaging  . . . . . . . . . . . . . . . . . . . . . . .   51Camera, video recorder, pictures, screen saver.Entertainment  . . . . . . . . . . . . . . . . . .   57Media player, sounds, themes, games.Connectivity  . . . . . . . . . . . . . . . . . . . .  63Internet and email settings, synchronizing, Bluetooth™ wireless technology, infrared.More features . . . . . . . . . . . . . . . . . . .  72Time and date, alarm clock, calendar, tasks, SIM card lock, etc.Troubleshooting  . . . . . . . . . . . . . . . . .  81Why doesn’t the phone work the way I want?Additional information  . . . . . . . . . . . .  84Sony Ericsson Web site, safe and efficient use, warranty, declaration of conformity.Icons . . . . . . . . . . . . . . . . . . . . . . . . . .  91Icon descriptions.Index   . . . . . . . . . . . . . . . . . . . . . . . . .  93K700UG-R1A-AE.book  Page 1  Thursday, April 15, 2004  12:32 PM
2Sony EricssonGSM 900/1800/1900First edition (March 2004)This manual is published by Sony Ericsson Mobile Communications AB, without any warranty. Improvements and changes to this manual necessitated by typographical errors, inaccuracies of current information, or improve-ments to programs and/or equipment, may be made by Sony Ericsson Mobile Communications AB at any time and without notice. Such changes will, however, be incorporated into new editions of this manual.All rights reserved.© Sony Ericsson Mobile Communications AB, 2004Publication number: AE/LZT 108 6824 R1APlease note:Some of the services in this manual are not supported by all networks. This also applies to the GSM International Emergency Number 112.Please contact your service provider if you are in doubt whether you can use a particular service or not.Please read the Guidelines for safe and efficient use and the Limited warranty chapters before you use your mobile phone.The Bluetooth word mark and logos are owned by the Bluetooth SIG, Inc. and any use of such marks by Sony Ericsson is under license.T9™ Text Input is a trademark or a registered trademark of Tegic Communications.T9™ Text Input is licensed under one or more of the following: U.S. Pat. Nos. 5,818,437, 5,953,541, 5,187,480, 5,945,928, and 6,011,554; Canadian Pat. No. 1,331,057; United Kingdom Pat. No. 2238414B; Hong Kong Standard Pat. No. HK0940329; Republic of Singapore Pat. No. 51383; Euro. Pat. No. 0 842 463 (96927260.8) DE/DK, FI, FR, IT, NL, PT, ES, SE, GB; and additional patents are pending worldwide.Java and all Java based trademarks and logos are trademarks or registered trademarks of Sun Microsystems, Inc. in the U.S. and other countries.End-user license agreement for Sun™ Java™ J2ME™.1Restrictions: Software is confidential copyrighted information of Sun and title to all copies is retained by Sun and/or its licensors. Customer shall not modify, decompile, disassemble, decrypt, extract, or otherwise reverse engineer Software. Software may not be leased, assigned, or sublicensed, in whole or in part.K700UG-R1A-AE.book  Page 2  Thursday, April 15, 2004  12:32 PM
32Export Regulations: Software, including technical data, is subject to U.S. export control laws, including the U.S. Export Administration Act and its associated regulations, and may be subject to export or import regulations in other countries. Customer agrees to comply strictly with all such regulations and acknowledges that it has the responsibility to obtain licenses to export, re-export, or import Software. Software may not be downloaded, or otherwise exported or re-exported (i) into, or to a national or resident of, Cuba, Iraq, Iran, North Korea, Libya, Sudan, Syria (as such listing may be revised from time to time) or any country to which the U.S. has embargoed goods; or (ii) to anyone on the U.S. Treasury Department’s list of Specially Designated Nations or the U.S. Commerce Department’s Table of Denial Orders.3Restricted Rights: Use, duplication or disclosure by the United States government is subject to the restrictions as set forth in the Rights in Technical Data and Computer Software Clauses in DFARS 252.227-7013(c) (1) (ii) and FAR 52.227-19(c) (2) as applicable.Part of the software in this product is copyright ©SyncML initiative Ltd. (1999-2002). All rights reserved.Other product and company names mentioned herein may be the trademarks of their respective owners.Any rights not expressly granted herein are reserved.K700UG-R1A-AE.book  Page 3  Thursday, April 15, 2004  12:32 PM
4Getting startedGetting startedAssembling the phone, SIM card, battery, making a call.More information and downloads are available at www.SonyEricsson.com.Instruction iconsThe following instruction icons appear in this user guide:AssemblyBefore you can use your phone you need to:• Insert the SIM card.• Attach and charge the battery.SIM cardWhen you register as a subscriber with a service provider, you get a SIM (Subscriber Identity Module) card. The SIM card contains a computer chip that keeps track of your phone number, the services included in your subscription, and your phonebook information, among other things.SIM card and battery informationAlways turn off the phone and detach the charger before you insert or remove a SIM card. } Use the selection keys or the navigation key to scroll and select. %10 Navigating the menus. % See also page ...ImportantNoteContact your service provider for details. %6 Available services.If you have been using a SIM card in another phone, make sure that your information is saved to the SIM card before you remove it from the other phone. For example, contacts may have been saved in the phone memory %19 Phonebook.It may take up to 30 minutes before the battery icon appears when charging.K700UG-R1A-AE.book  Page 4  Thursday, April 15, 2004  12:32 PM
5Getting startedTo insert the SIM card and charge the battery1Insert the SIM card. Make sure the SIM card is placed under the silvery holders.2Place the battery on the back of the phone with the label side up and the connectors facing each other.3Place the back cover as shown in the picture and slide it into place.4Open the connector cover and connect the charger to the phone at the flash symbol. The flash symbol on the charger plug must face upwards.5It may take up to 30 minutes before the battery icon appears on the screen.6Wait approximately 4 hours or until the battery icon indicates that the battery is fully charged. If you do not see the battery icon after this time, press any key or   to activate the screen.7Remove the charger by tilting the plug upwards.PIN (Personal Identity Number)You may need a PIN (Personal Identity Number) to activate the services in your phone. Your PIN is provided by your service provider. When you enter your PIN, the digits are hidden with an *, unless your PIN starts with the same digits as an emergency number, for example 112. ≈30 min.≈4 h.K700UG-R1A-AE.book  Page 5  Thursday, April 15, 2004  12:32 PM
6Getting startedThis is so that you can see and call an emergency number without entering a PIN %19 Emergency calls.If you make a mistake while entering your PIN, delete the number by pressing  .Available servicesSome services and functions described in this user guide are network- or subscription-dependent. Because of this, all menus may not be available in your phone.Please consult your service provider for more information about your subscription.Turning on the phone and making callsMake sure that the phone is charged before you turn it on. When you have turned the phone on, you can use a setup wizard to quickly and easily prepare your phone for use.Setup wizardYou can use the setup wizard to help you get started with the basic settings in your phone. If you do not want help the first time you turn on your phone, you can select to use the wizard later. You can also select to start the wizard from the menu system at any time. The wizard gives you tips on how to use the keypad and guides you through the following settings:• Time and time format.• Date and date format.• Copying names and numbers from your SIM card to Contacts in the phonebook.To start the setup wizard from the menu system1}Settings }the General tab }Setup Wizard.2Select language for your phone.3To use the wizard }Yes and follow the instructions that appear.If you enter the wrong PIN three times in a row, the SIM card is blocked and the message PIN blocked appears. To unblock it, you need to enter your PUK (Personal Unblocking Key), %78 SIM card lock.This symbol indicates that a service or function is network- or subscription-dependent.K700UG-R1A-AE.book  Page 6  Thursday, April 15, 2004  12:32 PM
7Getting startedTo turn on the phone1Press and hold  .2Enter your PIN if you have one for your SIM card.3At first start-up, select the language you want for your phone, that is, the language for the menus.4}Yes if you want the setup wizard to help you get started, and follow the instructions that appear.To make and receive calls• Enter the area code and phone number }Call to make the call. }End Call to end the call.• When the phone rings }Yes.K700UG-R1A-AE.book  Page 7  Thursday, April 15, 2004  12:32 PM
8Getting to know your phoneGetting to know your phonePhone overview, using the menus, entering letters, file manager.Phone overview12345678910111213141Infrared port.2Press and hold to activate the camera and video recorder.3Volume buttons.4Screen.5, 11 Selection keys.6Press once to go back one level in the menus. Press and hold to return to standby.7Stereo headset and charger connector. Connector cover.8Press and hold to turn the phone on/off.9Speaker.10 Internet button.12 Navigation key. Press to enter the desktop menu. Move through menus, lists and texts.13 Delete numbers, letters or an item from alist.14 Microphone.K700UG-R1A-AE.book  Page 8  Thursday, April 15, 2004  12:32 PM
9Getting to know your phoneOverview, menu  1. Sony Ericsson*   2. Internet Services*   3. Entertainment   4. Camera   5. MessagesWrite NewInboxMy FriendsCall VoicemailEmailDraftsTemplatesOutboxSent ItemsSaved ItemsSettings  6. RadioGamesMusicDJ™Record Sound  7. File Manager   8. Phonebook**   8. Phonebook**   9. Media PlayerPicturesSoundsVideosThemesGamesApplicationsOtherContactsOptions:Speed DialMy Business CardGroupsSIM NumbersSpecial NumbersAdvanced  1    2    3   4    5    6   7    8    9  10  11  12SIM NumbersOptions:Speed DialMy Business CardContactsSpecial NumbersAdvanced10. Connect 11. Organizer 12. SettingsOnline ServicesBluetoothInfrared PortSynchronizationMobile NetworksData Comm.Internet SettingsStreaming SettingAccessoriesCalendarTasksNotesApplicationsAlarm SignalTimerStopwatchCalculatorCode MemoGeneralProfilesTime & DateLanguageVoice ControlPhone StatusShortcutsLocksSetup WizardMaster ResetSounds & AlertsRing VolumeRingtoneSilent ModeVibrating AlertMessage AlertKey SoundDisplayWallpaperThemesStartup ScreenScreen SaverLightCallsForward CallsManage CallsTime & CostShow or Hide No.Handsfree*Please note that some menus are provider- network- and subscription-dependent.**The menu depends on which phonebook is selected as default.K700UG-R1A-AE.book  Page 9  Thursday, April 15, 2004  12:32 PM
10Getting to know your phoneNavigating the menusThe main menus are shown as icons on the desktop. Some submenus include tabs that appear on the screen. Scroll to a tab with the navigation key and select an option.Phone languageMost SIM cards automatically set the language used in the menu to the language of the country where you bought your SIM card. If this is not the case, the predefined language is English. If you use the setup wizard to help you get started with your phone, you will be asked to select phone language, %6 Setup wizard.To change the phone language1}Settings }the General tab }Language }Phone Language.2Select a language.Help textsMore information, explanations or tips about selected features, menus or functions are available in your phone.To get helpScroll to the menu item }Info.1Press  to go to the desktop.Press  to select highlighted items.Move  ,  ,  ,   through menus and tabs.2Press to go back one level in the menus.Press and hold to return to standby.3Press to select the options shown immediately above these keys on the screen.123You can always choose Automatic language by pressing  8888  in standby.You can always choose English by pressing 0000  in standby.K700UG-R1A-AE.book  Page 10  Thursday, April 15, 2004  12:32 PM
11Getting to know your phoneShortcutsA quicker way to move through the menus is to use shortcuts. You can use keypad shortcuts or you can create your own shortcuts from standby.Using keypad shortcutsEnter the menus by pressing   and then enter the number of the menu to which you want to go. For example, to reach the fifth menu item, press . To reach the tenth, eleventh and twelfth menu items, press ,  and  respectively. To get back to standby, press and hold  .Creating standby shortcutsYou can create your own shortcuts and use   to go directly to that function.To create a standby shortcut1Press  in a direction for which there is no predefined shortcut. }Yes when you are asked if you want to create a shortcut.2Scroll to a function that you want to create a shortcut to }Shortcut.To edit a standby shortcut1}Settings }the General tab }Shortcuts and select which shortcut you want to edit }Edit.2Scroll to a function that you want to create a new shortcut to }Shortcut.More options}More to enter a list of options. There are different alternatives in the list of options depending on where you are in the menus.Entering lettersThere are two ways of entering letters, for example, when writing a message or writing a name in the phonebook:• Multitap text inputYou press each key as many times as needed to show the letter you want.• T9™ Text InputThe T9 Text Input method uses a built-in dictionary to recognize the most commonly used word for each sequence of key presses. This way you press each key only once, even if the letter you want is not the first letter on the key.K700UG-R1A-AE.book  Page 11  Thursday, April 15, 2004  12:32 PM
12Getting to know your phoneWriting languagesBefore you start entering letters, you need to select the languages that you want to use when writing.When writing, you can switch to one of your selected languages by pressing and holding  .To select writing language1}Settings }the General tab }Language }Writing Language.2Scroll to the language that you want to use for entering letters and mark each language you want. }OK to exit the menu.To enter letters using multitap text input1To enter text, you have to be in a function where text input is possible, for example }Messages }Write New }Text Message.2Press the appropriate key,   –  , or  , repeatedly until the character you want appears on the screen.Press… to get…. , - ? ! ' @ : ; / ( ) 1A B C Å Ä Æ à Ç 2 ΓD E F è É 3 ∆ ΦG H I ì 4J K L 5 ΛM N O Ñ Ö Ø ò 6P Q R S ß 7 Π ΣT U V Ü ù 8W X Y Z 9+ 0 Θ Ξ Ψ Ωspace ↵ ¶to delete letters and numbersto shift between upper- and lower-case letters –  press and hold to enter numbersK700UG-R1A-AE.book  Page 12  Thursday, April 15, 2004  12:32 PM
13Getting to know your phoneExample:• To enter an ‘A’, press   once.• To enter a ‘B’, quickly press   twice.• To shift between upper- and lower-case letters, press  , then enter the letter.• You can use the volume buttons as a shortcut to certain letters: To enter a ‘B’, press and hold  and press  . To enter a ‘C’, press and hold  and press  .To enter letters using T9 Text Input1}Messages }Write New }Text Message.2For example, if you want to write the word “Jane”, press , , , .3If the word shown is the one you want, press  to accept and add a space. To accept a word without adding a space, press  . If the word shown is not the one you want: press   or  repeatedly to view alternative words. Accept a word and add a space by pressing .4Continue writing your message. To enter a period or other punctuation marks, press  and then   or   repeatedly. Accept by pressing  .To add words to the T9 dictionary1While entering letters }More }Spell Word.2Edit the word by using multitap input. Navigate between the letters with  and  . To delete a character, press  . To delete the entire word, press and hold  .3When you have edited the word }Insert. The word is added to the T9 dictionary. Next time you enter this word using T9, it will appear as one of the alternative words.To select another writing methodBefore, or while entering letters, press and hold  to select another writing method.Options when entering letters}More to view a list of options. The list may contain some or all of the following:•Add Symbol – symbols and punctuation marks such as ? and , are shown. Move between the symbols by using  ,  ,   and  .•Add Item – pictures, melodies and sounds.•Spell Word – for T9 Text Input only. Edit the suggested word by using multitap text input.•Text Format – change style, size and alignment.K700UG-R1A-AE.book  Page 13  Thursday, April 15, 2004  12:32 PM
14Getting to know your phone•Writing Language – a list of available languages is shown.•Writing Method – a list of methods available for the current language is shown.•Dictionary (T9) – turn T9 text input on or off.•Word Suggestions – select to view, or not, word suggestions when writing a word.•My Words – manage the words that you have added to the dictionary.•National Chars. – turn off language-specific characters to save space. This option appears only for some writing languages.File managerItems such as pictures, videos, sounds, themes and games are saved as files in folders. All files that the phone cannot recognize are saved in the Other folder. The phone has several predefined folders. You can create your own subfolders in the predefined folders to which you can move your saved files.When handling files, you can select several files at the same time to delete, send or move to a folder.To move a file to a folder1}File Manager and select a folder.2Scroll to a file, for example, a picture that you want to move }More }Manage Files }Move to Folder.3Select the folder you want to move the file to, or select New folder and name the folder }OK.To create a subfolder1}File Manager and select a folder.2}More }Manage Files }New Folder and enter a name for the folder.3}OK to save the folder.To select several files1}File Manager and select a file }More }Mark Several.2Scroll and select more files by pressing Mark or Unmark.File informationItems that are downloaded or received using Bluetooth wireless technology, the infrared port, text or picture messages may be copyright-protected. If a file is protected, you may not be able to copy or send that file – a message will appear to inform you about this. You can also select to view information for the file.K700UG-R1A-AE.book  Page 14  Thursday, April 15, 2004  12:32 PM
15Getting to know your phoneQuick keysUseful key combinations are described below.Navigating menusEnter the main menu and select menu itemsNavigate in the menu and lists   Delete an item press   when in listsEnter a list of options }MoreEnter the status menu to see, for example, date, profile, free memory and model namepress a volume button onceChange the language to Automatic 8888 Change the language to English 0000 Go back to standby press and hold Making and receiving callsMake an emergency call enter the international emergency number }CallSet the phone to silent press and hold Call your voicemail press and hold Enter call list }CallsVoice dial press and hold a volume button or say your magic wordReach a contact beginning with a specific letterpress and hold any of the keys   – Speed dial press any of the number keys  –   and }CallReject a call quickly press a volume button twice when receiving a call or }NoK700UG-R1A-AE.book  Page 15  Thursday, April 15, 2004  12:32 PM
16Getting to know your phoneTurn off the ringtone when receiving a callpress a volume button once or press Put a call on hold }HoldRetrieve a call }RetrieveTurn off the microphone press and hold Enter a list of options }MoreEntering lettersShift between upper- and lower-case letterspress , then the letterDelete letters and numberspress Shift between multitap or T9 Text input methodspress and hold Shift between writing languagespress and hold Enter numbers press and hold any of the number keysEnter the + sign press and hold Enter a p (pause) press and hold   when entering numbers or saving codesUsing multitap text inputReach the second letter or character of a keypress and hold   and press any of the number keysReach the third letter or character of a keypress and hold   and press any of the number keysEnter a space press Using T9 Text InputView alternative words  or Accept a word and add aspacepress Enter a full stop press View alternative punctuation markspress , then  or  repeatedlyK700UG-R1A-AE.book  Page 16  Thursday, April 15, 2004  12:32 PM
17CallingCallingCalls, phonebook, voice control, call options.Making callsBefore you can make or receive any calls, you must turn on the phone and be within range of a network. %6 Turning on the phone and making calls.NetworksWhen you turn on the phone, it automatically selects your home network if this is within range. If it is not within range, you may use another network, provided your service provider has an agreement that allows you to do so. This is called roaming.You can select the network you want to use, or you can add a network to your list of preferred networks. You can also change the order in which networks are selected during an automatic search. For all such options }Connect }Mobile Networks.To make a call1Enter the area code and the phone number.2}Call to make the call.3}End Call to end the call.To change the speaker volume during a callUse the volume buttons on the side of the phone to increase or decrease the speaker volume during a call.To turn off the microphone during acall1Press   }Mute Microphone, or press and hold  until the icon for muted microphone is displayed.2}Replace?, or press and hold   again to resume the conversation.Receiving callsWhen you receive a call, the phone rings and Answer? is displayed.If your subscription includes the Caller ID service and the caller’s number is identified, the number is displayed.You can call numbers from the call list and the phonebook, %23 Call list, and %19 Phonebook. You can also use your voice to make calls, %24 Voice control.K700UG-R1A-AE.book  Page 17  Thursday, April 15, 2004  12:32 PM
18CallingIf you have saved the number in the phonebook, the name and number are displayed. If you have assigned a picture to a contact, the picture is also displayed. If the number is a restricted number, Withheld is displayed.To answer a call}Yes.To reject a call}No or quickly press a volume button twice.Missed callsIf you have missed a call, Missed Calls: appears in standby indicating the number of missed calls. }Yes to view the missed calls in the call list. If you want to view the missed calls later }No. Use , ,  and  to scroll between the tabs.To check your missed calls1From standby }Calls and scroll to the missed calls tab.2To call a number from the list, scroll to the number }Call.Automatic redialingThe phone redials the number up to ten times or until:• The call is connected•You press Cancel• You receive a callAutomatic redialing is not available for data calls.To redial a numberIf the connection of the call failed and Retry? is displayed }Yes.Making international callsWhen you make an international call, the + replaces the international prefix number of the country from which you are calling.To make international calls1Press and hold   until a + sign appears on the screen.2Enter the country code, area code (without the leading zero) and phone number }Call.Do not hold the phone to your ear while waiting. When the call is connected, the phone gives a loud signal.K700UG-R1A-AE.book  Page 18  Thursday, April 15, 2004  12:32 PM
19CallingEmergency callsYour phone supports the international emergency numbers 112, 911 and 08. This means that these numbers can normally be used to make an emergency call in any country, with or without a SIM card inserted if a GSM network is within range.To make an emergency callEnter, for example, 112 (the international emergency number) }Call.To view your local emergency numbers}Phonebook }Options }Special Numbers }Emergency Nos.PhonebookYou can save your phonebook information in the phone memory as contacts or on the SIM card as names and numbers. You can choose which phonebook – contacts or SIM numbers – is shown as default.For useful information and settings in either of these phonebooks }Options.ContactsYou can save up to 510 numbers in your contacts. You can also add pictures, ringtones and personal information, such as email, Web and street addresses, to the contacts.When you add information to a contact, the information is organized under five tabs. Use  , ,   and   to scroll between the tabs and their information fields.SIM numbersOn your SIM card, you can save entries as a name with a single number. The number of entries you can save depends on the amount of memory available on the SIM card, see Phonebook }Options }Advanced }Memory Status.Contacts or SIM numbers as default phonebookIf you select to use contacts as default, your phonebook will show all information saved in contacts. If you select SIM numbers as default, the phonebook will only show names and numbers saved on the SIM card.In some countries, other emergency numbers may also be promoted. Your service provider may therefore have saved additional local emergency numbers on the SIM card.Contact your service provider for more information.K700UG-R1A-AE.book  Page 19  Thursday, April 15, 2004  12:32 PM
20CallingTo select contacts or SIM numbers as your phonebook1}Phonebook }Options }Advanced }My Phonebook.2Select Contacts or SIM Numbers.To add a contact1}Phonebook }New Contact }Add.2Enter the name directly or press Add and enter the name }OK.3Enter the number directly or press Add and enter the number }OK.4Select a number type.5Scroll between the tabs and select fields to enter more information. To enter symbols, for example, @ in an email address }Symbols and select a symbol }Insert.6When you have entered the information you want for your contact }Save.To add a SIM numberIf SIM numbers is your default phonebook, follow the same steps as for adding a contact. You can add only name and number to the SIM numbers phonebook.Pictures and personal ringtonesYou can add a picture and a personal ringtone to a phonebook contact. When that person calls, the picture is displayed (provided your subscription supports the Caller ID service) and the ringtone is played.To add a picture or a personal ringtone to a contact1}Phonebook and select the contact you want to add a picture or ringtone to }More }View & Edit.2Scroll to the relevant tab and select Picture: or Ringtone: }Edit. This takes you to Pictures or Sounds in the File Manager menu.3Select a picture or sound. }Save to save the picture or sound.Calling from the phonebookYou can call one of the numbers saved for one of your contacts, or a number on your SIM card.If contacts is the default phonebook, you can choose to call from contacts or from the SIM card.If SIM numbers is the default phonebook, you can only call the numbers on the SIM card.K700UG-R1A-AE.book  Page 20  Thursday, April 15, 2004  12:32 PM
21CallingTo call a contact1}Phonebook. Scroll to or enter the first letters of the contact you want to call.2When the contact you want to call is highlighted, press   or   to select a number }Call.To call a SIM number1}Phonebook. If SIM numbers is the default phonebook, select the name and number you want to call from the list }Call.2If Contacts is the default phonebook }Phonebook }Options }SIM Numbers and select the name and number you want to call from the list }Call.Ask to saveWhen you end a call, the phone can prompt you to add a phone number or email address to your contacts.To activate ask to save in contacts}Phonebook }Options }Advanced }Ask To Save }On.Updating the phonebookWhen needed, you can easily update and edit any information in your phonebook.To edit a contact1}Phonebook and select a contact }More }View & Edit.2Scroll to the relevant tab and edit the information you want to edit }Save.To edit SIM numbers1If SIM numbers is your default phonebook }Phonebook and the number you want to edit. If contacts is your default phonebook }Phonebook }Options }SIM Numbers. Select the name and number you want to edit.2}More }Edit and edit the name and number.To delete a contact or a SIM number}Phonebook and scroll to the contact or SIM number you want to delete, press  .K700UG-R1A-AE.book  Page 21  Thursday, April 15, 2004  12:32 PM
22CallingTo delete all contacts1}Phonebook }Options }Advanced }Delete All Contacts.2}Yes and enter the phone lock code }OK. The default phone lock code is 0000. Names and numbers that are saved on the SIM card are not deleted.Default items for contactsYou can choose which item – a phone number, email address or a Web address – that is displayed first for each contact.To set the default item for a contact1}Phonebook and scroll to a contact }More }Default.2Select the phone number, email address or Web address that you want as default item.Copying contactsYou can copy SIM numbers to and from your contacts and the SIM card. Choose if you want to copy all SIM numbers, or a SIM number.To copy names and numbers to the SIM card1}Phonebook }Options }Advanced }Copy to SIM.2Select Copy All or Copy a Number.To copy SIM numbers to contacts1}Phonebook }Options }Advanced }Copy from SIM.2Select Copy All or Copy a Number.Sending contactsYou can send contacts using Bluetooth wireless technology, the infrared port or a text or picture message.To send a contact1}Phonebook and select a contact }More }Send Contact.2Select a transfer method.To send all contacts}Phonebook }Options }Advanced }Send All Contacts and select a transfer method.When you copy from the phone, all existing information on the SIM card will be replaced.K700UG-R1A-AE.book  Page 22  Thursday, April 15, 2004  12:32 PM
23CallingChecking the memoryWith the memory status function in your phonebook, you can check how many positions you have left in the phone memory and SIM memory.To check the memory}Phonebook }Options }Advanced }Memory Status.Synchronizing contactsYou can back up and synchronize your contacts with a phonebook on the Web. For more information about a phonebook on the web, please contact your service provider.1}Phonebook }Options }Sync. Contacts }Select.2If you have more than one account, select which account to use }Select. If you do not have an account in the phone, %67 To enter the remote synchronization settings.Call listThe numbers of the last 30 calls that you have made are saved in the call list. If your subscription includes the Caller ID service and the caller’s number is identified, the call list also shows the numbers of answered and missed calls.In addition to the call list with all numbers, there are also separate lists for dialed, answered and missed calls, organized under tabs.To call a number from the call list1}Calls from standby and select a tab.2Scroll to the name or number you want to call }Call.To clear the call list}Calls and scroll to the tab with all calls }More }Delete all.Speed dialingYou can save the phone numbers that you want to reach easily in positions 1-9 in your phone and on your SIM card. To speed dial with contacts as default phonebook, numbers have to be saved as contacts, and to speed dial with SIM numbers as default phonebook, numbers have to be saved on your SIM card.K700UG-R1A-AE.book  Page 23  Thursday, April 15, 2004  12:32 PM
24CallingTo speed dialFrom standby, enter the position number and }Call.To set the position number for speed dialing1}Phonebook }Options }Speed Dial and scroll to the position to which you want to add a phone number }Add.2Select a number.To replace a number in the speed dial list1}Phonebook }Options }Speed Dial.2Scroll to the number }Replace. Select a new number for the position.VoicemailIf your subscription includes an answering service, callers can leave a voicemail message when you cannot answer a call.Receiving a voicemail messageDepending on your service provider, you are informed that someone has left a message by a text message or by a voicemail icon. Press Yes to read the text message and call the voicemail service to listen to the message.Calling your voicemail serviceYou can easily call your voicemail service by pressing and holding  . If you have not set your voicemail number, you will be asked if you want to enter the number. }Yes to enter the number. You get the number from your service provider.To enter the number to your voicemail service}Messages }Settings }Voicemail Number.Voice controlWith your phone, you can use your voice to:• Voice dial – call someone by saying the name.• Activate voice control by saying a “magic word”.• Answer and reject calls when using ahandsfreekit.You can save approximately 30 recorded words as voice commands in the phone. Voice commands cannot be saved on the SIM card. There are 25 seconds available for voice commands. When recording, make sure that you are in a quiet environment and try to use names that are distinct from each other %27 Tips when recording and using voice commands.K700UG-R1A-AE.book  Page 24  Thursday, April 15, 2004  12:32 PM
25CallingBefore voice dialingYou must first activate the voice dialing function and record your voice commands. An icon appears next to a phone number that has a voice command.To activate voice dialing and record names1}Settings }the General tab }Voice Control }Voice Dialing }Activate }New Voice Cmd. and select a contact.2If the contact has more than one number, use  and   to view the numbers. Select the phone number to which you want to add the voice command. Now you are going to record a voice command such as “John mobile” for the phone number you selected.3Instructions appear. Lift the phone to your ear, wait for the tone and say the command that you want to record. The voice command is played back to you.4If the recording sounds ok }Yes. If not }No and repeat step 3.5To record another voice command for a contact }New Voice Cmd. again and repeat steps 2-5 above.Caller nameYou can choose whether you want to hear the recorded contact name when you receive a call from that contact.To turn the caller name On or Off}Settings }the General tab }Voice Control }Play Caller Name.Voice dialingYou can voice dial by saying a prerecorded voice command. Start voice dialing from standby using the phone, a portable handsfree, a Bluetooth headset or by saying your magic word.To make a call from the phone1From standby, press and hold one of the volume buttons.2Lift the phone to your ear, wait for the tone and say the name you recorded earlier, for example “John mobile”. The name is played back to you and the call is connected.To make a call with a handsfreeFrom standby, press the handsfree button, or Bluetooth headset button.K700UG-R1A-AE.book  Page 25  Thursday, April 15, 2004  12:32 PM
26CallingThe magic wordYou can record a magic word and use it as a voice command to allow totally handsfree access to voice dialing. Instead of pressing and holding a volume button to voice dial, you say the magic word and then one of your recorded voice commands. The magic word is especially suitable when using a car handsfree kit.To activate and record the magic word1}Settings }the General tab }Voice Control }Magic Word }Activate.2Instructions appear. }Continue and lift the phone to your ear. Wait for the tone and say the magic word.3Instructions appear. }Continue and select the environments in which you want your magic word to be activated. You can select several alternatives.Voice answeringYou can answer or reject incoming calls by using your voice when using a portable handsfree or a car handsfree kit.To activate voice answering and record voice answer commands1}Settings }the General tab }Voice Control }Voice Answer }Activate.2Instructions appear. }Continue and lift the phone to your ear. Wait for the tone and say “Answer”, or another word. If the recording sounds ok }Yes. If not }No and repeat step 2.3Say “Busy”, or another word }Yes.4Instructions appear. }Continue and select the environments in which you want voice answering to be activated. You can select several alternatives.To answer a call using voice commandsWhen the phone rings, say “Answer” and the call is connected.Choose a long, unusual word or phrase that can easily be distinguished from ordinary background speech.You cannot use voice answering if you have selected an MP3 file as ringtone.K700UG-R1A-AE.book  Page 26  Thursday, April 15, 2004  12:32 PM
27CallingTo reject a call using voice commandsWhen the phone rings, say “Busy”.The call is rejected. The caller is forwarded to voicemail, if activated, or hears a busy tone.Editing your voice commandsYou can keep all your voice commands up to date by rerecording them or deleting the ones you do not use. You can also edit a voice command for a phone number in the phonebook. Select the contact you want to edit a voice command for }More }View & Edit. Scroll to the relevant tab and edit your voice command.To rerecord a voice command1}Settings }the General tab }Voice control }Voice Dialing }Edit Names.2Select a voice command }More }Replace Voice.3Lift the phone to your ear, wait for the tone and say the command.Tips when recording and using voice commandsIf your phone cannot detect speech, one of the following might have happened:• You spoke too softly – try speaking louder.• You held the phone too far away – hold it as you do during a call.• The voice command was too short – it should be around one second long and more than one syllable.• You spoke too late or too soon – speak immediately after the tone.• You did not record the voice command when the handsfree was attached – for voice control with a handsfree kit, record when the handsfree is attached.• You used another intonation – use the same intonation as you did when recording the voice command.K700UG-R1A-AE.book  Page 27  Thursday, April 15, 2004  12:32 PM
28CallingForwarding callsIf you cannot answer incoming calls, you can forward them to another number, for example, your answering service.You can choose between the following forward options:•Always Forward – forward all calls.•When Busy – forward calls if you are already on the phone.•Not Reachable – forward calls if your phone is turned off or if you are unreachable.•No Reply – forward calls that you do not answer within a specified time limit (service provider-dependent).To activate call forwarding1}Settings }the Calls tab }Forward Calls.2Select a call type and then one of the forward options }Activate.3Enter the phone number to which you want your calls to be forwarded, or }Lookup to find the contact in your phonebook }OK.To deactivate call forwardingScroll to the forward option }Deactivate.To check all forwarding options}Settings }the Calls tab }Forward Calls }Check All.More than one callYou can handle more than one call simultaneously. For example, you can put an ongoing call on hold, while you make or answer a second call, and then switch between the two calls.Call waiting serviceIf the call waiting service is activated, you hear a beep if you receive a second call during an ongoing call.To activate or deactivate the call waiting service}Settings }the Calls tab }Manage Calls }Call Waiting.To make a second call1}Hold to put the ongoing call on hold.2Enter the number you want to call }Call.When the Restrict calls function is activated, some Forward calls options are not available.K700UG-R1A-AE.book  Page 28  Thursday, April 15, 2004  12:32 PM
29CallingReceiving a second callWhen you receive a second call, you can do the following:•}Answer to answer the second call and put the ongoing call on hold.•}Busy to reject the second call and continue the ongoing call.•}Replace Active Call to answer the second call and to end the ongoing call.Handling two callsWhen you have one ongoing call and one call on hold, you can do the following:•}Switch to switch between the two calls.•Press  }Join Calls to join the two calls into a conference call.•Press  }Transfer Call to connect the two calls. You are disconnected from both calls.•}End Call to end the ongoing call, then press Yes to retrieve the held call.•}End Call twice to end both calls.• You cannot answer a third call without ending one of the first two calls or joining them into a conference call.Conference callsIn a conference call, you can have a joint conversation with up to five other people. You can also put a conference call on hold and make another call.Creating a conference callTo create a conference call, you must first have one ongoing call and one call on hold. In a conference call you can can have a private conversation with one of the participants or release a participant.To join the two calls into a conference callPress  }Join Calls.To add a new participant1}Hold to put the joined calls on hold.2Press  }Add Call and call the next person you want to include in the conference call.3Press  }Join Calls.4Repeat steps 1-3 to include more participants.There may be additional charges for calls involving multiple parties. Contact your service provider for more information.K700UG-R1A-AE.book  Page 29  Thursday, April 15, 2004  12:32 PM
30CallingTo release a participantPress  }Release Part. and select the participant that you want to release from the conference call.To have a private conversation1Press  }Talk To and select the participant that you want to talk to.2}Join Calls to resume the conference call.Two voice linesThis may be useful if, for example, you want to keep business calls and private calls on separate lines. You select which line you want to use for outgoing calls. All outgoing calls are made on this line until you change it. Incoming calls can still be received on either line.You can change the names of the lines, and have different settings for each line, for example, different ringtones.To select a line}Settings }the Calls tab and select line 1 or 2.To change the name of a line}Settings }the Display tab }Edit Line Names and select one of the lines to edit the name.My numbersYou can view, add and edit your own phone numbers.To check your phone numbers}Phonebook }Options }Special Numbers }My Numbers and select one of the options.Accept callsWith the accept calls service, you can choose to receive calls only from certain phone numbers. Other calls are automatically rejected by a busy tone. If the call forward option When Busy is activated, calls are forwarded instead of rejected by a busy tone. The phone numbers of calls you have rejected are saved in the call list.If you have a subscription that supports alternate line service, your phone may have two voice lines with different phone numbers.K700UG-R1A-AE.book  Page 30  Thursday, April 15, 2004  12:32 PM
31CallingTo add numbers to the accepted callers list1}Settings }the Calls tab }Manage Calls }Accept Calls }Only From List.2}Edit }New }Add. This takes you to phonebook look up. Select numbers from your phonebook.To accept all calls}Settings }the Calls tab }Manage Calls }Accept Calls }From All.Restricted dialingThe following calls can be restricted:• All outgoing calls – All Outgoing.• All outgoing international calls – Outgoing Intl.• All outgoing international calls except to your home country – Outgoing Intl Roam.• All incoming calls – All Incoming.• All incoming calls when you are abroad (when roaming) – Inc. When Roaming.To activate or deactivate a call restriction1}Settings }the Calls tab }Manage Calls }Restrict Calls and select an option.2Select Activate or Deactivate.3Enter your password }OK.Fixed dialingPartial numbers can be saved. For example, saving 0123456 allows calls to be made to all numbers starting with 0123456.You can use the restrict calls service to restrict outgoing and incoming calls. This may be useful, for example, when you are abroad. To use this service, you need a password which you get from your service providerIf you forward incoming calls, you cannot activate some Restrict calls options.The fixed dialing function allows calls to be made only to certain numbers saved on the SIM card. Fixed dialing requires a SIM card that allows fixed numbers to be saved. The fixed numbers are protected by your PIN2.Calls to the international emergency number 112 can still be made even when the fixed dialing function is activated.K700UG-R1A-AE.book  Page 31  Thursday, April 15, 2004  12:32 PM
32CallingTo activate or deactivate fixed dialing1}Phonebook }Options }Special Numbers }Fixed Dialing and select Activate or Deactivate.2Enter your PIN2 }OK and then }OK again to confirm.To save a fixed number}Phonebook }Options }Special Numbers }Fixed Dialing }Fixed Numbers }New Number and enter the information.Call time and costTo check the call time}Settings }the Calls tab }Time & Cost }Call Timers.To reset the call time meter}Settings }the Calls tab }Time & Cost }Call Timers }More and select Reset total or Reset Outgoing.To check the call cost}Settings }the Calls tab }Time & Cost }Call Costs.To reset the call cost meter}Settings }the Calls tab }Time & Cost }Call Costs }More }Clear Total Cost.Setting the call costYou can use the tariff function to specify the price per call unit. If you do not specify a price per call unit, the number of call units appears.During a call, the duration of the call is shown on the screen. If you subscribe to cost information, you can check the duration of your last call, outgoing calls and the total time.You can also check the cost of your last call and the total cost of your calls.If you subscribe to cost information, you must enter your PIN2 to reset the cost or time counter.K700UG-R1A-AE.book  Page 32  Thursday, April 15, 2004  12:32 PM
33CallingTo enter the price per call unit1}Settings }the Calls tab }Time & Cost }Call Costs }More }Set Rate.2Enter your PIN2 }OK.3}Currency and enter the code for the currency you want (for example USD for US Dollars) }OK.4}Units and enter the price per call unit }OK. To enter a decimal point, press  .Credit limit for callsYou can enter a total amount of money that can be used for making calls. When the amount reaches zero, no more calls can be made. Please note that the credit limit is only an estimated value.To set a credit limit1}Settings }the Calls tab }Time & Cost }Call Costs }More }Set Credit and enter your PIN2 }OK.2Select Limited or Unlimited. If you select Limited, enter an amount }OK.Call priority serviceYou can request a certain priority when you make a call, if your subscription supports the call priority service.To check or change your standard priority level1}Settings }the Calls tab }Manage Calls }Default Priority.2The network sends available priority levels. Select a priority level.To change the priority for one call1Enter the phone number you want to call.2}More }Call Priority and select a priority. The number is called.The priority levels are defined by your service provider and are normally within the range of 0-4, where 0 is the highest priority.K700UG-R1A-AE.book  Page 33  Thursday, April 15, 2004  12:32 PM
34CallingClosed user groupsTo add a group1}Settings }the Calls tab }Manage Calls }Closed Groups }Edit List }New Group }Add.2Enter the name of the user group }Continue.3Enter the index number }Save. You get the index number from your service provider.To call outside a closed user group}Settings }the Calls tab }Manage Calls }Closed Groups }Open Calls }On. When Off is selected, it is only possible to call within the group.Additional calling functionsTone signalsYou can use telephone banking services or control an answering machine by sending tone signals (also known as DTMF tones or touch tones) during a call.• To send the tones, press the keys   –  ,  or  .• To clear the screen after the call is finished, press .• To turn the tones on or off during a call }More in standby and select Turn Off Tones or Turn On Tones.NotepadYou can use the phone to make a note of a phone number during a call. When you end the call, the number remains on the screen. }Call to call the number. }More }Save Number and select a contact to save the number. If you want to create a new contact and save the number }New Contact.Showing or hiding your numberIf your subscription supports the Caller ID Restriction service, you can hide your phone number when making a call. You can do this per call, or select this as a default setting. }More in standby to quickly change this default setting.To show or hide your phone number1Enter the phone number you want to call.2}More and select Hide Number or Show Number.The closed user group function is a way of lowering call costs. If you subscribe to closed user groups it is cheaper on some networks to make calls within a call group. You can save ten groups.K700UG-R1A-AE.book  Page 34  Thursday, April 15, 2004  12:32 PM
35CallingTo always show or hide your phone number1}Settings }the Calls tab }Show or Hide No.2Select Show Number, Hide Number or Network Default.GroupsYou can create a group of numbers. By doing so, you can send text messages and picture messages to several recipients at the same time %36 Messaging.To create a group of numbers1}Phonebook }Options }Groups }Send DTMF Tones }Add.2Enter a name for the group }Continue.3}New Number }Add to find the contact in your phonebook.4Select a number from the contact.5Repeat steps 3-4 to add more numbers to the group. }Done to save the group.Business cardsYou can add your own business card to the phonebook. You can exchange business cards between your phone and another similar phone, a PDA or a PC using Bluetooth wireless technology, the infrared port, cable or a text or picture message.To add your own business card}Phonebook }Options }My Business Card and enter the information for your business card }Save.To send your business card}Phonebook }Options }My Business Card }Send My Card and select a transfer method.To receive a business cardWhen you receive the business card }Yes }Save to save the business card in the phonebook.K700UG-R1A-AE.book  Page 35  Thursday, April 15, 2004  12:32 PM
36MessagingMessagingText messaging, picture messaging, email, My Friends, messaging glossary.Text messagingText messages are sent via SMS (Short Message Service). Text messages can contain pictures, animations, melodies and sound effects. Text messages can be sent to one person, several recipients or to a group of recipients that you have saved in the phonebook %35 Groups.Before you startFirst make sure that the number of your service center is set. The number is supplied by your service provider and is usually saved on the SIM card.To set the service center number1}Messages }Settings }Text Message }Service Center. If the service center number is saved on the SIM card, it is shown in the list.2If there is no number in the list }Add and enter the number, including the international “+” sign and country code }Save.Sending text messagesFor information about entering letters %11 Entering letters.To write and send a text message1}Messages }Write New }Text Message.2Write your message }Continue. If you want to save the message for later, press   }Yes to save it in Drafts.3}Phone Number and enter the recipient’s phone number, or }Phonebook LookUp to retrieve a number or a group from the phonebook. To enter an email address }Enter Email Addr. A list below the send options shows the last 10 recipients. You can also select a recipient from this list. }Send.Your phone supports various messaging services – text messaging, picture messaging, email and My Friends. Please contact your service provider for details on which services you can use.If you send a text message to a group, you are charged for each member of that group.Some language-specific characters use more space. For some languages you can deactivate National Chars. to save space. %13 Options when entering letters.K700UG-R1A-AE.book  Page 36  Thursday, April 15, 2004  12:32 PM
37MessagingTo insert an item in a text message1}Messages }Write New }Text Message.2While writing your message }More }Add Item.3Select Picture, Sound Effect, Melody, Animation, Templates or Picture (other).4Select an item.Formatting textYou can change the style, size and alignment of the text, and create new paragraphs.To format the text in a text message1}Messages }Write New }Text Message.2While writing your message }More }Text Format. Then select Text Size, Text Style, Alignment or New Paragraph.3Select a text format.Receiving text messagesWhen you receive a text message, a message alert sounds and a text is displayed that informs you that a text message has been received.}Yes to read the text message or }No if you want to read the message later.While reading the text message you can, for example, go to a Web address found in the text message, save a picture found in the text message or listen to a sound inserted in the text message.When you have read the text message }More to view a list of options. Press   to close the text message.Calling a number in a text messageYou can call a phone number that appears in a text message.To call a number in a text messageSelect the phone number }Call.Saving received text messagesReceived text messages are saved in the phone memory. When the phone memory is full, you must delete messages or move them to the SIM card to be able to receive new messages. Messages that you have saved on the SIM card remain there until you delete them.To save a message to the SIM card}Messages }Inbox }More }Save Message }SIM.K700UG-R1A-AE.book  Page 37  Thursday, April 15, 2004  12:32 PM
38MessagingTo save an item from a text message1Select the phone number, Web address, picture or sound that you want to save in the message }More.2If you have selected to save a phone number }Use }Save Number. If you have selected a Web address }Save Bookmark, a picture }Save Picture, a sound }Save Sound.Long messagesThe number of characters that a text message can contain depends on the language you are writing in. You can send a longer message by linking two or more messages. Please note that you are charged for each of the messages linked in a long message. You may not receive all parts of a long message at the same time.To turn long messages on}Messages }Settings }Text Message }Max. Msg Length }Max. Available.TemplatesIf you have one or more messages that you send often, you can save these as templates. There are predefined templates in your phone, but you can also create your own templates.To create a template1}Messages }Templates }New Template }Add }Text.2Write the message }OK.3Enter a title for the message }OK.Message optionsYou can set a default value for several message options or choose the settings each time you send a message. You can, for example, select to request a reply to a sent message, select what type of text message you want to send or set how long a message should be valid. For details about the message options %49 Messaging glossary.To set a default text message option}Messages }Settings }Text Message and select an option.Check with your service provider for the maximum number of messages that can be linked.K700UG-R1A-AE.book  Page 38  Thursday, April 15, 2004  12:32 PM
39MessagingTo set a message option for a specific message1When you have selected a recipient to send your text message to }More }Advanced.2Select the option that you want to change }Edit and select a new setting.3}Done when you have changed the options.To check the status of a sent message}Messages }Sent Items and select a text message }View }More }View Status.Picture messagesPicture messages can contain text, pictures, video clips, camera pictures, and sound recordings and are sent via MMS (Multimedia Messaging Service). You must have a subscription that supports MMS, and the receiver of the picture message must also have support for MMS. Picture messages can be sent to a mobile phone and an email account. You can send your business card as an attachment in a picture message.Before you startBefore sending a picture message, make sure that:1The address to your message server is set }Messages }Settings }Picture Msg. }Message Server.2You have entered the correct settings }Messages }Settings }Picture Msg. }Internet Profile. Select a profile or New Profile. To create an Internet profile, %63 Setting up Internet and email. You can also download all the settings you need automatically from your service provider.Writing and sending picture messagesWhen composing a picture message, you select from different items to format your message. The different items are: Picture, Text, Sound, Video, Camera Picture, Video Clip and Sound Recording.Before sending a picture message, you can select from different options to adjust and enhance your message. You can, for example, preview the entire message or a single page in the message, change the timing for items in the message and add or replace items to be sent in the message. For details about options %49 Messaging glossary.K700UG-R1A-AE.book  Page 39  Thursday, April 15, 2004  12:32 PM
40MessagingTo write and send a picture message1}Messages }Write New }Picture Msg. }Add to view a list of items to add to your message. Select an item.2}Add to add more items to the message. You can view and select options to enhance the message by highlighting items in the message and pressing the left selection key.3When you have finished writing your message }More }Send.4}Phone Number and enter the recipient’s phone number, or }Phonebook LookUp to retrieve a number or a group from the phonebook. To enter an email address }Enter Email Addr. A list below the send options shows the last 10 recipients. You can also select a recipient from this list. }Send.To make a call while writing a picture message1While writing your message }More.2}Make a Call and enter or retrieve a phone number }Call. You return to the message.3To end the call }More }End Call.To set a default message option}Messages }Settings }Picture Msg. and select one of the options.Additional send optionsYou can request a read receipt, a delivery report and set a priority for a specific message. You can also add more recipients to the message. For details about the additional send options %49 Messaging glossary.To select additional send options1When you have entered the recipient’s phone number }More.2Select Add Recipient or Recipients to add more recipients, or Advanced to select an additional send option.Receiving picture messagesWhen you receive a picture message, a message alert sounds and a text is displayed that informs you that a message has been received.K700UG-R1A-AE.book  Page 40  Thursday, April 15, 2004  12:32 PM
41Messaging}Yes to read or play the message. Press any key to stop. When you have read the message }Reply to reply immediately or }More to view a list of options. Press   to close the message.Save items from a picture messageWhen you have viewed a picture message, you can save items from the message. }More }Save Items and select an item from the list that appears.TemplatesYou can base your message on one of the predefined templates. You can also add new templates.To use a predefined template for a picture message1}Messages }Templates and select a template.2}Use }Picture Msg. }Add to make changes or add new items.3}More }Send to send the message.Automatic downloadYou can select how you want your picture messages to be downloaded.}Messages }Settings }Picture Msg. }Auto Download to view the following:•Always – your phone automatically downloads messages to your phone as soon as they come to your service provider’s server. This is default.•Ask in Roaming – you will be asked if you want to download messages when you are using another network than your service provider’s.•Never in Roam – the messages are never downloaded when you are using a network other than your service provider’s.•Always Ask – you will always be asked if you want to download messages regardless of the network being used.•Off – new messages appear in the inbox as icons. Select the message }View }Yes to download.You can select a message from the list of messages and press   to delete the entire message.K700UG-R1A-AE.book  Page 41  Thursday, April 15, 2004  12:32 PM
42MessagingPostcardYou can have a message with picture and text delivered as a postcard to a street address.To send a postcard1}Messages }Write New }Postcard }Add.2Select Picture or Camera Picture to add a picture to your message.3}Add }Text to add a message to accompany the picture.4Write your message }OK.5}Send }Street Address to enter name and address, or you can either select Phonebook LookUp to retrieve a contact, or select a recipient from the list of previous recipients.6When you have entered name and address }OK }Send. The picture and message will be printed on a postcard and sent to the address you choose.To view a sent postcard}Messages }Sent Items and highlight the message }View.EmailYou can use your phone to send and receive email messages. Please note that you need a subscription that supports data transmission. For more information, contact your service provider.Before you startFirst make sure that:• You have set up a data account, %63 Entering Internet and email settings.• You have set up and selected an email account.Email account settingsAn email account specifies, for example, the server that is used for your email messages. There are three ways to create an email account:• Download settings from Internet• Send a request in a text message• Create an email account manuallyThis service is not available in all countries. Another way of sending a postcard is to use the phonebook by selecting a contact, More }Send Message }Postcard. You can also create a postcard by selecting File Manager }Pictures. Select a picture }More }Send }As Postcard.K700UG-R1A-AE.book  Page 42  Thursday, April 15, 2004  12:32 PM
43MessagingReceiving settingsAt www.SonyEricsson.com you can get support on how to enter your email settings. Some service providers provide a service with which you can request settings in a text message. Contact your service provider for information about your settings.To request settings in a text message}Messages }Email }Settings }Auto Configure.To create an email account manually1}Messages }Email }Settings }New Account.2Enter a name for the account, for example “Home” or “Office” }Connect Using.3Select the data account that you want to use with this email account.4Enter the rest of the settings, some of which are optional. To enter the settings, scroll to the setting }Select. Enter the information }OK to confirm. Repeat this for each required setting. You use the same email settings in your phone as in your PC email program. If you do not have an email service, contact your service provider to get all the necessary settings. For details about the settings %49 Messaging glossary.Default email accountIf you have both an office and a home email account, you can set one of them as default: }Messages }Email }Settings and select an account.Writing and sending email messagesWhen writing and sending your email message, you can select from several options to accompany your message. For details about the options %49 Messaging glossary.}Messages }Email }Inbox }More }Send & Receive offers the fastest way to check for new email messages.To write and send an email message1}Messages }Email }Write New.2Write the subject for your message }OK and then the text }OK.3}Enter Email Addr. to enter an email address or }Phonebook LookUp to retrieve an address from your phonebook.4}Send to send your email message or }More to view a list of options for your message.The number of email messages that can be saved depends on memory left in the phone. All email messages are also saved on your email server, and you can view both older and newer messages on the server.K700UG-R1A-AE.book  Page 43  Thursday, April 15, 2004  12:32 PM
44MessagingTo receive and read email messages1}Messages }Email }Inbox }More }Send & Receive to download new messages.2Select a message to read it.To reply to an email message1Open the email message }Reply.2Write your message. }More to view options for the message.3}Send to send the message.To save an email address or a phone number in an email message1Select the email address or phone number that you want to save }More.2If you have selected to save an email address }Use }Save Email. If you have selected to save a phone number }Save Number.To save an email message1Open the email message }More }Save Message.2The message is saved in Saved Items in the Email menu.To delete an email message (POP3 users)1}Messages }Email }Inbox and select the message }More.2Select Mark for Deletion. The message is deleted the next time you connect to your email server.To delete an email message (IMAP4 users)1}Messages }Email }Inbox and select the message }More.2}Mark for Deletion. The message is marked for deletion on the server.3}More }Clear Inbox. The message is deleted the next time you connect to your email server.K700UG-R1A-AE.book  Page 44  Thursday, April 15, 2004  12:32 PM
45MessagingMy FriendsMy Friends contactsYou can add contacts from the phonebook to a list of contacts in My Friends, even if you do not have a My Friends account and are not connected to the My Friends server. You can then quickly access your favorite contacts and choose how you want to communicate with them.Log in to the My Friends serverYou can select to log in to your My Friends server each time you want to send or receive instant messages, or you can be logged in automatically when you turn on your phone. You can edit the settings for your My Friends account. To set automatic log in and edit your account settings you have to be logged out from the My Friends server.To log in to your My Friends server}Messages }My Friends }Myself }Log In.To set automatic log in}Messages }Myself }More }Accounts }Edit }Auto-Login }On.To edit the My Friends account}Messages }Myself }More }Accounts }Edit and edit your settings.List of contactsYou can create a list of contacts – people you want to send messages to on a regular basis. You can add contacts from your phonebook or from your My Friends server.The My Friends function gives you more options when messaging. You can create a list of favorite contacts either from the phonebook or from the My Friends server. You can see which of your contacts are online and what mood they are in. To see contacts online, they have to be connected to the My Friends server. You can also send and receive instant messages and join community chats. Please contact your service provider for information about your subscription and My Friends settings.K700UG-R1A-AE.book  Page 45  Thursday, April 15, 2004  12:32 PM
46MessagingTo add a contact from the phonebook1}Messages }My Friends }More }Add Contact }From Contacts.2Enter the first letters of the contact and then select a contact.3When you have selected a contact, you can choose to subscribe to status information for that contact. To subscribe }Yes and follow the instructions that appear. }No if you do not want to subscribe.To add a contact from a network server}Messages }My Friends }More }Add Contact }From Server and follow the instructions that appear.StatusYou can view the status of your contacts and choose to show your own status to others. You can also change your own status with the help of the following options:•Picture – select a picture from Pictures or take a picture with the camera. You can change, update or remove pictures.•About Me – write a short text about yourself.•Availability – select what to show others when you are online, Available, Busy, Away, or Invisible. If you select Invisible, you will appear as offline to others.•Mood – select a mood from the list.•Show My Status – }To All if you want to show full status to friends but limited status to others, and }Only To contacts if you want to show full status to friends but nothing to others.•Username: – view your username.To view the status of a contact}Messages }My Friends and select a contact }More }View Status.To change your own status}Messages }My Friends }Myself }Change Status and edit your status according to the options.To send a message from My Friends1}Messages }My Friends and select a contact.2If the contact is linked to your phonebook }More }Send Instant Msg. }Send. If not, select the contact }Send IM.K700UG-R1A-AE.book  Page 46  Thursday, April 15, 2004  12:32 PM

Navigation menu