Sony A3724011 GSM900/1800/1900 UMTS mobile phone with RFID User Manual
Sony Mobile Communications Inc GSM900/1800/1900 UMTS mobile phone with RFID
UserManual.wiki
>
Sony
>
A3724011 User Manual
>
08 user guide part 1
Contents
1.
08 user guide part 1
2.
08 user guide part 2
08 user guide part 1
Navigation menu
Upload a User Manual
Namespaces
Wiki Guide
HTML
PDF
Info
Views
User Manual
Discussion / Help
Navigation
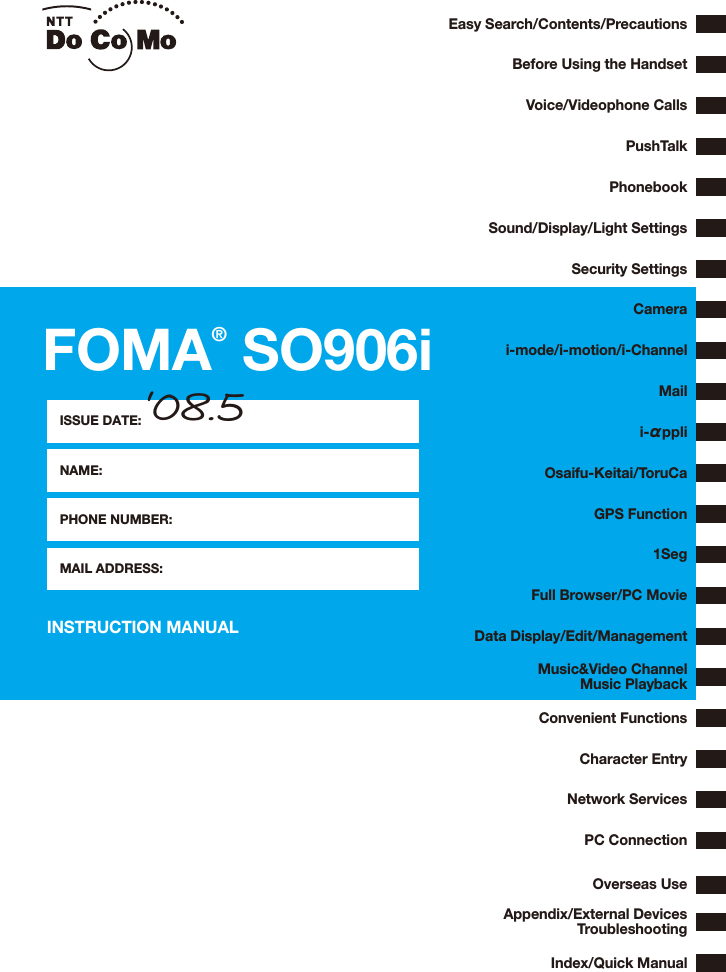
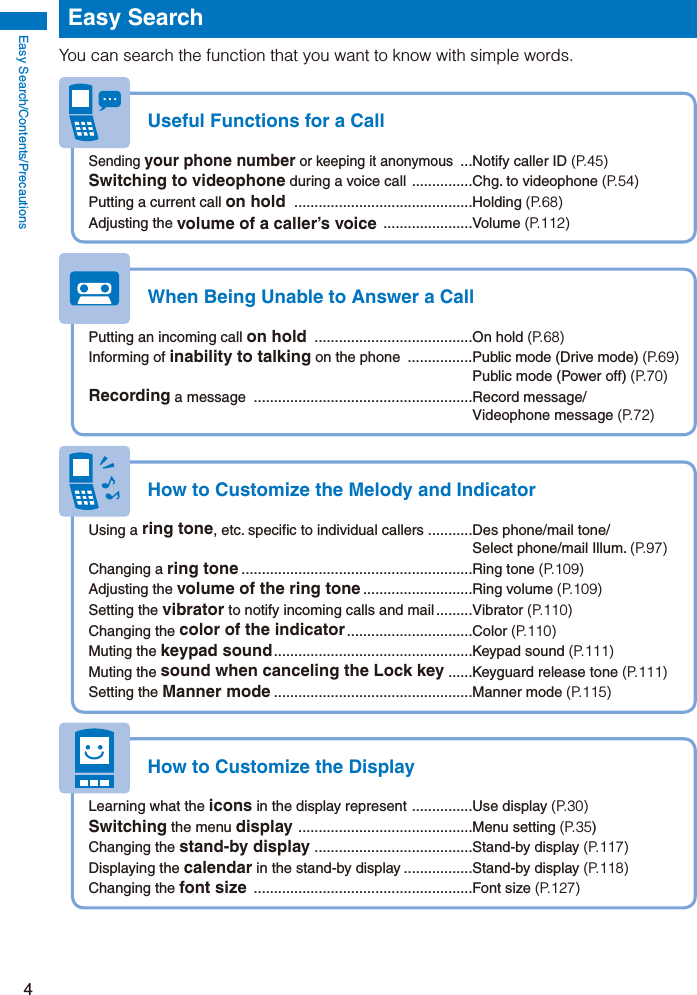
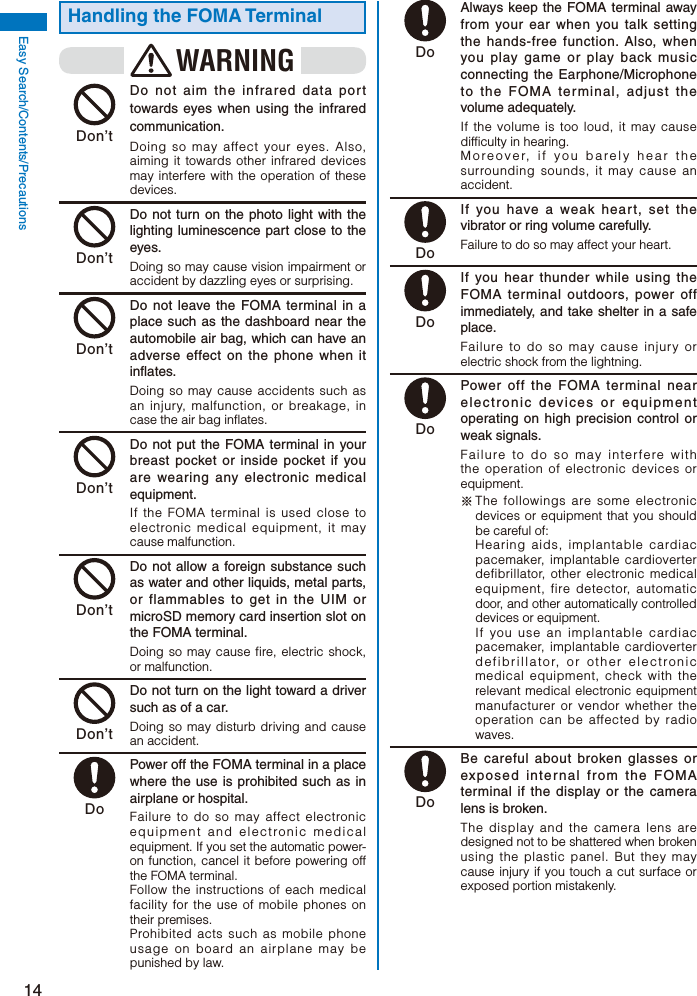
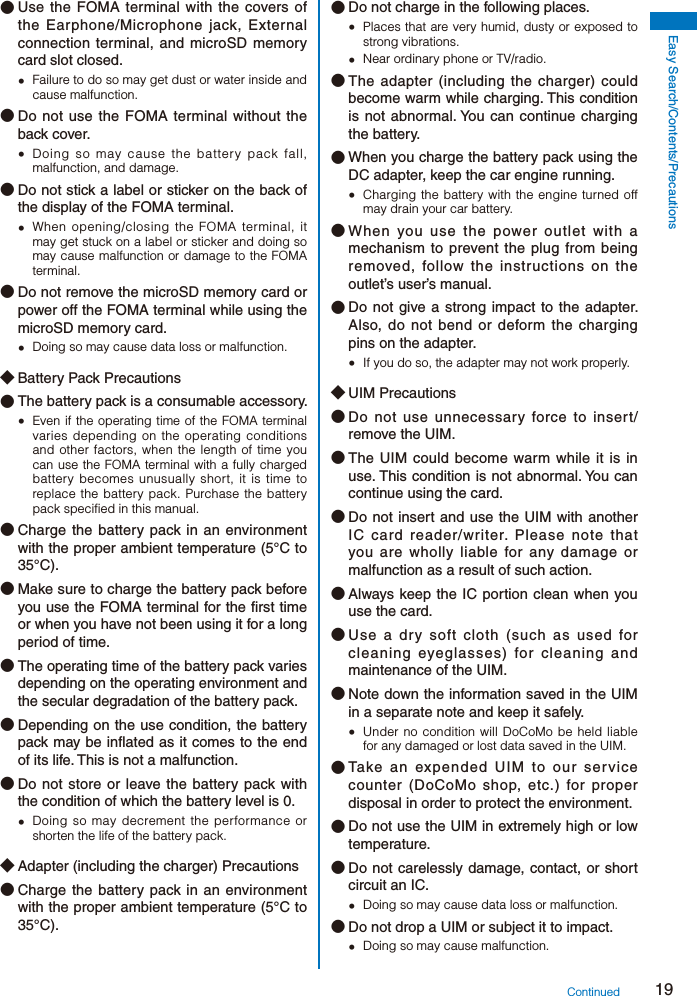
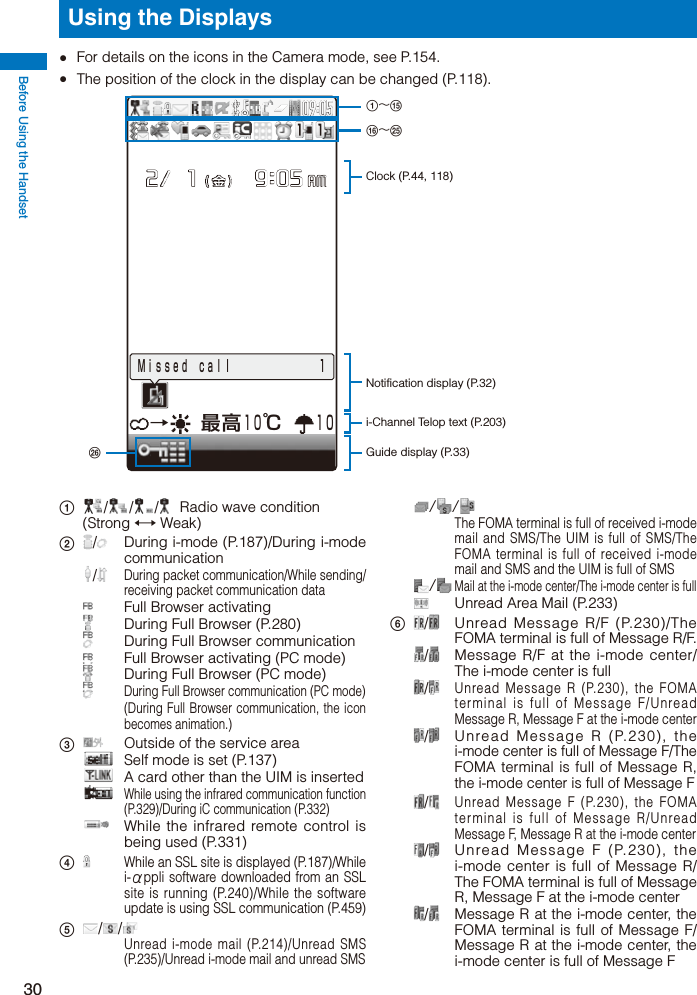
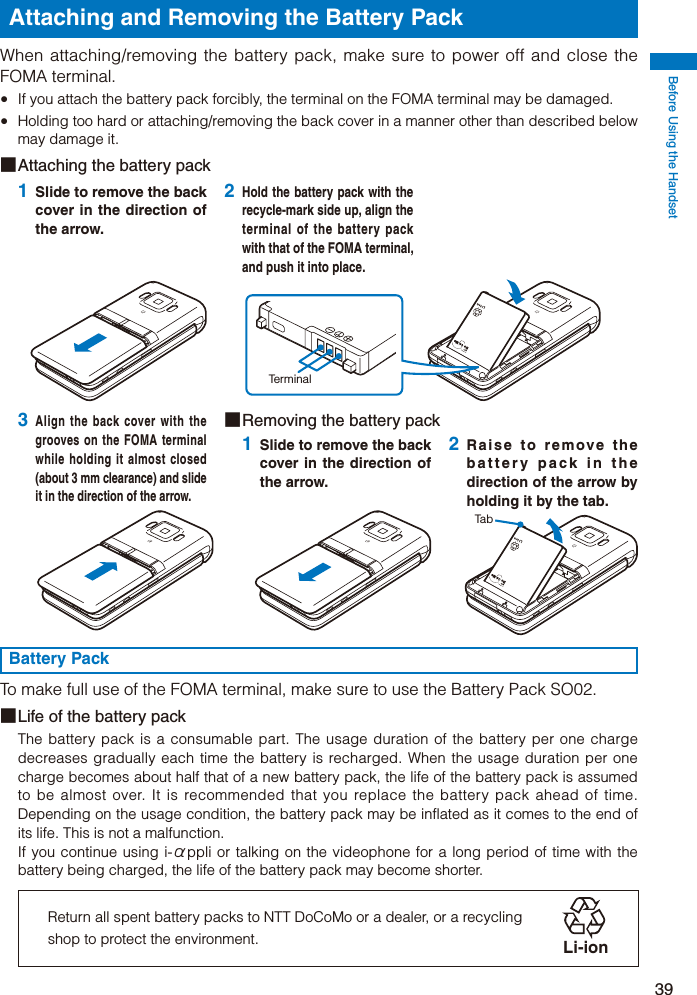
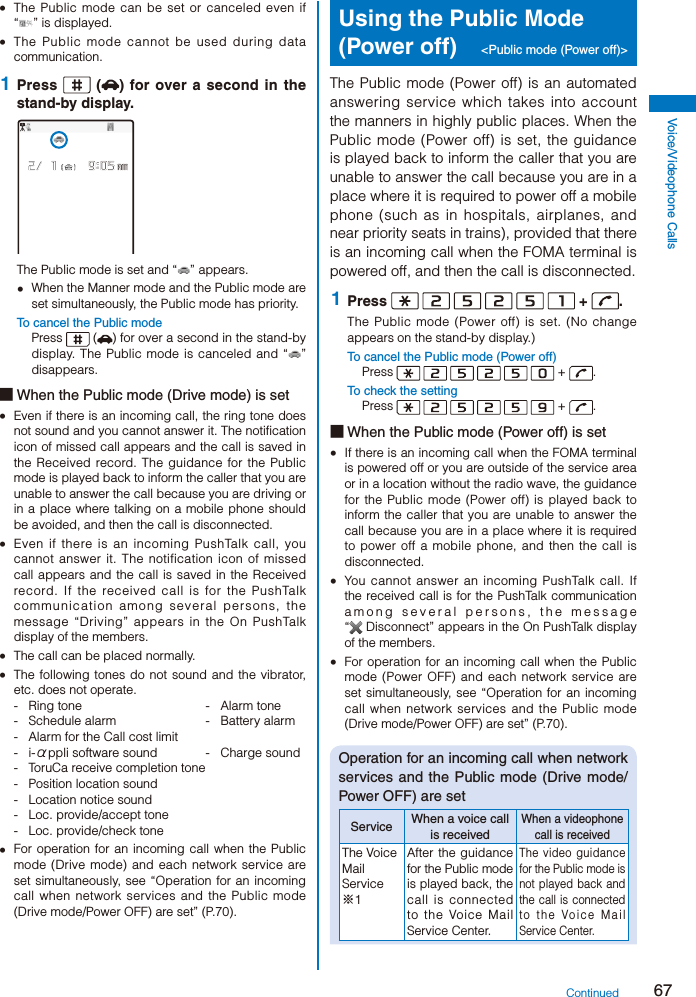
![3■ Typical layout of the operating instructions page45Before Using the HandsetNotifying the Recipient of Your Phone Number <Notify caller ID>When placing a call, your phone number can be shown in the display of the recipient’s phone you are calling. The caller ID is important personal information. Carefully decide whether you want to notify a recipient of your caller ID. 1 From the Menu, select [Settings] → [Management] → [NW Services] → [Notify Caller ID] → [Set Notification] and press .The network security code screen appears. 2 Select [Notify]/[Not notify] and press .Select Caller IDnotificationsetting Notify Not notify[Notify] : Your phone number (caller ID) is notified to the recipient.[Not notify] : Your phone number (caller ID) is not notified to the recipient.The Notify caller ID is set.To check the settingFrom the Menu, select [Settings] → [Management] → [NW Services] → [Notify Caller ID] → [Check setting].● If you hear a guidance asking to send the caller ID when you place a call, call again after setting the Set Notification to [Notify] or by adding “186” before the recipient’s phone number.Useful information, additional information, and points of cautionIndexA display sample if important for proper operationOperation procedure described step by stepPage numberFunction nameChapter titleAn outline and objectives of the functionAdditional information relating to the procedureSection titleOptions listed in the display and their descriptionsAdditional notes and restrictions of the function※ Please note that the above page is only for explanation purpose and is partly different from the actual page.■ About the menu operationThroughout this manual the operations for selecting from the menu are described as follows. Actual operationsPress (MENU). DisplayStand−by displayBacklightPower saver 1minMenu settingKisekae settingAnimationFont sizeUse to move the cursor to [Settings] and press (Select). CallIncoming setMissed call ONVideophoneCall displayCall assistCall settingCall qualityHeadset settingSelf mode OFFMelody CallUse to move the cursor to [Call] and press (Select). Incoming setIncoming callIncoming V.phonePushTalkMailMessageRMessageFUse to move the cursor to [Incoming set] and press (Select). Typical description of the operationsFrom the Menu, select [Settings] → [Call] → [Incoming set] and press .● Display examples and illustrations used in this manual are just images for explanations and may be different from actual ones.Actual keyIllustration in this manual● Some parts of the keys are deformed or omitted in the illustration in this manual.● Display examples in this manual show the conditions based on the Kisekae menu (White Scrapbook) of the main body color: WHITE, the Color theme setting (White & Gold), and Clock set to [Digital clock5]. The position of the clock in the display in this manual is different from the default position.● The shorter form “Osaifu-Keitai-compatible i-αppli” is used for “Osaifu-Keitai-compatible i-αppli software supporting IC card function” in this manual.](https://usermanual.wiki/Sony/A3724011.08-user-guide-part-1/User-Guide-929851-Page-5.png)

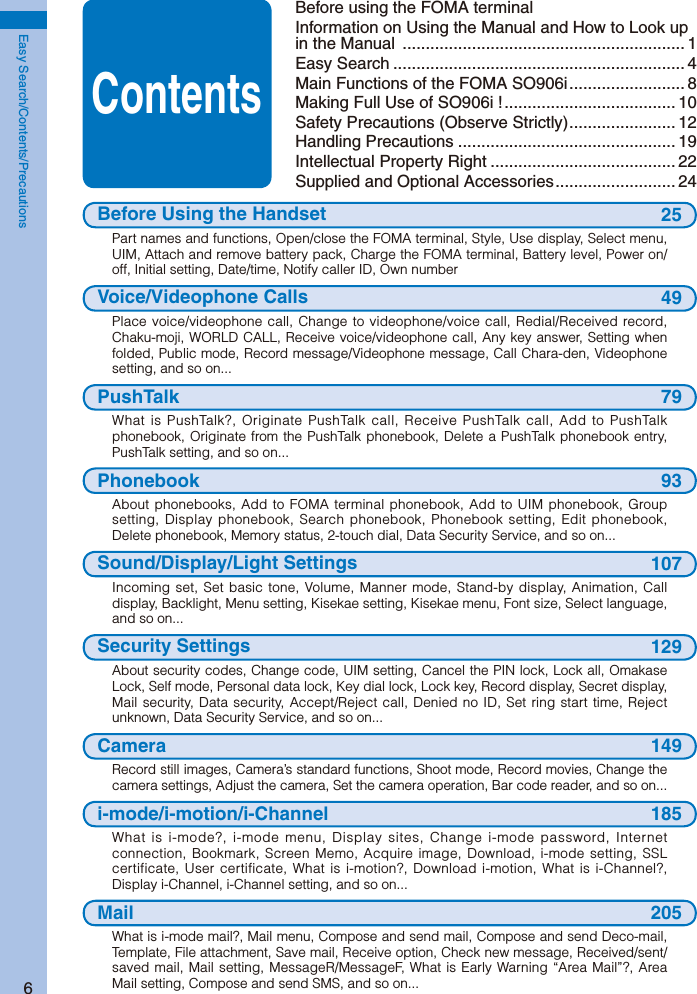
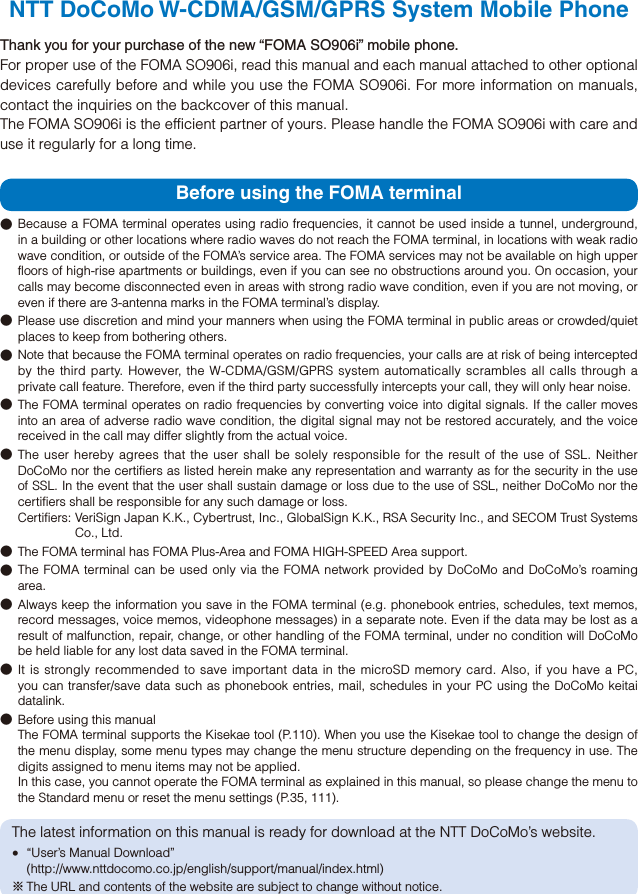
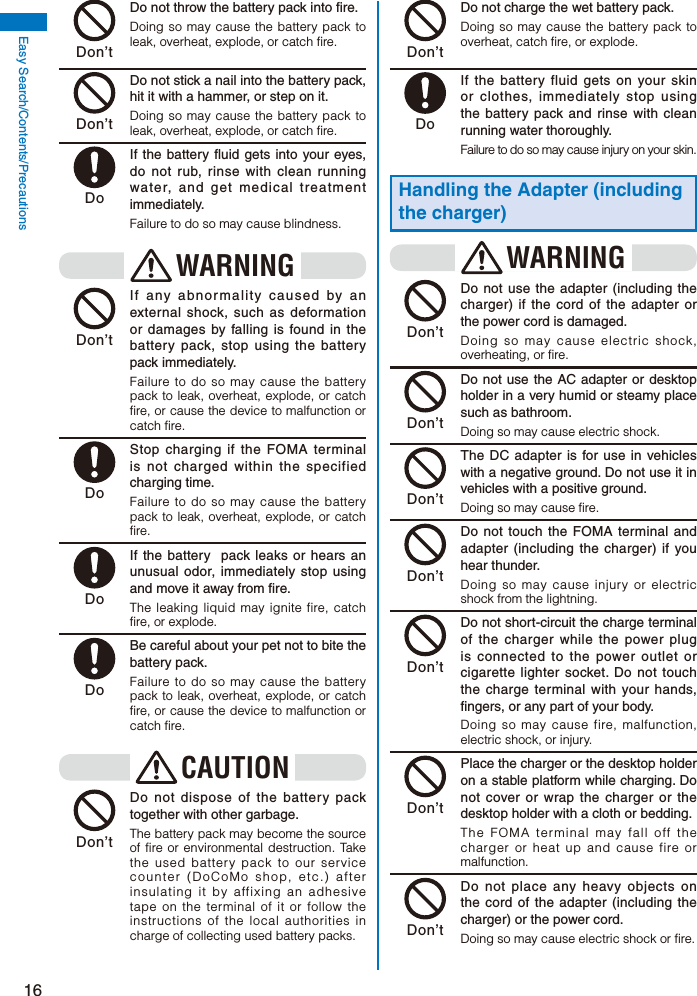
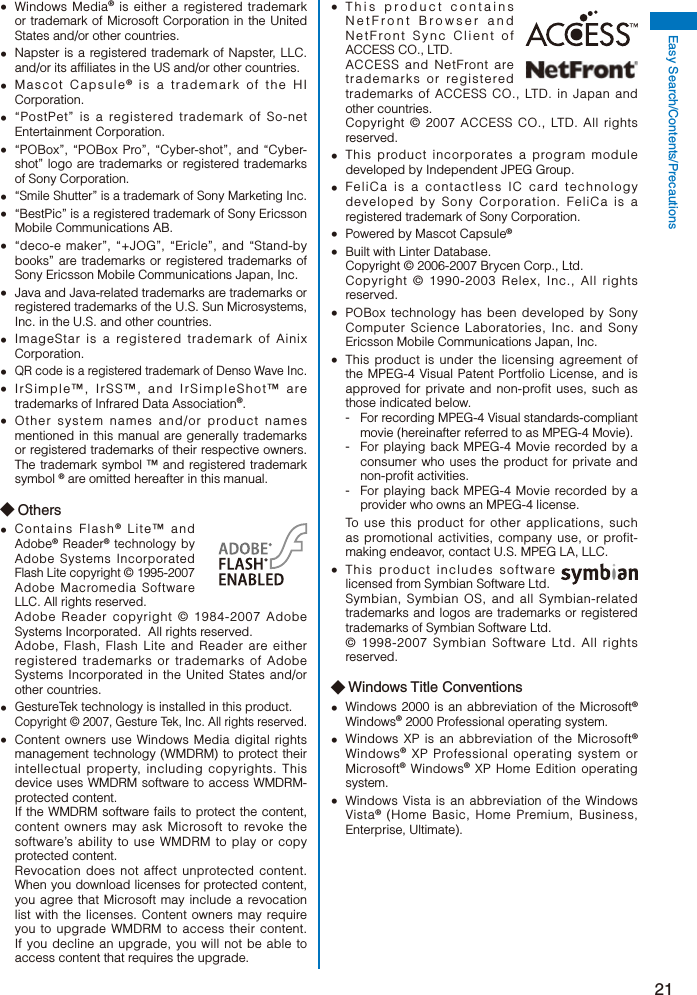
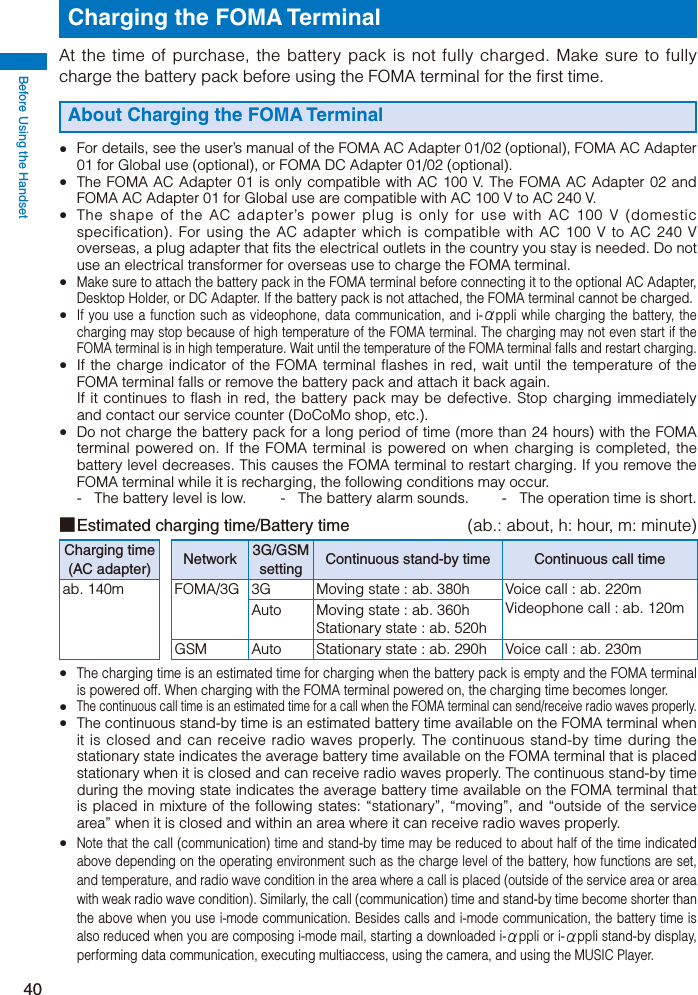
![Easy Search/Contents/Precautions9Stand-by booksThere are eight unique preinstalled Flash contents which display various information such as bits of knowledge, general knowledge, and picture books wave after wave every time when the stand-by display appears.You can set your favorite content selecting from the [Preinstalled] folder in My picture of the Data Box and enjoy it (P.118).Quick deco. Mail FunctionFun Deco-mail is available with simple steps (P.210).“POBox Pro 2.0” and Convenient Text InputThe FOMA terminal is provided with the prediction conversion function “POBox Pro 2.0” (Predictive Operation Based On eXample Pro 2.0). Pressing allows you to move vertically and horizontally in the “POBox Pro 2.0”, enabling to select the target word. Also, switching tabs allows you to enable the speedy selection of the matching words list (P.383).MultiaccessYou can use voice call and packet communication simultaneously. You can receive i-mode mail even when you are in a call and you can also make a call while you are using i-mode (P.352).High-Definition Wide VGA Liquid-Crystal Screen DisplayA 2.7-inch high-resolution full wide liquid-crystal screen display is employed. Not only you can enjoy viewing websites, but also perform mail and i-mode operations in the large screen comfortably.Lifetime CalendarThe Lifetime Calendar allows you to display an image, mail, Schedule, and Phonebook (birthday) data directly from the Calendar and provides you with more pleasant way of retrieving your memories saved in the FOMA terminal (P.355).Infrared Communication/Infrared Remote ControlYou can exchange data with other FOMA terminals using the infrared communication function. You can also use the FOMA terminal to operate equipment such as a TV that is provided with infrared remote control. Moreover, the FOMA terminal supports the high-speed infrared communication standard IrSimple™ function, allowing you to transfer high-quality images to compatible devices at a high speed (P.327, 331).Security Settings (P.129)Omakase LockIf you misplace the FOMA terminal, it can be locked by your request. You can cancel the lock as well. See the contact address at the backcover of this manual for inquiries (P.136). Please note that Omakase Lock is a paid service*.* When you subscribe to this service together with your request to suspend the FOMA terminal or while the FOMA terminal is suspended, the service charge is not required. Omakase Lock allows the FOMA terminal to be locked by a request from a subscriber of the UIM inserted in the FOMA terminal. Note that if the UIM subscriber and user of the FOMA terminal are different, the FOMA terminal may be locked without knowledge of the user by request of the subscriber.Data Security ServiceYou can save the Phonebook, images, and mail of the FOMA terminal at the Data Security Service Center, and restore the data stored at the Center in case you lose any of it. You can also use a PC to edit/manage the data stored at the Center and update the FOMA terminal with newly edited data.See the “Mobile Phone User’s Guide 【i-mode】 FOMA version” to learn about the precautions and details on how to use the Data Security Service when you use this service. See the contact address at the backcover of this manual for inquiries. Data Security Service is a paid service that requires a subscription (P.147).Comprehensive Line-up of Network Services Voice Mail Service (Paid) (P.392) Call Waiting Service (Paid) (P.393) Call Forwarding Service (Free) (P.393) Nuisance Call Blocking Service (Free) (P.394) Caller ID Display Request Service (Free) (P.395) Dual Network Service (Paid) (P.395) English Guidance Service (Free) (P.395) Multi Number Service (Paid) (P.397) 2in1 (Paid) (P.398)](https://usermanual.wiki/Sony/A3724011.08-user-guide-part-1/User-Guide-929851-Page-11.png)

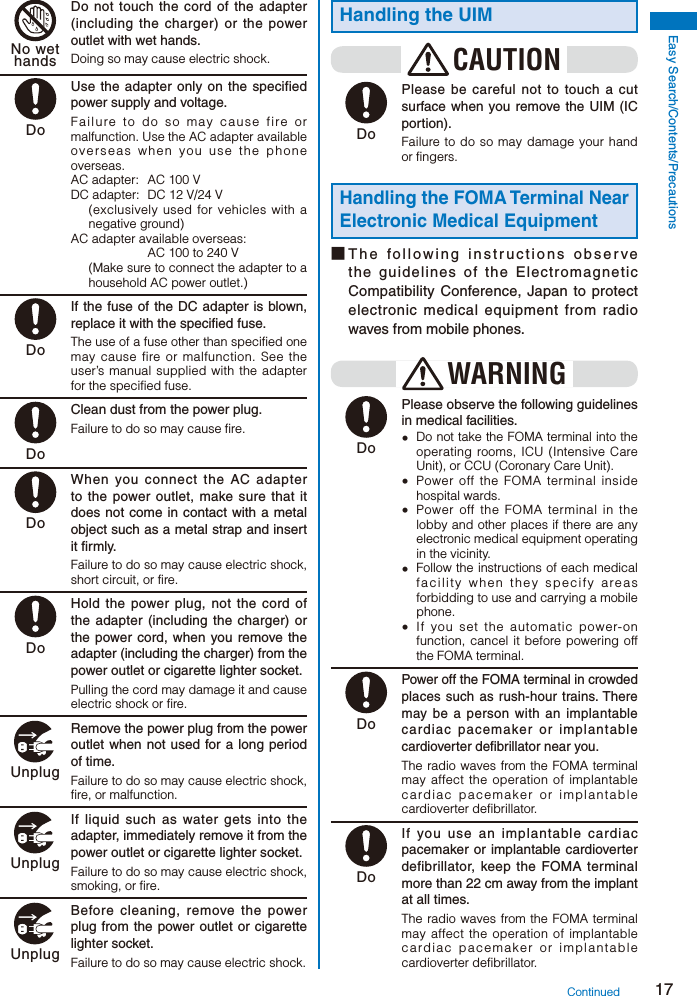

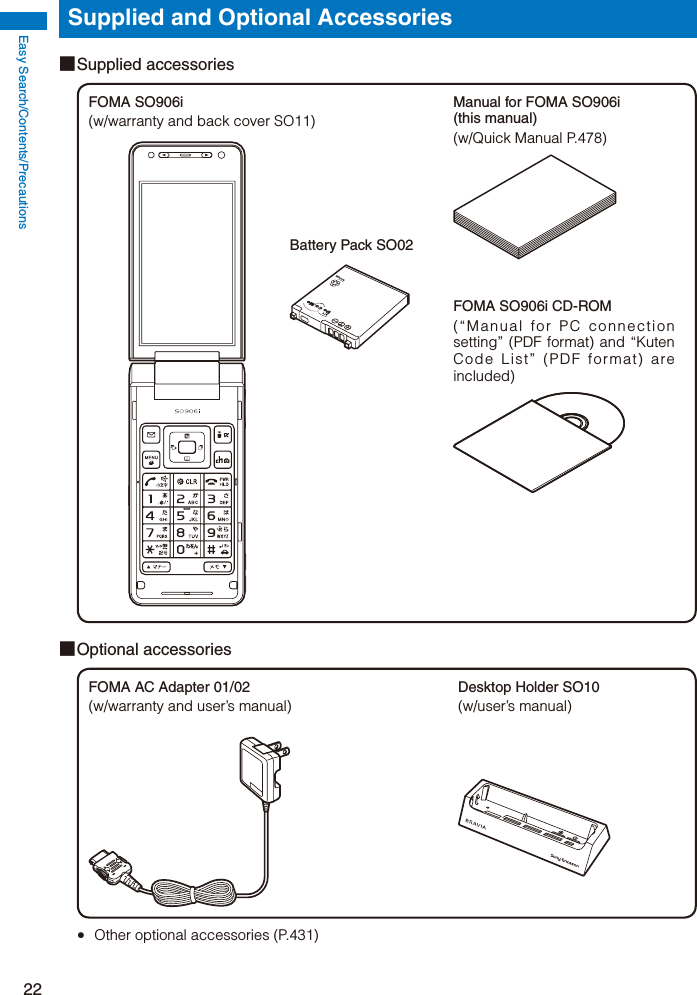
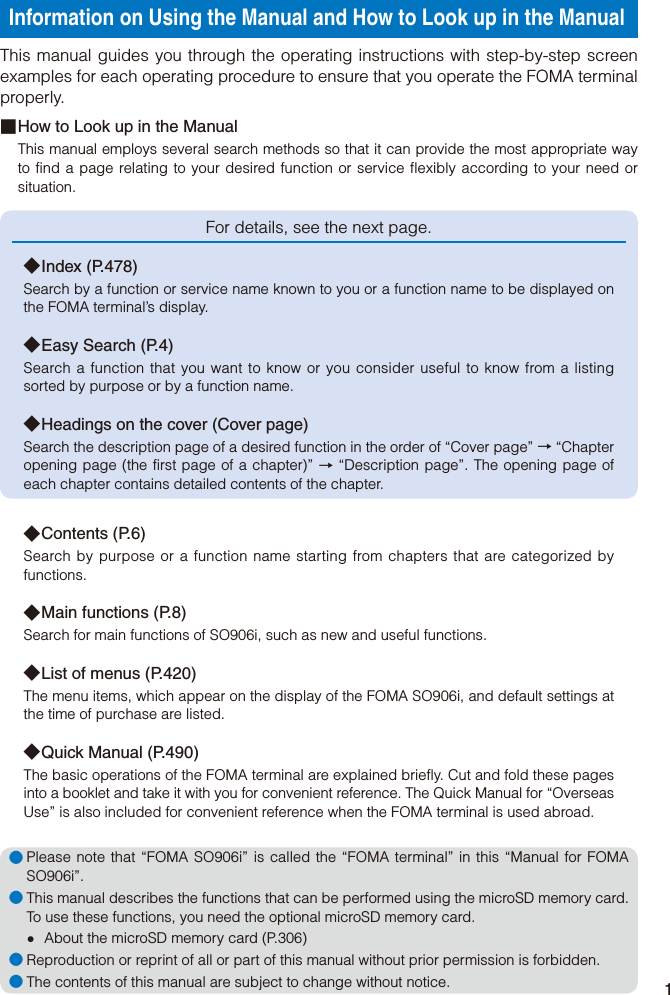
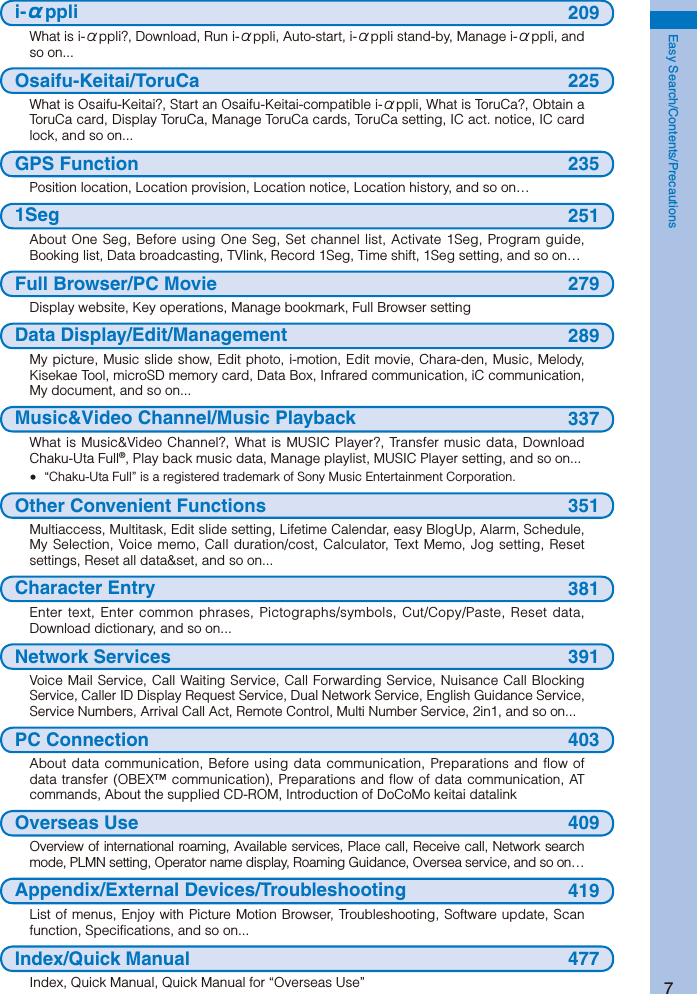
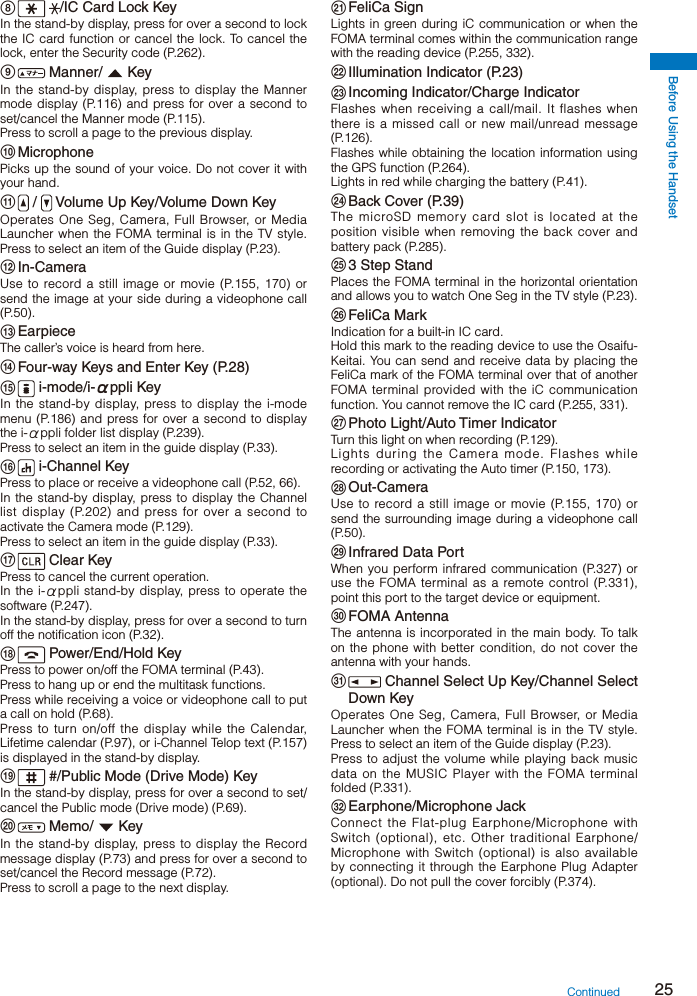
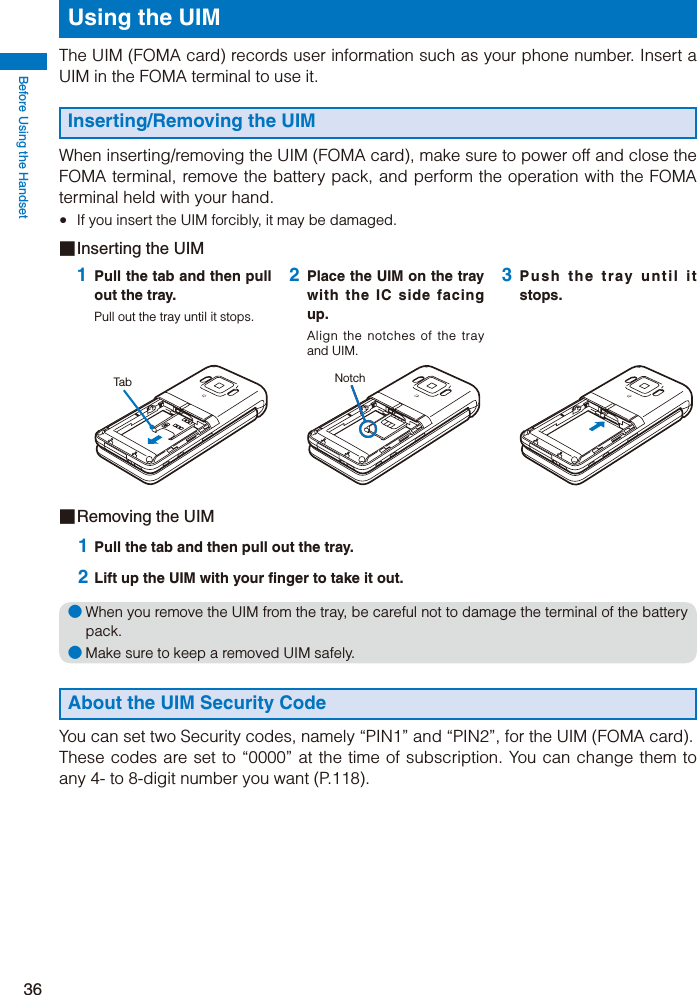
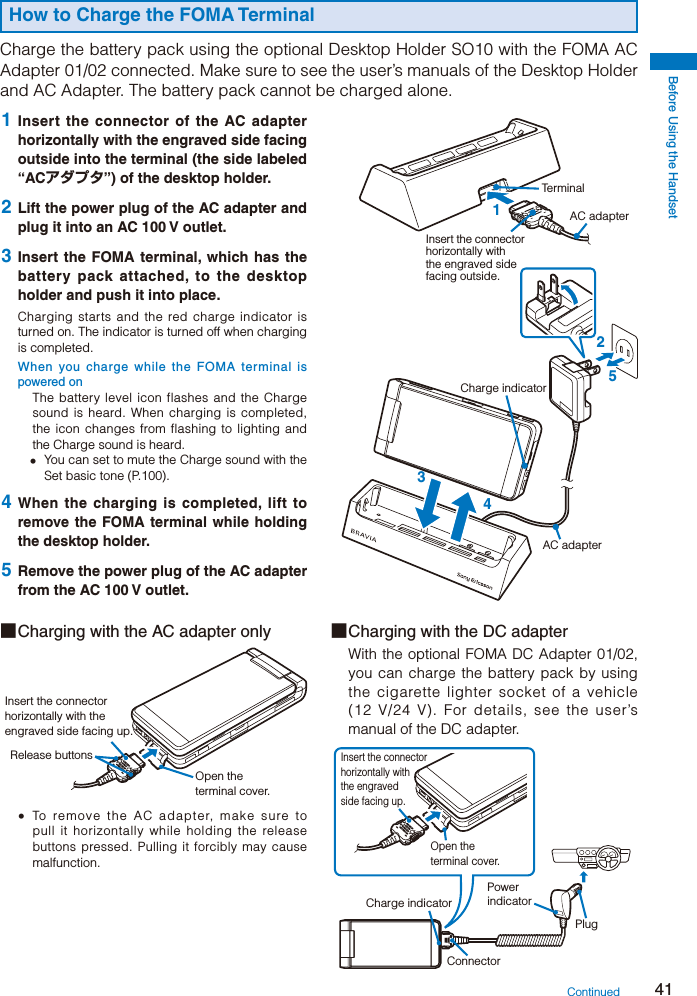
![Before Using the Handset24Part Names and Functions Brightness SensorAdjust the display light brightness and set ON/OFF of the keypad light automatically to adapt for the surrounding brightness (P.121). Display (P.30) 3 Units Front SpeakerSounds including the ring tone are heard from here. Mail KeyIn the stand-by display, press to display the Mail menu (P.206) and press for over a second to perform the Check new message (P.216, 231).Press to select an item in the guide display (P.33). MENU KeyPress to display the menu (P.33, 353). Call/Hands-free Switch KeyPress to place a voice call or start talking on the phone of a voice, videophone, or PushTalk call.Press during a call to switch ON/OFF of the hands-free function (P.53). KeypadEnter phone numbers or text (P.430).In the stand-by display, press for over a second to switch ON/OFF of the Shield view (P.115).In the stand-by display, press for over a second to display the Reset display (P.376).In the stand-by display, press for over a second to switch [Display]/[Undisplay] of the Secret data display. To set [Display], enter the Security code (P.115).In the stand-by display, press for over a second and enter the Security code to display the 2in1 setting display or Mode switching display (P.399).In the stand-by display, press for over a second to check your current location (P.264). Connecting the Flat-plug Earphone/Microphone with Switch (optional)](https://usermanual.wiki/Sony/A3724011.08-user-guide-part-1/User-Guide-929851-Page-26.png)

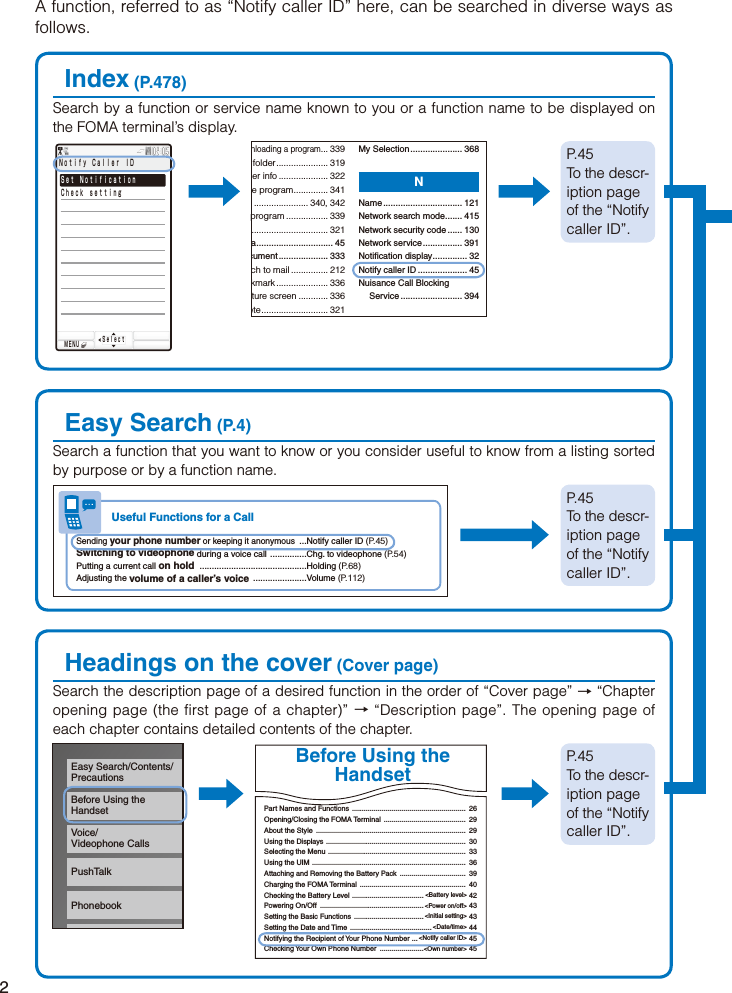
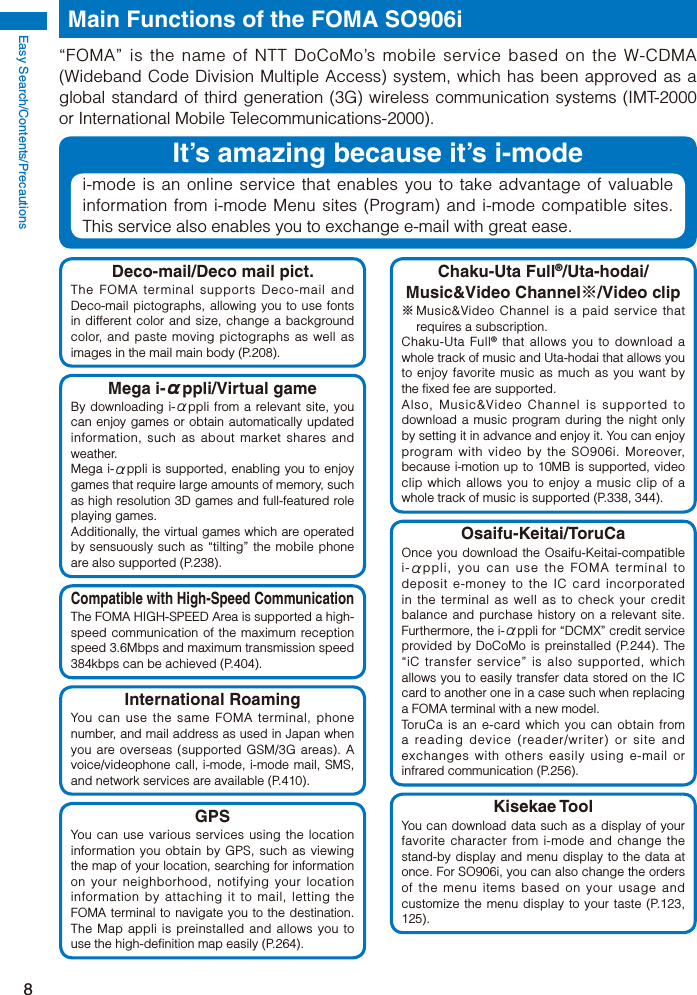
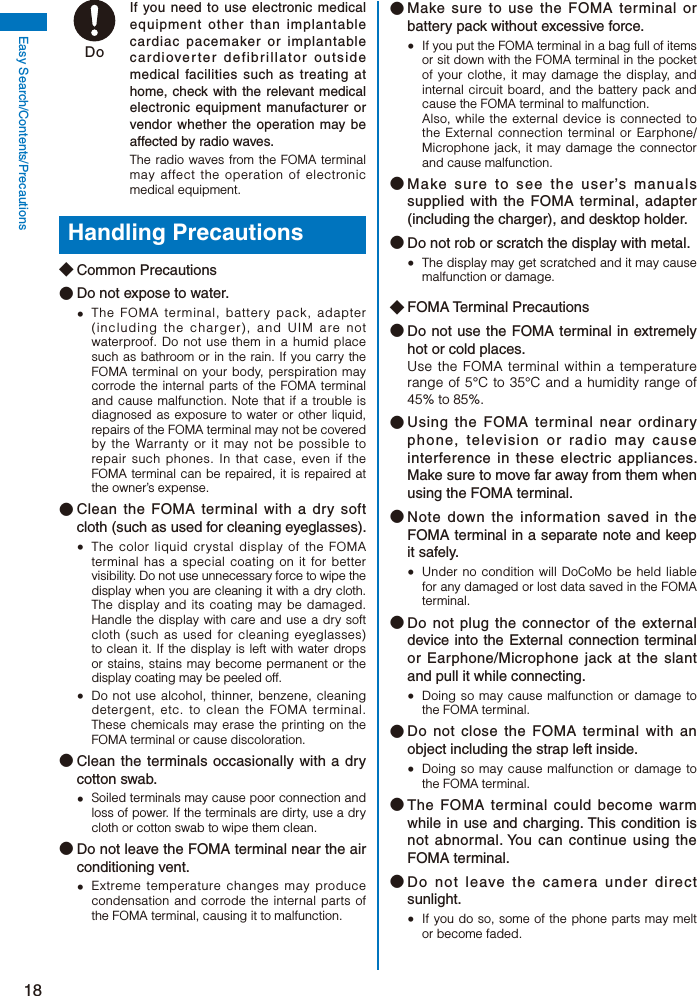
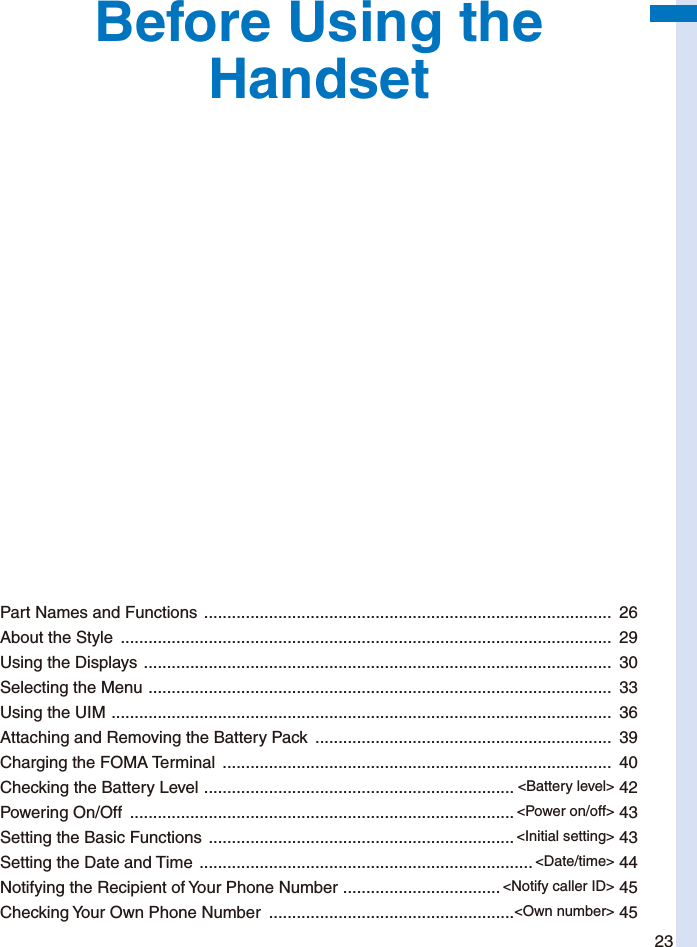
![Before Using the Handset31 / The i-mode center is full of Message R, Message F at the i-mode center/The i-mode center is full of Message R, the FOMA terminal is full of Message F While providing location information by GPS/While accepting to provide location information during the period of accepting the location request While rejecting to provide location information during the period of accepting the location request During GPS positioning (Blue)/ (Red) While connecting to the 3G network (Packet communication: able)/While connecting to the 3G network (Packet communication: disable) / While connecting to the GSM network/While connecting to the GPRS network / While running i-αppli (i-αppli stand-by display)/While running i-αppli DX / i-αppli stand-by display is set/i-αppli DX stand-by display is set (P.247) The USB mode setting is set to Communication mode (P.315) The USB mode setting is set to microSD mode (P.315) /// The USB mode setting is set to MTP mode: Connecting/Transferring/Transfer completed/Error (P.315) While using a hands-free device (P.65) Secret display is [ON] (P.141) While the microSD memory card is inserted (P.307) (Flashes during preparation for access after insertion of the microSD memory card) While the microSD memory card management information is being updated (P.314) During a voice call During a videophone call (P.50) During PushTalk communication (P.80) While using PushTalkPlus (P.89) During 64K data communication / / 1/2/3 or more tasks are being executed (P.353) ( changes to while playback is in progress on the MUSIC Player) While data in the MUSIC Player is being updated / / / Battery level (P.42) Current time (Displayed in 24-hour format in other than the stand-by display) When the Clock is set to [Pict clock], the clock is displayed in the stand-by display (P.118). The vibrator is set for incoming calls (P.110) The vibrator is set for incoming mail (P.110) The vibrator is set for incoming calls and mail (P.110) Incoming call ring volume is OFF (P.109) Incoming mail ring volume is OFF (P.109) Incoming call and mail ring volumes are OFF (P.109) Manner mode is set ( is pink) (P.115) Silent mode is set (P.115) Original manner mode is set ( is blue) (P.115) Public mode (Drive mode) is set (P.69) Personal data lock is set (P.138) Key dial lock is set (P.139) Personal data lock and Key dial lock are set (P.138, 139) IC card lock is set (P.262) During Music&Video Channel reservation (P.339) Alarm is set (P.362) Schedule alarm is set (P.364) Alarm and Schedule alarm are set (P.362, 364) / Record message is set ( is white) (P.72) There are non-played back record messages ( is light blue) There is no non-played back record message ( is blue) / Record message is OFF (There are record messages) ( is gray) There are non-played back record messages ( is light blue) There is no non-played back record message ( is blue) The number of recorded messages is displayed at . When the number of recorded messages becomes full, “ ” appears. / Videophone message is set ( is green) (P.72) There are non-played back videophone messages ( is light blue) There is no non-played back videophone message ( is blue) / Videophone message is OFF (There are videophone messages) ( is gray) There are non-played back videophone messages ( is light blue) There is no non-played back videophone message ( is blue) The number of recorded videophone messages is displayed at . When the number of recorded videophone messages becomes full, “ ” appears. Lock key is set (P.140)● The FOMA terminal’s display is manufactured based on the leading edge technologies, and some pixels unlit or lit may appear constantly in the display. This is not a malfunction.Continued](https://usermanual.wiki/Sony/A3724011.08-user-guide-part-1/User-Guide-929851-Page-33.png)
![Before Using the Handset33Guide DisplayTo utilize the FOMA terminal’s functions, use the 4-way keys (Up/Down/Left/Right arrow keys), the JOG, the Mail key, the i-mode/i-αppli key, the MENU key, and the i-Channel key according to the instructions shown in the guide display.Display Operation Display OperationMENU Link i.chi−modeMailPress .MENU Link i.chi−modeMailPress .MENU Link i.chi−modeMailPress or scroll up.MENU Link i.chi−modeMailPress .MENU Link i.chi−modeMailPress or scroll down.MENU Link i.chi−modeMailPress .MENU Link i.chi−modeMailPress .MENU Link i.chi−modeMailPress .MENU Link i.chi−modeMailPress .● The guide display does not appear in the stand-by display at the time of purchase. To display it, set the Soft key to [ON] (P.117).● The display may differ from the above depending on websites and i-αppli software.Selecting the MenuPress (MENU) to display the Menu display. You can select the menu display from [Kisekae menu]/[Standard menu]/[My Selection]. The Kisekae menu is displayed at the time of purchase. You can change the menu when you start or settings of icons for the Standard menu, and you can switch the Kisekae menus (P.122, 125). Main body color: SILVER Main body color: WHITE Main body color: PINKContinued](https://usermanual.wiki/Sony/A3724011.08-user-guide-part-1/User-Guide-929851-Page-35.png)
![Before Using the Handset34Kisekae menuMenu name DescriptionMy Selection Used to access My Selection.Imaging Used to access Camera, Movie, easy BlogUp, Music slide show, and Stand-by pictures.i mode Used to access an i-mode and Full Browser functions.Mail Used to access an i-mode mail and SMS functions.i appli Used to access an i-αppli function.Phone Used to access mainly related to Phone such as Phonebook, Call record, PushTalk phonebook, and Record message.Data Box Used to access data such as those saved in My picture, MUSIC, Music&Video Channel, i-motion, Melody, My document, Kisekae Tool, and Chara-den.Music Used to access MUSIC player and Music&Video Channel functions.Osaifu-Keitai Used to access IC card content, DCMX, and ToruCa functions.Own number Used to display the own phone number.LifeKit Used to access functions such as Bar code reader, Receive Ir data, microSD, Camera, Movie, Lifetime Calendar, Alarm, Schedule, Text Memo, Calculator, Data Security Service, and GPS.Settings Used to set items such as Display, Call, Application, Lock/Security, and Management. ● You can turn on/off the Standard menu guide by pressing (Help ON)/ (Help OFF).● Functions displayed in gray are not available.● When another function is activated or the FOMA terminal is connected to a PC while the USB mode setting is set to [MTP mode], the Standard menu is displayed by pressing .● The Kisekae menu at the time of purchase varies depending on the color of the FOMA terminal and the displayed menu changes based on the Kisekae Tool. The descriptions of this manual are written based on the Kisekae menu (White Scrapbook) of the main body color: WHITE and the Color theme setting (White & Gold).● For the list of menus in the Standard menu, see P.420.Selecting a Function from the Menu DisplayA function can be executed easily by going through the menus. 1 Press (MENU).The menu display appears. 2 Use to select a menu and press .The function associated to the menu is selected.● You can execute a function in the menu display by pressing a key on the keypad. For the functions that can be executed using a number key, see the list of menus (P.420).](https://usermanual.wiki/Sony/A3724011.08-user-guide-part-1/User-Guide-929851-Page-36.png)
![Before Using the Handset35Selecting a Function from the Function MenuThe Function menu is a menu that plays an auxiliary role for each function.Whenever the Function menu is available, [Func] appears in the guide display. Press to display a list of available Function menus. The contents of the Function menu vary depending on the functions and displays. For details, see the description of operation for the individual option. When the numbers and symbols are displayed in the Function menu, press a key on the keypad to activate a function.MENU Func CreateSelectText Memo list 1/4 Book airline ticket Milk and sugar 090XXXXXXXX 12345 Close SelectMENU Edit Delete Copy Text memo Save to microSD Send Ir data iC transmission Close SelectMENU Edit Delete Copy Text memo Save to microSD Send Ir data iC transmission Delete one Select&delete Delete all (Func) + ● Function menus displayed in gray are not available.Switching the Menu DisplayYou can switch the menu (Kisekae menu, Standard menu, and My Selection) to be displayed temporarily. At the time of purchase, the activated menu when you press in the stand-by display is the Kisekae menu. To change the activated menu, display the menu to be changed and press (Chg.MENU) for over a second. 1 Press (MENU) in the stand-by display and press (Chg.MENU). Kisekae menu Standard menu My Selection (Chg.MENU) (Chg.MENU) (Chg.MENU)● When you use the Kisekae tool to change the design of the menu display, some menu types may change the menu structure depending on the frequency in use. The digits assigned to menu items may not be applied. In this case, you cannot operate the FOMA terminal as explained in this manual, so please change the menu to the Standard menu or reset the menu settings (P.124).](https://usermanual.wiki/Sony/A3724011.08-user-guide-part-1/User-Guide-929851-Page-37.png)
![Before Using the Handset38About the Differences in UIM FunctionsA UIM (FOMA card) (blue) has the following functional differences from a UIM (green/white).Item UIM (blue) UIM (green/white) PageNumber of digits that can be saved for a phone number in the UIM phonebookMaximum 20 digitsMaximum 26 digitsP.98User certificate operation for using FirstPass Unavailable Available P.199Use of WORLD WING service Unavailable Available P.38Service Numbers (Use of [ドコモ故障問合せ] (Contact for Repairs) and [ドコモ総合案内・受 付 ] (General Inquiries))Unavailable Available P.396WORLD WINGWORLD WING is the DoCoMo’s FOMA international roaming service that enables you to place or receive a call using the same mobile phone number even if you are overseas, just by using the UIM (green/white) and a WORLD WING service-compatible FOMA terminal.※ If you subscribed to the FOMA services after September 1, 2005, you already have WORLD WING and no application is required. If you declined to use WORLD WING when you subscribed to the FOMA services or cancel the WORLD WING service halfway, you need to make an application again to use WORLD WING.※ If you subscribed to the FOMA services before August 31, 2005 and did not make an application to “WORLD WING”, you need to make a separate application. This service is not available in some service charge plans. If you should lose your UIM (green/white) or have it stolen abroad, please report it to DoCoMo and take steps to cancel the use of the UIM as soon as possible. For information on where to call, see “General Contact” on the backcover of this manual. Note that you are still liable for the call and communication charge incurred after the loss or theft occurred.](https://usermanual.wiki/Sony/A3724011.08-user-guide-part-1/User-Guide-929851-Page-40.png)
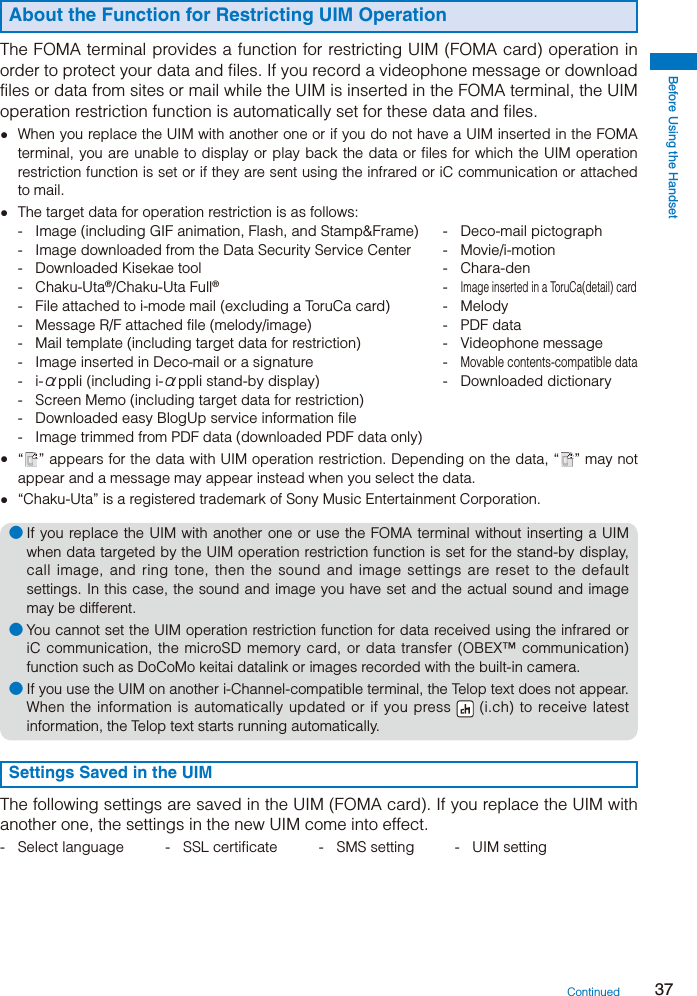
![Before Using the Handset42● During iC communication or when the FOMA terminal comes within the communication range with the reading device while charging the battery, the Charge indicator and FeliCa Sign light at the same time.● When not using the AC adapter for a long period of time, remove its power plug from the AC outlet.● Make sure that the phone strap, etc. does not get caught in between the FOMA terminal and the desktop holder.● The fuse (2.0 A) of the DC adapter is a consumable part. Purchase an equivalent fuse from an automobile parts store when it is necessary to replace the fuse.Checking the Battery Level <Battery level>The estimated battery level is indicated in the display.Display Charge levelSufficiently charged.Slightly low.Very low. Charge. (Flashes) The battery level is 0. Charge. Finish operationand chargebattery Charge battery● When the battery level becomes nearly 0, the screen shown to the right appears and warning sound is heard. The sound may be suppressed by other sound, etc. in operation. It is heard again when the battery level is 0 and the function you are performing is terminated. During a call, the warning sound is heard from the earpiece and the call is terminated when another warning sound is heard after about 20 seconds. If you do not charge the battery, the FOMA terminal is automatically powered off after about 60 seconds.Checking the Battery Level with the Sound and Display The confirmation beep does not sound when the volume of the keypad sound is [OFF] (P.111). 1 From the Menu, select [Settings] → [Management] → [Battery level] and press .The current battery level is displayed using bars in the display and the confirmation beep sounds according to the remaining battery level.Battery level Battery level Battery level Battery level Sufficiently charged. Slightly low. Very low. Battery level 0. (three beeps) (two beeps) Charge. (one beep) Charge. (no beeps)](https://usermanual.wiki/Sony/A3724011.08-user-guide-part-1/User-Guide-929851-Page-44.png)
![Before Using the Handset43Powering On/Off <Power on/off> When you power on the FOMA terminal, the screen informing to execute the software update automatically may appear (P.456). 1 Press (PWR) for over two seconds.The FOMA terminal is powered on, the display and the keypad lights are turned on, and an animation is displayed. After a while, the stand-by display appears. If you have set the PIN1 code setting to [ON], the PIN1 code input screen appears. Enter the PIN1 code and press (OK) (P.131).To power offPress (PWR) for over two seconds.● If you replace the UIM with another one (except when the Omakase Lock is set), you need to enter a 4- to 8-digit Security code when the FOMA terminal is powered on. When the entered code is correct, the stand-by display appears. If you enter a wrong Security code five times consecutively, the FOMA terminal is powered off. (You can still power on the FOMA terminal, however.)Setting the Basic Functions <Initial setting>The Initial setting can be used to make basic settings such as the Date/time and Security code. See the respective pages for details about the settings.■ Available setting itemsItem DescriptionDate/time Set the date and time of the FOMA terminal (P.44).Change code Change the Security code (P.132).Keypad sound Set the volume of the tone to sound when you press the key (P.111).Location request Set whether to provide positioning information (P.271).All font size setting Set the size of fonts to be used for displaying the Phonebook, Call record, Mail, i-mode sites, and Input text display (P.127). 1 From the Menu, select [Settings] → [Management] → [Initial setting] and press .Date/timeChange code YetKeypad sound 1Location request YetAll font size setting YetInitial setting 2 Set each item.● If you perform the Reset all data&set or do not change the Security code of the FOMA terminal or settings of the Location request or All font size setting, the message “Initial setting is incomplete. Execute?” appears when you power on the FOMA terminal. When you select [Yes], the display in step 1 appears and you can perform the initial setting.](https://usermanual.wiki/Sony/A3724011.08-user-guide-part-1/User-Guide-929851-Page-45.png)
![Before Using the Handset44Setting the Date and Time <Date/time>You can set the date and time either by automatically correcting the time based on the time information obtained from the DoCoMo network or by manually setting the time.Example: Correcting the time automatically 1 From the Menu, select [Settings] → [Management] → [Date/time] and press .Auto time adjust ONManual clock setDate/time[Auto time adjust] : Set the time automatically.[Manual clock set] : Enter the time manually. When you set the time using the Manual clock set, the Auto time adjust is set to [OFF]. 2 Select [ON] at [Auto time adjust].[ON] : Correct the date and time automatically.[OFF] : Do not correct the date and time automatically. Set the time using the Manual clock set.To set the time manuallySelect [Manual clock set] → [Yes] and enter the year and date within the range from 2000/01/01 to 2050/12/31, the time in 24-hour format (00:00 to 23:59), and select time zone. Press (Complete).● When you set the Auto time adjust to [ON], the date and time are corrected automatically when the FOMA terminal is powered on with a UIM installed. Note, however, that there may be an error lasting several seconds. The time cannot be automatically corrected in the following cases. - Outside of the service area (The time may not be corrected automatically even inside the service area depending on the radio wave condition.) - While i-αppli is running● The date and time settings are retained even when you replace the battery pack. However, if you leave the FOMA terminal without a battery pack or with a fully expended battery pack, the date and time may be reset to “----/--/-- --- --:--”. In this case, set the date and time once again.● If the date and time are not set, functions that use the clock, such as the current time icon, Schedule, Alarm, i-αppli Auto-start, and calendar/clock display cannot be used. The date and time for the Redial/Received record and the date and time on images shot with the camera are also not recorded.● When you receive time correction information from the network of the carrier to which the FOMA terminal is connected during international roaming, the time is automatically corrected when the Auto time adjust is set to [ON]. When the time is corrected to the local time, the date and time used for the Redial/Received record and sent/received mail also are corrected to the local time and “ ” appears. Note, however, that some overseas networks may not perform time correction.](https://usermanual.wiki/Sony/A3724011.08-user-guide-part-1/User-Guide-929851-Page-46.png)
![Before Using the Handset45Notifying the Recipient of Your Phone Number <Notify caller ID>When placing a call, your phone number can be shown in the display of the recipient’s phone you are calling. The caller ID is important personal information. Carefully decide whether you notify a recipient of your caller ID. 1 From the Menu, select [Settings] → [Management] → [NW Services] → [Notify Caller ID] → [Set Notification] and press . 2 Select [Notify]/[Not notify] and press .The Notify caller ID is set.To check the settingFrom the Menu, select [Settings] → [Management] → [NW Services] → [Notify Caller ID] → [Check setting].● The setting, whether to originate a PushTalk call with/without the caller ID, follows this setting.● If you hear a guidance asking to send the caller ID when you place a call, call again after setting the Set Notification to [Notify] or by adding “186” before the recipient’s phone number. The caller ID is not displayed even if you add “186” when you originate a PushTalk call.● You cannot set the Notify Caller ID when the FOMA terminal is outside of the service area.Checking Your Own Phone Number <Own number>Your phone number can be checked. You can also save your name, mail address, etc. If the Own number is saved as Secret, the data other than your phone number is not displayed. Set the Secret display to [ON] to display all data. Number B does not appear on the Own number display of the B mode at the time of purchase. To display Number B, perform the Check service (P.47). 1 From the Menu, select [Own number] and press . 090XXXXXXXX docomo.taro.△△@docom o.ne.jp ドコモ太郎 ト゛コモタロウ OFF Basic DetailYour phone number appears at [ ]. If the data other than a phone number is saved, that data also appears.To place a callPress , move the cursor to a phone number, and press .To originate a PushTalk callPress , move the cursor to a phone number, and press .To send i-mode mailPress , move the cursor to a mail address, and press (Mail).To check the imagePress , move the cursor to the image, and press (Play).To switch the Own number display between the A and B modes when 2in1 is set to the Dual modePress (Number A)/ (Number B).Continued](https://usermanual.wiki/Sony/A3724011.08-user-guide-part-1/User-Guide-929851-Page-47.png)
![Before Using the Handset46● You cannot originate a PushTalk call from the Own number display of the B mode.● When you replace the UIM (From 2in1 subscriber to 2in1 subscriber) while 2in1 is used, to obtain a correct Number B, you need to perform the 2in1 function OFF (P.400) first, and then set the 2in1 to ON again. When you replace the UIM (From 2in1 subscriber to 2in1 non-subscriber), perform the 2in1 function OFF.● When you replace the UIM while 2in1 is used, you need to reset all the items of the personal data at the B mode (P.47).Saving Your Personal DataYou can save your personal data such as your name, postal address, and mail address, and check saved data in the Own number display and quote this data in the text input display. 1 Press (Edit) in the Own number display. 090XXXXXXXX OFF Basic Detail 2 Save each item at the Basic display.Icon SettingsEnter your mail address within 50 half-width alphanumeric characters and symbols.Enter your name within 16 full-width or 32 half-width characters.When entering your name, the reading is automatically entered. To edit the reading, enter a reading within 32 half-width characters.Select [ON]/[OFF] of the Secret. To display the entry saved as Secret, set the Secret display to [ON].](https://usermanual.wiki/Sony/A3724011.08-user-guide-part-1/User-Guide-929851-Page-48.png)
![Before Using the Handset47 3 Press and save each item at the Detail display.Icon SettingsSelect an image from My picture/i-motion of the Data Box or record one. You can set the following files.Category File format File size Image sizeMy picture GIF/JPEG Max. 100K bytes Max. [QVGA(240×320)]i-motion※MP4 Max. 10M bytes Max. [VGA(640×480)]※ Some i-motion may not be set. It may take time to display a large-sized image. To use an image after recording it by the camera, select [Camera]/[Movie] (P.155, 170).You can record an image in the following sizes.Still image Max. [QVGA(240×320)]Movie Max. [VGA(640×480)] To specify no image, select [None]. To check the image, move the cursor to the image and press (Play).Enter the postal code of your home address within seven half-width digits.Enter the postal address of your home within 64 full-width or 128 half-width characters.Enter your home phone number within 26 digits.Enter your home mail address within 50 half-width alphanumeric characters and symbols.Enter the name of your office within 64 full-width or 128 half-width characters.Enter the postal code of your office address within seven half-width digits.Enter the postal address of your office within 64 full-width or 128 half-width characters.Enter your office phone number within 26 digits.Enter your office mail address within 50 half-width alphanumeric characters and symbols.Enter your birthday within the range from 1900/01/01 to 2050/12/31. 4 Press (Complete).Your personal data is saved.To reset to the default settingsFrom the Function menu in the Own number display, select [Reset all] → [Yes].To register Number B at the Own number display of the B modeIn the Own number display of the B mode, from the Function menu, select [Check service].● At [ ] your phone number is displayed and at [ ] and [ ] Additional Nos. set for the Multi Number Service are displayed. These numbers cannot be edited or deleted.● At the time of purchase, your mail address does not appear. Check your mail address by selecting (i-mode) → [i Menu] → [English iMenu] → [Options] → [Mail Settings] → [Confirm Mail Address]. When you change your mail address, edit the Own number display accordingly.● When you replace the UIM while 2in1 is used, you need to reset all the items of the personal data at the B mode (P.46).](https://usermanual.wiki/Sony/A3724011.08-user-guide-part-1/User-Guide-929851-Page-49.png)
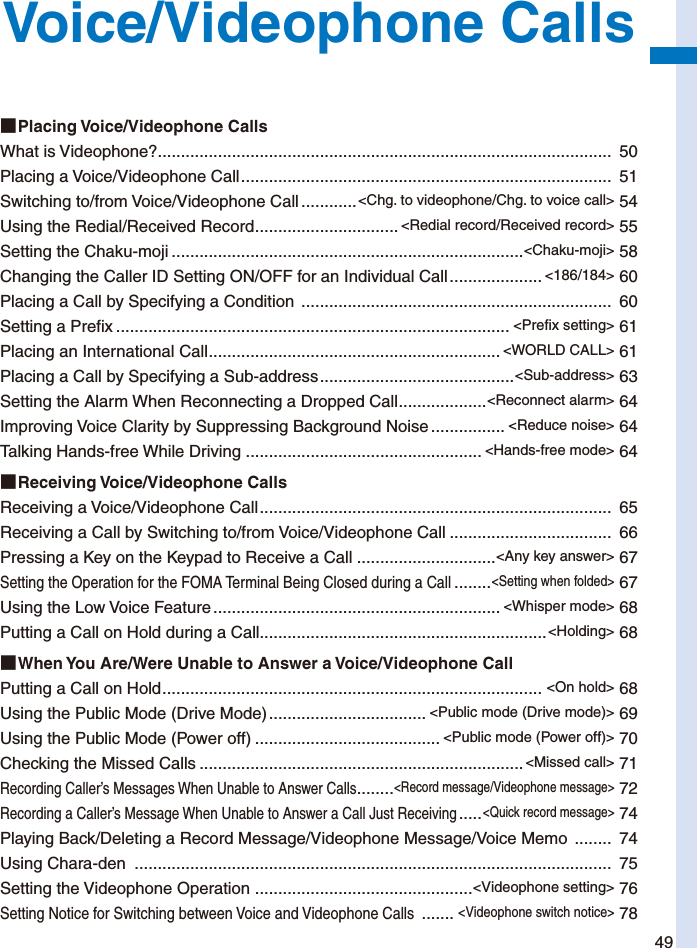
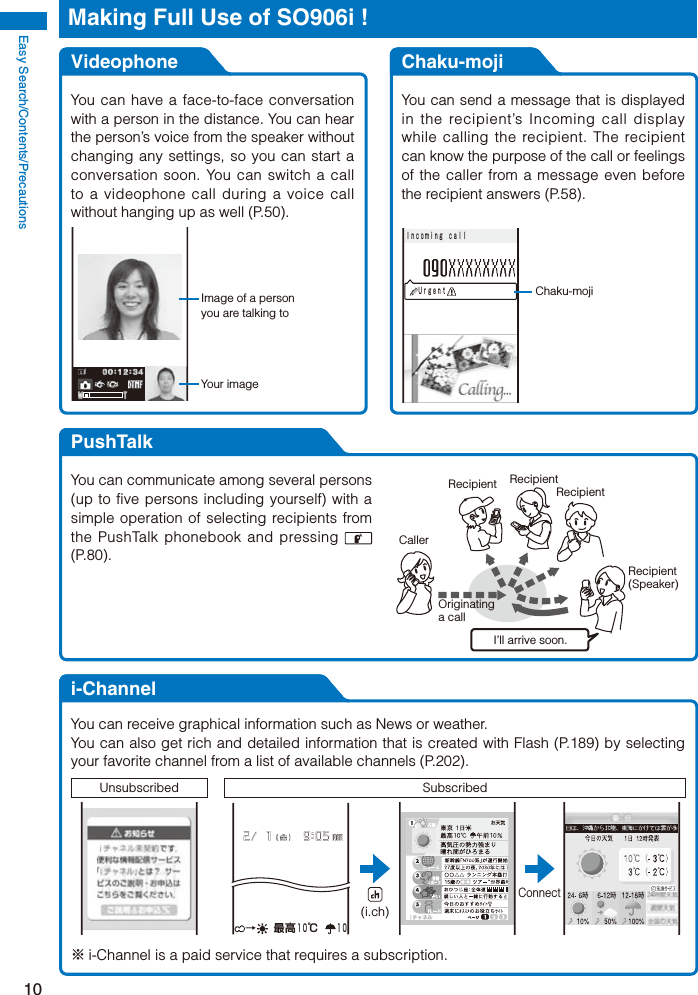
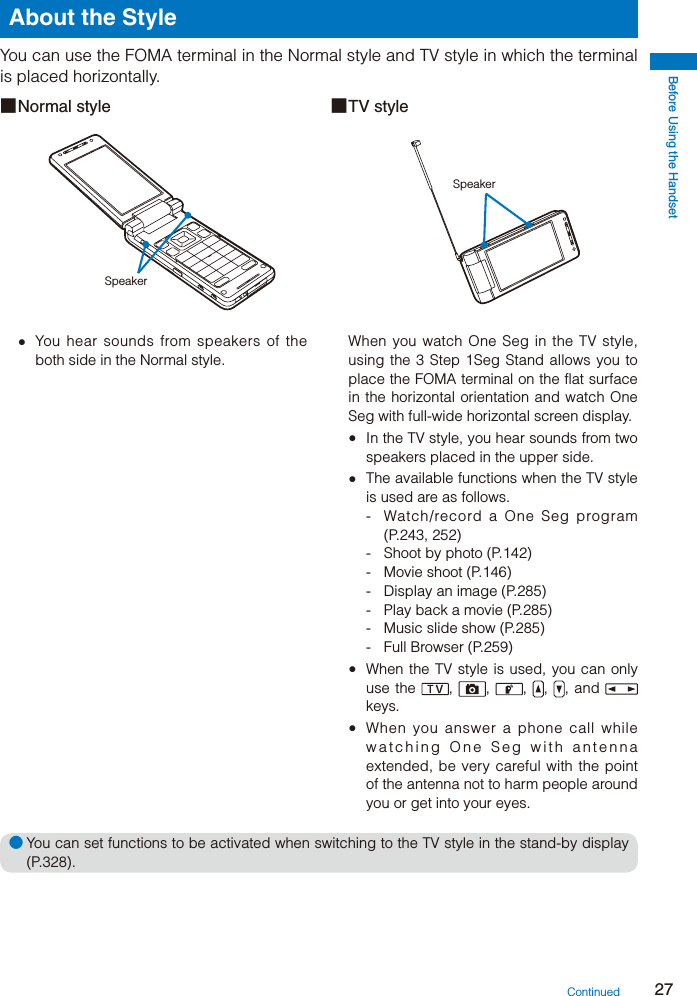
![50Voice/Videophone CallsWhat is Videophone?You can use the videophone function between DoCoMo videophone compatible terminals. You can use videophone to talk to the recipient/caller while looking at each other’s image. You can send a still image, substitute image, or Chara-den character instead of your own.DoCoMo’s videophone complies with “3G-324M※1 standardized by 3GPP※2 for global standard”. The FOMA terminal cannot be connected to a videophone that uses a different system.※1 3G-324M Global standard for third-generation mobile videophones.※2 3GPP (3rd Generation Partnership Project) Local standardization committee set up for development of common technology specifications related to third-generation mobile wireless communication systems (IMT-2000).Using the Display during a Videophone Call : During videophone call Videophone image (Large) Display an image of a person you are talking to (default setting). Videophone image (Small) Display your image (default setting). Call duration Display the call duration in the hh:mm:ss format. Outgoing image status : Camera image is being sent. : A still image is being sent. : A Chara-den character is being sent. Zoom magnification Display the zoom magnification bar. : Hands-free ON : Photo light ON Mode : Mode for operating full-body actions : Mode for operating parts actions : Mode for sending touch-tones (DTMF)Operations during a Videophone CallOperation Key operationSwitch between camera image/substitute imagePress (MySide/Sub). Every time you press the key, the display is switched between camera image/substitute image.Switch cameras Press (In/Out). Every time you press the key, the camera is switched between the In-/Out-camera.You can also switch between the In-/Out-camera by opening/closing the lens cover.Switch ON/OFF of the hands-free operationPress ( ). Every time you press the key, the ON/OFF setting is switched.Zoom-in/-out image Press (Zoom in) / (Zoom out) when recording with the Out-camera.Put a call on hold F r o m the Function menu, select [Holding]. To cancel this function, press .Switch the display From the Function menu, select [Display setting].Switch the quality of the outgoing imageFrom the Function menu, select [Visual preference]. When you finish a call, the image quality set for the Visual preference of the Videophone setting is restored.Select a substitute imageFrom the Function menu, select [Select sub image].Switch ON/OFF of the photo lightFrom the Function menu, select [Photo light] (when using the Out-camera only).Display your phone numberFrom the Function menu, select [Own number].Switch to a voice callFrom the Function menu, select [Chg. to voice call] (when placing a videophone call only).● When you switch to the Out-camera with the lens cover closed, the message “Please open the lens cover” appears and your own image is sent instead of switching to the Out-camera.](https://usermanual.wiki/Sony/A3724011.08-user-guide-part-1/User-Guide-929851-Page-52.png)
![51Voice/Videophone CallsPlacing a Voice/Videophone CallCheck the radio wave condition and enter a phone number.Example: Placing a voice call 1 Enter a phone number in the stand-by display. You can enter a phone number of up to 80 digits. Make sure to include the area code, even for a local call.When you press the wrong numberPress to delete the entered digits one by one from the right. Press for over a second to delete all digits. 2 Press .CallingA ringing sound is heard when the call is connected.To place a videophone callPress (V.phone). When the call is answered, your image is sent to the recipient and the call is switched to the hands-free operation that allows you to hear the recipient’s voice from the speaker.When 2in1 is set to the Dual modeSelect [Number A]/[Number B] (P.398).When a busy tone soundsThe line is busy. Press to hang up and call again after a while.When you hear a guidanceCall again according to the guidance. 3 Press to hang up.● See P.59 for sending the Chaku-moji and P.60 for placing a voice or videophone call by specifying the condition.● For a voice call, you can also place it in the order of step 2 → step 1. Press and enter a phone number, and the call is dialed automatically after about five seconds.● You are charged for digital communication even if you send a substitute image during a call.● If the videophone call is not connected, the following messages appear in the display. The displayed message may not correctly represent the status of the recipient depending on the type of the phone of the recipient or whether the recipient has subscribed to any network service.Message DescriptionCheck number, then redialThe phone number is no longer in use.Busy The recipient is talking on the phone.(This message may appear also during packet communication on some recipient’s terminals.)Busy with packet transmissionThe recipient is using packet communication.Outside of service area/power offThe recipient is in a place where radio waves do not reach or the phone is powered off.Set Caller ID to ONThis message appears when the call was connected without a Caller ID (when a call is placed to Visual Net or other sites).Please try voice callThis message appears when the Call Forwarding Service is set on the recipient’s phone and the terminal to which the call was forwarded is not equipped with the videophone function.(As of December 2007, this message may appear also when the Voice Mail Service is set on the recipient’s phone.)Connection failedThis message appears when none of the above reasons apply.Please make your call from the i-mode web pageTo view V-Live contents, visit and view an official i-mode site once, and then place a videophone call.Upper limit has been exceeded. Connection failedThe upper limit set to the plan with a Limit (Type Limit or Family Wide Limit) has been exceeded.Continued](https://usermanual.wiki/Sony/A3724011.08-user-guide-part-1/User-Guide-929851-Page-53.png)
![52Voice/Videophone Calls● If you use the FOMA terminal to place a videophone call to emergency numbers (110, 119, and 118), it automatically switches to voice call dialing.● When you place a videophone call to a terminal that is not equipped with a videophone function, or when a recipient is outside of the service area or the phone is powered off (even if the FOMA terminal has the videophone function), your call is not connected. When you place a videophone call to a terminal that is not equipped with a videophone function and the Auto redial(voice) is set to [ON], the recipient’s terminal disconnects your videophone call before it is connected, and the FOMA terminal redials the call as a voice call. If, however, you dial a wrong number such as an ISDN synchronous 64kbps or PIAFS access points, or ISDN videophone that is not 3G-324M (as of December 2007) compatible, the above operations may not take place. Note also that you may be charged for the call.Using the Hands-free FunctionWhen you switch to the hands-free operation during a call, you can hear the caller’s voice from the speaker and talk hands-free.Example: Switching to the hands-free operation during a voice call 1 Press ( ) during a call.TalkingCall duration 0:03The call is switched to the hands-free operation and “ ” appears.To cancel the hands-free functionPress ( ) again. When you finish the call, the hands-free operation is automatically canceled.● Talk into the FOMA terminal from a distance of 30 cm or less.Entering a Pause, Timer, or +You can include a pause, timer, or + in a phone number (within 80 digits in all) to place a call.The phone number and pause, timer, or + can be saved together in the Phonebook. Pause and timer are valid only for a voice call.Entering a pause “P”If you enter “P (pause)” between the phone number and touch-tones when you book a ticket or play back your home answering machine, the touch-tones are sent by separating the numbers at the pause (P). 1 Press in the phone number input display.“P” is entered.To send touch-tones saved in the PhonebookWhen the touch-tones are displayed after you place a call from the Phonebook, press (Call).● Some receiver devices may not be able to accept touch-tones.Entering a timer “T”To dial an inside line number following an outside line number, enter “T (timer)” between the outside and inside line numbers. After a preset interval in seconds, the inside line number is dialed following the outside line number. An interval of about one second is added for every timer (T) entry. You can enter “T” consecutively to make the interval longer. 1 Press for over a second in the phone number input display.“T” is entered.](https://usermanual.wiki/Sony/A3724011.08-user-guide-part-1/User-Guide-929851-Page-54.png)
![53Voice/Videophone CallsEntering a “+”If you enter “+” at the beginning of a phone number when the Auto conversion of the Int’l dial assist setting is set to [ON], a call is dialed by automatically adding the set international access number (set to “009130010” at the time of purchase). 1 Press for over a second in the stand-by display.“+” is entered.● You may not be able to place the call if you enter other than a phone number after “+” or enter only “+”.Switching to/from Voice/Videophone Call <Chg. to videophone/Chg. to voice call>A caller can switch to/from voice/videophone call during a call. This function can be used only between terminals that can switch between voice and videophone calls. A recipient must preset the V.ph switch notice to [Indication ON] (P.78).Example: Switching from voice call to videophone call 1 Press (Func) during a voice call, select [Chg. to videophone], and press . Change to videophone? Yes No[Yes]:Switch the call from voice call to videophone call.[No]:Return to the voice call without switching the call.To switch from videophone call to voice callFrom the Function menu, select [Chg. to voice call] → [Yes]. When the call is switched to the voice call, the hands-free operation is canceled. 2 Select [Yes] and press .Chg.to videophoneThe recipient’s imageA substitute image may appear according to the setting on the recipient’s terminal.While the call is switched, an animation is displayed and you hear a guidance notifying you that a call is switched.When the call is switched to the videophone call, your image is sent to the recipient and the call is switched to the hands-free operation that allows you to hear the recipient’s voice from the speaker.Continued](https://usermanual.wiki/Sony/A3724011.08-user-guide-part-1/User-Guide-929851-Page-55.png)
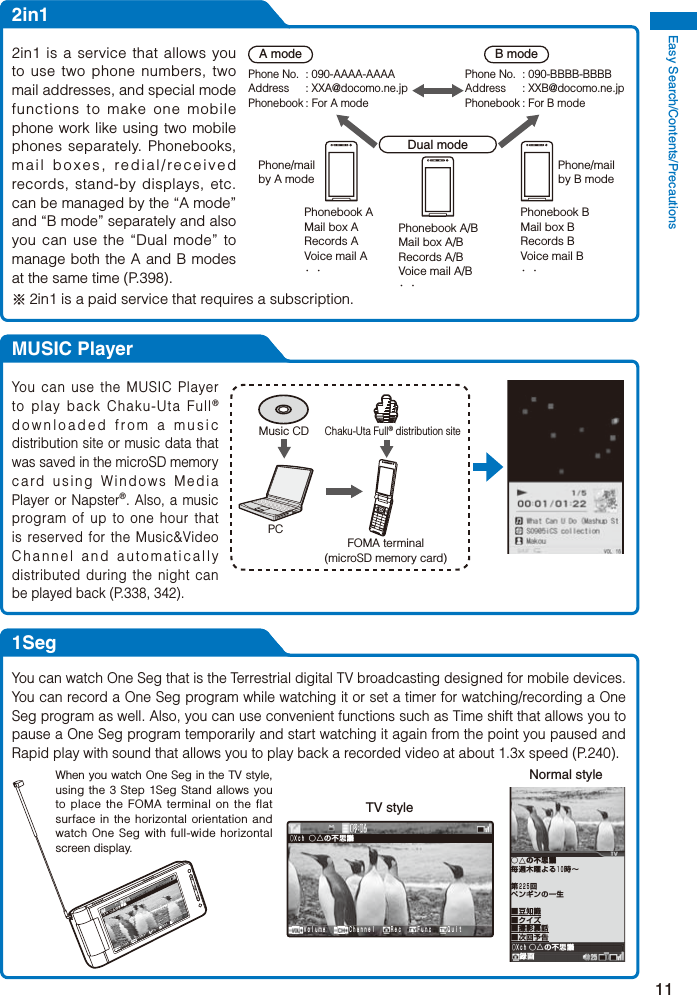
![54Voice/Videophone Calls● If packet communication is in progress, it is disconnected and the FOMA terminal is switched to videophone.● When the call is put on hold on the recipient or while the recipient is performing packet communication, you cannot switch to videophone.● The switching operation takes about five seconds. It may take time depending on the radio wave condition.● Switching to/from voice/videophone call may not be performed in some radio wave condition, and the phone may be disconnected.● You are not charged while “Chg. to videophone”/“Chg. to voice call” is displayed.● Every time you switch, the call duration starts from 0 seconds. When you finish the call, the total call duration is displayed for each of the voice and videophone calls.Using the Redial/Received Record <Redial record/Received record>Up to 30 previously placed/received calls are saved as call records with their dates/times, phone numbers, and names. The phone numbers or names appear in descending order from the most recent call. For a PushTalk call, the group name or the first member’s name appears. When 2in1 is used, up to 30 redial/received records of Number A and Number B can be saved for each separately. When 2in1 is set to the Dual mode or OFF, up to 30 redial/received records of both numbers appear in descending order from the most recent call at once. The call records of Number A and Number B are defined by different colors for each. The displayed color varies depending on the Color theme setting of the Kisekae setting (P.124). Also, you can set the color for Number B from [dark]/[light] at the Disp. call/rcv. No. of 2in1 (P.400). Redial record Dial frequency record 2/13 10:32 ドコモ二郎 2/12 10:30090XXXXXXXX 2/12 9:35 ドコモ一郎 2/11 10:32 携帯はる子 2/10 22:15 ○○○同好会 2/10 10:28 携帯あき子Recv Freq Redial ドコモ一郎 ドコモ二郎 ドコモ二郎 携帯あき子 携帯はる子 ○○○同好会 090XXXXXXXX 携帯あき子 △△△クラブ 03XXXXXXXX 080XXXXXXXX 携帯なつ子Recv Redl DialFreq Received record 2/13 10:32 ドコモ二郎 2/12 10:30090XXXXXXXX 2/12 9:35 ドコモ一郎 2/11 10:32 携帯はる子 2/10 22:15 ○○○同好会 2/10 10:28 携帯あき子Freq Redl Received Call type/※Placed/received voice call / Missed voice call (“ ” appears in case of the Dial frequency record)/※Placed/received videophone call / Missed videophone call (“ ” appears in case of the Dial frequency record)/Received 64K data communication / Missed 64K data communication/Originated/received PushTalk call / Missed PushTalk call/ / PushTalk type (to one person)/(to multiple persons)/(PushTalkPlus)With Chaku-moji (Displayed only in the Received record)※ “ ” appears when the Record message/Videophone message is recorded. Phone typeMobile1Mobile2Public phoneVideophoneHome phoneOffice phoneHome FAXOffice FAXQUICKCAST The phone type icons do not appear when the Personal data lock is set.](https://usermanual.wiki/Sony/A3724011.08-user-guide-part-1/User-Guide-929851-Page-56.png)
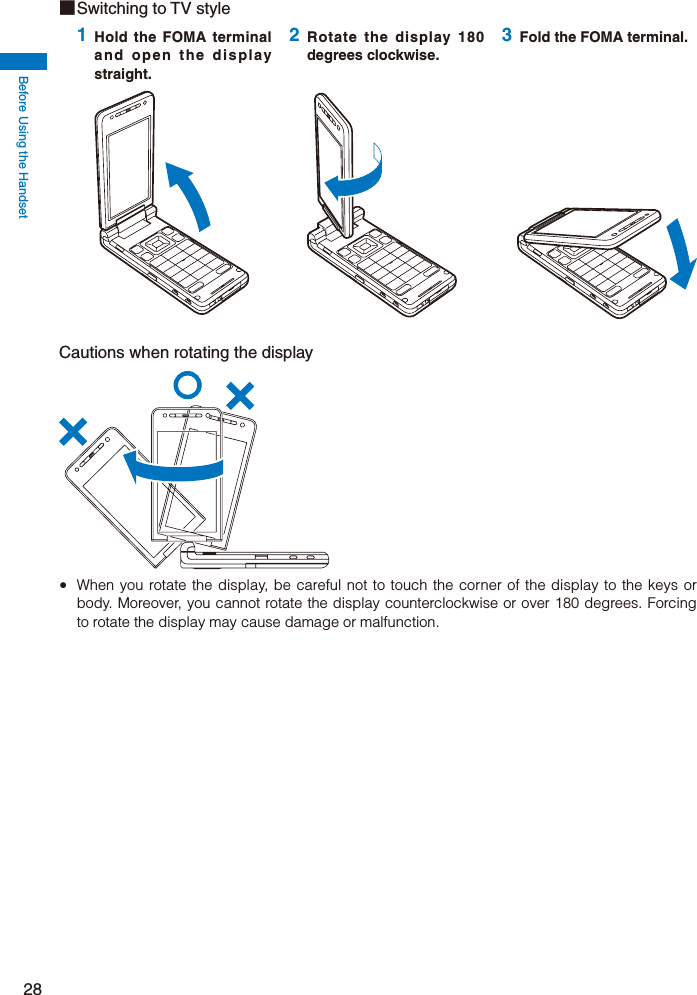
![55Voice/Videophone CallsExample: Displaying the Redial record 1 Press ( ) in the stand-by display.The Redial record display appears.To display the Received recordPress ( ) in the stand-by display.To display the Dial frequency recordPress in the Redial record display.To display phone numbersWhen saved in the Phonebook, the name and phone type of a recipient are displayed instead of the phone number. Press to switch the display temporarily between names and phone numbers. The display is not switched when a group name for a PushTalk call is displayed.To place a voice callMove the cursor to a call record and press .To place a videophone callMove the cursor to a call record and press (V.phone).To originate a PushTalk callMove the cursor to a call record and press .To send mailYou can send mail to a person whose phone number and mail address are saved in the Phonebook. Move the cursor to a call record and from the Function menu, select [Reply by mail] → a mail address. Compose mail and send it.To save in a group of the PushTalk phonebookWhen you perform PushTalk communication among several persons saved in the PushTalk phonebook, move the cursor to a received record of the PushTalk call ( ), press (Save), select a group, and press (Complete).● If the same phone number has been repeatedly called, only the most recent call is saved in the Redial record. Note, however, that when you originate a PushTalk call, individual PushTalk communication among several persons are recorded.● If you switch the call between voice and videophone during a call, the call you placed/received first is saved in the Redial/Received record.● When a caller uses a “Dial-in” phone number, the phone number displayed may be different from the caller’s dial-in number.● When you place a voice or videophone call from the Received record, a Chaku-moji recorded in the Received record is not sent.● When the date and time are corrected to the local time during international roaming, “ ” appears next to the name/phone number (P.44).Displaying the Detailed Information of the Redial/Received Record 1 From the call record display, select a call record and press (Detail).Redial recordRedial UsrSet 2/10 Sun 10:05 ドコモ太郎 090XXXXXXXX 付加番号1 090XXXXXXXXMulti Number typeCall typePhone typeReceived record 2/10 Sun 10:05 ドコモ太郎 090XXXXXXXX 12sec 付加番号1 090XXXXXXXX UrgentReceivedMulti Number typeCall typePhone typeRing time for a missed callChaku-moji message The following icons show the Multi Number type.基本契約番号 (Basic Number)付加番号1 (Additional No.1)付加番号2 (Additional No.2)● When you select a call record of a PushTalk call, [] group name, [ ] caller name (Received record only), and all members are displayed.Continued](https://usermanual.wiki/Sony/A3724011.08-user-guide-part-1/User-Guide-929851-Page-57.png)
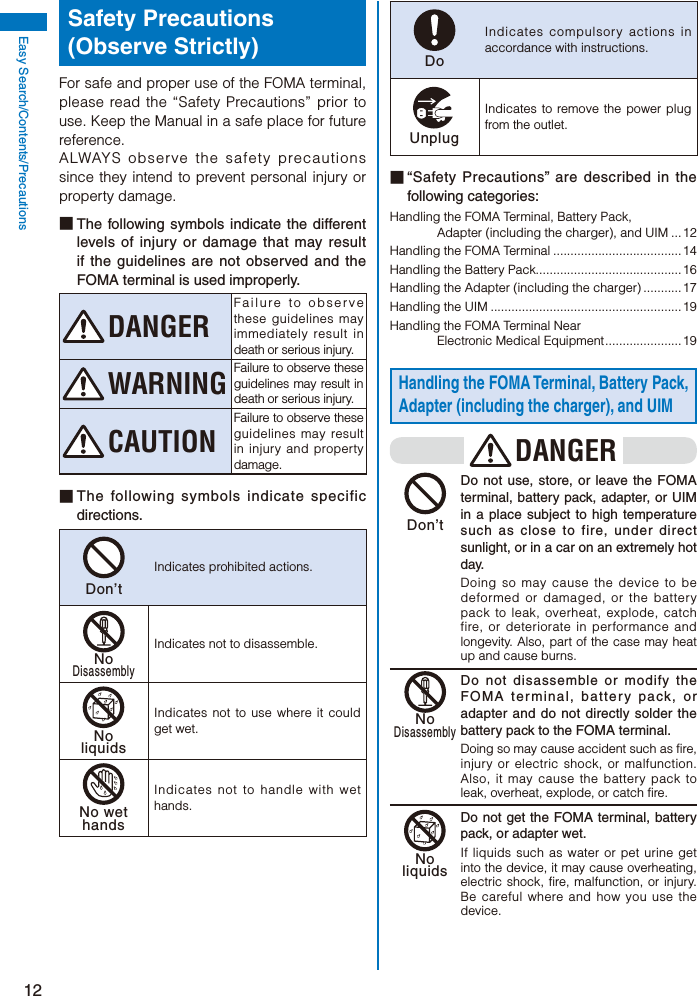
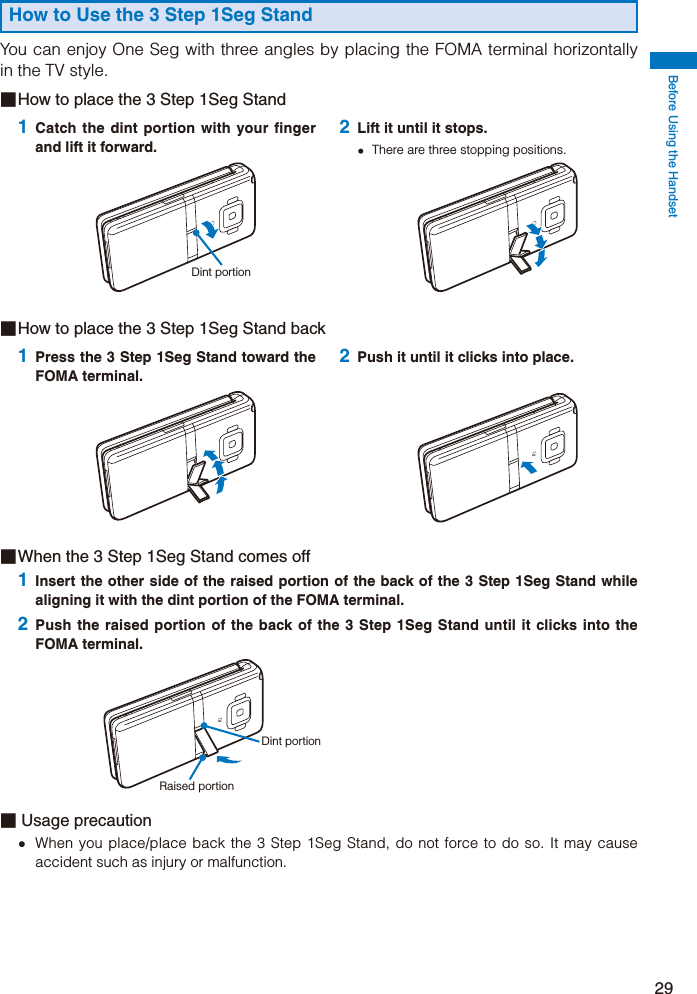
![56Voice/Videophone CallsDeleting the Redial/Received RecordThe call records are retained even if the FOMA terminal is powered off. If you do not wish others to know the previously dialed records, delete one or all of the call records. If you delete either a redial record or a dial frequency record, both records are deleted.Example: Deleting a call record 1 From the call record display, select a call record and press (Func).The Function menu appears.To delete several call recordsFrom the Function menu, select [Delete] → [Select&delete], select call records, press (Complete), and select [Yes].To delete all call recordsFrom the Function menu, select [Delete] → [Delete all], enter the Security code, and select [Yes]. 2 Select [Delete] → [Delete one] → [Yes] and press .The selected call record is deleted.● If you perform the Delete all when 2in1 is used, all the Call records of Number A and Number B are deleted, regardless of the 2in1 mode.Setting the Chaku-moji <Chaku-moji>When you place a voice or videophone call, you can send a message (Chaku-moji) that is displayed in the recipient’s Incoming call display in order to notify the purpose of the call even before this recipient answers. UrgentIncoming callChaku-mojiChaku-moji disappears when you start talking on the phone.Chaku-moji can be checked in the detailed information display of the Received Record (P.57). For more details about the Chaku-moji or compatible models, see the DoCoMo’s website or “Mobile Phone User’s Guide 【Network services】”. Charge is required for the Chaku-moji sender, but no charge for a recipient. Chaku-moji cannot be used for PushTalk calls. When you use the FOMA terminal overseas, you cannot send or receive a Chaku-moji message.Editing Chaku-moji MessagesYou can save up to 10 Chaku-moji messages. 1 From the Menu, select [Settings] → [Management] → [NW Services] → [Chaku-moji] → [Create message] and press .To delete a Chaku-moji messageMove the cursor to a Chaku-moji message and from the Function menu, select [Delete one] → [Yes]. To delete all Chaku-moji messages, from the Function menu, select [Delete all], enter the Security code, and select [Yes]. 2 Press (Edit) and enter a Chaku-moji message.Enter a message within 10 characters regardless of pictographs, symbols, full-width, or half-width.The Chaku-moji message is saved.](https://usermanual.wiki/Sony/A3724011.08-user-guide-part-1/User-Guide-929851-Page-58.png)
![57Voice/Videophone CallsSetting the Display for Chaku-moji Being ReceivedYou can set the display style to be used when you receive a Chaku-moji message. 1 From the Menu, select [Settings] → [Management] → [NW Services] → [Chaku-moji] → [Set Message display] and press .Set Message display Display all Msgs Only numbers in PB Only calls w/ID Hide all messages[Display all Msgs]:Receive and display all Chaku-moji.[Only numbers in PB]:Receive and display Chaku-moji sent only from callers who are saved in the Phonebook. You cannot receive Chaku-moji from a caller who is saved in the Phonebook as Secret unless the Secret display is set to [ON].[Only calls w/ID]:Receive and display Chaku-moji sent only from callers who notify their caller IDs.[Hide all messages]:Do not receive or display any Chaku-moji. 2 Select the Chaku-moji display style and press .The display style for Chaku-moji is set.Placing a Call with a Chaku-moji MessageYou can place a voice or videophone call together with a Chaku-moji message. 1 Enter a phone number in the stand-by display and press (Option).The Option call display appears. 2 Select [Chaku-moji] and press . Select the way to input chaku−moji None specified Create message Select message[None specified]:Place a call without a Chaku-moji message.[Create message]:Create a Chaku-moji message and place a call. Enter a message within 10 characters regardless of pictographs, symbols, full-width, or half-width.[Select message]:Select a saved Chaku-moji message and place a call. (This menu appears only when the Chaku-moji message is saved.)[Sent messages]:Select a sent Chaku-moji message and place a call. Up to 10 Chaku-moji messages can be saved. (This menu appears only when there is a sent Chaku-moji message.) 3 Compose/Select a Chaku-moji message.The Chaku-moji message is composed/selected. 4 Select another call condition and press (Call).Calling UrgentThe call is dialed according to the selected Chaku-moji message and call condition.Continued](https://usermanual.wiki/Sony/A3724011.08-user-guide-part-1/User-Guide-929851-Page-59.png)
![58Voice/Videophone Calls● When a Chaku-moji is received by the recipient, “” appears in the sender’s terminal display and charge is required.● If the recipient does not receive the Chaku-moji, “” appears. In this case, there is no charge. (For example, when the recipient’s terminal does not have Chaku-moji support or if the Chaku-moji was received in a condition other than that set using the Set Message display menu.)● If the recipient’s terminal has the following settings or conditions, Chaku-moji cannot be delivered to this recipient and the call is not saved in the Received record of the recipient’s terminal. “ ” or “ ” is not displayed on the sender’s terminal and there is no charge for this transmission.- When the recipient’s terminal is outside of the service area- When the recipient’s terminal is powered off- When the Public mode (Drive mode) is set- When the To answer the Record message is set to 0 seconds, etc.● Even if a Chaku-moji was delivered successfully to the recipient, “ ” or “ ” may not be displayed in the sender’s terminal display depending on the radio wave condition. In this case, charge is required.● If you place a videophone call with a Chaku-moji while the Auto redial(voice) is set to [ON], the Chaku-moji is sent even when this call is redialed as a voice call.Changing the Caller ID Setting ON/OFF for an Individual Call <186/184>You can choose whether to notify a recipient of your phone number (caller ID) every time you place a call. The caller ID is important personal information. Carefully decide whether you want to notify a recipient of your caller ID.You can use the following methods to notify or not notify your caller ID.Presetting for all callsUse the Set Notification to set [Notify]/[Not notify] (P.45).Setting in the PhonebookAdd “186/184” to the recipient’s phone number when you save it in the Phonebook (P.95).Setting when you place a callSet [Call with ID]/[Call without ID] at the Caller ID of the Option call display after dialing a recipient’s phone number (P.60).Enter “186/184” before dialing a recipient’s phone number (P.51).To notify the caller IDPress 186 + Phone number + .Not to notify the caller IDPress 184 + Phone number + .● When you place a call by pressing after dialing a phone number with “186/184”, the phone number is saved in the Redial record with “186/184”.● You cannot set whether to notify the caller ID when you originate a PushTalk call even when you add “186/184”.](https://usermanual.wiki/Sony/A3724011.08-user-guide-part-1/User-Guide-929851-Page-60.png)
![59Voice/Videophone CallsPlacing a Call by Specifying a ConditionWhen you place a call, you can set a call condition at the Option call display such as selecting a call type or whether to notify a recipient of your phone number for each call. 1 Enter a phone number in the stand-by display and press (Option).Option callPhone numberCall method Voice callCaller ID None specifiedV.phone outgoing img My sideChaku−moji None specifiedPrefix[Call method]:Select [Voice call]/[Videophone]/[PushTalk]/[SMS].[Caller ID]:Select whether to notify your phone number to the recipient. When you select [None specified], follow the setting of the Set Notification.[V.phone outgoing img]:Select an image to be sent when placing a videophone call.[Chaku-moji]:Compose/select a Chaku-moji message (P.59).[Prefix]:Place a voice or videophone call by selecting a saved prefix (P.61). (This item appears only when a prefix is saved.)[Int’l prefix]:Place a voice or videophone call by selecting a saved international access number (P.63). (This item appears only when you enter a phone number with a preceding “+”.)[Country code]:Place a voice or videophone call by selecting a saved country code (P.63).[2in1 call number]:Select a Caller ID when 2in1 is set to the Dual mode.[Multi Number]:Select a Caller ID when the Multi Number call is set to [ON]. 2 Set each item. 3 Press (Call).The call is dialed according to the set call condition.● You cannot place a call even if you set [Prefix], [Int’l prefix], or [Country code] from the Call condition if a phone number you dialed exceeds 81 digits when the call condition is added.Setting a Prefix <Prefix setting>You can save up to three specific numbers (prefixes) to be added at the beginning of a phone number when you place a call. 1 From the Menu, select [Settings] → [Call] → [Call assist] → [Prefix setting] and press .Prefix settingNumberNumberNumber 2 Select a number and press .The number input display appears. 3 Enter a prefix and press (OK).Enter a prefix within 26 digits.Placing an International Call <WORLD CALL>With WORLD CALL, you can place an international call from a DoCoMo mobile phone. The users who subscribe to the FOMA services are automatically signed up for the “WORLD CALL” service when the agreement is concluded. (Excluding users who choose to refuse the WORLD CALL service.)■ Placing an international call by entering a phone number009130 −010 −Country code −Area code(City code) −Phone number You can save the above procedure in the Phonebook of the FOMA terminal. If an area code begins with “0”, omit the “0” when dialing (except when calling ordinary phones, etc. in Italy).Continued](https://usermanual.wiki/Sony/A3724011.08-user-guide-part-1/User-Guide-929851-Page-61.png)
![60Voice/Videophone Calls■ Placing an international call by using “+”When you enter “+” at the beginning of a phone number, you can place an international call without entering an international access number such as “009130010” (P.54). The Auto conversion of the Int’l dial assist is set to [ON] at the time of purchase. An international access number is entered automatically. (for over a second) −Country code −Area code(City code) −Phone number You can save the above procedure in the Phonebook of the FOMA terminal. If an area code begins with “0”, omit the “0” when dialing (except when calling ordinary phones, etc. in Italy). You can place calls to about 240 countries and regions in the world. Charges for this service are billed together with the monthly call charges. No application fees or monthly basic charges are required. This service is not available in some service charge plans. Change in the dial procedure for international calls. Since mobile communication such as mobile phones is beyond the scope of the “MYLINE” service, “MYLINE” service is not available also for WORLD CALL. With the introduction of “MYLINE” service, however, the dial procedure for international calls on mobile phones has been changed. Note that the old dial procedure (excluding “010” from the above mentioned dial procedure) is not available. For the WORLD CALL details, call the “General Contact” on the backcover of this manual. To use an international call service company other than DoCoMo, contact them directly. If you have an overseas specific 3G mobile phone, you can connect to an international videophone by selecting videophone after the above dialing method.※ See the NTT DoCoMo’s website for information about countries to which a videophone call can be connected and telecommunication companies.※ A recipient’s image displayed on the FOMA terminal may be fuzzy or a call may not be connected successfully depending on the terminal to which the international videophone is connected.Setting a Number Other Than WORLD CALLYou can save up to three international access numbers and up to 30 country codes to be added at the beginning of a phone number in order to place an international call from Japan. You can automatically add the international access number by entering “+” when you place a call. You can automatically convert the first digit “0” of the phone number to a country code when you place a call from the Phonebook, etc. 1 From the Menu, select [Settings] → [Management] → [NW Services] → [Int’l dial assist] and press .Int’l dial assistAuto conversion ONInt’l prefix World CallCountry code 日本[Auto conversion]:Set whether an international access number is automatically added.[Int’l prefix]:Save an international access number and set the Auto assist number. You can also add an international access number by selecting [Int’l prefix] at the Option call display when you place a call.[Country code]:Save a country code. You can add a country code by selecting [Country code] at the Option call display when you place a call. 2 Select [ON]/[OFF] at [Auto conversion].[ON]:Automatically add the additional number you set for the Int’l prefix.[OFF]:Do not automatically add the additional number. 3 Select [Int’l prefix] and press .The Int’l prefix setting display appears. 4 Select an input field and press .Int’l dial assistAuto conversion ONInt’l prefix World CallCountry code 日本](https://usermanual.wiki/Sony/A3724011.08-user-guide-part-1/User-Guide-929851-Page-62.png)
![61Voice/Videophone Calls 5 Enter a name in the name field and an international access number in the international access number field.Enter a name within 10 full-width characters or 20 half-width characters and an international access number within 10 digits. 6 Press (Complete) and press .The international access number is saved.To set the Auto assist numberMove the cursor to the input field and press (Auto). “ ” appears to the left of the Auto assist number. 7 Select [Country code] and press .The Set country code display appears. 8 Select an input field and press .Country code23Country NameCountry code 9 Enter a country name in the country name field and a country code in the country code field.Enter a country name within seven full-width characters or 14 half-width characters and a country code within five digits. “+” is already entered in the country code field. 10 Press (Complete).The country code is saved.To set the Auto assist numberMove the cursor to the input field and press (Auto). “ ” appears to the left of the Auto assist number.Placing a Call by Specifying a Sub-address <Sub-address>You can set to place a call to a specific phone or communication device by specifying a sub-address. The sub-address is also used when you select a content in V-Live. 1 From the Menu, select [Settings] → [Call] → [Call assist] → [Sub-address] and press .[ON]:Recognize the numbers after “ ” as a sub-address.[OFF]:Do not recognize the numbers after “ ” as a sub-address. 2 Select [ON]/[OFF] and press .The Sub-address is set.To place a call by specifying a sub-addressIn the stand-by display, enter a phone number + + sub-address and press either or (V.phone).● Even if the Sub-address is set to ON, “ ” is not recognized as the sub-address separator but as part of a phone number in the following cases: where it is at the beginning of a phone number and immediately after a number entered using Prefix/Int’l prefix/Country code of the Option call display for placing a call.](https://usermanual.wiki/Sony/A3724011.08-user-guide-part-1/User-Guide-929851-Page-63.png)
![62Voice/Videophone CallsSetting the Alarm When Reconnecting a Dropped Call <Reconnect alarm>This function automatically reconnects the call interrupted during a voice, videophone, or PushTalk call due to the radio wave condition, such as in a tunnel or between buildings, right after the radio wave condition is recovered. You can set an alarm tone when a call is reconnected. 1 From the Menu, select [Settings] → [Call] → [Call setting] → [Recnct ALM] and press .[High]:Sound the high alarm tone.[Low]:Sound the low alarm tone.[OFF]:Do not sound the alarm tone. 2 Select the type of the alarm tone and press .The alarm tone during reconnection is set.● The recipient does not hear any sound while the radio wave is interrupted.● The time required for reconnection depends on the usage and radio wave condition. The average reconnection time is about 10 seconds and the caller is charged for the time spent for reconnection.Improving Voice Clarity by Suppressing Background Noise <Reduce noise>You can suppress background noise during a voice or videophone call or during playing back an answering message set for the record message. 1 From the Menu, select [Settings] → [Call] → [Call quality] → [Reduce noise] and press .[ON]:Suppress background noise.[OFF]:Do not suppress background noise. 2 Select [ON]/[OFF] and press .The Reduce noise is set.Talking Hands-free While Driving <Hands-free mode>You can place or receive a voice call using a hands-free device by connecting the FOMA terminal to a device such as the In-Car Hands-Free Kit 01 (optional) or car navigation system.For details about the operation of the hands-free device, see the user’s manual of the device. When you use the In-car Hands-free Kit, you need the FOMA In-Car Hands-Free Cable 01 (optional).● The incoming call display and ring tone operation follow the FOMA terminal settings.● When a setting is made for hearing sound from the hands-free device, a ring tone sounds from the hands-free device even if the FOMA terminal is set to the Manner mode or its Ring volume is set to [OFF].● Even if you connect the FOMA terminal to a hands-free device, the Public mode (Drive mode) and Record message function operate normally.● When a setting is made for hearing sound from the FOMA terminal, the operation when the FOMA terminal is closed during a call follows the Setting when folded. When a setting is made for hearing sound from the hands-free device, the call continues even if the FOMA terminal is closed regardless of the setting of the Setting when folded.● When you use the In-Car Hands-Free Kit 01, “” appears. If you use any other commercially available car adapter, “ ” may appear.](https://usermanual.wiki/Sony/A3724011.08-user-guide-part-1/User-Guide-929851-Page-64.png)
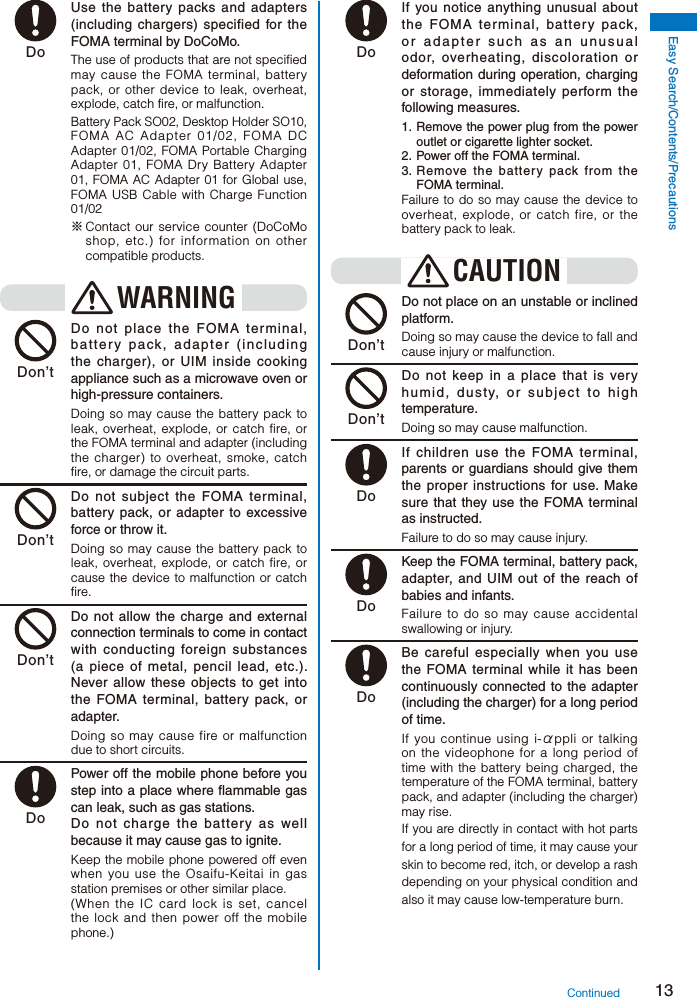
![63Voice/Videophone CallsReceiving a Voice/Videophone CallWhen you receive a voice or videophone call, you are notified by flashing indicator, ring tone, vibrator, etc. The operation for an incoming call varies depending on the settings of the Incoming set, Manner mode, etc.Example: Receiving a voice call 1 When receiving a call, press . UrgentIncoming call TalkingCall duration 0:03Chaku-moji (P.58)A phone number appears in the display when a caller sends it.When you receive a videophone callYour image is sent to the caller and the call is switched to the hands-free operation that allows you to hear the caller’s voice from the speaker.When the caller notifies you of the phone numberWhen saved in the Phonebook, the name and phone number of a caller are displayed. If you saved the same phone number for several names in the Phonebook, the name stored using the smallest memory number is displayed. The Des phone tone, Des call display, and Select phone Illum. saved in the Phonebook are used.When the caller does not notify you of the phone numberThe reason why the phone number is not displayed appears.Non-display reason DescriptionUser Unset When a call is received from a caller who does not notify the caller’s phone number intentionally.PublicPhone When a call is received from a public phone, etc.Unavailable When a call is received from a caller who cannot notify the caller’s phone number, such as from overseas and from an ordinary phone through call forwarding services (however, the caller’s phone number may be displayed depending on the intermediary telephone company).To connect a call to the Voice Mail Service CenterFrom the Function menu, select [FWD to Voice Mail].To forward a call to a forwarding numberFrom the Function menu, select [Call Forwarding].To reject a callFrom the Function menu, select [Call Rejection]. 2 Press to hang up.Continued](https://usermanual.wiki/Sony/A3724011.08-user-guide-part-1/User-Guide-929851-Page-65.png)
![64Voice/Videophone Calls● When you receive a voice call, you can answer it by pressing (Call) instead of . When you set the Any key answer to [ON], you can also press to , , or to answer a call (P.67).● When you receive a videophone call, you can answer it by pressing (V.phone) instead of . To answer a call with a substitute image, press (Sub) (P.76).● When the Slide open setting is set to [Answer], you can answer a voice/videophone call just by opening the FOMA terminal (P.67).● If you receive a videophone call while the Manner mode is set, the screen for confirming whether the hands-free operation is set to ON appears. If you do not want to use the hands-free operation, select [No].● You can preset the hands-free function of a videophone call to [OFF] (P.77).● You may hear beeps (ring tone during a call) while talking on the FOMA terminal. If [Answer] is set for the Arrival Call Act with the Voice Mail Service, the Call Forwarding Service, or the Call Waiting Service subscribed, the beeps (the ring tone during a call) sound and the following operations are available when there is another incoming call during a call:<Contents of subscription>- The Voice Mail Service Forward a call to the Voice Mail Service Center.- The Call Forwarding Service Forward a call to a forwarding number.- The Call Waiting Service Put the active call on hold and answer the incoming call.Receiving a Call by Switching to/from Voice/Videophone CallA caller can switch between voice and videophone calls during a call. When the caller switches the voice call to the videophone call, a recipient can select whether to send a camera image. This function can be used only between terminals that can switch between voice and videophone calls. Preset the V.ph switch notice to [Indication ON] (P.78).Example: When the voice call is switched to the videophone call 1 When the screen for confirming whether to send your own image appears during a voice call, select [Yes] and press .Chg.to videophone Send camera image Yes NoWhile the call is switched, an animation is displayed and you hear a guidance notifying you that a call is switched.[Yes]:Send a camera image to the caller’s phone display.[No]:Send a preinstalled image to the caller.When the videophone call is switched to the voice callThe call is automatically switched to the voice call. When the call is switched to the voice call, the hands-free operation is canceled.When the call is switched to the videophone call, your image is sent to the caller and the call is switched to the hands-free operation that allows you to hear the caller’s voice from the speaker.](https://usermanual.wiki/Sony/A3724011.08-user-guide-part-1/User-Guide-929851-Page-66.png)
![65Voice/Videophone CallsPressing a Key on the Keypad to Receive a Call <Any key answer>You can set to answer a call by pressing a key on the keypad instead of pressing when you receive a voice or PushTalk call. 1 From the Menu, select [Settings] → [Call] → [Call assist] → [Any key ans] and press .[ON]:Enable to answer a voice or PushTalk call also by pressing to , , or .[OFF]:Disable to answer a voice or PushTalk call by pressing to , , or .To answer a voice call, press or (Call) (, , or (Answer) for a PushTalk call). 2 Select [ON]/[OFF] and press .The Any key ans is set.Setting the Operation for the FOMA Terminal Being Closed during a Call <Setting when folded>You can end a call, put a call on hold, or continue the conversation just by closing the FOMA terminal during a voice/videophone call. You can also end or continue a call, or switch a call to the hands-free operation by closing the FOMA terminal during PushTalk communication. 1 From the Menu, select [Settings] → [Management] → [Slide setting] → [Setting when folded] and press .Setting when foldedVoice call/V.phone Continuous callPushTalk Speaker call[Voice call/V.phone]:Set the operation for the FOMA terminal being closed during a voice/videophone call.[PushTalk]:Set the operation for the FOMA terminal being closed during PushTalk communication (P.91). 2 Select the Setting when folded at [Voice call/V.phone].[Holding]:Put the call on hold. Both you and the recipient hear the melody “Hamabe no uta”. During a videophone call, the preinstalled image is sent to the recipient.[Mute]:Put the call on hold with the voice muted. During a videophone call, a substitute image is sent to the recipient (P.76).[Disconnect]:Hang up the call.[Continuous call]:Continue a conversation.The Seting when folded during a voice or videophone call is set.● When the Flat-plug Earphone/Microphone with Switch (optional) is connected, the Setting when folded is disabled and the call continues even if you close the FOMA terminal. If it is during a videophone call that you close the FOMA terminal, a substitute image is sent.](https://usermanual.wiki/Sony/A3724011.08-user-guide-part-1/User-Guide-929851-Page-67.png)
![66Voice/Videophone CallsUsing the Low Voice Feature <Whisper mode>You can set the FOMA terminal so that the recipient can hear your voice at a normal volume level even if you speak in low voice during a voice call. 1 Press during a call.Whisper mode 12:34TalkingThe call is switched to the Whisper mode and the message “Whisper mode” is displayed.To cancel the Whisper modePress again. When you finish a call, the Whisper mode is canceled automatically.Putting a Call on Hold during a Call <Holding>The call can be put on hold during a voice or videophone call so that your voice cannot be heard by the recipient. Even if the call is put on hold, the caller is charged for the call. 1 Press (Func) during a call, select [Holding], and press .Both you and the recipient hear the melody “Hamabe no uta”. During a videophone call, a preinstalled image is sent to the recipient.To cancel the HoldingPress .Putting a Call on Hold <On hold>If you cannot answer a voice or videophone call immediately, you can put the call on hold. Even if the answer is put on hold, the caller is charged for the calling charge.Example: Putting a voice call on hold 1 When receiving a call, press (HLD).Call duration 0:03On holdThe answer is put on hold.The guidance to inform the caller that you are currently unable to answer the call is played back. During a videophone call, a preinstalled image is sent to the recipient. If you press while the call is put on hold, the call on hold is disconnected. 2 When ready to answer the call, press .The On hold is canceled and you can talk.● If you have signed up for the Voice Mail or Call Forwarding Service, you can select [FWD to Voice Mail] or [Call Forwarding] from the Function menu while you are receiving a call, in order to use those services.Using the Public Mode (Drive Mode) <Public mode (Drive mode)>The Public mode is an automated answering service which takes into account the manners in highly public places. When the Public mode is set, the guidance is played back to inform the caller that you are unable to answer the call because you are driving or in a place where talking on a mobile phone should be avoided (trains, buses, or movie theaters), and then the call is disconnected.](https://usermanual.wiki/Sony/A3724011.08-user-guide-part-1/User-Guide-929851-Page-68.png)
![70Voice/Videophone CallsSetting the Operation of the Record Message 1 Press in the stand-by display, select [Set rec msg], and press .Set record messageSet OFFTo answer 013 sec (000−120)Answer img(V.phone) テレヒ゛電話動作中Record img(V.phone) テレヒ゛電話動作中 2 Enter the time before starting the answering message at [To answer].Enter from 000 to 120 seconds. 3 Select an image to be sent when answering a call from My picture of the Data Box at [Answer img(V.phone)]. You can set the following files.Category File format File size Image sizeMy pictureGIF/JPEGMax. 50K bytesMax. [QCIF(W176×H144)]※ You cannot set an image with file restrictions or a frame image. 4 Select an image to be sent when recording the caller’s image from My picture of the Data Box at [Record img(V.phone)]. You can set the following files.Category File format File size Image sizeMy pictureGIF/JPEGMax. 50K bytesMax. [QCIF(W176×H144)]※ You cannot set an image with file restrictions or a frame image. 5 Press (Complete).The operation of the Record message is set.● When the Voice Mail or Call Forwarding Service and the Record message are set simultaneously, and if you want to give priority to the Record message, set the time before starting the answering message for the Record message shorter than the ring time for the Voice Mail or Call Forwarding Service.Recording a Caller’s Message When Unable to Answer a Call Just Receiving <Quick record message>You can start the Record message for temporary use when you receive a voice or videophone call even if the Record message is [OFF]. If three record messages are recorded when the FOMA terminal receives a voice call, the Quick record message function cannot be operated. Similarly, if three videophone messages are recorded when it receives a videophone call, the Quick record message function cannot be operated. 1 Press while receiving a call.ドコモ一郎Play answer messageThe answering message is played back to the caller.To talk to a callerPress .When you receive a videophone callThe answering message is played back and the answering image is displayed to the caller. Press (V.phone) to talk to the caller. If you press (Sub), you can answer the call with a substitute image.](https://usermanual.wiki/Sony/A3724011.08-user-guide-part-1/User-Guide-929851-Page-72.png)
![71Voice/Videophone CallsPlaying Back/Deleting a Record Message/Videophone Message/Voice MemoYou can play back or delete a recorded record message/videophone message and voice memo (P.369).Playing Back a Record Message/Videophone Message/Voice MemoExample: Playing back a record message 1 Press in the stand-by display, select [Play rec msg], and press .Play record message 2/12 9:35 ドコモ一郎 2/ 5 22:00 User Unset 2/ 5 7:50 携帯あき子To play back a videophone messagePress in the stand-by display and select [Play Vphone msg].To play back a voice memoPress in the stand-by display and select [Play voice memo].To display phone numbersWhen saved in the Phonebook, the name and phone type of a caller are displayed instead of the phone number. Press to switch the display temporarily between names and phone numbers. The display is not switched when a voice memo is displayed. 2 Select a record message and press (Play).Play record message 2/12 9:35 ドコモ一郎The record message is played back.To stop the playbackPress (Stop).To play back the previous/next record messageUse during playback to play back the previous record message and during playback to play back the next record message.Deleting a Record Message/Videophone Message/Voice MemoYou can record up to three record messages, three videophone messages, and three voice memos. Delete unnecessary record/videophone messages or voice memos.Example: Deleting a record message 1 Press in the stand-by display, select [Play rec msg], and press .To delete a videophone messagePress in the stand-by display and select [Play Vphone msg].To delete a voice memoPress in the stand-by display and select [Play voice memo].To delete all record messagesFrom the Function menu, select [Delete all], enter the Security code, and select [Yes]. 2 Select a record message and press (Func).The Function menu appears. 3 Select [Delete one] → [Yes] and press .The selected record message is deleted.Using Chara-denWhen you place a videophone call, you can send a character instead of a camera image. You can press keys on the keypad to move a character or some character’s mouth to correspond to the voice on the microphone. For details about the action lists of the preinstalled Chara-den characters, see P.302. 1 Press ( ) in the stand-by display, select [Chara-den], and press .The Chara-den list appears. 2 Select a Chara-den file, press (Func), select [Call Chara-den], and press .The screen for selecting the method of entering the phone number appears. 3 Select the method, press , and enter the phone number.Continued](https://usermanual.wiki/Sony/A3724011.08-user-guide-part-1/User-Guide-929851-Page-73.png)
![72Voice/Videophone Calls 4 Press (V.phone).©SEGAThe videophone call is dialed with a Chara-den character set as the substitute image.To switch between the full-body action and parts action modesPress (Change).To display the action listPress (List).To switch to the mode for sending touch-tones (DTMF)From the Function menu, select [DTMF send mode].To switch to the Chara-den action operating modeFrom the Function menu, select [Action input mode].● When the mode for sending touch-tones (DTMF) is set, the Chara-den action cannot be operated.Setting the Videophone Operation <Videophone setting>Setting the Display to Be Used in a Videophone CallYou can set the image to be displayed on the videophone images (Large) and (Small) during a videophone call. 1 From the Menu, select [Settings] → [Call] → [Videophone] → [Display setting] and press .[Main-Other side]:Display the recipient’s/caller’s image on the videophone image (Large) and your image on the videophone image (Small).[Main-My side]:Display your image on the videophone image (Large) and the recipient’s/caller’s image on the videophone image (Small).[Other side only]:Display the recipient’s/caller’s image only on the videophone image (Large).[My side only]:Display your image only on the videophone image (Large). 2 Select a display method and press .The Display setting is set.](https://usermanual.wiki/Sony/A3724011.08-user-guide-part-1/User-Guide-929851-Page-74.png)
![73Voice/Videophone CallsSetting a Video to Be Sent to the Recipient/CallerYou can set whether to send a camera image to the recipient when you place a videophone call. You can also set an image from either My picture or Chara-den as a substitute image if you do not want to send a camera image. 1 From the Menu, select [Settings] → [Call] → [Videophone] → [Set outgoing image] and press .Set outgoing imageCamera image ONSubstitute image アイアイ 2 Select [ON]/[OFF] at [Camera image].[ON]:Send a camera image to the recipient when you place a videophone call.[OFF]:Send a substitute image to the recipient when you place a videophone call. 3 Select a substitute image from My picture/Chara-den of the Data Box at [Substitute image]. You can set the following files.Category File format File size Image sizeMy pictureGIF/JPEGMax. 50K bytesMax. [QCIF(W176×H144)]Chara-den−Max. 100K bytes −※ You cannot set an image with file restrictions or a frame image.The Set outgoing image is set.Setting the Videophone Image Quality You can set the quality of an image to be sent to the recipient. 1 From the Menu, select [Settings] → [Call] → [Videophone] → [Visual preference] and press .[Prefer img qual]:Send an image with priority on image quality.[Normal]:Send an image by keeping a balance between image quality and movement.[Prefer motion]:Send an image with priority on movement. 2 Select the quality of an image to be sent and press .The Visual preference is set.Redialing by Voice Call When the Videophone Is Not ConnectedWhen the videophone call is not connected, the FOMA terminal automatically redials by voice call. When the videophone call is connected successfully, the FOMA terminal does not redial by voice call. 1 From the Menu, select [Settings] → [Call] → [Videophone] → [Auto redial(voice)] and press .[ON]:Redial by voice call.[OFF]:Do not redial by voice call. 2 Select [ON]/[OFF] and press .The Auto redial(voice) is set.● You are charged for a call instead of digital communication when you redial by voice call.Continued](https://usermanual.wiki/Sony/A3724011.08-user-guide-part-1/User-Guide-929851-Page-75.png)
![74Voice/Videophone CallsUsing the Hands-free FunctionYou can set whether to use the hands-free function during a videophone call. 1 From the Menu, select [Settings] → [Call] → [Videophone] → [Hands-free] and press .[ON]:You hear the recipient’s/caller’s voice from the speaker during a videophone call.[OFF]:You hear the recipient’s/caller’s voice from the earpiece during a videophone call. 2 Select [ON]/[OFF] and press .The Hands-free is set.● When the Flat-plug Earphone/Microphone with Switch (optional) is connected to the FOMA terminal, you hear a recipient’s voice from the Earphone/Microphone, regardless of the Hands-free setting.Setting How to Answer a Videophone Call during i-modeYou can set how to answer a videophone call received during i-mode or packet communication, for example, sending or receiving mail. 1 From the Menu, select [Settings] → [Call] → [Videophone] → [V.ph while packet] and press .[Prefer V.phone]:Receive a videophone call. When you answer the videophone call, the packet communication in progress is disconnected.[Prefer packet]:Continue the packet communication without receiving a videophone call. The received call is saved in the Received record.[V.ph voicemail]:Connect a received videophone call to the Voice Mail Service Center.[Call forwarding]:Connect a received videophone call to a forwarding phone number. 2 Select the operation to be performed when you receive a videophone call during i-mode communication and press .The V.ph while packet is set.Setting Notice for Switching between Voice and Videophone Calls <Videophone switch notice>You can set whether to notify the recipient/caller that the FOMA terminal is capable of switching between voice and videophone calls. You cannot perform this setting when you are outside of the service area or in a place where radio waves do not reach, or during a voice or videophone call. 1 From the Menu, select [Settings] → [Management] → [NW Services] → [V.ph switch notice] and press .V.ph switch noticeIndication ONIndication OFFCheck setting 2 Select [Indication ON] → [Yes] and press .When you do not want to notifySelect [Indication OFF] → [Yes].To check the settingSelect [Check setting].](https://usermanual.wiki/Sony/A3724011.08-user-guide-part-1/User-Guide-929851-Page-76.png)

![76PushTalkWhat is PushTalk?You can communicate among several persons (up to five persons including yourself) with a simple operation of pressing for over a second to display the PushTalk phonebook, selecting recipients, and pressing . Every time you press (speak), you are charged for PushTalk communication. For more details on PushTalk or compatible models, see the DoCoMo’s website or “Mobile Phone User’s Guide 【Network services】”.PushTalkPlusThe PushTalkPlus is a service that allows you to communicate simultaneously with up to 20 persons (including yourself). It also allows you to use PushTalk more conveniently by using the shared phonebook on the network or checking the status of members.※ For details about operations, see the general information which you are handed when you subscribe to the service.※ You need to subscribe to PushTalkPlus separately.Using the Display during PushTalk Communication ドコモ一郎 ○○○同好会On PushTalkドコモ一郎 Connectedドコモ三郎 Connectedドコモ二郎 Disconnect090XXXXXXXX Calling : During PushTalk communication : Hands-free ON Active speaker The phone number (or the member name when the speaker is saved in the Phonebook) appears[Myself] : You are currently the active speaker (you can speak)[User Unset] : The Caller ID of the caller is set to [OFF][?] : The active speaker is not identified(No indication) : There is no active speaker (open status) Group name Displayed only in the display of the caller who originated a call using a group Members The phone number (or the member name when the member is saved in the Phonebook) appears[User Unset] : The Caller ID of the caller is set to [OFF] Communication status Connected : The caller who originated a PushTalk call Connected : Currently participating in the PushTalk communication Calling※ : The recipient’s terminal is ringing Disconnect※ : The recipient ended the PushTalk session, does not answer the call, or is outside of the service area. Otherwise the recipient’s terminal is powered off Driving※ : Public mode (Drive mode) is set※ These icons appear only when PushTalk communication is performed among several persons.Operations during PushTalk CommunicationOperation Key operationSpeak When the floor is open, you can speak only while you press and hold .While another member has the floor, you cannot get it even if you press .Add a member Press (Add). This operation is enabled only when you originate a PushTalk call.Switch ON/OFF of the hands-free operationPress ( ). Every time you press the key, the ON/OFF setting is switched.Adjust the volume of the caller’s voicePress .Terminate a PushTalk callPress .Receive a voice callPress (P.65).If you receive a voice call, the PushTalk communication is terminated.The operation for an incoming voice call while using PushTalk can be customized (P.90).](https://usermanual.wiki/Sony/A3724011.08-user-guide-part-1/User-Guide-929851-Page-78.png)
![77PushTalk● Each speech session granted by obtaining the floor is time limited. The obtained floor is released after the time limit. The PushTalk communication is terminated if no member takes over the floor within a certain interval.● When there is any change in PushTalk communication status or a member takes over the floor, the signal tone sounds.● You cannot use i-mode during PushTalk communication.● When other functions are activated, you cannot obtain the floor. However, when you activate a function while you have the floor, you can speak while you press and hold .● When you receive a videophone call, data communication, or a PushTalk call during PushTalk communication, a new call is saved in the Received record and the current PushTalk call is continued.Originating a PushTalk Call You cannot originate a PushTalk call during a voice call, a videophone call, or data communication, or while the B mode is set in 2in1. If you originate a PushTalk call during i-mode communication, the i-mode communication is terminated. Originating a PushTalk call while running i-αppli also stops the i-αppli. Number B of 2in1 cannot be used for PushTalk and PushTalkPlus services. 1 Enter a phone number in the stand-by display. 2 Press . Myself090XXXXXXXX ConnectedOn PushTalk 090XXXXXXXXDialing PushTalkWhen you originate a PushTalk call, it is switched to the hands-free operation that allows you to hear the signal tone from the speaker.To speakPress while the floor is open. You can speak while you press and hold . 3 Press to end the communication.● You cannot use PushTalk to place a call to emergency numbers (110, 119, and 118).● You cannot set whether to notify the caller ID when you originate a PushTalk call even if you add “186/184”.● The setting whether to originate a PushTalk call with/without the caller ID follows the setting of the Set Notification (P.45).● When you set the Set Notification to [Notify], all members including added members are notified the phone numbers of the person who originates and all members. When you set it to [Not notify], [User Unset] is displayed in the fields of the speaker and all members including added members.● If you set [Call with ID]/[Call without ID] of the caller ID at the Option call display when you originate a PushTalk call, the phone numbers of yours and all members are/are not notified to all members based on the selected call condition.● When you originate a PushTalk call, if the Set Notification is set as well as the Call condition is set at the Option call display, the following priority is applied.1. Call condition selected at the Option call display when originating a PushTalk call2. Set NotificationOriginating a PushTalk Call from the Call RecordYou can originate a PushTalk call using the Redial and Received records. You cannot originate a PushTalk call using the call records of Number B when 2in1 is used.Example: Originating a PushTalk call from the Received record 1 Press ( ) in the stand-by display.The Received record display appears. 2 Select a received record and press .When a PushTalk call is originated, the signal tone sounds.● If a member is disconnected during PushTalk communication among several persons, the disconnected member can come back to the session using the Redial/Received record as long as the other members continue it. When the PushTalk communication is already ended, the call is going to be a new one.](https://usermanual.wiki/Sony/A3724011.08-user-guide-part-1/User-Guide-929851-Page-79.png)
![78PushTalkAdding a Member during PushTalk CommunicationIf you originate a PushTalk call, you can add a member during PushTalk communication.You can add members up to the maximum number allowed for communication (up to five persons including yourself) and also place a second call to a non-participating member.Example: Selecting a member from the PushTalk phonebook 1 Press (Add) during PushTalk communication.The screen for selecting the method of adding a member appears.[View PushTalk PB]:Select a member from the PushTalk phonebook.[View phonebook]:Select a member from the FOMA terminal phonebook.[Direct input]:Enter a phone number directly. 2 Select [View PushTalk PB] and press .携帯あき子携帯なつ子携帯はる子ドコモ一郎ドコモ二郎MemberTo select a member from a groupPress (Group) and select a group. 3 Select a member and press .“” appears for the selected member. 4 Press (Complete).The Members to add display appears. 5 Press (Call). Myself携帯あき子 Connectedドコモ一郎 Connectedドコモ二郎 Connected携帯はる子 CallingOn PushTalkThe FOMA terminal starts calling the selected member.● Members added during PushTalk communication are not displayed in the detailed information of the Redial/Received record.● You can add a party who uses a PushTalk-compatible model, as a PushTalk group member. However, this added member is not displayed on the displays of non-compatible models and the signal tone does not sound either.Receiving a PushTalk CallWhen you receive a PushTalk call, you are notified by flashing indicator, ring tone, vibrator, etc. The operation for an incoming PushTalk call varies depending on the settings of the Incoming set, Manner mode, etc. If you receive a PushTalk call during a voice call, the PushTalk call is not connected. The notification icon of missed call appears and the call is saved in the Received record. A PushTalk call received during a videophone call or data communication is not connected, either. The call is not saved in the Received record. When receiving a PushTalk call during i-mode communication, the setting for the i-mode arrival act is applied. 1 When you receive a PushTalk call, press or . ドコモ一郎 ドコモ三郎 ドコモ二郎 090XXXXXXXXPushTalk Gr call ドコモ二郎ドコモ一郎 Connectedドコモ三郎 Connectedドコモ二郎 Connected090XXXXXXXX CallingOn PushTalkWhen the call is answered, it is switched to the hands-free operation that allows you to hear the recipient’s voice from the speaker.When you do not want to answer the callPress .The names of the members appear. If the member is not saved in the Phonebook, this member’s phone number appears instead. When the person who originates a PushTalk call sets the Set Notification to [Notify], all members including added members are notified the phone numbers of the person who originates and all members. When the person sets it to [Not notify], all members are displayed as [User Unset].To speakPress while the floor is open. You can speak while you press and hold .](https://usermanual.wiki/Sony/A3724011.08-user-guide-part-1/User-Guide-929851-Page-80.png)
![79PushTalk 2 Press to end the communication.● You can answer a PushTalk call by pressing (Answer) instead of or . When you set the Any key answer to [ON], you can also press to , , or to answer a PushTalk call (P.67). When the Slide open setting is set to [Answer], you can answer a PushTalk call just by opening the FOMA terminal (P.67).● A PushTalk call cannot be put on hold.● When you receive a PushTalk call originated from a caller who is saved as a nuisance caller, the call is rejected. The notification icon of missed call appears and the call is saved in the Received record.Saving Data in the PushTalk PhonebookYou can save up to 1,000 members in the PushTalk phonebook.Members you want to save in the PushTalk phonebook must be also saved in the FOMA terminal phonebook. You can save only one phone number in the PushTalk phonebook for each FOMA terminal phonebook entry. The name of a member displayed in the PushTalk phonebook is diverted from that saved in the FOMA terminal phonebook. When 2in1 is set to the B mode, you cannot save data in the PushTalk phonebook. When 2in1 is set to the Dual mode, you cannot save the phonebook data for which the Phonebook 2in1 setting is set to [B] in the PushTalk phonebook. When 2in1 is set to the A mode, the member for which the Phonebook 2in1 setting is set to [B] is not displayed. 1 Press for over a second in the stand-by display and press (Func).The Function menu appears. 2 Select [Create] and press .The screen for selecting the saving method appears.[View phonebook]:Select from the FOMA terminal phonebook.[Direct input]:Save new data in the FOMA terminal phonebook and then save it in the PushTalk phonebook. Follow the same steps as in “Add to FOMA terminal phonebook” (P.95, step 3 to 6). 3 Select [View phonebook] and press .The FOMA terminal phonebook appears. 4 Select an entry → a phone number and press .Detail Setting Basicドコモ太郎 015 090XXXXXXXXThe phone number is saved in the PushTalk phonebook and “ ” appears in the entry in the FOMA terminal phonebook.● When you save a person saved as Secret in the FOMA terminal phonebook in the PushTalk phonebook, the entry is not displayed in the PushTalk phonebook. To display the name, set the Secret display to [ON] (P.141).Setting a GroupYou can originate a PushTalk call to several recipients by saving them in a group as members beforehand.You can save up to 20 groups in the PushTalk phonebook, 19 members for each group.Saving a Group 1 Press for over a second in the stand-by display and press (Func).The Function menu appears. 2 Select [Group setting] and press .The Group setting display appears.To display group numbersWhen saved, group icons are displayed instead of group numbers. Press to switch the display temporarily between group icons and group numbers. 3 Select a group and press .Edit group 3Group name グループ3Icon 4 Enter a group name at [Group name].Enter a group name within 10 full-width or 21 half-width characters. 5 Select a group icon at [Icon]. 6 Press (Complete).The group is saved in the PushTalk phonebook.Continued](https://usermanual.wiki/Sony/A3724011.08-user-guide-part-1/User-Guide-929851-Page-81.png)
![80PushTalkSaving a Member to a Group 1 Press for over a second in the stand-by display and press (Group).The Group list display appears. 2 Select a group and press .The Member list display of the selected group appears. 3 Press (Edit).携帯あき子携帯なつ子携帯はる子ドコモ一郎ドコモ二郎Select member 4/19 4 Select a member and press .“” appears on the selected member.To cancel all selectionsPress (Rel all). 5 Press (Complete).The selected member is saved in the group.Originating a PushTalk Call Using the PushTalk PhonebookIf you save persons as members in the PushTalk phonebook, you can originate a PushTalk call to several persons. When 2in1 is set to the B mode, you cannot use the PushTalk phonebook. When 2in1 is set to the Dual mode, you cannot use members for which the Phonebook 2in1 setting is set to [B]. 1 Press for over a second in the stand-by display, select a member, and press .Member携帯あき子携帯なつ子携帯はる子ドコモ一郎ドコモ二郎“ ” appears for the selected member.To display phone numbersPress to switch the display temporarily between names and phone numbers. 2 Press . 携帯あき子 携帯はる子 ドコモ一郎 ドコモ二郎Dialing PT group Myself携帯あき子 Calling携帯はる子 Connectedドコモ一郎 Connectedドコモ二郎 ConnectedOn PushTalkWhen a PushTalk call is originated, the signal tone sounds.To speakPress while the floor is open. You can speak while you press and hold . 3 Press to end the communication.Originating a PushTalk Call from the Group 1 Press for over a second in the stand-by display and press (Group).Group ○○○同好会 △△△クラブ ○△○愛好会 グループ4 グループ5 グループ6 グループ7 グループ8 グループ9 グループ10 グループ11 グループ12To display group numbersWhen saved, group icons are displayed instead of group numbers. Press to switch the display temporarily between group icons and group numbers.](https://usermanual.wiki/Sony/A3724011.08-user-guide-part-1/User-Guide-929851-Page-82.png)
![81PushTalk 2 Select a group and press . ○○○同好会 携帯あき子 携帯はる子 ドコモ一郎 ドコモ二郎Dialing PT group Myself ○○○同好会携帯あき子 Calling携帯はる子 Connectedドコモ一郎 Connectedドコモ二郎 ConnectedOn PushTalkWhen a PushTalk call is originated, the signal tone sounds.To originate a call to specific members by selecting them from a groupSelect a group → members and press .To speakPress while the floor is open. You can speak while you press and hold . 3 Press to end the communication.● When originating a PushTalk call to a group, you can originate a call to up to four members even if more than five members are saved in the group.Deleting a PushTalk Phonebook EntryYou can delete members saved in the PushTalk phonebook using three methods.Example: Deleting a member 1 Press for over a second in the stand-by display.To delete several membersFrom the Function menu, select [Delete] → [Select&delete], select members, press (Delete), and select [Yes]/[Delete from main].To delete all membersFrom the Function menu, select [Delete] → [Delete all], enter the Security code, and select [Yes]/[Delete from main]. When 2in1 is used, the screen informing to delete members of all modes of the Phonebook 2in1 setting appears. If you select [Yes], the members of all modes of the Phonebook 2in1 setting are deleted.To reset a group to the default settingPress (Group), move the cursor to a group and from the Function menu, select [Reset group] → [Yes]. 2 Select a member and press (Func).The Function menu appears. 3 Select [Delete] → [Delete one] → [Yes] and press .The selected member is deleted.To delete the selected member from the FOMA terminal phonebookSelect [Delete] → [Delete one] → [Delete from main].Using the PushTalk Phonebook <PushTalkPlus>You can connect to the network and use the PushTalkPlus service (P.80). To use the PushTalkPlus service, you must subscribe to this service. 1 Press for over a second in the stand-by display and press (Func).The Function menu appears. 2 Select [NW connection] → [Yes] and press .The call is connected to the network.Setting the PushTalk Operation <PushTalk setting>Setting Whether to Answer a Call AutomaticallyYou can set whether to answer an incoming PushTalk call automatically using the hands-free function. 1 From the Menu, select [Settings] → [Application] → [PushTalk] → [Auto answer setting] and press .[ON]:A PushTalk call you receive is answered automatically using the hands-free function. When the Manner mode is set, the call is not answered automatically.[OFF]:A PushTalk call you receive is answered by pressing , , etc. 2 Select [ON]/[OFF] and press .The Auto answer setting is set.Continued](https://usermanual.wiki/Sony/A3724011.08-user-guide-part-1/User-Guide-929851-Page-83.png)
![82PushTalkSetting the Ring TimeIf you select [OFF] for the Auto answer setting, set the ring time of the PushTalk call. 1 From the Menu, select [Settings] → [Application] → [PushTalk] → [Set ring time] and press .Enter the ring time within 01 to 60 seconds. 2 Enter the Push Talk ring time.The Set ring time is set.Setting How to Answer a Voice Call during PushTalk CommunicationYou can set how to answer a voice call when you receive it during PushTalk communication. 1 From the Menu, select [Settings] → [Application] → [PushTalk] → [P-Talk arrival act] and press .[Answer]:Receive a voice call and you can answer it.[Call Rejection]:Reject an incoming voice call. The missed call notification icon appears and the call is saved in the Received record.[Voice Mail]:Connect an incoming voice call to the Voice Mail Service Center.[Call Forwarding]:Connect an incoming voice call to a forwarding number. 2 Select the operation to be performed when you receive a voice call during PushTalk communication and press .The P-Talk arrival act is set.Setting Whether to Receive a PushTalk Call during i-modeYou can set whether to receive a PushTalk call by disconnecting i-mode if there is any incoming PushTalk call during i-mode or i-mode communication. 1 From the Menu, select [Settings] → [Application] → [PushTalk] → [i-mode arrival act] and press .[Prefer PushTalk]:Receive the PushTalk call and disconnect i-mode. After the PushTalk call is finished, the previous display reappears.[Prefer i-mode]:Continue i-mode without receiving a PushTalk call. The missed PushTalk call is not saved in the Received record. 2 Select the preferred function and press .The i-mode arrival act is set.Using the Hands-free FunctionYou can set whether to use the hands-free function during PushTalk communication. 1 From the Menu, select [Settings] → [Application] → [PushTalk] → [Hands-free] and press .[ON]:You hear a member’s voice from the speaker during PushTalk communication.[OFF]:You hear a member’s voice from the earpiece during PushTalk communication. 2 Select [ON]/[OFF] and press .The Hands-free is set.● When the Flat-plug Earphone/Microphone with Switch (optional) is connected to the FOMA terminal, you hear a member’s voice from the Earphone/Microphone, regardless of the Hands-free setting.● When the FOMA terminal is opened while the Manner mode is set, you cannot answer a call using the hands-free function regardless of the Hands-free setting.](https://usermanual.wiki/Sony/A3724011.08-user-guide-part-1/User-Guide-929851-Page-84.png)
![83PushTalkSetting the Operation for the FOMA Terminal Being Closed during PushTalk CommunicationYou can end a call or switch a call to the hands-free operation by closing the FOMA terminal during PushTalk communication. You can also continue the communication. 1 From the Menu, select [Settings] → [Management] → [Slide setting] → [Setting when folded] → [PushTalk] and press .[Continuous call]:Continue the PushTalk communication.[Speaker call]:You hear a member’s voice from the speaker during PushTalk communication.[Finish]:Hang up the PushTalk call. 2 Select an operation when the FOMA terminal is closed during the communication and press .The Setting when folded is set.● The Setting when folded is disabled when the Flat-plug Earphone/Microphone with Switch (optional) is connected to the FOMA terminal and the call remains connected through the Earphone/Microphone even if you close the FOMA terminal.](https://usermanual.wiki/Sony/A3724011.08-user-guide-part-1/User-Guide-929851-Page-85.png)

![86PhonebookPhonebooks the FOMA Terminal Can UseThe FOMA terminal is equipped with two types of phonebooks, the FOMA terminal phonebook, which you can set up with various functions, and the UIM (FOMA card) phonebook, which can be used with other FOMA terminals. Use either phonebook to your convenience. You can also use the PushTalk phonebook dedicated for PushTalk that can be created using data saved in the FOMA terminal phonebook (P.85).The table below shows the data you can save in each phonebook.Data to be savedFOMA terminal phonebook UIM phonebookNumber of data entriesYou can save up to 1,000 entries.You can save up to 50 entries.Group You can sort entries in groups from Group 0 to 19.You can sort entries in groups from Group 0 to 10.Phone number to be savedYou can save up to three numbers for each phonebook entry and a total of up to 3,000 numbers in the Phonebook.You can save one number for each phonebook entry in the PushTalk phonebook.You can save one number for each phonebook entry.You can select from nine types of icons, such as [ Public] and [ Mobile1].You cannot select icons. “” is saved automatically.Mail address to be savedYou can save up to three addresses for each phonebook entry and a total of up to 3,000 addresses in the Phonebook.You can also save one Secret code for each address.You can save one address for each phonebook entry.You can select from five types of icons, such as [ Mobile1] and [ Home].You cannot select icons. “” is saved automatically.Data to be savedFOMA terminal phonebook UIM phonebookImage to be savedYou can save one Des call display and one Des substitute image for each phonebook entry. You can save up to 1,000 each of still image and Chara-den files in the Phonebook.You cannot save images.Other data to be savedYou can save one name, reading, memory number, location information, postal code, postal address, and birthday for each phonebook entry.You can also set one type of Des phone tone, Des mail tone, Select phone Illum., Select mail Illum., and Secret for each phonebook entry.You can save one name and reading for each phonebook entry.Group to be savedYou can save one group name and group icon for each group.You can save one group name for each group. You cannot change a group name with [グループなし]. You cannot select icons.You can also set one type of Des call display, Des phone tone, Des mail tone, Select phone Illum., and Select mail Illum. for each group.Unavailable You can use phonebook data saved in your UIM when this UIM is used on another FOMA terminal.](https://usermanual.wiki/Sony/A3724011.08-user-guide-part-1/User-Guide-929851-Page-88.png)
![87Phonebook● For the order of priority between call image, ring tone, and incoming indicator color, see P.111.● When you receive a call or mail from a person saved as Secret, the regular ring tone, incoming image and incoming indicator color are used, and a name of the caller/sender is not displayed. To enable the settings of a person saved as Secret or a group that includes a person saved as Secret, set the Secret display to [ON].● When 2in1 is used, the phonebook is automatically switched to the available one according to the 2in1 modes. When you save data in the phonebook, the Phonebook 2in1 setting is automatically set according to a compatible 2in1 mode. You can also change the Phonebook 2in1 setting by each data or group (P.399).● Please note that when you change models and attempt to transfer the saved data to a new mobile phone at our service counter (DoCoMo shop, etc.), you may not be able to copy it to the FOMA terminal depending on the specifications of your new phone.Saving an Entry in the FOMA Terminal Phonebook <Add to FOMA terminal phonebook>Up to 1,000 entries can be saved in the FOMA terminal phonebook. 1 Press ( ) in the stand-by display and press (Create). 2 Select [Main memory] and press . 000 グループなし Public Mobile1 OFF Detail Basic SettingTo save an entry in the UIM phonebookSelect [UIM] (P.98). 3 Save each item at the Basic display.Icon SettingsEnter a name within 16 full-width or 32 half-width characters.When entering a name, the reading is automatically entered. To edit the reading, enter the reading within 32 half-width characters.Enter a memory number from 000 to 999. The smallest available memory number is automatically entered. Enter a name/phone number/mail address to change it.Select a group. [ グループなし] is automatically entered. Enter a name/phone number/mail address to change it.Enter within 26 digits per phone number. You can save the pause (P), timer (T), “+”, “#”, and sub-address separator ( ). If a phone number is saved with the “184” or “186”, SMS cannot be sent to this phone number even if you select it.Select a phone number type icon. [ Public] is automatically entered. Enter a phone number to change it.Enter within 50 half-width alphanumeric characters and symbols per mail address. When sending mail to an i-mode terminal (including a Mova terminal), you need to specify only the mail address portion before the @ mark.Select a mail address type icon. [ Mobile1] is automatically entered. Enter a mail address to change it.When the recipient saves a Secret code in a mail address (phone number@docomo.ne.jp), enter the Secret code. When sending mail, the Secret code is automatically added. When you save a mail address as “phone number + Secret code@docomo.ne.jp” in the Phonebook, if you save a Secret code, you cannot send mail or reply mail to this address. To avoid this problem, change the mail address to “phone number@docomo.ne.jp” and save a Secret code. The Secret code is masked by “****”. Only when the Secret display is set to [ON], it is displayed in numbers. To save your Secret code, see the “Mobile Phone User’s Guide 【i-mode】 FOMA version”.Select [ON]/[OFF] of the Secret. To display the entry saved as Secret, set the Secret display to [ON].Continued](https://usermanual.wiki/Sony/A3724011.08-user-guide-part-1/User-Guide-929851-Page-89.png)
![88Phonebook 4 Press and save each item at the Detail display.Icon SettingsSelect an image from My Picture/i-motion of the Data Box or record a new one to be used as the Des call display that is displayed when placing/receiving a voice or videophone call, right after receiving mail, or when displaying the individual Phonebook entry. You can set the following files.CategoryFile formatFile size Image sizeMy picture GIF/JPEGMax. 100K bytesMax. [QVGA(240×320)]i-motion※MP4Max. 10M bytesMax. [VGA(640×480)]※ Some i-motion may not be set. It may take time to display a large-sized image. To use an image after recording it by the camera, select [Camera]/[Movie] (P.155, 170). You can record an image in the following sizes.Still image Max. [QVGA(240×320)]Movie Max. [VGA(640×480)] To specify no image, select [None]. To check the image, move the cursor to an image and press (Play).Add the location information from the Position location, Location history, or image (P.277). When the location information is saved, the message “Has loc. info” appears.Enter a postal code within seven half-width digits.Enter a postal address within 64 full-width or 128 half-width characters.Enter a birthday within the range from 1900/01/01 to 2050/12/31. 5 Press and save each item at the Setting display.Icon SettingsSelect the Des substitute image to be sent during a videophone call from My picture/Chara-den of the Data Box. You can set the following files.CategoryFile formatFile size Image sizeMy picture GIF/JPEG Max. 50K bytesMax. [QCIF(176×144)]Chara-den−Max. 100K bytes− To specify no substitute image, select [None]. A substitute image or your own image set in the Set outgoing image (P.76) is sent.Select a ring tone from MUSIC/i-motion/Melody of the Data Box to be used as the Des phone tone/Des mail tone that sounds when receiving a voice or videophone call and right after receiving mail. You can set the following files. You can select a Chaku-Uta® from [i-motion].CategoryFile formatFile size Image sizeMUSIC※AAC-LC/HE-AACMax. 5M bytes −i-motion※MP4Max. 10M bytesMax. [VGA(640×480)]Melody SMF/MFiMax. 350K bytes−※ Some files may not be set.When you select a Chaku-Uta Full® that has a choice of specified playback ranges from [MUSIC], the screen for selecting a type of setting appears. If you select [Full song], the entire track of Chaku-Uta Full® is set for the ring tone. If you select [Point], the specified playback range of Chaku-Uta Full® is set for the ring tone. To specify no ring tone, select [None]. To mute the ring tone, select [Silent]. To check the ring tone, move the cursor to the ring tone and press (Play).Select a color for the Select phone/mail Illum. that flashes when receiving a voice or videophone call and right after receiving mail. When you move the cursor to a color, the incoming indicator flashes accordingly. To specify no color, select [None].](https://usermanual.wiki/Sony/A3724011.08-user-guide-part-1/User-Guide-929851-Page-90.png)
![89Phonebook 6 Press (Complete).The entered data is saved in the FOMA terminal phonebook.● If you set [None] for the Des call display, Des phone/mail tone, or Select phone/mail Illum., then the call image, ring tone, and indicator color saved for the Group setting are automatically used for the respective function. If these settings are not saved in the Group setting, the Incoming set (P.108) or Animation (P.120) is used.● If you set an i-motion with video and sound tracks for the Des mail tone, the i-motion image appears when mail reception is completed.● If you set an i-motion for the Des call display, the image set for the Animation is displayed when you place a voice or videophone call.● If you set an i-motion or Chaku-Uta Full® for the Des phone/mail tone or set an i-motion for the Des call display, the settings may be changed in some cases.Saving an Entry in the UIM Phonebook <Add to UIM phonebook>Up to 50 entries can be saved in the UIM (FOMA card) phonebook. 1 Press ( ) in the stand-by display and press (Create). 2 Select [UIM] and press . グループなし BasicTo save an entry in the FOMA terminal phonebookSelect [Main memory] (P.95). 3 Save each item.Icon SettingsEnter a name within 10 full-width or 21 half-width characters. If you use a mixture of full-width and half-width characters or half-width katakana characters for the name, the number of characters that you can save is limited to 10 characters.When entering a name, the reading is automatically entered. To edit the reading, enter the reading within 12 full-width katakana characters or 25 half-width alphanumeric characters. If you use a mixture of full-width and half-width characters for the reading, the number of characters that you can save is limited to 12 characters.Select a group. When entering a name/phone number/mail address, group [ グループなし] is automatically entered.Enter a phone number within 26 digits (20 digits for some types of UIM). Enter a mail address within 50 half-width alphanumeric characters and symbols. If you use symbols for the mail address, you may not be able to save up to the maximum allowable number of characters. When sending mail to an i-mode terminal (including a Mova terminal), you need to specify only the mail address portion before the @ mark. 4 Press (Complete).The entered data is saved in the UIM phonebook.● Data copied from the FOMA terminal phonebook or received using a function such as the infrared or iC communication may not be saved correctly.](https://usermanual.wiki/Sony/A3724011.08-user-guide-part-1/User-Guide-929851-Page-91.png)
![90PhonebookSaving the Redial/Received Record in the PhonebookA phone number saved in the record can be directly added to the Phonebook.Example: Saving a received record in the FOMA terminal phonebook as a new entry 1 Press ( ) in the stand-by display.To save a number from the redial recordPress ( ) in the stand-by display. 2 Select a received record and press (Save).The screen for selecting where to save appears. 3 Select [Ordinary PB] and press .The screen for selecting how to save to the Phonebook appears.To save data in the PushTalk phonebookSelect [PushTalk PB] → a PushTalk phone number. 4 Select [New] and press .The screen for selecting where to save appears.When you select [Add]Select an entry to which you want to add from the Phonebook. 5 Select [Main memory] and press .The Edit phonebook display appears.To save to the UIM phonebookSelect [UIM]. 6 Save other items. Follow the same steps as in “Add to FOMA terminal phonebook” (P.95, step 3 to 5) or in “Add to UIM phonebook” (P.98, step 3). 7 Press (Complete).The entry is saved in the FOMA terminal phonebook.Saving a Group <Group setting>Up to 20 groups can be saved in the FOMA terminal phonebook, and up to 10 groups can be saved in the UIM (FOMA card) phonebook. You cannot change [ グループなし] in the UIM phonebook.Example: Saving a group in the FOMA terminal phonebook 1 Press (Func) in the Phonebook.The Function menu appears. 2 Select [Group setting] and press .Group setting グループなし Friends Office グループ3 グループ4 グループ5 グループ6 グループ7 グループ8 グループ9 グループ10 グループ11To display group numbersWhen saved, group icons are displayed instead of group numbers. Press to switch the display temporarily between group icons and group numbers.To reorder a groupPress (Reorder), select a group, move the cursor to the place to move to, press (Move), and press (Complete). 3 Select a group and press . グループなし Basic Setting 4 Enter a group name at [ ].Enter a group name within 10 full-width or 21 half-width characters. For data in the UIM phonebook, if you use a mixture of full-width and half-width characters or half-width katakana characters for the group name, the number of characters that you can save is limited to 10 characters. For data in the UIM phonebook, go to step 7. 5 Select a group icon at [ ].](https://usermanual.wiki/Sony/A3724011.08-user-guide-part-1/User-Guide-929851-Page-92.png)
![91Phonebook 6 Press and save the Des call display, Des phone tone, and Select phone Illum. Follow the same steps as those for the Des call display, Des phone/mail tone, and Select phone/mail Illum. described in the Add to FOMA terminal phonebook (P.95, step 3 to 5). 7 Press (Complete).The group is set.● When the Des call display, Des phone/mail tone, or Select phone/mail Illum. is set for both the Phonebook and Group setting, the setting for the Phonebook has higher priority.Displaying the PhonebookYou can use the Phonebook to perform various operations.Example: Displaying the FOMA terminal phonebook 1 Press ( ) in the stand-by display.かさ なはまやらたドコモ一郎ドコモ三郎ドコモ二郎ドコモ太郎 When 2in1 is set to the Dual mode, the Phonebook 2in1 setting is confirmed by the following icons.A modeB modeCommonTo change the phonebook being displayedFrom the Function menu, select [Change to UIM]/[Change to Main]. “ ” appears in the UIM phonebook.To switch the display stylePress (Display), select [Alphabet]/[Group]/[Number]/[Phone number].To attach a Phonebook entry to mailMove the cursor to data and from the Function menu, select [Attach to mail].To place a voice callMove the cursor to data and press . 2 Select an entry and press .ト゛コモタロウ015Friends090XXXXXXXXdocomo.taro.△△@docomo.ne.jpOFFドコモ太郎Detail Setting BasicTo place a videophone callMove the cursor to a phone number and press (V.phone).To originate a PushTalk callMove the cursor to a phone number and press .To send mailMove the cursor to a mail address and press (Mail).To check the call imagePress , move the cursor to a call image and press (Play).To use the location informationPress , move the cursor to [ Has loc. info], and press .To display the detailed location informationPress , move the cursor to [ Has loc. info], and press (Detail).To check the Des substitute imagePress and move the cursor to the Des substitute image and press (Play).To check a ring tonePress and move the cursor to a ring tone and press (Play).To check an incoming indicatorPress and move the cursor to an incoming indicator and press (Check).To turn on/off the image displayPress to temporarily turn on/off an image.● When 2in1 is set to the Dual mode, you can select a caller ID at the Option call display before placing a call (P.60).](https://usermanual.wiki/Sony/A3724011.08-user-guide-part-1/User-Guide-929851-Page-93.png)
![92PhonebookSearching the Phonebook <Search phonebook>You can search the desired data of the Phonebook by entering a reading, memory number, and phone number.Example: Phonebook is ordered alphabetically 1 Press ( ) in the stand-by display. 2 Enter a reading.ドコモ一郎ドコモ三郎ドコモ二郎ドコモ太郎タ カナAa12かさ なはまやらたEvery time you enter a letter, the cursor moves to the data which is the closest one to the entered reading.When the Phonebook is ordered by the groupEnter a reading. Every time you enter a letter, the cursor moves to the data which is the closest one to the entered reading within the group.When the Phonebook is ordered by the memory numberEnter a memory number. Every time you enter a digit, the cursor moves to the data which is the closest one to the entered memory number.When the Phonebook is ordered by the phone numberEnter a phone number. Every time you enter a digit, the cursor moves to the data which is the closest one to the entered phone number.Setting the Display of the Phonebook <Phonebook setting>You can set the type of a phonebook to be displayed and font size to be used for the Phonebook when you display it and whether to display an image when you display a single entry of the Phonebook. 1 Press (Func) in the Phonebook.The Function menu appears. 2 Select [PB setting] and press .Phonebook settingWhich PB to use PhonebookFont size MSet image display ONSave/attach image Valid[Which PB to use]:Select a phonebook to be displayed when you display the Phonebook.[Font size]:Select the font size of the Phonebook from [Extra extra large], [Extra large], [Large], or [Medium].[Set image display]:Select whether to display the Des call display that was saved when a single entry of the Phonebook is displayed.[Save/attach image]:Select whether to save an image that is set for the Des call display to the microSD memory card when you save Phonebook data or attach to mail. 3 Select [Phonebook]/[UIM phonebook] at [Which PB to use]. 4 Select [ON]/[OFF] at [Set image display]. 5 Select [Valid]/[Invalid] at [Save/attach image].[Valid]:Save an image.[Invalid]:Do not save an image.The Phonebook setting is set.](https://usermanual.wiki/Sony/A3724011.08-user-guide-part-1/User-Guide-929851-Page-94.png)
![93PhonebookEditing a Phonebook Entry <Edit phonebook> 1 From the Phonebook, select an entry and press . 2 Press (Edit).The Edit phonebook display appears. 3 Edit each item. Follow the same steps as in “Add to FOMA terminal phonebook” (P.95, step 3 to 5) or in “Add to UIM phonebook” (P.98, step 3). 4 Press (Complete).The edited data is saved in the Phonebook.Deleting a Phonebook Entry <Delete phonebook>You can delete Phonebook entries using three methods. When the Phonebook is ordered by the phone number, [Delete one] and [Select&delete] cannot be selected.Example: Deleting an entry 1 Press ( ) in the stand-by display.ドコモ一郎ドコモ三郎ドコモ二郎ドコモ太郎かさ なはまやらたTo delete several entriesFrom the Function menu, select [Delete] → [Select&delete], select entries, press (Complete), and select [Yes]. Every time you enter a letter or digit in the Data selection display, the cursor moves to the data which is the closest one to the entered reading or memory number. To delete all Phonebook entriesFrom the Function menu, select [Delete] → [Delete all], enter the Security code, and select [Yes]. 2 Select an entry and press (Func).The Function menu appears. 3 Select [Delete] → [Delete one] → [Yes] and press .The selected entry is deleted.● When an entry to be deleted is also saved in the PushTalk phonebook, it is automatically deleted from the PushTalk phonebook. When you delete all data of the FOMA terminal phonebook, the Group setting of the PushTalk phonebook is reset to the default setting.Checking the Number of Entries Saved <Memory status>You can check the number of entries saved in the FOMA terminal phonebook and UIM (FOMA card) phonebook and entries saved as Secret. 1 Press (Func) in the Phonebook.The Function menu appears. 2 Select [Memory status] and press .Memory statusUsed 450Secret 5Used(UIM) 20[Used]:Display the number of entries saved in the FOMA terminal phonebook (including entries saved as Secret).[Secret]:Display the number of entries saved as Secret in the FOMA terminal phonebook (this data is displayed only when the Secret display is set to [ON]).[Used(UIM)]:Display the number of entries saved in the UIM phonebook.](https://usermanual.wiki/Sony/A3724011.08-user-guide-part-1/User-Guide-929851-Page-95.png)
![94PhonebookDialing Quickly to Frequently Called Numbers <2-touch dial>A call can be placed easily to the recipients saved in memory numbers from 000 to 009 by using a shortcut.It is useful to save frequently used phone numbers in memory numbers from 000 to 009. When the Secret display is set to [OFF], the 2-touch dial cannot be used to place a call to a phone number saved as Secret.Example: Placing a call to the recipient saved in the memory number 001 1 Enter the last one digit of the memory number (0 to 9) in the stand-by display.To check a recipient’s data saved in a memory numberEnter the memory number (one or two digits) and press or . A list of used memory numbers and their associated entries appears with the entered memory number highlighted. 2 Press .After about five seconds, the call is connected to the first phone number of the recipient saved in memory number 001.To place a videophone callPress (V.phone).To send mailPress (Mail).To send SMSPress (Mail) for over a second.● The call can be placed or SMS can be sent to the recipients saved in memory numbers from 010 to 099 by entering the last two digits (10 to 99) of the memory numbers.Storing (Restoring/Updating) the Phonebook at the Data Security Service Center <Data Security Service>You can use the Data Security Service to store the FOMA terminal phonebook at the Data Security Service Center. You can update or restore the stored Phonebook by connecting to the Data Security Service Center. Data Security Service is a paid service that requires a subscription. For details on this service, see the “Mobile Phone User’s Guide 【i-mode】 FOMA version”. You cannot save the UIM phonebook at the Center.Storing/Updating/Restoring the Phonebook 1 From the Menu, select [LifeKit] → [Data Security Service] → [Connect to Center] and press .The Security code screen appears.To connect to the Data Security Service Center from the PhonebookFrom the Function menu in the Phonebook, select [Cnct to Center]. 2 Enter the Security code and press (OK).The screen for confirming whether to connect to the Data Security Service Center appears. 3 Select [Yes] and press .The call is connected to the Data Security Service Center and the data is updated. When the update is completed, the update result screen appears.● The automatic update of the Phonebook may fail when another function is executed. In this case, “” (PB update failed) appears in the stand-by display.](https://usermanual.wiki/Sony/A3724011.08-user-guide-part-1/User-Guide-929851-Page-96.png)
![95PhonebookSetting Whether to Send Images of the PhonebookYou can set whether to send a Des call display (JPEG/GIF image) saved in the Phonebook to the Data Security Service Center. 1 From the Menu, select [LifeKit] → [Data Security Service] → [Service setting] and press .The Service setting display appears. 2 Select [Send]/[Unsend] at [Send phonebook img].The Send phonebook img is set.Displaying the Communication HistoryYou can save up to 30 history records of communication with the Data Security Service Center. When the number of communication history records exceeds 30, the records with the oldest date/time are overwritten, in that order. 1 From the Menu, select [LifeKit] → [Data Security Service] → [Exchanging history] and press .The Exchanging history display appears. 2 Select a record and press .The update result screen appears.](https://usermanual.wiki/Sony/A3724011.08-user-guide-part-1/User-Guide-929851-Page-97.png)
![98Sound/Display/Light SettingsSetting the Ring Tone/Image/Indicator Color for Incoming Call and Mail <Incoming set>You can set a ring tone, ring volume, incoming image, vibration pattern, and incoming indicator color for each type of incoming transmission (voice, videophone, or PushTalk call, or mail, etc.).Example: Performing incoming mail settings 1 From the Menu, select [Settings] → [Call] → [Incoming set] and press .Incoming setIncoming callIncoming V.phonePushTalkMailMessageRMessageF 2 Select [Mail] and press .Mail<Receiving setting>Receiving img White Scrapbook<Complete setting>Received image White ScrapbookRing tone 着信音1Ring volume 4Vibrator OFFColor C9Ring time 04sTo perform the settings for an incoming videophone callIf you set [Link incoming call] to [ON], the settings for the incoming call are applied.To perform the settings for an incoming Message R/Message FIf you set [Link receive mail] to [ON], the settings for the incoming mail are applied. 3 Select an image from the Data Box at [Receiving img]. You can set the following files. Incoming call/Incoming V.phoneCategory File format File size Image sizeMy pictureGIF/JPEGMax. 250K bytesMax. [Stand-by(480×864)],Max. W480×H288 for GIF animationSWF Max. 100K bytes −i-motion※MP4 Max. 10M bytesMax. [VGA(640×480)] Mail/MessageR/MessageFCategory File format File size Image sizeMy pictureGIF/JPEGMax. 250K bytesMax. [Stand-by(480×864)],Max. W480×H288 for GIF animationSWF Max. 100K bytes −※ Some i-motion may not be set.To check the incoming imageMove the cursor to the incoming image and press (Play). 4 Select an image from the Data Box at [Received image]. You can set the following files.Category File format File size Image sizeMy pictureGIF/JPEGMax. 250K bytesMax. [Stand-by(480×864)],Max. W480×H288 for GIF animationSWF Max. 100K bytes −To check the Received imageMove the cursor to the Received image and press (Play).](https://usermanual.wiki/Sony/A3724011.08-user-guide-part-1/User-Guide-929851-Page-100.png)
![99Sound/Display/Light Settings 5 Select a ring tone from MUSIC/i-motion/Melody of the Data Box at [Ring tone]. You can set the following files. You can select a Chaku-Uta® from [i-motion].Category File format File size Image sizeMUSIC※AAC-LC/HE-AACMax. 5M bytes −i-motion※MP4 Max. 10M bytesMax. [VGA(640×480)]Melody SMF/MFiMax. 350K bytes −※ Some files may not be set. You cannot set an i-motion with video track only. You can set only an i-motion with sound track only (i-motion without video track, such as singer’s voice) for incoming PushTalk calls.When you select a Chaku-Uta Full® that has a choice of specified playback ranges from [MUSIC]The screen for selecting a type of setting appears. If you select [Full song], the entire track of Chaku-Uta Full® is set for the ring tone. If you select [Point], the specified playback range of Chaku-Uta Full® is set for the ring tone.To mute the ring toneSelect [Silent].To check the ring toneMove the cursor to the ring tone and press (Play). 6 Set the volume of the ring tone at [Ring volume].Select from [OFF] and [1 to 6]. For an incoming voice, videophone, or PushTalk call, you can set [STEP DOWN] and [STEP UP]. [STEP DOWN] turns down the volume every six seconds and [STEP UP] turns up the volume every six seconds.To set the ring tone volume to [OFF]Press at level 1. When you set the ring tone volume for incoming calls, incoming mail, or both incoming calls and mail to [OFF], “ ”, “ ”, or “” appears in the stand-by display respectively. 7 Set a vibration pattern at [Vibrator].Select vibrator Pattern1 Pattern2 Link melody OFF[Pattern1]:Set a short intermittent vibration.[Pattern2]:Set a long intermittent vibration.[Link melody]:Set vibration to be synchronized with the vibration pattern of the melody. When you set the ring tone to [Silent] or the melody is not specified with a vibration pattern, [Pattern1] is used.[OFF]:Do not set the vibrator.When you set the vibrator for incoming calls, incoming mail, or both incoming calls and mail, “”, “ ”, or “ ” appears in the stand-by display respectively.To check the vibrationMove the cursor to the vibration pattern and press (Confirm). 8 Select an indicator color at [Color].Select from 12 colors plus [C13:ALL] (in which the 12 colors flash in turn).When you move the cursor through the colors, the incoming indicator flashes accordingly. 9 Select [Ring time] and press . You can set the ring time for incoming mail, Message R, and Message F. 10 Select [ON]/[OFF] of the ring tone at [Set]. 11 Enter the duration for sounding the ring tone at [Ring time].Enter the duration within the range from 01 to 30 seconds. 12 Press (Complete).The Ring time is set.Continued](https://usermanual.wiki/Sony/A3724011.08-user-guide-part-1/User-Guide-929851-Page-101.png)
![100Sound/Display/Light Settings■ Preinstalled melodiesTitle Title着信音1∼5 ElevatorSymphony ※Giant GongTsuki ※Whistle ※Pavane PilsnerRaindrop ※Brilliance ※Forest ※Typewriter ※Cuckoo Clock ※Vibe x VibeSchool Chime Get Many Bananas!Ecosound ※※ 3D sound support (P.111)■ Preinstalled musicTitleActiveCatNatural LifeStylishWhat Can U Do● If several ring tones, call images, and incoming indicator colors are set for voice/videophone call/mail, the following priority is applied.1. Ring tone of Number Setting (When you receive a call to an Additional No. for the Multi Number)2. Des phone tone, Des call display, and Select phone/mail Illum. of an entry saved in the Phonebook3. Des phone tone, Des call display, and Select phone/mail Illum. of the Group setting4. Ring tone of the Ringtone for Number B of 2in15. Ring tone, incoming image, and indicator color of the Incoming set However, when you set an i-motion or Chaku-Uta Full® for the ring tone or an i-motion for the incoming image, the order of priority may vary.● You can adjust the ring volume while receiving a call. The volume last set is applied regardless of whether you adjust the volume in advance or while receiving a call.● When you set an i-motion or Chaku-Uta Full® for the ring tone or set an i-motion for the incoming image, the settings may be changed in some cases.Setting the Sounds of the FOMA Terminal <Set basic tone>You can set to turn on/off the sound effect that can be used when canceling the Lock key or charging starts and is completed. You can also set whether the 3D sound is played back through the stereo speaker and set the keypad sound volume. 1 From the Menu, select [Settings] → [Management] → [Set basic tone] and press .Set basic toneKeypad sound 1Keyguard release tone ONStereo&3D ONCharge sound ON[Keypad sound]:Set the volume of the keypad sound to be heard when you press a key.[Keyguard release tone]:Set whether the sound effect is heard when canceling the Lock key.[Stereo&3D]:Set whether to play back 3D sound with 3-dimensional stereophonic reproduction through the stereo speaker.[Charge sound]:Set whether the sound effect is heard when charging starts and is completed. 2 Set the volume of the keypad sound at [Keypad sound].Select from [OFF] and [1 to 2]. 3 Select [ON]/[OFF] at [Keyguard release tone]. 4 Select [ON]/[OFF] at [Stereo&3D]. 5 Select [ON]/[OFF] at [Charge sound].The sounds of the FOMA terminal are set.](https://usermanual.wiki/Sony/A3724011.08-user-guide-part-1/User-Guide-929851-Page-102.png)
![101Sound/Display/Light Settings● The Keyguard release tone and Charge sound may not be heard under some conditions, such as when another sound is active.● The 3D sound function reproduces a 3-dimensional stereophonic sound or space-wise moving sound, over the stereo speaker (or the Flat-Plug Stereo Earphone Set (optional)). This function lets you enjoy 3D sound i-αppli games and ring tones with realistic sound. You can feel the effect of this function when you hold the FOMA terminal about 40 cm (this distance depends on the sense of an individual) away and facing toward you. Note that if the FOMA terminal is moved left or right or the distance between the terminal and you is not suitable, you cannot enjoy the effect. The perception of this 3D effect varies depending on the senses of an individual. If you feel uncomfortable in any way, set the Stereo&3D to [OFF].Adjusting the Volume of Caller’s Voice <Volume>The volume of caller’s voice during a voice, videophone, or PushTalk call can be adjusted in six levels from level 1 (smallest) to level 6 (largest). 1 From the Menu, select [Settings] → [Call] → [Call setting] → [Volume] and press .The Volume display appears. 2 Use to adjust the volume and press (OK).Select from [1 to 6].The volume of caller’s voice is set.● The volume can be adjusted by pressing during a call. Whichever way you may take, the most recently adjusted volume is used until it is adjusted next time.Adjusting the Volume While Playing Flash Movie <Sound effect>The sound volume while playing Flash movie can be adjusted in seven levels: OFF (silent), level 1 (smallest) to level 6 (largest). 1 From the i-mode menu, select [i-mode setting] → [Sound effect] and press . 2 Set the sound effect volume.Select from [OFF] and [1 to 6].The sound volume while playing Flash movie is set.● You can also adjust the volume by selecting [Sound effect] from the Function menu while playing Flash movie (P.189).● The sound effect may not be heard depending on Flash movie.Adjusting the Volume While Running i-αppli Software <Volume setting>The sound volume while running i-αppli software can be adjusted in seven levels: OFF (silent), level 1 (lowest) to level 6 (highest). 1 From the Menu, select [i appli] → [i αppli setting] → [Volume setting] and press .The Volume setting display appears. 2 Set the software volume.Select from [OFF] and [1 to 6].The sound volume while running i-αppli software is set.Setting Whether to Prioritize the i-αppli Sound <Pref. i αppli sound>You can set whether to prioritize the i-αppli sound when the MUSIC Player and i-αppli are activated simultaneously. 1 From the Menu, select [i appli] → [i αppli setting] → [Pref. i αppli sound] and press . 2 Select [preference]/[unpreference] and press .[preference]:You hear the i-αppli sound.[unpreference]:You hear the sound of the MUSIC Player or Music&Video Channel.● Even if the Perf. i αppli sound is set to [preference], you may not hear the i-αppli sound.● Even if you select [unpreference], you hear the i-αppli sound when the sound of the MUSIC Player or Music&Video Channel is muted.](https://usermanual.wiki/Sony/A3724011.08-user-guide-part-1/User-Guide-929851-Page-103.png)
![102Sound/Display/Light SettingsSetting the Sound/Indicator While Using the GPS FunctionYou can set the sound volume to be used and the vibrator and incoming indicator operations to be performed when you position and notify your current location and when you are requested to provide your location information.Example: Setting the sound/indicator of the Position location 1 From the Menu, select [LifeKit] → [GPS] → [GPS settings] → [Sound/Color setting] and press .Sound/Color settingPosition locationLocation noticeLoc. provide/acceptLoc. provide/check[Position location]:Set the operation to be performed when the current location is determined.[Location notice]:Set the operation to be performed when the current location is notified.[Loc. provide/accept]:Set the operation to be performed when you are requested to provide location information when the settings for using each service is set to “許可” (accept).[Loc. provide/check]:Set the operation to be performed when you are requested to provide location information when the settings for using each service is set to “毎回確認” (Check every time). 2 Select [Position location] and press .Position locationVolume OFFVibrator OFFColor ON 3 Select the sound volume at [Volume].Select from [OFF] and [1 to 6].To set the volume to [OFF]Press at level 1. 4 Select [ON]/[OFF] of the vibrator at [Vibrator]. 5 Select [ON]/[OFF] of the incoming indicator at [Color]. You can set the incoming indicator to the Position location and Location notice functions. 6 Press (Complete).The sound volume level and incoming indicator ON/OFF settings to be applied when you use the GPS function are set.Setting the Poor Signal Quality Alert <Quality alarm>You can set to inform you with alarm of the possibility of the call being disconnected during a voice call due to the radio wave condition. 1 From the Menu, select [Settings] → [Call] → [Call quality] → [Quality alarm] and press .[High]:Sound a high alarm tone.[Low]:Sound a low alarm tone.[OFF]:Do not sound an alarm tone. 2 Select the type of alarm tones and press .The Quality alarm is set.● If the radio wave condition becomes weak suddenly, the call may be disconnected with no alarm.](https://usermanual.wiki/Sony/A3724011.08-user-guide-part-1/User-Guide-929851-Page-104.png)
![103Sound/Display/Light SettingsSetting Earphone Only for the Ring Tone <Headset usage setting>You can set the position where the ring tone sounds when the Flat-plug Earphone/Microphone with Switch (optional) is connected to the FOMA terminal. The other tones, such as the Alarm and Schedule alarm tones also sound from the position you set for the ring tone. Even if [Headset only] is set, the ring tone of a voice, videophone, or PushTalk call sounds from both the earphone and speaker about 20 seconds later after it starts sounding. 1 From the Menu, select [Settings] → [Call] → [Headset setting] → [Headset usage setting] and press .[Headset only]:The tone sounds only from the earphone.[Headset+speaker]:The tone sounds from both the earphone and the speaker. 2 Select [Headset only] and press .The tone sounds only from the earphone.Changing the Ringing Sound <Melody Call>You can change the ringing sound which a caller hears to a melody with sense of the season or popular music, etc. This service is a paid service that requires a subscription. For more details about this service, see the “Mobile Phone User’s Guide 【Network services】”. 1 From the Menu, select [Settings] → [Call] → [Melody Call] and press .The screen for confirming whether to connect a site appears. 2 Select [Yes] and press .The Melody Call site is connected. 3 Set each item. For details how to set, see the “Mobile Phone User’s Guide 【Network services】”.● When a call is a videophone or PushTalk call, the Melody call does not sound.● When you select the Melody Call, the FOMA terminal is connected to the i-mode site and packet communication charge is required. However, the packet communication of the setting site is free of charge.Muting the Ring Tone <Manner mode>All sounds from the FOMA terminal can be disabled to avoid disturbing others by using the Manner mode.There are three types of the Manner mode. Set the mode by using the Manner mode setting (P.116). Even if the Manner mode is set, the shutter sound of the camera can be heard. 1 Press for over a second in the stand-by display.The Manner mode is set and the icon for the current type appears.Manner ( is pink)SilentOriginal manner ( is blue)To cancel the Manner modePress for over a second in the stand-by display. The Manner mode is canceled and “ // ” disappears.Continued](https://usermanual.wiki/Sony/A3724011.08-user-guide-part-1/User-Guide-929851-Page-105.png)
![104Sound/Display/Light Settings■ Functions of each modeManner Silent Original mannerInitial settingSetting rangeVibrator (P.110)※1Follow each setting (Vibrates in Pattern1 when [OFF] is set.)OFF OFF Pattern1/Pattern2/Link melody/Follow each setting/OFFPhone volume (P.109)※2OFF OFFSD (STEP DOWN)SU (STEP UP)/SD (STEP DOWN)/6 to 1/OFFMail volume (P.109)※3OFF OFF 4 6 to 1/OFFAlarm volume (P.361, 365)OFF OFF 4 6 to 1/OFFKeypad sound (P.111)※4OFF OFF 1 2 to 1/OFFKeyguard release tone (P.111)OFF OFF ON ON/OFFCharge sound (P.111)OFF OFF ON ON/OFFBattery ALM (P.42)※5OFF + VibratorOFF ON※6 ON/OFF※6Whisper mode (P.68)ON OFF OFF ON/OFF※1 Vibrator setting common to voice, videophone, and PushTalk calls, mail, Message R/F, Alarm, and Schedule alarm.※2 Setting common to the ring volume for voice, videophone, and PushTalk calls and the alarm for the Call cost limit.※3 Setting common to the ring volume for mail and Message R/F.※4 Setting common to the battery level confirmation beep.※5 During a call, the battery alarm is heared from the earpiece regardless of the setting. When a call is put on hold, however, only the display is provided and the battery alarm does not sound.※6 When the Battery ALM is set to [ON], the vibrator operates regardless of the Vibrator setting.● Press during a voice call to set the Whisper mode and press it again to cancel the Whisper mode.Changing the Manner Mode Settings <Manner mode setting>The Manner mode can be selected from three types: “Manner”, “Silent”, and “Original manner”. 1 Press in the stand-by display.Manner modeSet OFFMode MannerOriginal manner 2 Select the type of the Manner mode at [Mode]. 3 Press (Complete).The type of the Manner mode is changed.Changing the Original MannerThe operations of the Original manner can be customized. For the items you can set, see “Functions of each mode” (P.116).Example: Setting the battery alarm 1 Press in the stand-by display, select [Original manner], and press .Original mannerVibrator OFFPhone volume SDMail volume 4Alarm volume 4Keypad sound 1Keyguard release tone ONCharge sound ONBattery ALM ONWhisper mode OFF 2 Select [ON]/[OFF] at [Battery ALM].The battery alarm setting is changed.](https://usermanual.wiki/Sony/A3724011.08-user-guide-part-1/User-Guide-929851-Page-106.png)
![105Sound/Display/Light SettingsSetting the Stand-by Display <Stand-by display>You can set the image for the stand-by display, image quality, Calendar/Clock display, and whether to show or hide the guide display. 1 From the Menu, select [Settings] → [Display] → [Stand-by display] and press .Stand−by displayStand−by White ScrapbookImage quality SharpCalendar/ClockSoft key OFFCamera in key locking Not activate[Stand-by]:Set an image or i-αppli software to be displayed in the stand-by display.[Image quality]:Set an image quality of an image to be displayed in the stand-by display.[Calendar/Clock]:Set the type of calendar and clock to be displayed in the stand-by display and also set the font color, display style, and position of the clock.[Soft key]:Set whether to display the guide display in the stand-by display.[Camera in key locking]:Set whether to activate the camera by sliding the lens cover while the Lock key is set. 2 Select an image from My picture/i-motion of the Data Box at [Stand-by]. You can set the following files.Category File format File size Image sizeMy pictureGIF/JPEGMax. 500K bytesMax. [1M(1280×960)]SWF Max. 100K bytes −i-motion※MP4 Max. 10M bytesMax. [VGA(640×480)]※ Some i-motion may not be set.When you select a JPEG imageThe screen for selecting a display pattern appears. Select [V]/[H] at [Direction] and [True img]/[Screen size]/[Twice the size] at [Size] and press (Complete).When you select a GIF imageThe screen for selecting a display pattern appears. Select [True img]/[Screen size]/[Twice the size] at [Size] and press (Complete).To set the i-αppli stand-by displaySelect [i αppli list] and a software supporting i-αppli stand-by display from the list of i-αppli software.To set the Stand-by picturesSelect [Stand-by pictures] (P.119).To set Stand-by booksSelect from [世界遺産1], [世界遺産2], [四字熟語], [魚へんの漢字], [日本の首相], [日本の温泉], [歴史上の名言], or [恋の格言] in the [Preinstall] folder of My picture.To display no imageSelect [None specified].To check the imageMove the cursor to the image and press (Play). 3 Select an image quality at [Image quality].[Sharp]:Sharply edged image quality.[Normal]:The standard image quality emphasized naturalness.[Dynamic]:The clear image quality in which an edge and contrast of an image is emphasized. 4 Select [Calendar/Clock] and press .Calendar/ClockCalendar OFFCal. font color BlkClock Digital clock5Clock style 12hArrangement settingContinued](https://usermanual.wiki/Sony/A3724011.08-user-guide-part-1/User-Guide-929851-Page-107.png)
![106Sound/Display/Light Settings 5 Select the type of calendar at [Calendar].[LTC 1Week]:Display the one-week Lifetime Calendar.[LTC 1Month]:Display the one-month Lifetime Calendar.[Cal. 1Month(S)]:Display the one-month calendar (small).[Cal. 1Month(L)]:Display the one-month calendar (large).[Cal. 2Months]:Display the two-month calendar.[OFF]:Do not display the calendar. 6 Select the font color of the calendar at [Cal. font color]. You cannot change the font color of Saturdays and holidays. 7 Select a clock type at [Clock].Select from [Digital clock1 to 5], [Analog clock], [Pict clock], or [OFF]. 8 Select the format to display the clock in the display at [Clock style].[12h]:Display in 12-hour format.[24h]:Display in 24-hour format. 9 Select [Arrangement setting] and press .The screen for selecting a position appears.Press (Change) to switch between calendar and clock, and then press to select a position to be displayed. 10 Press (Complete).The position of calendar/clock is set. 11 Press and select [ON]/[OFF] at [Soft key].The Soft key is set. 12 Select [Not activate]/[Activate] at [Camera in key locking].[Not activate]:You cannot activate the camera by sliding the lens cover while the Lock key is set.[Activate]:You can activate the camera by sliding the lens cover while the Lock key is set.● If you change the setting so that the i-Channel Telop text is displayed when an i-motion or i-αppli is set for the stand-by display, the screen for confirming whether to cancel the setting for the stand-by display appears. If you select [Yes], the i-motion or i-αppli set for the stand-by display is canceled and the image for the stand-by display is changed to that of the Kisekae menu.● If you set an i-motion or i-αppli for the stand-by display when the i-Channel Telop text is displayed, the screen for confirming whether to cancel the display of the Telop text appears. If you select [Yes], the Telop text is turned off. When you change the setting for the stand-by display to other than an i-motion or i-αppli, the display of the Telop text is automatically restored.● If you set an i-motion for the stand-by display, the playback starts in the case, such as when you open the FOMA terminal, return to the stand-by display, or press in the stand-by display, and the first frame of it is displayed as the stand-by display image. While the i-motion is played back, the setting of the Calendar is not displayed.● If you set a Flash movie, GIF animation, or Stand-by pictures for the stand-by display, the playback starts in the case, such as when you open the FOMA terminal, return to the stand-by display, or press in the stand-by display. The playback stops after a certain period of time. A frame displayed at the time of the playback being stopped is used as the stand-by display image. To restart the playback, press (however, while displaying the i-Channel Telop text, the playback does not start even if you press ). The sound effect of the Flash movie set for the stand-by display is not heard.● The displayed contents of Stand-by books are employed using part of examples/explanations.](https://usermanual.wiki/Sony/A3724011.08-user-guide-part-1/User-Guide-929851-Page-108.png)
![107Sound/Display/Light SettingsSetting the Stand-by PicturesSeveral images in the specified folder can be displayed in the stand-by display automatically, decorated with a frame. The images are rotated in the specified interval or when the FOMA terminal is powered on. JPEG images saved in My picture of the Data Box can be used as Stand-by pictures. 1 From the Menu, select [Imaging] → [Stand-by pictures] and press .Stand−by picturesFrame Bulletin Board(↑Screen update Every 1hoursSelect folderUpdate image 2 Select a frame to be used at [Frame].Select from [Bulletin Board(↑)], [Sweet(↑)], [Balloon(↑)], [Museum(↑)], [Tile(↑)], [Simple(↑)], [Single(↑)], [Window(→)], [Magazine(→)], or [Random display].To check a frameMove the cursor to the frame and press (Play). 3 Select an interval to change images at [Screen update].Select from [Every 30min], [Every 1hours], [Every 3hours], [Every 6hours], [Every 12hours], or [Every days]. 4 Select [Select folder] and press .The screen for selecting a folder appears.To set the specified folder to “OFF”Move the cursor to a field for specifying the folder, press (Reset), and select [Yes]. 5 Select a folder from My picture of the Data Box at the field and press . Up to five folders can be specified. 6 Select [Yes]/[No] at [Update image]. 7 Press (Activate).The Stand-by pictures is set for the Stand-by display.● Updating images is performed in the interval based on the time set in the FOMA terminal rather than the time past from when the Stand-by pictures is set for the Stand-by display.Setting Images for Placing a Call/Sending Mail <Animation>You can set an image that appears when you place a voice or videophone call, send mail, and perform other events.Example: Setting an image to be used when you place a call 1 From the Menu, select [Settings] → [Display] → [Animation] and press .Animation settingCalling White ScrapbookV.phone calling img White ScrapbookMail sending img White ScrapbookCheck new message White Scrapbook[Calling]:Set an image that appears when you place a voice call.[V.phone calling img]:Set an image that appears when you place a videophone call.[Mail sending img]:Set an image that appears when you send i-mode mail or SMS.[Check new message]:Set an image that appears when you check new messages or SMS. 2 Select an image from My picture of the Data Box at [Calling]. You can set the following files.Category File format File size Image sizeMy pictureGIF/JPEGMax. 250K bytesMax. [Stand-by(480×864)],Max. W480×H288 for GIF animationSWF Max. 100K bytes −To check the imageMove the cursor to the image and press (Play).● If you set the Phonebook image of the Set call display to [ON], the Des call display set in the Phonebook is displayed when you place a voice or videophone call regardless of the above setting.](https://usermanual.wiki/Sony/A3724011.08-user-guide-part-1/User-Guide-929851-Page-109.png)
![108Sound/Display/Light SettingsSetting the Display for Incoming and Outgoing Calls <Call display> You can set whether the Des call display or the name saved in the Phonebook is displayed. 1 From the Menu, select [Settings] → [Call] → [Call display] and press .Set call displayPhonebook image ONName ONDisp. call/rcv. No. None specified[Phonebook image]:Set whether to display the Des call display set for a specific individual/group saved in the Phonebook.[Name]:Set whether to display the name of a caller/recipient saved in the Phonebook.[Disp. call/rcv. No.]:Set the display or call record display when placing/receiving a voice or videophone call, or the color of the font for the received/sent mail lists. 2 Select [ON]/[OFF] at [Phonebook image].[ON]:Display the image set for the Des call display in the Phonebook when placing/receiving a voice or videophone call.[OFF]:Display the image set in the Animation or Incoming set when placing/receiving a voice or videophone call. 3 Select [ON]/[OFF] at [Name].[ON]:Display the name saved in the Phonebook when placing/receiving a voice or videophone call, or originating/receiving a PushTalk call, or right after receiving mail or SMS.[OFF]:Do not display the name saved in the Phonebook when placing/receiving a voice or videophone call, or originating/receiving a PushTalk call, or right after receiving mail or SMS. 4 Select a color of the font to be displayed at [Disp. call/rcv. No.].[dark]:Set the darker color for the display or call record display when placing/receiving a voice or videophone call, or the font for the received/sent mail lists.[light]:Set the lighter color for the display or call record display when placing/receiving a voice or videophone call, or the font for the received/sent mail lists.[None specified]:Do not specify the color of the font. When 2in1 is set to ON, the information of Number A/Address A is displayed in the font color which is set at the Disp. call/rcv. No. To display the information of Number B/Address B in the different color, you can set at the Set call/receive No. of the 2in1 setting (P.400).Setting the Display and Keypad Illumination <Backlight>You can set the display light brightness, ON/OFF of the keypad light, and whether to turn on the light of the display. 1 From the Menu, select [Settings] → [Display] → [Backlight] and press .BacklightAuto setting ONAdjust light 3Keypad light ONBacklight always on[Auto setting]:Set whether to adjust the display light brightness and set ON/OFF of the keypad light automatically by the Brightness Sensor to adapt for the surrounding brightness. [Adjust light]:Set the display light brightness.[Keypad light]:Set whether to turn on the keypad light.[Backlight always on]:Set whether to keep the display light on all the time including at the time of charging or recording. 2 Select [ON]/[OFF] of adjusting automatically at [Auto setting].](https://usermanual.wiki/Sony/A3724011.08-user-guide-part-1/User-Guide-929851-Page-110.png)
![109Sound/Display/Light Settings 3 Set the display light brightness at [Adjust light].Select from [1 to 5].To reset to the default brightnessPress (Reset). 4 Select [ON]/[OFF] of the Keypad light at [Keypad light]. 5 Select [Backlight always on] and press .Backlight always onCharging OFFVideophone ONInternet OFFPict. shoot ONMovie shoot ONMovie play ON[Charging]:Set whether to keep the light on during charging.[Videophone]:Set whether to keep the light on during a videophone call.[Internet]:Set whether to keep the light on while displaying sites or Internet home pages.[Pict. shoot]:Set whether to keep the light on while recording a still image.[Movie shoot]:Set whether to keep the light on while recording a movie.[Movie play]:Set whether to keep the light on while playing back a movie. 6 Select [ON]/[OFF] of the Backlight always on for each item and press .● It may take time to complete charging when [Charging] of the Backlight always on is [ON].● When the Auto setting is set to [ON], the brightness is automatically adjusted based on the value set at the Adjust light.Saving Power for the Display <Power saver>The display is automatically turned off to save battery power when no operations are made for a specific period. You can set the time before turning off the display. 1 From the Menu, select [Settings] → [Display] → [Power saver] and press . 2 Select a time before starting the Power saver mode and press .Select from [1min], [3min], [5min], [10min], [15min], and [30min].● When the Lock key is set, the Power saver is activated after about 15 seconds if no operations are made, regardless of the setting of the Power saver mode.● When the Music slide show is running, the software update (rewrite) is in progress, or the Camera mode is being activated while a function for which the Backlight always on is set to [ON] is in use, the Power saver mode does not work.● The Power saver mode may be canceled if there is an incoming call, an activation of the Alarm or Schedule alarm, etc.](https://usermanual.wiki/Sony/A3724011.08-user-guide-part-1/User-Guide-929851-Page-111.png)
![110Sound/Display/Light SettingsChanging the Appearance of the Menu <Menu setting>You can switch the menu to be displayed when you press (MENU) in the stand-by display, and also set images to customize 12 icons displayed in the Standard menu.Example: Setting an image as the icon for i-mode 1 From the Menu, select [Settings] → [Display] → [Menu setting] and press .Menu settingStart menu setting Kisekae menuIcon setting[Start menu setting]:Set the menu to be displayed when you press (MENU) in the stand-by display.[Icon setting]:Set the icons to be displayed in the Standard menu display (P.33). 2 Select a display menu at [Start menu setting].[Kisekae menu]:Display the Kisekae menu.[Standard menu]:Display the Standard menu.[My Selection]:Display the menu of My Selection. 3 Select [Icon setting] and press .The Icon setting display appears. You can only set it when [Standard menu] is set at the Start menu setting. 4 Select an image from My picture of the Data Box at [i-mode]. You can set the following files.Category File format File size Image sizeMy pictureGIF/JPEGMax. 250K bytesMax. [Stand-by(480×864)],Max. W480×H288 for GIF animation An image exceeding 60×80 dots in image size is displayed in reduced size.To check the imageMove the cursor to the image and press (Play).● If you set a GIF animation as an icon, the image in the first frame is displayed.Using the Kisekae Tool <Kisekae setting>Using the Kisekae Tool allows you to change settings such as the Kisekae menu, ring tone, stand-by display, icon, and coloration pattern at once. You can also use the Kisekae tools downloaded from i-mode sites, “PlayNow by SO”, etc. (P.305). The following items can be set by the Kisekae Tool. Display - Stand-by display - Voice call Calling image - V.phone Calling image - Mail Sending image - Check new message - Voice call Incoming image - V.phone Incoming image - Mail Receiving image - Mail Complete image - MessageR Receiving image - MessageR Complete image - MessageF Receiving image - MessageF Complete image - Battery level icon - Radio wave level icon - Menu icon - Color theme - Kisekae menu Sound - Voice call Ring tone - V.phone Ring tone - PushTalk Ring tone - Mail Ring tone - MessageR Ring tone - MessageF Ring tone - Alarm tone - Schedule alarm tone Some displays or sounds of Kisekae Tool may not be set.Example: Setting a Kisekae tool 1 From the Menu, select [Settings] → [Display] → [Kisekae setting] and press .Kisekae settingKisekae Tool White ScrapbookColor theme setting White&Gold[Kisekae Tool]:Set the Kisekae tool.[Color theme setting]:Set the colors such as background color or coloration pattern at once. 2 Select data from Kisekae Tool of the Data Box at [Kisekae Tool].To check an imageMove the cursor to the image and press (Play).To set the Color theme settingSelect a color theme at [Color theme setting].](https://usermanual.wiki/Sony/A3724011.08-user-guide-part-1/User-Guide-929851-Page-112.png)
![111Sound/Display/Light Settings● When 2in1 is used, the following items are not changed even if the Kisekae Tool is set.- Stand-by display of the Dual and B modes- Voice call Ring tone, Voice call Calling image, Voice call Incoming image, V.phone Ring tone, V.phone Incoming image, and V.phone Calling image for Number B- Mail Ring tone, Mail Receiving image, Mail Complete image, and Mail Sending image for Address B● If you have deleted the preinstalled Kisekae tool, you can download it from “PlayNow by SO”. [i Menu] → [メニュー/検索] (Menu/Search) → [ケータイ電話メーカー] (Mobile Phone Manufacturers) → [PlayNow by SO] (Japanese only)● When you use the Kisekae tool to change the design of the menu display, some menu types may change the menu structure depending on the frequency in use. The digits assigned to menu items may not be applied. In this case, you cannot operate the FOMA terminal as explained in this manual, so please change the menu to the Standard menu or reset the menu settings (P.35, 124).● When the Kisekae Tool is set to [ドコモダケ], if you select [基本メニュー呼び出し] (loading the basic menu), the menu structure can be changed to normal temporarily.● Some menus are displayed in Japanese even if the Select language is set to English depending on the Kisekae Tool.Resetting the Menu DisplayYou can reset the display of the Kisekae menu to the default setting. 1 From the Menu, select [Settings] → [Management] → [Reset] → [Reset menu screen] and press .The Security code screen appears. The Reset display also appears by pressing for over a second in the stand-by display. Select [Reset menu screen] and press . 2 Enter the Security code and press (OK).The screen for confirming whether to perform the Reset menu screen appears. 3 Select [Yes] and press .The default setting is restored.Resetting the Settings of the Display and SoundYou can reset the settings of the display and sound set by the Kisekae Tool to the default settings. 1 From the Menu, select [Settings] → [Management] → [Reset] → [Reset display/sound] and press .The Security code screen appears. The Reset display also appears by pressing for over a second in the stand-by display. Select [Reset display/sound] and press . 2 Enter the Security code and press (OK).The screen for confirming whether to perform the Reset display/sound appears. 3 Select [Yes] and press .The default settings are restored.Customizing the Kisekae Menu <Kisekae menu>Changing the Menu ItemsYou can change the items of the saved Kisekae menu with other menu items. You may not be able to change menu items depending on the Kisekae menus. Menu items which can be changed vary depending on a Kisekae menu you use. You may not be able to change some menu items. Some Kisekae menus change the menu items automatically based on the operation history. You need to set the Start menu setting to [Kisekae menu] in advance (P.122). 1 Select a menu item in the Kisekae menu display and press (Exchange).ReplacementMy SelectionImagingi−modeMail ppliPhoneData BoxMUSICOsaifu−KeitaiOwn numberLifeKitSettings※ The display shown is when the Kisekae Tool is set to [Manual Custom].Continued](https://usermanual.wiki/Sony/A3724011.08-user-guide-part-1/User-Guide-929851-Page-113.png)
![112Sound/Display/Light Settings 2 Select a menu item to be saved newly and press (Save).The screen for confirming whether to change a menu item with the selected item appears. 3 Select [Yes] and press .The selected menu item is saved.Resetting the Operation History of the Kisekae MenuSome Kisekae menus save the frequencies in use of menu items as an operation history and change the menu items automatically. The Operation history can be deleted. 1 From the Menu, select [Settings] → [Management] → [Reset] → [Reset menu log] and press .The Security code screen appears. The Reset display also appears by pressing for over a second in the stand-by display. Select [Reset menu log] and press . 2 Enter the Security code and press (OK).The screen for confirming whether to reset the operation history appears. 3 Select [Yes] and press .The operation history of the menu is reset.● To restore the default settings for the Kisekae menu display, see P.124.Informing Missed Call/New Mail with Indicator <Missed call>The incoming indicator can be set to flash about every five seconds to notify you that there is a missed call or unread mail/SMS/message. The indicator is turned off by checking the missed call or displaying mail/SMS/message. 1 From the Menu, select [Settings] → [Call] → [Missed call] and press . 2 Select [ON]/[OFF] and press .The Missed call is set.● The indicator color for a missed call follows that set in the Incoming set.● The indicator flashes in the following order of priority when there are mix of missed calls and unread mail/messages.1. Voice call indicator color2. Videophone call indicator color3. PushTalk call indicator color4. Mail indicator color5. Message R indicator color6. Message F indicator color7. Location provision indicator color If there are several calls, mails, messages, etc. of the same priority, the indicator color of the latest one has priority.Setting the Font Size <Font size>Setting the Font Size At OnceYou can set the size of fonts to be used for displaying the Kisekae menu, Phonebook, Call record, mail/SMS, and sites or for entering a word at once. 1 From the Menu, select [Settings] → [Display] → [Font size] → [All font size setting] and press .[Standard disp.]:Set the standard font size (40 dots) at once.[Large disp.(XL)]:Set the extra large font size (60 dots) at once.[Large disp.(XXL)]:Set the extra-extra large font size (80 dots) at once. When the font size of the Kisekae menu is changed between [Standard disp.] and [Large disp.(XL)]/[Large disp.(XXL)], the menu display is changed from the one which is used before the setting is changed. 2 Select a font size to be set at once and press .The All font size setting is set.● Even if the Select language is set to English, when you set the font size to [Large disp.(XL)] or [Large disp.(XXL)], the menus are displayed in Japanese.](https://usermanual.wiki/Sony/A3724011.08-user-guide-part-1/User-Guide-929851-Page-114.png)
![113Sound/Display/Light SettingsSetting the Font Size IndividuallyYou can set the size of fonts to be used individually for displaying the Phonebook, Own number Call record, mail/SMS, and sites or for entering a word.Example: Setting the font size of the Phonebook 1 From the Menu, select [Settings] → [Display] → [Font size] → [Individual font size] and press .Individual font sizePhonebook MCall record MMail MInternet MInput text M[Phonebook]:Select a font size for the Phonebook and Own number from [Extra extra large], [Extra large], [Large], and [Medium].[Call record]:Select a font size for the Call record from [Extra extra large], [Extra large], [Large], and [Medium].[Mail]:Select a font size for the contents display of an i-mode mail, SMS, or Message R/F from [Extra extra large], [Extra large], [Large], [Medium], and [Small].[Internet]:Select a font size for the contents display of a site, Full Browser, or screen memo from [Extra extra large], [Extra large], [Large], [Medium], and [Small].[Input text]:Select a font size when entering a word from [Extra extra large], [Extra large], [Large], [Medium], and [Small]. 2 Select a font size at [Phonebook].The Phonebook font size is set.● Even if you change the mail font size, the size of Deco mail pict. does not change.● The font size of the Mail list is displayed in [Extra large] when [Extra extra large] or [Extra large] is selected at [Mail] of the Individual font size, or in [Medium] when [Large], [Medium], or [Small] is selected.● The font size in the Input text display (address, subject, and main body) of mail/SMS is displayed in [Extra large] when [Extra extra large] or [Extra large] is selected at [Input text] of the Individual font size, in [Large] when [Large] is selected, or in [Medium] when [Medium] or [Small] is selected. When the [Small] is selected, only the font size in the matching word list is displayed in [Small].Changing the Screen Display to English <Select language>Menus, messages, and other displays can be displayed in either Japanese or English. 1 From the Menu, select [設定] → [管理] → [バイリンガル] and press .バイリンガル Japanese English[Japanese]:Set the display language to Japanese.[English]:Set the display language to English.When the display language is set to EnglishSelect [Settings] → [Management] → [Select language]. 2 Select [English] and press .The display language is set to English.● When you set the display language with the UIM inserted, the setting is recorded to the UIM.](https://usermanual.wiki/Sony/A3724011.08-user-guide-part-1/User-Guide-929851-Page-115.png)
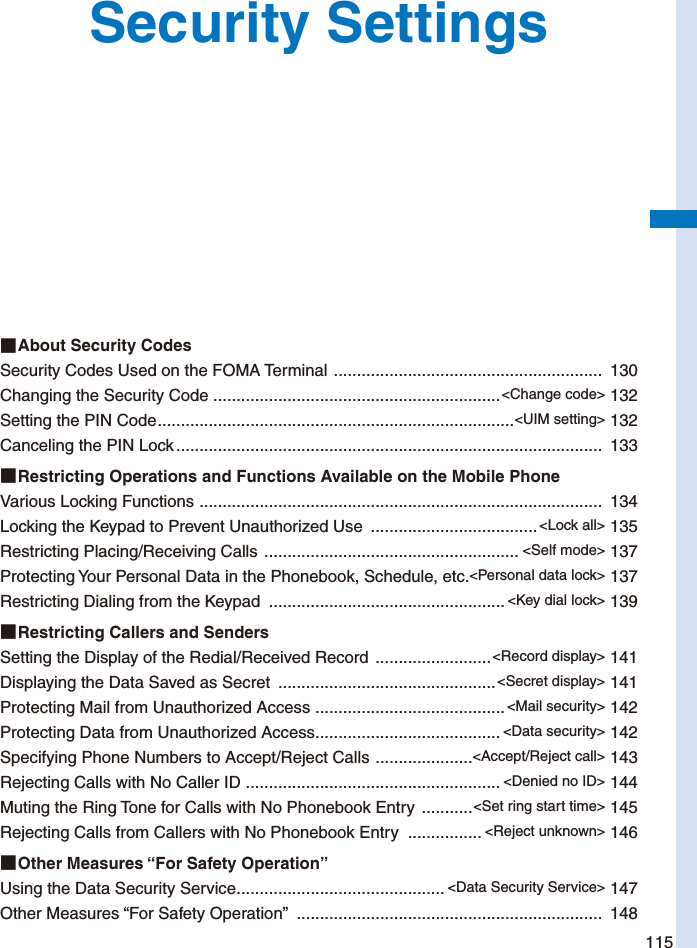
![116Security SettingsSecurity Codes Used on the FOMA TerminalSome functions provided for convenient use of the FOMA terminal require the security code to use them. Besides the Security code for operating the mobile phone, the network security code necessary for the network services, i-mode password, etc. are available. Make use of the FOMA terminal using an appropriate security code according to the purpose.Notes on the security codes● Avoid using a number that is easy to guess, such as “birth date”, “part of your phone number”, “street address number or room number”, “1111”, and “1234”. Make sure to make a note of the security code you set lest you should forget it.● Be very careful not to let others know your security code. If your security code is known by anyone else, DoCoMo shall have no liability for any loss due to any unauthorized use of it.● DoCoMo by no means inquires your security code. ● If you forget any of your security codes, you must bring your official identification (such as driver’s license), the FOMA terminal, and UIM with you to the nearest DoCoMo shop. For details, call the “General Contact” on the backcover of this manual.Security CodeThe Security code is set to “0000” at the time of purchase. It can be changed by yourself (P.132). Input security codeWhen the Security code screen appears, enter the 4- to 8-digit Security code and press (OK). The entered Security code is displayed as asterisks (*).When you enter the wrong Security codeThe message “Invalid security code” appears. Enter the correct Security code.Network Security CodeThe network security code, a 4-digit number necessary for performing procedures on ドコモeサイト (DoCoMo e-site) and using the DoCoMo Network Services, can be set to any number at the time of subscription. It can be also changed later by yourself.You can change your network security code to the new one using the PC if you have the “DoCoMo ID”/“Password” for the “My DoCoMo” General support site for PC. You can also change it by yourself using i-mode, from “各種手続き” (Applications and Procedures) available on ドコモeサイト (DoCoMo e-site).※ For information on “My DoCoMo” or “DoCoMo e-site”, see the backcover of this manual.i-mode PasswordThe 4-digit “i-mode password” is required when saving/deleting My Menu or subscribing/canceling message service or i-mode charged service, etc.(There may be other passwords for the i-mode used by IP (information service providers).)The i-mode password is set to “0000” at the time of subscription. It can be changed by yourself.You can change the i-mode password using i-mode, by selecting [i Menu] → [English iMenu] → [Options] → [Change i-mode Password].](https://usermanual.wiki/Sony/A3724011.08-user-guide-part-1/User-Guide-929851-Page-118.png)
![117Security SettingsPIN1 Code and PIN2 CodeYou can set two Security codes, namely PIN1 and PIN2, for the UIM (FOMA card). These codes are set to “0000” at the time of subscription. They can be changed by yourself (P.133).PIN1 is a 4- to 8-digit number (code) that must be entered for user confirmation to prevent unauthorized use by a third party every time you insert the UIM into the FOMA terminal or when the FOMA terminal is powered on. Only after you enter the PIN1 code, you can use the FOMA terminal for placing/receiving a call and other operation.PIN2 is a 4- to 8-digit number (code) that must be entered in order to reset the total call cost, use a user certificate, or request the issue of a user certificate. If you continue to use the current UIM with a newly purchased FOMA terminal, use the previous PIN1 and PIN2 codes you set for the UIM.Input PIN1 code.3times leftWhen the PIN1 or PIN2 code input screen appears, enter the 4- to 8-digit PIN1/PIN2 code and press (OK). The entered PIN1/PIN2 code is displayed as asterisks (*). If you enter a wrong PIN1/PIN2 code three times consecutively, the PIN1/PIN2 code is locked and cannot be used anymore. (“X times left” appears on the screen, indicating the remaining number of times for retry operation.) When you enter the correct PIN1/PIN2 code, the number of times left is reset to 3.PUK CodeThe PUK code is a 8-digit number for canceling the locked PIN1/PIN2 code. The PUK code cannot be changed by yourself. If you enter a wrong PUK code 10 times consecutively, the UIM is locked.Security provided when you power on the FOMA terminalEnter the PIN1 codeUser certificate operation Connection to a FirstPass-compatible siteEnter the PIN2 codeEnter the PUK codeConsecutive three times incorrect inputCorrect inputContact the nearest DoCoMo shopEnter a new PIN1/PIN2 codeConsecutive 10 times incorrect inputChanging the Security Code <Change code> 1 From the Menu, select [Settings] → [Management] → [Change code] and press . Input security code 2 Enter the current Security code and press (OK).The entered Security code is displayed as asterisks (*). 3 Enter the new Security code and press (OK).Enter a 4- to 8-digit code. 4 Select [Yes] and press .The Security code is changed.](https://usermanual.wiki/Sony/A3724011.08-user-guide-part-1/User-Guide-929851-Page-119.png)
![118Security SettingsSetting the PIN Code <UIM setting>You can set the FOMA terminal to require the PIN1 code input when powered on. You can change the PIN1 and PIN2 codes. 1 From the Menu, select [Settings] → [Management] → [UIM setting] and press .The Security code screen appears. 2 Enter the Security code and press (OK).UIM settingPIN1 code setting OFFChange PIN1 codeChange PIN2 code 3 Select [ON]/[OFF] at [PIN1 code setting].[ON]:You need to enter the PIN1 code when the FOMA terminal is powered on.[OFF]:Do not need to enter the PIN1 code when the FOMA terminal is powered on. 4 Enter a PIN1 code and press (OK).The entered PIN1 code is displayed as asterisks (*). The PIN1 code is set to “0000” at the time of subscription.The PIN1 code setting is set.Changing the PIN1 Code/PIN2 Code To change the PIN1 code, set the PIN1 code setting to [ON].Example: Changing the PIN1 code 1 From the Menu, select [Settings] → [Management] → [UIM setting] and press .The Security code screen appears. 2 Enter the Security code and press (OK).The UIM setting display appears. 3 Select [Change PIN1 code] and press .Input PIN1 code.3times leftTo change the PIN2 codeSelect [Change PIN2 code]. 4 Enter the current PIN1 code and press (OK).The entered PIN1/PIN2 code is displayed as asterisks (*). 5 Enter a new PIN1 code and press (OK).Enter a 4- to 8-digit code. 6 Enter the new PIN1 code again and press (OK).The new PIN1 code is set.Canceling the PIN LockExample: Canceling the PIN1 code lock 1 Enter the 8-digit PUK code and press (OK). Input PUK code. 10times leftThe entered PUK code is displayed as asterisks (*). 2 Enter a new PIN1 code and press (OK).Enter a 4- to 8-digit code.The entered PIN1 code is displayed as asterisks (*). 3 Enter the new PIN1 code again and press (OK).The PIN lock is canceled and the PIN1 code is changed to the new one.](https://usermanual.wiki/Sony/A3724011.08-user-guide-part-1/User-Guide-929851-Page-120.png)
![119Security SettingsVarious Locking FunctionsThe FOMA terminal offers many lock functions to assure safety operation, such as preventing unauthorized use of the FOMA terminal, protecting the Phonebook from being seen by others. You can use any mix of these functions depending on the purpose.Functions DescriptionLock all Prevent others from using the FOMA terminal (P.135).Omakase LockLock the FOMA terminal to prevent others from using it. For example, this service is useful when you lose or misplace the FOMA terminal (P.136).Self mode Disable all functions that involve calls and communication, such as placing/receiving a voice or videophone call, originating/receiving a PushTalk call, sending/receiving mail, infrared communication, or the infrared remote control (P.137).Personal data lockDisable some functions to prevent others from viewing/editing your personal information such as the Phonebook and Schedule data (P.137).Key dial lock Disable the dial keys to prevent placing a voice/videophone call or originating a PushTalk call (P.139).Lock key Pr event the keypad from being accidentally pressed while carrying around the FOMA terminal with the power on (P.140).Record displaySet the Redial, Dial frequency, and Received records not to be displayed (P.141).Secret display Display/not display phonebook entries (PushTalk phonebook)/Own number/schedules saved as Secret (P.141).Mail security Set the FOMA terminal not to display the saved mail, Receive ranking, etc. (P.142).Data security Set the FOMA terminal not to display data in My picture or i-motion of the Data Box (P.142).Accept/Reject callAccept/reject a voice, videophone, or PushTalk call from a specific phone number/group when it is received (P.143).Denied no ID Set not to accept a voice, videophone, or PushTalk call without the caller’s phone number (P.144).Functions DescriptionSet ring start timeSet a time interval before performing the receiving operation for a voice, videophone, or PushTalk call from a caller who is not saved in the Phonebook (P.145).Reject unknownReject a voice, videophone, or PushTalk call from a caller who is not saved in the Phonebook (P.146).IC card lock Lock the IC card to prevent others from using the IC card function (P.262).Locking the Keypad to Prevent Unauthorized Use <Lock all>You can set the Lock all to prevent others from using the FOMA terminal. When the Lock all is set, you cannot perform any operation other than powering on/off the FOMA terminal and answering a voice or videophone call. 1 From the Menu, select [Settings] → [Lock/Security] → [Lock all] and press .The Security code screen appears. 2 Enter the Security code and press (OK).The screen for confirming whether to set the Lock all appears. 3 Select [Yes] and press .The Lock all is set and the message “Lock all” appears in the stand-by display.To cancel the Lock allEnter the Security code and press (OK).Continued](https://usermanual.wiki/Sony/A3724011.08-user-guide-part-1/User-Guide-929851-Page-121.png)
![120Security Settings● To call emergency numbers (110, 119, and 118) when the Lock all is set, enter the emergency number and press . The emergency number is displayed as asterisks (*) in the security code input field of the Security code screen.● The FOMA terminal is powered off after five unsuccessful attempts to cancel the Lock all.● When the Lock all is set, the default ring tone is used for an incoming voice or videophone call. One of the images from the [Preinstall] folder in My picture of the Data Box is used for the incoming image. In this case, not the caller’s name but the caller’s phone number is displayed. Chaku-moji, if received, is not displayed, but when you cancel the Lock all, Chaku-moji can be checked in the Received record (P.57).● When the Lock all is set, you cannot send a substitute image to answer a videophone call. You can only adjust the volume of the caller’s voice or switch the camera during a call.● If there is an incoming PushTalk call when the Lock all is set, the FOMA terminal does not receive the call and the caller hears a busy tone. The call is saved in the Received record. When you cancel the Lock all, the notification icon “ ” (Missed call) appears.● If you receive a request for your location information while the Lock all is set, the FOMA terminal answers the request. In this case, not the caller’s name but the caller’s phone number is displayed.● When the Lock all is set, i-mode mail, Message R/F, and SMS are still received automatically, however, the receiving operations, such as displaying the incoming mail display or the received mail display or the sounding of the ring tone, are not performed and you are not notified of the reception.● When you set the Lock all, the Alarm and Schedule alarm do not operate.● When you set the Lock all, the image set for the stand-by display is changed to the preinstalled [Cyber-shot Logo] image. The i-Channel Telop text is not displayed.● When you set the Lock all, the notification icons other than “ ” (Answer X) are not displayed. When you cancel the Lock all, the icons are displayed again.Using the Omakase LockOmakase Lock is a service that allows you to lock the FOMA terminal remotely if you lose the FOMA terminal by requesting DoCoMo or using a procedure available on the My DoCoMo website. Use this service to protect your important private information and Osaifu-Keitai.You can also request DoCoMo by a call, etc. to unlock the FOMA terminal.※ Omakase Lock is a paid service. However, when you subscribe to this service together with your request to suspend the FOMA terminal or while the FOMA terminal is suspended, the service charge is not required.※ If the Location request is set to ON while the Omakase Lock is set, the FOMA terminal answers a request of location information of the GPS function.Setting/Canceling the Omakase Lock 0120-524-360 Service hours: 24 hours※ You can also use your PC to set/cancel the lock from the My DoCoMo website. For details on how to use/charges, etc. of the Omakase Lock, see the “Mobile Phone User’s Guide 【Procedures and After-Sales Services】”. Omakase Lock activatedThe message “Omakase Lock activated” appears and the Omakase Lock is set. The Omakase Lock service locks a FOMA terminal if it has an installed UIM card you are currently subscribing to. When the Omakase Lock is set, the user can answer a voice or videophone call and power on/off the FOMA terminal, but all keypad operation is locked and all functions (including the IC card function) are disabled. When the Omakase Lock is set, the received mail is stored at the Mail Center. Although the user can power on/off the FOMA terminal, powering off does not cancel the lock. Note, however, that the UIM and microSD memory card are not locked.](https://usermanual.wiki/Sony/A3724011.08-user-guide-part-1/User-Guide-929851-Page-122.png)
![121Security Settings● Any other active function is terminated when the Omakase Lock is set.● The Omakase Lock can be used even when another lock function is set. If you set the Omakase Lock while the Public mode (Drive mode) is set, you cannot receive a voice or videophone call.● The Omakase Lock cannot be set if the FOMA terminal is outside of the service area, in the Self mode, or powered off.● The Omakase Lock cannot be set if you subscribe to the Dual Network Service and use the Mova service.● The Omakase Lock service locks the FOMA terminal upon request from a subscriber of the UIM inserted in the FOMA terminal. Even if this UIM subscriber and user of the FOMA terminal are different, the FOMA terminal is locked if requested by the subscriber.● You can cancel the Omakase Lock only when the UIM the phone number of which is the same as of the one inserted when you set the lock is inserted in the FOMA terminal. If the lock cannot be canceled, call the “General Contact” on the backcover of this manual.● When the Omakase Lock is set, the default ring tone is used for an incoming voice or videophone call. One of the images from the [Preinstall] folder in My picture of the Data Box is used for the incoming image. In this case, not the caller’s name but the caller’s phone number is displayed. Chaku-moji, if received, is not displayed, but when you cancel the Omakase Lock, Chaku-moji can be checked in the Received record (P.57).● When the Omakase Lock is set, you cannot send a substitute image to answer a videophone call. You can only adjust the volume of the caller’s voice and switch the camera during a call.● When you set the Omakase Lock, the image set for the stand-by display is changed to the preinstalled [Cyber-shot Logo] image. The i-Channel Telop text is not displayed.Restricting Placing/Receiving Calls <Self mode>You can disable all functions that involve calls or communication, such as placing/receiving a voice or videophone call, originating/receiving a PushTalk call, and sending/receiving mail. You cannot use infrared communication, infrared remote control, and iC communication, either. 1 From the Menu, select [Settings] → [Call] → [Self mode] and press .The screen for confirming whether to set the Self mode appears.To cancel the Self modeSelect [Yes] on the screen for confirming whether to cancel the Self mode. 2 Select [Yes] and press .The Self mode is set and “ ” appears.● Even if the Self mode is set, you can call emergency numbers (110, 119, and 118). The Self mode is canceled after you call an emergency number.● If there is an incoming voice call when the Self mode is set, the caller hears a guidance informing that the FOMA terminal is outside of the service area or the FOMA terminal is powered off. When using the DoCoMo Voice Mail Service or Call Forwarding Service, these services can be used in the same manner as when the FOMA terminal is powered off.● If you receive a PushTalk call when the Self mode is set, the call is disconnected. If the received call is for the PushTalk communication among several persons, the message “ Disconnect” appears in the On PushTalk display of the members.](https://usermanual.wiki/Sony/A3724011.08-user-guide-part-1/User-Guide-929851-Page-123.png)
![122Security SettingsProtecting Your Personal Data in the Phonebook, Schedule, etc. <Personal data lock>You can disable the following functions to prevent others from viewing/editing your personal information such as the Phonebook and Schedule data.- MUSIC Player - Music&Video Channel- Lifetime Calendar - Camera- Full Browser - microSD- Mail - i-mode- i-Channel - i-αppli- DCMX - Own number- Phonebook - PushTalk phonebook- Data Security Service - Record message- Voice memo - Bar code reader- Infrared/iC communication - ToruCa- IC card content - GPS- Alarm - Schedule- Text memo - Data Box- Stand-by display - Kisekae tool- Icon settings - Animation- Ring tone - Incoming image- Substitute image - Reset- Chaku-moji - Melody Call- easy BlogUp - Music slide show- Stand-by pictures When the Reject unknown is set, you cannot set the Personal data lock. 1 From the Menu, select [Settings] → [Lock/Security] → [Pers. data lock] and press .The Security code screen appears. 2 Enter the Security code and press (OK). 3 Select [ON] and press .The Personal data lock is set and “ ” appears.To cancel the Personal data lockSelect [OFF]. The Personal data lock is canceled and “ ” disappears.● When the Personal data lock and Key dial lock are set simultaneously, “ ” is displayed instead of “ ”.● If you set the Personal data lock when data other than that of the Kisekae menu or that preinstalled in the [Preinstall] folder of the Data Box is set for the image, substitute image, or ring tone in the stand-by or other display, the setting is reset to the default setting. If you cancel the Personal data lock, the image or ring tone you set is restored.● When the Personal data lock is set, the regular ring tone, incoming image (excluding PushTalk), and indicator color are used for an incoming voice, videophone, or PushTalk call. In this case, not the caller’s name but the caller’s phone number is displayed. Chaku-moji, if received, is not displayed, but when you cancel the Personal data lock, Chaku-moji can be checked in the Received record (P.57).● If you receive a request for your location information while the Personal data lock is set, the FOMA terminal answers the request. In this case, not the caller’s name but the caller’s phone number is displayed.● When the Personal data lock is set, i-mode mail, Message R/F, and SMS are still received automatically, however, the receiving operations, such as displaying the incoming mail display or the received mail display or the sounding of the ring tone, are not performed and you are not notified of the reception.● When you set the Personal data lock, the name, phone type icon, and Chaku-moji are not displayed in the Redial/Received record.● When you set the Personal data lock, the Alarm and Schedule alarm do not operate.● When you set the Personal data lock, all incoming call is accepted regardless of the Accept/Reject call setting.● When you set the Personal data lock, the i-Channel Telop text is not displayed.● When you set the Personal data lock, the FOMA terminal does not display the following icons. If you cancel the lock, they appear.- “ ” (New mail)- “ ” (Mail at center)- “ ” (New MessageR)- “ ” (New MessageF)- “ ” (New ToruCa)- “ ” (New Record msg)- “ ” (New V.phone msg)- “ ” (Voice Mail)- “ ” (Download completed)- “ ” (Download failed)- “ ” (PB update failed)- “ ” (Stand-by SW error)- “ ” (Update completed)- “ ” (Update definitions)](https://usermanual.wiki/Sony/A3724011.08-user-guide-part-1/User-Guide-929851-Page-124.png)
![123Security SettingsRestricting Dialing from the Keypad <Key dial lock>The keypad is locked to restrict placing a voice or videophone call or originating a PushTalk call. To cancel the Key dial lock temporarily, enter the Security code. When you set the Key dial lock, you cannot perform the following functions.- Place a call using the keys on the keypad (excluding calls made by the 2-touch dial or using the Flat-plug Earphone/Microphone with Switch) or [Call back] from i-mode mail- Add a member during PushTalk communication using the keys on the keypad- Place a call to a recipient who is not saved in the Phonebook using the Redial/Dial frequency/Received record- Send i-mode mail or SMS to a recipient who is not saved in the Phonebook- Phone To (AV Phone To) or Mail To- Save new data or edit/delete data in the Phonebook- Operate the Phonebook stored in the microSD memory card- Select the Phonebook attached to i-mode mail- Save/edit/delete the Location notice or information of a party- Send the Phonebook data using the infrared communication 1 From the Menu, select [Settings] → [Lock/Security] → [Key dial lock] and press .The Security code screen appears. 2 Enter the Security code and press (OK). 3 Select [ON] and press .The Key dial lock is set and “ ” appears.To cancel the Key dial lockSelect [OFF]. The Key dial lock is canceled and “” disappears.● When the Key dial lock and Personal data lock are set simultaneously, “ ” is displayed instead of “ ”.● Even if the Key dial lock is set, you can call emergency numbers (110, 119, and 118).Setting the Display of the Redial/Received Record <Record display>The Redial, Dial frequency, and Received record can be set not to be displayed. Playback of the Record message is also disabled. To cancel the Record display temporarily, enter the Security code. 1 Press ( ) in the stand-by display and press (Func).The Function menu appears. 2 Select [Set call record] → [Record display] and press .The Security code screen appears. 3 Enter the Security code and press (OK).The Record display appears. 4 Select [ON]/[OFF] and press .The Record display is set.● The call is saved in the Redial/Received record even if the Record display is [OFF].Displaying the Data Saved as Secret <Secret display>The Phonebook (PushTalk phonebook), Own number, and Schedule saved as Secret are not displayed unless the Secret display is set to [ON]. Make sure to save the Phonebook, Own number, and Schedule as Secret if you do not want others to see them. Even if the Secret display is set to [ON], it is changed to [OFF] when you power off the FOMA terminal. 1 From the Menu, select [Settings] → [Lock/Security] → [Secret display] and press .The Security code screen appears. 2 Enter the Security code and press (OK). 3 Select [ON]/[OFF] and press .The Secret display is set.When set to [ON], “ ” appears.Continued](https://usermanual.wiki/Sony/A3724011.08-user-guide-part-1/User-Guide-929851-Page-125.png)
![124Security Settings● When a caller or recipient is saved as Secret in the Phonebook, the name and phone type are not displayed in the Redial/Received record. Once you cancel the Secret, they are displayed.Protecting Mail from Unauthorized Access <Mail security>You can set the FOMA terminal not to display the received/sent/saved mail by folder. You can also use this function not to display the Receive/Send ranking and Sort inbox/outbox. To cancel this function temporarily, enter the Security code. 1 From the Mail menu, select [Inbox]/[Outbox]/[Draft] and press . 2 Press (Func).The Function menu appears. 3 Select [Mail security] and press .The Security code screen appears. 4 Enter the Security code and press (OK).The Mail security set display appears. 5 Select a folder to be locked and press .“” appears.To lock all foldersPress (Sel. all).To unlock the selected folderPress (Rel.). 6 Press (Complete).The Mail security is set and “ ” (yellow)/“ ” (blue)/“ ” appears (P.219).Protecting Data from Unauthorized Access <Data security>You can set the FOMA terminal not to display data in My picture or i-motion of the Data Box. You can select data not to display by folder. To cancel this function temporarily, enter the Security code. Even if the Data security is set for a folder, images in the folder are displayed without entering the Security code in cases such as when the folder is set for the Stand-by pictures.The Data security can be set for the following folders.Category FolderMy picture i-mode, Camera, Data exchange, and User-created folderi-motion i-mode, Camera, Data exchange, and User-created folder 1 From the Data Box, select a category and press .The folder list appears. 2 Press (Func).The Function menu appears. 3 Select [Data security] and press .The Security code screen appears. 4 Enter the Security code and press (OK).The screen for selecting a security folder appears. 5 Select a folder to be locked and press .To lock all foldersPress (Sel. all).To unlock the selected folderPress (Rel.). 6 Press (Complete).The screen for confirming the change of the security setting appears. 7 Select [Yes] and press .The Data security is set.](https://usermanual.wiki/Sony/A3724011.08-user-guide-part-1/User-Guide-929851-Page-126.png)
![125Security SettingsSpecifying Phone Numbers to Accept/Reject Calls <Accept/Reject call>You can set to accept/reject voice, videophone, or PushTalk calls only from specific phone numbers. For the Accept/Reject calls, up to 20 phone numbers can be saved (Phone No.).You can also set to accept/reject calls only from specific groups in the FOMA terminal phonebook. For the Accept/Reject calls, up to three groups can be saved (Group list).This function is valid only when a caller sends the phone number. It is recommended to set the Caller ID Display Request Service and the Denied no ID together with this function. SMS and i-mode mail can be received regardless of this function. For an incoming PushTalk call, it is only to the caller’s phone number that the Accept/Reject call setting is valid. The Accept/Reject setting does not work even if you set it to a member other than the caller. When you make the Accept/Reject setting through the Group list, a call is accepted/rejected if the caller of it belongs to the specified group in the FOMA terminal phonebook. When the Personal data lock is set, you cannot set the Accept/Reject calls.Example: Setting [Accept]/[Reject] for calls from specified phone numbers 1 From the Menu, select [Settings] → [Lock/Security] → [Acpt/Rjct call] and press .The Security code screen appears. 2 Enter the Security code and press (OK).Accept/Reject callSet OFFPhone No. 0/20Group list 0/3 3 Select [Accept]/[Reject] at [Set].[Accept]:Set to accept a call. When you receive a call from a phone number/group other than specified, the call is not connected. The missed call notification icon appears and the call is saved in the Received record.[Reject]:Set to reject a call. When you receive a call from a specified phone number/group, the call is not connected. The missed call notification icon appears and the call is saved in the Received record.[OFF]:Cancel the Accept/Reject call setting. 4 Select [Phone No.] and press .Phone No. listNumber fieldTo specify a groupSelect [Group list] and select a group at the group field.To delete a phone number or groupMove the cursor to the number or group field and from the Function menu, select [Delete] → [Delete one] → [Yes]. To delete all numbers or groups, from the Function menu, select [Delete] → [Delete all] → [Yes]. 5 Enter a phone number at the number field. 6 Press .The list is saved and the Accept/Reject call display is restored. 7 Press (Complete).The Accept/Reject call from specified phone numbers is set.](https://usermanual.wiki/Sony/A3724011.08-user-guide-part-1/User-Guide-929851-Page-127.png)
![126Security SettingsRejecting Calls with No Caller ID <Denied no ID>When receiving a voice, videophone, or PushTalk call without the caller’s phone number displayed, the reason for not displaying it is shown. You can decide whether to accept a call based on the reason. SMS and i-mode mail can be received regardless of this function. If you receive a call with no caller ID when the Denied no ID is [ON], the call is not connected. The missed call notification icon appears and the call is saved in the Received record. 1 From the Menu, select [Settings] → [Lock/Security] → [Denied no ID] and press .The Security code screen appears. 2 Enter the Security code and press (OK).Denied no IDUser Unset OFFPublicPhone OFFNot supported OFF 3 Select [ON]/[OFF] of the Denied no ID for each non-display reason.The Denied no ID is set.Muting the Ring Tone for Calls with No Phonebook Entry <Set ring start time>You can set a time interval before starting operation of the ring tone, incoming indicator, and vibrator when you receive a voice, videophone, or PushTalk call from a person/group who is not saved in the Phonebook. This function is also useful for blocking a nuisance call such as from a malicious caller. When the Reject unknown is set, you cannot set the Set ring start time. 1 From the Menu, select [Settings] → [Call] → [Call assist] → [Set ring start time] and press .Set ring start timeSet OFFStart time 04 sec (01−99)Missed call display OFF 2 Select [ON]/[OFF] for the Set ring start time at [Set]. 3 Enter the time before starting the ring tone for an incoming call at [Start time].Enter from 01 to 99 seconds. 4 Select [ON]/[OFF] at [Missed call display].[ON]:Display all calls in the Received record.[OFF]:For a call the start time of which is shorter than the set time, neither the missed call notification icon nor the received record is displayed. The call is saved in the Received record. When the operation of the record message or videophone message is started, the notification icon of missed call appears and the received record is displayed. 5 Press (Complete).The Set ring start time is set.● In the following cases, the Set ring start time setting works to a call even if you receive it from a person saved in the Phonebook.- A call from a person saved as Secret in the Phonebook (when the Secret display is set to [OFF])- A call with no caller ID- When the Personal data lock is set● To display all received records when the Missed call display is [OFF], from the Function menu in the Received record display, select [Display all].● If the time set for the Start time is same as that for the answer or ring times for the Record message, Auto answer setting, Voice Mail Service, and Call Forwarding Service, the ring tone may sound.](https://usermanual.wiki/Sony/A3724011.08-user-guide-part-1/User-Guide-929851-Page-128.png)
![127Security SettingsRejecting Calls from Callers with No Phonebook Entry <Reject unknown>You can set to reject voice, videophone, or PushTalk calls from callers not saved in the Phonebook. It is recommended that you set the Caller ID Display Request Service together with this function. SMS and i-mode mail can be received regardless of this function. If you receive a call from a caller who is not saved in the Phonebook when the Reject unknown is [ON], the call is not connected. The missed call notification icon appears and the call is saved in the Received record. When the Set ring start time or Personal data lock is set, you cannot set the Reject unknown. 1 From the Menu, select [Settings] → [Lock/Security] → [Reject unknown] and press .The Security code screen appears. 2 Enter the Security code and press (OK). 3 Select [ON]/[OFF] and press .The Reject unknown is set.● In the following cases, the Reject unknown setting works to a call even if you receive it from a person saved in the Phonebook.- A call from a person saved as Secret in the Phonebook (when the Secret display is set to [OFF])- A call with no caller IDUsing the Data Security Service <Data Security Service>The Data Security Service is a service that allows you to store the Phonebook, images, and mail (hereinafter referred to as “stored data”) saved in your FOMA terminal at the Data Security Service Center.Even if you lose the stored data, for example, if you accidentally lost the FOMA terminal or it had a water-related trouble, you can restore the stored data at the Center into a new FOMA terminal. Also, the phonebook data saved in both the FOMA terminal and Data Security Service Center can be kept it latest automatically on a regular basis. Furthermore, you can easily edit the stored data at the Data Security Service Center by accessing the My DoCoMo website on your PC, and save the edited stored data in the FOMA terminal.※ For details on the Data Security Service, see the “Mobile Phone User’s Guide 【i-mode】 FOMA version”.Store the Phonebook, images, and mail.FOMA terminalData Security Service CenterPC, etc.InternetView and edit the stored data.Update the FOMA terminal after editing the data on a PC.Easily restore data when the FOMA terminal is lost or has a water-related trouble.※ Data Security Service is a paid service that requires a subscription. (To apply for this service, you need an i-mode subscription.) Saving the Phonebook (P.105) Saving the mail (P.221) Saving the images (P.295)](https://usermanual.wiki/Sony/A3724011.08-user-guide-part-1/User-Guide-929851-Page-129.png)
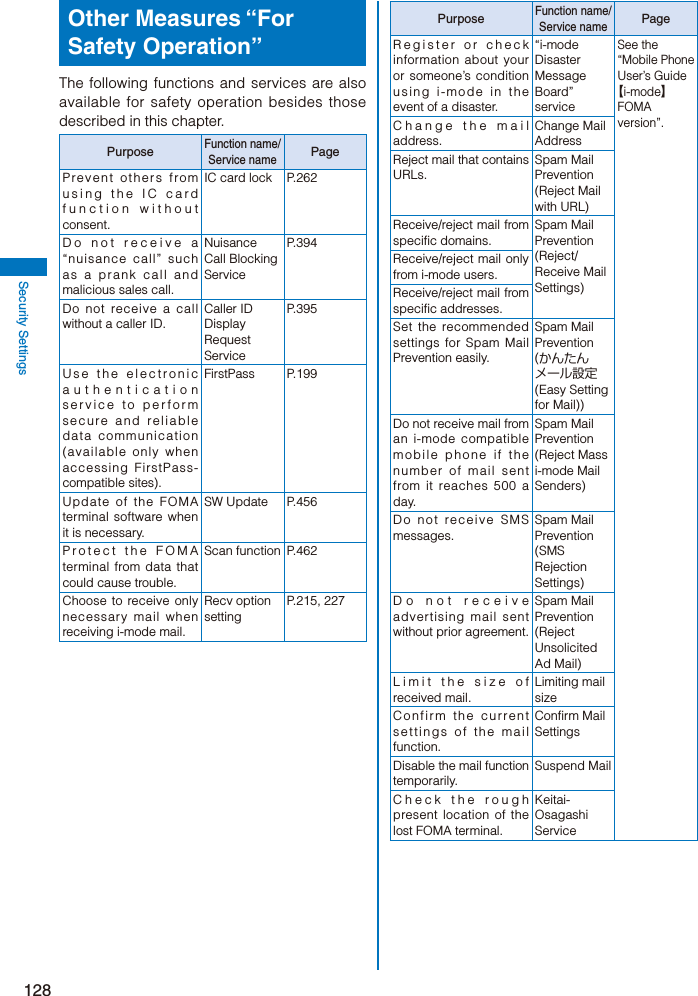
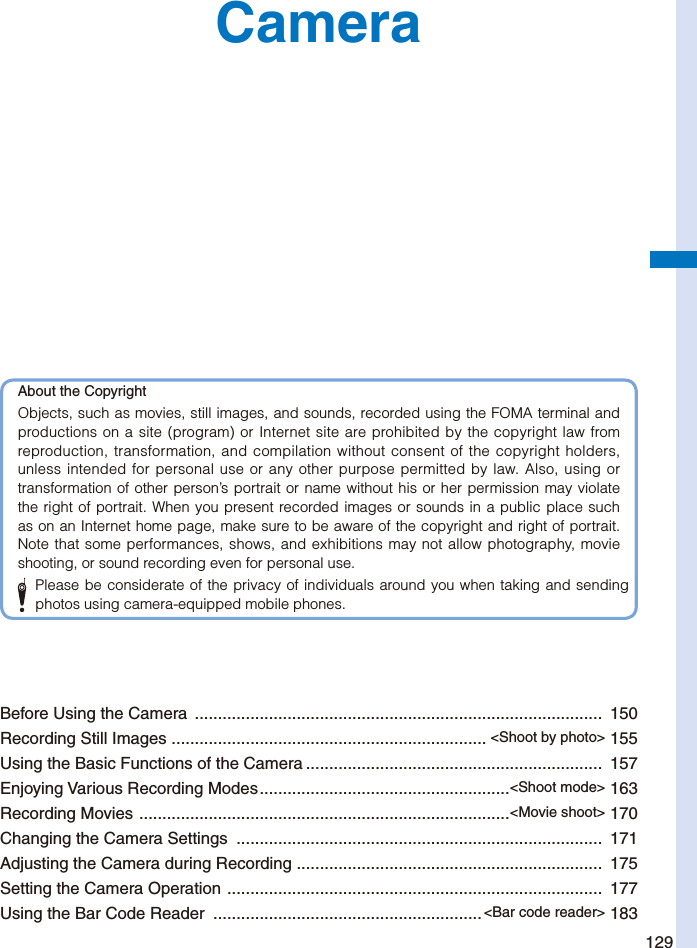
![130CameraBefore Using the CameraYou can record images using the built-in camera, and you can send them by attaching to i-mode mail, posting on a blog, setting for the stand-by display, and so on.When you save an image to the microSD memory card, you can also select a mode to save a replicated image of smaller size in the FOMA terminal at the same time (P.178, 319).To use the microSD memory card, you need to obtain a microSD memory card separately. If you do not have a microSD memory card, you can purchase one at a home electric appliance store or other similar store (P.306). The image recorded by the camera may differ from actual color or brightness of object.About Using the CameraNotes Before Using the Camera Clear images cannot be obtained if the camera lens is stained with fingerprints or grease. Wipe the camera with a soft clean cloth before recording an image. Leaving the FOMA terminal in a place exposed to direct sunlight or high temperature for a long period of time may deteriorate the image quality. You cannot start the Camera mode when the battery level is very low. To use the camera, charge the battery sufficiently. The Camera mode may not be activated when the FOMA terminal is charged electrostatically. When you post or send an image recorded by the camera, it is at your own risk to decide whether or not to share your location information attached to the image. If you do not want to send location information, set the Auto attach loc. info to [OFF] (P.171).Notes on Using the Camera To prevent shaking, hold the FOMA terminal firmly or place it on a stable place and use the Auto timer when recording. When you try to record a strong light source directly, such as the sun or a lamp, the screen may black out or the image on the screen may be distorted. The camera is manufactured based on the leading edge technologies. Nevertheless, black and bright points or lines may appear constantly in the display. Additionally, increased noise may appear as white lines when recording in a low-light environment. These are not malfunctions. When the battery level becomes very low in the Camera mode, the Camera mode is terminated.About the Camera ModeTo use the camera, slide the lens cover to open in the stand-by display or menu display. The camera activation sound is heard, the Camera mode is activated, an image through the camera lens appears in the display, and the Auto timer indicator is turned on.To terminate the Camera mode, close the lens cover. You can also activate the Camera mode by pressing for over a second in the stand-by display.● The Camera mode is terminated automatically if the keypad is not pressed for about two minutes.● Depending of the functions you are using, the Camera mode may not be terminated even if you close the lens cover. Press (Stop) or to terminate it.● When the camera is activated or swiched to the Out-camera with the lens cover closed, the message “Open the lens cover” appears.](https://usermanual.wiki/Sony/A3724011.08-user-guide-part-1/User-Guide-929851-Page-132.png)
![131CameraAbout Still Image/MovieItem Still image MovieFile formatJPEG (Exif format) MP4 (MobileMP4)File nameWhen saved to [Data Box]YYYYMMDDhhmmss The recorded year, month, date, hour, minute, second is displayed. For example, when a still image is recorded at February 1, 2008, 18:02:10, it appears as “20080201180210”. When using the Continuous mode, 00 to 03 is added after the year, month, date, hour, minute, second, resulting in a format like “20080201180210_00”.When saved to [microSD]DSC0nnnnWhen saved to [Data Box]YYYYMMDDhhmmss The recorded year, month, date, hour, minute, second is displayed. For example, when a movie is recorded at February 1, 2008, 18:02:10, it appears as “20080201180210”.When saved to [microSD]MOLnnnFile numberNNN-nnnn The file number is displayed when saved to [microSD]. You can reset the file number (P.181).− A number “100 to 999” is assigned to “NNN”, “001 to FFF” is assigned to “nnn”, and “0001 to 9999” is assigned to “nnnn” in the order of recorded time. If you have not set the date/time, the file name is displayed as “--------------”.About the Orientation of Still Images Being SavedImages recorded with the camera are saved in landscape or portrait orientation depending on the image size to be recorded. An image of a size of [QCIF(176×144)], [VGA(640×480)], [1M(1280×960)], [2M(1632×1224)], [2M Wide(1920×1080)], or [3M(2048×1536)] is saved in landscape orientation and of a size of [QVGA(240×320)] or [Stby(480×864)]※ is saved in portrait orientation.※ When the Shoot mode is set to [BestPic™], the orientation of a saved image is landscape even if you set the image size to [Stby(480×864)].Continued](https://usermanual.wiki/Sony/A3724011.08-user-guide-part-1/User-Guide-929851-Page-133.png)
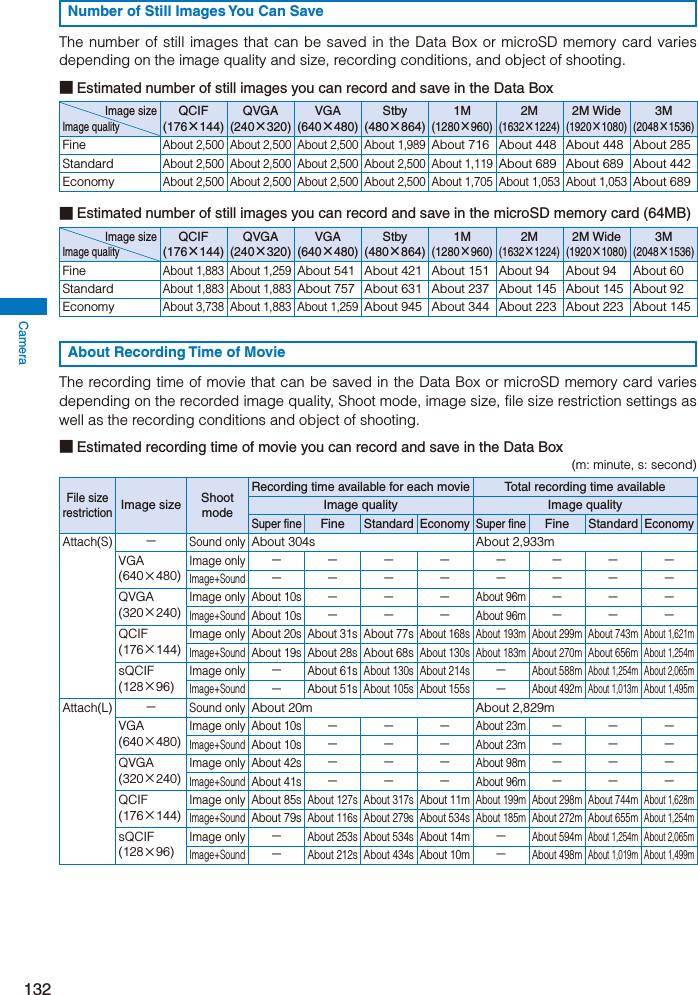
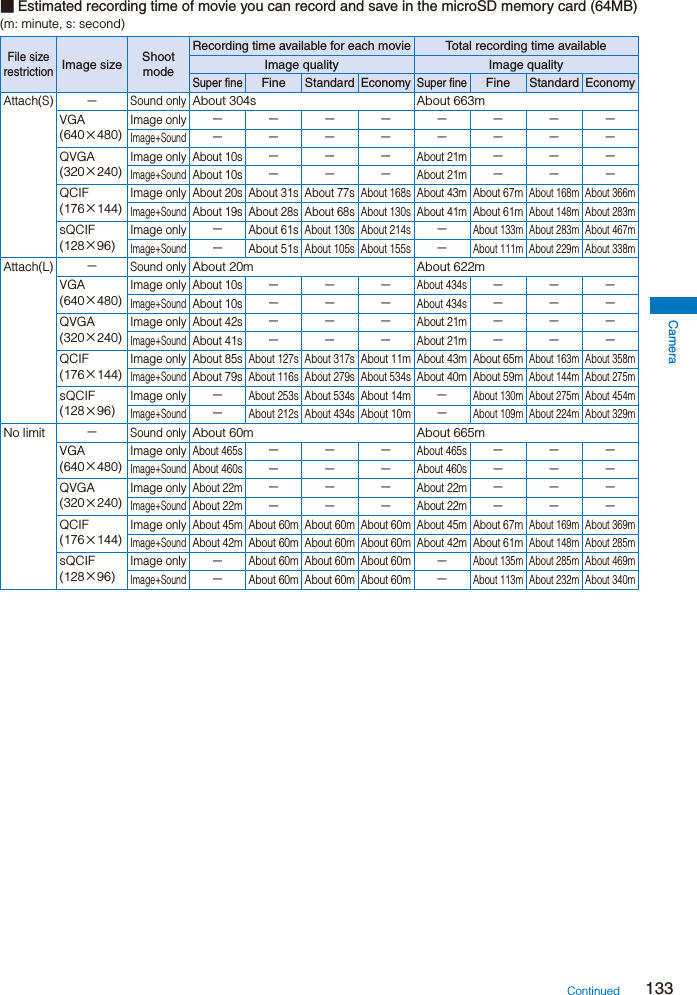
![134CameraIcons in the Camera ModeIn the Camera mode display, the following icons appear according to the settings and functions selected. You can use to switch display of the icons and guide display (Standard, Key operation guide display, or Display off). Even if you select “Display off”, related icons are displayed when you perform any operations.When recording a still imageMENU ShootFuncZoom(T)Zoom(W) When recording a movieMENU ShootFuncZoom(T)Zoom(W) Shoot mode (P.182) “ ” appears when recording a still image. Flash (P.174) Photo light ON (P.174) Auto Focus (P.173) Multi focus (P.172) During the Auto Focus operation Image quality (P.178) The number of a folder to save to Appears when saving data to/playing data from the microSD memory card (does not appear when no microSD memory card is inserted). Save to (P.177) Estimated number of images that can be recorded If the number of images that can be recorded is higher than 9,999, “ ” appears. Image size (P.159) Shoot mode (P.163) Switch camera (Out-camera/In-camera) Select scene (P.160) EV (P.162) Face detection OFF (P.162) White balance (P.175) Photometry (P.176) Image stabilize (P.180) Auto timer ON (P.173) Zoom (P.161) Does not appear when the Zoom cannot be used. Saved with this side up indication (P.159, 179) Focus frame when the digital zoom is used Spot photometry (P.176) Spot Focus frame Multi focus frame Set attach loc. info ON (P.171) GPS positioning accuracy (P.265) : Nearly accurate location information (with an error less than approximately 50 m) : Relatively accurate location information (with an error less than approximately 300 m) : Approximate location information (with an error more than approximately 300 m) Positioning failed Guide for using the key operation guide display Mini-Photo creator set to [Replicate] (P.178) Auto orientation ON (P.179) Common replay mode (P.175) File size (P.181) Recording sound only Recording status Stopped During image recording During image playing During pausing During image fast-forwarding During image fast-reversing Progress bar Estimated recordable time](https://usermanual.wiki/Sony/A3724011.08-user-guide-part-1/User-Guide-929851-Page-136.png)
![135CameraRecording Still Images <Shoot by photo>When recording with the Out-camera, you can record still images by focusing on five spots in the display when the Multi focus is set to [Multi AF] or a spot at the center of the display when set to [Spot AF]. When the Auto orientation is set to [ON], the orientation of the FOMA terminal is automatically detected while recording and orientation information is recorded in the image file. The allowable distance for the Auto focus between the camera and an object is about 30 cm or more using [Macro OFF], about 10 cm or more using [Macro], and about 3 cm to 18 cm using [S-macro]. When the zoom magnification is increased into the digital zoom range, the Multi focus function does not operate even if the Multi focus is set to [Multi AF]. An auto-focus function that finds a focus in the central area of the display is used instead. You cannot use the Auto Focus when you set the Select scene to [Night scene]/[Low Light] for recording still images. 1 Slide the lens cover to open in the stand-by display.The Camera mode is activated. You can also activate the Camera mode by sliding the lens cover to open in the menu display. 2 Point the camera at the object and press halfway down to focus on it.MENU ShootFuncWhen the Multi focus is set to [Multi AF], objects are brought to focus at up to five spots within the white Multi focus frame. When set to [Spot AF], the focus is adjusted using the white Spot focus frame at the center of the display. When the image comes into focus, the confirmation sound is heard, and the focus frame/frames turn green. While recording a still image, the Auto timer indicator flashes. When failed to adjust the focus, the white focus frame/frames turn red.To focus on an area other than the center of the display when the Multi focus is set to [Spot AF]Press halfway to focus, point the camera where you want to record, and then press .To switch to the In-cameraFrom the Function menu, select [ ] (Switch camera) → [ ] (In camera). When using the In-camera, the white focus frame/frames do not appear, indicating that the Auto Focus function is disabled.To record images using (Shoot)Press (Shoot). To focus on an area other than the center of the display when the Multi focus is set to [Spot AF], press to focus, point the camera where you want to record, and then press (Shoot). 3 Press .A still image is recorded with the shutter sound and the screen for confirming whether to save the image appears. 4 Press (Save).The still image is saved. You can display the saved still image for checking by pressing .To attach to mailPress (Func) for over a second. The still image is saved and the Edit mail display appears. You can also attach an image to mail by selecting [ ] from the Function menu.To cancel a recorded imagePress and select [Yes].To post on a blogFrom the Function menu, select [ ] (P.358).To add location informationFrom the Function menu, select [ ] (Location info) → [ ] (Rcv location info). To display the obtained detailed information, from the Function menu, select [ ] (Location info) → [ ] (Location detail) (P.277).To save as a mirror image when recording with the In-cameraFrom the Function menu, select [ ]. To switch between Normal image and Mirror image, from the Function menu, select [ ] (Display) → [ ] (Mirror image)/[ ] (Normal image). When you switch an image between Normal image and Mirror image, the image is reversed horizontally, seen in the orientation in which it is saved. Depending on the orientation of a saved image, the image may be displayed as if it is reversed vertically.Continued](https://usermanual.wiki/Sony/A3724011.08-user-guide-part-1/User-Guide-929851-Page-137.png)
![136Camera● When there is not enough memory or the number of saved images exceeds the maximum number, the message appears. Change the place to save the image or delete unnecessary images.● When you switch to the Shoot by photo mode from the Movie shoot mode, the following items are reset.Item Default settingSwitch camera Out cameraSelect scene AUTOZoom magnification ×1.0EV ±0.0EVAuto timer OFFPhoto light OFFGrid Line OFFWhite balance AUTOPhotometry CenterPicture effect OFF● The image may not be saved when you receive a call before the shutter sound ends.● Depending on the object of shooting and the recording conditions, you may not be able to adjust focus or an unexpected portion may be brought into focus.● When you record an object under the following conditions, the Auto Focus may not be able to adjust the focus of the object.- The object does not have color contrast.- The object is moving.- You are recording in a dark place.- You are recording while moving the FOMA terminal.- There is a light within range of the camera view.● When you record an image while the Auto orientation is set to [ON], the image may be displayed in an orientation different from that seen in the FOMA terminal in the following cases.- When attaching an image to mail or posting it on a blog- When transferring an image to a PC, etc. using USBUsing the Basic Functions of the CameraGraphical MenuMain settings of the camera can be changed from the Graphical menu.In this manual, the icons displayed defaultly at the time of purchase are used for describing operations available from the Graphical menu, regardless of them being changed because of change in the settings. Because the icons of the Graphical menu vary depending on the settings at the time, icons used in this manual may differ from the actual ones. 1 Press (Func) in the Camera mode display.Photograph image to fit the size of stand−by displaySelect sizeStby(480×864) Submenu of the selected menu item Name of the selected item Guide of the selected item Menu item The icon for the currently set item appears. 2 Set each item.Use to select a menu item to be set and to select an item on the submenu, and press .● For the operations in the horizontal orientation, the 4-way keys are described differently according to the key positions seen in the horizontal orientation of the FOMA terminal. represent and represent for normal operations respectively. Also, the scrolling directions of the JOG upward and downward in the normal operations become to the left and right.](https://usermanual.wiki/Sony/A3724011.08-user-guide-part-1/User-Guide-929851-Page-138.png)
![137CameraDirect Key OperationFrequently used functions are assigned a Direct key. You can use Direct keys to change settings with a simple key operation instead of selecting from the Menu. Every time you press the Direct key, the settings are changed.For functions for which the Direct key operation is available, the assigned Direct keys are also mentioned in this manual. Functions are assigned to the Direct keys as follows.Operation Key operation PageSelect size Press or . P.159Switch the Auto timer Press . P.173Switch the Flash Press . P.174Auto Focus setting Press . P.173Decrease the EV value Scroll the Jog to left. P.162Increase the EV value Scroll the Jog to right. P.162Switch camera Press . P.159Select scene setting Press . P.160White balance setting Press . P.175Photometry setting Press . P.176Switch ON/OFF of the Grid LinePress . P.174Picture effect setting Press . P.176Position the current locationPress for over a second.P. 1 7 2Reset all setting Press . P.177Switch ON/OFF of the Photo lightPress . P.174Switch the Shoot by photo/Movie shootPress . P.170 You may not be able to operate some functions depending on the Shoot mode.Example: Setting the Auto timer 1 Press in the Camera mode display.Auto timer:10secPhotograph 10 seconds after pressing shutterEvery time you press , the time is changed among [OFF], [10sec], [5sec], and [2sec]. After about 2 seconds without any operations, the display restores and the Auto timer is set to the last selected setting. 2 Press until the time you want or [OFF] appears.The Auto timer is set.● The Direct keys and functions assigned to them can be checked on the Key operation guide display that appears by pressing or sliding the FOMA terminal to open.Selecting an Image SizeYou can select the size of a still image and movie to be recorded from nine and four types, respectively. When the Shoot mode of the still image is set to [Panorama], [Continuous mode], or [Shoot with frame], you cannot select the image size. When the size of a movie is set to [QVGA(320×240)] or [VGA(640×480)], the image quality of the movie is changed to [Super fine]. When the size of a movie whose image quality is [Super fine] is set to [sQCIF(128×96)], the image quality of the movie is changed to [Standard]. 1 Press (Func) in the Camera mode display, select [ ] (Select size) → an image size, and press . You can also set an image size by pressing or in the Camera mode display.The image size is set and the icon for the current image size appears. When the image size is set to [QVGA(240×320)] or [Stby(480×864)], the saved with this side up indication “ ” appears. The image is saved with the indicated side up.Still image (Out-camera)QCIF(176×144)QVGA(240×320)VGA(640×480) Stby(480×864) 1M(1280×960)2M(1632×1224)2M Wide(1920×1080)3M(2048×1536) The image size which can be recorded with the In-camera is [QCIF(176×144)], [QVGA(240×320)], or [VGA(640×480)].Movie (Out-/In-camera)sQCIF(128×96)QCIF(176×144)QVGA(320×240) VGA(640×480)Continued](https://usermanual.wiki/Sony/A3724011.08-user-guide-part-1/User-Guide-929851-Page-139.png)
![138CameraSwitching the Camera Used for RecordingYou can switch between the Out- and In-cameras for recording. When the Shoot mode of the still image is set to [Smile shutter], [Panorama], [High sensitivity], [BestPic™], or [Continuous mode], you cannot switch the camera. When the Shoot mode of the still image is set to [Shoot with frame] while the image size is set to [Stby(480×864)], you cannot switch the camera from the Out-camera to In-camera. When the camera is switched from the Out-camera to In-camera, the following items are changed. The Select scene, Face detection, Auto Focus, Flash, Digital Zooming, and Image stabilize restore the previous settings when switching the camera to the Out-camera.Item SettingImage size VGA(640×480)※1Select scene AUTOEV ±0.0EV※1※2Face detection OFFAuto Focus OFFFlash OFFWhite balance AUTO※2Photometry Center※2Picture effect OFF※2※3Digital Zooming OFFImage stabilize OFF※1 The setting of the Image size or EV is changed to the listed one when it cannot be set for the In-camera.※2 The setting of the EV, White balance, Photometry, or Picture effect is changed to the listed one when the Select scene is set to other than [AUTO] for the Out-camera.※3 The Picture effect is changed to [OFF] when it is set to [Solarization]. 1 Press (Func) in the Camera mode display, select [ ] (Switch camera) → [] (Out camera)/[ ] (In camera), and press . You can also switch the camera by pressing in the Camera mode display.The camera is switched.● While switching the camera from Out-camera to In-camera and if the lens cover is closed, the message “Open the lens cover” appears. Once you open the lens cover, the Camera mode is activated.Switching the Recording SceneWhen you record an image with the Out-camera, you can automatically adjust the camera settings in accordance with a scene. When you change a scene, the White balance, Photometry, EV, and Picture effect settings are reset. When the Shoot mode is set to [BestPic™] or [Continuous mode] or while recording a movie, you cannot select [Night scene] and [Low Light]. When the Face detection is set to [ON], [Landscape], [Night scene], [Low Light], [Sports], or [Beach/snow] cannot be selected. When the Shoot mode is set to [High sensitivity] or [Smile shutter], the Select scene changes to [AUTO]. You cannot change the Select scene. When the Shoot mode of movie is set to [Sound only], you cannot set the Select scene. 1 Press (Func) in the Camera mode display, select [ ] (Select scene) → a scene, and press . You can also set the Select scene by pressing in the Camera mode display.[] (AUTO):Record an image by automatically adjusting the color and brightness.[] (People):Make a clear recording of a person’s skin in bright and warm tones of color.[] (Landscape):Make a clear recording of an outdoor scene with a vivid expression of the color of ocean, sky, and trees.[] (Night scene):Record night scenes without compromising the atmosphere of darkness.[] (Low Light):Increase the film speed in a dark place to record the scene as brightly as possible.[] (Sports):Record an object that is moving in a brightly lit place such as the outdoors.[] (Beach/snow):Record the bright colors of the ocean, lake, and snow scene even more vividly.[] (Party):Make a clear recording of a party scene by enhancing the mood of the illumination in a room.The Select scene is set and the icon for the current scene appears. If you set to [AUTO], no icon appears.](https://usermanual.wiki/Sony/A3724011.08-user-guide-part-1/User-Guide-929851-Page-140.png)
![139CameraContinuedAdjusting ZoomYou can adjust the zoom of an image when you record using the Out-camera. The zoom magnifications that can be adjusted for each image size are as follows.When recording a still imageImage size Maximum magnification display[sQCIF(128×96)] About ×16 (33 levels)[QCIF(176×144)] About ×10.6 (31 levels)[QVGA(240×320)] About ×6.4 (27 levels)[CIF(352×288)] About ×6.4 (27 levels)[VGA(640×480)] About ×6.4 (27 levels)[Stby(480×864)] About ×6.4 (27 levels)[1M(1280×960)] About ×6.4 (27 levels)[2M(1632×1224)] About ×6.4 (27 levels)[3M(2048×1536)] About ×6.4 (27 levels)When recording a movieImage size Maximum magnification display[sQCIF(128×96)] About ×16 (33 levels)[QCIF(176×144)] About ×10.6 (31 levels)[QVGA(320×240)] About ×6.4 (27 levels)[VGA(640×480)] About ×6.4 (27 levels) 1 Use in the Camera mode display. Use to increase the zoom and to decrease it. When you press these keys for over a second, an image is zoomed in/out continuously.The zoom is adjusted and the current magnification is indicated on the zoom bar.For the TV stylePress in the Camera mode display.Adjusting BrightnessThe image brightness (EV: Exposure Value) can be adjusted according to the ambient condition. The exposure can be adjusted in 13 levels from -2.0EV to +2.0EV for recording with the Out-camera and in seven levels from -1.0EV to +1.0EV for recording with the In-camera. 1 Press (Func) in the Camera mode display, select [ ] (EV) → the EV value, and press . When you scroll the JOG to the left in the Camera mode display, the EV value decreases, to the right, the EV value increases.The brightness is adjusted and the icon “ ” to “” for the current EV value appears. When the EV is set to ±0.0EV, no icon appears.● When the place is extremely bright or dark, the brightness may not be changed even after being adjusted.Adjusting the Focus Automatically by Detecting FacesYou can detect up to three persons’ faces at a time. The Face detection frame chases the faces and adjusts the focus and brightness to the one best suited for the scene automatically even if they move. When you set the Face detection to [ON] while the Select scene is set to [Landscape], [Night scene], [Low Light], [Sports], or [Beach/snow], the Select scene is changed to [AUTO]. When you set the Face detection to [ON], the Picture effect is changed to [OFF]. The Digital Zooming is also changed to [OFF] temporarily. When the Auto Focus is set to other than [Macro OFF], the Face detection is temporarily set to [OFF] and the setting cannot be changed. 1 Press (Func) in the Camera mode display, select [ ] (Face detection) → [ ] (ON)/[ ] (OFF), and press .The Face detection is set. When you select [OFF], “” appears. When you set [ON], no icon appears.](https://usermanual.wiki/Sony/A3724011.08-user-guide-part-1/User-Guide-929851-Page-141.png)
![140Camera 3 Point the camera at the object.The white Face detection frame appears and the Face detection operation begins. When the person targeted for the smile detection comes into focus, the confirmation sound is heard and the Face detection frame turns green.When the smiling face of the object is detected, the shutter is released automatically and an image is recorded. Up to three persons’ faces can be detected. When several faces are detected, the camera selects a person who is closer to the center of the display and focuses on the face of the person. It is only the smiling face of a person for whom the green Face detection frame is displayed that can be detected. If you fail to adjust the focus, the white Face detection frame turns red.When failed to adjust the focusPress or and retry the Face detection again. 4 Press (Save).The image is saved.● Depending on the recording conditions, the Face detection operation may fail and the shutter cannot be released.● In the following cases, a smile may not be detected.- When the light is too dark or too bright on a face- When the distance between the camera and objects are too far and faces are too small- When the part of the face is covered with sunglasses, a mask, hat, etc.- When the face turns away from the camera or is tilted● The Face detection operation may fail when a face is tilted, part of a face is covered, a targeted face is of other than a person such as of any pet animal, or recording in a dark place.● Even if you record in a scene where no face is found, the Face detection frame may appear if there found any object that looks like a face.Enjoying Various Recording Modes <Shoot mode>Recording a Smiling Face Using the Smile ShutterThe camera detects a smile and automatically releases the shutter. The Zoom cannot be used during the Smile shutter mode. Also, you cannot release the shutter manually, either by pressing or (Shoot). When the Shoot mode is set to [Smile shutter], the following items are changed temporarily.Item SettingSwitch camera Out cameraSelect scene AUTOFace detection ONAuto Focus OFF(before detecting faces)※Auto timer OFFWhite balance AUTOPhotometry CenterPicture effect OFFDigital Zooming OFF※ After detecting faces, the effective range is set to the same level as [Macro OFF]. The items above cannot be changed. 1 Press (Func) in the Camera mode display, select [ ] (Shoot mode) → [ ] (Smile shutter), and press . 2 Press (Close).The Shoot mode is set to [Smile shutter] and “ ” appears.](https://usermanual.wiki/Sony/A3724011.08-user-guide-part-1/User-Guide-929851-Page-142.png)
![141CameraDecorating Images Fashionably Using the Deco-Snap ModeUsing frames and stamps, you can decorate images in fashionable way. For Out-camera recording, you can select an image size of [QCIF(144×176)], [QVGA(240×320)], [VGA(480×640)], and [Stby(480×864)]. For In-camera recording, you can select the image size of [QCIF(144×176)] and [QVGA(240×320)]. When the Shoot mode is set to [Deco-Snap], the following items are changed temporarily. The items other than Select size, Switch camera, EV(Whitening mode), and Flash cannot be changed.Item SettingSelect size QVGA(240×320)Switch camera In cameraSelect scene AUTOEV Whitening mode [OFF] : ±0.0EVFace detection ON※1Set attach loc. info OFFAuto Focus Macro OFF※1Multi focus Spot AF※1Auto timer※2 5secPhoto light OFFFlash OFFGrid Line OFFWhite balance AUTOPhotometry AveragePicture effect OFFAuto save OFFImage quality FineDigital Zooming OFFImage stabilize AUTOAuto orientation OFF※1 The listed settings for the Face detection, Auto Focus, and Multi focus are those assumed for use of the Out-camera. These functions do not operate when recording with the In-camera.※2 The previous setting of the Auto timer is not restored even if the Shoot mode is changed. Once you set the Shoot mode to [Deco-Snap], the zoom magnification is set default to [×1.0] even if the Shoot mode is changed to other setting. 1 Press (Func) in the Camera mode display, select [ ] (Shoot mode) → [ ] (Deco-Snap), and press .Select sizeStby(480×864)Photograph image to fit the size of stand−by displayThe Shoot mode is set to [Deco-Snap] and “ ” appears.When recording with the In-camera, point the camera at the object and go to step 3.To switch the cameraSelect [ ] (Switch camera) → [ ] (Out camera)/[ ] (In camera).To set the Select sizeSelect [ ] → a size.To record an image with a frameSelect [ ] (Frame) → [ ] (ON)/[ ] (OFF). If you select [ON], select a frame.To emit the flash light (Out-camera only)Select [ ] (Flash) → a type of flash light.To change the sound for Deco-SnapSelect [ ] (Deco-Snap beep) → a sound for Deco-Snap.To set the Whitening modeSelect [ ] (Whitening mode) → [ ] (ON)/[ ] (OFF). When the Whitening mode is set to [ON], the EV is set to +1.0EV for the Out-camera and +0.3EV for the In-camera. When set to [OFF], the EV is set to ±0.0EV. 2 Point the camera at the object and press halfway.The Face detection function is activated and the focus is adjusted based on a face. When the face comes into focus, the confirmation sound is heard and the Face detection frame turns green. 3 Press .The Auto timer is activated and the Deco-Snap beep is heard. An image is recorded with the shutter sound, and the menu before saving images appears.Continued](https://usermanual.wiki/Sony/A3724011.08-user-guide-part-1/User-Guide-929851-Page-143.png)
![142Camera 4 Select [ ] (Save) → [ ] (Save) → [Yes] and press .The image is saved.To paste a frameSelect [ ] → a frame.To paste an image stampSelect [ ] → a stamp, adjust the position to paste the stamp, press (Paste), and then press (Cancel).To paste textSelect [ ], compose a text stamp, adjust the position to paste the text stamp, press (Paste), and then press (Cancel). Follow the same steps as in “Pasting Text” (P.293, step 2 to 3).To undo all editingSelect [ ].To post on a blogSelect [ ] (Save) → [ ] (easy BlogUp) (P.358).To attach to mailSelect [ ] (Save) → [ ] (Attach to mail) (P.212).Recording a Panorama ImageYou can record several images sequentially and compose them into one panorama image just by pressing the shutter key once and moving the FOMA terminal horizontally. You can also record a 360-degree view of panorama image. When the Shoot mode is set to [Panorama], the Picture effect is changed to [OFF]. Also, the Face detection, Auto Focus, Auto timer, Auto save, and Digital Zooming are temporarily changed to [OFF] and the Flash is changed to [OFF]. The zoom cannot be used during the Panorama mode. 1 Press (Func) in the Camera mode display, select [ ] (Shoot mode) → [ ] (Panorama), and press .The display for selecting the Panorama mode (size×number) appears.[NormalPanorama(VGA×4)]:Up to four images are recorded to create one panorama image.[360°Panorama(QVGA×10)]:Up to 10 images are recorded to create a 360-degree panorama image that surrounds you. 2 Select a recording size and press .The Shoot mode is set to [Panorama] and “ ” appears. 3 Press . Guide to show the recording direction Move the camera in the direction of the arrow. Number of recordable images The frame of the image to be recorded next turns green. Number of the image to be recorded next counted from the beginning Thumbnail of the image recorded previously Camera orientation guide When you move the camera according to the guide, the green frame also moves along with the movement of the camera. The frame turns red when the camera reaches the spot for recording the next image.The first image is recorded with the shutter sound. Keep the FOMA terminal horizontally and slowly move it in either direction left or right. When you move the camera with the help of the green-framed camera orientation guide and once bring it to the spot for recording the next image, the frame turns red and the next image is recorded automatically with the shutter sound.After recording the last image, all images are composed into one image and the entire image is displayed. Press to scroll the display to check the hidden portions of the image.To stop recordingPress (Stop). If the screen for confirming whether to compose the images appears, select [Activate]/[Erase photo]. 4 Press (Save).The composed panorama image is saved.● After the shutter sound is heard, do not move the camera while the message “Photographing. Please keep for a while” remains displayed. Failure not to do so may cause the composed image to be extremely compressed vertically or failure in composition.● Once you press the shutter key to start recording a panorama image, the Shoot mode is not terminated even if no operation is made for over two minutes.](https://usermanual.wiki/Sony/A3724011.08-user-guide-part-1/User-Guide-929851-Page-144.png)
![143CameraRecording an Image Using the High Sensitivity ModeYou can record an image beautifully by reducing the blurring of an object under low-light condition or in a dark room without using the flash. The image size which can be recorded using the High sensitivity is [QCIF(176×144)], [QVGA(240×320)], [VGA(640×480)], [Stby(480×864)], or [1M(1280×960)]. When you set the Shoot mode to [High sensitivity] while the image size is [2M(1632×1224)] or more, the image size is changed to [1M(1280×960)]. When you set the Shoot mode to [High sensitivity], the Flash is temporarily set to [OFF] and the Select scene is set to [AUTO]. The setting of the Select scene cannot be changed. 1 Press (Func) in the Camera mode display, select [ ] (Shoot mode) → [ ] (High sensitivity), and press . 2 Press (Close).The Shoot mode is set to [High sensitivity] and “” appears. 3 Point the camera at the object and press halfway.The white focus frame/frames are used to adjust the focus. When the image comes into focus, the confirmation sound is heard, and the focus frame/frames turn green. 4 Press .An Image is recorded with the shutter sound and the screen for confirming whether to save the image appears. 5 Press (Save).The image is saved.Recording a Still Image Using the BestPic™ ModeJust by bringing an object into focus using the Auto Focus function and pressing the shutter key, you can record a total of nine continuous still images in a moment before and after you press the shutter key, from which you can select the best shot. The image size of BestPic™ is [VGA(640×480)], [Stby(480×864)], [1M(1280×960)], [2M(1632×1224)], [2M Wide(1920×1080)], or [3M(2048×1536)]. When you set the Shoot mode to [BestPic™] while the image size is [QCIF(176×144)] or [QVGA(240×320)], the image size is temporarily changed to [Stby(480×864)]. When you set the Shoot mode to [BestPic™] while the Auto Focus is set to [OFF], the Auto Focus is changed to [Macro OFF]. When the Shoot mode is set to [BestPic™], the Image stabilize and Auto save are temporarily set to [OFF] and the Image quality is set to [Standard]. The image quality cannot be changed. If you use the flash when recording images using BestPic™, the light intensity of the flash drops to the photo light level. When you set the Shoot mode to [BestPic™] while the Select scene is set to [Night scene] or [Low Light], the Select scene is changed to [AUTO]. 1 Press (Func) in the Camera mode display, select [ ] (Shoot mode) → [ ] (BestPic™) and press . 2 Press (Close). Lock Auto focus Lock Auto focusThe Shoot mode is set to [BestPic™] and “ ” appears. 3 Point the camera at the object and press halfway.The white focus frame/frames are used to adjust the focus. When the image comes into focus, the confirmation sound is heard, and the focus frame/frames turn green.Continued](https://usermanual.wiki/Sony/A3724011.08-user-guide-part-1/User-Guide-929851-Page-145.png)
![144Camera 4 Press .Images are recorded continuously with the shutter sound, and the screen for confirming whether to save the images appears. 5 Use to select an image and press (Save).The selected image is saved and the screen for confirming whether to save another image appears.To save another imageSelect [Yes], select an image, and press (Save).To return to the Camera mode displaySelect [No].● When you set the image size to [Stby(480×864)] while the Shoot mode is set to [BestPic™], an image is saved in landscape orientation even if you record it with the FOMA terminal held vertically. The Saved with this side up indication “” does not appear in the Camera mode display.Recording Still Images in the Continuous ModeYou can record four still images continuously at an interval of about 0.2 seconds with a single press of or (Shoot). The image size in the Continuous mode is [VGA(640×480)]. You cannot change the image size. When you set the Shoot mode to [Continuous mode] while the Select scene is set to [Night scene] or [Low Light], the Select scene is changed to [AUTO]. When the Shoot mode is set to [Continuous mode], the Image stabilize function is temporarily set to [OFF]. If you use the flash when recording images using the Continuous mode, the light intensity of the flash drops to the photo light level. 1 Press (Func) in the Camera mode display, select [ ] (Shoot mode) → [ ] (Continuous mode), and press . 2 Press (Close).The Shoot mode is set to [Continuous mode] and “” appears. 3 Point the camera at the object and press halfway.The white focus frame/frames are used to adjust the focus. When the image comes into focus, the confirmation sound is heard, and the focus frame/frames turn green. 4 Press .Images are recorded continuously with the burst sound, and the screen for confirming whether to save the images appears. 5 Press (Save).Four continuous images are saved.Recording Images with FramesYou can record an image with a frame, which can be selected from the preinstalled frames or downloaded frames. For Out-camera recording, you can select a frame size of [QCIF(176×144)], [QVGA(240×320)], [VGA(640×480)], and [Stand-by(480×864)]. For In-camera recording, you can select the frame size of [QCIF(176×144)], [QVGA(240×320)], and [VGA(640×480)]. The size of images recorded with a frame is determined according to the frame you selected and cannot be changed. 1 Press (Func) in the Camera mode display, select [ ] (Shoot mode) → [] (Shoot with frame), and press .Select frame size QCIF(176×144) QVGA(240×320) VGA(640×480) Stand−by(480×864) 2 Select a frame size and press .The Frame display appears.](https://usermanual.wiki/Sony/A3724011.08-user-guide-part-1/User-Guide-929851-Page-146.png)
![145Camera 3 Select a frame and press .The Shoot mode is set to [Shoot with frame] and “” and the selected frame appear.To check a frameMove the cursor to a frame and press (Play). 4 Point the camera at the object and press halfway.The white focus frame/frames are used to adjust the focus. When the image comes into focus, the confirmation sound is heard, and the focus frame/frames turn green. 5 Press .An image is recorded with the shutter sound and the screen for confirming whether to save the image appears. 6 Press (Save).The image is saved.Recording Movies <Movie shoot>You can record a movie with the camera. The movie recording time varies depending on where to save a movie (P.152, 153). 1 Press (Func) in the Camera mode display, select [ ] (Shoot mode) → [ ] (Movie shoot), and press . You can also switch to the Movie shoot display by pressing in the Camera mode display. Every time you press , the display switches between the Shoot by photo display and Movie shoot display. The display switches to the Movie shoot display and “ ” appears. 2 Point the camera at the object and press .The recording start tone is heard and the movie is recorded. “ ” changes to “ ”. While you record a movie, the estimated recordable time is displayed by both a bar and numbers under the image and the Auto timer indicator flashes.To pause recordingPress (Pause). The recording pause tone sounds and “ ” appears. To restart the recording, press (Record).To record movies using (Shoot)Press (Shoot). To end the recording, press (Stop). 3 Press to end recording.The recording end tone is heard, the recording is stopped, and the screen for confirming whether to save the movie appears. 4 Press (Save).The movie is saved.To cancel movie recordingPress and select [Yes].To check before savingPress (Play).To attach to mailPress (Func) for over a second. The movie is saved and the Edit mail display appears. You can also attach a movie to mail by selecting [ ] from the Function menu.To post on a blogFrom the Function menu, select [ ] (P.358).Continued](https://usermanual.wiki/Sony/A3724011.08-user-guide-part-1/User-Guide-929851-Page-147.png)
![146Camera● When there is not enough memory or the number of recorded time of saved movies exceeds the maximum number, the message appears. Change the place to save the movie or delete unnecessary movies. Even if recording is possible, the maximum recording time may not be achieved.● When you switch to movie recording from still image recording, the following items are reset.Item Default settingSwitch camera Out cameraSelect scene AUTOZoom magnification ×1.0EV ±0.0EVShoot mode RegularAuto Focus Macro OFFAuto timer OFFPhoto light OFFGrid Line OFFWhite balance AUTOPhotometry CenterPicture effect OFF● Noise in the form of a mosaic may appear in an image or the image or sound may be interrupted while you are recording a movie. Note that this is not malfunction.● The movie sound is recorded via the microphone of the FOMA terminal. If you operate the keys or block the microphone during recording, the recording may be affected by the sound of the keys and other noise.● The motion of the recorded movie may be rough depending on the object you are shooting and the recording conditions.Changing the Camera SettingsSetting Whether to Add Location Information to an Image When SavingYou can add location information automatically to a recorded still image using the GPS function. When an image recorded with the Auto attach loc. info of the Set attach loc. info set to [ON] is posted on a blog, sent with mail, etc., the location information is at risk of being known by other persons. 1 Press (Func) in the Camera mode display, select [ ], and press .Set attach loc. infoAuto FocusMulti focusAuto timerPhoto lightFlashGrid LineOFFMacro OFFMulti AFOFFOFFOFFOFF Shoot Adjust Set 2 Select [Shoot] → [Set attach loc. info] and press .Set attach loc. infoAuto attach loc. info OFFAttach loc. info meth. From act. cameraLocation info[Auto attach loc. info]:Select whether to add location information automatically when saving an image.[Attach loc. info meth.]:Select an obtaining method of location information to be added automatically.[Location info]:Save location information to be added to an image. 3 Select [ON]/[OFF] of whether to add location information automatically at [Auto attach loc. info].](https://usermanual.wiki/Sony/A3724011.08-user-guide-part-1/User-Guide-929851-Page-148.png)
![147Camera 4 Select [From saved info]/[From act. camera] at [Attach loc. info meth.].[From saved info]:Add the location information saved in the Location info.[From act. camera]:Obtain location information when activating the camera and add it automatically. 5 Save location information at [Location info]. Follow the same steps as in “Adding the Location Information” (P.277, step 2 to 3).When the location information is already savedThe Has loc. info display appears. To check the location information, select [Check]. To change the location information, select [Change] and obtain location information. To delete the location information, select [Delete]. 6 Press (Complete).The Set attach loc. info is set.When the Auto attach loc. info is set to [ON], the Set attach loc. info is set and “ ” appears.● When the Auto attach loc. info is set to [ON], it may take time to start next recording.● When the Auto attach loc. info is set to [ON] and the Attach loc. info meth. is set to [From act. camera], the icons which show the accuracy appear in the Camera mode display (P.154).● If the positioning is failed when activating the camera, you can do it manually by pressing for over a second in the Camera mode display.● The location information may not be added to an image properly if you record it right after the camera is activated or in a place where it is difficult to obtain location information.Using the Auto Focus Functions ProperlyWhen recording a still image with the Out-camera, you can select the Auto Focus setting properly according to the shooting conditions, such as when two persons are standing alongside, to record a beautiful image surely and easily. You can bring an object into focus with the Spot focus frame or Multi focus frame so long as the zoom magnification is within the optical zoom range. When the zoom magnification is increased into the digital zoom range, the focus frame is changed to that for the digital zoom and the focus is adjusted on an object around the focus frame. When the Auto Focus is set to [OFF], the focus frame does not appear. 1 Press (Func) in the Camera mode display, select [ ], and press . 2 Select [Shoot] → [Multi focus] and press .[Multi AF]:The Multi focus frame appears and searches objects to be focused at multiple spots in the display. When the focus is set, up to five focus frames are displayed. It is very useful to use in a case such as when recording two persons stand alongside.[Spot AF]:The Spot focus frame is displayed in the center of the display and you use it to focus on an object. It is recommended to use when you want to focus exactly on the spot that you want. 3 Select [Multi AF]/[Spot AF] and press .The Multi focus is set and the icon for the current Multi focus type appears.Multi AFSpot AFSetting the Effective Distance of the Auto FocusYou can set the effective distance of the Auto Focus function when you record still images with the Out-camera. When the Select scene is set to [Night scene] or [Low Light], the Auto Focus is temporarily changed to [OFF]. The setting of the Auto Focus cannot be changed. 1 Press (Func) in the Camera mode display, select [ ], and press . 2 Select [Shoot] → [Auto Focus] and press . You can also set the Auto Focus by pressing in the Camera mode display.The menu for selecting the Auto Focus type appears.[Macro OFF]:Record an image by focusing the object. The minimum focusing distance is about 30 cm.[Macro]:Record an image by focusing a close object. The minimum focusing distance is about 10 cm.[S-macro]:Record an image by focusing a very close object. The focusing distance is between about 3 cm to 18 cm.[OFF]:Record an image without using the Auto Focus.Continued](https://usermanual.wiki/Sony/A3724011.08-user-guide-part-1/User-Guide-929851-Page-149.png)
![148Camera 3 Select the Auto Focus type and press .The Auto Focus is set and the icon for the current Auto Focus type appears. No icon appears for [Macro OFF].OFF MacroS-macroUsing the Auto TimerThe Auto timer allows you to record yourself or others without holding the FOMA terminal. You can also set the interval until recording is started after you press the shutter key. 1 Press (Func) in the Camera mode display, select [ ], and press . 2 Select [Shoot] → [Auto timer] and press . You can also set the Auto timer by pressing in the Camera mode display.The menu for selecting a time for the Auto timer appears. 3 Select a time until recording is started after you press the shutter key and press .Select from [OFF], [10sec], [5sec], and [2sec].The Auto timer is set and “ ” appears.● If there is an incoming call when you are recording with the Auto timer, the recording stops.● After recording, the Auto timer is automatically reset to [OFF].Turning on the Photo LightThe FOMA terminal’s built-in photo light can be used when recording with the Out-camera in a dark place, etc. 1 Press in the Camera mode display.Every time you press , the photo light is switched to [ON]/[OFF].When switched to [ON], the photo light is turned on and “ ” appears.● The photo light is for helping you record in a dark place. You cannot expect as much amount of light from the photo light as from the electric flash of a normal camera.Emitting the FlashYou can use the flash when recording with the Out-camera in a dark place. When the Shoot mode is set to [BestPic™] or [Continuous mode], if you use the flash when recording images, the light intensity of the flash drops to the photo light level. When the Shoot mode is set to [Panorama], the Flash is set to [OFF] temporarily. 1 Press (Func) in the Camera mode display, select [ ], and press . 2 Select [Shoot] → [Flash] and press . You can also set the Flash by pressing in the Camera mode display.[AUTO]:The flash is emitted depending on the brightness of surroundings.[Forced ON]:The flash is always emitted.[OFF]:The flash is not emitted. 3 Select a flash type and press .The Flash is set and the icon for the current Flash setting appears. No icon appears for [AUTO].Forced ONOFFUsing the Grid LineThe Grid Line which divides the display into 3×3 panes helps you, as auxiliary lines, position objects on the display. Using the Grid Line, you can record an image in which all objects are arranged well-balanced. When the Shoot mode is set to [Deco-Snap], the Grip Line does not appear. When the Shoot mode of movie is set to [Sound only], the Grid Line does not appear. 1 Press (Func) in the Camera mode display, select [ ], and press . 2 Select [Shoot] → [Grid Line] and press . You can also set the Grid Line by pressing in the Camera mode display. 3 Select [ON]/[OFF] and press .When you select [ON], the Grid Line appears.](https://usermanual.wiki/Sony/A3724011.08-user-guide-part-1/User-Guide-929851-Page-150.png)
![149CameraSetting Movies to Enable Playback on Other FOMA TerminalYou can change a set of settings necessary for a recorded movie to be played back on other FOMA terminal with a single operation. When the Common replay mode is set to either [High quality] or [Long play], the settings of the camera are changed, as follows.Item High quality Long playImage size [QCIF(176×144)] [sQCIF(128×96)]Image quality Super fine FineFile size Attach(S) Attach(S)Shoot mode Image+Sound Image+Sound 1 Press (Func) in the Camera mode display, select [ ] (Shoot mode) → [ ] (Movie shoot), and press .The display switches to the Movie shoot display. 2 Press (Func), select [ ], and press . 3 Select [Shoot] → [Common replay mode] and press .The screen for selecting the Common replay mode appears.[OFF]:Record a movie regularly.[High quality]:Record a movie focused on the image quality to be clearer.[Long play]:Record a movie focused on the recording time to be longer. 4 Select a common replay mode and press .The Common replay mode is set and the icon for the current Common replay mode appears. No icon appears for [OFF].High qualityLong playAdjusting the Camera during RecordingAdjusting White BalanceThe color balance of the image can be adjusted depending on the lighting condition. If a recording image appears in unnatural colors, set the white balance in accordance with the recording environment. 1 Press (Func) in the Camera mode display, select [ ], and press . 2 Select [Adjust] → [White balance] and press . You can also set the White balance by pressing in the Camera mode display.The menu for selecting a white balance appears.[AUTO]:Adjust the color balance automatically.[Bulb]:Set when recording under bulbs or incandescent lamps.[Fluorescent]:Set when recording under fluorescent lamps.[Fine]:Set when recording outdoors on a clear day.[Cloudy]:Set when recording outdoors on a cloudy day or in the shade. 3 Select a white balance type and press .The White balance is set and the icon for the current white balance type appears. No icon appears for [AUTO].BulbFluorescentFineCloudySetting a Position for Automatic Adjustment of the ExposureYou can set what position on the screen to use as a reference for the image brightness (EV) adjustment. 1 Press (Func) in the Camera mode display, select [ ], and press .Continued](https://usermanual.wiki/Sony/A3724011.08-user-guide-part-1/User-Guide-929851-Page-151.png)
![150Camera 2 Select [Adjust] → [Photometry] and press . You can also set the Photometry by pressing in the Camera mode display.The menu for selecting a photometry mode appears.[Center]:Photometry mode for centerweighted metering of the display, including the periphery.[Average]:Photometry mode for average metering of the whole display.[Spot]:Photometry mode for metering only a part in the center of the display. Aim the object at the Spot photometry point “ ” in the center of the display. You can use this mode effectively when recording an object against light or an object with the strong contrast to the background. 3 Select a photometry mode and press .The Photometry mode is set and the icon for the current photometry mode appears.CenterAverageSpotAdding a Picture EffectThe images can be recorded with a special effect. When you record an image using the In-camera, you cannot select the [Solarization]. 1 Press (Func) in the Camera mode display, select [ ], and press . 2 Select [Adjust] → [Picture effect] and press . You can also set the Picture effect by pressing in the Camera mode display.The menu for selecting a picture effect appears.[OFF]:Cancel the picture effect.[Negative art]:Set the color and brightness of the image as in a negative.[Solarization]:Set the image as an illustration with sharp tones.[Sepia]:Set the image sepia-toned like an old photograph.[Black&White]:Set the image monochrome (black and white). 3 Select a special effect and press .The Picture effect is set.Restoring the Default Camera SettingsYou can reset the camera settings to the default settings. The camera settings listed below can be reset.Item Default settingSelect scene AUTOZoom magnification ×1.0EV ±0.0EVWhite balance AUTOPhotometry CenterPicture effect OFF 1 Press (Func) in the Camera mode display, select [ ], and press . 2 Select [Adjust] → [Reset all] and press . You can also display the screen for confirming whether to perform the Reset all by pressing in the Camera mode display.The screen for confirming whether to perform the Reset all appears. 3 Select [Yes] and press .The default settings are restored.Setting the Camera OperationSelecting Where to Save ImagesYou can set the place to save recorded images.Example: Selecting the microSD memory card to save the recorded still images 1 Press (Func) in the Camera mode display, select [ ], and press .](https://usermanual.wiki/Sony/A3724011.08-user-guide-part-1/User-Guide-929851-Page-152.png)
![151Camera 2 Select [Set] → [Select save to] and press .The menu for selecting a place to save to appears.[Data Box]:Save images in the Data Box. Select a folder for saving still images and movies from My picture and i-motion, respectively.[microSD]:Save images in the microSD memory card. Still images are saved in the [Camera] folder in My picture, movies with video and sound tracks and with video track only in the [Distribute contents] folder in i-motion, and movies with sound track only in the MM file, respectively. 3 Select [microSD] and press .The place to save images is set and the icon for the selected place appears.Data Box※microSD memory card※ Does not appear when no microSD memory card is inserted.● When you set the Mini-Photo creator to [Not replic.] while the Select save to is set to [microSD], the message “Activate Mini-Photo creator?” appears. To create and save a replicated image, select [Replicate] (P.178, 319).Setting Whether Recorded Images Are Automatically SavedYou can set the save method of an image recorded. When the Shoot mode is set to [Deco-Snap], [Panorama], or [BestPic™], the Auto save is temporarily changed to [OFF] and the setting cannot be changed. 1 Press (Func) in the Camera mode display, select [ ], and press . 2 Select [Set] → [Auto save] and press .The menu for selecting whether to automatically save the recorded images appears.[ON]:After recording, the image is automatically saved.[OFF]:After recording, press (Save) on the screen for confirming whether to save the image if you want to save it. 3 Select [ON]/[OFF] and press .The image save method is set.Setting Whether Replicated Images Are Saved AutomaticallyWhen a recorded image is saved to the microSD memory card, you can set to create and save the replicated image automatically. A replicated image is created in the following size according to the size of the original image and saved in the [Camera] folder in My picture of the Data Box.Image size when recorded Replicated image size1M(1280×960), 2M(1632×1224), 3M(2048×1536)VGA(640×480)2M Wide(1920×1080) 852×480QCIF(176×144), QVGA(240×320), VGA(640×480), Stby(480×864), Panorama image, Deco-Snap imageOriginal image size 1 Press (Func) in the Camera mode display, select [ ], and press . 2 Select [Set] → [Mini-Photo creator] and press . 3 Select [Replicate]/[Not replic.] and press .The Mini-Photo creator is set. When it is set to [Replicate], “ ” appears.Selecting the Image QualityYou can select the image quality for recording images. When the size of a movie is set to [QVGA(320×240)] or [VGA(640×480)], you can only select [Super fine] for the image quality. When the size of a movie is set to [sQCIF(128×96)], you cannot select [Super fine] for the image quality. 1 Press (Func) in the Camera mode display, select [ ], and press . 2 Select [Set] → [Image quality] and press .The menu for selecting an image quality appears.Still image[Fine]:Higher image quality mode. The file size is larger.[Standard]:Standard image quality mode.[Economy]:Lowest image quality mode. The file size is smaller.Continued](https://usermanual.wiki/Sony/A3724011.08-user-guide-part-1/User-Guide-929851-Page-153.png)
![152CameraMovie[Super fine]:Higher image quality mode. The file size is larger and the recording time is shortest.[Fine]:Image quality mode for smoother movement in movies.[Standard]:Standard image quality mode.[Economy]:Lowest image quality mode. The file size is smaller and the recording time is longest. 3 Select the image quality and press .The image quality is set and the icon for the current image quality appears.Super fine (Movie only)FineStandardEconomyRotating the Direction of a Recorded Image to Align to the FOMA TerminalYou can set a recorded image to be displayed in the same orientation as that of the FOMA terminal by obtaining the orientation information of the FOMA terminal and adding it to the image when it is recorded. 1 Press (Func) in the Camera mode display, select [ ], and press . 2 Select [Set] → [Auto orientation] and press . 3 Select [ON]/[OFF] and press .The Auto orientation is set. When it is set to [ON], the icon which shows the orientation of the FOMA terminal appears. When the image size is set to [QVGA(240×320)] or [Stby(480×864)], the saved with this side up indication “ ” appears. The image is saved with the indicated side up.The FOMA terminal is held normallyThe FOMA terminal is rotated to the right by 90 degreesThe FOMA terminal is rotated by 180 degreesThe FOMA terminal is rotated to the left by 90 degrees● An image recorded with the Auto orientation set to [ON] is displayed rotated accordingly depending on which orientation the FOMA terminal is in when the image is recorded. Therefore, the orientation of an image may differ between when it is displayed and when it is saved (P.151).Changing the Shutter SoundThe shutter sound can be selected from three types when the Shoot mode for still images is [Regular], [Smile shutter], [Panorama], [High sensitivity], [BestPic™], or [Shoot with frame]. The shutter sound volume is fixed and cannot be adjusted or muted. The shutter sound is heard even if the Manner mode is set. When the Shoot mode is set to [Deco-Snap], the current shutter sound is heard when recording. You cannot set the shutter sound. 1 Press (Func) in the Camera mode display, select [ ], and press . 2 Select [Set] → [Shutter sound] and press .The menu for selecting a shutter sound appears. 3 Select a shutter sound and press .The Shutter sound is set.To check the shutter soundMove the cursor to the shutter sound and press (Play).](https://usermanual.wiki/Sony/A3724011.08-user-guide-part-1/User-Guide-929851-Page-154.png)
![153CameraCorrecting Camera ShakeYou can set whether to use the Image stabilize when you record still images with the Out-camera. 1 Press (Func) in the Camera mode display, select [ ], and press . 2 Select [Set] → [Image stabilize] and press .The menu for selecting whether to correct camera shake appears. 3 Select [AUTO]/[OFF] and press .The Image stabilize is set and the icon for the current Image stabilize setting appears.AUTOOFF● While recording movies, the Image stabilize is set to [AUTO] if you use the Out-camera and [OFF] if you use the In-camera.● The Image stabilize function is to reduce camera shake. Its effect may differ depending on the object of shooting and recording conditions.● In the following cases, the effect of the Image stabilize may be small.- When camera shake is too strong- When using the zoom function- When [Night scene] or [Low Light] is set for the Select scene● When recording a moving object, an afterimage may remain in the image. In this case, set the Image stabilize to [OFF].Resetting File NumbersWhen a still image with the file number (P.151) “999-9999” is saved in the microSD memory card, no more still images can be saved even if there is a vacant space in these memories. The Reset file No. allows you to reset the file numbers up to the largest file number saved in the microSD memory card. To reset the file numbers, delete still images that have file numbers larger than that you want to reset beforehand. The images cannot be saved even if the file numbers are reset when the microSD memory card has no free space. In this case, change the microSD memory card or delete data saved in the microSD memory card. 1 Press (Func) in the Camera mode display, select [ ], and press . 2 Select [Set] → [Reset file No] and press .The screen for confirming whether to perform the Reset file No. appears. 3 Select [Yes] and press .The file numbers are reset.Restricting the Size of a File Used for Movie RecordingYou can restrict the size of a movie file to a file size that can be attached to i-mode mail. 1 Press (Func) in the Camera mode display, select [ ] (Shoot mode) → [ ] (Movie shoot), and press .The display switches to the Movie shoot display. 2 Press (Func), select [ ], and press . 3 Select [Set] → [File size] and press .The menu for selecting a file size restriction appears.[Attach(S)]:You can record up to about 500K bytes.[Attach(L)]:You can record up to about 2M bytes.[No limit]:No file size restriction. You can record up to about one hour. Selectable when [microSD] is set as the place to save to. 4 Select a file size restriction type and press .The file size restriction for movie is set and the icon for the current file size restriction type appears.Attach(S)Attach(L)No limit● Depending on the recording conditions and object of shooting, the recording may be stopped before the maximum file size set in the file size restriction is reached.Continued](https://usermanual.wiki/Sony/A3724011.08-user-guide-part-1/User-Guide-929851-Page-155.png)
![154CameraSelecting the Shoot Mode of MovieYou can select the shoot mode of movie from three types. 1 Press (Func) in the Camera mode display, select [ ] (Shoot mode) → [ ] (Movie shoot), and press .The display switches to the Movie shoot display. 2 Press (Func), select [ ], and press . 3 Select [Set] → [Shoot mode] and press .The menu for selecting a shoot mode appears.[Image+Sound]:Record a movie with video and sound tracks.[Image only]:Record a movie with video track only. No sound is recorded.[Sound only]:Record a movie with sound track only. No video is recorded. 4 Select a shoot mode and press .The Shoot mode is set and the icon for the current shoot mode appears.Image+SoundImage onlySound onlyUsing the Bar Code Reader <Bar code reader>You can use the Out-camera to scan JAN or QR code. The scanned text data can be used for Phone To (AV Phone To), Mail To, Web To and i-αppli To functions, Bookmark and Phonebook entries, and also for displaying and copying/pasting text. You can also obtain a ToruCa card, and play and save the scanned images and melodies. To scan the JAN/QR code, hold the Out-camera more than about 30 cm in [Macro OFF] and 10 cm in [Macro] away from the code to be scanned. When the code cannot be scanned, change the distance between the code and the Out-camera, angle, or direction. The FOMA terminal may not be able to scan JAN or QR code if it is scratched, smudged, damaged, of poor print quality, too small in size, or in certain light reflection conditions. It also may not be able to scan some QR code versions. The FOMA terminal cannot scan a bar code/2-dimensional code other than JAN and QR codes.■ What is JAN code?“Example: 4942857133110”A bar code that represents numbers using vertical lines (bars) of different widths. The FOMA terminal can scan 13-digit and 8-digit JAN codes.■ What is QR code?“Example: FOMA SO906i”One of the 2-dimensional codes that represent data in the vertical and horizontal directions. This data includes alphanumeric characters, character strings (kanji, kana, pictographs), melodies, still images, and ToruCa cards. Up to 16 QR codes can be scanned serially so that they connect to each other and saved as a single data set. When scanning multiple segmented QR codes, the message prompting you to scan the next QR code appears after you scan the first one. Scan the QR code in response to the message.Scanning JAN/QR CodeYou can scan JAN or QR code and save the maintained data for later use. Specifically, you can use text data from the scanned JAN or QR code to enter information in a textbox while entering text (P.387). 1 From the Menu, select [LifeKit] → [Bar code reader] → [Scan code] and press .The bar code reader is activated and “ ” appears.To change the effective distance of the Auto FocusPress (Normal/Closeup). Every time you press this key, the mode is switched between [Normal] and [Closeup].](https://usermanual.wiki/Sony/A3724011.08-user-guide-part-1/User-Guide-929851-Page-156.png)
![155Camera 2 Locate the JAN/QR code at the center of the display and press (Scan).ScanningScanning Fix camera Fix cameraThe scanning of the JAN/QR code starts.When the scanning is completed, the end sound is heard and the data that has been scanned is displayed in the normal display.To save a scanned URL as a bookmarkMove the cursor to the URL and from the Function menu, select [Add bookmark] → [Yes] → a folder.To save scanned data such as a phone numberMove the cursor to data such as a phone number and from the Function menu, select [Add to phonebook] → [Yes] and save the scanned data in the Phonebook. Follow the same steps as in “Add to FOMA terminal phonebook” (P.95, step 3 to 6) or “Add to UIM phonebook” (P.98, step 3 to 4). 3 Press (Save).The data from the scanned JAN/QR code is saved.● Some QR codes allow you to save data such as a name, phone number, and mail address all at once in the Phonebook just by scanning them.● When scanned characters cannot be entered in the text editing display, they are replaced with as many spaces (blanks).● A scanned image may not be saved depending on its image or file size.Displaying the Saved DataYou can save up to 10 data entries for JAN or QR codes that are scanned. When a total of 10 data entries is saved and a new JAN/QR code is scanned, unprotected data is overwritten from the oldest. 1 From the Menu, select [LifeKit] → [Bar code reader] → [Saved data] and press .Data list 2008/02/14 13:56 2008/02/07 23:13 2008/01/28 14:25 2008/01/28 10:42 2008/01/23 16:21 2008/01/12 13:29 2008/01/03 19:28 2008/01/03 09:47 2007/12/30 14:05 2007/12/30 13:50To delete dataMove the cursor to the data and from the Function menu, select [Delete] → [Delete one] → [Yes]. To delete several data, from the Function menu, select [Delete] → [Select&delete], select data, press (Complete), and then select [Yes]. To delete all data, from the Function menu, select [Delete] → [Delete all], enter the Security code, and select [Yes].To protect dataMove the cursor to the data and from the Function menu, select [Protect ON/OFF] → [Yes]. “” changes to “ ”. 2 Select the data and press .2008/02/14 13:56Add to phonebookName:ドコモ太郎Reading:ト゛コモタロウTEL:03XXXXXXXXE−mail:docomo.taro.△△@docomo.ne.jp](https://usermanual.wiki/Sony/A3724011.08-user-guide-part-1/User-Guide-929851-Page-157.png)
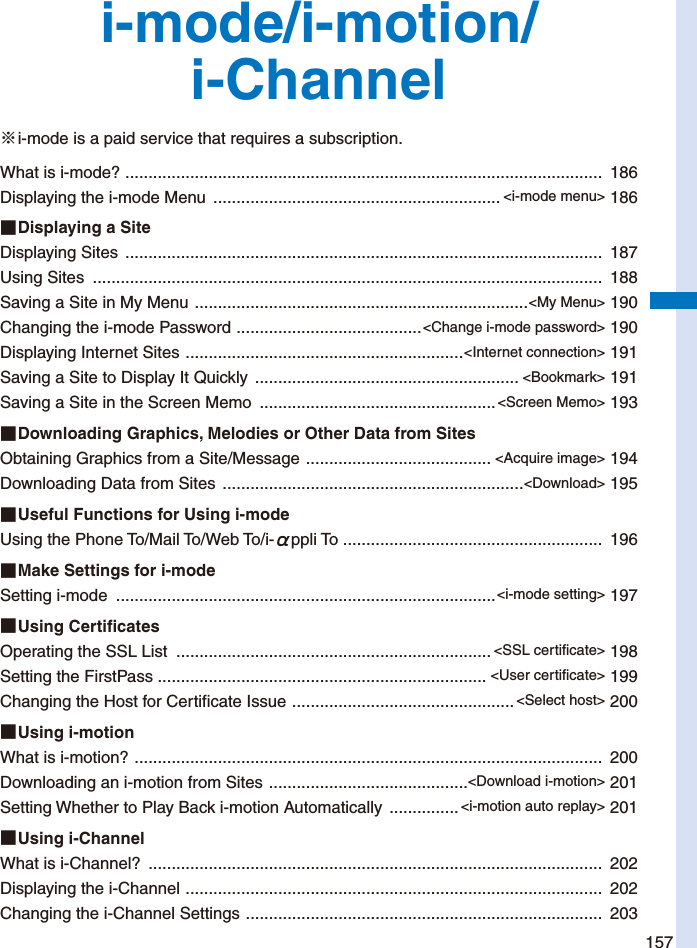
![158i-mode/i-motion/i-ChannelWhat is i-mode?i-mode allows you to use the i-mode compatible FOMA terminal (hereinafter referred to as i-mode terminal) to access various online services such as site (program) connection, Internet connection, and i-mode mail. i-mode is a paid service that requires a subscription. For details on i-mode, see the “Mobile Phone User’s Guide 【i-mode】 FOMA version”.Important information about using i-mode● The data on sites (programs) or Internet sites is generally protected by the copyright laws. Part or all of the data such as documents and graphics obtained to the i-mode terminal from these sites (programs) or Internet sites cannot be sold or redistributed, whether they are changed or not, without consent of the copyright holders except for personal use.● When the UIM is switched to another card, or the i-mode terminal is powered on without inserting the UIM, some of the terminal models may not be able to display/play back still images/movies/melodies downloaded from sites, attached files (still images/movies/melodies, etc.) sent/received by mail, screen memos, and Message R/F.● If you set a file whose display/playback is restricted by the UIM for the stand-by display, ring tone, and/or other applications, those settings are reset to the initial settings if the UIM is switched to another card or the FOMA terminal is powered on without inserting a UIM.Displaying the i-mode Menu <i-mode menu> 1 Press (i-mode) in the stand-by display.Menu name Functioni Menu Connect the FOMA terminal to the i-mode center (P.187).Bookmark Display favorite sites and Internet sites (P.191).Screen Memo Display sites saved in the FOMA terminal (P.193).Last accessed URLDisplay sites and Internet sites displayed last (P.187).Go to location Connect the FOMA terminal to the Internet (P.191).i-Channel Display the channel menu (P.202).Message Display the list of Message R/Message F received (P.231).Check new messageCheck if the i-mode center holds mail, Message R, and Message F (P.216, 231).i-mode setting Set the i-mode settings on the FOMA terminal (P.112, 127, 197, etc.).Full Browser Display the Full Browser menu (P.280).To display i Menu while displaying a siteFrom the Function menu, select [i Menu].](https://usermanual.wiki/Sony/A3724011.08-user-guide-part-1/User-Guide-929851-Page-160.png)
![159i-mode/i-motion/i-ChannelDisplaying SitesVarious sites offered by IP (information service providers) can be displayed (the subscription is necessary for some sites). 1 From the i-mode menu, select [i Menu] → [メニュー/検索] (Menu/Search) and press . 2 Select a site and press .The FOMA terminal is connected to the site.● Some of the connected sites may request you to send the “manufacturer’s serial number of the mobile phone/UIM (FOMA card)” before you access the site. The “manufacturer’s serial number of the mobile phone/UIM (FOMA card)” that you send is used by IP (information service providers) to identify you in order to provide information customized for you and to determine whether the content provided by IP is compatible with your FOMA terminal. Since the “manufacturer’s serial number of the mobile phone/UIM (FOMA card)” is sent to IP via the Internet, it might be accessed by a third party. Note, however, that IP is not notified of your phone number, address, age, and sex by this operation.● When you receive a request from a site about information of music you play back on your FOMA terminal, the screen for confirming whether to send the music information appears. If you select [Yes], the music information (names of title and artist and date of playing back) played back on your FOMA terminal is sent. The sent music information is used by IP (information service providers) to provide a customer with the customized information.Reconnecting to the Web Page Displayed LastThe site displayed when you last connected to i-mode is recorded as the Last accessed URL. You can directly connect to this site from the Last accessed URL. Some web pages cannot be recorded as Last accessed URL. 1 From the i-mode menu, select [Last accessed URL] and press .Last accessed URLhttp://www.△△△△.□□.jpTo delete the Last accessed URLPress (Delete) and select [Yes].To copy the Last accessed URLPress (Copy). 2 Press (Cnct).The FOMA terminal is connected to the site displayed last.Displaying SSL SiteYou can display SSL-compatible sites (SSL page) using an operation similar to that for general sites. To display an SSL site, make sure to set the date and time with the Date/time setting beforehand. Establishing SSL session (Authenti− cating)The message on the left appears when connecting to an SSL site. “ ” appears when displaying an SSL site.To display the certificateFrom the Function menu, select [Certificates]. SSL session is released Yes NoThe message on the left appears when moving from an SSL site to a non-SSL site. “ ” disappears when displaying a non-SSL site.Continued](https://usermanual.wiki/Sony/A3724011.08-user-guide-part-1/User-Guide-929851-Page-161.png)
![160i-mode/i-motion/i-Channel● The confirmation message may appear when the connected site may not be secure. Select [Yes] to connect to the SSL site, or select [No] to cancel connecting to the SSL site.● If there are any problems such as an invalid certificate of the server, the SSL site may not be displayed.Using SitesSelecting Links or Other Items of ChoiceWhen using a site, you may display a linked site, enter texts (textbox) or select an item from multiple options (radio button, check box, and pull-down menu).For more infoYour mail address:Sex: Male FemaleMonth/Year of Birth: Feb 2008Select your favoriteprograms: Drama Film Variety Sports SendLinkGo to the related web page.TextboxEnter a text. The mode and number of characters you can use depend on the textbox. When you enter a code such as the i-mode password, it may be masked by “*”.Radio buttonSelect one item. “ ” of the selected item changes to “ ”.Pull-down menuSelect an item from the item list.Check boxSelect one or more items. “ ” of the selected items changes to “ ”. To cancel the selection, select the check box again.Displaying the Previous/Next PageThe FOMA terminal stores up to 20 most recently displayed site pages in its cache.The stored site pages are deleted when i-mode is terminated.When the left or right arrow is displayed in the guide display, the pages stored in the cache can be used for display using without accessing the site. Note, however, that if the recorded site pages exceed the cache size or when a site page is programmed always to download the latest information, network communication is performed. The text or setting you entered in a site is not stored in the cache. The cache is a place in the terminal used for temporarily storing the displayed screen data.Func SelectMENU : Indicates that the previous page is recorded. Use to display the previous page. : Indicates that the next page is recorded. Use to display the next page.Example: When viewing site pages in the order of →→→→Assuming that you view site pages in the order of →→ and go to a new site page after going back to as shown in the above illustration, the history for → is cleared and starts afresh for → at the time you go to a new site page .Reloading a PageThe page, which is displayed incorrectly or updated frequently, can be reloaded so that the latest data is displayed. 1 While displaying a site, press (Func).The Function menu appears. 2 Select [Reload] and press .The display of the page is updated.](https://usermanual.wiki/Sony/A3724011.08-user-guide-part-1/User-Guide-929851-Page-162.png)
![161i-mode/i-motion/i-ChannelDisplaying a Site URLThe URL of the currently displayed site can be displayed. 1 While displaying a site, press (Func).The Function menu appears. 2 Select [URL] and press .The URL of the site is displayed.To copy the URLPress (Copy).Sending a URL by MailThe URL of the currently displayed site can be sent by mail. 1 While displaying a site, press (Func).The Function menu appears. 2 Select [Compose message] and press .The Edit mail display appears.The site URL is already entered in the main body. 3 Compose mail and send it. Follow the same steps as in “Compose and send mail” (P.207, step 2 to 5).Displaying a Site CorrectlyIf the display of the text is incorrect on a site, you can reload the page after changing the character code. 1 While displaying a site, press (Func).The Function menu appears. 2 Select [Word translate] → [Convert]/[Auto select] and press .[Convert]:Sequentially convert the character codes and display the page again. If the text is still incorrectly displayed, repeat this operation. The original display reappears when you repeat [Word translate] → [Convert] several times.[Auto select]:Automatically select and convert the character code and display the page.The character code is converted and the page is displayed again.● The page may not be displayed correctly even if the character code is changed. Note that changing the character code when the page is displayed correctly may cause the page to be displayed incorrectly.Changing the Display to Full BrowserYou can change the current site display to Full Browser. 1 While displaying a site, press (Func).The Function menu appears. 2 Select [To Full Browser] → [OK] and press .The display is switched to Full Browser. For information on the operations of Full Browser, see P.280.What is Flash?Flash is an animation technology that uses animation and sound. Flash movies enhance site content for richer expression. You can set a Flash movie for the stand-by display and other applications.● When a Flash movie is displayed, the action may differ from other sites.● Even if (Select) is displayed, you may not be able to use the Select function.● Some Flash movies may be accompanied by a sound effect. To mute the sound effect, set the Sound effect to [OFF].● If you do not operate the FOMA terminal for more than about 30 seconds while the Flash movie is played back, the playback pauses. To operate a Flash movie again, from the Function menu, select [Retry]. If the playback is not started, either display the Flash movie entirely or adjust the display position until it can be played back.● Even if a Flash movie is displayed, it may not operate properly in some cases.● When you save a Flash movie using the Save image function or save it in Screen Memo, a portion of it may not be saved or it may appear differently from the one you viewed on the site.● When you play back a Flash movie saved in the Data Box, Screen Memo, or microSD memory card, the image may be displayed differently depending on the saved places.Continued](https://usermanual.wiki/Sony/A3724011.08-user-guide-part-1/User-Guide-929851-Page-163.png)
![162i-mode/i-motion/i-Channel● If an error occurs during a Flash movie playback, this Flash movie cannot be saved.● Some of the Flash movies vibrate the FOMA terminal during playback. Note that this could happen even if the vibrator is set to [OFF].● Some Flash movies may have to use data saved in the i-mode terminal. To allow such a Flash movie to use saved data, set the Use phone info of the i-mode setting to [Yes] (P.198). This item is set to [Yes] at the time of purchase. Saved data that may be used by a Flash movie is as follows.- Battery level - Reception level- Clock information - Sound effect setting- Language setting - Terminal type- Model informationTerminating i-mode 1 Press during i-mode, select [Yes], and press .i-mode is terminated and “ ” disappears.Saving a Site in My Menu <My Menu>If you save the frequently used sites in My Menu, you can access them easily from next time. Up to 45 sites can be saved in My Menu. Only i-mode sites can be saved in My Menu. To save Internet sites, use the Bookmark. 1 While displaying a site, select [マイメニュー登録] (Save My Menu) and press . The location of [マイメニュー登録] (Save My Menu) and the menu structure may vary depending on each site. 2 Enter the i-mode password at [iモードパスワード] (i-mode Password).The password is masked by “****”. 3 Select [決定] (OK) and press .The site is saved in My Menu.● The site is saved automatically in My Menu when you subscribe to a paid site.Changing the i-mode Password <Change i-mode password>The “i-mode password” is used for saving/deleting My Menu and changing i-mode mail settings, etc. The i-mode password is set to “0000” at the time of subscription. Change it to your own i-mode password.Make sure to keep the i-mode password confidential. If you forget the i-mode password, you must bring your official identification (such as driver’s license), the FOMA terminal, and UIM with you to the nearest DoCoMo shop. 1 From the i-mode menu, select [i Menu] → [English iMenu] → [Options] → [Change i-mode Password] and press .Change i−modePasswordCurrent Password New PasswordNew Password(Confirmation)Select※You will use your i−mode password to subscribe andunsubscribesites and setto youroptions. 2 Enter the current i-mode password at [Current Password].The password is masked by “****”. 3 Enter the new password at [New Password]. 4 Enter the new password at [New Password (Confirmation)]. 5 Select [Select] and press .The i-mode password is changed.](https://usermanual.wiki/Sony/A3724011.08-user-guide-part-1/User-Guide-929851-Page-164.png)
![163i-mode/i-motion/i-ChannelDisplaying Internet Sites <Internet connection>i-mode compatible Internet site can be displayed from the i-mode terminal. Sites that are not compatible with i-mode may not be displayed correctly. 1 From the i-mode menu, select [Go to location] → [Enter URL] and press .The Enter URL display appears. When the URL has been entered before, the URL entered previously is displayed. The beginning of the URL “http://” is entered beforehand. 2 Press (Edit) and enter the URL.Enter the URL including “http://” within 256 half-width alphanumeric characters and symbols. 3 Press (Cnct).The FOMA terminal is connected to the site. Operations while displaying Internet sites are the same as while displaying the i-mode sites.Displaying Using the URL HistoryUp to 50 sites that have been displayed by entering their URLs are saved in the URL history. The sites can be directly accessed from the URL history. If a total of 50 URLs is saved in the URL history, the URL is overwritten from the oldest. 1 From the i-mode menu, select [Go to location] → [URL history] and press .The URL history display appears.To delete a URLMove the cursor to the URL and from the Function menu, select [Delete one] → [Yes]. To delete several URLs, from the Function menu, select [Select&delete], select URLs, press (Complete), and select [Yes]. To delete all URLs, from the Function menu, select [Delete all], enter the Security code, and select [Yes]. 2 Select a URL and press .The URL history display appears.To copy a URLPress (Copy). 3 Press (Cnct).The FOMA terminal is connected to the site of the selected URL.Saving a Site to Display It Quickly <Bookmark>Up to 200 URLs of the sites you display frequently can be saved in the Bookmark. The sites can be directly accessed from the Bookmark. Both i-mode and Internet sites can be saved as bookmarks, but with some exceptions. The text or setting you entered on the site, etc. is not saved in the Bookmark.Saving a Site in the BookmarkA URL including “http://” of up to 256 half-width alphanumeric characters and symbols can be saved as a bookmark. 1 While displaying a site, press (Func).The Function menu appears. 2 Select [Add bookmark] → a folder and press .The bookmark is saved in the selected folder.When the maximum number of bookmarks has been reachedThe screen for confirming whether to overwrite a bookmark appears. To overwrite a bookmark, select [Yes] and select a bookmark to overwrite.● A title of up to 12 full-width or 24 half-width characters can be saved in the Bookmark. If the length of the title exceeds the limit, extra characters are deleted. If there is no title on the bookmark, the URL appears instead.Continued](https://usermanual.wiki/Sony/A3724011.08-user-guide-part-1/User-Guide-929851-Page-165.png)
![164i-mode/i-motion/i-ChannelDisplaying a SiteA site can be displayed using a bookmark. 1 From the i-mode menu, select [Bookmark] and press .A list of bookmark folders appears. The following icons show the type of folder. (Yellow) Preset folder (Blue) User-created folder 2 Select a folder and press .A list of bookmarks appears. 3 Select a bookmark and press (Cnct).The FOMA terminal is connected to the site of the selected bookmark.To check the URLMove the cursor to the bookmark and press (Check).To copy a bookmark URLMove the cursor to the bookmark and press (Check) and (Copy).To change the titleMove the cursor to the bookmark and from the Function menu, select [Edit title]. Enter the title within 12 full-width or 24 half-width characters.To display other site while displaying a siteFrom the Function menu, select [Bookmark] → a folder → a bookmark.● “ ” for the i-mode bookmark and “ ” for the Full Browser bookmark appear on the list of bookmarks of the microSD memory cardAdding/Deleting FoldersFolders in which bookmarks are saved can be added or deleted. Up to 10 folders can be used to manage bookmarks and folder names can also be changed. You cannot delete the preset folders.Example: Adding a folder 1 From the i-mode menu, select [Bookmark] and press , then press (Func).The Function menu appears. 2 Select [Edit folder] → [Create folder] and press , then enter a folder name.Enter a name within 10 full-width or 20 half-width characters.The folder is added.To change a folder nameMove the cursor to a folder and from the Function menu, select [Edit folder] → [Edit folder name]. Enter a name within 10 full-width or 20 half-width characters.To delete a folderMove the cursor to a folder and from the Function menu, select [Edit folder] → [Delete folder]. Enter the Security code and select [Yes].Moving a Bookmark to a Different FolderBookmarks can be moved to a different folder using three methods.Example: Moving a bookmark 1 From the i-mode menu, select [Bookmark] → a folder and press .To move all bookmarks in the folderFrom the Function menu, select [Move] → [Move all] → [Yes] → a folder.To move several bookmarksFrom the Function menu, select [Move] → [Select&move], select bookmarks, and press (Complete). Select [Yes] → a folder. 2 Select a bookmark and press (Func).The Function menu appears.](https://usermanual.wiki/Sony/A3724011.08-user-guide-part-1/User-Guide-929851-Page-166.png)
![165i-mode/i-motion/i-Channel 3 Select [Move] → [Move one] → [Yes] and press .The Select move to display appears. 4 Select a folder and press .The selected bookmark is moved to the different folder.Deleting a BookmarkYou can delete bookmarks using four methods.Example: Deleting a bookmark 1 From the i-mode menu, select [Bookmark] and press .To delete all bookmarksFrom the Function menu, select [Delete all], enter the Security code, and select [Yes]. 2 Select a folder and press .To delete all bookmarks in the folderFrom the Function menu, select [Delete] → [Delete all], enter the Security code, and select [Yes].To delete several bookmarksFrom the Function menu, select [Delete] → [Select&delete], select bookmarks, press (Complete), and select [Yes]. 3 Select a bookmark and press (Func).The Function menu appears. 4 Select [Delete] → [Delete one] → [Yes] and press .The selected bookmark is deleted.Saving a Site in the Screen Memo <Screen Memo>You can save sites as your favorite ones in the Screen Memo. You can also instantaneously call up a saved screen memo. You can save up to 100 screen memos, each up to 100K bytes. The number of screen memos that can be saved may decrease depending on the data to be saved. The text or setting you entered on the site, etc. is not saved in the Screen Memo.Saving a Screen Memo 1 While displaying a site, press (Func).The Function menu appears. 2 Select [Add screen memo] and press .The screen memo is saved.When there is not enough memoryThe screen for confirming whether to overwrite a screen memo appears. To overwrite, select [Yes], select unnecessary screen memos, press (Complete), and select [Yes].When the maximum number of screen memos has been reachedThe screen for confirming whether to overwrite a screen memo appears. To overwrite, select [Yes] and select a screen memo to overwrite.Displaying a Screen MemoSaved screen memos can be displayed. The following icons show the status of the screen memo.Normal screen memoProtected screen memo 1 From the i-mode menu, select [Screen Memo] and press .A list of screen memos appears. 2 Select a screen memo and press .The screen memo is displayed.To check the URLMove the cursor to the screen memo and from the Function menu, select [URL].To change the titleMove the cursor to the screen memo and from the Function menu, select [Edit title]. Enter the title within 10 full-width or 20 half-width characters.● To operate the Flash movie or GIF animation again, from the Function menu, select [Retry].If the playback is not started, either display the Flash movie entirely or adjust the display position until it can be played back.Continued](https://usermanual.wiki/Sony/A3724011.08-user-guide-part-1/User-Guide-929851-Page-167.png)
![166i-mode/i-motion/i-ChannelProtecting a Screen MemoYou can protect screen memos from being overwritten. You can protect up to 50 screen memos. 1 Select a screen memo from the screen memo list and press (Func).The Function menu appears.To cancel the protectionMove the cursor to the protected screen memo and press (Func). 2 Select [Protect ON/OFF] → [Yes] and press .The screen memo is protected and “ ” changes to “”.Deleting a Screen MemoYou can delete screen memos using three methods.Example: Deleting a screen memo 1 From the i-mode menu, select [Screen Memo] and press .To delete all screen memosFrom the Function menu, select [Delete] → [Delete all], enter the Security code, and select [Yes].To delete several screen memosFrom the Function menu, select [Delete] → [Select&delete], select screen memos, press (Complete), and select [Yes]. 2 Select a screen memo and press (Func).The Function menu appears. 3 Select [Delete] → [Delete one] → [Yes] and press .The selected screen memo is deleted.Obtaining Graphics from a Site/Message <Acquire image>You can obtain images and frames from sites and screen memos, and save them in My picture. You can save up to 100K bytes for each image entry. The number of images that you can save varies depending on the free memory space on the place to save to and data size.Example: Saving a graphic displayed in a site 1 While displaying a site, press (Func).The Function menu appears. 2 Select [Acquire image] and press .To save the background imageSelect [Acquire BG image]. 3 Select [Save] → a graphic and press .The selected image is displayed in a frame and the screen for selecting the place to save to appears.[Data Box]:Save an image in the Data Box. Select a folder to save to.[microSD]:Save an image in the microSD memory card.To perform the Display setting after saving an imageSelect [Save&setting] → an image → a place to save to → the Display setting.To save the frame/stamp/Deco-mail pictographSelect [Save] → an image. The image is saved in an appropriate folder in My picture of the Data Box. 4 Select a place to save to and press .The graphic is saved in the selected place to save to.When there is not enough memory or the maximum number of graphics has been reachedThe screen informing insufficient memory or that the maximum number has been reached appears. To save the new graphic, select [Sel. delete file] → a folder → a file, press (Complete), and select [Yes].● You cannot save a GIF image exceeding [UXGA(1600×1200)] and a GIF animation exceeding [Stby(480×864)] in the Data Box. You may also not be able to save some JPEG images in the Data Box.](https://usermanual.wiki/Sony/A3724011.08-user-guide-part-1/User-Guide-929851-Page-168.png)
![167i-mode/i-motion/i-ChannelDownloading Data from Sites <Download>You can download melodies, PDF data, Chara-den, ToruCa cards, Deco-mail templates, dictionaries, Kisekae Tool, mail (vMessage format), and easy BlogUp service information file from related sites.■ Files that can be downloadedType Maximum downloadable sizeMelody (SMF/MFi)※100K bytesPDF data※2M bytesChara-den 100K bytesToruCa※1K bytesToruCa(detail)※100K bytesDeco-mail template 200K bytesDictionary data 100K bytesKisekae Tool 2M bytesMail (vMessage)※200K byteseasy BlogUp service information file100K bytes※ The number of files that you can save varies depending on the free memory space on the place to save to and data size.Example: Downloading a melody from a related site 1 While displaying a site, select a melody and press . Download completed Play Save BackThe melody is downloaded and the screen for confirming whether to save the melody appears.To check the melody before savingSelect [Play].To cancel the savingSelect [Back] → [Yes]. 2 Select [Save] and press .The screen for selecting where to save appears.[Data Box]:Save melodies in the Data Box of the FOMA terminal. Select a folder for saving melodies.[microSD]:Save melodies in the microSD memory card. 3 Select a place to save to and press .The melody is saved.To download Chara-den/Deco-mail template/dictionary dataWhile displaying the site, select data and select [Save].To download a Kisekae toolWhile displaying the site, select a Kisekae tool and select [Save]/[Save temporary]/[Save&setting].To download PDF dataWhile displaying the site, select PDF data and select [Data Box]/[microSD].To download a ToruCa cardWhile displaying the site, select a ToruCa card and select [Yes] → a folder.To download mailWhile displaying the site, select mail and select [Save] /[Save in mail box]. When you select [Save in mail box], the mail is saved in the Mail box. If the data contains several mails, only the first mail is saved.To download an easy BlogUp service information fileWhile displaying the site, select an easy BlogUp service information file and select [Save] → [Yes].When there is not enough memoryThe screen for confirming whether to overwrite the data appears. To overwrite, select unnecessary data (P.326).Continued](https://usermanual.wiki/Sony/A3724011.08-user-guide-part-1/User-Guide-929851-Page-169.png)
![168i-mode/i-motion/i-Channel● Downloaded melodies may not be played back properly.● PDF data whose size is unknown is downloaded until the downloaded size of it reaches 2M bytes.● You may be able to display the PDF data you failed to download by downloading it again. However, some PDF data may be disabled for display.● If you have deleted preinstalled Chara-den files or PDF data, you can download them from “PlayNow by SO”. [i Menu] → [メニュー/検索] (Menu/Search) → [ケータイ電話メーカー] (Mobile Phone Manufacturers) → [PlayNow by SO] (Japanese only)Using the Phone To/Mail To/Web To/i-αppli ToYou can use highlighted information in a site, message, mail main body, i-αppli, ToruCa card, PDF data, and i-Channel channel list to place a call, compose mail, display an Internet website, and start i-αppli. Sometimes, you may not be able to select an item for establishing a link to the displayed phone number/mail address/URL/i-αppli. Whether you can use the function depends on sites, mail, messages, software, ToruCa cards, and i-Channel contents.Placing a Call from the Current DisplayYou can place a voice or videophone call, originate a PushTalk call, or send SMS from a phone number currently displayed in the display (Phone To, AV Phone To). When 2in1 is set to the B mode, you cannot originate a PushTalk call. You cannot send SMS from i-αppli. 1 Select a phone number in the display and press .The screen for confirming whether to place a call appears. 2 Select [Yes] → [Voice call]/[Videophone]/[PushTalk]/[SMS] and press . Follow the same steps as in “Placing a call by specifying a condition” (P.60, step 1 to 3).Composing/Sending Mail from the Current DisplayYou can compose/send mail to a mail address currently displayed in the display (Mail To). When 2in1 is set to the B mode, you cannot use the Mail To function. 1 Select a mail address in the display and press .The Edit mail display appears.The selected mail address is entered as the address. 2 Compose mail and send it. Follow the same steps as in “Compose and send mail” (P.207, step 3 to 5).Accessing a Site from the Current DisplayYou can connect to a site by i-mode of Full Browser from a URL currently displayed in the display (Web To). 1 Select a link (URL) in the display and press .The FOMA terminal is connected to the linked site.Running i-αppli from the Current DisplayYou can start i-αppli software from a link currently displayed in the display. The software can also be started using the infrared communication (i-αppli To). Download software that can be started by the i-αppli To beforehand. i-αppli cannot be started to run when the i-αppli To is set to [No] (P.241). 1 Select i-αppli link in the display and press .The screen for confirming whether to start i-αppli appears. 2 Select [Yes] and press .The software is started to run.](https://usermanual.wiki/Sony/A3724011.08-user-guide-part-1/User-Guide-929851-Page-170.png)
![169i-mode/i-motion/i-ChannelSetting i-mode <i-mode setting>Setting the Connection TimeoutThe duration before disconnecting the FOMA terminal automatically can be set when you cannot send or receive data due to heavy traffic at the i-mode center. 1 From the i-mode menu, select [i-mode setting] → [Common setting] → [Connection timeout] and press .[60sec]:Disconnect automatically when unable to send/receive data for 60 seconds.[90sec]:Disconnect automatically when unable to send/receive data for 90 seconds.[Unlimited]:Do not set the connection timeout (however, the connection can be disconnected due to the radio wave condition or other reasons). 2 Select the waiting duration and press .The Connection timeout is set.Changing the i-mode Host (ISP Connection Communication)※ You do not need to change the Host setting when using the i-mode service of DoCoMo.You can set up to 10 hosts for receiving services other than the services provided by i-mode (DoCoMo). When you change a host to other than [i-mode(UIM)], you cannot use i-mode. You must always enter [Host name], [Host number], and [Host address]. 1 From the i-mode menu, select [i-mode setting] → [Common setting] → [Host selection] and press .Host selectioni−mode(UIM)To edit the settings of the set hostMove the cursor to the set host and from the Function menu, select [Edit], and enter the Security code. Edit each item.To delete the set hostMove the cursor to the set host and from the Function menu, select [Delete one], enter the Security code, and select [Yes]. 2 Press (Create).The Security code screen appears. 3 Enter the Security code and press (OK).Host settingHost nameHost numberHost addressHost address2[Host name]:Enter a host name within eight full-width or 16 half-width characters.[Host number]:Enter a host number within 99 half-width alphanumeric characters and symbols.[Host address]/[Host address2]:Enter a host address within 30 half-width alphanumeric characters and symbols. 4 Enter each item. 5 Press (Complete).The entered host is saved. 6 Select the host and press .The host is changed.● Note that packet communication is not covered by the Pake-Houdai/Pake-Houdai Full service if a host of the packet communication is set to other than [i-mode(UIM)].Continued](https://usermanual.wiki/Sony/A3724011.08-user-guide-part-1/User-Guide-929851-Page-171.png)
![170i-mode/i-motion/i-ChannelSetting Whether to Use the Saved Data for Flash MoviesYou can set whether to use the saved data (P.190) when you play back a Flash movie displayed on a site or saved in the Screen Memo. 1 From the i-mode menu, select [i-mode setting] → [Use phone info] and press . 2 Select [Yes]/[No] and press .The Use phone info is set.Disabling the Display of GraphicsYou can set whether to display graphics when displaying sites or screen memos. 1 From the i-mode menu, select [i-mode setting] → [Display img] and press . 2 Select [ON]/[OFF] and press .The Display img is set.When set to [OFF], “ ” is displayed instead of a graphic.● Some graphics may not be displayed correctly even if the Display img is [ON].Displaying a Site Automatically with the Correct Character CodeYou can set to identify the character code of a site automatically. 1 From the i-mode menu, select [i-mode setting] → [Auto detect.] and press . 2 Select [ON]/[OFF] and press .The Auto detect. is set.● Even if the Auto detect. is [ON], some sites may not be displayed correctly.Operating the SSL List <SSL certificate>You can set to validate/invalidate the certificate that is required to connect to an SSL site. 1 From the i-mode menu, select [i-mode setting] → [SSL list] and press .SSL list 13 CA cert. 1 CA cert. 2 CA cert. 3 CA cert. 4 CA cert. 5 CA cert. 6 CA cert. 7 CA cert. 8 CA cert. 9 CA cert.10 CA cert.11 DoCoMo cert.1[CA cert.]:An authentication company issues these certificates. They are saved in the FOMA terminal at the time of purchase.[DoCoMo cert.]:This certificate is required for connecting to the FirstPass Center and FirstPass-compatible sites and is saved on the UIM (green/white).[User cert.]:This certificate is downloaded from the FirstPass Center by [User certificate] and is saved in the UIM (green/white).To check the certificateMove the cursor to the certificate and press . 2 Select an SSL certificate and press (Set).The Security code screen appears. 3 Enter the Security code and press (OK).The Valid/Invalid display appears. 4 Select [Valid]/[Invalid] and press .The SSL certificate is set.When set to [Invalid], “ ” changes to “ ”. The SSL communication is canceled when connecting to an SSL site that requires a certificate.](https://usermanual.wiki/Sony/A3724011.08-user-guide-part-1/User-Guide-929851-Page-172.png)
![171i-mode/i-motion/i-ChannelSetting the FirstPass <User certificate>You can issue and download the user certificate from the FirstPass Center.The user certificate certifies that you are a FOMA subscriber. The downloaded user certificate is saved on the green/white UIM (FOMA card) and enables you to use FirstPass-compatible sites. You cannot use the user certificate using the blue UIM. To connect to the FirstPass Center, set the date and time (P.44). The screens and operation methods displayed by the FirstPass Center may change. While the FOMA terminal is connected to the FirstPass Center, you cannot send/receive mail or receive Message R/F. The User certificate is not available overseas. 1 From the i-mode menu, select [i-mode setting] → [User certificate] and press . FirstPass・FirstPassをご利用いただくためには、ユーサ゛証明書の発行申請、タ゛ウンロート゛が必要です。・「次へ」を選択して、ユーサ゛証明書の発行申請、タ゛ウンロート゛を行ってください。・当サイトの閲覧/ご利用にあたってのハ゜ケット通信料は無料です。次へ/English 2 Select [English] and press . FirstPass Request your certificate Download your certificate Other settings The usage regulation (Japanese only) 3 Select [Request your certificate] → [Continue] and press .The PIN2 code input screen appears.To void the issued certificateSelect [Other settings] → [Revoke your certificate] → [Yes], enter the PIN2 code, and select [Continue] → [Continue] → [Continue]. 4 Enter the PIN2 code and press (OK). If you do not enter the PIN2 code within 15 seconds, the request for issuing your certificate is canceled. 5 Select [Download] → [Continue] and press . FirstPassRequesting a certificateis completed.Download the certificate.Download/MenuThe user certificate is downloaded and added to the list of SSL certificates (P.198).Precautions on the use of FirstPass● The packet communication charge is free when you connect to the FirstPass Center.● The packet communication performed when connecting to a FirstPass-compatible site is covered by the Pake-Houdai/Pake-Houdai Full service. However, data communication with a PC connected is not covered by the Pake-Houdai/Pake-Houdai Full service.● FirstPass is an electronic authentication service provided by DoCoMo. Using FirstPass enables client authentication, which is performed between the site and FOMA terminal user by exchanging certificates and verifying the received certificate of the other side for mutual authentication.● FirstPass can be used for Internet communication from the FOMA terminal as well as for Internet communication by connecting the FOMA terminal to a PC. To use on a PC, you must install the FirstPass PC software on the supplied CD-ROM.● When you request the user certificate to be issued, carefully read the displayed “FirstPass Agreement” and then make the request if you accept the terms.● You need to enter the PIN2 code in order to use the user certificate (P.131). You are liable for all operations performed after you enter the PIN2 code. Therefore, exercise care to prevent the use of your UIM or PIN2 code by others.● If you have lost or stolen your UIM, you can invalidate your user certificate at the “General Contact” numbers provided on the backcover of this manual.● DoCoMo shall have no liability for any content and information provided by FirstPass-compatible sites. Any problem must be resolved between you and the FirstPass-compatible site.● DoCoMo and the authentication company do not guarantee the security for using FirstPass and SSL. Therefore, you must use them at your own discretion and responsibility.](https://usermanual.wiki/Sony/A3724011.08-user-guide-part-1/User-Guide-929851-Page-173.png)
![172i-mode/i-motion/i-ChannelChanging the Host for Certificate Issue <Select host>※ Normally, you do not need to change the setting.When you want a service other than FirstPass services, you can set one host. Note that if you change the setting, you cannot connect to the FirstPass Center. You cannot set this function during i-mode connection. 1 From the i-mode menu, select [i-mode setting] → [Select host] and press .Select hostドコモTo edit the set hostMove the cursor to the set host and from the Function menu, select [Edit] and enter the Security code. Edit each item.To restore the default host settingFrom the Function menu, select [Reset], enter the Security code, and select [Yes]. 2 Press (Create).The Security code screen appears. 3 Enter the Security code and press (OK).Host settingHost nameHost address[Host name]:Enter a host name within 99 half-width alphanumeric characters and symbols.[Host address]:Enter a host address within 100 half-width alphanumeric characters and symbols. 4 Enter each item. 5 Press (Complete).The entered host is saved. 6 Select a host and press .The host is changed.What is i-motion?i-motion is movie data that contains both video and sound tracks. You can play back an i-motion on the FOMA terminal and set a saved i-motion for the stand-by display.The i-motion can be of the following types. The type of i-motion varies depending on a site and cannot be selected.Category DescriptionType Playback methodStandard type(Allowed to be saved※)Playback is performed while loading data(10M bytes maximum)Playback starts after halfway downloading i-motion data and proceeds while downloading the rest of the data.Playback is performed after loading data(10M bytes maximum)Playback starts after all i-motion data is downloaded.Streaming type(Not allowed to be saved)Playback is performed while loading data(10M bytes maximum) Playback starts after halfway downloading i-motion data and proceeds while downloading the rest of the data. The i-motion data is deleted once it is played back.※ Some i-motion cannot be saved.](https://usermanual.wiki/Sony/A3724011.08-user-guide-part-1/User-Guide-929851-Page-174.png)
![173i-mode/i-motion/i-ChannelDownloading an i-motion from Sites <Download i-motion>You can download i-motion from a site and save it to the FOMA terminal. You can save up to 150 i-motion, each up to 10M bytes. The number of i-motion that can be saved may decrease depending on the data to be saved. 1 While displaying a site, select an i-motion and press .i−motionPlaySaveFile propertyBackThe i-motion is downloaded to the FOMA terminal.When the i-motion auto replay is set to [ON], playback of the i-motion starts automatically after the downloading is completed. (For i-motion that can be played back while being downloaded, playback starts after halfway downloading data.) The operations during playback is the same as those described for i-motion in the Data Box (P.295). Even if you stop playback while the downloading is in progress, the downloading continues. 2 Select [Save]/[Save temporary] and press .The screen for selecting where to save appears.[Data Box]:Save the i-motion in i-motion of the Data Box of the FOMA terminal. Select a folder for saving data.[microSD]:Save the i-motion in the microSD memory card.To play back dataSelect [Play].To display detailed informationSelect [File property]. 3 Select a place to save to and press .The i-motion is saved.● Some i-motion may not be played back/saved properly even if its data is downloaded successfully.● The playback may be stopped or the image may be distorted when you play back i-motion while downloading data depending on the radio wave condition, communication line conditions, or the communication speed. A standard type i-motion allows you to play back as many times as you want after downloading (using the saved data). However, a streaming type i-motion does not allow further playback once it is played back (unless you download it again).● If you close the FOMA terminal or execute another function while downloading/playing back an i-motion, the downloading/playing back may be stopped depending on some i-motion.● You cannot download or play back an i-motion in the ASF format.Setting Whether to Play Back i-motion Automatically <i-motion auto replay>You can set whether to automatically play back standard type i-motion. 1 From the i-mode menu, select [i-mode setting] → [i-motion auto replay] and press . 2 Select [ON]/[OFF] and press .[ON]:Automatically play back the i-motion during or after downloading.[OFF]:Do not automatically play back the i-motion during or after downloading and display the download completion screen.](https://usermanual.wiki/Sony/A3724011.08-user-guide-part-1/User-Guide-929851-Page-175.png)
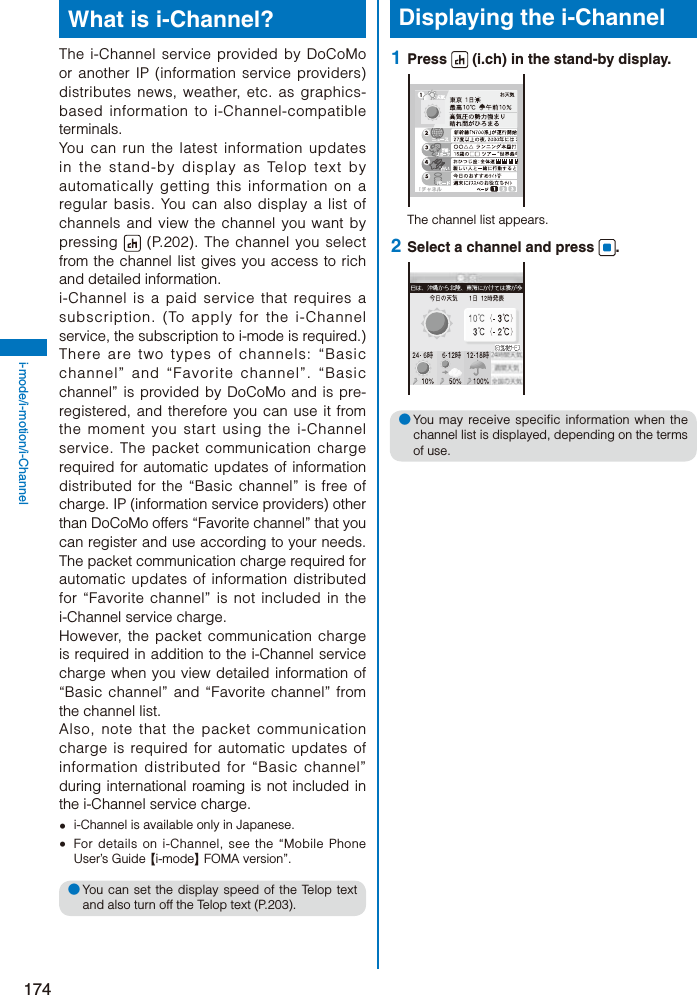
![175i-mode/i-motion/i-ChannelWhen You Receive i-Channel → 最高10℃ 10Tel o pWhen you receive information, the information is automatically run as Telop text on the stand-by display.To display the channel listPress (i.ch).● When you receive i-Channel information, “ ”→“” flashes. Even if you receive information, the FOMA terminal does not sound the ring tone or vibrate, and the incoming indicator does not operate, either.● If you change the host, the Telop text may be turned off and information may not be automatically updated. To receive latest information, press (i.ch) and display the channel list. The Telop text starts running automatically.● You can change the i-Channel host using the Host selection (P.197). Normally, you do not need to change the host.● When the FOMA terminal is powered off, outside of the service area, or in poor radio wave condition, you may not be able to receive information. When you receive information by pressing (i.ch), the Telop text is automatically displayed in the stand-by display.● Telop text is not displayed in the following cases.- When the Lock all is set- When the Personal data lock is set- When the Omakase Lock is set- When the Public mode (Drive mode) is set- When the UIM is not inserted- When the i-Channel or i-mode service is canceledChanging the i-Channel SettingsSetting the Telop TextYou can set the display speed of the Telop text and also turn off the Telop text. 1 From the i-mode menu, select [i-Channel] → [Ticker] and press .The Ticker display appears. 2 Set the speed for displaying the Telop text at [Stand-by].Select from [Fast], [Std], and [Slow].To turn off the Telop textSelect [OFF].● When 2in1 is used, you can set the Ticker for each 2in1 mode. Restoring the Default Settings You can delete saved i-Channel data and reset the Ticker settings to the default settings. If an i-motion or i-αppli is set for the stand-by display, the Ticker settings are not reset. 1 From the i-mode menu, select [i-Channel] → [Reset i-Channel] and press .The screen for confirming whether to reset the i-Channel data appears. 2 Select [Yes] and press .The i-Channel is reset.](https://usermanual.wiki/Sony/A3724011.08-user-guide-part-1/User-Guide-929851-Page-177.png)
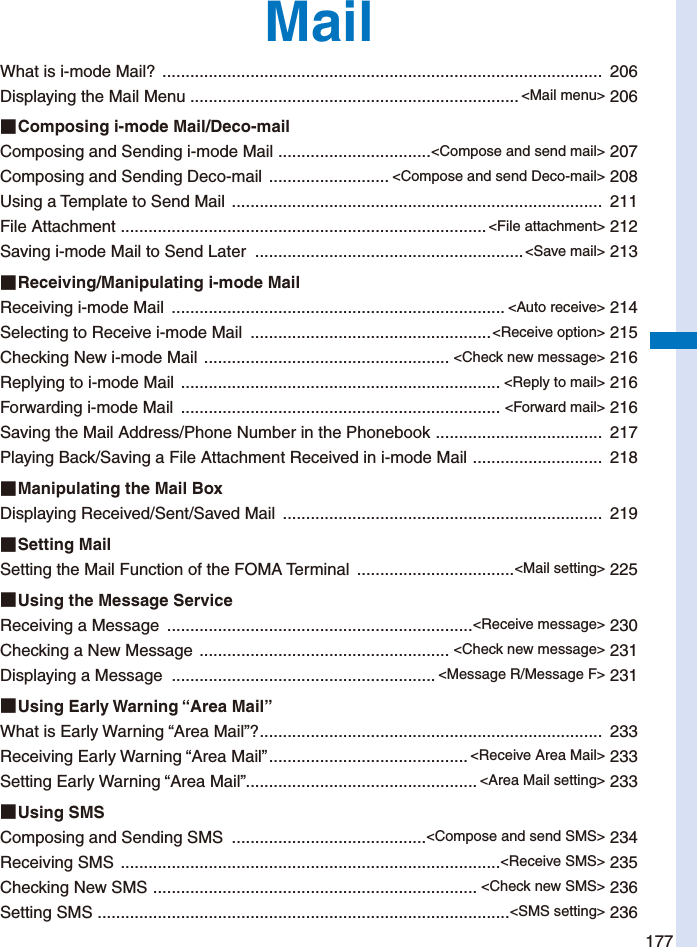
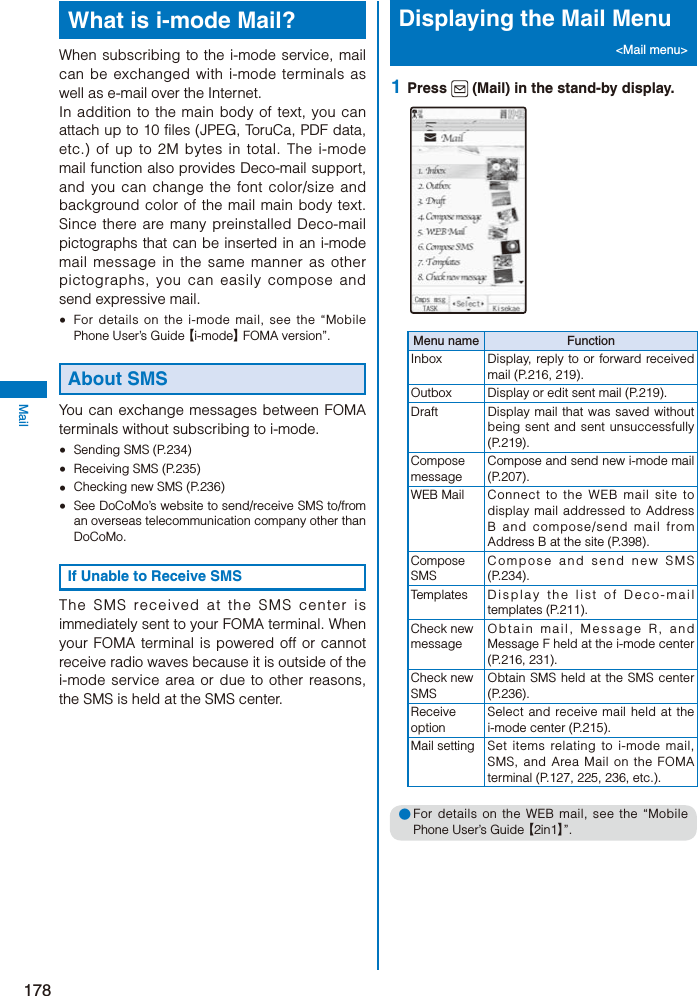
![179MailContinuedComposing and Sending i-mode Mail <Compose and send mail>Sent mail is saved in [Outbox]. Mail may not be displayed correctly on the recipient’s phone depending on the radio wave condition. 1 From the Mail menu, select [Compose message] and press . You can also display the mail compose display by pressing (Cmps msg) in the Mail menu.0Edit mailNumber of entered bytes 2 Enter an address at [ ].Enter an address within 50 half-width alphanumeric characters and symbols. 3 Enter a subject at [ ].Enter a subject within 100 full-width or 200 half-width characters. 4 Enter the main body at [ ].Enter the main body within 5,000 full-width or 10,000 half-width characters. You can enter a Deco mail pict. to compose Deco-mail (P.208).To obtain the location informationFrom the Function menu, select [Rcv loc. info] (P.277).To display the preview imageFrom the Function menu, select [Preview]. 5 Press (Send).The mail is sent.To save the main body of text as signatureFrom the Function menu, select [Save signature].● When you change the font size, from the Function menu, from [Input method] → [Font size], in the Edit mail or Edit address display, the setting is only applied for the font size in the matching word list. The setting for the font size of an address, subject, and main body text is changed from the next time when you compose mail (P.127). ● When the number of saved draft mail has reached 50 or there is not enough memory left for draft mail, you cannot compose new mail nor edit draft mail.● If new mail is sent when the number of saved sent mail has reached 500 or there is not enough free space, the unprotected sent mail is overwritten from the oldest.● If mail you send to several addresses is sent successfully to some and unsuccessfully to other addresses, the same mail is saved in [Outbox] as sent mail and in [Draft] as unsent mail/mail sent unsuccessfully.● Even if the mail is sent successfully, you may receive the error message “Transmission failed” depending on the radio wave condition and the mail is saved in [Draft].● When 2in1 is set to the B mode, you cannot compose any i-mode mail.● You cannot send i-mode mail using Address B.● When you obtain location information and attach the location information URL, “ ” appears in front of the location information URL in the main body. Attached location information URL is counted as the characters in the mail main body.● All the part of a title may not be received depending on the recipient’s terminal model.Adding an AddressYou can send i-mode mail containing the same information up to five addresses all at once by adding these addresses. You can select the type of address from To, Cc, and Bcc. 1 Press (Func) in the Edit mail display.The Function menu appears.](https://usermanual.wiki/Sony/A3724011.08-user-guide-part-1/User-Guide-929851-Page-181.png)
![180Mail 2 Select [Add receiver] → address type (To/Cc/Bcc) and press .The address field of the selected address type ([ ]/[ ]/[ ]) is added. 3 Enter an address in the added address field [ ]/[ ]/[ ].To delete an addressMove the cursor to an address and from the Function menu, select [Delete receiver] → [Yes].To change the address typeMove the cursor to an address and from the Function menu, select [Change addr type] → an address type (To/Cc/Bcc). 4 Compose mail and send it. Follow the same steps as in “Compose and send mail” (P.207, step 3 to 5).● The mail addresses entered in To and Cc are displayed in the recipient’s terminal display. Note, however, that they may not be displayed depending on the terminal, device, or mail software of the recipient. The mail addresses entered in Bcc are not displayed in the recipient’s terminal display.Entering an Address from the Mail ListYou can send mail to several recipients saved in the mail list. 1 Press (Func) in the Edit mail display.The Function menu appears. 2 Select [Mail list] → a mail list and press .All the members in the list are entered in the address box.To select a specific address from the mail listPress (Each) in the Mail list display and select a member. 3 Compose mail and send it. Follow the same steps as in “Compose and send mail” (P.207, step 3 to 5).Composing and Sending Deco-mail <Compose and send Deco-mail>You can compose and send Deco-mail, i-mode mail that has a decorated main body. Deco-mail may not be received or displayed correctly depending on the recipient’s terminal model. Main body input displayInputR.ab4061 漢カナAa12Sasha and Beckie are very cute and so frisky. They are running throughout the house tirelessly. Why not see ’emIf you miss this chance, you will never see such cute little kittens. NewcommersDeco-mailIcons for the specified decoration itemsBlink/Move Preview displayPreviewR.4061 漢カナAa12Sasha and Beckie are very cute and so frisky. They are running throughout the house tirelessly. Why not see ’emIf you miss this chance, you will never see such cute little kittens. NewcommersColor/Size/AlignBackground colorInsert imageInsert line 1 From the Mail menu, select [Compose message] and press .The Edit mail display appears. 2 Enter an address and subject. Follow the same steps as in “Compose and send mail” (P.207, step 2 to 3).](https://usermanual.wiki/Sony/A3724011.08-user-guide-part-1/User-Guide-929851-Page-182.png)
![181Mail 3 Enter/decorate the main body at [ ].Enter the main body within 5,000 full-width or 10,000 half-width characters. Number of characters permitted in the main body may be reduced depending on the type and volume of decoration you use.Press in the Main body input display to display the decoration menu. Decorate the selected textInput Deco. slcted txtSet the decorations and press (Close) to end the decoration menu.The following table indicates the decoration items, buttons displayed in the decoration menu, and icons which appear in the title field of the Main body input display after decoration.Decoration menu Icon Description[1]:Color/Size Use to select a font size from three types, large/medium/small and to select font and line colors from 20 colors. When you select a font color, the color of a pictograph is also changed. To reset to the normal pictograph color, select [None]. You cannot change the size of the Deco-mail pictograph.[2]:Quick deco. Mail −You can specify the background and font colors of Deco-mail all at once and also insert a decoration line above and below the text by selecting a pattern image and its color scheme (P.210).Decoration menu Icon Description[3]:Blink/Move/Align Use to select whether or not to allow the text to blink (ON/OFF) and to select the alignment (left justified/centered/right justified) or move (none/Telop text/swing).[4]:Insert image −You can insert up to 20 types of images (90K bytes) from My picture of the Data Box. You can also select a Deco-mail pictograph.[5]:Deco. slcted txt −After specifying the range of the main body, you can decorate it. You can decorate the mail using [Color/Size] and [Blink/Move/Align], one after the other (P.210).[6]:Insert line−The line in the color set in [Color/Size] is inserted.[7]:Close −You can quit the decoration menu.[8]:Background color−You can select the background color from 80 colors.[9]:Reset all −You can cancel the all decorations. You can set a decoration by entering a digit in front of the name of the decoration menu.To undo the last decoration settingPress (Undo).To check the decoration settingsPress (Close) and from the Function menu, select [Preview].To enter Deco mail pict.Press (Pict/Sym) to select Deco mail pict.Deco mail pict. is a Deco-mail pictograph that can be entered only in the Edit mail, Edit template, and Edit signature displays. 4 Press (Close) and then press (Send).To save the composed Deco-mail as a templateFrom the Function menu, select [Save template] → [Yes]. The Deco-mail is saved in Templates.Continued](https://usermanual.wiki/Sony/A3724011.08-user-guide-part-1/User-Guide-929851-Page-183.png)
![182Mail● Even if you delete a decorated character, the data used for decoration may not be erased and the number of characters in the mail main body that you can enter could be reduced. After canceling the decoration, delete the character. When you press for over a second, both the character and the decoration data are deleted.● Blinking, motion, and animation stop automatically after a certain period of time.● When Deco-mail exceeding 10,000 bytes is sent to a terminal of other than the following models※, it is received as ordinary mail in which a URL for viewing the Deco-mail is included. However, some terminals may receive mail only of the main body in which no URL for viewing the Deco-mail is included.※ 903i series, 904i series, 905i series, 703i series (excluding P703iµ), 704i series (excluding P704iµ), 705i series, and F801iSpecifying Decoration After Entering the Main Body 1 Press in the main body input display.The decoration menu appears. 2 Select [ ] and press . 3 Select the decoration start point and press .The first character to be decorated is set. 4 Select the decoration end point and press .The range of the text to be decorated is set and the Cross Deco-palette appears. 5 Select the font size/color and press .Use to select the font size (large/medium/small) and to select the font color. If you do not set the font size/color, press . 6 Select the text blink/move/alignment and press .Use to select whether or not to allow the text to blink (ON/OFF) and to select the alignment (left justified/centered/right justified) or move (none/Telop text/swing). If you do not set the text blink/move/alignment, press .Specifying Decoration All at Once If you select “ ” from the decoration menu, all the specified decorations are canceled. 1 Press in the main body input display.The decoration menu appears. 2 Select [ ] and press .The Cross Deco-palette appears.InputSample Quick deco. MailFont colorBackground color 3 Select the font/background color and press .Use to select the font color and to select the background color. If you do not set the font/background color, press .Input Quick deco. Mail 4 Select a pattern image/color scheme and press .Use to select a pattern image to be inserted above and below the text and to select a pattern image/color scheme. If you do not set a pattern image/color scheme, press . 5 Press (Close) and enter the main body.Enter text within 5,000 full-width or 10,000 half-width characters. Number of characters permitted in the main body may be reduced depending on the type and volume of decoration you use.● You can also select the Quick deco. Mail after entering the main body.](https://usermanual.wiki/Sony/A3724011.08-user-guide-part-1/User-Guide-929851-Page-184.png)
![183MailEntering the Main Body After Specifying Decoration 1 Press in the main body input display.The decoration menu appears. 2 Select the decoration and press .The Cross Deco-palette appears.When you select “ ”InputSample Color/SizeUse to select the font size (“ ” large/“ ” medium/“ ” small) and to select the font color.Font sizeFont colorFont color [none]When you select “ ”InputSample Blink/Move/AlignUse to select whether or not to allow the text to blink (“ ” ON/“ ” OFF) and to select the alignment (“ ” left justified/“” centered/“ ” right justified) or move (“ ” none/“ ” Telop text/“ ” swing).BlinkMoveAlignWhen you select “ ”Select an image from My picture of the Data Box.When you select “ ”Insert a line at the line where the cursor is displayed.When you select “ ”InputSample Background colorUse to select the background color.Background colorBackground color [none] 3 Press (Close) and enter the main body.Enter text within 5,000 full-width or 10,000 half-width characters. Number of characters permitted in the main body may be reduced depending on the type and volume of decoration you use.Using a Template to Send MailA template is a model used for Deco-mail, which is preset with decorations for the main body. You can use templates to easily compose/send Deco-mail.You can download a template from a site and also save up to 50 composed/received/sent Deco-mails as templates (P.209). You cannot edit or delete a preinstalled template. 1 From the Mail menu, select [Templates] and press .Templatesモモ:Happy Birthday!モモ:遊びに行こうよモモ:ありがとう!モモ:旅行に行ってきたよモモ:探検中浜でお散歩海でぷかぷからぶらぶ男の子お化けきのこきらりTo check a templateSelect a template.To change the titleMove the cursor to a template and from the Function menu, select [Edit title]. Enter the title within 10 full-width or 20 half-width characters.To delete a templateMove the cursor to a template and from the Function menu, select [Delete] → [Delete one] → [Yes]. To delete several templates, from the Function menu, select [Delete] → [Select&delete], select templates, press (Complete), and select [Yes]. To delete all templates, from the Function menu, select [Delete] → [Delete all], enter the Security code, and select [Yes]. To edit a templateMove the cursor to a template and press (Edit).Continued](https://usermanual.wiki/Sony/A3724011.08-user-guide-part-1/User-Guide-929851-Page-185.png)
![184Mail 2 Select a template and press (Mail).The Edit mail display appears. 3 Compose mail and send it. Follow the same steps as in “Compose and send Deco-mail” (P.208, step 2 to 4).● When you save Deco-mail containing an image that cannot be sent as a mail attachment or Deco-mail with a file attachment as a template, the image or file attachment is not saved.File Attachment <File attachment>You can send i-mode mail with up to 10 file attachments, 2M bytes in total, including still images, movies/i-motion, melodies, ToruCa cards, PDF data, Phonebook, Schedule, Bookmark, My data, and other files.■ Files that can be attachedType Restrictions, etc. Image (GIF/JPEG/SWF) A JPEG image exceeding 2M bytes is automatically converted to a file of 2M bytes or less. (It is only the first file attachment that can be selected for conversion.) Movie/i-motion (MP4) A movie/i-motion file exceeding 2M bytes is automatically clipped from the beginning within 2M bytes. (It is only the first file attachment that can be selected for conversion.) A movie/i-motion whose image size is set to [VGA(640×480)] or less can be attached. An attached movie may appear grainy or may be displayed after being converted into several continuous still images depending on the recipient’s terminal model. Some i-motion files may not be attached. (Green) Melody (SMF) (Orange) Melody (MFi) A melody may not be sent properly to mobile phones other than SO906i. ToruCa You may not be able to send some ToruCa cards. PDF data (PDF) PDF data that you obtained by page cannot be attached.Type Restrictions, etc. Tool data The Phonebook, My data, Schedule, and Bookmark data can be attached. Other files − Files that cannot be attached to mail and files prohibited from being retrieved out of the FOMA terminal cannot be attached. When you reply to mail saved in the microSD memory card, you cannot attach a file (P.311). 1 Press (Func) in the Edit mail display.The Function menu appears. 2 Select [Add attach file] and press .The Select attach file display appears.[Image]:Select an image from My picture of the Main memory/microSD.[i-motion]:Select a movie/i-motion from i-motion of the Main memory/microSD.[Melody]:Select a melody from Melody of the Main memory/microSD.[ToruCa]:Select data from ToruCa of the Main memory/microSD.[PDF]:Select PDF data from My document of the Main memory/microSD.[Phonebook]:Select data from Phonebook of the Main memory/microSD. However, when the Save/attach image of the Phonebook is set to [Invalid], the image is not attached.[My data]:Attach My data.[Schedule]:Select data from Schedule of the Main memory/microSD.[Bookmark]:Select data from Bookmark of the Main memory/microSD.[Others]:Select data from Others of the microSD.[Activate camera]:Select [Camera]/[Movie] and record images/movies using the camera (P.155, 170).](https://usermanual.wiki/Sony/A3724011.08-user-guide-part-1/User-Guide-929851-Page-186.png)
![185Mail 3 Select a file type and press .To check the contents of a fileMove the cursor to a file and press (Play). 4 Select a folder → a file and press .0 20080214183006. 11.4KBEdit mailThe file is attached and “ ”, “ ”, “ ”(Green), “ ”(Orange), “ ”, “ ”, “ ”, or “ ” appears.When you select the image that is added the location informationThe screen for confirming whether to attach the location information URL to the main body appears. If you select [Yes], “ Location information URL” is entered at the end of the main body. 5 Compose mail and send it. Follow the same steps as in “Compose and send mail” (P.207, step 2 to 5).● It may take time to send mail depending on the size of a file attachment.● When you send mail with a still image attached, the sent image may be displayed in an orientation different from that seen in the FOMA terminal.● When you send mail to an i-mode terminal which does not support 2M-byte file transmission, you can only attach files of the supported types and size within the capacity of the recipient’s terminal. If you attach files of unsupported types or size exceeding the capacity, the file attachments are deleted and only the mail main body is sent to the recipient. When you send a movie as a file attachment to i-mode terminals of other than the following models※, a movie that is recorded with [High quality] or [Long play] set at the Common replay mode is recommended.※ 903i series, 904i series, 905i series, 703i series (excluding P703iµ), 704i series (excluding P704iµ), 705i series, and F801i● When you attach an image using [File attach] for easy BlogUp, a location information URL is not entered in the mail main body in spite of the location information being added to the image.● When you send mail to an i-mode terminal for the Mova service, file attachment is restricted to one JPEG image, melody of the MFi format, or i-motion file. The recipient receives it as mail with a URL linked to the file. If you attach multiple files or an unsupported file, the attached files are deleted and only the mail main body is sent to the recipient.Deleting a File Attachment 1 Select a file in the Edit mail display and press (Func).The Function menu appears. 2 Select [Del attach file] → [Yes] and press .The file attachment is deleted.Saving i-mode Mail to Send Later <Save mail>If you do not want to send composed mail immediately, you can save it in [Draft]. 1 Press (Func) in the Edit mail display.The Function menu appears. 2 Select [Save] and press .The composed mail is saved as unsent mail in [Draft].To edit saved mailFrom the Mail menu, select [Draft] → [Draft] → mail.](https://usermanual.wiki/Sony/A3724011.08-user-guide-part-1/User-Guide-929851-Page-187.png)
![186MailReceiving i-mode Mail <Auto receive>When mail is sent to the i-mode center, the FOMA terminal automatically receives them. Receiving mailUnread mail/messageMailMessageRMessageF 1 0 0While receiving mail, “ ” flashes.To cancel receiving mailPress (Cancel). “” appears in the next display informing the completion of reception.Receiving may be completed depending on the timing of cancellation.When receiving is completed, “ ” is displayed, the indicator flashes, the ring tone sounds, and the number of received mail is displayed.The display before receiving reappears after about 15 seconds. When returning to the stand-by display, the notification icon “ ” (New mail) appears. Press (Link) and select “ ” to display the Inbox display.● You can automatically receive up to 100K bytes of data in each mail, including the file attachment. You have to manually obtain a file attachment exceeding 100K bytes from the i-mode center (P.219).● If new mail is received when the number of saved received mail has reached 1,000 or there is not enough free space, the unprotected read mail is overwritten from the oldest.● When you receive multiple mail at the same time, the ring tone, call picture, and indicator color of the last received mail have priority.● Mail that has been sent to you in the following situations is held at the i-mode center.- During a videophone call- When the FOMA terminal is powered off- When the FOMA terminal is outside of the i-mode service area- During PushTalk communication- While receiving SMS- While the Self mode is set- While the Omakase Lock is set- During the infrared communication- During the iC communication- While updating the software- While connected to the FirstPass Center- While connected to the Data Security Service Center● Some mail is held at the i-mode center when “ ” appears (sometimes “ ” does not appear even if mail is held at the i-mode center). If the maximum number of mail is held at the i-mode center, “ ” appears. In this case, check the contents of unread mail, delete unnecessary received mail, or cancel protection of received mail before performing the Check new message.● When the size of received mail (number of characters and file attachment size) has exceeded the number of characters (data size) specified at Limit Mail Size accessible through [i Menu] → [English iMenu] → [Options] → [Mail Settings], the file attachment cannot be received automatically.](https://usermanual.wiki/Sony/A3724011.08-user-guide-part-1/User-Guide-929851-Page-188.png)
![187MailSelecting to Receive i-mode Mail <Receive option>You can check through mail held at the i-mode center, where you can select mail to receive and delete mail without receiving it based on the information such as mail subject. To use this function, set the Recv option setting to [ON]. When the Recv option setting is set to [ON], i-mode mail is not received automatically. When the Recv option setting is set to [ON], the Mail tone does not sound and when the Manner mode or Vibrator is set, the vibrator does not operate.Mail at centerWhen receiving mail, the notification icon “ ” (Mail at center) appears.To check mailPress (Link) in the stand-by display and select “ ” → [Yes]. The FOMA terminal is connected to the i-mode center.Receiving i-mode Mail after SelectingConnect to the i-mode center and select mail to receive. When 2in1 is set to the B mode, the Receive option cannot be performed. 1 From the Mail menu, select [Receive option] and press . メール選択受信 (1/2ページ) −−−−−−−− 選択受信説明[1]保留 08/02/12 17:54 Sorry for delay docomotaro@△△.□□□.co.jpサイス゛:1.3Kハ゛イトThe call is connected to the i-mode center and the list of i-mode mail saved at the center appears. When the mail contains a file attachment, the following icons appear.Still image file attachmenti-motion attachmentMelody attachmentToruCa card attachmentOther file attachment 2 Select [保留] (Holding) for the mail and press .[受信] (Receive):Receive a selected i-mode mail.[削除] (Delete):Delete a selected i-mode mail.[保留] (Holding):Hold a selected i-mode mail at the i-mode center. 3 Select [受信] (Receive) and press . 4 Select [受信/削除] (Receive/Delete) and press .1/2ページまで選択したメールを 受信/削除 −−−−−−−−iモードセンターから全てのメールを 削除To delete all mailSelect [削除] (Delete) below [iモードセンターから全てのメールを] (All mail from the i-mode center). 5 Select [決定] (OK) and press .The selected mail is received.](https://usermanual.wiki/Sony/A3724011.08-user-guide-part-1/User-Guide-929851-Page-189.png)
![188MailChecking New i-mode Mail <Check new message>New mail held at the i-mode center while the FOMA terminal is powered off or outside of the i-mode service area can be checked. Depending on the radio wave condition, you may not be able to check new mail. 1 Press (Mail) for over a second in the stand-by display.The FOMA terminal is connected to the i-mode center, and an inquiry result is displayed. To check mailSelect [Mail].Replying to i-mode Mail <Reply to mail>You can compose and send replies to the received mail. You may not be able to reply to some received mail. 1 From the received mail list, select mail and press (Quote).The Edit mail display appears.The mail address as address, “Re: title of the received mail” as subject, and “>main body of the received mail” as main body are entered beforehand. When the subject including “Re:” exceeds 100 full-width or 200 half-width characters, the extra characters are automatically deleted. When the subject of the received mail includes more than one “Re:”, some “Re:” are brought together in one automatically.To reply to mail without the sender’s messageMove the cursor to mail and press (Reply).To reply to broadcast mailSelect mail, press (Quote) or (Reply), and select [Reply to sender]/[Reply all]. 2 Compose mail and send it. Follow the same steps as in “Compose and send mail” (P.207, step 3 to 5).The reply mail is sent and “ ” appears.● No quote is used for a file attachment, a melody or i-αppli To link that is inserted in the mail main body, and an image in Deco-mail that cannot be redistributed.● You cannot reply to the i-mode mail sent to Address B of 2in1.● When you set [Quote reply]/[Reply] at [Inbox(List/Detail)] of the Edit slide setting, you can reply to a received mail just by opening the FOMA terminal in the received mail list or while displaying the contents of the mail (P.354).Forwarding i-mode Mail <Forward mail>You can forward received mail to another person. A file attachment is also forwarded. 1 From the received mail list, select mail and press (Func).The Function menu appears. 2 Select [Forward] and press .The Edit mail display appears.“Fw: title of the received mail” as subject and “main body of the received mail” as main body are entered beforehand. When the subject including “Fw:” exceeds 100 full-width or 200 half-width characters, the extra characters are automatically deleted. When the subject of the received mail includes more than one “Fw:”, some “Fw:” are brought together in one automatically. 3 Compose mail and send it. Follow the same steps as in “Compose and send mail” (P.207, step 2 to 5).The mail is forwarded and “ ” appears.● A melody or i-αppli To link inserted in the mail main body, an image in Deco-mail that cannot be redistributed, and a file not yet downloaded are not forwarded.](https://usermanual.wiki/Sony/A3724011.08-user-guide-part-1/User-Guide-929851-Page-190.png)
![189MailSaving the Mail Address/Phone Number in the PhonebookSaving the Sender’s/Recipient’s Mail Address in the PhonebookYou can save the mail address of a received mail sender and recipient or sent/saved mail recipient in the Phonebook.Example: Saving the mail address of a received mail sender to the FOMA terminal phonebook as a new entry 1 From the received mail list, select mail, press , and press (Func).The Function menu appears. 2 Select [Save address] and press .The screen for selecting how to save to the Phonebook appears. 3 Select [New] and press .The screen for selecting where to save appears.When you select [Add]Select an entry to which you want to add the mail address from the Phonebook.When there are multiple mail addressesSelect mail addresses → [New]/[Add]. 4 Select [Main memory] and press .The Edit phonebook display appears.To save to the UIM phonebookSelect [UIM]. 5 Save other items. Follow the same steps as in “Add to FOMA terminal phonebook” (P.95, step 3 to 5) or in “Add to UIM phonebook” (P.98, step 3). 6 Press (Complete).The entry is saved in the FOMA terminal phonebook.Saving the Phone Number/Mail Address in Display in the PhonebookThe mail addresses or phone numbers currently displayed in the site, received mail/sent mail, or ToruCa card can be saved in the Phonebook. Depending on the site, the displayed phone number or mail address may not be saved.Example: Saving the phone number contained in the main body of the received mail to the FOMA terminal phonebook as a new entry 1 From the received mail list, select mail and press , and then select the phone number and press (Func).The Function menu appears. 2 Select [Add to phonebook] and press .The screen for selecting how to save to the Phonebook appears. 3 Select [New] and press .The screen for selecting where to save appears.When you select [Add]Select an entry to which you want to add the phone number from the Phonebook. 4 Select [Main memory] and press .The Edit phonebook display appears.To save to the UIM phonebookSelect [UIM]. 5 Save other items. Follow the same steps as in “Add to FOMA terminal phonebook” (P.95, step 3 to 5) or in “Add to UIM phonebook” (P.98, step 3). 6 Press (Complete).The entry is saved in the FOMA terminal phonebook.](https://usermanual.wiki/Sony/A3724011.08-user-guide-part-1/User-Guide-929851-Page-191.png)
![190MailPlaying Back/Saving a File Attachment Received in i-mode MailYou can display/play back/save/delete a file that is attached or pasted in i-mode mail or a message including an image, movie/i-motion, melody, ToruCa card, PDF data, Phonebook, Schedule, Bookmark, and My data.■ File attachments that can be played back and savedFormat RestrictionsImage (JPEG/GIF/SWF) You can save a Deco-mail pictograph and stamp/frame in the Data Box only. You cannot play back a Flash movie of 100K bytes or more. You can save a Flash movie of 100K bytes or more in the microSD memory card only.Movie/i-motion (MP4) −Melody (SMF/MFi) You cannot play back a melody of 100K bytes or more. You can save a melody of 100K bytes or more in the microSD memory card only. You may not be able to play back correctly a melody sent from a mobile phone other than SO906i.ToruCa card You cannot play back a ToruCa card of 1K bytes or more and a ToruCa(detail) card of 100K bytes or more.PDF data (PDF) −Tool data You can save the Phonebook, Schedule, and Bookmark data. When you save a file using [Save attached], you cannot select the Main memory.Other files You can save other files in the microSD memory card only. The number of files that you can save varies depending on the free memory space on the place to save to and data size.Example: Saving a file attachment received in mail 1 From the received mail list, select mail and press . 2 Select a file attachment and press (Func).The Function menu appears.To display/play back a file attachmentMove the cursor to the file attachment and press . 3 Select [Save attached] and press .The Save to display appears.[Data Box]:Save a file attachment in the Data Box. Select a folder to save to.[microSD]:Save a file attachment in the microSD memory card.To play back a melody pasted in a messageSelect [Play melody].To save a melody pasted in a messageSelect [Save melody] → a place to save to.To check a melody titleSelect [Confirm title].To display details about an inserted imageSelect [Insert img info] → an image. The detailed information appears.To save an inserted imageSelect [Save insert img] → an image → a place to save to. 4 Select a place to save to and press .The file is saved.To display Tool dataMove the cursor to the file attachment, press , and select [Confirm].To save Tool data in the FOMA terminalMove the cursor to the file attachment, press , select [Register], enter the Security code, and select [Add]/[Overwrite].When there is not enough memoryThe screen for confirming whether to overwrite the data appears. To overwrite, select unnecessary data (P.326).● Some of the received image and movie/i-motion may not be played back correctly.](https://usermanual.wiki/Sony/A3724011.08-user-guide-part-1/User-Guide-929851-Page-192.png)
![191MailReceiving a File Attachment SelectivelyYou can obtain a file attachment exceeding 100K bytes and one for which the Attached file pref. is set to [Invalid]. You cannot obtain a file attachment whose retention period is expired. 1 From the received mail list, select mail and press . 2 Select “ ” and press .The obtaining operation starts and the file attachment is obtained.● If you obtain a file attachment not yet existing when there exist already 1,000 received mails or there is no more free memory space in the FOMA terminal, the obtained data overwrites the unprotected read mail from the oldest one. Depending on the size of the file attachment to be obtained, multiple mails may be overwritten by it.Deleting a File AttachmentYou can delete a file that is attached to i-mode mail. You cannot delete an i-αppli To link that is displayed in the mail main body.Example: Deleting a file attached to the received mail 1 From the received mail list, select mail and press . 2 Select a file attachment and press (Func).The Function menu appears. 3 Select [Del attach file] → [Yes] and press .The file attachment is deleted.Displaying Received/Sent/Saved MailYou can display received/sent/saved mail any time you want to. Received and sent mail can be saved in [Inbox] and [Outbox], respectively. Mail that was saved without being sent or sent unsuccessfully, is saved in [Draft]. You can save up to 1,000 received mails, up to 500 sent mails, up to 50 saved mails, and up to 30 Area Mail. The number of files that can be saved may decrease depending on the data to be saved. For SMS saved in the UIM, some function menu items are not available. 1 From the Mail menu, select [Inbox]/[Outbox]/[Draft] and press .Received mailInbox 25/66 Inbox MessageR MessageF The number of saved mail in the folder at the cursor/the total number of mail is displayed at the right end of the title line. The following icons show the status of the folder. Next to the icon, the folder name is displayed./ (Yellow)Preset folder/Mail security is set/ (Blue)User-created folder/Mail security is set/Folder created by i-αppli with mail/Mail security is set If there is unread mail, “ ” appears at the lower left of the icon. When 2in1 is set to Address B, sent and saved mail cannot be displayed.To display the SMS list in the UIMPress (UIM). When 2in1 is set to the B mode, the SMS list cannot be displayed.Continued](https://usermanual.wiki/Sony/A3724011.08-user-guide-part-1/User-Guide-929851-Page-193.png)
![192Mail 2 Select a folder and press .The received/sent/saved mail list appears.Received mailInbox 1/25 15:51 ドコモ一郎Photo contest 12:34 ドコモ二郎Concert ticket next mo 02/13 携帯なつ子 Yesterday’s subjec 02/12 携帯なつ子 Happy Birthday 02/11 docomo.taro Place set for meetin 02/10 携帯はる子Sorry, 20 minutes l wiThe application deadline of the next photo contest is the day after tomorrow. To apply, either reply to this mail or call us. We hope to hear from you.Received date/timeSenderSubjectSent mailOutbox 1/25 20:12 携帯はる子 Departure date an 10:24 docomo.taroIt’s a long time since 02/13 ドコモ一郎 Present 02/12 携帯はる子 New melody 02/11 ドコモ二郎 Snapshots during the 02/11 携帯なつ子Schedule for tomorrowLong desired XXX! The long awaited departure is close at hand. Let’s meet together at XXX on 16th at 5:45 pm. − END −Sent date/timeRecipientSubjectSaved mailDraft 1/25 15:51 ドコモ二郎 I’ve got the tick 02/13 docomo.taroGive me a call 02/13 携帯はる子 How about skiing 02/12 ドコモ二郎Sorry! 02/12 ドコモ一郎 Souvenir for you 02/11 携帯はる子 Map to the eventSaved date/timeRecipientSubjectYou can change the display style of the mail list (P.225). The received/sent/saved date/time field indicates the time when the mail is received/sent/saved today, and otherwise the date. When the date/time is corrected to the local time during international roaming, “ ” appears (P.44). For SMS, the beginning of the mail main body is displayed instead of the subject. For Area Mail, “エリアメール” and the beginning of the mail main body are displayed instead of the sender and the subject, respectively. All the part of a title may not be displayed. When 2in1 is used, mails for each Address A and Address B are colored differently. The following icons show the status and type of the mail and the type of the file attachment.Mail statusUnread mail( ) Read mail (Protect ON)( ) Replied mail (Protect ON)( ) Forwarded mail (Protect ON)( ) Sent mail (Protect ON)Unsent mail/mail sent unsuccessfullyMail typeSMSSMS in the UIM (Received/sent mail only)Area Mail (Received mail only)Unable to reply mail (Received mail only)Mail used by i-αppli with mailFile attachment typeWith image attachmentWith movie attachmentWith melody attachmentWith ToruCa card attachmentWith i-αppli ToWith PDF data attachmentWith Tool data attachment (Phonebook, Schedule, Bookmark)With other file attachmentTo display mail addresses or phone numbersWhen saved in the Phonebook, the name is displayed instead of the mail address/phone number. Press to switch the display temporarily between the names and mail addresses/phone numbers. While displaying the mail list, press to change the display.For 2linesName of sender ←→ Mail address/phone numberFor 1lineSubject → Name of sender → Mail address/phone number↑ When the Secret display is set to [ON], the name is displayed even if a caller or recipient is saved as Secret in the Phonebook.](https://usermanual.wiki/Sony/A3724011.08-user-guide-part-1/User-Guide-929851-Page-194.png)
![193MailTo place a callWhen a mail address and phone number is saved in the Phonebook, you can place a call to this number. Move the cursor to the mail and from the Function menu, select [Call back]. 3 Select mail and press .Received mailIn 4 2008/02/12 11:54 携帯なつ子 Happy Birthday 080212.mid 0.9KBHappy birthday! It’s already one year since you left. You surely familiarize yourself with the local culture. I hope you enjoy your coming year.Attached is our memorial song. − END −Address typeReceived date/timeSenderSubjectSent mailOut 1 2008/02/14 20:12 携帯はる子 携帯なつ子 ドコモ一郎 Departure date and tiLong desired XXX! The long awaited departure is close at hand. Let’s meet together at XXX on 16th at 5:45 pm. − END − 080214.mid 0.9KBSent date/timeRecipientRecipient (Cc)Recipient (Bcc)Subject The following icons show the details of mail. Other icons are the same as in step 2.File attachment typeInvalid pasted data (when several data is pasted)( )(Green)With SMF-format melody attachment (Invalid data)( )(Orange)With MFi-format melody attachment (Invalid data)( ) With image attachment (Invalid data)( ) With movie attachment (Invalid data)( ) With ToruCa card attachment (Invalid data)( ) With PDF data attachment (Invalid data)( )With Tool data attachment (Phonebook, Schedule, Bookmark) (Invalid data)Not loaded file attachmentFile attachment loading in progressFile attachment loading errorFile attachment already deletedTo change the font sizePress for over a second. Every time you press for over a second, the font size changes to one level bigger than it. When the font size is [Extra extra large], the font size changes to [Small].To display the previous or next mailUse to display the previous mail or to display the next mail.● You can set the received/sent/saved mail not to be displayed by folder (Mail security) (P.142).Storing the Mail at the Data Security Service CenterYou can use the Data Security Service to store up to 10 i-mode mails, SMS messages, or Area Mail at one time at the Data Security Service Center. Data Security Service is a paid service that requires a subscription. For details on this service, see the “Mobile Phone User’s Guide 【i-mode】 FOMA version”. You can also store an image inserted in Deco-mail. You cannot store a file attachment and also a mail file exceeding 100K bytes.Example: Storing received mail 1 Press (Func) in the received mail list.The Function menu appears. 2 Select [Store in Center] and press .The Security code screen appears. 3 Enter the Security code and press (OK).The Select mail display appears.Continued](https://usermanual.wiki/Sony/A3724011.08-user-guide-part-1/User-Guide-929851-Page-195.png)
![194Mail 4 Select mail and press . To store several mails, repeat step 4. 5 Press (Complete).The screen for confirming whether to store the mail appears. 6 Select [Yes] and press .The call is connected to the Data Security Service Center and mail is stored. When the storing is completed, the storing result display appears.● You cannot store SMS report.Adding/Deleting FoldersIn addition to [Inbox]/[Outbox], you can create up to 20 folders each to manage received and sent mail. Besides these folders, additional five folders are reserved for i-αppli with mail each in [Inbox]/[Outbox]/[Draft]. You can also change a folder name or sort the folders. You cannot delete the preset folders, folders including protected mail, mail folders supported by i-αppli with mail software, and [MessageR]/[MessageF]. Folders of i-αppli with mail can be deleted if there is no supporting software for that i-αppli with mail. In this case, the other folders of that i-αppli with mail in the received, sent, or saved mail list are also deleted. You cannot change the names of the preset folders, folders of i-αppli with mail, and [MessageR]/[MessageF].Example: Adding a folder for received mail 1 From the Mail menu, select [Inbox], press , and press (Func).The Function menu appears. 2 Select [Edit folder] → [Create folder], press , and enter a folder name.Enter a name within 10 full-width or 20 half-width characters.The folder is added.To change a folder nameMove the cursor to a folder and from the Function menu, select [Edit folder] → [Edit folder name]. Enter a name within 10 full-width or 20 half-width characters.To reorder foldersFrom the Function menu, select [Edit folder] → [Reorder folders] → a folder. Move the cursor to a position to move to, press (Move), and press (Complete).To delete a folderMove the cursor to a folder and from the Function menu, select [Edit folder] → [Delete folder]. Enter the Security code and select [Yes].● After downloading i-αppli with mail, the folders of i-αppli with mail are automatically created in [Inbox], [Outbox], and [Draft].● When you delete a folder, all mail for both Address A and Address B and SMS for both Number A and Number B within the folder are deleted, regardless of the 2in1 mode.Moving Mail to a Different FolderYou can move received/sent mail to another folder using three methods. You cannot move messages in the [MessageR]/[MessageF] folder to another folder or mail from another folder to the [MessageR]/[MessageF] folder.](https://usermanual.wiki/Sony/A3724011.08-user-guide-part-1/User-Guide-929851-Page-196.png)
![195MailExample: Moving received mail 1 From the Mail menu, select [Inbox] → a folder and press .To move all mail in a folderFrom the Function menu, select [Move] → [Move all] → [Yes] → a folder.To move several mailsFrom the Function menu, select [Move] → [Select&move], select mails, and press (Complete). Select [Yes] → a folder. 2 Select mail and press (Func).The Function menu appears. 3 Select [Move] → [Move one] → [Yes] and press .The Select move to display appears. 4 Select a folder and press .The selected mail is moved to the different folder.● When you perform the Move all, only the displayed mail of each 2in1 mode are moved.Protecting MailReceived or sent mail can be protected from being overwritten. Up to 500 received mails and 250 sent mails can be protected. You cannot set protection for unread mail, unsent mail/mail, and Area Mail sent unsuccessfully.Example: Protecting received mail 1 From the received mail list, select mail and press (Func).The Function menu appears.To cancel the protectionMove the cursor to the protected mail and press (Func). 2 Select [Protect ON/OFF] → [Yes] and press .The mail is protected and “ / / ” appears.To cancel the protection of all mailFrom the Function menu, select [Unprotect all] → [Yes].Deleting MailYou can delete the received or sent mail using the following six methods.Delete one※1 Delete a mail in the folder.Select&delete※1 Delete several mails in a folder. Up to 30 mails can be selected at a time.Delete read msg (for received mail only)※1Delete all read mail.Delete all※1 Delete all mail in the folder.Delete read msg (for received mail only)※1Delete all read mail in the folder.Delete all※2 Delete all received or sent mail.※1 Deleting only displayed mail at each 2in1 mode.※2 Deleting all mail for both Address A and Address B and SMS for both Number A and Number B within the folder, regardless of the 2in1 mode.Example: Deleting received mail 1 From the Mail menu, select [Inbox] and press .To delete all received mailFrom the Function menu, select [Delete] → [Delete all], enter the Security code, and select [Yes].To delete all read mailFrom the Function menu, select [Delete] → [Delete read msg], enter the Security code, and select [Yes].Continued](https://usermanual.wiki/Sony/A3724011.08-user-guide-part-1/User-Guide-929851-Page-197.png)
![196Mail 2 Select a folder and press .The received mail list appears.To delete all read mail in the folderFrom the Function menu, select [Delete] → [Delete read msg], enter the Security code, and select [Yes].To delete all mail in the folderFrom the Function menu, select [Delete] → [Delete all], enter the Security code, and select [Yes].To delete several mailsFrom the Function menu, select [Delete] → [Select&delete], select mails, press (Complete), and select [Yes]. 3 Select mail and press (Func).The Function menu appears. 4 Select [Delete] → [Delete one] → [Yes] and press .The selected mail is deleted.Displaying i-αppli Mail as Regular Maili-αppli mail can be displayed as regular mail. If after the i-αppli with mail software is deleted, mail saved in the folder of the i-αppli with mail can be displayed in the same way as regular mail.Example: Displaying received i-αppli mail 1 From the Mail menu, select [Inbox] and press . 2 Select the folder of i-αppli with mail and press (Func).The Function menu appears. 3 Select [i-mode mail form] and press .The i-αppli mail can be displayed as regular mail.Checking the Number of Mail SavedThe number of mail saved can be checked for each folder.Example: Checking the number of received mail saved 1 From the Mail menu, select [Inbox] and press . 2 Select a folder and press (Func).The Function menu appears. 3 Select [Memory status] and press .Memory status All 1 55 10Ttl 66 Folder 1 22 2 25 The number of received mail saved in the selected folder and the total number of received mail saved are displayed.Received mailNumber of unread mailNumber of read mailNumber of protected read mailSent mailNumber of sent mailNumber of protected sent mailSaved mailThe number of saved mail in the selected folders and the total number of saved mail are displayed.Sorting MailReceived or sent mail in a folder can be sorted for display temporarily.](https://usermanual.wiki/Sony/A3724011.08-user-guide-part-1/User-Guide-929851-Page-198.png)
![197MailExample: Sorting received mail 1 Press (Func) in the received mail list.The Function menu appears. 2 Select [Sort] → a sorting order and press .Received mail[Date]:Sort mail from newest to oldest received date.[From address]:Sort mail by the sender’s mail address in alphabetical order.[Subject]:Sort mail by the subject in Japanese alphabetical order.[Size]:Sort mail by the mail file size from the largest (including an obtained file attachment).Sent mail[Date]:Sort mail from newest to oldest sent date.[To address]:Sort mail by the recipient’s mail address in alphabetical order.[Subject]:Sort mail by the subject in Japanese alphabetical order.[Size]:Sort mail by the mail file size from the largest (including a converted file attachment).The mail is listed in the selected order.● When you select [Subject], sorting may not be performed exactly in Japanese alphabetical order if, for example, some subjects contain a mixture of full-width and half-width characters. For SMS, sorting may not be performed exactly in Japanese alphabetical order because it is treated as mail without the subject.Setting the Mail Function of the FOMA Terminal <Mail setting> When 2in1 is set to the B mode, the following functions are not available. - Sort outbox - Edit signature - Signature - Recv option setting - Mail list - Attached file pref. - Clear Send/Recv rankingSetting How to Display a List of MailsYou can select the display style of Inbox, Outbox, and Draft lists using the following four methods. The set display style is applies to all folders. 2lines+body 2lines Inbox 1/25 15:51 ドコモ一郎Photo contest 12:34 ドコモ二郎Concert ticket next mo 02/13 携帯なつ子 Yesterday’s subjec 02/12 携帯なつ子 Happy Birthday 02/11 docomo.taro Place set for meetin 02/10 携帯はる子Sorry, 20 minutes l wiThe application deadline of the next photo contest is the day after tomorrow. To apply, either reply to this mail or call us. We hope to hear from you. Inbox 1/25 15:51 ドコモ一郎Photo contest 12:34 ドコモ二郎Concert ticket next mo 02/13 携帯なつ子 Yesterday’s subjec 02/12 携帯なつ子 Happy Birthday 02/11 docomo.taro Place set for meetin 02/10 携帯はる子Sorry, 20 minutes l wi 1line+body 1line Inbox 1/25 Photo contest Concert ticket next Yesterday’s subj Happy Birthday Place set for meet Sorry, 20 minutes I Plan for next week Long time no see you Place changed Check attendees Contest result Info on class reThe application deadline of the next photo contest is the day after tomorrow. To apply, either reply to this mail or call us. We hope to hear from you. Inbox 1/25 Photo contest Concert ticket next Yesterday’s subj Happy Birthday Place set for meet Sorry, 20 minutes I Plan for next week Long time no see you Place changed Check attendees Contest result Info on class re 1 From the Mail menu, select [Mail setting] → [Mail list setting] and press . 2 Select the display style and press .The display style of a mail list is set.● When [2lines+body] or [1line+body] is set, the beginning of the mail at the cursor is displayed. Even if the mail is previewed, the status is still to be read.● For the Draft list, the preview display does not appear.● The preview display may not appear depending on the character string (URL, etc.) in mail.● When you press in the Mail list display, the display can be changed (P.220).Continued](https://usermanual.wiki/Sony/A3724011.08-user-guide-part-1/User-Guide-929851-Page-199.png)
![198MailAssigning Separate Folders for MailYou can save requirements to sort received or sent mail so that they can be automatically assigned to folders. Up to 30 sorting requirements can be saved.Example: Setting a sorting requirement for received mail 1 From the Mail menu, select [Mail setting] → [Sort inbox] and press .Sort inboxSorting requirement fieldTo set a sorting requirement for sent mailFrom the Mail menu, select [Mail setting] → [Sort outbox].To delete a sorting requirementMove the cursor to the sorting requirement field and from the Function menu, select [Delete] → [Delete one] → [Yes]. To delete several sorting requirements, from the Function menu, select [Delete] → [Select&delete], select sorting requirements, press (Complete), and select [Yes]. To delete all sorting requirements, from the Function menu, select [Delete] → [Delete all], enter the Security code, and select [Yes].To reorder the sorting requirementsFrom the Function menu, select [Reorder] → a sorting requirement, move the cursor to a folder to move to, press (Move), and press (Complete).To cancel editingFrom the Function menu, select [Cancel]. 2 Select the sorting requirement field and press .Sort rule1Sorting criteriaFolder to sort into 3 Select the sorting method at [Sorting criteria].[Address]:Specify a mail address. The mail address portion after the @ mark is required. However, when you set the mail address to “phone number@docomo.ne.jp”, enter the phone number only.[Group]:Specify a group.[Subject]:Enter a subject or a part of it within 100 full-width or 200 half-width characters.[None]:Sort mail that does not meet any specified sorting requirement. 4 Select a folder to be used for sorted mail at [Folder to sort into].When no folder is specifiedMail is sorted to [Inbox]/[Outbox]. 5 Press (Complete).The sorting requirement is saved.● If mail satisfies several sorting requirements, the sorting requirement with a lower number in the list has higher priority. If you set [None] for sorting requirement, the sorting requirements lower than the number you set become invalid, and mail is sorted to the folder for which [None] is set. ● If you delete a folder for which the sorting requirement was set, [Inbox]/[Outbox] is used as a sort destination folder.● If data saved as Secret is contained in a group that has been set as a sorting requirement, and if you receive mail from a sender or send mail to a recipient who is relevant to the data, it is saved in [Inbox]/[Outbox]. To enable the sorting requirement, set the Secret display to [ON].● An i-αppli with mail is automatically sorted to the corresponding i-αppli with mail folder regardless of the sorting requirement.● Mail received before the sorting requirement is set is not sorted automatically.● When 2in1 is set to ON, the sorting requirement of the Group may become invalid. You need to set the sorting requirement from the Address, Subject, or None.](https://usermanual.wiki/Sony/A3724011.08-user-guide-part-1/User-Guide-929851-Page-200.png)