Spacelabs Healthcare 010-0914-00 User Manual Wireless Ethernettm
Spacelabs Healthcare, Inc. Wireless Ethernettm
Contents
- 1. User Manual 1 of 3
- 2. User Manual 2 0f 3
- 3. User Manual 3 of 3
User Manual 1 of 3
Part Number 062-0983-01 Rev C page 3 - 1
Wireless Ethernettm
Product Description and Installation Guide
Volume III
062-0983-01 Rev C
Bill Adams 02/01/00
COMPANY CONFIDENTIAL
FOR AUTHORIZED Spacelabs Medical USE ONLY
© 2000, Spacelabs Medical, Inc
Part Number 062-0983-01 Rev C page 3 - 2
Table of Contents
1. Wireless Ethernet Product Description
a. Overview of Spacelabs Wireless Networks ............................................................................
b. 90309 Option "W"....................................................................................................................
c. UCW – Z, 90367 and 90369 Option "Z" ..................................................................................
d. 90310 Option "A", "B", or “C” (Central, Master, or Slave interface unit) ................................
e. Technical description of operation .........................................................................................
f. Ethernet Interface Card ..........................................................................................................
g. OEM radio card ......................................................................................................................
h. Understanding Signal Interference ........................................................................................
i. Coverage Area ........................................................................................................................
j. Possible Monitor and WNI Configurations ..............................................................................
k. Communication Limitations of the wireless network ..............................................................
l. Selecting Wireless Network Equipment Locations ..................................................................
m. Installation Hardware ............................................................................................................
n. Part Numbers .........................................................................................................................
2. Wireless Network Site Survey Procedure
a. Things to have before beginning the survey ...........................................................................
b. Things to know about the site before beginning ......................................................................
c. Actions Before the site survey: ................................................................................................
d. Performing a Wireless site survey: .........................................................................................
e. Completing the site survey: .....................................................................................................
3. Post-Installation Verification and Troubleshooting
a. Acceptance Criteria ................................................................................................................
b. Troubleshooting with RangeLAN2 .........................................................................................
c. Troubleshooting with ULTRAVIEW-1030/ULTRAVIEW-1050 Site Survey screen ................
APPENDIX 1 - The RangeLAN2 PCMCIA Card ............................................................................
a. Installing and configuring the RangeLAN2 ............................................................................
b. Using the RangeLAN2 PCMCIA card for site survey ............................................................
APPENDIX 2 - Microwave Leakage Measurements ....................................................................
1
1
2
2
2
3
4
5
6
8
10
10
12
13
15
17
17
17
17
18
20
22
22
22
25
26
26
29
33
1. Wireless Ethernet Product Description
a. Overview of Spacelabs Wireless Networks
Spacelabs wireless ethernet allows connection between a conventional wired ethernet network and a
wireless (radio) ethernet network. This enables the two networks to function as one.
Wireless ethernet provides 1 to 5 outbound waveforms and numeric vital signs. The wireless ethernet
option applies to the 90309-W PC Ranger, the 90367-Z Ultraview 1030, the 90369-Z Ultraview 1050, and
the 90385-Z wireless Universal Clinical Workstation (UCW).
Wireless ethernet uses 2.4GHz two-way cellular radio communications to transmit and receive patient
data. Waveforms, alarms, numeric data, bed information and configuration messages can be transmitted
from the bedside/transport monitor, “slave”, to the rest of the network through one Wireless Network
Interface, “master”. For ambulatory patients, an array of Wireless Network Interface devices is used to
provide complete cellular coverage. The Wireless Network Interface (WNI) serves as the wireless access
point to the hardwired ethernet LAN. With optional interactive networking, bed to bed access is possible.
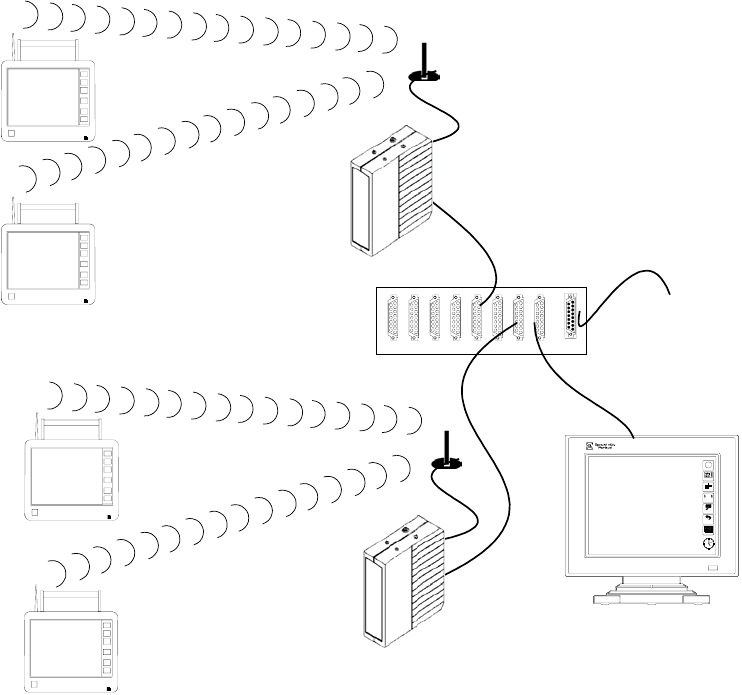
As shown below, wireless monitors use a radio link to communicate with a Wireless Network Interface
(WNI). The wireless monitors each synchronize their communications with one WNI, referred to as a
“master”. The WNI completes the ethernet link to the hard-wired network.
21 FEB 1994
HELP
?
MONITOR
SETUP
NORMAL
SCREEN
R
X
%
4
SPECIAL
FUNCTIONS
RECORD
%
X
TONE RESET
ALM SUSPEND
3
3
PREVIOUS
MENU
12345678NET
WNI Master #1
WNI Master #2
Central Station
Ethernet Hub
Wireless
Monitor
synchronized
to Master #1
Wireless
Monitor
synchronized
to Master #1
Wireless
Monitor
synchronized
to Master #2
Wireless
Monitor
synchronized
to Master #2
Spacelabs
Monitoring
Network
Part Number 062-0983-01 Rev C page 3 - 3
b. 90309 Option "W" (Bedside or Slave)
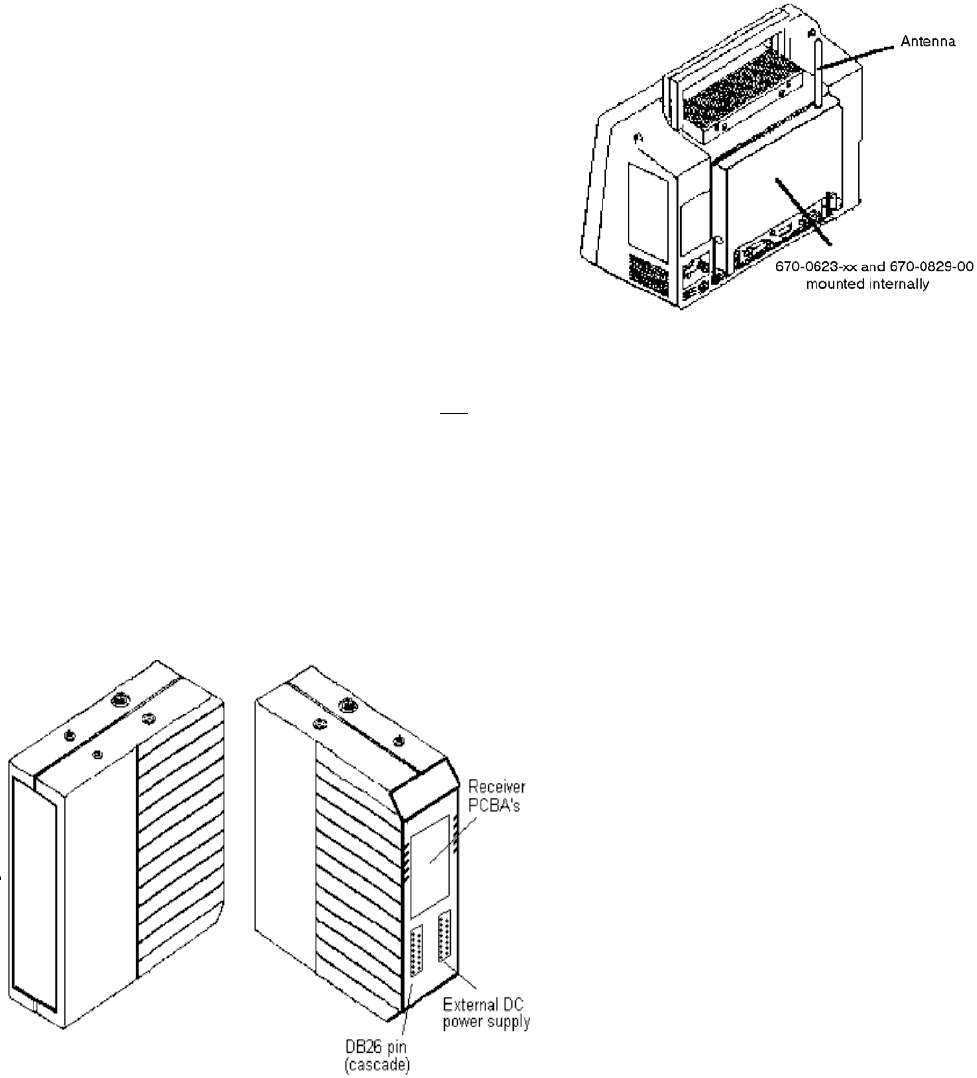
The PC Ranger (90309-W) is a PC Scout bedside/transport monitor with added wireless communications
capability. The PC Ranger includes an extended rear panel containing the I/O Bay board (670-0623-xx),
with an attached ethernet Interface board (670-0829-xx) in a slave configuration, a Proxim Radio card
(010-0914-xx), and a dipole whip antenna. The Bedside (Slave) has two way communications with the
90310 Wireless Network Interface (WNI) "Master" (described in following paragraphs) using a 2.4 GHz to
2.485 GHz frequency-hopping radio link.
Waveforms, alarms, bed information, and configuration
messages are transmitted from the slave to the network via
the master. Network and configuration messages are sent
from the master to the slave or from slave to master. WITH
THE WIRELESS NETWORK SOFTWARE VERSION 2.03.06 OR
HIGHER AND RADIO FIRMWARE VERSION 1.57 OR HIGHER, BED TO
BED COMMUNICATION IS ALLOWED; WITH OPTIONAL INTERACTIVE
NETWORK, FULL BED TO BED ACCESS TO BEDSIDE MONITOR
MENUS IS POSSIBLE. THIS CAPABILITY ALSO INCLUDES ACCESS TO
HARDWIRE MONITORS.
c. UCW – Z, 90367 and 90369 Option "Z" (Bedside or
Slave)
The Ultraview 1030/1050 option Z (Wireless option) contains a built-in wireless unit similar to the external
wireless unit on the PC Ranger Monitor. The basic difference between the Ranger and the Ultraview
1030/1050 is that the Ultraview 1030/1050 does not contain a 670-0829-XX ETHERNET INTERFACE
card. The 90367/90369 imbeds the control functions of the 670-0829-XX card into the monitor’s main
board, and the 010-0914-XX OEM radio card is connected directly to the main board. Additionally the
Ultraview 1030/1050 supports five outbound parameters and enhanced site survey functionality. The
UCW option Z utilizes a 90310-C WNI which has been configured as a “slave”. This WNI communicates
through the ethernet port of the UCW.
d. 90310 Option "A", "B", or “C” (Master, or Slave interface unit)
The Spacelabs Medical 90310 is unique to the wireless network. The 90310/Master/WNI (Wireless
Network Interface) uses a modified 90485
module housing (see illustration at left) and
a standard 90486 power supply combined
with the 670-0829-XX PCBA (mounted
internally from the rear of the module
housing) and the 010-0914-XX OEM radio
card. For purpose of this document, the
"Master", "WNI", and the "90310" have the
same meaning, except for the 90310-C,
which is a Slave. The “Master” coordinates
the communication with the “Slaves” on the
same channel by controlling the frequency
hopping pattern. Slave monitors synchronize
with the master’s frequency hopping pattern,
allowing continuous communication. The
frequency-hopping pattern is dictated by the
selected WNI “channel”. Therefore, the
channel is not a specific frequency, but a
pre-defined sequence of frequencies.
Part Number 062-0983-01 Rev C page 3 - 4
The 90310-A is a Master WNI and contains one Network Interface and one Radio board; the 90310-B
WNI has two Network Interface and Radio boards, and functions as two separate Masters in a single WNI
housing. The 90310-C WNI is used as a slave interface for Spacelabs bedside monitors without internal
wireless network capability. This allows wireless connection of Spacelabs network patient monitoring
devices such as a UCW bedside monitor.
e. Technical Description Of Operation
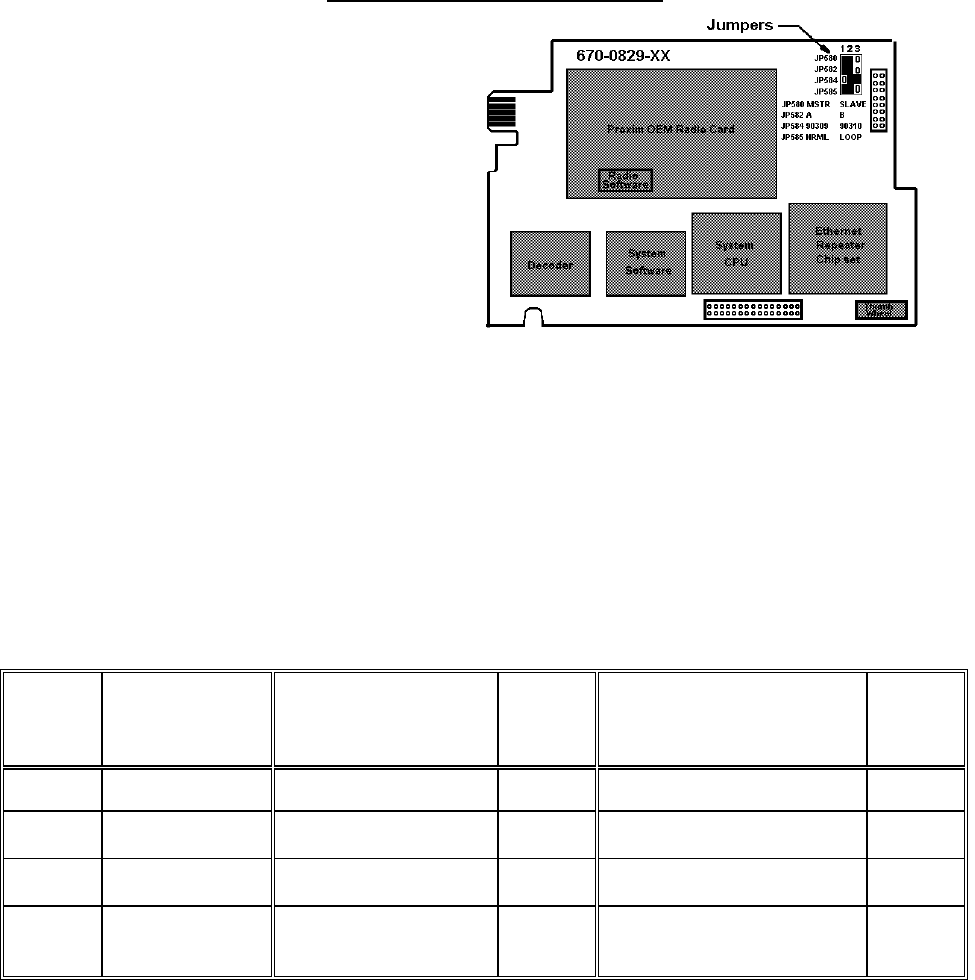
The WNI uses a microprocessor located on
the 670-0829-xx (PCB ASSY, ETHERNET
INTERFACE, 90309) to handle all
communication between the network interface
circuitry and the OEM radio frequency card.
Software controls the 12.5 MHz main CPU,
the 25 MHz network CPU and the OEM RF
card. All Spacelabs Medical software resides
in a 2-megabyte PROM memory IC chip. The
software for the OEM RF card resides in a 32-
pin IC socket on the OEM RF card.
Master
The Master (always a 90310-A or B) functions
as a network interface. It can be thought of as basically a wireless ethernet multiport. Each master only
allows data traffic headed for wireless monitors that are in sync with that master to pass onto the wireless
network. Data traffic for monitors that are in sync with another master will be handled by that master. A
master also passes data from its wireless network onto the hardwire network. (See the table at the
bottom of the page and drawing above for jumper locations.)
Slave
A Slave (a 90310-C, 90309-W Ranger, or wireless Ultraview 1030/1050) passes all of its ethernet data
onto the wireless network. As mentioned earlier, it synchronizes with the frequency hopping pattern of
one master, and that determines which master receives its data. (See the table below and drawing above
for jumper locations.)
Jumper
Number
Jumper
Description
Factory Default for
“MASTER
CONFIGURATION”
(90310 A or B)
Jumper
Setting
Factory Default for “SLAVE
CONFIGURATION” (90309
W, or 90310-C)”
Jumper
Setting
JP580 MSTR/SLAVE MSTR (Master) 1-2 SLAVE 2-3
JP582 A (90310 A/B)
B (90310 C)
A (90310 A/B) 1-2 B (90310-C) 2-3
JP584 90309/90310 90310-A/B/C, Enables
10Base5 connector
2-3 90309, Disables 10Base5
connector
1-2
JP586 Diagnostic
NRML/LOOP
NRML, this is the
normal software
operating mode
1-2 NRML, this is the normal
software operating mode
1-2
Part Number 062-0983-01 Rev C page 3 - 5
f. Ethernet Interface Card
Note that the 670-0829-XX (PCB Assembly, Ethernet Interface) is used in the 90310 and the 90309-W.
The Ultraview 1030/1050 wireless monitor does not have the 670-0829-XX with the components
discussed below.
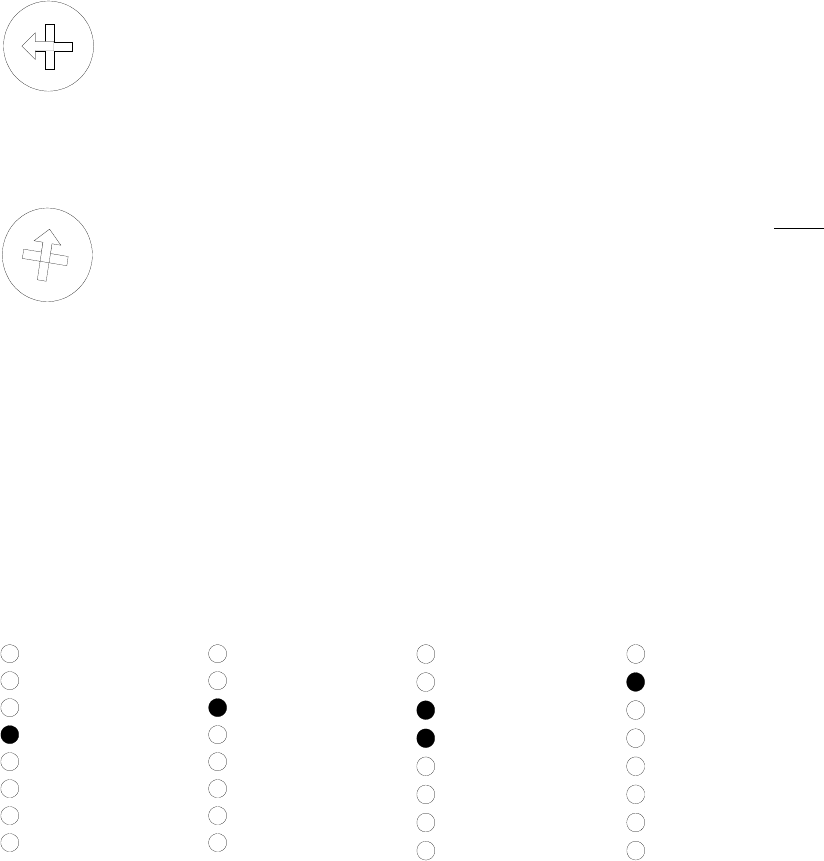
The 670-0829-XX PCBA has a 16-position rotary microswitch (also referred to as a "thumb wheel switch")
for channel selection. The switch is normally covered by a protective cap. Switch selections are made
using a small screwdriver.
There are two operating modes for a Wireless bedside: fixed channel and auto channel select.
Fixed channel Mode
0
1
2
B
A
9
8
7
6
5
4
3
F
E
D
C
Any switch position from 1 though F (not zero) will assign a specific, fixed channel number
to the 90310 or 90309-W. (On an Ultraview-1030/1050 the Radio configuration is set to a
non-zero value). The channel selection on the slave monitor and the WNI must be the same
for them to communicate. This limits the Wireless bedside to only one channel; even if a
valid master is in the area on a different channel, the Wireless bedside will never synch to it.
In the example illustrated here, channel C has been selected.
Auto-select Channel Mode
0
1
2
B
A
9
8
7
6
5
4
3
F
E
D
C
Setting the switch position to 0 allows a slave monitor to "roam". A WNI is never set to Auto-
select. With this setting, the slave will change its channel to synchronize with any available
Master, choosing the first one with an acceptable signal. Monitors that move frequently, or
are used in transport situations, will be more likely to use auto channel select. Remember
that only 20 waveforms from slaves may synch with any given master. Allowing more then
20 waveforms to attach to a single WNI can cause data dropouts and failure to attach to the
WNI.
There are also 8 LED's on the edge of the 670-0829-XX PCBA that are viewable through a cutout just
above the thumb wheel switch. During power-on diagnostics, these LED's display the test numbers as the
self tests are performed. If a failure occurs, the LED’s will indicate which test failed. (Refer to the
90309/90309-W Service Manual, 070-0438-xx for diagnostic guidance). Note that the LED’s should only
go through the self-test sequence at power up; if this sequence occurs during normal operation, it may
indicate a hardware failure.
If the self tests complete successfully, all LED’s flash twice, the yellow (bottom) LED flashes to indicate
that the system is operational, and the four highest LED’s indicate the current thumb wheel switch
position in binary format. For example:
X
X
X
X
Thumbwheel
set to
channel 1.
X
X
X
X
Thumbwheel
set to
channel 2.
X
X
X
X
Thumbwheel
set to
channel 3.
X
X
X
X
Thumbwheel
set to
channel 4.
… and so on.
Part Number 062-0983-01 Rev C page 3 - 6
g. OEM radio card
There are two types of OEM radio cards used in the Spacelabs wireless ethernet system, one for U.S.
and one for European use. Both cards are identical in form, fit and function; only the filtering circuitry is
different.
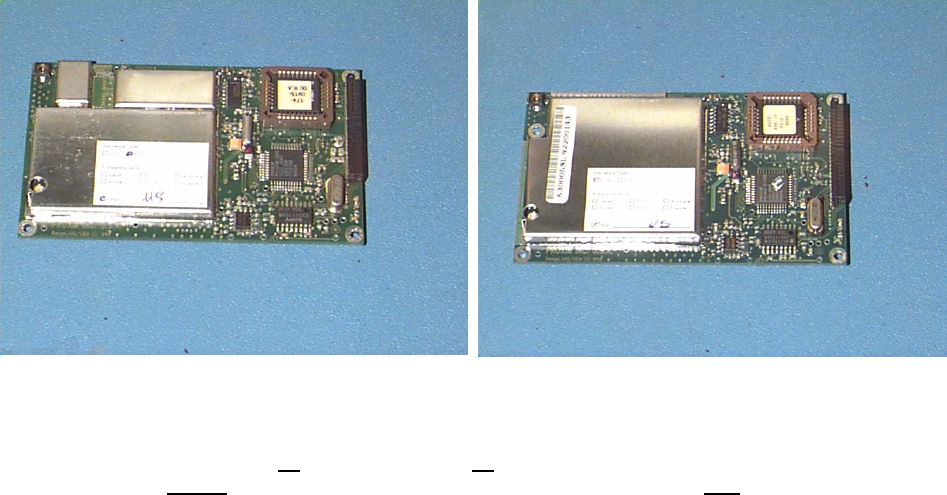
Part number 010-0914-xx is for use in the US only. There are two versions of this card:
Proxim Radio card 010-0914-04 -- may use software version 1.57m or 1.8B
Proxim Radio card 010-0914-05 -- requires the use of software version 1.8eB
The 010-0914-04 can be easily recognized because it has three metal RF shields on the card. There is a
single, larger RF shield on the 010-0914-05 radio card (see picture below). The version of radio software
is printed on the label on the software EPROM.
Older Proxim card (010-0914-04)
Newer Proxim card (010-0914-05)
• Software level 1.8 is available for both radio cards 010-0914-04 and 010-0914-05, but the specific
version is 1.8B for the -04 and 1.8eB for the -05. The 010-0914-04 can have either 1.8B or
1.57m but cannot use 1.57 (with no m) or 1.8eB. The 010-0914-05 can only use 1.8eB. A radio
card with the wrong version will work, but will have poor communications (visible as waveform
gaps or dropouts) at distance or on loaded networks.
• ALL Masters must contain version 1.8eB if ANY node is at software version 1.8x.
The other type of radio card, part number 010-0940-00, has enhanced circuitry to meet the more stringent
European RF signal requirements and is called the "ETSI" OEM radio card. This card is NOT used with
U.S. installations.
All three cards have a transmitting frequency range of 2.4 GHz to 2.4835 GHz with a transmitting power
measured at the antenna of 100 milliwatts. The radio functions as a "frequency hopper" and by definition
will "hop" between a preset range of frequencies and will spend less than 200 ms on each frequency
before moving on to the next. The frequency hop sequence will vary depending on the thumb wheel
channel selected, or the channel selected in the Network Setup, Radio Setup menu with the wireless
90367 / 90369 monitors.
Part Number 062-0983-01 Rev C page 3 - 7
h. Understanding Signal Interference
Physical Obstructions and Communication Range
Communication range between master and slave may be up to 500 feet nominal or 1000 feet for a clear
line of sight transmission path across an open space. In a hospital environment this will likely be limited to
250 feet or less based on walls and other barriers.
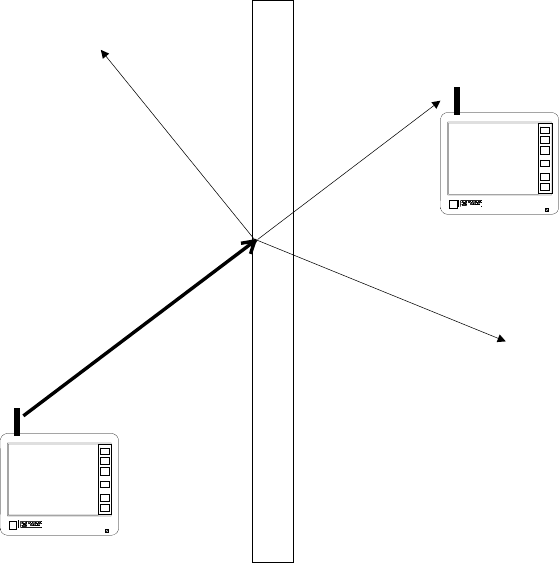
How Solid Matter Affects Radio Transmission: All items found in hospitals will partially block or
attenuate (reduce) RF radio waves by absorbing them, reflecting them, or refracting them (changing their
direction). This can also lead to situations where signal strength is good but signal quality can be poor.
Solid Object
Reflected Signal
Refracted Signal
Intended Signal PathAttenuated Signal
Cement, metal, plaster, wood, and
even plants or people all block some
fraction of an RF signal.
The denser the material, the greater
the attenuation. For example,
cement and metal will strongly
attenuate an RF signal, while wood,
plaster, or glass attenuate less. A
signal will pass through windows
(including safety windows with
internal wire mesh) or non-metallic
partition walls with only a slight loss
of strength.
The signal will degrade but pass
through solid walls of concrete.
However a sheet of solid metal will
effectively block transmission.
Signals from Master and Slave wireless monitors can travel only a very short distance through some
items (depending on their thickness) and not at all through others. The greatest working distance between
master and slave will occur when there is a clear line of sight between them. Anything placed between
the master and slave will reduce the signal strength.
Communication range between master and slave will also vary depending on antenna positioning, the
physical environment, and other factors.
Part Number 062-0983-01 Rev C page 3 - 8
Solid Object
Reflected Signal
Refracted Signal
Intended Signal PathAttenuated Signal
Object
Object
Reflected Signal
Reflected Signal
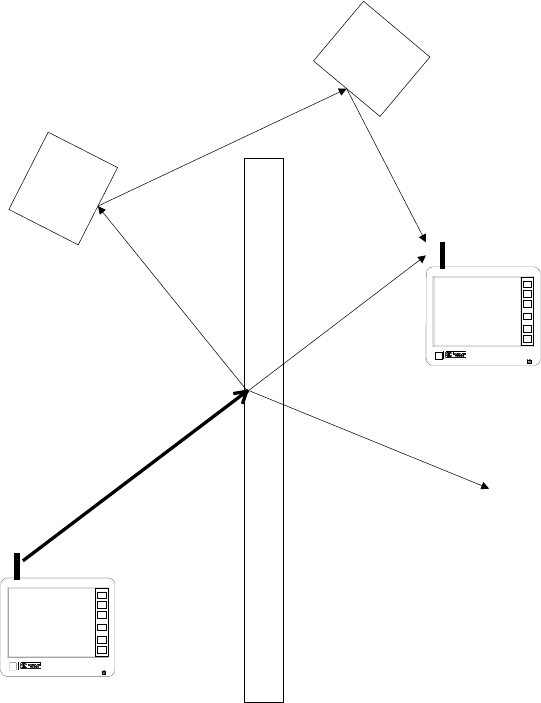
Signal Strength And Signal Quality:
Signal strength and signal quality are
not the same. Reflections can
interfere with intended signals even
though the strength of the signal will
still measure as acceptable.
Familiar examples of this are "ghosts"
on a television screen caused by
reflections off buildings or hills; the TV
antenna is picking up plenty of signal
strength, but the signal quality is poor.
If you see good received signal
strength, but the Link Quality value is
poor, you may be seeing the affect of
reflected signals. Changing the
locations of wireless network
components may clear up the
problem.
RF Interference
Interference can affect the SMI wireless network in several ways. The most common is a loss of data,
which results in waveform dropouts. Many devices can cause RF Interference by broadcasting or
producing noise in the 2.4 GHz to 2.4835 GHz range. These devices include microwave ovens, airport
radar systems, microwave communication systems, and other nearby electronic devices. The frequency
hopping radio attempts to minimize this problem by jumping to another frequency every 200 milliseconds.
Part Number 062-0983-01 Rev C page 3 - 9
i. Coverage Area
Domains
NOTE: Information about Domains is only supplied for information and to better understand existing
wireless networks which may already be installed in the hospital. Wireless networks sold to date
(01/18/00) do not have capability to alter Domains in both the WNI and bedside monitors.
For communication on the wireless network to function, all nodes must be set to the same Domain. The
default domain for Spacelabs Medical is 1 (one). Keep this in mind if installing wireless in a hospital that
already uses Proxim wireless for other networks, as you may need to change the hospitals domain to a
number other than one.
As of this date (01/18/00), only the Ultraview 1030/1050 wireless has the ability to change Domain.
However, since the Domain number of the WNI cannot be altered, all Ultraview 1030/1050 wireless
monitors must remain set to Domain 1.
Cells
A cell consists of a master and at least one slave synchronized to that master. In a physical sense, a cell
may be defined as the boundary within which adequate communication from the master to the slave is
assured. Cell boundaries are defined as test data throughput rates of greater than 40,000 Bytes per
second. This throughput is measured during the pre-installation site survey (See Wireless Site Survey
Procedure).
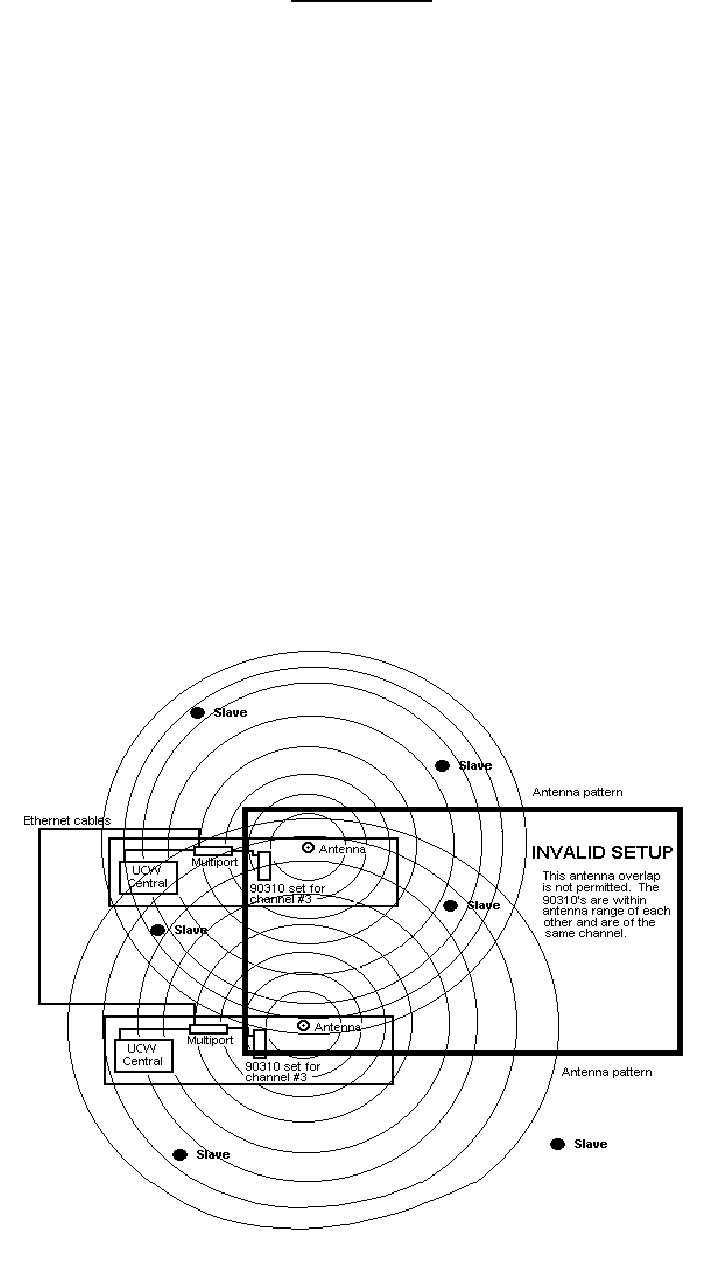
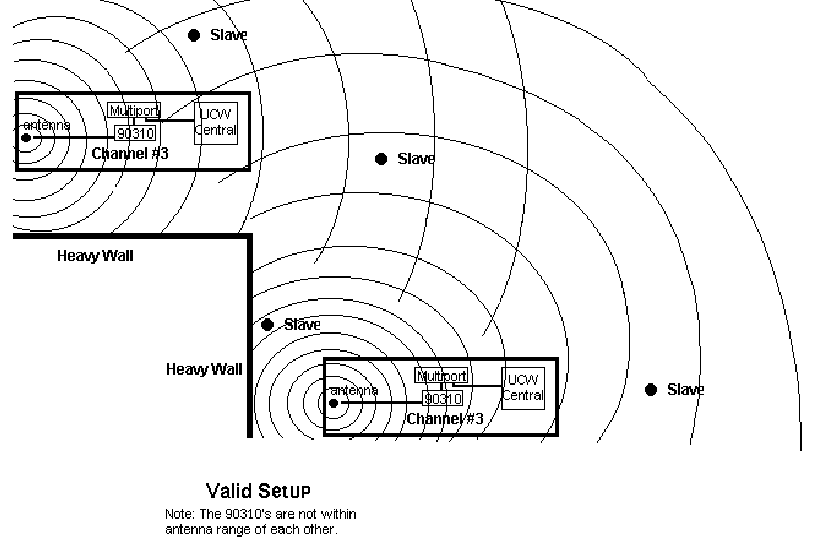
WNI’s set to the same channel may never be in the same cell (see following two figures), though the
fringes of the two or more WNI’s cells may overlap. A WNI on a different channel, and its slaves, may be
in the physical area defined as another WNI’s cell, and the two systems will not interfere.
Part Number 062-0983-01 Rev C page 3 - 10
Range
Range is the RF coverage distance between a master and a slave on the same channel. The absolute
maximum range between a master and a slave is nominally 500 feet. This range is achieved only under
ideal conditions. A more realistic maximum for very open areas in hospitals is 250 feet. Objects
obstructing the line of sight between the master and slave reduce transmission distance.
Range vs. Cell
Even though a slave is within RF range of a master, it may not be seen within that cell. This is because
the radios may see adequate RF signal strength, yet they may not be able to decode the network packets
adequately to ensure communication.
Roaming
Roaming is the ability of a slave to change from one master to another and continue communications
using the new master. Roaming occurs when the synchronized master stops transmitting or
acknowledging transmissions. This includes both master failures and out of range conditions.
Roaming occurs as a slave moves in and out of various cells. In some installations, there may be more
than one cell in an environment using the same channel (in the event you need to cover another area
blocked by a solid RF impenetrable object you might use another master set for the same channel). A
slave using the fixed channel mode may only communicate with masters on the same channel, so as the
slave moves out of the cell of the first master, it loses synch, then acquires the signal of the second
master.
Other installations may have overlapping cells of different masters. Wireless bedsides in the auto-channel
select mode have the ability to move in and out of active cells of different masters. This would allow the
Part Number 062-0983-01 Rev C page 3 - 11

masters to communicate with the moving slave even though their channels don't match. The Wireless
bedside would look for masters on another channel when it looses synchronization with its current
master.
In either case, as the Wireless bedside approaches the boundary of the cell, and looses synch, a brief
period of signal dropout is experienced at remote monitors until the Wireless bedside establishes synch
with the new master. Generally speaking, the auto channel select mode allows quicker roaming since the
cells of different channels may overlap more than WNI’s on the same channel.
j. Possible Monitor & WNI Configurations
There are different network configurations available for use with the Wireless network product. Selecting
a configuration depends on several factors. These factors include the number of monitors to be used on
the network, the coverage area needed, and the intended usage of the monitors - mobile or stationary.
Basic Network Types
Simple network (no roaming): Less than ten monitors in a single area with no roaming desired.
Suggested configuration: Use Wireless bedsides in fixed channel mode.
Simple network with roaming: Less than ten monitors with transport capability
Suggested configuration: Use Wireless bedsides in auto-channel select mode. Position WNI’s as
needed to cover all areas in the transport corridor.
Large network (no roaming): More than ten monitors in single area, no roaming
Suggested configuration: Use Wireless bedsides in fixed channel mode (maximum 10/WNI).
Configure WNI Channels to balance load (i.e. 16 monitors = 8/WNI
where cell boundaries permit). NOTE: This configuration is not
suggested if the WNI’s can see each other.
Large Network with roaming: More than ten monitors with transport capability.
Suggested configuration: It is preferable to use Auto Channel Select mode with the WNI’s carefully
positioned to observe the 10 slave/WNI requirement by ensuring that cell
boundaries cover bed locations and transport corridors.
Hospital-Wide networks: Coverage of multiple units or floors, with or without transport capability
Suggested configuration: It is preferable to use Auto Channel Select mode with the WNI’s carefully
positioned to observe the 10 slave/WNI requirement by ensuring that cell
boundaries cover bed locations and transport corridors.
k. Communication Limitations of the Wireless Network
Network traffic
The network must be configured to assure that a single WNI will not be overloaded. Therefore, if using
UCW or Ultraview 1030/1050 monitors you must assure that there are sufficient WNI’s to handle loads
based on the number of waveforms being transmitted by the wireless monitors.
One WNI is limited to a maximum of 20 waveforms at a time. If this parameter is exceeded, unacceptable
numbers of waveform dropouts will occur.
The first step in planning a wireless network installation is to know the number and type of wireless
monitors that will be used in the intended coverage area.
Part Number 062-0983-01 Rev C page 3 - 12

When looking at the equipment in a wireless network, you must remember these capabilities and
limitations:
1. Each 90309-W PC Ranger can transmit either 1 or 2 waveforms at a time to a 90310 WNI.
2. Each UCW wireless or Ultraview 1030/1050 wireless can transmit from 1 to 5 waveforms at a time to a
90310.
3. A single 90310-A supports a maximum of 20 waveforms, and the 90310-B supports a maximum of 40
waveforms on two unique cells.
4. There are 15 unique radio channels. All 15 channels can co-exist in a cell at the same time.
Channel Assignment and WNI location: Upon powering up a Ranger, Ultraview 1030/1050 wireless, or
wireless UCW monitor, it will search for and synch to the first WNI (master) it sees. The WNI generates a
signal known as a “beacon" that tells the Ranger the master’s next frequency hop. Basically, the first WNI,
with sufficient signal strength that the wireless monitor sees is the WNI that the wireless monitor will
synch to. When it becomes necessary to use more than one WNI, the monitors and WNI’s need to have
two or more channel numbers set so that some of the monitors communicate with one WNI, and the
others communicate with the other. The WNI’s should be positioned to be sure that each monitor is
communicating with the closest WNI.
NOTE: Keep in mind that the closest WNI will not necessarily be the one the wireless monitor attaches to.
If signal strength and quality are acceptable from a more distant WNI, and it is the first one seen as the
wireless monitor searches for a Master to synch with, then the wireless monitor will synch with the more
distant WNI even though the closer WNI has more signal strength or better signal quality.
The number of monitors is based on the customer's order. Since this is not under your control, you need
to calculate how many waveforms will potentially be active in the coverage area. You must also account
for any monitors that are likely to roam through this cell (monitors on roll stands, etc.). Based on the
numbers above, the maximum number of wireless monitors is calculated as follows:
EXAMPLE 1:
The proposed coverage area has 6 rooms with one 90309 wireless monitor in each room. Six monitors
sending two waveforms each will result in a total of 12 waveforms. This is less than the limit of 20
waveforms maximum for a 90310-A, so this area will only require a single 90310-A.
EXAMPLE 2:
The proposed coverage area has 6 rooms with one Ultraview 1030/1050 wireless monitor in each room.
Six monitors sending five waveforms each will result in a total of 30 waveforms. This exceeds the limit of
20 waveforms maximum for a 90310-A, so this area will require two 90310-A units or one 90310-B.
EXAMPLE 3:
The proposed coverage area has 10 rooms with one Ultraview 1030/1050 wireless monitor in each room.
Ten monitors sending five waveforms each will result in a total of 40 waveforms. This exceeds the limit of
40 waveforms maximum for a 90310-B, so this area will require a 90310-B and an additional 90310-A, or
three 90310-A units.
Part Number 062-0983-01 Rev C page 3 - 13

l. Selecting Wireless Network Equipment locations
WNI Master location
The placement of the 90310-A/B and its antenna is critical. Antenna placement and relative polarity
(vertical orientation) are critical. Best placement of a Master for most universal coverage and greatest
range will be in an unobstructed, centrally placed locations. This is, of course, an ideal location and may
not be the most practical location to place the antenna. Mount the antenna such that it is vertically
orientated (either upright or upside down) since any angle other than vertical will result in weaker RF
transmission and receive strength relative to the slave(s). A pedestal mount style antenna is available
with a six-foot cable. For best performance place this antenna near the ceiling. Therefore, since the cable
length is six feet, the WNI (Wireless Network Interface) (Master) and antenna placement must be in close
proximity. The central PCMS monitor is connected to the WNI via a standard SMI ethernet cable.
In open areas such as long hallways, it may be better to place some of the WNI’s in rooms off the
hallway, allowing some intentional attenuation of the signal. This can actually improve performance where
several rooms are located on a long corridor because roaming monitors will be forced to switch more
often to a closer WNI. Remember that a wireless monitor does not switch to a new master just because
its signal is stronger, so if all of the WNI’s are in the open hallway a monitor may stay synchronized to a
distant WNI even though it may be right next to a WNI that would provide much better signal quality.
Sources of interference: Watch out for sources of RF interference such as microwave ovens and do not
place a WNI antenna closer than 20 feet from such sources. Remember to test all microwave ovens for
emissions! Remember to check the floors above and below the wireless location also, as an interference
source may easily penetrate a floor or ceiling.
WNI Channel Numbers - a setup tip: When low signal strength forces a wireless monitor to switch to
another WNI, it tries to synchronize with the available WNI’s from its list of known Masters. It may improve
performance slightly if the next number on the list happens to be the actual next WNI in the hallway. If
the WNI channel numbers are set so that, as a wireless monitor moves up the hallway, it encounters
numerically sequential channel numbers, it will tend make better Master selections. For example, if the
WNI channel numbers are set so that the monitor will encounter #2, then #3, then #4, etc. the monitor is
more likely to synchronize with the closest WNI. If the WNI channel numbers are set so that you pass #2,
then #9, then #6, etc, the monitor may synchronize with a more distant WNI (with less signal quality)
simply because it is the first WNI found that has acceptable signal quality.
Bedside or Slave location
The placement of the slaves follows similar rules as the placement of a master. An open unobstructed
area is best for universal coverage and greatest range. Remember that other RF transmissions or
physical objects may interrupt the slave signals and waveform causing “drop outs”. Slaves can be in a
fixed location or they may be mobile within range of the master.
Overlapping Restrictions
Central or Masters
One master’s signal must never directly overlap another master on the same channel. Electronic devices
will not be damaged, but communications between some masters and slaves will be unpredictable
resulting in increased waveform dropouts. If there are two or more masters on the same channel, they
must be sufficient distance apart that the RF signal from one master will not directly overlap another.
Masters on the same channel, correctly separated, may be networked together by using Multiport
repeaters and standard SMI ethernet cables allowing areas blocked off by solid objects to be covered by
another master on the same channel. Multiple masters that are within RF signal coverage of each other
will not cause problems if masters are on separate, thumb wheel selected, channels.
Part Number 062-0983-01 Rev C page 3 - 14

Bedsides or Slaves
Slaves may overlap the coverage (transmission) areas of other slaves. Slaves on the same channel or on
different channels may overlap.
m. Installation Hardware
Antennae
IMPORTANT NOTE: The Ranger or Ultraview 1030/1050 wireless antenna and the WNI antenna are
different:
• The Ranger or Ultraview 1030/1050 wireless use the 117-0029-00 Ranger 2.4 GHz Dipole Antenna
(stubby antenna), which has a gain of x2. Do NOT use this antenna with a 90310 Wireless Network
Interface (WNI)! Do NOT use the WNI antenna (650-0521-00) with a wireless monitor (90309 or
90367 / 90369)!
• The 90310-A/-B/-C WNI uses the 650-0521-00 Base-Mounted WNI Omni-directional Antenna (with
6' cable), which has a gain of x1. Do NOT use this antenna with 90309 or 90367 / 90369 Wireless
monitors. Do NOT use the 117-0029-00 antenna with a 90310!
DO NOT try to use an Ultraview 1030/1050 wireless as a Master to do a site survey! Obviously, if
you set an Ultraview 1030/1050 wireless to be a Master to use in place of the 90310 WNI, you will get
TWICE the received signal level that a real WNI would produce because of the higher antenna gain. If
this is done for a site survey, this will result in designing a layout that will be too cold to work with a real
WNI Master.
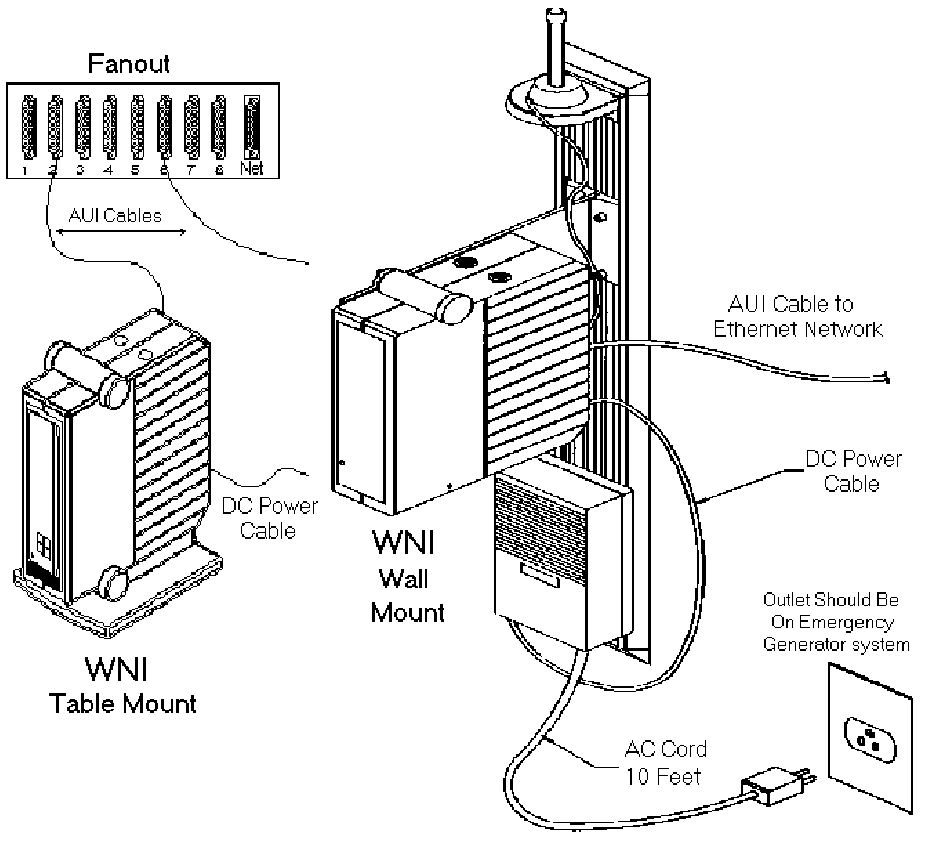
WNI / 90486 / antenna wall mounting
The WNI uses the same wall mounts as the 90485 remote module housing.
Power Source
The power for the WNI (Wireless Network Interface) Master unit comes from a 90486 power supply. Each
WNI (90310-A, -B, or -C) should have its own dedicated 90496 external power supply.
Cables
There is no direct connection between a WNI and a central station monitor; they communicate using
ethernet. The cables for communication from the ethernet repeaters use the same 15 pin AUI cables as
existing SMI network cables. The 90310 housing utilizes the same DC power cables as the 90485 Module
Housing.
Part Number 062-0983-01 Rev C page 3 - 15
Bed Rail, Bedside, Rolling Stand & Wall mounting
All portable bedside monitors are supported by the existing bedside mounts and roll stands. Wall
mounting a 90310 is performed using the UCW wall channels. Part numbers for mounting hardware are
included in the parts list which follows.
Part Number 062-0983-01 Rev C page 3 - 16

n. Part Numbers
Description Part Number
WNI Antenna Kit, includes Pedestal Mount Antenna and Antenna Mount 650-0521-00
Antenna, Dipole, 2.4 GHz, 90309 ("stubby" antenna for Ranger and wireless UV1050) 117-0029-00
Wall Mount, track, 24” 016-0350-00
Wall Mount, track, 38” 016-0355-00
Wall Mount, Arm 016-0375-00
Accessory Kit, Flush Mount, 90310 016-0425-00
Cable, brick to WNI, 2' 012-0391-02
Cable, brick to WNI, 4' 012-0391-04
Cable, brick to WNI, 8' 012-0391-08
Cable, brick to WNI, 10' 012-0391-10
Cable, WNI to WNI housing, 1' 012-0392-00
Cable, Brick to WNI 012-0387-00
90309-W Ranger Parts
Ranger Antenna, 2.4 GHz Dipole (stubby antenna) 117-0029-00
Cover, I/O Bay,Wireless,90309 200-0201-00
Proxim Radio Card -- Requires The Use Of Software Version 1.57M 010-0914-04
Proxim Radio Card -- Requires The Use Of Software Version 1.8EB 010-0914-05
PCB Assy, Ethernet Interface, 90309 670-0829-00
IC, Flash, 28F010 - EPROM installed as U610 on the I/O Bay PCB Assy 170-0087-00
PCB Assy, I/O Bay,Ethernet,90309 670-0623-08
Bracket, Ethernet / Flex, I/O Bay, 90309 407-0324-00
Cable Assy, Ethernet, I/O Bay, 90309 175-0910-00
Cable Assy, Flexport, I/O Bay, 90309 175-0909-00
Cable, I/O Bay,Wireless,90309 175-0944-00
Label, I/O Bay W/L Connector, 90309 334-1429-00
Meter, Microwave Leakage Detector - for Ranger site surveys, see PSN 149-0002-00
90310-A, B, C
Omnidirectional Antenna, WNI 650-0521-00
Cable, Antenna, 90310 175-0922-01
Proxim Radio card -- requires the use of software version 1.57M 010-0914-04
Proxim Radio card -- requires the use of software version 1.8EB 010-0914-05
PCBA, Connector Board, 90310 670-0841-00
PCB Assy, Ethernet Interface, 90309 670-0829-00
Enclosure, Left, Module Housing, 90310 437-0093-02
Enclosure, Right, Module Housing, 90310 437-0093-01
Cover, Top, 90310 200-0208-00
Enclosure, Card Cage, 90310 437-0112-00
Part Number 062-0983-01 Rev C page 3 - 17

Cover, Left, 90310 200-0205-00
Cover, Right, 90310 200-0204-00
Cover, Rear Panel, DC, 90310 200-0209-00
Cover, Bottom, 90310 200-0206-00
Cover, Front Panel, 90310 200-0207-00
Label, Front Panel, 90310 334-1440-00
Cable Assy, PCB To Power Supply, 90310 175-0939-00
Cable Assy, Ribbon, AUI, 90310 175-0938-00
Power Supply 90486
Meter, Microwave Leakage Detector 149-0002-00
90367 / 90369 Wireless Ethernet Option Parts
Proxim Radio card -- requires the use of software version 1.57M 010-0914-04
Proxim Radio card -- requires the use of software version 1.8EB 010-0914-05
Cable, Antenna, 90363/90369 (cable from stubby antenna to radio card) 175-0922-01
Cable, Flex Circuit, 90363/90369 (ribbon cable from radio card to Main Board) 175-1002-01
Ranger Antenna, 2.4 GHz Dipole (stubby antenna) 117-0029-00
Part Number 062-0983-01 Rev C page 3 - 18

2. Wireless Network Site Survey Procedure
(NOTE: Refer to Appendix 1 for information regarding operation of the site survey laptop computer with
the RangeLAN2 PCMCIA card that is used during this procedure.)
a. Things To Have Before Beginning The Site Survey
• Current, accurate floor plans for the proposed coverage area from the hospital Facility Manager.
• Meter, Microwave Leakage Detector, Spacelabs part number 149-0002-00. (Refer to Appendix 2,
Microwave Leakage Measurements, for information on using this device).
• Model 90310 Wireless Network Interface (WNI).
• Laptop computer with Proxim RangeLAN2 program and PCMCIA card.
b. Things To Know About The Site Before Beginning The Survey:
• Review the floor plans obtained from the hospital Facility Manager. Look for any potential
architectural problems, such as thick load-bearing walls, x-ray areas, fire walls, elevator shafts, heavy
doors, or doors with leaded glass or walls with wire mesh, or any other features that may make radio
transmission difficult. These areas will need special attention in the survey to ensure adequate coverage.
• Are there any other wireless products operating in the 2.4 - 2.485 GHz band? If so, ask who
manufactures it, and if known, who makes the radio portion of that product? The presence of other
frequency hopping radios in the area does not preclude a SMI wireless installation, but before
proceeding, consult with the hospital Biomedical Engineering and MIS departments to identify which
products are in use, and specifically, the maker of the radio portion of that product. Submit a complete list
of other wireless equipment including model, manufacturer and other information along with complete site
survey. Flag this survey for review by Monitoring Technical Support.
c. Actions Before Site Survey:
1. Obtain current, accurate floor plans for the proposed coverage area(s) from the hospital Facility
Manager. Make several "working" copies for use in planning the installation.
2. Walk through the area with hospital staff to identify the desired coverage area for the wireless network.
IMPORTANT: Clearly mark the boundaries of the proposed coverage area on the floor plan, and have a
qualified representative of the customer site sign the resulting coverage diagram to confirm their approval
of the coverage area. Explain that any changes after the survey may affect the amount of equipment
required and render the survey (and Sales quotation) invalid. A copy of the signed floor plans must be
submitted with the TIP book for approval.
3. Perform an RF sweep of the area to identify any possible interfering frequencies. Mark locations of
known potential interference sources such as microwave ovens on the floor plan. (Remember that
interference can be generated from a floor above or below the installation floor). If microwave ovens are
in the area, perform an emission test using the “Microwave leakage detector tool”, part number 149-0002-
XX (see Appendix 2, "Microwave Leakage Measurements"). To minimize interference caused by
microwaves, do not place a WNI within 20 ft. of these areas.
Part Number 062-0983-01 Rev C page 3 - 19

d. Performing a Wireless Site Survey:
Use the up-to-date floor plans for the coverage area with the coverage area desired by the hospital staff.
1. Find a boundary for the coverage area.
2. Place the WNI at the boundary of the coverage area. Mount the test antenna to the ceiling, which is
how it will be positioned in actual use - do NOT place it on a desk or table.
3. Place the survey laptop in the location that the typical bedside antenna would be.
4. Assure vertical antenna orientation for best signal strength.
5. Start the RL2SETUP site survey mode and establish a Directed Link to the WNI.
6. Walk the laptop away from the WNI to the point where the data throughput averages 40 KB/Sec.
7. Move the WNI to the location just identified, and plot the rest of the area, staying within the 40 KB/sec
boundary.
8. Repeat the process if necessary to provide full coverage of the desired area.
9. Document the site survey and complete the other pre-installation documentation.
When making measurements, be sure to close room and hallway doors in the area you are surveying.
Solid core or metal doors can severely attenuate an RF signal!
NOTE: If your proposed installation has WNI’s that are on the same channel, it is necessary that the WNI
locations be out of range of each other. Refer to drawings in previous sections of this document for
additional details.
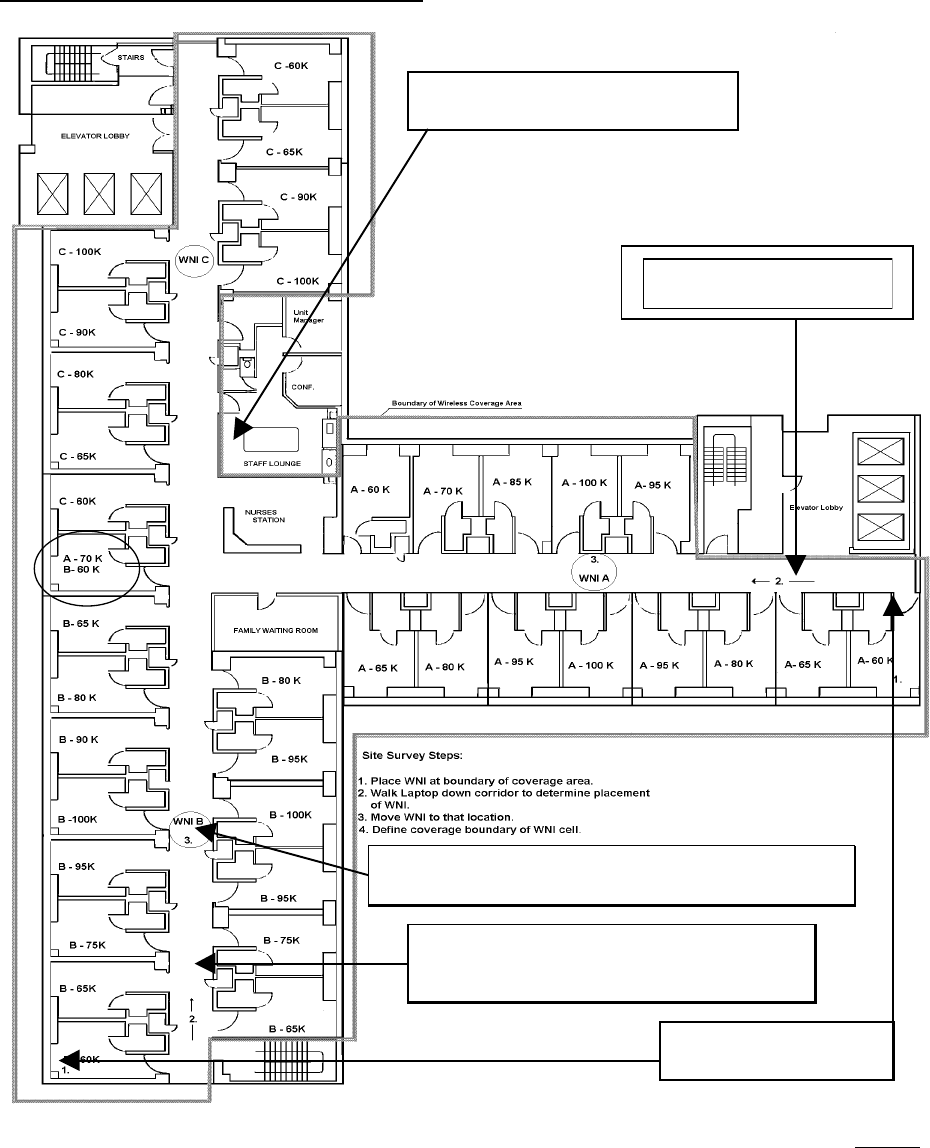
A Sample Survey.
Refer to the floor plan illustrated on the next page as an example. Using the steps previously outlined,
place the WNI in the room at the end of a hall (step 1). Take laptop computer to a point (step 2) down the
corridor where the data throughput of 40 KB/Sec is seen from the room. Move the WNI to that location
and map the rest of the area (step 3), using the minimum data rate of 40000 Bytes/Sec minimum AND a
minimum Link Quality of 3 to define the limits of the coverage area of the WNI.
Repeat the process at all three ends of the unit.
Part Number 062-0983-01 Rev C page 3 - 20
Site Survey Example 2: Completed drawing.
(or use tab and space keys,)
Microwave oven position
Throughput @60kB/sec move WNI here
Walk down hallway
Place WNI here
Walk down hallway recordin
g
si
g
nal stren
g
ths
3. When throughput falls to 40kB/sec,
move WNI here
2. Walk down hallway recording signal
strength as you go.
1. Place WNI here.
Note all rooms and corridors to be covered by this survey. Note microwave placement and allow at least
20 feet between any potential microwave location and a WNI antenna. When a microwave is present
check it for interference as described in Appendix 2. If the microwave is causing interference have the
Biomed Department remove it, shield it, or attempt to clean the seals and retest. Dirty seals are the
largest cause of unsafe radiation from microwave ovens.
Part Number 062-0983-01 Rev C page 3 - 21
Final documentation:
Document the findings of the survey on the floor plan. Provide one copy with the TIP book for future
review should this be necessary.
e. Completing the site survey:
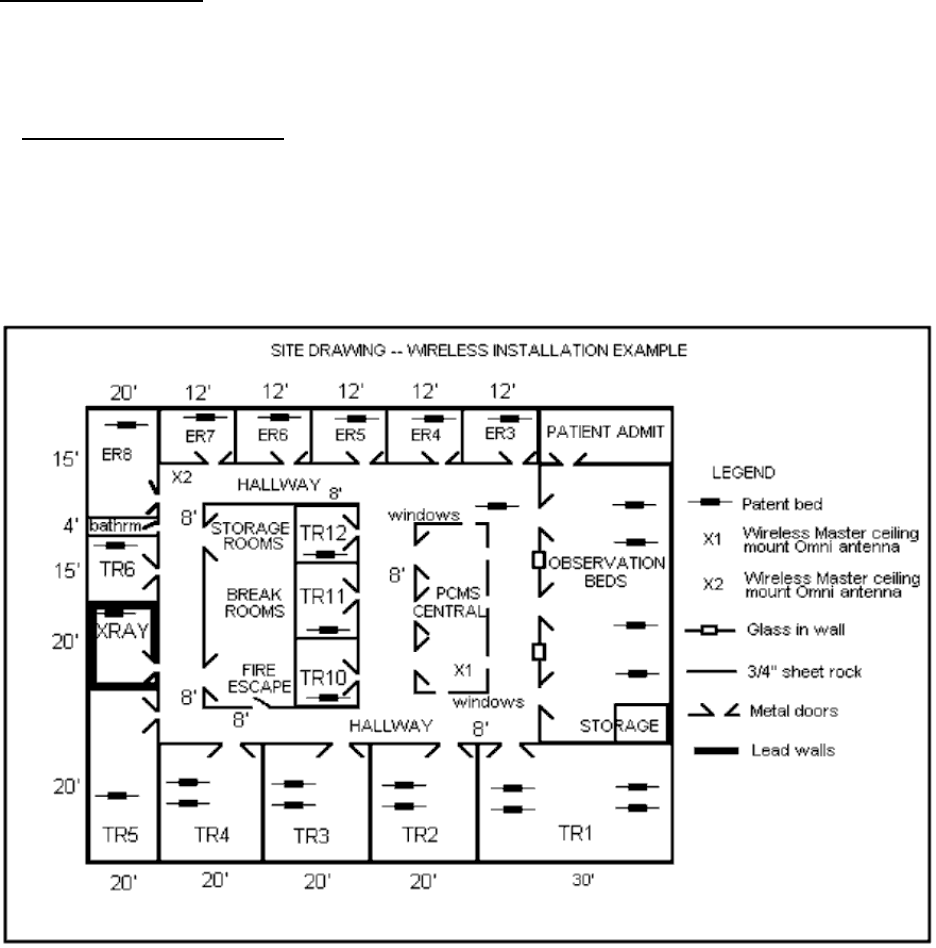
Site Survey Example 1: Concerns and Logical Placement
The following site survey illustrates concerns and logical placement. This would be the first step in
designating test areas. The drawing should also show the location, or potential location, of any microwave
ovens. Also noted must be any other wireless devices in the 2.4 GHz band.
Emergency Room shown below has ordered a quantity of ten 90309's equipped with option W (wireless).
The coverage area defined by the hospital staff is any of the following areas:
• Emergency rooms
• Trauma rooms
• One observation area
• X-ray room does not require coverage
• All hallways in the emergency ward
The floor plan must show desired coverage of each room to be monitored. Also listed must be hallways,
type or walls, windows, doors and the general attributes of the area where the wireless is to be installed.
Part Number 062-0983-01 Rev C page 3 - 22
Based on the complex physical shape and the site survey of the coverage area, it is determined that we
need two masters. The survey shows that X1 master can cover; TR1, TR2, TR3, TR4, TR10, TR11,
TR12, ER5, ER4, ER3, the lower hallway, the middle hallway, the right half of the upper hallway, the
PCMS central area and the observation area. Thus we need X2 to cover TR5, TR8, ER8, ER7, ER6, the
left side hallway, and the left half of the upper hallway. We may notice X2 will also cover ER5, the right
half of the upper hallway, the left end of the lower hallway, TR4 and possibly TR12.
IMPORTANT: As mentioned earlier, one WNI is limited to a maximum of 20 waveforms at a time. If this
parameter is exceeded, unacceptable numbers of waveform dropouts will occur. The two WNI’s in this
example may not be adequate if the number of wireless monitors is increased, even though they provide
full area coverage.
Installation options for this example:
• Use a different channel for each master and Auto-channel select mode for the slaves. This allows
more flexibility to reposition masters to optimize coverage without concern that the masters would
interfere with each other. This illustrates the ability of a monitor to roam from one channel master to
another.
• Use a single fixed channel for both masters and all slaves. If both X1 and X2 are on the same
channel, and as long as masters on the same channel cannot directly receive other master signals,
the setup will be valid. [Don’t forget the floors above and below in channel selection. Masters on
these floors may have overlap on this floor.]
If the x-ray room needs coverage, a separate master, on a third channel, would need to be installed in the
“X-RAY” room, and the slaves must use auto-channel select mode.
If the installation described above included twenty monitors, the installation options would be as follows:
• If the monitors are not mobile, and x-ray is not covered, it would be possible to use two WNI’s on two
different channels (also keeping in mind the limit of 20 parameters per WNI. If the monitors are going
to be set for more than 2 outbound parameters, more than 2 WNI’s may be needed). The slaves need
to be positioned so that they are equally divided between the two WNI’s according to the cell
boundary of each WNI. Half of the Wireless bedsides must be set to one channel, and half on another
channel.
• If the monitors are mobile, and must function from any room in the unit, then a pair of WNI’s must be
installed where the X1 and X2 master locations are indicated. The slaves must use auto-channel
select mode.
Part Number 062-0983-01 Rev C page 3 - 23

3. Post-Installation Verification and Troubleshooting
a. Acceptance Criteria:
Because of the nature of microwave communications, and the effects on it from some of the transient
events listed earlier, it is normal to observe infrequent gaps in remote views of Wireless waveforms.
The maximum number of waveform gaps allowed is three per minute, lasting less than 3 seconds each,
on a 16-waveform central where the Wireless bedsides are stationary.
During transport, it is expected that the number of dropouts will increase as the wireless monitor nears
the edge of the WNI coverage area and switches to a new WNI.
ALL monitor locations must meet or exceed the following minimums as measured with the RangeLAN2
card:
• The LINK QUALITY is displayed on the main site survey screen as a number from 0 (out of
range) to 5 (best) must be 3 or above.
• The RECEIVED SIGNAL STRENGTH (RSSI), displayed as a bar graph from 0-100% must be at
least 40%.
• In the Directed Link display ensure that the minimum DATA THROUGHPUT from the laptop to
the WNI, is at least 40 Kbytes/second.
b. Troubleshooting with the RangeLAN2.
Once the wireless network is installed, you may use the RangeLAN2 utility to test the installation and
verify system performance.
With the WNI’s in their installed locations, verify each bedside location has minimum throughput of 40
KB/second and a Link Quality of at least 3. Verify throughput and quality for any WNI that can be seen
from any given room.
Wireless bedside software version 2.03.06 and beyond will display the radio card’s network address as
the Wireless bedside software signs on after power-up. Knowing this information is useful in trouble-
shooting Wireless bedsides with radio problems. If the received signal strength (RSSI) of a Ranger,
1030/1050 wireless, or wireless UCW is significantly lower than RSSI for other bedsides, or data
throughput is low compared to other radios on the air, you can suspect a problem with the radio PCBA,
the antenna or antenna cable, or the monitor’s internal antenna cable.
One feature of the RangeLAN2 program is the master list (see illustration below). The master list will
show all masters in a given area. To search for Spacelabs WNI’s, search Network Domain One. To
search for other Proxim Masters, (non-Spacelabs equipment), search all Network Domains.
Part Number 062-0983-01 Rev C page 3 - 24
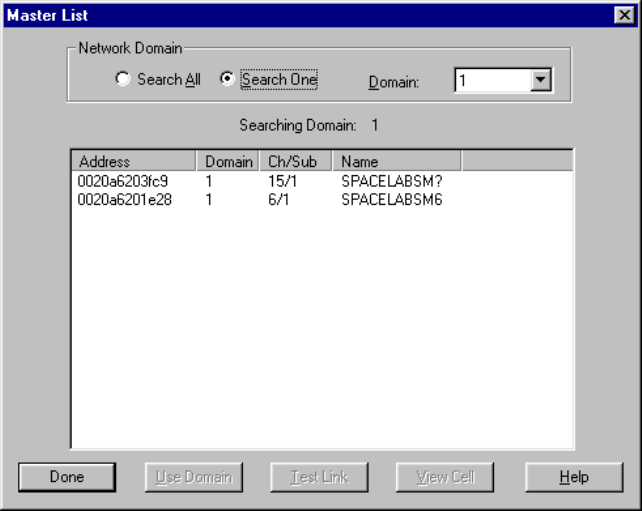
The master list will provide you with the WNI radio’s network address. Use the network address to
differentiate WNI’s in cases where multiple WNI’s are set to the same channel.
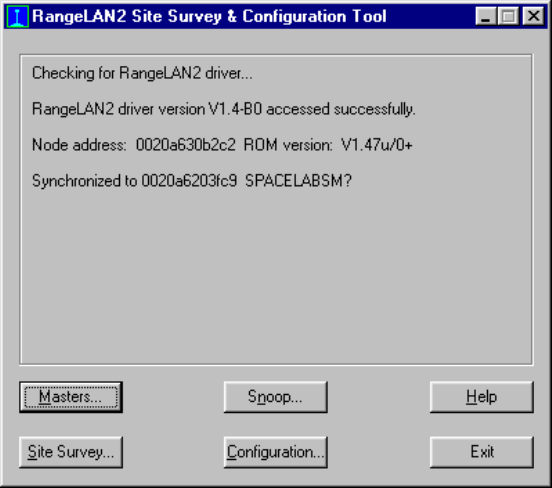
When the Main Menu is opened, the window displays which master (WNI) the laptop is synchronized to
(see illustration below). The Site Survey window lists all stations (wireless bedsides) synchronized to that
specific WNI. Since you can determine the radio address of the monitor at power up. You know the WNI
address from the master list; thus, you can determine which WNI a given wireless monitor is
communicating with. This is especially useful when you have an installation with multiple WNI’s on the
same channel, or the wireless bedsides are set to use the Auto-Channel Select mode, and there are
coverage problems. Channels dropping off the central display or numerous gaps in the waveform display
at the central are evidence of coverage problems.
Part Number 062-0983-01 Rev C page 3 - 25
For example, the floor plan on page 9 illustrates one room where two WNI’s are clearly seen. Let’s say
that any wireless monitor placed in that room frequently has gaps in the waveform at the central station.
You can use the RangeLAN2 program to determine which WNI the wireless monitor in the problem room
is communicating with. You may find that the wireless monitor is subject to more dropouts when it is
synchronized with WNI A than WNI B. To determine this, use Site Survey tool as previously described, to
determine the actual throughput of the bedside to WNI A and WNI B.
Upon power up of a wireless monitor (or laptop), it will search for and synch to the first WNI (master) it
sees generating a signal known as a “beacon”. The beacon tells the wireless monitor the master’s next
frequency hop. There are other factors involved, but simply stated, the first valid WNI the wireless monitor
sees is the one that it will synch to. You can observe this by placing the laptop between two WNI’s.
Repeatedly open, and then exit the site survey mode. By observing the percentage of times the laptop
synchs to one WNI over another, you can approximate how a wireless monitor would act, if booted in the
same location. If you want to link to a WNI you can carry the laptop to that location and wait for it to
switch. Or you can disable Roaming and force the laptop to connect to a specific WNI.
Going back to our example, in the suspect room you find a tendency to synch to WNI A about 30% of the
time, and WNI B 70 %. Open a Directed Link to WNI A and WNI B and observe the throughput data. In
this example, the data throughput from the suspect location to WNI A is actually 10-15 kB/sec, and the
data throughput to WNI B is closer to 40-50 kB/sec.
The reason that data throughput falls is that the radio portion of the network guarantees delivery. If the
radio need to re-send packets, the throughput naturally falls. This can occur for many reasons:
interference from microwaves or other sources; radio malfunctions; metal carts rolling down a corridor; fire
doors closing; a large crowd of people gathered in a corridor. 10 Kb/sec throughput means that data is
still getting through, but some packets may be lost because at the monitor level, waveform packets are
sent as multicast messages. This means that there is no destination address associated with the
waveform; therefore, the sender (wireless monitor) does not know that packets are missed and will not re-
transmit. The result is gaps or holes in the waveform.
Part Number 062-0983-01 Rev C page 3 - 26

Again, back to our example. If the lowered throughput from WNI A is not attributable to transient causes
as listed above, WNI A may need to be relocated to an area where is will be out of range of the suspect
room. This will assure that a wireless monitor in the suspect room will synch to WNI B, where the
communications are better.
Remember that the effect of any change of WNI position must be evaluated from all rooms that can see
the WNI, not just the suspect room.
Part Number 062-0983-01 Rev C page 3 - 27

c. Troubleshooting with the ULTRAVIEW 1030 / ULTRAVIEW 1050 Site Survey screen.
NOTE: Current ULTRAVIEW-1030/ULTRAVIEW-1050 site survey screen does not provide
throughput information. Therefore this tool is only to be used for network troubleshooting and
operational verifications.
To enter the SITE SURVEY mode:
Go to “MONITOR CONFIGURATION” Screen.
Select “PRIVILEGED ACCESS” button.
Enter Password.
Select “MORE” button.
Select “SERVICE FUNCTIONS” button.
Select “SYSTEM INFORMATION” button.
Select “SITE SURVEY” button.
ULTRAVIEW-1030/ULTRAVIEW-1050 site survey mode display provides important information for
verification of site operation.
Note: In the ULTRAVIEW-1030/ULTRAVIEW-1050 Site survey, signal range is 80 to 230. A reading
below 100 should be considered as Marginal operation. A reading below 90 will experience dropouts and
should be cause for re-evaluation of WNI locations and coverage areas.
ULTRAVIEW-1030/ULTRAVIEW-1050 Site Survey Display
• The Channel number shown at the top of the screen is the current sync, or “Master”, channel number.
• In site survey the statistics screen is a running total of all nodes seen since the last system reset.
• Before each entry in the table there is either a “*” or “-“ indication. The “*” indicates node sent a
configuration message in the last 20 seconds. The “–“indicates configuration message not seen
within the last 20 seconds.
• Assure you are using an available node number for the survey monitor. If the node number of this bed
is in the survey table then the node number is a duplicate. Since the table only shows received
configuration packets it must never show a node with the same number as the survey tool node.
Part Number 062-0983-01 Rev C page 3 - 28
APPENDIX 1 - RangeLAN2 PCMCIA Card
a. Installing and Configuring the RangeLAN2 PCMCIA card.
The RangeLAN2 card will come with driver disk(s) that are used to install the RangeLAN2 software onto a
laptop computer. REFER TO THE MANUFACTURER’S SOFTWARE INSTALLATION INSTRUCTIONS
FOR SPECIFIC STEP-BY-STEP SOFTWARE INSTALLATION INFORMATION. A typical installation is
shown here to provide essential configuration information needed to make the RangeLAN2 work with
Spacelabs wireless networks.
Installing PCMCIA card:
The RangeLAN2 card must be installed in the lower PCMCIA socket of the laptop.
Installing software onto laptop:
1. Install the RangeLAN2 card in the lower PCMCIA socket of the laptop. Start the laptop and wait until
Windows 95/98 auto-detects the RangeLAN2 card. The window will say “Select which driver you want to
install for your new hardware:” Choose “Driver from disk provided by hardware manufacturer”. Put the
driver disk into the A:/ drive and click on “OK”.
2. The installation screen will appear. Follow the on-screen instructions.
3. Complete the installation by following the manufacturer’s instructions.
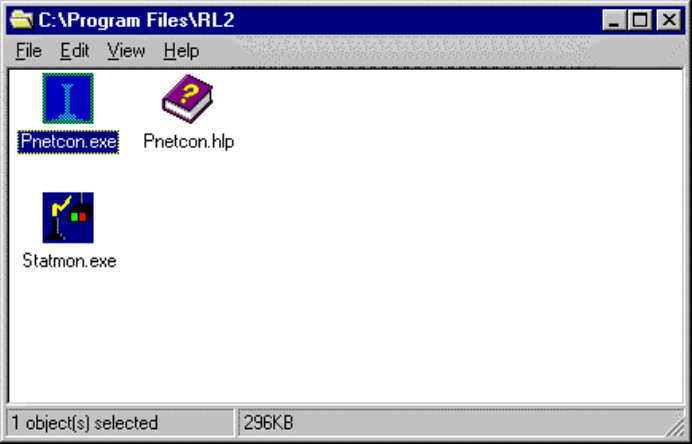
5. Using Windows Explorer, find the directory containing the file named Pnetcon.exe (see example
below) and right-drag the Pnetcon.exe icon onto the Desktop to create a shortcut.
6. Double-click on the Pnetcon.exe icon to start the RangeLAN2 program. The Main Menu will appear:
Part Number 062-0983-01 Rev C page 3 - 29
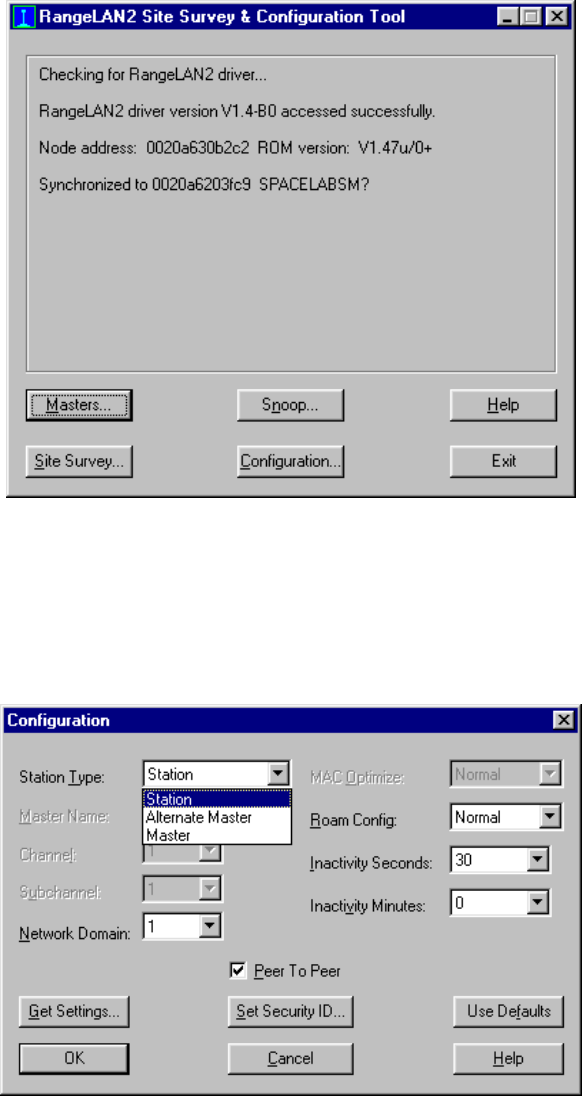
7. Select Configuration.
8. Click on the arrow beside the station type pull-down menu. Set the station type as a Station (see
below). There may be times that the laptop will need to be set up as a Master or Alternate Master;
however, for most site survey mode applications, Station is the desired setting.
Part Number 062-0983-01 Rev C page 3 - 30
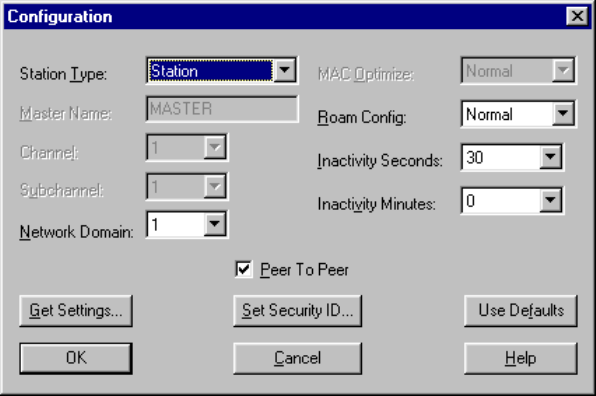
9. In the Configuration screen set the Network Domain to 1 (see below).
10. Click OK.
11. The software is now installed and configured.
Part Number 062-0983-01 Rev C page 3 - 31
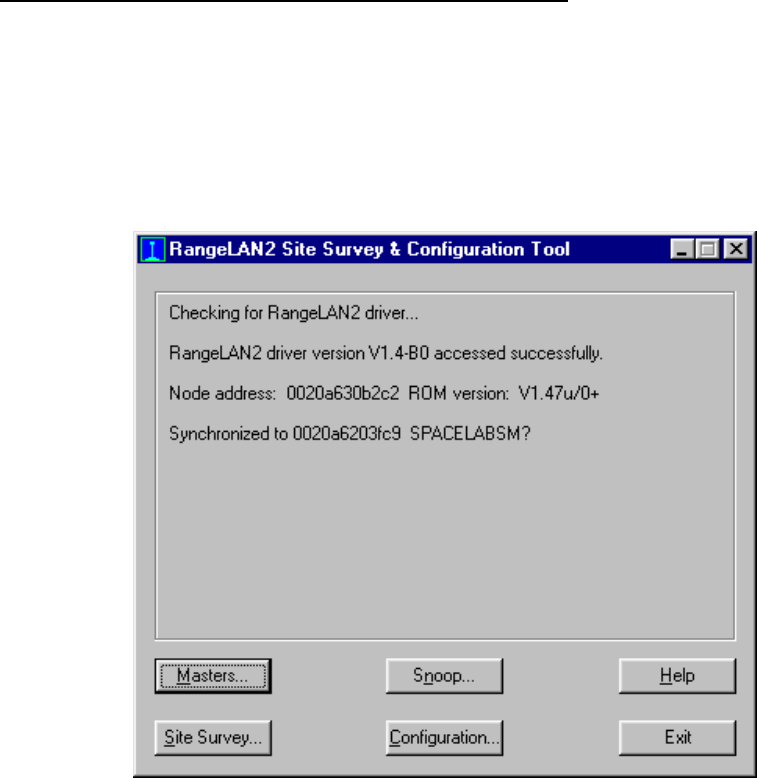
b. Using the Proxim RangeLAN2 PCMCIA card for Site Survey.
Equipment required:
Laptop computer with RangeLAN2 PCMCIA card installed and RL2SETUP program loaded.
Spacelabs Medical 90310 WNI with 90486 power supply
Starting the RangeLAN2 program:
Double-click on the Pnetcon.exe icon on the Desktop.
The program Main Window is as follows:
Performing an RF Sweep:
• Start the RangeLAN2 program.
• Select SNOOP.
The display below will appear:
Part Number 062-0983-01 Rev C page 3 - 32
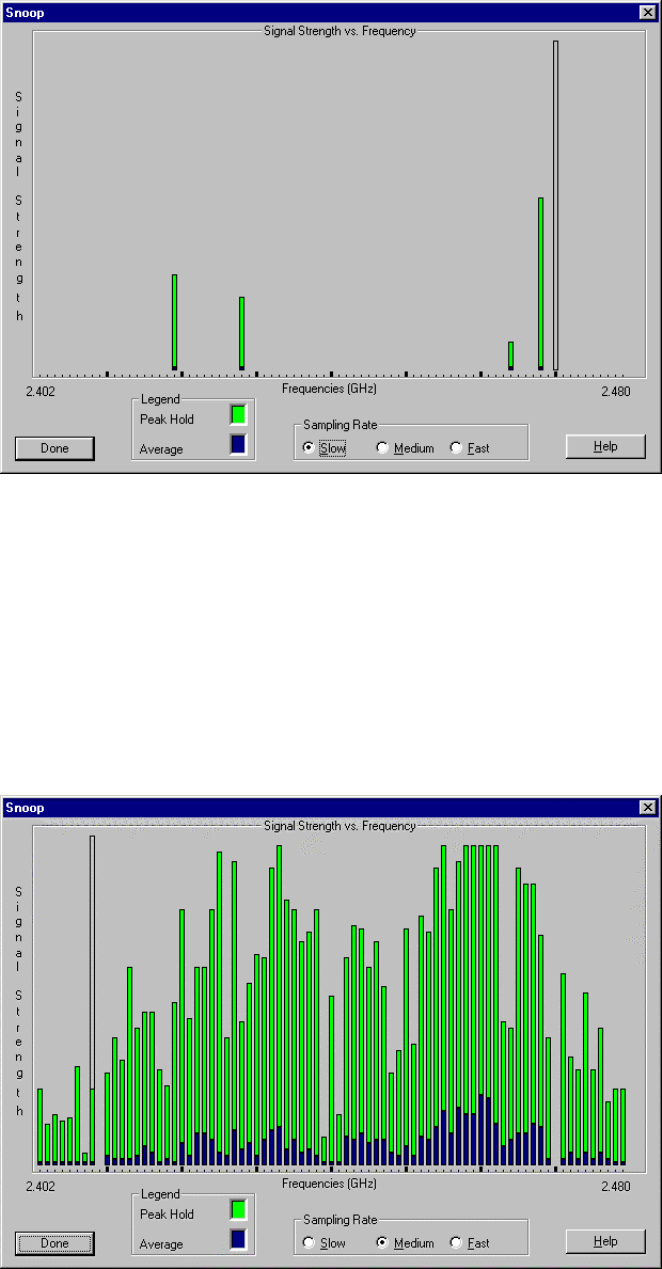
The SNOOP MODE display shows the RF spectrum that the wireless monitor radio uses. If the site
survey is for a new SMI wireless monitor installation, there should not be any activity in this spectrum. If
there is, other wireless products or noise sources are in the area. The activity characteristic of a spread
spectrum, frequency-hopping radio is several peaks per screen update. Once the activity in the RF
spectrum is identified, power the WNI on. You should now see the typical display as above.
A display as shown in the following example indicates the presence of interference in the wireless radio
frequency band. This interference may be due to microwave ovens, or other wireless products. Note any
difficulties encountered on the survey forms. These difficulties should be noted even if the interference
seems to go away during the survey. Flag these problems and refer them to Spacelabs Technical
Support along with the completed survey forms. If interference is severe, contact Technical Support to
obtain a 2.4 GHz Spectrum analyzer for completion of the survey.
Part Number 062-0983-01 Rev C page 3 - 33
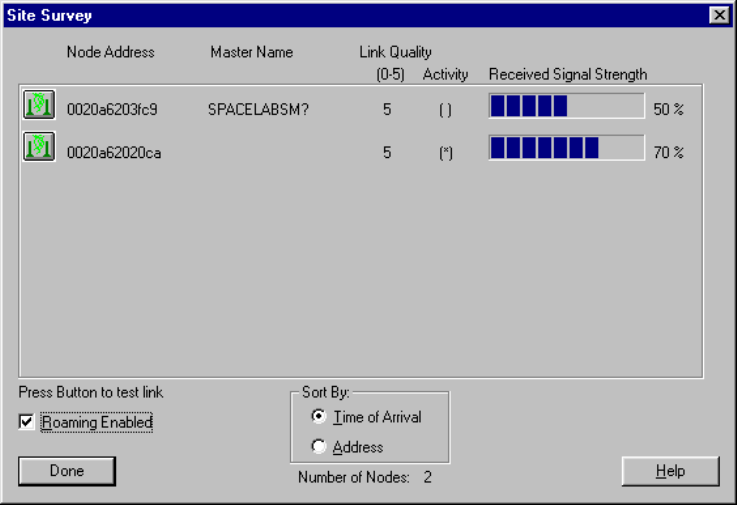
Entering SITE SURVEY mode:
Start the RangeLAN2 program.
Select SITE SURVEY.
The Site Survey mode display provides three important pieces of information for testing a wireless
installation: Link Quality, Received Signal Strength, and data throughput via a Directed Link.
The Site Survey mode displays the Node Address of the radio. This Node Address (MAC address) is for
the wireless card and is not associated with the monitor’s Node ID number. This window also identifies
the WNI Master Name as SPACELABSM?. A flashing asterisk flashes indicates activity.
The LINK QUALITY is displayed on the main site survey screen as a number from 0 (out of range) to 5
(best). In the site survey mode, the higher the link quality, the better.
The RECEIVED SIGNAL STRENGTH (RSSI) is displayed as a bar graph from 0-100%. The RSSI is a
less desirable method of surveying, since it is possible that the radios may see an adequate RF signal,
yet the quality of the data may be lower than desired.
Note: Both Link Quality and RSSI are good first line tests. However for best determination of
signal quality, continue with the following tests using Directed Link.
The Site Survey screen also has a selection for Roaming Enabled. This feature allows the laptop to
“roam”, (switch masters as needed). In the site survey process, the roam enabled should not be
selected, since you want to stay synchronized to the WNI, and not switch to another master. To change
from roaming to non-roaming, use a mouse to de-select “roaming enabled” (see below).
Part Number 062-0983-01 Rev C page 3 - 34
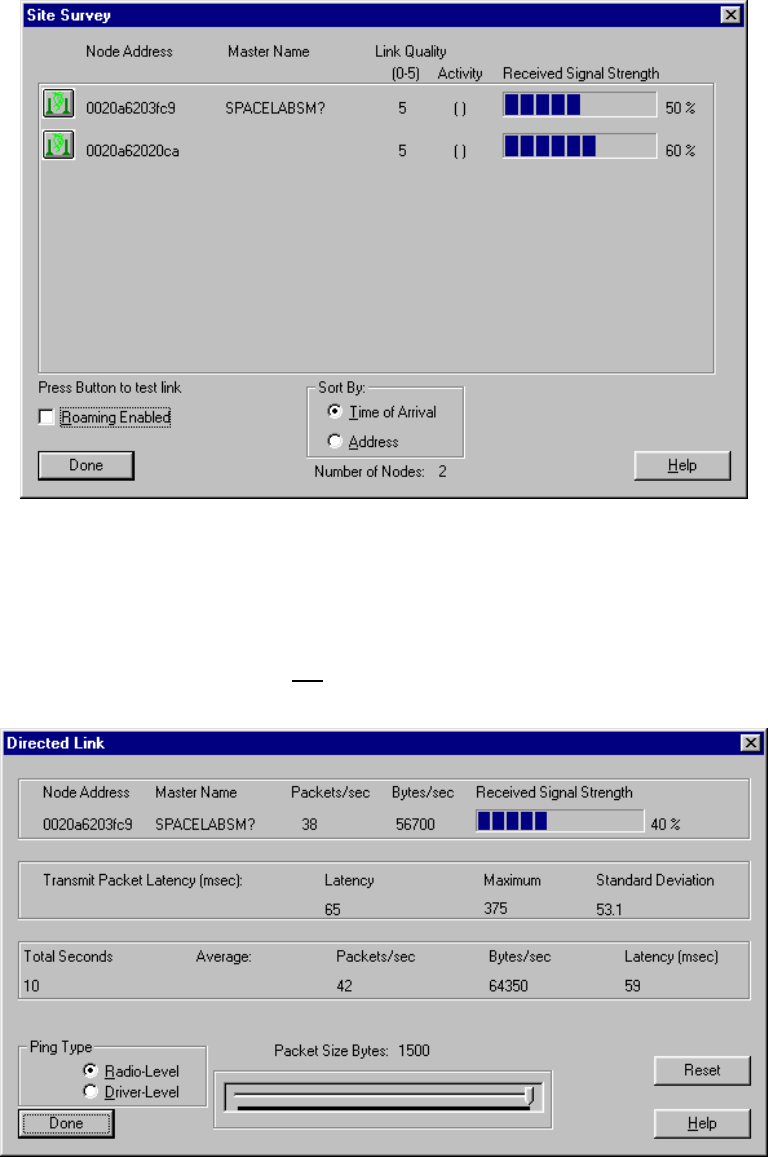
DIRECTED LINK. To enable the Directed Link display, on the Site Survey main screen place the mouse
pointer over a displayed master and click. A Directed Link allows measurement of the data throughput
from the laptop to the WNI.
The desired minimum data throughput from the laptop to the WNI, in a Directed Link, is 40
Kbytes/second. Signal strength should not go below 40%.
Part Number 062-0983-01 Rev C page 3 - 35

APPENDIX 2 - Microwave Leakage Measurements
a. Microwave ovens can be a major source of interference in the 2.450 GHz range and may cause loss of
data between the bedside and central stations or remote views. This loss of data will be seen as “holes”
in waveform data, or if the interference is of a long duration, complete loss of a channel at the central
station. In the event microwave ovens are located in the wireless coverage area anywhere within about
300 feet of either the WNI or wireless bedside, then these microwave ovens must be tested for possible
interference. If in doubt about interference “potential” setup a network using central station, WNI and one
bedside. Place a glass of water into the center of the microwave (NEVER TURN ON A MICROWAVE
OVEN WITHOUT A “LOAD” PLACED INSIDE OF IT) and turn it on at it’s highest power setting. Watch
the central station and verify that NO data dropouts occur while the oven is turned on ( a test duration of
30 seconds to a minute is adequate, be sure to change water if a longer test is desired as water should
not be boiling for this test).
b. A simple measuring device has been released for use in determining oven leakage (Spacelabs part
number 149-0002-00, "Meter, Microwave Leakage Detector"), and assist you in finding offending oven
noise sources. Both EPA and FCC have limits concerning emission levels for these ovens and published
the following as guidelines (excerpt):
• Power density of microwave ovens shall not exceed one milliwatt per square centimeter at any
point 5 centimeters (2 inches) or more from the external surface of the oven, measured prior to
acquisition by a purchaser, and thereafter, 5 milliwatts per square centimeter at any point 5
centimeters (2 inches) or more from the external surface of the oven.
• Leakage testing – Microwave should be operating at it’s maximum output and containing a load of
275 ±15 milliliters of tap water placed within the cavity of the center of the load carrying surface
provided by the manufacturer.
c. Refer to the operator's instructions for the microwave oven emission meter that you are using.
d. Emission measurement - With the oven set for maximum power output, operational, and water placed
into it, test for leakage as indicated in the figure above. Readings above 5 mW/cm2 are unacceptable and
the oven should be removed from service. To co-exist with Spacelabs wireless networks, emission levels
should be no greater then 1.5 mW/cm2 (Federal safety standards allow higher leakage levels for safety
purposes, but an emission level exceeding 1.5 mW/cm2 may cause wireless network problems). If
emissions are greater, the hospital responsible party must service the unit. Cleaning the door and mating
surfaces in some cases may resolve the issue.
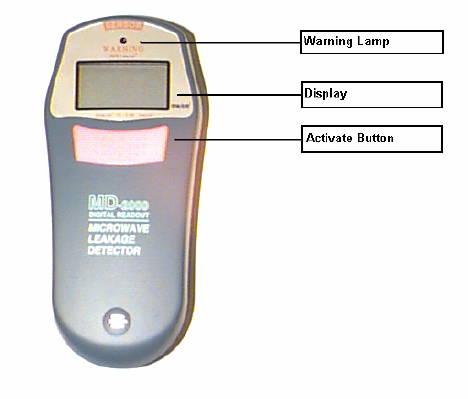
e. MD-2000 MICROWAVE DETECTOR OPERATING INSTRUCTIONS
A Microwave Detector (part number 149-0002-00) is available for use by Customer Service
Representatives to determine the emissions level of microwave ovens in areas where wireless
products are in use. Proper use of the microwave detector enables the CSR to find sources of
wireless communications interference and prevent signal drop-offs.
To use the MD-2000:
1. Place a cup of water inside the microwave oven.
2. Press and hold the orange button on the microwave detector MD-2000. The unit’s display will show
a count-up sequence, the warning light will briefly turn on, and a beeping tone will be generated for
1 second. When the tone stops, the display will show a 0.00 reading. This numeric value is
measured in mW/cm2.
Part Number 062-0983-01 Rev C page 3 - 36
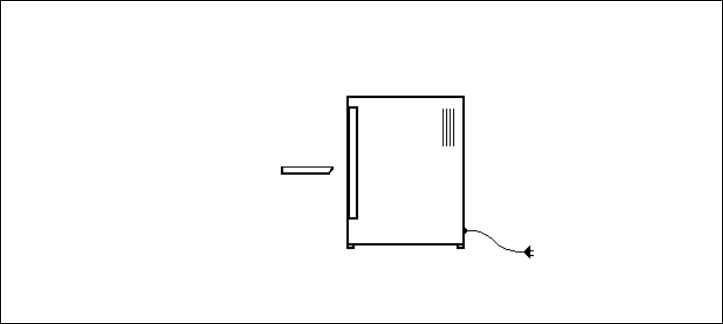
3. While pressing the orange button on the MD-2000 unit, start the operation of the microwave oven
(highest power output setting). The microwave oven must be operational for a minimum of 30
seconds.
4. Place the MD-2000 unit within 2 inches around the door cracks of the microwave oven. The meter
MUST be held in a horizontal orientation perpendicular to the surface you are measuring, such that
you can read the display from the top. Do NOT turn the device vertically as this will severely affect
the unit’s accuracy (see drawing below for proper orientation).
Microwave oven and MD-2000 in side view. Note the orientation of the MD-2000
and the oven door. During the test the oven is plugged in and running.
5. Note the MD-2000 readings on the display. Typical readings of properly insulated ovens will show
a value of less than 1.00 mW/cm2. Readings of 5.0 mW/cm2 or greater will be accompanied by a
beeping alarm tone and the flashing of the red warning lamp. Microwave ovens that emit 5.0
mW/cm2 or greater of energy violate the FDA and EPA recommended safety levels and must be
replaced or repaired immediately.
6. Readings close to but less than 5.0 mW/cm2 may affect wireless communications and should be
located as far as possible from any wireless devices. As mentioned earlier, Spacelabs Medical
recommends that ovens in proximity of wireless networks emit less than 1.5 mW/cm2.
Part Number 062-0983-01 Rev C page 3 - 37
Part Number 062-0983-01 Rev C page 3 - 38