Speech Processing Solutions PSP1 Smart Voice Recorder User Manual Rev1
Speech Processing Solutions GmbH Smart Voice Recorder Rev1
User Manual
User
manual
Smart voice recorder
PSP1000 series
SpeechAir

2
Tble of contents
Importnt informtion
Sfety instructions
Rechrgeble builtin bttery
Dt reset
Hering protection
Medicl device interference
Use in ircrft
Clening nd disinfection
Recycling
About this user mnul
Modelspecic fetures
Symbols used
Your smrt voice recorder
Product highlights
Wht’s in the box
Overview of the recorder
Overview of the docking sttion
Getting strted
Chrging the bttery
Chrge vi USB power supply
Chrge vi docking sttion
Chrge vi computer
Turn the device on nd o
Using your voice recorder
Using the touch screen
Home screen
Customize your Home screen
Add nd remove items nd widgets
Mnge Home screen pnels
Orgnize folders
Sttus br nd notiction pnel
Sttus br
Notiction pnel
Lock screen
Set screen lock
Set the dte nd time
Set the device nd input lnguge
Chnge the device lnguge
Chnge the input lnguge
Switch between input lnguges
Using pps
Preinstlled pps
Instll pps
Uninstll pps
Chnge the screen orienttion
Typing text
Enter text
Copy nd pste text
Using WiFi
Using Bluetooth
Cpture screenshots
Chnge sound settings nd sound mode
Power sving mode
Using emil pp
Set up n emil ccount
Add further emil ccounts
Remove emil ccounts
Send n emil
Emil ccount settings
Device settings
Tble of contents
Philips dicttion recorder pp
Open the pp
Onetouch strt
Recording screen
Record dicttions
Dene settings prior to recording
Record dicttion
Voicectivted recording
Plybck
Delete dicttion
Edit dicttion
Insert, overwrite or ppend recording
Add index mrks
Add keywords
Add pictures
Chnge dicttion nme
Lock dicttions/EOL
Mrk priority dicttions
Add brcodes
Send dicttion
Send dicttion vi emil
Send dicttion to Philips SpeechLive
Send dicttion to Philips SpeechLive
trnscription service
Send dicttion to Philips SpeechLive
speech recognition service
Send dicttion to Philips SpeechExec
mobile server
Send dicttion to Philips dicttion hub
Send dicttion vi Philips SpeechExec
softwre
Send dicttion to network folder
Using dt lists
Dt list options
Dicttion pp settings
Audio settings
Forwrding
Security
User interfce
Connectivity
Help
About
Device nd dt mngement
Trnsfer dt to nd from the computer
Reset your device nd dt
Device reset
Fctory dt reset
Updting your device
Philips SpeechAir mngement softwre
Instll SpeechAir mngement softwre
Congure SpeechAir with SpeechAir
mngement softwre
Device congurtion screen
Congure SpeechAir nd Philips dicttion
recorder pp settings
Using SpeechAir with Philips SpeechExec
softwre
Instll SpeechExec on your computer
Congure SpeechAir in SpeechExec
Congure SpeechAir with the SpeechAir
wizrd
Congure delivery methods for SpeechAir
Downlod dicttions to SpeechExec

3
Service nd support
Disply device informtion
Disply informtion bout Philips dicttion
recorder pp
Open Quick strt guide
Send emil to technicl support
Contct our supporting Philips prtners
Open source softwre
Troubleshooting
Technicl dt

4Important information
1 Importnt
informtion
Don’t make any adjustments and modications that
aren’t described in this manual. Follow all safety
instructions to ensure proper operation of the device. The
manufacturer assumes no liability for damages resulting
from non-compliance with the safety instructions.
Sfety instructions
• Protect the device from rain and liquids to prevent
damage to the device or a short circuit.
• Don’t expose the device to excessive heat caused by
placing it on a heating device or in direct sunlight.
• Protect the cables from damage by being trapped,
particularly at the plugs and where cables exit the
housing.
• Back up your data and recordings. The manufacturer’s
warranty doesn’t cover loss of data resulting from user
actions.
• Don’t perform any maintenance operations that aren’t
described in this user manual. Don’t disassemble the
device into its component parts to carry out repairs.
The device may only be repaired in authorized service
centers.
Rechrgeble built-in bttery
• Don’t attempt to replace the battery yourself. The
battery may only be replaced in authorized service
centers.
• Before your battery is replaced by an authorized
service center, back up your data and recordings.
• Batteries contain substances that may pollute the
environment. Used batteries should be disposed of at
an ocial collection point.
Dt reset
Philips SpeechAir has an internal memory with 1 GB
RAM and 16 GB built-in storage. If you want to perform a
factory data reset, observe the following cautions:
• Back up your data and recordings. Performing a
factory data reset will delete all data on your device.
• Formatting the memory on a computer may cause
incompatibilities with your device. Format the memory
only on the device.
Hering protection
Observe the following guidelines when you use
headphones:
• Set the volume to a moderate level and don’t use
headphones to listen for excessively long periods of
time.
• Be particularly careful to avoid adjusting the volume to
a level that your hearing can’t deal with.
• Don’t turn the volume up so high that you can’t hear
what is going on around you.
• In potentially dangerous situations, be particularly
careful or temporarily discontinue use.
• Don’t use headphones while you are operating a
motorized vehicle, cycling, skateboarding, and so on.
You could be a hazard to yourself and other road
users, and possibly be breaking the law.
Medicl device interference
SpeechAir contains components that emit
electromagnetic waves. Electromagnetic waves might
interfere with the operation of a pacemaker. Keep a safe
distance of separation between SpeechAir and your
pacemaker.
Use in ircrft
Wireless transmitters can negatively aect the operation
of other electronic equipment, causing them to
malfunction. Turn o SpeechAir or use Airplane mode
when you travel in aircraft. In Airplane mode, SpeechAir’s
signal transmitting functions are turned o.
Legl restrictions on recording
• The use of the device’s recording function is subject to
the legal restrictions that may apply in your country.
You should also respect the privacy and personal
rights of third parties if you record talks or lectures.
• If you want to record telephone calls, check if this
is legal in your country. In certain countries, you
may be legally required to inform the person you
are conversing with on the telephone that you are
recording the conversation.
Clening nd disinfection
• Before cleaning, disconnect all cables from the device.
• To clean the device, use a soft dry cloth.
• To disinfect the device, use products for disinfection of
surfaces in clinical areas and patient care equipment,
such as surface disinfectant wipes.
• Don’t use harsh chemicals or strong detergents.
• Avoid getting moisture in openings.
• Don’t rub or strike the surface with anything hard or
sharp as this may scratch or damage the surface
permanently.
Recycling
A crossed-out wheeled bin symbol attached
to a product indicates that the product is
covered by the European Directive 2011/65/EU.
Please get informed about the local separate
collection system for electrical and electronic
products. Please act according to your local rules and
don’t dispose of your old products with your normal
household waste. Correct disposal of your old product
helps to prevent potential negative consequences for the
environment and human health.
›
5Important information
About this user mnul
Find a quick overview of your device on the next pages.
For detailed description, see the following chapters of
this user manual. Read the instructions carefully.
Model-specic fetures
This user manual describes dierent models of the
device product range. Please note that some features
are only available on certain models.
Symbols used
Tip
• This symbol identies information that helps you to
use your device more eciently and simply.
Note
• This symbol indicates notices which you should
observe when handling or operating the device.
Caution
• This symbol warns of damage to the device and
possible data loss. Damage can be caused by
improper handling.
6Your smart voice recorder
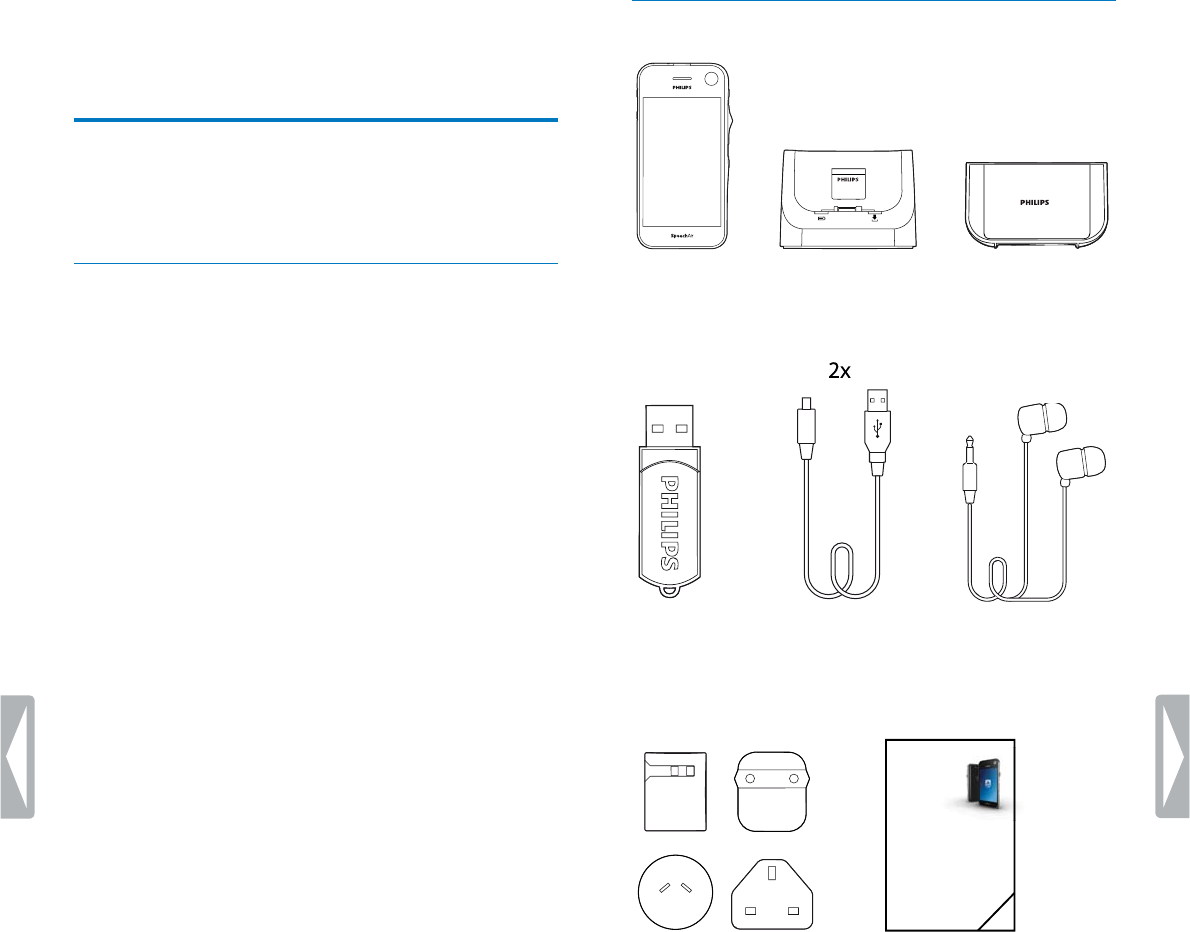
Wht’s in the box
Recorder Docking station Inlay
USB ash
drive
Micro USB
cable
Headphones
Power supply and
outlet adapters
Quick
start
guide
Quick start guide
2 Your smrt voice
recorder
We are delighted that you have chosen a Philips device.
Visit our website for comprehensive support, such as user
manuals, software downloads, warranty information and
more: www.philips.com/dictation.
Product highlights
• Three dedicated microphones for optimized voice
recording
• Large speaker for crystal clear audio playback
• Gorilla glass touch screen and shockproof,
antimicrobial housing for durability
• Wear-free and ergonomic slide switch and function
button for ecient single-handed operation
• Wi-Fi, LAN, Bluetooth, USB and VoIP for staying
connected anywhere you go
• Barcode scanner and camera for quick le association
and proof documentation
• File encryption for maximum data security
• Android OS for intuitive use
• Philips dictation recorder app for professional dictation
features (optional)
• Docking station for fast battery charging and data
transfer
• Dictation workow software for an even more ecient
workow (optional)
7Your smart voice recorder
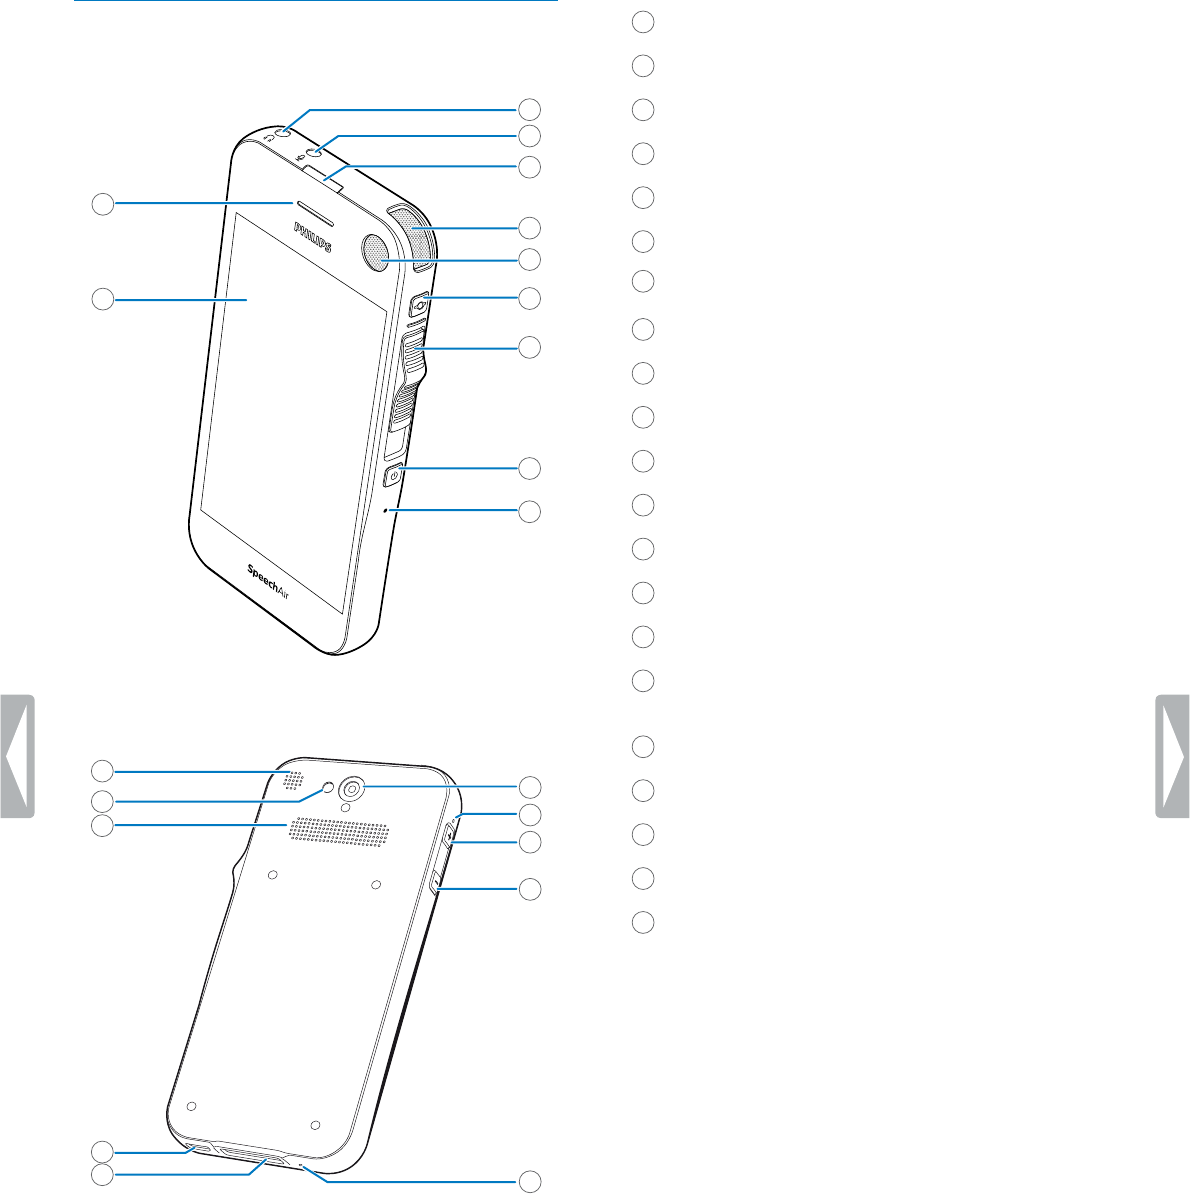
Overview of the recorder
1
2
3
4
5
6
8
9
10
7
11
15
16
17
18
19
14
12
13
20
21
1 Touch screen
2 Telephony speaker
3 Headphones jack
4 External microphone jack
5 Recording LED light
6 Dictation microphone (directional microphone)
7
Dictation microphone (directional microphone)
8 Function button
9 Slide switch
10
Power button
11 Reset hole
12 Speaker
13 Camera ash
14 Dictation microphone (directional microphone)
15 Camera
16 360° meeting microphone (omnidirectional
microphone)
17
Volume up button
18 Volume down button
19 Telephony microphone (VoIP)
20
Docking station connector
21 Micro USB port
8Your smart voice recorder
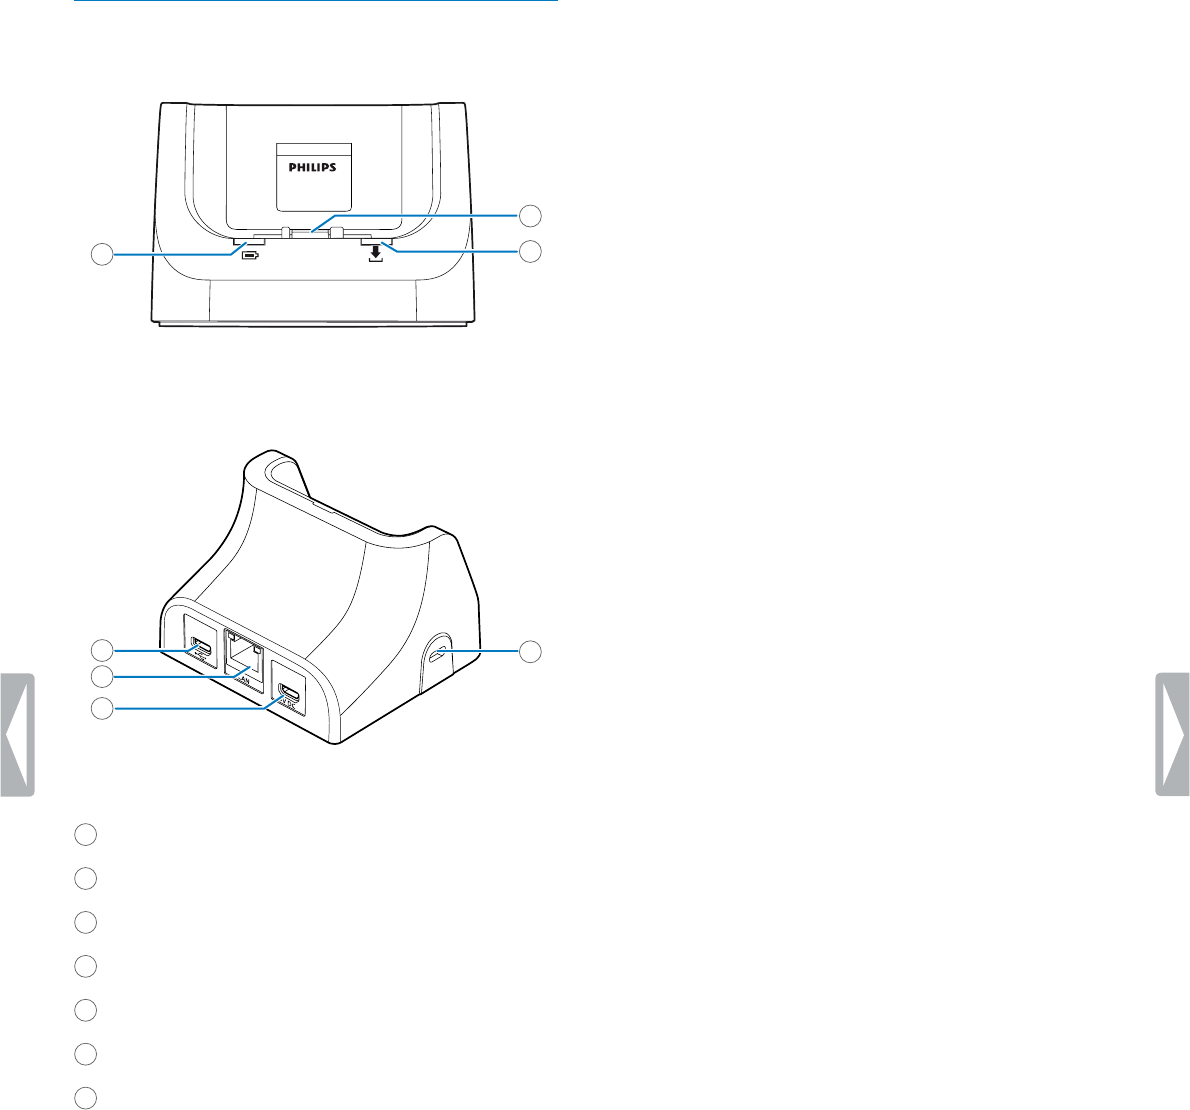
Overview of the docking sttion
1
2
3
4
5
6
7
1 Charging LED light
2 Docking station connector
3 Data transfer LED light
4 Data transfer micro USB port
5 LAN port
6 Charging micro USB port
7
Kensington Security Slot
9Getting started
3 Getting strted
Caution
• Before you connect and install your recorder, rst
read the safety instructions (see Safety instructions).
Chrging the bttery
Charge the built-in battery before you use the device
for the rst time or if you haven’t used it for an extended
time period. If the battery is completely discharged and
your device turns o, allow the battery to charge for a
while before you turn on the device.
Note
• The length of the USB cable might impact the
charging speed. Longer cables usually extend the
charging time.
Chrge vi USB power supply
Note
• The included USB power supply is a US standard
power supply. Depending on your region, you might
need to use the supplied outlet adapters to t
regional power outlets.
XThe battery icon appears on the touch screen
after a few seconds if the device is turned o. This
indication disappears after some seconds. To
reactivate the indication, press the Power button
once.
XThe charging battery icon on the status bar of
the Home screen shows the charging status if the
device is turned on.
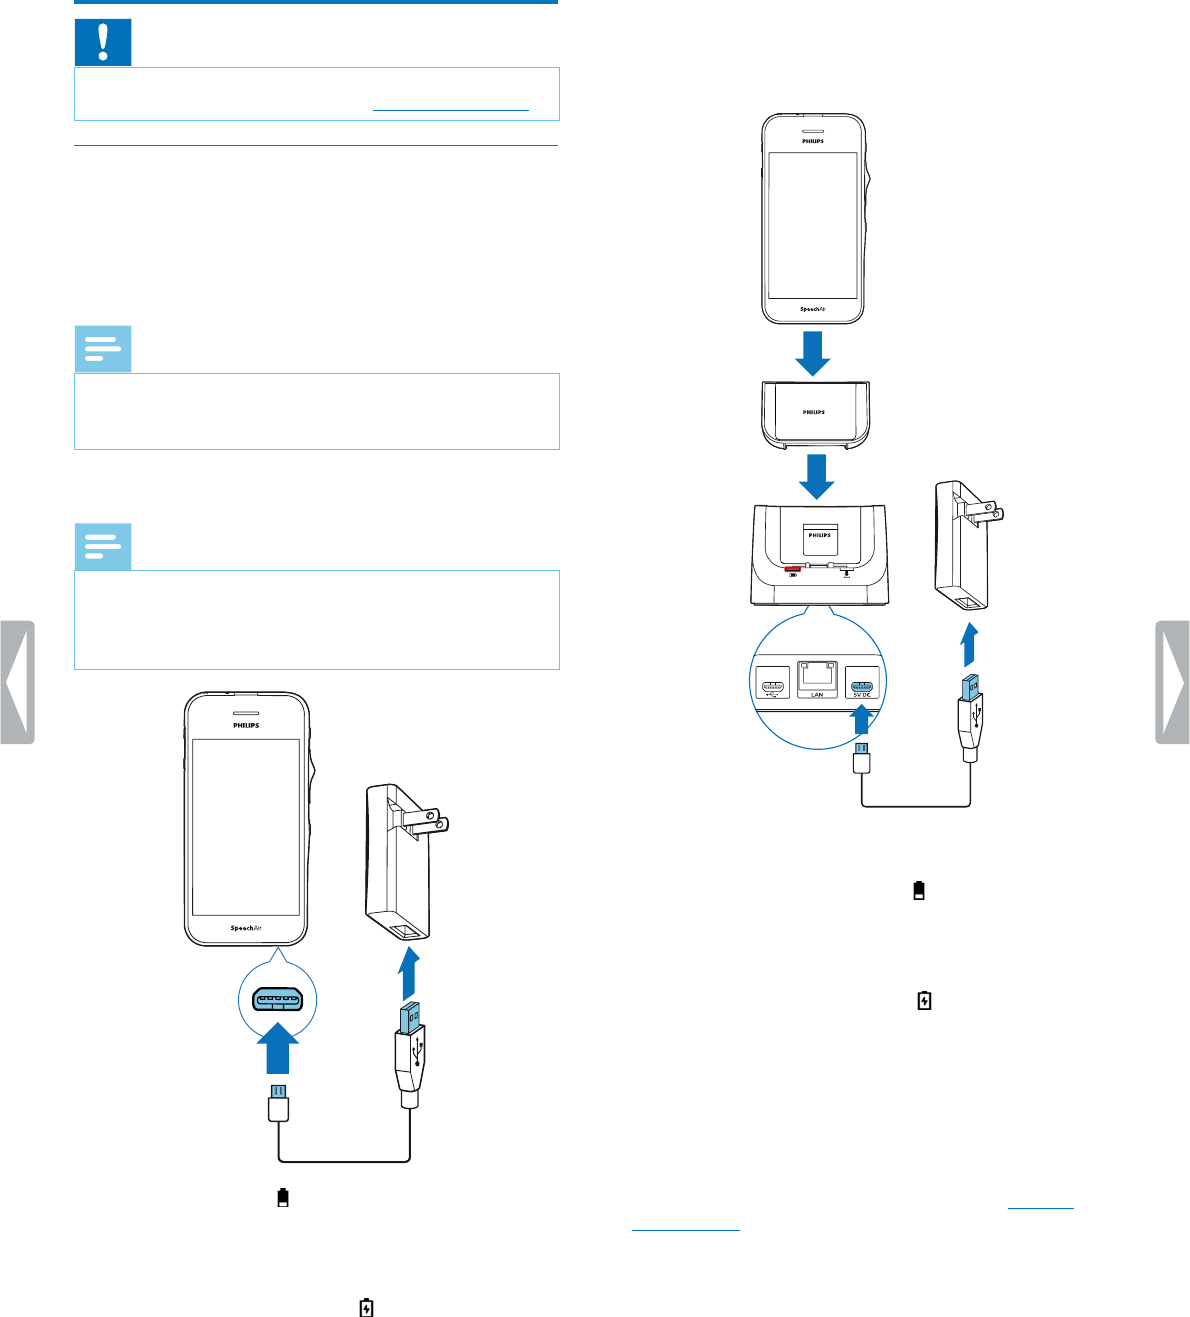
Chrge vi docking sttion
If you charge your device via docking station, make
sure that the micro USB connector is connected to the
charging micro USB port marked with 5V DC.
Chrge without cse
XThe red charging LED on the docking station
illuminates.
XThe charging battery icon appears on the touch
screen after a few seconds if the device is turned
o. This indication disappears after some seconds.
To reactivate the indication, press the Power
button once.
XThe charging battery icon on the status bar of
the Home screen shows the charging status if the
device is turned on.
Chrge with cse (optionl)
To charge your SpeechAir with the shock-proof case via
docking station, rst remove the inlay from the docking
station. Afterwards, proceed as described in Charge
without case.
10 Getting started
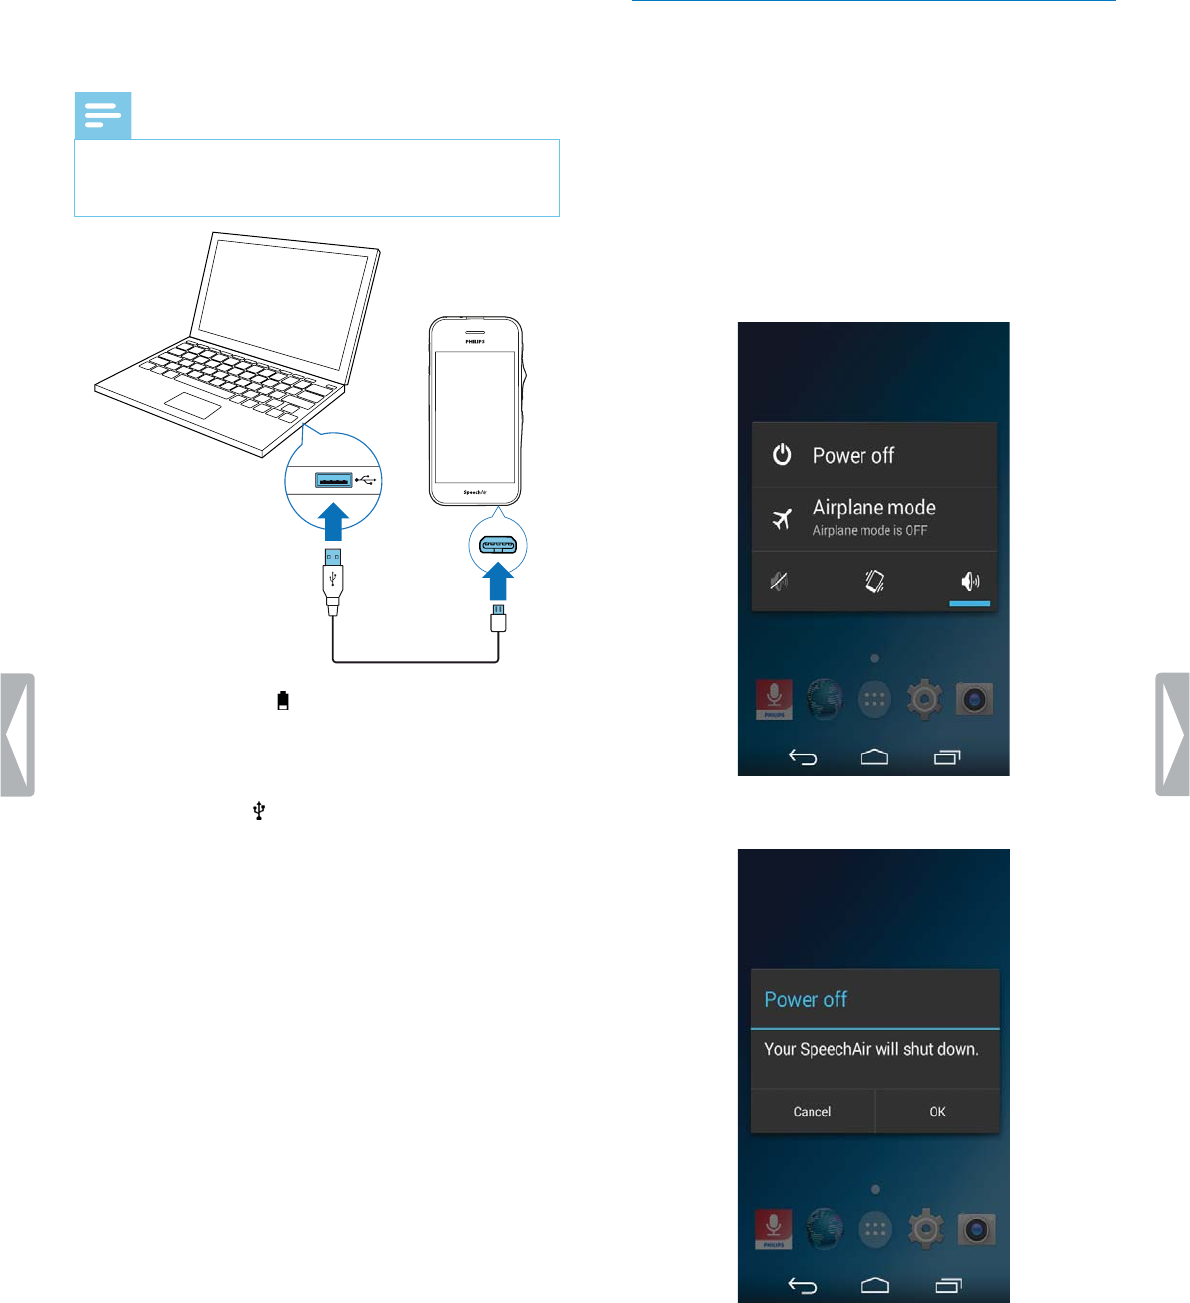
Chrge vi computer
Before you charge the battery via computer, make sure
that your computer is turned on.
Note
• If you charge your device via computer instead of
using the power supply, the charging speed might
slow down due to a lower charging current.
XThe battery icon appears on the touch screen
after a few seconds if the device is turned o. This
indication disappears when after some seconds.
To reactivate the indication, press the Power
button once.
XThe USB icon appears on the touch screen if
the device is turned on.
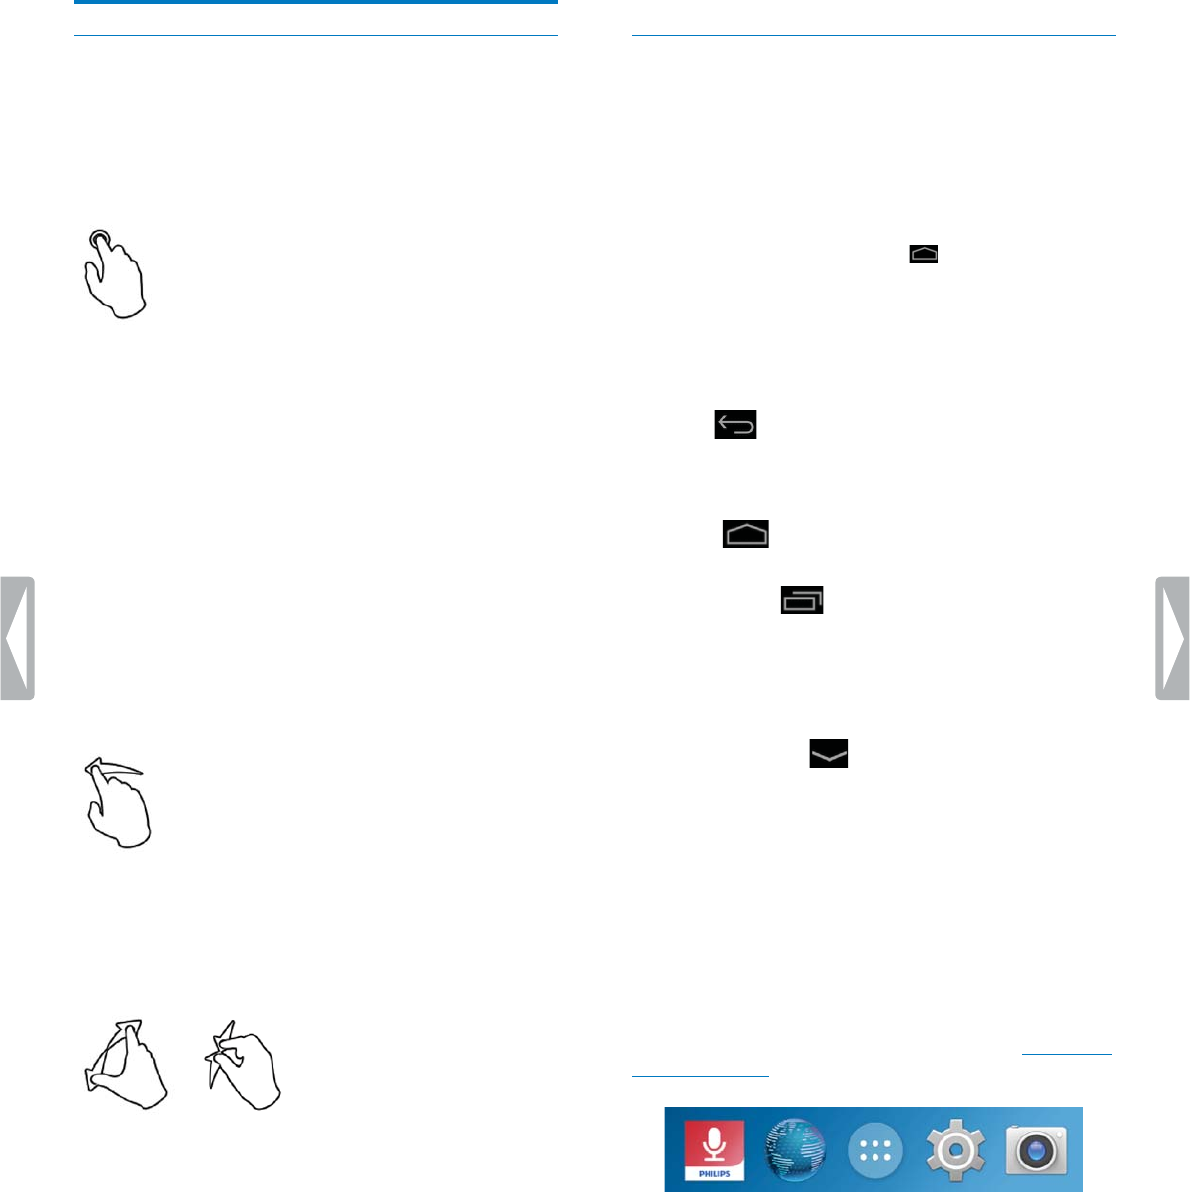
Turn the device on nd o
To turn the device on:
• Press and hold the Power button for six seconds until
the device gently vibrates.
To turn the device o:
1Press and hold the Power button for one second.
XThe Power o pop-up window appears.
2Tap Power o.
XA second pop-up window appears.
3Tap OK.
11Using your voice recorder
4 Using your voice
recorder
Using the touch screen
The interface of your SpeechAir is operated by touching
the screen. To operate the interface, use the following
basic gestures:
Tpping
To open n ppliction nd to select or unselect n
item or menu option:
• Gently tap the item with your ngertip.
To zoom in n imge or web pge:
• Double-tap the screen.
To return to the originl disply size:
• Double-tap the screen again.
To ccess vilble options for selected item:
• Tap and hold the item.
Swiping
To scroll through or switch lists nd screens:
• Swipe up, down, left, or right.
Spreding nd pinching
To grdully zoom in prt of n imge or web pge:
• Place your ngers on the screen and spread them
apart.
To grdully zoom out gin:
• Place your ngers on the screen and pinch them
together.
Drgging
To move n item:
• Tap and hold an item and drag it to a new position.
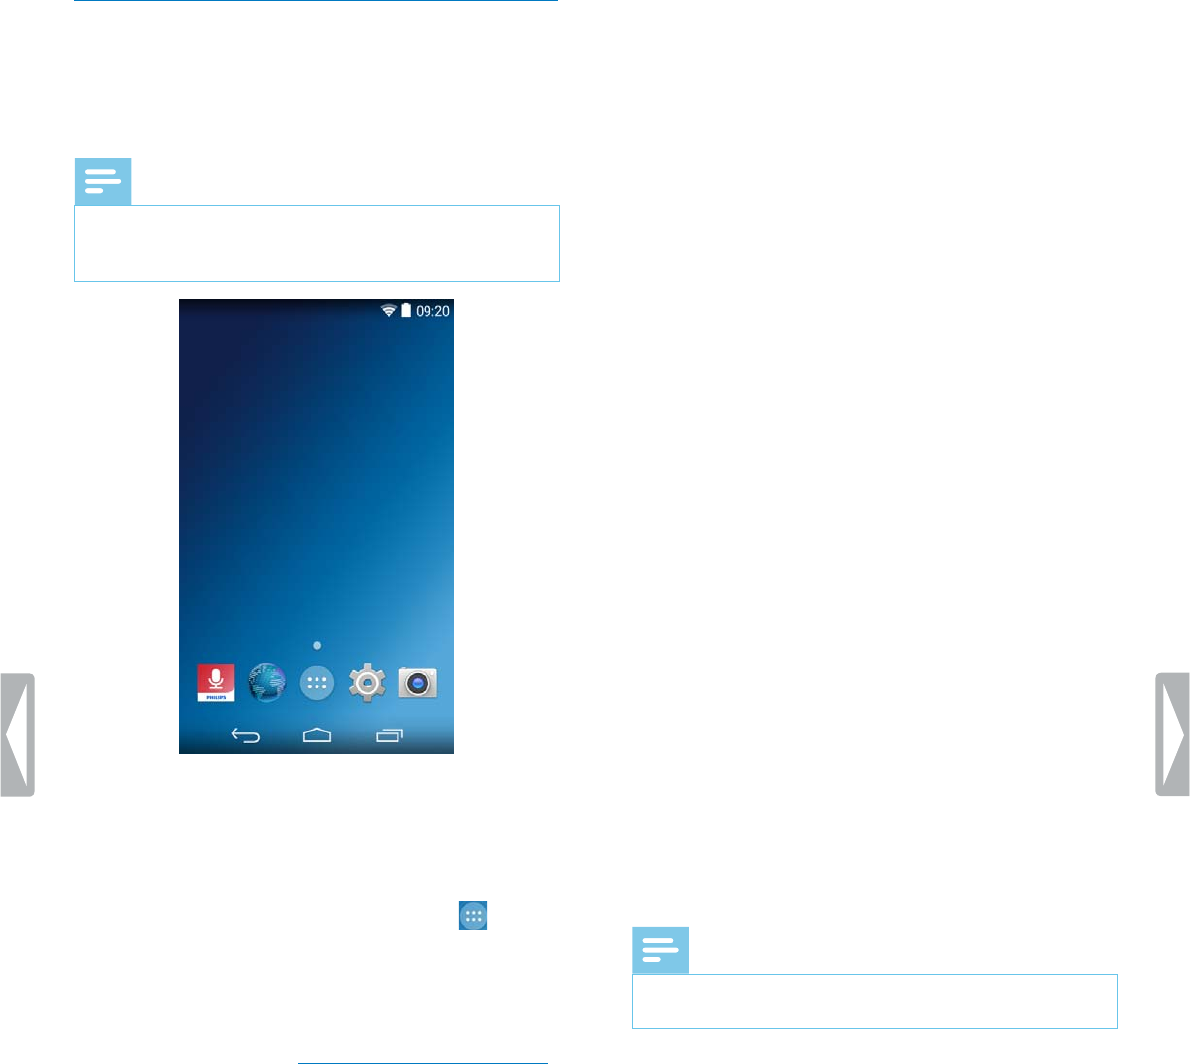
Home screen
From the Home screen, you can access the main
features on your recorder and view the status of your
device.
Customize your Home screen by adding your favorite
apps, widgets and folders, so they’re always just a tap
away.
You can open the Home screen from anywhere on your
device by tapping the Home key .
Keys
At the bottom of your display, no matter which app
or feature you are just using, you will always nd the
navigation bar with the following keys:
Bck key
• Opens the previous screen you were working in, even
if it was in a dierent app. Once you back up to the
Home screen, you can’t go back any further.
Home key
• Opens the central Home screen.
Recent Apps key
• Opens a list of thumbnail images of apps you’ve
worked with recently. This way you can easily and
quickly switch between apps or close running apps. To
open an app, tap it. To remove a thumbnail from the
list, swipe it left or right.
Close Keybord key
• Closes the on-screen keypad and replaces the Back
key. This key is only available when the keyboard is
open. When you tap the Close Keyboard key, the Back
key appears on the display again.
Fvorites try
You will nd the Favorites tray at the bottom of the
Home screen. The Favorites tray is a quick way to access
your favorite apps. It is always available when your
Home screen is open.
To change the apps on the Favorites tray, see Add items
to Favorites tray.
12 Using your voice recorder
Customize your Home screen
Create your Home screen according to your own
preferences. Add apps, widgets, or folders to your Home
screen, add Home screen panels, or customize the
Favorites tray.
Note
• Depending on the conguration of your device, the
starting panel might look dierent than the starting
panel described here.
Add nd remove items nd widgets
On the All Apps screen, you can nd all apps,
preinstalled as well as newly installed apps.
To open the All Apps screen, tap the shortcut on the
Home screen.
The All Apps screen has multiple panels. Depending on
the number of apps, the device automatically adds new
panels. To scroll through the panels, swipe left or right.
For more information, see Manage Home screen panels.
Add items to Home screen
To move n pp or folder from the All Apps screen to
the Home screen:
1Open the All Apps screen.
2Tap and hold an app or a folder on the All Apps
screen, and then drag it to the Home screen.
To move n pp or folder from the All Apps screen to
prticulr pnel of the Home screen:
1Open the All Apps screen.
2Tap and hold an item on the All Apps screen and
then drag it left or right to the desired panel.
Add widgets to Home screen
Widgets are small apps that provide specic information
and convenient access on your Home screen, such as
the bookmarks widget. There are two preinstalled widget
panels.
1Tap and hold an empty area on the Home screen.
2Tap Widgets.
3Tap and hold a widget, and then drag it to the Home
screen.
XThe Crete widget nd llow ccess pop-up
window appears.
4Tap Crete, or mark the checkbox Alwys llow to
crete widgets and then tap Crete.
To dd widgets to prticulr pnel of the Home
screen:
1Tap and hold an empty area on the Home screen.
2Tap Widgets.
3Tap and hold a widget, and then drag it left or right to
the desired panel.
4Tap Crete, or mark the checkbox Alwys llow to
crete widgets and then tap Crete.
To swipe through widget pnels:
1Tap and hold an empty area on the Home screen.
2Tap Widgets.
3Swipe right to switch to the next widget panel.
Add items to Fvorites try
Note
• Before you can add items to the Favorites tray, rst
remove existing items.
You will nd the Favorites tray at the bottom of all Home
screen panels. With the Favorites tray, you can easily
and quickly access frequently used apps and folders.
Apart from the non-movable All Apps screen shortcut,
you can arrange your Favorites tray as you like.
To move n item to the Fvorites try:
• Tap and hold the item and drag it to the Favorites tray.
To remove n item from the Fvorites try:
• Tap and hold the item and drag it either to Remove at
the top of the screen or to a Home screen panel.
13Using your voice recorder
Remove items nd widgets
Note
• By removing items and widgets from the Home screen
or Favorites tray, you don’t uninstall them.
To uninstall items and widgets, see Uninstall apps.
To remove n item or widget:
• Tap and hold the item on the Home screen, and then
drag it to Remove at the top of the screen.
Mnge Home screen pnels
The Home screen has multiple panels. When you use
your device for the rst time or have reset your data, you
will see only the starting panel.
Add pnel
• Tap and hold an item and drag it to the right.
XThe device automatically adds a new panel.
Remove pnel
• Tap and hold an item on the desired panel and drag
it either to Remove at the top of the screen or to a
dierent panel.
XWhen you have moved or removed all icons
on a panel, the panel is empty and the device
automatically removes it.
Move pnel
1Tap and hold an empty area on the Home screen.
XA panel preview appears.
2Tap and hold a desired panel and then drag it to a
new location.
To scroll through the pnels:
• Swipe left or right.
Orgnize folders
Crete folder
You can create folders on any Home screen panel and
also drag them to the Favorites tray.
To crete folder:
• Tap and hold an item and drag it onto another item.
Repeat this step with multiple items which you would like
to have in the same folder.
To nme or renme folder:
1Tap the folder.
X All apps in the folder are displayed.
2Tap Unnmed Folder or the existing name of the
folder.
3Name the folder.
Remove folder
To remove folder including ll its pps:
• Tap and hold the folder and then drag it to Remove at
the top of the screen.
To only delete folder, but keep its pps:
• Tap the folder. Tap and hold each app and drag it out.
XThe folder is deleted automatically.
Sttus br nd notiction pnel
Sttus br
Note
• In some apps, the status bar might not appear. To
view the status bar from these apps, swipe down
from the top of the screen.
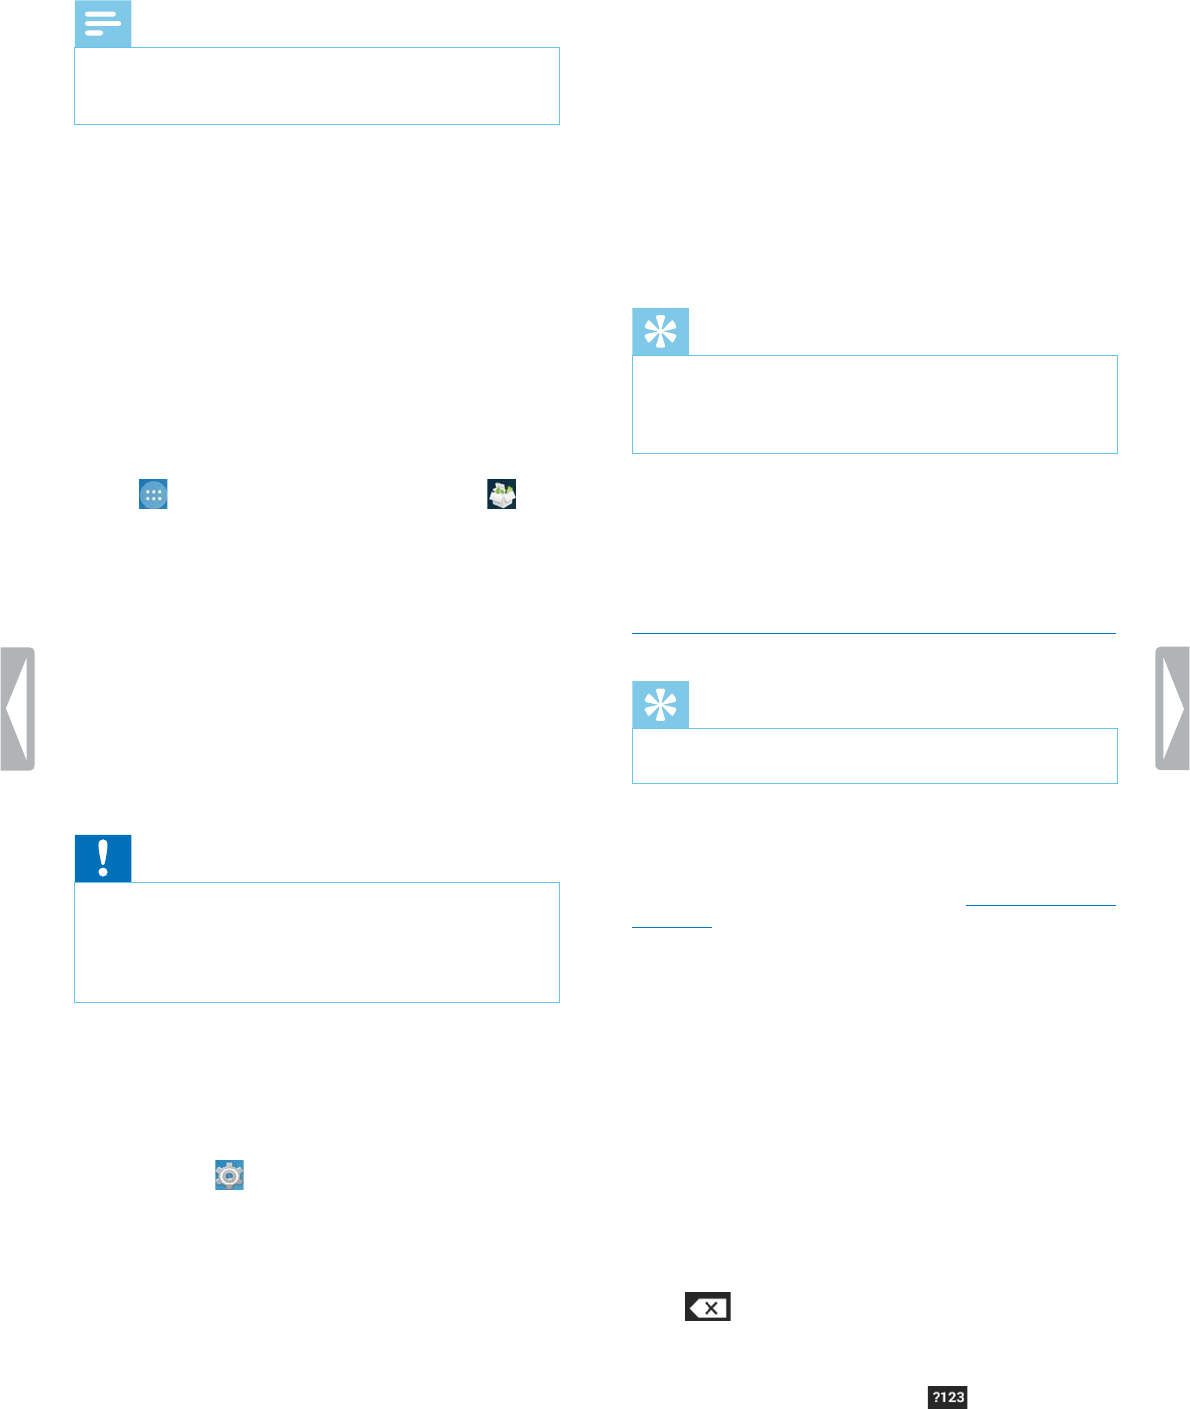
The status bar at the top of the screen shows indicator
icons. On the left side of the status bar, you will nd new
notications, such as email notications. On the right
side of the status bar, status information is displayed,
such as the time, battery status, or Wi-Fi connection.
Find the most common status bar icons in the following
table:
Icon Mening
Wi-Fi connected
Bluetooth activated
Battery power level
Charging battery
Airplane mode activated
Mute mode activated
Vibration mode activated
New email
Recording dictation (when
outside the recording
screen of Philips dictation
recorder app)

14 Using your voice recorder
Notiction pnel
The notication panel allows you to see a preview of
your notications on the status bar, which you can
either acknowledge or clear. You can also access Quick
Settings from the notication panel and quickly adjust
basic settings.
Open the notiction pnel
• Swipe down from the top of the screen.
Close the notiction pnel
• Swipe up on the screen.
Note
• Indicator icons remain on the status bar until you
either acknowledge or clear them.
Acknowledge notiction
• Tap the notication.
Cler ll notictions
•Tap .
Quick Settings
The notication panel also allows you access to Quick
Settings, where you can quickly adjust basic settings, such
as Wi-Fi or Bluetooth, and access the Settings menu.
To ccess Quick Settings:
1Swipe down from the top of the screen.
2Tap .
Lock screen
When you use your SpeechAir for the rst time or have
reset your data, no screen lock is set.
You can lock the touch screen when it’s active to prevent
any unwanted device operations or access as well as
to save battery power. When your device is on and not
used for a set time period, the screen turns o and locks
automatically.
Tip
• The status bar is also displayed in lock screen mode.
Lock nd unlock the screen
To turn o nd lock the screen:
• Briey press the Power button.
To turn on nd unlock the screen:
• Briey press the Power button again.
Set screen lock
You can change the screen lock method by using one of
the following options: None, Slide, PIN, Password.
1Tap Settings on the Home screen or on the All
Apps screen.
2Swipe down and tap Security.
3Tap Screen lock.
4Select a screen lock method.
None
Choose this option to deactivate the screen lock.
Slide
Choose the slide lock method to unlock the screen.
PIN
Enter a personal PIN code consisting of 4-16 digits to
unlock the screen.
Pssword
Enter your personal password consisting of 4-16
characters to unlock the screen.
Note
• If you have set a PIN code or password and want to
change your screen lock method, rst conrm the old
PIN or password.
• Longer PIN codes and passwords are safer than short
ones.
• It is very important that you remember your PIN or
password. If you forget this information, it might not
be possible to restore important data.

15Using your voice recorder
Set the dte nd time
You can always change the date and time on your
device and how they are displayed. Choose if you want
SpeechAir to set the date and time automatically or
change the settings manually.
To set the dte nd time utomticlly,
1Tap Settings on the Home screen or on the All
Apps screen.
2Swipe down and tap Dte & time.
3Mark the checkbox next to Automtic dte & time.
To set the dte nd time mnully:
1Tap Settings on the Home screen or on the All
Apps screen.
2Swipe down and tap Dte & time.
3Unmark the checkbox next to Automtic dte & time.
4Tap Set dte or Set time.
5Swipe up or down to set the desired date or time.
In the Dte & time menu, you can also select a time
zone and the date and time format.
Set the device nd input lnguge
You can always change the device and input language.
If you choose a device language, the device sets the
relevant input language automatically.
Chnge the device lnguge
1Tap Settings on the Home screen or on the All
Apps screen.
2Swipe down and tap Lnguge & input.
3Tap Lnguge, and then select the language to use.
Chnge the input lnguge
1Tap Settings on the Home screen or on the All
Apps screen.
2Swipe down and tap Lnguge & input.
3In the Keybord & Input methods sub-menu, tap .
XThe Android Keybord Settings window opens.
4Tap Input lnguges.
XThe Input lnguges window opens.
5Make sure that the checkbox next to Use system
lnguge is unmarked.
6Change the language or select multiple languages to
use from the list by marking the relevant checkboxes.
Switch between input lnguges
If you have selected two or more input languages, you
can switch between the languages on your keyboard.
1Tap and hold the space key on your keyboard.
XThe Choose input method pop-up window
appears.
2Select the desired language from the list.
Alternatively, tap next to the space key to switch
between the input languages. For more information
about using the keyboard, see Typing text.
Using pps
Preinstlled pps
You can nd multiple preinstalled apps on your
SpeechAir. This allows you to perform basic tasks with
your SpeechAir, such as sending an email, browsing the
Internet, or taking photos. Four apps are already set on
the Favorites tray. More apps are available on the All
Apps screen.
To open the All Apps screen, tap the All Apps screen
shortcut on the Home screen. See more information
about organizing apps in Customize your Home screen.
Instll pps
SpeechAir doesn’t support Google Play Store due to
security reasons. However, you can install apps by
copying and downloading an installation le (.apk le,
for example, Filename_xy.apk) for the relevant app to
your SpeechAir. This installation le is necessary to install
an app on your SpeechAir. We highly recommend using
a source you trust for downloading installation les.
Note
• Only the preinstalled apps have been tested for
SpeechAir. Download and install apps from external
sources only at your own risk. Philips assumes no
liability for the functioning of any external apps.
• If you use apps from external sources, make sure that
they are compatible with Android 4.4.2.
• Before you download apps from external sources,
make sure that the checkbox in Settings > Security >
Unknown sources is marked.
16 Using your voice recorder
To instll pps vi instlltion le:
Note
• Make sure that your SpeechAir is turned on when you
connect it to the computer. Your computer can only
detect SpeechAir when it is turned on.
1Connect your device to the computer.
2Open Windows Explorer on a Windows computer, or
open Finder on a Mac computer.
XSpeechAir is recognized as an external drive.
3Double-click the SpeechAir drive.
XThe content of your SpeechAir is displayed in a
new window.
4Drag the downloaded installation le (.apk le, for
example, Filename_xy.apk) to the SpeechAir window.
XThe .apk le is now available on your SpeechAir.
5Disconnect your device from the computer.
6Tap on SpeechAir, and then tap Explorer .
7Tap SA-HARDDISK.
8Swipe to the .apk le, for example, Filename_XY, and
tap the .apk le.
9Tap Next twice, and then tap Instll.
XThe app is installed.
10 Tap Done to go back to the SA-HARDDISK screen, or
tap Open to open the app.
Uninstll pps
Caution
• It is not possible to uninstall preinstalled apps, you
can only disable them.
• Disabling preinstalled apps might cause other apps
to misbehave and will delete associated data for the
relevant app.
• Disble: Disable preinstalled apps that can’t be
uninstalled from the device.
• Uninstll: Uninstall newly installed apps
To uninstll or disble n pp:
1Tap Settings on the Home screen or on the All
Apps screen.
2Tap Apps.
3To uninstall a downloaded app, select it from the
Downloded tab.
To disable a preinstalled app, swipe right to the All
tab and select the desired app.
XThe App info window opens.
4Tap Uninstll or Disble.
Alternatively, uninstall an app following the next steps:
1Open the All Apps screen.
2Tap and hold the app you would like to uninstall.
3Drag it to Uninstll in the upper left corner of the
screen.
XA pop-up window appears asking you to cancel
or conrm uninstalling the app.
4Tap OK.
Chnge the screen orienttion
Tip
• If your screen doesn’t automatically change the view
when you turn your device sideways, go to Settings >
Disply and mark the checkbox next to Auto-rotte
screen.
In many apps, you can change the view of your screen
when you rotate your device. The screen automatically
changes the orientation from portrait to landscape
when you turn the device sideways. When entering text,
you can turn the device sideways to bring up a bigger
keyboard.
Typing text
Tip
• If the on-screen keyboard doesn’t open
automatically, tap the text eld to open the keyboard.
You can enter text with the on-screen Android keyboard
(AOSP). The on-screen keyboard opens automatically
when you use apps and options where entering text is
needed. Set and use multiple keyboard languages, and
switch between them while typing (see Change the input
language).
You can also rotate your device to change the keyboard
view from portrait to landscape and bring up a bigger
keyboard.
Enter text
• Tap each letter on the keyboard individually.
• To uppercase, tap shift.
• To use caps lock, double-tap Shift.
• To release caps lock, tap Shift again.
Delete text
• Tap on the keyboard.
Enter dditionl chrcters
• Tap the additional character key on the keyboard.
XThe additional character key automatically
changes to a letter key.
17Using your voice recorder
Return to the text keybord
• Tap the letter key on the keyboard.
Switch between the input lnguges
Note
• Before you can switch between the input languages
on your keyboard, rst set your desired input
languages (see Change the input language).
1Tap and hold the space key on your keyboard.
XThe Choose input method pop-up window
appears.
2Select the desired language from the list.
Alternatively, tap next to the space key to switch
between the input languages.
Enter lnguge-specic chrcters
1Select the desired input language on your keyboard
as described in Switch between the input languages.
2Tap and hold the desired key.
XA pop-up window appears above the key showing
available characters.
3Select a character by dragging your nger left or right
to the desired character, and then release your nger.
Hide the keybord
• Tap on the Home screen when the on-screen
keyboard is open.
Copy nd pste text
1Tap and hold or double-click part of the entered text.
XThe selected part of the text is marked.
2Tap and drag or left or right to select the text
you would like to copy or cut.
XAn action bar appears at the top of the screen
showing available options.
3Tap to copy or to cut the text.
4Place the cursor by tapping and holding where you
would like to insert the text.
5Tap Pste above the marked text.
Using Wi-Fi
Use Wi-Fi to connect your SpeechAir to the Internet
or other network devices wirelessly anywhere a Wi-Fi
access point or hotspot is available.
Note
• Using Wi-Fi might consume additional battery power.
Turn o Wi-Fi when not in use to save battery power.
• The Wi-Fi signal strength might vary depending on
obstacles and the distance between the device and
Wi-Fi access point.
Turn on Wi-Fi
1Tap Settings on the Home screen.
2Tap the Wi-Fi switch or drag it to the right to turn on
Wi-Fi.
XYour device searches for available Wi-Fi networks.
Alternatively, turn on Wi-Fi by using Quick Settings:
1Swipe down from the top of the screen.
2Tap to open Quick Settings.
3Tap Wi-Fi O.
4Tap the Wi-Fi switch or drag it to the right to turn on
Wi-Fi.
XYour device searches for available Wi-Fi networks.
Connect to Wi-Fi network
Note
• If you select a secured network, you will be prompted
to enter the relevant password or network key.
• If you select an open network, you will be
automatically connected to the network.
1Tap Settings on the Home screen.
2Tap Wi-Fi.
XAll available Wi-Fi networks are displayed.
3Select a Wi-Fi network to connect to.
4Tap Connect.
X is displayed on the status bar once you are
connected.
Alternatively, connect to a Wi-Fi network by using Quick
Settings:
1Swipe down from the top of the screen.
2Tap to open Quick Settings.
3Tap Wi-Fi.
XAll available Wi-Fi networks are displayed.
4Select a Wi-Fi network to connect to.
18 Using your voice recorder
5Tap Connect.
X is displayed on the status bar once you are
connected.
Chnge the Wi-Fi network
1Tap Settings on the Home screen.
2Tap Wi-Fi.
XAll available Wi-Fi networks are displayed.
3Select a dierent Wi-Fi network to connect to.
Alternatively, change the Wi-Fi network by using Quick
Settings:
1Swipe down from the top of the screen.
2Tap to open Quick Settings.
3Tap the active Wi-Fi network.
XAll available Wi-Fi networks are displayed.
4Select a dierent Wi-Fi network to connect to.
If you have turned on Wi-Fi, but haven’t connected to
a network yet, a Wi-Fi symbol with a question mark is
displayed on the status bar. This notication informs you
that there are Wi-Fi networks available.
To open the Wi-Fi network notiction:
1Swipe down from the top of the screen.
2Tap the Wi-Fi notication.
XAll available Wi-Fi networks are displayed.
Using Bluetooth
Use Bluetooth to connect your SpeechAir to other
Bluetooth-compatible devices for exchanging les.
Note
• Using Bluetooth might consume additional battery
power. Turn o Bluetooth when not in use to save
battery power.
• The Bluetooth signal strength might vary depending
on obstacles and the distance between the paired
devices.
• iPhone devices don’t support le transfer via
Bluetooth from an Android device.
Turn on Bluetooth
1Tap Settings on the Home screen or on the All
Apps screen.
2Tap Bluetooth.
3Tap the Bluetooth switch or drag it to the right to turn
on Bluetooth.
XThe Bluetooth symbol is displayed on the
status bar when Bluetooth is turned on.
Alternatively, turn on Bluetooth by using Quick Settings:
1Swipe down from the top of the screen.
2Tap to open Quick Settings.
3Tap Bluetooth O.
4Tap the Bluetooth switch or drag it to the right to turn
on Bluetooth.
X is displayed on the status bar when Bluetooth
is turned on.
Pir with other devices
Note
• If the device you want to pair with is not displayed in
the list of available Bluetooth devices, make sure that
it turns on its visibility.
• Some devices might have a generic Bluetooth PIN,
such as 0000.
1Turn on Bluetooth.
2Go to the Bluetooth settings in Settings > Bluetooth,
and turn on your device’s visibility by tapping your
device name.
3Tap Serch for devices.
XAll available Bluetooth devices are displayed.
4Select a device to pair with.
5Enter the passkey or PIN code, if needed, and tap
Pir. The external device also has to accept the
connection and, if needed, enter the passkey or your
device’s PIN code.
Unpir devices
1Tap Settings on the Home screen or on the All
Apps screen.
2Tap Bluetooth.
3Tap next to the device you want to unpair.
XThe Pired Bluetooth device window opens.
4Tap Unpir.
Send dicttions vi Bluetooth
1Turn on Bluetooth on both the sending and the
receiving device.
2Select the dictation you want to send.
3Tap the share icon .
4Select Bluetooth .
5Accept the Bluetooth connection request on the
paired device.
19Using your voice recorder
Cpture screenshots
Capture images of your screen while you are using your
device.
Note
• Taking screenhots might not be possible in some
apps and features.
To cpture screenshot:
• Press and hold the Power button and the Volume
down button simultaneously.
XCaptured images are saved to Gllery .
XA notication symbol is displayed on the status
bar.
Chnge sound settings nd sound
mode
Change the settings for various sounds on your device.
You can also switch between the sound modes loud,
mute and silent.
To chnge the settings for system sounds:
1Tap Settings on the Home screen or on the All
Apps screen.
2Tap Sound, and change the desired settings.
To chnge the sound mode:
1Press the Volume down button all the way down until
the sound mode switches to mute.
XThe mute mode icon is displayed on the status
bar.
XThe sound is turned o and your device only
vibrates now.
2In mute mode, press the Volume key once more to
switch the sound mode to silent.
XThe silent mode icon is displayed on the status
bar.
XThe sound and the vibration are turned o.
3To turn the vibration on again when in silent mode,
press the Volume up button once.
4To turn the sound on again, press the Volume up
button until the desired volume is reached.
Power sving mode
To save your SpeechAir’s battery power, you can set the
display brightness to be automatically controlled, reduce
the brightness of the display and the backlight time, or
turn on Airplane mode.
Set utomtic disply brightness or reduce the
brightness
1Swipe down from the top of the screen.
2Tap to open Quick Settings.
3Tap Brightness.
4To set automatic display brightness, tap the blue
Auto bar.
To reduce the display brightness, tap and hold the
blue control, and drag it left.
Alternatively, adjust the display brightness following the
nest steps:
1Tap Settings on the Home screen or on the All
Apps screen.
2Tap Disply.
3Tap Brightness.
4To set automatic display brightness, tap the blue
Auto bar.
To reduce the display brightness, tap and hold the
blue control, and drag it left.
Reduce the bcklight time
1Tap Settings on the Home screen or on the All
Apps screen.
2Tap Disply.
3Tap Sleep.
XThe Sleep pop-up window appears.
4Select the length of time for your screen to turn o the
backlight when the device is not used.
Turn on Airplne mode
In Airplane mode, SpeechAir’s signal transmitting
functions are turned o. This way you can save battery
power.
To turn on Airplne mode:
1Swipe down from the top of the screen.
2Tap to open Quick Settings.
3Tap Airplne Mode.

20 Using your voice recorder
Alternatively, turn on Airplane mode by following the
next steps:
1Tap Settings on the Home screen or on the All
Apps screen.
2Tap More....
3Tap Airplne Mode.
Using emil pp
On the All Apps screen, you will nd a preinstalled
Android email app. Alternatively, you can also use the
browser on your device to check your emails.
To open the emil pp:
•Tap on the Home screen, and then tap Emil .
Set up n emil ccount
Set up an email account to send and receive emails with
the email app.
Note
• Before you set up an account, make sure that Wi-Fi
is turned on and that you are connected to a Wi-Fi
network.
Initil emil ccount setup
1Open the email app on the All Apps screen.
XThe Account setup window opens.
2Enter a valid email address into the Emil ddress
text eld.
3Enter the relevant password you use for your email
address into the Pssword text eld.
4Tap Next.
5Select the desired options for your account.
Note
• Setting short inbox checking frequency intervals
might consume additional battery power.
• If you want to change the inbox checking frequency,
tap the relevant eld.
XA drop-down list opens.
• Select the desired frequency for email
synchronization.
6Tap Next.
7If necessary, enter a name which is displayed on
outgoing messages. Optionally, change the account
name, then tap Done.
Mnul emil ccount setup
If you want to set up an email account manually, make
sure that you have the correct server settings.
IMAP or POP is an email protocol used to download
emails to your device. If you’re not sure whether to use
IMAP or POP, contact your email provider or check the
Internet for more information.
• IMAP: Emails are stored on remote email servers until
you delete them.
• POP: Emails are downloaded for oine reading and
might be removed from the remote server.
• Exchnge: A company email address that uses
Microsoft Exchange servers.
Note
• If you set up an IMAP or POP account, only your
emails will be synchronized to your device. Any
other information associated with that account, for
example, calendar details, remain stored on your
local computer.
To set up n emil ccount mnully:
1Open the email app on the All Apps screen.
XThe Account setup window opens.
2Enter a valid email address into the Emil ddress
text eld.
3Enter the relevant password you use for your email
address into the Pssword text eld.
4Tap Mnul setup.
5Depending on the type of account you’re setting up,
select IMAP,POP3 or Exchnge.
6If necessary, check all server settings for incoming
emails, and tap Next.
7If necessary, check all server settings for outgoing
emails, and tap Next.
8Select the desired options for your account.
Note
• Setting short inbox checking frequency intervals
might consume additional battery power.
• If you want to change the inbox checking frequency,
tap the relevant eld.
XA drop-down list opens.
• Select the desired frequency for email
synchronization.
9Tap Next.
10 If necessary, enter a name which is displayed on
outgoing messages. Optionally, change the account
name, and then tap Done.

21Using your voice recorder
If you have problems setting up your account, check that
you have entered your email address and password
correctly, and then try again.
If you still can’t set up your account, there might be a
problem with the server settings. In this case, contact
your email provider or visit their website.
Add further emil ccounts
1Tap Settings on the Home screen or on the All
Apps screen.
2Swipe down, and tap Add ccount.
3Tap IMAP or Corporte.
4Proceed as described in Set up an email account.
Switch emil ccounts
If you have added more than one email account, you
can switch between the accounts when you want to
send an email.
To switch emil ccounts:
1Open the email app on the All Apps screen.
2In the Email window, tap in the upper left
corner.
XA sliding sidebar opens.
XAll available email accounts are displayed on the
sliding sidebar.
3Select your desired account.
Remove emil ccounts
1Tap Settings on the Home screen or on the All
Apps screen.
2Swipe down, and tap IMAP or Exchnge.
3Tap the account you want to remove.
4Tap the options icon .
XTap Remove ccount.
5The Remove ccount pop-up window appears.
6Tap Remove ccount.
Send n emil
1Open the email app on the All Apps screen.
2Tap the options icon in the upper right corner.
3Select Compose.
XThe Compose email window opens.
4Enter a recipient and a subject, and then enter your
email text by tapping the relevant text eld.
5Tap the Send icon .
Emil ccount settings
You can always change the general email settings as
well as account-specic settings.
To chnge emil ccount settings:
1Tap Settings on the Home screen or on the All
Apps screen.
2Swipe down, and tap IMAP or Exchnge.
XAll IMAP or Exchange accounts are displayed.
3Tap Account settings.
4To change general email settings, tap Generl
settings. To change account-specic settings for a
particular account, select the account.
5Select the options for your accounts.
22 Using your voice recorder
Device settings
In the preinstalled Settings app, you can select various
options related to networks, your device, privacy settings,
accounts and the system.
To open the Settings pp:
• Tap Settings on the Home screen or on the All
Apps screen.
Setting Function
Wi-Fi • Turn Wi-Fi on or o.
• Select and connect to Wi-
Fi networks.
• Change Wi-Fi settings.
Bluetooth • Turn Bluetooth on or o.
• Select and connect to
available Bluetooth
devices.
• Change Bluetooth settings.
• View received Bluetooth
les.
Dt usge • Track your data usage for
communication via the
network.
More... • Select Wireless & networks
options, for example,
Airplane mode or VPN.
Sound • Set sound volumes and
system sounds.
Disply • Change display settings,
for example, wallpaper or
sleep mode.
Storge • Track the available and
used storage of your
device.
Bttery • Track the battery usage
and status.
Apps • Check information about
all installed apps.
Loction • Change the location mode.
• View recent location
requests by apps.
Security • Select various security
options.
Lnguge & input • Select various language
and input options, for
example, device or input
languages.
Bckup & reset • Reset your device to its
original system state and
delete all data.
Setting Function
Add ccount • Add a new email account.
Dte & time • Set the date and time for
your device.
Accessibility • Select various options for
a personalized access to
your device.
About SpeechAir • View information about
your device.
23Philips dictation recorder app
5 Philips dicttion
recorder pp
The Philips dictation recorder app is designed to t
perfectly with your SpeechAir. Recording, editing, and
sending dictation les from your SpeechAir oers mobile
exibility and reduces document turnaround times.
Note
• Depending on the conguration of your device, a
dierent dictation app than the Philips dictation
recorder app might be preinstalled on your SpeechAir.
For information about other preinstalled dictation
apps, contact the supporting Philips partner you
purchased your device from.
• Only the default conguration of the slide switch is
described in the following section. Your device’s slide
switch assignment might vary depending on your
device’s conguration. For more information, contact
the supporting Philips partner you purchased the
device from. Change the slide switch assignment in
Settings > User interfce > Slider ssignment.
Open the pp
The Philips dictation recorder app is preinstalled on your
device. You will nd the app on the Favorites tray of your
Home screen. This way you can start dictating from any
Home screen panel.
To open the pp:
1Open the app on the Home screen or on the All
Apps screen.
XA quick walkthrough appears when you open the
app for the rst time.
2Swipe right to navigate through the walkthrough. To
close the walkthrough, tap the Back key on your
device .
XThe recording screen is displayed, and you can
start dictating straight away.
One-touch strt
Start the Philips dictation recorder app with only one
touch. Press the function button once to start the app
from anywhere on your device.
Note
• To use the one-touch start feature, your device needs
to be unlocked. The function button can’t be used in
lock screen mode.
The recorder app has three tabs: Dictate, Recordings
and Settings.
In the Dictate tab, you can record dictations and select
all main options related to your current recording, for
example, mark a priority dictation, lock the dictation, or
edit the recording.
In the Recordings tab, all your recordings are listed.
Open, edit or delete dictations from the list.
In the Settings tab, general settings related to your
recordings, such as forwarding settings or security
settings, are available. To switch between the screens,
select the desired tab.
24 Philips dictation recorder app
Recording screen
The recording screen is the main interface for recording
dictations and editing existing recordings. Mark a
recording as a priority dictation, edit the dictation name,
add an index, insert, overwrite or append recordings,
and more.
Tip
• Change the name of your recording by tapping it
either on the recording screen or in the Properties
window (see table below).
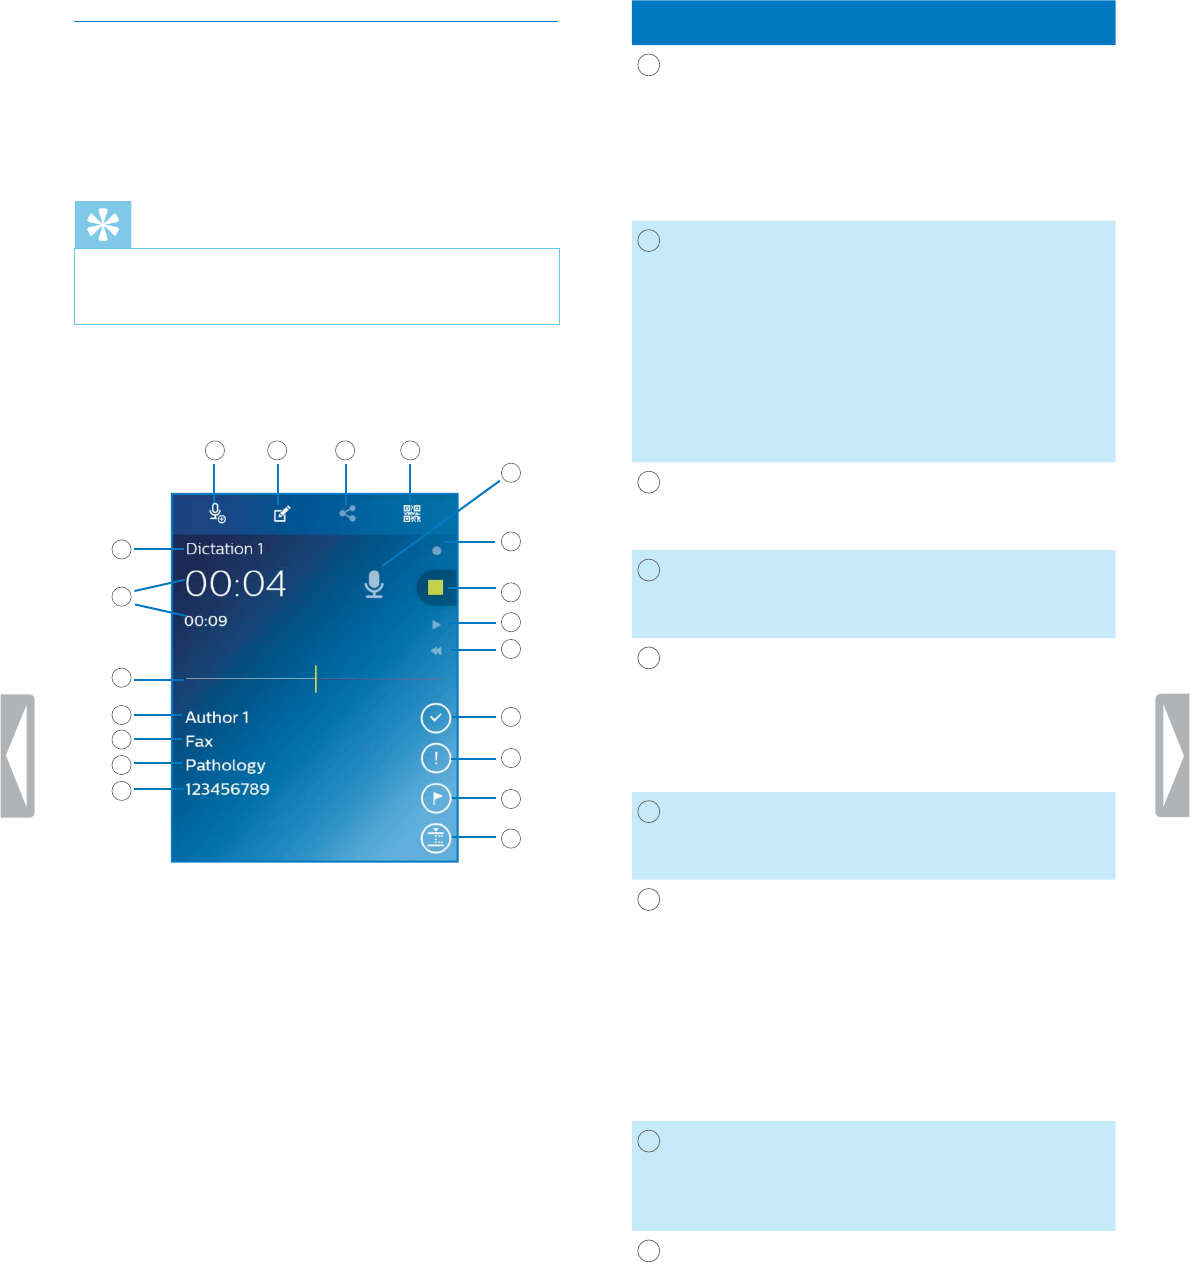
Find the description of the icons on the recording screen
in the following table:
1 2 3 4
5
6
12
13
14
15
16
7
8
9
10
11
17
18
19
20
Key Function
1Strt new recording • Start a new dictation right
from the recording screen.
The current audio le is
automatically saved to
your recordings list in the
Recordings tab when you
start a new dictation.
2Properties • Add a picture to your
dictation.
• Add various keywords
to your dictation, for
example, worktype,
author, or attributes.
Before you add keywords,
rst set them up in
Settings > Forwrding >
Workow.
3Sending options • Select an option how
you want to send your
dictation.
4Brcode scnner • Scan a barcode. The
barcode is automatically
added to your dictation.
5 Dicttion nme • Shows the title of the
dictation. If you want
to change the dictation
name, tap the title and
enter the new dictation
name.
6Audio time • Shows the passed and
the total time of the
recording.
7
Microphone mode • Shows the microphone
mode. The microphone
mode can be controlled
by the built-in motion
sensor which senses
when the device is placed
on the desk or held in the
hand. The microphone
mode is set accordingly
then.
8Record key • Shows that a dictation
is being recorded when
the slide switch is in the
recording position.
9Stop key • Shows that the recording
is stopped when the
slide switch is in the stop
position.
• Shows that the playback
of a recording is stopped
when the slide switch is in
the stop position.

25Philips dictation recorder app
Key Function
10
Ply key • Shows that a recording is
being played back when
the slide switch is in the
playback position.
11 Rewind key • Shows that the recording
is being rewinded as
long as the slide switch
is pressed in the rewind
position.
12 Audio progress br • Shows your current
position in the recording.
13 Author nme • Shows the author name.
If you want to change
the author name, select
a dierent name in the
Properties window.
14 Worktype • Shows the worktype,
for example, email, fax,
or letter. If you want to
change the worktype,
select a dierent type in
the Properties window.
15 Ctegory • Shows a particular
category, for example
Standard or Condential.
If you want to change the
category, select a dierent
one in the Properties
window.
16 Brcode number • Shows the barcode
number. When you
scan a barcode, the
barcode number is added
automatically to your
current dictation. You can
also change the barcode
number manually in the
Properties window.
17
End of letter key (EOL) • Lock your dictation to
prevent it from being
accidentally modied.
• The Send options window
automatically pops up
when you tap the EOL
key. This setting must be
enabled in Settings >
Forwrding > Send EOL
dicttions utomticlly.
If you don’t want to send
the dictation straight
away, you can see the
status of your dictation in
the recordings list. The
dictation is marked as
.
Key Function
18 Priority key • Mark your dictation as a
priority dictation.
19 Index key • Set an index to mark
certain points in a
dictation as points of
reference.
20
Edit mode • Edit an existing dictation
by overwriting a part of
it, inserting or appending
additional recording parts.
Record dicttions
Dene settings prior to recording
Before you start a recording session, set the desired
preferences for your recordings, such as audio settings,
forwarding settings, security and user interface settings.
The most important settings for your recordings are
described below. For information about further settings,
see Dictation app settings.
Microphone sensitivity
Adjust the microphone sensitivity of your SpeechAir.
Select the sensitivity according to the background noise,
number of speakers and distance between speaker and
microphone.
Low:
5-10 cm (2-4 inches) speaking distance
Medium:
10-20 cm (4-8 inches) speaking distance
High:
Large speaking distance as in meetings, interviews, or
conferences
To set the microphone sensitivity:
1Tap Settings in the dictation app.
2Tap Audio Settings.
3In the Microphone sensitivity sub-menu, tap
Sensitivity, and select the appropriate sensitivity
level Low,Medium, or High.

26 Philips dictation recorder app
Microphone directivity
Directionl:
• The focus is on the right microphone.
• Background sounds are ltered.
• Recommended for dictations with much background
noise and low microphone sensitivity.
360°:
• The focus is on the left microphone.
• Sounds from all directions are recorded.
• Recommended for dictations with little background
noise and high microphone sensitivity.
SpeechAir allows you to record high-quality single-
speaker dictations as well as multi-speaker dictations.
By default, the microphone directivity is set to 360°
in order to allow the best recording quality for single-
speaker as well as multi-speaker dictations.
We recommend using the directional microphone
for single-speaker dictations in noisy environments
and when you send dictations to speech recognition
software. For all other situations, we recommend using
the 360° microphone.
You can always change the microphone directivity
according to your own preferences.
To chnge the microphone settings:
1Tap the Settings tab in the app.
2Tap Audio settings.
3Tap Mic in hnd or Mic on desk, and select the
desired setting.
Audio formt
Set the recording quality for your dictations and choose
between the audio formats WAV (PCM) and DS2 (DSS
Pro). DS2 is preset as the standard audio format, but you
can always change the audio format in Settings >Audio
settings > Audio formt.
Function button ssignment
Change the functionality of the right function button
on your device. Choose between End of letter, New
dictation, or Fast forward, or disable this feature. The
default assignment of the function button is set to End of
letter.
Note
• You can only change the function button assignment
if your slide switch is set to International. For more
information, see User interface.
To chnge the function button ssignment:
1Go to Settings >User interfce > Button ssignment.
XThe Button ssignment pop-up window appears.
2Select the desired function button functionality.
Record dicttion
Note
• If your device has only 8% or less battery power left
while you are recording, you will see a notication
message on your screen and hear a notication
sound. Your current dictation will be saved
automatically. To avoid unintended data loss, you will
neither be able to continue recording nor to start a
new recording unless you charge your device.
• While you are in recording mode, all options within
the dictation recorder app, except for setting index
marks, are disabled for security reasons.
• Be careful not to cover the 360° microphone with your
hand or ngers while recording. This might result in a
lower recording quality.
Tip
• Your recording continues even if you leave the
recording screen. If you leave the recording screen,
the recording LED will still be lighted and you will see
a microphone symbol on the status bar.
• If you want to stop the recording, you have to go back
to the recording screen. Moving the slide switch to
the stop position doesn’t work outside the recording
screen.
• To change the slide switch assignment, go to Settings
>User interfce > Slider ssignment. For more
information, see Dictation app settings.
To record dicttion:
• Make sure that you see the recording screen, and
move the slide switch to the recording position .
XIf you have enabled the record notication beep
in Audio settings, you will hear a beep sound
when you start recording. For more information,
see Dictation app settings.
XThe recording LED light illuminates green in insert
mode and red in overwrite or append mode while
recording.
Stop recording
• Move the slide switch to the stop position .
Strt new recording
1In stop mode, tap the new dictation icon .
2Move the slide switch to the recording position .

27Philips dictation recorder app
Voice-ctivted recording
Use voice activation to start recording when you begin
speaking. When you stop speaking, the device will
automatically pause recording after two seconds of
silence. It will resume only when you begin speaking
again.
Before you start using voice-activated recording, make
sure that this feature is enabled.
To enble voice-ctivted recording:
1Tap the Settings tab in the app.
2Tap Audio settings.
3In the Voice ctivtion sub-menu, tap the switch
next to Voice ctivtion to enable this feature.
Use the voice activation threshold to set the volume at
which the device should begin recording.
To set the voice ctivtion level:
1Tap the Settings tab in the app.
2Tap Audio settings.
3In the Voice ctivtion sub-menu, tap Level.
4Tap and hold the blue control, and drag it left or right.
5Tap OK.
To strt voice-ctivted recording:
• Point the microphone toward the sound source and
move the slide switch to the recording position.
XThe recording starts when you begin speaking
(or the sound level is above the voice activation
level).
XWhen you stop speaking (or the sound level drops
below the voice activation level), the device will
automatically pause recording.
To stop recording:
• Move the slide switch to the stop position .
Plybck
Select recording
1Tap the Recordings tab.
2If necessary, swipe up to scroll through the recordings
list.
3Select the desired recording by tapping it.
Ply bck recording
1Move the slide switch to the playback position.
2Press the Volume up or Volume down button on the
device to adjust the volume.
To ply bck dicttion from certin point of the
recording:
1In Stop mode, tap the green marker on the Audio
progress bar and drag it left or right to the desired
position of the recording.
2Move the slide switch to the playback position.
3Press the Volume up or Volume down button on the
device to adjust the volume.
Rewind recording
1Move the slide switch to the rewind position and hold
it.
2Rewind to the desired part of the recording.
3Release the Rewind button to play back the
dictation.
Alternatively, rewind a dictation following the next steps:
1In stop mode, tap the green marker on the Audio
progress bar and drag it left to the desired part of the
recording.
2Move the slide switch to the playback position.
3Press the Volume up or Volume down button on the
device to adjust the volume.
Fst forwrd recording
1In stop mode, tap the green marker on the Audio
progress bar and drag it right to the desired part of
the recording.
2Move the slide switch to the playback position.
3Press the Volume up or Volume down button on the
device to adjust the volume.
28 Philips dictation recorder app
Edit dicttion
Insert, overwrite or ppend recording
Insert mode: Insert additional recording parts without
overwriting existing dictation.
Overwrite mode: Overwrite a previous recording part
starting from any point within the dictation.
Append mode: Add additional recording parts after an
existing dictation.
1Tap the green marker on the Audio progress bar
and drag it left or right to the desired position of the
recording.
2Tap .
3Select Insert,Overwrite or Append.
Add index mrks
Use one or more index marks to mark certain points in a
recording as points of reference.
Note
• Up to 32 index marks can be set per dictation.
To dd n index mrk:
1Rewind or fast forward to the part of your recording
where you want to insert an index mark.
2In playback mode or stop mode, tap the index mark
icon .
XThe index number is displayed for one second.
Wait for one second before you add further index
marks.
To select n index mrk:
Before you select an index mark, make sure you are in
stop mode.
You have dierent options to select an index mark:
• Tap an index mark on the Audio progress bar.
• Tap and hold the green marker on the Audio progress
bar and drag it left or right to the desired index mark.
• Press the Volume up or Volume down button to jump
between the next index marks.
To delete n index mrk:
1Select an index mark.
XThe index mark icon turns red .
2Tap the red index mark icon .
XThe Delete index mrk pop-up window appears.
3Tap Yes.
Quick serch
Scan backward or forward in the current dictation quickly
and precisely. This allows you to nd a specic part of
the recording.
In stop mode or in playback mode, tap the green marker
on the Audio progress bar and drag it left or right to the
desired part of the recording.
Delete dicttion
Delete individual dictations or all recordings
simultaneously. In addition, use the automatic purge
function to automatically delete all your dictations after
a set interval.
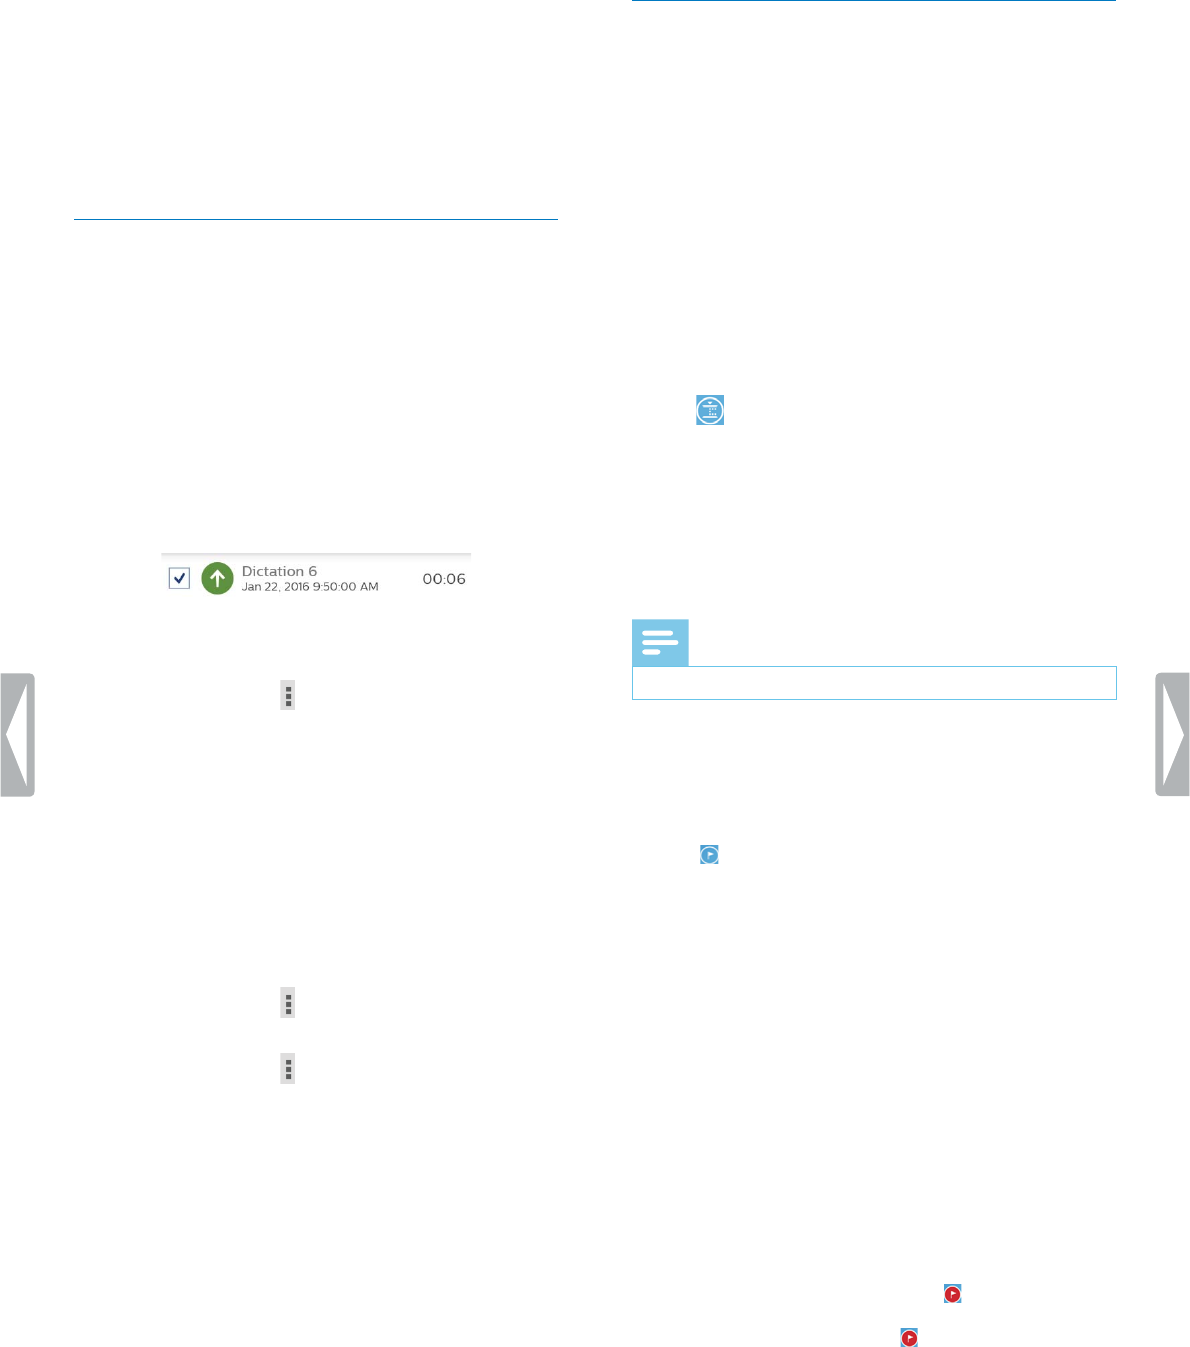
To delete individul dicttions:
1Go to your recordings list in the Recordings tab.
2Swipe right.
XCheckboxes appear on the left next to each
dictation.
3Mark the checkboxes next to the dictations you want
to delete.
4Tap the options icon in the bottom right corner, and
then tap Delete.
XThe Delete recording(s) pop-up window appears.
5Tap Yes.
To delete ll dicttions simultneously:
1Go to your recordings list in the Recordings tab.
2Swipe right.
XCheckboxes appear on the left next to each
dictation.
3Tap the options icon in the bottom right corner, and
then tap Select ll.
4Tap the options icon in the bottom right corner
again, and then tap Delete.
XThe Delete recording(s) pop-up window appears.
5Tap Yes.
To utomticlly delete dicttions:
1Tap Settings in the dictation app.
2Tap Audio settings.
3In the Purge dicttions sub-menu, tap Purge
intervls.
4Select an interval for your dictations to be purged.
29Philips dictation recorder app
Add keywords
Add various keywords to each recording, for example,
the author’s name, a worktype, or attributes. These
keywords can help you identify and assign recordings in
your workow solution, for example, Philips SpeechExec
software or SpeechLive.
Note
• Before you add keywords to a recording, rst set them
up.
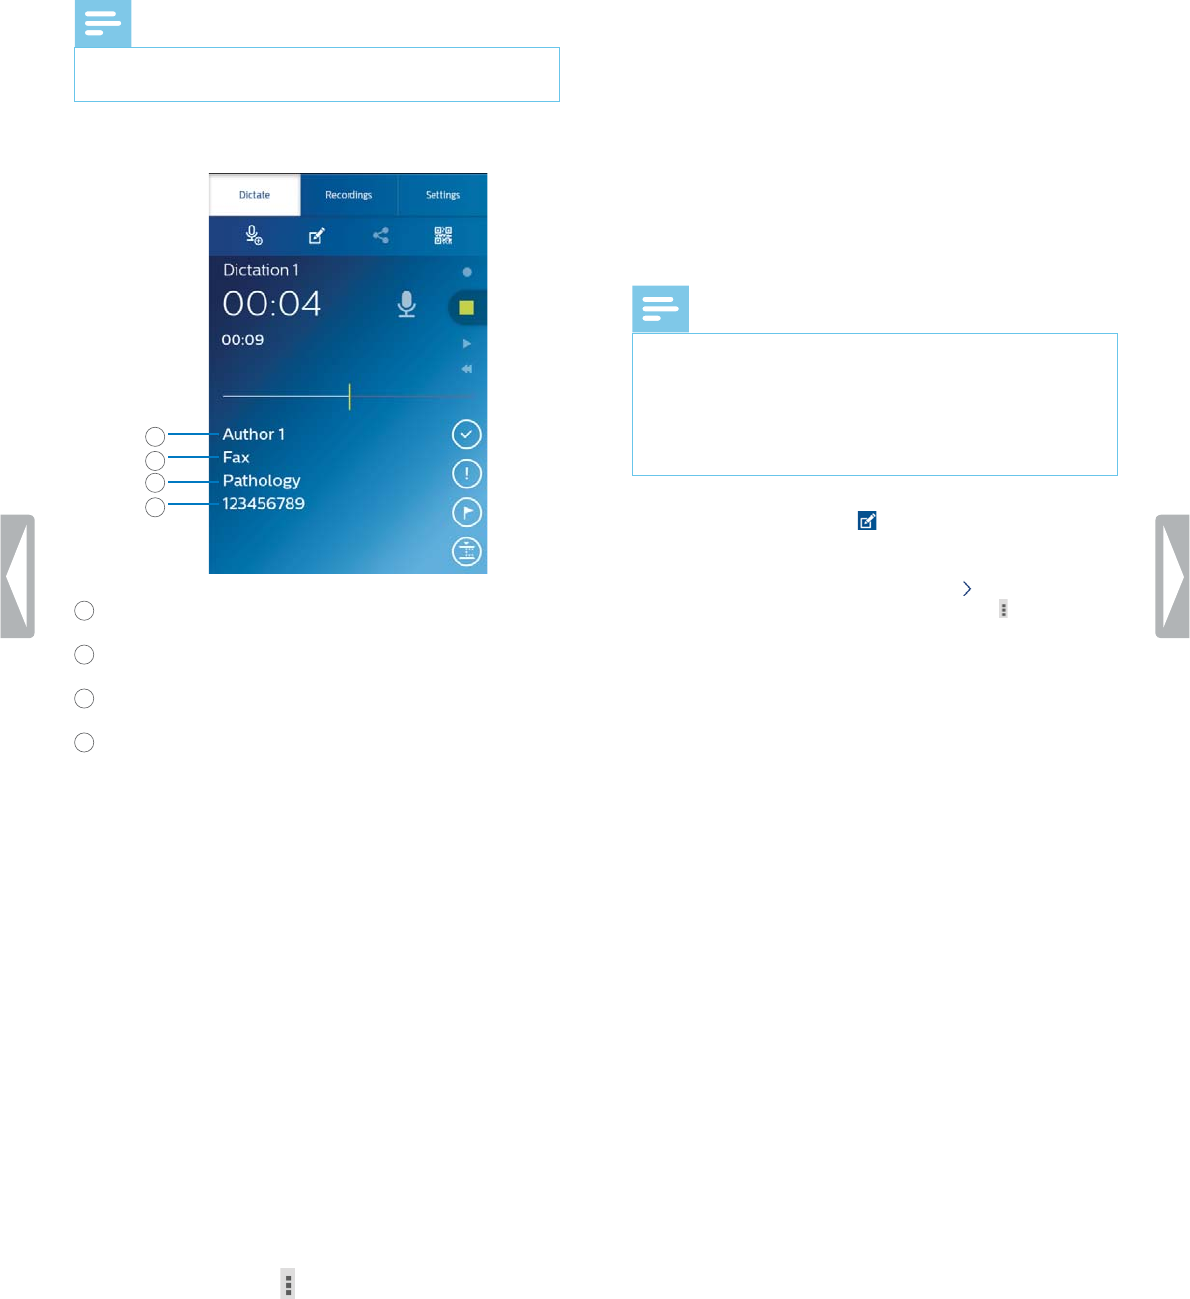
1
2
4
3
1Author name
2Worktype
3Category
4Barcode
Set up keywords
Set up keywords in order to be able to add them to your
dictations.
To set up keyword:
1Go to Settings > Forwrding > Workow in the
dictation recorder app.
1Select the label you want to add keywords to.
2Enter a keyword.
3Tap OK.
To dd further keywords:
1Go to Settings > Forwrding > Workow in the
dictation recorder app.
2Select the label you want to add further keywords to.
3Tap the options icon .
4Tap Add.
5Enter a keyword.
6Tap OK.
To set defult keyword:
1After you have set up a keyword, go to Settings >
Forwrding > Workow.
2Select a label that you have added keywords to.
3Select a keyword from your keywords list.
XA pop-up window opens.
4Tap Set s Defult.
Add keywords to dicttion
Note
• Only the labels Category, Worktype, Author, and
Delivery have drop-down lists available. All other
labels are free-text elds.
• If you have scanned a barcode, the barcode number
will automatically be displayed in the Properties
window and on the recording screen.
1Select a recording from your recordings list, and then
tap the Properties icon on the recording screen.
Alternatively, go to your recordings list in the
Recordings tab, and tap the arrow next to the
relevant recording. Tap the options icon , and then
tap Edit.
XThe Properties window opens.
2Tap the text eld next to the labels Category,
Worktype, Author, or Delivery.
XA drop-down list with your predened keywords
opens.
3Select a keyword from the drop-down list.
4Tap the free-text eld next to the labels Barcode,
Attribute, or Comment, and enter the desired text.
5Tap the Back key when you’re nished.
XThe Sve recording detils pop-up window
appears.
6Tap Sve.
XYour selected keywords are displayed on the
recording screen.
30 Philips dictation recorder app
Add pictures
1Select a recording from your recordings list, and then
tap the Properties icon on the recording screen.
Alternatively, go to your recordings list in the
Recordings tab, and tap the arrow next to the
relevant recording. Tap the options icon , and then
tap Edit.
XThe Properties window opens.
2Tap the Add picture icon .
XThe Options pop-up window appears.
3Tap Tke picture to take a photo straight away:
• Tap to take a photo.
• Tap to conrm and add the picture to your
recording.
Alternatively, tap Show Gllery to select a photo
from your Gallery app:
• Tap the options icon .
• Tap Device Gllery.
• Select a picture.
• Tap the Back key.
XThe picture is displayed in the Properties
window.
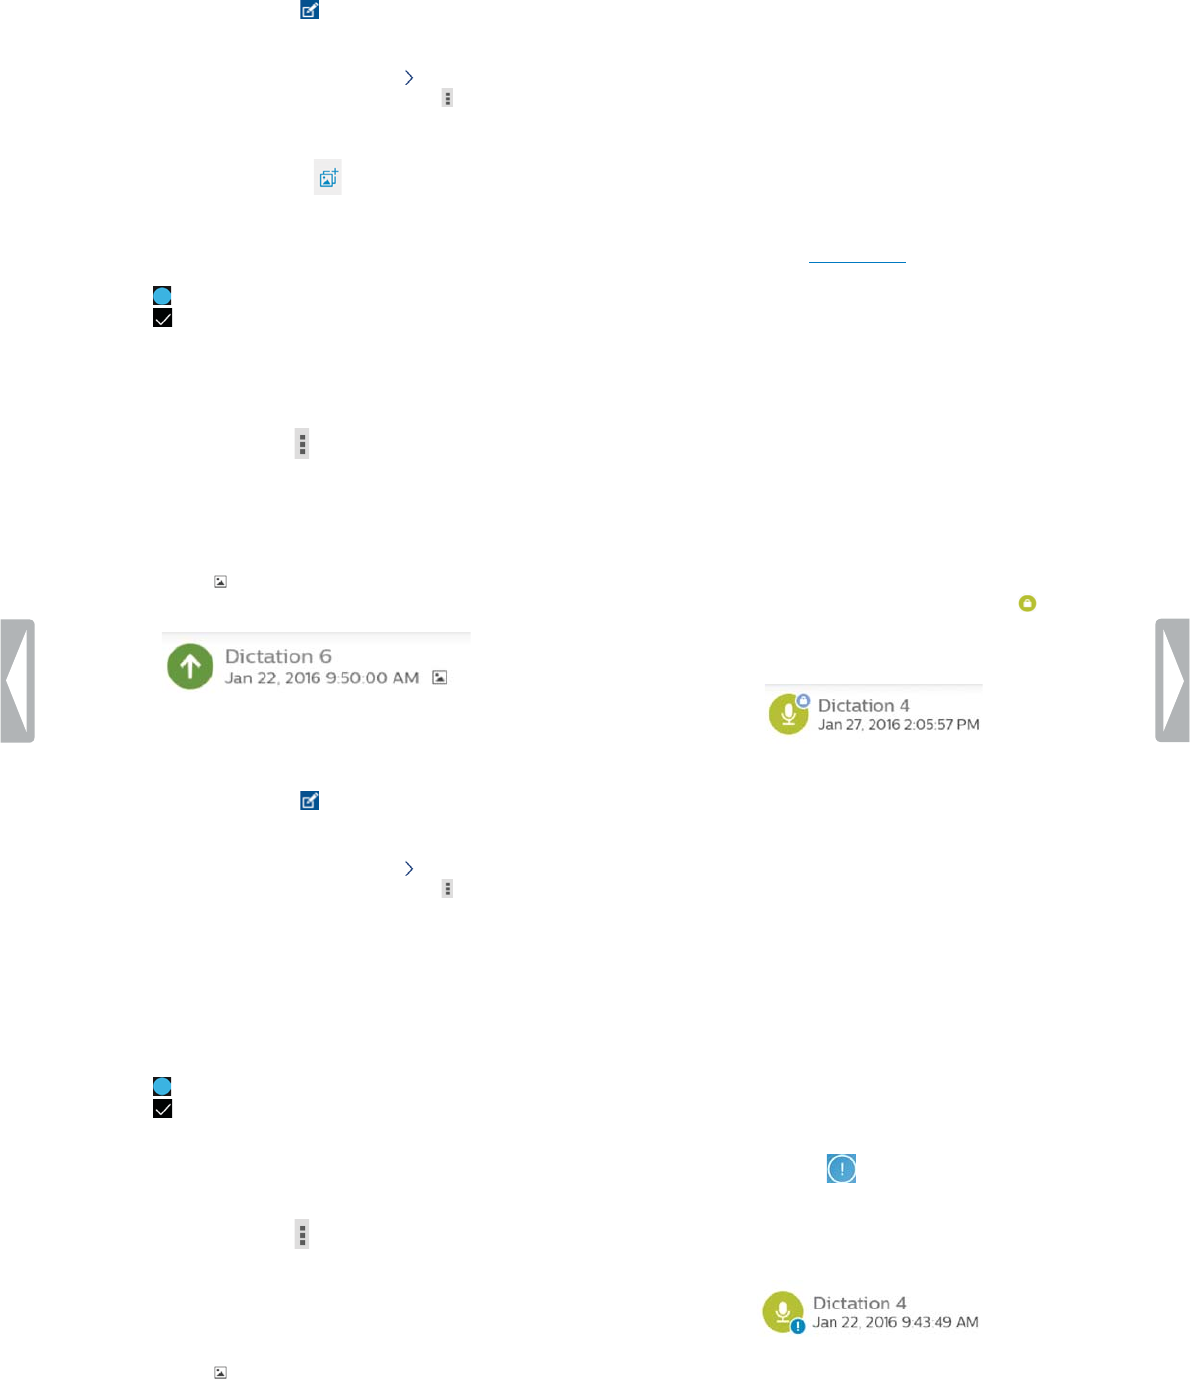
XAn icon is displayed next to the details of the
relevant dictation in the recordings list.
To chnge n existing picture:
1Select a recording from your recordings list, and then
tap the Properties icon on the recording screen.
Alternatively, go to your recordings list in the
Recordings tab, and tap the arrow next to the
relevant recording. Tap the options icon , and then
tap Edit.
XThe Properties window opens.
2Tap the current picture.
XThe Options pop-up window appears.
3Tap Tke picture to take a photo straight away.
• Tap to take a photo.
• Tap to conrm and add the picture to your
recording.
Tap Show Gllery to select a photo from your Gallery
app.
• Tap the options icon .
• Tap Device Gllery.
• Select a picture.
• Tap the Back key.
XThe picture is displayed in the Properties
window.
XAn icon is displayed next to the details of the
relevant dictation in the recordings list.
Chnge dicttion nme
Change the name of your recordings in order to make
it easier to identify and assign your dictations in your
workow solution, for example, SpeechExec software or
SpeechLive.
To chnge the dicttion nme:
1Select a recording from your recordings list in the
Recordings tab.
2Tap the dictation name on the recording screen, and
edit the existing name. For more information about
entering text, see Typing text.
Lock dicttions/EOL
Use the End of letter function to lock important
recordings and prevent them from being accidentally
modied. By default, you can also nish your dictation
and send it straight away when you tap the End of letter
key.
To lock dicttion:
1Tap the End of letter key while the recorder is in stop
mode. Alternatively, press the function button on the
right side of the recorder.
XThe dictation is now marked as locked on the
recording screen and cannot be modied.
It is also marked as locked in the recordings list:
XThe Send options pop-window appears if this
setting is enabled in Settings > Forwrding >
Send EOL dicttions utomticlly.
2To unlock a dictation and make changes to the
recording, tap the End of letter key or press the
function button again while the recorder is in Stop
mode.
Mrk priority dicttions
Mark your recording as a priority dictation. With the
priority option, it is easier to identify and prioritize urgent
recordings during transcription.
To ssign priority sttus to dicttion:
1Tap the Priority key while the recorder is in stop
mode.
XThe recording is marked as a priority dictation in
your recordings list in the Recordings tab.
2To change the priority status of a dictation, tap the
priority key again while the recorder is in stop mode.
31Philips dictation recorder app
Add brcodes
With the dictation app’s built-in barcode scanning
function you can scan QR codes as well as one-
dimensional (linear) barcodes. Your device detects
barcodes on paper and on screens.
Note
• The maximum scanning distance depends on various
factors, such as print quality and size of the barcode,
distance between camera and barcode, or lighting
conditions.
To dd brcode to dicttion or chnge brcode:
• Tap the barcode icon while the recorder is in stop
mode, and scan the barcode.
XWhen the device recognizes the barcode, you will
hear a notication sound.
XThe barcode is automatically displayed on the
recording screen.
To dd or chnge brcode mnully:
1Tap the properties icon on the recording screen.
Alternatively, go to your recordings list in the
Recordings tab, and tap the arrow next to the
relevant recording. Tap the options icon , and then
tap Edit.
XThe Properties window opens.
2Tap the free-text eld next to Brcode and enter the
a barcode.
Send dicttion
Send an individual dictation or multiple dictations
simultaneously, and choose between various forwarding
options. Before you send your dictations, set up the
relevant sending options in Settings >Forwrding. For
more information, see Dictation app settings.
Send n individul dicttion
1Make sure that you are connected to a Wi-Fi network.
2Tap on the recording screen.
XThe Send options pop-up window appears.
3Select your desired sending option from the
displayed list.
XThe dictation is marked as sent in the
recordings list.
Send multiple dicttions simultneously
1Make sure that you are connected to a Wi-Fi network.
2Open your recordings list from the Recordings tab.
3Swipe right.
XCheckboxes appear on the left next to each
dictation.
4Mark the checkboxes next to the dictations you want
to send.
5Tap the options icon in the bottom right corner, and
then tap Send.
XThe Send options pop-window appears.
6Select your desired sending option from the
displayed list.
XThe dictation is marked as sent in the
recordings list.
Send dicttion vi emil
Before you send a dictation via email:
• Set up an email account rst. Alternatively, set up an
email account when you send the recording via email
for the rst time. If you haven’t set up an account yet,
you will be prompted to create an account when you
send the dictation. For more information about how to
set up an email account, see Using email app.
• Make sure that the email option is enabled in Settings
>Forwrding.

32 Philips dictation recorder app
To send dicttion vi emil:
1Make sure that you are connected to a Wi-Fi network.
2Tap on the recording screen.
XThe Send options pop-up window appears.
3Tap Send mil.
XThe Compose email window opens.
4Enter the recipient’s email address, and then tap
to send the dictation.
XThe dictation is marked as sent in the
recordings list.
If you haven’t set up an email account yet:
1Make sure that you are connected to a Wi-Fi network.
2Tap on the recording screen.
XThe Send options pop-up window appears.
3Tap Send mil.
XThe Account setup window opens. Follow the
instructions on the screen. For more information
about how to set up an email account, see Using
email app.
4Tap the Back key twice.
XThe Compose email window opens.
5Enter the recipient’s email address, and then tap
to send the dictation.
XThe dictation is marked as sent in the
recordings list.
Send dicttion to Philips SpeechLive
Philips SpeechLive is a cloud dictation solution that
allows you to store, access and share dictation les
from anywhere in the world and around the clock while
guaranteeing maximum le security.
For more information about how to use SpeechLive
and SpeechLive services, see the SpeechLive Quick
start guide for authors or the Quick start guide for
administrators. Download the quicks starts guides at
www.speechlive.com/us/support.
Before you send a dictation to SpeechLive:
• You need to have a valid SpeechLive account. If
you are not using SpeechLive yet, create a new user
account at www.speechlive.com.
• Set up your SpeechLive user account in the dictation
app.
• Make sure that you have enabled SpeechLive in
Settings > Forwrding > SpeechLive.
Set up SpeechLive
Before you set up SpeechLive in the Philips dictation
recorder app, you need to have a valid SpeechLive user
account. If you are not using SpeechLive yet, create a
new SpeechLive user account at www.speechlive.com.
To set up your SpeechLive ccount:
1Make sure that you are connected to a Wi-Fi network.
2Go to Settings > Forwrding >SpeechLive.
3Tap the Emil ddress eld.
XThe SpeechLive login window opens.
4Enter your SpeechLive email address and your
password.
5Tap Sign in.
XYour SpeechLive account name is automatically
assigned to your email address.
XIf you have more than one SpeechLive user
account with the same email address and
password, you will be prompted to select an
account. Tap the desired account.
XAfter you have set up your SpeechLive account,
you will see a Syncing successful notication in
your recordings list.
Send dicttion to SpeechLive
1Make sure that you are connected to a Wi-Fi network.
2Tap on the recording screen.
XThe Send options pop-up window appears.
3Tap SpeechLive.
XThe dictation is marked as sent in the
recordings list.
XYou can now access your dictations in the
SpeechLive portal at login.speechlive.com.

33Philips dictation recorder app
Send dicttion to Philips SpeechLive
trnscription service
The Philips SpeechLive transcription service oers you a
complete speech-to-text workow solution. If you have
assigned your dictation a priority status, you will receive
important dictations even faster.
The SpeechLive transcription service also supports
dictations with multiple speakers, such as interviews,
telephone conversations, or meetings. As soon as
a dictation is transcribed, the nished document is
attached to your dictation in the SpeechLive portal.
Depending on your SpeechLive notication settings, the
document can additionally be sent to you via email.
For more information about the Philips SpeechLive
transcription service, visit www.speechlive.com.
For information about how to manage dictations
and notications in your SpeechLive account, see the
SpeechLive Quick start guide for authors and the Quick
start guide for administrators. Download the quick start
guides at www.speechlive.com/support.
Note
• You can only send dictations to the transcription
service after you have purchased transcription
minutes for the SpeechLive transcription service
through your account administrator.
Before you send a dictation to the SpeechLive
transcription service:
• You need to have a valid SpeechLive user account. If
you are not using SpeechLive yet, create a new user
account at www.speechlive.com.
• Set up your SpeechLive account in the dictation app.
• Make sure that you have enabled the transcription
service in Settings > Forwrding >SpeechLive > Use
trnscription service.
Send single-speker dicttion to trnscription service
1Make sure that you are connected to a Wi-Fi network.
2Enable Single-speker in Settings > Forwrding >
SpeechLive > Use trnscription service.
3Open a recording from the Recordings tab.
4Tap on the recording screen.
XThe Send options pop-up window appears.
5Tap Trnscription service.
XThe sent dictation is marked in the recordings list
.
Send multi-speker dicttion to trnscription service
Note
• The multi-speaker option is only available in the
Philips dictation recorder app if this feature is
enabled in your SpeechLive account. For further
information, contact your account administrator.
1Make sure that you are connected to a Wi-Fi network.
2Enable Multi-speker in Settings > Forwrding >
SpeechLive > Use trnscription service.
3Open a recording from the Recordings tab.
4Tap on the recording screen.
XThe Send options pop-up window appears.
5Tap Trnscription service.
XThe dictation is marked as sent in the
recordings list.
Send dicttion to Philips SpeechLive
speech recognition service
The Philips SpeechLive speech recognition service is
a fast and ecient speech-to-text solution. Choose
between multiple languages that you want your
dictation to be transcribed in.
Note
• The SpeechLive speech recognition service
languages are intended for native speakers. If
you are a non-native speaker, the accuracy of the
transcription might be aected.
As soon as a dictation is transcribed, the nished
document is attached to your dictation in the
SpeechLive portal. Depending on your SpeechLive
notication settings, the document can additionally be
sent to you via email.
For information about how to manage dictations
and notications in your SpeechLive account, see the
SpeechLive Quick start guide for authors or the Quick
start guide for administrators. Download the quick start
guides at www.speechlive.com/support.
Note
• You can only send dictations to the speech
recognition service after you have purchased
transcription minutes for the SpeechLive speech
recognition service through your account
administrator.
Before you send a dictation to the SpeechLive speech
recognition service:
• You need to have a valid SpeechLive user account. If
you are not using SpeechLive yet, create a new user
account at www.speechlive.com.
• Set up your SpeechLive account in the dictation app.
34 Philips dictation recorder app
Send dicttion to speech recognition service
1Make sure that you are connected to a Wi-Fi network.
2Enable speech recognition in Settings > Forwrding
>SpeechLive > Use speech recognition service.
3Open a recording from the Recordings tab.
4Tap on the recording screen.
XThe Send options pop-up window appears.
5Tap Speech recognition.
XThe Select the lnguge of your dicttion pop-
up window appears.
6Select the language of your dictation by scrolling to
the desired language.
7Optionally, mark the Remember setting checkbox if
you don’t want the pop-up window to appear again.
The dictation app saves this setting.
8Tap Send.
XThe dictation is marked as sent in the
recordings list.
Set defult speech recognition lnguge
Set a default language for the speech recognition service
if you mainly record dictations in the same languages.
To set defult lnguge:
1Enable speech recognition in Settings > Forwrding
>SpeechLive > Use speech recognition service.
2Select your favorite language by scrolling to the
desired language.
3Mark the Remember lnguge checkbox.
XThe app will remember this setting for further
dictations and you will not be prompted to select
a language anymore.
Send dicttion to Philips SpeechExec
mobile server
Philips SpeechExec mobile server is an on-premise
workow solution that oers you maximum le security
due to real-time encryption.
Before you send a dictation to Philips SpeechExec
mobile server:
• Your system administrator needs to set up and activate
the server. Contact your system administrator for
access data.
• Set up your mobile server account in the dictation app.
Set up mobile server
Before you set up Philips SpeechExec mobile server:
• Send your device ID to your system administrator via
email as described below. Make sure that you have set
up an email account rst.
• Your system administrator needs to set up and activate
the server. Contact your system administrator for
access data.
To set up mobile server:
1Make sure that you are connected to a Wi-Fi network.
2Go to Settings > Forwrding >Mobile server.
3Tap the options icon and then tap Send device ID.
XThe Compose email window opens.
4Enter your system administrator’s email address.
5Tap to send the email.
XYour device ID is sent to your system
administrator.
6Enter the username, password and URL (Internet
address) provided by your system administrator.
7 Optionally, change the server name.
Send dicttion to mobile server
1Make sure that you are connected to a Wi-Fi network.
2Tap on the recording screen.
XThe Send options pop-up window appears.
3Tap Mobile server.
XThe dictation is marked as sent in the
recordings list.

35Philips dictation recorder app
Send dicttion to Philips dicttion hub
Philips dictation hub is a mobile server hosted by Philips.
With the dictation hub, you can send your dictation les
to a predened email address or to Philips SpeechExec
workow software. If you have special requirements,
for example, keyword-based data transfer or sending
dictations to an FTP location, contact your supporting
Philips partner you purchased the device from.
Note
• To have your dictation les transcribed, your
transcriptionist needs to have SpeechExec software
installed.
Before you send a dictation to Philips dictation hub:
• You need to have a valid dictation hub account.
• Set up your dictation hub account in the dictation app.
Set up dicttion hub
Note
• If you are not using the dictation hub yet and are
creating a new dictation hub user account, you
will rst sign up for a 30-day trial. To purchase an
account after the trial period, contact your supporting
Philips partner you purchased the device from.
To crete new dicttion hub user ccount or log in to
n existing ccount:
1Go to Settings > Forwrding >Dicttion hub.
XIf you are setting up your dictation hub account
for the rst time, a welcome screen opens.
2On the welcome screen, tap Yes.
3On the End user license agreement screen, tap
Accept.
4Enter the recipient’s email address.
5Enter your own email address and your initials.
6Tap Next.
7Select an audio format, and then tap Next.
8Select a language for your dictation hub workow
emails, and then tap Connect.
Send dicttion to dicttion hub
1Make sure that you are connected to a Wi-Fi network.
2Tap on the recording screen.
XThe Send options pop-up window appears.
3Tap Dicttion hub.
XThe dictation is marked as sent in the
recordings list.
Send dicttion vi Philips SpeechExec
softwre
With Philips SpeechExec workow software, you can
download all new dictations from your connected
SpeechAir to the local Finished folder in SpeechExec.
For more information about how to download dictations
from SpeechAir to SpeechExec, see Download dictations
to SpeechExec.
For information about how to install SpeechExec, see
Install SpeechExec on your computer.
Additionally, congure delivery options for SpeechAir
with the SpeechAir wizard in SpeechExec. SpeechExec
uploads the precongured delivery options to the
dictation recorder app on SpeechAir. Choose between
the delivery options SpeechLive speech recognition,
SpeechLive transcription service, email, or Dragon
speech recognition. If you select a delivery method in
the dictation recorder app and connect your device to
SpeechExec, the software will automatically send your
new dictations via the delivery method preselected in
the dictation recorder app.
Congure delivery methods for SpeechAir
1Start SpeechExec.
2Make sure that SpeechAir is turned on and connect
the device to your computer.
3Select your desired delivery methods in the SpeechAir
wizard in SpeechExec. For more information, see
Congure SpeechAir in SpeechExec.
XAfter you have nished the SpeechAir wizard
conguration, SpeechExec uploads the selected
delivery methods, author name and worktypes to
the dictation recorder app on SpeechAir.
4Disconnect SpeechAir from SpeechExec.
Set defult delivery method
1Congure delivery options for SpeechAir as described
in Congure delivery methods for SpeechAir.
2Select the desired delivery method in the dictation
recorder app in Settings >Forwrding > Workow >
Delivery before you send your dictation.
XThe Delivery pop-up window appears.
3Tap Set s Defult.
XSpeechAir will save this setting and remember
the selected default delivery method each time
you download dictations from SpeechAir to
SpeechExec.
36 Philips dictation recorder app
Chnge the delivery method for individul dicttions
Note
• If you change the delivery method for your current
dictation, you don’t change the default delivery
option. SpeechAir won’t remember this setting for
your next dictation. If you want to change the default
delivery method, proceed as described in Set a
default delivery method in the dictation app.
1Congure delivery methods in SpeechExec as
described in Congure delivery methods for
SpeechAir.
2Tap the Properties icon on the recording screen of
the dictation recorder app.
3Tap the text eld next to Delivery.
4Select a delivery option from the drop-down menu.
Send dicttion vi SpeechExec
1Congure delivery options for SpeechAir as described
in Congure delivery methods for SpeechAir.
2Optionally, tap the Properties icon on the
recording screen of the dictation recorder app if you
want to change the delivery method.
• Tap the text eld next to Delivery.
• Select a delivery option from the drop-down menu.
3Connect your SpeechAir to your computer.
4Start SpeechExec on your computer.
XSpeechExec downloads all new dictations from
SpeechAir and sends them via the delivery
method selected in the dictation recorder app.
XBy default, your dictations are deleted from your
recorder after the download is nished.
Send dicttion to network folder
Share your dictations in folders and subfolders over
the network. Everyone who uses the same network can
access your dictations in the selected folders.
Note
• To be able to use this feature, make your destination
folder accessible over the network.
• Make sure that your device is connected to the right
network.
For more information, contact your system
administrator.
Before you send a dictation to a network folder:
• Contact your system administrator for access data.
• Set up your network folder settings in the dictation
app.
Set up your network folder settings
1Tap Settings.
2Tap Forwrding.
3Tap Network folder.
4Enter the username and password provided by your
system administrator.
5Enter the folder path provided by your system
administrator. This is an IP address starting with
smb://, such as smb://111.111.111.11/Data/XY.
6Optionally, select a subfolder type. Your destination
folder will be named according to the selected
subfolder type Author or Seril number.
7Tap the Back key.
XThe Sve network folder pop-up window
appears.
8Tap Sve.
Send dicttion to network folder
1Make sure that you are connected to a Wi-Fi network.
2Tap on the recording screen.
XThe Send options pop-up window appears.
3Tap Network folder.
XThe dictation is marked as sent in the
recordings list.
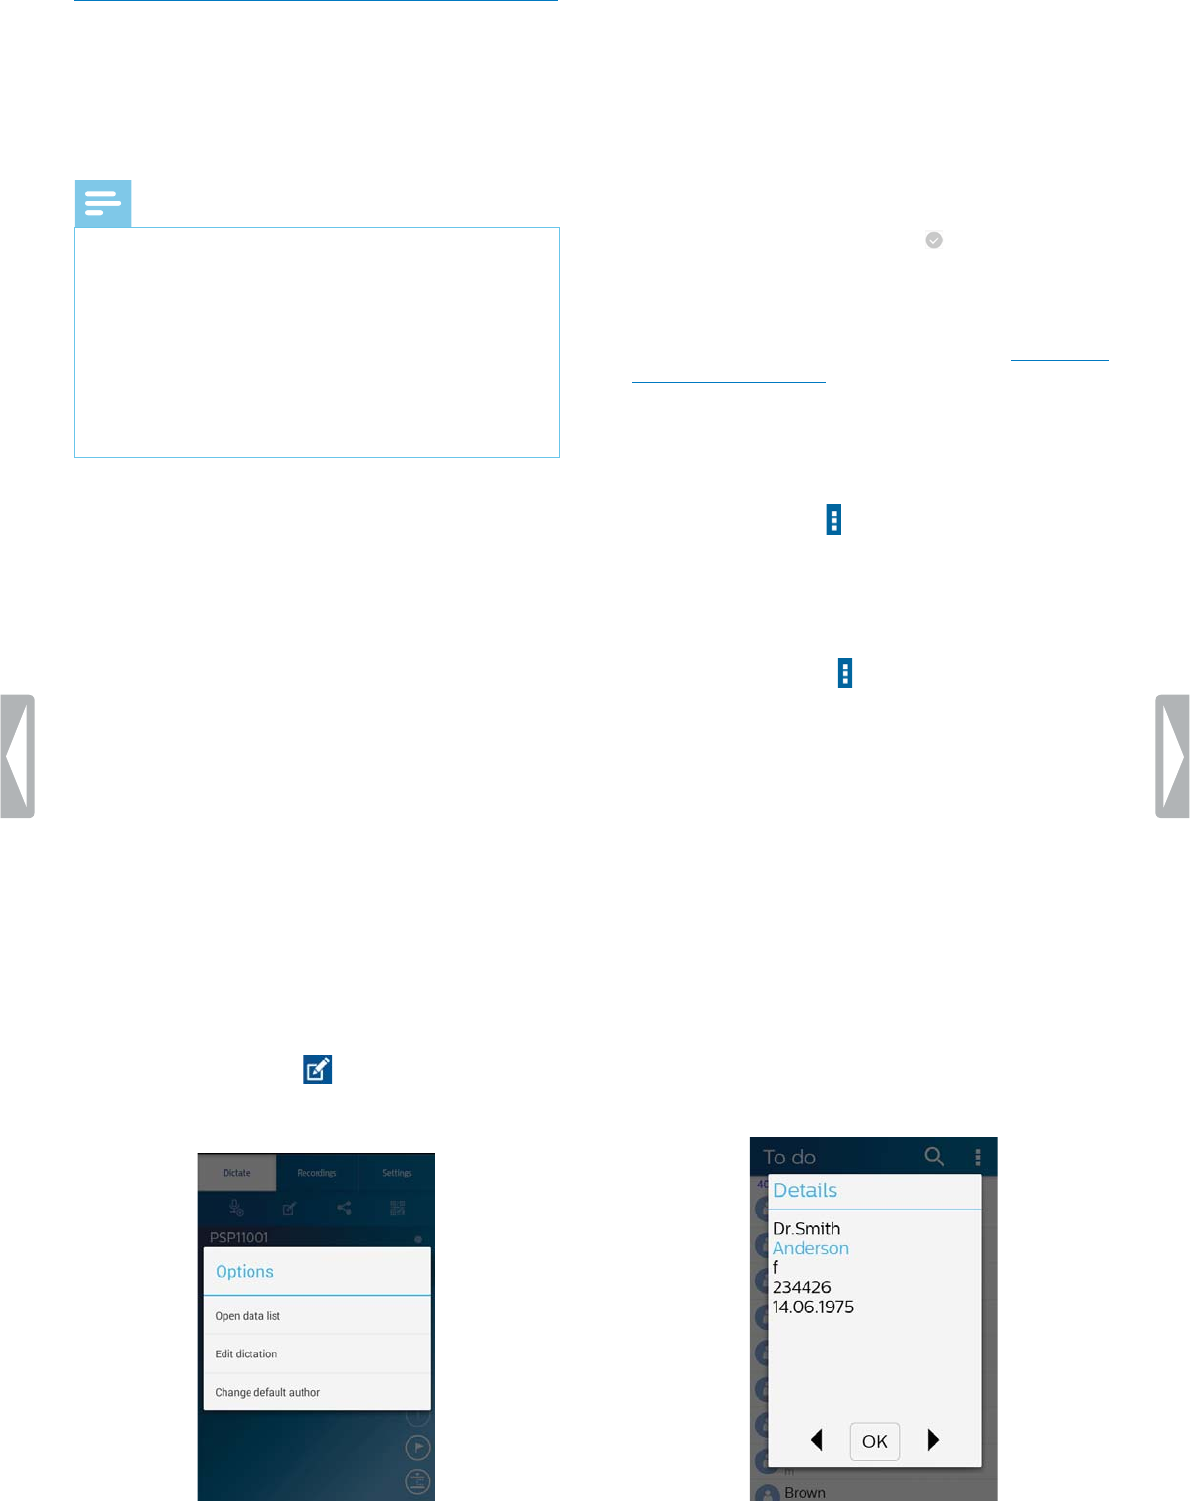
37Philips dictation recorder app
Using dt lists
Import a .csv le with data, such as patient data, from a
web server into your SpeechAir and use it in the dictation
recorder app. You lso hve the option to select
dt list refresh intervl. After your dt list hs been
imported, it will be updted t the dened intervl.
Note
• The data list must contain at least three rows and
one property, such as author, patient name, or
department. A property may contain a maximum of
30 characters. You can add a maximum of 2000 rows
and up to 10 properties to each data list.
• Don’t use blank spaces, neither in the data list name
nor in the data list items.
• Pay attention to upper and lower case spelling.
• If your data list can’t be downloaded, check the
Internet address and your Wi-Fi connection.
Import .csv dt list
1Make sure that you are connected to a Wi-Fi network.
2Tap Settings in the dictation app.
3Tap Connectivity.
4Tap URL and enter the Internet address where your
.csv le is stored.
XThe data list is downloaded from the web server
and can be used now.
Set dt list refresh intervl
1Tap Settings in the dictation app.
2Tap Connectivity.
3Tap Refresh intervl and select the desired interval
for your data list to be updated.
Use dt list in the dicttion pp
1Open a dictation from the recordings list or start a
new dictation.
2Tap the Properties icon on the recording screen.
3The Options pop-up window appears.
4Tap Open dt list.
5Select an item from your data list.
XThe Detils pop-up window with all details
related to that item appears.
6Tap OK.
XThe recording screen opens. The details related
to the selected data item are added to your
dictation.
XThe item is marked as used in your data list.
Dt list options
When you open the data list as described in Use a data
list in the dictation app, you can choose between various
options for your data list. Scan a barcode, change the
default author, select how you want your data to be
ltered, or search for data list items.
To open the dt list options:
• Tap the options icon on the Dt list window.
Scn brcode
Use the barcode feature to nd a data list item that
matches the scanned barcode.
1Tap the options icon on the Dt list window to
open the data list options.
2Swipe down and tap Brcode.
Alternatively, press the function button on the right side
of the device.
3Scan the barcode or the QR code.
XThe scanned barcode is compared to your data
list.
XIf no item was found that matches the barcode,
you will hear a notication beep.
XIf a match is found, the Detils pop-up window
with all details related to that item appears. The
barcode matching an entry in the data list item is
highlighted in blue color.
XIf more than one item was found that matches
the barcode, black arrows appear next to the OK
button.
38 Philips dictation recorder app
4Tap OK on the Detils pop-up window, or tap the
arrow next to the OK button to scroll to the desired
data list item.
XThe recording screen opens.
Chnge defult uthor
If you want to change the default author, rst set up
dierent authors in Settings > Forwrding > Workow >
Author. For more information, see Set up keywords.
To chnge the uthor:
1Tap the options icon on the Dt list window to
open the data list options.
2Swipe down and tap Chnge uthor.
XThe Author window opens.
3Select another author from the list.
XThe Author pop-up window appears.
4Tap Set s Defult.
XThe selected author is now set as the default
author for all further dictations until you change
the default author again.
Filter dt items
To lter data list items, either use the search function or
the data list options.
To lter dt list items:
1Tap and enter text into the search bar to search
for an item.
2Tap the options icon to select additional lters,
such as done items or alphabetical sorting.
If no items are found, the reason might be too strong
ltering. In this case, tap the options icon on the Dt
list window to open the data list options. Then swipe
down and tap All items unltered.
Dicttion pp settings
Change various settings in your dictation app according
to your own preferences. Adjust settings related to audio
control, forwarding, security, and user interface for the
most ecient and comfortable recording with your
SpeechAir and the Philips dictation recorder app.
You can see all settings in the Settings tab of the
dictation recorder app. Find these options described in
the following table.
Note
• Depending on the conguration of your device, some
of the settings might be locked.
Audio settings
Setting Function
Purge dicttions • Tap Purge dicttion
intervls to set an
interval for your
dictations to be
automatically deleted
from your device. For
more information, see
Delete a dictation.
Audio formt • Select the recording
quality for your dictations
by choosing between
the audio formats WAV
(PCM) and DS2. DS2 is
preset as the standard
audio format.
Microphone sensitivity • Adjust the microphone
sensitivity to avoid
recording background
noises and to adapt
to the recording
environment. For
more information, see
Microphone sensitivity.
Microphone directivity • Adjust the settings for
directivity in hand and
directivity on desk.
Choose if you want to
use the directional or
the 360° microphone
when you are dictating
with your device in the
hand or on the desk. For
more information, see
Microphone directivity.

39Philips dictation recorder app
Setting Function
Voice ctivtion • Enable voice activation
to automatically start
recording when you
begin speaking, and
pause recording when
you stop speaking.
For more information,
see Voice-activated
recording.
Record notiction beep • Enable the record
notication beep to hear
a beep sound when you
start recording.
Auto bckspce • Tap Jump bck to select
the number of seconds
you want to jump back in
your recordings when you
rewind them.
Forwrding
Setting Function
Emil • Enable this feature to be
able to send dictations via
email.
SpeechLive • Enable this feature to be
able to send dictations
to SpeechLive. For more
information, see Send a
dictation to SpeechLive.
• Set up your SpeechLive
account. For more
information, see Set up
SpeechLive.
• Enable the SpeechLive
transcription service
and speech recognition
service to be able to
send dictations to the
transcription service and
speech recognition service.
For more information,
see Send a dictation
to Philips SpeechLive
transcription service
and Send a dictation to
Philips SpeechLive speech
recognition service.
Mobile server • Set up your mobile server
account to be able to send
dictations via the Philips
Speechexec mobile server.
For more information, see
Send a dictation to Philips
SpeechExec mobile server
and Set up mobile server.
Setting Function
Dicttion hub • Enter a predened
recipent’s address and
set up your dictation hub
account to be able to
send dictations to Philips
dictation hub. For more
information, see Send
a dictation to Philips
dictation hub and Set up
dictation hub.
Network folder • The network folder
option is a comfortable
way to share dictations
via dened folders and
its subfolders over the
network. Everyone who
uses the same network can
access your dictation les
in the selected folders. For
more information, see Send
a dictation to a network
folder.
Workow • Dene one or more
keywords that you can
assign to each recording.
Use keywords for automatic
le routing and to identify
recordings more easily. For
more information, see Add
keywords to a dictation.
Send EOL dicttions
utomticlly
• Enable this function to
automatically be prompted
to select a sending option
when you mark a dictation
as locked.
Security
Setting Function
Encryption • Tap Encryption to
dene a 16-character
encryption key.
If you have selected DS2
as the standard audio
format, the encryption
key provides real-time
encryption of your
dictations while you are
recording.
• The encryption key also
provides additional
encryption of dictations
that are sent to Philips
dictation hub or Philips
SpeechExec mobile
server.

40 Philips dictation recorder app
Setting Function
Use encryption • Enable encryption to use
the dened encryption
key and to protect
your dictations from
unauthorized use or le
playback.
User interfce
Setting Function
Disply • Enable the setting
Keep disply on during
recording if you don’t
want the display to turn o
while you are recording.
The predened length of
time before your screen
turns o when the device
is not used (see Power
saving mode) is disabled
then.
Slide switch • Customize the
functionality of the
slide switch. By default,
the slide switch is set
to Interntionl. To
change the slide switch
assignment, go to Settings
>User interfce > Slider
ssignment and select
Philips,Interntionl, or
Germn.
Philips
A
H/(function button)
B
Interntionl
G
F
B
Germn
A
H/(function button)
B
Function button • Customize the
functionality of the
right function button on
your device. Tap Button
ssignment and select the
desired function you want
to assign to the function
button.
Connectivity
Setting Function
Dt list •Import .csv les with
dt, such s ptient
dt, from n Internet
ddress into your
SpeechAir by entering
your dt list URL
(Internet ddress).
•Select your desired
dt list refresh intervl.
After your dt list hs
been imported, it will be
updted t the dened
intervl.
For more information,
see Using dt lists.
Help
Setting Function
Technicl support • Send an email to our
technical support if you
have technical issues
with your dictation
recorder app or if
you want to send us
feedback on the app.
Quick strt guide • Open the quick start
guide to get a quick
overview of the main
dictation app functions.
About
• See information about your dictation app version.
• Follow the links to our Terms and conditions and to
our Privacy policy.
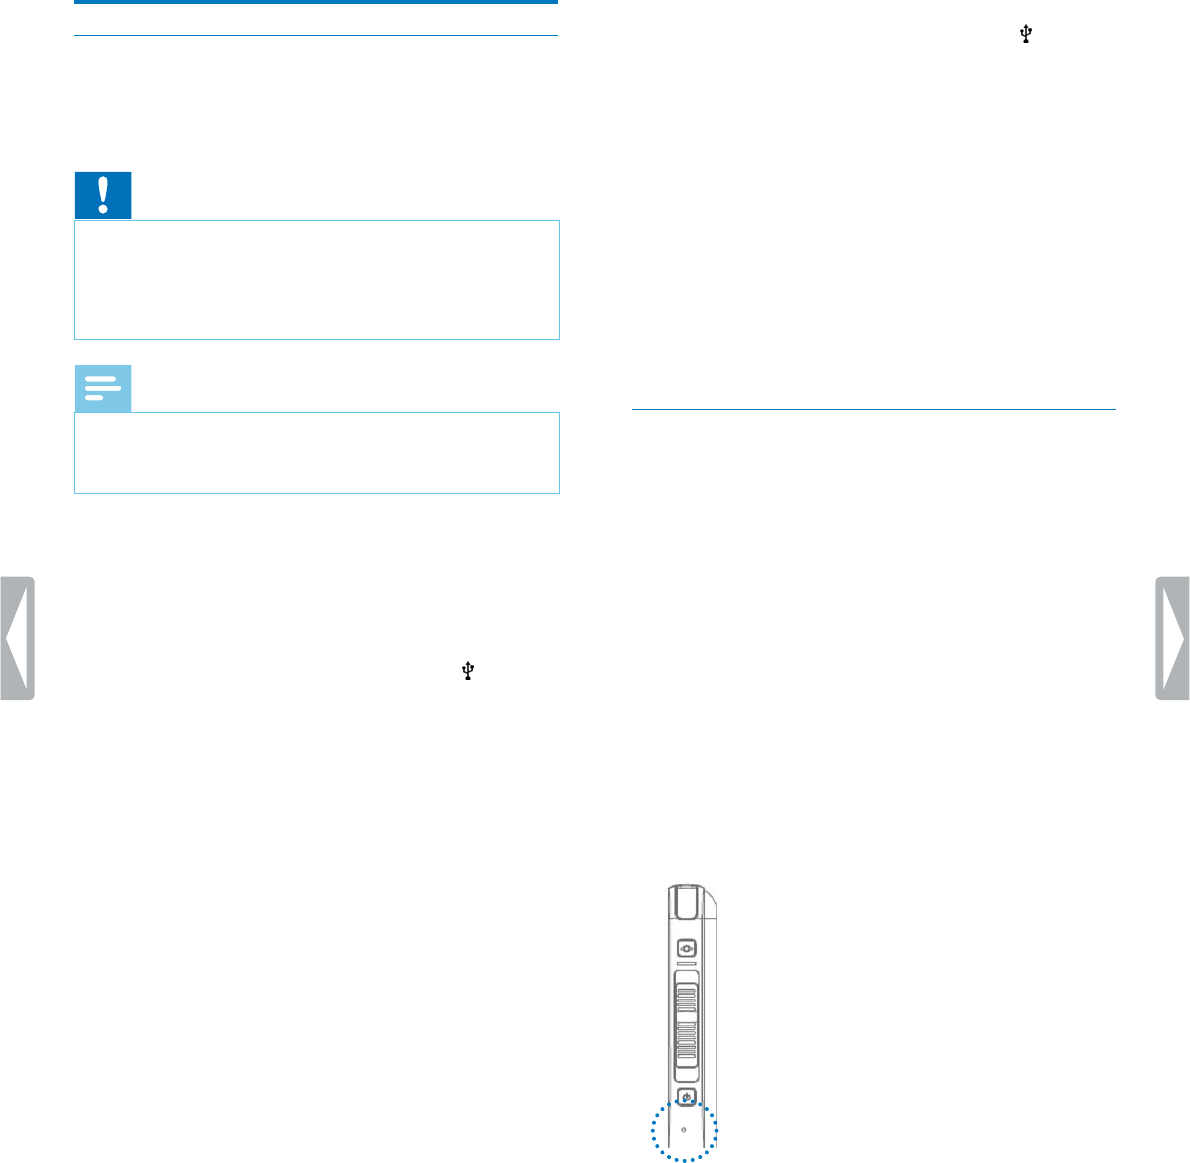
41Device and data management
6 Device nd dt
mngement
Trnsfer dt to nd from the
computer
Move your les from the device to the computer, or vice
versa.
Caution
• Don’t disconnect the USB cable from the device while
you are transferring les. This might cause data loss.
• Don’t delete any preinstalled folders from SpeechAir.
Deleting them might cause malfunctioning of the
device software.
Note
• For reasons of data security, the operation of the
device is disabled while the device is connected to
the computer.
To trnsfer dt from SpeechAir to the computer:
1Connect the device to the computer via micro USB
cable.
Alternatively, connect the device to the computer by
using the docking station. Make sure that you use the
data transfer micro USB port marked with on the
docking station.
XThe green transfer LED on the docking station
illuminates.
2Open Windows Explorer on a Windows computer, or
open Finder on a Mac computer.
XSpeechAir is recognized as an external drive.
3Double-click the SpeechAir drive.
XThe content of your SpeechAir is displayed in a
new window.
4Select the desired les in the SpeechAir window and
copy, cut or drag them to the desired location on your
computer.
To trnsfer dt from the computer to SpeechAir:
1Connect the device to the computer via micro USB
cable.
Alternatively, connect the device to the computer by
using the docking station. Make sure that you use the
data transfer micro USB port marked with on the
docking station.
XThe green transfer LED on the docking station
illuminates.
2Open Windows Explorer on a Windows computer, or
open Finder on a Mac computer.
XSpeechAir is recognized as an external drive.
3Double-click the SpeechAir drive.
XThe content of your SpeechAir is displayed in a
new window.
4Select the desired les on your computer and copy,
cut or drag them to the desired location on your
SpeechAir.
Reset your device nd dt
Device reset
If you should encounter problems with your device
software, for example, the software freezes, the device
works slowly or apps don’t respond, you can reset your
device and restart it.
When you reset your SpeechAir, you won’t lose any
saved data. However, if you reset the device while using
a software program or app, the device shuts down all
active programs and unsaved data might get lost.
To reset your device:
1Press and hold the reset button on the right side
of your device by using a small, pointed object, for
example, a paper clip.
2Restart your device by pressing and holding the
Power button until the device gently vibrates.
42 Device and data management
Fctory dt reset
You can reset your device to its original system state
and delete all data. After a factory data reset, the device
is restored to its default settings—the way it was when
you rst purchased it and turned it on. Any apps you
installed, data you added and settings you customized
on your device will be lost. Also the rmware will be set
to its factory state and needs to be updated again.
Caution
• Performing a factory data reset will delete all data on
your device. Before you perform a factory data reset,
back up any important data saved on your device.
To perform fctory dt reset:
1Tap Settings on the Home screen or on the All
Apps screen.
2Swipe down and tap Bckup & reset.
3Tap Fctory dt reset.
XThe Factory data reset window opens.
4Tap Reset SpeechAir.
XThe Reset window opens.
5Tap Erse everything.
XSpeechAir turns o and restarts automatically.
Updting your device
Your device is controlled by an internal program called
rmware. As a part of ongoing product maintenance, the
rmware is upgraded and errors are corrected.
It is possible that a newer version (an ‘update’) of the
rmware has been released since you purchased the
device. In this case, you can easily update your device to
the latest version.
Update your device manually by copying the update
le from our website to your device. Alternatively,
update the rmware with the supplied Philips SpeechAir
management software. You can nd the software on
the supplied USB ash drive or implemented in Philips
SpeechExec software. For more information, see Philips
SpeechAir management software.
Caution
• Before you update the rmware, make sure that your
device has at least 30% battery power left. This helps
to prevent the power supply being interrupted during
the update.
• Before you use other device functions, wait until the
rmware update is complete. Failures in the rmware
update might result in the device’s malfunctioning.
Note
• To nd out about new rmware versions, regularly
check our website at www.philips.com/dictation.
• Before you can use Philips SpeechAir management
software, rst install the software. For more
information, see Install SpeechAir management
software.
Updte the rmwre mnully
1Download the rmware update le updte.img
from the website www.philips.com/dictation to your
computer.
2Make sure that SpeechAir is turned on and connect
the device to your computer.
3Copy the rmware update le to the SpeechAir folder
on your computer. You can nd the SpeechAir folder
in WIndows Explorer on Windows computers, and in
Finder on Mac computers.
4Disconnect the device from the computer.
XThe Updte pop-up window appears on your
SpeechAir.
5Tap Updte now. If you want to update the rmware
at a later time, tap Postpone for 2 hours. You can
postpone the update three times. Afterwards,
the device will inform you that the rmware will
automatically be updated.
XSpeechAir turns o and starts the installation of
the update le.
XYou can see the progress of the installation on the
screen.
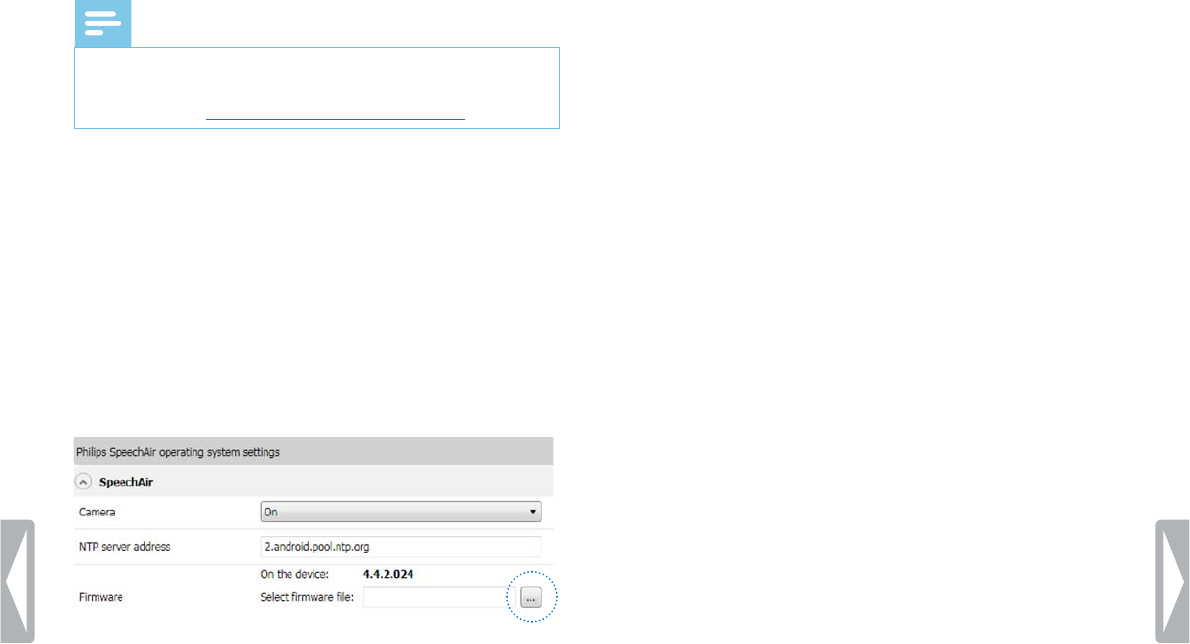
43Device and data management
XWhen the rmware update has nished,
SpeechAir restarts automatically.
Updte the rmwre with SpeechAir mngement
softwre
Note
• On Mac computers, it is only possible to update
the rmware manually with the updte.img le as
described in Update the rmware manually.
1Download the rmware update le updte.sfw
from the website www.philips.com/dictation to your
computer.
2Start Philips SpeechAir management software.
3Make sure that SpeechAir is turned on and connect
the device to your computer.
4On the device conguration window of the software,
go to SpeechAir > Firmwre, and select the rmware
le on your computer.
5Click Send to SpeechAir on the tool bar.
XA pop-up window conrming the successful
conguration transfer appears.
6To apply the conguration to SpeechAir, disconnect
the device from the computer.
XThe Updte pop-up window appears on your
SpeechAir.
7Tap Updte now. If you want to update the rmware
at a later time, tap Postpone for 2 hours. You can
postpone the update three times. Afterwards,
the device will inform you that the rmware will
automatically be updated.
XSpeechAir turns o and starts the installation of
the update le.
XYou can see the progress of the installation on the
screen.
XWhen the rmware update has nished,
SpeechAir restarts automatically.

44 Philips SpeechAir management software
7 Philips SpeechAir
mngement
softwre
Philips SpeechAir management software allows
advanced congurations of your SpeechAir that can’t
be performed directly on the device. You can update
your device’s rmware, dene an NTP server address, or
disable the camera function. All other settings related to
your SpeechAir can be changed directly on the device.
Additionally, the software enables you to
congure,change and control all settings for the Philips
dictation recorder app. Some of these settings are also
accessible directly in the app. Advanced options which
are only available in the management software include
conguring data list settings or dening text elds to
be displayed on the recording screen, for example the
author or worktype.
For more information about settings in the dictation
recorder app, see Dictation app settings.
Instll SpeechAir mngement
softwre
If you have purchased SpeechAir without SpeechExec
software, you will nd SpeechAir management software
on the supplied USB ash drive.
If you have purchased SpeechAir with SpeechExec
software, you will nd SpeechAir management software
implemented in SpeechExec. For more information
about how to install SpeechExec, see Install SpeechAir
management software.
Instll SpeechAir mngement softwre on your
computer
1Connect the supplied USB ash drive to your
computer.
2Open Windows Explorer on your computer.
3Double-click the USB ash drive in Windows Explorer.
XThe content of the USB ash drive is displayed in
a new window.
4Double-click the le
PhilipsSpeechAirMngementSoftwreSetup.exe.
XThe InstllShield Wizrd window opens.
5Follow the on-screen instructions.
6Click Finish when the installation process has
nished.
XThe management software is now installed on
your computer.
Strt SpeechAir mngement softwre from
SpeechExec
1Install SpeechExec software as described in Install
SpeechExec on your computer.
2Make sure that SpeechAir is turned on and connect
the device to your computer.
3Click or on the tool bar in SpeechExec.
XThe Generl Settings window opens.
4In the Generl Settings window, click SpeechAir
congurtion > Device congurtion > Strt
SpeechAir mngement softwre.
Congure SpeechAir with
SpeechAir mngement softwre
The management software allows you to congure
various settings for your SpeechAir and Philips dictation
recorder app. The conguration can be immediately
transferred to your connected SpeechAir.
Note
• Before you start Philips SpeechAir management
software, connect SpeechAir to your computer.
The mangement software can only be used with a
connected device.
• Depending on your device’s preset congurations,
some settings might be locked. In this case, you can’t
congure any settings with SpeechAir management
software.
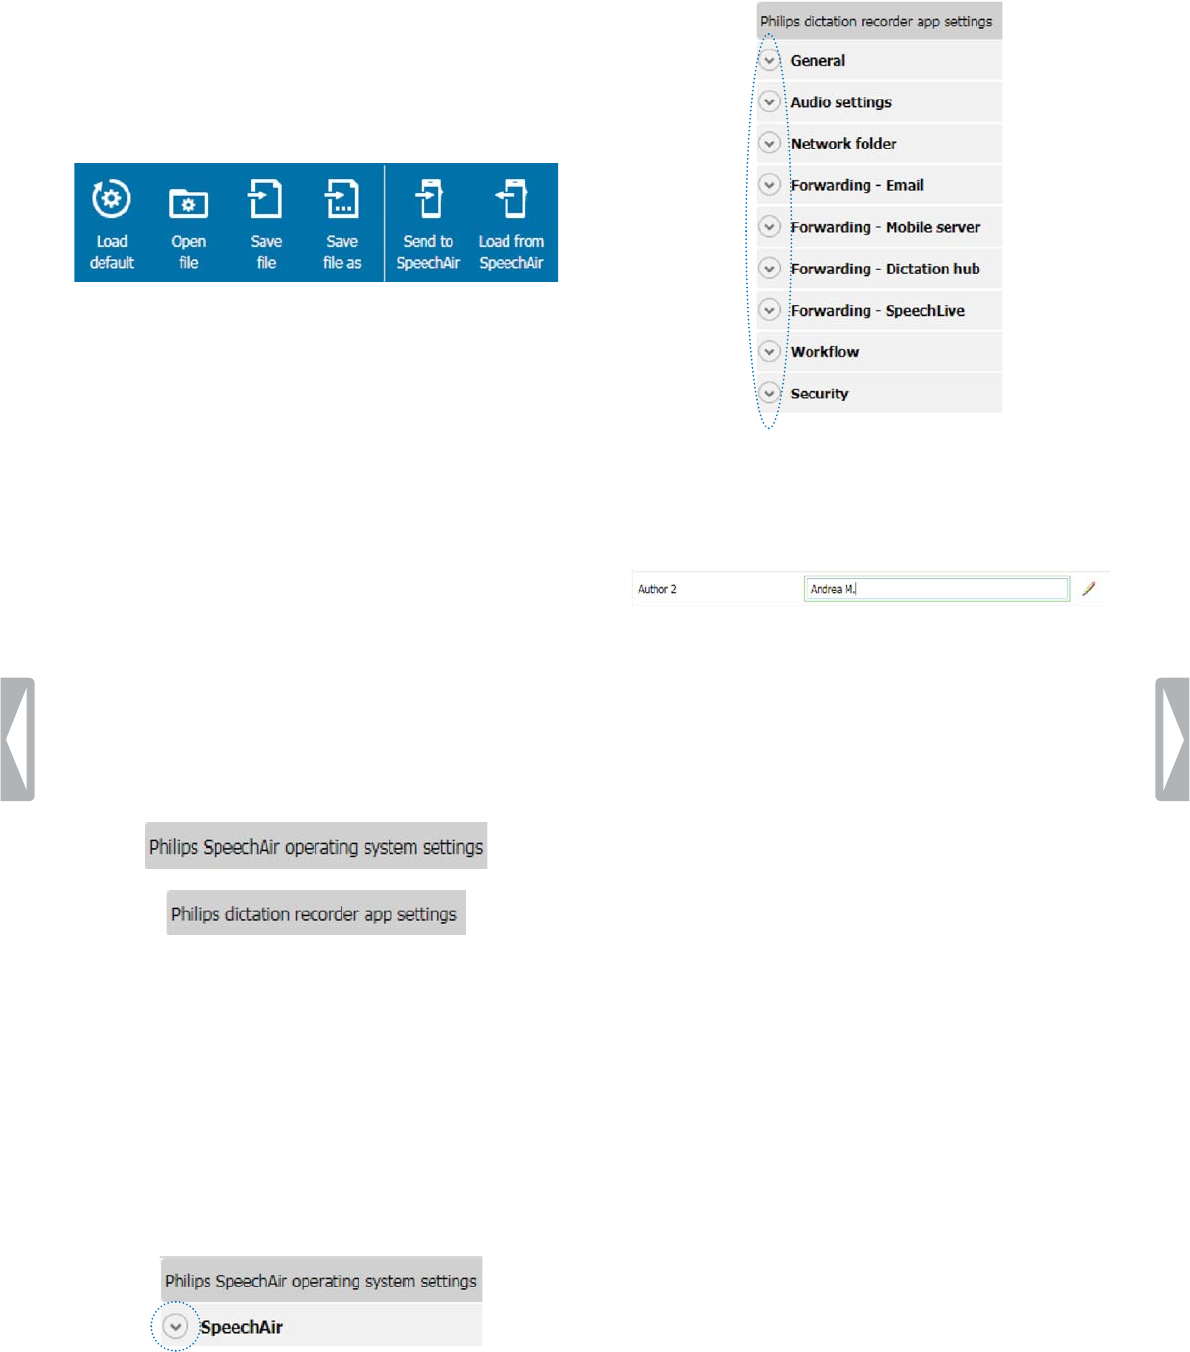
45Philips SpeechAir management software
3Congure your desired settings.
XWhenever you change a setting, the relevant
setting is highlighted in green and a pencil icon
appears next to it.
4After you have nished your conguration, click Sve
le,Sve le s or Send to SpeechAir on the tool bar.
Device congurtion screen
When you start the management software, you will see
a welcome screen. Once you connect SpeechAir to your
computer, you will see the device conguration screen.
The tool bar contains the following options:
• Click Lod defult to discard all your changes and
revert back to the factory settings.
• Click Open le to open a conguration previously
saved on your computer.
• Click Sve le to save the current conguration to your
computer.
• Click Sve le s to save the current conguration to
your computer with a dierent name.
• Click Send to SpeechAir to transfer the current
conguration to your SpeechAir.
• Click Lod from SpeechAir to download the current
SpeechAir conguration to the management software.
Below the tool bar, you will see two sections: a
conguration section for SpeechAir and a conguration
section for the Philips dictation recorder app. You can set
your desired congurations for SpeechAir or the Philips
dictation recorder app in the relevant section.
Congure SpeechAir nd Philips dicttion
recorder pp settings
1Start the management software and connect your
SpeechAir to the computer.
XThe device conguration screen opens.
2To congure settings for SpeechAir, click the arrow in
the SpeechAir section. To congure settings for the
dictation recorder app, click the arrow in the Philips
dicttion recorder pp section.

46 Using SpeechAir with Philips SpeechExec software
8 Using SpeechAir with
Philips SpeechExec
softwre
If you use Philips SpeechExec workow software,
you can connect your SpeechAir to your computer
and download your dictations from your device to
SpeechExec software. Your secretary can access your
dictations in SpeechExec transcription software. This
way you can forward your dictations to transcription
without having to use an Internet connection.
Additionally, you can congure delivery options for
SpeechAir with the SpeechAir wizard in SpeechExec.
SpeechExec uploads the precongured delivery options
to the dictation recorder app on SpeechAir. The author
name and worktypes dened in SpeechExec are also
uploaded to the dictation recorder app.
Choose between the delivery options SpeechLive
speech recognition, SpeechLive transcription service,
email, or Dragon speech recognition. If you select a
delivery method in the dictation recorder app and
connect your device to SpeechExec, the software will
automatically send your new dictations via the delivery
method preselected in the dictation recorder app.
For more information about SpeechExec, refer to
the SpeechExec user manual or the online help in
SpeechExec. Download the SpeechExec user manual at
www.dictation.philips.com/support.
Instll SpeechExec on your
computer
Before you connect your SpeechAir to SpeechExec
software, you rst need to install the software on your
computer.
If you have purchased SpeechAir including SpeechExec
software (SpeechAir PSP1200), you will nd the software
on the supplied USB ash drive. The necessary license
key is printed on a sticker on the USB ash drive.
To instll SpeechExec on your computer:
1Connect the supplied USB ash drive to your
computer.
2Open Windows Explorer on your computer.
3Double-click the USB ash drive in Windows Explorer.
XThe content of the USB ash drive is displayed in
a new window.
4Double-click the Autorun.exe le.
5Follow the on-screen instructions.
6Click Finish when the installation process has
nished.
XSpeechExec is now installed on your computer.
Congure SpeechAir in SpeechExec
Generally, you don’t need to perform any congurations
for using SpeechAir with SpeechExec. After installation,
the software is immediately ready for use with SpeechAir.
However, you can change basic settings of your
SpeechAir device in SpeechExec using the SpeechAir
wizard.
With the SpeechAir wizard, you can also congure
the delivery methods you want to use in the dictation
recorder app.
Congure SpeechAir with the SpeechAir
wizrd
1Start SpeechExec.
2Make sure that SpeechAir is turned on and connect
the device to your computer.
3Click or on the tool bar in SpeechExec.
XThe Generl Settings window opens.
4In the Generl Settings window, click SpeechAir
congurtion > Device congurtion, and then click
Open SpeechAir wizrd.
XThe SpeechAir wizard opens.
5Follow the on-screen instructions.
6Click Finish in the Summry section.
XYour settings have been applied and the
conguration is nished.
7Disconnect SpeechAir from your computer.
Congure delivery methods for SpeechAir
If you connect SpeechAir to SpeechExec, the
precongured delivery methods will be uploaded
from the software to SpeechAir. Each time you
connect SpeechAir to SpeechExec, the software will
automatically download all new dictations from your
device and send them via the precongured delivery
methods SpeechLive speech recognition, SpeechLive
transcription service, email, or Dragon speech
recognition.
Note
• If you want to use SpeechLive speech recognition or
SpeechLive transcription service as delivery methods,
you rst need to allow SpeechExec to download your
dictations to your SpeechLive folder.
Click Settings > SpeechAir Congurtion > SpeechAir
nd SpeechLive. In the Loction for downlod
window, select In SpeechLive folders from the drop-
down menu.
• Before you can send dictations to SpeechLive
services, you need to have a valid SpeechLive
account. If you are not using SpeechLive yet, create a
new user account at www.speechlive.com.

47Using SpeechAir with Philips SpeechExec software
To congure delivery methods:
1Start SpeechExec.
2Make sure that SpeechAir is turned on and connect
the device to your computer.
3Click or on the tool bar in SpeechExec.
XThe Generl Settings window opens.
4In the Generl Settings window, click SpeechAir
congurtion > Device congurtion, and then click
Open SpeechAir wizrd.
XThe SpeechAir wizard opens.
5Follow the on-screen instructions until you reach the
USB downlod section.
6Make sure that the checkbox ‘Yes, I would like to
use...’ is marked, and select your desired delivery
methods.
7Click Finish in the Summry section.
XYour settings have been applied and the
conguration is nished.
8Disconnect SpeechAir from your computer.
Set defult delivery method in the dicttion pp
1Congure delivery options for SpeechAir as described
in Congure delivery methods for SpeechAir.
2Select the desired delivery method in the dictation
recorder app in Settings >Forwrding > Workow >
Delivery before you send your dictation.
XThe Delivery pop-up window appears.
3Tap Set s Defult.
XSpeechAir will save this setting and remember
the selected default delivery method each time
you download dictations from SpeechAir to
SpeechExec.
Chnge the delivery method for individul dicttions
Note
• If you change the delivery method for your current
dictation, you don’t change the default delivery
option. SpeechAir won’t remember this setting for
your next dictation. If you want to change the default
delivery method, proceed as described in Set a
default delivery method.
1Congure delivery methods in SpeechExec as
described in Congure delivery methods for
SpeechAir.
2Tap the Properties icon on the recording screen of
the dictation recorder app.
3Tap the text eld next to Delivery.
4Select a delivery option from the drop-down menu.
Send dicttion vi SpeechExec
1Congure delivery methods in SpeechExec as
described in Congure delivery methods for
SpeechAir.
2Connect your SpeechAir to your computer.
3Start SpeechExec on your computer.
XSpeechExec downloads all new dictations from
SpeechAir and sends them via the delivery
method selected in the dictation recorder app.
XBy default, your dictations are deleted from your
recorder after the download is nished.
Downlod dicttions to
SpeechExec
If you don’t want to use Wi-Fi to send your dictations,
connect SpeechAir to your computer and download your
dictations from the recorder to SpeechExec workow
software. The downloaded dictations are saved to a
local SpeechExec folder. Your secretary can access
your dictations via SpeechExec Pro Transcribe software.
This way you can exchange your dictations with your
transcriptionist without having to use an Internet
connection.
Note
• To exchange dictation les with your transcriptionist
within SpeechExec software, your secretary needs to
have SpeechExec Pro Transcribe software installed.
Select your desired downlod settings
1Start SpeechExec.
2Click Settings on the tool bar in SpeechExec.
XThe Generl Settings window opens.
3In the Generl Settings window, click SpeechAir
congurtion > Downlod.
4Select your desired settings.
Downlod dicttions from SpeechAir to SpeechExec
• Make sure that SpeechAir is turned on and connect the
device to your computer.
XBy default, SpeechExec automatically downloads
all new dictations from SpeechAir. To change
this setting, proceed as described in Select your
desired download settings.
XA pop-up window in SpeechExec appears
and conrms that your dictations have been
downloaded to SpeechExec.
XBy default, your dictations are deleted from your
recorder after the download is nished.

48 Service and support
9 Service nd support
Don’t perform any maintenance operations that aren’t
described in this user manual. Don’t disassemble the
device into its component parts to carry out repairs.
The device may only be repaired in authorized service
centers.
Disply device informtion
See various information about your device, such as the
serial number or model number.
1Tap Settings on the Home screen or on the All
Apps screen.
2Scroll down to the very bottom and tap About
SpeechAir.
Disply informtion bout Philips
dicttion recorder pp
See information about your dictation app version, our
Terms and conditions, and our Privacy policy.
1Open the app on the Home screen or on the All
Apps screen.
2Tap the Settings tab.
3Tap About.
Open Quick strt guide
Open the quick start guide to get a quick overview of the
main dictation app functions.
1Open the app on the Home screen or on the All
Apps screen.
2Tap the Settings tab.
3Tap Help.
4Tap Quick strt guide > Strt now.
Send emil to technicl support
Send an email to our technical support if you have
technical issues with your dictation recorder app or if you
want to send us feedback on the app.
1Open the app on the Home screen or on the All
Apps screen.
2Tap the Settings tab.
3Tap Help.
4Tap Technicl support > Submit issue.
XThe Compose email window opens.
XOur technical support’s email address is
automatically inserted.
5Compose an email and send it to us.
Contct our supporting Philips
prtners
If you have any questions on your SpeechAir or
experience technical issues, contact one of our
supporting Philips partners. The local partner you
purchased your SpeechAir from will strive to answer
your questions and to solve your problem as soon as
possible.
Open source softwre
This product may contain open source software.
Speech Processing Solutions GmbH hereby oers
to deliver, upon request, a copy of the complete
corresponding source code for the copyrighted open
source software packages used in this product for which
such oer is requested by the respective licenses. This
oer is valid up to three years after product purchase.
To obtain the source code, please write in English to:
info@speech.com.

49Service and support
Troubleshooting
Find the most common problems you could encounter
with SpeechAir in the following table. If you are unable
to solve the problem with the information below, contact
the supporting Philips partner you purchased the device
from.
Problem Possible cuse Solution
The device doesn’t turn on. • The battery has run out of
power.
• Charge the device for a while and
then turn it on again.
The device doesn’t respond. • There is a problem with the
operating system.
• Try to turn the device o and then
restart it.
• If you can’t turn the device o or if
turning the device o doesn’t solve
the problem, perform a device reset.
For more information, see Device
reset.
The device doesn’t play back recordings. • The volume is o or too low.
• The playback marker on the
recording screen is placed
at the end of the recording
(dictation recorder app).
• You are outside the recording
screen (dictation recorder app).
• Turn on or turn up the volume.
• Rewind the recording and play back
the dictation again, or drag the
playback marker on the recording
screen to the left (dictation recorder
app). For more information, see
Rewind a recording.
• Go back to the recording screen
and restart the playback (dictation
recorder app).
I can’t hear anything from the speakers. • The headphones are
connected to the device.
• The volume is o or too low.
• Unplug the headphones.
• Turn on or turn up the volume.
The recording doesn’t start. • The battery has only 8% or less
power left (dictation recorder
app).
• You are outside the recording
screen (dictation recorder app).
• Charge the device before you start
recording or connect the device to the
power supply while recording.
• Go back to the recording screen and
start the recording (dictation recorder
app).
I can’t download a data list. • Wi-Fi isn’t turned on or you
aren’t connected to a Wi-Fi
network.
• The Internet address (URL)
where your data list is stored is
incorrect or invalid.
• Make sure that Wi-Fi is turned on and
that you are connected to a Wi-Fi
network.
• Make sure that the Internet address
you entered is correct and valid
(dictation recorder app). For more
information, see Import a .csv data
list.

50 Service and support
Problem Possible cuse Solution
The recording quality is poor. • The microphone sensitivity is
too high.
• You recorded the dictation
with the built-in 360° meeting
microphone.
• The distance between your
mouth and the built-in
microphone was too short.
• You recorded a dictation with
an external microphone and
connected it to the wrong jack
(i.e. headphones jack).
• Change the microphone sensitivity
to medium or low (dictation recorder
app). For more information, see
Microphone sensitivity.
• Change the microphone directivity
and use the built-in directional
microphone (dictation recorder
app). For more information, see
Microphone directivity.
• Try to keep a distance of approx. 10
cm (4") between your mouth and the
microphone while recording.
• Disconnect the external microphone
and connect it to the microphone jack
on SpeechAir.
There’s too much background noise in
my recording.
• The microphone sensitivity is
too high.
• You recorded the dictation
with the built-in 360° meeting
microphone.
• Change the microphone sensitivity
to medium or low (dictation recorder
app). For more information, see
Microphone sensitivity.
• Change the microphone directivity
and use the built-in directional
microphone (dictation recorder
app). For more information, see
Microphone directivity.
I can’t hear anything from the
headphones.
• The volume is o or too low.
• The headphones aren’t
connected properly.
• The headphones are
connected to the wrong jack
(i.e. external microphone jack).
• Turn on or turn up the volume.
• Disconnect the headphones and
connect them to the headphones
jack again.
• Disconnect the headphones and
connect them to the headphones
jack.
An external microphone connected to
SpeechAir doesn’t work.
• The external microphone is
connected to the wrong jack
(headphones jack).
• Disconnect the external microphone
and connect it to the microphone jack
on SpeechAir.
I can’t scan barcodes. • The camera lense is dirty. • Clean the camera lense with a soft,
dry cloth.
The picture quality is poor. • The camera lense is dirty. • Clean the camera lense with a soft,
dry cloth.
The battery charges slowly. • The device is connected to the
computer.
• The device is connected to the
wrong micro USB port (i.e. data
transfer micro USB port) on the
docking station.
• You are using a dierent micro
USB cable than the cable
originally supplied with the
device.
• Disconnect the device from the
computer and connect it to the power
supply.
• Disconnect the device from the
docking station and connect it to the
charging micro USB port marked with
5V DC on the docking station.
• Use the original micro USB cable that
was supplied with the device.

51Service and support
Problem Possible cuse Solution
I can’t connect to a Wi-Fi network. • The Wi-Fi function is turned o.
• The connection settings for the
Wi-Fi network are incorrect.
• The distance between the
device and the Wi-Fi access
point is too long.
• An obstacle is blocking the
signal between the device and
the Wi-Fi access point.
• Turn on Wi-Fi. For more information,
see Turn on Wi-Fi.
• Check the Wi-Fi settings.
• Try to move the device closer to the
Wi-Fi access point.
• Check if there are any obstacles
between the device and the Wi-Fi
access point.
I can’t transfer data from my SpeechAir to
my computer.
• The micro USB cable is
connected to the wrong micro
USB port (i.e. charging micro
USB port) on the docking
station.
• Disconnect the micro USB cable from
the docking station and connect it to
the data transfer micro USB port
marked with on the docking station.

52 Technical data
10 Technicl dt
Device
• Model color: dark grey pearl metallic and chrome
frame
• Slide switch type: International slide switch:
Record/Stop/Play/Rewind
• OS: Android 4.4.2
• CPU: Dual Core Cortex-A9 1.6 GHz
• RAM: 1GB DDR3
• Wi-Fi: IEEE 802.11. a/b/g/n
• Bluetooth: 4.0
• Vibration module
• Anti-microbial housing parts
• Customizable function button
Docking sttion
• LAN connection
• Kensington Security Slot
• Removable magnetic inlay for use with case
Specictions
• Product dimensions (W×D×H):
SpeechAir: 62×127×15 mm / 2.4×5×0.6"
Docking station: 82×77×56 mm / 3.2×3×2.2"
• Weight:
SpeechAir: 116 g / 4.1 oz
Docking station: 264 g / 9.3 oz
Sensors:
• Light sensor
• Motion sensor
• Optical proximity sensor
Connectivity
• Headphones: 3.5 mm / 1.4"
• Microphone: 3.5 mm / 1.4"
• USB: micro USB 2.0
• Docking connector
Disply
• Type: IPS with 16 million colors
• Touch screen
• Scratch-resistant Gorilla glass
• Diagonal screen size: 10.16 cm / 4"
• Resolution: 800×480 px
Memory
• 1 GB RAM
• Total internal memory: 16 GB (available user memory
approx. 12 GB)
Audio
• Recording format supported by OS: AMR, ACC
• Playback format supported by OS: MPEG (MP1, MP2,
MP3), WMA, WAV, APE, OGG (OGG, OGA), FLAC, AAC
(AAC, M4A)
• Built-in microphones: one dictation microphone
(directional), one 360° meeting microphone
(omnidirectional), one telephony microphone (VoIP)
Philips dicttion recorder pp
• Recording time: 1073 hrs (DS2), 117 hrs (WAV)
• Recording modes: DSS Pro (DS2/mono), PCM Voice
(WAV/mono)
• Bit rate: 28 kbit/s (DS2), 256 kbit/s (WAV)
• Sample rate: 16 kHz/16 bit (WAV), 16 kHz/16 bit
(DS2)
Sound
Front speaker:
• Speaker type: built-in rectangular dynamic speaker
• Speaker dimensions: 6×12 mm / 0.2×0.5"
Rear speaker:
• Speaker type: built-in rectangular dynamic speaker
• Speaker dimensions: 11×15 mm / 0.4×0.6"
Cmer
• 5 Mpx
• Image formats supported by OS: JPG, JPEG, BMP, GIF,
PNG
• Autofocus
• Flash
Video
• Recording formats supported by OS: H.264/AVC (MOV,
3GP) 30 fps up to 1920×1088 px
• Playback formats supported by OS: MPEG-1/2 (DAT,
MPG, VOB, TS) 30 fps up to 1920×1088 px, MPEG4 (AVI,
MKV, MP4,MOV, 3GP) 30 fps up to 1920×1088 px, DIVX
(AVI, MKV, MP4, MOV, 3GP) 30 fps up to 1920×1088 px,
REAL MEDIA (RM, RMVB) 30 fps up to 1920×1088 px,
H.264 (AVI,MKV, MP4, MOV, 3GP, TS, FLV) 30 fps up to
1920×1088 px, H.264 MVC (AVI, MOV) 60 fps up to
1920×1088 px, VP8 (WEBM) 30 fps up to 1920×1088 px,
VC-1 (WMV, ASF, TS, MKV, AVI) 30 fps up to 1920×1088
px), H.263 (3GP, MOV, MP4) 30 fps up to 704×576 px,
Sorenson Spark (FLV) 30 fps up to 1920×1088 px, ON2
VP6 (AVI,FLV) 30 fps up to 1920×1088 px, Motion JPEG
(AVI, MOV) 30 fps up to 1920×1088 px
• Autofocus
• Flash
802.11b/g/n

53Technical data
Brcode scnning
• 1D barcodes: Code 39, Code 93, Codabar, Code128,
Code 25, Code 11, MSI/Plessey, EAN, UPC
• 2D barcodes: QR code, Data Matrix code
Power
• Battery type: built-in rechargeable Li-ion battery
• Battery capacity: 2700mAh
• Battery lifetime: up to 12 hours of recording (DSS Pro
mode)
• Standby time: 97 hours
• Charging time (full charge): 3 hours
Security
• Real-time le encryption
• Encryption standard (Philips dictation recorder app):
Advanced Encryption Standard (AES) 256 bits
• Congurable security settings (with Software
Development Kit (SDK) or conguration software)
• Device lock with PIN code or password
• Lockable settings
Green specictions
• Compliant to 2011/65/EU (RoHS)
Opertion conditions
• Temperature: 5° – 45° C/41° – 113° F
• Humidity: 10% – 90%, non-condensing
System requirements for
SpeechExec workow softwre
• Processor: 1 GHz Intel® dual core or equivalent AMD
processor
• RAM: 1 GHz Intel® dual core or equivalent AMD
processor
• Free hard disk space: 100 MB for SpeechExec
installation, 1 GB (32 bit) or 2 GB (64 bit) for Microsoft
.NET 4.0 Framework Client Prole
• Operating systems: Windows 10/8/7 (32/64 bit)
• Free USB port
• Screen resolution: minimum 1024×768 px, maximum
3200×1800 px with a maximum display size of 150%
• Windows Media Player must be installed on a
Windows operating system
Accessories (optionl)
• Philips SpeechAir shock-proof case ACC1120
• Philips telephone pickup microphone LFH9162
• Philips meeting microphone LFH9172
• Philips SDK for dictation hardware LFH7475

54 Technical data
55Technical data
FCC Wrning Sttement
œ
Changes or modications not expressly approved by the
party responsible for compliance could void the user’s
authority to operate the equipment.
This equipment has been tested and found to comply
with the limits for a Class B digital device, pursuant
to Part 15 of the FCC Rules. These limits are designed
to provide reasonable protection against harmful
interference in a residential installation. This equipment
generates uses and can radiate radio frequency energy
and, if not installed and used in accordance with the
instructions, may cause harmful interference to radio
communications. However, there is no guarantee that
interference will not occur in a particular installation. If
this equipment does cause harmful interference to radio
or television reception, which can be determined by
turning the equipment o and on, the user is encouraged
to try to correct the interference by one or more of the
following measures:
• Reorient or relocate the receiving antenna.
• Increase the separation between the equipment and
receiver.
• Connect the equipment into an outlet on a circuit
dierent from that to which the receiver is connected
• Consult the dealer or an experienced radio/TV
technician for help.
CE Declrtion of Conformity
The conformity with the relevant EU directives is
conrmed by the CE mark.
Declrtion of conformity
Speech Processing Solutions GmbH hereby declares that
the devices SpeechAir PSP1000 series fully comply with
the basic requirements and other relevant provisions of
directives 2006/95/EC, 2004/108/EC and 2009/125/EC.
A complete declaration of conformity for this product is
available at www.philips.com/dictation.
Neither Speech Processing Solutions GmbH nor its
aliates shall be liable to the purchaser of this product
or third parties with respect to claims for damages,
losses, costs or expenses incurred by purchaser or
third parties as a result of an accident,misuse or abuse
of this product or unauthorized modications, repair,
modication of the product or failure to meet the
operating and maintenance instructions provided by the
manufacturer.
MPEG Layer-3 audio coding technology licensed from
Fraunhofer IIS and Thomson Licensing.
This user manual is a document with no contractual
nature. We accept no liability for changes, mistakes or
printing errors.

56 Technical data

57Technical data
Issue date 2016-05-02
Version 1.0
© 2016 Speech Processing Solutions GmbH. All rights reserved.
Specications are subject to change without notice. Philips and the Philips shield emblem
are registered trademarks of Koninklijke Philips N.V. and are used by Speech Processing
Solutions GmbH under license from Koninklijke Philips N.V. All trademarks are the property
of their respective owners.
www.philips.com/dictation