Contents
- 1. Users Manual
- 2. User Manual_Compliance Info
- 3. User Manual
User Manual
1455 Market Street, Suite 600, San Francisco, CA 94103 CONTRIBUTORS APPROVALS
PROJECT X2 Packaging DELIVERABLE GSG - US - 16 pages INKS 1/1 + Anti-scuff Matte AQ
BLACK
MATTE AQ
COPYWRITING
Approved
Changes
CREATIVE
Approved
Changes
EDITING
Approved
Changes
LEGAL
Approved
Changes
LOCALIZATION
Approved
Changes
PMM (MARKETING)
Approved
Changes
IMAGING
Approved
Changes
COUNTRY MANAGER
Approved
Changes
OTHER __________
Approved
Changes
PROGRAM MANAGER
Approved
Changes
DESIGN Eric Manago SIZE Flat: 288mm x 144mm
Folded: 144mm x 144mm
PRODUCTION Jordan Lebrecht MATERIAL 130gm couche
PART # M-LIT-0094 FINISHING Diecut, score, fold, staple PRODUCTION NOTES
Adhesive _______
Dieline _______
Pe ______
REV -03 VENDOR Veritiv China
VERSION M08 MODIFIED August 30, 2017 2:14 PM REV NOTES
REV-02 (06/17): Added 4 pages,
updated content.
REV-03 (08/17): Added regulatory
language
FILE NAME M-LIT-0094-03_X2_GSG_16-pages_US_M09
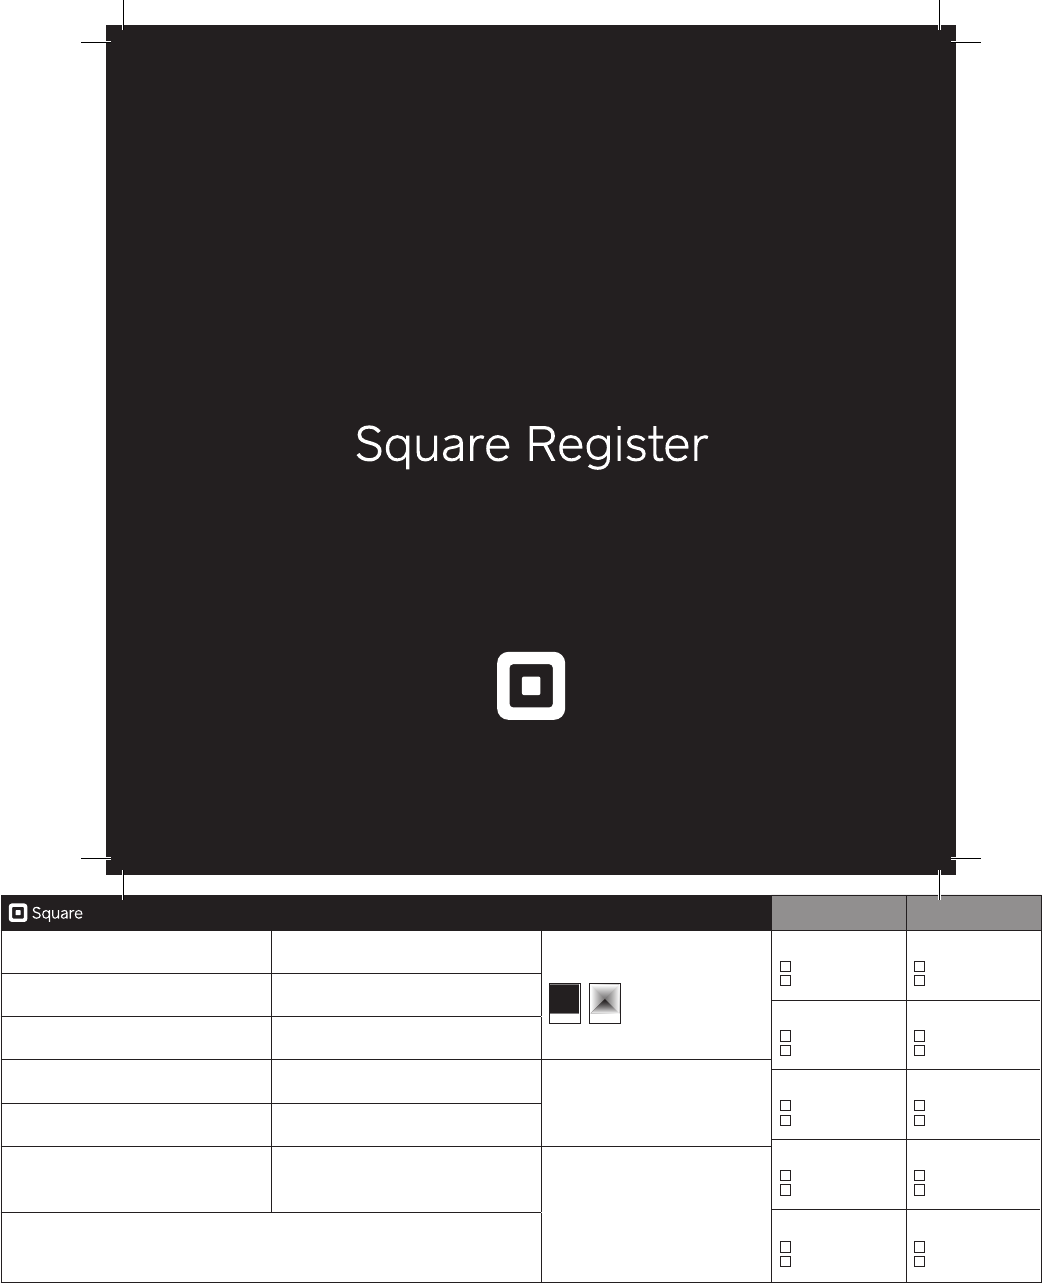
Getting Staed
1. Power adapter cable
2. Power adapter
3. Accessory hub
4. Customer display cable
5. Mounting plate with cleat
6. Mounting tools
WELCOME TO SQUARE
Let’s get your Square Register up and running. Sta by taking a quick look at what’s in the box.
Square Register Customer Display
Customer display
release latch
Power button
Micro
USB po
Micro USB pos
12
Mounting plate
cleat slot
345 6
Front Back
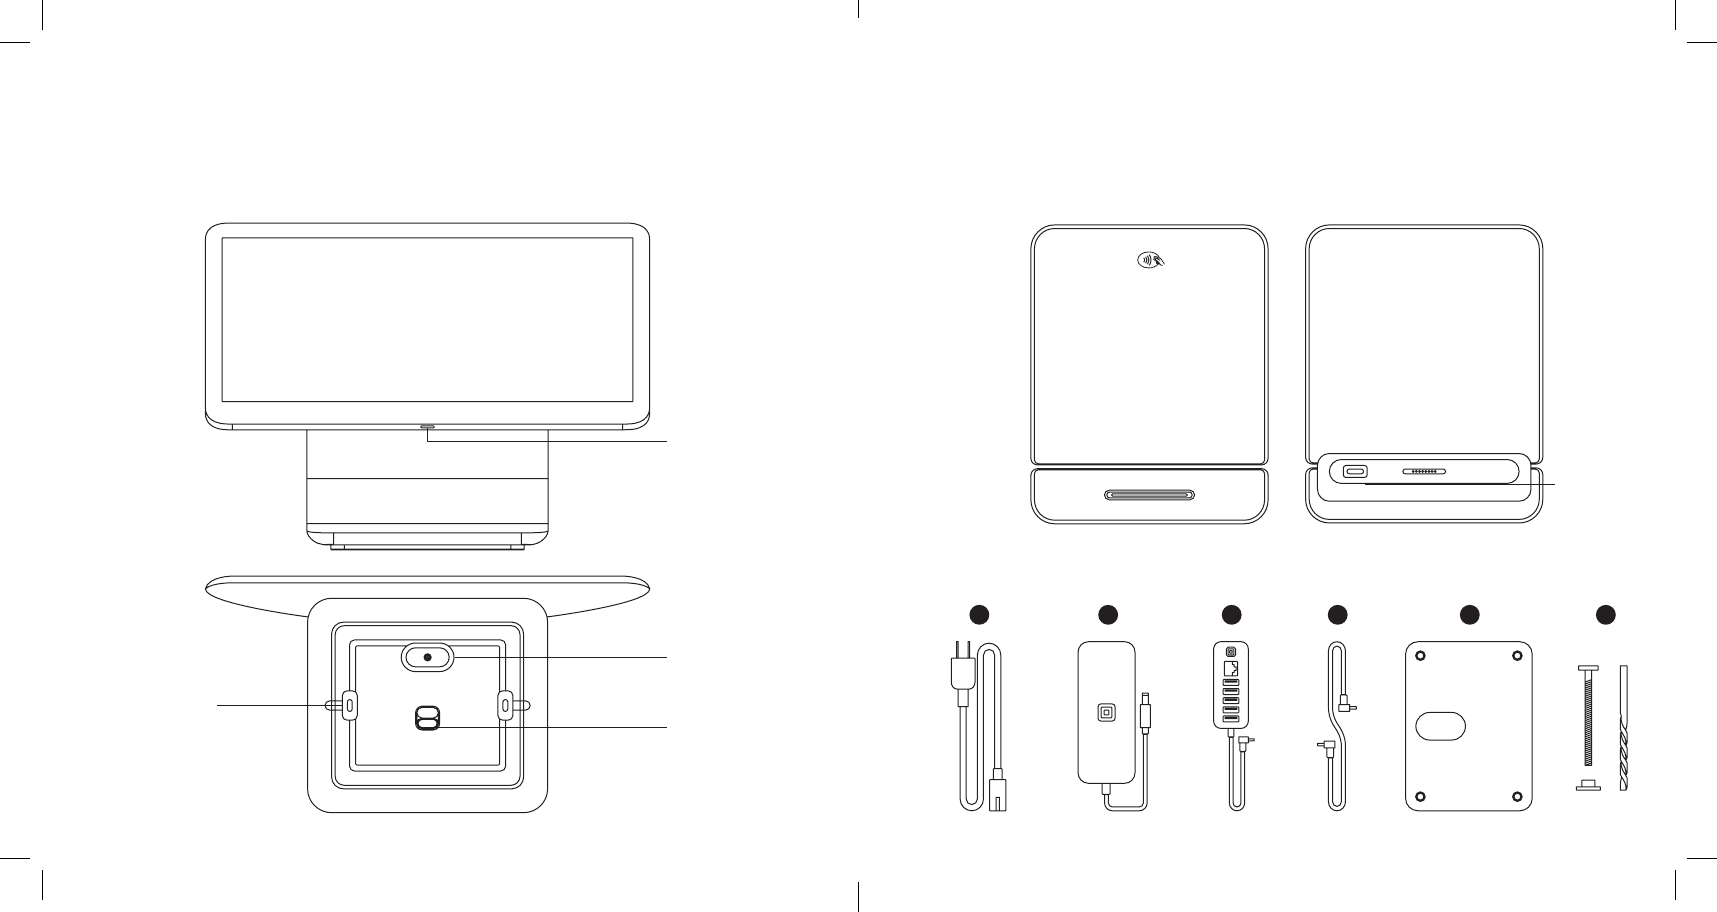
GET SET UP
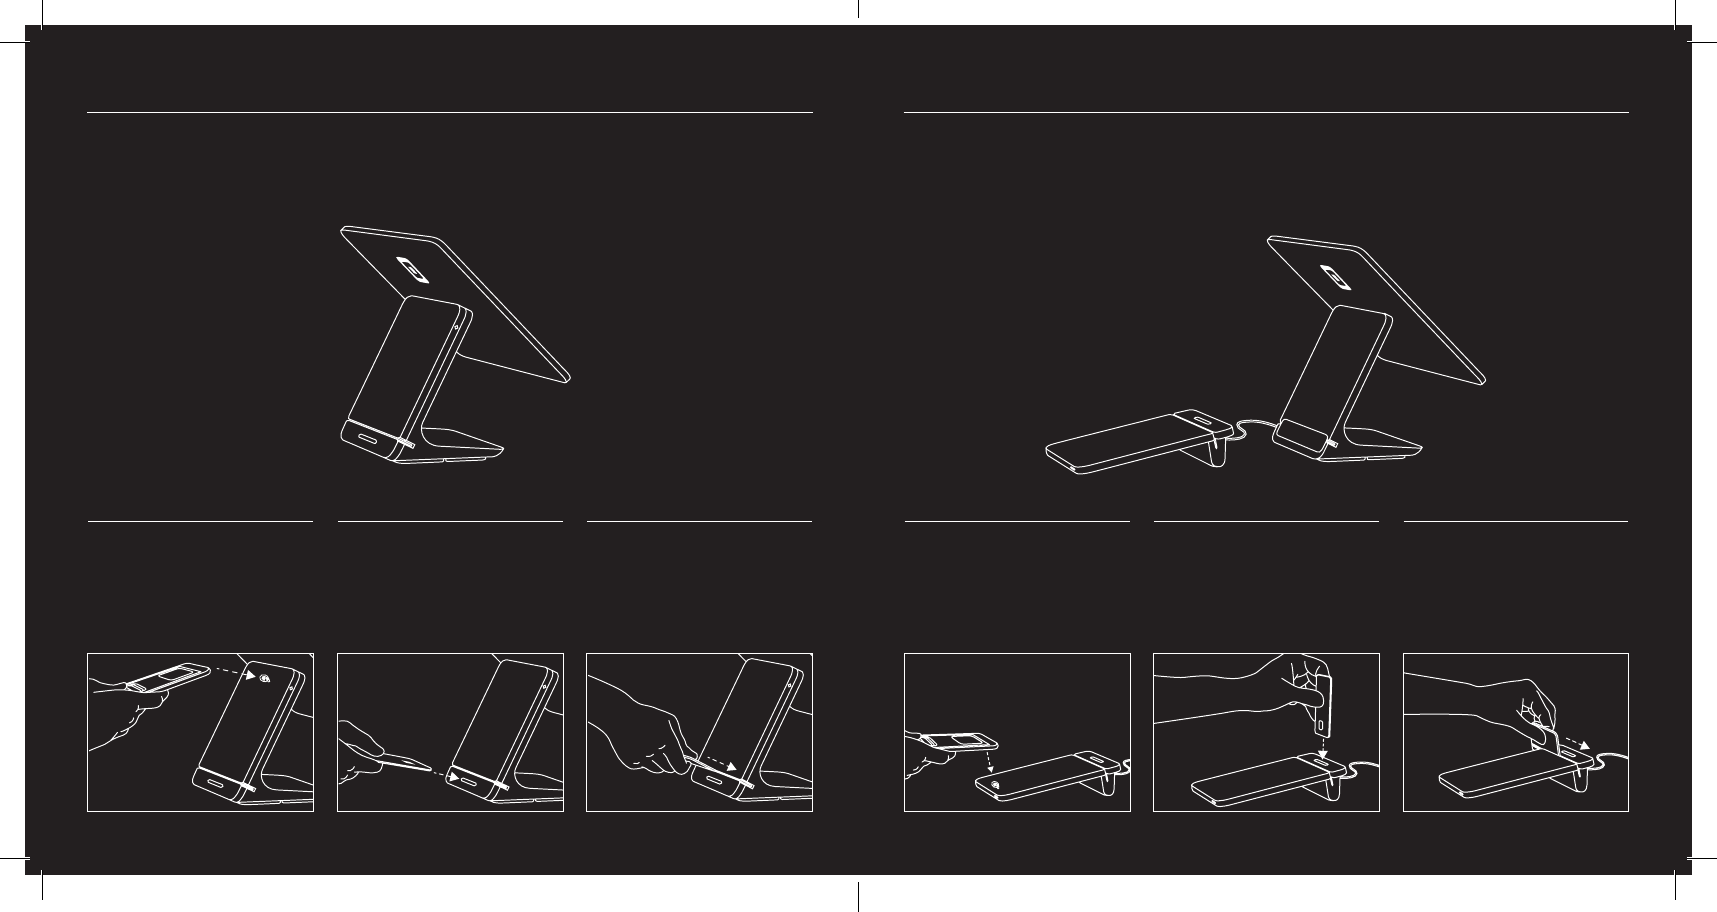
1. Separate the customer display
Remove the instructional wrap, carefully lift the
customer display out of Register, and remove
the protective foam pad. Place the customer
display aside for now—make sure you lay it
down flat.
2. Connect the accessory hub to Register
Simply plug the cable into one of the micro
USB pos located on the bottom of Register.
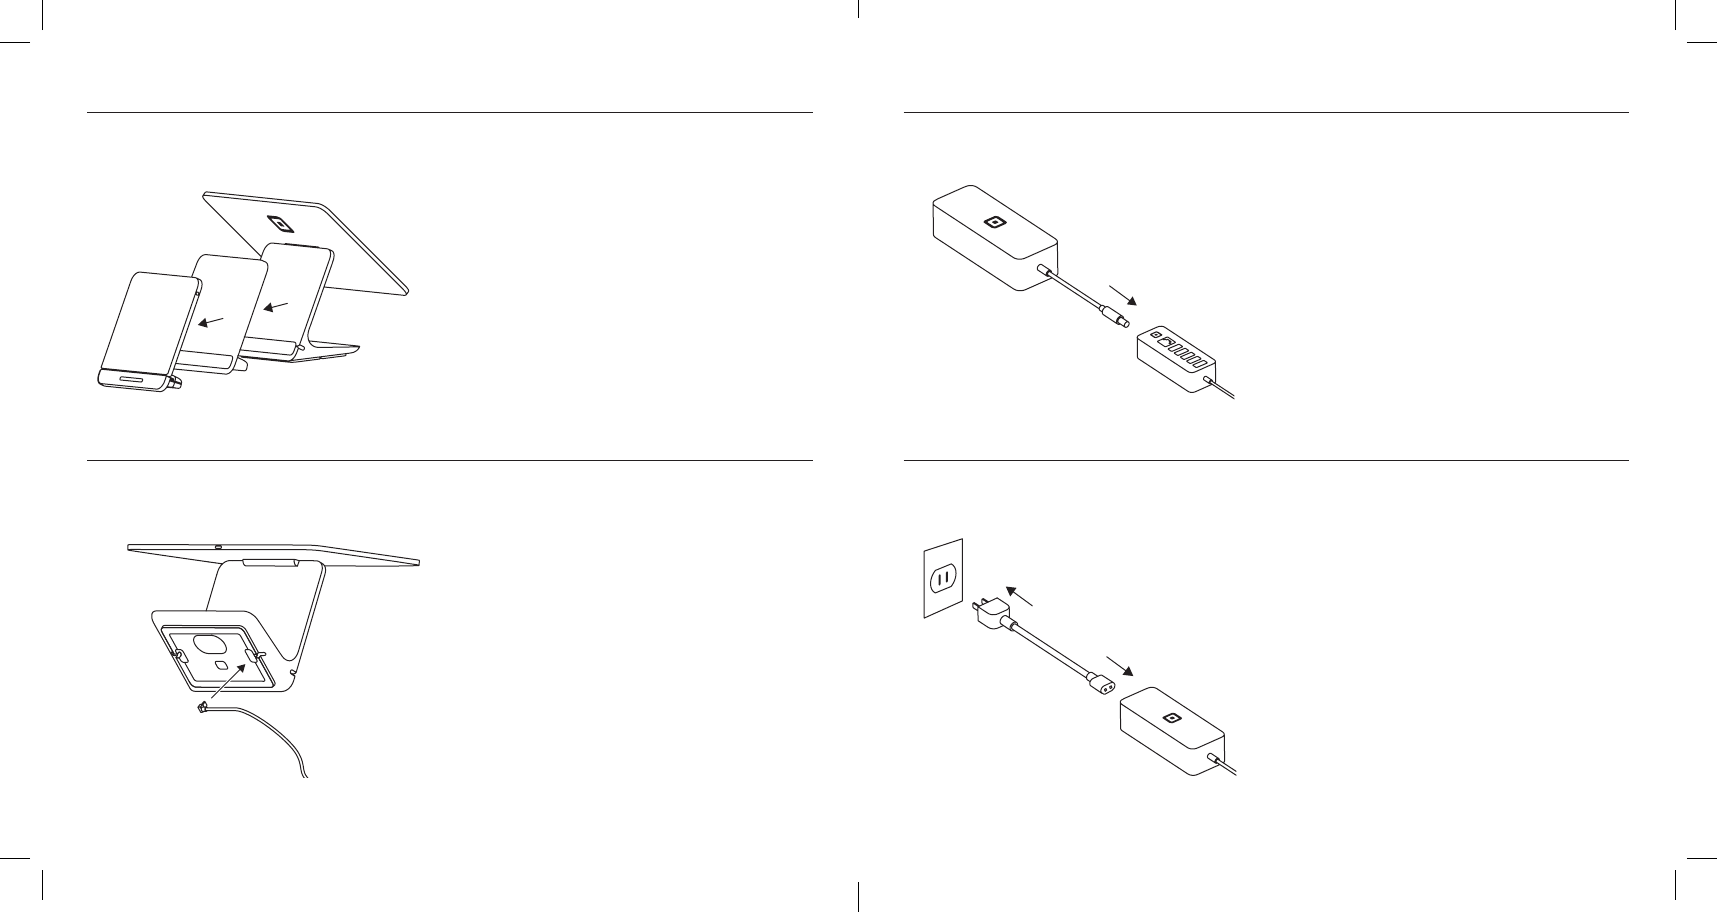
4. Plug it in
With the power adapter cable, plug one end
into the power adapter and the other end into
a power outlet.
3. Connect the power adapter to the
accessory hub
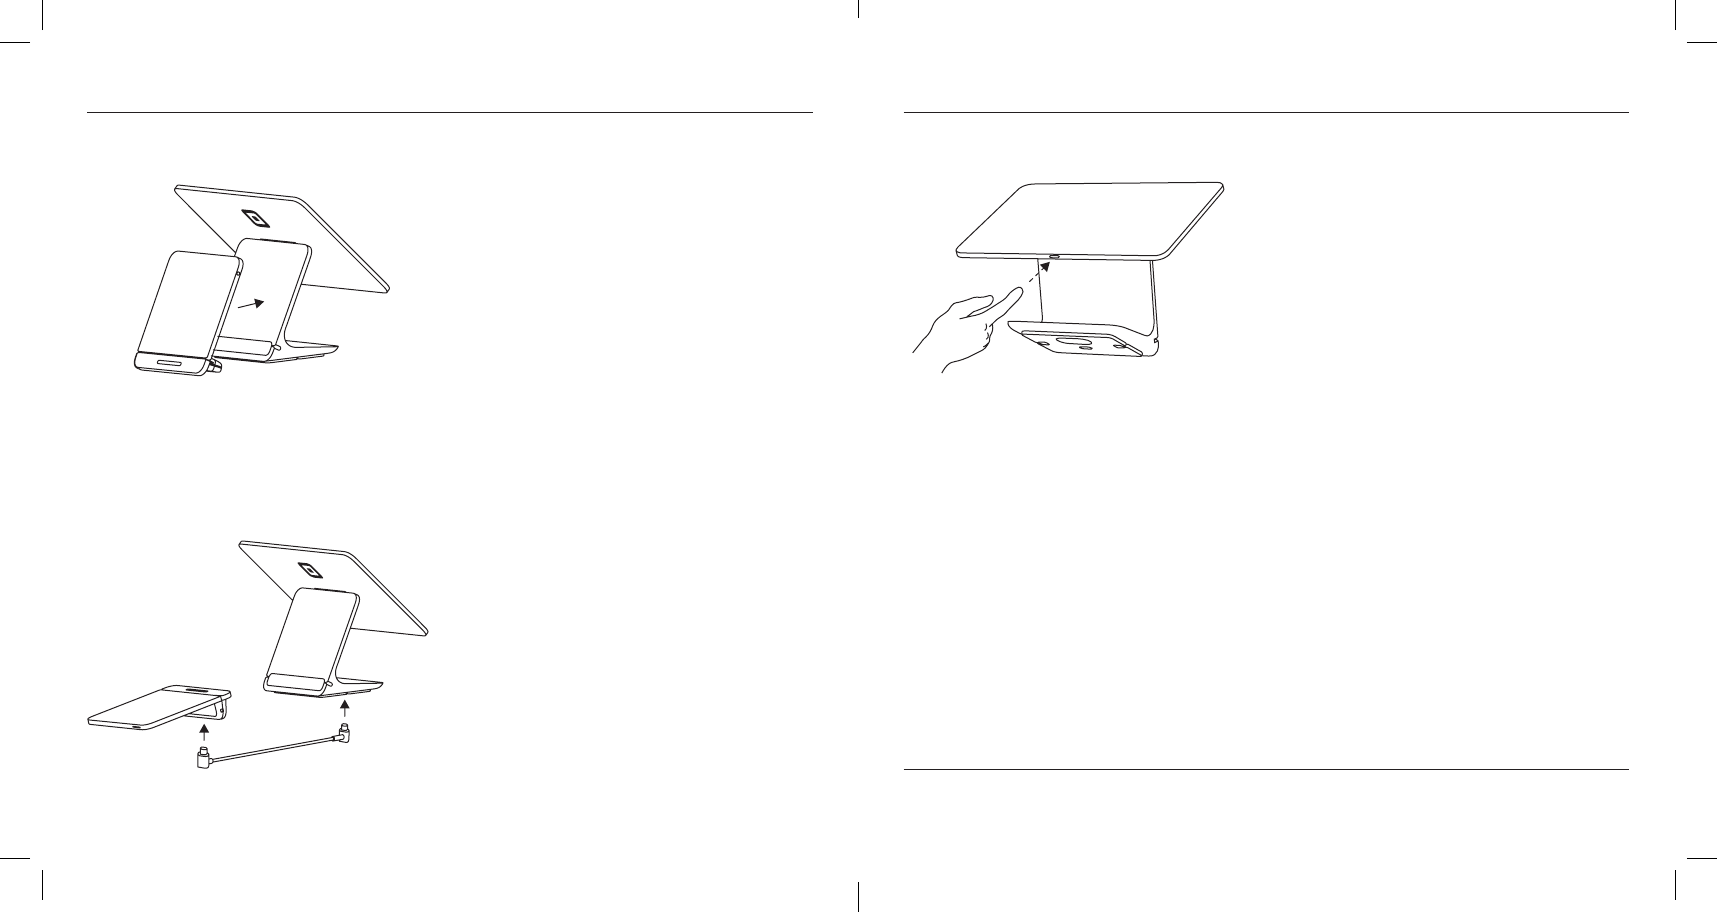
5. Choose a setup
Docked
Simply place the customer display back into
its slot on Register. Press firmly on the edges
of the customer display to ensure it’s locked
in place. If you need to undock the customer
display, hold in the release latch located on
the bottom of Register and lift the customer
display out.
Undocked
Grab the included customer display cable.
Plug one end into the customer display and
the other end into the bottom of Register.
All set up? Learn how to create items, add your business logo to the customer display, and more at
square.com/register-setup.
6. Power up
Press the power button on the base of the
Register display until the Square logo appears
on the screen.
7. Sign in
You can now sign in with your Square account. If you’re new to Square,
create your free account at square.com/signup.
GET SET UP (CONTINUED)
HOW TO TAKE PAYMENTS
Docked
Position Register so your customers can easily see the customer display and pay with their cards
and devices. To take a payment, ring up the sale and tap Charge.
Undocked
Make sure the customer display is correctly oriented so it’s sitting horizontally on your
counteop. Position the customer display so your customers can easily see it and pay with
their cards and devices. To take a payment, ring up the sale and tap Charge.
Tap
Ask your customer to hold
a contactless device or card
near the customer display to
trigger payment.
Dip
Ask your customer to inse
a chip card into the chip card
slot on the customer display
and leave it in place until the
sale is complete.
Swipe
Ask your customer to swipe a
magnetic-stripe card through
the magstripe reader on the
customer display.
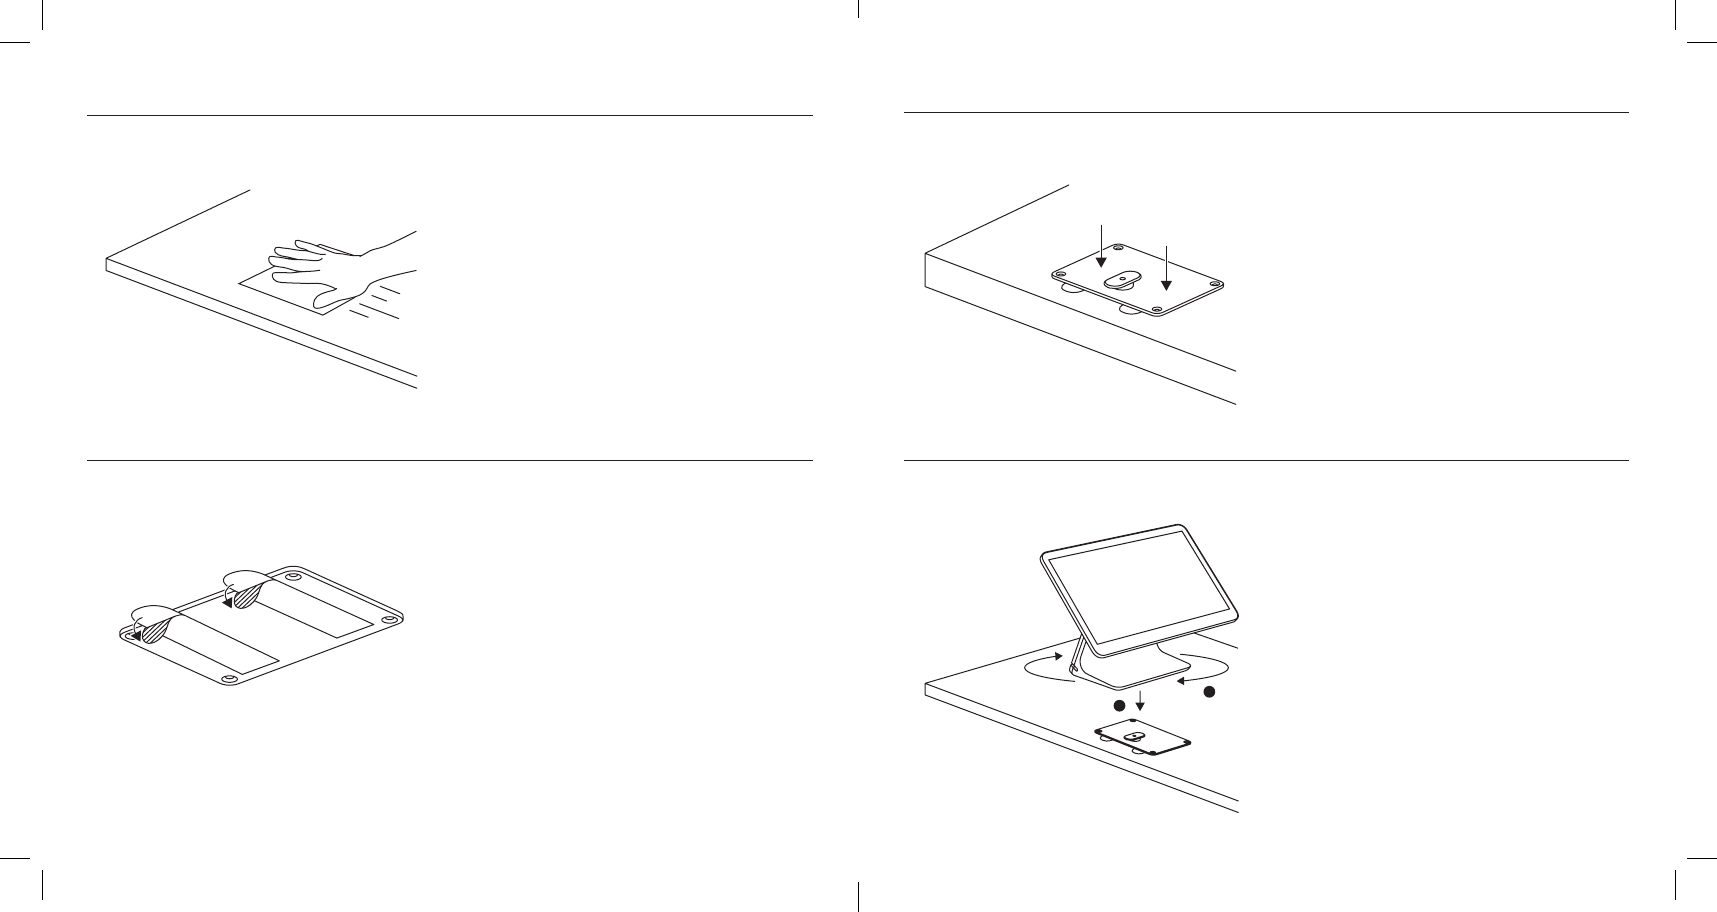
MOUNT SQUARE REGISTER TO YOUR COUNTER WITH ADHESIVE
1. Pick a spot
Using a damp cloth, clean the area where you
want to secure Register. Wait for the suace
to dry completely.
2. Prepare the adhesive strips
Grab the mounting plate. Remove the backing
from the adhesive strips located on the
underside of the plate.
4. Twist and lock
Place Register onto the mounting plate with the
larger screen facing right. Make sure the cleat is
positioned in its slot. Turn Register 90 degrees
clockwise so it locks in place.
3. Position properly
Make sure the raised cleat of the mounting
plate is on your side of the counter, not the
customer’s side. Adhere the plate to your
counter in the desired position and press down
firmly for 30 seconds. Wait 30 minutes for the
adhesive to set. If you need to remove the plate,
slowly pull the tabs on the adhesive strips until
they release.
1
2
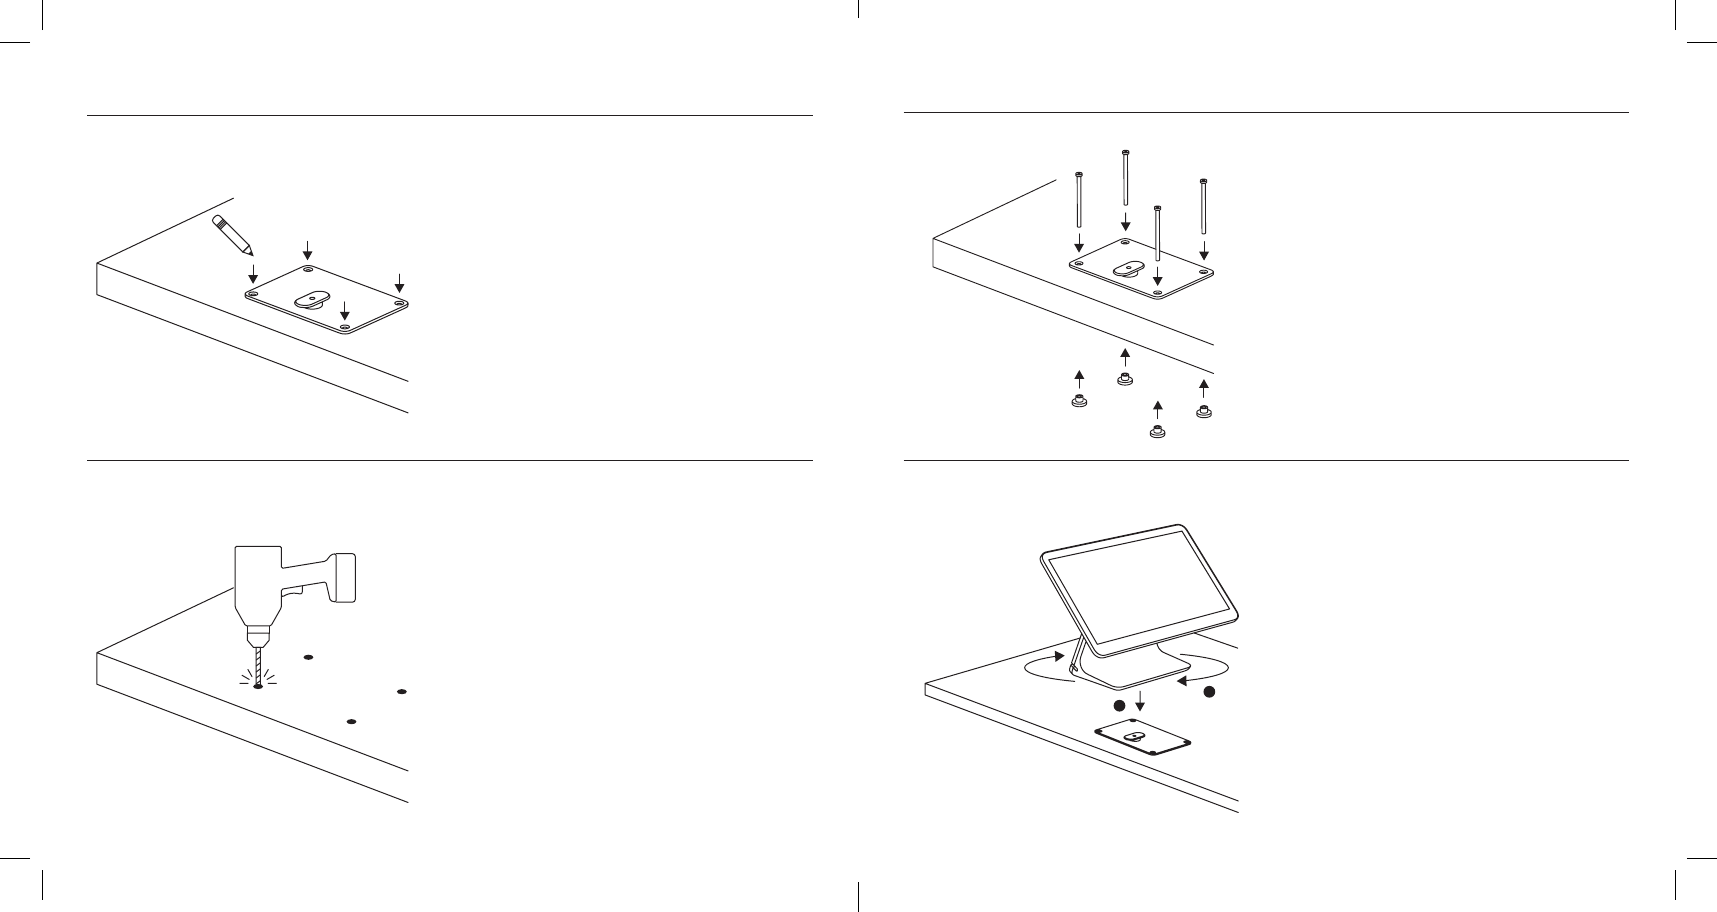
MOUNT SQUARE REGISTER TO YOUR COUNTER WITH SCREWS
1. Pick a spot
Grab the mounting plate. Pick a spot on your
counter for Register, position the plate, and
use a pencil to mark the four screw holes on
your counter. Make sure the raised cleat is on
your side of the counter, not the customer’s
side. Note: Maximum counter thickness is
2 inches (50 mm).
2. Drill your counter carefully
You need a drill and the included tools: drill bit,
screws, and thumb nuts. Use the drill and drill
bit to make the four holes you’ve marked
for the plate.
4. Twist and lock
Place Register onto the mounting plate with the
larger screen facing right. Make sure the cleat is
positioned in its slot. Turn Register 90 degrees
clockwise so it locks in place.
3. Position properly
Position the mounting plate onto the holes
you’ve drilled, then inse a screw into each
hole. From the underside of your counter, place
a thumb nut onto each screw and tighten until
the thumb nut is flush against your counter.
1
2
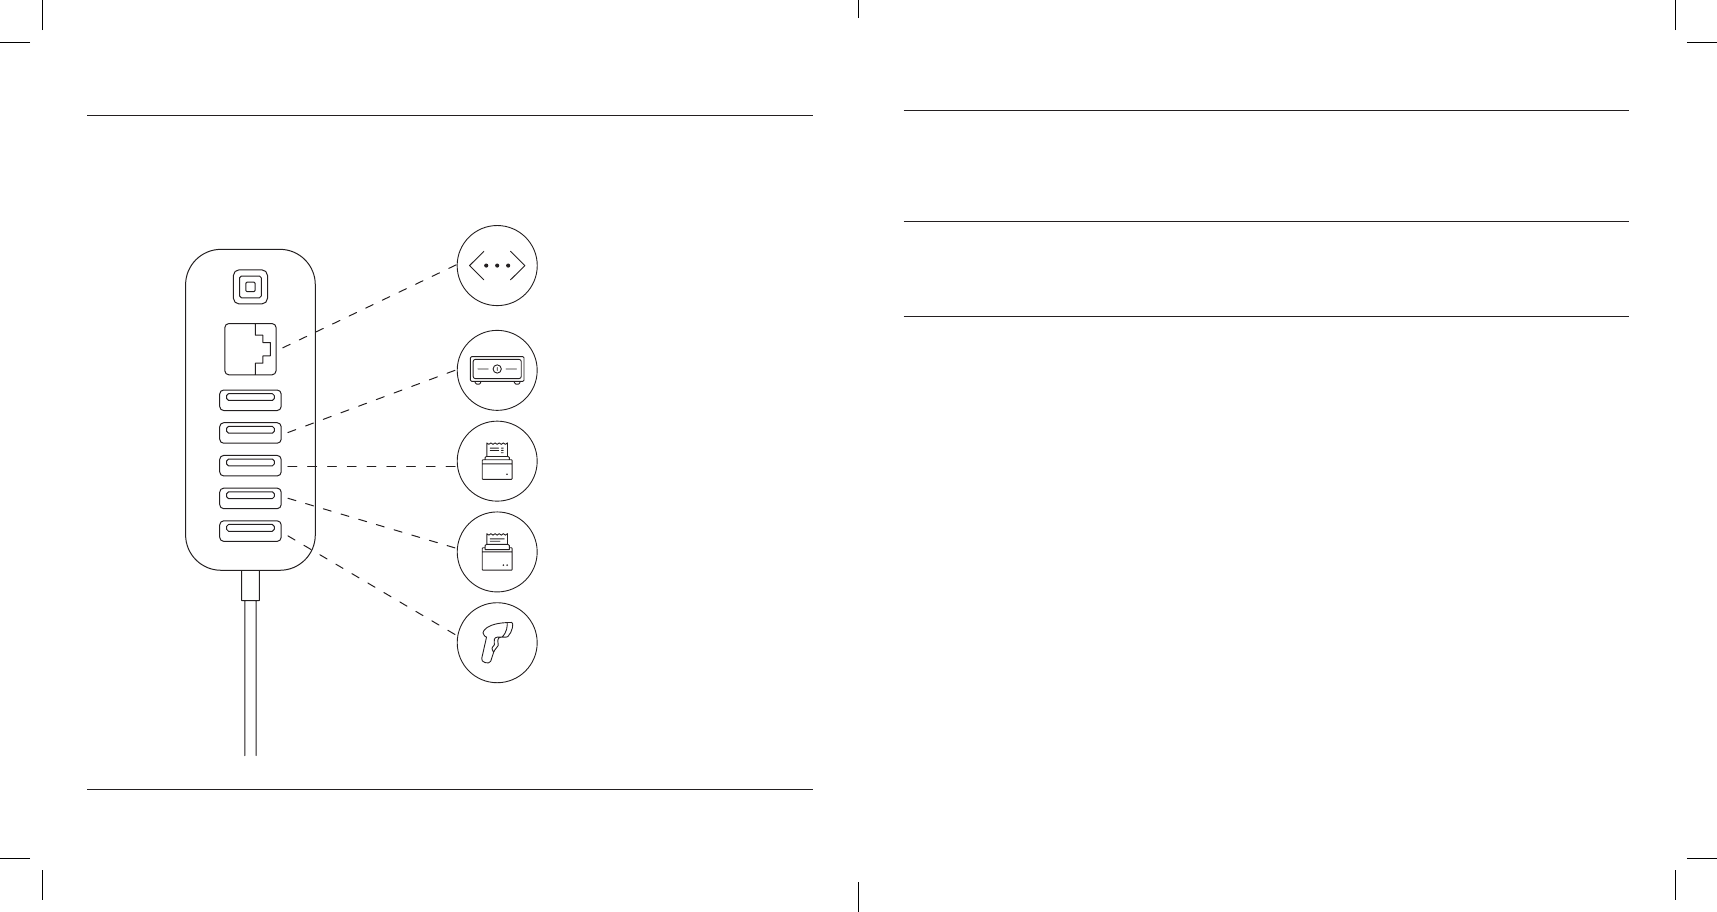
HOW TO USE THE ACCESSORY HUB
The accessory hub gives you USB pos to connect a cash drawer, printer, or bar code scanner, and an
Ethernet po if you need a wired internet connection. To learn more about setting up accessories and
connecting to the internet, go to square.com/register-setup.
HELP AND SUPPORT
Read our FAQs, learn more about compatible hardware, and get troubleshooting suppo at
square.com/register-setup.
HARDWARE WARRANTY
You’re covered from defects for up to two years under a limited warranty. See square.com/warranty.
FREE 30DAY RETURNS
Square offers a 30-day, risk-free return policy for all purchases made from square.com/shop.
Simply go to square.com/returns so we can make things right. After a return is complete, a
refund will be credited back to you.
Ethernet po
Cash drawer
Receipt printer
Order ticket printer
Bar code scanner
Note: Only use the Ethernet po for connecting Square Register to the internet.

REGULATORY INFORMATION
You can view regulatory information for Square Register by going to Settings > General > About Register > Regulatory. To view FCC information, go to
Suppo > Legal > Hardware Disclaimer.
This device complies with Pa 15 of the FCC Rules. Operation is subject to the following two conditions: (1) this device may not cause harmful inteerence,
and (2) this device must accept any inteerence received, including inteerence that may cause undesired operation.
ACCESSORY HUB INFORMATION
Hub output provides power to peripherals. Register output provides power to Square Register.
© 2017 Square, Inc., 1455 Market St., Ste. 600, San Francisco, CA 94103. Square, the Square logo, and Square Register are trademarks of Square, Inc.
M-LIT-0094-03