Star Solutions 2-10-01-00-1 iCell QUADPAC DO IP-RAN 1900MHz CPU (wo CPU) AC GPS User Manual QuadPac EVDO IIC Guide
Star Solutions International Inc iCell QUADPAC DO IP-RAN 1900MHz CPU (wo CPU) AC GPS QuadPac EVDO IIC Guide
Contents
- 1. Part 1
- 2. Part 2
Part 1

All‐IPCDMA2000®
iCell®QuadPACIP‐RAN
EV‐DOQuadPAC
InstallationandInitialConfiguration
Guide
PartNumberD02698GSRevA1

All‐IPCDMA2000®
iCell®QuadPACIP‐RAN
EV‐DOQuadPAC
InstallationandInitialConfiguration
Guide
PartNumberD02698GSRevA1
STARSOLUTIONSCONFIDENTIAL
TheinformationcontainedhereinisthepropertyofStarSolutionsInternationalInc."StarSolutions"andisstrictlyconfidential.
ExceptasexpresslyauthorizedinwritingbyStarSolutions,theholdershallkeepallinformationcontainedhereinconfidential,in
wholeorinpart,fromdisclosureanddisseminationtothirdparties.
COPYRIGHTNOTICE
Copyright©2013,StarSolutionsInternationalInc.Allrightsreserved.Nopartofthisdocumentationmaybereproducedinany
formorbyanymeansorusedtomakeanyderivativework(suchastranslation,transformation,oradaptation)withoutprior
writtenpermissionfromStarSolutions.
StarSolutions,theStarSolutionslogo,iCellandSonataareregisteredtrademarksortrademarksofStarSolutionsInternational
Inc.anditssubsidiaries.Allotherbrandandproductnamesmayberegisteredtrademarksandarethepropertyoftheir
respectiveowners.
StarSolutionsreservestherighttorevisethisdocumentationandtomakechangesincontentfromtimetotimewithout
obligationonthepartofStarSolutionstoprovidenotificationofsuchrevisionorchange.
StarSolutionsprovidesthisdocumentationwithoutwarrantyofanykind,eitherimpliedorexpressed,including,butnotlimited
to,theimpliedwarrantiesofmerchantabilityandfitnessforaparticularpurpose.StarSolutionsmaymakeimprovementsor
changesintheproduct(s)and/ortheprogram(s)describedinthisdocumentationatanytime.
UNITEDSTATESGOVERNMENTLEGENDS:
IfyouareaUnitedStatesgovernmentagency,thenthisdocumentationandthesoftwaredescribedhereinareprovidedtoyou
subjecttothefollowing:
UnitedStatesGovernmentLegend:Alltechnicaldataandcomputersoftwareiscommercialinnatureanddevelopedsolelyat
privateexpense.SoftwareisdeliveredasCommercialComputerSoftwareasdefinedinDFARS252.227?7014(June1995)orasa
commercialitemasdefinedinFAR2.101(a)andassuchisprovidedwithonlysuchrightsasareprovidedinStarSolutions's
standardcommerciallicensefortheSoftware.TechnicaldataisprovidedwithlimitedrightsonlyasprovidedinDFAR
252.227?7015(Nov1995)orFAR52.227?14(Dec2007),whicheverisapplicable.Youagreenottoremoveordefaceanyportion
ofanylegendprovidedonanylicensedprogramordocumentationcontainedin,ordeliveredtoyouinconjunctionwith,this
documentation.

iCell®QuadPACIP‐RANEV‐DOQuadPACInstallationandInitialConfigurationGuide
PartNumberD02698GSRevA1|November2013
STARSOLUTIONSCONFIDENTIAL
CONTENTS
ABOUTTHISGUIDE
ProductOverview ‐‐‐‐‐‐‐‐‐‐‐‐‐‐‐‐‐‐‐‐‐‐‐‐‐‐‐‐‐‐‐‐‐‐‐‐‐‐‐‐‐‐‐‐‐‐‐‐‐‐‐ 13
All‐IPCDMA2000®SystemArchitecture ‐‐‐‐‐‐‐‐‐‐‐‐‐‐‐‐‐‐‐‐‐‐‐‐‐‐‐‐‐‐‐‐ 13
QuadPACFunctionality ‐‐‐‐‐‐‐‐‐‐‐‐‐‐‐‐‐‐‐‐‐‐‐‐‐‐‐‐‐‐‐‐‐‐‐‐‐‐‐‐‐‐‐‐‐ 15
QuadPACConfiguration ‐‐‐‐‐‐‐‐‐‐‐‐‐‐‐‐‐‐‐‐‐‐‐‐‐‐‐‐‐‐‐‐‐‐‐‐‐‐‐‐‐‐‐‐ 15
TechnicalSpecifications ‐‐‐‐‐‐‐‐‐‐‐‐‐‐‐‐‐‐‐‐‐‐‐‐‐‐‐‐‐‐‐‐‐‐‐‐‐‐‐‐‐‐‐‐ 16
OrderofTasks ‐‐‐‐‐‐‐‐‐‐‐‐‐‐‐‐‐‐‐‐‐‐‐‐‐‐‐‐‐‐‐‐‐‐‐‐‐‐‐‐‐‐‐‐‐‐‐‐‐‐‐‐‐‐ 16
Pre‐InstallationTaskOutline ‐‐‐‐‐‐‐‐‐‐‐‐‐‐‐‐‐‐‐‐‐‐‐‐‐‐‐‐‐‐‐‐‐‐‐‐‐‐‐‐‐ 17
InstallationTaskOutline‐‐‐‐‐‐‐‐‐‐‐‐‐‐‐‐‐‐‐‐‐‐‐‐‐‐‐‐‐‐‐‐‐‐‐‐‐‐‐‐‐‐‐‐ 17
InitialConfigurationTaskOutline ‐‐‐‐‐‐‐‐‐‐‐‐‐‐‐‐‐‐‐‐‐‐‐‐‐‐‐‐‐‐‐‐‐‐‐‐‐ 17
Conventions ‐‐‐‐‐‐‐‐‐‐‐‐‐‐‐‐‐‐‐‐‐‐‐‐‐‐‐‐‐‐‐‐‐‐‐‐‐‐‐‐‐‐‐‐‐‐‐‐‐‐‐‐‐‐‐ 17
Notices ‐‐‐‐‐‐‐‐‐‐‐‐‐‐‐‐‐‐‐‐‐‐‐‐‐‐‐‐‐‐‐‐‐‐‐‐‐‐‐‐‐‐‐‐‐‐‐‐‐‐‐‐‐‐‐‐ 17
FiguresandScreenCaptures‐‐‐‐‐‐‐‐‐‐‐‐‐‐‐‐‐‐‐‐‐‐‐‐‐‐‐‐‐‐‐‐‐‐‐‐‐‐‐‐‐ 18
Text ‐‐‐‐‐‐‐‐‐‐‐‐‐‐‐‐‐‐‐‐‐‐‐‐‐‐‐‐‐‐‐‐‐‐‐‐‐‐‐‐‐‐‐‐‐‐‐‐‐‐‐‐‐‐‐‐‐‐‐ 18
RelatedDocumentation ‐‐‐‐‐‐‐‐‐‐‐‐‐‐‐‐‐‐‐‐‐‐‐‐‐‐‐‐‐‐‐‐‐‐‐‐‐‐‐‐‐‐‐‐‐‐‐ 18
iCellDocumentation‐‐‐‐‐‐‐‐‐‐‐‐‐‐‐‐‐‐‐‐‐‐‐‐‐‐‐‐‐‐‐‐‐‐‐‐‐‐‐‐‐‐‐‐‐‐‐ 20
TechnicalSupport ‐‐‐‐‐‐‐‐‐‐‐‐‐‐‐‐‐‐‐‐‐‐‐‐‐‐‐‐‐‐‐‐‐‐‐‐‐‐‐‐‐‐‐‐‐‐‐‐‐‐‐ 20
ObtainingTechnicalAssistance‐‐‐‐‐‐‐‐‐‐‐‐‐‐‐‐‐‐‐‐‐‐‐‐‐‐‐‐‐‐‐‐‐‐‐‐‐‐‐ 20
ServiceCentersOperationalHours ‐‐‐‐‐‐‐‐‐‐‐‐‐‐‐‐‐‐‐‐‐‐‐‐‐‐‐‐‐‐‐‐‐ 20
WarrantySupport ‐‐‐‐‐‐‐‐‐‐‐‐‐‐‐‐‐‐‐‐‐‐‐‐‐‐‐‐‐‐‐‐‐‐‐‐‐‐‐‐‐‐‐‐‐‐‐‐‐‐‐ 21
ContactingTechnicalDocumentation‐‐‐‐‐‐‐‐‐‐‐‐‐‐‐‐‐‐‐‐‐‐‐‐‐‐‐‐‐‐‐‐‐‐‐‐‐ 21
PARTIPRE‐INSTALLATION
1PREREQUISITES
AboutThisChapter ‐‐‐‐‐‐‐‐‐‐‐‐‐‐‐‐‐‐‐‐‐‐‐‐‐‐‐‐‐‐‐‐‐‐‐‐‐‐‐‐‐‐‐‐‐‐‐‐‐‐ 25
InstallerRequirements‐‐‐‐‐‐‐‐‐‐‐‐‐‐‐‐‐‐‐‐‐‐‐‐‐‐‐‐‐‐‐‐‐‐‐‐‐‐‐‐‐‐‐‐‐‐‐‐ 25
RequiredSkills‐‐‐‐‐‐‐‐‐‐‐‐‐‐‐‐‐‐‐‐‐‐‐‐‐‐‐‐‐‐‐‐‐‐‐‐‐‐‐‐‐‐‐‐‐‐‐‐‐‐‐ 25
SupportingDocumentation ‐‐‐‐‐‐‐‐‐‐‐‐‐‐‐‐‐‐‐‐‐‐‐‐‐‐‐‐‐‐‐‐‐‐‐‐‐‐‐‐‐ 25
RequiredToo ls ‐‐‐‐‐‐‐‐‐‐‐‐‐‐‐‐‐‐‐‐‐‐‐‐‐‐‐‐‐‐‐‐‐‐‐‐‐‐‐‐‐‐‐‐‐‐‐‐‐‐‐ 25
TestClientHardware ‐‐‐‐‐‐‐‐‐‐‐‐‐‐‐‐‐‐‐‐‐‐‐‐‐‐‐‐‐‐‐‐‐‐‐‐‐‐‐‐‐‐‐‐‐‐ 26
Cables ‐‐‐‐‐‐‐‐‐‐‐‐‐‐‐‐‐‐‐‐‐‐‐‐‐‐‐‐‐‐‐‐‐‐‐‐‐‐‐‐‐‐‐‐‐‐‐‐‐‐‐‐‐‐‐‐‐ 26
EngineeringPlanningRequirements ‐‐‐‐‐‐‐‐‐‐‐‐‐‐‐‐‐‐‐‐‐‐‐‐‐‐‐‐‐‐‐‐‐‐‐‐‐‐ 27
IPAddressAssignment ‐‐‐‐‐‐‐‐‐‐‐‐‐‐‐‐‐‐‐‐‐‐‐‐‐‐‐‐‐‐‐‐‐‐‐‐‐‐‐‐‐‐‐‐‐ 27
TestClientIPAddressing‐‐‐‐‐‐‐‐‐‐‐‐‐‐‐‐‐‐‐‐‐‐‐‐‐‐‐‐‐‐‐‐‐‐‐‐‐‐‐‐‐ 27
AccessNetworkIPAddressing ‐‐‐‐‐‐‐‐‐‐‐‐‐‐‐‐‐‐‐‐‐‐‐‐‐‐‐‐‐‐‐‐‐‐‐‐‐ 27
PasswordsandUsernames‐‐‐‐‐‐‐‐‐‐‐‐‐‐‐‐‐‐‐‐‐‐‐‐‐‐‐‐‐‐‐‐‐‐‐‐‐‐‐‐‐‐‐‐‐ 28

iCell®QuadPACIP‐RANIP‐RANEV‐DOQuadPACInstallationandInitialConfigurationGuide
PartNumberD02698GSRevA1|November2013
6Contents
STARSOLUTIONSCONFIDENTIAL
2SITEPREPARATION
AboutThisChapter ‐‐‐‐‐‐‐‐‐‐‐‐‐‐‐‐‐‐‐‐‐‐‐‐‐‐‐‐‐‐‐‐‐‐‐‐‐‐‐‐‐‐‐‐‐‐‐‐‐‐ 29
SiteRequirements‐‐‐‐‐‐‐‐‐‐‐‐‐‐‐‐‐‐‐‐‐‐‐‐‐‐‐‐‐‐‐‐‐‐‐‐‐‐‐‐‐‐‐‐‐‐‐‐‐‐‐ 29
MountingOptions ‐‐‐‐‐‐‐‐‐‐‐‐‐‐‐‐‐‐‐‐‐‐‐‐‐‐‐‐‐‐‐‐‐‐‐‐‐‐‐‐‐‐‐‐‐‐‐‐ 30
PowerRequirements ‐‐‐‐‐‐‐‐‐‐‐‐‐‐‐‐‐‐‐‐‐‐‐‐‐‐‐‐‐‐‐‐‐‐‐‐‐‐‐‐‐‐‐‐‐‐ 30
SiteExternalGroundingRequirements‐‐‐‐‐‐‐‐‐‐‐‐‐‐‐‐‐‐‐‐‐‐‐‐‐‐‐‐‐‐‐‐‐ 30
SiteGroundingResponsibility ‐‐‐‐‐‐‐‐‐‐‐‐‐‐‐‐‐‐‐‐‐‐‐‐‐‐‐‐‐‐‐‐‐‐‐‐‐ 30
GroundRods‐‐‐‐‐‐‐‐‐‐‐‐‐‐‐‐‐‐‐‐‐‐‐‐‐‐‐‐‐‐‐‐‐‐‐‐‐‐‐‐‐‐‐‐‐‐‐‐‐‐ 30
ACPowerGrounding‐‐‐‐‐‐‐‐‐‐‐‐‐‐‐‐‐‐‐‐‐‐‐‐‐‐‐‐‐‐‐‐‐‐‐‐‐‐‐‐‐‐‐‐ 30
GroundTesting ‐‐‐‐‐‐‐‐‐‐‐‐‐‐‐‐‐‐‐‐‐‐‐‐‐‐‐‐‐‐‐‐‐‐‐‐‐‐‐‐‐‐‐‐‐‐‐‐ 30
OtherCableGrounding‐‐‐‐‐‐‐‐‐‐‐‐‐‐‐‐‐‐‐‐‐‐‐‐‐‐‐‐‐‐‐‐‐‐‐‐‐‐‐‐‐‐‐‐‐ 30
GPSReceiverProtection ‐‐‐‐‐‐‐‐‐‐‐‐‐‐‐‐‐‐‐‐‐‐‐‐‐‐‐‐‐‐‐‐‐‐‐‐‐‐‐‐‐‐‐‐ 31
SpaceRequirements‐‐‐‐‐‐‐‐‐‐‐‐‐‐‐‐‐‐‐‐‐‐‐‐‐‐‐‐‐‐‐‐‐‐‐‐‐‐‐‐‐‐‐‐‐‐‐ 31
InspectingandVerifyingSiteRequirements‐‐‐‐‐‐‐‐‐‐‐‐‐‐‐‐‐‐‐‐‐‐‐‐‐‐‐‐‐‐ 31
SafetyPrecautions ‐‐‐‐‐‐‐‐‐‐‐‐‐‐‐‐‐‐‐‐‐‐‐‐‐‐‐‐‐‐‐‐‐‐‐‐‐‐‐‐‐‐‐‐‐ 31
FireProtection ‐‐‐‐‐‐‐‐‐‐‐‐‐‐‐‐‐‐‐‐‐‐‐‐‐‐‐‐‐‐‐‐‐‐‐‐‐‐‐‐‐‐‐‐‐‐‐‐ 31
VerifyingTemperatureControl ‐‐‐‐‐‐‐‐‐‐‐‐‐‐‐‐‐‐‐‐‐‐‐‐‐‐‐‐‐‐‐‐‐‐‐‐ 32
InspectingandVerifyingSiteConditions ‐‐‐‐‐‐‐‐‐‐‐‐‐‐‐‐‐‐‐‐‐‐‐‐‐‐‐‐‐ 32
SiteInstallationChecklist‐‐‐‐‐‐‐‐‐‐‐‐‐‐‐‐‐‐‐‐‐‐‐‐‐‐‐‐‐‐‐‐‐‐‐‐‐‐‐‐‐‐‐‐‐‐ 32
PARTII INSTALLATION
3QUADPACINSTALLATION
AboutThisChapter ‐‐‐‐‐‐‐‐‐‐‐‐‐‐‐‐‐‐‐‐‐‐‐‐‐‐‐‐‐‐‐‐‐‐‐‐‐‐‐‐‐‐‐‐‐‐‐‐‐‐ 35
UnpackingtheShipment ‐‐‐‐‐‐‐‐‐‐‐‐‐‐‐‐‐‐‐‐‐‐‐‐‐‐‐‐‐‐‐‐‐‐‐‐‐‐‐‐‐‐‐‐‐‐ 35
InstallingtheQuadPAC‐‐‐‐‐‐‐‐‐‐‐‐‐‐‐‐‐‐‐‐‐‐‐‐‐‐‐‐‐‐‐‐‐‐‐‐‐‐‐‐‐‐‐‐‐‐‐‐ 36
InstallingtheMountingEars ‐‐‐‐‐‐‐‐‐‐‐‐‐‐‐‐‐‐‐‐‐‐‐‐‐‐‐‐‐‐‐‐‐‐‐‐‐‐‐‐‐ 36
MountingtheQuadPACintotheRack ‐‐‐‐‐‐‐‐‐‐‐‐‐‐‐‐‐‐‐‐‐‐‐‐‐‐‐‐‐‐‐‐‐‐ 37
Grounding ‐‐‐‐‐‐‐‐‐‐‐‐‐‐‐‐‐‐‐‐‐‐‐‐‐‐‐‐‐‐‐‐‐‐‐‐‐‐‐‐‐‐‐‐‐‐‐‐‐‐‐‐‐‐‐‐‐ 38
4INTERFACECONNECTIONS
AboutThisChapter ‐‐‐‐‐‐‐‐‐‐‐‐‐‐‐‐‐‐‐‐‐‐‐‐‐‐‐‐‐‐‐‐‐‐‐‐‐‐‐‐‐‐‐‐‐‐‐‐‐‐ 39
Front/RearPanelInterfaceConnections‐‐‐‐‐‐‐‐‐‐‐‐‐‐‐‐‐‐‐‐‐‐‐‐‐‐‐‐‐‐‐‐‐‐ 40
Ethernet/LANConnections‐‐‐‐‐‐‐‐‐‐‐‐‐‐‐‐‐‐‐‐‐‐‐‐‐‐‐‐‐‐‐‐‐‐‐‐‐‐‐‐‐‐‐‐ 42
ConnectingtheQuadPACtotheNetwork‐‐‐‐‐‐‐‐‐‐‐‐‐‐‐‐‐‐‐‐‐‐‐‐‐‐‐‐‐‐‐ 42
“Typical”connectionmode ‐‐‐‐‐‐‐‐‐‐‐‐‐‐‐‐‐‐‐‐‐‐‐‐‐‐‐‐‐‐‐‐‐‐‐‐‐‐‐ 42
“AllInOne”connectionmode ‐‐‐‐‐‐‐‐‐‐‐‐‐‐‐‐‐‐‐‐‐‐‐‐‐‐‐‐‐‐‐‐‐‐‐‐‐ 46
RFAntennaConnections ‐‐‐‐‐‐‐‐‐‐‐‐‐‐‐‐‐‐‐‐‐‐‐‐‐‐‐‐‐‐‐‐‐‐‐‐‐‐‐‐‐‐‐‐‐‐ 49
GPSAntennaConnection ‐‐‐‐‐‐‐‐‐‐‐‐‐‐‐‐‐‐‐‐‐‐‐‐‐‐‐‐‐‐‐‐‐‐‐‐‐‐‐‐‐‐‐‐‐‐ 49
PowerConnection ‐‐‐‐‐‐‐‐‐‐‐‐‐‐‐‐‐‐‐‐‐‐‐‐‐‐‐‐‐‐‐‐‐‐‐‐‐‐‐‐‐‐‐‐‐‐‐‐‐‐‐ 50
ResetButton‐‐‐‐‐‐‐‐‐‐‐‐‐‐‐‐‐‐‐‐‐‐‐‐‐‐‐‐‐‐‐‐‐‐‐‐‐‐‐‐‐‐‐‐‐‐‐‐‐‐‐‐‐‐‐ 50
StatusLED ‐‐‐‐‐‐‐‐‐‐‐‐‐‐‐‐‐‐‐‐‐‐‐‐‐‐‐‐‐‐‐‐‐‐‐‐‐‐‐‐‐‐‐‐‐‐‐‐‐‐‐‐‐‐‐‐‐ 51
PARTIII INITIALCONFIGURATION

iCell®QuadPACIP‐RANEV‐DOQuadPACInstallationandInitialConfigurationGuide
PartNumberD02698GSRevA1|November2013
Contents 7
STARSOLUTIONSCONFIDENTIAL
5QUADPACIPCONFIGURATION
AboutThisChapter ‐‐‐‐‐‐‐‐‐‐‐‐‐‐‐‐‐‐‐‐‐‐‐‐‐‐‐‐‐‐‐‐‐‐‐‐‐‐‐‐‐‐‐‐‐‐‐‐‐‐ 55
FactoryDefaultSettings ‐‐‐‐‐‐‐‐‐‐‐‐‐‐‐‐‐‐‐‐‐‐‐‐‐‐‐‐‐‐‐‐‐‐‐‐‐‐‐‐‐‐‐‐‐‐‐ 55
QuadPACIPConfigurationProcedure ‐‐‐‐‐‐‐‐‐‐‐‐‐‐‐‐‐‐‐‐‐‐‐‐‐‐‐‐‐‐‐‐‐‐‐‐‐ 55
ConnectingtheTestClient ‐‐‐‐‐‐‐‐‐‐‐‐‐‐‐‐‐‐‐‐‐‐‐‐‐‐‐‐‐‐‐‐‐‐‐‐‐‐‐‐‐‐ 55
PerformingaDefaultPingTest ‐‐‐‐‐‐‐‐‐‐‐‐‐‐‐‐‐‐‐‐‐‐‐‐‐‐‐‐‐‐‐‐‐‐‐‐‐‐‐ 56
ChangingtheDO‐BTSIPConfiguration ‐‐‐‐‐‐‐‐‐‐‐‐‐‐‐‐‐‐‐‐‐‐‐‐‐‐‐‐‐‐‐‐‐ 57
ChangingtheRNCIPConfiguration ‐‐‐‐‐‐‐‐‐‐‐‐‐‐‐‐‐‐‐‐‐‐‐‐‐‐‐‐‐‐‐‐‐‐‐‐ 60
ResettingtheQuadPACtoFactoryDefaultIPSettings‐‐‐‐‐‐‐‐‐‐‐‐‐‐‐‐‐‐‐‐‐‐‐‐‐ 61
6QUADPACPARAMETERCONFIGURATION
AboutThisChapter ‐‐‐‐‐‐‐‐‐‐‐‐‐‐‐‐‐‐‐‐‐‐‐‐‐‐‐‐‐‐‐‐‐‐‐‐‐‐‐‐‐‐‐‐‐‐‐‐‐‐ 63
ConnectingtotheRNCElementManager‐‐‐‐‐‐‐‐‐‐‐‐‐‐‐‐‐‐‐‐‐‐‐‐‐‐‐‐‐‐‐‐‐‐ 63
ModifyingtheRNCMIB‐‐‐‐‐‐‐‐‐‐‐‐‐‐‐‐‐‐‐‐‐‐‐‐‐‐‐‐‐‐‐‐‐‐‐‐‐‐‐‐‐‐‐‐‐‐‐ 67
LockingtheRNCandInterfaces‐‐‐‐‐‐‐‐‐‐‐‐‐‐‐‐‐‐‐‐‐‐‐‐‐‐‐‐‐‐‐‐‐‐‐‐‐‐‐ 68
‐‐‐‐‐‐‐‐‐‐‐‐‐‐‐‐‐‐‐‐‐‐‐‐‐‐‐‐‐‐‐‐‐‐‐‐‐‐‐‐‐‐‐‐‐‐‐‐‐‐‐‐‐‐‐‐‐‐‐‐‐‐ 68
UnlockingtheRNCelements ‐‐‐‐‐‐‐‐‐‐‐‐‐‐‐‐‐‐‐‐‐‐‐‐‐‐‐‐‐‐‐‐‐‐‐‐‐‐‐‐ 68
SavingtheRNCConfiguration ‐‐‐‐‐‐‐‐‐‐‐‐‐‐‐‐‐‐‐‐‐‐‐‐‐‐‐‐‐‐‐‐‐‐‐‐‐‐‐‐ 69
RestartingtheRNC‐‐‐‐‐‐‐‐‐‐‐‐‐‐‐‐‐‐‐‐‐‐‐‐‐‐‐‐‐‐‐‐‐‐‐‐‐‐‐‐‐‐‐‐‐‐‐‐‐‐‐ 71
CheckingtheRNCstatus ‐‐‐‐‐‐‐‐‐‐‐‐‐‐‐‐‐‐‐‐‐‐‐‐‐‐‐‐‐‐‐‐‐‐‐‐‐‐‐‐‐‐‐‐‐‐ 72
ConnectingtotheDO‐BTSElementManager‐‐‐‐‐‐‐‐‐‐‐‐‐‐‐‐‐‐‐‐‐‐‐‐‐‐‐‐‐‐‐ 74
ModifyingtheDO‐BTSMIB ‐‐‐‐‐‐‐‐‐‐‐‐‐‐‐‐‐‐‐‐‐‐‐‐‐‐‐‐‐‐‐‐‐‐‐‐‐‐‐‐‐‐‐‐ 75
SavingtheDO‐BTSConfiguration ‐‐‐‐‐‐‐‐‐‐‐‐‐‐‐‐‐‐‐‐‐‐‐‐‐‐‐‐‐‐‐‐‐‐‐‐‐ 76
RestartingtheDO‐BTS‐‐‐‐‐‐‐‐‐‐‐‐‐‐‐‐‐‐‐‐‐‐‐‐‐‐‐‐‐‐‐‐‐‐‐‐‐‐‐‐‐‐‐‐‐‐‐‐ 78
CheckingtheDO‐BTSstatus ‐‐‐‐‐‐‐‐‐‐‐‐‐‐‐‐‐‐‐‐‐‐‐‐‐‐‐‐‐‐‐‐‐‐‐‐‐‐‐‐‐‐‐‐ 79
PARTIV APPENDICES
AREGULATORYNOTICES
U.S.RegulatoryStatement ‐‐‐‐‐‐‐‐‐‐‐‐‐‐‐‐‐‐‐‐‐‐‐‐‐‐‐‐‐‐‐‐‐‐‐‐‐‐‐‐‐‐‐‐‐ 83
CanadianRegulatoryStatement ‐‐‐‐‐‐‐‐‐‐‐‐‐‐‐‐‐‐‐‐‐‐‐‐‐‐‐‐‐‐‐‐‐‐‐‐‐‐‐‐‐ 83
RFMaximumPermissibleExposure(MPE)ExhibitRequirements ‐‐‐‐‐‐‐‐‐‐‐‐‐‐‐‐ 84
BUSINGTHECOMMONELEMENTMANAGER
AboutThisAppendix‐‐‐‐‐‐‐‐‐‐‐‐‐‐‐‐‐‐‐‐‐‐‐‐‐‐‐‐‐‐‐‐‐‐‐‐‐‐‐‐‐‐‐‐‐‐‐‐‐ 87
AbouttheCommonElementManager ‐‐‐‐‐‐‐‐‐‐‐‐‐‐‐‐‐‐‐‐‐‐‐‐‐‐‐‐‐‐‐‐‐‐‐‐ 87
LaunchingtheCEM ‐‐‐‐‐‐‐‐‐‐‐‐‐‐‐‐‐‐‐‐‐‐‐‐‐‐‐‐‐‐‐‐‐‐‐‐‐‐‐‐‐‐‐‐‐‐‐‐‐‐ 88
UsingtheCEMConsole ‐‐‐‐‐‐‐‐‐‐‐‐‐‐‐‐‐‐‐‐‐‐‐‐‐‐‐‐‐‐‐‐‐‐‐‐‐‐‐‐‐‐‐‐‐‐‐ 90
CEMConsoleScreenComponents ‐‐‐‐‐‐‐‐‐‐‐‐‐‐‐‐‐‐‐‐‐‐‐‐‐‐‐‐‐‐‐‐‐‐‐‐ 90
CEMHelp‐‐‐‐‐‐‐‐‐‐‐‐‐‐‐‐‐‐‐‐‐‐‐‐‐‐‐‐‐‐‐‐‐‐‐‐‐‐‐‐‐‐‐‐‐‐‐‐‐‐‐‐‐‐‐ 91
UsingConfigurationTabs ‐‐‐‐‐‐‐‐‐‐‐‐‐‐‐‐‐‐‐‐‐‐‐‐‐‐‐‐‐‐‐‐‐‐‐‐‐‐‐‐‐‐‐ 92
Pop‐upMenus‐‐‐‐‐‐‐‐‐‐‐‐‐‐‐‐‐‐‐‐‐‐‐‐‐‐‐‐‐‐‐‐‐‐‐‐‐‐‐‐‐‐‐‐‐‐‐‐‐‐‐ 95
RNCFunctionPop‐upMenu ‐‐‐‐‐‐‐‐‐‐‐‐‐‐‐‐‐‐‐‐‐‐‐‐‐‐‐‐‐‐‐‐‐‐‐‐‐‐ 96
DO‐BTSFunctionPop‐upMenu ‐‐‐‐‐‐‐‐‐‐‐‐‐‐‐‐‐‐‐‐‐‐‐‐‐‐‐‐‐‐‐‐‐‐‐‐ 98
CheckingRNCandDO‐BTSStatusUsingCEM ‐‐‐‐‐‐‐‐‐‐‐‐‐‐‐‐‐‐‐‐‐‐‐‐‐‐‐‐‐‐ 100

iCell®QuadPACIP‐RANIP‐RANEV‐DOQuadPACInstallationandInitialConfigurationGuide
PartNumberD02698GSRevA1|November2013
8Contents
STARSOLUTIONSCONFIDENTIAL
UpdatingtheStatusManually‐‐‐‐‐‐‐‐‐‐‐‐‐‐‐‐‐‐‐‐‐‐‐‐‐‐‐‐‐‐‐‐‐‐‐‐‐‐‐ 100
ViewingtheStateIcons ‐‐‐‐‐‐‐‐‐‐‐‐‐‐‐‐‐‐‐‐‐‐‐‐‐‐‐‐‐‐‐‐‐‐‐‐‐‐‐‐‐‐‐ 101
ChangingtheStateIconState‐TypeDisplay‐‐‐‐‐‐‐‐‐‐‐‐‐‐‐‐‐‐‐‐‐‐‐‐‐‐ 102
CheckingtheStateTab ‐‐‐‐‐‐‐‐‐‐‐‐‐‐‐‐‐‐‐‐‐‐‐‐‐‐‐‐‐‐‐‐‐‐‐‐‐‐‐‐‐‐‐‐ 102
CACRONYMSANDABBREVIATIONS
AcronymsandAbbreviations‐‐‐‐‐‐‐‐‐‐‐‐‐‐‐‐‐‐‐‐‐‐‐‐‐‐‐‐‐‐‐‐‐‐‐‐‐‐‐‐‐‐ 105

9
iCell®QuadPACIP‐RANEV‐DOQuadPACInstallationandInitialConfigurationGuide
PartNumberD02698GSRevA1|November2013
STARSOLUTIONSCONFIDENTIAL
LISTOFTABLES
Table 1QuadPACTechnicalSpecifications‐‐‐‐‐‐‐‐‐‐‐‐‐‐‐‐‐‐‐‐‐‐‐‐‐‐‐‐‐‐‐ 16
Table 2NoticeIconDescriptions ‐‐‐‐‐‐‐‐‐‐‐‐‐‐‐‐‐‐‐‐‐‐‐‐‐‐‐‐‐‐‐‐‐‐‐‐‐‐ 17
Table 3TextConventionDescriptions ‐‐‐‐‐‐‐‐‐‐‐‐‐‐‐‐‐‐‐‐‐‐‐‐‐‐‐‐‐‐‐‐‐‐ 18
Table 4ToolsRequiredforInstallation ‐‐‐‐‐‐‐‐‐‐‐‐‐‐‐‐‐‐‐‐‐‐‐‐‐‐‐‐‐‐‐‐‐‐ 25
Table 5TestClientRequirements‐‐‐‐‐‐‐‐‐‐‐‐‐‐‐‐‐‐‐‐‐‐‐‐‐‐‐‐‐‐‐‐‐‐‐‐‐‐ 26
Table 6CablesSuppliedbytheNetworkOperator ‐‐‐‐‐‐‐‐‐‐‐‐‐‐‐‐‐‐‐‐‐‐‐‐‐ 26
Table 7ExampleofTestClientIPAddressing‐‐‐‐‐‐‐‐‐‐‐‐‐‐‐‐‐‐‐‐‐‐‐‐‐‐‐‐‐ 27
Table 8RequiredIPAddressing ‐‐‐‐‐‐‐‐‐‐‐‐‐‐‐‐‐‐‐‐‐‐‐‐‐‐‐‐‐‐‐‐‐‐‐‐‐‐‐ 27
Table 9sshLoginInformation‐‐‐‐‐‐‐‐‐‐‐‐‐‐‐‐‐‐‐‐‐‐‐‐‐‐‐‐‐‐‐‐‐‐‐‐‐‐‐‐ 28
Table 10HTTPLoginInformation ‐‐‐‐‐‐‐‐‐‐‐‐‐‐‐‐‐‐‐‐‐‐‐‐‐‐‐‐‐‐‐‐‐‐‐‐‐‐ 28
Table 11TemperatureandHumidityRanges‐‐‐‐‐‐‐‐‐‐‐‐‐‐‐‐‐‐‐‐‐‐‐‐‐‐‐‐‐‐ 32
Table 12ComponentList ‐‐‐‐‐‐‐‐‐‐‐‐‐‐‐‐‐‐‐‐‐‐‐‐‐‐‐‐‐‐‐‐‐‐‐‐‐‐‐‐‐‐‐‐ 35
Table 13QuadPACFrontPanelInterfaceConnections ‐‐‐‐‐‐‐‐‐‐‐‐‐‐‐‐‐‐‐‐‐‐‐ 40
Table 14QuadPACRearPanelInterfaceConnections ‐‐‐‐‐‐‐‐‐‐‐‐‐‐‐‐‐‐‐‐‐‐‐‐ 41
Table 15ResetButtonTiming ‐‐‐‐‐‐‐‐‐‐‐‐‐‐‐‐‐‐‐‐‐‐‐‐‐‐‐‐‐‐‐‐‐‐‐‐‐‐‐‐‐ 50
Table 16StatusLEDBehavior ‐‐‐‐‐‐‐‐‐‐‐‐‐‐‐‐‐‐‐‐‐‐‐‐‐‐‐‐‐‐‐‐‐‐‐‐‐‐‐‐‐ 51
Table 17QuadPACFactoryDefaultIPSettings‐‐‐‐‐‐‐‐‐‐‐‐‐‐‐‐‐‐‐‐‐‐‐‐‐‐‐‐‐ 55
Table 18BootConfigurationParameters ‐‐‐‐‐‐‐‐‐‐‐‐‐‐‐‐‐‐‐‐‐‐‐‐‐‐‐‐‐‐‐‐‐ 59
Table 19RNCConfigurationParameters ‐‐‐‐‐‐‐‐‐‐‐‐‐‐‐‐‐‐‐‐‐‐‐‐‐‐‐‐‐‐‐‐‐ 67
Table 20DO‐BTSConfigurationParameters ‐‐‐‐‐‐‐‐‐‐‐‐‐‐‐‐‐‐‐‐‐‐‐‐‐‐‐‐‐‐‐ 75
Table 21RNCFunctionPop‐upMenuOptions ‐‐‐‐‐‐‐‐‐‐‐‐‐‐‐‐‐‐‐‐‐‐‐‐‐‐‐‐‐ 96
Table 22DO‐BTSFunctionPop‐UpMenuOptions‐‐‐‐‐‐‐‐‐‐‐‐‐‐‐‐‐‐‐‐‐‐‐‐‐‐ 99
Table 23StateIconColorDefinitions‐‐‐‐‐‐‐‐‐‐‐‐‐‐‐‐‐‐‐‐‐‐‐‐‐‐‐‐‐‐‐‐‐‐‐ 101
Table 24StateTypes ‐‐‐‐‐‐‐‐‐‐‐‐‐‐‐‐‐‐‐‐‐‐‐‐‐‐‐‐‐‐‐‐‐‐‐‐‐‐‐‐‐‐‐‐‐‐‐ 103
Table 25ListofAcronyms ‐‐‐‐‐‐‐‐‐‐‐‐‐‐‐‐‐‐‐‐‐‐‐‐‐‐‐‐‐‐‐‐‐‐‐‐‐‐‐‐‐‐‐ 105

10 Chapter:
iCell®QuadPACIP‐RANEV‐DOQuadPACInstallationandInitialConfigurationGuide
PartNumberD02698GSRevA1|November2013
STARSOLUTIONSCONFIDENTIAL
LISTOFFIGURES
Figure 1All‐IPCDMA2000®NetworkArchitecture‐‐‐‐‐‐‐‐‐‐‐‐‐‐‐‐‐‐‐‐‐‐‐‐‐ 14
Figure 2ExternalFrontViewofQuadPAC ‐‐‐‐‐‐‐‐‐‐‐‐‐‐‐‐‐‐‐‐‐‐‐‐‐‐‐‐‐‐‐15
Figure 3DocumentRoadmap ‐‐‐‐‐‐‐‐‐‐‐‐‐‐‐‐‐‐‐‐‐‐‐‐‐‐‐‐‐‐‐‐‐‐‐‐‐‐‐‐ 19
Figure 4AttachingBrackettoMountingEar ‐‐‐‐‐‐‐‐‐‐‐‐‐‐‐‐‐‐‐‐‐‐‐‐‐‐‐‐‐‐ 36
Figure 5AttachingMountingEarAssemblytoQuadPAC ‐‐‐‐‐‐‐‐‐‐‐‐‐‐‐‐‐‐‐‐‐ 36
Figure 6TiltingtheQuadPACtogetitintotheRack‐‐‐‐‐‐‐‐‐‐‐‐‐‐‐‐‐‐‐‐‐‐‐‐ 37
Figure 7MountingtheQuadPACintheRack ‐‐‐‐‐‐‐‐‐‐‐‐‐‐‐‐‐‐‐‐‐‐‐‐‐‐‐‐‐ 37
Figure 8Grounding ‐‐‐‐‐‐‐‐‐‐‐‐‐‐‐‐‐‐‐‐‐‐‐‐‐‐‐‐‐‐‐‐‐‐‐‐‐‐‐‐‐‐‐‐‐‐‐‐ 38
Figure 9QuadPACFrontView‐ClockModuleandDO‐BTSModule ‐‐‐‐‐‐‐‐‐‐‐‐ 40
Figure 10QuadPACFrontView‐DO‐BTSModuleandGPSModule‐‐‐‐‐‐‐‐‐‐‐‐‐‐ 40
Figure 11QuadPACRearView‐CPUModuleandPowerSupplyModule ‐‐‐‐‐‐‐‐‐ 41
Figure 12QuadPACRearView‐PowerSupplyModule‐‐‐‐‐‐‐‐‐‐‐‐‐‐‐‐‐‐‐‐‐‐‐ 41
Figure 13“Typical”ConnectionSetupforQuadPACwithGPSModule‐‐‐‐‐‐‐‐‐‐‐‐ 43
Figure 14“Typical”ConnectionSetupforQuadPACwithClockModule‐‐‐‐‐‐‐‐‐‐‐ 44
Figure 15FerriteBeadontheDO‐BTSETHcable ‐‐‐‐‐‐‐‐‐‐‐‐‐‐‐‐‐‐‐‐‐‐‐‐‐‐‐ 45
Figure 16ClockModuleSymmetricportconnectionin“Typical”connectionmode.‐ 45
Figure 17“AllInOne”ConnectionSetupforaQuadPACwithaGPSModule ‐‐‐‐‐‐‐ 46
Figure 18“AllInOne”connectionsetupforQuadPACwithClockModule ‐‐‐‐‐‐‐‐‐ 47
Figure 19ClockModuleSymmetricportconnectionin“AllInOne”connectionmode48
Figure 20RFAntennaConnectionsonDO‐BTSModule ‐‐‐‐‐‐‐‐‐‐‐‐‐‐‐‐‐‐‐‐‐‐ 49
Figure 21GPSModule:GPSSMAPort‐‐‐‐‐‐‐‐‐‐‐‐‐‐‐‐‐‐‐‐‐‐‐‐‐‐‐‐‐‐‐‐‐‐‐ 49
Figure 22ResetButtonandPowerBreakerSwitch ‐‐‐‐‐‐‐‐‐‐‐‐‐‐‐‐‐‐‐‐‐‐‐‐‐‐ 50
Figure 23ConnectingTestClientfromQuadPAC‐‐‐‐‐‐‐‐‐‐‐‐‐‐‐‐‐‐‐‐‐‐‐‐‐‐‐‐ 56
Figure 24LoginScreen ‐‐‐‐‐‐‐‐‐‐‐‐‐‐‐‐‐‐‐‐‐‐‐‐‐‐‐‐‐‐‐‐‐‐‐‐‐‐‐‐‐‐‐‐‐‐ 57
Figure 25BootChangeOptioninSidebarMenu‐‐‐‐‐‐‐‐‐‐‐‐‐‐‐‐‐‐‐‐‐‐‐‐‐‐‐‐ 58
Figure 26DefaultQuadPACBootChangeConfigurationPage ‐‐‐‐‐‐‐‐‐‐‐‐‐‐‐‐‐‐ 58
Figure 27ExampleofaModifiedQuadPACBootConfigurationPage ‐‐‐‐‐‐‐‐‐‐‐‐ 59
Figure 28BootConfigurationConfirmationPage‐‐‐‐‐‐‐‐‐‐‐‐‐‐‐‐‐‐‐‐‐‐‐‐‐‐‐ 60
Figure 29Exampleofmodifiedifcfg‐eth0file ‐‐‐‐‐‐‐‐‐‐‐‐‐‐‐‐‐‐‐‐‐‐‐‐‐‐‐‐‐‐ 60
Figure 30Exampleofmodifiednetworkfile ‐‐‐‐‐‐‐‐‐‐‐‐‐‐‐‐‐‐‐‐‐‐‐‐‐‐‐‐‐‐‐ 61
Figure 31Exampleofmodifiedhostsfile‐‐‐‐‐‐‐‐‐‐‐‐‐‐‐‐‐‐‐‐‐‐‐‐‐‐‐‐‐‐‐‐‐ 61
Figure 32CreatingaNewEquipmentFolder ‐‐‐‐‐‐‐‐‐‐‐‐‐‐‐‐‐‐‐‐‐‐‐‐‐‐‐‐‐‐ 64
Figure 33LabellingaNewRNCEquipmentFolder ‐‐‐‐‐‐‐‐‐‐‐‐‐‐‐‐‐‐‐‐‐‐‐‐‐‐ 64
Figure 34UsingtheDiscoverTool ‐‐‐‐‐‐‐‐‐‐‐‐‐‐‐‐‐‐‐‐‐‐‐‐‐‐‐‐‐‐‐‐‐‐‐‐‐‐ 65
Figure 35NewDeviceDialogBoxExample ‐‐‐‐‐‐‐‐‐‐‐‐‐‐‐‐‐‐‐‐‐‐‐‐‐‐‐‐‐‐‐‐ 65
Figure 36DeviceDiscoveryDialogBox ‐‐‐‐‐‐‐‐‐‐‐‐‐‐‐‐‐‐‐‐‐‐‐‐‐‐‐‐‐‐‐‐‐‐‐ 66
Figure 37RNCNodeDiscovery ‐‐‐‐‐‐‐‐‐‐‐‐‐‐‐‐‐‐‐‐‐‐‐‐‐‐‐‐‐‐‐‐‐‐‐‐‐‐‐‐ 66
Figure 38LockingtheRNCandInterfaces ‐‐‐‐‐‐‐‐‐‐‐‐‐‐‐‐‐‐‐‐‐‐‐‐‐‐‐‐‐‐‐‐ 68
Figure 39LockingtheRNC‐DialogBox ‐‐‐‐‐‐‐‐‐‐‐‐‐‐‐‐‐‐‐‐‐‐‐‐‐‐‐‐‐‐‐‐‐‐ 68
Figure 40UnlockingtheRNCandInterfaces‐‐‐‐‐‐‐‐‐‐‐‐‐‐‐‐‐‐‐‐‐‐‐‐‐‐‐‐‐‐‐ 69
Figure 41UnlockingtheRNCElementsDialogBox ‐‐‐‐‐‐‐‐‐‐‐‐‐‐‐‐‐‐‐‐‐‐‐‐‐‐ 69
Figure 42SavingtheRNCConfiguration ‐‐‐‐‐‐‐‐‐‐‐‐‐‐‐‐‐‐‐‐‐‐‐‐‐‐‐‐‐‐‐‐‐‐ 70
Figure 43SavingtheRNCConfigurationPop‐upMenu ‐‐‐‐‐‐‐‐‐‐‐‐‐‐‐‐‐‐‐‐‐‐‐ 70
Figure 44SavingtheRNCconfigurationdialogbox‐‐‐‐‐‐‐‐‐‐‐‐‐‐‐‐‐‐‐‐‐‐‐‐‐‐ 70
Figure 45RestartingtheRNCElement ‐‐‐‐‐‐‐‐‐‐‐‐‐‐‐‐‐‐‐‐‐‐‐‐‐‐‐‐‐‐‐‐‐‐‐ 71
Figure 46RestartingtheRNCElementDialogBox ‐‐‐‐‐‐‐‐‐‐‐‐‐‐‐‐‐‐‐‐‐‐‐‐‐‐ 71
Figure 47CheckingtheRNCStatususingtheCEM‐‐‐‐‐‐‐‐‐‐‐‐‐‐‐‐‐‐‐‐‐‐‐‐‐‐ 72
Figure 48CheckingtheRNCStatusfromtheHTTPSummaryPage‐‐‐‐‐‐‐‐‐‐‐‐‐‐ 73
Figure 49DO‐BTSElementManagerInterface‐‐‐‐‐‐‐‐‐‐‐‐‐‐‐‐‐‐‐‐‐‐‐‐‐‐‐‐‐ 74
Figure 50CommandsOptiononDO‐BTSiCellMenu‐‐‐‐‐‐‐‐‐‐‐‐‐‐‐‐‐‐‐‐‐‐‐‐‐ 76
Figure 51commandSaveConfigOptionfromListofCommands ‐‐‐‐‐‐‐‐‐‐‐‐‐‐‐‐ 76
Figure 52CommandSave‐SetButton ‐‐‐‐‐‐‐‐‐‐‐‐‐‐‐‐‐‐‐‐‐‐‐‐‐‐‐‐‐‐‐‐‐‐‐ 77
Figure 53commandResetOptionfromlistofCommands ‐‐‐‐‐‐‐‐‐‐‐‐‐‐‐‐‐‐‐‐‐ 78
Figure 54CommandReset‐SetButton‐‐‐‐‐‐‐‐‐‐‐‐‐‐‐‐‐‐‐‐‐‐‐‐‐‐‐‐‐‐‐‐‐‐ 78
Figure 55DO‐BTSStatusSummaryPage ‐‐‐‐‐‐‐‐‐‐‐‐‐‐‐‐‐‐‐‐‐‐‐‐‐‐‐‐‐‐‐‐‐ 79
Figure 56CEMServerWelcomeScreen‐‐‐‐‐‐‐‐‐‐‐‐‐‐‐‐‐‐‐‐‐‐‐‐‐‐‐‐‐‐‐‐‐‐ 88
Figure 57CEMServerLoginScreen‐‐‐‐‐‐‐‐‐‐‐‐‐‐‐‐‐‐‐‐‐‐‐‐‐‐‐‐‐‐‐‐‐‐‐‐‐ 89
Figure 58DigitalSignatureSecurityWarning‐‐‐‐‐‐‐‐‐‐‐‐‐‐‐‐‐‐‐‐‐‐‐‐‐‐‐‐‐‐ 89
Figure 59CEMStartupScreen ‐‐‐‐‐‐‐‐‐‐‐‐‐‐‐‐‐‐‐‐‐‐‐‐‐‐‐‐‐‐‐‐‐‐‐‐‐‐‐‐‐ 90
Figure 60CEMConsoleScreenComponents ‐‐‐‐‐‐‐‐‐‐‐‐‐‐‐‐‐‐‐‐‐‐‐‐‐‐‐‐‐‐ 91
Figure 61ExampleofaHelpAdvisorScreen‐‐‐‐‐‐‐‐‐‐‐‐‐‐‐‐‐‐‐‐‐‐‐‐‐‐‐‐‐‐‐ 92
Figure 62RNCNetworkElementConfigurationTabs ‐‐‐‐‐‐‐‐‐‐‐‐‐‐‐‐‐‐‐‐‐‐‐‐ 93
Figure 63RNCFunctionConfigurationTabs‐‐‐‐‐‐‐‐‐‐‐‐‐‐‐‐‐‐‐‐‐‐‐‐‐‐‐‐‐‐‐94
Figure 64DO‐BTSNetworkElementConfigurationTabs ‐‐‐‐‐‐‐‐‐‐‐‐‐‐‐‐‐‐‐‐‐‐ 94
Figure 65DO‐BTSFunctionConfigurationTabs‐‐‐‐‐‐‐‐‐‐‐‐‐‐‐‐‐‐‐‐‐‐‐‐‐‐‐‐‐ 95
Figure 66RNCFunctionPop‐UpMenu‐‐‐‐‐‐‐‐‐‐‐‐‐‐‐‐‐‐‐‐‐‐‐‐‐‐‐‐‐‐‐‐‐‐‐ 96
Figure 67DO‐BTSSNMPAgentPop‐UpMenu ‐‐‐‐‐‐‐‐‐‐‐‐‐‐‐‐‐‐‐‐‐‐‐‐‐‐‐‐‐ 98
Figure 68CEMConsoleScreenComponents ‐‐‐‐‐‐‐‐‐‐‐‐‐‐‐‐‐‐‐‐‐‐‐‐‐‐‐‐‐ 101
Figure 69ExampleoftheRNCStateTab‐‐‐‐‐‐‐‐‐‐‐‐‐‐‐‐‐‐‐‐‐‐‐‐‐‐‐‐‐‐‐‐‐ 102

iCell®QuadPACIP‐RANEV‐DOQuadPACInstallationandInitialConfigurationGuide
PartNumberD02698GSRevA1|November2013
STARSOLUTIONSCONFIDENTIAL
ABOUTTHISGUIDE
ThischaptercontainsanoverviewofthisguideandoftheiCell®QuadPAC
IP‐RAN.Thischapteralsoliststheguideconventionsandrelateddocumentation,
liststheorderinwhichinitialconfigurationtasksshouldbecompleted,and
describeshowtocontactcustomerservice.
Thisguideisintendedforthosewhoareresponsibleforinstallingandinitially
configuringtheQuadPAC.
Thischapterincludes:
■ProductOverview
■OrderofTasks
■Conventions
■RelatedDocumentation
■TechnicalSupport
■WarrantySupport
■ContactingTechnicalDocumentation
Releasenotesareissuedwithsomeproducts.Iftheinformationintherelease
notesdiffersfromtheinformationinthisguide,followtheinstructionsinthe
releasenotes.
ProductOverview TheQuadPACispartoftheStarSolutionsAll‐IPCDMA2000®network.
All‐IPCDMA2000®System
Architecture
TheAll‐IPCDMA2000®networkisanend‐to‐end,all‐Internet‐Protocol(IP)‐based,
wirelesscommunicationsolution.TheCDMA2000®systemprovidesthemobility
andmediacontroltraditionallyassociatedwithacircuit‐switchedMobile
SwitchingCenter(MSC),butinapacket‐basedenvironment.
TheAll‐IPCDMA2000®systemis2G‐and3G‐capable,supportingcdmaOneand
CDMA20001xandEvolutionDataOptimized(EV‐DO)networks.Bydeployingthe
CDMA2000®systemin2Gand3Genvironments,networkoperatorsgainthe
efficiencyinherentinpacket‐basednetworks,whilebuildinganetworkcorethat
iscapableofsupporting3Gstandards.
All‐IPCDMA2000®systembenefitsinclude:
■Anetworkcorethatsupportsbothvoiceanddatatraffic,eliminatingtheneed
tooperateseparateTimeDivisionMultiplexing(TDM)andpacketbackbones.
14 Chapter:AboutThisGuide
iCell®QuadPACIP‐RANEV‐DOQuadPACInstallationandInitialConfigurationGuide
PartNumberD02698GSRevA1|November2013
STARSOLUTIONSCONFIDENTIAL
■Distributedswitchingforefficientcallroutingfromendpointtoendpoint.
■Centralizedcontrolofdistributedswitchingforcost‐effectivescalability,
security,andeaseofoperation.
■Voicecarriedinnativeair‐interfaceformatacrossthepacketcorefor
maximumbandwidthefficiency,withPulseCodeModulation(PCM)vocoding
donebytheMediaGatewaysatthenetworkedgeforPublicSwitched
TelephoneNetwork(PSTN)connectivity.
■SupportforANSIIS‐41requirements.
■3GarchitectureforCDMA2000EV‐DO.
■3GarchitectureforEV‐DO.
TheAll‐IPCDMA2000®networkenablestheevolutiontoanall‐IPnetworkwhile
deliveringareducedcostofconstructionandownershipcomparedtotraditional
TDMnetworks.
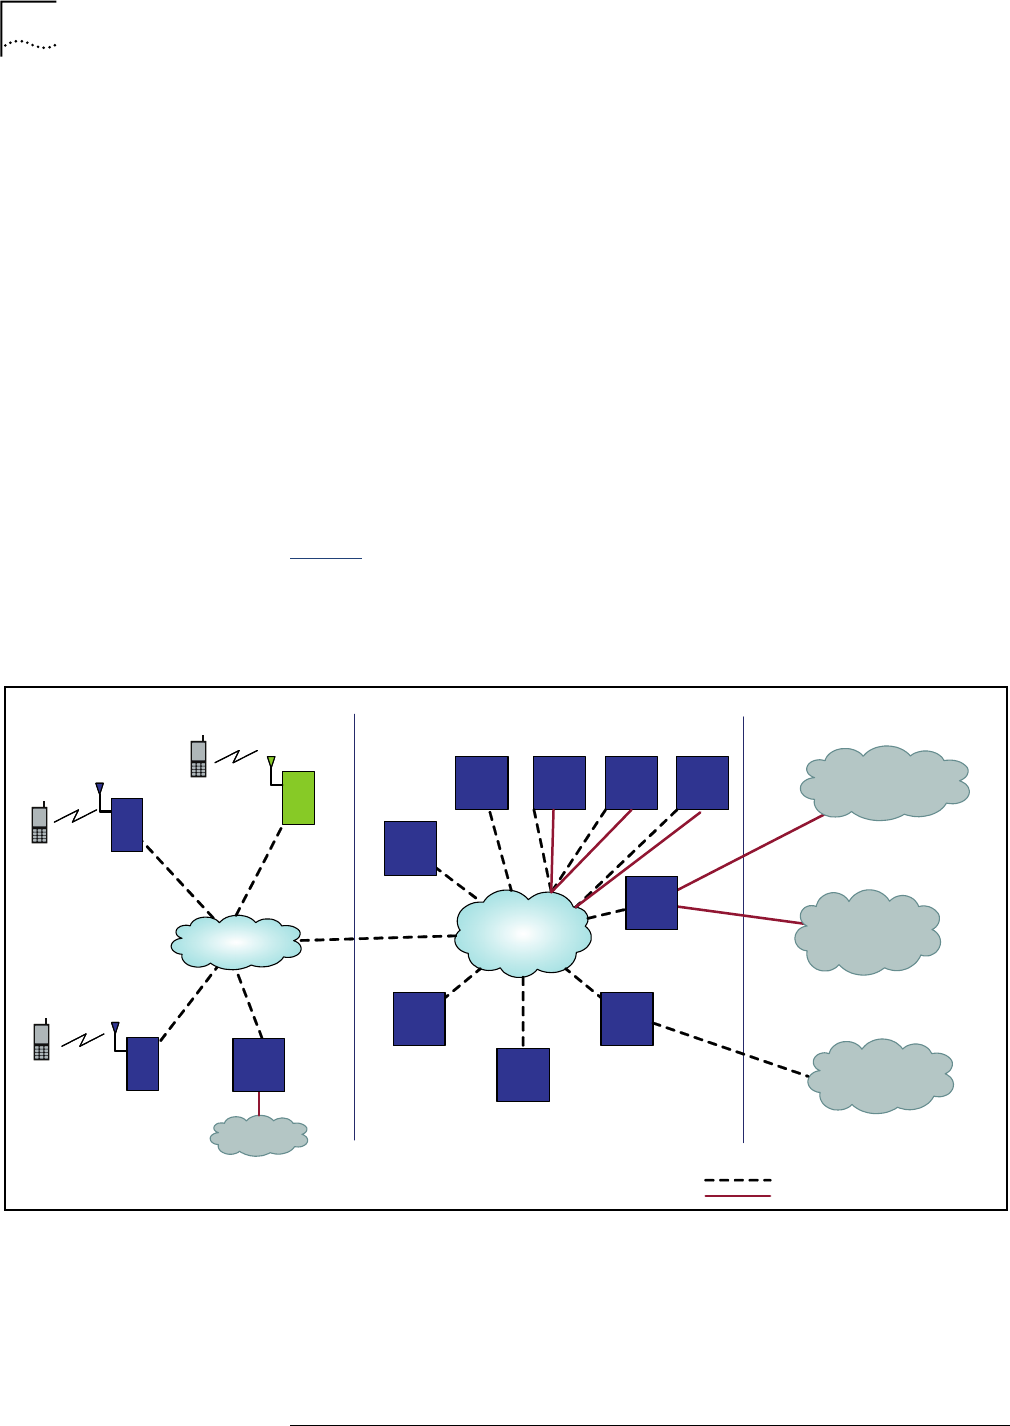
Figure 1showsahigh‐levelarchitectureexamplefortheAll‐IPCDMA2000®
network,includingtheQuadPAC.ThefeaturesandfunctionalityoftheAll‐IP
CDMA2000®networkarenotdiscussedhere.
Figure 1All‐IPCDMA2000®NetworkArchitecture
IP RAN
Network
IP Core
Network
PSTN
iCell
1X+EV-DO
BSS / RAN
iCell
QuadPAC
EV-DO RAN
Sonata
IMG
IOS
Sonata
MSC/VLR
Sonata
OMC
Sonata
IMG
CEM
OMC-R
AAA
PDSN
TDM Networks
PLMN, PSTN,
LD/IXC
SS7 Networks
STP, HLR, HA. SMSC
Packet Network
(Internet)
ALL IP RADIO ACCESS ALL IP CORE NETWORKS PUBLIC NETWORKS
IP Connectivity
TDM/SS7 Connectivity
iCell
QuadPAC
EV-DO
RAN
HLR STP SMSC
ProductOverview 15
iCell®QuadPACIP‐RANEV‐DOQuadPACInstallationandInitialConfigurationGuide
PartNumberD02698GSRevA1|November2013
STARSOLUTIONSCONFIDENTIAL
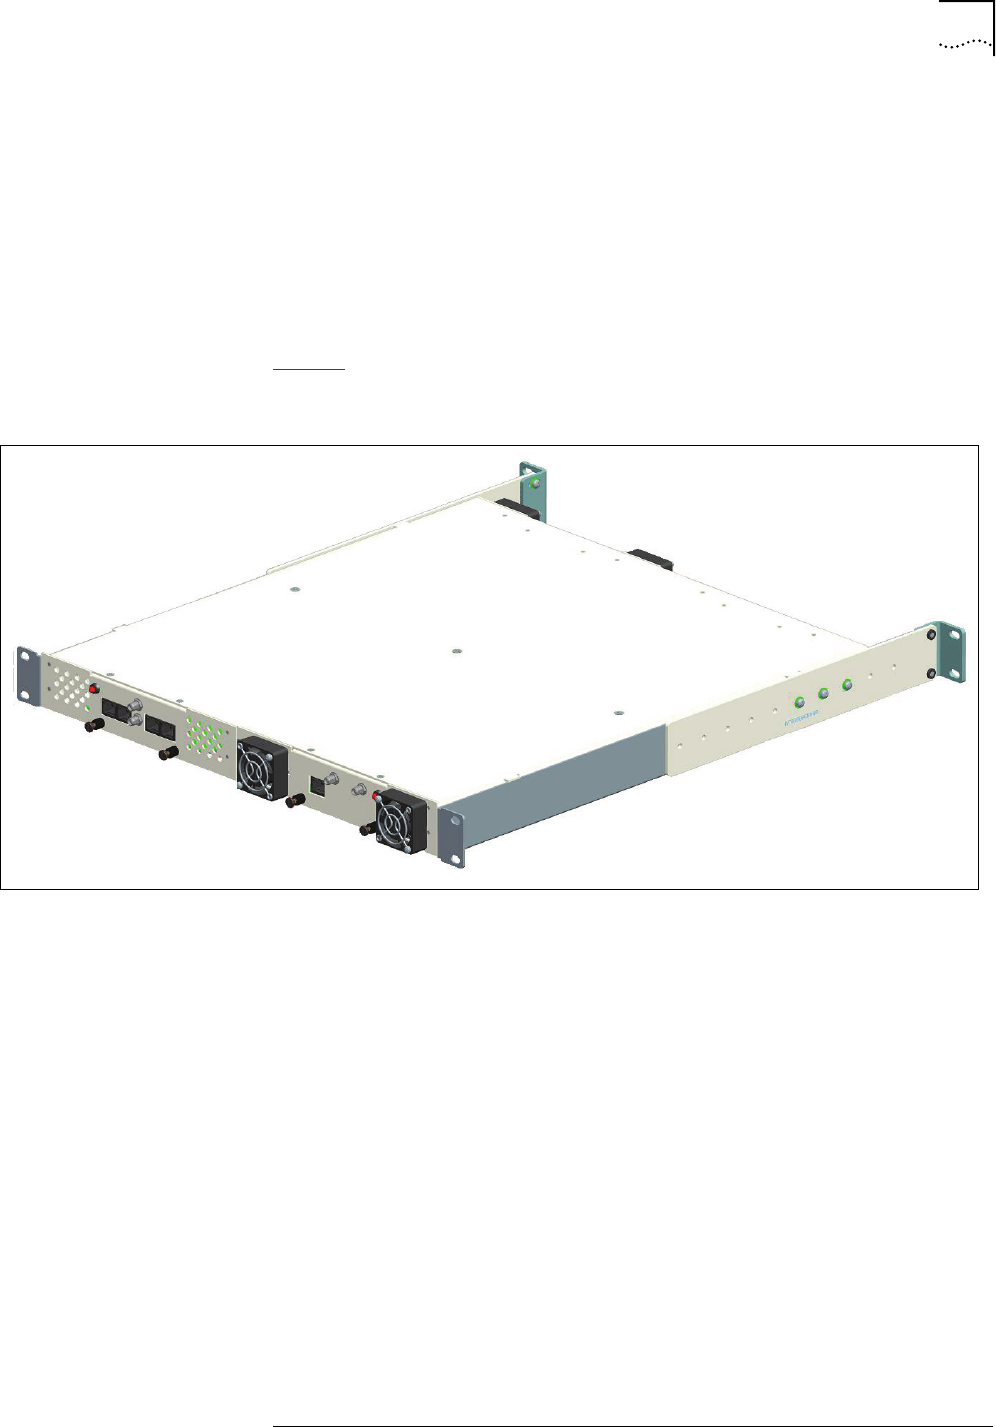
QuadPACFunctionality TheiCell™QuadPACIP‐RANisaconfigurable1RUrackmountbasestationsolution
forCDMA2000™EV‐DOpicocelldeploymentrequirements.TheQuadPACunitis
designedtohouseanEV‐DOBTSModule,aPowerSupplyModule,atiming
sourcemodule(eitheraclock(higher‐performanceOCXO)moduleoraGPS
receivermodule),andanoptionalCPUNetworkModulethatenablesCDMA
networkfunctionalitysuchastheRNC,PDSN,andWirelessCallManager.
TheQuadPACprovidessingle‐carrier,single‐sectorcoveragewitha32
channel‐elementcapacity.
Figure 2showsanexternalviewoftheQuadPAC.
Figure 2ExternalFrontViewofQuadPAC
QuadPACConfiguration TheiCellQuadPAChardwareconfigurationconsistsofabaseconfigurationwith
additionaloptionalmodulesthatcanbeinstalleddependingonthedeployment
scenario.
Thebaseconfigurationconsistsof:
■DO‐BTSModule
■PowerSupplyModule
■Timingsourcemodule,with2options:
■GPSModule‐Providesafrequencyreference1PPSsignalviaaGPS
antenna
■ClockModule‐Providesastand‐alonefrequencyreferenceifaGPSsignal
isnotreadilyavailable
Theadditionaloptionalmoduleis:
■CPUModule‐EnablesCDMAnetworkfunctionalitysuchastheRNC,PDSN,
andWirelessCallManager(wCM).(ContactStarSolutionssalesforadditional
information.)

16 Chapter:AboutThisGuide
iCell®QuadPACIP‐RANEV‐DOQuadPACInstallationandInitialConfigurationGuide
PartNumberD02698GSRevA1|November2013
STARSOLUTIONSCONFIDENTIAL
TechnicalSpecifications Table 1liststheQuadPACtechnicalspecifications.
TheQuadPACsupportsiCellEV‐DOsoftwarerelease8.1.0orhigher.
OrderofTasks ThisQuadPACInstallationandInitialConfigurationGuidedescribesallthetasks
requiredtoinstallandconfigureaQuadPAC.Thisguidehasthreemainsections:
■Pre‐Installation
■Installation
■InitialConfiguration
Followthetasksintheorderthattheyarepresentedtosuccessfullyinstalland
configuretheQuadPAC.
Table 1QuadPACTechnicalSpecifications
Capacity/Performance
RFconfiguration 1FA/1S
RFoutputpower Upto50mW(optionalconfigurationupto125mW)
CDMAtechnology EV‐DORevA,RevB
Channelelements64
Packetdatarate(peakburst) EV‐DOpeakdatarates:
RevA‐3.1MbpsFwd/1.8MBbpsRev
RevB–4.9MbpsFwd/1.8MBbpsRev(percarrier)
FrequencyBands
BandClass0
BandClass1
BandClass5,BlockA
Tx:869–894MHz|Rx:824–849MHz
Tx:1930‐1990MHz|Rx:1850‐1910MHz
Tx:462.5‐467.5MHz|RX:452.5‐457.5MHz
ProtocolSupport
DO‐BTS/RNCinterfacesignaling Abis,A10,A11,A12,A13
PacketdataGRE/IP
Operations,Administration,and
Maintenanceinterface
SNMPv2c
Hardware
Dimensions1UHx15inWx20inD
Nominalinputvoltage:
ANSIstandardC84.1/
CAN3‐235
120V(+10,10%)at60Hz
European 230V(+6,10%)at50Hz
Powerconsumption100W(intypicaloperatingconditions)
Operatingtemperature 0to40degreesCelsius
Conventions 17
iCell®QuadPACIP‐RANEV‐DOQuadPACInstallationandInitialConfigurationGuide
PartNumberD02698GSRevA1|November2013
STARSOLUTIONSCONFIDENTIAL
Pre‐InstallationTaskOutline Pre‐InstallationtasksaretasksthatshouldbedonebeforetheQuadPACarrives
onsite.
InstallationTaskOutline Installationtasksaretasksthataredoneafterallpre‐installationtasksare
completedandtheQuadPACisonsite.
InitialConfigurationTask
Outline
InitialConfigurationtasksaretasksthataredoneafterallinstallationtasksare
completed.
Conventions Thisguidemaycontainnotices,figures,screencaptures,andcertaintext
conventions.
Notices Table 2listsnoticeiconsusedinthisguide.
.
Table 2NoticeIconDescriptions
Icon NoticeType Description
InformationNote Informationthatcontainsimportantfeaturesor
instructionsbutisnothazard‐related.
Cautionor
Warning
CautionsareprecededwiththewordCaution.This
typeofcautionindicatesapotentiallyhazardous
situationwhich,ifnotavoided,mayresultinminor
ormoderateinjury.Itmayalsoalertagainstunsafe
practicesandpotentialprogram,data,system,or
devicedamage.
WarningsareprecededwiththewordWarning.This
typeofwarningindicatesapotentiallyhazardous
situationwhich,ifnotavoided,couldresultindeath
orseriousinjury.
Cautionor
Warningdueto
potential
electricalhazard
Cautionsduetopotentialelectricalhazardsare
precededwiththewordCaution.Thistypeof
cautionindicatesapotentialelectricalhazard.This
hazard,ifnotavoided,mayresultinminoror
moderateinjury.Itmayalsoalertagainstunsafe
practicesandpotentialprogram,data,system,or
devicedamage.
Warningsduetopotentialelectricalhazardsare
precededwiththewordWarning.Thistypeof
warningindicatesapotentialelectricalhazard.This
hazard,ifnotavoided,couldresultindeathor
seriousinjury.
ESD Informationthatindicatespropergrounding
precautionsarerequiredbeforehandlingaproduct.

18 Chapter:AboutThisGuide
iCell®QuadPACIP‐RANEV‐DOQuadPACInstallationandInitialConfigurationGuide
PartNumberD02698GSRevA1|November2013
STARSOLUTIONSCONFIDENTIAL
FiguresandScreenCaptures Thisguideprovidesfiguresandscreencapturesasexamples.Theseexamples
containsampledata.Thisdatamayvaryfromtheactualdataonaninstalled
system.
Text Table 3liststextconventionsinthisguide
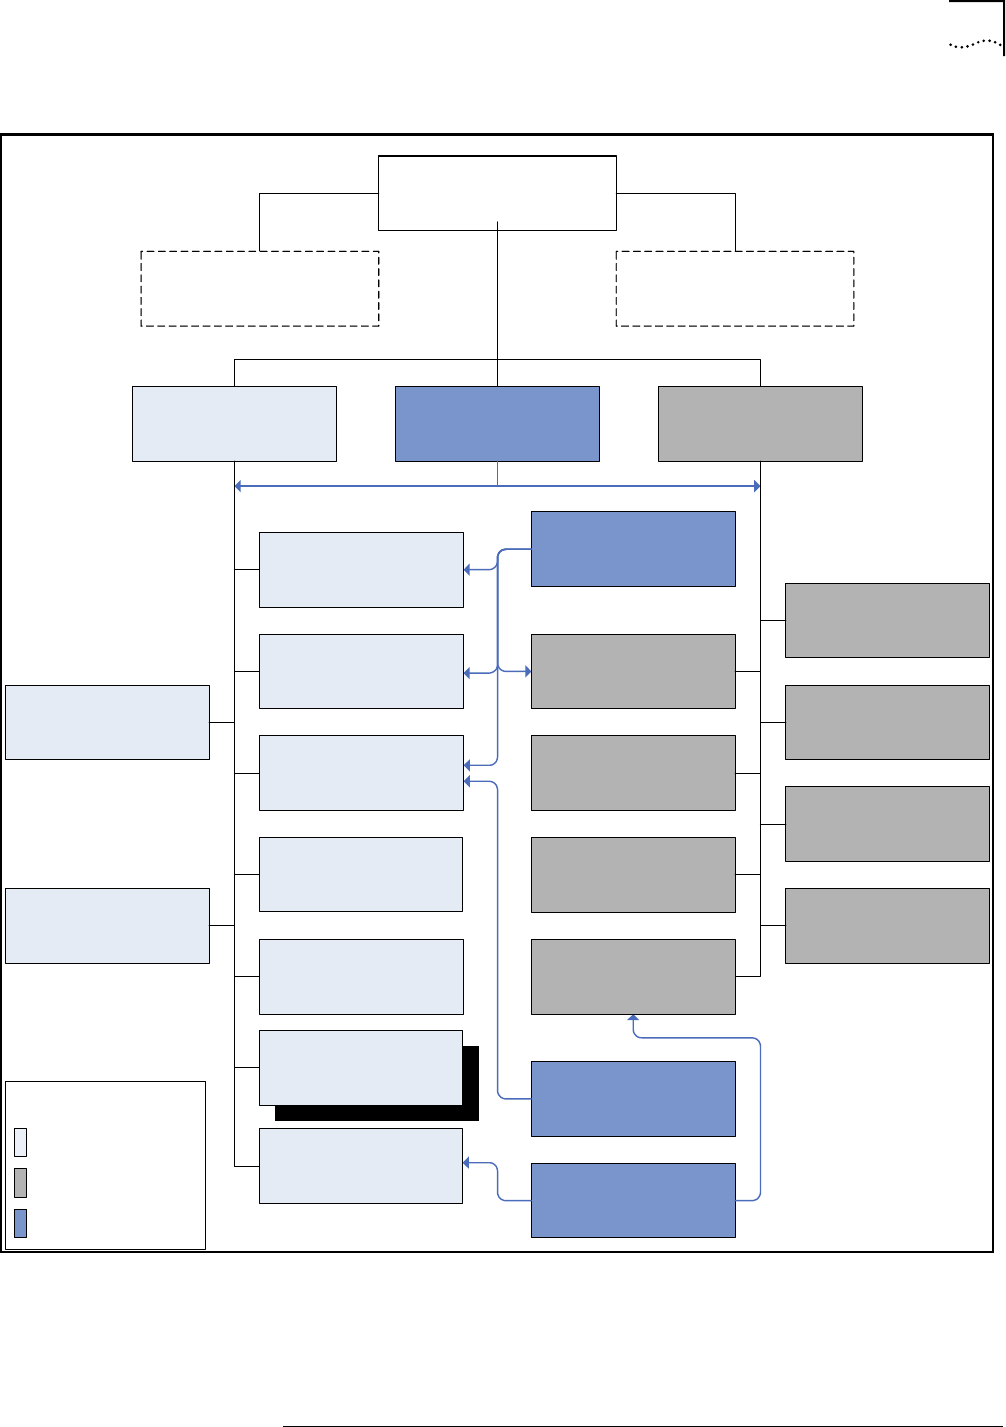
RelatedDocumentation TheiCellproductsarepartoftheAll‐IPCDMA2000®networkproductlinefor
CDMA2000®.TheiCellQuadPACdocumentationispartofthedocumentationfor
theentireAll‐IPCDMA2000®networkproductline.
TherelationshipoftheiCellQuadPACEV‐DOInstallationandInitialConfiguration
GuidetootherAll‐IPCDMA2000®networkdocumentationisdisplayedinthe
All‐IPCDMA2000®networkdocumentroadmapshowninFigure 3.
Table 3TextConventionDescriptions
Convention Description
Textrepresentingascreen
display
Thistypefacerepresentstextthatappearsona
terminalscreen,forexamplelogin:.
Textrepresentedasuser
entry.
Thistypefacerepresentscommandsenteredbythe
user,forexample,cd$HOME.
Textrepresentedasmenus,
sub‐menus,buttons,tabs,
directories,andfieldnames
Thistypefacerepresentsallmenus,sub‐menus,buttons,
tabs,directories,andfieldnameswithinprocedures,for
example:
OntheFilemenu,clickNew.
Textrepresentedby
<variable>
Thistypefacerepresentsarequiredvariable,forexample:
<filename>
RelatedDocumentation 19
iCell®QuadPACIP‐RANEV‐DOQuadPACInstallationandInitialConfigurationGuide
PartNumberD02698GSRevA1|November2013
STARSOLUTIONSCONFIDENTIAL
Figure 3DocumentRoadmap
Star Solutions All-IP
CDMA2000© Network
Core Network
Documentation Set
iCell ACM Release
Notes
iCell EV-DO Release
Notes
iCell EV-DO Release
Notes
iCell Macro IP-RAN
Hardware
Maintenance Guide
iCell Compact
Macro EV-DO IP-RAN
Installation and Initial
Configuration Guide
iCell EV-DO
Parameter Reference
iCell Pico EV-DO IP-RAN
Installation and Initial
Configuration Guide
iCell EV-DO
Operations and Software
Maintenance Guide
iCell EV-DO
Fault Management Guide
iCell EV-DO
Performance
Management Guide
Element Management
Documentation Set
iCell
EV-DO Operations and
Software
Maintenance Guide
iCell EV-DO
Performance
Management Guide
iCell Timing Control Module
Installation and Initial
Configuration Guide
iCell COMPAC Outdoor
Micro EV-DO IP-RAN
Installation and Initial
Configuration Guide
1xRTT
Documentation
EV-DO
Documentation
1xRTT and EV-DO
Documentation
Legend
iCell Micro IP-RAN
Hardware
Maintenance Guide
iCell Pico 1xRTT IP-RAN
Installation and Initial
Configuration Guide
iCell Compact
Macro 1xRTT IP-RAN
Installation and Initial
Configuration Guide
iCell Enterprise 1xRTT
IP-RAN Installation and
Initial Configuration Guide
iCell Macro 1xRTT IP-RAN
Installation and Initial
Configuration Guide
iCell Outdoor Micro
1xRTT IP-RAN
Installation and Initial
Configuration Guide
iCell Macro EV-DO IP-RAN
Installation and Initial
Configuration Guide
iCell COMPAC Outdoor
Micro 1xRTT IP-RAN
Installation and Initial
Configuration Guide
iCell QuadPAC
EV-DO IP-RAN
Installation and Initial
Configuration Guide

20 Chapter:AboutThisGuide
iCell®QuadPACIP‐RANEV‐DOQuadPACInstallationandInitialConfigurationGuide
PartNumberD02698GSRevA1|November2013
STARSOLUTIONSCONFIDENTIAL
iCellDocumentation Thefollowingdocumentscontaininformationonhowtoinstall,operate,
maintain,andmanagetheQuadPACandrelatedcomponents:
■iCellEV_DOReleaseNotes
■iCellQuadPACEV‐DOInstallationandInitialConfigurationGuide(thisguide)
■iCellEV‐DOOperationsandSoftwareMaintenanceGuide
■iCellEV‐DOPerformanceManagementGuide
TechnicalSupport TheStarSolutionsProductSupportTeamdeliversthesupportservicesrequired
forbusinessandprofessionalneeds.OurproductexpertsdeliverTier1,2and3
technicalsupportdirectlytonewandcontract‐entitledcustomersincludingthe
followingservices:
■BasicSupportPackage:Non‐emergencytechnicalsupport
■PremiumSupportPackage:24hoursaday,7daysaweek,and365daysayear
Emergencytechnicalsupport
TheStarSolutionsServiceGuideoutlinesthespecificdetailsforobtaining
technicalsupport.Theguideisavailablefromasalesaccountmanager.Referto
theServiceGuideforservicesandoptionsspecifictoindividualsupportplans,
includingguidelinesforproblemseverityandthetechnicalresolutionescalation
process.
ObtainingTechnical
Assistance
StarSolutionsmaintainsaglobalpresencethroughitsTechnicalResponseand
ServiceCenters.Thesecentersareavailablefortechnicaltelephonesupportto
entitledcustomersduringnormalbusinesshours.
Beforecontactingtechnicalsupport,havethisinformationavailable:
■Productinformation
■Softwareandhardwarerevisions
■Serialnumbers
■Problemdescription
■Symptoms
■Knowncauses
■Troublelocatingandclearingattempts.
Forinformationaboutcustomerservice,includingsupport,training,code
releasesandupdates,contracts,anddocumentation,contactusat:
http://www.starsolutions.com/support/support‐portal
ServiceCentersOperationalHours
■NorthAmerica/CALARegion:
■09:00–18:00PacificTime(UTC‐8:00)
■EMEA/AsiaPacificRegion:

WarrantySupport 21
iCell®QuadPACIP‐RANEV‐DOQuadPACInstallationandInitialConfigurationGuide
PartNumberD02698GSRevA1|November2013
STARSOLUTIONSCONFIDENTIAL
■09:30–18:30IndianStandardTime(UTC+5:30).
WarrantySupport StarSolutionsprovidesitscustomerswarrantysupportperthetermsoftheStar
SolutionsWarrantyStatementfortheirequipment.Customerswhorequire
warrantysupportshouldcontacttheStarSolutionsCustomerServiceCenteras
specifiedinthecustomerserviceguideorat:
http://www.starsolutions.com/support/support‐portal
ContactingTechnical
Documentation
Toprovidecommentsonthisdocumentation,sendane‐mailto:
TechCom@starsolutions.com
Pleaseincludethenameandpartnumberoftheguidebeingreferenced.If
applicable,providethechapterandpagenumber.


iCell®QuadPACIP‐RANEV‐DOQuadPACInstallationandInitialConfigurationGuide
PartNumberD02698GSRevA1|November2013
STARSOLUTIONSCONFIDENTIAL
1PREREQUISITES
AboutThisChapter ThischapterdescribestheprerequisitesforinstallingtheQuadPAC.
Thischapterincludes:
■InstallerRequirements
■EngineeringPlanningRequirements
■PasswordsandUsernames
InstallerRequirements Thissectionincludes:
■RequiredSkills
■SupportingDocumentation
■RequiredTools
■TestClientHardware
■Cables
RequiredSkills Theinstallershouldbeexperiencedintheinstallationandconfigurationof
telecommunicationsequipmentwithabasicknowledgeofIPnetworking.
SupportingDocumentation Thefollowingdocumentsarerequiredtoinstall,configure,integrate,andtesta
QuadPAC:
■QuadPACInstallationandInitialConfigurationGuide(thisguide)
■SiteEngineeringPlanningDocument
Engineeringspecificationsforthesitearerequiredforconfigurationof
CDMA2000©parametersafterinstallationandinitialconfiguration.TheSite
EngineeringPlanningDocumentalsoprovidesthenecessaryinputsto
EngineeringPlanningRequirements.
RequiredTools ThetoolsrequiredfortheinstallationoftheQuadPACarelistedinTable 4
.
Table 4ToolsRequiredforInstallation
Tool
SMAtorquewrench(maximum8lbs/in)
#2Phillipsscrewdriver
#1Phillipsscrewdriver

26 Chapter1:Prerequisites
iCell®QuadPACIP‐RANEV‐DOQuadPACInstallationandInitialConfigurationGuide
PartNumberD02698GSRevA1|November2013
STARSOLUTIONSCONFIDENTIAL
TestClientHardware AlaptopPC,knownasthetestclient,isrequiredfortheinstallation,
configuration,verification,andnetworkintegrationoftheQuadPAC.The
recommendedrequirementsforthetestclientarelistedinTable 5.
Cables Severalcablesarerequiredthroughouttheinstallation,configuration,and
verificationprocess.
Table 6listscablesthatshouldbesuppliedbythenetworkoperatortosupport
theinstallationandoperationoftheQuadPAC.
Table 5Test ClientRequirements
Component Recommended
Processor 1.3GHz
OperatingSystem Microsoft®Windows®XPPro/Vista/7
Memory 512MB
HardDrive 10GB
CDROMDrive 48X
USBPort Optional
EthernetPortandCard 10/100
Table 6CablesSuppliedbytheNetworkOperator
Cable Description
Antennacables MainanddiversitywithSMAmaleconnectors.
GroundingCable 20AWG(minimum)withacrimplugononeend
BackhaulEthernetcable CAT‐6orCAT‐5EthernetcablewithRJ‐45connector
ends.RefertoEthernet/LANConnectionsonpage 42.

EngineeringPlanningRequirements 27
iCell®QuadPACIP‐RANEV‐DOQuadPACInstallationandInitialConfigurationGuide
PartNumberD02698GSRevA1|November2013
STARSOLUTIONSCONFIDENTIAL
EngineeringPlanning
Requirements
Thissectionincludes:
■IPAddressAssignment
IPAddressAssignment Thissectionincludes:
■TestClientIPAddressing
■AccessNetworkIPAddressing
TestClientIPAddressing
ThetestclientisusedtoconnecttotheQuadPACfortheinitialconfigurationand
mustbeonthesamesubnetastheQuadPACfactorydefaultIP(seeTable 17).
Table 7showsanexampleofthetestclientIPaddress,netmask,anddefault
gatewayassignment.
AccessNetworkIPAddressing
Table 8liststheIPaddressinginformationrequiredfortheIPandparameter
configurationcoveredinthisguide.
Table 7ExampleofTestClientIPAddressing
TestClient Value
IPaddress 10.10.10.100
Netmask 255.255.255.0
Defaultgateway 10.10.10.1
Table 8RequiredIPAddressing
RNC Value
DO‐BTSIPAddress DO‐BTSIPaddressassignedtotheQuadPAC.
RNCIPAddress RNCIPaddressassignedtotheQuadPAC.
PDSNIPAddress IPaddressofthePDSN.
AAAIPAddress IPaddressforAAAserver

28 Chapter1:Prerequisites
iCell®QuadPACIP‐RANEV‐DOQuadPACInstallationandInitialConfigurationGuide
PartNumberD02698GSRevA1|November2013
STARSOLUTIONSCONFIDENTIAL
PasswordsandUsernames TheicellEV‐DOsoftwaredeployedontheQuadPAChasdefaultusernamesand
passwordsconfigured.
Table 9andTable 10listtheusernamesandpasswordsusedtoconnecttothe
QuadPAC.
ThedefaultHTTPusername/passwordcanbechangedbasedonoperator
requirements.ContactStarSolutionssupportforadditionalinformation.
Table 9sshLoginInformation
RAN
Component
Default
Username DefaultPassword
RNC rnc ContactStarSolutionssupportengineeringforpassword
information.
root ContactStarSolutionssupportengineeringforpassword
information.
PDSN(ssh) tc3000 ContactStarSolutionssupportengineeringforpassword
information.
Table 10HTTPLoginInformation
RAN
Component
Default
Username DefaultPassword
RNC icell ContactStarSolutionssupportengineeringforpassword
information.
DO‐BTS icell ContactStarSolutionssupportengineeringforpassword
information.

iCell®QuadPACIP‐RANEV‐DOQuadPACInstallationandInitialConfigurationGuide
PartNumberD02698GSRevA1|November2013
STARSOLUTIONSCONFIDENTIAL
2SITEPREPARATION
Caution:
AboutThisChapter TheQuadPAChasspecificstructural,electrical,andtelecommunications
requirements.Whenselectingandpreparingasite,specificpersonneland
documentsmustbeavailabletoensurethedeviceisinstalledcorrectlyand
safely.
Thischapterdescribeshowtopreparethesitefortheinstallationofthe
QuadPAC.
Thischapterincludes:
■SiteRequirements
■SiteInstallationChecklist
SiteRequirements TheQuadPACisdesignedtobemountedina19inchrack.
Thenetworkoperatorisresponsibleforsupplyingsupportingcomponents,
cabling,andthenecessaryoperatingenvironmentfortheQuadPAC.
Thenetworkoperatorisresponsibleforsitepower,grounding,lightning
protection,fireprotection,andsafetyprecautions.Verifythatallgrounding,
powerconnections,andlightning,fireprotectionandsafetyprecautionsmeetor
exceedlocalstandards.
Thissectionincludes:
■MountingOptions
■PowerRequirements
■SiteExternalGroundingRequirements
■OtherCableGrounding
■GPSReceiverProtection
■SpaceRequirements
■InspectingandVerifyingSiteRequirements
Therequiredtools,hardware,andnetworkinformationareoutlinedinChapter 3
onpage 29.

30 Chapter2:SitePreparation
iCell®QuadPACIP‐RANEV‐DOQuadPACInstallationandInitialConfigurationGuide
PartNumberD02698GSRevA1|November2013
STARSOLUTIONSCONFIDENTIAL
MountingOptions TheQuadPACisdesignedtobemountedina19inchrachandmustbeinstalled
inanindoorenvironment.
PowerRequirements TheACQuadPACsitemustbecabledwithsufficientACpower.Itacceptsvoltages
of120@60Hzto230VAC@50Hz.
SiteExternalGrounding
Requirements
Externalgroundingrequirementsinclude:
■SiteGroundingResponsibility
■GroundRods
■ACPowerGrounding
■GroundTesting
SiteGroundingResponsibility
Groundingofthesiteistheresponsibilityofthecustomer.Allgroundingand
powerconnectionsshouldbemadeaccordingtolocalstandards.
GroundRods
Severalfactorsaffectexternalgrounding.Themostsignificantfactoristhe
resistanceofgroundrods,whichisdirectlyrelatedtosoilresistivityinthe
immediatevicinityoftherod.Theresistivityofthesoildetermineshowmany
rodsareneededandtheirdimensions.
ACPowerGrounding
TheACpowergroundconductormustbebondedtothegroundrodlocatedat
theserviceentrance.Groundlugsprovidedinallserviceentranceequipment
mustbebondedtotheservicegroundconductor.Thesystemgroundandneutral
mustbebondedatonelocationonly,ascloseasispracticaltotheservice
entrance.
Allservicegroundingmustconformtolocalelectricalcodes.
GroundTesting
Theexternalgroundsystemsmustbetestedseparatelyafterinstallationand
eachresistance‐to‐earthgroundmustbelessthan5ohms.
Testsmustbeperformedtwiceperyeartoensuregroundsystemintegrity.
OtherCableGrounding Allothercablessuchastelephonecables,datacables,andpowercablesmustbe
connectedtothesingle‐pointgroundandmustemployimpulse/surge
suppressors.
Cablesbetweenanytwocabinetsmustbeshieldedandemployamessenger
cable.Themessengercablemustbebondedtotherespectivebuildinggroundat
eachcorner.Theshieldsmustbebondedtothegroundateachring.
Amessengercableismadeofstrandedsteelandsupportsaerialcablesbetween
poles.

SiteRequirements 31
iCell®QuadPACIP‐RANEV‐DOQuadPACInstallationandInitialConfigurationGuide
PartNumberD02698GSRevA1|November2013
STARSOLUTIONSCONFIDENTIAL
Warning:
GPSReceiverProtection TheQuadPACmayconnecttotheroof‐mountedGPSantennaandshouldbe
protectedwithasurgesuppressorthatisattachedtotheexteriorofthebuilding
andinstalledinthecablingpathway.
ThisisapplicableonlywhentheGPSModuleisdeployedwiththeQuadPAC.
SpaceRequirements TheQuadPACrequiressufficientareaclearancetoprovideadequatespacefor
thebendingradiusnecessaryfortherequiredRFcables.
Properinstallationalsorequiresadequatemechanicalclearance.
InspectingandVerifyingSite
Requirements
InspectthephysicallocationwheretheQuadPACistobeinstalled,toverifythe
locationmeetstheminimumrequirements.
Thissectionincludes:
■SafetyPrecautions
■FireProtection
■VerifyingTemperatureControl
■InspectingandVerifyingSiteConditions
SafetyPrecautions
Theinstallershouldtakeappropriatesafetyprecautionsasspecifiedbylocal
standards,suchas:
■Providingon‐sitefireextinguishers.SeeFireProtection.
■Usingappropriatesafetyequipmentandclothing.
■Ensuringon‐sitefirstaidsupportisavailable,andsoon.
FireProtection
Fireprotectiononlyappliestoindoorinstallations.
Possibletypesoffixedfiresuppressionsequipmentare:
■Halongassystem
■Carbondioxide(CO2)system
■Sprinklersystem(StarSolutionsrecommendsusing"drypipe"sprinkler
systemsthatremoveallpowertoaroombeforefillingtheoverhead
sprinklerswithwater.)
Inadditiontothefixedsuppressionequipment,haveatleasttwo5‐lbABCclass
portablefireextinguishersonthepremisesbeforeequipmentinstallationbegins.
Ifthereisnofiresuppressionequipmentinstalled,contactthesitemanageror
facilityrepresentative.
32 Chapter2:SitePreparation
iCell®QuadPACIP‐RANEV‐DOQuadPACInstallationandInitialConfigurationGuide
PartNumberD02698GSRevA1|November2013
STARSOLUTIONSCONFIDENTIAL
VerifyingTemperatureControl
VerifythefunctionalityoftheairconditioningunitstoensuretheQuadPACwill
neverbesubjectedtotemperaturesandhumiditylevelsoutsidetherangeslisted
inTable 11.
InspectingandVerifyingSiteConditions
Thesiteshouldbecleanandfreeofobstructions.
Donotplacecomponentsorotherequipmentdirectlyontheground.
Ifsiteconditionsdonotcomply,contactthesitemanagerorfacility
representative.
Iftheinstallerisnotresponsibleforcorrectingnotedshortfalls,notifyresponsible
individualsofanydeficienciesassoonaspossible.Deficienciesmustbecorrected
beforecommencinginstallation.
Installationofancillaryequipment(forexample:powersupplies,cableracks,
batteries)istheresponsibilityoftheinstaller.
SiteInstallationChecklist Thefollowingchecklistisprovidedtoassistinthesiteplanningprocedure.After
completingtherequiredsteps,checkthemoff,orreferbacktothislist,toensure
allsiteplanningrequirementshavebeenmet:
■Reviewpersonnelrequirements
■Gatherrelateddocumentation
■Verifypower
■Verifythegrounding
■Verifysiteconditions
■Verifytemperaturecontrol
■Reviewstandardequipmentracklocationspecifications
■Reviewequipmentmountingguidelines
■PreparethesitefortheQuadPAC
Table 11TemperatureandHumidityRanges
Temperature/HumidityCondition Range
Operatingtemperature 32°to104°F(0°to40°C)
Operatinghumidity 0to95%(non‐condensing)
Non‐operatingshippingandstorage
temperature
‐13°to+167°F(‐25°to+75°C)
Non‐operatingshippingandstorage
humidity
0to100%(non‐condensing)


iCell®QuadPACIP‐RANEV‐DOQuadPACInstallationandInitialConfigurationGuide
PartNumberD02698GSRevA1|November2013
STARSOLUTIONSCONFIDENTIAL
3QUADPACINSTALLATION
Warning:
AboutThisChapter Thischapterincludes:
■UnpackingtheShipment
■InstallingtheQuadPAC
UnpackingtheShipment Inspectthepackingcontainerimmediatelyonarrivalattheinstallationsiteto
verifythatnodamagehasoccurredduringshipment.
Donotopenthecasing.Nouserserviceablepartsareinside.Referservicingto
qualifiedservicepersonnel.
Ifanydamageisobserved,notifytheshipperimmediatelytobegintheinsurance
claimprocess.Donotopenorunpackthecontaineruntilaninsuranceadjuster
hasinspectedthecontainersforexteriordamage.
Ifthecontainerappearstobeinsatisfactorycondition,openitandcarefully
unpacktheequipment.Verifythecontentsandquantitiesagainstthepacking
list.
NotifyStarSolutionsimmediatelyifanydiscrepanciesarediscovered,toverify
whetherthecompleteshipmenthasbeenreceived.
Table 12listscomponentsintheQuadPACshippingpackage.
Donotdiscardtheshippingcarton.Usetheshippingcartonifunitsneedtobe
returnedforrepairandreplacement.
Table 12ComponentList
Item Quantity
QuadPACunit 1
Rackrailswithscrews,pre‐assembled,pre‐packed 1
ACpowercord 1
FerriteBead(260ohm@100MHz) 1
1ftEthernetpatchcable 1(onlyifClockModule
included)
GPSantenna 1(onlyifGPSModuleincluded)
36 Chapter3:QuadPACInstallation
iCell®QuadPACIP‐RANEV‐DOQuadPACInstallationandInitialConfigurationGuide
PartNumberD02698GSRevA1|November2013
STARSOLUTIONSCONFIDENTIAL
Warning:
InstallingtheQuadPAC Thissectionincludes:
■InstallingtheMountingEars
■MountingtheQuadPACintotheRack
RemovepowertotheunitbeforeremovingorinstallingtheQuadPAC.
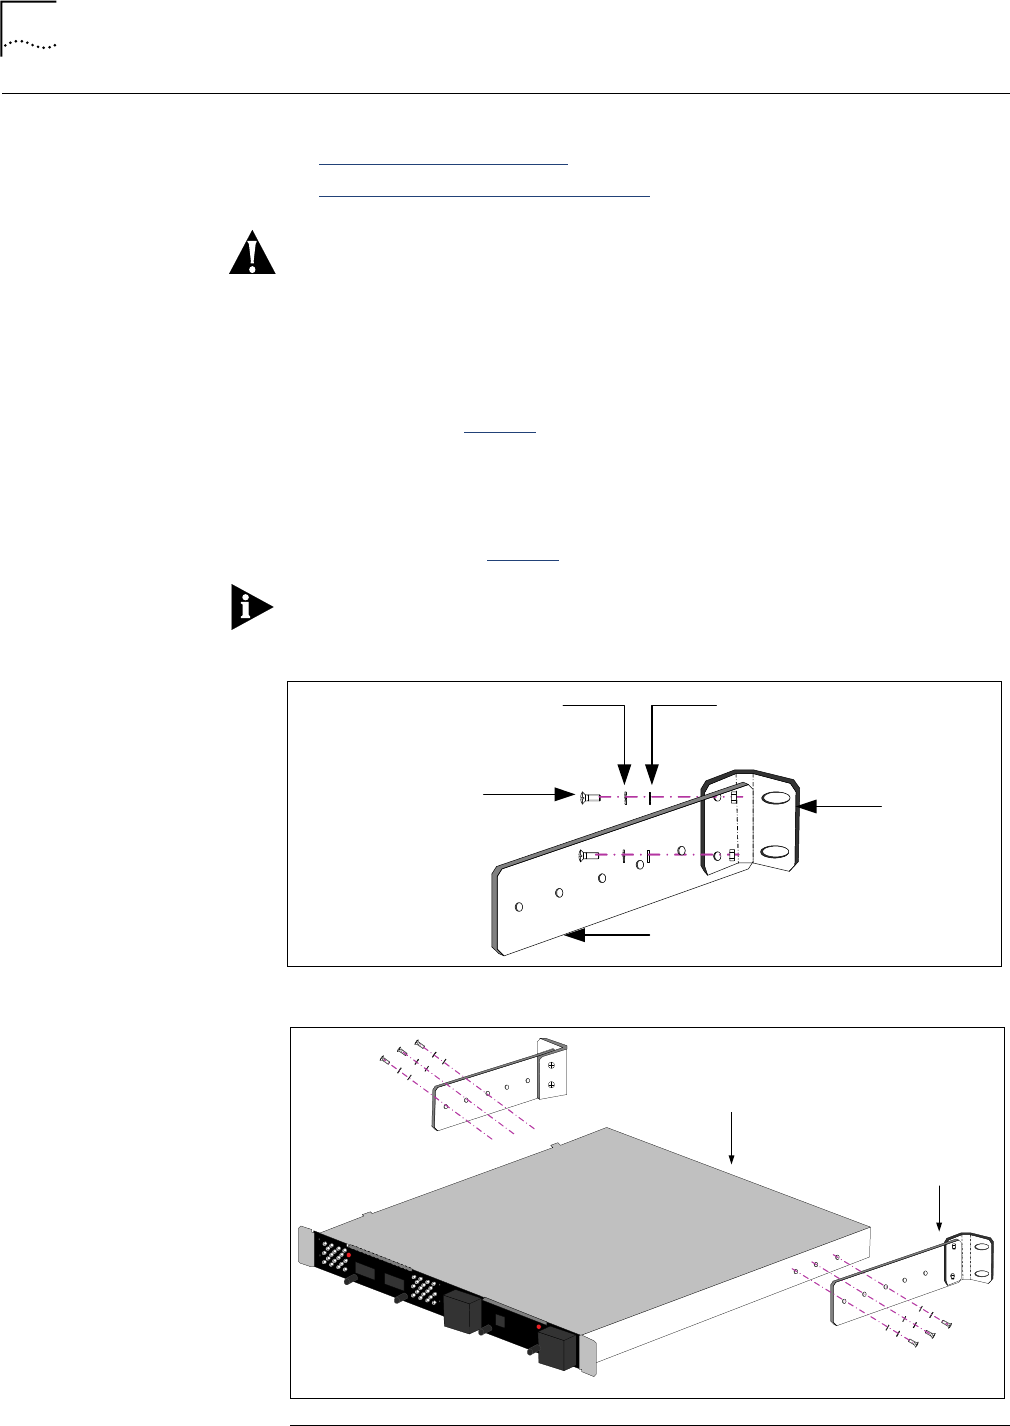
InstallingtheMountingEars ToinstallthemountingearsontotheQuadPACunit:
1Screwthebracket(80483868GS)tothemountingear(80483869GS),usingthe
KXX01336GSandKXX01337GSwashersandKXX02013GSPhillipspan‐head
screwsasshowninFigure 4.
2Repeatforthesecondbracketandmountingear.
3Connectthebracketandmountingear(AssemblyA)totheQuadPACusingthe
KXX01336GS(flat)andKXX01337GS(locking)washersandKXX02013GSPhillips
pan‐headscrews.SeeFigure 5.
Thelockingwashershouldalwaysbein‐betweenthescrewandtheflatwasher.
Figure 4AttachingBrackettoMountingEar
Figure 5AttachingMountingEarAssemblytoQuadPAC
80483869GS
80483868GS
KXX02013GS
KXX01337GS KXX01336GS
Assembly A
QuadPAC
InstallingtheQuadPAC 37
iCell®QuadPACIP‐RANEV‐DOQuadPACInstallationandInitialConfigurationGuide
PartNumberD02698GSRevA1|November2013
STARSOLUTIONSCONFIDENTIAL
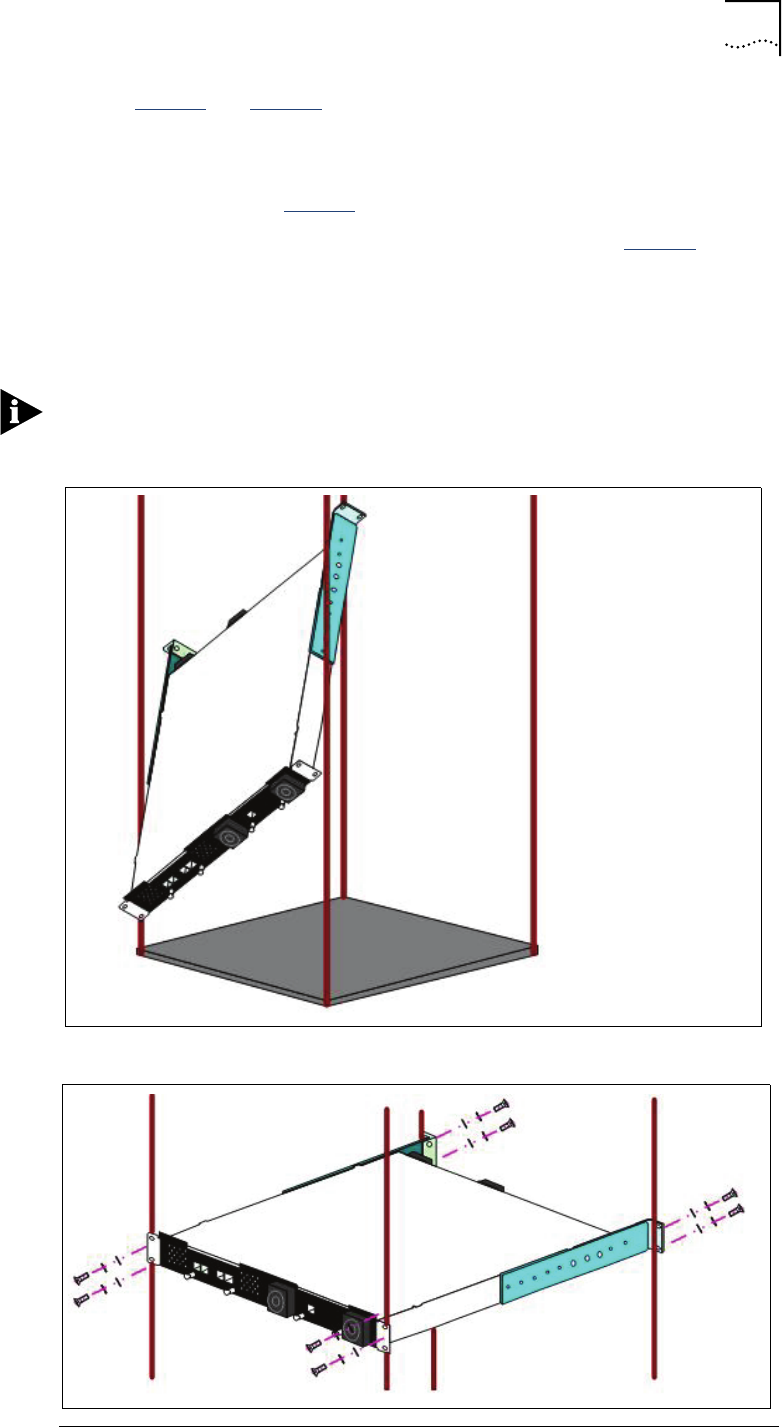
MountingtheQuadPACinto
theRack
RefertoFigure 6andFigure 7forthefollowinginstructions.
TomounttheQuadPACintherack:
1TilttheQuadPACunit,puttheunitinsidetherackandensurethemountingears
areoutsidetherack.SeeFigure 6.
2LifttheQuadPACunituptothecorrecthorizontalposition.SeeFigure 7
3UsingaPhillips#2screwdriver,connecttheQuadPACunittotherackwiththe
flatwasher,lockwasherandM6screws.Use2screwsetspercorner.
4Ensureallfourcornersareattachedusingatotalof8screws.
Thelockingwashershouldalwaysbein‐betweenthescrewandtheflatwasher.
Figure 6TiltingtheQuadPACtogetitintotheRack
Figure 7MountingtheQuadPACintheRack
38 Chapter3:QuadPACInstallation
iCell®QuadPACIP‐RANEV‐DOQuadPACInstallationandInitialConfigurationGuide
PartNumberD02698GSRevA1|November2013
STARSOLUTIONSCONFIDENTIAL
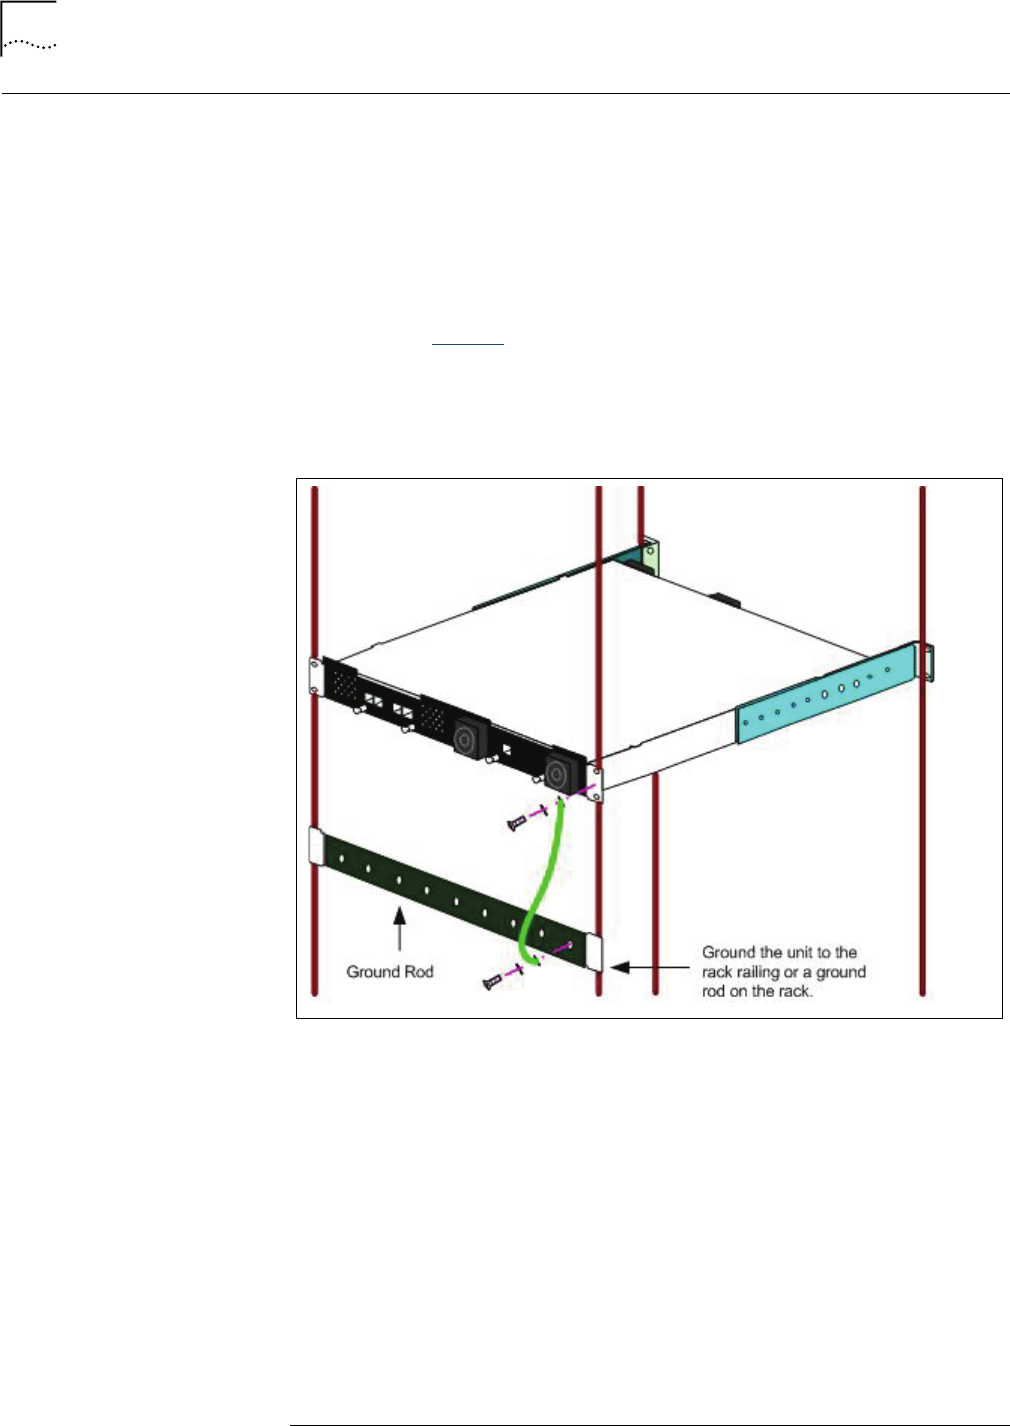
Grounding GroundtheQuadPACiusingthe1Uchassis.
TogroundtheQuadPAC:
1Usingthe#2Phillipsscrewdriver,removeoneofthesetsofrackmountscrews,
lockwashersandflatwashers.
2Replacetheflatwasherwiththegroundcableslug.
3Usingthe#2Phillipsscrewdriver,re‐installthescrew,lockwasherandground
cableslug.(SeeFigure 8.)
4Usingthe#2Phillipsscrewdriver,screwtheothersideofthegroundcableinto
thegroundingrod.
Figure 8Grounding

iCell®QuadPACIP‐RANEV‐DOQuadPACInstallationandInitialConfigurationGuide
PartNumberD02698GSRevA1|November2013
STARSOLUTIONSCONFIDENTIAL
4INTERFACECONNECTIONS
Warning:
AboutThisChapter Thischapterincludes:
■Front/RearPanelInterfaceConnections
■Ethernet/LANConnections
■RFAntennaConnections
■RFAntennaConnectionsonDO‐BTSModule
■PowerConnection
■ResetButton
■StatusLED
Allconnectorsthatarenotconnectedmustbeterminated.Theshieldingofall
coaxialconnectionsmustbegrounded.
40 Chapter4:InterfaceConnections
iCell®QuadPACIP‐RANEV‐DOQuadPACInstallationandInitialConfigurationGuide
PartNumberD02698GSRevA1|November2013
STARSOLUTIONSCONFIDENTIAL
Front/RearPanelInterface
Connections
TheQuadPACcanbeorderedinseveralconfigurations(seeQuadPAC
Configurationonpage 15).Thepanelinterfaceconnectionsvarydependingon
thehardwareconfigurationthatwasordered.
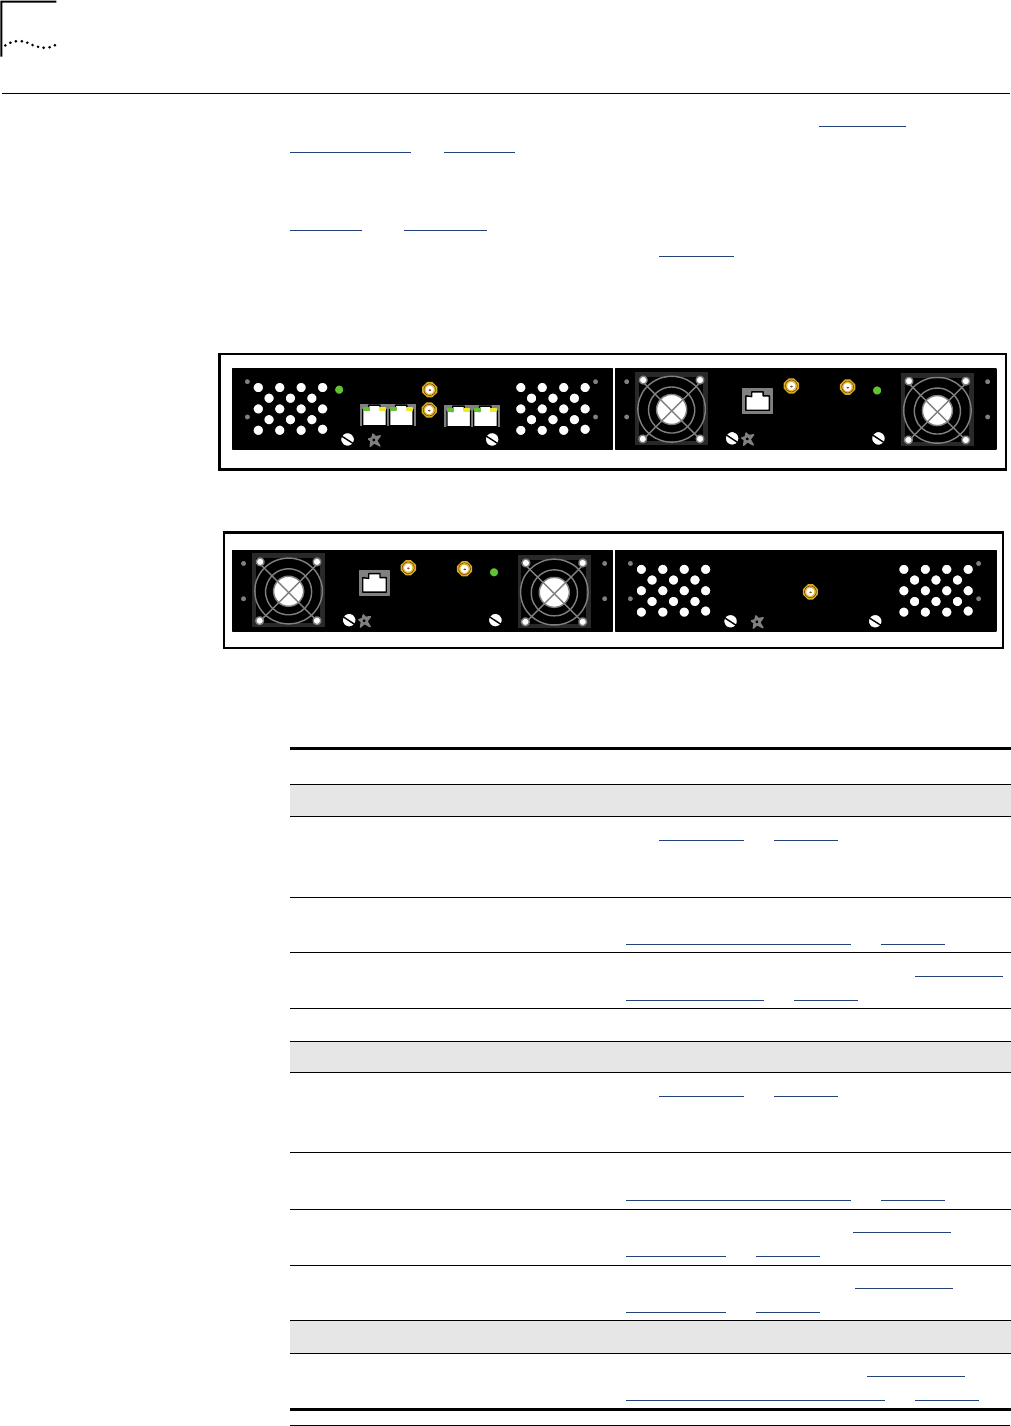
Figure 9andFigure 10showtwodifferentQuadPACfrontpanelviews,depending
ontheQuadPAChardwareconfiguration.Table 13liststhefrontpanelinterface
connections.
Figure 9QuadPACFrontView‐ClockModuleandDO‐BTSModule
Figure 10QuadPACFrontView‐DO‐BTSModuleandGPSModule
Status
ETH + PP1SETH
CLOCK MODULE
STARSOLUTIONS TM
PP1S
MAIN ETH
BTS MODULE
STARSOLUTIONSTM
Status
Tx OUT Rx IN
MAIN ETH
BTS MODULE
STARSOLUTIONSTM
Status
Tx OUT Rx IN
GPS MODULE
STARSOLUTIONS TM
GPS
Table 13QuadPACFrontPanelInterfaceConnections
Connection Type Notes
ClockModule
Status Operational
statusindicator
LED
SeeStatusLEDonpage 51.
ETH RJ45 Interfaceforbackhaulconnectivity.See
Ethernet/LANConnectionsonpage 42.
ETH+PP1S RJ45 InterfaceforLVDSconnectivity.SeeEthernet/
LANConnectionsonpage 42.
PP1S FemaleSMA Plushperonesecondoutput.
DO‐BTSModule
Status Operational
statusindicator
LED
SeeStatusLEDonpage 51.
MAINETH RJ45 Interfaceforbackhaulconnectivity.See
Ethernet/LANConnectionsonpage 42.
TxOUT FemaleSMA Txantennaconnection.SeeRFAntenna
Connectionsonpage 49.
RxIN FemaleSMA Rxantennaconnection.SeeRFAntenna
Connectionsonpage 49.
GPSModule
GPS FemaleSMA GPSantennaconnection.SeeRFAntenna
ConnectionsonDO‐BTSModuleonpage 49.

Front/RearPanelInterfaceConnections 41
iCell®QuadPACIP‐RANEV‐DOQuadPACInstallationandInitialConfigurationGuide
PartNumberD02698GSRevA1|November2013
STARSOLUTIONSCONFIDENTIAL
Figure 11andFigure 12showtwodifferentQuadPACrearpanelviews,
dependingontheQuadPAChardwareconfiguration.Table 14liststherearpanel
interfaceconnections.
Figure 11QuadPACRearView‐CPUModuleandPowerSupplyModule
Figure 12QuadPACRearView‐PowerSupplyModule
Status
LAN1 LAN2
USB0 USB1 COM1 VGA
CPU MODULE
STARSOLUTIONS TM
RESET
AC POWER SUPPLY
STARSOLUTIONSTM
RESET
AC POWER SUPPLY
STARSOLUTIONSTM
Table 14QuadPACRearPanelInterfaceConnections
Connection Type Notes
PowerSupplyModule
Power ACPlug Nominal230V(+6,‐10%)at50Hz
Nominal120V(+10,‐10%)at60Hz
Resetbutton Pushbutton Factoryresetbutton.See
Powerswitch Breaker
ON/OFFswitch
ON–systemispoweredonandoperational
OFF–systemispoweredoff
CPUModule
StatusLED Operational
statusindicator
SeeStatusLEDonpage 51.
USB0,1StandardUniver
salSerialBus
port
MouseUSBconnection.
LAN1,2RJ45 Interfaceforbackhaulconnectivity.
COM1 MaleDE‐9
connector
Keyboardserialconnection.
VGA FemaleDE‐15
connector
Monitorconnection.

42 Chapter4:InterfaceConnections
iCell®QuadPACIP‐RANEV‐DOQuadPACInstallationandInitialConfigurationGuide
PartNumberD02698GSRevA1|November2013
STARSOLUTIONSCONFIDENTIAL
Ethernet/LAN
Connections
TheQuadPACcanbeconnectedtothenetworkinseveralways,dependingon
theQuadPAChardwareconfigurationandthedeploymentrequirements.
TherearetwoportsontheQuadPACmodules,labeledasfollowstoindicatethe
portstouseforIPconnectivitytothenetwork:
■EthernetontheDO‐BTSandClockmodules
■LANontheCPUmodule
ConnectingtheQuadPACto
theNetwork
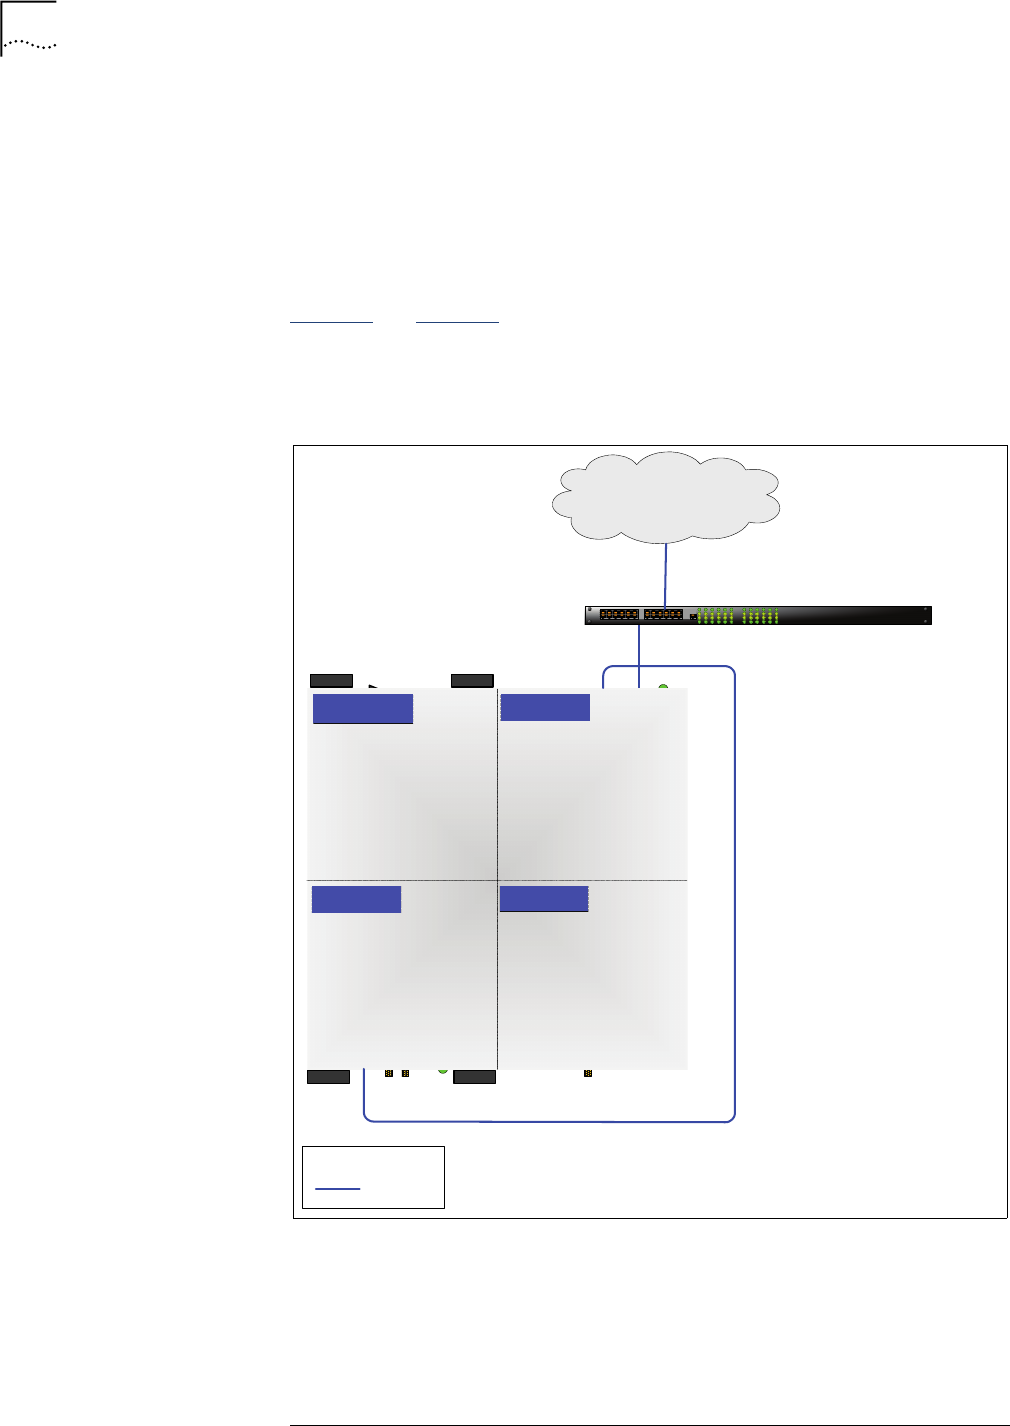
Thetwomainarchitecturesfornetworkconnectivityaredescribedinthis
section:
■“Typical”connectionmode
■“AllInOne”connectionmode
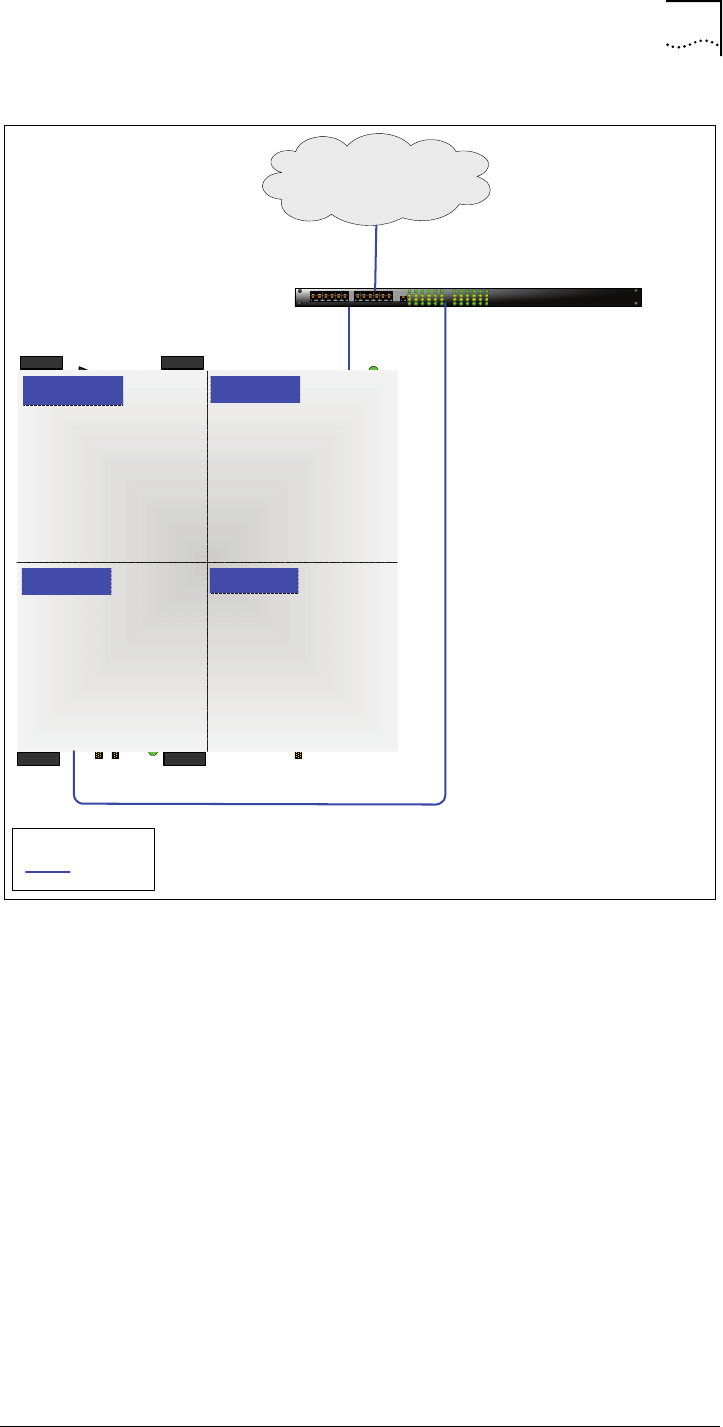
“Typical”connectionmode
The“Typical”connectionsetupallowstheapplicationstoconnecttothenetwork
independently,directlyfromtheQuadPACmoduleinterface.
Thisconnectionsetupisusedformostdeploymentscenarios.
Figure 13andFigure 14showthe“Typical”connectionsetupforthehardware
configurationsofaQuadPACwithaGPSModuleandaQuadPACwithaClock
Module,respectively.Figure 14showstheuseoftheFerriteBeadwhen
connectingtheDO‐BTSmoduledirectlytothenetwork.
Ethernet/LANConnections 43
iCell®QuadPACIP‐RANEV‐DOQuadPACInstallationandInitialConfigurationGuide
PartNumberD02698GSRevA1|November2013
STARSOLUTIONSCONFIDENTIAL
Figure 13“Typical”ConnectionSetupforQuadPACwithGPSModule
Network
CPU Module
BTS Module GPS
Power Supply
Module
Switch
Legend:
Ethernet
1 U
LAN1
Main ETH
44 Chapter4:InterfaceConnections
iCell®QuadPACIP‐RANEV‐DOQuadPACInstallationandInitialConfigurationGuide
PartNumberD02698GSRevA1|November2013
STARSOLUTIONSCONFIDENTIAL
Figure 14“Typical”ConnectionSetupforQuadPACwithClockModule
UsetheFerriteBeadontheETHcablewhenconnectingtheDO‐BTSModule
directlytothenetwork.
LooptheETHcablethroughtheFerritebead,closetooneoftheplugs,twoor
threetimes,asshowninFigure 15.
Network
CPU Module
Clock Module BTS Module
Power Supply
Module
Switch
1 U
Main ETH
ETH
LAN1
ETH+PP1S
Legend:
Ethernet
Ethernet/LANConnections 45
iCell®QuadPACIP‐RANEV‐DOQuadPACInstallationandInitialConfigurationGuide
PartNumberD02698GSRevA1|November2013
STARSOLUTIONSCONFIDENTIAL
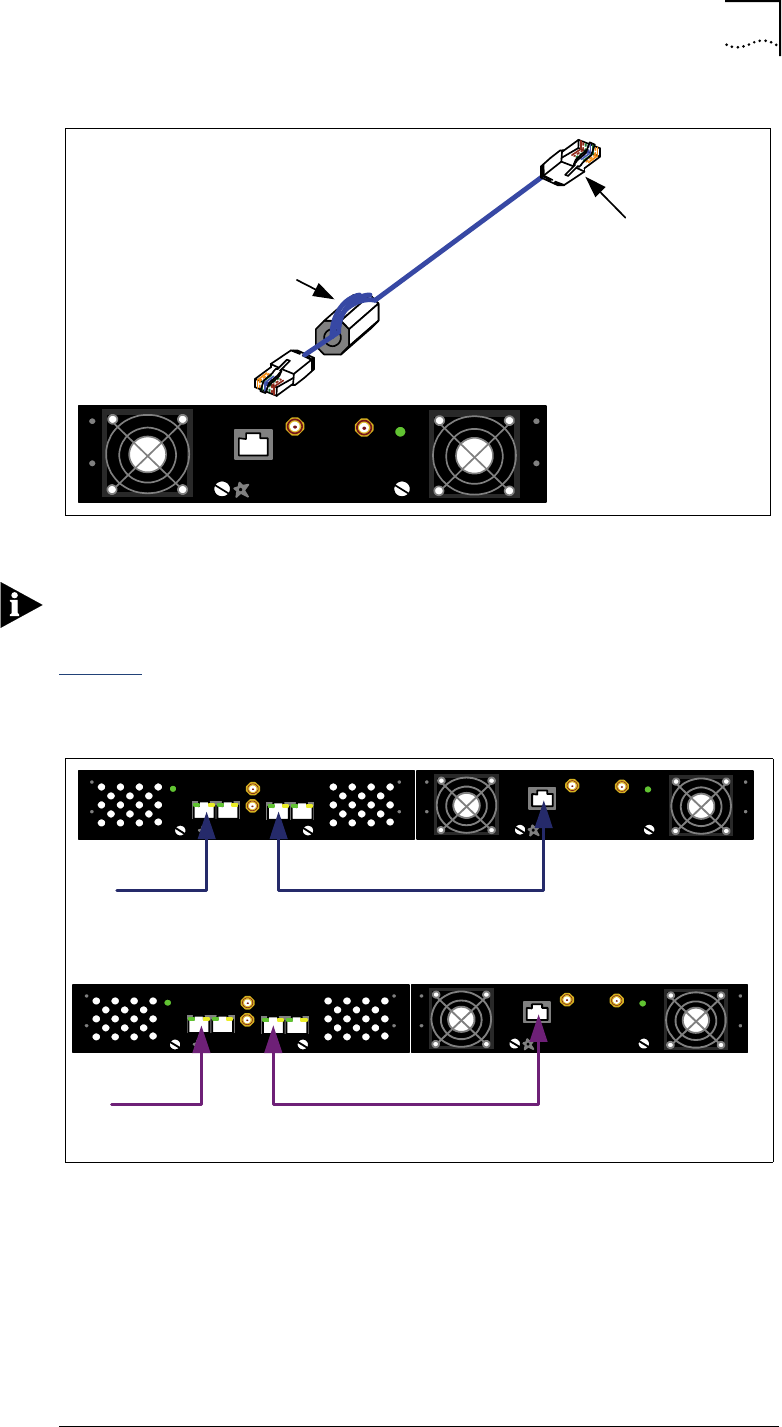
Figure 15FerriteBeadontheDO‐BTSETHcable
TheportsontheClockModule(ETH+PP1SfromtheDO‐BTSandETHtoswitch)
shouldbesymmetricallyconnected.Forexample,ifyouusetherightETH+PP1S
portcomingfromtheDO‐BTS,usetherightETHportgoingouttotheswitch.See
Figure 16.
Figure 16ClockModuleSymmetricportconnectionin“Typical”connectionmode.
Ferrite Bead close to
BTS MAIN ETH port
to the Switch
port
MAIN ETH
BTS MODULE
STARSOLUTIONS TM
Status
Tx OUT Rx IN
Status
ETH + PP1SETH
CLOCK MODULE
STARSOLUTIONS TM
PP1S
MAIN ETH
BTS MODULE
STARSOLUTIONSTM
Status
Tx OUT Rx IN
1 ft Ethernet Patch Cable
Status
ETH + PP1SETH
CLOCK MO DULE
STARSOLUTIONS TM
PP1S
MAIN ETH
BTS MODUL ESTARSOLUTIONSTM
Status
Tx OUT Rx IN
1 ft Ethernet Patch Cable
46 Chapter4:InterfaceConnections
iCell®QuadPACIP‐RANEV‐DOQuadPACInstallationandInitialConfigurationGuide
PartNumberD02698GSRevA1|November2013
STARSOLUTIONSCONFIDENTIAL
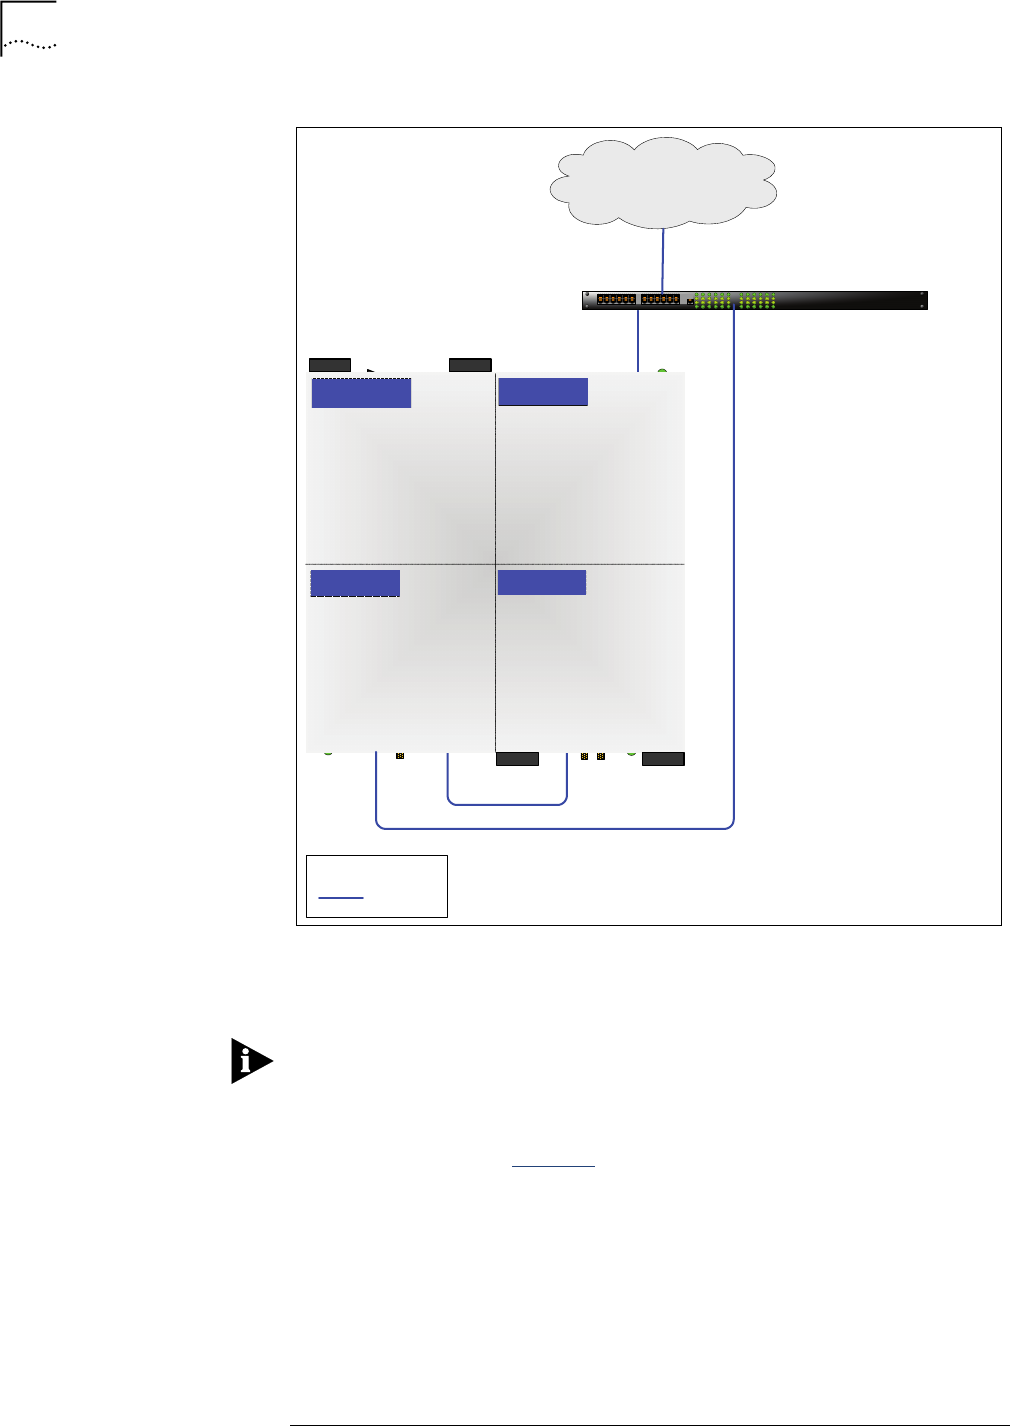
“AllInOne”connectionmode
The“AllInOne”connectionsetupallowsasingleinterfacefromtheQuadPACto
thenetwork.
ThisconnectionsetupisusedwhenthePDSNapplicationisconfiguredonthe
CPUmoduleorwhenthereisonlyasingleinterfaceavailablethroughthe
network.
Figure 17andFigure 18showthe“AllInOne”connectionsetupforthehardware
configurationsofaQuadPACwithaGPSModuleandaQuadPACwithaClock
Module,respectively.
Figure 17“AllInOne”ConnectionSetupforaQuadPACwithaGPSModule
Network
CPU Module
BTS Module GPS
Power Supply
Module
Switch
Legend:
Ethernet
1 U
LAN1
Main ETH
LAN2
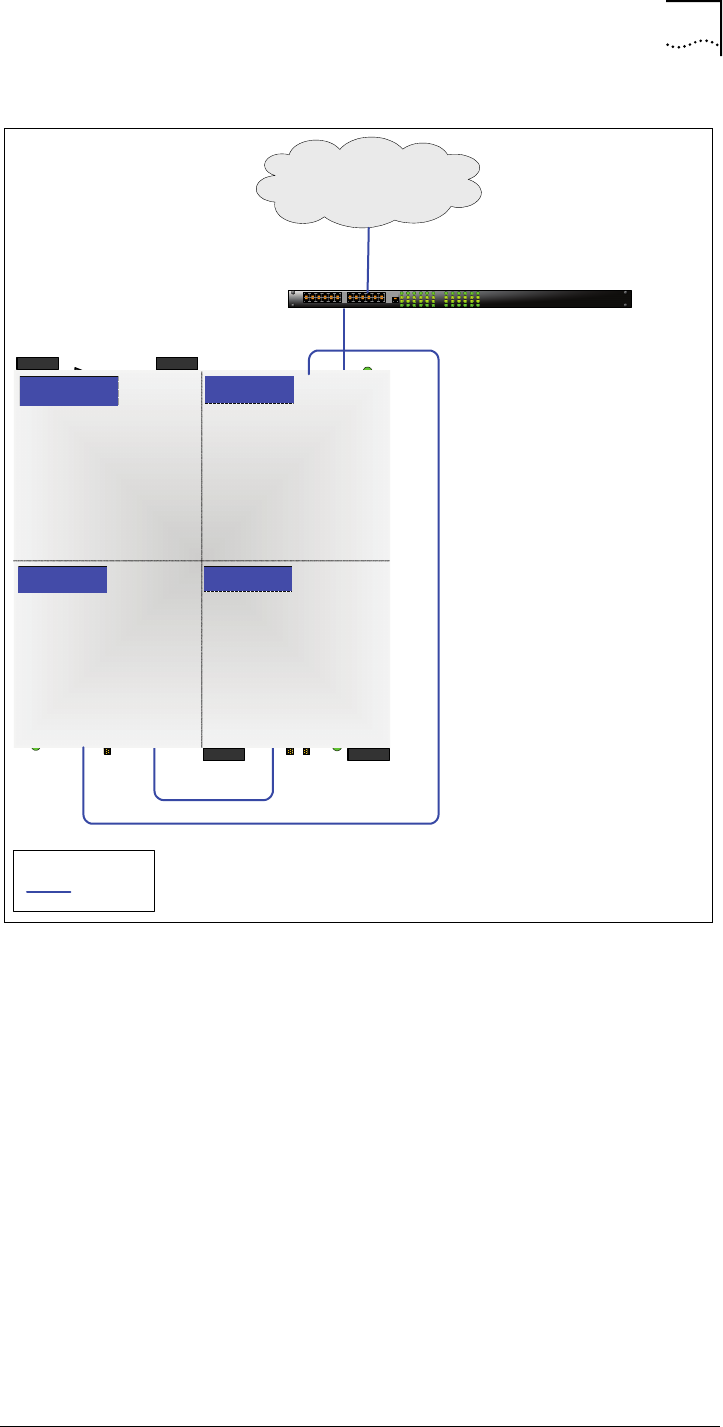
Ethernet/LANConnections 47
iCell®QuadPACIP‐RANEV‐DOQuadPACInstallationandInitialConfigurationGuide
PartNumberD02698GSRevA1|November2013
STARSOLUTIONSCONFIDENTIAL
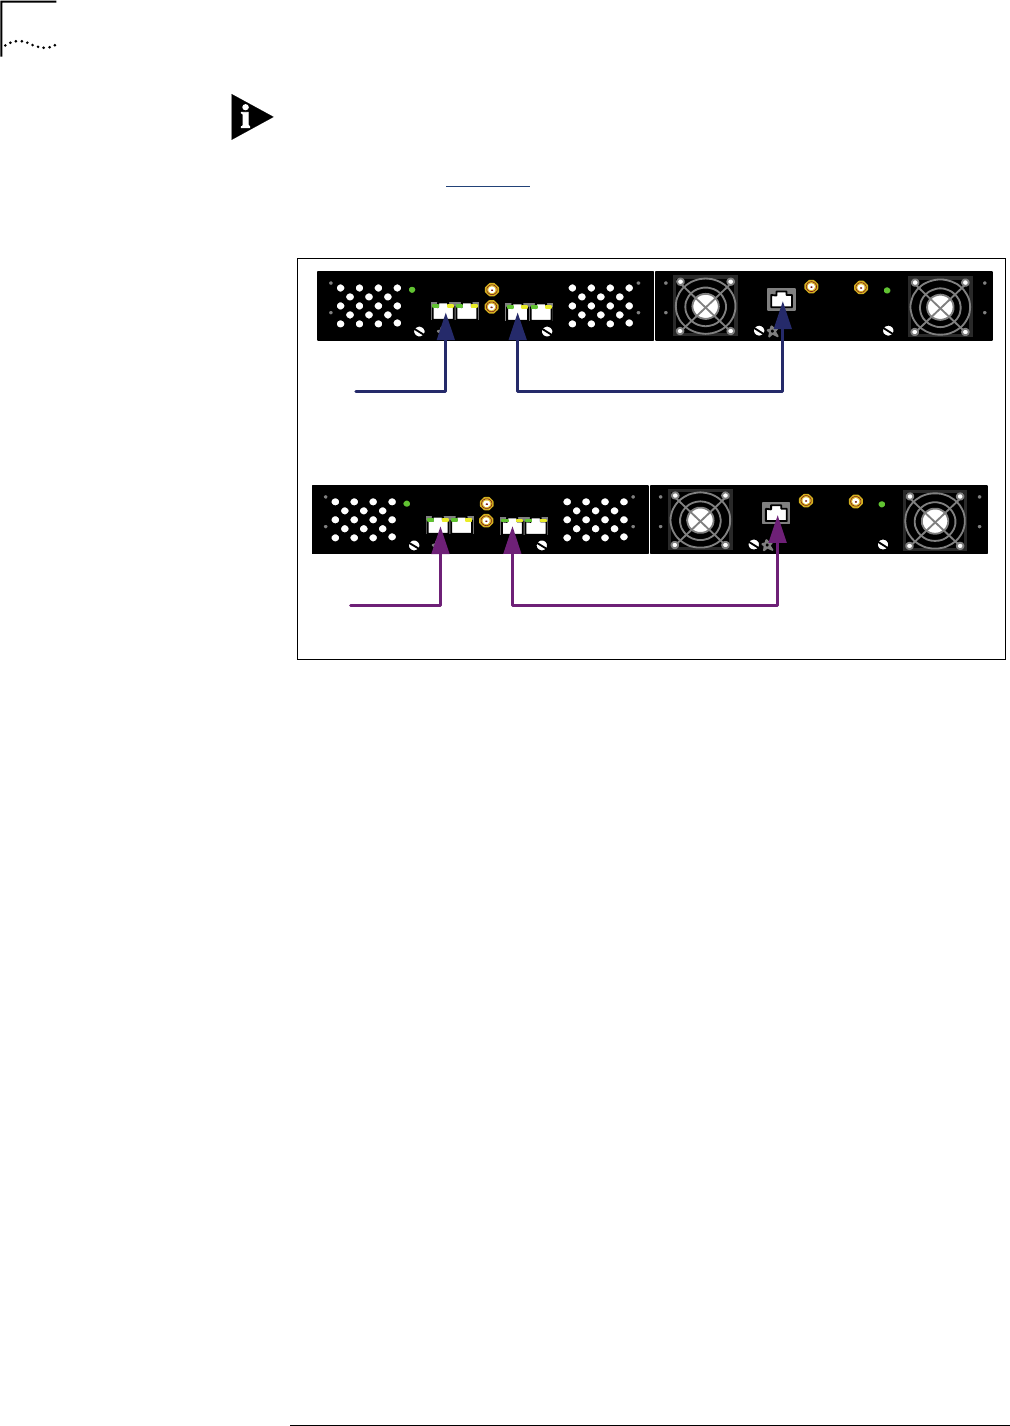
Figure 18“AllInOne”connectionsetupforQuadPACwithClockModule
Network
CPU Module
Clock Module BTS Module
Power Supply
Module
Switch
1 U
Main ETH
ETH ETH+PP1S
Legend:
Ethernet
LAN1LAN2
48 Chapter4:InterfaceConnections
iCell®QuadPACIP‐RANEV‐DOQuadPACInstallationandInitialConfigurationGuide
PartNumberD02698GSRevA1|November2013
STARSOLUTIONSCONFIDENTIAL
TheportsontheClockModule(ETH+PP1SfromtheDO‐BTSandETHtoCPU
Module)shouldbesymmetricallyconnected.Forexample,ifyouusetheright
ETH+PP1SportcomingfromtheDO‐BTS,usetherightETHportgoingouttothe
CPUModule.SeeFigure 19.
Figure 19ClockModuleSymmetricportconnectionin“AllInOne”connectionmode
Status
ETH + PP1SETH
CLOCK MODULE
STARSOLUTIONS TM
PP1S
MAIN ETH
BTS MODULE
STARSOLUTIONSTM
Status
Tx OUT Rx IN
1 ft Ethernet Patch Cable
Status
ETH + PP1SETH
CLOCK MODULE
STARSOLUTIONS TM
PP1S
MAIN ETH
BTS MODULESTARSOLUTIONSTM
Status
Tx OUT Rx IN
1 ft Ethernet Patch Cable
RFAntennaConnections 49
iCell®QuadPACIP‐RANEV‐DOQuadPACInstallationandInitialConfigurationGuide
PartNumberD02698GSRevA1|November2013
STARSOLUTIONSCONFIDENTIAL
RFAntennaConnections TheRFantennasareconnectedtotheTxandRxSMAconnectorsontheDO‐BTS
Module.SeeFigure 20.
Figure 20RFAntennaConnectionsonDO‐BTSModule
GPSAntennaConnection TheGPSantennaisconnectedtotheGPSSMAconnectorontheGPSModule.
SeeFigure 21.
Figure 21GPSModule:GPSSMAPort
MAIN ETH
BTS MODULE
STARSOLUTIONSTM
Status
Tx OUT Rx IN
TX and RX Antenna Ports
GPS MODULE
STARSOLUTIONS TM
GPS
GPS Antenna Port

50 Chapter4:InterfaceConnections
iCell®QuadPACIP‐RANEV‐DOQuadPACInstallationandInitialConfigurationGuide
PartNumberD02698GSRevA1|November2013
STARSOLUTIONSCONFIDENTIAL
Warning:
Warning:
Caution:
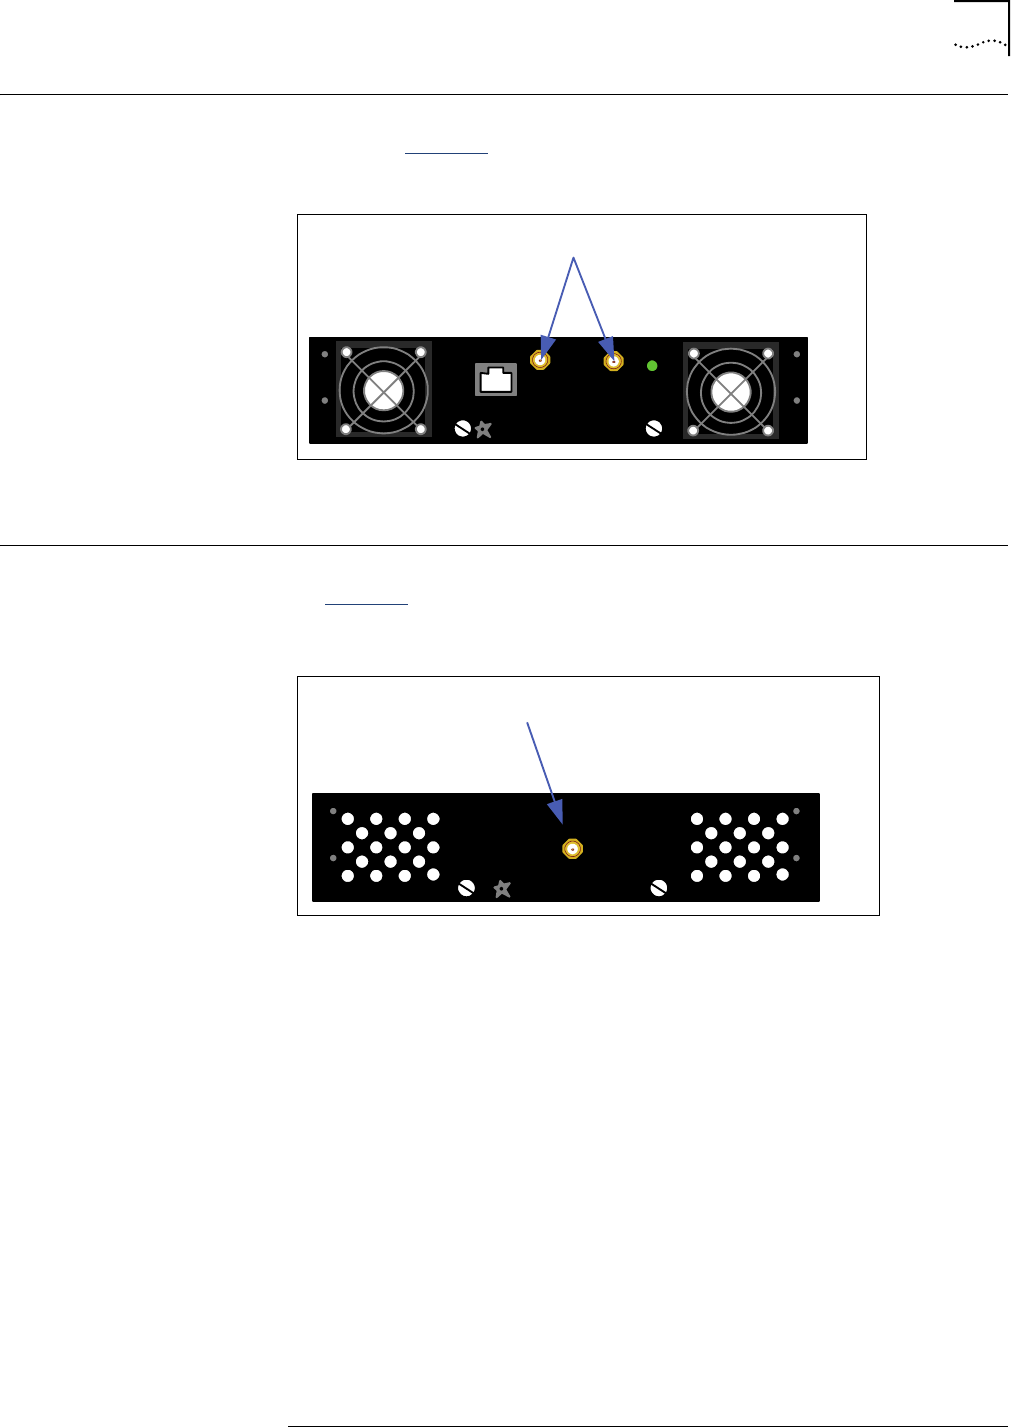
PowerConnection ToconnectpowertotheQuadPAC:
1EnsurethebreakerswitchonthePowerSupplyModuleisinthe"OFF"position.
2ConnecttheACpowercable.
PowerconnectionstotheQuadPACmustcomplywithlocalsafetycodes.
Powerconnectionsmustbeperformedbyqualifiedpersonnelonly.
TopowertheQuadPACon,togglethepowerswitchonthePowerSupplyModule
tothe"ON"position.(SeeFigure 22.)
Figure 22ResetButtonandPowerBreakerSwitch
ResetButton TheResetbutton(seeFigure 22)isusedtoeffectdifferenttypesofresetonthe
QuadPAC,dependingonhowlongtheresetbuttonishelddown.
Theresetbuttonshouldnotbepressedduringpowerup.Doingsocancausethe
QuadPACtomalfunction,resultinginthepotentiallossofdata.
Table 15liststheresetbuttontimingduringnormaloperations.
RESET
AC POWER SUPPLY
STARSOLUTIONS TM
Reset
button
Power
switch
Table 15ResetButtonTiming
ButtonHoldTime(seconds) ResetAction
1TheDO‐BTSisreset.
5TheDO‐BTSispowercycled.TheLEDgoesoff.
20 Theunitisresettofactorydefaultsettings.

StatusLED 51
iCell®QuadPACIP‐RANEV‐DOQuadPACInstallationandInitialConfigurationGuide
PartNumberD02698GSRevA1|November2013
STARSOLUTIONSCONFIDENTIAL
StatusLED TheQuadPAChasasingleexternalstatusLEDthatdisplaysthestateoftheunit.
Thisallowstheusertodeterminethestateofthesystembeforeother
communicationmethods,suchasanIPconnection,havebeenestablished.
TheQuadPAChasstatusLEDsontheDO‐BTS,ClockandCPUModules.TheLED
behavioroneachmodulerepresentsthestatusofthatspecificmodule.
Table 16liststherelationshipbetweentheLEDbehaviorandthestatusofeach
module.
Table 16StatusLEDBehavior
LEDBehavior SystemState ServiceProvided
DO‐BTSModule
Off Notpowered. No
SolidRed Systembooting. No
BlinkingRed Systeminitializing. No
Alternating
Green/Red
RFinitializing. No
BlinkingGreen Timingsynchronizing.
CellularRFnottransmitting.
No
SolidGreen Timingcomplete.
RFtransmitting.
Yes
ClockModule
Off Notpowered. No
SolidRed Clockinitializing. No
SolidGreen Clocksynchronized. Yes
CPUModule
Off Notpowered. No
SolidGreen Poweredon Yes