Sun Communications USADECT-B05 US DECT PHONE - BASE User Manual
SunCorp Communications Limited US DECT PHONE - BASE
USERS MANUAL
7471
–
hilips
DE
B)
–
1
14.06.06
USA DECT-B05 –
3111-
DECT6.0
di
g
ital
co
r
dless
p
hone
US
A
DECT-B05
U
s
e
r
m
a
nu
a
l
USA DECT-B05-UG
_
3111-285-31161-
(
GB
)
.indd 1 14/6/06 17:02:
0

7471
–
hilips
DE
B)
–
1
14.06.06
CT
522
–
3111-285-31161-
522-UG
_
3111-285-31161-
(
GB
)
.indd 2 14/6/06 17:02:
0
FCC Interference Information
This device complies with Part 15 of the FCC Rules. Operation is subject
to the following two conditions: (1) This device may not cause harmful
interference; and (2) This device must accept any interference received,
including interference that may cause undesired operation.
This equipment has been tested and found to comply with the limits for a
Class B digital device, pursuant to Part 15 of the FCC Rules. These limits
are designed to provide reasonable protection against harmful interference
in a residential installation.
This equipment generates, uses, and can radiate radio frequency energy
and, if not installed and used in accordance with the instructions, may
cause harmful interference to radio communications. However, there is no
guarantee that interference will not occur in a particular installation.
If this equipment does cause harmful interference to radio or television
reception, which can be determined by turning the equipment off and on,
the user is encouraged to try to correct the interference by one or more of
the following measures:
• Reorient or relocate the receiving antenna (that is, the antenna for radio
or television that is “receiving” the interference).
• Reorient or relocate and increase the separation between the
telecommunications equipment and receiving antenna.
• Connect the telecommunications equipment into an outlet on a circuit
different from that to which the receiving antenna is connected
FCC RF Radiation Exposure Statement
The installation of the base unit should allow at least 20 centimeter
between the base and persons to be in compliance with FCC RF exposure
guidelines. For body worn operation, the portable part (handset) has been
tested and meets FCC RF exposure guidelines.
This device must not be co-located or operating in conjunction with any
other antenna or transmitter. The changes or modifications not expressly
approved by the party responsible for compliance could void the user’s
authority to operate the equipment.

7471
–
hilips
DE
B)
–
1
14.06.06
CT
522
–
3111-285-31161-
Contents
EN
4
Impor
tant
inf
ormatio
n
4
F
or
y
our
saf
et
y
4
Installation
r
equir
ement
s
4
Need
help
?
5
What’
s
in
the
bo
x
6
Y
our
DECT
522
6
Over
vie
w
of
the
handse
t
8
Displa
y
icon
s
9
Over
vie
w
of
the
base
statio
n
9
Main
f
eatur
es
of
y
our
DECT
522
10
Men
u
na
vigatio
n
11
Connec
t
11
Connect
the
base
statio
n
12
Instal
l
12
Install
and
charge
the
handset
batterie
s
12
Batter
y
lif
e
and
range
13
Settin
g
up
y
our
DECT
522
14
Cal
l
14
Mak
e
a
cal
l
15
Call
in
pr
ogr
es
s
16
Inter
co
m
17
Thr
ee-par
ty
conf
er
ence
cal
l
17
Call
W
aitin
g
18
Caller
identificatio
n
18
Voicemai
l
19
Name
s
19
Vie
w
and
dial
phonebook
entrie
s
19
Ad
d
entr
y
in
the
phoneboo
k
21
Cop
ying
phonebook
entrie
s
23
Netw
ork
Ser
vices
25
Call
Lo
g
25
Viewing
a
call
log
27
Access
the
r
edial
lis
t
28
Clock
&
A
lar
m
28
D
ate
and
tim
e
29
Alar
m
30
P
ersonal
Setting
s
30
Handset
setting
s
36
Base
setting
s
37
System
PI
N
38
Master
r
ese
t
39
Registratio
n
39
Register
an
ad
ditional
handse
t
40
Switch
bases
40
Unr
egister
a
handse
t
41
Other
f
eatur
e
s
42
T
r
oub
leshootin
g
44
General
inf
ormatio
n
44
Conf
ormity
44
Recycling
and
disposal
45
Inde
x
3
522-UG
_
3111-285-31161-
(
GB
)
.indd 3 14/6/06 17:02:
0

7471
–
hilips
DE
B)
–
1
14.06.06
CT
522
–
3111-285-31161-
EN
Im
p
or
tant
inf
ormation
F
o
r
y
our
saf
ety
This
equipment
is
not
designed
to
mak
e
emerg
ency
calls
in
the
e
v
ent
of
a
po
w
er
failur
e
.
An
alternativ
e
has
to
be
made
a
vailab
le
to
allo
w
emerg
ency
calls.
•
Do
not
allo
w
the
pr
oduct
to
come
into
contact
with
liquid.
•
D
o
n
o
t
o
p
e
n
i
t
as
y
o
u
c
o
u
l
d
b
e
e
x
p
o
s
e
d
t
o
h
i
g
h
v
o
l
t
ag
e
s
.
•
N
eve
r
u
s
e
a
n
y
b
a
tt
e
r
y
t
y
p
e
o
t
h
e
r
t
h
a
n
t
h
e
o
n
e
s
upp
li
e
d
.
T
h
e
r
e
i
s
a
r
i
s
k
o
f
e
x
p
l
o
s
i
o
n
i
f
t
h
e
b
a
tt
e
r
i
e
s
a
r
e
r
e
p
l
a
ce
d
b
y
a
n
i
n
c
o
rr
ec
t
t
y
p
e
.
D
i
s
p
o
s
e
o
f
u
s
e
d
b
a
tt
e
r
i
e
s
a
cc
o
r
d
i
n
g
t
o
t
h
e
i
n
s
t
r
u
c
t
i
o
n
s
(
s
ee
p
ag
e
44
)
.
•
W
h
e
n
t
h
e
ph
o
n
e
i
s
r
i
n
g
i
n
g
o
r
w
h
e
n
a
c
t
i
v
a
t
i
n
g
t
h
e
l
o
u
d
s
p
e
a
k
e
r
,
p
l
e
as
e
d
o
n
o
t
h
o
l
d
t
h
e
h
a
n
d
s
e
t
t
oo
c
l
o
s
e
t
o
y
o
u
r
e
a
r
as
i
t
m
a
y
d
a
m
ag
e
y
o
u
r
h
e
a
r
i
n
g
.
Installation
r
equi
r
ements
This
pr
oduct
r
equir
es
an
electrical
suppl
y
of
220–240
v
olts,
alternating
monophased
po
w
er
,
excluding
IT
installations
defined
in
standar
d
EN
60-950.
In
case
of
po
w
er
failur
e
,
the
comm
unication
can
be
lost.
The
electrical
netw
ork
is
classifi
ed
as
hazar
dous
accor
ding
to
criteria
in
the
standar
d
EN
60-950.
The
onl
y
wa
y
to
po
w
er
down
this
pr
oduct
is
to
unplug
the
po
w
er
suppl
y
unit
fr
om
the
electrical
outlet.
Ensure
the
electrical
outlet
is
located
close
to
the
a
pparatus
and
is
al
wa
ys
easil
y
accessible
.
The
v
oltage
on
the
netw
ork
is
classifi
ed
as
TNV
-3
(
T
elecomm
unication
Netw
ork
V
olta
g
es
)
,
as
defined
in
the
standar
d
EN
60-950.
Need
help?
T
r
oubleshooting
on
page
42
Online
hel
p
:
www
.
p
4c
.
p
hili
p
s.com
4
522-UG
_
3111-285-31161-
(
GB
)
.indd 4 14/6/06 17:02:
0
7471
–
hilips
DE
B)
–
1
14.06.06
CT
522
–
3111-285-31161-
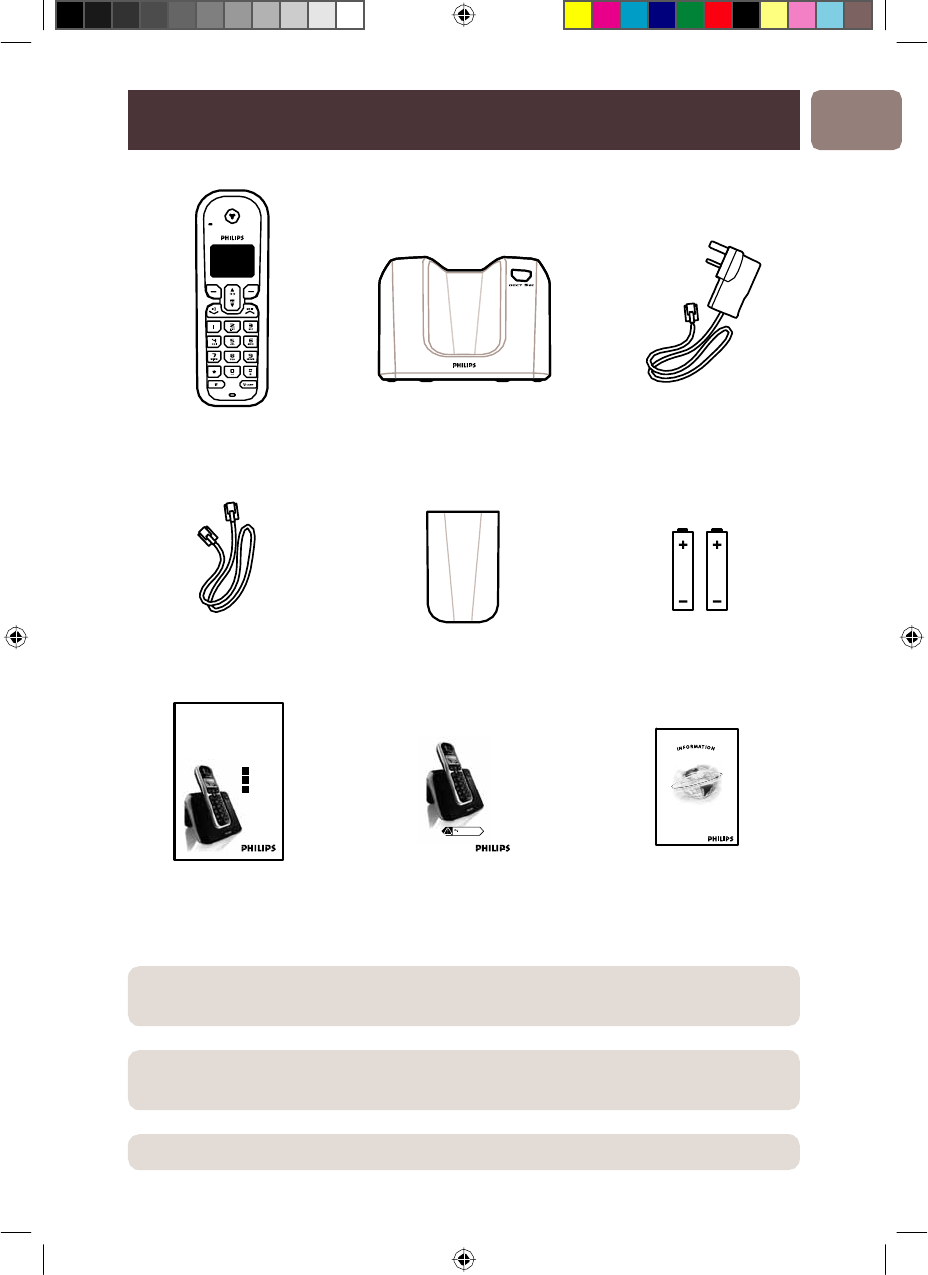
What’
s
in
the bo
x
EN
DECT
522
handset
DECT
522
base
station
P
ow
e
r
ada
pto
r
f
o
r
base
station
Line
co
r
d
*
Batter
y
door
2
x AAA
r
echargeable
batteries
�
�
�
�
�
�
�
�
�
�
�
�
�
�
�
�
�
�
�
�
�
�
�
�
����������������
�����������
��������
�
�
�
�
�
�
�
��
�
�
�
�
���
��
�
�
�
�
�
�
�
��
Quick
star
t
g
uide
Use
r
man
ual
W
a
r
rant
y
inf
ormation
*
The
line
ada
pto
r
may
not
be
attached
to
the
line
co
r
d.
If
this
is
the
case
,
please
connect
the
line
ada
ptor
to
the
line
cor
d
bef
or
e
plugging
it
into
the
line
sock
et.
In
m
ulti-handset
packs,
y
ou
will
find
one
o
r
mo
r
e
ad
ditional
handsets,
chargers
with
po
w
er
suppl
y
units
and
ad
ditional
r
echargeable
batteries.
W
A
RNING
A
l
w
a
y
s
use
the
cables
and
batteries
that
came
with
y
our
p
hone
5
522-UG
_
3111-285-31161-
(
GB
)
.indd 5 14/6/06 17:02:1
7471
–
hilips
DE
B)
–
1
14.06.06
CT
522
–
3111-285-31161-
EN
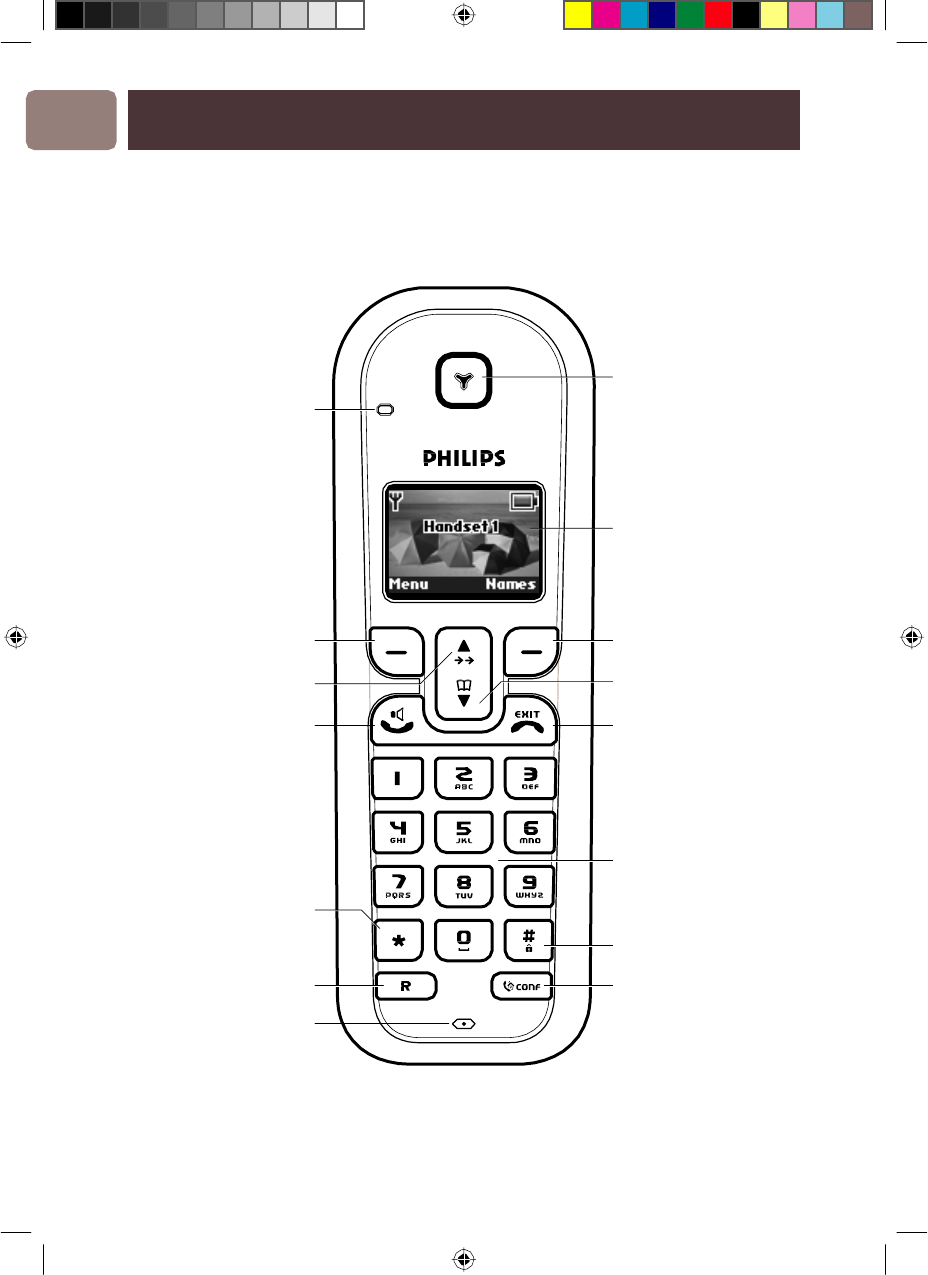
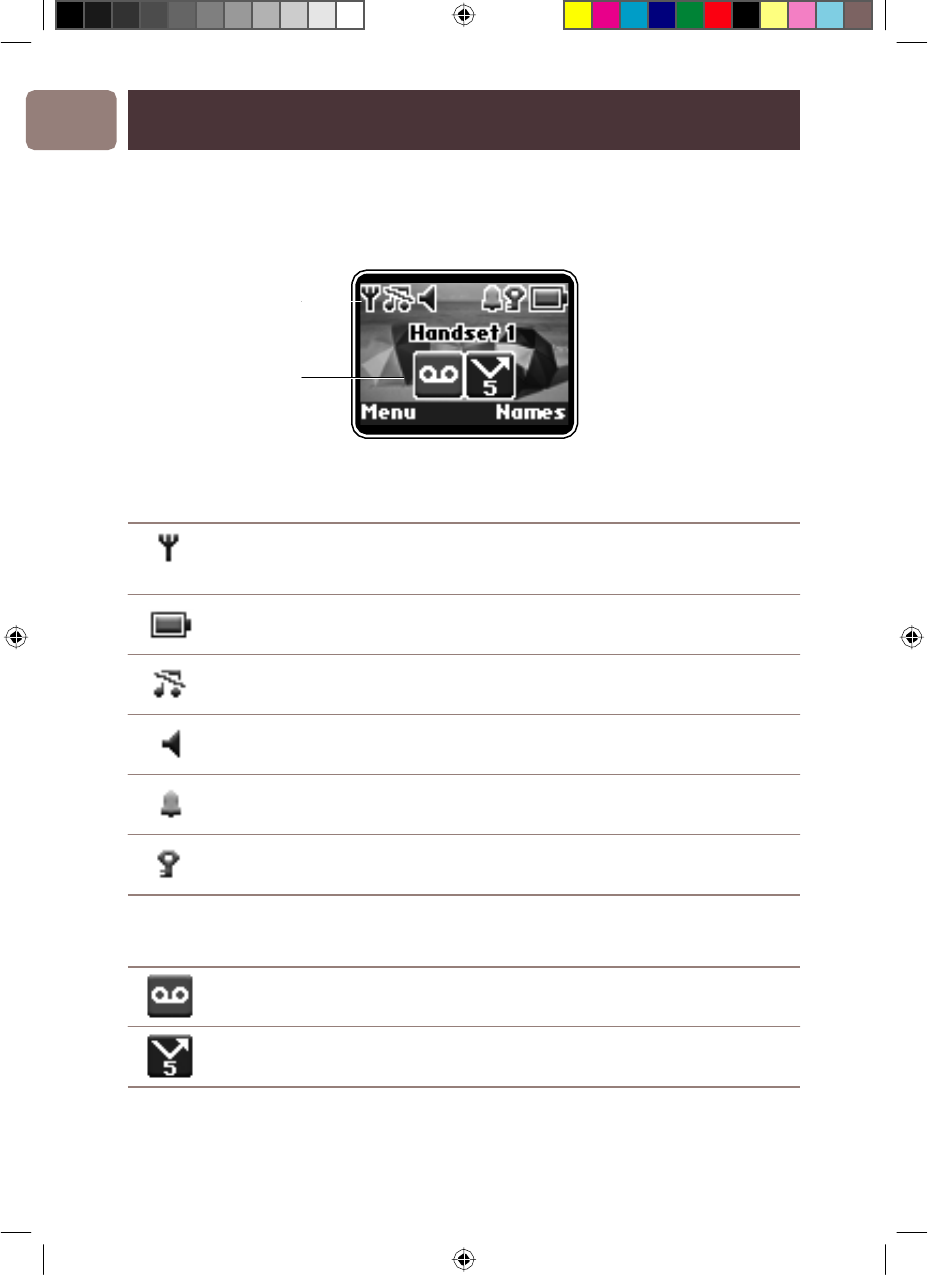
Y
our
DECT
522
O
v
er
vie
w
o
f
the
handset
Handset
LED
Lights
up
when
the
handset
is
in
use
Flashes
when
y
o
u
ha
v
e
an
incoming
call
,
missed
calls
and/or
ne
w
v
oicemai
l
Earpiece
LCD
sc
r
een
Left
soft
k
e
y/Men
u
Up/Redial
k
e
y
T
alk/Handsf
r
ee
*
k
e
y
Right
soft
k
e
y/Names
Do
wn/Phonebook
k
e
y
End
call/Exit
menu
k
e
y
A
l
p
han
umeric
k
e
yp
ad
Switch
f
r
om
pulse
to
tone
dialling
Recall
k
e
y
Mic
r
ophone
K
eypad
lock
k
e
y
Inte
r
com
k
e
y
*
W
A
RNING
Hands
f
r
ee
activation
can
sud
denl
y
inc
r
ease
the
v
olume in
the
earpiece
to
a
v
er
y
high
le
v
el.
Mak
e
sur
e
the
handset
is
not
too
close
to
y
our
ear
.
6
522-UG
_
3111-285-31161-
(
GB
)
.indd 6 14/6/06 17:02:1
7471
–
hilips
DE
B)
–
1
14.06.06
CT
522
–
3111-285-31161-
Y
our
DECT
522
EN
Handset
k
e
y
s
Pr
ess
T
o
Go
to
the
Redial
list
fr
om
standb
y
Scr
oll
up
thr
ough
lists
and
men
us
Incr
ease
the
earpiece
or
loudspeak
er
v
olume
Enter
a
pause
when
dialling
or
storing
a
n
umber
(press and hold)
Enter
the
phonebook
fr
om
standb
y
Scr
oll
down
thr
ough
lists
and
men
us
Decr
ease
the
earpiece
or
loudspeak
er
v
olume
Ans
w
er
a
call
Switch
betw
een
handset
and
handsfr
ee
(loudspeak
er)
during
a
cal
l
W
ARNING
Handsfr
ee
activation
can
sud
denl
y
incr
ease
the
v
olume
in
the
earpiece
to
a
v
er
y
high
le
v
el.
Mak
e
sur
e
the
handset
is
not
too
close
to
y
our
ear
.
End
a
call
Exit
a
menu
and
r
eturn
to
standb
y
Pr
ess
and hold
to
s
witch
handset
off
(when in standby)
or
s
witch
handset
on
Switch
fr
om
pulse
dialling
to
tone
dialling
(press and hold during a call)
Pr
ess
and hold
to
lock
the
k
e
ypad.
To
unlock,
f
ollow
on
scr
een
instructions
Dial
R
to
access
operator
or
s
witchboar
d
ser
vices
during
a
call
Ma
k
e
internal
calls
Soft
k
e
ys
(see
page
10
f
or
mor
e
inf
ormation)
The
soft
k
e
ys
ar
e
the
and
k
e
ys
dir
ectl
y
belo
w
the
scr
een.
Pr
ess
the
cor
r
esponding
k
ey
to
select
the
options
displayed,
f
or
example
fr
om
the
standb
y
scr
een:
Pr
ess
T
o
M
enu
Enter
the
main
menu
N
ame
s
Enter
the
phonebook
menu
7
522-UG
_
3111-285-31161-
(
GB
)
.indd 7 14/6/06 17:02:1
7471
–
hilips
DE
B)
–
1
14.06.06
CT
522
–
3111-285-31161-
EN
Y
our
DECT
522
Dis
p
l
a
y
icons
Status
icons
Reminde
r
icons
(with
n
umber
)
eg.
v
oicemail
message
s
and
5
missed
calls
)
Status
icon
Description
The
handset
is
r
egister
ed
and
within
range
of
the
base
station.
Blinks
when
the
handset
is
out
of
range
or
is
searching
f
or
a
base
.
Handset
batter
y
char
g
e
le
v
el
Rin
g
er
v
olume
is
set
to
‘off
’
The
handsfr
ee
louds
p
ea
k
e
r
is
on
A
larm
clock
is
activated
The
k
e
yp
ad
is
loc
k
ed
Reminder
icon
Ne
w
v
oicemail
messa
g
e
(
s
)
on
y
our
netw
ork
ans
w
erin
g
ser
vice
Missed
calls
8
522-UG
_
3111-285-31161-
(
GB
)
.indd 8 14/6/06 17:02:1
7471
–
hilips
DE
B)
–
1
14.06.06
CT
522
–
3111-285-31161-
Y
our
DECT
522
EN
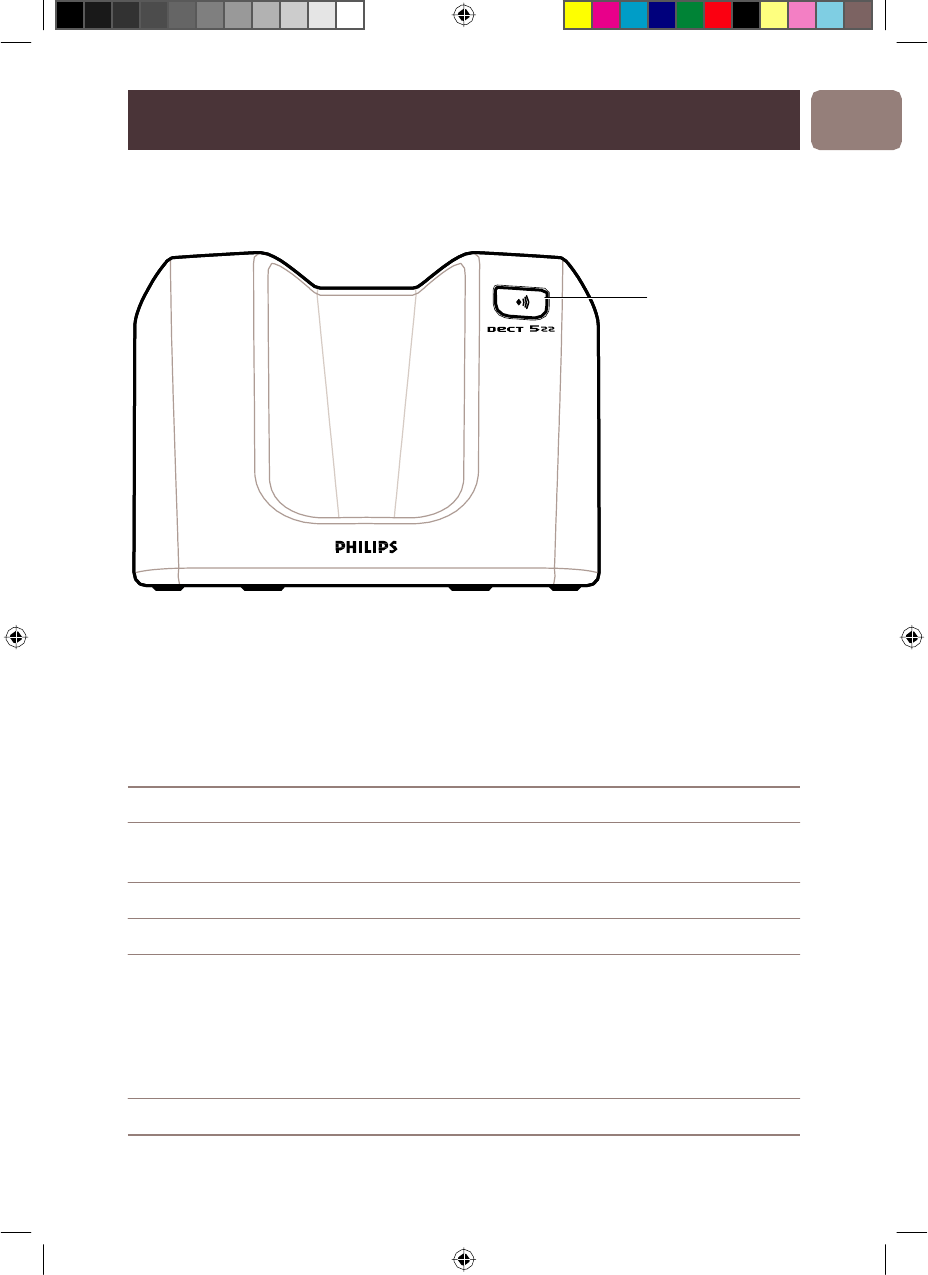
O
v
er
vie
w
o
f
the
base
station
Pa
g
in
g
k
e
y
Main
f
eatu
r
es
o
f
y
our
DECT
522
Her
e
is
a
quick
vie
w
of
the
menu
options
a
vailable
in
y
our
DECT
522.
F
or
a
full
ex
p
lanation
o
f
each
menu
o
p
tion,
see
the
detailed
sections
in this
Use
r
Man
ual.
Menu
T
o
P
a
g
e
Names
Ad
d,
edit
and
manage
y
our
phonebook
entries
19
Call
Log
Displa
y
details
of
missed,
r
eceiv
ed
and
dialled
and
calls.
25
Call,
sa
ve
or
delete
n
umbers.
Netw
ork
Services
Stor
e
up
to
10
impor
tant
netw
ork
ser
vice
n
umbers
23
Clock
&
Alarm
Set
the
date
and
time
,
set
an
alarm
28
Handset
Settings
Set
ringtone
,
ringer
v
olume
,
r
eceiv
er
v
olume
,
30
handset
name
,
language
,
wallpa
per
,
scr
eensa
v
er
and
mor
e
on
the
handset.
Base
Settings
Set
dialling
mode
,
ring
priority
,
system
PIN,
36
master
r
eset
and
mor
e
on
the
base
station
Re
g
istration
Re
g
ister
and
unr
e
g
ister
handsets. Select
pr
ef
e
r
r
ed
base
.
39
9
522-UG
_
3111-285-31161-
(
GB
)
.indd 9 14/6/06 17:02:1
7471
–
hilips
DE
B)
–
1
14.06.06
CT
522
–
3111-285-31161-
EN
Y
our
DECT
522
Men
u
na
vigation
The
basic
steps
of
na
vigating
thr
ough
the
men
us
and
on-scr
een
options:
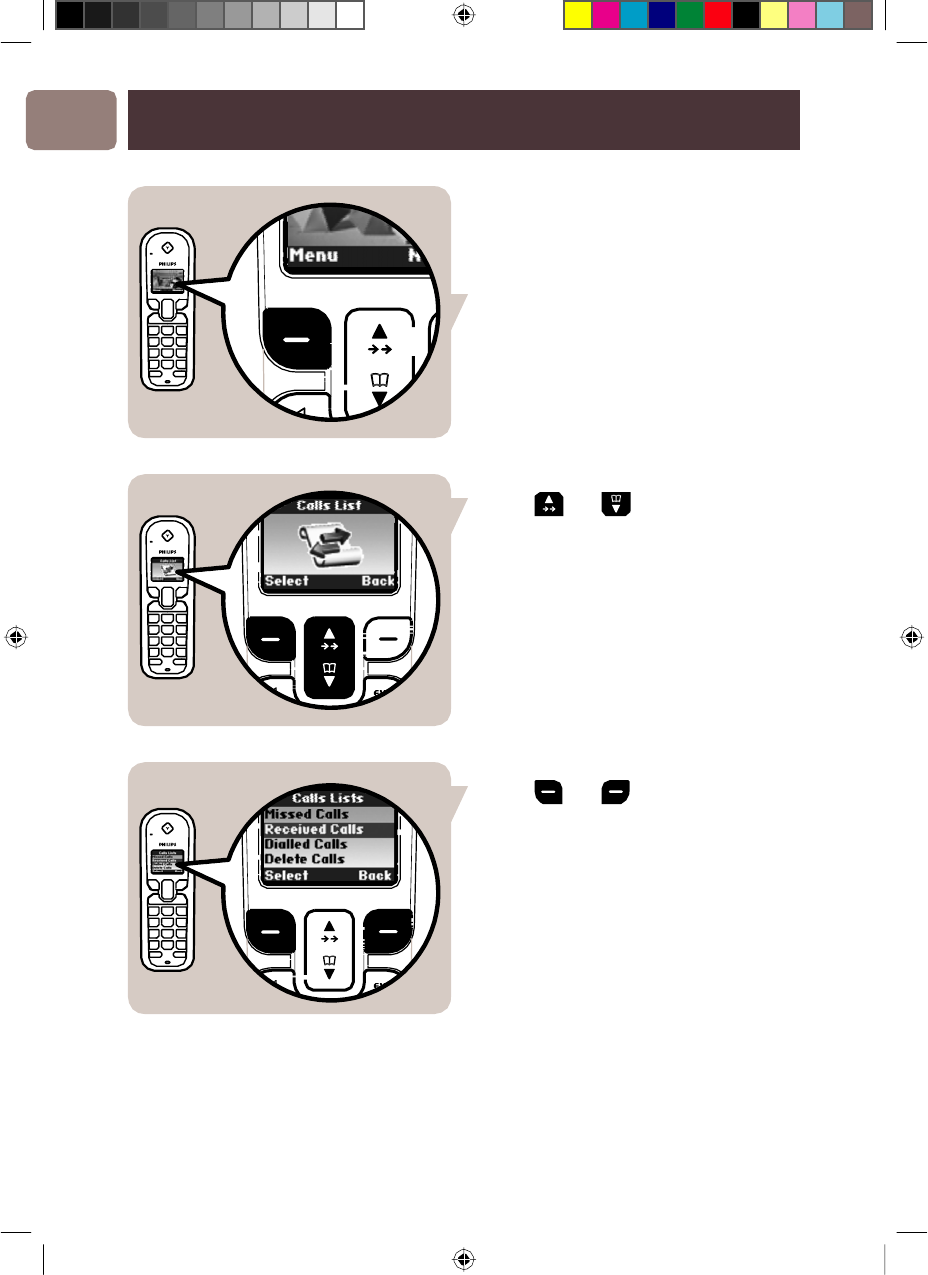
1
Fr
om
the
standb
y
scr
een,
pr
ess
Me
n
u
The
main
me
n
u
is
opened
2
Use
and
to
scr
oll
th
r
ough
the
options
and
pr
ess
Select
to
open
the
menu
displayed.
3
Use
and
soft
k
e
ys
to
select
on-scr
een
options,
eg.
Select
to
choose
the
highlighted
option,
or
Back
to
r
eturn
to
the
pr
e
vious
men
u.
Standb
y
mode
If
y
ou
do
not
pr
ess
an
y
button
on
the
handset
f
or
30
seconds
the
display
will
automaticall
y
r
eturn
to
standb
y
.
It
will
also
r
eturn
to
standb
y
when
the
handset
i
s
placed
on
the
base
station.
10
522-UG
_
3111-285-31161-
(
GB
)
.indd 10 14/6/06 17:02:1
7471
–
hilips
DE
B)
–
1
14.06.06
CT
522
–
3111-285-31161-
Connect
EN
Connect
the
base
station
TIP
The
position
in
which
y
ou
placed
the
base
station
can ha
ve
an
e
f
f
ect
on
the
range
and
perf
ormance
of
y
our
DECT
522.
A
v
oid
placing
the
base
station
too
close
to
large
metal
objects
such
as
filing
cabinets,
radiators
or
electrical
a
ppliances.
This
can
impair
the
range
and
sound
quality
.
Buildings
with
thick
internal
and
external
walls
may
impair
transmission
of
signals
to
and
fr
om
the
base
.
P
osition
the
base
station
Place
the
base
station
within
r
each
of
the
telephone
line
and
electricity
sock
ets.
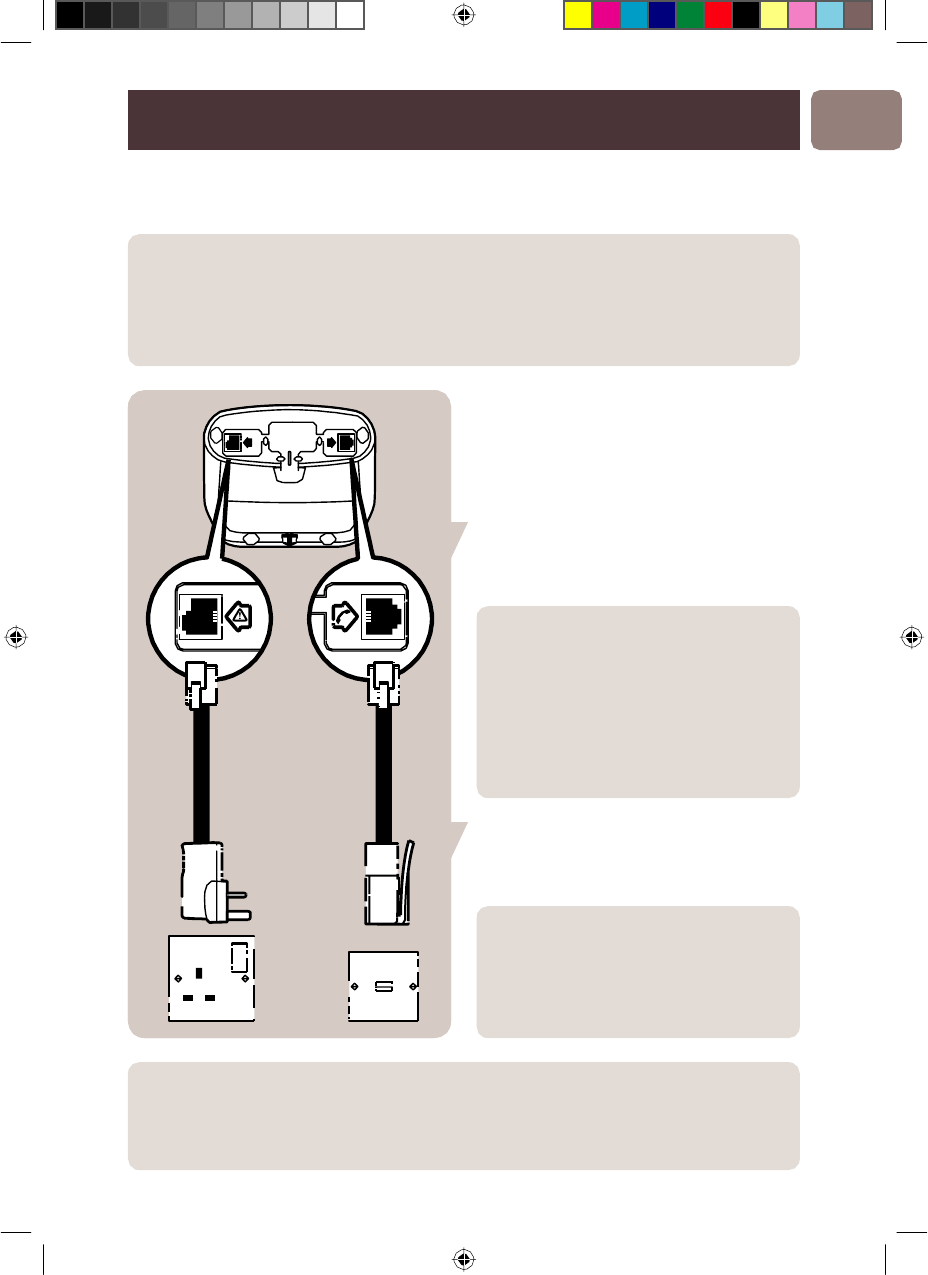
Connect
the
cab
les
1
Plug
the
line
cor
d
and
the
po
w
er
cable
to
the
sock
ets
at
the
back
of
the
base
Ma
k
e
su
r
e y
ou
connect
the po
w
e
r
ada
ptor
and
telephone
line
cor
d
cor
r
ectl
y
,
as
incor
r
ect
connection
could
damage
the
unit.
A
l
wa
ys
use
the
telephone
line
cor
d
supplied
with
the
unit.
Otherwise
,
y
ou
ma
y
not
g
et
a
dial
tone
.
2
Plug
the
othe
r
end
o
f
the
line
co
r
d
and
po
w
er
cable
to
the
telephone
wall
sock
et
and
mains
po
w
er
sock
et.
The line
ada
pto
r
may
not
be
attached
to
the
line
cor
d.
If
this
is
the
case
,
please
connect
the
line
cor
d
to
the
line
ada
ptor
bef
or
e
plugging
it
into
the
line sock
et.
W
A
R
N
I
N
G
T
h
e
b
as
e
s
t
a
t
i
o
n
d
o
e
s
n
o
t
h
a
ve
a
n
O
N
/
O
FF s
w
i
t
c
h
.
P
ow
e
r
i
s
a
pp
li
e
d
w
h
e
n
t
h
e
p
ow
e
r
a
d
a
p
t
o
r
i
s
p
l
u
gg
e
d
i
n
t
o
t
h
e
un
i
t
a
n
d
c
o
nn
ec
t
e
d
t
o
t
h
e
e
l
ec
t
r
i
c
i
t
y
s
o
c
k
e
t
.
T
h
e
o
n
l
y
w
a
y
t
o
p
ow
e
r
d
ow
n
t
h
e
un
i
t
i
s
t
o
unp
l
u
g
t
h
e
p
ow
e
r
a
d
a
p
t
o
r
f
r
o
m
t
h
e
e
l
ec
t
r
i
c
i
t
y
s
o
c
k
e
t
.
T
h
e
r
e
f
o
r
e
,
e
n
s
u
r
e
t
h
a
t
t
h
e
e
l
ec
t
r
i
c
i
t
y
s
o
c
k
e
t
i
s
e
as
il
y
a
cce
ss
i
b
l
e
.
11
522-UG
_
3111-285-31161-
(
GB
)
.indd 11 14/6/06 17:02:1
7471
–
hilips
DE
B)
–
1
14.06.06
CT
522
–
3111-285-31161-
EN
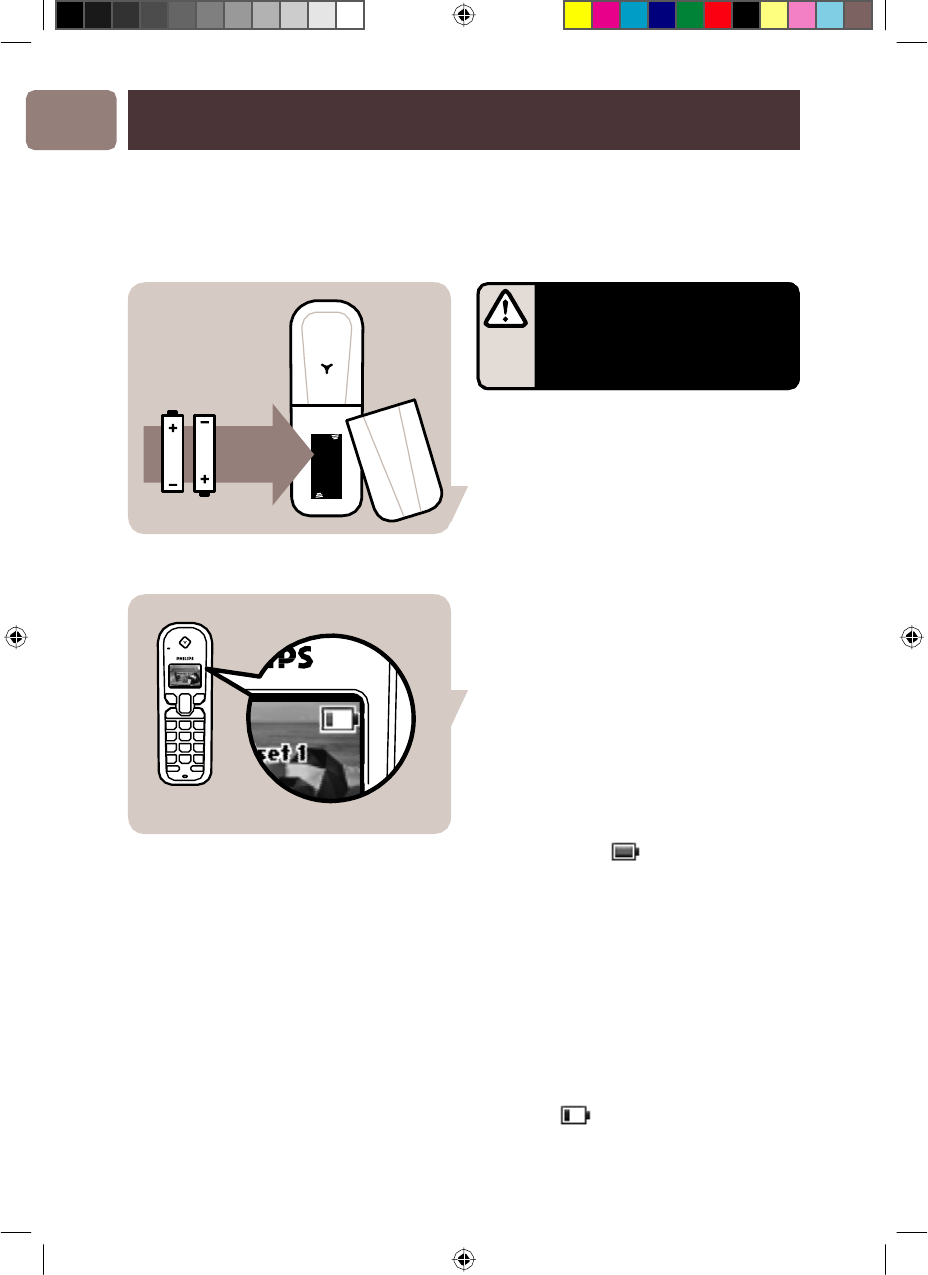
Install
Install
and
charge
the
handset
batteries
Y
our
DECT
522
is
su
pp
lied
with
2
r
echar
g
eable
batteries.
IMPOR
T
A
NT
The
handset
m
ust
be
charged
f
or
at
least
24
hours
bef
or
e
using
it
f
or
the
first
time
.
Install batteries
1
Slide
off
the
batter
y
door
(if
fitted).
2
Inser
t
the
batteries
as
sho
wn
and
slide
back
the
door
.
Charg
e
batteries
1
Place
the
handset
face-up
on
the
base
station.
A
beep
confirms
that
the
handset
is
placed
cor
r
ectl
y
.
> A charging animation on the handset
screen shows that the battery is charging.
2
Lea
ve
the
handset
until
the
batteries ar
e
full
y
charged
(at
least
24
hours).
> The handset batteries are fully
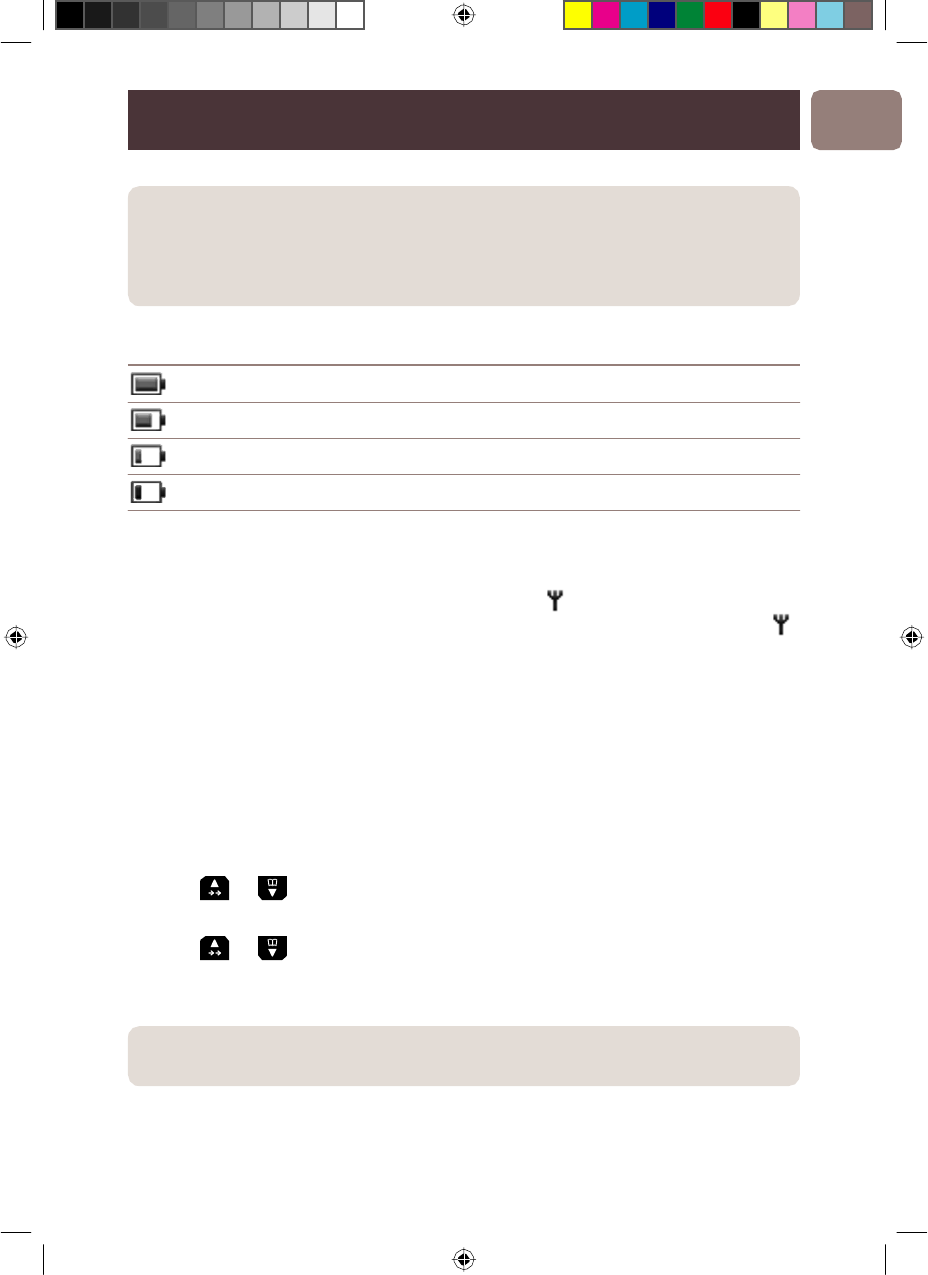
Batter
y
lif
e
and
range
T
alk
time
and
standb
y
time
When
the
batter
y
is
full
y
charged,
the
talk
time
of
y
our
DECT
522
is
a
ppr
o
ximatel
y
12
hours
and
the
standb
y
time
is
a
ppr
o
ximatel
y
150
hours.
Low
batter
y
warning
The
batter
y
le
v
el
is
sho
wn
in
the
top
right-hand
corner
of
the
handset
scr
een.
If
the
batter
y
le
v
el
becomes
low
,
y
ou
will
hear
a
beep
and
the
icon
is
display
ed
r
ed.
12
522-UG
_
3111-285-31161-
(
GB
)
.indd 12 14/6/06 17:02:1
7471
–
hilips
DE
B)
–
1
14.06.06
CT
522
–
3111-285-31161-
Install
EN
A
low
batter
y
aler
t
will
inf
orm
y
ou
that
the
handset
has
to
be
r
echarged.
If
this
ha
ppens
during
a
call,
the
call
may
end
shor
tl
y
after
the
aler
t.
If
the
batter
y
le
v
el
becomes
exceedingl
y
low
,
the
phone
automaticall
y
s
witches
off
shor
tl
y
afte
r
the
aler
t.
An
y
function
in
pr
o
g
r
ess
will not
be
sa
ved.
The
a
pp
r
o
ximate
p
o
w
e
r
le
v
els
o
f
y
our
batter
y
a
r
e
indicated
as
f
ollo
ws:
Batter
y
is
full
y
charged
Batter
y
is
par
tiall
y
charged
Batter
y
is
running
low
Batter
y
is
almost
full
y
dischar
g
ed
(
Red
)
Out
of
rang
e
warning
In
ideal
conditions,
the
range
of
the
phone
is
up
to
50
metr
es
indoors
and
300
metr
es
outdoors.
If
the
handset
mo
v
es
outside
this
range
,
the
icon
will
flash
and
the
display
will
sho
w
S
ea
r
c
h
i
ng
…
then
N
o
t
A
v
a
il
ab
l
e
.
Mo
ve
back
to
war
ds
the
base
until
the
icon
stops
flashing.
Setting
up
y
our
DECT
522
Depending
on
y
our
countr
y
,
the
W
elcome
scr
een
may
not
a
ppear
.
In
this
case
,
y
ou
will
not
be
as
k
ed
to
select
y
our
countr
y
/o
p
erator/lan
g
ua
g
e
settin
g
s.
If
the
W
elcome
scr
een
a
ppears
1
The
W
elcome
scr
een
will
briefly
a
ppear
,
then
a
list
of
countries
is
displayed.
2
Scr
oll
or
to
y
our
countr
y
and
pr
ess
Select
.
A
list
of
netw
ork
operators
is
displayed.
If
y
ou
made
a
mistak
e
,
pr
ess
Back
.
3
Scr
oll
or
to
y
our
operator
and
pr
ess
Select
.
> The handset and base will reset to load the correct settings.The standby screen is the
n
displa
y
ed and
y
ou
r
phone is
r
eady to use.
Y
ou
can
still
ma
k
e
and
r
eceive
calls
without
first
selecting
y
our
countr
yand
netw
ork
operator
,
ho
w
ev
er
the
W
elcome
scr
een
will
a
ppear
after
each
call.
If
the
W
elcome
scr
een
does
not
a
ppear
Y
our
lan
g
ua
g
e
and
netw
ork
o
p
erator
is
p
r
e-set.
13
522-UG
_
3111-285-31161-
(
GB
)
.indd 13 14/6/06 17:02:1

7471
–
hilips
DE
B)
–
1
14.06.06
CT
522
–
3111-285-31161-
EN
Call
Ma
k
e
a
call
1
Pr
ess
.
Displa
y
sho
ws
C
a
lli
ng
.
2
Ente
r
the
n
umbe
r
Pr
e-dial
1
Enter
the
phone
n
umber
(maximum
32
digits).
If
y
ou
mak
e
a
mistak
e
,
pr
ess
Cle
a
to
delete
the
last
digit.
2
Pr
ess
to
dial
the
n
umber
.
Call
fr
om
the
phonebook
1
Pr
ess
in
standb
y
mode
.
2
Scr
oll
or
to
a
phonebook
entr
y
.
3
Pr
ess
to
dial
the
n
umber
.
Sear
ch
alphabeticall
y
f
or
phonebook
entries
1
Pr
ess
Names
then
pr
ess
Select
to
choose
S
ea
r
c
h
.
2
Pr
ess
the
n
umeric
k
ey
containing
the
first letter
of
the
name
y
ou
want.
F
o
r
example
,
pr
essing
will
sho
w
th
e
entries
star
ting
with
A
.
Pr
essing
again
will
sho
w
th
e
Call
fr
om
the
netw
ork
ser
vice
n
umbers
list
1
Pr
ess
Menu
and
scr
oll
or
to
N
e
t
w
o
r
k
S
e
r
v
i
c
e
s
.
2
Pr
ess
Select
and
scr
oll
or
to
the
n
umber
.
3
Pr
ess
to
dial
the
n
umber
.
Call
fr
om
the
call
lo
g
1
Pr
ess
Menu
and
scr
oll
or
to
C
a
ll
Log
.
2
Pr
ess
Select
and
scr
oll
or
to
the
calls
log
y
ou
want.
3
Pr
ess
Select
and
scr
oll
or
to
an
entr
y
.
4
Pr
ess
to
dial
the
n
umbe
r
.
Y
ou
need
to
subscribe
to
y
our
netw
ork’
s
Calle
r
Line
Identification
ser
vice
to
be
able
to
see
the
caller’
s
n
umber
or
name
in
the
Missed
and
Receiv
ed
Calls
logs.
See
pa
g
e
25
f
o
r
mo
r
e
details.
14
522-UG
_
3111-285-31161-
(
GB
)
.indd 14 14/6/06 17:02:1
7471
–
hilips
DE
B)
–
1
14.06.06
CT
522
–
3111-285-31161-
Call
EN
A
ns
w
er
a
call
1
When
the
p
hone
rin
g
s,
p
r
ess
.
TIP
If
Auto
T
alk
mode
(see
page
34)
is
on,
y
ou
can
simpl
y
lift
up
the
handset
f
r
o
m
its
base
station
to
ans
w
er
the
call.
The
default
setting
is
off.
A
n
i
n
c
o
m
i
n
g
c
a
ll
h
as
p
r
i
o
r
i
t
y
o
ve
r
o
t
h
e
r
eve
n
t
s
.
W
h
e
n
eve
r
t
h
e
r
e
i
s
a
n
i
n
c
o
m
i
n
g
c
a
ll
,
o
t
h
e
r
s
t
a
t
u
s
i
n
p
r
o
g
r
e
ss
s
u
c
h
as
ph
o
n
e
s
e
tt
i
n
g
,
m
e
nu
n
a
v
i
ga
t
i
o
n
,
e
t
c
.
w
ill
b
e
a
b
o
r
t
e
d
.
W
A
R
N
I
N
G
When
the
handset rings
during
an
incoming
call,
please
do
not
hol
d
the
handset
too
close
to
y
our
ear
as
the
v
olume
of
the
ringing
tone
may
damage
y
our
hearing.
A
ns
w
er
a
call
in
handsfr
ee
mode
(loudspeak
er)
1
When
the
phone
rings,
pr
ess
then
pr
ess
again.
The
call
is
transf
er
r
ed
to
the
handset
loudspeak
er
.
The
icon
is
display
ed
2
Pr
ess
to
s
witch
betw
een
the
earpiece
and
loudspeak
er
.
W
A
R
N
I
N
G
S
w
i
t
c
h
i
n
g
o
n h
a
n
d
s
f
r
ee
m
o
d
e c
a
n
s
u
dd
e
n
l
y
i
n
c
r
e
as
e
t
h
e v
o
l
u
m
e
i
n
t
h
e
e
a
r
p
i
ece
t
o
a
ve
r
y
h
i
g
h
l
eve
l
.
M
a
k
e
s
u
r
e
t
h
e
h
a
n
d
s
e
t
i
s
n
o
t
t
oo
c
l
o
s
e
t
o
y
o
u
r
e
a
r
.
End
a
call
1
Pr
ess
.
The
call
duration
will
be
dis
p
la
y
ed
on the
handset
scr
een
f
o
r
about
5
seconds.
Call
in
p
r
og
r
ess
The
f
ollo
win
g
o
p
tions
a
r
e
a
vailable
durin
g
a
call:
A
djust
earpiece
v
olume
1
Pr
ess
o
r
to
ad
j
ust
the
v
olume
dis
p
la
y
ed
on-sc
r
een.
Mute
Y
ou
can
m
ute
the
micr
ophone
so
that
y
ou
can
talk
to
someone
else
in
the
r
oom
without
y
our
caller
hearing
y
ou.
1
Pr
ess
Mute
to
turn
the
micr
ophone
off.
2
Pr
ess
Off
to
turn
the
micr
ophone
back
on.
15
522-UG
_
3111-285-31161-
(
GB
)
.indd 15 14/6/06 17:02:
2
7471
–
hilips
DE
B)
–
1
14.06.06
CT
522
–
3111-285-31161-
EN
Call
Handsfr
ee
(Loudspeak
er)
mode
1
During
a
call,
pr
ess
to
s
witch
on
the
loudspeak
er
.
Pr
ess
again
to
s
witch
the
call
back
to
the
earpiece
.
W
A
R
N
I
N
G
S
w
i
t
c
h
i
n
g
o
n h
a
n
d
s
f
r
ee
m
o
d
e c
a
n
s
u
dd
e
n
l
y
i
n
c
r
e
as
e
t
h
e v
o
l
u
m
e
i
n
t
h
e
e
a
r
p
i
ece
t
o
a
ve
r
y
h
i
g
h
l
eve
l
.
M
a
k
e
s
u
r
e
t
h
e
h
a
n
d
s
e
t
i
s
n
o
t
t
oo
c
l
o
s
e
t
o
y
o
u
r
e
a
r
.
A
djust
loudspeak
er
v
olume
1
Pr
ess
o
r
to
ad
j
ust
the
v
olume
dis
p
la
y
ed
on-sc
r
een.
Inte
r
com
This
f
eatur
e
is
onl
y
a
vailable
when
ther
e
ar
e
at
least
2
r
egister
ed
handsets.
It
allows
y
ou
mak
e
internal
calls,
transf
er
external
calls
fr
om
one
handset
to
another
and
use
the
conf
e
r
ence
o
p
tion.
Call
another
handset
1
Pr
ess
.
2
D
i
a
l
t
h
e
nu
m
b
e
r
o
f
t
h
e
o
t
h
e
r
h
a
n
d
s
e
t
,
f
o
r
e
x
a
m
p
l
e
,
t
h
e
n
p
r
e
ss
O
K
.
3
Pr
ess
to
end
the
call.
If
the
handset
does
not
belong
to
the DECT
522/527
range
,
this
function
may
not
be
a
vailable
.
T
ransf
er
an
e
xternal
call
to
another
handset
1
During
an
external
call,
pr
ess
.
Y
our
caller
is
put
on
hold.
2
Enter
the
n
umber
of
the
other
handset
and
pr
ess
OK
.
3
When
the
other
handset
ans
w
ers
y
ou
can
announce
the
caller
.
4
Pr
ess
to
transf
er
the
call.
If
the
other
handset
is
engaged,
the
scr
een
sho
ws
N
o
t
A
v
a
il
ab
l
e
,
pr
ess
to
speak
to
y
our
caller
a
g
ain.
16
522-UG
_
3111-285-31161-
(
GB
)
.indd 16 14/6/06 17:02:
2
7471
–
hilips
DE
B)
–
1
14.06.06
CT
522
–
3111-285-31161-
Call
EN
Switch
betw
een
an
internal
and
e
xternal
call
1
During
an
external
call,
pr
ess
.
Y
our
caller
is
put
on
hold.
2
Enter
the
n
umber
of
the
other
handset
and
pr
ess
OK
.
3
When
the
other
handset
ans
w
ers
y
ou
can
speak
privatel
y
to
y
our
internal
call
e
4
Pr
ess
to
transf
er
back
and
f
or
th
betw
een
calls.
5
Pr
ess
to
han
g
u
p
.
Th
r
ee-par
ty
conf
e
r
ence
call
1
During
an
external
call,
pr
ess
.
Y
our
caller
is
put
on
hold.
2
Enter
the
n
umber
of
the
other
handset
and
pr
ess
OK
.
3
When
the
other
handset
ans
w
ers,
pr
ess
and
hold
to
join
both
calls
together
.
The
display
sho
ws
C
on
f
e
r
en
c
e
C
a
ll
.
4
Pr
ess
to
han
g
u
p
.
Call
W
aiting
If
y
ou
ha
ve
subscribed
to
a
Call
W
aiting
ser
vice
,
the
earpiece
will
emit
a
beep
tone
to
inf
orm
y
ou
that
ther
e
is
a
second
incoming
call.
The
n
umber
or
name
of
the
second
caller
will
also
be
display
ed
(if
y
ou
ha
ve
subscribed
to
Caller
Line
Identification
ser
vice).
Please
contact
y
our
netw
ork
pr
o
vider
f
or
mor
e
inf
ormation
on
these
ser
vices.
1
To
ans
w
er
the
second
call
and
put
y
our first
call
on
hold,
pr
ess
.
2
To
s
witch
betw
een
both
callers,
pr
ess
.
3
Pr
ess
to
hang
up
on
the
person
y
ou
ar
e
talking
to
and
r
eturn
to
the
caller
on
hold.
17
522-UG
_
3111-285-31161-
(
GB
)
.indd 17 14/6/06 17:02:
2

7471
–
hilips
DE
B)
–
1
14.06.06
CT
522
–
3111-285-31161-
EN
Call
Calle
r
identification
If
y
ou
ha
ve
subscribed
to
a
Caller
Line
Identification
(CLI),
the
name
of
the
caller
will
be
display
ed
together
with
the
date
&
time
of
the
call
(if
pr
o
vided
b
y
the
netw
ork).
If
the
n
umber
matches
an
entr
y
in
the
phonebook,
the
name
will
be
display
ed
instead.
F
or
some
incoming
calls
the
telephone
n
umber
may
not
be
a
vailable
.
The
handset
will
dis
p
la
y
an
alternativ
e
ex
p
lanation, f
o
r
exam
p
le:
U
na
v
a
il
ab
l
e
the
n
umbe
r
is
not
a
vailable
W
i
t
hhe
l
d
the
caller
has
withheld
their
n
umber
R
i
ngba
ck
it
is
a
Ringback
call
O
pe
r
a
t
o
r
the
call
has
been
made
thr
ough
the
operator
P
a
y
phone
the
caller
is
ringing
fr
om
a
pa
yphone
I
n
t
e
r
na
t
i
ona
l
it
is
an
international
n
umber
Inf
ormation
about
incoming
calls
will
var
y
b
y
countr
yand
netw
ork
operator
.
Some
operators
may
charge
a
subscription
f
ee
f
or
their
Caller
Line
Identification
ser
vice
.
Voicemail
If
y
ou
ha
ve
subscribed
to
y
our
netw
ork
operator’
s
v
oicemail
messaging
ser
vice
,
y
our
handset
can
inf
orm
y
ou
when
y
ou
r
eceive
ne
w
v
oicemail.
If
y
ou
ha
ve
ne
w
v
oicemail,
Y
ou
ha
v
e
ne
w
v
o
i
c
ema
il
is
displayed.
•
Pr
ess
Listen
to
access
y
our
v
oicemail.
Y
our
handset
will
automaticall
y
dial
y
our
v
oicemail
messaging
ser
vice
.
•
Or
pr
ess
Back
to
listen
to
y
our
v
oicemail
at
a
later
time
.
A
r
eminder
icon
will
be
dis
p
la
y
ed.
18
522-UG
_
3111-285-31161-
(
GB
)
.indd 18 14/6/06 17:02:
2
7471
–
hilips
DE
B)
–
1
14.06.06
CT
522
–
3111-285-31161-
Names
EN
N
ame
s
.
...
.
.
.
.
...
.
A
dd
en
t
r
y
.
.
...
.
C
op
y
P
honeboo
k
.
.
...
.
M
emo
r
y
S
t
a
t
u
s
.
.
...
.
D
e
l
e
t
e
P
honeboo
k
Vie
w
and
dial
phonebook
entries
1
Pr
ess
in
standb
y
mode
to
open
the
phonebook.
If
ther
e
ar
e
entries
stor
ed
the
y
ar
e
listed
in
alphabetical
or
der
.
2
Scr
oll
or
to
br
o
wse
the
phonebook.
TIP
Instead
o
f
scrolling
o
r
to
br
o
wse
the phonebook
entries,
y
ou
can
pr
ess
the
n
umeric
k
ey
cor
r
esponding
to
the
first letter
of
the
entr
y
y
ou
wish
to
locate
.
F
or
example
,
pr
essing
will
sho
w
the
entries
star
ting
with
A
.
Pr
essing
again
will
sho
w
the
entries
star
ting
with
B
,
etc…
3
Pr
ess
to
dial
the
display
ed
entr
y
.
O
r
to
vie
w
details
o
f
a
phonebook
entr
y
,
pr
ess
Options
then
S
elect
to
choose
S
ho
w
D
e
t
a
il
s
.
4
Pr
ess
to
r
eturn
to
standb
y
.
A
d
d
entr
y
in
the
phonebook
Y
ou
can
stor
e
up
to
50
entries.
Each
entr
y
m
ust
included
a
name
and
n
umber
.
1
Pr
ess
Names
.
2
Scr
oll
to
A
dd
E
n
t
r
y
and
pr
ess
S
elect
.
3
Enter
the
name
(see
next
page).
Pr
ess
OK
.
4
Enter
the
n
umber
.
Pr
ess
Sa
v
e
.
5
If
y
ou
wish,
scr
oll
or
to
select
the
ringer
melody
.
Pr
ess
S
elect
.
The
display
sho
ws
[
E
n
t
r
y
]
S
a
v
ed
.
R
i
n
g
e
r
m
e
l
o
d
y
Y
o
u
c
a
n
c
h
oo
s
e
a
d
i
ff
e
r
e
n
t
r
i
n
g
e
r
m
e
l
o
d
y
f
o
r
d
i
ff
e
r
e
n
t
nu
m
b
e
r
s
.
F
o
r
e
x
a
m
p
l
e
,
ass
i
g
n
o
n
e
m
e
l
o
d
y
f
o
r
f
r
i
e
n
d
s
a
n
d
f
a
m
il
y
a
n
d
a
n
o
t
h
e
r
f
o
r
wo
r
k
.
W
h
e
n
t
h
e
ph
o
n
e
r
i
n
gs
,
y
o
u
w
ill
h
a
ve
a
n
a
u
d
i
b
l
e
i
n
d
i
c
a
t
i
o
n
o
f
w
h
o
i
s
c
a
lli
n
g
.
P
l
e
a
s
e
n
o
t
e
T
h
i
s
f
e
a
t
u
r
e
r
e
qu
i
r
e
s
a
s
ub
s
c
r
i
p
t
i
o
n
t
o
a
C
a
ll
e
r
L
i
n
e
Id
e
n
t
i
fi
c
a
t
i
o
n
(
C
L
I
)
s
e
r
v
i
ce
.
6
Pr
ess
to
r
eturn
to
standb
y
.
19
522-UG
_
3111-285-31161-
(
GB
)
.indd 19 14/6/06 17:02:
2
7471
–
hilips
DE
B)
–
1
14.06.06
CT
522
–
3111-285-31161-
EN
Names
T
e
xt
and
n
umber
entr
y
F
or
example
,
to
enter
the
name
‘Paul’:
Pr
ess
once
to
enter
P
,
pr
ess
once
to
enter
A
,
pr
ess
twice
to
enter
U
,
then
pr
ess
three times
to
enter
L
.
If
y
ou
mak
e
a
mistak
e
,
pr
ess
Clear
to
delete
the
last
character
.
Names
can
be
up
to
12
characters
and
n
umbers
up
to
24
digits.
The
n
umber
of
a
vailable
characters/digits
r
emaining
is
sho
wn
at
the
top
right
of
the
display
.
When
entering
a
name
,
the
first
character
is
automaticall
y
giv
en
as
an
upper
case
letter
with
the
r
est
of
the
name
in
low
er
case
lettering.
Pr
ess
to
s
witch
betw
een
upper
and
low
er
case
,
the
A
b
c
icon
indicates
the
cur
r
ent
letter
case
.
Edit
phonebook
entr
y
1
Pr
ess
in
standb
y
mode
.
2
Scr
oll
or
to
the
entr
y
and
pr
ess
Options
.
3
Scr
oll
or
to
E
d
i
t
E
n
t
r
y
and
pr
ess
S
elect
.
Pr
ess
Clear
to
delete
cur
r
ent
name
.
Enter
the
ne
w
name
then
pr
ess
OK
.
4
Pr
ess
Clear
to
delete
cur
r
ent
n
umber
.
Enter
the
ne
w
n
umber
then
pr
ess
Sa
v
e
5
Scr
oll
or
to
select
the
ringer
melody
.
Pr
ess
S
elect
.
6
The
display
sho
ws
[
E
n
t
r
y
]
S
a
v
ed
.
Pr
ess
to
r
eturn
to
standb
y
.
Chan
g
e
rin
g
tone
f
or
an
entr
y
R
i
n
g
t
o
n
e
Y
o
u
c
a
n
c
h
oo
s
e
a
d
i
ff
e
r
e
n
t
r
i
n
g
e
r
m
e
l
o
d
y
f
o
r
d
i
ff
e
r
e
n
t
nu
m
b
e
r
s
.
F
o
r
e
x
a
m
p
l
e
,
ass
i
g
n
o
n
e
m
e
l
o
d
y
f
o
r
f
r
i
e
n
d
s
a
n
d
f
a
m
il
y
a
n
d
a
n
o
t
h
e
r
f
o
r
wo
r
k
.
W
h
e
n
t
h
e
ph
o
n
e
r
i
n
gs
,
y
o
u
w
ill
h
a
ve
a
n
a
u
d
i
b
l
e
i
n
d
i
c
a
t
i
o
n
o
f
w
h
o
i
s
c
a
lli
n
g
.
P
l
e
a
s
e
n
o
t
e
T
h
i
s
f
e
a
t
u
r
e
r
e
qu
i
r
e
s
a
s
ub
s
c
r
i
p
t
i
o
n
t
o
a
C
a
ll
e
r
L
i
n
e
Id
e
n
t
i
fi
c
a
t
i
o
n
(
C
L
I
)
s
e
r
v
i
ce
.
20
1
Pr
ess
in
standb
y
mode
.
2
Scr
oll
or
to
the
entr
y
and
pr
ess
Options
.
3
Scr
oll
or
to
E
d
i
t
E
n
t
r
y
and
pr
ess
S
elect
.
4
Pr
ess
OK
then
S
elect
to
display
the
list
of
melodies.
5
Scr
oll
or
to
the
ringtone
y
ou
want
and
pr
ess
S
elect
to
sa
ve
the
changes.
The
display
sho
ws
[
E
n
t
r
y
]
S
a
v
ed
.
6
Pr
ess
to
r
eturn
to
standb
y
.
522-UG
_
3111-285-31161-
(
GB
)
.indd 20 14/6/06 17:02:
2
7471
–
hilips
DE
B)
–
1
14.06.06
CT
522
–
3111-285-31161-
Names
EN
Delete
phonebook
entr
y
1
Pr
ess
in
standb
y
mode
.
2
Scr
oll
or
to
the
entr
y
and
pr
ess
Options
.
3
S
c
r
o
ll
t
o
D
e
l
e
t
e
E
n
t
r
y
a
n
d
p
r
e
ss
S
e
l
e
c
t
.
The
display
s
h
ow
s
D
e
l
e
t
e
[
E
n
t
r
y
]
?
.
4
Pr
ess
Y
es
to
confirm
or
No
to
cancel.
The
display
sho
ws
[
E
n
t
r
y
]
D
e
l
e
t
ed
.
5
Pr
ess
to
r
eturn
to
standb
y
.
Delete
all
phonebook
entries
1
Pr
ess
Names
.
2
Scr
oll
to
D
e
l
e
t
e
P
honeboo
k
and
pr
ess
S
elect
.
The
display
sho
ws
D
e
l
e
t
e
A
ll
E
n
t
r
i
e
s
?
.
3
Pr
ess
Y
es
to
confirm
or
No
to
cancel.
The
display
sho
ws
A
ll
E
n
t
r
i
e
s
D
e
l
e
t
ed
.
4
Pr
ess
to
r
eturn
to
standb
y
.
Co
p
y
in
g
p
honebook entries
When
cop
ying
phonebook
entries,
the
othe
r
handset
m
ust
be
r
egister
ed
to
the
same
base
as
y
our
handset.
If
the
other
handset
does
not
belong
to
the
DECT
522/527
range
,
this
function
may
not
be
a
vailable
.
Cop
y
entr
y
to
another
handset
1
Pr
ess
in
standb
y
mode
.
2
Scr
oll
or
to
the
entr
y
and
pr
ess
Options
.
3
Scr
oll
to
C
op
y
E
n
t
r
y
and
pr
ess
S
elect
.
4
T
o
H
and
s
e
t
is
highlighted.
Pr
ess
S
elect
.
5
Scr
oll
or
to
the
destination
handset
n
umber
and
pr
ess
S
elect
.
The
display
sho
ws
C
op
y
i
ng
[
E
n
t
r
y
]
and
the
entr
y
is
copied.
Once
copied,
the
display
sho
ws
[
E
n
t
r
y
]
C
op
i
ed
.
6
Select
anothe
r
entr
y
to
be
copied
o
r
pr
ess
to
r
eturn
to
standb
y
.
If
the
r
eceiving
handset
memor
y
is
full,
it
displa
ys
P
honeboo
k
M
emo
r
y
F
u
ll
!
.
The
sending
handset
displa
ys
C
op
y
i
ng
U
n
s
u
cc
e
ss
f
u
l
!
.
21
522-UG
_
3111-285-31161-
(
GB
)
.indd 21 14/6/06 17:02:
2
7471
–
hilips
DE
B)
–
1
14.06.06
CT
522
–
3111-285-31161-
EN
Names
Cop
y
phonebook
to
another
handset
1
Pr
ess
Names
in
standb
y
mode
.
2
Scr
oll
or
to
C
op
y
P
honeboo
k
and
pr
ess
S
elect
.
3
Pr
ess
S
elect
to
choose
T
o
hand
s
e
t
then
scr
oll
or
to
the
destination
handset
n
umber
.
4
Pr
ess
S
elect
to
begin
cop
ying.
The
display
sho
ws
C
op
y
i
ng
..
.
On
completion
the
n
umber
of
entries
copied
is
displayed.
5
Pr
ess
to
r
eturn
to
standb
y
.
At
the
r
eceiving
handset:
1
The
displ
a
y
sh
o
ws
R
e
p
l
a
c
e
P
hon
ebo
o
k
?
.
P
r
ess
Y
es
to
con
fi
rm
or
No
to
cance
Check
phonebook
memor
y
status
1
Pr
ess
N
ame
s
in
standb
y
mode
.
2
Scr
oll
or
to
M
emo
r
y
S
t
a
t
u
s
and
pr
ess
Select
.
The
display
sho
ws
ho
w
m
uch
space
y
ou
ha
ve
left
in
the
phonebook
f
or
tw
o
seconds
then
r
eturns
to
th
e
pr
e
vious
scr
een.
3
Pr
ess
to
r
eturn
to
standb
y
.
22
522-UG
_
3111-285-31161-
(
GB
)
.indd 22 14/6/06 17:02:
3
7471
–
hilips
DE
B)
–
1
14.06.06
CT
522
–
3111-285-31161-
Net
w
ork
Services
EN
N
e
t
w
o
r
k
S
e
r
v
i
c
e
s
.......
S
ho
w
.
.
.....
E
d
i
t
E
n
t
r
y
.
.
.....
D
e
l
e
t
e
E
n
t
r
y
.
.
.....
D
e
l
e
t
e
A
ll
Stor
e
a
netw
ork
ser
vice
n
umber
Stor
e
up
to
10
of
y
our
most
impor
tant
or
useful
netw
ork
ser
vice
n
umbers,
f
or
example
helplines,
dir
ector
y
ser
vices,
v
oicemail
ser
vice
etc
.
1
Pr
ess
Menu
,
scr
oll
or
to
N
e
t
w
o
r
k
S
e
r
v
i
c
e
s
and
pr
ess
Select
.
2
Scr
oll
or
to
an
empty
space
and
pr
ess
Options
.
3
Scr
oll
to
E
d
i
t
E
n
t
r
y
and
pr
ess
Select
.
4
Enter
the
name
and
pr
ess
Sa
v
e
.
5
Enter
the
n
umber
and
pr
ess
Sa
v
e
6
Pr
ess
to
r
eturn
to
standb
y
.
Vie
w
and
dial
a
netw
ork
ser
vice
n
umber
1
Pr
ess
Menu
,
scr
oll
or
to
N
e
t
w
o
r
k
S
e
r
v
i
c
e
s
and
pr
ess
Select
.
2
Scr
oll
or
to
the
entr
y
and
pr
ess
Options
.
3
Pr
ess
Select
to
choose
S
ho
w
D
e
t
a
il
s
.
4
Pr
ess
Dial
to
call
the
n
umber
.
If
the
n
umber
is
a
pr
efix,
y
ou
can
enter
the
r
est
o
the
n
umber
or
ad
d
an
entr
y
fr
om
the
phonebook.
O
r
p
r
ess
to
r
eturn
to
standb
y
.
Edit
a
netw
ork
ser
vice
n
umber
1
Pr
ess
Menu
,
scr
oll
or
to
N
e
t
w
o
r
k
S
e
r
v
i
c
e
s
and
pr
ess
Select
.
2
Scr
oll
or
to
the
entr
y
and
pr
ess
Options
.
3
Scr
oll
to
E
d
i
t
E
n
t
r
y
and
pr
ess
Select
.
4
Edit
the
name
,
pr
ess
Sa
v
e
.
5
Edit
the
n
umber
,
pr
ess
Sa
v
e
.
The
display
sho
ws
[
E
n
t
r
y
]
S
a
v
ed
.
6
Pr
ess
to
r
eturn
to
standb
y
.
23
522-UG
_
3111-285-31161-
(
GB
)
.indd 23 14/6/06 17:02:
3
7471
–
hilips
DE
B)
–
1
14.06.06
CT
522
–
3111-285-31161-
EN
Net
w
ork
Services
Delete
a
netw
ork
ser
vice
n
umber
1
Pr
ess
Menu
,
scr
oll
or
to
N
e
t
w
o
r
k
S
e
r
v
i
c
e
s
and
pr
ess
Select
.
2
Scr
oll
or
to
the
entr
y
and
pr
ess
Options
.
3
Scr
oll
to
D
e
l
e
t
e
and
pr
ess
Select
.
The
display
sho
ws
D
e
l
e
t
e
[
E
n
t
r
y
]
?
.
4
Pr
ess
Y
es
to
confirm
or
No
to
cancel.
The
display
sho
ws
[
E
n
t
r
y
]
D
e
l
e
t
ed
.
5
Pr
ess
to
r
eturn
to
standb
y
.
Delete
all
netw
ork
ser
vice
n
umber
1
Pr
ess
Menu
,
scr
oll
or
to
N
e
t
w
o
r
k
S
e
r
v
i
c
e
s
and
pr
ess
Select
.
2
Pr
ess
Options
,
scr
oll
to
D
e
l
e
t
e
A
ll
E
n
t
r
i
e
s
and
pr
ess
Select
.
The
display
sho
ws
D
e
l
e
t
e
A
ll
E
n
t
r
i
e
s
?
.
3
Pr
ess
Y
es
to
confirm
or
No
to
cancel.
The
display
sho
ws
A
ll
E
n
t
r
i
e
s
D
e
l
e
t
e
d
4
Pr
ess
to
r
eturn
to
standb
y
.
24
522-UG
_
3111-285-31161-
(
GB
)
.indd 24 14/6/06 17:02:
3
7471
–
hilips
DE
B)
–
1
14.06.06
CT
522
–
3111-285-31161-
Call
Lo
g
EN
C
a
ll
Log
.
.
.
.
.
.
M
i
ss
ed
C
a
ll
s
.
.
.
.
.
.
R
e
c
e
i
v
ed
C
a
ll
s
.
.
.
.
.
.
D
i
a
ll
ed
C
a
ll
s
.
.
.
.
.
.
D
e
l
e
t
e
C
a
ll
s
The
call
log
contains
details
o
f
missed,
r
eceiv
ed
and
dialled
calls.
Entries
a
r
edisplay
ed
in
chr
onological
or
der
with
the
most
r
ecent
call
at
the
top
of
the
list.
In
o
r
der
to
r
eceive
details
o
f
r
eceiv
ed
and missed
calls
y
ou
will
need
to
subscribe
to
a
Caller
Line
Identification
(CLI)
ser
vice
.
Some
operators
may
charge
a
f
ee
f
or
this
ser
vice
.
The
r
eceiv
ed
calls
log
holds
details
o
f
up
to
the
last
30
calls
r
eceiv
ed
and
the
dialled
calls
log
holds
up
to
20
of
the
last
n
umbers
dialled.
When
a
calls
log
is
full,
a
ne
w
call
r
eplaces
the
oldest
in
the
lo
g
.
Missed
calls
When
y
ou
ha
ve
missed
calls
(incoming
calls
that
y
ou
ha
v
en’
t
ans
w
er
ed)
the
scr
een
will
display
Y
ou
ha
v
e
x
ne
w
c
a
ll
s
.
•
Pr
ess
Vie
w
to
vie
w
y
our
missed
calls.
The
scr
een
sho
ws
the
missed
calls
log
with
the
ne
w
est
call
at
the
top
.
Ne
w
calls
ar
e
mark
ed
with
a
gr
een
dot.
•
Or
pr
ess
Back
to
vie
w
the
calls
later
.
A
r
eminder
icon
will
be
display
ed
indicatin
g
the
n
umbe
r
o
f
missed
calls.
Viewing
a
calls
log
1
Pr
ess
Menu
and
scr
oll
or
to
C
a
ll
Log
and
pr
ess
Select
.
2
Scr
oll
or
to
the
log
y
ou
want:
M
i
ss
ed
C
a
ll
s
,
R
e
c
e
i
v
ed
C
a
ll
s
or
D
i
a
ll
ed
C
a
ll
s
and
pr
ess
Select
.
3
Scr
oll
or
to
vie
w
the
entries.
If
the
list
is
empty
,
the
scr
een
displa
ys
C
a
ll
Log
(
s
)
E
mp
t
y
.
If
a
calls
log
contains
a
n
umbe
r
f
r
om
y
our
phonebook,
the
name
sto
r
ed
with
the
n
umber
will
be
display
ed
in
the
calls
log(s).
25
522-UG
_
3111-285-31161-
(
GB
)
.indd 25 14/6/06 17:02:
3
7471
–
hilips
DE
B)
–
1
14.06.06
CT
522
–
3111-285-31161-
EN
Call
Lo
g
4
T
o
vie
w
fur
the
r
details
about
the
call,
pr
ess
Options
then
Select
to
choo
s
S
ho
w
D
e
t
a
il
s
.
Or
,
to
dial
the
n
umber
displayed,
pr
ess
.
5
Pr
ess
to
r
eturn
to
standb
y
.
Sa
v
e
a
n
umber
fr
om
the
call
lo
g
to
the
phonebook
1
Pr
ess
Menu
and
scr
oll
or
to
C
a
ll
Log
and
pr
ess
Select
.
2
Scr
oll
or
to
the
log
y
ou
want:
M
i
ss
ed
C
a
ll
s
,
R
e
c
e
i
v
ed
C
a
ll
s
or
D
i
a
ll
ed
C
a
ll
s
and
pr
ess
Select
.
3
Scr
oll
or
to
the
entr
y
y
ou
want
and
pr
ess
Options
.
4
Sc
r
oll
o
r
to
S
a
v
e
N
umbe
r
and
pr
ess
Select
.
The
S
a
ve
Number
option
will not
be
a
vailable
i
f
the
n
umbe
r
is
al
r
eady
sto
r
ed
in
the
phonebook.
If
the
phonebook
is
full
when
Sa
ve
Number
is
selected,
the
display
will
sho
w
P
honeboo
k
M
emo
r
y
F
u
ll
and
r
eturns
to
the
pr
e
vious
scr
een.
5
Ente
r
a
name
f
o
r
the
entr
yand
pr
ess
OK
.
The
n
umbe
r
is
displayed.
If
y
ou
need
to
edit
the
n
umber
,
pr
ess
Clear
to
delete
incor
r
ect
digits.
6
P
r
e
ss
S
a
v
e
a
n
d
s
c
r
o
ll
o
r
t
o
s
e
l
ec
t
a
r
i
n
g
e
r
m
e
l
o
d
y
.
P
r
e
ss
S
e
l
e
c
t
t
o
c
o
n
fi
r
m
.
T
h
e
d
i
s
p
l
a
y
s
h
ow
s
[
E
n
t
r
y
]
S
a
v
ed
.
7
Pr
ess
to
r
eturn
to
standb
y
.
Delete
a
call
lo
g
entr
y
1
Pr
ess
Menu
and
scr
oll
or
to
C
a
ll
Log
and
pr
ess
Select
.
2
Scr
oll
or
to
the
log
y
ou
want:
M
i
ss
ed
C
a
ll
s
,
R
e
c
e
i
v
ed
C
a
ll
s
or
D
i
a
ll
ed
C
a
ll
s
and
pr
ess
Select
.
3
Scr
oll
or
to
the
entr
y
y
ou
want
and
pr
ess
Options
4
Scr
oll
to
D
e
l
e
t
e
C
a
ll
and
pr
ess
Select
.
The
display
sho
ws
C
a
ll
D
e
l
e
t
ed
.
5
Pr
ess
to
r
eturn
to
standb
y
.
26
522-UG
_
3111-285-31161-
(
GB
)
.indd 26 14/6/06 17:02:
3

7471
–
hilips
DE
B)
–
1
14.06.06
CT
522
–
3111-285-31161-
Call
Lo
g
EN
Delete
all entries
in
a
call
lo
g
Y
ou
can
delete
all
entries
in
an
y
one
of
the
individual
call
logs
or
all
entries
in
the
entir
e
call
log.
1
Pr
ess
Menu
and
scr
oll
or
to
C
a
ll
Log
and
pr
ess
Select
.
2
Scr
oll
to
D
e
l
e
t
e
C
a
ll
s
and
pr
ess
Select
.
3
S
c
r
o
ll
o
r
t
o
t
h
e
l
o
g
y
o
u
w
a
n
t
:
M
i
ss
ed
C
a
ll
s
,
R
e
c
e
i
v
ed
C
a
ll
s
,
D
i
a
ll
ed
C
a
ll
s
or
A
ll
C
a
ll
s
and
pr
ess
Select
.
4
Pr
ess
Y
es
to
confirm
or
No
to
cancel.
The
display
sho
ws
A
ll
C
a
ll
s
D
e
l
e
t
ed
.
5
Pr
ess
to
r
eturn
to
standb
y
.
A
ccess
the
r
edial
list
1
Pr
ess
f
r
om
standb
y
and
scr
oll
o
r
to
vie
w
the
entries.
Sa
v
e
a
r
edial
list
entr
y
to
phonebook
1
Pr
ess
fr
om
standb
y
and
scr
oll
or
to
the
entr
y
y
ou
want
to
sa
ve
.
2
Pr
ess
Options
and
scr
oll
or
to
S
a
v
e
N
umbe
r
and
pr
ess
Select
.
3
Enter
a
name
f
or
the
entr
y
and
pr
ess
OK
.
The
n
umber
is
displayed.
If
y
ou
need
to
edit
the
n
umber
,
pr
ess
Clear
to
delete
incor
r
ect
digits.
4
P
r
e
ss
S
a
v
e
a
n
d
s
c
r
o
ll
o
r
t
o
s
e
l
ec
t
a
r
i
n
g
e
r
m
e
l
o
d
y
.
P
r
e
ss
S
e
l
e
c
t
t
o
c
o
n
fi
r
m
.
T
h
e
d
i
s
p
l
a
y
s
h
ow
s
[
E
n
t
r
y
]
S
a
v
ed
.
5
Pr
ess
to
r
eturn
to
standb
y
.
Delete
a
n
umber
fr
om
r
edial
list
1
Pr
ess
fr
om
standb
y
and
scr
oll
or
to
the
n
umber
.
2
Pr
ess
Options
.
Scr
oll
or
to
D
e
l
e
t
e
C
a
ll
s
and
pr
ess
Select
.
Delete
the
r
edial
list
1
Pr
ess
fr
om
standb
y
.
2
Pr
ess
Options
.
Scr
oll
or
to
D
e
l
e
t
e
A
ll
and
pr
ess
Select
.
3
Pr
ess
Y
es
to
confirm
or
No
to
cancel.
4
Pr
ess
to
r
eturn
to
standb
y
.
27
522-UG
_
3111-285-31161-
(
GB
)
.indd 27 14/6/06 17:02:
3
7471
–
hilips
DE
B)
–
1
14.06.06
CT
522
–
3111-285-31161-
EN
Clock
&
Alarm
C
l
o
ck
&
A
l
a
r
m
.
.
.
.
.
.
.
D
a
t
e
&
.
.
.
.
.
.
.
A
l
a
r
m
.
.
.
.
.
.
.
T
i
me
F
o
r
ma
t
Date
and
time
If
y
o
u
h
a
ve
s
ub
s
c
r
i
b
e
d
t
o
a
C
a
ll
e
r
L
i
n
e
Id
e
n
t
i
fi
c
a
t
i
o
n
s
e
r
v
i
ce
(
C
L
I
)
,
t
h
e
d
a
t
e
a
n
d
t
i
m
e
i
s
a
u
t
o
m
a
t
i
c
a
ll
y
s
e
t
w
h
e
n
t
h
e
fi
r
s
t
i
n
c
o
m
i
n
g
c
a
ll
i
s
r
ece
i
ve
d
.
If
y
o
u
h
a
ve
n
o
t
s
ub
s
c
r
i
b
e
d
t
o
a
C
L
I
s
e
r
v
i
ce
o
r
y
o
u
r
C
L
I
s
e
r
v
i
ce
d
i
d
n
o
t
a
u
t
o
m
a
t
i
c
a
ll
y
s
e
t
t
h
e
d
a
t
e
a
n
d
t
i
m
e
,
y
o
u
c
a
n
s
e
t
t
h
e
m
m
a
nu
a
ll
y
.
Set
the
date
and
time
1
Pr
ess
Menu
,
scr
oll
or
to
C
l
o
ck
&
A
l
a
r
m
and
pr
ess
Select
.
2
Pr
ess
Select
to
choose
D
a
t
e
&
T
i
me
.
3
Enter
the
date
(DD/MM/YY)
then
time
(HH:MM)
in
24-hour
f
ormat
using
the
k
e
ypad,
eg.
7.30pm
is
1930.
Use
and
to
mo
ve
left
and
right.
Then
pr
ess
Sa
v
e
to
sa
ve
the
settings.
4
Pr
ess
to
r
eturn
to
standb
y
.
If
y
ou
ha
ve
mo
r
e
than
one
handset, y
ou
onl
y
need
to
set
the
time
and
date
on
one
handset.
The
other
handsets
ar
e
updated
automaticall
y
.
Set
time
f
ormat
Choose
betw
een
12
and
24
hour
f
ormats.
1
Pr
ess
Menu
,
scr
oll
or
to
C
l
o
ck
&
A
l
a
r
m
and
pr
ess
Select
.
2
Scr
oll
to
T
i
me
F
o
r
ma
t
and
pr
ess
Select
.
3
Scr
oll
or
to
1
2
hou
r
or
24
hou
r
and
pr
ess
Select
.
4
Pr
ess
to
r
eturn
to
standb
y
.
If
y
ou
ha
ve
mo
r
e
than
one
handset,
y
ou
can
set
a
diff
e
r
ent
time
f
ormat
f
o
r
each.
28
522-UG
_
3111-285-31161-
(
GB
)
.indd 28 14/6/06 17:02:
4
7471
–
hilips
DE
B)
–
1
14.06.06
CT
522
–
3111-285-31161-
Clock
&
Alarm
EN
A
larm
Y
ou
can
set
a
dail
y
,
w
eekday
or
once
onl
y
alarm.
If
y
ou
ha
ve
mor
e
than
one
handset,
y
ou
can
set
a
diff
e
r
ent
alarm
on
each.
Set/cancel
an
alarm
1
Pr
ess
Menu
,
scr
oll
or
to
C
l
o
ck
&
A
l
a
r
m
and
pr
ess
Select
.
2
Scr
oll
to
A
l
a
r
m
and
pr
ess
Select
.
3
Scr
oll
to
O
n
and
pr
ess
Select
.
Or
,
to
cancel
an
alr
eady
set
alarm,
pr
ess
Select
to
choose
O
ff
,
then
to
r
eturn
to
standb
y
.
4
Sc
r
oll
o
r
to
choose:
O
n
c
e
f
o
r
a
once
onl
y
alarm
M
onda
y
-
F
r
i
da
y
f
or
alarm
to
sound
Monda
y-Frida
y
onl
y
O
n
D
a
il
y
f
or
the
alarm
to
sound
ev
er
y
da
y
6
Pr
ess
Select
,
enter
the
time
f
o
r
the
alarm
to
g
o
of
f
and
pr
ess
Sa
v
e
7
Pr
ess
to
r
eturn
to
standb
y
.
When
an
alarm
is
set
the
icon
is
dis
p
la
y
ed.
Silence
the
alarm
1
When
the
alarm
sounds
the
handset
(
s
)
will
rin
g
.Pr
ess
Sto
p
If
no
button
is
p
r
essed
the
alarm
will
sto
p
automaticall
y
afte
r
I
min
ute
.
If
the
handset
is
in
use
when
the
alarm
sounds,
the icon
will
flash
and
a
beep
will
be
heard
at
the
handset
earpiece
.
29
522-UG
_
3111-285-31161-
(
GB
)
.indd 29 14/6/06 17:02:
4
7471
–
hilips
DE
B)
–
1
14.06.06
CT
522
–
3111-285-31161-
EN
P
ersonal
Settin
g
s
H
and
s
e
t
...
.
R
i
ng
t
on
e
B
a
s
e
.....
D
i
a
lli
ng
M
od
e
.
...
.
R
i
nge
r
V
o
l
um
e
.....
R
i
ng
.
...
.
R
e
c
e
i
v
e
r
V
o
l
um
e
.....
R
e
c
a
ll
.
...
.
H
and
s
e
t
N
am
e
.....
F
i
r
s
t
.
...
.
.....
S
ys
t
em
.
...
.
.....
M
a
s
t
e
r
.
...
.
M
enu
.
...
.
S
c
r
een
s
a
v
e
r
.
...
.
L
i
gh
t
T
i
meou
t
.
...
.
D
i
s
p
l
a
y
C
on
t
r
a
s
t
.
...
.
A
u
t
o
.
...
.
K
e
y
.
...
.
R
ed
i
a
l
.
...
.
PABX
A
cc
e
ss
C
od
e
Handset
settings
Chang
e
the
ringtone
Choose
fr
om
10
ringtones
(8
pol
yphonic).Y
ou
can
set
diff
er
ent
ringtones
f
or
internal
and
external
calls.
1
Pr
ess
Menu
,
then
scr
oll
to
S
e
tt
i
ng
s
and
pr
ess
Select
.
2
Pr
ess
Select
to
choose
H
and
s
e
t
S
e
tt
i
ng
s
.
3
Pr
ess
Select
again
to
choose
R
i
ng
t
one
,
then
scr
oll
or
to
choose
E
x
t
e
r
na
l
C
a
ll
s
or
I
n
t
e
r
na
l
C
a
ll
s
and
pr
ess
Select
.
4
Scr
oll
or
to
choose
the
ringtone
,
then
pr
ess
Select
to
confirm.
5
Pr
ess
to
r
eturn
to
standb
y
.
30
522-UG
_
3111-285-31161-
(
GB
)
.indd 30 14/6/06 17:02:
4
7471
–
hilips
DE
B)
–
1
14.06.06
CT
522
–
3111-285-31161-
P
ersonal
Settin
g
s
EN
Set
the
ring
er
v
olume
Ther
e
ar
e
5
v
olume
le
v
els,
or
y
ou
can
s
witch
the
ringer
off.
1
Pr
ess
Menu
,
then
scr
oll
to
S
e
tt
i
ng
s
and
pr
ess
Select
.
2
Pr
ess
Select
to
choose
H
and
s
e
t
S
e
tt
i
ng
s
.
3
Scr
oll
to
R
i
nge
r
V
o
l
ume
and
pr
ess
Select
.
4
Scr
oll
or
to
choose
the
v
olume
le
v
el
1
–
5
or
R
i
nge
r
O
ff
.
5
Pr
ess
Sa
v
e
to
confirm.
6
Pr
ess
to
r
eturn
to
standb
y
.
When
Rin
g
er
Off
is
selected
is,
the icon
is
dis
p
la
y
ed
on the
scr
een.
W
A
RNING
When
the
handset rings
during
an
incoming
call,
please
do
not
hol
d
the
handset
too
close
to
y
our
ear
as
the
v
olume
of
the
ringing
tone
may
damage
y
our
hearing.
Set
the
r
eceiv
er
v
olume
Ther
e
ar
e
8
v
olume
le
v
els.
1
Pr
ess
Menu
,
then
scr
oll
to
S
e
tt
i
ng
s
and
pr
ess
Select
.
2
Pr
ess
Select
to
choose
H
and
s
e
t
S
e
tt
i
ng
s
.
3
Scr
oll
to
R
e
c
e
i
v
e
r
V
o
l
ume
and
pr
ess
Select
.
4
Scr
oll
or
to
choose
the
v
olume
le
v
el
1
–
8
.
5
Pr
ess
Sa
v
e
to
confirm.
6
Pr
ess
to
r
eturn
to
standb
y
.
31
522-UG
_
3111-285-31161-
(
GB
)
.indd 31 14/6/06 17:02:
4
7471
–
hilips
DE
B)
–
1
14.06.06
CT
522
–
3111-285-31161-
EN
P
ersonal
Settin
g
s
Chang
e
the
handset
name
Y
ou
can
name
the
handset
and
display
the
handset
name
in
standb
y
mode
.
The
default
name
of
y
our
handset
is
PHILIPS.
The
handset
name
can
be
a
maximum
of
10
characters,
e
.g.
Mik
e
,
Kitchen.
1
Pr
ess
Menu
,
then
scr
oll
to
S
e
tt
i
ng
s
and
pr
ess
Select
.
2
Pr
ess
Select
to
choose
H
and
s
e
t
S
e
tt
i
ng
s
.
3
Scr
oll
to
H
and
s
e
t
N
ame
and
pr
ess
Select
.
4
Enter
the
name
(up
to
10
characters).
If
y
ou
mak
e
a
mistak
e
,
pr
ess
Clear
.
5
Pr
ess
Sa
v
e
to
confirm.
6
Pr
ess
to
r
eturn
to
standb
y
.
Chang
e
the
display
langua
g
e
Vie
w
men
us
and
display
inf
ormation
in
diff
er
ent
languages.
1
Pr
ess
Menu
,
then
scr
oll
to
S
e
tt
i
ng
s
and
pr
ess
Select
.
2
Pr
ess
Select
to
choose
H
and
s
e
t
S
e
tt
i
ng
s
.
3
Scr
oll
to
Language
and
pr
ess
Select
.
4
Scr
oll
or
to
choose
the
language
.
5
Pr
ess
Select
to
confirm.
6
Pr
ess
to
r
eturn
to
standb
y
.
Chang
e
the
wallpa
per
The
‘wallpa
per’
is
the
backgr
ound
image
y
ou
see
on
the
standb
y
scr
een.
1
Pr
ess
Menu
,
then
scr
oll
to
S
e
tt
i
ng
s
and
pr
ess
Select
.
2
Pr
ess
Select
to
choose
H
and
s
e
t
S
e
tt
i
ng
s
.
3
Scr
oll
to
W
a
ll
pape
r
and
pr
ess
Select
.
4
Scr
oll
or
to
choose
the
wallpa
per
.
5
Pr
ess
Vie
w
to
see
the
wallpa
per
.
6
Pr
ess
Use
to
select
the
wallpa
per
.
7
Pr
ess
to
r
eturn
to
standb
y
.
32
522-UG
_
3111-285-31161-
(
GB
)
.indd 32 14/6/06 17:02:
4
7471
–
hilips
DE
B)
–
1
14.06.06
CT
522
–
3111-285-31161-
P
ersonal
Settin
g
s
EN
Chang
e
the
men
u
colour
1
Pr
ess
Menu
,
then
scr
oll
to
S
e
tt
i
ng
s
and
pr
ess
Select
.
2
Pr
ess
Select
to
choose
H
and
s
e
t
S
e
tt
i
ng
s
.
3
Scr
oll
to
M
enu
C
o
l
ou
r
and
pr
ess
Select
.
4
Scr
oll
or
to
choose
the
colour
B
l
ue
,
O
r
ange
or
P
i
n
k
.
5
Pr
ess
Select
to
use
the
ne
w
colour
.
6
Pr
ess
to
r
eturn
to
standb
y
.
Switch
the
scr
eensa
v
er
on/off
The
scr
eensa
v
er
displa
ys
a
clock
face
plus
the
time
and
date
.
The
scr
eensa
v
er
comes
on
when
the
backlight
g
oes
off
and
will
onl
y
a
ppear
when
y
our
handset
is
in
standb
y
.
1
Pr
ess
Menu
,
then
scr
oll
to
S
e
tt
i
ng
s
and
pr
ess
Select
.
2
Pr
ess
Select
to
choose
H
and
s
e
t
S
e
tt
i
ng
s
.
3
Scr
oll
to
S
c
r
een
s
a
v
e
r
and
pr
ess
Select
.
4
Scr
oll
or
to
C
l
o
ck
or
O
ff
.
5
Pr
ess
Select
to
confirm.
6
Pr
ess
to
r
eturn
to
standb
y
.
Set
the
backlight
time
Y
ou
can
set
ho
w
long
the
backlight
sta
ys
on
–
15,
30
or
45
seconds.
1
Pr
ess
Menu
,
then
scr
oll
to
S
e
tt
i
ng
s
and
pr
ess
Select
.
2
Pr
ess
Select
to
choose
H
and
s
e
t
S
e
tt
i
ng
s
.
3
Scr
oll
to
L
i
gh
t
T
i
meou
t
and
pr
ess
Select
.
4
Scr
oll
or
to
15,
30
or
45
seconds.
5
Pr
ess
Select
to
confirm.
6
Pr
ess
to
r
eturn
to
standb
y
.
33
522-UG
_
3111-285-31161-
(
GB
)
.indd 33 14/6/06 17:02:
4
7471
–
hilips
DE
B)
–
1
14.06.06
CT
522
–
3111-285-31161-
EN
P
ersonal
Settin
g
s
Set
the
display
contrast
Y
ou
can
adjust
the
contrast
to
suit
diff
er
ent
lighting
conditions.
1
Pr
ess
Menu
,
then
scr
oll
to
S
e
tt
i
ng
s
and
pr
ess
Select
.
2
Pr
ess
Select
to
choose
H
and
s
e
t
S
e
tt
i
ng
s
.
3
Scr
oll
or
to
D
i
s
p
l
a
y
C
on
t
r
a
s
t
and
pr
ess
Select
.
4
Scr
oll
or
to
Lo
w
,
M
ed
i
um
or
H
i
gh
.
5
Pr
ess
Select
to
confirm.
6
Pr
ess
to
r
eturn
to
standb
y
.
Switch
A
uto
T
alk
on/off
This
function
enables
y
ou
to
ans
w
er
a
call
automaticall
y
b
y
simpl
y
lifting
the
handset
fr
om
the
base
station
or
charger
and
ending
a
call
b
y
r
eturning
it
to
the
base
station
or
charger
.
The
default
setting
is
Off.
When
Auto
T
alk
is
s
witched
off,
y
ou
m
ust
al
wa
ys
pr
ess
to
ans
w
er
a
call
and
to
end
a
call.
1
Pr
ess
Menu
,
then
scr
oll
to
S
e
tt
i
ng
s
and
pr
ess
Select
.
2
Pr
ess
Select
to
choose
H
and
s
e
t
S
e
tt
i
ng
s
.
3
Scr
oll
or
to
A
u
t
o
T
a
l
k
and
pr
ess
Select
.
4
Scr
oll
or
to
O
n
or
O
ff
.
5
Pr
ess
Select
to
confirm.
6
Pr
ess
to
r
eturn
to
standb
y
.
Switch
k
e
y
beeps
on/off
A
single
beep
is
emitted
when
a
k
ey
is
pr
essed.
Y
ou
can
enable
or
disable
this
k
ey
beep
.
By
default,
the
k
ey
beep
is
On.
1
Pr
ess
Menu
,
then
scr
oll
to
S
e
tt
i
ng
s
and
pr
ess
Select
.
2
Pr
ess
Select
to
choose
H
and
s
e
t
S
e
tt
i
ng
s
.
3
Scr
oll
or
to
K
e
y
B
eep
and
pr
ess
Select
.
4
Scr
oll
or
to
O
n
or
O
ff
.
5
Pr
ess
Select
to
confirm.
6
Pr
ess
to
r
eturn
to
standb
y
.
34
522-UG
_
3111-285-31161-
(
GB
)
.indd 34 14/6/06 17:02:
4
7471
–
hilips
DE
B)
–
1
14.06.06
CT
522
–
3111-285-31161-
P
ersonal
Settin
g
s
EN
Set
the
r
edial
n
umber
length
This
sets
the
length
of
n
umbers
stor
ed
in
the
r
edial
list.The
maximum
length
is
32
digits.
1
Pr
ess
Menu
,
then
scr
oll
to
S
e
tt
i
ng
s
and
pr
ess
Select
.
2
Pr
ess
Select
to
choose
H
and
s
e
t
S
e
tt
i
ng
s
.
3
Scr
oll
or
to
R
ed
i
a
l
Leng
t
h
and
pr
ess
Select
.
4
Scr
oll
or
to
Long
or
S
ho
r
t
.
5
Pr
ess
Select
to
confirm.
6
Pr
ess
to
r
eturn
to
standb
y
.
Set
the
P
A
BX/s
witchboar
d
access
code
If
y
our
DECT
522
is
connected
to
a
P
ABX/s
witchboar
d
y
ou
may
ha
ve
to
dial
a
n
umber
–
e
.g.
9
–
in
or
der
get
an
outside
line
.
Y
ou
can
set
this
n
umber
so
that
y
our
DECT
522
dials
it
automaticall
y
bef
or
e
each
n
umber
in
the
phonebook
and
netw
ork
ser
vices
list.
Y
ou
can
set
the
access
code
and
s
witch
the
function
on
or
off.
1
Pr
ess
Menu
,
then
scr
oll
to
S
e
tt
i
ng
s
and
pr
ess
Select
.
2
Scr
oll
to
H
and
s
e
t
S
e
tt
i
ng
s
and
pr
ess
Select
.
3
Scr
oll
or
to
PABX
A
cc
e
ss
C
ode
and
pr
ess
Select
.
4
Scr
oll
or
to
O
ff
,
O
n
or
S
e
t
C
ode
and
pr
ess
Select
.
5
If
y
ou
chose
Set
Code
,
enter
the
access
code
and
pr
ess
Sa
v
e
,
y
ou
can
no
w
use
or
to
s
witch
the
code
On
or
Off.
6
Pr
ess
Select
to
confirm.
7
Pr
ess
to
r
eturn
to
standb
y
.
35
522-UG
_
3111-285-31161-
(
GB
)
.indd 35 14/6/06 17:02:
5
7471
–
hilips
DE
B)
–
1
14.06.06
CT
522
–
3111-285-31161-
EN
P
ersonal
Settin
g
s
Base
settings
Set
the
diallin
g
mode
The
default
DECT
522
dialling
mode
setting
is
suitable
f
o
r
y
our
countr
yand
netw
ork
operator
.
It
is
unlik
el
y
that
y
ou
should
need
to
change
this
setting.
When
connected
to
cer
tain
s
witchboar
ds
o
r
public
exchanges,
y
ou
may
need
to
s
witch
fr
om
tone
to
pulse
dialling.
1
Pr
ess
Menu
,
then
scr
oll
to
S
e
tt
i
ng
s
and
pr
ess
Select
.
2
Scr
oll
to
B
a
s
e
S
e
tt
i
ng
s
and
pr
ess
Select
.
3
Scr
oll
or
to
D
i
a
lli
ng
M
ode
and
pr
ess
Select
.
4
Scr
oll
or
to
T
one
or
P
u
l
s
e
.
5
Pr
ess
Sa
v
e
to
confirm.
6
Pr
ess
to
r
eturn
to
standb
y
.
T
o
set
ring
priority
If
y
ou
ha
ve
mor
e
than
one
handset,
all
the
handsets
ring
at
the
same
time
when
y
ou
r
eceive
an
incoming
call.
Ho
w
ev
er
,
y
ou
can
set
one
handset
to
ring
2,
4
or
6
rings
bef
or
e
the
others.
This
giv
es
one
person
the
chance
to
act
as
a
r
eceptionist
and
ans
w
er
incoming
calls
first.
Calls
can
then
be
transf
er
r
ed
to
other
handsets
(see
page
16)
1
Pr
ess
Menu
,
then
scr
oll
to
S
e
tt
i
ng
s
and
pr
ess
Select
.
2
Scr
oll
to
B
a
s
e
S
e
tt
i
ng
s
and
pr
ess
Select
.
3
Scr
oll
or
to
R
i
ng
P
r
i
o
r
i
t
y
and
pr
ess
Select
.
4
Scr
oll
to
S
e
l
e
c
t
H
and
s
e
t
and
pr
ess
Select
.
5
Scr
oll
or
to
the
handset
n
umber
y
ou
want
to
ring
first
and
pr
ess
Select
.
Then
pr
ess
or
to
choose
the
n
umber
of
rings
that
will
be
heard
bef
or
e
the
other
handsets
star
t
ringing
and
pr
ess
Select
.
6
Pr
ess
to
r
eturn
to
standb
y
.
T
o
set
all handsets
to
ring
to
together
again,
r
epeat
the instructions
and
select
A
ll
Handsets.
36
522-UG
_
3111-285-31161-
(
GB
)
.indd 36 14/6/06 17:02:
5
7471
–
hilips
DE
B)
–
1
14.06.06
CT
522
–
3111-285-31161-
P
ersonal
Settin
g
s
EN
Set
the
r
ecall
mode
The
k
ey
is
used
with
cer
tain
netw
ork
ser
vices
and
PBX/s
witchboar
d
ser
vices.
Y
ou
will
not
normall
y
need
to
change
this
setting
unless
advised
to
do
so
.
1
Pr
ess
Menu
,
then
scr
oll
to
S
e
tt
i
ng
s
and
pr
ess
Select
.
2
Scr
oll
to
B
a
s
e
S
e
tt
i
ng
s
and
pr
ess
Select
.
3
Scr
oll
or
to
R
e
c
a
ll
M
ode
and
pr
ess
Select
.
4
Scr
oll
or
to
R
e
c
a
ll
1
or
R
e
c
a
ll
2
.
5
Pr
ess
Select
to
confirm.
6
Pr
ess
to
r
eturn
to
standb
y
.
Set
first
ring
When
this
function
is
set
to
Off,
the
first
ring
fr
om
a
v
oice
call
will
not
sound.
This
is
par
ticularl
y
useful
in
countries
wher
e
calling
line
identity
is
sent
after
the
first
ring,
so
no
phones
in
the
house
w
ould
ring
without
displaying
caller
inf
ormation.
1
Pr
ess
Menu
,
then
scr
oll
to
S
e
tt
i
ng
s
and
pr
ess
Select
.
2
Scr
oll
to
B
a
s
e
S
e
tt
i
ng
s
and
pr
ess
Select
.
3
Scr
oll
or
to
F
i
r
s
t
R
i
ng
and
pr
ess
Select
.
4
Scr
oll
or
to
choose
O
n
or
O
ff
.
5
Pr
ess
Select
to
confirm.
6
Pr
ess
to
r
eturn
to
standb
y
.
System
PIN
The
system
PIN
is
a
4-digit
code
which
is
used
as
a
security
check
when
changing
cer
tain
settings.
The
default
system
PIN
is
0000
;
this
can
be
changed
f
or
incr
eased
security
.
Chang
e
system
PIN
1
Pr
ess
Menu
,
then
scr
oll
to
S
e
tt
i
ng
s
and
pr
ess
Select
.
2
Scr
oll
to
B
a
s
e
S
e
tt
i
ng
s
and
pr
ess
Select
.
3
Scr
oll
or
to
S
ys
t
em
P
I
N
and
pr
ess
Select
.
4
Ente
r
the
cur
r
ent
PIN
and
pr
ess
Sa
v
e
.
37
522-UG
_
3111-285-31161-
(
GB
)
.indd 37 14/6/06 17:02:
5

7471
–
hilips
DE
B)
–
1
14.06.06
CT
522
–
3111-285-31161-
EN
P
ersonal
Settin
g
s
5
Ente
r
the
ne
w
PIN
and
pr
ess
Sa
v
e
.
6
Re-enter
the
ne
w
PIN
and
pr
ess
Sa
v
e
.
Maste
r
r
eset
This
r
estor
es
all
the
original
settings
to
y
our
DECT
522.
Handset
r
egistrations
will
not
be
aff
ected.
W
arnin
g
When
p
e
r
f
ormin
g
a
master
r
eset, all
p
honebook entries
a
r
e
deleted
T
o
achie
v
e
a
master
r
eset
1
Pr
ess
Menu
,
then
scr
oll
to
S
e
tt
i
ng
s
and
pr
ess
Select
.
2
Scr
oll
to
B
a
s
e
S
e
tt
i
ng
s
and
pr
ess
Select
.
3
Scr
oll
or
to
M
a
s
t
e
r
R
e
s
e
t
and
pr
ess
Select
.
4
Pr
ess
Y
es
to
confirm
or
No
to
cancel
5
If
Y
es,
enter
y
our
System
PIN
(default
setting
0000).
6
Pr
ess
OK
and
wait
while
y
our
DECT
522
is
r
eset.
38
522-UG
_
3111-285-31161-
(
GB
)
.indd 38 14/6/06 17:02:
5
7471
–
hilips
DE
B)
–
1
14.06.06
CT
522
–
3111-285-31161-
Re
g
istration
EN
Up
to
5
handsets
can
be
r
egister
ed
to
one
base
station.
Ad
ditional
handsets
m
ust
be
r
egister
ed
to
the
base
unit
bef
or
e
y
ou
can
use
them.
Y
our
DECT
522
handset
can
also
be
r
egister
ed
to
a
total
of
4
bases.
Y
ou
can
then
select
the
base
y
ou
want
to
use
.
F
or
example
,
one at
w
ork
and
anothe
r
at
home
.
The
instructions
belo
w
a
ppl
y
specificall
y
to
y
our
Philips
DECT
522
handset.
If
y
ou
wish
to
r
egister
another
man
ufactur
er’
s
handset,
the
instructions
may
var
y
.
In
this
case
,
please
r
ef
er
to
the
man
ufactur
er
of
the
ad
ditional
handset.
The
system
PIN
is
r
equir
ed
bef
or
e
y
ou
can
r
egister
or
unr
egister
handsets.
The
default
PIN
is
0000.
Register
a
handset
to
a
base
1
Pr
ess
and
hold
the
button
on the
base
station
f
o
r
3
seconds.
T
he
base
station
is
able
to
accept
r
egistration
f
r
om
a
handset
within
60
seconds.
If
no
k
ey
is
pr
essed
within
10
seconds,
the
r
egistration
pr
ocedur
e
will
be
abor
ted.
2
A
t
the
handset,
pr
ess
Menu
the
scr
oll
to
R
eg
i
s
t
r
a
t
i
on
and
pr
ess
Select
.
3
Pr
ess
Select
again
to
choose
R
eg
i
s
t
e
r
H
and
s
e
t
.
4
Scr
oll
or
to
select
the
B
a
s
e
and
pr
ess
Select
.
5
Enter
the
system
PIN
(original
setting
0000)
and
pr
ess
OK
to
star
t
r
egistration.
If
the
base
is
f
ound
and
the
PIN
is
cor
r
ect,
the
un
used
handset
n
umbers
will
be
sho
wn
and
y
ou
can
select
a
handset
n
umbe
r
b
y
enterin
g
the
n
umbe
r
dir
ectl
y
.
If
the
PIN
is
incor
r
ect,
I
n
c
o
rr
e
c
t
S
ys
t
em
P
I
N
!
will
be
display
ed
and
the
handset
r
eturns
to
standb
y
mode
.
A
long
confirmation
tone
is
emitted
to
indicate
successful
r
egistration
and
the
scr
een
displa
ys
H
and
s
e
t
R
eg
i
s
t
e
r
e
d
bef
or
e
r
eturning
to
standb
y
mode
.
If
the
r
egistration
fails,
the
display
sho
ws
R
eg
i
s
t
r
a
t
i
on
U
n
s
u
cc
e
ss
f
u
l
!
.
T
r
y
r
epeating
the
r
egistration
pr
ocess.
If
r
egistration
is
unsuccessful
mak
e
sur
e
that
ther
e
ar
e
not
5
handsets
alr
ead
y
r
egister
ed
to
the
base
.
If
ther
e
ar
e
,
y
ou
m
ust
unr
egister
one
of
the
handsets
i
n
o
r
der
to
r
e
g
ister
the
ne
w
one
.
39
522-UG
_
3111-285-31161-
(
GB
)
.indd 39 14/6/06 17:02:
5
7471
–
hilips
DE
B)
–
1
14.06.06
CT
522
–
3111-285-31161-
EN
Re
g
istration
Switch
bases
If
y
our
handset
is
r
e
g
ister
ed
to
mo
r
e
than one
base
,
y
ou
can
s
witch betw
een
them.
Switch
bases
1
At
the
handset,
pr
ess
Menu
the
scr
oll
to
R
eg
i
s
t
r
a
t
i
on
and
pr
ess
Select
.
2
Scr
oll
to
S
e
l
e
c
t
B
a
s
e
and
pr
ess
Select
.
3
I
n
U
s
e
is
sho
wn
next
to
the
base
cur
r
entl
y
being
used
b
y
the
handset.
Scr
oll
or
to
select
a
ne
w
base
and
pr
ess
Select
.
Un
r
egiste
r
a
handset
Y
ou
can
use
one
handset
to
unr
e
g
ister
anothe
r
.
T
o
unr
egister
a
handset
1
Pr
ess
Menu
then
Select
2
Scr
oll
or
to
R
eg
i
s
t
r
a
t
i
on
and
pr
ess
Select
.
3
Scr
oll
or
to
U
n
r
eg
i
s
t
e
r
and
pr
ess
Select
.
4
Enter
the
system
PIN
(original
setting
0000)
and
pr
ess
OK
.
5
Scr
oll
or
to
the
handset
to
be
unr
egister
ed
and
pr
ess
Select
.
6
Pr
ess
Y
es
to
confirm
o
r
No
to
cancel.
40
522-UG
_
3111-285-31161-
(
GB
)
.indd 40 14/6/06 17:02:
5
7471
–
hilips
DE
B)
–
1
14.06.06
CT
522
–
3111-285-31161-
Othe
r
f
eatur
es
EN
Lock
the k
e
ypad
Y
o
u
c
a
n
l
o
c
k
t
h
e
k
ey
p
a
d
t
o
p
r
eve
n
t
a
cc
i
d
e
n
t
a
l
d
i
a
lli
n
g
w
h
il
e
c
a
rr
y
i
n
g
t
h
e
h
a
n
d
s
e
t
a
r
o
un
d
.
1
Pr
ess
and
hold
.
A
beep
confirms
the
k
eypad
is
lock
ed
and
the
scr
een
sho
ws
the
icon.
2
T
o
unlock
the
k
e
y
pad
pr
ess
Unlock
,
then
pr
ess
within
t
w
o
seconds.
P
a
ging
Paging
is
a
useful
wa
y
of
finding
lost
handsets.
1
Pr
ess
on
the
base
.
All
handsets
ring
and
display
P
ag
i
ng
C
a
ll
.
2
Pr
ess
a
g
ain
to
cancel
the
pa
g
in
g
call.
Switch
the
handset
on/off
1
Pr
ess
and
hold
to
s
witch
the
handset
on
o
r
off.
41
522-UG
_
3111-285-31161-
(
GB
)
.indd 41 14/6/06 17:02:
5
7471
–
hilips
DE
B)
–
1
14.06.06
CT
522
–
3111-285-31161-
EN
T
r
oubleshootin
g
Pr
ob
lem
Solution
The
icon
is
not
blinking
when
the
handset
is
placed
on the
base
•
Bad
batter
y
contact
–
mo
ve
the
handset
slightl
y
•
Dir
ty
contact
-
Clean
the
batter
y
contact
with
a
cloth
moistened
with
alcohol
•
Batter
y
is
full
–
no
need
to
char
g
e
No
diallin
g
tone
•
No
po
w
e
r
–
check
the
connections.
Reset
the
phone:
unplug
and
plug
back
in
the
mains
•
Batteries
ar
e
empty
-
charge
the
batteries
f
or
at
least
24
hours
•
Y
ou
ar
e
too
far
fr
om
the
base
station
-
mo
ve
closer
to
the
base
station
•
Wr
ong
line
cable
-
use
the
line
cable
pr
o
vided
•
Line
ada
ptor
(when
needed)
is
not
connected
to
th
e
line
cor
d
–
connect
the
line
ada
ptor
(when
needed
)
to
the
line
co
r
d
P
oo
r
audio
q
ualit
y
•
The
base
station
is
too
close
to
electrical
a
ppliances,
r
einf
or
ced
concr
ete
walls
or
metal
doorframes
-
mo
ve
the
base
station
at
least
one
metr
e
a
wa
y
fr
om
an
y
electrical
a
ppliances
The
icon
is
blinkin
g
•
Handset
is
not
r
egister
ed
to
the
base
station
-
r
egister
the
handset
to
the
base
station
•
Y
ou
ar
e
too
far
fr
om
the
base
station
-
mo
ve
closer
to
the
base
station
The
handset
display
is
not
a
vailable
…when
attempting
to
ad
d
another
handset
to
the
base
station
•
T
r
y
again
b
y
disconnecting
and
connecting
the
base
station
po
w
er
suppl
y
and
f
ollow
the
pr
ocedur
e
t
o
r
egister
a
handset
(see
page
39).
Remo
ve
and
plac
e
back
the
handset
batteries
•
Maximum
n
umber
of
5
handsets
has
been
r
eached
–
unr
egister
a
handset
in
or
der
to
r
egister
a
ne
w
one
.
42
522-UG
_
3111-285-31161-
(
GB
)
.indd 42 14/6/06 17:02:
5

7471
–
hilips
DE
B)
–
1
14.06.06
CT
522
–
3111-285-31161-
T
r
oubleshootin
g
EN
Pr
ob
lem
Solution
…
when
usin
g
a
handset
•
Base
station
may
be
busy
with
anothe
r
handset.
W
ait
until
it
is
a
vailable
.
Noise
inte
r
fe
r
ence
on
y
our
radio
or
tele
vision
•
Y
our
base
station
o
r
charger
may
be
too
close
.
Mo
ve
it
as
far
a
wa
y
as
possible
.
Calle
r
Line
Identification
ser
vice
does
not
w
ork
•
Check
y
our
subscription
with
y
our
netw
ork
operator
No
rin
g
tone
•
The
rin
g
tone
is
deactivated.
Incr
ease
the
v
olume
.
A
phonebook
entr
y
cannot
be
stor
ed
•
The
phonebook
is
full.
Delete
an
entr
y
to
fr
ee
memor
y
.
43
522-UG
_
3111-285-31161-
(
GB
)
.indd 43 14/6/06 17:02:
5

7471
–
hilips
DE
B)
–
1
14.06.06
CT
522
–
3111-285-31161-
EN
General inf
ormation
Electric
,
Ma
gnetic
and
Electr
oma
gnetic
Fields
(EMF)
1
Philips
Ro
yal
Electr
onics
man
ufactur
es
and
sells
many
consumer
oriented
pr
oducts
which
usually
,
as
with
an
y
electr
onic
a
pparatus,
ha
ve
the
ability
to
emit
and
r
eceive
electr
omagnetic
signals.
2
O
n
e
o
f
P
h
ili
p
s
’
l
e
a
d
i
n
g
B
u
s
i
n
e
ss
P
r
i
n
c
i
p
l
e
s
i
s
t
o
t
a
k
e
a
ll
n
ece
ssa
r
y
h
e
a
l
t
h
a
n
d
sa
f
e
t
y
p
r
ec
a
u
t
i
o
n
s
f
o
r
o
u
r
p
r
o
d
u
c
t
s
,
t
o
c
o
m
p
l
y
w
i
t
h
a
ll
a
pp
li
c
a
b
l
e
l
e
ga
l
r
e
qu
i
r
e
m
e
n
t
s
a
n
d
t
o
s
t
a
y
w
e
ll
w
i
t
h
i
n
t
h
e
E
M
F
s
t
a
n
d
a
r
d
s
a
pp
li
c
a
b
l
e
a
t
t
h
e
t
i
m
e
o
f
p
r
o
d
u
c
i
n
g
t
h
e
p
r
o
d
u
c
t
s
.
3
Philips
is
committed
to
de
v
elop
,
pr
oduce
and
mark
et
pr
oducts
that
cause
no
adv
erse
health
eff
ects.
4
Philips
confirms
that
if
its
pr
oducts
ar
e
handled
pr
operl
y
f
or
their
intended
use
,
th
e
ar
e
saf
e
to
use
accor
ding
to
scientific
e
vidence
a
vailable
toda
y
.
5
Philips
pla
ys
an
activ
e
r
ole
in
the
de
v
elopment
of
international
EMF
and
saf
ety
standar
ds,
enabling
Philips
to
anticipate
fur
ther
de
v
elopments
in
standar
dization
f
or
earl
y
inte
g
ration
in
its
p
r
oducts.
Conf
ormity
The
Declaration
o
f
conf
ormit
y
is
a
vailable
on
www
.
p
4c
.
p
hili
p
s.com.
Recycling
and
disposal
T
h
e
pu
r
p
o
s
e
o
f
t
h
e
W
EEE
d
i
r
ec
t
i
ve
(
W
as
t
e
E
l
ec
t
r
i
c
a
l
&
E
l
ec
t
r
o
n
i
c
E
qu
i
p
m
e
n
t
;
2002
/
96
/
E
C
)
i
s
t
o
e
n
s
u
r
e
t
h
a
t
p
r
o
d
u
c
t
s
a
r
e
r
ecyc
l
e
d
u
s
i
n
g
b
e
s
t
a
v
a
il
a
b
l
e
t
r
e
a
t
m
e
n
t
,
r
ec
o
ve
r
y
a
n
d
r
ecyc
li
n
g
t
ec
hn
i
qu
e
s
t
o
e
n
s
u
r
e
hu
m
a
n
h
e
a
l
t
h
a
n
d
h
i
g
h
e
n
v
i
r
o
n
m
e
n
t
a
l
p
r
o
t
ec
t
i
o
n
.
Y
our pr
oduct
is
designed
and
man
ufactur
ed
with
high
quality
materials
and
components,
which
can
be
r
ecycled
and
r
eused.
Do
not
dispose
of
y
our
old
pr
oduct
in
y
our
general
household
waste
bin.
Inf
orm
y
ourself
about
the
local
separate
collection
system
f
or
electrical
and
electr
onic
pr
oducts
mark
ed
b
y
the
symbol
sho
wn.
Use
one
of
the
f
ollo
wing
disposal
options:
1
Dispose
of
the
complete
pr
oduct
(including
its
cables,
plugs
and
accessories)
in
th
designated
WEEE
collection
facilities.
2
If
y
ou
pur
chase
a
r
eplacement
pr
oduct,
hand
y
our
complete
old
pr
oduct
back
to
th
r
etaile
r
.
He
should
acce
p
t
it
as
r
e
q
ui
r
ed
b
y
the
WEEE
dir
ectiv
e
.
44
522-UG
_
3111-285-31161-
(
GB
)
.indd 44 14/6/06 17:02:
5

7471
–
hilips
DE
B)
–
1
14.06.06
CT
522
–
3111-285-31161-
Index
EN
A
ccess
the
r
edial
list
27
A
d
d
entr
y
to
phonebook
19
A
djust
earpiece
v
olume
15
A
djust
loudspeak
er
v
olume
16
A
ns
w
er
a
call
15
A
ns
w
er
a
call
handsfr
ee
15
A
ns
w
er
a
second
call
17
Delete
all call
log
entries
27
Delete
a
r
edial
list
n
umber
27
Delete
entir
e
r
edial
list
27
Displa
y
icons
&
symbols
8
Edit
phonebook
entr
y
20
Edit
a
netw
ork
ser
vice
n
umber
23
End
a
call
15
Base
station
o
v
er
vie
w
9
Find
a
solution
42
Bo
x
contents
5
Call
fr
om
the
phonebook
14
Call
a
netw
ork
ser
vice
n
umber
14
Call
a
n
umber
fr
om
the
call
log
14
Call
handsfr
ee
15
Call
anothe
r
handset
16
Handset
k
e
ys
7
Handset
o
v
er
vie
w
6
Identify
y
our
caller
18
Install
batteries
12
Installation
r
e
q
ui
r
ements 4
Cancel
alarm
29
Lock
the
k
e
yp
ad
41
Change
ringtone
f
or
a
phonebook
entr
y
20
Change
ringtone
30
Change
handset
name
31
Change
displa
y
language
31
Change
wallpa
per
31
Change
menu
colour
33
Change
system
PIN
37
Charge
batteries
12
Check
phonebook
memor
y
22
Collect
y
our
v
oicemail
18
Conf
er
ence
call
17
Connect
the
base
station
11
Ma
k
e
a
call
14
Na
vigate
the
menu
10
Page
a
handset
41
Pr
e-dial
a
call
14
Put
caller
on
hold
to
ans
w
er
a
second
caller
17
Recycle
y
our
phone
44
Register
a
handset
to
a
base
39
Saf
ety
inf
ormation
4
Sa
v
e
a
netw
ork
ser
vice
n
umber
23
Sa
v
e
a
call
log
n
umber
to
the
phonebook
26
C
o
p
y
a
ph
o
n
e
b
oo
k
e
n
t
r
y
t
o
a
n
o
t
h
e
r
h
a
n
d
s
e
t
2
1
Cop
y
entir
e
phonebook
to
another
handset
22
Delete
a
phonebook
entr
y
21
Delete
all
phonebook
entries
21
Delete
a
netw
ork
ser
vice
n
umber
24
Delete
all
netw
ork
ser
vice
n
umbers
24
Sea
r
ch alphabetically
f
or
phonebook
entries
14
Set
up
y
our
phone
13
Set
date
and
time
28
Set
time
f
ormat
28
Set
alarm
29
Set
ringer
v
olume
31
45
522-UG
_
3111-285-31161-
(
GB
)
.indd 45 14/6/06 17:02:
5

7471
–
hilips
DE
B)
–
1
14.06.06
CT
522
–
3111-285-31161-
EN
Set
backlight
time
33
Set
displa
y
contrast
34
Set
r
edial
n
umber
length
35
Set
PBX/s
witchboar
d
access
code
35
Set
dialling
mode
36
Set
ring
priority
36
Set
r
ecall
mode
37
Set
first
ring
37
Set
maste
r
r
eset
38
Silence
a
rin
g
in
g
alarm
29
Switch
betw
een
internal
and
external
calls
17
Switch
secr
ecy
on/off
15
Switch
scr
eensa
v
er
on/off
33
Switch
auto
talk
on/off
34
Switch
k
e
y
beeps
on/off
34
Switch
handset
to
another
base
40
Switch
handset
on/off
41
T
rans
f
er
an
external
call
to
anothe
r
handset
T
r
oubleshootin
g
42
Unr
e
g
iste
r
a
handset
40
Vie
w
y
our
phonebook
entries
19
Vie
w
a
netw
ork
ser
vice
n
umber
23
Vie
w
a
call
lo
g
25
46
522-UG
_
3111-285-31161-
(
GB
)
.indd 46 14/6/06 17:02:
5

7471
–
hilips
DE
B)
–
1
14.06.06
CT
522
–
3111-285-31161-
522-UG
_
3111-285-31161-
(
GB
)
.indd 47 14/6/06 17:02:
5

7471
–
hilips
DE
B)
–
1
14.06.06
CT
522
–
3111-285-31161-
Specifications
a
r
e
subject
to
change
without
notice
..
T
rademarks
ar
e
the
pr
oper
ty
of
K
oninklijk
e
Philips
Electr
onics
N.
V
.
or
their
r
espectiv
e
o
wners.
2006
©
K
oninkli
j
k
ePhili
p
s
Elect
r
onics
N.
V
.
All
ri
g
hts
r
eser
v
ed.
ww
w
.
p
hili
p
s.com
3111 285 31161
(
GB
)
522-UG
_
3111-285-31161-
(
GB
)
.indd 48 14/6/06 17:02:
5