Symbol Technologies DP4046 User Manual
Symbol Technologies Inc
User Manual
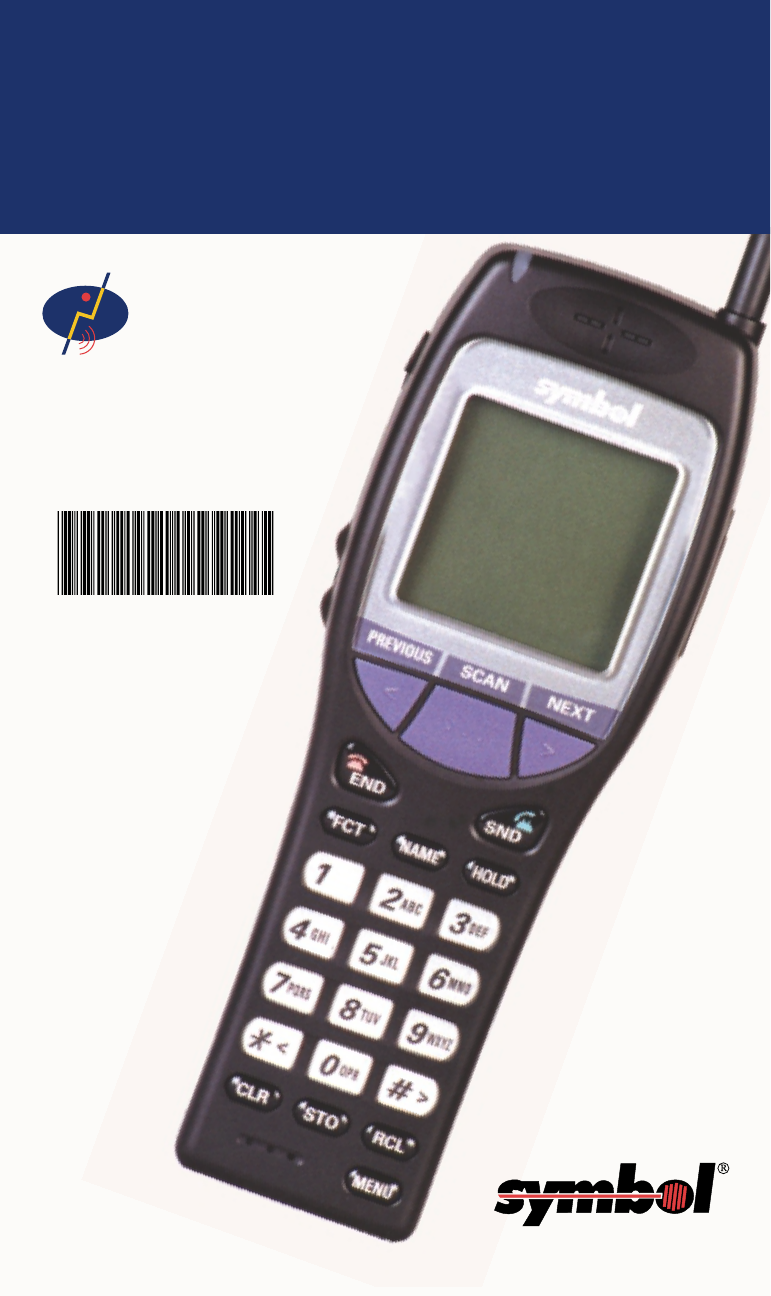
NetVision®
Data Phone
User Guide
www.symbol.com
Copyright © 1999 by
Symbol Technologies, Inc.
All rights reserved.
Symbol, Spectrum24 and
NetVision are registered trade-
marks of Symbol Technologies, Inc.
Symbol Technologies, Inc.
One Symbol Plaza
Holtsville, N.Y. 11742-1300
Telephone:(800)SCAN234
(516)738-2400, TLX:6711519
A Spectrum24®
Wireless LAN
Solution
70-20620-01
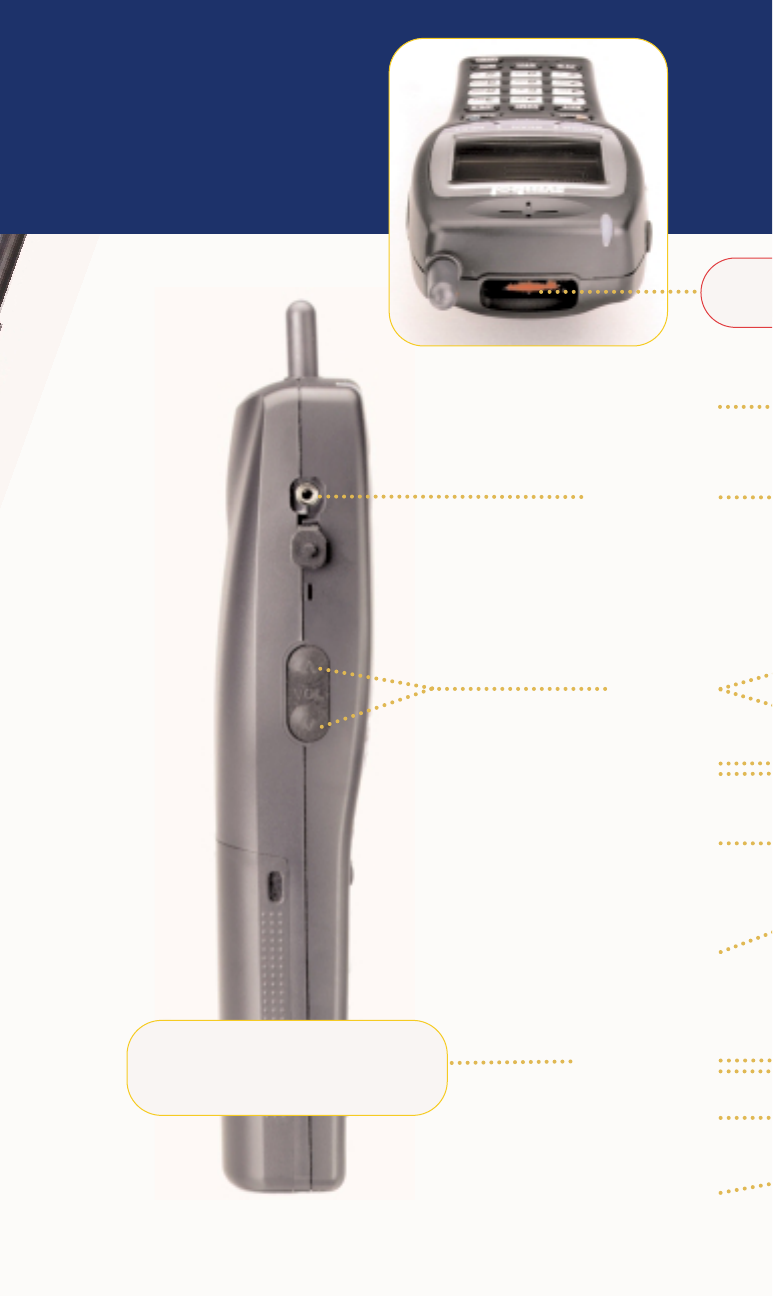
Call Indicator
Volume Buttons
Adjusts the current call volume.
Mini-Headset Jack
For hands-free use.
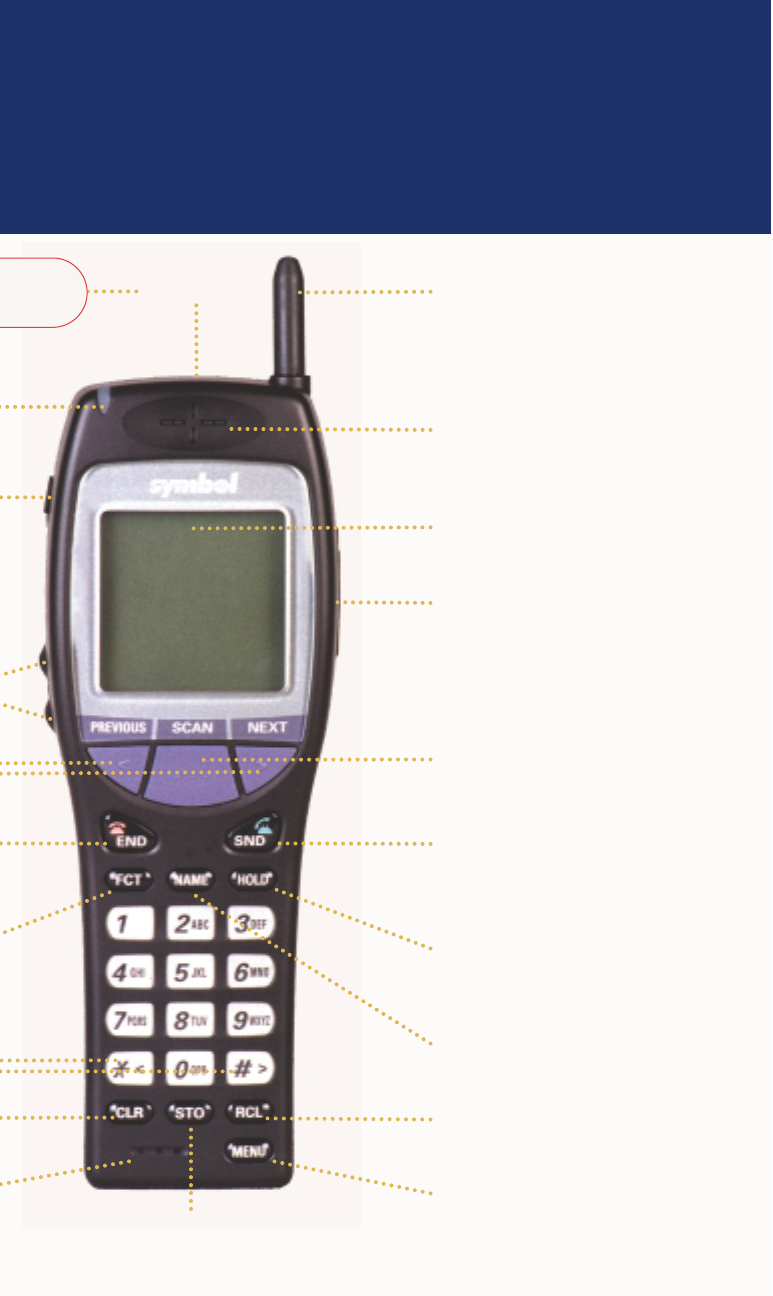
Menu Scrolling Keys
END Key
Refuses or ends a call.
Powers off the phone.
Returns to a previous menu.
Ends data collection.
Previous/Next Keys
Tabs between application fields.
FCT Key
Accesses additional Data Phone features.
Mouthpiece
Use the Menu Scrolling Keys to select
phone menu items and to
set volume and contrast levels.
CLR Key
Removes the last digit entered from
the keypad.
Do no
into sc
High Gain Antenna.
The antenna does not extend.
Laser Scanner
Scan Key
Activates the scanner for data collection.
Serial Port Connector
For network administration use.
Data Phone Display
Displays phone status, menu options,
messages and application prompts.
Earpiece
SND Key
Powers on the phone.
Accepts or activates a call.
Sends data.
Selects menu items.
NAME Key
Displays names from the call list.
MENU Key
Displays the phone user menu.
RCL Key
Recalls the last number dialed, and accesses
the speed-dial directory.
STO Key
Stores a number in the speed-dial directory.
HOLD Key
Places a call on hold.
NetVision®Data Phone
Feature Overview
ot stare
scanner!
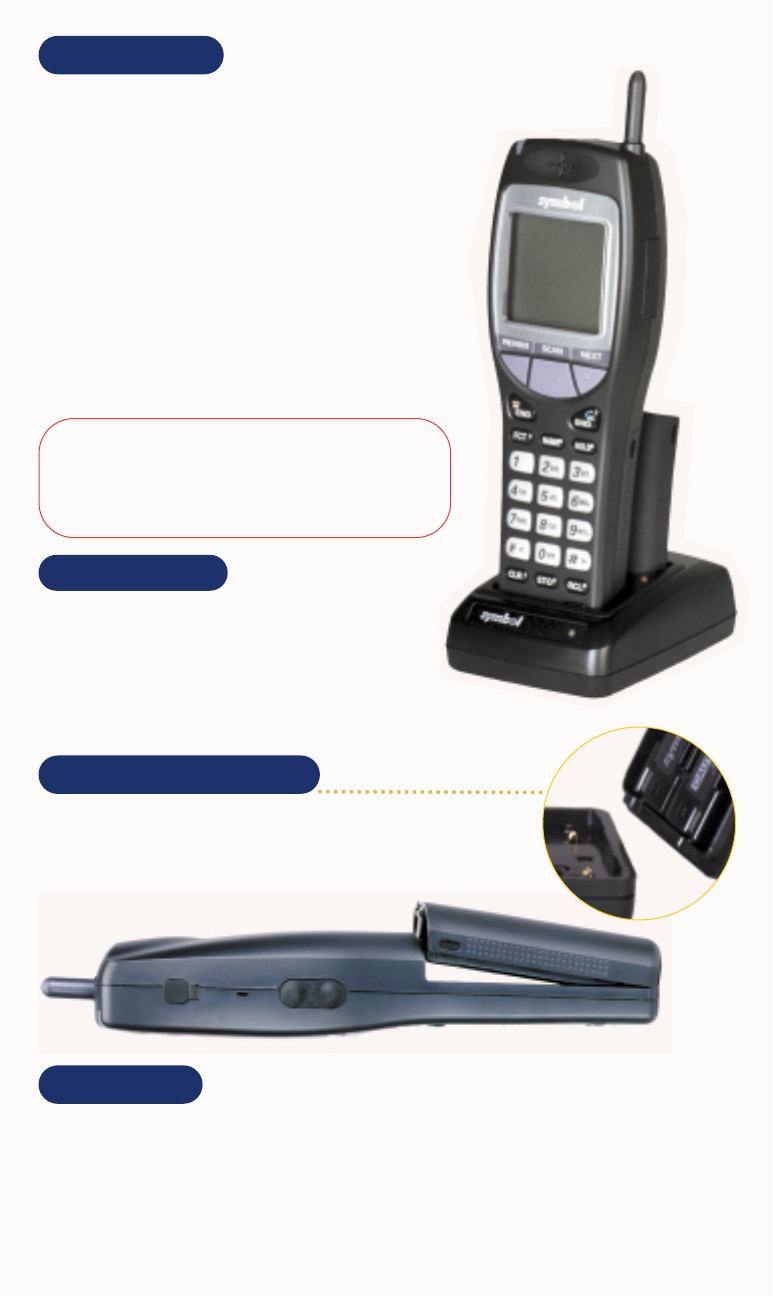
Battery Attaching/Detaching
1. Attach the battery to the phone by aligning the feet on the battery with
the notches on the phone. Push the battery top into the phone until
the latch clicks.
2. Detach the battery by depressing the latch and pulling the battery top
away from the phone.
Battery Swapping
NetVision Data Phone users can swap the battery during
data operations when the phone is idle. The Data Phone
beeps to warn that the battery has reached a level that can-
not support phone functions. Remove the battery without first
powering off the phone and install a fully charged battery.
Install a fresh battery within three minutes to retain user configuration.
After installing the new battery, press
SND
to connect and log into the network.
Technical Data
Battery: 7.2 volts rechargeable; Lithium ion
Battery Life: 150 minutes (2.5 hours) talk time, 24 hours standby operation per charge.
Frequency Range: 2.4 - 2.485 GHz
Wireless Output Power: 100 mW
Light Source: Visible Laser Diode at 650 nm
Laser Class: CDRH Class II, IEC 825 Class 2
Drop Specification: 3.3 ft./1 meter to tile
Temperature: -30°C to 60°C/-22°F to 140°F
To prevent injury or burns, do not short-circuit the bat-
tery terminals with metal objects. Use only approved
batteries and charging accessories with the NetVision
Data Phone. Do not charge the battery in a charger
other than a Symbol NetVision Data Phone Charger.
Battery Charging
The NetVision Data Phone Battery Charger can recharge two batteries, attached to
and detached from the Data Phone. When charging the battery attached to the
phone, turn off the phone before inserting it into the charger. Place
the battery into the rear charger slot or battery and phone combina-
tion into the front charger slot. The indicators for each slot on the
charger indicate the following status:
GREEN battery is fully charged and ready for use.
RED battery is charging; wait until the status indicator
changes to GREEN before using battery. Fully charge
the battery before using the NetVision Data Phone.
AMBER charger is charging the other battery. The charger
begins the charging cycle for the first device inserted;
the charging cycle for the other device begins after
the first cycle finishes.

Operating the Phone
Press
SND
to power on the Data Phone
and activate a network connection. After
the initial message, the phone
displays
Idle
status.
Connecting to the Network
The quality of Data Phone communication and data collection depends on the network radio recep-
tion. Large objects and other radiating devices can affect network reception. Use the Radio Signal
Strength Indicator on the display to monitor reception quality. The NetVision Data Phone can also
cause radio-frequency interference to other devices. Use the Data Phone only in areas designated by
the network administrator.
If the phone cannot connect to the network, the phone displays
No Network
. The phone cannot
make or receive calls, receive paged messages or perform data collection when disconnected from
the network.
The NetVision Data Phone ships with basic defaults for immediate use. The network administrator
preloads each Data Phone with configuration data to enable the advanced features and access other
system-related applications. The network administrator configures NetVision Data Phones in one of
two ways:
- As a shared phone, the system administrator preloads the Data Phone with a list of user profiles.
This allows you to pick up and use any Data Phone.
- As a personal phone, the system administrator preloads the Data Phone for one user.
The Setup user profile is reserved for the network administrator. Support and Symbol user profiles are
reserved for Symbol Technologies support personnel.
Logging on to a NetVision Data Phone
Users log onto the network to operate the NetVision Data Phone.
Obtain a user name and password (PIN) from the network
administrator.
1. Press
FCT
,
NAME
to log on to the network.
2. Select the user name from the list.
3. Press
SND
to select the user name.
4. Enter the PIN for the user name and press
SND
to complete the
network log in.
Battery
status icon
User name
Network and
phone status
Radio Signal Strength
Indicator (RSSI)
Phone line
and APPS icon
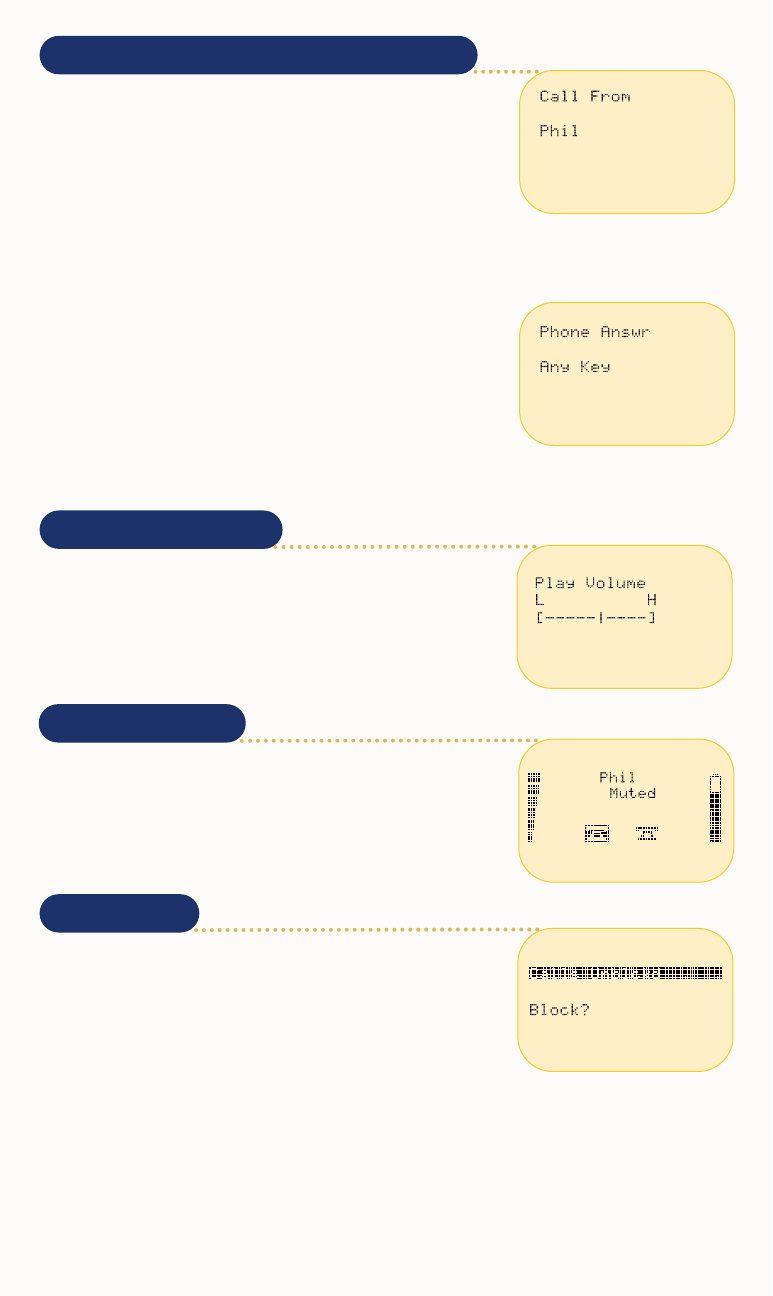
Receiving Calls with the NetVision Data Phone
The NetVision Data Phone provides user-configurable features to
determine how a call is answered. The caller ID feature allows you
to identify callers before answering the call. You can select from
three answering modes:
- Auto-Answering: automatically answers the call after the first ring.
- Single-Key Answering: requires you to press
SND
to initiate
the call.
- Any-Key Answering: requires you to press any key or button to answer the incoming call.
END
,
SCAN
and
HOLD
retain their call-refusing and data collection features.
1. Press
MENU
.
2. Select
User Options
and press
SND
.
3. Select
Phone Answr
and press
SND
.
4. Select the desired mode and press
SND
, press
END
to cancel.
When the NetVision Data Phone receives a call, and Auto-Answering is
not selected, it rings until the caller ends the call, the call is refused or
the call transfers to voice mail when available.
- To refuse a call, press
END
.
- To terminate a call, press
END
.
- To stop participating in an intercom call, press
END
.
Call Blocking
The NetVision Data Phone can block incoming calls. This feature is set
to off, allowing calls to come through each time the phone powers on.
To block incoming calls:
1. Press
FCT
,
8
.
2. Press
SND
to block, press
END
to cancel.
To unblock all incoming calls, press
FCT
,
8
,
SND
.
Calling to a blocked NetVision Data Phone causes a
Call Declined
message to appear.
Microphone Muting
To mute the microphone on the phone during a call:
- Press
FCT
,
CLR
to activate the muting feature.
- Press
FCT
,
CLR
again to continue talking.
This feature is only available during an active call.
Setting the Call Volume
To permanently adjust the earpiece volume during a phone call:
1. Press
FCT
,
9
.
2. Use the scroll controls to adjust the volume.
3. Press
SND
to set the volume.
Extension and Outside Number Dialing
If the network is configured, the Data Phone can make calls to other Data Phones and wired phones on
the network, and can send and receive outside phone calls.
- To call to an extension, dial the extension number and press
SND
.
- To call an outside number, dial the network-specific code to access the outside line, then dial the
number along with required long distance access codes. The dialing function allows 31 digits
maximum. See the network administrator for details for using access codes.
Clearing the Speed-Dial List
To clear existing numbers from the speed-dial list:
1. Press
MENU
to display the Main menu.
2. Select
User Options
and press
SND
.
3. Select
Clear SD
from the User options Menu.
4. Press
SND
to clear the speed-dial list.
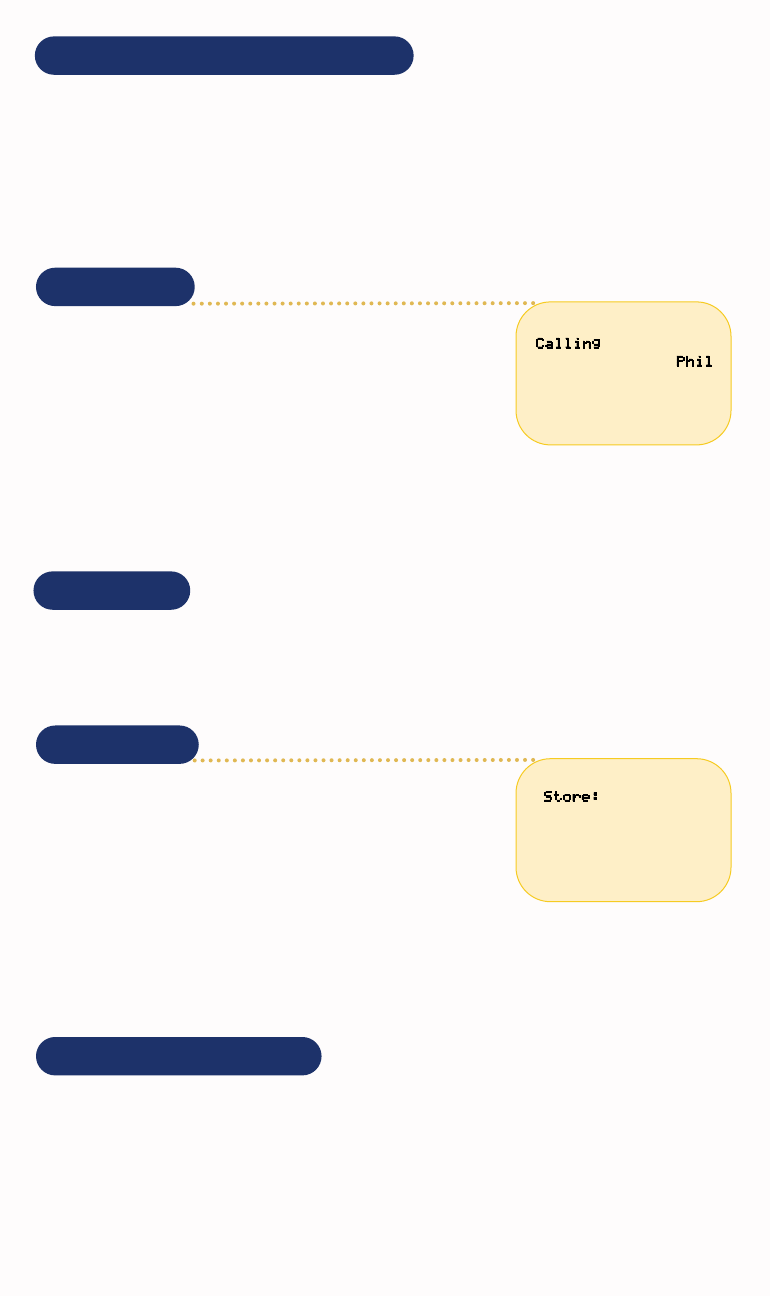
Speed-Dialing
Depending on the network configuration, you can speed-dial to other
NetVision phones, local extensions or outside phone numbers pro-
grammed into the speed-dial directory.
1. Press
RCL
to activate the speed-dial list.
2. Key in the speed-dial reference number (00-99) or use the scroll
keys to select the listed number.
3. Press
SND
to activate the call.
To add or replace a number in the speed-dial list:
1. Key in the desired number and press
STO
.
2. Enter the two-digit number referencing the location to add or replace the number on the list.
The phone stores the number in the list, and returns to the status display.
Call Redialing
The NetVision Data Phone stores the last eight calls, including intercom calls and calls made from the
NetVision Data Phone. The NetVision Data Phone does not store the numbers for external calls.
1. Press
RCL
to display the last call. Press
RCL
to scroll through the list. Do not use the scroll keys.
2. Press
SND
to initiate the call.
Name Dialing
The NetVision Data Phone can contain a list of up to 25 users set up by
the network administrator.
1. Press volume buttons or
NAME
to activate the name list.
2. Select the desired name and press
SND
to initiate the call.
Use alphanumeric keys to jump to specific names when the list is long.
1. Press
NAME
.
2. Press the alphanumeric key with the character corresponding to the letter of the user name. If a letter
has no entries, the phone displays
No entries for #
.
Use the scroll keys for smaller cursor movements through the list.
3. Press
SND
to initiate the call to the selected user.
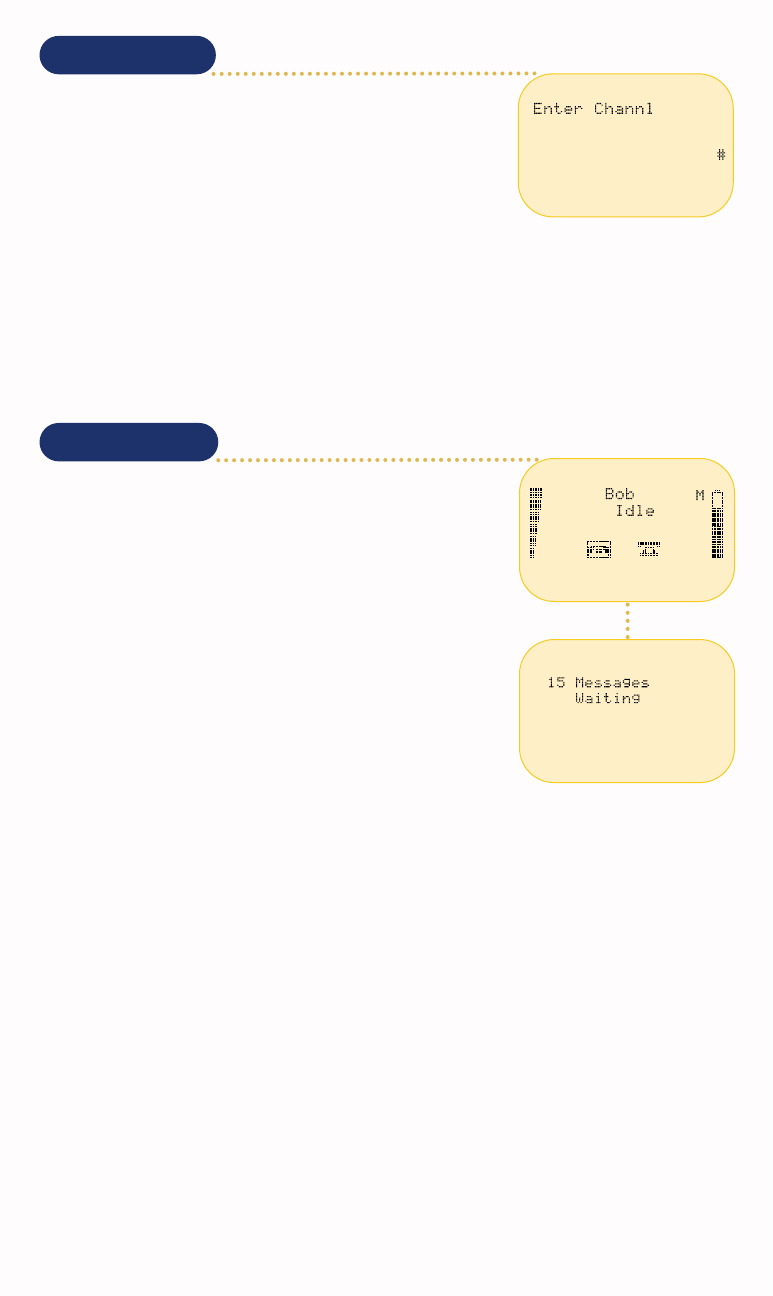
Intercom Calling
This feature allows NetVision Phone users to connect to users of a
group. NetVision Data Phone users can belong to as many as 10
intercom groups. The network administrator manages access levels to
the intercom groups. You can communicate with only one intercom
group at a time. The NetVision Data Phone automatically answers an
intercom call if a call is not currently active. If a call is active, a three-
beep alert indicates that a call is waiting. The Data Phone enters the
intercom call when you end or place the current call on hold.
1. Press
#
.
2. Enter the intercom group number (0-9) and Press
SND
.
The NetVision Data Phone dials the intercom group, and occupies the channel until the call terminates.
Message Paging
This feature allows the NetVision Data Phone to receive messages
similar to most pagers. Depending on the configuration, the network
administrator can arrange for other network users to send messages
to the NetVision Data Phone. The Data Phone alerts you to new mes-
sages with a special tone.
To view messages:
1. Press
FCT
,
RCL
.
2. Press
SND
to view the last new message received.
3. Press
SND
repeatedly to scroll through messages or type in the
number corresponding to a specific message.
Press
RCL
repeatedly to scroll through the Subject, Sender and
Recipient fields.
To delete a message, press
CLR
while viewing the message.
Press
END
to return to phone operations.
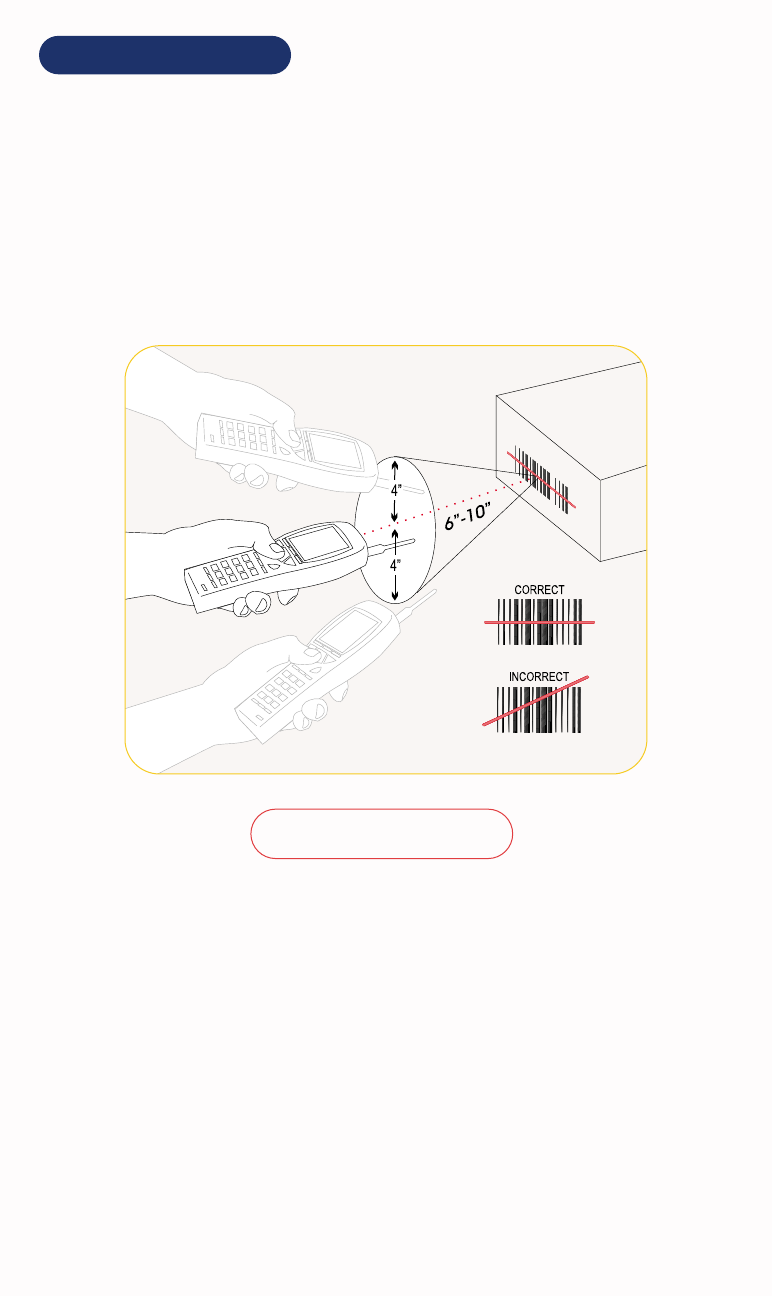
Data Collection Features
The NetVision Data Phone can collect data for many different applications. The type of data collected
depends on the network configuration. You can enter data by keypad entry or using the built-in, bar
code scanner. To scan a bar code:
1. Aim the top of the NetVision Data Phone towards the bar code. Adjust the distance to the bar code.
Hold the Data Phone farther away for larger bar codes. Optimum distance is approximately six to
ten inches (15 to 25 cm).
2. Press
SCAN
to switch to the data collection application
.
Observe that the scan beam crosses all the
bars of the bar code. The call indicator turns green and the Data Phone beeps after successfully
reading the bar code.
The scanning success depends on the quality, size of the bar code, and the scan distance and angle of
the scanner.
Do not stare into laser aperture.
Manually Entering Data
The NetVision Data Phone performs data entry best using the scanner.
However, you can enter alphanumeric characters using the keypad. To
enter alphanumeric characters, press and hold FCT, then press a key-
pad key to display a list of characters associated with that key.
Navigating through Data Collection Applications
This feature maps the Data Phone keypad to functions different than when operating during a call.
Press Key Key Function Status Indicator
NAME
Application help B
STO
Scroll keys S
RCL
Edit keys E
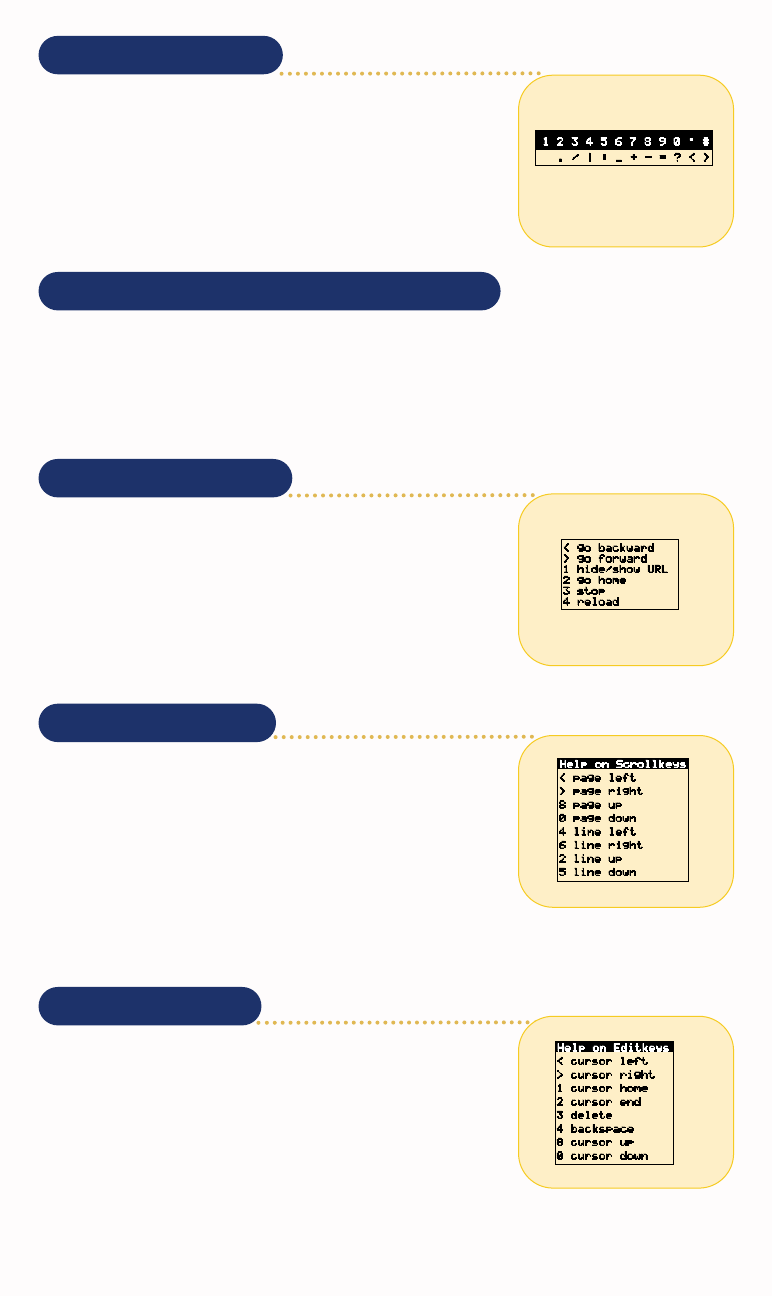
Application Edit Keys
Press and hold
RCL
and press any of the following keys edit data:
<
Moves the cursor over the previoous character.
>
Moves the cursor over the next character.
1
Moves cursor to beginning of a field.
2
Moves cursor to end of a field.
3
Deletes a character.
4
Backspaces over a character.
8
In a multi-line field moves cursor up one line.
0
In a multi-line field moves cursor down one line.
Application Scroll Keys
Press and hold
STO
and press any of the following keys to move
through a page:
<
Scrolls the page towards the left margin.
>
Scrolls the page towards the right margin.
8
Scrolls the page towards the top margin.
0
Scrolls the page towards the bottom margin.
4
Scrolls the page one column towards the left margin.
6
Scrolls the page one column towards the right margin.
2
Scrolls the page one line towards the top margin.
5
Scrolls the page one line towards the bottom margin.
Application Control Keys
Press and hold
NAME
and press any of the following keys to access
application features:
<
Moves backward through application screens.
>
Moves forward through application screens.
1
Hides/shows an application field.
2
Moves to the current application Home screen.
3
Stops the current application.
4
Reloads the current application.
Data Phone Ring Styles
This feature allows NetVision Data Phone users to select different rings to announce incoming phone
and intercom calls. You can also add the vibrator to the ring selection.
Tone 1
One-second beep
Tone 2
Two short beeps
Tone 3
A half-second beep
Tone 4
A two-second beep
Tone 5
One short beep
Tone 6
Five short beeps
LED-only
Repeated LED flashes
Vibrator
Repeated brief vibrations
To set the ring styles:
1. Press
MENU
.
2. Select
User Options
and press
SND
.
3. Select
Phone Ring
and Press
SND
.
4. Select a ring style from the menu and press SND. The phone rings once using the selected tone.
Press
END
to cancel.
Controlling LCD Contrast
You can configure the NetVision Data Phone display contrast levels for readibility in different
environments.
1. Press
MENU
.
2. Select
User Options
and press
SND
.
3. Select
Contrast
and press
SND
.
4. Select the contrast level and press
SND.
Press
END
to cancel.
Key Locking
This feature allows you to lock the keypad to prevent accidental Data Phone operation and unnecessary
battery power consumption. Any incoming call automatically unlocks the keypad.
1. Press
MENU
.
2. Select
User Options
and press
SND
.
3. Select
Keypad Lock
and press
SND
.
4. Select
Enable
or
Disabled
and press
SND
. Press
END
to cancel.
To unlock the keypad before initiating a call or other phone function, press and hold
SND
until the phone
status changes to
Idle
.
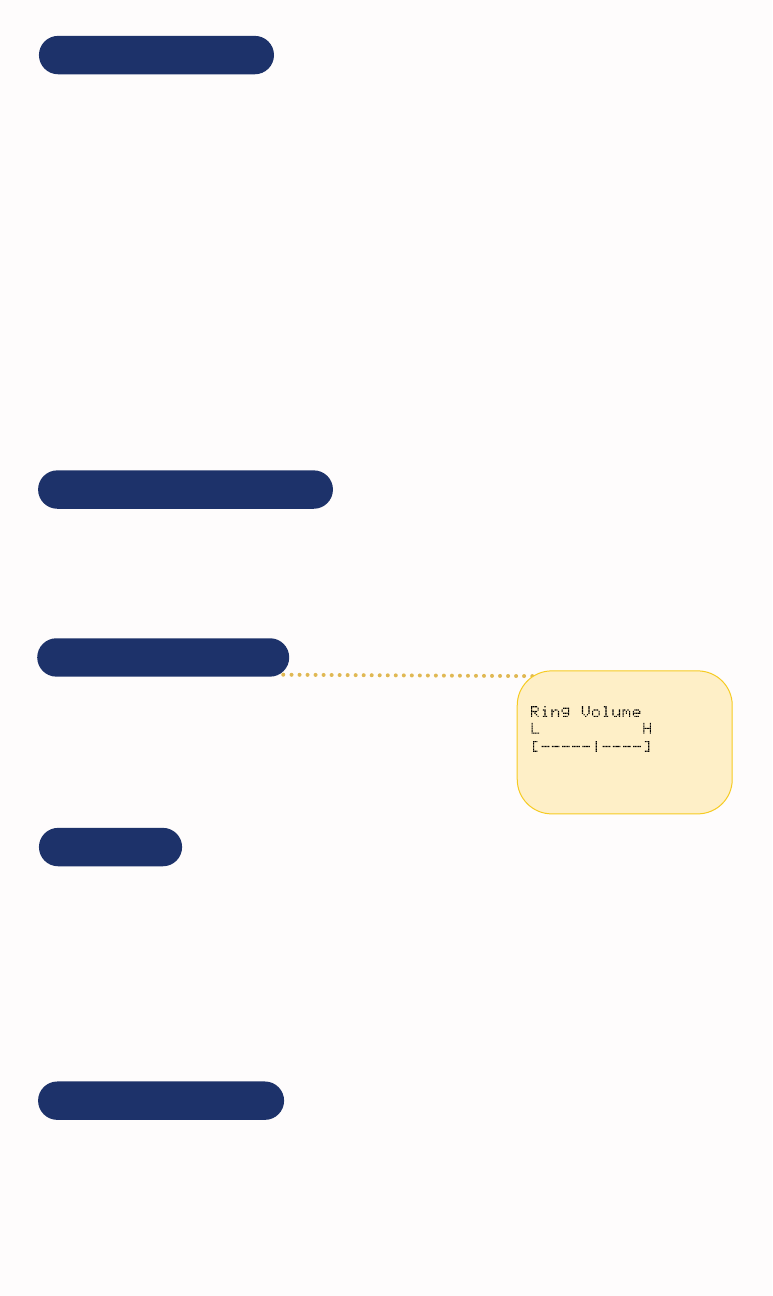
Data Phone Ring Volume
This feature allows you to adjust the ring volume for incoming calls.
1. Press
MENU
.
2. Select
User Options
and press
SND
.
3. Select
Ring Volume
and press
SND
.
4. Set the ring volume level and press
SND
. Press
END
to cancel.
Adding Vibration to Ring Style
1. Press
MENU
.
2. Select
User Options
. Press
SND
.
3. Select
Ring Vibrate
and press
SND
.
4. Select
Enable
or
Disabled
and press
SND
to set. Press
END
to cancel.

Regulatory Compliance
To comply with U.S. and international regulatory requirements, the following information has been included. The document applies to the
complete line of Symbol products. Some of the labels shown, and statements applicable to other devices might not apply to all products.
Radio Frequency Interference Requirements
This device has been tested and found to comply with the limits for a Class A digital device pursuant to Part 15 of the Federal
Communications Commissions Rules and Regulation. These limits are designed to provide reasonable protection against harmful interfer-
ence when the equipment is operated in a commercial environment. This equipment generates, uses, and can radiate radio frequency
energy and, if not installed and used in accordance with the instruction manual, may cause harmful interference to radio communica-
tions. Operation of this equipment in a residential area is likely to cause harmful interference in which case the user will be required to
correct the interference at his own expense.
However, there is no guarantee that interference will not occur in a particular installation. If the equipment does cause harmful interfer-
ence to radio or television reception, which can be determined by turning the equipment off and on, the user is encouraged to try to cor-
rect the interference by one or more of the following measures:
- Reorient or relocate the receiving antenna.
- Increase the separation between the equipment and receiver.
Connect the equipment into an outlet on a circuit different from that which the receiver is connected.
Consult the dealer or an experienced radio/TV technician for help.
Radio Frequency Interference Requirements - Canada
This Class A digital apparatus meets the requirements of the Canadian Interference-Causing Equipment Regulations.
CE Marking & European Union Compliance
Products intended for sale within the European Union are marked with the CEMark which indicates compliance to
applicable Directives and European Normes (EN), as follows. Amendments to these Directives or ENs are included:
Normes (EN), as follows.
Applicable Directives:
Electromagnetic Compatibility Directive 89/336/EEC
Low Voltage Directive 73/23/EEC
Applicable Standards:
EN 55 022 - Limits and Methods of Measurement of Radio Interference Characteristics of Information Technology Equipment
EN 50 082-1 - Electromagnetic Compatibility - Generic Immunity Standard, Part 1: Residential, commercial, Light Industry
IEC 801.2 - Electromagnetic Compatibility for Industrial Process Measurement and Control Equipment Part 2: Electrostatic Discharge
Requirements
IEC 801.3 - Electromagnetic Compatibility for Industrial Process Measurement and Control Equipment Part 3: Radiated Electromagnetic
Field Requirements
IEC 801.4 - Electromagnetic Compatibility for Industrial Process Measurement and Control Equipment Part 4: Electrical Fast Transients
Requirements
EN 60 950 + Amd 1 + Amd 2 - Safety of Information Technology Equipment Including Electrical Business Equipment
EN 60 825-1 (EN 60 825) - Safety of Devices Containing Lasers
RF Devices
Symbol RF products are designed to be compliant with the rules and regulations in the locations into which they are sold and will be
labeled as required. The majority of Symbol RF devices are type approved and do not require the user to obtain license or authorization
before using the equipment. Any changes or modifications to Symbol Technologies equipment not expressly approved by Symbol
Technologies could void user authority to operate the equipment.
Laser Devices
Symbol products using lasers comply with US 21CFR1040.10, Subchapter J and IEC825/EN 60 825 (or IEC825-1/EN 60
825-1, depending on the date of manufacture). The laser classification is marked one of the labels on the product.
Class 1 Laser devices are not considered to be hazardous when used for their intended purpose. The following statement is
required to comply with US and international regulations:
Use of controls, adjustments or performance of procedures other than those specified herein may result in hazardous visible or invisible
laser light exposure.
Class 2 Laser scanners use a low power, visible light diode. As with any very bright light source, such as the sun, the user should avoid
staring directly into the light beam. Momentary exposure to a Class 2 laser is not known to be harmful.
Patents
This product is covered by one or more of the following U.S. and foreign Patents:
U.S. Patent No.
4,360,798; 4,369,361; 4,387,297; 4,460,120; 4,496,831; 4,593,186; 4,603,262; 4,607,156; 4,652,750; 4,673,805;
4,736,095; 4,758,717; 4,816,660; 4,845,350; 4,896,026; 4,897,532; 4,923,281; 4,933,538; 4,992,717; 5,015,833;
5,017,765; 5,021,641; 5,029,183; 5,047,617; 5,103,461; 5,113,445; 5,130,520; 5,140,144; 5,142,550; 5,149,950;
5,157,687; 5,168,148; 5,168,149; 5,180,904; 5,229,591; 5,230,088; 5,235,167; 5,243,655; 5,247,162; 5,250,791;
5,250,792; 5,262,627; 5,262,628; 5,266,787; 5,278,398; 5,280,162; 5,280,163; 5,280,164; 5,280,498; 5,304,786;
5,304,788; 5,306,900; 5,321,246; 5,324,924; 5,337,361; 5,367,151; 5,373,148; 5,378,882; 5,396,053; 5,396,055;
5,399,846; 5,408,081; 5,410,139; 5,410,140; 5,412,198; 5,418,812; 5,420,411; 5,436,440; 5,444,231; 5,449,891;
5,449,893; 5,468,949; 5,471,042; 5,478,998; 5,479,000; 5,479,002; 5,479,441; 5,504,322; 5,519,577; 5,528,621;
5,532,469; 5,543,610; 5,545,889; 5,552,592; 5,578,810; 5,581,070; 5,589,679; 5,589,680; 5,608,202; 5,612,531;
5,619,028; 5,664,229; 5,668,803; 5,675,139; 5,693,929; 5,698,835; 5,705,800; 5,714,746; 5,723,851; 5,734,152;
5,734,153; 5,745,794; 5,754,587; 5,762,516; 5,763,863; 5,767,500; 5,789,728; 5,808,287; 5,811,785; 5,811,787;
5,815,811; 5,821,519; 5,821,520; 5,823,812; 5,828,050; 5,850,078; 5,861,615; 5,874,720; 5,875,415; D305,885;
D341,584; D344,501; D359,483; D362,453; D363,700; D363,918; D370,478; D383,124; D391,250; D405,077;
D406,581
Invention No. 55,358; 62,539; 69,060; 69,187 (Taiwan); No. 1,601,796; 1,907,875; 1,955,269 (Japan); European Patent
367,299; 414,281; 367,300; 367,298; UK 2,072,832; France 81/03938; Italy 1,138,713