Symbol Technologies PDT687C Portable Data Terminal w/WLAN PC Module User Manual 68xx
Symbol Technologies Inc Portable Data Terminal w/WLAN PC Module 68xx
Contents
- 1. Product Reference Guide
- 2. Quick Reference Guide
- 3. GRG Addendum
Quick Reference Guide
68XX Series

68XX Series
1998-2002 SYMBOL TECHNOLOGIES, INC. All rights reserved.
Symbol reserves the right to make changes to any product to improve reliability, function,
or design.
Symbol does not assume any product liability arising out of, or in connection with, the
application or use of any product, circuit, or application described herein.
No license is granted, either expressly or by implication, estoppel, or otherwise under any
patent right or patent, covering or relating to any combination, system, apparatus,
machine, material, method, or process in which Symbol products might be used. An
implied license exists only for equipment, circuits, and subsystems contained in Symbol
products.
Symbol and the Symbol logo are registered trademarks of Symbol Technologies, Inc. Other
product names mentioned in this manual may be trademarks or registered trademarks of
their respective companies and are hereby acknowledged.
Symbol Technologies, Inc.
One Symbol Plaza
Holtsville, N.Y. 11742-1300
http://www.symbol.com
Patents
This product is covered by one or more of the following U.S. and foreign Patents:
U.S. Patent No. 4,593,186; 4,603,262; 4,607,156; 4,652,750; 4,673,805; 4,736,095;
4,758,717; 4,760,248; 4,806,742; 4,816,660; 4,845,350; 4,896,026; 4,897,532; 4,923,281;
4,933,538; 4,992,717; 5,015,833; 5,017,765; 5,021,641; 5,029,183; 5,047,617; 5,103,461;
5,113,445; 5,130,520; 5,140,144; 5,142,550; 5,149,950; 5,157,687; 5,168,148; 5,168,149;
5,180,904; 5,216,232; 5,229,591; 5,230,088; 5,235,167; 5,243,655; 5,247,162; 5,250,791;
5,250,792; 5,260,553; 5,262,627; 5,262,628; 5,266,787; 5,278,398; 5,280,162; 5,280,163;
5,280,164; 5,280,498; 5,304,786; 5,304,788; 5,306,900; 5,324,924; 5,337,361; 5,367,151;
5,373,148; 5,378,882; 5,396,053; 5,396,055; 5,399,846; 5,408,081; 5,410,139; 5,410,140;
5,412,198; 5,418,812; 5,420,411; 5,436,440; 5,444,231; 5,449,891; 5,449,893; 5,468,949;
5,471,042; 5,478,998; 5,479,000; 5,479,002; 5,479,441; 5,504,322; 5,519,577; 5,528,621;
5,532,469; 5,543,610; 5,545,889; 5,552,592; 5,557,093; 5,578,810; 5,581,070; 5,589,679;
5,589,680; 5,608,202; 5,612,531; 5,619,028; 5,627,359; 5,637,852; 5,664,229; 5,668,803;
5,675,139; 5,693,929; 5,698,835; 5,705,800; 5,714,746; 5,723,851; 5,734,152; 5,734,153;
5,742,043; 5,745,794; 5,754,587; 5,762,516; 5,763,863; 5,767,500; 5,789,728; 5,789,731;
5,808,287; 5,811,785; 5,811,787; 5,815,811; 5,821,519; 5,821,520; 5,823,812; 5,828,050;
5,848,064; 5,850,078; 5,861,615; 5,874,720; 5,875,415; 5,900,617; 5,902,989; 5,907,146;
5,912,450; 5,914,478; 5,917,173; 5,920,059; 5,923,025; 5,929,420; 5,945,658; 5,945,659;
5,946,194; 5,959,285; 6,002,918; 6,021,947; 6,029,894; 6,031,830; 6,036,098; 6,047,892;
6,050,491; 6,053,413; 6,056,200; 6,065,678; 6,067,297; 6,082,621; 6,084,528; 6,088,482;
6,092,725; 6,101,483; 6,102,293; 6,104,620; 6,114,712; 6,115,678; 6,119,944; 6,123,265;
6,131,814; 6,138,180; 6,142,379; 6,172,478; 6,176,428; 6,178,426; 6,186,400; 6,188,681;
6,209,788; 6,209,789; 6,216,951; 6,220,514; 6,243,447; 6,244,513; 6,247,647; 6,308,061;
6,250,551; 6,295,031; 6,308,061; 6,308,892; 6,321,990; 6,328,213; 6,330,244; 6,336,587;
6,340,114; 6,340,115; 6,340,119; 6,348,773; 6,380,949; 6,394,355; D305,885; D341,584;
D344,501; D359,483; D362,453; D363,700; D363,918; D370,478; D383,124; D391,250;
D405,077; D406,581; D414,171; D414,172; D418,500; D419,548; D423,468; D424,035;
D430,158; D430,159; D431,562; D436,104.
Invention No. 55,358; 62,539; 69,060; 69,187, NI-068564 (Taiwan); No. 1,601,796;
1,907,875; 1,955,269 (Japan); European Patent 367,299; 414,281; 367,300; 367,298; UK
2,072,832; France 81/03938; Italy 1,138,713
rev. 06/02
1
Quick Reference
Introduction
The 68XX is a ruggedized, weather-resistant, hand-held portable
computer combining the following capability in one package:
• PC-standard architecture (8088 16-bit architecture)
• DR-DOS compatibility
• 16-line by 21-character display
• Key input from a 35 or 46-key alphanumeric keyboard
• Integrated scanning capability
• Lithium Ion and NiCd rechargeable battery pack
• Batch communications or RF network communications (with
internally mounted antenna):
-Spectrum One
® RF network (681X)
-Spectrum24
® RF network (684X).
About This Guide
This guide provides the operator with instructions for the following
procedures:
• Installing/removing the battery
• Charging the battery
• Powering the 68XX on and off
• Adjusting the display contrast
• Turning the backlight on/off
• Using the keyboard
• Using the integrated scanner
• Running communications
• Troubleshooting the 68XX.
2
68XX Series
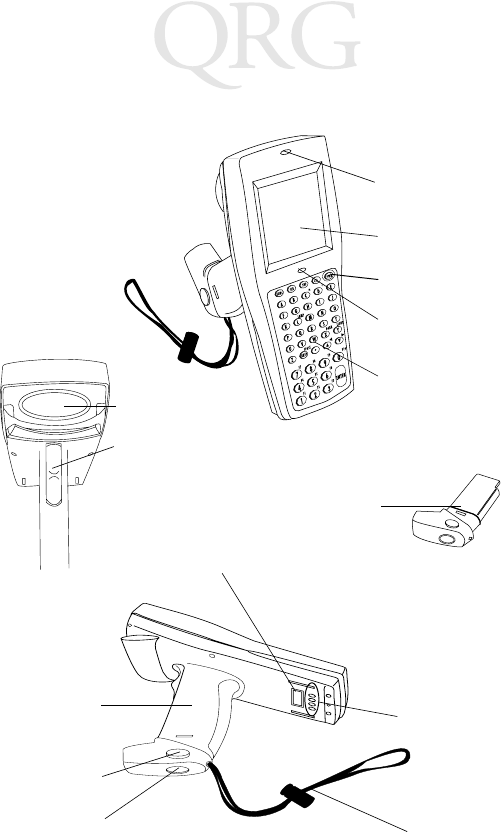
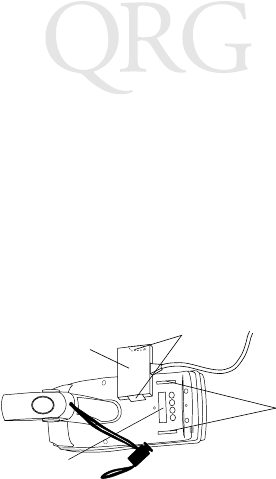
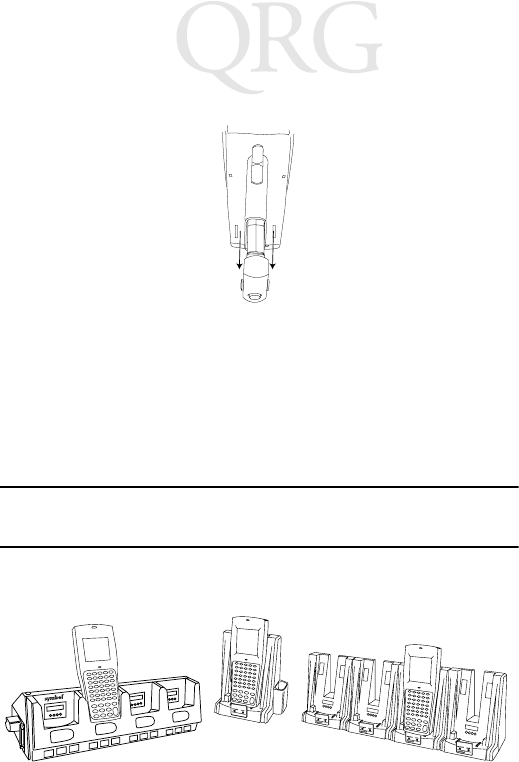
Parts of the 68XX
+-
=
Status
-
Display
Keyboard
Scan LED
Status LED
Scan Window
PWR Key
Scan Trigger
Battery Lock Handstrap
Charging
Contacts
Optical
Connectors
Battery
Compartment
Battery
Release
Battery
Pack
3
Quick Reference
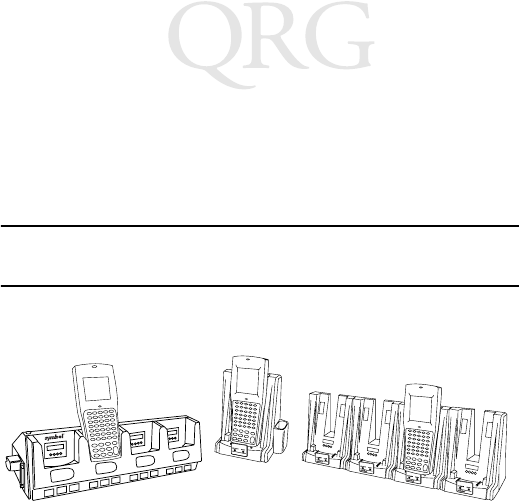
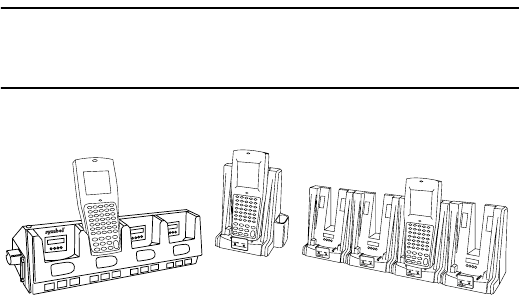
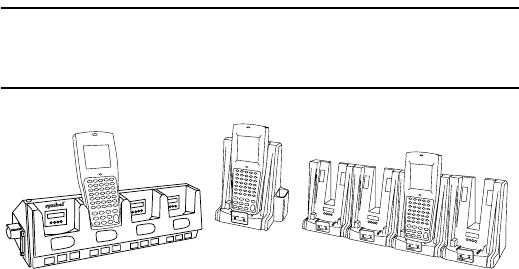
Required Accessories
Required 68XX accessories include:
• Lithium Ion or NiCd rechargeable battery pack or
intrinsically safe NiCd rechargeable battery pack
• CCM 38/6860 4-slot charging and communication module
with spare battery charging slot
or
• CRD 38/6865 1-slot cradle charging and communications
cradle
or
• CRD 38/6866 4-slot charging and communications cradle
• RS-232 serial cable(s)
• Power supply (1 per cradle).
Optional Accessories
Optional 68XX accessories include:
• Wall mounting kit (p/n 3866-000)
• UBC battery charger
• PC adapter and printer interface module (PIM)
• 10-hour trickle battery charger (wall cube)
• Spectrum One and Spectrum24 network accessories
•Holster.
4
68XX Series
Providing Power
Power for the 68XX is provided by a Lithium Ion or Nickel
Cadmium (NiCd) rechargeable battery pack.
Note: The Series 3800 NiCd battery packs, 3872-103, 3872-
105, and 3872-115, CANNOT be used in the 68XX.
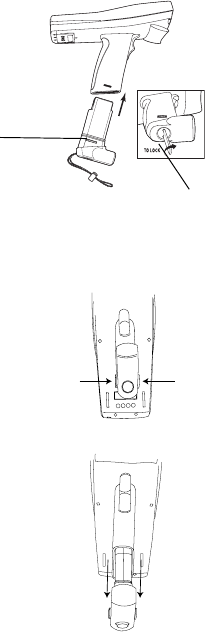
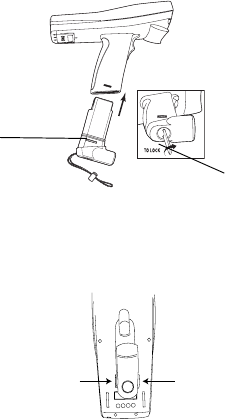
Installing New or Recharged Batteries
To install the battery:
1. Orient the battery pack with the handle facing the 6800’s scan
window.
2. Slide the pack into the battery compartment with the battery
release buttons pressed in.
3. Press the battery lock in to secure.
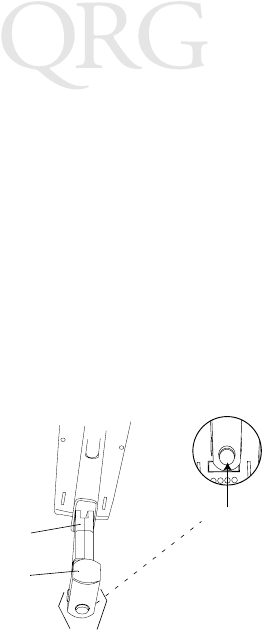
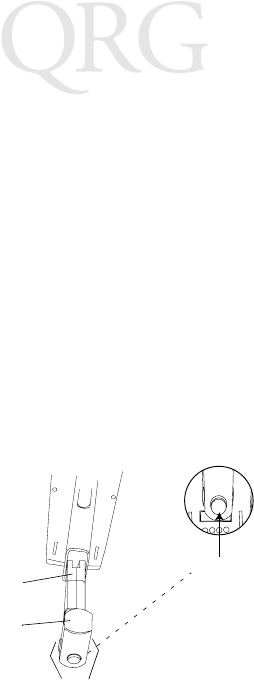
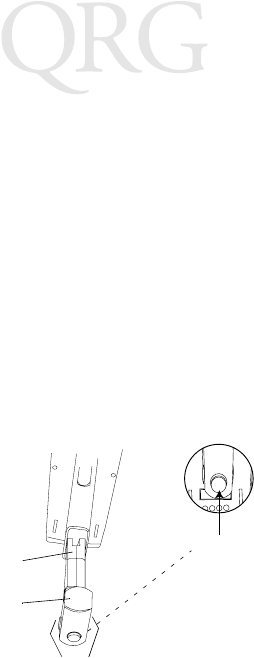
Changing the Battery Pack for the Intrinsically Safe PDT
68xx terminal
To insert the battery pack:
1. Firmly insert the battery into the bottom of the terminal as
shown in the following illustration.
Battery
Handle
Battery
Lock
Release
Button
Battery
Compartment
Scan Window
5
Quick Reference
2. Use the enclosed battery locking key to lock the battery into
place. As you are turning the locking key, the battery locking
mechanism should be turning and locking the battery into
place.
3. To unlock and remove the battery, use the battery locking key
to unlock the battery locking mechanism, and pull the battery
out of the bottom of the terminal.
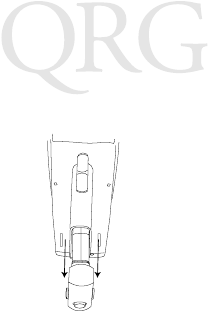
Removing the Battery Pack
1. Press the battery release buttons on both sides of the handle.
2. Slide the battery pack out of the handle.
Battery Locking Key
Battery
Locking
Mechanism
Press release
button
Press release
button
6
68XX Series
Charging the NiCd Battery
To charge the NiCd battery in the 68XX, use one of the cradles
listed in Required Accessories on page 3 or the Universal Battery
Charger. Refer to the QRG for your cradle or the QRG for the UBC
for instructions on charging the battery.
Caution: Use only Symbol battery 21-32801-01, 21-35217-01,
21-35241-01, or 21-38796-01 in this terminal.
Charging the Lithium Ion Battery
Note: Placing the terminal in the cradle with a Lithium Ion
battery installed does not damage the battery.
The Lithium Ion battery does not charge when the terminal is
placed in a cradle. Use the cradle for communications and as a place
holder for the terminal when a lithium Ion battery is installed.
To charge the Lithium Ion battery (p/n 21-40340-01), remove the
battery from the terminal and charge in a UBC 2000 battery adapter
p/n 21-32665-24. Refer to the charger’s documentation for more
information.
CRD 38/6865 CRD 38/6866CCM 38/6860

7
Quick Reference
Operating the 68XX
Powering the 68XX On/Off
Power the 68XX on by:
• squeezing the scan trigger,
•or pressing the PWR key.
Note: The battery must be installed, or the 68XX must be in a
cradle to power the terminal on.
To suspend the 68XX’s operation, press the PWR key.
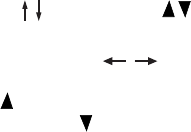
Adjusting the Contrast
The 68XX’s display contrast can be set to 8 levels. To adjust the
contrast:
• Press FUNC then X to increase the contrast
• Press FUNC then Y to decrease the contrast.
Turning Backlight On/Off
The 68XX has a backlight to illuminate the display for operating in
dim light. To turn the backlight on or off, press FUNC then L
(Lamp).
The backlight turns off automatically in approximately 15 seconds
or when the 68XX is powered off.
Using the Keyboard
The 68XX uses an alphanumeric keyboard that produces the 26-
character alphabet (A-Z), numbers (0-9), and assorted characters
(+, -, X, ÷, =, etc.). The keypad is color-coded to indicate which
modifier key to press to produce a particular character or action.
• The Alpha keys produce the upper-case characters A to Z.
• The default numeric keypad produces the numbers 0-9.
• Press FUNC and the corresponding numeric key to produce
function keys F1 to F10.
• Press the cursor keys (35-key) or (46-key) to scroll
8
68XX Series
up and down the screen.
• 35-key - press the cursor keys to scroll left and right.
46-key - press FUNC then to scroll left, and FUNC then
to scroll right.
• Press BKSP to erase information entered on the display, one
character at a time.
• 35-key - press SPACE to enter a blank space. 46-key - press
FUNC then BKSP to enter a blank space.
• Press CLEAR (35-key) or CLR (46-key) to partially or com-
pletely escape from an application level or screen; also erases
all entered data from the screen.
• Press SHIFT (35-key) or SHF (46-key) to access the shifted
keyboard.
•CTRL (35-key) or CTL (46-key) performs the control func-
tion and is under application control.
• Press ENTER to place entered data into the 68XX’s memory.
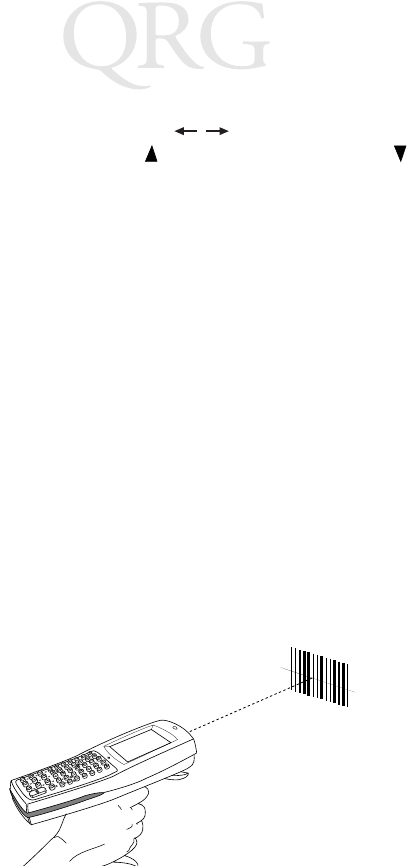
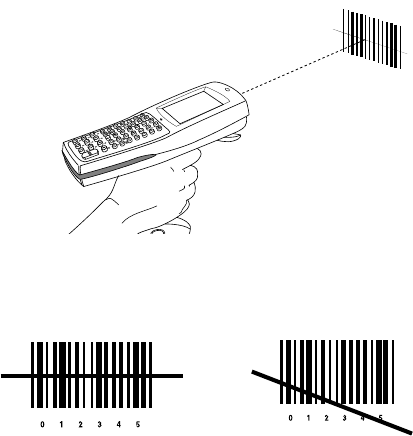
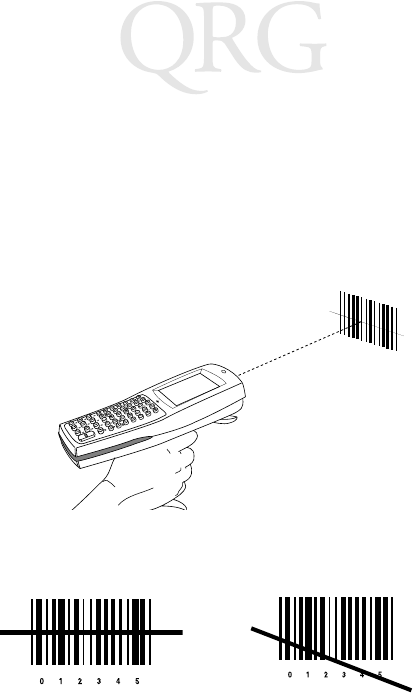
Using the Integrated Laser Scanner
To scan:
1. Press the scanner trigger to power the 68XX and scanner on.
The Scan LED turns red if scanning is enabled and the
laser is on.
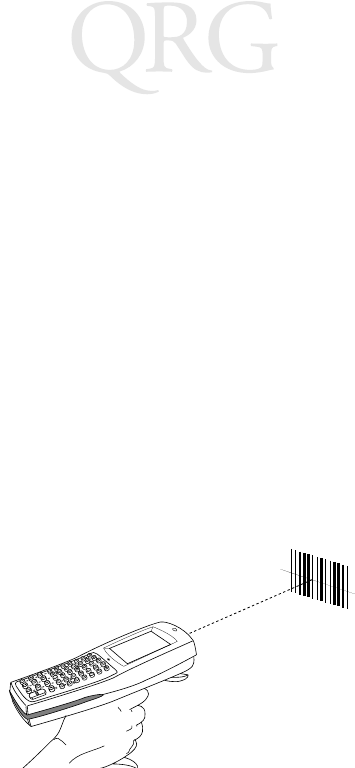
2. Point the 68XX at the bar code and press the trigger.
9
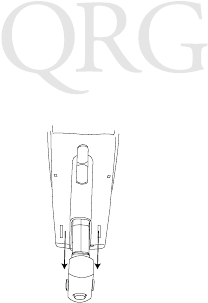
Quick Reference
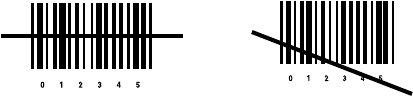
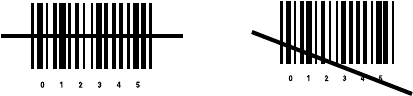
3. Ensure that the scan beam crosses all bars and spaces on the
bar code symbol, as shown below:
Hold the scanner farther away for larger symbols, and closer
for symbols with bars that are close together.
Long-range versions support a two-level scan trigger. The
first, narrow beam is for aiming, and the second beam decodes
the label.
4. The LED turns from red to green for successful decodes. The
68XX may also beep.
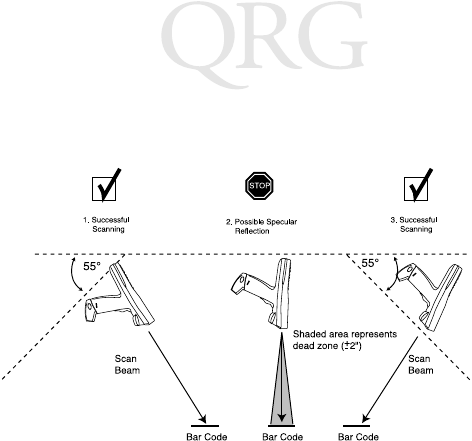
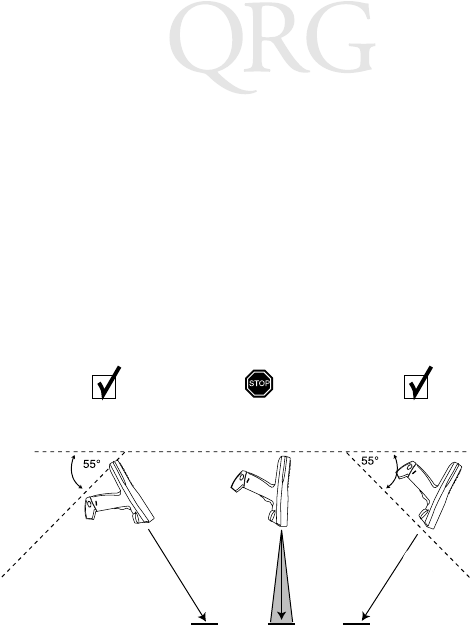
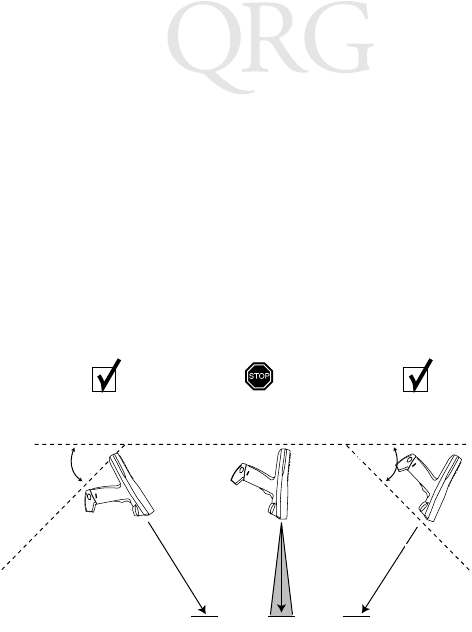
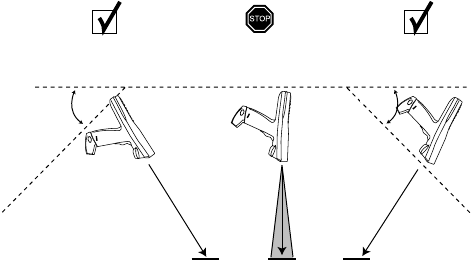
Aiming: Hold at an Angle
Do not hold the 68XX’s scan window directly over the bar code.
Laser light reflecting directly back into the scan window from the
bar code is known as specular reflection. This strong light can
“blind” the scanner and make decoding difficult. The area where
specular reflection occurs is known as a “dead zone”.
Right Wrong
10
68XX Series
You can tilt the 68XX up to 55° forward or back and achieve a
successful decode. Practice quickly shows what tolerances to work
within.
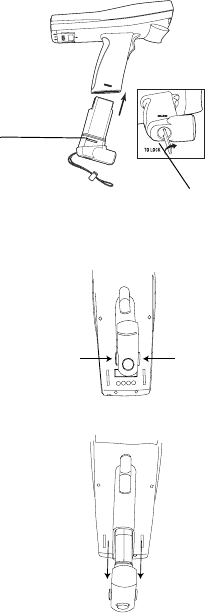
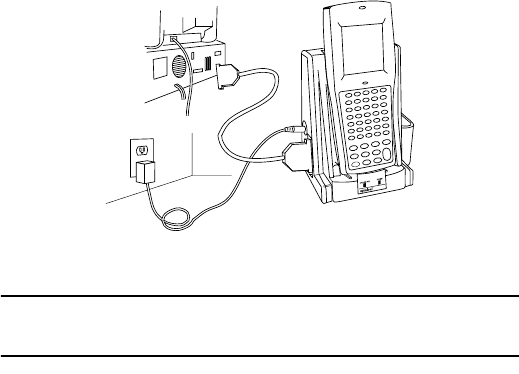
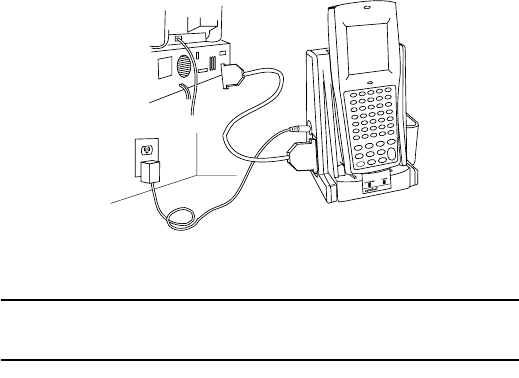
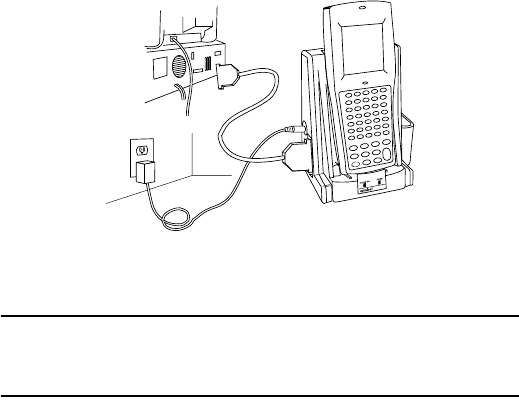
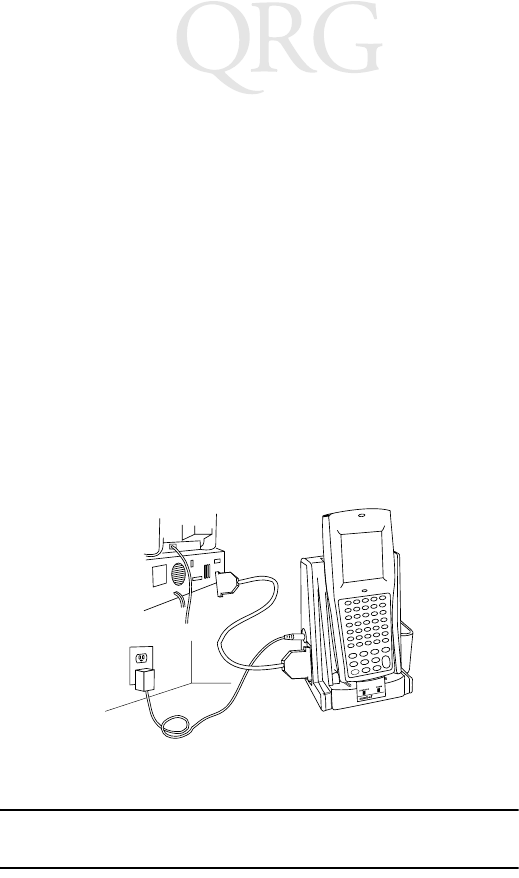
Performing Communications
Communicating with a Host
The 68XX communicates with a host through the CCM 38/6860,
CRD 38/6865, CRD 38/6866, or PC Adapter. For information on
setting up the CCM, cradles, or PC Adapter, refer to the PDT 6800
Series Product Reference Guide or the Quick Reference Guide
provided with each unit.
To communicate with a host:
1. Set up the cradle(s) or PC Adapter as described in the PDT
6800 Series Product Reference Guide or Quick Reference
Guide for the device.
2. Place the 68XX’s base in the cradle. Press the top of the 68XX
against the cradle back until it is firmly seated.
11
Quick Reference
The Status LED lights solid green when the 68XX is securely
placed in the cradle.
3. Start the communications program on the host and the 68XX.
Caution: Do NOT remove the 68XX while the cradle’s red
COMM LED is blinking.

12
68XX Series
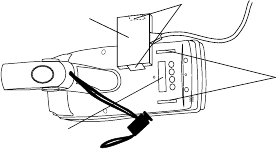
Communicating with a Printer
The 68XX communicates with a printer through the printer
interface module (PIM). To connect the 68XX to the printer:
1. Attach the PIM’s optical connector to the 68XX’s port by in-
serting the clips on the connector in the slots on either side of
the port.
2. Plug the PIM’s DB-9 connector in the printer’s port.
3. Power the printer and 68XX on.
Communicating in a RF Network
The PDT 6810 operates in a Symbol Spectrum One RF network; the
PDT 684X operates in a Symbol Spectrum24 RF network.
The Status LED indicates the state of the terminal’s connection to
the RF network:
Refer to the documentation for the Spectrum One or Spectrum24
network for more information on operating the PDT 68XX in that
RF environment.
Off indicates that the radio is working and associated with an
access point (Spectrum24) or base station (Spectrum
One).
Flashes red
once per
second
to indicate that the radio is out of range or not associated
with an access point or base station.
PIM
Optical Connector Clips
68XX’s
Optical Port
Slots

13
Quick Reference
Switching from 802.11 to Spring RF Protocol
(PDT 6842)
Note: The terminal boots up with the 802.11 RF protocol.
Perform the following procedure to switch to the Spring
RF protocol.
1. Boot up the terminal. The following prompt displays:
2. Within four seconds, type the letter “y”. If you do not type the
letter “y” within four seconds, the terminal boots up with the
802.11 RF protocol.
The next prompt displays:
3. Within ten seconds, type the letter “y”. If you do not type the
letter “y” within ten seconds, the terminal boots up with the
802.11 RF protocol.
The next prompt displays:
4. Select 2 to boot up with the Spring RF protocol.
SOFTWARE UPDATE
Update?[y/n]:
RF PROTOCOL UPDATE
OPPORTUNITY
Update RF protocol
[y/n]:
RF Protocol
Currently 802.11
1. Abort update
2. Make pre-802.11
3. Make 802.11
Select[1,2,3]:

14
68XX Series
The next prompt displays:
5. Enter the password RFPROT, then press the ENTER key. The
terminal continues to boot up. If a compatibility problem ex-
ists, the terminal pauses with an error message. Contact your
System Administrator.
Troubleshooting
Symptom Possible Cause Action
68XX does not
power on.
Battery is not installed. Verify that the 68XX has
power from a battery.
Battery is not charged. NiCd battery - Charge
the battery in the termi-
nal, or remove the battery
and charge in the spare
battery charging slot on
the CCM 38/6860 or
CRD 38/6866.
Lithium Ion - Remove the
battery from the terminal
and charge in a UBC
2000 adapter.
Low Battery
message.
The main battery pack
is running low.
NiCd battery - Place the
68XX in a cradle and re-
charge the battery.
OR
Power the 68XX off and
replace the battery.
Enter password
→

15
Quick Reference
Low Battery
message. (contin-
ued)
The main battery pack
is running low. (contin-
ued)
Lithium Ion battery - Re-
move the battery from the
68XX and charge in a
UBC 2000 adapter.
OR
Power the 68XX off and
replace the battery.
Battery is dead. Battery not replaced
after receiving Low
Battery message.
Replace the battery.
Cannot see charac-
ters on display.
68XX not powered on. Press the PWR key.
Battery pack is missing
or dead.
Replace or recharge the
battery pack.
Contrast not adjusted
properly.
Refer to page 7 for the
key sequence.
Scanner does not
decode a bar code.
The bar code is
unreadable.
Verify that the bar code is
not defective, e.g.,
smudged or dirty.
Scan window is dirty. Clean scan window with
lens tissues for use with
eyeglasses. Do NOT use
tissues with lotion.
Double Key error
message displays.
Two or more keys were
pressed at the same
time.
Press keys in sequence.
68XX does not re-
spond when keys
are pressed.
Application was not
successfully download-
ed.
Ask System Administra-
tor to repeat application
download.
Symptom Possible Cause Action

16
68XX Series
17
Guide utilisateur
Présentation
Le 68XX est un ordinateur portable robuste et résistant aux
intempéries qui réunit les caractéristiques suivantes :
• Architecture PC standard (architecture 16 bits 8088)
• Compatible DR-DOS
• Ecran 16 lignes de 21 caractères
• Saisie à partir du clavier alphanumérique à 35 touches ou à 46
touches
• Lecteur intégré
• Batteries lithium-ion et NiCd rechargeables
• Communications batch ou via le réseau radio (avec antenne
interne) :
- Réseau radio Spectrum One® (681X)
- Réseau radio Spectrum24® (684X).
A propos de ce guide
Ce guide fournit à l'utilisateur des instructions pour réaliser les
opérations suivantes :
• Mise en place/extraction de la batterie
• Chargement de la batterie
• Activation/désactivation du 68XX
• Réglage du contraste de l’écran
• Activation/désactivation du rétroéclairage
• Utilisation du clavier
• Utilisation du lecteur intégré
• Etablissement de communications
• Dépannage du 68XX.

18
Série des 68XX
Composants du 68XX
+-
=
Status
-
Display
Keyboard
Scan LED
Status LED
Scan Window
PWR Key
Scan Trigger
Verrou de Sangle
Plots de
Connecteurs
Battery
Pack
Témoin du
lecteur
Ecran
Bouton “Power”
(touche de mise
sous tension)
Témoin
d’état
Clavier
Pack de
batterie
Fenêtre de
lecture
Gâchette de
lecture
optiques
chargement
des batteries
batterie
Déverrouillage
de batterie
Compartiment
de batterie
19
Guide utilisateur
Accessoires indispensables
Voici quelques accessoires nécessaires pour le terminal 68XX :
• Pack de batterie rechargeable lithium-ion ou NiCd ou pack de
batterie rechargeable NiCd sûr
• Module de chargement et de communication à quatre
positions CCM 38/6860 avec logement de chargement de
batterie de rechange
ou
• Puits de chargement et de communication à une position
CRD 38/6865
ou
• Puits de chargement et de communication à quatre positions
CRD 38/6866
• Câble(s) série RS-232
• Alimentation (une par puits).
Accessoires optionnels
Voici une liste d’accessoires optionnels pour le terminal 68XX :
• Kit de fixation murale (réf. 3866-000)
• Chargeur de batterie UBC
• Adaptateur PC et module d’interface d’imprimante (PIM)
• Chargeur lent de batterie 10 heures (cube mural)
• Accessoires de réseau Spectrum One et Spectrum24
•Etui.

20
Série des 68XX
Alimentation
Le terminal 68XX est alimenté par un pack de batterie rechargeable
au lithium-ion ou Nickel Cadmium (NiCd).
Remarque : Les packs de batterie NiCd série 3800, 3872-
103, 3872-105 et 3872-115 NE PEUVENT
PAS ETRE utilisés avec le terminal 68XX.
Mise en place d’une batterie neuve ou rechargée
Procédure :
1. Orientez le pack de batterie, la poignée faisant face à la fenêtre
de lecture du terminal 6800.
2. Insérez le pack dans le compartiment de la batterie en
appuyant sur les boutons de déverrouillage.
3. Appuyez sur le verrou de batterie pour verrouiller le dispositif.
Changement du pack de batterie du terminal PDT 68xx
haute sécurité
Procédure de mise en place du pack de batterie :
1. Insérez fermement la batterie dans la partie inférieure du
terminal comme indiqué dans l’illustration suivante.
Poignée
de batterie
Verrou
Bouton de
déverrouillage
Compartiment
de batterie
Fenêtre
de lecture
de batterie
21
Guide utilisateur
2. Pour bloquer la batterie en position, utilisez la clé de
verrouillage fournie. Lorsque vous tournez la clé, le
mécanisme de verrouillage doit pivoter et bloquer la batterie.
3. Pour déverrouiller et extraire la batterie, utilisez la clé pour
débloquer le dispositif de verrouillage, puis extrayez la
batterie du terminal.
Extraction du pack de batterie
1. Appuyez sur les boutons de déverrouillage de batterie de part
et d’autre de la poignée.
2. Tirez le pack de batterie pour l'extraire de la poignée.
Clé de verrouillage de la batterie
Mécanisme de
verrouillage
de la batterie
Appuyez sur le bou
de déverrouillage
Appuyez sur le bouton
de déverrouillage

22
Série des 68XX
Chargement de la batterie NiCd
Pour charger la batterie NiCd dans le terminal 68XX, utilisez un des
puits figurant dans la liste Accessoires indispensables à la page 19
ou le chargeur universel de batterie. Reportez-vous au Guide
utilisateur de votre puits ou de l’UBC pour connaître la procédure
de chargement de la batterie.
Attention : Utilisez uniquement les batteries Symbol 21-32801-01,
21-35217-01, 21-35241-01 ou 21-38796-01
dans ce terminal.
Chargement de la batterie lithium-ion
Remarque : Le fait de placer le terminal équipé d’une batte-
rie lithium-ion dans le puits n’endommage pas
la batterie.
La batterie lithium-ion ne se charge pas lorsque le terminal est placé
dans le puits. Utilisez le puits pour les communications et comme
endroit de maintien pour le terminal lorsqu’une batterie lithium-ion
est installée.
Pour charger une batterie lithium-ion (référence 21-40340-01),
déposez la batterie du terminal et chargez-la sur un adaptateur de
batterie UBC 2000, référence 21-32665-24. Reportez-vous à la
documentation sur le chargeur pour plus d’informations.
CRD 38/6865 CRD 38/6866CCM 38/6860
23
Guide utilisateur
Utilisation du terminal 68XX
Activation/désactivation du terminal 68XX
Mise en marche du terminal 68XX :
• appuyez sur la gâchette de lecture,
• ou appuyez sur la touche PWR.
Remarque : La batterie doit être installée ou le terminal
68XX doit être placé dans un puits pour mettre
le terminal en marche.
Pour éteindre le terminal 68XX appuyez sur la touche PWR.
Réglage du contraste
Le terminal 68XX est équipé de 8 crans de réglage du contraste de
l’écran. Pour régler le contraste :
• Appuyez sur FUNC, puis sur X pour augmenter le contraste
• Appuyez sur FUNC, puis sur Y pour réduire le contraste.
Activation/désactivation du rétroéclairage
Le terminal 68XX est équipé d’un rétroéclairage qui éclaire l’écran,
ce qui permet de l’utiliser dans les zones faiblement éclairées. Pour
activer/désactiver le rétroéclairage, appuyez sur FUNC, puis sur L
(Lampe).
Le rétroéclairage se coupe automatiquement au bout de 15 secondes
environ ou lorsque le terminal 68XX est mis hors tension.
Utilisation du clavier
Le terminal 68XX est équipé d’un clavier alphanumérique qui
reproduit l’alphabet de 26 caractères (A à Z), les chiffres (0 à 9) et
les caractères correspondants (+, -, X, ÷, =, etc.). Le clavier dispose
d’un codage couleur pour indiquer quelles touches de commutation
actionner pour obtenir un caractère ou exécuter une action donnée.
• Les touches alphabétiques produisent les caractères en
majuscule de A à Z.
• Le pavé numérique par défaut produit les chiffres de 0 à 9.
24
Série des 68XX
• Appuyez sur FUNC et sur la touche numérique
correspondante pour obtenir les touches de fonction F1 à F10.
• Appuyez sur les touches du curseur (35 touches) ou
(46 touches) pour faire défiler l’écran vers le haut ou vers le
bas.
• 35 touches, appuyez sur les touches du curseur pour
faire défiler vers la gauche et la droite. 46 touches, appuyez sur
FUNC puis sur pour défiler vers la gauche et sur FUNC,
puis sur pour défiler vers la droite.
• Appuyez sur BKSP pour effacer les informations saisies dans
l’écran, caractère par caractère.
• 35 touches : appuyez sur SPACE pour saisir un espace vierge.
46 touches : appuyez sur FUNC puis sur BKSP (ESPACE)
pour saisir un espace vierge.
• Appuyez sur CLEAR (35 touches) ou CLR (46 touches) pour
sortir partiellement ou totalement d'un niveau d'application
ou d'un écran. Cela efface également toutes les données saisies
de l'écran.
• Appuyez sur SHIFT (35 touches) ou SHF (46 touches) pour
accéder au clavier commuté.
•CTRL (35 touches) ou CTL (46 touches) exécute la fonction
de contrôle et est contrôlé par l’application.
• Appuyez sur ENTER pour placer les données saisies dans la
mémoire du 68XX.
25
Guide utilisateur
Utilisation du lecteur intégré
Procédure :
1. Appuyez sur la gâchette du lecteur pour mettre le terminal
68XX et le lecteur sous tension. Le témoin du lecteur vire au
rouge si la lecture est activée et que le laser est sous tension.
2. Pointez le terminal 68XX sur le code à barres, puis appuyez
sur la gâchette.
3. Vérifiez que le faisceau de lecture couvre bien toutes les barres
et les espaces composant le code à barres, comme indiqué ci-
dessous :
Eloignez le lecteur des codes de grand format et rapprochez-le
des codes constitués de barres rapprochées.
La version longue distance est équipée d’une gâchette à deux
niveaux. Le premier faisceau étroit permet de viser et le second
faisceau lit le code.
4. Le témoin passe du rouge au vert si le décodage réussit. Le
terminal 68XX peut également émettre un bip.
Correct Incorrect
26
Série des 68XX
Visée : Inclinaison du lecteur
Ne tenez pas la fenêtre de lecture du terminal 68XX directement au-
dessus du code à barres. Le faisceau laser réfléchi risque de rebondir
directement dans la fenêtre de lecture, c’est le phénomène de
“réflexion spéculaire”. Cette lumière très intense risque
“d’aveugler” le lecteur et de rendre difficile tout décodage. L’angle
dans lequel se produit cette réflexion spéculaire est appelée “angle
mort”.
Vous pouvez incliner le terminal 68XX jusqu’à 55° vers l’avant ou
l’arrière sans compromettre le décodage. Un peu d’entraînement
suffit pour se familiariser avec les marges de travail.
2. Risque de réflexion spéculaire
1. Décodage réussi 1. Décodage réussi
Faisceau de lecture
Code à barres Code à barres Code à barres
La zone grisée représente
l’angle mort (±5 cm)
Faisceau
de lecture
27
Guide utilisateur
Etablissement de communications
Communication avec un ordinateur central
Le terminal 68XX peut communiquer avec un ordinateur central via
le CCM 38/6860, le CRD 38/6865, le CRD 38/6866 ou l’adaptateur
PC. Pour plus d’informations sur la configuration du CCM, des puits
ou de l’adaptateur PC, reportez-vous au Guide de référence produit
du PDT6800 ou au Guide utilisateur fourni avec chaque appareil.
Procédure de communication avec un ordinateur central :
1. Configurez le(s) puits ou l’adaptateur PC comme indiqué dans
le Guide de référence produit PDT6800 ou le Guide
utilisateur de l’appareil.
2. Insérez la base du terminal 68XX dans le puits. Appuyez sur
le dessus du terminal 68XX jusqu’à ce qu’il s’enclenche
fermement dans le puits.
Le témoin d’état vert reste allumé lorsque le 68XX est inséré
correctement dans le puits.
3. Lancez le programme de communication sur l’ordinateur
central et le terminal 68XX.
Attention : N’extrayez PAS le terminal 68XX lorsque le témoin
rouge COMM du puits clignote.
28
Série des 68XX
Communication avec une imprimante
Le terminal 68XX peut communiquer avec une imprimante via le
module d’interface d’imprimante (PIM). Pour connecter le terminal
68XX à l’imprimante :
1. Fixez le connecteur optique du PIM au port du terminal 68XX
en insérant les attaches du connecteur dans les fentes situées
de part et d’autre du port.
2. Branchez le connecteur DB-9 du PIM au port de l’imprimante.
3. Mettez en marche l’imprimante et le terminal 68XX.
Communication via un réseau radio
Le PDT 6810 utilise le réseau radio Spectrum One de Symbol. Le
PDT 684X fonctionne sur le réseau radio Spectrum24 de Symbol.
Le témoin indique l’état de la connexion du terminal au réseau radio :
Reportez-vous à la documentation du réseau Spectrum One ou
Spectrum24 pour plus d’informations sur l’utilisation du PDT
68XX dans cet environnement radio.
Eteint indique que la radio fonctionne et est associée à un point
d’accès (Spectrum24) ou à une station de base
(Spectrum One).
Rouge
clignotant
une fois par
seconde
indique que la radio est hors de portée ou n’est pas associée
à un point d’accès ou à une station de base.
Connecteur optique
du PIM
Port optique
du 68XX
Fentes
Attaches

29
Guide utilisateur
Passer de 802.11 au protocole radio Spring
(PDT 6842)
Remarque : Le terminal se réinitialise avec le protocole ra-
dio 802.11. Effectuez la procédure suivante
pour passer au protocole radio Spring.
1. Réinitialisation du terminal. Le message suivant s’affiche :
2. Tapez la lettre “y” dans les quatre secondes. Si vous n’effectu-
ez pas cette tâche dans les quatre secondes, le terminal se réini-
tialise avec le protocole radio 802.11.
Le message suivant s’affiche :
3. Tapez la lettre “y” dans les dix secondes. Si vous n’effectuez
pas cette tâche dans les dix secondes, le terminal se réinitialise
avec le protocole radio 802.11.
Le message suivant s’affiche :
SOFTWARE UPDATE
Update?[y/n]:
RF PROTOCOL UPDATE
OPPORTUNITY
Update RF protocol
[y/n]:
RF Protocol
Currently 802.11
1. Abort update
2. Make pre-802.11
3. Make 802.11
Select[1,2,3]:
30
Série des 68XX
4. Sélectionnez 2 pour réinitialiser avec le protocole radio
Spring.
Le message suivant s’affiche :
5. Saisissez le mot de passe RFPROT, puis pressez la touche
ENTER. Le terminal continue à se réinitialiser. Si un problème
de compatibilité existe, le terminal se met en pause avec un
message d’erreur. Contactez votre administrateur système.
Dépannage
Symptôme Cause possible Solution
Le terminal 68XX
ne se met pas en
marche.
La batterie n’est pas
installée.
Vérifiez que le terminal
68XX est alimenté par
une batterie.
La batterie n’est pas
chargée.
Batterie NiCd : Chargez
la batterie dans le
terminal ou retirez-la
pour la charger dans le
logement pour batterie de
rechange sur le
CCM 38/6860 ou le
CRD 38/6866.
Batterie lithium-ion :
Retirez la battterie du
terminal pour la charger
dans un adaptateur UBC
2000.
Enter password
→

31
Guide utilisateur
Message
Batterie déchargée
Le pack de batterie
principal est déchargé.
Batterie NiCd : Placez le
terminal 68XX dans un
puits et rechargez la
batterie.
OU
Mettez le terminal 68XX
hors tension et remplacez
la batterie.
Batterie lithium-ion :
Retirez la battterie du
terminal pour la charger
dans un adaptateur UBC
2000.
OU
Mettez le terminal 68XX
hors tension et remplacez
la batterie.
Batterie épuisée La batterie n’a pas été
remplacée après
l’affichage du message
Batterie déchargée.
Remplacez la batterie.
Les caractères ne
sont pas visibles à
l’écran.
Le terminal 68XX n’est
pas sous tension.
Appuyez sur la touche
PWR.
Le pack de batterie fait
défaut ou est épuisé.
Remplacez ou rechargez
le pack de batterie.
Le contraste est mal
réglé.
Reportez-vous à la
page 23 pour connaître
la séquence de touches.
Le lecteur ne
parvient pas à lire
un code à barres.
Le code à barres est
illisible.
Vérifiez que le code à
barres n’est pas
défectueux, par exemple
sale ou taché.
Symptôme Cause possible Solution

32
Série des 68XX
La fenêtre de lecture est
sale.
Nettoyez la fenêtre de
lecture avec un tissu pour
lunettes. N’utilisez PAS
de tissus imbibés de
lotion.
Message d’erreur
“Double Key”
(double touche)
Deux touches au moins
ont été actionnées
simultanément.
Actionnez les touches
dans l’ordre.
Le terminal 68XX
ne répond pas
lorsque des
touches sont
actionnées.
L’application a été mal
téléchargée.
Demandez à
l’administrateur du
système de télécharger à
nouveau l’application.
Symptôme Cause possible Solution
33
Kurzübersicht
Einführung
Bei dem 68XX handelt es sich um einen robusten, wetter-
beständigen, mobilen handheld Computer, der folgende Funktionen
vereint:
• Standard-PC-Architektur (Prozessor 8088, 16-Bit-
Architektur)
• DR-DOS-Kompatibilität
• Anzeige: 16 Zeilen x 21 Zeichen
• Eingabe über Tastatur: alphanumerische Tastatur mit
35 oder 46 Tasten
• Integrierte Scanfunktion
• Lithiumionen- und wiederaufladbarer NiCd-Akkusatz
• Batch-Kommunikation oder Kommunikation im Datenfunk-
Netzwerk (mit eingebauter Antenne):
-Spectrum One
®-Datenfunk-Netzwerk (681X)
-Spectrum24
®-Datenfunk-Netzwerk (684X).
Informationen zu dieser Kurzübersicht
Die vorliegende Kurzübersicht enthält Hinweise für das
Bedienungspersonal zu folgenden Themen:
• Einsetzen bzw. Herausnehmen des Akkus
• Laden des Akkus
• Ein-/Ausschalten des 68XX
• Einstellen des Anzeigenkontrasts
• Ein-/Ausschalten der Hintergrundbeleuchtung
• Verwenden der Tastatur
• Verwenden des integrierten Scanners
• Durchführung der Kommunikation
• Fehlersuche beim 68XX.

34
Serie 68XX
Die Einzelteile des 68XX
+-
=
Status
-
Display
Keyboard
Scan LED
Status LED
Scan Window
PWR Key
Scan Trigger
Optische
Battery
Pack
Scan-LED
Anzeige
Netzschalter
Status-LED
Tastat ur
Akkusatz
Scanfenster
Scan-Auslöser
Anschlüsse
Akkufach-
verriegelung
Akkufächer
Halteschlaufe
Akkuverriegelung
Ladekontakte
35
Kurzübersicht
Erforderliches Zubehör
Das erforderliche Zubehör für das 68XX umfaßt:
• Lithiumionen- oder wiederaufladbarer NiCd-Akkusatz
oder
eigensicherer, wiederaufladbarer NiCd-Akkusatz
• Lade- und Kommunikationsmodul CCM 38/6860 mit vier
Fächern und Ladefach für Ersatzakku
oder
• Lade- und Kommunikationsladestation CRD 38/6865 mit
einem Fach
oder
• Lade- und Kommunikationsladestation CRD 38/6866 mit
vier Fächern
• Serielle(s) RS-232-Kabel
• Netzteil (eines pro Ladestation).
Optionales Zubehör
Das optionale Zubehör für das 68XX umfaßt:
• Wandmontage-Kit (Teilnr. 3866-000)
• Universal-Akku-Ladegerät (UBC - Universal Battery Charger)
• PC-Adapter und Druckerschnittstellen-Modul (PIM - Printer
Interface Module)
• Ladegerät für langsame Aufladung (10 Stunden) (Adapter-
Netzteil)
• Zubehör für Spectrum One- und Spectrum24-Netzwerke
• Halfter
36
Serie 68XX
Stromversorgung
Die Stromversorgung für das 68XX erfolgt durch einen
Lithiumionen- oder wiederaufladbaren Nickel-Cadmium- (NiCd-)
Akkusatz.
Hinweis: Die NiCd-Akkusätze der Serie 3800 (3872-103,
3872-105 und 3872-115) KÖNNEN NICHT für das
68XX verwendet werden.
Neue oder aufgeladene Akkus einsetzen
So installieren Sie den Akku:
1. Legen Sie den Akkusatz so ein, daß sich der Griff gegenüber
dem Scanfenster des Modells 6800 befindet.
2. Schieben Sie den Akkusatz in das Akkufach. Dabei müssen die
Entriegelungstasten am Akku gedrückt sein.
3. Drücken Sie auf die Akkuverriegelung, damit sie einrastet.
Auswechseln des Akkusatzes für das eigensichere
Terminal PDT 68xx
So legen Sie den Akkusatz ein:
Akkuverriegelung
Akkufach
Akkugriff
Entriegelungstaste
Scanfenster

37
Kurzübersicht
1. Setzen Sie den Akku fest in den unteren Teil des Terminals ein.
Gehen Sie so vor, wie es in der nachfolgenden Abbildung
dargestellt ist.
2. Drehen Sie die beigfügte Akkuverriegelung, um den Akku zu
arretieren.
3. Zum Entriegeln und Entfernen des Akkus, lösen Sie den
Verriegelungsmechanismus. Danach ziehen Sie den Akku aus
dem Terminal heraus.
Entnahme des Akkusatzes
1. Drücken Sie auf die Akkuentriegelungstasten auf beiden
Seiten des Griffs.
Akkuverriegelungs-
mechanismus
Akkuverriegelung
Drücken Sie auf die
Entriegelungstaste.
Drücken Sie auf die
Entriegelungstaste.
38
Serie 68XX
2. Ziehen Sie den Akkusatz aus dem Griff heraus.
39
Kurzübersicht
Laden des NiCd-Akkus
Zum Laden des NiCd-Akkus im 68XX verwenden Sie eine der
Ladestationen, die im Abschnitt Erforderliches Zubehör auf
Seite 35 aufgeführt sind oder das Universal-Akku-Ladegerät.
Anweisungen zum Aufladen des Akkus enthält die Kurzüber-
sicht zu Ihrer Ladestation oder Ihrem Universal-Akku-
Ladegerät.
Vorsicht: Benutzen Sie für dieses Terminal ausschließlich die
Akkus 21-32801-01, 21-35217-01, 21-35241-01 oder
21-38796-01 von Symbol.
Laden des Lithiumionenakkus
Hinweis: Der Akku wird nicht beschädigt, wenn das Terminal
mit einem installiertem Lithiumionenakku in die
Ladestation gesetzt wird.
Der Lithiumionenakku lädt sich nicht auf, wenn sich das Terminal
in der Ladestation befindet. Verwenden Sie die Ladestation zur
Kommunikation und als Halter für das Terminal, wenn ein
Lithiumionenakku installiert ist.
Um den Lithiumionenakku aufzuladen (Teilenr. 21-40340-01),
nehmen Sie den Akku aus dem Terminal, und laden Sie ihn in einem
CRD 38/6865 CRD 38/6866CCM 38/6860

40
Serie 68XX
UBC 2000 Akku-Ladegerät (Teilenr. 21-32665-24-01) auf. Weitere
Informationen finden Sie in der Dokumentaion zum Ladegerät.
Die Bedienung des 68XX
Ein-/Ausschalten des 68XX
So schalten Sie das 68XX ein:
• Drücken Sie auf den Scan-Auslöser
• oder drücken Sie auf die Taste PWR.
Hinweis: Sie können das Terminal nur einschalten, wenn der
Akku installiert ist oder das 68XX sich in der Lade-
station befindet.
Wenn Sie den Betrieb des 68XX beenden wollen, drücken Sie die
Taste PWR.
Einstellen des Anzeigenkontrasts
Es gibt acht verschiedene Stufen für die Einstellung des
Anzeigenkontrasts beim 68XX. So stellen Sie den Kontrast ein:
• Drücken Sie auf FUNC und dann auf X, um den Kontrast zu
verstärken.
• Drücken Sie auf FUNC und dann auf Y, um den Kontrast zu
verringern.
Ein-/Ausschalten der Hintergrund-Beleuchtung
Das 68XX verfügt über eine Hintergrundbeleuchtung, mit der die
Anzeige erhellt werden kann, wenn das Gerät bei schwachem Licht
betrieben wird. Um die Hintergrund-Beleuchtung ein- bzw.
auszuschalten, drücken Sie auf FUNC und dann auf L (Leuchte).
Die Hintergrund-Beleuchtung schaltet sich automatisch nach ca.
15 Sekunden aus bzw. wenn das 68XX ausgeschaltet wird.
41
Kurzübersicht
Verwenden der Tastatur
Das 68XX verfügt über eine alphanumerische Tastatur. Damit
lassen sich die 26 Buchstaben des Alphabets (A-Z), Ziffern (0-9)
und verschiedene andere Zeichen (+, -, X, ÷, = usw.) darstellen. Die
Tastatur verfügt über Farbkennzeichnungen, die angeben, welche
Änderungstaste gedrückt werden muß, damit ein bestimmtes
Zeichen dargestellt wird bzw. eine bestimmte Aktion durchgeführt
wird.
• Mit den alphanumerischen Tasten werden die
Großbuchstaben (A bis Z) erzeugt.
• Mit der numerischen Standardtastatur werden die Zahlen von
0 bis 9 eingegeben.
• Für die Funktionstasten F1 bis F10 drücken Sie FUNC und die
entsprechende numerische Taste.
• Drücken Sie die Cursortasten (35 Tasten) oder
(46 Tasten), um nach oben bzw. nach unten zu scrollen.
• 35 Tasten - Drücken Sie die Cursortasten , um nach
links bzw. nach rechts zu scrollen.
46 Tasten - Drücken Sie FUNC und dann , um nach links
zu scrollen, sowie FUNC und dann , um nach rechts zu
scrollen.
• Wenn Sie BKSP drücken, werden eingegebene Daten, die auf
der Anzeige dargestellt werden, zeichenweise wieder gelöscht.
• 35 Tasten - Drücken Sie SPACE, wenn Sie ein Leerzeichen
eingeben möchten. 46 Tasten - Drücken Sie FUNC und dann
BKSP (SPACE), wenn Sie Leerzeichen eingeben möchten.
42
Serie 68XX
• Drücken Sie CLEAR (35 Tasten) bzw. CLR (46 Tasten), um
eine Anwendung oder einen Bildschirm ganz oder teilweise zu
verlassen. Es können auch sämtliche eingegebenen Daten, die
auf dem Bildschirm dargestellt werden, gelöscht werden.
• Drücken Sie SHIFT(35 Tasten) bzw. SHF (46 Tasten), um auf
die umgeschaltete Tastatur zuzugreifen.
•CTRL (35 Tasten) bzw. CTL (46 Tasten) führt die Funktion
„Steuerung“ aus. Diese Funktion wird von der Anwendung
gesteuert.
• Drücken Sie ENTER, wenn die eingegebenen Daten in den
Speicher des 68XX gestellt werden sollen.
Verwenden des integrierten Laserscanners
So scannen Sie:
1. Drücken Sie den Abzug des Scanners, um das 68XX und den
Scanner einzuschalten. Die Scan-LED leuchtet rot, wenn die
Scanfunktion aktiviert und der Laser eingeschaltet ist.
2. Zeigen Sie mit dem 68XX auf den Barcode und drücken Sie
den Abzug.
43
Kurzübersicht
3. Stellen Sie sicher, daß der Scanstrahl sämtliche Striche und
Zwischenräume des Barcodes erfaßt. Gehen Sie entsprechend
der nachfolgenden Abbildung vor:
Vergrößern Sie die Entfernung zwischen dem Scanner und
dem Objekt ein wenig, wenn größere Symbole gescannt wer-
den sollen, und verringern Sie diesen Abstand bei Symbolen
mit eng beieinander liegenden Strichen.
Die Versionen für große Reichweiten unterstützen einen Scan-
Auslöser mit zwei Stufen. Der erste, dünnere Strahl, wird zum
Zielen verwendet, und der zweite Strahl decodiert das Etikett.
4. Die Farbe der LED ändert sich bei erfolgreichen Decodie-
rungen von rot in grün. Außerdem sendet das 68XX eventuell
einen Piepton aus.
Richtig Falsch
44
Serie 68XX
Zielen: In einem bestimmten Winkel halten
Halten Sie das Scanfenster des 68XX nicht direkt über den Barcode.
Laserlicht, das vom Barcode direkt zurück in das Scanfenster
reflektiert wird, wird auch als „Spiegelreflexion“ bezeichnet. Dieses
starke Licht kann den Scanner „blenden“ und die Decodierung
erschweren. Der Bereich, in dem eine Spiegelreflexion auftreten
kann, wird als „toter Bereich“ bezeichnet.
Sie können das 68XX um bis zu 55° nach vorne oder hinten neigen,
ohne daß die Decodierung fehlschlägt. Durch Übung finden Sie
schnell heraus, welche Toleranzen beim Betrieb zulässig sind.
Durchführung der Kommunikation
Kommunikation mit einem Host
Das 68XX kommuniziert mit einem Host über ein CCM 38/6860,
CRD 38/6865, CRD 38/6866 oder einen PC-Adapter. Weitere
Informationen über das Durchführen des Set-ups bei Lade- und
Kommunikationsmodulen (CCM - Charging and Communications
Module), Ladestationen oder PC-Adaptern fnden Sie im 6800
Product Reference Guide (6800 Produktleitfaden) oder in der
Kurzübersicht, die jeweils mit dem Gerät mitgeliefert wird.
1. Erfolgreiches
Scannen
2. Spiegelreflexion
ist möglich
3.
Erfolgreiches
Scanstrahl
Barcode Barcode Barcode
Schattierter Bereich stellt
toten Bereich dar (±2”)
Scan-
strahl
55° 55°
45
Kurzübersicht
So kommunizieren Sie mit einem Host:
1. Führen Sie das Set-up für die Ladestation(en) oder den
PC-Adapter so durch, wie dies im 6800 Product Reference
Guide (6800 Produktleitfaden) oder in der Kurzübersicht für
das Gerät beschrieben ist.
2. Legen Sie die Basis des 68XX in die Ladestation. Drücken Sie
den oberen Teil des 68XX gegen die Rückseite der
Ladestation, so daß das Gerät festsitzt.
Wenn das 68XX fest in der Ladestation sitzt, leuchtet die
Status-LED deckend grün.
3. Starten Sie das Kommunikationsprogramm auf dem Host und
dem 68XX.
Vorsicht: Nehmen Sie das 68XX NICHT aus der Ladestation,
während die rote COMM-LED an der Ladestation
blinkt.
46
Serie 68XX
Kommunikation mit einem Drucker
Das 68XX kommuniziert mit einem Drucker über das
Druckerschnittstellen-Modul. So verbinden Sie das 68XX mit dem
Drucker:
1. Verbinden Sie den optischen Anschluß des
Druckerschnittstellen-Moduls mit dem Port des 68XX.
Führen Sie dazu die Klemmen des Steckers in die dafür
vorgesehenen Steckplätze auf beiden Seiten des Ports ein.
2. Stecken Sie den DB-9-Stecker des Druckerschnittstellen-
Moduls in den Port des Druckers.
3. Schalten Sie den Drucker und das 68XX ein.
Kommunikation in einem Datenfunk-Netzwerk
Das PDT 6810 wird in einem Symbol Spectrum One-Datenfunk-
Netzwerk betrieben und das PDT 684X in einem Symbol
Spectrum24-Datenfunk-Netzwerk.
Die Status-LED gibt den Status der Verbindung des Terminals mit
dem Datenfunk-Netzwerk an:
Off (Aus) bedeutet, daß der Datenfunk aktiviert ist und einem Access
Point (Spectrum24) oder einer Basisstation (Spectrum One)
zugeordnet ist.
Steckplätze
Klemmen
Optischer Anschluß
des Druckerschnittstellen-
Moduls
Optischer Port des 68XX

47
Kurzübersicht
Weitere Informationen über den Betrieb des PDT 68XX in diesem
Datenfunk-Netzwerk finden Sie in der Dokumentation zu dem
Spectrum One- bzw. Spectrum24-Netzwerk.
Vom 802.11 zum Spring RF Protokoll
(PDT 6842) wechseln
Hinweis: Das Terminal startet mit dem 802.11 RF Protokoll.
Gehen Sie folgendermaßen vor, um zum Spring RF
Protokoll zu wechseln.
1. Starten Sie das Terminal. Die folgende Eingabeaufforderung
wird angezeigt.
2. Sie müssen den Buchstaben „y“ innerhalb von 4 Sekunden
eintippen. Wenn Sie den Buchstaben „y“ nicht innerhalb von
4 Sekunden eintippen, startet das Terminal mit dem 802.11
RF Protokoll.
Die nächste Eingabeaufforderung wird angezeigt.
3. Sie müssen den Buchstaben „y“ innerhalb von 10 Sekunden
eintippen. Wenn Sie den Buchstaben „y“ nicht innerhalb von
10 Sekunden eintippen, startet das Terminal mit dem 802.11
RF Protokoll.
Blinkt einmal
pro Sekunde
rot
um darauf hinzuweisen, daß der Datenfunkbereich
verlassen wurde oder die Zuordnung zu einem Access Point
bzw. einer Basisstation nicht besteht.
SOFTWARE UPDATE
Update?[y/n]:
RF PROTOCOL UPDATE
OPPORTUNITY
Update RF protocol
[y/n]:
48
Serie 68XX
Die nächste Eingabeaufforderung wird angezeigt.
4. Wählen Sie 2, um mit dem Spring RF Protokoll zu starten.
Die nächste Eingabeaufforderung wird angezeigt.
5. Geben Sie das Paßwort RFPROT ein, und drücken Sie dann
ENTER. Das Terminal fährt mit dem Starten fort. Im Falle
eines Kompatibilitätsproblems, hält das Terminal an und zeigt
eine Fehlermeldung an. Wenden Sie sich an Ihren Systemver-
walter.
RF Protocol
Currently 802.11
1. Abort update
2. Make pre-802.11
3. Make 802.11
Select[1,2,3]:
Enter password
→

49
Kurzübersicht
Fehlerbehebung
Merkmal Möglicher Grund Aktion
68XX läßt sich
nicht einschalten. Akku wurde nicht
installiert. Überprüfen Sie, ob das
68XX durch Akku mit
Strom versorgt wird.
Akku wurde nicht
geladen. NiCd-Akku - Laden Sie
den Akku, der sich in dem
Terminal befindet, oder
entnehmen Sie den Akku
und laden Sie ihn in dem
Ladefach für Ersatzakkus
des CCM 38/6860 oder
des CRD 38/6866.
Lithiumionenakku -
Nehmen Sie den Akku aus
dem Terminal, und laden
Sie ihn in einem UBC 2000
Ladegerät auf.
Die Meldung
Low Battery
(Akku ist fast leer)
wird angezeigt.
Der Hauptakkusatz ist
fast leer. NiCd-Akku - Legen Sie
das 68XX in eine
Ladestation, und laden Sie
den NiCd-Akku auf.
ODER
Schalten Sie das 68XX
aus, und tauschen Sie den
Akku aus.
Lithiumionenakku -
Nehmen Sie den Akku aus
dem 68XX, und laden Sie
ihn in einem UBC 2000
Ladegerät auf.
ODER
Schalten Sie das 68XX
aus, und tauschen Sie den
Akku aus.

50
Serie 68XX
Akku ist völlig leer. Der Akku wurde nicht
ausgetauscht, nachdem
die Meldung Low
Battery (Akku ist fast
leer) angezeigt wurde.
Tauschen Sie den Akku
aus.
Es sind keine
Zeichen auf der
Anzeige zu sehen.
Das 68XX ist nicht
eingeschaltet. Drücken Sie die Taste
PWR.
Akkusatz fehlt oder ist
völlig leer. Ersetzen Sie den Akkusatz
bzw. laden Sie ihn auf.
Der Kontrast ist nicht
richtig eingestellt. Die entsprechenden
Tastenfolgen sind auf Seite
42 beschrieben.
Der Scanner
decodiert einen
Barcode nicht.
Der Barcode ist
unleserlich. Vergewissern Sie sich, daß
der Barcode keine Fehler
aufweist, also z. B. ver-
schmiert oder verschmutzt
ist.
Scanfenster ist
schmutzig. Reinigen Sie das Scan-
fenster mit Brillenputz-
tüchern. Befeuchten Sie
diese Tücher NICHT mit
einer Reinigungslösung.
Fehlermeldung
Double Key
(Zweifache Taste)
Mehrere Tasten wurden
gleichzeitig gedrückt. Drücken Sie die Tasten
nacheinander.
Das 68XX reagiert
nicht, wenn eine
Taste gedrückt
wird.
Die Anwendung wurde
nicht erfolgreich
heruntergeladen.
Bitten Sie den System-
verwalter, die Anwendung
noch einmal herunter-
zuladen.
Merkmal Möglicher Grund Aktion
51
Guida Rapida
Introduzione
Il 68XX è un robusto computer portatile resistente agli agenti
atmosferici con le seguenti caratteristiche:
• Architettura PC standard (architettura a 16 bit 8088)
• Compatibilità DR-DOS
• Display a 16 linee per 21 caratteri
• Tastiera alfanumerica a 35 o 46 tasti
• Capacità di scansione integrata
• Batterie agli ioni di litio e NiCd ricaricabile
• Comunicazioni batch o di rete RF (tramite antenna interna):
- Rete RF (681X) Spectrum One®
- Rete RF (684X) Spectrum24®
Informazioni sulla guida
Questa guida fornisce all’operatore le istruzioni per le seguenti
procedure:
• Installazione/rimozione della batteria
• Ricarica della batteria
• Accensione e spegnimento del 68XX
• Regolazione del contrasto del display
• Accensione/spegnimento della retroilluminazione del display
• Uso della tastiera
• Uso dello scanner integrato
• Esecuzione delle comunicazioni
• Risoluzione dei problemi del 68XX.

52
Serie 68XX
Parti del 68XX
+-
=
Status
-
Display
Keyboard
Scan LED
Status LED
Scan Window
PWR Key
Scan Trigger
Connettori
Battery
Pack
LED di
scansione
Display
Tast o di
accensione
LED di stato
Tastiera
Batteria
Finestra di
scansione
Grilletto di
scansione
ottici
Rilascio
batteria
Scomparto
batteria
Cinghietta
Blocco batteria
Contatti per
la ricarica
53
Guida Rapida
Accessori indispensabili
Gli accessori indispensabili per il 68XX sono:
• Batterie ricaricabili agli ioni di litio e NiCd o batterie
ricaricabili NiCd “Intrinsically Safe”
• Modulo di comunicazione e di ricarica CCM 38/6860 a 4
posizioni con alloggiamento di ricarica batteria di riserva
oppure
• Base CRD 38/6865 a 1 posizione per ricarica e comunicazioni
oppure
• Base CRD 38/6866 a 4 posizioni per ricarica e comunicazioni
• Cavo o cavi seriali RS-232
• Alimentatore (1 per base).
Accessori opzionali
Gli accessori opzionali per il 68XX sono:
• Kit per il montaggio a parete (n/p 3866-000)
• Caricabatteria universale UBC
• Scheda PCMCIA e modulo di interfaccia stampante (PIM)
• Caricabatteria “trickle” da 10 ore, montaggio a parete
• Accessori di rete Spectrum One e Spectrum24
• Custodia.
54
Serie 68XX
Alimentazione
Il 68XX è alimentato da una batteria agli ioni di litio o al Nickel
Cadmio (NiCd) ricaricabile.
Nota: Le batterie NiCd della serie 3800, 3872-103, 3872-105
e 3872-115 NON possono essere utilizzate con la
serie 68XX.
Installazione di batterie nuove o ricaricate
Per installare la batteria:
1. Porre la batteria con il manico rivolto verso la finestra di
scansione del 6800.
2. Far scorrere la batteria nello scomparto batteria tenendo
premuti i pulsanti di rilascio.
3. Per bloccare la batteria, premere il dispositivo di blocco.
Sostituzione della batteria nel terminale PDT 68xx
“Intrinsically Safe”
Per inserire la batteria:
1. Inserire la batteria nella parte inferiore del terminale, come
mostrato nella seguente illustrazione.
Blocco
batteria
Scomparto
batteria
Manico batteria
Pulsante
di rilascio
Finestra di scansione

55
Guida Rapida
2. Utilizzare la chiave blocca-batteria in dotazione per bloccare
la batteria in posizione. Girando la chiave blocca-batteria,
viene azionato un meccanismo che blocca la batteria in
posizione.
3. Per sbloccare e rimuovere la batteria, sbloccare il meccanismo
di blocco con la chiave bloccabatteria ed estrarre la batteria
dalla parte inferiore del terminale.
Rimozione della batteria
1. Premere i pulsanti di rilascio batteria su entrambi i lati del
manico.
Meccanismo di
blocco della
batteria
Chiave bloccabatteria
Premere il pulsante
di rilascio
Premere il pulsante
di rilascio
56
Serie 68XX
2. Estrarre la batteria fuori dal manico.
57
Guida Rapida
Ricarica della batteria NiCd
Per caricare la batteria NiCd nel 68XX, utilizzare una delle basi
elencate in Accessori indispensabili a pagina 53 o il caricabatteria
universale (UBC). Per istruzioni sulla ricarica delle batterie, consul-
tare la Guida rapida della base o del caricabatteria universale.
Attenzione: Con questo terminale, utilizzare esclusivamente batterie
Symbol 21-32801-01, 21-35217-01, 21-35241-01
o 21-38796-01.
Ricarica della batteria agli ioni di litio
Nota: Riporre il terminale nella base con una batteria agli ioni
di litio installata non causa danni alla batteria.
La batteria agli ioni di litio non si ricarica quando il terminale è
situato nella base. Usare la base per le comunicazioni e per il
collocamento del terminale quando è installata una batteria agli ioni
di litio.
Per ricaricare la batteria agli ioni di litio (n/p 21-40340-01),
rimuovere la batteria dal terminale e ricaricarla in un adattatore per
batteria n/p 21-32665-24. Consultare la documentazione del
caricatore per ulteriori informazioni.
CRD 38/6865 CRD 38/6866CCM 38/6860

58
Serie 68XX
Uso del 68XX
Accensione e spegnimento del 68XX
Accendere il 68XX in uno dei seguenti modi:
• premendo il grilletto di scansione,
• oppure premendo il tasto PWR.
Nota: Per accendere il terminale, è necessario installare la
batteria o inserire il 68 XX in una base.
Per sospendere l’utilizzo del 68XX, premere il tasto PWR.
Regolazione del contrasto
Il contrasto del display del 68XX può essere impostato su 8 livelli.
Per regolare il contrasto:
• Per aumentare il contrasto, premere FUNC e quindi X
• Per diminuire il contrasto, premere FUNC e quindi Y.
Attivazione/disattivazione della retroilluminazione
Il 68XX è dotato di retroilluminazione del display, per l’utilizzo in
condizioni di scarsa illuminazione. Per attivare o disattivare la
retroilluminazione, premere FUNC e quindi L (Illuminazione).
La retroilluminazione viene disattivata automaticamente dopo 15
secondi di inattività o dopo lo spegnimento del 68XX.
Uso della tastiera
Il 68XX utilizza una tastiera alfanumerica con 26 caratteri
alfabetici (da A a Z), numeri (da 0 a 9) e caratteri vari
(+, -, X, :, =, ecc.). La tastiera si avvale dell'uso dei colori per
segnalare i tasti modificatori da premere per ottenere determinati
caratteri o azioni.
• I tasti alfabetici rendono maiuscoli i caratteri da A a Z.
• Il tastierino numerico predefinito serve a digitare i numeri
da 0 a 9.
59
Guida Rapida
• Premere FUNC e il corrispondente tasto numerico per
produrre i tasti di funzione da F1 a F10.
• Premere i tasti cursore (tastiera a 35 tasti) o
(tastiera a 46 tasti) per scorrere in alto e in basso i dati a video.
• Nella tastiera a 35 tasti premere i tasti cursore per
scorrere i dati verso sinistra e verso destra. Nella tastiera a 46
tasti premere FUNC e per scorrere i dati verso sinistra e
FUNC e per scorrere i dati verso destra.
• Premere BKSP per eliminare dal display le informazioni
immesse, un carattere alla volta.
• Nella tastiera a 35 tasti premere SPAZIO per inserire uno
spazio.
• Nella tastiera a 46 tasti premere FUNC poi BKSP (SPAZIO).
• Premere CLEAR (tastiera a 35 tasti) o CLR (tastiera a 46 tasti)
per uscire da un livello o da uno schermo di applicazione.
Questi tasti eliminano inoltre tutti i dati dallo schermo.
• Per accedere alla tastiera attivata da Shift, premere SHIFT
(tastiera a 35 tasti) SHF (tastiera a 46 tasti).
•CTRL (tastiera a 35 tasti) e CTL (tastiera a 46 tasti) svolgono
la funzione Control e sono sotto il controllo dell’applicazione.
• Premere ENTER per immagazzinare i dati immessi nella
memoria del 68XX.
60
Serie 68XX
Uso dello scanner laser integrato
Per eseguire la scansione:
1. Premere il grilletto dello scanner per accendere sia il 68XX che
lo scanner. Se la scansione è abilitata e il laser è attivo, il LED
di scansione diventa rosso.
2. Rivolgere il 68XX verso un codice a barre e premere il
grilletto.
3. Assicurarsi che il fascio di lettura attraversi tutte le barre e gli
spazi del codice a barre, come illustrato sotto:
Tenere lo scanner più lontano per i codici a barre grandi e più
vicino per i codici a barre più piccoli.
Le versioni a lungo raggio supportano un grilletto di scansione
a due livelli. Il primo fascio, più ristretto, serve a prendere la
mira, mentre il secondo decodifica l’etichetta.
4. Se la decodifica ha esito positivo, il LED da rosso diventa
verde. Il 68XX può anche emettere un segnale acustico.
Corretto Errato
61
Guida Rapida
Mira: consigliata una posizione inclinata
Non tenere la finestra di scansione del 68XX verticalmente sul
codice a barre. Il raggio laser riflesso dal codice a barre direttamente
sulla finestra di scansione, viene detto riflessione speculare. Questa
forte rifrazione può “accecare” lo scanner e rendere problematica la
scansione. La zona in cui avviene una riflessione speculare viene
detta “zona morta”.
Per eseguire scansioni corrette, inclinare il 68XX fino a 55° in
avanti o indietro. È sufficiente un minimo di pratica per capire i
limiti di tolleranza di angolazione dello scanner.
1. Scansione con
esito positivo
2. Possibile riflessione
speculare
3. Scansione con
esito positivo
Fascio
di
lettura
Codice a barre Codice a barre Codice a barre
L’area ombreggiata
rappresenta la zona
morta (±2”)
55° 55°
Fascio
di
lettura
62
Serie 68XX
Esecuzione delle comunicazioni
Comunicazione con un host
Il 68XX comunica con un host tramite CCM 38/6860,
CRD 38/6865, CRD 38/6866, o la scheda PCMCIA. Per informa-zioni
sull’impostazione del CCM, di basi o di schede PCMCIA, consultare la
PDT 6800 Product Reference Guide (Manuale di riferimento del PDT
6800) o la Guida rapida fornite con ciascuna unità.
Per eseguire la comunicazione con un host:
1. Impostare le basi o la scheda PCMCIA come descritto nella
PDT6800 Product Reference Guide (Manuale di riferimento
del PDT6800) o nella Guida rapida del dispositivo.
2. Inserire la base del 68XX nella base. Premere la parte
superiore del 68XX contro la parte posteriore della base, in
modo da inserirlo saldamente.
Una volta inserito il 68XX nella base, il LED di stato diviene
verde fisso.
3. Avviare il programma di comunicazioni sull’host e sul 68XX.
Attenzione: NON rimuovere il 68XX mentre il LED rosso COMM
della base lampeggia.
63
Guida Rapida
Comunicazione con la stampante
Il 68XX comunica con la stampante tramite il modulo di interfaccia
stampante (PIM). Per connettere il 68XX alla stampante:
1. Collegare il connettore ottico del PIM alla porta del 68XX,
inserendo i fermagli sul connettore nelle fessure su ciascun lato
della porta.
2. Inserire il connettore DB-9 del PIM nella porta della stampante.
3. Accendere la stampante e il 68XX.
Comunicazioni di rete RF
Il PDT 6810 funziona su reti RF Symbol Spectrum One, il
PDT 684X su reti RF Symbol Spectrum24.
Il LED di stato indica lo stato della connessione del terminale alla
rete RF:
Per ulteriori informazioni sull’uso del PDT 68XX con reti RF,
consultare la documentazione delle reti Spectrum One o
Spectrum24.
Spento indica che la radio è funzionante ed associata a un punto
di accesso (Spectrum24) o a una stazione base
(Spectrum One).
Lampeggiante rosso
(un lampeg-gio al
secondo)
indica che la radio non funziona o non è associata a un
punto di accesso o a una stazione base.
Fessure
Fermagli
Connettore ottico
PIM
Porta ottica del 68XX
64
Serie 68XX
Passare da 80211 alla procedura Spring RF (PDT 6842)
Nota: Il terminale si avvia con la procedura 802.11 RF. Es-
eguire le seguenti operazioni per passare alla procedura
Spring RF.
1. Avviare il terminale. Si visualizzerà il seguente messaggio:
2. Entro quattro secondi digitare la lettera “y”. Se non si digita
la lettera “y” entro quattro secondi, il terminale si avvia con
la procedura 802.11 RF.
Il messaggio successivo sarà visualizzato nel modo seguente:
3. Entro dieci secondi, digitare la lettera “y”. Se non si digita la
lettera “y” entro dieci secondi, il terminale si avvia con la
procedura 802.11 RF.
Il messaggio successivo sarà visualizzato nel modo seguente:
SOFTWARE UPDATE
Update?[y/n]:
RF PROTOCOL UPDATE
OPPORTUNITY
Update RF protocol
[y/n]:
RF Protocol
Currently 802.11
1. Abort update
2. Make pre-802.11
3. Make 802.11
Select[1,2,3]:

65
Guida Rapida
4. Selezionare 2 per avviare il terminale con la procedura Spring
RF.
Il messaggio successivo sarà visualizzato nel modo seguente:
5. Inserire la password RFPROT, poi premere il tasto ENTER. Il
terminale continua l'avviamento. Se si presenta un problema
di incompatibilità, il terminale presenta un messaggio di
errore. Contattare il vostro Amministratore di sistema.
Enter password
→

66
Serie 68XX
Risoluzione dei problemi
Sintomo Possibile causa Azione
Il 68XX non si
accende. La batteria non è
installata. Verificare che il 68XX sia
alimentato da una batteria.
La Batteria non è caricata. Batteria NiCd - Caricare la
batteria nel terminale o
rimuovere la batteria e
caricarla separata-mente in
un alloggiamento di ricarica
su CCM 38/6860 o CRD 38/
6866.
Ioni di litio - Togliere la
batteria dal terminale e
caricarla con un adattatore
UBC 2000.
Messaggio Batteria
scarica. La batteria principale si
sta scaricando. Batteria NiCd - Collocare il
68XX in una base e
ricaricare la batteria.
OPPURE
Spegnere il 68XX e
sostituire la batteria.
Ioni di litio - Togliere la
batteria dal terminale e
caricarla con un adattatore
UBC 2000.
OPPURE
Spegnere il 68XX e
sostituire la batteria.
La batteria è esaurita. Batteria non sostituita
dopo aver ricevuto il
messaggio Batteria
scarica.
Sostituire la batteria.
I caratteri non vengono
visualizzati sul display. Il 68XX non si accende. Premere il tasto PWR.
La batteria manca o è
esaurita. Sostituire o ricaricare la
batteria.
Non è possibile regolare
correttamente il contrasto. Consultare la pagina 58 per
la sequenza di tasti.

67
Guida Rapida
Lo scanner non
decodifica un codice a
barre.
Il codice a barre è
illeggibile. Verificare che il codice a
barre non sia difettoso, ad
esempio macchiato o
sporco.
La finestra di scansione è
sporca. Pulire la finestra di
scansione con una salvietta
per lenti di occhiali. NON
utilizzare salviette
detergenti.
Display messaggio di
errore Doppio tasto. Sono stati premuti
contemporaneamente due
o più tasti.
Premere i tasti in sequenza.
Il 68XX non risponde
alla pressione dei tasti. L’applicazione non è stata
caricata correttamente. Chiedere all’amministratore
di sistema di caricare
nuovamente l’applicazione.
Sintomo Possibile causa Azione

68
Serie 68XX
69
Guía Rápida
Introducción
El 68XX es un ordenador de mano robusto y resistente a climas
extremos que combina las siguientes capacidades en un solo objeto:
• Arquitectura de PC estándar (arquitectura 8088 de 16 bits)
• Compatibilidad con DR-DOS
• Pantalla de 16 líneas por 21 caracteres
• Entrada de caracteres mediante un teclado alfanumérico de 35
ó 46 teclas
• Capacidad de lectura incorporada
• Baterías de NiCd y litio-ión recargables
• Comunicaciones por lotes o comunicaciones de radio
(con antena interna):
- Radio Spectrum One® (681X)
- Radio Spectrum24® (684X).
Acerca de esta guía
Esta guía le proporciona al operador las instrucciones necesarias
para realizar los siguientes procedimientos:
• Instalación/extracción de las baterías
• Carga de las baterías
• Encendido/apagado del 68XX
• Ajuste del contraste de la pantalla
• Encendido/apagado de la retroiluminación
• Utilización del teclado
• Utilización del scanner integrado
• Ejecución de las comunicaciones
• Solución de problemas del 68XX.

70
Serie 68XX
Partes del 68XX
+-
=
Status
-
Display
Keyboard
Scan LED
Status LED
Scan Window
PWR Key
Scan Trigger
Conectores
Battery
Pack
LED de
lectura
Pantalla
Te c l a d e
alimentación
LED de
estado
Te c l a d o
Baterías
Ventana del
scanner
Gatillo de
lectura
ópticos
Liberación
de las baterías
Compartimento
de las baterías
Correa de
mano
Cierre del
compartimento
de las baterías
Contactos
de carga
71
Guía Rápida
Accesorios necesarios
Los accesorios necesarios para el 68XX son:
• Baterías recargables de NiCd o litio-ión, o baterías
recargables de NiCd intrinsecamente seguras
• Módulo de carga y comunicaciones CCM 38/6860 de
4 ranuras, con ranura de carga de baterías de repuesto
o
• Soporte de carga y comunicaciones CRD 38/6865 de 1 ranura
o
• Soporte de carga y comunicaciones CRD 38/6866 de
4 ranuras
• Cable(s) serie RS-232
• Fuente de alimentación (1 por soporte).
Accesorios opcionales
Los accesorios opcionales del 68XX son:
• Juego de montaje en pared (n/p 3866-000)
• Cargador de batería UBC
• Adaptador de PC y módulo de interfaz de la impresora (PIM)
• Cargador de baterías de 10 horas de carga lenta (cubo de
pared)
• Accesorios de red Spectrum One y Spectrum24
• Funda.

72
Serie 68XX
Suministro de energía
Las baterías recargables de níquel cadmio (NiCd) o litio-ión
proporcionan la energía del 68XX.
Nota: Las baterías de NiCd 3872-103, 3872-105 y 3872-115
de la serie 3800 NO PUEDEN utilizarse en el 68XX.
Instalación de baterías nuevas o recargadas
Para instalar las baterías:
1. Coloque las baterías de manera que el mango mire hacia la
ventana del scanner del 6800.
2. Introduzca las baterías en el compartimento para baterías
manteniendo pulsados los botones de liberación de las
baterías.
3. Empuje el cierre del compartimento de las baterías para
bloquearlo.
Cambio de las baterías del PDT 68xx intrínsicamente
seguro
Para introducir las baterías:
1. Introduzca las baterías con firmeza en el fondo del terminal,
tal como se muestra en la siguiente ilustración.
Cierre del
compartimento
de las baterías
Compartimento
de las baterías
Mango de las
baterías
Botón de
liberación
Ventana del scanner
73
Guía Rápida
2. Utilice la llave de la cerradura del compartimiento de las
baterías que se incluye para que las baterías queden fijas en
su lugar. Cuando gire la llave, el mecanismo de cierre de las
baterías deberá girar y fijar las baterías en su sitio.
3. Para desbloquear el compartimento y retirar las baterías,
utilice la llave de cierre del compartimento para abrir el
mecanismo de cierre de las baterías y saque las baterías del
fondo del terminal.
Extracción de las baterías
1. Pulse los botones de liberación de las baterías que están a
ambos lados del mango.
Mecanismo
de cierre de
las baterías Llave de la cerradura
del compartimento
de las baterías
Pulse el botón
de liberación
Pulse el botón de
liberación
74
Serie 68XX
2. Saque las baterías del mango.
Carga de las baterías de NiCd
Para cargar las baterías de NiCd en el 68XX, utilice uno de los
soportes que se incluyen en la lista de Accesorios necesarios en la
página 73 o el cargador de baterías universal. Consulte la Guía de
referencia rápida de su soporte o la Guía de referencia rápida del
cargador de baterías universal para seguir las instrucciones de carga
de las baterías.
Precaución: Utilice únicamente las baterías Symbol 21-32801-01,
21-38796-01 ó 21-35241-01 en este terminal.
Carga de las baterías de litio-ión
Nota: Colocar el terminal en el soporte con una batería de
litio-ión ya instalada, no daña la batería.
CRD 38/6865 CRD 38/6866CCM 38/6860
75
Guía Rápida
La batería de litio-ión no se carga cuando el terminal está colocado
en un soporte. Use el soporte para las comunicaciones y como lugar
para mantener el terminal cuando se instale una batería de litio-ión.
Para cargar una batería de litio-ión (n/p 21-40340-01), extraiga la
batería del terminal y cárguela en un adaptador de batería
UBC2000 n/p 21-32665-24. Para mayor información, consulte la
documentación del cargador.

76
Serie 68XX
Funcionamiento del 68XX
Encendido/Apagado del 68XX
Para encender el 68XX:
• apriete el gatillo de lectura,
• o pulse la tecla PWR.
Nota: Las baterías deben estar instaladas, o bien el 68XX debe
estar en el soporte para que pueda encenderse el
terminal.
Para interrumpir el funcionamiento del 68XX, pulse la tecla PWR.
Ajuste del contraste
El contraste de la pantalla del 68XX puede configurarse en
8 niveles. Para ajustar el contraste:
•Pulse FUNC y seguidamente X para aumentar el contraste.
•Pulse FUNC y seguidamente Y para disminuir el contraste.
Encendido/apagado de la retroiluminación
El 68XX tiene retroiluminación para iluminar la pantalla cuando se
trabaja con poca luz. Para encender o apagar la retroiluminación
pulse FUNC y seguidamente L (luz).
La retroiluminación se apaga automáticamente después de
aproximadamente 15 segundos o cuando se apaga el 68XX.
Utilización del teclado
El 68XX utiliza un teclado alfanumérico que contiene el alfabeto de
26 caracteres (A-Z), los números (0-9) y caracteres varios (+, -, X,
÷, =, etc.). El teclado está codificado con colores para indicar qué
tecla modificadora se debe pulsar para producir un determinado
carácter o acción.
• Las teclas del alfabeto producen los caracteres de las letras
mayúsculas de la A a la Z .
77
Guía Rápida
• El teclado numérico por defecto produce los números del 0 al 9.
• Pulse FUNC y la tecla numérica correspondiente para
producir las teclas de función de F1 a F10.
• Pulse las teclas de cursor (35 teclas) o (46 teclas)
para recorrer la pantalla hacia arriba y hacia abajo.
• 35 teclas - Pulse las teclas del cursor para recorrer la
pantalla hacia la izquierda y hacia la derecha. 46 teclas - Pulse
FUNC y seguidamente para recorrer la pantalla hacia la
izquierda; FUNC y seguidamente para recorrer la pantalla
hacia la derecha.
• Pulse BKSP para borrar los caracteres introducidos en la
pantalla de uno en uno.
• 35 teclas - Pulse SPACE para introducir un espacio en blanco.
46 teclas - Pulse FUNC y seguidamente BKSP para introducir
un espacio en blanco.
• Pulse CLEAR (35 teclas) o CLR (46 teclas) para salir parcial
o totalmente de un nivel o pantalla de la aplicación. CLR
también borra de la pantalla todos los datos introducidos.
• Pulse SHIFT (35 teclas) o SHF (46 teclas) para acceder al
teclado cambiado.
•CTRL (35 teclas) o CTL (46 teclas) realiza la función de
control y está bajo el control de la aplicación.
• Pulse ENTER para guardar los datos introducidos en la
memoria del 68XX.
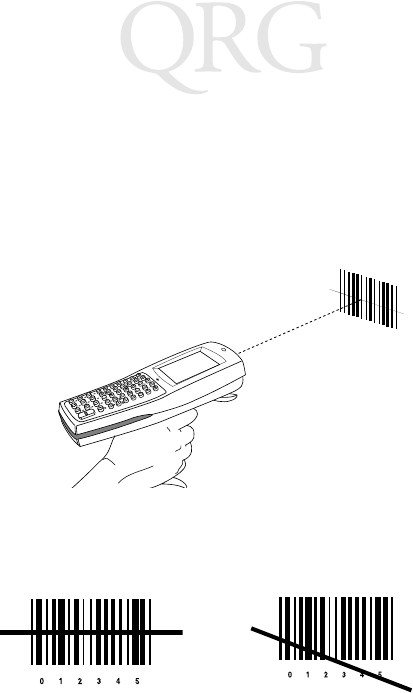
78
Serie 68XX
Utilización del scanner láser Integrado
Para realizar la lectura:
1. Pulse el gatillo del scanner para encender el 68XX y el scanner.
El LED de lectura se pone rojo, si la lectura está activada y el
láser está encendido.
2. Dirija el 68XX hacia el código de barras y pulse el gatillo.
3. Asegúrese de que el haz de lectura atraviese todas las barras y
espacios del símbolo del código de barras, tal como se muestra
a continuación:
Mantenga el scanner más alejado cuando se trate de símbolos
más grandes y más cerca para los símbolos cuyas barras estén
más juntas.
Las versiones de largo alcance admiten un gatillo de lectura de
dos niveles. El primer haz estrecho sirve para apuntar y el se-
gundo para decodificar la etiqueta.
Correcto Incorrecto
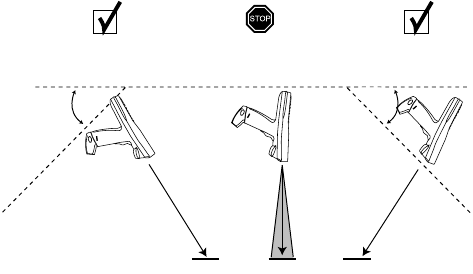
79
Guía Rápida
4. El LED cambia de rojo a verde en las decodificaciones
correctas. El 68XX también puede emitir señales sonoras.
Apuntado: mantener en un ángulo
No ponga la ventana del scanner del 68XX directamente sobre el
código de barras. La luz láser que se refleja directamente en la
ventana del scanner desde el código de barras se conoce como
reflexión especular. Esta potente luz puede “cegar” al scanner y
dificultar la decodificación. El área donde se produce la reflexión
especular se conoce como “zona muerta”.
Puede inclinar el 68XX hasta 55 grados hacia delante o hacia atrás
para lograr una decodificación correcta. La práctica muestra
rápidamente con qué tolerancias se puede trabajar.
Ejecución de las comunicaciones
Comunicación con un ordenador central (host)
El 68XX se comunica con un ordenador central (host) a través del
CCM 38/6860, CRD 38/6865, CRD 38/6866 o del adaptador de
PC. Para más información sobre cómo configurar el CCM, los
soportes o el adaptador de PC, consulte la Guía de referencia del
producto PDT6800 o la Guía de referencia rápida que se
proporciona con cada unidad.
1. Lecura
satisfactoria
2. Posible reflexión
especular
3. Lecura
satisfactoria
Haz de
lectura
Código de Código de Código de barras
El área sombreada
representa la zona
muerta Haz de
lectur
a
55° 55°
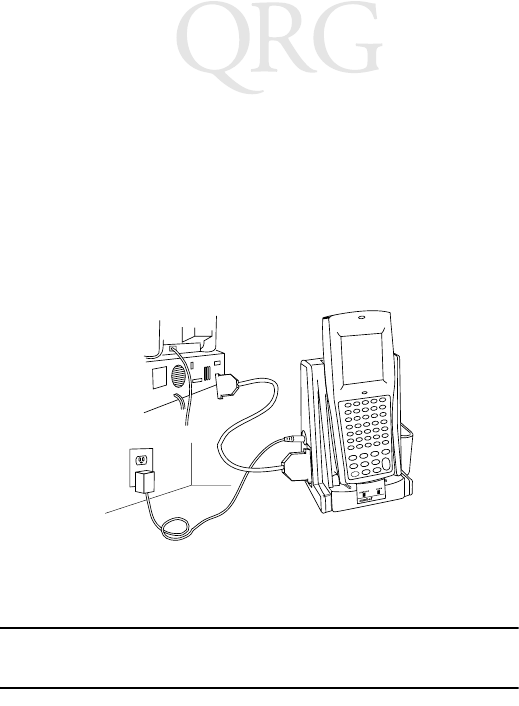
80
Serie 68XX
Para establecer la comunicación con un ordenador central (host):
1. Configure el(los) soporte(s) o adaptador de PC tal como se
describe en la Guía de referencia del producto del PDT6800 o
en la Guía de referencia rápida del dispositivo.
2. Coloque la base del 68XX sobre el soporte. Empuje el 68XX
contra la parte posterior del soporte hasta que encaje bien.
El LED de estado del terminal se enciende en verde sin par-
padeo cuando el 68XX está firmemente colocado en el soporte.
3. Inicie el programa de comunicaciones en el ordenador central
(host) y el 68XX.
Precaución: NO retire el 68XX mientras el LED COMM rojo del
soporte esté parpadeando.
Comunicación con una impresora
El 68XX se comunica con una impresora a través del módulo de
interfaz de la impresora (PIM). Para conectar el 68XX a la
impresora:
1. Conecte el conector óptico del PIM al puerto del 68XX
introduciendo las lengüetas del conector en las ranuras que se

81
Guía Rápida
encuentra a cada lado del puerto.
2. Enchufe el conector DB-9 del PIM en el puerto de la
impresora.
3. Encienda la impresora y el 68XX.
Comunicación por radio
El PDT 6810 funciona en una radio Spectrum One de Symbol; el
PDT 684X funciona en una radio Spectrum24 de Symbol.
El LED de estado indica el estado de la conexión del terminal a la
red RF:
Consulte la documentación de la red Spectrum One o Spectrum24
para más información sobre cómo utilizar el PDT 68XX en ese
entorno RF.
Apagado indica que la radio está funcionando y que está asociada
a un punto de acceso (Spectrum24) o estación de base
(Spectrum One).
Parpadea en
rojo una vez
por segundo
para indicar que la radio está fuera de rango o que no está
asociada a un punto de acceso o estación de base.
Ranuras
Lengüetas
Conector óptico
del PIM
Puerto óptico del 68XX

82
Serie 68XX
Cambio del 802.11 al protocolo RF Spring
(PDT 6842)
Note: El terminal arranca con el protocolo RF 802.11. Realice
el siguiente procedimiento para cambiar al protocolo RF
Spring.
1. Arranque el terminal. El siguiente mensaje aparecerá en la
pantalla:
2. En el espacio de cuatro segundos, pulse la letra "y". Si no pul-
sa la letra "y" dentro de los cuatro segundos, el terminal a-
rranca con el protocolo RF 802.11 .
El próximo mensaje se muestra en la pantalla:
3. En el espacio de diez segundos, pulse la letra "y". Si no pulsa
la letra "y" en diez segundos, el terminal arranca con el pro-
tocolo RF 802.11.
El próximo mensaje se muestra en la pantalla:
SOFTWARE UPDATE
Update?[y/n]:
RF PROTOCOL UPDATE
OPPORTUNITY
Update RF protocol
[y/n]:
RF Protocol
Currently 802.11
1. Abort update
2. Make pre-802.11
3. Make 802.11
Select[1,2,3]:
83
Guía Rápida
4. Seleccione 2 para arrancar con el protocolo RF Spring.
El siguiente mensaje se muestra en la pantalla:
5. Introduzca la contraseña RFPROT, luego pulse la tecla
ENTER. El terminal continúa funcionando. Si existe un pro-
blema de compatibilidad, el terminal se detendrá con un men-
saje de error. Póngase en contacto con el administrador del
sistema.
Solución de problemas
Síntoma Causa posible Acción
El 68XX no se
enciende.
Las baterías no están
instaladas.
Verifique que el 68XX
esté recibiendo energía de
una batería.
Las baterías no están
cargadas.
Baterías de NiCd -
Cargue las baterías en el
terminal, o bien retire las
baterías y cargue la
ranura de carga de
batería de repuesto en el
CCM 38/6860 o
CRD 38/6866.
Litio-ión - Retire las
baterías del terminal y
cárguelas en un
adaptador UBC 2000.
Enter password
→

84
Serie 68XX
Mensaje Batería
baja.
Las baterías principales
están bajas de carga.
Baterías de NiCd - Ponga
el 68XX en un soporte y
recargue las baterías
O
Apague el 68XX y
cambie las baterías.
Baterías de litio-ión -
Retire las bateriás del
68XX y cárguelas en un
adaptador UBC 2000.
O
Apague el 68XX y
cambie las baterías.
Las baterías están
agotadas.
Las baterías no se
cambiaron después de
recibir el mensaje de
Batería baja.
Cambie las baterías.
No pueden verse
los caracteres en la
pantalla.
El 68XX no está
encendido.
Pulse la tecla PWR.
Las baterías no están
puestas o están
agotadas.
Cambie o recargue las
baterías.
El contraste no está
bien ajustado.
Consulte la página 76
para información sobre la
secuencia de teclas.
Síntoma Causa posible Acción

85
Guía Rápida
El scanner no
decodifica un
código de barras.
El código de barras es
ilegible.
Compruebe que el código
de barras no esté
defectuoso, por ejemplo,
emborronado o sucio.
La ventana del scanner
está sucia.
Limpie la ventana del
scanner con paños
especiales para gafas. NO
utilice telas empapadas en
loción.
Se muestra el
mensaje de error
Tecla doble.
Se han pulsado dos
teclas o más al mismo
tiempo.
Pulse las teclas
consecutivamente.
El 68XX no
responde cuando
se pulsan las teclas.
La aplicación no se
cargó correctamente.
Pida al administrador de
sistemas que repita la
carga de la aplicación.
Síntoma Causa posible Acción

86
Serie 68XX
87
クイック リファレンス
はじめに
68XX は、耐久性、耐候性に優れたハンド ヘルド型のポータブル
コンピュータで、次のような機能を備えています。
•PCスタンダードアーキテクチャ (8088 16 ビット アーキテク
チャ )
•DR-DOS との互換性
•16 行× 21 桁ディスプレイ
•35 または 46 キーの英数字キーボードによるキー入力
•バーコードレーザスキャナ内蔵
•リチウム イオンおよび NiCd 充電式バッテリ パック
•バッチ通信、または次の RF ネットワーク通信 ( 内蔵型の
アンテナによる ):
- Spectrum One® RF ネットワーク (681X)
- Spectrum24® RF ネットワーク (684X)
このガイドについて
このガイドでは、次の項目について説明します。
•バッテリの取り付け /取り外し
•バッテリの充電方法
•68XX の電源のオン /オフ
•画面コントラストの調整
•バックライトのオン /オフ
•キーボードの使い方
•バーコードスキャナの使い方
•通信の実行
•68XX のトラブルシューティング
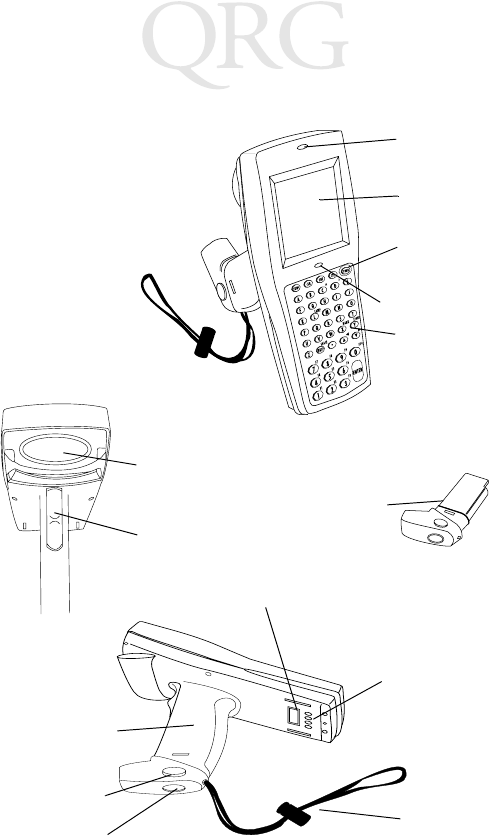
88
68XX シリーズ
68XX の各部名称
+-
=
Status
-
スキャン
LED
ディスプレ
イ
キーボード
スキャン ウィン
ドウ
スキャン トリガ
バッテリ パッ
充電接点
バッテリ
コンパートメ
バッテリ
リリース
バッテリ ロッ
ステータス LED
電源キー
ハンド
ストラップ
光コネクタ
89
クイック リファレンス
必要なアクセサリ
68XX に必要なアクセサリには、次のものがあります。
•リチウム イオンまたは充電式 NiCd バッテリ パック、ま
たは 安全な充電式 NiCd バッテリ パック
•CCM 38/6860 4 スロット充電 /通信モジュール ( 予備バッテ
リ充電スロット付き )
または
•CRD 38/6865 1 スロット充電 /通信クレードル
または
•CRD 38/6866 4 スロット充電 /通信クレードル
•RS-232 シリアル ケーブル
•電源ユニット ( クレードルあたり 1 台)
オプションのアクセサリ
68XX のオプションのアクセサリには、次のものがあります。
•壁掛け用キット (p/n 3866-000)
•UBC バッテリ チャージャ
•PC アダプタおよびプリンタ インタフェース モジュール
(PIM)
•10 時間トリクル バッテリ チャージャ ( コンセント直付け
タイプ )
•Spectrum One および Spectrum24 ネットワーク アクセサリ
•ホルスタ
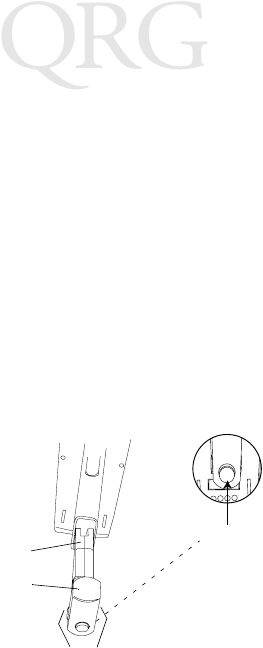
90
68XX シリーズ
電源の供給
68XX は、リチウム イオンニッケル カドミウム (NiCd) 充電式
バッテリ パックによって電源を供給します。
注: シリーズ 3800 NiCd バッテリ パック 3872-103、
3872-105、および 3872-115 は、68XX では使用でき
ません。
新しい バッテリ、または充電済みバッテリの取り付け
バッテリを取り付けるには、次の手順に従います。
1. バッテリ パックを 6800 のスキャン ウィンドウの側にあ
るハンドルに合わせます。
2. バッテリ リリース ボタンを押しながら、バッテリ パック
をバッテリ コンパートメントに差し込みます。
3. バッテリ ロックを押して固定します。
安全な PDT 68xx 用のバッテリ パックの交換方法
バッテリ パックを取り付けるには、次の手順に従います。
1. 次の図で示しているように、バッテリをターミナルにしっ
かりと差し込みます。
バッテリロック
バッテリ コンパートメ
ント
バッテリ ハンドル
リリースボタン
スキャン ウィンド
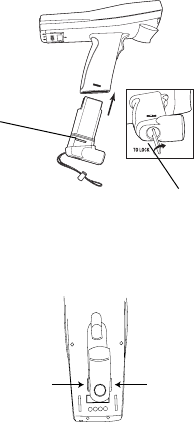
91
クイック リファレンス
2. 付属のバッテリ ロック キーを使って、バッテリを所定の
位置にロックします。ロック キーを回すと、バッテリ
ロック機構が回転し、バッテリが所定の位置にロックされ
ます。
3. ロックを解除して、バッテリを取り出すには、バッテリ
ロック キーを使ってバッテリ ロック機構を解除し、ター
ミナルから引き出します。
バッテリ パックの取り外し方
1. ハンドルの両側にあるバッテリ リリース ボタンを押しま
す。
バ
ッテリ ロック機
構
バッテリ ロック
リリース ボタンを
リリース ボタンを押
す
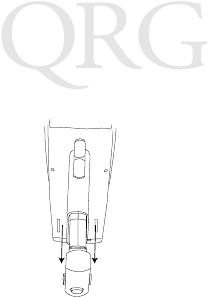
92
68XX シリーズ
2. バッテリ パックをハンドルから引き出します。
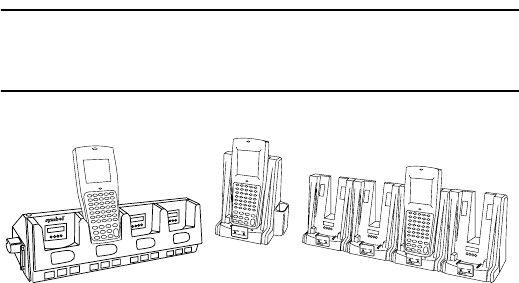
93
クイック リファレンス
NiCd バッテリの充電方法
68XX の NiCd バッテリを充電するには、89 ページの
必要なアク
セサリ
で説明しているいずれかのクレードル、または汎用バッ
テリ チャージャを使用します。バッテリの充電方法について
は、クレードルのクイック リファレンス ガイド、または UBC
のクイック リファレンス ガイドを参照してください。
注意: このターミナルでは、必ず 21-32801-01、21-35217-
01、 21-35241-01 または 21-38796-01 のバッテリを使
用してください。
リチウム イオン バッテリの充電方法
注意: リチウム イオン バッテリが取り付けられたクレード
ルに
ターミナルを差し込んでもバッテリは損傷しません。
ターミナルがクレードルに差し込まれている状態では、リチウ
ム イオン バッテリは充電されません。リチウム イオン バッテ
リが取り付けられている場合は、クレードルを通信用として使
用し、また、ターミナルのホールダとして使用します。
リチウム イオン バッテリ (p/n 21-40340-01) を充電するには、
バッテリをターミナルから取り外し、UBC 2000 バッテリ アダプ
タ p/n 21-32665-24 で充電します。詳細は、チャージャに関す
る記述を参照してください。
CRD 38/6865 CRD 38/6866CCM 38/6860

94
68XX シリーズ
68XX の操作方法
68XX の電源のオン /オフ
次のいずれかの方法で 68XX の電源を入れます。
•スキャン トリガを握ります。
•または、PWR キーを押します。
注: 68XX の電源を入れるには、バッテリが入っているか、
68XX がクレードルに入っている必要があります。
68XX の電源を切るには、PWR キーを押します。
コントラストの調整方法
68XX の画面コントラストは、8 段階で調節できます。コントラ
ストを調節するには、次の手順に従います。
•コントラストを上げるには、FUNC を押してから X を押
します。
•コントラストを下げるには、FUNC を押してから Y を押
します。
バックライトのオン /オフ
68XX には、暗い場所での操作用に画面を照らすことができる
バックライトが付いています。バックライトをオン /オフにす
るには、FUNC を押してから L ( ランプ ) を押します。
バックライトは約 15 秒後に自動的に消灯します。また、68XX
の電源を切ると消灯します。
キーボードの使い方
68XX は、アルファベット 26 文字 (A ~ Z)、数字 (0 ~ 9)、
記号 (+、-、X、 ÷、=、など) が入力可能な 英数字キーボードを
装備しています。キーボードは色分けされていて、特殊な文字
を入力したり、特殊な動作を行う際に押す必要のある修飾キー
が一目でわかるようになっています。
•アルファベット キーでは、A ~ X の大文字を入力できま
95
クイック リファレンス
す。
•デフォルトの数字キーパッドでは、0 ~ 9 の数字を入力で
きます。
•FUNC を押してから数字キーを押すと、ファンクション
キー F1 ~ F10 を入力できます。
•画面を上下にスクロールするには、カーソル キー (35
キー ) または (46 キー )を押します。
•35 キー - カーソル キー を押して左右にスク
ロールします。46 キー - 左にスクロールするには、
FUNC を押してから を押します。右にスクロールする
には、FUNC を押してから を押します。
•画面に入力した情報を 1 文字ずつ削除するには、BKSP を
押します。
•35 キー - スペースを挿入するには、SPACE を押します。
46 キー - スペースを挿入するには、FUNC を押してから
BKSP を押します。
•アプリケーション レベルまたは画面の一部あるいは全部を
終了するには、CLEAR (35 キー ) または、CLR を押しま
す。また、入力したすべてのデータを画面から消去するこ
ともできます。
•キーボードのシフト機能を使用するには、SHIFT (35 キー
) または、 SHF (46 キー )を押します。
•CTRL (35 キー ) または CTL (46 キー )は、アプリケー
ションの制御機能を実行し、アプリケーションに従って機
能します。
•入力したデータを 68XX のメモリに取り込むには、 ENTER
を押します。
バーコード レーザ スキャ ナの使い方
スキャンを行うには、次の手順に従います。
1. スキャナ トリガを押して、68XX の電源とスキャナをオン
にします。スキャン可能な状態になり、レーザがオンにな
ると、スキャン LED が赤色に点灯します。
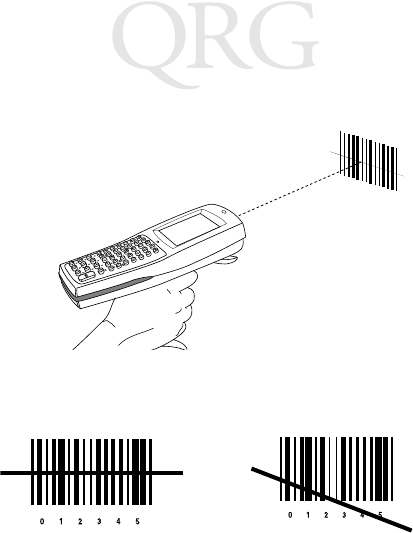
96
68XX シリーズ
2. 68XX をバー コードに向け、トリガを押します。
3. スキャン ビームがバー コード シンボルのすべてのバーと
バー スペースにあたるようにしてください ( 下図参照 )。
バー コードが大きい場合はスキャナを離し、バーの間隔が
狭い場合はスキャナを近づけます。
ロングレンジ バージョンは、2 段階のスキャン トリガを
サポートしています。最初のナロービームで照準を定め、
2 番目のビームでラベルを読み取ります。
4. 正しく読み取れた場合、LED が赤色から緑色になります。
また 68XX はビープ音を鳴らすこともできます。
正誤
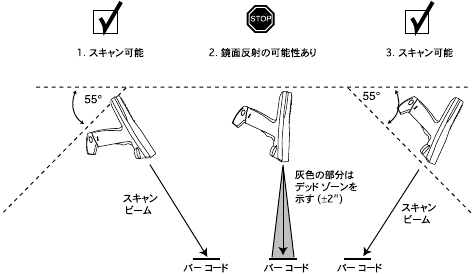
97
クイック リファレンス
スキャナを構える角度について
68XX のスキャン ウィンドウをバー コード面に対して直角にな
らないように構えてください。バー コードに当って反射した
レーザ光がスキャン ウィンドウに直接戻ることを鏡面反射と言
います。この強い光により、スキャナが「眼つぶし」状態にな
り、読み取りが行えなくなることがあります。この鏡面反射が
起こるエリアを「デッド ゾーン」と言います。
68XX は、前後に 55°まで傾けても正常に読み取ることができま
す。実際に試してみれば、どの程度で読み取れるかすぐにわか
ります。
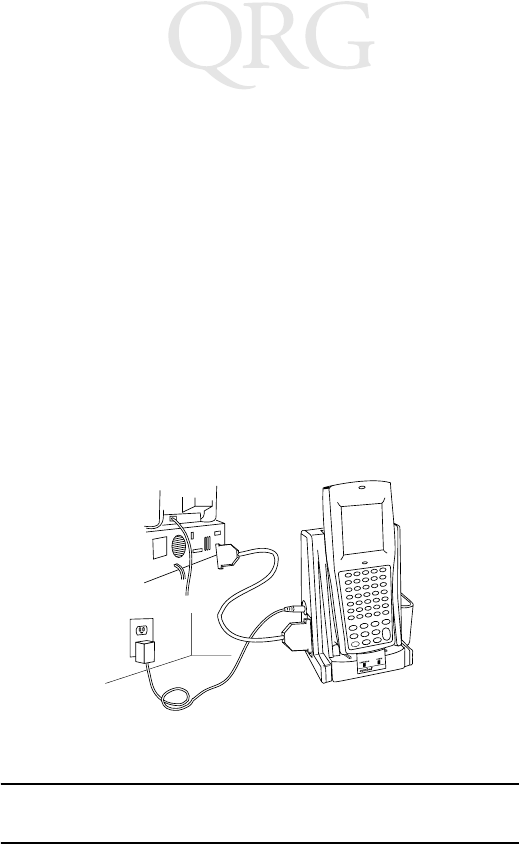
98
68XX シリーズ
通信の実行
ホストとの通信
68XX は、CCM 38/6860、CRD 38/6865、CRD 38/6866、または PC
アダプタを通してホストと通信します。CCM、クレードル、また
は PC アダプタのセットアップ方法については、各ユニットに付
属されている
『PDT6800 プロダクト リファレンス ガイド』
また
は
『クイック リファレンス ガイド』
を参照してください。
ホストと通信するには、次の手順に従います。
1.
『68XX プロダクト リファレンス ガイド』
または機器のク
イック リファレンス ガイドの説明に従って、クレードル
または PC アダプタをセットアップします。
2. 68XX の底部をクレードルにセットします。68XX がしっかりと収
まるまで 68XX の上部をクレードルの背面に向かって押します。
68XX がクレードルに正常に収まるとステータス LED が緑
色に点灯します。
3. ホストおよび 68XX で通信プログラムを開始します。
注意: クレードルの通信 LED が赤色に点滅している間は、
絶対に 68XX を取り出さないでください。

99
クイック リファレンス
プリンタとの通信
68XX は、プリンタ インタフェース モジュール (PIM) を通してプリン
タと通信します。68XX をプリンタに接続するには、次の手順に従いま
す。
1. PIM の光コネクタのクリップをポートの両側にあるスロットに差
し込んで、光コネクタを 68XX のポートに接続します。
2. PIM の DB-9 コネクタをプリンタのポートに差し込みます。
3. プリンタと 68XX の電源を入れます。
RF ネットワークでの通信
PDT 6810 は Symbol Spectrum One RF ネットワークで動作し、
PDT 684X は Symbol Spectrum24 RF ネットワークで動作します。
ステータス LED は、 RF ネットワークとの接続状態を次のように示
します。
Spectrum One RF または Spectrum24 RF ネットワークでの PDT
68XX の操作方法については、それぞれのネットワークのマニュ
アルを参照してください。
オフ 無線状態が正常で、アクセス ポイント (Spectrum24)
またはベースステーション (Spectrum One) につながっ
ていることを示します。
1 秒間隔で
赤色に点滅
電波が範囲外になっていて、アクセス ポイント
(Spectrum24) またはベースステーションとつながっていない
ことを示します。
スロット
クリッ
PIM
光コネクタ
68XX の光ポート

100
68XX シリーズ
802.11 から Spring RF プロトコルへの交換
(PDT 6842)
注: ターミナルは、802.11 RF プロトコルで起動します。
Spring RF プロトコルへの交換は、以下の手順を実行
してください。
1. ターミナルを起動させる。プロンプトが以下を表示しま
す:
2. 4 秒以内にアルファベットの「y」をタイプしてください。
時間内にタイプしないと、ターミナルは 802.11 RF プロト
コルで起動します。
次に、プロンプトが以下を表示します:
3. 10 秒以内にアルファベットの「y」をタイプしてください。
時間内にタイプしないと、ターミナルは 802.11 RF プロト
コルで起動します。
次に、プロンプトが以下を表示します:
4. 2 を選択し、Spring RF プロトコルで起動させてください。
SOFTWARE UPDATE
Update?[y/n]:
RF PROTOCOL UPDATE
OPPORTUNITY
Update RF protocol
[y/n]:
RF Protocol
Currently 802.11
1. Abort update
2. Make pre-802.11
3. Make 802.11
Select[1,2,3]:

101
クイック リファレンス
次に、プロンプトが以下を表示します:
5. パスワード「RFPROT」を入力し、ENTER キーを押してくだ
さい。ターミナルは起動状態を維持します。互換性におい
て問題がある場合、ターミナルは一時停止し、エラー メッ
セージが出ます。システム管理者に連絡してください。
トラブルシューティング
現象 原因 対処方法
68XX の電源が
入らない。
バッテリが入っていませ
ん。
バッテリから電源が供給
されていることを確認し
てください。
バッテリが充電されて
いません。
NiCd バッテリ - バッテリ
をターミナル内で充電す
るか、バッテリを取り出
して、CCM 38/6860 または
CRD 38/6866 の予備バッテ
リ充電スロットで充電し
てください。
リチウム イオン - バッテ
リをターミナルから外し、
UBC 2000 アダプタで充電
してください。
Low Battery
メッセージが
表示される。
メインバッテリ パック
のバッテリ残量が少な
くなっています。
NiCd バッテリ - 68XX を
クレードルに入れて、
バッテリを充電してくだ
さい。
または
68XX の電源を切り、バッ
テリを交換してください。
Enter password
→

102
68XX シリーズ
Low Battery
メッセージが
表示される。
(続き)
メインバッテリ パック
のバッテリ残量が少な
くなっています。
(続き)
リチウム イオン バッテリ
- 68XX からバッテリを外
し、UBC 2000 アダプタで
充電してください。
または
68XX の電源を切り、バッ
テリを交換してください。
バッテリが完
全に放電して
いる。
Low Battery
メッセー
ジが表示されてから
バッテリが交換されて
いません。
バッテリを交換してくだ
さい。
画面に文字が
表示されない。
68XX の電源が入ってい
ません。
PWR
キーを押してくださ
い。
バッテリ パックが入っ
ていない、または完全
に放電しています。
バッテリ パックを交換す
るか、充電してください。
コントラストが適切に
調節されていません。
94 ページのキーの操作方
法を参照してください。
スキャナが
バー コードを
読み取らない。
バー コードが読み取り不
可能な状態になっていま
す。
バー コードが読み取り不
可能な状態 ( 不鮮明また
は汚れている ) になって
いないことを確認してく
ださい。
スキャン ウィンドウが
汚れています。
眼鏡用のレンズ拭きでス
キャン ウィンドウを拭い
てください。湿式のレン
ズ拭きは使用しないでく
ださい。
Double Key
エ
ラー メッセー
ジが表示され
た。
複数のキーが同時に押
されました。
順番にキーを押してくださ
い。
現象 原因 対処方法
103
クイック リファレンス
キーを押して
も 68XX が応答
しない。
アプリケーションが正
常にダウンロードされ
ていません。
システム管理者に連絡して、
アプリケーションを再度ダウ
ンロードしてもらってくださ
い。
現象 原因 対処方法

104
68XX シリーズ
105
快速查阅
介绍
68XX 是一个坚固耐用、全天候的手持便携式计算机,它集下列性
能于一身:
•PC 标准体系结构 (8088 16 位体系结构)
•DR-DOS 兼容性
•16 行、每行 21 个字符显示
•35 至46 键字母数字混合式键盘输入
•集成的扫描功能
•可再充电的锂离子和 NiCd 电池组
•批量通讯或 RF 网络通讯 (使用内置天线):
- Spectrum One® RF 网络 (681X)
- Spectrum24® RF 网络 (684X)。
关于本指南
本指南向操作人员提供下列操作说明:
•安装 /取下电池
•对电池充电
•打开和关闭 68XX 的电源
•调节显示器对比度
•打开 /关闭背光
•使用键盘
•使用集成的扫描仪
•进行通讯
•68XX 故障解决
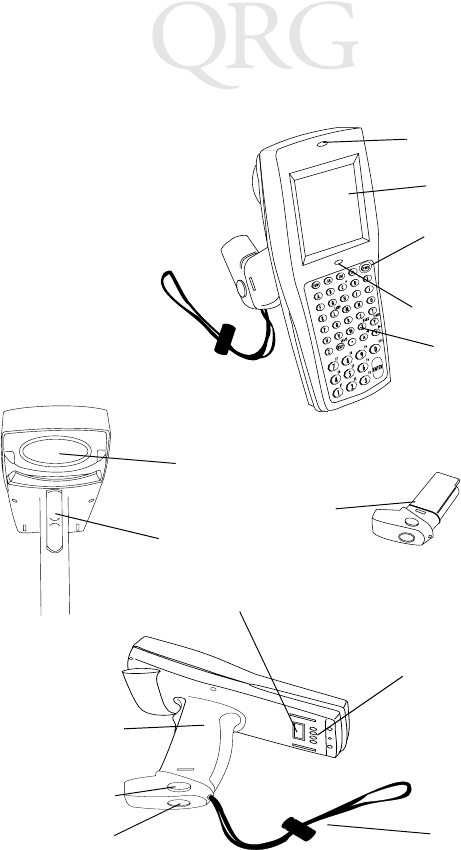
106
68XX 系列
68XX 的部件
充电触点
+-
=
Status
-
扫描发光管
显示器
键盘
扫描窗口
扫描触发开关
电池组
电池舱
电池
脱扣
电池锁 手带
光连接器
电源键
状态发光管
107
快速查阅
必需附件
68XX 必需附件包括:
•锂离子或 NiCd 可充电电池组或
内在安全的 NiCd 可充电电池组
•带有备用电池充电插槽的 CCM 38/6860 4- 插槽充电和通讯模
块
或
•CRD 38/6865 1- 插槽支座充电和通讯支座
或
•CRD 38/6866 4- 插槽充电和通信支座
•RS-232 串行电缆
•电源 (每支座一个)。
可选附件
68XX 可选附件包括:
•墙上安装组件 (p/n 3866-000)
•UBC 电池充电器
•PC 转换器和打印机接口模块 (PIM)
•10 小时细流电池充电器 (壁装立方体)
•Spectrum One 和Spectrum24 网络附件
•皮套。
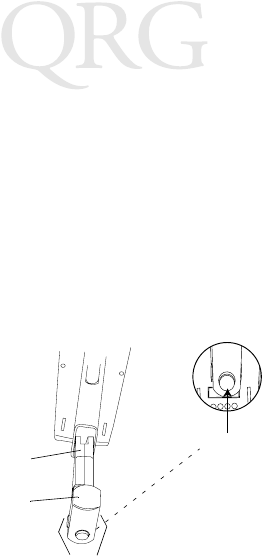
108
68XX 系列
所提供电源
68XX 的电源由一个锂离子或镍镉 (NiCd) 可充电电池组提供。
注意 : 3800 系列 NiCd 电池组,3872-103、3872-105 和3872-
115 不能用于 68XX 中。
安装新的或可充电电池
要安装电池:
1. 将电池组的手柄朝向 6800 的扫描窗口。
2. 将电池组滑动推入电池舱,同时电池脱扣按钮被压入。
3. 按下电池锁以固定。
更换内在安全的 PDT 68xx 终端电池组
要插入电池组:
1. 将电池平稳插入终端底部,如下面插图中所示。
电池
锁
电池舱
电池手柄
脱扣
扫描窗口

109
快速查阅
2. 使用附带的电池锁定钥匙将电池锁定到位。当您转动锁定钥
匙时,电池锁定机构将被旋转并把电池锁定到位。
3. 要解锁并取下电池,请使用电池锁钥匙打开电池锁定机构,
并将电池从终端底部拉出。
取下电池组
1. 按下手柄两侧的电池脱扣按钮。
2. 将电池组从手柄中滑动拉出。
电池锁定机
构
电池锁钥匙
按下脱扣按钮
按下脱扣按钮
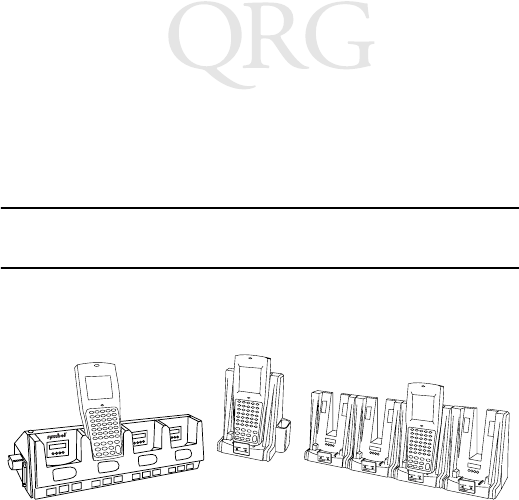
110
68XX 系列
对NiCd 电池充电
要对 68XX 中的 NiCd 电池充电,请使用第 107 页
必需附件
中列出
的一种支座或使用通用电池充电器。有关对电池充电的方法,请
参阅您支座的 QRG 或UBC 的QRG。
小心 :在此终端中只能使用 Symbol 电池 21-32801-01、21-
35217-01,21-35241-01 或21-38796-01。
对锂离子电池充电
注意 : 将装有锂离子电池的终端放在支座上不会损坏电池。
当终端置于支座上时,锂离子电池不充电。在终端里装有锂离子
时,支座用于通讯和作为架子。
要对锂离子电池 (p/n 21-40340-01)充电,请将电池从终端卸
下,并同过一个 UBC 2000 电池转换器充电。更多信息请参阅有关
充电资料。
CCM 38/6860 CRD 38/6865 CRD 38/6866

111
快速查阅
操作 68XX
打开 /关闭 68XX 的电源
通过下列方式打开 68XX 的电源:
•挤压扫描触发开关,
•或按下 PWR 键。
注意 : 必须已装入电池,或者68XX 必须在支座中以打开
终端电源。
要终止68XX 的操作,请按下 PWR 键。
调节对比度
68XX 的显示器对比度可设为 8级。要调节对比度:
•按下 FUNC 然后 X 增加对比度
•按下 FUNC 然后按下 Y 减小对比度
打开 /关闭背光
68XX 具有背光功能,可在光线暗淡情况下操作时照亮显示器。要
打开或关闭背光,请按 FUNC 然后按下 L(灯)。
背光在大约 15 秒后或68XX 断电时自动关闭。
使用键盘
68XX 使用字母数字混合式键盘来产生 26 个字符的字母表 (A-Z)、
数字 (0-9)和多种字符 (+, -, X, ÷, =, • 等)。键区用不同的颜色标
记以指明按下了哪一个修改键以产生特定的字符或动作。
•字母键产生大写字符 A到Z。
•缺省的数字键区产生数字 0-9。
•按下 FUNC 和相应的数字键可产生功能键 F1 至F10。
•按下光标键↓↑ (35 键) 46 键可上下滚动屏幕。
•35 键 - 按下光标键←→向左、右滚动。46 键 - 按下 FUNC,
然后按下 向左滚动,按下 FUNC 然后按下 可向右滚动。

112
68XX 系列
•按下 BKSP 可擦除显示器上输入的信息,每次擦除一个字符。
•35键 - 按下SPACE键输入一个空格。46键 - 按下FUNC然后按
下BKSP(空格 )可输入一个空格。
•按下 CLEAR(35 键)或 CLR 可部分或完全从应用程序级或
屏幕中退出。也可将屏幕中输入的所有数据擦除。
•按下 SHIFT (35 键)或 SHF (46 键)可使用换档键盘。
•CTRL(35 键)或 CTL(46 键)用于执行控制功能并受应用
程序控制。
•按下 ENTER 可将已输入的数据送入68XX 的存储器中。
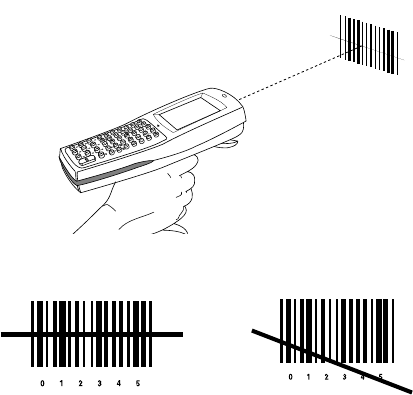
113
快速查阅
使用集成的激光扫描仪
要进行扫描:
1. 按下扫描仪触发开关打开 68XX 和扫描仪的电源。如果已启
动扫描并且激光已打开,扫描发光管将变为红色。
2. 将68XX 对准条码并按下触发开关。
3. 确认扫描光束划过条码符号上所有的条和空白,如下所示:
对于较大的符号,将扫描仪移得更远一些,对于条排列紧密
的符号,将扫描仪更靠近一些。
远程版本支持两级扫描触发开关。第一窄光束用于对准,第
二光束用于解码标签。
4. 解码成功则发光管由红变绿。68XX 也可能发出蜂鸣声。
正确 错误
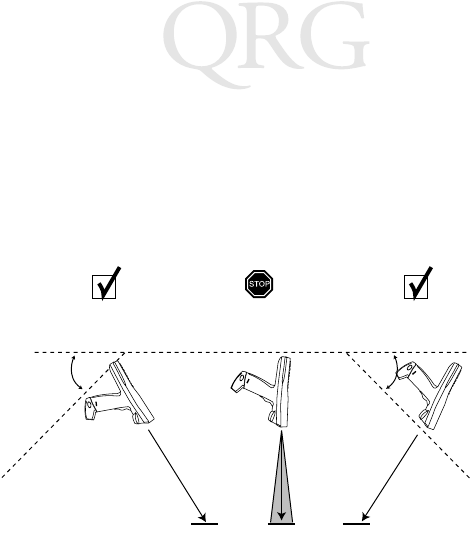
114
68XX 系列
对准:保持一个角度
不要将 68XX 的扫描窗直接对着条码。就象我们所知道的镜面反射
一样,激光从条码直接反射回扫描窗口。这一强光能使扫描仪失
去判断力,并使解码变得困难。镜面反射发生的区域称之为 “盲
区”。
您可以将 68XX 向前或向后倾斜到55°完成一次成功解码。经过实
践很快可以得出可允许的范围。
1. 扫描成构2. 可能的镜面反射
3. 扫描成构
扫描光束
条码
阴影区域表示盲区 (±2")
55° 55°
扫描
光束
条码 条码

115
快速查阅
执行通信
与主机通信
68XX 通过CCM 38/6860、CRD 38/6865、CRD 38/6866 或PC 转换器
与主机通信。有关设置CCM、支座或 PC 适配器的信息,请参阅随
同每个设备提供的
PDT 6800 系列产品参考指南
或
快速参考指南
。
要与主机通信:
1. 按照
PDT 6800 系列
产品参考指南
或快速参考指南中所述设置支座或 PC 转换器。
2. 将68XX 的底座放入支座中。对着支座的后部按压 68XX 的顶
部,直到它稳定就位。
当68XX 牢靠放入支座中时,状态发光管点亮为纯绿色。
3. 在主机和 68XX 上启动通讯程序。
小心 :当支座上红色的COMM 发光管闪烁时,切勿移去
68XX。
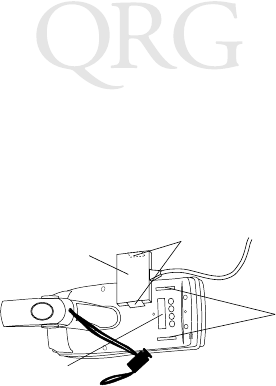
116
68XX 系列
与打印机通讯
68XX 通过打印机接口模块 (PIM) 与打印机通讯。要将 68XX 连接到
打印机:
1. 将PIM 光连接器上的夹子插入 68XX 端口两侧的插槽中,可
以将连接器连接到此端口。
2. 将PIM 的DB-9 连接器插入打印机的端口。
3. 打开打印机和 68XX 的电源。
在 RF 网络中通讯
PDT 6810 将在 Symbol Spectrum One RF 网络中运行;PDT 684X 则
在Symbol Spectrum24 RF 网络中运行。
状态发光管指明终端与RF 网络的连接状态:
有关在 RF 环境下操作 PDT 68XX 的更多信息,请参阅 Spectrum
One 或Spectrum24 的相关文档。
关闭 指明正在使用射频,且与接入点 (Spectrum24) 或基站
(Spectrum One) 相关联。
红灯每秒闪
烁一次
指明在射频范围之外或者没有相关的接入点或基站。
插槽
夹子
PIM
光连接器
68XX 的光端口

117
快速查阅
从802.11 切换至 Srping RF 协定(PDT 6842)
注意 : 通过802.11 RT 协定引导启动终端。然后通过下述程序
切换至 Spring RF 协定。
1. 引导启动终端。显示下面提示:
2. 请在 4秒钟内键入 “y”。否则,终端会以802.11 RT 协定引导
启动。
显示下一个提示:
3. 请在 10 秒钟内键入 “y”。否则,终端会以802.11 RT 协定引
导启动。
显示下一个提示:
SOFTWARE UPDATE
Update?[y/n]:
RF PROTOCOL UPDATE
OPPORTUNITY
Update RF protocol
[y/n]:
RF Protocol
Currently 802.11
1. Abort update
2. Make pre-802.11
3. Make 802.11
Select[1,2,3]:
118
68XX 系列
4. 选择2以Spring RF 协定引导启动。
显示下一个提示:
5. 输入密码 REPROT,然后按输入键。终端继续引导启动。如果有
兼容性问题,终端会停滞,并显示一个错误信息。请联系您的
系统管理员。
故障解决
故障现象 可能原因 操作
没有打开 68XX 的
电源。
未安装电池。 检验 68XX 已由电池供
电。
电池未充电。 NiCd 电池—对终端中的
电池充电,或取下电池并
在CCM 38/6860 或
CRD38/6866 的备用电池
充电插槽中充电。
锂离子电池—自终端卸下
电池,并用 UBC 2000 转
换器对其充电。
电池电量低
消息
主电池组电量低。 NiCd 电池—将68XX 放入
支座中并重新对电池充
电。
或
关闭 68XX 的电源并更换
电池。
Enter password
→

119
快速查阅
电池电量低
消息 (续)
主电池组电量低。
(续)
锂离子电池—自终端卸下
电池,并用 UBC 2000 转
换器对其充电。
或
关闭 68XX 的电源并更换
电池。
电池已用尽。在收到
电池电量低
消
息后没有更换电池。
更换电池。
显示器上不显示字
符。
68XX 电源没有打开。 按下 PWR 键。
未装电池组或已耗尽。 更换电池组或对它重新充
电。
对比度未正确调整。 请参阅第 111 页以了解关
键顺序。
扫描仪不能对条码
进行解码
读不到
条码。
检查条码有无损坏,如,
沾上污迹或弄脏。
扫描窗口变脏。 用镜片所用的镜头纸清洁
扫描窗口。切勿使用沾有
洗涤剂的棉纸。
双键
错误信息两个或更多键被同时
按下。
按次序击键。
按下键时 68XX 没
有响应
应用程序没有成功下
载。
请求系统管理员重新下载
应用程序。
故障现象 可能原因 操作

120
68XX 系列
121
요약 설명서
소개
68XX 는 궂은 날씨에도 효과적으로 사용할 수 있는 휴대용 컴퓨터
로 한 패키지 안에 다음과 같은 기능이 들어 있습니다 .
•PC 표준 구조 (8088 16- 비트 구조 )
• DR-DOS 호환성
• 16X21 문자 디스플레이
• 35 및 46-Key 영숫자 키보드로 키 입력
•스캔 기능 내장
•리튬 이온 및 NiCd 교체 가능한 알카라인 배터리 팩
•배치 통신 또는 RF 네트워크 통신 (내부에 안테나 장착 )
-Spectrum One® RF 네트워크 (681X)
-Spectrum24® RF 네트워크 (684X).
이 제품 설명서에 대해
이 제품 설명서는 작동자에게 다음 절차에 대한 지침을 제공합니
다.
•배터리 설치 /제거
•배터리 충전
• 68XX 전원 켜기 /끄기
•디스플레이 대비 조정
•배경 조명법 켜기 /끄기
•키보드 사용
•내장 스캐너 사용
•통신 실행
• 68XX 문제 해결 .
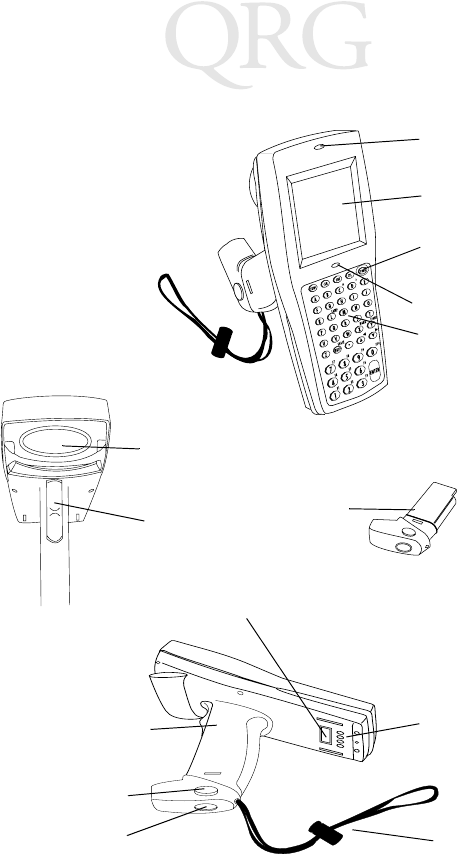
122
68XX 시리즈
68XX 의 부품
+-
=
Status
-
스캔 LED
디스플레이
키보드
스캔 창
스캔 트리거 배터리
팩
배터리 실
배터리
해제 장치
배터리 잠금 장치
상태 LED
전원 키
손잡이
광 커넥터
충전
연결부
123
요약 설명서
필수 악세서리
필수 68XX 악세서리는 다음과 같습니다 .
•리튬 이온 및 NiCd 충전 가능한 배터리 팩 또는
안전한 충전 가능한 배터리 팩
•보조 배터리 충전 슬롯이 있는 4- 슬롯 CCM 38/6860 충전 및
통신 모듈
또는
•1- 슬롯 CRD 38/6865 크래들 충전 및 통신 크래들
또는
•4- 슬롯 CRD 38/6866 충전 및 통신 크래들
• RS-232 직렬 케이블
•전원 공급장치 (크래들 당 한 개).
옵션 악세서리
옵션 68XX 악세서리는 다음과 같습니다 .
•벽면 설치용 키트 (부품 번호 3866-000)
•UBC 배터리 충전기
•PC 어댑터 및 프린터 인터페이스 모듈 (PIM)
•10 시간 소형 배터리 충전기 (벽면에 설치 )
• Spectrum One 및 Spectrum24 네트워크 악세서리
•홀스터 .

124
68XX 시리즈
전원 공급하기
68XX 전원은 리튬 이온 및 니켈 카드뮴(NiCd) 충전 가능한 배터리
팩으로 공급됩니다 .
참고 :시리즈 3800 NiCd 배터리 팩인 3872-103, 3872-105 및
3872-115 는 68XX 에 사용할 수 없습니다 .
신품 또는 재충전된 배터리 설치하기
배터리를 설치하려면 :
1. 배터리 팩의 손잡이 방향이 6800 의 스캔 창을 마주 보도록
잡으십시오 .
2. 배터리 해제 단추를 누른 상태로 팩을 배터리 실에 밀어 넣
으십시오 .
3. 배터리 잠금 장치를 눌러서 고정하십시오 .
안전한 PDT 68xx 단말기를 위한 배터리 팩 충전하기
배터리 팩을 끼우려면 :
1. 다음 그림처럼 단말기 바닥에 배터리를 단단히 끼우십시오 .
2. 함께 제공된 배터리 잠금 키를 사용하여 배터리를 제 자리에
넣고 잠그십시오 . 잠금 키를 돌리면 배터리 잠금 장치가 돌
아가 배터리가 제 자리에 고정되어야 합니다 .
배터리
잠금 장치
배터리 실
배터리 손잡이
해제 단추
스캔 창
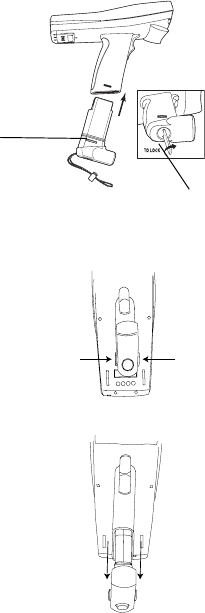
125
요약 설명서
3. 배터리 잠금을 풀고 밖으로 빼려면 배터리 잠금 키로 배터리
잠금 장치를 풀고 , 배터리를 단말기 바닥에서 잡아 당기십
시오 .
배터리 팩 제거하기
1. 손잡이 양쪽에 있는 배터리 해제 단추를 누르십시오 .
2. 배터리 팩을 손잡이에서 꺼내십시오 .
배터리
잠금 장치
배터리 잠금 키
해제 단추를
누르십시오
해제 단추를
누르십시오

126
68XX 시리즈
NiCd 배터리 충전하기
68XX 에서 NiCd 배터리를 충전하려면 123 쪽에 있는
필수 악세서
리
에 나열된 크래들 중 하나 또는 범용 배터리 충전기를 사용하십
시오 . 배터리 충전 방법은 크래들 요약 설명서나 UBC 요약 설명
서를 참조하십시오 .
주의 :이 단말기에는 Symbol 배터리 21-35217-01, 21-35241-01
또는 21-38796-01 만 사용하십시오 .
리튬 이온 배터리 충전하기
참고 : 크래들에 리튬 이온 배터리가 설치된 단말기를 놓아도
배터리에 손상은 없습니다 .
단말기가 크래들에 놓여 있을 때 리튬 이온 배터리는 충전되지 않
습니다 . 리튬 이온 배터리가 설치되어 있으면 크래들을 통신 또는
단말기를 위한 보관 홀더로 사용하십시오 .
리튬 이온 배터리 (부품 번호 21-40340-01)를 충전하려면 단말기
에서 배터리를 제거하고 부품 번호 21-32665-24 UBC 2000 배터리
어댑터에서 충전합니다 . 자세한 정보는 충전기의 문서를 참조하
십시오 .
CRD 38/6865 CRD 38/6866CCM 38/6860

127
요약 설명서
68XX 작동하기
68XX 전원 켜기/끄기
다음 방법으로 68XX 전원을 켜십시오 .
•스캔 트리거를 당기거나
•또는 PWR 키를 누릅니다 .
참고 : 배터리가 설치되어 있거나 68XX 가 크래들에 있어야
단말기 전원이 켜집니다 .
68XX 의 작동을 일시 중지하려면 PWR 키를 누르십시오 .
대비 조정하기
68XX의 디스플레이 대비는 8 단계로 설정할 수 있습니다 . 대비를
조정하려면 :
•FUNC 를 누른 다음 , X를 누르면 대비가 증가합니다 .
•FUNC 를 누른 다음 , Y를 누르면 대비가 줄어듭니다 .
배경 조명 켜기 /끄기
68XX 에는 희미한 조명에서 작동할 경우 디스플레이를 밝게 하기
위한 배경 조명이 있습니다 . 배경 조명을 켜거나 끄려면 FUNC 를
누른 다음 , L (등)을 누르십시오 .
배경 조명은 약 15 초 후 자동으로 꺼지거나 68XX 의 전원을 끄면
꺼집니다 .
키보드 사용하기
68XX 는 26 자의 영문자 (A-Z), 숫자 (0-9) 및 각종 문자 (+, -, X, ÷,
=, 기타)를 표시하는 영숫자 키보드를 사용합니다 . 키패드에는 누
르면 특정 문자가 나타나거나 작동되는 색상으로 구분된 수식 키
가 있습니다 .
•영문 키는 대문자 A부터 Z를 생성합니다 .
•기본 숫자 키패드는 0-9 의 숫자를 생성합니다 .
•FUNC 를 누르고 대응하는 숫자 키를 누르면 기능 키 F1 부터
F10 까지 생성됩니다 .
•커서 키(35-키) 및(46-키)를 눌러 화면을 위와 아
래로 스크롤합니다 .
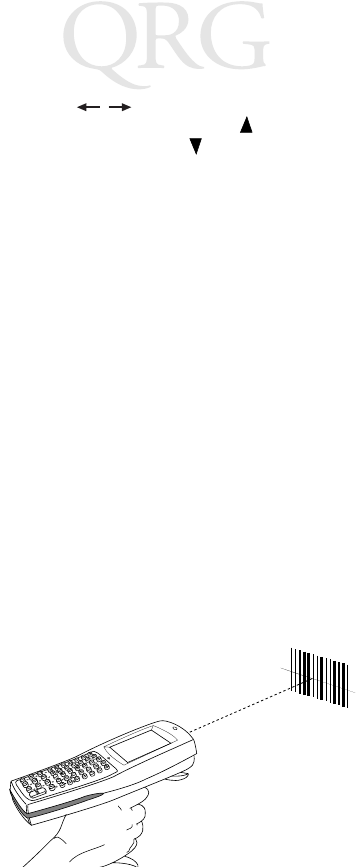
128
68XX 시리즈
•35- 키 - 커서 키 를 눌러 왼쪽, 오른쪽으로 스크롤합
니다 . 46- 키- FUNC 를 누른 다음 , 를 누르면 왼쪽으로
스크롤하고 FUNC 를 누른 다음 를 누르면 오른쪽으로 스크
롤합니다 .
•BKSP 를 누르면 디스플레이에 입력한 정보가 한 번에 한 문자
씩 삭제됩니다 .
•35- 키 - SPACE를 눌러 공백을 입력합니다. 46-키- FUNC
를 누른 다음 , BKSP (SPACE) 를 누르면 공백 문자를 입력할
수 있습니다 .
•CLEAR(35-키) 또는 CLR(46-키)를 누르면 응용 프로그램의
한 수준이나 화면에서 일부 또는 전부가 종료됩니다. 또한 화
면에 입력한 모든 정보가 삭제됩니다.
• SHIFT(35-키) 또는 SHF(46-키)를 눌러 시프트로 이동한 키
보드에 접근합니다 .
•CTRL(35-키) 또는 CTL(46- 키)은 제어 기능을 수행하며 응
용 프로그램으로 제어됩니다 .
• ENTER 를 누르면 입력한 데이터가 68XX 메모리에 입력됩니
다.
내장 레이저 스캐너 사용하기
스캔하려면 :
1. 스캐너 트리거를 눌러 68XX 과 스캐너 전원을 켜십시오 . 스
캔 기능을 사용 가능하게 되면 스캔 LED 가 적색이 되고
레이저가 켜집니다 .
2. 68XX 로 바코드를 향해 트리거를 누르십시오 .

129
요약 설명서
3. 아래 그림처럼 스캔 광선은 바코드 기호에 있는 모든 막대와
여백을 가로 질러야 합니다 .
바코드가 크면 스캐너를 더 멀리하고 바 사이가 좁은 바코드
의 경우 더 가까이 대십시오 .
Long-range 버전은 두 단계 스캔 트리거를 지원합니다 . 첫번
째 좁은 광선은 조준용이고 두 번째 광선은 레이블을 해독합
니다 .
4. 해독에 성공하면 LED 가 적색에서 녹색으로 바뀝니다 .
68XX 에서 경고음을 울릴 수도 있습니다 .
조준 : 각도 유지
68XX 의 스캔 창을 바코드 바로 위에 대지 마십시오 . 바코드에서
스캔 창으로 레이저 광선이 직접 반사되는 것을 거울 반사라고 합
니다 . 이런 강한 광선이 스캐너의 " 눈을 멀게" 만들어 해독을 어
렵게 합니다 . 거울 반사가 발생하는 영역을 " 사각 지대 "라고 합
니다 .
올바름틀림
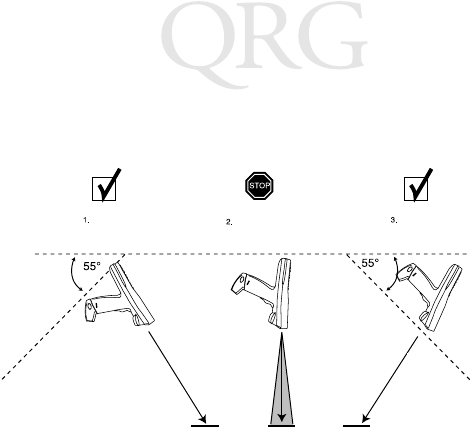
130
68XX 시리즈
68XX 을 최대 55° 까지 앞이나 뒤로 기울이면 성공적으로 해독됩
니다 . 허용되는 각도가 어느 정도인지는 연습해 보면 간단히 알
수 있습니다 .
통신 수행하기
호스트와 통신하기
68XX 는 CCM 38/6860, CRD 38/6865, CRD 38/6866 또는 PC 어댑터
를 통해 호스트와 통신합니다 . CCM, 크래들 또는 PC 어댑터 설
정에 대한 정보는 각 장치에 제공된 PDT 6800
시리즈 제품 설명서
또는
요약 설명서
를 참조하십시오 .
호스트와 통신하려면 :
1. 크래들이나 PC 어댑터를 해당 장치의 PDT 6800
시리즈 제품
설명서
또는 요약 설명서의 설명에 따라 설치하십시오 .
2. 68XX 바닥을 크래들에 내려 놓으십시오 . 크래들에 완전히
끼워질 때까지 68XX 상단을 누르십시오 .
성공적인
스캔
예상되는
거울 반사
성공적인
스캔
스캔
광선
스캔
광선
빗금친 영역은 사각 지대
(±2") 를 나타냅니다
바코드 바코드 바코드
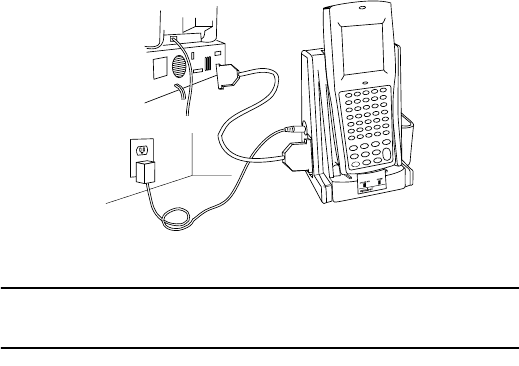
131
요약 설명서
68XX이 크래들에 제대로 끼워지면 상태 LED는 녹색 점등 상
태가 됩니다 .
3. 호스트와 68XX 에서 통신 프로그램을 실행하십시오 .
주의 :크래들의 적색 COMM LED 가 깜박이는 동안에는
68XX 를 꺼내지 마십시오 .
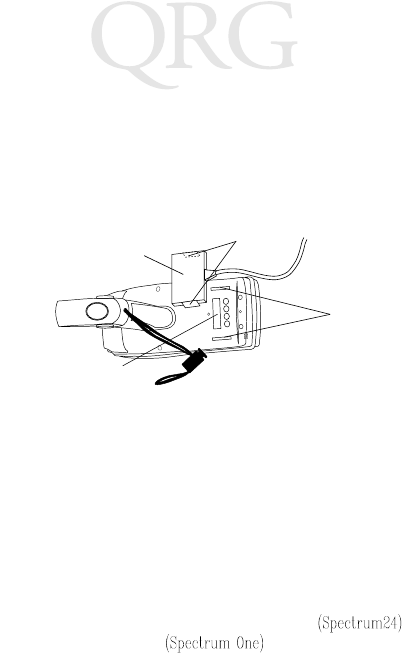
132
68XX 시리즈
프린터와 통신하기
68XX 는 프린터 인터페이스 모듈 (PIM) 을 통해 프린터와 통신합니
다. 68XX 를 프린터에 연결하려면 :
1. 포트 양쪽에 있는 슬롯에 커넥터의 클립을 끼워 PIM 의 광 커
넥터를 68XX 포트에 연결하십시오 .
2. PIM 의 DB-9 커넥터를 프린터 포트에 꽂으십시오 .
3. 프린터와 68XX 전원을 켜십시오 .
RF
네트워크에서 통신하기
PDT 6810 은 Symbol Spectrum One RF 네트워크에서 작동하며 PDT
684X 는 Symbol Spectrum24 RF 네트워크에서 작동합니다 .
상태 LED 는 단말기의 RF 네트워크와의 연결 상태를 보여 줍니다
.
해당 RF 환경에서 PDT 68XX 작동에 대한 자세한 정보는 Spectrum
One 또는 Spectrum24 네트워크 설명서를 참조하십시오.
꺼짐무선 통신이 작동 중이며 액세스 포인트 또는
베이스 스테이션 과 관련이 있음을 나타냅
니다 .
초 당 한번
씩 적색
점멸
무선 통신이 범위를 벗어났고 액세스 포인트나 베이스
스테이션과 관련이 없음을 나타냅니다 .
슬롯
클립
68XX 의 광 포트
PIM
광 커넥터

133
요약 설명서
802.11 에서 Spring RF 프로토콜 (PDT 6842) 로
전환하기
참고 : 단말기는 802.11 RF 프로토콜로 시동됩니다 .
Spring RF 프로토콜로 다음 과정을 통해 전환됩니다 .
1. 단말기를 시동합니다 . 다음 프롬프트가 표시됩니다 :
2. 4 초 내에 "y" 문자를 입력합니다 . 4 초 동안에 "y" 문자를 입
력하지 않으면 단말기는 802.11 RF 프로토콜로 시동됩니다 .
다음 프롬프트가 아래와 같이 나타납니다 :
3. 10 초 이내에 "y" 문자를 입력합니다 . 10 초 동안에 "y" 문자
를 입력하지 않으면 단말기는 802.11 RF 프로토콜로 시동됩
니다 .
다음 프롬프트가 아래와 같이 나타납니다 :
4. 2를 선택하여 Spring RF 프로토콜로 시동합니다 .
SOFTWARE UPDATE
Update?[y/n]:
RF PROTOCOL UPDATE
OPPORTUNITY
Update RF protocol
[y/n]:
RF Protocol
Currently 802.11
1. Abort update
2. Make pre-802.11
3. Make 802.11
Select[1,2,3]:
134
68XX 시리즈
다음 프롬프트가 아래와 같이 나타납니다 :
5. 암호 "RFPROT" 를 입력하고 나서 ENTER 키를 누릅니다 .
단말기가 시동됩니다 . 만일 호환상의 문제가 존재하면 단
말기는 오류 메시지와 함께 중단됩니다 . 시스템 관리자에
게 문의하십시오 .
문제 해결하기
증상 예상되는 원인 조치
의 전원이 켜
지지 않습니다 .
배터리가 설치되지 않
았습니다 .
가 배터리로부터 전
원을 공급받고 있는지 확
인하십시오 .
배터리가 충전되지 않
습니다 .
배터리 - 단말기에
서 배터리를 충전하거나
배터리를 제거하고
또는
의 보조 배터리 충전
슬롯에서 충전하십시오 .
리튬 이온 - 단말기에서
배터리를 제거하고
어댑터에서 충전하십
시오 .
(배터리
부족)
메시지
주 배터리 팩 전원이
부족합니다 .
배터리 - 크래들에
을 끼우고 배터리를
재충전하십시오 .
또는
전원을 끄고 배터리
를 교체하십시오 .
Enter password
→
135
요약 설명서
(배터리
부족)
메시지 (계
속).
주 배터리 팩 전원이
부족합니다 (계속).
리튬 이온 배터리 - 배터
리를 로부터 제거하
고 어댑터에서 충전
하십시오 .
또는
의 전원을 끄고 배터
리를 교체하십시오 .
배터리가 다 소모
되었습니다 .
( 배터리 부
족)
메시지가 나타난
후에 배터리를 교환하
지 않았습니다 .
배터리를 교환하십시오 .
화면상 문자를 볼
수 없습니다 .
전원이 켜지지 않
았습니다 .
PWR 키를 누르십시오 .
배터리 팩이 없거나 수
명이 다 되었습니다 .
배터리 팩을 교체하거나
재충전하십시오 .
대비를 적절히 조정하
지 않았습니다 .
키 순서는 127 쪽을 참조
하십시오 .
스캐너가 바코드
를 해독하지 못합
니다 .
바코드가
읽을 수 없는 상태입니
다.
바코드에 얼룩이나 먼지
등이 있는지 확인하십시
오.
스캔 창이 더럽습니다 . 안경에 사용하는 렌즈 청
소용 천을 사용하여 스캔
창을 청소하십시오 . 천에
로션을 사용하지 마십시
오.
( 이중 키
)
오류 메시지
둘 이상의 키를 동시에
눌렀습니다 .
키를 순서대로 누르십시
오.
키를 눌렀을 때
가 반응이 없습
니다
응용 프로그램이 성공
적으로 다운로드되지
않았습니다 .
시스템 관리자에게 응용
프로그램을 다시 다운로
드하도록 요청하십시오 .
증상 예상되는 원인 조치

136
68XX 시리즈

137
Quick Reference
Ergonomic Recommendations
Caution: In order to avoid or minimize the potential risk of ergonomic injury follow the
recommendations below. Consult with your local Health & Safety Manager to ensure that you
are adhering to your company's safety programs to prevent employee injury.
• Reduce or eliminate repetitive motion
• Maintain a natural position
• Reduce or eliminate excessive force
• Keep objects that are used frequently within easy reach
• Perform tasks at correct heights
• Reduce or eliminate vibration
• Reduce or eliminate direct pressure
• Provide adjustable workstations
• Provide adequate clearance
• Provide a suitable working environment
• Improve work procedures.
Regulatory Information
All Symbol devices are designed to be compliant with rules and regulations in locations they
are sold and will be labeled as required.
Any changes or modifications to Symbol Technologies equipment, not expressly approved by
Symbol Technologies, could void the user's authority to operate the equipment.
Applying the Regulatory Country Stamp
A regulatory label is applied to signify the device is approved for use in the following
countries: United States, Canada, Australia, Japan & Europe.
Note: Europe includes, Austria, Belgium, Croatia, Denmark, Estonia, Finland, France,
Germany, Greece, Iceland, Ireland, Italy, Liechtenstein, Luxembourg, Netherlands, Norway,
Portugal, Spain, Sweden, Switzerland, United Kingdom.
In addition to the list above other countries may require a regulatory stamp to be affixed to
the product.
Please refer to www.symbol.com/ for the list of countries where mandatory stamps are
required.
For countries that require regulatory label, a sheet of stamps may be enclosed within the
package.
If the appropriate stamp is not provided, please contact your supplier.
To apply the country stamp:
1. Peel the stamp appropriate to the country where this device is to be used.
2. Apply the country stamp in the space provided on the regulatory label
Operation of the device without a regulatory label or the correct country Stamp is
illegal.
138
68XX Series
FCC RF Exposure Guidelines
This device was tested for typical body-worn operations with the holster providing a minimal
spacing of 2.0 cm from the body to the back of the terminal/antenna. To maintain compliance
with FCC RF exposure compliance requirements, use only belt-clips, holsters, or similar
accessories that maintain a 2.0 cm separation distance between the user's body and the back
of the terminal, including the antenna. The use of third-party belt-clips, holsters, and similar
accessories should not contain metallic components in its assembly. The use of these
accessories that do not satisfy these requirements may not comply with FCC RF exposure
compliance requirements, and should be avoided.
Radio Frequency Interference Requirements
Note: This equipment has been tested and found to comply with
the limits for a Class B digital device, pursuant to Part 15 of the
FCC rules. These limits are designed to provide reasonable
protection against harmful interference in a residential
installation. This equipment generates, uses and can radiate radio
frequency energy and, if not installed and used in accordance with the instructions, may cause
harmful interference to radio communications. However there is no guarantee that
interference will not occur in a particular installation. If this equipment does cause harmful
interference to radio or television reception, which can be determined by turning the
equipment off and on, the user is encouraged to try to correct the interference by one or more
of the following measures:
• Reorient or relocate the receiving antenna
• Increase the separation between the equipment and receiver
• Connect the equipment into an outlet on a circuit different from that to which the
receiver is connected
• Consult the dealer or an experienced radio/TV technician for help.
Radio Frequency Interference Requirements - Canada
This device complies with RSS 210 of Industry & Science Canada. Operation is subject to the
following two conditions: (1) this device may not cause harmful interference and (2) this
device must accept any interference received, including interference that may cause undesired
operation.
This Class B digital apparatus complies with Canadian ICES-003.
Cet appareil numérique de la classe B est conforme à la norme NMB-003 du Canada.
Label Marking: The Term "IC:" before the radio certification only signifies that Industry
Canada technical specifications were met.
Marking and European Economic Area (EEA)
RLAN's (2.4GHz) for use through the EEA have the following restrictions:
• Maximum radiated transmit power of 100 mW EIRP in the frequency range 2.400 -
2.4835 GHz
• France, equipment is restricted to 2.4465 -2.4835 GHz frequency range
• Belgium outside usage, the equipment is restricted to 2.460 -2.4835 GHz frequency
range
• Italy requires a user license for outside usage.
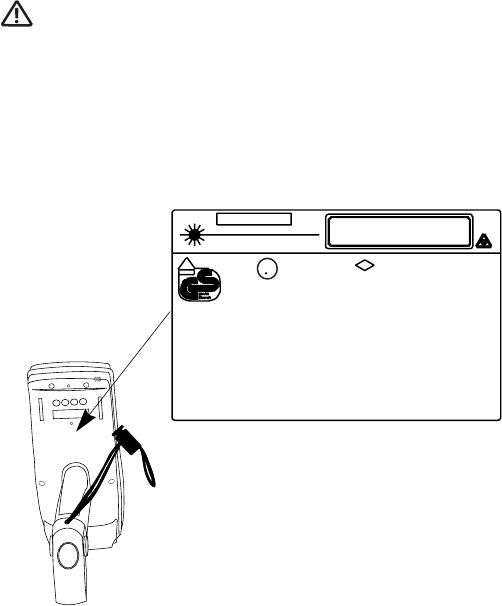
139
Quick Reference
Statement of Compliance
Symbol Technologies, Inc., hereby declares that this device is in compliance with all the
applicable Directives, 1999/5/EC, 89/336/EEC, 73/23/EEC. A Declaration of Conformity
may be obtained from http://www2.symbol.com/doc/
Other Countries
Mexico - Restrict Frequency Range to: 2.450 - 2.4835 GHz.
Israel - Restrict Frequency Range to: 2.418 - 2.457 GHz.
Sri Lanka - Restrict Frequency Range to: 2.400 - 2.430 GHz.
Laser Devices
Symbol devices using lasers comply with US 21CFR1040.10, and IEC825-1:1993, EN60825-
1:1994+A11:1996. The laser classification is marked on one of the labels on the device.
Class 1 Laser devices are not considered to be hazardous when used for their intended
purpose. The following statement is required to comply with US and international regulations:
Caution: Use of controls, adjustments or performance of procedures other than those specified
herein may result in hazardous laser light exposure.
Class 2 laser scanners use a low power, visible light diode. As with any very bright light source,
such as the sun, the user should avoid staring directly into the light beam. Momentary
exposure to a Class 2 laser is not known to be harmful.
Scanner Labeling
w/Symbol battery 21-32810-01
See Manual 70-32644-01 for Accessories
SYMBOL TECHNOLOGIES, INC.
BOHEMIA, NY 11716 MADE IN U.S.A.
APPROVED
LASER
BARCODE
SCANNER
9897
LASER LIGHT - DO NOT STARE INTO BEAM
630-680nm LASER 1.0 mW MAX OUTPUT
CLASS II LASER PRODUCT
E143267
LISTED
ACCESSORY
I.T.E.
CL
UUS
CAUTION
V
DE
ACHTUNG LASERSTRAHL. LASERCLASSE 2. NICHT IN DEN STRAHL
BLICKEN. LUMIERE LASER-NE PAS REGARDER DANS LE FAISCEAU
APPAREIL A LASER DE CLASSE 2. CAUTION LASER LIGHT. DO NOT
STARE INTO BEAM. CLASS 2 LASER PRODUCT 630-680nW, 1mW LASER
`
Nonincendive CL I, Div 2, Gps ABCD
Suitable for CL I I, Div 2, Gps F
G
Class III. Div 1,2
FM T4A
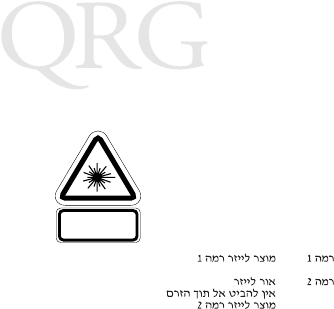
140
68XX Series
In accordance with Clause 5, IEC 825 and EN60825, the following information is
provided to the user:
ENGLISH HEBREW
CLASS 1 CLASS 1 LASER PRODUCT
CLASS 2 LASER LIGHT
DO NOT STARE INTO BEAM
CLASS 2 LASER PRODUCT
DANISH / DANSK ITALIAN / ITALIANO
KLASSE 1 KLASSE 1 LASERPRODUKT CLASSE 1 PRODOTTO AL LASER DI CLASSE 1
KLASSE 2 LASERLYF CLASSE 2 LUCE LASER
SE IKKE IND I STRÅLEN NON FISSARE IL RAGGIOPRODOTTO
KLASSE 2 LASERPRODUKT AL LASER DI CLASSE 2
DUTCH / NEDERLANDS NORWEGIAN / NORSK
KLASSE 1 KLASSE-1 LASERPRODUKT KLASSE 1 LASERPRODUKT, KLASSE 1
KLASSE 2 LASERLICHT KLASSE 2 LASERLYS IKKE STIRR INN I LYSSTRÅLEN
NIET IN STRAAL STAREN LASERPRODUKT, KLASSE 2
KLASSE-2 LASERPRODUKT
FINNISH / SUOMI PORTUGUESE / PORTUGUÊS
LUOKKA 1 LUOKKA 1 LASERTUOTE CLASSE 1 PRODUTO LASER DA CLASSE 1
LUOKKA 2 LASERVALO CLASSE 2 LUZ DE LASER NÃO FIXAR O RAIO LUMINOSO
ÄLÄ TUIJOTA SÄDETTÄ PRODUTO LASER DA CLASSE 2
LUOKKA 2 LASERTUOTE
FRENCH / FRANÇAIS SPANISH / ESPAÑOL
CLASSE 1 PRODUIT LASER DE CLASSE 1 CLASE 1 PRODUCTO LASER DE LA CLASE 1
CLASSE 2 LUMIERE LASER CLASE 2 LUZ LASER
NE PAS REGARDER LE RAYON FIXEMENT NO MIRE FIJAMENTE EL HAZ
PRODUIT LASER DE CLASSE 2 PRODUCTO LASER DE LA CLASE 2
GERMAN / DEUTCH SWEDISH / SVENSKA
KLASSE 1 LASERPRODUKT DER KLASSE 1 KLASS 1 LASERPRODUKT KLASS 1
KLASSE 2 LASERSTRAHLEN KLASS 2 LASERLJUS STIRRA INTE MOT STRÅLEN
NICHT DIREKT IN DEN LASERSTRAHL SCHAUEN LASERPRODUKT KLASS 2
LASERPRODUKT DER KLASSE 2
141
Quick Reference
Warranty
(A) Seller's hardware Products are warranted against defects in workmanship and
materials for a period of twelve (12) months from the date of shipment, provided the
Product remains unmodified and is operated under normal and proper conditions.
Warranty provisions and durations on software, integrated installed systems, Product
modified or designed to meet specific customer specifications ("Custom Products"),
remanufactured products, and reconditioned or upgraded products, shall be as
provided in the applicable Product specification in effect at the time of purchase or in
the accompanying software license. (B) Products may be serviced or manufactured with
parts, components, or subassemblies that originate from returned products and that
have been tested as meeting applicable specifications for equivalent new material and
Products. The sole obligation of Seller for defective hardware Products is limited to
repair or replacement (at Seller's option) on a "return to service depot" basis with prior
Seller authorization. Shipment to and from Seller will be at Seller's expense, unless no
defect is found. No charge will be made to Buyer for replacement parts for warranty
repairs. Seller is not responsible for any damage to or loss of any software programs,
data or removable data storage media, or the restoration or reinstallation of any
software programs or data other than the software, if any, installed by Seller during
manufacture of the Product. The aforementioned provisions do not extend the original
warranty period of any Product that had either been repaired or replaced by Seller. (C)
The above warranty provisions shall not apply to any Product (i) which has been
repaired, tampered with, altered or modified, except by Seller's authorized service
personnel; (ii) in which the defects or damage to the Product result from normal wear
and tear, misuse, negligence, improper storage, water or other liquids, battery leakage
or failure to perform operator handling and scheduled maintenance instructions
supplied by Seller; (iii) which has been subjected to unusual physical or electrical stress,
abuse, or accident, or forces or exposure beyond normal use within the specified
operational and environmental parameters set forth in the applicable Product
specification; nor shall the above warranty provisions apply to any expendable or
consumable items, such as batteries, supplied with the Product. EXCEPT FOR THE
WARRANTY OF TITLE AND THE EXPRESS WARRANTIES STATED ABOVE,
SELLER DISCLAIMS ALL WARRANTIES ON PRODUCTS FURNISHED
HERUNDER INCLUDING ALL IMPLIED WARRANTIES OF
MERCHANTABLILTY AND FITNESS FOR A PARTICULAR USE. ANY IMPLIED
WARRANTIES THAT MAY BE IMPOSED BY LAW ARE LIMITED IN DURATION
TO THE LIMITED WARRANTY PERIOD. SOME STATES OR COUNTRIES DO
NOT ALLOW A LIMITATION ON HOW LONG AN IMPLIED WARRANTY
LASTS OR THE EXCLUSION OR LIMITATION OF INCIDENTAL OR
CONSEQUENTIAL DAMAGES FOR CONSUMER PRODUCTS. IN SUCH STATES
OR COUNTIRES, FOR SUCH PRODUCTS, SOME EXCLUSIONS OR
LIMITATIONS OF THIS LIMITED WARRANTY MAY NOT APPLY. The stated
express warranties are in lieu of all obligations or liabilities on the part of Seller for
damages, including but not limited to, special, indirect or consequential damages
arising out of or in connection with the use or performance of the Product or service.
Seller's liability for damages to Buyer or others resulting from the use of any Product
or service furnished hereunder shall in no way exceed the purchase price of said Product
or the fair market value of said service, except in instances of injury to persons or
property.

70-32644-02
Revision B — July 2002
Symbol Technologies, Inc. One Symbol Plaza Holtsville, NY 11742-1300
Service Information
Before you use the unit, it must be configured to operate in your facility’s network and
run your applications.
If you have a problem runnin g your unit or using your equipment, contact your
facility’s Technical or Systems Support. If there is a problem with the equipment, they
will contact the Symbol Support Center:
For the latest version of this guide go to: http://www.symbol.com/manuals.
United States11-800-653-5350
1-631-738-2400 Canada 905-629-7226
United Kingdom 0800 328 2424 Asia/Pacific 337-6588
Australia 1-800-672-906 Austria/Österreich 1-505-5794-0
Denmark/Danmark 7020-1718 Finland/Suomi 9 5407 580
France 01-40-96-52-21 Germany/Deutch-
land 6074-49020
Italy/Italia 2-484441 Mexico/México 5-520-1835
Netherlands/
Nederland 315-271700 Norway/Norge +47 2232 4375
South Africa 11-8095311 Spain/España 91 324 40 00
Inside Spain
Sweden/Sverige 84452900 +34 91 324 40 00
Outside Spain
Latin America
Sales Support 1-800-347-0178 Inside US
+1-561-483-1275 Outside US
Europe/Mid-East
Distributor Operations Contact local distributor or call
+44 118 945 7360
1Customer support is available 24 hours a day, 7 days a week.