TEAC AG-H600NT Stereo Receiver User Manual
TEAC Corporation Stereo Receiver
UserManual.wiki
>
TEAC
>
AG H600NT User Manual
User Manual
Navigation menu
Upload a User Manual
Namespaces
Wiki Guide
HTML
PDF
Info
Views
User Manual
Discussion / Help
Navigation

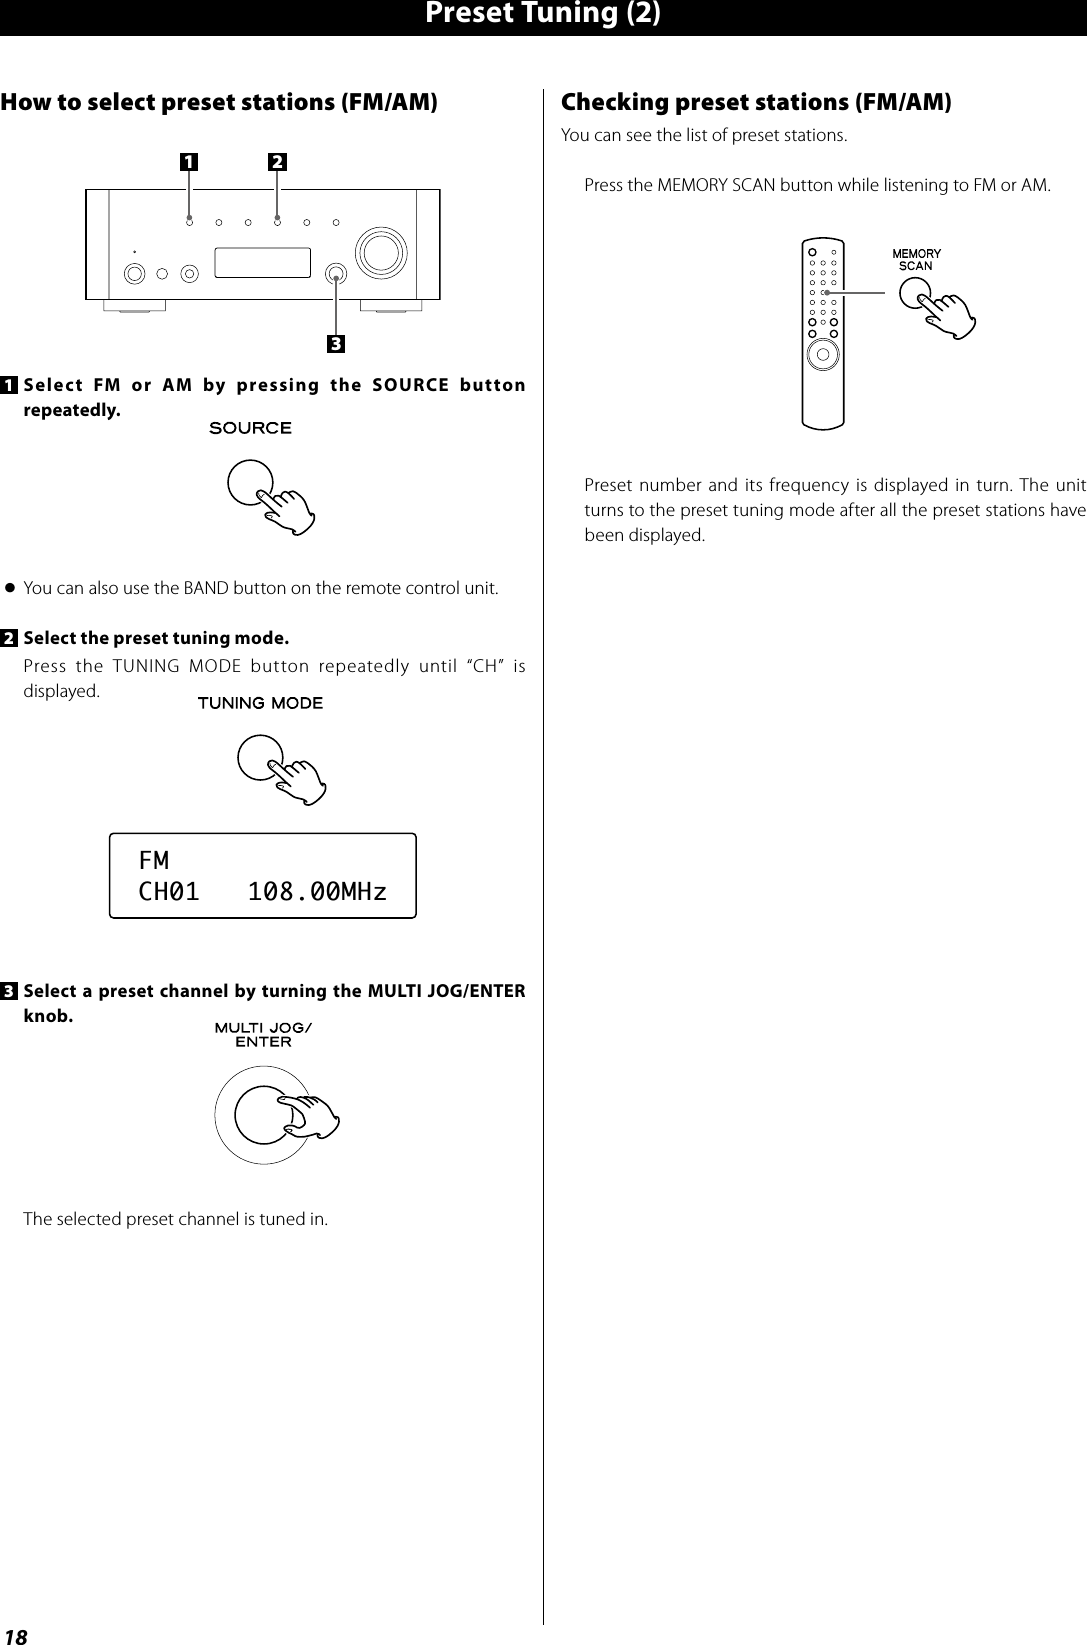
![15ENGLISHShuffle playbackEach time the SHUFFLE button is pressed, the shuffle mode changes as follows:Song (shuffle songs)Album (shuffle albums)Shuffle Off< When you select “Song“, the iPod shuffles songs within the list you choose to play.< When you select “Album“, the iPod plays all the songs on an album in order, and then randomly selects another album in the list and plays through it in order.< During playback, the Shuffle icon ( ) appears in the iPod’s display.Menu operationsTo go back to the previous menuPress the MENU button.< This button is equivalent to the MENU button on your iPod.To select the menu itemPress the scroll buttons (.°//‡) to scroll to the menu item you want, and then press the ENTER button.< On the main unit, turn the MULTI JOG/ENTER knob to scroll to the menu item you want, and then press the MULTI JOG/ENTER knob.Repeat playbackEach time the REPEAT button is pressed, the repeat mode changes as follows:One (repeat one song)All (repeat all the songs in the list)Repeat Off< When you select the “One”, the Repeat One icon ( ) appears in the iPod’s display.< When you select the “All”, the Repeat icon ( ) appears in the iPod’s display.Docking an iPod to this systemiPod video outputMake the following settings on your iPod’s menu to output video to a TV via the dock.In the [Video] menu, select [Video Settings]. Set [TV OUT] to [On] or [Ask].If you have set [TV OUT] to [Ask], your iPod prompts you each time you play a video to specify whether to output it to a TV.Note< If you output video to a TV from your iPod, the video is not displayed on the iPod’s screen.< iPod touch does not contain this menu. You will have to specify whether to a output video to a TV each time you play it.Using the alarm on your iPod touchIf you specify [Slide to power off] on your iPod touch, you cannot use the alarm even if the iPod touch is docked to this system. To use the alarm on your iPod touch, do not select [Slide to power off]. (The screen can be turned off without any problem.)< When video is displayed on your iPod touch’s screen, you cannot use the alarm even if the iPod touch is docked to this system. To use the alarm on your iPod touch, select any item other than video.](https://usermanual.wiki/TEAC/AG-H600NT/User-Guide-1135536-Page-15.png)
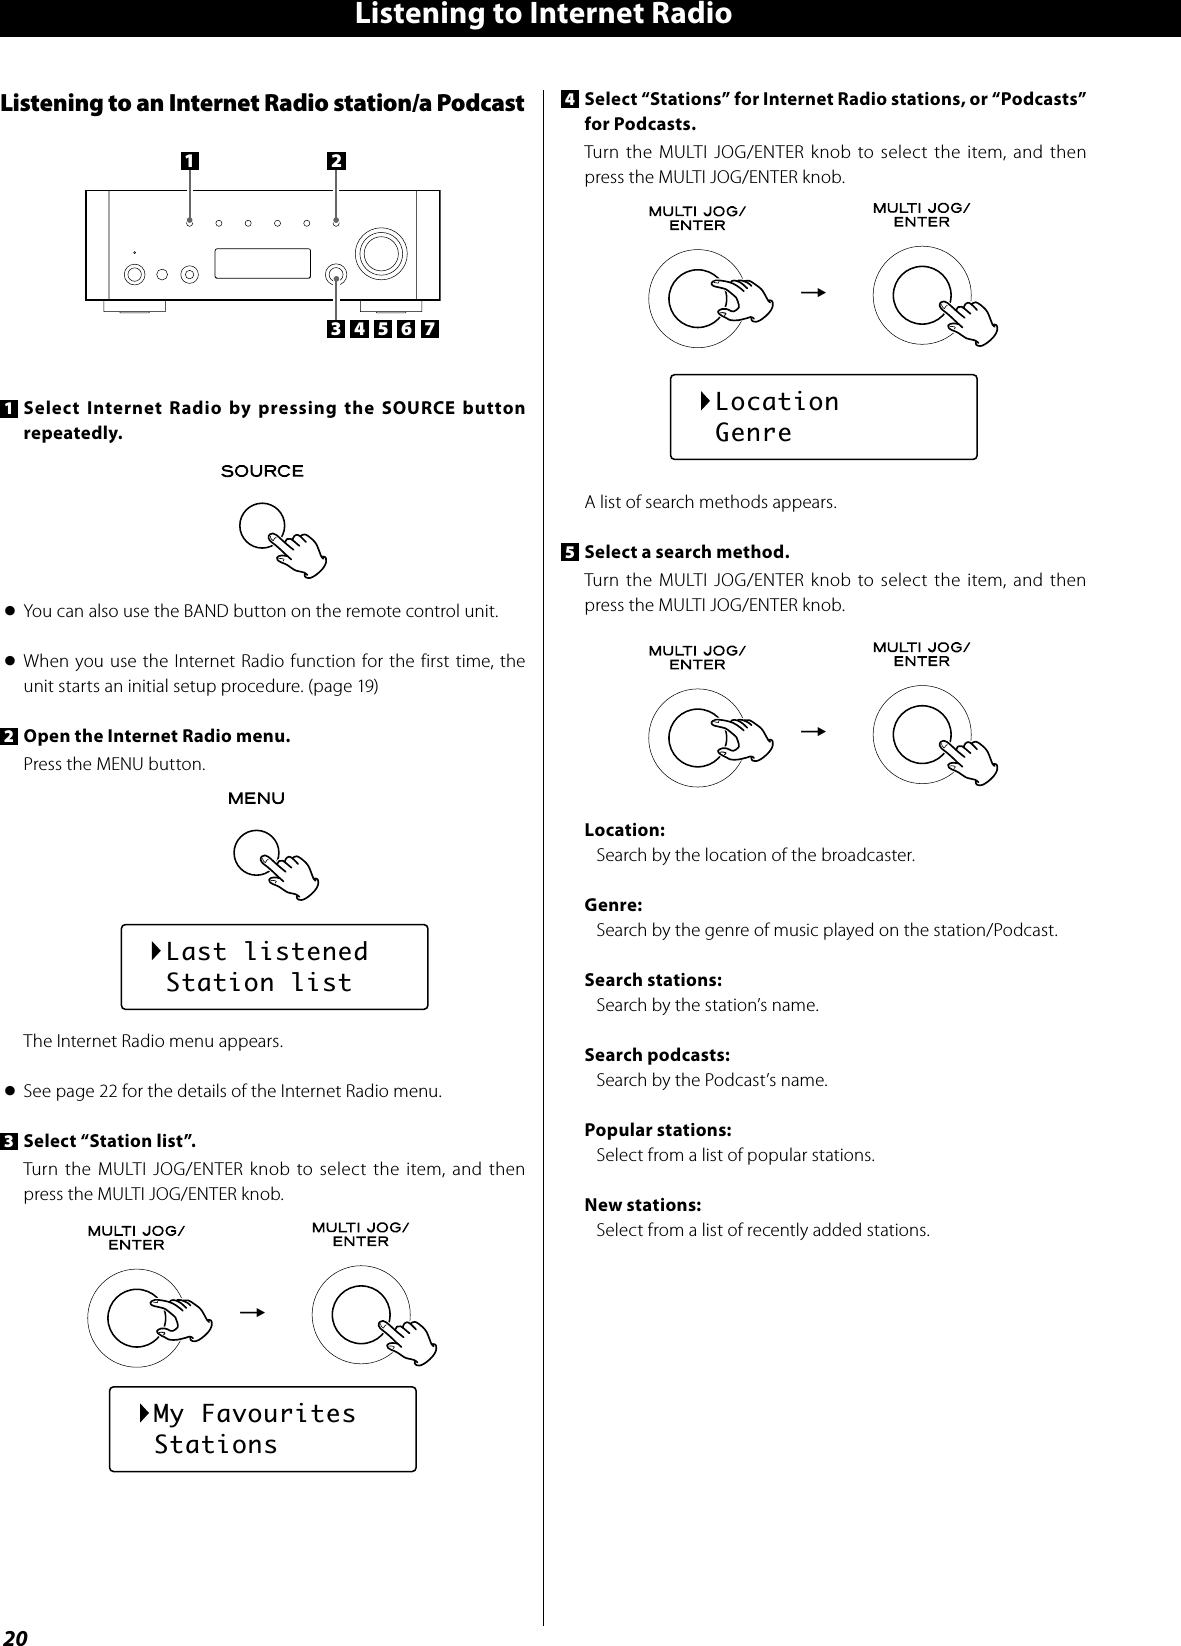
![19ENGLISH4 Enter the correct password for the network if required.< See “How to input characters” below.Now the unit starts to connect to the Internet.When connection is established successfully, the Internet radio menu is displayed. See page 20 to select a station.< If you have a problem connecting to the Internet, see page 23.Internet Radio Initial SetupInitial setupWhen you use the Internet radio function for the first time, the unit starts an initial setup procedure to connect to the Internet.1 Select Internet Radio by pressing the SOURCE button repeatedly.< You can also use the BAND button on the remote control unit.Initial setup wizard starts.2 Select your country/area.Turn the MULTI JOG/ENTER knob to select the item, and then press the MULTI JOG/ENTER knob.3 Select a network name you want to use.Turn the MULTI JOG/ENTER knob to select the item, and then press the MULTI JOG/ENTER knob.< To use a wired Internet connection, select “[Wired]”. Most of Europe USA123How to input characters< You can input characters only from the remote control unit.1. Press the skip/scroll buttons (.°//‡) to select a set of characters.2. Press the search buttons (m/,) to select the character you want to input.3. Press the ENTER button to input the selected letter. Repeat steps 1 to 3 to input next characters.<: Deletes the last character.E: Enters your input.C: Cancels the operation and goes back to the previous screen.Characters you can input0123456789ABCDEFGHIJKLMNOPQRSTUVWXYZabcdefghijklmnopqrstuvwxyz(space)!”#$%&’()*+,-./:;<=>?@[\]^_`{|}~Key:Ge0123456789<EC 005AD904JM2 [Wired]TT/ÒÚ°/ƇENTER](https://usermanual.wiki/TEAC/AG-H600NT/User-Guide-1135536-Page-19.png)
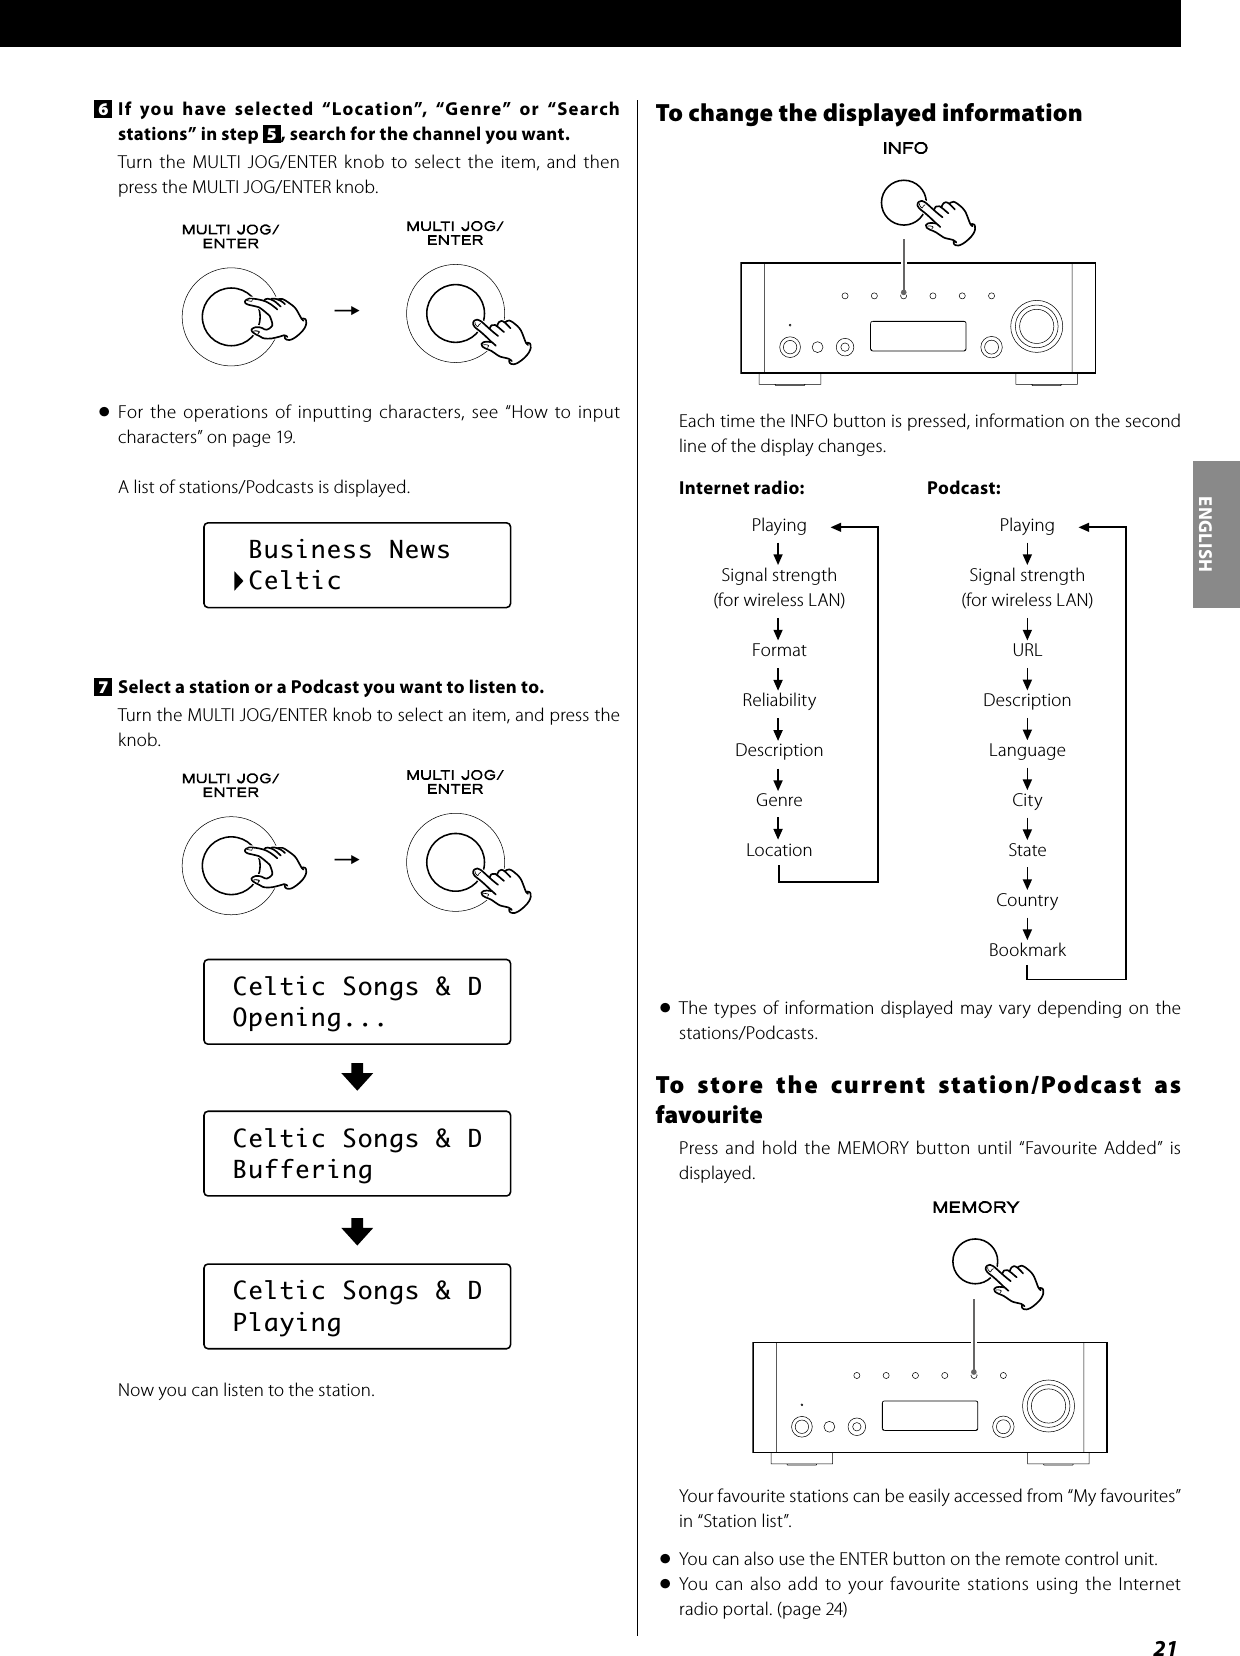
![284 Select a network name you want to use.Turn the MULTI JOG/ENTER knob to select the item, and then press the MULTI JOG/ENTER knob.< To use a wired Internet connection, select “[Wired]”.5 Enter the correct password for the network if required.< See “How to input characters” page19.< If you have a problem connecting to the LAN, see page 23.Now the unit starts to connect to the LAN.When connection is established successfully, the Music Player menu is displayed.Initial setupWhen you use the Music player function for the first time, the unit starts an initial setup procedure to connect to the LAN.123 41 Select Music Player by pressing the SOURCE button repeatedly.< You can also use the BAND button on the remote control unit.2 Select “Shared media” or “Shared folders”.Turn the MULTI JOG/ENTER knob to select the item, and then press the MULTI JOG/ENTER knob. Shared media Shared folders3 Select your country/area.Turn the MULTI JOG/ENTER knob to select the item, and then press the MULTI JOG/ENTER knob. Most of Europe USA 005AD904JM2 [Wired]TTTMusic Player Initial Setup](https://usermanual.wiki/TEAC/AG-H600NT/User-Guide-1135536-Page-28.png)
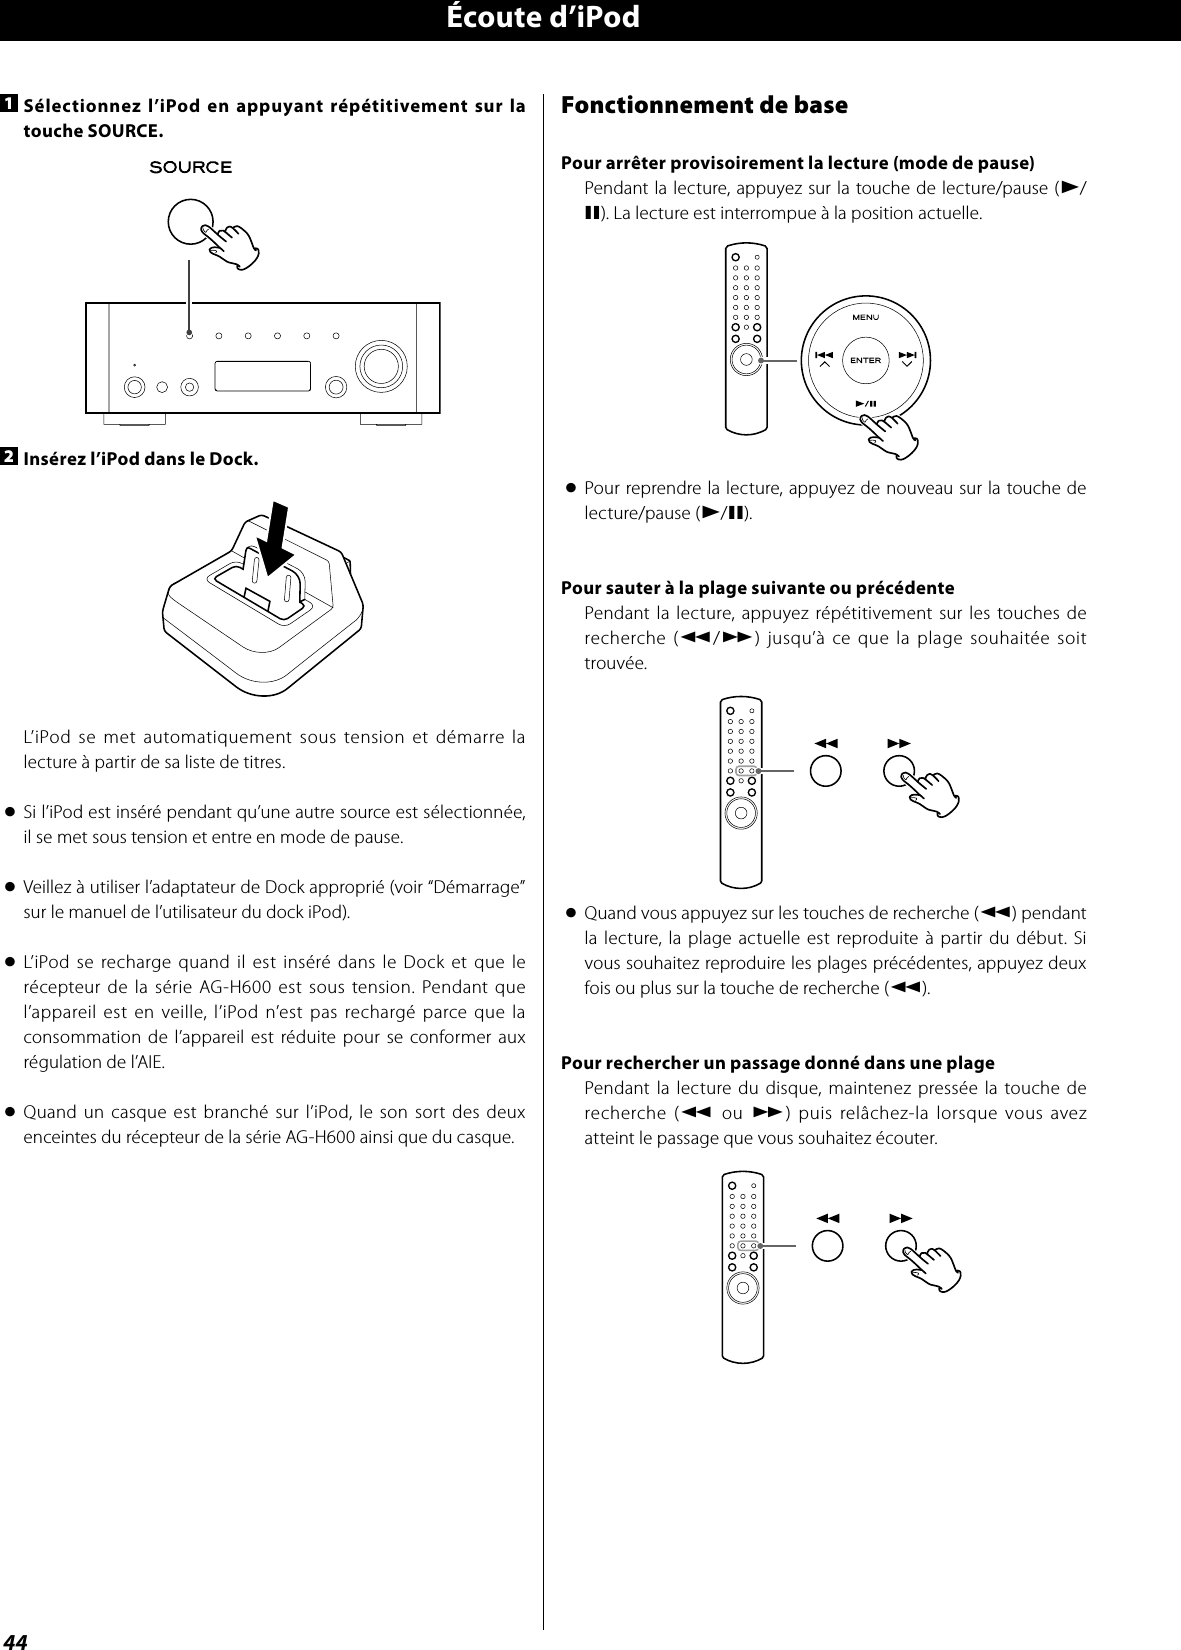
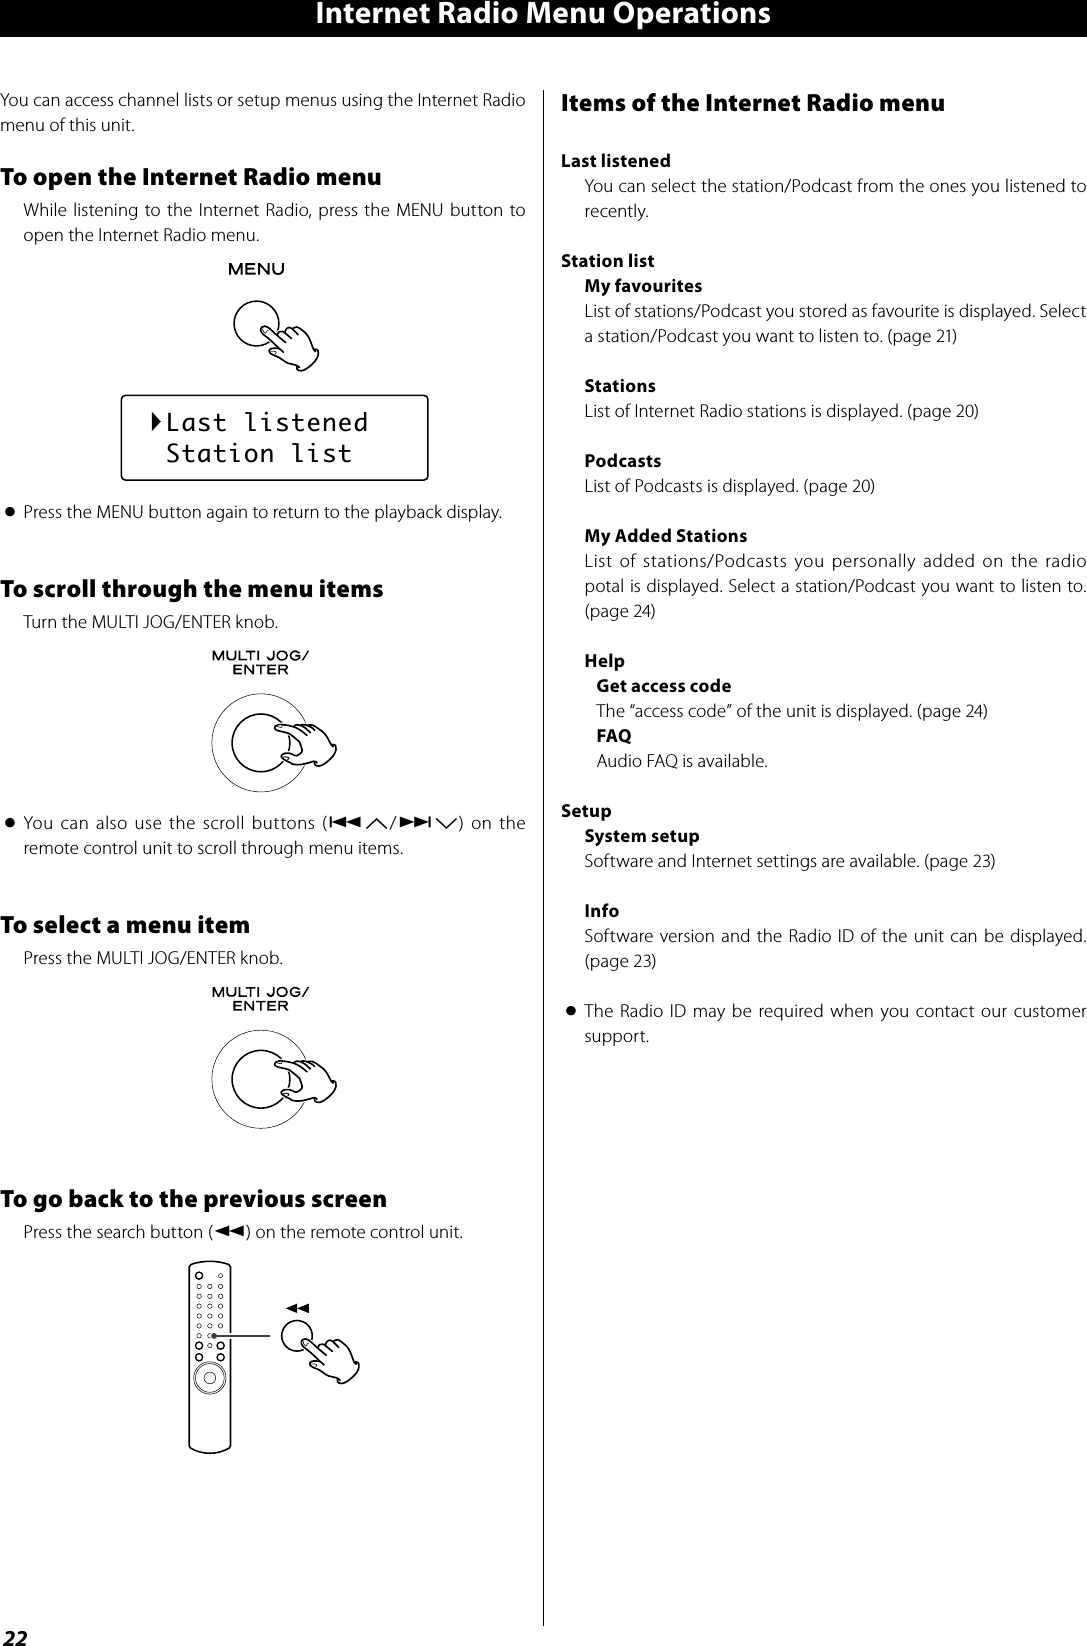
![45FRANÇAIS Lecture aléatoireChaque fois que vous appuyez sur la touche SHUFFLE, le mode de lecture aléatoire change comme suit:Song (piste aléatoire)Album (Album aléatoire)Shuffle Off (lecture aléatoire hors service)< Quand vous sélectionnez “Song“, l’iPod lit aléatoirement les pistes de la liste que vous avez choisie de reproduire.< Quand vous sélectionnez “Album“, le iPod reproduit tous les pistes de l’album dans l’ordre, puis sélectionne aléatoirement un autre album dans la liste et reproduit ses pistes dans l’ordre.< Pendant la lecture, l’icône de lecture aléatoire ( ) apparaît sur l’écran de l’iPod.Utilisation du menuPour retourner au menu précédentAppuyez sur la touche MENU.< Cette touche est équivalente à la touche MENU de votre iPod.Pour sélectionner une option de menuAppuyez sur les touches de défilement (.°//‡) pour faire défiler les options de menu jusqu’à celle souhaitée, puis appuyez sur la touche ENTER.< Sur l’appareil lui-même, tournez le bouton MULTI JOG/ENTER pour faire défiler jusqu’à l’option de menu souhaitée, puis appuyez sur le bouton MULTI JOG/ENTER.Lecture en boucleChaque fois que vous appuyez sur la touche REPEAT, le mode de lecture en boucle change comme suit:One (répétition d’une piste)All (répétition de toutes les pistes de la liste)Répétition hors service< Quand vous sélectionnez “One”, l’icône de répétition d’une seule piste ( ) apparaît sur l’écran de l’iPod.< Quand vous sélectionnez “All”, l’icône de répétition de toutes les pistes ( ) apparaît sur l’écran de l’iPod.Connexion d’un iPod au systèmeSortie vidéo de l’iPodFaites le réglage suivant dans le menu de votre iPod pour produire par le Dock l’image vidéo destinée à un téléviseur.Dans le menu [Video], sélectionnez [Video Settings]. Réglez [TV OUT] sur [On] ou [Ask].Si vous avez réglé [TV OUT] sur [Ask], votre iPod vous demande chaque fois que vous voulez reproduire une séquence vidéo si vous souhaitez l’envoyer à un téléviseur.Note< Si vous affichez le signal vidéo sur un téléviseur à partir de votre iPod, l’image vidéo n’est pas affichée sur l’iPod.< L’iPod touch ne possède pas ce menu. Chaque fois que vous reproduisez une vidéo, vous devez à chaque fois spécifier si le signal vidéo sera affiché sur un téléviseur.Utilisation du réveil de votre iPod touchSi vous spécifiez [Slide to power off] sur votre iPod touch, vous ne pouvez pas utiliser le réveil même si l’iPod touch est sur le Dock de ce système. Pour utiliser le réveil de votre iPod touch, ne sélectionnez pas [Slide to power off]. (L’écran peut être mis hors service sans aucun problème.)< Si une image vidéo est affichée sur l’écran de votre iPod touch, vous ne pouvez pas utiliser le réveil même si l’iPod touch est sur le Dock de ce système. Pour utiliser le réveil sur votre iPod touch, sélectionnez une autre option que Vidéo.](https://usermanual.wiki/TEAC/AG-H600NT/User-Guide-1135536-Page-45.png)
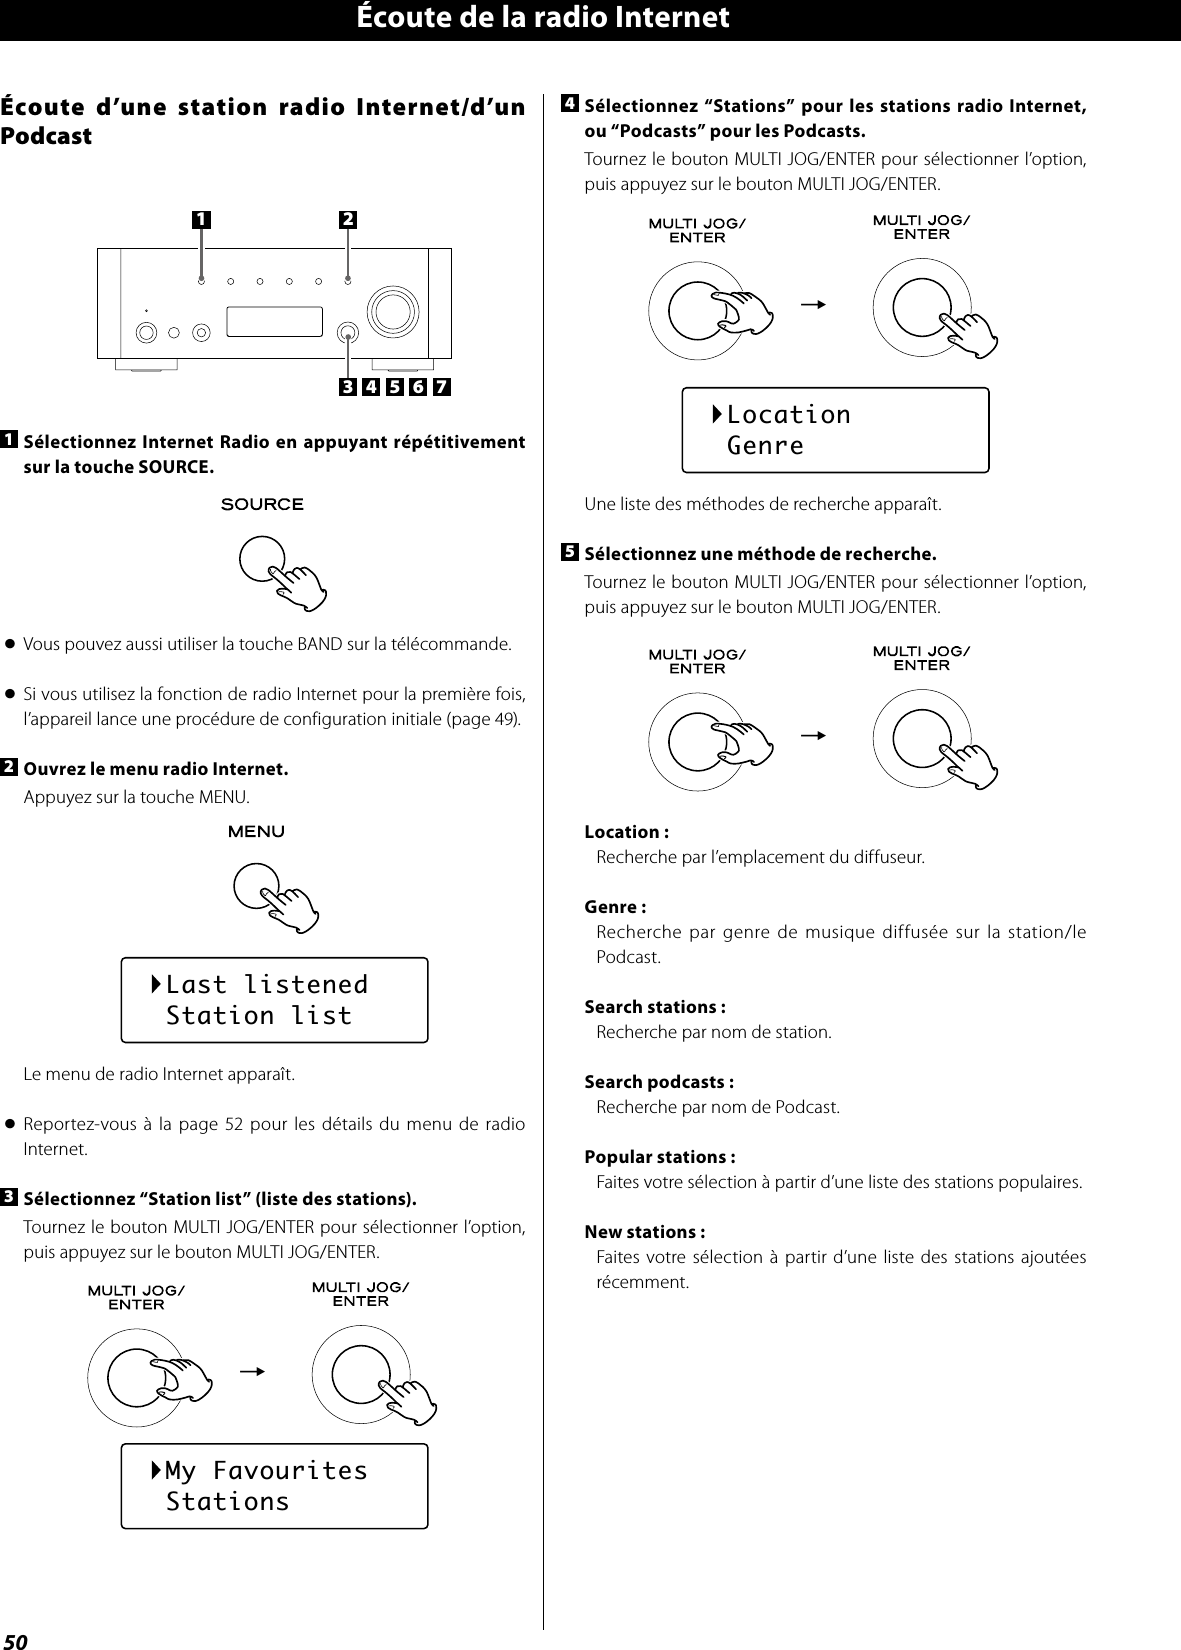
![49FRANÇAIS 4 Si nécessaire, entrez le mot de passe correct pour le réseau.< Reportez-vous à “Comment saisir les caractères” ci-dessous.L’appareil lance alors la connexion à Internet.Quand la connexion est établie avec succès, le menu de radio Internet est affiché. Reportez-vous à la page 50 pour sélectionner la station.< Si vous avez un problème pour vous connecter à Internet, reportez-vous à la page 53.Réglage initial pour la radio InternetRéglage initialSi vous utilisez la fonction radio Internet pour la première fois, l’appareil lance une procédure de configuration initiale pour permettre la connexion à Internet.123 41 Sélectionnez Internet Radio en appuyant répétitivement sur la touche SOURCE.< Vous pouvez aussi utiliser la touche BAND sur la télécommande.L’assistant de réglage initial démarre.2 Sélectionnez votre pays/région.Tournez le bouton MULTI JOG/ENTER pour sélectionner l’option, puis appuyez sur le bouton MULTI JOG/ENTER. Most of Europe USA3 Sélectionnez le nom du réseau que vous souhaitez utiliser.Tournez le bouton MULTI JOG/ENTER pour sélectionner l’option, puis appuyez sur le bouton MULTI JOG/ENTER.< Pour utiliser une connexion Interne câblée, sélectionnez “[Wired]”.Comment saisir les caractères< Vous ne pouvez saisir les caractères qu’à partir de la télécommande.1. Appuyez sur les touches de saut/défilement (.°//‡) pour sélectionner un jeu de caractères.2. Appuyez sur les touches de recherche (m/,) pour sélectionner le caractère que vous souhaitez saisir.3. Appuyez sur la touche ENTER pour valider la lettre sélectionnée. Répétez les étapes 1 à 3 pour entrer les caractères suivants.<: Supprime le dernier caractère.E: Valide votre entrée.C: Annule l’opération et rappelle l’écran précédent.Caractères que vous pouvez saisir0123456789ABCDEFGHIJKLMNOPQRSTUVWXYZabcdefghijklmnopqrstuvwxyz(espace)!”#$%&’()*+,-./:;<=>?@[\]^_`{|}~Key:Ge0123456789<EC 005AD904JM2 [Wired]TT/ÒÚ°/ƇENTER](https://usermanual.wiki/TEAC/AG-H600NT/User-Guide-1135536-Page-49.png)