TENDA TECHNOLOGY DH301 Wireless N300 ADSL2+ High Power Modem Router User Manual
SHENZHEN TENDA TECHNOLOGY CO., LTD. Wireless N300 ADSL2+ High Power Modem Router
UserManual.wiki
>
TENDA TECHNOLOGY
>
DH301 User Manual
>
Users Manual Part I
Contents
1.
Users Manual Part I
2.
User Manual Part II
Users Manual Part I
Navigation menu
Upload a User Manual
Namespaces
Wiki Guide
HTML
PDF
Info
Views
User Manual
Discussion / Help
Navigation

![Wireless N300 ADSL2+ High Power Modem Router 15 4.1.6 DHCP Here you can view the DHCP leases, including IP and MAC addresses of the PCs, hostnames and remaining lease time as seen in the screenshot: 4.2 Advanced Setup 4.2.1 Layer2 Interface Click Advanced Setup > Layer2 Interface to enter the Layer2 Interface screen. This router provides two Layer2 Interfaces: - ATM Interface for ADSL broadband Internet service. (By default, system applies the ATM Interface [ADSL uplink].) - ETH Interface for connecting to the Internet via an Ethernet cable. If you directly connect to the ADSL line via a phone cable, first refer to To Set up the ATM interface and then skip to To Set up WAN Service for ATM Interface. If you connect to the Internet via a fiber/cable modem using an Ethernet cable, first refer to To Set up the ETH interface and then skip to To Set up WAN Service for ETH Interface.](https://usermanual.wiki/TENDA-TECHNOLOGY/DH301.Users-Manual-Part-I/User-Guide-2548711-Page-19.png)


![Wireless N300 ADSL2+ High Power Modem Router 88 Interface Address: Enter the interface address with prefix length. E.g., the interface IPv6 address is “2000::1/64”, then you need to input http://[2000::1] in the browse address bar to access the device management interface. Enable DHCPv6 Server: Check to enable the DHCPv6 Server. Select Stateless or Stateful as you need. Stateless: If selected, IPv6 clients will generate IPv6 addresses automatically based on the Prefix Delegation's IPv6 prefix and their own MAC addresses. Stateful: Stateful DHCPv6 is supported based on the assumption of prefix length less than 64. Select this option and configure the start/end interface ID and leased time. The router will automatically assign IPv6 addresses to IPv6 clients. Enable RADVD: Check it to enable the RADVD for informing computers in the LAN of your router’s existence. When computers get the message, they will take the router’s IP address as the secondary route for easy use. In addition, checking RADVD can also broadcast the prefix address generated from the computer in the LAN. Enable IGMP Snooping: Check to enable the IGMP Snooping feature. IGMP Snooping is to restrain broadcast on Layer 2. Enabling IGMP snooping is good for managing and controlling IPv6 broadcasts. Suggest to select Blocking Mode. Standard Mode: If no members join in one broadcast group, packets of this group will be broadcasted; if there’re members joining in the group, packets will be only forwarded to the LAN port where the group members exist. Blocking Mode: If no members join in one broadcast group, packets of this group will be dropped; if there’s members joining in the broadcast group, packets will be only forwarded to the LAN port where the group members exist.](https://usermanual.wiki/TENDA-TECHNOLOGY/DH301.Users-Manual-Part-I/User-Guide-2548711-Page-92.png)
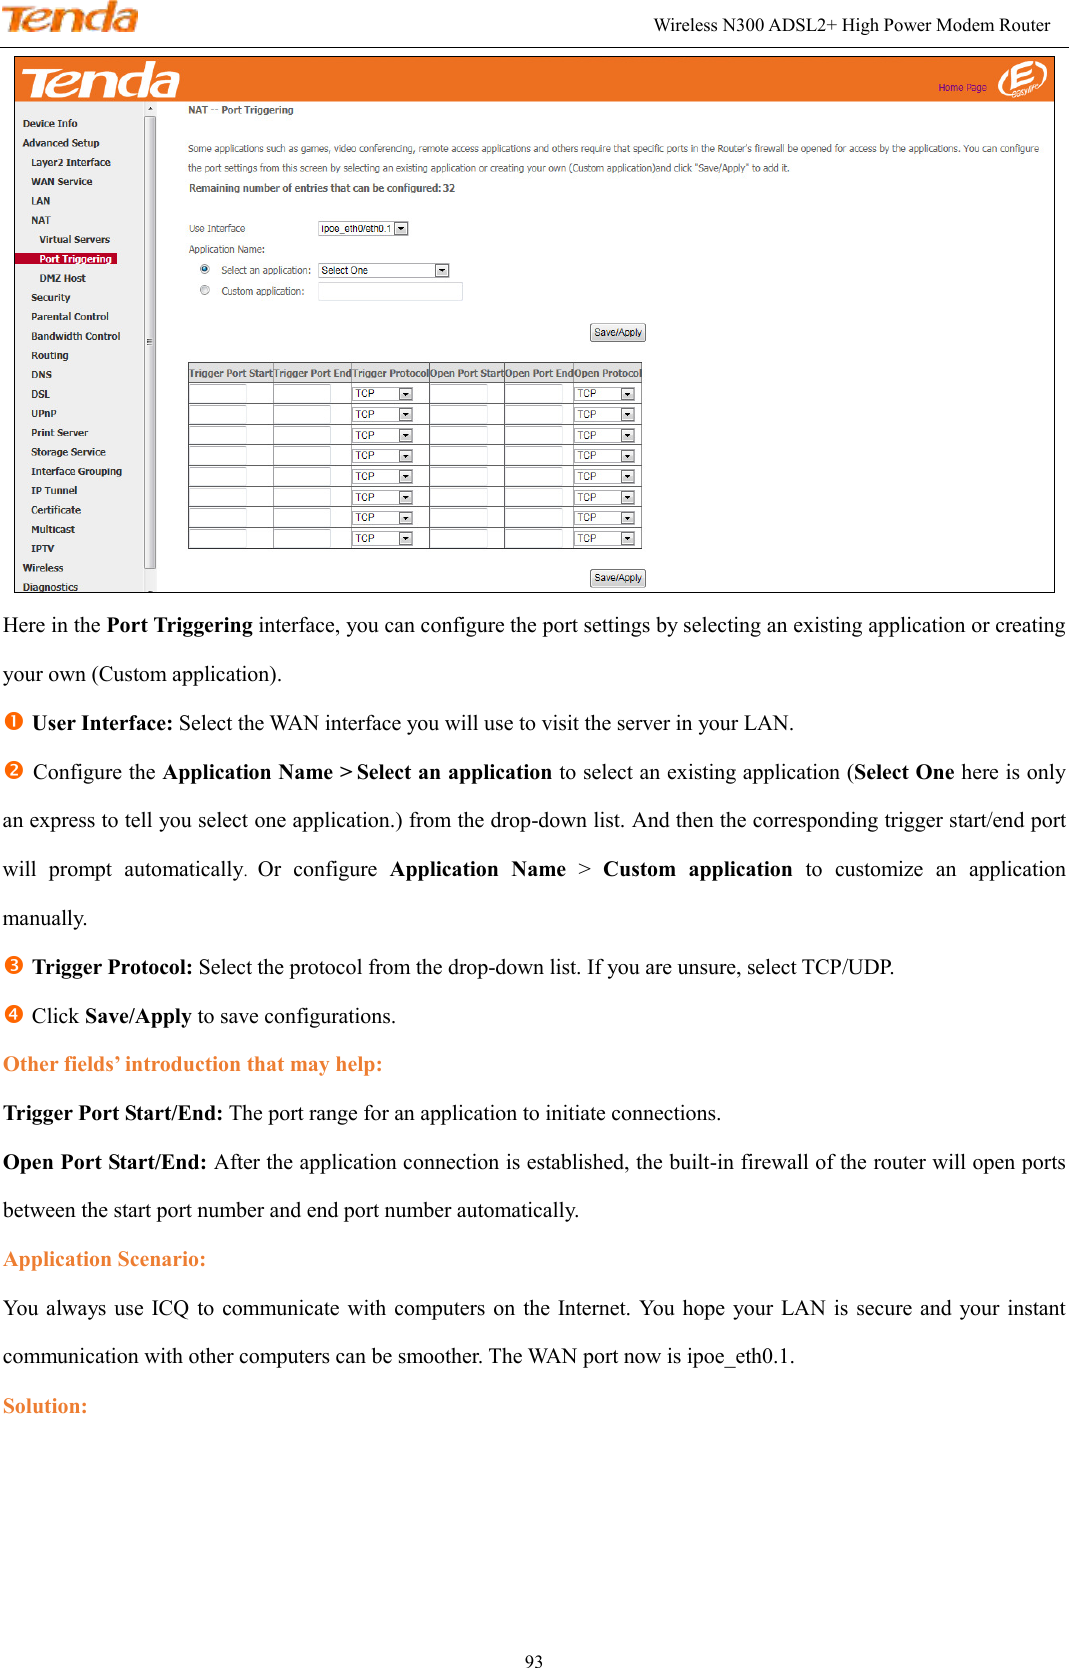

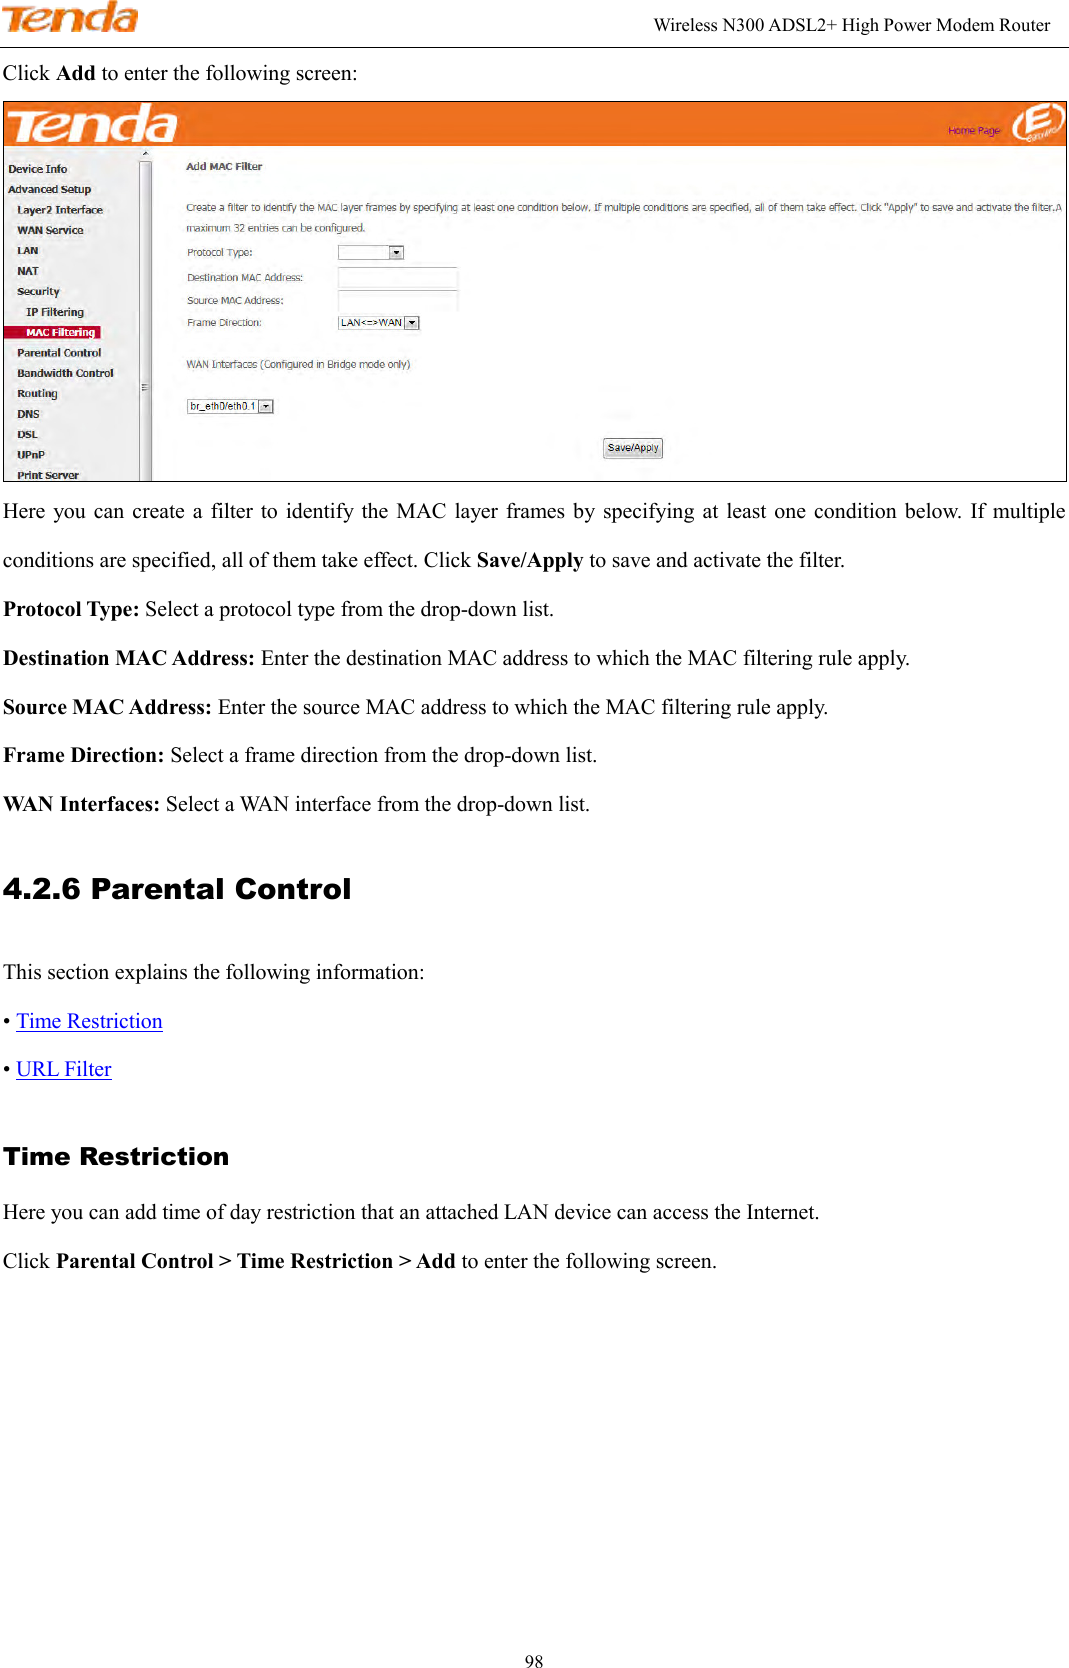
![Wireless N300 ADSL2+ High Power Modem Router 96 Protocol: TCP/UDP, TCP, UDP and ICMP are available for your option. Source IP address [/prefix length]: Enter the [LAN IP address/prefix length] to be filtered. Source Port (port or port: port): Specify a port number or a range of ports used by LAN PCs to access the Internet. If you are unsure, leave it blank. Destination IP address [/prefix length]: Specify the external network IP address to be accessed by specified LAN PCs. Destination Port (port or port:port): Specify a port number or a range of ports used by LAN PCs to access external network. Incoming IP Filtering Setup When the firewall is enabled on a WAN or LAN interface, all incoming IP traffic is BLOCKED. However, some IP traffic can be ACCEPTED by setting up filters. Choose Add or Remove to configure incoming IP filters. Click Add to enter the following screen: This screen allows you to create a filter rule to identify incoming IP traffic by specifying a new filter name and at least one condition below. All of the specified conditions in this filter rule must be satisfied for the rule to take effect. Click Apply/Save to save and activate the filter.](https://usermanual.wiki/TENDA-TECHNOLOGY/DH301.Users-Manual-Part-I/User-Guide-2548711-Page-100.png)
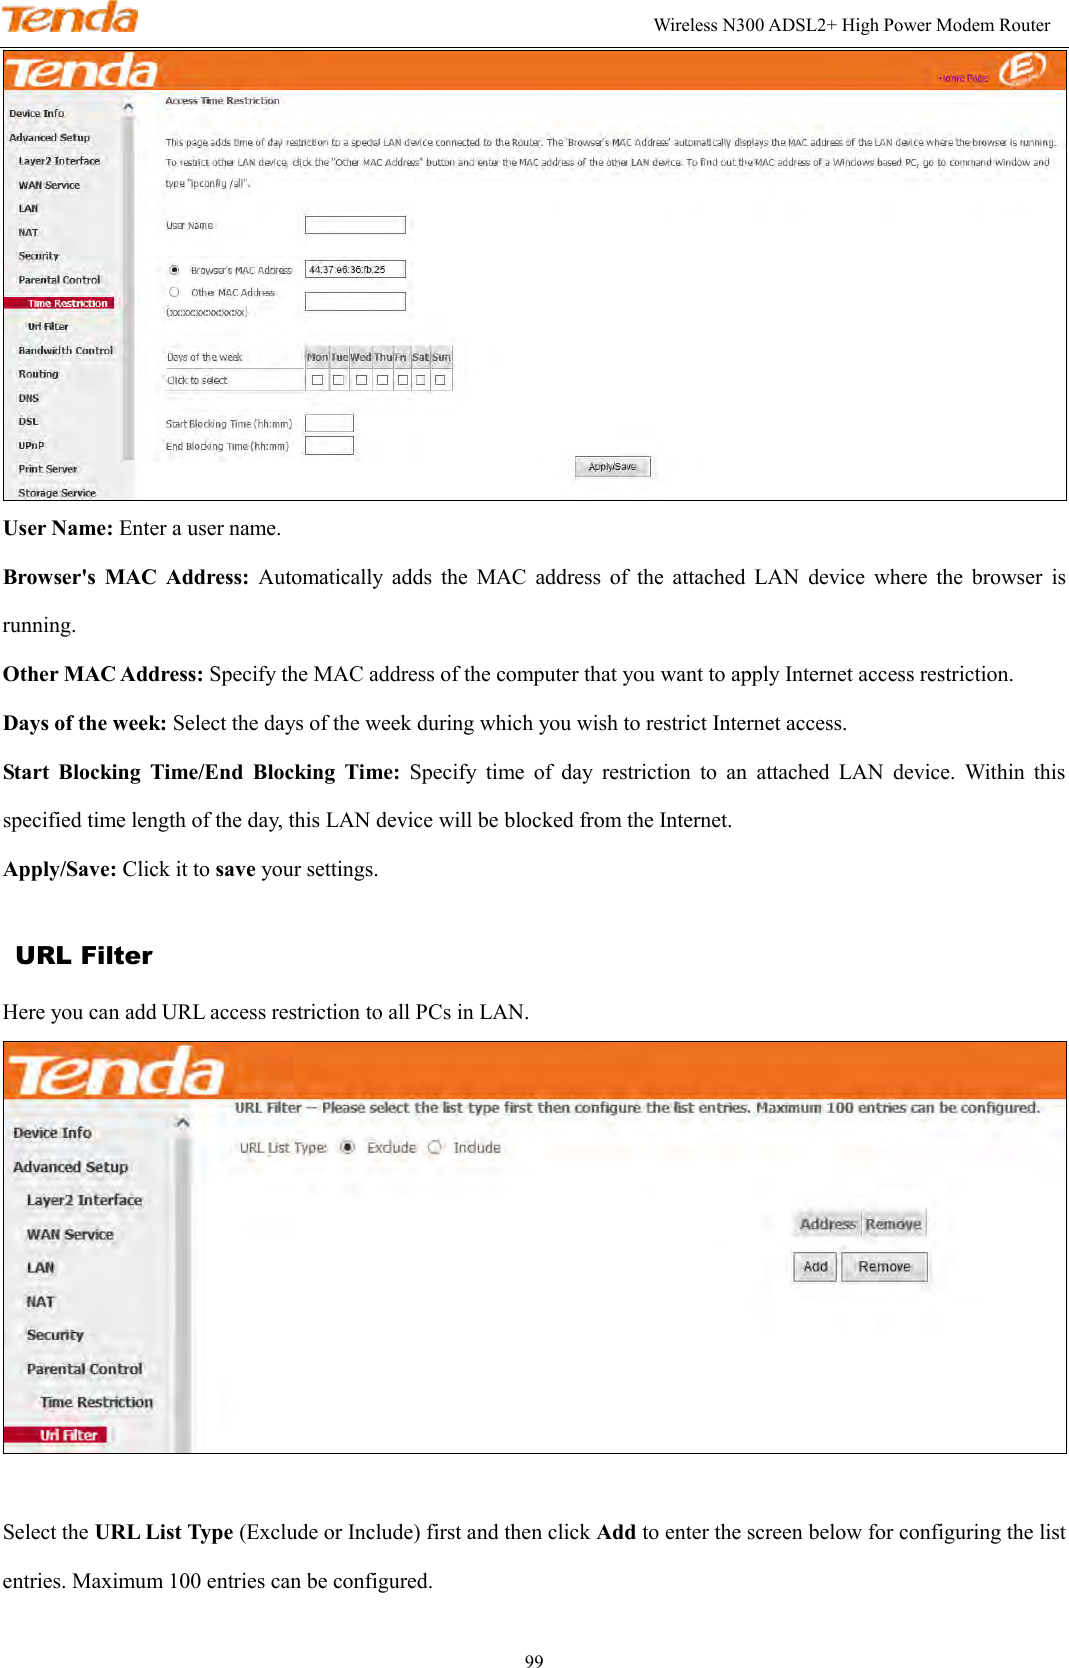
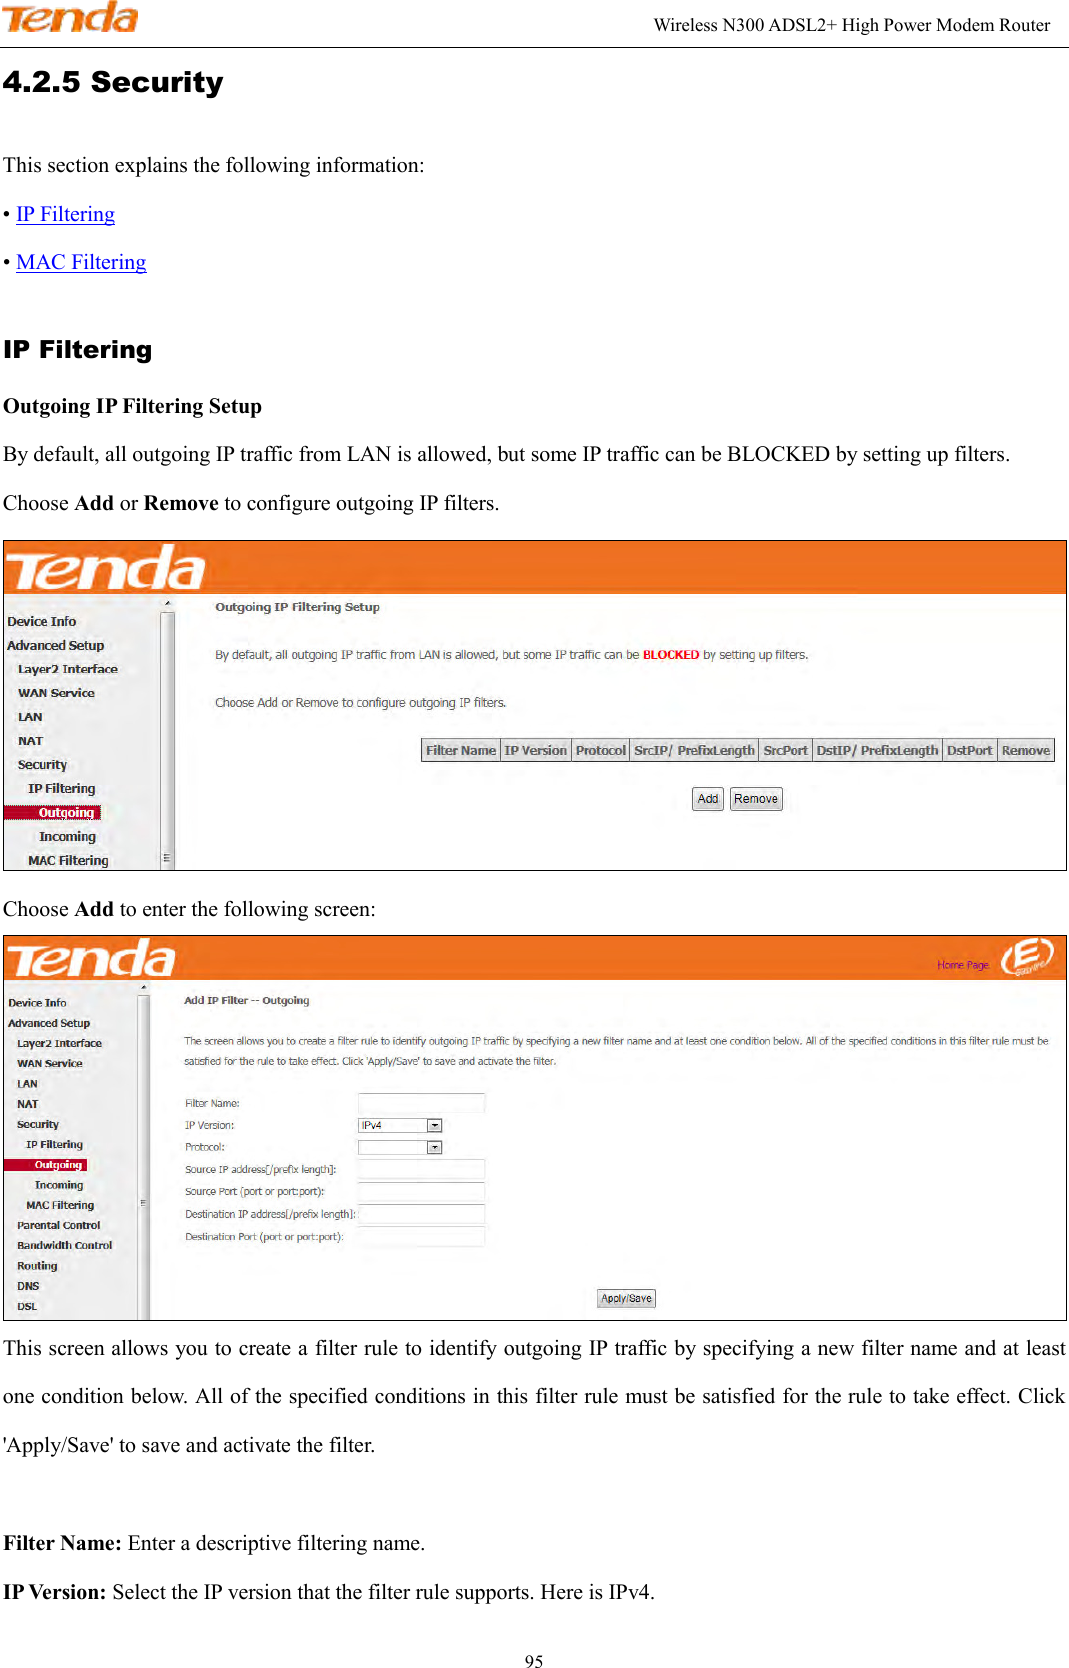
![Wireless N300 ADSL2+ High Power Modem Router 97 IP Version: Select the IP version that the filter rule supports. Here is IPv4. Protocol: TCP/UDP, TCP, UDP and ICMP are available for your option. Source IP address [/prefix length]: Enter the Internal IP address [/prefix length] to be filtered. Source Port (port or port:port): Specify a port number or a range of ports used by PCs from external network to access your internal network. Destination IP address [/prefix length]: Specify the internal network IP address [/prefix length] to be accessed by the specified PCs from external network. Destination Port (port or port:port): Specify a port number or a range of ports used by PCs from external network to access your internal network. MAC Filtering Note: This feature can only be configured in a bridge WAN service. MAC Filtering is only effective on ATM PVCs configured in Bridge mode. FORWARDED means that all MAC layer frames will be FORWARDED except those matching with any of the specified rules in the following table. BLOCKED means that all MAC layer frames will be BLOCKED except those matching with any of the specified rules in the following table. Choose Add or Remove to configure MAC filtering rules. _________________________________________________________________________________________________ Warning! Changing from one policy to another of an interface will cause all defined rules for that interface to be REMOVED AUTOMATICALLY! You will need to create new rules for the new policy.](https://usermanual.wiki/TENDA-TECHNOLOGY/DH301.Users-Manual-Part-I/User-Guide-2548711-Page-101.png)