TENDA TECHNOLOGY DH301 Wireless N300 ADSL2+ High Power Modem Router User Manual
SHENZHEN TENDA TECHNOLOGY CO., LTD. Wireless N300 ADSL2+ High Power Modem Router
Contents
- 1. Users Manual Part I
- 2. User Manual Part II
Users Manual Part I
Wireless N300 ADSL2+ High Power Modem Router
i

Wireless N300 ADSL2+ High Power Modem Router
ii
Copyright Statement
is the registered trademark of Shenzhen Tenda Technology Co., Ltd. All the products and product names
mentioned herein are the trademarks or registered trademarks of their respective holders. Copyright of the whole product
as integration, including its accessories and software, belongs to Shenzhen Tenda Technology Co., Ltd. No part of this
publication can be reproduced, transmitted, transcribed, stored in a retrieval system, or translated into any language in
any form or by any means without the prior written permission of Shenzhen Tenda Technology Co., Ltd. If you would
like to know more about our product information, please visit our website at http://www.tendacn.com.
Disclaimer
Pictures, images and product specifications herein are for references only. To improve internal design, operational
function, and/or reliability, Tenda reserves the right to make changes to the products without obligation to notify any
person or organization of such revisions or changes. Tenda does not assume any liability that may occur due to the use or
application of the product described herein. Every effort has been made in the preparation of this document to ensure
accuracy of the contents, but all statements, information and recommendations in this document do not constitute the
warranty of any kind, express or implied.
Technical Support
Website: http://www.tendacn.com
Telephone: (86 755) 2765 7180
Email: support@tenda.com.cn

Wireless N300 ADSL2+ High Power Modem Router
iii
Contents
Chapter 1 Get to Know Your Router ..................................................................................................................................... 1
1.1 What it does ............................................................................................................................................................ 1
1.2 Product Features ...................................................................................................................................................... 1
1.3 Package Contents .................................................................................................................................................... 2
Chapter 2 Hardware Install ................................................................................................................................................... 3
2.1 LED Indicators, Buttons and Interfaces .................................................................................................................. 3
2.2 Install the Device .................................................................................................................................................... 5
Chapter 3 Quick Internet Setup ............................................................................................................................................. 6
3.1 Log in to Web Manager ........................................................................................................................................... 6
3.2 Internet Setup .......................................................................................................................................................... 6
3.2.1 ADSL Mode ................................................................................................................................................. 6
3.2.2 Ethernet Mode .............................................................................................................................................. 8
3.2.3 Test Internet Connectivity ............................................................................................................................ 9
Chapter 4 Advanced Settings .............................................................................................................................................. 10
4.1 Device Info ............................................................................................................................................................ 11
4.1.1 Summary .................................................................................................................................................... 11
4.1.2 WAN........................................................................................................................................................... 12
4.1.3 Statistics ..................................................................................................................................................... 12
4.1.4 Route .......................................................................................................................................................... 14
4.1.5 ARP ............................................................................................................................................................ 14
4.1.6 DHCP ......................................................................................................................................................... 15
4.2 Advanced Setup..................................................................................................................................................... 15
4.2.1 Layer2 Interface ......................................................................................................................................... 15
4.2.2 WAN Service .............................................................................................................................................. 18
4.2.3 LAN ........................................................................................................................................................... 85
4.2.4 NAT ............................................................................................................................................................ 89
4.2.5 Security ...................................................................................................................................................... 95
4.2.6 Parental Control ......................................................................................................................................... 98
4.2.7 Bandwidth Control ................................................................................................................................... 100
4.2.8 Routing ..................................................................................................................................................... 101
4.2.9 DNS .......................................................................................................................................................... 104
4.2.10 DSL ........................................................................................................................................................ 109
4.2.11 UPnP ...................................................................................................................................................... 110
4.2.12 Print Server ............................................................................................................................................ 111
4.2.13 Storage Service....................................................................................................................................... 117
4.2.14 Interface Grouping ................................................................................................................................. 120
4.2.15 IP Tunnel ................................................................................................................................................ 123
4.2.16 Certificate ............................................................................................................................................... 125
4.2.17 Multicast................................................................................................................................................. 129
4.2.18 IPTV ....................................................................................................................................................... 130
4.3 Wireless ............................................................................................................................................................... 131
4.3.1 Basic ......................................................................................................................................................... 131
4.3.2 Security .................................................................................................................................................... 132
4.3.3 MAC Filter ............................................................................................................................................... 134

Wireless N300 ADSL2+ High Power Modem Router
iv
4.3.4 Wireless Bridge ........................................................................................................................................ 136
4.3.5 Station Info ............................................................................................................................................... 137
4.4 Diagnostics .......................................................................................................................................................... 138
4.4.1 Diagnostics ............................................................................................................................................... 138
4.4.2 Ping test .................................................................................................................................................... 138
4.5 Management ........................................................................................................................................................ 139
4.5.1 Settings ..................................................................................................................................................... 139
4.5.2 System Log .............................................................................................................................................. 141
4.5.3 SNMP Agent ............................................................................................................................................ 142
4.5.4 TR-069 Client........................................................................................................................................... 143
4.5.5 Internet Time ............................................................................................................................................ 144
4.5.6 Access Control ......................................................................................................................................... 145
4.5.7 Update Firmware ...................................................................................................................................... 147
4.5.8 Reboot ...................................................................................................................................................... 147
Appendix 1 Configure Your PC ........................................................................................................................................ 149
Windows 8 ................................................................................................................................................................ 149
Windows 7 ................................................................................................................................................................ 151
Windows XP ............................................................................................................................................................. 153
MAC ......................................................................................................................................................................... 154
Appendix 2 Join Your Wireless Network .......................................................................................................................... 156
Windows 8 ................................................................................................................................................................ 156
Windows 7 ................................................................................................................................................................ 157
Windows XP ............................................................................................................................................................. 158
MAC ......................................................................................................................................................................... 160
iPhone/iPad ............................................................................................................................................................... 162
Appendix 3 FAQs.............................................................................................................................................................. 164
Appendix 4 VPI/VCI List ................................................................................................................................................. 166
Appendix 5 Regulatory Compliance Information ............................................................................................................. 174

Wireless N300 ADSL2+ High Power Modem Router
1
Chapter 1 Get to Know Your Router
1.1 What it does
The Wireless N300 ADSL2+ High Power Modem Router provides you with an easy and secure way to set up a wireless
home network with fast access to the Internet over a high-speed digital subscriber line (DSL). Complete with a built-in
ADSL modem, it is compatible with all major ADSL Internet service providers. It offers wireless speeds of up to
300Mbps needed for demanding applications, such as large file transfers, streaming HD video, and multiplayer gaming.
The unit comes with a wide range of premium features and applications such as IPv6, SNMP, Multicast, IP tunnel, ready
share USB, IPTV service and parental controls, etc. Plus, with the router, you can access the Internet via the ATM
interface or Ethernet interface.
1.2 Product Features
Wireless N speeds up to 300 Mbps for streaming HD videos and online gaming in addition to basic Internet applications
All-in-one device combines a built-in ADSL2+ modem, wired router, wireless router and switch
Sharable USB lets you access and share files on an attached USB hard drive
Sharable Printer lets you print from your Windows computer to a connected USB printer
Advanced QoS helps prioritize media streaming and gaming applications for best entertainment experience
Parental Control keeps your kids Internet experience safe using flexible and customizable filter settings
One-touch WPS ensures a quick and secure network connection
WEP and WPA/WPA2 are supported for advanced encryptions
Compatibility: Works with all major ADSL Internet service providers (ISPs); backward compatible with 802.11b/g WiFi
devices
Interchangeable LAN/WAN ports to schedule the Ethernet port to function either as a LAN or a WAN port
Interchangeable LAN/IPTV to schedule the Ethernet port to function either as a LAN or an IPTV port
Optional Ethernet and ADSL Uplinks: Access the Internet via ADSL2+ Broadband Internet Service or an
interchangeable LAN/WAN RJ45 port
Multiple Internet Connection Types: Bridging, PPPoE, IPoE, PPPoA, IPoA, dynamic IP and static IP
IPTV Service lets your surf the Internet while watching online TV
6000V lightning-proof design fits into lightning-intensive environment
Strong driving capability up to 6.5Km transmission distance

Wireless N300 ADSL2+ High Power Modem Router
2
High ADSL speed up to 24Mbps downstream 1Mbps upstream
Built-in firewall prevents hacker attacks
Channel auto-select for optimum performance
FDM technology enables telephoning, faxing and surfing activities to proceed simultaneously without mutual
interference
Other Advanced Features: IPv6, DDNS, virtual server, DMZ, port triggering, IP filter, MAC filter and UPnP, etc.
Tenda Setup Wizard for easy and fast installation and configuration
Tenda Green: Use hardware Power On/Off and software WiFi On/Off buttons to turn on and off power and WiFi to save
energy when not in use
1.3 Package Contents
Your box should contain the following items:
Wireless N300 ADSL2+ High Power Modem Router
Telephone Line
Ethernet Cable
ADSL Splitter
Install Guide
Power Adapter
Resource CD
If any of the parts are incorrect, missing, or damaged, keep the carton, including the original packing materials and
contact the dealer for immediate replacement.
Wireless N300 ADSL2+ High Power Modem Router
3
Chapter 2 Hardware Install
If you have not set up your new router using the Install Guide that comes in the box, this chapter walks you through the
hardware install. To set up your Internet connection, see Chapter 3 Quick Internet Setup.
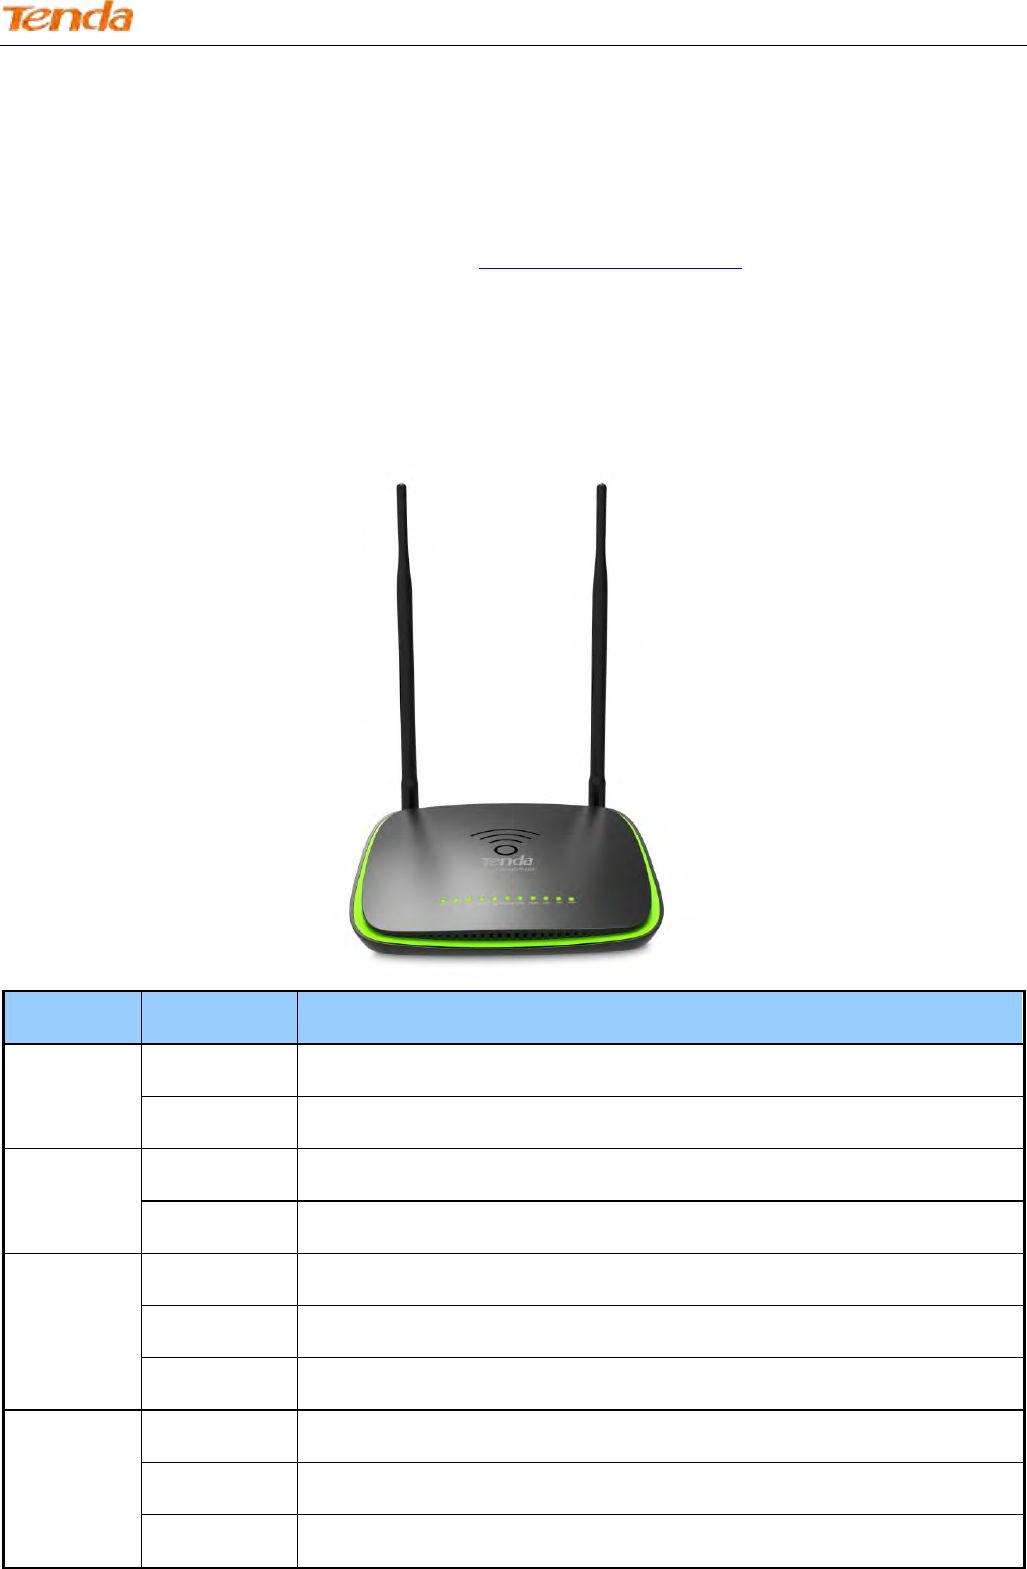
2.1 LED Indicators, Buttons and Interfaces
Front Panel
LED
Status
Description
PWR
Solid
Power is supplied to the device.
Off
Power is not supplied to the device.
SYS
Blinking
System is functioning correctly.
Solid/Off
System is functioning incorrectly.
WLAN
Blinking
Transmitting data via wireless
Off
Wireless is disabled.
Solid
Wireless is enabled.
DSL
Slow Blinking
Physical connection failure.
Fast Blinking
Synchronizing...
Solid
ADSL connection is established.
Wireless N300 ADSL2+ High Power Modem Router
4
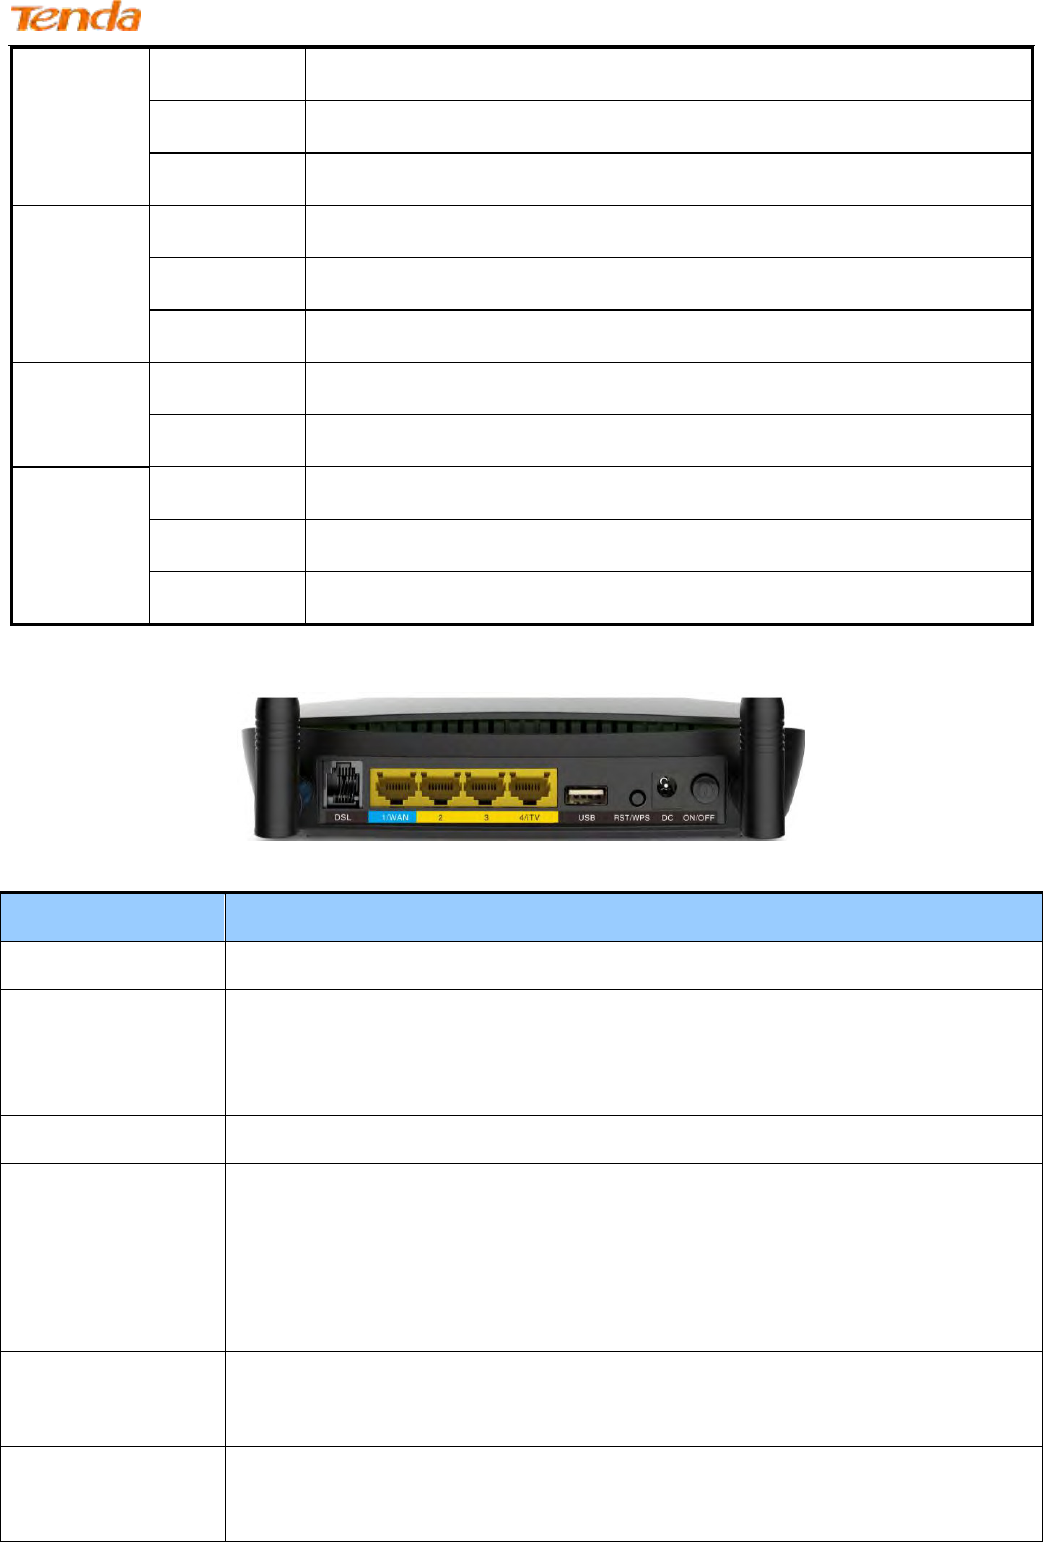
Back Panel
Button & Interface
Description
DSL
For connecting the router to the Internet via a phone cable provided by your ISP.
1/WAN
LAN port or WAN port. When you access the Internet via the DSL, this port works as a LAN
port which can be used to connect to a PC, switch, or a router; when you access the Internet
via an Ethernet cable from your ISP directly, this port works as a WAN port.
Note: It works as a LAN port by default.
2/3
LAN port, used to cable the device to the local network devices such as computers.
4/iTV
LAN port or IPTV port. When IPTV feature is disabled, it works as a LAN port which can be
used to connect to a PC, switch or a router; when IPTV feature is enabled, it works as an IPTV
port, and it can only be connected to a set-top box.
Note: IPTV feature is disabled by default.
USB
Used to connect a USB device, such as a 3G USB modem, USB print server or storage
service.
RST/WPS
Press it for 1-3 seconds to enable WPS-PBC feature;
Press it for about 10 seconds to restore all configurations to factory defaults.
4/iTV
3/2
1/WAN
Off
No connection established
Blinking
Transmitting data
Solid
Connection is established.
WPS
Solid
Client connected successfully.
Blinking
WPS LED starts blinking if you press the WPS button on the device or interface.
Off
No wireless clients are connected. WPS LED turns off after blinking for 2 minutes.
USB
Solid
Connection is successfully established on the USB port.
Off
Connection is not established on the USB port.
INTERNET
Solid
Current client is connecting to the Internet; no data is transmitted via the Internet.
Blinking
Current client is connecting to the Internet; data is transmitted via the Internet.
Off
Current Internet client is not connecting to the Internet.
Wireless N300 ADSL2+ High Power Modem Router
5
DC
Used to connect to the power adapter, which is included in the package.
ON/OFF
Power switch to turn the router on or off.
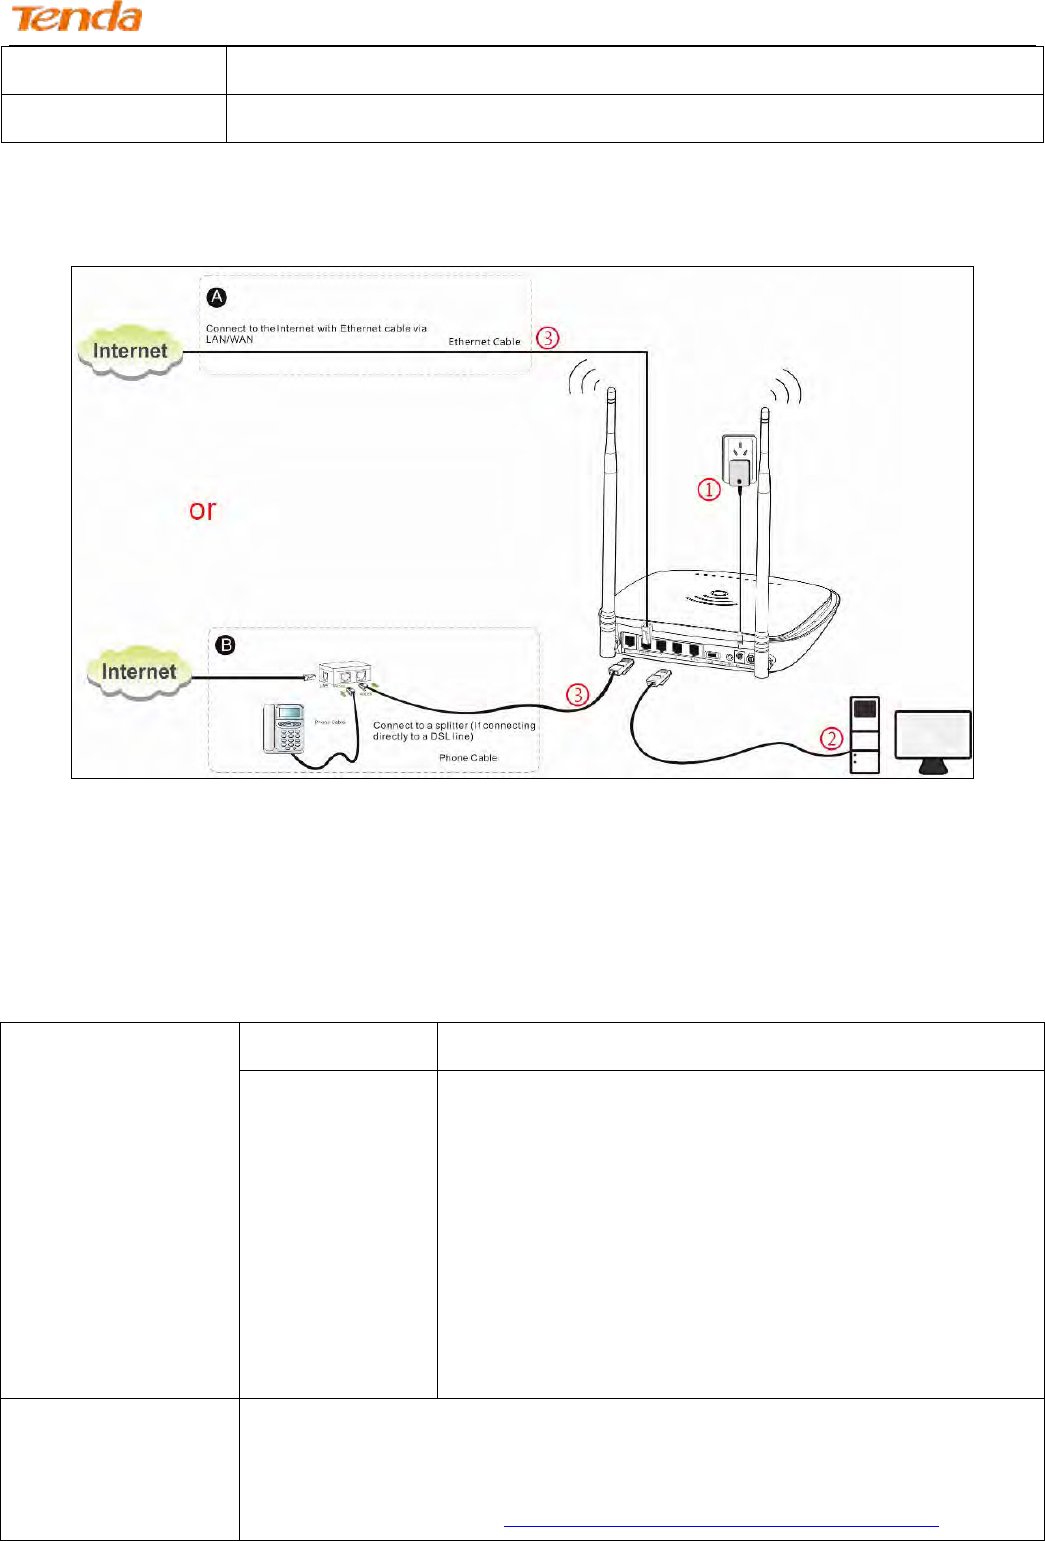
2.2 Install the Device
Connect the included power adapter to your router and turn on the router.
Connect your computer to your router.
Connect your router to the Internet. Choose ADSL Mode or ETH Mode according to your actual Internet service
type.
ADSL Mode
(Phone cable access)
With a telephone
Simply connect the DSL line to the DSL port of your router.
Without a telephone
Use the splitter as a medium:
1) Connect the DSL line from the Internet side to the LINE port of
the splitter;
2) Connect the telephone with a phone cable to the PHONE port of
the splitter;
3) Connect the MODEM port of the splitter and DSL port of your
router via another phone cable.
ETH Mode
(Ethernet cable access)
Do not go to Step 3 (connect the Ethernet cable to the LAN/WAN port) until you finish the
Primary Setup of Internet connection type on the Web Management Homepage, i.e., finish
settings in Ethernet Mode in Chapter 3 Quick Internet Setup >3.2 Internet Setup.
Wireless N300 ADSL2+ High Power Modem Router
6
Chapter 3 Quick Internet Setup
This chapter instructs you to quickly set up your Internet connection.
3.1 Log in to Web Manager
1. Set your PC to Obtain an IP address automatically. For more information, see Appendix 1 Configure Your PC.
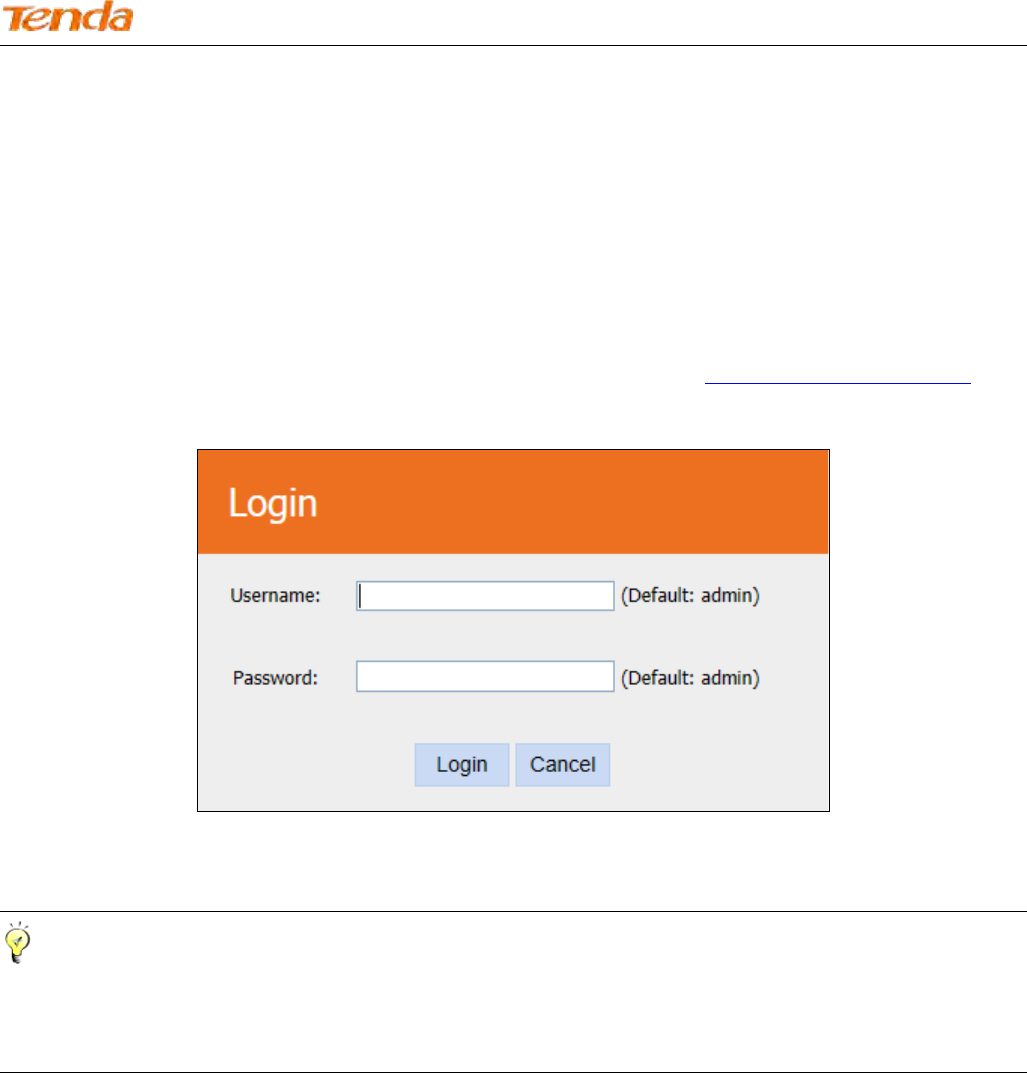
2. Launch a web browser and enter 192.168.1.1 to display the login window.
3. Enter admin in both the Login Username and Password fields if you access the router for the first time and then click
Login to enter the home page.
Tip
If you change the login username and password and forget them, press the RST/WPS button on the device for about 10
seconds to reset the router, and then enter the home page with the default username and password “admin”.
3.2 Internet Setup
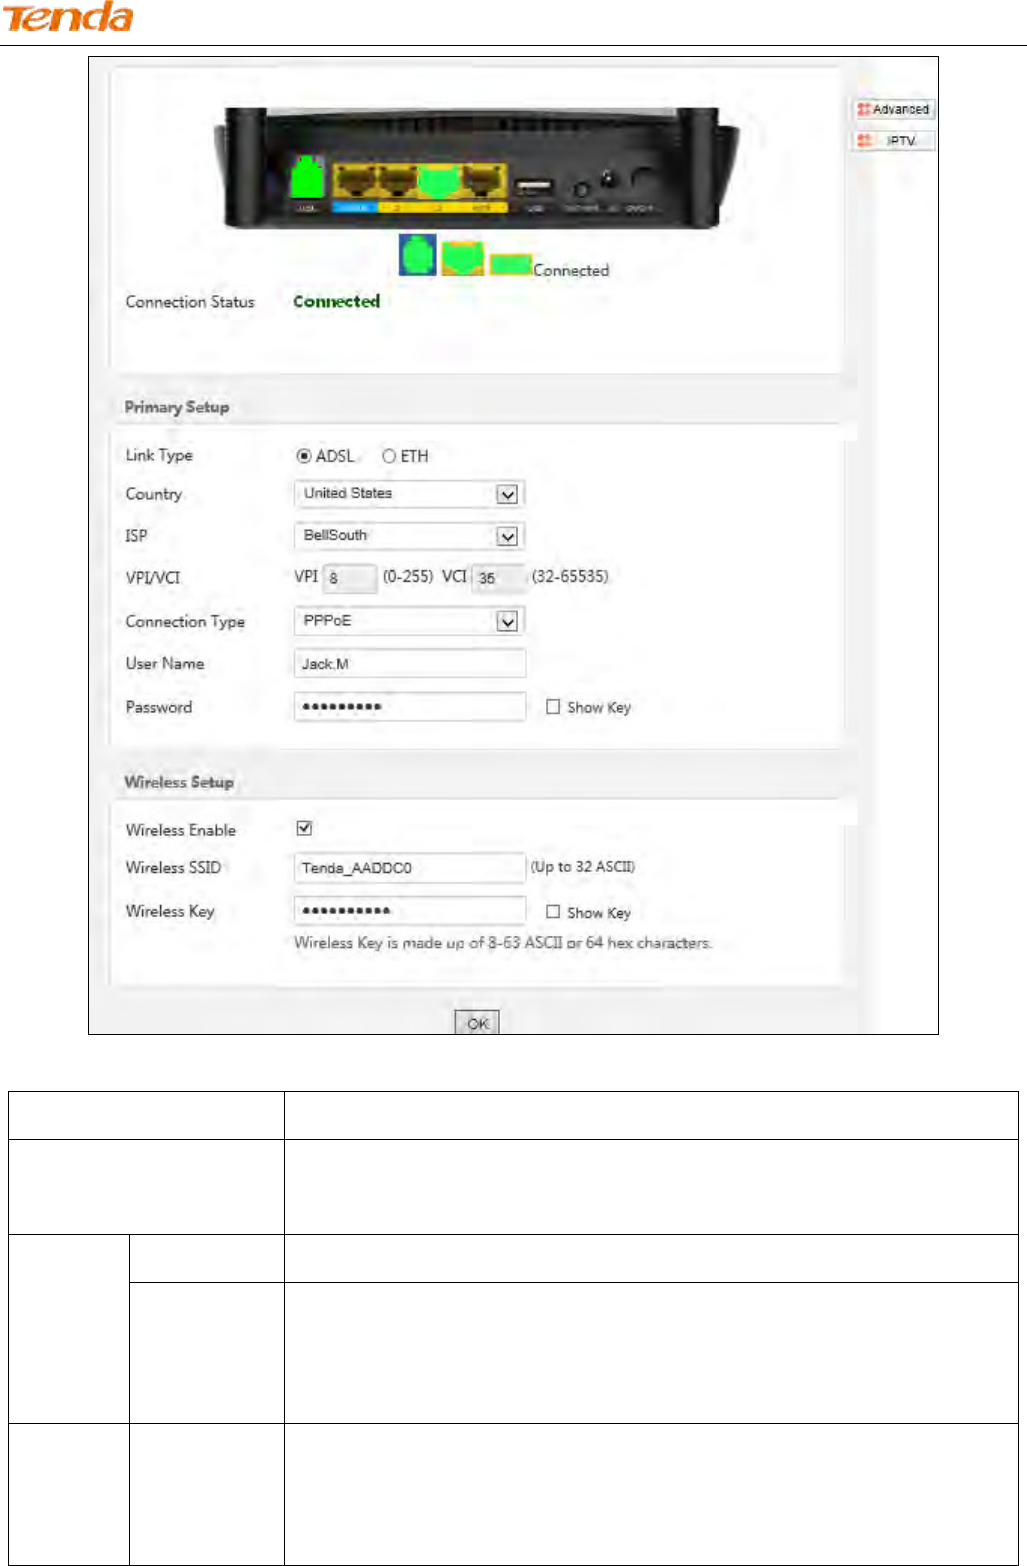
3.2.1 ADSL Mode
1. Link Type: Select ADSL.
2. Select your country.
3. Select your ISP.
4. VPI/VCI fields will be populated automatically if you select a correct country and ISP.
5. Select your Connection Type, and fill the relevant Internet information.
6. Secure your wireless network. (Strongly Recommended)
7. Click OK to apply your configurations.
Wireless N300 ADSL2+ High Power Modem Router
7
Depending on the type of connection, you are prompted to enter your ISP settings, as shown in the following table:
Connection Type
Description
PPPoE/PPPoA
Enter the ISP user name and password. If you cannot locate this information, ask
your ISP to provide it.
IPoE
Dynamic IP
No entries are needed.
Static IP
Enter the assigned IP address, subnet mask, and the IP address of your ISP’s primary
DNS server. This information should have been provided to you by your ISP. If a
secondary DNS server address is available, enter it also.
IPoA
Static IP
Enter the assigned IP address, subnet mask, and the IP address of your ISP’s primary
DNS server. This information should have been provided to you by your ISP. If a
secondary DNS server address is available, enter it also.
Wireless N300 ADSL2+ High Power Modem Router
8
Bridge
When Bridge mode is enabled, this device works as a modem. If you wish to initiate
a dialup directly from your PC for Internet access or enjoy the entire Internet
connection by yourself (instead of sharing it with others), you can select Bridge.
Note
If your country and/or your ISP are not covered on the home page, select Other country and ISP, and set VCI and VPI
value manually. If you cannot locate this information, refer to Appendix 4 VPI/VCI List or ask your ISP to provide it.
For more information, see To Set up the ATM interface and To Set up WAN Service for ATM Interface.
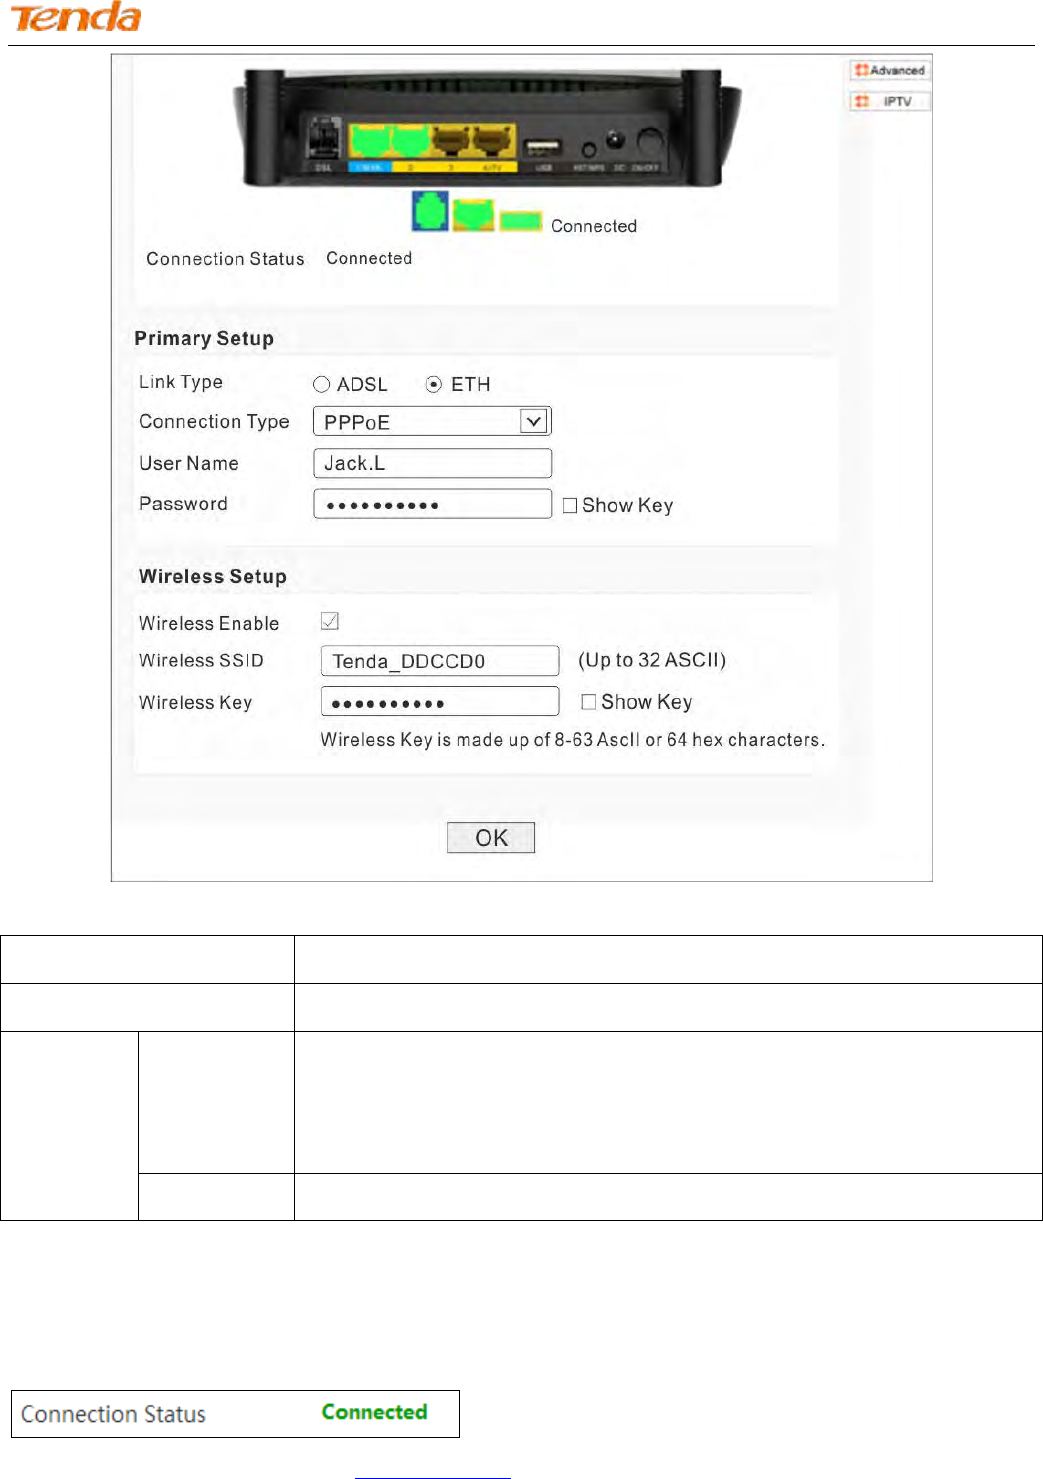
3.2.2 Ethernet Mode
1. Link Type: Select ETH.
2. Select your Connection Type according to your accessing method.
3. Secure your wireless network. (Strongly Recommended)
4. Click OK to apply your configurations.
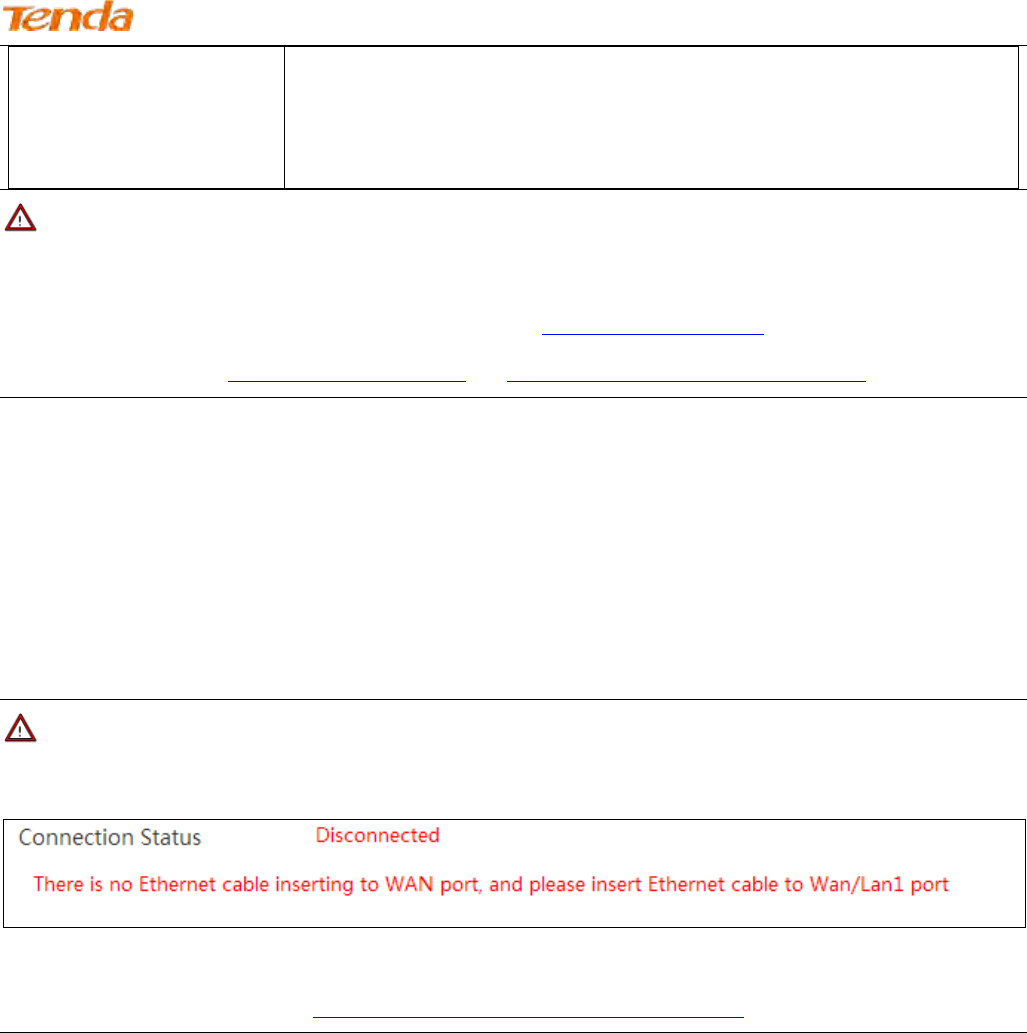
Note
After saving the Ethernet mode settings, you will see the following prompt:
And then you need to connect the Ethernet cable from the Internet side provided by your ISP to the LAN/WAN port, i.e.
to finish Step 3 of Ethernet Mode in Chapter 2 Hardware Install-> 2.2 Install the Device.
Wireless N300 ADSL2+ High Power Modem Router
9
Depending on the type of connection, you are prompted to enter your ISP settings, as shown in the following table:
Connection Type
ISP Information
PPPoE
No entries are needed.
IPoE
Static IP
Enter the assigned IP address, subnet mask, and the IP address of your ISP’s primary
DNS server provided by your ISP. If a secondary DNS server address is available,
enter it also.
Dynamic IP
Enter the user name and password provided by your ISP.
3.2.3 Test Internet Connectivity
If Connection Status shows Connected shown as below, you access the Internet now.
Try to launch a web browser and enter www.tendacn.com. If the webpage displays properly, you are connected to the
Internet.
Wireless N300 ADSL2+ High Power Modem Router
10
Chapter 4 Advanced Settings
If you prefer configuring your router for unique situations, consult this chapter to know advanced features.
Click Advanced on the home page to enter the screen below.
Wireless N300 ADSL2+ High Power Modem Router
11
4.1 Device Info
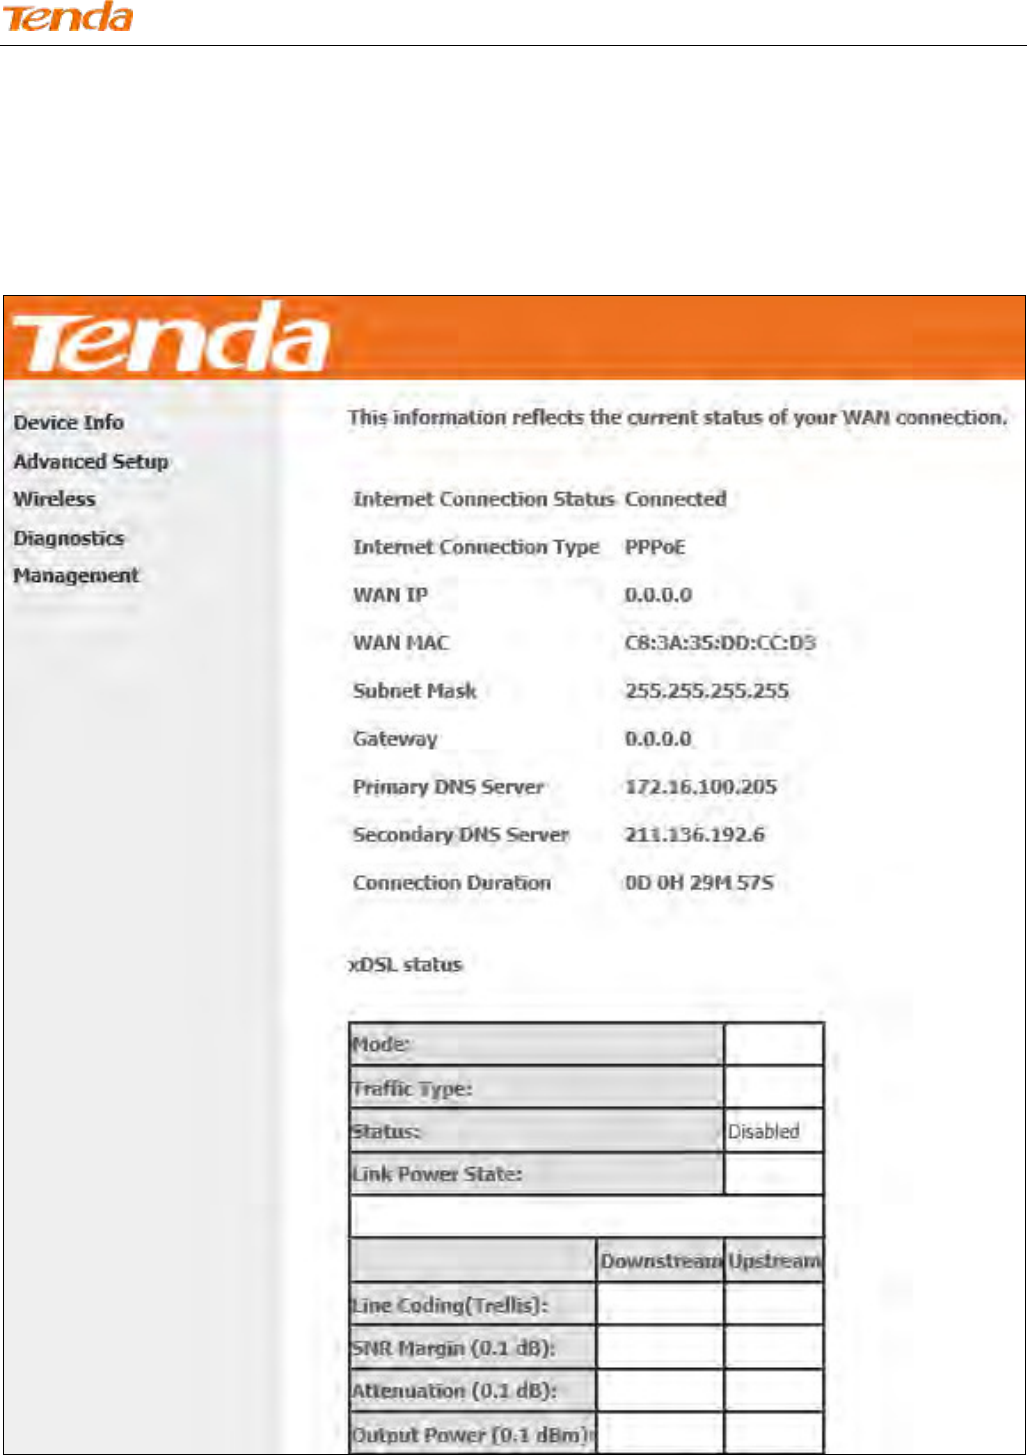
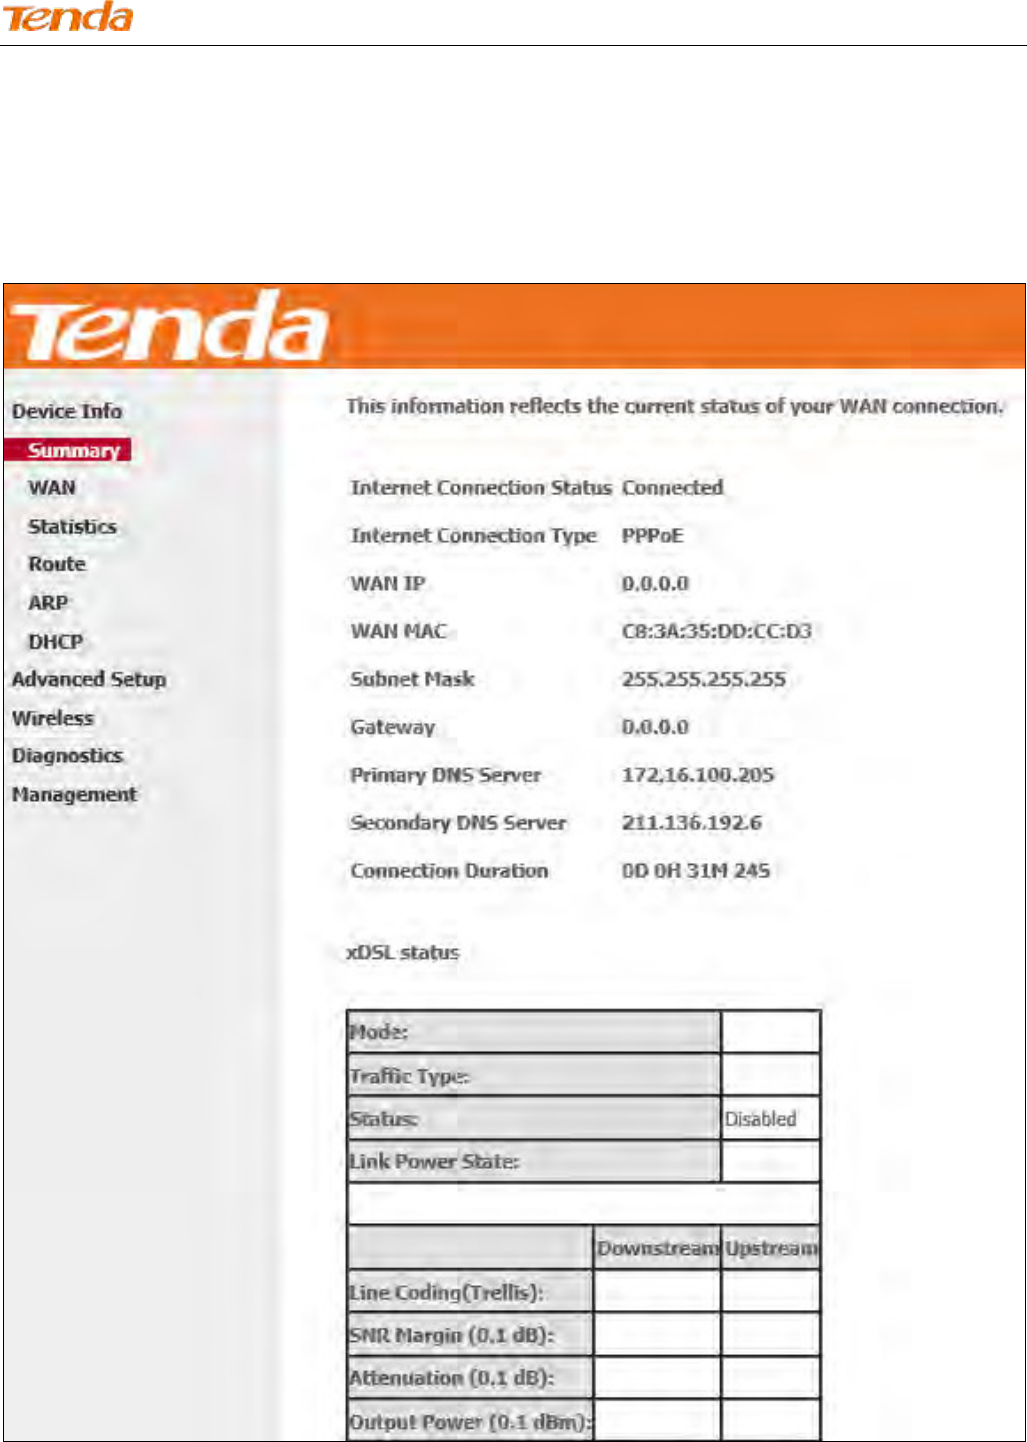
4.1.1 Summary
Here you can view system information and current status of your WAN connection as seen in the screenshot.
Wireless N300 ADSL2+ High Power Modem Router
12
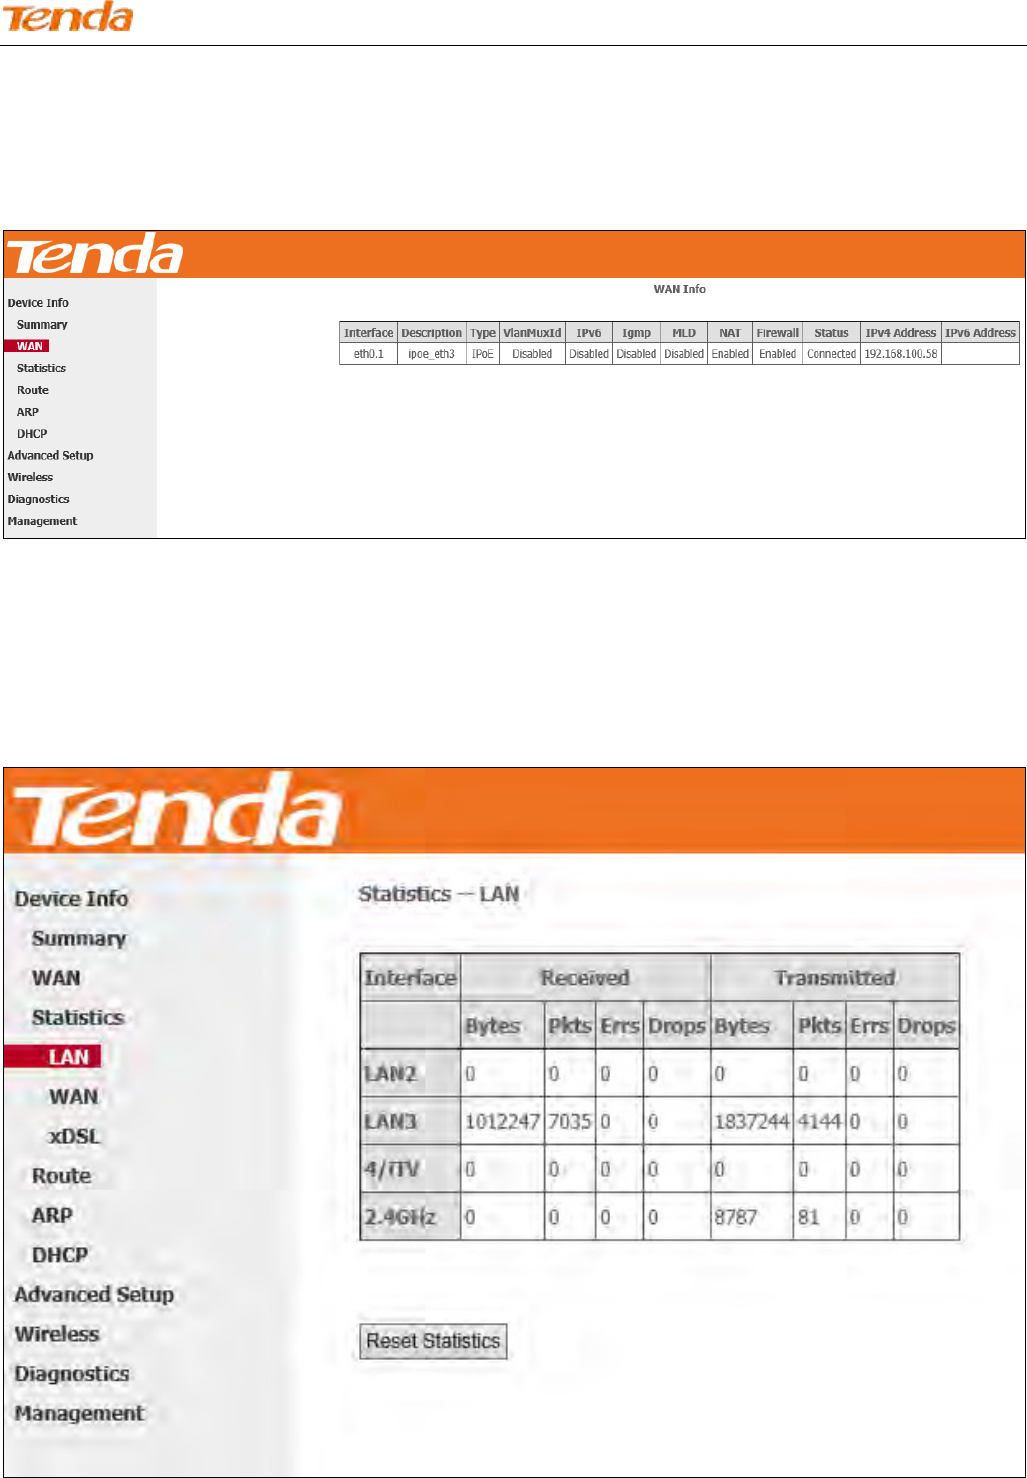
4.1.2 WAN
Here you can view the WAN Information including Interface, Description, Type, IGMP, NAT, Firewall, Status, IPv4
Address, etc.
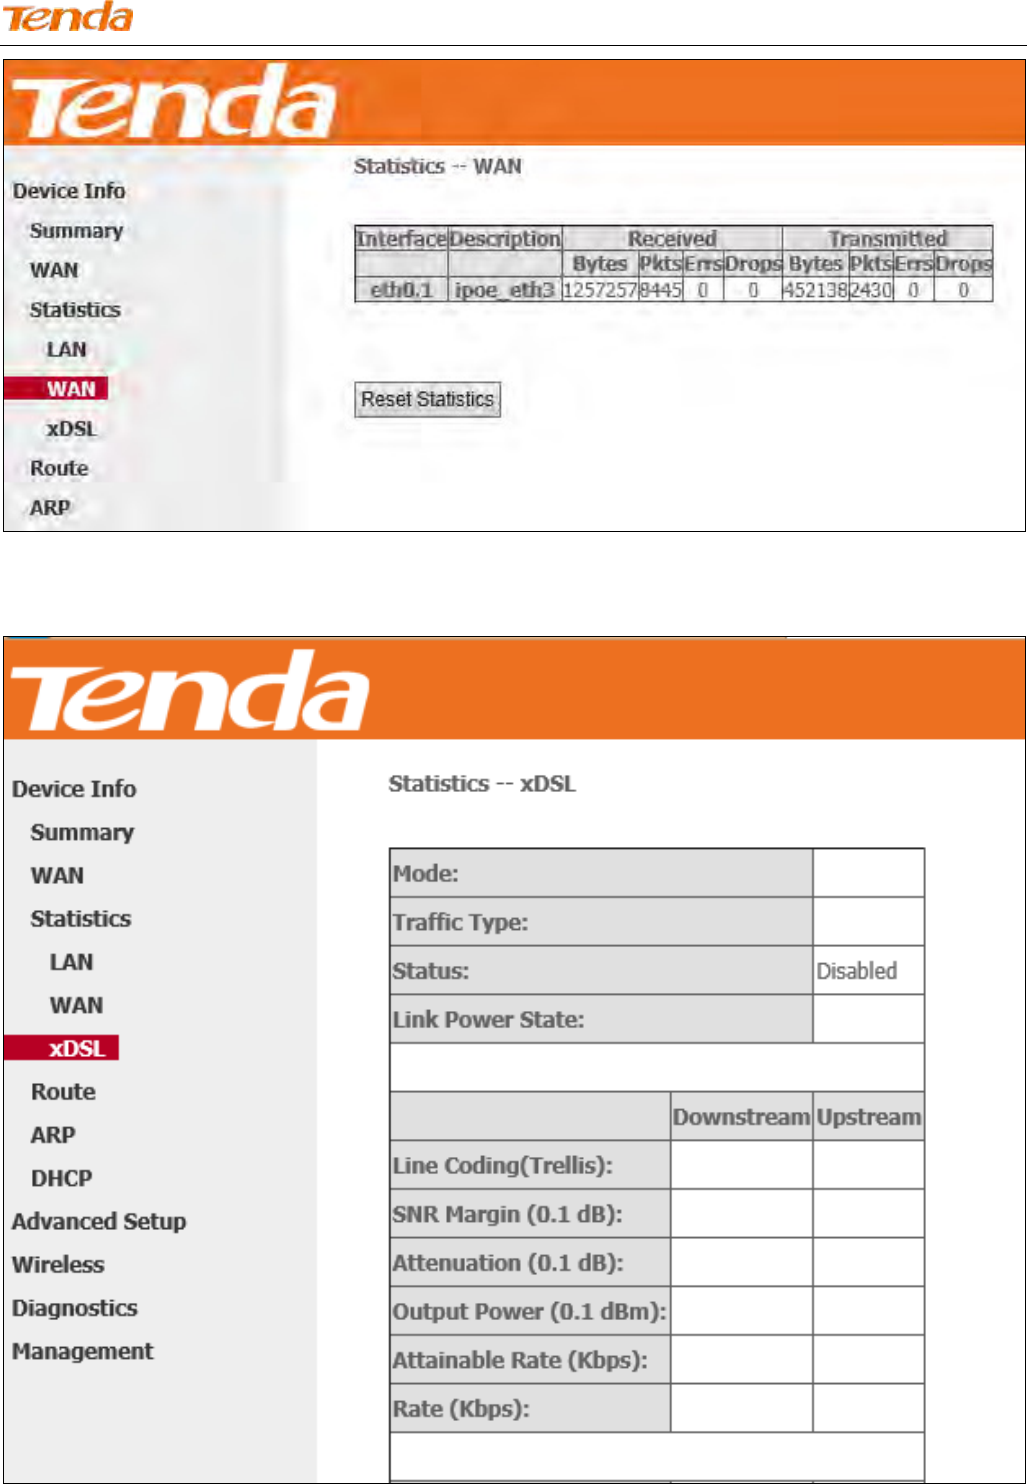
4.1.3 Statistics
Here you can view the packets received and transmitted on LAN and WAN ports.
Statistics--LAN: Displays the packets received and transmitted on the LAN ports as seen in the screenshot below.
Statistics--WAN: Displays the packets received and transmitted on the WAN port as seen in the screenshot below.
Wireless N300 ADSL2+ High Power Modem Router
13
Statistics-xDSL: Display the packets received and transmitted on the DSL port.
Wireless N300 ADSL2+ High Power Modem Router
14
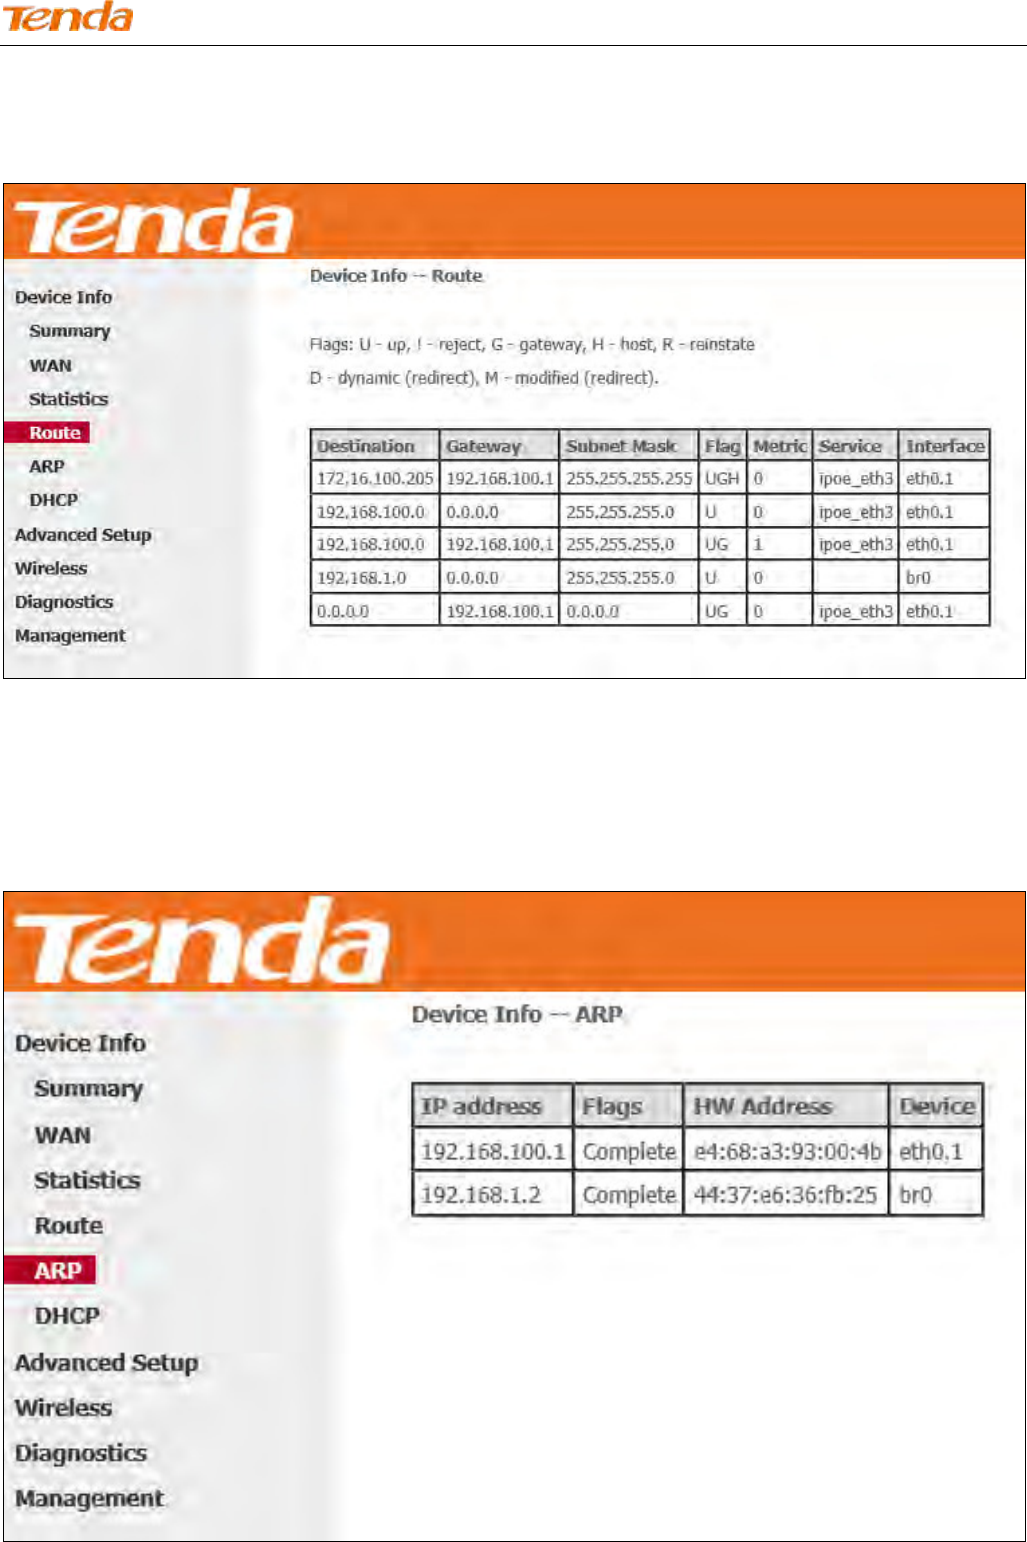
4.1.4 Route
Here you can view the route table as seen in the screenshot:
4.1.5 ARP
Here you can view the IP and MAC addresses of the PCs that attach to the device either via a wired or wireless
connection as seen in the screenshot:
Wireless N300 ADSL2+ High Power Modem Router
15
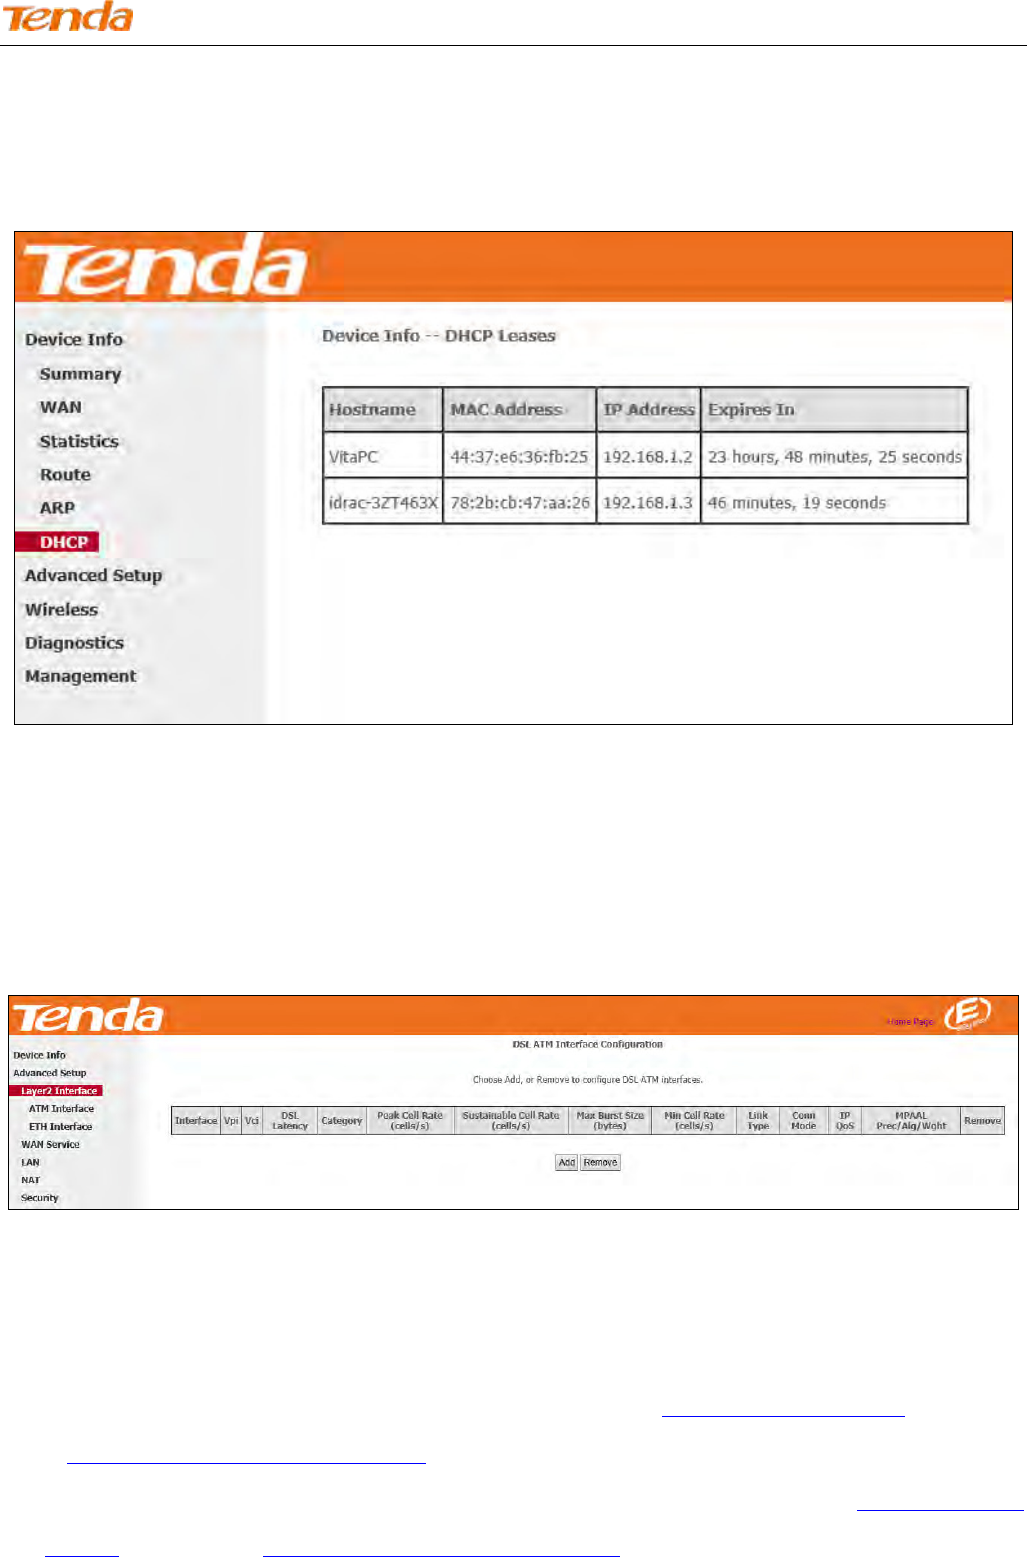
4.1.6 DHCP
Here you can view the DHCP leases, including IP and MAC addresses of the PCs, hostnames and remaining lease time
as seen in the screenshot:
4.2 Advanced Setup
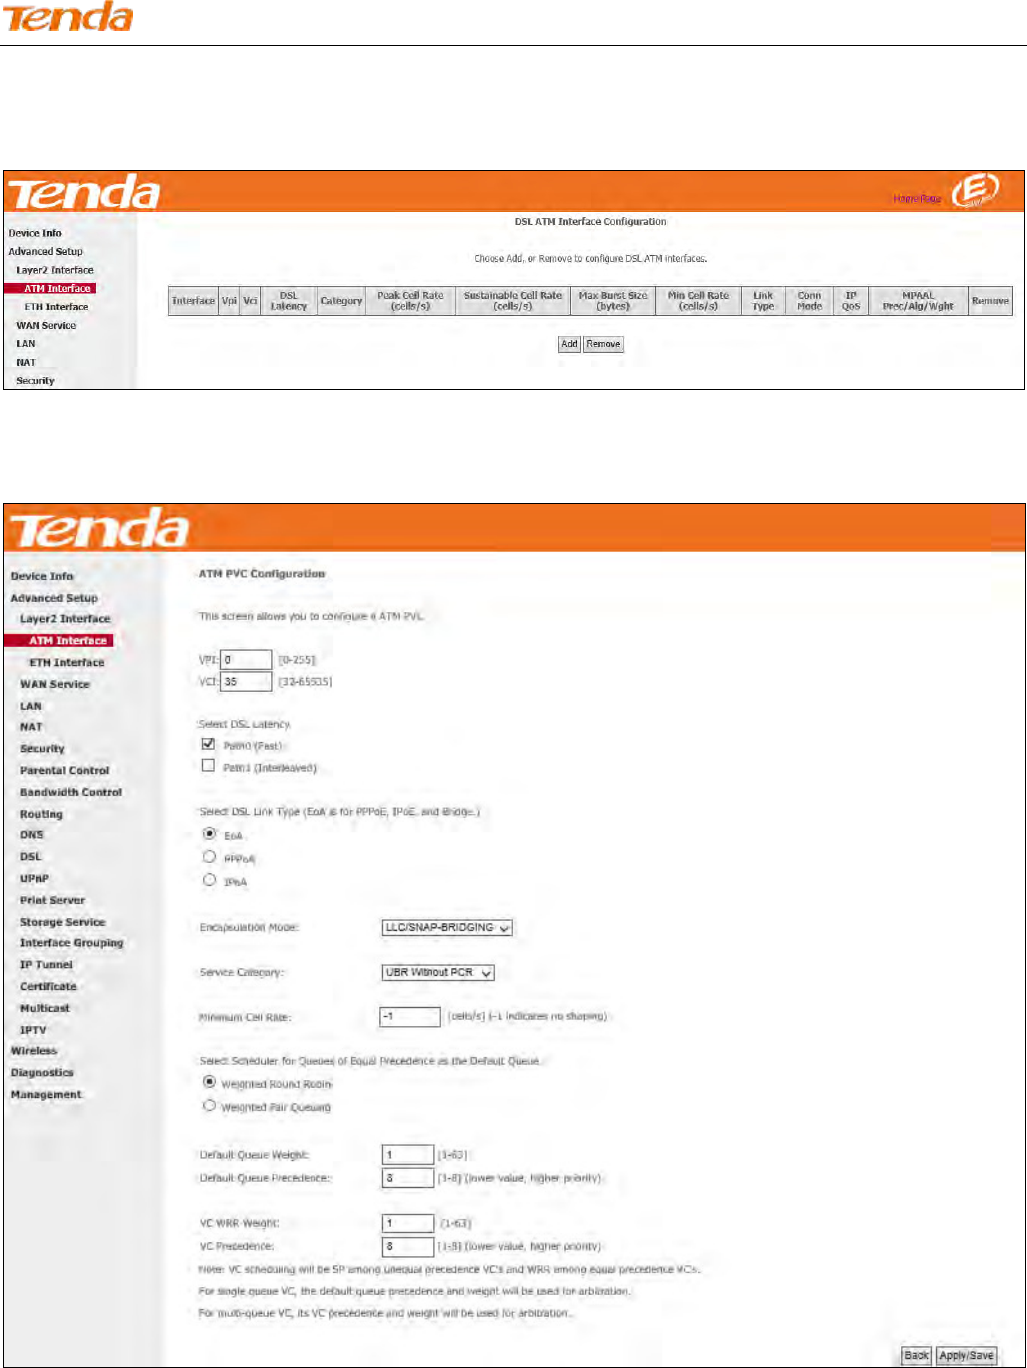
4.2.1 Layer2 Interface
Click Advanced Setup > Layer2 Interface to enter the Layer2 Interface screen.
This router provides two Layer2 Interfaces:
- ATM Interface for ADSL broadband Internet service. (By default, system applies the ATM Interface [ADSL uplink].)
- ETH Interface for connecting to the Internet via an Ethernet cable.
If you directly connect to the ADSL line via a phone cable, first refer to To Set up the ATM interface and then skip
to To Set up WAN Service for ATM Interface.
If you connect to the Internet via a fiber/cable modem using an Ethernet cable, first refer to To Set up the ETH
interface and then skip to To Set up WAN Service for ETH Interface.
Wireless N300 ADSL2+ High Power Modem Router
16
To set up the ATM interface
Step 1: Select ATM Interface and click Add to configure it.
Step 2: Enter the VPI and VCI values. Select a DSL Link Type (Internet connection type): EoA, PPPoA or IPoA. Leave
other options unchanged from factory defaults. Click Apply/Save.
Wireless N300 ADSL2+ High Power Modem Router
17
Go to To Set up WAN Service for ATM Interface to configure the WAN service for Internet access.
Tip
If you are unsure about the VPI/VCI parameters, see Appendix 4 VPI/VCI List, or ask your ISP to provide it.
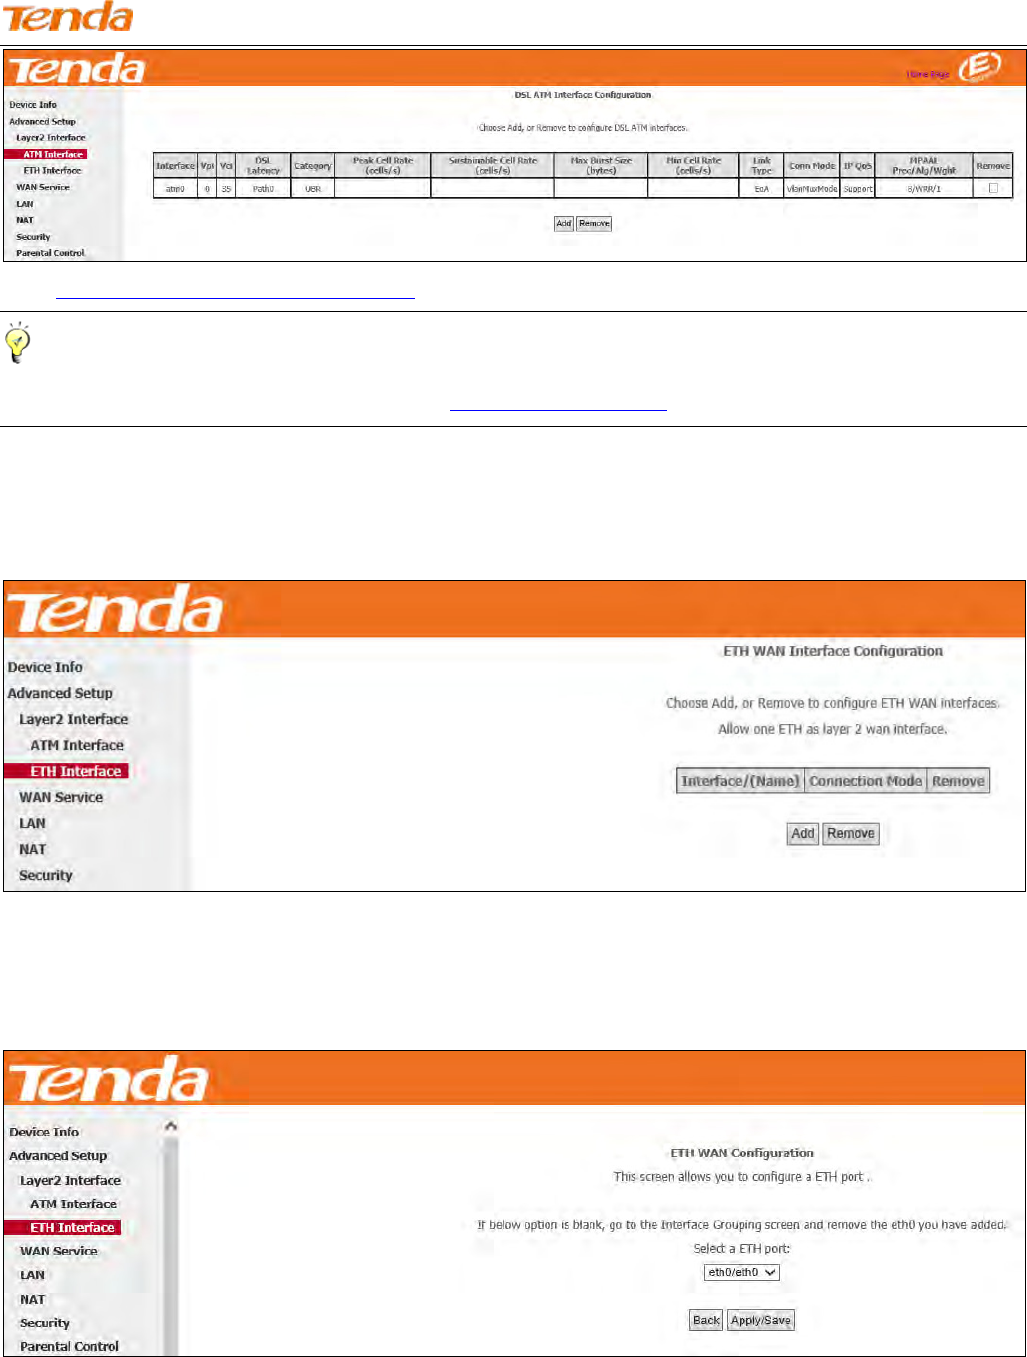
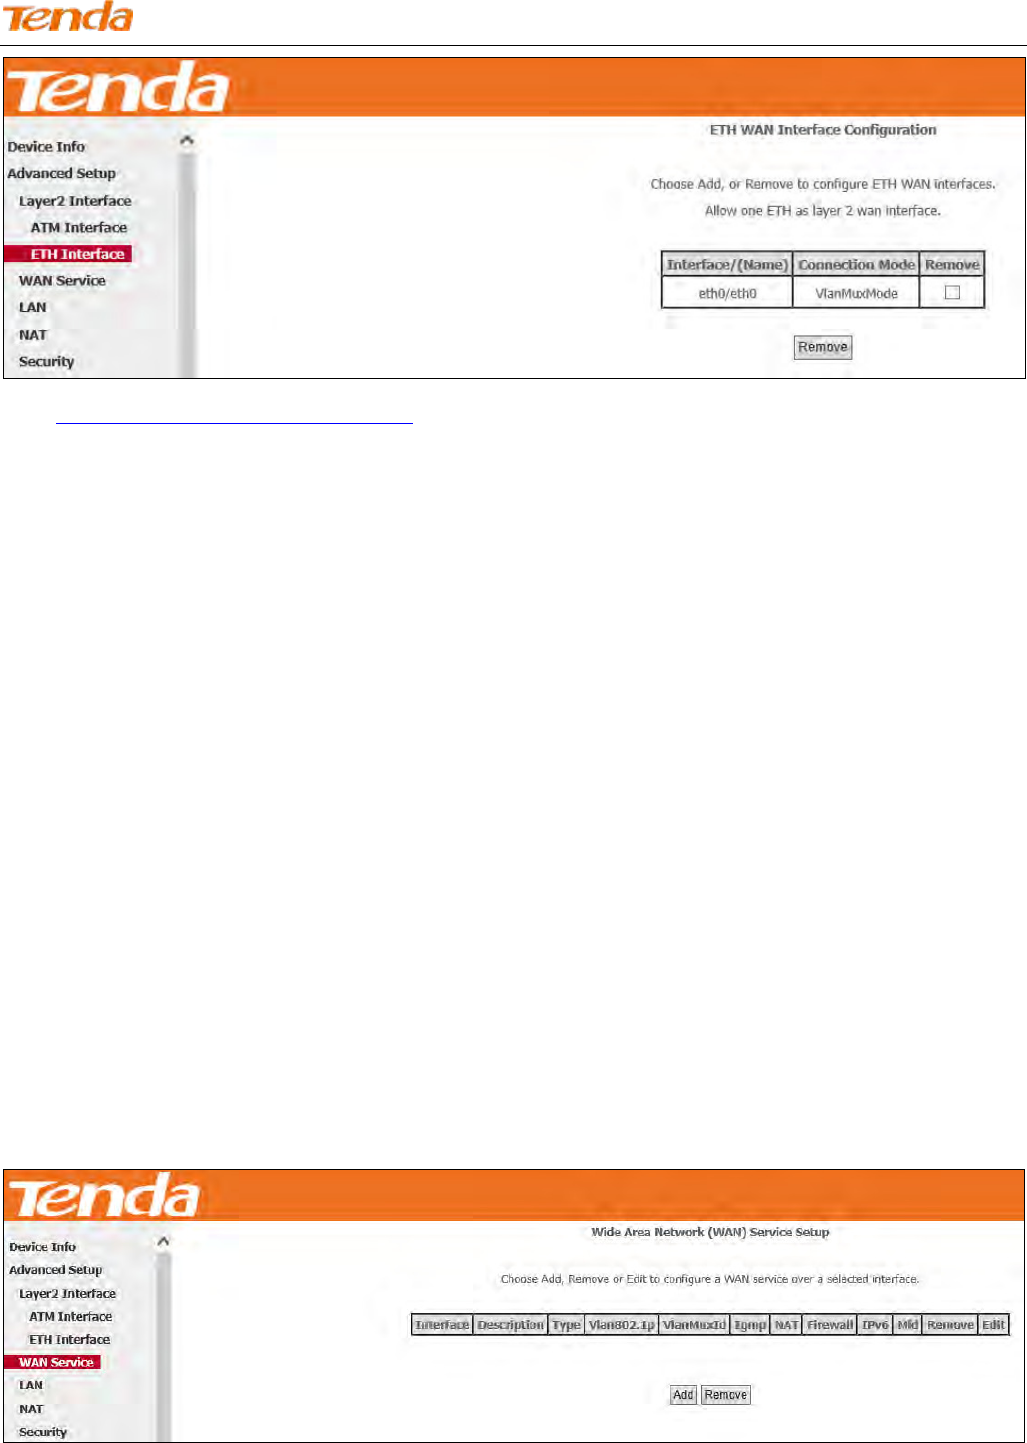
To set up the ETH interface
Step 1: Select ETH Interface and click Add.
Step 2: Select eth0/eth0 in the box to function as a WAN port. Only one LAN port can be configured as the WAN port at
a time. Click Apply/Save to take the settings into effect.
Wireless N300 ADSL2+ High Power Modem Router
18
Go to To Set up WAN Service for ETH Interface to configure the WAN service for Internet access.
4.2.2 WAN Service
This router provides two WAN services:
- WAN Service for ATM Interface (ADSL uplink)
- WAN Service for ETH Interface (Ethernet uplink)
To Set up WAN Service for ATM Interface
EoA (PPPoE, IPoE and Bridge)
If you configured the ATM Interface (ADSL uplink) and select EoA as the DSL link type, follow below steps to
configure the WAN service:
PPPoE
IPv4 Only
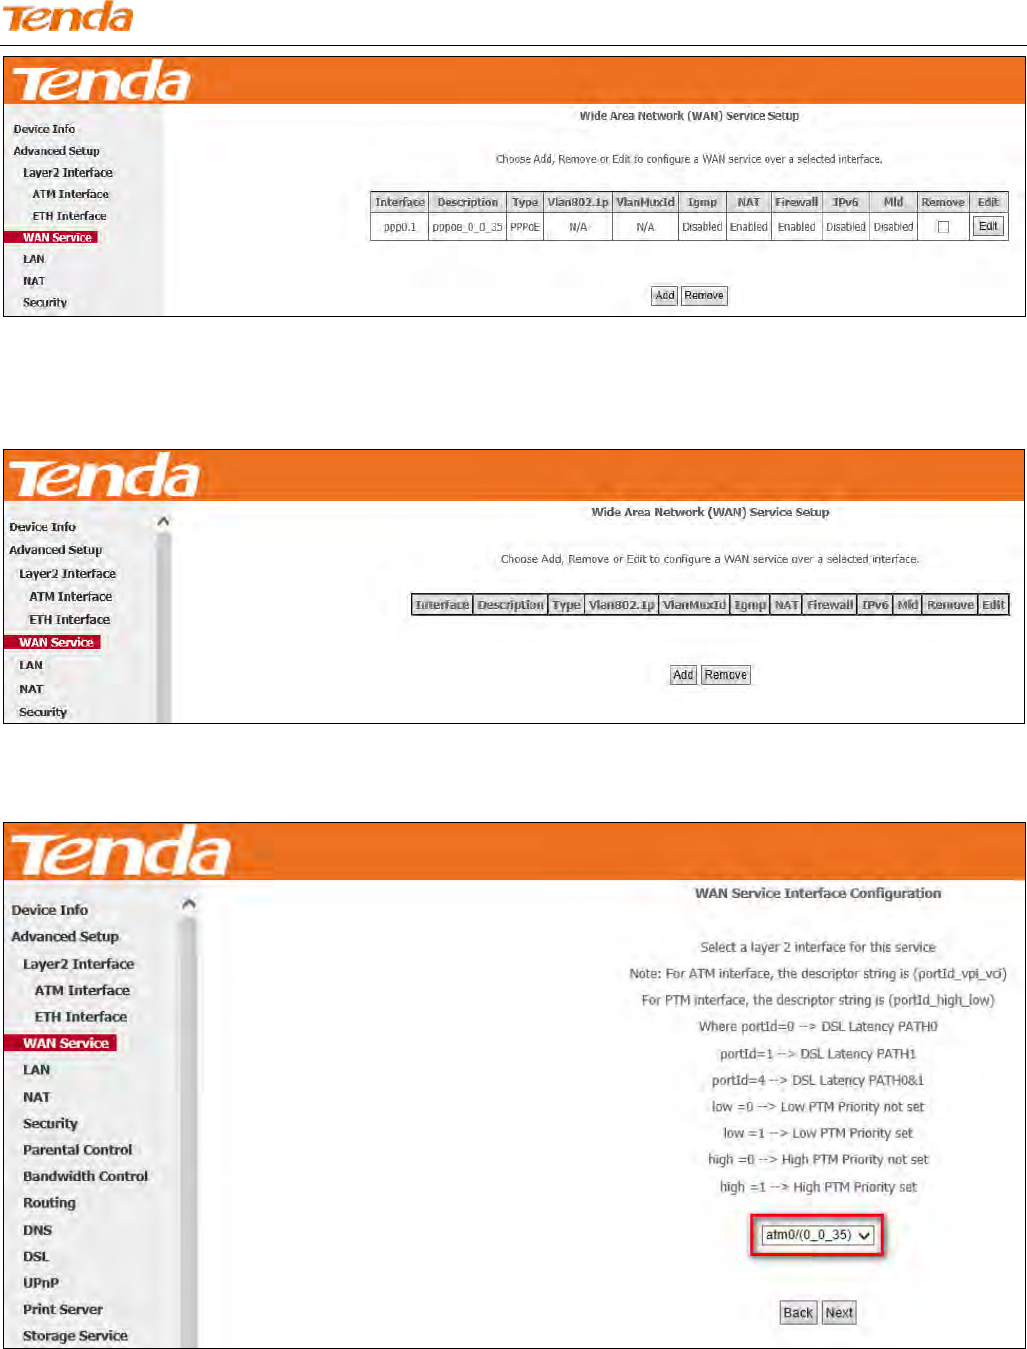
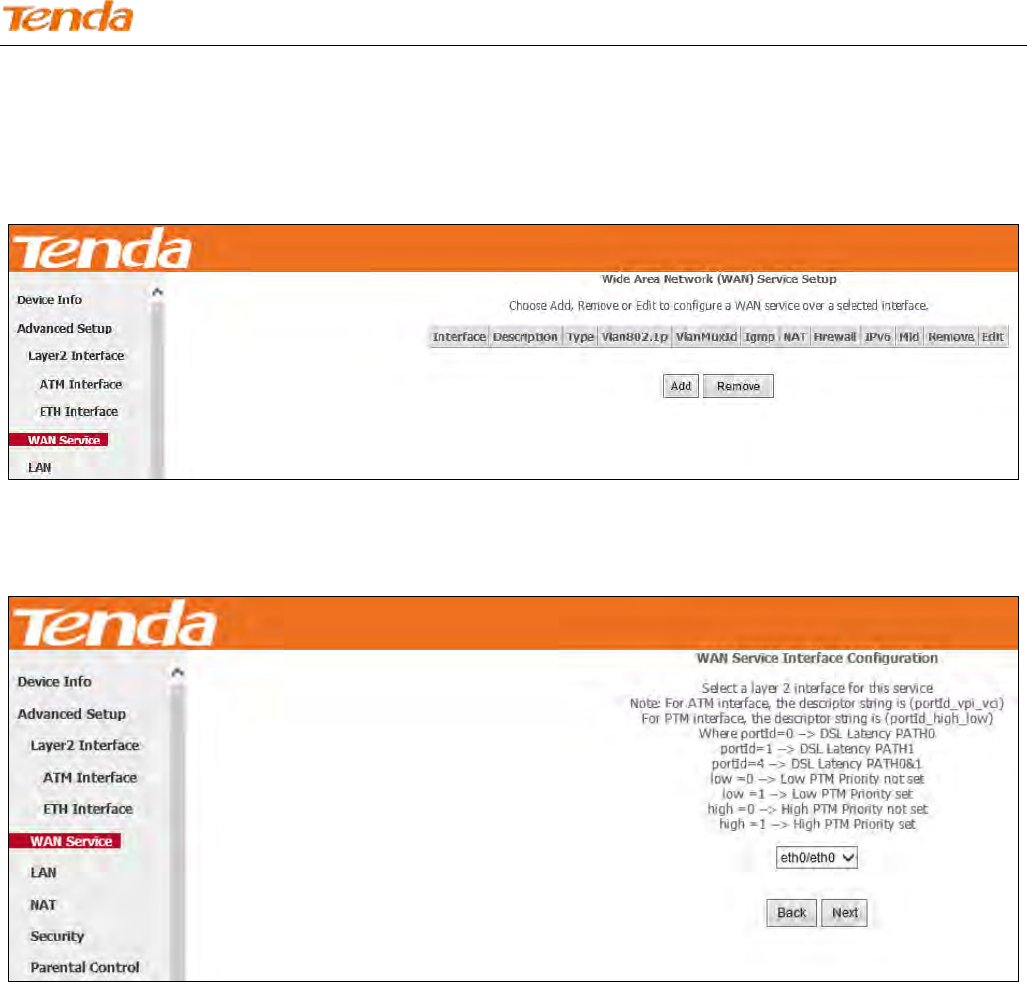
Step 1: Click Advanced Setup > WAN Service and then click the Add button.
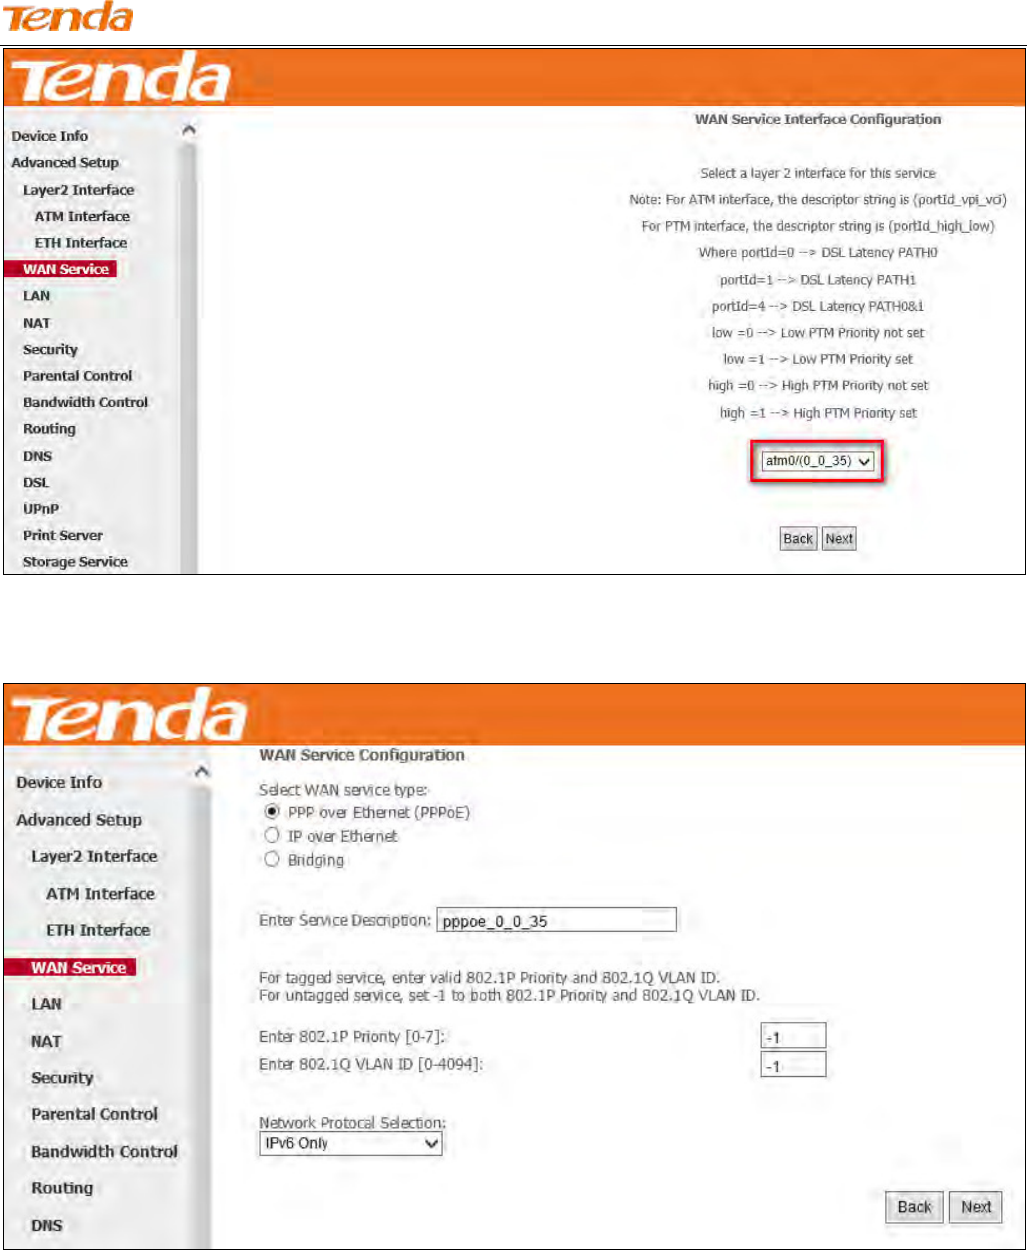
Step 2: Select the ATM interface you added just now from the pull-down menu in the figure below. Click Next.

Wireless N300 ADSL2+ High Power Modem Router
19
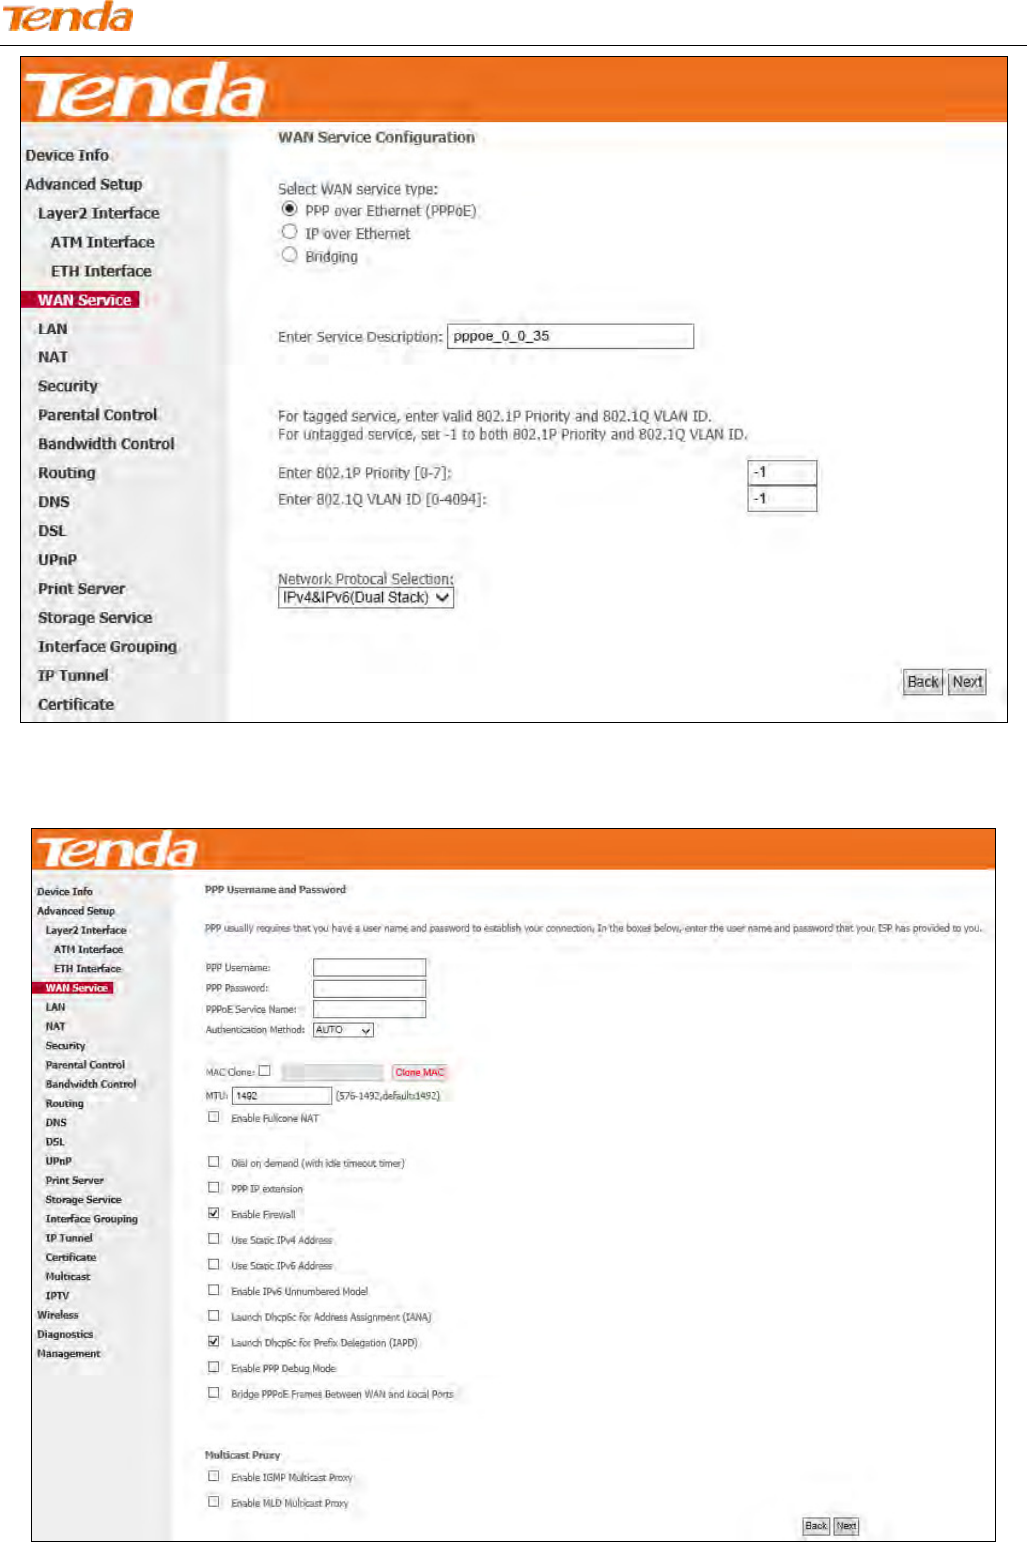
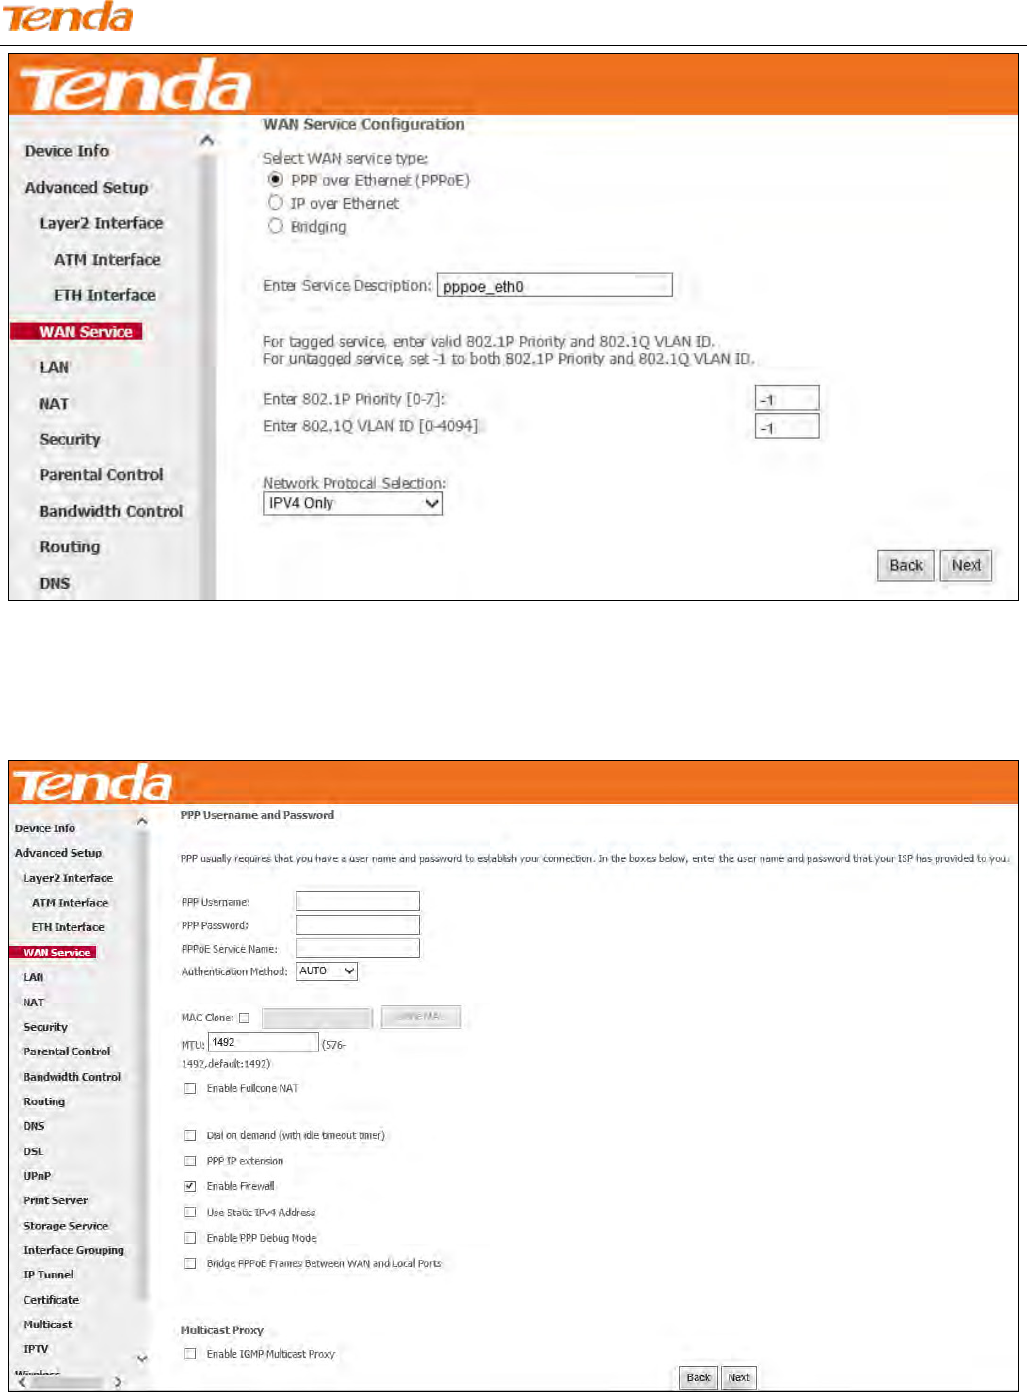
Step 3: Select PPP over Ethernet (PPPoE). Edit the Enter Service Description field which is optional. Suggest you
keep the default. Select a network protocol: IPv4 Only. Click Next.
Wireless N300 ADSL2+ High Power Modem Router
20
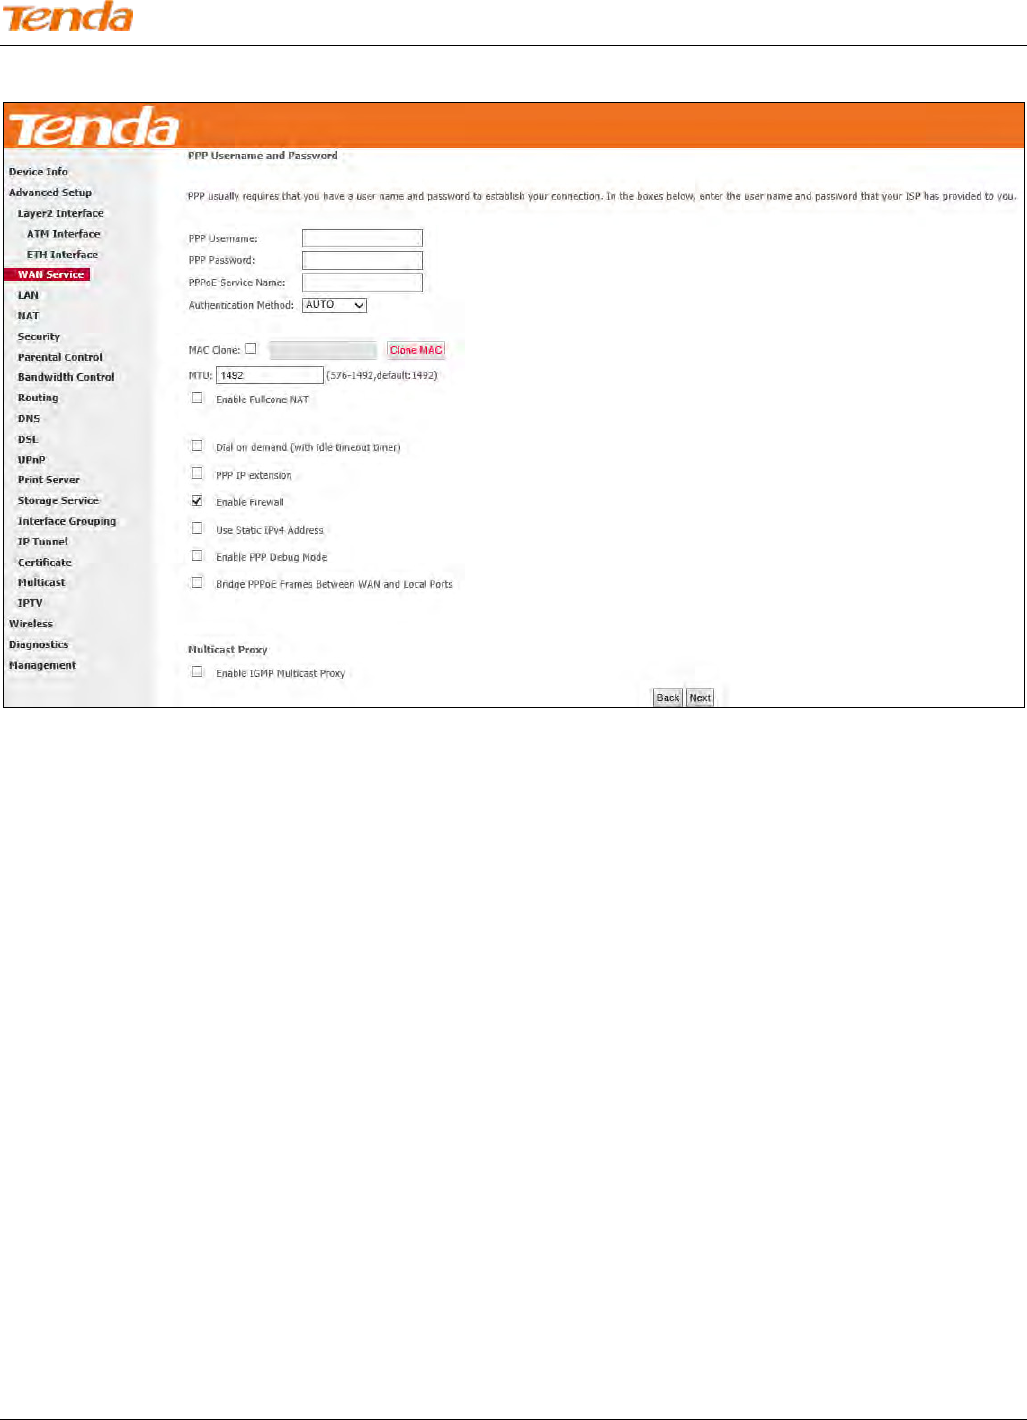
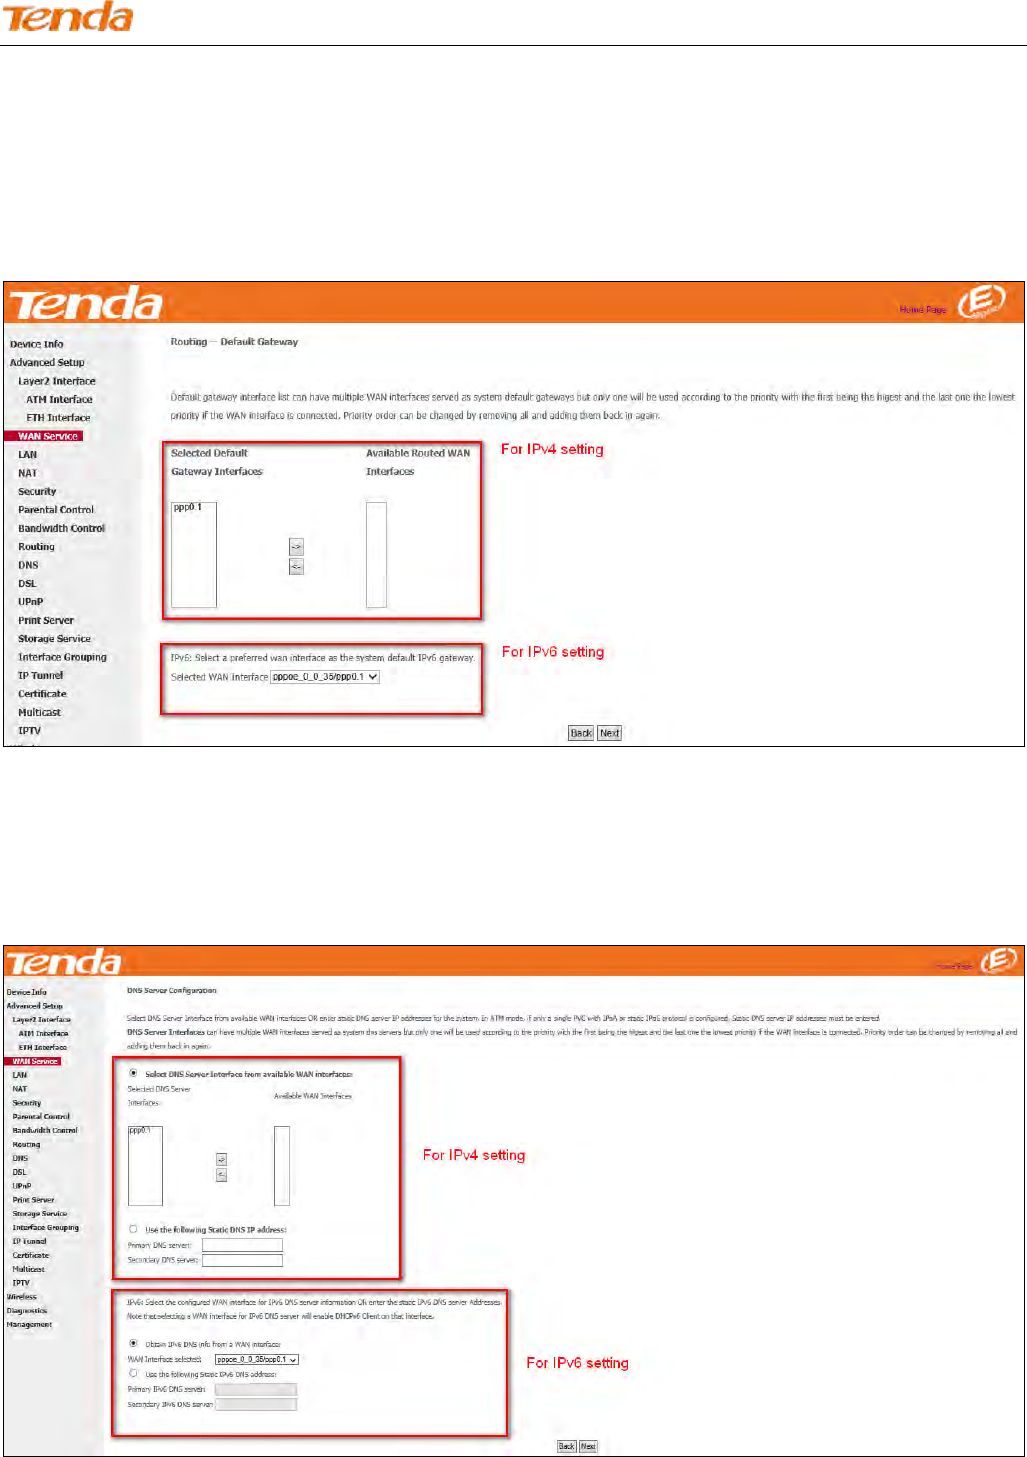
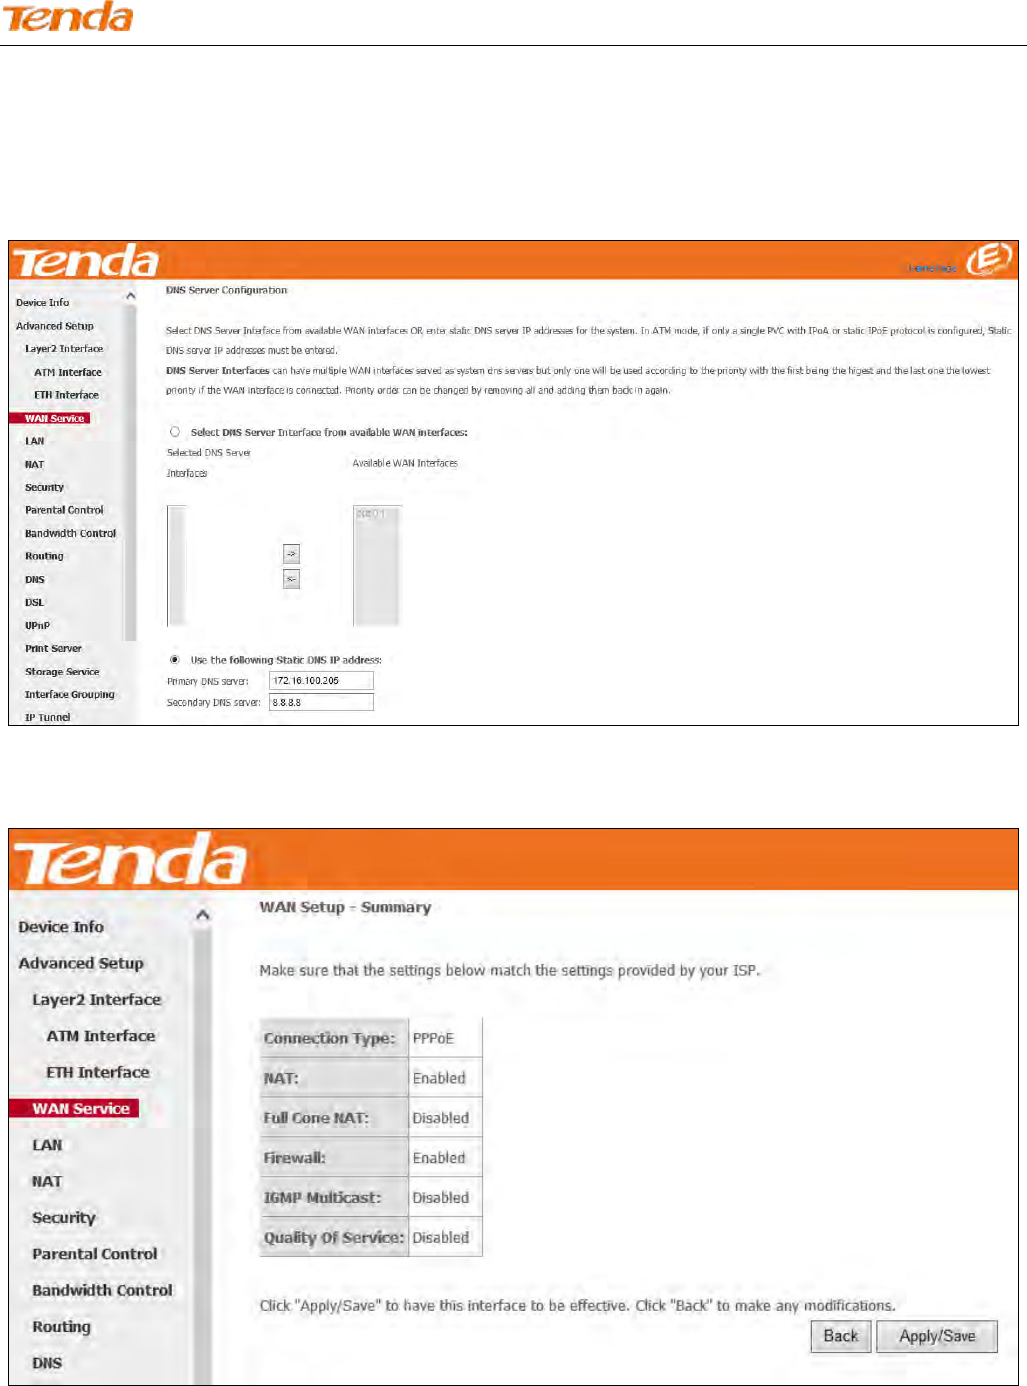
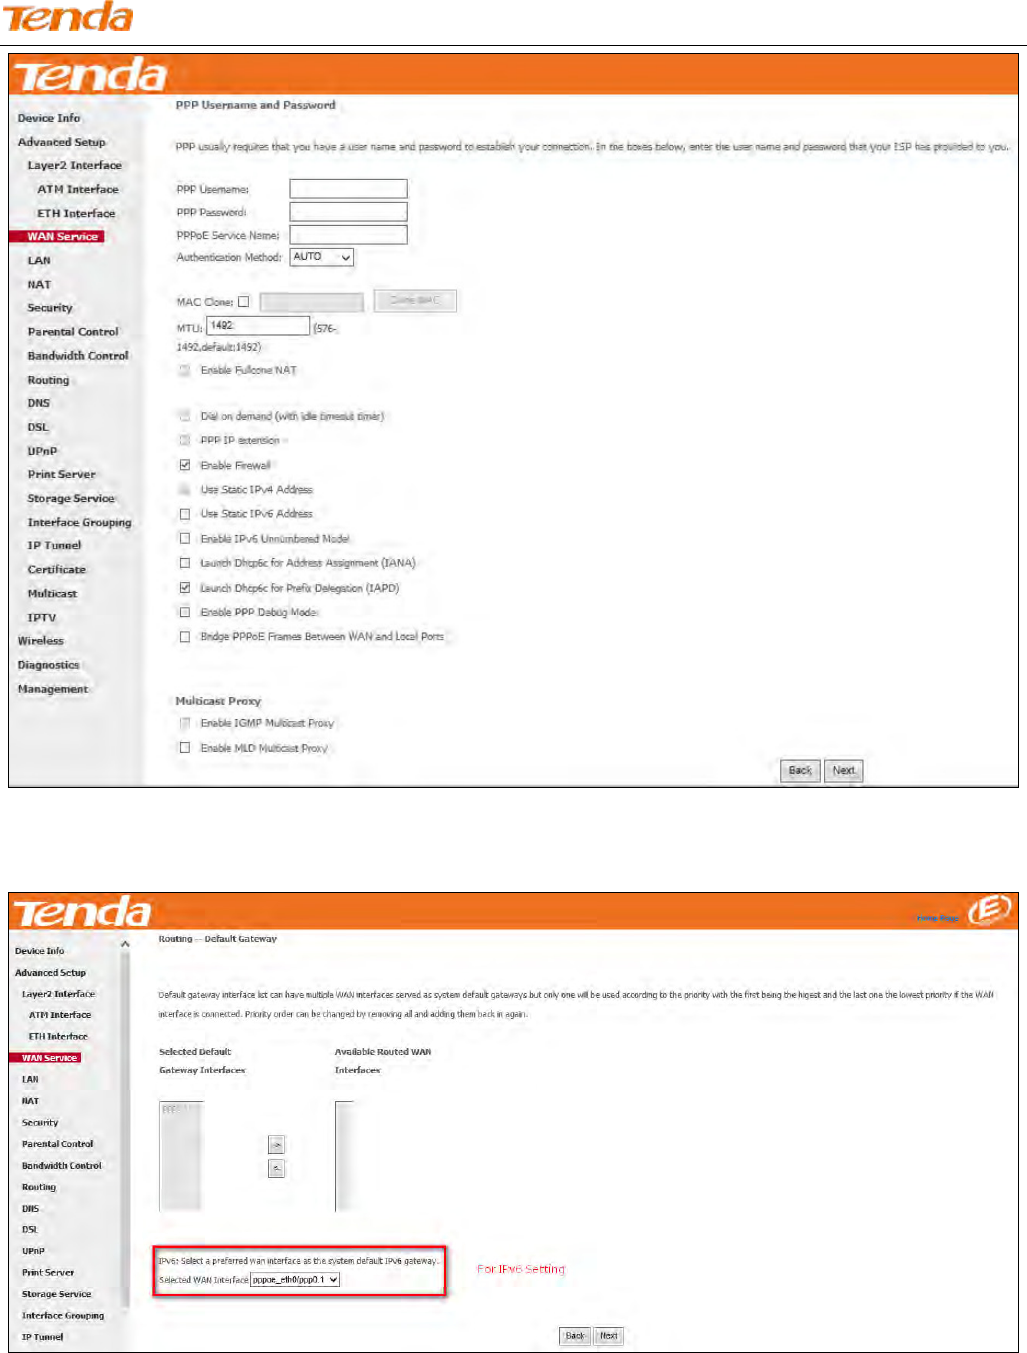
Step 4: Finish PPP Username and Password and other settings on the figure below. Click Next.
PPP Username/Password: For logging in to your ISP. If you cannot locate this information, ask your ISP to provide it.
PPPoE Service Name: Provided by your ISP. Only enter it if instructed by your ISP.
Authentication Method: Used by ISP to authenticate the client that attempts to connect. If you are not sure, consult
your ISP or select AUTO.
MAC Clone: When you cannot access the Internet after finishing other settings here except this option, consider
whether it’s the matter of the MAC address of your computer. Clicking Clone MAC button copies the MAC address of
your computer to the router.
MTU: Keep the default value unless you are sure it is necessary for your ISP connection.
Dial on demand: Connect to ISP only when there is traffic transmission. This saves your broadband Internet service bill.
PPP IP extension: If enabled, all the IP addresses in outgoing packets including management packets on the WAN port
will be changed to the device's WAN IP address. Only change the default settings if necessary.
Enable PPP Debug Mode: Only enable this feature if supported by your ISP.
Bridge PPPoE Frames Between WAN and Local Ports: If enabled, PPPoE dialup frame from LAN side will directly
egress the WAN port without modification.
Multicast Proxy: If enabled, the router will use multicast proxy.
Knowledge Expansion
1. MAC Clone: Many broadband ISPs restrict access by allowing traffic only from the MAC address of your broadband
modem, but some ISPs additionally register the MAC address of your computer when your account is first opened. If so,
Wireless N300 ADSL2+ High Power Modem Router
21
only by cloning the MAC address of your computer can you access the Internet through the router.
2. MTU: Short for Maximum Transmission Unit, the largest physical packet size, measured in bytes, which
a network can transmit. Any messages larger than the MTU are divided into smaller packets before being sent. The
default MTU is 1492 bytes. For some ISPs, you might need to change the MTU. This is rarely required, and should not
be done unless you are sure it is necessary for your ISP connection.
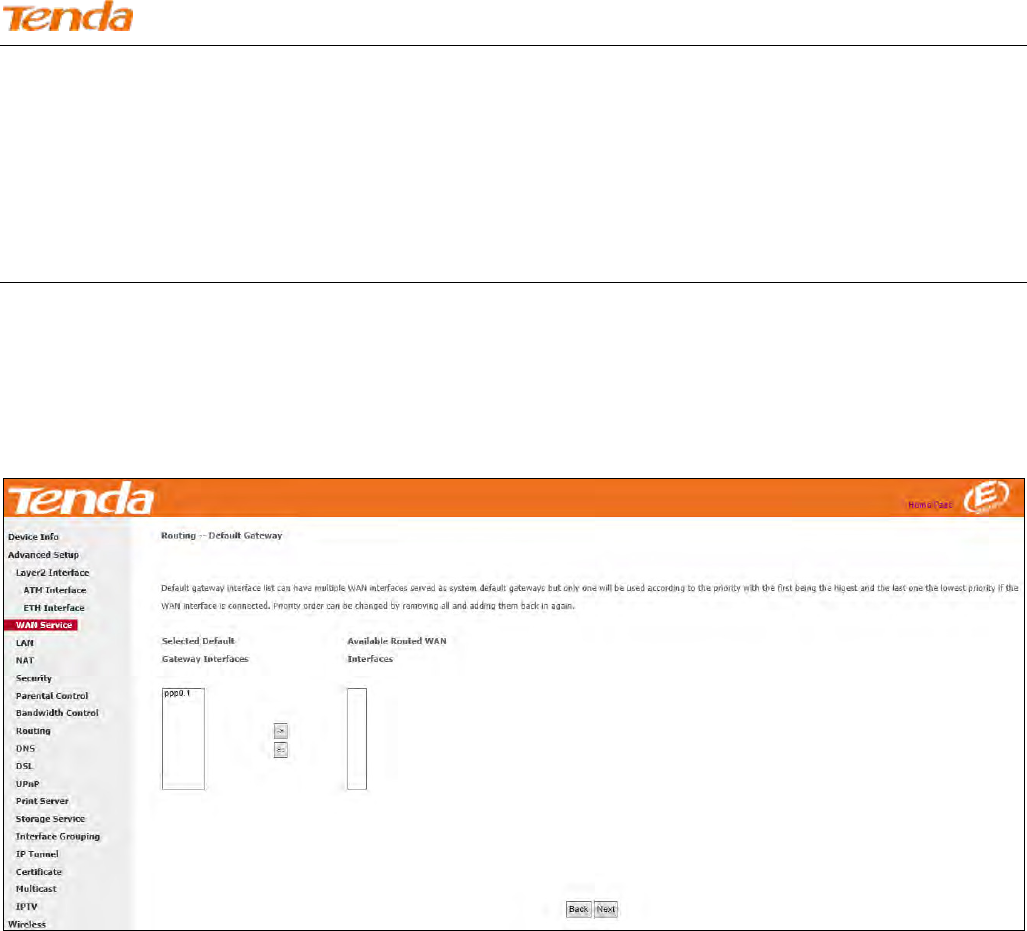
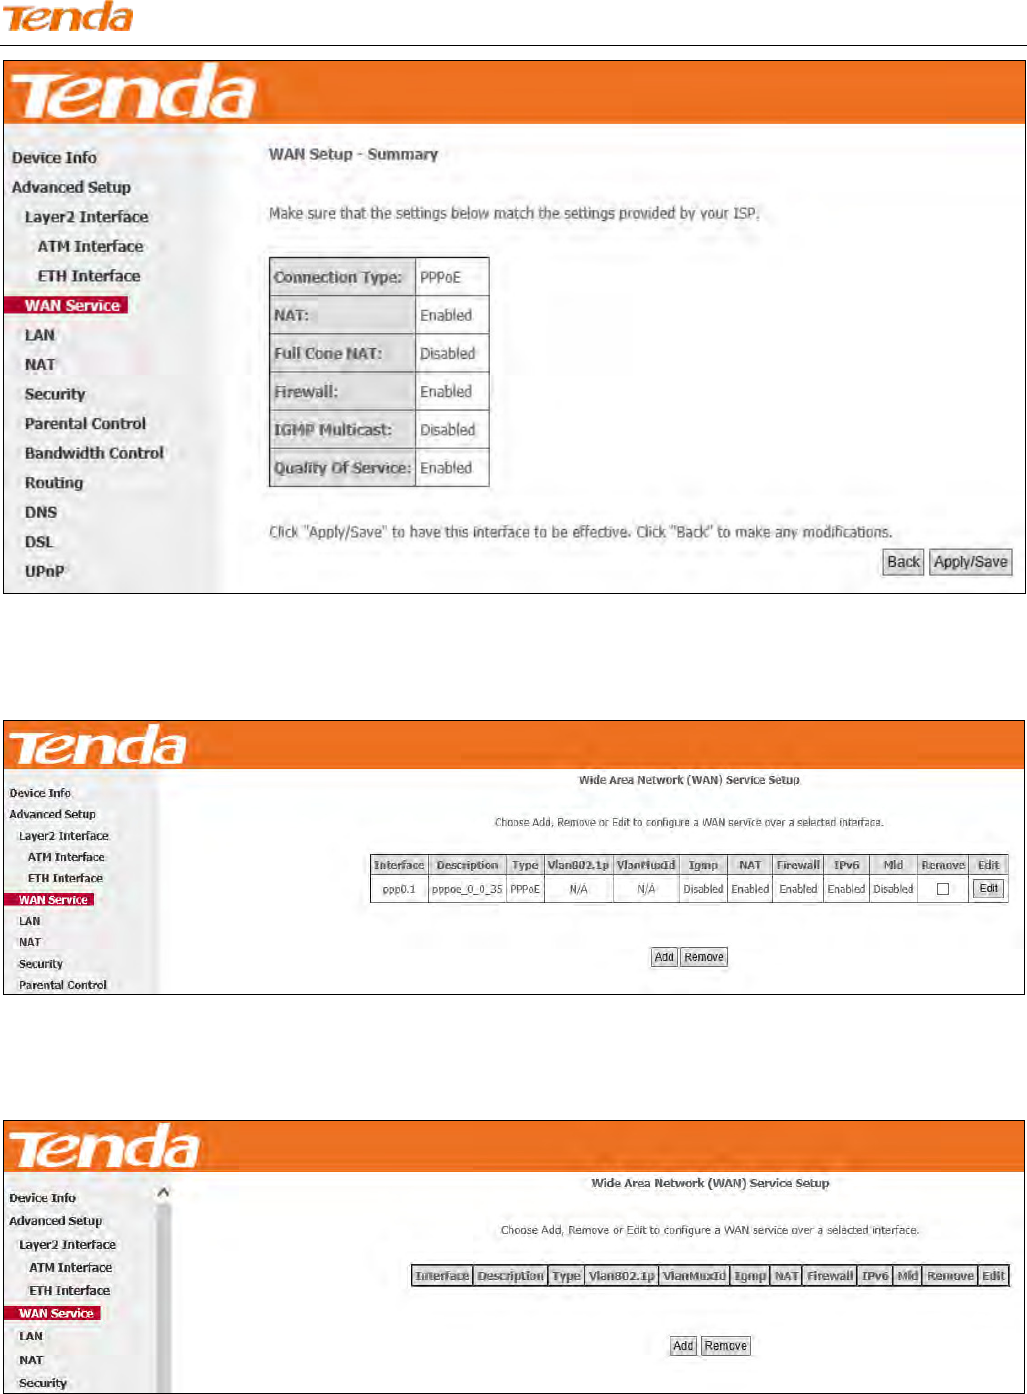
Step 5: To configure the Default Gateway interface, select the interface that you want to configure with the WAN
gateway address in Available Routed WAN Interfaces box and move it into Selected Default Gateway Interfaces box.
The default setting is recommended. Then click Next.
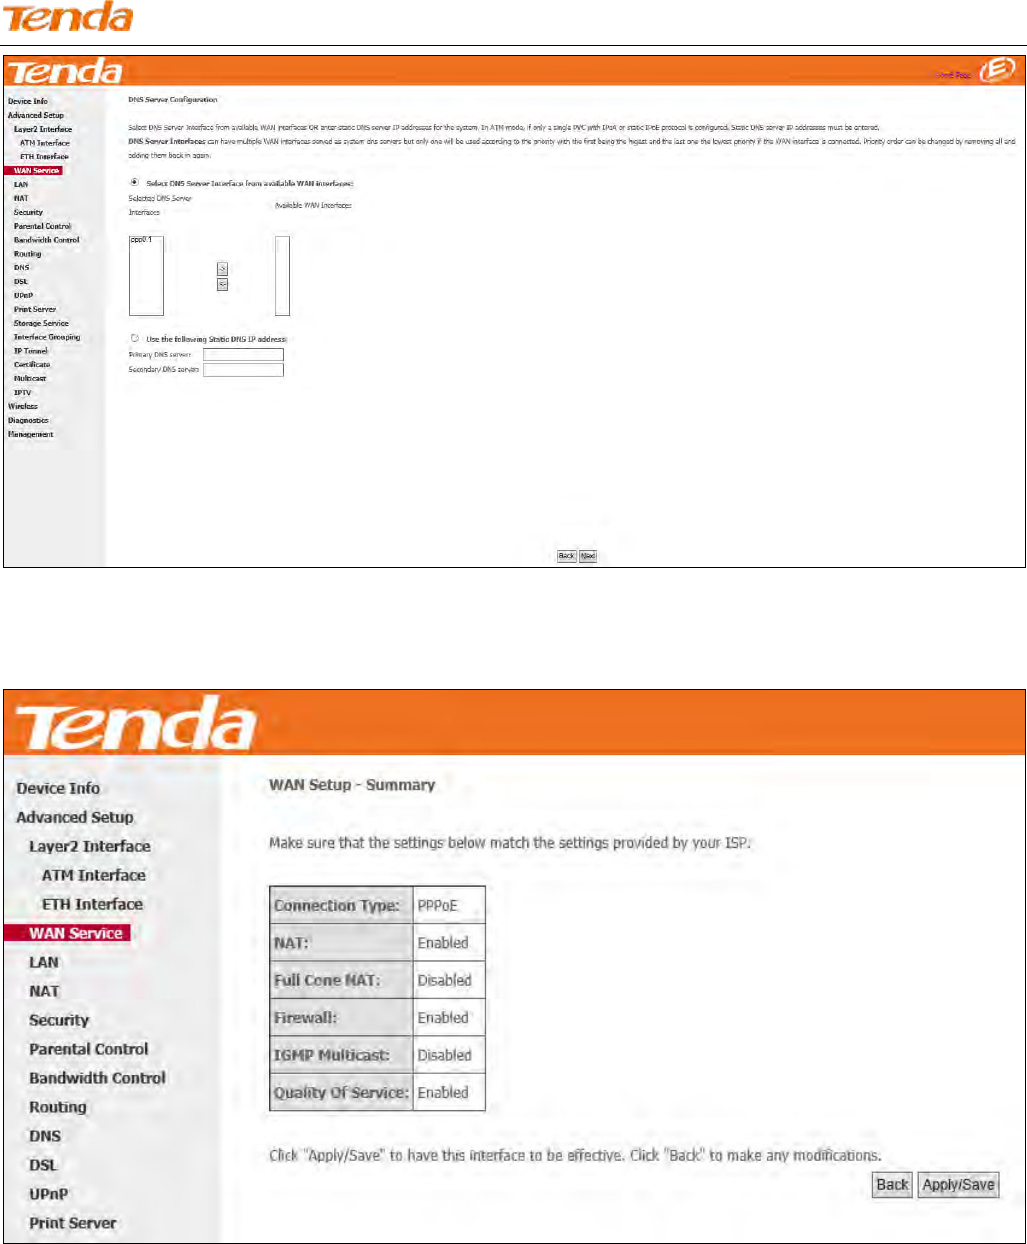
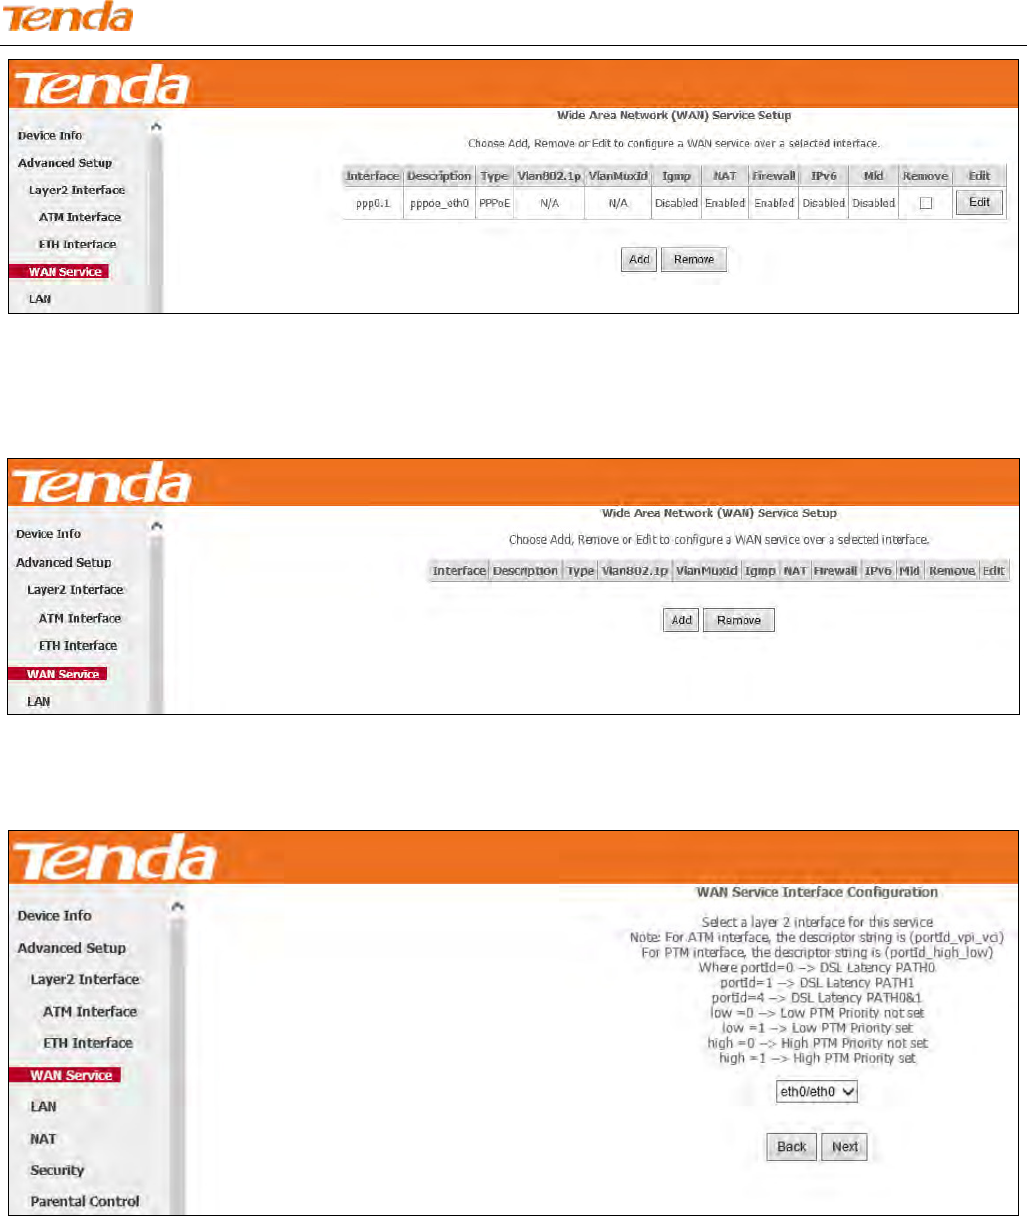
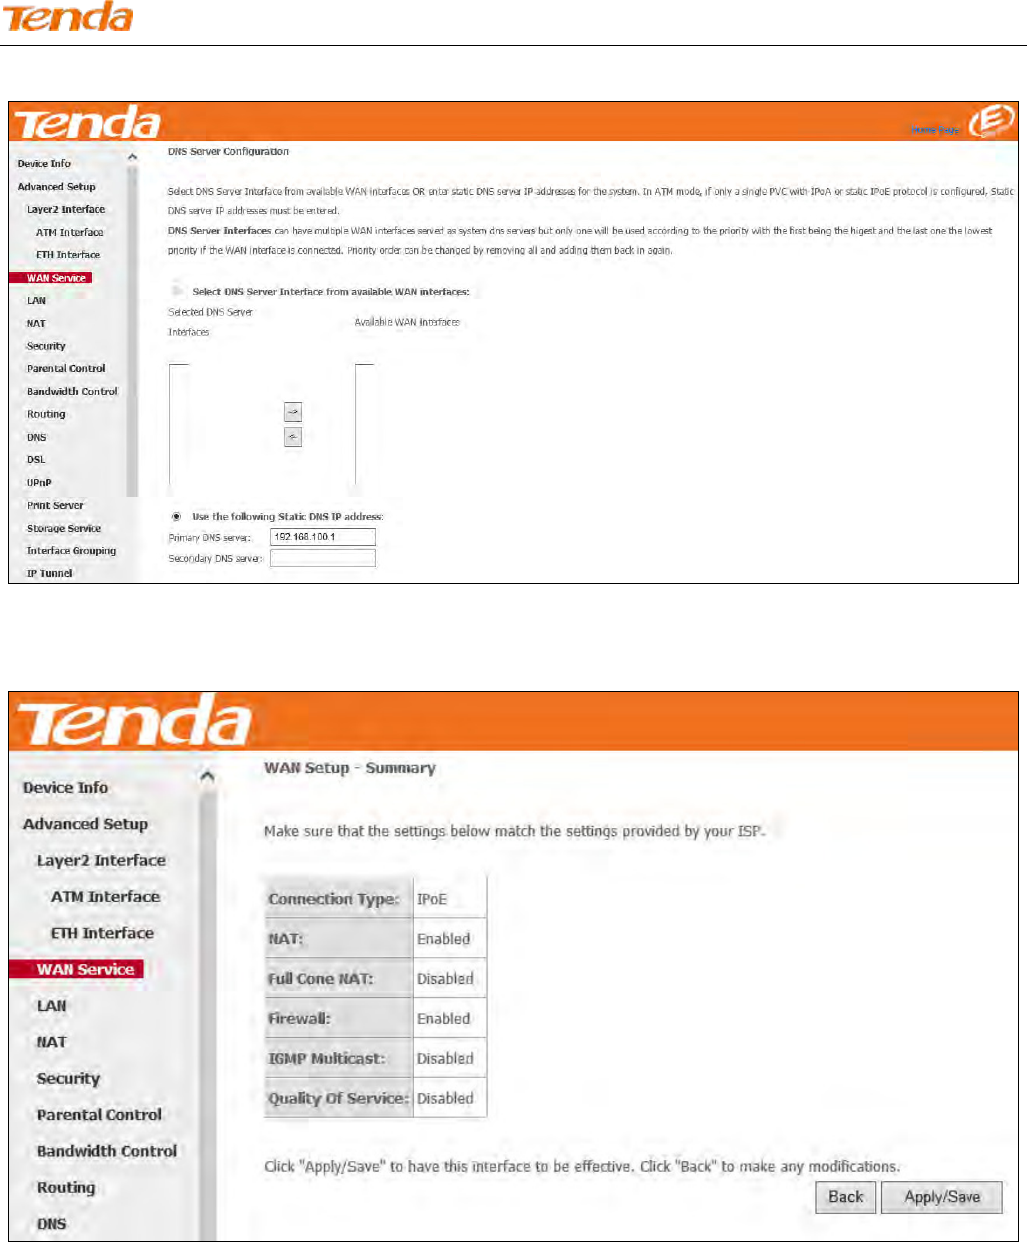
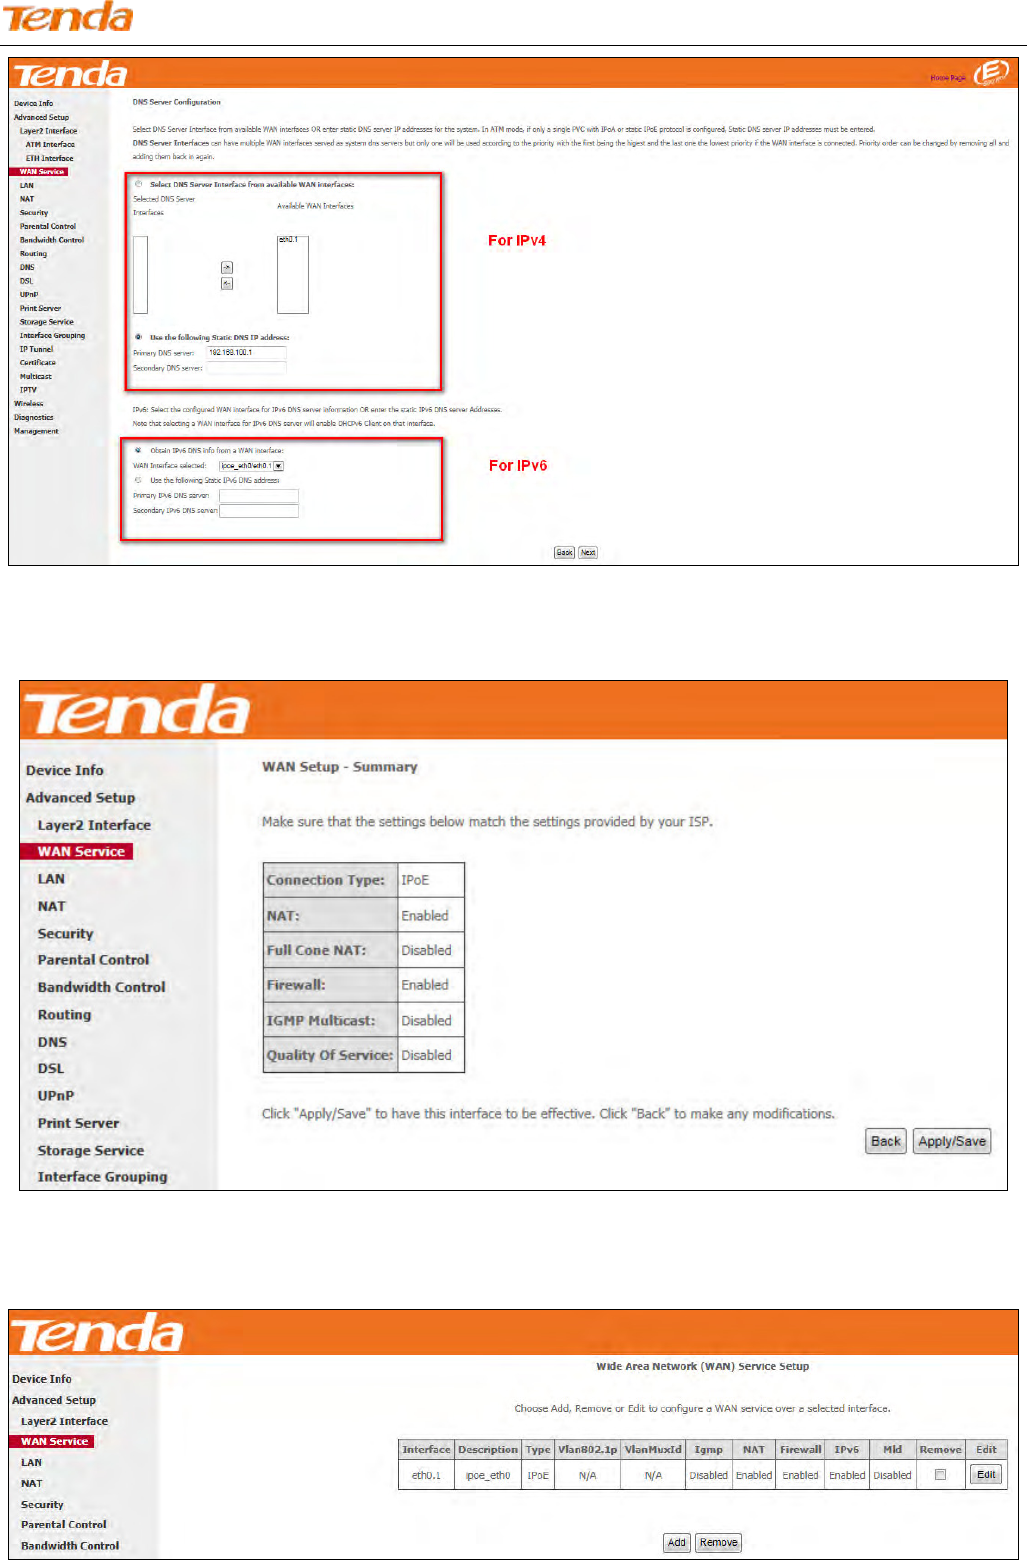
Step 6: To configure the WAN DNS address, click the Select DNS Server Interface from available WAN interfaces
option, or select the Use the following Static DNS IP address option and enter the static DNS server IP addresses
provided by your ISP. At last, click Next.
Wireless N300 ADSL2+ High Power Modem Router
22
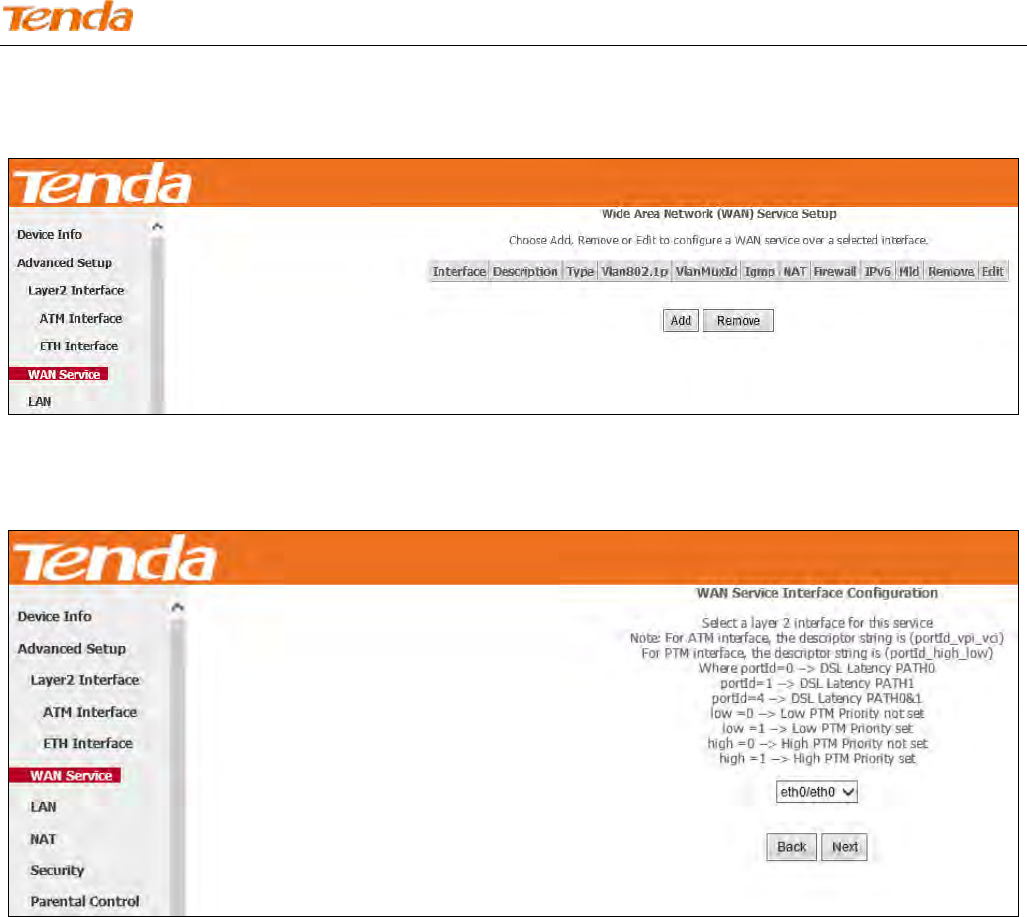
Step 7: Here you can view your configurations. Click Apply/Save to save your settings if everything is correctly set.
When the PPPoE connection is successful, you can access the Internet.
Wireless N300 ADSL2+ High Power Modem Router
23
IPv4 & IPv6 (Dual Stack)
Step 1: Click Advanced Setup > WAN Service and then click the Add button.
Step 2: Select the ATM interface you added just now from the pull-down menu in the figure below. Click Next.
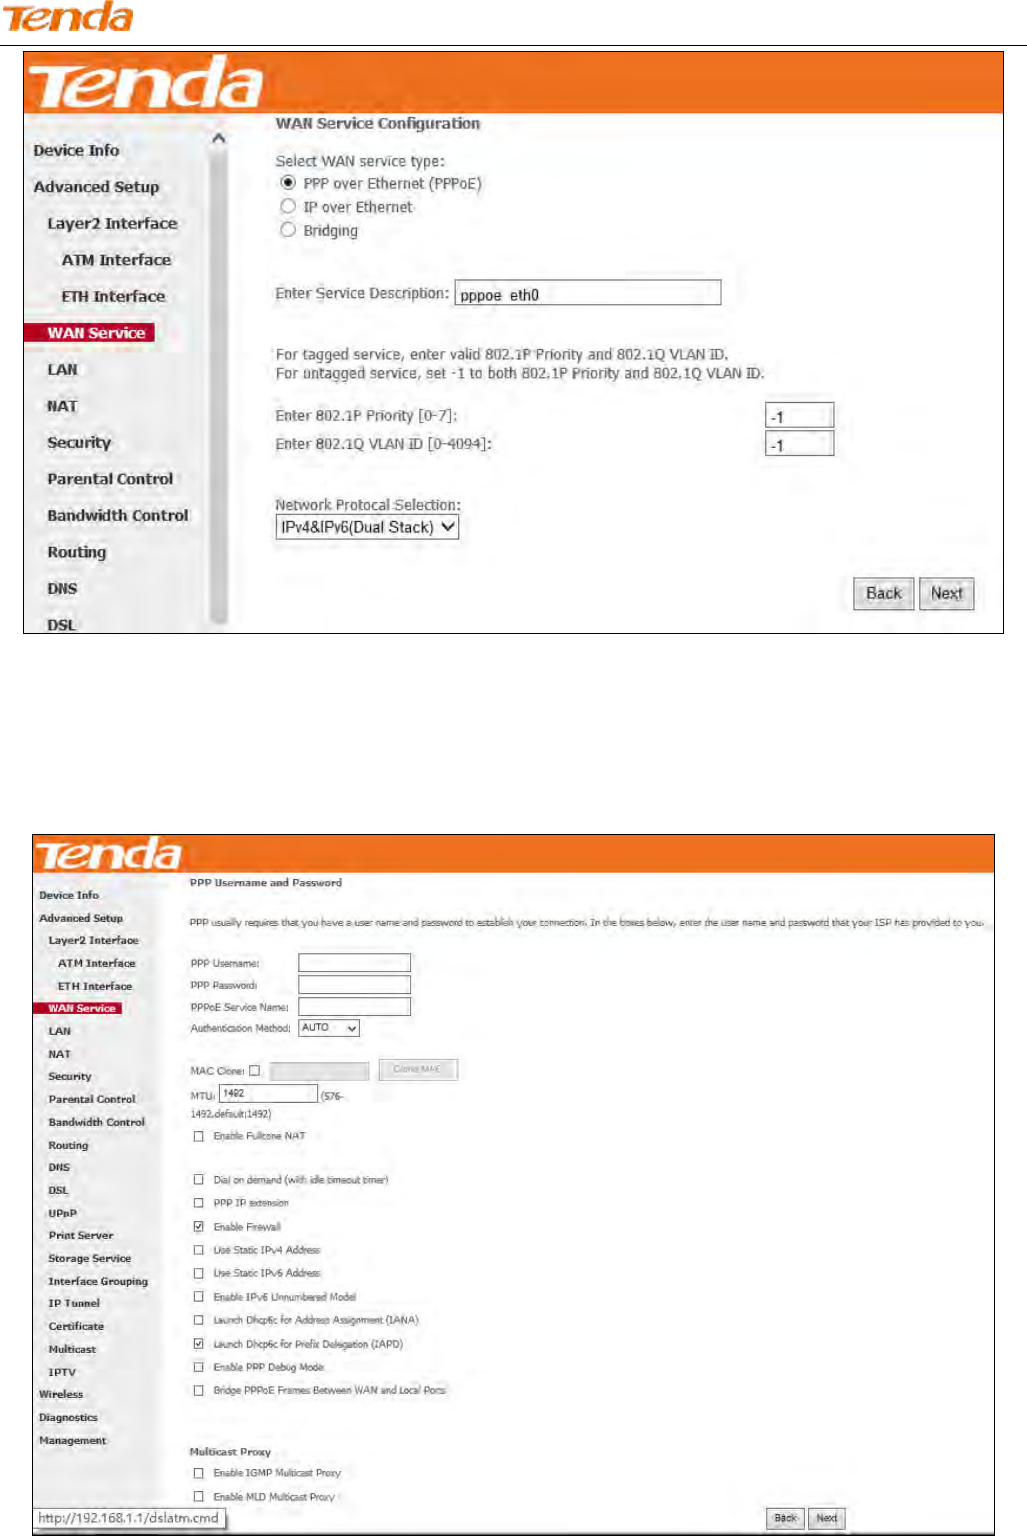
Step 3: Select PPP over Ethernet (PPPoE). Edit the Enter Service Description field which is optional. Suggest you
keep the default. Select a network protocol: IPv4&IPv6 (Dual Stack). Click Next.
Wireless N300 ADSL2+ High Power Modem Router
24
Step 4: Configure PPP Username and Password and other settings on the figure below. Each field with its indication is
mentioned above in IPv4 Only (PPPoE) section. Check Launch Dhcp6c for Prefix Delegation (IAPD). Click Next.
Wireless N300 ADSL2+ High Power Modem Router
25
If your ISP is using static DHCPv6, check Launch Dhcp6c for Address Assignment (IANA) also, or configure a static
IP address by checking Use Static IPv6 Address and enter the static IPv6 address.
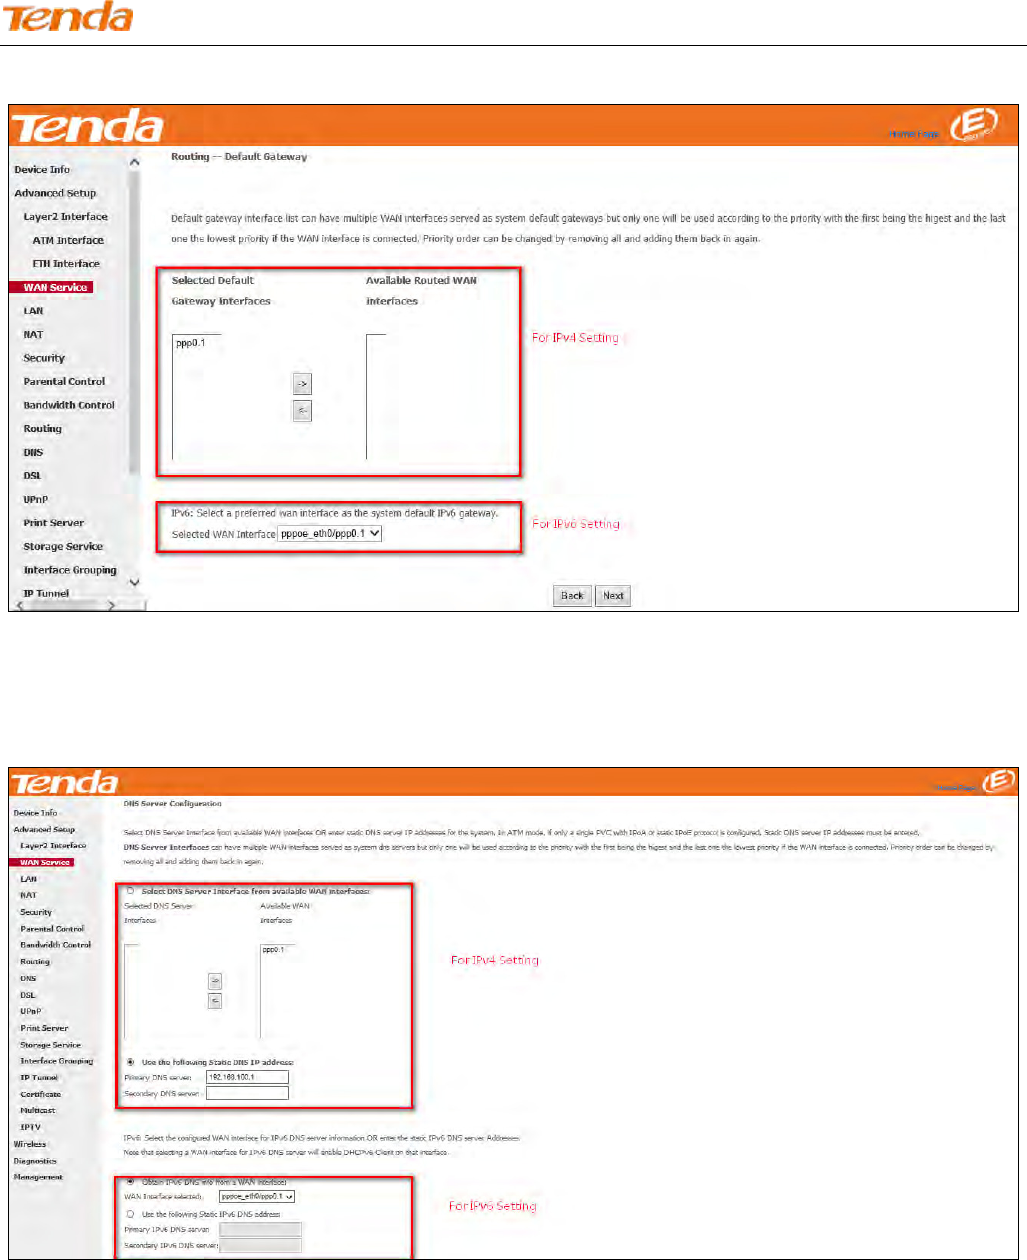
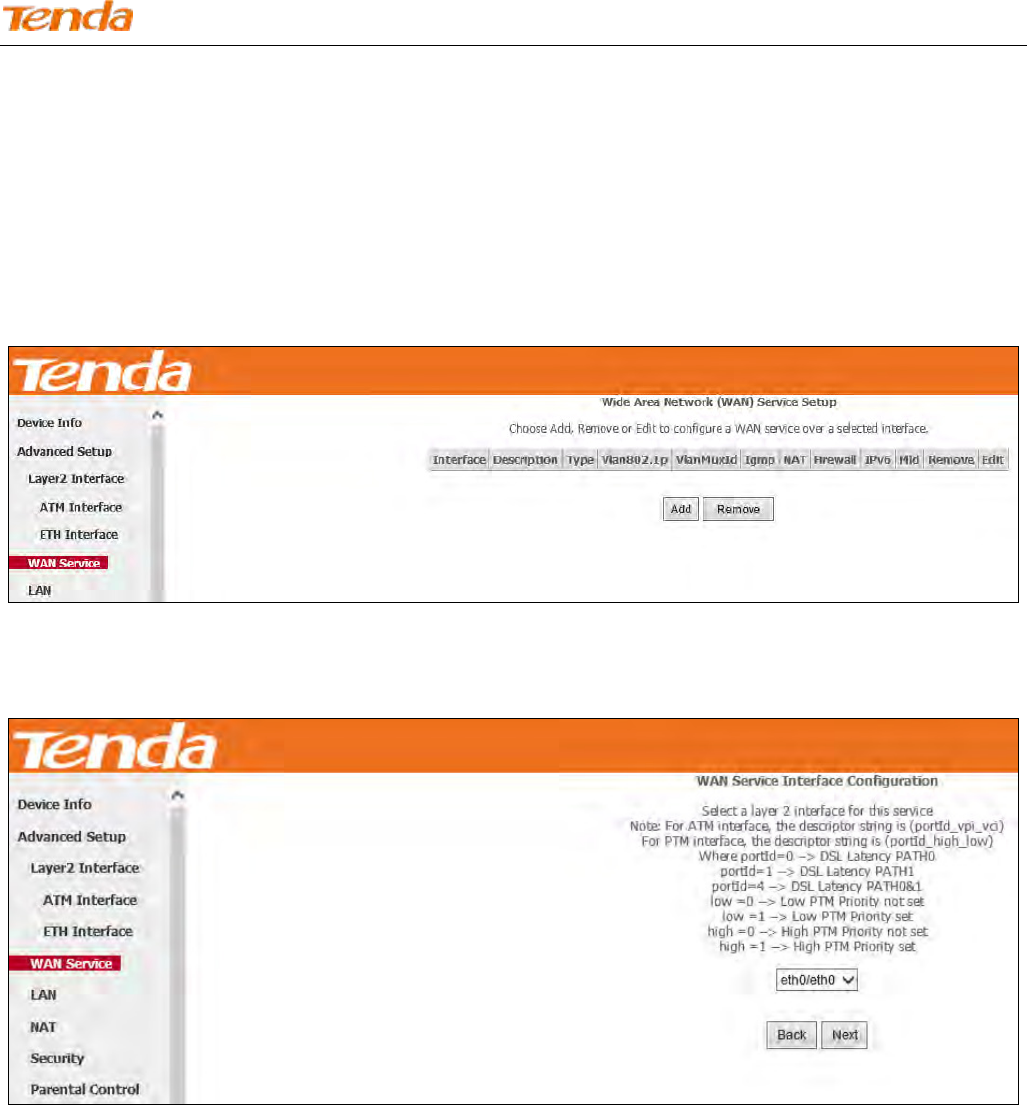
Step 5: To configure the Default Gateway interface when using IPv6, select the interface that you want to configure with
the WAN gateway address in Selected WAN Interface box. Then click Next.
Step 6: To configure the WAN DNS address, check the Obtain IPv6 DNS info from a WAN interface option, or select
the Use the following Static IPv6 DNS address option to enter the static DNS server IPv6 addresses provided by your
ISP. At last, click Next.
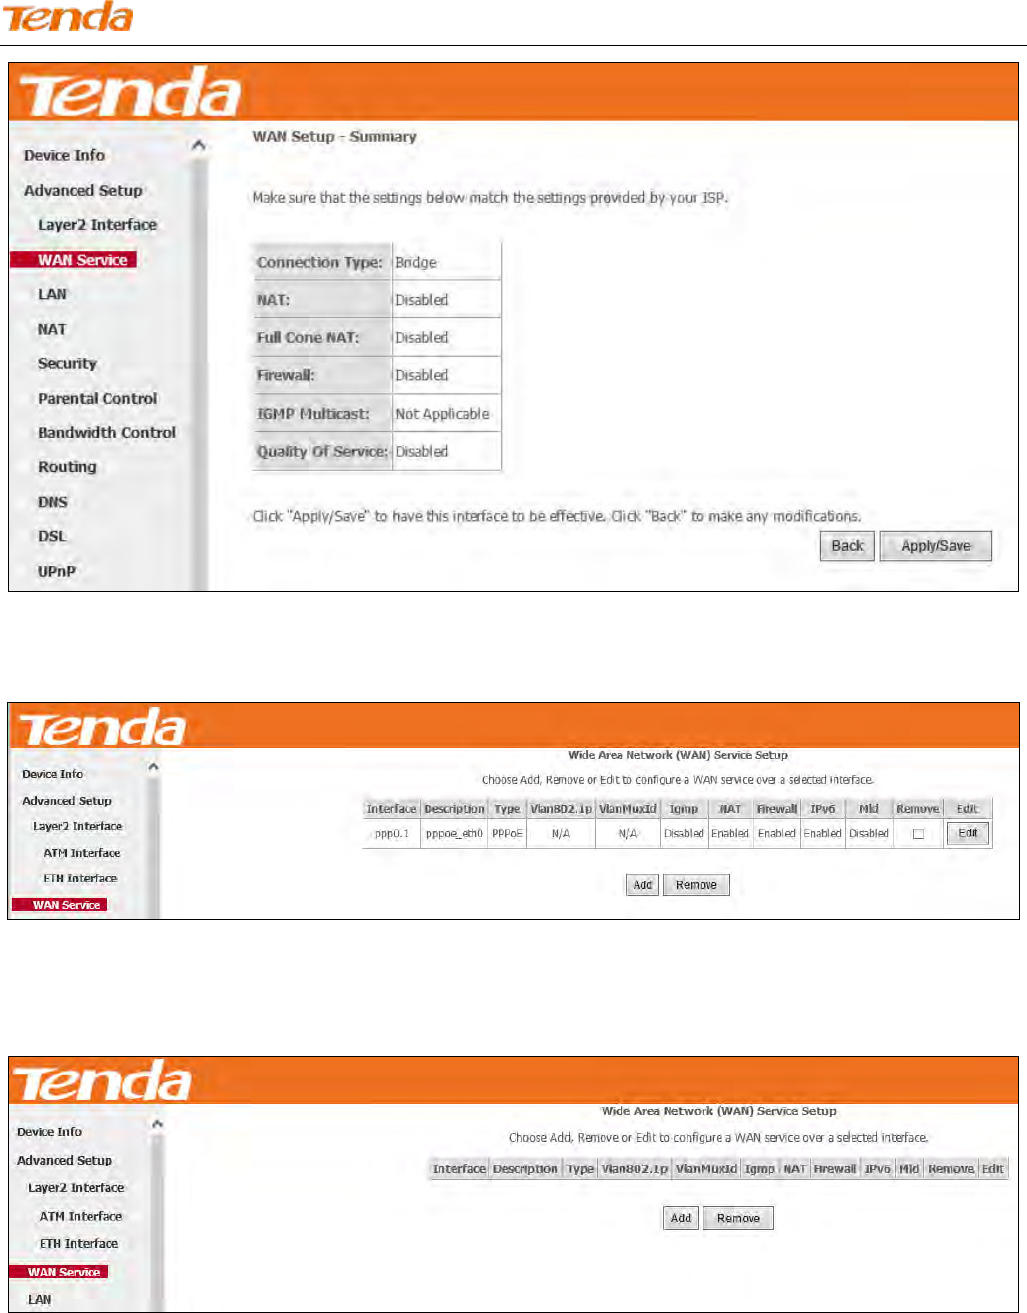
Step 7: Here you can view your configurations. Click Apply/Save to save your settings if everything is correctly set.
Wireless N300 ADSL2+ High Power Modem Router
26
When the PPPoE connection is successful, you can access the Internet.
IPv6 Only
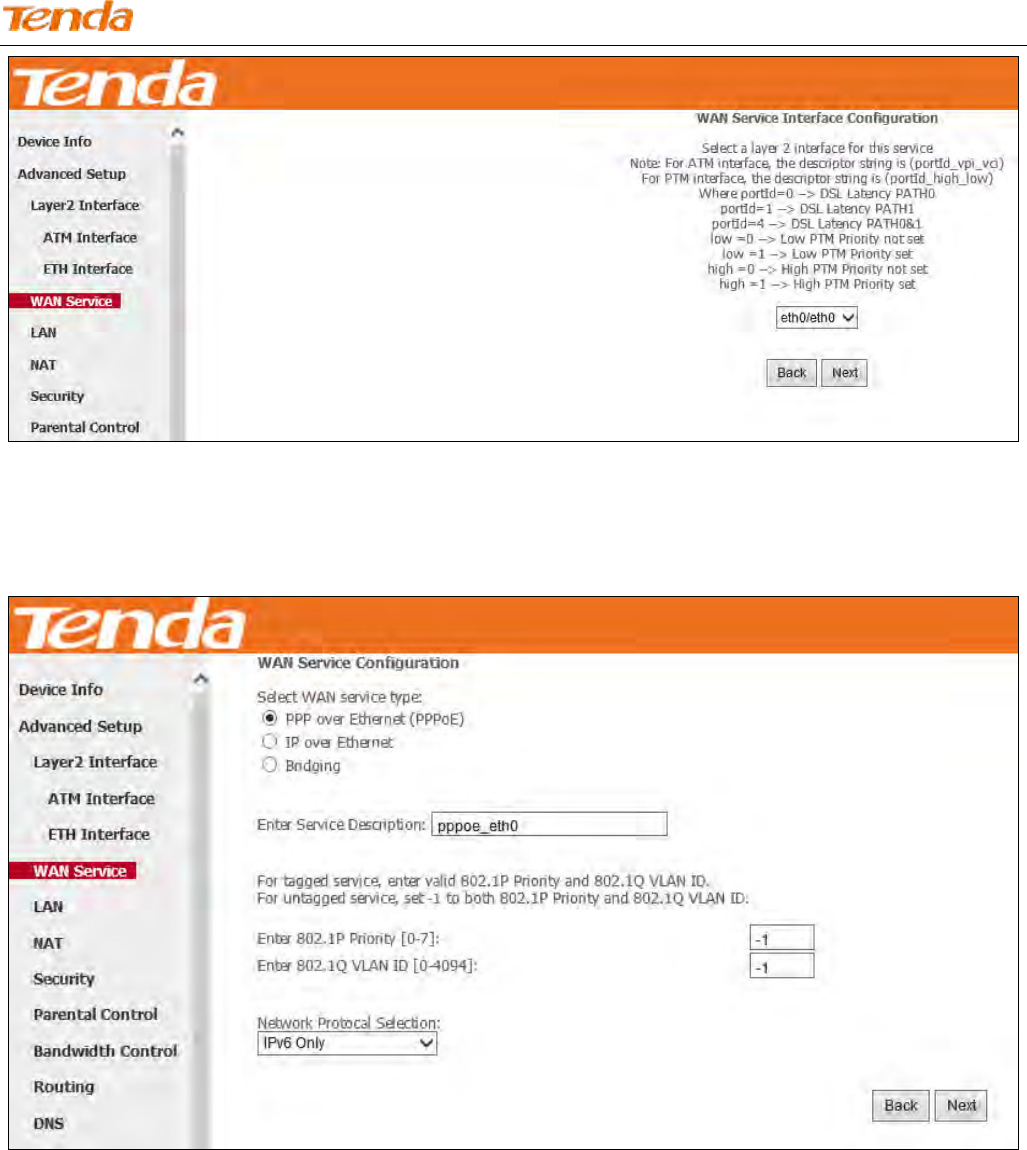
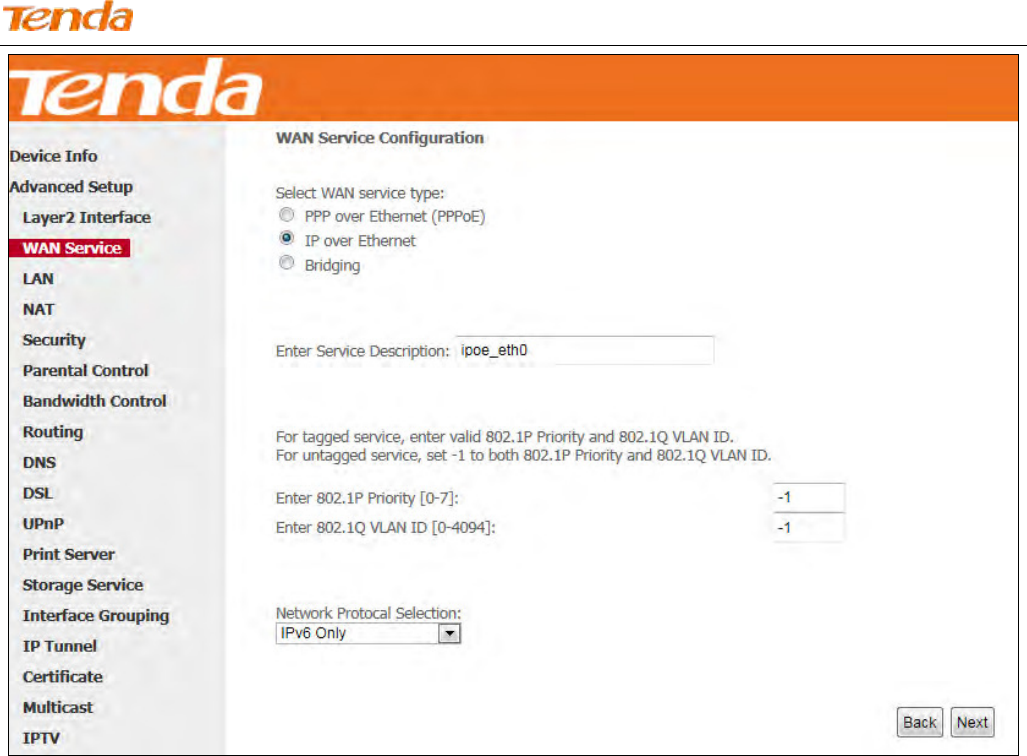
Step 1: Click Advanced Setup > WAN Service and then click the Add button.
Step 2: Select the ATM interface you added just now from the pull-down menu in the figure below. Click Next.
Wireless N300 ADSL2+ High Power Modem Router
27
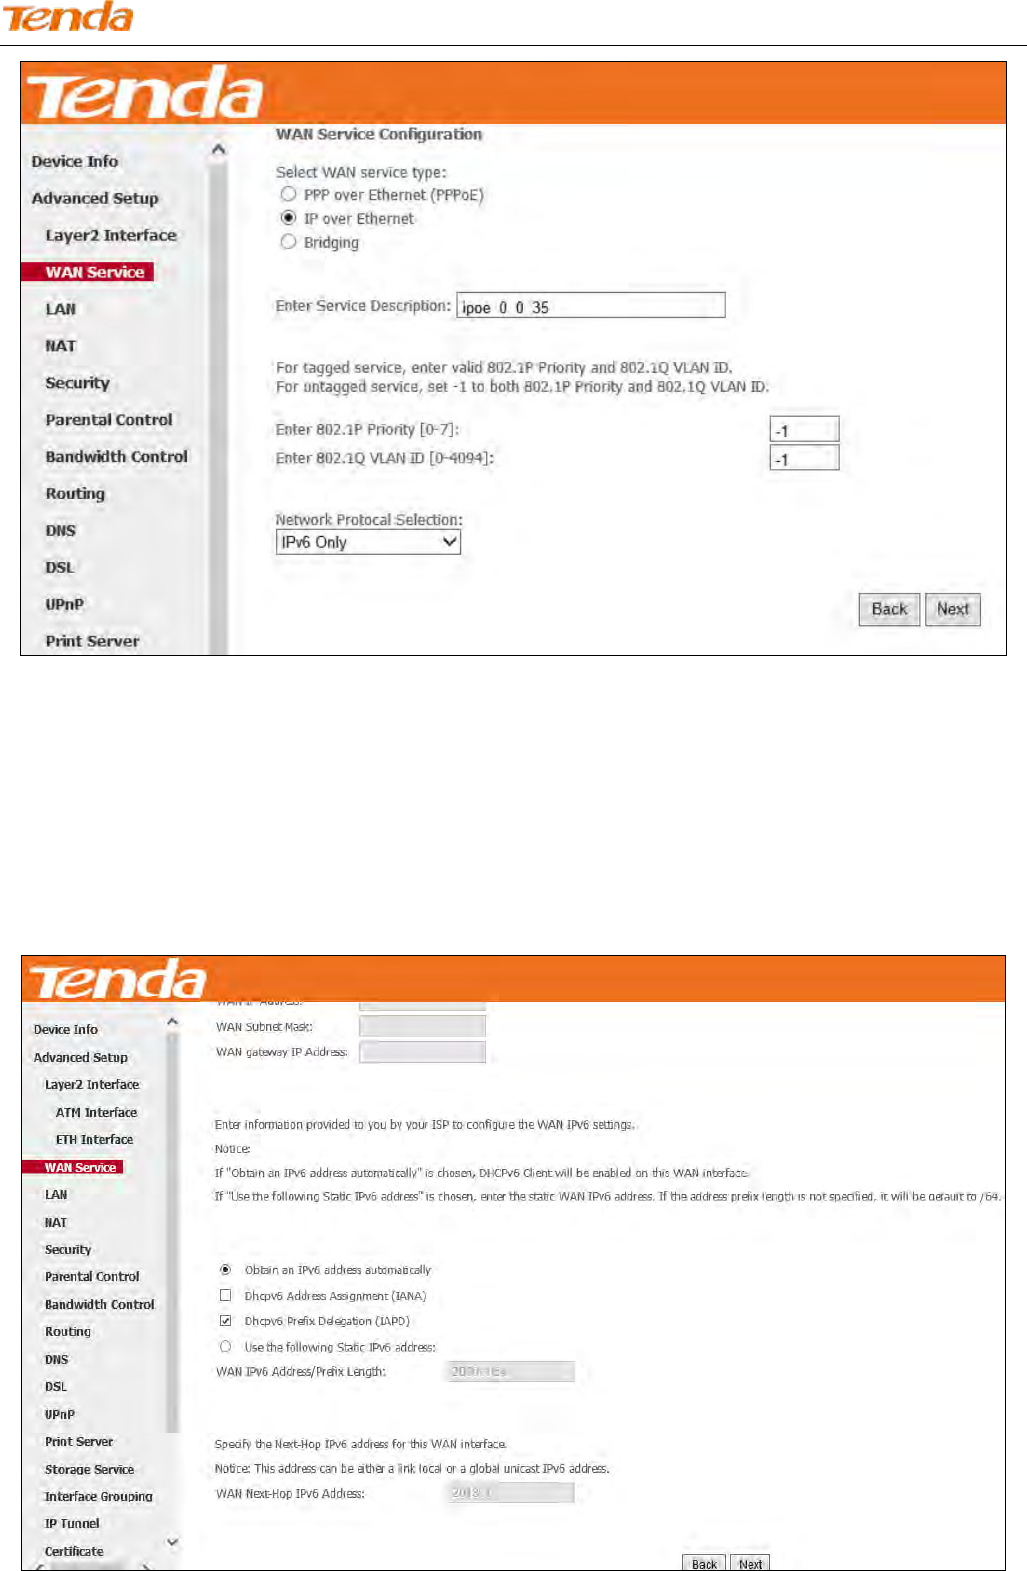
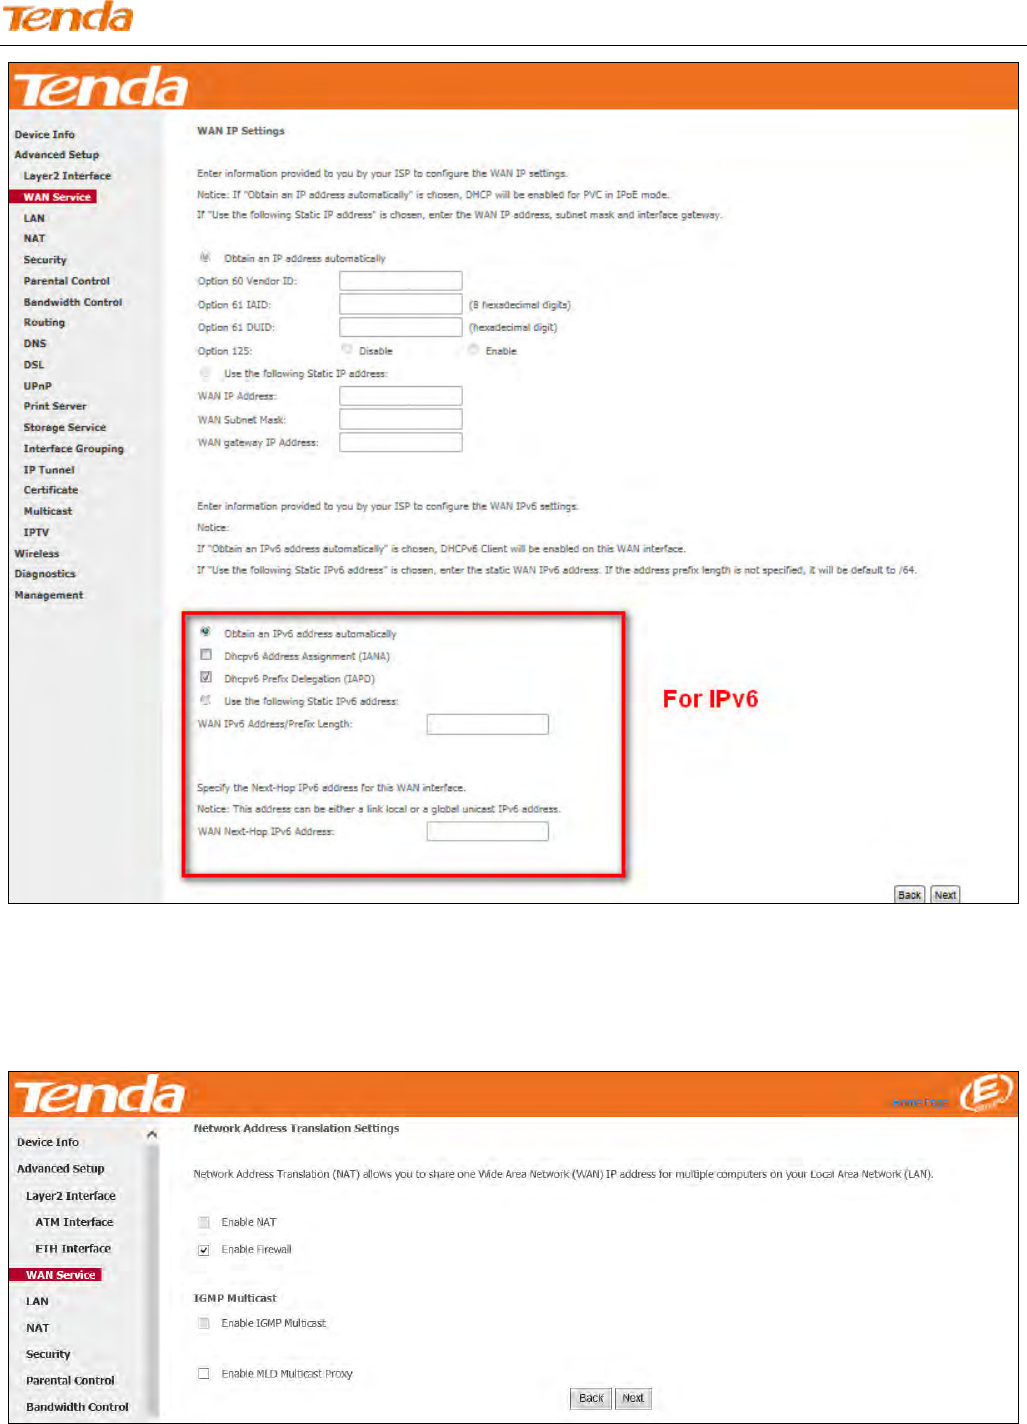
Step 3: Select PPP over Ethernet (PPPoE). Edit the Enter Service Description field which is optional. Suggest you
keep the default. Select a network protocol you need: IPv6 Only. Click Next.
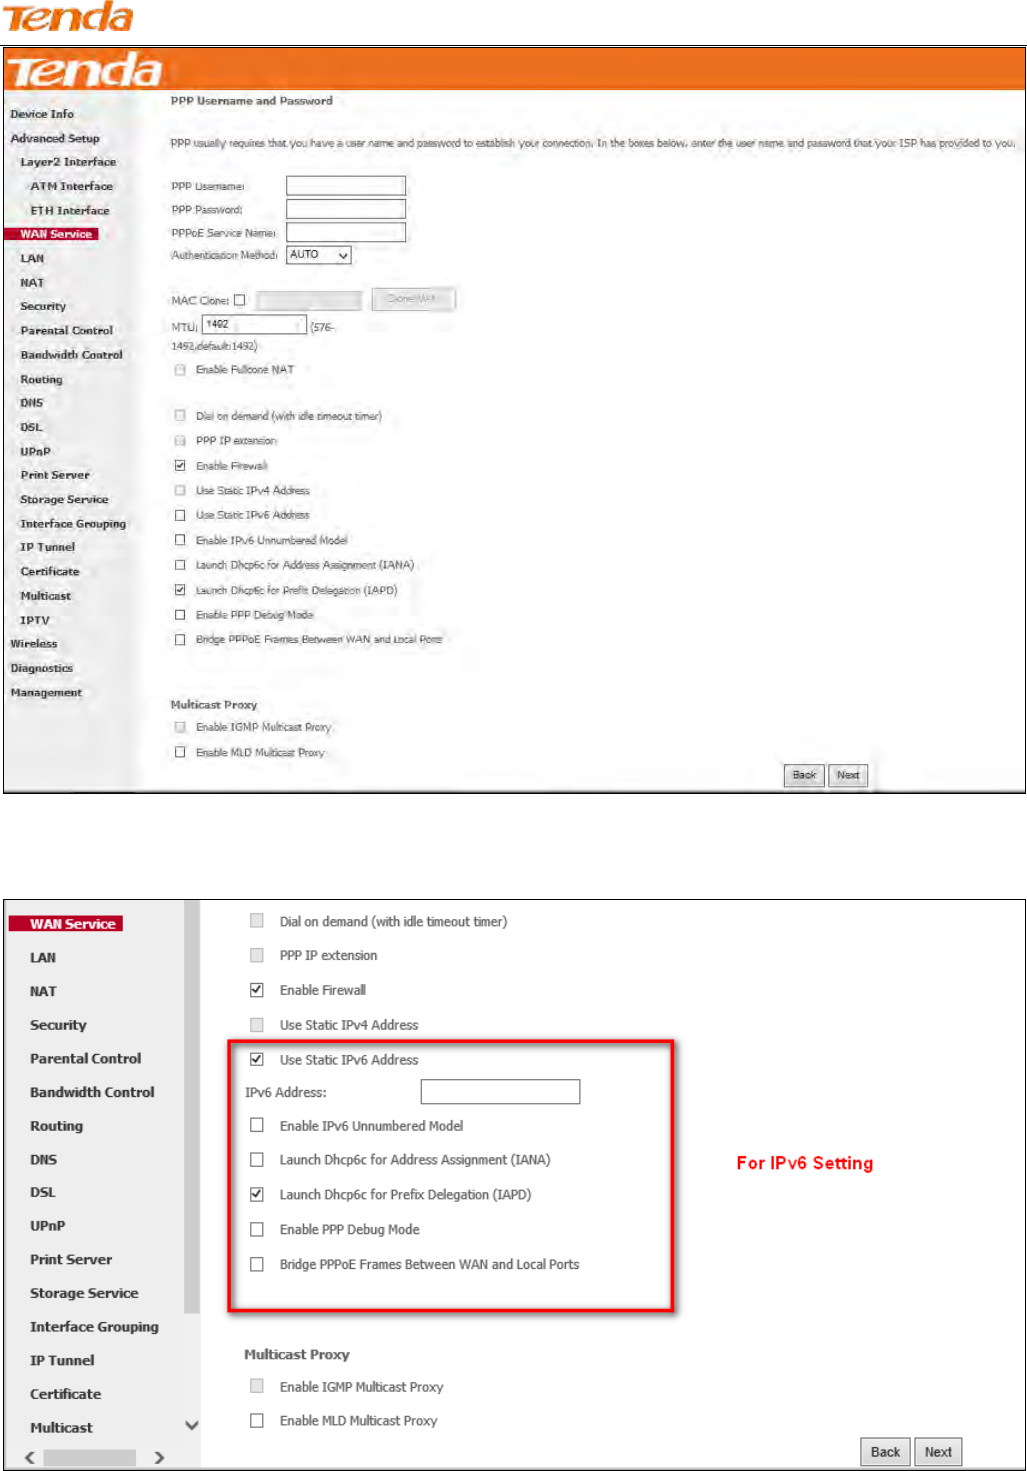
Step 4: Configure PPP Username and Password and other settings on the figure below. Each field with its indication is
mentioned above in IPv4 Only (PPPoE) section.
If ISP provides you no static IPv6 address, you just keep the default settings for it’s by default the DHCP mode. Check
Launch Dhcp6c for Prefix Delegation (IAPD). If your ISP is using stateful DHCPv6, check Launch Dhcp6c for
Address Assignment (IANA) also. Click Next.
Wireless N300 ADSL2+ High Power Modem Router
28
If ISP provides you with the static IPv6 address, configure a static IP address by checking Use Static IPv6 Address and
enter the static IPv6 address.
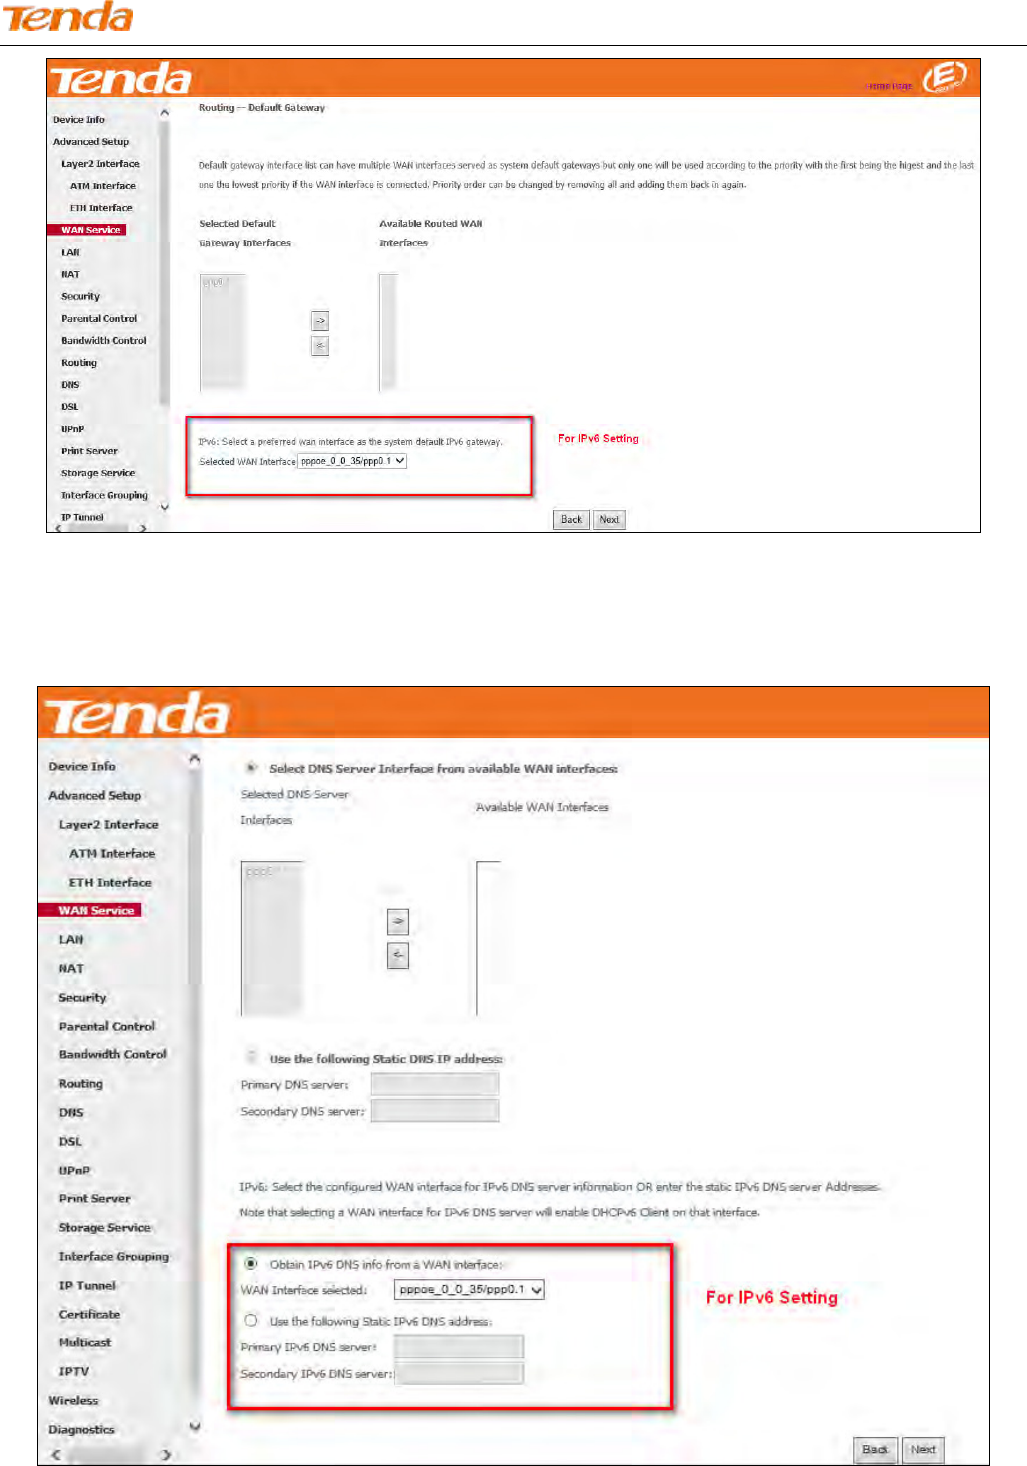
Step 5: To configure the Default Gateway interface when using IPv6, select the interface that you want to configure with
the WAN gateway address in Selected WAN Interface box. Then click Next.
Wireless N300 ADSL2+ High Power Modem Router
29
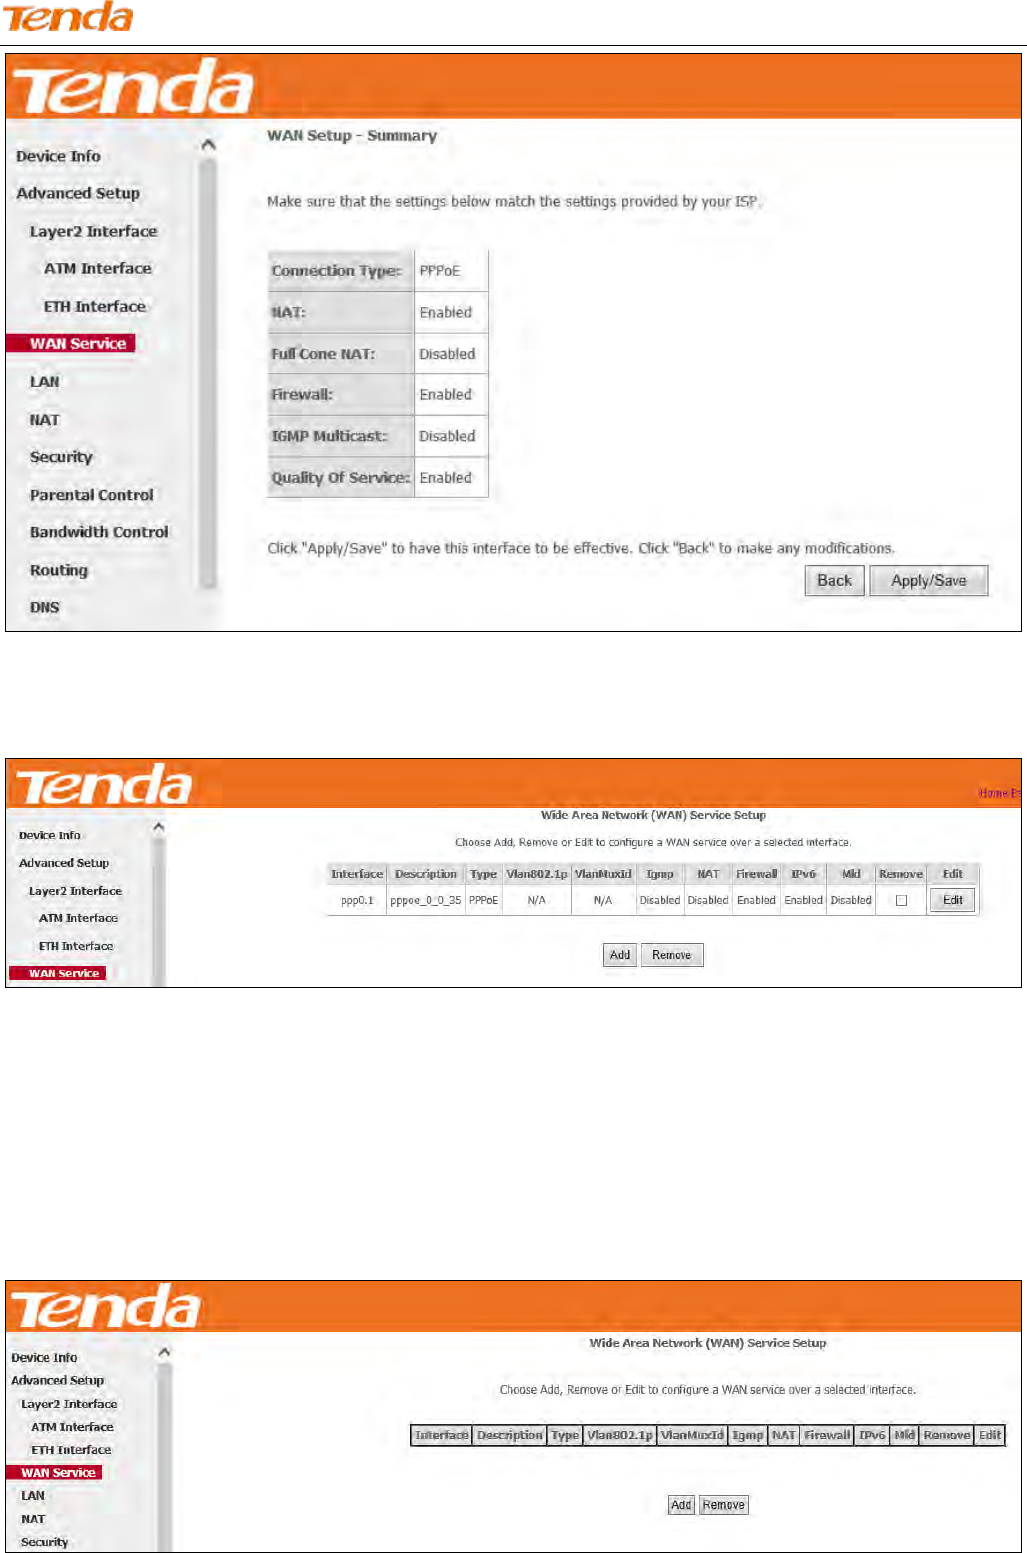
Step 6: To configure the WAN DNS address, check the Obtain IPv6 DNS info from a WAN interface option, or select
the Use the following Static IPv6 DNS address option to enter the static DNS server IPv6 addresses provided by your
ISP. At last, click Next.
Step 7: Here you can view your configurations. Click Apply/Save to take this interface into effect.
Wireless N300 ADSL2+ High Power Modem Router
30
When the PPPoE connection is successful, you can access the Internet.
IPoE
IPv4 Only
If your ISP uses DHCP to assign your IP address or if your ISP assigns you a static (fixed) IP address, IP subnet mask
and the gateway IP address, you need to select the IP over Ethernet (IPoE).
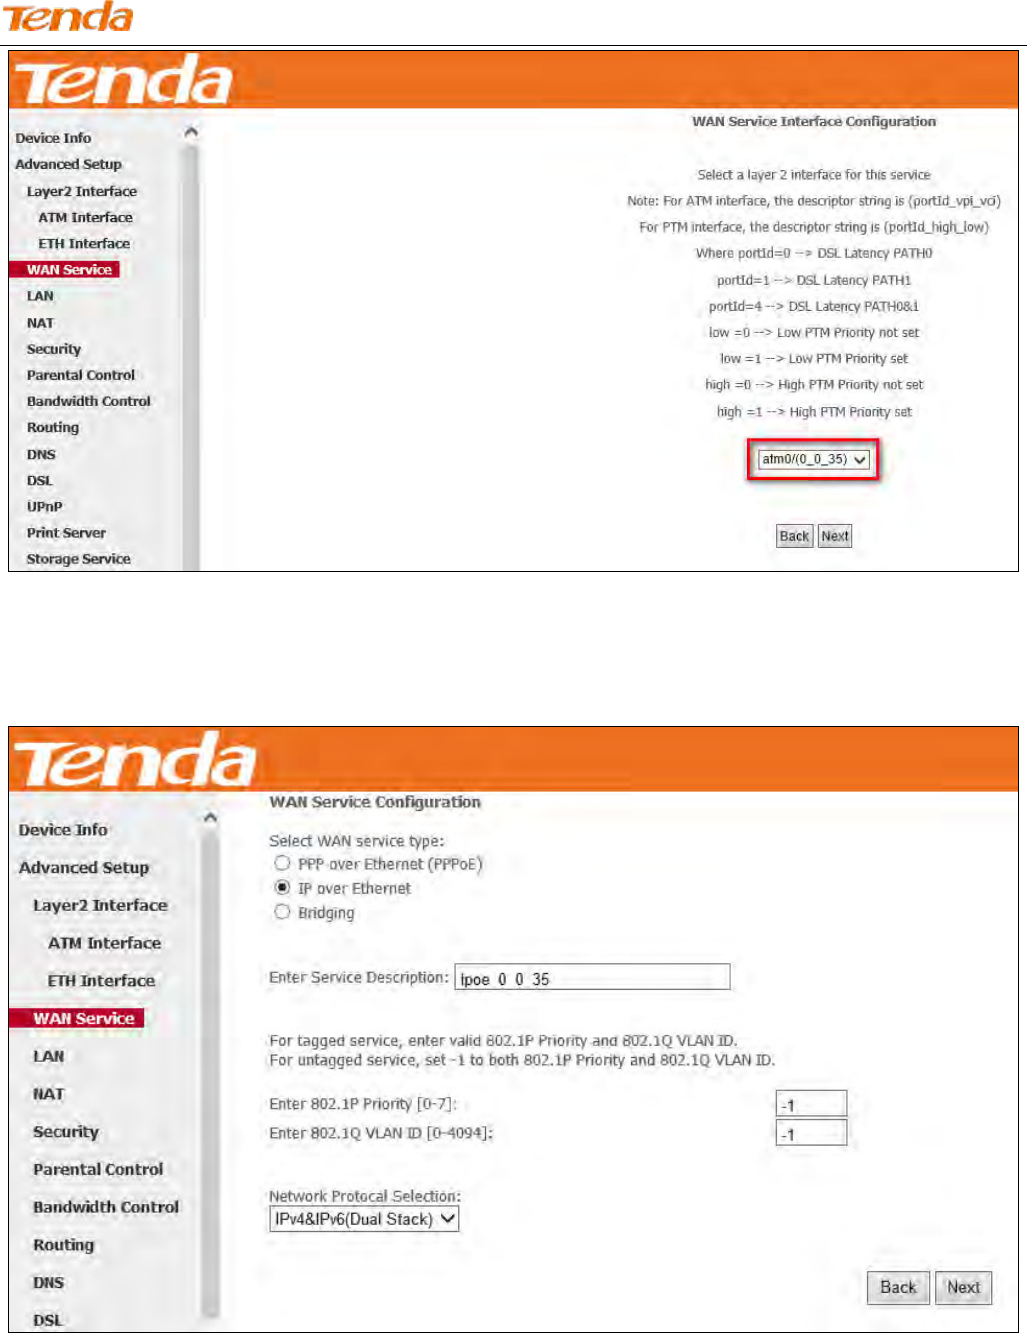
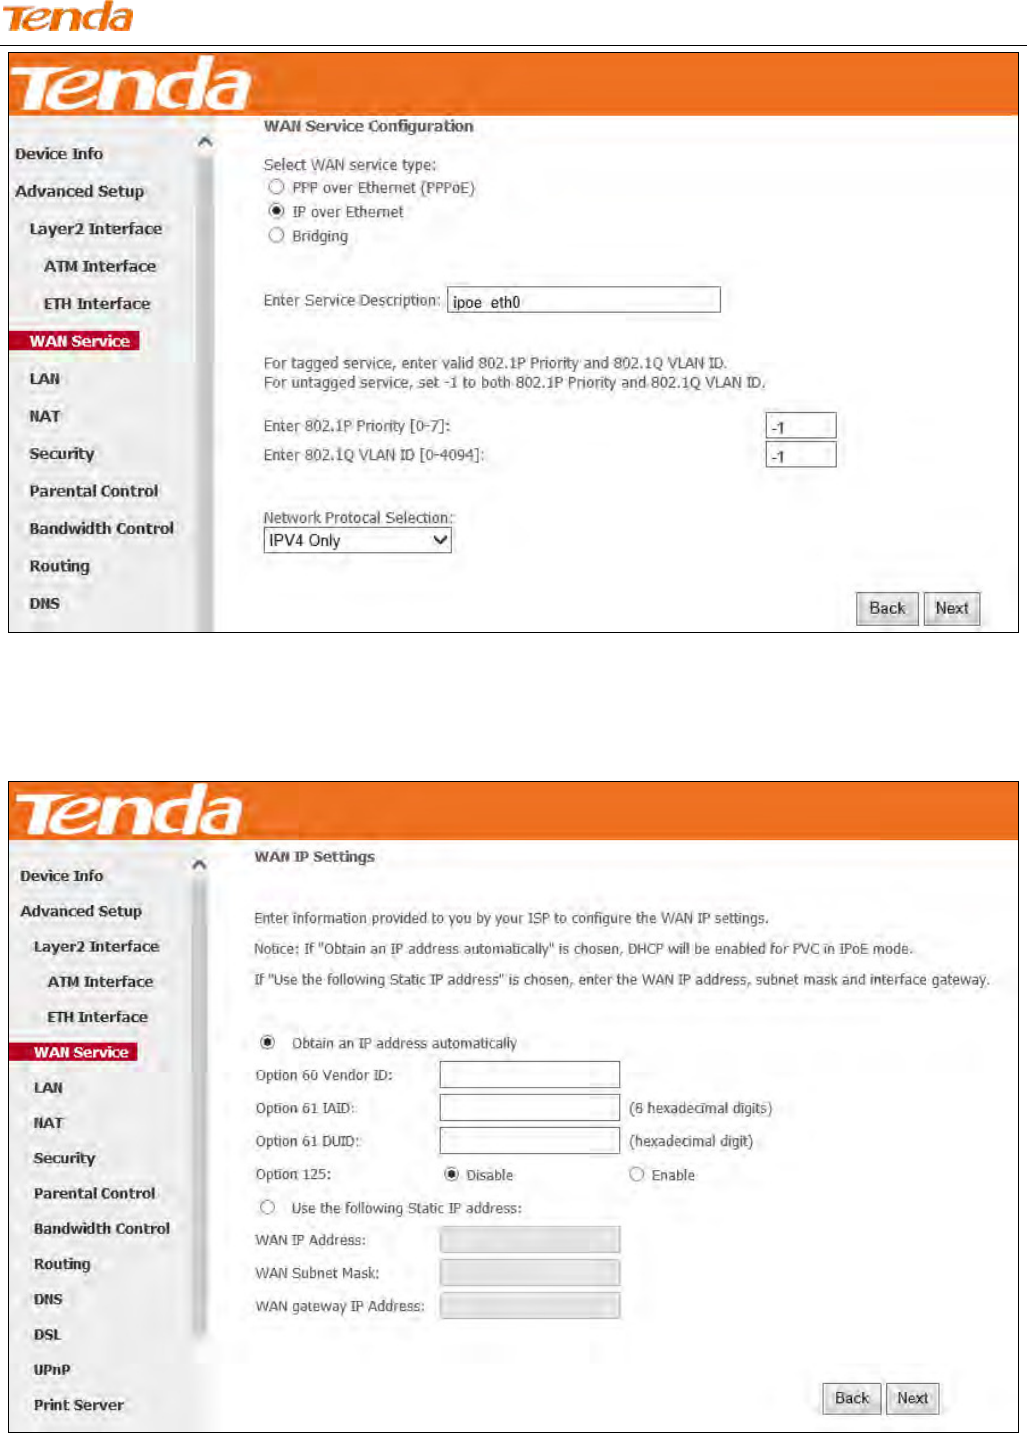
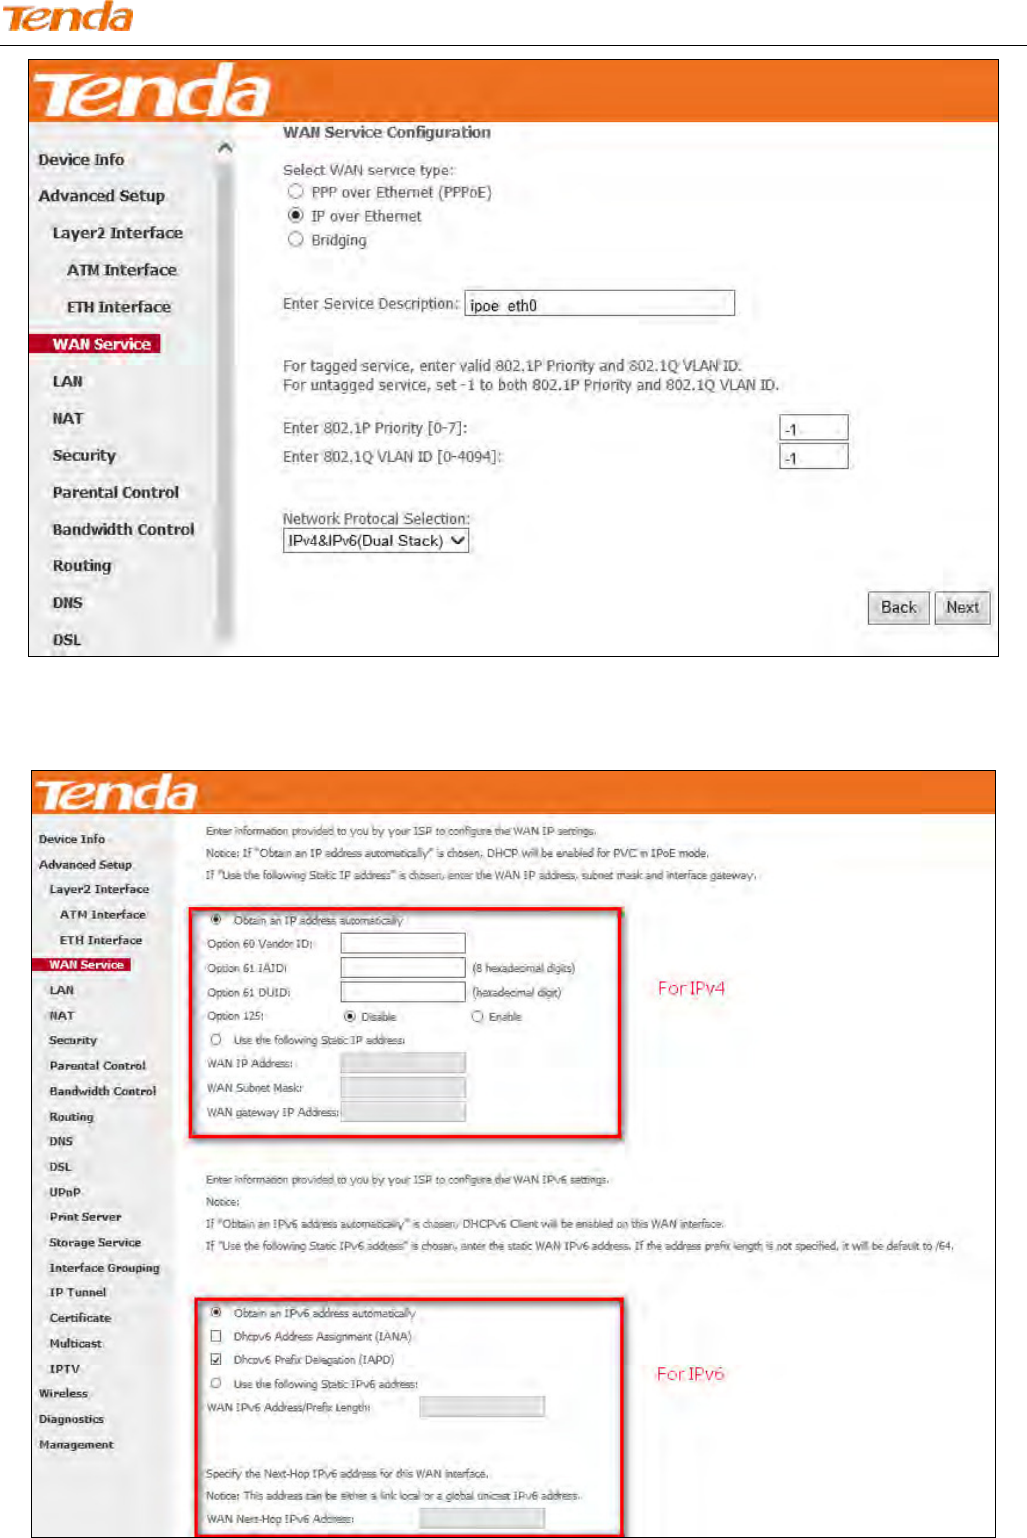
Step 1: Click Advanced Setup > WAN Service and then click the Add button.

Wireless N300 ADSL2+ High Power Modem Router
31
Step 2: Select the ATM interface you added just now from the pull-down menu in the figure below. Click Next.
Step 3: Select IP over Ethernet. Edit the Enter Service Description which is optional. Suggest you keep the default.
Select a network protocol: IPv4 Only. Click Next.
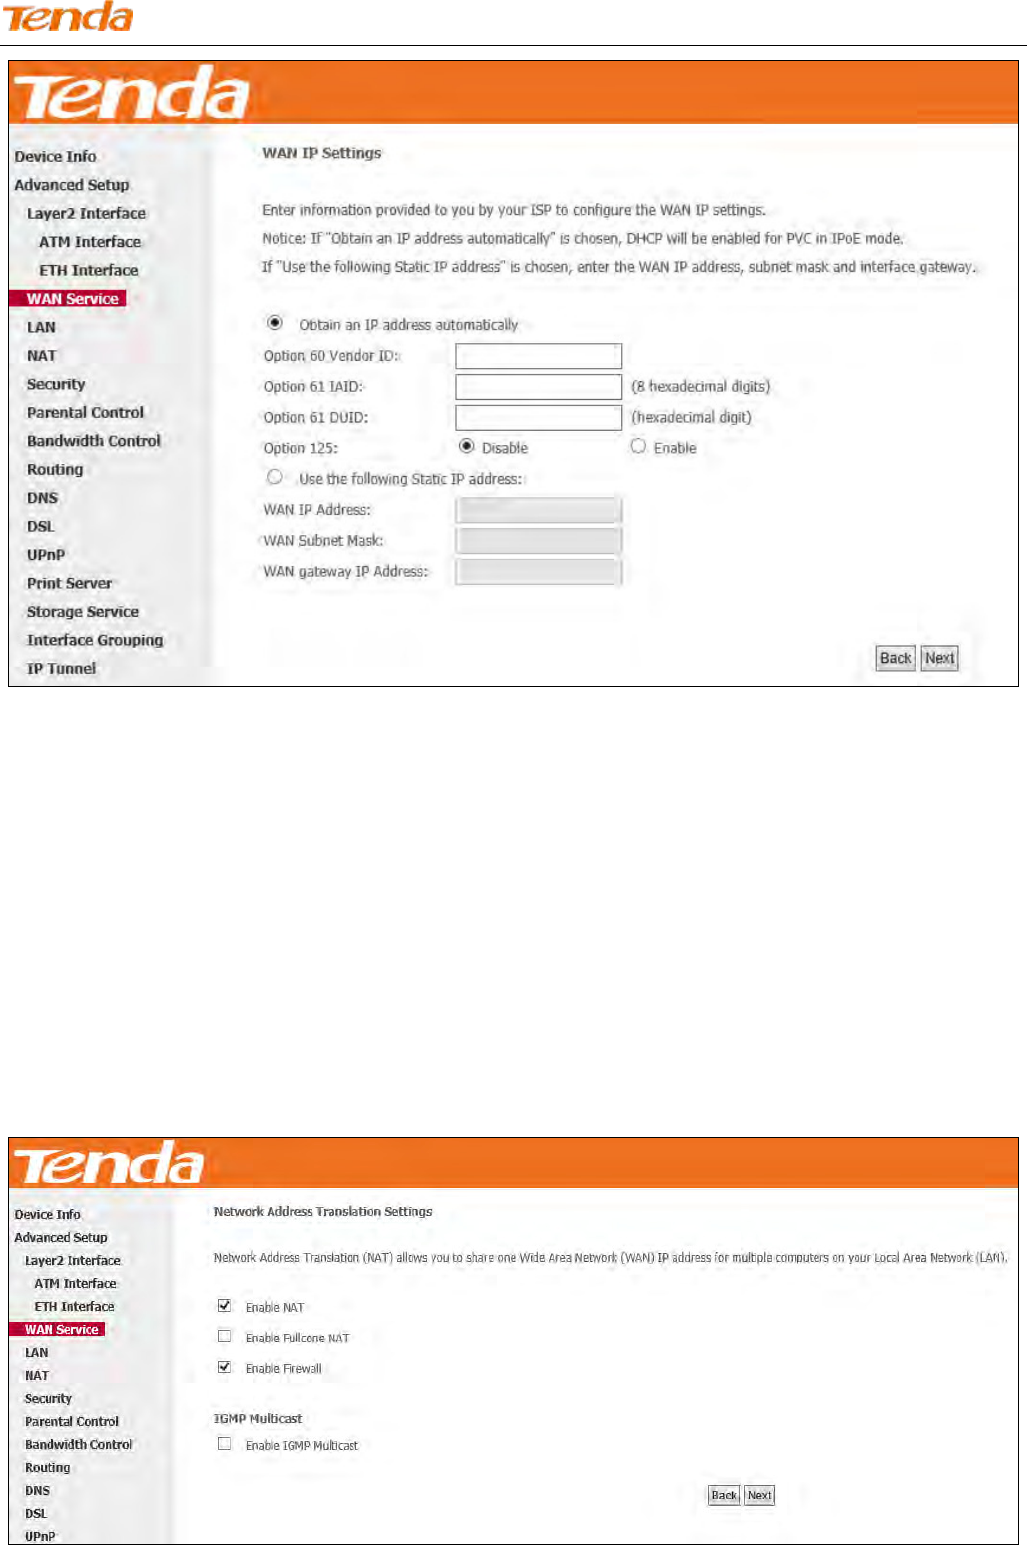
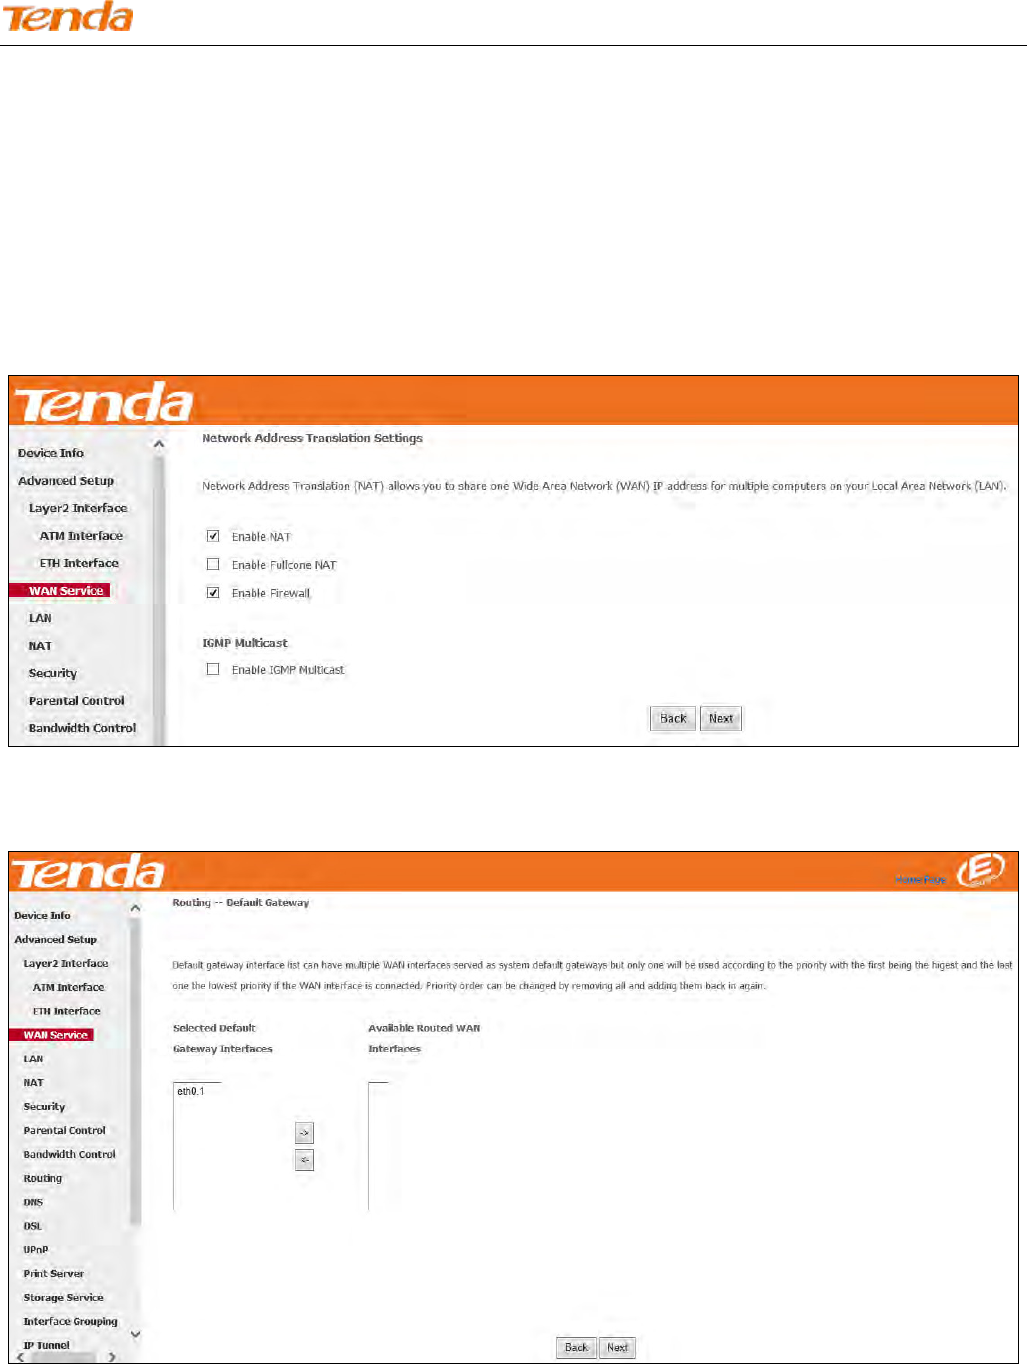
Step 4: Finish WAN IP Settings on the figure below. Click Next.
Wireless N300 ADSL2+ High Power Modem Router
32
Obtain an IP address automatically: This allows the router to automatically acquire IP information from your ISP or
your existing networking equipment.
Use the following Static IP address: This allows you to specify the Static IP information provided by your ISP or that
corresponds with your existing networking equipment.
WAN IP Address: The Internet IP address provided by your ISP for accessing the Internet.
WAN Subnet Mask: The subnet mask address provided by your ISP for accessing the Internet.
WAN gateway IP Address: The gateway IP address provided by your ISP for accessing the Internet.
Step 5: Finish Network Address Translation Settings. Suggest keep the default settings. Click Next.
Wireless N300 ADSL2+ High Power Modem Router
33
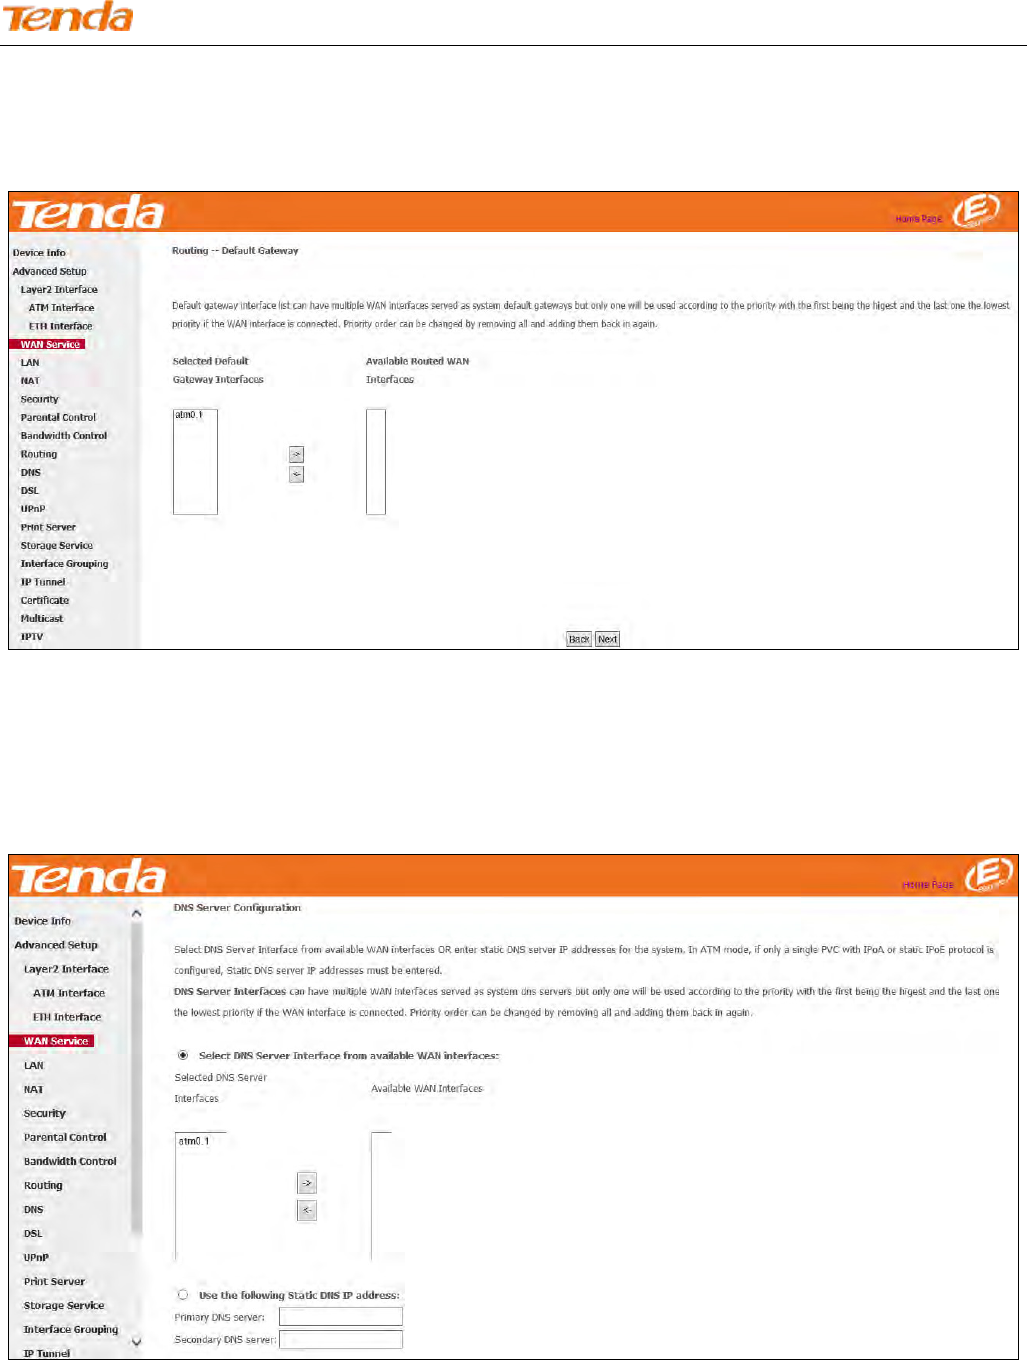
Step 6: To configure the Default Gateway interface, select the interface that you want to configure with the WAN
gateway address in Available Routed WAN Interfaces box and move it into Selected Default Gateway Interfaces box.
The default setting is recommended. Then click Next.
Step 7: To finish DNS Server Configuration, click the Select DNS Server Interface from available WAN interfaces
option, or select the Use the following Static DNS IP address option and enter the static DNS server IP addresses
provided by your ISP. At last, click Next.
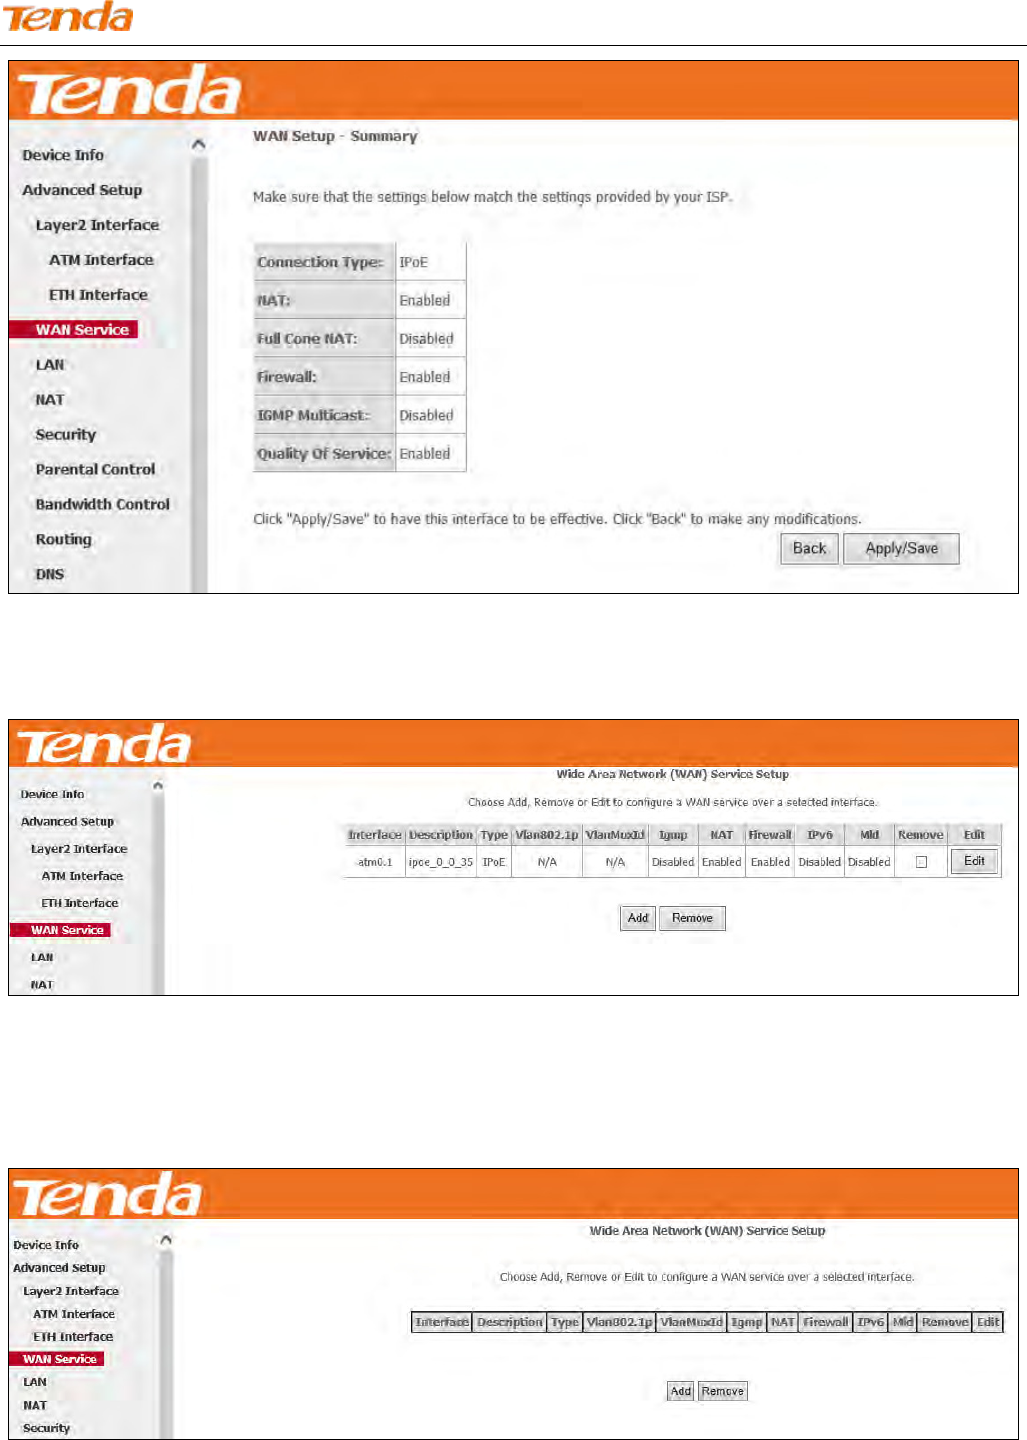
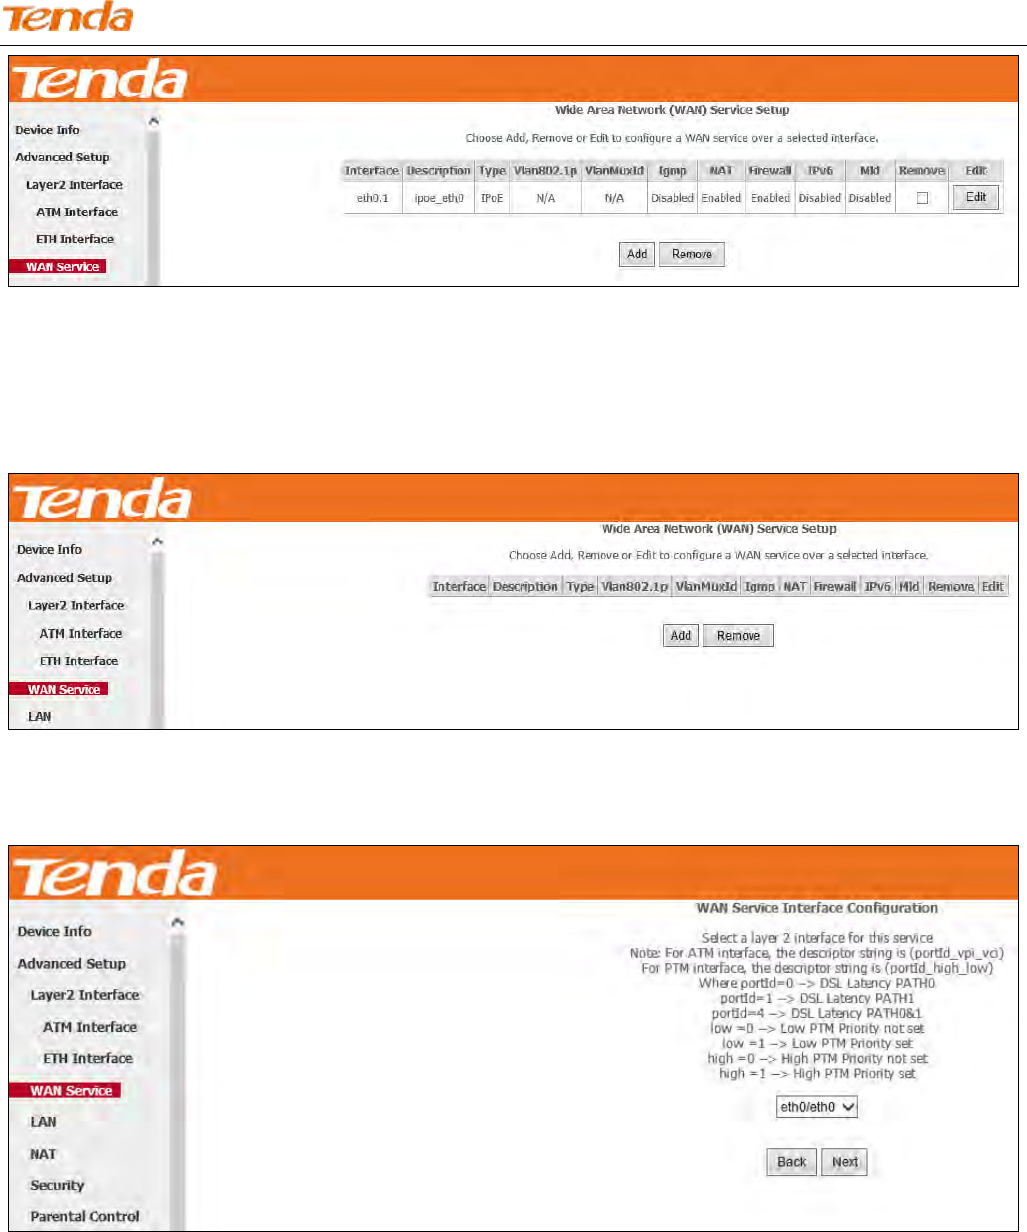
Step 8: Here you can view your configurations. Click Apply/Save to save your settings if everything is correctly set.
Wireless N300 ADSL2+ High Power Modem Router
34
When the IPoE connection is successful, you can access the Internet.
IPv4 & IPv6 (Dual Stack)
Step 1: Click Advanced Setup > WAN Service and then click the Add button.
Step 2: Select the ATM interface you added just now from the pull-down menu in the figure below. Click Next.
Wireless N300 ADSL2+ High Power Modem Router
35
Step 3: Select IP over Ethernet. Edit the Enter Service Description which is optional. Suggest you keep the default.
Select a network protocol: IPv4&IPv6 (Dual Stack). Click Next.
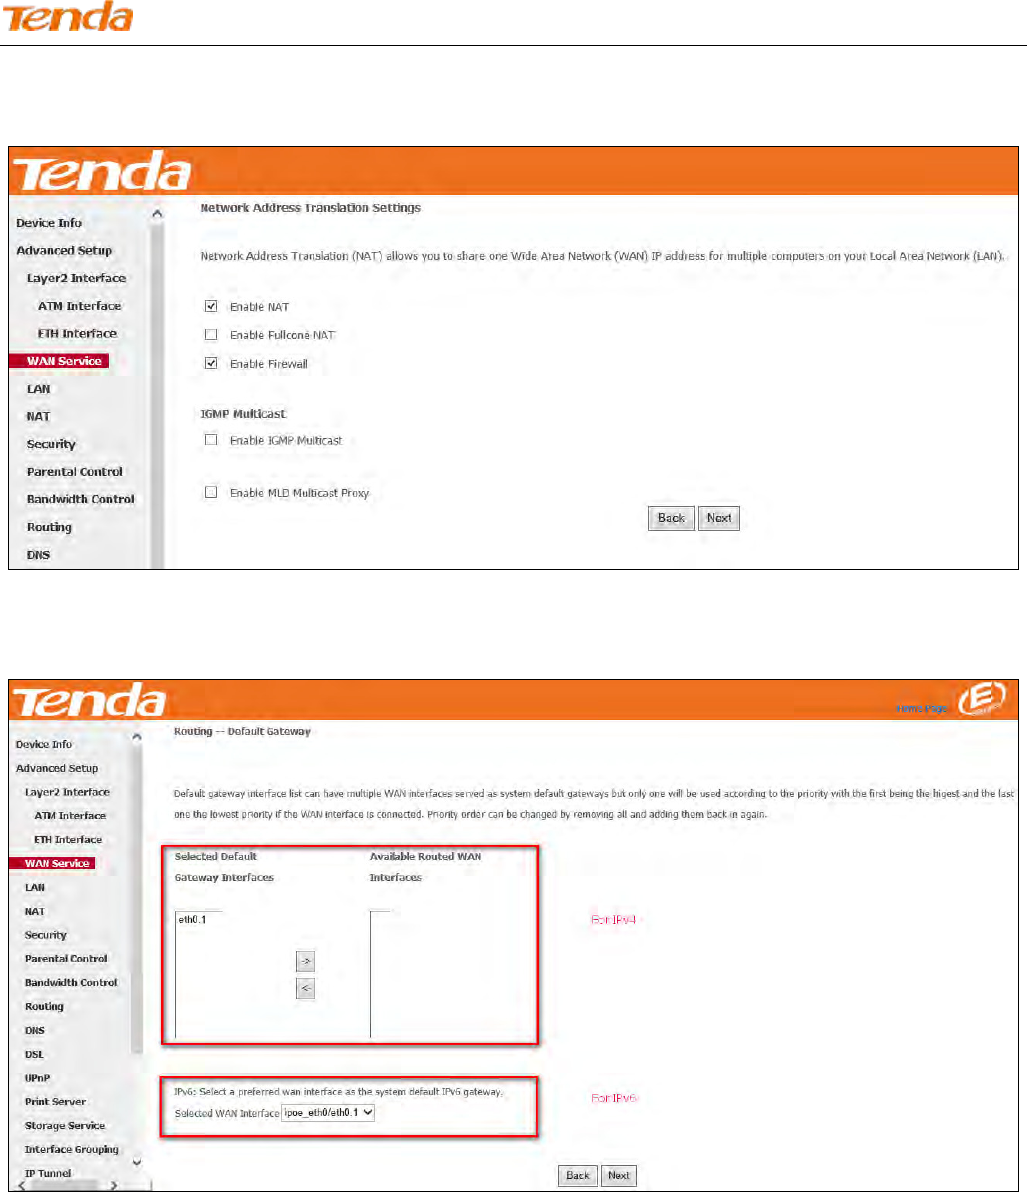
Step 4: To finish WAN IP Settings, select Obtain an IPv6 address automatically, check Dhcpv6 Prefix Delegation
(IAPD). If your ISP is using stateful DHCPv6, check Dhcpv6 Address Assignment (IANA) also. Or select Use the
following Static IP address if your ISP provides you with an IPv6 address. Click Next.
Wireless N300 ADSL2+ High Power Modem Router
36
If ISP provides you with the static IPv6 address, configure a static IP address by checking Use the following Static IPv6
address and enter the static IPv6 address.
Step 5: Configure NAT settings. If you are unsure about the options, please keep the default settings and then click Next.
Wireless N300 ADSL2+ High Power Modem Router
37
Step 6: Configure the WAN gateway address. Default gateway interface list can have multiple WAN interfaces served as
system default gateways but only one will be used according to the priority with the first being the highest and the last
one the lowest priority if the WAN interface is connected. Priority order can be changed by removing all and adding
them back in again.
If you are unsure about the options, please keep the default settings and then click Next.
If you are using static IPv6 DNS address, select Use the following Static IPv6 DNS address and manually enter the
DNS server address. If you have two DNS server addresses, enter the secondary also. And click Next.
Wireless N300 ADSL2+ High Power Modem Router
38
Step 7: Here you can view your configurations. Click Apply/Save to save your settings if everything is correctly set.
When the IPoE connection is successful, you can access the Internet.
Wireless N300 ADSL2+ High Power Modem Router
39
IPv6 Only
Step 1: Click Advanced Setup > WAN Service and then click the Add button.
Step 2: Select the ATM interface you added just now from the pull-down menu in the figure below. Click Next.
Step 3: Select IP over Ethernet (IPoE). Edit the Enter Service Description field which is optional. Suggest you keep
the default. Select a network protocol you need: IPv6 Only. Click Next.
Wireless N300 ADSL2+ High Power Modem Router
40
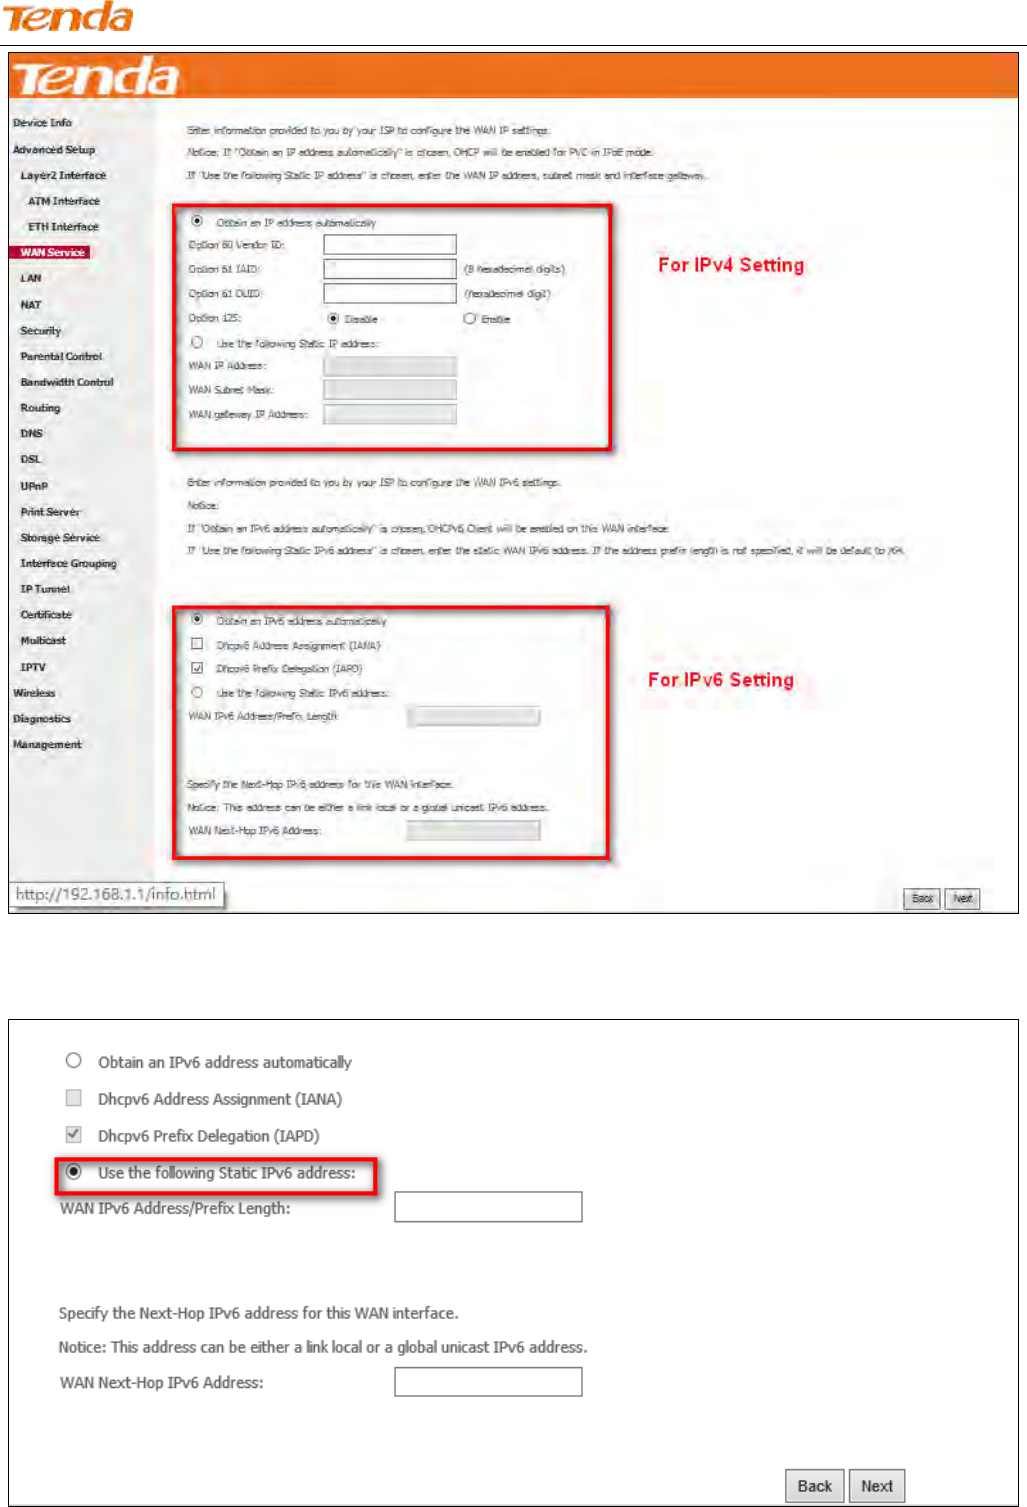
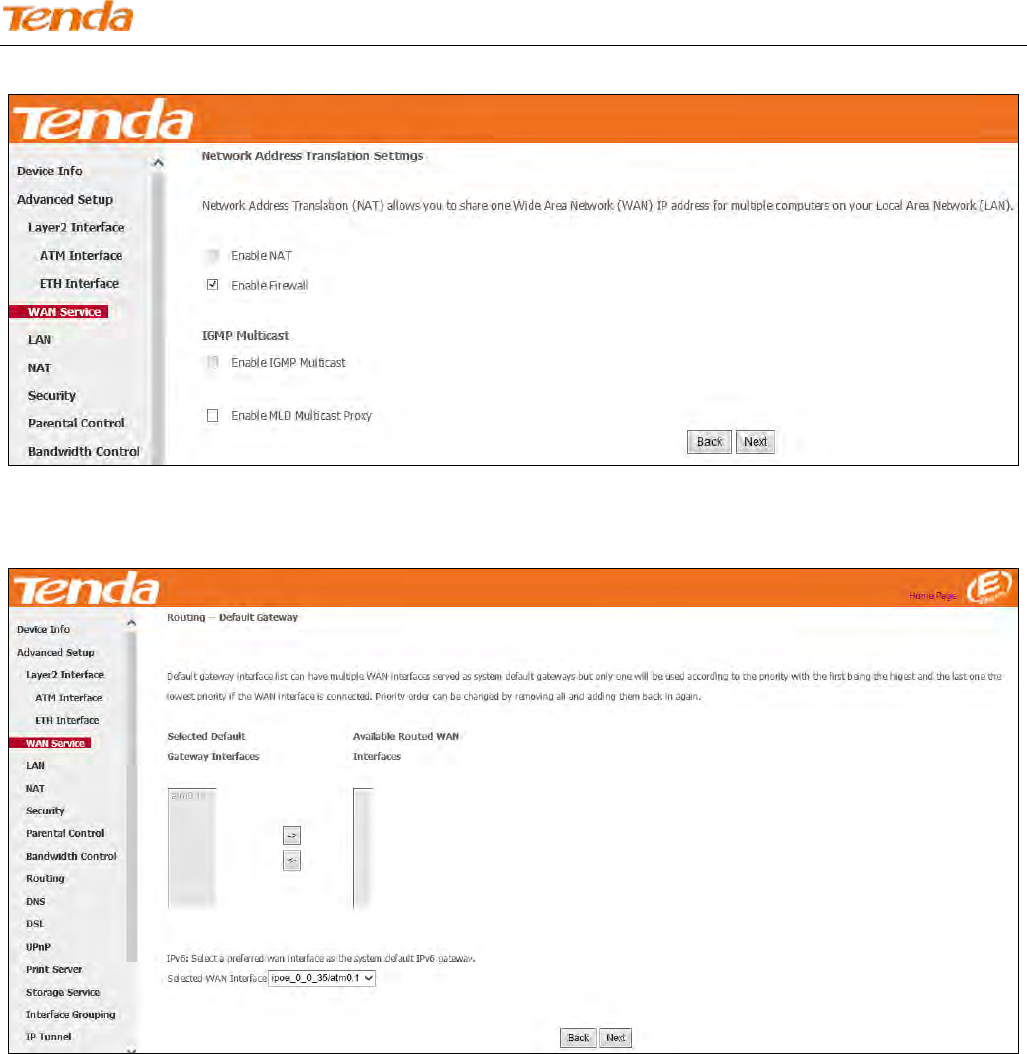
Step 4: Enter the WAN information provided by your ISP to configure the WAN IPv6 settings.
To obtain an IP address automatically:
Select Obtain an IPv6 address automatically.
Check Dhcp6c Prefix Delegation (IAPD).
If your ISP is using stateful DHCPv6, check Dhcp6c Address Assignment (IANA) also.
Click Next to go forwards.
Wireless N300 ADSL2+ High Power Modem Router
41
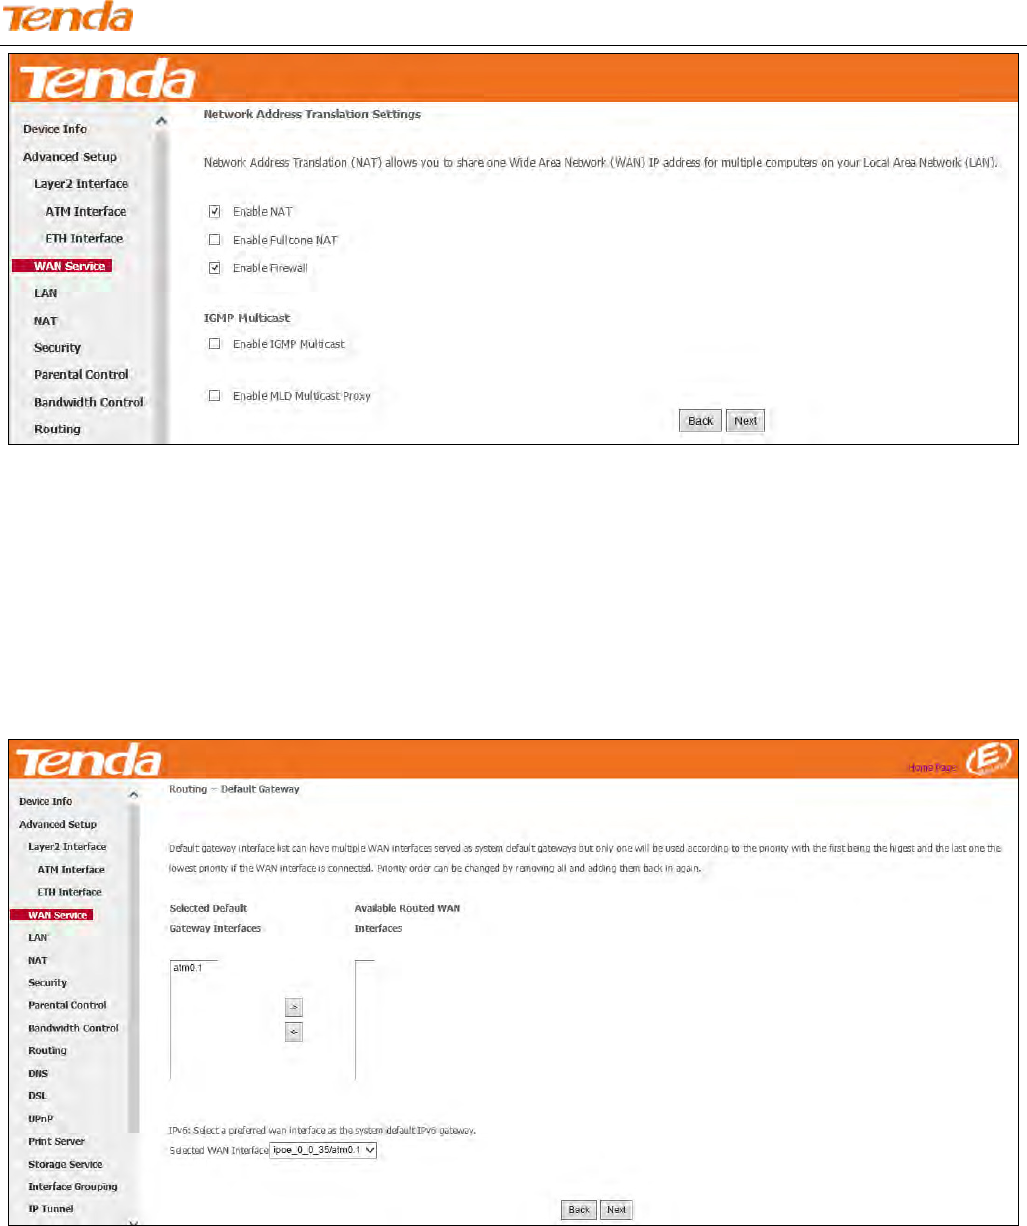
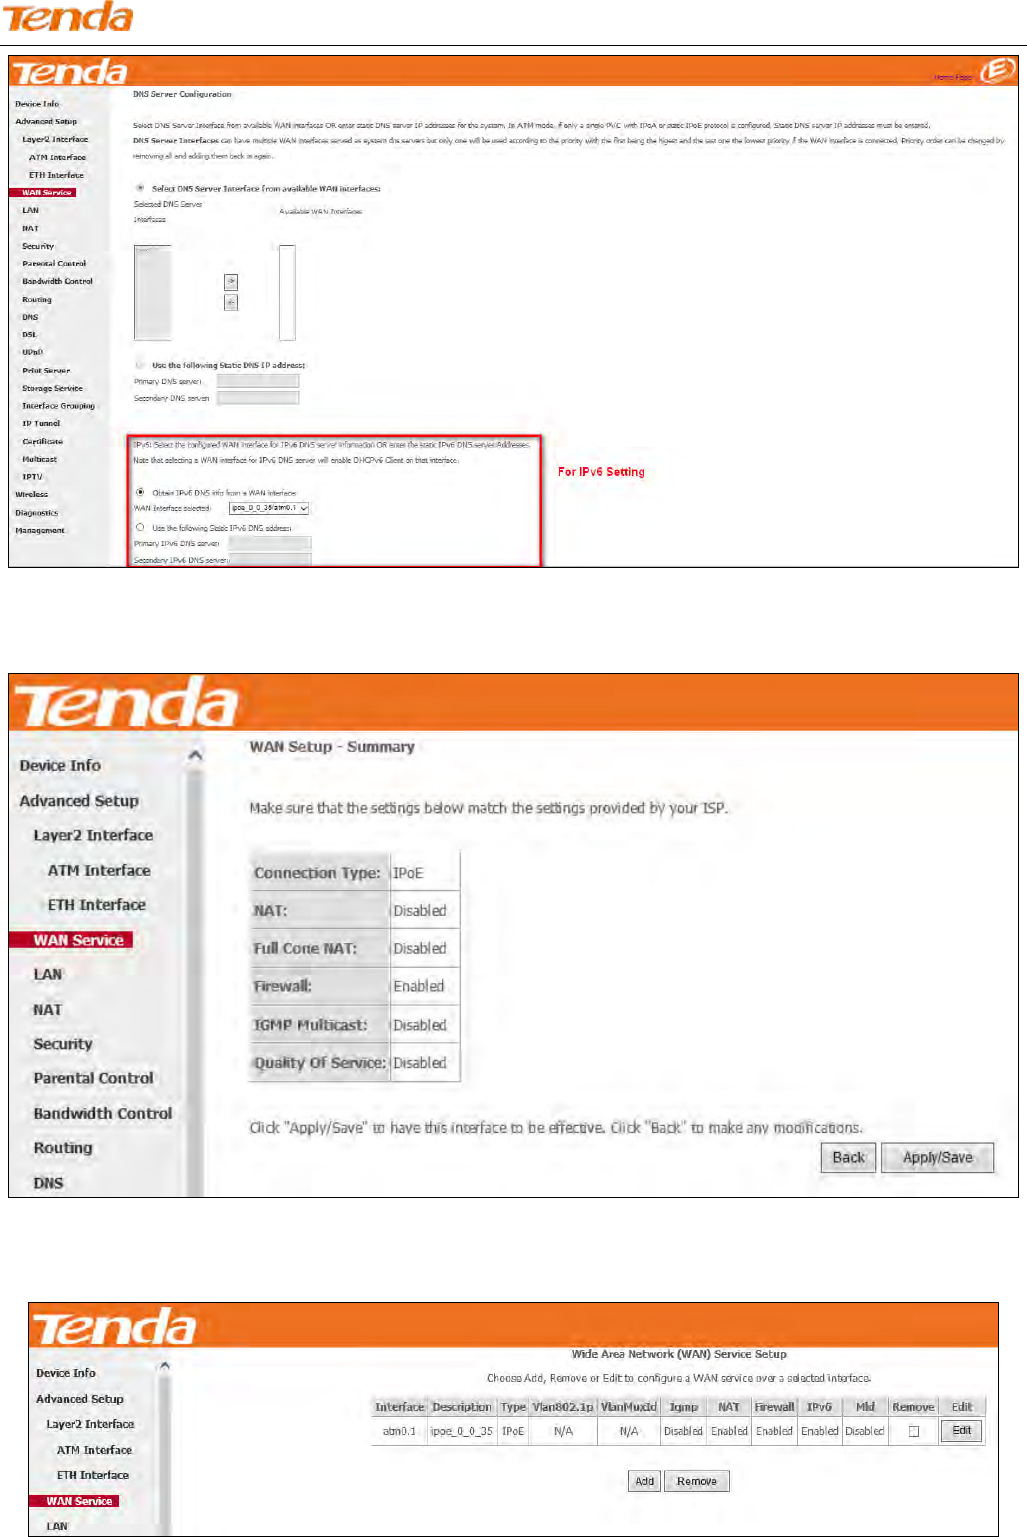
Step 5: Finish Network Address Translation Settings. Suggest keep the default settings. Click Next.
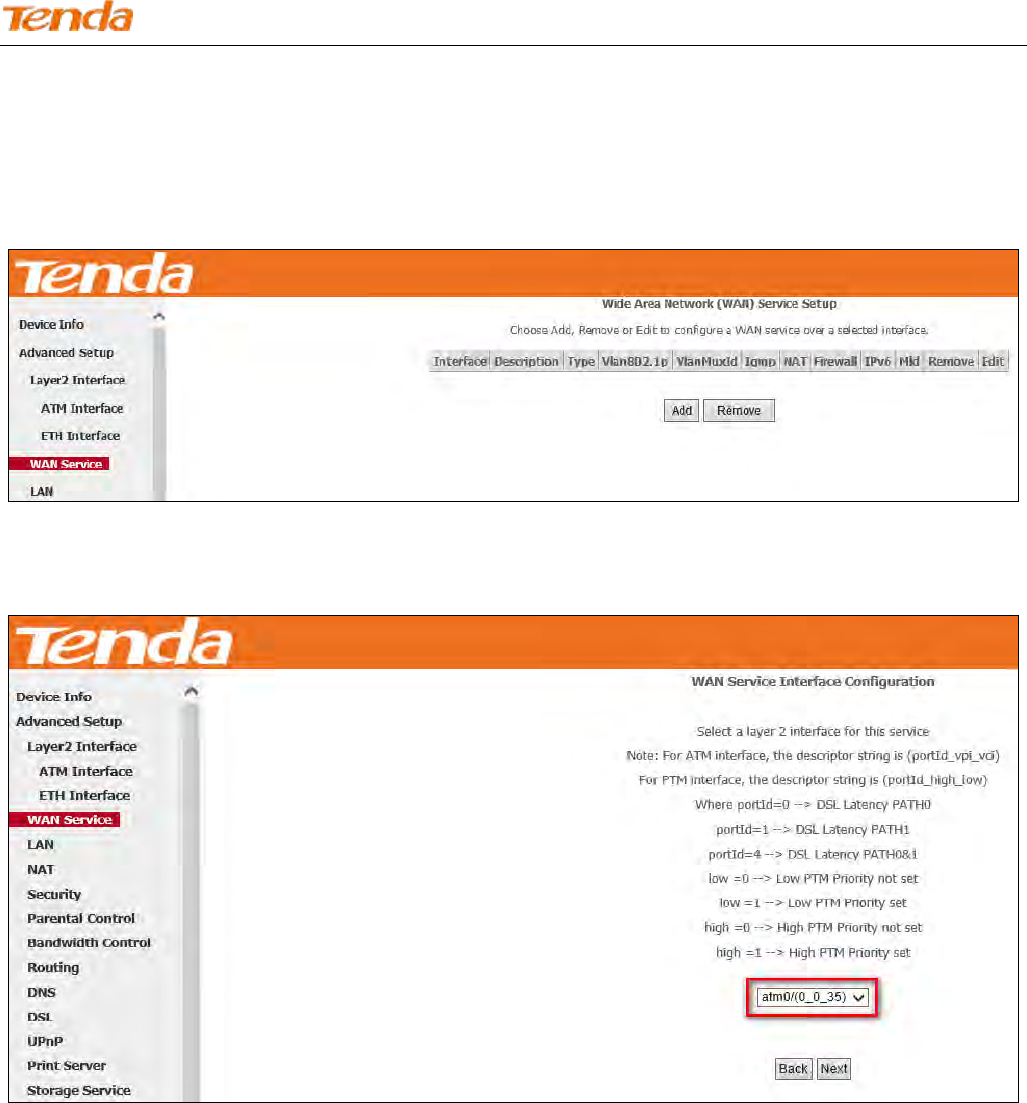
Step 6: To configure the Default Gateway interface when using IPv6, select the interface that you want to configure with
the WAN gateway address in Selected WAN Interface box. Then click Next.
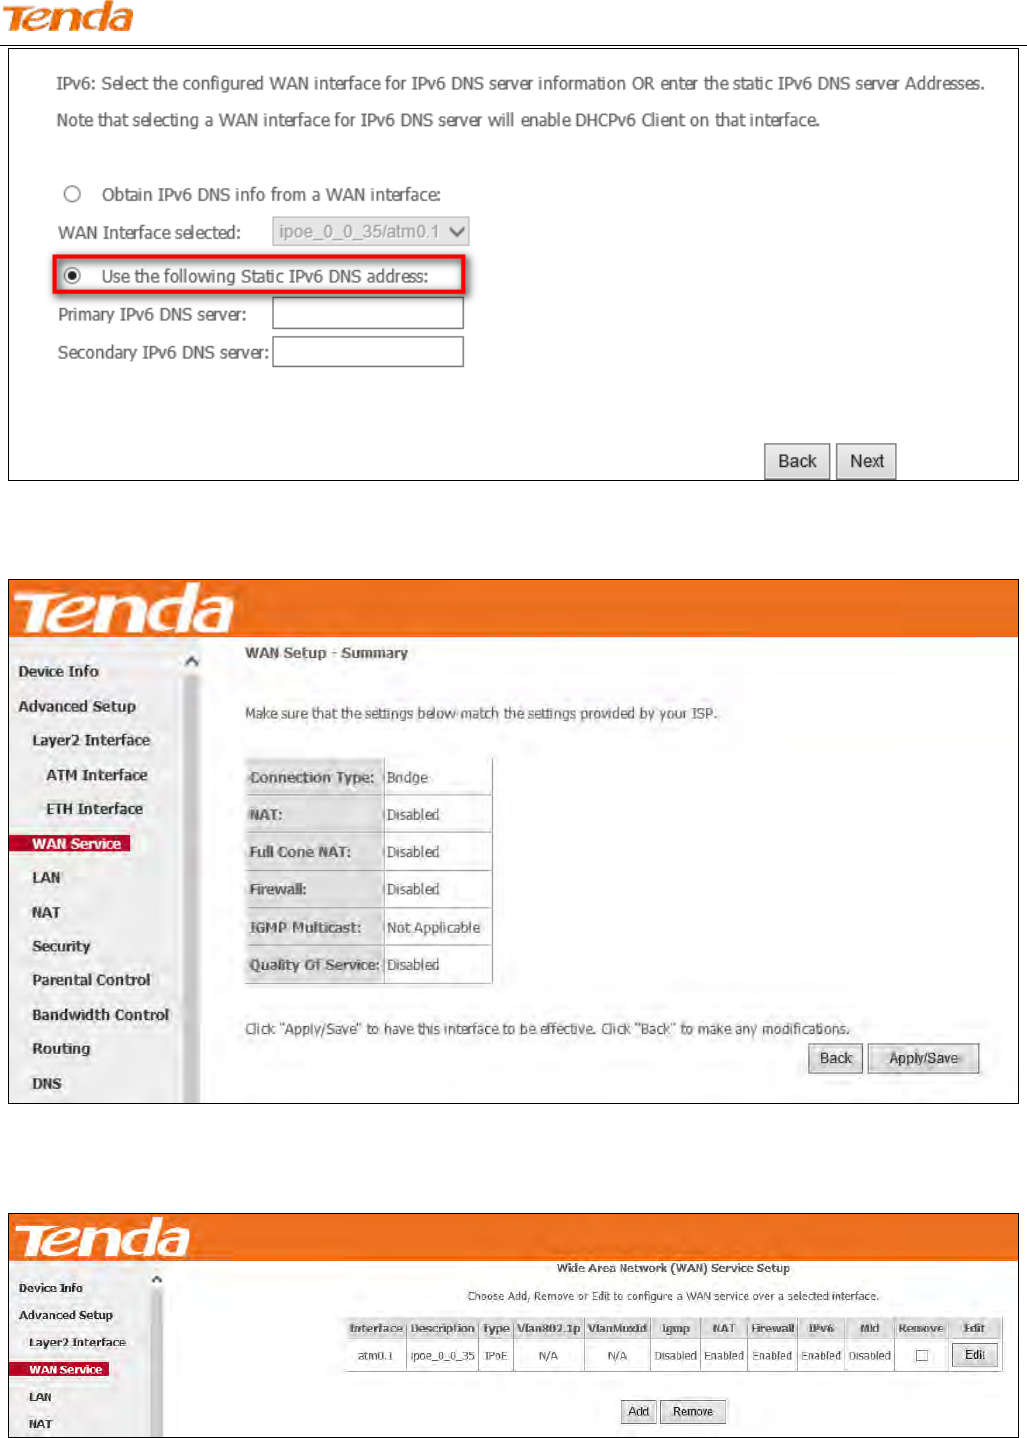
Step 7: To configure the WAN DNS address, check the Obtain IPv6 DNS info from a WAN interface option, or select
the Use the following Static IPv6 DNS address option to enter the static DNS server IPv6 addresses provided by your
ISP. At last, click Next.
Wireless N300 ADSL2+ High Power Modem Router
42
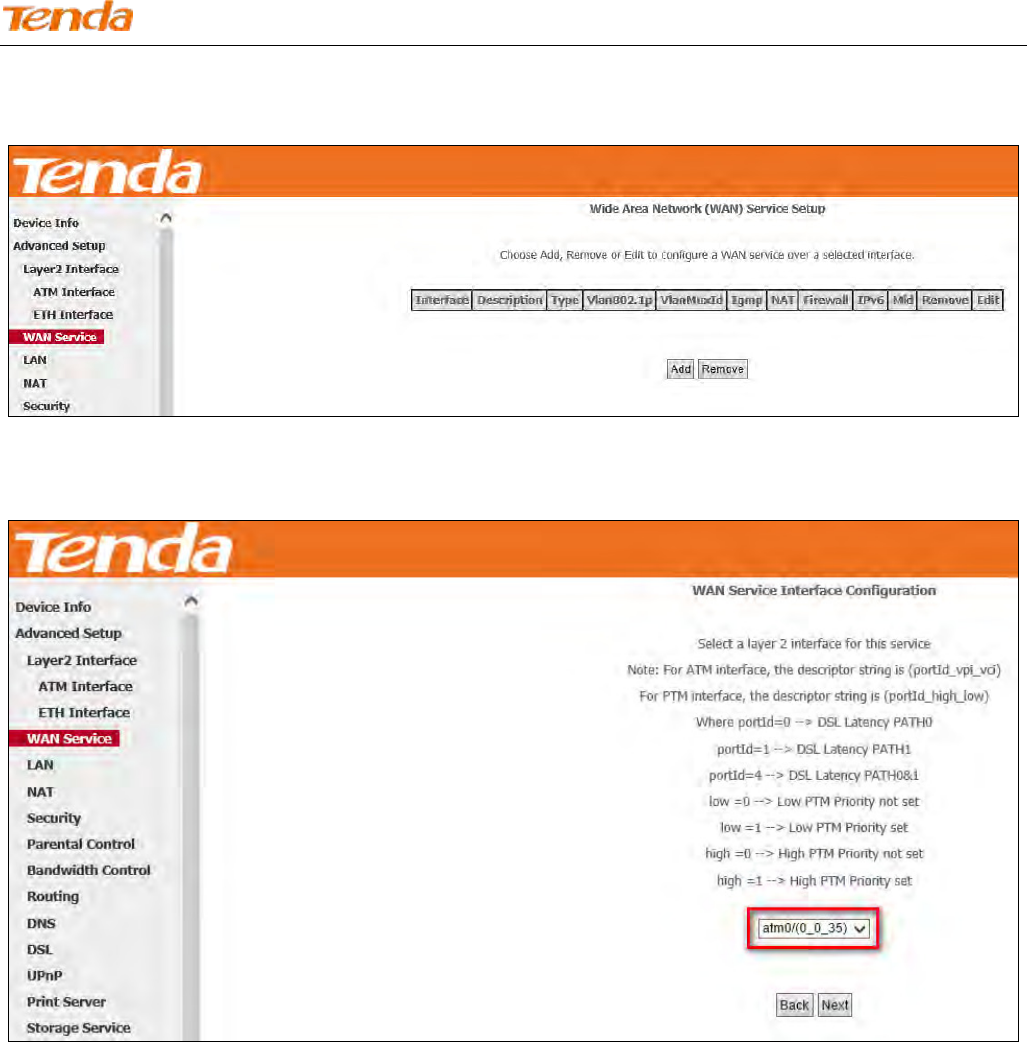
Step 8: Here you can view your configurations. Click Apply/Save to have this interface to be effective.
When the IPoE connection is successful, you can access the Internet.
Wireless N300 ADSL2+ High Power Modem Router
43
Bridge
If you wish to initiate a dialup directly from your PC for Internet access or enjoy the entire Internet connection (instead
of sharing it with others), you can use the Bridging DSL link type and create a dialup program on your PC.
Step 1: Click Advanced Setup > WAN Service and then click the Add button.
Step 2: Select the ATM interface you added just now from the pull-down menu in the figure below. Click Next.
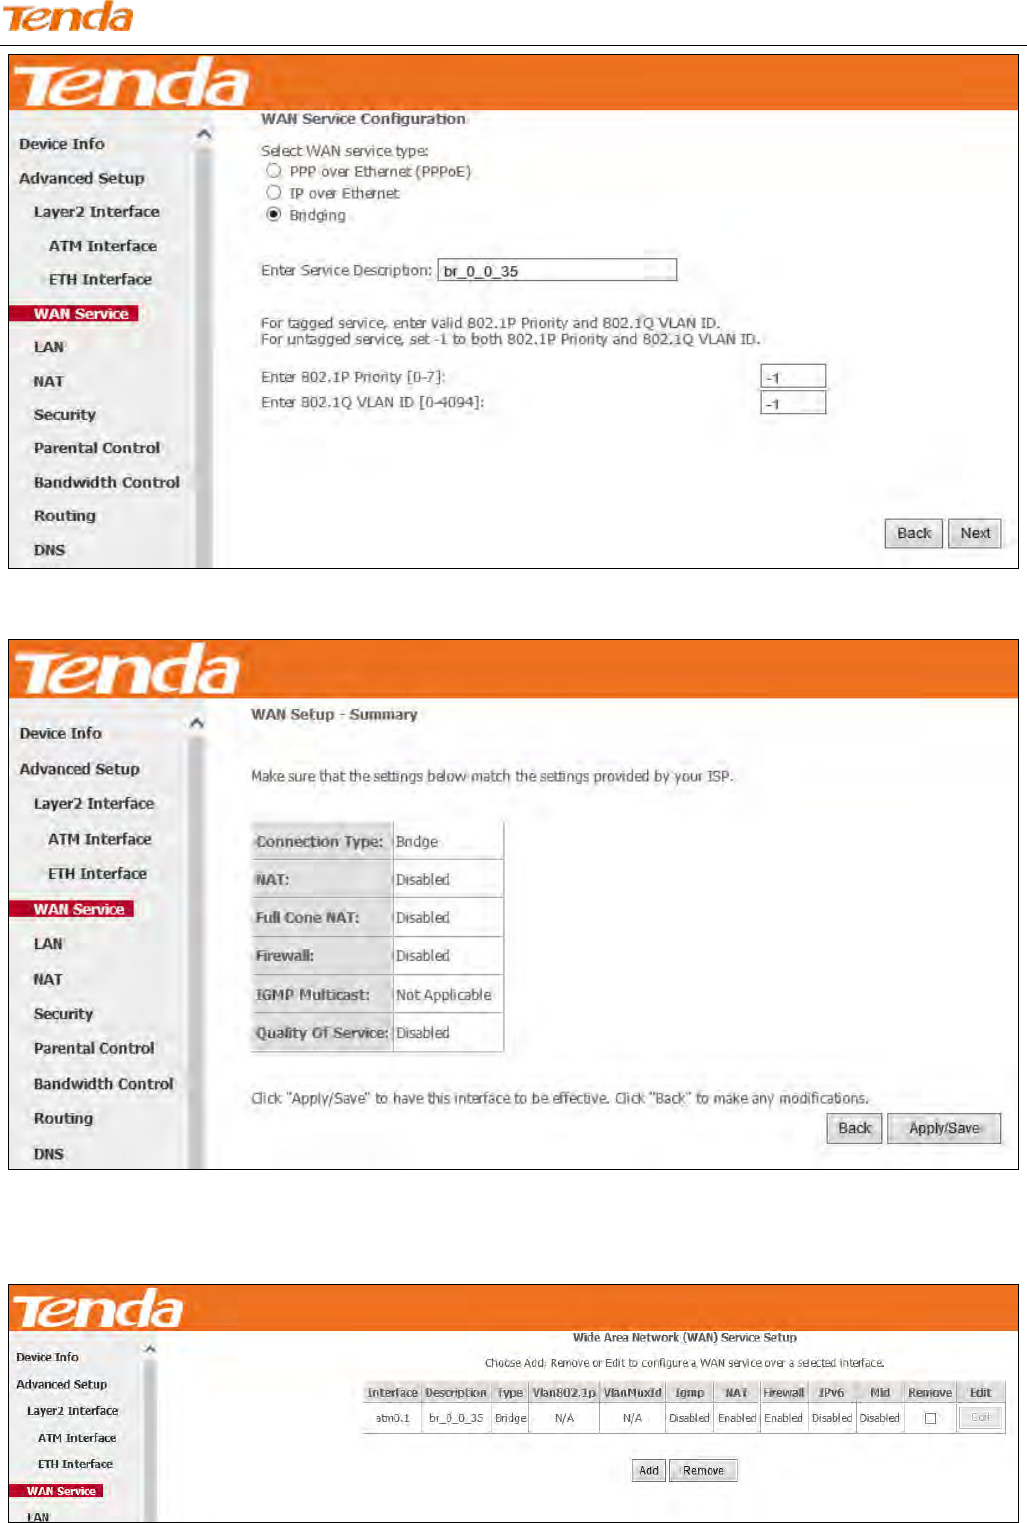
Step 3: Select Bridging. Edit the Enter Service Description which is optional. Suggest you keep the default. Click
Next.
Wireless N300 ADSL2+ High Power Modem Router
44
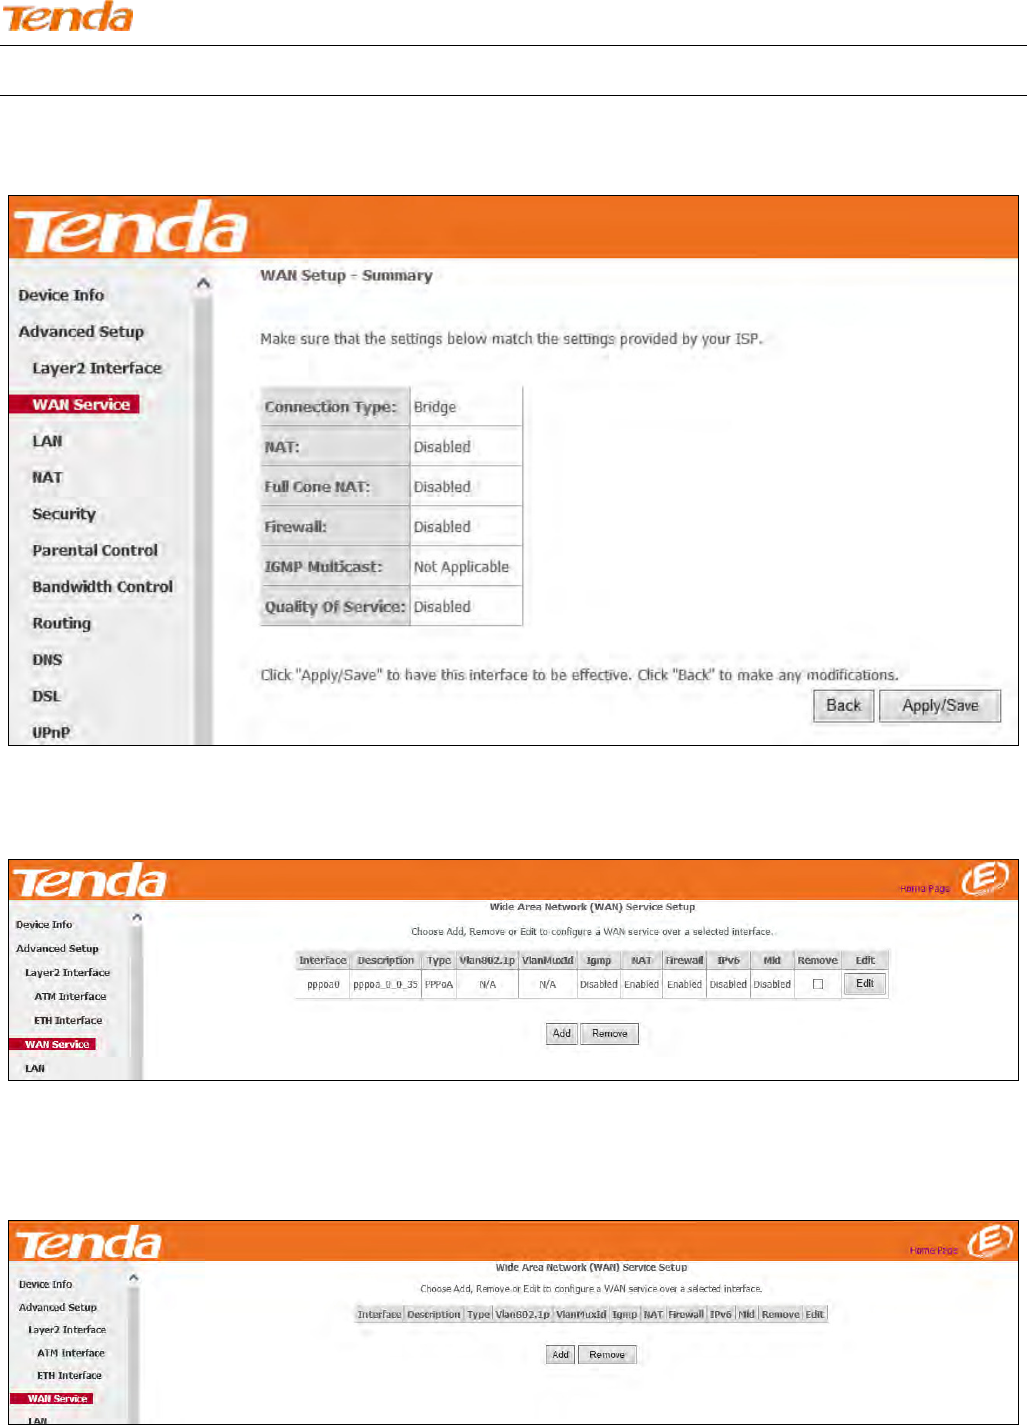
Step 4: Here you can view your configurations. Click Apply/Save to have this interface to be effective.
After the bridging connection is successful, initiate a dialup directly from your PC for Internet access.
Wireless N300 ADSL2+ High Power Modem Router
45
Note
To configure multiple WAN connect ions, simply configure multiple ATM interfaces and then follow the instructions
above.
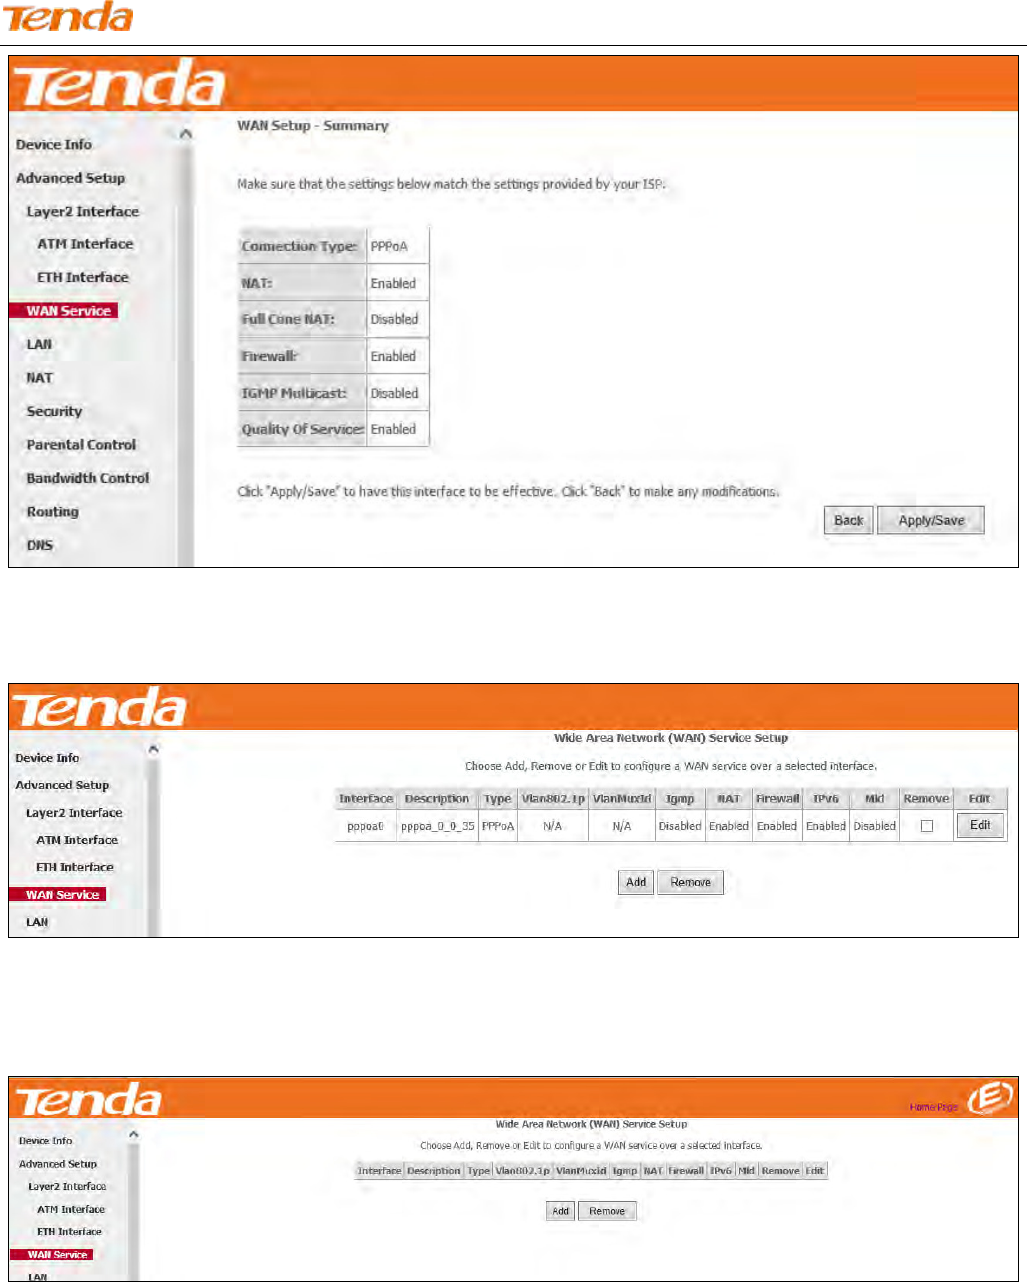
PPPoA
If you have selected the PPPoA from the ATM Interface screen in Layer2 Interface, you will see the screen below
when you click the WAN Service tab, select the configured interface and click Next.
IPv4 Only
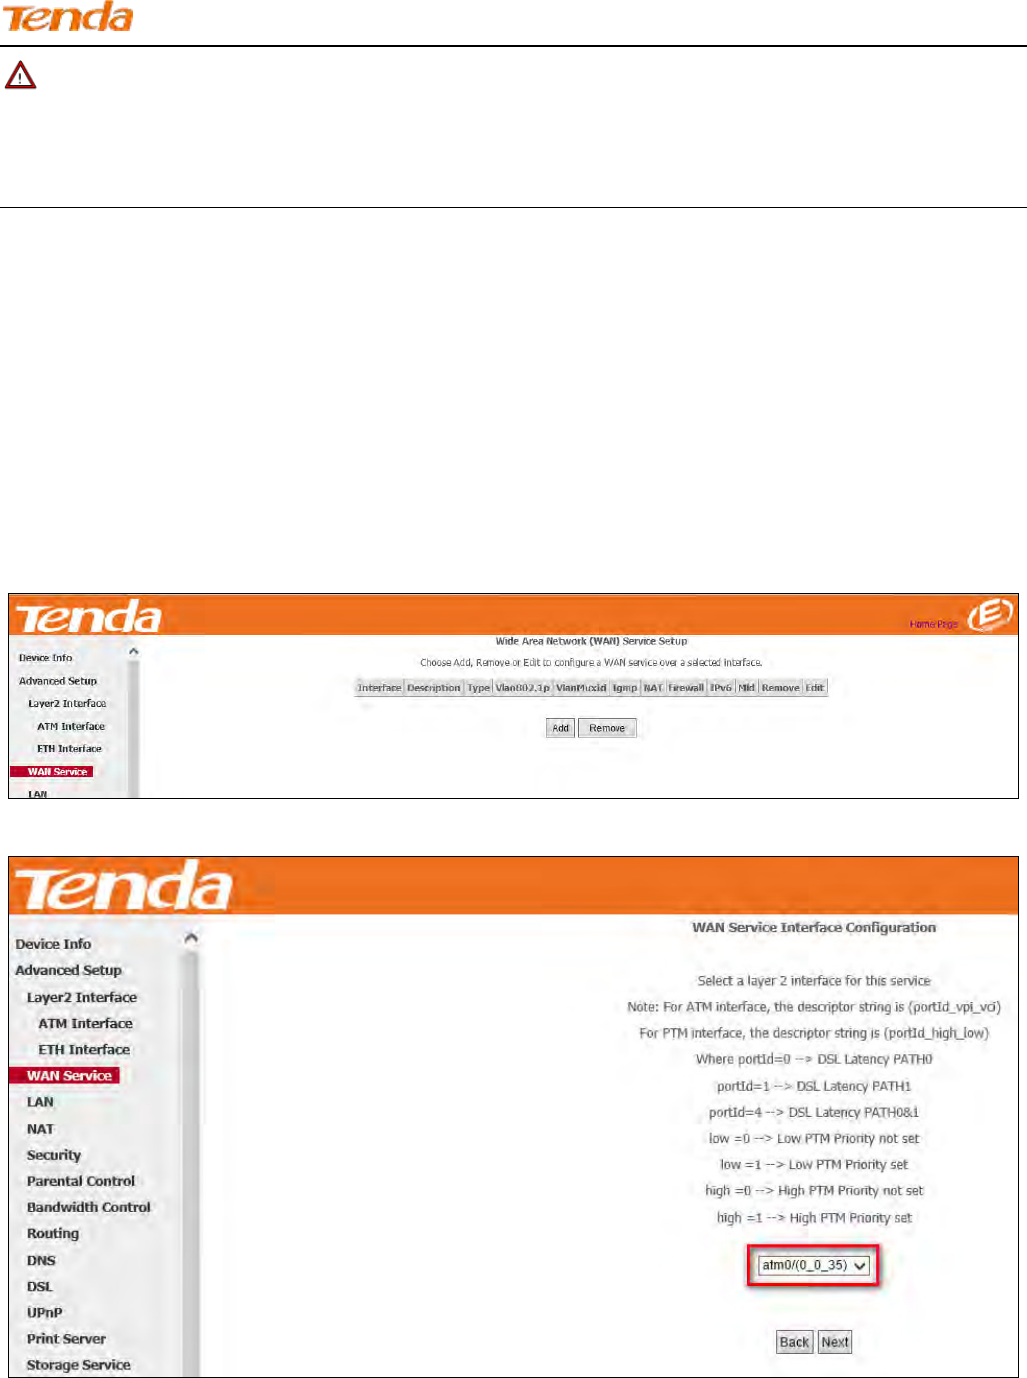
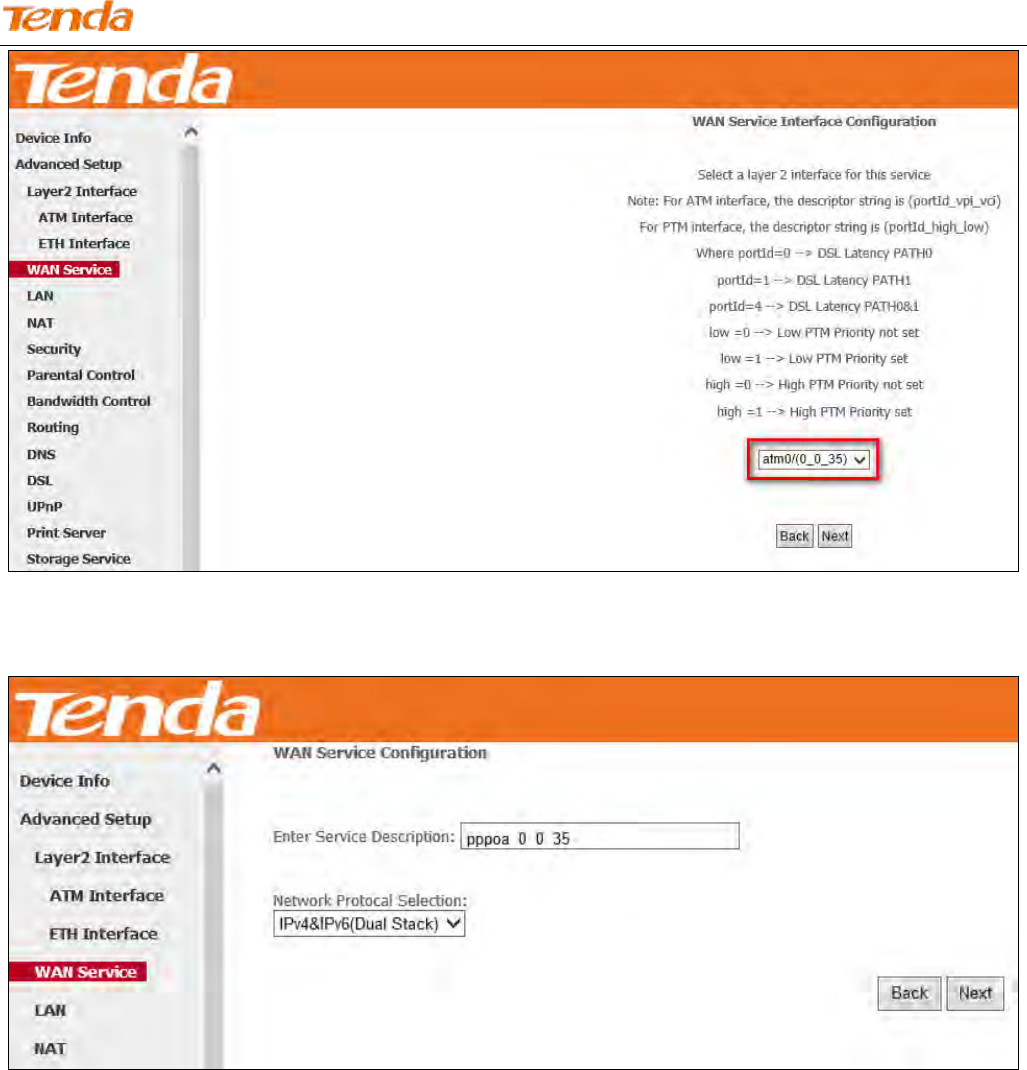
Step 1: Click Advanced Setup > WAN Service and then click the Add button.
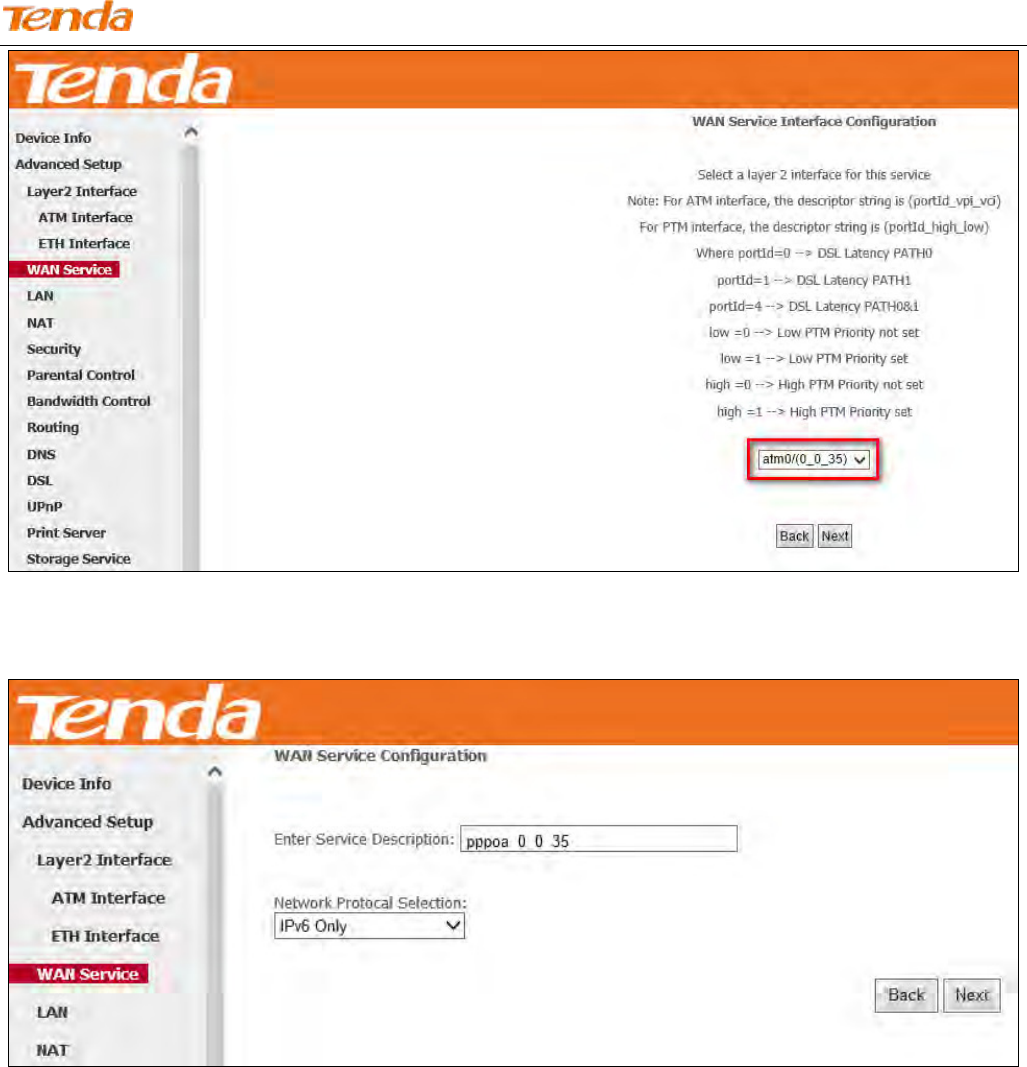
Step 2: Select the ATM interface you added just now from the pull-down menu in the figure below. Click Next.
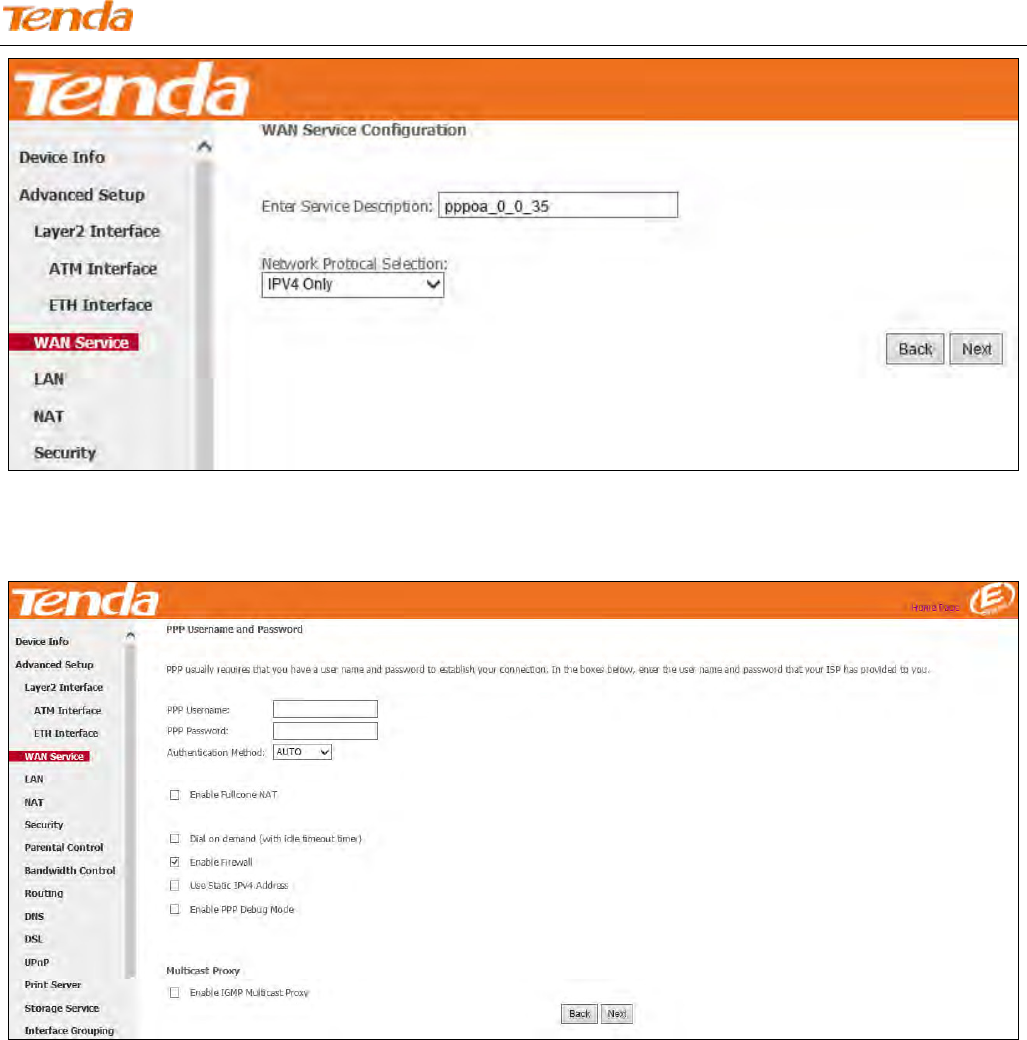
Step 3: Edit the Enter Service Description. This field is optional. We recommend that you keep the default.
Select a network protocol: IPv4 Only, IPv6 Only or IPv4 & IPv6 (Dual Stack). Click Next.
Wireless N300 ADSL2+ High Power Modem Router
46
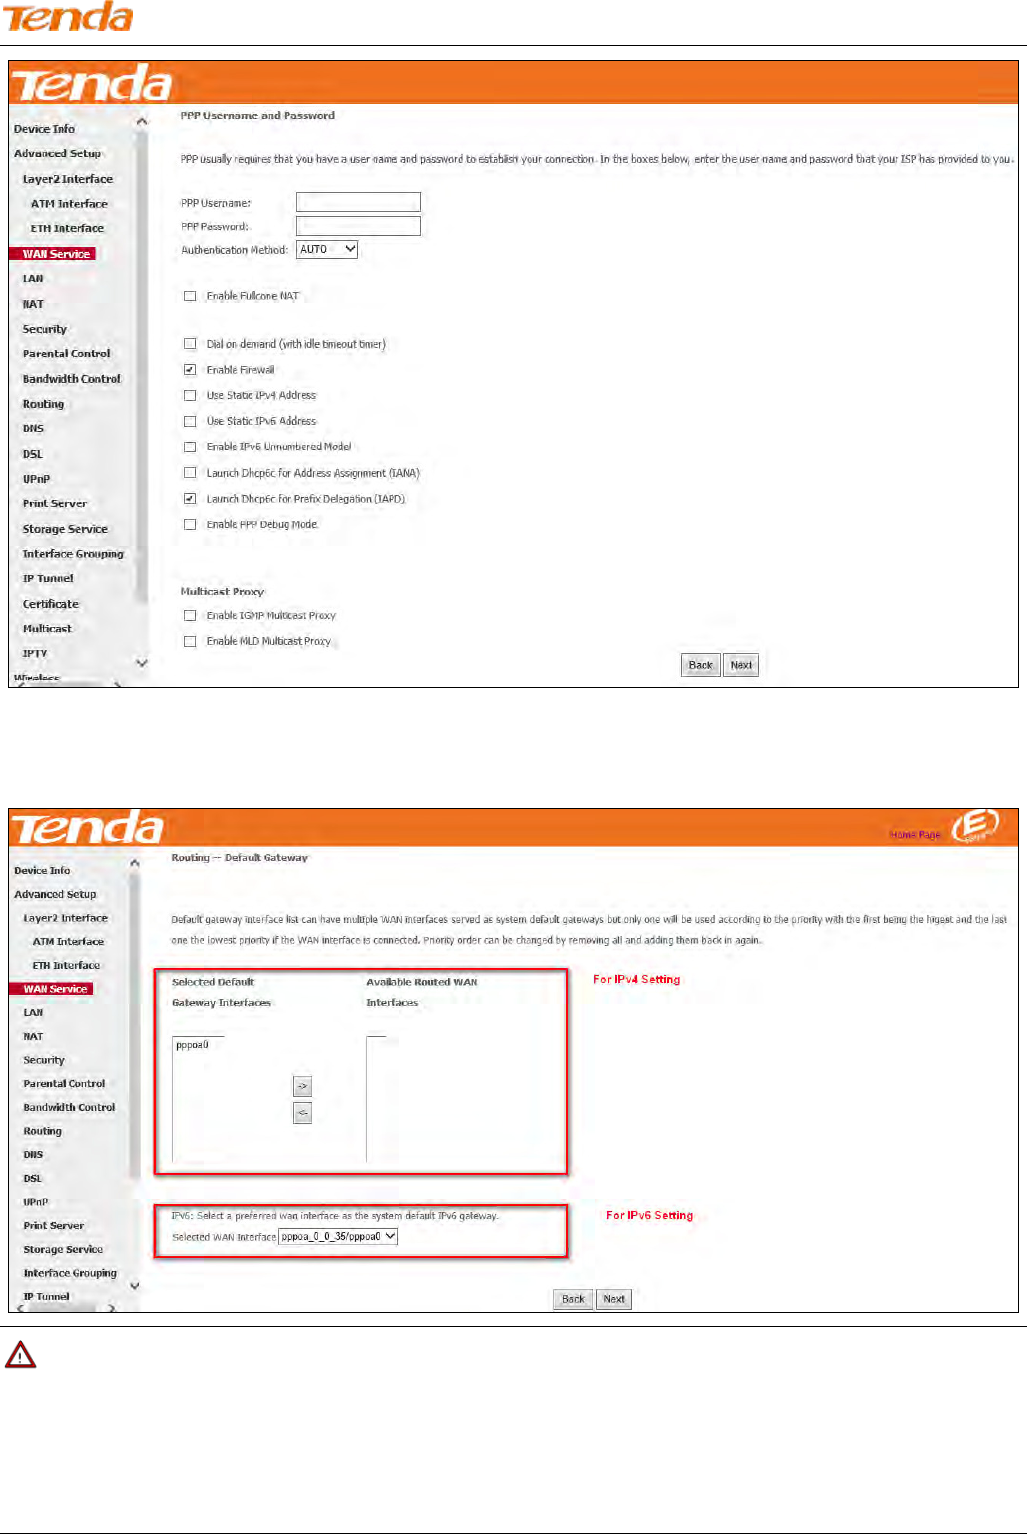
Step 4: Enter PPP username and its password provided by your ISP. Click Next.
PPP Username: This is for logging in to your ISP. If you cannot locate this information, ask your ISP to provide it.
PPP Password: This is for logging in to your ISP. If you cannot locate this information, ask your ISP to provide it.
Authentication Method: This is used by ISP to authenticate the client that attempts to connect. If you are not sure,
consult your ISP or select AUTO.
Dial on demand: Connect to ISP only when there is traffic transmission. This saves your broadband Internet service bill.
Enable PPP Debug Mode: Only enable this feature if supported by your ISP.
Multicast Proxy: If enabled, the router will use multicast proxy.
If you are not sure about the options on this screen, simply enter your ISP user name and password and leave the other
options unchanged from defaults. Click Next to enter the following screen.
Wireless N300 ADSL2+ High Power Modem Router
47
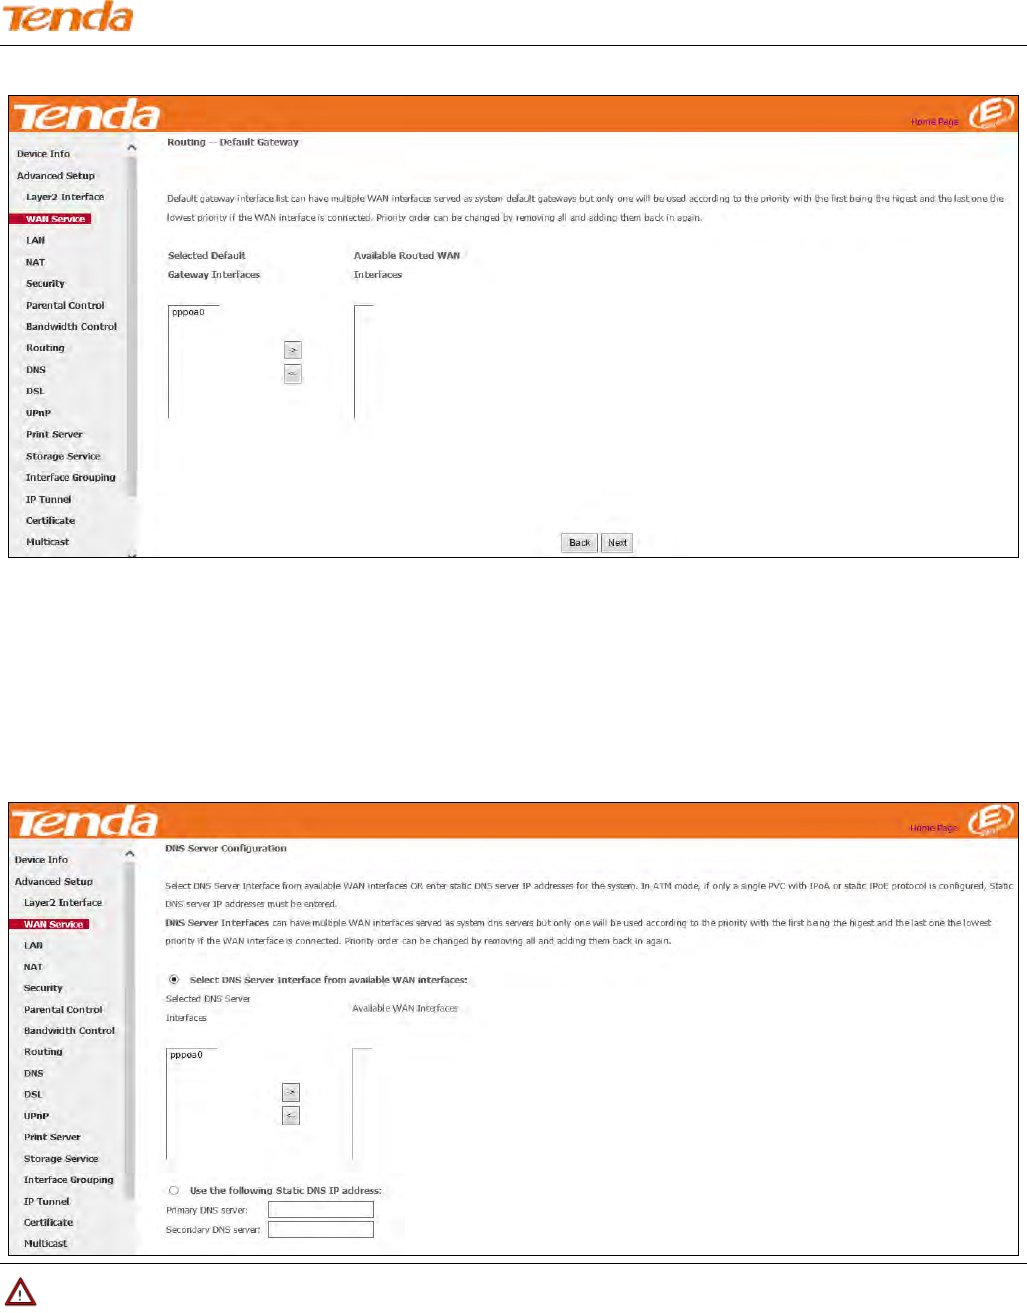
Step 5: To configure the WAN gateway address. After you configure it click Next. The default setting is recommended.
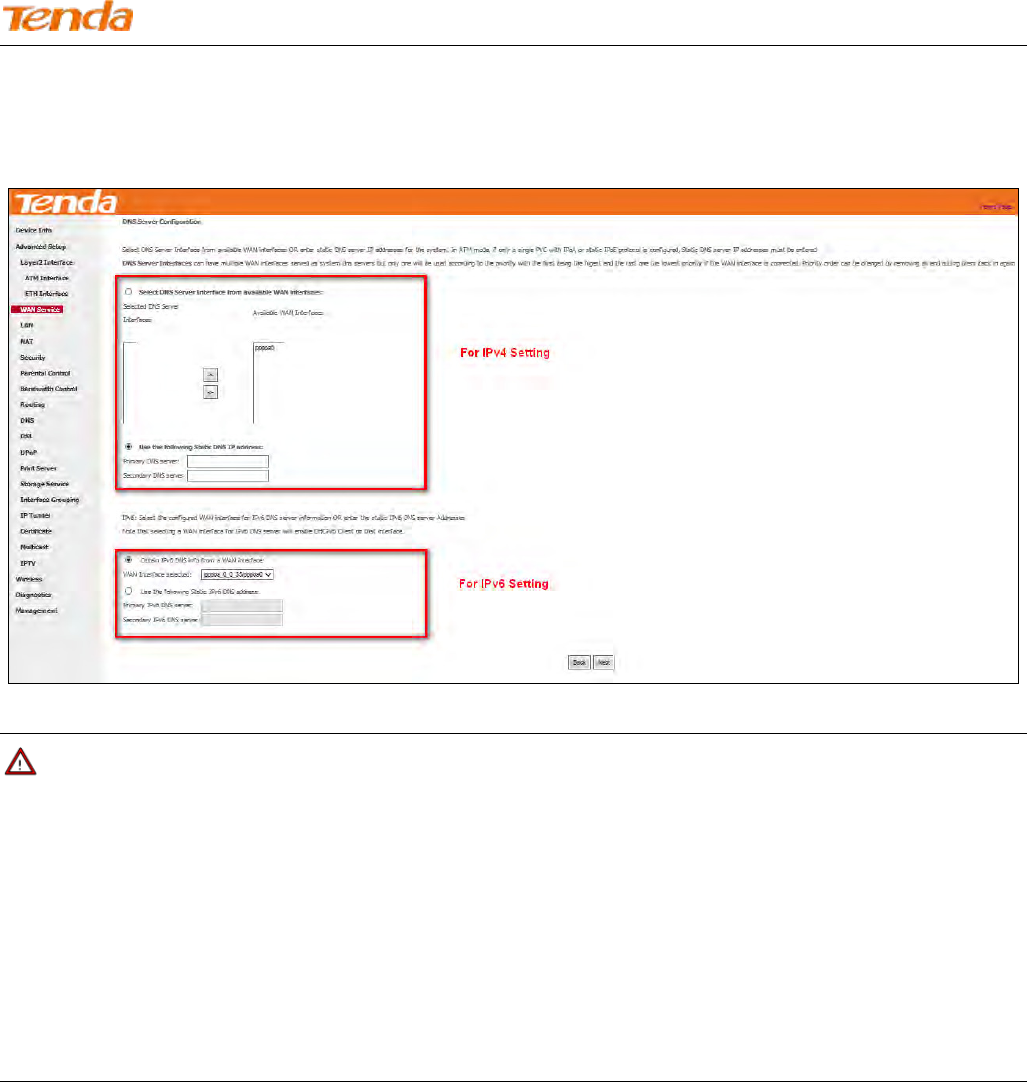
Step 6: To configure the WAN DNS address. Choose a way to get DNS server according to what your ISP has provided.
-Click the Select DNS Server Interface from available WAN interfaces option.
-Select the Use the following Static DNS IP address option and enter static DNS server IP addresses for the system.
And then click Next.
Note
1. DNS Server Interfaces can have multiple WAN interfaces served as system DNS servers but only one will be used
according to the priority with the first being the highest and the last one the lowest priority if the WAN interface is
connected. Priority order can be changed by removing all and adding them back in again.
2. In ATM mode, if only a single PVC with IPoA or static IPoE protocol is configured, Static DNS server IP addresses
must be entered.
Wireless N300 ADSL2+ High Power Modem Router
48
3. If you cannot locate the static DNS server IP information, ask your ISP to provide it.
Step 7: Here you can view your configurations. Click Apply/Save to have this interface to be effective.
Step 8: When the PPPoA connection is successful, you can access the Internet.
IPv4 & IPv6 (Dual Stack)
Step 1: Click Advanced Setup > WAN Service and then click the Add button.
Step 2: Select the ATM interface you added just now from the pull-down menu in the figure below. Click Next.
Wireless N300 ADSL2+ High Power Modem Router
49
Step 3: Edit the Enter Service Description. This field is optional. We recommend that you keep the default.
Select a network protocol: IPv4 & IPv6 (Dual Stack). Click Next.
Step 4: Enter PPP username and its password provided by your ISP. Click Next.
Wireless N300 ADSL2+ High Power Modem Router
50
Step 5: To configure the WAN gateway address. After you configure it click Next. The default setting is recommended.
Note
Default gateway interface list can have multiple WAN interfaces served as system default gateways but only one will be
used according to the priority with the first being the highest and the last one the lowest priority if the WAN interface is
connected. Priority order can be changed by removing all and adding them back in again.
Wireless N300 ADSL2+ High Power Modem Router
51
Step 6: To configure the WAN DNS address
Select DNS Server Interface from available WAN interfaces OR enter static DNS server IP addresses for the system. And
then click Next.
Note
1. DNS Server Interfaces can have multiple WAN interfaces served as system DNS servers but only one will be used
according to the priority with the first being the highest and the last one the lowest priority if the WAN interface is
connected. Priority order can be changed by removing all and adding them back in again.
2. In ATM mode, if only a single PVC with IPoA or static IPoE protocol is configured, Static DNS server IP addresses
must be entered.
3. If you cannot locate the static DNS server IP information, ask your ISP to provide it.
Step 7: Here you can view your configurations. Click Apply/Save to save your settings if everything is correctly set.
Wireless N300 ADSL2+ High Power Modem Router
52
Step 8: When the PPPoA connection is successful, you can access the Internet.
IPv6 Only
Step 1: Click Advanced Setup > WAN Service and then click the Add button.
Step 2: Select the ATM interface you added just now from the pull-down menu in the figure below. Click Next.
Wireless N300 ADSL2+ High Power Modem Router
53
Step 3: Edit the Enter Service Description. This field is optional. We recommend that you keep the default.
Select a network protocol: IPv6 Only. Click Next.
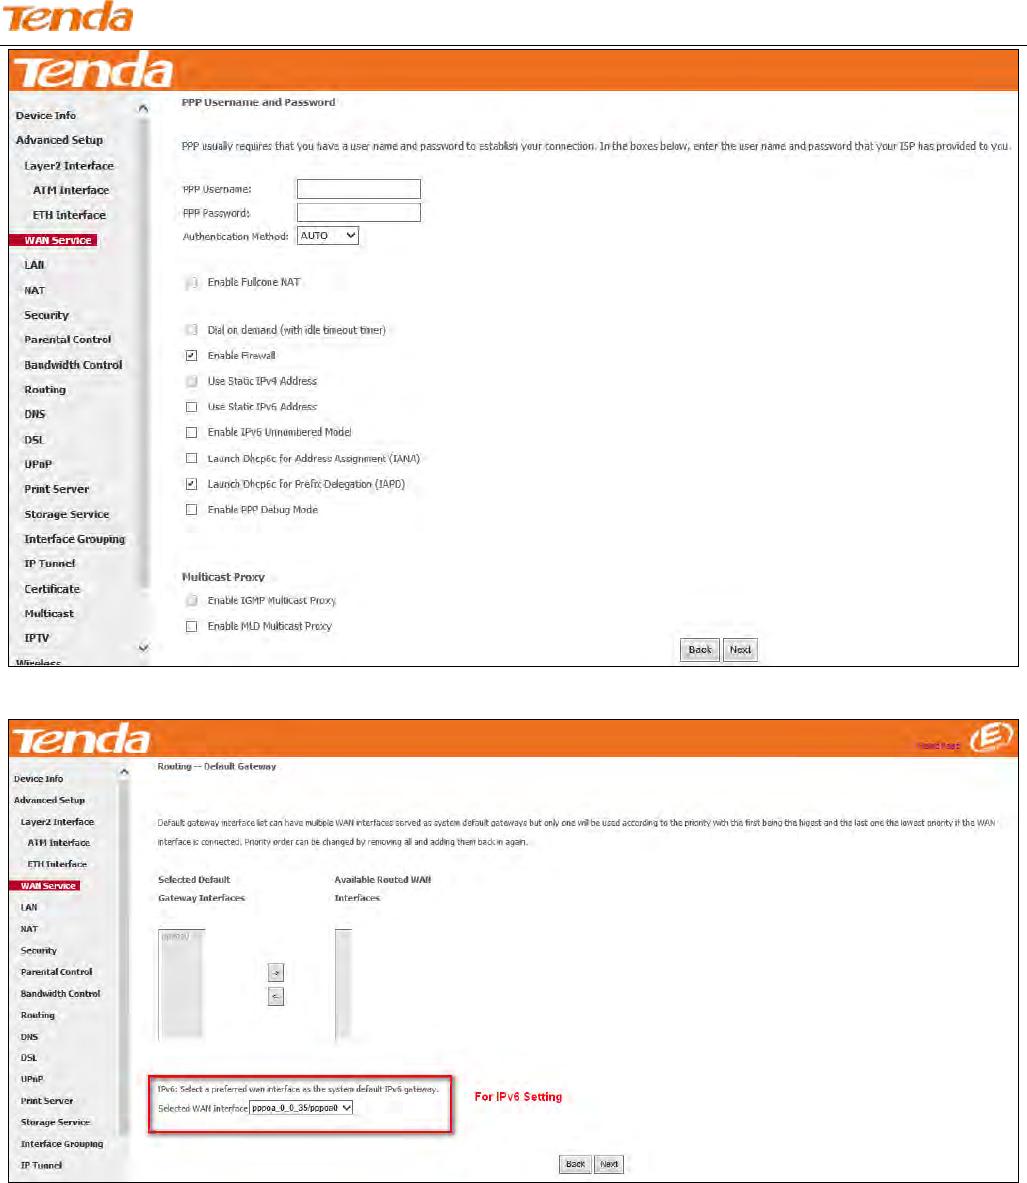
Step 4: Enter PPP username and its password provided by your ISP. Click Next.
Wireless N300 ADSL2+ High Power Modem Router
54
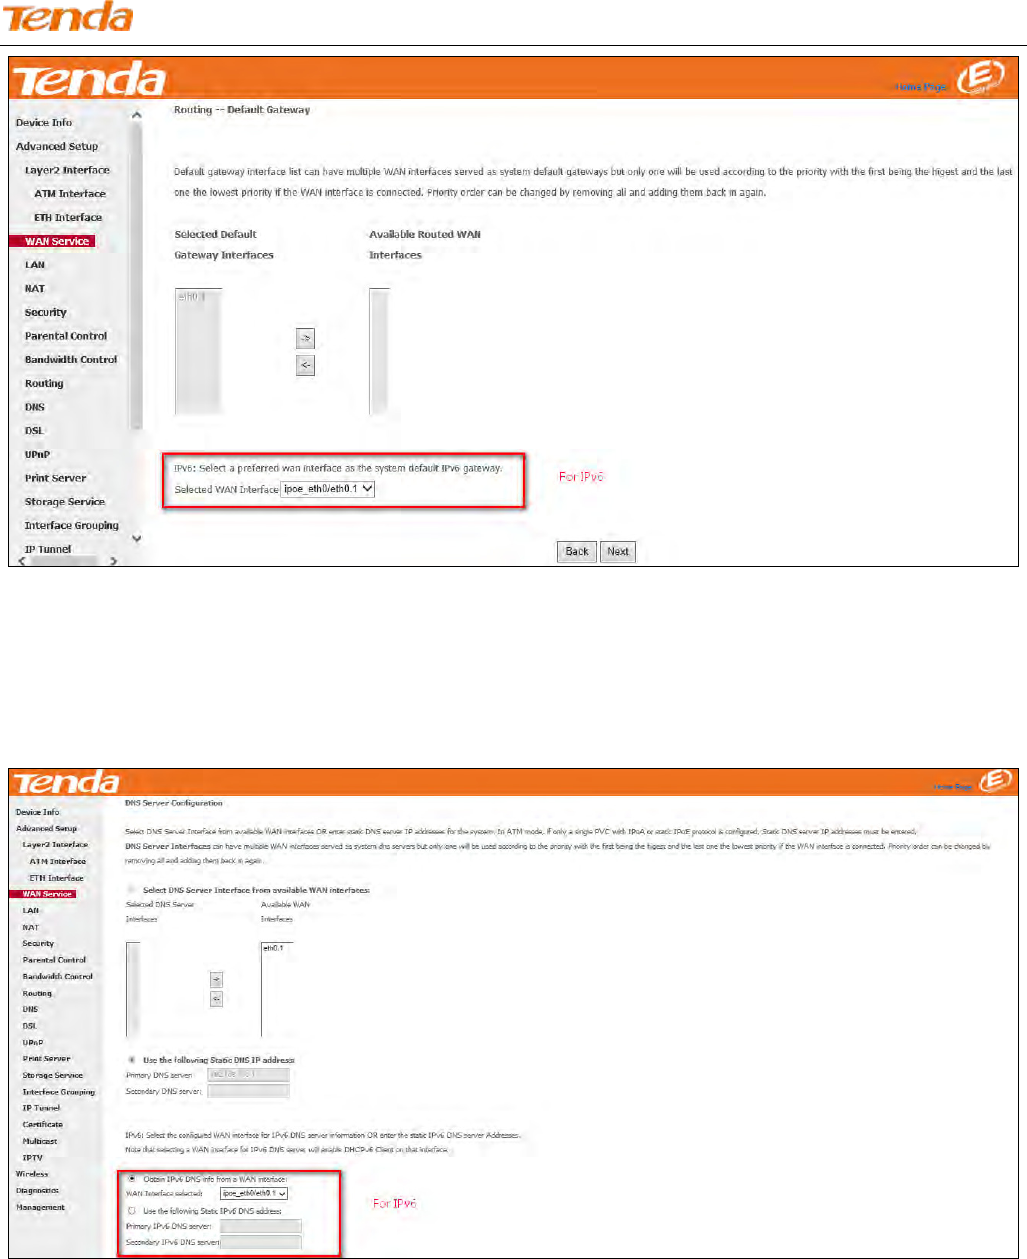
Step 5: Select a preferred wan interface as the system default IPv6 gateway. Click Next.
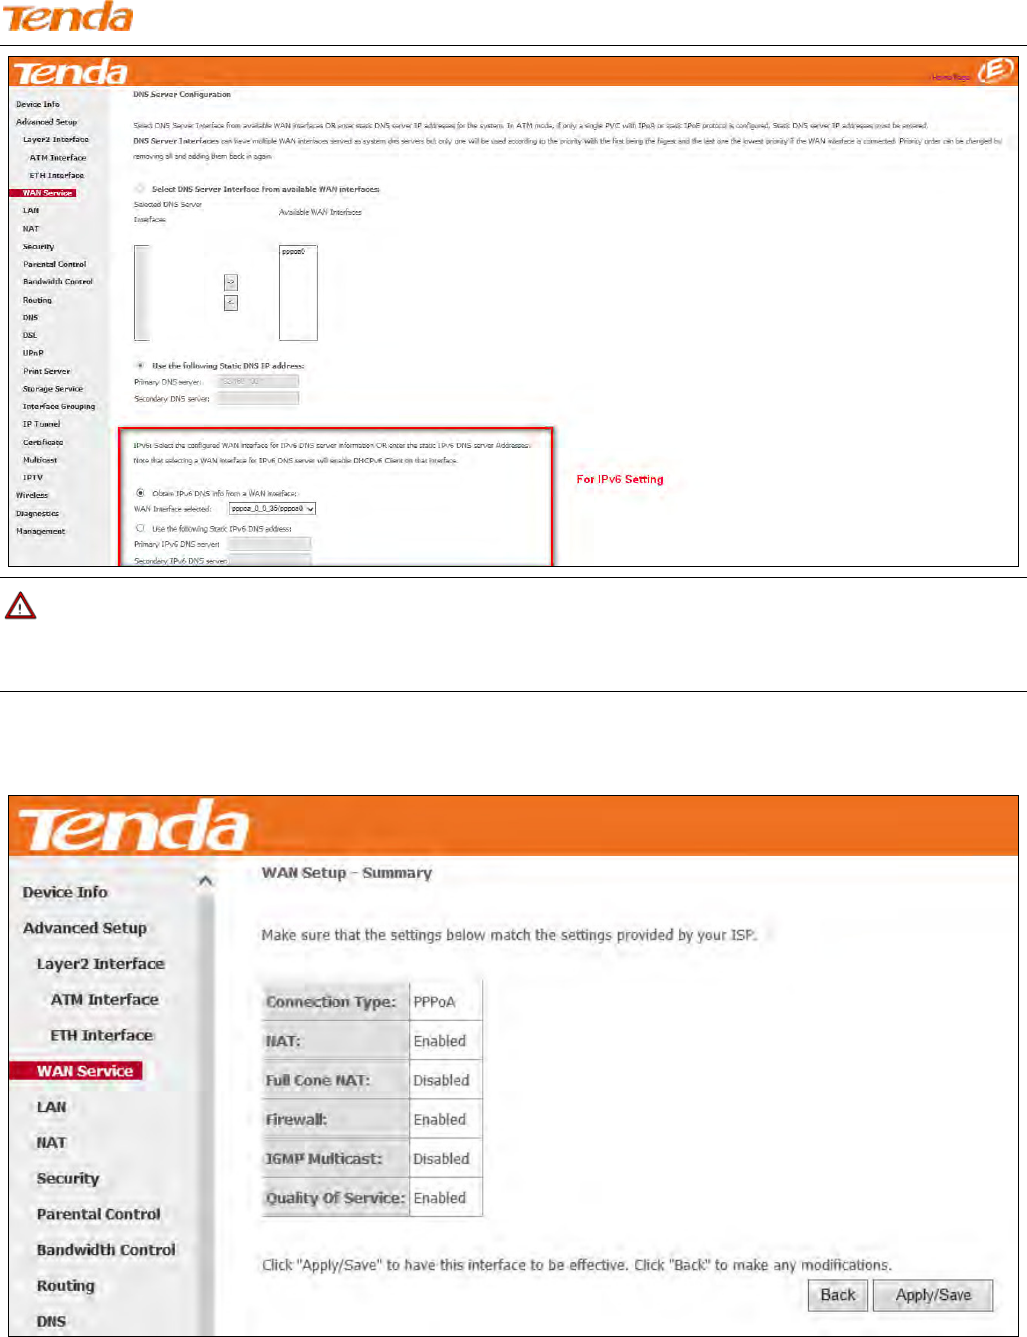
Step 6: To configure the WAN DNS address, select the configured WAN interface for IPv6 DNS server information or
enter the static IPv6 DNS server addresses. And then click Next.
Wireless N300 ADSL2+ High Power Modem Router
55
Note
Selecting a WAN interface for IPv6 DNS server will enable DHCPv6 Client on that interface.
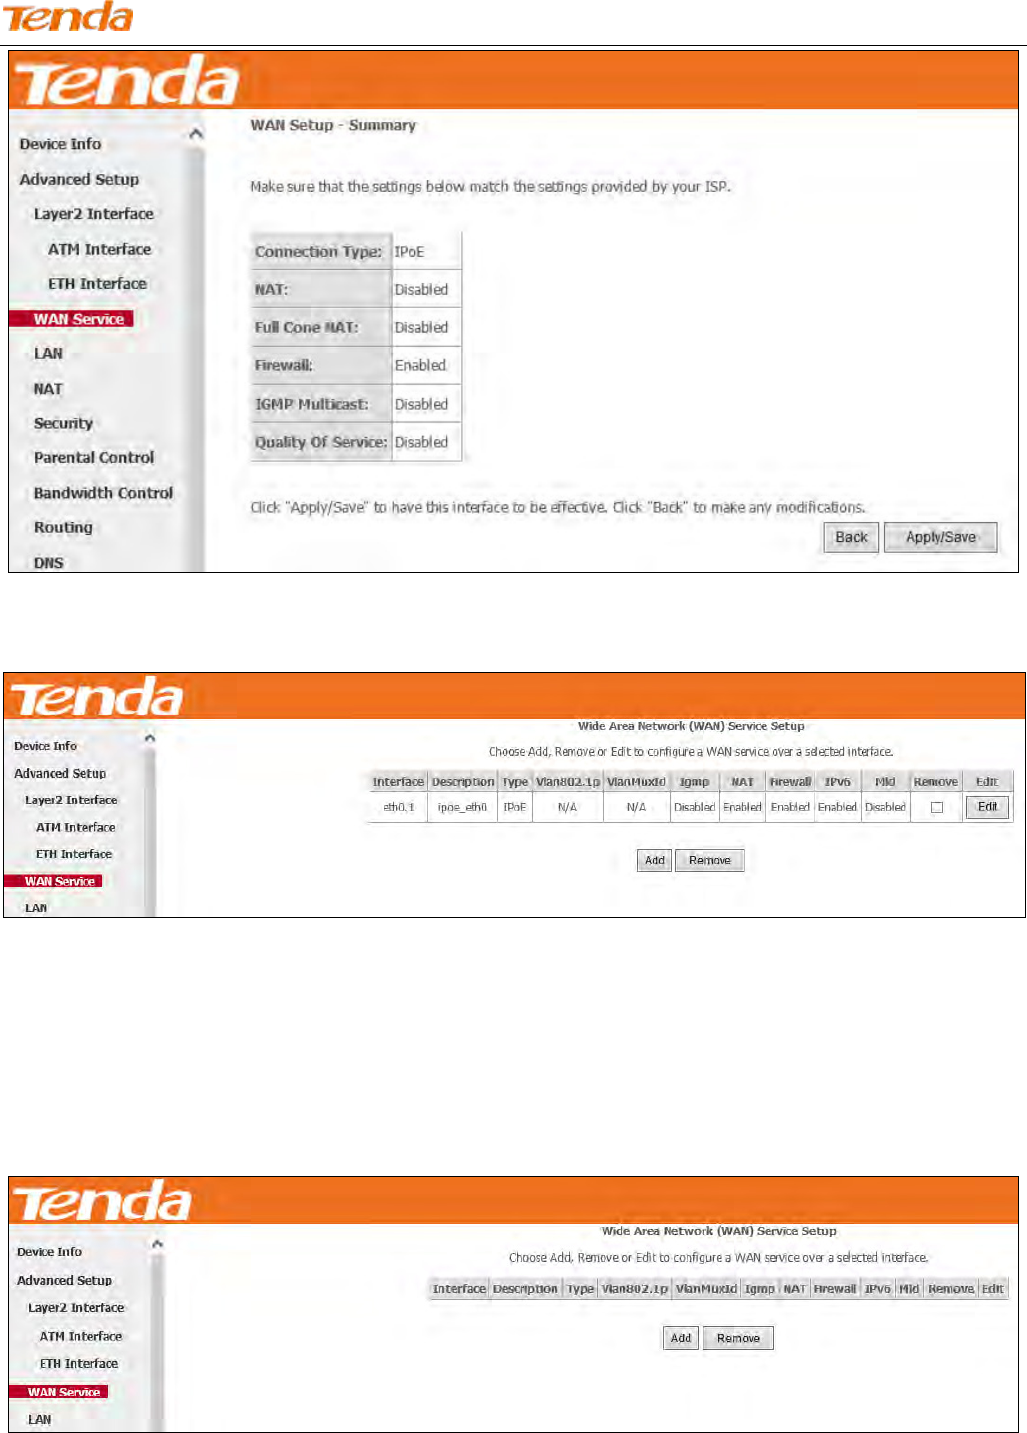
Step 7: Here you can view your configurations. Click Apply/Save to save your settings if everything is correctly set.
Step 8: When the PPPoA connection is successful, you can access the Internet.
Wireless N300 ADSL2+ High Power Modem Router
56
IPoA
If you have selected the IPoA from the ATM Interface screen in Layer2 Interface, you will see the screen above when
you click the WAN Service tab, select the configured interface and click Next.
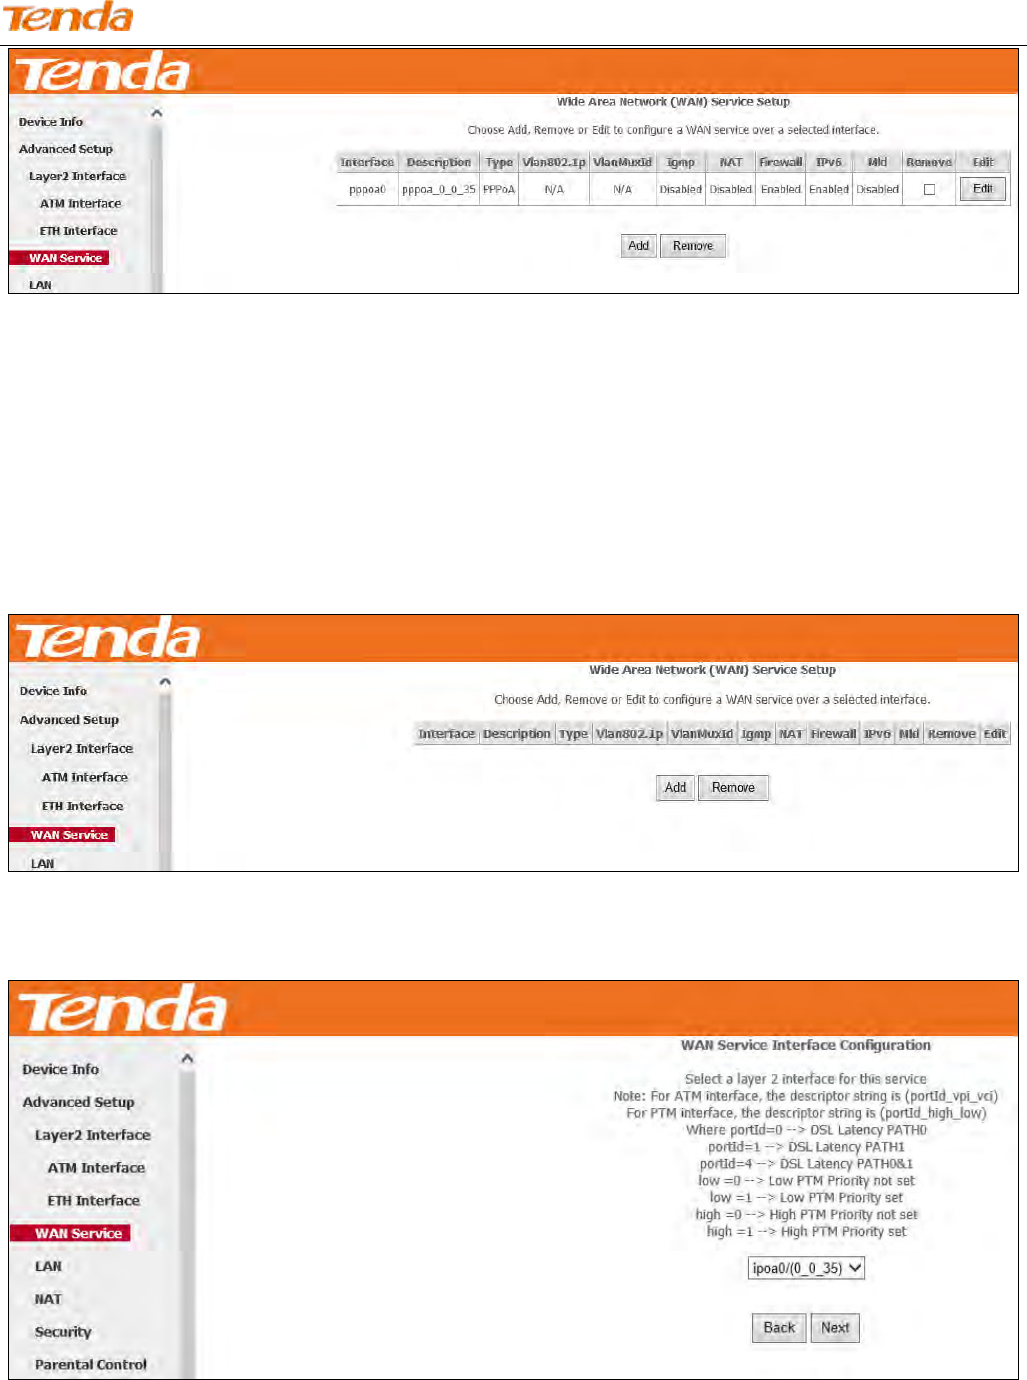
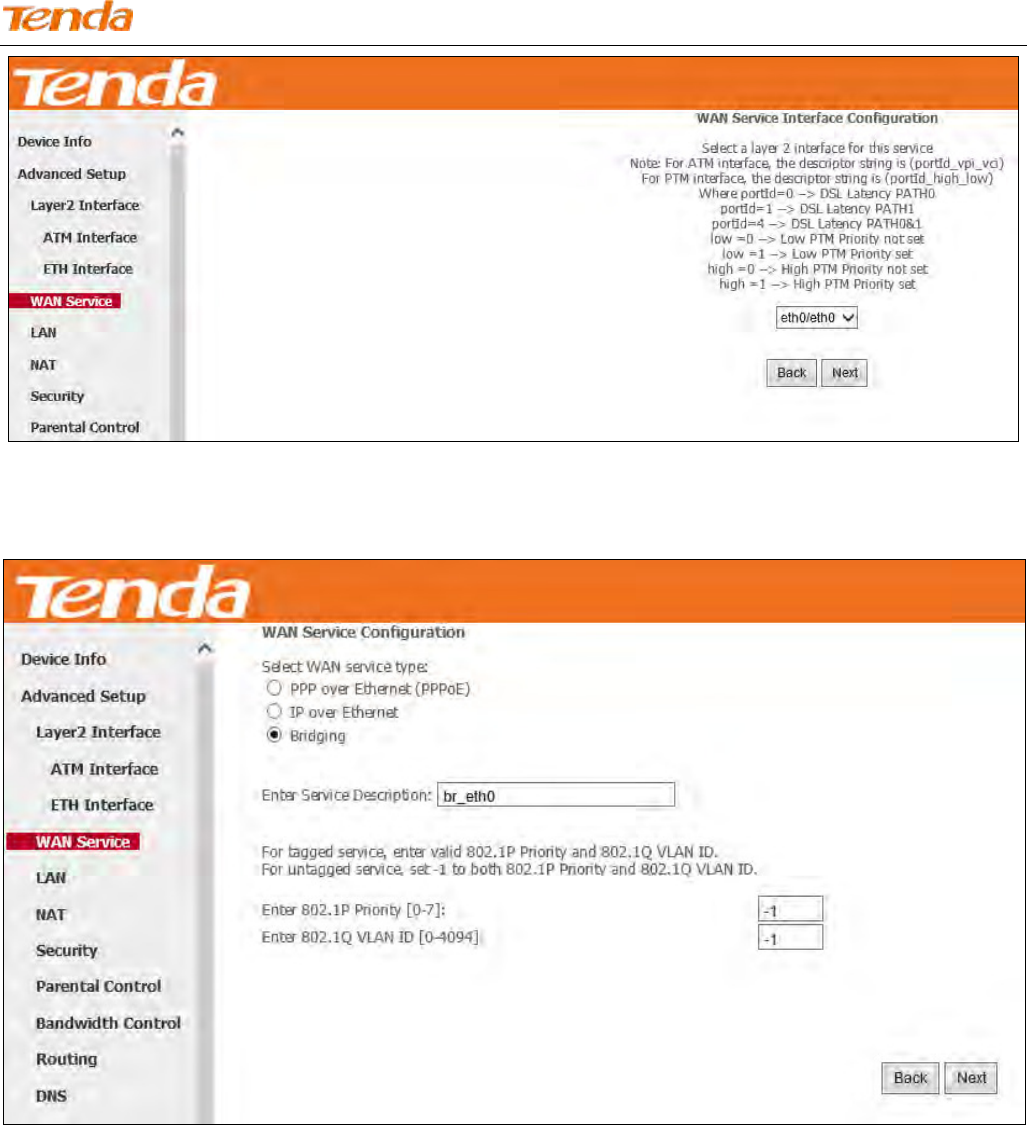
Step 1: Click Advanced Setup > WAN Service and then click the Add button.
Step 2: Select the ATM interface you added just now from the pull-down menu in the figure below. Click Next.
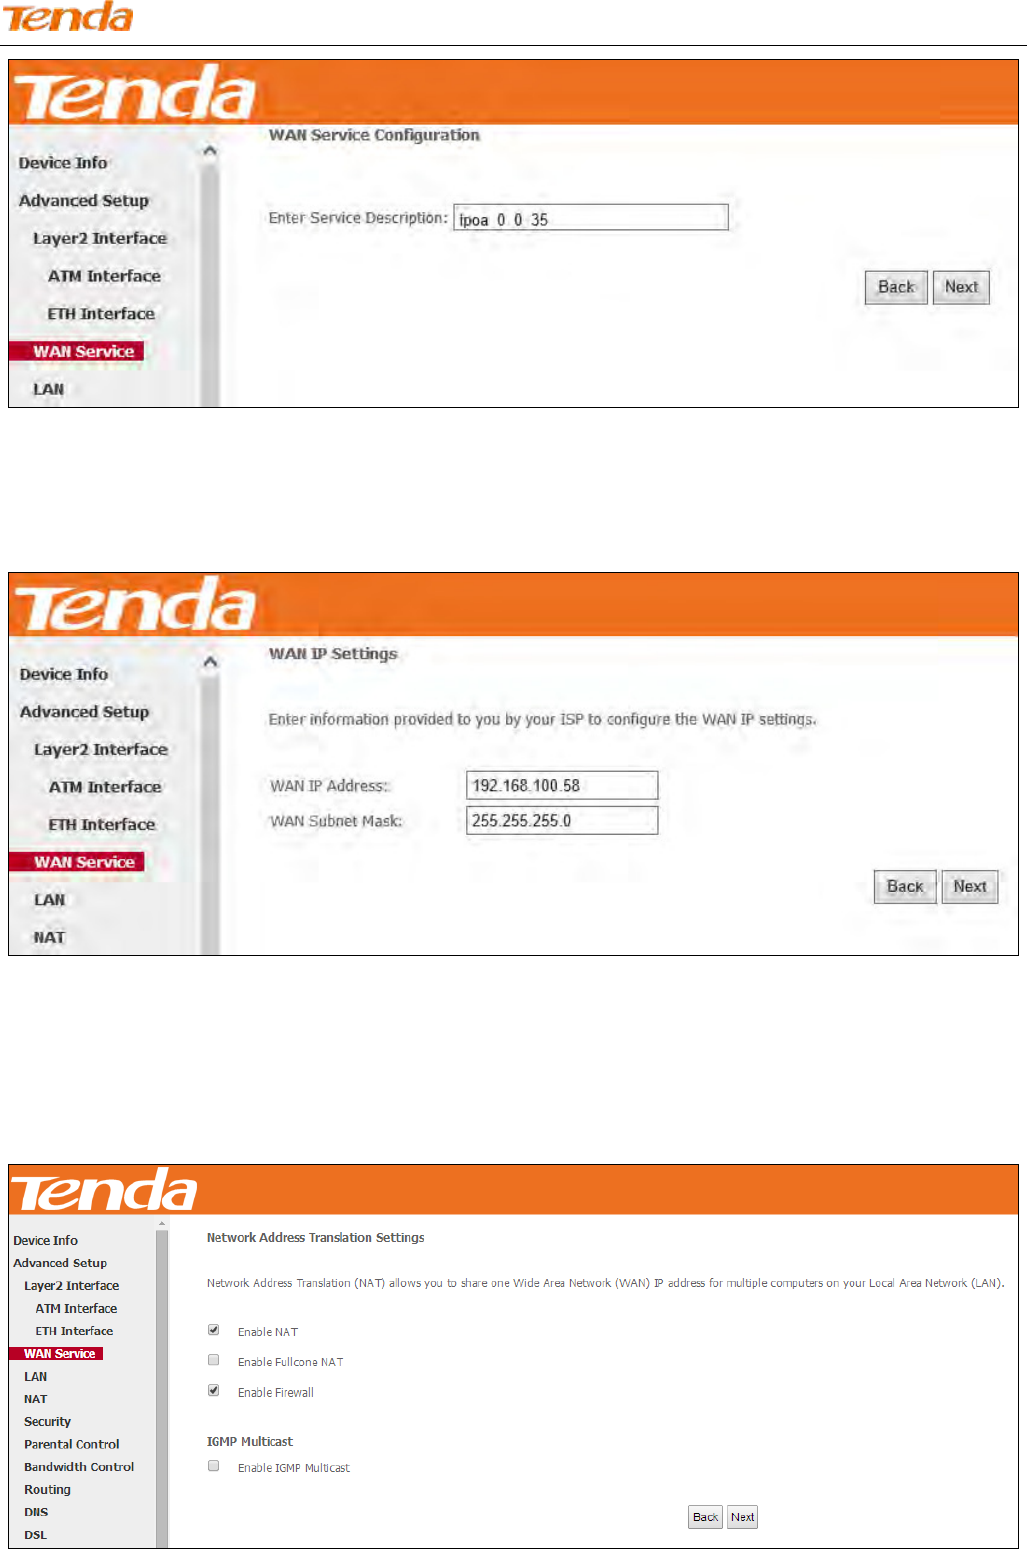
Step 3: Edit the Enter Service Description. This field is optional. We recommend that you keep the default. Click Next.
Wireless N300 ADSL2+ High Power Modem Router
57
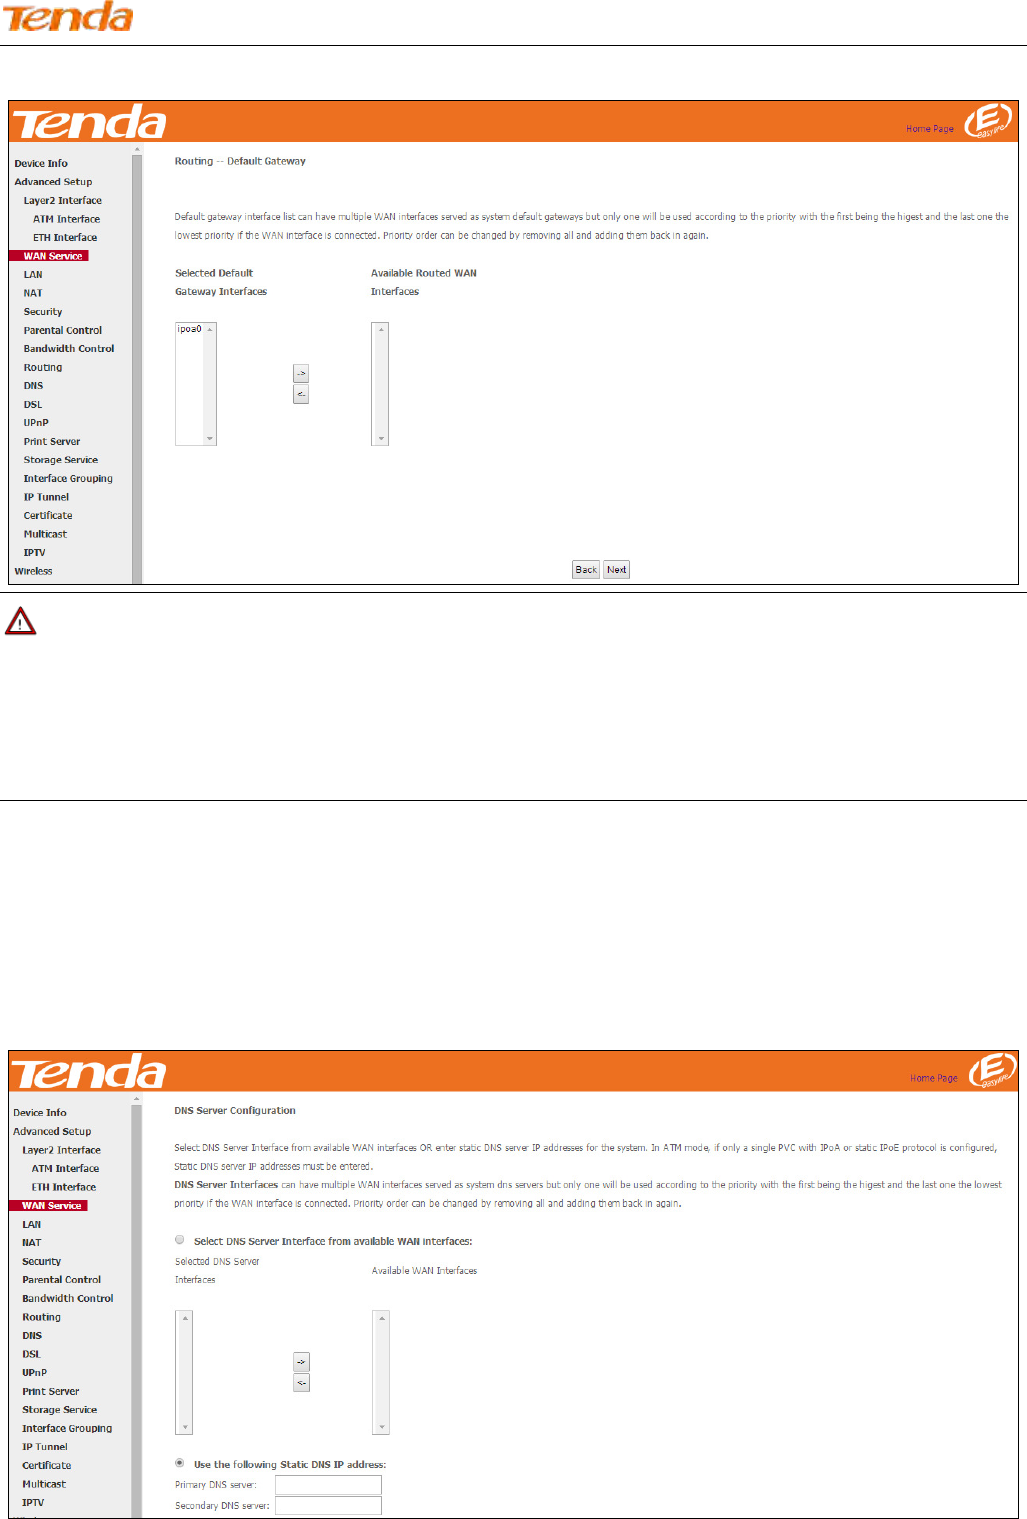
Step 4: Enter the WAN IP address and subnet mask which should have been provided to you by your ISP. If you cannot
locate this information, ask your ISP to provide it. And then click Next.
WAN IP Address: The Internet IP address provided by your ISP for accessing the Internet.
WAN Subnet Mask: The subnet mask address provided by your ISP for accessing the Internet.
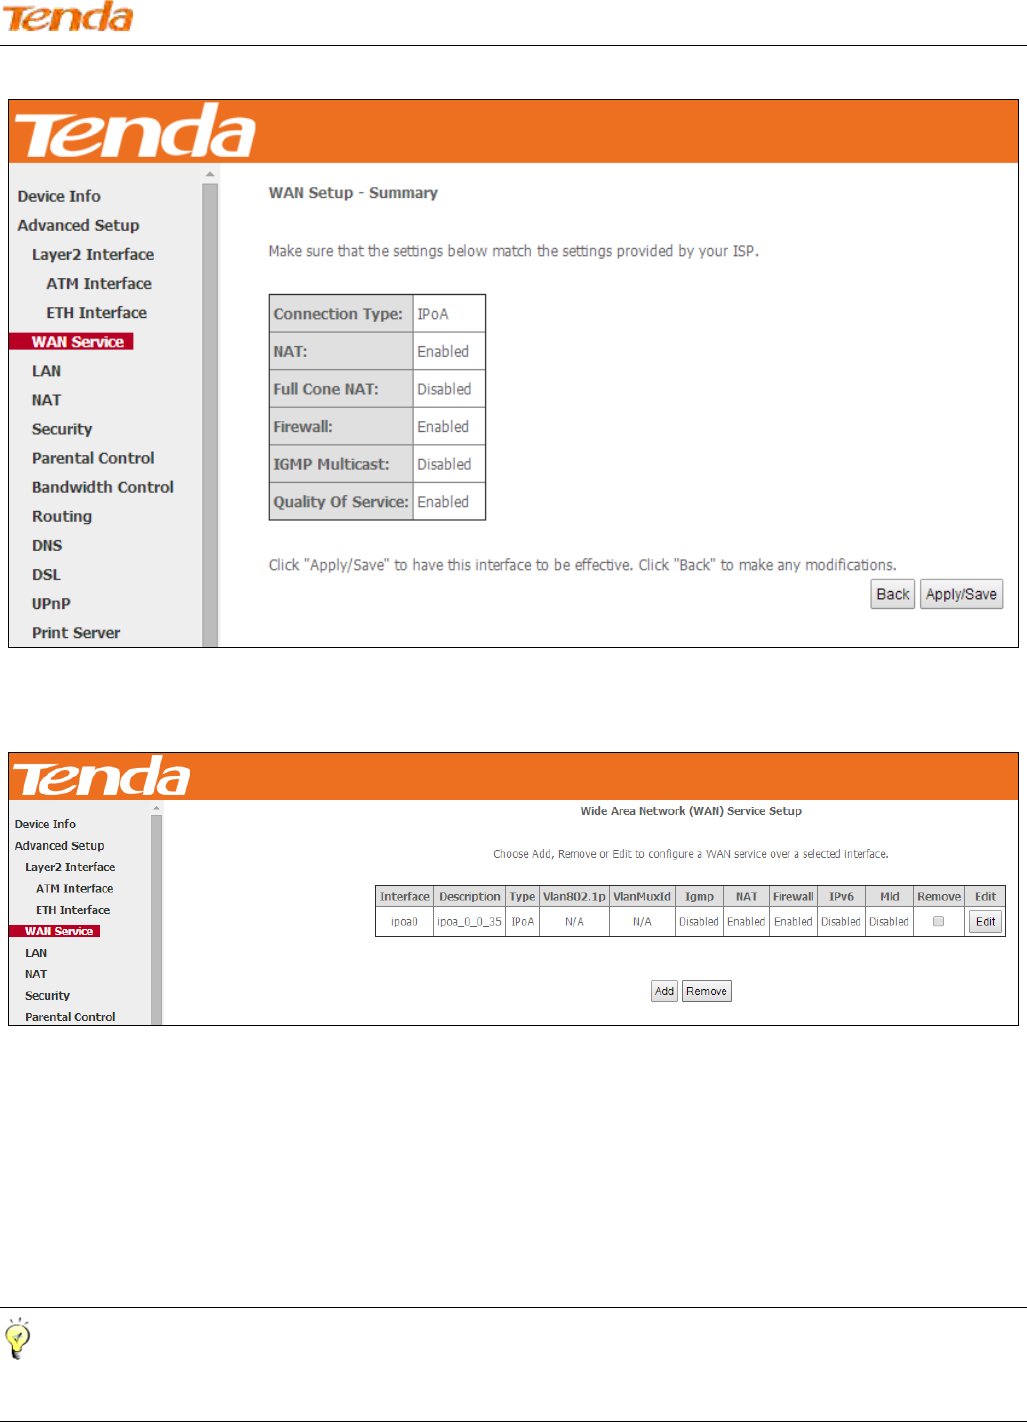
Step 5: Keep the defaults if you are unsure about the options on the screen below and click Next.
Wireless N300 ADSL2+ High Power Modem Router
58
Step 6: To configure the WAN gateway address. After you configure it click Next. The default setting is recommended.
Note
Default gateway interface list can have multiple WAN interfaces served as system default gateways but only one will be
used according to the priority with the first being the highest and the last one the lowest priority if the WAN interface is
connected. Priority order can be changed by removing all and adding them back in again.
Step 7: Configure the WAN DNS Server configuration according to your ISP.
-Click the Select DNS Server Interface from available WAN interfaces option;
-Or select the Use the following Static DNS IP address option and enter static DNS server IP addresses for the system.
And then click Next.
Wireless N300 ADSL2+ High Power Modem Router
59
Step 8: Here you can view your configurations. Click Apply/Save to save your settings if everything is correctly set.
Step 9: IPoA WAN service setup parameter is shown as below.
To Set up WAN Service for ETH Interface
Three Internet connections: PPP over Ethernet (PPPoE), IP over Ethernet (IPoE) and Bridging are available in the
Ethernet uplink mode.
If you selected and configured the ETH Interface (Ethernet uplink), follow steps below to configure the WAN service:
Tip
eth0, eth1, eth2 and eth3 respectively represent the LAN port1, LAN port2, LAN port3 and LAN port4 of the device.
Wireless N300 ADSL2+ High Power Modem Router
60
PPP over Ethernet (PPPoE)
IPv4
Step 1: Click Advanced Setup > WAN Service and then click the Add button.
Step 2: Select the ETH interface you added just now from the pull-down menu in the figure below. Click Next.
Step 3: Select PPP over Ethernet. Edit the Enter Service Description. This field is optional. We recommend that you
keep the default. Select a network protocol: IPv4 Only. And click Next.
Wireless N300 ADSL2+ High Power Modem Router
61
Step 4: Enter the PPP username and password provided by your ISP. If you are not sure about other options, just leave
them unchanged from defaults. And click Next.
PPP Username: This is for logging in to your ISP. If you cannot locate this information, ask your ISP to provide it.
PPP Password: This is for logging in to your ISP. If you cannot locate this information, ask your ISP to provide it.
PPPoE Service Name: This information is provided by your ISP. Only enter it if instructed by your ISP.

Wireless N300 ADSL2+ High Power Modem Router
62
Authentication Method: This is used by ISP to authenticate the client that attempts to connect. If you are not sure,
consult your ISP or select Auto.
MAC Clone: Clicking Clone MAC button copies the MAC address of your PC to the router. Many broadband ISPs
restrict access by allowing traffic only from the MAC address of your broadband modem, but some ISPs additionally
register the MAC address of the network interface card in your computer when your account is first opened. They then
accept traffic only from the MAC address of that computer. If so, configure your router to “clone” the MAC address
from the authorized computer.
MTU: Short for Maximum Transmission Unit, the largest physical packet size, measured in bytes, which a network can
transmit. Any messages larger than the MTU are divided into smaller packets before being sent. The default MTU is
1492 bytes. For some ISPs, you might need to change the MTU. This is rarely required, and should not be done unless
you are sure it is necessary for your ISP connection.
Dial on demand: Connect to ISP only when there is traffic transmission. This saves your broadband Internet service bill.
PPP IP extension: If enabled, all the IP addresses in outgoing packets including management packets on the WAN port
will be changed to the device's WAN IP address. Only change the default settings if necessary.
Enable PPP Debug Mode: Only enable this feature if supported by your ISP.
Bridge PPPoE Frames Between WAN and Local Ports: If enabled, PPPoE dialup frame from LAN side will directly
egress the WAN port without modification.
Multicast Proxy: If enabled, the router will use multicast proxy.
Step 5: Configure the WAN gateway address. After you configure it click Next. The default setting is recommended.
Wireless N300 ADSL2+ High Power Modem Router
63
Step 6: Configure the WAN DNS address according to your ISP.
-Click the Select DNS Server Interface from available WAN interfaces option;
-Or select the Use the following Static DNS IP address option and enter static DNS server IP addresses for the system.
And then click Next.
Step 7: Here you can view your configurations. Click Apply/Save to save your settings if everything is correctly set.
When the PPPoE connection is successful, you can access the Internet.
Wireless N300 ADSL2+ High Power Modem Router
64
IPv4 & IPv6 (Dual Stack)
Step 1: Click Advanced Setup > WAN Service and then click the Add button.
Step 2: Select the ETH interface you added just now from the pull-down menu in the figure below. Click Next.
Step 3: Select PPP over Ethernet. Edit the Enter Service Description. This field is optional. We recommend that you
keep the default. Select a network protocol: IPv4&IPv6 (Dual Stack). And click Next.
Wireless N300 ADSL2+ High Power Modem Router
65
Step 4: Enter PPP username and PPP password provided by your ISP. Check Launch Dhcp6c for Prefix Delegation
(IAPD). If your ISP is using stateful DHCPv6, check Launch Dhcp6c for Address Assignment (IANA) also. Or
configure a static IP address.
Wireless N300 ADSL2+ High Power Modem Router
66
Step 5: Select a avaliable WAN interface as the system default gateway. Then click Next.
Step 6: Configure DNS server (Select an available DNS server interface or use a specified DNS server); configure IPv6
DNS server (Obtain IPv6 DNS info from a WAN interface or use a specified DNS server), and then click Next.
Step 7: Here you can view your configurations. Click Apply/Save to save your settings if everything is correctly set.
Wireless N300 ADSL2+ High Power Modem Router
67
When the PPPoE connection is successful, you can access the Internet.
IPv6
Step 1: Click Advanced Setup > WAN Service and then click the Add button.
Step 2: Select the ETH interface you added just now from the pull-down menu in the figure below. Click Next.
Wireless N300 ADSL2+ High Power Modem Router
68
Step 3: Select PPP over Ethernet. Edit the Enter Service Description. This field is optional. We recommend that you
keep the default. Select a network protocol: IPv6 Only. And click Next.
Step 4: Enter PPP username and PPP password provided by your ISP. Check Launch Dhcp6c for Prefix Delegation
(IAPD). If your ISP is using stateful DHCPv6, check Launch Dhcp6c for Address Assignment (IANA) also. Or
configure a static IP address.
Wireless N300 ADSL2+ High Power Modem Router
69
Step 5: Select a preferred WAN interface from the WAN interface lise as the system default IPv6 gateway. Click Next.
Step 6: Select the configured WAN interface for IPv6 DNS server information or use a static IPv6 DNS server address.
Note that selecting a WAN interface for IPv6 DNS server will enable DHCPv6 Client on that interface. And then click
Next.

Wireless N300 ADSL2+ High Power Modem Router
70
Step 7: Here you can view your configurations. Click Apply/Save to save your settings if everything is correctly set.
When the PPPoE connection is successful, you can access the Internet.
Wireless N300 ADSL2+ High Power Modem Router
71
IP over Ethernet (IPoE)
If your ISP uses DHCP to assign your IP address or if your ISP assigns you a static (fixed) IP address, IP subnet mask
and the gateway IP address, you need to select the IP over Ethernet (IPoE).
IPv4
Step 1: Click Advanced Setup > WAN Service and then click the Add button.
Step 2: Select the ETH interface you added just now from the pull-down menu in the figure below. Click Next.
Step 3: Select IP over Ethernet as WAN service type. Edit the Enter Service Description. This field is optional. We
recommend that you keep the default. Select a network protocol: IPv4 Only. And then click Next.
Wireless N300 ADSL2+ High Power Modem Router
72
Step 4: Enter the IP address/subnet mask/gateway IP address provided by your ISP or select Obtain an IP address
automatically and then click the Next button.
Obtain an IP address automatically: This allows the router to automatically acquire IP information from your ISP or
your existing networking equipment.
Use the following Static IP address: This allows you to specify the Static IP information provided by your ISP or that
Wireless N300 ADSL2+ High Power Modem Router
73
corresponds with your existing networking equipment.
WAN IP Address: The Internet IP address provided by your ISP for accessing the Internet.
WAN Subnet Mask: The subnet mask address provided by your ISP for accessing the Internet.
WAN gateway IP Address: The gateway IP address provided by your ISP for accessing the Internet.
Step 5: Here you can configure the NAT. If you are not an advanced user we recommend you to keep the default settings
and then click Next.
Step 6: Here you can configure the WAN gateway address. After you configure it click Next. The default setting is
recommended.
Step 7: Here you can configure the WAN DNS address.
-Click the Select DNS Server Interface from available WAN interfaces option;
-Or select the Use the following Static DNS IP address option and enter static DNS server IP addresses for the system.
Wireless N300 ADSL2+ High Power Modem Router
74
And then click Next.
Step 8: Here you can view your configurations. Click Apply/Save to save your settings if everything is correctly set.
When the IPoE connection is successful, you can access the Internet.
Wireless N300 ADSL2+ High Power Modem Router
75
IPv4 & IPv6 (Dual Stack)
Step 1: Click Advanced Setup > WAN Service and then click the Add button.
Step 2: Select the ETH interface you added just now from the pull-down menu in the figure below. Click Next.
Step 3: Select IP over Ethernet as WAN service type. Edit the Enter Service Description. This field is optional. We
recommend that you keep the default. Select a network protocol: IPv4&IPv6 (Dual Stack). And then click Next.
Wireless N300 ADSL2+ High Power Modem Router
76
Step 4: Enter information provided by your ISP to configure the WAN IP settings.
Wireless N300 ADSL2+ High Power Modem Router
77
Step 5: Here you can configure the NAT. If you are not an advanced user we recommend you to keep the default settings
and then click Next.
Step 6: Configure a WAN interface as the default gateway.
Step 7: Configure DNS server (Select an available DNS server interface or use a specified DNS server); configure IPv6
DNS server (Obtain IPv6 DNS info from a WAN interface or use a specified DNS server), and then click Next.
Wireless N300 ADSL2+ High Power Modem Router
78
Step 8: Here you can view your configurations. Click Apply/Save to save your settings if everything is correctly set.
When the IPoE connection is successful, you can access the Internet.
Wireless N300 ADSL2+ High Power Modem Router
79
IPv6
Step 1: Click Advanced Setup > WAN Service and then click the Add button.
Step 2: Select the ETH interface you added just now from the pull-down menu in the figure below. Click Next.
Step 3: Select IP over Ethernet as WAN service type. Edit the Enter Service Description. This field is optional. We
recommend that you keep the default. Select a network protocol: IPv6 Only. And then click Next.
Wireless N300 ADSL2+ High Power Modem Router
80
Step 4: Enter the WAN information provided by your ISP to configure the WAN IPv6 settings.
To obtain an IP address automatically:
Select Obtain an IPv6 address automatically and Check Dhcp6c Prefix Delegation (IAPD).
If your ISP is using stateful DHCPv6, check Dhcp6c Address Assignment (IANA) also. Click Next to go forwards.
Wireless N300 ADSL2+ High Power Modem Router
81
Step 5: Here you can configure the NAT. If you are not an advanced user we recommend you to keep the default settings
and then click Next.
Step 6: To configure the Default Gateway interface when using IPv6, select the interface that you want to configure with
the WAN gateway address in Selected WAN Interface box. Then click Next.
Wireless N300 ADSL2+ High Power Modem Router
82
Step 7: To configure the WAN DNS address, check the Obtain IPv6 DNS info from a WAN interface option, or select
the Use the following Static IPv6 DNS address option to enter the static DNS server IPv6 addresses provided by your
ISP. At last, click Next.
Step 8: Here you can view your configurations. Click Apply/Save to save your settings if everything is correctly set.
Wireless N300 ADSL2+ High Power Modem Router
83
When the IPoE connection is successful, you can access the Internet.
Bridging
If you wish to initiate a dialup directly from your PC for Internet access or enjoy the entire Internet connection (instead
of sharing it with others), you can select the Bridging and create a dialup program on your PC.
Step 1: Click Advanced Setup > WAN Service and then click the Add button.
Step 2: Select the ETH interface you added just now from the pull-down menu in the figure below. Click Next.
Wireless N300 ADSL2+ High Power Modem Router
84
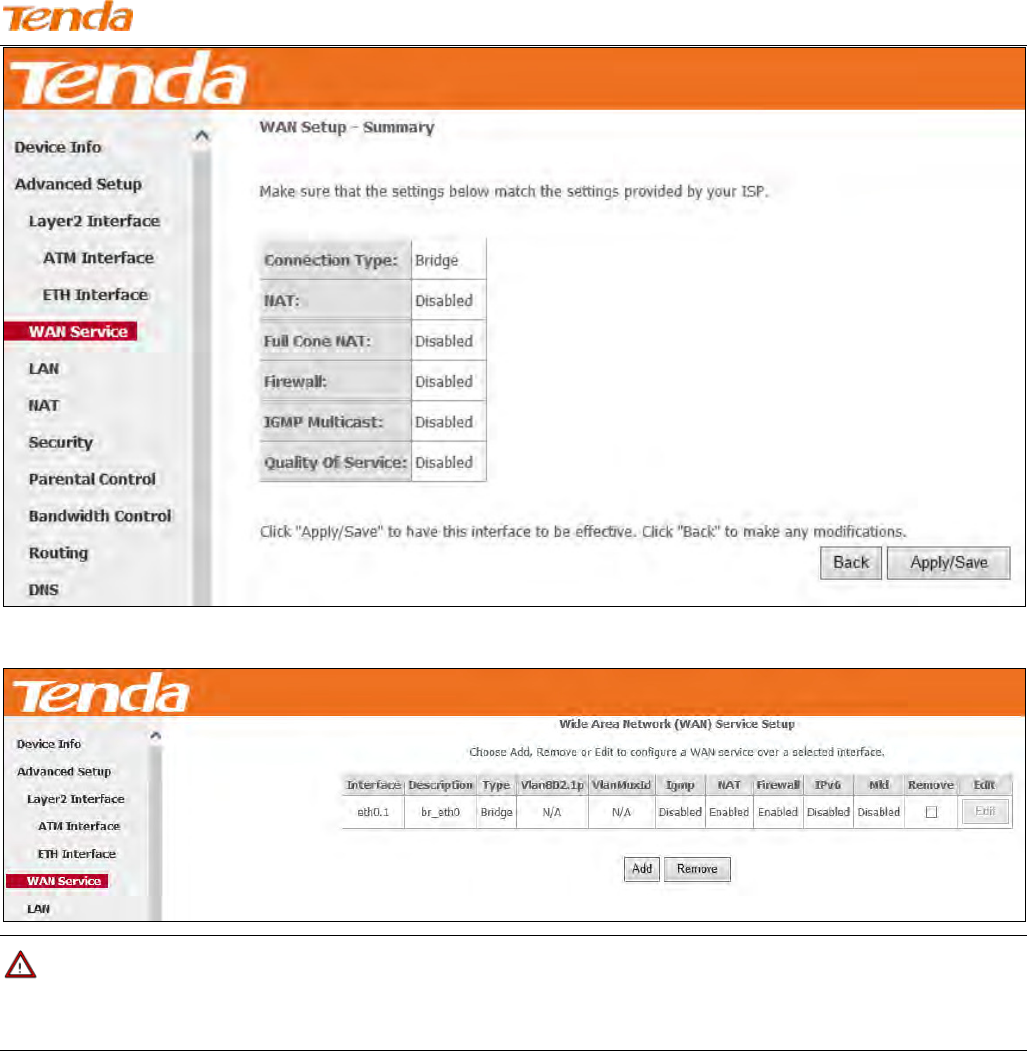
Step 3: Select Bridging. Edit the Enter Service Description. This field is optional. We recommend that you keep the
default. And click Next.
Step 4: Here you can view your configurations. Click Apply/Save to save your settings if everything is correctly set.
Wireless N300 ADSL2+ High Power Modem Router
85
After the bridging connection is successful, initiate a dialup directly from your PC for Internet access.
Note
The device functions as a switch in Bridge mode -Ethernet uplink.
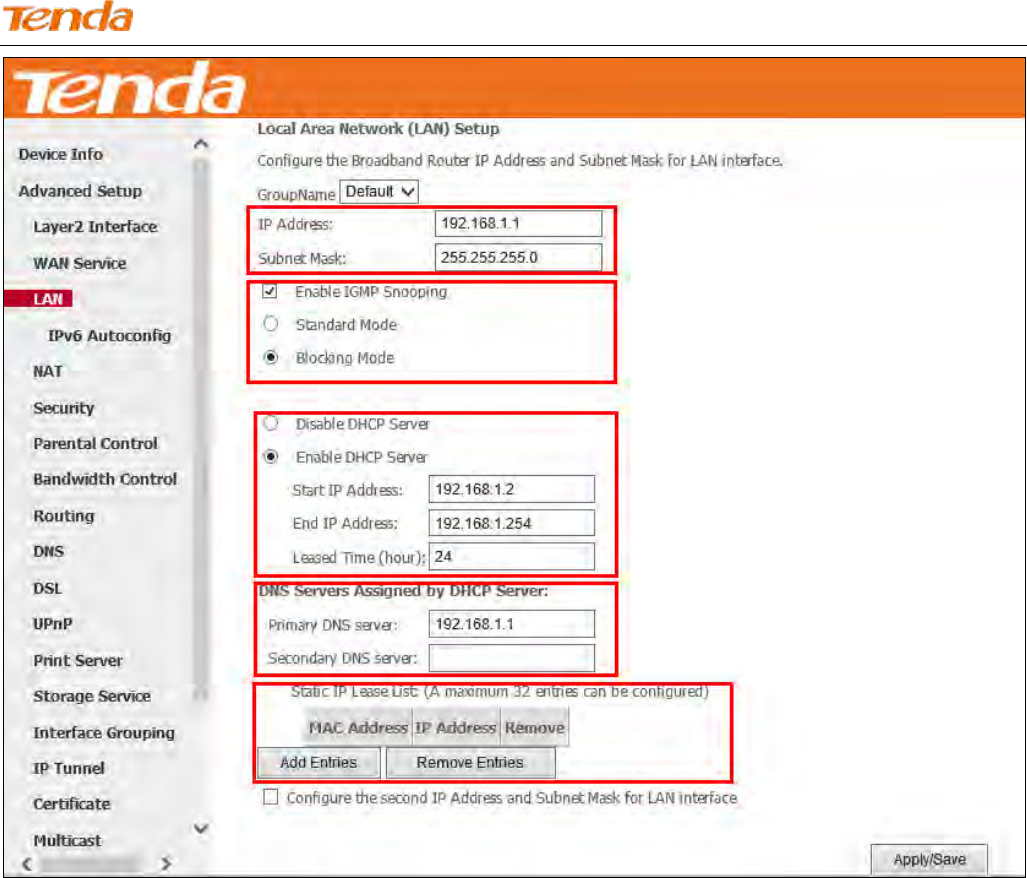
4.2.3 LAN
Here you can configure the LAN IP address and subnet mask. This IP address is to be used to access the device’s settings
through a web browser. Be sure to make a note of any changes you apply to this page.
IPv4
Click Advanced > LAN to enter the IPv4 address setting interface.
Wireless N300 ADSL2+ High Power Modem Router
86
1) IP Address/Subnet Mask: The device's LAN IP address and subnet mask that both you can change to fit your
network. The default IP address is 192.168.1.1. If you change the LAN IP address, you should use the new address
to access the management interface next time.
2) Enable IGMP Snooping: Check to enable the IGMP Snooping feature. IGMP Snooping is to restrain broadcast on
Layer 2. Enabling IGMP snooping is good for managing and controlling IPv4 broadcasts. Suggest selecting
Blocking Mode.
Standard Mode: If no members join in one broadcast group, packets of this group will be broadcasted; if
there’re members joining in the group, packets will be only forwarded to the LAN port where the group
members exist.
Blocking Mode: If no members join in one broadcast group, packets of this group will be dropped; if
there’s members joining in the broadcast group, packets will be only forwarded to the LAN port where the
group members exist.
3) Enable DHCP Server: Check to enable the DHCP Server so that every upstream device connected to your router
can obtain the IP address to access the Internet. If you would like to configure every upstream device with static IP

Wireless N300 ADSL2+ High Power Modem Router
87
address to access the Internet, you can check Disable DHCP Server.
4) Start/End IP Address: Specify the start/end of the range for the IP address pool in the same subnet as the router.
Only enabling DHCP server need you to finish this part configurations.
5) Leased Time: A time length that the IP address is assigned to each device before it is refreshed.
6) Static IP Lease List: A list of devices with reserved static IP addresses. If you prefer to configure each upstream
device of your router with a static IP address for better management, you can add static IP addresses to the list.
Add Entries: Click this button to add a static IP lease entry. A maximum 32 entries can be configured.
Remove Entries: Click this button to remove a static IP lease entry.
7) Configure the second IP Address and Subnet Mask for LAN interface: If you want to configure two IP
addresses for the LAN interface, you can check this option and enter the second IP Address and Subnet Mask manually.
The second IP address and subnet mask have the same function as the first ones.
8) Apply/Save: After you configure all the needed settings, click this button to apply and save them.
Tip:
DHCP (Dynamic Host Configuration Protocol) assigns an IP address to each device on the LAN/private network. When
you enable the DHCP Server, the DHCP Server will automatically allocate an unused IP address from the IP address pool
specified in this screen to the requesting device as long as the device is set to "Obtain an IP Address Automatically". By
default, DHCP server is enabled.
IPv6 Autoconfig
IPv6 address can only be Aggregatable Global Unicast Addresses and Unique Local Address. Link-Local Unicast
Addresses and Multicast Addresses are not permitted.
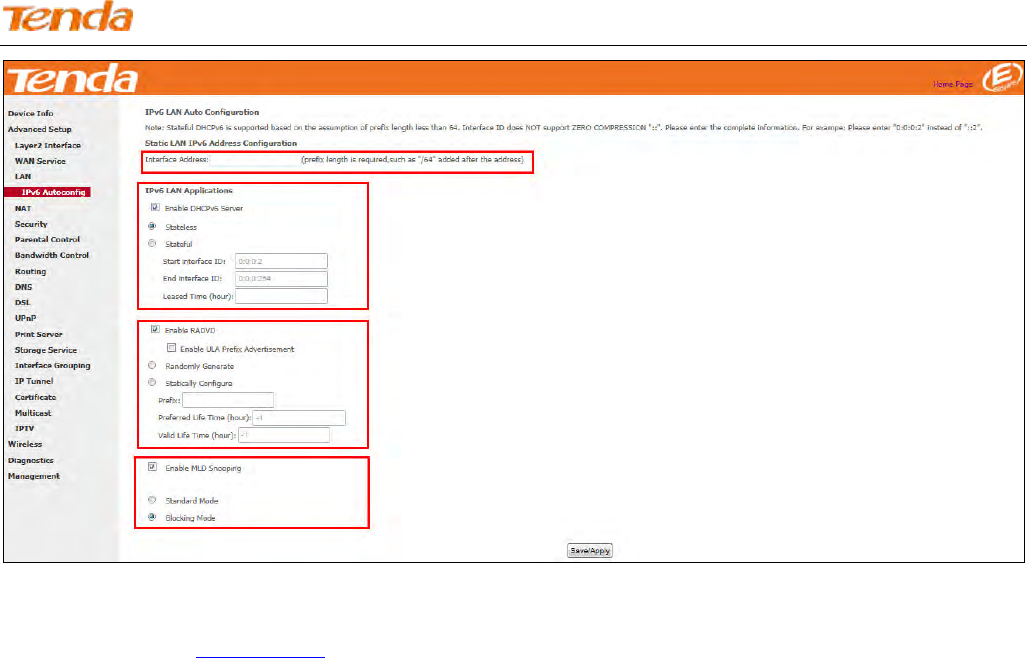
Click Advanced > LAN > IPv6 Autoconfig to enter the IPv6 address setting page.
Wireless N300 ADSL2+ High Power Modem Router
88
Interface Address: Enter the interface address with prefix length. E.g., the interface IPv6 address is “2000::1/64”,
then you need to input http://[2000::1] in the browse address bar to access the device management interface.
Enable DHCPv6 Server: Check to enable the DHCPv6 Server.
Select Stateless or Stateful as you need.
Stateless: If selected, IPv6 clients will generate IPv6 addresses automatically based on the Prefix Delegation's
IPv6 prefix and their own MAC addresses.
Stateful: Stateful DHCPv6 is supported based on the assumption of prefix length less than 64. Select this
option and configure the start/end interface ID and leased time. The router will automatically assign IPv6
addresses to IPv6 clients.
Enable RADVD: Check it to enable the RADVD for informing computers in the LAN of your router’s existence.
When computers get the message, they will take the router’s IP address as the secondary route for easy use. In addition,
checking RADVD can also broadcast the prefix address generated from the computer in the LAN.
Enable IGMP Snooping: Check to enable the IGMP Snooping feature. IGMP Snooping is to restrain broadcast on
Layer 2. Enabling IGMP snooping is good for managing and controlling IPv6 broadcasts. Suggest to select Blocking
Mode.
Standard Mode: If no members join in one broadcast group, packets of this group will be broadcasted; if
there’re members joining in the group, packets will be only forwarded to the LAN port where the group
members exist.
Blocking Mode: If no members join in one broadcast group, packets of this group will be dropped; if
there’s members joining in the broadcast group, packets will be only forwarded to the LAN port where the
group members exist.

Wireless N300 ADSL2+ High Power Modem Router
89
Click Save/Apply.
Other fields’ introduction that may help:
Enable ULA Prefix Advertisement: If enabled, the router will advertise ULA prefix periodically.
Leased Time (hour): A time length that the IP address is assigned to each device before it is refreshed.
Start interface ID/End interface ID: Specify the start/end interface ID Interface ID does NOT support ZERO
COMPRESSION "::". Please enter the complete information. For example: Please enter "0:0:0:2" instead of "::2".
Randomly Generate: If selected, address prefix can be automatically generated.
Statically Configure: If you select this option, you need to manually configure the address prefix and life time.
Prefix: Specify the prefix.
Preferred Life Time (hour): Specify the preferred life time in hour.
Valid Life Time (hour): Specify the valid life time in hour.
Enable MLD Snooping: MLD is used by IPv6 routers for discovering multicast listeners on a directly attached link.
If disabled on layer2 devices, IPv6 multicast data packets will be broadcast on the entire layer2; if enabled, these
packets will be multicast to only specified recipient instead of being broadcast on the entire layer2.
4.2.4 NAT
This section explains the following:
• Virtual Server
• Port Triggering
• DMZ Host
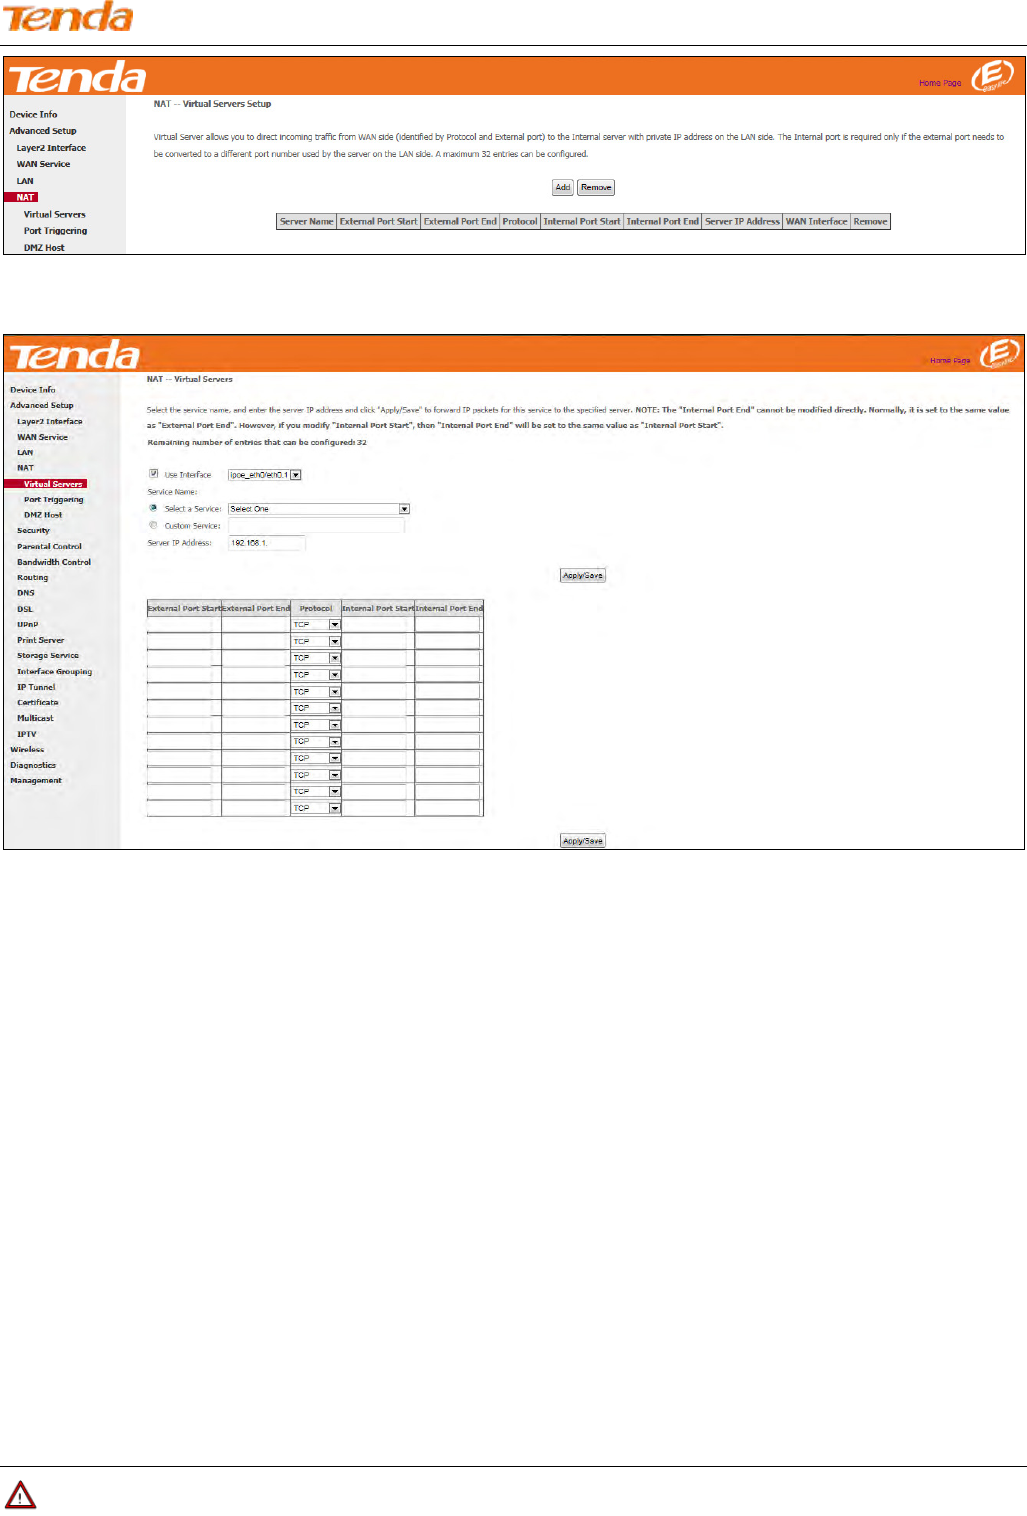
Virtual Server
The Virtual Server is useful for web servers, ftp servers, e-mail servers, gaming and other specialized Internet
applications.
Scenario: If you have a server in the LAN, such as a website, FTP server or game server, you want e-friends to visit the
server, but the firewall and NAT function of your router stop visitors from accessing computers in the LAN.
Solution: Set virtual server rules to allow visitors to access the server via WAN IP address of your router.
Click Advanced Setup > NAT > Virtual Servers to enter the virtual server setup page. Click Add to add rules.
Wireless N300 ADSL2+ High Power Modem Router
90
User Interface: Select the WAN interface you will use to visit the server in your LAN.
Configure the Service Name > Select a Service to select an existing service (Select One here is only an express to
tell you select one service.) from the drop-down list. And then the corresponding external/internal start/end port will
prompt automatically. Or configure Service Name > Custom Service to customize a service manually.
Server IP Address: Enter the IP address of your local computer that will provide this service.
Click Apply/Save to save configurations.
Other fields’ introduction that may help:
External Port Start/External Port End: Server ports provided for Internet users to accessing the LAN.
Protocol: Select the protocol from the Protocol drop-down list. If you are unsure, select TCP/UDP.
Internal Port Start/Internal Port End: The ports used by the server in the LAN.
After all the configurations, visitors on the Internet can access your server by simply using “Protocol Name://WAN IP
address: External Port”.
Note
If UPnP feature on the router and some applications of the connected PC is enabled, you will be prompted on the Virtual
Wireless N300 ADSL2+ High Power Modem Router
91
Server page that the UPnP interface is being used.
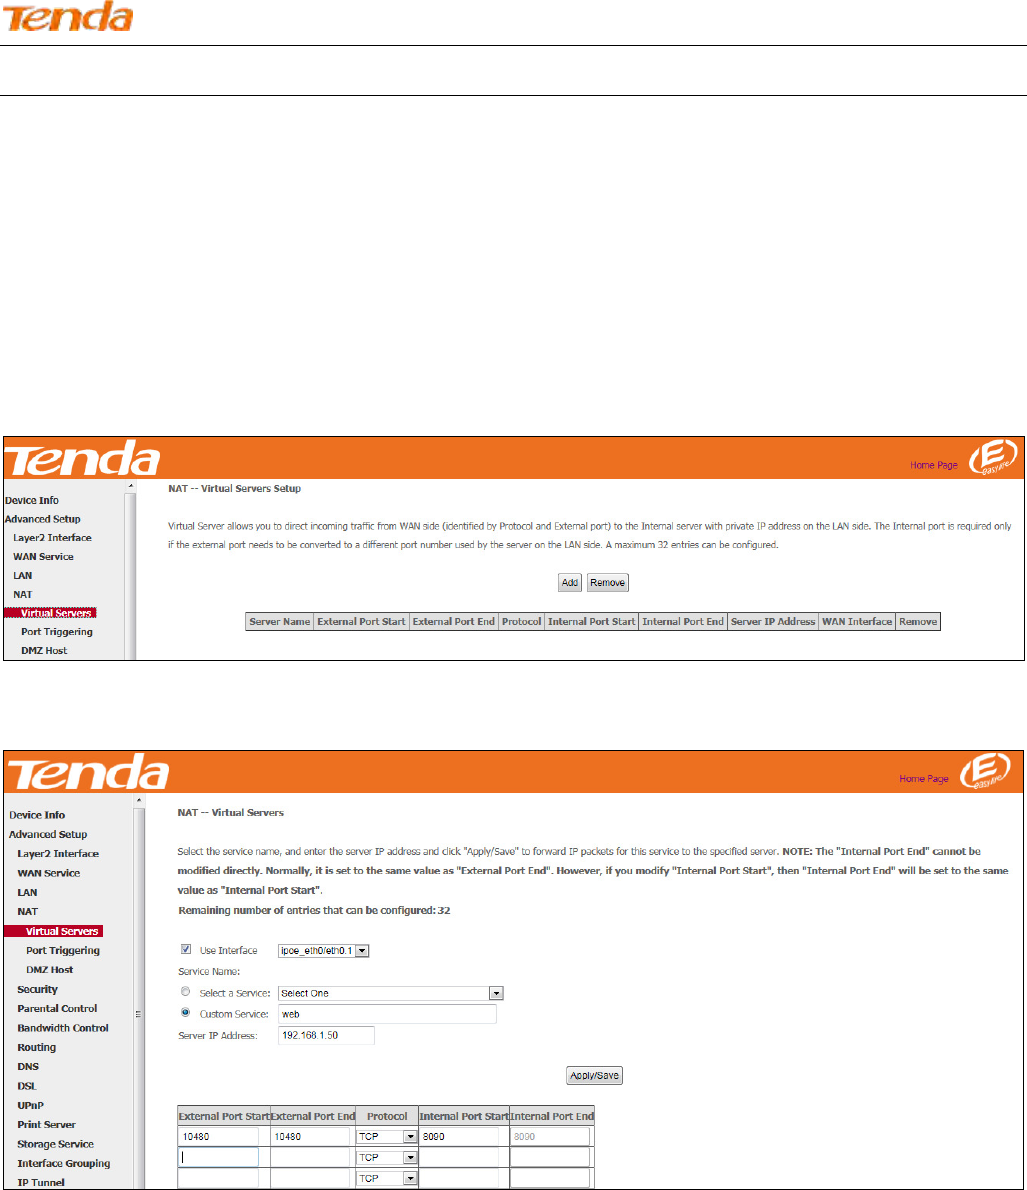
Application Scenario:
You have set up one web server on the LAN. Web server——IP: 192.168.1.50, TCP port: 8090.
Now you hope friends on the Internet can access your web by Port 10480 through WAN port. WAN
port——ipoe_eth0.1, IP: 1.2.3.4
Configuration Steps:
Click Advanced Setup > NAT > Virtual Server to enter it and then click the Add button.
Select the WAN interface ipoe_eth0/eth0.1 here.
Input the word web in the Custom Service field. Then manually enter the port number 10480 in the External Port
Start and External Port End fields, and enter the port number 8090 in the Internal Port Start and Internal Port End
fields. Actually port in the Internal Port End filed follows the port number in the Internal Port Start field
automatically.
Select a protocol from the Protocol drop-down list. If you are unsure, select TCP/UDP.
In the Server IP Address field, enter the IP address of the web server: 192.168.1.50.
Click Apply/Save to save the configuration.
Wireless N300 ADSL2+ High Power Modem Router
92
Result:
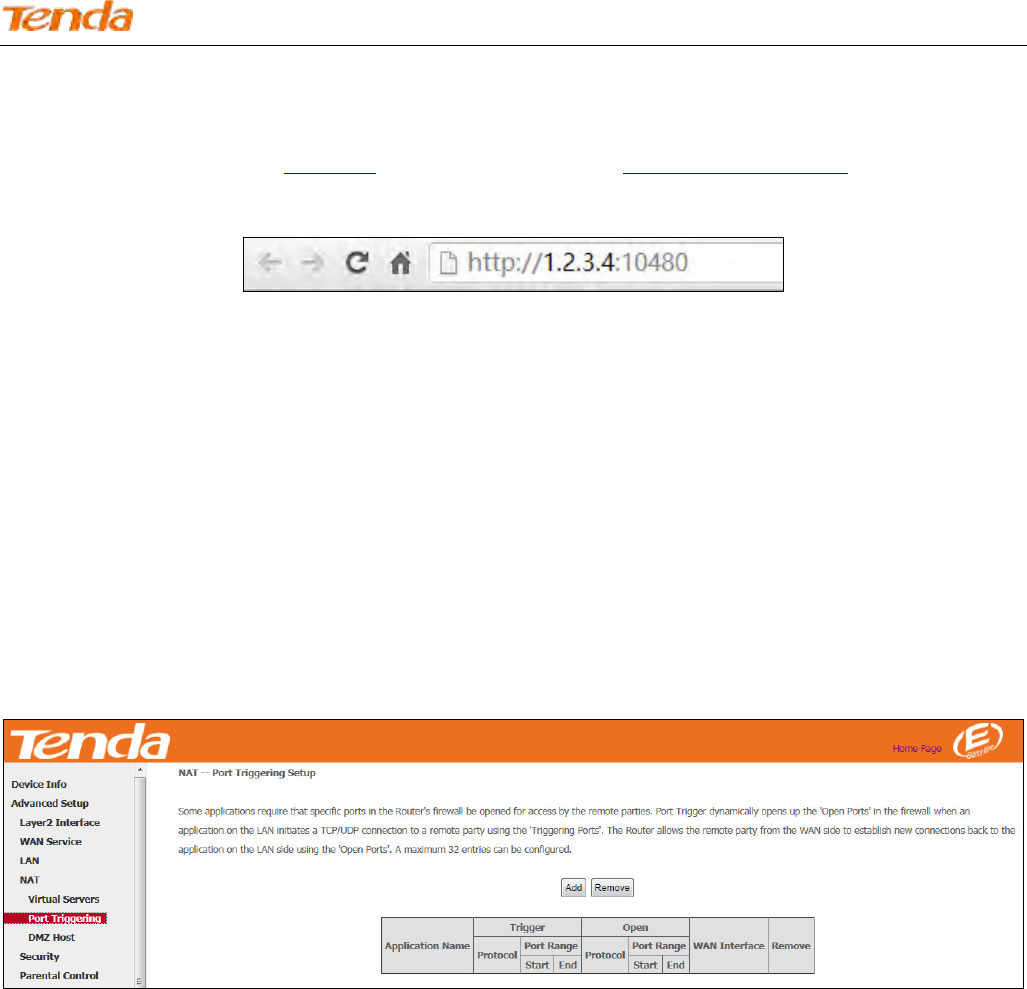
Your friend on the Internet will be able to access your web server simply by entering “http://1.2.3.4:10480” in browser.
Actually if you set the DNS in 4.2.9 DNS, your friend can also enter http://domain name:10480 to access your web
server.
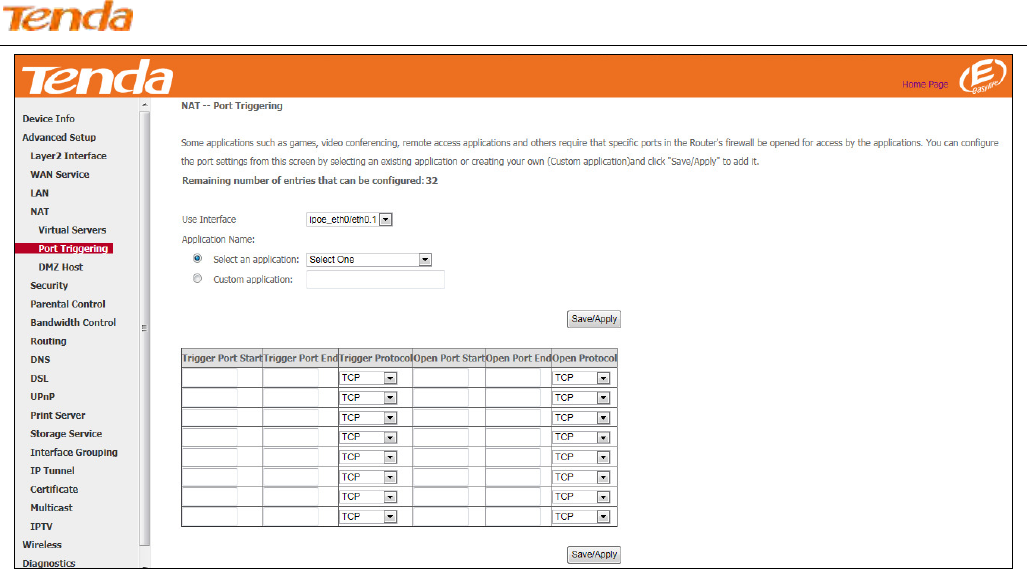
Port Triggering
Ports of some applications such as games, video conferencing and instant messenger, etc., are specified and meanwhile,
your router’s firewall will stop messages to/from such ports, so for those applications, you cannot use them properly.
However, Port Triggering is provided to help your play such games, or use this kind of instant messenger normally.
Some safety system applications (like, safe guard and firewall) in the computer on the LAN may interfere with the Port
triggering function. When using Port triggering, you can disable such applications.
Click Advanced Setup > NAT > Port Triggering and then click the Add button to add rules.
Wireless N300 ADSL2+ High Power Modem Router
93
Here in the Port Triggering interface, you can configure the port settings by selecting an existing application or creating
your own (Custom application).
User Interface: Select the WAN interface you will use to visit the server in your LAN.
Configure the Application Name > Select an application to select an existing application (Select One here is only
an express to tell you select one application.) from the drop-down list. And then the corresponding trigger start/end port
will prompt automatically. Or configure Application Name > Custom application to customize an application
manually.
Trigger Protocol: Select the protocol from the drop-down list. If you are unsure, select TCP/UDP.
Click Save/Apply to save configurations.
Other fields’ introduction that may help:
Trigger Port Start/End: The port range for an application to initiate connections.
Open Port Start/End: After the application connection is established, the built-in firewall of the router will open ports
between the start port number and end port number automatically.
Application Scenario:
You always use ICQ to communicate with computers on the Internet. You hope your LAN is secure and your instant
communication with other computers can be smoother. The WAN port now is ipoe_eth0.1.
Solution:
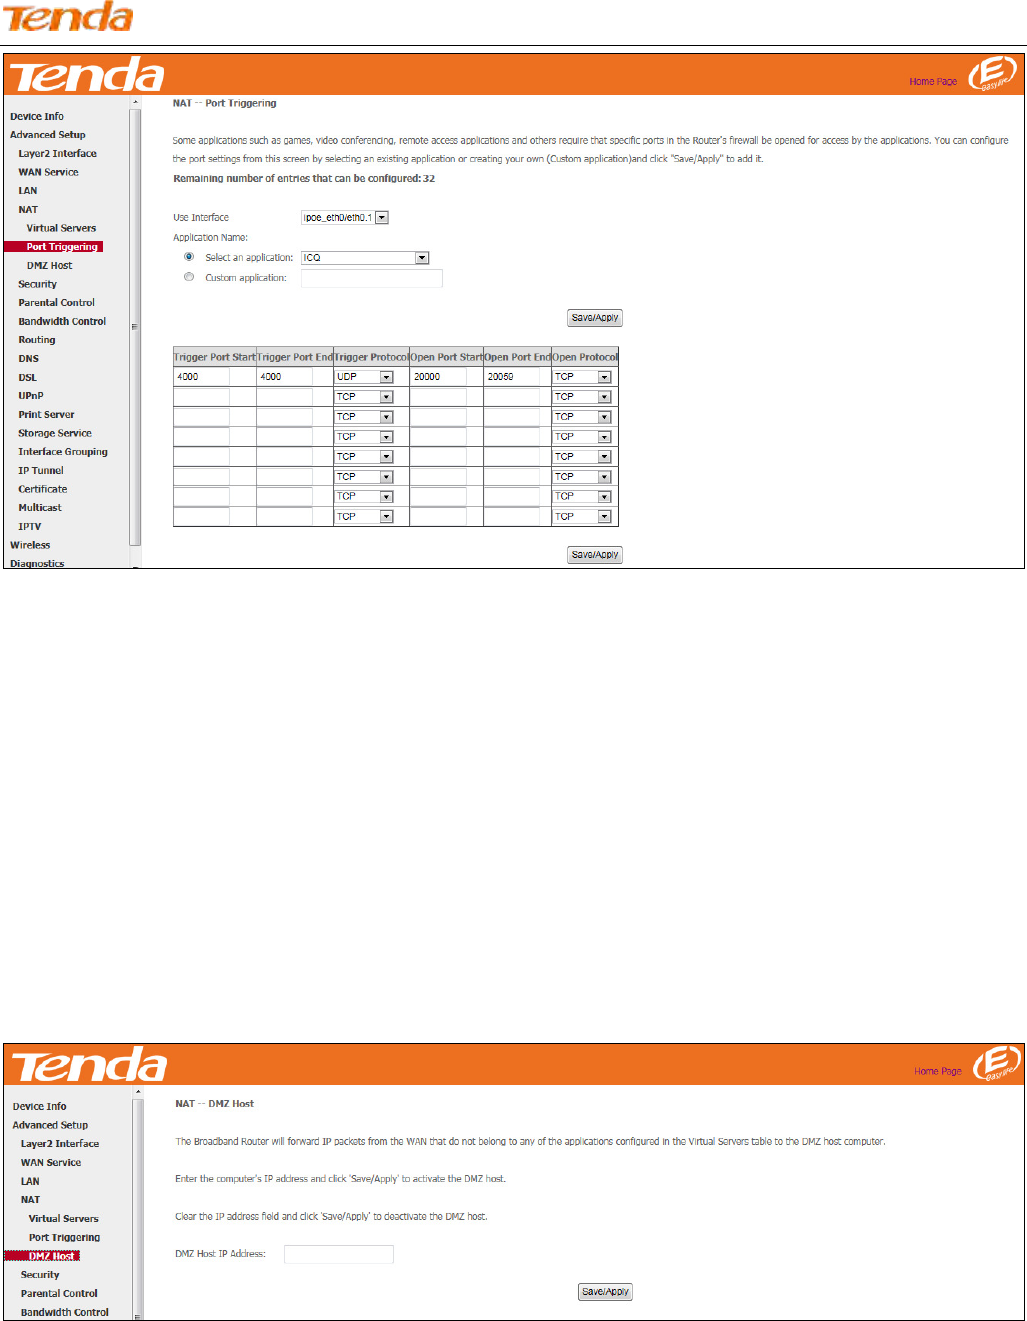
Wireless N300 ADSL2+ High Power Modem Router
94
DMZ Host
The default DMZ (De-Militarized Zone) host feature is helpful when you are using some online games and
videoconferencing applications that are not compatible with NAT (Network Address Translation). Note that enabling
DMZ host means the built-in firewall of your router takes no effect, and your computer that’s set as the DMZ host will
totally expose itself to the Internet. In this case, hacker may easily attack the DMZ host. Strongly recommend you to
disable DMZ host and clear all the DMZ host settings as soon as possible when you do not use it.
Click Advanced Setup > NAT > DMZ Host, input the IP address of the computer that you want to configure as the
DMZ host into the DMZ Host IP Address field. At last, click Save/Apply.
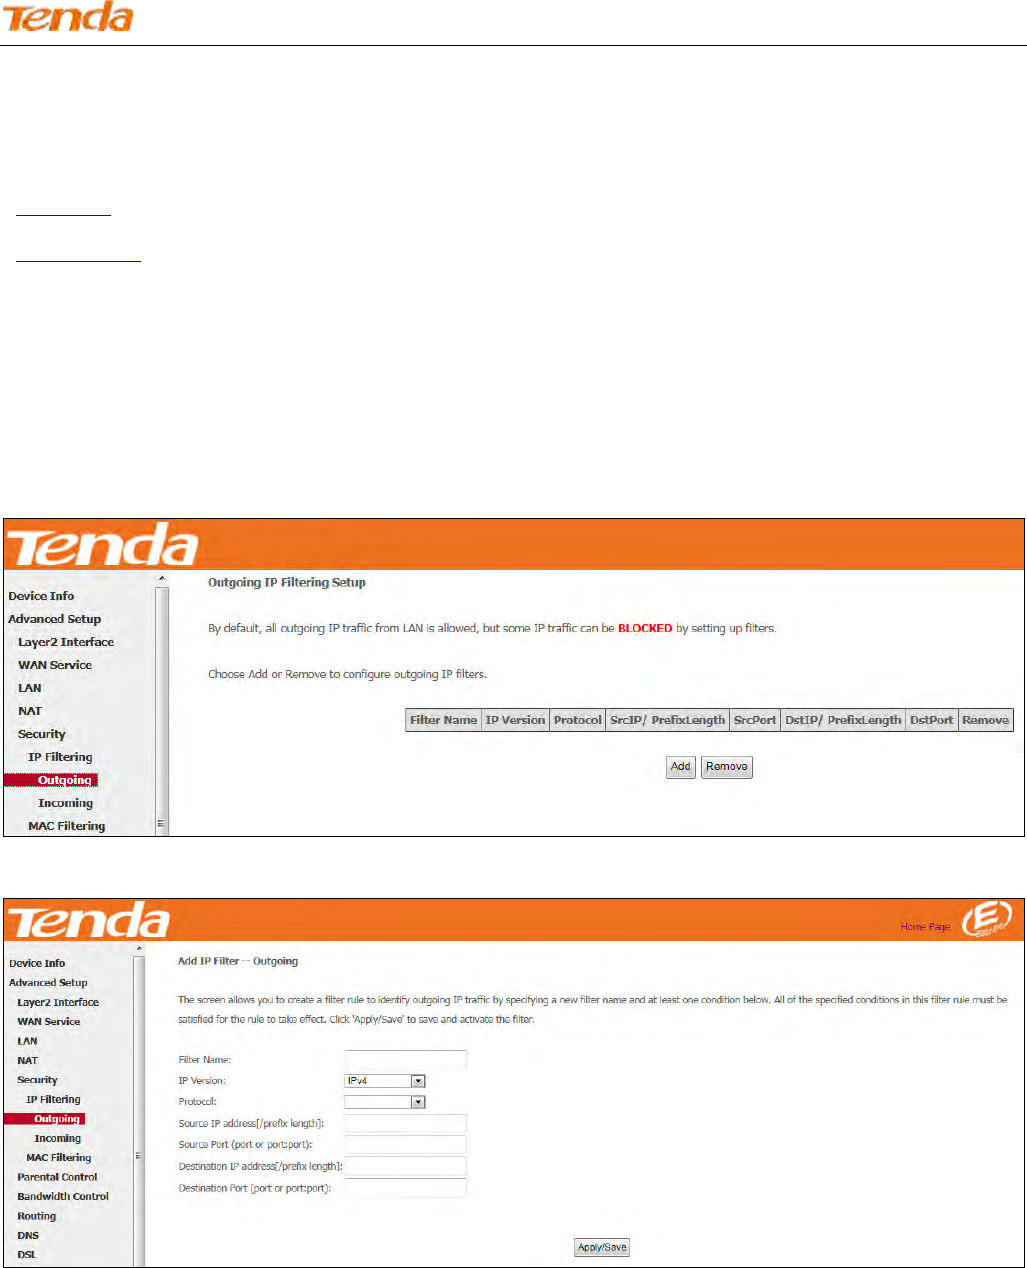
Wireless N300 ADSL2+ High Power Modem Router
95
4.2.5 Security
This section explains the following information:
• IP Filtering
• MAC Filtering
IP Filtering
Outgoing IP Filtering Setup
By default, all outgoing IP traffic from LAN is allowed, but some IP traffic can be BLOCKED by setting up filters.
Choose Add or Remove to configure outgoing IP filters.
Choose Add to enter the following screen:
This screen allows you to create a filter rule to identify outgoing IP traffic by specifying a new filter name and at least
one condition below. All of the specified conditions in this filter rule must be satisfied for the rule to take effect. Click
'Apply/Save' to save and activate the filter.
Filter Name: Enter a descriptive filtering name.
IP Version: Select the IP version that the filter rule supports. Here is IPv4.
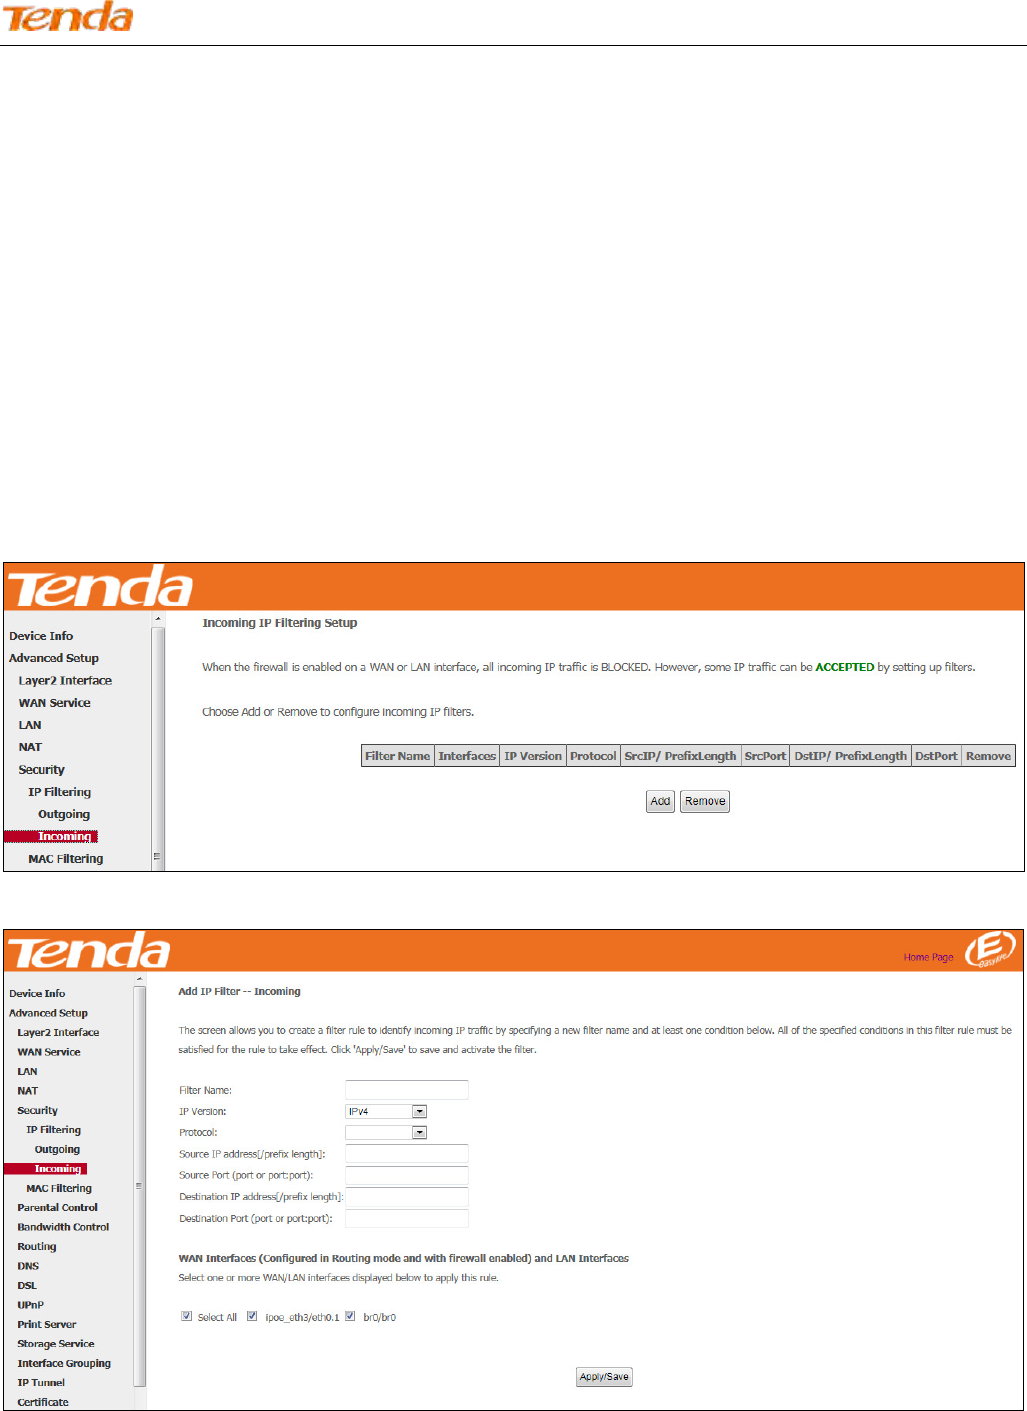
Wireless N300 ADSL2+ High Power Modem Router
96
Protocol: TCP/UDP, TCP, UDP and ICMP are available for your option.
Source IP address [/prefix length]: Enter the [LAN IP address/prefix length] to be filtered.
Source Port (port or port: port): Specify a port number or a range of ports used by LAN PCs to access the Internet. If
you are unsure, leave it blank.
Destination IP address [/prefix length]: Specify the external network IP address to be accessed by specified LAN PCs.
Destination Port (port or port:port): Specify a port number or a range of ports used by LAN PCs to access external
network.
Incoming IP Filtering Setup
When the firewall is enabled on a WAN or LAN interface, all incoming IP traffic is BLOCKED. However, some IP
traffic can be ACCEPTED by setting up filters.
Choose Add or Remove to configure incoming IP filters.
Click Add to enter the following screen:
This screen allows you to create a filter rule to identify incoming IP traffic by specifying a new filter name and at least
one condition below. All of the specified conditions in this filter rule must be satisfied for the rule to take effect. Click
Apply/Save to save and activate the filter.
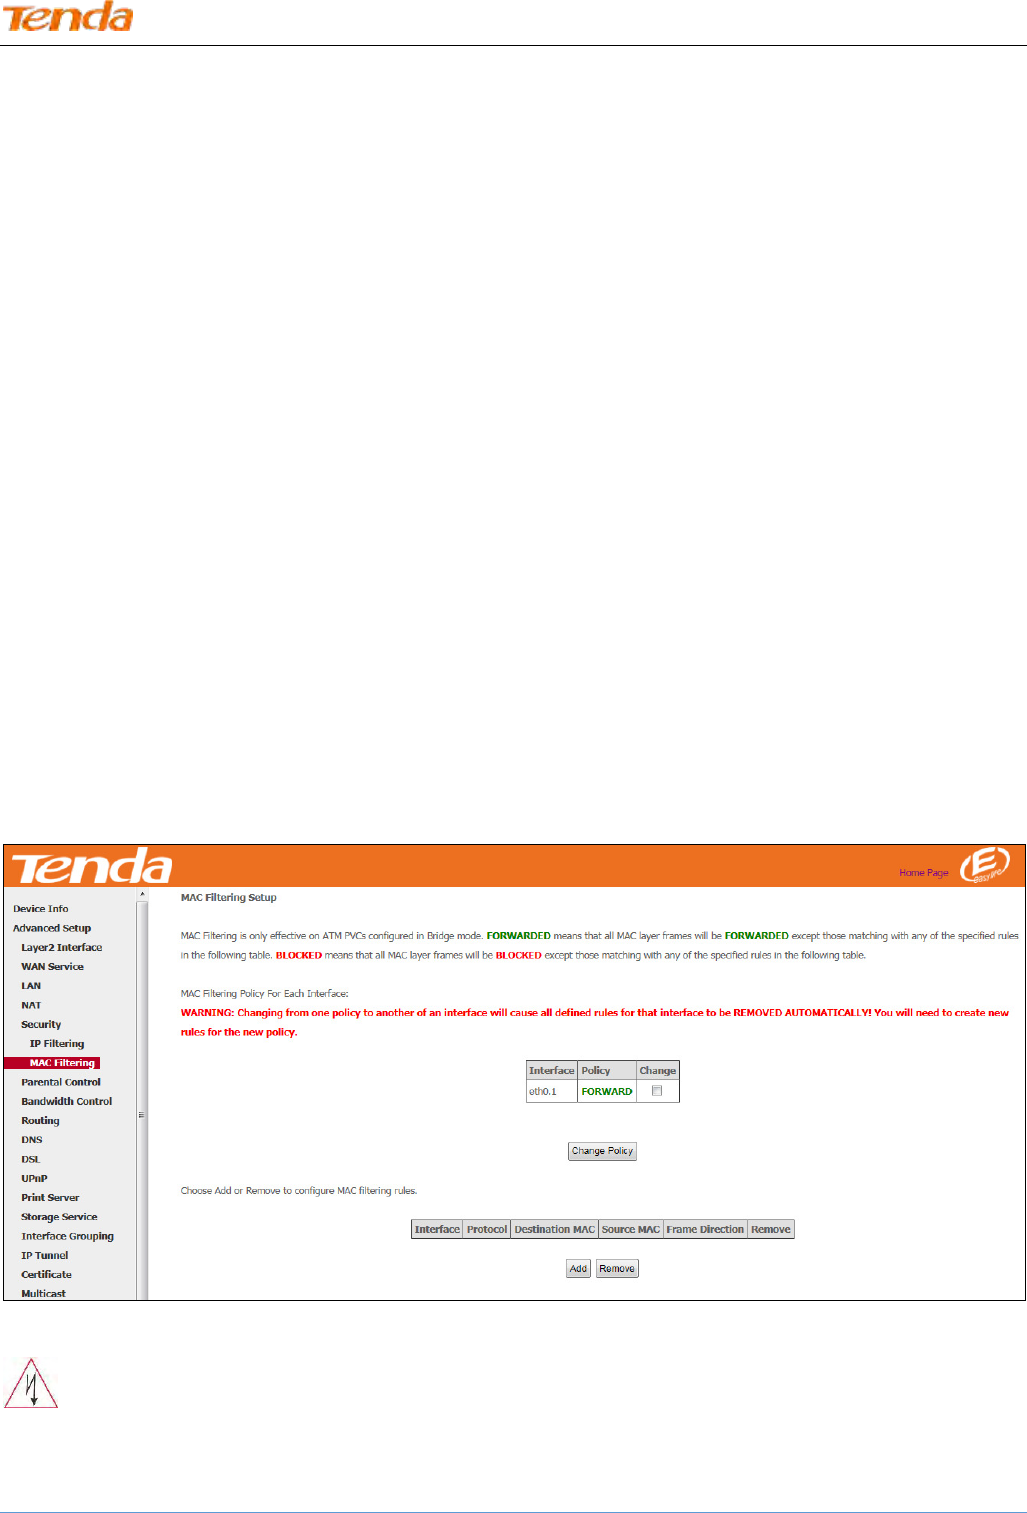
Wireless N300 ADSL2+ High Power Modem Router
97
IP Version: Select the IP version that the filter rule supports. Here is IPv4.
Protocol: TCP/UDP, TCP, UDP and ICMP are available for your option.
Source IP address [/prefix length]: Enter the Internal IP address [/prefix length] to be filtered.
Source Port (port or port:port): Specify a port number or a range of ports used by PCs from external network to access
your internal network.
Destination IP address [/prefix length]: Specify the internal network IP address [/prefix length] to be accessed by the
specified PCs from external network.
Destination Port (port or port:port): Specify a port number or a range of ports used by PCs from external network to
access your internal network.
MAC Filtering
Note: This feature can only be configured in a bridge WAN service.
MAC Filtering is only effective on ATM PVCs configured in Bridge mode. FORWARDED means that all MAC layer
frames will be FORWARDED except those matching with any of the specified rules in the following table. BLOCKED
means that all MAC layer frames will be BLOCKED except those matching with any of the specified rules in the
following table.
Choose Add or Remove to configure MAC filtering rules.
_________________________________________________________________________________________________
Warning!
Changing from one policy to another of an interface will cause all defined rules for that interface to be REMOVED
AUTOMATICALLY! You will need to create new rules for the new policy.
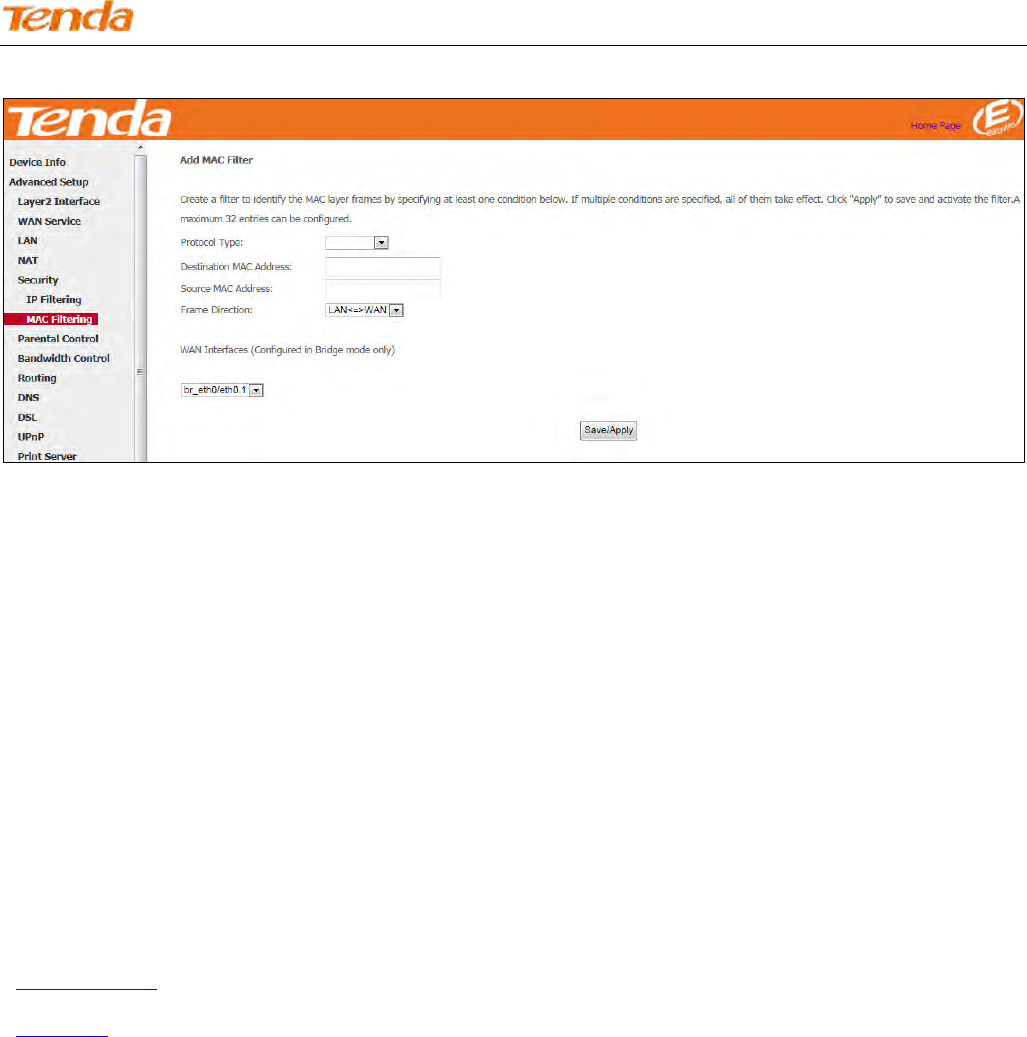
Wireless N300 ADSL2+ High Power Modem Router
98
Click Add to enter the following screen:
Here you can create a filter to identify the MAC layer frames by specifying at least one condition below. If multiple
conditions are specified, all of them take effect. Click Save/Apply to save and activate the filter.
Protocol Type: Select a protocol type from the drop-down list.
Destination MAC Address: Enter the destination MAC address to which the MAC filtering rule apply.
Source MAC Address: Enter the source MAC address to which the MAC filtering rule apply.
Frame Direction: Select a frame direction from the drop-down list.
WAN Interfaces: Select a WAN interface from the drop-down list.
4.2.6 Parental Control
This section explains the following information:
• Time Restriction
• URL Filter
Time Restriction
Here you can add time of day restriction that an attached LAN device can access the Internet.
Click Parental Control > Time Restriction > Add to enter the following screen.
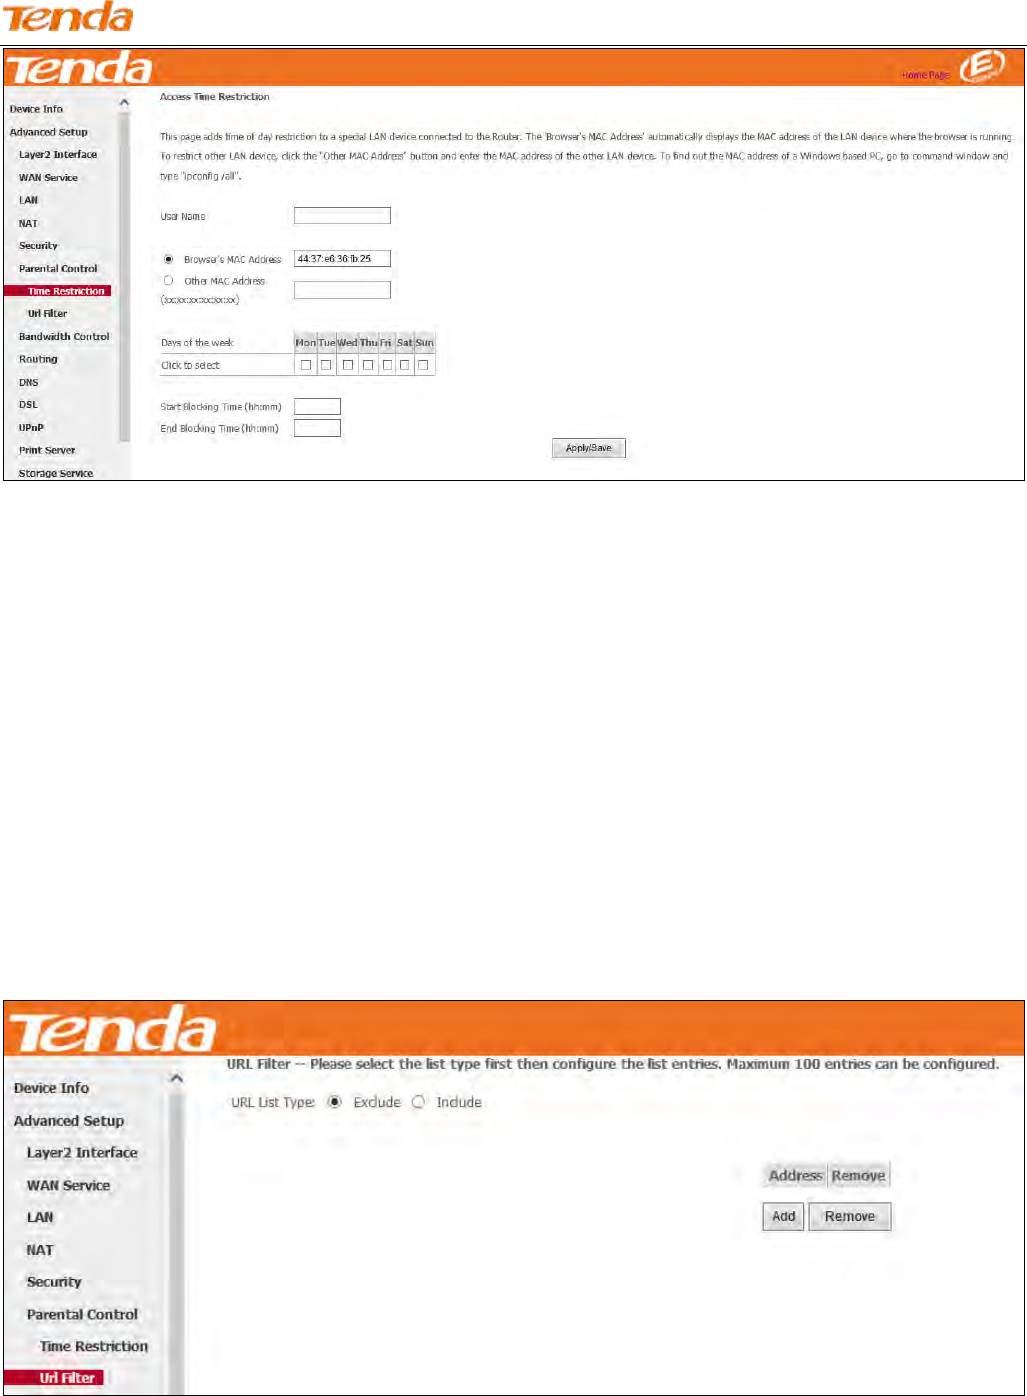
Wireless N300 ADSL2+ High Power Modem Router
99
User Name: Enter a user name.
Browser's MAC Address: Automatically adds the MAC address of the attached LAN device where the browser is
running.
Other MAC Address: Specify the MAC address of the computer that you want to apply Internet access restriction.
Days of the week: Select the days of the week during which you wish to restrict Internet access.
Start Blocking Time/End Blocking Time: Specify time of day restriction to an attached LAN device. Within this
specified time length of the day, this LAN device will be blocked from the Internet.
Apply/Save: Click it to save your settings.
URL Filter
Here you can add URL access restriction to all PCs in LAN.
Select the URL List Type (Exclude or Include) first and then click Add to enter the screen below for configuring the list
entries. Maximum 100 entries can be configured.
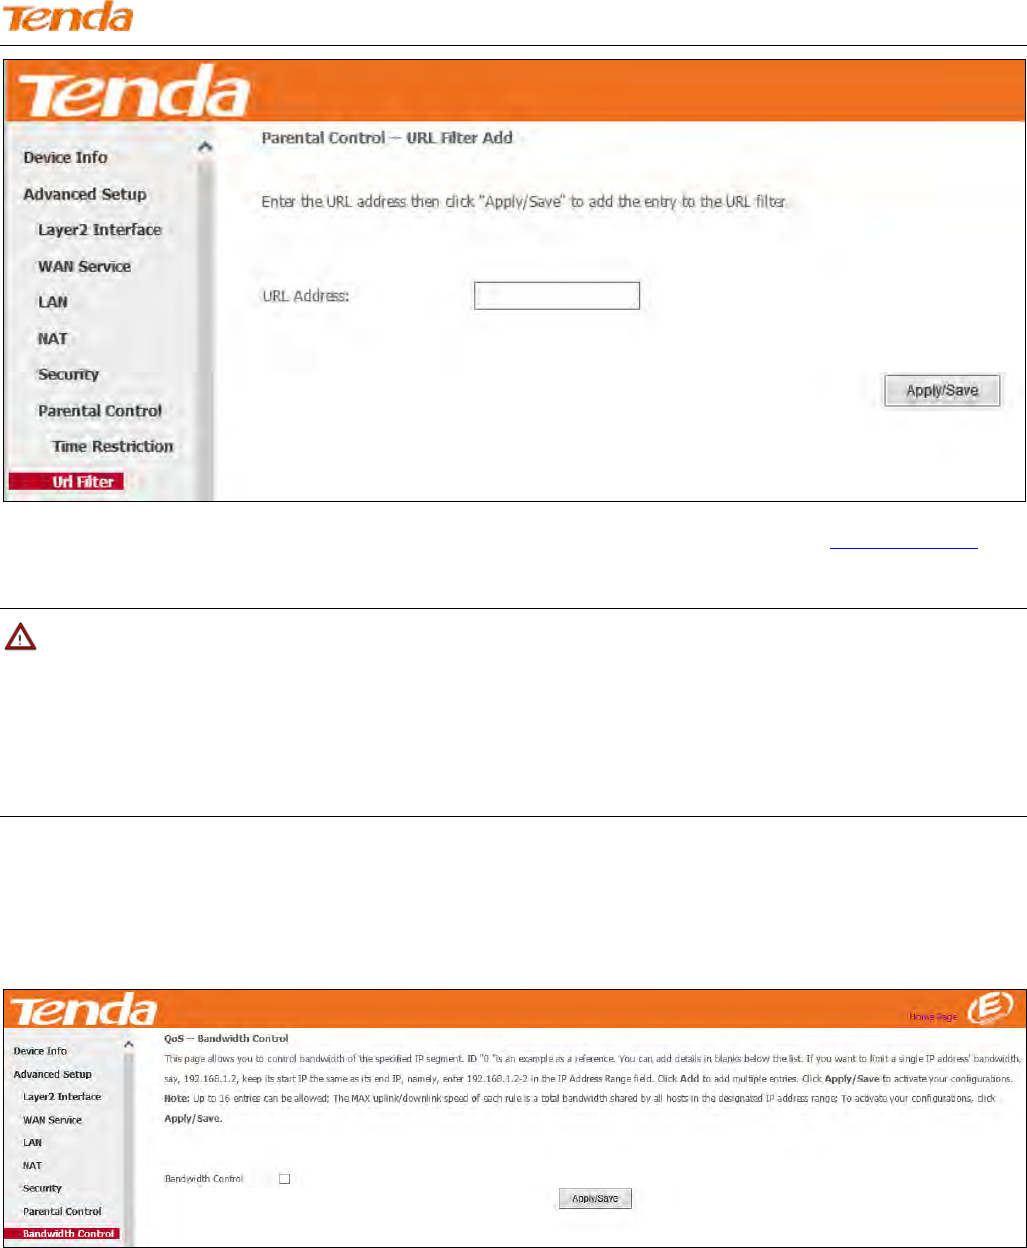
Wireless N300 ADSL2+ High Power Modem Router
100
URL Address: Enter the URL you want to control the access. It can be a complete url address www.google.com, or a
part of the domain, like “google”.
Note
If you have accessed the URL before you include it in a URL filter rule, you must reboot the router and erase it from
your PC to activate this URL filter rule. To erase the domain name from your PC, click Win+R to enable Run process;
enter cmd and then type ipconfig /flushdns.
4.2.7 Bandwidth Control
This page allows you to control bandwidth of the specified IP segment.
Bandwidth Control: Check/uncheck to enable/disable the bandwidth control feature.
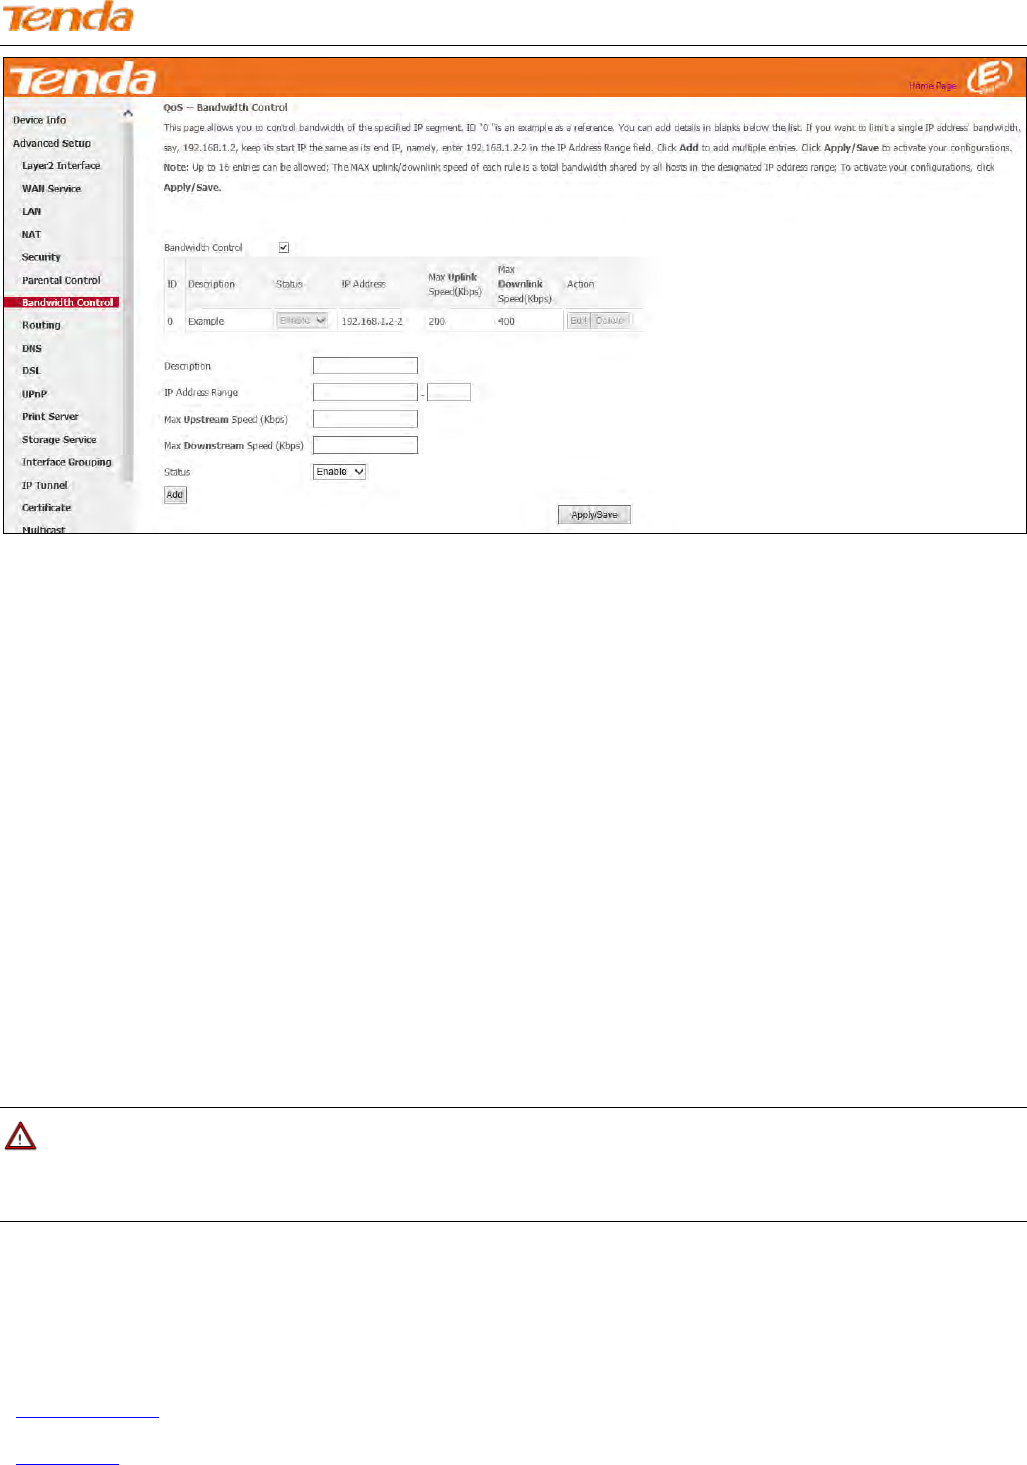
Wireless N300 ADSL2+ High Power Modem Router
101
Description: Enter the description of the controlled host.
IP Address Range: Enter the IP address of the host you want to control. It can be hosts or a single host. If you want to
limit a single IP address’s bandwidth, just keep the start IP same with the end IP, like 192.168.1.2-2
Max Upstream Speed (Kbp/s): Set the max upstream speed.
Max Downstream Speed (Kbp/s): Set the max downstream speed.
Status: You can view the current status of the controlled hosts, or you can select Enable/Disable from the drop-down list
to enable or disable the current control rule.
Action: Here displays the actions you can do about the corresponding rule. There are tow actions: Edit and Delete.
Edit: Click the Edit button corresponding to the ID to eidt its control rule. And click OK to apply the modification.
Delete: Click the Delete button corresponding to the ID to delete its control rule.
Add: Aftre finishing the bandwidth control settings, click Add to generate the control rule.
Apply/Save: Click this button to activate your configurations.
Note
Up to 16 entries can be allowed.
4.2.8 Routing
This section explains the following:
• Default Gateway
• Static Route
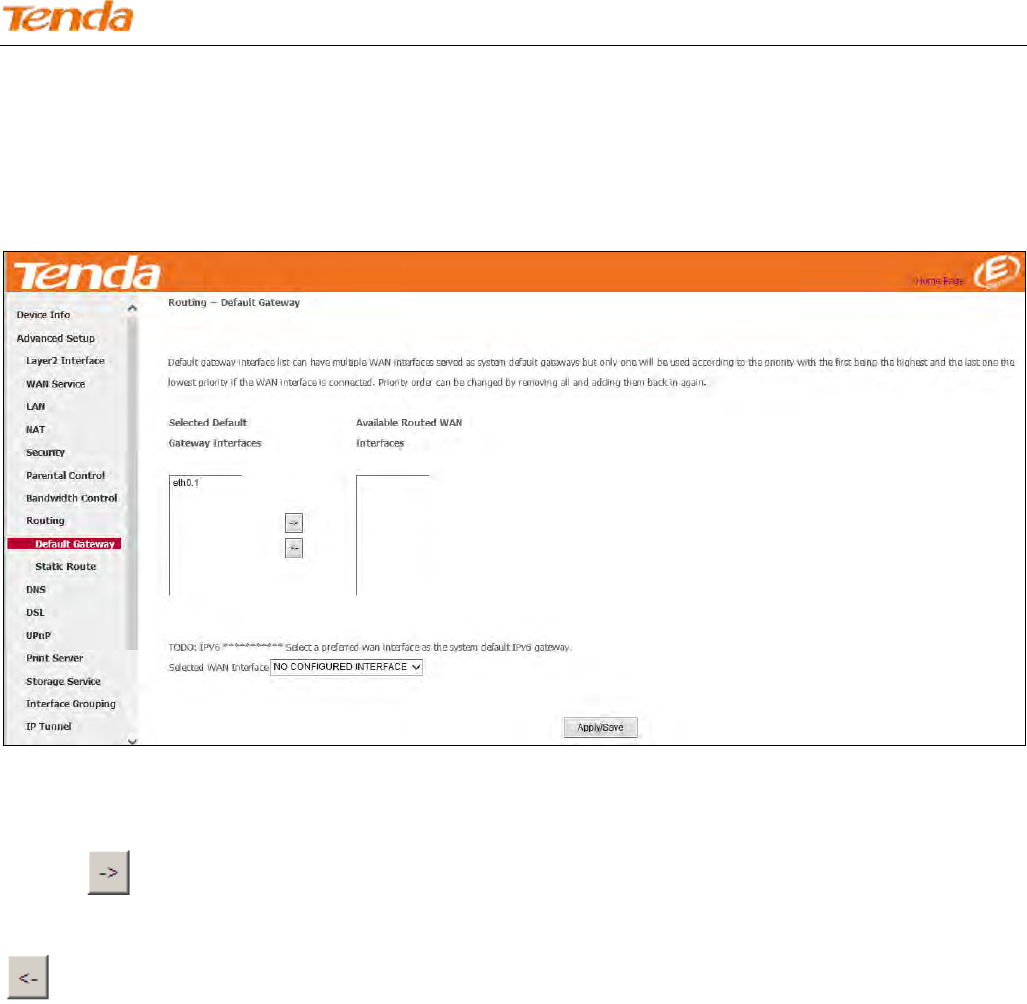
Wireless N300 ADSL2+ High Power Modem Router
102
Default Gateway
Default gateway interface list can have multiple secondary WAN interfaces served as system default gateways but only
one will be used according to the priority with the first being the highest and the last one the lowest priority if the WAN
interface is connected. Priority order can be changed by removing all and adding them back in again.
Selected Default Gateway Interfaces: Displays the selected default gateway interfaces. Select a WAN interface and
click the button to move it to the Available Routed WAN Interfaces box.
Available Routed WAN Interfaces: Displays the available routed WAN interfaces. Select a WAN interface and click the
button to add it to the Selected Default Gateway Interfaces box.
Apply/Save: Click it to save and activate your settings.
Static Route
Static routes provide additional routing information to your router. Typically, you do not need to add static routes.
However, when there are several routers in the network, you may want to set up static routing. Static routing determines
the path of the data in your network. You can use this feature to allow users on different IP domains to access the Internet
via this device. It is not recommended to use this setting unless you are familiar with static routing. In most cases,
dynamic routing is recommended, because this feature allows the router to detect the physical changes of the network
layout automatically. If you want to use static routing, make sure the router’s DHCP function is disabled.
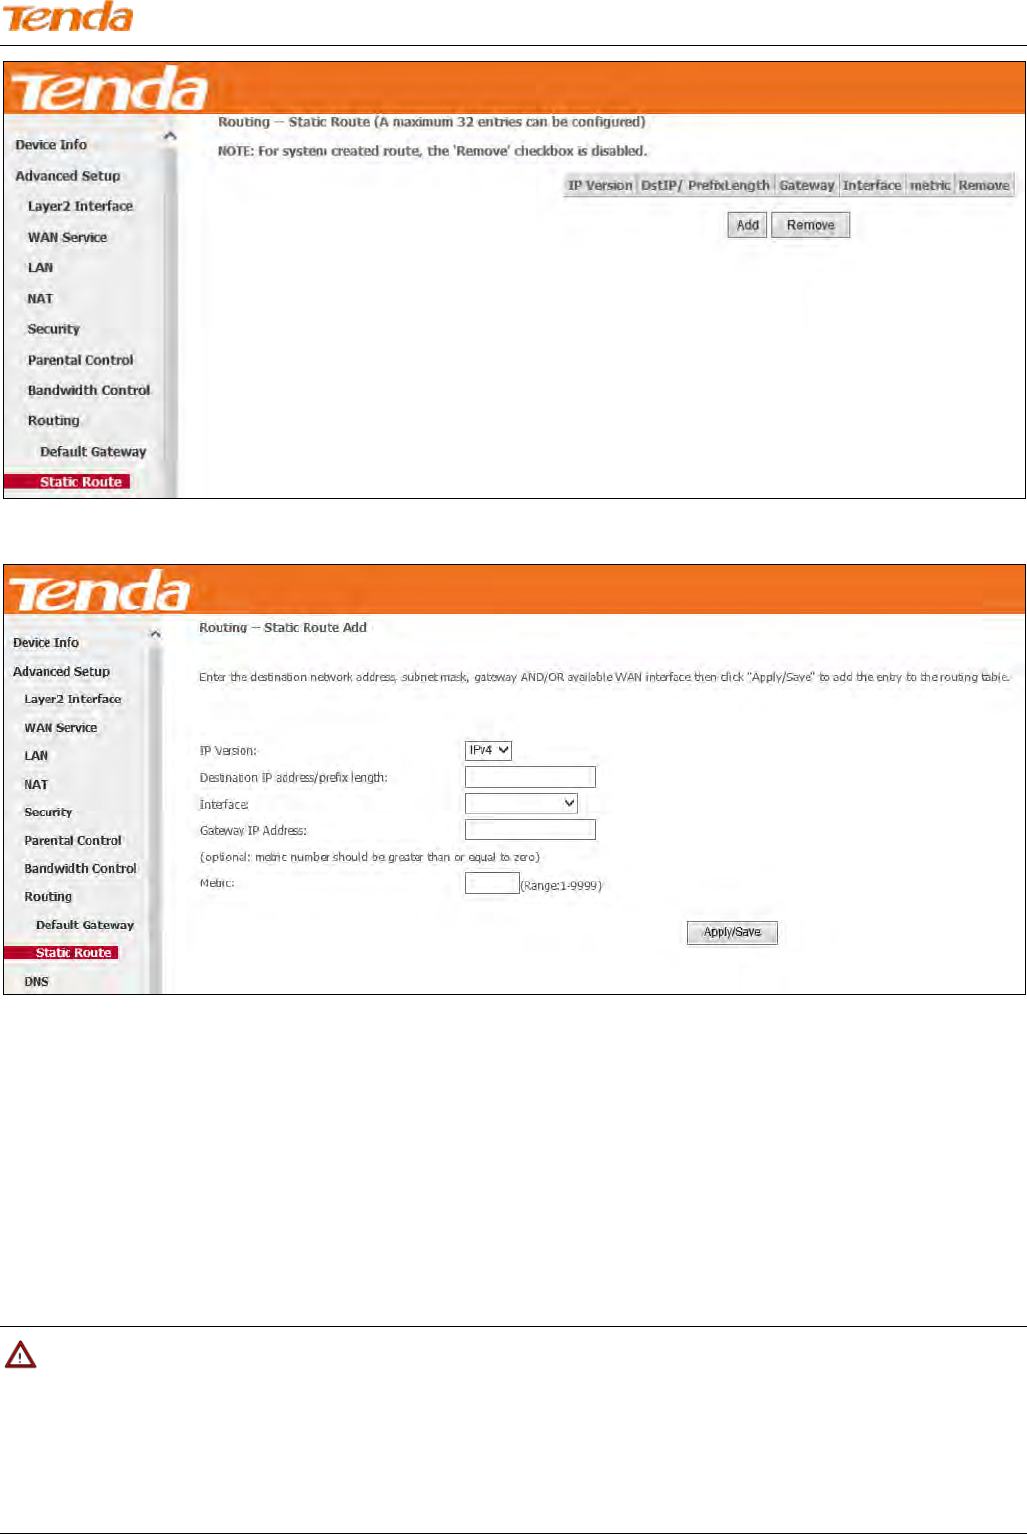
Wireless N300 ADSL2+ High Power Modem Router
103
Click Add to enter the following screen:
IP Version: Select IPv4 or IPv6.
Destination IP address/prefix length: Enter the destination IP address and prefix length of the final destination.
Interface: Select an interface from the drop-down list.
Gateway IP Address: Enter the gateway IP address, which must be a router on the same LAN segment as the router.
Metric: Enter a number in the Metric field. This stands for the number of routers between your network and the
destination.
Apply/Save: Click it to apply and save your settings.
Note
1. Destination IP address cannot be in the same IP segment as WAN or LAN segment of the router.
2. Only configure additional static routes for unusual cases such as multiple routers or multiple IP subnets located on
your network. Wrong static routes may lead to network failure.
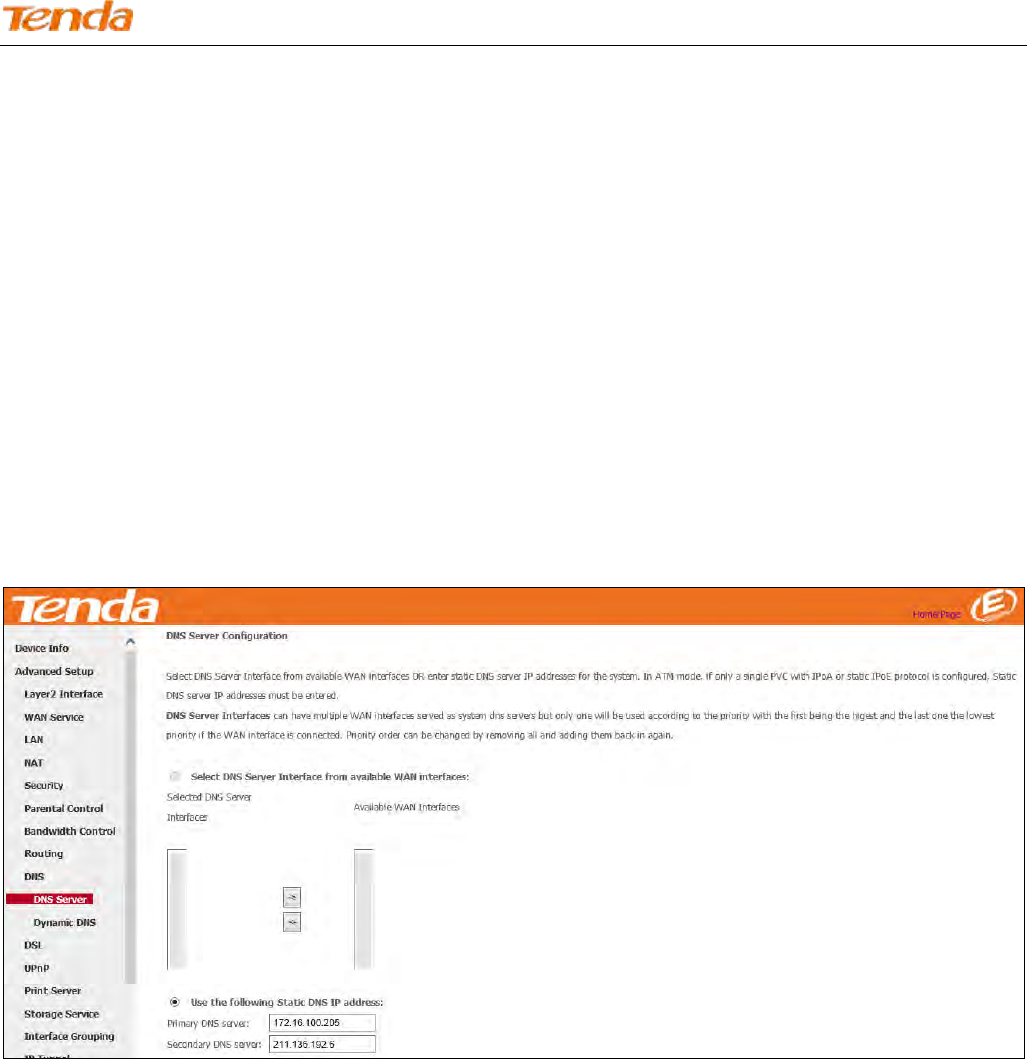
Wireless N300 ADSL2+ High Power Modem Router
104
4.2.9 DNS
DNS Server (Static DNS)
The DNS server translates domain names to numeric IP addresses. It is used to look up site addresses based on their
names.
Select DNS Server Interface from available WAN interfaces or enter static DNS server IP addresses for the system.
Here you can configure the WAN DNS address:
For IPv4:
-Click the Select DNS Server Interface from available WAN interfaces option;
-Or select the Use the following Static DNS IP address option and enter static DNS server IP addresses for the system.
And then click Apply/Save.
For IPv6:
-Select Obtain IPv6 DNS info from a WAN interface and Select a configured WAN interface for the IPv6 DNS server
information.
-Select Use the following Static IPv6 DNS address and enter the static IPv6 DNS server addresses.
And then click Apply/Save.
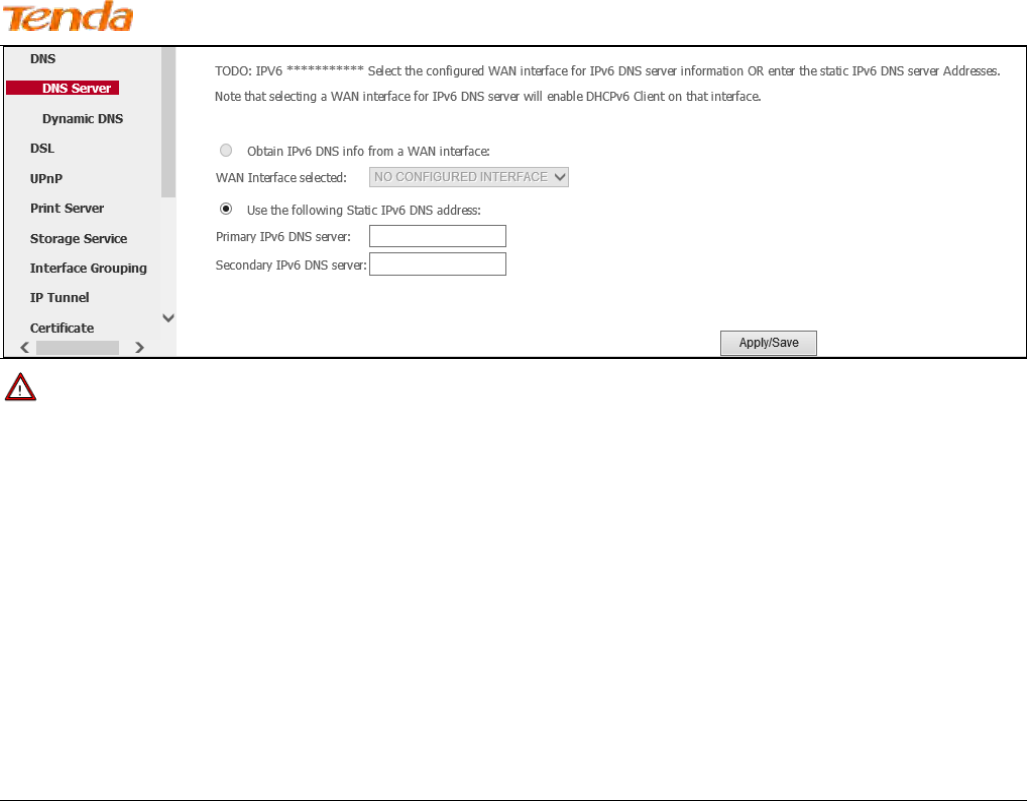
Wireless N300 ADSL2+ High Power Modem Router
105
Note
1. DNS Server Interfaces can have multiple WAN interfaces served as system DNS servers but only one will be used
according to the priority with the first being the highest and the last one the lowest priority if the WAN interface is
connected. Priority order can be changed by removing all and adding them back in again.
2. In ATM mode, if only a single PVC with IPoA or static IPoE protocol is configured, Static DNS server IP addresses
must be entered.
3. If you cannot locate the static DNS server IP information, ask your ISP to provide it.
4. The default settings are recommended if you are unsure about the DNS server addresses. If a wrong DNS server
address is configured, webpages may not be open.
Dynamic DNS (DDNS)
If your Internet service provider (ISP) gave you a static (fixed) public IP address, you can register a domain name and
have that name associated with your IP address by public Domain Name Servers (DNS). However, if your ISP gave you
a dynamic (changing) public IP address, you cannot predict what your IP address will be, and the address can change
frequently. In this case, you can use a commercial Dynamic DNS service. It lets you register your domain to their IP
address and forwards traffic directed at your domain to your frequently changing IP address. If your ISP assigns a private
WAN IP address (such as 192.168.x.x or 10.x.x.x), the Dynamic DNS service does not work because private addresses
are not routed on the Internet.
Click Advanced Setup > DNS > Dynamic DNS to enter the Dynamic DNS screen.
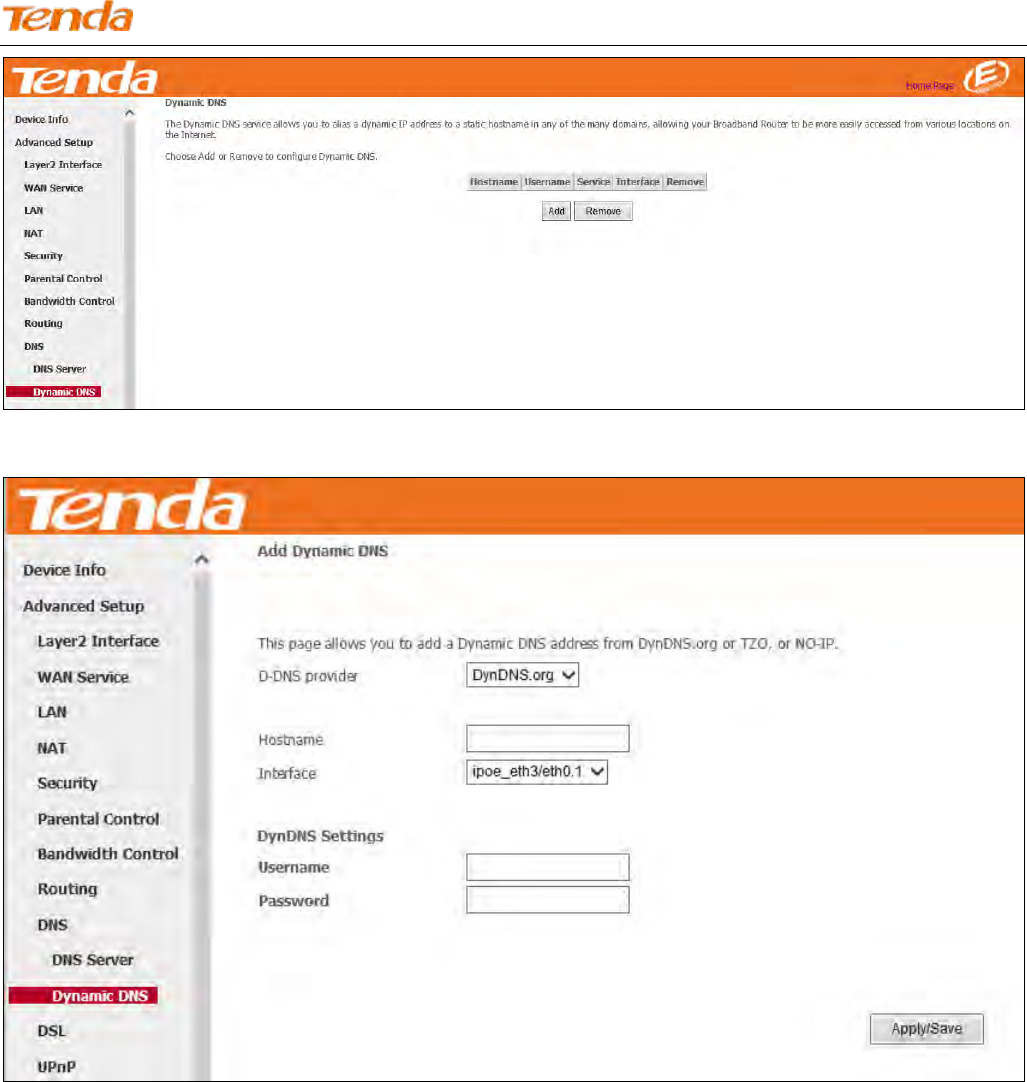
Wireless N300 ADSL2+ High Power Modem Router
106
Click the Add button to configure the DDNS settings.
D-DNS Provider: Select your DDNS service provider from the drop-down menu. It supports three kinds of D-DNS
service: DynDNS.org, TZO and NO-IP.
Hostname: Enter the DDNS domain name registered with your DDNS service provider.
Interface: Specify a WAN connection interface.
Username: Enter the DDNS user name registered with your DDNS service provider.
Password: Enter the DDNS password registered with your DDNS service provider.
Example: Dyndns.org
Username: qiangweianbian
Password: 414637

Wireless N300 ADSL2+ High Power Modem Router
107
Hostname: xhh3793.dyndns.org
Add Dynamic DNS
1) Select DynDNS.org from the D-DNS provider drop-down list.
2) Enter your Dyndns hostname. Here is “xhh3793.dyndns.org” as an example.
3) Specify a WAN connection interface.
DynDNS Settings
1) Enter your DynDNS username. Here is “qiangweianbian” as an example.
2) Enter the password of your DynDNS.org account. Here is “414637” as an example.
3) Click Apply/Save to save your configurations.
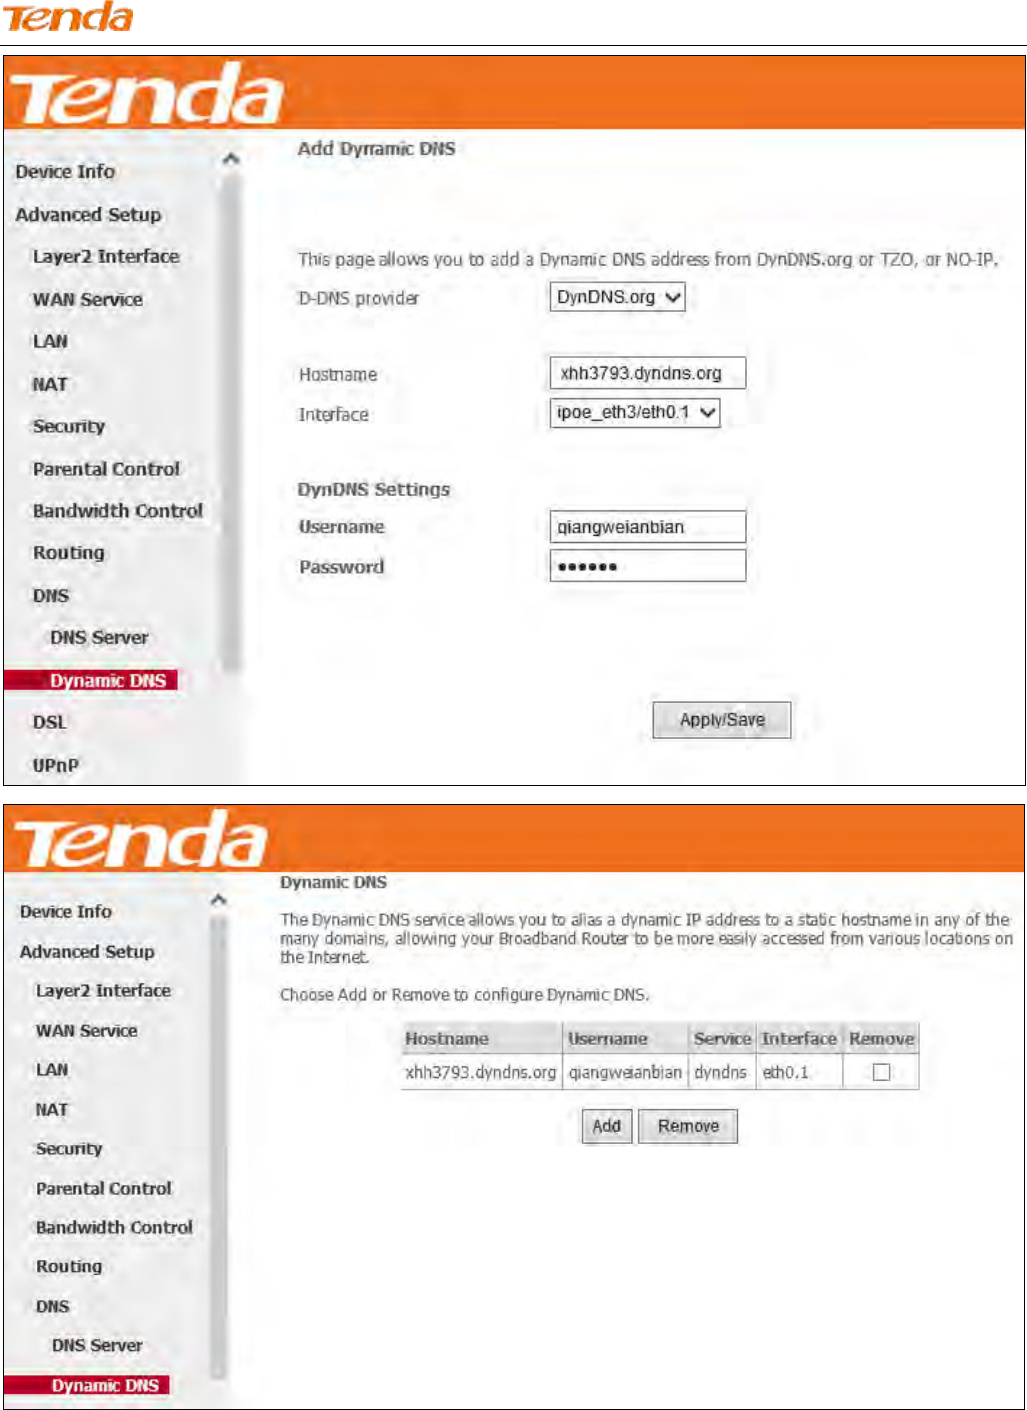
Wireless N300 ADSL2+ High Power Modem Router
108
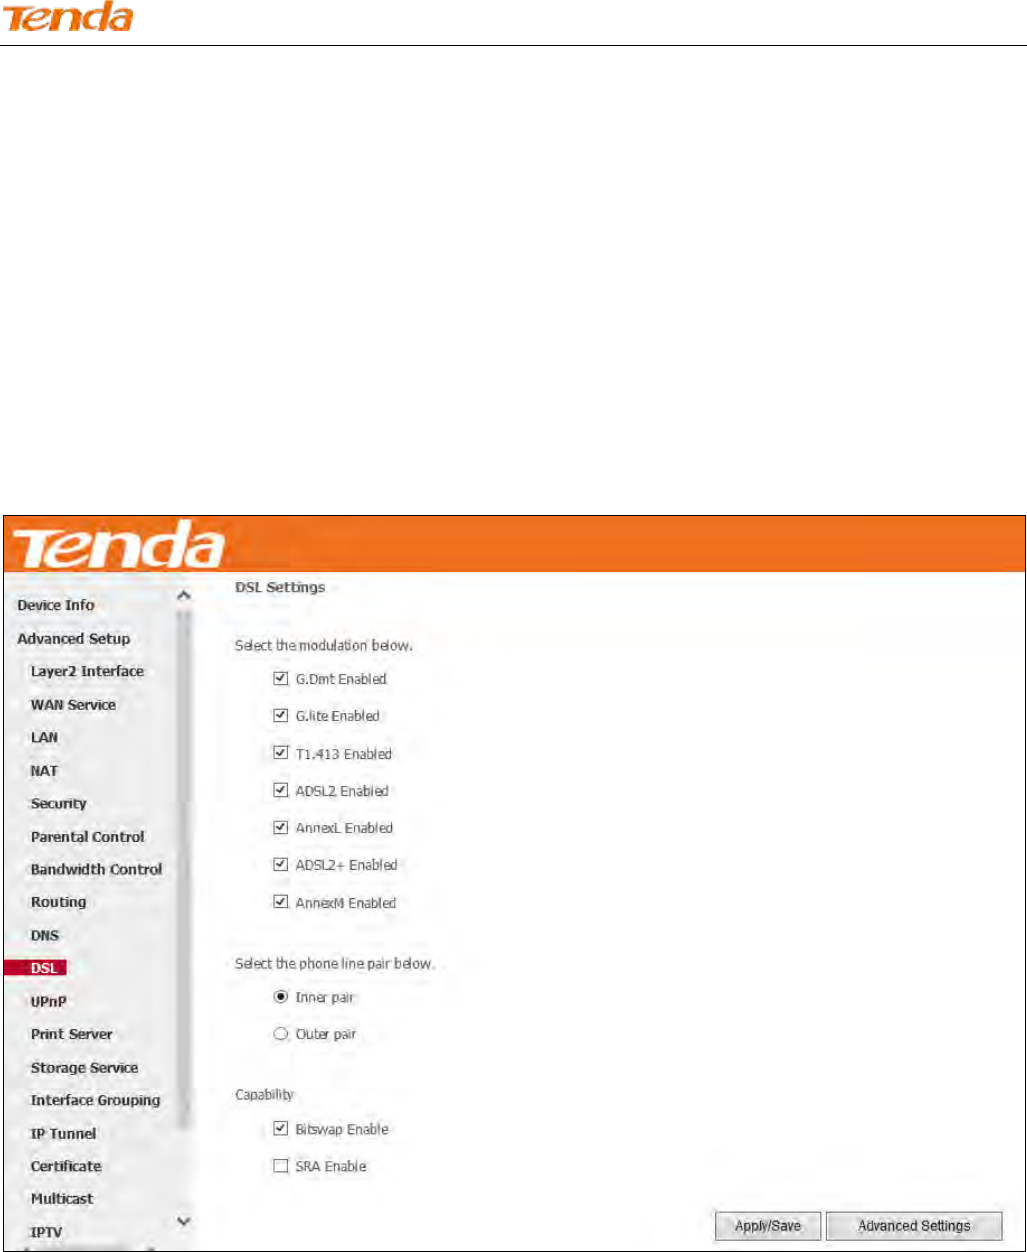
Wireless N300 ADSL2+ High Power Modem Router
109
4.2.10 DSL
This screen provides multiple ASDL modulation modes to meet diversified environments. You can also select phone line
pair and Capability.
DSL parameter configurations must be supported by ISP to take effect. Actual parameters (see Statistics-xDSL) resulted
from the negotiation between your router and ISP. Wrong configurations may fail your Internet access.
The best DSL configurations are the factory defaults. Only change them if you are instructed by your ISP or our
technical staff when your router fails to negotiate with ISP in DSL (ATM) mode. Usually, this failure can be identified
and confirmed if the ADSL LED on the device keeps displaying a slow or quick blinking light.
Check the checkbox next to a modulation to enable it and then click Apply/Save.
Advanced Settings: Click it to enter the Advanced Settings screen as below.
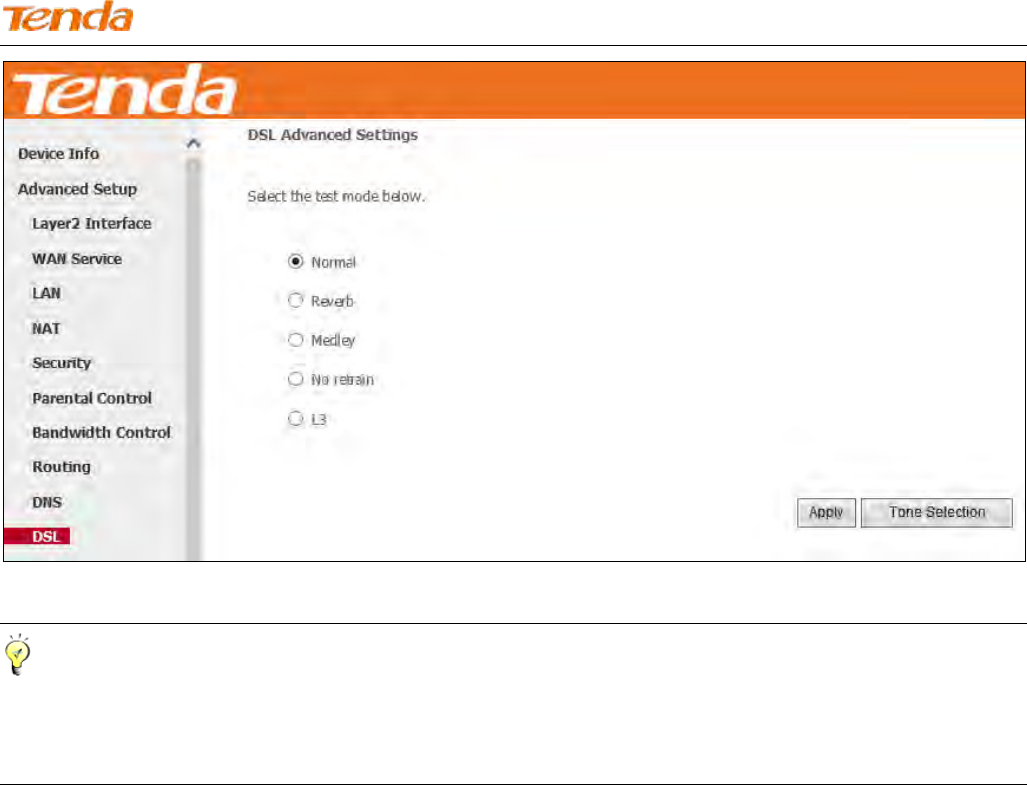
Wireless N300 ADSL2+ High Power Modem Router
110
Here you can select the test mode and tone.
Tip
If you are unsure about the ADSL parameters, please apply the factory default settings. Wrong configurations may fail
your Internet access.
4.2.11 UPnP
UPnP (Universal Plug and Play) allows Windows based systems to configure the device for various Internet applications
automatically. UPnP devices can automatically discover the services from other registered UPnP devices on the network.
If you use applications such as multiplayer gaming, peer-to-peer connections, or real-time communications, like instant
messaging or remote assistance (a feature in Windows XP), you should enable UPnP.

Wireless N300 ADSL2+ High Power Modem Router
111
Enable UPnP: Check/uncheck to enable/disable the UPnP feature.
Note
UPnP is activated only when there is a live WAN service with NAT enabled.
4.2.12 Print Server
Enabling the Print Server makes all PCs in the LAN have an access to the USB printer which has been connected to this
router. Click Advanced Setup > Printer Server to enter screen below:
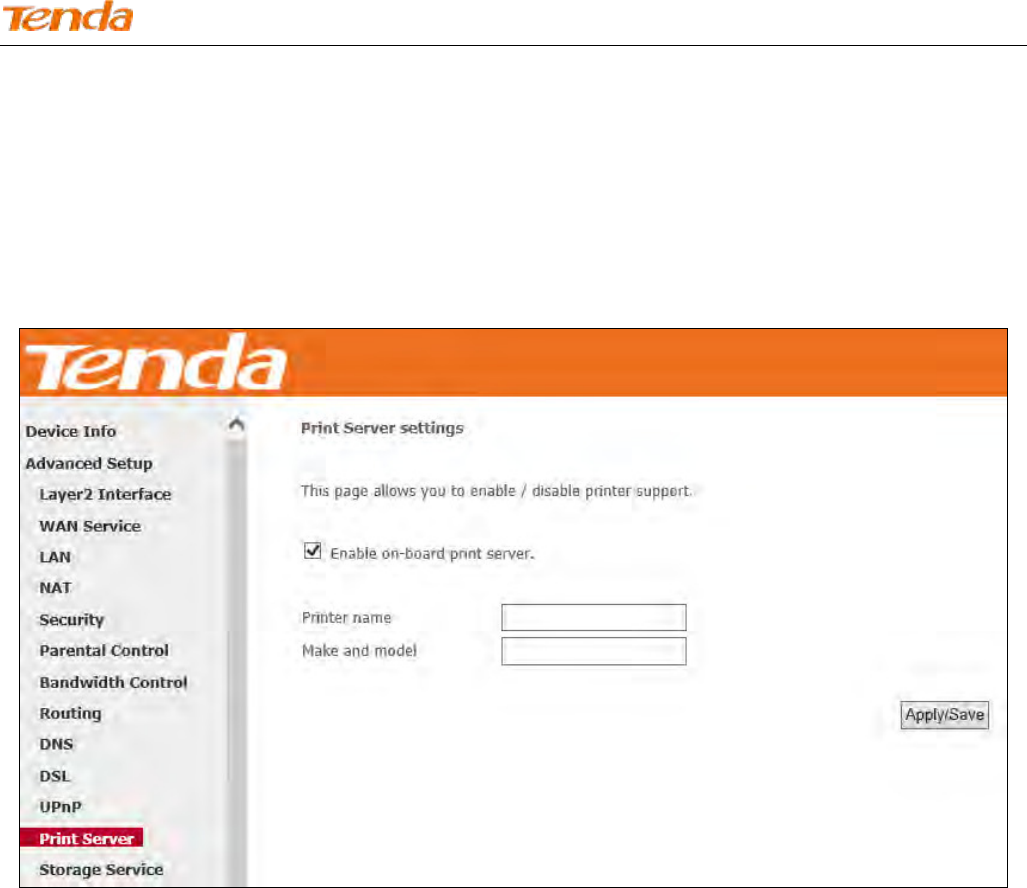
Wireless N300 ADSL2+ High Power Modem Router
112
USB printing config:
Step 1: Connect the USB printer to the USB port of the device.
Step 2: Enable USB printing service of the device (the router).
Enter the name of the USB printer in Printer name box.
Enter the manufacturer and model of the USB printer in the Make and model box.
Click Apply/Save.
Step 3: Add the printer from your local PC (In Windows XP OS)
Click Start > Control Panel > Printers and Faxes > Add a printer;
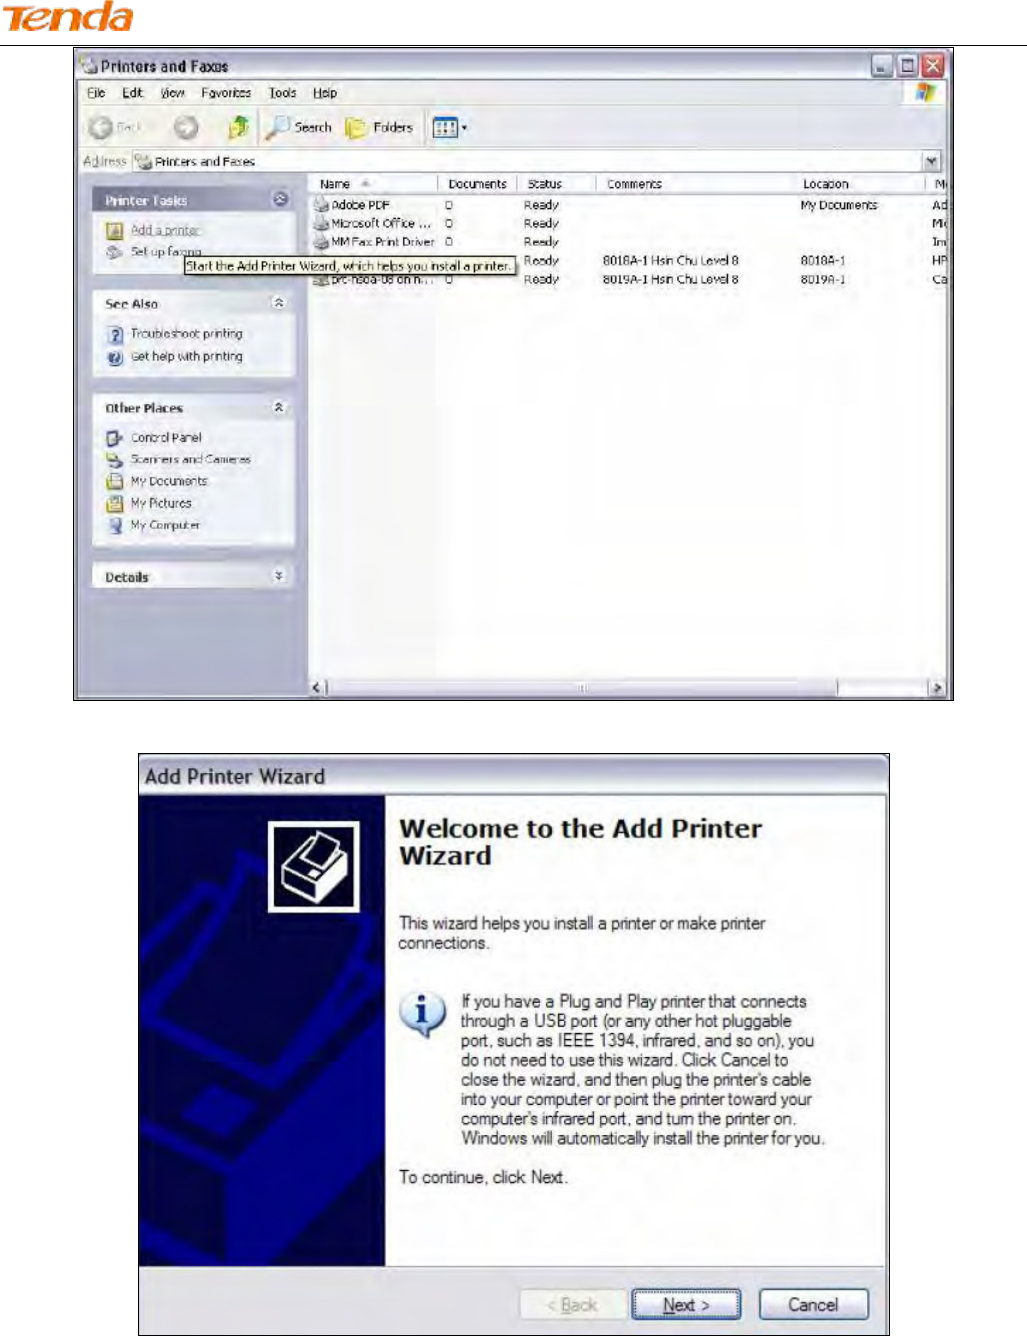
Wireless N300 ADSL2+ High Power Modem Router
113
Click Next;
Select A network printer, or a printer attached to another computer and click Next;
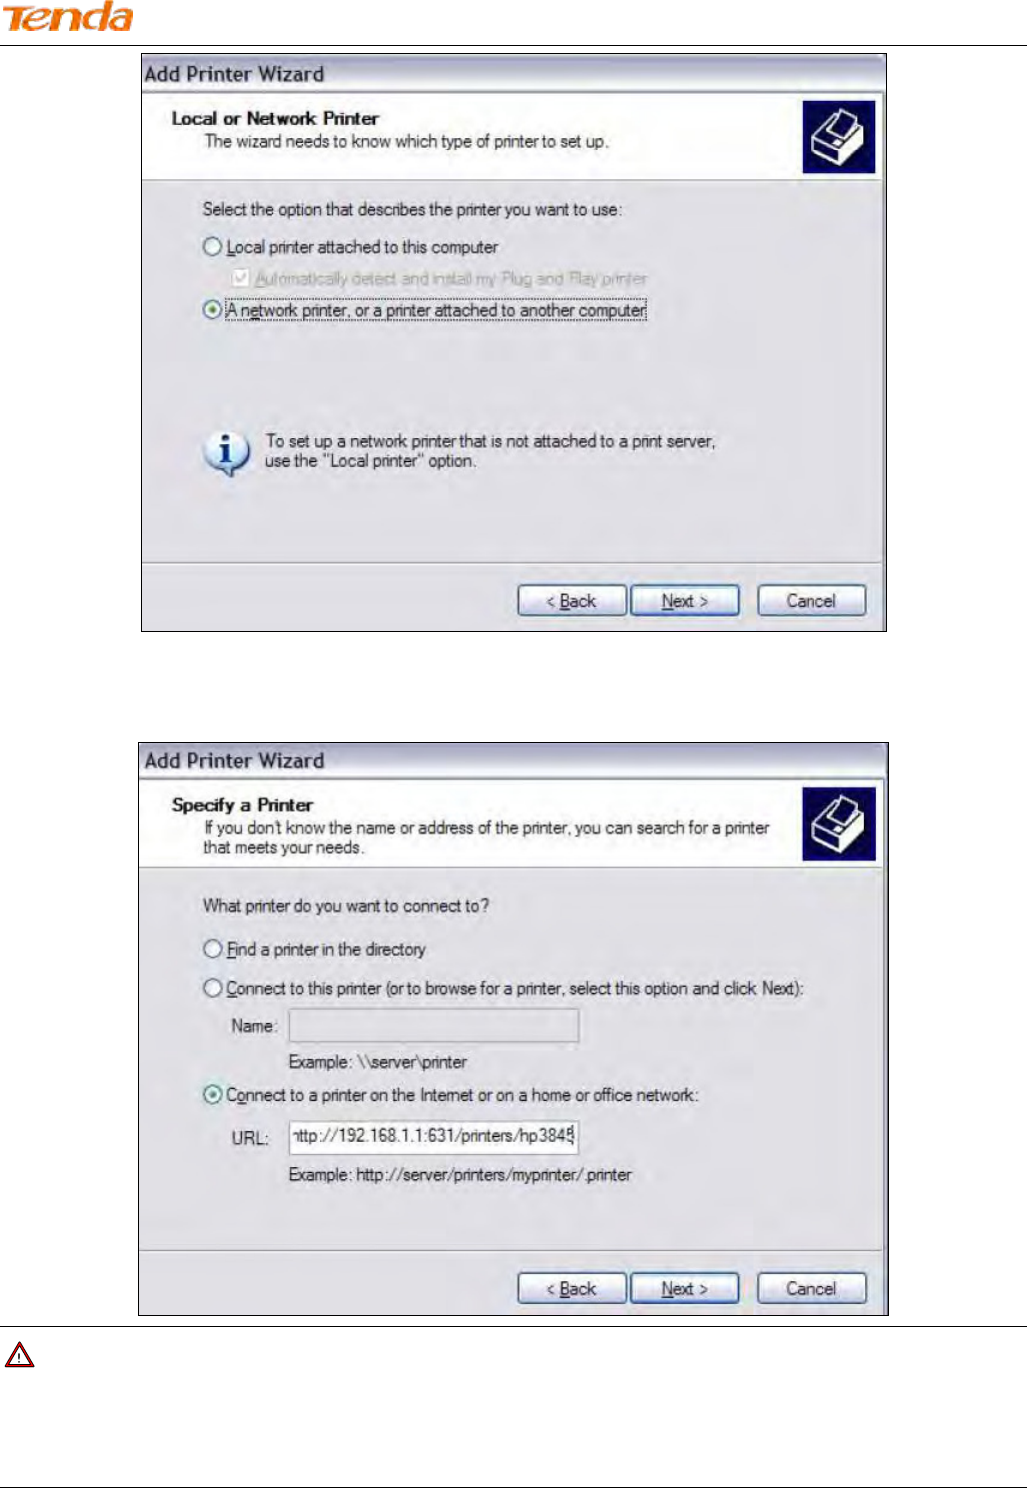
Wireless N300 ADSL2+ High Power Modem Router
114
Select Connect to a printer on the Internet or on a home or office network, type in
“http://192.168.1.1:631/printers/hp3845” in the URL field and click Next;
Note:
Here “192.168.1.1” refers to this router’s LAN IP address and “hp3845” refers to the USB printer name you’ve filled in
on the Print Server Settings page (See Step 2).
Insert the printer driver CD into your computer and click Have Disk…;
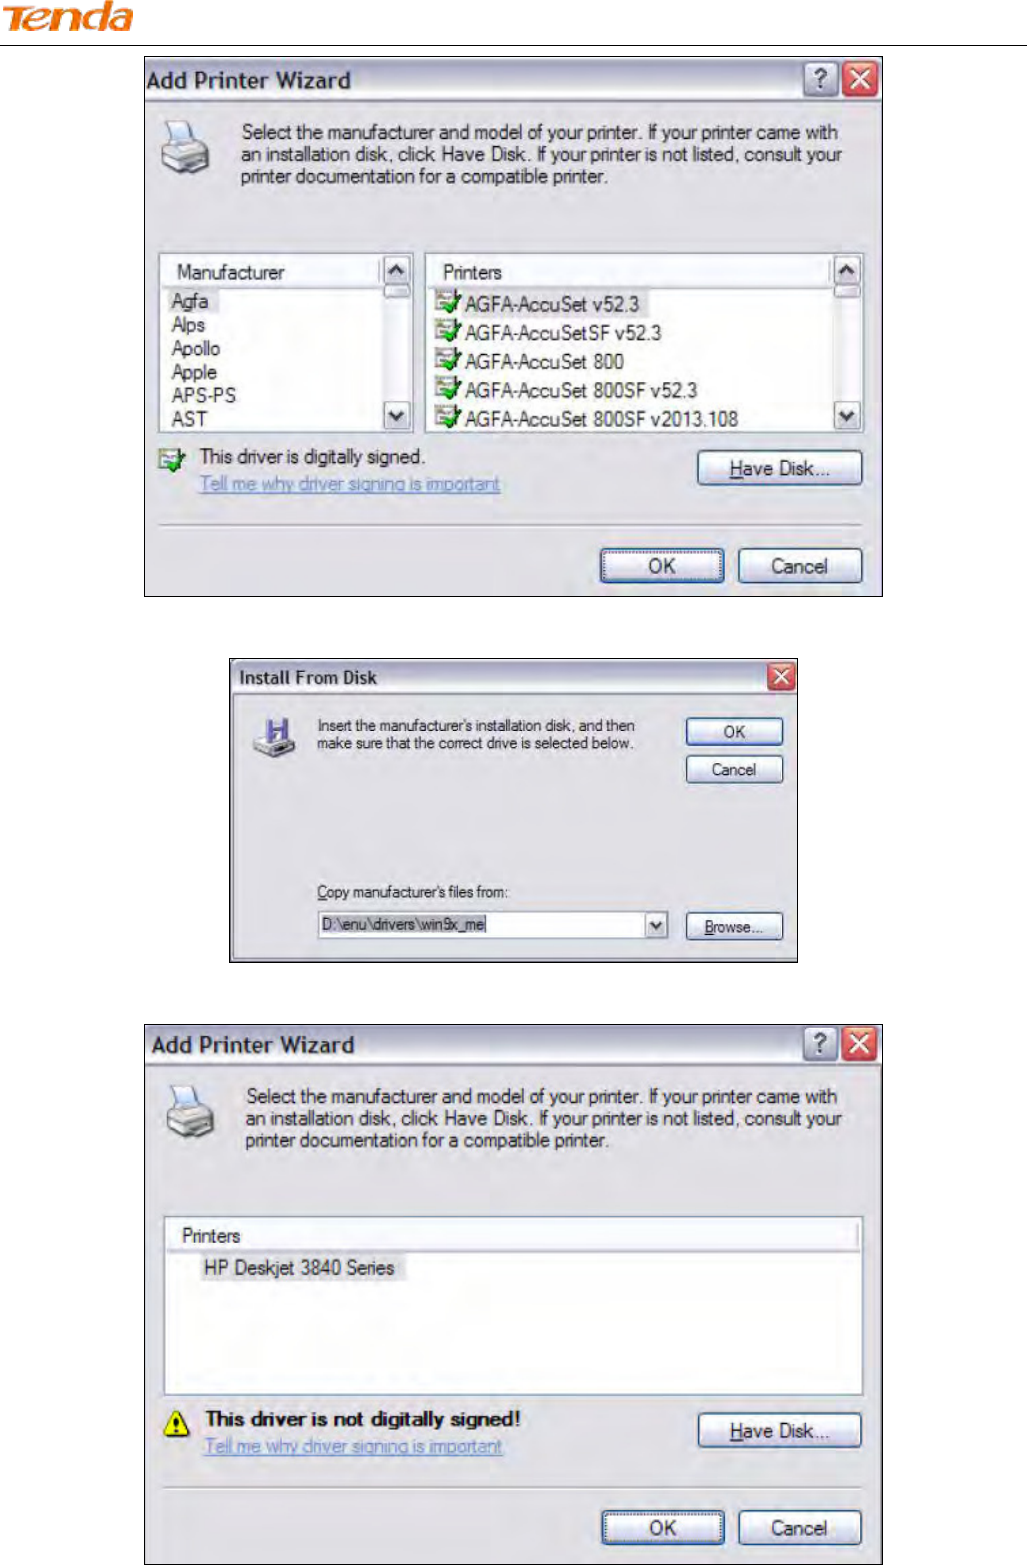
Wireless N300 ADSL2+ High Power Modem Router
115
Click Browse, select driver file directory on CD-ROM and click OK;
Select the manufacturer and the model of your printer. And click OK.
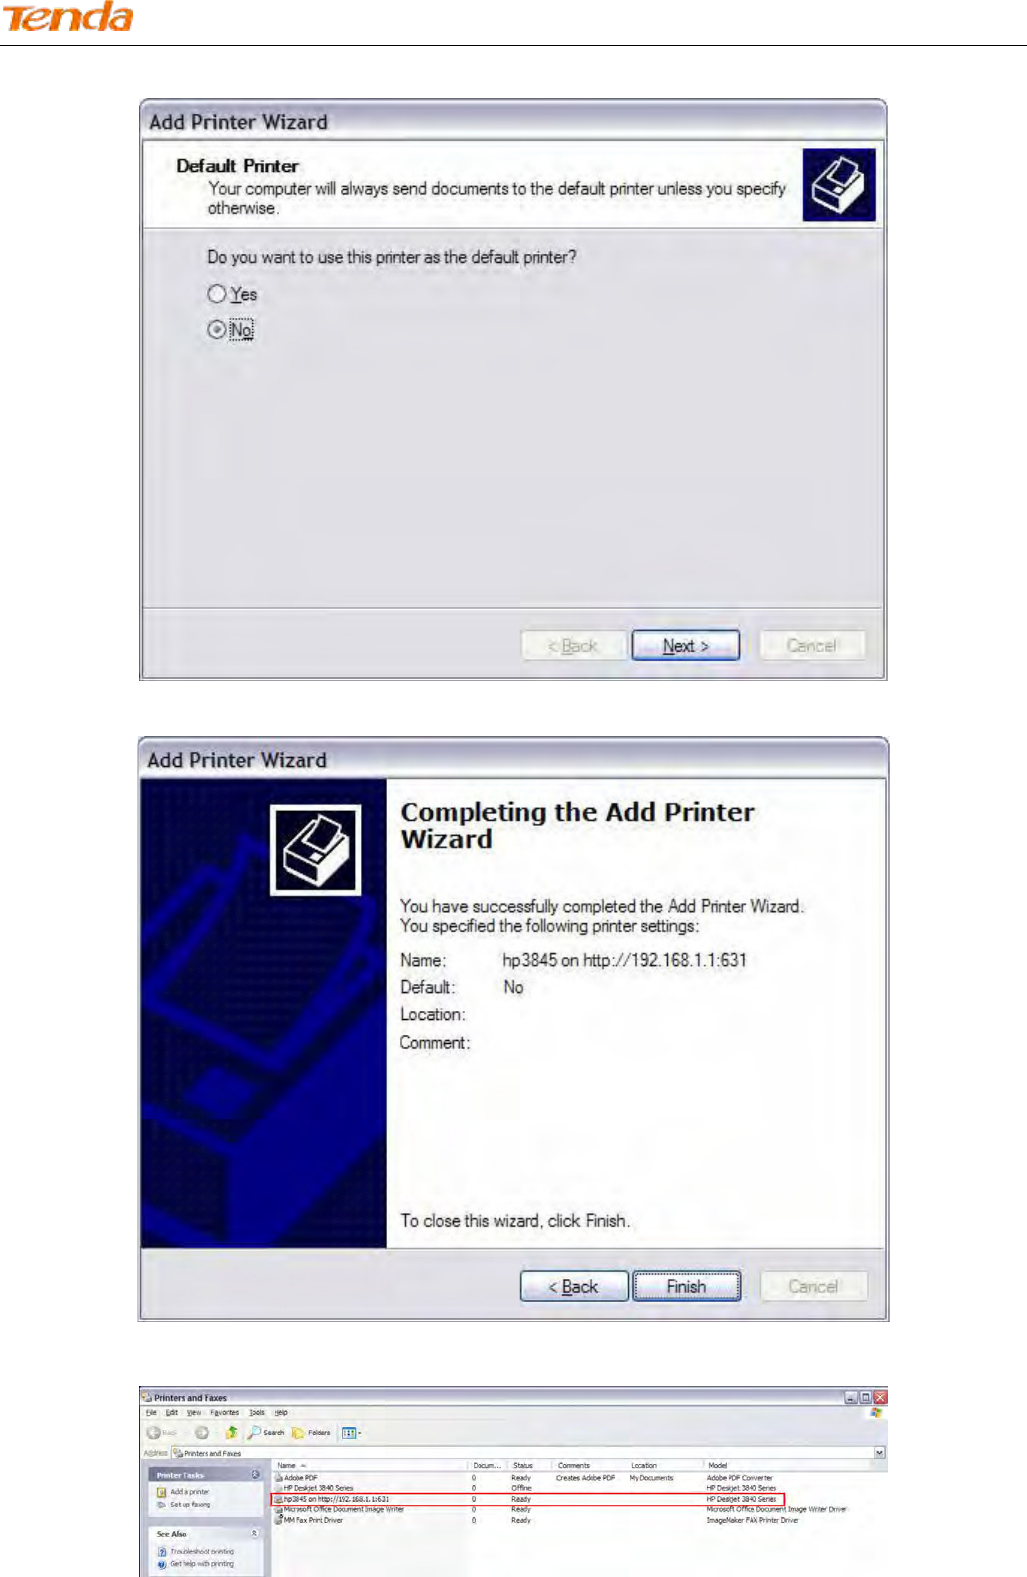
Wireless N300 ADSL2+ High Power Modem Router
116
Choose “Yes” or “No” for default printer setting and click Next.
Click Finish.
Check the status of printer from Windows “Control Panel”, printer window. Status should be shown “ready”.