TOSHIBA TEC Singapore S-0501 Printer User Manual Quick Start en
TOSHIBA TEC Singapore Pte Ltd Printer Quick Start en
Contents
- 1. User Manual 1
- 2. User Manual 2
User Manual 2
Operating the printer Quick start guide
12
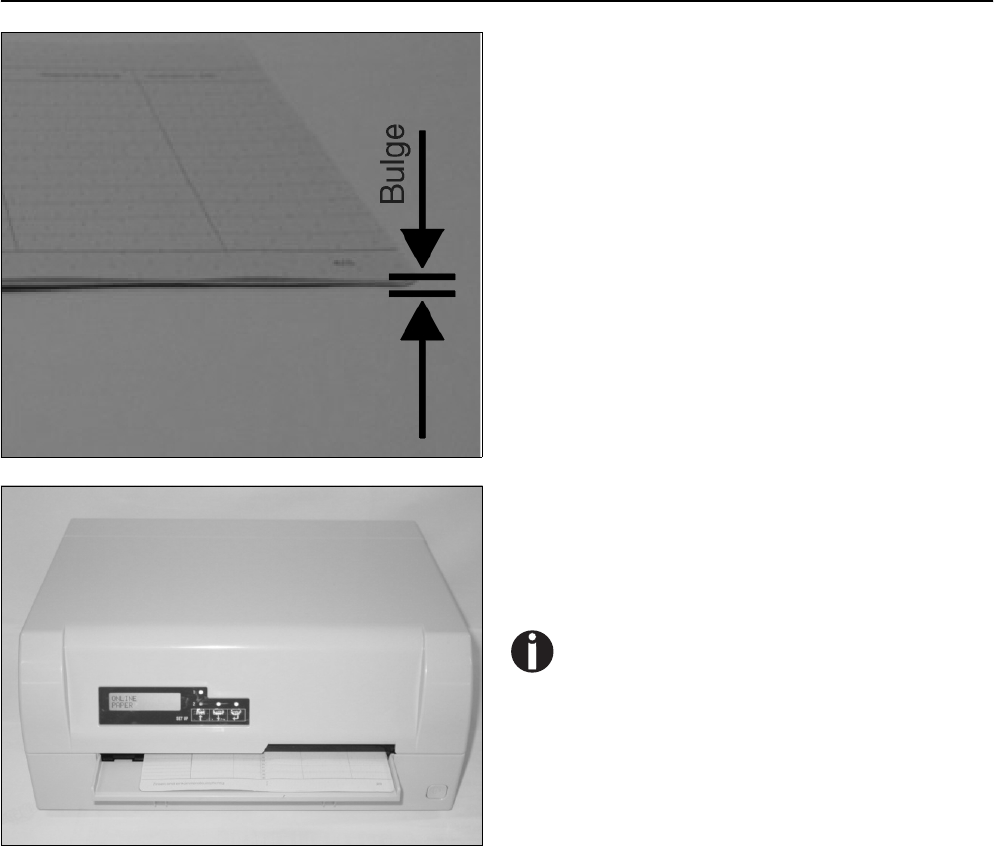
The bulge of the opened passbook should be as flat as possi-
ble to avoid malfunctions when the passbook is drawn into
the printer.
Place the passbook on the right-hand side of the document
support with the page to be printed facing up. Press the fold
down while you push the passbook into the document chute
towards the stop. Keep pushing it in until it is automatically
pulled into the correct print position.
If the automatic document alignment cannot properly
grasp stiff or bent passbooks, you should place the
passbook manually at the stop at the right-hand side
of the document support and insert it.
Quick start guide Operating the printer
13
ENGLISH
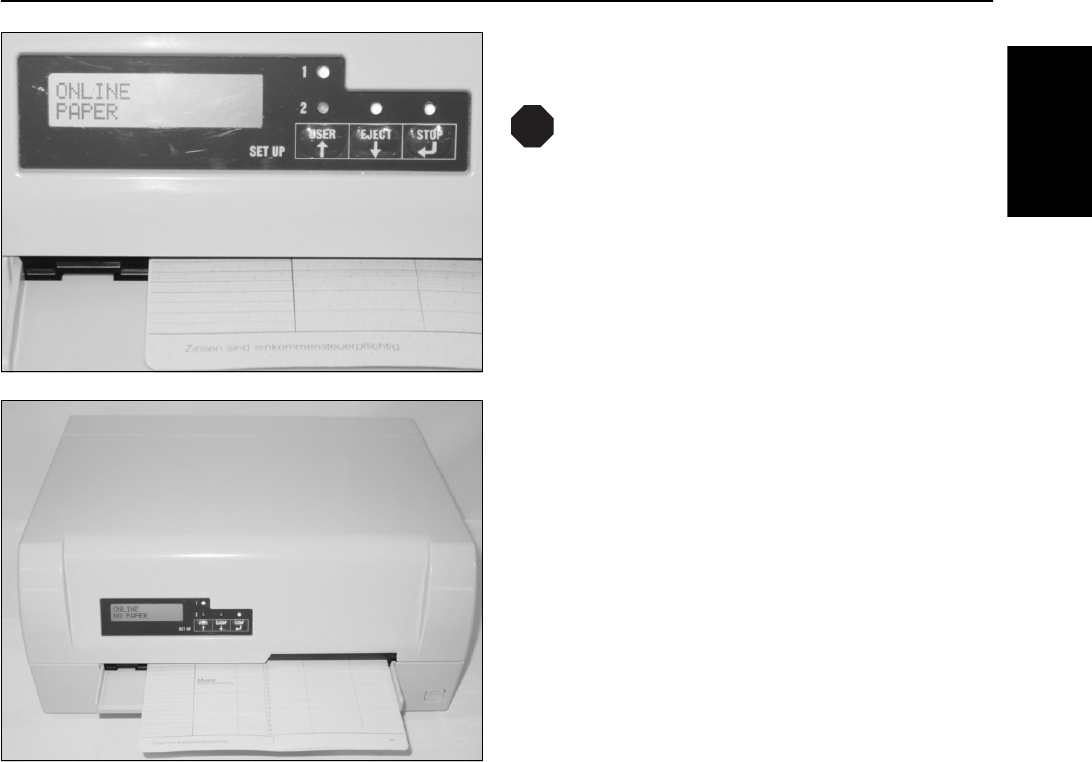
When the passbook is inserted, the message ONLINE
PAPER is displayed on the LCD.
Do not use passbooks that do not correspond to the
specifications listed in the section “Paper specifica-
tions”. Otherwise the passbooks and the print head
may be damaged.
When the passbook is printed, it is automatically transported
out of the printer and released for removal.
If the passbook will not be transported automatically out of
the printer you can eject it by pressing the EJECT key.
The message ONLINE NO PAPER appears on the LCD
again.
STOP
Service and Maintenance Quick start guide
14
Service and Maintenance
`Replacing the ribbon
cassette Make sure that the printer is switched off before replacing the ribbon cassette.
The print head may be hot if the printer has been printing for a long time. Wait
until it cools down and you are no longer in danger of being burnt.
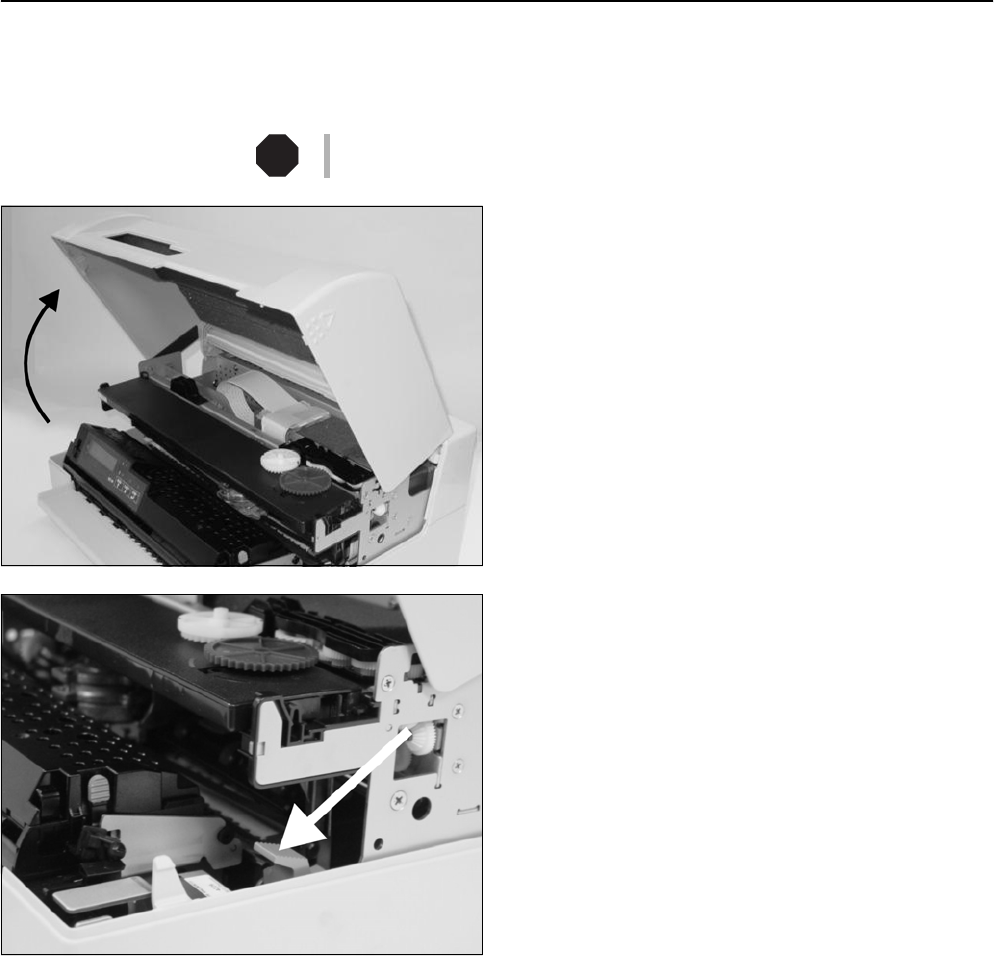
Open the cover by grasping it at the right and left-hand side
and swing it upward until it clicks into position.
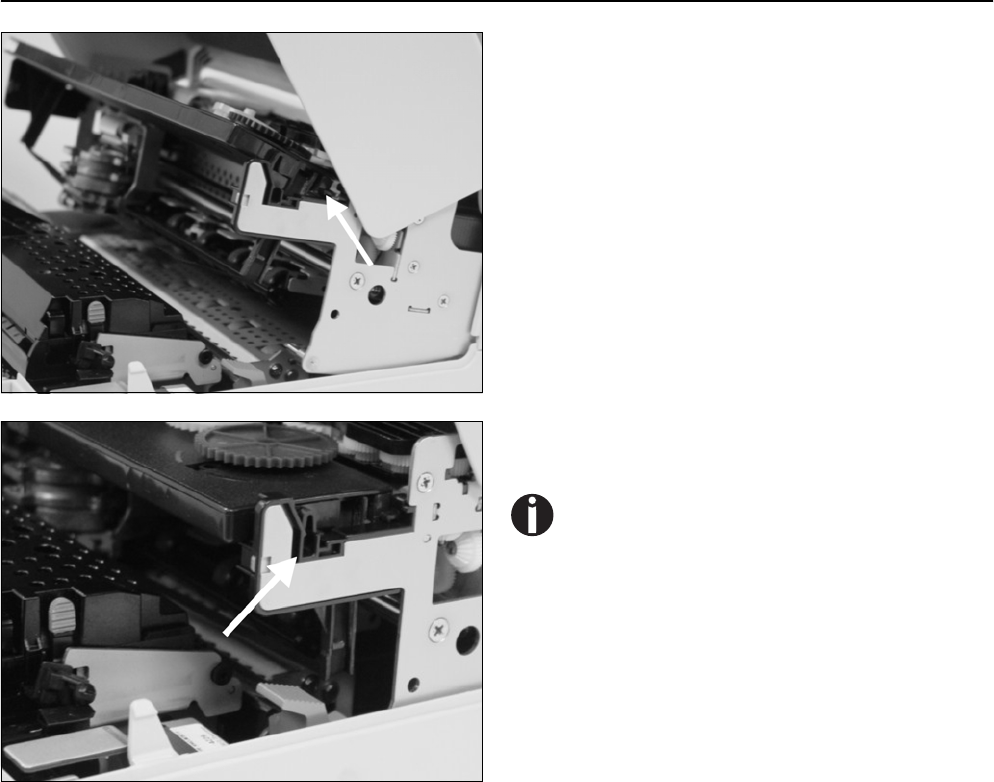
Press the green release lever for the printing mechanism.
This swings the printing mechanism backwards.
STOP
Quick start guide Service and Maintenance
15
ENGLISH
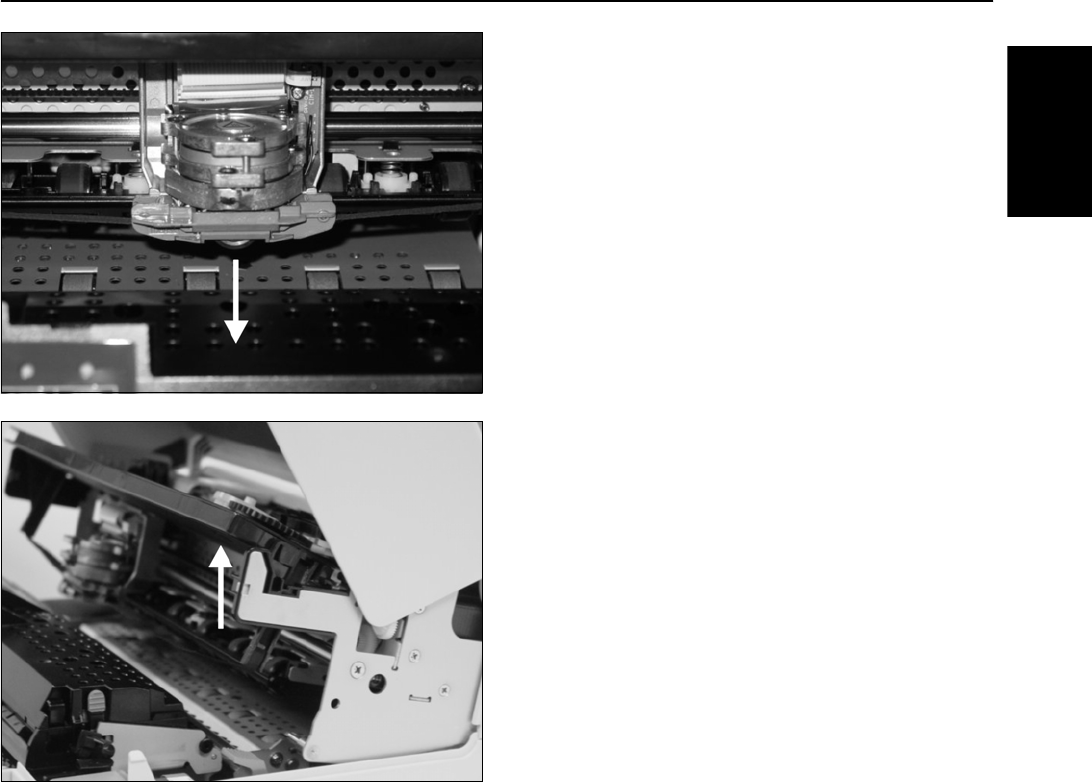
Remove the colored ribbon guide from the print head by pull-
ing it downwards.
Raise the front end of the ribbon cassette on both sides.
Take the ribbon cassette out of the printer.
Service and Maintenance Quick start guide
16
Take the new ribbon cassette from the packaging and lift the
ribbon guide from the cassette.
Remove the transportation lock which fixes the ribbon guide
to the cassette.
Insert the new ribbon cassette by hooking it into the rear slots
of its mountings first.
Push the front of the cassette into its mounting so that it
clicks into position.
Please do not press the center of the ribbon cassette
as this will deform the ribbon cassette and will cause
operation problem.
Quick start guide Service and Maintenance
17
ENGLISH
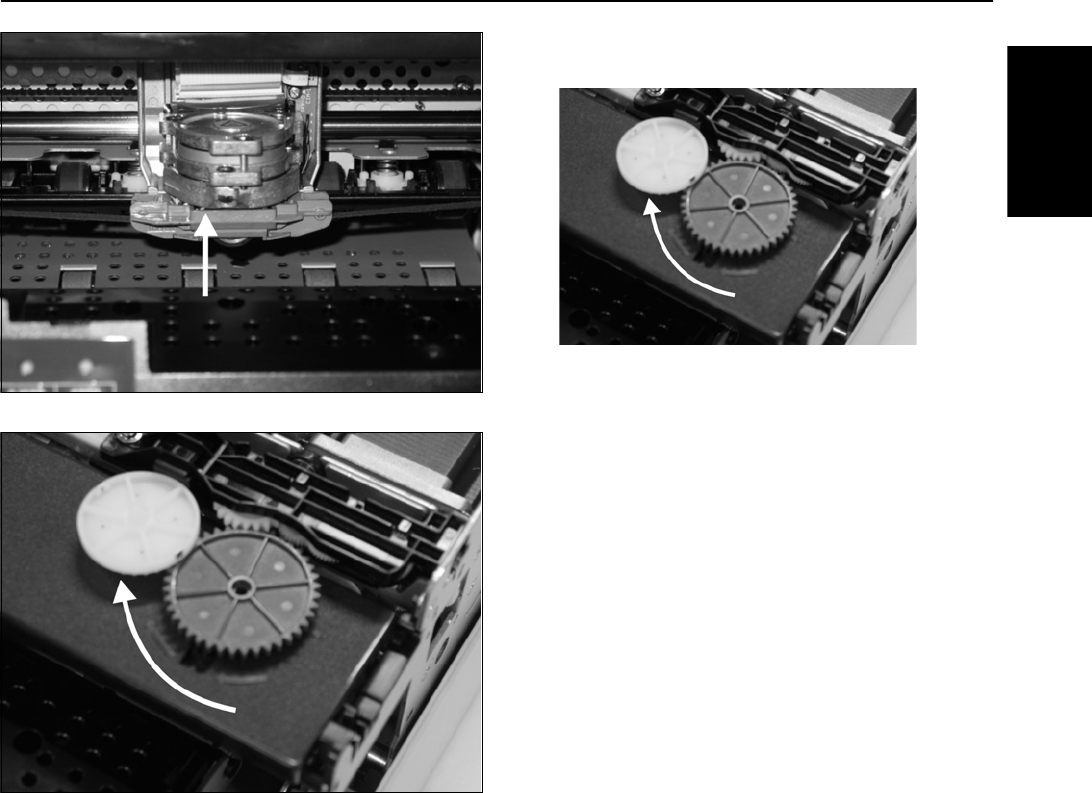
Pull the ribbon guide under the print head. Tighten the ribbon
by turning the tension gear in the direction of the arrow.
Press the ribbon guide onto the print head from underneath
until you hear it click into place.
Check if the ribbon is transported correctly by turning the
tension gear in the direction of the arrow.
Service and Maintenance Quick start guide
18
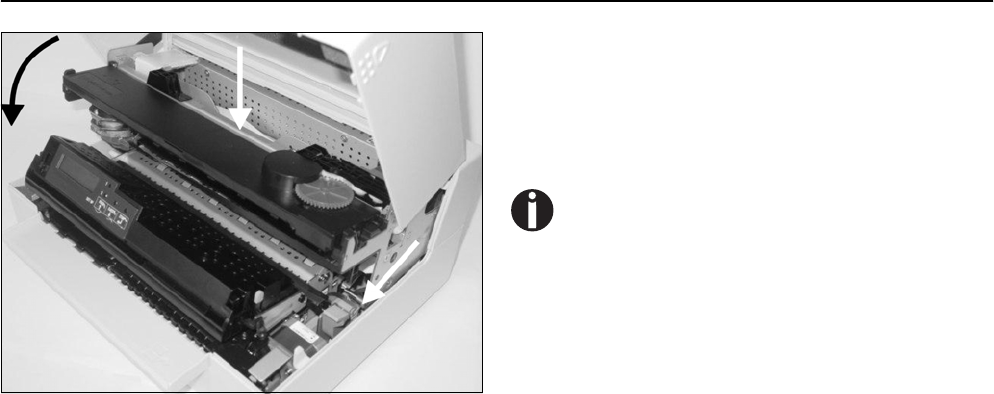
Close the main frame by pressing the colored section in the
middle of the frame as shown and ensure both left and right
hand sides of the frames are fully latched.
Close the cover. The printer is now ready to operate and to be
switched on again.
We recommend to check the printer's operation after
replacing the ribbon cassette by performing a print-
out of the parameter settings (see section “Printing
the Status Page” on page 19”).
Quick start guide Service and Maintenance
19
ENGLISH
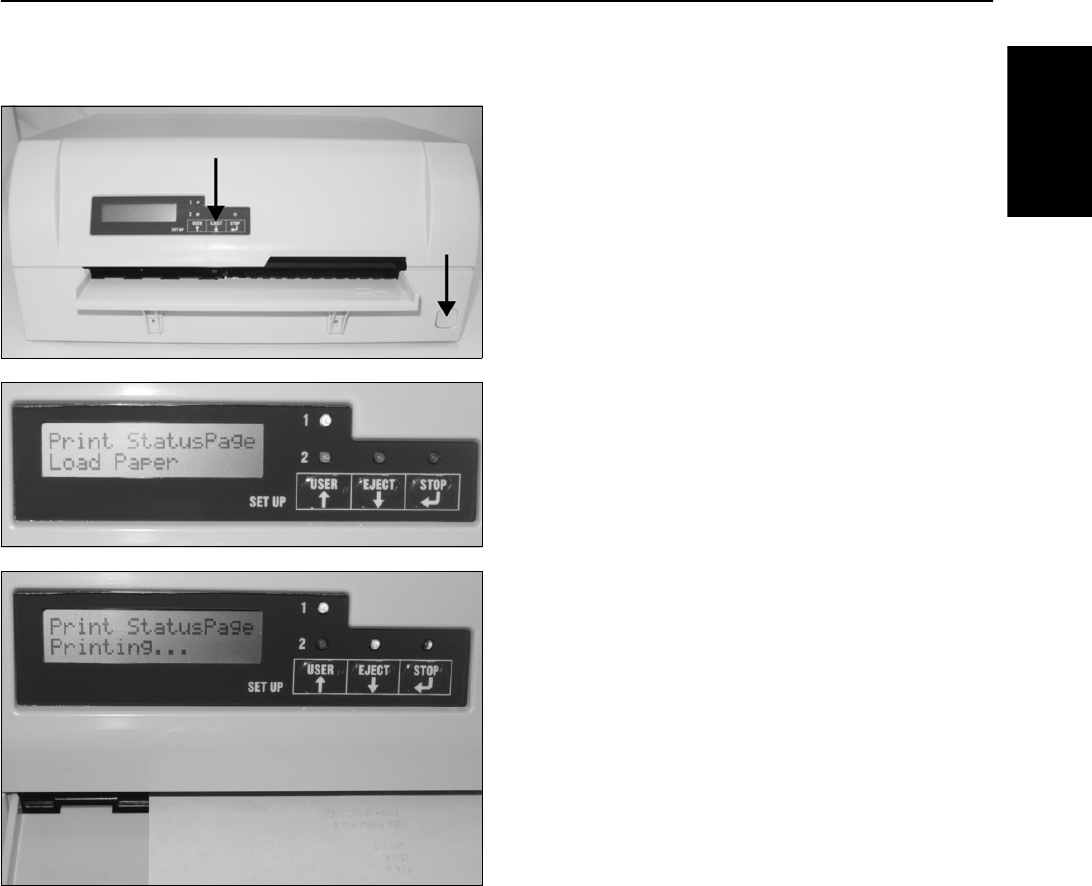
`Printing the Status Page The printer has a function that allows you to printout the current parameter
settings.
Power the printer off.
Press and hold the EJECT key while switching on the printer.
The LCD displays Print StatusPage Load Paper. Release
the EJECT key.
Insert the paper in the printer. The LCD displays Print
StatusPage Printing and the printout of the status page is
carried out.
The paper will be ejected once printing is complete.
Service and Maintenance Quick start guide
20
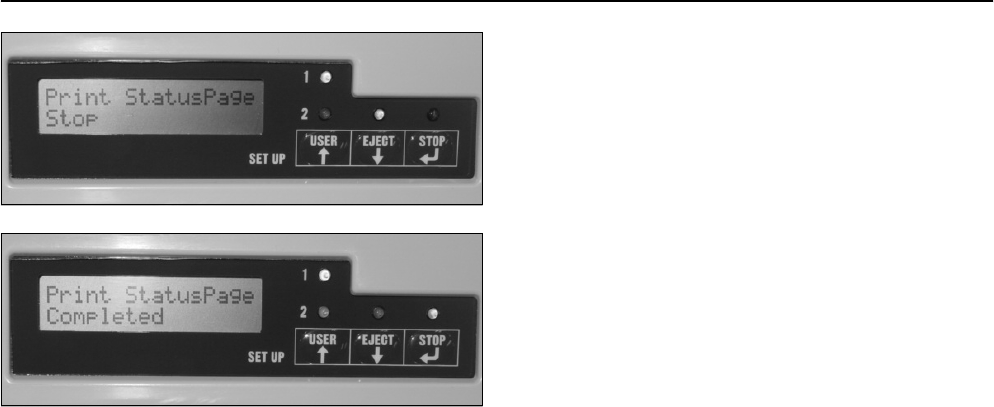
While printing, you can use the STOP key to pause the print-
ing and LCD will display Print StatusPage Stop. You can
resume the printing by pressing the STOP key again.
If EJECT key is pressed in the Pause state, paper will be
ejected and a reset will be performed.
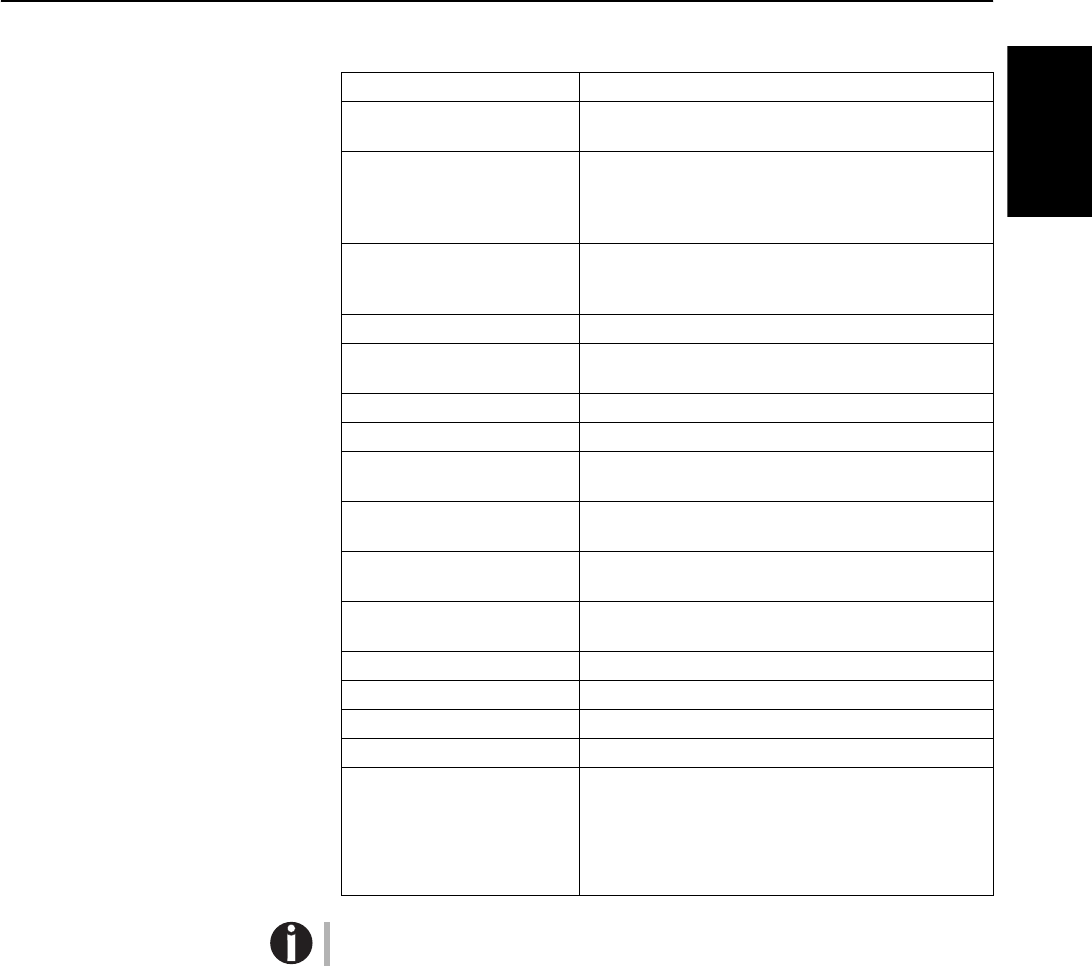
When the test printout is aborted or completed, LCD will dis-
play Print StatusPage Completed.
The Print setting mode will be ended automatically and a
Power ON reset will be performed.
Quick start guide Technical data
21
ENGLISH
Technical data
`Printer specifications
For more information on printer specifications as well as interface specifications,
refer to the User guide on the Online CD-ROM.
Printing method 24-pin Dot matrix impact printer
Character pitch 10; 12; 15; 17; 20; 24 characters/inch and
proportional type (emulation-dependent)
Line spacing Optional in microsteps
n/60 inches n = 0 to 127
n/180 inches n = 0 to 255
n/360 inches n = 0 to 255
Print width 194 characters/line at 10 cpi
112 characters/line at 12 cpi
141 characters/line at 15 cpi
Print speed LQ: 133 cps; DQ: 400 cps
Interface serial (RS232C), parallel (compatible Mode, ECP),
USB 2.0 (Full speed)
Nominal voltage 120V ± 10%, 230V ± 10%
Line frequency 50/60Hz ± 3%
Network form For use in power distribution systems with neutral and
protective earth conductors (TN)
Rated current intake Operation (maximum): US: 1.30 A; EU: 0.59 A
Standby US: 0.11 A; EU: 0.072 A
Apparent power
consumption Operation (maximum): US: 89.7 VA; EU: 93.6 VA
Standby US: 88.8 VA; EU: 11.4 VA
True output Operation (maximum): US: 70.0 W; EU: 73.0 W
Standby US: 76.9 W; EU: 78.9 W
Sound output level LWAd 7.1 dB in operation
Sound pressure level LpAm 55 dB in operation
Dimensions Height: 168 mm, Width: 378 mm, Depth: 280 mm
Weight Standard = 9,10 kg, MSR-H = 9,95 kg
Approvals DIN EN 60 950 / VDE 0805, TUV (EN 60950) / Certified
CE Mark, UL 60950 3rd Edition / C-UL (CSA C22.2 No
60950-00) new reversion, IEC 60950-1, EN 55022 :1998
(Class B), EN 55024 :1998, FCC PT 15B : 2000 (Class
B), EN61000-3-2 :2000, EN61000-3-3 :1995, Energy
Star
Technical data Quick start guide
22
`Paper specifications Only use paper that corresponds to the paper specifications and test new sorts of
paper before use.
For more information on general paper specifications, refer to the User guide on
the Online CD-ROM.
Paper specifications
for passbooks Paper width Open Book 105 to 235 mm (Horizontal pass-
book)
105 to 235 mm (Vertical pass-
book)
Paper length Open Book 140 to 210 mm (Horizontal pass-
book)
125 to 210 mm (Vertical pass-
book)
Passbook thickness 2.0 mm Max. (One cover + inner
page)
Thickness difference 1.4 mm Max.
Paper weight 75 to 120 g/m2
Book condition Recommend to be flattened care-
fully before insertion.
Paper specifications
for single and multi-
copy sheets
Paper width 70 to 240 mm
Paper length 70 to 500 mm
Paper weight Single sheet: 60 to 160 g/m2
Multi sheet: 80 to 260 g/m2
Paper Thickness Single sheet: 0.08 to 0.5 mm
Multi sheet: 0.08 to 0.5 mm
Number of Copies Original + 4 copies (Copy mode)
Recycled paper is permitted on principle.
Paper specification
for cheques for the
magnetic ink reader
The magnetic ink reader (MICR) processes cheques that
have a printing zone with magnetizable ink.
Document width 76 mm to 102 mm
Document length 152 mm to 210 mm

Quick start guide Technical data
23
ENGLISH
`Accessories Only use ribbon cassettes from the manufacturer as products from other manufac-
turers may damage the print head or the ribbon drive.
Only use print heads that are approved to prevent damage to your printer.
Accessory Order no.
Fabric ribbon in recyclable cassettes, color: black 043 393
Print head 24 needles 400 805
“All rights reserved. Translations, reprinting or copying by any means of this manual complete or in part or in any different form requires our explicit approval. We reserve
the right to make changes to this manual without notice. All care has been taken to ensure accuracy of information contained in this manual. However, we cannot accept
responsibility for any errors or damages resulting from errors or inaccuracies of information herein.”
«Tous droits réservés. Toute reproduction ou traduction de ce manuel, qu'elle soit complète, partielle ou sous une forme différente est interdite sans notre accord formel.
Nous nous réservons le droit de modifier ce manuel sans préavis. Toutes les précautions ont été prises afin d'assurer l'exactitude des informations contenues dans ce
manuel. Cependant, nous déclinons toute responsabilité pour les fautes ou dégats provenant d'erreurs ou d'inexactitudes qui seraient restées dans ce manuel.»
TRADEMARK ACKNOWLEDGEMENTS
• Centronics is a trademark of Centronics Data Computer Corporation.
• PCL and PCL6 are trademarks of Hewlett-Packard Company.
• IBM and IBM PC are trademarks of International Business Machines
Corporation.
• Apple, AppleTalk, TrueType, Laser Writer and Macintosh are trade-marks
of Apple Computer, Inc.
• Microsoft, Windows, Windows 9x, Windows 2000, Windows NT and MS-
DOS are registered trademarks of Microsoft Corporation.
• PostScript is a trademark of Adobe Systems Inc.
• All other brand or product names are trademarks of their respective
companies or organizations.
MARQUES DÉPOSÉES
• Centronics est une marque déposée de Centronics Data Computer
Corporation.
• PCL et PCL6 sont des marques déposées de Hewlett-Packard Company.
• IBM et IBM PC sont des marques déposées d’International Business
Machines Corporation.
• Apple, AppleTalk, TrueType, LaserWriter et Macintosh sont des mar-ques
déposées d’Apple Computer Inc.
• Microsoft, Windows, Windows 9x, Windows 2000, Windows NT et MS-
DOS sont des marques déposées de Microsoft Corporation.
• PostScript est une marque déposée d’Adobe Systems Inc.
• Toutes les autres marques ou noms de produit sont des marques
déposées de leur détenteur respectif.
TALLYGENICOM REPRESENTATIVES
© June 2005 TallyGenicom Computerdrucker GmbH 043 398a
U.S.A.
TallyGenicom
4500 Daly Drive, Suite 100
Chantilly, VA 20151
U.S.A.
Phone: +1 703 633 8700
Fax: +1 703 222 7629
http://www.tallygenicom.com
UNITED KINGDOM
TallyGenicom Limited
Rutherford Road
Basingstoke, Hampshire
RG24 8PD
England, U.K.
Phone: +44 870 872 2888
Fax: +44 870 872 2889
http://www.tallygenicom.co.uk
SPAIN
TallyGenicom SRL
Joaquin Lorenzo 4, Local
28033 Madrid
España
Phone: +34 902 196 183
Fax: +34 913 739 943
http://www.tallygenicom.es
SINGAPORE
TallyGenicom Pte. Ltd
63 Hillview Avenue
#08-22, Lam Soon Industrial Building
Singapore 669569
Phone: +65 6760 8833
Fax: +65 6760 1066
http://www.tallygenicom.com.sg
GERMANY
TallyGenicom
Computerdrucker GmbH
Postfach 2969
D-89019 Ulm
Deutschland
Tel.: +49 731 2075 0
Fax: +49 731 2075 100
http://www.tallygenicom.de
ITALY
TallyGenicom S.R.L.
Via Borsini 6
I-20094 Corsico (MI)
Italia
Tel.: +39 02 48608 1
Fax: +39 02 48601 141
http://www.tallygenicom.it
CANADA
TallyGenicom
125 Traders Boulevard, 9
Missisauga, Ontario L4Z 2E5
Canada
Phone: +1 905 8904646
Fax: +1 905 8904567
http://www.tallygenicom.com
MALAYSIA
TallyGenicom Sdn. Bhd.
Wisma KT, Suite 3.02
No 14 Jalan 19/1
46300 Petaling Jaya
Selangor Darul Ehsan
Malaysia
Phone: +3 7625 1988
Fax: +3 7625 2688
http://www.tallygenicom.com.my
FRANCE
TallyGenicom S.A.
19 avenue de L'lle Saint Martin
F-92237 Nanterre Cedex
France
Tél.: +33 1 41 30 11 00
Fax: +33 1 41 30 11 10
http://www.tallygenicom.fr
AUSTRIA
TallyGenicom Ges.m.b.H.
Eduard-Kittenberger-Gasse 95B
A-1232 Wien
Austria
Tel.: +43 1 863 40 0
Fax: +43 1 863 40 240
http://www.tallygenicom.co.at
Russian Federation and C.I.S.
TallyGenicom Representative
Park Place Moscow
Office D-206
Leninsky Prospekt 113/1
117198 Moscow
Russian Federation
Phone: +7 095 956 56 40
Fax: +7 095 956 56 41
http://www.tallygenicom.ru