TRENDNET TEW656BRG 3G Mobile Wireless N Router User Manual English TEW 656BRG 1 01
TRENDNET, Inc. 3G Mobile Wireless N Router English TEW 656BRG 1 01
TRENDNET >
Contents
- 1. Manual 1
- 2. Manual 2
- 3. Hanging Clip guide
Manual 1

Table of Contents
Version 04.05.2010
English 1
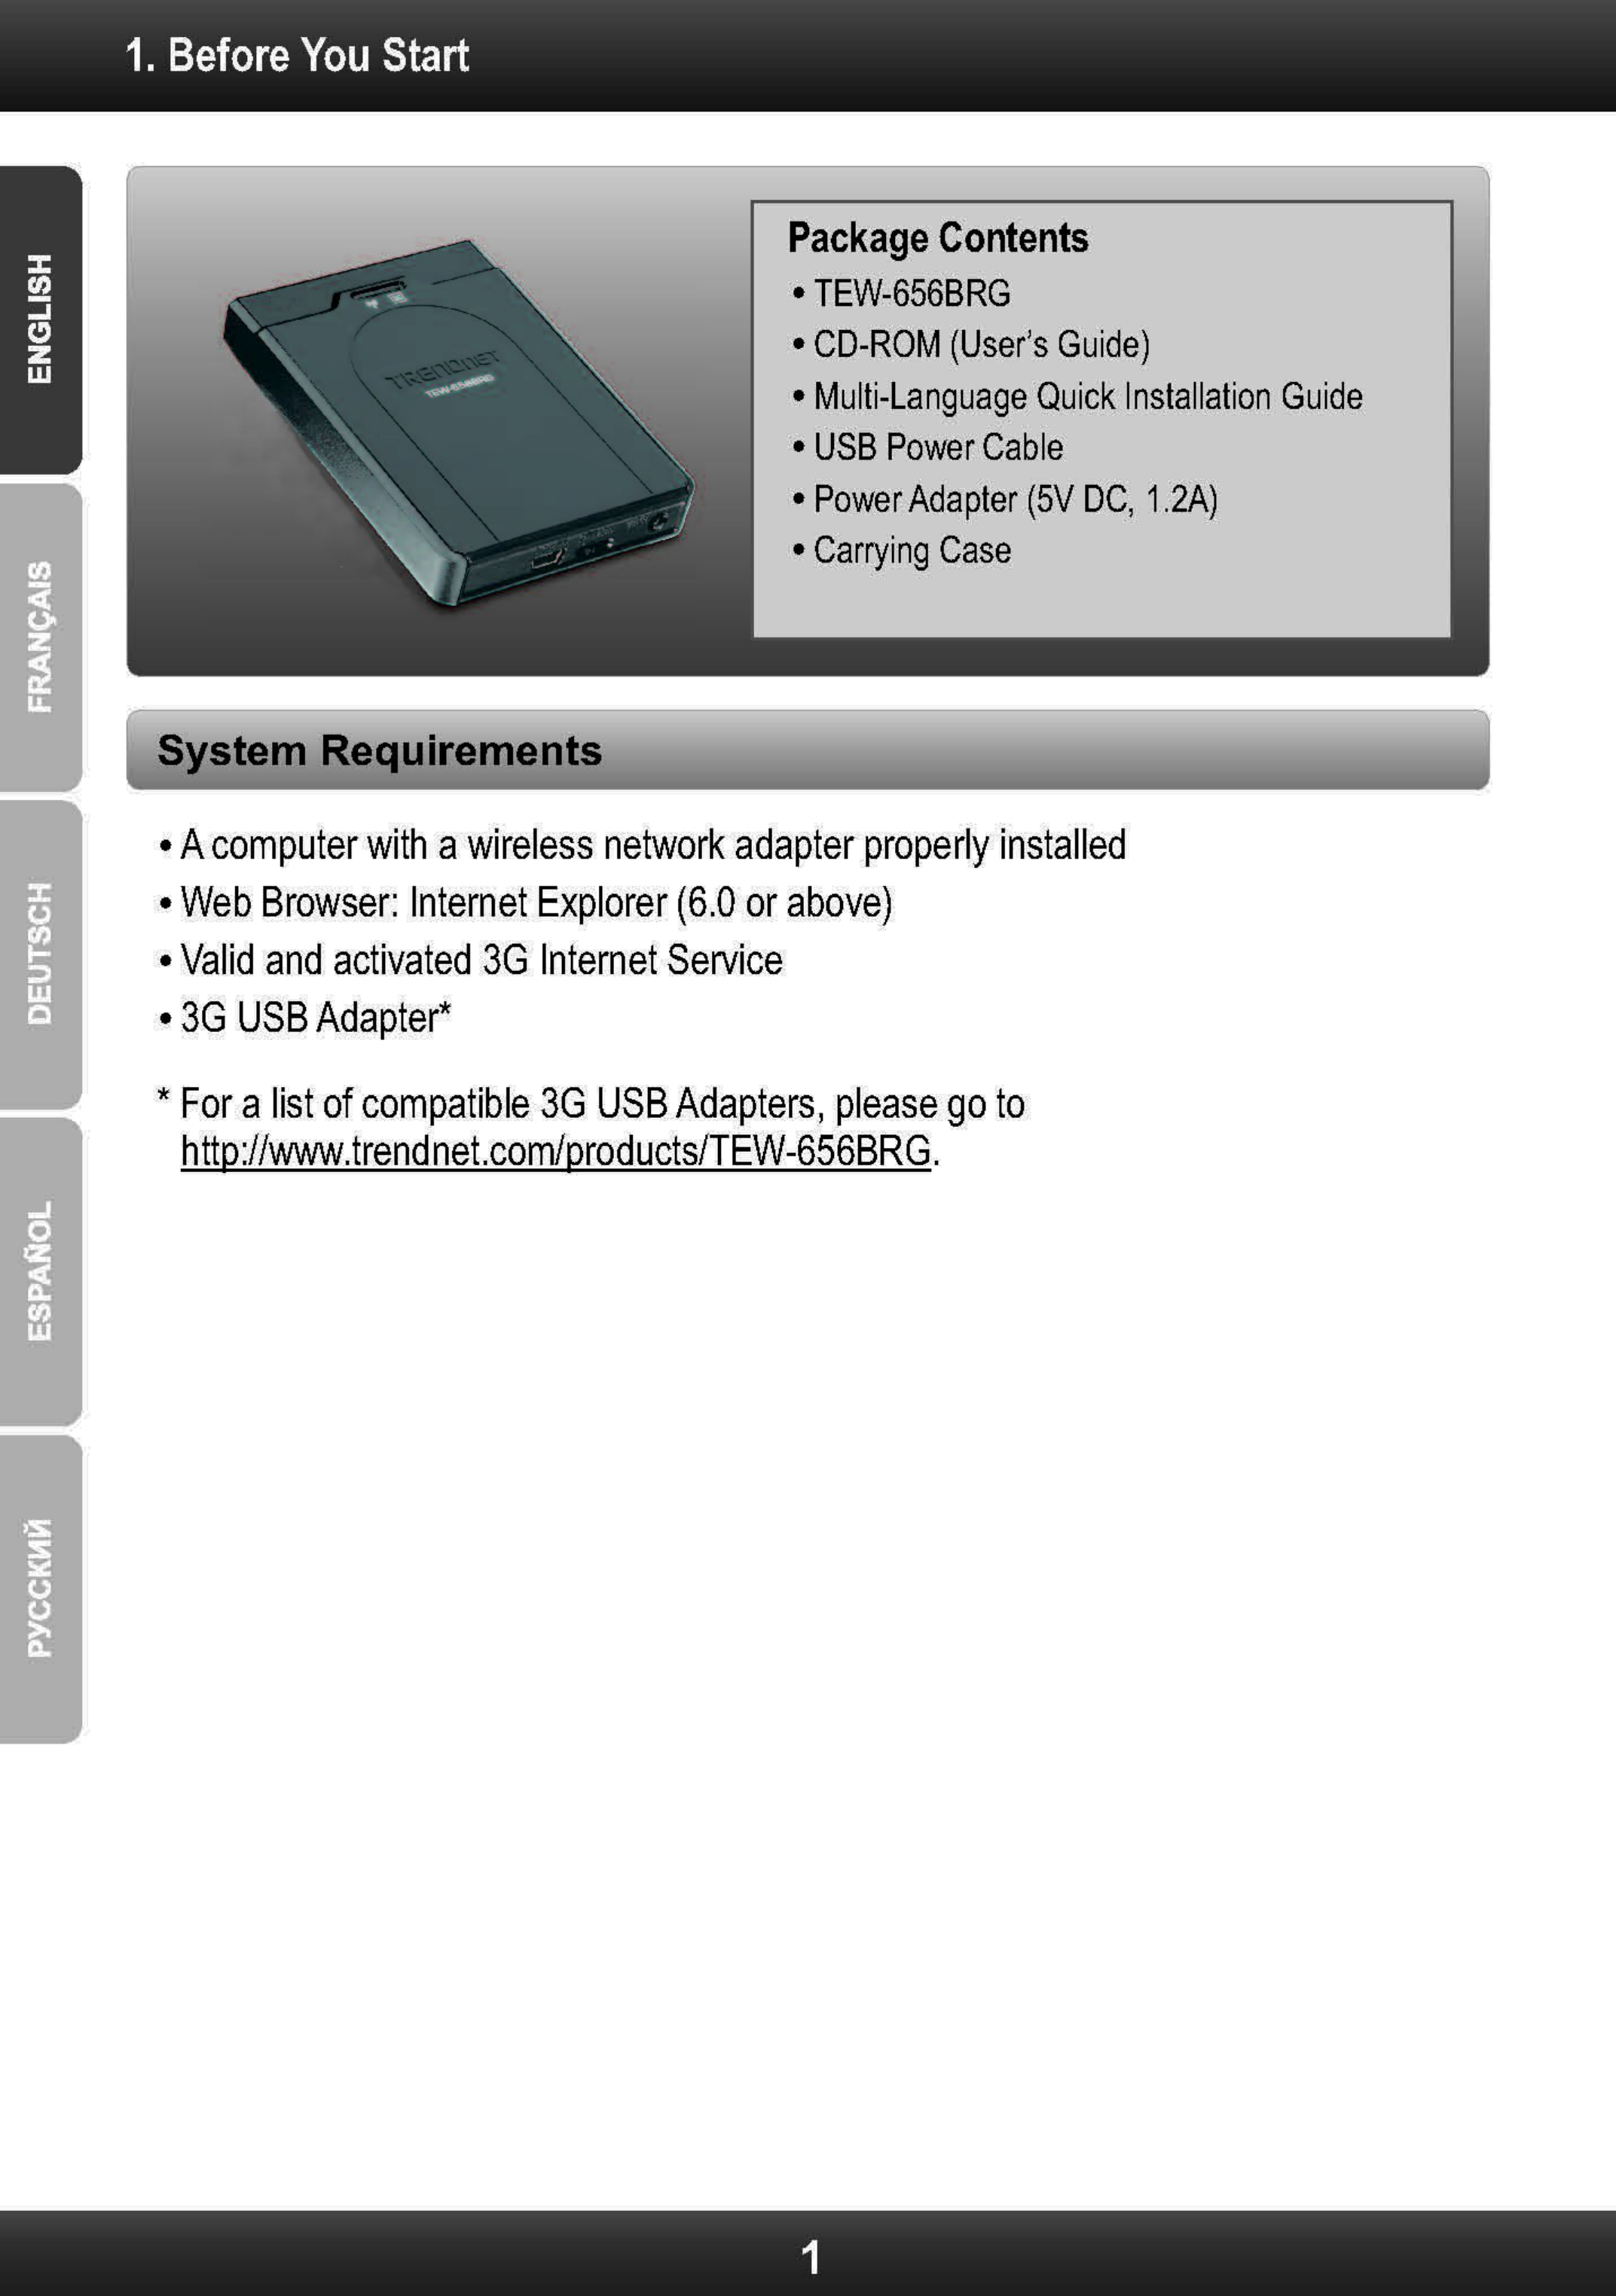
1. Before You Start
2. Hardware Installation 3
3. Configure the TEW-656BRG 4
4. LEDs 8
1
Troubleshooting 9
Wireless Tips 11
2
During the installation of the TEW-656BRG, the Setup Wizard will automatically detect
your ISP connection type. If the router cannot detect your ISP connection type, you can
manually specify the connection type. Please contact your ISP and ensure you have all
the information for one of the following connection types:
1. 3G (Auto Detection)
Pin Code (Optional): ________________
2. 3G (Manual)
Country: ________________
Telecom: ________________
3G Network: ________________
APN (Optional): ________________
Pin Code (Optional): ________________
Dialed Number: ________________
Account (Optional): ________________
Password (Optional): ________________
3. iBurst
Account: _________
Password: ________________
Primary DNS:_____. _____._____._____
Secondary DNS:_____. _____._____._____
Service Name (Optional): ________________
Assigned IP Address (Optional): ________________
Collect Internet Service Provider (ISP) Information
3
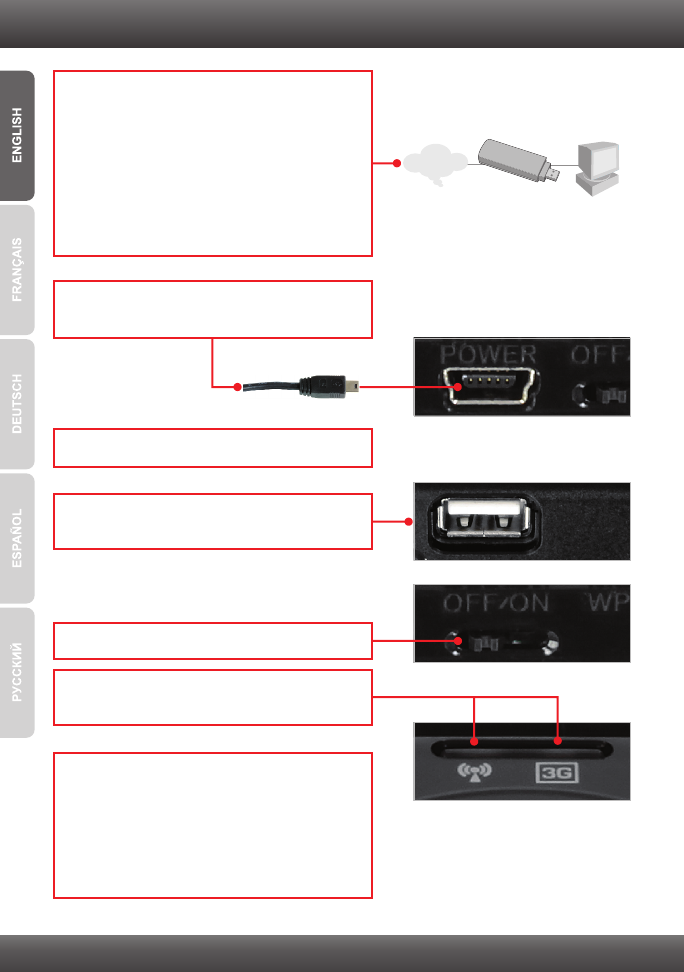
2. Hardware Installation
1. Verify that you have an Internet connection
when connecting the 3G USB adapter to your
computer. Open your browser (e.g. Internet
Explorer) and type in a URL (e.g.
http://www.trendnet.com) in the address bar.
Note: You may need to activate your Internet
connection. Please contact your ISP for more
information.
3. Connect the power adapter to a power outlet.
3G USB Adapter
Internet
7. Connect your computer wirelessly to the
TEW-656BRG. The default SSID (Wireless
Network Name) of the TEW-656BRG is
TRENDnet656. Contact the manufacturer of
your wireless network adapter and make sure
the wireless network adapter is configured with
the proper SSID.
6. Verify that the following panel lights are on:
Wireless (Blue) and 3G (USB) (Blue).
5. Move the Power switch to the On position.
4. Connect your 3G USB adapter to the USB port
on the TEW-656BRG.
2. Connect the Mini-USB end of the power
adapter to the TEW-656BRG.
’
4
Note:
Gather all information related to your Internet Connection before you start. If necessary,
contact your Internet Service Provider (ISP).
3. Configure the TEW-656BRG
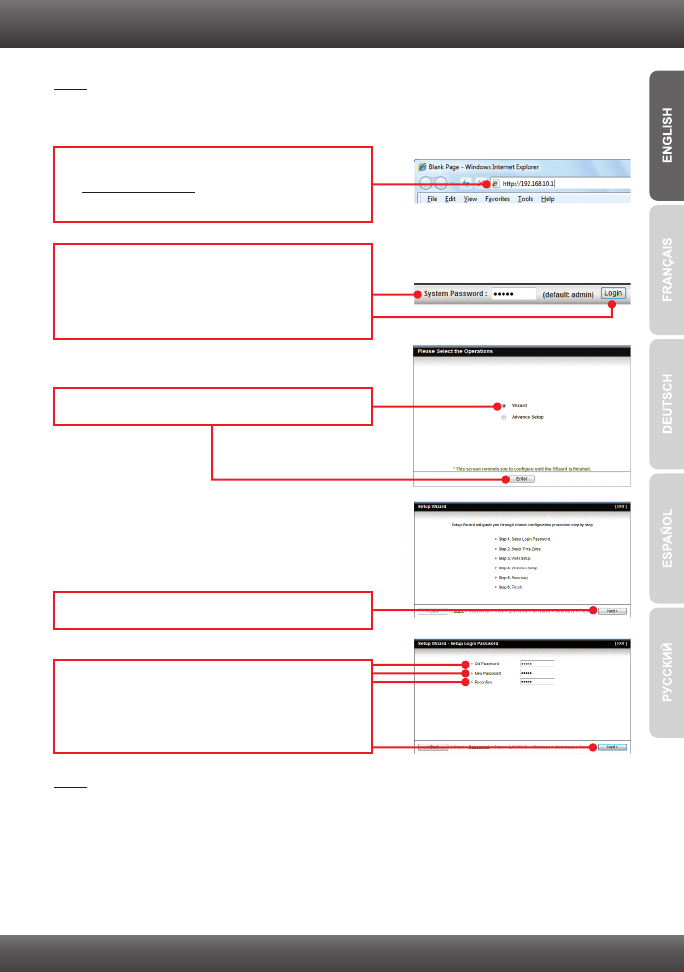
1. Open your web browser, type
http://192.168.10.1 in the Address bar, and
then press Enter.
2. Enter the System Password, and then click
Login. By default:
System Password: admin
3. Select Wizard and then click Enter.
4. Click Next.
5. Enter the Old password (By default, the
Password is admin), enter a New Password,
reconfirm the New Password and then click
Next.
Note:
1. Setting a password prevents other users from accessing the TEW-656BRG
configuration.
2. It is recommended that you enter a new password. If you decide to change this
setting, please write down the new password.
3. Password is limited to up to 8 characters.
5
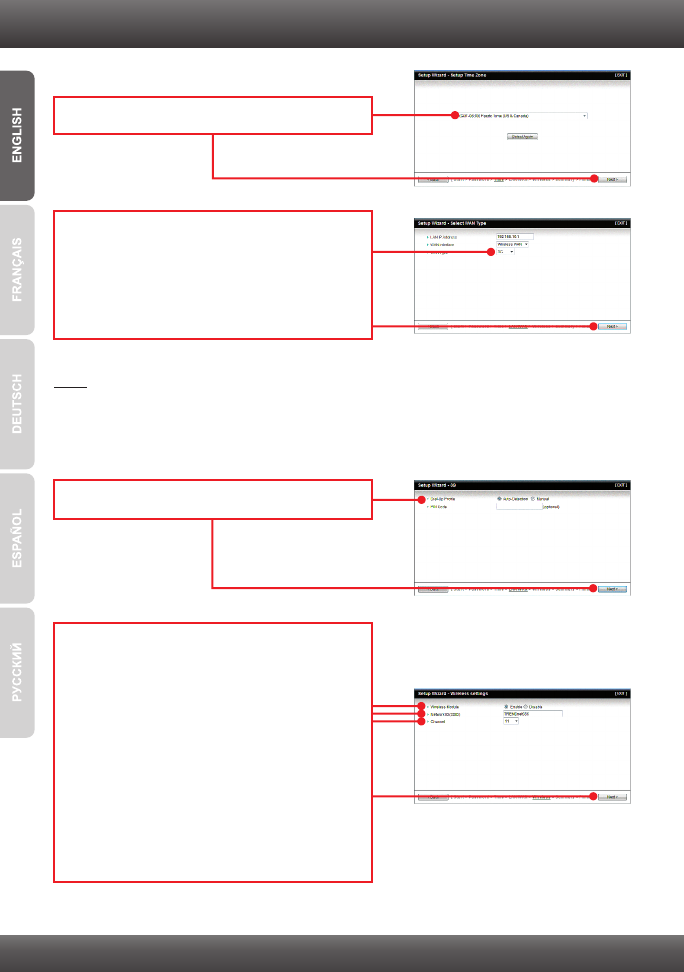
7. Select 3G or iBurst (the example shown is for
3G). Then click Next. Configure the settings
based on information provided by your ISP.
Follow the wizard instructions to complete the
configuration. Note: Each WAN type may have
different options.
6. Select your Time Zone and then click Next.
Note:
The example below is for Auto-detection. If the Setup Wizard could not automatically
detect your Internet connection, select Manual and input the information using the
information provided by your ISP.
9. You will need to configure the following:
Wireless Module (Enable/Disable): The default
setting (Enable) must be selected.
Network ID (SSID): The SSID is the wireless
network name of your wireless network (e.g.
wireless router or access point). Enter a unique
SSID. Do not use anything that would be
identifying like “Smith Family Network”.
Choose something that you would easily
identify when searching for available wireless
networks.
Channel: In most cases, the default setting
should be fine.
8. Select Auto-Detection and then click Next.
6
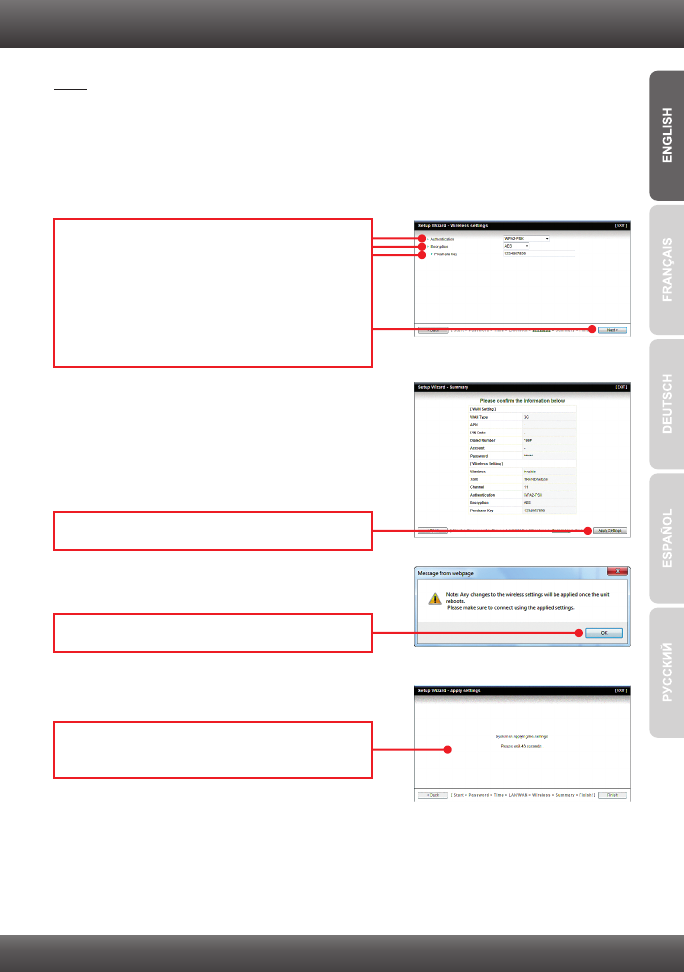
Note:
1. To protect your network from any unauthorized access it is recommended to enable
wireless encryption.
2. The example below is for WPA2-PSK (AES) security. If you select WPA-PSK or
WPA2-PSK, make sure your wireless adapters support WPA or WPA2. If your
wireless adapters do not support WPA or WPA2, then select WEP.
10. Select the desired Authentication mode,
select the desired Encryption type, enter
characters for your Pre-Shared key and then
click Next. For WPA-PSK or WPA2-PSK, the
Pre-Shared Key must be between 8 and 63
ASCII or 64 HEX characters. Make sure to
copy down the Pre-Shared Key.
11. Click Apply Settings.
12. Click OK.
13. Wait around 40 seconds while the
TEW-656BRG reboots.
7
Your Configuration is now complete
Register Your Product
To ensure the highest level of customer service and support, please take a moment to
register your product Online at: www.trendnet.com/register
Thank you for choosing TRENDnet
For detailed information regarding the TEW-656BRG’s configuration and advanced settings,
please refer to the Troubleshooting section, User's Guide CD-ROM, or TRENDnet's website
at http://www.trendnet.com.
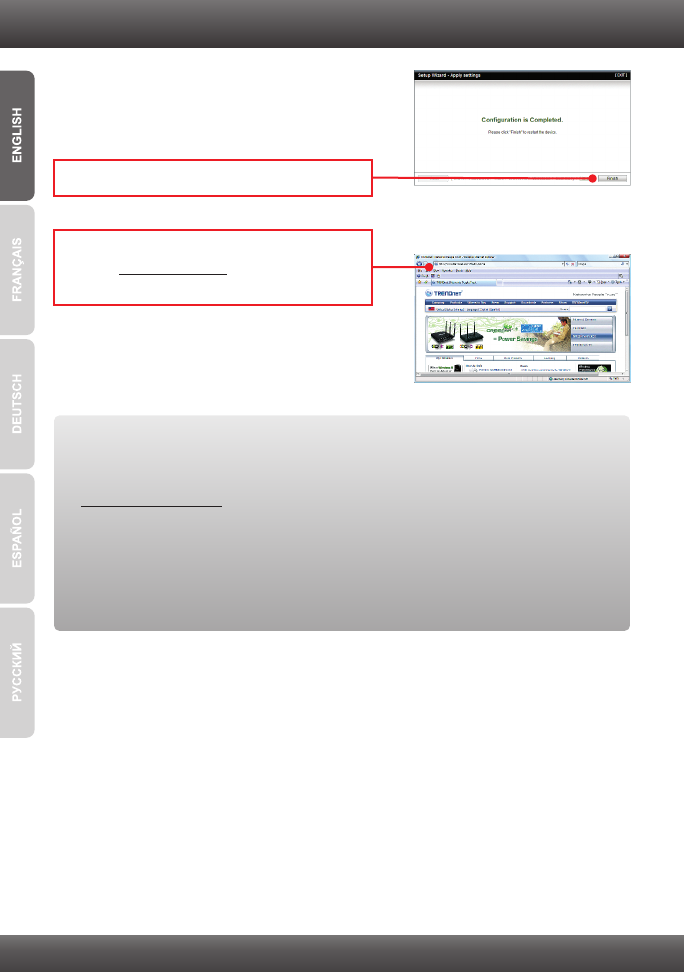
14. Click Finish.
15. Open up your browser and enter in a URL
(e.g. www.trendnet.com) to verify that you
have Internet connection.
8
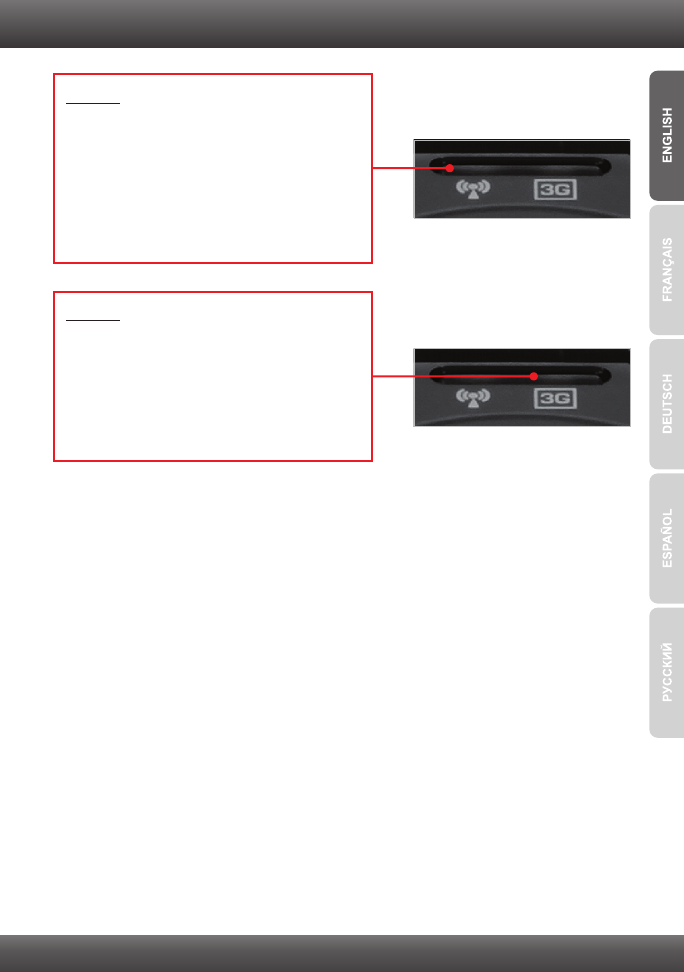
4. LEDs
Wireless
Blue (Solid):
Wireless is enabled.
Blue (Blinking):
Activity is occurring from this link.
Not Illuminated:
Wireless is not enabled or no power is being
supplied to the TEW-656BRG.
3G(USB)
Blue (Solid):
3G connection is established
Blue (Blinking):
Activity is occurring from this link
Not Illuminated:
3G connection is not established.