TRIMBLE EUROPE 802168 MobileMapper 20, WCDMA/GSM/GPS Portable Receiver User Manual NZI802168 09x
TRIMBLE NANTES S.A.S. MobileMapper 20, WCDMA/GSM/GPS Portable Receiver NZI802168 09x
User Manual

Getting Started Guide
MobileMapper
®20

CopyrightNotice
Copyright2013TrimbleNavigationLimited.Allrights
reserved.
Trademarks
Allproductandbrandnamesmentionedinthis
publicationaretrademarksoftheirrespectiveholders.
SPECTRAPRECISIONLIMITEDWARRANTYTERMSAND
CONDITIONS
PRODUCTLIMITEDWARRANTY‐Subjecttothefollowing
termsandconditions,SpectraPrecisionwarrantsthatfor
aperiodofone(1)yearfromdateofpurchasethis
SpectraPrecisionproduct(the“Product”)will
substantiallyconformtoSpectraPrecision’spublicly
availablespecificationsfortheProductandthatthe
hardwareandanystoragemediacomponentsofthe
Productwillbesubstantiallyfreefromdefectsin
materialsandworkmanship.
PRODUCTSOFTWARE‐Productsoftware,whetherbuilt
intohardwarecircuitryasfirmware,providedasa
standalonecomputersoftwareproduct,embeddedin
flashmemory,orstoredonmagneticorothermedia,is
licensedsolelyforusewithorasanintegralpartofthe
Productandisnotsold.Ifaccompaniedbyaseparateend
userlicenseagreement(“EULA”),useofanysuch
softwarewillbesubjecttothetermsofsuchenduser
licenseagreement(includinganydifferinglimited
warrantyterms,exclusions,andlimitations),whichshall
controloverthetermsandconditionssetforthinthis
limitedwarranty.
SOFTWAREFIXES‐Duringthelimitedwarrantyperiod
youwillbeentitledtoreceivesuchFixestotheProduct
softwarethatSpectraPrecisionreleasesandmakes
commerciallyavailableandforwhichitdoesnotcharge
separately,subjecttotheproceduresfordeliveryto
purchasersofSpectraPrecisionproductsgenerally.Ifyou
havepurchasedtheProductfromaSpectraPrecision
AuthorizedDistributionPartnerratherthanfromSpectra
Precisiondirectly,SpectraPrecisionmay,atitsoption,
forwardthesoftwareFixtotheSpectraPrecision
AuthorizedDistributionPartnerforfinaldistributionto
you.MinorUpdates,MajorUpgrades,newproducts,or
substantiallynewsoftwarereleases,asidentifiedby
SpectraPrecision,areexpresslyexcludedfromthis
updateprocessandlimitedwarranty.Receiptofsoftware
Fixesorotherenhancementsshallnotservetoextend
thelimitedwarrantyperiod.
Forpurposesofthiswarrantythefollowingdefinitions
shallapply:(1)“Fix(es)”meansanerrorcorrectionor
otherupdatecreatedtofixaprevioussoftwareversion
thatdoesnotsubstantiallyconformtoitsSpectra
Precisionspecifications;(2)“MinorUpdate”occurswhen
enhancementsaremadetocurrentfeaturesina
softwareprogram;and(3)“MajorUpgrade”occurswhen
significantnewfeaturesareaddedtosoftware,orwhen
anewproductcontainingnewfeaturesreplacesthe
furtherdevelopmentofacurrentproductline.Spectra
Precisionreservestherighttodetermine,initssole
discretion,whatconstitutesaFix,MinorUpdate,or
MajorUpgrade.
WARRANTYREMEDIES‐IftheSpectraPrecisionProduct
failsduringthewarrantyperiodforreasonscoveredby
thislimitedwarrantyandyounotifySpectraPrecisionof
suchfailureduringthewarrantyperiod,SpectraPrecision
willrepairORreplacethenonconformingProductwith
new,equivalenttonew,orreconditionedpartsor
Product,ORrefundtheProductpurchasepricepaidby
you,atSpectraPrecision’soption,uponyourreturnof
theProductinaccordancewithSpectraPrecision’s
productreturnproceduresthenineffect.
HOWTOOBTAINWARRANTYSERVICE‐Toobtain
warrantyservicefortheProduct,pleasecontactyour
localSpectraPrecisionAuthorizedDistributionPartner.
Alternatively,youmaycontactSpectraPrecisionto
requestwarrantyserviceat+1‐303‐323‐4100(24hoursa
day)ore‐mailyourrequestto
support@spectraprecision.com.Pleasebepreparedto
provide:
• yourname,address,andtelephonenumbers
• proofofpurchase
• acopyofthisSpectraPrecisionwarranty
• adescriptionofthenonconformingProduct
includingthemodelnumber
• anexplanationoftheproblem
Thecustomerservicerepresentativemayneed
additionalinformationfromyoudependingonthe
natureoftheproblem.
WARRANTY EXCLUSIONS AND DISCLAIMER‐
ThisProductlimitedwarrantyshallonlyapplyinthe
eventandtotheextentthat(a)theProductisproperly
andcorrectlyinstalled,configured,interfaced,
maintained,stored,andoperatedinaccordancewith
SpectraPrecision’sapplicableoperator'smanualand
specifications,and;(b)theProductisnotmodifiedor
misused.ThisProductlimitedwarrantyshallnotapplyto,
andSpectraPrecisionshallnotberesponsiblefor,defects
orperformanceproblemsresultingfrom(i)the
combinationorutilizationoftheProductwithhardware
orsoftwareproducts,information,data,systems,
interfaces,ordevicesnotmade,supplied,orspecifiedby
SpectraPrecision;(ii)theoperationoftheProductunder
anyspecificationotherthan,orinadditionto,Spectra
Precisionstandardspecificationsforitsproducts;(iii)the
unauthorizedinstallation,modification,oruseofthe
Product;(iv)damagecausedby:accident,lightningor
otherelectricaldischarge,freshorsaltwaterimmersion
orspray(outsideofProductspecifications);orexposure
toenvironmentalconditionsforwhichtheProductisnot
intended;(v)normalwearandtearonconsumableparts
(e.g.,batteries);or(vi)cosmeticdamage.Spectra
Precisiondoesnotwarrantorguaranteetheresults
obtainedthroughtheuseoftheProduct,orthat
softwarecomponentswilloperateerrorfree.
NOTICEREGARDINGPRODUCTSEQUIPPEDWITH
TECHNOLOGYCAPABLEOFTRACKINGSATELLITE
SIGNALSFROMSATELLITEBASEDAUGMENTA‐
TIONSYSTEMS(SBAS)(WAAS/EGNOS,AND
MSAS),OMNISTAR,GPS,MODERNIZEDGPSORGLONASS
SATELLITES,ORFROMIALABEACON
SOURCES:SPECTRAPRECISIONISNOTRESPON‐
SIBLEFORTHEOPERATIONORFAILUREOFOPERATIONOF
ANYSATELLITEBASEDPOSITIONINGSYSTEMORTHE
AVAILABILITYOFANYSATELLITEBASEDPOSITIONING
SIGNALS.
THEFOREGOINGLIMITEDWARRANTYTERMS

STATESPECTRAPRECISION’SENTIRELIABILITY,
ANDYOUREXCLUSIVEREMEDIES,RELATINGTO
THESPECTRAPRECISIONPRODUCT.EXCEPTAS
OTHERWISEEXPRESSLYPROVIDEDHEREIN,THE
PRODUCTANDACCOMPANYINGDOCUMENTATIONAND
MATERIALSAREPROVIDED“AS‐IS”
ANDWTHOUTEXPRESSORIMPLIEDWARRANTYOFANY
KIND,BYEITHERSPECTRAPRECISION
ORANYONEWHOHASBEENINVOLVEDINITS
CREATION,PRODUCTION,INSTALLATION,ORDIS‐
TRIBUTION,INCLUDING,BUTNOTLIMITEDTO,
THEIMPLIEDWARRANTIESOFMERCHANTABILI‐
TYANDFITNESSFORAPARTICULARPURPOSE,
TITLE,ANDNONINFRINGEMENT.THESTATEDEX‐
PRESSWARRANTIESAREINLIEUOFALLOBLI‐
GATIONSORLIABILITIESONTHEPARTOF
SPECTRAPRECISIONARISINGOUTOF,ORIN
CONNECTIONWITH,ANYPRODUCT.BECAUSE
SOMESTATESANDJURISDICTIONSDONOTALLOW
LIMITATIONSONDURATIONORTHEEXCLU‐
SIONOFANIMPLIEDWARRANTY,THEABOVE
LIMITATIONMAYNOTAPPLYORFULLYAPPLYTOYOU.
LIMITATIONOFLIABILITY‐SPECTRAPRECISION’SENTIRE
LIABILITYUNDERANYPROVI‐
SIONHEREINSHALLBELIMITEDTOTHE
AMOUNTPAIDBYYOUFORTHEPRODUCT.TO
THEMAXIMUMEXTENTPERMITTEDBYAPPLICA‐
BLELAW,INNOEVENTSHALLSPECTRAPRECI‐
SIONORITSSUPPLIERSBELIABLEFORANY
INDIRECT,SPECIAL,INCIDENTAL,ORCONSEQUENTIAL
DAMAGEWHATSOEVERUNDERANY
CIRCUMSTANCEORLEGALTHEORYRELATINGINANYWAY
TOTHEPRODUCTS,SOFTWARE,ANDACCOMPANYING
DOCUMENTATIONANDMATERIALS,
(INCLUDING,WITHOUTLIMITATION,DAMAGES
FORLOSSOFBUSINESSPROFITS,BUSINESS
INTERRUPTION,LOSSOFDATA,ORANYOTHER
PECUNIARYLOSS),REGARDLESSOFWHETHER
SPECTRAPRECISIONHASBEENADVISEDOFTHE
POSSIBILITYOFANYSUCHLOSSANDREGARD‐
LESSOFTHECOURSEOFDEALINGWHICHDEVELOPSOR
HASDEVELOPEDBETWEENYOUANDSPECTRA
PRECISION.BECAUSESOMESTATES
ANDJURISDICTIONSDONOTALLOWTHEEXCLU‐
SIONORLIMITATIONOFLIABILITYFORCONSE‐
QUENTIALORINCIDENTALDAMAGES,THEABOVE
LIMITATIONMAYNOTAPPLYORFULLYAPPLYTOYOU.
PLEASENOTE:THEABOVESPECTRAPRECISION
WARRANTYPROVISIONSWILLNOTAPPLYTOPRODUCTS
PURCHASEDINTHOSEJURISDICTIONS(E.G.,MEMBER
STATESOFTHEEUROPEAN
ECONOMICAREA)INWHICHPRODUCTWARRAN‐
TIESARETHERESPONSBILITYOFTHELOCAL
SPECTRAPRECISIONAUTHORIZEDDISTRIBUTION
PARTNERFROMWHOMTHEPRODUCTSARE
ACQUIRED.INSUCHACASE,PLEASECONTACT
YOURLOCALSPECTRAPRECISIONAUTHORIZED
DISTRIBUTIONPARTNERFORAPPLICABLEWARRANTY
INFORMATION.
OFFICIALLANGUAGE‐THEOFFICIALLANGUAGE
OFTHESETERMSANDCONDITIONSISENGLISH.
INTHEEVENTOFACONFLICTBETWEENENGLISHAND
OTHERLANGUAGEVERSIONS,THEENGLISHLANGUAGE
SHALLCONTROL.
REGISTRATION‐To receiveinformationregarding
updatesandnewproducts,pleasecontactyourlocal
SpectraPrecisionAuthorizedDistributionPartneror
visittheSpectraPrecisionwebsiteat
www.spectraprecision.com/register.Uponregistration
youmayselectthenewsletter,upgrade,ornewproduct
informationyoudesire.
PRODUCTSAFETYWARNINGS
Useresponsibly.Readallinstructionsandsafety
informationbeforeusetoavoidinjury.
Themaximumoperatingambienttemperatureofthe
equipmentdeclaredbythemanufactureris60°C.
Batterysafety
Chargebatteryonlyatambienttemperaturesranging
from0°Cto60°C.
(1)CAUTION:Dangerofexplosionifbatteryisincorrectly
replaced.Replaceonlywiththesameorequivalenttype
ofbatteryrecommendedbythemanufacturer.Dispose
ofusedbatteriesaccordingtobatterymanufacturer’s
instructions.
(2)CAUTION:RISKOFEXPLOSIONIFBATTERYIS
REPLACEDBYANINCORRECTTYPE.DISPOSEOFUSED
BATTERIESACCORDINGTOTHEINSTRUCTIONS.
(2)CAUTION:RISKOFEXPLOSIONIFBATTERYIS
REPLACEDBYANINCORRECTTYPE.DISPOSEOFUSED
BATTERIESACCORDINGTOTHEINSTRUCTIONS.
Wi‐FiSafety
TurnWi‐FioffinareaswhereWi‐Fiuseisprohibitedor
whenitmaycauseinterferenceordanger,suchasin
airplaneswhileflying.
Care&Maintenance
Excessivesoundpressurefromearphonesand
headphonescancausehearingloss.
USBdatacables
CAUTION:UseofUSBdatacablesisrestrictedtostandard
USBversion2.0orhigher.PoweredUSBisprohibited.
HandStrap
Usethehandstrapresponsibly.Itisprimarilydesigned
toeasehandhelduseoftheproduct(limbworn).The
handstrapshouldnotbeusedtoattachtheproduct
nexttothebody.
TableofContents
First‐TimeUse..................................................................................................1
Unpacking...................................................................................................1
InsertingtheBatteryIntotheReceiver.......................................................1
TurningtheReceiverOn..............................................................................2
UsingtheACAdaptertoChargetheBattery..............................................3
UsingtheQuickToolbar...............................................................................4
SwitchingtheReceiverManuallytoSuspendMode...................................4
AdjustingBacklightLevelandIdleTime.....................................................4
PowerManagement....................................................................................5
SettingTime&Date....................................................................................5
RegionalSettings.........................................................................................6
LockingtheScreenandtheKeypad.............................................................6
HowtoHoldtheReceiver............................................................................7
TurningtheReceiverOff..............................................................................7
ReceiverDescription.........................................................................................8
FrontView..................................................................................................8
RearView...................................................................................................9
BottomView..............................................................................................10
GNSSToolbox..............................................................................................11
GNSSSettings.............................................................................................11
GNSSStatus.................................................................................................11
Reset...........................................................................................................12
About.............................................................................................................12
AdvancedFeatures..............................................................................................13
PowerModes.................................................................................................13
InternalBattery..............................................................................................13
USBConnection.............................................................................................15
WirelessCommunication..............................................................................16
MotionSensor...............................................................................................17
UsingtheCamera..........................................................................................18
MakingaVideo..............................................................................................20
E‐CompassCalibration.........................................................................................23
PlatformSpecifications........................................................................................24
GNSSCharacteristics.......................................................................................24
AccuracySpecifications..................................................................................24
Processor.........................................................................................................24
OperatingSystem...........................................................................................24
Communication...............................................................................................24
PhysicalCharacteristics...................................................................................25
UserInterface..........................................................................................25
Memory....................................................................................................25
EnvironmentalCharacteristics....................................................................25
PowerRequirements...................................................................................25
Multimedia&Sensors.................................................................................25
SoftwareOptions.........................................................................................25
StandardAccessories.................................................................................26
1
First-Time Use
Unpacking
Openthereceiverboxandunpackthefollowingitems:
• Receiver
• Battery
• UniversalACadapter
• USBcable
• Handstrap
• Lanyard
• Stylus
Inserting the
Battery Into
the Receiver
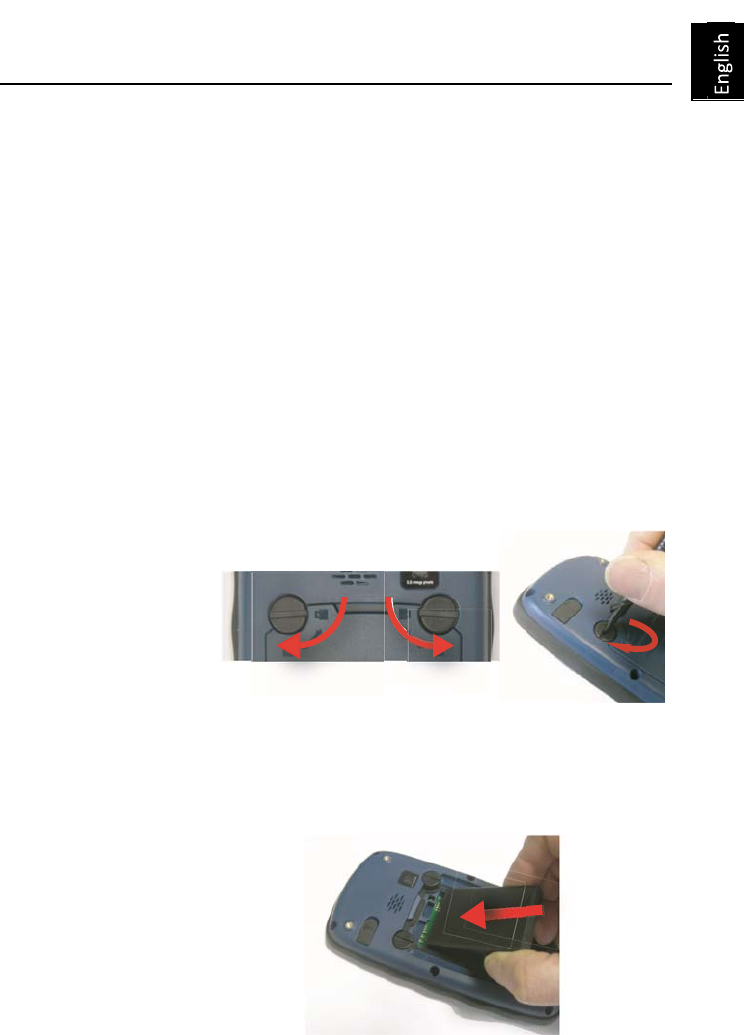
Followtheinstructionsbelow:
• Turnoverthereceiver.
• Usingthetopendofthestylus(oracoin),rotatethetwo
screwstoopenthetrapdoor:turntheleft‐handone
clockwisebyaquarterturn,andtheright‐handone
• Insertthebatteryasshown.Orientatethebatterysothatits
electriccontactscancomeintocontactwiththoseatthe
bottomofthebatterycompartment.Inserttheupperpartof
thebatteryfirst,asshown,thenpushthebatteryin.
anticlockwise,alsobyaquarterturn.
•Pullthetrapdooropen.
2
• Putthetrapdoorbackintoplacebyfirstinsertingthetwolugs
locatedatthebottomofthetrapdoor.
•
Thenpushthedooragainstthereceivercaseandrotatethe
twoscrewsbackintheirinitialpositionstosealthebattery
compartment.
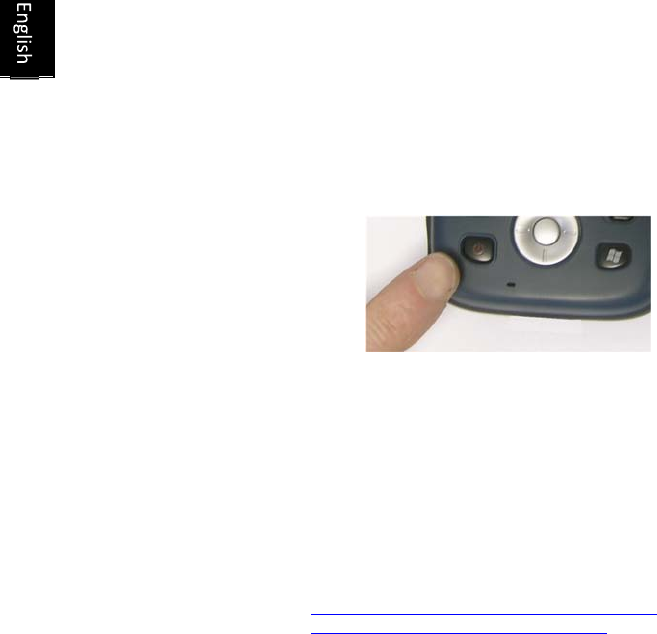
Turning the
Receiver On
•
PressthePowerkey[1]foracoupleofsecondsuntilyoufeel
avibrationinyourhand,thenreleasethekey.
Letthereceiverrunitsbootsequence.Waituntilthescreen
displaystheWindowsEmbeddedHandHeld
Homescreen.Atthisstage,youmaybeaskedtoinitializethe
receiver(screenalignment,etc.).Justfollowtheinstructions
onthescreentocompletethisstep.
TheoperatingsystemusedinthereceiverisMicrosoft
WindowsEmbeddedHandHeld.Formoreinformationon
howtousethedifferentapplications,youcanvisitthe
Microsoftwebsiteat:
http://www.microsoft.com/windowsembedded/en-
us/windowsembedded-handheld-6-5.aspx
Dependingonhowlongyourproductwasstoredinitspackage
beforebeingshippedtoyou,theremainingpowerinthebattery
maybetoolowtoallowthereceivertooperateforyourentire
workingsession.Forthisreason,thefirstthingtodoistocheck
thebatterychargestatus:
• Taponthetitlebaratthetopofthescreen.TheQuickToolbar
appearsjustunderneath.
• TapontheBatteryicon.ThisopensthePowerwindowand
simultaneouslyclosestheQuickToolbar.
ThePowerwindowshowsthestatusofthebattery(seealso
InternalBatteryonpage13).Iftheremainingpoweris
greaterthan50%,thenyoucanusethereceiverwithout
havingtochargethebatteryfirst(with50%ofremaining
charge,youcanusethereceiverforseveralhours).Skipthe
[1]
3
nextsectionandgodirectlytoAdjusting Backlight Level and
Idle Time on page 4.
• Ifitless,SpectraPrecisionrecommendsyoufirstchargethe
batteryasexplainedinUsing the AC Adapter to Charge the
Battery on page 3.
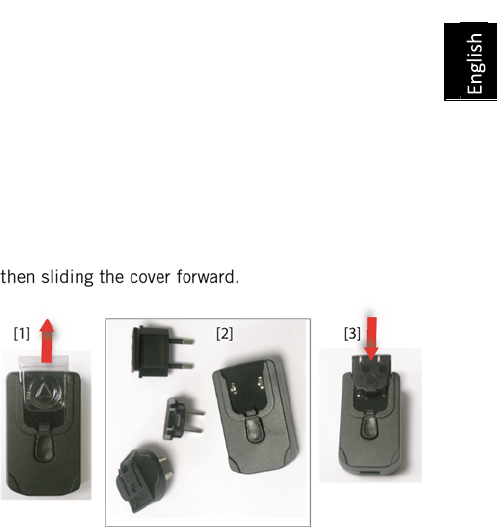
Using the AC
Adapter to
Charge the
Battery
Followtheinstructionsbelow.
•PreparetheACadapter:
–Removetheprotectivecover[1]bypushingthebutton
–Choosetheplugthatfitsyourcountry’sACoutletstandard(see
[2])andslideitintotheACadapter[3].
(A“click”mustbeheardwhenfullyinserted.)
• TaketheUSBcableprovided[4].Connecttheendfittedwitha
standardUSBconnectortotheACadapter.Connecttheother
end(fittedwithamini‐USBconnector)tothebottomsideofthe
receiver(opentheflap[5]first).

4
• ConnecttheACadaptertoanelectricoutlet.Afterabout4
seconds,thereceiverscreenlightsup.Aniconshowsup
indicatingthatthebatteryisbeingcharged.Thescreenisthen
turnedbackoffafterabout10seconds.Afterthistime,battery
chargingwillcontinueatthesamerateuntilthebatteryisfully
charged(chargingtime:4hoursmax.).
• ToreadthebatterychargingstatususingtheQuickToolbar,refer
totheinstructionsinTurning the Receiver On on page 2(seealso
Using the Quick Toolbar on page 4).
Using the Quick
Toolbar
Windowsoffersaquicktoolbarallowingyoutoquicklyaccess
frequentlyusedfunctions(zoom,Bluetooth,WiFi,phone,
soundvolume,batterypowerandclock).
•Taponthetitlebaratthetopofthescreen.Thequick
toolbarappearsjustunderneath.
simultaneouslyclosesthequicktoolbar.
Thezoomfunctionenlargesthescreencontent,whichmeans
onlypartofthescreenisshownatatime,andsoyoushould
dragthestylusoverthescreentoscrollthroughthewhole
display.
Toreturnto1:1zoom,taponthetitlebaragaintore‐openthe
quicktoolbar,thentaponthezoomfunctionagain.
[4]
[4]
[4]
[3]
[5]

5
• Runthedesiredfunctionbyjusttappingonthecorresponding
icon.Thisrunstherequestedfunctionandhotsun.
Switching the
Receiver Manually
to Suspend Mode
SwitchingthereceivertoSuspendmodeistherightthingtodo
whenyouneedtomakeashortpauseinyourworkandyouwant
tosavetheoperatingtimeofyourbattery.Youshouldnot
howeverswitchthereceivertoSuspendmodewhenitis
collectingrawdata.
InSuspendmode,thereceiverisidle,usingtheminimumo
f
energyrequiredtosavetheusecontext.
ToswitchtoSuspendmode,justpressbrieflyonthePower
button[1].Thereceiverscreenisturnedoffinstantly.
Towakeupthereceiver,justpressbrieflythesamebuttonagain.
Thiswillinstantlyswitchthescreenbackonandrestoretheuse
contextinwhichthereceiverwasbeforeenteringtheSuspend
mode.
Adjusting
Backlight Level
and Idle Time
BacklightLevel:Thescreenbacklightmaybeadjustedtomatch
theambientlightforoptimizedvisibility.Youdon’tneedthesame
levelofscreenbacklightindarkareasthanin
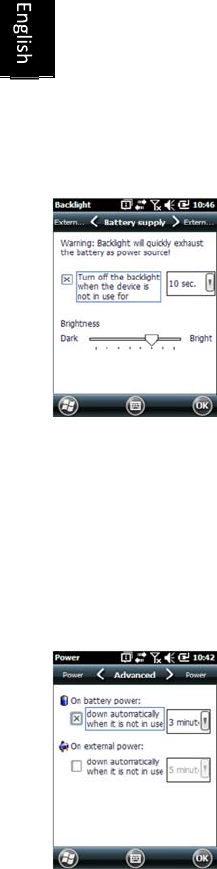
6
BacklightIdleTime:Onewayofsavingthebatteryistoavoid
thoseperiodsoftimeduringwhichthescreenbacklightis
unnecessarilyon.Asthereceiverautomaticallycountsthetime
duringwhichneitherthekeypadnorthetouchscreenisactive,
youcansetthereceivertoturnoffthebacklightautomatically
afteracertainidletime.
Followtheinstructionsbelowtosetthesetwoparameters:
• PresstheWindowskeyandtapsuccessivelyonSettings,
SystemandBacklight.
• TapontheBattery Powertab.
• Dragthecursortotherightorlefttosetthescreenbacklightto
thedesiredlevel(betweenDarkandBright).Theresulting
brightnessisobtainedwhenyoureleasethecursor.
• TicktheTurn off backlight if device...checkboxandthen
choosetheidletimebeforethebacklightisturnedoff
(10seconds,30secondsor1to5minutes)
Setting Time & Date
ofinactivity.
• PresstheWindowskeyandtapsuccessivelyonSettings,
SystemandPower.
• TapontheAdvancedtab.Thistaballowsyoutoaskforthe
receivertoswitchautomaticallytoSuspendmodeifitstays
idlefortheperiodoftimeyouchoose.Youmaychoosea
differentsettingdependingonwhetherthereceiveris
poweredfromtheinternalbatteryorfromanexternalpower
source.
• TapOKtosavethesettingsandreturntothepreviousscreen.
RememberthatthereceivershouldNOTbeallowedtoswitch
automaticallytoSuspendmodeifitisexpectedtocollectdatafor
Notethatthebacklightlevelandidletimecanbesetto
differentvaluesforwhenthereceiverisoperatedfroman
externalpowersourceinsteadofitsinternalbattery.Youcan
makethesesettingsaftertappingontheExternal Power
tab.
•TapOKtosaveallyourchangesandreturntotheprevious
screen.
Power
Management
Anotherwayofsavingthebatteryistoallowthereceiverto
switchautomaticallytoSuspendmodeafteracertainperiod

7
alongperiodoftime
andyouknowthe
keyboardwillbeleft
idleduringthistime.
• PresstheWindowskeyandtapsuccessivelyonSettings,and
Clock & Alarms.
• OntheTimetab,selectyourtimezoneandthenenterthe
localdateandtime.
• TapOKtosaveyoursettings.
Regional Settings
It’sagoodideatocustomizeyourreceiversothatitcomplieswith
anumberoflocalpreferences,suchascountry’scurrency,decimal
pointrepresentation,timeanddateformats,etc.
• PresstheWindowskeyandtapsuccessivelyonSettings,
SystemandRegional Settings.
• OntheRegiontab,selectyourcountry.
• Usetheothertabstosetyourlocalsettings:
– Numberformat
– Currencychoice
–
Timeanddateformats
•TapOKtosavethesettingsandreturntotheToday screen.
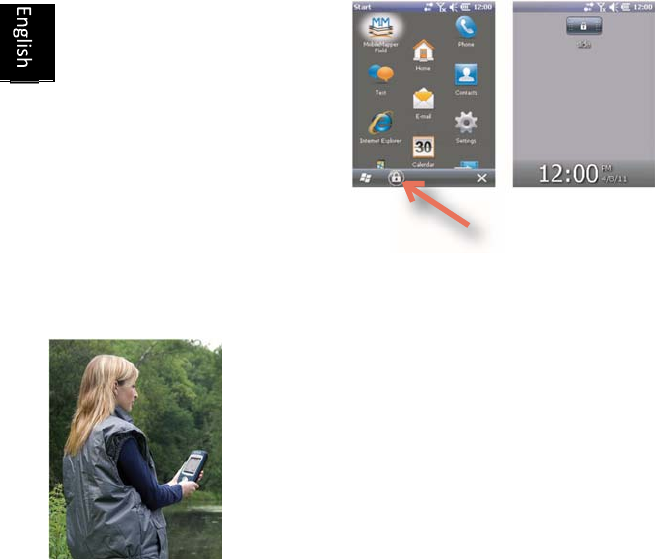
Locking the
Screen and the
Keypad
Atsomestageinyourwork,youmayneedtolockthereceiverto
makesurenouserinterventionfromthescreenorkeypadcan
affecttheworkinprogress.
• PresstheWindowskey.
• Inthetaskbaratthebottomofthescreen,taponthepadlock
icon(seescreenbelow).Asaresult,thetouchscreenandkeypad
aremadeinactive.
• Tounlockthetouchscreenandkeypad,justdragtheonscreen
slidebuttoneithertotheleftorright.Thiswilltakeyoubackto
theHomescreen.
8
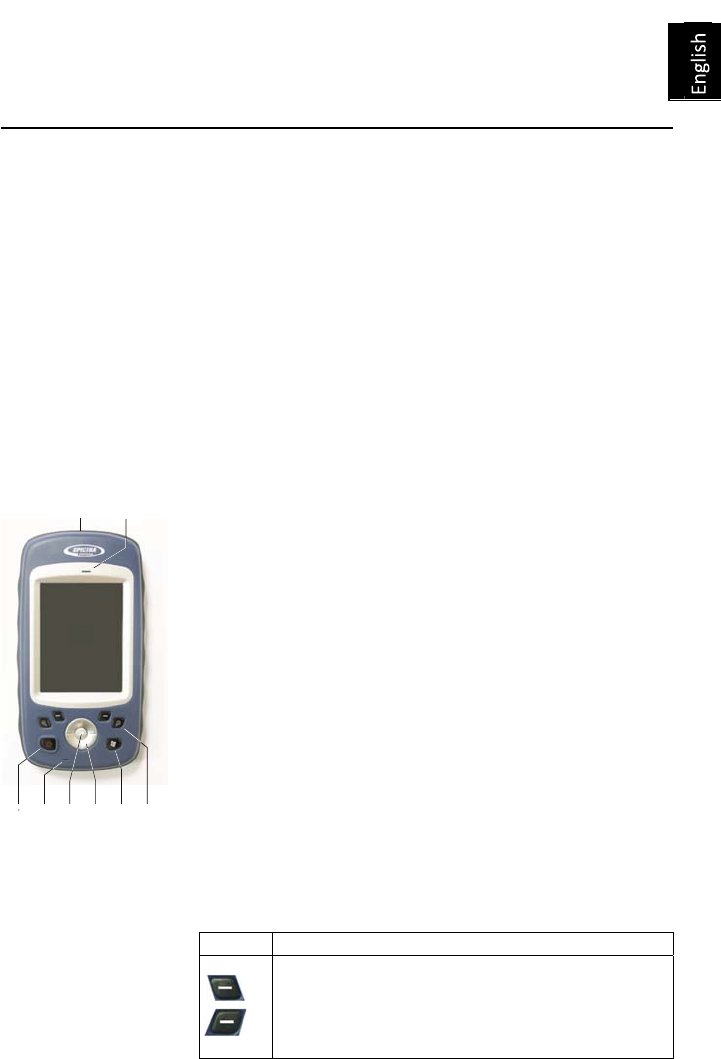
How to Hold the
Receiver
Trackingsatelliteswithyourreceiverrequiresthatyouusethereceiver
outdoorandholditinanappropriatemanner.
Thereceiverwillhavethebestviewoftheskywhenyouholditat
anangleofaround45degreesfromhorizontalandnottoocloseto
yourbody.
Youcancheckthatyourreceiveristrackingenoughsatellitesby
runningtheGNSSToolbox,andmoreparticularlytheGNSSStatus
function(seeGNSS Status on page 11).Whenenoughsatellitesare
tracked,youcanstartusingyourreceiverandrunyourapplication
software.
Turning the
Receiver Off
Afteryouhavefinishedyourwork,turnoffyourreceiverby
holdingthePowerbutton[1]presseduntilaWarning
messageisdisplayedonthescreenaskingyoutoconfirmthe
power‐offrequest.TapYes.Thereceiverwillshutdowninthe
nextcoupleofsecondsafteraduo‐tonesoundhasbeenheard.
9
Receiver Description
Front View Power Key
UsethePowerkey[1]toturnonoroffthereceiver.
Toturnonthereceiver,pressthePowerkey[1]untilyoucanfeel
avibrationinyourhand,meaningthereceiverhasstarteda
power‐onprocedure.Youcanthenreleasethekey.
ToturnoffthereceiverpressthePowerkey[1]untilasoundis
heardandawarningmessagepopsuponthescreenaskingyou
toconfirmthepowershutdownrequest.TapYesonthescreen.
Atwo‐tonesoundcanthenbeheardjustbeforethereceivershuts
down.
Windows key
TheWindowskey[2]isusedtogiveimmediateandunconditional
accesstotheWindowsStartmenu.
Display Screen
Thedisplayscreen[3]isa3.5‐inch,VGA,256‐color(18‐bitRGB)touch
screen(240x320pixels).
Scroll / Enter keys
TheEnterbutton[4]isusedtoaccepthighlightedinputandinitiate
variousfunctions.
TheScrollbutton[5]istheringaroundtheEnterbutton.Itisused
tomovethecursoronthescreen,fromonedatafieldtothenext
onaparameterscreen,fromoneoptiontoanotherinamenu,from
onegeographicallocationtoanotheronamapscreen.
Function keys
Thereceiverisfittedwithfourfunctionkeys[6].Thespecificfunction
ofeachofthemisgiveninthetablebelow.
Button Function
The keypad includes two of these buttons, one on the
right, the other on the left.
[8]
[3]
[9]
[1][7][4] [5][2][6]
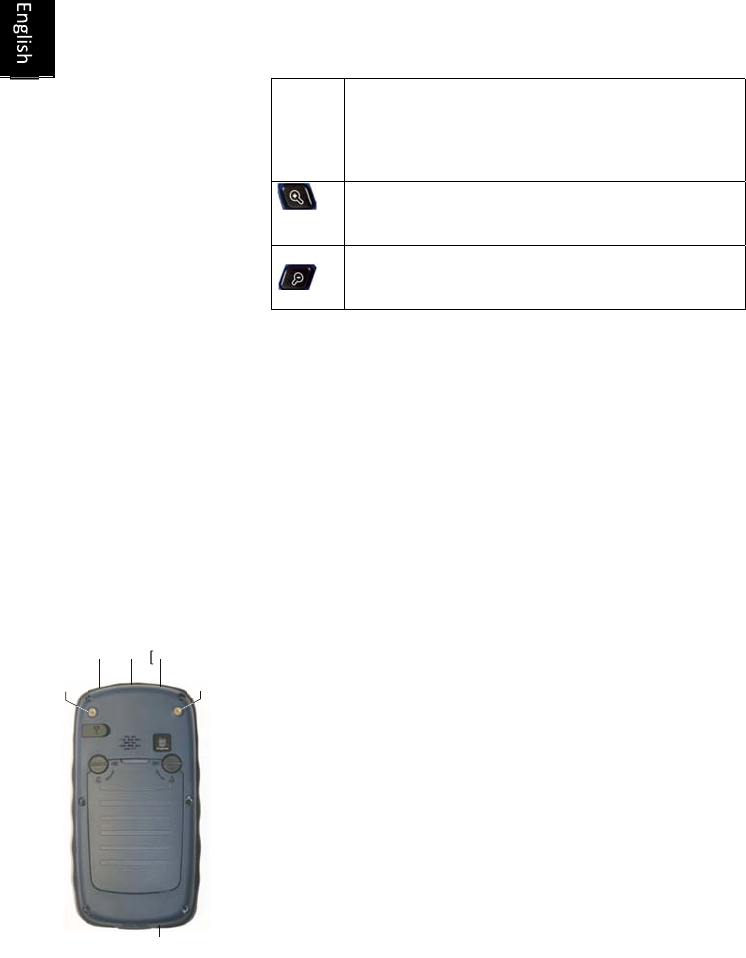
10
Each of them is a convenient alternative to tapping on
the functions appearing just above in the task bar at the
bottom of the screen (e.g.
Notifications, Contacts, Menu, Log, etc.).
In Spectra Precision applications with a map screen
displayed, use this button to zoom in. In Windows
Embedded, displays the Start menu.
In Spectra Precision applications with a map screen
displayed, use this button to zoom out. In Windows
Embedded, displays the Phone screen.
Microphone
Amicrophoneisusedbythevoicerecorder.Keepthesmallaperture[7]
clearwhenrecordingavocalcomment.
Built-in GPS Antenna
Thereceiverincorporatesabuilt‐inGPSantenna[8].Thereceiver
shouldbeheldproperlytooptimizesatellitereception.
Earpiece
Asamulti‐mediadevice,thereceiverincludesanearpiece[9],
whichcanbeusedbyanyvoice‐basedsoftwareapplication.
Rear View
External GPS Antenna Input
Usethisinput[10]toconnectanexternalGPSantennatothe
receiver.Whenanexternalantennaisconnected,thebuilt‐inGPS
antennaisautomaticallydisconnectedfromthereceiverinput.
Theantennainputconnectorisprotectedbyarubberflap.Spectra
Precisionrecommendsyoukeeptheflapclosewhennoexternal
antennaisused.
Loudspeaker
Thebackofthereceiverincorporatesahigh‐qualityloudspeaker[11].
Camera Lens
Keepthecameralens[12]clearwhentakingpicturesorrecordingvideos.
[10]
[17]
[12][11]
[15][16]
[13][14]
11
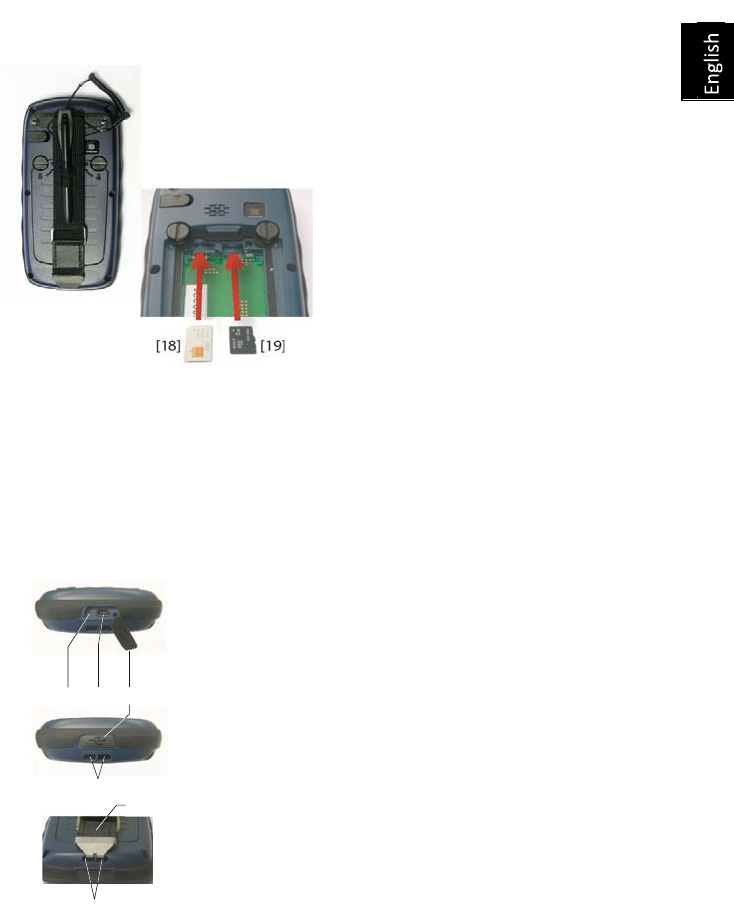
Hand strap
Thehandstrapprovidedmaybeattachedtothebackofthereceiver
throughtwothreadedholes[13]and[14]andthetworecesses
locatedatthebottomofthereceiver(seeBottomViewbelow).
Thehandstrapmayalsoaccommodatethestylus,whichcanalsobe
attachedtotheleatherstripofthehandstrapusingthelanyard
provided.
Battery Compartment
ThereceivermakesuseofarechargeableLi‐Ion
batterypack.Loosenthequarter‐turnscrews[15]
[16]usingthestylus(oracoin)toaccessthe
batterycompartment[17].Thetwoscrewsuseopposite
directionsofrotationforopeningandclosingthetrapdoor.
ThebatterycompartmentcanalsoaccommodateaSIMcard[18]
andamicroSDcard[19].
Whenputtingbackthetrapdoor,insertthebottomfirst,pushthetrapdooragainstthebackof
thereceiverandsealthebatterycompartmentbyfullyrotatingthetwoscrewsintheopposite
direction.
Informationonbatterycharging:seeInternal Battery on page 13.
Bottom View
Thebottomviewprovidesaccesstoastandardmini‐USBconnector
[20].Youfirstneedtoopentheprotectiverubberflap[21],usinga
fingernailorasharpandrigidtiptopulltheflapfromitsleft‐handside.
Themini‐USBportisusedtoconnectthereceivertotheACadapter,
forafastbatterychargingcycle,ortoacomputerforfiletransfer
throughMicrosoftActiveSync.Inbothcases,youneedtousetheUSB
cableprovided.
Informationonbatterycharging:seeInternal Battery on page 13.
ThebottompartofthereceiveralsoaccommodatesaResetbutton
[22],whichisaccessibleafteryouhaveopenedtherubberflap[21].
Shouldthereceivergetstuck,youcanpressthatbuttonusingasharp
tooltorestartthereceiver.
Warning!NeverusetheResetbuttonwhilethereceiverisoperating
normallyoryouwoulddefinitivelyloseallthedatayouarecollecting.
Thebottomviewalsoshowsthetworecesses[23]inwhichthehand
strap[24]canbeanchored.
[22][20][21]
[23]
[23]
[24]

12
GNSS Settings
• OpentheGNSS ToolboxandtaponGNSS Settings.This
opensanewwindowwhereyoucanmakethefollowingsettings:
– Tracking mode:Onlythe“GPSL1”optionis
available,whichmeansthereceivercanonly
operatefromtheL1signaloftheGPSconstellation.
– Use SBAScheckbox:Checkthisboxtoenable
SBASreception,clearitotherwise.
• TapOKtoconfirmyourchoicesandreturntotheGNSSToolbox
window.
GNSS Status
•OpentheGNSS ToolboxandtaponGNSS Status.
GNSS Toolbox
GNSS Toolbox
isusedtocontrolandmonitorimportant
functionsinyourreceiver.Thesearelistedanddetailed
below.
•GNSS Settings
:Constellationsandfrequenciesusedinthe
receiver.
•GNSS Status
:ViewsGNSSreceptionmonitoringscreens.
•Reset
:Resetsthereceiver.
•About
:ProvidesthesoftwareversionofGNSSToolbox.

13
ThedefaultPositiontabshowsthelatitude,longitudeand
altitudeofthecurrentposition,ascomputedbythereceiver,
aswellthenumberofsatellitesusedandthecurrentPDOP
value.
IfSBASisused,thescreenalsoshowsthepositionstatus
(SDGPS).
Theunitusedtoexpressthecurrentaltitude(metersorfeet)
dependsontheregion(languageandcountry)youselectedin
Start,Settings,System,Regional Settings.
• TheSatellitestabdisplaysapolardiagramshowingthelocations
intheskyofthetrackedsatellites.Differentcolorsareusedto
displaythenumbersofthevisiblesatellites:
– Yellowcharacters:GPSsatellitesused
– Greycharacters:VisibleSBASsatellites.AlsorejectedGPS
satellites,becauseunhealthyorundertheelevationmask.
•TheSignaltabshowsthesignallevelforeachofthetracked
satellites:
– DarkbluebarsforallGPSsatellitesused
– RedbarsforallSBASsatellitesused
– Greybarsforalltracked,butnotused,GPSsatellites
GPSsatellitesarenumberedfrom1to32andSBASsatellitesfrom
120to138.
Reset •OpentheGNSS ToolboxandtaponReset.Amessagethen
asksyouifyouwanttoresetthereceivernow.Usethisoption
onlyifyouthinkthereceiverisnotworkingproperly.
Usingthisfunctionresultsinacold resetofthereceiver.
Throughacoldreset,alltheGNSSsettings,includingalmanac
data,areclearedmakingitnecessaryforyoutorestoreeach
ofthemmanually.Afewminutesareneededafteracoldreset
beforethereceiverisbacktowork.
UsingtheResetfunctionisrecommendedwhenonlytheGNSS
Toolbox(andnototherfieldsoftware)isrunningonthe
platform.
About ThisfunctionprovidesthesoftwareversionofGNSSToolbox,followed
bytheSpectraPrecisionlegalline.

14
Advanced Features
Power ModesThereceiverhasthreepowermodes:
• Shutdown:Thereceiverisoff.
• On:Thereceiverisfullypowered
• Suspend:Inthismode,thescreencontentandbacklightare
turnedofftosavepowerandtheusecontextissaved.When
quittingtheSuspendmode,theusecontextisrestored
instantly.Typicallythismodeisusedinthefieldtoallowa
quickrestartafterapause.
ThereceivercanalsoentertheSuspendmode
automaticallyincaseofaverylowbatteryafterdismissing
successivelythetwo“lowbattery”alerts,orafteranidletime
thatyoucansetthroughapressontheWindowskey,and
selectingSettings,Power(Advancedtab)(SeealsoPower
Management on page 5).
Suspend Mode
ThereceivercanbeswitchedtoSuspendmode.Thisisapower
savingmodetypicallyusedinthefieldtoallowaquickrestartafter
apause.Inthismode,onlysomepartsofthereceiverare
poweredforthesolepurposeofrestoringthecontextofusein
whichthereceiverwaswhenitwasswitchedtoSuspendmode.
ThereceivershouldNOThoweverbeusedinthatmodewhile
collectingrawdata.
ThereceivercanalsoentertheSuspendmodeautomaticallyin
caseofaverylowbatteryafterdismissingsuccessivelythetwo
“lowbattery”alerts,orafteranidletimethatyoucansetthrough
apressontheWindowskey,thenSettings,SystemandPowe
r
(Advancedtab)(SeealsoPower Management on page 5).When
collectingrawdata,pleaseclearthisoptionsothatthereceiver
canneverenterthismode.
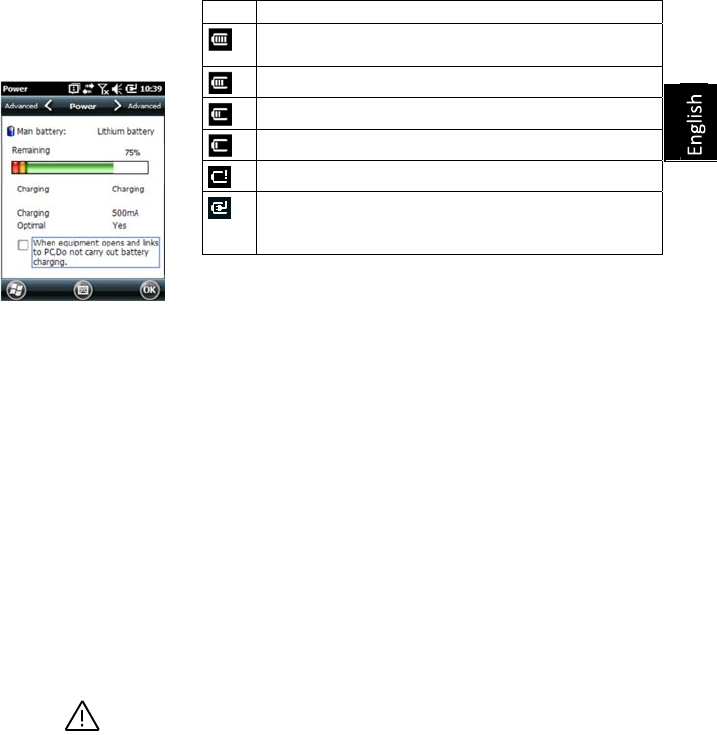
Internal BatteryMonitoring the Battery Discharging Status
Thereceiverwillcontinuouslyinformyouofthecurrentstatusof
thebatterythroughaniconlocatedintheWindowsEmbedded
titlebar(ontheright).Thedifferentshapesofthisiconindicate
thecurrentdischargingstatus,aslistedbelow:
15
Atanytimeyoucanreadmoreindetailthebatterystatusby
pressingtheWindowskeyandthenselectingSettings, System,
Power(seescreenexample).
Whentheremainingpowerdropsbelow10%offullcharge
(orangearea),youwillseethemessage“MainBatteryLow”
promptingyoutoreplaceorrechargethebattery.TapDismissin
thetaskbar.Youshouldconsiderreplacingthebatteryforafresh
onebutyoumaystillcontinuetousethereceiverforawhile.
Withonlyabout5%ofremainingpower(redarea),anew
messagewillpopup:“MainBatteryVeryLow”.TapDismissin
thetaskbartocontinueusingthereceiver.SpectraPrecision
howeverrecommendsthatyouturnoffthereceiverandreplace
thebattery.
Withonlyabout1%ofremainingpower,thereceiverwillswitchoff,
meaningthebatteryisnolongerchargedenoughtoensureproper
operationofthereceiver.SpectraPrecisionrecommendsyoudonot
gothatfarintheuseoftheinternalbatteryasthereisariskof
losingpartofyourfielddata.
Incaseoflong‐timestorage,rememberLi‐Ionbatteriesmustalwaysberecharged
regularly,abouteverysixmonths.Thisistopreventirreversibledamageofthe
batteries.
Battery Charging Scenarios
Thebatterycanbechargedintwodifferentways:
• Fromthepowerline,throughtheACadapterandUSBcable
provided.Thisconfigurationoffersfastbatterycharging,with
around700mAofDCchargingcurrent.
• Fromanofficecomputerconnectedtothereceiverthrougha
USBline,usingthesameUSBcableprovided.Accordingtothe
USB2.0specification,theDCcurrentdeliveredwillbelimited
to500mA,whichmeansitwilltakelongertochargethe
batteryfromacomputer’sUSBportthanfromtheACadapter.
Icon Meaning
Battery high: Remaining power ranges between
approximately 75 and 100% of full charge.
Approx. 50-75% remaining
Approx 25-50% remaining
Approx. 10-25% remaining
Battery low: Remaining power is less than 5%.
Receiver powered from external source (AC adapter,
computer via
USB line)
16
Youcanaskthereceivernottoallowthechargingofthe
batterythroughtheUSBportwhenthisportisconnectedtoa
computer.Todothis:
– PresstheWindowskey
– SelectSettings, System, Power
– Cleartheoption:When equipment opens and
links to PC, do not carry out battery charging
– TapOK.
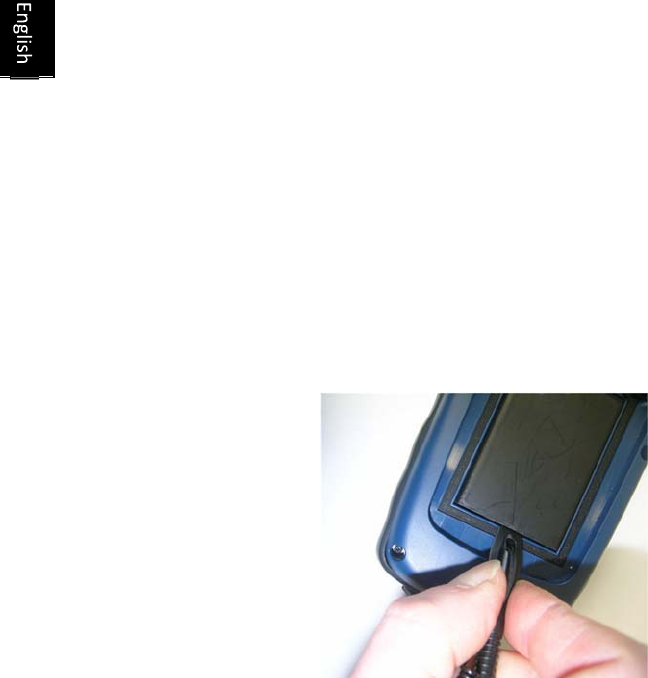
Extracting the Battery from the Compartment
Leverthebatteryoutofitscompartmentusingthestylusoraflat
screwdriver.(Theflatendofthestylusisinsertedinthegroove
locatedonthebottomsideofthebattery,asshownbelow.)
Likewise,extractingtheSIMcardormicroSDcardfromthe
batterycompartmentrequirestheuseofaspiky‐tippedtoolto
pullthecardoutofitsslot.
USB Connection
Bydefault,themini‐USBconnectorissettoallowa
connectiontoacomputerusingActiveSync.Youjustneedto
connecttheUSBcableprovidedbetweenthereceiver’sminiUSB
connectorandanycomputerfittedwithastandardUSBconnector.
ProvidedMicrosoftActiveSynchasbeeninstalledonthe
computer,aserialconnectionwillbeinitiatedautomaticallywhen
youplugthecable.Youcanthenusethisconnectiontoexchange
files,explorethereceiver’sfilesystem,installnewapplications
directlyfromthecomputer,etc.
17
Ifyouwanttomakeadifferentuseofthereceiver’sUSBoutput,
presstheWindowskey,gotoSettings>Connections>USB
to PCandchangethesettingsaccordingly.
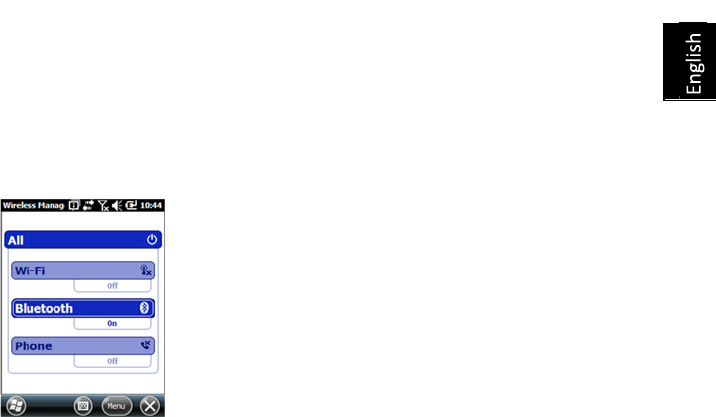
Wireless
Communication
Thereceiverincorporatesthreewirelesscommunicationdevices:
• Bluetooth
• WiFi
• GSM/GPRSModem
ThethreedevicescanbecontrolledfromtheWireless
Managericon(presstheWindowsbuttonandgoto
Settings>Connections>Wireless Manager).
Bluetooth
FollowtheprocedurebelowtoturnonBluetoothandmakea
connectionwithanothersystem,whichissupposedtohaveits
Bluetoothbeenturnedonandmadevisibletoothers.
• PresstheWindowskeyandtapsuccessivelyonSettings and
Bluetooth.
• TapontheModetab.
• ActivateTurn on Bluetooth.
• TapontheDevicestab.
• TaponAdd new device.Waituntiltheexternalsystemisfound
• Taponthenameofthissystem,tapNext,enterapasscode
(optional)andthenchoosetheBluetoothserviceavailableon
thissystemthatyouwouldliketousenow.
• Completetheconnectionsetupasinstructed.
BeingonlyaBluetoothclient,thereceiverwillnotofferany
Bluetoothservicestoexternalsystems.
WiFi
TheintegratedWi‐FideviceallowsyoutoaccesstheInternet
throughawirelessconnection.
• PresstheWindowskeyandtapsuccessivelyonSettings,
ConnectionsandWi-Fi.
• TapontheWirelesstab.

18
• TaponSearch for NetworkstoturnonWi‐Fiandstart
searchingforthenetworksthatareavailablefromyourlocation.
• Chooseone,thenfollowtheinstructionsuntilyouaregiven
accesstotheInternet.
GSM/GPRS Module
ProvidedtheappropriateSIMcardhasprevioulsybeeninserted
inthebatterycompartment,theGSM/GPRSmodemallowsyou
to:
• Makeaphonecall(modemusedinGSMmode)
• EstablishanInternetconnection(modemusedinGPRSmode).
Motion Sensor Enabling Automatic Screen Rotation
Bydefault,thereceiverscreenisusedinportraitformat.Rotating
thereceiverby90°willnotcausethescreenformattoswitchto
landscapeformat.
Operatingthereceiverthiswayisusuallywhatyouexpectfrom
yourreceiverbecauseyouneedtokeepitalwaysinportrait
position,withanangleof45°forbestsatellitereception.
Youcanhoweveraskthereceivertorotatethedisplayautomatically,
dependingonthepositionyougivetothereceiver.
• PresstheWindowskeyandtapsuccessivelyonSettings,System
andMotion Sensor.
• Tapontheswitchtab
• EnabletheScreen rotationfunction.UsingtheSensitivity cursor,
youcanalsoadjustthesensitivitywithwhichthereceiverwillreact
tomotion.
• TapOKtovalidateallyoursettings.
Disabling Automatic Screen Rotation
JustbeforedisablingtheScreen rotationfunction(seeabove),
makesurethecurrentscreenformat(portraitorlandscape)isthe
oneyouwishtouse.Ifit’snot,firstrotatethereceiveraccordingly
soyougetthisscreenformat,andthenyoucandisablethe
Screen rotationfunction.
Scrolling through Your Picture Gallery
19
Bysettingthemotionsensorasaswitch,youcaneasilygo
throughallyourpicturesoraudiofiles,justusingthehandthat
holdsthereceiver,leavingyourotherhandfree.
AfteryouhaveopenedtheMyPicturesfolderforexampleand
tappedonthefirstpicturetoviewit,youjustneedtoshakethe
receiverbrieflytoviewthenextone,andsoforthuntilallthe
picturesinthefolderhavebeenviewed.
Tosetthemotionsensorasaswitch:
• PresstheWindowskeyandtapsuccessivelyonSettings,System
andMotion Sensor.
• Tapontheswitchtab
• EnabletheSwitch songs or picturesfunctionandtapOK.
Fall Alarm
Youmaysetthereceivertoproduceasoundalarmwhenitfallsdown:
• PresstheWindowskeyandtapsuccessivelyonSettings,System
andMotion Sensor.
• TapontheFall Alarmtab
• EnabletheFall AlarmfunctionandtapOK.
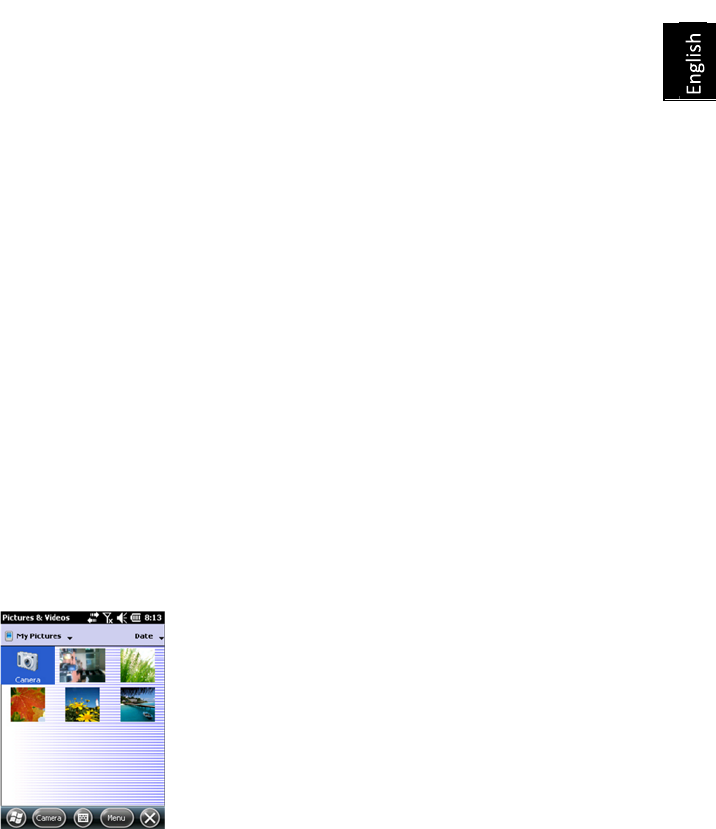
Using the Camera Taking a Picture
• PresstheWindowskeyandtapPictures & Videos.Thisopensthe
“MyPictures”folderinwhichyoucanseethelistofexistingimages
andvideos.ThefirstiteminthelististheCamera,thetoolyouwill
nowbeusingtotakepictures.Thelight‐bluebackgroundmeansthe
cameraiscurrentlyselected.
• TapCamera,orpresstheEnterbutton,toturnonthecamera.Wait
acoupleofsecondsuntilthecenterofthewindowdisplaysthe
viewfinderofthecamera.
• Nowusethereceiverasacamera.Lookattheviewfindertoframe
thepictureyouwanttotake.
• Whenyouareready,stayasstillaspossibleandpresstheEnter
buttontotakethepicture.Whenyouheartheclickofthecamera,
staystillforanothertwosecondsuntilthescreendisplaysthepicture
youhavejusttaken.
• TapOKtocomebacktotheviewfinder,thentapanywhereonthe
screentore‐activatethetaskbarathebottomofthescreen.
• TapOKtoturnoffthecameraandclosethewindow.Thepicture
youhavetakenisnowvisibleinthe“MyPictures”folder.
20
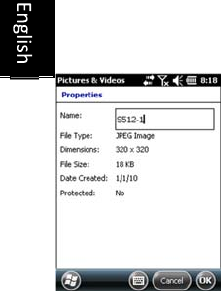
Renaming a Picture
• Withthe“MyPictures”folderopen,taponthedesiredpicture.This
opensanewwindowshowingthepicture.
• TapMenuandProperties.
• RenamethefileandtapOK.
Rotating a Picture
• Withthe“MyPictures”folderopen,taponthedesiredpicture(or
taponViewinthetaskbar).Thisopensanewwindowshowingthe
picture.
• TapMenuandEdit.
• TapRotateinthetaskbar.Thisrotatestheimage90°clockwise.
Repeattheoperationuntiltheimagehastherightorientation.
• TapOKtosavetheimage.
Cropping a Picture
• Withthe“MyPictures”folderopen,taponthedesiredpicture(or
taponViewinthetaskbar).Thisopensanewwindowshowingthe
picture.
• TapMenuandEdit.
• TapMenuagainandselectCrop.
• Asinstructed,dragarectangleonthepicturerepresentingwhatthe
finalimageshouldbelike,thentapinsidetherectangletocomplete
thecropoperation.Ifyou’renothappywiththeresult,youcan
alwayscomebacktotheinitialimagebyselectingMenuand
Revert to Saved.
• TapOKtosavethepicture.
Auto-correcting a Picture
• Withthe“MyPictures”folderopen,taponthedesiredpicture(or
taponViewinthetaskbar).Thisopensanewwindowshowingthe
picture.
• TapMenuandEdit.
• TapMenuagainandselectAuto Correct.Thisrefinesthepicture’s
brightness,contrastandcolors.
• TapOKtosavethepicture.
Deleting a Picture
• Withthe“MyPictures”folderopen,tapandholdthedesiredpicture.
21
• SelectDeleteinthecontext‐sensitivemenu.
• TapYestoconfirmfiledeletion.
Changing Picture Settings
• PresstheWindowskeyandtapPictures & Videos.Thisopensthe
“MyPictures”folder.
• TapCameratoturnonthecamera.Waitacoupleofsecondsuntil
thecenterofthewindowdisplaystheviewfinderofthecamera.
• Taponthescreentore‐activatethetaskbar,tapMenu,then
Resolution.Chooseoneofthedimensionsavailable(expressedin
pixels).Theresolutionsettingimpactsthequalityandsizeofthe
pictureyoutake.
• TapMenu,thenMode.ChoosebetweenNormal(onepicture
taken),Burst(fivepicturestakenataone‐secondintervalonceyou
havepressedEnter)andTimer(picturetaken5secondsafter
pressingEnter).
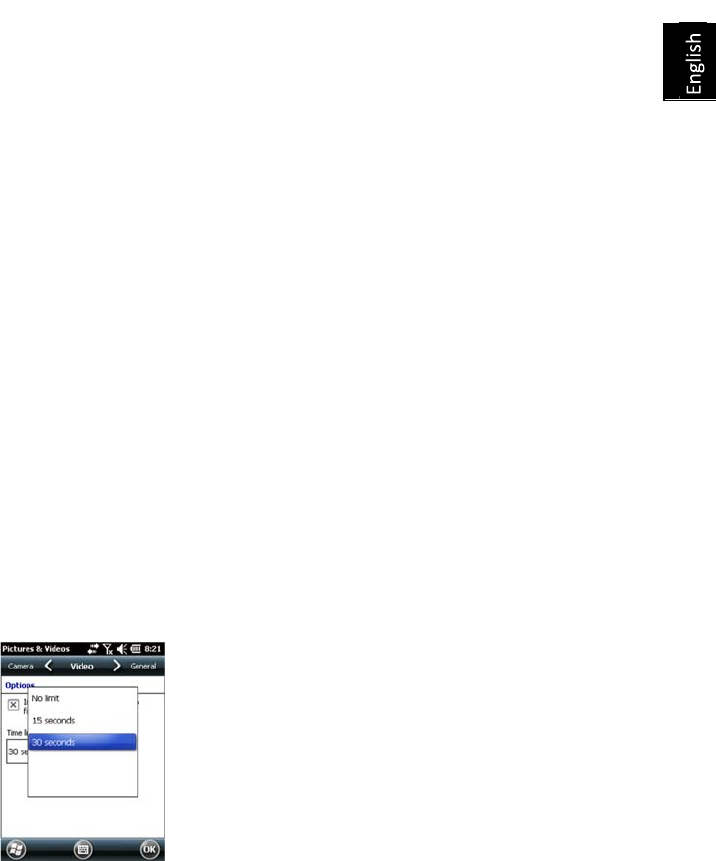
Making a Video Setting the Duration of a Video Film
• PresstheWindowskeyandtapPictures & Videos.Thisopensthe
“MyPictures”folderinwhichyoucanseethelistofexistingimages
andvideos.
• TapMenu,ToolsandthenOptions.
• TapontheVideotab.
• Theaudiotrackmay,ormaynotbeincludedinyourvideofiles.Clear
orchecktheInclude Audio..optionasneeded.
• TapwithintheTime limit for videos.fieldandselectoneofthe
optionsbelow:
– No limit:Choosethisoptiontobeabletofilmavideo
overanunlimitedperiodoftime.
– 15 seconds:Choosethisoptiontolimitthedurationof
everyvideoyou’llfilmto15seconds.
– 30 seconds:Choosethisoptiontolimitthedurationof
everyvideoyou’llfilmto30seconds.
• TapOKtoacceptthechangesandclosetheOptionswindow.
Starting a Video
• TapCameratoturnonthecamera.Waitacoupleofsecondsuntil
thecenterofthewindowdisplaystheviewfinderofthecamera.
• Tapanywhereonthescreentomakethetaskbarvisibleatthe
bottomofthescreen

22
• Whenyouarereadytofilm,tapMenuandthenVideo.
• PresstheEnterbuttontostartfilming.
Ending a Video
• Dependingonthevideosettings,thevideocamerawillstopfilming
asexplainedbelow:
– Withapresettimelimit(15or30seconds),thevideo
camerawillstopfilmingautomaticallyandclosethe
videofileafterthistimehaselapsed.Adowncounter
undertheviewfinderwillkeepyouinformedofthe
remainingtimeasyoufilm.
– Withnotimelimit,thevideocamerawillfilm
indefinitely.Acounterundertheviewfinderwilltellyou
thecurrentdurationofthevideo.Tostopfilmingand
closethevideofile,presstheEnterbuttonagain.
• Attheendofthevideoshooting,theviewfinderfreezeswhilethe
endofthevideoisbeingprocessed.
• Again,tapanywhereonthescreentomakethetaskbarvisibleat
thebottomofthescreenandthentapOKtoturnoffthecamera
andclosethewindow.Thevideofileyouhavecreatedisnowlisted
inthe“MyPictures”folder.
Playing Back a Video
• Withthe“MyPictures”folderopen,taponthedesiredvideofile.
ThiswillautomaticallylaunchtheWindowsMediaplayer.
• TaptocloseWindowsMediaplayerandreturntothe“My
Pictures”folder.
Renaming a Video
• Withthe“MyPictures”folderopen,selectthedesiredvideofile
usingtheScrollbutton.
• TapMenu,ToolsandthenProperties.
• RenamethefileandtapOK.
Deleting a Video
• Withthe“MyPictures”folderopen,tapandholdthedesiredvideo
file.
• SelectDeleteinthecontext‐sensitivemenu.
• TapYestoconfirmfiledeletion.
23
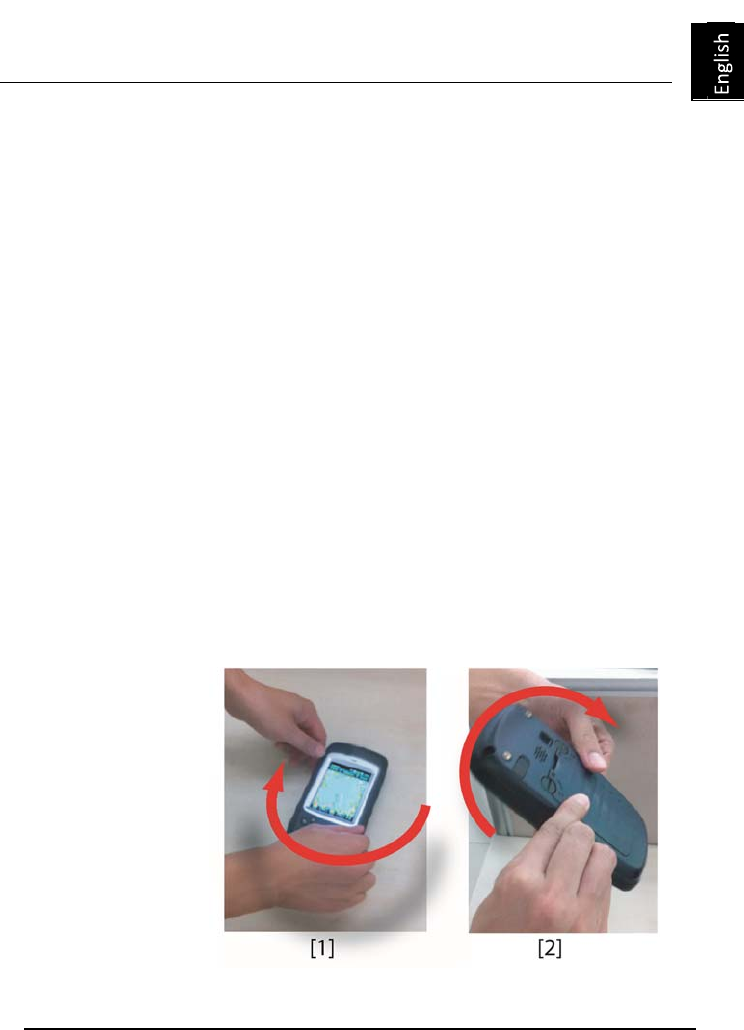
E-Compass Calibration
• PressontheWindowskey.
• ScrolldownuntilyouseetheCompassicon.
• TapontheCompassicontoopentheCompassutility.
• TapontheCalibrationtab.
• Putthereceiverdownonatabletogiveitahorizontalposition(see
picture[1]below).
• TapontheStartbuttonlocatedinthetaskbartostartthe
calibrationprocess.
Firsthorizontalcalibrationisreadytogo.
• Slowlyrotatethereceiverbyacoupleofturnswhilekeepingit
horizontal(seepicture[1]below).
Waituntilthereceiverindicatesthathorizontalcalibrationis
completeandpromptsyoutostartverticalcalibration
(“Ready”displayedunderneaththeVerticalcalibration
button).
• Takethereceiverinyourhands(seepicture[2]below),putitin
verticalpositionthenslowlyrotateitbyacoupleofturns,inthe
verticalplane.Thengentlyputitbackdownonthetable.
• Waituntilcalibrationiscompletebeforeproceeding.
Platform Specifications

24
GNSS
Characteristics
20channels
• GPSL1C/A
• SBAS:WAAS/EGNOS/MSAS
• Externalantennaconnector
• NMEAOutput
Accuracy
Specifications
AllspecifiedvaluesarehorizontalRMS,handheldaccuracy
performanceachievedingoodconditions(opensky)withPDOP
<3andmorethansevensatellitesinview.
• Real‐timeSBAS:<2mtypical
• Post‐processed:<50cmtypical
Processor• ARM9™
• Clockfrequency:600MHz
Operating System • MicrosoftWindowsEmbeddedHandHeld.
• Installedlanguageatdelivery:English,French,Spanish,
German,Portuguese,Italian,Simplified&Traditional
Chinese,Greek,JapaneseorKorean.InstalledOSlanguage
cannotbechangedoncetheproducthasbeenshippedina
givenlanguage.
• Softwarepackageincludes:
– InternetExplorer®
– MicrosoftOfficeMobile
– ActiveSync®
– Transcriber(handwritingrecognition)
CommunicationCellular:
• Built‐incellmodem
• Bands:DependingonMobileMapper20P/Nanddetected
network:
‐ P/N802168‐00(EU):3GWCDMA:900and2100MHz
2GGSM:850,900and1800MHz
‐ P/N802168‐10(US):3GWCDMA:850and900MHz
2GGSM:850,900,1800and1900MHz
Bluetooth:2.1withEDR
WiFi:Integrated
Interface:USB

25
Physical
Characteristics
• Receiversize:169x88x25mm
• Receiverweight,alone:310g
• Receiverweight(batteriesincluded):380g
User InterfaceKeyboard:
• Alphanumericvirtualkeyboard
• Four‐directionScrollandEnterbutton,ZoomIn/Outkeys+
context‐sensitivekeys
• Illuminatedkeyboardwithtouchscreen
• Virtualkeyboard
Display:
• ColorTFT,VGA,high‐resolutiondisplay,sunlightreadable,
withtouchscreen,LEDbacklight
• Size:3.5”
• Colors:262k
Memory •256‐MBSDRAM
•512‐MBNANDFlash(non‐volatile)
•MicroSDHC™memorycard(upto32GB)
Environmental
Characteristics
•
•
Operatingtemperature:‐10°to+60°C(14to140°F)
Storagetemperature:‐30°to+70°C(‐13to158°F)
•Humidity:95%noncondensing
•Waterproofness:IP54
•Freedrop:1.2mtoconcrete
Power
Requirements
•Batterylife:>20hours@20ºC,withGPSon,Bluetooth
andWiFidisabled,screenbacklightusedatminimum
level20%ofthetime.
•Chargingtime:4hours
•Removablebattery
Multimedia &
Sensors
•
•
3‐Megapixelcamera
E‐Compass
•G‐Sensor
•Speaker
•Microphone
Software Options•SpectraPrecisionMobileMapperFieldandOfficesoftware

26
•Post‐processing
•ESRIArcPadsoftwarebundle(USAonly)
Standard
Accessories
•
•
Stylus
Handstrap
•UniversalACadapter
•USBcable.

Index
A
Accessories 26
Adjustingbacklight 5, 6, 16, 17, 18
Alignment 2
B
Batterycompartment 10
Batterylife 25
Batterystatusicon 13
Bluetooth 24
Burst 20
C
Calibration(screen) 2
Camera 18
Cameralens 9
Camerasettings 20
D
Deletepicture 20
Deletevideofile 22
Displayscreen 25
E
Earpiece 9
Environmentalcharacteristics 25
Externalantenna 9
Externalantennainput 9
G
GNSSreceptioncharacteristics 24
GNSSsettings 11 GNSS
status 11
GNSSToolb ox 11
GPSantenna(built‐in) 9
H
Holdingthereceiverproperly 7
I
Insertingbattery 1
K
Keyboard 25
L
Lockkeypad 6
Longtimebatterystorage 14
M
MainBatteryLow 14
MainBatteryVeryLow 14
Memory 25
Microphone 9
Mini‐USB 10
Modem(internal) 24
O
Openingbatterydoor 1
Operatingsystem 2, 24
OPP(ObjectPushProfile) 24
P
PDOP 11
Playbackvideo 21
POGOcable 14
Powermodes 14
Processor 24
R
Renamepicture 19
Renamevideofile 21
Reset 12 Resolution
20
S
SBAS 11 Screenalignment 2
Sensors 25
Standby 21
Startshootingvideo 21 Stop
shootingvideo 21
Suspendmode 4, 13
T
Timelimit(video) 20
Timer 20 Tracking
mode 11
U
UniversalACadapter 1
USB 10
VVideo(durationsetting) 20
VGA 8

GettingStartedGuide
FCC Regulations
• Thisdevicecomplieswithpart15oftheFCC
Rules.Operationissubjecttothefollowingtwo
conditions:
• Thisdevicemaynotcauseharmfulinterference
• Thisdevicemustacceptanyinterference
received,includinginterferencethatmaycause
undesiredoperation.
• Thisdevicehasbeentestedandfoundtocomply
withthelimitsforaClassBdigitaldevice,
pursuanttoPart15oftheFCCRules.These
limitsaredesignedtoprovidereasonable
protectionagainstharmfulinterferenceina
residentialinstallation.Thisequipment
generatesusesandcanradiateradiofrequency
energyand,ifnotinstalledandusedin
accordancewiththeinstructions,maycause
harmfulinterferencetoradiocommunications.
However,thereisnoguaranteethat
interferencewillnotoccurinaparticular
installationIfthisequipmentdoescause
harmfulinterferencetoradioortelevision
reception,whichcanbedeterminedbyturning
theequipmentoffandon,theuseris
encouragedtotrytocorrecttheinterferenceby
oneormoreofthefollowingmeasures:
• ‐Reorientorrelocatethereceivingantenna.
• ‐Increasetheseparationbetweenthe
equipmentandreceiver.
• ‐Connecttheequipmentintoanoutletona
circuitdifferentfromthattowhichthereceiver
isconnected.
• ‐Consultthedealeroranexperiencedradio/TV
technicianforhelp.
• Changesormodificationsnotexpressly
approvedbythepartyresponsiblefor
compliancecouldvoidtheuser‘sauthorityto
operatetheequipment.
FCCRFExposureInformationandStatement:
TheSARlimitofUSA(FCC)is1.6W/kgaveragedover
onegramoftissue.Devicetypes:MobileMapper20
(FCCID:
NZI802168)hasalsobeentestedagainst
thisSARlimit.ThehighestSARvaluereportedunder
thisstandardduringproductcertificationforuseat
theearis0.285W/kgandonthebodyis0.689W/kg.
IC Notice
• ThisdevicecomplieswithIndustryCanada
license‐exemptRSSstandard(s).Operationis
subjecttothefollowingtwoconditions:
• thisdevicemaynotcauseinterference,and
• thisdevicemustacceptanyinterference,
includinginterferencethatmaycauseundesired
operationofthedevice.
• Leprésentappareilestconformeaux
CNRd'IndustrieCanadaapplicables
auxappareilsradioexemptsde
licence.L'exploitationestautorisée
auxdeuxconditionssuivantes:
• l'appareilnedoitpasproduirede
brouillage,et
• l'utilisateurdel'appareildoitaccepter
toutbrouillageradioélectriquesubi,
mêmesilebrouillageestsusceptible
d'en
• ThisClassBdigitalapparatus
complieswithCanadianICES‐003.
• CetappareilnumériquedelaclasseB
estconformeàlanormeNMB‐003du
Canada.
• ForSARtest,Bodywornmodetest
distanceis10mm.
MobileMapper
® 20
©2013TrimbleNavigationLimited.Allrightsreserved.SpectraPrecisionisaDivisionofTrimbl eNavigationLimited.SpectraPrecisionandtheSpectra
PrecisionlogoaretrademarksofTrimbleNavigationLimitedoritssubsidiaries.P/N6316 75‐01 A.
SpectraPrecisionDivision
RueThomasEdison
ZACdelaFleuriaye,BP60433
44474CarquefouCedex,FRANCE
Contact Information:
Spectra Precision Division
10368WestmoorDrive,Suite
Westminster,CO80021,
USA
www.spectraprecision.com
SpectraPrecisionDivision
MarineParadeRoad80
#22‐06,ParkwayParade
Singapore449269,Singapore
AMERICASEUROPE,MIDDLEEAST&AFRICA ASIA‐PACIFIC