TYT ELECTRONICS THREEBANDS Analog Transceiver User Manual TH 350 1
TYT ELECTRONICS CO., LTD Analog Transceiver TH 350 1
UserManual.wiki
>
TYT ELECTRONICS
>
THREEBANDS User Manual
User Manual
Navigation menu
Upload a User Manual
Namespaces
Wiki Guide
HTML
PDF
Info
Views
User Manual
Discussion / Help
Navigation


![20 214. Wide / Narrow band settingAfter pressing [ ] key, rotate the channel knob to select the menu [ ] .1. Press [ ] to enter W/N settings.2. Rotate the channel knob to select WIDE/NARROW.3. Press [ ] to confirm.4. Press [ ] to exit to the main menu.5. Battery savingAfter pressing [ ] key, rotate the channel knob to select the menu [ ] .1. Press [ ] to enter SAVE settings.2. Rotate the channel knob to select ON/OFF.3. Press [ ] to confirm.4. Press [ ] to exit to the main menu.6. Step frequency setting STEPAfter pressing [ ] , rotate the channel knob to select menu [ ] .1. Press [ ] to enter STEP settings.2. Rotate the channel knob to select step: 5, 6.25, 10, 12.5, 20, 25.3. Press [ ] to confirm.4. Press [ ] to exit to the main menu.7. TOTAfter pressing [ ] , rotate the channel knob to select menu [ ] .1. Press [ ] to enter TOT setting. 2. Rotate the channel knob to select OFF/1-7.3. Press [ ] to confirm.4. Press [ ] to exit to the main menu.8. BEEPAfter pressing [ ] key, rotate the channel knob to select the menu [ ] .1. Press [ ] to enter BEEP setting.2. Rotate the channel knob to select ON/OFF.3. Press [ ] to confirm.4. Press [ ] to exit to the main menu.9. ABR backlight switchAfter pressing [ ] key, rotate the channel knob to select the menu [ ] .1. Press [ ] to enter ABR settings.2. Rotate the channel knob to select ON/OFF.3. Press [ ] to confirm.4. Press [ ] to exit to the main menu.10. Reverse frequency REVAfter pressing [ ] , rotate the channel knob to select the menu [ ] .1. Press [ ] to enter the REV setting.2. Rotate the channel knob to select ON/OFF.3. Press [ ] to confirm.4. Press [ ] to exit to the main menu.](https://usermanual.wiki/TYT-ELECTRONICS/THREEBANDS/User-Guide-4114692-Page-14.png)
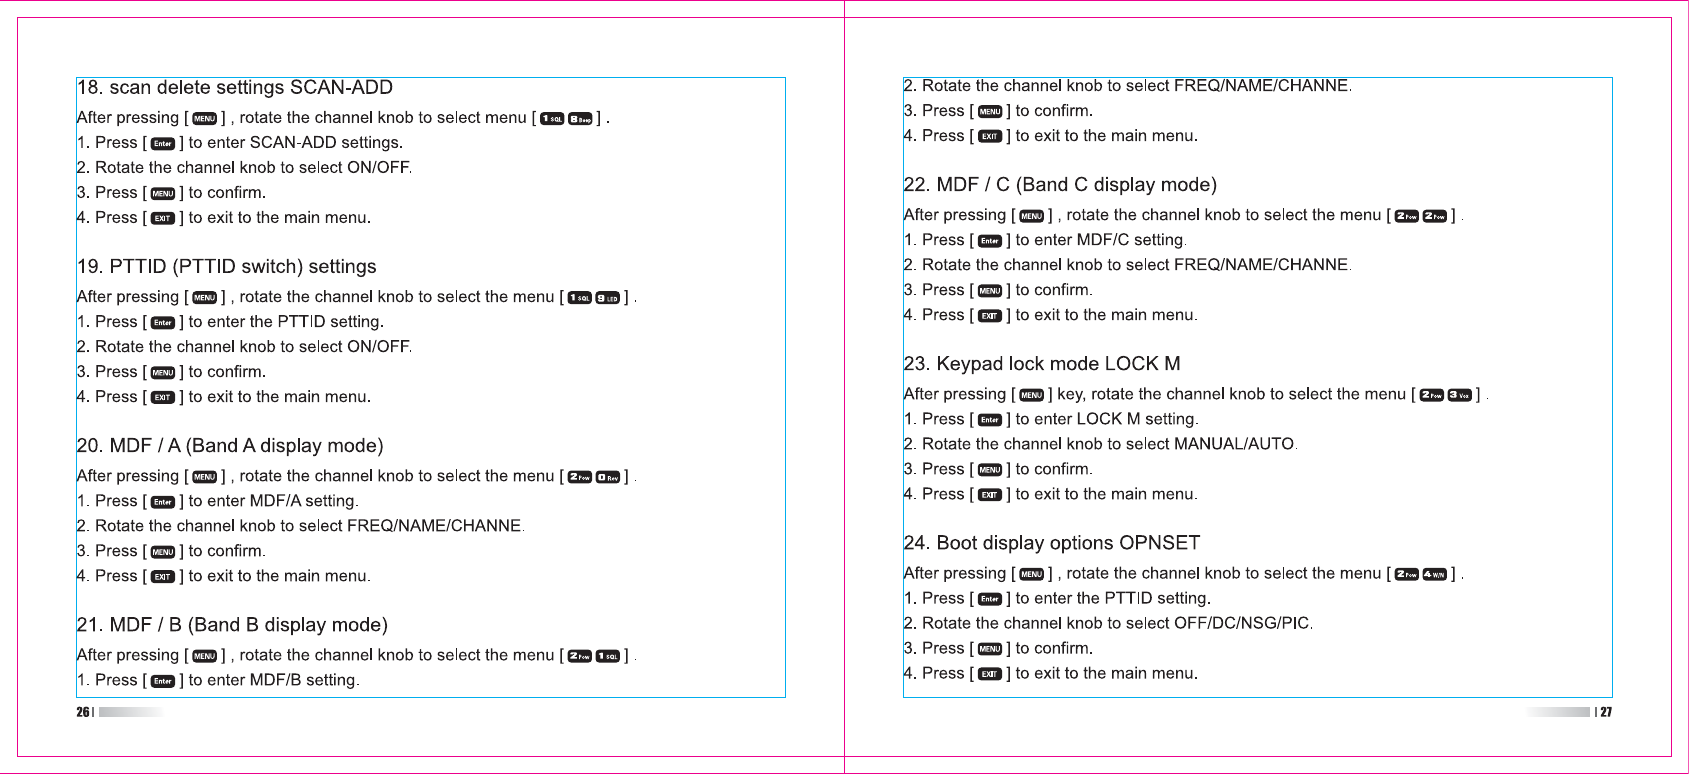
![22 2311. Talk around T / AAfter pressing [ ] , rotate the channel knob to select the menu [ ] .1. Press [ ] to enter the T/A setting.2. Rotate the channel knob to select ON/OFF.3. Press [ ] to confirm.4. Press [ ] to exit to the main menu.12. Tri-band stand by TDRAfter pressing [ ] , rotate the channel knob to select the menu [ ] .1. Press [ ] to enter TDR setting.2. Rotate the channel knob to select ON/OFF.3. Press [ ] to confirm.4. Press [ ] to exit to the main menu.13. Transmit channel selection TX-FAfter pressing [ ] key, rotate the channel knob to select the menu [ ] .1. Press [ ] to enter TX-F settings.2. Rotate the channel knob to select Auto/F1/F2/F3.3. Press [ ] to confirm.4. Press [ ] to exit to the main menu.14. RX CTCSS/DCS setting R-CDC (support non-standard CTCSS/DCS)After pressing [ ] , rotate the channel knob to select menu [ ] .1. Press [ ] to enter R-CDC settings. 2. Press [ ] key to select the group: (OFF /67HZ / D023N / D023I).3. Rotate the channel knob to select the desired CTCSS/DCS.4. Press [ ] to confirm.5. Press the [ ] button to exit to the main menu.15. TX CDCSS/DCS setting T-CDC (support non-standard CTCSS/DCS)After pressing [ ] , rotate the channel knob to select menu [ ] .1. Press [ ] to enter T-CDC settings.2. Press [ ] key to select the group: (OFF / 67HZ / D023N / D023I).3. Rotate the channel knob to select the desired CTCSS/DCS.4. Press [ ] to confirm.5. Press the [ ] button to exit to the main menu.](https://usermanual.wiki/TYT-ELECTRONICS/THREEBANDS/User-Guide-4114692-Page-15.png)
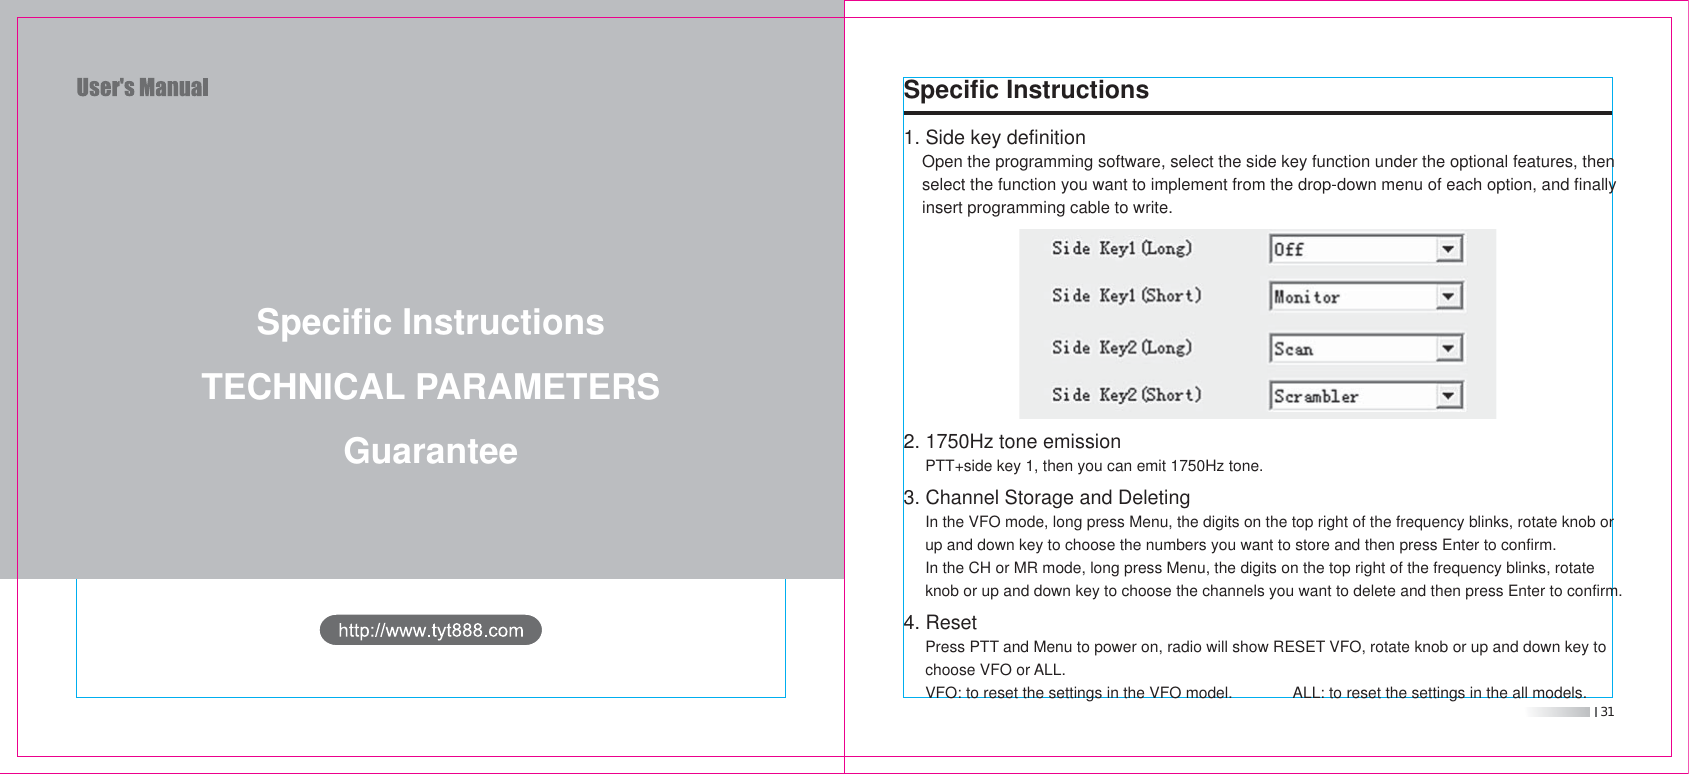
![24 2516. DTMF settings After pressing [ ] , rotate the channel knob to select the menu [ ] .1. Press [ ] to enter DTMFST settings.2. Rotate the channel knob to select ON/OFF.3. Press [ ] to confirm.4. Press [ ] to exit to the main menu.Note:1) You can send the corresponding DTMF code by pressing the button during the transmission.2) You can set in software, and turn on Menu 19 PTT ID to send DTMF code.17. Scan mode settings SMODEAfter pressing [ ] , rotate the channel knob to select the menu [ ] .1. Press [ ] to enter SCAND setting.2. Rotate the channel knob to select TO\CO\SE.3. Press [ ] to confirm.4. Press [ ] to exit to the main menu. ](https://usermanual.wiki/TYT-ELECTRONICS/THREEBANDS/User-Guide-4114692-Page-16.png)
![28 2925. Busy channel lock BCLAfter pressing [ ] key, rotate the channel knob to select the menu [ ] .1. Press [ ] to enter BCL setting.2. Rotate the channel knob to select ON/OFF.3. Press [ ] to confirm.4. Press [ ] to exit to the main menu.26. Shift direction selection setting S-DAfter pressing [ ] , rotate the channel knob to select menu [ ] .1. Press [ ] to enter S-D settings.2. Rotate the channel knob to select o/+/-.3. Press [ ] to confirm.4. Press [ ] to exit to the main menu.27. offset setting DIFFRAfter pressing [ ] , rotate the channel knob to select menu [ ] .1. Press [ ] to enter DIFFR settings.2. Manually input offset.3. Press [ ] to confirm.4. Press [ ] to exit to the main menu.28. End of emission ROGERAfter pressing [ ] key, rotate the channel knob to select the menu [ ] .1. Press [ ] to enter the ROGER setting. 2. Rotate the channel knob to select ON/OFF.3. Press [ ] to confirm.4. Press [ ] to exit to the main menu.29. Scrambler function SCRMAfter pressing [ ] key, rotate the channel knob to select the menu [ ] .1. Press [ ] to enter the SCRM setting.2. Rotate the channel knob to select ON/OFF.3. Press [ ] to confirm.4. Press [ ] to exit to the main menu.30. Compandor COMPAfter pressing [ ] key, rotate the channel knob to select the menu [ ] .1. Press [ ] to enter COMP settings.2. Rotate the channel knob to select ON/OFF.3. Press [ ] to confirm.4. Press [ ] to exit to the main menu.](https://usermanual.wiki/TYT-ELECTRONICS/THREEBANDS/User-Guide-4114692-Page-18.png)