TYT ELECTRONICS THREEBANDS Analog Transceiver User Manual TH 350 1
TYT ELECTRONICS CO., LTD Analog Transceiver TH 350 1
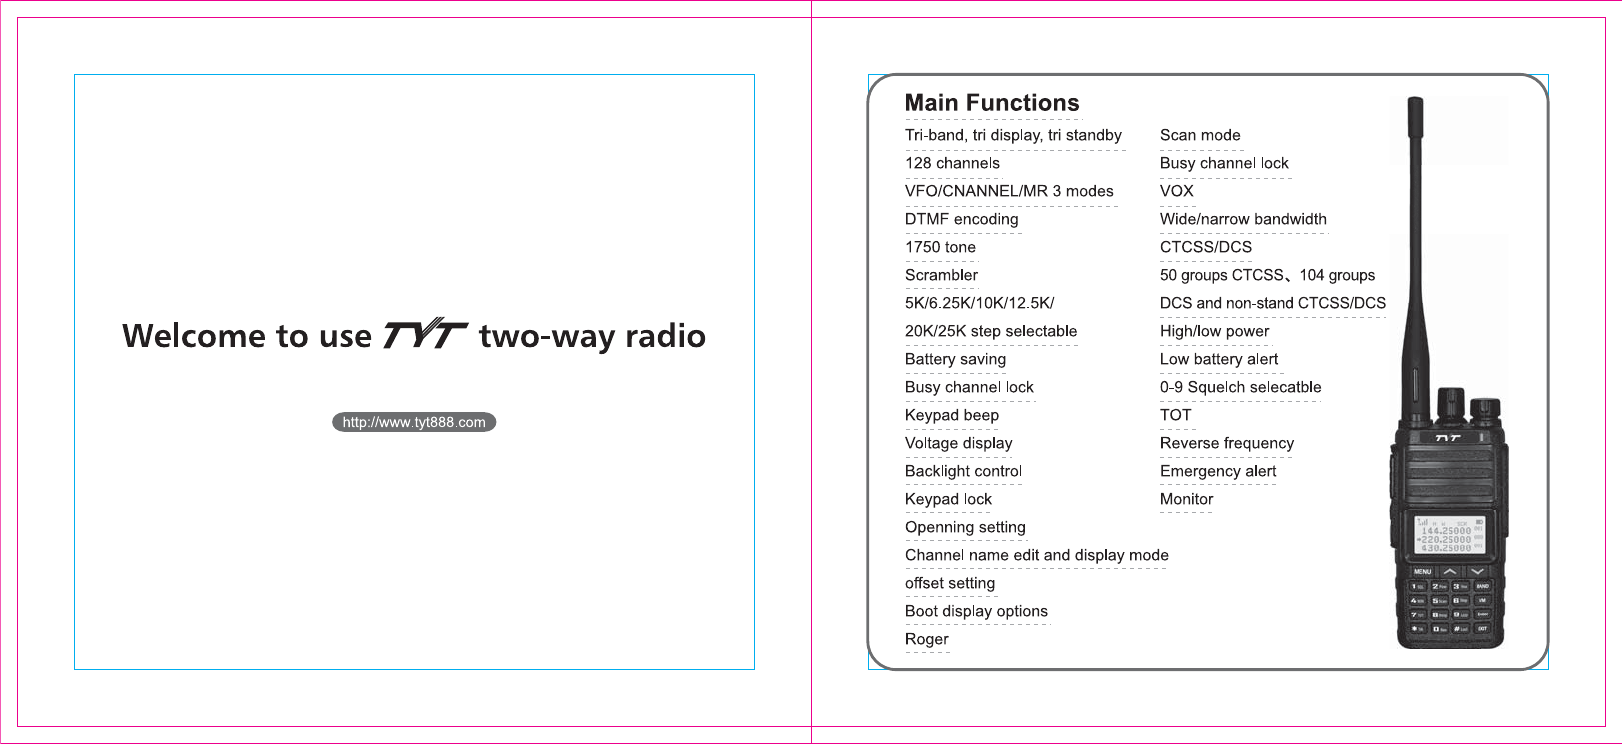
User Manual


USING TIPS
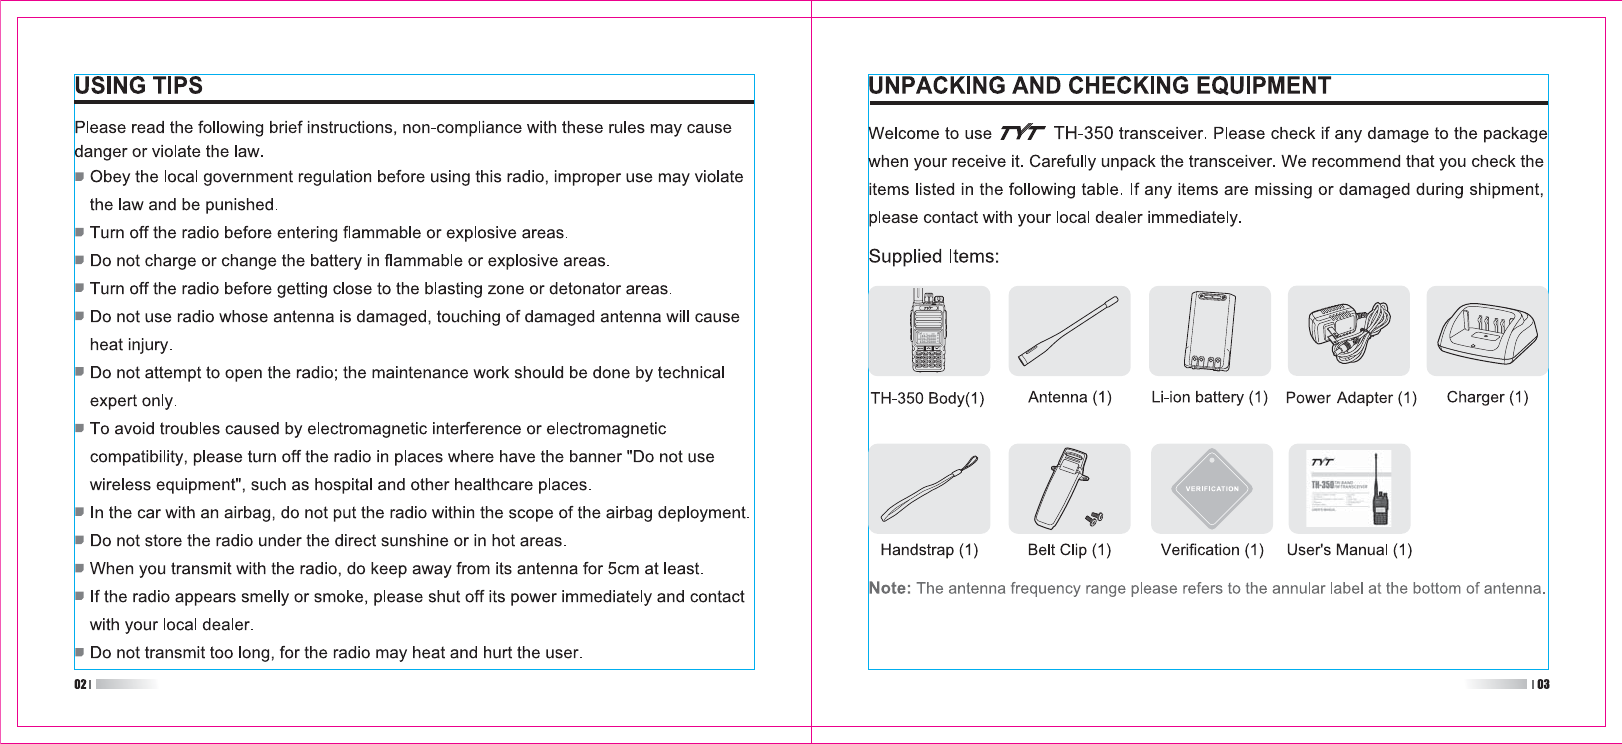
UNPACKING AND CHECKING EQUIPMENT
CHARGING BATTERY PACK
Charging Precaution
Charging Operation
Indicator light of charger will show charging condition
INSTALLATION OF ACCESSORIES
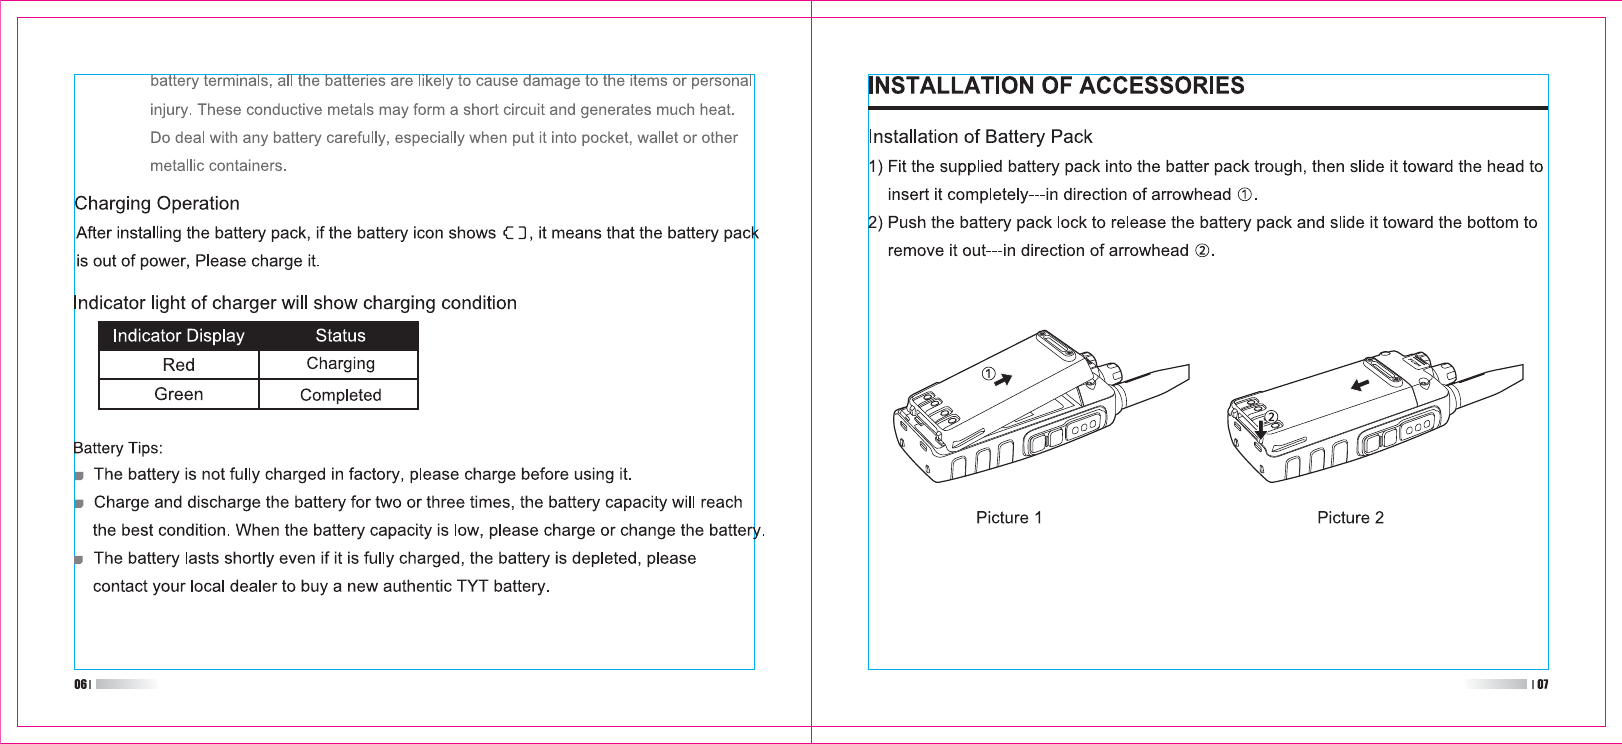
Installation of Battery Pack
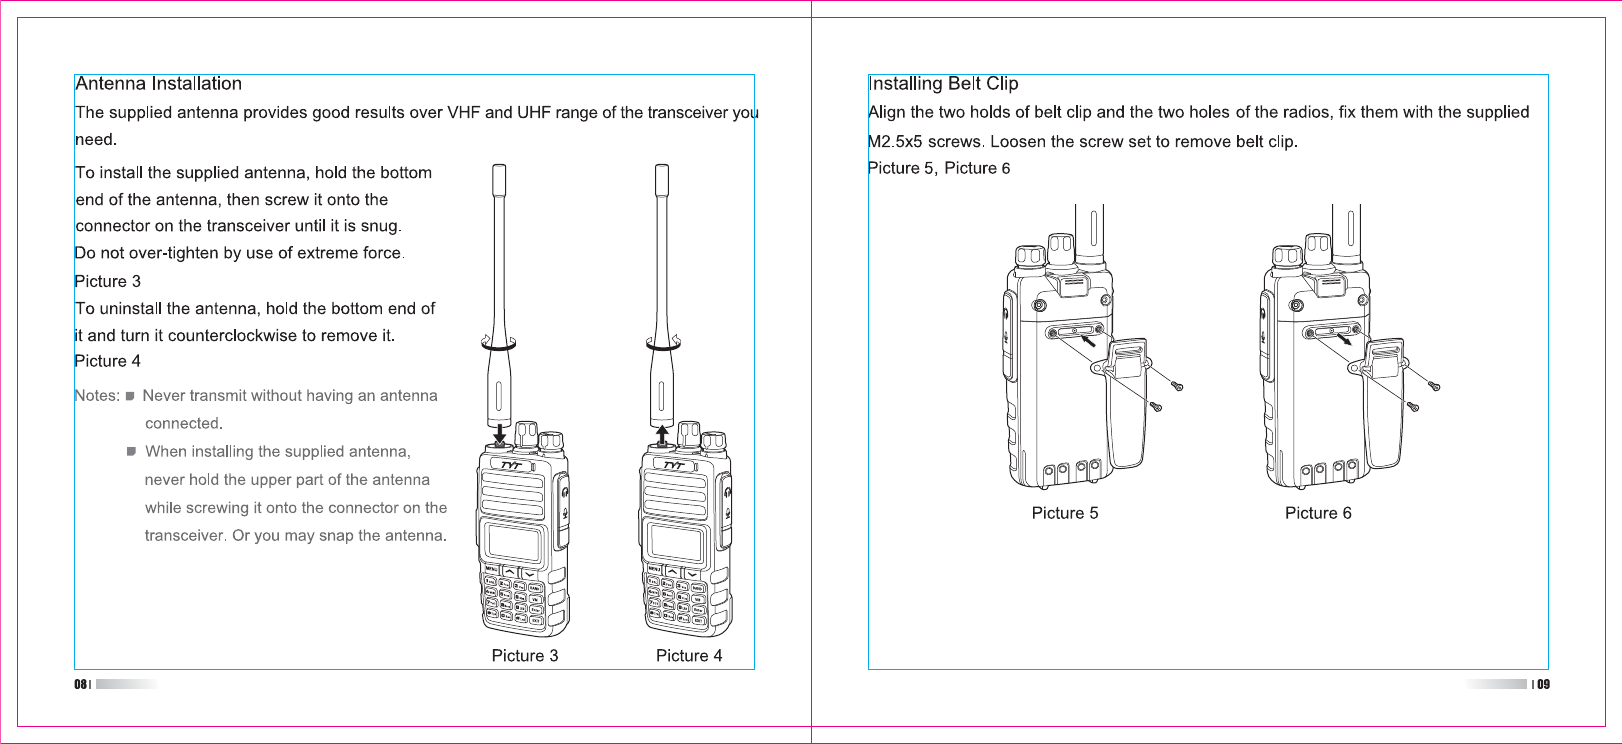
Antenna Installation
Installing Belt Clip
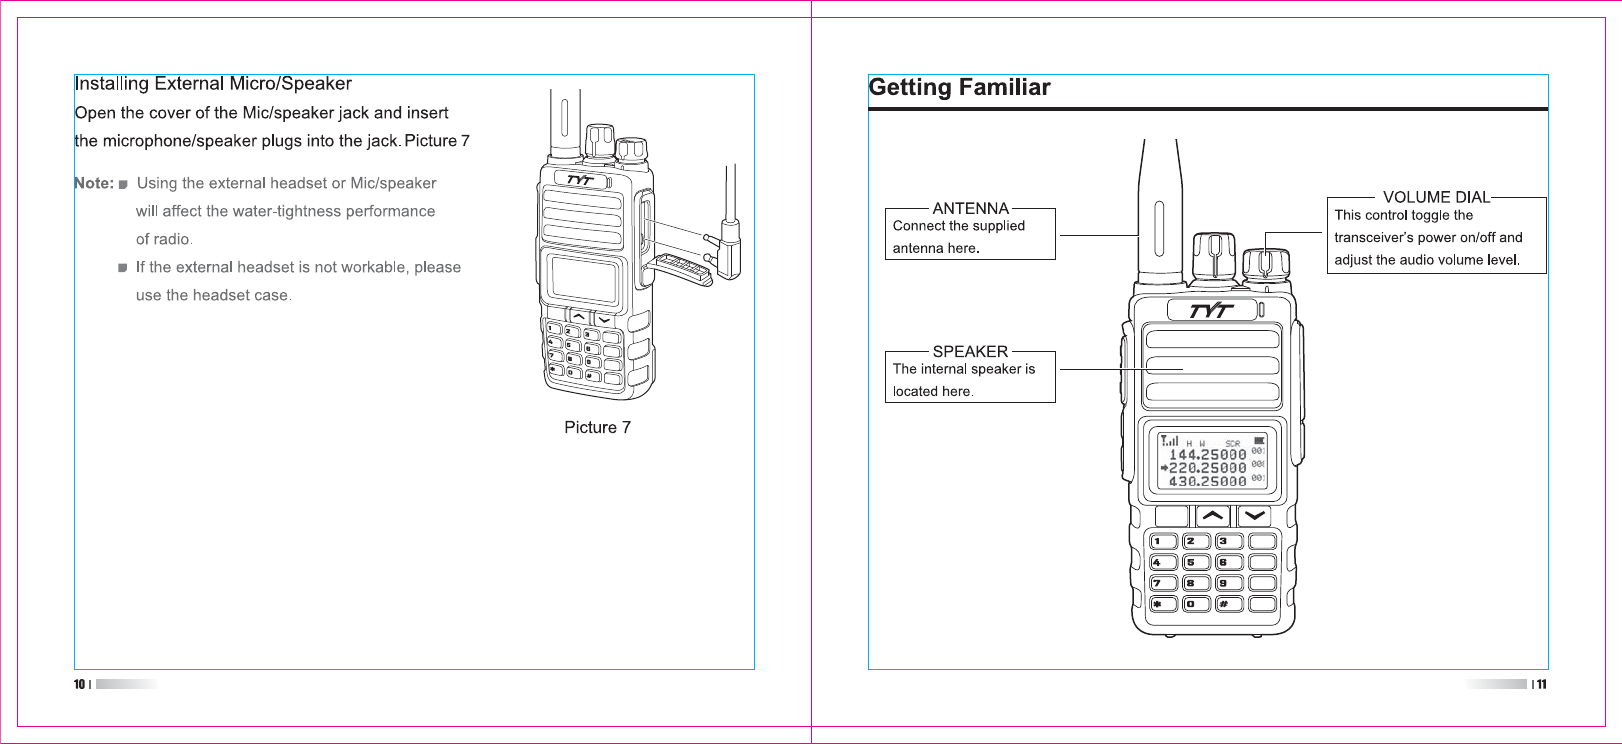
Installing External Micro/Speaker
Getting Familiar
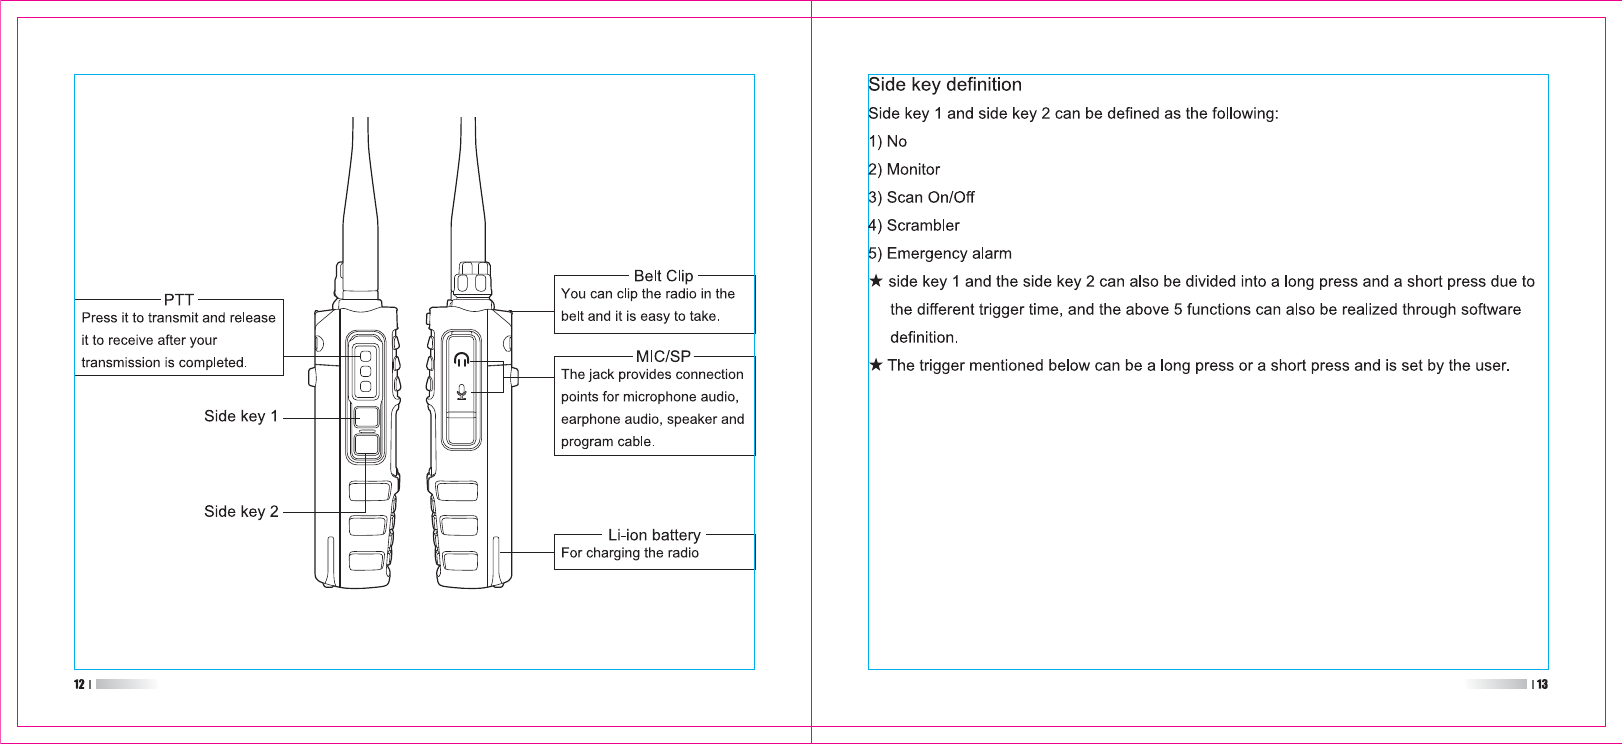
Side key definition
Icons and description
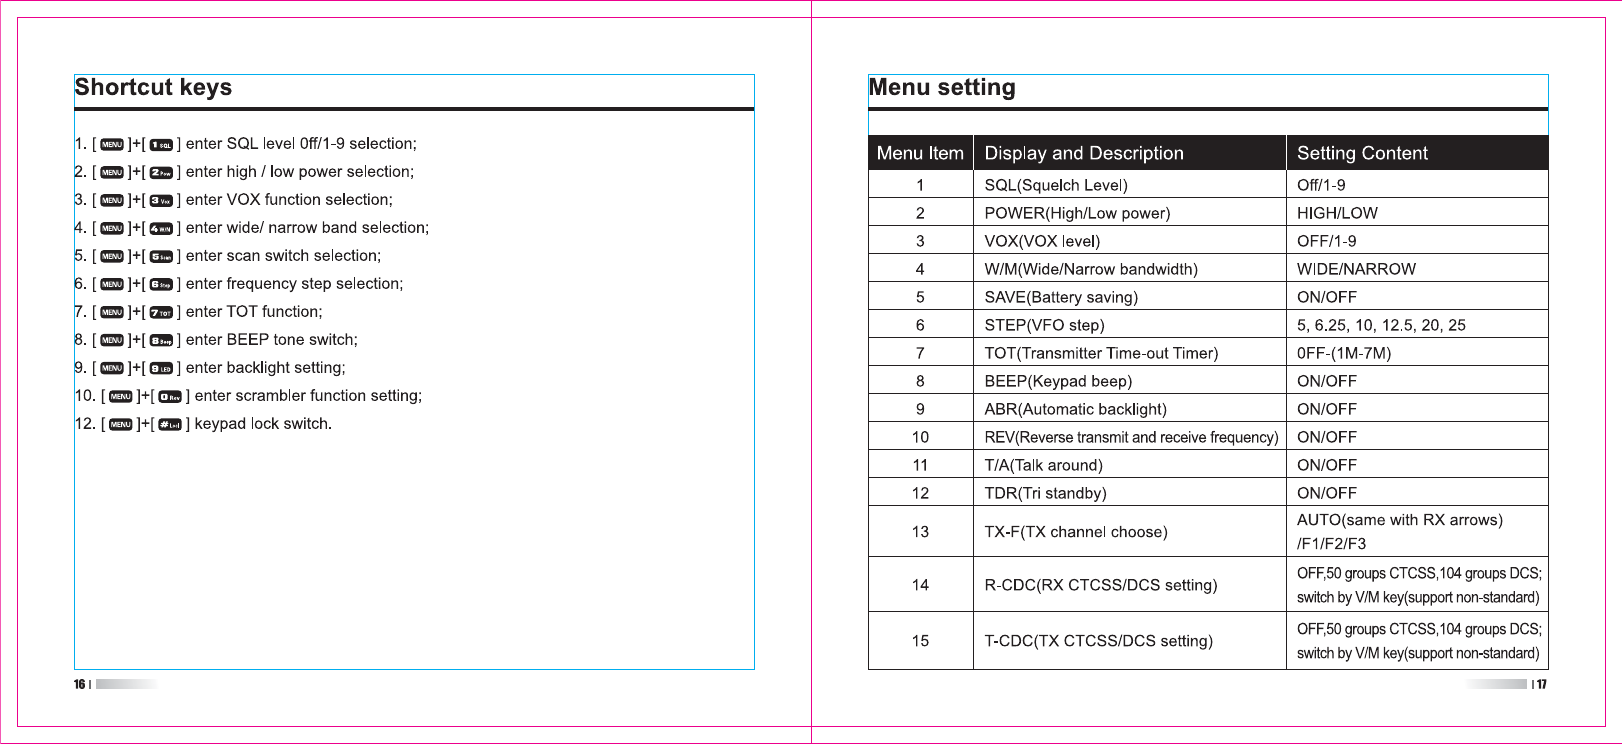
Shortcut keys
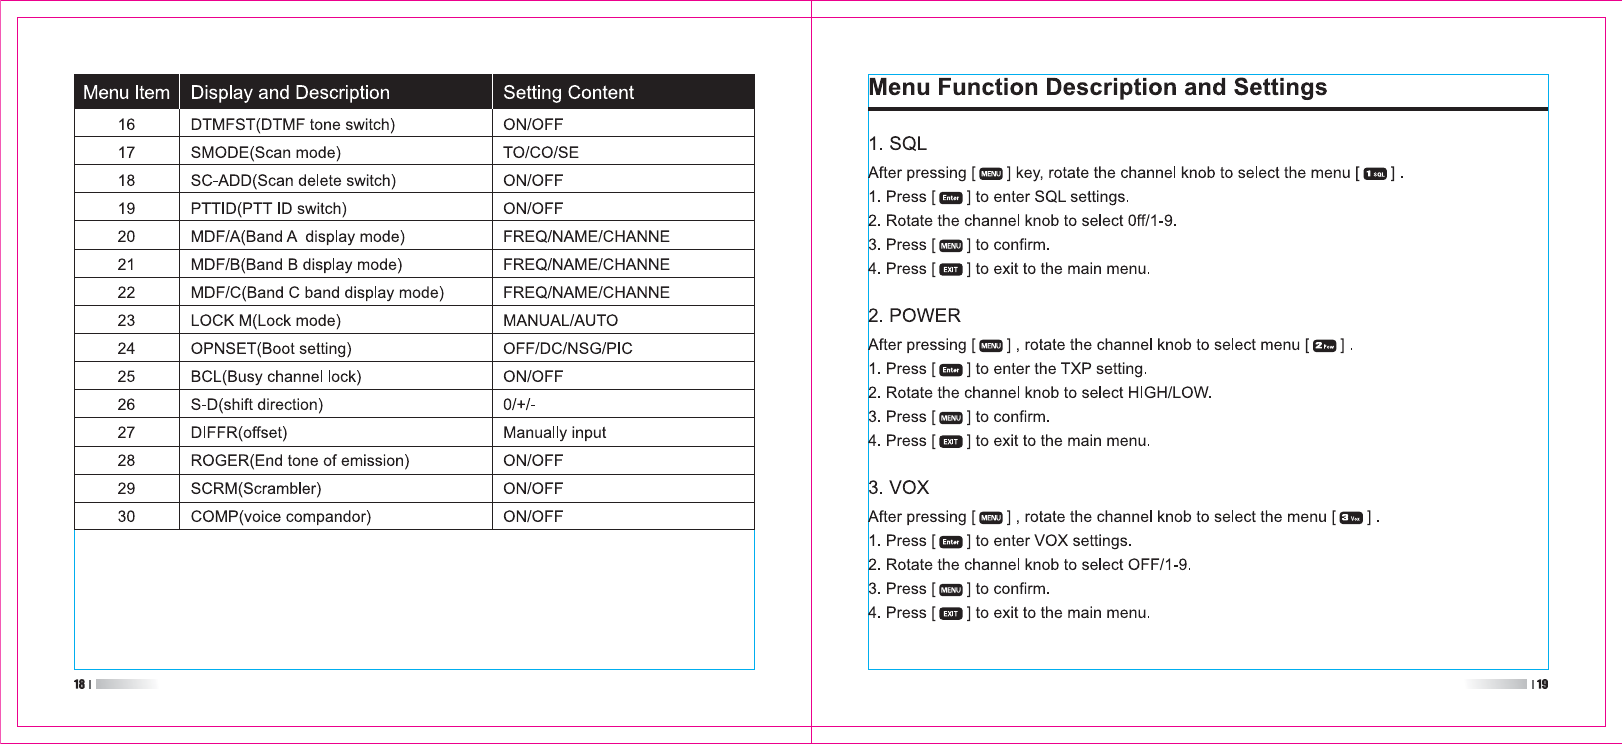
Menu setting
Menu Function Description and Settings
1. SQL
02
03
05
05
06
06
07
07
08
09
10
11
13
15
16
17
19
19
2. POWER
3. VOX
4. Wide / Narrow band setting
5. Battery saving
6. Step frequency setting STEP
7. TOT
8. BEEP
9. ABR backlight switch
10. Reverse frequency REV
11. Talk around T / A
12. Tri-band stand by TDR
13. Transmit channel selection TX-F
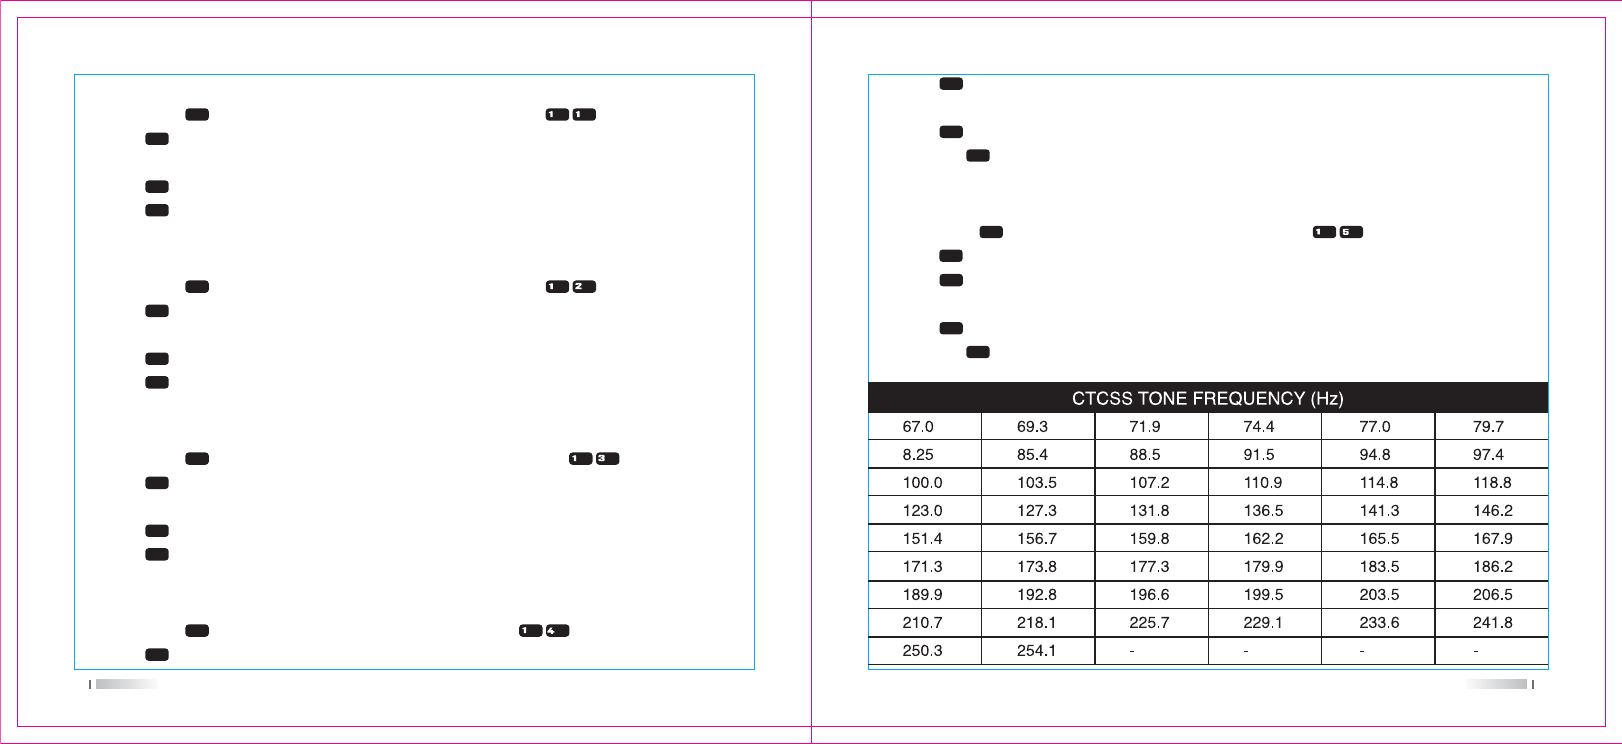
14. RX CTCSS/DCS setting R-CDC (support non-standard CTCSS/DCS)
15. TX CDCSS/DCS setting T-CDC (support non-standard CTCSS/DCS)
16. DTMF settings
17. Scan mode settings SMODE
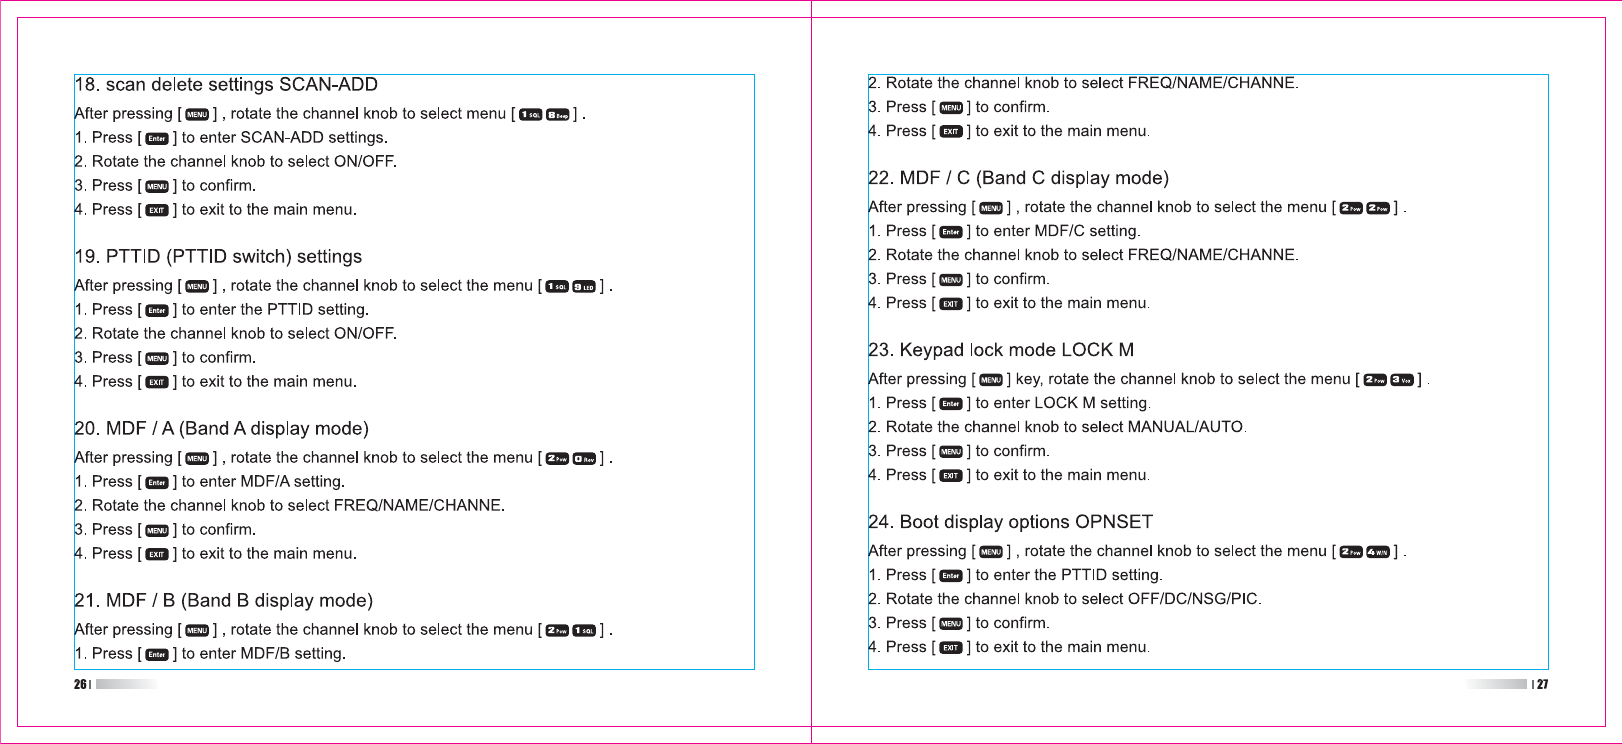
18. scan delete settings SCAN-ADD
19. PTTID (PTTID switch) settings
20. MDF / A (Band A display mode)
21. MDF / B (Band B display mode)
22. MDF / C (Band C display mode)
19
19
20
20
20
20
21
21
21
22
22
22
22
23
24
25
26
26
26
26
27

23. Keypad lock mode LOCK M
24. Boot display options OPNSET
25. Busy channel lock BCL
26. Shift direction selection setting S-D
27. offset setting DIFFR
28. End of emission ROGER
29. Scrambler function SCRM
30. Compandor COMP
Specific Instructions
TECHNICAL PARAMETERS
Guarantee
27
27
28
28
28
28
29
29
31
32

PUSH
PUSH
MENU
MENU

20 21
4. Wide / Narrow band setting
After pressing [ ] key, rotate the channel knob to select the menu [ ] .
1. Press [ ] to enter W/N settings.
2. Rotate the channel knob to select WIDE/NARROW.
3. Press [ ] to confirm.
4. Press [ ] to exit to the main menu.
5. Battery saving
After pressing [ ] key, rotate the channel knob to select the menu [ ] .
1. Press [ ] to enter SAVE settings.
2. Rotate the channel knob to select ON/OFF.
3. Press [ ] to confirm.
4. Press [ ] to exit to the main menu.
6. Step frequency setting STEP
After pressing [ ] , rotate the channel knob to select menu [ ] .
1. Press [ ] to enter STEP settings.
2. Rotate the channel knob to select step: 5, 6.25, 10, 12.5, 20, 25.
3. Press [ ] to confirm.
4. Press [ ] to exit to the main menu.
7. TOT
After pressing [ ] , rotate the channel knob to select menu [ ] .
1. Press [ ] to enter TOT setting.
2. Rotate the channel knob to select OFF/1-7.
3. Press [ ] to confirm.
4. Press [ ] to exit to the main menu.
8. BEEP
After pressing [ ] key, rotate the channel knob to select the menu [ ] .
1. Press [ ] to enter BEEP setting.
2. Rotate the channel knob to select ON/OFF.
3. Press [ ] to confirm.
4. Press [ ] to exit to the main menu.
9. ABR backlight switch
After pressing [ ] key, rotate the channel knob to select the menu [ ] .
1. Press [ ] to enter ABR settings.
2. Rotate the channel knob to select ON/OFF.
3. Press [ ] to confirm.
4. Press [ ] to exit to the main menu.
10. Reverse frequency REV
After pressing [ ] , rotate the channel knob to select the menu [ ] .
1. Press [ ] to enter the REV setting.
2. Rotate the channel knob to select ON/OFF.
3. Press [ ] to confirm.
4. Press [ ] to exit to the main menu.
22 23
11. Talk around T / A
After pressing [ ] , rotate the channel knob to select the menu [ ] .
1. Press [ ] to enter the T/A setting.
2. Rotate the channel knob to select ON/OFF.
3. Press [ ] to confirm.
4. Press [ ] to exit to the main menu.
12. Tri-band stand by TDR
After pressing [ ] , rotate the channel knob to select the menu [ ] .
1. Press [ ] to enter TDR setting.
2. Rotate the channel knob to select ON/OFF.
3. Press [ ] to confirm.
4. Press [ ] to exit to the main menu.
13. Transmit channel selection TX-F
After pressing [ ] key, rotate the channel knob to select the menu [ ] .
1. Press [ ] to enter TX-F settings.
2. Rotate the channel knob to select Auto/F1/F2/F3.
3. Press [ ] to confirm.
4. Press [ ] to exit to the main menu.
14. RX CTCSS/DCS setting R-CDC (support non-standard CTCSS/DCS)
After pressing [ ] , rotate the channel knob to select menu [ ] .
1. Press [ ] to enter R-CDC settings.
2. Press [ ] key to select the group: (OFF /67HZ / D023N / D023I).
3. Rotate the channel knob to select the desired CTCSS/DCS.
4. Press [ ] to confirm.
5. Press the [ ] button to exit to the main menu.
15. TX CDCSS/DCS setting T-CDC (support non-standard CTCSS/DCS)
After pressing [ ] , rotate the channel knob to select menu [ ] .
1. Press [ ] to enter T-CDC settings.
2. Press [ ] key to select the group: (OFF / 67HZ / D023N / D023I).
3. Rotate the channel knob to select the desired CTCSS/DCS.
4. Press [ ] to confirm.
5. Press the [ ] button to exit to the main menu.

24 25
16. DTMF settings
After pressing [ ] , rotate the channel knob to select the menu [ ] .
1. Press [ ] to enter DTMFST settings.
2. Rotate the channel knob to select ON/OFF.
3. Press [ ] to confirm.
4. Press [ ] to exit to the main menu.
Note:
1) You can send the corresponding DTMF code by pressing the button during the transmission.
2) You can set in software, and turn on Menu 19 PTT ID to send DTMF code.
17. Scan mode settings SMODE
After pressing [ ] , rotate the channel knob to select the menu [ ] .
1. Press [ ] to enter SCAND setting.
2. Rotate the channel knob to select TO\CO\SE.
3. Press [ ] to confirm.
4. Press [ ] to exit to the main menu.
28 29
25. Busy channel lock BCL
After pressing [ ] key, rotate the channel knob to select the menu [ ] .
1. Press [ ] to enter BCL setting.
2. Rotate the channel knob to select ON/OFF.
3. Press [ ] to confirm.
4. Press [ ] to exit to the main menu.
26. Shift direction selection setting S-D
After pressing [ ] , rotate the channel knob to select menu [ ] .
1. Press [ ] to enter S-D settings.
2. Rotate the channel knob to select o/+/-.
3. Press [ ] to confirm.
4. Press [ ] to exit to the main menu.
27. offset setting DIFFR
After pressing [ ] , rotate the channel knob to select menu [ ] .
1. Press [ ] to enter DIFFR settings.
2. Manually input offset.
3. Press [ ] to confirm.
4. Press [ ] to exit to the main menu.
28. End of emission ROGER
After pressing [ ] key, rotate the channel knob to select the menu [ ] .
1. Press [ ] to enter the ROGER setting.
2. Rotate the channel knob to select ON/OFF.
3. Press [ ] to confirm.
4. Press [ ] to exit to the main menu.
29. Scrambler function SCRM
After pressing [ ] key, rotate the channel knob to select the menu [ ] .
1. Press [ ] to enter the SCRM setting.
2. Rotate the channel knob to select ON/OFF.
3. Press [ ] to confirm.
4. Press [ ] to exit to the main menu.
30. Compandor COMP
After pressing [ ] key, rotate the channel knob to select the menu [ ] .
1. Press [ ] to enter COMP settings.
2. Rotate the channel knob to select ON/OFF.
3. Press [ ] to confirm.
4. Press [ ] to exit to the main menu.
31
Specific Instructions
TECHNICAL PARAMETERS
Guarantee
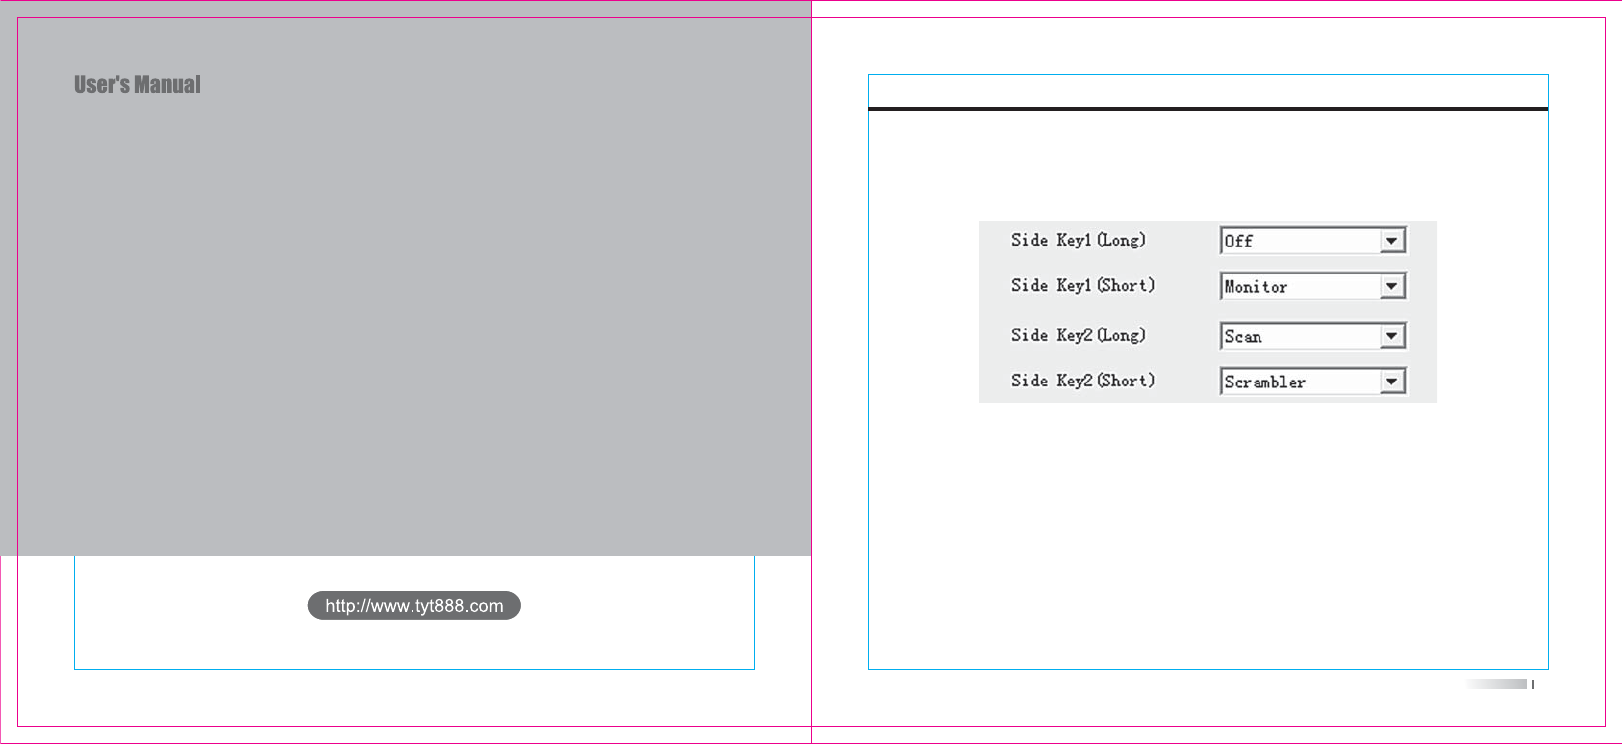
Specific Instructions
1. Side key definition
Open the programming software, select the side key function under the optional features, then
select the function you want to implement from the drop-down menu of each option, and finally
insert programming cable to write.
2. 1750Hz tone emission
PTT+side key 1, then you can emit 1750Hz tone.
3. Channel Storage and Deleting
In the VFO mode, long press Menu, the digits on the top right of the frequency blinks, rotate knob or
up and down key to choose the numbers you want to store and then press Enter to confirm.
In the CH or MR mode, long press Menu, the digits on the top right of the frequency blinks, rotate
knob or up and down key to choose the channels you want to delete and then press Enter to confirm.
4. Reset
Press PTT and Menu to power on, radio will show RESET VFO, rotate knob or up and down key to
choose VFO or ALL.
VFO: to reset the settings in the VFO model. ALL: to reset the settings in the all models.

32 33
Frequency
Channel
Operating Voltage
Operating Temperature
Frequency Stability
Dimension(Hxwxd
Weight
Antenna Impedence
Mode of operation
R x:136-174MHz, 220-260MHz & 400-480MHz
128
7.4V DC
-10°C ~ +50°C
±2.5ppm
116x53x36mm
106g(battery and antenna included)
ȍ
Simplex or semi-duplex
General
Frequency
Power
Modulation Type
Spurious Power
Modulation Noise
Modulation Distortion
Frequency Stability
Max Fr. Deviation
Current
Audio response(300-3400Hz)
Adjacent Ch Power
Tx:144-148MHz, 222-225MHz & 420-450MHz
5W
FM
-15dB
< -40dB
< 5%
5ppm
±5KHz
1600mA
+6.5 ~ -14dB
65dB
Transmitter
Frequency
Sensitivity
Occupied Bandwidth
Selectivity
Intermediation
Audio power
Audio distortion
Frequency Stability
Current
Audio response(300-3400Hz)
R x:136-174MHz, 220-260MHz & 400-480MHz
ȝ9
16KHz
65dB
55dB
> 500mW
10%
5ppm
standby: 60mA working: 250Ma
+7 ~ -12.5dB
Receiver

Class B digital device, pursuant to part 15 of the FCC Rules. These limits are
designed to provide reasonable protection against harmful interference in a
residential installation. This equipment generates uses and can radiate radio
frequency energy and, if not installed and used in accordance with the instructions,
may cause harmful interference to radio communications. However, there is no
guarantee that interference will not occur in a particular installation. If this
equipment does cause harmful interference to radio or television reception, which
can be determined by turning the equipment off and on, the user is encouraged to
try to correct the interference by one or more of the following measures:
- Reorient or relocate the receiving antenna.
- Increase the separation between the equipment and receiver.
-Connect the equipment into an outlet on a circuit different from that to which the
receiver is connected.
-Consult the dealer or an experienced radio/TV technician for help
Changes or modifications not expressly approved by the party responsible for compliance
could void the user's authority to operate the equipment. This device complies with Part
15 of the FCC Rules. Operation is subject to the following two conditions:
(1) this device may not cause harmful interference, and
(2) this device must accept any interference received, including interference that may
cause undesired operation.
NOTE: This equipment has been tested and found to comply with the limits for a