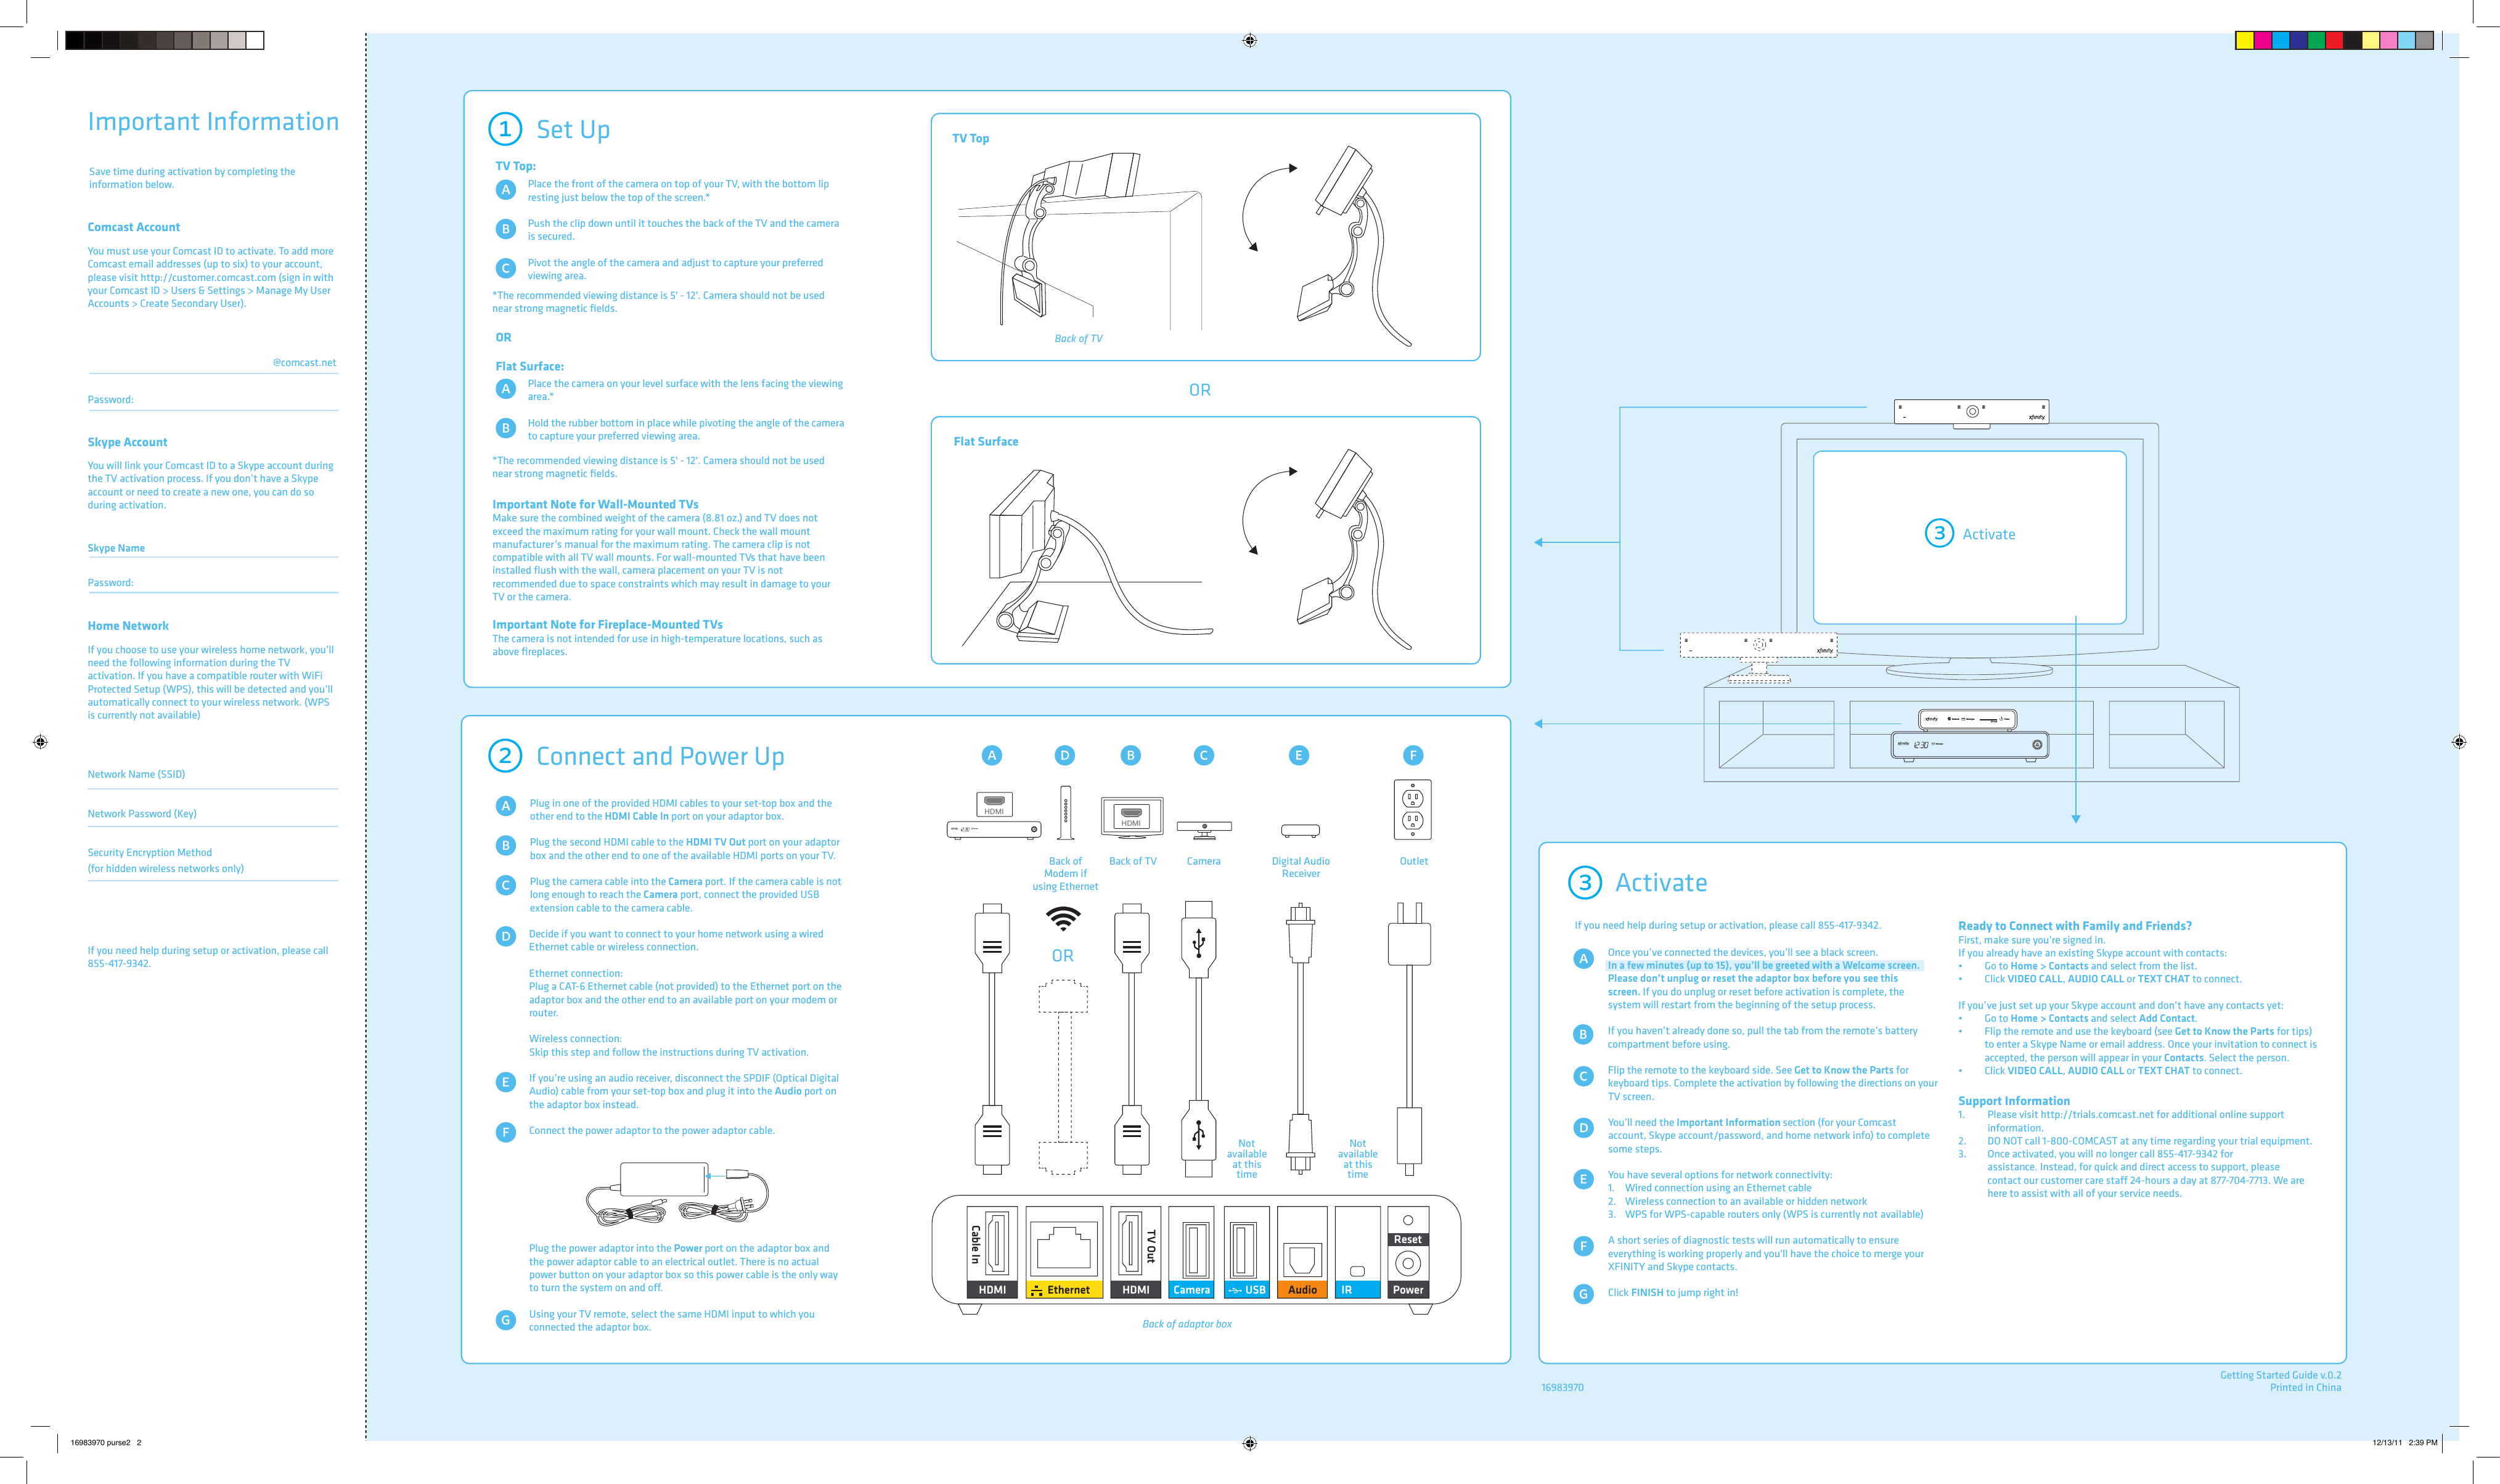
Technicolor Connected Home USA DWI219 IP Set Top Box User Manual getting started

Technicolor Connected Home USA LLC IP Set Top Box getting started

user manual getting started

Cable InHDMITV OutHDMI Camera USB IRAudioEthernetResetPowerLock Press to prevent accidental typing while using front of remote.Back of remoteOn/O IndicatorGlowing LED indicates camera is on.Lens with ShutterShutter closes when camera is o.ClipAdjust forplacement.Front of cameraNetworkMessages PowerSD CardWPSUse for wireless setup with WPS capable routers.(Currently not available) SD SlotUse for viewing media (Currently not available)Message IndicatorGlowing LED indicatesnew messages.Network IndicatorGlowing LEDindicates connectionto home network.PowerGlowing LED indicatesadaptor is on.Front of adaptor boxTop of adaptor boxHDMI Cable InHDMI TV OutUSB/IR(Currently not available)PowerEthernet Camera Audio ResetBack of adaptor boxLED indicates key pressUse to pair remoteReturn home Close and return to TVEnd call and ignoreincoming callZoom self-view andpan/scan to adjust videoPause cameraFast forwardSwitch profilesChange screen layoutPlace call on hold,mute mic and pause cameraPlay and pauseBattery compartmentSee self-viewMute microphoneAccept incoming calls and access contactsSelect current option and navigate left/right/up/downAdjust volumeMute callRewindALTPress ALT for characters in blue—i.e. press ALT then Q for 1. You will need to press ALT for each character.Front of remoteWPSGet to Know the PartsNetworkMessagesPowerSD CardRemote (1)Pull the tab from the remote’s battery compartment before usingAdaptor box (1)Camera with clip  (1) If anything is missing, pleasecall Comcast at 855-417-9342for assistance.What’s in the BoxYou’ll Also Need:XFINITY® is your interface to a growing number of new products, services and features that will become available to you on your HDTV. Getting Started GuideThe Reset button has two functions, depending on the length of time held:Normal Reset Insert a thin object and hold the Reset button for 2-5 seconds to reboot the adaptor and keep your personal settings.      Factory Reset Insert a thin object and hold the Reset button for 15 or more seconds to delete ALL personal settings and restore the adaptor to the default factory settings.PULLjaleUse the Left arrow to go back to the previous screen.Play/Pause/Forward/Rewind are not available at this time.Important InformationMicrophones MicrophonesMessagesPower•  HDMI-capable Comcast    set-top box•  HDTVhttp://speedtest.comcast.net)•  Internet connection with at    least 1.5 Mbps simultaneous    upload and download speeds  (check your speeds at   •  Comcast ID•  Skype™ account Power adaptor cable (1) HDMI cable (2)Power adaptor (1) USB extension cable (1)Note: This packaging has been specially designed using sustainable materials. Be kind to the environment and re-use this box. 16983970 purse2   1 12/13/11   2:39 PM
TV TopSet Up 1Flat SurfaceORTV TopSet Up 1OR  Place the front of the camera on top of your TV, with the bottom lip   resting just below the top of the screen.*  Push the clip down until it touches the back of the TV and the camera    is secured.   Pivot the angle of the camera and adjust to capture your preferred     viewing area.  Place the camera on your level surface with the lens facing the viewing   area.* Hold the rubber bottom in place while pivoting the angle of the camera    to capture your preferred viewing area.*The recommended viewing distance is 5' - 12'. Camera should not be used near strong magnetic fields.*The recommended viewing distance is 5' - 12'. Camera should not be used near strong magnetic fields.Important Note for Wall-Mounted TVsMake sure the combined weight of the camera (8.81 oz.) and TV does not exceed the maximum rating for your wall mount. Check the wall mount manufacturer’s manual for the maximum rating. The camera clip is not compatible with all TV wall mounts. For wall-mounted TVs that have been installed flush with the wall, camera placement on your TV is not recommended due to space constraints which may result in damage to your TV or the camera. Important Note for Fireplace-Mounted TVsThe camera is not intended for use in high-temperature locations, such as above fireplaces.Flat Surface  Plug in one of the provided HDMI cables to your set-top box and the    other end to the HDMI Cable In port on your adaptor box.  Plug the second HDMI cable to the HDMI TV Out port on your adaptor    box and the other end to one of the available HDMI ports on your TV.    Plug the camera cable into the Camera port. If the camera cable is not    long enough to reach the Camera port, connect the provided USB     extension cable to the camera cable.  Decide if you want to connect to your home network using a wired    Ethernet cable or wireless connection.  Ethernet connection:   Plug a CAT- 6 Ethernet cable (not provided) to the Ethernet port on the    adaptor box and the other end to an available port on your modem or    router.   Wireless connection:   Skip this step and follow the instructions during TV activation.   If you’re using an audio receiver, disconnect the SPDIF (Optical Digital   Audio) cable from your set-top box and plug it into the Audio port on    the adaptor box instead.  Connect the power adaptor to the power adaptor cable.   Plug the power adaptor into the Power port on the adaptor box and    the power adaptor cable to an electrical outlet. There is no actual     power button on your adaptor box so this power cable is the only way    to turn the system on and o.   Using your TV remote, select the same HDMI input to which you     connected the adaptor box. Connect and Power Up2Cable InHDMITV OutHDMI Camera USB IRAudioEthernetResetPowerDigital Audio ReceiverOutletCameraBack of TVBack of Modem if using EthernetORNot available at this timeNot available at this timeNetworkMessagesPowerSD CardActivate3MessagesPower16983970  Printed in China    Getting Started Guide v.0.2Back of TVHDMIHDMIMessagesPowerBack of adaptor boxTV Top: ORFlat Surface:   Once you’ve connected the devices, you’ll see a black screen.   In a few minutes (up to 15), you’ll be greeted with a Welcome screen. Please don’t unplug or reset the adaptor box before you see this     screen. If you do unplug or reset before activation is complete, the    system will restart from the beginning of the setup process.  If you haven’t already done so, pull the tab from the remote’s battery   compartment before using.   Flip the remote to the keyboard side. See Get to Know the Parts for    keyboard tips. Complete the activation by following the directions on your   TV screen.  You’ll need the Important Information section (for your Comcast   account, Skype account/password, and home network info) to complete    some steps. You have several options for network connectivity:  1.  Wired connection using an Ethernet cable  2.  Wireless connection to an available or hidden network  3.  WPS for WPS-capable routers only (WPS is currently not available)   A short series of diagnostic tests will run automatically to ensure    everything is working properly and you'll have the choice to merge your    XFINITY and Skype contacts.  Click FINISH to jump right in!Activate3If you need help during setup or activation, please call 855-417-9342. Ready to Connect with Family and Friends?First, make sure you’re signed in.If you already have an existing Skype account with contacts:• • If you’ve just set up your Skype account and don’t have any contacts yet:• •• Support Information1.  Please visit http://trials.comcast.net for additional online support    information.2.  DO NOT call 1-800-COMCAST at any time regarding your trial equipment.  3.  Once activated, you will no longer call 855-417-9342 for       assistance. Instead, for quick and direct access to support, please   contact our customer care sta 24-hours a day at 877-704-7713. We are    here to assist with all of your service needs. Go to Home > Contacts and select from the list.Click VIDEO CALL, AUDIO CALL or TEXT CHAT to connect.Go to Home > Contacts and select Add Contact.Flip the remote and use the keyboard (see Get to Know the Parts for tips) to enter a Skype Name or email address. Once your invitation to connect is accepted, the person will appear in your Contacts. Select the person.Click VIDEO CALL, AUDIO CALL or TEXT CHAT to connect.In a few minutes (up to 15), you’ll be greeted with a Welcome screen.Comcast AccountYou will link your Comcast ID to a Skype account during the TV activation process. If you don’t have a Skype account or need to create a new one, you can do so during activation.Skype AccountYou must use your Comcast ID to activate. To add more Comcast email addresses (up to six) to your account, please visit http://customer.comcast.com (sign in with your Comcast ID > Users & Settings > Manage My User Accounts > Create Secondary User).@comcast.netPassword:Skype NamePassword:Network Password (Key)If you choose to use your wireless home network, you’ll need the following information during the TV activation. If you have a compatible router with WiFi Protected Setup (WPS), this will be detected and you’ll automatically connect to your wireless network. (WPS is currently not available)If you need help during setup or activation, please call 855-417-9342.(for hidden wireless networks only)Home NetworkNetwork Name (SSID)Security Encryption MethodSave time during activation by completing the information below.Important Information16983970 purse2   2 12/13/11   2:39 PM

Navigation menu