Telecommunication Laboratories Chunghwa Telecom CHTS200202 HARDWARE SECURE MODULE User Manual SafGuard200 user guide for FCC
Telecommunication Laboratories , Chunghwa Telecom Co., Ltd HARDWARE SECURE MODULE SafGuard200 user guide for FCC
Contents
- 1. USERS MANUAL 1
- 2. USERS MANUAL 2
USERS MANUAL 1

SafGuard 200 Hardware Security
Module and Key Management User
Guide
Ver 1.1
Chunghwa Telecom Co., Ltd.
Telecommunication Lab
October, 2002
Note: This equipment has been tested and found to comply with the limits
for a Class B digital device, pursuant to part 15 of the FCC Rules. These
limits are designed to provide reasonable protection against harmful
interference in a residential installation. This equipment generates, uses
and can radiate radio frequency energy and, if not installed and used in
accordance with the instructions, may cause harmful interference to radio
communications. However, there is no guarantee that interference will not
occur in a particular installation. If this equipment does cause harmful
interference to radio or television reception, which can be determined by
turning the equipment off and on, the user is encouraged to try to correct
the interference by one or more of the following measures:
♦ Reorient or relocate the receiving antenna.
♦ Increase the separation between the equipment and receiver.
♦ Connect the equipment into an outlet on a circuit different from that
to which the receiver is connected.
♦ Consult the dealer or an experienced radio/TV technician for help.
Modifications not expressly approved by the manufacturer could void the
user's authority to operated the equipment under FCC rules.

Table of Contents
1. INTRODUCTION ............................................................................................... 5
2. INSTRUCTIONS FOR SAFGUARD 200 HARDWARE SECURE
M ODULE..................................................................................................................... 5
2.1. INITIALIZATION PROCESS ............................................................................... 5
2.1.1 Before left the Factory (before SafGuard 200 handed to customers) ... 5
2.1.2 After Left the Factory (Customers obtain SafGuard 200) .................... 6
2.2. KEY USAGE.................................................................................................... 7
2.3. ENVIRONMENTS FOR SMARTCARDS CONTROL ............................................... 8
3. INSTRUCTIONS FOR KEY MANAGEMENT PROGRAM ........................ 8
3.1. SERVICE TYPES .............................................................................................. 8
3.1.1 Security Officer Service ........................................................................ 8
3.1.2 User Service.......................................................................................... 9
3.1.3 Normal Service...................................................................................... 9
4. SETTING UP THE SAFGUARD200 .............................................................. 10
4.1. INITIALIZATION OF SAFGUARD 200.............................................................. 10
4.1.1. Setting the identification name of SafGuard200..................................11
4.1.2. Setting up the Real Time Clock of SafGuard200..................................11
4.1.3. Configuring SafGuard 200 Network Information............................... 12
4.1.4. Instialitation of Master Key ................................................................ 13
4.1.5. Installing Security Officer Key............................................................ 14
4.1.6. Produce the Key-Pair of SafGuard200............................................... 15
4.1.7. Complete SafGuard 200 initialization ................................................ 15
4.2. KEY MANAGEMENT FUNCTIONS................................................................... 16
4.2.1. Security Officer Logon........................................................................ 16
4.2.2. Produce User Key ............................................................................... 18
4.2.3. Setting up user group .......................................................................... 19
4.2.4 Produce AP Key .................................................................................. 20
4.2.5 Key Recovery and Key Backup ........................................................... 23
4.2.6 Key Destroy ......................................................................................... 25
4.2.7 Enable or Disable Key(WINDOWS) ................................................... 27
4.2.8 Enable or Disable Key (UNIX_LIKE)................................................ 32
5. SAFGUARD200 INSTALLATION ................................................................. 37
5.1 INSTALLATION OF WINDOWS2000 DRIVER................................................... 37
5.1.1 Installation .......................................................................................... 37
5.1.2 Enable Service Program ..................................................................... 39
5.1.3 Remove Service Program .................................................................... 44
5.2 INSTALLATION OF SOLARIS/LINUX DRIVER................................................... 44
5.3 ACTIVE_AP_K EY_FILE DIRECTORY............................................................. 45
5.4 THE DIRECTORY PUBKEY_FILE.................................................................... 45
6. THE INSTALLATION AND OPERATION OF THE AUDITING SERVER
46
6.1 INSTALLATION.............................................................................................. 46
6.1.1 Step 1. :................................................................................................ 46
6.1.2 Step 2. :................................................................................................ 47
6.1.3 Step 3. :................................................................................................ 47
6.2 ACTIVATION ................................................................................................. 47
6.2.1 Step 1. :................................................................................................ 47
6.2.2 Step 2. :................................................................................................ 48
6.3 INSTALL ASASERVICE ................................................................................. 48
6.4 SHOW THE STATUS OF THE AUDITING SERVER............................................. 49
6.5 STOP THE AUDITING SERVER ....................................................................... 50
6.6 STOP AND REMOVE THE AUDITING SERVER SERVICE .................................. 51
6.7 UNINSTALL THE AUDITING SERVER ............................................................. 51
7. THE LOG VIEWER ......................................................................................... 52
7.1 SYSTEM REQUIREMENTS .............................................................................. 52
7.2 OPERATION .................................................................................................. 52
7.2.1 Start The Log Viewer........................................................................... 52
7.2.2 Function Description .......................................................................... 52
7.3 VIEW THE LOG............................................................................................. 55
7.3.1 Select The Audit File To View:............................................................ 55
7.3.2 View The Detailed Record: ................................................................. 56
7.3.3 Display the Apk public key: ................................................................ 56
7.4 THE EVENT CODE OFAUDIT RECORDS........................................................ 58
1. Introduction
SafGuard 200 Hardware Security Module and Key management program
transmit data each other via Internet, since a 10M/100Mbps network interface
is used. In this way, we are able to transfer and receive information more
efficiently.
There are 3 or 4 entities in SafGuard 200 environment; (1) SafGuard 200
hardware security Module; (2) a CA server which requests SafGuard 200 for
cryptographic operations ; (3) Smartcards; (4) whether provides a Audit Serve
to record the events of cryptographic moduleǶ
For security consideration, the Initialization process for SafGuard200 has
to meet the following purposes;
1. There must be a unique relationship between SafGuard 200 and CA
server. SafGuard 200 can only provide services to the CA servers
which have partic ipated in the initialization process. This CA server
can only request SafGuard 200 which has participated in this
initialization process to provide cryptographic operation servicesǶ
2. SafGuard 200 provides the cryptographic service which depends on
the identity of the smartcard; certain identity can only request certain
services from SafGuard 200; this is decided while an smartcard is
generated, SafGuard 200 will store the services which could be
requested by this identity into the hardware.
3. This CA server requests that SafGuard 200 to insert an Smartcard
while providing some cryptographic services; in such a way, this
SafGuard 200 can ensure that the identity of this Smartcard having
the authorization to execute this cryptographic service.
2. Instructions for SafGuard 200 Hardware
Secure Module
In order to reach the above goals, we set the following SafGuard 200
Initialization process.
2.1. Initialization Process
2.1.1 Before left the Factory (before SafGuard 200
handed to customers)
While Customers obtain SafGuard 200, they will obtain several empty
Smartcards and the files used for installing a CA server; at this moment SafGuard
200 firmware already exists without key stored in it.
2.1.2 After Left the Factory (Customers obtain
SafGuard 200)
When SafGuard 200 is handed to a customer, all services related to
cryptographic modules are disable.SafGuard 200 state is at Initialization state;
customers can return it to the original factory, if it is not at the Initialization state.
Before initializing any service, customers have to execute initialization
process (Key Management Program). After SafGuard 200 left the factory,
Initialization process can be divided into the following two stages, customers
have to execute these stages by order.
2.1.2.1. Generating Smartcards for different identities
The process is as follows: generating MK (Master Key) and storing it to the
Smartcard marked as SO (Security Officer). The results that SafGuard 200
generates MK are stored in SafGuard 200 itself and also Smartcards, which are
held by 4 Security Officer. Once generating MK, SafGuard 200 will store MK
forever, until SO needs to restore a new MK or this SafGuard 200 is damaged.
While changing MK, it is necessary to provide the old MK before installing a
new one. If MK is changed, then all keys related to cryptographic modules have
to be regenerated again by using this new MK.
There are 4 Security Officer Key Pair being generated, SafGuard 200
encrypts Private Key using MK, then stored it to the Smartcard marked as
Security Officer. On the other hand, SafGuard 200 will store its Public Key in its
interior.
While generating HK, Key Pair (RSA key pair with 1024-bit key length) will
be stored in SafGuard 200, and the Public Key is transferred back for key
management program to use.
After completion of the above activities, SafGuard 200 system state will be
configured as Authentication State. Rebooting SafGuard 200 is necessary for
entering the Authentication State for normal operations.

2.1.2.2. Generating Application Key
Generating an Application Key (APK) and stored it to Smartcards used
by differently authorized personnel.
System administrators can generate User key pair by their needs and store
them to the Smartcard marked as “user” (or “operator”).
System administrators then use SafGuard 200 to generate APKs for
different authorized users.The generated APK is a Public-key/Private-key key
pair, 3DES or RC6, which is stored in the SafGuard 200 and held by different
Smartcards. Then they configure the ACL of APK. System administrators may
configure system state of SafGuard 200 as Initialization State; however, this
activity will erase any key stored in SafGuard 200.
Every Application Key has its corresponding ACL and Status. While
generating APK, Status is “0x00”; once ACL is set, Status is enabled.
2.2. Key Usage
The keys generated above and their usages are as figure 2-1.
Type of
Key
Role of Key
holder
Methods of
storing to
Smartcard
Number of
Smartcards
Merge of
Smartcard
Methods of
Storing to
HSM
Security
Officer
Key
Security
Officer,
System
Officer
CA pvk
plaintext
(signature
only)
4 With MK CA public
key
MK Security
Officer,
System
Administrator
Plaintext, split
by 4
personsǴ2 out
of 4 split
With SO
Key
Key Splits
User Key User1,
System
Operators
CA pvk
Plaintext
(signature
only)
3 Independent CA public
key
AP Key
(optional)
User2, Key
Holders
3 out of 5
splits, no
encryption
before split
5 Independent Plaintext
AP Key
(optional)
User2, Key
Holders
2 out of 3
splits, no
encryption
before split
3 Independent Plaintext
Table 2-1: Key Usage
According to the above analysis, one SafGuard 200 needs at most twelve
Smartcard holders, at least four holders, three combinations are as follows.
(1) 12 persons
(2) 9 person (if Security officer and User1 are in the same group)
(3) 4 persons (if Security officer and User1, User2 are in the same
group )
Two types of Smartcards are as follows.
(1) First type is for Security officer and User1.
(2) Second type is for User2. Because SafGuard 200 may store more than
one key, this type of Smartcard is for saving more memory, and
satisfies the separation principle of operation Smartcards and backup
Smartcards.
2.3.Environments for Smartcards Control
CA is under a 12-person control, and RA is suitable for a 9-person or
4-person control. Standard ID-based control is feasible.
3. Instructions for Key Management Program
This chapter is for more details about the Authentication State for the
hardware SafGuard 200.
3.1. Service Types
When the system is at the Authentication State, there are three types of
Authentication Services, namely, Security Officer Service, User Service and
Normal Service.
3.1.1 Security Officer Service
When executing the Security Officer Service, security officers need to do
Security Officer Logon (SOLogon). Two Smartcards, called SO Smartcards, are
also needed in this activity.This will generate a SessionKey, using this
SessionKey for MAC to ensure that one can execute this service. There is only
one SessionKey for Security Officer at a time.
Backup Application keys to Smartcards
Restore application keys from Smartcards
Create Security Officers
Cerate Users
Generate Application Keys
Set AP Key ACL (Access Control Limit)
Set Real-time Clock
Set network configuration
Switch to Initialization/Maintenance State
Erase AP Key
Write CA Software version- info.
3.1.2 User Service
When executing the User Service, a User needs to do User Logon
(UserLogon). User Logon is mainly for AP Keys; the key management program
needs to transfer APK-keyType and APK-keyID to SafGuard 200. There are at
least n different User Smartcards according to the Limit_auth_num “n” in ACL of
AP Key. SafGuard 200 will also compare User ID in the Smartcard and that in
the ACL.
Every UserLogon generates a SessionKey for MAC to ensure whether this
service is executable. Every AP Key has only one SessionKey at a time.
Use AP Key for cryptographic services
3.1.3 Normal Service
View SafGuard 200 information
Change Smartcard PIN
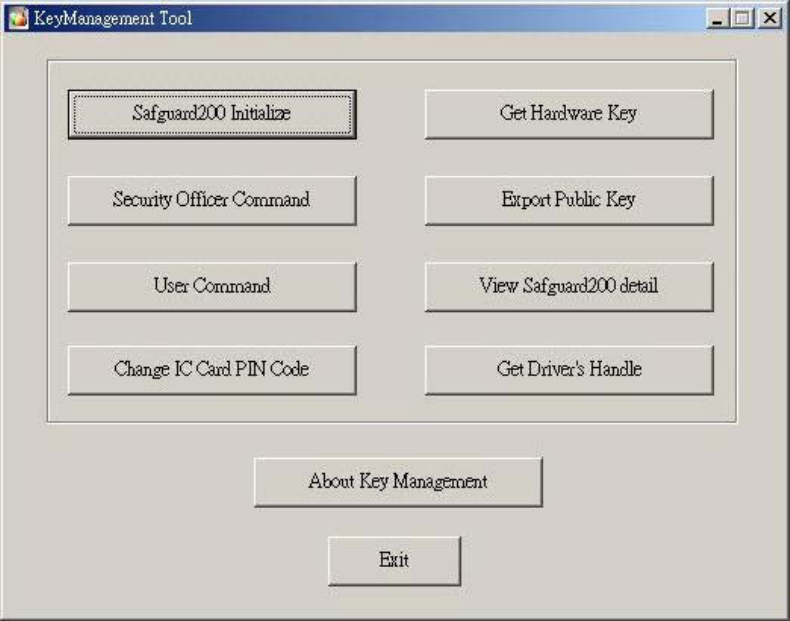
4. Setting Up the SafGuard200
Fig. 4 -1 SafGuard200 setting up screen
4.1. Initialization of SafGuard 200
Selecting “Initialization” buttons to initialize the SafGuard200

Fig. 4-2 Selecting the button of initialization
4.1.1. Setting the identification name of SafGuard200
Give an identification name for the safguard200.
Fig. 4-3 Setting the identification name
4.1.2. Setting up the Real Time Clock of SafGuard200
The program will show the time of SafGuard200 “Real Time Clock” on screen
Fig. 4-4 The time of SafGuard200
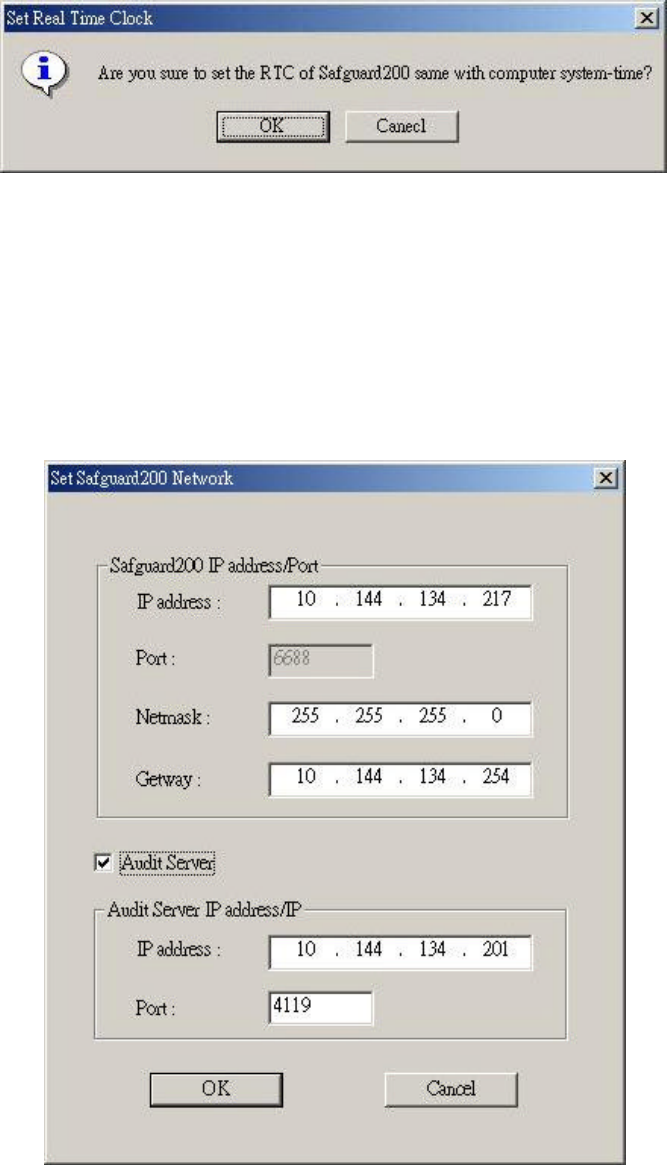
Setting up the SafGuard200 “Real Time Clock”.
Fig. 4-5 Setting upSafGuard200 Real Time Clock
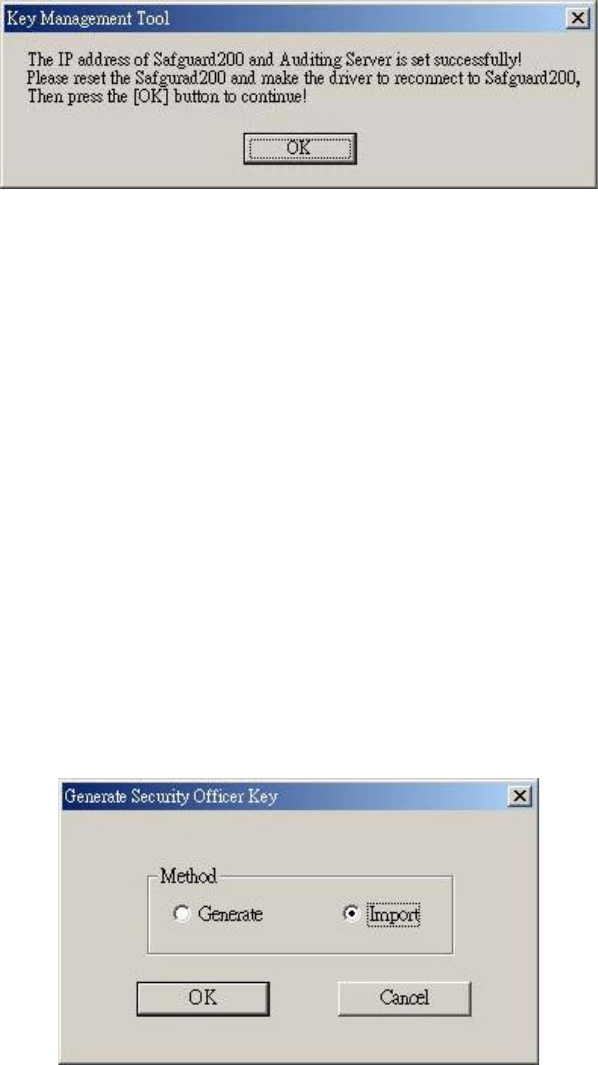
4.1.3. Configuring SafGuard 200 Network Information
(1) The network information of SafGuard200 has default values, please
modify the data according to the environment used.
Fig. 4-6 Setting up SafGuard200 network information
(2) After configure the network information, please restart SafGuard200.
Fig. 4-7 ReStart SafGuard200
4.1.4. Instialitation of Master Key
4.1.4.1. Produce Master Key
Four Security Officers are required to produce Master Key.
4.1.4.2. Impose Master Key
Two SO are required to impose the Master KeyǴand these two SO
needto have IC card with correct Master KeyǶ
Fig. 4-8 ProduceǵImpose Master Key
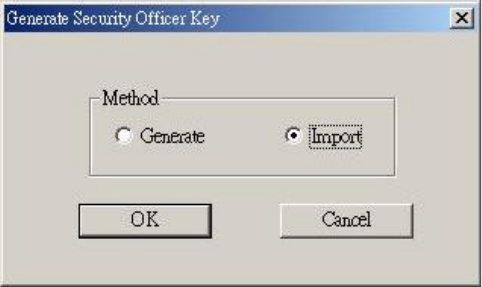
4.1.5. Installing Security Officer Ke y
4.1.5.1. Produce Security Officer Key
Four Security Offices are required to produce Security Officer Keys.
4.1.5.2. Impose Security Officer Key
If selecting impose Security Officer KeysǴthe key-pair of SO IC card
needed tobe encoded by the SafGuard 200 MK such that the SOLogon ё
can be used.
Fig. 4-9 ProduceǵImpose Security Officer Key
Please give this Security Officer an identification name such that the
Security Officer can be identified in key management tool.
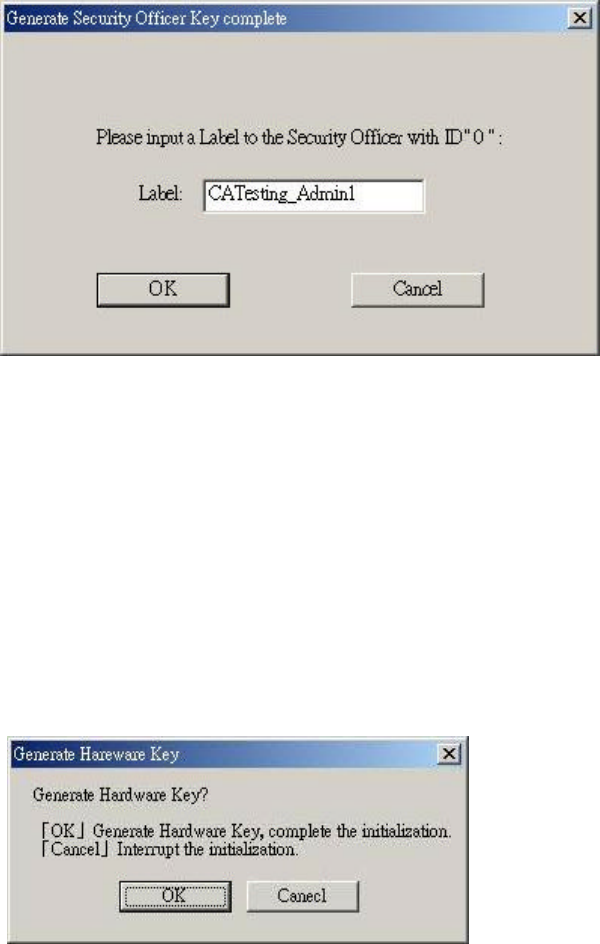
Fig. 4-10 Setting the id name of SO
4.1.6. Produce the Key-Pair of SafGuard200
The Key-Pair of SafGuard 200 are required for the usage of UserLogon
and SOLogon.
Fig. 4-11 Produce SafGuard 200 Key-Pair
4.1.7. Complete SafGuard 200 initialization
(1) If previous steps all complete without any error, the initialization can
be completed
Restart SafGuard200 and change the state to Authentication StateǶ
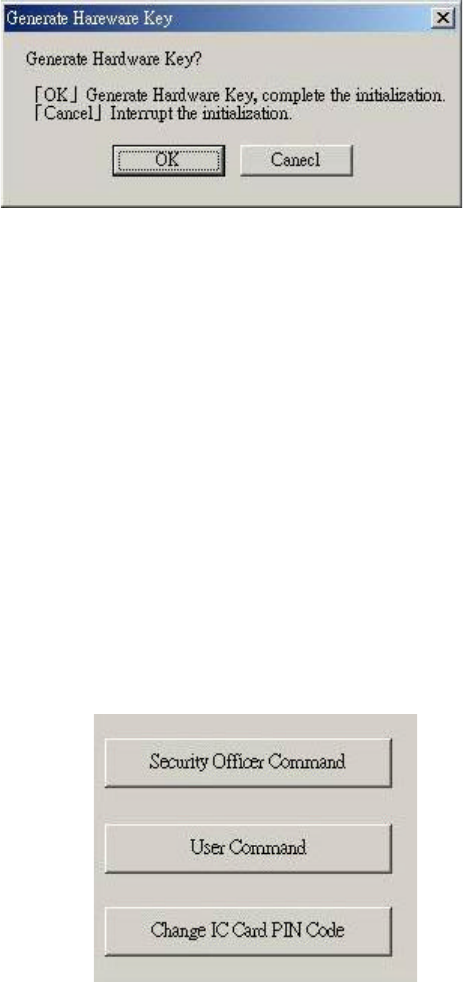
Fig. 4-12 Initialization complete
If there is any error or the button “Cancle” was pressed, the initialization will be
stop. If you want to initialiaze SafGuard200 again, you need to go step 1 .
4.2. Key Management functions
Two Security Officers are required to generate key pairs.
Selecting Security Officr command on the key management screen.
Fig. 4-13 Selecting Security Officer button
4.2.1. Security Officer Logon
(1) To Logon Security Officer, Security Office will be required to
insert his/her IC cardǶ
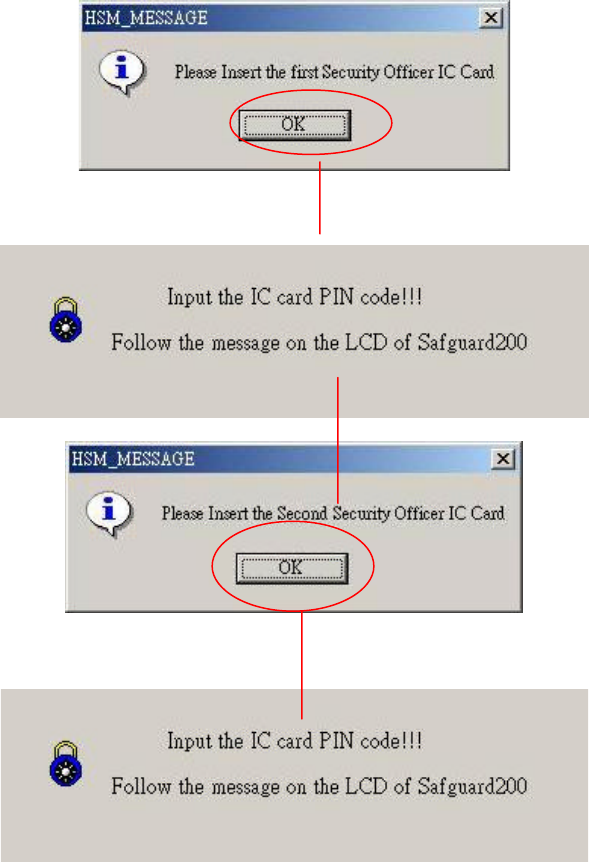
Fig.4-14 message of Security Officer Logon
(2) After SO Logon successfully, the window of selecting will show
up as following
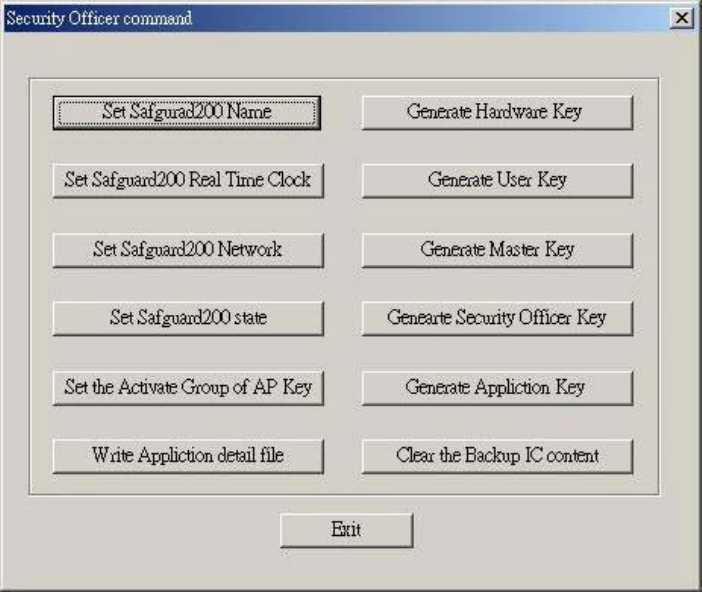
Fig. 4-15 the window of Security Officer function
4.2.2. Produce User Key
Ther are two ways to produce User KeyȭǺ
4.2.2.1. Produce User Key
ȜProduceȝǴa user(system operator) is required to generate a new
key-pair.
4.2.2.2. Impose User Key
ȜImposeȝ User KeyǴ make sure that the key of IC card is encoded
by the MK of SafGuard 200.

Fig. 4-16 the window of producing User Key
4.2.3. Setting up user group
After the User Key has been generated, please select Ȭset up Groupȭ
on ȜSecurity Officer function tableȝǶ This function can classify Security
Officer and User which can be used by Application Key(APK).
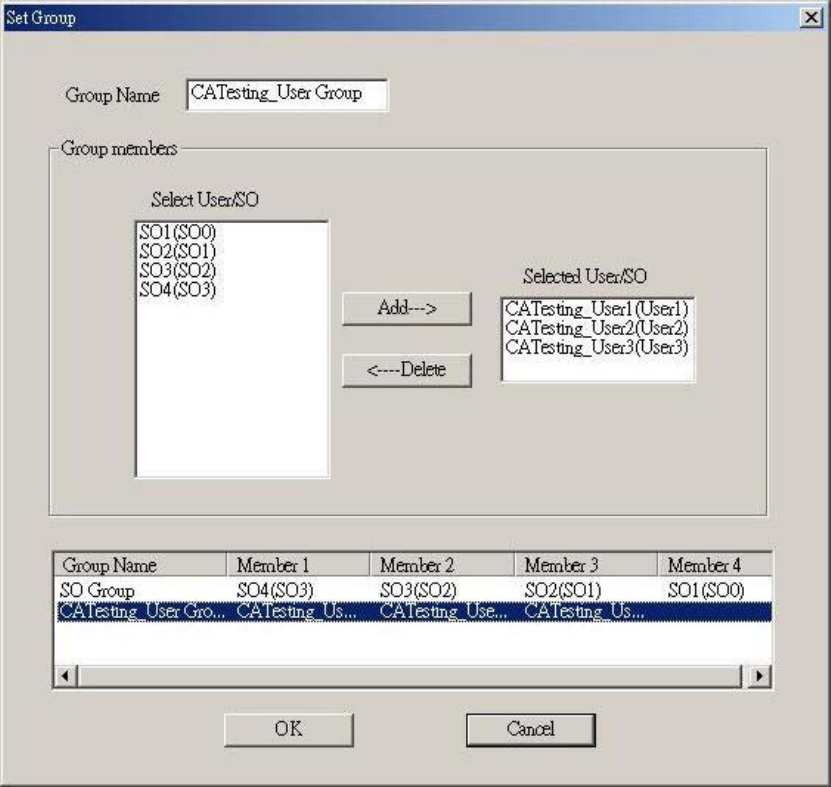
Fig. 4-17 Setting User-Group
4.2.4 Produce AP Key
From Security Officer function window, clickȜProduce AP Keyȝ and
go to the window of producing AP Key.
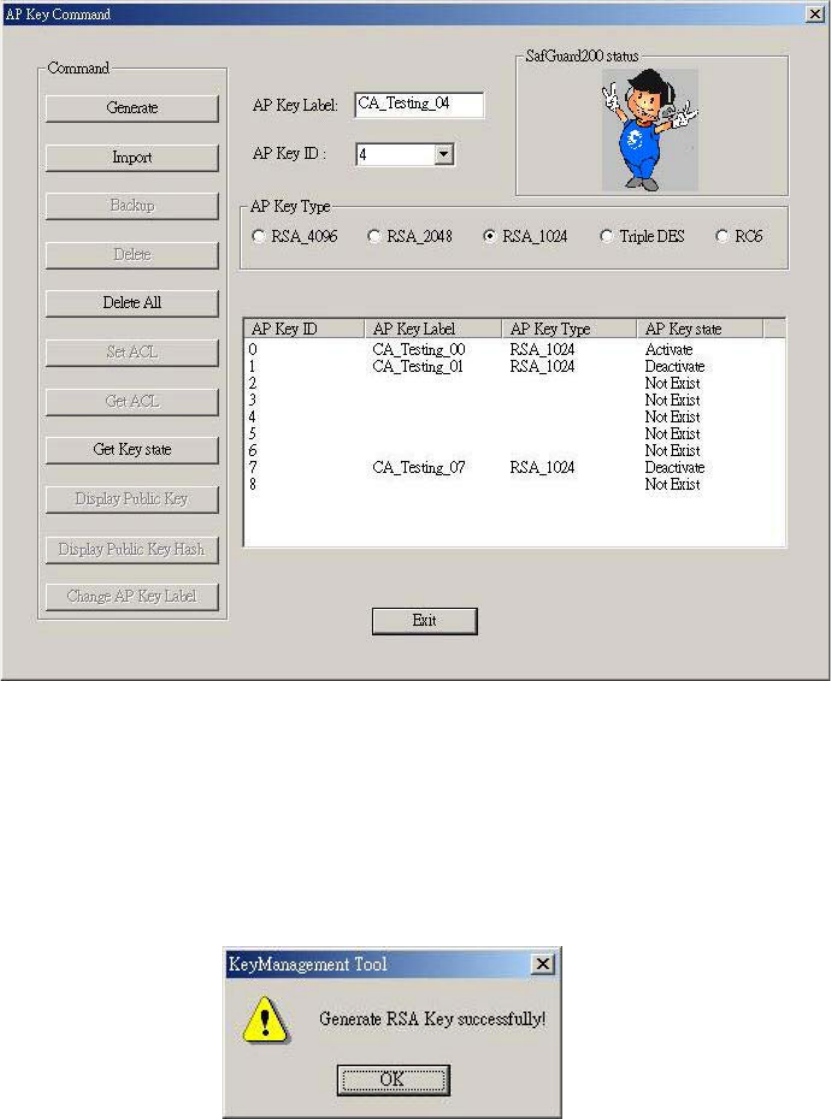
Fig. 4-18 the window of producing AP Key
4.2.4.1. Generating Keys
Click ȬGenerating keyȭon Ȝproducing AP KeyȝwindowǶ
Fig. 4-19 the complete of producing AP Key
Then you will be asked to set up the ACL(Access Control Limit) of the
Application Key.
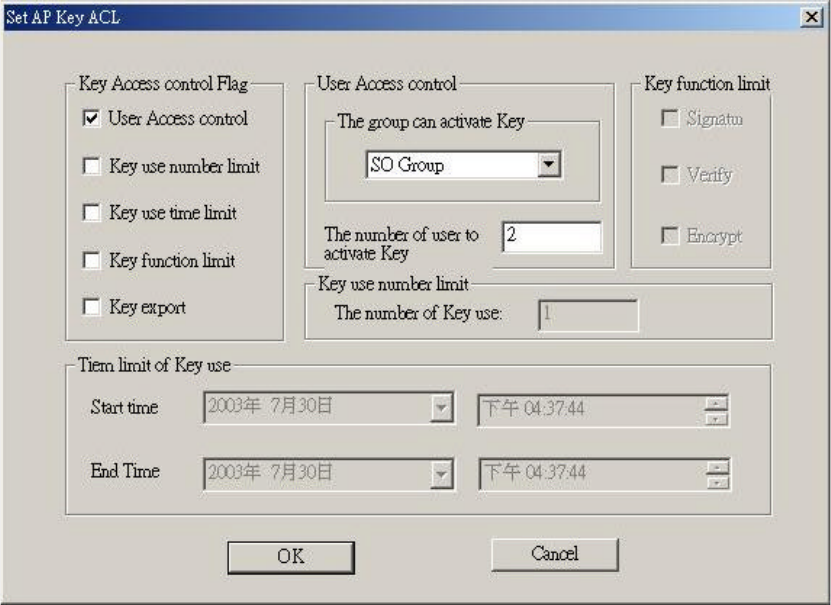
4.2.4.2. Setting up the ACL of Key
Fig. 4-20 Setting up the ACL of AP Key
4.2.5 Key Recovery and Key Backup
Fig. 4-21 the screen of AP Key Backup and Recovery
4.2.5.1. Key BackUp
Click onȬBackUpȭ of Ȝproducing AP Key screenȝ. Make sure the APK
has been generated and SafGuard200 already has the key-pair of AP Key.
კύޑ AP Key ߚȴۘ҂ቪΕȵջё ϐࡕΕഢҽ AP Key ޑۓ
ฝय़Ƕ
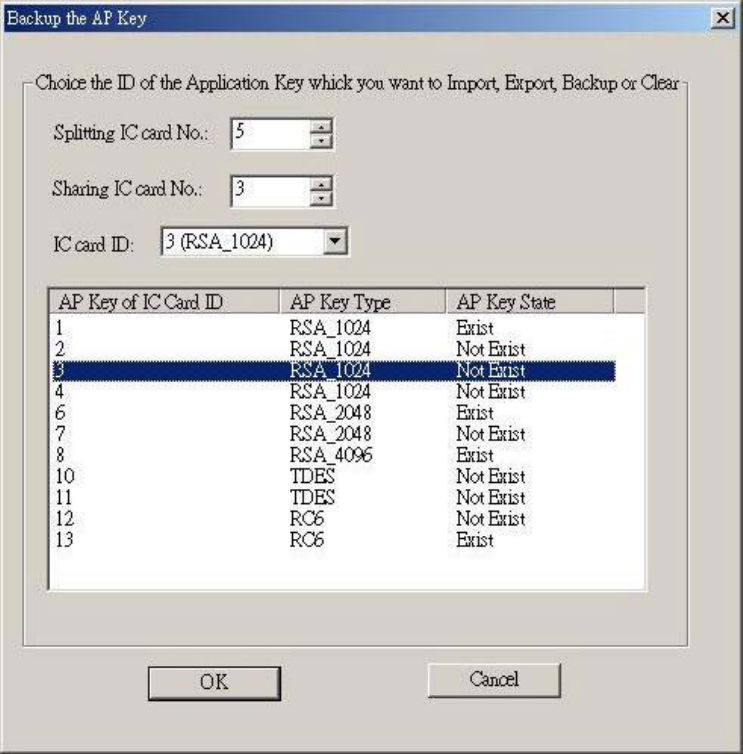
Fig. 4-22 the screen of setting up the AP Keybackup information
4.2.5.2. Key Recovery
Click Ȭimposeȭon ȜProducing AP Keyscreenȝ
User need to have the backup data in order to excute thekey recovery
operation.The screen of setting up the AP Key
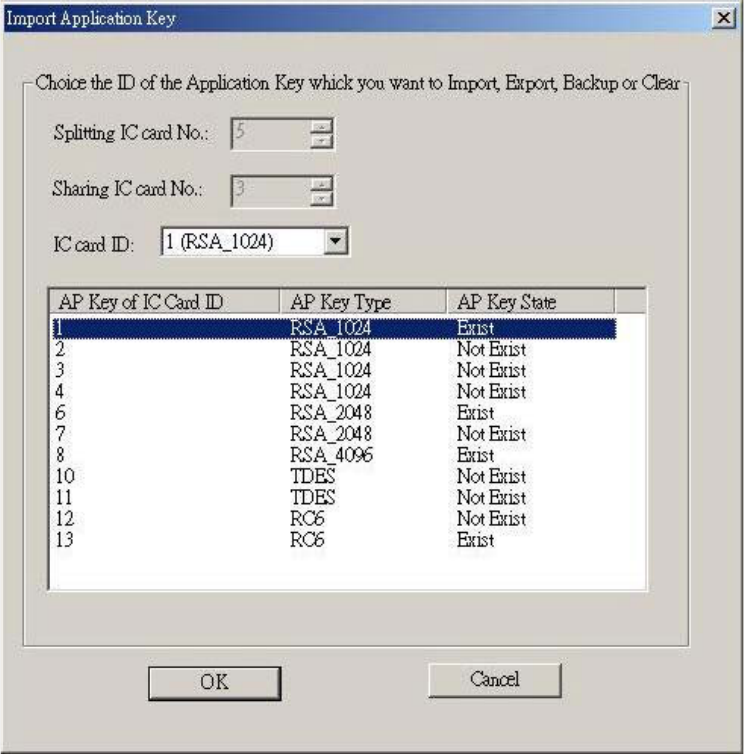
Fig. 4-23 the operation window of Impose AP Key
After Key Recovery, you will be asked to set up the ACL of AP Key.
Please reference ȤFigure 4-20 Setting up the ACL of AP KeyȥǶ
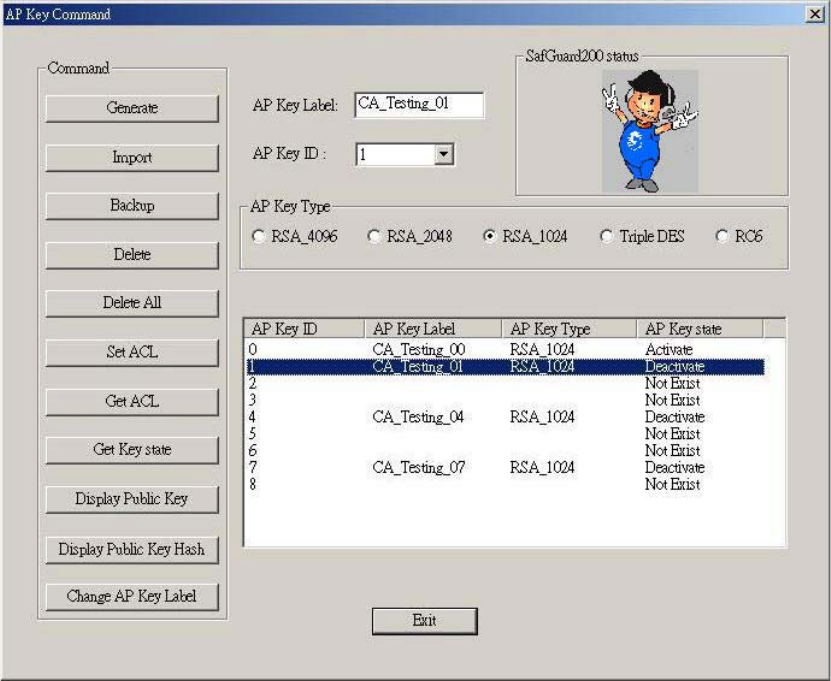
4.2.6 Key Destroy
4.2.6.1. SafGuard200 Key Destroy
Selecting ȬDeleteȭorȬDelete Allȭ on the ȜAP Keywindowȝ.
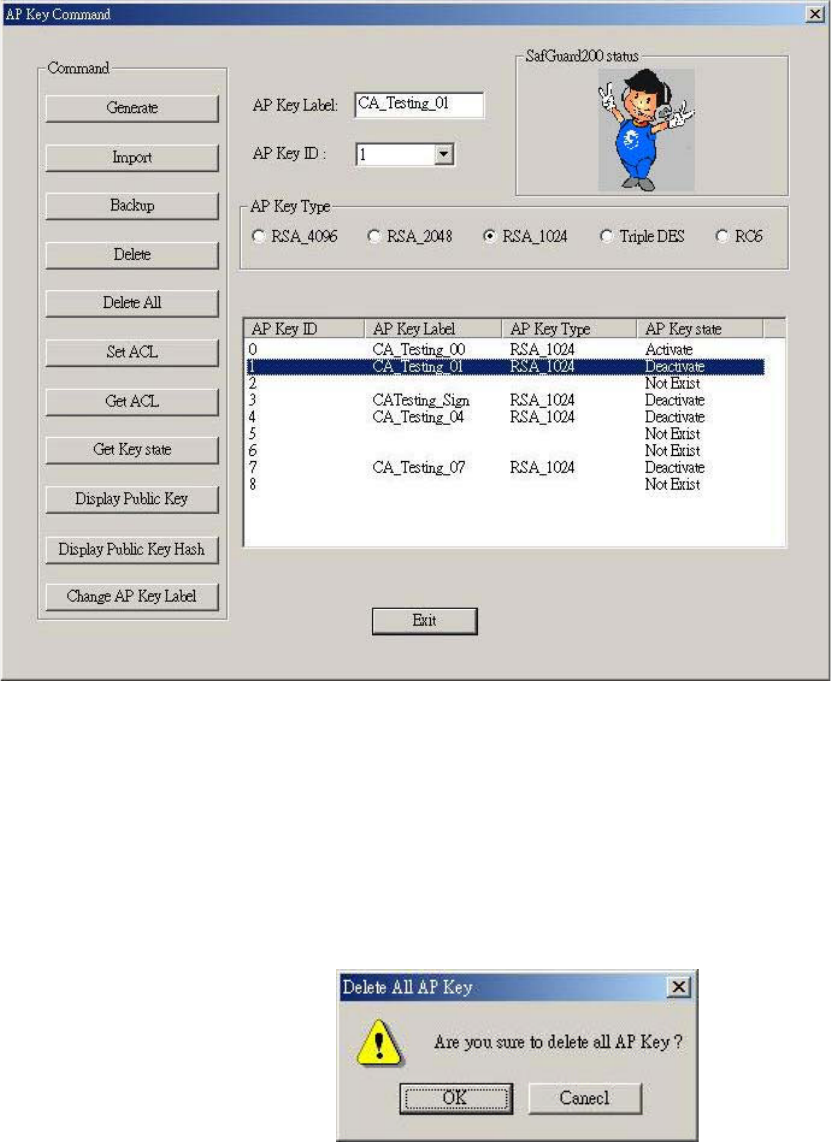
Fig .4-24 The screen of SafGuard Destroy
(1) ȬDeleteȭthe selected AP Key .
(2) orȬDelete Allȭto delete all AP KeyǶ
Fig. 4-25 key destroy
4.2.6.2. IC Card Backup Key Destroy
Selecting ȜDelete the context of Backup ICcardȝ on the Security Officer
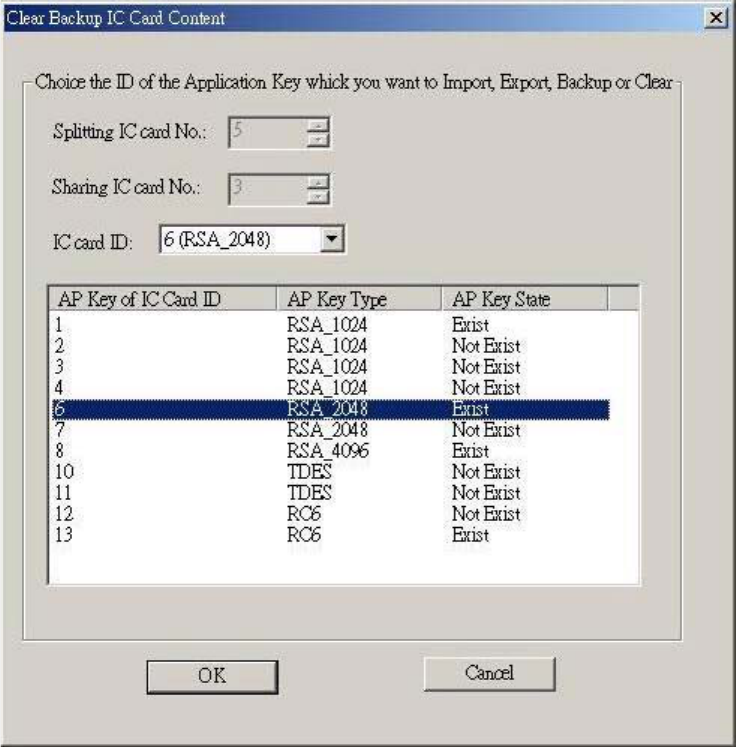
selecting window.
Delete the key on Backup IC Card.
Fig. 4-26 Delete the context of Backup IC Card
4.2.7 Enable or Disable Key(WINDOWS)
Click ȬUser commandsȭon the SafGuard200 setting up screen

Fig. 4-27 Selecting the button of User commands
4.2.7.1. Enable Key
(1) Selecting the AP Key that you want to be enabledon on the List, than press
ȜEnableȝǶ
Fig. 4-28 The screen of key enable(User Logon)
(2) You will be asked to insert at least one User IC Card, according to
Limist_auth_num of the ACL of eack AP Key(Reference Figure 4-20 Setting
up the ACL of AP Key)Ƕ
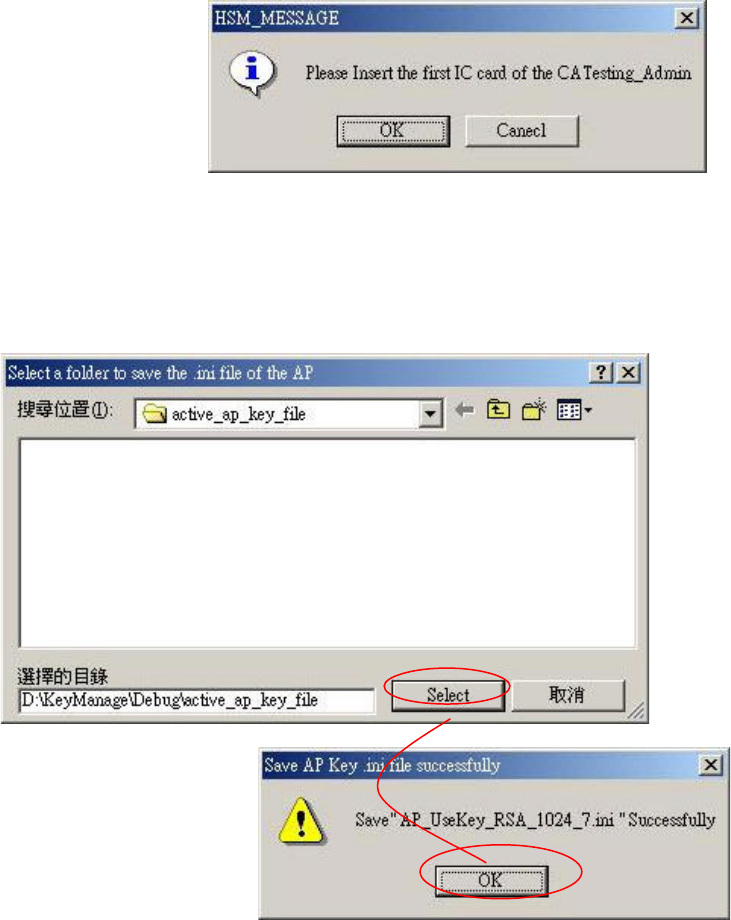
Fig. 4-29 Enable AP KeyǶThe message of inserting User IC Card
(3) After enable the key, set up the information about the AP Key
a. Selecting the directory to save
Fig. 4-30 Selecting the location of AP Key
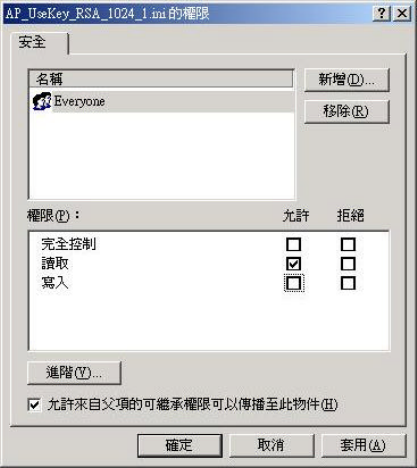
b. Setting up the privilege
c.
d.
Fig. 4-31 AP Key configure file, setting up the privilege
4.2.7.2. Disable a using Key
Selecting the AP key you want to be disabled on the List, then
pressȜDeactivateȝǶ