Telit Mobile Terminals S p A SAT550 TELITAL SAT 550 DUAL MODE PORTABLE MOBILE EARTH ST User Manual Manuale d uso SAT550 inglese pub
Telit Mobile Terminals S.p.A. TELITAL SAT 550 DUAL MODE PORTABLE MOBILE EARTH ST Manuale d uso SAT550 inglese pub
Contents
- 1. DMUT USER GUIDE
- 2. SAT 550 USER GUIDE
- 3. TECHNICAL MANUAL
- 4. TECHNICAL SPEC
SAT 550 USER GUIDE


INTRODUCTION
Thank
y
ou for choosin
g
this product. Read the entire manual carefull
y
to make the
best use of
y
our phone.
This dual mode telephone allows
y
ou to make and receive calls all over the world,
as it uses - where suitable - terrestrial GSM 900 MHz networks (subject to a
g
reements
si
g
ned between
y
our network operator and the network
y
ou are workin
g
on) and elsewhe-
re the Globalstar satellite network.
Despite its advanced functionalit
y
, the use of the SAT 550 is extremel
y
simple: on
one hand it
g
rants all the functions of a common GSM telephone whilst, on the other, b
y
usin
g
a eas
y
menu it enables
y
ou to access to the Globalstar satellite service with its
world-wide covera
g
e.
Just readin
g
the first sections of this manual
y
ou will be able to make calls, to sa-
ve and store phone numbers and to send and receive short text messa
g
es (SMS).
CE MARK
The telephone complies with the following EU standards:
CTR 19, CTR 20 and CTR 41; ETS 300342 and ETS 300831; EN 60950 in accordance with the pro-
visions of the following European directives:
91/263/EEC
89/336/EEC
73/23/EEC
93/97/EC
and with the USA standards:
FCC part 2
FCC part 15
FCC part 25
UL 1492
UL 1950
UL 2089
In accordance with ongoing improvements the specifications, design and other descriptions
in the present manual are subject to modifications without notice.

PATENT INFORMATION
This product is manufactured under license to the following patents of QUAL-
COMM Incorporated (other patents pending):
4,901,307 5,487,175 5,603,096
5,056,109 5,490,165 5,604,730
5,099,204 5,497,395 5,617,060
5,101,501 5,499,280 5,621,784
5,103,459 5,504,773 5,621,853
5,107,225 5,506,865 5,625,876
5,109,390 5,509,015 5,627,857
5,228,054 5,511,067 5,629,955
5,257,283 5,511,073 5,629,975
5,265,119 5,528,593 5,633,881
5,267,261 5,544,196 5,638,412
5,267,262 5,546,459 5,640,414
5,283,536 5,561,618 5,642,398
5,289,527 5,566,000 5,644,591
5,307,405 5,566,206 5,644,596
5,309,474 5,566,357 5,646,991
5,339,046 5,568,483 5,652,599
5,341,456 5,572,172 5,654,979
5,373,259 5,574,773 5,655,220
5,383,219 5,576,662 5,657,420
5,392,287 5,577,022 5,666,122
5,396,516 5,577,025 5,673,259
5,408,697 5,581,575 5,675,644
5,414,796 5,588,043 5,687,229
5,416,797 5,590,069 5,689,557
5,426,392 5,590,406 5,691,974
5,442,627 5,590,408 5,692,006
5,452,473 5,592,481
5,461,639 5,592,548
5,469,115 5,594,718
5,475,870 5,596,570
5,479,475 5,600,754
5,485,486 5,602,833

CONTENTS
1 Description ---------------------------------------------------------------------------------------------- 10
Keys Description ------------------------------------------------------------------------------------------- 10
Display indicators ------------------------------------------------------------------------------------------ 11
Satellite antenna ------------------------------------------------------------------------------------------- 13
Positioning of the antenna during use ---------------------------------------------------------------- 13
Positioning of the antenna in stand-by --------------------------------------------------------------- 13
Plugs for car-kit device ----------------------------------------------------------------------------------- 13
2 Quick starting guide --------------------------------------------------------------------------------- 14
How to make the first call -------------------------------------------------------------------------------- 14
How to receive the first call ------------------------------------------------------------------------------ 14
Satellite communications ------------------------------------------------------------------------------- 14
Personalising the menu ---------------------------------------------------------------------------------- 14
How to store a number in the phone-book ---------------------------------------------------------- 15
How to recall a phone-book location ------------------------------------------------------------------ 15
How to send the first text message (SMS) ---------------------------------------------------------- 16
How to read the first text message (SMS) ----------------------------------------------------------- 16
3 Important warnings -----------------------------------------------------------------------------------17
4 Inserting the SIM card and connecting the battery ---------------------------------------- 18
Inserting the SIM card ------------------------------------------------------------------------------------ 18
Connecting the battery ----------------------------------------------------------------------------------- 18
5 Charging the battery ---------------------------------------------------------------------------------- 19
Charging the battery -------------------------------------------------------------------------------------- 19
Faults during charging ------------------------------------------------------------------------------------ 19
Battery low alarm ------------------------------------------------------------------------------------------ 19
6 Main functions ------------------------------------------------------------------------------------------ 20
Switching on ------------------------------------------------------------------------------------------------- 20
Switching off ------------------------------------------------------------------------------------------------- 20
Access codes ----------------------------------------------------------------------------------------------- 20
Security code (6 digits) ----------------------------------------------------------------------------------- 20
PIN and PIN2 codes (from 4 to 8 digits) ------------------------------------------------------------- 20

PUK and PUK2 codes (8 digits) ------------------------------------------------------------------------ 21
Phone lock password ------------------------------------------------------------------------------------- 21
How to make a call ---------------------------------------------------------------------------------------- 21
Internationals calls ----------------------------------------------------------------------------------------- 21
Automatic redial -------------------------------------------------------------------------------------------- 21
Correcting dialling errors --------------------------------------------------------------------------------- 21
Recalling from the phone-book ------------------------------------------------------------------------- 21
Repeating the last dialled numbers ------------------------------------------------------------------- 21
Speed dialling ----------------------------------------------------------------------------------------------- 22
Single key calls --------------------------------------------------------------------------------------------- 22
Pauses or call wait functions (DTMF) ----------------------------------------------------------------- 22
Using the notebook function ---------------------------------------------------------------------------- 22
Confirming an option -------------------------------------------------------------------------------------- 22
Answering a call -------------------------------------------------------------------------------------------- 23
Automatic answer ------------------------------------------------------------------------------------------ 23
Any key to answer ----------------------------------------------------------------------------------------- 23
Changing the speaker volume -------------------------------------------------------------------------- 23
Microphone on/off ------------------------------------------------------------------------------------------ 23
Protecting the keypad ------------------------------------------------------------------------------------- 23
Autolock ------------------------------------------------------------------------------------------------------ 23
Erasing credit unit ------------------------------------------------------------------------------------------ 23
PNP Private Numbering Plan --------------------------------------------------------------------------- 24
ECT Explicit Call Transfer ------------------------------------------------------------------------------- 24
Emergency calls -------------------------------------------------------------------------------------------- 24
7 Call options ---------------------------------------------------------------------------------------------- 25
Accept call --------------------------------------------------------------------------------------------------- 25
Switching to call wait -------------------------------------------------------------------------------------- 25
Reject call ---------------------------------------------------------------------------------------------------- 25
Hold/Resume ----------------------------------------------------------------------------------------------- 25
Disconnect --------------------------------------------------------------------------------------------------- 25
Join/Divide --------------------------------------------------------------------------------------------------- 25
Sending DTMF tone signals ----------------------------------------------------------------------------- 25
Number information --------------------------------------------------------------------------------------- 25

8 Using the phone-book ------------------------------------------------------------------------------- 26
Storing a phone number with associated name --------------------------------------------------- 26
Recalling a phone number ------------------------------------------------------------------------------ 27
Selecting a location --------------------------------------------------------------------------------------- 27
Last numbers dialled -------------------------------------------------------------------------------------- 28
Last unanswered calls ------------------------------------------------------------------------------------ 28
Phone-book menu ----------------------------------------------------------------------------------------- 28
9 Menu functions ----------------------------------------------------------------------------------------- 29
Standard method ------------------------------------------------------------------------------------------- 29
Short method ------------------------------------------------------------------------------------------------ 29
Personalising the menu ---------------------------------------------------------------------------------- 29
Network services ------------------------------------------------------------------------------------------- 29
SIM Toolkit (menu 0) -------------------------------------------------------------------------------------- 32
Own number (menu 1) ------------------------------------------------------------------------------------ 32
Calls (menu 2) ---------------------------------------------------------------------------------------------- 32
Call divert (menu 3) --------------------------------------------------------------------------------------- 32
Fast divert (menu 3 1) ----------------------------------------------------------------------------------- 32
Divert always (menu 3 2) -------------------------------------------------------------------------------- 32
Divert Missed Calls (menu 3 3) ------------------------------------------------------------------------ 32
Cancel (menu 3 4) ---------------------------------------------------------------------------------------- 32
Clock (menu 4) --------------------------------------------------------------------------------------------- 33
Set (menu 4 1) --------------------------------------------------------------------------------------------- 33
Alarm (menu 4 2) ------------------------------------------------------------------------------------------ 33
Settings (menu 5) ------------------------------------------------------------------------------------------ 33
Audio (menu 5 1) ------------------------------------------------------------------------------------------ 33
Display (menu 5 2) ---------------------------------------------------------------------------------------- 34
Language (menu 5 3) ------------------------------------------------------------------------------------ 34
Auto answer (menu 5 4) --------------------------------------------------------------------------------- 34
Any key answer (menu 5 5) ---------------------------------------------------------------------------- 34
Call waiting (menu 5 6) ---------------------------------------------------------------------------------- 34
Keypad lock (menu 5 7) --------------------------------------------------------------------------------- 34

Security (menu 6) ------------------------------------------------------------------------------------------ 35
PIN control (menu 6 1) ----------------------------------------------------------------------------------- 35
Phone security (menu 6 2) ----------------------------------------------------------------------------- 35
Call barring (menu 6 3) ---------------------------------------------------------------------------------- 35
Fixed dialling (menu 6 4) -------------------------------------------------------------------------------- 35
GSM Networks (menu 7) --------------------------------------------------------------------------------- 36
Search network (menu 7 1) ----------------------------------------------------------------------------- 36
Auto selection (menu 7 2) ------------------------------------------------------------------------------ 36
Network list (menu 7 3) ---------------------------------------------------------------------------------- 36
Home network (menu 7 4) ------------------------------------------------------------------------------ 36
Call control (menu 8) -------------------------------------------------------------------------------------- 37
Minute beep (menu 8 1) --------------------------------------------------------------------------------- 37
Call duration (menu 8 2) -------------------------------------------------------------------------------- 37
Charge rate (menu 8 3) ---------------------------------------------------------------------------------- 37
Trans.own number (menu 8 4) ------------------------------------------------------------------------ 37
Closed User Group (menu 8 5) ------------------------------------------------------------------------ 37
Network Identity Time Zone (menu 8 6) ------------------------------------------------------------- 37
Information (menu 9) -------------------------------------------------------------------------------------- 38
IMEI (menu 9 1) ------------------------------------------------------------------------------------------- 38
Software (menu 9 2) -------------------------------------------------------------------------------------- 38
SIM info (menu 9 3) -------------------------------------------------------------------------------------- 38
Total life (menu 9 4) -------------------------------------------------------------------------------------- 38
10 Menu satellite ------------------------------------------------------------------------------------------ 39
Mode (menu 1) --------------------------------------------------------------------------------------------- 40
GS (menu 1 1) --------------------------------------------------------------------------------------------- 40
GSM (menu 1 2) ------------------------------------------------------------------------------------------- 40
GS then GSM (menu 1 3) ------------------------------------------------------------------------------- 40
GSM then GS (menu 1 4) ------------------------------------------------------------------------------- 40
Positioning (menu 2) -------------------------------------------------------------------------------------- 40
Error display (menu 2 1) --------------------------------------------------------------------------------- 40
Position (menu 2 2) --------------------------------------------------------------------------------------- 40
Last position (menu 2 3) -------------------------------------------------------------------------------- 40
GS service (menu 3) -------------------------------------------------------------------------------------- 41
Search network (menu 3 1) ----------------------------------------------------------------------------- 41
Auto selection (menu 3 2) ------------------------------------------------------------------------------ 41
Network list (menu 3 3) ---------------------------------------------------------------------------------- 41
Local time (menu 4) --------------------------------------------------------------------------------------- 41

11 Short Message Service Menu -------------------------------------------------------------------- 42
Call mailbox (menu 1) ------------------------------------------------------------------------------------ 43
Messages (menu 2) --------------------------------------------------------------------------------------- 43
Write now (menu 2 1) ------------------------------------------------------------------------------------ 43
Send (menu 2 1 1) ---------------------------------------------------------------------------------------- 43
Store (menu 2 1 2) ---------------------------------------------------------------------------------------- 43
Send and store (menu 2 1 3) -------------------------------------------------------------------------- 43
Parameters (menu 2 1 4) ------------------------------------------------------------------------------- 43
Received (menu 2 2) ------------------------------------------------------------------------------------- 43
Written (menu 2 3) ---------------------------------------------------------------------------------------- 44
Parameters (menu 2 4) ---------------------------------------------------------------------------------- 44
Name (menu 2 4 1) --------------------------------------------------------------------------------------- 44
Service Centre number (menu 2 4 2) ---------------------------------------------------------------- 45
Validity (menu 2 4 3) ------------------------------------------------------------------------------------- 45
Destination (menu 2 4 4) -------------------------------------------------------------------------------- 45
Protocol ID. (menu 2 4 5) ------------------------------------------------------------------------------- 45
Set default (menu 2 4 6) -------------------------------------------------------------------------------- 45
Autodelete (menu 2 5) ----------------------------------------------------------------------------------- 45
Reply path (menu 2 6) ----------------------------------------------------------------------------------- 45
Status report (menu 2 7) -------------------------------------------------------------------------------- 45
Information (menu 2 8) ---------------------------------------------------------------------------------- 45
Cell Broadcast (menu 3) --------------------------------------------------------------------------------- 46
Message (menu 3 1) ------------------------------------------------------------------------------------- 46
Activation (menu 3 2) ------------------------------------------------------------------------------------ 46
Languages (menu 3 3) ---------------------------------------------------------------------------------- 46
List (menu 3 4) --------------------------------------------------------------------------------------------- 46
Appendix
Technical specifications ---------------------------------------------------------------------------------- 47

Keys
1. DESCRIPTION
Key Description
switched on led: connected to the satellite
network. Swtiched off led: connected to the
GSM network. Blinking led: satellite
search.
used to make calls, confirm a selection,
personalise the menu, find information,
access missed calls and to start the unlock
procedure.
used to access to the menu, to move to
the next item, access other options, and to
activate the silent ring signal (if pressed
for 1 second).
used to end a call, reject a selection, exit
the menu and re-activate the auto-lock
function (if pressed for 1 second);
used to delete a character or all characters
if held down, to cancel data, a missed call,
an SMS, or the contents of a memory. If
not used to enter or cancel a character,
this key can be used to reject a selection
or (press and hold) to exit a menu.
used to access the phone-book.
used to access the SMS menu.
used to access the Satellite menu; pressed
for long time it switches from the satellite
mode to the GSM mode, and viceversa.
used to switch the telephone on and off;
during a conversation this key enables the
mute function.
- used to enter numbers or letters as
marked on each key.
used to enter DTMF pauses and call wait
functions - when pressed repeatedly; ot-
herwise used to decrease a value or scroll
through selections or messages.
preceded by a number to recall the corre-
sponding phone-book location; in standby
to lock or unlock the keypad, when pres-
sed before key , this key is used to in-
crease a value, and scroll through selec-
tions or messages.

Display indicators
The telephone display features a number
of indicators which provide information on
various functions.
displayed when the alarm is set.
displayed when the car kit device
(optional) is connected.
displayed on connection to the net-
work and to indicate signal strength (max.
3 segments); flashes when searching the
network.
displayed when an SMS is in the
memory; flashes when the SIM card text
message (SMS) memory is full.
displays 3 fixed segments (max.)
when the battery is charged; displays no
segments and flashes when discharged.
During charging it displays gradual increa-
se of segments and remains fixed on
completion of charging.
displays clock; flashes when clock
is not set.
displayed when the divert funtion
has been activated.
displayed when call barring has
been activated.
Note: After the disconnection of the SIM,
to display the transfers and/or the call bar-
rings, it is necessary to check-out the net-
work in order to know the status.
displayed when a maintenance of
the telephone is requested, although the
detected problems are not so serious to
block the telephone.
displayed when the satellite net-
work blocks the telephone because se-
rious problems are detected. In this case
the telephone shall be switched off and
switched on again to release the network
blocking; if the telephone remains blocked
it shall be repaired.
Instead of the following ring si-
gnal messages are displayed:
when the ring volume has been di-
sabled through the menu.
when the ring has been disabled in
quick mode (press for one second).
Note: when the automatic display of Cell
Broadcast is enabled (e.g. Zone) this con-
ceals the above information and other
messages; to display permanently press
illuminates when telephone is con-
nected to the battery charger and is char-
ging; flashes when the telephone is still
connected but charging is complete.
X
* * * * * * * * * * * * * * * *

Keypad locked.
block enabled on telephone calls,
SMS access and memory use.
displayed during outgoing calls;
flashes on incoming calls.
automatic answer enabled.
the specified network does not pro-
vide the service.
network nationalities or icon indica-
ting satellite network connection.
connected network; when negati-
ve it indicates roaming status. Negative
display of own network or positive display
of one in roaming status indicates access
problems to the network (e.g. all chan-
nels engaged).
personalised user message;
functions performed by multifunction keys
in the menu, in the memory and messa-
ges; display of functions (e.g. microphone
off, ring activation, etc.); display of credit
units if the network offers this type of ser-
vice.
Other descriptions are provided in the manual
in the relative chapters.

Satellite antenna
For satellite network communications the
correct use of the antenna of the telepho-
ne is fundamental in order to enjoy the
enormous potentiality offered by the Glo-
balstar satellite service.
Positioning of the antenna during use
Before starting the satellite connection,
the antenna should be carefully lifted from
its seat in order to position it (based on
the conversation quality) as shown below:
Once accustomed to its use, you will be
able to quickly choose the best positio-
ning of the antenna.
Positioning of the antenna in stand-by
To receive calls from the satellite network
whilst the telephone is in stand-by, the an-
tenna should be positioned, following the
explanations above, as shown in this pic-
ture:
Note: the telephone and the satellite
should be able to “see each other” during
the connection in order to achieve the
best possible quality.
Therefore satellite network connections
guarantee the very best quality when in
open air.
Plugs for the car-kit device
On the rear side of the telephone there
are connections for the installation of a
car-kit (optional) device.
car-kit connections
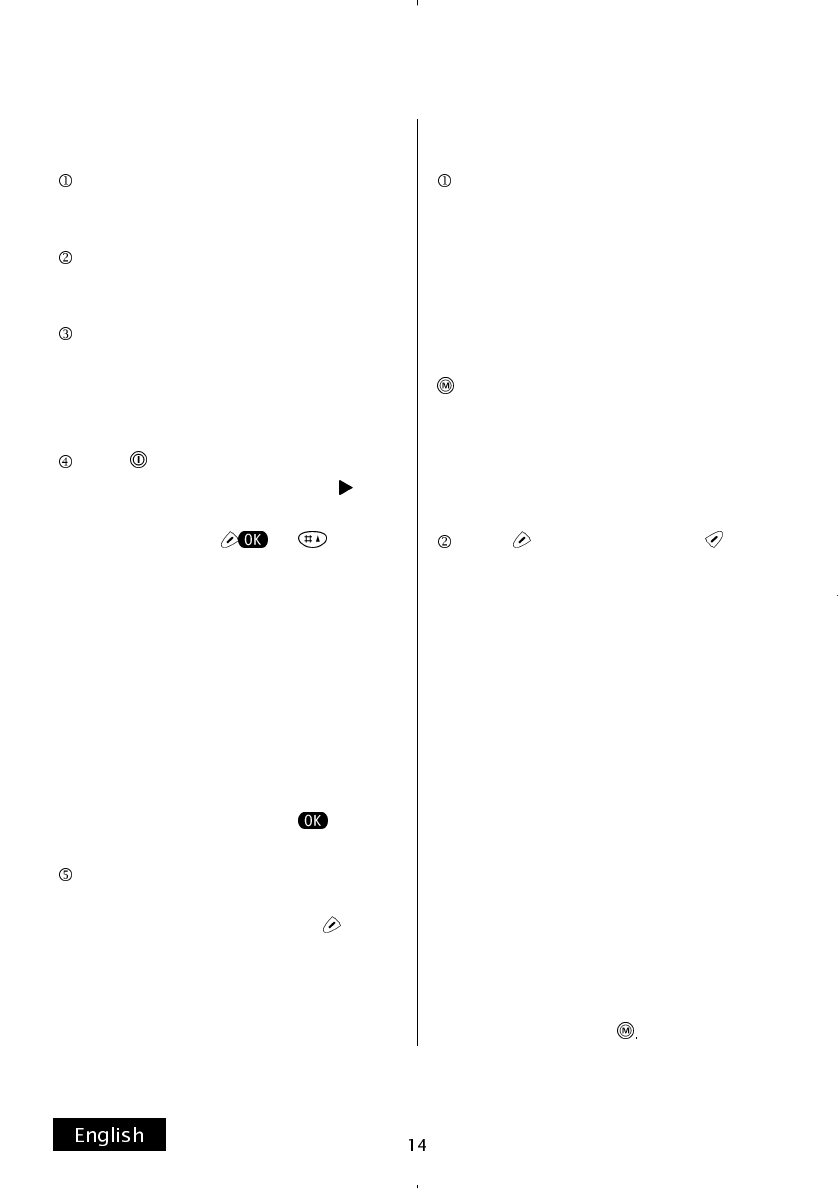
How to make the first call
Insert a valid SIM card while the tele-
phone is switched off.
Refer to chapter 4. Inserting the SIM card.
Connect the battery.
Refer to chapter 4. Connecting the batte-
ry.
Connect the telephone to the battery
charger to charge the battery.
Refer to chapter 5. Charging the battery.
The telephone can be used during rechar-
ging but the procedure will take longer.
Press for a few seconds to switch on
the telephone. If the message PIN is di-
splayed, enter the PIN code supplied with
the SIM card and press or .
The telephone sets the display text lan-
guage automatically, according to the in-
formation on the SIM card.
To change the display language, refer to
chapter 9. Menu functions - Settings
(Menu 5) - Language (Menu 5 3).
To change the connection mode between
the terrestrial GSM and the Globalstar sa-
tellite network. Refer to chapter 10. Satel-
lite Menu - Mode (Menu 1).
Note: negative symbols (e.g. ) appear
on the third line of the display.
When the name of the SIM card provi-
der is displayed, enter the area code and
the telephone number and press .
How to receive the first call
Ensure that the telephone is switched
on and in a zone with radio signal covera-
ge to receive an incoming call which ap-
pears on the display and is indicated by a
ring signal.
Note: the ring signal can be rapidly sup-
pressed.
To activate/deactivate this function press
for one second: a confirmation messa-
ge is displayed.
This function is temporary in that it is not
stored in the memory when the telephone
is switched off; to activate the function
permanently, refer to the menu functions.
Press to answer and then at the
end of the call.
Satellite communications
Please refer to the previous page for the
correct use of the antenna in this mode.
Personalising the menu
Access to the sub-menus and settings
used
most frequently
can be simplified
considerably by using the personalisation
function.
To personalise the menu, refer to chapter
9. Menu functions - Personalising the me-
nu.
Note: sub-menus and settings can be
personalised but not menus 0-9 which
appear after pressing
2. QUICK STARTING GUIDE
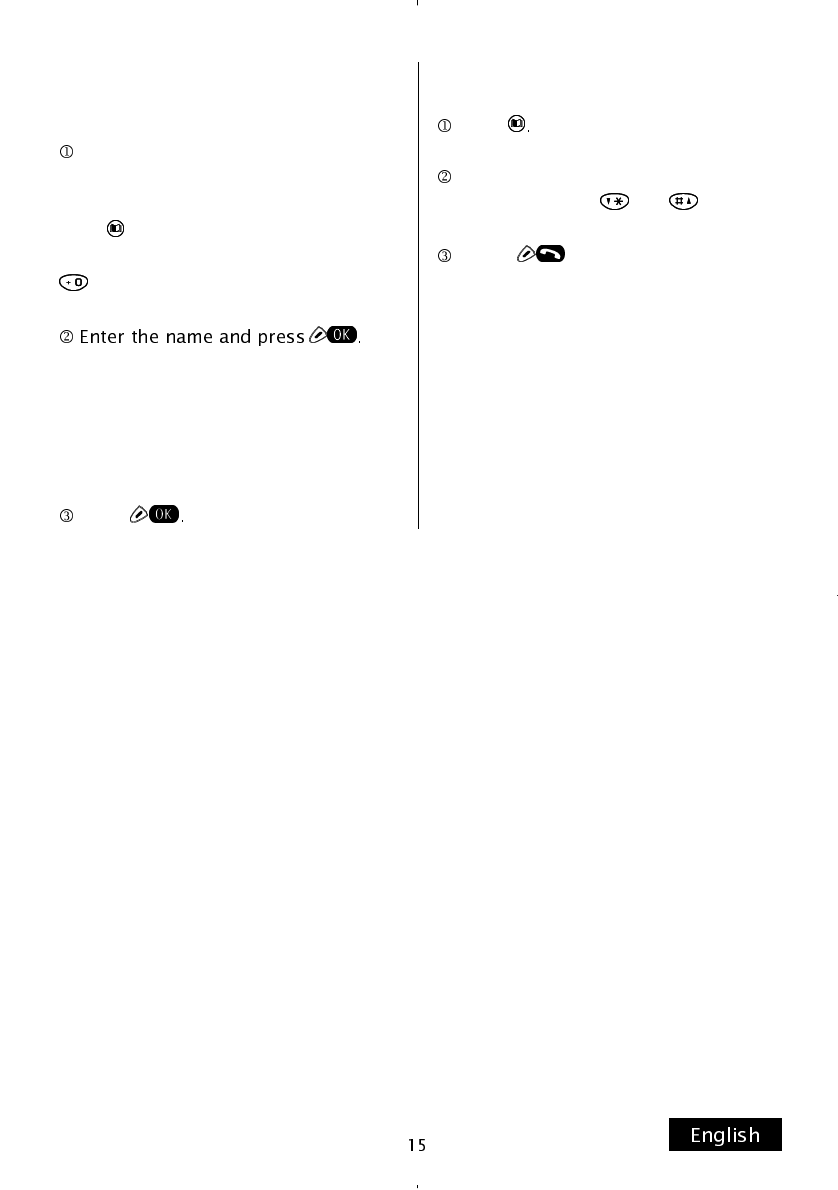
How to store a number in the phone-
book
Dial the number (we recommend to dial
the international code without the zeros to
be replaced with the character +) and
press .
Note: for the + character, keep pressed
until the plus symbol is displayed.
The letters are marked on each key;
press once for the first letter, twice for the
second and so on.
Refer to chapter 8 - Using the phone-
book.
Press
How to recall a phone-book location
Press
Scroll through the phone-book loca-
tions using the keys and .
Press on the required phone-
book location.
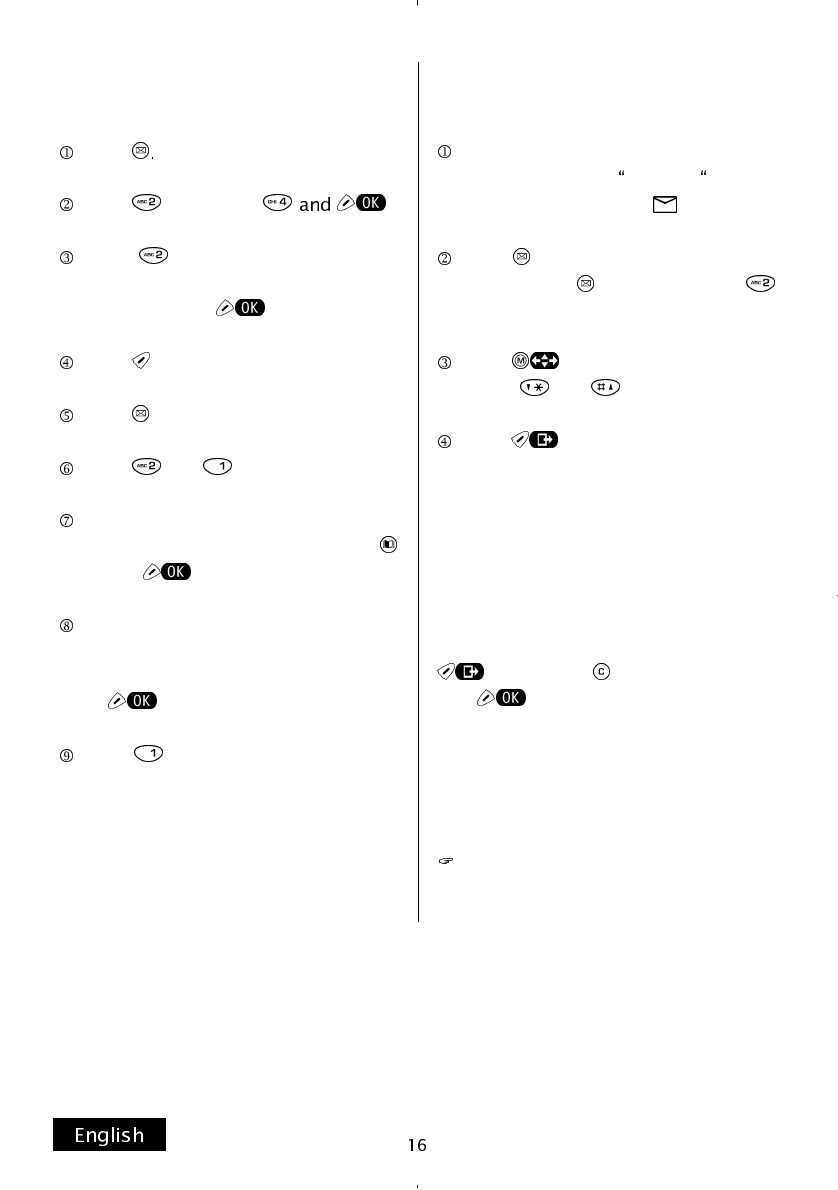
How to send the first text message
(SMS)
Press
Press followed by .
Press , enter the number of the
Service Centre (supplied by the network
operator) and press .
Press for one second.
Press .
Press and .
Enter the number you wish to call, or
access the phone-book by pressing
and press .
Enter the message (the letters are en-
tered according to the same criteria ap-
plied to enter names in the memory) and
press .
Press to send the short text mes-
sage (SMS).
Note: the procedures described in points
1, 2, 3 and 4 apply only to the first SMS:
they can be omitted for all subsequent
messages.
How to read the first text message
(SMS)
A different ring from the standard ver-
sion is activated and Message appears
on display with the symbol .
Press to read a previously received
message press and then press
twice.
Press and scroll through messa-
ges using and .
Press twice.
Note: messages are stored in the SIM
card memory. To avoid occupying space
in the memory, delete messages once
read to leave sufficient space for new in-
coming messages.
To enable the autodelete function
(Message menu 2 5) after point 3 press
once only, for 1 second and
then .
For more detailed information refer
to the realtive sections in the manual.

♦Refuelling: switch the telephone
off when refuelling; the same
precaution should be taken in
the vicinity of chemical plants or
where explosives are used.
♦Keep the telephone out of reach
of children.
♦When driving only use the tele-
phone with the hands-free devi-
ce; never stop on the hard shoul-
der on motorways or dual carria-
ge ways to make or receive calls
unless in the event of an emer-
gency.
♦Switch off the telephone when on
board an aeroplane (even when
stationary on the runway). Use of
mobile telephones constitutes a
hazard to flight systems and use
is illegal. In certain countries fai-
lure to observe this provision is
considered a criminal offence
and may lead to suspension or
prohibition of mobile telephone
services, legal action or both.
♦Take great care when using the
telephone in the vicinity of devi-
ces such as pacemakers, hea-
ring aids and electro-medical
equipment.
♦Use exclusively original accesso-
ries and spare parts; use of other
parts will render the guarantee
null and void.
♦Never attempt to disassemble
the telephone: no internal parts
can be repaired by the user.
♦Ensure that the telephone does
not come into contact with any
liquid: if this occurs, disconnect
from the power supply if charging
and contact the supplier.
♦Avoid use of the telephone outsi-
de the specified temperature
range:-10ºC to + 55ºC. Never
leave the telephone exposed to
direct sunlight or in environments
with high humidity levels or expo-
sed to dust.
♦Clean the telephone using a
damp cloth and a weak deter-
gent/water solution.
♦There is no evidence to date of
the harm caused by electro-
magnetic waves generated by
cellular telephones. In any event
exposure to electromagnetic wa-
ves can be reduced drastically
using a car kit device.
3. IMPORTANT WARNINGS

Inserting the SIM card
A valid “plug-in” type SIM card is required
to use the telephone.
This card is supplied by the network ope-
rator.
Note: keep all plug-in SIM cards out of
the reach of children.
Lift the antenna from its seat and turn it
anti-clockwise, press the retainer clip to
unlock the battery and then slide and lift
the battery out.
Insert the card in the special tracks, ta-
king care that the rounded edges of the
SIM card face the top of the telephone
and that the golden contacts face the tele-
phone, so that they are not visible.
Refit the battery as described below in
the section “Connecting the battery”.
Connecting the battery
Lift the satellite antenna from its seat and
turn it anti-clockwise. Position the battery
in the relative seat at the rear of the tele-
phone, press down and push forwards un-
til it locks into place. To remove, press the
retainer clip and lift out.
Note: to ensure correct recharging, the
ambient temperature (not the value on di-
splay) must be between 0º and +45º.
4. INSERTING THE SIM CARD AND CONNECTING THE BATTERY
5. CHARGING THE BATTERY
Charging the battery
This telephone is powered by a rechar-
geable Li-Ion battery. Use exclusively ori-
ginal batteries and battery chargers ap-
proved by the manufacturer.
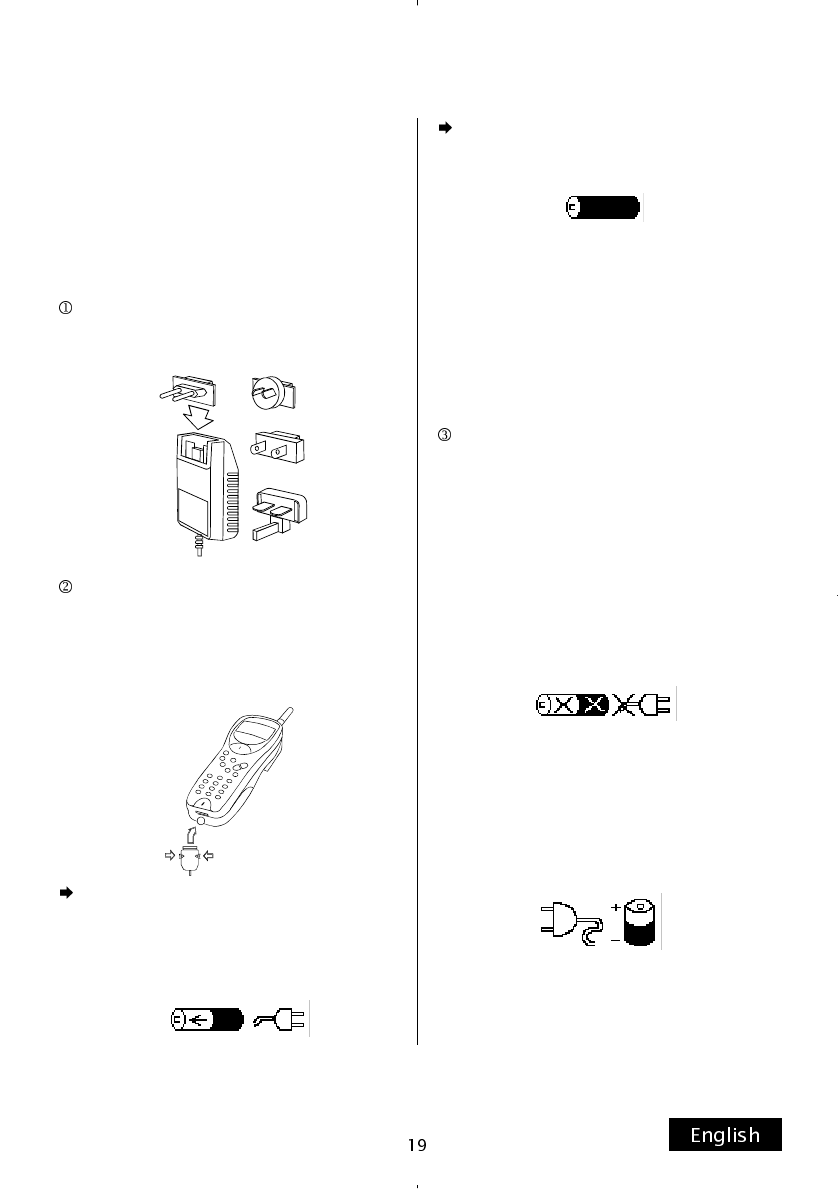
Fit the plug (among the 4 available)
suitable for the type used in the country
you are.
Fit the battery charger cable connector
(the arrows shall be visible, facing the di-
rection shown in the figure below) to the
bottom of the telephone and the power
transformer to the socket.
During charging with the telephone
switched off, the indicator on the first line
of the display increases gradually and the
following is displayed:
When the indicator fills all three lines
the above symbol is replaced with the fol-
lowing:
to show that charging is complete.
Note: the telephone can be used during
recharging but the procedure will take lon-
ger. Total recharging time for Li-Ion batte-
ries takes maximum 3 hours, but 80%
power is already available after one hour.
On completion of charging disconnect
the battery charger from the telephone
(press the unlocking buttons aside the
connection socket of the telephone) and
from the socket.
Faults during charging
Faults are displayed as follows
(temperature off range, etc.):
Battery low alarm
When the battery is completely dischar-
ged and requires recharging the following
is displayed for a few seconds:
accompanied by an acoustic warning si-
gnal. In this case recharge immediately or
replace the battery.
Switching on
Press and hold key to switch on the
telephone. If the message PIN is di-
splayed enter the code (supplied with the
SIM card) and press the left key or
The telephone can only receive calls
when switched on with an active SIM card
and in a zone covered by the terrestrial
GSM or Globalstar satellite network.
If necessary, change the display lan-
guage by pressing 5 3.
Switching off
Press and hold key for 2 seconds.
Access codes
The telephone and SIM card use different
access codes to prevent unauthorised
use. When the relative request is di-
splayed, enter the code (displayed as a
series of asterisks) and press . In
the event of an error, erase single digits
by pressing as required.
Security code (6 digits)
The security code, 000000 programmed
by the manufacturer, enables access to
the Phone Security (6 2) sub-menu.
PIN and PIN2 codes (from 4 to 8 digits)
The PIN (Personal Identity Number) is
supplied with the SIM card and serves to
protect use of the telephone.
If the request for the PIN code is di-
splayed, enter the code and press
or
If three consecutive errors are made
when entering the PIN, the SIM card is
blocked and cannot be used. Use the
PUK code to change the PIN code of the
blocked SIM card.
The PIN2 code, which has to be assigned
by the network operator, is required for
access to specific functions regarding
protected fixed dialling numbers (FDN)
and unit meters which require insertion of
the SIM card.
6. MAIN FUNCTIONS

PUK and PUK2 codes (8 digits)
The PUK (Personal Unblocking Key) code
is supplied with the SIM card.
This code is required to modify a blocked
SIM card.
The PUK2 code, supplied by some SIM
cards, is required to modify or unblock
PIN2.
For further information, contact your net-
work operator.
Phone lock password
This comprises a 4-digit password reque-
sted only by the network service to block
calls. It is provided by the network opera-
tor or service provider on subscription to
the service.
How to make a call
Enter the number with area code and
press .
During an outgoing call information on the
calling status is displayed and at the end
of it its duration and cost.
Note: the cost displayed is either tran-
smitted by the network or calculated by
the telephone on the basis of the data en-
tered. (Menu 8 3 3)
International calls
Press and hold .
The character + is displayed. Enter the
international code for the required coun-
try, the area code without the leading zero
(for Italy with zero), the number and press
.
Automatic redial
When the dialled number is engaged a
request message is displayed after which
you can press to enable the automatic
redial function which attempts to redial the
number automatically ten times.
Note: to reject this function immediately
or later (during call attempts) press .
Correcting dialling errors
Erase the last character on display by
pressing . To erase the entire line press
and hold .
Recalling from the phone-book
Refer to the chapter 8. Using the phone-
book: for information on storing a telepho-
ne number with associated name.
Repeating the last dialled number
If characters are on display, cancel by
pressing and then press twice to for-
ward the call to the last called number;
otherwise scroll or to position on
the requested number (among the twenty
available) and press to forward the call.

Speed dialling
Enter the phone-book location number
(from 1 to 9) corresponding to the stored
phone number and press
To correct a number before dialling, enter
the phone-book location number (from 1
to 9) followed by , modify as required,
and then press .
Single key calls
Press and hold the location number key
(from 1 to 9) to dial the number; the mes-
sage Calling is displayed with the na-
me, if stored, of the recipient.
Pauses or call wait functions (DTMF)
Pause and call wait functions can be use-
ful for access to certain services (e.g. voi-
ce mailboxes).
After entering at least one number, press
repeatedly to display first the symbol
P(pause) and then W(wait).
Select the function and on completion of
dialling the number can be sent immedia-
tely or stored in the normal way.
Note: In the event of invalid entries the
relative message is displayed.
Call wait functions can only be interrupted
by pressing .
Pauses continue automatically after three
seconds.
Pause and call wait functions cannot be
entered before a number.
The P command cannot be entered twice
consecutively.
The + command followed by the required
stored number sends the relative memory
contents.
More than one of the above commands
per number are not admitted. However
the stored number recalled in this way
may contain another + command followed
by the stored number and so on.
Pauses and call wait functions depend on
the type of SIM card used; not all cards
enable these functions.
When dialling a number containing a pau-
se and/or call wait command, press or
to disable the function immediately.
Using the notebook function
During a conversation you can dial anot-
her number to call or store in the memory
at the end of the call in progress; simply
enter the number and a few seconds after
the end of the call it will appear automati-
cally on the display.
Confirming an option
Within a menu, never press key for too
long or the menu will be personalised
and the option will not be confirmed.
Answering a call
When a call is received, the ring signal is
activated and the message >>>CALL<<<
flashes on the display. If the caller can be
identified, the telephone number (or name
if previously stored in the phone-book) is
also displayed.
Press s to answer, to silence the
ringer or to reject the call.
Press at the end of the call.
Automatic answer
If this function is enabled (Menu 5 4) inco-
ming calls are answered automatically af-
ter approximately 6 seconds.
Any key to answer
If this function is enabled (Menu 5 5) inco-
ming calls can be answered by pressing
any key (except ).
Changing the speaker volume
The telephone speaker volume can be
adjusted by means of the keys
(increase) and (decrease) during con-
versations only; press for one second to
modify.
Microphone on/off
Press for one second (during conver-
sation only).
Protecting the keypad
The keypad can be protected to prevent
accidental key action (including ).
To lock the keypad with the display emp-
ty, press and hold .
To unlock the keypad, press the same
key followed by .
If the automatic keypad lock function is
enabled (Menù 5 7) the keypad is locked
automatically thirty seconds after a key is
pressed.
Note: emergency calls can still be made
when the keypad lock is enabled.
In the case of a broadcast message the
symbol ( ) indicating the lock is no longer
visible but a message indicating the lock
is displayed whenever a key is pressed.
Autolock
If this function is enabled (Menu 6 2 4)
press for one second to lock the pho-
ne. Press to start the unlock procedure
and enter the three-digit code (manufacturer
setting is 1 2 3).
Erasing credit unit
To erase from the display the total credit
units, press .
PNP Private Numbering Plan
If this function is offered by the network
operator to the subscribers of this service,
it allows to forward a call without dialling
the whole telephone number, but only few
numbers, previously agreed with the net-
work operator.
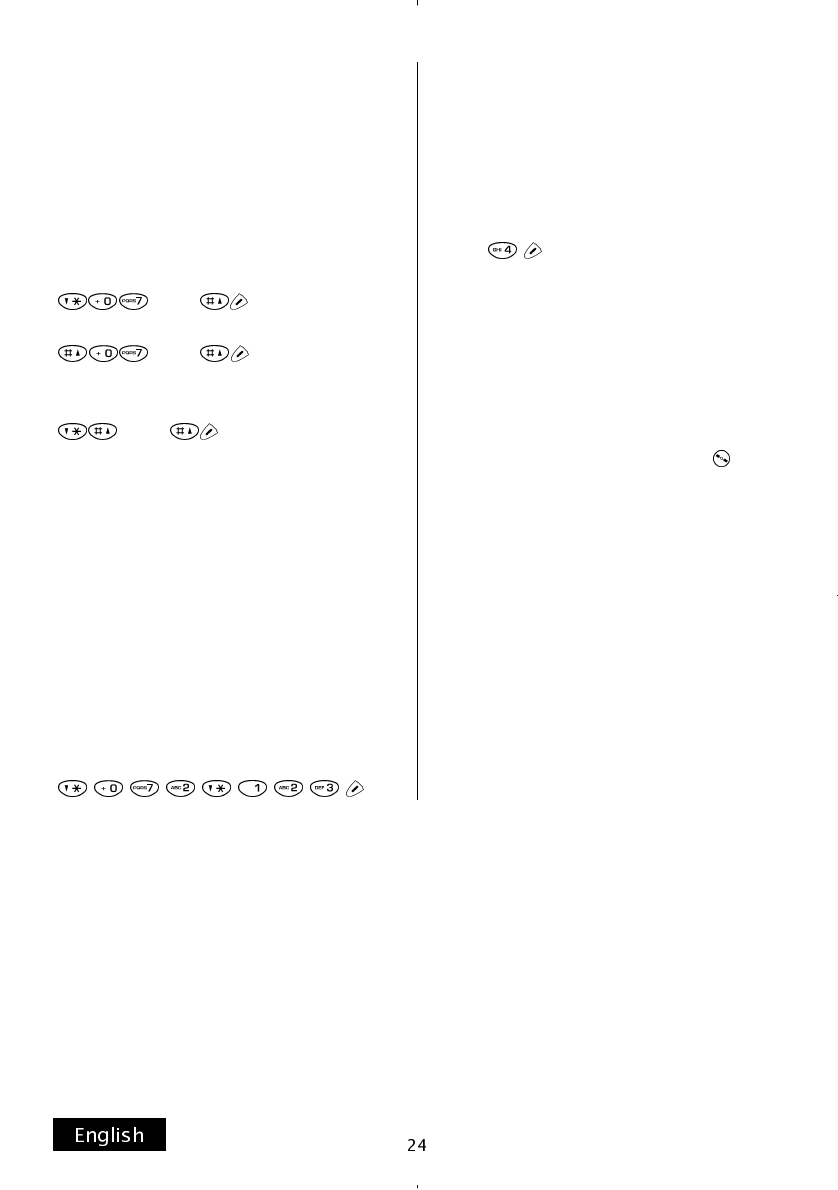
To activate the service press:
(No.)
To deactivate the service press:
(No.)
To know the status of the service (activate
or deactivate), press:
(No.)
(No.) is the number of the keyboard
between 0 and 9 that corresponds to the
number of the phone box (group of tele-
phone numbers) agreed with and registe-
red by the network operator. The network
operator assigns to each phone box a
group of telephone numbers, related to a
short numbering.
Example of a PNP call to the telephone
number 123 (correspondent to a complete
telephone number) stored at position 2 of
the phone box by the network operator:
ECT Explicit Call Transfer
If this function is offered by the network
operator to the subscribers of this service,
it enables to end a phone call with two
speakers, allowing them to continue their
phone call.
Press .
Emergency calls
It is always possible to make emergency
calls even if the SIM card is not inserted.
Note: if the selected mode is out of co-
verage (terrestrial GSM or satellite) it is
possible, by pressing for long , to
switch to the other mode, so that when
the signal is available the emergency call
can be made.

7. CALL OPTIONS
The phone features a wide ran
g
e of func-
tions that can be used durin
g
a call. For
access to these functions, press and hold
. The options available are listed below
(depending on the type of service you are
subscribed to).
Note: the list has been sorted in chronolo-
gical order of incoming and/or outgoing
calls.
Accept call
Accepts incoming call putting the call in
progress on hold.
Switching to call wait
Enables you to resume conversation with
the call previously put on hold and sends
the current conversation to call wait sta-
tus.
Reject call
Terminates the call on hold.
Hold/Resume
Enables you to put a call or conference on
hold and make a new call. At the end of
the new call the previous conversation
can be resumed by selecting Resume.
Disconnect
Ends the selected conversation.
Join/Divide
This function enables you to make a con-
ference call with up to six persons.
Select the option Join Conf. to add a
new participant in the conversation.
For one-to-one conversations during a
conference call, move the bar to Divide
at the required number.
Sending DTMF tone signals
DTMF signals enable communication with
answer machines, computerised telepho-
ne systems, etc. Dial the required num-
ber, select the send DTMF option, enter
the required sequence and press .
Note: DTMF tones are active until disa-
bled manually (Menu 5 1 5) and therefore
can be sent by simply pressing the corre-
sponding key without accessing the speci-
fic menu.
Number information
Various items of information are available
for a call in progress; move the cursor bar
to the required item and press .
Names and numbers can only be stored
in the SIM card memory.
The number of positions in the standard
memory on SIM cards varies according to
the type of card. The same applies to the
maximum name length, number length
and storage of last calls made.
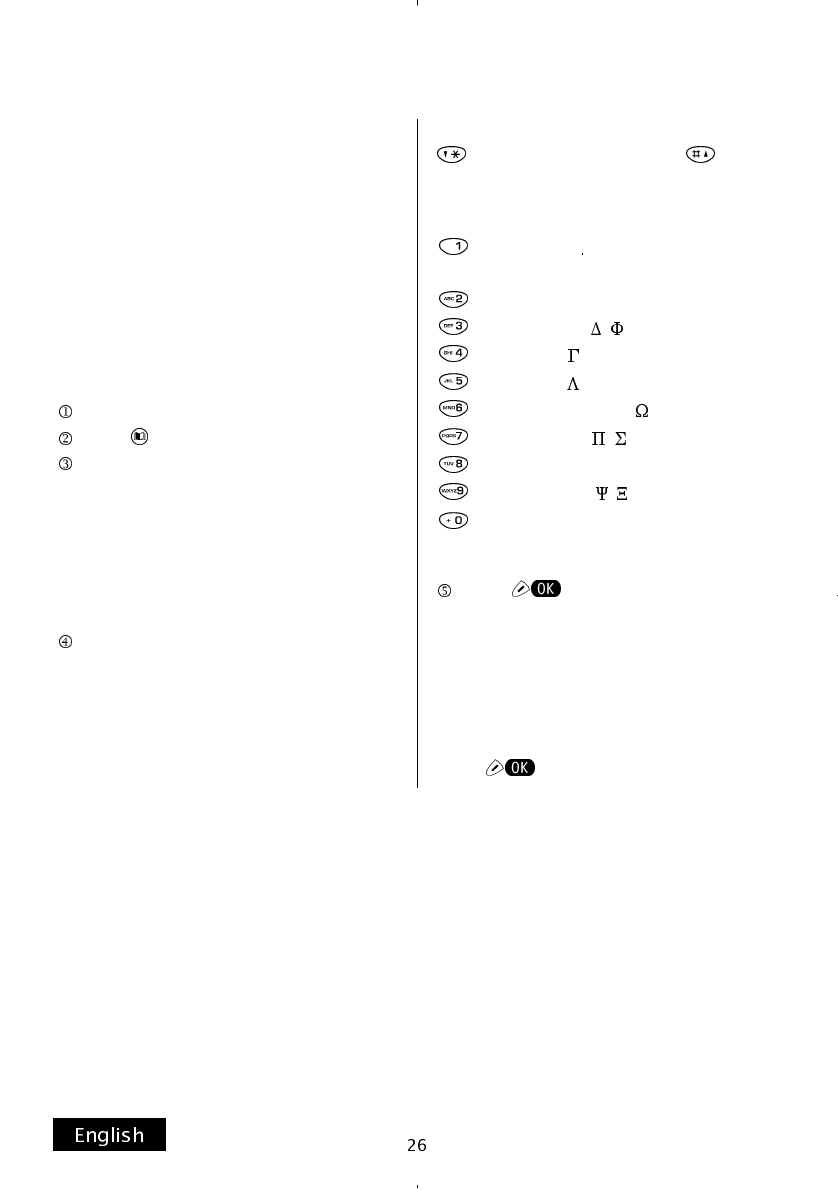
Storing a phone number with associa-
ted name
Enter the phone number.
Press .
Select the key with the required letter.
Press once to enter the first letter, twice
for the second and so on. For small let-
ters, press and hold the key until the letter
changes to lower case. All subsequent
letters will appear in small case until the
key is pressed and held again.
Select the other letters as above.
Note: to move the cursor to the left press
; to move to the right press .
The following characters are available:
Press followed by the same key
to accept the recommended memory lo-
cation.
OR
enter the required memory location and
press to confirm.
8. USING THE PHONE-BOOK
space
1 , : ; !¡?¿ ' @
# $ £ ¥ % & * ( ) - + = < > “ /_§
A B C 2
Ä
ß
Ç
Å
Æ
D E F 3
É
G H I 4
J K L 5
M N O 6
Ñ
Ö
Ø
P Q R S 7
T U V 8
Ü
W X Y Z 9 Θ
0 +
Recalling a phone number
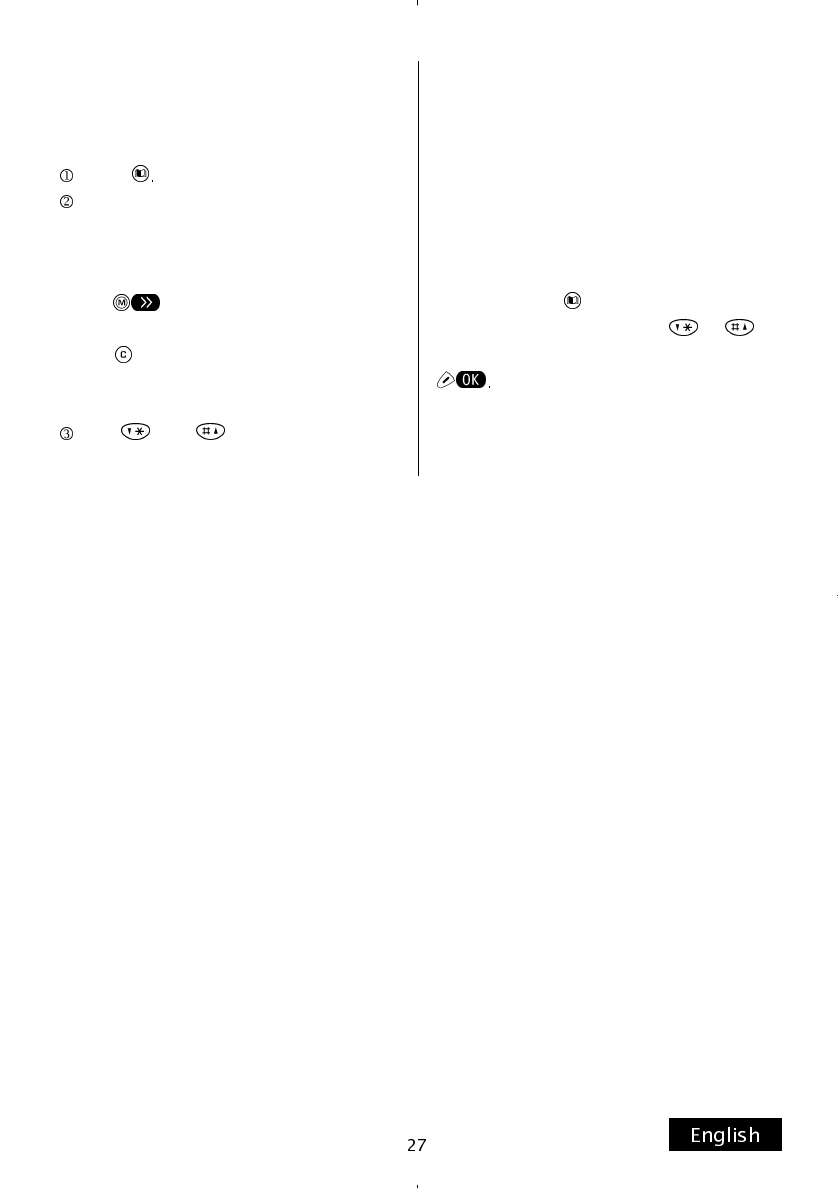
To recall a number by name:
Press
Enter the first letter.
OR
Press to display the names accor-
ding to the memory location.
Press to enable modifications to the
phone number.
Use and to scroll through the
list of names.
Selecting a location
This telephone has the facility to identify a
name or number by scrolling through the
contents of the phone-book rather than
entering a number. This is especially use-
ful when you wish to divert calls to a diffe-
rent number or send a short text message
to a telephone number. On request for the
number, press and select the number
from the list displayed; use or to
scroll through the list, select and press

Last numbers dialled
The telephone stores the last twenty dial-
led telephone numbers. To recall the last
number press or use and to
scroll through the others in the list.
Note: when the SIM card is removed the
telephone numbers are stored in it. There-
fore, in this case, the quantity of the last
stored numbers is SIM card dependent.
Last unanswered calls
The telephone stores the last twenty inco-
ming calls (only if the telephone number is
sent), ordering them by date and time.
The caller’s name is also displayed
(provided that it has been previously sto-
red into the phone-book). These numbers
can be displayed by pressing when the
message Call appears or by scrolling
through the numbers with the keys
and . To see these numbers later, to-
gether with the list of answered calls and
with the last twenty outgoing calls, use
Menu 2.
Phone-book menu
Press and then for a second for
access to this menu.
This menu enables you to delete a memo-
ry location following a request for confir-
mation and facilitates storage in the pho-
ne book.
To store a number, confirm the request
Enter Record, enter the first name,
confirm, then enter the number and con-
firm; lastly enter the required memory loca-
tion and confirm.
Following the above, check on display if
the fixed dialling numbers are enabled or
disabled together with the SIM card infor-
mation: phase, type of active ADN/FDN
memories, number used/available and the
max. number of characters for name and
number entries.
All standard functions are also available in
this menu.
9. MENU FUNCTIONS
The telephone features a series of func-
tions which enable modification to opera-
tion according to your specific require-
ments. These functions are divided into
menus and sub-menus accessible via the
menu function.
Each menu and sub-menu enables modi-
fication and inspection of the various func-
tions.
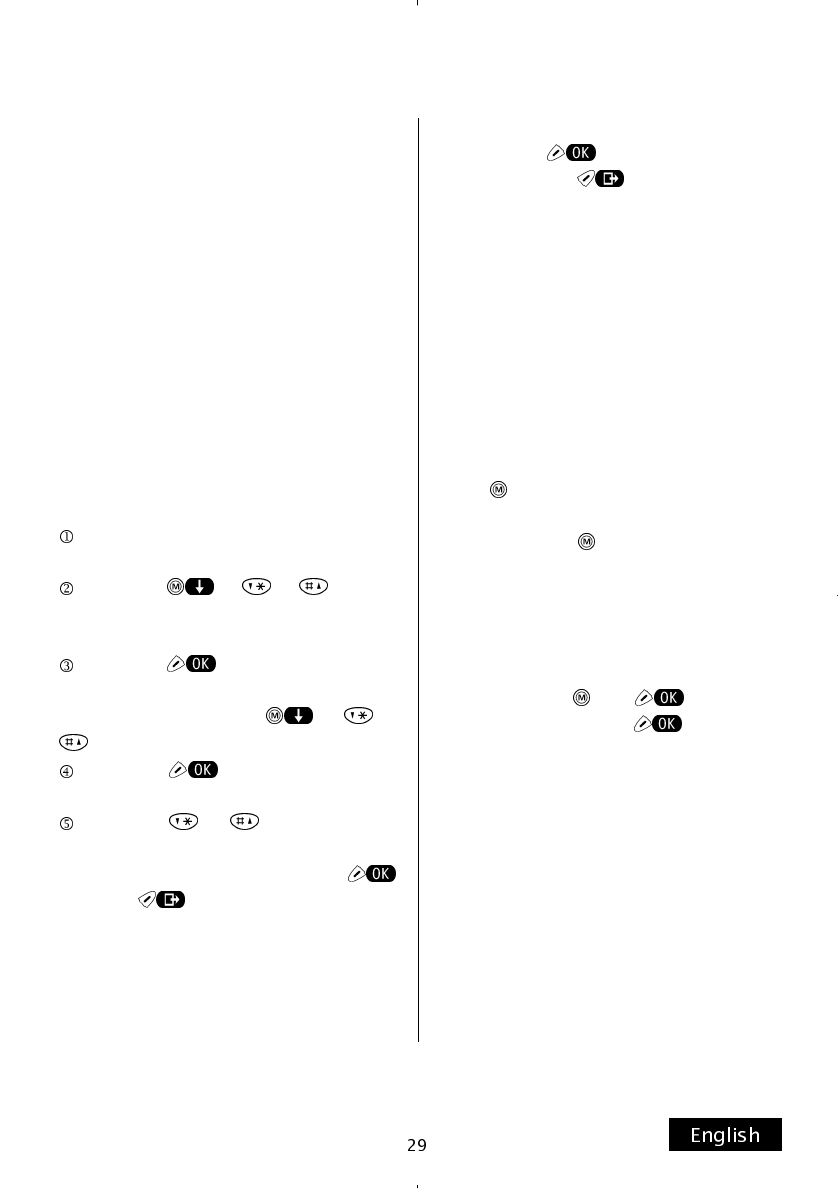
To access the menus or submenus, sim-
ply scroll through the list (standard met-
hod) or enter the associated number
(short method).
Standard method
Press m to access the menu func-
tion.
Press or or to scroll
through the list until the required item is
displayed.
Press for access to the cor-
responding sub-menu and select the re-
quired item by means of or or
.
Press to display the current
setting of the selected function.
Press or to scroll through
the list of settings and select the required
option. To select the setting, press
or press to exit without modifying
the setting. In some cases one of the fol-
lowing requests is displayed after selec-
ting a function or option:
Security code, Enter PIN,
Enter PIN2.
In this case, simply enter the required co-
de and press .
Note: if the key is pressed briefly
the display returns to the previous menu
without modifying the settings; press and
hold to exit the function completely.
Short method
All menus, sub-menus and settings are
marked with a number which appears on
the right of the display.
To access a menu function via this num-
ber, proceed as follows:
press followed by the required menu,
sub-menu and setting numbers. For
example, press and then 5 5 1 to
access the “Any Key” settings.
Personalising the menu
To select a sub-menu or setting for rapid
access via keys and , select the
required item and press for one se-
cond; use the same key and procedure to
deselect the item.
Network services
Some menu functions correspond to net-
work services available to the user only if
supplied by the home cellular network.
You need to subscribe to use these servi-
ces.
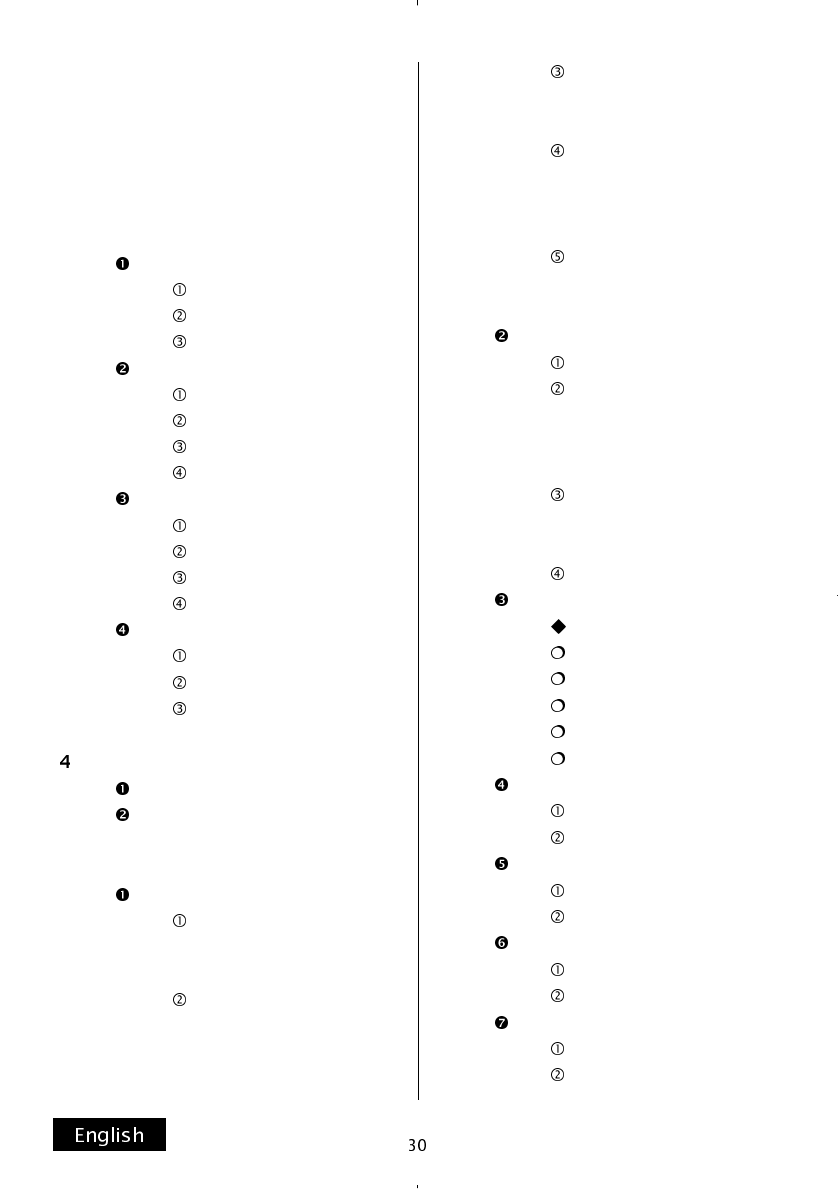
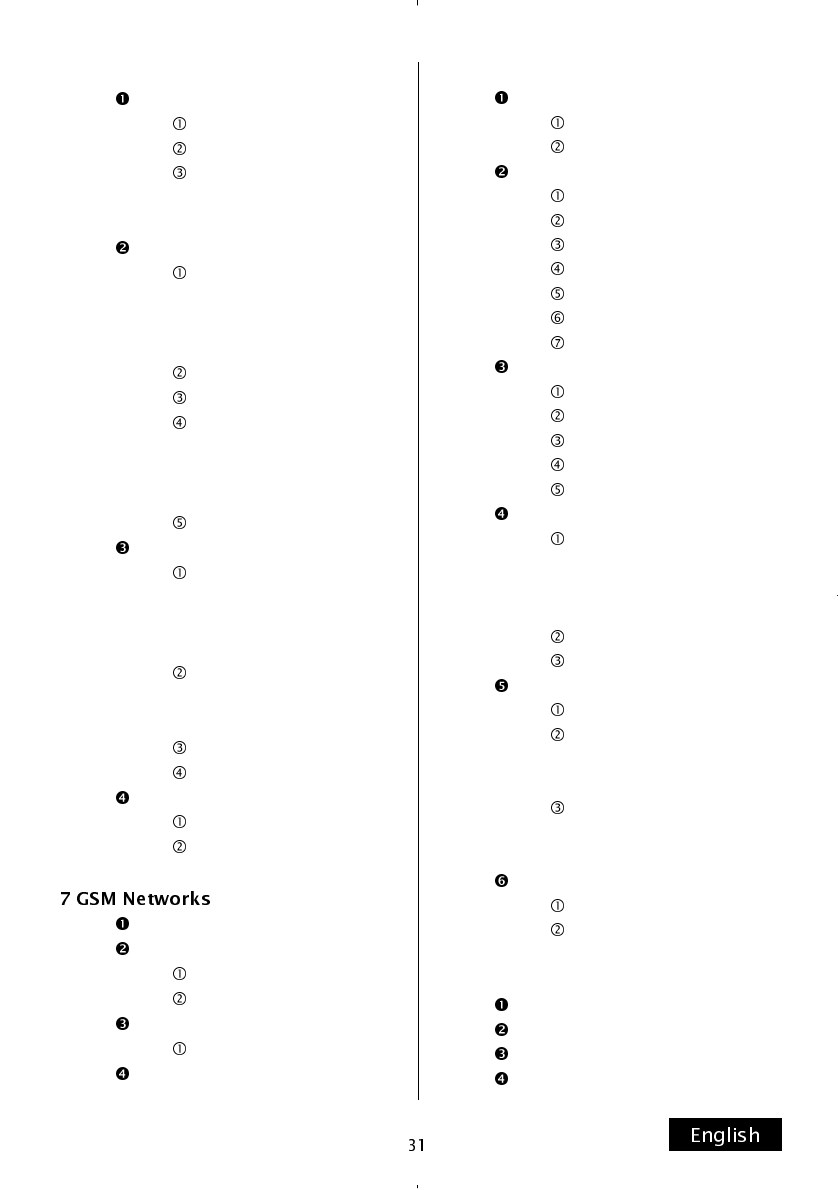
0 SIM Toolkit
1 Own number
2 Calls
3 Call Divert
Fast divert
On
Off
Parameters
Divert always
All teleservices
Speech
Fax
Data async
DivMissedCalls
If busy
If not reachable
If no reply
All missed calls
Cancel
All
DivMissedCalls
Divert always
Clock
Set
Alarm
5 Settings
Audio
Ringing
1 Tone
2 Volume
Keypad
1 Off
2 Low
3 High
Warning tones
1 On
2 Off
Service Beep
1 On
2 Only NoServ
3 Off
DTMF
1 On
2 Off
Display
Brightness
Bright. length
1 Off
2 Short
3 Long
PersonalMessag
1 Fixed
2 Rotating
Contrast
Language
Automatic
English
Italiano
Deutsch
Español
Fran
ç
ais
Auto answer
On
Off
Any key answer
On
Off
Call waiting
On
Off
Keyboard lock
On
Off
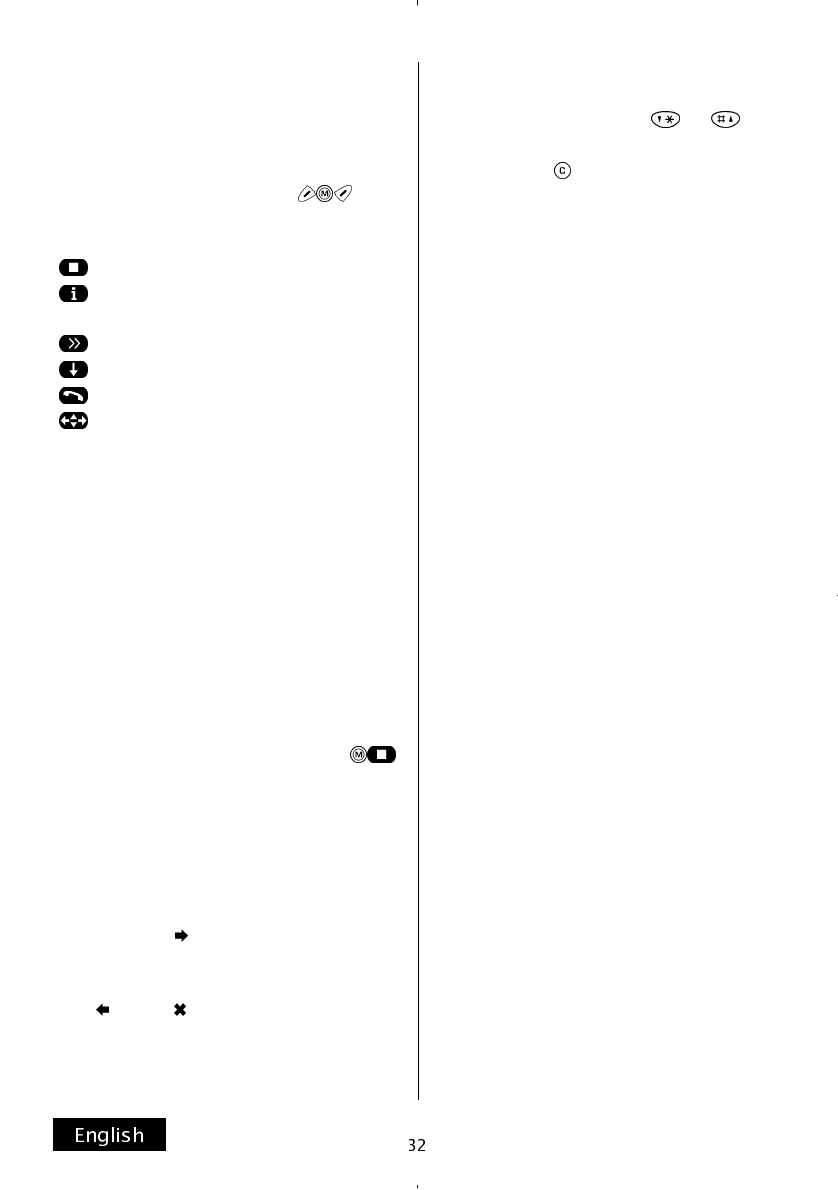
6 Security
PIN Control
Change PIN1
Change PIN2
PIN request
1 Enabled
2 Disabled
Phone security
Type
1 On
2 Off
3 SIM list
Clear SIM list
Change code
Autoblock
1 On
2 Off
3 Change code
Restore defaul
Call barring
Outgoing
1 Outgoing calls
2 International
3 Only to home
Incoming
1 Incoming calls
2 Call if abroad
Cancel
Change code
Fixed dialling
On
Off
Search network
Auto selection
On
Off
Network list
“Empty”
(example)
Home network
8 Call control
Minute beep
On
Off
Call duration
Last call
Incoming home
Incoming roam
Outgoing home
Outgoing roam
Total time
Clear timers
Charge rate
Last call
All calls
Cost control
Reset
Units account
Transfer own no.
For all calls
1 Transmit
2 Don’t transmi
3 Net default
Transmit
Don’t transmit
CUG (Closed User Group)
CUG index
Suppress CUG
1 On
2 Off
Suppress OA
1 On
2 Off
NITZ (Network Id. Time Zone)
Enabled
Disabled
9 Information
IMEI
Software
SIM info
Total life
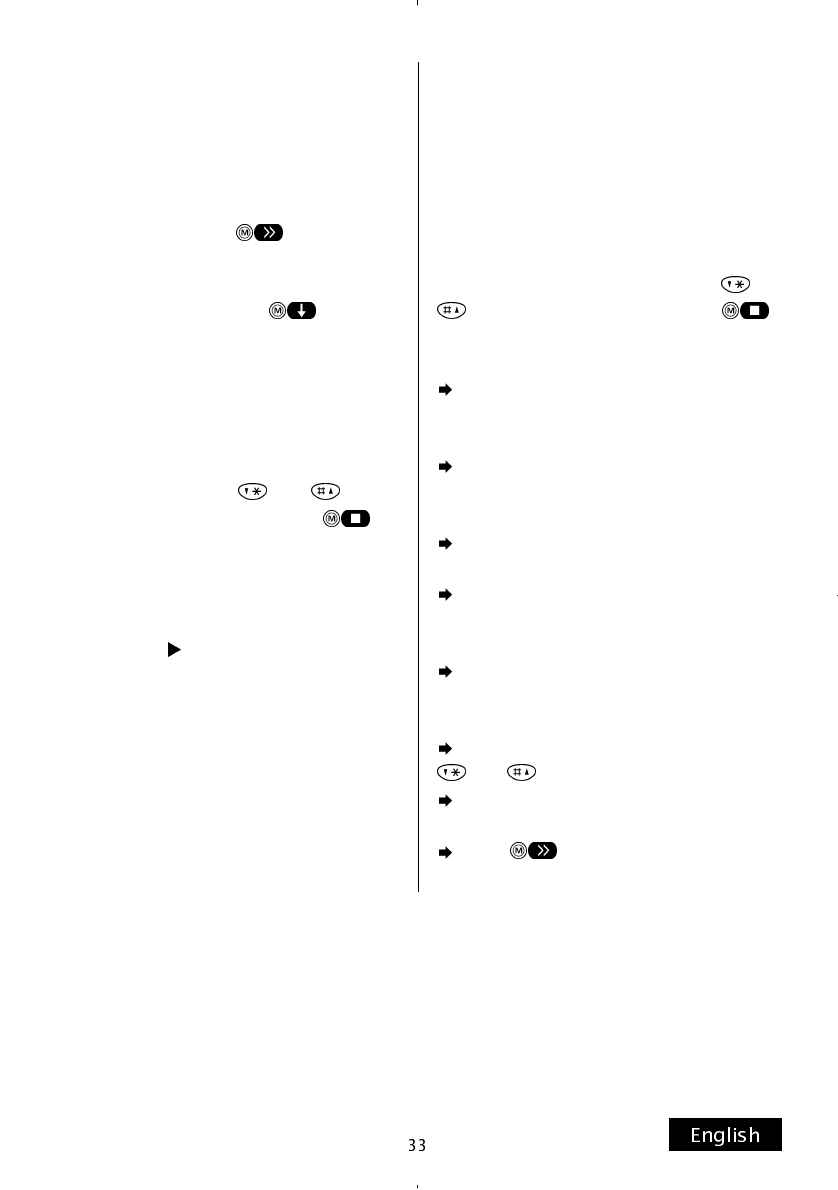
The following pages list the available me-
nu functions with a brief description of e-
ach. For access to these functions, refer
to information provided in the previous
sections.
In menus only, the three keys - - per-
form additional functions depending on the
symbol displayed immediately above them:
more options are available.
query to network for information on an
option status.
move to next item in the same menu.
move to the next item in the next menu.
divert the call to the specified number.
enlarge information on display.
SIM Toolkit (Menù 0)
The presence or not of this menu, its deno-
mination, the number and type of performan-
ces are strictly dependent upon the SIM
used.
Own number (Menu 1)
This function displays your own telephone
number.
If the number is not displayed, press
enter the number and confirm.
This function depends on the SIM card.
Calls (Menu 2)
This function displays the last twenty
outgoing calls ( ) and the last twenty inco-
ming calls (if the telephone number has
been sended) to which you have answe-
red ( ) or not ( ).
Each call displays the incoming order and af-
ter the (/) symbol the list of calls, followed
by the telephone number and - if stored -
the relevant caller’s name. At the end da-
te and time of the call is displayed. To di-
splay in sequence, press or . To
erase a missed call, move to the item and
press and hold and then confirm.
Call Divert (Menu 3)
Fast divert (Menu 3 1)
This network service enables to divert all
incoming calls to another telephone num-
ber.
Note: before activating the divert function,
enter the number to which the calls are to
be diverted (Menu 3 1 3).
Divert always (Menu 3 2)
This network service diverts all incoming
calls (depending on the type of service: voi-
ce, data and fax) to a different telephone
number; before activating this function, enter
the number to which the calls are to be di-
verted.
Divert Missed Calls (Menù 3 3)
This network service diverts calls according
to different reception failure conditions and
also to the type of service available; before
activating this function, enter the number to
which the calls are to be diverted.
The option “If no reply” must also contain the
time lapse before activating this function.
Cancel (Menu 3 4)
Cancels the various active divert functions
according to type of service and reception
failure conditions.
Clock (Menu 4)
Set (Menu 4 1)
This function sets the following in sequen-
ce: clock (displayed at the top right of the
display) and, after its confirmation, date.
In both cases, press to pass from
one item to the other.
Later this function sets the day: select the
required day by pressing and con-
firm.
Alarm (Menu 4 2)
This function sets the alarm-clock and the
days for activation. After setting and con-
firming the time, use and to se-
lect the required items (press to
enable and a second time to disable the
selection) and, on completion of selection
(s), confirm.
Note:
The symbol next to selection means
that it is enabled; the alarm-clock will be
activated even if the phone is switched
off: in this case, following activation, con-
firmation is requested or the option to
reject activation: the telephone switches
off automatically if no key is pressed.
Settings (Menu 5)
Audio (Menu 5 1)
This function enables you to change the
tone and volume of the ring signal.
Personalising the ring signal
To personalise the ring signal, enter sub-
menu (5 1 1 1 followed by keys or
up to 9) and, after pressing ,
enter the required notes (max.80 inclu-
ding pauses), then confirm.
the composition of a note requires its
specific entry, the sharp sign (if relevant)
and its duration.
press the same key again to change the
letter from upper to lower case thereby
changing the octave (higher frequency).
the sharp sign must be entered imme-
diately after the relative letter.
the duration of the note can be extend-
ed by pressing the relative key (9) repea-
tedly (up to four times).
the duration of the pause can be ex-
tended by pressing the relative key (0) re-
peatedly (up to four times).
scroll through items by means of keys
and .
errors are displayed by a flashing cursor
at the point of the error.
press to listen to the melody
composed.

The signal tones can be enabled as requi-
red to indicate line connection, off/on, ac-
tivation/deactivation of the battery charger
and the battery low signal.
Warning tones can also be activated/
deactivated to indicate the absence/
presence of the radio signal or in the case
of absence only.
DTMF tones can be activated as required;
when this option is activated the tone cor-
responding to the key pressed is sent im-
mediately.
Display (Menu 5 2)
This function enables the adjustment of
display brightness and duration of illumi-
nation after pressing a key. It also ena-
bles text settings in fixed mode (16 cha-
racters) or in scrolling mode (50 cha-
racters) displayed on the last line. Display
contrast can also be modified as required.
Language (Menu 5 3)
This function enables selection of the di-
splay language. The telephone recogni-
ses the SIM card automatically and di-
splays messages in the associated lan-
guage.
Auto answer (Menu 5 4)
This function answers a call automatically
without pressing a key 6 seconds after the
call is received.
Any key answer (Menu 5 5)
This function enables all keys (except
) to answer a call.
Call waiting (Menu 5 6)
This network service enables an acoustic
warning during a conversation to indicate
another incoming call.
Keypad lock (Menu 5 7)
This function automatically locks the
keypad after approx. 30 seconds after
pressing a key. The keypad can be unloc-
ked as per the manual locking procedure.
Key Display Note/Action
A a
LA
B b SI
C c DO
D d RE
E e MI
F f FA
G g SOL
# Sharp
Note length
Pause length

Security (Menu 6)
PIN control (Menu 6 1)
This function enables you to change the
PIN and PIN2 codes and allows you, if the
SIM card supports the function, to activate
or deactivate the PIN request when swit-
ching on the telephone.
Phone security (Menu 6 2)
Access to this sub-menu depends upon
the correct entry of the security code set
by the manufacturer: 000000 (if it has not
been changed).
This function activates/deactivates the re-
quest for the security code when the tele-
phone is switched on or the use of the
phone only with one of the ten last SIM
cards inserted.
It also enables cancellation of the list of
stored SIM cards, change the access co-
de to this menu and activation/deactivation
of the autolock, modifying the relative code
(manufacturer setting 1 2 3).
The option Reset default values re-
turns settings to manufacturer values.
Call barring (Menu 6 3)
This network service enables barring of
outgoing calls (3 options) and incoming
calls (2 options) to personalise the type of
call in blocks (voice, fax, data and all ser-
vices).
It also enables cancellation of the pre-
viously set block and modification of the
code for this service provided by the net-
work operator.
Fixed dialling (Menu 6 4)
If enabled (PIN2 is needed), this function
allows you to make calls exclusively to the
telephone numbers contained in the FDN
memories. It also allows you to recall only
the numbers stored in the FDN memories
(quantity depending on the SIM card) and
to store new numbers only there.
Note: not all SIM cards provide FDN me-
mories.

GSM Networks (Menu 7)
Search network (Menu 7 1)
This function displays the networks that
can be received in a specific zone in order
to make the manual selection.
Auto selection (Menu 7 2)
This function searches for networks auto-
matically.
If this function is not activated, and the si-
gnal of the network operator who has is-
sued the SIM card lacks, you have to cho-
se each time a network manually (both at
the switching on and later).
Network list (Menu 7 3)
This function enables the insertion of net-
works (or cancellation if already present,
by pressing and holding ) to make out a
priority list. In absence of coverage of the
network operator which has issued the
SIM card, the telephone will follow this list
in search for a network.
Press to display the pre-set net-
works that can be added to the list.
Press to display all data listed for a
single network.
If the required network is not displayed in
the list, use the cursor bar to select User
defined, press and enter the data
required as supplied by the network ope-
rator and then confirm. For example:
MCC: 222 (for Italy)
MNC: 10 (for Omnitel)
C: I (for Italy)
AC: +39 (for Italy)
N: Omnitel (for Omnitel)
Use to move from one item to the
next.
Home network (Menu 7 4)
This function displays the home network
operator which has issued the SIM card.

Call control (Menu 8)
Minute beep (Menu 8 1)
This function activates a beep every mi-
nute during an outgoing call to indicate
duration.
Call duration (Menu 8 2)
This function registers the duration of the
last outgoing call, all incoming national
and international calls, all outgoing calls
(national and international) and total con-
versation time. This last function also re-
quests confirmation to clear all timers.
Charge rate (Menu 8 3)
This network service displays the charge
for the last call (and all calls) as well as
the corresponding number of units.
If the PIN2 is also entered, this function
enables you to set the value and currency
of a single unit, reset the units counter
and restrict it to a pre-set number.
Note:
The value, currency and the duration in
seconds of a single unit can only be set if
Local is displayed on the last line of the
function COST CONTROL.
Use to move from one item to anot-
her and confirm.
Transfer own number (Menu 8 4)
This network service enables (for all calls)
to transmit or retain (leaving the opera-
tor’s settings unchanged) your own tele-
phone number to the display of the tele-
phone called. The subsequent functions
enable (or not) the option to transmit the
number for each single call.
Closed User Group (Menu 8 5)
If this function is offered by the network
operator to the subscribers of this service,
it enables you to make calls only to one or
more defined user groups.
You have to dial and confirm into the in-
dex the code number of the user groups
assigned by the network operator.
If activated, the other two sub-menus are
used to inhibit calls to users of a different
group than the one indicated as preferred
(a message will be shown in the last row
of the display), as far as Suppress CUG is
concerned, and to inhibit calls to users
out of the selected user group, as far as
Suppress OA is concerned.
Note: If calls are made out of your own
user group, you have to dial the code of
the new user group into the index.
Network Identity Time Zone (Menu 8 6)
If this function is offered by the network
operator to the subscribers of this service,
it enables you to display the effective local
time of the place where you are, without
changing the settings of the relevant menu.

Information (Menu 9)
IMEI (Menu 9 1)
This function displays the serial number of
the telephone. In case of robbery, inform
immediately the network operator noti-
fying this number (supplied with the sales
pack) in order to block the use on GSM
networks offering this service.
Software (Menu 9 2)
Displays the telephone software version.
SIM info (Menu 9 3)
Displays the phase (1 or 2) of the SIM
card followed by the Mobile Country Code
(MCC) number and the Mobile Network
Code (MNC) number.
Total life (Menu 9 4)
Displays the total time of incoming and
outgoing calls.
This data cannot be reset.
10. MENU SATELLITE
This menu is accessible b
y
pressin
g
and provides rapid access to the satellite menus
where the settings could be modified and information obtained.
Menu 1 and 3 are available only if not in conversation. Menu 2 and 3 are available only if
connected with the satellite network, and not with the GSM terrestrial network. Menu 4 is
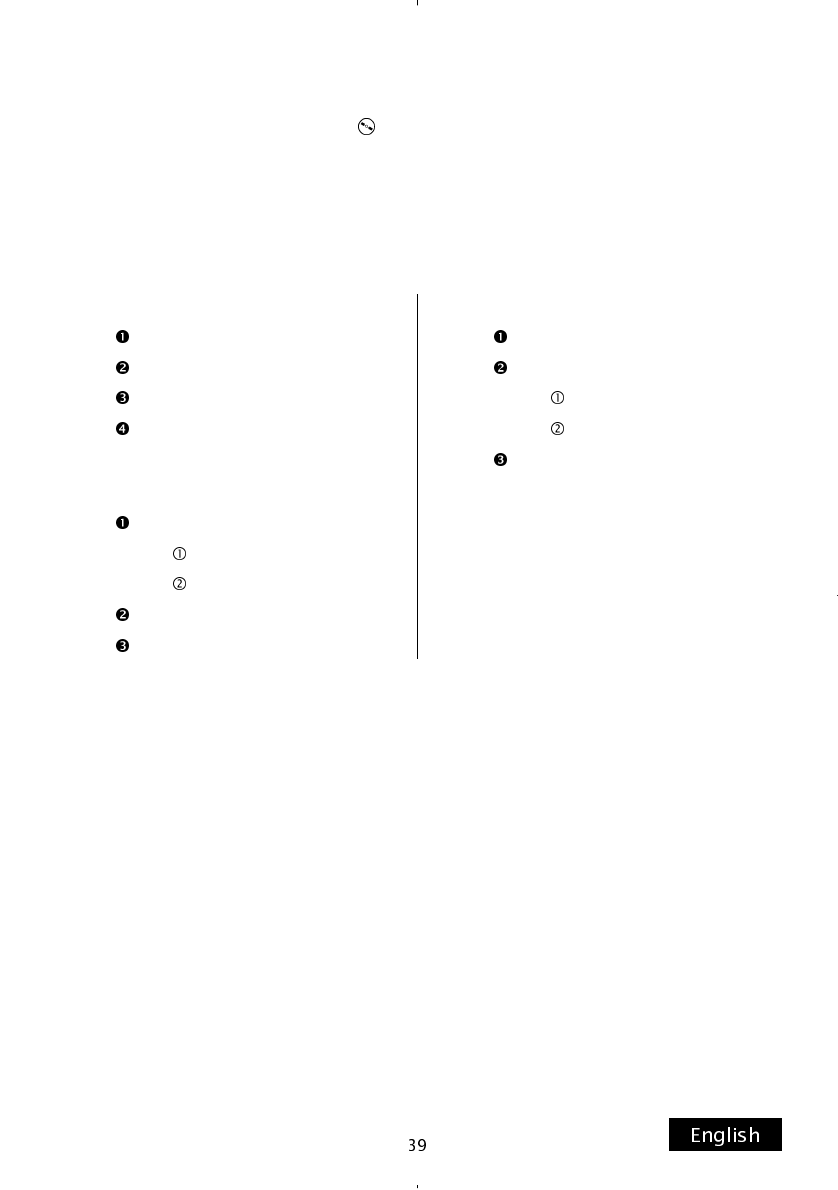
available (with certain exceptions, explained further on) on both networks.
1 Mode
GS
GSM
GS then GSM
GSM then GS
2 Positioning
Error display
On
Off
Position
Last Position
3 GS service
Search network
Auto selection
On
Off
Network list
4 Local time

The following pages list the menu func-
tions available together with a brief de-
scription of each. To access these func-
tions, refer to the section on using the me-
nu.
Mode (Menu 1)
GS (Menu 1 1)
When switched on, this function enables
you to use the Globalstar satellite network
only.
GSM (Menu 1 2)
When switched on, this function enables
you to use the terrestrial GSM network
only.
GS then GSM (Menu 1 3)
When switched on, the telephone will
connect as far as possible to the Global-
star satellite network.
Note: if there is no satellite network si-
gnal, the telephone will switch on the ter-
restrial GSM network. Usually every
30’ (but this time varies upon the network
operator’s request) the telephone will re-
peat the network search: if the signal is
available, it switches automatically on the
satellite network, otherwise it remains on
the terrestrial GSM network.
GSM then GS (Menu 1 4)
When switched on, the telephone will
connect as far as possible to the terre-
strial GSM network.
Note: if there is no terrestrial GSM net-
work signal, the telephone will switch on
the Globalstar satellite network. Usually
every 30’ (but this time varies upon the
network operator’s request) the telephone
will repeat the network search: if the si-
gnal is available, it swtiches automatically
on GSM network, otherwise it remains on
the satellite network.
Positioning (Menu 2)
Error display (Menu 2 1)
This function allows to display the recei-
ved position information of the telephone,
even if position error is greater than 10
Km in comparison to the effective position
(see the following menu).
Position (Menu 2 2)
This function allows to detect the geo-
graphic position of the telephone: the re-
ceived position in relation to the effective
position of the telephone is of approxima-
tely 10 Km.
Last Position (Menu 2 3)
This function allows to display the last 10
received position values. To scroll the me-
nu up and down, press keys and .

GS service (Menu 3)
Search network (Menu 3 1)
This function has the same use as alrea-
dy explained for the terrestrial GSM net-
work search (7 1), but allows to search for
all Service Providers available on the sa-
tellite you are connected to.
Auto selection (Menu 3 2)
This function has the same use as alrea-
dy explained for the network search (7 2),
but is available only for the satellite net-
works.
Network list (Menu 3 3)
This function has the same use as alrea-
dy explained to set up a list of networks (7
3) but is available only for the satellite net-
works.
Local time (Menu 4)
This function enables you to set the local
time of the place where you are, which
could differ from that displayed by the sa-
tellite network.
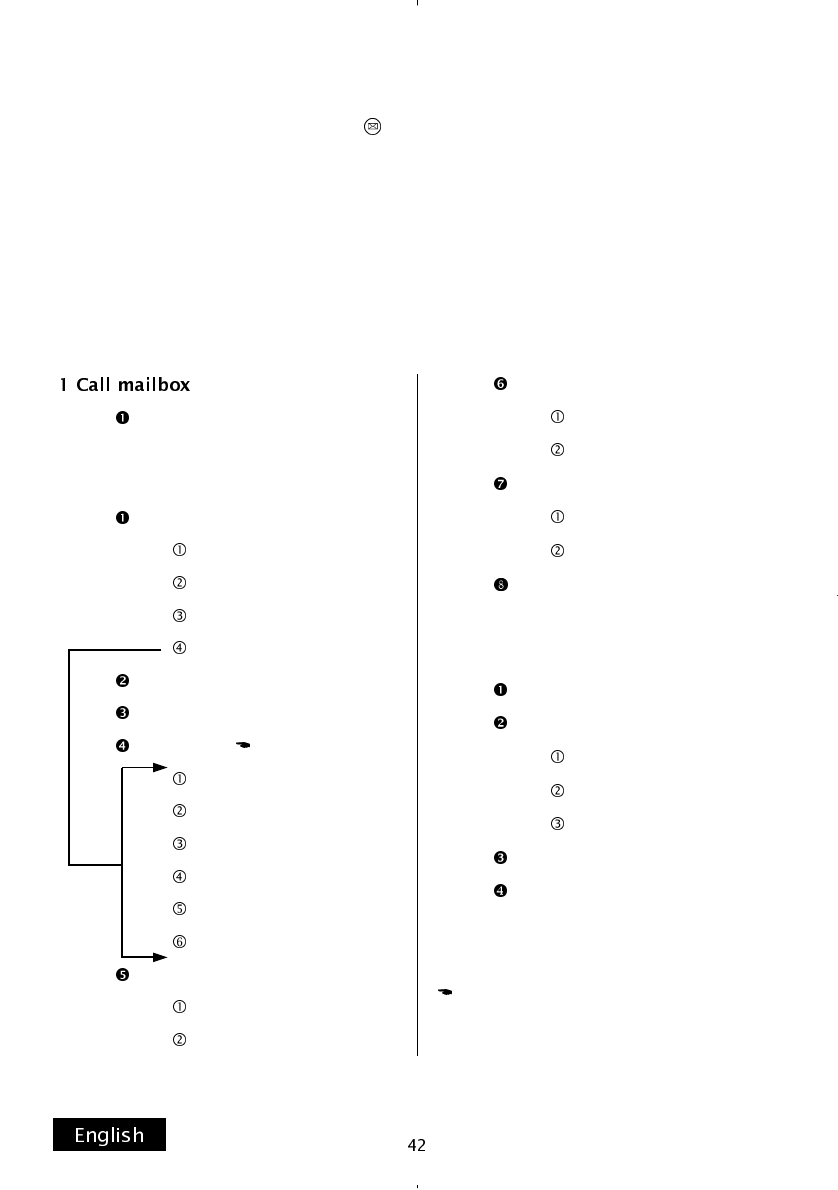
11. SHORT MESSAGES SERVICE MENU
This menu is accessible b
y
pressin
g
and provides rapid access to the voice mailbo-
xes, option for transmission and receipt of short text messages (SMS) and messages
sent by the network to all subscribers in a specific area (Cell Broadcast).
The text message function (SMS, Short Message Service) is a service that may not be
available on the network. To use SMS, call a message centre number (supplied by the
network operator).
The Cell Broadcast function may also not be available on the GSM network.
The Cell Broadcast function is not available on the Globalstar satellite network.
Call mailbox?
2 Messages
Write new
Send
Store
Send and store
Parameters
Received
Written
Parameters
Name
SMS-Center no.
Validity
Destination
Protocol Id.
Set default
Autodelete
On
Off
Reply path
Activate
Deactivate
Status Report
On
Off
Information
3 Cell Broadcast
Message
Activation
On
Off
Auto display
Languages
List
It is possible, but depends on SIM,
to record also further parameters.
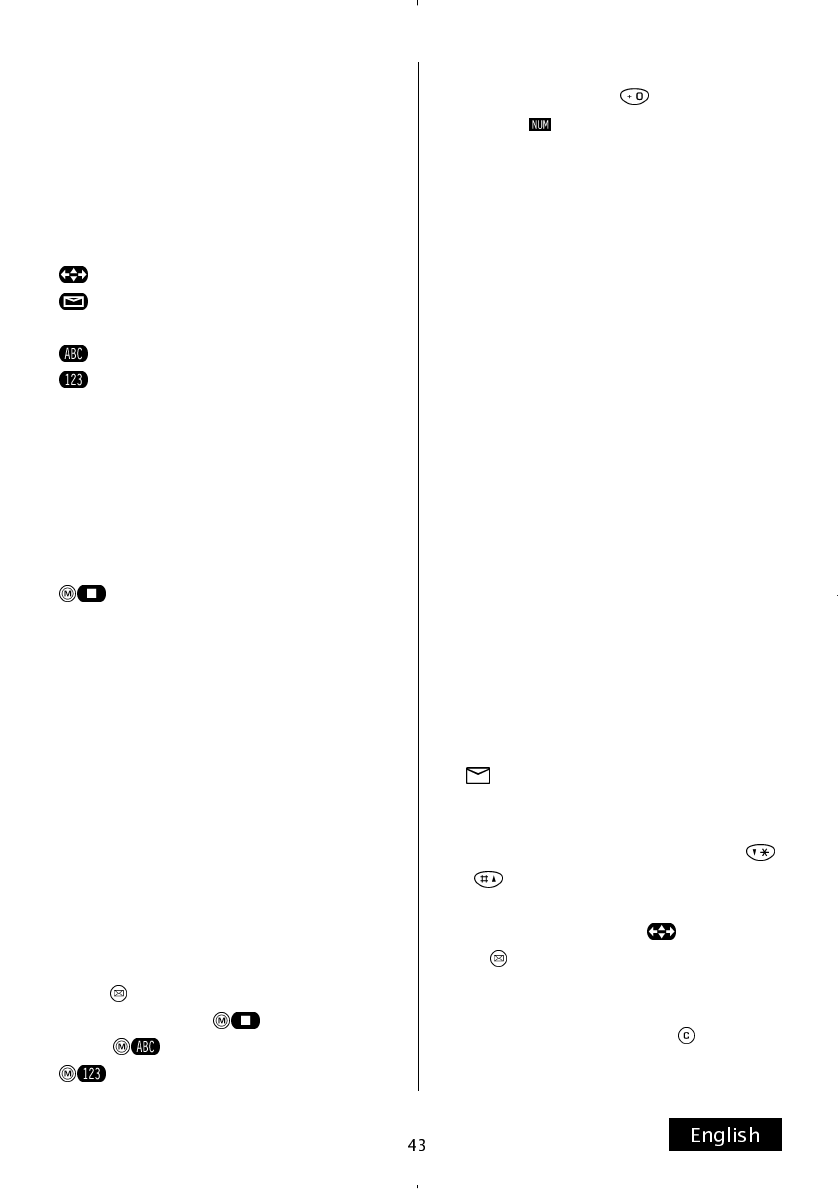
The following pages list the menu func-
tions available together with a brief de-
scription of each. To access these func-
tions, refer to the section on using the me-
nu.
In messages only, the two keys -sm- per-
form additional functions according to the
symbol located above the key:
enlarge message
answer incoming message or update
previous message
enter message
enter telephone number
Call mailbox (Menu 1)
This function (if supplied by the network)
enables you to listen to voice mails stored
in a specific mailbox. The telephone calls
the number stored in this menu after
is pressed.
The number of the mailbox must be sup-
plied by the network operator.
Messages (Menu 2)
Write new (Menu 2 1)
This function enables you to enter the
message first (max.160 characters) and
then the telephone number to call (which
is requested if not stored in parameters
specified in section Parameters 2 4 be-
low).
The characters are entered as described
for entering names in the phone-book.
Press to define and store user messa-
ges (after pressing ).
Press to enter the message, and
to enter the number to be called.
To enter a series of numbers after ente-
ring a message, press for one second
after which is displayed.
Send (Menu 2 1 1)
This function sends the message.
Store (Menu 2 1 2)
This function stores the message without
sending.
Send and store (Menu 2 1 3)
This function sends and stores the mes-
sage.
Parameters (Menu 2 1 4)
This function enables immediate access
to the parameters sub-menu (2 4) descri-
bed below.
Received (Menu 2 2)
On receipt of an SMS message, the sym-
bol is displayed and an acoustic signal
is activated.
Messages can now be read.
To scroll through messages, press
and ; the same keys can be used to
scroll through a long message following
enlargement (by pressing ).
Press (before enlarging the message)
to display the number of the Service Cen-
tre that has transmitted the message.
To delete a message, press for 1 se-
cond and then confirm the request.

If the message was previously enlarged
press before deleting.
To reply to a message, press enter
the message on request, confirm by pres-
sing and enter the number to be
called.
To call the sender of the message, press
and for one second; if several num-
bers are present in the message, select
the required number using or
and press twice: the first time to select
the required number and the second to
make the call.
Note: some network operator send a spe-
cial SMS in order to inform on the presen-
ce of messages into the call mailbox. The-
se messages are not registered into the
SIM card as the other SMS, but shown
only on the display: after you read the
message, press twice in order to can-
cel.
If you get a call while the message is di-
splayed, scroll as usual this menu to read
the message ( signals the presence of
messages).
As far as these special messages are not
written on the SIM card, they are automa-
tically cancelled when you switch off the
telephone.
Written (Menu 2 3)
This function enables modifications to pre-
viously written and stored messages.
Parameters (Menu 2 4)
Before sending the first message enter in
the sub-menus described below all - or at
least the number of the Service Centre
provided by the network operator - data
required to perform the SMS function
(once only if the subsequent destinations
do not change).
Note: the number of parameters that can
be stored depends on the SIM card type
and comprehends: the name given to the
parameter, the number of the Service
Centre, the maximum time within the Ser-
vice Centre tries to send the SMS
(Validity), the telephone number of the re-
ceiver and the protocol to be used.
The option Phone para stores the para-
meters permanently in the telephone me-
mory and not in the SIM card.
Name (Menu 2 4 1)
This function enables you to assign a na-
me to a parameter. It is particularly useful
when, in the presence of several parame-
ters, you need to assign to each one a
specific profile, including the data ente-
red in the three following sub-menus.
For example, if you often send short text
messages (SMS) to a person called
“Marc“ then the parameter should be na-
med the same.
Service Centre number (Menu 2 4 2)
Enter the Service Centre number supplied
by the network operator.
Note: do not confuse this number with
that of the message recipient.
Validity (Menu 2 4 3)
This network service enables you to set a
time interval during which messages are
stored at the Service Centre. To move
through items press and to modify
time units (min., hour, days, week) use
and .
Note: if the maximum time entered
exceeds Service Centre specifications the
value is changed automatically to the spe-
cified value.
Destination (Menu 2 4 4)
This function enables you to store a desti-
nation number to which all messages are
sent.
Note: if the telephone number is stored
there it will not be requested every time
you send a message.
Protocol Id. (Menu 2 4 5)
This network service enables the conver-
sion of messages into different formats,
such as Email, Fax, X.400. Modify the
pre-set value (0) only after contacting the
Service Centre.
Set default (Menu 2 4 6)
This function activates the selected para-
meter. In case of several stored profiles, it
allows you to chose and applicate (as
long as another is not set as default) the
selected parameter.
Autodelete (Menu 2 5)
This function deletes messages automati-
cally after they have been read.
Reply path (Menu 2 6)
This network service enables the receiver
of the message to send a replay by using
the same Service Centre.
Status report (Menu 2 7)
This network service enables the sender
to receive confirmation of receipt of the
message from the recipient.
Information (Menu 2 8)
This option supplies information on the
messages present in the SIM card.
The first line displays the number of mes-
sages present and the maximum permit-
ted number of messages.
The next two lines display respectively the
number of messages received and those
written and stored.
Note: written and stored messages (and
those received) are also stored on the
SIM card: they keep the memory usy and
therefore remember to delete them if they
are not useful.
Cell Broadcast (Menu 3)
Message (Menu 3 1)
This function displays the messages sent
by the network operator to all subscribers
of an area, containing news and informa-
tion on hospitals, surgeries, chemists,
road traffic, taxis, weather forecasts, zo-
ne, etc.
Activation (Menu 3 2)
When this function is activated it displays
the message only if the previous menu (3
1) is used. If deactivated, the messages
are not displayed. If the automatic display
is activated the messages are displayed
on the first two lines of the display, provi-
ded that the telephone is not being used.
To scroll through remaining messages be-
low the two lines, press and hold to
continue scrolling. To change the scrolling
direction press twice: the direction of
the arrow confirms the change. To cancel
the message from the display, press and
hold (although it will remain stored in
the previous menu).
Note: the message remains on the di-
splay when a telephone number is ente-
red.
Languages (Menu 3 3)
More languages can be stored,
(according to the SIM card type) selected
among those available, in which messa-
ges can be received. Confirm the langua-
ge and then select another one using the
scrolling keys, confirm the selection or
exit the function.
If the list is empty, messages will be recei-
ved in all languages.
Note: unless for specific requirements (e.
g. the network operator - to whom this
service is referred - sends messages in
several languages or wish to receive mes-
sages in one language only) it is better
not to store specific language(s) as the
network operators do not always send
messages in their own language but in
another one (very often in English).
List (Menu 3 4)
A number of subjects can be stored,
(according to the SIM card type) selected
among those available, according to
which messages can be received. In this
function, confirm and make another selec-
tion by pressing and use the scrol-
ling keys to select the required item. Se-
lect and confirm or exit the function.
If the required subject does not appear on
the list, use the scrolling keys to move to
User defined, press to make
another selection and enter the code of
the required subject (supplied by the net-
work operator).
Move on to the next item to name the sub-
ject and confirm the selection or exit the
function.
If the list is empty all subjects are recei-
ved.
Note: display of the languages and sub-
jects depends on the SIM card.
To delete a language or subject, select
the item, press then hold and confirm
on request.

TECHNICAL SPECIFICATIONS
Dimensions:
Hei
g
ht: 224 mm
Width: 65,5 mm
Depth: 50 mm
Wei
g
ht: 300
g
r. (without batter
y
pack)
Environmental characteristics:
Temperatur: -10°C ÷ +55°C
Humidit
y
: 5% ÷ 95% noncondensin
g
