The Genie a Division of Overhead Door 315390K Remote Control Transmitter for Garage Door Opener Operation User Manual 37257501192 ODC WK English
The Genie Company a Division of Overhead Door Corporation Remote Control Transmitter for Garage Door Opener Operation 37257501192 ODC WK English
Exhibit D Users Manual per 2 1033 b3
STEP 1:
This Wireless Keypad is compatible with all
and CODEDODGER® 2 radio equipped GENIE® products.
s
Drill with 1/16" Drill Bit
s
Phillips Screwdriver
s
Pencil
s
Mounting Screws INCLUDED
s
Ability to Control up to three
Overhead Door®CODEDODGER®1
or 2 Openers
s
Simple to Program and Install
s
PIN Codes can be up to 8 Characters
s
Low Battery Power Indicator
s
Stays Programmed During
Battery Change
s
Temporary PIN for Special
Purpose Access
OPERATING INSTRUCTIONS
(KEEP FOR FUTURE REFERENCE)
37257501192
STEP 3:
Following programming—
On your Wireless Keypad:
Enter your PIN.
OPERATING DOOR OPENERS
Proceed to Section 3 - Mounting Instructions.
MOUNTING INSTRUCTIONS
The Keypad must be mounted in sight of the Door(s), at
least 5 feet above the ground and clear of any moving
Door parts.
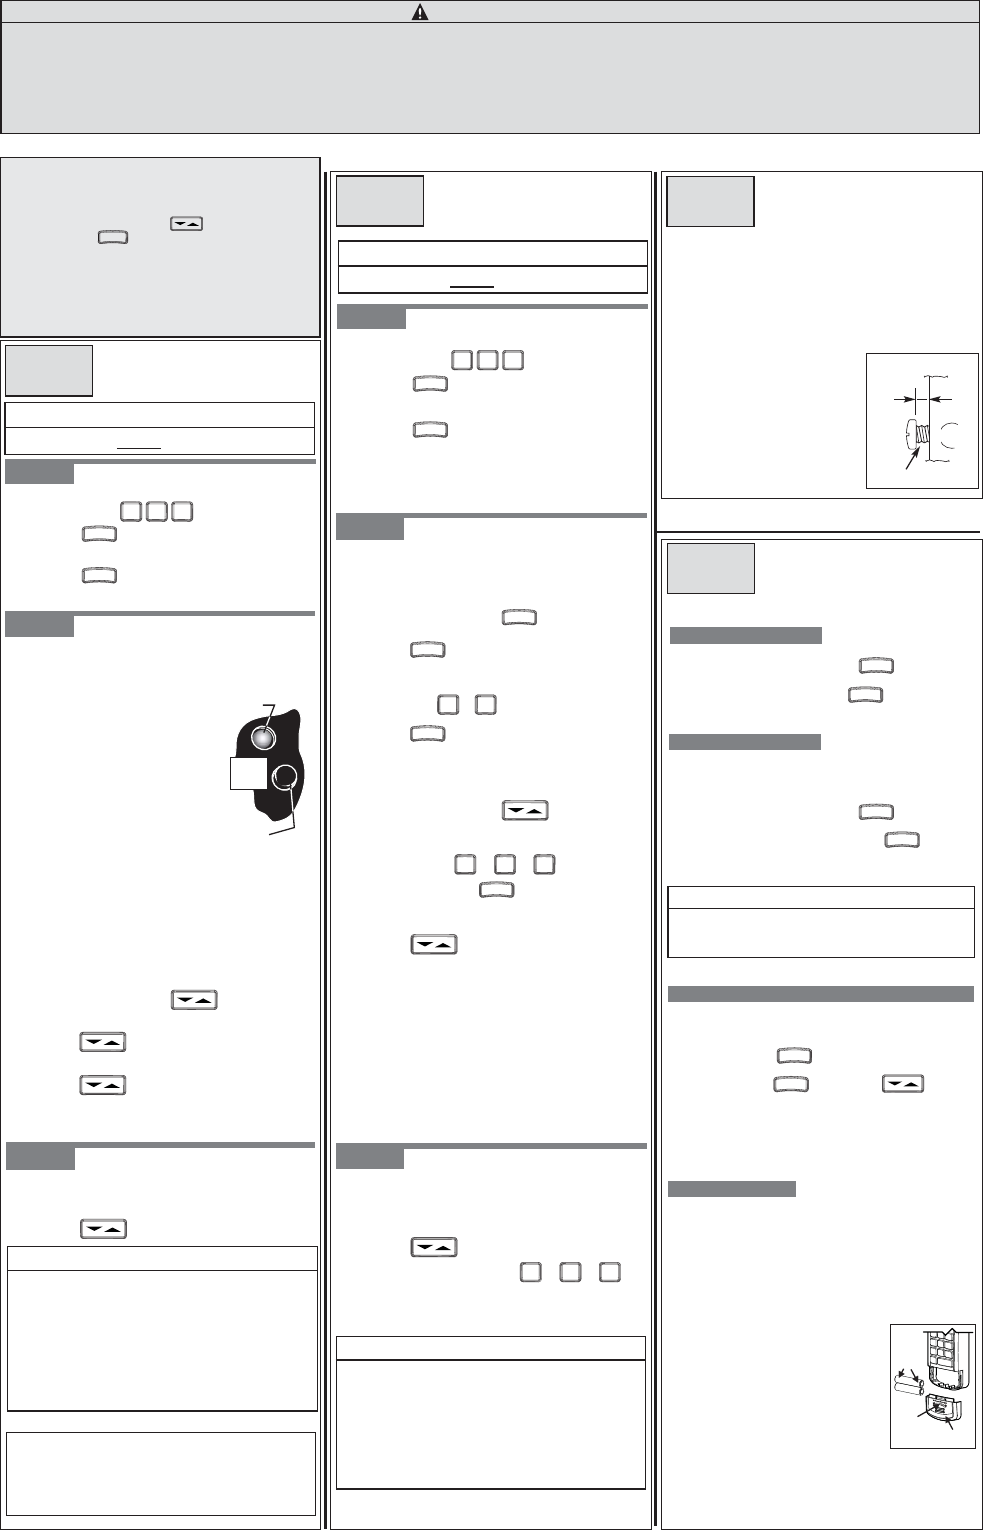
AMount Keypad.(Mounting screws located inside
Battery Compartment.)
sRemove Battery Cover and batteries. (See Figure 3).
s
Drill a 1/16”pilot hole for the top mounting screw.
sInstall a screw into the drilled
hole,leaving a 1/8" gap
between the screw head
and the wall. (See Figure 2.)
sHook the Keypad over
the screw.
sMark and drill pilot hole and
fasten bottom screw.
snstall Batteries and Cover.
For answers to questions,call 1-800-275-6187 , or visit
www.overheaddoor.com
Overhead Door Corp., 2501 S State Hwy.,Suite 200, Lewisville, TX
75067. Additional products can be ordered through local
Overhead Door® Professional Dealers. To locate a dealer near you,
call 1-800-929-DOOR.
SECTION
2
SECTION
3
ADDITIONAL OPERATIONS
SECTION
4
U
SING A
T
EMPORARY
PIN
A temporary PIN allows temporary access to your home by
If you have forgotten your PIN or you fear it may have fallen
into unauthorized hands, you must erase the old programming.
repair persons, meter readers, etc.if you so desire.
NOTE
DONOT reprogram the Door Opener(s).
s
Temporary PIN remains active only until the next time
nyour ormal PIN is entered.
F
ORGOT
Y
OUR
PIN (RESETTING WIRELESS KEYPAD)
C
HANGING
Y
OUR
PIN
Enter your current PIN and press .
Wall
screw head gap
Figure 2
FOR CONVENIENCE
Program Keypad BEFORE mounting.
MULTIPLE
F
EATURES
:
T
OOLS
N
EEDED
:
2YHUKHDG'RRU&RUSRUDWLRQ
FCC and IC CERTIFIED
This device complies with FCC Part 15 and RSS 210 of Industry Canada. This equipment has been tested and
found to comply with the limits for a Class B digital device, pursuant to Part 15 of the FCC Rules. These limits are
designed to provide reasonable protection against harmful interference in a residential installation. This
equipment generates, uses and can radiate radio frequency energy and, if not installed and used in accordance
with the instructions, may cause harmful interference to radio communications. However, there is no guarantee
that interference will not occur in a particular installation. If this equipment does cause harmful interference to
radio or television reception, which may be determined by turning the equipment OFF and ON, the user is
encouraged to try to correct the interference by one or more of the following measures:
s Re-orient or relocate the receiver antenna.
s Increase the separation between the opener and receiver.
s Connect the opener into an outlet on a circuit different from that to which the receiver is connected.
s Consult your local dealer.
C
HANGING
B
ATTERY
NOTE
s
If the Door does not move,check the LED on Keypad.
If the LED is blinking rapidly,the PIN was entered
incorrectly. After the LED stops blinking,re-enter
your PIN and try again.
s
Any Keypad Button will control the Door for 30 seconds
after the Door starts moving.
s
Rapid blinking of the red LED indicates an error. After a
few seconds the LED will turn off. Start over.
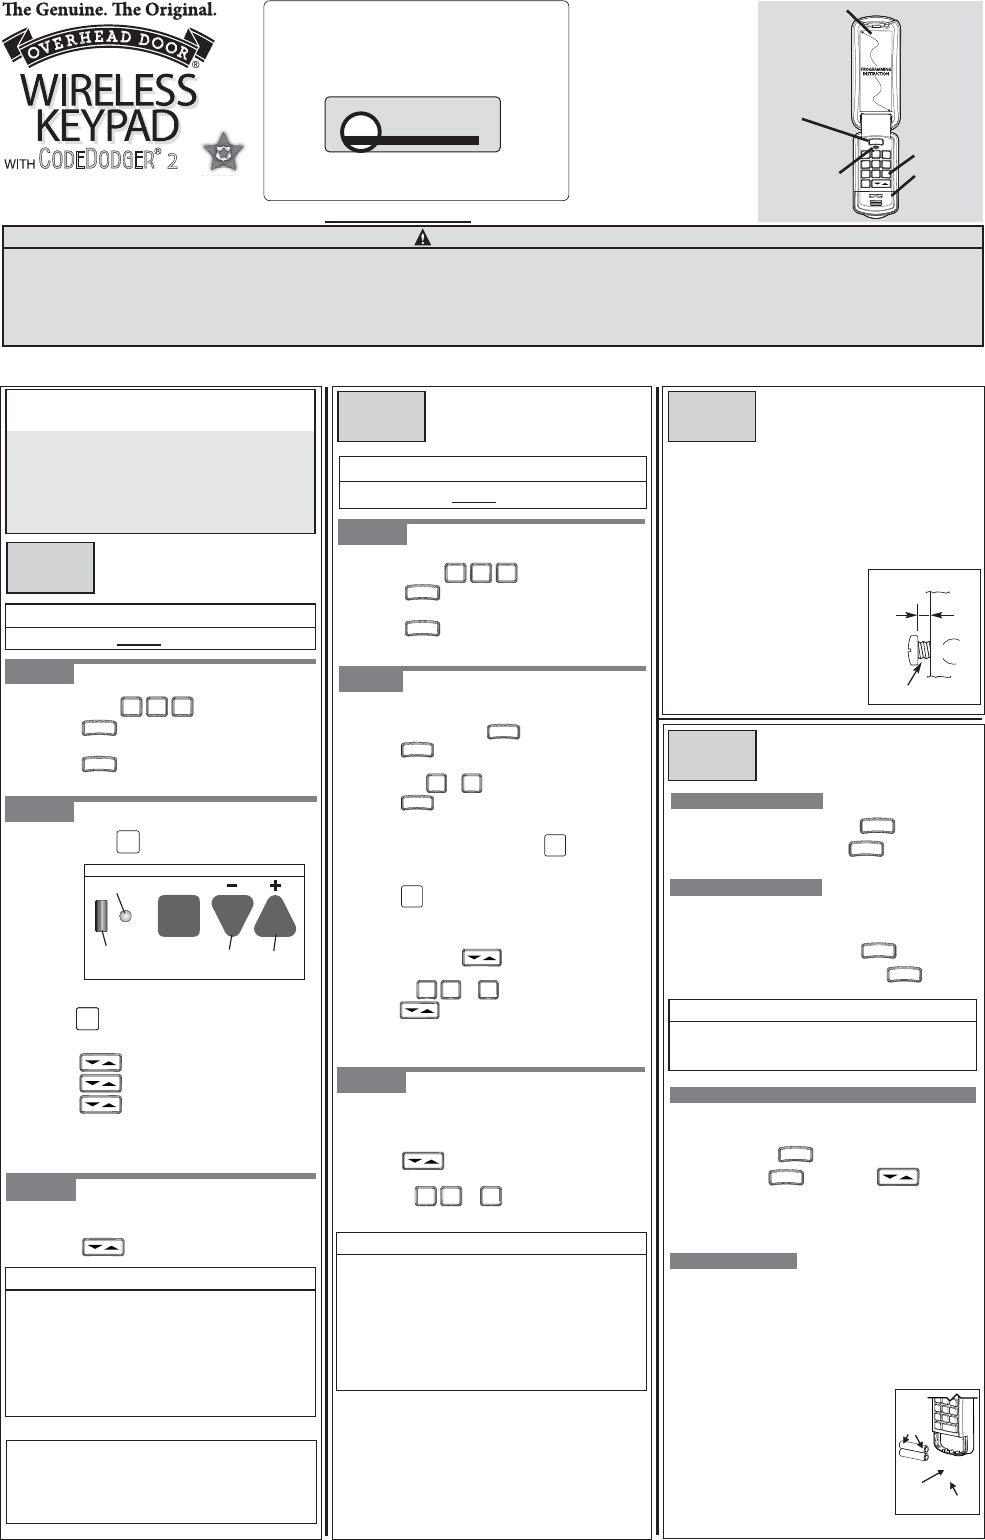
If your garage door opener has a Serial Number
sticker which looks like this, in which the
first two numbers are 10 or higher, your opener
is equipped with CODEDODGER®2.
Follow the instructions on this page.
Otherwise, follow the instructions on back.
sPress in order .
sPress .
sEnter your PIN (3 to 8 characters).
s
sClose keypad cover and wait 30 seconds.
Press .
3 5 7
STEP 1: CREATING YOUR WIRELESS KEYPAD PIN
(P
ERSONAL
I
DENTIFICATION
N
UMBER
)
s
s
s
s
s
s
s
s
s
s
1 2 3
Enter your current PIN and press 3 times.
Press and hold .
Release both buttons. You must now start from the
beginning and reprogram your Wireless Keypad.
Wile holding press and hold for
5 seconds.
Enter your NEW PIN and press .
Enter your TEMPORARY PIN and press .
sPress the number of the door you wish to
operate or .
sPress any key to operate the door.
s
s
Press .
+ AAA -
+ AAA -
If the Keypad backlight does not come on, this indicates the
need to replace the batteries.
Figure 3
Press
here
Polarity
markings
Battery
Cover
Press in on the front of the battery cover and slide it down
off of the Keypad.
Remove used batteries and replace
s
No programming is lost during
replacement of batteries.
with "AAA." Make sure the
batteries are inserted properly
using the polarity markings.
ATTENTION
2
MODEL AC SR3 OVERHEAD DOOR CORP.
FCC ID: B8Q AC SR3 Residential Door Operator
IC: 2133A-CSD1D 120V. 60HZ. 5A
FOR HELP CALL 1-800-275-6187 OR WWW.OVERHEADDOOR.COM
Interchangeable
Flip-up Cover
available in 3
optional Classic
Colors to match
your home’s
exterior decor
GREEN LED
indicates Pre-Set
toIntellicode® 2
Backlit
Keypad
for Ease
of Use
at Night
Battery
Compartment
2 AAA Batteries
(included)
Program
Button
Covers available in:
sTan - P/N 37227T
sAlmond - P/N 37227U
sGray- P/N 37227S
sWhite- - P/N 37227R
STEP 3: OPERATING ONE DOOR OPENER
ATo open or close the Garage Door.
sEnter your PIN.
sPress .
FOR CONVENIENCE
Program Keypad BEFORE mounting.
SECTION
1
Proceed to Section 3 - Mounting Instructions.
NOTE
s
If the Door does not move,check the LED on Keypad.
If the LED is blinking rapidly,the PIN was entered
incorrectly. After the LED stops blinking,re-enter
your PIN and try again.
s
Any Keypad Button will control the Door for 30 seconds
after the Door starts moving.
s
Rapid blinking of the red LED indicates an error. After a
few seconds the LED will turn off. Start over.
Wait until Keypad Backlight turns off (approximately 30 seconds).
STEP 1: CREATING YOUR
STEP 2:
P
ROGRAMMING
S
INGLE
D
OOR
O
PENER
WIRELESS KEYPAD PIN
(P
ERSONAL
I
DENTIFICATION
N
UMBER
)
sPress in order .
sPress .
sEnter your PIN (3 to 8 characters).
s
sClose keypad cover and wait 30 seconds.
Press .
3 5 7
Figure 1
Press and hold until both LEDs turn BLUE.
s On the Wireless Keypad—enter your PIN.
s Press . LEDs will stay on solid.
s Press again. LEDs will turn off.
s Press again. Door opener should run.
s Press any key to stop opener. (It will automatically
stop at the fully open or fully closed position.)
PROGRAM
SET
sPres
s ,
release again. Long
LED should blink PURPLE.
s Release button. Only round LED will be BLUE.
Figure 1
SET
PROGRAM
Open
Travel
Button
ROUND LED
LONG LED Close
Travel
Button
ON THE OPENER
S/N:10XXXXXXXXXXXX
I
PROGRAM
PROGRAM
PROGRAM
PROGRAM
PROGRAM
PROGRAM
PROGRAM
PROGRAM
PROGRAM
PROGRAM
A Moving Door can cause serious injury or death.
1Keep
3Wall Control should be mounted within sight of door, at least 5 feet above floor and clear of moving parts.
people clear of opening while Door is moving.
2DoNotallow children to play with Wireless Keypad.
4During programming, the Door Opener could begin to run, so stay away from the moving Door and its parts. To keep
the Door from moving, close the Door and disconnect it from the Opener by pulling the Emergency Release Cord.
WARNING
B
ASIC
P
ROGRAMMING FOR
O
NE
D
O
CODEDODGER®
OR
O
PENERS
If Safety Reverse does not work properly:
1Close Door and disconnect the opener using Emergency Release Cord.
2 Do not use Door Opener, Remote , or Wireless Keypad.
3Refer to Door and Door Opener Owner’s Manuals before attempting
any repairs.
D
O
CODEDODGER®
OR
O
P
M
ULTIPLE
ENERS
PROGRAMMING FOR
PROGRAM
SET
PROGRAM
SET
This page is for CodeDodger® 2 Only:
If you have an CodeDodger® 1 opener
or openers, go to the reverse side
of this instruction.
CODEDODGER® 2 MODE OF TRANSMISSION
CODEDODGER® 1
PROGRAMMING
INSTRUCTION
PROG
1
4
7
0
2
5
8
3
6
9
ABC DEF
GHI
PQRS TUV WXYZ
JKL MNO
STEP 2:
P
ROGRAMMING
M
ULTIPLE
D
OOR
OPENERS
Wait until Keypad Backlight turns off (approximately 30 seconds).
PROGRAM
SET
1 2 3
On your Wireless Keypad:
On your opener’s power head:
sSelect first opener and press and hold until
both LEDs turn BLUE.
sPress and release again.
LEDs should blink PURPLE.
sEnter PIN and press .
sPress the number that you have picked for
this door or .
sPress 3 times — opener will run.
s
Repeat procedure below dotted line for remaining openers.
s Release button. Only round LED will be BLUE.
PROGRAM
SET
All Door Openers will use the same PIN.
On your keypad:
sEnter your PIN and press .
sPress again.
sPress the number of Doors (total) you wish
to control ( or ).
s
ssssssssssssssssssssssssssssssss
Press .
2 3
PROGRAM
PROGRAM
PROGRAM
Decide which Door will be Door #1, #2 and #3.
A Moving Door can cause serious injury or death.
1Keep
3Wall Control should be mounted within sight of door, at least 5 feet above floor and clear of moving parts.
people clear of opening while Door is moving.
2 Do Not allow children to play with Wireless Keypad.
4During programming, the Door Opener could begin to run, so stay away from the moving Door and its parts.
To keep the Door from moving, close the Door and disconnect it from the Opener by pulling the Emergency
Release Cord.
WARNING
S
TEP
3: O
PERATING
O
NE
D
OOR
O
PENER
To open or close the Garage Door.
sEnter your PIN.
sPress .
S
TEP
2:
Find the Learn Code Button and Learn Code
Indicator LED on your door opener.
–
– If your Door Opener does not
have an Antenna,
you have an External Receiver.
The External Receiver cover
must be removed to access
the Learn Code Button
and Indicator LED.
sPress the Learn Code Button.
–
Learn Code Indicator LED (on Opener) will blink.
sEnter your PIN and press on
Keypad.
– Learn Code Indicator LED stays on.
sPress again.
– Learn Code Indicator LED turns off.
B
ASIC
P
ROGRAMMING FOR
O
NE
D
O
CODEDODGER
®
OR
O
PENER
D
O
CODEDODGER
®
OR
O
PENER
Decide which Door will be Door #1, #2 and #3.
sEnter your PIN and press on Keypad.
sPress the
sPress and hold the for 2 seconds.
number you have picked for this
Door Opener ( or or ).
sPress 3 times.
– Opener will run.
Repeat procedure below dotted line for each opener.
(Each Door Opener must be programmed to receive the
signal from the Wireless Keypad).
S
TEP
3: O
PERATING
M
ULTIPLE
D
OOR
O
PENERS
To open or close a Door after programming is complete.
sEnter your PIN.
sPress .
sPress Door Opener number ( or or ).
Proceed to Section 3 - Mounting Instructions.
PROGRAMMING FOR 2OR 3
FOR CONVENIENCE
Program Keypad BEFORE mounting.
SECTION
1
SECTION
2
FOR CONVENIENCE
Program Keypad BEFORE mounting.
S
TEP
2:
All Door Openers will use the same PIN.
On your keypad:
sEnter your PIN and press .
sPress again.
sPress the number of Doors (total) you wish
to control ( or ).
s
ssssssssssssssssssssssssssssssss
Press .
If Safety Reverse does not work properly:
1Close Door and disconnect the opener using Emergency
Release Cord.
2 Do not use Door Opener, Remote , or Wireless Keypad.
3Refer to Door and Door Opener Owner’s Manuals before
attempting any repairs.
Proceed to Section 3 - Mounting Instructions.
NOTE
s
If the Door does not move,check the red LED on
Keypad. If the LED is blinking rapidly, the PIN was
entered incorrectly. After the LED stops blinking,re-enter
your PIN and try again.
s
Any Keypad Button will control the Door for 30 seconds
after the Door starts moving.
s
Rapid blinking of the red LED indicates an error. After a
few seconds the LED will turn off. Start over.
Wait until Keypad Backlight turns off (approximately 30 seconds).
Wait until Keypad Backlight turns off (approximately 30 seconds).
2 3
1 2 3
1 2 3
sPress again.
– Opener will run.
S
TEP
1: C
REATING
Y
OUR
W
IRELESS
K
EYPAD
PIN
(P
ERSONAL
I
DENTIFICATION
N
UMBER
)
sPress in order .
sPress .
sEnter your PIN (3 to 8 characters).
s
sClose keypad cover and wait 30 seconds.
Press .
3 5 7
sPress in order .
sPress .
sEnter your PIN (3 to 8 characters).
s
sClose keypad cover and wait 30 seconds.
Press .
3 5 7
S
TEP
1: C
REATING
Y
OUR
W
IRELESS
K
EYPAD
PIN
(P
ERSONAL
I
DENTIFICATION
N
UMBER
)
T
EACHING
PIN
TO
S
INGLE
O
PENER
P
ROGRAMMING
M
ULTIPLE
D
OOR
O
PENERS
MOUNTING INSTRUCTIONS
The Keypad must be mounted in sight of the Door(s), at
least 5 feet above the ground and clear of any moving
Door parts.
AMount Keypad.(Mounting screws located inside
Battery Compartment.)
sRemove Battery Cover (See Figure 3).
s
Drill a 1/16”pilot hole for the top mounting screw.
sInstall a screw into the drilled
hole,leaving a 1/8" gap
between the screw head
and the wall. (See Figure 2.)
sHook the Keypad over
the screw.
sMark and drill pilot hole and
fasten bottom screw.
sReinstall Battery Cover.
SECTION
3
ADDITIONAL OPERATIONS
SECTION
4
U
SING A
T
EMPORARY
PIN
A temporary PIN allows temporary access to your home by
If you have forgotten your PIN or you fear it may have fallen
into unauthorized hands, you must erase the old programming.
repair persons, meter readers, etc.if you so desire.
NOTE
DO NOT reprogram the Door Opener(s).
s
Temporary PIN remains active only until the next time
nyour ormal PIN is entered.
F
ORGOT
Y
OUR
PIN (R
ESETTING
W
IRELESS
K
EYPAD
)
C
HANGING
Y
OUR
PIN
Enter your current PIN and press .
Wall
screw head gap
Figure 2
C
HANGING
B
ATTERY
s
s
s
s
s
s
s
s
s
s
Enter your current PIN and press 3 times.
Press and hold .
Release both buttons. You must now start from the
beginning and reprogram your Wireless Keypad.
While holding press and hold for
5 seconds.
Enter your NEW PIN and press .
Enter your TEMPORARY PIN and press .
If the Keypad backlight does not come on, this indicates the
need to replace the batteries.
Press in on the front of the battery cover and slide it down
off of the Keypad.
Remove used batteries and replace
with "AAA." Make sure the
batteries are inserted properly
using the polarity markings.
CODEDODGER® 1 MODE of CODE TRANSMISSION
Red Indicator
LED
Learn
Code
Button
Located
on Opener
Housing
PROGRAM
PROGRAM
PROGRAM
PROGRAM
PROGRAM
PROGRAM
PROGRAM
PROGRAM
sPress the Learn Code Button. (See Step 2 in Section 1.)
PROGRAM
PROGRAM
PROGRAM
PROGRAM
PROGRAM
PROGRAM
Covers available in:
sTan - P/N 37227T
sAlmond - P/N 37227U
sGray- P/N 37227S
sWhite- - P/N 37227R
If your Door Opener has a black
antenna wire and the serial
number does not start with
10 or higher, the Learn Code
Button and Indicator LED are
located near the antenna. (The
light lens may need to be
opened. If you use an external
receiver, it may need to be opened
to access the Learn Code Button
and Indicator LED.
s
No programming is lost during
replacement of batteries.
T
o Operate CodeDodger® 1 Openers:
This Wireless Keypad comes from the factory as an CodeDodger® 2 unit.
In order to initially program an opener or openers which are
CodeDodger®1, you must switch the Keypad to CodeDodger®1 mode.
s
After entering your PIN, Press .
s
s
s
Press and hold for two seconds and the
GREEN LED above the number keys will turn RED.
PROGRAM
Once all your doors have been programmed, there is no need to
switch back and forth between CodeDodger® modes. The Keypad will
automatically remember the mode of each opener.
Close the Keypad cover.
Follow the instructions on this page for programming
your CodeDodger® 1 opener(s).
For answers to questions,call 1-800-275-6187 , or visit
www.overheaddoor.com
Overhead Door Corp., 2501 S State Hwy.,Suite 200, Lewisville, TX
75067. Additional products can be ordered through local
Overhead Door® Professional Dealers. To locate a dealer near you,
call 1-800-929-DOOR.
2YHUKHDG'RRU&RUSRUDWLRQ
+ AAA -
+ AAA -
Figure 3
Press
here
Polarity
markings
Battery
Cover