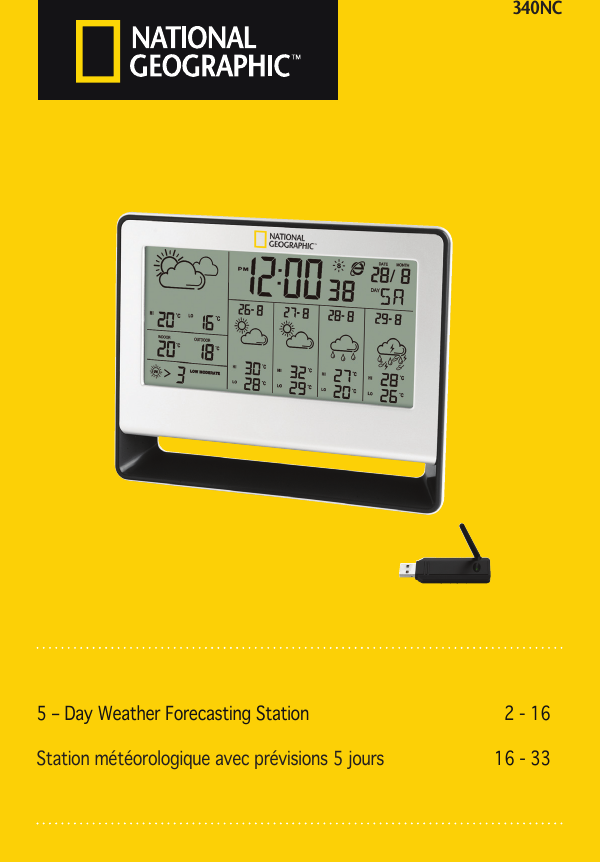
Thermor 340BC 5-Day Weather Forecasting Station User Manual
Thermor Ltd. 5-Day Weather Forecasting Station
UserManual.wiki
>
Thermor
>
340BC User Manual
User Manual
Navigation menu
Upload a User Manual
Namespaces
Wiki Guide
HTML
PDF
Info
Views
User Manual
Discussion / Help
Navigation
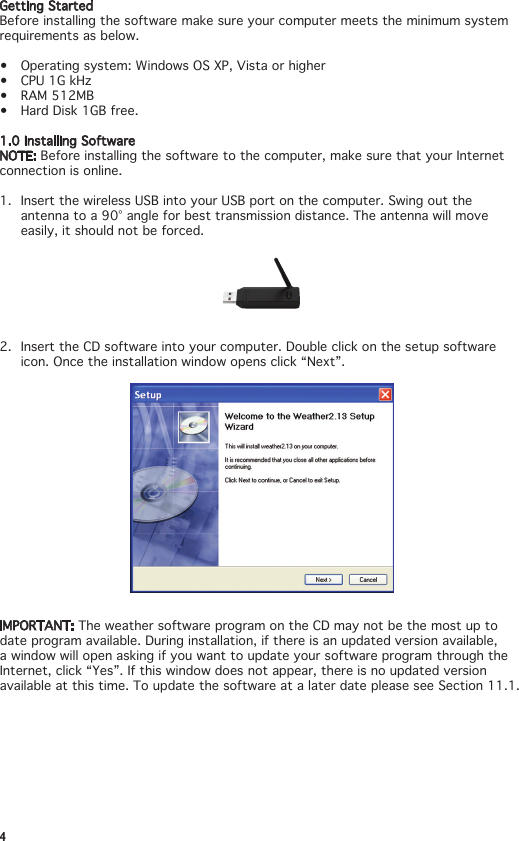

![18Avant de commencerAvantd’installerlelogiciel,assurez-vousquevotreordinateurrencontrelacongurationminimalenécessairesuivante:• Systèmed’exploitation:WindowsOSXP,Vistaouultérieur• CPU1GokHz• Mémoirevive(RAM)512Mo• Disquedur1God’espacelibre1.0Méthoded’installationdulogicielREMARQUE : Avantd’installerlelogicielsurvotreordinateur,assurez-vousquelaconnexion à Internet est en ligne.1. Insérezl’USBsansldansleportUSBdevotreordinateur.Levezl’antenneverticalementàunanglede90°pourunemeilleuredistancedetransmission. L’antenne se déplace facilement, elle ne doit en aucun cas être forcée.2. InsérezlelogicielsurCDdansvotreordinateur.Double-cliquezsurl’icôneinstallationdulogiciel.Lorsquelafenêtres’ouvre,cliquezsur“Suivant[Next].”IMPORTANT : Il se peut que la mise à jour du programme informatique météo sur le CD ne soit pas la plus récente. Pendant l’installation, s’il y a une mise à jour du logiciel disponible,unefenêtres’ouvrirapourvousdemandersivousvoulezfaireunemiseàjourdevotreprogrammelogicielparInternet,cliquezsur“Oui[Yes]”.Sicettefenêtren’apparaît pas, c’est qu’il n’y a pas de mise à jour du logiciel disponible à ce moment-ci.Sivousvoulezfaireunemiseàjourdulogicielultérieurement,veuillezvousréférerà la section 11.1.](https://usermanual.wiki/Thermor/340BC/User-Guide-1684319-Page-18.png)
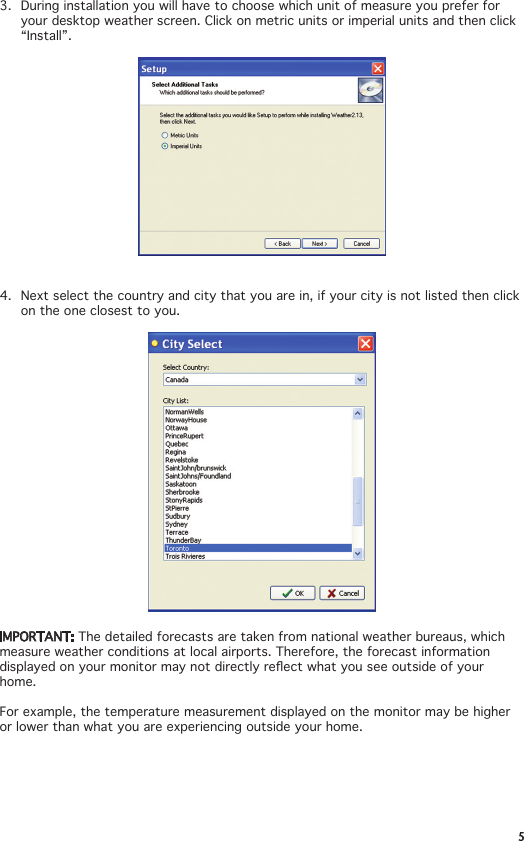
![193. Pendantl’installation,vousdevrezchoisirquelleunitédemesurevouspréférezpourl’achagedeslecturessurl’écrandevisualisationmétéodevotreordinateurpersonnel.Cliquezsoitsurlesunitésmétriquesouimpériales;puiscliquezsur″Installer[Install]″.4. Puis,choisissezlepaysetlavilleoùvoushabitez;sivotrevillen’estpasénuméréesurlaliste,cliquezsurlavillequiestlaplusrapprochéedelavôtre.IMPORTANT : Lesprévisionsdétailléesproviennentdesocesnationauxdelamétéorologie, lesquels fournissent les relevés des conditions météorologiques aux aéroportslocaux.Cependantl’informationmétéorologiqueachéesurvotremoniteurpeutnepasreéterexactementcequevousvoyezàl’extérieurdevotredemeure.Parexemple,lamesuredetempératureachéesurlemoniteurpeutêtreplusélevéeouplusbassedecequevousressentezàl’extérieurdevotredemeure.](https://usermanual.wiki/Thermor/340BC/User-Guide-1684319-Page-19.png)
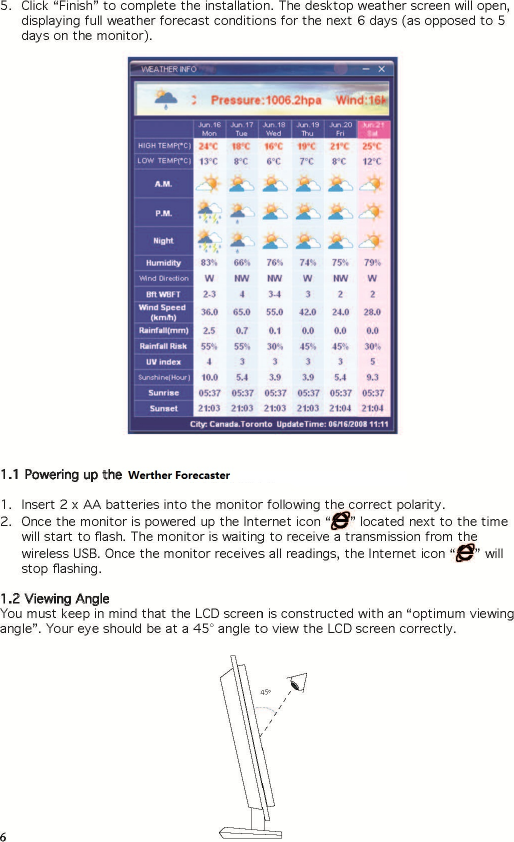
![205. Cliquezsur“Terminer[Finish]”pourcompléterl’installation.L’écrandevisualisationmétéodevotrebureaus’ouvriraachantlesprévisionsmétéocomplètes pour les 6 prochains jours (en opposition à 5 jours sur le moniteur).1.1 Mise sous tension de votre station météorologique avec prévisions météo1. Insérez2pilesAAdanslemoniteurenrespectantlespolarités.2. Dès que le moniteur est mis sous tension, l’icône Internet “ ” située à côté de l’heure clignotera. Le moniteur est en attente de recevoir une transmission de l’USBsansl.Dèsquelemoniteurreçoittoutesleslectures,l’icôneInternet “ “ cessera de clignoter.1.2 Angle de visionnementVousdevezvousrappelerquel’écranACLestconstruitavecun“anglevisueloptimal”.Vosyeuxdoiventregarderàunanglede45°pourvoirclairementl’écranACL.45º](https://usermanual.wiki/Thermor/340BC/User-Guide-1684319-Page-20.png)
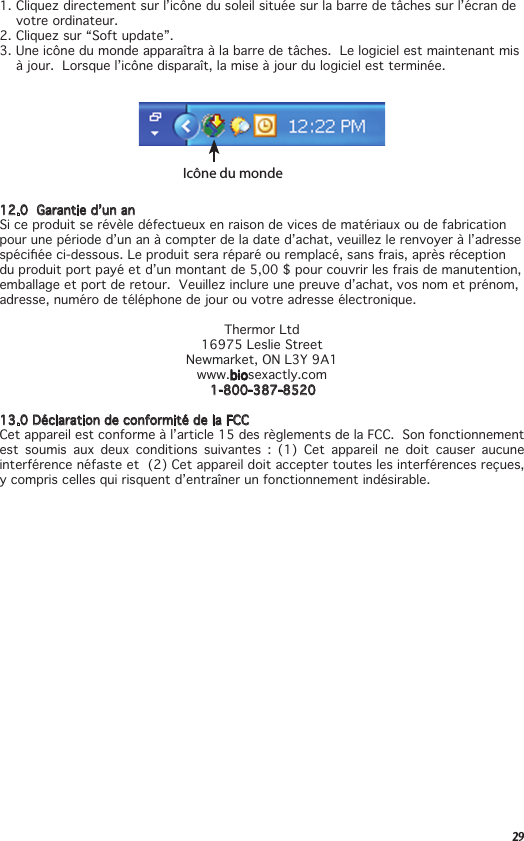
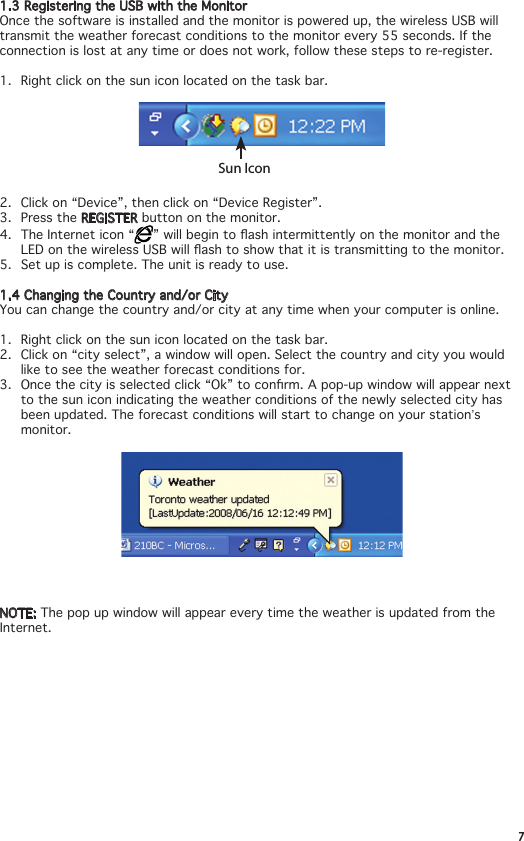
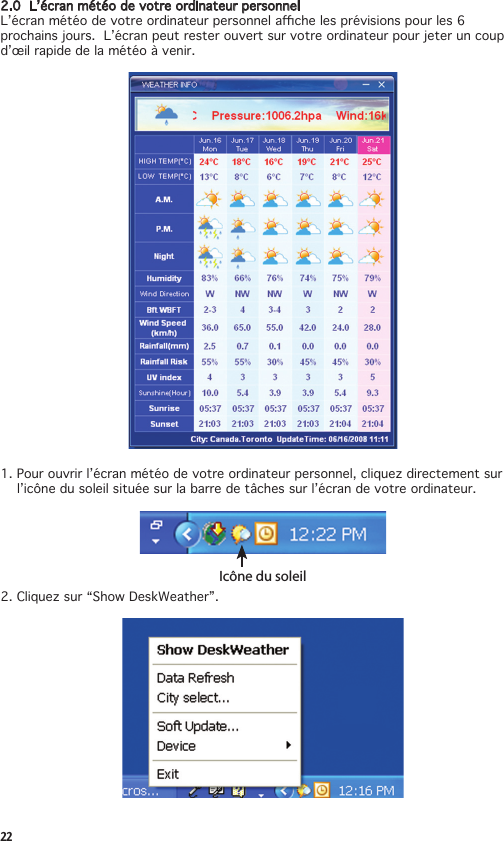
![211.3 Enregistrement de l’USB et du moniteurDès que le logiciel est installé et que le moniteur est mis sous tension, l’USB sans ltransmettraàtoutesles55secondesaumoniteurdesprévisionsmétéo.Si,àn’importequelmoment,laconnexionseperdounefonctionnepas,veuillezsuivrecesdirectives pour enregistrer de nouveau.1. Cliquezdirectementsurl’icônedusoleilsituéesurlabarredetâches.Icône du soleil2. Cliquezsur″Device″,puiscliquezsur″DeviceRegister″.3. Appuyezsurlatouche[REGISTER] sur le moniteur. 4. L’icône Internet “ ” clignotera par intermittence sur le moniteur et le voyant DEL surl’USBsanslclignoterapourindiquerqu’iltransmetaumoniteur.5. L’installation est terminée. L’appareil est prêt.1.4 Changement de pays et/ou de villeVouspouvezchangerdepayset/oudevilleàtoutmomentlorsquevotreordinateurest en ligne.1. Cliquezdirectementsurl’icônedusoleilsurlabarredetâches.2. Cliquezsur“Choixdelaville[CitySelect]”;unefenêtres’ouvrira.Choisissezlepaysetlavilledontvousdésirezvoirlesconditionsdesprévisionsmétéo.3. Dèsquelavilleestchoisie,cliquezsur“OK”pourconrmer.Unefenêtrecontextuelle apparaîtra à côté de l’icône du soleil indiquant les conditions météo récemment mises à jour pour cette ville choisie. Les conditions météorologiques commenceront à changer sur le moniteur de votre station.REMARQUE : La fenêtre contextuelle apparaîtra à chaque fois que la météo sera mise à jour sur Internet.](https://usermanual.wiki/Thermor/340BC/User-Guide-1684319-Page-21.png)
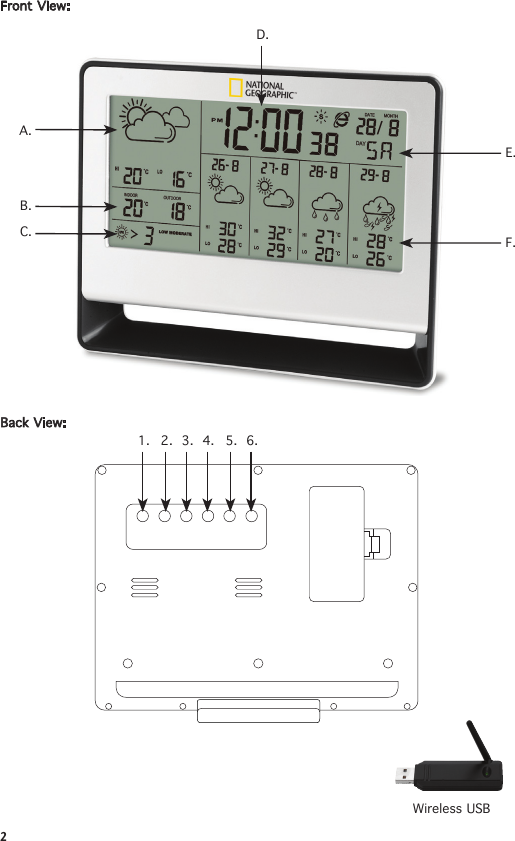
![243.0Réglagedel’heureetdeladateDèsquelemoniteuretquel’USBsanslsontenregistrés,lemoniteursynchroniseral’heure et la date avec l’ordinateur. Pour régler la date et l’heure manuellement, veuillezsuivrecesdirectives:REMARQUE : Siàn’importequelmomentunepausedeplusde20secondesseproduitlorsquevousréglezladateetl’heure,lemoniteurretourneraautomatiquement au mode normal.1. Appuyezsurlatouche[MODE]ettenez-laenfoncéependant3secondes;l’annéeclignotera.Appuyezsurlatouche[UP] ou [DOWN] pour choisir l’année exacte. Appuyezsurlatouche[MODE]pourconrmer.2. Puisleschiresdumoisclignoteront.Appuyezsurlatouche[UP] ou [DOWN] pourchoisirlemoisexact.Appuyezsurlatouche[MODE]pourconrmer.3. Ensuiteleschiresdeladateclignoteront.Appuyezsurlatouche[UP] ou [DOWN]pourchoisirladateexacte.Appuyezsurlatouche[MODE] pour conrmer.4. Puisclignoteralechoixpourl’achagedelalanguepourlejourdelasemaine.Appuyezsurlatouche[UP] ou [DOWN] pour choisir la langue préférentielle. Appuyezsurlatouche[MODE]pourconrmer.REMARQUE : Vousavezlapossibilitédechoisirentre7langues:anglais(EN),allemand (GE), français (FR), danois (DA), italien (IT), espagnol (ES), hollandais (NE).5. Puislemode12/24heuresclignotera.Appuyezsurlatouche[UP] ou [DOWN] pourchoisirlemodepréférentieldel’horloge.Appuyezsurlatouche[MODE] pour conrmer.6. Puisleschiresdel’heureclignoteront.Suivezladirective5pourréglerlesheureset les minutes exactes.3.1 L’heure avancée (HA)Le moniteur s’ajustera à l’heure avancée automatiquement depuis Internet. Lorsque l’heure avancée est activée, l’icône “ ”apparaîtraàcôtédeschiresdel’heure.4.0Réglagedesalarmesquotidiennes1. Pourréglerl’alarme1,appuyezsurlatouche[MODE]. L’heure pour l’alarme 1 s’ache.2. Appuyezsurlatouche[MODE]ettenez-laenfoncéependant2secondes;leschiresdel’heureclignoteront.Appuyezsurlatouche[UP] ou [DOWN] pour réglerl’heure.Appuyezsurlatouche[MODE]pourconrmer.3. Puisleschiresdesminutesclignoteront;Appuyezsurlatouche[UP] ou [DOWN] pourréglerlesminutes.Appuyezsurlatouche[MODE]pourconrmer.Lemoniteur retournera à l’heure normale.4. Pourréglerl’alarme2,appuyezdeuxfoissurlatouche[MODE]. L’heure pour l’alarme2s’ache.5. Suivezlesétapes2et3pourréglerl’alarme2.](https://usermanual.wiki/Thermor/340BC/User-Guide-1684319-Page-24.png)
![254.1 Activer/désactiver les alarmes1. Appuyezsurlatouche[AL ON/OFF],″ ″s’acheraàcôtédel’heurepourindiquer que l’alarme 1 est activée.2. Appuyezdenouveausurlatouche[AL ON/OFF]pouractiverl’alarme2;″ ″s’acheraàcôtédel’heurepourindiquerquel’alarme2estactivée.3. Appuyezdenouveausurlatouche[AL ON/OFF] et les deux alarmes seront activées.Appuyezdenouveausurlatouche[AL ON/OFF] et les deux alarmes seront désactivées.REMARQUE : Lorsquel’alarmesonne,appuyezsurn’importequelletouchesauflatouche [SNZ]. L’alarme sonnera de nouveau le lendemain.REMARQUE : Pouractiverlafonctionrappeld’alarme,appuyezsurlatouche[SNZ] lorsque l’alarme sonne; l’icône “ ” ou l’icône “ ” clignotera. L’alarme sonnera de nouveau dans 5 minutes.5.0°C/°FcommutableSurlemoniteur,pouralternerentreleslecturesCelsiusetFahrenheit,appuyezsimplement sur la touche [DOWN]. 6.0IndiceUVLa lecture de l’indice UV est prise depuis l’Internet et indique l’intensité du rayonnement ultraviolet (UV) du soleil.L’indice UV est une échelle normalisée, laquelle indique l’intensité du rayonnement ultravioletdusoleil.PluslechireUVestélevé,pluslerayonnementdusoleilestpuissant; donc des précautions s’imposent grandement. Indice UV Description0-2 Risque minime de danger pour la plupart des personnes3-5 Risque modéré de danger sans aucune protection contre l’intensité du rayonnement UV du soleil6-7 Risque élevé de danger sans aucune protection contre l’intensité du rayonnement UV du soleil 8-10 Risque très élevé de danger sans aucune protection contre l’intensité du rayonnement UV du soleil 11-12 Risque extrême de danger sans aucune protection contre l’intensité du rayonnement UV du soleil](https://usermanual.wiki/Thermor/340BC/User-Guide-1684319-Page-25.png)
![279.0DépannagePROBLÈME SYMPTÔMES SOLUTIONSLe moniteur ne fonctionne pasL’écran sur le moniteur est vide.Assurez-vousquelespiles sont insérées correctement.Lemoniteurache: 1. Uniquement sont achéesl’heure/ladate, la température intérieure sans icônes de prévisions météo.2. La station perd les données des prévisions météo.1.Assurez-vousquevotre ordinateur est sous tension et qu’il est en ligne avec Internet.2.Assurez-vousquel’USBsanslestconnectéau port USB de votre ordinateur.3.Appuyezsurlatouche[REGISTER]ettenez-laenfoncée pendant 2 secondes pour recevoir à nouveau la transmission.4.Cliquezdirectementsur l’icône du soleil située sur la barre detâchessurl’écrande votre ordinateur. Cliquezsur″Device″puiscliquezsur″DeviceRegister″.Appuyezsurlatouche[REGISTER]ettenez-laenfoncée sur votre station météo avec prévisions.5. Après avoir essayé les étapes ci-dessus et qu’aucune prévisionnes’ache,retirezlelogicieldevotre ordinateur. Réinstallez-le(voirsection1.0).](https://usermanual.wiki/Thermor/340BC/User-Guide-1684319-Page-27.png)
![28Prévisions météorologiquesLes conditions des prévisions météo ne sont pas “pertinentes” de vos conditions météo extérieures.La ville a été choisie incorrectement.Cliquezdirectement sur l’icône du soleil située sur la barredetâches.Cliquezsur “Choisir la ville [City Select]”.Choisissezlepays et la ville de votre localité. Si votre ville n’est pas énumérée sur laliste,choisissezlaplusprès.Calendrier L’achagedel’heureestincorrect sur le moniteur.Vousdevezréglerlalangue pour le jour de lasemaine.Suivezlesdirectives de la section 3.0Heure L’achagedel’heureestincorrect sur le moniteur.1.Assurez-vousquel’heure est réglée correctement sur l’ordinateur, sinon réglezl’heuresurl’ordinateur pour acherl’heureexacte. Le moniteur se synchronisera avec l’ordinateuretacheral’heure exacte.2.Suivezlesdirectivesdelasection3.010.0SpécicationsduproduitGamme de mesure de la températureDonnées techniquesMoniteur 0°Cà50°C/32°Fà122°FDistance de transmission 20mètres/65piedsdansunespacelibre11.0SiteInternetocielToutes les données météorologiques proviennent du site Internet : www.weatheronline.de11.1 Mise à jour du logicielVouspouvezfaireunemiseàjourdulogicielsurInternetàtoutmoment.](https://usermanual.wiki/Thermor/340BC/User-Guide-1684319-Page-28.png)