Thomson 2-8021A 5.8 GHz Single-Line FHSS Cordless Telephone User Manual users manual 6

Thomson Inc. 5.8 GHz Single-Line FHSS Cordless Telephone users manual 6
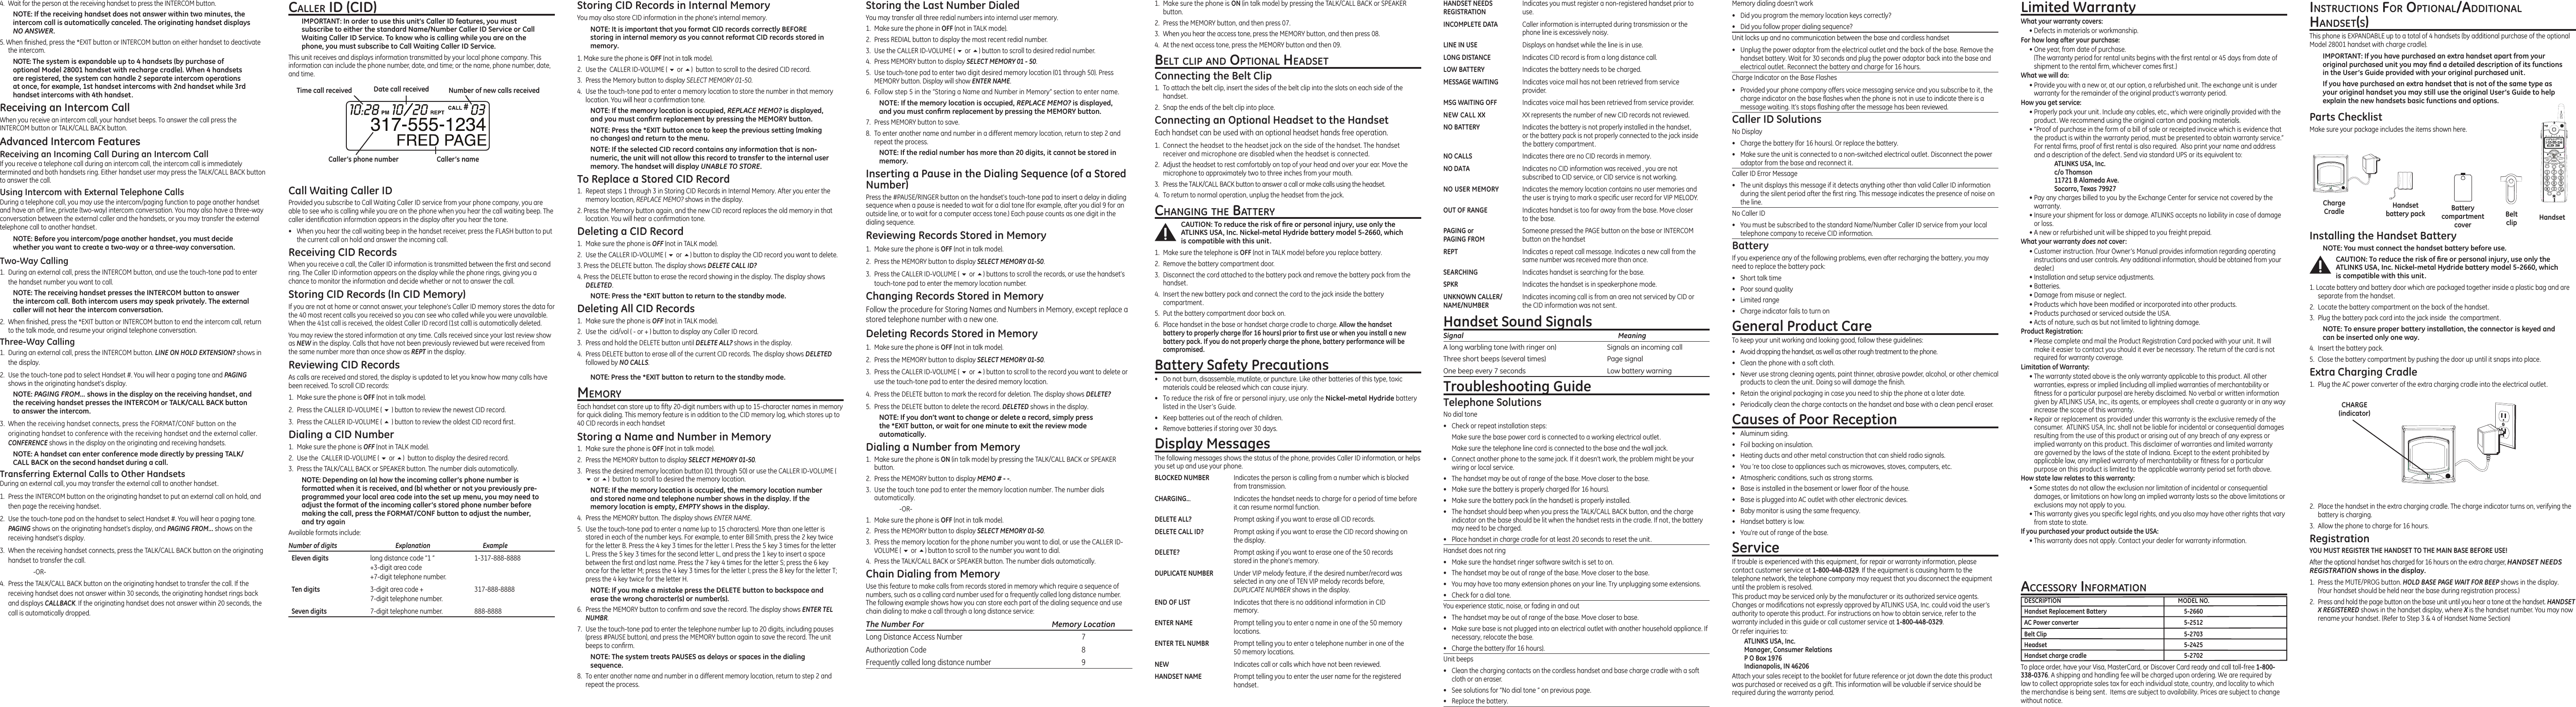
users manual 6

HANDSET NEEDS  Indicates you must register a non-registered handset prior to  REGISTRATION  use.    INCOMPLETE DATA  Caller information is interrupted during transmission or the    phone line is excessively noisy.LINE IN USE   Displays on handset while the line is in use.LONG DISTANCE  Indicates CID record is from a long distance call.LOW BATTERY  Indicates the battery needs to be charged.MESSAGE WAITING  Indicates voice mail has not been retrieved from service    provider.MSG WAITING OFF  Indicates voice mail has been retrieved from service provider.NEW CALL XX  XX represents the number of new CID records not reviewed.NO BATTERY  Indicates the battery is not properly installed in the handset,    or the battery pack is not properly connected to the jack inside    the battery compartment.NO CALLS  Indicates there are no CID records in memory.NO DATA  Indicates no CID information was received , you are not    subscribed to CID service, or CID service is not working.NO USER MEMORY Indicates the memory location contains no user memories and   the user is trying to mark a specic user record for VIP MELODY.OUT OF RANGE  Indicates handset is too far away from the base. Move closer   to the base.PAGING or   Someone pressed the PAGE button on the base or INTERCOM PAGING FROM  button on the handsetREPT  Indicates a repeat call message. Indicates a new call from the    same number was received more than once.SEARCHING  Indicates handset is searching for the base.SPKR  Indicates the handset is in speakerphone mode.UNKNOWN CALLER/  Indicates incoming call is from an area not serviced by CID or  NAME/NUMBER  the CID information was not sent.Handset Sound SignalsSignal  MeaningA long warbling tone (with ringer on)  Signals an incoming call Three short beeps (several times)  Page signalOne beep every 7 seconds  Low battery warningTroubleshooting GuideTelephone SolutionsNo dial tone•  Check or repeat installation steps:  Make sure the base power cord is connected to a working electrical outlet.  Make sure the telephone line cord is connected to the base and the wall jack.•  Connect another phone to the same jack. If it doesn’t work, the problem might be your wiring or local service.•  The handset may be out of range of the base. Move closer to the base.•  Make sure the battery is properly charged (for 16 hours).•  Make sure the battery pack (in the handset) is properly installed.•  The handset should beep when you press the TALK/CALL BACK button, and the charge indicator on the base should be lit when the handset rests in the cradle. If not, the battery may need to be charged.•  Place handset in charge cradle for at least 20 seconds to reset the unit.Handset does not ring•  Make sure the handset ringer software switch is set to on.•  The handset may be out of range of the base. Move closer to the base.•  You may have too many extension phones on your line. Try unplugging some extensions.•  Check for a dial tone.You experience static, noise, or fading in and out•  The handset may be out of range of the base. Move closer to base.•  Make sure base is not plugged into an electrical outlet with another household appliance. If necessary, relocate the base.•  Charge the battery (for 16 hours).Unit beeps•  Clean the charging contacts on the cordless handset and base charge cradle with a soft cloth or an eraser.•  See solutions for “No dial tone ” on previous page.•  Replace the battery.4.  Wait for the person at the receiving handset to press the INTERCOM button.NOTE: If the receiving handset does not answer within two minutes, the intercom call is automatically canceled. The originating handset displays NO ANSWER.5. When nished, press the *EXIT button or INTERCOM button on either handset to deactivate the intercom.NOTE: The system is expandable up to 4 handsets (by purchase of optional Model 28001 handset with recharge cradle). When 4 handsets are registered, the system can handle 2 separate intercom operations at once, for example, 1st handset intercoms with 2nd handset while 3rd handset intercoms with 4th handset.Receiving an Intercom CallWhen you receive an intercom call, your handset beeps. To answer the call press the INTERCOM button or TALK/CALL BACK button.Advanced Intercom FeaturesReceiving an Incoming Call During an Intercom CallIf you receive a telephone call during an intercom call, the intercom call is immediately terminated and both handsets ring. Either handset user may press the TALK/CALL BACK button to answer the call.Using Intercom with External Telephone CallsDuring a telephone call, you may use the intercom/paging function to page another handset and have an off line, private (two-way) intercom conversation. You may also have a three-way conversation between the external caller and the handsets, or you may transfer the external telephone call to another handset.NOTE: Before you intercom/page another handset, you must decide whether you want to create a two-way or a three-way conversation.Two-Way Calling1.  During an external call, press the INTERCOM button, and use the touch-tone pad to enter the handset number you want to call.NOTE: The receiving handset presses the INTERCOM button to answer the intercom call. Both intercom users may speak privately. The external caller will not hear the intercom conversation.2.  When nished, press the *EXIT button or INTERCOM button to end the intercom call, return to the talk mode, and resume your original telephone conversation.Three-Way Calling1.  During an external call, press the INTERCOM button. LINE ON HOLD EXTENSION? shows in the display.2.  Use the touch-tone pad to select Handset #. You will hear a paging tone and PAGING shows in the originating handset’s display.NOTE: PAGING FROM... shows in the display on the receiving handset, and the receiving handset presses the INTERCOM or TALK/CALL BACK button to answer the intercom.3.  When the receiving handset connects, press the FORMAT/CONF button on the originating handset to conference with the receiving handset and the external caller. CONFERENCE shows in the display on the originating and receiving handsets.NOTE: A handset can enter conference mode directly by pressing TALK/CALL BACK on the second handset during a call.Transferring External Calls to Other HandsetsDuring an external call, you may transfer the external call to another handset.1.  Press the INTERCOM button on the originating handset to put an external call on hold, and then page the receiving handset.2.  Use the touch-tone pad on the handset to select Handset #. You will hear a paging tone. PAGING shows on the originating handset’s display, and PAGING FROM... shows on the receiving handset’s display.3.  When the receiving handset connects, press the TALK/CALL BACK button on the originating handset to transfer the call.    -OR-4.  Press the TALK/CALL BACK button on the originating handset to transfer the call. If the receiving handset does not answer within 30 seconds, the originating handset rings back and displays CALLBACK. If the originating handset does not answer within 20 seconds, the call is automatically dropped.caller Id (cId)IMPORTANT: In order to use this unit’s Caller ID features, you must subscribe to either the standard Name/Number Caller ID Service or Call Waiting Caller ID Service. To know who is calling while you are on the phone, you must subscribe to Call Waiting Caller ID Service.This unit receives and displays information transmitted by your local phone company. This information can include the phone number, date, and time; or the name, phone number, date, and time. Storing the Last Number DialedYou may transfer all three redial numbers into internal user memory.1.  Make sure the phone in OFF (not in TALK mode).2.  Press REDIAL button to display the most recent redial number.3.  Use the CALLER ID-VOLUME ( 6 or 5) button to scroll to desired redial number.4.  Press MEMORY button to display SELECT MEMORY 01 - 50.5.  Use touch-tone pad to enter two digit desired memory location (01 through 50). Press MEMORY button. Display will show ENTER NAME.6.  Follow step 5 in the “Storing a Name and Number in Memory” section to enter name.NOTE: If the memory location is occupied, REPLACE MEMO? is displayed, and you must confirm replacement by pressing the MEMORY button.7.  Press MEMORY button to save.8.  To enter another name and number in a different memory location, return to step 2 and repeat the process.NOTE: If the redial number has more than 20 digits, it cannot be stored in memory.Inserting a Pause in the Dialing Sequence (of a Stored Number)Press the #PAUSE/RINGER button on the handset’s touch-tone pad to insert a delay in dialing sequence when a pause is needed to wait for a dial tone (for example, after you dial 9 for an outside line, or to wait for a computer access tone.) Each pause counts as one digit in the dialing sequence.Reviewing Records Stored in Memory1.  Make sure the phone is OFF (not in talk mode).2.  Press the MEMORY button to display SELECT MEMORY 01-50.3.  Press the CALLER ID-VOLUME ( 6 or 5) buttons to scroll the records, or use the handset’s touch-tone pad to enter the memory location number.Changing Records Stored in MemoryFollow the procedure for Storing Names and Numbers in Memory, except replace a stored telephone number with a new one.Deleting Records Stored in Memory1.  Make sure the phone is OFF (not in talk mode).2.  Press the MEMORY button to display SELECT MEMORY 01-50.3.  Press the CALLER ID-VOLUME ( 6 or 5) button to scroll to the record you want to delete or use the touch-tone pad to enter the desired memory location.4.  Press the DELETE button to mark the record for deletion. The display shows DELETE?5.  Press the DELETE button to delete the record. DELETED shows in the display.NOTE: If you don’t want to change or delete a record, simply press the *EXIT button, or wait for one minute to exit the review mode automatically.Dialing a Number from Memory1.  Make sure the phone is ON (in talk mode) by pressing the TALK/CALL BACK or SPEAKER button.2.  Press the MEMORY button to display MEMO # - -.3.  Use the touch tone pad to enter the memory location number. The number dials automatically.    -OR-1.  Make sure the phone is OFF (not in talk mode).2.  Press the MEMORY button to display SELECT MEMORY 01-50.3.  Press the memory location for the phone number you want to dial, or use the CALLER ID-VOLUME ( 6 or 5) button to scroll to the number you want to dial.4.  Press the TALK/CALL BACK or SPEAKER button. The number dials automatically.Chain Dialing from MemoryUse this feature to make calls from records stored in memory which require a sequence of numbers, such as a calling card number used for a frequently called long distance number. The following example shows how you can store each part of the dialing sequence and use chain dialing to make a call through a long distance service:The Number For   Memory LocationLong Distance Access Number  7Authorization Code  8Frequently called long distance number  91.  Make sure the phone is ON (in talk mode) by pressing the TALK/CALL BACK or SPEAKER button.2.  Press the MEMORY button, and then press 07.3.  When you hear the access tone, press the MEMORY button, and then press 08.4.  At the next access tone, press the MEMORY button and then 09.Belt clIp and optIonal HeadSetConnecting the Belt Clip1.  To attach the belt clip, insert the sides of the belt clip into the slots on each side of the handset. 2.  Snap the ends of the belt clip into place.Connecting an Optional Headset to the HandsetEach handset can be used with an optional headset hands free operation.1.  Connect the headset to the headset jack on the side of the handset. The handset receiver and microphone are disabled when the headset is connected.2.  Adjust the headset to rest comfortably on top of your head and over your ear. Move the microphone to approximately two to three inches from your mouth.3.  Press the TALK/CALL BACK button to answer a call or make calls using the headset.4.  To return to normal operation, unplug the headset from the jack.cHangIng tHe BatterYCAUTION: To reduce the risk of fire or personal injury, use only the ATLINKS USA, Inc. Nickel-metal Hydride battery model 5-2660, which is compatible with this unit.1.  Make sure the telephone is OFF (not in TALK mode) before you replace battery.2.  Remove the battery compartment door.3.  Disconnect the cord attached to the battery pack and remove the battery pack from the handset.4.  Insert the new battery pack and connect the cord to the jack inside the battery compartment.5.  Put the battery compartment door back on.6.  Place handset in the base or handset charge cradle to charge. Allow the handset battery to properly charge (for 16 hours) prior to first use or when you install a new battery pack. If you do not properly charge the phone, battery performance will be compromised.Battery Safety Precautions•  Do not burn, disassemble, mutilate, or puncture. Like other batteries of this type, toxic materials could be released which can cause injury.•  To reduce the risk of re or personal injury, use only the Nickel-metal Hydride battery listed in the User’s Guide.•  Keep batteries out of the reach of children.•   Remove batteries if storing over 30 days.Display MessagesThe following messages shows the status of the phone, provides Caller ID information, or helps you set up and use your phone.BLOCKED NUMBER  Indicates the person is calling from a number which is blocked   from transmission.CHARGING...  Indicates the handset needs to charge for a period of time before   it can resume normal function.DELETE ALL?  Prompt asking if you want to erase all CID records.DELETE CALL ID?  Prompt asking if you want to erase the CID record showing on   the display.DELETE?  Prompt asking if you want to erase one of the 50 records    stored in the phone’s memory.DUPLICATE NUMBER  Under VIP melody feature, if the desired number/record was    selected in any one of TEN VIP melody records before,   DUPLICATE NUMBER shows in the display. END OF LIST  Indicates that there is no additional information in CID    memory.ENTER NAME  Prompt telling you to enter a name in one of the 50 memory    locations.ENTER TEL NUMBR  Prompt telling you to enter a telephone number in one of the    50 memory locations.NEW  Indicates call or calls which have not been reviewed.HANDSET NAME   Prompt telling you to enter the user name for the registered   handset.Memory dialing doesn’t work•  Did you program the memory location keys correctly?•  Did you follow proper dialing sequence?Unit locks up and no communication between the base and cordless handset•  Unplug the power adaptor from the electrical outlet and the back of the base. Remove the handset battery. Wait for 30 seconds and plug the power adaptor back into the base and electrical outlet. Reconnect the battery and charge for 16 hours.Charge Indicator on the Base Flashes•  Provided your phone company offers voice messaging service and you subscribe to it, the charge indicator on the base ashes when the phone is not in use to indicate there is a message waiting. It’s stops ashing after the message has been reviewed.Caller ID SolutionsNo Display•  Charge the battery (for 16 hours). Or replace the battery.•  Make sure the unit is connected to a non-switched electrical outlet. Disconnect the power adaptor from the base and reconnect it.Caller ID Error Message•  The unit displays this message if it detects anything other than valid Caller ID information during the silent period after the rst ring. This message indicates the presence of noise on the line.No Caller ID•  You must be subscribed to the standard Name/Number Caller ID service from your local telephone company to receive CID information.BatteryIf you experience any of the following problems, even after recharging the battery, you may need to replace the battery pack:•  Short talk time•  Poor sound quality•  Limited range•  Charge indicator fails to turn onGeneral Product CareTo keep your unit working and looking good, follow these guidelines:•  Avoid dropping the handset, as well as other rough treatment to the phone.•  Clean the phone with a soft cloth.•  Never use strong cleaning agents, paint thinner, abrasive powder, alcohol, or other chemical products to clean the unit. Doing so will damage the nish.•  Retain the original packaging in case you need to ship the phone at a later date.•  Periodically clean the charge contacts on the handset and base with a clean pencil eraser.Causes of Poor Reception•  Aluminum siding.•  Foil backing on insulation.•  Heating ducts and other metal construction that can shield radio signals.•  You ’re too close to appliances such as microwaves, stoves, computers, etc.•  Atmospheric conditions, such as strong storms.•  Base is installed in the basement or lower oor of the house.•  Base is plugged into AC outlet with other electronic devices.•  Baby monitor is using the same frequency.•  Handset battery is low.•  You’re out of range of the base.ServiceIf trouble is experienced with this equipment, for repair or warranty information, please contact customer service at 1-800-448-0329. If the equipment is causing harm to the telephone network, the telephone company may request that you disconnect the equipment until the problem is resolved.This product may be serviced only by the manufacturer or its authorized service agents. Changes or modications not expressly approved by ATLINKS USA, Inc. could void the user’s authority to operate this product. For instructions on how to obtain service, refer to the warranty included in this guide or call customer service at 1-800-448-0329.Or refer inquiries to:ATLINKS USA, Inc. Manager, Consumer Relations P O Box 1976 Indianapolis, IN 46206Attach your sales receipt to the booklet for future reference or jot down the date this product was purchased or received as a gift. This information will be valuable if service should be required during the warranty period.Limited WarrantyWhat your warranty covers:• Defects in materials or workmanship.For how long after your purchase:• One year, from date of purchase. (The warranty period for rental units begins with the rst rental or 45 days from date of shipment to the rental rm, whichever comes rst.)What we will do:• Provide you with a new or, at our option, a refurbished unit. The exchange unit is under warranty for the remainder of the original product’s warranty period.How you get service:• Properly pack your unit. Include any cables, etc., which were originally provided with the product. We recommend using the original carton and packing materials.• ”Proof of purchase in the form of a bill of sale or receipted invoice which is evidence that the product is within the warranty period, must be presented to obtain warranty service.” For rental rms, proof of rst rental is also required.  Also print your name and address and a description of the defect. Send via standard UPS or its equivalent to:    ATLINKS USA, Inc.   c/o Thomson   11721 B Alameda Ave.   Socorro, Texas 79927• Pay any charges billed to you by the Exchange Center for service not covered by the warranty.• Insure your shipment for loss or damage. ATLINKS accepts no liability in case of damage or loss.• A new or refurbished unit will be shipped to you freight prepaid.What your warranty does not cover:• Customer instruction. (Your Owner’s Manual provides information regarding operating instructions and user controls. Any additional information, should be obtained from your dealer.)• Installation and setup service adjustments.• Batteries.• Damage from misuse or neglect.• Products which have been modied or incorporated into other products.• Products purchased or serviced outside the USA.• Acts of nature, such as but not limited to lightning damage.Product Registration:• Please complete and mail the Product Registration Card packed with your unit. It will make it easier to contact you should it ever be necessary. The return of the card is not required for warranty coverage.Limitation of Warranty:• The warranty stated above is the only warranty applicable to this product. All other warranties, express or implied (including all implied warranties of merchantability or tness for a particular purpose) are hereby disclaimed. No verbal or written information given by ATLINKS USA, Inc., its agents, or employees shall create a guaranty or in any way increase the scope of this warranty.• Repair or replacement as provided under this warranty is the exclusive remedy of the consumer.  ATLINKS USA, Inc. shall not be liable for incidental or consequential damages resulting from the use of this product or arising out of any breach of any express or implied warranty on this product. This disclaimer of warranties and limited warranty are governed by the laws of the state of Indiana. Except to the extent prohibited by applicable law, any implied warranty of merchantability or tness for a particular purpose on this product is limited to the applicable warranty period set forth above.How state law relates to this warranty:• Some states do not allow the exclusion nor limitation of incidental or consequential damages, or limitations on how long an implied warranty lasts so the above limitations or exclusions may not apply to you.• This warranty gives you specic legal rights, and you also may have other rights that vary from state to state.If you purchased your product outside the USA:• This warranty does not apply. Contact your dealer for warranty information.Storing CID Records in Internal MemoryYou may also store CID information in the phone’s internal memory. NOTE: It is important that you format CID records correctly BEFORE storing in internal memory as you cannot reformat CID records stored in memory.1. Make sure the phone is OFF (not in talk mode).2.  Use the  CALLER ID-VOLUME ( 6 or 5)  button to scroll to the desired CID record.3.  Press the Memory button to display SELECT MEMORY 01-50.4.  Use the touch-tone pad to enter a memory location to store the number in that memory location. You will hear a conrmation tone. NOTE: If the memory location is occupied, REPLACE MEMO? is displayed, and you must confirm replacement by pressing the MEMORY button.NOTE: Press the *EXIT button once to keep the previous setting (making no changes) and return to the menu.NOTE: If the selected CID record contains any information that is non-numeric, the unit will not allow this record to transfer to the internal user memory. The handset will display UNABLE TO STORE.To Replace a Stored CID Record1.  Repeat steps 1 through 3 in Storing CID Records in Internal Memory. After you enter the memory location, REPLACE MEMO? shows in the display.2. Press the Memory button again, and the new CID record replaces the old memory in that location. You will hear a conrmation tone.Deleting a CID Record1.  Make sure the phone is OFF (not in TALK mode).2.  Use the CALLER ID-VOLUME ( 6 or 5) button to display the CID record you want to delete.3. Press the DELETE button. The display shows DELETE CALL ID?4. Press the DELETE button to erase the record showing in the display. The display shows DELETED.NOTE: Press the *EXIT button to return to the standby mode.Deleting All CID Records1.  Make sure the phone is OFF (not in TALK mode).2.  Use the  cid/vol ( - or + ) button to display any Caller ID record.3.  Press and hold the DELETE button until DELETE ALL? shows in the display.4.  Press DELETE button to erase all of the current CID records. The display shows DELETED followed by NO CALLS.NOTE: Press the *EXIT button to return to the standby mode.MeMorYEach handset can store up to fty 20-digit numbers with up to 15-character names in memory for quick dialing. This memory feature is in addition to the CID memory log, which stores up to 40 CID records in each handsetStoring a Name and Number in Memory1.  Make sure the phone is OFF (not in talk mode).2.  Press the MEMORY button to display SELECT MEMORY 01-50.3.  Press the desired memory location button (01 through 50) or use the CALLER ID-VOLUME ( 6 or 5)  button to scroll to desired the memory location. NOTE: If the memory location is occupied, the memory location number and stored name and telephone number shows in the display. If the memory location is empty, EMPTY shows in the display.4.  Press the MEMORY button. The display shows ENTER NAME.5.  Use the touch-tone pad to enter a name (up to 15 characters). More than one letter is stored in each of the number keys. For example, to enter Bill Smith, press the 2 key twice for the letter B. Press the 4 key 3 times for the letter I. Press the 5 key 3 times for the letter L. Press the 5 key 3 times for the second letter L, and press the 1 key to insert a space between the rst and last name. Press the 7 key 4 times for the letter S; press the 6 key once for the letter M; press the 4 key 3 times for the letter I; press the 8 key for the letter T; press the 4 key twice for the letter H.NOTE: If you make a mistake press the DELETE button to backspace and erase the wrong character(s) or number(s).6.  Press the MEMORY button to conrm and save the record. The display shows ENTER TEL NUMBR.7.  Use the touch-tone pad to enter the telephone number (up to 20 digits, including pauses (press #PAUSE button), and press the MEMORY button again to save the record. The unit beeps to conrm.NOTE: The system treats PAUSES as delays or spaces in the dialing sequence.8.  To enter another name and number in a different memory location, return to step 2 and repeat the process.Time call received Date call received Number of new calls receivedCaller’s nameCaller’s phone numberacceSSorY InforMatIonTo place order, have your Visa, MasterCard, or Discover Card ready and call toll-free 1-800-338-0376. A shipping and handling fee will be charged upon ordering. We are required by law to collect appropriate sales tax for each individual state, country, and locality to which the merchandise is being sent.  Items are subject to availability. Prices are subject to change without notice. DESCRIPTION  MODEL NO.Handset Replacement Battery  5-2660AC Power converter  5-2512Belt Clip  5-2703Headset  5-2425Handset charge cradle   5-2702Call Waiting Caller IDProvided you subscribe to Call Waiting Caller ID service from your phone company, you are able to see who is calling while you are on the phone when you hear the call waiting beep. The caller identication information appears in the display after you hear the tone.•  When you hear the call waiting beep in the handset receiver, press the FLASH button to put the current call on hold and answer the incoming call.Receiving CID RecordsWhen you receive a call, the Caller ID information is transmitted between the rst and second ring. The Caller ID information appears on the display while the phone rings, giving you a chance to monitor the information and decide whether or not to answer the call.Storing CID Records (In CID Memory)If you are not at home or cannot answer, your telephone’s Caller ID memory stores the data for the 40 most recent calls you received so you can see who called while you were unavailable. When the 41st call is received, the oldest Caller ID record (1st call) is automatically deleted.You may review the stored information at any time. Calls received since your last review show as NEW in the display. Calls that have not been previously reviewed but were received from the same number more than once show as REPT in the display.Reviewing CID RecordsAs calls are received and stored, the display is updated to let you know how many calls have been received. To scroll CID records:1.  Make sure the phone is OFF (not in talk mode).2.  Press the CALLER ID-VOLUME ( 6 ) button to review the newest CID record.3.  Press the CALLER ID-VOLUME ( 5 ) button to review the oldest CID record rst.Dialing a CID Number1.  Make sure the phone is OFF (not in TALK mode). 2.  Use the  CALLER ID-VOLUME ( 6 or 5)  button to display the desired record. 3.  Press the TALK/CALL BACK or SPEAKER button. The number dials automatically.NOTE: Depending on (a) how the incoming caller’s phone number is formatted when it is received, and (b) whether or not you previously pre-programmed your local area code into the set up menu, you may need to adjust the format of the incoming caller’s stored phone number before making the call, press the FORMAT/CONF button to adjust the number, and try againAvailable formats include:Number of digits   Explanation   Example  Eleven digits  long distance code “1 ”  1-317-888-8888   +3-digit area code   +7-digit telephone number.  Ten digits  3-digit area code +  317-888-8888   7-digit telephone number.  Seven digits  7-digit telephone number.  888-8888InStructIonS for optIonal/addItIonal HandSet(S) This phone is EXPANDABLE up to a total of 4 handsets (by additional purchase of the optional Model 28001 handset with charge cradle).IMPORTANT: If you have purchased an extra handset apart from your original purchased unit you may find a detailed description of its functions in the User’s Guide provided with your original purchased unit. If you have purchased an extra handset that is not of the same type as your original handset you may still use the original User’s Guide to help explain the new handsets basic functions and options.  Parts ChecklistMake sure your package includes the items shown here.Installing the Handset BatteryNOTE: You must connect the handset battery before use.CAUTION: To reduce the risk of fire or personal injury, use only the ATLINKS USA, Inc. Nickel-metal Hydride battery model 5-2660, which is compatible with this unit.1. Locate battery and battery door which are packaged together inside a plastic bag and are separate from the handset.2.  Locate the battery compartment on the back of the handset.3.  Plug the battery pack cord into the jack inside  the compartment.NOTE: To ensure proper battery installation, the connector is keyed and can be inserted only one way.4.  Insert the battery pack.5.  Close the battery compartment by pushing the door up until it snaps into place.Extra Charging Cradle1.  Plug the AC power converter of the extra charging cradle into the electrical outlet.HandsetBeltclipHandset battery pack Battery compartment coverCharge CradleREGNRIPROGABC DEFGHI JKL MNOPQRS TUV WXYZEXIT OPER PAUSE2.  Place the handset in the extra charging cradle. The charge indicator turns on, verifying the battery is charging. 3.  Allow the phone to charge for 16 hours.RegistrationYOU MUST REGISTER THE HANDSET TO THE MAIN BASE BEFORE USE!After the optional handset has charged for 16 hours on the extra charger, HANDSET NEEDS REGISTRATION shows in the display. 1.  Press the MUTE/PROG button. HOLD BASE PAGE WAIT FOR BEEP shows in the display.  (Your handset should be held near the base during registration process.)2.  Press and hold the page button on the base unit until you hear a tone at the handset. HANDSET X REGISTERED shows in the handset display, where X is the handset number. You may now rename your handset. (Refer to Step 3 & 4 of Handset Name Section)CHARGE (indicator)

Navigation menu