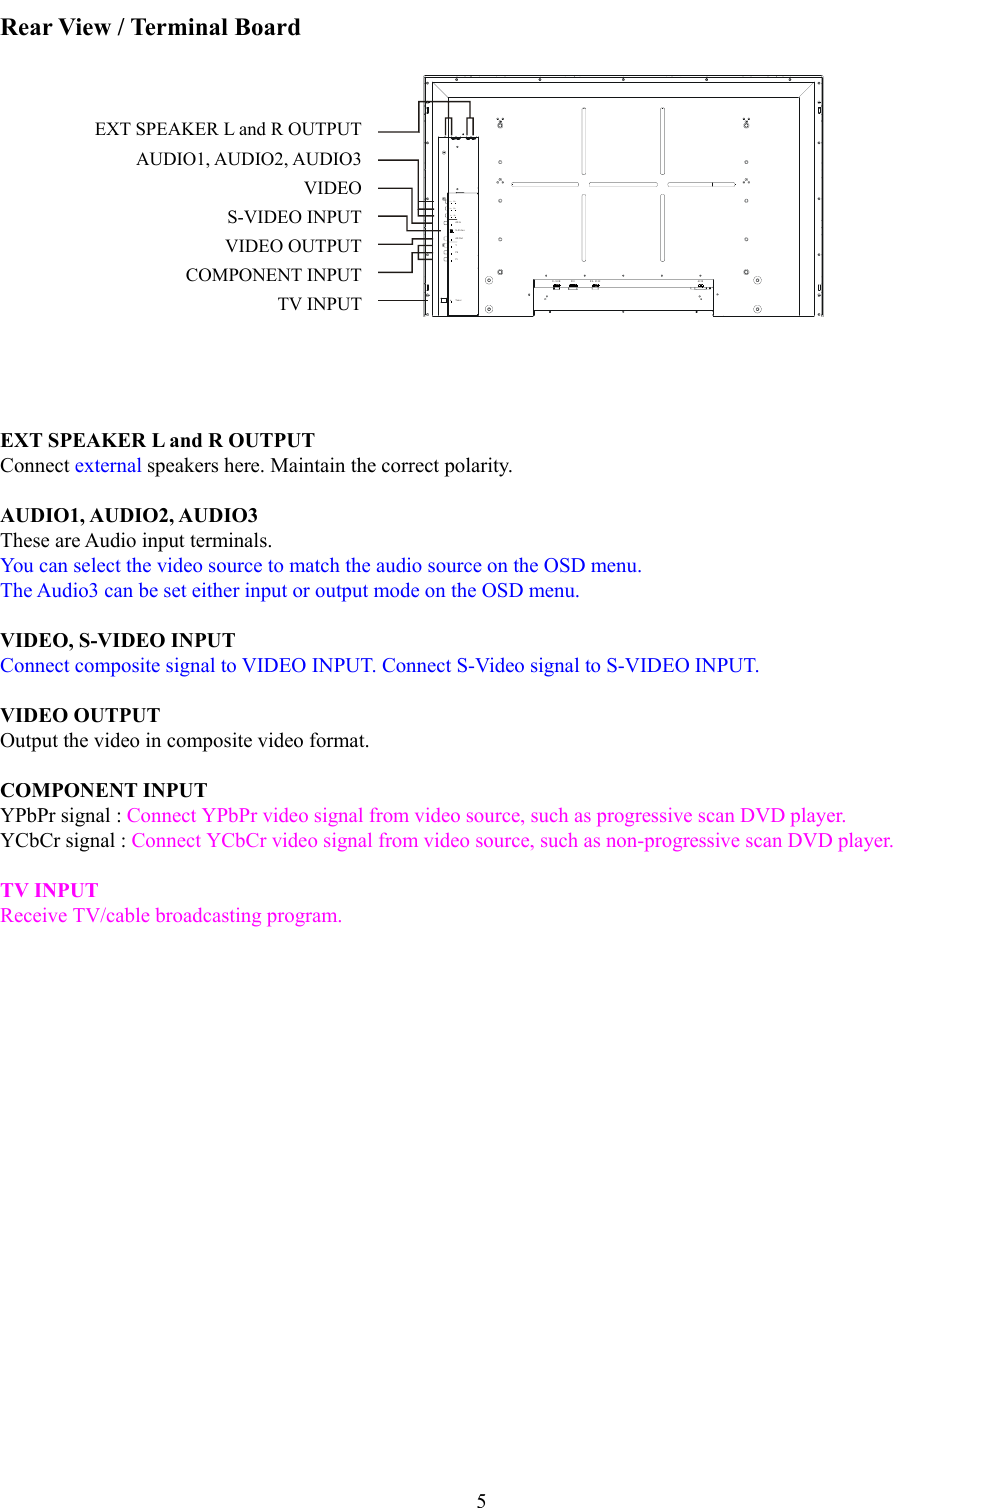
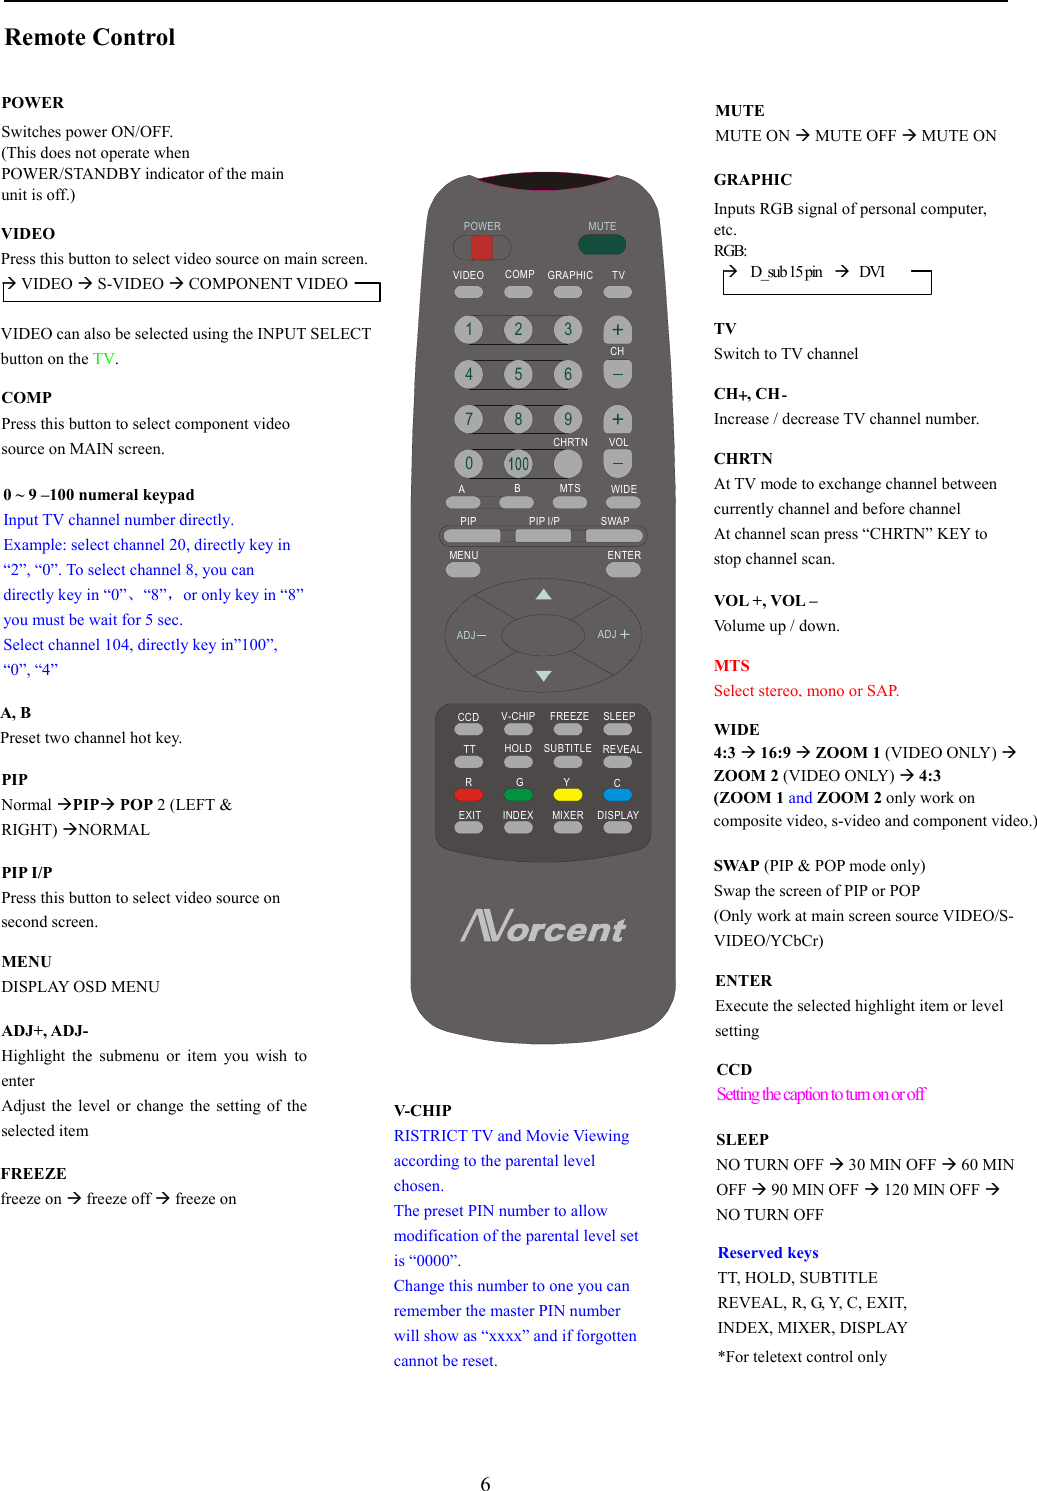
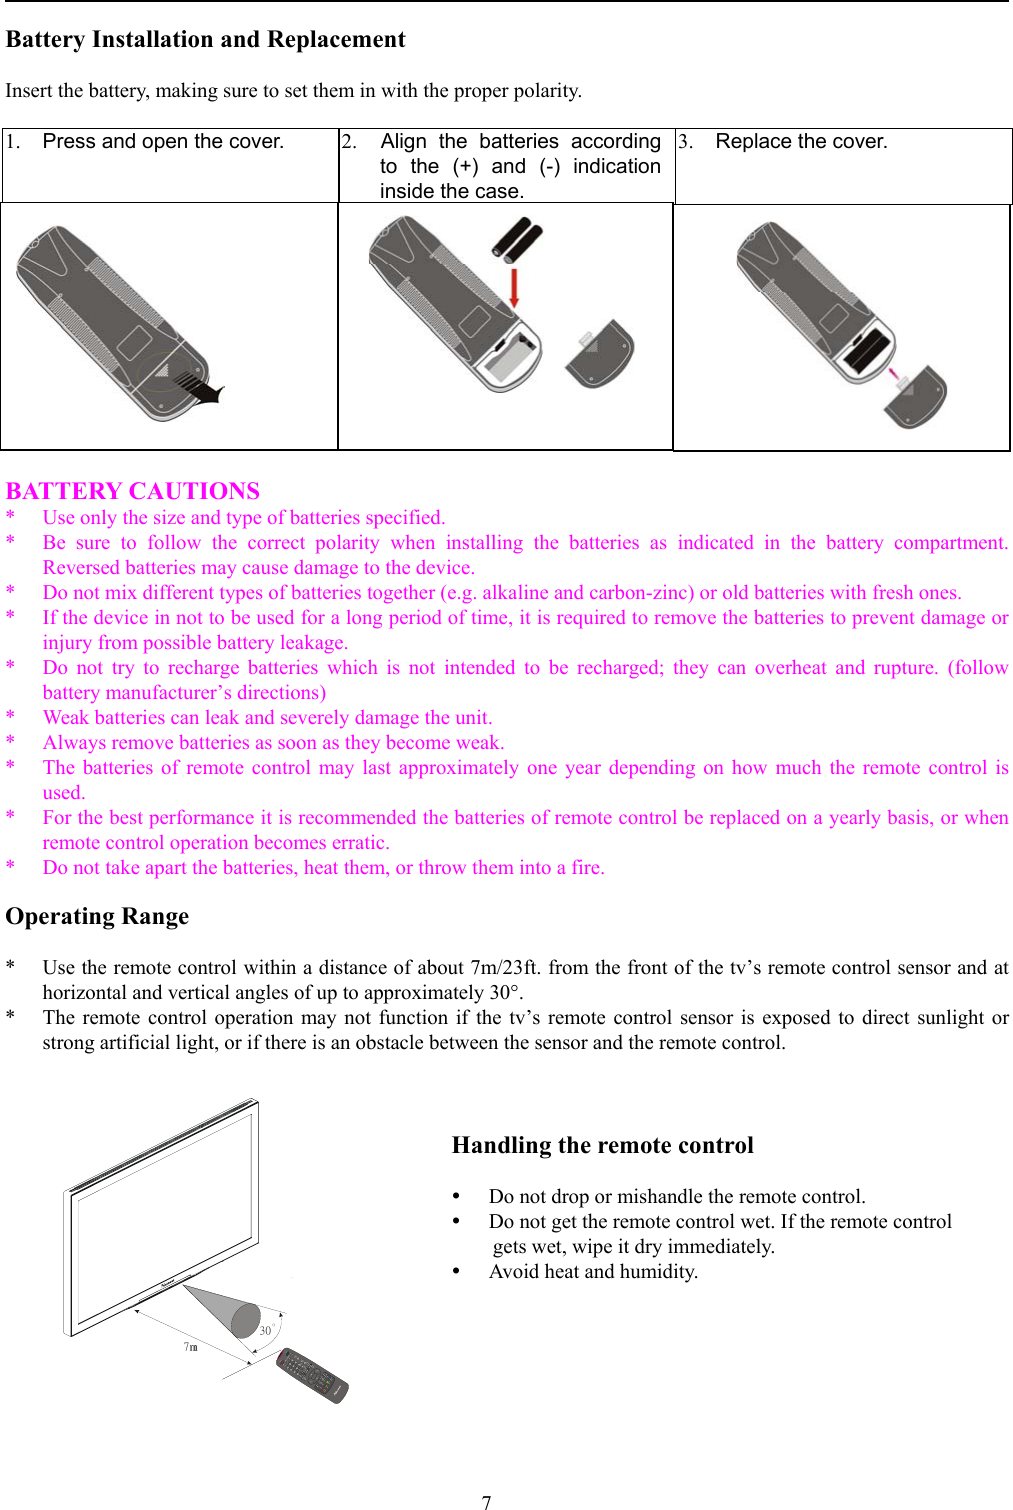
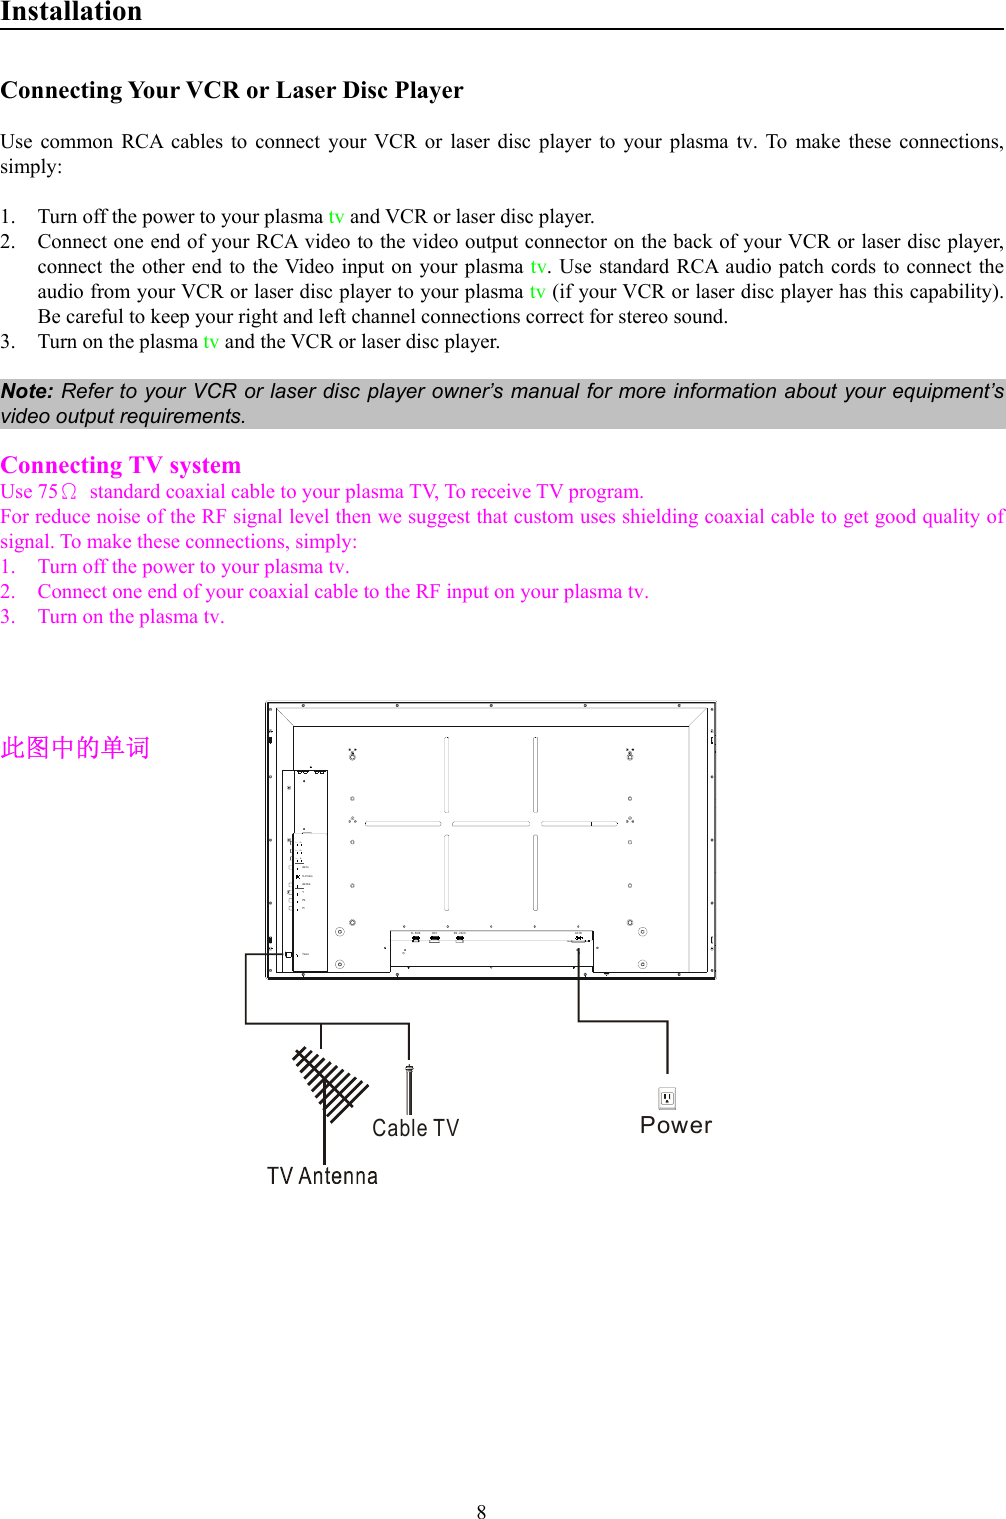
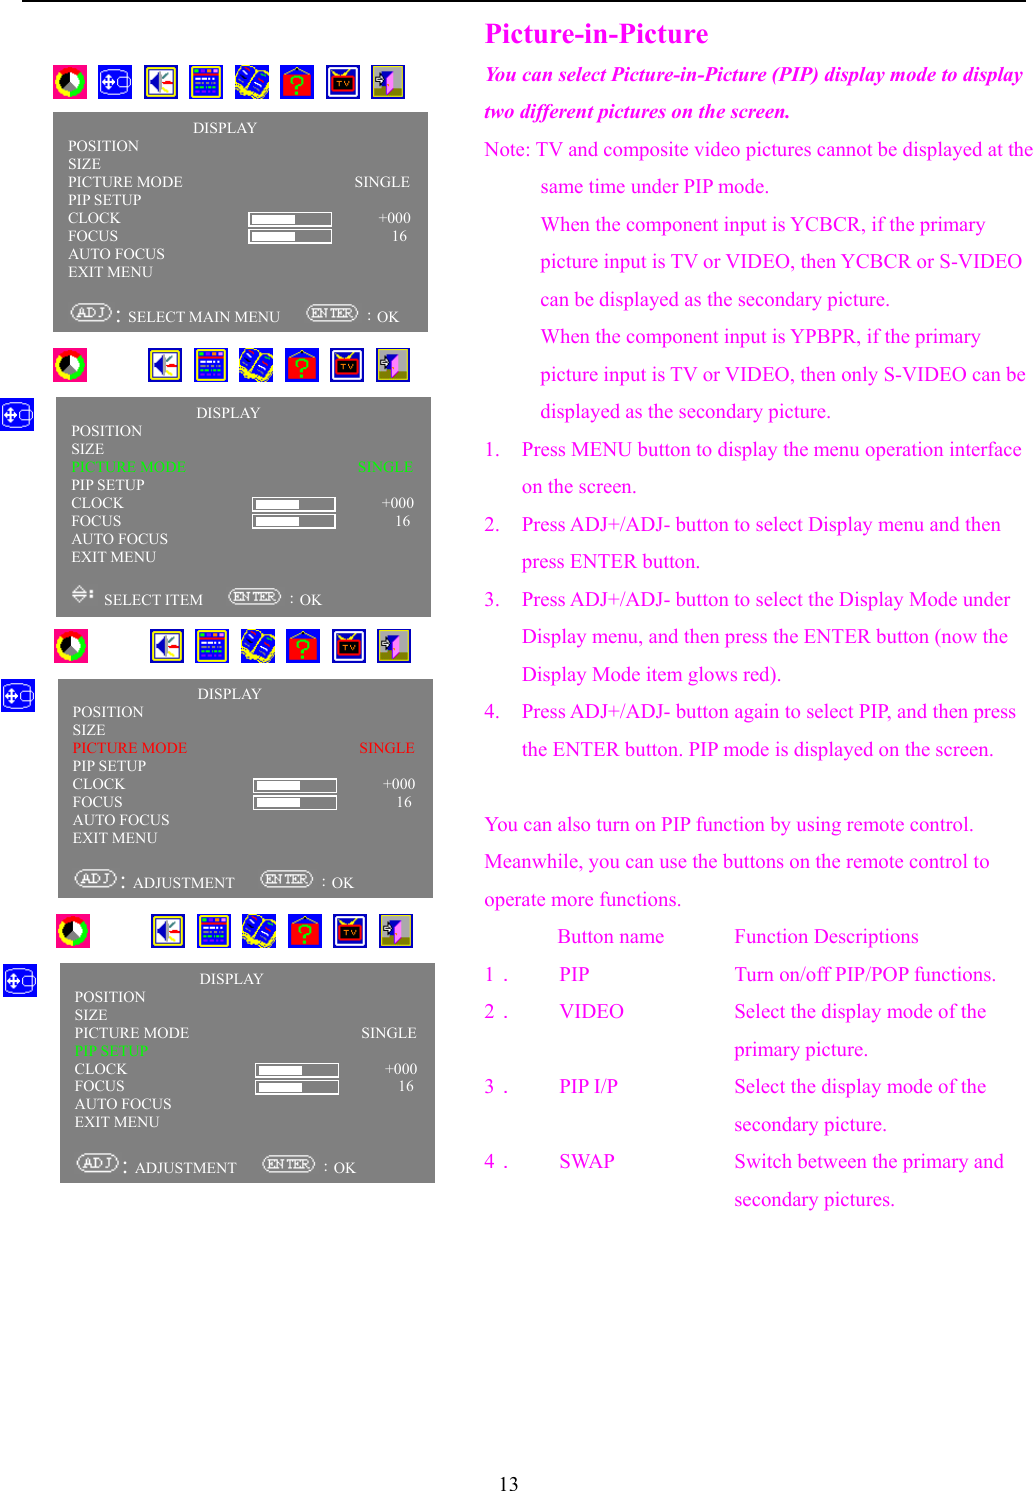
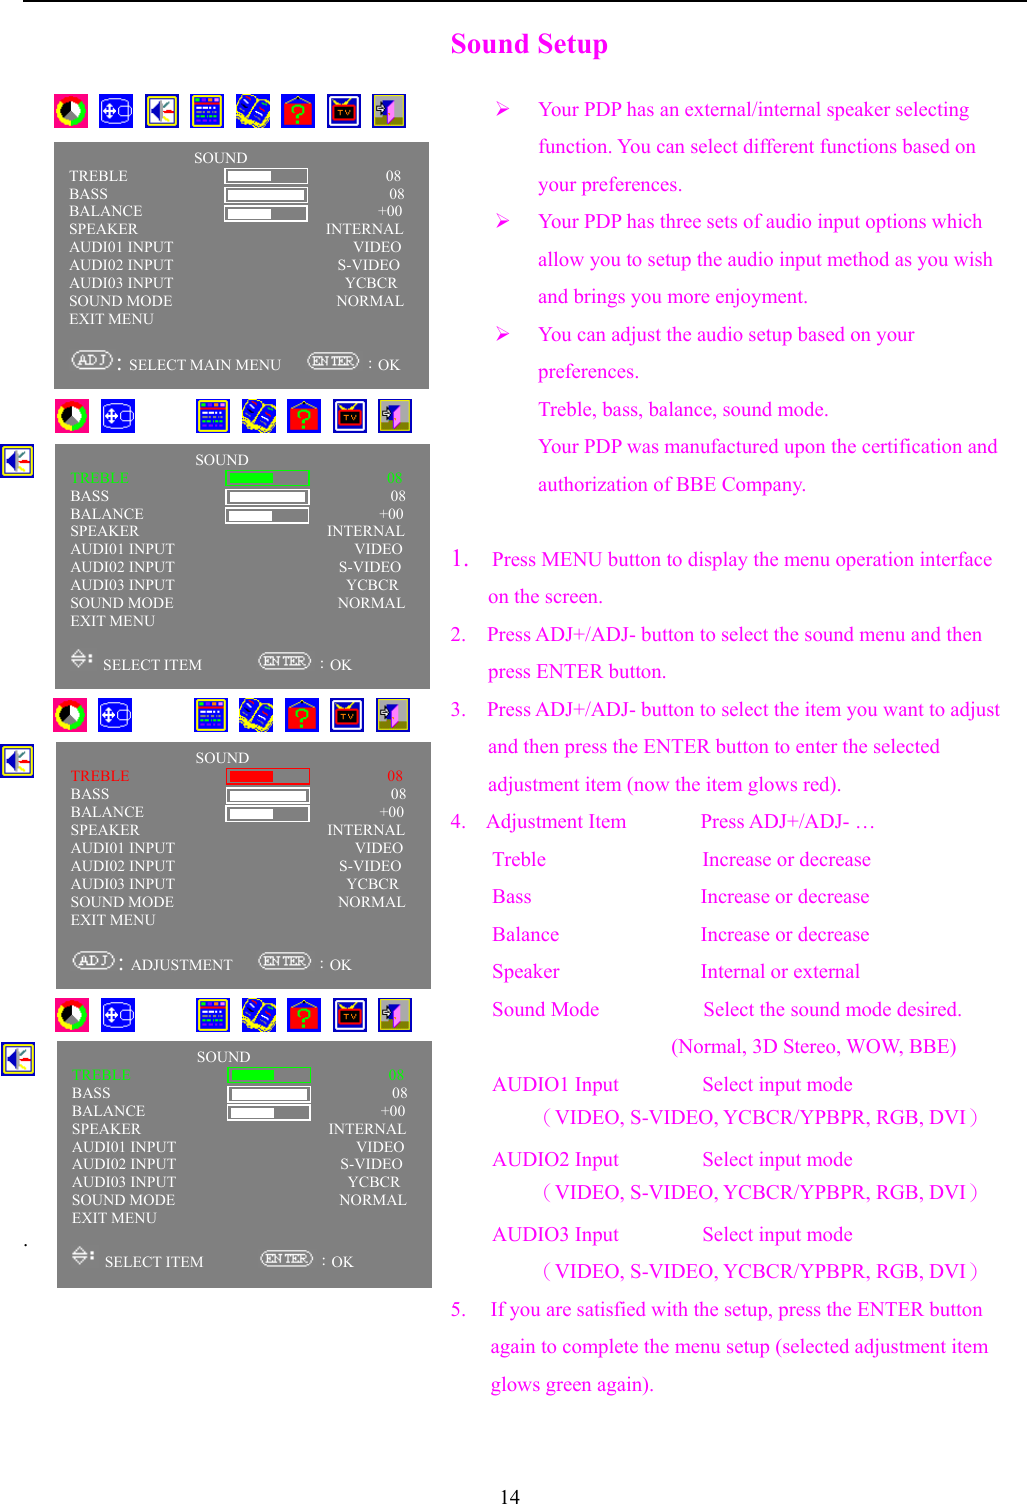
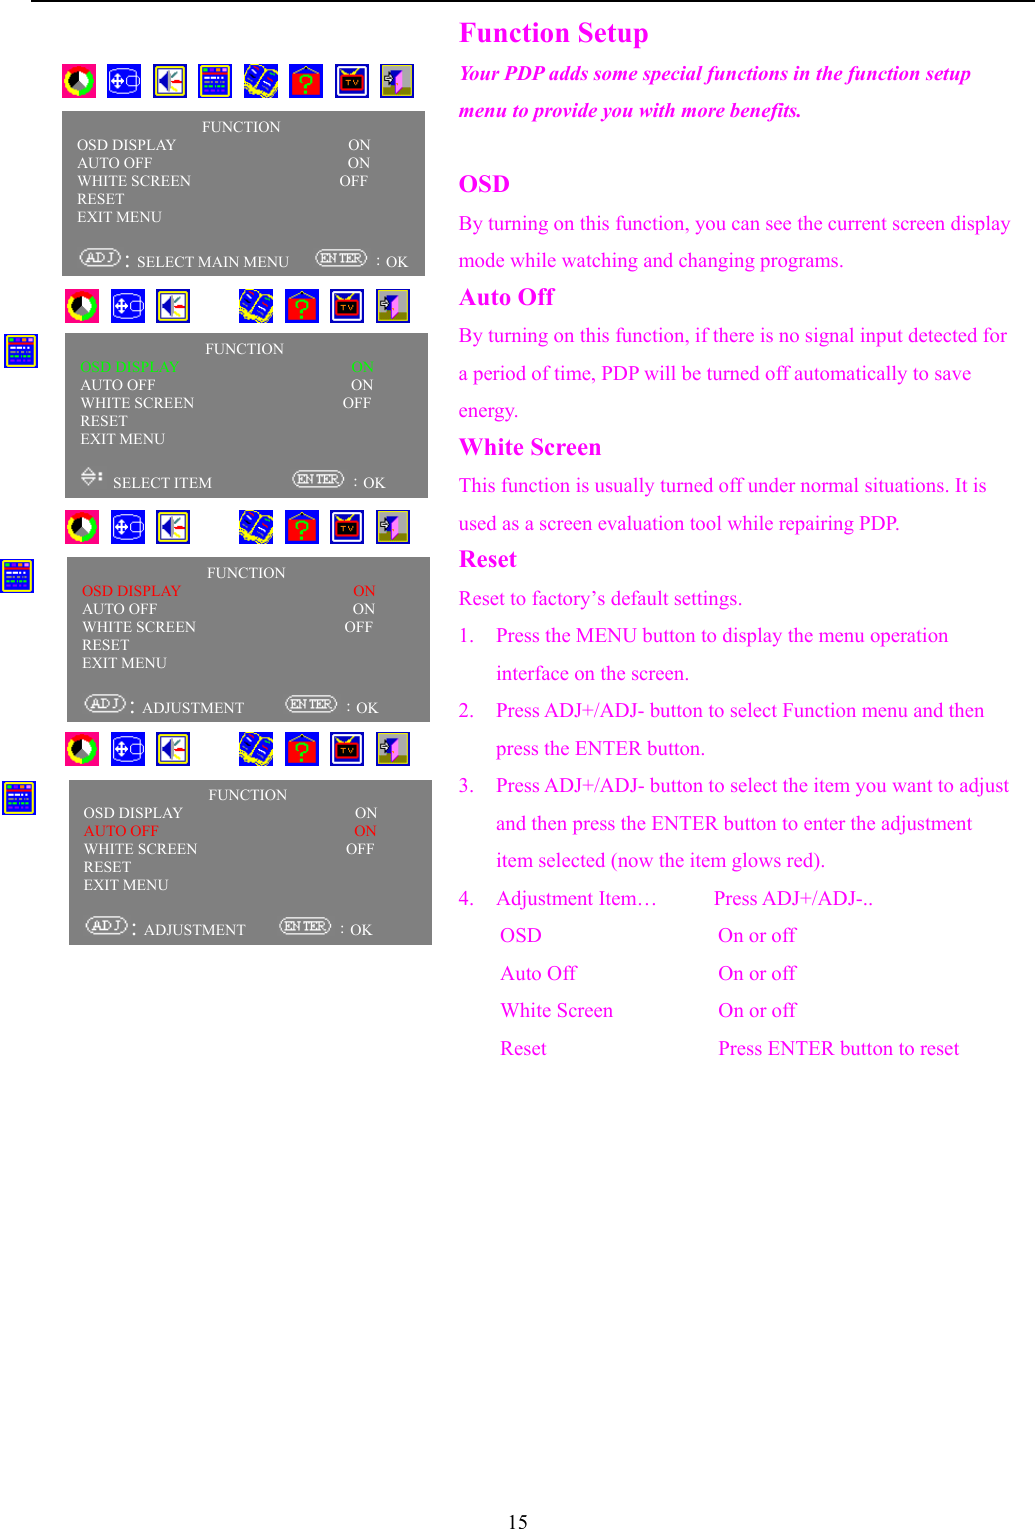
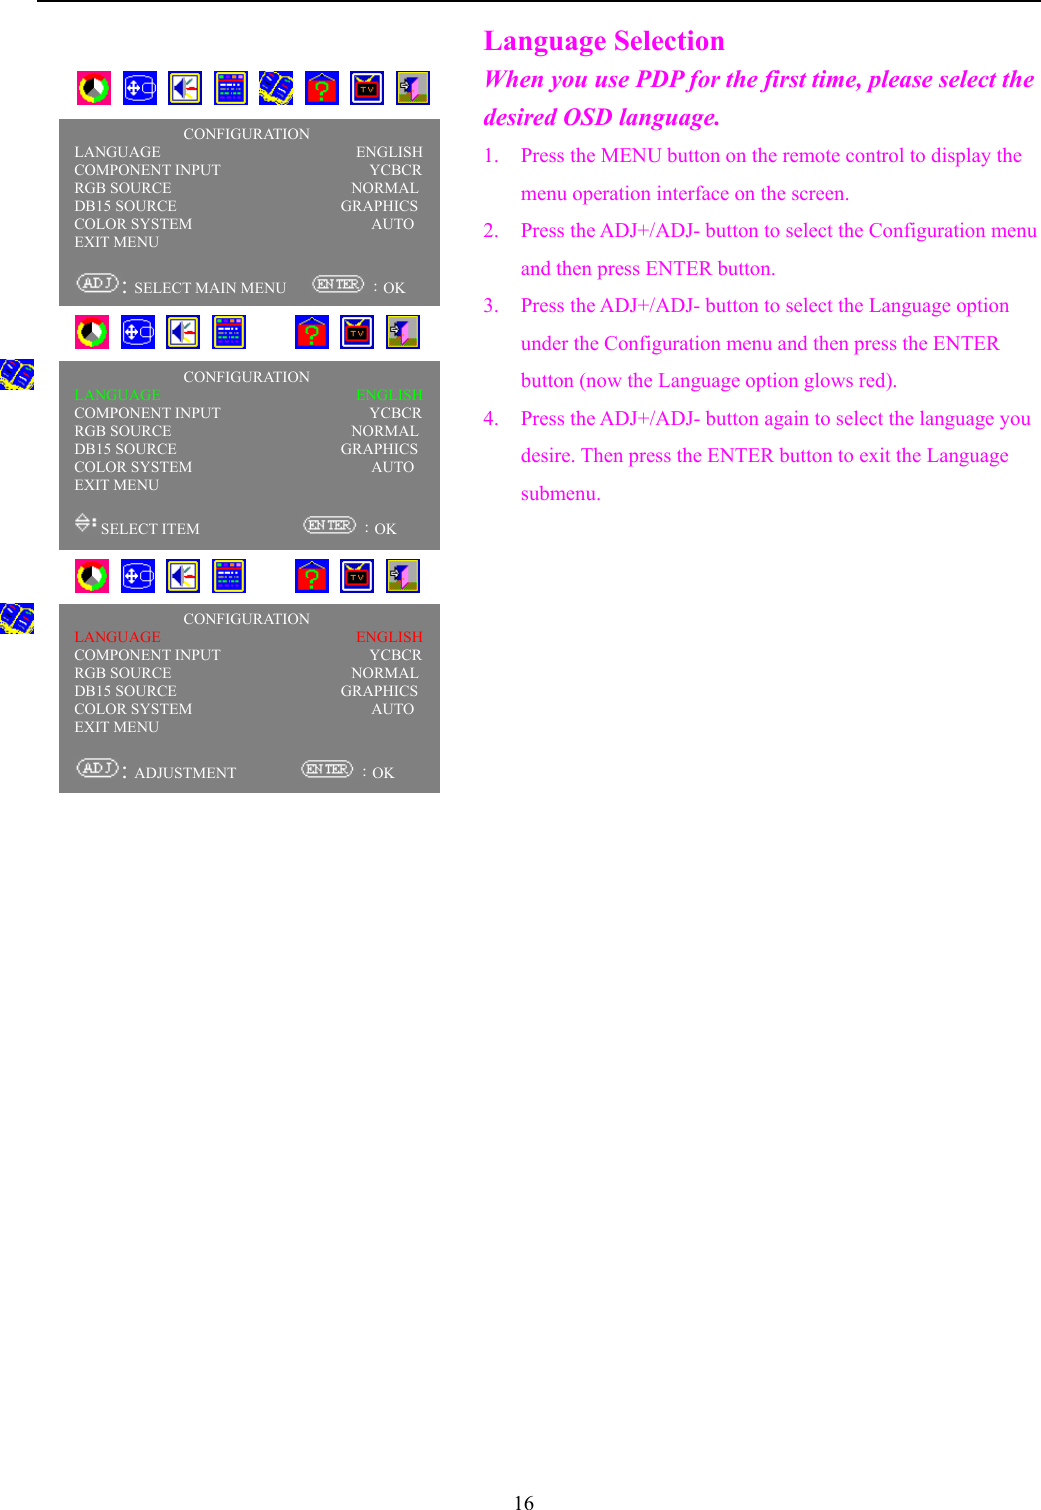
Top Victory Electronics PD4203G 42" pdp User Manual PT4231 English TV

Top Victory Electronics (Taiwan) Co Ltd 42" pdp PT4231 English TV

Contents

users manual 1

1TABLE OF CONTENTSBefore Use…………………...………………………………………….…… 2Introduction ……………………………………………………..……….… 3Part Names and Function ……………………………………………….... 4Installation ……………………………………………………………….… 8OSD (On Screen Display) Controls ………………………………….…… 11RS232C Control …………………………………………………………..... 19Troubleshooting ……………………………………………………….…… 20Specifications …………………………………………………………….… 20
2Before UseBefore operating the tv, please read this manual thoroughly. This manual should be retained for future reference.FCC Class B Radio Frequency Interference Statement WARNING: (FOR FCC CERTIFIED MODELS)NOTE: This equipment has been tested and found to comply with the limits residential installation. This equipmentgenerates, uses and can radiate radio frequency energy, and if not installed and used in accordance with the instructions,may cause harmful interference to radio communications. However, there is no guarantee that interference will notoccur in a particular installation. If this equipment does cause harmful interference to radio or television reception,which can be determined by turning the equipment off and on, the user is encouraged to try to correct the interferenceby one or more of the following measures:1.  Reorient or relocate the receiving antenna.2.  Increase the separation between the equipment and receiver.3.  Connect the equipment into an outlet on a circuit different from that to which the receiver is connected.4. Consult the dealer or an experienced radio/TV technician for help.NOTICE:1. The manufacturer is not responsible for any radio or TV interference caused by unauthorized modification to thisequipment. It is the responsibilities of the user to correct such interference.2. To avoid the risk of electric shock or component damage, switch off the power before connecting the PDP to otherdevices, such as VCR, DVD or PC.
3IntroductionThe features you’ll enjoy include:y Advanced DCDi Sampling Progressive Scan method is employed.y 480p, 720p and 1080i HDTV signal compatibility.y PCs, VCRs, Laser Disc and DVD player source compatibility.y RGB input (2*), Video input (2*), YPbPr or YCbCr input (1*), Audio input (3), External Control input (1).y Component video input terminal for DVD, 15.75 kHz (YCbCr), 31.5 kHz (YPbPr).y Receive TV / cable broadcasting program.Contents of the Package Video/Audio cable (RCA pin jack to RCA pin jack connector × 3 ).
4Part Names and Function1. POWER2. POWER/Standby Indicator3. REMOTE SENSOR Windows4. INPUT Select5. MENU6. SETTING7. ADJ. + , ADJ. - / VOL + , VOL -8. CH+, CH-Front View4. INPUT SelectSwitch the input in the following order.The available component input depends on the setting of “component input”.Video Æ  S-video  Æ Component input ( YCbCr or YPbPr )                               TV Å DVI    Å  D-sub 15 PIN5. MENUSets the On-Screen Display (OSD) Menu mode and displays the main menu.6. SETTING. In the on screen menu execute the selected highlight item or level setting˙ Not in the on screen menu mode:Switches the second screen input in the following orderVideo Æ S-video Æ Component input (YCbCr) ÆTV                               8.  CH+, CH- (Only for TV function)Increase / decrease TV channel number.CH8 7 6 5 4 3 21
5TunerR3L3R2L2S-VideoR1L1AV-InAV-Ou tYPbPrAC IND - SUB RS - 232CDVIEXT SPEAKER L and R OUTPUTAUDIO1, AUDIO2, AUDIO3VIDEOS-VIDEO INPUTVIDEO OUTPUTCOMPONENT INPUTTV INPUTRear View / Terminal BoardEXT SPEAKER L and R OUTPUTConnect external speakers here. Maintain the correct polarity.AUDIO1, AUDIO2, AUDIO3These are Audio input terminals.You can select the video source to match the audio source on the OSD menu.The Audio3 can be set either input or output mode on the OSD menu.VIDEO, S-VIDEO INPUTConnect composite signal to VIDEO INPUT. Connect S-Video signal to S-VIDEO INPUT.VIDEO OUTPUTOutput the video in composite video format.COMPONENT INPUTYPbPr signal : Connect YPbPr video signal from video source, such as progressive scan DVD player.YCbCr signal : Connect YCbCr video signal from video source, such as non-progressive scan DVD player.TV INPUTReceive TV/cable broadcasting program.
6VIDEOPress this button to select video source on main screen.Æ VIDEO Æ S-VIDEO Æ COMPONENT VIDEOVIDEO can also be selected using the INPUT SELECTbutton on the TV. Remote ControlPOWERSwitches power ON/OFF.(This does not operate whenPOWER/STANDBY indicator of the mainunit is off.)GRAPHICInputs RGB signal of personal computer,etc.RGB: Æ  D_sub 15 pin  Æ  DVIMENUDISPLAY OSD MENUADJ+, ADJ-Highlight the submenu or item you wish toenterAdjust the level or change the setting of theselected itemReserved keysTT, HOLD, SUBTITLEREVEAL, R, G, Y, C, EXIT,INDEX, MIXER, DISPLAY*For teletext control onlyMUTEMUTE ON Æ MUTE OFF Æ MUTE ONSLEEPNO TURN OFF Æ 30 MIN OFF Æ 60 MINOFF Æ 90 MIN OFF Æ 120 MIN OFF ÆNO TURN OFFWIDE4:3 Æ 16:9 Æ ZOOM 1 (VIDEO ONLY) ÆZOOM 2 (VIDEO ONLY) Æ 4:3(ZOOM 1 and ZOOM 2 only work oncomposite video, s-video and component video.)PIP I/PPress this button to select video source onsecond screen.VOL +, VOL –Volume up / down.COMPPress this button to select component videosource on MAIN screen.TVSwitch to TV channelCHRTNAt TV mode to exchange channel betweencurrently channel and before channelAt channel scan press “CHRTN” KEY tostop channel scan.CH+, CH-Increase / decrease TV channel number.0 ~ 9 –100 numeral keypadInput TV channel number directly.Example: select channel 20, directly key in“2”, “0”. To select channel 8, you candirectly key in “0”、“8”,or only key in “8”you must be wait for 5 sec.Select channel 104, directly key in”100”,“0”, “4”SWAP (PIP & POP mode only)Swap the screen of PIP or POP(Only work at main screen source VIDEO/S-VIDEO/YCbCr)A, BPreset two channel hot key.MTSSelectstereo, mono or SAP.ENTERExecute the selected highlight item or levelsettingCCDSetting the caption to turn on or offV-CHIPRISTRICT TV and Movie Viewingaccording to the parental levelchosen.The preset PIN number to allowmodification of the parental level setis “0000”.Change this number to one you canremember the master PIN numberwill show as “xxxx” and if forgottencannot be reset.PIPNormal ÆPIPÆ POP 2 (LEFT &RIGHT) ÆNORMALPOWER MUTEVIDEO COMP GRAPHIC TVCHVOLWIDECHRTNMTSABPIP PIP I/P  SWAPMENU ENTERADJADJCCD V-CHIP FREEZE SLEEPTT HOLD SUBTITLE REVEALRGYCEXIT INDEX MIXER DISPLAY1234567890FREEZEfreeze on Æ freeze off Æ freeze on
7Battery Installation and ReplacementInsert the battery, making sure to set them in with the proper polarity.1. Press and open the cover. 2.  Align the batteries accordingto the (+) and (-) indicationinside the case.3. Replace the cover.BATTERY CAUTIONS* Use only the size and type of batteries specified.* Be sure to follow the correct polarity when installing the batteries as indicated in the battery compartment.Reversed batteries may cause damage to the device.* Do not mix different types of batteries together (e.g. alkaline and carbon-zinc) or old batteries with fresh ones.* If the device in not to be used for a long period of time, it is required to remove the batteries to prevent damage orinjury from possible battery leakage.* Do not try to recharge batteries which is not intended to be recharged; they can overheat and rupture. (followbattery manufacturer’s directions)* Weak batteries can leak and severely damage the unit.* Always remove batteries as soon as they become weak.* The batteries of remote control may last approximately one year depending on how much the remote control isused.* For the best performance it is recommended the batteries of remote control be replaced on a yearly basis, or whenremote control operation becomes erratic.*  Do not take apart the batteries, heat them, or throw them into a fire.Operating Range* Use the remote control within a distance of about 7m/23ft. from the front of the tv’s remote control sensor and athorizontal and vertical angles of up to approximately 30°.* The remote control operation may not function if the tv’s remote control sensor is exposed to direct sunlight orstrong artificial light, or if there is an obstacle between the sensor and the remote control.Handling the remote controly Do not drop or mishandle the remote control.y Do not get the remote control wet. If the remote controlgets wet, wipe it dry immediately.y Avoid heat and humidity.7m30OPOWERMUTEVIDEOCOMPGRAPHICTVCHVOLWIDECHRTNMTSABPIPPIP I/P SWAPMENUENTERADJADJCCDV-CHIPFREEZESLEEPTTHOLDSUBTITLEREVEALRGYCEXITINDEXMIXERDISPLAY1234567890
8InstallationConnecting Your VCR or Laser Disc PlayerUse common RCA cables to connect your VCR or laser disc player to your plasma tv. To make these connections,simply:1. Turn off the power to your plasma tv and VCR or laser disc player.2. Connect one end of your RCA video to the video output connector on the back of your VCR or laser disc player,connect the other end to the Video input on your plasma tv. Use standard RCA audio patch cords to connect theaudio from your VCR or laser disc player to your plasma tv (if your VCR or laser disc player has this capability).Be careful to keep your right and left channel connections correct for stereo sound.3. Turn on the plasma tv and the VCR or laser disc player.Note: Refer to your VCR or laser disc player owner’s manual for more information about your equipment’svideo output requirements.Connecting TV systemUse 75Ω  standard coaxial cable to your plasma TV, To receive TV program.For reduce noise of the RF signal level then we suggest that custom uses shielding coaxial cable to get good quality ofsignal. To make these connections, simply:1. Turn off the power to your plasma tv.2. Connect one end of your coaxial cable to the RF input on your plasma tv.3. Turn on the plasma tv.此图中的单词PowerTunerR3L3R2L2S-VideoR1L1AV-InAV-OutYPbPrAC IND - SU B RS - 232CDVICable TV
9Connecting Your DVD PlayerYou can connect your plasma tv to a DVD player. To do so, simply:1. Turn off the power to your plasma tv and DVD player.2. Use a video cable (with Yellow RCA terminal) to connect your DVD player to the video input of plasma TV. Ifyour DVD player has component video output (YCbCr or YPbPr), use component cable to connect to componentinputs on your plasma TV. Or use the DVD player’s S-Video output. Use a standard S-Video cable to connect tothe S-Video input on the plasma TV S-Video input.3. Use a pair of RCA audio cable (with Red and White RCA terminals) to connect the audio outputs of DVD player toone of the audio inputs on plasma TV.4. Turn on the plasma tv and the DVD player.此图中的单词  DVD/VCR/Laser DiscSettop BoxPCPowerTunerR3L3R2L2S-VideoR1L1AV-InAV-OutYPbPrAC IND - S UB RS - 232CDVISpeakerAmplifierVIDEO/OUT       TV
10External Speaker ConnectionsExternal speakers (Option) may be connected to the plasma tv to reproduce sound.External speakers may be connected directly to the EXT SPEAKER L and R Output terminals.(Connect EXT SPEAKER OUTPUTS to external speakers only. DO not connect EXT SPEAKER OUTPUTS to audiopower amplifier, because you may damage the audio power amplifier.)CAUTION: Unplug the plasma tv and all connected components before connecting external speakers. Useonly speakers with 8-ohm impedance and a power input rating of 10 watts or more.To connect external speakers directly to the plasma tv:1. Strip the ends of the speaker wires.2. Press down the tabs below the SPEAKERS terminals, insert the speaker wire and release the tab to secure thespeaker sire connection:(a) Connect the right speaker (located at right side of the tv when viewed from the front) positive (+) wire toRIGHT +.(b) Connect the right speaker negative (-) wire to RIGHT -.(c) Connect the left speaker negative (-) wire to LEFT -.(d) Connect the left speaker positive (+) wire to LEFT+.
11OSD (On Screen Display) ControlsMenu OperationsYour PDP screen has an easy and convenient menu operationsystem. It helps you to use each PDP function quickly.1. After powering on PDP, press the MENU button on theremote control. The menu operation system will display onthe screen.2. Press the ADJ+/ADJ- button on the remote control to display,change, or use the selected menu. Press the ENTER button toenter each item on the menu (now the item glows green); ifyou need to change the selected item, press the ENTERbutton again to make changes (now the item glows red). Afterthe change is made, press the ENTER button to exit the menusetup. If no operation is detected, the on screen menu willdisappear after 20 seconds. You may also exit menu operationinterface quickly by pressing the MENU button on theremote control.       PICTUREBRIGHTNESS                            08CONTRAST                              16SHARPNESS                            +00COLOR                                  16TINT                                   +00COLOR TEMPERATURE             NORMALEXIT MENU: SELECT MAIN MENU      :OKPICTUREBRIGHTNESS                            08CONTRAST                              16SHARPNESS                            +00COLOR                                  16TINT                                   +00COLOR TEMPERATURE             NORMALEXIT MENU: ADJUSTMENT       :OKPICTUREBRIGHTNESS                            08CONTRAST                              16SHARPNESS                            +00COLOR                                  16TINT                                   +00COLOR TEMPERATURE             NORMALEXIT MENU SELECT ITEM         :OK
12   Picture Quality AdjustmentYour PDP has the following setup options which allow you toimprove the picture quality.Brightness, contrast, sharpness, color, tint (only for NTSC), andcolor temperature.When the Picture is selected, you can adjust the following items:1. Press MENU button to display the menu operation interfaceon the screen.2. Press ADJ+/ADJ- button to select Picture menu. Then pressENTER again to enter Picture submenu (selected item glowsgreen).3. Press ADJ+/ADJ- button to select the item you need thenpress ENTER button again to enter the selectedadjustment submenu (Now the item glows red).4. Adjustment items…   Press ADJ+/ADJ- …Brightness           Increase or decreaseContrastSharpnessColorTintColor Temperature    Select desired color temperature                      (Normal, cold, warm)5. If you are satisfied with your setup, press ENTER buttonagain to complete menu setup (selected adjustment itemglows green again).       PICTUREBRIGHTNESS                            08CONTRAST                              16SHARPNESS                            +00COLOR                                  16TINT                                   +00COLOR TEMPERATURE             NORMALEXIT MENU: SELECT MAIN MENU      :OKPICTUREBRIGHTNESS                            08CONTRAST                              16SHARPNESS                            +00COLOR                                  16TINT                                   +00COLOR TEMPERATURE             NORMALEXIT MENU SELECT ITEM         :OK      PICTUREBRIGHTNESS                            08CONTRAST                              16SHARPNESS                            +00COLOR                                  16TINT                                   +00COLOR TEMPERATURE             NORMALEXIT MENU: ADJUSTMENT       :OK      PICTUREBRIGHTNESS                            08CONTRAST                              16SHARPNESS                            +00COLOR                                  16TINT                                   +00COLOR TEMPERATURE             NORMALEXIT MENU SELECT ITEM         :OK      PICTUREBRIGHTNESS                            08CONTRAST                              16SHARPNESS                            +00COLOR                                  16TINT                                   +00COLOR TEMPERATURE             NORMALEXIT MENU: ADJUSTMENT       :OK
13Picture-in-PictureYou can select Picture-in-Picture (PIP) display mode to displaytwo different pictures on the screen.Note: TV and composite video pictures cannot be displayed at thesame time under PIP mode.When the component input is YCBCR, if the primarypicture input is TV or VIDEO, then YCBCR or S-VIDEOcan be displayed as the secondary picture.When the component input is YPBPR, if the primarypicture input is TV or VIDEO, then only S-VIDEO can bedisplayed as the secondary picture.1. Press MENU button to display the menu operation interfaceon the screen.2. Press ADJ+/ADJ- button to select Display menu and thenpress ENTER button.3. Press ADJ+/ADJ- button to select the Display Mode underDisplay menu, and then press the ENTER button (now theDisplay Mode item glows red).4. Press ADJ+/ADJ- button again to select PIP, and then pressthe ENTER button. PIP mode is displayed on the screen.You can also turn on PIP function by using remote control.Meanwhile, you can use the buttons on the remote control tooperate more functions.Button name      Function Descriptions1. PIP Turn on/off PIP/POP functions.2. VIDEO Select the display mode of the primary picture.3. PIP I/P Select the display mode of the secondary picture.4. SWAP Switch between the primary and secondary pictures.                DISPLAYPOSITION      SIZE      PICTURE MODE                      SINGLEPIP SETUP         CLOCK                                 +000FOCUS                                   16AUTO FOCUS      EXIT MENU: SELECT MAIN MENU     :OK           DISPLAYPOSITION      SIZE      PICTURE MODE                      SINGLEPIP SETUP         CLOCK                                 +000FOCUS                                   16AUTO FOCUS      EXIT MENU SELECT ITEM      :OK           DISPLAYPOSITION      SIZE      PICTURE MODE                      SINGLEPIP SETUP         CLOCK                                 +000FOCUS                                   16AUTO FOCUS      EXIT MENU: ADJUSTMENT    :OK           DISPLAYPOSITION      SIZE      PICTURE MODE                      SINGLEPIP SETUP         CLOCK                                 +000FOCUS                                   16AUTO FOCUS      EXIT MENU: ADJUSTMENT    :OK
14                    .Sound Setup¾ Your PDP has an external/internal speaker selectingfunction. You can select different functions based onyour preferences.¾ Your PDP has three sets of audio input options whichallow you to setup the audio input method as you wishand brings you more enjoyment.¾ You can adjust the audio setup based on yourpreferences.Treble, bass, balance, sound mode.Your PDP was manufactured upon the certification andauthorization of BBE Company.1.    Press MENU button to display the menu operation interfaceon the screen.2.    Press ADJ+/ADJ- button to select the sound menu and thenpress ENTER button.3.  Press ADJ+/ADJ- button to select the item you want to adjustand then press the ENTER button to enter the selectedadjustment item (now the item glows red).4.  Adjustment Item Press ADJ+/ADJ- …Treble               Increase or decreaseBass                 Increase or decreaseBalance              Increase or decreaseSpeaker              Internal or externalSound Mode          Select the sound mode desired.     (Normal, 3D Stereo, WOW, BBE)AUDIO1 Input        Select input mode(VIDEO, S-VIDEO, YCBCR/YPBPR, RGB, DVI)AUDIO2 Input        Select input mode(VIDEO, S-VIDEO, YCBCR/YPBPR, RGB, DVI)AUDIO3 Input        Select input mode(VIDEO, S-VIDEO, YCBCR/YPBPR, RGB, DVI)5. If you are satisfied with the setup, press the ENTER buttonagain to complete the menu setup (selected adjustment itemglows green again).       SOUNDTREBLE                                 08BASS                                    08BALANCE                 +00          +00SPEAKER                        INTERNALAUDI01 INPUT                       VIDEOAUDI02 INPUT                     S-VIDEOAUDI03 INPUT                      YCBCRSOUND MODE                     NORMALEXIT MENU: SELECT MAIN MENU      :OK           SOUNDTREBLE                                 08BASS                                    08BALANCE                 +00          +00SPEAKER                        INTERNALAUDI01 INPUT                       VIDEOAUDI02 INPUT                     S-VIDEOAUDI03 INPUT                      YCBCRSOUND MODE                     NORMALEXIT MENU SELECT ITEM        :OK           SOUNDTREBLE                                 08BASS                                    08BALANCE                 +00          +00SPEAKER                        INTERNALAUDI01 INPUT                       VIDEOAUDI02 INPUT                     S-VIDEOAUDI03 INPUT                      YCBCRSOUND MODE                     NORMALEXIT MENU: ADJUSTMENT    :OK           SOUNDTREBLE                                 08BASS                                    08BALANCE                 +00          +00SPEAKER                        INTERNALAUDI01 INPUT                       VIDEOAUDI02 INPUT                     S-VIDEOAUDI03 INPUT                      YCBCRSOUND MODE                     NORMALEXIT MENU SELECT ITEM        :OK
15Function SetupYour PDP adds some special functions in the function setupmenu to provide you with more benefits.OSDBy turning on this function, you can see the current screen displaymode while watching and changing programs.Auto OffBy turning on this function, if there is no signal input detected fora period of time, PDP will be turned off automatically to saveenergy.White ScreenThis function is usually turned off under normal situations. It isused as a screen evaluation tool while repairing PDP.ResetReset to factory’s default settings.1. Press the MENU button to display the menu operationinterface on the screen.2. Press ADJ+/ADJ- button to select Function menu and thenpress the ENTER button.3. Press ADJ+/ADJ- button to select the item you want to adjustand then press the ENTER button to enter the adjustmentitem selected (now the item glows red).4. Adjustment Item…      Press ADJ+/ADJ-..OSD                 On or offAuto Off On or offWhite Screen On or offReset Press ENTER button to reset       FUNCTIONOSD DISPLAY                      ONAUTO OFF                         ON     WHITE SCREEN                   OFFRESET                                  EXIT MENU                               : SELECT MAIN MENU     :OK          FUNCTIONOSD DISPLAY                      ONAUTO OFF                         ON     WHITE SCREEN                   OFFRESET                                  EXIT MENU                                SELECT ITEM           :OK                    FUNCTIONOSD DISPLAY                      ONAUTO OFF                         ON     WHITE SCREEN                   OFFRESET                                  EXIT MENU                               : ADJUSTMENT      :OKFUNCTIONOSD DISPLAY                      ONAUTO OFF                         ON     WHITE SCREEN                   OFFRESET                                  EXIT MENU                               : ADJUSTMENT     :OK
16Language SelectionWhen you use PDP for the first time, please select thedesired OSD language.1. Press the MENU button on the remote control to display themenu operation interface on the screen.2. Press the ADJ+/ADJ- button to select the Configuration menuand then press ENTER button.3. Press the ADJ+/ADJ- button to select the Language optionunder the Configuration menu and then press the ENTERbutton (now the Language option glows red).4. Press the ADJ+/ADJ- button again to select the language youdesire. Then press the ENTER button to exit the Languagesubmenu.       CONFIGURATIONLANGUAGE                         ENGLISHCOMPONENT INPUT                   YCBCRRGB SOURCE                       NORMALDB15 SOURCE                     GRAPHICSCOLOR SYSTEM                       AUTOEXIT MENU                                  : SELECT MAIN MENU      :OK           CONFIGURATIONLANGUAGE                         ENGLISHCOMPONENT INPUT                   YCBCRRGB SOURCE                       NORMALDB15 SOURCE                     GRAPHICSCOLOR SYSTEM                       AUTOEXIT MENU                                  SELECT ITEM              :OK           CONFIGURATIONLANGUAGE                         ENGLISHCOMPONENT INPUT                   YCBCRRGB SOURCE                       NORMALDB15 SOURCE                     GRAPHICSCOLOR SYSTEM                       AUTOEXIT MENU                                  : ADJUSTMENT         :OK
17Information InquiryYou can obtain the information of the current PDPinput signal by using this function.1. Press the MENU button to display the menu operationinterface on the screen.2. Press the ADJ+/ADJ- button to select the Information menu.The signal input information of the primary and secondarypictures will be displayed on the screen.       INFORMATIONINPUT 1                              VIDEO                                                                             INPUT 2                NONE                                                                            : SELECT MAIN MENU     :OK
18TV Setup OperationsYou can use your PDP in many different countries. Each countryhas its own TV broadcast standard. You can select the TV systemyou need in the TV Setting menu based on the TV standard ofyour country.User CHThe user can setup the TV channels to a mode that he/she is morefamiliar with.CH Fine Tune/Auto Fine TuneIn some areas with weaker TV signals, you can use this functionto modify and correct the signal to obtain a better picture on thescreen.1. Press the MENU button to display the menu operationinterface on the screen.2. Press the ADJ+/ADJ- button to select the TV Setup menu andthen press ENTER button.3. Press the ADJ+/ADJ- button to select the item you wish toadjust and then press the ENTER button to enter the selecteditem (now the item glows red).4. Adjustment Item… Press ADJ+/ADJ- …System Setup Select the item to adjust(The adjusting method is the same as the menu operation.)CH Fine Tune Increase or decreaseAuto Fine Tune On or offMTS      Select “Mono”、 “Stereo”、“Sap”V Chip Setup         The V-Chip reads informationencoded in the rated program andblocks programs from the set basedupon the rating selected by the  parent.C.C Setup            Setting the caption to turn on or off5. If you are satisfied with the setup, press the ENTER buttonagain to complete the setup (the selected adjustment itemglows green again).When you use the PDP’s TV function the first time, werecommend channel scanning after selecting the required TVsystem. This lets you to watch more and higher quality TVprograms.If the signal is weaker in the area you live, we recommend youuse the auto channel scanning.1. Press the MENU button to display the menu operationinterface on the screen.2. Press the ADJ+/ADJ- button to select the TV Setup menu andthen press ENTER button.3. Press the ADJ+/ADJ- button to select CH Mapping optionand then press ENTER button to enter the CH Mappingadjustment item.4. Press the ADJ+/ADJ- button again to select the Channel Scanoption and then press ENTER button. This item glows red.5. Press the ADJ+/ADJ- button to select “on” and then press theENTER button. The system turns on the channel scanningfunction.        TV SETUPUSER CH                            10    SYSTEM SETUP                     CH MAPPING                            CH FINE TUNE                      +00AUTO FINE TUNE                   OFFMTS                             MONOV CHIP SETUPC.C SETUPEXIT MENU                                                          : SELECT MAIN MENU      :OK                  SYSTEM SETUPCOLOR SYSTEM                  NTSC  SOUND SYSTEM                     MFREQUENCY TYPE           CABLE TVEXIT MENU                                                           SELECT ITEM       :OK         TV SETUPUSER CH                            2     SYSTEM SETUP                     CH MAPPING                            CH FINE TUNE                      +00AUTO FINE TUNE                   OFFMTS                             MONOV CHIP SETUPC.C SETUPEXIT MENU                                                           SELECT ITEM       :OKTV SETUPUSER CH                             2    SYSTEM SETUP                     CH MAPPING                            CH FINE TUNE                      +00AUTO FINE TUNE                   OFFMTS                             MONOV CHIP SETUPC.C SETUPEXIT MENU                                                           SELECT ITEM        :OK
19RS232C ControlApplicationOnly use in factory.Table of HDTV resolution supported.H(KHz) V(Hz) Dotclock720*480 480p 31.54 60.08 27.001280*720 720p 45.00 60.00 74.251920*1080 1080i 33.75 30.00 74.25
20TroubleshootingIf the picture quality is poor or there is some other problem, check the adjustments, operations, etc., before requestingservice.Symptom Checks RemedyPicture appears but no sound is y Is the volume set at the minimum? y Increase the volume.Produced. y Is the mute mode set?y Are the speakers properly connected?y Press the remote control’s MUTE button.y Connect the speakers properly.y Is AUDIO INPUT set correctly? y Set AUDIO INPUT on the SOUND menucorrectly.Poor picture with VIDEO signalinput.y Improper control setting.Local interference.Cable interconnections.Input impedance is not correct level.y Adjust picture control as needed.Try another location for the tv.Be sure all connections are secure.SpecificationsInput Signals RGB, NTSC, PAL, HD*1, DVD*1, DTV*1Input TerminalsRGB ANALOG RGB: 1 * mini D-sub 15-pinDIGITAL RGB: 1 * DVI-D 29-pin(Not compatible with analog input)Video  COMPOSITE VIDEO: 1 * RCAS-Video: 1 * DIN 4-pinCOMPONENT VIDEO ( YCbCr )    3 * RCADTV COMPONENT VIDEO ( YPbRr )    3 * RCAAudio Stereo RCA  × 3(selectable)RS232C control D-sub 9-pin  × 1Audio output Internal 5W + 5W at 16 ohm / External (option) 10W + 10W at 8 ohmOSD Functions Picture (Brightness / Contrast / Sharpness / Color / Tint / Color temperature),Display (Position / Size / Picture mode / PIP setup / Clock / Focus / Auto focus),Sound (Bass / Treble / Balance / Speaker / Audio 1 input / Audio 2 input / Audio 3 input &output ),Function (OSD / Power saving / White Screen / Reset),Configuration (Language / Component input / RGB source / DB15 source / Color system),Information (Main source / Second source)TV setup(User ch / System setup / Ch mapping / Ch fine tune / MTS ./ V chip setup /CC setup)Other features 3D motion adaptive Scan Converter with 2-2 (50Hz), 2-3 (60Hz) Pull Down Converter,Accessories AV cable, User’s Manual (about TV part )

Navigation menu