Top Victory Electronics PD4203G 42" pdp User Manual PT4231 English TV
Top Victory Electronics (Taiwan) Co Ltd 42" pdp PT4231 English TV
Contents
- 1. users manual 1
- 2. users manual 2
users manual 1

1
TABLE OF CONTENTS
Before Use…………………...………………………………………….…… 2
Introduction ……………………………………………………..……….… 3
Part Names and Function ……………………………………………….... 4
Installation ……………………………………………………………….… 8
OSD (On Screen Display) Controls ………………………………….…… 11
RS232C Control …………………………………………………………..... 19
Troubleshooting ……………………………………………………….…… 20
Specifications …………………………………………………………….… 20

2
Before Use
Before operating the tv, please read this manual thoroughly. This manual should be retained for future reference.
FCC Class B Radio Frequency Interference Statement WARNING: (FOR FCC CERTIFIED MODELS)
NOTE: This equipment has been tested and found to comply with the limits residential installation. This equipment
generates, uses and can radiate radio frequency energy, and if not installed and used in accordance with the instructions,
may cause harmful interference to radio communications. However, there is no guarantee that interference will not
occur in a particular installation. If this equipment does cause harmful interference to radio or television reception,
which can be determined by turning the equipment off and on, the user is encouraged to try to correct the interference
by one or more of the following measures:
1. Reorient or relocate the receiving antenna.
2. Increase the separation between the equipment and receiver.
3. Connect the equipment into an outlet on a circuit different from that to which the receiver is connected.
4. Consult the dealer or an experienced radio/TV technician for help.
NOTICE:
1. The manufacturer is not responsible for any radio or TV interference caused by unauthorized modification to this
equipment. It is the responsibilities of the user to correct such interference.
2. To avoid the risk of electric shock or component damage, switch off the power before connecting the PDP to other
devices, such as VCR, DVD or PC.

3
Introduction
The features you’ll enjoy include:
y Advanced DCDi Sampling Progressive Scan method is employed.
y 480p, 720p and 1080i HDTV signal compatibility.
y PCs, VCRs, Laser Disc and DVD player source compatibility.
y RGB input (2*), Video input (2*), YPbPr or YCbCr input (1*), Audio input (3), External Control input (1).
y Component video input terminal for DVD, 15.75 kHz (YCbCr), 31.5 kHz (YPbPr).
y Receive TV / cable broadcasting program.
Contents of the Package
Video/Audio cable (RCA pin jack to RCA pin jack connector × 3 ).
4
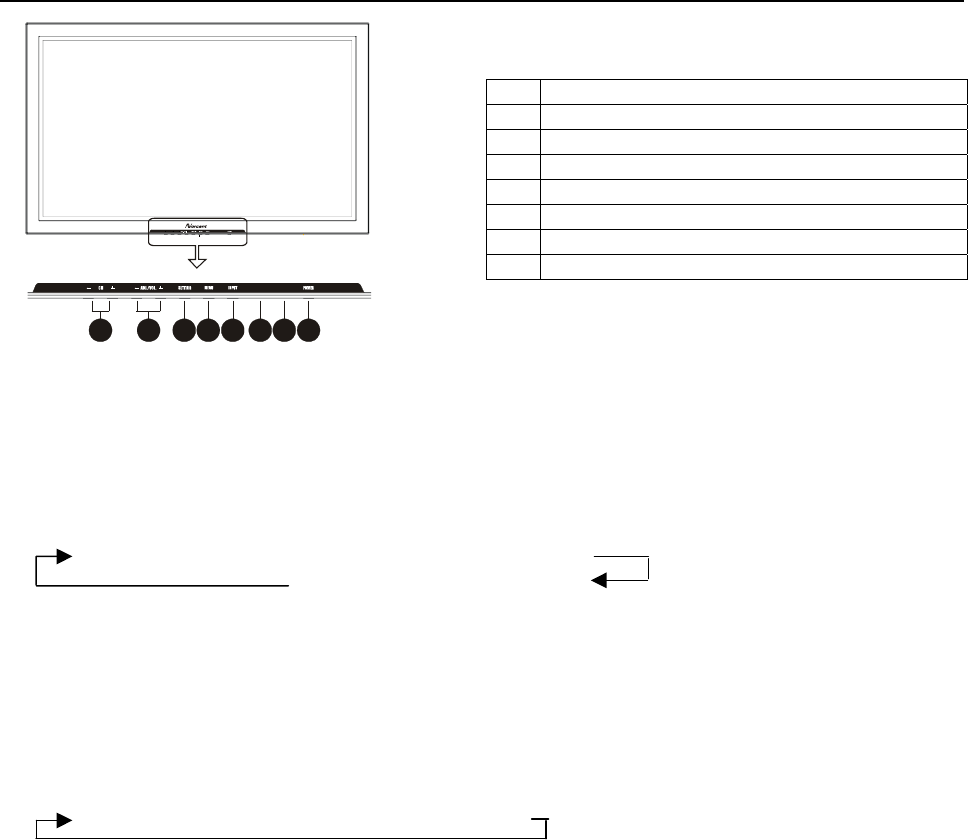
Part Names and Function
1. POWER
2. POWER/Standby Indicator
3. REMOTE SENSOR Windows
4. INPUT Select
5. MENU
6. SETTING
7. ADJ. + , ADJ. - / VOL + , VOL -
8. CH+, CH-
Front View
4. INPUT Select
Switch the input in the following order.
The available component input depends on the setting of “component input”.
Video Æ S-video Æ Component input ( YCbCr or YPbPr )
TV Å DVI Å D-sub 15 PIN
5. MENU
Sets the On-Screen Display (OSD) Menu mode and displays the main menu.
6. SETTING
. In the on screen menu execute the selected highlight item or level setting
˙ Not in the on screen menu mode:
Switches the second screen input in the following order
Video Æ S-video Æ Component input (YCbCr) ÆTV
8. CH+, CH- (Only for TV function)
Increase / decrease TV channel number.
CH
8 7 6 5 4 3 21

5
Tuner
R
3
L
3
R
2
L
2
S-Video
R
1
L
1
AV-In
AV-Ou t
Y
Pb
Pr
A
C IND - SUB RS - 232CDVI
EXT SPEAKER L and R OUTPUT
AUDIO1, AUDIO2, AUDIO3
VIDEO
S-VIDEO INPUT
VIDEO OUTPUT
COMPONENT INPUT
TV INPUT
Rear View / Terminal Board
EXT SPEAKER L and R OUTPUT
Connect external speakers here. Maintain the correct polarity.
AUDIO1, AUDIO2, AUDIO3
These are Audio input terminals.
You can select the video source to match the audio source on the OSD menu.
The Audio3 can be set either input or output mode on the OSD menu.
VIDEO, S-VIDEO INPUT
Connect composite signal to VIDEO INPUT. Connect S-Video signal to S-VIDEO INPUT.
VIDEO OUTPUT
Output the video in composite video format.
COMPONENT INPUT
YPbPr signal : Connect YPbPr video signal from video source, such as progressive scan DVD player.
YCbCr signal : Connect YCbCr video signal from video source, such as non-progressive scan DVD player.
TV INPUT
Receive TV/cable broadcasting program.
6
VIDEO
Press this button to select video source on main screen.
Æ VIDEO Æ S-VIDEO Æ COMPONENT VIDEO
VIDEO can also be selected using the INPUT SELECT
button on the TV.
Remote Control
POWER
Switches power ON/OFF.
(This does not operate when
POWER/STANDBY indicator of the main
unit is off.)
GRAPHIC
Inputs RGB signal of personal computer,
etc.
RGB:
Æ D_sub 15 pin
Æ DVI
MENU
DISPLAY OSD MENU
ADJ+, ADJ-
Highlight the submenu or item you wish to
enter
Adjust the level or change the setting of the
selected ite
m
Reserved keys
TT, HOLD, SUBTITLE
REVEAL, R, G, Y, C, EXIT,
INDEX, MIXER, DISPLAY
*For teletext control only
MUTE
MUTE ON Æ MUTE OFF Æ MUTE ON
SLEEP
N
O TURN OFF Æ 30 MIN OFF Æ 60 MIN
OFF Æ 90 MIN OFF Æ 120 MIN OFF Æ
N
O TURN OFF
WIDE
4:3 Æ 16:9 Æ ZOOM 1 (VIDEO ONLY) Æ
ZOOM 2 (VIDEO ONLY) Æ 4:3
(ZOOM 1 and ZOOM 2 only work on
composite video, s-video and component video.)
PIP I/P
Press this button to select video source on
second screen.
VOL +, VOL –
Volume up / down.
COMP
Press this button to select component video
source on MAIN screen.
TV
Switch to TV channel
CHRTN
At TV mode to exchange channel between
currently channel and before channel
At channel scan press “CHRTN” KEY to
stop channel scan.
CH+, CH-
Increase / decrease TV channel number.
0 ~ 9 –100 numeral keypad
Input TV channel number directly.
Example: select channel 20, directly key in
“2”, “0”. To select channel 8, you can
directly key in “0”、“8”,or only key in “8”
you must be wait for 5 sec.
Select channel 104, directly key in”100”,
“0”, “4”
SWAP (PIP & POP mode only)
Swap the screen of PIP or POP
(Only work at main screen source VIDEO/S-
VIDEO/YCbCr)
A, B
Preset two channel hot key.
MTS
S
elect
stereo, mono or SAP.
ENTER
Execute the selected highlight item or level
setting
CCD
Setting the caption to turn on or off
V-CHIP
RISTRICT TV and Movie Viewing
according to the parental level
chosen.
The preset PIN number to allow
modification of the parental level set
is “0000”.
Change this number to one you can
remember the master PIN number
will show as “xxxx” and if forgotten
cannot be reset.
PIP
N
ormal ÆPIPÆ POP 2 (LEFT &
RIGHT) ÆNORMAL
POWER MUTE
VIDEO COMP GRAPHIC TV
CH
VOL
WIDE
CHRTN
MTS
AB
PIP PIP I/P SWAP
MENU ENTER
ADJ
A
DJ
CCD V-CHIP FREEZE SLEEP
TT HOLD SUBTITLE REVEAL
RGYC
EXIT INDEX MIXER DISPLAY
123
456
789
0
FREEZE
freeze on Æ freeze off Æ freeze on
7
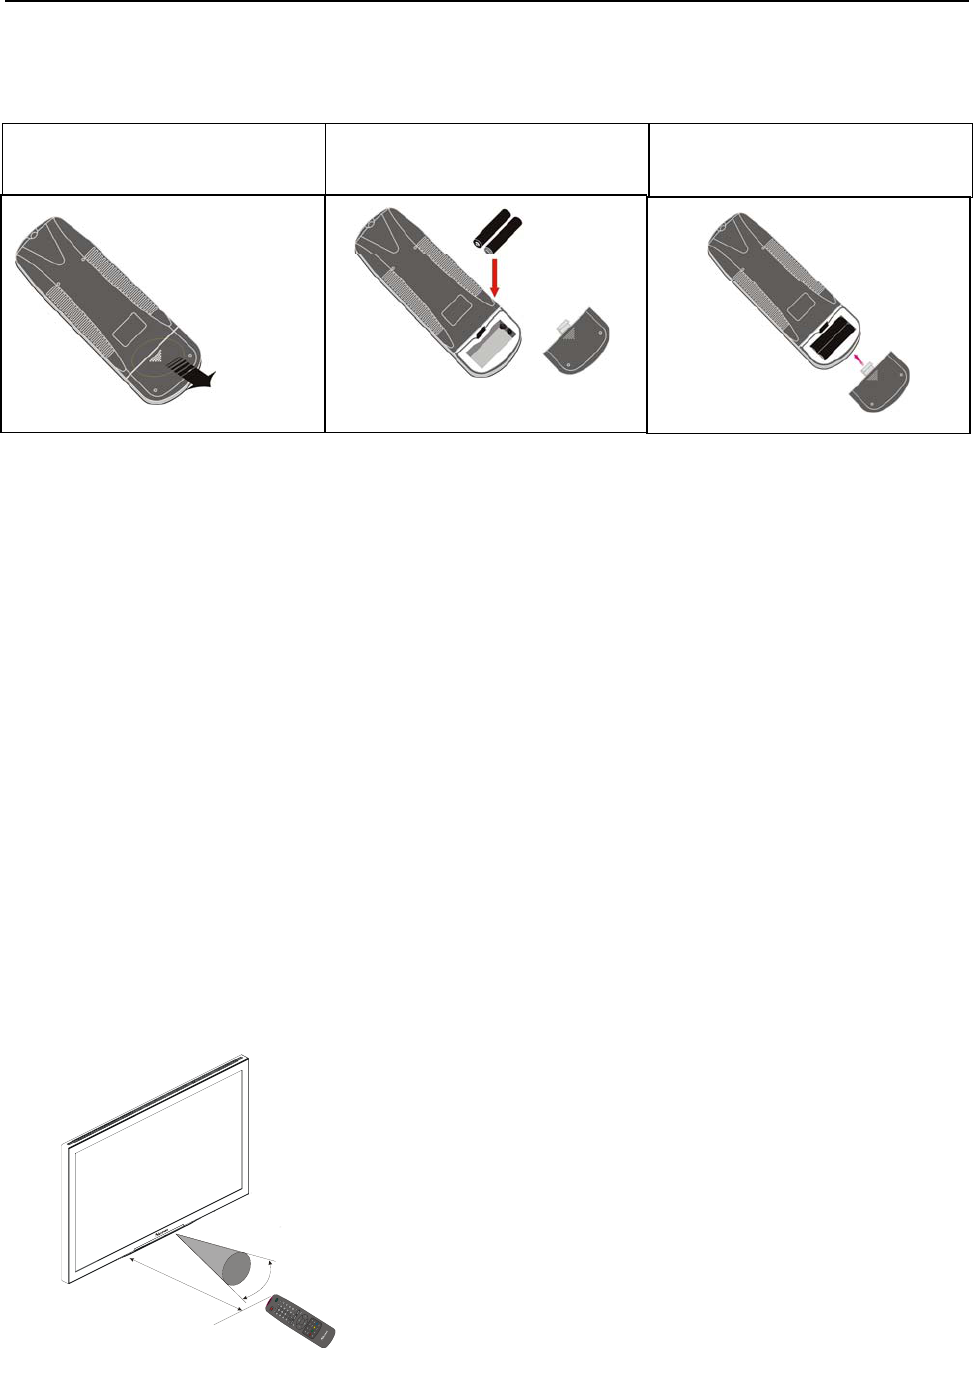
Battery Installation and Replacement
Insert the battery, making sure to set them in with the proper polarity.
1. Press and open the cover. 2. Align the batteries according
to the (+) and (-) indication
inside the case.
3. Replace the cover.
BATTERY CAUTIONS
* Use only the size and type of batteries specified.
* Be sure to follow the correct polarity when installing the batteries as indicated in the battery compartment.
Reversed batteries may cause damage to the device.
* Do not mix different types of batteries together (e.g. alkaline and carbon-zinc) or old batteries with fresh ones.
* If the device in not to be used for a long period of time, it is required to remove the batteries to prevent damage or
injury from possible battery leakage.
* Do not try to recharge batteries which is not intended to be recharged; they can overheat and rupture. (follow
battery manufacturer’s directions)
* Weak batteries can leak and severely damage the unit.
* Always remove batteries as soon as they become weak.
* The batteries of remote control may last approximately one year depending on how much the remote control is
used.
* For the best performance it is recommended the batteries of remote control be replaced on a yearly basis, or when
remote control operation becomes erratic.
* Do not take apart the batteries, heat them, or throw them into a fire.
Operating Range
* Use the remote control within a distance of about 7m/23ft. from the front of the tv’s remote control sensor and at
horizontal and vertical angles of up to approximately 30°.
* The remote control operation may not function if the tv’s remote control sensor is exposed to direct sunlight or
strong artificial light, or if there is an obstacle between the sensor and the remote control.
Handlin
g
the remote control
y Do not drop or mishandle the remote control.
y Do not get the remote control wet. If the remote control
gets wet, wipe it dry immediately.
y Avoid heat and humidity.
7m
30
O
P
OWE
RMU
TE
VIDE
OC
O
MPGRAP
H
IC
TV
C
H
VOL
WID
E
CH
RTN
M
TS
AB
PIPPIP
I/P
SW
AP
M
EN
UE
NTE
R
A
D
JA
D
J
CC
DV
-C
HIPFR
E
EZESL
EE
P
TTH
O
LDS
UB
T
ITL
ER
EV
E
AL
RGYC
E
XITINDE
XMIX
ERDISP
LA
Y
1
2
3
456
789
0
8
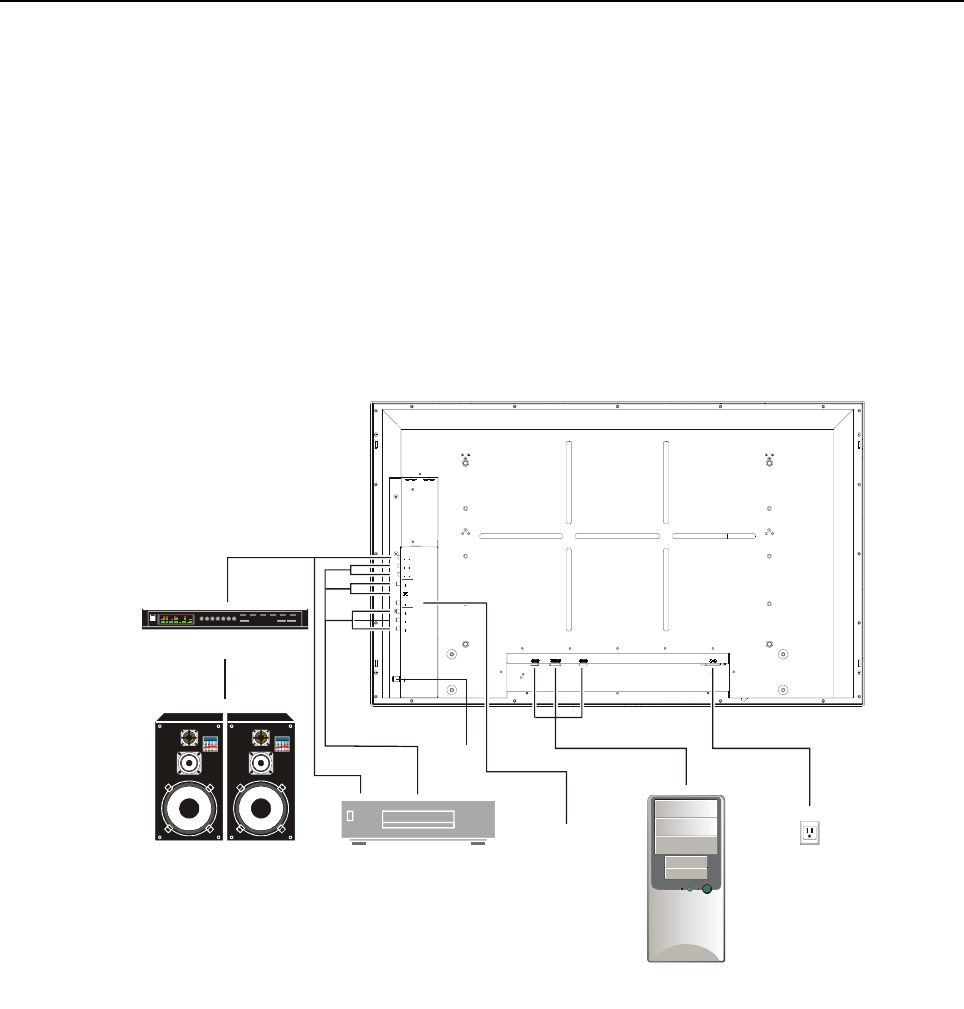
Installation
Connecting Your VCR or Laser Disc Player
Use common RCA cables to connect your VCR or laser disc player to your plasma tv. To make these connections,
simply:
1. Turn off the power to your plasma tv and VCR or laser disc player.
2. Connect one end of your RCA video to the video output connector on the back of your VCR or laser disc player,
connect the other end to the Video input on your plasma tv. Use standard RCA audio patch cords to connect the
audio from your VCR or laser disc player to your plasma tv (if your VCR or laser disc player has this capability).
Be careful to keep your right and left channel connections correct for stereo sound.
3. Turn on the plasma tv and the VCR or laser disc player.
Note: Refer to your VCR or laser disc player owner’s manual for more information about your equipment’s
video output requirements.
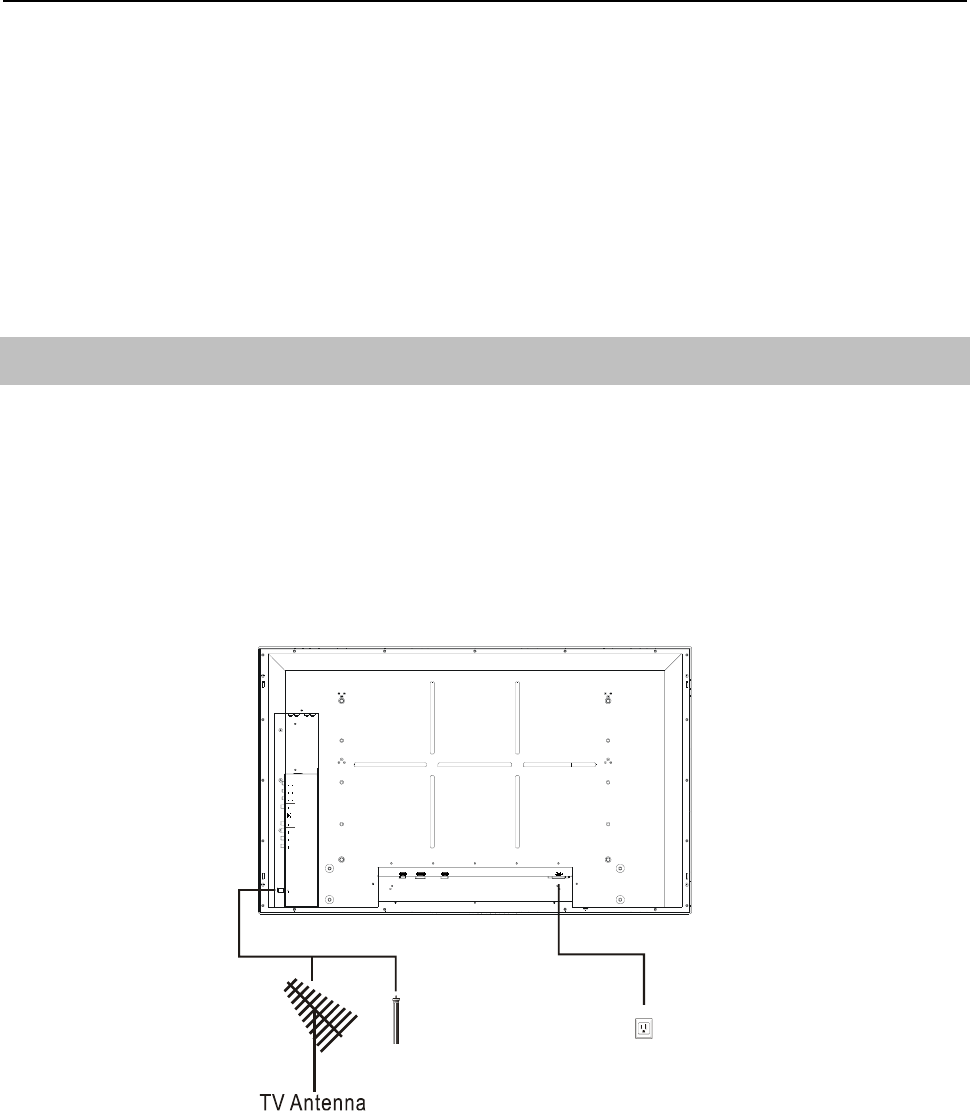
Connecting TV system
Use 75Ω standard coaxial cable to your plasma TV, To receive TV program.
For reduce noise of the RF signal level then we suggest that custom uses shielding coaxial cable to get good quality of
signal. To make these connections, simply:
1. Turn off the power to your plasma tv.
2. Connect one end of your coaxial cable to the RF input on your plasma tv.
3. Turn on the plasma tv.
此图中的单词
Power
Tuner
R
3
L
3
R
2
L
2
S-Video
R
1
L
1
AV-In
AV-Out
Y
Pb
Pr
AC IND - SU B RS - 232CDVI
Cable TV
9
Connecting Your DVD Player
You can connect your plasma tv to a DVD player. To do so, simply:
1. Turn off the power to your plasma tv and DVD player.
2. Use a video cable (with Yellow RCA terminal) to connect your DVD player to the video input of plasma TV. If
your DVD player has component video output (YCbCr or YPbPr), use component cable to connect to component
inputs on your plasma TV. Or use the DVD player’s S-Video output. Use a standard S-Video cable to connect to
the S-Video input on the plasma TV S-Video input.
3. Use a pair of RCA audio cable (with Red and White RCA terminals) to connect the audio outputs of DVD player to
one of the audio inputs on plasma TV.
4. Turn on the plasma tv and the DVD player.
此图中的单词
DVD/VCR/Laser Disc
Settop Box
P
C
Power
Tuner
R
3
L
3
R
2
L
2
S-Video
R
1
L
1
AV-In
AV-Out
Y
Pb
Pr
A
C IND - S UB RS - 232CDVI
Speaker
Amplifier
VIDEO/OUT
TV
10
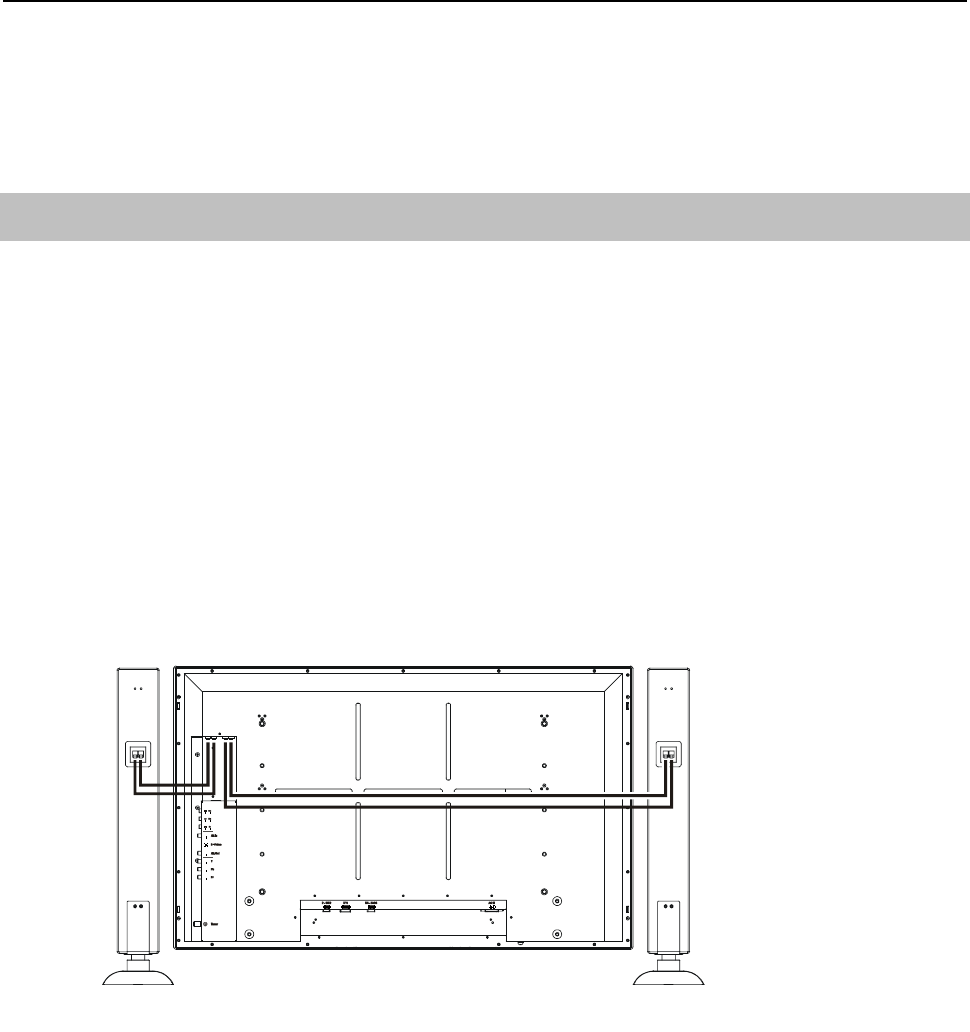
External Speaker Connections
External speakers (Option) may be connected to the plasma tv to reproduce sound.
External speakers may be connected directly to the EXT SPEAKER L and R Output terminals.
(Connect EXT SPEAKER OUTPUTS to external speakers only. DO not connect EXT SPEAKER OUTPUTS to audio
power amplifier, because you may damage the audio power amplifier.)
CAUTION: Unplug the plasma tv and all connected components before connecting external speakers. Use
only speakers with 8-ohm impedance and a power input rating of 10 watts or more.
To connect external speakers directly to the plasma tv:
1. Strip the ends of the speaker wires.
2. Press down the tabs below the SPEAKERS terminals, insert the speaker wire and release the tab to secure the
speaker sire connection:
(a) Connect the right speaker (located at right side of the tv when viewed from the front) positive (+) wire to
RIGHT +.
(b) Connect the right speaker negative (-) wire to RIGHT -.
(c) Connect the left speaker negative (-) wire to LEFT -.
(d) Connect the left speaker positive (+) wire to LEFT+.

11
OSD (On Screen Display) Controls
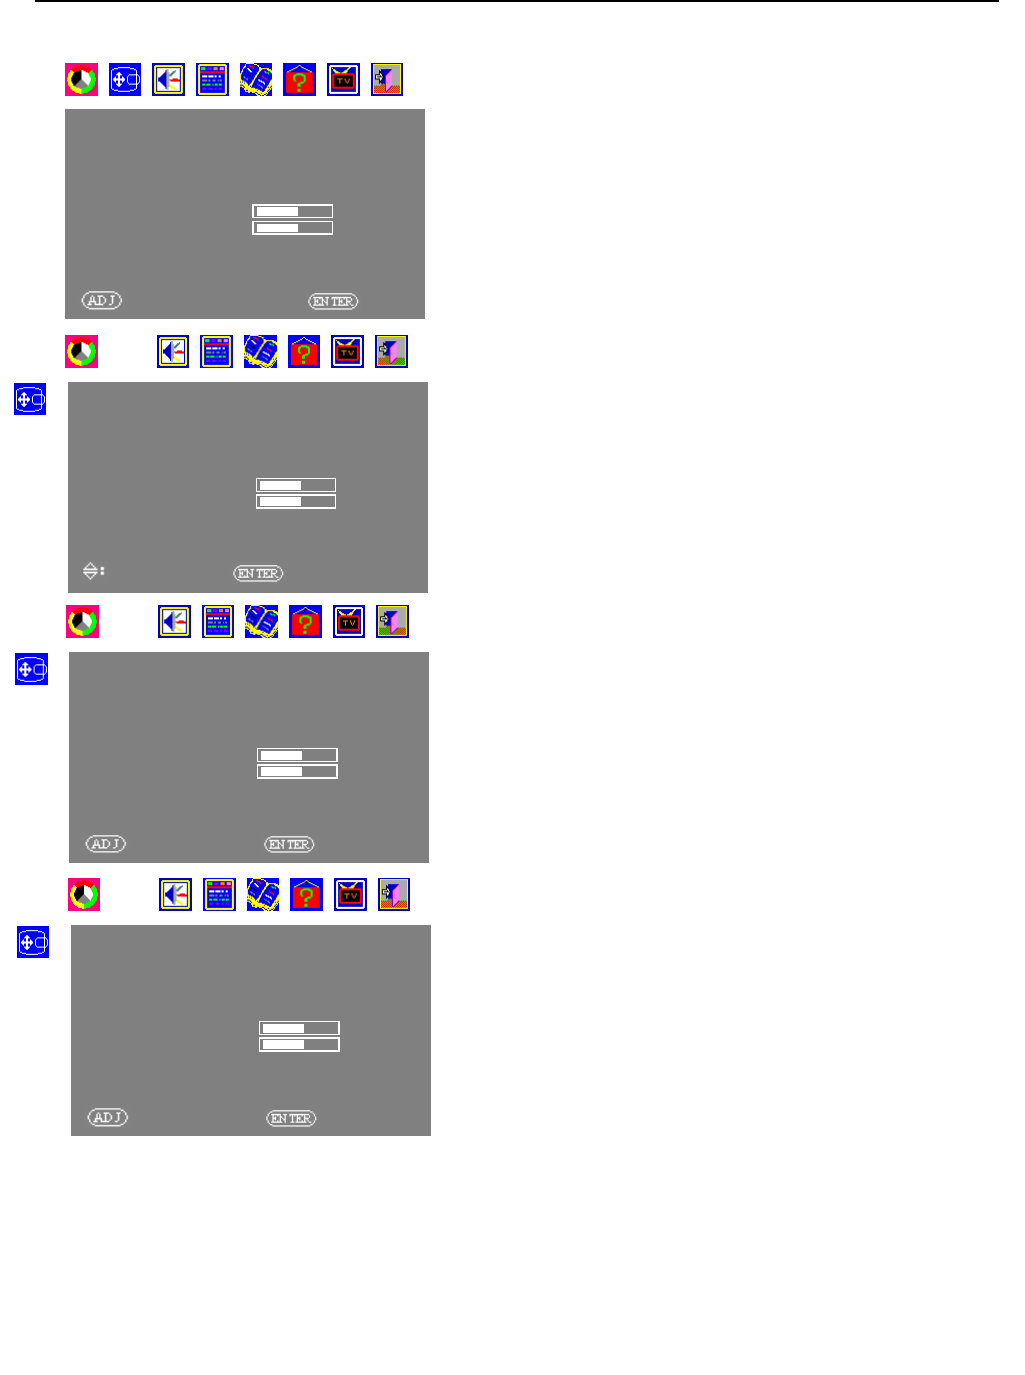
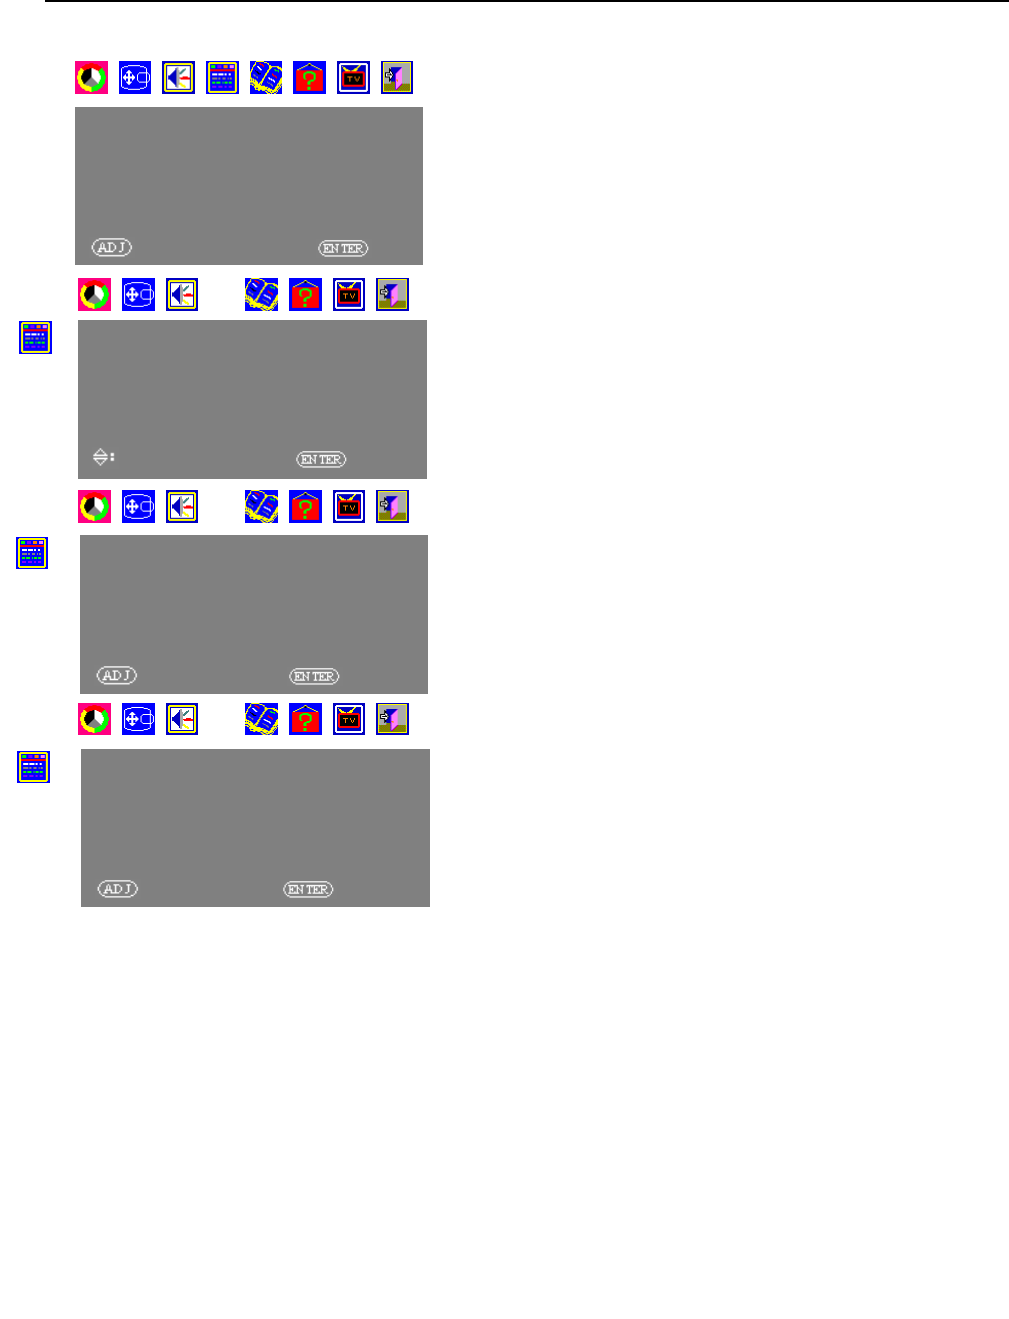
Menu Operations
Your PDP screen has an easy and convenient menu operation
sy
stem. It helps
y
ou to use each PDP
f
unction quickl
y
.
1. After powering on PDP, press the MENU button on the
remote control. The menu operation system will display on
the screen.
2. Press the ADJ+/ADJ- button on the remote control to display,
change, or use the selected menu. Press the ENTER button to
enter each item on the menu (now the item glows green); if
you need to change the selected item, press the ENTER
button again to make changes (now the item glows red). After
the change is made, press the ENTER button to exit the menu
setup. If no operation is detected, the on screen menu will
disappear after 20 seconds. You may also exit menu operation
interface quickly by pressing the MENU button on the
remote control.
PICTURE
BRIGHTNESS 08
CONTRAST 16
SHARPNESS +00
COLOR 16
TINT +00
COLOR TEMPERATURE NORMAL
EXIT MENU
: SELECT MAIN MENU :OK
PICTURE
BRIGHTNESS 08
CONTRAST 16
SHARPNESS +00
COLOR 16
TINT +00
COLOR TEMPERATURE NORMAL
EXIT MENU
: ADJUSTMENT :OK
PICTURE
BRIGHTNESS 08
CONTRAST 16
SHARPNESS +00
COLOR 16
TINT +00
COLOR TEMPERATURE NORMAL
EXIT MENU
SELECT ITEM :OK

12
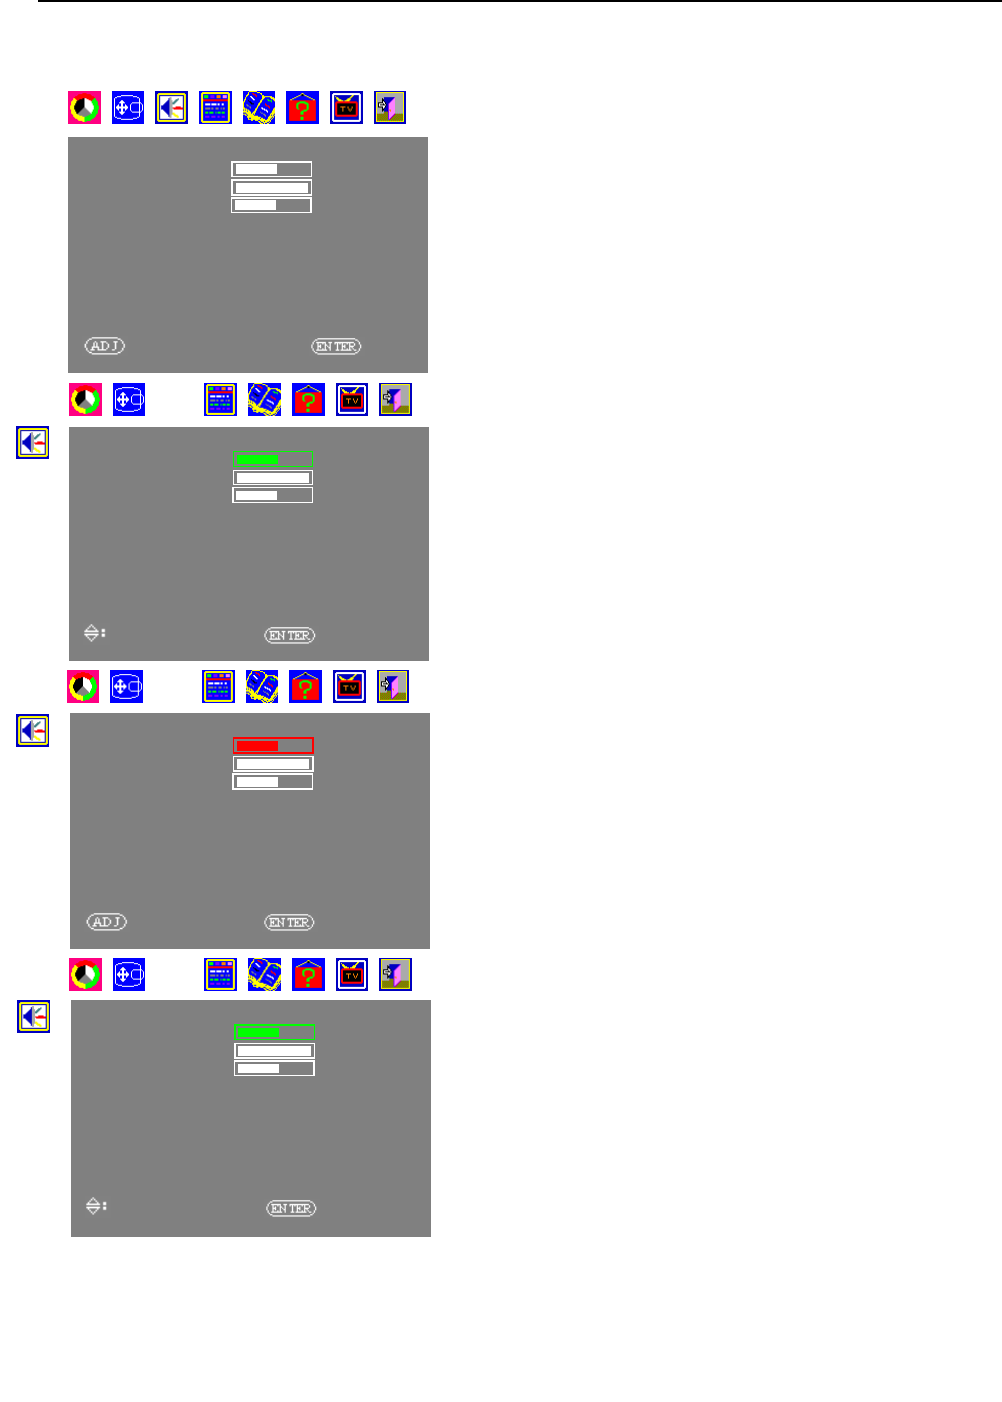
Picture Quality Adjustment
Your PDP has the following setup options which allow you to
improve the picture quality.
Brightness, contrast, sharpness, color, tint (only for NTSC), and
color temperature.
When the Picture is selected, you can adjust the following items:
1. Press MENU button to display the menu operation interface
on the screen.
2. Press ADJ+/ADJ- button to select Picture menu. Then press
ENTER again to enter Picture submenu (selected item glows
green).
3. Press ADJ+/ADJ- button to select the item you need then
press ENTER button again to enter the selected
adjustment submenu (Now the item glows red).
4. Adjustment items… Press ADJ+/ADJ- …
Brightness Increase or decrease
Contrast
Sharpness
Color
Tint
Color Temperature Select desired color temperature
(Normal, cold, warm)
5. If you are satisfied with your setup, press ENTER button
again to complete menu setup (selected adjustment item
glows green again).
PICTURE
BRIGHTNESS 08
CONTRAST 16
SHARPNESS +00
COLOR 16
TINT +00
COLOR TEMPERATURE NORMAL
EXIT MENU
: SELECT MAIN MENU :OK
PICTURE
BRIGHTNESS 08
CONTRAST 16
SHARPNESS +00
COLOR 16
TINT +00
COLOR TEMPERATURE NORMAL
EXIT MENU
SELECT ITEM :OK
PICTURE
BRIGHTNESS 08
CONTRAST 16
SHARPNESS +00
COLOR 16
TINT +00
COLOR TEMPERATURE NORMAL
EXIT MENU
: ADJUSTMENT :OK
PICTURE
BRIGHTNESS 08
CONTRAST 16
SHARPNESS +00
COLOR 16
TINT +00
COLOR TEMPERATURE NORMAL
EXIT MENU
SELECT ITEM :OK
PICTURE
BRIGHTNESS 08
CONTRAST 16
SHARPNESS +00
COLOR 16
TINT +00
COLOR TEMPERATURE NORMAL
EXIT MENU
: ADJUSTMENT :OK
13
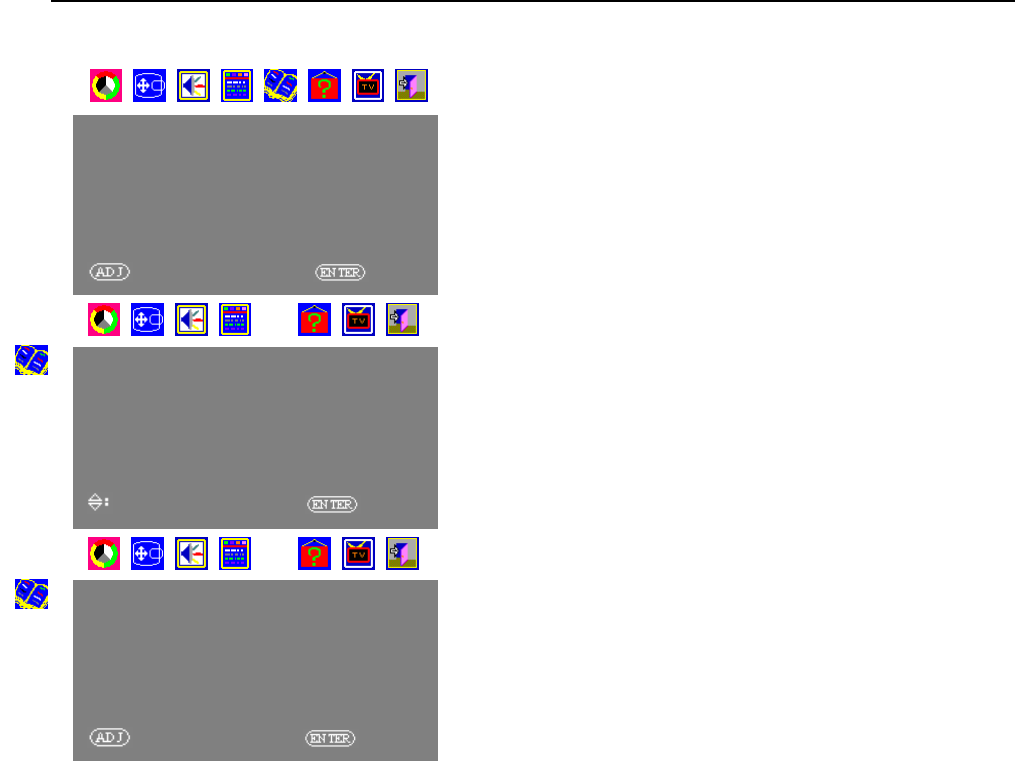
Picture-in-Picture
You can select Picture-in-Picture (PIP) display mode to display
two different pictures on the screen.
N
ote: TV and composite video pictures cannot be displayed at the
same time under PIP mode.
When the component input is YCBCR, if the primary
picture input is TV or VIDEO, then YCBCR or S-VIDEO
can be displayed as the secondary picture.
When the component input is YPBPR, if the primary
picture input is TV or VIDEO, then only S-VIDEO can be
displayed as the secondary picture.
1. Press MENU button to display the menu operation interface
on the screen.
2. Press ADJ+/ADJ- button to select Display menu and then
press ENTER button.
3. Press ADJ+/ADJ- button to select the Display Mode under
Display menu, and then press the ENTER button (now the
Display Mode item glows red).
4. Press ADJ+/ADJ- button again to select PIP, and then press
the ENTER button. PIP mode is displayed on the screen.
You can also turn on PIP function by using remote control.
Meanwhile, you can use the buttons on the remote control to
operate more functions.
Button name Function Descriptions
1. PIP Turn on/off PIP/POP functions.
2. VIDEO Select the display mode of the
primary picture.
3. PIP I/P Select the display mode of the
secondary picture.
4. SWAP Switch between the primary and
secondary pictures.
DISPLAY
POSITION
SIZE
PICTURE MODE SINGLE
PIP SETUP
CLOCK +000
FOCUS 16
AUTO FOCUS
EXIT MENU
: SELECT MAIN MENU :O
K
DISPLAY
POSITION
SIZE
PICTURE MODE SINGLE
PIP SETUP
CLOCK +000
FOCUS 16
AUTO FOCUS
EXIT MENU
SELECT ITEM :O
K
DISPLAY
POSITION
SIZE
PICTURE MODE SINGLE
PIP SETUP
CLOCK +000
FOCUS 16
AUTO FOCUS
EXIT MENU
: ADJUSTMENT :O
K
DISPLAY
POSITION
SIZE
PICTURE MODE SINGLE
PIP SETUP
CLOCK +000
FOCUS 16
AUTO FOCUS
EXIT MENU
: ADJUSTMENT :O
K
14
.
Sound Setup
¾ Your PDP has an external/internal speaker selecting
function. You can select different functions based on
your preferences.
¾ Your PDP has three sets of audio input options which
allow you to setup the audio input method as you wish
and brings you more enjoyment.
¾ You can adjust the audio setup based on your
preferences.
Treble, bass, balance, sound mode.
Your PDP was manufactured upon the certification and
authorization of BBE Company.
1. Press MENU button to display the menu operation interface
on the screen.
2. Press ADJ+/ADJ- button to select the sound menu and then
press ENTER button.
3. Press ADJ+/ADJ- button to select the item you want to adjust
and then press the ENTER button to enter the selected
adjustment item (now the item glows red).
4. Adjustment Item Press ADJ+/ADJ- …
Treble Increase or decrease
Bass Increase or decrease
Balance Increase or decrease
Speaker Internal or external
Sound Mode Select the sound mode desired.
(Normal, 3D Stereo, WOW, BBE)
AUDIO1 Input Select input mode
(VIDEO, S-VIDEO, YCBCR/YPBPR, RGB, DVI)
AUDIO2 Input Select input mode
(VIDEO, S-VIDEO, YCBCR/YPBPR, RGB, DVI)
AUDIO3 Input Select input mode
(VIDEO, S-VIDEO, YCBCR/YPBPR, RGB, DVI)
5. If you are satisfied with the setup, press the ENTER button
again to complete the menu setup (selected adjustment item
glows green again).
SOUND
TREBLE 08
BASS 08
BALANCE +00 +00
SPEAKER INTERNAL
AUDI01 INPUT VIDEO
AUDI02 INPUT S-VIDEO
AUDI03 INPUT YCBCR
SOUND MODE NORMAL
EXIT MENU
: SELECT MAIN MENU :OK
SOUND
TREBLE 08
BASS 08
BALANCE +00 +00
SPEAKER INTERNAL
AUDI01 INPUT VIDEO
AUDI02 INPUT S-VIDEO
AUDI03 INPUT YCBCR
SOUND MODE NORMAL
EXIT MENU
SELECT ITEM :OK
SOUND
TREBLE 08
BASS 08
BALANCE +00 +00
SPEAKER INTERNAL
AUDI01 INPUT VIDEO
AUDI02 INPUT S-VIDEO
AUDI03 INPUT YCBCR
SOUND MODE NORMAL
EXIT MENU
: ADJUSTMENT :OK
SOUND
TREBLE 08
BASS 08
BALANCE +00 +00
SPEAKER INTERNAL
AUDI01 INPUT VIDEO
AUDI02 INPUT S-VIDEO
AUDI03 INPUT YCBCR
SOUND MODE NORMAL
EXIT MENU
SELECT ITEM :OK
15
Function Setup
Your PDP adds some special functions in the function setup
menu to provide you with more benefits.
OSD
By turning on this function, you can see the current screen display
mode while watching and changing programs.
Auto Off
By turning on this function, if there is no signal input detected for
a period of time, PDP will be turned off automatically to save
energy.
White Screen
This function is usually turned off under normal situations. It is
used as a screen evaluation tool while repairing PDP.
Reset
Reset to factory’s default settings.
1. Press the MENU button to display the menu operation
interface on the screen.
2. Press ADJ+/ADJ- button to select Function menu and then
press the ENTER button.
3. Press ADJ+/ADJ- button to select the item you want to adjust
and then press the ENTER button to enter the adjustment
item selected (now the item glows red).
4. Adjustment Item… Press ADJ+/ADJ-..
OSD On or off
Auto Off On or off
White Screen On or off
Reset Press ENTER button to reset
FUNCTION
OSD DISPLAY ON
AUTO OFF ON
WHITE SCREEN OFF
RESET
EXIT MENU
: SELECT MAIN MENU :O
K
FUNCTION
OSD DISPLAY ON
AUTO OFF ON
WHITE SCREEN OFF
RESET
EXIT MENU
SELECT ITEM :O
K
FUNCTION
OSD DISPLAY ON
AUTO OFF ON
WHITE SCREEN OFF
RESET
EXIT MENU
: ADJUSTMENT :O
K
FUNCTION
OSD DISPLAY ON
AUTO OFF ON
WHITE SCREEN OFF
RESET
EXIT MENU
: ADJUSTMENT :O
K
16
Language Selection
When you use PDP for the first time, please select the
desired OSD language.
1. Press the MENU button on the remote control to display the
menu operation interface on the screen.
2. Press the ADJ+/ADJ- button to select the Configuration menu
and then press ENTER button.
3. Press the ADJ+/ADJ- button to select the Language option
under the Configuration menu and then press the ENTER
button (now the Language option glows red).
4. Press the ADJ+/ADJ- button again to select the language you
desire. Then press the ENTER button to exit the Language
submenu.
CONFIGURATION
LANGUAGE ENGLISH
COMPONENT INPUT YCBCR
RGB SOURCE NORMAL
DB15 SOURCE GRAPHICS
COLOR SYSTEM AUTO
EXIT MENU
: SELECT MAIN MENU :OK
CONFIGURATION
LANGUAGE ENGLISH
COMPONENT INPUT YCBCR
RGB SOURCE NORMAL
DB15 SOURCE GRAPHICS
COLOR SYSTEM AUTO
EXIT MENU
SELECT ITEM :OK
CONFIGURATION
LANGUAGE ENGLISH
COMPONENT INPUT YCBCR
RGB SOURCE NORMAL
DB15 SOURCE GRAPHICS
COLOR SYSTEM AUTO
EXIT MENU
: ADJUSTMENT :OK

17
Information Inquiry
You can obtain the information of the current PDP
input signal by using this function.
1. Press the MENU button to display the menu operation
interface on the screen.
2. Press the ADJ+/ADJ- button to select the Information menu.
The signal input information of the primary and secondary
pictures will be displayed on the screen.
INFORMATION
INPUT 1
VIDEO
INPUT 2
N
ONE
: SELECT MAIN MENU :O
K
18
TV Setup Operations
You can use your PDP in many different countries. Each country
has its own TV broadcast standard. You can select the TV system
you need in the TV Setting menu based on the TV standard of
your count
r
y.
User CH
The user can setup the TV channels to a mode that he/she is more
familiar with.
CH Fine Tune/Auto Fine Tune
In some areas with weaker TV signals, you can use this function
to modify and correct the signal to obtain a better picture on the
screen.
1. Press the MENU button to display the menu operation
interface on the screen.
2. Press the ADJ+/ADJ- button to select the TV Setup menu and
then press ENTER button.
3. Press the ADJ+/ADJ- button to select the item you wish to
adjust and then press the ENTER button to enter the selected
item (now the item glows red).
4. Adjustment Item… Press ADJ+/ADJ- …
System Setup Select the item to adjust
(The adjusting method is the same as the menu operation.)
CH Fine Tune Increase or decrease
Auto Fine Tune On or off
MTS Select “Mono”
、 “Stereo”、“Sap”
V Chip Setup The V-Chip reads information
encoded in the rated program and
blocks programs from the set based
upon the rating selected by the
parent.
C.C Setup Setting the caption to turn on or off
5. If you are satisfied with the setup, press the ENTER button
again to complete the setup (the selected adjustment item
glows green again).
When you use the PDP’s TV function the first time, we
recommend channel scanning after selecting the required TV
system. This lets you to watch more and higher quality TV
programs.
If the signal is weaker in the area you live, we recommend you
use the auto channel scanning.
1. Press the MENU button to display the menu operation
interface on the screen.
2. Press the ADJ+/ADJ- button to select the TV Setup menu and
then press ENTER button.
3. Press the ADJ+/ADJ- button to select CH Mapping option
and then press ENTER button to enter the CH Mapping
adjustment item.
4. Press the ADJ+/ADJ- button again to select the Channel Scan
option and then press ENTER button. This item glows red.
5. Press the ADJ+/ADJ- button to select “on” and then press the
ENTER button. The system turns on the channel scanning
function.
TV SETUP
USER CH 10
SYSTEM SETUP
CH MAPPING
CH FINE TUNE +00
AUTO FINE TUNE OFF
MTS MONO
V CHIP SETUP
C.C SETUP
EXIT MENU
: SELECT MAIN MENU :OK
SYSTEM SETUP
COLOR SYSTEM NTSC
SOUND SYSTEM M
FREQUENCY TYPE CABLE TV
EXIT MENU
SELECT ITEM :OK
TV SETUP
USER CH 2
SYSTEM SETUP
CH MAPPING
CH FINE TUNE +00
AUTO FINE TUNE OFF
MTS MONO
V CHIP SETUP
C.C SETUP
EXIT MENU
SELECT ITEM :OK
TV SETUP
USER CH 2
SYSTEM SETUP
CH MAPPING
CH FINE TUNE +00
AUTO FINE TUNE OFF
MTS MONO
V CHIP SETUP
C.C SETUP
EXIT MENU
SELECT ITEM :OK

19
RS232C Control
Application
Only use in factory.
Table of HDTV resolution supported.
H(KHz) V(Hz) Dot
clock
720*480 480p 31.54 60.08 27.00
1280*720 720p 45.00 60.00 74.25
1920*1080 1080i 33.75 30.00 74.25
20
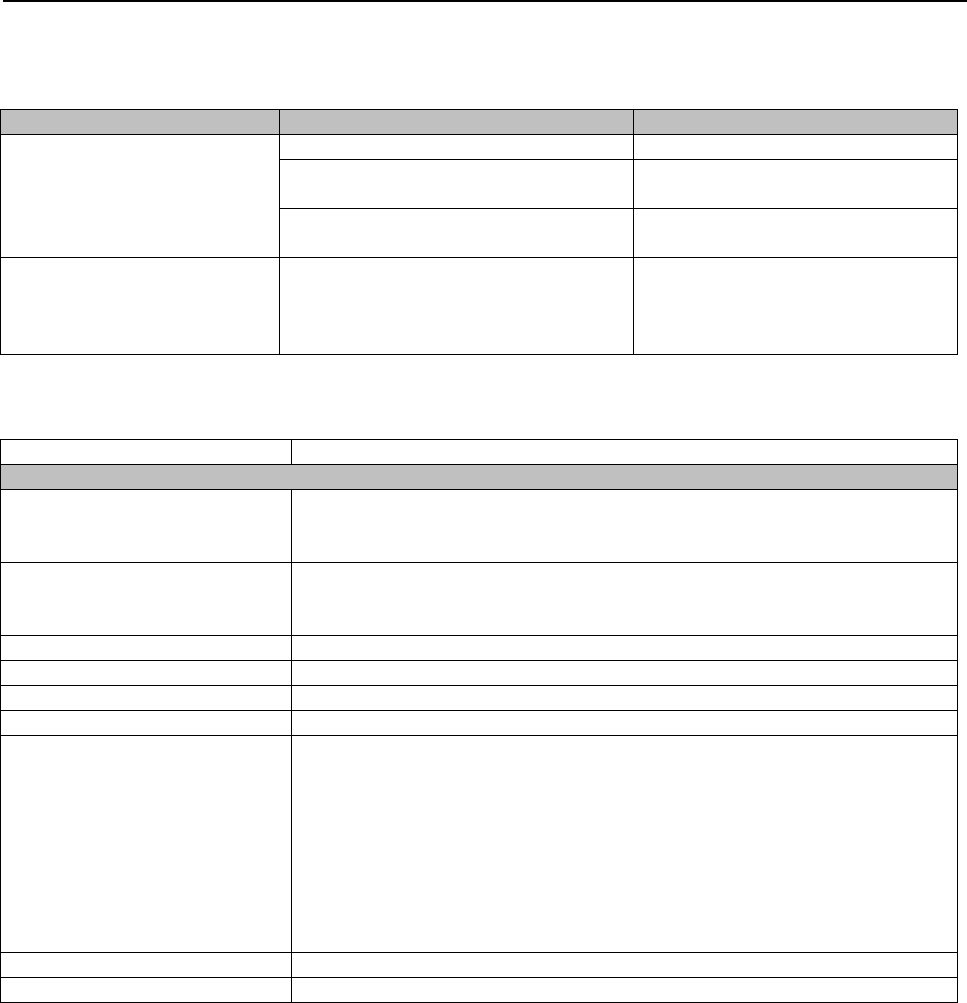
Troubleshooting
If the picture quality is poor or there is some other problem, check the adjustments, operations, etc., before requesting
service.
Symptom Checks Remedy
Picture appears but no sound is y Is the volume set at the minimum? y Increase the volume.
Produced. y Is the mute mode set?
y Are the speakers properly connected?
y Press the remote control’s MUTE button.
y Connect the speakers properly.
y Is AUDIO INPUT set correctly? y Set AUDIO INPUT on the SOUND menu
correctly.
Poor picture with VIDEO signal
input.
y Improper control setting.
Local interference.
Cable interconnections.
Input impedance is not correct level.
y Adjust picture control as needed.
Try another location for the tv.
Be sure all connections are secure.
Specifications
Input Signals RGB, NTSC, PAL, HD*1, DVD*1, DTV*1
Input Terminals
RGB ANALOG RGB: 1 * mini D-sub 15-pin
DIGITAL RGB: 1 * DVI-D 29-pin
(Not compatible with analog input)
Video
COMPOSITE VIDEO: 1 * RCA
S-Video: 1 * DIN 4-pin
COMPONENT VIDEO ( YCbCr ) 3 * RCA
DTV COMPONENT VIDEO ( YPbRr ) 3 * RCA
Audio Stereo RCA × 3(selectable)
RS232C control D-sub 9-pin × 1
Audio output Internal 5W + 5W at 16 ohm / External (option) 10W + 10W at 8 ohm
OSD Functions Picture (Brightness / Contrast / Sharpness / Color / Tint / Color temperature),
Display (Position / Size / Picture mode / PIP setup / Clock / Focus / Auto focus),
Sound (Bass / Treble / Balance / Speaker / Audio 1 input / Audio 2 input / Audio 3 input &
output ),
Function (OSD / Power saving / White Screen / Reset),
Configuration (Language / Component input / RGB source / DB15 source / Color system),
Information (Main source / Second source)
TV setup(User ch / System setup / Ch mapping / Ch fine tune / MTS ./ V chip setup /
CC setup)
Other features 3D motion adaptive Scan Converter with 2-2 (50Hz), 2-3 (60Hz) Pull Down Converter,
Accessories AV cable, User’s Manual (about TV part )