Topcon America 090521 GNSS Receiver User Manual Introduction
Topcon America Corporation GNSS Receiver Introduction
Contents
HiPerII Operation Manual 2
HiPerII Chapter 2
Pre-survey Preparation
Before beginning to survey with the HiPerII receiver, the follow-ing software needs to be
installed and configurations need to be applied:
Install receiver configuration software See
"Installing Sokkia Topcon Software" on page 2-2.
Optional: install SD card and/or SIM card
See "Installing the Optional SD and SIM Cards" on page
2-7. Charge the batteries
See "Charging the Batteries" on page 2-9.
Enable power source settings ( either attached or external )
See "Power Management" on page 2-11 and "Power-ing the Receiver" on page 2-14.
Configure the Bluetooth wireless technology module
See "Bluetooth Module Configuration" on page 2-23.
Collect almanacs and ephemerides ( after first-time configuration activities as described in
Chapter 3 )
See "Collecting Almanacs and Ephemerides" on page 2-26.
This chapter also discusses connecting batteries to the receiver, connecting the receiver and a
computer, and powering the receiver using different sources.
Installing Sokkia Topcon Software
The Sokkia Topcon GPS+ CD includes the following software programs used for configuring and
maintaining the receiver. This soft-ware is also available on the Sokkia Topcon website to
registered users.
PC-CDU Lite ver. 2.1.15 or newer
Modem-TPS ver. 2.2p2 or newer
BTCONF ver. 1.3 or newer
FLoader ver 1.0.07 or newer
If installing the program ( s ) from the GPS+ CD, insert the CD into the computer's CD-ROM
drive.
If downloading the program ( s ) from the website, extract the program's files into a folder on
the hard drive.
The following sections describe installing this software, and other sections throughout the
manual describe using this software with the receiver.
HiPerII Chapter 2
HiPerII Chapter 2
Installing PC-CDU
PC-CDU is a comprehensive Windows software product designed for controlling GPS+ receivers
developed by Sokkia Topcon. PC-CDU uses the GPS Receiver Interface Language ( GRIL ) to
configure various receiver settings and diagnose receiver performance.
The PC-CDU software exists in two versions: a full-functionality version called PC-CDU MS and
a reduced-functionality version called PC-CDU Lite. PC-CDU Lite is available for free on the
Sokkia Topcon website ( www.sokkia.co.jp ) or the GPS+ CD.
Computer requirements for PC-CDU are: Windows98 or newer and an RS-232C or Bluetooth
capable. Use PC-CDU version 2.1.15 or newer to correctly configure the receiver.
Refer to the PC-CDU Reference Manual for full details on installing and using PC-CDU.
To Install PC-CDU:
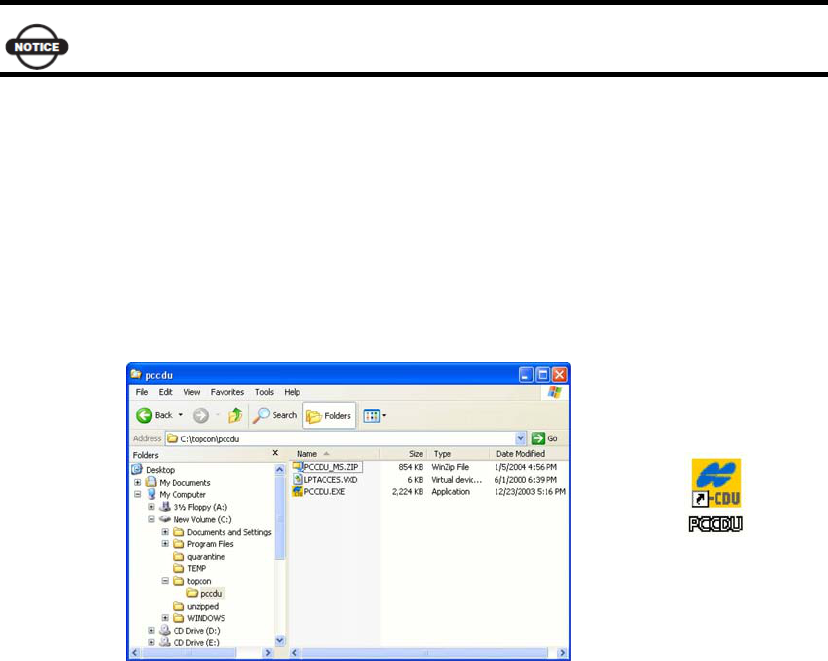
1. Create a PC-CDU folder on the hard drive, and place the compressed PC-CDU zip file
( retrieved from either the website or the GPS+ CD ) in this folder.
2. Navigate to the PC-CDU folder, and double-click the PC-CDU_MS zip file.
3. Extract the PCCDU.EXE and associated *.dll file to the PC-CDU folder ( Figure 2-1 ).
4. Optionally, create a shortcut on the computer's desktop for quick access to PC-CDU ( Figure
2-1 ).
Figure 2-1. Extract Program and Create Shortcut
To uninstall PC-CDU, navigate to the location of the *.exe file. Select the file, and press
Delete.
Installing Modem-TPS
Modem-TPS is a configuration program for the radio modem board inside the receiver.
HiPerII Chapter 2
HiPerII Chapter 2
Modem-TPS is available from the Sokkia Topcon website ( www.sokkia.co.jp ) or on the GPS+
CD.
Computer requirements for Modem-TPS are: Windows98 or newer and an RS-232C port or
Bluetooth wireless technology. Use Modem- TPS version 2.2p2 or newer to correctly configure
the receiver.
To install Modem-TPS:
1. Navigate to the location of the Modem-TPS program, and double-click the Setup.exe icon.
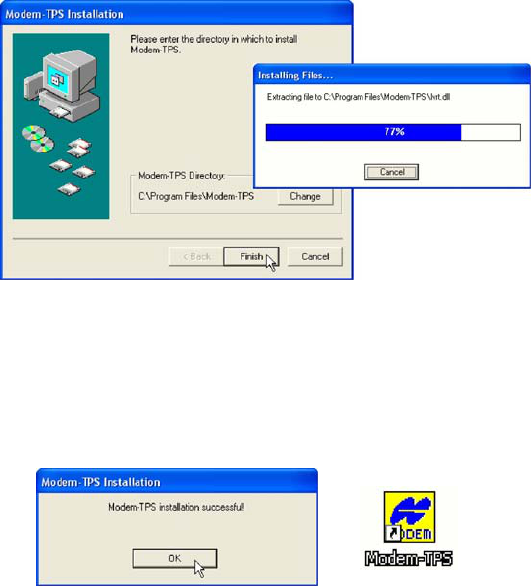
2. Keep the default installation location or select a new location. Click Finish ( Figure 2-2 ).
Figure 2-2. Select Modem-TPS Installation Location and Install
3. Click OK to complete the installation ( Figure 2-3 ).
4. Optionally, create a shortcut on the computer's desktop for quick access to Modem-TPS
( Figure 2-3 )
Figure 2-3. Installation Complete and Shortcut
To uninstall Modem-TPS, use the Start menu on the computer:
1. Click Start Programs Modem-TPS UninstallModem-TPS, and click Yes at the prompt.
2. Click OK when the uninstall completes.
Installing BTCONF
BTCONF is a configuration program for the Bluetooth wireless technology module inside the
receiver. BTCONF is available from the Sokkia Topcon website ( www.sokkia.co.jp ) or on the
GPS+ CD.
Computer requirements for BTCONF are: Windows98 or newer and an RS-232C port or
HiPerII Chapter 2
HiPerII Chapter 2
Bluetooth wireless technology. Use BTCONF version 1.3 or newer to correctly configure the
receiver.
To install BTCONF:
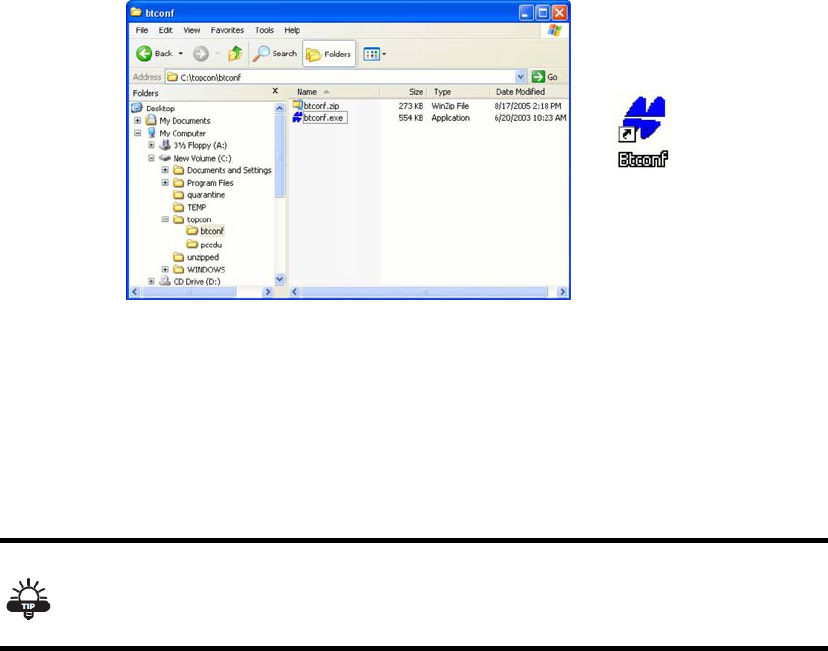
1. Create a BTCONF folder on the hard drive, and place the compressed BTCONF zip file
( retrieved from either the website or the GPS+ CD ) in this folder.
2. Navigate to the BTCONF folder, and double-click the BTCONF zip file.
3. Extract the btconf.exe to the BTCONF folder.
4. Create a shortcut on the computer's desktop for quick access to BTCONF ( Figure 2-4 ).
Figure 2-4. Extract Program and Create Shortcut
To uninstall BTCONF, navigate to the location of the *.exe file. Select the file, and press
Delete.
Each time BTCONF runs and configures the Bluetooth module, BTCONF saves the settings in a
file ( btconf.ini ). BTCONF automatically updates the file each time changes are made to the
Bluetooth module's settings.
To maintain unique Bluetooth module settings for different purposes, keep copies of
BTCONF in separate folders.
Installing FLoader
FLoader is a firmware loading program for the power board, GPS module, and modem board
inside the receiver. FLoader is available from the Sokkia Topcon website ( www.sokkia.co.jp )
or on the GPS+ CD.
Computer requirements for FLoader are: Windows98 or newer and an RS-232C port or
Bluetooth wireless technology. Use FLoader version 1.0.07 or newer to correctly configure the
receiver.
HiPerII Chapter 2
HiPerII Chapter 2
To install FLoader:
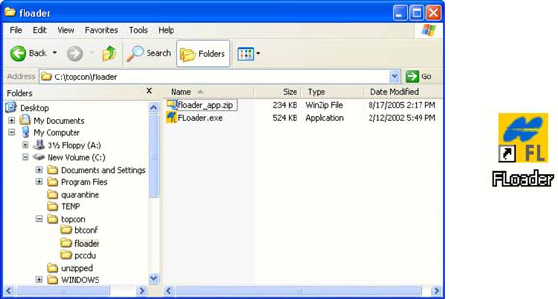
1. Create an FLoader folder on the hard drive and place the compressed FLoader zip file
( retrieved from either the website or the GPS+ CD ) in this folder.
2. Navigate to the FLoader folder, and double-click the zip file.
3. Extract the FLoader.exe file to the FLoader folder ( Figure 2-5 ).
4. Optionally, create a shortcut on the computer's desk-top for quick access to FLoader (Figure
2-5).
Figure 2-5. Extract Program and Create Shortcut
To uninstall FLoader, navigate to the location of the *.exe file, select the file, and press Delete
Installing the Optional SD and SIM Cards
Behind each detachable battery is a slot for the optional SD card or the optional SIM card. The
SD card provides memory space in which to save logged data; the SIM card provides
telephony communication for data transfer between two GSM-capable receivers. The SD card
can be purchased at a local computer store; the SIM card can be purchased at a local cellular
phone supply store. The receiver currently supports an SD card with up to 2GB ( FAT16
format ) capacity.
Once installed, the card ( s ) generally remains installed. The card can then be accessed via
the receiver board using a data port or Bluetooth wireless technology.
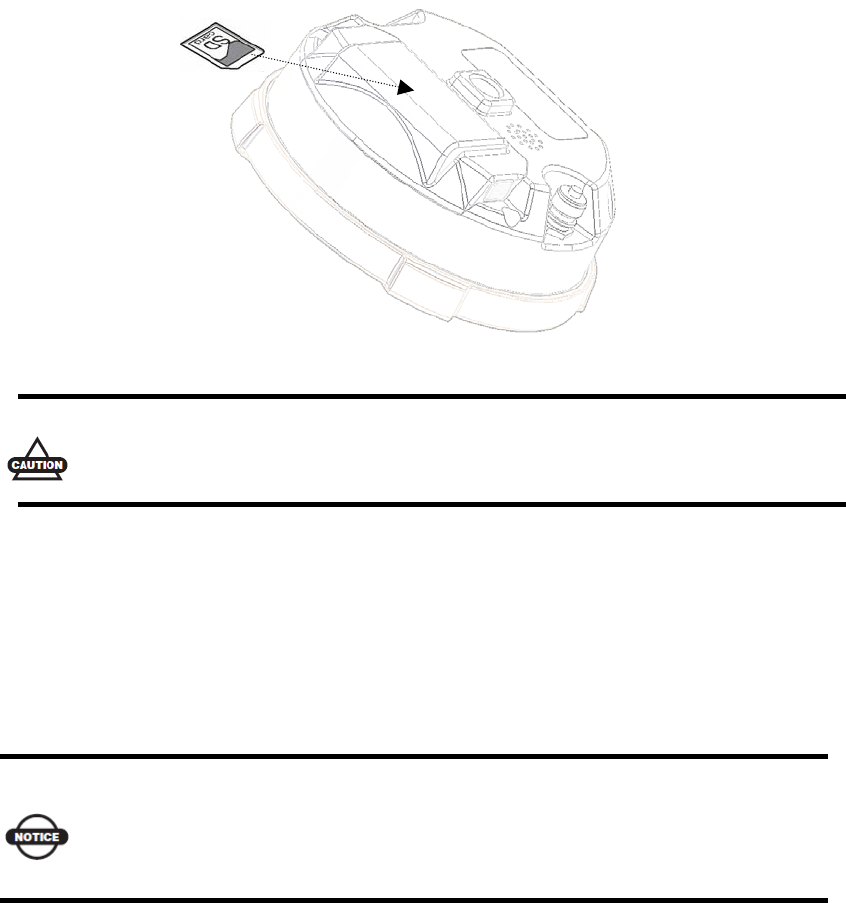
To install the SD card ( Figure 2-6 ):
1. Ensure the receiver is turned off.
2. Remove the battery.
3. Carefully insert the SD card, label side down, into the SD card slot located at the top of the
battery pocket.
HiPerII Chapter 2
HiPerII Chapter 2
Figure 2-6. Install SD Card
Do not remove the card if the receiver is powered on. Damage to data may result
from improper removal of the card.
Once the receiver is turned on, the receiver board will detect the SD card, and it will be ready
to use as needed.
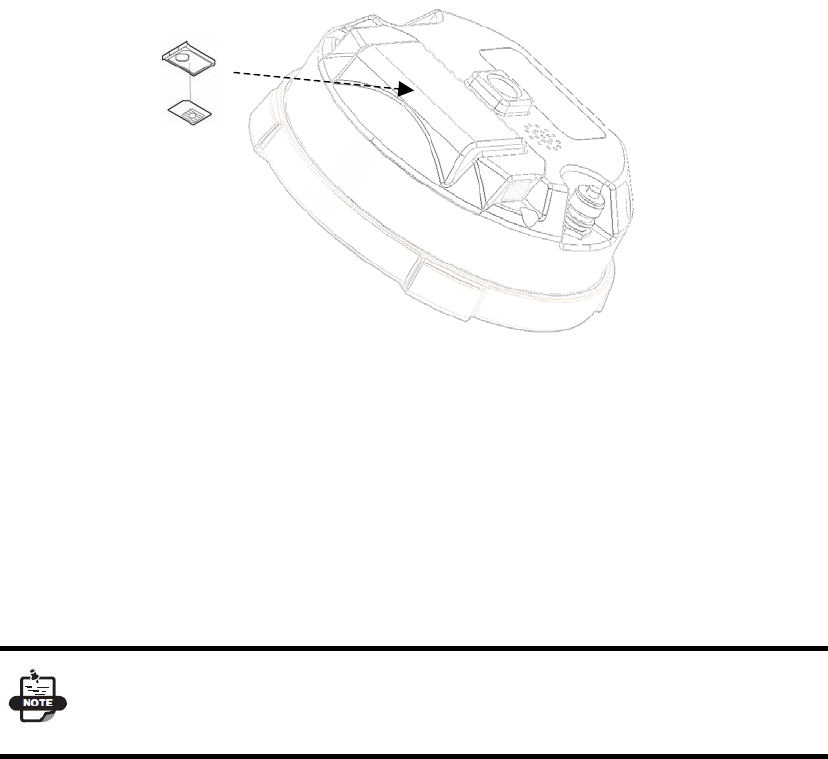
To install the SIM card ( Figure 2-7 ):
The SIM card must support Circuit Switched Data to communicate directly between receivers.
The SIM card must have GPRS or EDGE support to communicate with a GPS Network IP
ad-dress.
For direct communication between Base and Rover receivers, you must install a SIM
card with a Circuit Switch Data plan and have subscriptions to the same service
provider for proper data communication.
1. Ensure the receiver is turned off.
2. Remove the battery.
3. If needed, snap the SIM card into its holder.
4. Carefully insert the holder, label side down, into the SIM card slot located at the top of the
battery pocket.
HiPerII Chapter 2
HiPerII Chapter 2
Figure 2-7. Install SIM Card
Once the receiver is turned on, the receiver board will detect the SIM card, and it will be ready
to use as needed.
Charging the Batteries
To charge the battery, use the included charger. It takes approximately two hours to
completely charge one battery, and four hours to charge two batteries.
The batteries are shipped from the factory without power. Fully charge the batteries
be-fore surveying.
The Li-Ion batteries used in the battery packs should run at no less than 80% capacity after
500 charging cycles. These batteries do not need to be drained before recharging.
Power Management
This chapter describes how to power your receiver. Before using the receiver for the first time,
ensure that you have followed the setup instructions.
Powering the Receiver
HiPerII Chapter 2

HiPerII Chapter 2
The receiver's power button is used to switch the receiver on or off. However, the receiver will
also automatically turn on if it detects activity on COM1. If you turn off the receiver while it is
logging data to the memory, it will save and close any open files before turning off. The
receiver does not support the use of schedules.
As an alternative to using the internal battery ( for example, if the internal battery is
discharged ), the receiver can also be powered using an external battery, following the
recommendations in this section.
If the external power input exceeds 18 VDC, it may damage the receiver.
When the external battery is discharged, the receiver will automatically switch to using the
internal battery. If the internal battery does not have sufficient charge ( or is not present ),
the receiver will turn off.
The receiver draws a small amount of power from the batteries while the receiver is off.
During long term storage, you should remove the battery.
If the internal battery and any external power input voltage are below minimum operating
parameters ( in other words, if the main battery is depleted, or external power is removed or
insufficient ), the receiver will initiate a power-down sequence. It will turn off and become
inactive. If this happens, you will not be able to turn the receiver on until you restore
sufficient power.
To return to normal operation, insert a charged battery or connect a valid external power input
to the receiver. When sufficient power is restored, the receiver will turn on if the power button
is pressed.
The receiver may also become inactive if the external power input is greater than the
power specified as acceptable for the receiver.
.
Using the Detachable Batteries
The receiver uses one rechargeable lithium-ion battery. It also contains an internal backup
battery, which maintains internal RTC. The backup battery is automatically charged from the
main battery.
The battery is capable of running for more than 8 hours on a single charge. ( static
observation )
The battery compartment door provides access to the main battery. The receiver can also be
HiPerII Chapter 2
HiPerII Chapter 2
powered using an external power source.
Remove or insert the battery
To remove the battery:
1. Please turn bottom to the top in HiPerII.
2. Push battery knob of both sides, and please lift battery cover. It becomes easy to lift a
battery cover when push the center of a battery cover lightly.
3. Please slide with battery sideways, and please separate battery from connector.
4. Please lift up battery.
HiPerII Chapter 2
HiPerII Chapter 2
HiPerII Chapter 2