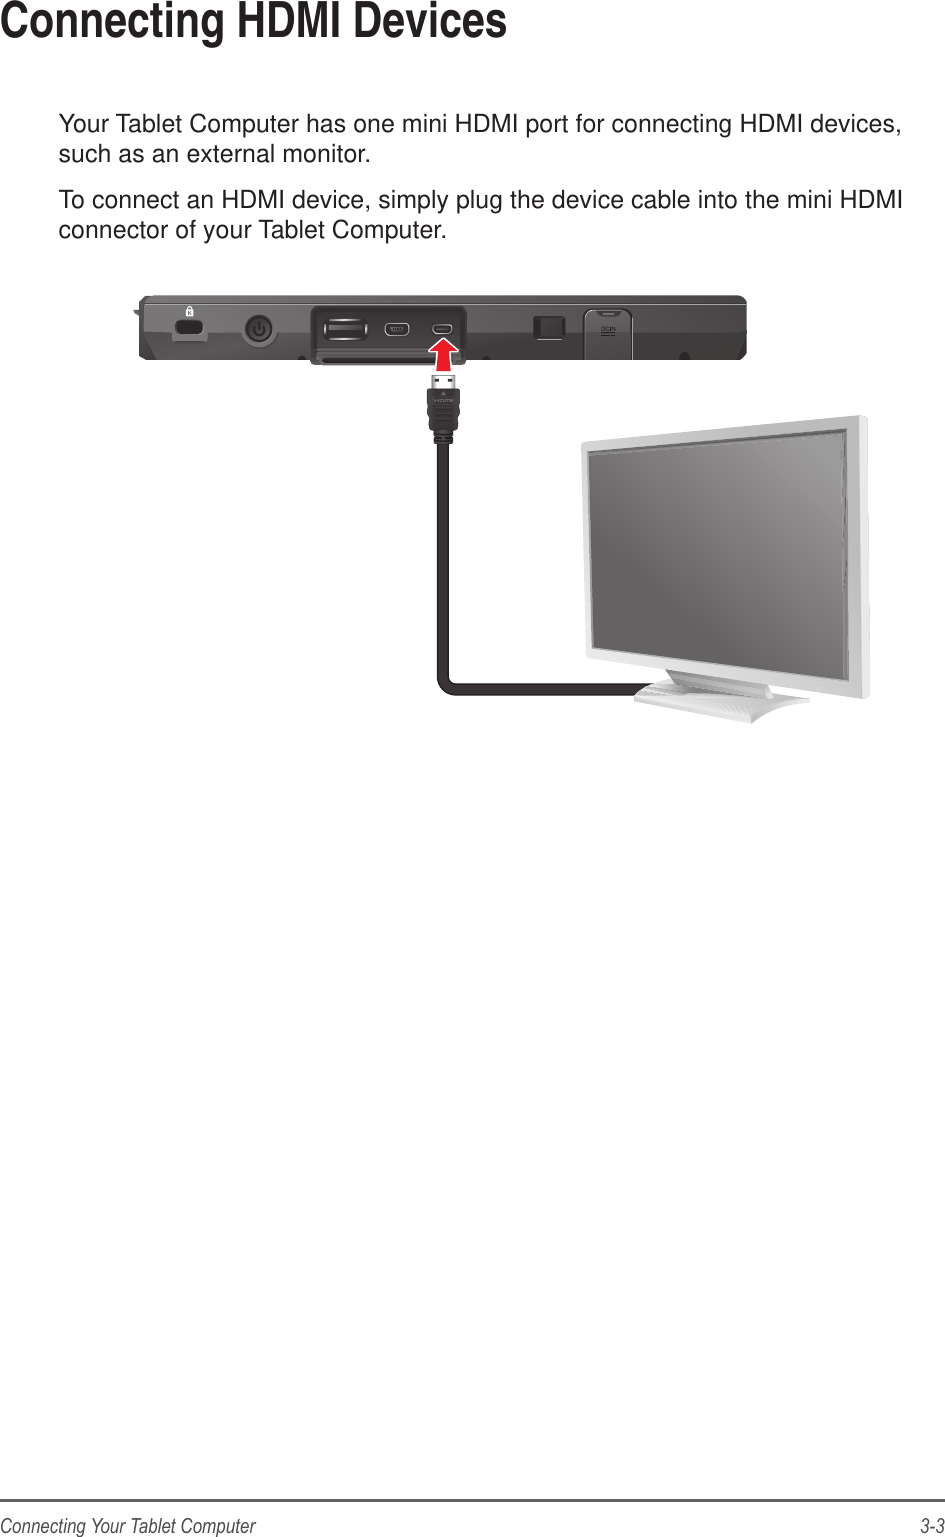
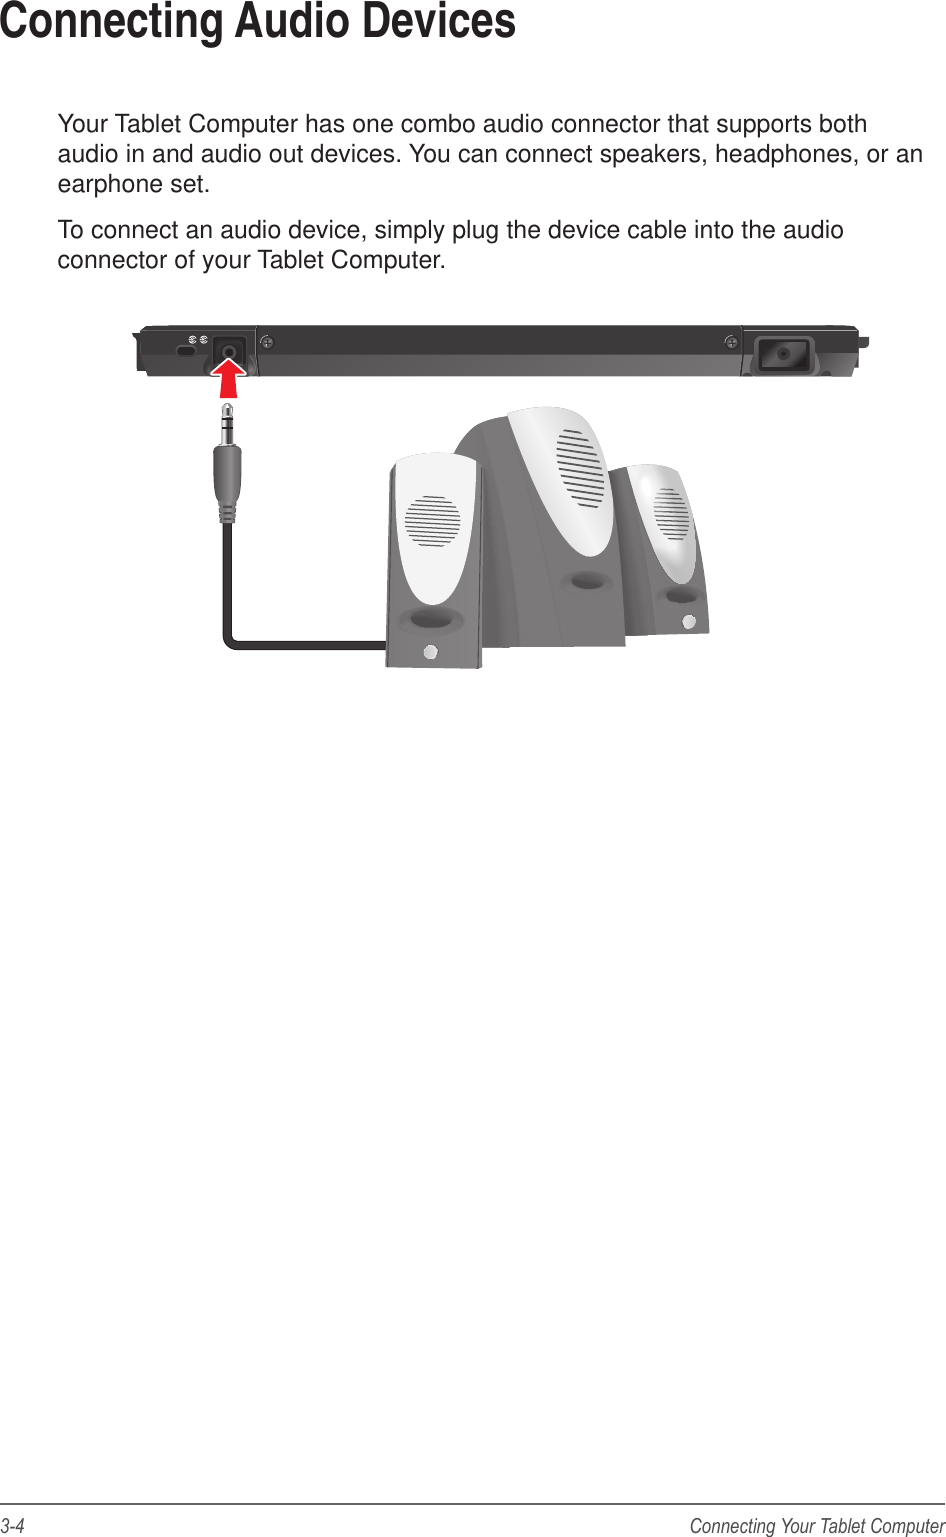
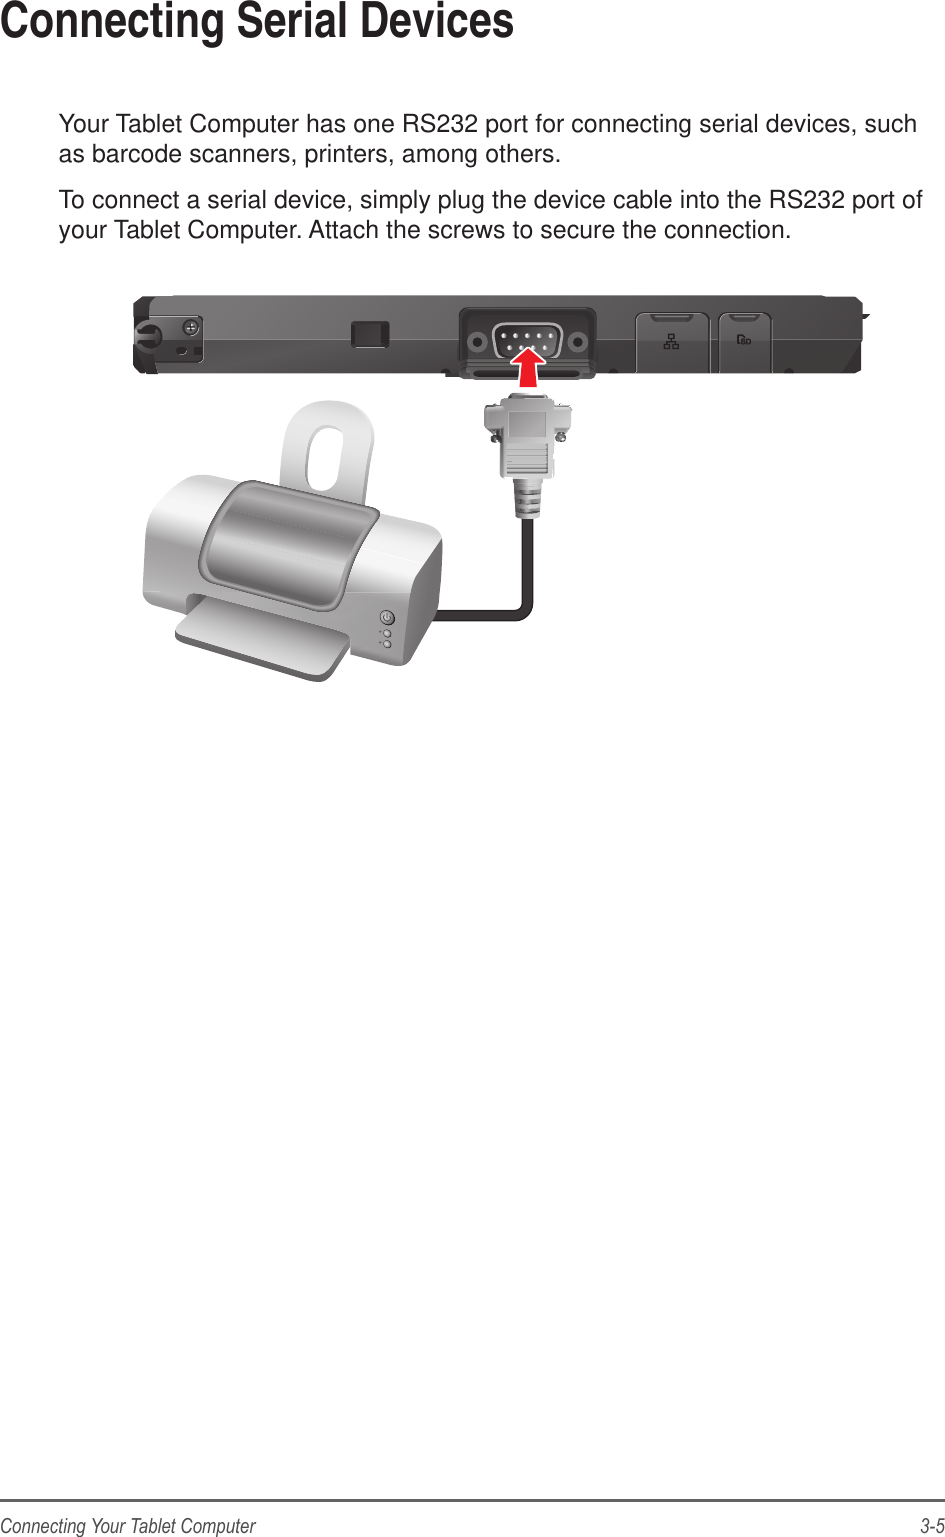
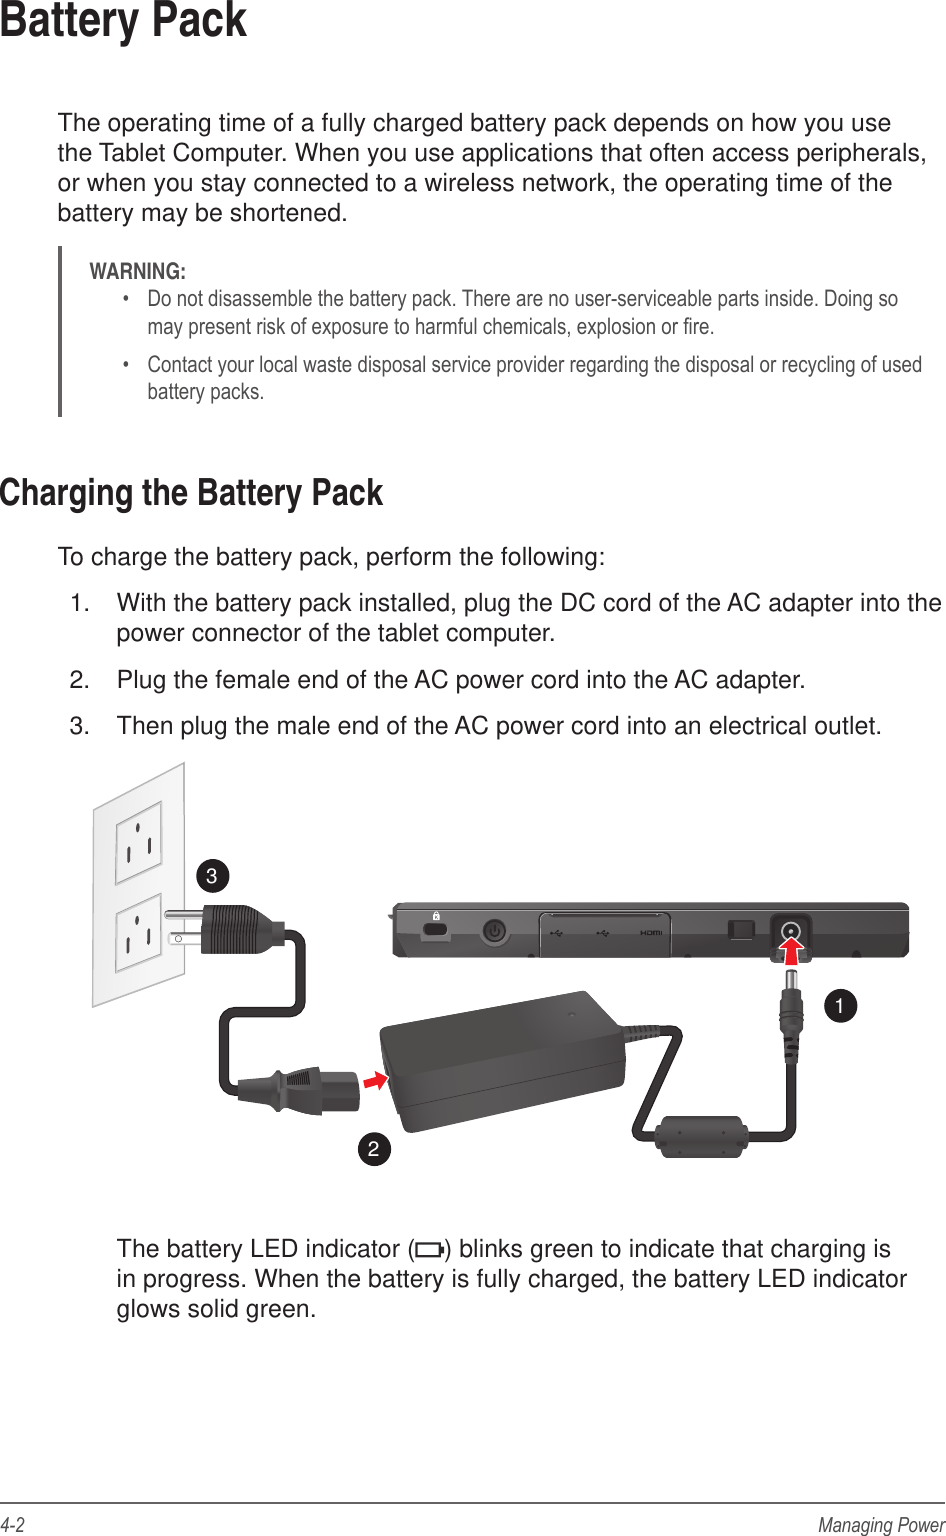
TransCore M1010WBWW Tablet PC User Manual Part 2
TransCore Tablet PC Part 2
UserManual.wiki
>
TransCore
>
M1010WBWW User Manual
>
User Manual Part 2
Contents
1.
User Manual Part 1
2.
User Manual Part 2
User Manual Part 2
Navigation menu
Upload a User Manual
Namespaces
Wiki Guide
HTML
PDF
Info
Views
User Manual
Discussion / Help
Navigation


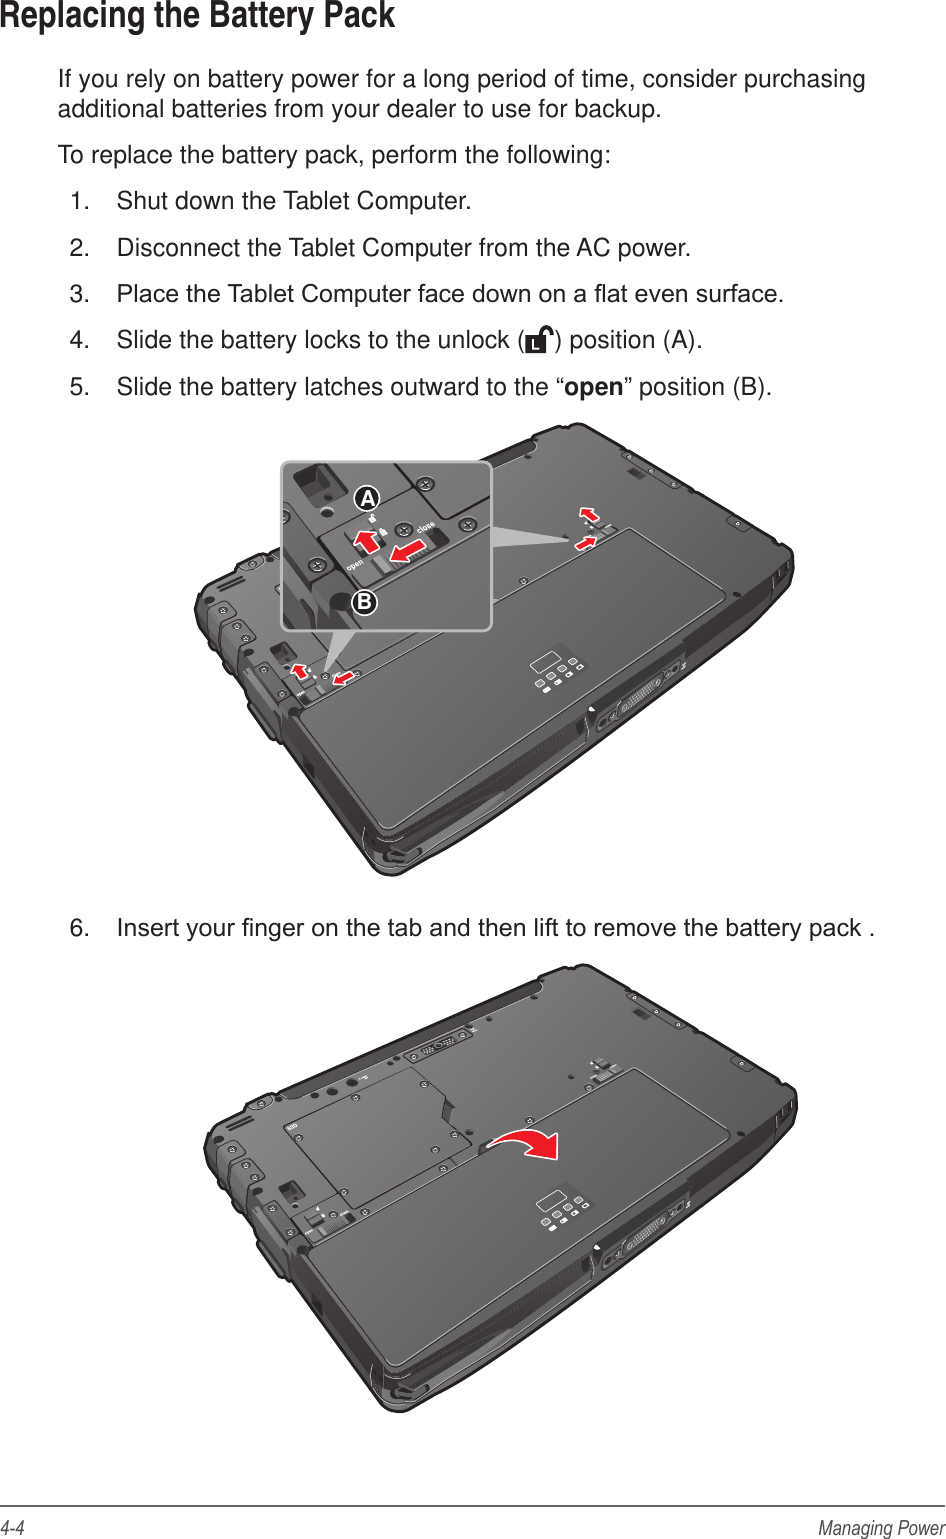


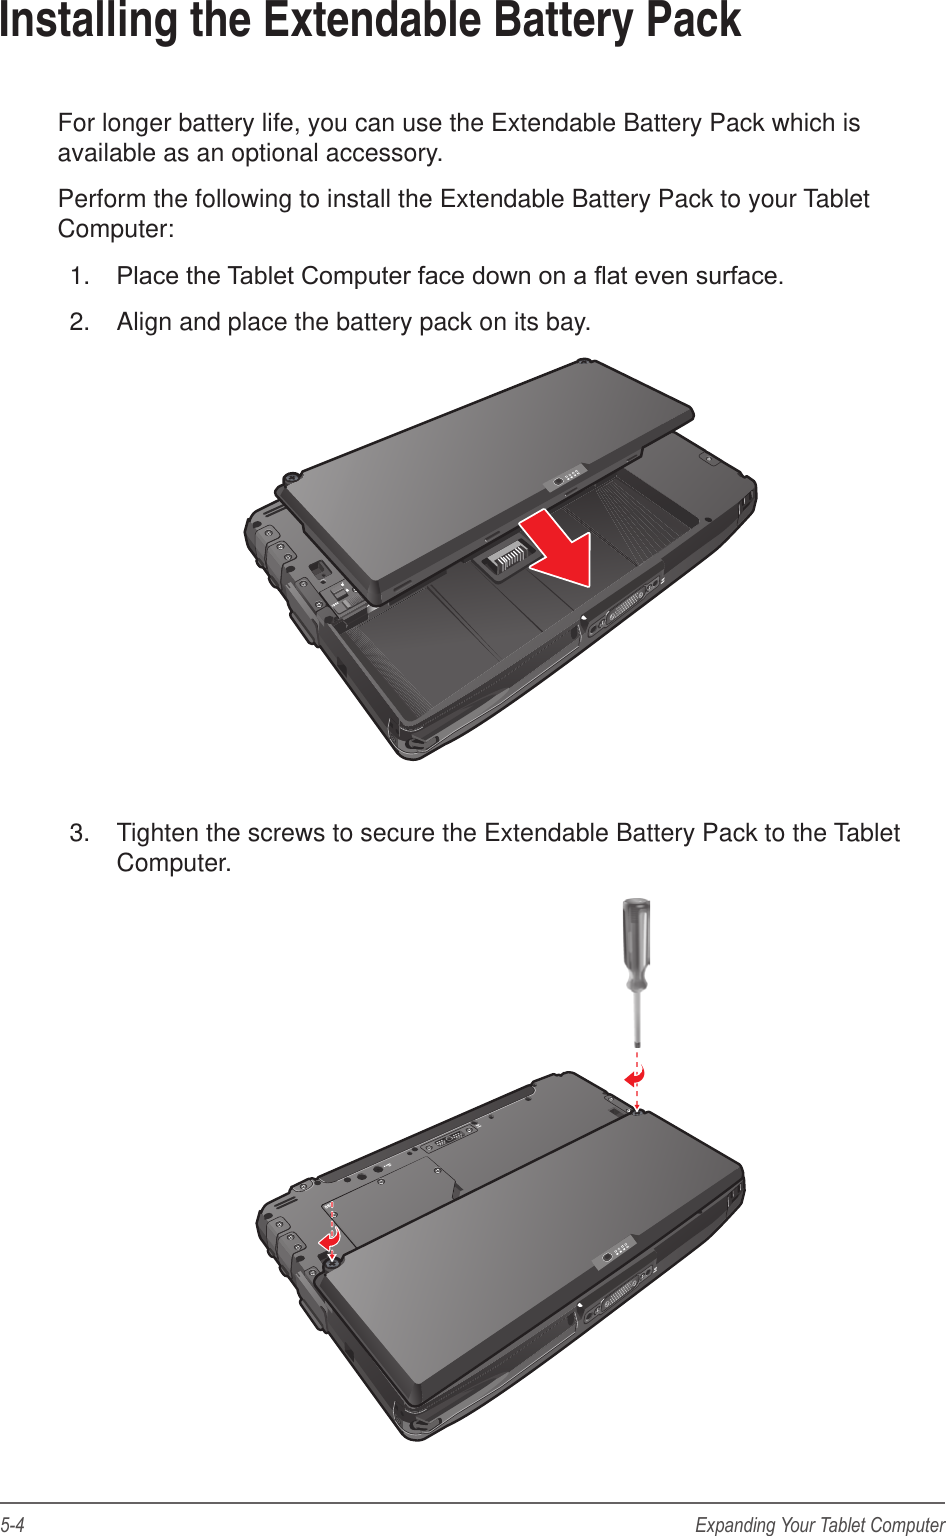

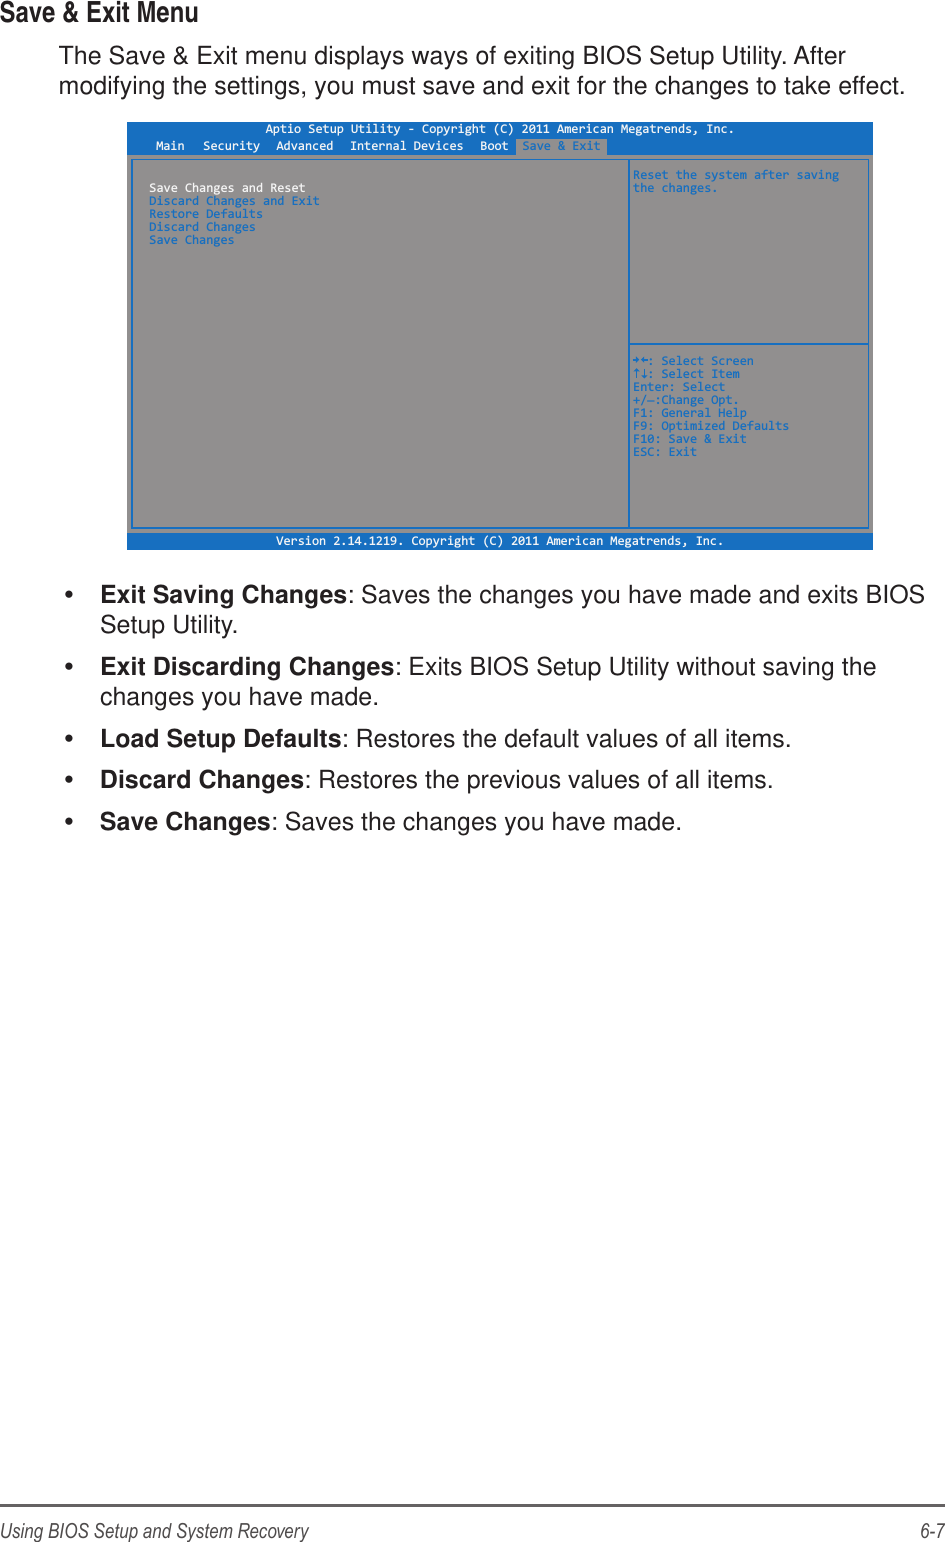
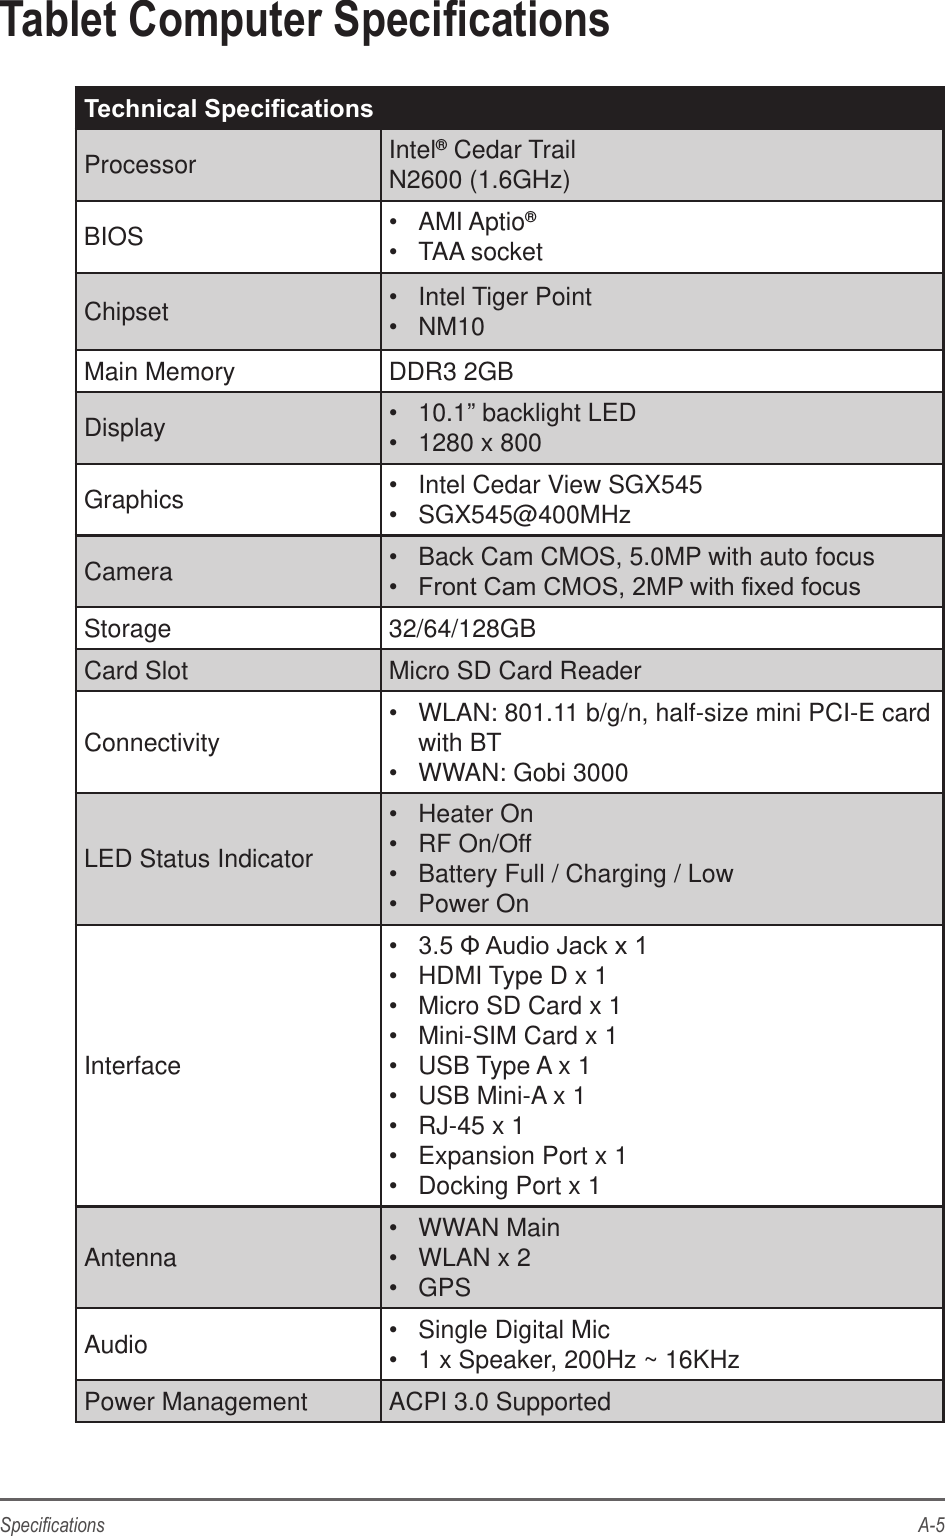
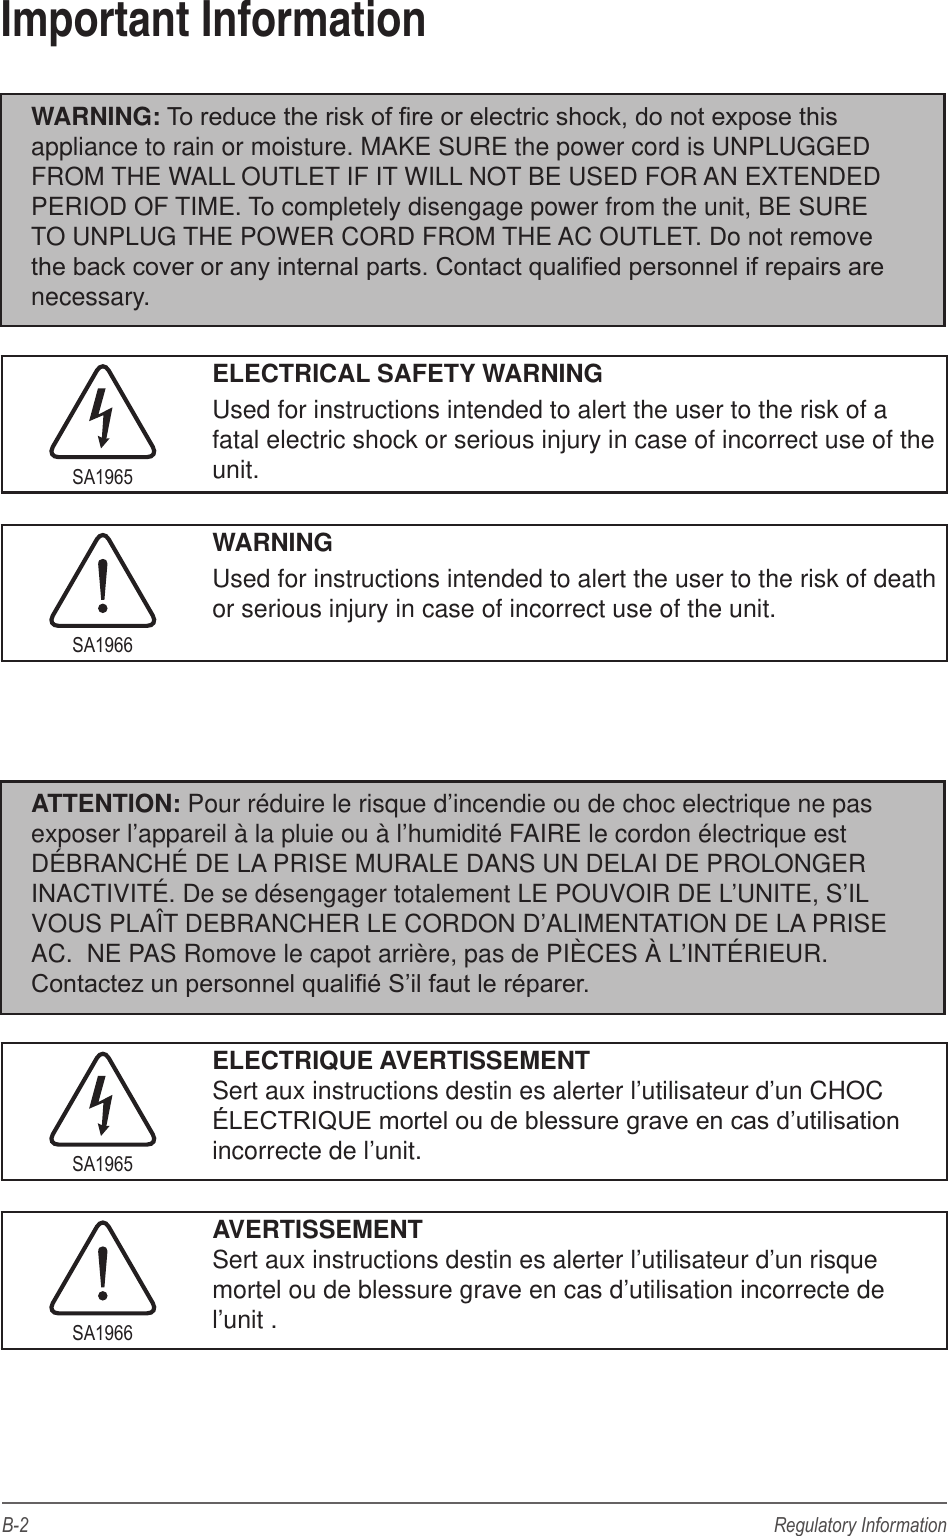
![6-4 Using BIOS Setup and System RecoveryBIOS MenuMain MenuThe Main menu contains the system date and time settings and shows the basic system information.Main AdvancedInternal DevicesSecurityBootSave & ExitAptio Setup Utility - Copyright (C) 2011 American Megatrends, Inc.Version 2.14.1219. Copyright (C) 2011 American Megatrends, Inc.System Date [Thu 09/06/2012]System Time [19:12:12]Processor Type Intel(R) Atom(TM) CPUProcessor Speed 1600 MHzTotal Memory 2048 MBInternal Drive Model 64GB SATA F1 (64GB)System Model GT101CBios Version E06Quiet Boot [Enabled]Set the Date. Use Tab to switch between Date elements. : Select Screen : Select ItemEnter: Select+/_:Change Opt.F1: General HelpF9: Optimized DefaultsF10: Save & ExitESC: Exit• System Date: Sets the system date.• System Time: Sets the system time.• Quiet Boot: Enables or disables the Quiet Boot option.Security MenuThe Security menu contains the security settings, such as conguring the Supervisor Password and Trusted Computing.Main AdvancedInternal DevicesSecurityBoot Save & ExitAptio Setup Utility - Copyright (C) 2011 American Megatrends, Inc.Version 2.14.1219. Copyright (C) 2011 American Megatrends, Inc.Supervisor PasswordSupervisor Password ClearTrusted ComputingSet Supervisor PasswordTo clear supervisor password, please enter old password first and leave new password and new password confirmation blank. : Select Screen : Select ItemEnter: Select+/_:Change Opt.F1: General HelpF9: Optimized DefaultsF10: Save & ExitESC: Exit• Supervisor Password: Congures the supervisor password which will be required before you can enter the BIOS Setup Utility. When the Supervisor Password is congured, the word “Set” is shown on the screen. If the](https://usermanual.wiki/TransCore/M1010WBWW.User-Manual-Part-2/User-Guide-1939186-Page-33.png)
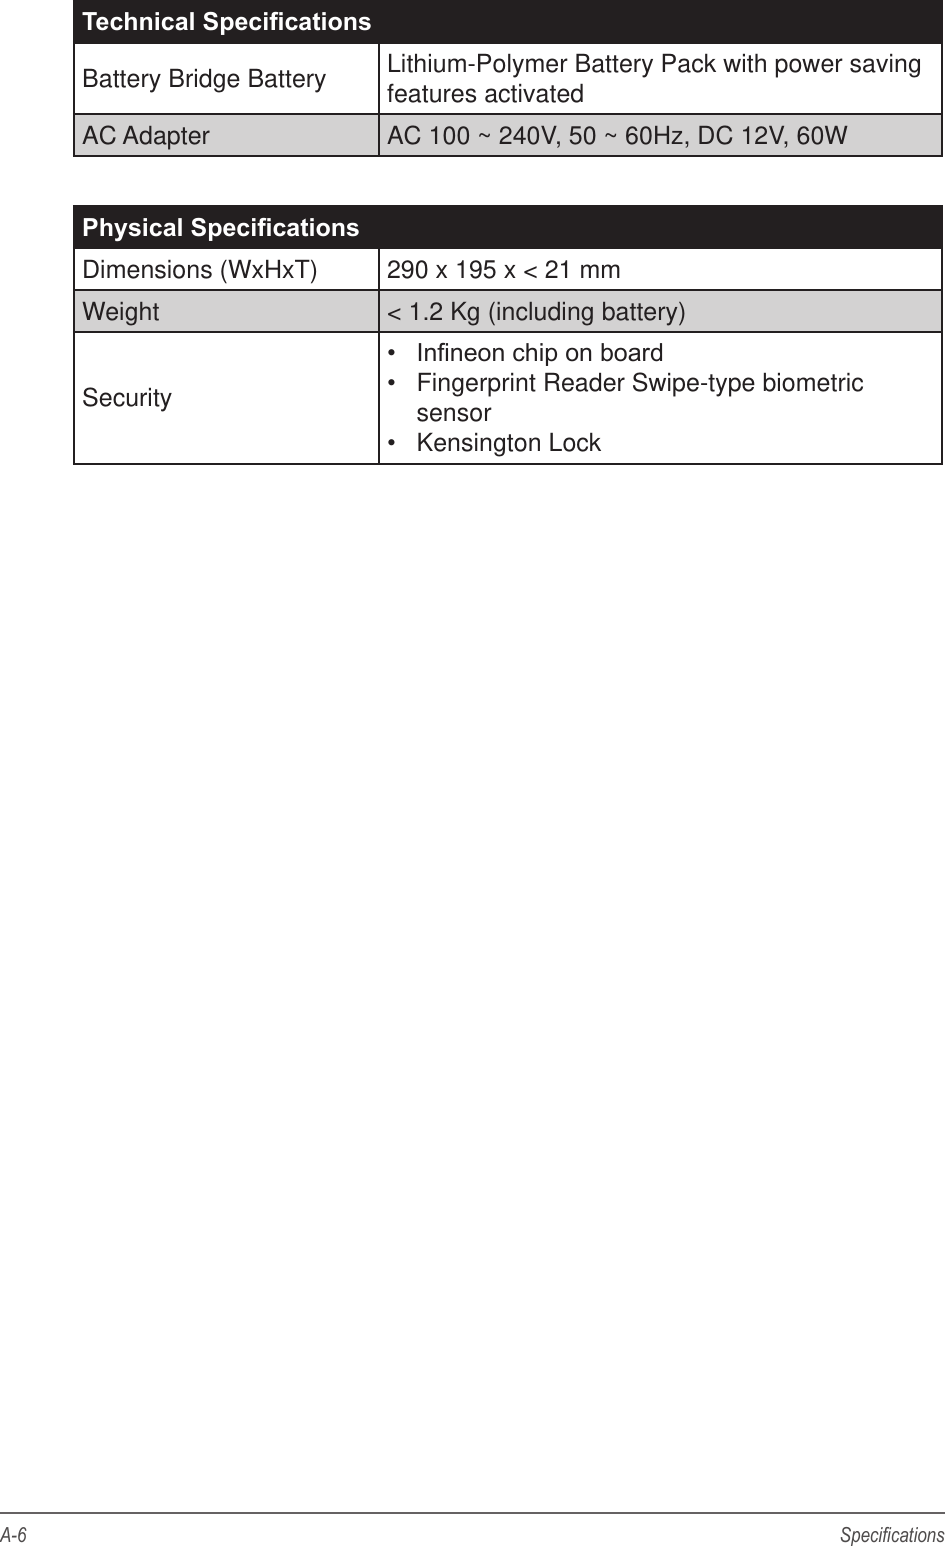
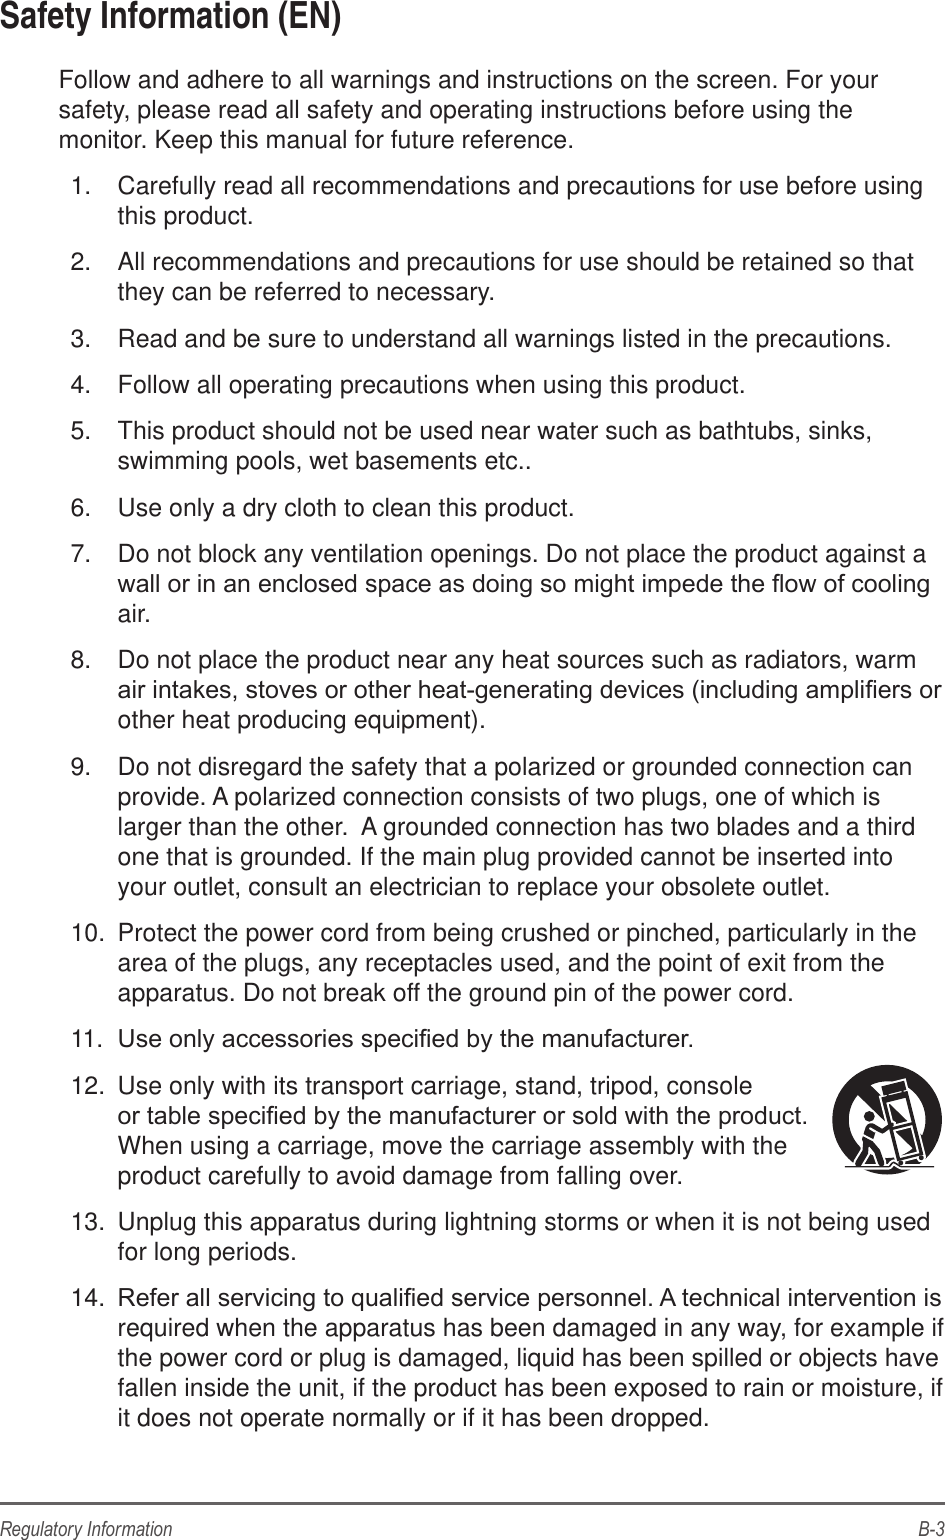
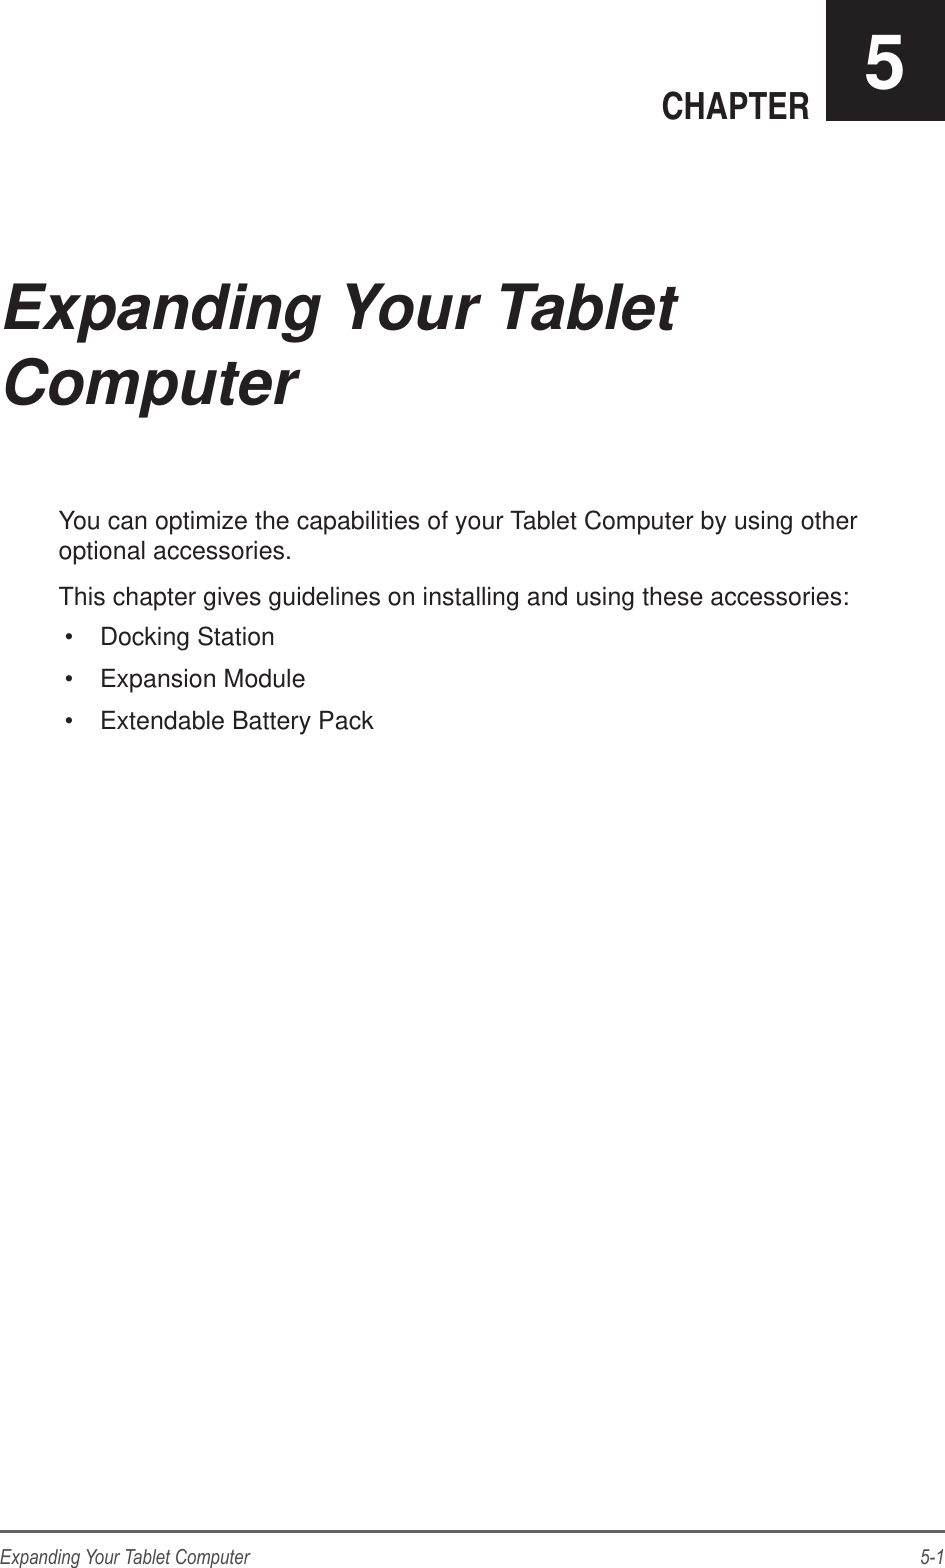
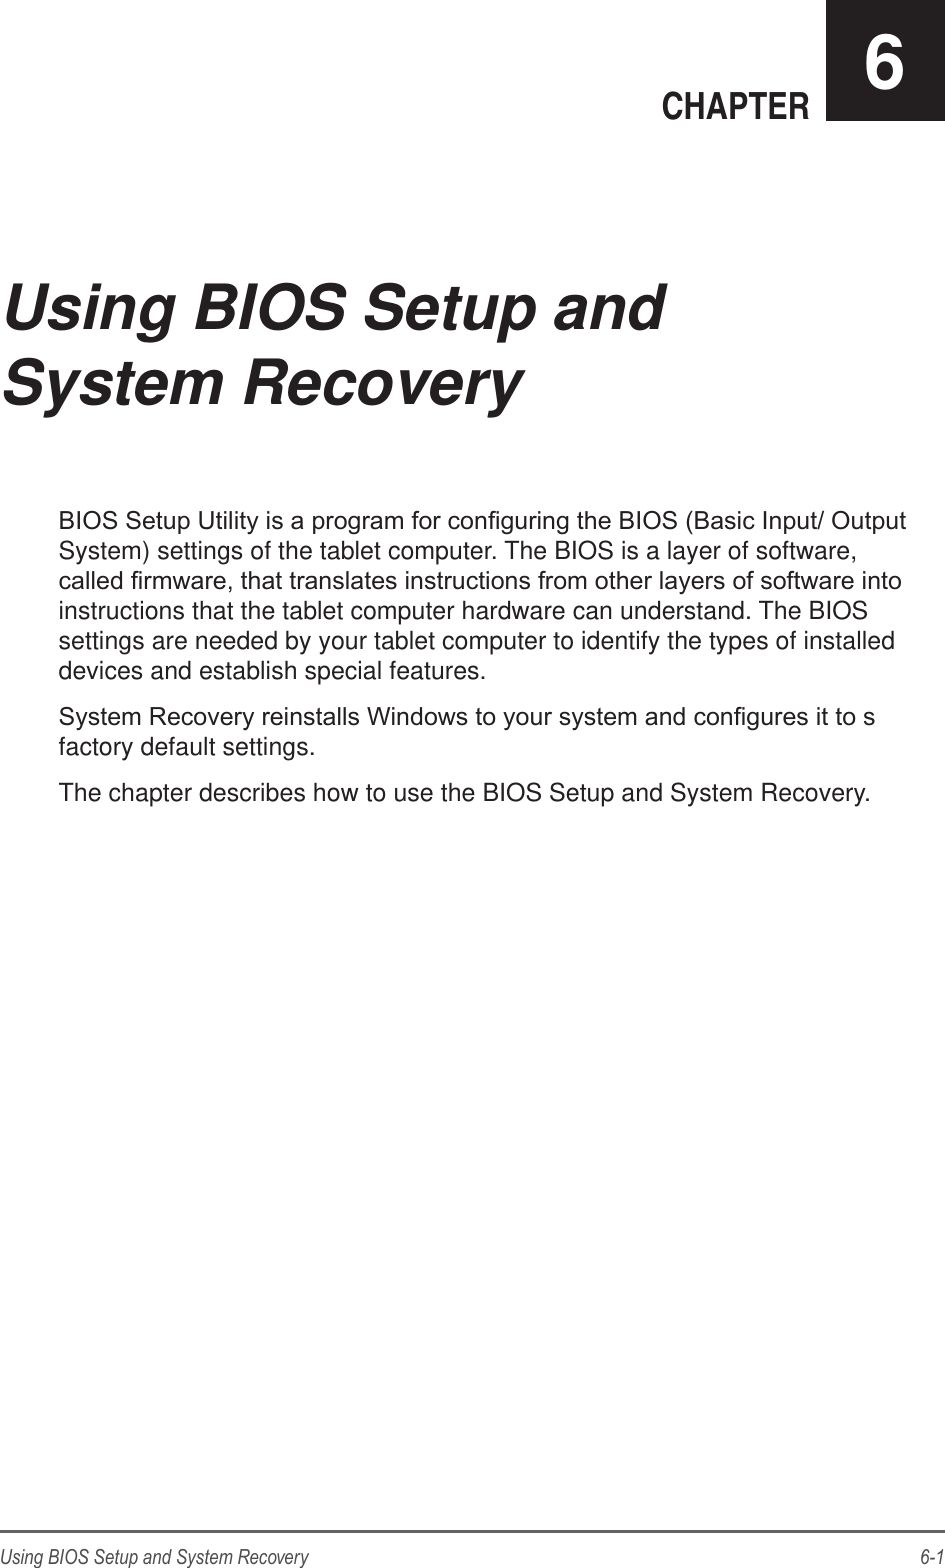
![6-5Using BIOS Setup and System RecoverySupervisor Password is not congured, the word “Clear” is displayed.• Trusted Computing: Enables or disables BIOS support for TPM (Trusted Platform Module) security devices. Advanced MenuThe Advanced menu contains the advanced settings, such as Wake On LAN and Storage Device Data Interface settings.Main AdvancedInternal DevicesSecurityBootSave & ExitAptio Setup Utility - Copyright (C) 2011 American Megatrends, Inc.Version 2.14.1219. Copyright (C) 2011 American Megatrends, Inc. : Select Screen : Select ItemEnter: Select+/_:Change Opt.F1: General HelpF9: Optimized DefaultsF10: Save & ExitESC: ExitWake On LAN [Enabled]Storage Device Data Interface [AHCI]Wake On LAN[Enabled]: Allow Wake On LAN.[Disabled]: Prevent Wake On LAN.• Wake On Lan: Enables or disables the device to wake on LAN.• Storage Device Data Interface: Selects how the hard disk controller operates, options are IDE or AHCI mode.](https://usermanual.wiki/TransCore/M1010WBWW.User-Manual-Part-2/User-Guide-1939186-Page-34.png)
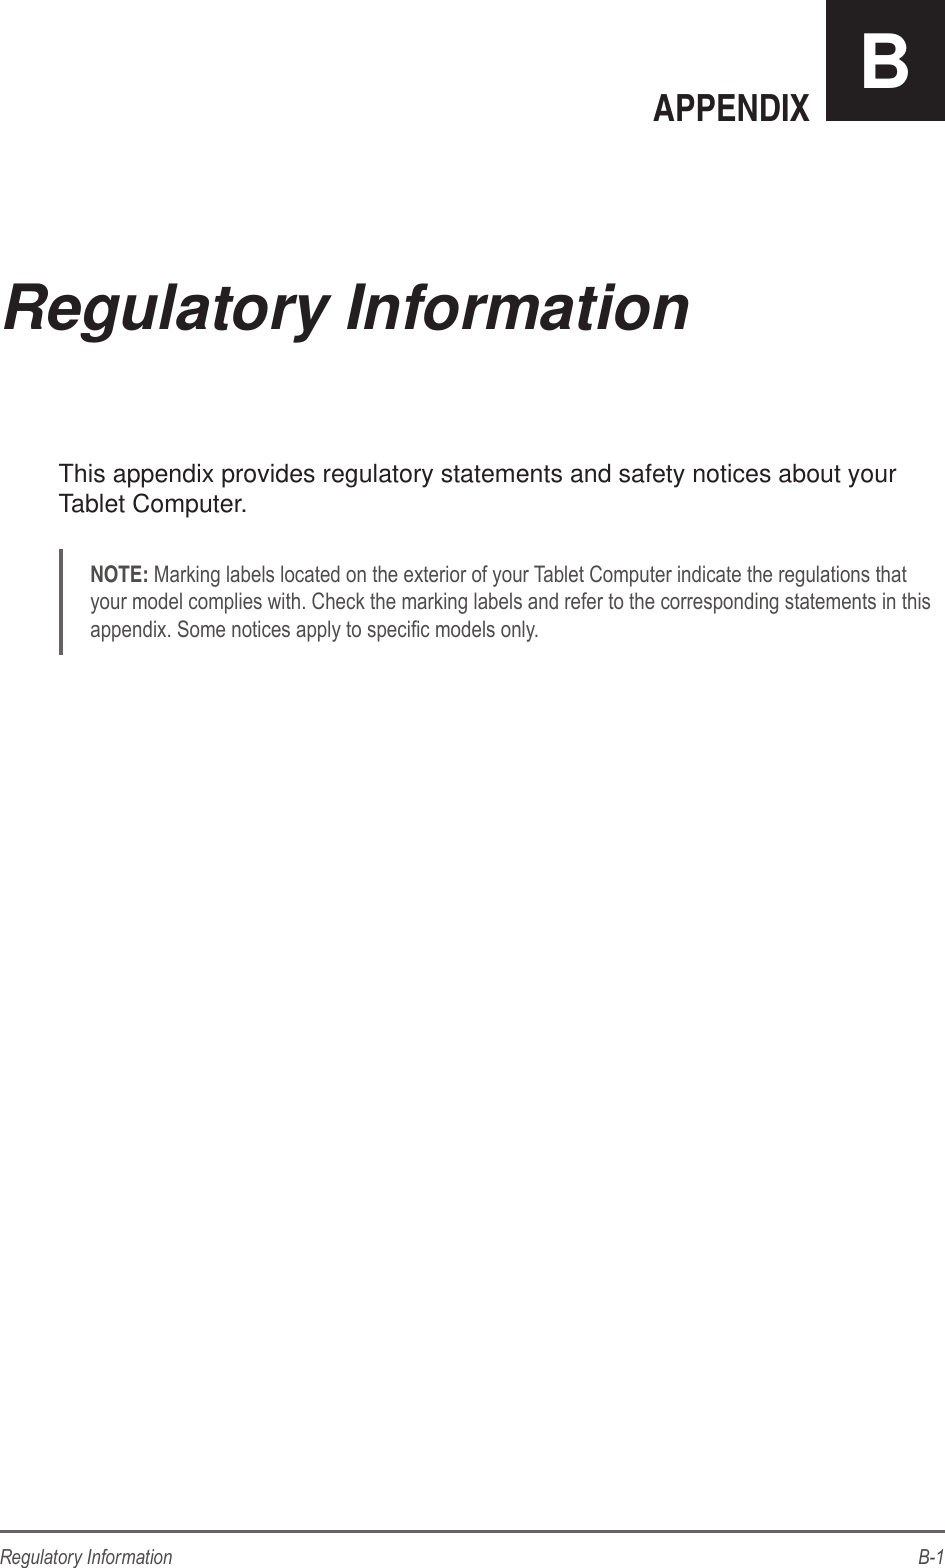
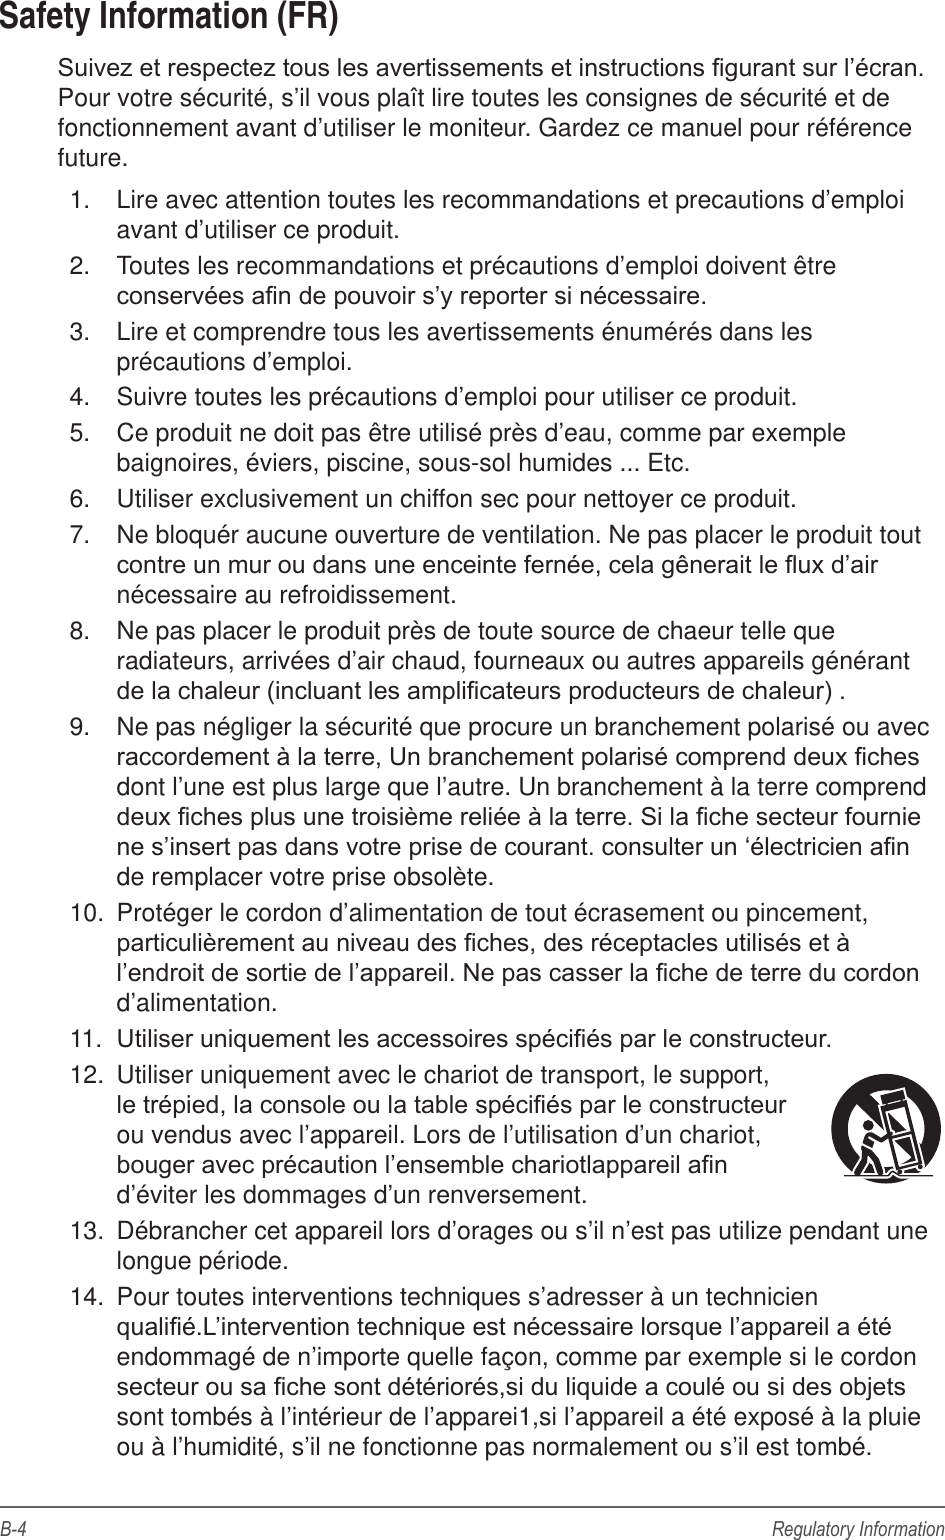
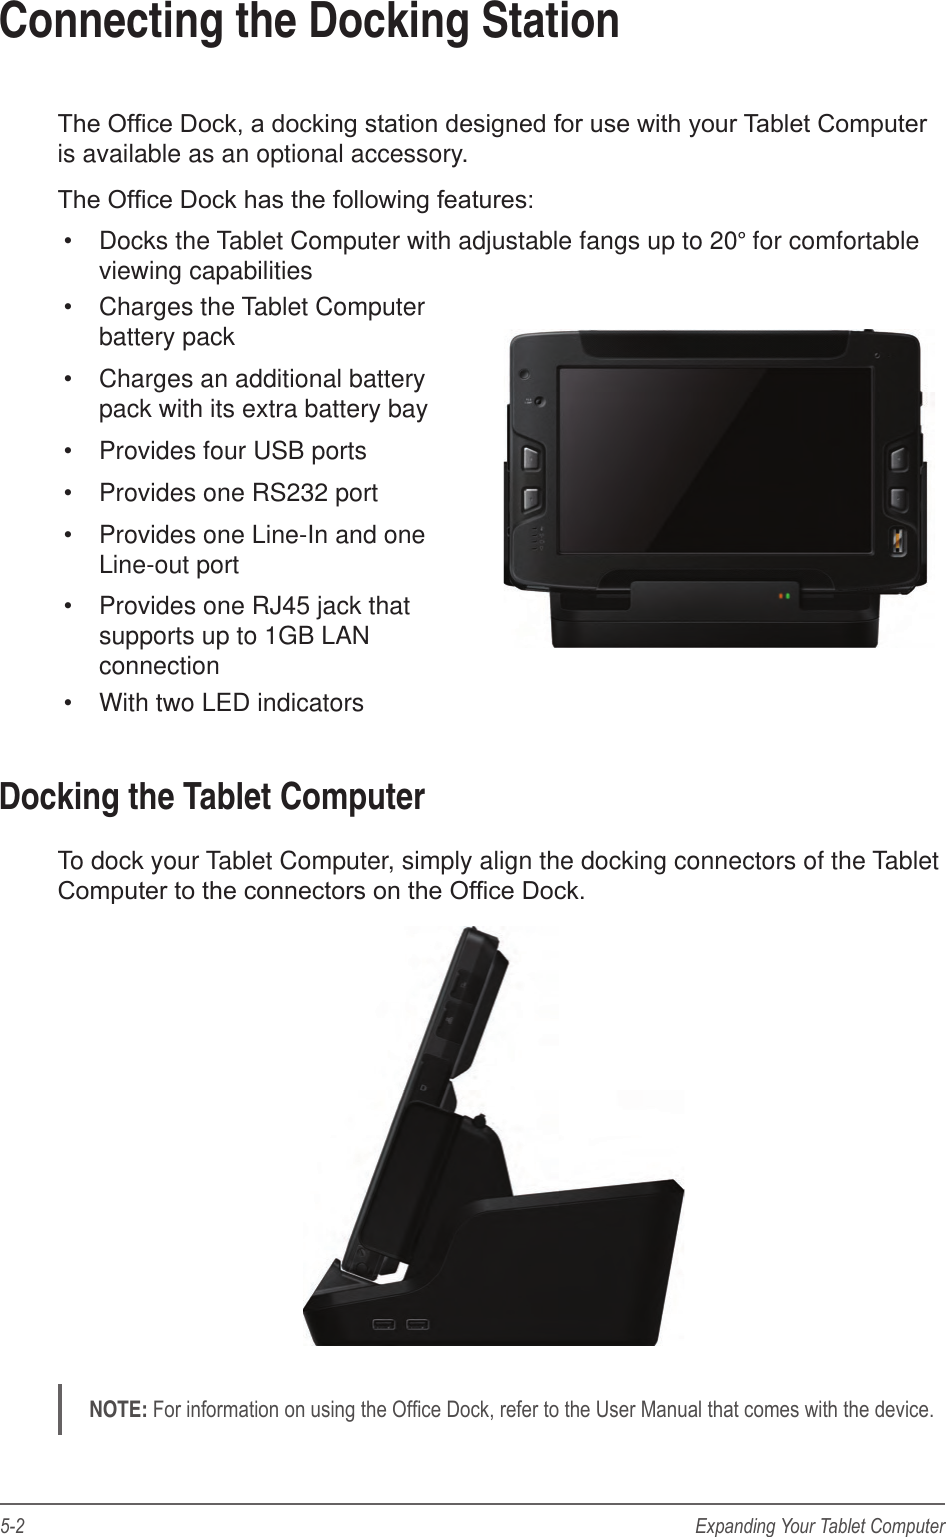
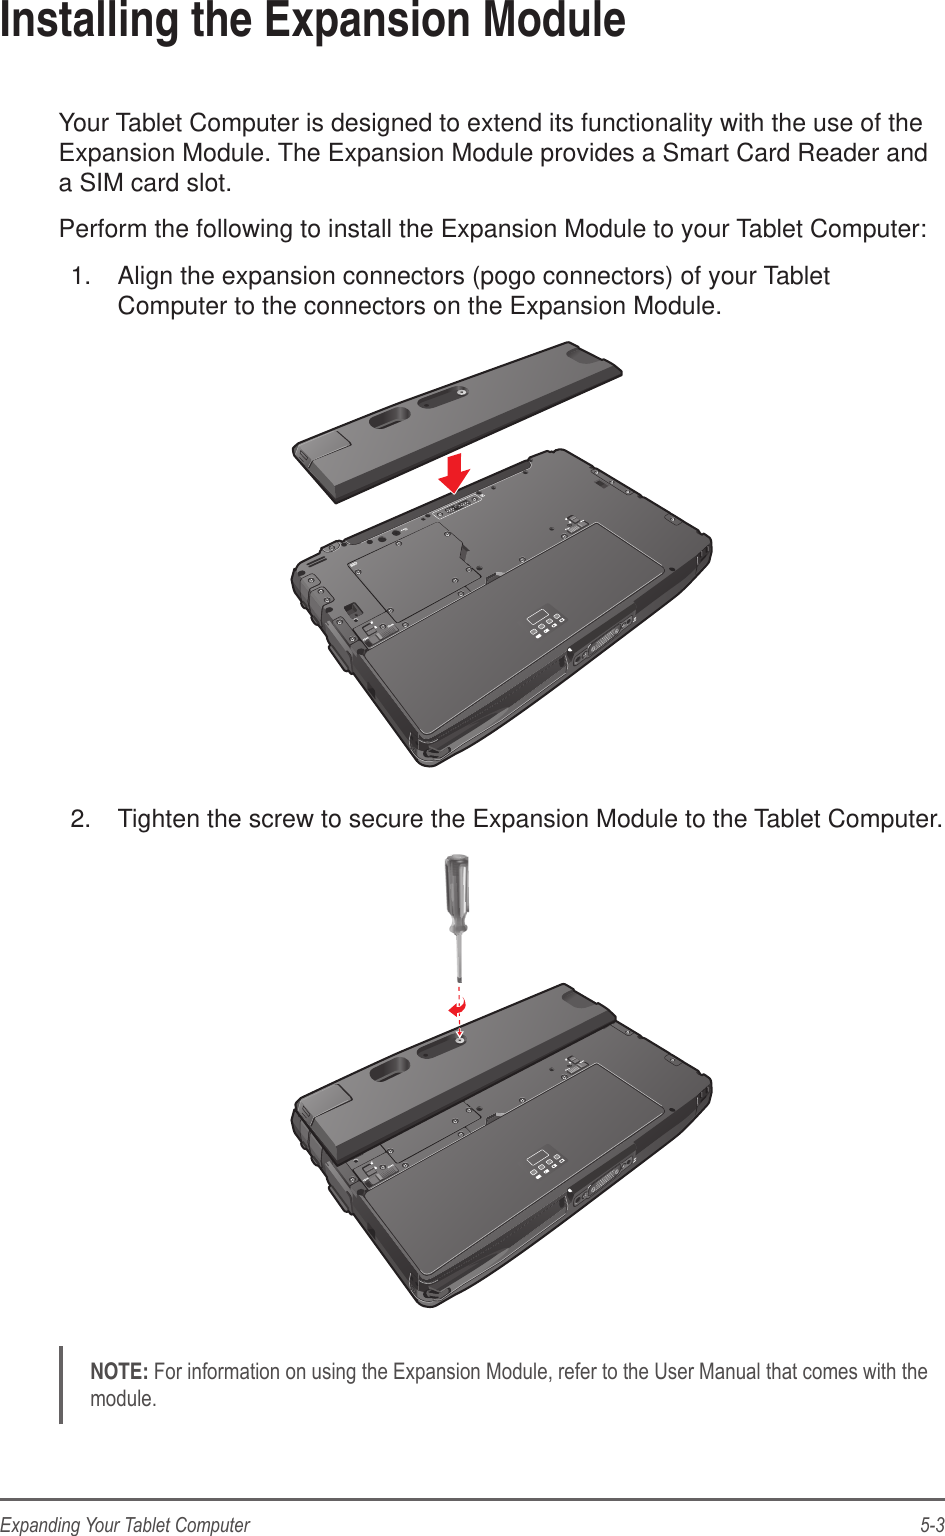
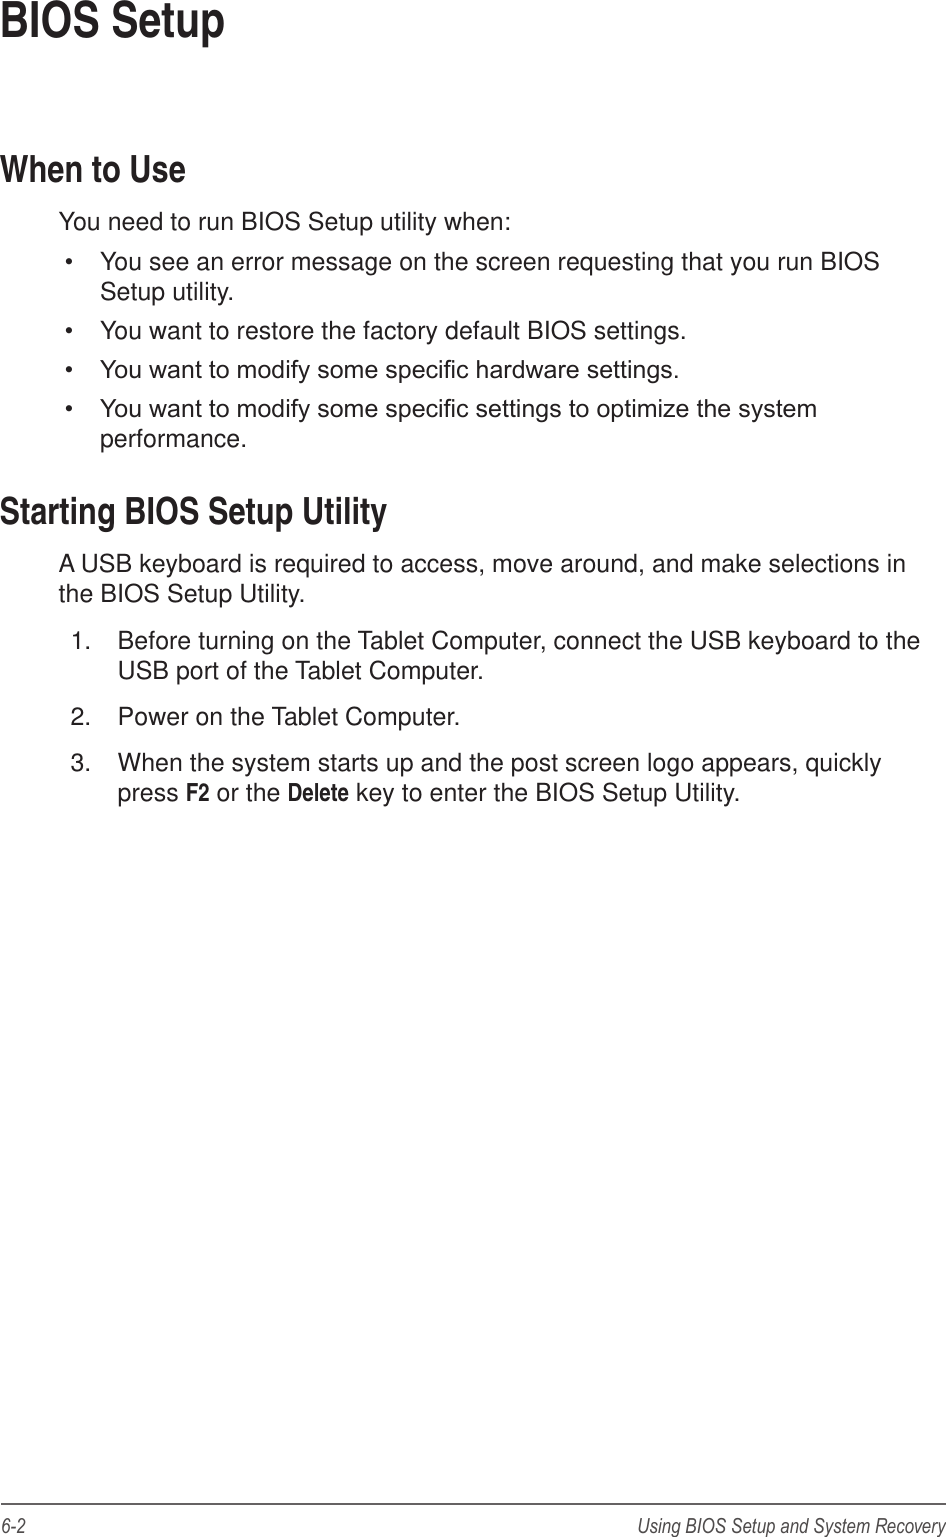
![6-6 Using BIOS Setup and System RecoveryInternal Devices MenuThe Internal Devices menu enables or disables the built-in devices in the Tablet Computer.Main AdvancedInternal DevicesSecurityBootSave & ExitAptio Setup Utility - Copyright (C) 2011 American Megatrends, Inc.Version 2.14.1219. Copyright (C) 2011 American Megatrends, Inc. : Select Screen : Select ItemEnter: Select+/_:Change Opt.F1: General HelpF9: Optimized DefaultsF10: Save & ExitESC: ExitWake On LAN [Enabled]Storage Device Data Interface [AHCI]Wake On LAN[Enabled]: Allow Wake On LAN.[Disabled]: Prevent Wake On LAN.• Front Camera: Enables or disables the front camera.• Rear Camera: Enables or disables the rear camera.• Fingerprint Reader: Enables or disables the ngerprint reader.• WWAN: Enables or disables the WWAN antenna.• WLAN/BT Module: Enables or disables the WLAN/BT antenna.• GPS: Enables or disables the GPS antenna.Boot MenuThe Boot menu sets the boot order of devices.Main AdvancedInternal DevicesSecurityBoot Save & ExitAptio Setup Utility - Copyright (C) 2011 American Megatrends, Inc.Version 2.14.1219. Copyright (C) 2011 American Megatrends, Inc. : Select Screen : Select ItemEnter: Select+/_:Change Opt.F1: General HelpF9: Optimized DefaultsF10: Save & ExitESC: ExitSet Boot Priority1st Boot [USB CD/DVD]2nd Boot [Hard Disk: 64GB SA...]3rd Boot [USB Hard Disk:Gene...]4th Boot [USB KEY]5th Boot [USB Floppy]6th Boot [Network:Realtek PX...]Set Boot Priority.](https://usermanual.wiki/TransCore/M1010WBWW.User-Manual-Part-2/User-Guide-1939186-Page-35.png)