Truly Instrument DB63 BLOOD PRESSURE MONITOR User Manual 61M 1
Truly Instrument Ltd. BLOOD PRESSURE MONITOR 61M 1
2ABG7-DB63_user manaul_Rev1
6. To disable Alarm, Press the ” MEMO ” or ”PAGE ” button
to select “OFF” and press the ” AVG” button to confirm.
7. To set 1st Alarm, Press the ” MEMO” or ”PAGE ” button
to select “ON”. Press the “ AVG” button to confirm.
8. When Hour digit flashes, press the “ MEMO” or “ PAGE ”
button to select Hour. Press the “ AVG”button to
confirm.
9. When Minute digit flashes, press the “ MEMO” or
“PAGE ” button to select Minute. Press the “ AVG”
button to confirm.
10. Follow the same steps to set the 2nd, 3rd, and 4th Alarm
5
4
Monitor
Blood Pressure Monitor
DB63
Instruction Manual
OVERVIEW
6 7 8
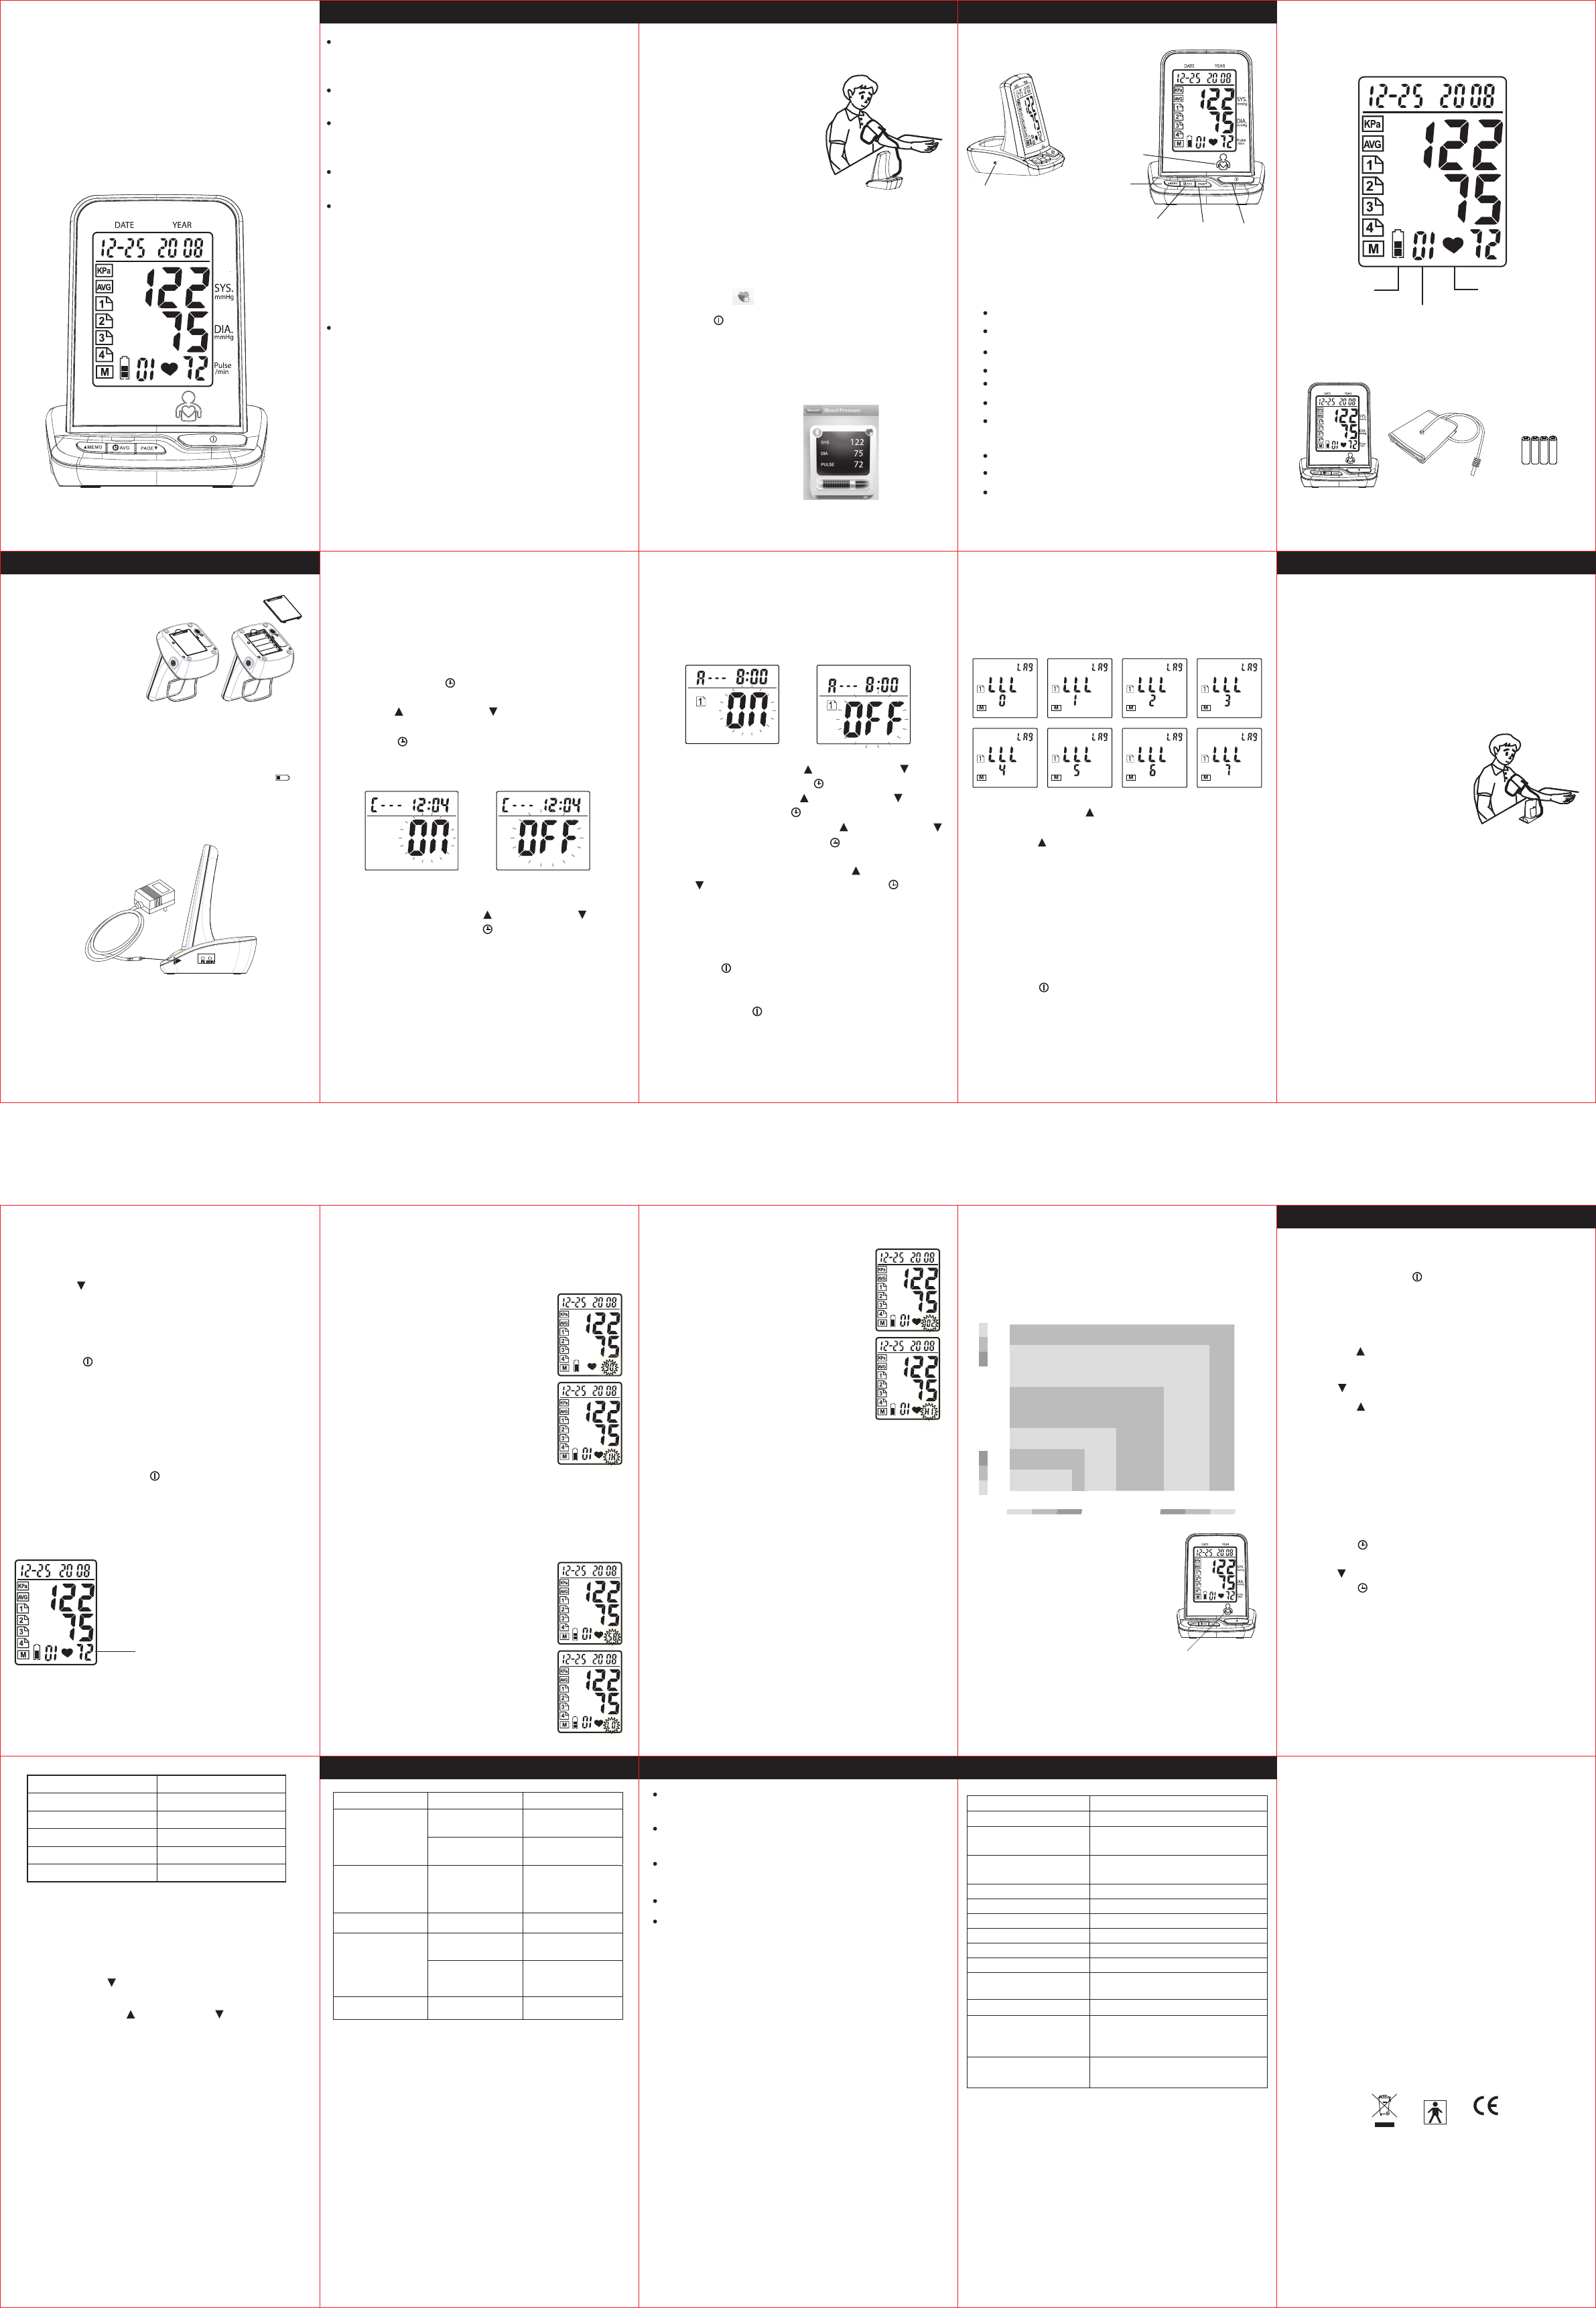
Display
Package Contents
Main Unit
Arm Cuff 4 x AA
Alkaline Batteries
2.1 Battery Installation
1. Pull and lift on the lock
to remove the battery
cover.
2. Insert 4 AA batteries
with the polarities in
correct direction.
3. Replace the battery cover.
Press it lightly until the lock securely clicks into place.
2.2 Connect AC Adaptor (Optional)
If you have the AC 6V adaptor, plug it into the AC adaptor
jack at the top of the device. Remove batteries when using
the AC adaptor.
2.3 Date & Time Setting
Note:
- Set the correct date and time before taking a
measurement.
- Date and time should be reset after replacing new
batteries.
Note: Replace batteries when the battery indicator “ ”
shows low voltage.
1. Press and hold the ” AVG” button for a few seconds
until the Year display flashes.
2. Press the“ MEMO” or ”PAGE ” button to select the
current year.
3. Press the “ AVG” button to confirm Year Setting.
4. Follow the same steps to set the Month, Date, Hour and
Minute.
5. You can choose Clock Function “ON” or “OFF” while the
monitor is not in use. Press “ MEMO” or ”PAGE ”
button to select. Press the ” AVG ” button to confirm.
Noted: If you select Clock Function “ON”, you will continue
at the Alarm Setting section. Otherwise, setting will
end.
2.4 Alarm Setting
Note:
- You will not be able to set alarm clock if Clock Function
is set to “OFF”.
- You can set a maximum of 4 alarms.
Note:
- Press the “ ” button anytime during clock setting/alarm
setting to start over if an error occurs.
- Each alarm clock lasts 45 seconds, or you can turn it off
by pressing the “ ” button.
PREPARATION
16
4.3 Delete Past Readings
User can delete all the past readings stored in each User
Page.
1. Press the “PAGE ” button to select the User Page you
want to delete.
2. Press and hold the “ MEMO” & “PAGE ” button
simultaneously for 5 seconds. Symbol of “ALL EE” will be
displayed and all past readings stored in that User Page
will be deleted.
Symbol on Display Average Values of
1 h One Hour
1 d One Day
7 d One Week
30 d One Month
ALL All Readings
10
Note:
- Avoid smoking, eating or exercising for 30 minutes
before taking measurement.
- Do not move or talk during measurement.
- Measurement can be taken on either arm.
1. Place your elbow on a table and palm facing upward,
and wrap the arm cuff around the upper left arm.
2. Pull on the end of the cuff until it wraps securely around
your upper arm. Do not over tighten the cuff. Allow 1-2
cm or ½ inch between the bottom of the cuff and your
elbow joint.
3. Make sure the cuff is at the same level as your heart.
3.1 Sitting Correctly
1. Relax
2. Sit upright in a chair with your both feet on the floor.
3. Remove tight fitting clothing
from you upper arm and thick
clothing. Do not roll up your
sleeve if it is too tight.
4. Place your arm on a table so
that the cuff will be at the
same level as your heart.
3.2 Applying the Arm Cuff
TAKING MEASUREMENT
SIZE:84*145MM 正面
SIZE:84*145MM 反面
18
Keep away the unit from direct sunlight, extreme
temperatures, humidity or moisture.
Use a dry, soft cloth to clean the unit, or if desired, use a
cloth lightly dampened with water.
Do not use alcohol, benzene, thinner or other volatile
liquids to clean the unit.
Do not wash or expose the arm cuff to liquid.
Remove batteries from the unit when it will not be used
for more than 3 months.
STORAGE & MAINTENANCE
Model No.
Measurement Method
Measurement Range
Accuracy
Inflation
Pressure Detection
Power Supply
Auto Power Off
Storage Environment
Operation Environment
External Dimensions
Net Weight
Cuff Dimensions
Package Content
Note: Subject to modification without prior notice.
DB63
Oscillometric
Pressure: 20 – 280 mmHg
Pulse Rate: 40 – 195 beats/min
Pressure: +/- 3 mmHg
Pulse Rate: +/- 5%
Pump driven
Semi-conductor
4 x AA batteries or AC/DC adaptor
3 minutes after last operation
-20°C to 60°C, 10% to 95% RH
10°C to 40°C, 15% to 90% RH
6.1” (L) x 5.1” (W) x 4.3” (H) or
15.5 (L) x 13 (W) x 11 (H) cm
410g (batteries excluded)
For arm circumference of
22-34 cm (Special size to be
ordered separately)
Cuff, Instruction Manual,
Battery Set, Warranty Card
19
SPECIFICATIONS
Note: If your problem cannot be solved by the above,
consult your store of purchase. Do not
disassemble the unit.
17
Check if the cuff is
properly connected.
Replace the air tube
if it is broken.
Fail to inflate
“Err P” displayed
“Err 1” displayed
“Err 2” displayed
“Err 3” displayed Incorrect results Measure again.
Remove interfering
source e.g. mobile
phones, magnets.
Do not move during
measurement
Return for servicing.Deflate too rapidly
Movement during
measurement
Signal interference
Problem Cause Solution
No display when
you press the
Power/Start
button
Have the batteries
run out?
Are the battery
polarities wrong?
Replace new
batteries.
Re-align batteries
in correct polarities.
TROUBLESHOOTING
Manufactured in accordance with International Standards
Manufacturer: Truly Instrument Ltd.
2/F, Chung Shun Knitting Centre,
1-3 Wing Yip St., Kwai Chung, N.T.,
Hong Kong
TEL: (852) 24879803
FAX: (852) 21465756
4.2 View Average Readings
1. Press the “ AVG” button to enter Average function.
2. If the User Page is not what you want to view, press the
“PAGE ” button to select.
3. Press the “ AVG” button to view different Average
Values. 5 different Average Values are available:
12 13 14 15
4.1 View Past Readings
1. Press the “ MEMO” button to enter memory function.
2. If the User Page is not what you want to view, press the
“PAGE ” button to select.
3. Press the “ MEMO” button to display the next sets of
values. Past readings are displayed from the most recent
to the oldest.
4. This can stored up to 99 sets of past readings for each
user (4 x 99).
After measurement, the last set of measured values will be
saved automatically after measurement when the unit is
turned off by pressing “ ” button or by automatic power
off after 3 minutes.
This unit features a 6-color LED light indicator to display
blood pressure level in accordance with the WHO (World
Health Organization) classification.
3.6 WHO Light Indicator
mmHg
mmHg
120 130 140 150 160 170 180
110
105
100
95
90
85
80
Grade 3 hypertension(severe) (Red)
Grade 2 hypertension(moderate)
(Yellow)
Grade 1 hypertension(mild)
(Purple)
High- normal(Green)
Normal
(Sky Blue)
Optimal(Blue)
Systolic Pressure
Diastolic Pressure
WHO Light Indicator
Irregular Heartbeat
This unit has a unique feature that alerts user of irregular
heartbeat detection during measurement.
Note:An irregular heartbeat is defined
as a heartbeat rhythm that has a
variation of more than25% from the
average rhythm detected during
measurement.
If such irregular rhythm occurs twice or
more during the same measurement,
the display screen will show the pulse
value and “IH” symbol alternately.
Example: (90 / IH)
Note:Please consult your doctor if irregular heartbeat
occurs often.
Regular but Below Normal Heartbeat
If the monitor detects a pulse rate below
60 beats per minute during
measurement, the monitor will display
the pulse value and “LO” symbol
alternately.Example: (58 / LO)
Regular but Above Normal Heartbeat
If the monitor detects a pulse rate
above 100 beats per minute during
measurement, the monitor will display
the pulse value and “HI” symbol
alternately.Example: (102 / HI)
WHO Classification Color
Optimal --------------------Blue
Normal ---------------------Sky Blue
High-normal --------------Green
Mild hypertension -------Purple
Moderate hypertension ---Yellow
Severe hypertension ----Red
Example: If your measurement reading is 122/75, the LED
light will display the color in blue.
MEMORY FUNCTIONS
Cuff Outlet
WHO Light
Indictor
Memory Recall
(Up)
Average Values
(Set) Page Select
(Down)
Power
(Start)
Kilopascal
User 1-4
Memory
Date & Year
Systolic
Diastolic
Pulse
Low Battery
Indicator
Memory No.
(1-99 readings)
Pulse Symbol
Memory
Average
11
3.3 User Setting
This unit allows a maximum of 4 users to store
measurement records in different User Pages.
3.4 Taking Measurement
3.5 Heartbeat Readings
Besides Systolic and Diastolic values,
Pulse will also be displayed after a
measurement
Press “PAGE ” button to switch between User Page 1, 2, 3
and 4.
1. Press the “ ” button. The cuff will automatically inflate
and the measurement will start.
2. When the measurement is complete, the cuff will
automatically deflate and your systolic and diastolic
pressure values and pulse rate will display.
3. Remove the arm cuff and take note of your
measurement results.
Note:You can press the “ ” button to stop measurement
at any time.
Pulse
0123
EC-Representative:Wellkang Ltd t/a Wellkang Tech Consulting
Suite B, 29 Harley Street, LONDON W1G 9QR,
United Kingdom
Rev.0
2013/11/11
32
Babies, young children or individuals who cannot express
their consent are not suitable to take blood pressure
measurement.
Individuals with serious arteriosclerosis are not suitable
to take blood pressure measurement.
Blood pressure readings may change in case of
pregnancy. Pregnant women can consult their doctor
before taking measurement.
Self-measurement is not medical treatment. If there are
unusual values, please consult your doctor.
Handling batteries properly:
- As soon as old batteries run out, replace with new
batteries.
- Do not use old and new batteries together.
- Align the polarities of batteries correctly.
- When the unit will not be used for more than 3
months, remove the batteries. Otherwise, batteries
may leak and cause damage to the unit.
Handling AC adapter properly:
- Never unplug the power cord with wet hands.
- Use only the original AC adapter designed for this unit.
SAFETY PRECAUTIONS QUICK START GUIDE
Avoid smoking, eating or exercising for 30 minutes before
taking measurement
2. Remove tight fitting clothing
from you upper arm and thick
clothing.
1. Sit upright in a chair with your
both feet on the floor.
3. Pull on the end of the cuff until
it wraps securely around your
upper arm. Place your arm on a table so that the
cuff will be at the same level as your heart.
7. When the measurement is complete,
the cuff will automatically deflate and
your systolic and diastolic pressure
values and pulse rate will
display on Blood Pressure
monitor & save on iOS
application screen.
8. After that check the
measurement history on
History screen or chart screen by iOS application.
4. Connect iOS device via Bluetooth (Turn Bluetooth "On"
under the "Settings" menu on the iOS device).
5. Open "TRULY" application, and then press the Blood
Pressure icon on Measure screen.
6. Press the “ ” button. The cuff will automatically inflate
and the measurement will start.
Setup Procedures
Installation
Prior to first use, Download and install "TRULY" application
to your iOS device.
(Bluetooth 4.0 capabilities, e.g. iPhone 4S, iPhone 5, NewiPad
and iPadMini).
9
2.5 Language Setting
When a measurement is completed, DB62V will read aloud
the systolic value, diastolic value and pulse automatically.
The default language is English.
1. Press and hold the “ MEMO” button until the screen
displays [LLLx] (x = 0 ~ 7), then release the button.
2. Press the “ MEMO” button to select language.
Number 0 ~ 7 represents the following languages:
0 Mute
1 English
2 German
3 Russian
4 Polish
5 Czech
6 Turkish
7 Chinese
3. Press the “ ” button to confirm the selection and begin
measurement.
Features
Bluetooth 4.0 compatible
One Touch Operation
Irregular Heartbeat Detector
Blood Pressure Mode and Clock Mode
4 User / 396 Total Memory
4 Alarm Clock Settings
5 Mode Averaging Function – Hour, Day,
Week, Month, and Overall
WHO Blood Pressure Indicator
Auto-off Power Saving Feature
Operated by 4 AA batteries(AC Adapter optional)
TROUBLESHOOTING
This device complles with part 15 of the FCC Rules. Operation
is subject to the fol-lowing two conditions:(1) This device
may not cause harmful interference, and (2) this device must
accept any interference re-ceived, including interference that
may cause undesired operation.
FCCStatement
ThisequipmenthasbeentestedandfoundtocomplywiththelimitsforaClassBdigitaldevice,
pursuanttopart15ofFCCRules.Theselimitsaredesignedtoprovidereasonableprotection
againstharmfulinterferenceinaresidentialinstallation.Thisequipmentgeneratesandcan
radiateradiofrequencyenergyand,ifnotinstalledandusedinaccordancewiththeinstructions,
maycauseharmfulinterferencetoradiocommunications.However,thereisnoguaranteethat
interferencewillnotoccurinaparticularinstallation.Ifthisequipmentdoescauseharmful
interferencetoradioortelevisionreception,whichcanbedeterminedbyturningtheequipment
offandon,theuserisencouragedtotrytocorrect
Theinterferencebyoneormoreofthefollowingmeasures:
Reorientorrelocatethereceivingantenna.
Increasetheseparationbetweentheequipmentandreceiver.
Connecttheequipmentintoanoutletonacircuitdifferentfromthattowhichthereceiveris
connected.
Consultthedealeroranexperiencedradio/TVtechnicianforhelp.
ThisdevicecomplieswithPart15ofFCCRules.
Operationissubjecttothefollowingtwoconditions:
Thisdevicemaynotcauseharmfulinterference,andThisdevicemustacceptanyinterference
received,includinginterferencethatmaycauseundesiredoperation.
Note:ThemanufacturerisnotresponsibleforanyradioorTVinterferencecausedby
unauthorizedmodificationstothisequipment.suchmodificationscouldvoidtheuser’sauthority
tooperatethisequipment.