Tyco Safety Canada 00NB9001 Receiver User Manual Users guide
Digital Security Controls Ltd. Receiver Users guide
Contents
- 1. Users guide
- 2. Installation guide
Users guide

Security Products
®
WARNING
This manual contains information on
limitations regarding product use and
function and information on the
limitations as to liability of the
manufacturer. The entire manual should
be carefully read.
NT9010
NT9010NT9010
NT9010
User’s
Guide
FCC COMPLIANCE STATEMENT
CAUTION: Changes or modifications not expressly approved
by Digital Security Controls Ltd. could void your authority to
use this equipment.
This equipment has been tested and found to comply with the
limits for a Class B digital device, pursuant to Part 15 of the FCC
Rules. These limits are designed to provide reasonable protection
against harmful interference in a residential installation. This
equipment generates, uses and can radiate radio frequency
energy and, if not installed and used in accordance with the
instructions, may cause harmful interference to radio communica-
tions. However, there is no guarantee that interference will not
occur in a particular installation. If this equipment does cause
harmful interference to radio or television reception, which can be
determined by turning the equipment off and on, the user is
encouraged to try to correct the interference by one or more of
the following measures:
• Re-orient the receiving antenna.
• Increase the separation between the equipment and receiver.
• Connect the equipment into an outlet on a circuit different from
that to which the receiver is connected.
• Consult the dealer or an experienced radio/television techni-
cian for help.
The user may find the following booklet prepared by the FCC use-
ful: “How to Identify and Resolve Radio/Television Interference
Problems”. This booklet is available from the U.S. Government
Printing Office, Washington D.C. 20402, Stock # 004-000-00345-
4.
IMPORTANT INFORMATION
This equipment complies with Part 68 of the FCC Rules. On
the side of this equipment is a label that contains, among
other information, the FCC registration number of this equip-
ment.
Notification to Telephone Company The customer shall notify
the telephone company of the particular line to which the
connection will be made, and provide the FCC registration
number and the ringer equivalence of the protective circuit.
FCC Registration Number: F53CAN-xxxxx-AL-E
Ringer Equivalence Number: 0.xB
USOC Jack: RJ31X
Telephone Connection Requirements Except for the telephone
company provided ringers, all connections to the telephone net-
work shall be made through standard plugs and telephone com-
pany provided jacks, or equivalent, in such a manner as to allow
for easy, immediate disconnection of the terminal equipment.
Standard jacks shall be so arranged that, if the plug connected
thereto is withdrawn, no interference to the operation of the equip-
ment at the customer’s premises which remains connected to the
telephone network shall occur by reason of such withdrawal.
Incidence of Harm Should terminal equipment or protective cir-
cuitry cause harm to the telephone network, the telephone com-
pany shall, where practicable, notify the customer that temporary
disconnection of service may be required; however, where prior
notice is not practicable, the telephone company may temporarily
discontinue service if such action is deemed reasonable in the
circumstances. In the case of such temporary discontinuance,
the telephone company shall promptly notify the customer and
will be given the opportunity to correct the situation.
Additional Telephone Company Information The security con-
trol panel must be properly connected to the telephone line with a
USOC RJ-31X telephone jack.
The FCC prohibits customer-provided terminal equipment be
connected to party lines or to be used in conjunction with coin
telephone service. Interconnect rules may vary from state to state.
Changes in Telephone Company Equipment or Facilities The
telephone company may make changes in its communications
facilities, equipment, operations or procedures, where such
actions are reasonably required and proper in its business.
Should any such changes render the customer’s terminal equip-
ment incompatible with the telephone company facilities the cus-
tomer shall be given adequate notice to the effect modifications
to maintain uninterrupted service.
Ringer Equivalence Number (REN) The REN is useful to deter-
mine the quantity of devices that you may connect to your tele-
phone line and still have all of those devices ring when your
telephone number is called. In most, but not all areas, the sum of
the RENs of all devices connected to one line should not exceed
five (5.0). To be certain of the number of devices that you may
connect to your line, you may want to contact your local tele-
phone company.
Equipment Maintenance Facility If you experience trouble with
this telephone equipment, please contact the facility indicated
below for information on obtaining service or repairs. The tele-
phone company may ask that you disconnect this equipment
from the network until the problem has been corrected or until you
are sure that the equipment is not malfunctioning.
Digital Security Controls Ltd. 160 Washburn St., Lockport, NY
14094
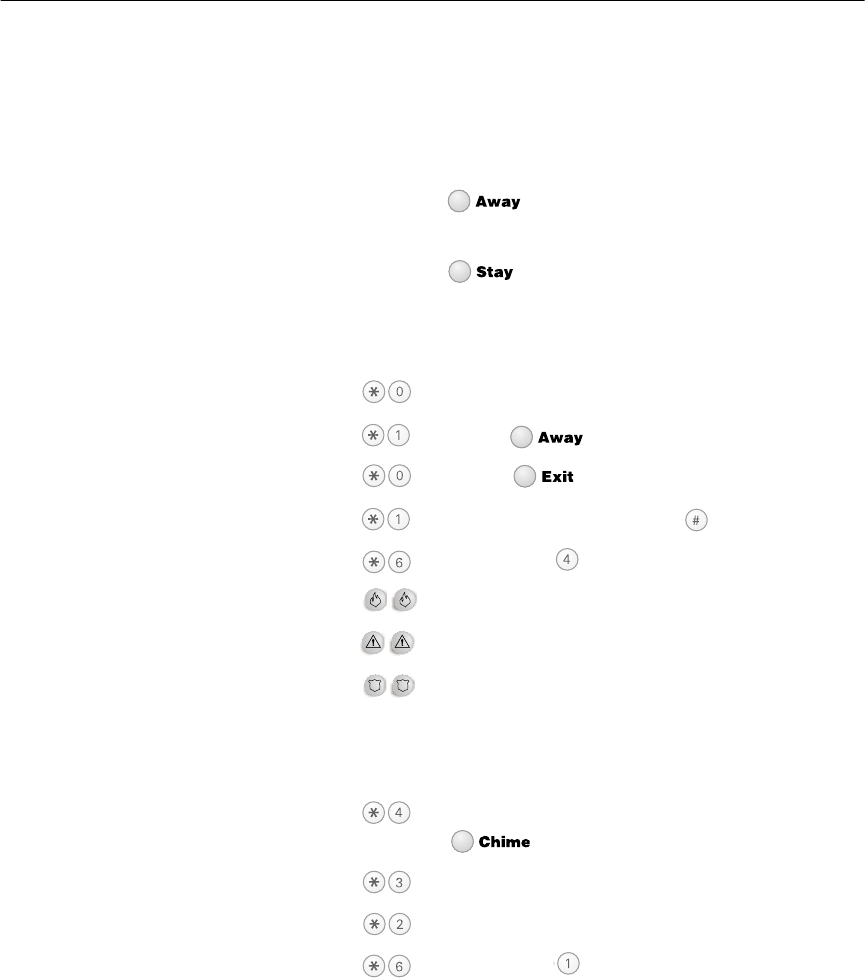
Quick Reference Guide
The following chart lists the basic functions of your system, and the keys to press for each
function. Refer to the listed page number for more information.
NOTE: Some functions may not be available on your system. Ask your installer for
more information.
To do this: Press this: Page:
Turn on system (Away): [access code], leave through entry/exit door 9
OR press (if enabled)
Turn on system (Stay):........................ [access code], do not leave premises 12
OR press (if enabled)
Turn off system:................................. [access code] 10
Turn on system (No Entry Time): ........ [access code] 13
Turn on system (Quick, if enabled): .... (from Ready state) 12
Turn on rest of system (if Stay armed): OR press (if enabled) 12
Exit premises when system on: .......... OR press (if enabled) 14
Turn off zones (Bypass): ..................... [two-digit zone number(s)], to exit 18
Test system ........................................ [master code] 20
Send Fire message: ............................ (press & hold for 2 seconds, if enabled) 17
Send Auxiliary message: .................... press & hold for 2 seconds, if enabled) 17
Send Panic message: ......................... (press & hold for 2 seconds, if enabled) 17
Silence fire alarm: .............................. [access code] 15
Silence intrusion alarm: ..................... [access code] 16
Turn door chime on/off: ...................... to toggle on or off 22
OR press (if enabled)
Check alarm memory: ....................... 16
Check troubles .................................. 19
Set time and date:............................. [master code] 21

1
Table of Contents
WLS9001 Control Unit Features 2
About This Guide 4
Introduction 5
How Your System Works ..................................5
IMPORTANT NOTICE ........................................5
Fire Detection ...................................................6
Testing .............................................................6
Remote Monitoring ..........................................6
Maintenance ....................................................6
Using Your WLS9000 System 7
Operating the System from the
WLS9001 Control Unit .....................................7
Operating the System from a Telephone ...........7
Receiving Incoming Calls ..................................8
Recording and Playing Voice Memos ................8
Turning Your System On (Arming) and Off
(Disarming) 9
Turning On Your System ..................................9
Turning Off Your System ...............................10
Other Ways to Turn Your System On ..............10
Turning On Your System When Everyone is
Away (Away Mode) ........................................11
What to do if the Siren Sounds Immediately
After You Exit .................................................11
Turning On Your System While You Are
At Home (Stay Mode) .....................................12
Turning On Your System With No Access Code
(Quick Arm) ....................................................12
Turing On Your System with No Entry Time ....13
Turning On Your System Automatically
(Automatic Arming) ........................................13
Exiting When the System is On (Quick Exit) .....14
Dealing With Alarms and Emergencies 15
Fire Alarms .....................................................15
Intrusion (Burglary) Alarms ............................. 16
Central Station Talk/Listen-in .......................... 16
Checking Alarms in Memory .......................... 16
Calling for Help .............................................. 17
Using Advanced Functions 18
Turning Off Part of Your System
(Bypassing Zones) ........................................... 18
Checking Trouble Conditions ......................... 19
Testing Your System ...................................... 20
Allowing Computer Access to Your System .... 20
Customizing Your System 21
Programming Access Codes ........................... 21
Setting the Time and Date ............................. 21
Turning the Door Chime On or Off ................ 22
Changing WLS9001 Speaker Loudness .......... 22
Changing Telephone Prompt Loudness .......... 22
Fire Safety 23
Household Fire Safety Audit ........................... 23
Fire Escape Planning ....................................... 23
Replacing Batteries 25
Tips for Buying Batteries ................................. 25
Door/Window Contacts ................................. 26
Motion Detectors ........................................... 26
Handheld Keypad .......................................... 26
Glassbreak Detector ....................................... 27
Smoke Detectors ............................................ 27
Wireless Keys ................................................. 27
Panic Pendants ............................................... 27
After Installing New Batteries ......................... 27
Glossary 28
System Information 30
Index 32
2
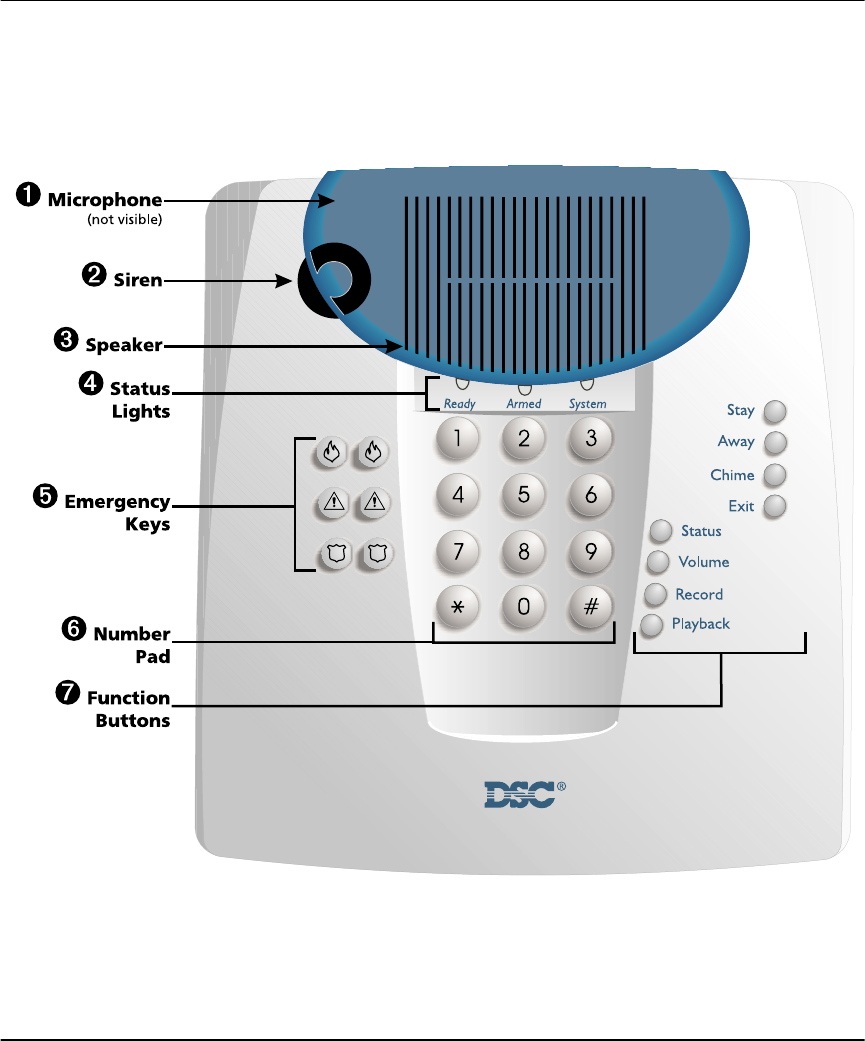
NT9010 Control Unit Features
This is the NT9010 control unit. This unit controls and monitors all devices on your NT9010 security
system. You can access all system functions using the buttons on the NT9010. In addition, the NT9010
provides easy to understand help on using the system through voice prompts. Please see the descrip-
tions at right for information on the features of the NT9010 control unit.

NT9010 Control Unit Features
3
➊ Microphone
You can use the microphone to record a voice
memo on the NT9010. To record a memo, press
and hold the Record button for two seconds,
then talk into the microphone. When you are
finished recording, press . To play the memo,
press and hold the Playback button for two sec-
onds.
If central station talk/listen-in is enabled on your
system, the microphone will also allow you to
talk to your central station operator when this
feature is active.
➋ Siren
The NT9010 uses the siren to warn you about
fire and burglary alarms.
➌ Speaker
The NT9010 uses the speaker to broadcast sys-
tem announcements, instructions, recorded
memos, and alarms.
➍ Status Lights:
The NT9010 status lights provide you with
instant visual feedback on the status of your
security system.
Green Ready Light
If the Ready light is ON, the system is ready to be
turned on. You will not be able to turn the sys-
tem on unless the Ready light is ON (see “Turn-
ing On Your System” on page 9).
If the Ready light is flashing, someone has
recorded a voice memo on the NT9010. Press
and hold the Playback button for two seconds to
listen to the recording.
Red Armed Light
If the Armed light is ON, the system has been
turned on successfully.
Orange System Light
If the System light is ON, one or more of these
conditions could be present on the system:
System Troubles (See “Checking Trouble Condi-
tions” on page 19).
Alarms in Memory (See “Turning Off Your Sys-
tem” on page 10).
Zones Bypassed (turned off) (See “Turning Off
Part of Your System (Bypassing Zones)” on page
18).
Programming. The System light will flash when
you are programming access codes, or perform-
ing other programming functions.
➎ Emergency Keys:
In an emergency, you can use these keys to
instantly contact your central station:
Press both * keys for two seconds to send a
Fire message.
Press both * Keys for two seconds to send an
Auxiliary message.
Press both * Keys for two seconds to send a
Panic message.
IMPORTANT NOTE: *The Fire, Auxiliary and
Panic keys will NOT function unless pro-
grammed by the installer. If these keys are in
service and the installer has enabled audible
feedback, holding down both keys for two
seconds will cause the keypad sounder to
beep indicating that the input has been
accepted and sent.
➏ Number Pad:
Use the number pad to enter your access code
and system commands. To select a function
press . To exit a function press .
➐ Function Buttons:
If your installer has enabled them, you can use
the function buttons to access the stay, away,
door chime, quick exit, status, volume control,
memo record, and memo playback features. To
use a feature, press and hold one of the buttons
for two seconds. Refer to this Guide for more
information on these features.

4
About This Guide
This NT9010 User’s Guide is for anybody using a NT9010 Security System. The
NT9010 has many useful features. Read this guide thoroughly to learn how to use
your security system. Ensure that all users of this system are equally instructed in its
use.
Important information about fire and burglary alarms is in section 3 on
page 15. Read this section carefully!
This guide provides step-by-step instructions for each function. Each key you need
to press will be indicated by its symbol (e.g. ).
For some functions, you will need to enter your access code (indicated by [access
code]). To program other access codes, or to perform advanced functions, you will
need to enter or your master code (indicated by [master code]). You can also use
the master code to turn the system on and off.
The NT9010 control unit and its lights and functions are described on pages 2 and
3.
The Quick Reference Guide inside the front cover shows you the commands
required to access basic system functions, and the page number each function is
described on.
See the Glossary on page 28 to learn more about words used in this manual.
Fill out the “System Information” page with all of your zone information
and access codes, and store this manual in a safe place for future reference.
5
Section 1: Introduction
Your installer has set up your system with your home or business in mind. You may
not need all of the features described in this manual. Your installer will only turn
on the features that you need, and should explain all the active features to you. If
you have any questions about which features are included on your system, please
ask your installer.
How Your
System Works
Your security system is made up of a DSC NT9010 control unit, and various detec-
tors and wireless devices.
The control unit is the “brain” of your security system. It controls and checks all
the detectors, and communicates with the central station (if remote monitoring is
enabled). You will access system functions with your NT9010 control unit, which is
described on pages 2 and 3 of this manual. Each NT9010 has a microphone, siren,
speaker, number pad, emergency keys, and eight function keys.
Using the NT9010 you can send commands to the system and check the current
system status. Your installer will mount the NT9010 in a convenient location inside
your premises.
Your security system can provide up to three kinds of monitoring: intrusion, fire,
and emergency.
The security system has several zones (monitored areas). Each of these zones will
be connected to a detector (motion detector, glassbreak detector, door contact,
etc.). If a detector goes into alarm, the NT9010 will sound an alarm and may
announce the specific zone that caused the alarm (depending on how your
installer has programmed the system).
IMPORTANT
NOTICE
A security system cannot prevent emergencies. It is only intended to alert
you and – if included – your central station of an emergency situation.
Security systems are generally very reliable but they may not work under
all conditions and they are not a substitute for prudent security practices
or life and property insurance. Your security system should be installed
and serviced by qualified security professionals who should instruct you
on the level of protection that has been provided and on system opera-
tions. For important warnings and cautions, please see inside the back
cover.

6
Fire Detection This equipment is capable of monitoring fire detection devices such as smoke
detectors and providing a warning if a fire condition is detected. Good fire detec-
tion depends on having adequate number of detectors placed in appropriate loca-
tions. This equipment must be installed in accordance with NFPA 72 (N.F.P.A.,
Batterymarch Park, Quincey MA 02269). Carefully review Section 7:“Fire Safety”
on page 23.
NOTE: Your installer must enable the fire detection portion of this equip-
ment for it to work.
Te s t i n g To make sure your system continues to work as intended, you must test your sys-
tem weekly. Please refer to “Testing Your System” on page 20. If your system does
not work correctly, call your installer for service.
Remote
Monitoring
This system can send alarms, troubles and emergency messages over telephone
lines to a central station. If you accidentally initiate an alarm, immediately call the
central station to prevent an unnecessary response.
NOTE: Your installer must enable remote monitoring for it to work.
Maintenance With normal use, the system requires minimum maintenance. Note the following
points:
1. Do not wash the security equipment with a wet cloth. Light dusting with a
slightly moistened cloth should remove normal accumulations of dust.
2. Use the system test described in “Testing Your System” on page 20 to check the
battery condition of the NT9010 control unit. We recommend, however, that
the stand-by battery be replaced every three years.
3. For other system devices such as smoke detectors, passive infrared, ultrasonic
or microwave motion detectors or glassbreak detectors, consult the manufac-
turer’s literature for testing and maintenance instructions. For instructions on
replacing detector batteries, see “Replacing Batteries” on page 25.

7
Section 2: Using Your NT9010 System
Operating the
System from
the NT9010
Control Unit
The NT9010 control unit provides easy to understand help on using the system
through voice prompts.
If the system asks you to enter an access code, use the number pad on the unit to
enter your 4- or 6-digit code.
You can check the current status of your system by pressing and holding the Sta-
tus button for two seconds. The NT9010 will announce whether the system is cur-
rently on (armed), or off (disarmed), if any zones are currently open or bypassed
(turned off), and if there are any trouble conditions currently present on the sys-
tem.
Operating the
System from
a Telephone
If your installer has connected your NT9010 system to an incoming telephone line,
you can access the system using a local telephone (a telephone on your premise).
You may also be able to use the system from a remote telephone (a telephone not
on your premise), if your installer has turned on this feature.
Even though you can use a telephone to operate your system, the telephone will
not automatically display or indicate system status or zones in alarm. Therefore, it
is essential that you check the NT9010 control unit regularly for any changes in
system status.
CAUTION: For the security of your codes, DO NOT use a telephone with a
redial button to arm or disarm your system.
Local Telephone Access
Use this procedure to call your NT9010 system from a telephone that is on the
same telephone line. No dial-in is necessary.
1. Pick up the telephone handset - you will hear a dial tone.
2. Enter your 3-digit Telephone Access Code. The dial tone will stop and the sys-
tem will announce:
“Hello.”
3. The system may also say:
“Enter your access code.”
If so, enter your [access code].
4. The system announces one or more messages to advise you of its status. Follow
the voice prompts to use the system functions.

8
Remote Telephone Access
1. From any touch-tone telephone, dial the number of your premises. If you have
more than one telephone line, call the number of the line on which your
NT9010 has been installed.
2. After one ring, hang up. Wait 10 seconds then call again. On the second call,
the system will answer after one or two rings and announce:
“Hello.”
3. Enter your 3-digit Telephone Access Code within 10 seconds. If you wait longer
than 10 seconds, the system will automatically hang up.
4. The system will then prompt:
“Enter your access code.”
Enter your [access code] within 20 seconds. If you wait longer than 20 seconds,
the system will hang up. The system will also hang up if 3 incorrect access
codes are entered.
5. Once you have entered an access code, the system will announce one or more
messages to advise you of its status. Follow the voice prompts to use the sys-
tem functions.
NOTE: There is only one “Telephone Access Code”. It is programmed by
your installer. It is not the same as your 4- or 6-digit system access code,
which you also enter on your system keypad. More than one system access
code may be programmed for use by different users of your system (see
“Programming Access Codes” on page 21).
Receiving
Incoming
Calls
If you are accessing the NT9010 system over a local telephone at the same time as
someone calls you, the system will announce:
“Attention, you have an incoming call. To receive the call, press pound now.”
To answer the incoming call, press . If you do not press , you can continue
to use the system.
Recording and
Playing Voice
Memos
You can record a voice memo on the NT9010 control unit, so that you or another
person can listen to it later. To record a voice memo:
1. Press and hold the Record function button for two seconds. The NT9010 says
“Record memo now.”
2. Speak into the microphone (located in the top left corner of the unit). When
you have finished recording, press . The green Ready light flashes to indicate
a new memo has been recorded.
To listen to a voice memo:
1. Press and hold the Playback function button for two seconds. Once the memo has
been played, the green Ready light stops flashing, however the memo remains in
memory until a new one is recorded, or until the NT9010 loses all power.
2. If the memo is not for you, you can press to stop the playback. If you press
before the playback finishes, the Ready light will continue to flash.

9
Section 3: Turning Your System On
(Arming) and Off (Disarming)
This section describes how to turn your system on and off. Read this section care-
fully.
Tur ning On
Your System
1. Before you turn on your system, make sure that it is Ready. You can tell that the
system is ready when the green (Ready) light is ON. If the green light is not on,
see the Note below.
2. Enter your access code on the keypad. If you have entered the wrong code, the
keypad will sound one long beep - try again to enter the correct code.
When you enter a valid access code:
• The keypad sounds fast beeps.
• The red (Armed) light turns ON.
• The keypad starts to beep once every second. This tells you that the sys-
tem is turning on.
3. If you will be leaving, go out through the entry/exit door. Doing this tells the sys-
tem that you are away, and the system turns on completely.
If you will be staying, do not open the entry/exit door. This tells the system that
you are staying, and the system turns on only the perimeter areas.
NOTE: If the green (Ready) light is not on:
• Close all doors and windows
• Stop motion in all areas with motion detectors
If the orange (System) light is ON, check for possible trouble conditions (see
“Checking Trouble Conditions” on page 19), and check that no zones are
turned off unintentionally (see “Turning Off Part of Your System (Bypassing
Zones)” on page 18).

10
Tur ning Off
Your System
1. If you are outside, enter through the entry/exit door. The keypad beeps to
remind you to turn off the system.
NOTE: Entering by any other door will immediately cause an alarm.
If you are inside, go to the keypad (the keypad will not beep).
2. Enter your [access code]. If you have entered from outside, you must enter the
correct access code before the keypad stops beeping. If you do not enter a
valid access code during this time, the system will sound an alarm.
NOTE: If you have entered the wrong code the keypad will sound one long
beep - try again to enter the correct code.
As soon as you enter the correct code, the red (Armed) light turns OFF and the
keypad stops beeping.
3. If no alarms occurred while the system was on and there are no trouble condi-
tions present, the NT9010 will announce: “System is off. No alarms in mem-
ory.”.
If an alarm occurred while the system was on, the NT9010 will announce: “Sys-
tem is off. There are (number) alarms in memory: {Zone XX}.” See “Checking
Alarms in Memory” on page 16.
CAUTION: If you return and find that an alarm has occurred while you
were away, it is possible that an intruder may still be on the premises. Go to
a nearby safe location, and call your central station or the local authorities
to investigate. The alarm memory is cleared each time the system is turned
on, so any alarms showing have occurred only during the last time the sys-
tem was on.
Other Ways to
Tur n Your
System On
There are two basic methods for turning on your security system.
•Away: Use this method when everyone will be away from the premises. See
below.
•Stay: Use this method when one or more people will stay on the premises. See
page 12.
You can also use any of these methods to turn on your system (see pages 10 to
11):
•Quick Arming: Turn on your system without having to enter an access code.
Your installer must turn on this feature before it will work.
•“No Entry” Arming: Turn on your system with no entry time - use this method
when no one else will be entering the premises.
•Automatic Arming: The system will turn itself on at pre-set times. Your
installer must turn on this feature before it will work.
NOTE: When turning on your system from a remote telephone, the system
will automatically be in Stay mode. (See “Turning On Your System While You
Are At Home (Stay Mode)” on page 12.)

Turning Your System On (Arming) and Off (Disarming)
11
Tur ning On
Your System
When
Everyone is
Away (Away
Mode)
When you turn on your system using the Away method, both interior zones (e.g.
motion detectors) and perimeter zones (e.g. door and window contacts) will be
active and will cause an alarm to sound when opened.
1. Check that your system is ready (green Ready light is ON).
2. Enter your [access code]. As you enter each digit, the keypad sounder beeps.
If you entered the access code incorrectly, the keypad sounder buzzes steadily
for two seconds. Re-enter your access code correctly.
When you enter a valid access code:
• The keypad sounds fast beeps.
• The red (Armed) light turns ON.
• The exit time begins and the keypad beeps once every second until the
end of the exit time. The keypad beeps quickly for the last 10 seconds of
the exit time.
3. Exit the premises through the entry/exit door. Doing this tells the system that
you are away, and the system turns on all the interior zones.
At the end of the exit time, all keypad lights, except the red (Armed) light, turn
OFF. The system is now on.
NOTE: If the system announces that any zones are bypassed, or if the
orange (System) light is ON, there are one or more zones not turned on.
See “Turning Off Part of Your System (Bypassing Zones)” on page 18. If you turn
on the system with a zone bypassed or a trouble present, your security pro-
tection is reduced.
Away Button
You may also be able to quickly turn on your system in Away mode using the
“Away” button on your keypad. If your installer has programmed this button,
press and hold it for two seconds to turn on the system in Away mode.
What to do if
the Siren
Sounds
Immediately
After You Exit
Your installer will tell you if this feature has been enabled on your system.
In order to reduce false alarms, the system will notify you of an improper exit
when turning on the system in the Away mode. If you do not securely close the
entry/exit door during the exit time, the keypad will emit one continuous beep and
the siren will sound.
If this occurs:
1. Re-enter the premises.
2. Enter your [access code] to turn off the system. You must do this before the
entry time ends.
3. Turn the system on again, making sure to close the entry/exit door properly.
(See “Turning On Your System When Everyone is Away (Away Mode)”.)

12
Tur ning On
Your System
While You Are
At Home (Stay
Mode)
Use the Stay mode when you want to stay on the premises, but prevent unautho-
rized entry from outside. The system will only turn on the perimeter zones (e.g.
door and window contacts), and will leave the interior zones off (e.g. motion
detectors) so that you will be free to move around inside.
1. Check that your system is ready (green Ready light is ON)
2. Enter your [access code]. As you enter each digit, the keypad sounder beeps.
If you entered the access code incorrectly, the keypad sounder buzzes steadily
for two seconds. Re-enter your access code correctly.
When you enter a valid access code:
• The keypad sounds fast beeps.
• The red (Armed) light turns ON.
• The exit time begins and the keypad beeps once every second until the
end of the exit time. The keypad beeps quickly for the last 10 seconds of
the exit time.
3. DO NOT leave through the entry/exit door. This tells the system that you are
staying, and the system automatically turns off the interior zones.
At the end of the exit time, all keypad lights, except the red (Armed) and
orange (System) lights, turn OFF. The system is now on.
Re-activate bypassed zones
To turn on the rest of the system when it is in Stay mode:
1. Press . The interior zones are now on.
NOTE: When you have turned on the interior zones, you will not be able to
enter areas protected by motion detectors, or open doors and windows. To
access these areas, you must enter your [access code] and turn off the sys-
tem.
Stay Button
You may also be able to quickly Stay arm your system using the “Stay” function
button on your keypad. If your installer has programmed this button, press and
hold it for two seconds to turn your system on in Stay mode.
Tur ning On
Your System
With No
Access Code
(Quick Arm)
Your installer will tell you if the Quick Arm method will work on your system.
Using this method, you can quickly turn on your system without having to enter
an access code.
1. Check that the system is ready (green Ready light is ON)
2. Press .
• The keypad sounds fast beeps.
• The red (Armed) light turns ON.
• The exit time begins and the keypad beeps once every second until the
end of the exit time.

Turning Your System On (Arming) and Off (Disarming)
13
3. Go out through the entry/exit door. The system will be in Away mode. If you do
not exit, the system will be in Stay mode.
NOTE: Pressing will only turn on the system. To turn the system off,
you must enter a valid [access code]. See “Turning Off Your System” on page
10.
Turing On
Your System
with No Entry
Time
If you want to turn on the system, and no one else will be entering, you can
remove the entry time from zones that normally have one. If somebody enters
through any zone, the system will sound an instant alarm.
1. Check that your system is ready (green Ready light is ON)
2. Press , then your [access code].
• The red (Armed) light flashes as a reminder that the system is on and has
no entry time.
• The keypad sounds fast beeps.
3. The system is now in Stay mode.
Tur ning On
Your System
Automatically
(Automatic
Arming)
Your installer may have set up your system to turn on at a pre-set time. If auto-
matic arming has been set up, when the system reaches the pre-set autoarm time,
the keypad buzzers will sound for one minute.
During this one-minute warning time, you may be able to stop automatic arming
by entering your [access code]. Ask your installer for more information.
Your installer may have set up the system so that users with a master code can
change the autoarm time at the keypad. If so, master users will be able to turn the
automatic arming function on or off, and program the time at which the system
will automatically turn on each day.
To turn automatic arming on or off:
1. Press , then [master code].
2. Press to turn automatic arming on or off. The keypad will beep 3 times
when auto-arm is turned ON, and once when it is turned OFF.
3. When you are finished, press .
To change the autoarm time:
1. Press , then [master code].
2. Press .
3. Enter the autoarm time using the 24Hr format (0000 - 2359). For example, to
set the time for 1:00pm, enter (1300).
5. When you are finished, press twice.
NOTE: The system must have the correct time and date in order for the
autoarm feature to work. Please see“Setting the Time and Date” on page 21.

14
Exiting When
the System is
On (Quick
Exit)
Your installer will tell you if the Quick Exit feature will work on your system. You
can use the quick exit feature to leave while the system is on, without having to
turn your system off and on again.
To use the quick exit feature:
1. While the system is on, press .
2. The system will start a two-minute countdown, during which you may leave
through the entry/exit door.
NOTE: During this time, you may only open and close the entry/exit door
once. Once the door is closed the system will end the two-minute quick exit
time. If the door is opened again, or is not closed before the two-minutes
are up, or if another entry/exit door is opened, the entry time will begin.
Exit Button
If your installer has programmed the “Exit” function button, press and hold the
button for two seconds to activate the quick exit feature.

15
Section 4: Dealing With Alarms and
Emergencies
If you return and the siren is on, do not enter, but contact the local author-
ities from a nearby safe location.
Read this section carefully so that you will know what to do if your system goes
into alarm.
Your installer will tell you if fire detection equipment has been installed and
enabled on your system.
NOTE: A fire alarm always has priority over an intrusion (burglary) alarm.
Fire Alarms A pulsing siren means a fire alarm. If there is a fire, or if you are not sure, fol-
low your evacuation plan immediately (see “Fire Escape Planning” on page
23). The system may also announce the label for the zone(s) that triggered the
alarm, if programmed by the installer.
If remote monitoring is enabled, the system will send a fire message to the central
station. Your installer may have set up the keypad Fire keys and other fire equip-
ment to send a fire alarm message to the central station as soon as they are acti-
vated.
Your installer may have set up other equipment (e.g. smoke detectors) to have a
30 second delay before sending the alarm message to the central station. Your
installer will inform you how the equipment on your system operates. Equipment
that has been set up with a 30 second delay (e.g. smoke detectors) gives you time
to correct the problem before a false alarm is sent to the central station.
If there is no fire condition, to silence the fire alarm:
1. Press within 30 seconds of the beginning of the alarm. The fire alarm and
communication to the central station will be delayed for 90 seconds to give you
time to clear the smoke detector.
2. If the detector still detects smoke after 90 seconds, the alarm will sound again.
If there is no smoke, the system will return to normal.
3. If you do not press within the 30 second delay time, the system will send a
fire message to the central station (if remote monitoring is enabled on your sys-
tem). To silence the fire alarm after the 30 second delay has expired, enter your
[access code].
NOTE: If you suspect that a fire message has been transmitted, but there is
no fire condition, call the central station to avoid an unnecessary response.
NOTE: Your installer may have programmed the system to operate differ-
ently than described above. Ask your installer for more information
regarding your system’s operation.

16
Intrusion
(Burglary)
Alarms
A steady siren means an intrusion alarm. The system may also announce the label
for the zone(s) that triggered the alarm, if programmed by the installer.
To silence the alarm:
1. Enter your [access code].
2. If the alarm was unintentional, call your central station or local authorities
immediately to avoid an unnecessary response.
3. Check the alarm memory to see which zone caused the alarm.
Once the source of the alarm has been corrected, the system will return to the
Ready state.
Central
Station Talk/
Listen-in
If your installer has set up remote monitoring on your system, the talk/listen-in fea-
ture may also be available. If an alarm, or other programmed event occurs on your
system, this feature allows a central station operator to listen to what is happening
on the premises. The operator may also be able to talk to whoever is present,
depending on the type of event that has occurred. Ask your installer for more
information on this feature and how it works.
Checking
Alarms in
Memory
The alarm memory announcement tells you which zone (detector) caused the
alarm. The alarm memory is cleared each time the system is turned on. Any alarms
announced by the system have only occurred the last time the system was on.
CAUTION: If you return and find that there was an alarm while you were
away, it is possible that an intruder may still be on the premises. Go to a
nearby safe location, and call your central station or the local authorities to
investigate.
If an alarm occurred while the system was turned on, the NT9010 will announce:
“There are (number) alarms in memory: {Zone XX}.”.
1. To cancel the alarm memory announcement, press .
2. After the announcement is over, the system will return to the Ready state, but
the orange (System) light will be ON. To listen to alarms in memory again, press
. The NT9010 will announce the zones that were in alarm.

Dealing With Alarms and Emergencies
17
Calling for
Help
The NT9010 has three pairs of emergency keys. Using these keys you can send an
immediate Fire, Auxiliary or Panic message to your central station.
IMPORTANT:The Fire, Auxiliary and Panic keys will NOT function unless
turned ON by the installer. If your installer has turned these keys ON, and
enabled audible feedback, holding down the keys for two seconds will
cause the keypad sounder to beep indicating that the alarm input has been
accepted and transmission to the central station is underway.
From the NT9010 Control Unit
Press both keys for two seconds to send a Fire message, and to trigger a
fire alarm on the system.
Press both keys for two seconds to send an Auxiliary message.
Press both keys for two seconds to send a Panic message.
From Your Local Telephone
If local telephone access is available on your system, you can also:
• send a Fire message and trigger a fire alarm by pressing and holding for 2 sec-
onds the [1] button on your telephone
• send an Auxiliary message by pressing and holding for 2 seconds the [2] button
on your telephone
• send a Panic message by pressing and holding for 2 seconds the [3] button on
your telephone
NOTE: In the U.S.A., do not program the Aux keys for use in medical emer-
gencies as per UL requirements.

18
Section 5: Using Advanced Functions
This section describes how to perform more specialized functions: turning off spe-
cific detectors (bypassing zones), turning the door chime on or off, checking sys-
tem troubles, and testing your system.
Tur ning Off
Part of Your
System
(Bypassing
Zones)
Sometimes, you may need to temporarily turn off a detector:
• if you will need to go into a protected area while the system is turned on
• or, if a detector is temporarily out of service but you need to turn on the system
This is called “bypassing”. When you bypass a detector, it will not turn on the next
time you turn on your system.
Detectors (zones) cannot be bypassed once the system is on. Bypasses on detec-
tors are automatically cancelled each time the system is turned off. You must
bypass the detectors again, if required, before you turn the system on again.
NOTE: Bypassed detectors will not be able to sound an alarm - this reduces
your level of security. If a detector is not working, call a service technician
immediately so that the problem can be resolved and your system returned
to proper working order.
NOTE: For security reasons, your installer may program the system to pre-
vent you from turning off certain detectors (for example, smoke detectors).
NOTE: If you have 24-hour zones on your system, they will stay bypassed
until you turn off the bypass using the steps below (ask your installer for
more information).
1. Start with the system turned off. Press .
2. If the system asks for your [access code], enter it now.
3. Enter the two-digit number (01-32) of the detector you want to turn off
(bypass) .
The system will announce the zones (detectors) that are bypassed: “There are
(number) zones bypassed: {Zone XX}, etc...To exit, press [#].”
TIP: To find out the number of a detector, check in “System Information” on
page 30.
3. To turn a detector back on, enter the two-digit number of the zone (01-32).
The system will announce the zones (detectors) which are bypassed: “There are
(number) zones bypassed: {Zone XX}, etc...To exit, press [#].”
4. When you are finished turning off detectors, press .
5. The next time you turn on your system, the bypassed detectors will not turn
on. When you turn your system off again, the detectors will return to normal
(they will not be bypassed).

Using Advanced Functions
19
Checking
Trouble
Conditions
Your system continuously checks for a number of possible trouble conditions. If
one of these trouble conditions occur:
• the orange (System) light will be ON until the trouble is fixed
• the keypad will beep twice every 10 seconds until you press any key
• the NT9010 will say “System Trouble” when announcing the status of the sys-
tem
NOTE: A Trouble condition reduces the level of security your system is
designed to provide. Call your installing company for service.
To listen to an announcement of the troubles that are present, press .
To exit the trouble announcement, press .
Here is a list of the various trouble conditions that your system might announce:
Announcement: Problem and how it should be addressed:
“Service is required” If this message is announced, call for service.
“AC Power Trouble.” Electrical power to the system has been interrupted. Check your
fuse box or circuit breaker to ensure that the electricity supply
for the system is on. If this does not correct the problem, call for
service. The NT9010 may go to sleep to conserve the backup
battery if the AC power is out for more than 30 seconds. If this
happens, you can “wake up” the unit by pressing and holding
for 2 seconds.
“Phone line trouble.” Your system has detected a problem with the telephone line. If
this problem does not correct itself, or happens frequently, call
for service.
“Communication trou-
ble.”
Your system has been unsuccessful in communicating an event
to your central station. If you hear this message, call for service
immediately.
“ Zone Fault, press
[5].”
Your system has detected a fault on one or more zones (detec-
tors). Press , and the system will announce which zones have
a fault. If you are unsure of how to clear a zone fault, call for
service.
“Zone tamper, press
[6].”
Your system has detected a tamper on one or more zones
(detectors). Press and the system will announce which
zone(s) have tampers. If you are unsure how to clear the zone
tamper, call for service.
“Device low battery,
press [7].”
Your system has detected that one or more of the wireless
detectors on the system has a low battery. Press , and the sys-
tem will announce which devices have a low battery. Change
the relevant batteries. See page 25 for instructions. If this does
not correct the problem, call for service.
“The time and date
are incorrect.”
If all power to the system is interrupted (AC and battery), the
system clock and date will need to be reset. See “Setting the
Time and Date” on page 21. If you are unsure of the cause of
the system power failure, call for service.

20
Te s t in g Yo u r
System
Test your system every week. Report any problems immediately to your installation
company.
NOTE: Perform system tests during off-peak hours, such as early morning
or late evening.
1. If your system has remote monitoring, call the central station to tell them that
you are testing your system.
2. Begin with the system turned off. Press [Master Code] . The system
sounds the siren and turns on all keypad lights for two seconds. When the
sounder and keypad test is complete, press .
3. To test each area of your system, open each door and window in turn, or walk
in motion detector areas.
4. Press and hold the Status button for two seconds. The system will announce all
open zones.
5. If the system has any fire zones, activation will cause the alarm to sound in a
pulsed mode. To silence the alarm, press .
CAUTION: Do not use an open flame or burning materials to test a smoke
or heat detector. Contact your installer for information on safe methods of
testing detectors.
6. When you are finished testing the system, inform your central station. If the
system did not work properly, contact your installer.
NOTE: Some features described above will not be functional unless
enabled by your installer. Ask your installer which features are functional
on your system.
Allowing
Computer
Access to Your
System
From time to time, your installer may need to send information to, or retrieve
information from your security system. Your installer will do this by having a com-
puter call your system over the telephone line. You may need to prepare your sys-
tem to receive this “downloading” call. To do this:
1. Press [Master code] . This allows downloading for a limited period of
time. During this time, the system will answer incoming downloading calls.
For more information on this feature, please ask your installer.

21
Section 6: Customizing Your System
This section describes how to customize your system to your needs. Refer to this
section for detailed instructions on: programming access codes, setting the time
and date, and adjusting the keypad sounders and lights.
Programming
Access Codes
The master code (code 40) can be used to program system options, arm and dis-
arm the system and program other access codes. You can program up to 32 addi-
tional access codes (01 through 32). Other access codes, such as system
supervisory and duress codes, are available. Contact your installer for more infor-
mation.
1. Press [Master Code]. The red (Armed) light turns on and the orange (Sys-
tem) light flashes.
2. Enter the two-digit number of the access code you want to program (01-32 for
access codes, 40 for master code). If an access code already exists for the code
number you have selected, it will be replaced by the new code.
3. Enter the new [code]. Access codes must be four digits unless otherwise indi-
cated by your installer. Enter digits 0 through 9 only. NOTE: Do not use the fac-
tory default or obvious codes such as [1111] or [1234].
4. To exit access code programming, press .
5. Record your new codes on the “System Information” page in this booklet.
Erasing a code:
1. Press [Master Code]
2. Enter the number of the code you want to erase [01 to 32]. The Master code
cannot be erased.
3. To erase the code, press .
4. To exit access code programming, press .
Setting the
Time and Date
You should make sure that your system has the correct time and date. This is
important for the auto-arm feature to function correctly, and for accurate report-
ing of events.
1. Press [Master Code] .
2. The system announces the current time and date. To change the time, press
, then enter the Time in Hours and Minutes using the 24-Hour format
(00:00 to 23:59).
3. To change the date, press , then enter the Date in Months, Days and Years
(MM DD YY).
4. To exit programming, press .

22
Tur ning the
Door Chime
On or Off
If your installer has enabled the door chime feature, your NT9010 will beep when-
ever designated doors or windows are opened or closed. The NT9010 may also
announce the zones that were opened or closed, if programmed. Your installer
has programmed which doors and windows will activate the door chime.
1. Press to turn the door chime feature ON
The keypad will beep 3 times.
2. Press again to turn the door chime feature OFF
The keypad will sound one long beep.
Changing
NT9010
Speaker
Loudness
You can select from 3 different volume levels for NT9010 announcements - high,
medium and low.
1. Press and hold the Volume function key for 2 seconds. The NT9010 announces
the current volume level.
2. To change the volume level, press and hold the Volume function key again.
The NT9010 announces the next volume level option.
3. Repeat step 2 until you find a volume setting you like.
Changing
Telephone
Prompt
Loudness
If you will be using a telephone to access your system, you can change the volume
of the telephone prompts. You can select from three different telephone volume
levels.
1. Press [Master Code] . The NT9010 announces the telephone volume
level: “ Phone volume is low. To change volume, press [1]. To exit, press '#'.”
2. To change the volume, press .
3. When you have selected the volume level you want, press to exit.

23
Section 7: Fire Safety
Read this section carefully for important information about fire safety.
Household
Fire Safety
Audit
Most fires occur in the home. To minimize this danger, we recommend that a
household fire safety audit is conducted and a fire escape plan is developed.
1. Are all electrical appliances and outlets in a safe condition? Check for frayed
cords, overloaded lighting circuits, etc. If you are uncertain about the condition
of your electrical appliances or household service, have a professional evaluate
these units.
2. Are all flammable liquids stored safely in closed containers in a well-ventilated
cool area? Cleaning with flammable liquids should be avoided.
3. Are fire hazardous materials (matches) well out of reach of children?
4. Are furnaces and wood burning appliances properly installed, clean and in
good working order? Have a professional evaluate these appliances.
Fire Escape
Planning
There is often very little time between the detection of a fire and the time it
becomes deadly. It is thus very important that a family escape plan be developed
and rehearsed.
1. Every family member should participate in developing the escape plan.
2. Study the possible escape routes from each location within the house. Since
many fires occur at night, special attention should be given to the escape
routes from sleeping quarters.
3. Escape from a bedroom must be possible without opening the interior door.
Consider the following when making your escape plans:
• Make sure that all border doors and windows are easily opened. Ensure that
they are not painted shut, and that their locking mechanisms operate smoothly.
• If opening or using the exit is too difficult for children, the elderly or handi-
capped, plans for rescue should be developed. This includes making sure that
those who are to perform the rescue can promptly hear the fire warning signal.
• If the exit is above the ground level, an approved fire ladder or rope should be
provided as well as training in its use.
• Exits on the ground level should be kept clear. Be sure to remove snow from
exterior patio doors in winter; outdoor furniture or equipment should not block
exits.
• Each person should know of a predetermined assembly point where everyone
can be accounted for i.e.: across the street or at a neighbor’s house. Once
everyone is out of the building, call the Fire Department.

24
• A good plan emphasizes quick escape. Do not investigate or attempt to fight
the fire, and do not gather belongings or pets as this wastes valuable time.
Once outside, do not re-enter the house. Wait for the fire department.
• Write the fire escape plan down and rehearse it frequently so that should an
emergency arise, everyone will know what to do. Revise the plan as conditions
change, such as the number of people in the home, or if there are changes to
the building’s construction.
• Make sure your fire warning system is operational by conducting weekly tests
(see “Here is a list of the various trouble conditions that your system might
announce:” on page 19). If you are unsure about system operation, contact
your installing dealer.
• We recommend that you contact your local fire department and request further
information on fire safety and escape planning. If available, have your local fire
prevention officer conduct an in-house fire safety inspection.

25
Section 8: Replacing Batteries
From time to time, the batteries in the detectors and other components on your
system will need to be changed. If a device has a low battery, your system will
announce a “Device Low Battery” trouble (see “Checking Trouble Conditions” on
page 19).
When batteries in one device need to be replaced, it is suggested that the batter-
ies in all devices be replaced at the same time. All of the batteries used in the secu-
rity system are Eveready Alkaline Energizer batteries.
NOTE: Before changing batteries in the detectors, you should inform your
central station.
Tips for
Buying
Batteries
• Your system is designed to work with Eveready Alkaline Energizer Batteries.
When replacing batteries, be sure to buy the same brand and type of batteries.
Do not replace the batteries on your system with any other type. The reliability
of your security system depends on its batteries, and “no name” or generic
brand batteries may not provide the best quality and dependability.
• Use fresh batteries. Most batteries have a “best before” date printed on their
packaging or on the batteries themselves. Buy batteries that have a “best
before” date of two years or more from your purchase date.
• When disposing of used batteries, follow the instructions and precautions
printed on the batteries. Many cities and communities have collection sites or
services for used household batteries. Contact your municipal offices for infor-
mation on the disposal of used batteries.
• If in doubt about the batteries used in your system, or if you have trouble
installing them, contact your installer for assistance.
Required Eveready Alkaline Energizer Batteries
WLS904 Motion Detector: Four ‘AAA’ batteries.
WLS906 Wireless Smoke Detector: Six ‘AA’ batteries.
WLS907 Universal Transmitter: Three ‘AAA’ batteries.
WLS908 Wireless Panic Pendant: battery cannot be changed - replace the unit.
WLS909 Wireless Key: Three Photo/Electronic 1.5V batteries.
WLS910 Wireless Handheld Keypad: Three ‘AAA’ batteries.
WLS912 Wireless Glassbreak Detector: Three ‘AA’ batteries.
WLS914 Pet Immune Motion Detector: Four ‘AAA’ batteries.
WLS915 Universal Transmitter: One Lithium Energizer No. EL123AP battery.
26
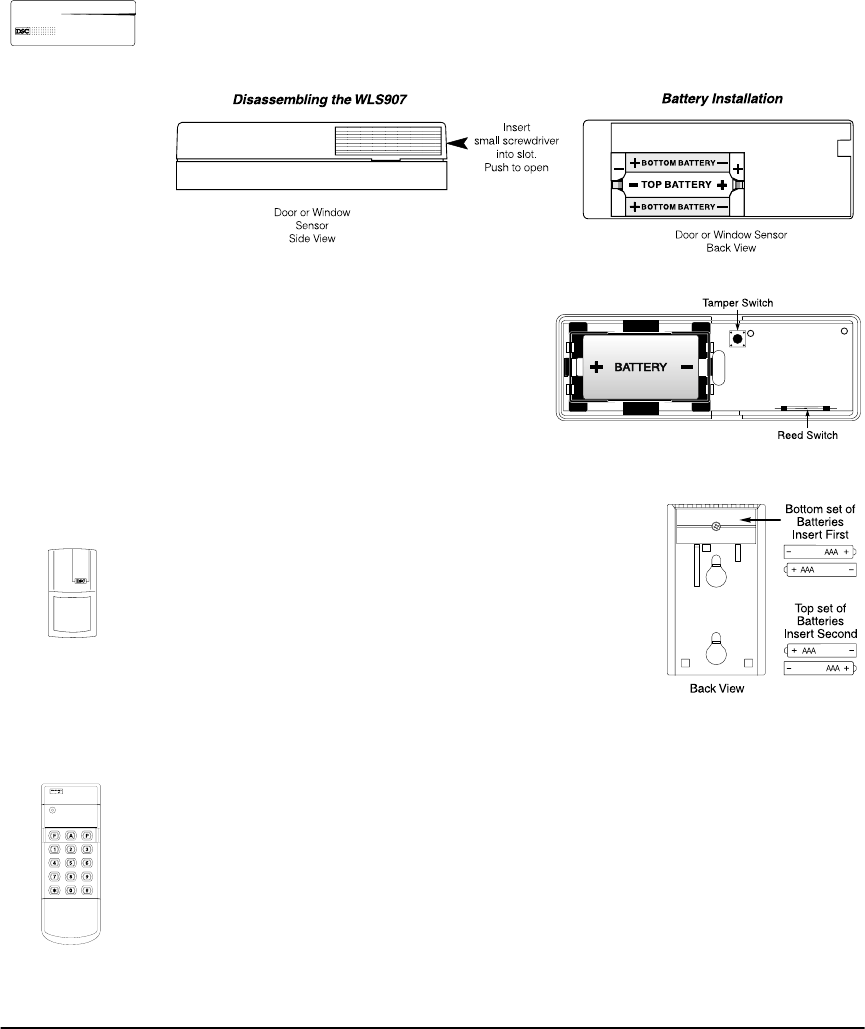
Door/Window
Contacts
WLS907
Insert a small screwdriver into the slot on the side of the detector. Push the screw-
driver in and lift off the cover.
Remove the old batteries and install three fresh Eveready Alkaline Energizer AAA
batteries. Be sure to insert the batteries in the proper orientation. Carefully
replace the cover.
WLS915
To remove the cover of the universal trans-
mitter, squeeze both sides of the unit where
the notches are. Pull to release the cover.
Use care when installing the battery and
observe the correct polarity (see diagram).
Use only a Eveready Lithium Energizer No.
EL123AP battery.
Motion
Detectors
Remove the motion detector from its mounting plate by
holding the detector by its sides and pushing up.
Remove the old batteries and install four fresh Eveready
Alkaline Energizer AAA batteries. Be sure to insert the
batteries in the proper orientation. Replace the detector
on its mounting plate, making sure it snaps into place.
Handheld
Keypad
The WLS910 requires three “AAA” batteries. To replace the batteries, remove the
plastic battery cover from the back of the unit. Remove all of the old batteries.
Insert the new batteries and replace the plastic battery cover.
Replacing Batteries
27
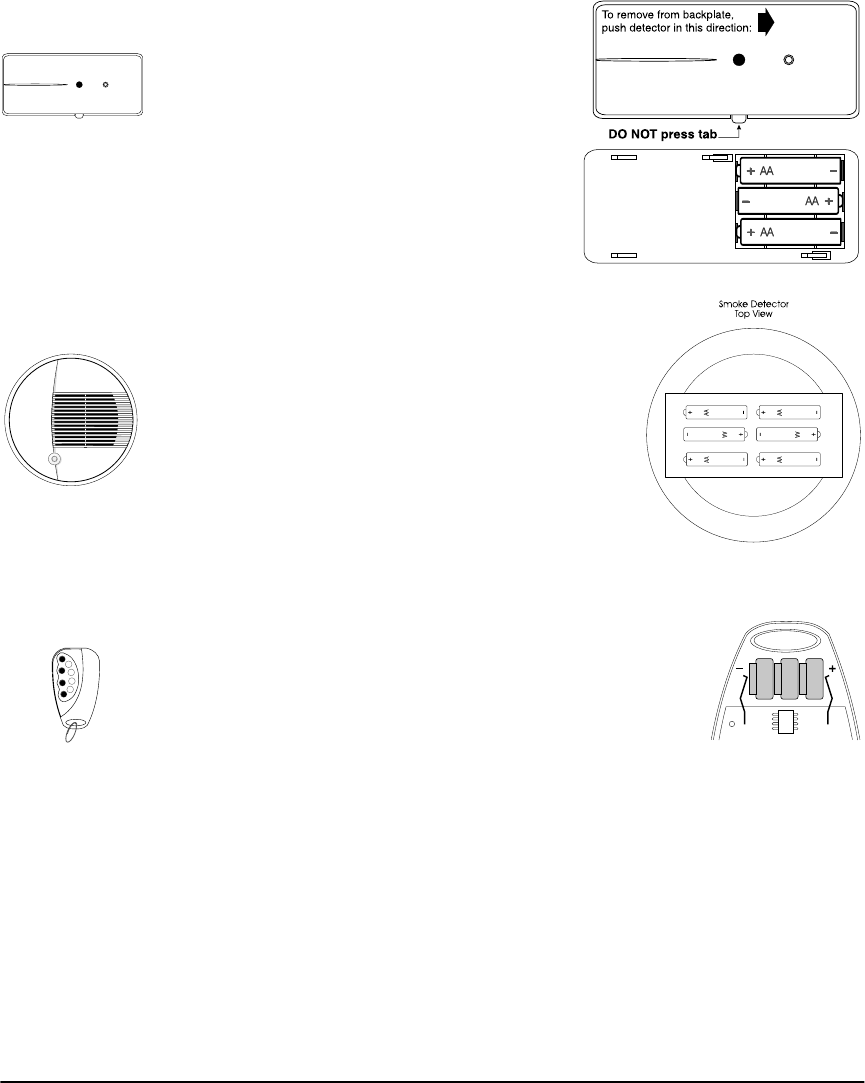
Glassbreak
Detector
Remove the detector from its mounting plate:
press the detector in the direction shown at
right.
Install the batteries negative (–) side first, with
the correct polarity, as shown at right.
Smoke
Detectors
The WLS906 requires six Eveready Energizer AA batter-
ies. To replace the batteries, remove the detector from
the mounting plate by pushing the locking tab and
turning the detector counter-clockwise.
Hold the unit with the battery compartment facing
you, and the imprinted wording right-side up. Install
the first two batteries in the row nearest to you, with
the + terminals facing left. Next, install the middle two
batteries with the + terminals facing to the right. Place
your thumb over the centre of these four batteries to
keep them in place. Install the last two batteries, with
their + terminals facing to the left, by snapping them past the nylon retainer.
Wireless Keys The WLS909 requires three LR44 batteries. To replace the bat-
teries, remove the screw on the back of the key and carefully
separate the two sides of the key’s plastic casing. Remove the
old batteries from between the two metal clips. Insert the new
batteries according to the diagram at right and reattach the
two sides of the key’s plastic casing. The polarity of the batter-
ies must be observed.
Panic
Pendants
You cannot change the batteries on a WLS908 Panic Pendant. Call your installer
and have the unit replaced.
After
Installing
New Batteries
After you change the batteries on your system, the system may announce trouble
conditions. A zone tamper should be displayed for each detector that had its bat-
teries changed. A zone fault may also be displayed for these detectors. Refer to
“Checking Trouble Conditions” on page 19 for information on checking Zone
Faults and Zone Tampers.
Be sure to perform a complete test of your system after new batteries are installed
to ensure that all detectors are working properly (see “Testing Your System” on
page 20).

28
Section 9: Glossary
Access code A 4- or 6-digit code that you enter on the keypad to turn your system on or off, or
to use other system features.
Alarm When a zone is violated (e.g. a smoke detector detects smoke, a motion detector
senses movement, a door with a contact is opened), it will trigger an alarm.
Intrusion (burglary) alarm: An alarm triggered by an intrusion detector (e.g.
motion detectors, glassbreak detectors, door/window contacts). Usually occurs
when the system is on. Intrusion alarms sound with a steady siren.
Fire alarm: An alarm triggered by fire, smoke or heat detectors. Fire alarms may
be triggered at any time, whether the system is on or off. Fire alarms sound with a
pulsing siren.
Audible exit
fault
A feature that warns you of an improper exit (e.g. door not completely shut) when
you attempt to turn on your system. Helps to prevent false alarms.
Away arming Turning on the system so that all the detectors (perimeter and interior) are on. (Use
when everyone is away from the premises.)
Bypassing a
zone
Turning off a detector temporarily. When you bypass a zone, the detector for that
zone will not monitor activity in the zone and will not be able to trigger an alarm.
Central
station
If remote monitoring is enabled, your system will send alarms, troubles and emer-
gency messages to the central station. The central station will then notify authori-
ties in your area, if necessary.
Detector A part of the system that can detect and report problems (e.g. a motion detector
can tell if there is movement in a room).
Emergency
message
A message sent to the central station when one of the pairs of emergency keys
( ) is pressed and held for two seconds. Your installer must program these
keys, or they will not work.
Entry time A timer programmed by your installer. It starts when you enter an area of the sys-
tem that is on. You must enter an access code to turn the system off before the
timer runs out, or else an alarm will be triggered.

Glossary
29
Entry/exit
doors
Your installer will set the doors you usually use to enter or exit the premises as
entry/exit doors. These doors are programmed to have entry and exit times so that
you can turn the system on and off without causing a false alarm.
Exit time A timer programmed by your installer. It starts when you turn on your system to
allow you a period of time to leave the premises. At the end of the exit time, the
system will be on.
Local
telephone
If your NT9010 system is connected to your premise telephone line, you may be
able to use a telephone located on the premise to access the system.
Master code The master code is a 4- or 6- digit access code that is used to set system options,
to turn the system on and off, and to program other access codes.
Remote
telephone
If your NT9010 system is connected to an incoming telephone line, you may be
able to use an off-premise (remote) telephone to access the system.
Stay mode Turning on the system so that only the perimeter zones are on. (Use when one or
more people will stay on the premises.)
Trouble The NT9010 control unit continuously checks the system for problems. If the con-
trol unit finds a problem (trouble), it will indicate this at the keypad. See “Checking
Trouble Conditions” on page 19 for a list of possible trouble conditions.
Zone A limited area of the premises monitored by a detector (smoke detector, door/win-
dow contact, motion detector, glassbreak detector, etc.).
Perimeter zone: A zone that detects intrusion from outside the premises (e.g.
door contact on an outside door, glassbreak detector).
Interior zone: A zone that detects intruders that have already entered (e.g.
motion detector).
Fire zone: A heat or smoke detector.

30
System Information
Fill out the following information for future reference and store this guide in a safe place.
For Service
Central Station Information:
Account #: ______________________________ Telephone #: ____________________________
Installer Information:
Company: _______________________________ Telephone #: ____________________________
Access Codes
Your Master Code is: ____________________________
Additional Access Codes:
System Information
[F] FIRE _____________________________________
[A] AUXILIARY ______________________________
[P] PANIC ___________________________________
The Exit Time is_______________________seconds.
The Entry Time is _____________________seconds.
Code # Access Code Code # Access Code Code # Access Code Code # Access Code
01 09 17 25
02 10 18 26
03 11 19 27
04 12 20 28
05 13 21 29
06 14 22 30
07 15 23 31
08 16 24 32

System Information
31
Zone Information
There are ________ active zones on the system.
Zone Protected Area Zone Type Zone Protected Area Zone Type
01 17
02 18
03 19
04 20
05 21
06 22
07 23
08 24
09 25
10 26
11 27
12 28
13 29
14 30
15 31
16 32

32
Index
A
AC power trouble message
19
Access codes
adding 21
changing 21
defined 28
erasing 21
Master code 29
programming 21
telephone code 7
Alarm
checking 16
defined 28
false 15
fire 15
intrusion 16
memory 16
Answering the telephone 8
Armed light 3
turning off system 10
turning on system 9
Arming
automatic 13
away 11
basic 9
no entry delay 13
quick 12
stay 12
Automatic arming 13
Auxiliary keys 17
Away 11
B
Batteries 25–27
Burglary alarm 16
Buttons
see Function buttons
Bypassing zones 18
C
Central station 6
defined 28
talk/listen-in feature 16
Checking
alarms 16
troubles 19
Chime 22
Cleaning the system 6
Codes See Access codes
Communication trouble
message 19
Computer access to system
20
D
Date
setting 21
Detectors
defined 28
See also Zones
Device low battery message
19
Disarming 10
Door
chime 22
entry/exit 9, 11, 29
Door/window contacts 26
Downloading 20
E
Emergency keys 17
Entry time 10
defined 28
Entry/exit door
defined 29
Exit 14
Exit time 11
defined 29
F
False alarm 15
Fire
alarm 15
detection 6
escape planning 23
keys 17
safety 23
Function buttons 3, 11, 12
G
Glassbreak detectors 27
H
Handheld keypad 26
I
Intrusion alarm 16
L
Local telephone access 7
M
Maintenance of system 6
Master code 29
Memos 8
Microphone 3
Monitoring station 6
Motion detectors 26
O
Operating the system
using a telephone 7
using NT9010 7
P
Panic keys 17
Panic pendants 27
Phone line trouble message
19
Playback 8
Problem, See Trouble
Programming
automatic arming 13
codes 21
time and date 21
Q
Quick
arming 12
exit 14
R
Ready light 3
turning on system 9
Record 8
Remote monitoring 6
Remote telephone access 8
Replacing batteries 25–27
S
Service is required message
19
Smoke detectors 27
Speaker 3
loudness 22
Status 7
Stay 12
System
how it works 5
maintenance 6
operating 7
testing 6, 20
trouble 19
turning off 10
turning on 9
System light 3
alarm in memory 16
programming codes 21
trouble 19
turning on system 11
T
Telephone calls
calling the system 7
receiving while using
system 8
Testing 6, 20
Time
setting 21
Time and date incorrect
message 19
Trouble
defined 29
messages 19
Turning off system
See Disarming
Turning on system
See Arming
V
Voice memos 8
Volume 22
W
Wireless keys 27
Z
Zone fault 27
message 19
Zone tamper 27
message 19
Zones
bypassing 18
defined 29
testing 20
WARNING Please Read Carefully
Note to Installers
This warning contains vital information. As the only individual in contact with
system users, it is your responsibility to bring each item in this warning to the
attention of the users of this system.
System Failures
This system has been carefully designed to be as effective as possible. There are
circumstances, however, involving fire, burglary, or other types of emergencies
where it may not provide protection. Any alarm system of any type may be com-
promised deliberately or may fail to operate as expected for a variety of reasons.
Some but not all of these reasons may be:
■
Inadequate Installation
A security system must be installed properly in order to provide adequate protec-
tion. Every installation should be evaluated by a security professional to ensure
that all access points and areas are covered. Locks and latches on windows and
doors must be secure and operate as intended. Windows, doors, walls, ceilings and
other building materials must be of sufficient strength and construction to provide
the level of protection expected. A reevaluation must be done during and after any
construction activity. An evaluation by the fire and/or police department is highly
recommended if this service is available.
■ Criminal Knowledge
This system contains security features which were known to be effective at the
time of manufacture. It is possible for persons with criminal intent to develop tech-
niques which reduce the effectiveness of these features. It is important that a secu-
rity system be reviewed periodically to ensure that its features remain effective
and that it be updated or replaced if it is found that it does not provide the protec-
tion expected.
■ Access by Intruders
Intruders may enter through an unprotected access point, circumvent a sensing
device, evade detection by moving through an area of insufficient coverage, dis-
connect a warning device, or interfere with or prevent the proper operation of the
system.
■ Power Failure
Control units, intrusion detectors, smoke detectors and many other security
devices require an adequate power supply for proper operation. If a device oper-
ates from batteries, it is possible for the batteries to fail. Even if the batteries have
not failed, they must be charged, in good condition and installed correctly. If a
device operates only by AC power, any interruption, however brief, will render
that device inoperative while it does not have power. Power interruptions of any
length are often accompanied by voltage fluctuations which may damage elec-
tronic equipment such as a security system. After a power interruption has
occurred, immediately conduct a complete system test to ensure that the system
operates as intended.
■ Failure of Replaceable Batteries
This system’s wireless transmitters have been designed to provide several years of
battery life under normal conditions. The expected battery life is a function of the
device environment, usage and type. Ambient conditions such as high humidity,
high or low temperatures, or large temperature fluctuations may reduce the
expected battery life. While each transmitting device has a low battery monitor
which identifies when the batteries need to be replaced, this monitor may fail to
operate as expected. Regular testing and maintenance will keep the system in good
operating condition.
■ Compromise of Radio Frequency (Wireless) Devices
Signals may not reach the receiver under all circumstances which could include
metal objects placed on or near the radio path or deliberate jamming or other inad-
vertent radio signal interference.
■ System Users
A user may not be able to operate a panic or emergency switch possibly due to
permanent or temporary physical disability, inability to reach the device in time, or
unfamiliarity with the correct operation. It is important that all system users be
trained in the correct operation of the alarm system and that they know how to
respond when the system indicates an alarm.
■ Smoke Detectors
Smoke detectors that are a part of this system may not properly alert occupants of
a fire for a number of reasons, some of which follow. The smoke detectors may
have been improperly installed or positioned. Smoke may not be able to reach the
smoke detectors, such as when the fire is in a chimney, walls or roofs, or on the
other side of closed doors. Smoke detectors may not detect smoke from fires on
another level of the residence or building.
Every fire is different in the amount of smoke produced and the rate of burning.
Smoke detectors cannot sense all types of fires equally well. Smoke detectors may
not provide timely warning of fires caused by carelessness or safety hazards such
as smoking in bed, violent explosions, escaping gas, improper storage of flamma-
ble materials, overloaded electrical circuits, children playing with matches or
arson.
Even if the smoke detector operates as intended, there may be circumstances when
there is insufficient warning to allow all occupants to escape in time to avoid
injury or death.
■ Motion Detectors
Motion detectors can only detect motion within the designated areas as shown in
their respective installation instructions. They cannot discriminate between intrud-
ers and intended occupants. Motion detectors do not provide volumetric area pro-
tection. They have multiple beams of detection and motion can only be detected in
unobstructed areas covered by these beams. They cannot detect motion which
occurs behind walls, ceilings, floor, closed doors, glass partitions, glass doors or
windows. Any type of tampering whether intentional or unintentional such as
masking, painting, or spraying of any material on the lenses, mirrors, windows or
any other part of the detection system will impair its proper operation.
Passive infrared motion detectors operate by sensing changes in temperature.
However their effectiveness can be reduced when the ambient temperature rises
near or above body temperature or if there are intentional or unintentional sources
of heat in or near the detection area. Some of these heat sources could be heaters,
radiators, stoves, barbeques, fireplaces, sunlight, steam vents, lighting and so on.
■ Warning Devices
Warning devices such as sirens, bells, horns, or strobes may not warn people or
waken someone sleeping if there is an intervening wall or door. If warning devices
are located on a different level of the residence or premise, then it is less likely that
the occupants will be alerted or awakened. Audible warning devices may be inter-
fered with by other noise sources such as stereos, radios, televisions, air condition-
ers or other appliances, or passing traffic. Audible warning devices, however loud,
may not be heard by a hearing-impaired person.
■ Telephone Lines
If telephone lines are used to transmit alarms, they may be out of service or busy
for certain periods of time. Also an intruder may cut the telephone line or defeat its
operation by more sophisticated means which may be difficult to detect.
■ Insufficient Time
There may be circumstances when the system will operate as intended, yet the
occupants will not be protected from the emergency due to their inability to
respond to the warnings in a timely manner. If the system is monitored, the
response may not occur in time to protect the occupants or their belongings.
■ Component Failure
Although every effort has been made to make this system as reliable as possible,
the system may fail to function as intended due to the failure of a component.
■ Inadequate Testing
Most problems that would prevent an alarm system from operating as intended
can be found by regular testing and maintenance. The complete system should be
tested weekly and immediately after a break-in, an attempted break-in, a fire, a
storm, an earthquake, an accident, or any kind of construction activity inside or
outside the premises. The testing should include all sensing devices, keypads, con-
soles, alarm indicating devices and any other operational devices that are part of
the system.
■ Security and Insurance
Regardless of its capabilities, an alarm system is not a substitute for property or
life insurance. An alarm system also is not a substitute for property owners, rent-
ers, or other occupants to act prudently to prevent or minimize the harmful effects
of an emergency situation.
Limited Warranty
Digital Security Controls Ltd. warrants the original purchaser that for a period of
twelve months from the date of purchase, the product shall be free of defects in
materials and workmanship under normal use. During the warranty period, Digital
Security Controls Ltd. shall, at its option, repair or replace any defective product
upon return of the product to its factory, at no charge for labour and materials. Any
replacement and/or repaired parts are warranted for the remainder of the original
warranty or ninety (90) days, whichever is longer. The original owner must
promptly notify Digital Security Controls Ltd. in writing that there is defect in
material or workmanship, such written notice to be received in all events prior to
expiration of the warranty period.
International Warranty
The warranty for international customers is the same as for any customer within
Canada and the United States, with the exception that Digital Security Controls
Ltd. shall not be responsible for any customs fees, taxes, or VAT that may be due.
Warranty Procedure
To obtain service under this warranty, please return the item(s) in question to the
point of purchase. All authorized distributors and dealers have a warranty pro-
gram. Anyone returning goods to Digital Security Controls Ltd. must first obtain
an authorization number. Digital Security Controls Ltd. will not accept any ship-
ment whatsoever for which prior authorization has not been obtained.
Conditions to Void Warranty
This warranty applies only to defects in parts and workmanship relating to normal
use. It does not cover:
•damage incurred in shipping or handling;
•damage caused by disaster such as fire, flood, wind, earthquake or lightning;
•damage due to causes beyond the control of Digital Security Controls Ltd. such
as excessive voltage, mechanical shock or water damage;
•damage caused by unauthorized attachment, alterations, modifications or foreign
objects;
•damage caused by peripherals (unless such peripherals were supplied by Digital
Security Controls Ltd.);
•defects caused by failure to provide a suitable installation environment for the
products;
•damage caused by use of the products for purposes other than those for which it
was designed;
•damage from improper maintenance;
•damage arising out of any other abuse, mishandling or improper application of
the products.
Digital Security Controls Ltd.’s liability for failure to repair the product under this
warranty after a reasonable number of attempts will be limited to a replacement of
the product, as the exclusive remedy for breach of warranty. Under no circum-
stances shall Digital Security Controls Ltd. be liable for any special, incidental, or
consequential damages based upon breach of warranty, breach of contract, negli-
gence, strict liability, or any other legal theory. Such damages include, but are not
limited to, loss of profits, loss of the product or any associated equipment, cost of
capital, cost of substitute or replacement equipment, facilities or services, down
time, purchaser’s time, the claims of third parties, including customers, and injury
to property.
Disclaimer of Warranties
This warranty contains the entire warranty and shall be in lieu of any and all other
warranties, whether expressed or implied (including all implied warranties of mer-
chantability or fitness for a particular purpose) And of all other obligations or lia-
bilities on the part of Digital Security Controls Ltd. Digital Security Controls Ltd.
neither assumes nor authorizes any other person purporting to act on its behalf to
modify or to change this warranty, nor to assume for it any other warranty or lia-
bility concerning this product.
This disclaimer of warranties and limited warranty are governed by the laws of the
province of Ontario, Canada.
WARN ING: Digital Security Controls Ltd. recommends that the entire system be
completely tested on a regular basis. However, despite frequent testing, and due to,
but not limited to, criminal tampering or electrical disruption, it is possible for this
product to fail to perform as expected.
Installer’s Lockout
Any products returned to DSC which have the Installer’s Lockout option enabled
and exhibit no other problems will be subject to a service charge.
Out of Warranty Repairs
Digital Security Controls Ltd. will at its option repair or replace out-of-warranty
products which are returned to its factory according to the following conditions.
Anyone returning goods to Digital Security Controls Ltd. must first obtain an
authorization number. Digital Security Controls Ltd. will not accept any shipment
whatsoever for which prior authorization has not been obtained.
Products which Digital Security Controls Ltd. determines to be repairable will be
repaired and returned. A set fee which Digital Security Controls Ltd. has predeter-
mined and which may be revised from time to time, will be charged for each unit
repaired.
Products which Digital Security Controls Ltd. determines not to be repairable will
be replaced by the nearest equivalent product available at that time. The current
market price of the replacement product will be charged for each replacement unit.

©2000 Digital Security Controls Ltd.
Printed in Canada 2900xxxx R001