Tyco Safety Canada 18PG9307 PowerG Recessed Contact User Manual My
Digital Security Controls Ltd. PowerG Recessed Contact My
Users Manual
D-307315
PG9307 PowerG recessed
door/window contact
The PG9307 is a discreet, supervised, 2- way wireless
PowerG magnetic contact device.
The PG9307 uses a replaceable lithium battery and
should last 10 years under normal usage.
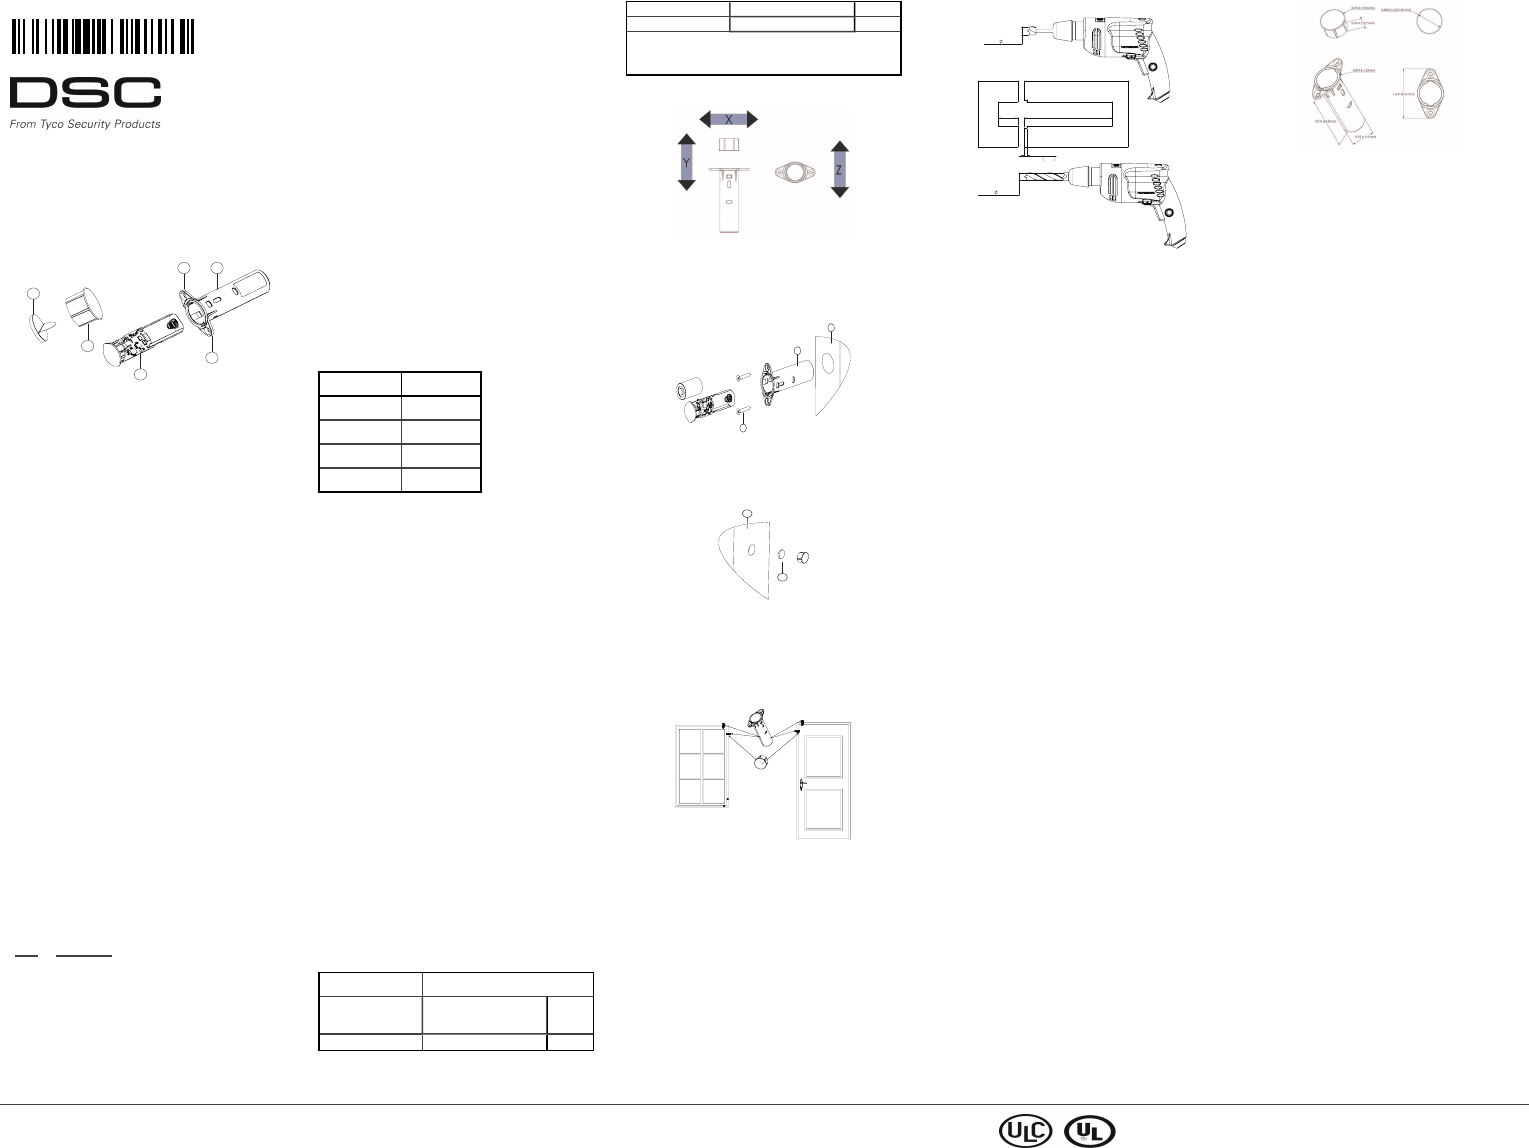
Legend
Figure 1.
A
B
B
C
D
E
Recesseddoor/window contact
A Door / window contact housing
B Breakable screw ears
C Contact cover and circuit board
D Magnet cover
E Magnet with double-sided tape
Inserting or replacing the battery
CAUTION! This product uses lithium batteries.
Improper handling of lithium batteries may result in
HEAT GENERATION, EXPLOSION or FIRE, which
may lead to personal injuries.
WARNING! Danger of explosion if batteries are
installed incorrectly. Replace only with the same or
equivalent type recommended by the manufacturer.
Dispose of used batteries according to the man-
ufacturer's instructions and according to local rules
and regulations.
Keep away from small children: if swallowed
promptly see a doctor.
Do not try to recharge these batteries.
NOTE: Battery replacement should be done by an
installer.
1. Insert a small, flat-head screwdriver into the slots
on the side of the contact housing and release the
contact cover.
2. Pull out the cover from the door/window contact
housing.
3. Observe the polarity and insert or replace the bat-
tery.
4. Reinsert the contact cover (with circuit board
attached).
Enrollment
Refer to the panel installation manual for the enroll-
ment procedure.
A general description of the procedure is provided in
the following flow chart:
Step Procedure
1 See the Installation Manual for the alarm sys-
tem that the device is being enrolled on to
ensure that the proper steps are used.
2 Enter the device enrollment option through
the specified method and select the appro-
priate option to add the new device.
3 Insert the battery and wait for the panel to
detectthe device or enter the device ID.
4 Select the desired zone number.
5 Configure any device parameters that are
required.
6 Mount and test the device. See Placement
Testing for information on testing the
device. In addition, see the alarm systems
Installation Manual that the device is
enrolled on for other test procedures that
are required.
Performing a placement test
Before you permanently mount any wireless device,
temporarily mount the device and perform a place-
ment test on the door frame, as close as possible to the
planned installation area. This is for checking the
radio link.
1. To tamper the device, pull the cover attached to
the device.
2. Reinsert the cover to restore the tamper. The
device now enters placement test mode for 15
minutes.
3. Trip the device by opening the door or window
and verify that the red LED blinks, indicating
detection.
After 2 seconds the LED blinks 3 times. The following
table indicates the received signal strength.
LED Response Signal Strength
Green LED blinks STRONG
Orange LED blinks GOOD
Red LED blinks POOR
No blinks No communication
IMPORTANT! Only GOOD or STRONG signal
strengths are acceptable. If you receive a POOR sig-
nal from the device, re-locate it and re- test until a
GOOD or STRONG signal is received.
NOTE: For UL/ULC installations, only STRONG sig-
nal levels are acceptable. After installation verify the
product functionality in conjunction with the com-
patible control panels HSM2HOST9, HS2LCDRF(P)9,
HS2ICNRF(P) 9, PG9920, W S900-19, and W S900- 29.
NOTE: For detailed Placement instructions refer to
the control panel reference manual.
Installation tips
WARNING:To comply with FCC and ISED Canada
RF exposure compliance requirements, the contact
should be located at a distance of at least 20 cm from
all persons during normal operation. The antennas
used for this product must not be co-located or oper-
ated in conjunction with any other antenna or trans-
mitter.
NOTE:The PG9307 PowerG recessed door/window
contact shall be installed and used within an envir-
onment that provides the pollution degree max 2 and
overvoltages category II in NON HAZARDOUS
LOCATIONS. The equipment is designed to be
installed only by qualified service persons.
It is recommended to install the contact in the door
frame and the magnet in the door.
NOTE:Before drilling holes, test the location. Tem-
porarily mount the contact and magnet and perform a
placement test.
Once drilled, the signal quality may be impacted.
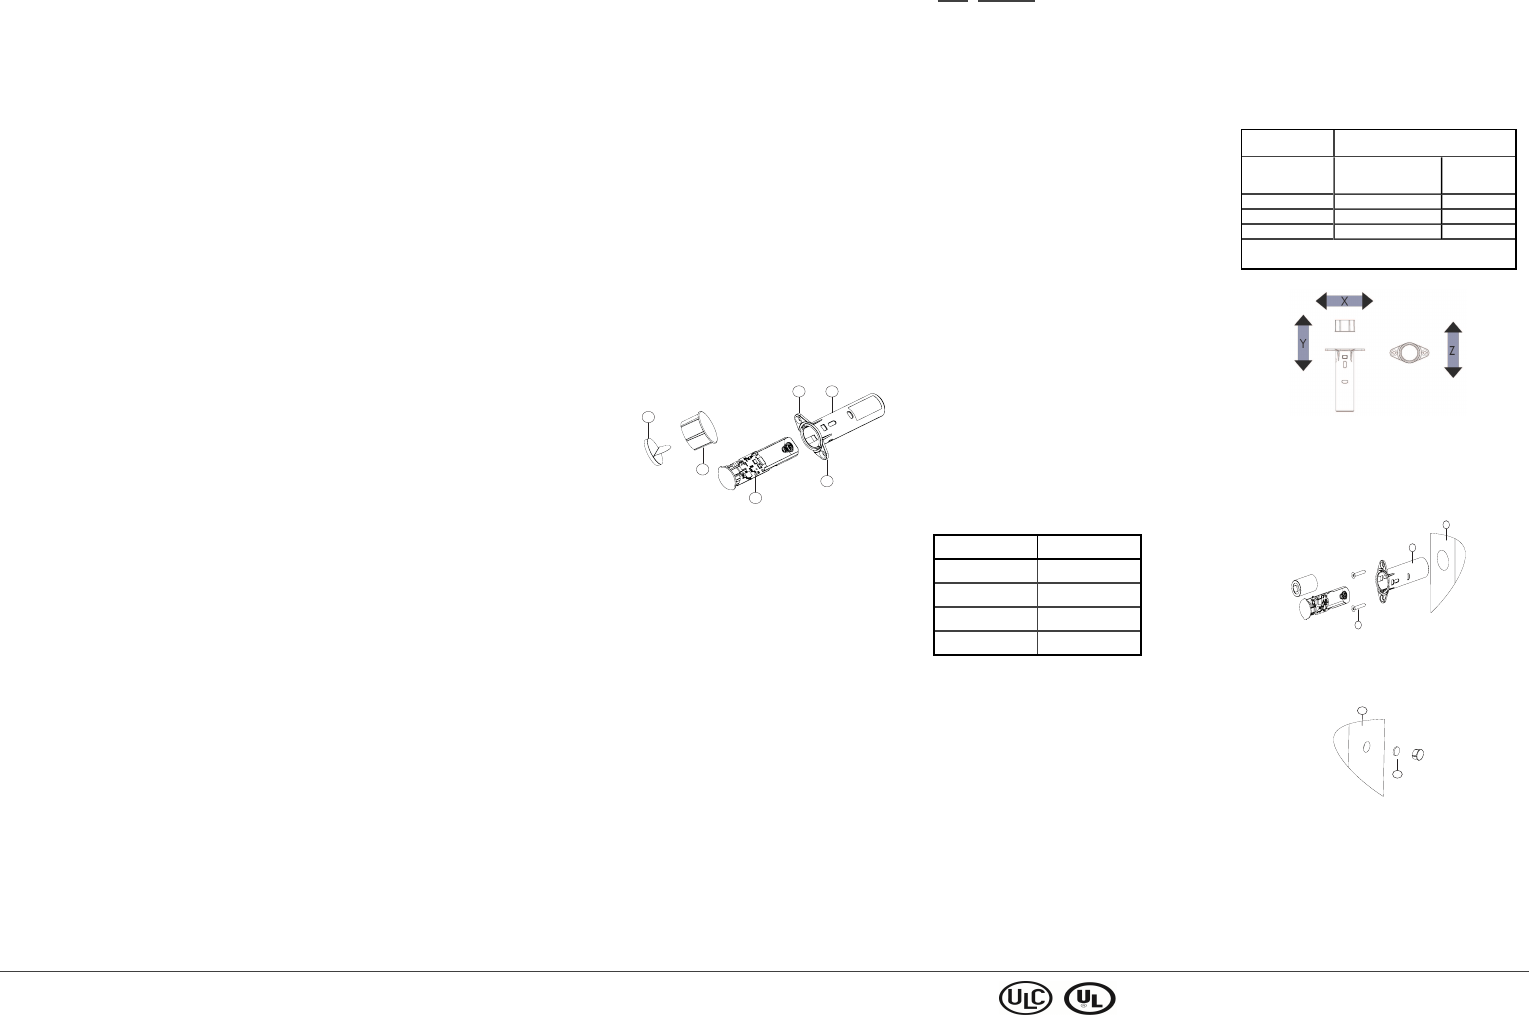
Gap separation
The following table outlines the gap separation inform-
ation.
Nonmetallic wood/plastic materials
Direction of move-
ment
of the magnet
Approach/Make Remove/
Break
Axis X 15 mm 17 mm
Axis Y 15 mm 17 mm
Axis Z 23 mm 28 mm
The recommended maximum gap separation for
installation (on specified materials and Axis Z) is 6
mm (0.24 in.).
Figure 2.
Mounting the device
NOTE: There are various ways to mount the device.
This procedure outlines one option for installation.
Allow 3mm minimum between the door and frame.
Figure 3: Mounting the recessed door/window contact
B
A
C
ADoor frame
BRecessed door/window contact
CScrews
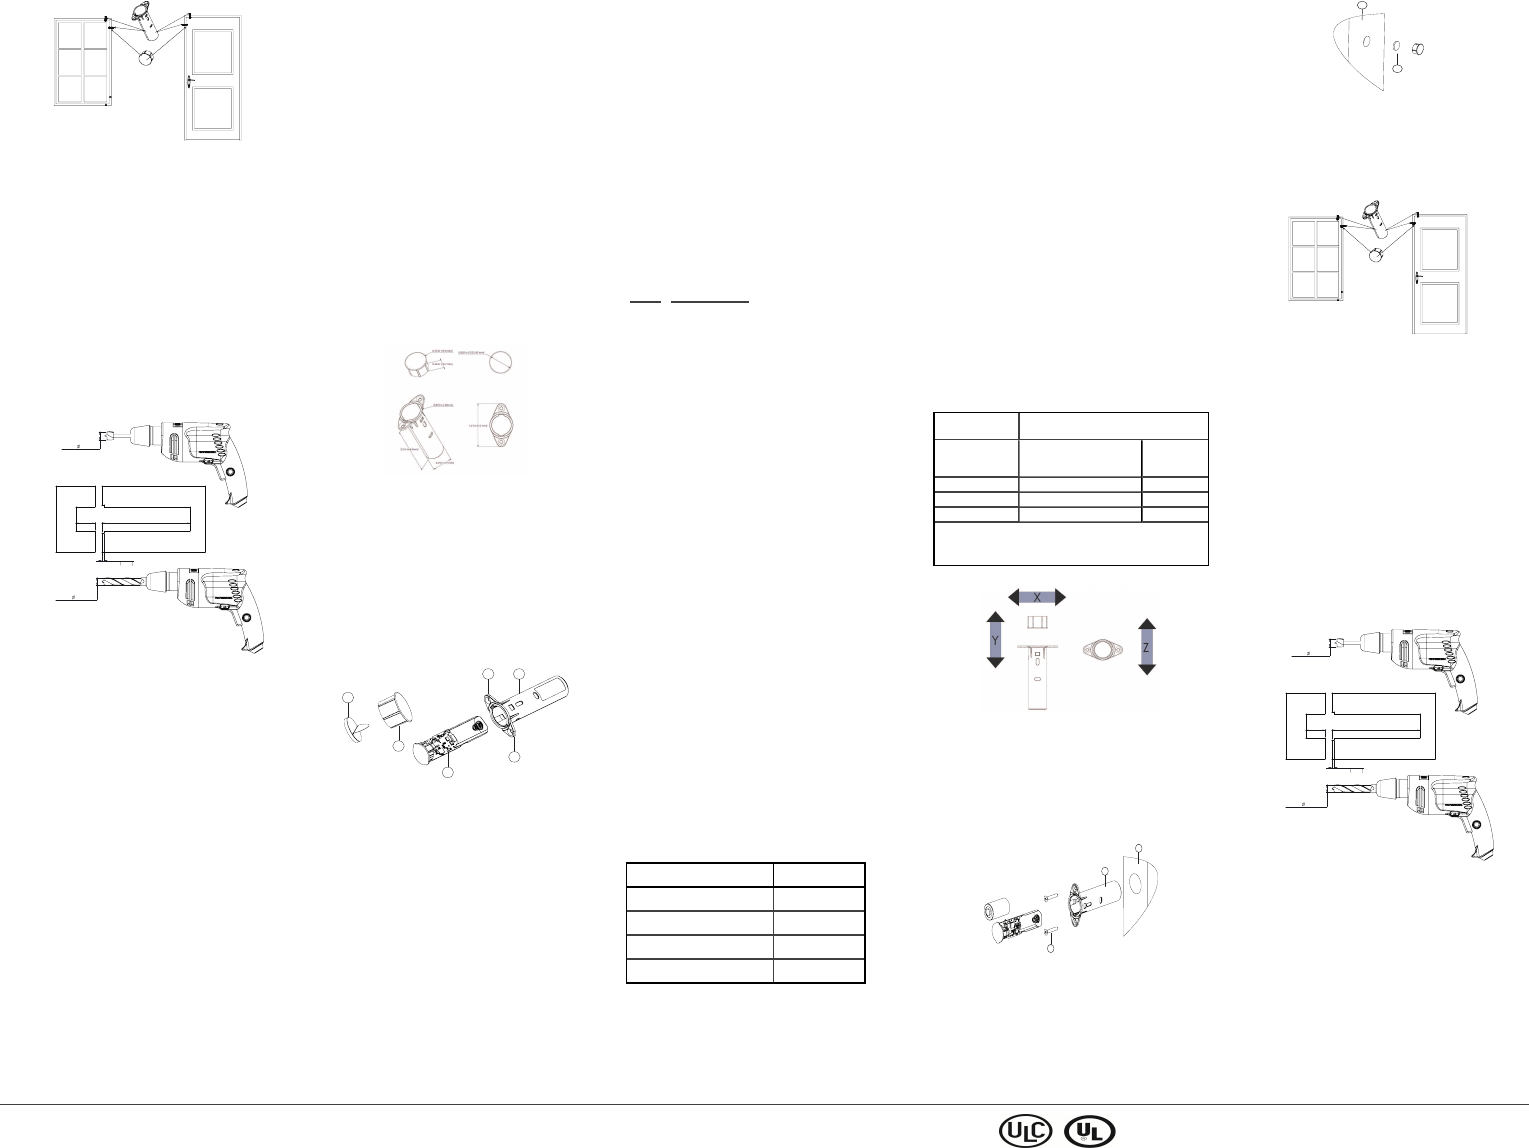
Figure 4: Mounting the magnet
A
B
ADoor
BMagnet
Install the device in the door frame, and install the
magnet on the door. Install the device a nd magnet on
either the side or the top of the door and the door
frame.
Figure 5.
Mark the locations for the door/window contact and
the magnet. Ensure that the locations for the contact
and the magnet are correctly aligned.
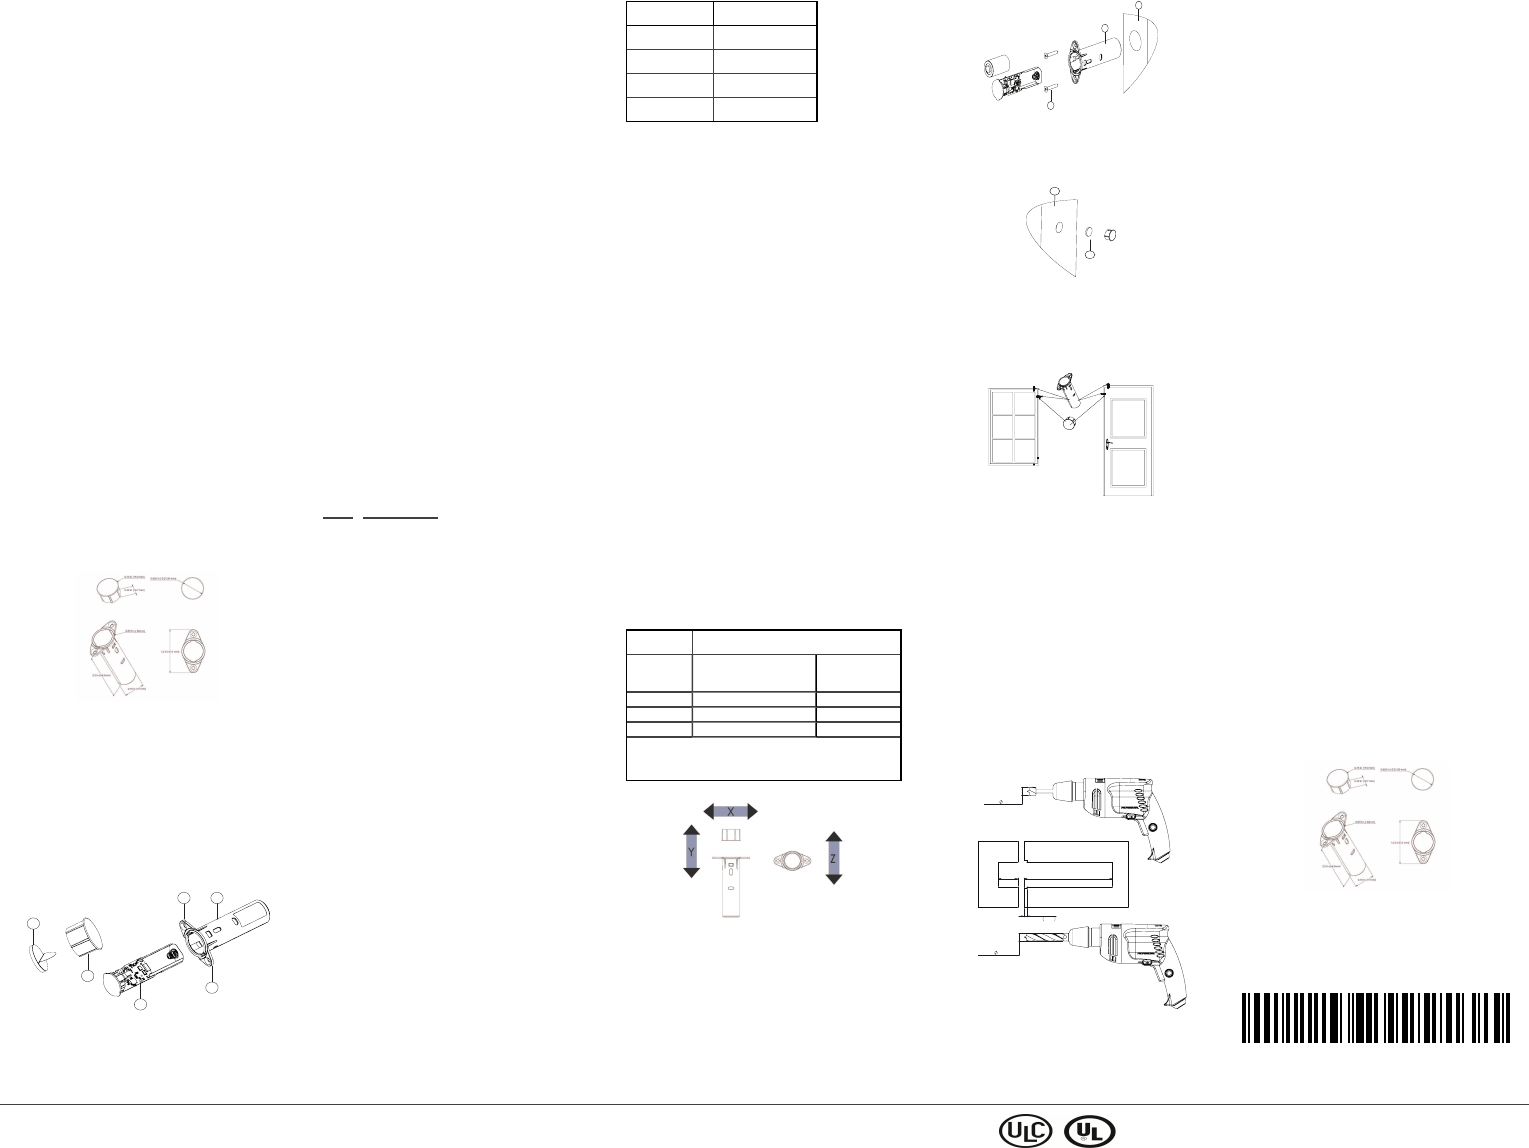
Sensor installation.
Install the sensor by the following steps:
1. Use a 3/4 drill bit to slowly drill a 3/4 inch hole for
the door/window contact in the door frame.
2. Fasten the contact housing to the mounting surface
with the two screws and insert the cover. If there
is no 3mm gap available between the door and the
frame, two step drilling is necessary. Using a
22mm tool, drill a 2mm shallow, followed by a
70mm deep hole with a 19mm tool. Break the slot
ears, clean the sharp edges and insert the device.
The device is recessed inside the frame, not inter-
fering with the door.
Figure 6: Sensor installation
3/4 in (
19.05 mm)
2.68 in
(68 mm)
0.6 in
(15 mm)
0.08 in
2 mm
Device/Frame
Magnet/Door
7/8 in (
22.2 mm)
Magnet installation.
Install the magnet by either of the following options:
1. By drilling:
a. Use a 3/4 inch drill bit to create a 15mm deep
hole.
b. Peel off the double-sided tape on the magnet
and stick it inside the magnet cover (part D).
2. By using the double-sided tape without the magnet
housing:
a. Peel off the double-sided tape on the magnet
and stick it on the door/window.
NOTE: Option 2 is possible only when there is a min-
imum gap of 2 mm between the door and the door
frame.
Optional: Use a sticker on both the contact cover and
the magnet cover to match the color of the door or the
door frame.
Specifications
Frequency 912 MHz to 919 MHz
Communication
protocol
PowerG
Maximum
power
+14 dBm
Battery type Panasonic or GP, 3V CR-2 or equi-
valent lithium batte ry
Battery life
expectancy
10 years (with typical use)
Battery
supervision
Automatic transmission of battery
condition data as part of periodic
status report and immediately upon
low battery condition detection.
Low battery
trouble level
2.5 V
Temperature
range
-10 °C to 50 °C
Relative
humidity
5% to 95% non condensing
Magnet type Rare earth
Contact size
(HxD)
2.66 inches x 0.75 inches
Magnet cover
size (HxD)
0.67 inches x 0.08 inches
Weight (with
battery and
magnet)
0.83 oz (25 g)
Color White or clear
Housing
material
Polycarbonate
Figure 7.
Compatible receivers
This device can be used with DSC panels and receiv-
ers that use PowerG technology.
UL/ULC Notes
Only model PG9307 operating in the frequency band 912-
919MHz is UL/ULC listed. The PG9307 has been listed by
UL for commercial and residential burglary applications and
by ULC for residential burglary applications in accordance
with the requirements in the Standards UL 634 and ULC
ORD-C634for Intrusion Detection Units.
For UL/ULC installations use these device only in con-
junction with compatible DSC wireless receivers:
HSM2HOST9, HS2LCDRF(P)9, HS2ICNRF(P)9, PG9920,
WS900-19, and WS900-29. After installation verify the
product functionality in conjunction with the compatible
receiverused.
FCC COMPLIANCE STATEM ENT
WARNING!Changes or modifications to this unit not
expressly approved by the party responsible for compliance
could void the user’s authority to operate the equipment.
This device has been tested and found to comply with the
limits for a Class B digital device, pursuant to Part 15 of
the FCC Rules. These limits are designed to provide reas-
onable protection against harmful interference in residential
installations. This equipment generates uses and can radiate
radio frequency energy and, if not installed and used in
accordance with the instructions, may cause harmful inter-
ference to radio and television reception.
However, there is no guarantee that interference will not
occur in a particular installation. If this device does cause
such interference, which can be verified by turning the
device off and on, the user is encouraged to eliminate the
interference by one or more of the following measures:
– Re-orient or re-locate the receiving antenna.
– Increase the distance between the device and the receiver.
– Connect the device to an outlet on a circuit different from
the one that supplies power to the receiver.
– Consult the dealer or an experienced radio/TV technician.
FCC ID: F5318PG9307
Innovation Science and Economic Development
Canada (ISED) Statement
This equipment complies with FCC and ISED Canada RF
radiation exposure limits set forth for an uncontrolled envir-
onment.
This device complies with FCC Rules Part 15 and with
ISED Canada licence-exempt RSS standard(s). Operation is
subject to the following two conditions: (1) This device
may not cause harmful interference, and (2) this device
must accept any interference that may be received or that
may cause undesired operation.
Le present appareil est conforme aux CNR d'ISED Canada
applicables aux appareils radio exempts de licence. L'ex-
ploitation est autorisee aux deux conditions suivantes :(1)
l'appareil ne doit pas produire de brouillage, et (2) l'util-
isateurde l'appareil doit accepter tout brouillage radi-
oelectrique subi, meme si le brouillage est susceptible d'en
compromettre le fonctionnement.
IC: 160A-PG9307
Limited Warranty
Digital Security Controls (DSC) warrants that for a period of
twelve months from the date of purchase, the product shall
be free of defects in materials and workmanship under nor-
mal use and that in fulfilment of any breach of such war-
ranty, DSC shall, at its option, repair or replace the
defective equipment upon return of the equipment to its
factory. This warranty applies only to defects in parts and
workmanship and not to damage incurred in shipping or
handling, or damage due to causes beyond the control of
DSC such as lightning, excessive voltage, mechanical
shock, water damage, or damage arising out of abuse, alter-
ation or improper application of the equipment.
The foregoing warranty shall apply only to the original
buyer, and is and shall be in lieu of any and all other war-
ranties, whether expressed or implied and of all other oblig-
ations or liabilities on the part of DSC. This warranty
PG9307 PowerG recessed door/window contact Installation Instructions ©2017 Tyco Security Products, Toronto, Canada www.dsc.com Tech. Support: 1-800-387-3630 1
contains the entire warranty. Digital Security Controls
neitherassumes responsibility for, nor authorizes any other
person purporting to act on its behalfto modify or to
change this warranty, nor to assume for it any other war-
ranty or liability concerning this product. In no event shall
DSC be liable for any direct or indirect or consequential
damages, loss of anticipated profits, loss of time or any
other losses incurred by the buyer in connection with the
purchase, installation or operation or failure of this product.
Warning: Digital Security Controls recommends that the
entire system be completely tested on a regular basis.
However, despite frequent testing, and due to, but not lim-
ited to, criminal tampering or electrical disruption, it is pos-
sible for this product to fail to perform as expected.
IMPORTANT - READ CAREFULLY: DSC Software pur-
chased with or without Products and Components is copy-
righted and is purchased under the following license terms:
This End-User License Agreement (“EULA”) is a legal agree-
ment between You (the company, individual or entity who
acquired the Software and any related Hardware) and Digital
Security Controls, a division of Tyco Safety Products
Canada Ltd. (“DSC”), the manufacturer of the integrated
security systems and the developer of the software and any
related products or components (“HARDWARE”) which
You acquired. If the DSC software product (“SOFTWARE
PRODUCT” or “SOFTWARE”) is intended to be accom-
panied by HARDWARE, and is NOT accompanied by new
HARDWARE, You may not use, copy or install the
SOFTWAREPRODUCT. The SOFTWARE PRODUCT
includes computer software, and may include associated
med ia, printed materials, and “online” or electro nic do c-
umentation. Any software provided along with the
SOFTWAREPRODUCT that is associated with a separate
end-user license agreement is licensed to You under the
terms of that license agreement.
By installing, copying, downloading, storing, accessing or
otherwise using the SOFTWAREPRODUCT, You agree
unconditionally to be bound by the terms of this EULA,
even if this EULA is deemed to be a modification of any
previous arrangement or contract. If You do not agree to the
terms of this EULA, DSC is unwilling to license the
SOFTWAREPRODUCT to You, and You have no right to
use it.
SOFTWARE PRODUCT LICENSE
The SOFTWARE PRODUCT is protected by copyright laws
and international copyright treaties, as well as other intel-
lectual property laws and treaties. The SOFTWARE
PRODUCT is licensed, not sold.
1. GRANT OF LICENSE This EULA grants You the fol-
lowing rights:
(a) Software Installation and Use - For each license You
acquire, You may have only one copy of the SOFTWARE
PRODUCT installed.
(b) Storage/Network Use - The SOFTWAREPRODUCT may
not be installed, accessed, displayed, run, shared or used
concurrently on or from different computers, including a
workstation, terminal or other digital electronic device
(“Device”). In other words, if You have several work-
stations, You will have to acquire a license for each work-
station where the SOFTWARE will be used.
(c) Backup Copy - You may make back-up copies of the
SOFTWAREPRODUCT, but You may only have one copy
per license installed at any given time. You may use the
back-up copy solely for archival purposes. Except as
expressly provided in this EULA, You may not otherwise
make copies of the SOFTWARE PRODUCT, including the
printed materials accompanying the SOFTWARE.
2. DESCRIPTION OF OTHER RIGHTS AND LIMITATIONS
(a) Limitations on Reverse Engineering, Decompilation and
Disassembly - You may not reverse engineer, decompile, or
disassemble the SOFTWARE PRODUCT, except and only
to the extent that such activity is expressly permitted by
applicable law notwithstanding this limitation. You may
not make any changes or modifications to the Software,
without the written permission of an officer of DSC. You
may not remove any proprietary notices, marks or labels
from the Software Product. You shall institute reasonable
measures to ensure compliance with the terms and con-
ditions of this EULA.
(b) Separation of Components - The SOFTWARE
PRODUCT is licensed as a single product. Its component
parts may not be separated for use on more than one
HARDWAREunit.
(c) Single INTEGRATED PRODUCT - If You acquired this
SOFTWAREwith HARDWARE, then the SOFTWARE
PRODUCT is licensed with the HARDWARE as a single
integrated product. In this case, the SOFTWARE PRODUCT
may only be used with the HARDWARE as set forth in this
EULA.
(d) Rental - You may not rent, lease or lend the
SOFTWAREPRODUCT. You may not make it available to
others or post it on a server or web site.
(e) Software Product Transfer - You may transferall of Your
rights under this EULA only as part of a permanent sale or
transferof the HARDWARE, provided You retain no cop-
ies, You transfer all of the SOFTWARE PRODUCT (includ-
ing all component parts, the media and printed materials,
any upgrades and this EULA), and provided the recipient
agrees to the terms of this EULA. If the SOFTWARE
PRODUCT is an upgrade, any transfer must also include all
prior versions of the SOFTWARE PRODUCT.
(f) Termination - Without prejudice to any other rights,
DSC may terminate this EULA if You fail to comply with
the terms and conditions of this EULA. In such event, You
must destroy all copies of the SOFTWARE PRODUCT and
all of its component parts.
(g) Trademarks - This EULA does not grant You any rights
in connection with any trademarks or service marks of DSC
or its suppliers.
3. COPYRIGHT - All title and intellectual property rights in
and to the SOFTWARE PRODUCT(including but not lim-
ited to any images, photographs, and text incorporated into
the SOFTWARE PRODUCT), the accompanying printed
materials, and any copies of the SOFTWARE PRODUCT,
are owned by DSC or its suppliers. You may not copy the
printed materials accompanying the SOFTWARE
PRODUCT. All title and intellectual property rights in and
to the content which may be accessed through use of the
SOFTWAREPRODUCT are the property of the respective
content owner and may be protected by applicable copy-
right or other intellectual property laws and treaties. This
EULA grants You no rights to use such content. All rights
not expressly granted under this EULA are reserved by DSC
and its suppliers.
4. EXPORT RESTRICTIONS - You agree that You will not
export or re-export the SOFTWARE PRODUCT to any
country, person, or entity subject to Canadian export restric-
tions.
5. CHOICE OF LAW - This Software License Agreement is
governed by the laws of the Province of Ontario, Canada.
6. ARBITRATION - All disputes arising in connection with
this Agreement shall be determined by final and binding
arbitration in accordance with the Arbitration Act, and the
parties agree to be bound by the arbitrator’s decision. The
place of arbitration shall be Toronto, Canada, and the lan-
guage of the arbitration shall be English.
7. LIMITED WARRANTY
(a) NO WARRANTY - DSC PROVIDES THE SOFTWARE
“AS IS” WITHOUT WARRANTY. DSC DOES NOT
WARRANT THAT THE SOFTWARE WILL MEET YOUR
REQUIREMENTS OR THAT OPERATION OF THE
SOFTWAREWILL BE UNINTERRUPTED OR ERROR-
FREE.
(b) CHANGES IN OPERATING ENVIRONMENT - DSC
shall not be responsible for problems caused by changes in
the operating characteristics of the HARDWARE, or for
problems in the interaction of the SOFTWARE PRODUCT
with non-DSC-SOFTWARE or HARDWARE PRODUCTS.
(c) LIMITATION OF LIABILITY; WARRANTY REFLECTS
ALLOCATION OF RISK - IN ANY EVENT, IF ANY
STATUTE IMPLIES WARRANTIES OR CONDITIONS NOT
STATED IN THIS LICENSE AGREEMENT, DSC’S ENTIRE
LIABILITY UNDER ANY PROVISION OF THIS LICENSE
AGREEMENT SHALL BE LIMITED TO THE GREATER OF
THE AMOUNT ACTUALLY PAID BY YOU TO LICENSE
THE SOFTWARE PRODUCT AND FIVE CANADIAN
DOLLARS (CAD$5.00). BECAUSE SOME
JURISDICTIONS DO NOT ALLOW THE EXCLUSION OR
LIMITATION OF LIABILITY FOR CONSEQUENTIAL OR
INCIDENTAL DAMAGES, THE ABOVE LIMITATION
MAY NOT APPLY TO YOU.
(d) DISCLAIMER OF WARRANTIES - THIS WARRANTY
CONTAINS THE ENTIRE WARRANTY AND SHALL BE IN
LIEU OF ANY AND ALL OTHER WARRANTIES,
WHETHER EXPRESSED OR IM PLIED (INCLUDING ALL
IMPLIED WARRANTIES OF M ERCHANTABILITY OR
FITNESS FOR A PARTICULAR PURPOSE) AND OF ALL
OTHER OBLIGATIONS OR LIABILITIES ON THE PART
OF DSC. DSC MAKES NO OTHER WARRANTIES. DSC
NEITHER ASSUMES NOR AUTHORIZES ANY OTHER
PERSON PURPORTING TO ACT ON ITS BEHALF TO
MODIFY OR TO CHANGE THIS WARRANTY, NOR TO
ASSUME FOR IT ANY OTHER WARRANTY OR
LIABILITY CONCERNING THIS SOFTWARE PRODUCT.
(e) EXCLUSIVE REMEDY AND LIMITATION OF
WARRANTY - UNDER NO CIRCUMSTANCES SHALL
DSC BE LIABLE FOR ANY SPECIAL, INCIDENTAL,
CONSEQUENTIAL OR INDIRECT DAMAGES BASED
UPON BREACH OF WARRANTY, BREACH OF
CONTRACT, NEGLIGENCE, STRICT LIABILITY, OR ANY
OTHER LEGAL THEORY. SUCH DAMAGES INCLUDE,
BUT ARE NOT LIMITED TO, LOSS OF PROFITS, LOSS
OF THE SOFTWARE PRODUCT OR ANY ASSOCIATED
EQUIPMENT, COST OF CAPITAL, COST OF
SUBSTITUTE OR REPLACEMENT EQUIPMENT,
FACILITIES OR SERVICES, DOWN TIME, PURCHASERS
TIME, THE CLAIMS OF THIRD PARTIES, INCLUDING
CUSTOMERS, AND INJURY TO PROPERTY. WARNING:
DSC recommends that the entire system be completely
tested on a regular basis. However, despite frequent testing,
and due to, but not limited to, criminal tampering or elec-
trical disruption, it is possible for this SOFTWARE
PRODUCT to fail to perform as expected.
The term IC before the radio certification number signifies
that the Industry Canada technical specifications were met.
This Class B digital apparatus complies with Canadian
ICES-003. This device complies with RSS-247 of Industry
Canada. Operation is subject to the following two con-
ditions: (1) this device may not cause interference, and (2)
this device must accept any interference, including inter-
ference that may cause undesired operation of the device.
Cet appareil numérique de la classe B est conforme à la
norme NMB-003 du Canada. Ce dispositif satisfait aux exi-
gences d’Industrie Canada, prescrites dans le document
CNR-247. son utilisation est autorisée seulement aux con-
ditions suivantes: (1) il ne doit pas produire de brouillage
et (2) l’utilisateur du dispositif doit être prêt à accepter tout
brouillage radioélectrique reçu, même si ce brouillage est
susceptible de compromettre le fonctionnement du dis-
positif.
Contact encastré pour
porte/fenêtre PowerG
PG9307
Le PG9307 est un émetteur à contact magnétique bid-
irectionnel PowerG sans fil, discret et géré.
Le PG9307 utilise une pile lithium remplaçable offrant
10 années d'autonomie en conditions normales d'util-
isation.
Légende
Figure 1.
A
B
B
C
D
E
Contact encastré pour porte/fenêtre
A Boîtier du contact pour porte/fenêtre
B Ailettes de vis cassables
C Capot du contact et carte à circuit imprimée
D Capot de l'aimant
E Aimant avec bande adhésive double-face
Insertion ou remplacement de la pile
ATTENTION:Ce produit utilise des piles au lithium.
Toute manipulation incorrecte des piles au lithium
peut entraîner une ÉMISSION DE CHALEUR, une
EXPLOSION ou un INCENDIE pouvant entraîner des
blessures.
ATTENTION:Mal positionnées, les piles pourraient
exploser. Remplacez les piles uniquement avec des
piles du modèle conseillé par le fabricant, ou par un
modèle équivalent. Mettez les piles usagées au rebut
en suivant les instructions du fabricant et con-
formément aux règles et réglementations locales.
Tenez-les hors de portée des enfants: en cas d'inges-
tion, consultez immédiatement un médecin.
N'essayez pas de recharger ces piles.
REMARQUE:Le remplacement de la pile doit être
effectué par un installateur.
1. Insérez un petit tournevis plat dans les fentes
latérales du boîtier du contact et libérez le capot.
2. Retirez le capot du boîtier du contact pour fenêtre/-
porte.
3. Respectez la polarité et insérez ou remplacez la
pile.
4. Remettez en place le capot du contact (avec carte
à circuit imprimée fixée).
Enregistrement
Pour des informations détaillées sur la procédure d'en-
registrement, consultez le manuel d'installation de la
centrale.
Une description générale de la procédure est indiquée
dans le tableau suivant:
Étape Procédure
1 Consultez le manuel d'installation du système
d'alarme dans lequel l'appareil est enregistré
afin de suivre la procédure adéquate.
2 Utilisez la méthode préconisée pour accéder
à l'option d'enregistrement de l'appareil et
sélectionnez l'option correspondante pour
ajouter un nouvel appareil.
3 Insérez la pile et attendez que la centrale
détecte l'appareil, ou saisissez l'identifiant de
l'appareil.
4 Sélectionnez le Numéro de zone voulu.
5 Configurez les paramètres nécessaires de
l'appareil.
6 Montez et testez l'appareil. Pour savoir com-
ment tester l'appareil, consultez la section
Test d'emplacement. Consultez également le
Manuel d'installation des systèmes d'alarme
dans lesquels l'appareil est enregistré pour
connaître la procédure à suivre.
Test de l'emplacement
Avant d'installer un appareil sans fil de manière défin-
itive, montez l'appareil provisoirement et testez sa pos-
ition sur le dormant, le plus près possible de
l'emplacement prévu. Ceci permet de tester la liaison
radio.
1. Pour déclencher l'auto-protection de l'appareil,
retirez le capot fixé à l'appareil.
2. Réinsérez ensuite le capot pour rétablir l'auto-pro-
tection. L'appareil passe en mode de test d'em-
placement pendant 15 minutes.
3. Déclenchez l'appareil en ouvrant momentanément
la porte ou la fenêtre et vérifiez que le voyant
rouge clignote pour signaler la détection.
Au bout de 2 secondes, le voyant clignote 3 fois. Le
tableau ci- dessous indique la puissance du signal reçu.
Voyant Puissance du signal
Voyant vert clignotant FORT
Voyant orange clignotant BON
Voyant rouge clignotant FAIBLE
Aucun clignotement Pas de comm.
IMPORTANT! Seul un signal BON ou FORT est
acceptable. Si vous recevez un signal FAIBLE de l'ap-
pareil, changez-le d'emplacement et recommencez les
tests jusqu'à obtenir un signal BON ou FORT.
REMARQUE:Pour les installations conformes
UL/ULC, seul un signal FORT est acceptable. Après
l'installation, vérifiez le fonctionnement du produit
avec les centrales HSM2HOST9, HS2LCDRF(P) 9,
HS2ICNRF(P) 9, PG9920, WS900-19, a nd WS900- 29.
compatibles.
REMARQUE:Pour des instructions de positionnement
détaillées, consultez le manuel de référence de la
centrale.
Conseils d'installation
ATTENTION: Pour des raisons de conformité aux
normes d'exposition aux fréquences radio FCC et
ISED Canada, le contact doit être distant d'au moins
20 cm de toute personne, en conditions de fonc-
tionnement normales. Les antennes utilisées pour ce
produit ne doivent pa s être positionnées dans un même
espace, ni utilisées avec une autre antenne ou
émetteur.
NOTE: Le PowerG recessed door/window contact
PG9307 sera installé et utilisé dans un environnement
non dangereux où le niveau de pollution est inférieur
à 2 et où il est exposé à des tensions de catégorie II.
L'équipement est conçu pour être installé par du per-
sonnel de maintenance qualifié uniquement.
Il est conseillé d'installer le contact sur le dormant de
la porte et l'aimant sur la porte.
NOTE: Avant de percer les trous, testez la position du
contact.Fixez le contact et l'aimant de manière pro-
visoire, et testez leur position.
Le perçage des trous pourrait avoir un impact sur la
qualité du signal.
Espacement
Le tableau ci-dessous apporte des informations sur
l'espacement à respecter.
Matériaux bois non métalliques /
plastiques
Sens du
mouvement
de l'aimant
Approche/Mise en
contact Retrait/Rupture
du contact
Axe X 15mm 17mm
Axe Y 15mm 17mm
Axe Z 23mm 28mm
L'espacement maximal conseillé pour l'installation
(sur les matériaux indiqués et l'Axe Z) est de 6 mm.
Figure 2.
Montage de l'appareil
REMARQUE: Il existe différentes façons de monter
l'appareil. Cette procédure décrit une possibilité d'in-
stallation.
Laissez au moins 3 mm entre la porte et le dormant.
Figure 3: montage du contact enc astré pour
porte/fenêtre
B
A
C
ADormant
BContact encastré pour porte/fenêtre
CVis
Figure 4: montage de l'aimant
A
B
APorte
BAimant
Installez l'appareil sur le dormant et l'aimant sur la
porte. Installez l'appareil et l'aimant sur le côté ou sur
le haut de la porte et du dormant.
Figure 5.
PG9307 PowerG recessed door/window contact Installation Instructions ©2017 Tyco Security Products, Toronto, Canada www.dsc.com Tech. Support: 1-800-387-3630 2
Marquez les emplacements du contact pour
porte/fenêtre et de l'aimant. Vérifiez que les emplace-
ments du contact et de l'aimant sont correctement
alignés.
Installation de capteur.
Installez le capteur en procédant comme suit:
1. Utilisez une mèche 3/4 pour percer lentement un
trou de 3/4 de pouce pour fixer le contact pour
porte/fenêtre sur le dormant.
2. Fixez le boîtier du contact à la surface de montage
avec deux vis et insérez le capot. S'il n'y a pas 3
mm entre la porte et le dormant, procédez au per-
çage en deux étapes. À l'aide d'une mèche 22 mm,
percez un trou de 2 mm de profondeur puis, avec
une mèche de 19mm, percez un trou de 70mm.
Cassez les ailettes, nettoyez les arêtes et insérez
l'appareil. L'appareil est encastré dans le dormant
et ne gêne pas la porte.
Figure 6 : installation du capteur
3/4 in (
19.05 mm)
2.68 in
(68 mm)
0.6 in
(15 mm)
0.08 in
2 mm
Device/Frame
Magnet/Door
7/8 in (
22.2 mm)
Installation de l'aimant.
Posez l'aimant en utilisant une des méthodes
suivantes:
1. En perçant:
a. Utilisez une mèche de 3/4 de pouces pour
percer un trou de 15 mm.
b. Retirez les pellicules protectrices de la bande
adhésive de l'aimant et collez-le à l'intérieur
du capot pour aimant (partie D).
2. En utilisant la bande adhésive double-face, sans le
boîtier pour aimant:
a. Retirez les pellicules protectrices de la bande
adhésive de l'aimant et collez-le sur la
fenêtre/porte.
REMARQUE: la méthode 2 n'est possible que s'il y a
au moins 2 mm entre la porte et le dormant.
Facultatif: apposez sur le capot du contact et le capot
de l'aimant un autocollant de la même couleur que
celle de la porte ou du dormant.
Caractéristiques techniques
Fréquence 912 à 919 MHz
Protocole de
communication
PowerG
Puissance
maximale
+14 dBm
Type de pile Pile au lithium 3V CR-2 de type
Panasonic ou GP, ou équivalent
Autonomie 10 ans (utilisation normale)
Supervision de
la pile
Transmission automatique des don-
nées sur l'étatde la pile dans le cadre
d'un rapport d'état périodique, et
immédiatement en cas de détection
de pile faible.
Niveaude pile
faible
2,5V
Plage de
températures
-10 °C à 50 °C
Humidité
relative
5% à 95% sans condensation
Type d'aimant Terre rare
Taille du
contact (HxP)
2,66 pouces x 0,75 pouces
Taille du capot
de l'aimant
(HxP)
0,67pouces x 0,08 pouces
Poids (avec pile
et aimant)
25 g
Couleur Blanc ou transparent
Matière du
boîtier
Polycarbonate
Figure 7.
Récepteurs compatibles
Cet appareil peut être utilisé avec les centrales et
récepteurs DSC qui utilisent la technologie PowerG.
PG9307 Contacto PowerG
para ventana/puerta
empotrada
PG9307 es un dispositivo de contacto magnético
PowerG inalámbrico doble, supervisado y discreto.
PG9307 utiliza una batería de litio sustituible y debería
durar 10 años con un uso normal.
Leyenda
Figura 1.
A
B
B
C
D
E
Contacto para ventana/puerta empotrada
A Carcasa de contacto para ventana/puerta
B Tornillos desarmables
C Cubierta de contacto y panel del circuito
D Cubierta del imán
E Imán con adhesivo de ambos lados
Introducción o cambio de la batería
PRECAUCIÓN:Este producto usa batería de litio. La
manipulación inapropiada de las baterías de litio
podría ocasionar GENERACIÓN DE CALOR,
EXPLOSIÓN o INCENDIO, lo que podría llevar a
lesiones personales.
ADVERTENCIA:Si las baterías no son colocadas cor-
rectamente, podría haber peligro de explosión. Reem-
plácelas únicamente por una igual o una equivale nte
recomendada por el fabricante. La eliminación de
baterías usadas se debe efectuar acorde con las
instrucciones del fabricante y de conformidad con las
reglas y reglamentaciones locales.
Mantenga alejado del alcance de los niños: en caso de
tragarlas, consulte inmediatamente a un médico.
No intente recargar estas baterías.
NOTA:El cambio de baterías debe estar a cargo de
un instalador.
1. Coloque un destornillador pequeño de cabeza
plana en las ranuras que se encuentran en la parte
lateral de la carcasa de contacto y retire la
cubierta de contacto.
2. Libere la cubierta de la carcasa de contacto de la
puerta/ventana.
3. Preste atención a la polaridad y coloque o ree-
mplace la batería.
4. Coloque nuevamente la cubierta de contacto (con
el panel de circuito sujetado).
Registro
Para información sobre el procedimiento de registro,
consulte el manual de instalación del panel.
En el siguiente diagrama de flujo se provee una
descripción general del procedimiento:
Etapa Procedimiento
1 Para garantizar la aplicación de las etapas
apropiadas, consulte el manual de instala-
ción del sistema de alarma en el que el dis-
positivo está registrado.
2 Entre en la opción Registro de dispositivo
por medio del método especificado y elija la
opción apropiada para agregar el nuevo dis-
positivo.
3 Coloque la batería y espere a que el panel
detecte el dispositivo o ingrese el ID del dis-
positivo.
4 Elija el número de la zona deseada.
5 Configure todos los parámetros del dis-
positivo que sean necesarios.
6 Coloque y pruebe el dispositivo. Para
obtener información acerca de cómo probar
el dispositivo, consulte Prueba de coloca-
ción. Consulte también el manual de instala-
ción de sistemas de alarma, para comprobar
si el dispositivo está registrado o para ver
otros procedimientos de prueba que sean
necesarios.
Cómo realizar una prueba de ubicación
Antes de colocar cualquier dispositivo inalámbrico de
manera permanente, coloque temporalmente el dis-
positivo y pruebe su ubicación en el marco de la
puerta, lo más cerca posible del área de instalación
planificada. Esto es para comprobar el link de radio.
1. Para manipular el dispositivo, retire la cubierta.
2. Coloque nuevamente la cubierta para reestablecer
la manipulación. El dispositivo entra ahora en
modo de prueba de ubicación por 15 minutos.
3. Para disparar el dispositivo, abra la puerta o
ventana y verifique que el indicador LED rojo
parpadee, lo que indica detección.
Al cabo de dos segundos, el indicador LED parpadea
tres veces. En la siguiente tabla se indica la potencia
de la señal recibida.
Respuesta del indicador LED Potencia de señal
El indicador LED verde parpadea ALTA
El indicador LED naranja parpadea BUENA
El indicador LED rojo parpadea BAJA
Sin parpadeo Sin comunicación
¡IMPORTANTE! Las únicas potencias de señal
aceptables son BUENA o ALTA. Si recibe una señal
BAJA del dispositivo, reubíquelo y vuelva a probar
hasta que reciba una potencia de señal BUENA o
ALTA.
NOTA:En instalaciones de UL/ULC, solo se admite
una potencia de señal ALTA. Después de la
instalación, verifique la funcionalidad del producto
junto con los paneles de control com-
patiblesHSM2HOST9, HS2LCDRF(P) 9, HS2ICNRF(P)
9, PG9920, WS900-19, and WS900-29.
NOTA:Para ver instrucciones de colocación, con-
sulte el manual de referencia del panel de control.
Consejos para la instalación
PRECAUCIÓN:Para cumplir con los requisitos de
cumplimiento de normas de exposición a RF de FCC e
ISED de Canadá, el contacto se debe ubicar a una dis-
tancia de al menos 20 cm de todas las personas dur-
ante el funcionamiento normal. Las antenas que se
utilizan para este producto no se deben instalar ni util-
izar junto con otra antena u otro transmisor.
NOTA:El PG9307 PowerG recessed door/window
contactse debe instalar y utilizar en un entorno que
provea el nivel de contaminación máximo de 2 y la
categoría de sobretensión II en LUGARES NO
PELIGROSOS. El equipo está diseñado para ser
instalado solo por personal de servicio capacitado.
Se recomienda colocar el contacto en el marco de la
puerta y el imán en la puerta.
NOTA:Antes de hacer los orificios, compruebe la
ubicación. Coloque temporalmente el contacto y el
imán para probar su ubicación.
Una vez hecho el orificio, podría impactar la calidad
de la señal.
Separación de espacio
La siguiente tabla describe la información acerca de
la separación de espacio.
Materiales no metálicos
plásticos/madera
Dirección de
movimiento
del imán
Acercamiento/Acción Retiro/Rotura
Eje X 15 mm 17 mm
Eje Y 15 mm 17 mm
Eje Z 23 mm 28 mm
La separación de espacio máxima recomendada
para la instalación (en materiales específicos y ejes
Z) es de 6 mm (0,24 pulgadas).
Figura 2.
Montaje del dispositivo
NOTA:Existen diversas maneras de colocar el dis-
positivo. Este procedimiento describe una opción para
la instalación.
Deje una distancia mínima de 3 mm entre la puerta y
el marco.
Figura 3: Montaje del contacto para ventana/puerta
empotrada
B
A
C
AMarco de la puerta
BContacto para ventana/puerta empotrada
CTornillos
Figura 4: Montaje del imán
A
B
APuerta
BImán
Coloque el dispositivo en el marco de la puerta e
instale el imán en la puerta. Coloque el dispositivo y el
imán ya sea en el costado o en la parte superior de la
puerta, y en el marco de la puerta.
Figura 5.
Marque la ubicación del contacto para ventana/puerta
y del imán. Asegúrese de que las ubicaciones del con-
tacto y del imán estén alineadas correctamente.
Instalación del sensor.
Instale el sensor según los siguientes pasos:
1. Use una broca de 3/4 para agujerear un orificio de
3/4 pulgadas en el marco de la puerta para el con-
tacto para ventana/puerta.
2. Fije la carcasa del contacto en la superficie de
montaje con los dos tornillos y coloque la cubierta.
Si no hay un espacio de 3 mm entre la puerta y el
marco, es necesario hacer la perforación de dos
pasos. Con una herramienta de 22 mm, haga un ori-
ficio poco profundo de 2 mm, seguido por un ori-
ficio profundo de 70 mm con una herramienta de
19 mm. Rompa los tornillos desarmables, limpie los
bordes puntiagudos y coloque el dispositivo. El dis-
positivo se empotra dentro del marco, sin interferir
con la puerta.
Figura 6: Instalación del sensor
3/4 in (
19.05 mm)
2.68 in
(68 mm)
0.6 in
(15 mm)
0.08 in
2 mm
Device/Frame
Magnet/Door
7/8 in (
22.2 mm)
Instalación del imán.
Instale el imán según una de las siguientes opciones:
1. Por perforación:
a. Use una broca de 3/4 pulgadas para hacer un
orificio profundo de 15 mm.
b. Quite el adhesivo de ambos lados del imán y
péguelo dentro de la cubierta del imán (parte
D).
2. Mediante el uso del adhesivo de ambos lados sin la
carcasa del imán:
a. Quite el adhesivo de ambos lados del imán y
péguelo en la ventana/puerta.
PG9307 PowerG recessed door/window contact Installation Instructions ©2017 Tyco Security Products, Toronto, Canada www.dsc.com Tech. Support: 1-800-387-3630 3
NOTA: La opción 2 es posible únicamente cuando
existe un espacio mínimo de 2 mm entre la puerta y el
marco de la puerta.
Opcional: Use un adhesivo tanto en el contacto como
en la cubierta del contacto y la cubierta del imán para
que coincida con el color de la puerta o del marco de
la puerta.
Especificaciones
Frecuencia 912 MHz a 919 MHz
Protocolo de
comunicaciones
PowerG
Potencia máxima +14 dBm
Tipo de batería Batería Panasonic o GP, 3V
CR-2 o batería de litio equi-
valente
Vida útil de la batería 10 años (con uso normal)
Supervisión de la
batería
Transmisión automática de la
datos de condición de la
batería como parte del
informe de estado periódico y
detección inmediata de la con-
dición de batería baja.
Nivel del problema de
batería baja
2,5 V
Margende
temperatura
-10 °C a 50 °C
Humedadrelativa 5 % a 95 % sin condensación
Tipo de imán Tierras raras
Tamaño del contacto
(AlturaxProfundidad)
2,66 pulgadas x 0,75 pulgadas
Tamaño de la
cubierta del imán
(AlturaxProfundidad)
0,67 pulgadas x 0,08 pulgadas
Peso (incluida la
batería y el imán)
0,83 oz (25 g)
Color Blanco o transparente
Materialde la
carcasa
Policarbonato
Figura 7.
Receptores compatibles
Este dispositivo se puede utilizar con paneles y recept-
ores DSC que utilizan la tecnología PowerG.
PG9307 Contato embutido
da porta/janela do PowerG
O PG9307 é um dispositivo de contato magnético
PowerG sem fio, bidirecional, discreto e super-
visionado.
O PG9307 usa uma bateria de lítio substituível e deve
durar 10 anos sob uso normal.
Legenda
Figura 1.
A
B
B
C
D
E
Contato embutido da porta/janela
A Alojamento de contato da porta/janela
B Orelhas de parafuso quebráveis
C Tampa de contato e placa de circuito
D Tampa do ímã
E Ímã com fita dupla face
Inserir ou trocar a pilha
CUIDADO: Este produto usa baterias de lítio. O
manuseio inadequado de baterias de lítio pode resultar
em AQUECIMENTO, EXPLOSÃO ou INCÊNDIO,
que podem levar a ferimentos.
AVISO: Perigo de explosão se as baterias forem
instaladas incorretamente. Troque somente pelo
mesmo tipo recomendado pelo fabricante ou equi-
valente. Descarte as baterias usadas de acordo com as
instruções do fabricante e com as regras e normas loc-
ais.
Mantenha longe de crianças pequenas: se ingerido,
consulte imediatamente um médico.
Não tente recarregar essas baterias.
NOTA:A substituição da bateria deve ser concluída
por um instalador.
1. Insira uma pequena chave de fenda nos encaixes
na lateral do alojamento de contato e solte a tampa
de contato.
2. Puxe a tampa do alojamento de contato da porta/-
janela.
3. Observe a polaridade e insira ou substitua a
bateria.
4. Reinsira a tampa de contato (com a placa de cir-
cuito conectada).
Registro
Consulte o manual de instalação do painel para apren-
der o procedimento de registro.
Uma descrição geral do procedimento é fornecida no
fluxograma a seguir:
Etapa Procedimento
1 Consulte o Manual de Instalação do sistema
de alarme ao qual o dispositivo está sendo
registrado para garantir que as etapas
adequadas sejam feitas.
2 Entre na opção de registro de dispositivo
pelo método especificado e selecione a
opção apropriada para adicionar o novo dis-
positivo.
3 Insira a bateria e aguarde até que o painel
detecte o dispositivo ou insira o ID do dis-
positivo.
4 Selecione o número da zona desejada.
5 Configure os parâmetros necessários do dis-
positivo.
6 Instale e teste o dispositivo. Consulte Teste
de colocação para obter informações sobre
como testar o dispositivo. Além disso, con-
sulte o Manual de Instalação dos sistemas de
alarme nos quais o dispositivo foi registrado
para ver outros procedimentos de teste que
são necessários.
Execução de um teste de colocação
Antes de montar permanentemente qualquer dis-
positivo sem fio, monte temporariamente o dispositivo
e faça um teste de colocação no quadro da porta, o
mais próximo possível da área de instalação plane-
jada. Isso serve para verificar o link de rádio.
1. Para adulterar o dispositivo, puxe a tampa presa ao
dispositivo.
2. Reinsira a tampa para restaurar a adulteração. O
dispositivo agora entra no modo de teste de
colocação por 15 minutos.
3. Acione o dispositivo, abrindo a porta ou janela, e
verifique se o LED vermelho pisca, indicando a
detecção.
Após 2 segundos, o LED piscará 3 vezes. A tabela a
seguir indica a força do sinal recebido.
Reposta do LED Intensidade do sinal
LED verde pisca FORTE
LED laranja pisca BOM
LED vermelho pisca RUIM
Nada pisca Sem comunicação
IMPORTANTE! Somente são aceitos intensidades de
sinal BOA ou FORTE. Se você receber um sinal
RUIM do dispositivo, reposicione-o e teste novamente
até receber um sinal BOM ou FORTE.
NOTA: Para instalações UL/ULC, apenas o nível de
sinal FORTE é aceitável. Após a instalação, verifique
a funcionalidade do produto em conjunto com os
painéis de controle compatíveis HSM2HOST9,
HS2LCDRF(P)9, HS2ICNRF(P)9, PG9920, WS900-19,
and WS900-29.
NOTA: Para obter instruções detalhadas de
colocação, consulte o Guia de referência do painel de
controle.
Dicas de Instalação
AVISO: A fim de obedecer os requisitos de con-
formidade de exposição do FCC e ISED Canada RF, o
contato deve estar localizado a uma distância de pelo
menos 20 cm de todas as pessoas durante a operação
normal. As antenas usadas para este produto não
podem estar colocalizadas ou ser operadas em con-
junto com qualquer outra antena ou transmissor.
NOTA:O PG9307 PowerG recessed door/window con-
tact deve ser instalado e usado dentro de um ambiente
que forneça o grau máximo de poluição 2 e sobre-
tensão de categoria II, LOCAIS NÃO PERIGOSOS.
O equipamento foi projetado para ser instalado apenas
pelo pessoal qualificado de serviço.
É recomendável instalar o contato no quadro da porta
e o imã na porta.
NOTA: Antes de fazer furos, teste o local. Instale
temporariamente o contato e o ímã e realize um teste
de colocação.
Uma vez perfurado, a qualidade do sinal pode ser
afetada.
Separação de espaços
A tabela a seguir mostra as informações de separação
de espaços.
Materiais não metálicos de madeira/plástico
Direção de
movimento
do ímã
Aproximação/Fabricação Remover/Quebrar
Eixo X 15 mm 17 mm
Eixo Y 15 mm 17 mm
Eixo Z 23 mm 28 mm
A separação de espaço máxima recomendada para
instalação (nos materiais especificados e no eixo Z)
é de 6 mm (0,24 pol.).
Figura 2.
Montagem do dispositivo
NOTA:Existem várias maneiras de instalar o dis-
positivo. Este procedimento descreve uma opção para
instalação.
Deixe 3 mm no mínimo entre a porta e o quadro.
Figura 3: Instalação do contato embutido da porta/-
janela
B
A
C
AQuadro da porta
BContato embutido da porta/janela
CParafusos
Figura 4: Instalação do ímã
A
B
APorta
BÍmã
Instale o dispositivo no quadro da porta e instale o ímã
na porta. Instale o dispositivo e o ímã no lado ou no
topo da porta e no quadro da porta.
Figura 5.
Marque os locais para o contato da porta/janela e o
ímã. Certifique-se de que os locais para o contato e o
ímã estejam alinhados corretamente.
Instalação do sensor.
Para instalar o sensor, siga estes passos:
1. Use uma broca de 3/4 para perfurar lentamente
um orifício de 3/4 de polegada para o contato da
porta/janela no quadro da porta.
2. Fixe o alojamento de contato à superfície de mont-
agem usando os dois parafusos e insira a tampa. Se
não houver um espaço de 3 mm entre a porta e o
quadro, será necessária perfuração em duas
etapas. Utilizando uma ferramenta de 22 mm, faça
um furo raso de 2 mm, seguido de um furo de 70
mm com uma ferramenta de 19 mm. Quebre as
orelhas do encaixe, limpe as bordas afiadas e
insira o dispositivo. O dispositivo está embutido
dentro do quadro, não interferindo na porta.
Figura 6: Instalação do sensor
3/4 in (
19.05 mm)
2.68 in
(68 mm)
0.6 in
(15 mm)
0.08 in
2 mm
Device/Frame
Magnet/Door
7/8 in (
22.2 mm)
Instalação do ímã.
Instale o ímã com uma das seguintes opções:
1. Ao perfurar:
a. Use uma broca de 3/4 de polegada para criar
um furo com 15 mm de profundidade.
b. Retire a fita dupla face do imã e cole-a den-
tro da tampa do ímã (parte D).
2. Usando a fita dupla face sem o alojamento do ímã:
a. Retire a fita dupla face do imã e cole-a den-
tro na porta/janela.
OBSERVAÇÃO: a opção 2 só é possível quando
existe um espaço mínimo de 2 mm entre a porta e o
quadro da porta.
Opcional: use um adesivo na tampa de contato e na
tampa do ímã para combinar com a cor da porta ou do
quadro da porta.
Especificações
Frequência 912 MHz a 919 MHz
Protocolo de
comunicação
PowerG
Potência
máxima
+14 dBm
Tipo de
bateria
Bateria de lítio de 3 V, Panasonic ou
GP CR-2 ou equivalente
Expectativa
de vida da
bateria
10 anos (com uso típico)
Supervisão
da bateria
Transmissão automática dos dados de
condição da bateria como parte do
relatório periódico de status e no
momento imediato da detecção de con-
dição de bateria fraca.
Nível de
problema:
bateria
fraca
2,5 V
Faixa de
temperatura
-10 °C a 50 °C
Umidade
relativa
5% a 95% sem condensação
Tipo de ímã Terra rara
Tamanho do
contato
(AxD)
2,66 polegadas x 0,75 polegadas
Tamanho da
tampa do
ímã (AxD)
0,67 polegadas x 0,08 polegadas
Peso (com
bateria e
ímã)
0,83 oz (25 g)
Cor Branco ou transparente
Materialda
caixa
Policarbonato
Figura 7.
Receptores compatíveis
Este dispositivo pode ser usado com painéis e recept-
ores DSC que usem a tecnologia PowerG.
©2018 Tyco Security Products, Toronto, Canada
www.dsc.com
Tech. Support: 1-800- 387-3630
D-307315 Rev 00 (05/18)
29010098R001
PG9307 PowerG recessed door/window contact Installation Instructions ©2017 Tyco Security Products, Toronto, Canada www.dsc.com Tech. Support: 1-800-387-3630 4