Unitech Electronics PA600BTGP Wireless Data Collection Terminal User Manual PDA PA600 II UM EN
Unitech Electronics Co., Ltd. Wireless Data Collection Terminal PDA PA600 II UM EN
Contents
- 1. User manual part 1 revise
- 2. User manual part 2
- 3. user manual part revise
- 4. user manual 2
User manual part 2
Chapter 3 Getting Connected
26
Copyright 2008 unitech Electronics Co., Ltd. All rights reserved. unitech is a registered trademark of unitech Electronics Co., Ltd.
9. Click Finish.
You may be prompted to restart your computer.
After you have installed ActiveSync and restarted your computer, the ActiveSync icon
appears in your computer’s system tray as shown and ActiveSync Connection
Wizard starts. For detailed information on how to use ActiveSync on your computer,
start ActiveSync then click Help → Microsoft ActiveSync Help.
Connecting the Device to Your Computer
1. After ActiveSync has been installed, connect the USB charging cable to the uni-
versal connector on the bottom of your device. If necessary, connect an
adapter. Refer to Connecting the PA600 II to a PC on page 10.
2. Plug the other end of the USB charging cable into a USB port on your com-
puter.
3. Turn the device on.
4. ActiveSync starts automatically and configure the USB port to work with the
PA600 II. The New Partnership setup wizard will automatically start.
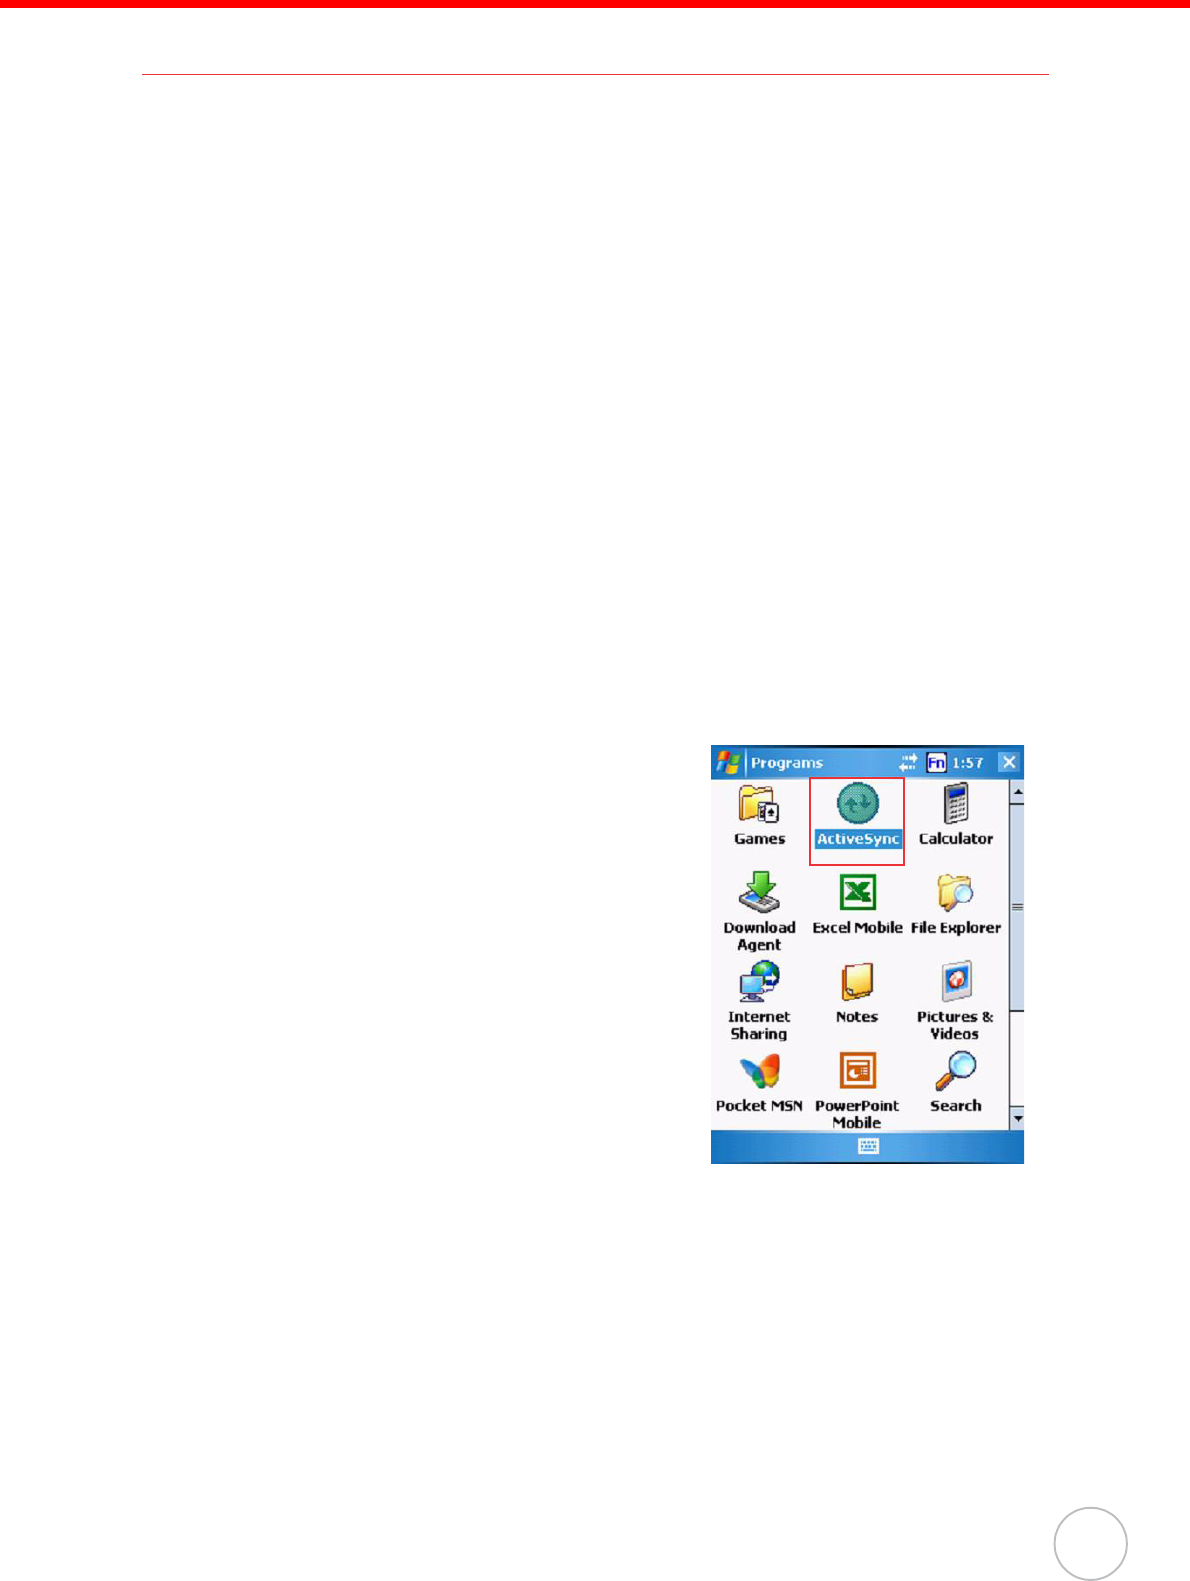
NOTE: If ActiveSync doesn’t start automatically, click Start → Programs →
Microsoft ActiveSync.
If a message appears indicating that it is unable to detect a connection,
click the Cancel button and manually configure the communication set-
tings.
5. Follow the onscreen instructions.
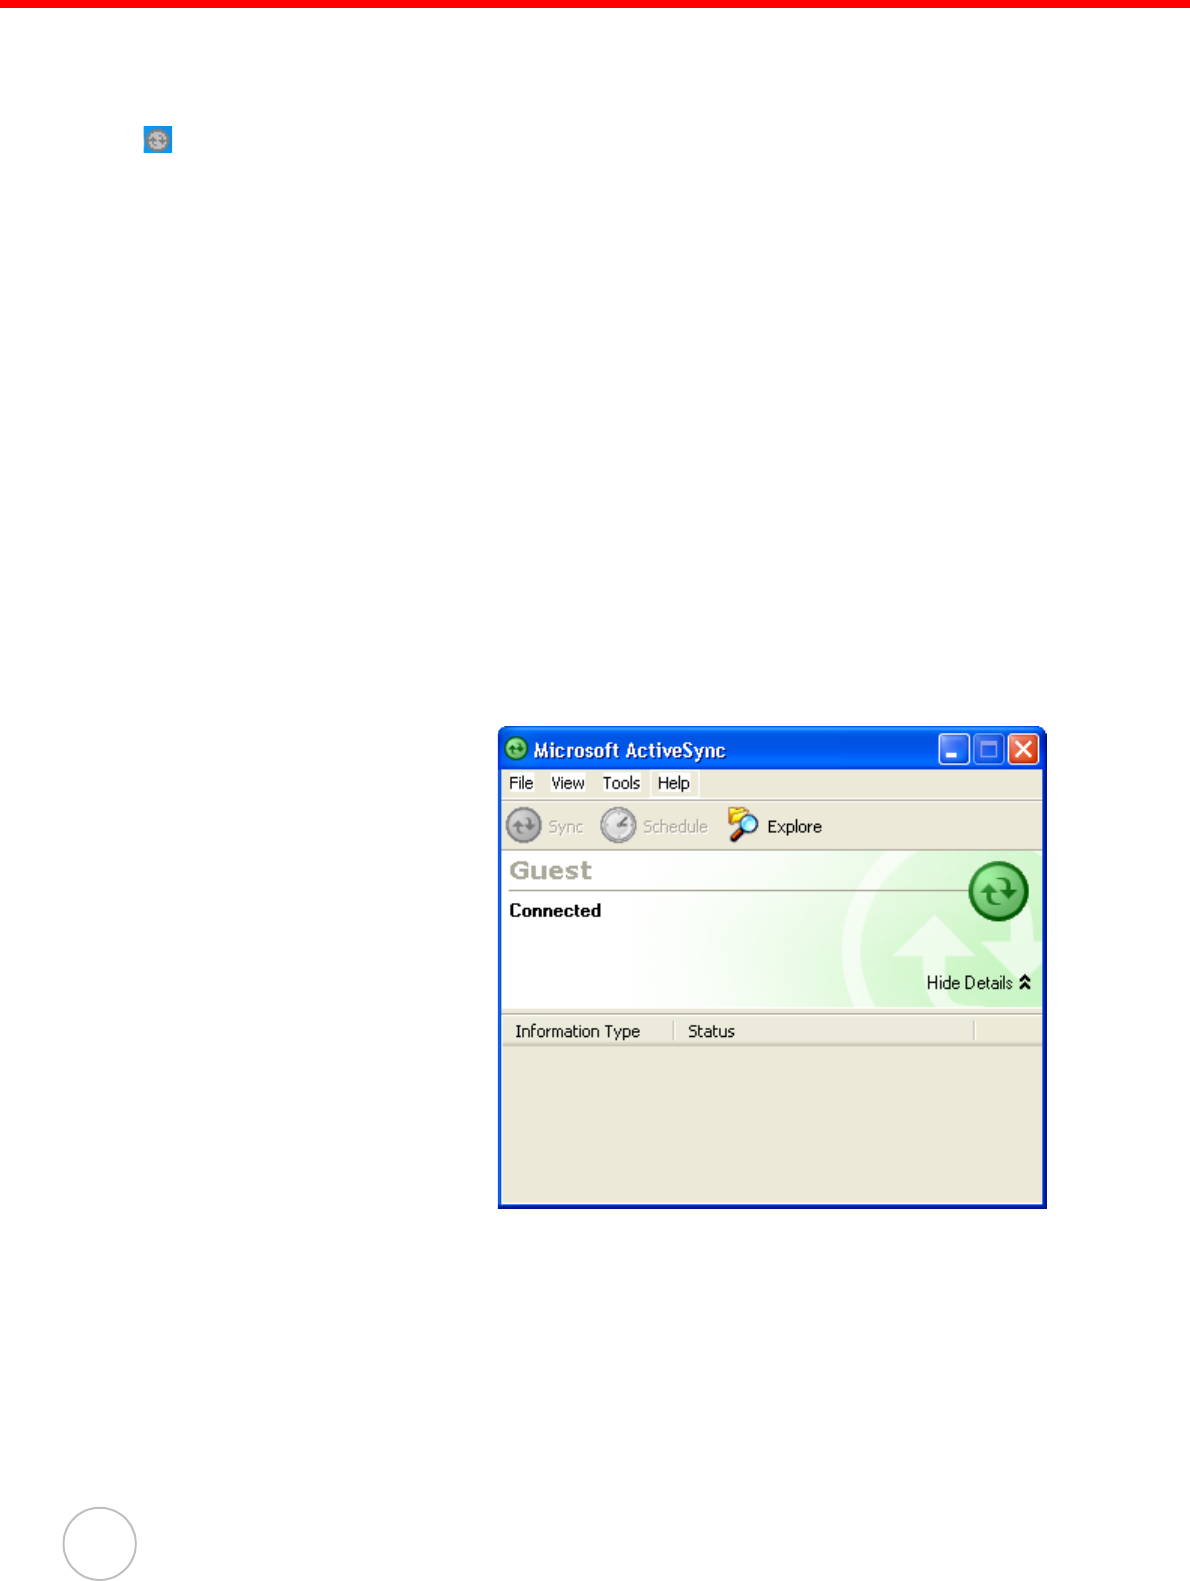
6. When the configuration
process is complete, the
ActiveSync window
appears.
7. Synchronization will be initialized and will take place if you’ve chosen to syn-
chronize periodically or upon connection.
NOTE: Your computer can create a partnership with multiple PA600 IIs. Also, a
PA600 II can create a partnership with up to two computers.
Chapter 3 Getting Connected
27
Synchronizing with Your Computer
Synchronization takes place according to the options you choose while setting up
ActiveSync on your computer. If you accept the default (On Connect) synchronization
option in the Microsoft ActiveSync Setup Wizard, you’ll be able to simply connect your
PA600 II to your desktop computer and synchronization will take place.
If you have not enabled the On Connect feature in Active Sync, you can start Active-
Sync in either of the following ways:
• On your computer, double-click My Computer → Mobile Devices folder.
• Connect the USB cable between the computer and PA600 II.
Connection options
You can set remote synchronization with your computer using the following connec-
tion options:
• USB connection
• Bluetooth connection
• GPRS Connection
• WiFi connection
USB Connection
To synchronize with your computer using a USB connection:
1. Connect your device to your computer using the USB charging cable.
2. Initiate connection by tapping Start → Pro-
grams → ActiveSync.
3. Tap Menu → Connections.
4. Select Synchronize all PCs using this con-
nection check box.
5. Select a baud rate or cable type connection.
6. Tap OK.
Bluetooth Connection
Your device is equipped with Bluetooth wireless technology that you can use to syn-
chronize information with a computer equipped with a Bluetooth adapter or access
point. Bluetooth wireless technology allows you to communicate with the computer
whenever it is within range.
Follow these instructions to set up a Bluetooth connection.
Chapter 3 Getting Connected
28
Copyright 2008 unitech Electronics Co., Ltd. All rights reserved. unitech is a registered trademark of unitech Electronics Co., Ltd.
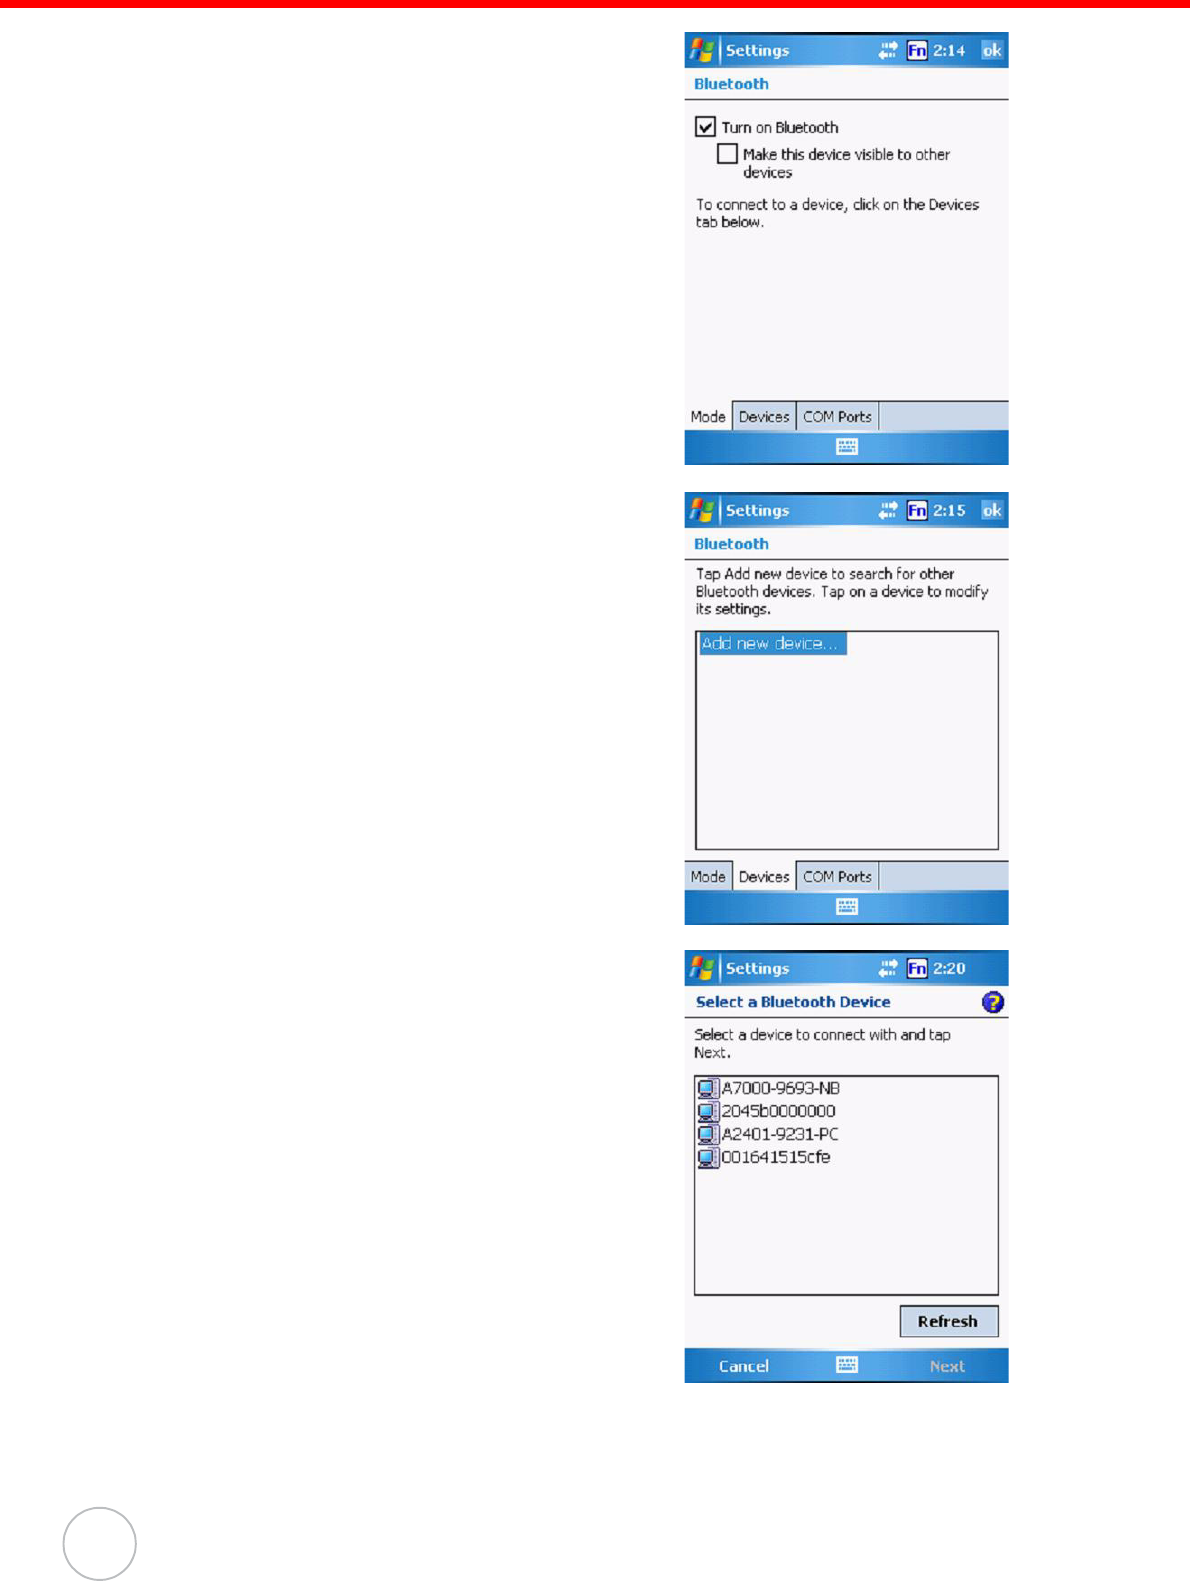
1. Tap Start → Settings → Connections →
Bluetooth → Mode and check Turn on
Bluetooth.
2. Tap Devices → Add new device.
3. Select a device from the list and tap Next.
Chapter 3 Getting Connected
29
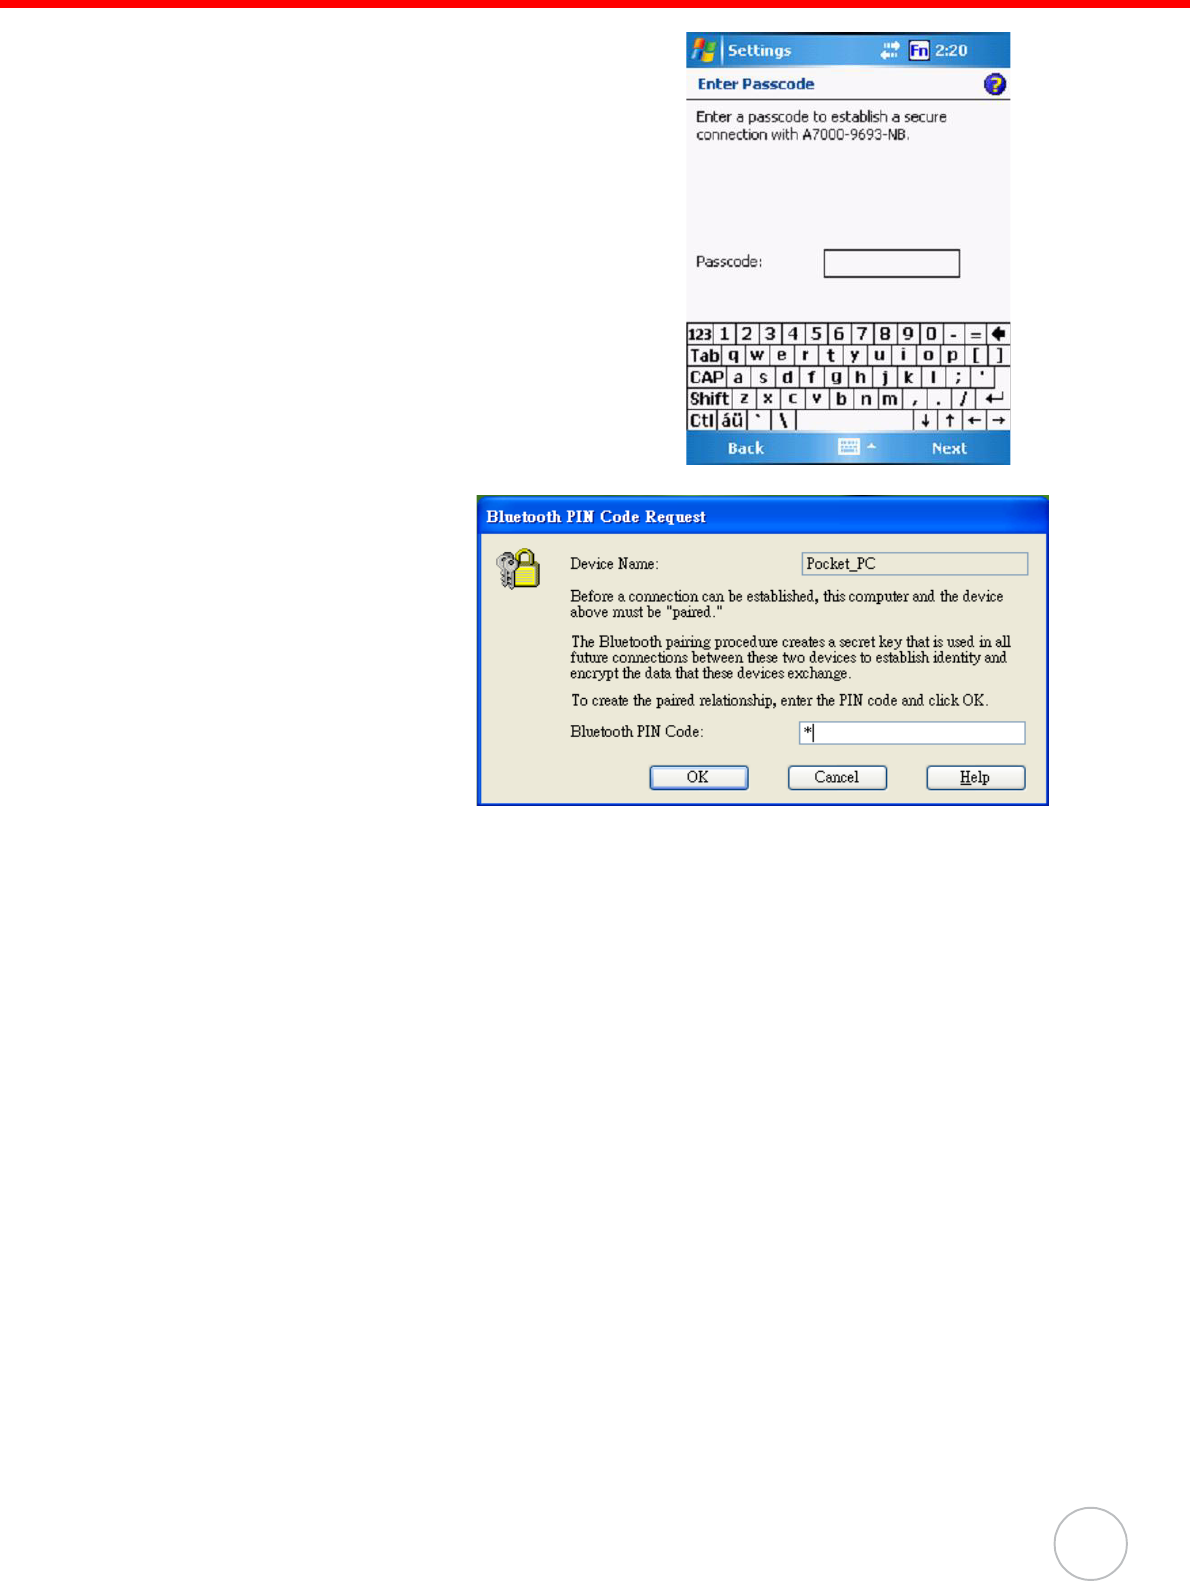
4. .You are prompted for a passkey.
5. Enter the Passkey.
On the PC screen, you
are prompted to enter
the Bluetooth PIN
Code Request.
6. Enter the same Blue-
tooth PIN Code you
entered in step 4.
7. Select service. Check Activesync and tap Finish.
8. To preserve battery power, be sure to end the bluetooth activesync connection
when synchronizing is complete. Tap OK.
9. From Start → Programs, double tap ActiveSync.
10. Tap Menu at right bottom corner. Select Connect via Bluetooth. Terminal con-
nects to the host via Bluetooth Activesync.
Chapter 3 Getting Connected
30
Copyright 2008 unitech Electronics Co., Ltd. All rights reserved. unitech is a registered trademark of unitech Electronics Co., Ltd.
GPRS Connection
PA600 II comes with a built-in GPRS module, which allows you to connect to the inter-
net. Follow the instructions below to access the internet.
NOTE: Make sure you insert the SIM card properly. See Using the SIM Card on
page 19.
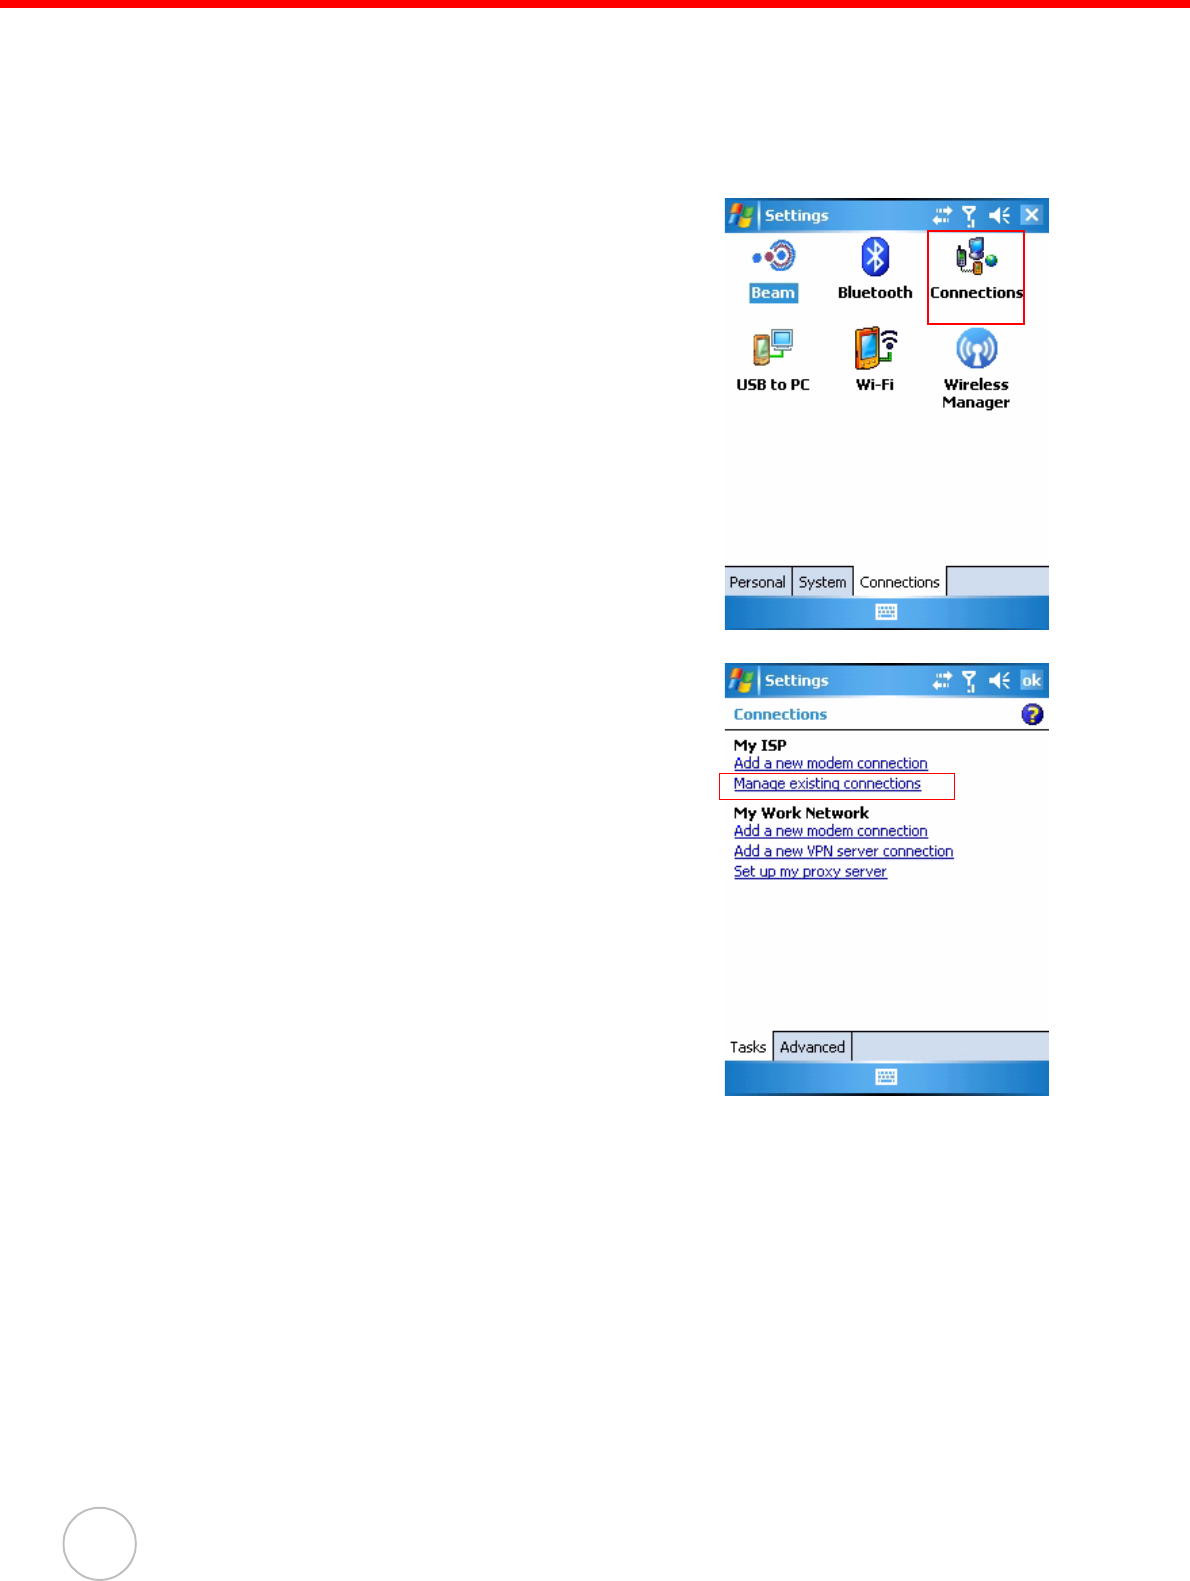
1. Tap Start → Settings. Under Connections
tab, tap Connections.
2. Under My ISP, tap Manage existing con-
nections.
Chapter 3 Getting Connected
31
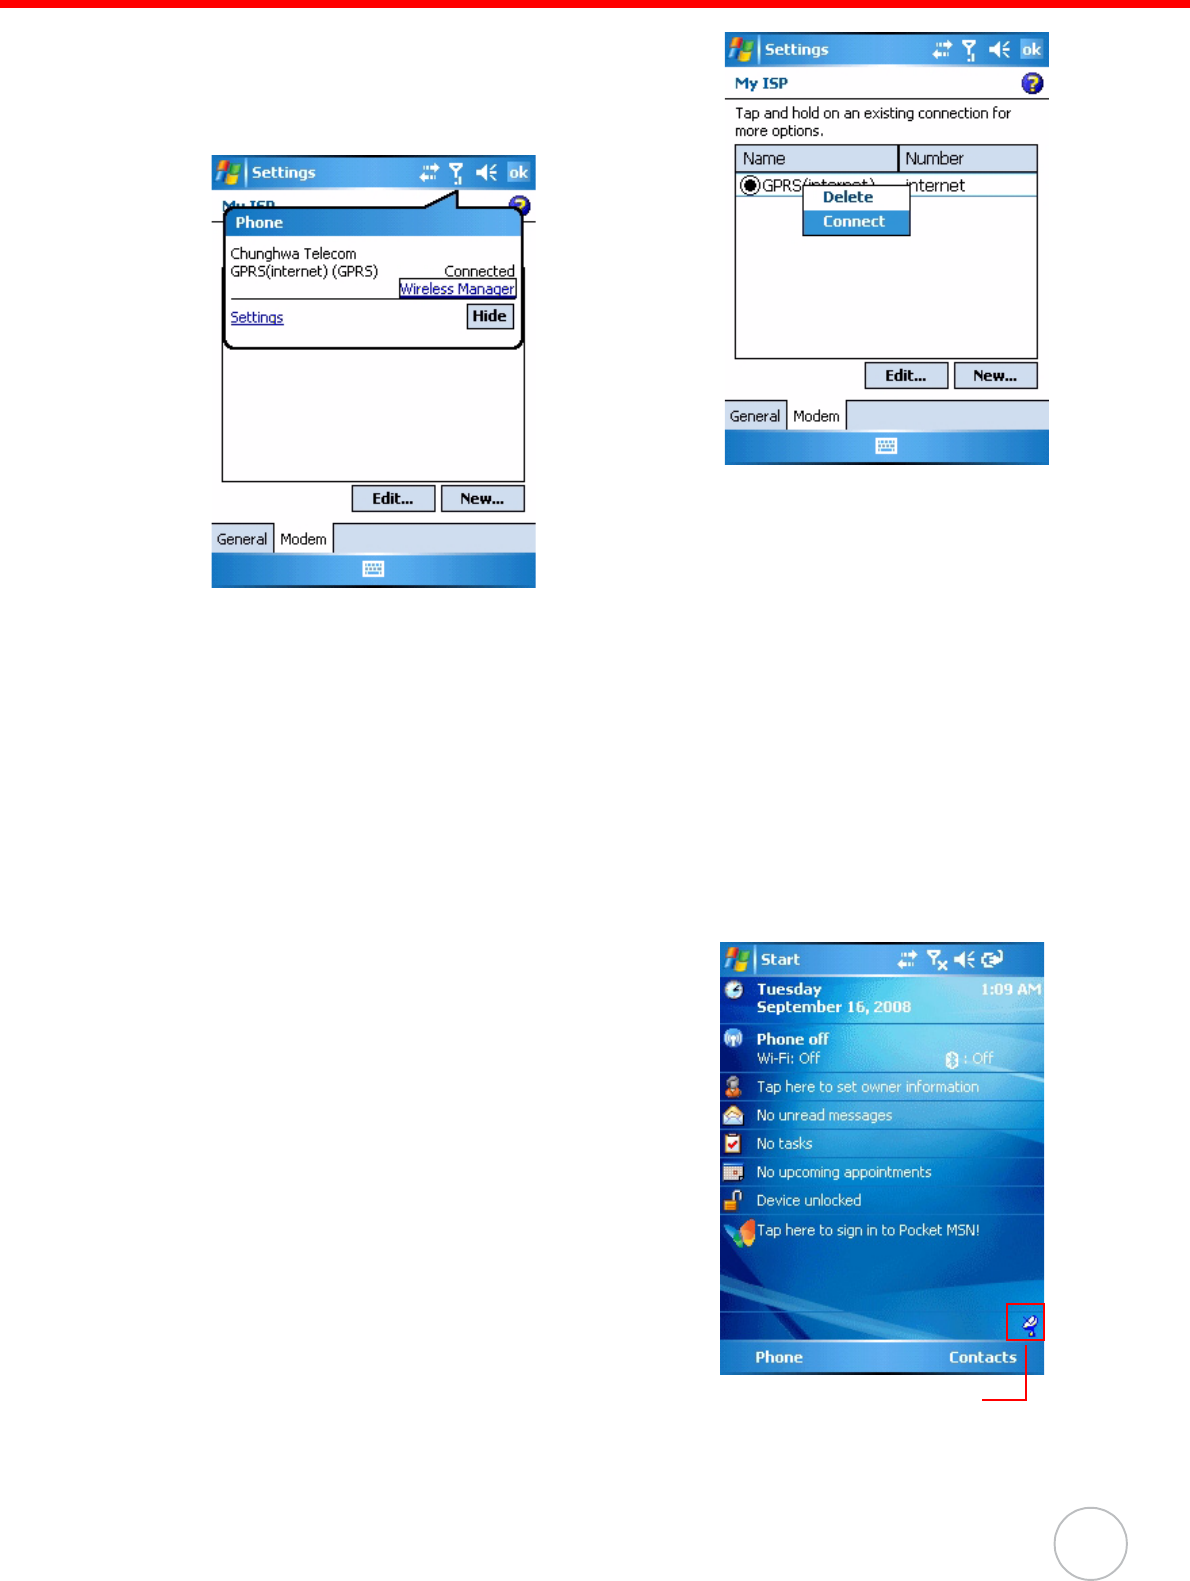
3. Tap and hold the GPRS (internet) in the list.
Select Connect.
A prompt appears, you are connected to
internet via GPRS.
WiFi Connection
With the device’s embedded WLAN module, you can send and receive signals to a
WiFi network then synchronize files.
NOTE: WiFi access requires a separate purchase of a service contract with a
wireless service provider. Contact a wireless service provider for more
information.
A wireless network can be added either when the network is detected or by manually
entering settings information. Before doing these steps, determine if authentication
information is needed.
1. If the WIFI icon appears on the device, dou-
ble-tap the icon and tap enable wireless.
WiFi icon
Chapter 3 Getting Connected
32
Copyright 2008 unitech Electronics Co., Ltd. All rights reserved. unitech is a registered trademark of unitech Electronics Co., Ltd.
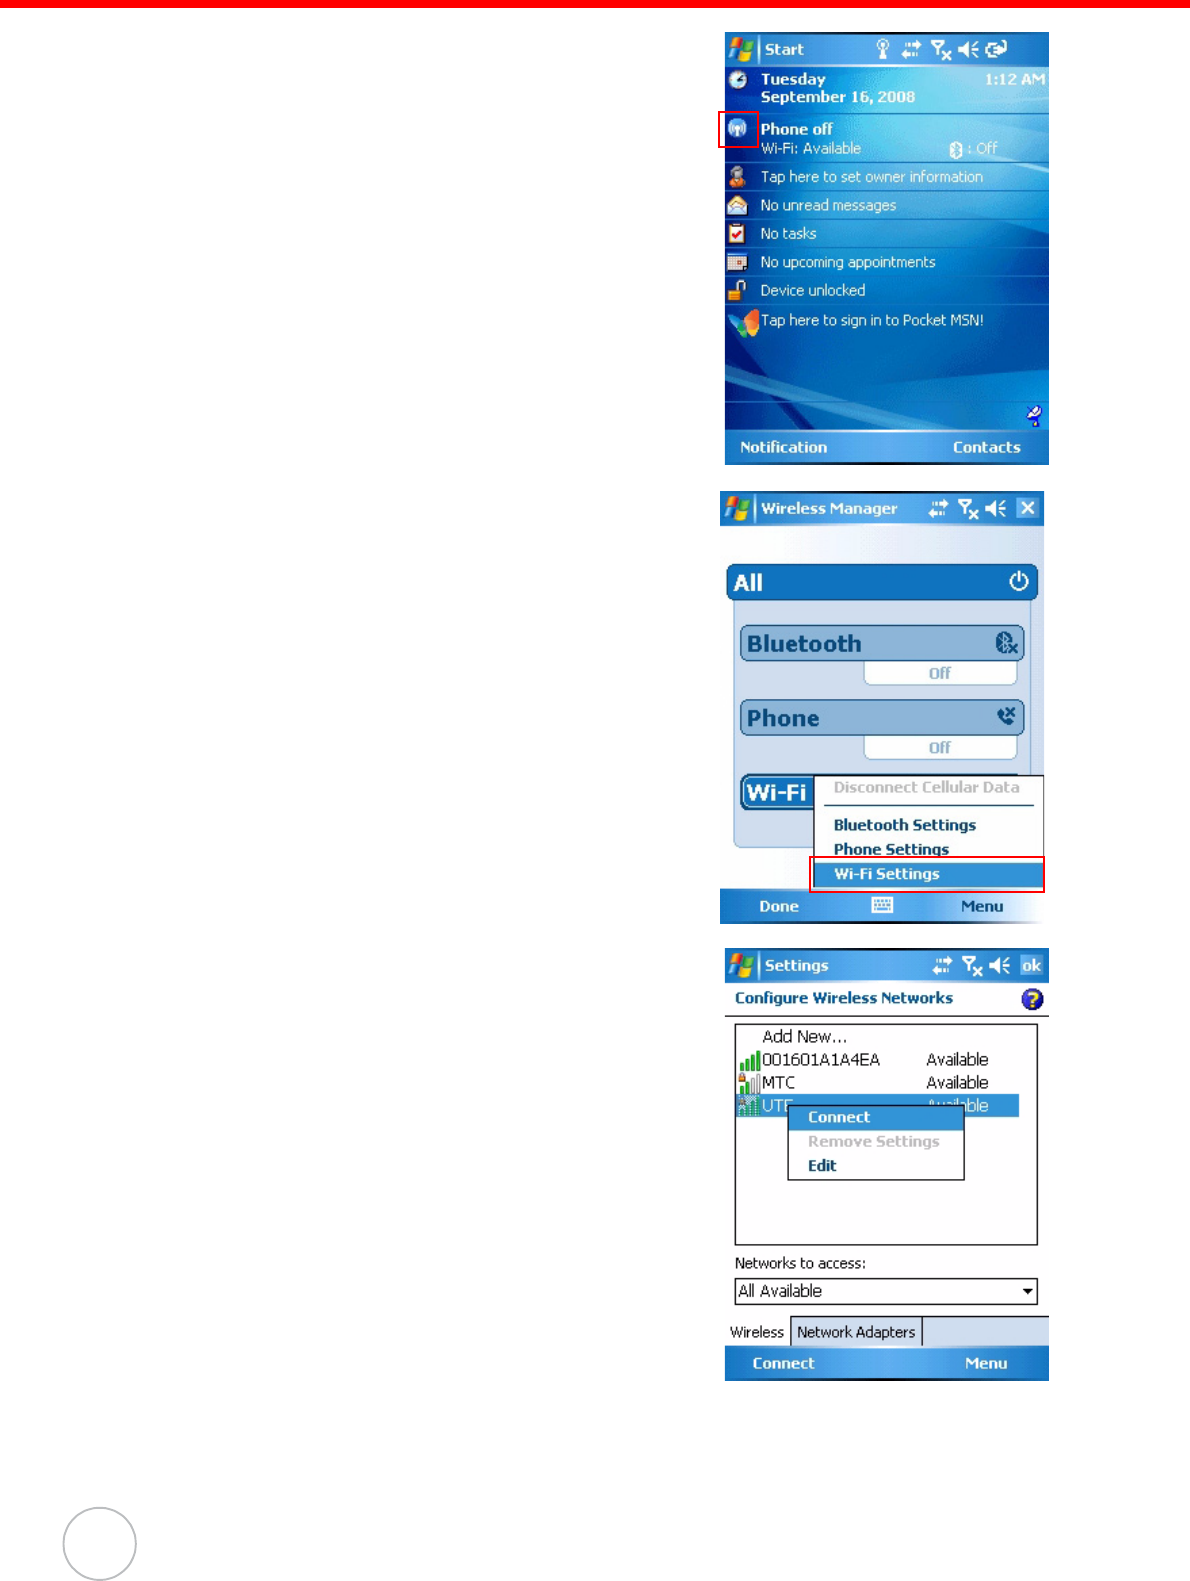
2. Tap the Wireless Manager icon.
3. Tap Menu at the right bottom corner of Wire-
less Manager. Select Wi-Fi Settings.
4. If there are available networks detected, tap
and hold the network name, and then select
Connect.
Chapter 3 Getting Connected
33
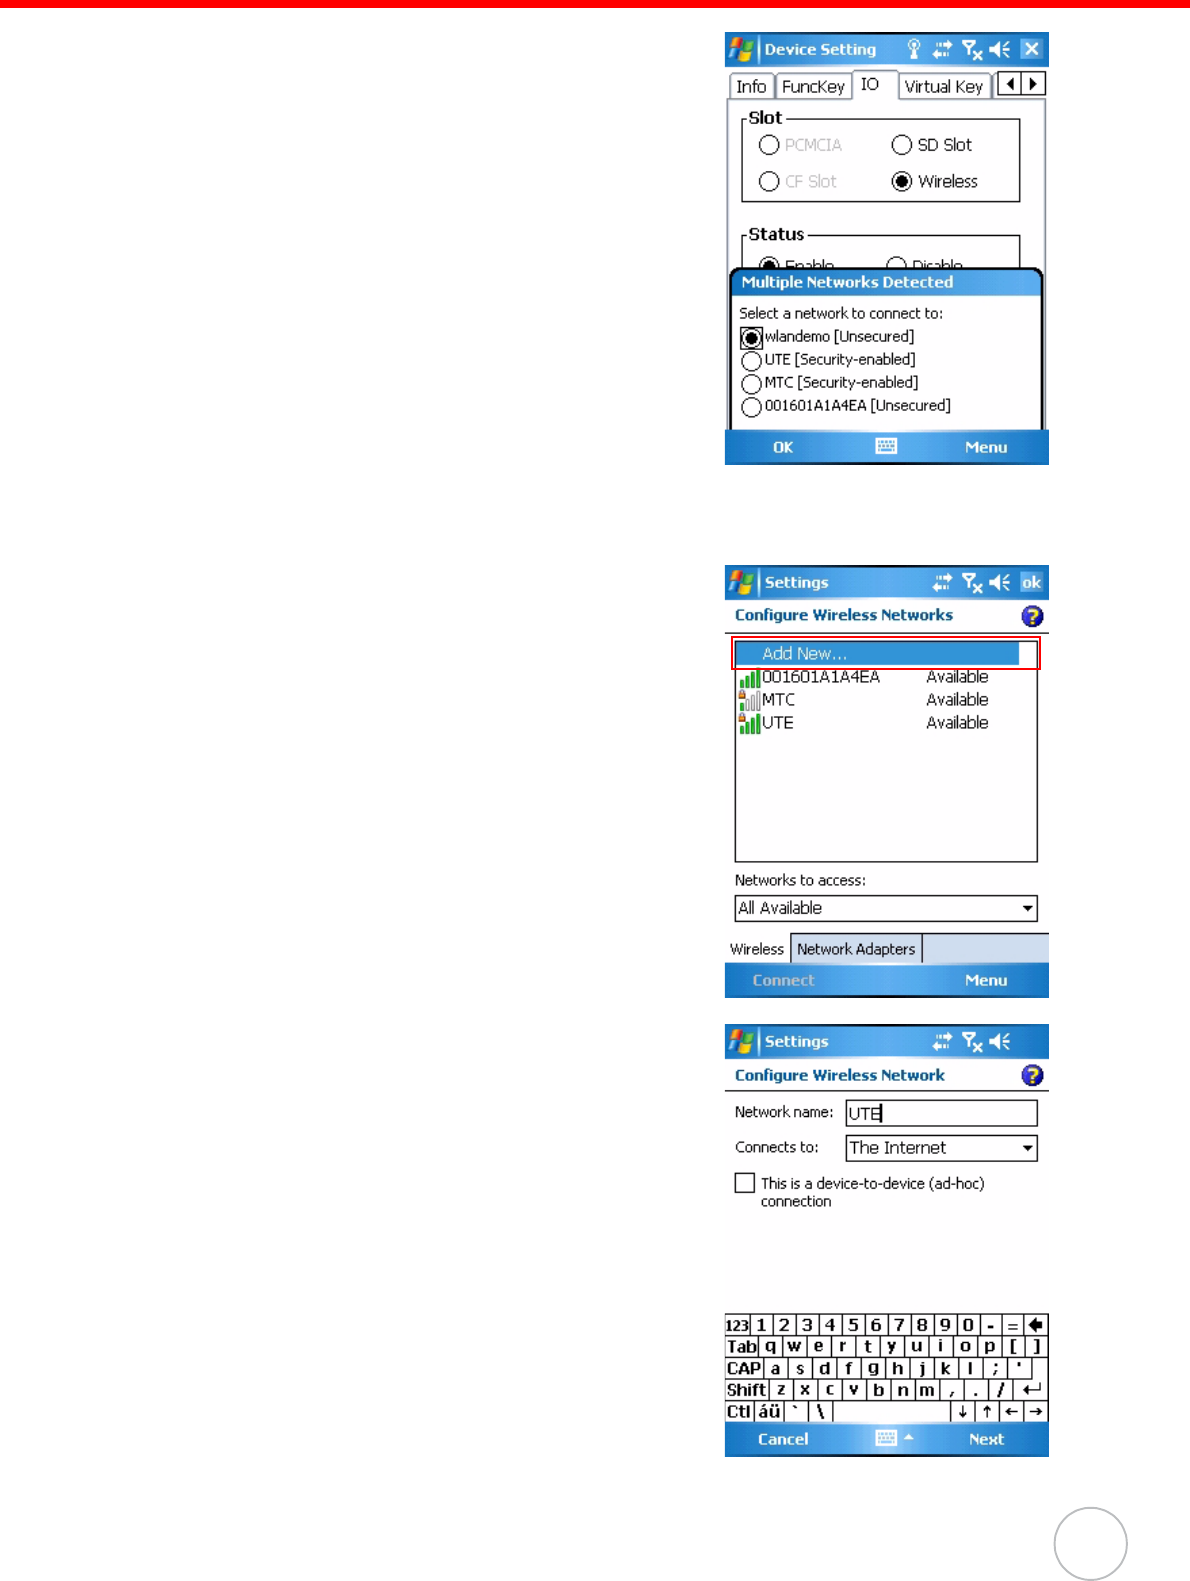
NOTE: Press Func key and “9” button to
bring the Device Setting screen.
Under IO, select Wireless and
Enable. While Multiple Networks
Detected screen pop up, select a net-
work to connect.
Follow instructions below to add a new wireless network.
1. Tap Add New. Configure Wireless Network
screen appears.
2. Enter a name for the network. Tap Next.
Chapter 3 Getting Connected
34
Copyright 2008 unitech Electronics Co., Ltd. All rights reserved. unitech is a registered trademark of unitech Electronics Co., Ltd.
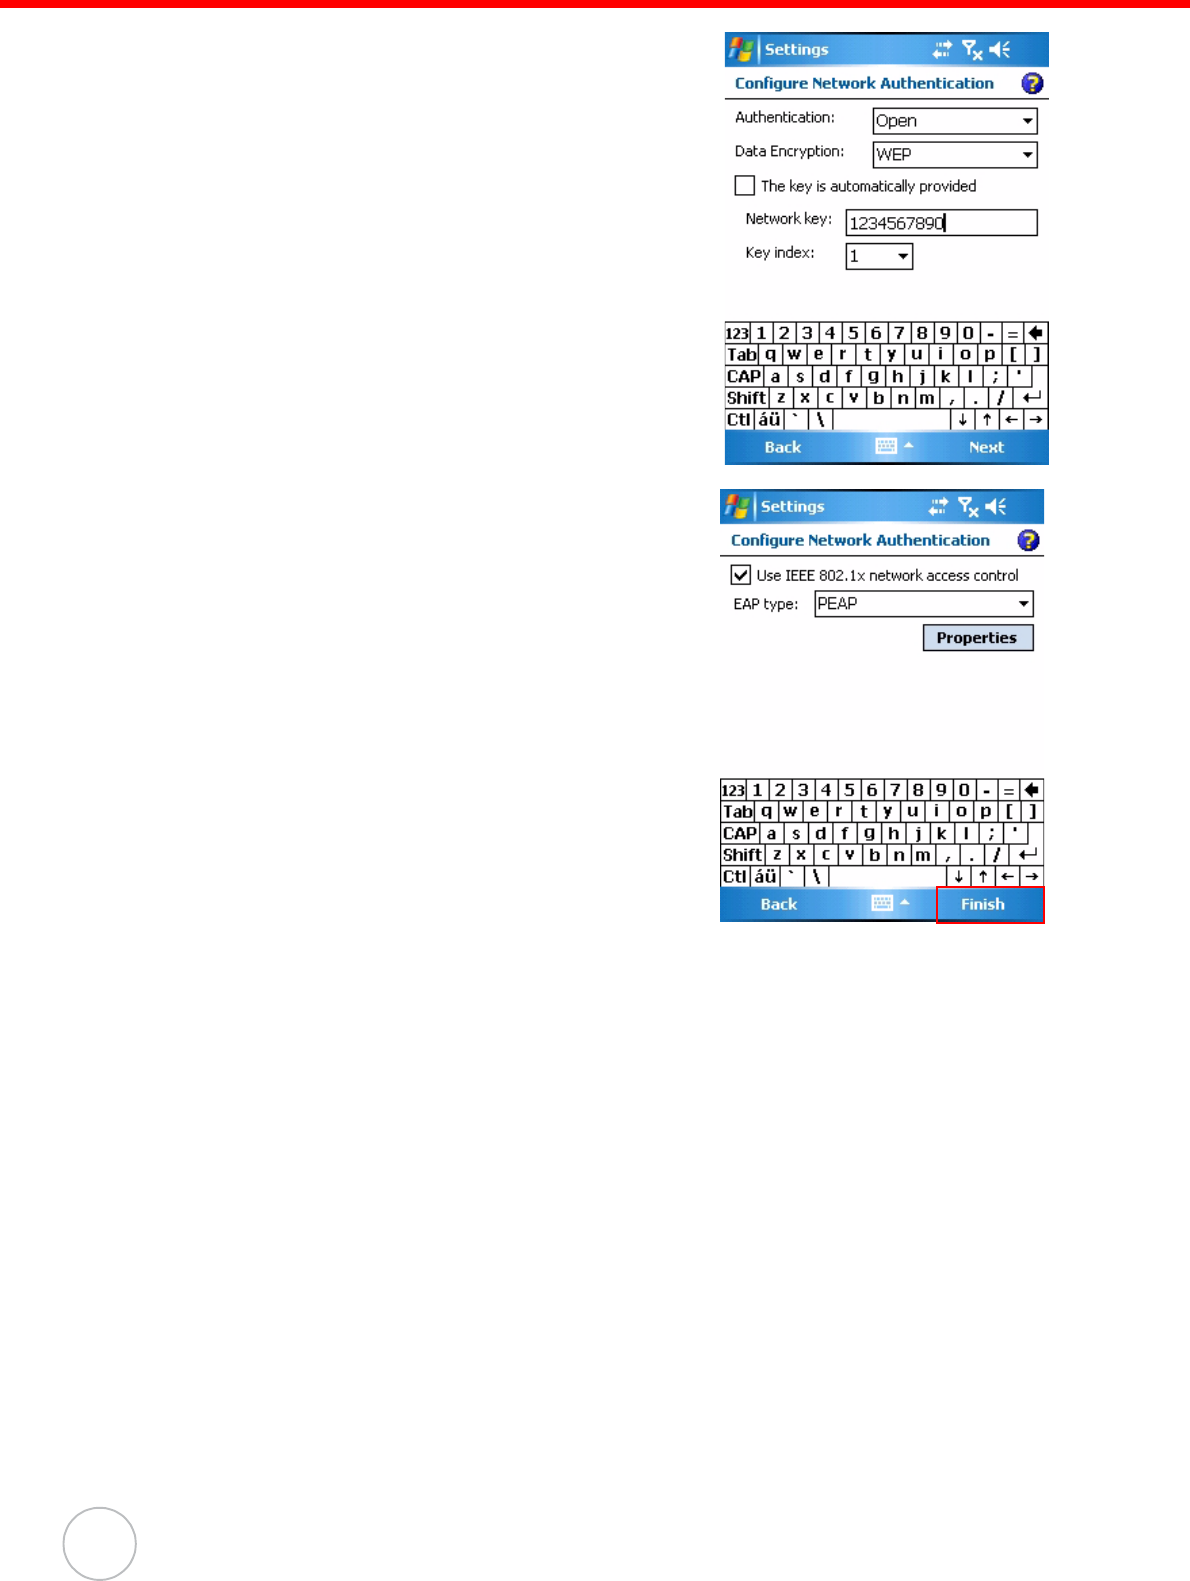
3. Enter the network key. Tap Next.
4. Tap Finish. Configure Wireless Network
screen appears again, and the new wireless
network becomes available in the list.
To disable the wireless network, you may do one of the following.
1. Double-tap the WIFI icon and tap Disable Wireless.
2. Tap the Wi-Fi bar in the Wireless Manager screen.
3. Press Func key and “9” button to bring the Device Setting screen. Under IO,
select Wireless and Disable.

Chapter 3 Getting Connected
35
Synchronizing Information
All files created on the device are stored in My Document/PA600 II My Document
folder (if the designated device name is PA600 II). You can view files by double-click-
ing the PA600 II My Documents icon on your computer.
If you have enabled file synchronization, your PA600 II files are automatically synchro-
nized in the My Documents folder on your computer, unless a different name was cho-
sen for PA600 II.
Synchronization Options
Synchronization options can be modified, including when you synchronize and what
gets synchronized. In the Mobile Device window, click Tools → Sync Options.
For each type of information, the synchronization process can be hastened by limiting
the amount of data to be synchronized. To do this, select a service and click the Set-
tings button. After enabling a service, you must close and reopen the ActiveSync.
Using ActiveSync to Exchange Files
You can use ActiveSync to exchange information from your device to your computer
and vice versa. Changes you made to the information on one location will not affect
the information on the other one. If you want to automatically update information on
both your device and computer, synchronize the information instead.
You can copy two types of information to your device: files and Pocket Access Win-
dows CE Store information.
The procedure below only applies to copying files. Refer to the ActiveSync Help on
your computer for instructions on how to copy Pocket Access Windows CE Store
information.
NOTE: Files created on your computer may need to be converted by Active-
Sync so that they can be viewed and edited on your device, and vice
versa.
To copy files:
1. Connect your device to your computer.
2. In ActiveSync on your computer,
click Explore.

Chapter 3 Getting Connected
36
Copyright 2008 unitech Electronics Co., Ltd. All rights reserved. unitech is a registered trademark of unitech Electronics Co., Ltd.
Windows Explorer opens the Mobile Device window for your device.
3. Locate the file that you want to copy on your device or computer.
4. Do either one of the following:
– To copy the file to your device, right-click the file and click Copy. Place the
cursor in the desired folder for your device, right-click, then click Paste.
– To copy the file to your computer, right-click the file and click Copy. Place the
cursor in the desired folder for your computer, right click, then click Paste.
37
Chapter 4
Barcode Scanner Programs
Scanner Setting
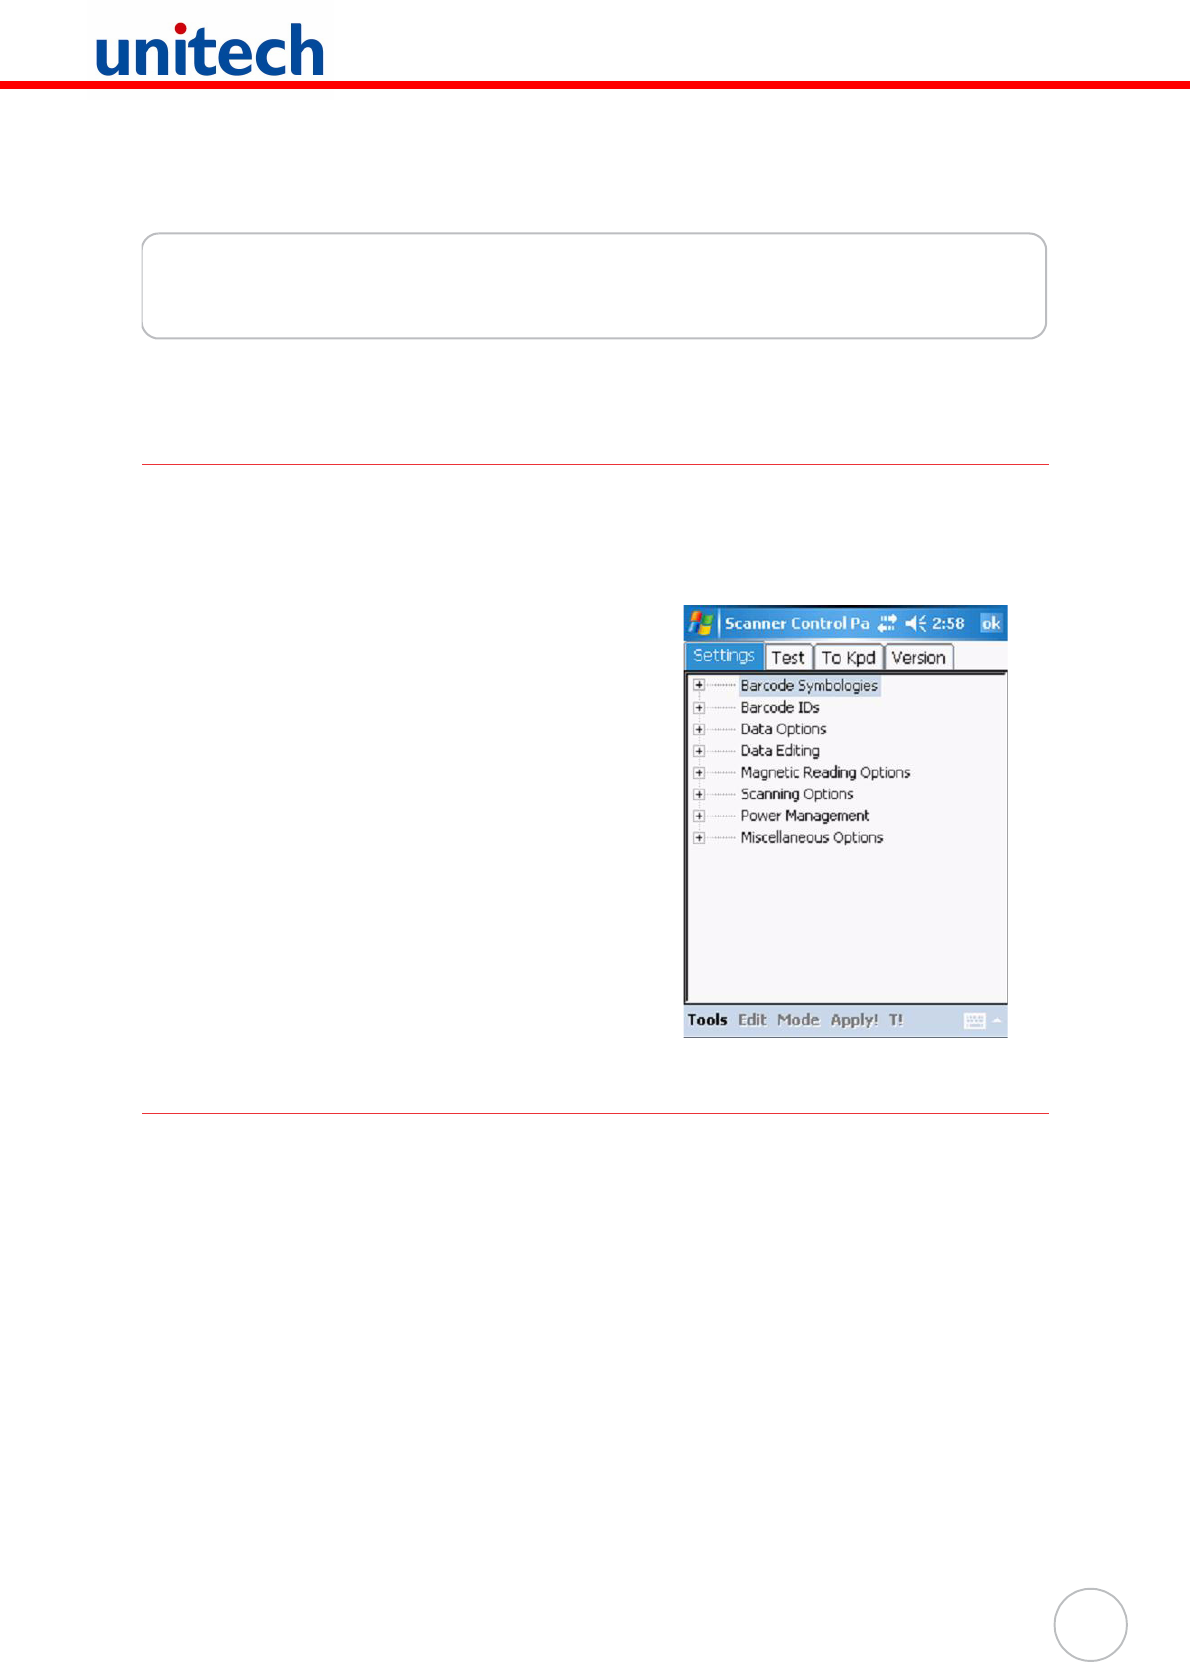
When it is necessary for the user to change the default barcode symbology for a differ-
ent application, the Scanner Control Panel provides the ability to change default sym-
bology, place delimiter characters behind scanned data, and save the settings.
Tap Start → Settings → System → Scanner.
Scan2Key
The Scan2Key application routes input from a scanner port to a keypad buffer, making
all input from the scanner emulate input from the keypad. Using Scan2Key, scanned
data will be directed from the scanner port to any waiting (active/focused) text editor
such as MS Mobile Word or a text box in an applicaton.

Chapter 4 Barcode Scanner Programs
38
Copyright 2008 unitech Electronics Co., Ltd. All rights reserved. unitech is a registered trademark of unitech Electronics Co., Ltd.
Barcode Symbologies
Note: *Value Adjustable Scanner Control Panel V.5.11
Barcode
Symbology
Enable/
Disable
Check
Char/Digit
verification
Transmit
Check
Char/digit
Max/
Min
Length
Transmit
Leading
Char/digit
Other
Bookland
EAN
YES
Codabar YES YES YES YES Transmit start &
stop bits, CLSI
format, *data length
Code 11 YES YES YES * check digits, *data
length
Code 128 YES YES *data length
Code 32
(Pharmacy
Code)
YES YES Transmit tailing digit
Code 39 YES YES YES YES Full ASCII,
Transmit start &
stop bits, Function
Code, *data length,
Double labels
decoding, *Double
labels separator
Code 93 YES YES *data length
Delta Code YES YES YES
EAN 128 YES Transmit code ID,
*Fields separator
EAN 13 YES YES YES
EAN 8 YES YES YES
Interleaved 2
of 5
YES YES YES YES *Not suppress start
or stop digit, Fixed
length, *data length
Label Code
IV & V
YES YES
MSI/Plessey YES YES YES *Check digital
double module 10,
*data length
Standard 2
of 5
YES YES YES YES Fixed length, *data
length
Telepen YES *Standard
character set
UPC A YES YES YES
UPC E YES YES YES Zero expansion, NSC
UPC/EAN
Group
Supplement 2,
Supplement 5, Insert
space before
supplement, Must
have supplement,
*Add-on code try level
39
Chapter 5
Advanced Settings
Adjusting Settings
This section describes how to adjust the settings of your device to accommodate your
work habits.
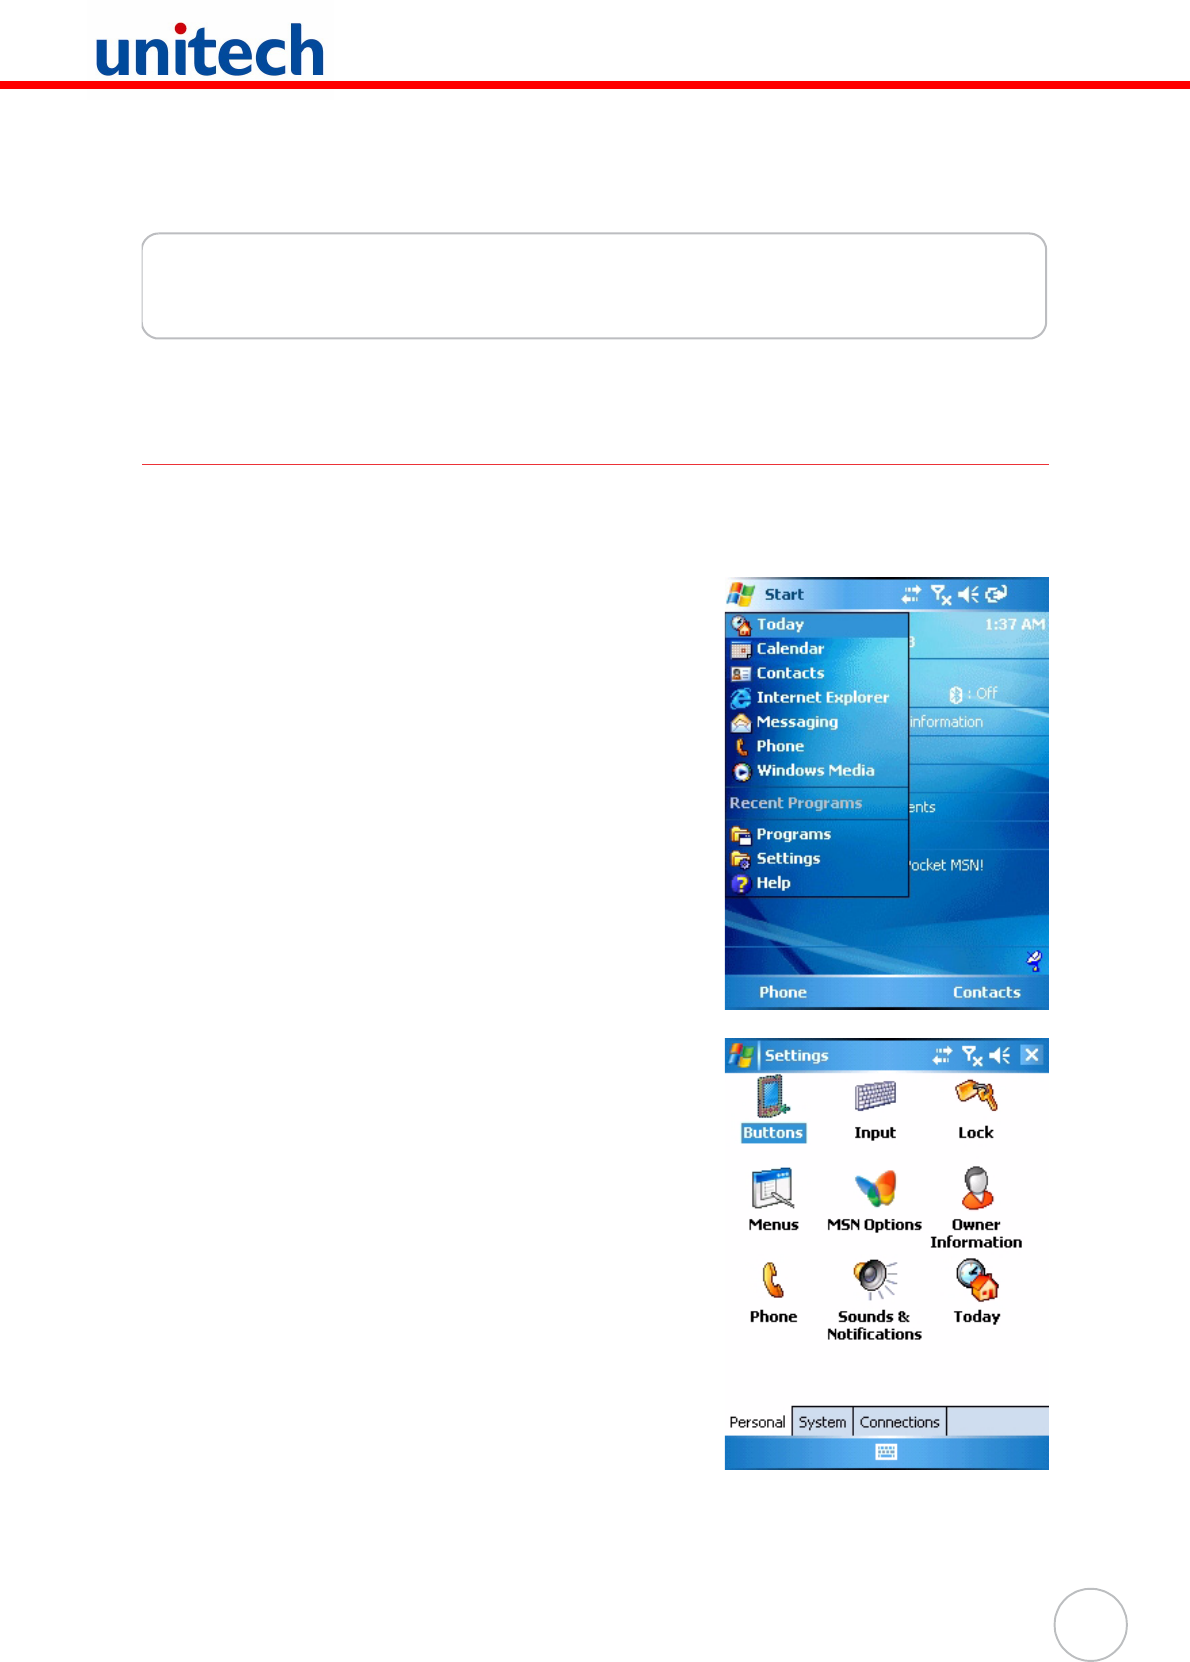
To access Settings, tap Start → Settings.
The Settings screen appears.
From here you can adjust such user configurable
items as the backlight, auto power off timer, system
volume, and processor speed. You can also assign
functions to buttons, configure menus, enter owner
information, and set up connections.
Chapter 5 Advanced Settings
40
Copyright 2008 unitech Electronics Co., Ltd. All rights reserved. unitech is a registered trademark of unitech Electronics Co., Ltd.
Checking the Main and Backup Battery Status
This section describes how to view the power level for both the main and backup bat-
tery. To minimize power consumption, you can define settings for the auto-off function
and the processor’s operation speed.
To check the main and backup battery status:
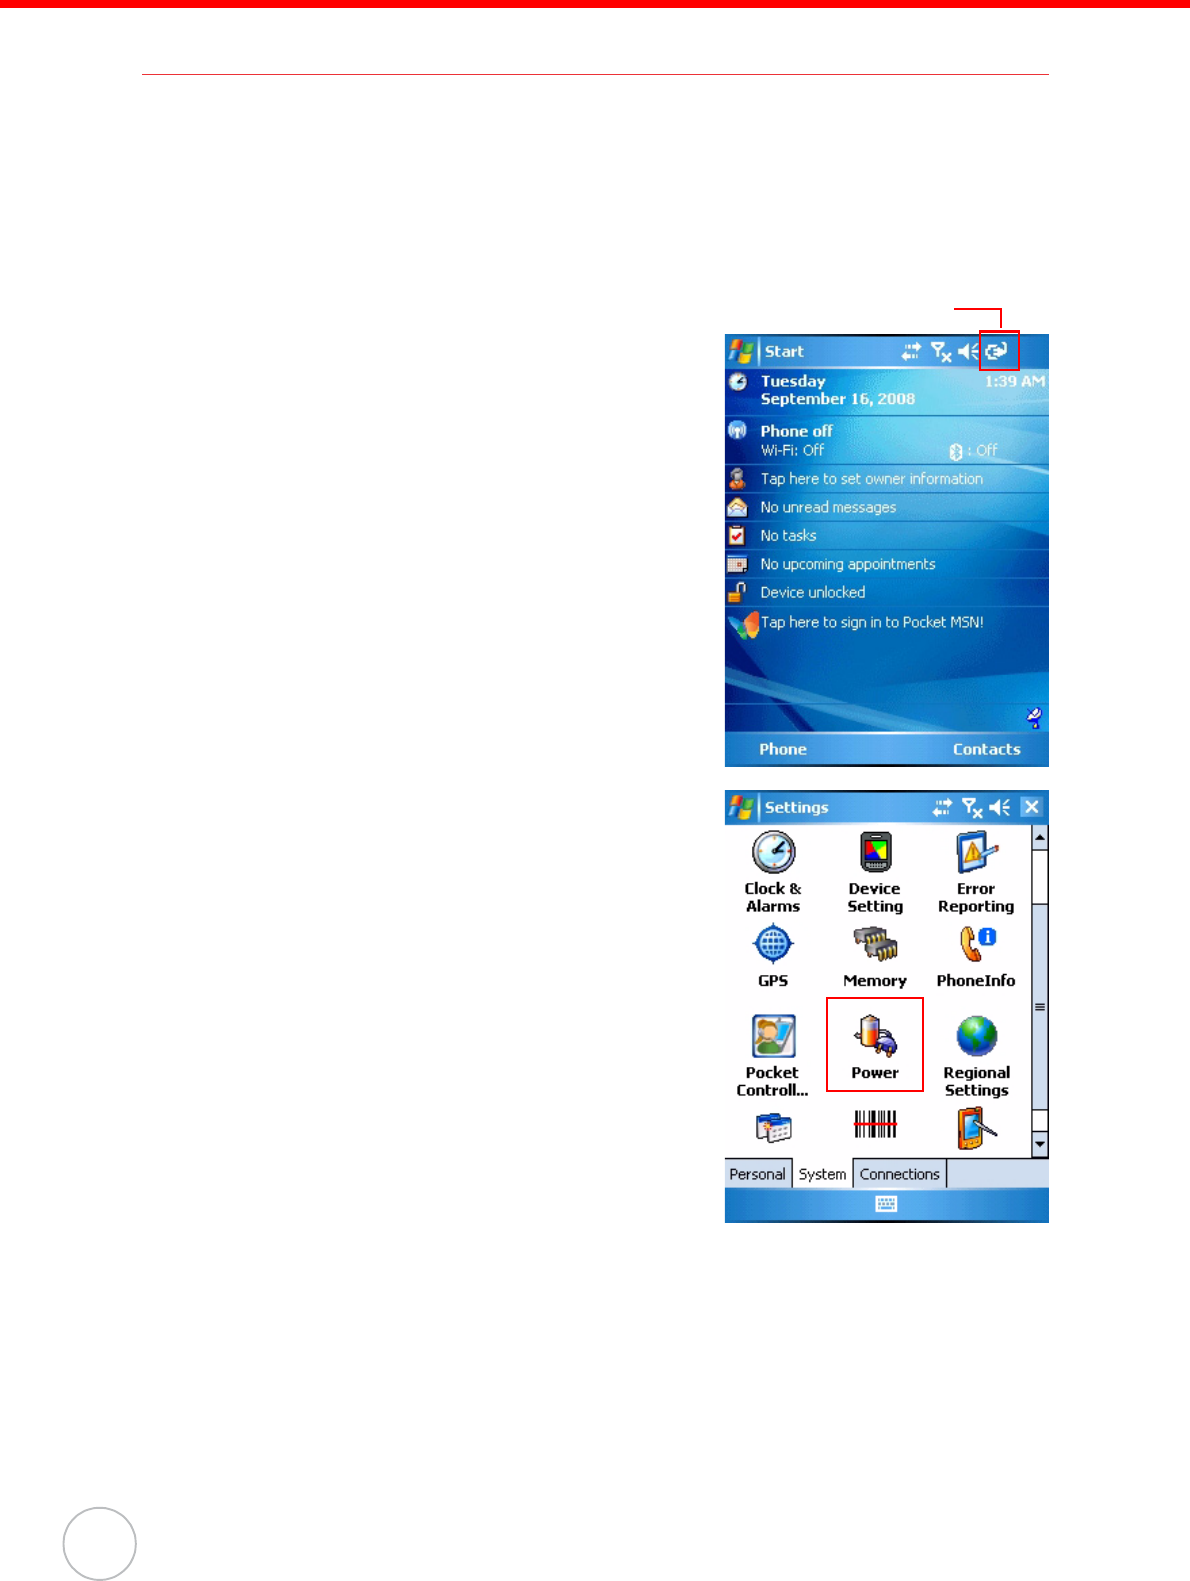
1. Open Power Properties. Do either of the following:
– If the Plug or Battery icon appears on your
device, double-tap the icon to bring the
Power Properties screen.
– Tap Start → Settings → System →
Power.
NOTE: Press Func key and “8” button.
Plug icon
Chapter 5 Advanced Settings
41
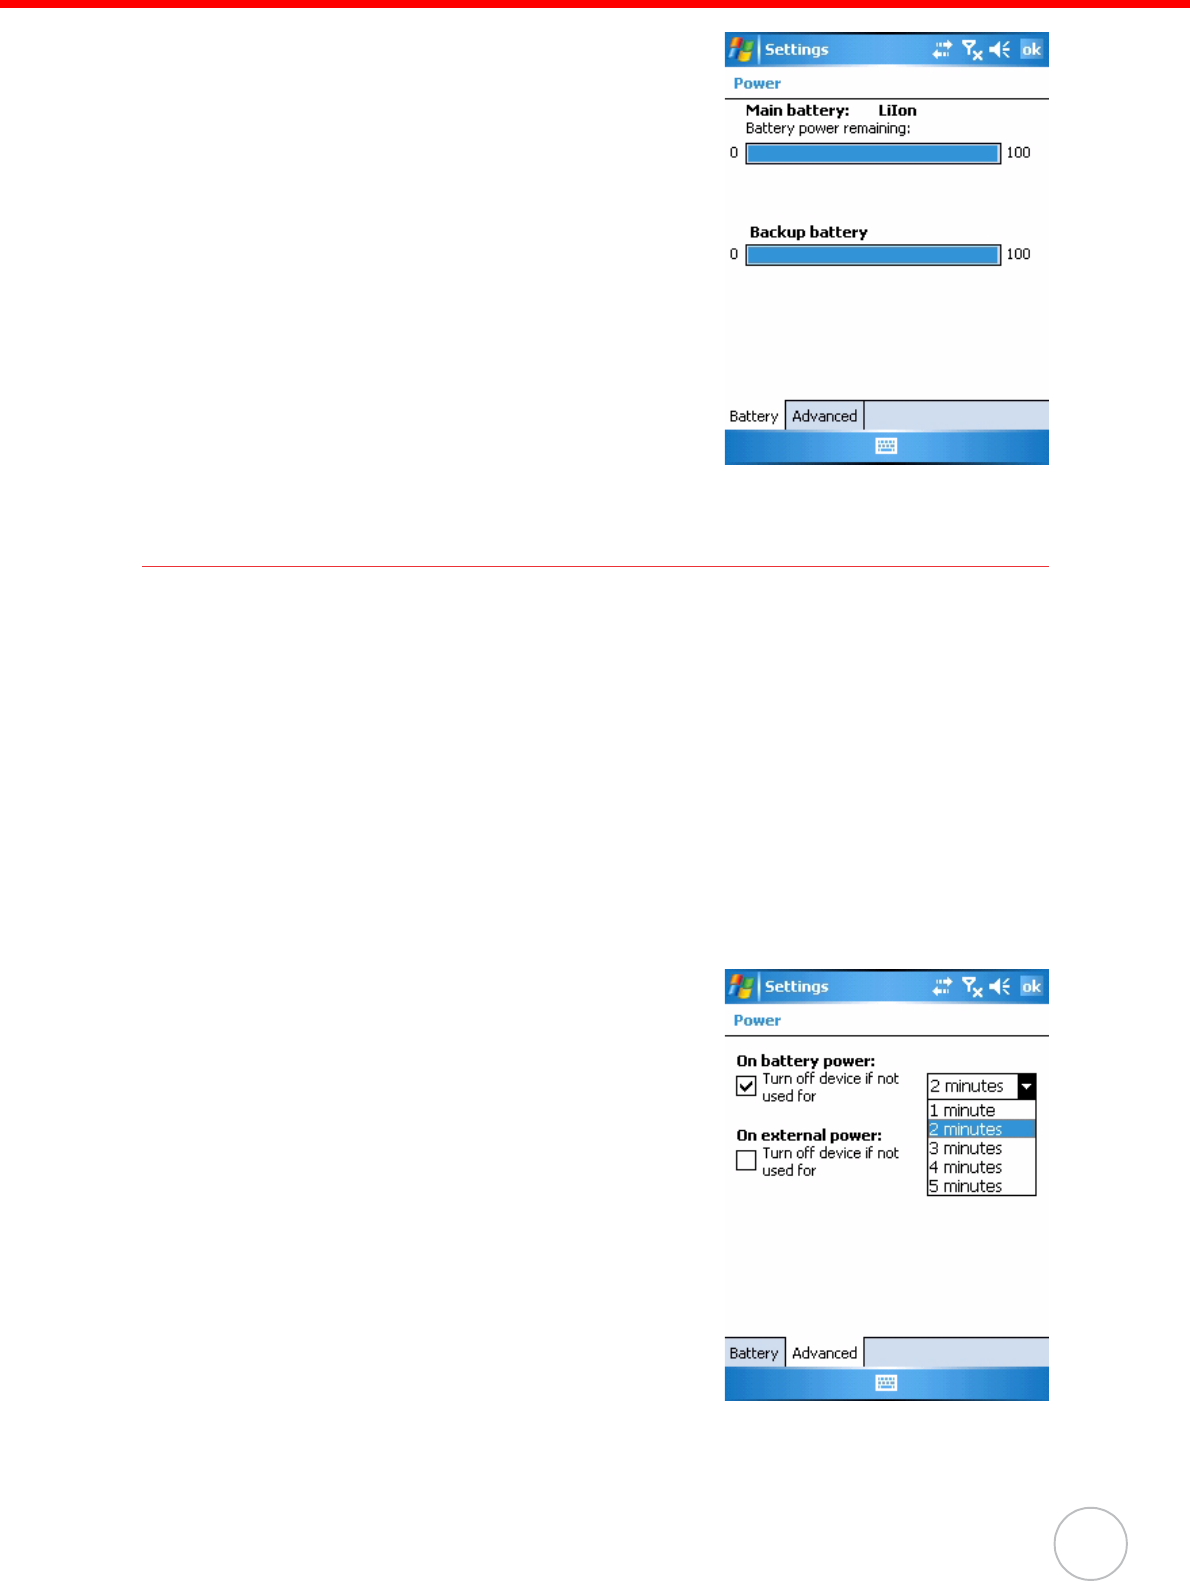
The Power screen appears.
2. The battery menu item displays the status of
the main and backup batteries.
On the screen shown here, both batteries are
Good.
NOTE: It is necessary to charge the battery
when the battery charge reaches
below 10%. If the battery does not
accept a charge, contact unitech
Technical Support.
Extending Battery Life
You can extend the PA600 II battery life by doing either of the following:
• Change the automatic power settings
• Minimize the use of backlight
Changing the Automatic Power Settings
The PA600 II will enter idle mode when there is no task, or all tasks are waiting for
input. In default setting, the PA600 II automatically turns itself off if it remains idle for 3
minutes and when there is no external charging power connected. Pressing the power
button returns the PA600 II to the same point at the time of automatic shutdown.
To change the automatic power settings:
1. In the Power screen tap the Advanced tag.
2. Tap the automatic shut off time arrow to
select from a list of time periods. The avail-
able time periods are 1, 2, 3, 4, and 5 min-
utes.
3. This function can also be activated when the
PA600 II is plugged into the power adapter
or placed in its docking station by tapping
the On external power check box and then
tapping the arrow to select from a list of time
periods. The available time periods are 1, 2,
5, 10, 15, and 30 minutes.
Chapter 5 Advanced Settings
42
Copyright 2008 unitech Electronics Co., Ltd. All rights reserved. unitech is a registered trademark of unitech Electronics Co., Ltd.
Adjusting Backlight Setting
The power consumption of the LCD backlight is high, turn off the backlight function if it
is not necessary.
If a backlight is required, set “automatically turn off the backlight” function.
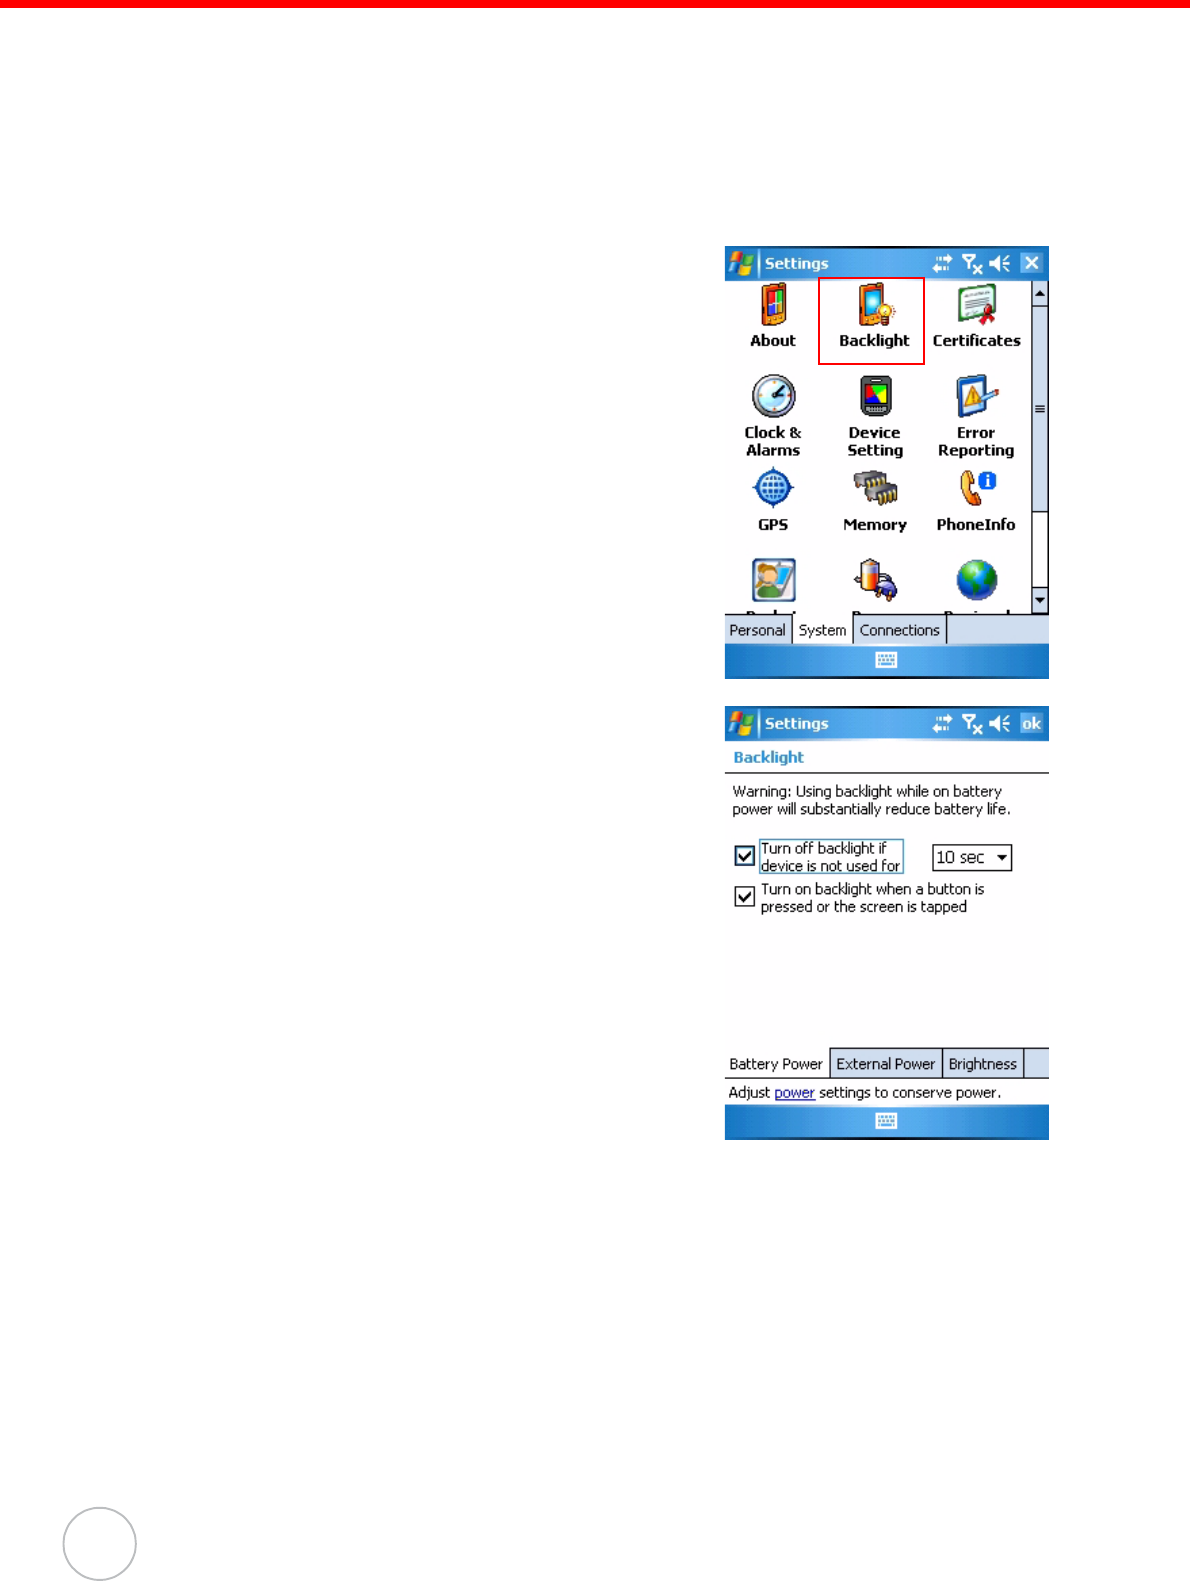
To change backlight settings:
1. Tap Start → Settings → System.
2. Tap Backlight.
3. The Backlight screen appears.
Do any of the following:
– In the Battery Power tab, tap the Turn off
backlight if device is not used for check-
box and select the amount of time before
the unit turns off the backlight while run-
ning in battery power mode from the drop-
down list.
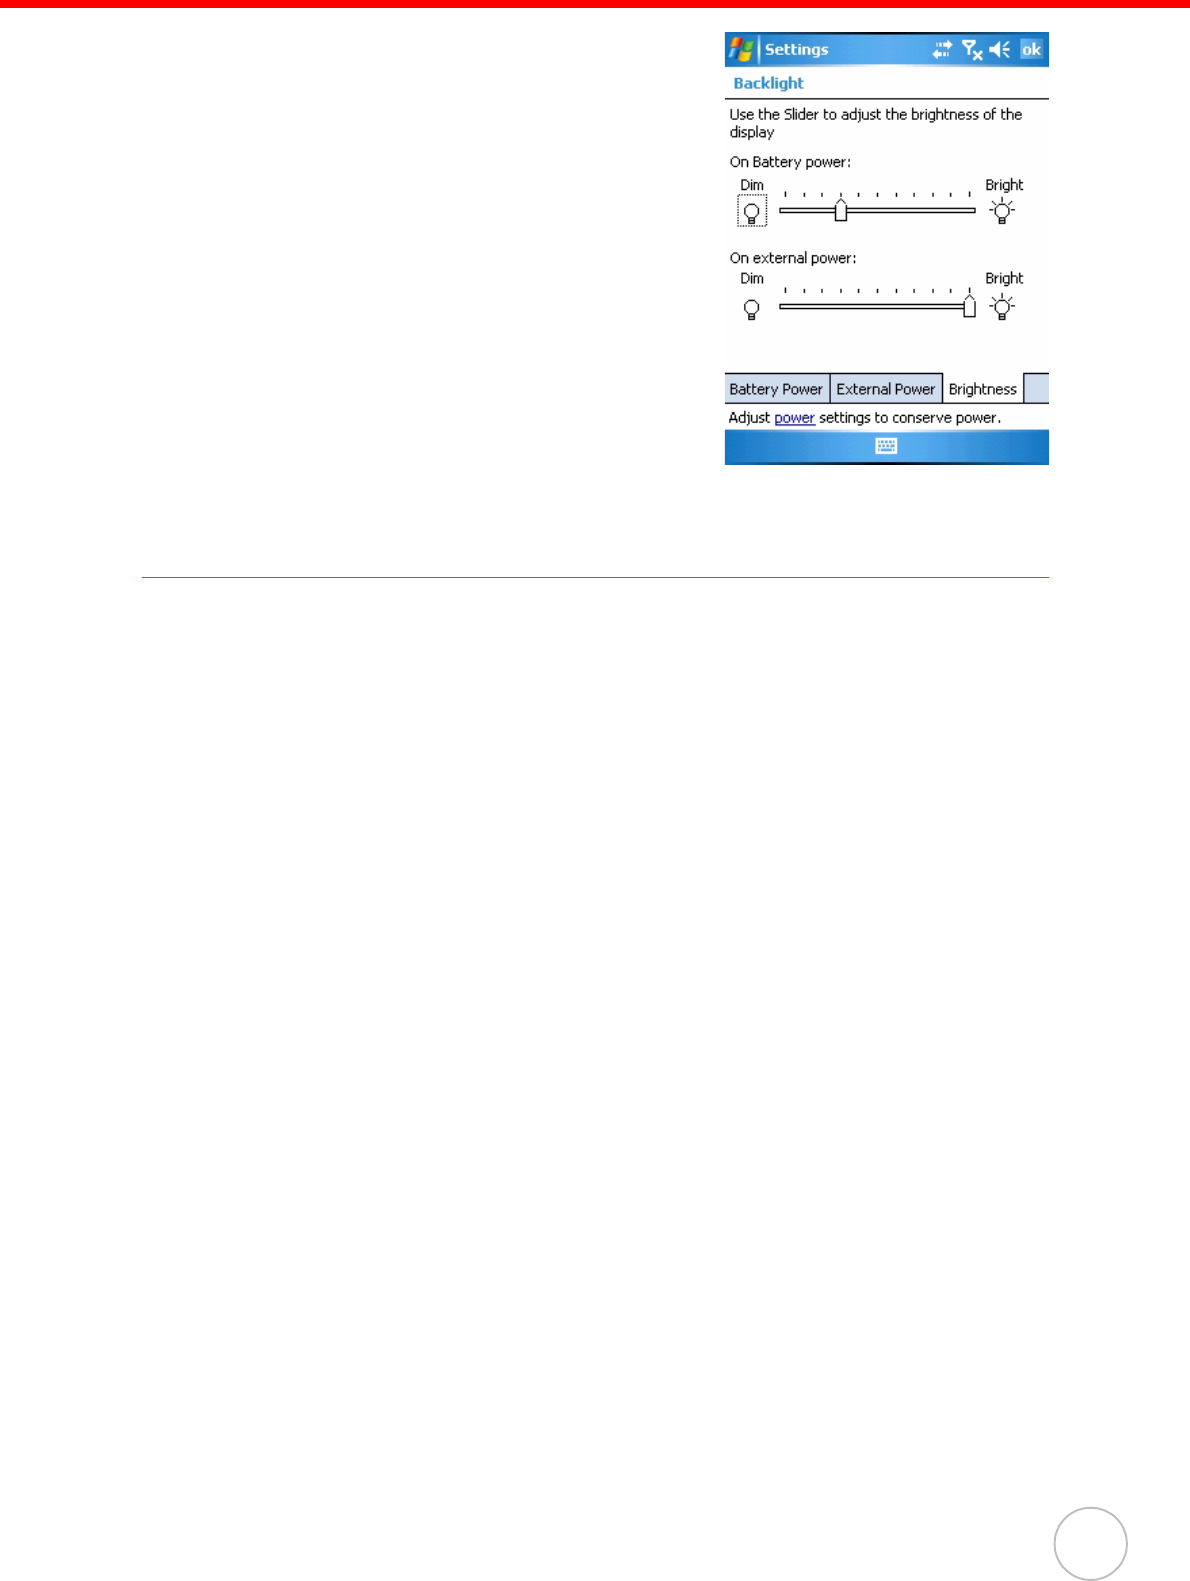
– In the External Power tab, tap the Turn off
backlight if device is not used for check-
box and select the amount of time before
the unit turns off the backlight while run-
ning in external power mode from the drop-
down list.
– Tap the Turn on backlight when check-
box to activate the backlight when a button
is pressed or the screen is tapped.
Chapter 5 Advanced Settings
43
– In the Brightness tap, tap and drag the
slider to adjust a dimmer backlight.
Viewing Flash Memory Files
The Flash Storage folder is a rewritable location for programs or data files. The benefit
of this feature is that files and programs saved in Flash Storage are unaffected by the
PA600 II power status.
To access the Flash Memory files:
1. Tap My Device > Flash Storage folder.
To transfer files to the Device’s flash memory:
1. Connect the device to your computer by ActiveSync.
2. On your computer’s Activesync, Click Mobile Device > Flash Storage.
3. Select the file that you want to transfer.
4. Drag the file from your terminal’s flash storage folder to your computer’s folder
or drag the file from your computer’s folder to the terminal’s flash storage folder.
Chapter 5 Advanced Settings
44
Copyright 2008 unitech Electronics Co., Ltd. All rights reserved. unitech is a registered trademark of unitech Electronics Co., Ltd.
Performing a hardware reset
You may have to perform a reset if the device freezes (i.e., device no longer responds
to the buttons or tapping on the screen).
A soft reset allows your device to get a fresh start, similar to rebooting a computer.
This will restart your device and adjust memory allocation. All records and entries are
retained after a soft reset. Unsaved data in open programs may in some cases be lost.
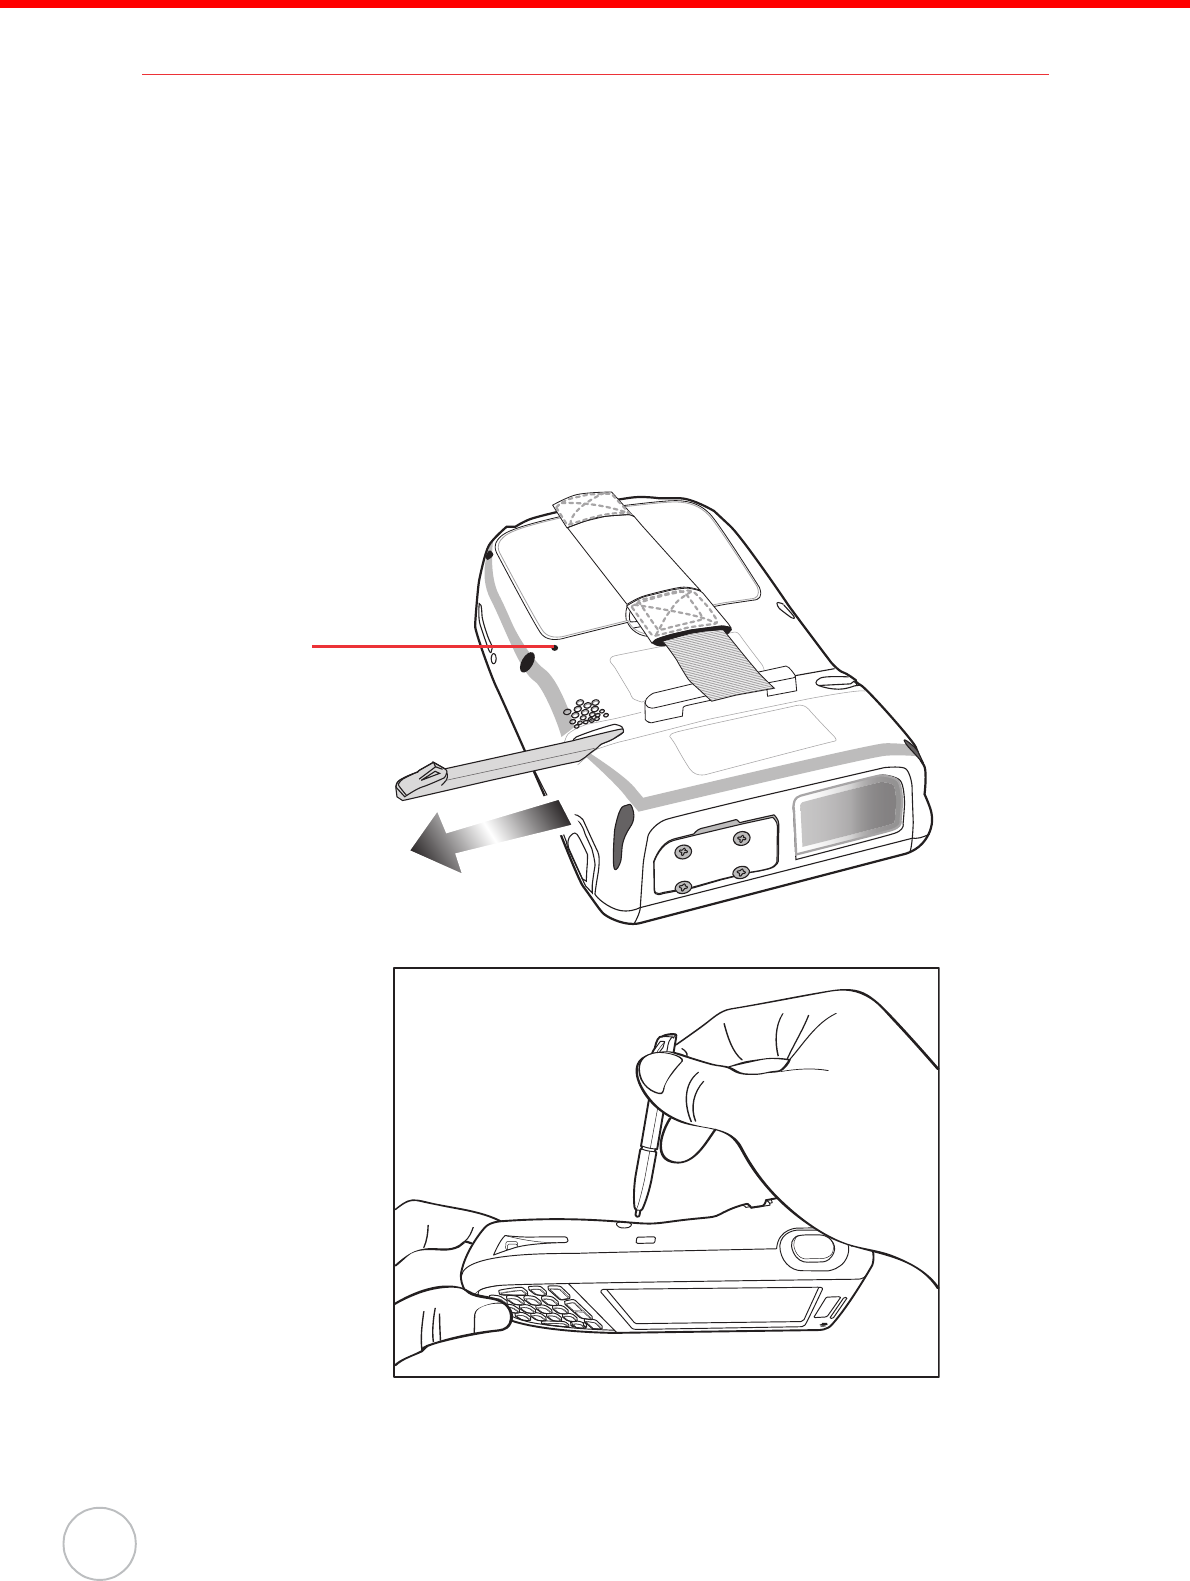
Performing a Warm Boot
1. Remove the stylus from its holder.
2. Lightly press the tip of the stylus to the reset button located on the rear of the
PA600 II.
Reset button
Chapter 5 Advanced Settings
45
Performing a Cold Boot
A cold boot cuts off power of your device, erasing all records and entries, deleting all
programs you have added, and restoring the device to default factory settings.
When you perform a cold boot, the date and time settings are not be retained. For-
mats, preferences, and other settings are restored to their default factory settings.
Data stored in the flash storage are retained.
NOTE: Never perform a hard reset unless a soft reset does not correct your
problem. When you perform your next ActiveSync operation, you can
restore any data that you previously synchronized to your computer or
you can restore data that you backed up to a storage card.
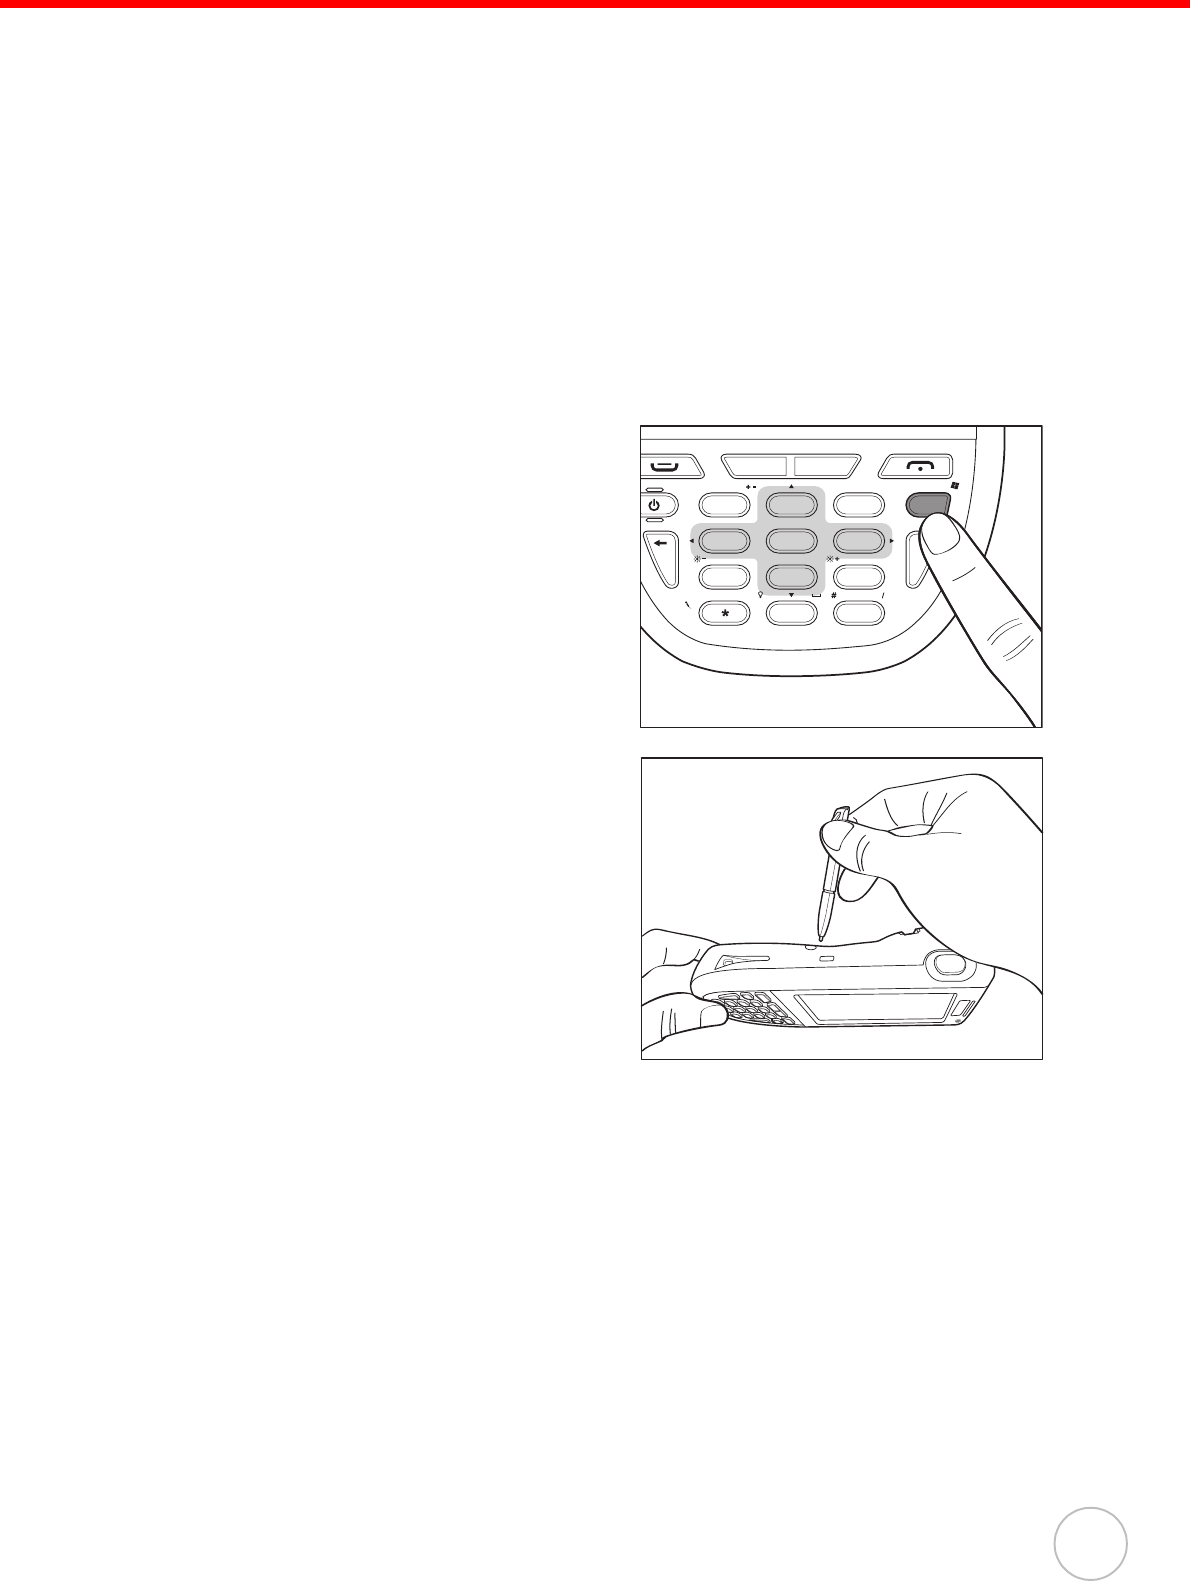
Follow these instructions to perform a cold boot.
1. Press the TAB key.
2. While holding the TAB key, insert the tip
of the stylus into the reset hold on the
back of the PA600 II. Press and hold
the reset button until you see the
unitech splash logo screen. Wait 5 sec-
onds and then release the TAB key.
NOTE: The system is returned to the default settings. All registry settings and all
files (include the hidden files) are returned to their original factory
defaults.
FUNC
Ls
ESC ghi jkl mno
wxyz
ENTER
TAB
tuvpqrs
key
OK
abc Rs def
ALPHA
1
4
7
2
5
8
0
3
6
9
.
Chapter 5 Advanced Settings
46
Copyright 2008 unitech Electronics Co., Ltd. All rights reserved. unitech is a registered trademark of unitech Electronics Co., Ltd.
Performing a Clean Boot
A clean boot, similar to cold boot, cuts off power of your device, erasing all records
and entries, deleting all programs you have added, cleaning storage memory, and
restoring the device to default factory settings.
When you perform a clean boot, the date and time settings are not be retained. For-
mats, preferences, and other setting are restored to their default factory settings. Data
stored in the flash storage are retained.
NOTE: Never perform a hard reset unless a soft reset does not correct your
problem. When you perform your next ActiveSync operation, you can
restore any data that you previously synchronized to your computer or
you can restore data that you backed up to a storage card.
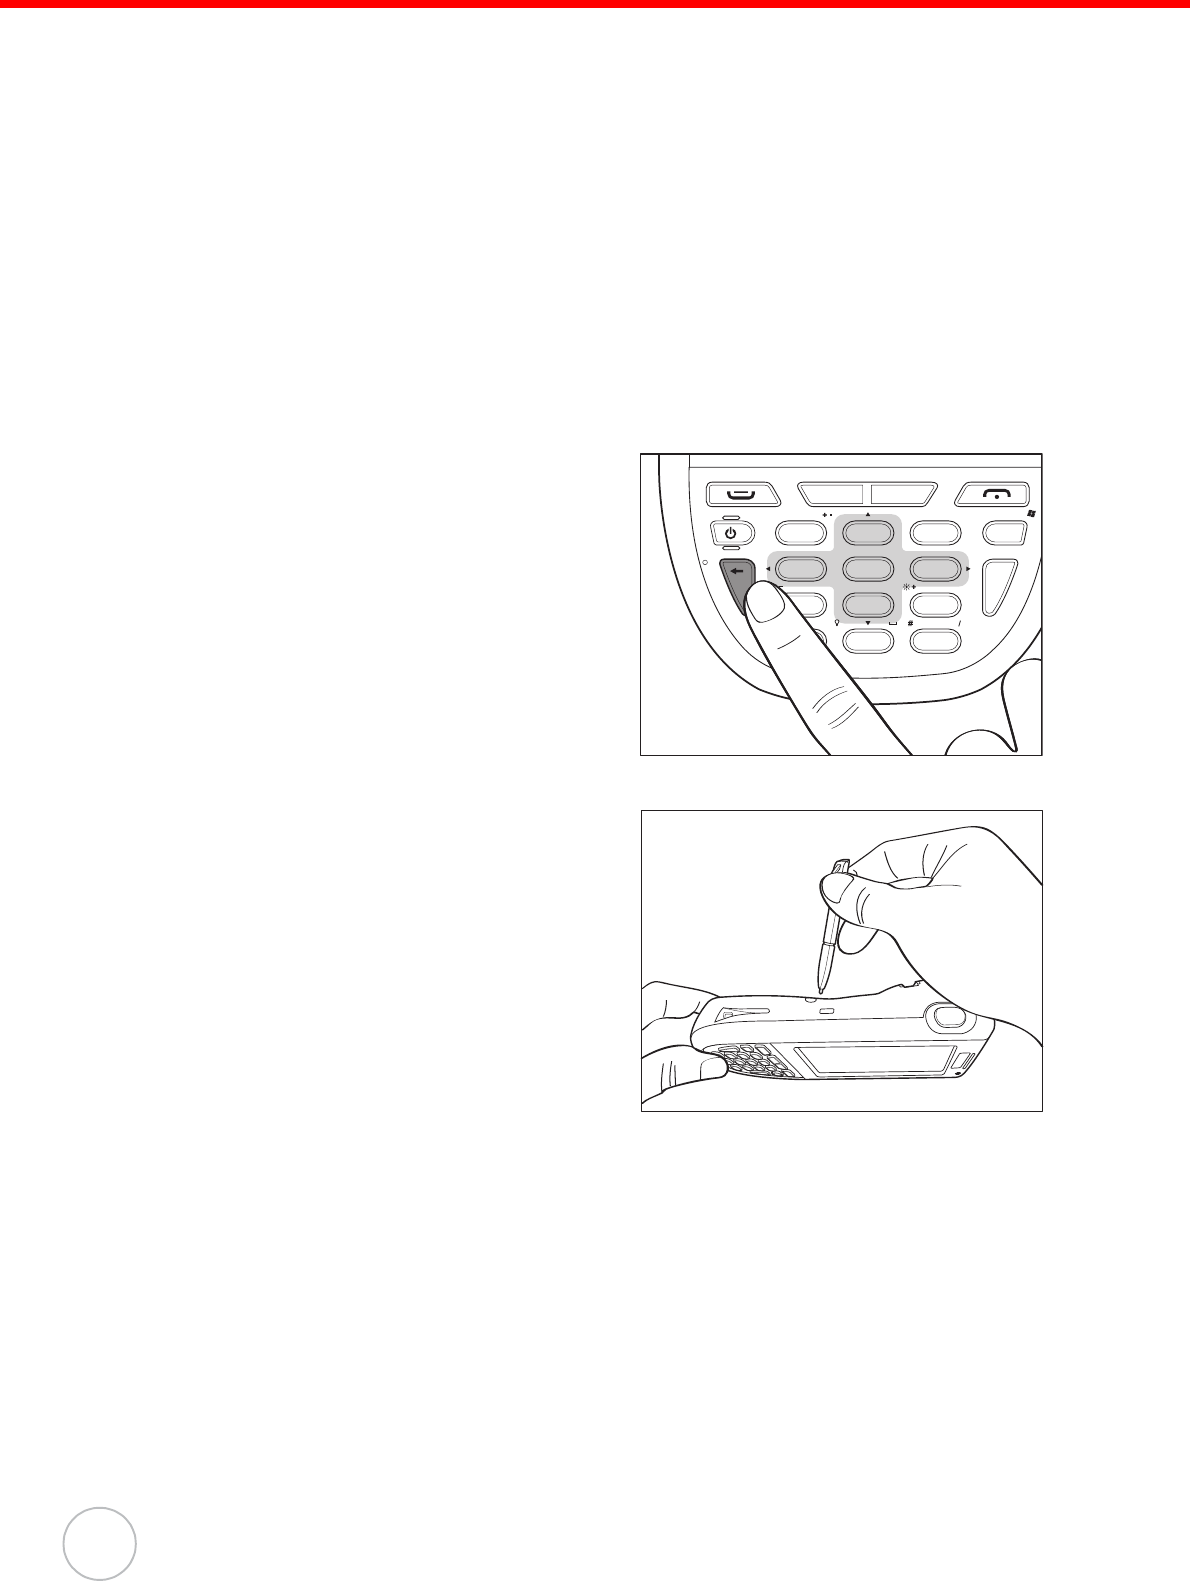
Follow these instructions to perform a clean boot.
1. Press and hold the Func key and Back-
space key.
2. While holding the Func key and Back-
space key, insert the tip of the stylus
into the reset hold on the back of the
PA600 II. Press and hold the reset but-
ton until you see the unitech splash
logo screen. Wait 5 seconds and then
release the Func key and Backspace
keys.
NOTE: The system is returned to the default settings. All registry settings and all
files (include the hidden files) are returned to their original factory
defaults. And this will clean up storage memory.
FUNC
Ls
ESC ghi jkl mno
wxyz
ENTER
TAB
tuvpqrs
key
OK
abc Rs def
ALPHA
1
4
7
2
5
8
0
3
6
9
.
47
Appendix
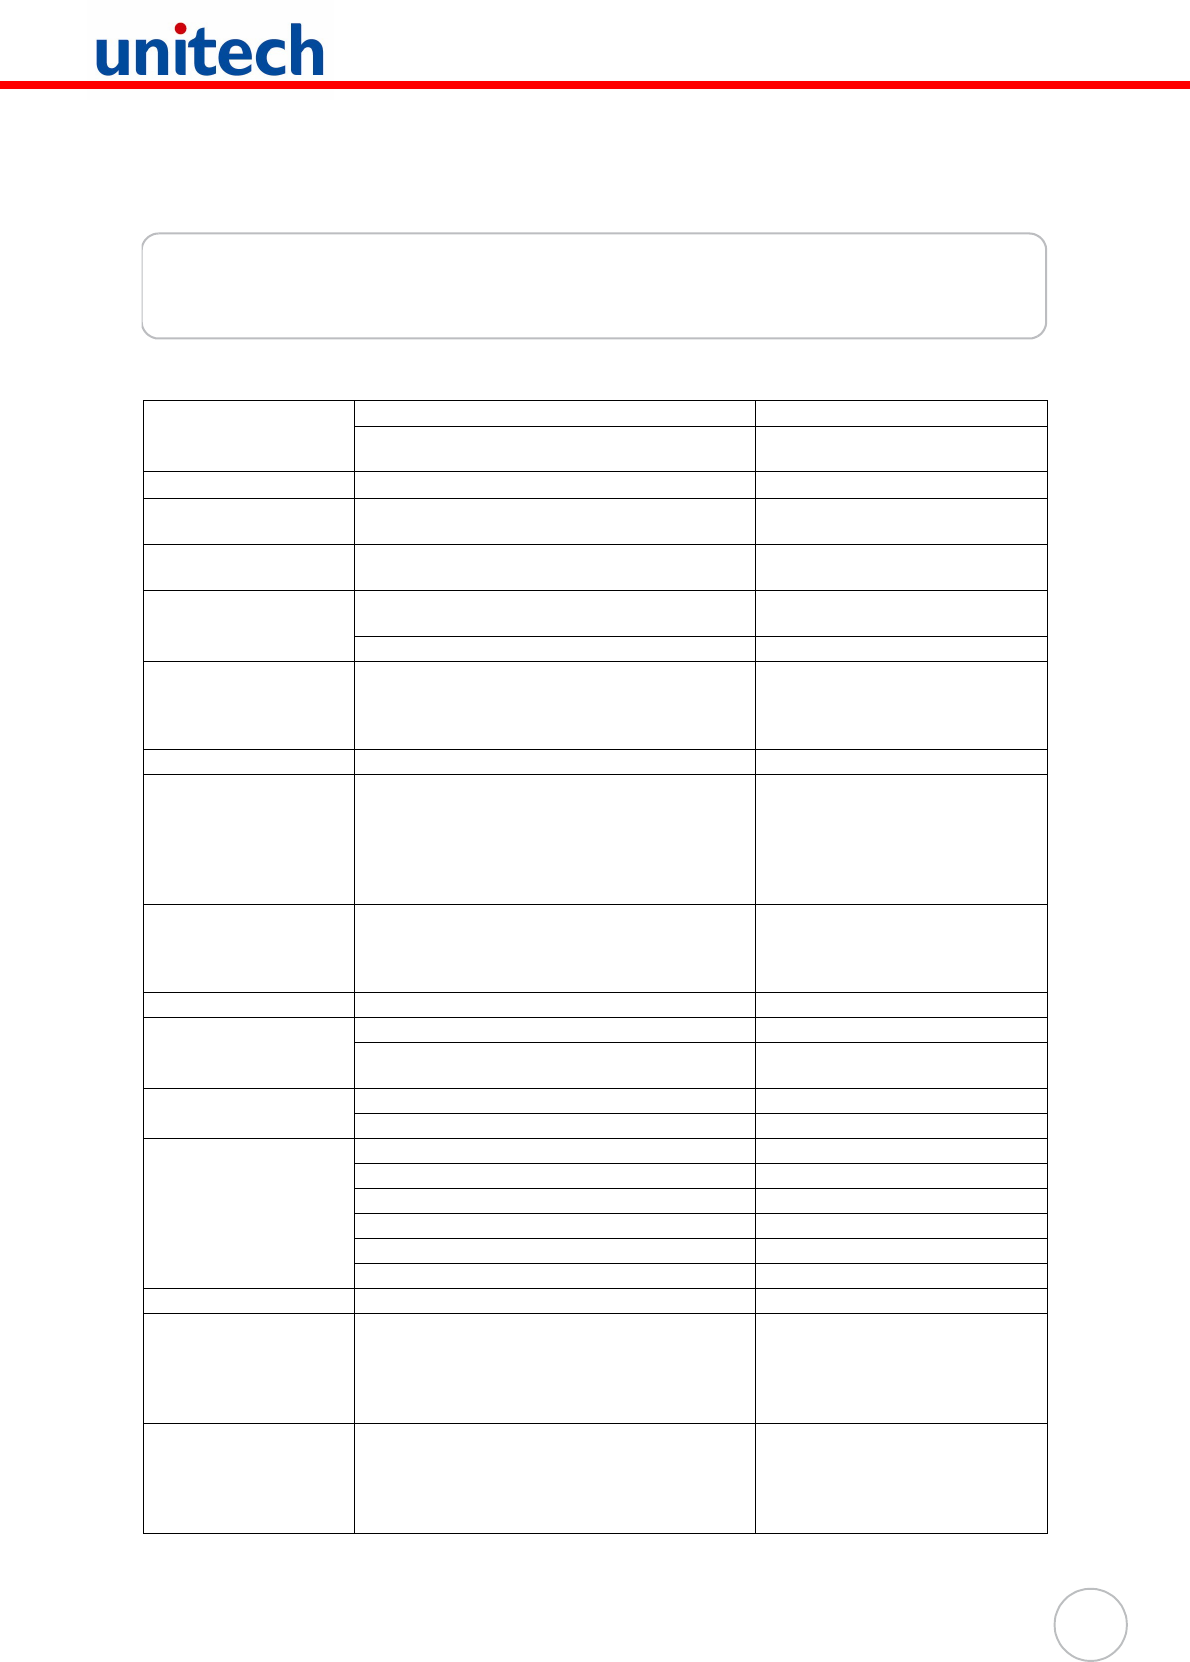
System Specifications
Processor / Memory CPU Intel PXA270 624MHz
Memory SDRAM: 128MB
Flash ROM: 320MB
OS Windows MobileTM version 5.0
Keypad 20-Key, including phone keys, alphanumeric keys,
and function keys
Display 240x320 QVGA, Color Transflective TFT,
with Touch Screen & backlight
Laser Barcode Scanner Scan rate 104 scans/sec. ± 12 scans/sec.
(bi-directional)
Scan angle 47°±3° default / 35°±3° reduced
Input Device Keypad
Touch Screen
Full Alphanumeric Software Keyboard
Barcode Scanner
Indicator Led, Vibrator
Communication USB Host & Client
802.11b/g
Bluetooth 2.0 + EDR
Bluetooth supports Bluetooth Printer, Bluetooth
Modem, Bluetooth ActiveSync
eGPRS (Siemens MC75 Radio Module)
Audio MIC
Speaker
Headset connector
Receiver
Expansion Slot SDIO slot supports SDHC up to 4G
Power Source Main 3.7V 2200mAh Li-ion battery pack
Backup One rechargeable Ni-MH backup
battery
Enclosure Weight 290g with battery
Dimension L149.5 X H26.6 X W85mm
Environmental Operating temperature -10° C~ 50° C (14° F to 122° F)
Storage temperature -20° C~ 60° C (-4° F to 140° F)
Charging temperature 10° C~ 45° C
Relative Humidity 5% ~ 95% (non-condensing)
Drop test to Concrete 4 feet (1.2 meter)
Environmental Sealing IP64
Certification CE, CB, FCC, BSMI, CCC, RoHS compliance
Accessories Battery Cradle
Battery Charger
Holster
4 slot Multi-Bay
Extended Battery
Vehicle Dock
Software Microsoft Visual Studio 2005
Microsoft Windows Mobile 5.0 SDK for Pocket PC
unitech PA600 SDK
Oracle Database Life
Wavelink Avalanche
MCL development suite