Universal Scientific UNA850 UNA 850 module User Manual UNA 850 UserMan
Universal Scientific Industrial Co., Ltd. UNA 850 module UNA 850 UserMan
user manual
The information contained herein is the exclusive property of Universal Scientific Industrial Co., Ltd. and shall not be
distributed, reproduced, or disclosed in whole or in part without prior written permission of USI Co., Ltd.
Doc. Title User Guide for UNA Module and
Socket EVB (V23)
Originator Max Shu
Date 2012/09/07
Version DVT V23
The information contained herein is the exclusive property of Universal Scientific Industrial Co., Ltd. and shall not be
distributed, reproduced, or disclosed in whole or in part without prior written permission of USI Co., Ltd.
Revision Record
Version Revise content Date
1.0 New release 2012-08-10
1.1 1.Add EVB test point pin define
2.
Identification of PCB version
2012-09-07
The information contained herein is the exclusive property of Universal Scientific Industrial Co., Ltd. and shall not be
distributed, reproduced, or disclosed in whole or in part without prior written permission of USI Co., Ltd.
Content
1.
FCC Regulations............................................................................................3
2.
RF Exposure Information..............................................................................4
3.
Information of Installed Module....................................................................5
4.
Guide to Use ..................................................................................................6
1)
Function of Socket EVB V23 and Identification of PCB version................6
2)
Configure the Socket EVB............................................................................ 8
3)
Insert the SIM card..................................................................................... 11
4)
Place the Module ....................................................................................... 12
5)
Connect the antenna..................................................................................13
6)
Download setting........................................................................................ 14
7)
Manual control module sleep mode:........................................................... 15
8)
Apply External power to module................................................................. 16
9)
Measure current of module setting............................................................. 17
10)
Connect extend cable for line in & line out :................................................ 18
11)
EVB test point pin define............................................................................19
The information contained herein is the exclusive property of Universal Scientific Industrial Co., Ltd. and shall not be
distributed, reproduced, or disclosed in whole or in part without prior written permission of USI Co., Ltd.
1. FCC Regulations
This device complies with part 15 of the FCC Rules. Operation is subject to
the following two conditions: (1) This device may not cause harmful
interference, and (2) this device must accept any interference received,
including interference that may cause undesired operation.
This device has been tested and found to comply with the limits for a Class
B digital device, pursuant to Part 15 of the FCC Rules. These limits are
designed to provide reasonable protection against harmful interference in a
residential installation. This equipment generates, uses and can radiated
radio frequency energy and, if not installed and used in accordance with
the instructions, may cause harmful interference to radio communications.
However, there is no guarantee that interference will not occur in a
particular installation If this equipment does cause harmful interference to
radio or television reception, which can be determined by turning the
equipment off and on, the user is encouraged to try to correct the
interference by one or more of the following measures:
Reorient or relocate the receiving antenna.
Increase the separation between the equipment and receiver.
Connect the equipment into an outlet on a circuit different from that to
which the receiver is connected.
Consult the dealer or an experienced radio/TV technician for help.
Changes or modifications not expressly approved by the party responsible for
compliance could void the user‘s authority to operate the equipment.
The information contained herein is the exclusive property of Universal Scientific Industrial Co., Ltd. and shall not be
distributed, reproduced, or disclosed in whole or in part without prior written permission of USI Co., Ltd.
2. RF Exposure Information
This Modular Approval is limited to OEM installation for mobile and fixed
applications only. The antenna installation and operating configurations of this
transmitter, including any applicable source-based time-averaging duty factor,
antenna gain and cable loss must satisfy MPE categorical Exclusion
Requirements of §2.1091.
The antenna(s) used for this transmitter must be installed to provide a
separation distance of at least 20 cm from all persons, must not be collocated
or operating in conjunction with any other antenna or transmitter, except in
accordance with FCC multi-transmitter product procedures.
The end user has no manual instructions to remove or install the device and a
separate approval is required for all other operating configurations, including
portable configurations with respect to 2.1093 and different antenna
configurations.
Maximum antenna gain allowed for use with this device is 2 dBi.
When the module is installed in the host device, the FCC ID label must be
visible through a window on the final device or it must be visible when an
access panel, door or cover is easily re-moved. If not, a second label must be
placed on the outside of the final device that contains the following text:
“Contains FCC ID: IXM-UNA850”.
The information contained herein is the exclusive property of Universal Scientific Industrial Co., Ltd. and shall not be
distributed, reproduced, or disclosed in whole or in part without prior written permission of USI Co., Ltd.
3. Information of Installed Module
Module Name
UNA_850
FCC ID
IXM-UNA850
HW Version
V2.3
SW Version
V3.1a
GSM Band
GSM 850, E-GSM 900, DCS 1800, PCS 1900
UMTS Band
FDD I, FDD V
GSM Feature
Release 99
GPRS
Release 6, Multi-slot class 12
EDGE
Release 6, Multi-slot class 12
UMTS Feature
HSDPA, HSUPA (UMTS Release 6)
AT Command
3GPP TS 27.007, 27.005
SIM/USIM
Support 3V and 1.8V
Interface
USB 2.0 high speed
Operating Temperature
Frequency Stability covers operating
temperature range of -20° to +50°C
Operating Voltage
3.3 ~ 4.2V
The information contained herein is the exclusive property of Universal Scientific Industrial Co., Ltd. and shall not be
distributed, reproduced, or disclosed in whole or in part without prior written permission of USI Co., Ltd.
4. Guide to Use
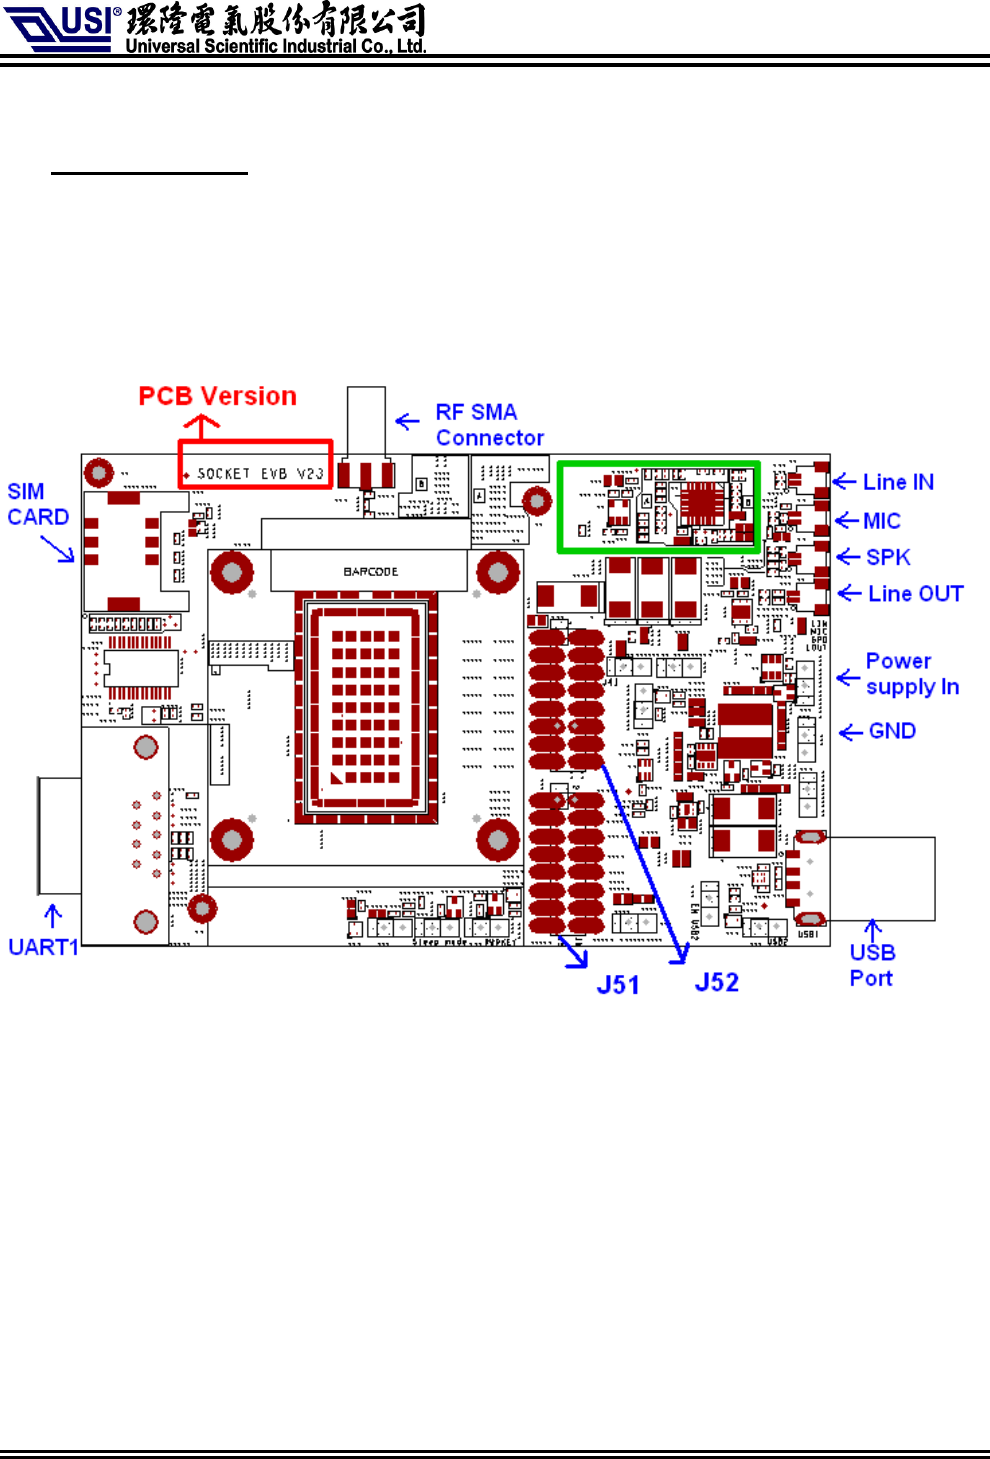
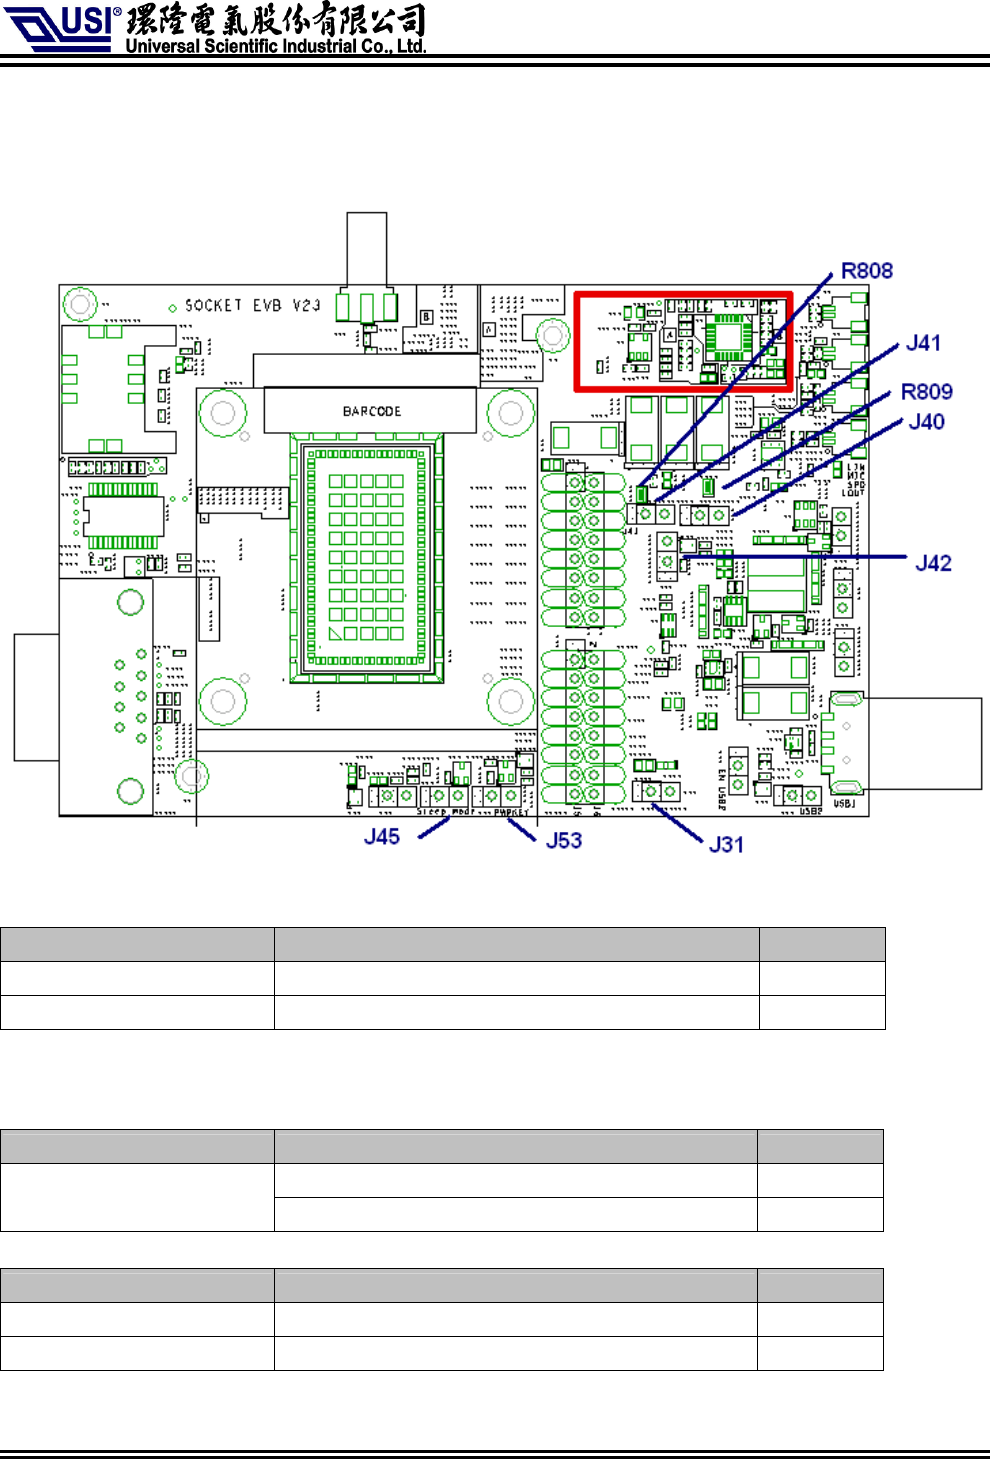
1) Function of Socket EVB V23 and Identification of PCB version
The information contained herein is the exclusive property of Universal Scientific Industrial Co., Ltd. and shall not be
distributed, reproduced, or disclosed in whole or in part without prior written permission of USI Co., Ltd.
Function Description Available Unavailable
USB PORT Connect to Host PC and Download Firmware V
Power supply IN Optional Connect to external Power supply input V
UART1 Download Firmware V
RF SMA connector Connect to external Antenna V
SIM card Connect to SIM card V
LINE IN Connect to Line in V
LINE OUT Connect to Line out V
J51 MP test connector V
J52 MP test connector V
The information contained herein is the exclusive property of Universal Scientific Industrial Co., Ltd. and shall not be
distributed, reproduced, or disclosed in whole or in part without prior written permission of USI Co., Ltd.
2) Configure the Socket EVB
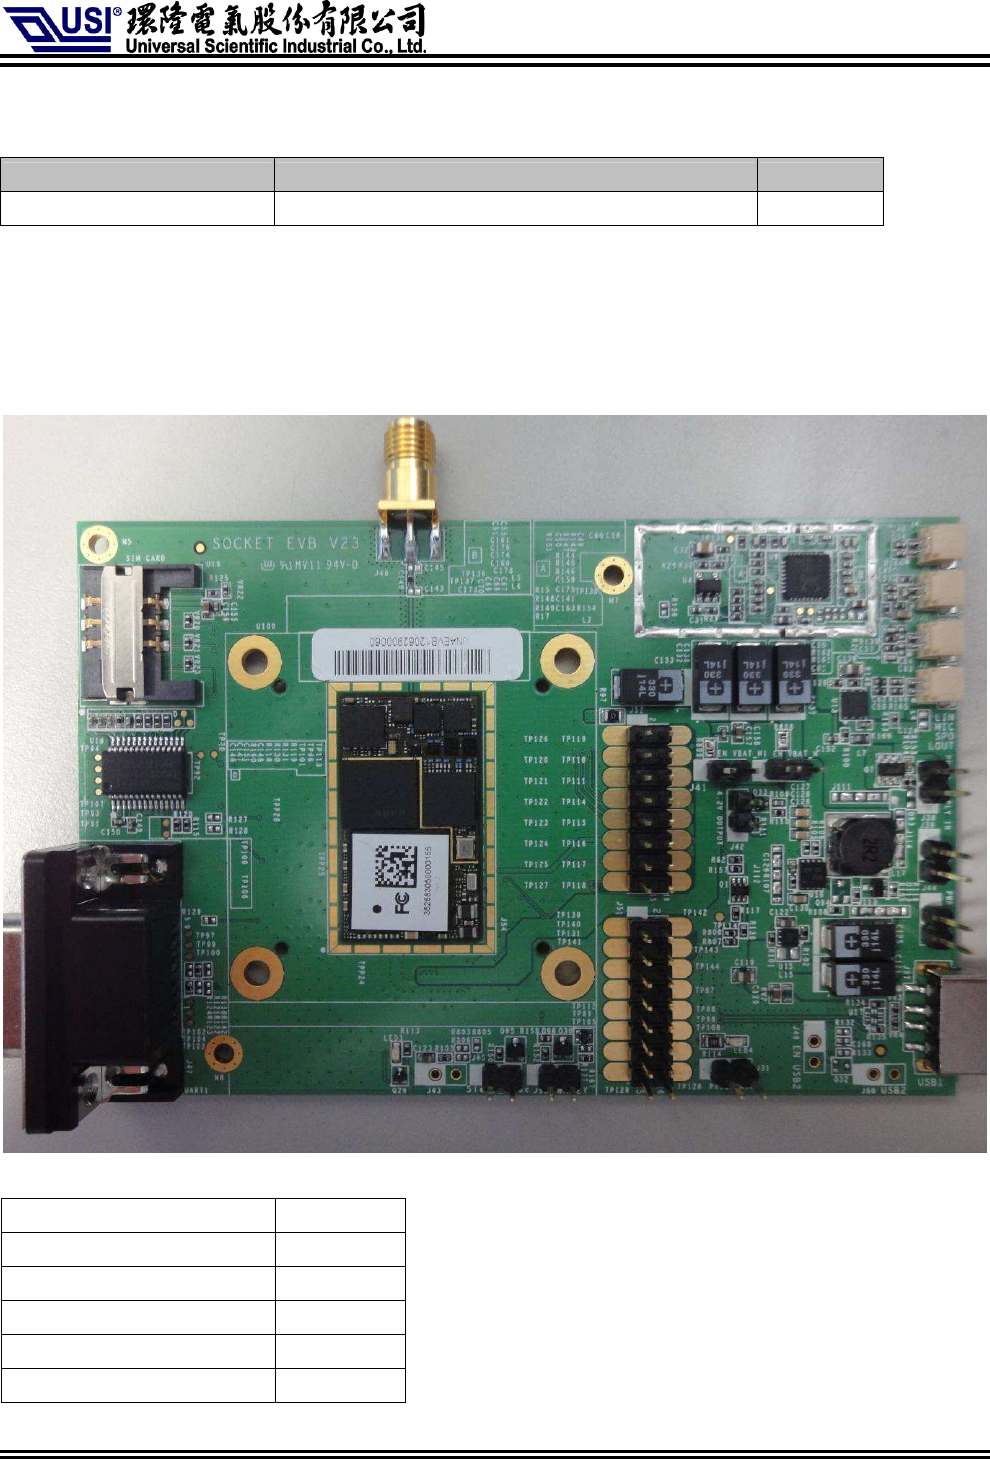
Default JUMP Setting :
Note1 :For current measurement of VBAT_M: de-solder R808. Close J40
Note2 :For current measurement of VBAT_M1: de-solder R809. Close J41
Component reference Function Jump 1-2
(Default) Output +3.3V for module No
J42 Output +4.2V for module Yes
Component reference Function Jump 1-2
J45 USB_EN high level input to turn on Module No
J53 PWRKEY high level input to turn on Module No
Component reference Function Jump 1-2
J40 Enable VBAT_M. (Default) R808 short. No, Note1
J41 Enable VBAT_M1.(Default) R809 short. No, Note2
The information contained herein is the exclusive property of Universal Scientific Industrial Co., Ltd. and shall not be
distributed, reproduced, or disclosed in whole or in part without prior written permission of USI Co., Ltd.
Download Key :
Component reference Function Jump 1-2
J31 Enable Download through USB No, Note3
Note 3: To enable download mode, Please close J31 and refer to “ Use Data Card Tool To
Update Image File Steps-V1.1-2012.07.18.pdf”
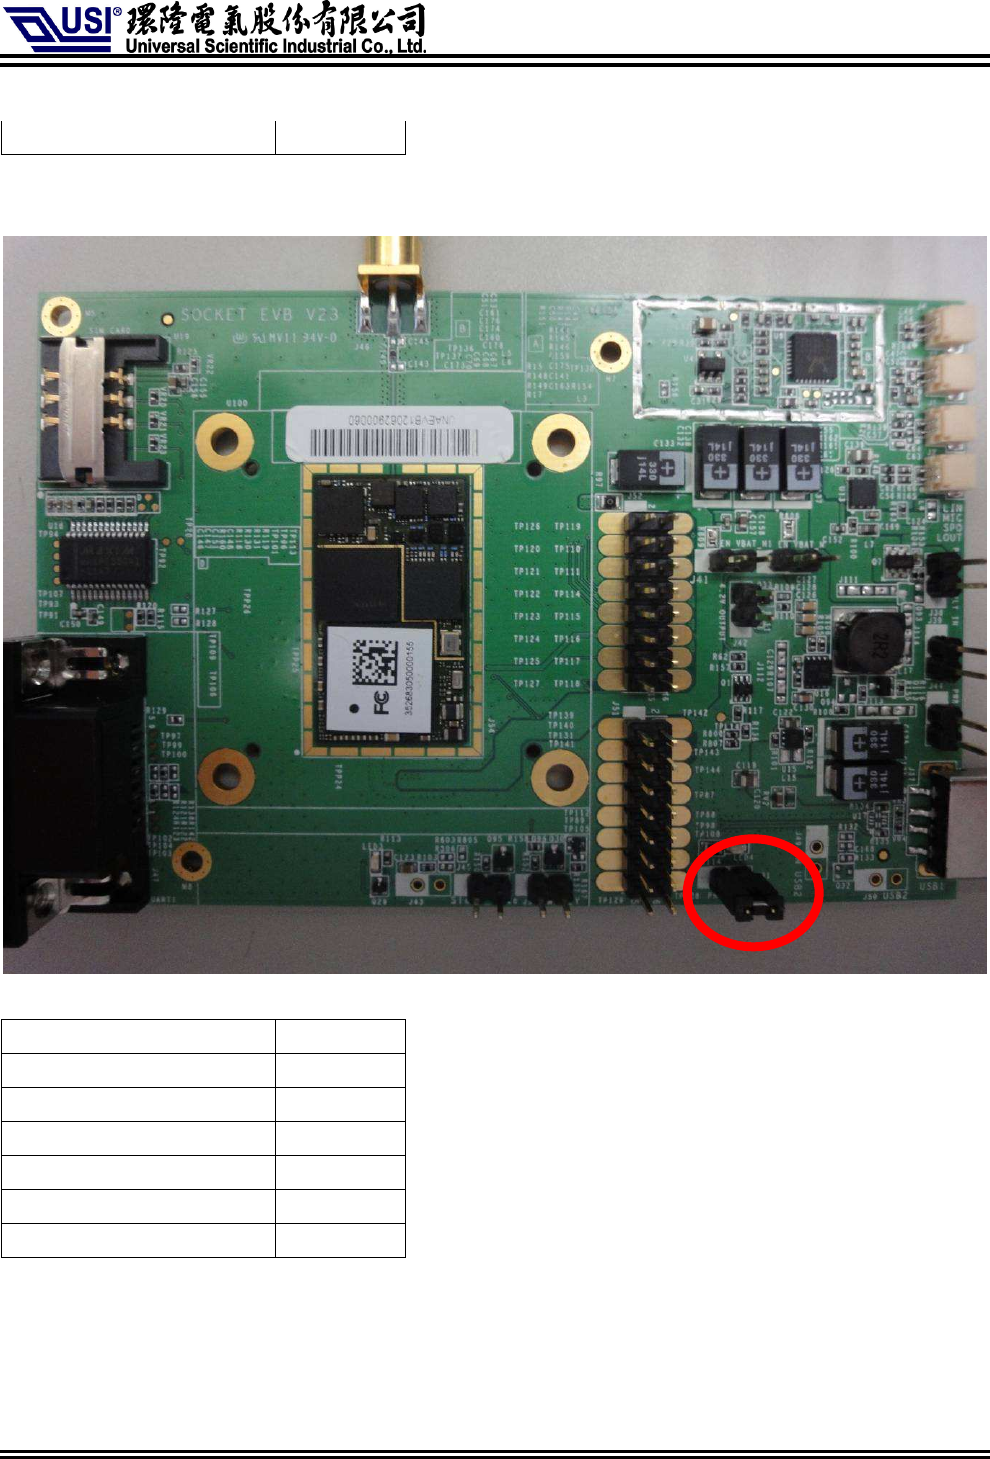
Jump setting for normal mode .
Component reference
JUMP 1-2
J40 NO
J41 NO
J42 NO
J31 NO
J45 NO
The information contained herein is the exclusive property of Universal Scientific Industrial Co., Ltd. and shall not be
distributed, reproduced, or disclosed in whole or in part without prior written permission of USI Co., Ltd.
J53 NO
Jump setting for Download mode :
Component reference
JUMP 1-2
J40 NO
J41 NO
J42 NO
J31 YES
J45 NO
J53 NO
The information contained herein is the exclusive property of Universal Scientific Industrial Co., Ltd. and shall not be
distributed, reproduced, or disclosed in whole or in part without prior written permission of USI Co., Ltd.
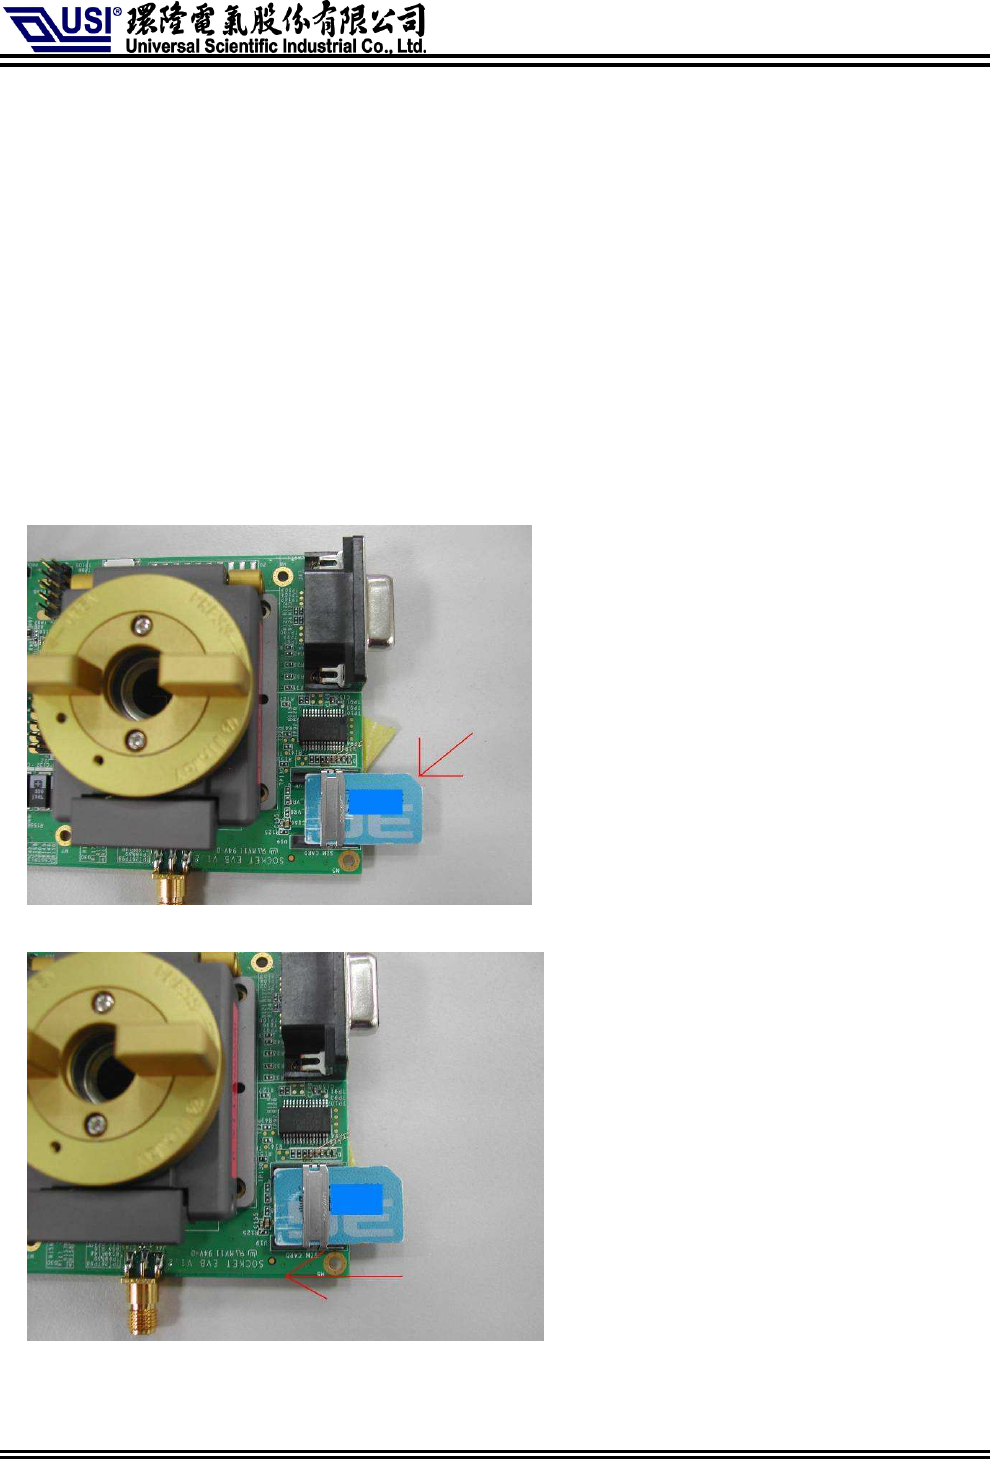
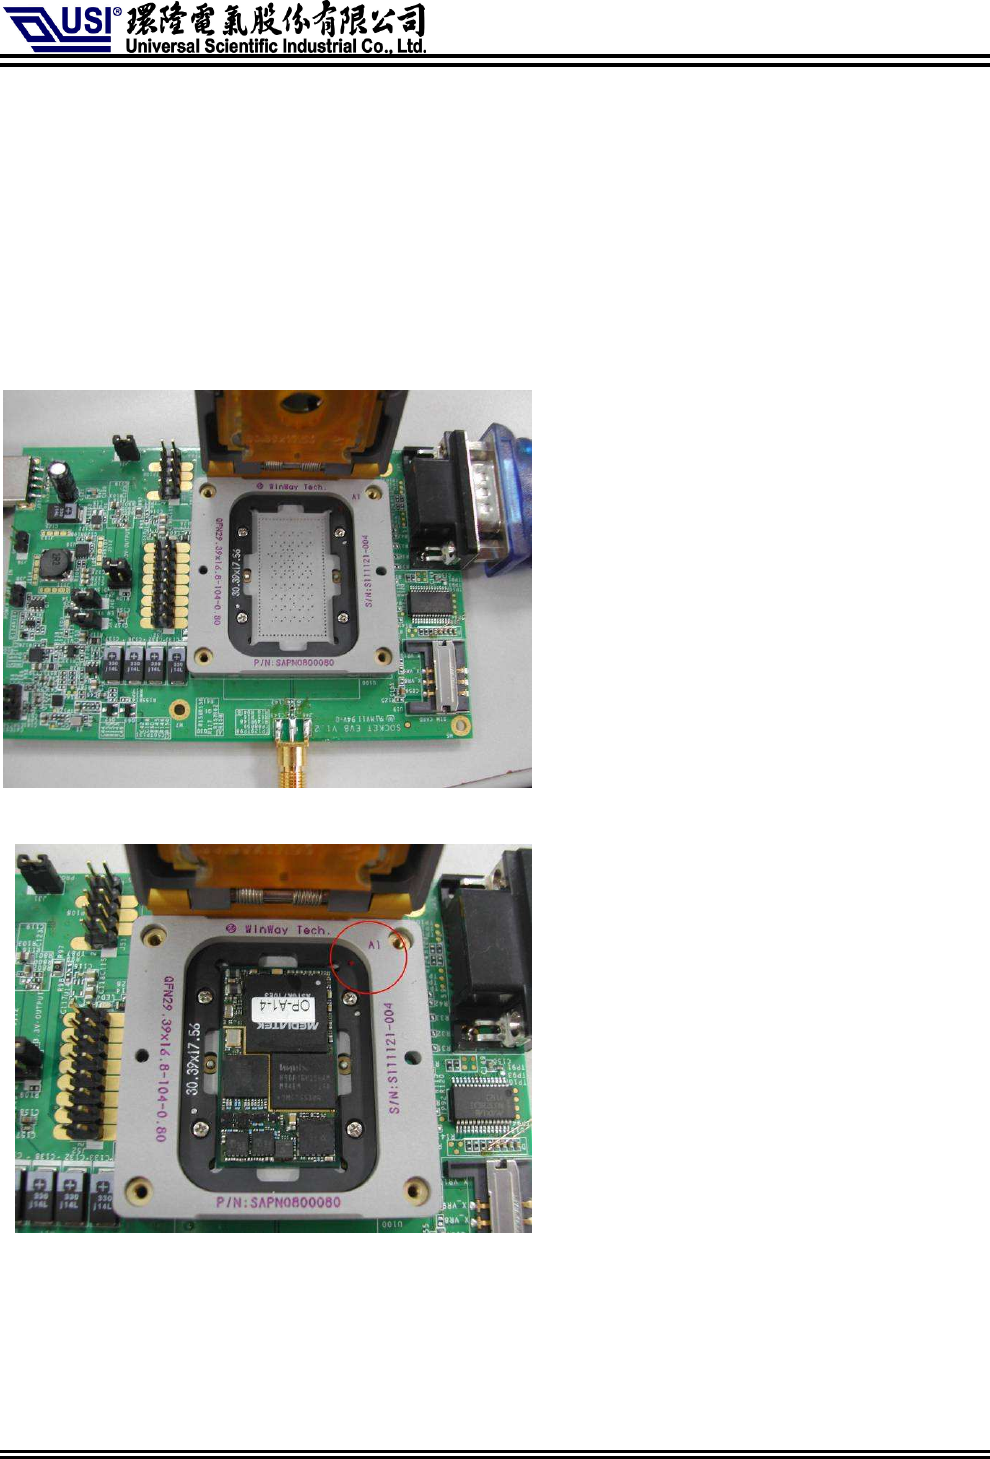
3) Insert the SIM card
To use a UNA module, you need to install:
a. A live SIM card (with an active account), or
b. A test SIM card for use with call box (for example ,an Agilent 8960 ..)
To install the SIM card:
a. Place the Socket EVB face-up(as shown) – the SIM slot is on right side.
b. Note the location of the notched corner of the card in the following image.
c. Inset the SIM card into the slot.
The information contained herein is the exclusive property of Universal Scientific Industrial Co., Ltd. and shall not be
distributed, reproduced, or disclosed in whole or in part without prior written permission of USI Co., Ltd.
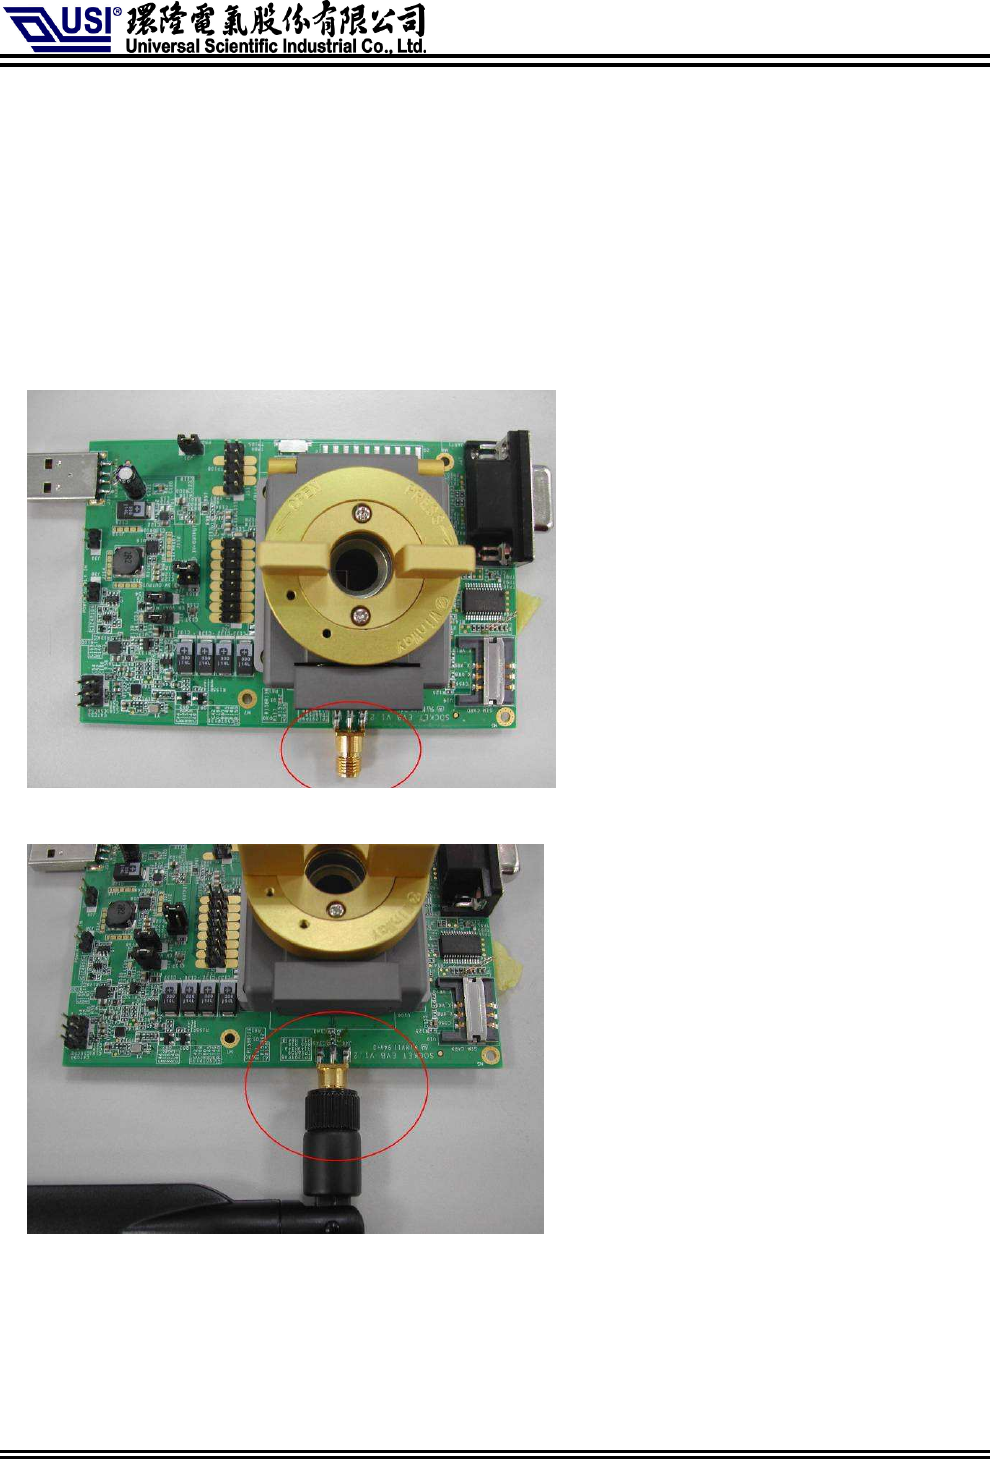
4) Place the Module
After inserting the SIM card, insert the module:
a. Place the Socket EVB face-up(as shown) – the socket is in the center.
b. Notice the pin 1 location on the socket.
The information contained herein is the exclusive property of Universal Scientific Industrial Co., Ltd. and shall not be
distributed, reproduced, or disclosed in whole or in part without prior written permission of USI Co., Ltd.
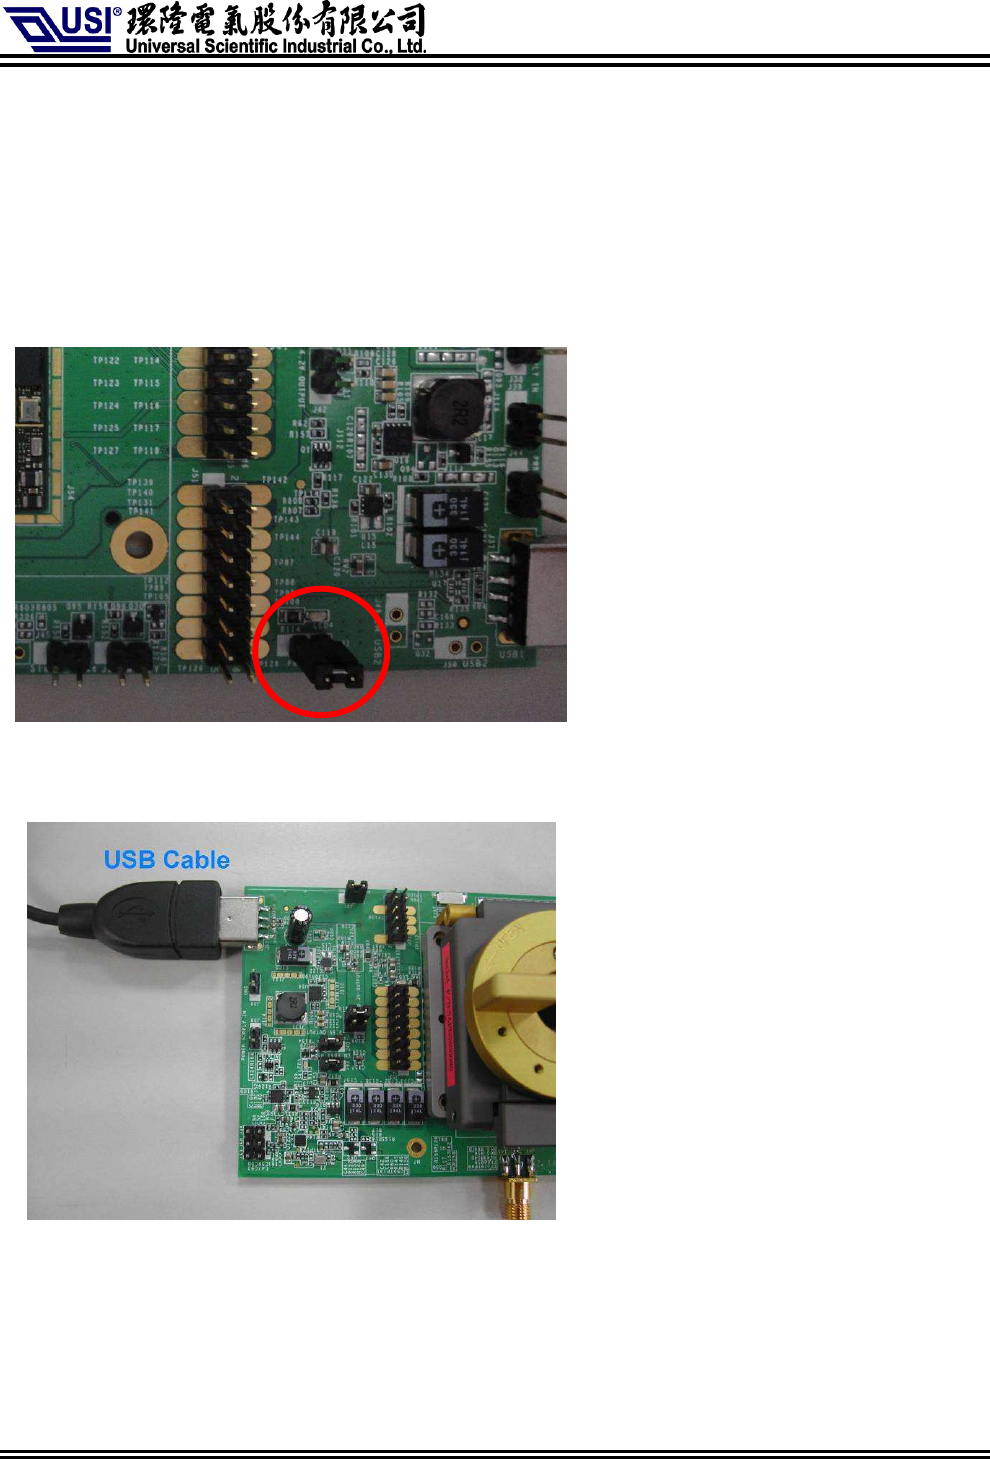
5) Connect the antenna
After installing the Module ,connect the supplied antenna to the EVB
a. Place the Socket EVB face-up. The antenna connector on the bottom side.
b. Connect the antenna to the adapter.
The information contained herein is the exclusive property of Universal Scientific Industrial Co., Ltd. and shall not be
distributed, reproduced, or disclosed in whole or in part without prior written permission of USI Co., Ltd.
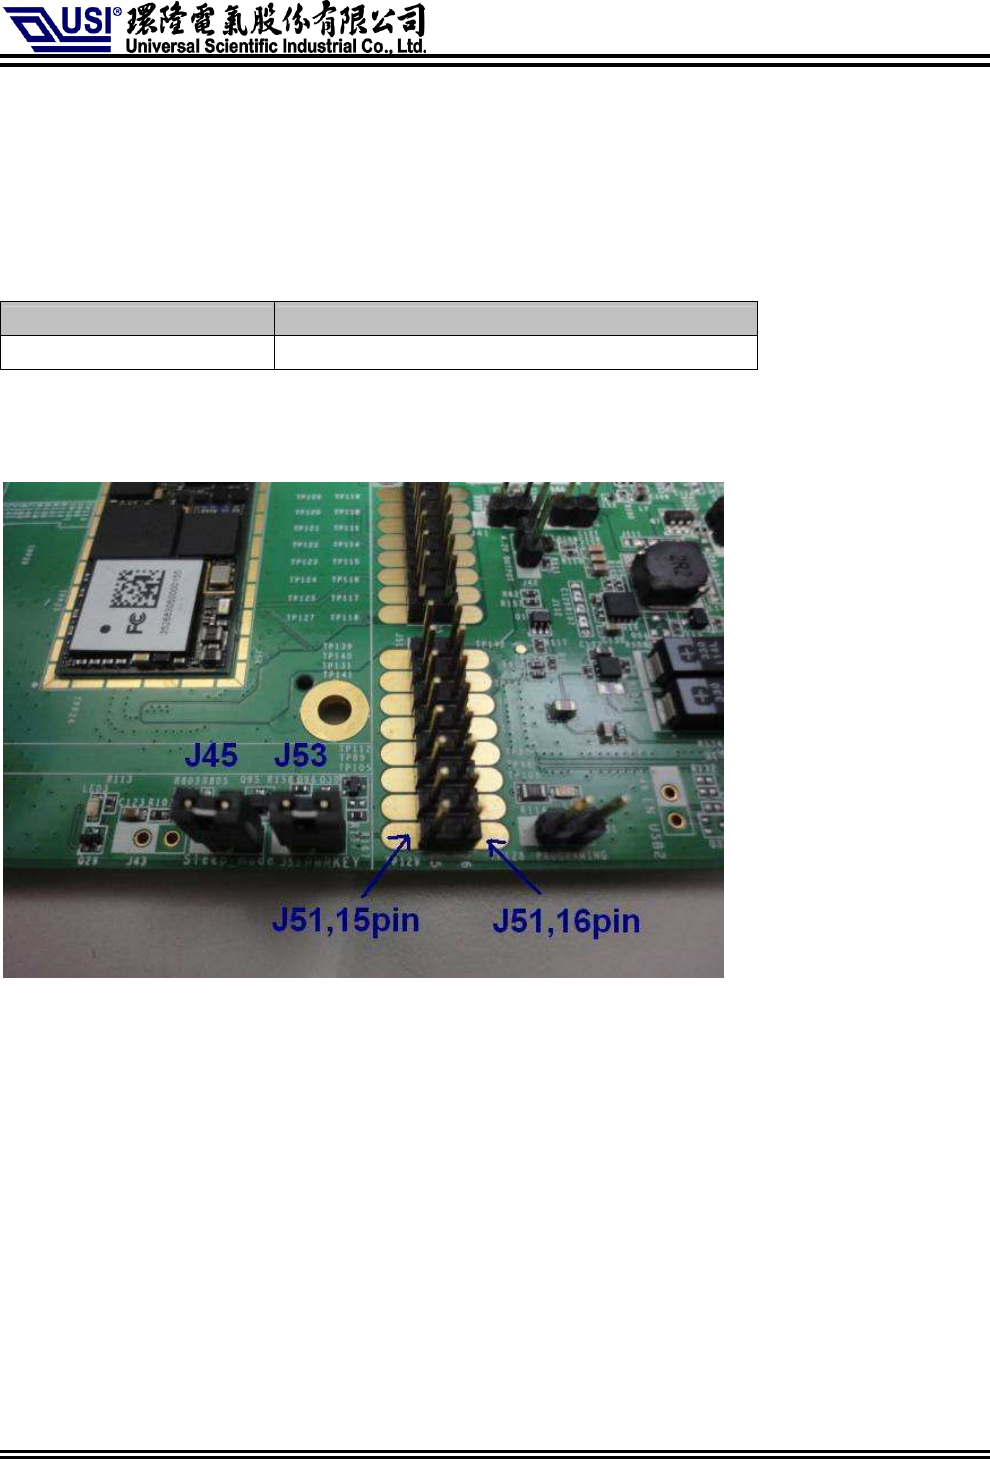
6) Download setting
a. Plug in the Jump.
b.Connect the USB cable between EVB & PC.
The information contained herein is the exclusive property of Universal Scientific Industrial Co., Ltd. and shall not be
distributed, reproduced, or disclosed in whole or in part without prior written permission of USI Co., Ltd.
7) Manual control module sleep mode:
Component reference Function
J45 USB_EN input for sleep / normal mode
a. Follow UNA IO application design notes
b. Plug in the Jump from J45 before use manual control.
c. Connect J51,16pin to control module .
J51,16pin:
Hi(3.3~5.0V): Normal mode ;
Low(0~0.3V): Sleep mode
The information contained herein is the exclusive property of Universal Scientific Industrial Co., Ltd. and shall not be
distributed, reproduced, or disclosed in whole or in part without prior written permission of USI Co., Ltd.
8) Apply External power to module
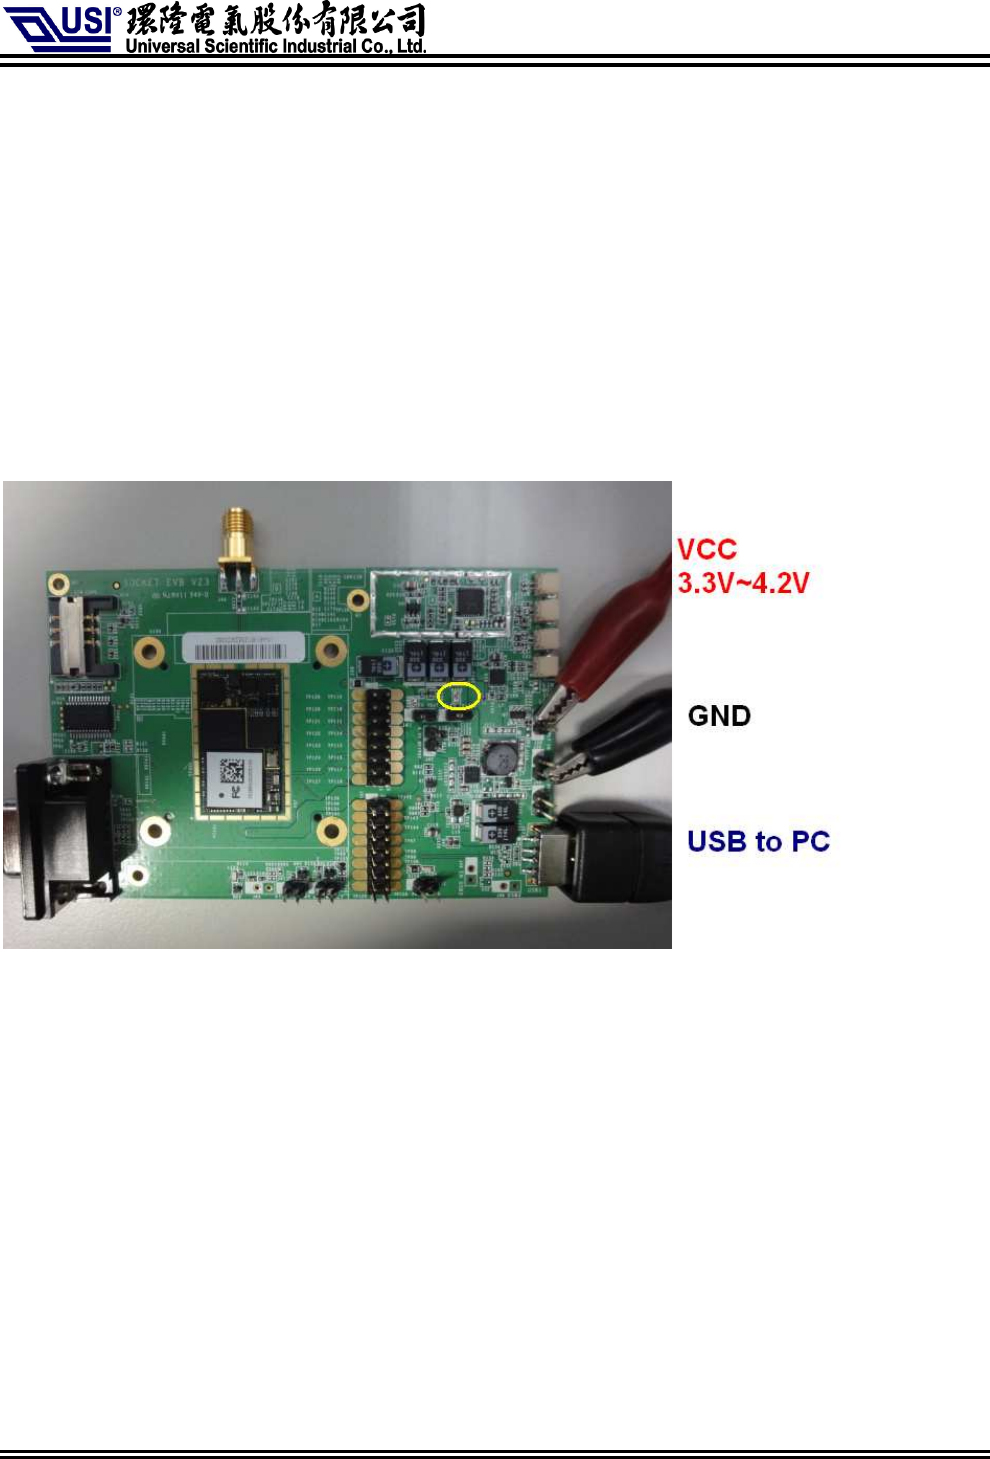
To use external power for module, please follow the steps to setting.
a. Red line VCC connect to J38.
b. Black line GND connect to J39.
c. De-solder the open pad R808.(yellow circle)
d. USB cable connect to Host PC.
The information contained herein is the exclusive property of Universal Scientific Industrial Co., Ltd. and shall not be
distributed, reproduced, or disclosed in whole or in part without prior written permission of USI Co., Ltd.
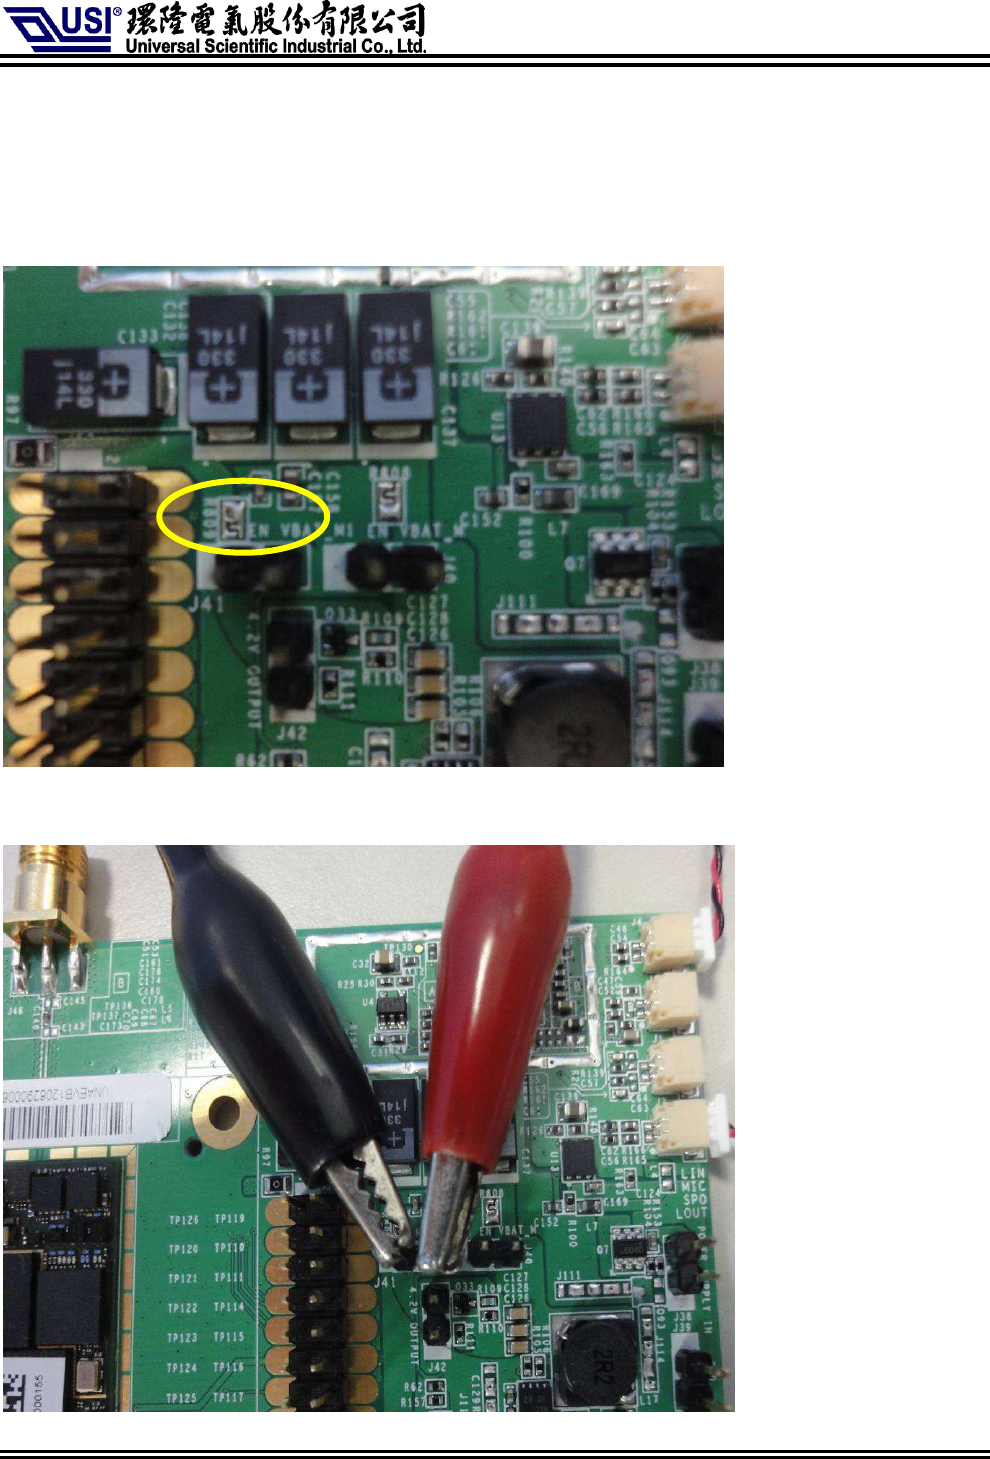
9) Measure current of module setting
a. De-solder the open pad R809.(yellow circle)
b. Please follow the photo to setup the current meter.
The information contained herein is the exclusive property of Universal Scientific Industrial Co., Ltd. and shall not be
distributed, reproduced, or disclosed in whole or in part without prior written permission of USI Co., Ltd.
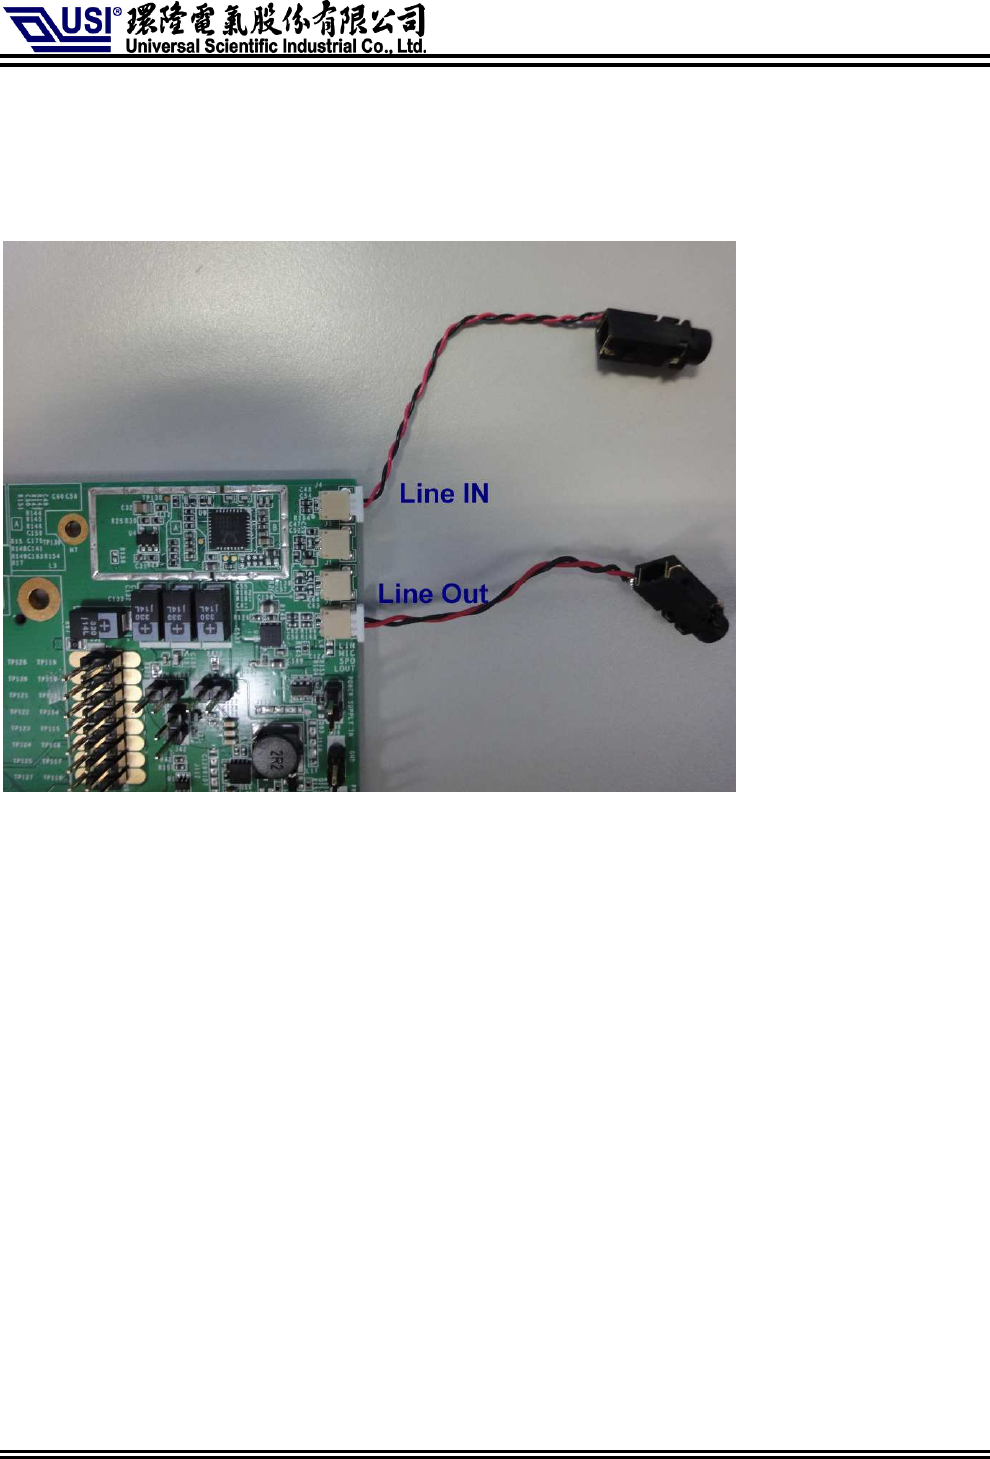
10) Connect extend cable for line in & line out :
The information contained herein is the exclusive property of Universal Scientific Industrial Co., Ltd. and shall not be
distributed, reproduced, or disclosed in whole or in part without prior written permission of USI Co., Ltd.
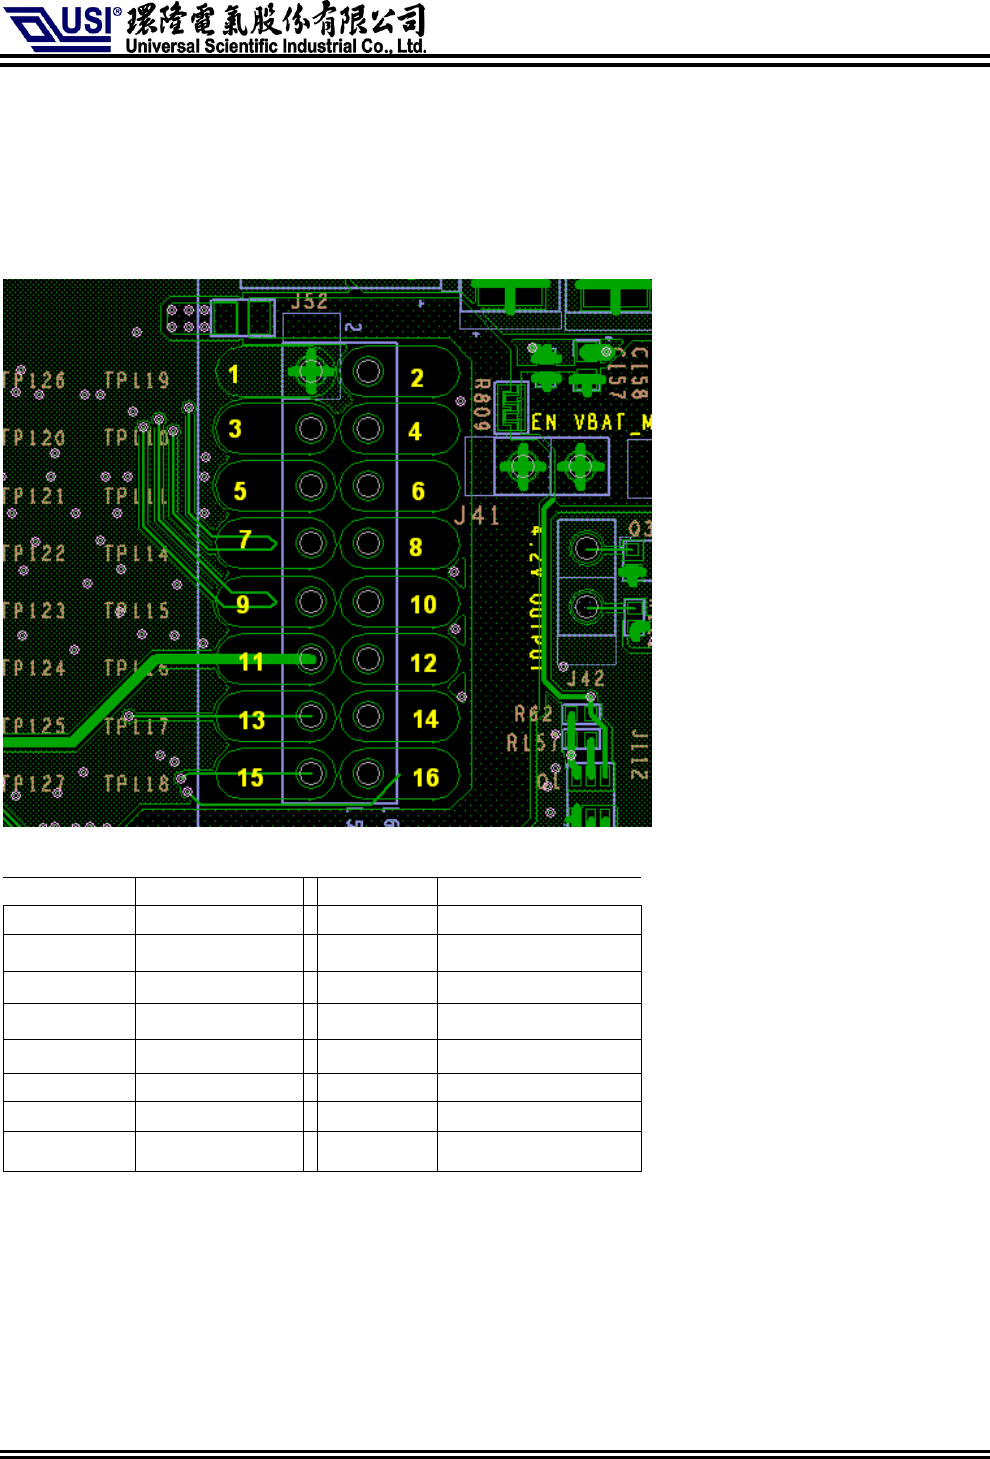
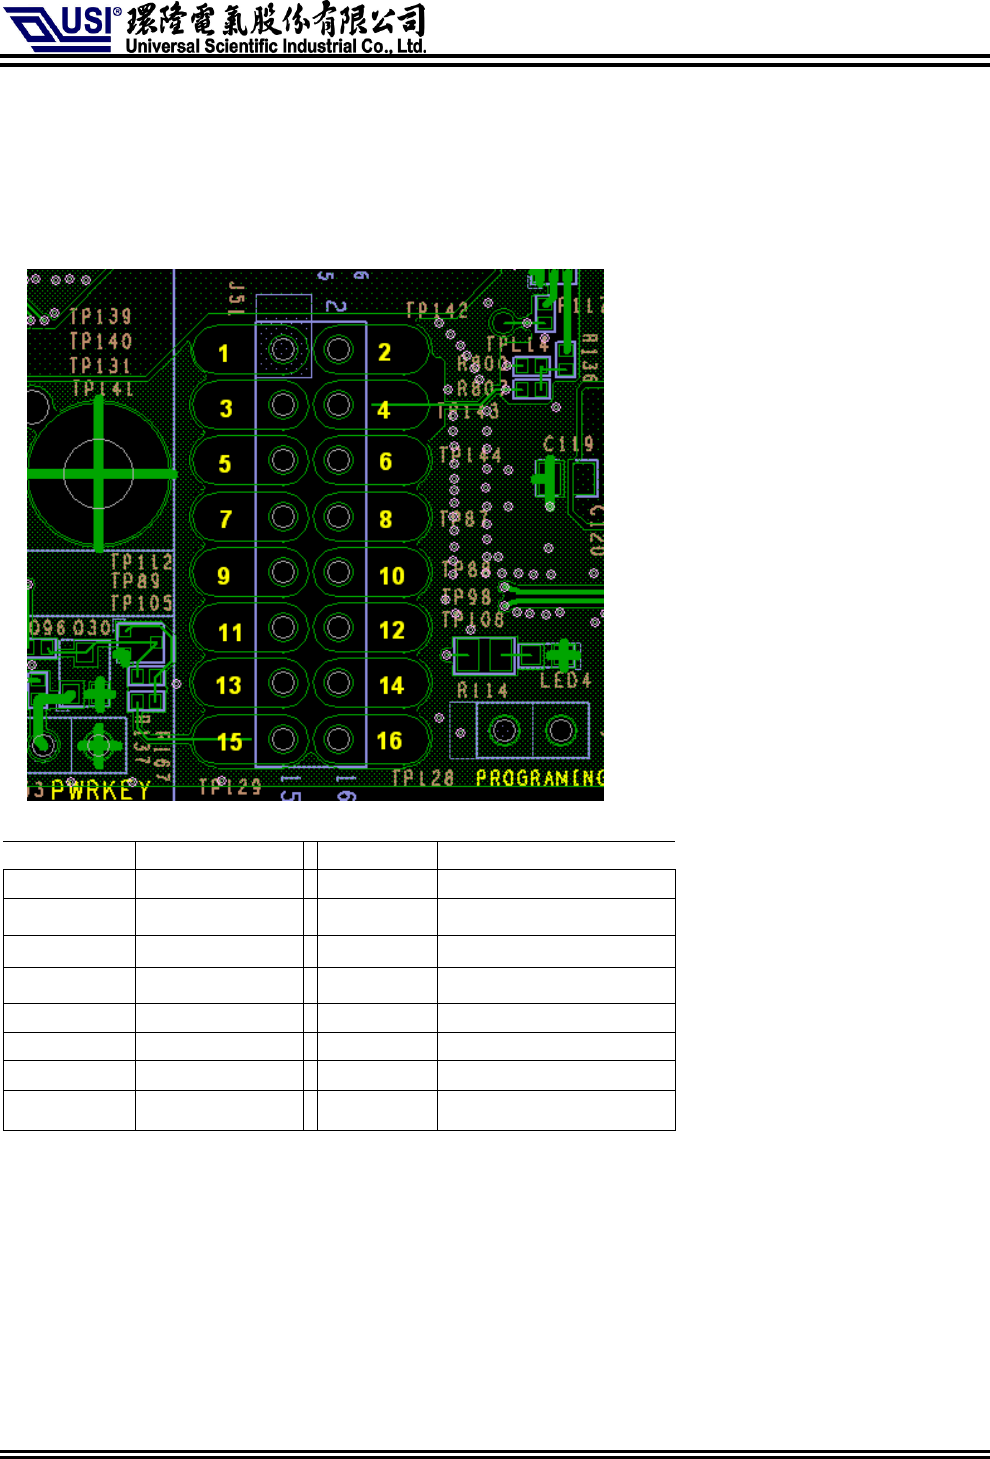
11) EVB test point pin define
1. J52 Pin define
Pin number
Pin name
Pin number
Pin name
1 GND
2 VBAT_M1
3 DAICLK
4 DAISYNC
5 DAIPCMOUT
6 DAIPCMIN
7 SCL
8 DAIRST
9 SDA
10 Reserve Pin
11 Reserve Pin
12 Reserve Pin
13 URXD2
14 UTXD2
15 URXD1
16 UTXD1
The information contained herein is the exclusive property of Universal Scientific Industrial Co., Ltd. and shall not be
distributed, reproduced, or disclosed in whole or in part without prior written permission of USI Co., Ltd.
2.J51 Pin define
Pin number
Pin name
Pin number
Pin name
1 GND
2 AP_Ready
3 Wake
4 #W_Disable
5 #EINT9
6 ID (
Note4)
7 GPIO2
8 GPIO1
9 GPIO0
10 #Sys_config (
Note5)
11 Reserve Pin
12 Reserve Pin
13 KROW0
14 KCOL6
15 Reserve Pin
16 Reserve Pin
Note4: Default- open (900 module);If use 850 module, this pin to pull low(1kΩ
ΩΩ
Ω).
Note5: enable "USB+UART "mode-
Default- open (USB only);If use”USB+UART” mode,
this pin to pull low(1kΩ
ΩΩ
Ω).